


ATW-3211
Table of contents
 Loading...
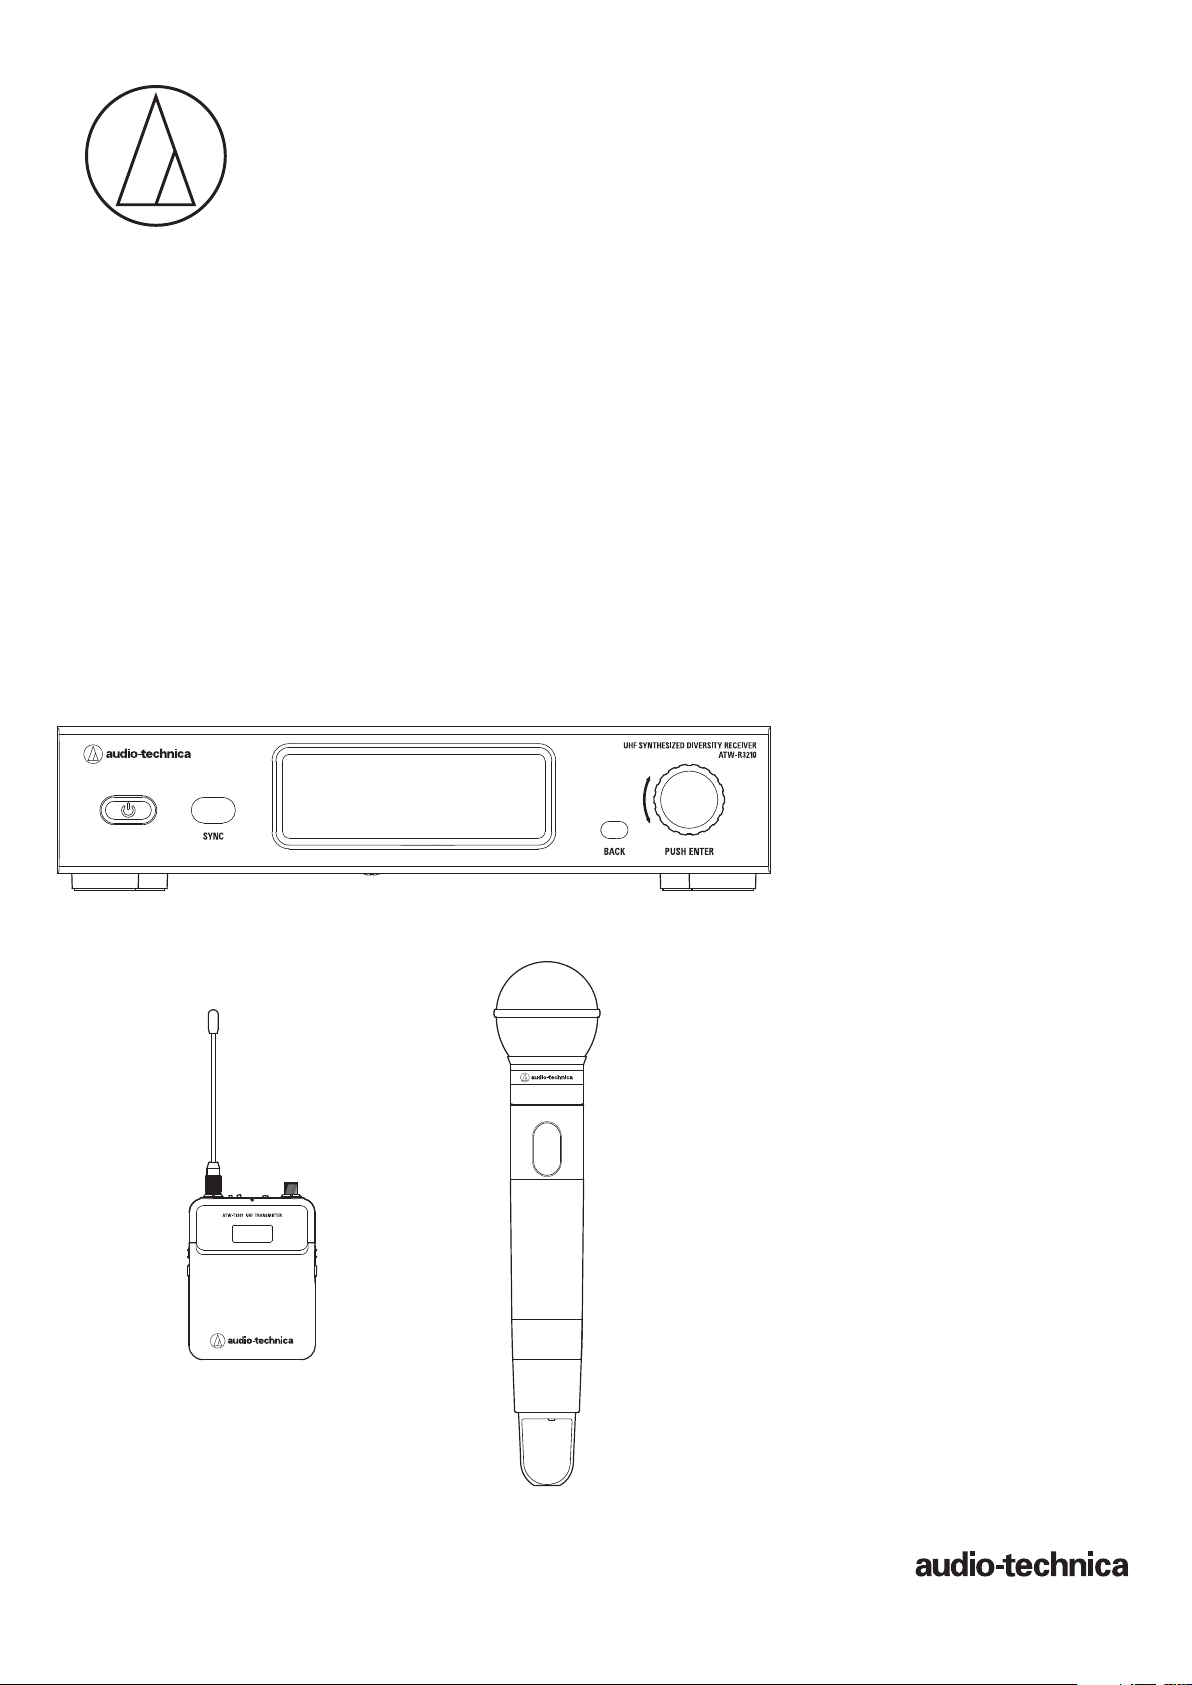
User Manual
UHF Wireless Systems
ATW-R3210
Receiver
ATW-T3201
Body-Pack Transmitter
ATW-T3202
Handheld Transmitter
3000 Series

1
Contents
Introduction .................................................................................2
Important information .................................................................2
Notes on use ...............................................................................3
Maintenance ................................................................................3
Part names and functions ............................................................4
ATW-R3210 ..................................................................................................... 4
ATW-T3201 ...................................................................................................... 6
ATW-T3202 ...................................................................................................... 7
How to insert batteries ................................................................8
ATW-T3201 ...................................................................................................... 8
ATW-T3202 ...................................................................................................... 8
How to attach and detach the interchangeable microphone
capsule (only for ATW-T3202) ......................................................9
How to attach ................................................................................................. 9
How to remove ............................................................................................... 9
How to read the display ............................................................10
ATW-R3210 ................................................................................................... 10
ATW-T3201/ATW-T3202 ................................................................................. 12
How to operate ..........................................................................13
Basic operation ............................................................................................. 13
Using IR SYNC .............................................................................................. 13
Settings .....................................................................................14
ATW-R3210 ................................................................................................... 14
ATW-T3201/ATW-T3202 ................................................................................. 14
Setting ATW-R3210 ...................................................................15
List of setting items ...................................................................................... 15
Setting the operating frequency .................................................................. 15
Setting the channel (receiver) name ............................................................. 15
Setting the audio output level ....................................................................... 16
Scanning for open channels ......................................................................... 16
Setting transmitters via IR SYNC ................................................................. 16
Setting the squelch level ............................................................................... 17
Setting the system-related functions ............................................................ 17
Setting ATW-T3201/ATW-T3202 .................................................20
List of setting items ...................................................................................... 20
Setting the transmission frequency .............................................................. 20
Setting the channel (transmitter) name ........................................................ 20
Adjusting the gain ......................................................................................... 21
Setting the RF power .................................................................................... 21
Setting HPF (High-Pass Filter) ....................................................................... 21
Setting lock ................................................................................................... 21
Setting the function for the function button ................................................. 21
Setting the mute mode (only for ATW-T3201) .............................................. 22
Setting the system-related functions ............................................................ 22
How to attach the transmitter (ATW-T3201) .............................24
Making connections (basic connections) ..................................24
Achieving stable reception ........................................................25
Rack-mounting the receiver.......................................................25
Troubleshooting .........................................................................26
ATW-R3210 ................................................................................................... 26
ATW-T3201/ATW-T3202 ................................................................................. 26
Dimensions ................................................................................27
ATW-R3210 ................................................................................................... 27
ATW-T3201 .................................................................................................... 28
ATW-T3202 .................................................................................................... 28
Specifications ............................................................................29
Overall system specifications........................................................................ 29
ATW-R3210 ................................................................................................... 29
ATW-T3201 .................................................................................................... 30
ATW-T3202 .................................................................................................... 30

2
Introduction
Thank you for purchasing this Audio-Technica product.
Before using the product, read through this user manual to ensure that you will use the product correctly. Please keep this manual for future
reference.
Important information
Warning:
• To prevent fire or shock hazard, do not expose this apparatus to rain or
moisture.
Caution:
• Do not expose this apparatus to drips or splashes.
• To avoid electric shock, do not open the cabinet.
• Refer servicing to qualified personnel only.
• Do not expose this apparatus to excessive heat such as that generated
by sunshine, fire or other heat sources.
• Do not subject this apparatus to strong impact.
• This apparatus should be located close enough to the AC outlet so
that you can easily grasp the AC adapter at any time.
• In case of emergency, disconnect the AC adapter quickly.
• Do not place any objects filled with liquids, such as vases, on this
apparatus.
• To prevent fire, do not place any naked flame sources (such as
lighted candles) on this apparatus.
• Do not install this apparatus in a confined space such as a bookcase
or similar unit.
• Install this apparatus only in the places with good ventilation.
• The rating label is put on the bottom of this apparatus.
Battery caution:
• Keep batteries out of the reach of children.
• Observe correct polarity as marked.
• Do not expose the battery to excessive heat such as sunshine, fire or
the like.
• Always consider the environment issues and follow local
regulations when disposing of batteries.
• Remove depleted battery immediately.
• Danger of explosion if battery is incorrectly replaced. Replace only
with the same or equivalent type.
• Use only disposable LR06(AA) alkaline or NiMH batteries.
• Do not use new batteries and old one at the same time.
• Do not use different battery types or models.
• Do not use a leaking battery. If battery leakage occurs, avoid
contact with skin. If contact occurs, immediately wash thoroughly
with soap and water.
• If battery leakage comes into contact with your eyes, immediately
flush with water and seek medical attention.
For customers in the USA
FCC Notice
Warning:
This device complies with Part 15 of the FCC Rules. Operation is
subject to the following two conditions: (1) This device may not cause
harmful interference, and (2) this device must accept any interference
received, including interference that may cause undesired operation.
Caution:
You are cautioned that any changes or modifications not expressly
approved in this manual could void your authority to operate this
equipment.
Note: This equipment has been tested and found to comply with
the limits for a Class B digital device, pursuant to part 15 of the FCC
Rules. These limits are designed to provide reasonable protection
against harmful interference in a residential installation. This equipment
generates, uses and can radiate radio frequency energy and, if not
installed and used in accordance with the instructions, may cause
harmful interference to radio communications. However, there is no
guarantee that interference will not occur in a particular installation. If
this equipment does cause harmful interference to radio or television
reception, which can be determined by turning the equipment off and
on, the user is encouraged to try to correct the interference by one or
more of the following measures:
- Reorient or relocate the receiving antenna.
- Increase the separation between the equipment and receiver.
- Connect the equipment into an outlet on a circuit different from that
to which the receiver is connected.
- Consult the dealer or an experienced radio/TV technician for help.
Contact:
Responsible Company: Audio-Technica U.S., Inc.
Address: 1221 Commerce Drive, Stow, Ohio 44224, USA
Tel: 330-686-2600
For customers in Canada
IC statement
CAN RSS-Gen/CNR-Gen
This device complies with INDUSTRY CANADA R.S.S. 210. Operation
is subject to the following conditions: (1) This device may not cause
harmful interference and (2) this device must accept any interference
received, including interference which may cause undesired operation.
This device complies with RSS-102 radiation exposure limits set forth
for an uncontrolled environment.

3
Notes on use
• Be sure to read the user manual for any microphone or cable that you attach to the product.
• Disconnect the AC adapter from the outlet when this product is not in use.
• Turn off the power of this product before connecting or disconnecting cables.
• If you use the product near a TV or radio antenna, you may hear unwanted noise in the television or radio. If this occurs, move the product away
from the device.
• Two waves of the same frequency can't be used simultaneously.
• Be careful of interference noise caused by the surrounding radio wave environment and use of multiple systems.
• Wireless systems may be affected by the spark noise of vehicles, dimmer of lighting apparatus, computers, office automation apparatus and
electronic musical instruments. Place and use the product where it is less likely to be affected by the above.
• Be sure to use this product in combination with components specified by our company.
• Be sure the connected cable is plugged all the way into the product.
• When you connect the product with a mixer, turn off the phantom power source.
• If you use the product close to an electronic or communications device (such as a mobile phone), the product may produce unwanted noise. If
this occurs, move the product away from the device.
• When setting up the product, make sure there are no obstacles between the transmitter and the receiver that might block the signal.
• To prevent the batteries from wearing out, turn the transmitter off when not in use.
• Over time, discoloration may occur due to ultraviolet rays (especially direct sunlight) and friction.
• It is legally prohibited to dismantle and modify this product. In addition, this product is so precisely manufactured that dismantling it could cause
electric shock, failure or fire. Never dismantle this product.
Using multiple wireless systems
• If you use more than one device at the same time, use them in the same group.
• When using multiple units simultaneously, maintain 1 meter or more between individual transmitters and 3 meters or more between transmitters
and receivers' antennas.
• When using multiple units, power on transmitters one by one, making sure there is no unwanted noise.
• When a howling (beeping or squealing) sound is produced during use, turn down the output volume of the connected mixer/amplifier.
Maintenance
• If the product becomes stained or covered with dust, be sure to disconnect the power plug before wiping it off with a dry and soft cloth.
• Do not use benzine, thinner or electrical contact cleaner, etc. They may deform or otherwise damage the product, or cause operational failure.
4
Part names and functions
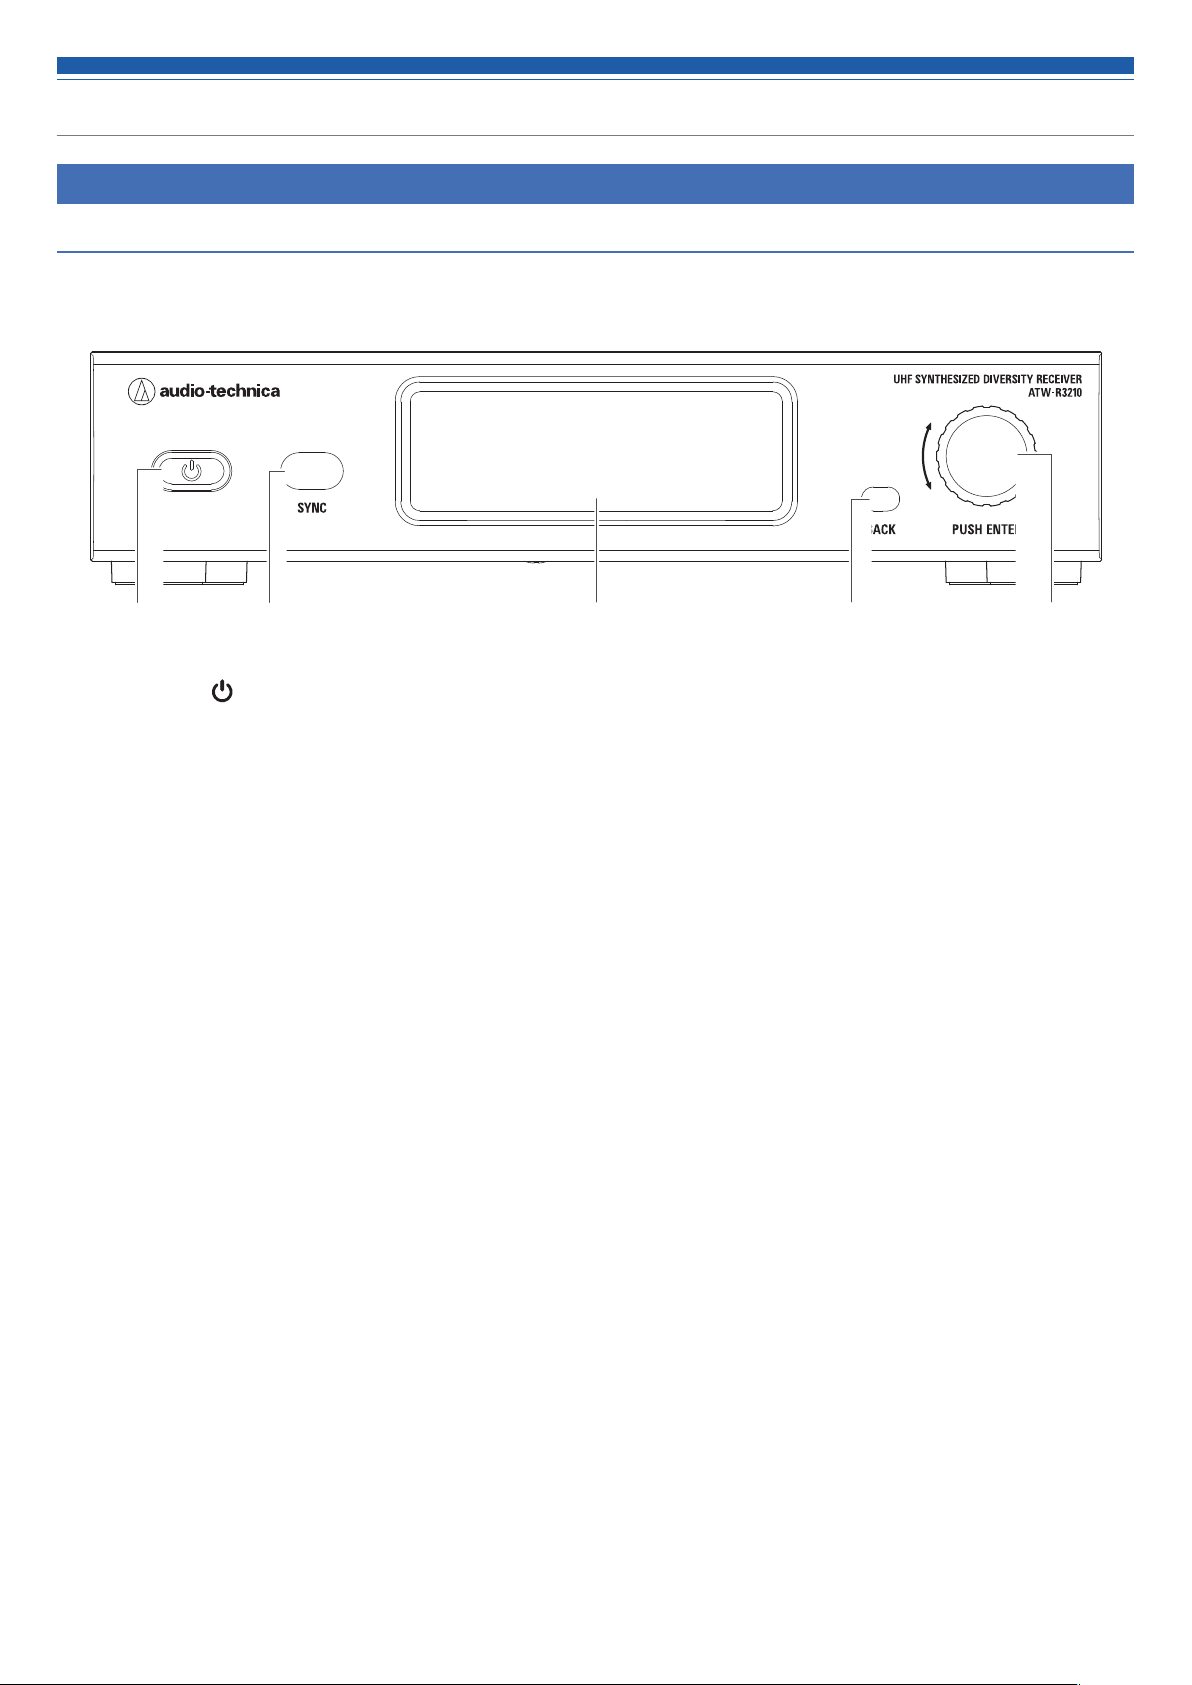
ATW-R3210
Front panel
❶ Power button ( )
Use to turn the receiver on or off.
❷ IR sync window
Use to IR SYNC with the transmitter (ATW-T3201, ATW-T3202).
❸ Display
Displays the receiver state and setting menus.
❹ BACK button
Press to take the display back one screen.
Returns to the Main screen when pressed and held.
❺ Control dial
Switches the screen when you turn the dial.
Displays the setting menu when you press the dial. Turn the dial to select a setting and press to confirm.
When you press and hold the dial, QUICK SYNC is started.
❷❶ ❹ ❺❸
5
Part names and functions
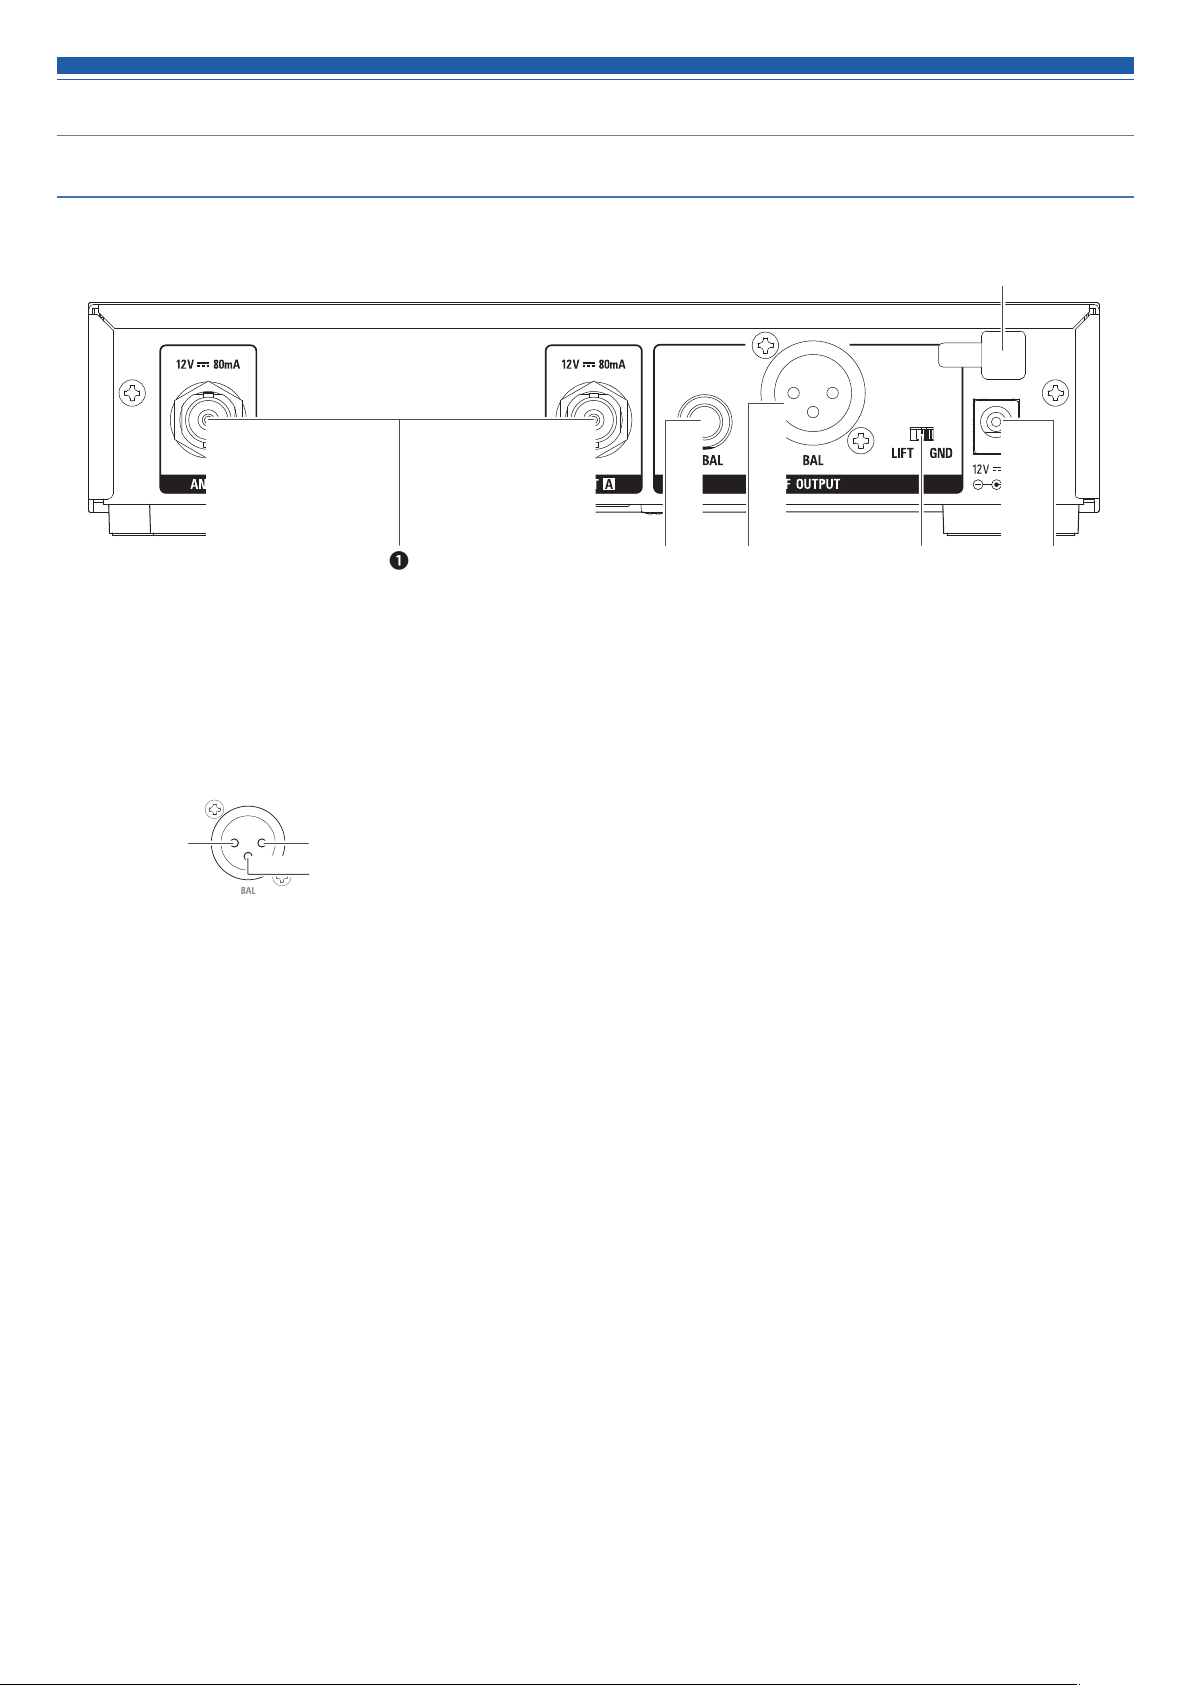
Rear panel
❶ Antenna input jack
Each jack supplies DC12 V to a connected antenna.
Additionally other compatible accessories (sold separately) can be connected.
❷ Unbalanced output terminal (6.3 mm mono jack)
❸ Balanced output jack
(XLR 3-pin male)
GND
HOT
COLD
❹ Ground lift switch
This switch isolates the GND pin of the balanced/unbalanced output from the ground.
Normally this is kept in the GND position, but if a hum develops due to a ground loop, switch to the LIFT side.
❺ DC input terminal
Connect DC plug from the included AC adapter.
❻ AC adapter cord hook
Hang the power cord of the AC adapter to prevent it from pulling loose accidentally.
❺❸❷ ❹
❻
❶
6
Part names and functions
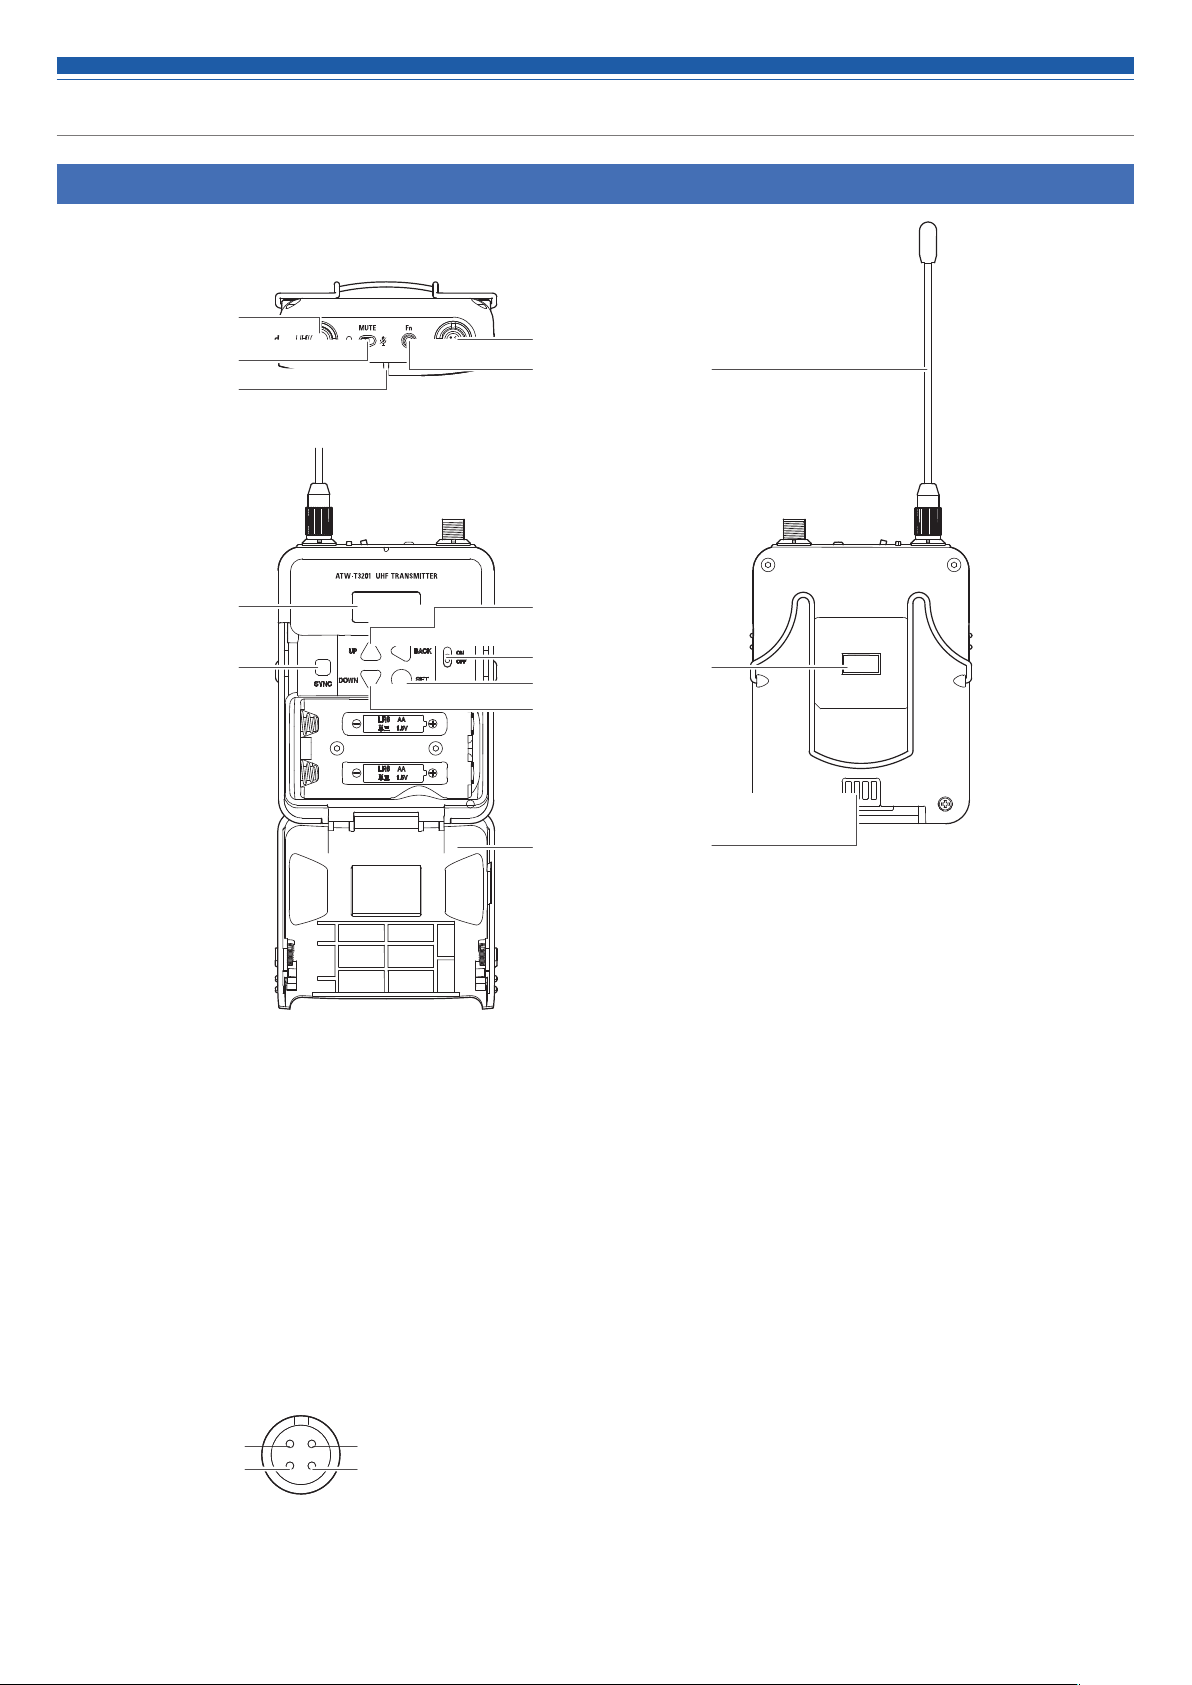
ATW-T3201
❶ Transmission antenna
❷ MUTE switch
Switches audio mute on and off.
❸ Indicator
LED that shows the status of the transmitter.
When the power is turned ON: Solid green
When the transmitter is muted: Solid red
❹ Function button
Press briefly to turn the screen back on if it shuts off. When the
function is set, the preselected operation is performed.
❺ Input connector
Connect a microphone, a headworn microphone, a guitar cable, etc.
Pin 1: GND
Pin 4: +5 V output
Pin 2: Instrument input
Pin 3: Microphone input
❻ Display
Shows the current status.
If no buttons are pressed for a period of 30 seconds, the display
will turn off.
❼ SYNC button
Use to IR SYNC with the receiver (ATW-R3210).
❽ UP button
Use to select various settings.
❾ BACK button
Press to return to the previous screen.
Returns to the Main screen when pressed and held.
❿ Power switch
Use to turn the power on or off.
⓫ SET button
Press to confirm a selection.
⓬ DOWN button
Use to select various settings.
⓭ Battery cover
⓮ IR sync window
Use to IR SYNC with the receiver (ATW-R3210).
⓯ Charging terminal
❶
❷
❸
❹
❺
❻
❼
❽
❾
❿
⓫
⓭
⓬
⓮
⓯
❶

7
Part names and functions
ATW-T3202
❶ Interchangeable microphone capsule
❷ Display
Shows the current status.
If no buttons are pressed for a period of 30 seconds, the display
will turn off.
❸ Grip case
❹ UP button
Use to select various settings.
❺ BACK button
Press to return to the previous screen.
Returns to the Main screen when pressed and held.
❻ IR sync window
Use to IR SYNC with the receiver (ATW-R3210).
❼ DOWN button
Use to select various settings.
❽ SET button
Press to confirm a selection.
❾ SYNC button
Use to IR SYNC with the receiver (ATW-R3210).
❿ Power switch
Use to turn the power on or off.
⓫ Battery cover
⓬ Function button
Press briefly to turn the screen back on if it shuts off. When the
function is set, the preselected operation is performed.
⓭ Indicator
LED that shows the status of the transmitter.
When the power is turned ON: Solid green
When the transmitter is muted: Solid red
⓮ Charging terminal
❸❷❶
❹ ❺ ❻
❼ ❽ ❾ ❿ ⓬ ⓮⓭
⓫
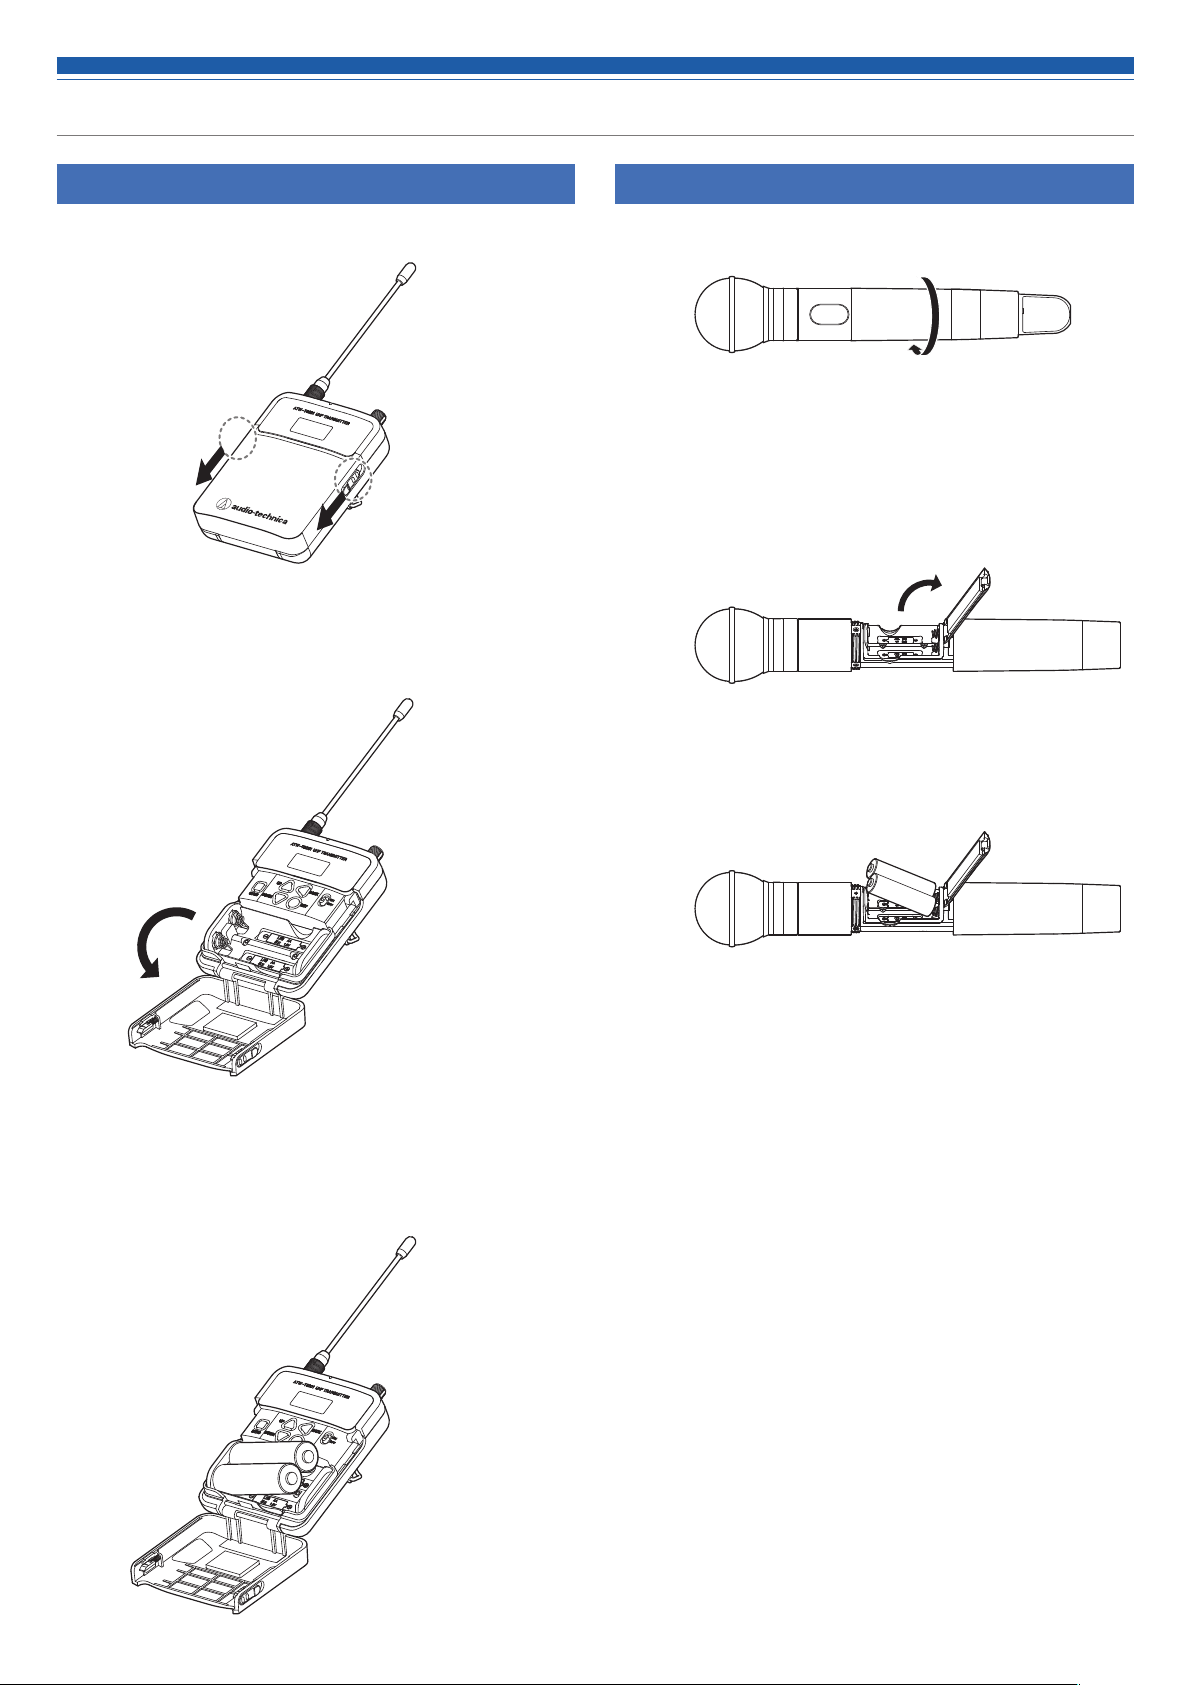
8
How to insert batteries
ATW-T3201
1. Slide the battery cover latches down.
2. Open the battery cover while the latches are slid.
3. Insert the batteries according to the plus (+) and minus (-) marks
found inside the battery compartment.
ATW-T3202
1. Rotate the grip case of the battery compartment.
2. Open the battery cover.
• Put your finger on the hook of the battery cover and pull it to open the
battery cover.
3. Insert the batteries according to the plus (+) and minus (-) marks
found inside the battery compartment.
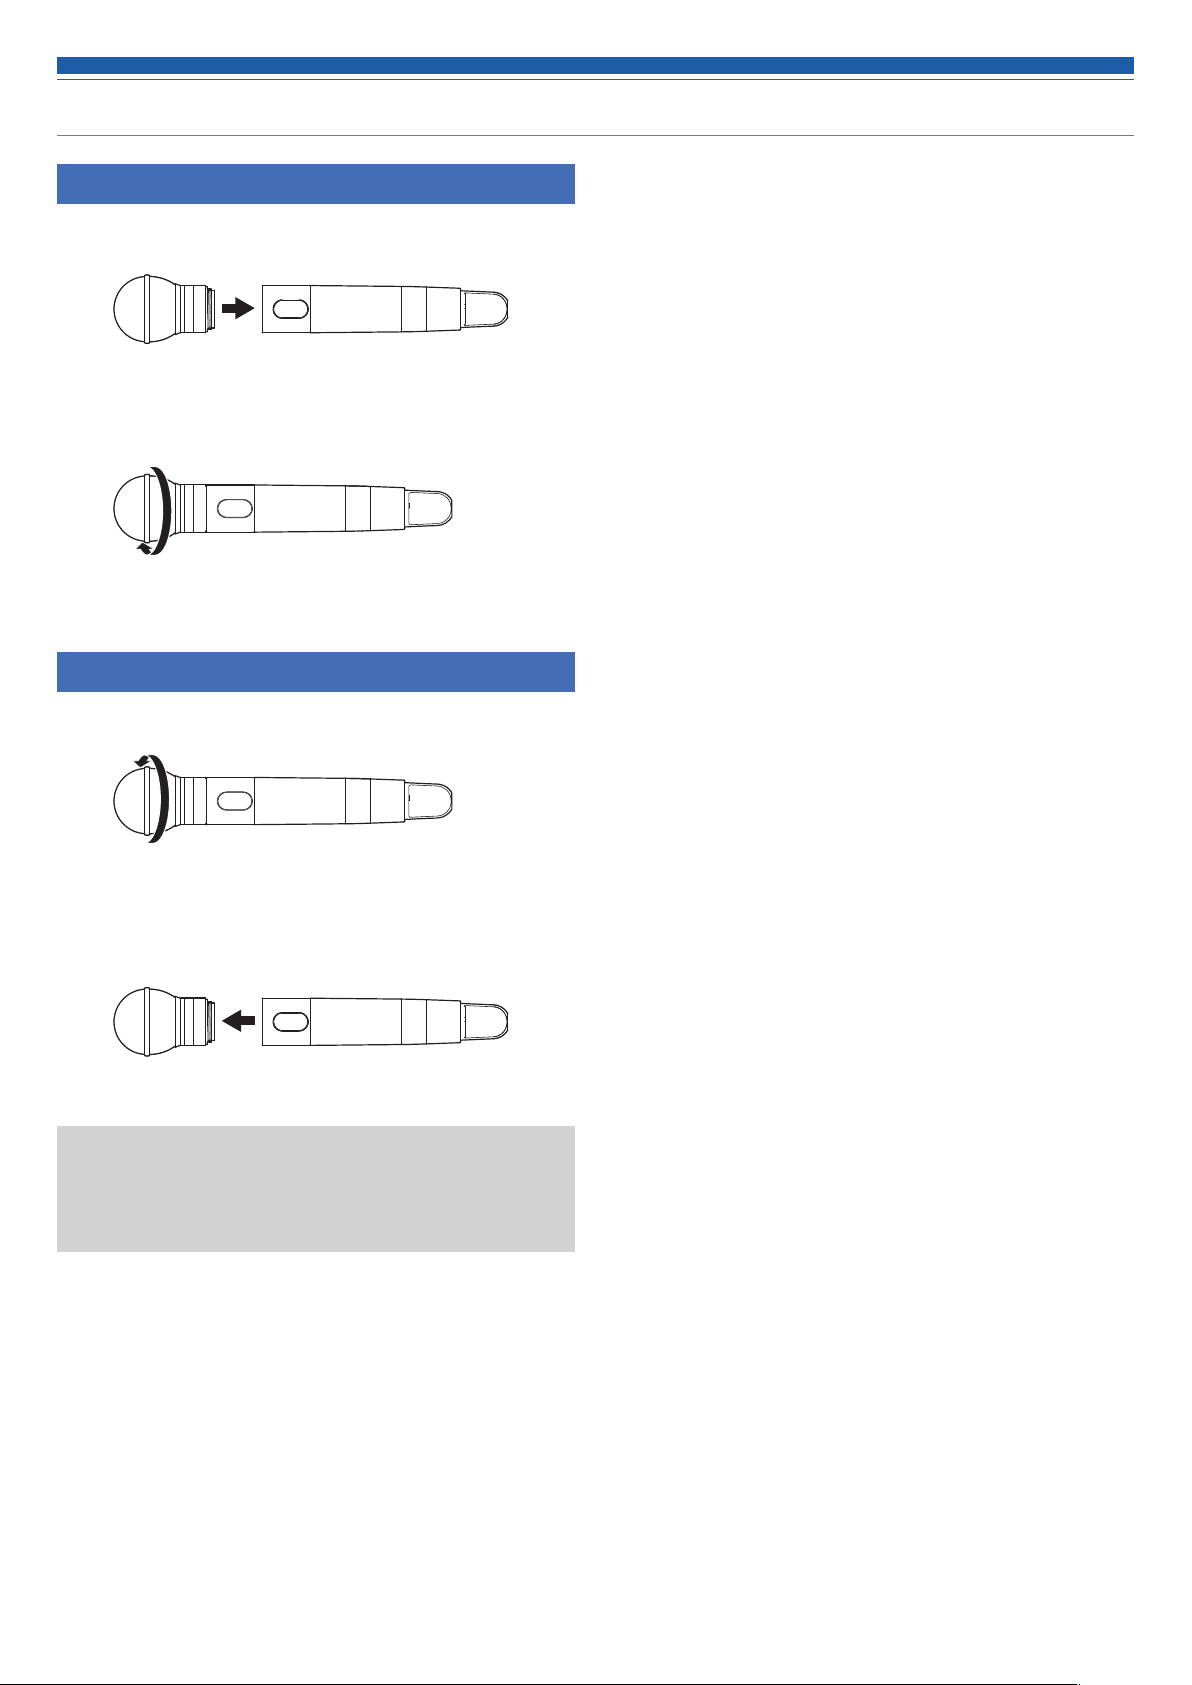
9
How to attach and detach the interchangeable microphone capsule (only for ATW-T3202)
How to attach
1. Attach the microphone capsule to the body of the transmitter.
2. Rotate the microphone capsule clockwise to tighten it.
How to remove
1. Rotate the microphone capsule counterclockwise to loosen it.
2. Detach the microphone capsule from the body of the
transmitter.
• Do not directly touch or scratch the connection surface.
• Be sure to turn off the power of the transmitter before attaching/
detaching the microphone capsule.
• Do not forcibly attach the microphone capsule. Doing so may damage
the transmitter or microphone capsule.
Loading...