

Page 1
Part 2
© 1998 Philips Consumer Communications, L.P. All rights reserved.
Printed in Mexico. 848236055 Issue 1AT&T
THIS NUMBER
LOWER
REDIAL
VOLUME
PROGRAM
FLASH
MUTE
PAUSE
HOLD
1
ABC
2
DEF
3
GHI
4
JKL
5
MNO
6
PQRS
7
TUV
8
WXYZ
9
#
0
OPER
TONE
SPEAKER
User's Manual for the
Speakerphone 925
Fold open this manual for information about
this telephone’s installation and operation.
Please read Part 1 — Important Product
Information, included in this package.
Page 2
INSTALLATION
NOTE: This telephone requires a
modular telephone jack.
Table
If you have a wall-mounted telephone,
remove the telephone from the wall
and follow these instructions:
1 Remove the base.
2 Connect line cord to telephone.
Plug the seven-foot line cord into
the LINE jack on the bottom of
the telephone.
3 Attach the base.
Turn the base so that the larger
end of the base is toward the top
of the telephone. Attach the base
by inserting the tabs into the slots.
Push down on the large end of the
base to lock it into place.
4 Connect the line cord to your
modular jack.
Plug the free end of the line cord
into a modular jack. Make sure it
snaps firmly into place.
5 Connect handset to telephone.
Plug the coiled cord into the handset jack on the side of the phone.
Plug the other end of the coiled
cord into the handset, and then
hang up.
6 Check for dial tone.
Lift the handset and listen for
a dial tone. If you cannot hear
a dial tone, turn to “In Case of
Difficulty.”
Wall
1 Remove the base.
2 Connect the line cord to
telephone.
Do not unbundle line cord. Plug
the seven-foot line cord into the
LINE jack on the underside of the
phone. Leave enough cord free to
connect to the wall jack, but keep
any excess cord unbundled. Store
the bundled cord in the open area
under the set.
3 Attach the base.
Turn the base so that the larger
end of the base is toward the bottom of the telephone. Attach the
base by inserting the tabs into the
slots. Push down on the large end
of the base to lock it into place.
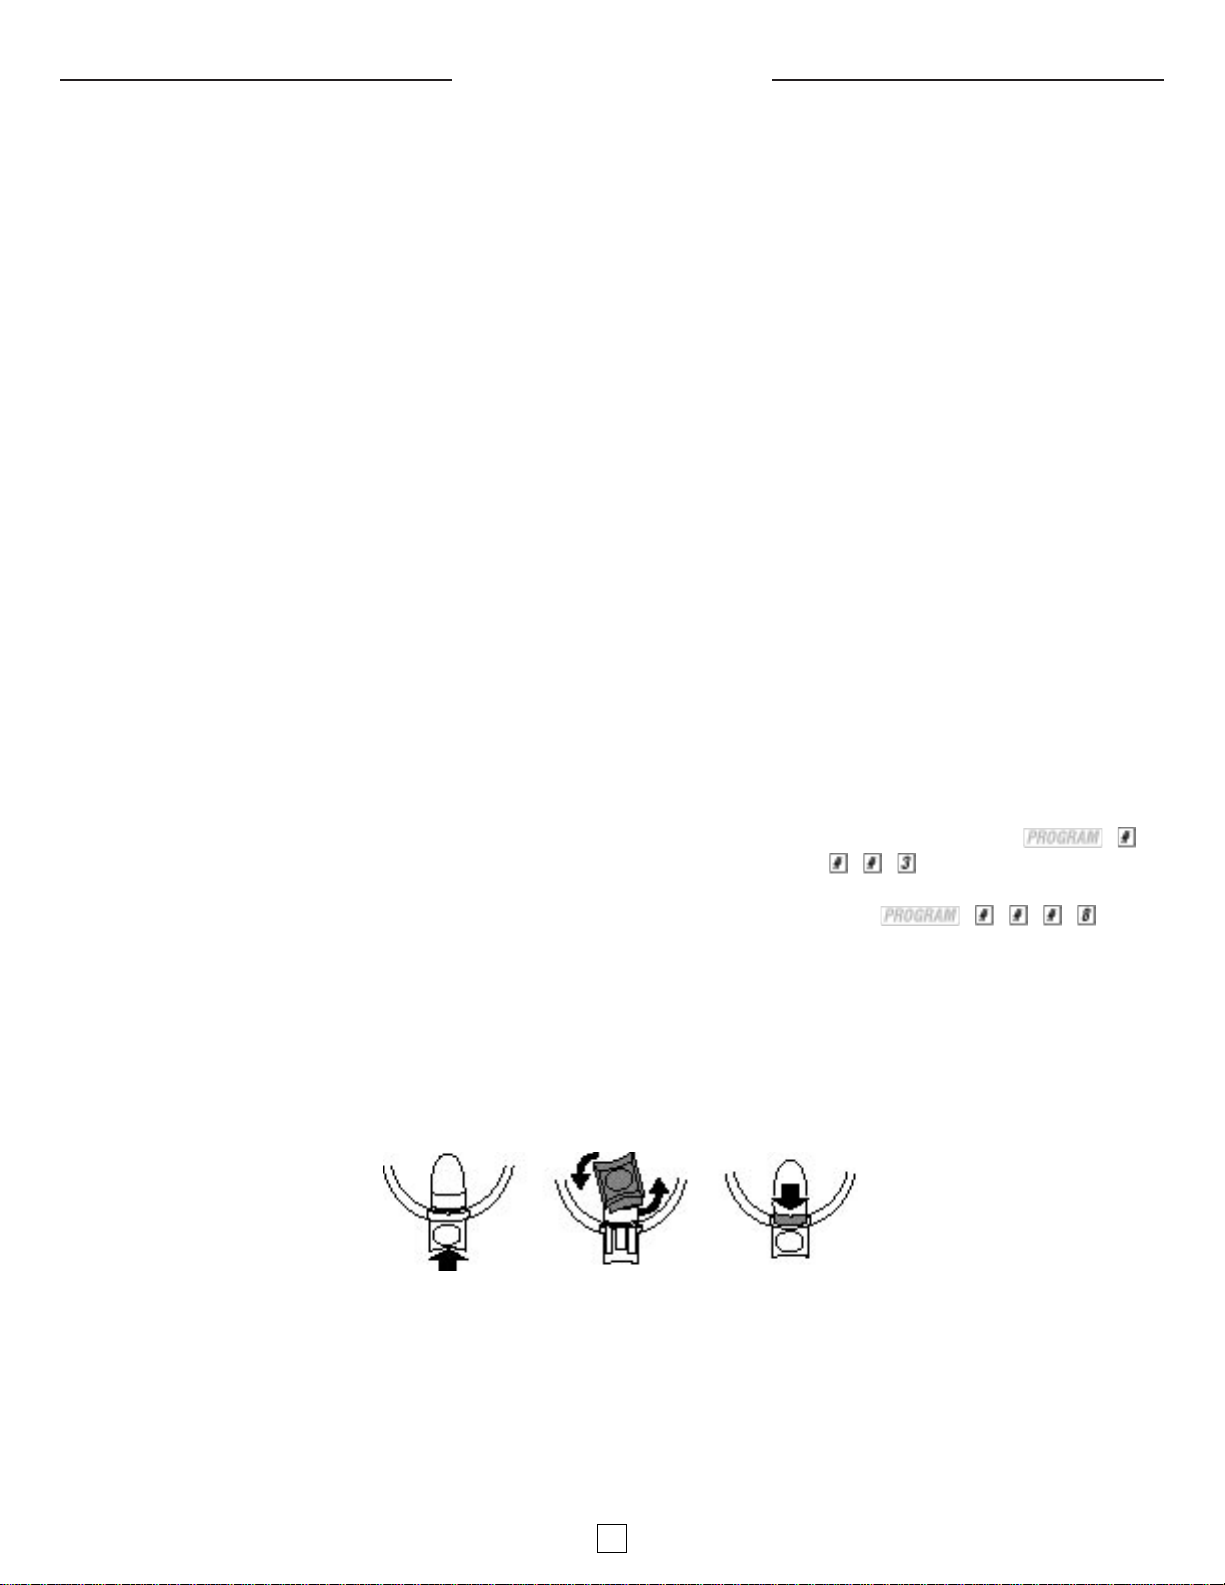
4 Reverse handset tab.
To mount the telephone on a wall,
you must reverse the handset tab.
This tab holds the handset when
you hang up.
Hold down the switchhook, and
slide the tab up and out of its
slot (Figure 1A). Turn the tab so
that the curved end is up (Figure
1B). Then insert the tab back into
its slot (Figure 1C).
5 Connect the line cord to modular
wall jack and mount phone onto
wall jack.
Make sure the cord snaps firmly
into place. Place the phone on the
wall jack mounting studs and pull
down until it is held securely.
Follow Steps 5 and 6 under “Table”
Installation.
Dial Mode Selection
This telephone will work with tone or
dial pulse (rotary) service. Even when
set to dial pulse service, the phone
can be switched temporarily to tone,
for access to services that require
tone signaling, including some toneactivated computer systems.
This product comes set in the
touch-tone mode. Make sure you
choose the correct dialing method;
touch-tone dialing will not work if
you have dial pulse service.
After the telephone is plugged in, if
you have dial pulse (rotary) service,
lift handset and press , ,
, , . To change back to touch
tone service, lift the handset, then
press , , , , .
Hang the handset up for dial mode
selection to take effect.
To switch from pulse to tone dialing
during a phone call, see “Temporary
Tone Dialing.”
Figure 1A Figure 1B Figure 1C
1
Page 3

THIS NUMBER
LOWER
REDIAL
VOLUME
PROGRAM
FLASH
MUTE
PAUSE
HOLD
1
ABC
2
DEF
3
GHI
4
JKL
5
MNO
6
PQRS
7
TUV
8
WXYZ
9
#
0
OPER
TONE
SPEAKER
Accesses memory
dialing numbers
Redials last call made
Mutes a call
Access Call Waiting
or other services
Switchhook
(under handset)
Temporary
Tone
Ringer
Volume
Handset
Turns speaker on and makes a call
Programs a number
in memory
Programs a pause
in memory
Directory
Card/Cover
One-Touch
Memory Locations
Two-Touch
Memory Locations
Puts a call on hold
Speaker/Handset Volume
Accesses
two-touch
memory dialing
numbers
TELEPHONE OPERATION
2
Page 4

TELEPHONE OPERATION
continued
Making and Answering a CallÑHandset
Lift the handset to make and receive
calls as you usually would.
Making and Answering a CallÑ
Speakerphone
NOTE: The red speakerphone light
will go on when the speakerphone is
being used.
To make a call using the speakerphone, press and hold until
the speakerphone light comes on, wait
for dial tone, then dial (either manually or using the memory feature).
To answer a call using the speakerphone, press and hold until
the speakerphone light comes on
(do not lift handset). When the call
is finished, press again to
hang up.
To switch from handset to speakerphone, press . To switch
from speakerphone to handset, lift
the handset.
NOTE: Using an extension phone is
not recommended while using the
speakerphone.
Volume Button
The VOLUME button adjusts the
speaker or the handset during your
call. Adjusting one does not affect
the other.
When on a call, press to increase
volume, to decrease volume.
Redial
The telephone stores in memory the
last number you called. The number
(up to 24 digits) will remain in the
Redial memory until you dial another
number.
To dial the same number again, lift
the handset or press , listen
for the dial tone, and press .
To erase Redial, lift the handset or
press , press ,
, then again.
Hold
The Hold feature allows you to keep
a call on the line while you step
away from the phone or while someone takes the call on an extension
phone. When a call is on Hold, the
red HOLD light flashes, and nothing
either party says can be heard. You
cannot access any special features.
To activate, press and release ,
and place the handset back in the
cradle. When using the speakerphone, press and release .
To release Hold, lift the handset
from the cradle or press
— OR —
Lift the handset of an extension
phone of the line on Hold
— OR —
If the handset is not in the cradle,
press or lift the handset and
press .
Mute
The Mute feature allows you to hear
your caller, but your caller will not
be able to hear anything you say.
Press and release (the red
MUTE light goes on) to talk privately with someone else in the room
without the person on the phone
hearing you. Press and release
again (the MUTE light goes off) to
continue your conversation with the
other party.
Flash
The Flash feature is useful if you
have subscribed to custom calling
services from your local telephone
company.
Press instead of the switchhook to activate services such as call
waiting or three-way calling.
You may have to press other buttons
before or after as explained in
the custom calling instructions provided by your local telephone company.
The button is used only as a
substitute for pressing the switchhook.
Temporary Tone Dialing
If you have rotary service, you can
change from pulse to tone dialing
during a call by pressing . This
is useful if you need to send tone
signals for access to telephone
banking or long-distance services.
EXAMPLE:
1 Dial a number.
2 Press and release ; all keys
pressed after this will send tone
signals.
3 After you hang up, the phone
automatically returns to rotary
service.
Digits pressed after will not be
stored in Redial.
Ringer Volume
The RINGER volume switch allows
you to turn the telephone ringer
OFF, or to set it to ring at LO or HI
volume. You can dial or answer calls
normally with the ringer off. Other
telephones in your home will still
ring; they are not affected by the
switch.
3
Page 5

Memory Features
Capacity: This telephone can store
up to 32 telephone numbers, up to 24
digits long.
One-Touch Dialing: The 16 white
spaces on the directory card are onetouch memory locations. You can dial
one of these numbers by pressing the
memory button next to the number.
Two-Touch Dialing: The 16 gray
spaces on the directory card are twotouch memory locations. To dial one
of these numbers you must press
, then the memory button next
to the number.
Directory Card: Remove the plastic
cover and the directory card which
is on the base. Write your telephone
numbers in the spaces provided,
and write the telephone numbers
(or names) that you want to store
in each memory location.
NOTE: You may choose to store
emergency numbers in memory
locations. This feature is provided
only as a convenience and the manufacturer assumes no responsibility for
customer reliance upon the memory
feature. Programming/testing of
emergency numbers should be
performed in the early morning or
late evening (off-peak) hours.
One-Touch Dialing
Storing Numbers
1 Lift the handset or press .
You will hear a dial tone.
2 Press and release .
3 Dial the telephone number you
want to store. You will hear a beep
each time you press a button.
If you want to store a dialing
delay in the phone number, press
where the delay is needed.
Each time you press , a
three-second dialing delay is
stored in the dialing sequence.
Each three-second pause counts
as one digit; memory locations
can store up to 24 digits.
4 Press and release the memory
button where you are storing the
number. You will hear two beeps
to confirm that the number has
been stored correctly.
5 Hang up or press after the
number is stored correctly.
Repeat Steps 1-5 to store another
number in memory.
NOTE: Each time you complete storing a telephone number by pressing a
memory location, listen for two
quick beeps to confirm that the number has been stored in memory. If
you hear several beeps, the number
has not been stored: hang up and
start over. An extension phone “off
the hook” can interrupt programming. If you still have trouble, see
“In Case of Difficulty.”
Dialing Numbers
1 Lift the handset or press
and listen for a dial tone.
2 Press and release a memory button.
Two-Touch Dialing
Storing Numbers
1 Lift the handset or press .
2 Press .
3 Dial the telephone number you
want to store. You will hear a beep
each time you press a button.
If you want to store a dialing
delay in the phone number, press
where the delay is needed.
Each time you press , a
three-second dialing delay is
stored in the dialing sequence.
Each three-second pause counts
as one digit; memory locations
can store up to 24 digits.
4 Press .
5 Press and release the memory
button where you are storing the
number. You will hear two beeps
to confirm that the number has
been stored correctly.
6 Hang up or press after the
number is stored correctly.
Repeat Steps 1-6 to store another
number in memory.
Dialing Numbers
1 Lift the handset or press
and listen for a dial tone.
2 Press .
3 Press and release a memory button.
Storing Numbers Just Dialed
Whenever you make a telephone
call, you can store the number you
dialed without re-entering the digits
by hanging up and following the
directions for storing a number in
“One-Touch Dialing” and “TwoTouch Dialing,” and pressing
instead of dialing the
telephone number.
Dialing Long Numbers
There are two ways to dial telephone
numbers that are too long to fit into a
memory location.
Use Two Memory Locations
You can store a number of more than
24 digits by dividing it and storing it
in two memory locations.
Follow the directions for storing
numbers in “One-Touch Dialing” and
“Two-Touch Dialing” to store the
number in two memory locations.
To dial, lift the handset or press
, listen for a dial tone, then:
• Press the memory button for the
first location (or press and
a memory button) and wait for the
dialing to stop.
• Press and release the memory button (or press and a memory button) for the second location.
Combine Manual and Memory
Dialing
Instead of using two memory locations, you might choose to store only
part of a long number. You can use
memory dialing to dial the stored portion, then dial the other digits manually. If the stored portion is dialed
first, wait for dialing to stop before
you continue with manual dialing.
Erasing Numbers
To remove any number from memory,
enter another number in the same
location. To clear a memory location
and leave it empty:
1 Lift the handset or press .
2 Press and release .
3 Press the memory (or and
a button) of the memory location
you want to clear.
MEMORY
4
Page 6

IN CASE OF DIFFICULTY
If this telephone does not work properly, try the following suggestions
before seeking repair assistance.
No Dial Tone
• Make sure all plugs are connected
properly. Inspect the line cord connections at the modular jack and at
the telephone. Also inspect the
coiled handset cord connection at
both ends.
• Make sure Hold is not on.
• Unplug the telephone and connect
it to another modular jack. If it
still does not work, and other telephones in your home are working,
the problem is with this telephone.
Call 1 800 722-9125.
Call Cannot Be Dialed Or Is
Dialed Slowly
• This product comes set in the
touch-tone mode. Make sure you
choose the correct dialing method;
touch-tone dialing will not work if
you have dial pulse service.
• See “Installation” to select the
correct dial mode. If you have
pulse dialing service, you cannot
dial numbers with the telephone
set to touch-tone.
• If you just used Temporary Tone,
leave the handset on the base for
a few seconds before making
another call.
Telephone Does Not Ring
• Make sure the RINGER switch is
set in the LO or HI position.
• If there are several other tele-
phones on the same line, try
disconnecting some of the other
telephones. Having too many
telephones connected can also
create problems such as low ringer
volume, or impaired sound quality
during calls.
Difficulty Storing Numbers In
Memory
• Review “One-Touch Dialing” and
“Two-Touch Dialing” to make
sure you are pressing the correct
sequence of buttons.
• If you are interrupted by a record-
ed announcement telling you to
hang up (or a loud buzzing noise),
hang up and try to enter the number more quickly.
• Try calling the number you want
to store into memory. When a call
is ended, press ,
and a memory button (or ,
, and a memory
button.
• If someone lifts an extension
phone while you are storing
numbers in memory, programming
might be interrupted. Make sure
all extensions are on hook while
storing numbers in memory.
• You might not hear the confirma-
tion beep if the RECEIVER
(handset) volume is set too low, or
if you are in a noisy location.
• If the number is more than 24
digits long, make sure you follow
the directions for “Dialing Long
Numbers.”
Speakerphone Does Not Work
The speakerphone might not work
well if someone picks up an extension phone on the same line. The
speakerphone will come back on if
the handset of the other phone is
replaced.
Other Problems
Make sure you have followed all
the instructions in this booklet. If
you continue to have problems,
call 1 800 722-9125. If you cannot
correct the problem, disconnect the
telephone and refer to the warranty
information.
5
 Loading...