


PU320
Package Contents
1 PU320 2-Port USB 3.0 Express Card
1 Power Adapter
1 Installation CD
1 User Guide
Hardware Review
A
Driver Installation Connecting Peripherals
B C
3
FCC Information
This equipment has been tested and found to comply with the limits for a Class B digital
device, pursuant to Part 15 of the FCC Rules. These limits are designed to provide reasonable
protection against harmful interference in a residential installation. This equipment generates,
uses and can radiate radio frequency energy, and if not installed and used in accordance with
the instruction manual, may cause interference to radio communications. However, there is
no guarantee that interference will not occur in a particular installation. If this equipment does
cause harmful interference to radio or television reception, which can be determined by turning
the equipment off and on, the user is encouraged to try to correct the interference by one or
more of the following measures:
• Reorient or relocate the receiving antenna;
• Increase the separation between the equipment and receiver;
• Connect the equipment into an outlet on a circuit different from that which the receiver is
connected;
• Consult the dealer/an experienced radio/television technician for help.
2-Port USB 3.0 Express Card
PU320
User Guide
© Copyright 2010 ATEN
ATEN and the ATEN logo are trademarks of ATEN International Co., Ltd. All rights reserved. All other
trademarks are the property of their respective owners.
This product is RoHS compliant.
Part No. PAPE-1285-210G Printing Date: 11/2010
PU320 2-Port USB 3.0 Express Card User Guide
Requirements
• Windows XP/Vista/7
• An Express Card Slot
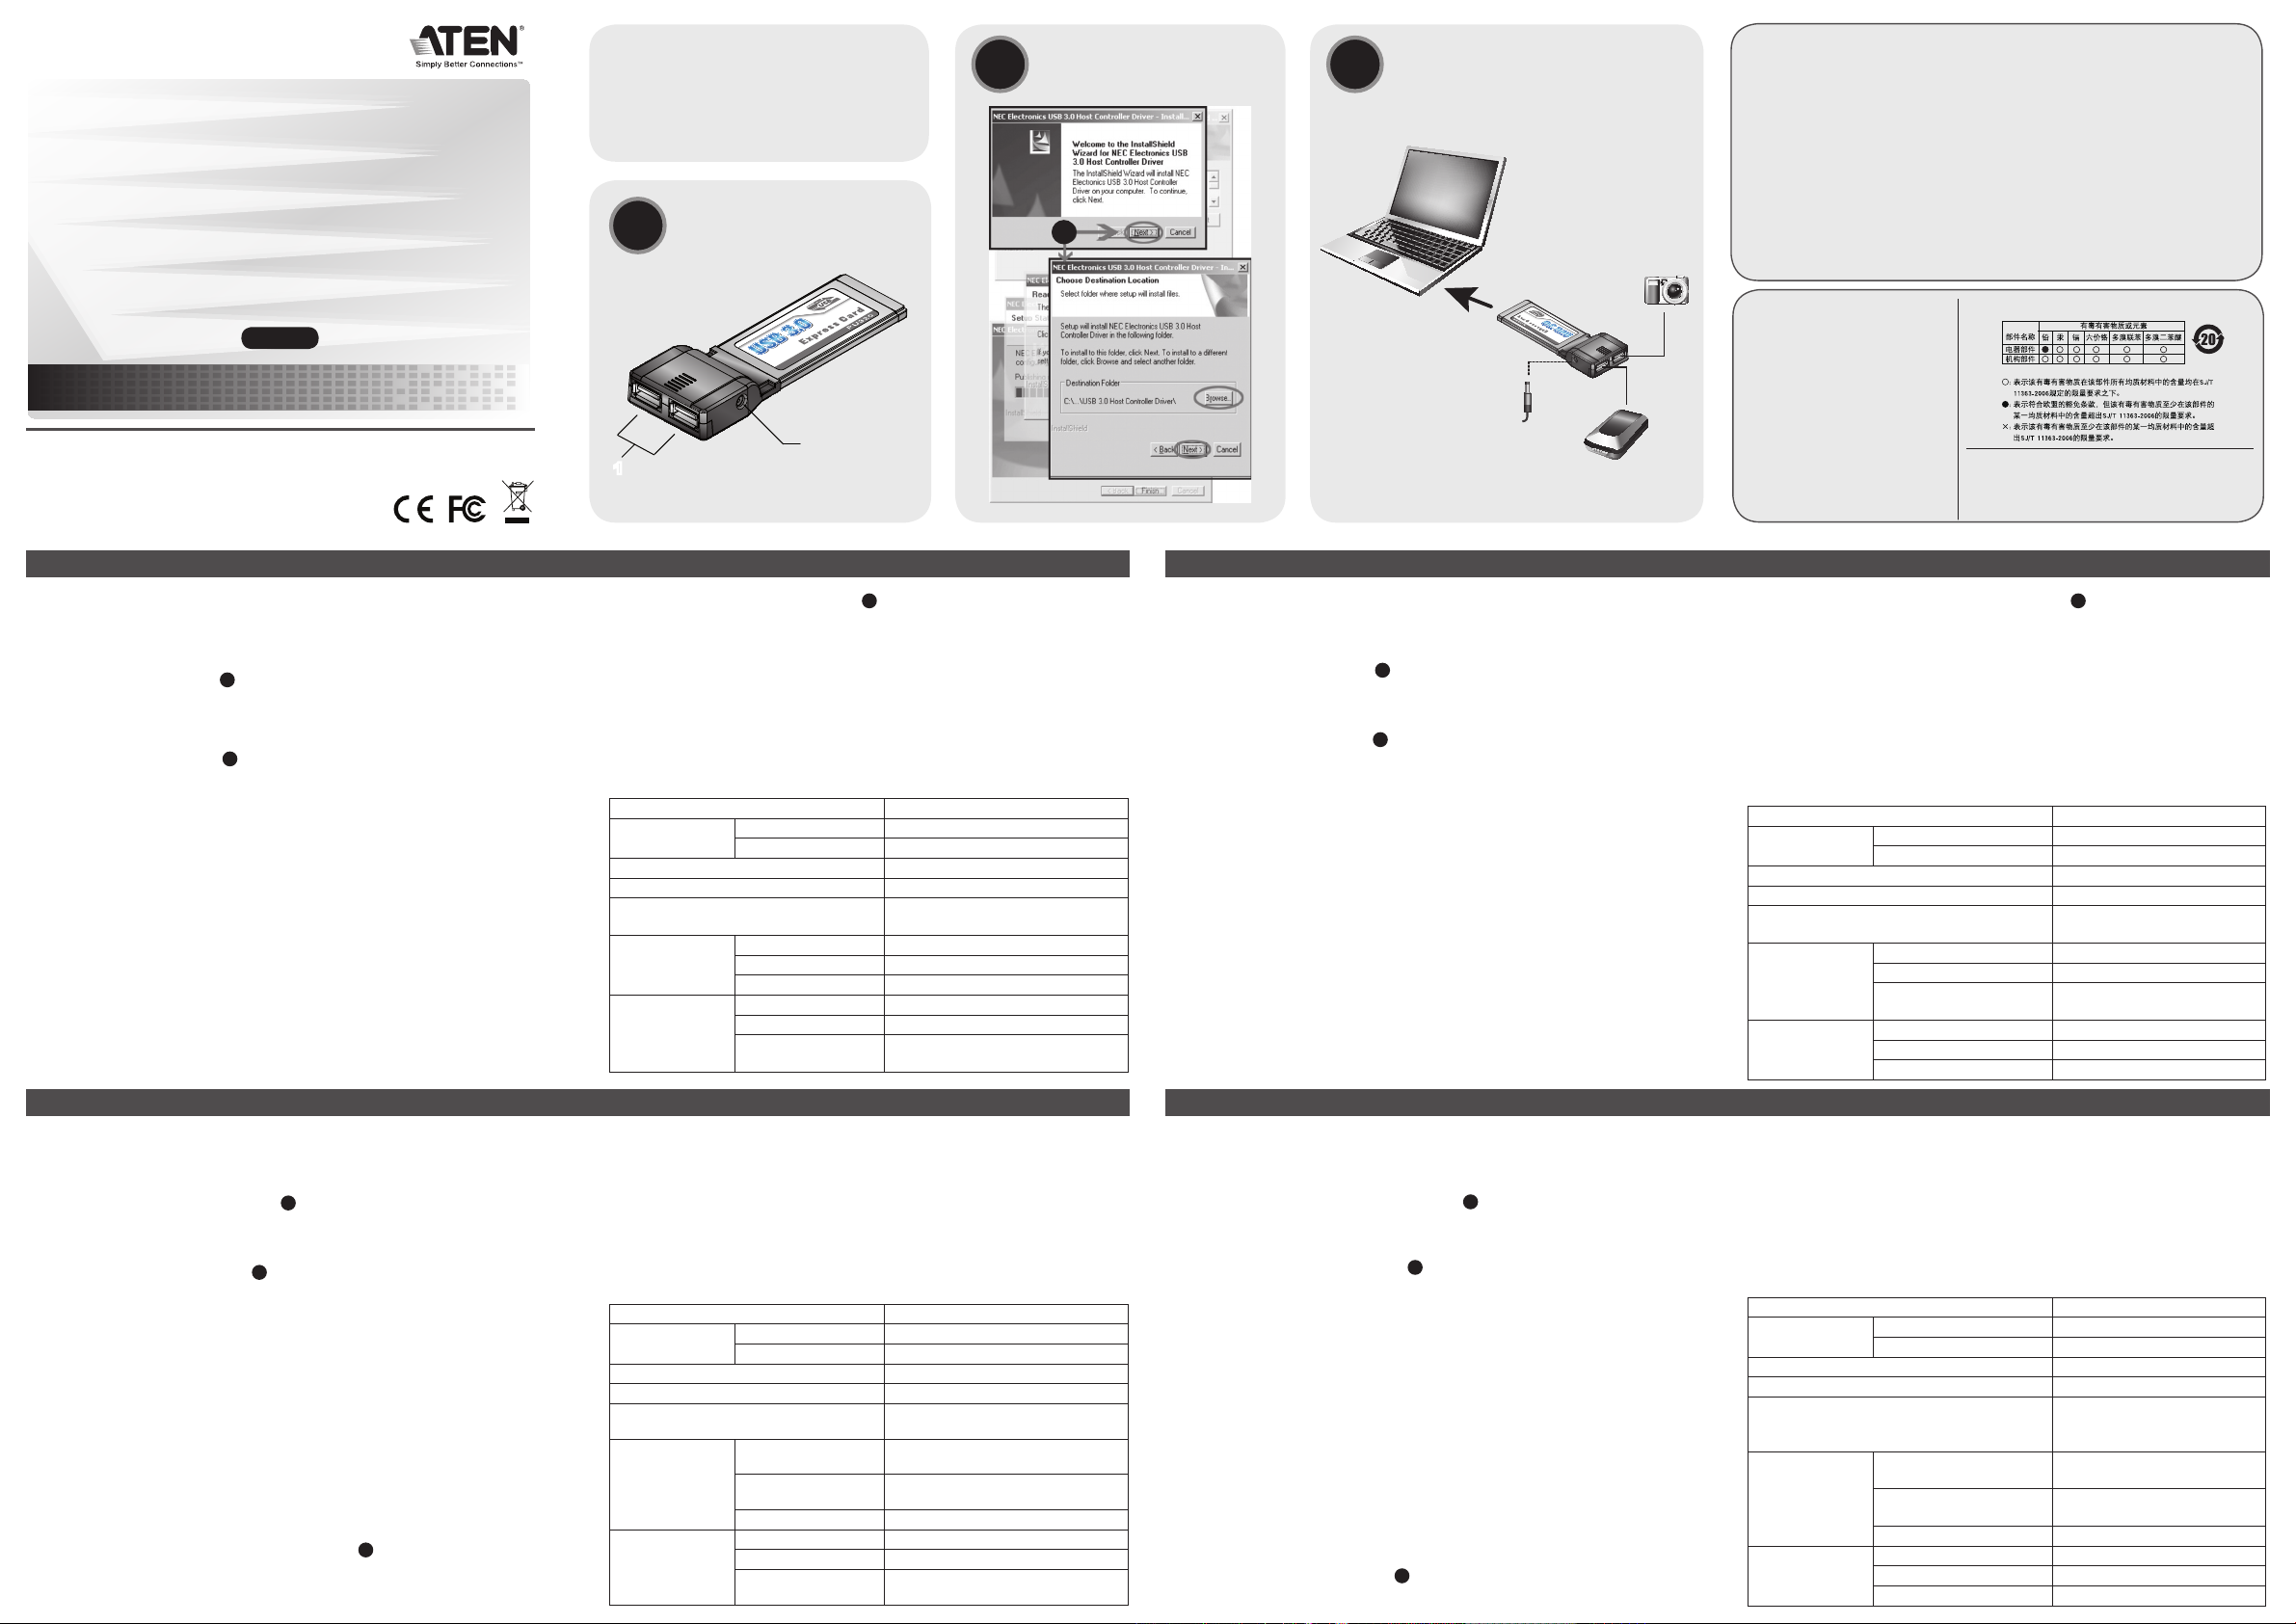
Hardware Review A
1. USB 3.0 Type A ports
2. DC Input Jack
Driver Installation B
To install the driver, do the following:
1. With your notebook booted up, slide the PU320 into its Express card slot.
Windows will automatically detect the card and will open a New Hardware
Wizard.
2. Follow the prompts. These depend on your version of Windows. The PU320
supports Microsoft Windows XP, Vista, and 7.
3. When you are prompted, insert the CD that came with the PU320 package
into your notebook’s CD-ROM drive. Navigate to the folder where the driver is
located. To do this, click USB 3.0 Host Controller Driver → PU320, then select
the folder according to your Windows version (VISTA, WIN7 or WIN-XP). Doubleclick NECEL-USB3-Host-Driver-10180-setup.exe.
4. Follow the prompts to copy the PU320 driver les to your notebook’s hard drive.
When the dialog box indicates that the installation has nished, click Finish, and
Windows reboots. Your PU320 is now ready for use.
Carte Express 2 ports USB 3.0 PU320 Manuel d’utilisation
Conguration minimale
• Windows XP/Vista/7
• Un emplacement Express Card
Description du matériel A
1. Ports USB 3.0 de type A
2. Connecteur femelle c.c.
Installation du pilote B
Pour installer le pilote, procédez comme suit :
1. Insérez la PU320 dans son logement de carte Express avec l’ordinateur en
fonction. Windows détecte la carte et lance l’Assistant Nouveau matériel.
2. Suivez les invites. Elles dépendent de votre version de Windows. La PU320 est
compatible avec Microsoft Windows XP, Vista et 7.
3. Lorsque l’on vous y invite, insérez le CD livré avec la PU320 dans le lecteur CDRom de votre ordinateur portable. Déplacez-vous dans le dossier où se trouve le
pilote. Pour ce faire, cliquez sur USB 3.0 Host Controller Driver → PU320, puis
sélectionnez le dossier correspondant à votre version de Windows (VISTA, WIN7
ou WIN-XP). Double-cliquez sur NECEL-USB3-Host-Driver-10180-setup.exe.
4. Suivez les messages vous invitant à copier les chiers du pilote PU320 sur le
disque dur de votre ordinateur portable. Lorsque la boîte de dialogue indique que
l’installation est terminée, cliquez sur Finish (Terminer) ; Windows se réinitialise.
Votre PU320 est prête à être utilisée.
Branchement de périphériques C
1. Une fois que les chiers du pilote ont été installés correctement, si vous souhaitez
®
International Co., Ltd.
2
1
www.aten.com
Connecting Peripherals C
1. After the drive les have been installed successfully, if you choose to use the
Power Adapter, plug it into an AC power source, and then connect it to the
PU320’s input jack.
Note: The Power adapter is optional. If used, the PU320 supplies up to
900mA to an attached USB device. If not used, the PU320 supplies
2. Plug your USB peripherals into any available port. The PU320 supports
402–500mA.
simultaneous operation of two USB 3.0, USB 2.0, or USB 1.1 devices.
Specications
Function PU320
Connectors
Maximum Transfer Rate 5 Gbps
Power Consumption DC5V, 11W
Maximum Current
Environment
Physical
Properties
utiliser l’adaptateur d’alimentation, branchez-le sur une prise secteur puis
connectez-le à la prise femelle d’entrée.
Remarque: L’adaptateur d’alimentation est facultatif. S’il est utilisé, la PU320
2. Branchez vos périphériques USB dans un port disponible. La PU320 prend
en charge l’utilisation simultanée de deux périphériques USB 3.0, USB 2.0 ou
USB 1.1.
USB 2 x USB 3.0 Type A
Power 1 x DC Jack
900 mA per port
(with Power Adapter)
Operating Temp. 0–50°C
Storage Temp. -20–60°C
Humidity 0-80% RH, Non-condensing
Housing Plastic, Metal
Weight 32 g
Dimensions
(L x W x H)
fournit jusqu’à 900 mA au périphérique USB qui y est raccordé.
Dans le cas contraire, la PU320 fournit entre 402 et 500 mA.
11.60 x 3.40 x 1.40 cm
www.aten.com
Caractéristiques techniques
Fonction PU320
Connecteurs
Débit de données maximum 5 Go/s
Consommation électrique DC5V, 11W
Courant maximal
Environne¬ment
Propriétés
physiques
USB 2 x USB 3.0 de type A
Alimentation 1 prise d’alimentation CC
900 mA par port
(avec adaptateur d’alimentation)
Température de
fonctionnement
Température de
stockage
Humidité HR de 0 à 80 %, sans condensation
Boîtier Plastique, métal
Poids 32 g
Dimensions (long. x
larg. x haut.)
0 à 50 °C
-20 à 60 °C
11,60 x 3,40 x 1,40 cm
PU320 2-Port-Express-Karte für USB 3.0 Benutzerhandbuch
Voraussetzungen
• Windows XP/Vista/7
• Einen Express-Kartensteckplatz
Hardwareübersicht A
1. USB-3.0-Anschlüsse Typ A
2. Stromeingangsbuchse
Treiber installieren B
Gehen Sie zur Installation des Treibers folgendermaßen vor:
1. Schieben Sie die PU320 in den Express-Kartensteckplatz Ihres eingeschalteten
Notebook-Computers. Daraufhin sollte Windows die Karte automatisch erkennen
und den Hardwareassistenten öffnen.
2. Folgen Sie den Anweisungen am Bildschirm. Diese sind von der verwendeten
Windows-Version abhängig. Die PU320 unterstützt Microsoft Windows XP, Vista
und 7.
3. Wenn Sie dazu aufgefordert werden, legen Sie die mitgelieferte CD in das CD-
Laufwerk des Notebook-Computers ein. Öffnen Sie den Ordner, in dem sich der
Treiber bendet. Dazu klicken Sie auf USB 3.0 Host Controller Driver → PU320
und wählen anschließend den Ordner aus, der zu Ihrer Windows-Version (VISTA,
WIN7 oder WIN-XP) passt. Doppelklicken Sie auf die Datei NECEL-USB3-HostDriver-10180-setup.exe.
4. Folgen Sie den Anweisungen am Bildschirm, um die erforderlichen Dateien
des PU320-Treibers auf die Festplatte Ihres Notebooks zu kopieren. Wenn die
Nachricht erscheint, dass die Installation abgeschlossen ist, klicken Sie auf
Fertig stellen. Daraufhin wird Windows neu gestartet. Anschließend ist die
PU320 einsatzbereit.
PU320 Tarjeta Express de 2 puertos USB 3.0 Manual del usuario
Requisitos
• Windows XP/Vista/7
• Una ranura para tarjetas Express
Presentación del hardware A
1. Puertos USB 3.0 de tipo A
2. Entrada de alimentación
Instalar el controlador B
Para instalar el controlador, proceda como se indica a continuación:
1. Con el ordenador portátil encendido, inserte la PU320 en la ranura para tarjetas
Express. Windows detectará la tarjeta automáticamente y abrirá el Asistente para
instalar nuevo hardware.
2. Siga las instrucciones. Éstas dependerán de la versión de Windows que tenga
instalada. La PU320 admite Microsoft Windows XP, Vista y 7.
3. Cuando el sistema se lo pida, inserte el CD incluido en la unidad de CD-ROM
del ordenador portátil. Navegue hasta la carpeta que contiene el controlador
adecuado. Para ello, haga clic en USB 3.0 Host Controller Driver → PU320 y
luego seleccione la carpeta en función de la versión de Windows que tenga
instalada (VISTA, WIN7 o WIN-XP). Haga doble clic en el archivo NECEL-USB3Host-Driver-10180-setup.exe.
4. Siga las instrucciones en pantalla para instalar el controlador de la PU320 en el
disco duro de su ordenador portátil. Cuando el cuadro de diálogo indique que
la instalación ha terminado, haga clic en Concluir. A continuación, Windows se
reiniciará. Después, la PU320 estará preparada.
Conectar periféricos C
1. Después de instalar los archivos del controlador con éxito y si desea utilizar el
Online Registration
International:
http://support.aten.com
North America:
http://www.aten-usa.com/
product_registration
The following contains information that relates to China:
Technical Phone Support
International:
886-2-86926959
North America:
1-888-999-ATEN Ext: 4988
United Kingdom:
44-8-4481-58923
All information, documentation, and specifications
contained in this Quick Start Guide are subject
to chang e w ith o ut pri or noti fic ati on by t he
manufacturer. Please visit our website to find the
most up to date version.
www.aten.com
Peripheriegeräte anschließen C
1. Wenn Sie nach erfolgter Installation das zusätzliche Netzteil anschließen
möchten, verbinden Sie dieses mit einer Netzsteckdose und der
Stromeingangsbuchse an der PU320.
Hinweis: Der Anschluss des Netzteils ist optional. Wird es verwendet, liefert
2. Verbinden Sie die USB-Peripheriegeräte mit einem beliebigen freien Port. Sie
können zwei Geräte vom Typ USB 3.0, USB 2.0 oder USB 1.1 gleichzeitig an
die PU320 anschließen.
die PU320 bis zu 900 mA Strom an das angeschlossenen USBGerät. Anderenfalls liefert die PU320 etwa 402–500 mA.
Technische Daten
Funktion PU320
Anschlüsse
Maximaler Datendurchsatz 5 Gbps
Stromverbrauch DC5V, 11W
Maximal verfügbarer Strom
Umgebung
Physische
Eigenschaften
adaptador de alimentación, conéctelo a una toma eléctrica y a la entrada de
alimentación de la PU320.
Nota: El empleo del adaptador de alimentación es opcional. Si lo utiliza, la
PU320 es capaz de suministrar hasta 900 mA a un dispositivo USB
conectado. Si no lo emplea, la PU320 suministra 402–500 mA.
2. Enchufe los equipos periféricos USB en cualquier puerto libre. La PU320
admite la conexión simultánea de dos dispositivos USB 3.0, USB 2.0 o USB
1.1.
USB 2 x USB 3.0 Typ A
Stromversorgung 1 x Stromeingangsbuchse
900 mA pro Port
(mit Netzteil)
Betriebstemperatur 0-50 °C
Lagertemperatur -20-60 °C
Feuchtigkeit
Gehäuse Kunststoff, Metall
Gewicht 32 g
Abmessungen (L x B x H) 11,60 x 3,40 x 1,40 cm
0 -80% rel. Luftfeuchte, nicht
kondensierend
www.aten.com
Especicaciones
Función PU320
USB
Tasa de transferencia máxima 5 Gbps
Consumo DC5V, 11W
Corriente máxima suministrada
Entorno
Propiedades
físicas
USB 2 x USB 3.0 Typ A
Alimentación 1 toma de c.c.
900 mA por puerto
(con adaptador de
alimentación)
Temperatura de
funcionamiento
Temperatura de
almacenamiento
Humedad 0 a 80% HR, sin condensar
Carcasa Plástico, metal
Peso 32 g
Dimensiones (L x An x Al) 11,60 x 3,40 x 1,40 cm
0 a 50 °C
-20 a 60 °C
 Loading...