


CS1742
B
Package Contents
1 2-Port USB Dual-View KVMP™ Switch
2 KVM Cables (Audio/Video)
2 KVM Cables (USB/Video)
1 Firmware Upgrade Cable
1 User Instructions
Hardware Installation
© Copyright 2014 ATEN® International Co., Ltd.
ATEN and the ATEN logo are trademarks of ATEN International Co., Ltd. All rights reserved. All
other trademarks are the property of their respective owners.
This product is RoHS compliant.
Part No. PAPE-1223-S01G Printing Date: 12/2014
2/4-Port USB Dual-View KVMP™ Switch
Quick Start Guide
CS1742 / CS1744
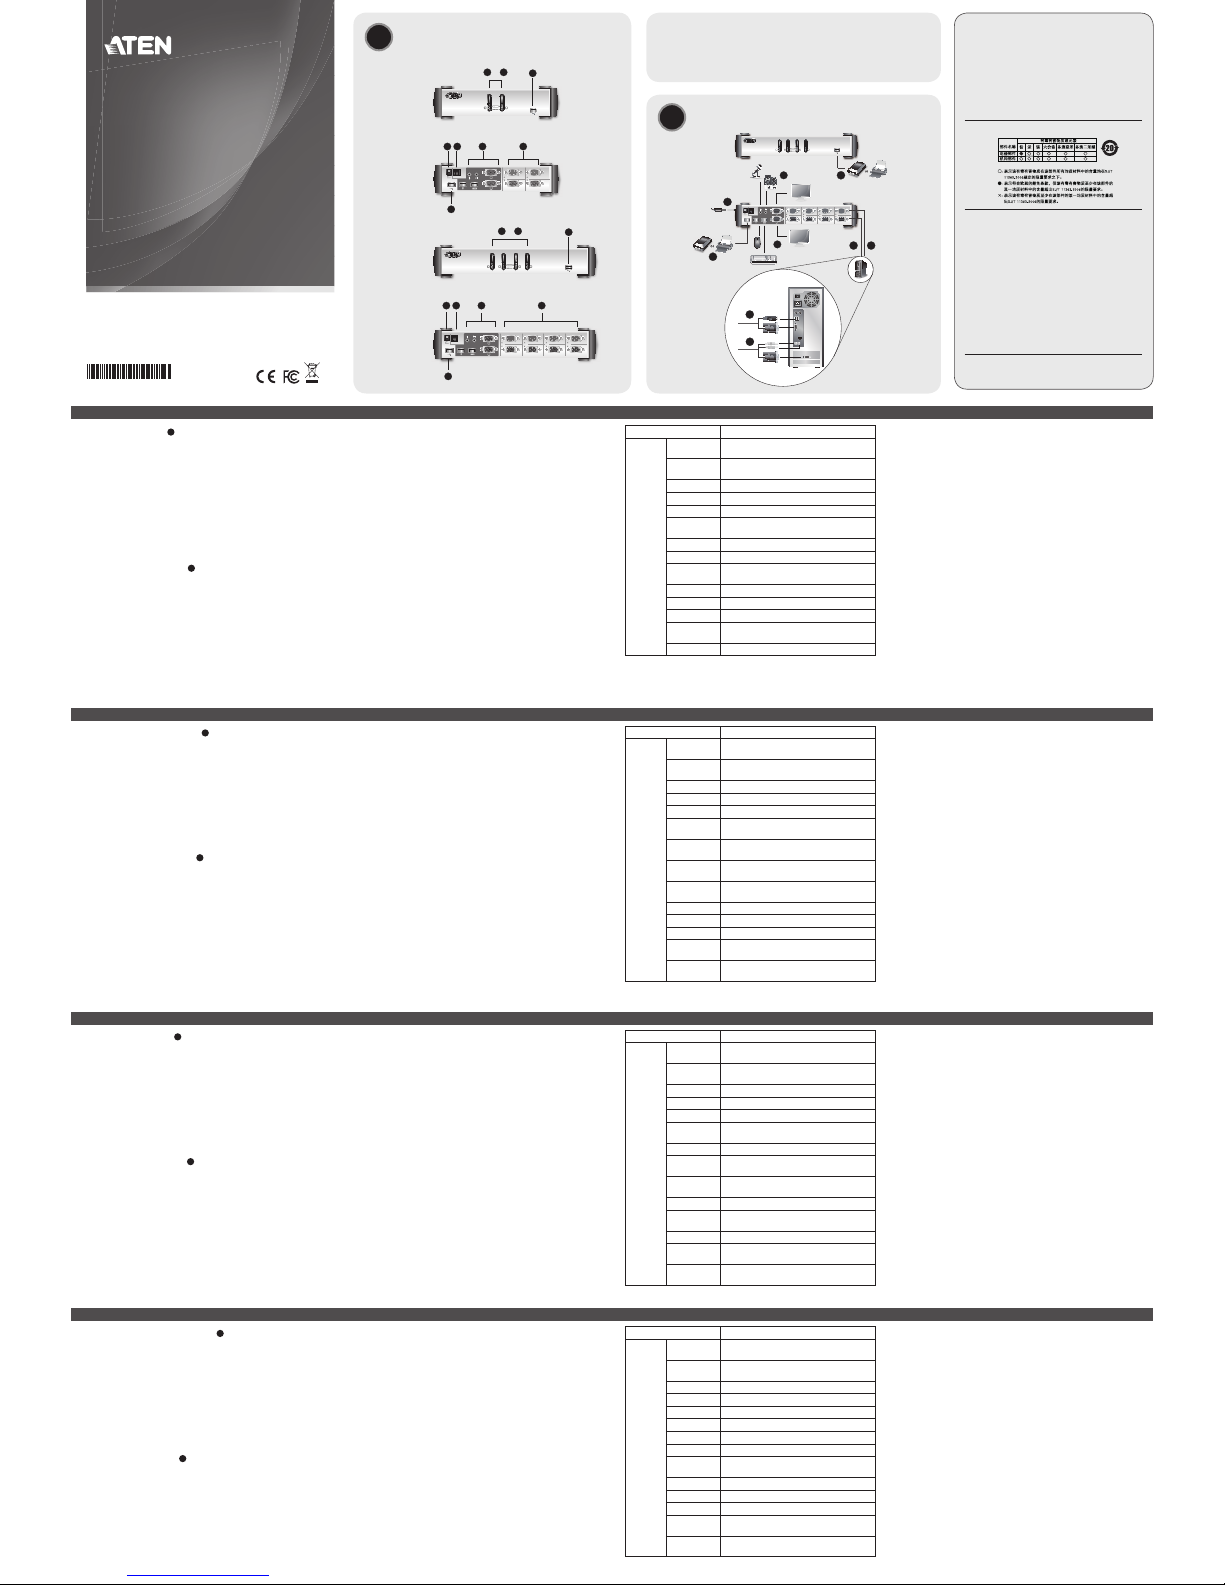
Hardware Review A
Front View
1. Port Selection Switches
2. Port LEDs
3. USB Port
Rear View
1. Power Jack
2. Firmware Upgrade Section
3. Console Port Section
4. CPU Port Section
5. USB Port
Hardware Installation B
1. Plug your Console devices (USB keyboard, USB mouse, monitors,
microphone and speakers), into the switch’s Console Ports.
2. Use the Port A KVM in Green cable (the one with the USB connector)
to connect any available CPU A port to the fi rst VGA port and the USB
port of the computer you are installing.
3. Use the Port B KVM cable in Orange (the one with the microphone and
speaker connectors) to connect the CPU B port to the second VGA port
and the audio jacks of the computer you are installing.
Note: Be sure that the Port B cable is in the same CPU port as the Port
A cable — both in Port 1; both in Port 2, etc.
4. Connect your USB peripherals to the USB ports located on the front
and rear panels.
5. If you choose to use external power, plug the power adapter cable
into the switch’s Power Jack, then plug the power adapter into an AC
power source.
Note: The power adapter should be DC5V 2.6A with the inside positive
and the outside negative:
6. Turn on the power to the computers.
Operation
The CS1742 / CS1744 hotkey function makes it convenient to operate
your KVM installation from the keyboard.
Note: If using the Scroll Lock key confl icts with other programs running
on the computer, the Ctrl key can be used
1. Invoking hotkey mode:
Press [Scroll Lock] or [Ctrl] twice
2. Detailed Hotkey operation
Hotkeys Action
[Scoll Lock]
[Scoll Lock]
[Enter]
Switches KVM focus + Audio + Peripheral to the
next Port
[n] [Enter]
Switches KVM focus + Audio + Peripheral to
Port n
[n] [K] [Enter] Switches KVM focus to Port n
[n] [U] [Enter] Switches Peripheral to Port n
[n] [S] [Enter] Switches Audio to Port n
[n] [K] [U]
[Enter]
Switches KVM focus + Peripheral to Port n
[n] [K] [S] [Enter] Switches KVM focus + Audio to Port n
[n] [U] [S] [Enter] Switches Audio + Peripheral to Port n
[n] [K] [U] [S]
[Enter]
Switches KVM focus + Audio + Peripheral to
Port n
[K] [Enter] Switches KVM focus to the next Port
[U] [Enter] Switches Peripheral to the next Port
[S] [Enter] Switches Audio to the next Port
[A] [Enter]
Begins Auto Scan function at 5 second intervals
(default)
[A] [n] [Enter] Begins Auto Scan function at n second intervals
[n] represents any number 1 to 4, except auto scan function where
signifi es 1 to 99 seconds
[K] represents the KVM focus
[U] represents the USB Peripheral device
[S] represents the speakers and microphone
[A] represents Auto Scan function
For a complete list of Hotkey functions, refer to the User Manual
Manual Switching
For manual port selection:
• Press a port selection pushbutton for less than two seconds to bring
the KVM, USB hub, and audio focus to the computer attached to its
corresponding port.
• Press a port selection pushbutton for longer than two seconds to bring
only the KVM focus to the computer attached to its corresponding port.
• Press pushbuttons 1 and 2 simultaneously for 2 seconds to start Auto
Scan Mode.
CS1742/CS1744 2/4-Port Dual-View KVM Switch Quick Start Guide
www.aten.com
Description de l’appareil A
Vue avant
1. Commutateurs de sélection des ports
2. Voyants de ports
3. Port USB
Vue arrière
1. Pris jack d’alimentation électrique
2. Section Mise à niveau du microprogramme
3. Section port de la console
4. Section port du processeur
5. Port USB
Installation du matériel B
1. Connectez les composants de console (clavier USB, souris USB, écrans,
microphone et haut-parleurs) au ports Console du commutateur.
2. Utilisez le câble KVM Port A dans le vert (celui qui comporte un
connecteur USB) pour connecter un port UC A disponible au premier
port VGA et le port USB de l'ordinateur que vous installez.
3. Utilisez le câble KVM Port B dans l'orange (celui qui comporte les
connecteurs du microphone et des haut-parleurs) pour connecter le
port UC B au second port VGA et les jacks audio de l'ordinateur que
vous installez.
Remarque : Veillez à connecter le câble Port B au port UC du câble
Port A (les deux aux port 1, les deux au port 2, etc.).
4. Connectez les périphériques USB aux ports USB situés sur les panneaux
avant et arrière.
5. Si vous choisissez d’utiliser une alimentation externe, branchez le
câble de l’adaptateur d'alimentation électrique au connecteur jack
d'alimentation électrique, puis connectez l’adaptateur électrique à une
source d’alimentation CA.
Remarque : L'adaptateur électrique doit avoir la spécifi cation DC5V
2,6 A avec borne intérieure positive et borne extérieure
négative :
6. Mettez sous tension les ordinateurs.
Opération
Le mode Raccourci clavier (Hotkey) CS1742 / CS1744 permet d'installer
aisément le commutateur KVM depuis le clavier.
Remarque : Si la touche Arr. déf. entre en confl it avec d'autres
programmes actifs, utilisez la touche Ctrl.
1. Activation du mode Raccourcis clavier :
Appuyez deux fois sur la touche [Arr. déf] ou [Ctrl]
2. Fonction des raccourcis clavier :
Raccourcis clavier Action
[Arr. déf.]
[Arr. déf.]
[Entrée]
Centre l’activité du KVM + son + périphérique
sur le port suivant
[n] [Entrée]
Centre l’activité du KVM + son + périphérique
sur le port n
[n] [K] [Entrée] Centre l’activité du KVM sur le port n
[n] [U] [Entrée] Bascule le périphérique vers le port n
[n] [S] [Entrée] Bascule le son vers le port n
[n] [K] [U]
[Entrée]
Centre l’activité du KVM + périphérique sur le
port n
[n] [K] [S]
[Entrée]
Centre l’activité du KVM + son sur le port n
[n] [U] [S]
[Entrée]
Bascule le son + périphérique vers le port n
[n] [K] [U] [S]
[Entrée]
Centre l’activité du KVM + son + périphérique
sur le port n
[K] [Entrée] Centre l’activité du KVM sur le port suivant
[U] [Entrée] Bascule le périphérique vers le port suivant
[S] [Entrée] Bascule le son vers le port suivant
[A] [Entrée]
Démarre la fonction Recherche automatique à
des intervalles de 5 secondes (par défaut)
[A] [n] [Entrée]
Démarre la fonction Recherche automatique à
des intervalles de n secondes
[n] correspond à un nombre compris entre 1 et 4, sauf pour la recherche
automatique où il correspond à un délai en secondes compris entre 1 et
99.
[K] représente la sélection du KVM
[U] représente le périphérique USB
[S] représente les haut-parleurs et le microphone
[A] représente la fonction Recherche automatique
Reportez-vous au manuel d'utilisation qui contient la liste complète des
fonctions des raccourcis clavier.
Commutation manuelle
Pour la sélection de port manuelle :
• Appuyez une fois sur un bouton de sélection de port pour transférer
le contrôle KVM, audio et USB à l'ordinateur connecté au port
correspondant.
• Appuyez sur un bouton de sélection de port et maintenez-le enfoncé
pendant plus de 2 secondes pour transférer uniquement le contrôle
KVM à l’ordinateur connecté au port correspondant.
• Appuyez simultanément sur les boutons de sélection de port 1 et 2 et
maintenez-les enfoncés pendant 2 secondes pour activer le mode de
commutation automatique.
CS1742/CS1744 Guide de mise en route rapide du commutateur KVM 2/4-Port Dual-View
www.aten.com
Hardwareübersicht A
Vorderseitige Ansicht
1. Anschlusswahlschalter
2. Anschluss-LEDs
3. USB-Port
Rückseitige Ansicht
1. Stromeingangsbuchse
2. Abschnitt zur Firmwareaktualisierung
3. Konsolportabschnitt
4. CPU-Portauswahl
5. USB-Port
Hardware installieren B
1. Schließen Sie Ihre Konsolgeräte (USB-Tastatur, USB-Maus, Monitor,
Mikrofon und Lautsprecher) an die Konsolports des Switch an.
2. Verbinden Sie einen beliebigen freien CPU-A-Port mit dem ersten VGAPort und dem USB-Port des Computers, der installiert werden soll.
Verwenden Sie dazu das Port A KVM-Kabel in Grun (das mit dem USBStecker).
3. Verbinden Sie einen beliebigen freien CPU-B-Port mit dem zweiten
VGA-Port und den Audio-Buchsen des Computers, der installiert
werden soll. Verwenden Sie dazu das Port B KVM-Kabel in der orange
(das mit den Mikrofon- und Lautsprecher-Steckern).
Hinweis: Achten Sie darauf, dass Sie das Port B-Kabel mit demselben
CPU-Port wie das Port A-Kabel verbinden (also beide an Port
1, beide an Port 2 usw.).
4. Verbinden Sie Ihre USB-Peripheriegeräte mit den USB-Ports auf der
Vorder- und Rückseite.
5. Wenn Sie eine externe Stromversorgung verwenden möchten, schließen
Sie das Kabel des Netzteils an die Stromeingangsbuchse des Switch
an und verbinden das Netzteil anschließend mit einer stromführenden
Steckdose.
Hinweis: Das Netzteil muss für 5V 2,6A Gleichstrom ausgelegt sein
und den positiven Pol in der Mitte aufweisen (Masse außen):
6. Schalten Sie Ihre Computer ein.
Bedienung
Dank der Hotkey-Funktionen können Sie den CS1742 / CS1744 bequem
über die Tastatur steuern.
Hinweis: Wenn die Taste Rollen mit anderen Programmen in Konfl ikt
gerät, können Sie anstelle die Taste Strg verwenden.
1. Hotkey-Modus aktivieren:
Drücken Sie zweimal die Taste [Rollen] oder [Strg].
2. Hotkey-Funktionen im Detail:
Hotkeys Aktion
[Rollen]
[Rollen]
[Enter]
Schaltet KVM-Fokus + Audio + Peripheriegerät
auf den nächsten Port
[n] [Enter]
Schaltet KVM-Fokus + Audio + Peripheriegerät
auf den Port n
[n] [K] [Enter] Schaltet den KVM-Fokus auf Port n
[n] [U] [Enter] Schaltet das Peripheriegerät auf Port n
[n] [S] [Enter] Schaltet die Audiogeräte auf Port n
[n] [K] [U]
[Enter]
Schaltet den KVM-Fokus + Peripheriegerät auf
Port n
[n] [K] [S] [Enter] Schaltet den KVM-Fokus + Audio auf Port n
[n] [U] [S] [Enter]
Schaltet das Audiogerät + Peripheriegerät auf
Port n
[n] [K] [U] [S]
[Enter]
Schaltet KVM-Fokus + Audio + Peripheriegerät
auf den Port n
[K] [Enter] Schaltet den KVM-Fokus auf den nächsten Port
[U] [Enter]
Schaltet das Peripheriegerät auf den nächsten
Port
[S] [Enter] Schaltet das Audiogerät auf den nächsten Port
[A] [Enter]
Startet die automatische Suchfunktion mit einer
Intervalldauer von 5 Sekunden (Standard)
[A] [n] [Enter]
Startet die automatische Suchfunktion mit einer
Intervalldauer von n Sekunden
[n] steht für eine Zahl zwischen 1 und 4, außer bei der Autoscan-Funktion,
wo sie für eine Zeit zwischen 1 und 99 Sekunden steht
[K] steht für den KVM-Fokus
[U] steht für das USB-Gerät
[S] steht für Lautsprecher und Mikrofon
[A] steht für die automatische Suchfunktion
Ein vollständige Liste der Hotkey-Funktionen fi nden Sie im
Benutzerhandbuch.
Manuelle Portumschaltung
Manuelle Portauswahl:
• Drücken Sie eine Portauswahltaste einmal, um die KVM-, Ton- und USB-
Signale auf den Computer dieses Ports umzuleiten.
• Halten Sie einen Port-Auswahlschalter länger als 2 Sekunden gedrückt,
um nur die KVMSteuerung auf den Computer des betreffendes Ports
umzuleiten.
• Um die automatische Portumschaltung zu starten, halten Sie gleichzeitig
die Tasten 1 und 2 mindestens 2 Sekunden lang gedrückt.
CS1742/CS1744 2/4-Port Dual-View-KVM-Switch Kurzanleitung
www.aten.com
Presentación del hardware
A
Vista frontal
1. Conmutadores de selección de puertos
2. Indicadores LED de los puertos
3. Puerto USB
Vista posterior
1. Entrada de alimentación
2. Sección para actualizaciones del fi rmware
3. Sección de puertos de consola
4. Sección de puertos CPU
5. Puerto USB
Instalar el hardware B
1. Conecte sus dispositivos de consola (teclado USB, ratón USB, monitores,
micrófono y altavoces) a los puertos de consola del concentrador.
2. Utilice el cable KVM Port A en verde (el que tiene el conector USB) para
conectar cualquiera de los puertos CPU A libre al primer puerto VGA y
puerto USB del ordenador que quiera instalar.
3. Utilice el cable KVM Port B en naranja (el que tiene los conectores para
micrófono y altavoces) para conectar cualquiera de los puertos CPU B
libre al segundo puerto VGA y a los puertos de audio del ordenador
que quiera instalar.
Nota: Conecte el cable Port B al mismo puerto de CPU que el cable
Port A (es decir, los dos al puerto 1, los dos al puerto 2, etc.).
4. Conecte los periféricos USB a los puertos USB ubicados en los paneles
anterior y posterior.
5. Si desea utilizar una alimentación externa, conecte la fuente de
alimentación a la entrada de alimentación del concentrador y luego la
fuente a una toma eléctrica.
Nota: El adaptador de alimentación debe ser de 5V c.c., 2,6A con el
polo positivo en el interior y el negativo en el exterior:
6. Encienda los ordenadores.
Operación
La función de teclas de acceso directo permite controlar al CS1742 /
CS1744 y toda la instalación KVM a través del teclado.
Nota: Si la tecla BloqDespl es utilizada por otros programas instalados y
ea confl ictos, puede emplear la tecla Ctrl en su lugar.
1. Para activar el modo de las teclas de acceso directo:
Pulse dos veces la tecla [BloqDespl] o [Ctrl].
2.. Funciones de las teclas de acceso directo en detalle:
Teclas de acceso directo Acción
[BloqDespl]
[BloqDespl]
[Intro]
Cambia el foco KVM + Audio + Periférico al
puerto siguiente
[n] [Intro]
Cambia el foco KVM + Audio + Periférico al
puerto n
[n] [K] [Intro] Cambia el foco KVM al puerto n
[n] [U] [Intro] Cambia el periférico al puerto n
[n] [S] [Intro] Cambia el audio al puerto n
[n] [K] [U] [Intro] Cambia el foco KVM + Periférico al puerto n
[n] [K] [S] [Intro] Cambia el foco KVM + Audio al puerto n
[n] [U] [S] [Intro] Cambia el Audio + Periférico al puerto n
[n] [K] [U] [S]
[Intro]
Cambia el foco KVM + Audio + Periférico al
puerto n
[K] [Intro] Cambia el foco KVM al puerto siguiente
[U] [Intro] Cambia el periférico al puerto siguiente
[S] [Intro] Cambia el audio al puerto siguiente
[A] [Intro]
Inicia la búsqueda automática con un intervalo
de 5 segundos (por defecto)
[A] [n] [Intro]
Inicia la búsqueda automática con un intervalo
de n segundos
[n] representa un número cualquiera entre 1 y 4, excepto para la función
de búsqueda automática, donde representa entre 1 a 99 segundos
[K] representa el foco KVM
[U] representa el dispositivo USB
[S] representa los altavoces y al micrófono
[A] representa la función de búsqueda automática
Para una lista completa de todas las teclas de acceso directo, véase el
manual del usuario.
Conmutación manual
Selección manual de puertos:
• Pulse una vez un conmutador de selección de puerto para pasar el
control KVM, la señal USB y la de audio al ordenador conectado al
puerto correspondiente.
• Mantenga pulsado un conmutador de selección de puertos durante
más de 2 segundos para pasar solamente el control KVM al ordenador
conectado al puerto correspondiente.
• Mantenga pulsados los botones de selección de puerto 1 y 2
simultáneamente durante 2 segundos para iniciar el modo de
conmutación automática.
CS1742/CS1744 Conmutador KVM Dual-View de 2/4-Puertos Guía rápida
www.aten.com
or
5
1
1
4
or
2
2 3
3
4
or
or
AAUUTTOO SSCCAANN
CONSOLE
3 B
3 A
4 B
4 A
CPU 4 CPU 3
1 B
1 A
2 B
2 A
CPU 2 CPU 1
AAUUTTOO SSCCAANN
1 2
&
CONSOLE
1 B
1 A
2 B
2 A
CPU 2 CPU 1
152 3 4
5
1 2 3 4
CONSOLE
3 B
3 A
4 B
4 A
CPU 4 CPU 3
1 B
1 A
2 B
2 A
CPU 2 CPU 1
AAUUTTOO SSCCAANN
1 2
&
3
3
CS1742 Front View
CS1744 Front View
CS1742 Rear View
CS1744 Rear View
Important Notice
Considering environmental protection, ATEN does not provide a fully
printed user manual for this product. If the information contained in the
Quick Start Guide is not enough for you to confi gure and operate your
product, please visit our website www.aten.com, and download
the full user manual.
Online Registration
http://eservice.aten.com
Technical Phone Support
International:
886-2-86926959
All information, documentation, firmware, software utilities, and
specifi cations contained in this package are subject to change without
prior notification by the manufacturer. Please visit our website http://
www.aten.com/download/?cid=dds for the most up-to-date versions.
EMC Information
FEDERAL COMMUNICATIONS COMMISSION INTERFERENCE STATEMENT:
This equipment has been tested and found to comply with the limits for a Class B
digital service, pursuant to Part 15 of the FCC rules. These limits are designed to provide
reasonable protection against harmful interference in a residential installation. Any
changes or modifi cations made to this equipment may void the user s authority to
operate this equipment. This equipment generates, uses, and can radiate radio frequency
energy. If not installed and used in accordance with the instructions, may cause harmful
interference to radio communications. However, there is no guarantee that interference
will not occur in a particular installation. If this equipment does cause harmful
interference to radio or television reception, which can be determined by turning the
equipment off and on, the user is encouraged to try to correct the interference by one or
more of the following measures:
- Reorient or relocate the receiving antenna;
- Increase the separation between the equipment and receiver;
- Connect the equipment into an outlet on a circuit different from that to
which the receiver is connected;
- Consult the dealer/an experienced radio/television technician for help.
FCC Caution: Any changes or modifi cations not expressly approved by the party
responsible for compliance could void the user's authority to operate this equipment.
This device complies with Part 15 of the FCC Rules. Operation is subject to the following
two conditions:(1) this device mat not cause harmful interference, and(2) this device
must accept any interference received, including interference that may cause undesired
operation.
The following contains information that relates to China:
North America:
1-888-999-ATEN Ext: 4988
United Kingdom:
44-8-4481-58923
A
Hardware Review
 Loading...