


Downloaded from
www . vandenborre . be
Gebruiksaanwijzing
Koelkast met vriesvak
Mode d’emploi
Réfrigérateur avec compartiment
Bedienungsanleitung
Kühlschrank mit Gefrierfach
Instructions for use
Fridge with freezer compartment
178 cm
Downloaded from
www . vandenborre . be

Downloaded from
www . vandenborre . be
DEUTSCH |
Gebrauchsanweisung |
Seite 4 |
FRANÇAIS |
Mode d’emploi |
Page 10 |
ENGLISH |
Instructions |
Page 16 |
NEDERLANDS |
Gebruiksaanwijzing |
Pagina 22 |
3
|
Downloaded |
|
|
USING FOR THE FIRST TIME |
from |
|
|
|
www |
||
Connect the appliance to the power supply. |
|
|
. |
Note: After turning the appliance on, you must wait for 4-5 hours for the correct storage |
|
vandenborre |
|
In models with electronics, a sound signal may be emitted, which means that the temperature |
|
||
alarm has been activated: press the sound alarm off button. Where provided, position the |
|
||
antibacterial anti-odour filter in the fan as demonstrated in the filter packaging. |
|
|
|
temperature to be reached for a normally filled appliance. |
|
|
be |
|
|
|
. |
MAINTENANCE AND CLEANING
OF THE APPLICANCE
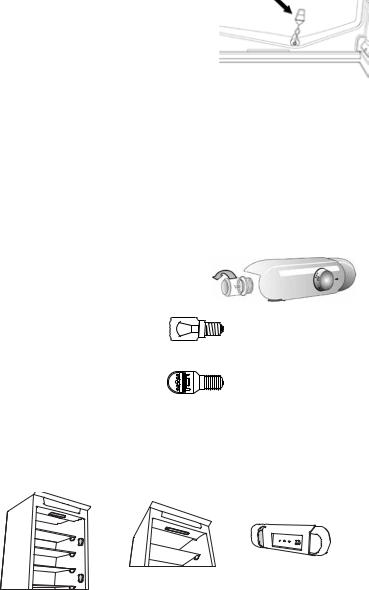
Clean the appliance occasionally with a cloth and a solution of warm water and neutral cleaning agents specifically for cleaning the inside of the refrigerator. Do not use abrasive cleaning agents. To ensure the constant and correct flow of the defrosting water, regularly clean the inside of the drain situated in the back wall of the refrigerator compartment near the fruit and vegetable drawer using the utensil provided (see figure).
Before carrying out any maintenance or cleaning, take the plug out of the socket or disconnect the appliance from the power supply.
REPLACING THE LIGHT BULB OR LED
(depending on the model)
Always disconnect the appliance from the power supply before replacing the light bulb. Then follow the instructions based on the type of light bulb for your product.
Replace the light bulb with one with the same features, available from the Technical Assistance Service and authorised sellers.
Light type 1)
To remove the light bulb, unscrew it in an anti-clockwise direction, as shown in the figure. Wait 5 minutes before reconnecting the appliance.
- traditional light bulb (max 25W) or
- LED light bulb (with the same features)
only available from the Technical Assistance Service
Light bulb
LED light bulb
Light type 2)
If the product has LED lights, as demonstrated in the figures below, contact the Technical Assistance Service if you need a replacement.
LEDs last longer than traditional light bulbs, improve internal visibility and are environmentallyfriendly.
16
|
Downloaded |
IN THE EVENT OF NON-USE |
from |
. |
|
OF THE APPLICANCE |
www |
Keep the doors slightly ajar to let air circulate inside the compartments. By doing this, you avoidvandenborre |
|
Disconnect the appliance from the power supply, empty it, defrost it (if necessary) and clean it. |
|
the development of mould and bad odours. |
be |
|
. |
IN THE EVENT OF AN INTERRUPTION TO THE POWER SUPPLY
Keep the doors closed so the food stays cold for as long as possible. Do not re-freeze food that has partially defrosted. If there is a prolonged power cut, the black out alarm may also activate (in products with electronics).
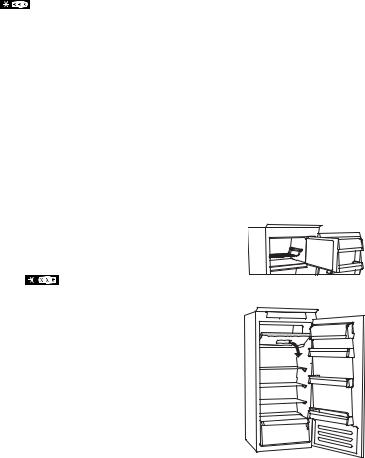
REFRIGERATOR COMPARTMENT
The refrigerator compartment allows for the storage of fresh food and drink.
The refrigerator compartment defrosts completely automatically.
The occasional presence of drops of water on the internal back wall of the compartment is a sign of the automatic defrosting phase. The defrosting water is channelled into a drain and then collected in a container, where it evaporates.
Depending on the model, the product may be equipped with a special “Zero Degrees” compartment, which is ideal for storing fresh meat and fish.
Warning: do not clean refrigerator accessories in a dishwasher.
Note: the ambient temperature, how often the doors are opened and the position of the appliance may affect the internal temperatures in the two compartments. Set the temperatures depending on these factors.
Note: in very humid conditions, condensation may form in the refrigerator compartment, especially on the glass shelves. In this case, it is recommended that you close containers with liquids in (e.g. a pot of stock), wrap up food with a high water content (e.g. vegetables) and turn on the fan, if there is one.
Removing the fruit and vegetable drawer (depending on the model)
Pull the drawer outwards as far as it will go, lift it up and take it out.
To make it easier to remove the fruit and vegetable drawer, it may be necessary to empty (and possibly remove) the two lower door shelves and then continue to remove the drawer.
Fan and antibacterial anti-odour filter (depending on the model)
The fan allows for the even distribution of the temperatures inside the compartments and, consequently, better preservation of the food and reduction of excess humidity. Do not obstruct the ventilation area. The fan can be turned on/off manually (see the Quick Guide); if it is turned on, it operates automatically when necessary.
17
|
|
Downloaded |
|
|
FREEZER COMPARTMENT |
from |
|
||
. |
|
|||
Model with separate freezer compartment |
www |
|
||
vandenborre |
||||
The freezer compartment |
|
|||
allows for the storage of frozen food (for the period indicated on the |
|
|||
packaging) and the freezing of fresh food. The quantity of fresh food that can be frozen in 24 hours is |
. |
|||
written on the rating plate. Arrange the fresh food in the freezing area inside the freezer compartment |
be |
|||
(see Quick Guide), leaving enough space around the food packages to allow air to circulate freely. It |
|
|||
is advisable that you do not re-freeze food that has partially defrosted. It is important to wrap the food in a way that prevents the ingress of water, humidity or condensation.
Making ice cubes
Fill 2/3 of the ice tray (if available) with water and put it back in the freezer compartment. Do not use sharp or pointed objects to remove the ice under any circumstances.
Removing the drawers (depending on the model)
Pull the drawers outwards as far as they will go, lift them up and remove them. To get more volume, the freezer compartment can be used without the drawers.
Make sure that the door is closed properly after putting the food back on the grilles/shelves.
Models with an internal product compartment |
|
|
In the freezer compartment |
you can also freeze fresh |
Figure 1 |
food. The quantity of fresh food that can be frozen in 24 hours |
|
|
is written on the rating plate.
How to freeze fresh food:
• arrange the food on the grille, if present (figure 1), or directly on the bottom of the compartment (figure 2)
• put the food in the middle of the  compartment without it coming into contact with food that is already frozen, keeping a distance of about 20 mm (figure 1 and 2).
HOW TO DEFROST Figure 2
THE FREEZER COMPARTMENT (depending on the model)
For frost free models it is not necessary to carry out any defrosting procedures.
For other models, the build up of frost is a normal occurrence.
The quantity and speed of frost accumulation varies depending on the ambient conditions and how often the door is opened. It is advisable to set the temperature colder or, if available, turn on the quick freeze function (see Quick Guide) four hours before removing the food from the freezer compartment, to prolong the preservation of the food during the defrosting phase. To defrost, turn the appliance off and remove the drawers. Put the frozen food in a cool place. Leave the door open to allow the frost to melt. To prevent the water from escaping during the defrost, it is advised that you place an absorbent cloth on the bottom of the freezer compartment and wring it out regularly.
Clean the inside of the freezer compartment and dry it carefully. Turn the appliance back on and put the food back inside.
18

-Open the freezer compartment door and remove the upper drawer (figure 2).
-Unfasten the STOP FROST accessory (figure 3) and remove it (figure 4), taking care not to drop it on the glass shelf below. Note: if the accessory is jammed or difficult to remove, do not keep trying to remove it, but proceed with the complete defrost of the freezer compartment.
-Close the door to the freezer compartment.
-Remove the frost on the accessory by rinsing it under running (not hot) water (figure 5).
-Let the accessory drip dry and dry the plastic parts with a soft cloth.
-Reinsert the accessory by placing the back part on the projections shown in figure 7-A, then refasten the handle of the accessory to the clasps above (figure 7-B).
-Reinsert the upper drawer and close the door to the freezer compartment.
It is possible to clean the STOP FROST accessory on its own without completely defrosting the freezer compartment. Cleaning the STOP FROST accessory regularly helps to reduce the need to completely defrost the freezer compartment.
Note: the product specifications, including volume and energy, are calculated without the STOP FROST accessory.
2 |
3 |
4 |
|
|
Click!! |
5 |
|
6 |
7 |
A |
|
|
|
B |
|
Click!! |
19

Downloaded |
|
|
“ZERO DEGREES” COMPARTMENT |
from |
|
|
. |
|
|
|
www |
(depending on the model) |
|
vandenborre |
|
|
|
The “Zero Degrees” compartment is specifically designed |
|
. |
to maintain a low temperature and the correct humidity to |
|
be |
preserve fresh food for longer (for example, meat, fish, fruits |
|
|
and winter vegetables).
Humidity control technology coupled with Activ0° provides the best food preservation when the food is not completely packed.
Turning on and turning off the compartment
The internal temperature of the compartment is approximately 0° when the compartment is turned on.
To turn on the compartment, press the button shown in the figure for more than
one second until the symbol lights up.
The lit symbol means that the compartment is working. Press the button again for more than one second to turn off the compartment. To turn off the compartment completely, you must remove the drawer.
For the correct functioning of the “Zero Degrees” compartment, it is necessary that:
-the refrigerator compartment is turned on
-the temperature is between +2°C and +6°C
-the drawer in the “Zero Degrees" compartment must be inserted for it to be turned on
-one of the following special functions is not selected: Stand-by, Cooling-Off, Vacation (if present), in this case, remove the food contained in it.
Note:
-if the symbol does not light up when you turn on the compartment, check that the drawer is properly inserted; if the problem persists contact the authorised Technical Assistance Service.
-if the compartment is turned on and the drawer is open, the symbol in the control panel may automatically turn off. The symbol will light up again when the drawer is inserted
-regardless of the state of the compartment, you may hear a faint noise, which you should consider as normal
-when the compartment is not in operation, the temperature inside it depends on the general temperature of the refrigerator compartment. In this case, it is advised that fruits and vegetables that are not sensitive to cold (berries, apples, apricots, carrots, spinach, lettuce, etc.) are stored in it.
Important: if the compartment is turned on and food with a high water content is present, condensation may form on the shelves. In this case, turn the function off temporarily.
Be careful when positioning food and containers that are small in size on the upper shelf of the “Zero Degrees” compartment in order to prevent them accidentally falling between the shelf and the back wall of the refrigerator compartment.
20

Before contacting the Technical
Assistance Service:
Restart the appliance to check if the problem has been solved. If not, disconnect the appliance again and repeat the procedure after one hour.
If, after having completed the checks listed in the guide for malfunctions and after restarting the appliance, your appliance continues to function incorrectly, contact the Technical Assistance Service, clearly describing the problem and stating:
• the type of malfunction
• the model
•the type and serial number of the appliance (written on the rating plate)
•the Service number (if available) (the number that is after the word SERVICE on the rating plate placed inside the appliance)
Note:
Reversing the doors of the appliance, if carried out by the Technical Assistance Service, is not considered as a warranty claim.
21
Downloaded from
www . vandenborre . be
DE |
FR GB NL |
5019 600 00815 |
07/11 |
 Loading...