

Page 1

Content
English ............................................................................. 1
Nederlands .................................................................... 27
Español.......................................................................... 53
Русский ........................................................................... 81
Română ....................................................................... 107
Italiano ......................................................................... 133
Português .................................................................... 159
Français ....................................................................... 185
Nederlan EnglishEspañol
Русский
RomânăItalianoPortuguêsFrançais
Page 2
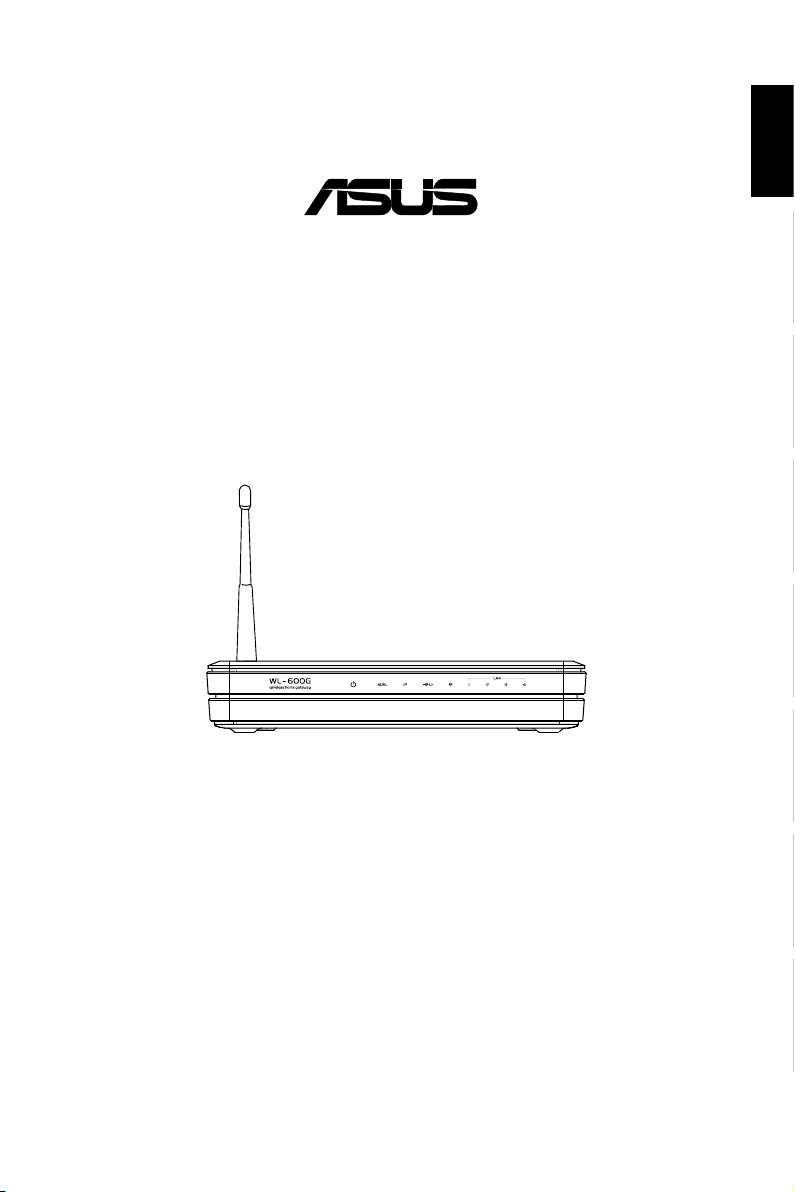
All-in-1 Wireless ADSL2/2+ Home Gateway
®
WL-600g
Nederlan EnglishEspañol
Русский
RomânăItalianoPortuguêsFrançais
Quick Start Guide
QE2458 / June 2006
Page 3

Manufacturer Contact Information
ASUSTeK COMPUTER INC. (Asia-Pacic)
NederlanEnglish Español
Company address: 15 Li-Te Road, Beitou, Taipei 11259
General (tel): +886-2-2894-3447 Web site address: www.asus.com.tw
General (fax): +886-2-2894-7798 General email: info@asus.com.tw
ASUS COMPUTER INTERNATIONAL (America)
Company address: 44370 Nobel Drive, Fremont, CA 94538, USA
General (fax): +1-510-608-4555 Web site address: usa.asus.com
Technical support
General support: +1-502-995-0883 Support (fax): +1-502-933-8713
Русский
Online support: http://vip.asus.com/eservice/techserv.aspx
ASUS COMPUTER GmbH (Germany & Austria)
Company address: Harkort Str. 25, D-40880 Ratingen, Germany
Română Italiano Português Français
General (tel): +49-2102-95990 Web site address: www.asus.com.de
General (fax): +49-2102-959911 Online contact: www.asus.com.de/sales
Technical support
Components: +49-2102-95990 Online support: www.asus.com.de/support
Notebook: +49-2102-959910 Support (fax): +49-2102-959911
Page 4
WL-600g All-in-1 Wireless ADSL2/2+ Home Gateway Quick Start Guide
Table of contents
Hardware Overview .......................................................................3
Front panel ......................................................................................3
Rear panel
Product features
....................................................................................... 4
.............................................................................. 4
Setup Process Overview ...............................................................5
Hardware Setup .............................................................................
Connecting ADSL splitter to your phone outlet ................................6
Connecting the splitter to WL-600g
Connecting your computer to WL-600g via Ethernet
................................................. 6
......................6
6
Quick Setup ....................................................................................5
Quick setup ......................................................................................7
Before you start .............................................................................................7
Login to the WL-600g conguration page ......................................................7
ADSL setup
Wireless setup
Manual Setup ...................................................................................9
ADSL Setup ..................................................................................................10
Wireless Setup
....................................................................................................7
................................................................................................8
.............................................................................................12
Nederlan EnglishEspañol
Русский
RomânăItalianoPortuguêsFrançais
Connecting to WL-600g from ASUS WLAN Card ..........................13
Conguring ASUS WLAN Card with One Touch Wizard™ ...........................13
Conguring WLAN card with Windows® WZC service..................................15
USB application ............................................................................16
FTP server function ........................................................................ 16
Setting up FTP server...................................................................................16
Setting up FTP account
................................................................................17
1
Page 5

WL-600g All-in-1 Wireless ADSL2/2+ Home Gateway Quick Start Guide
Table of contents
Setting up FTP security ................................................................................17
NederlanEnglish Español
Sharing USB printer .......................................................................18
Setting up printer client under Windows XP .................................................18
Compatible printer list
...................................................................................20
Gaming Blaster .............................................................................21
Gaming Blaster on WL-600g .......................................................... 21
User Specied Service ................................................................................21
IP phone and other A/V applications on WL-600g ........................22
Русский
Română Italiano Português Français
User Specied Service ................................................................................22
Other trafc control applications on WL-600g ............................... 23
Internet application .......................................................................................23
User Specied Service .................................................................................23
FTP Server
User Specied Service .................................................................................25
Long Packet Fragmentation
..................................................................................................24
.........................................................................26
2
Page 6
WL-600g All-in-1 Wireless ADSL2/2+ Home Gateway Quick Start Guide
Hardware Overview
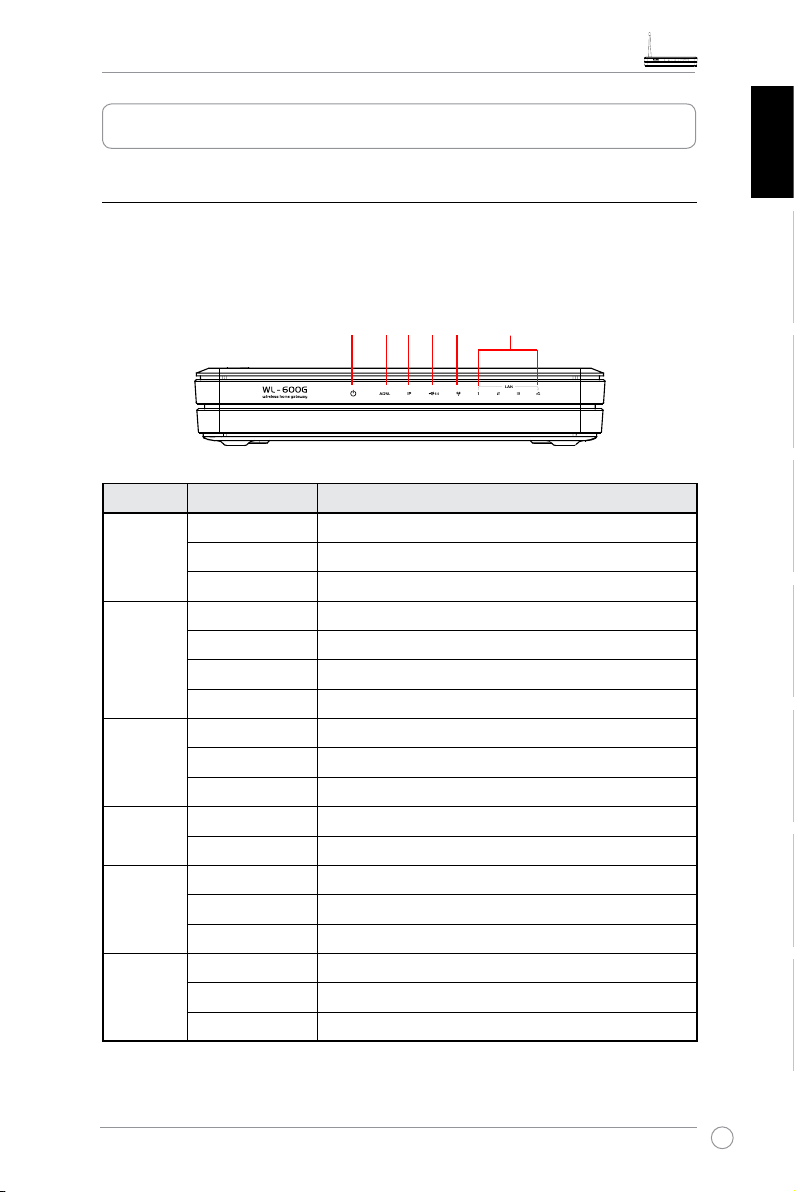
Front panel
The WL-600g Wireless ADSL2/2+ Home Gateway front panel contains LED indicators
which shows the status of WL-600g.
PWR ADSL IP USB AIR LAN
Label Activity Description
P W R
(Power)
ADSL ON (Green) ADSL link up
IP ON (Green) ADSL is up and the link is PPP
USB 2.0
AIR ON Wireless LAN ready
LAN 1-4
ON Power ON
OFF No power
Blink Restoring to factory default
Blink (Green) ADSL training
ON (Red) ADSL link down
OFF ADSL is down
ON (Red) ADSL is up, but the link is not PPP
OFF ADSL is down
ON USB device detected
OFF No USB device detected
Blink Transmiting or receiving data through wireless
OFF No power or wireless LAN not ready
ON Physically connected to an Ethernet device
Blink Transmitting or receiving data through Ethernet cable
OFF No power or no physical connection
Nederlan EnglishEspañol
Русский
RomânăItalianoPortuguêsFrançais
3
Page 7
WL-600g All-in-1 Wireless ADSL2/2+ Home Gateway Quick Start Guide
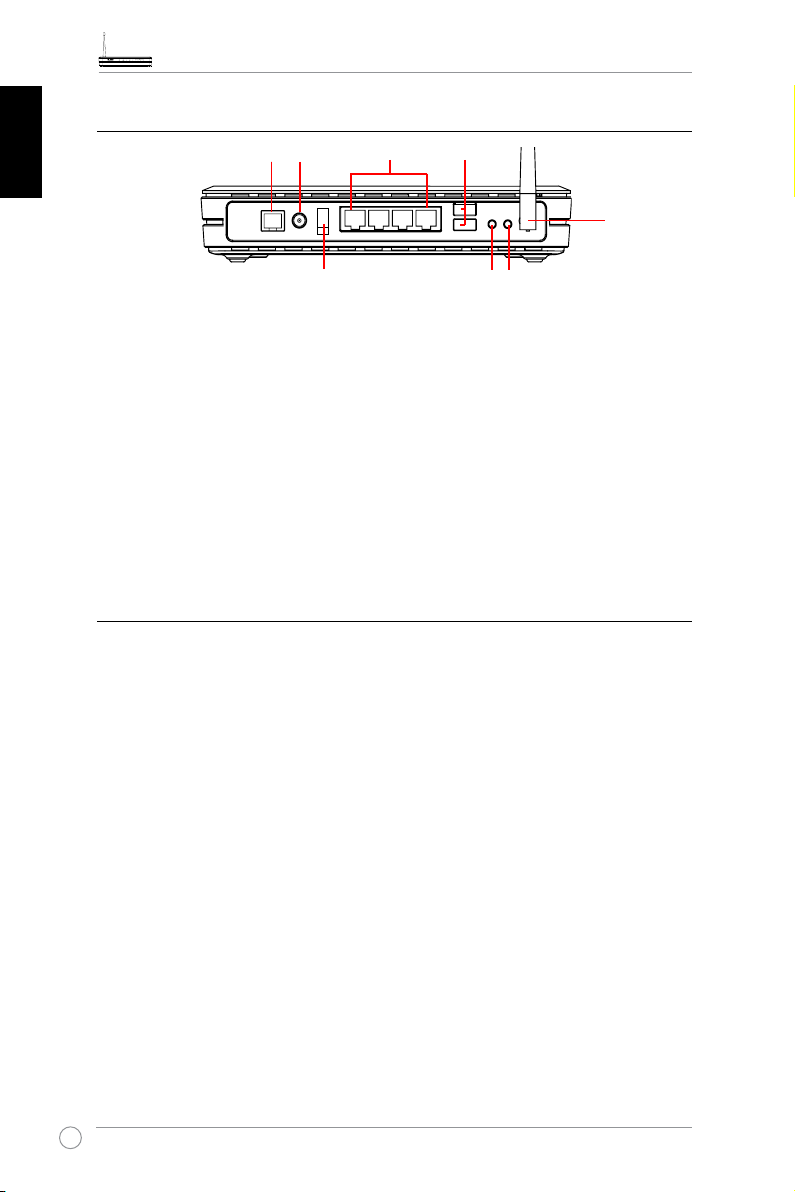
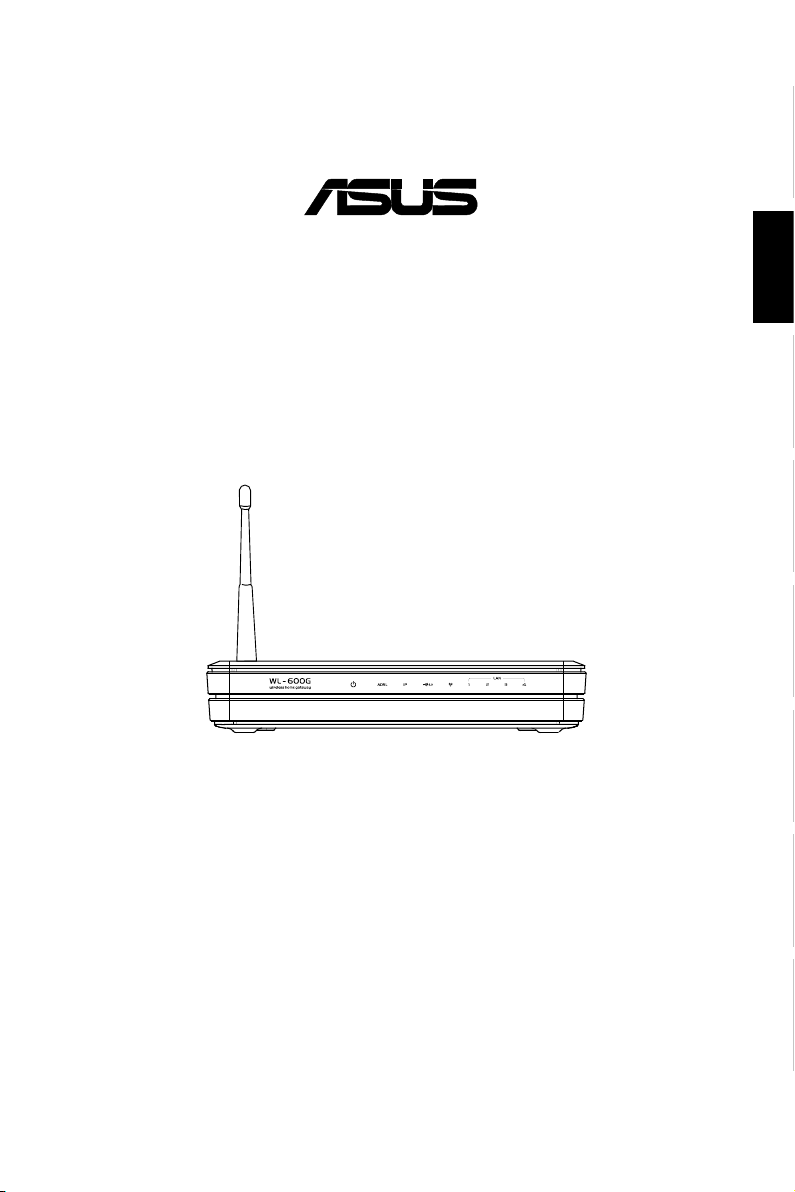
Rear panel
PWRADSL
LAN
USB 2.0
NederlanEnglish Español
Power switch
EZSetup
Reset
Antenna
Viewed from left to right, the rear panel of WL-600g contains the following elements:
• ADSL port
• Power connector
• Power switch
• Four Local Area Network (LAN) ports
• USB 2.0 ports
Русский
• EZSetup button
• Reset button
• SMA antenna connector
Română Italiano Português Français
Product features
The WL-600g Wireless ADSL 2/ 2+ Home Gateway provides the following features:
• Built-in ADSL modem
• Built-in firewall
• IEEE802.11g standard-based wireless network, backward compatible with
802.11b devices
• Easy-to-use Web-based configuration interface: Quick Setup for ADSL connection,
wireless, and security configuration
• Extensive routing protocol support: RIP v1, v2
• Content-based filter
• EZSetup™ utility for ADSL connection, wireless network and security quick setup
4
Page 8
WL-600g All-in-1 Wireless ADSL2/2+ Home Gateway Quick Start Guide
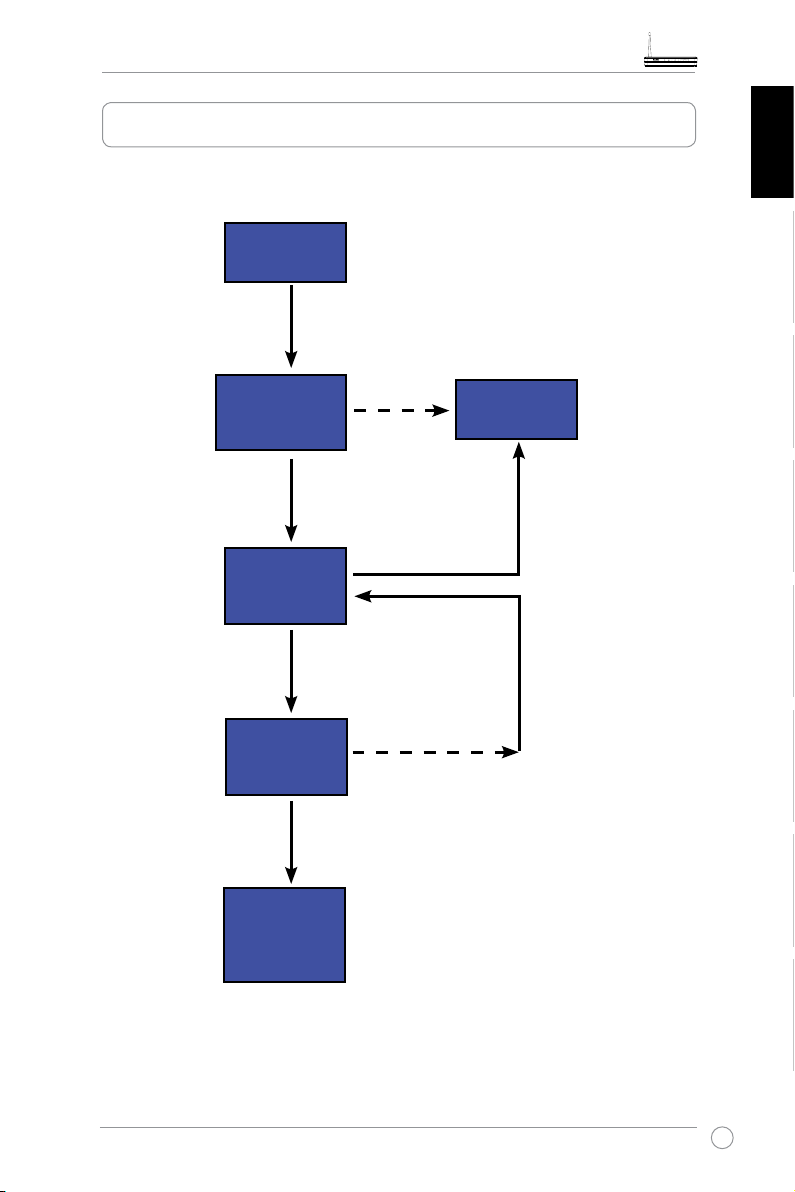
Setup Process Overview
Hardware
Quick Setup ADSL connection
auto-detection
Connection detected and
connection type is correct.
ADSL setup nished.
Quick Setup-
Wireless setup
Quick SetupSummary page
setup
Refer to the hardware diagram
on page 4.
Check OK. Login to 192.168.1.1 to
congure your WL-600g.
Connection not
detected OR
connection type
shown is not
correct.
Change wireless
settings.
Check not OK.
Nederlan EnglishEspañol
Manual
setup
Change ADSL settings.
Русский
RomânăItalianoPortuguêsFrançais
Check OK
Quick Setup
nished!
WL-600g is
ready to use.
5
Page 9
WL-600g All-in-1 Wireless ADSL2/2+ Home Gateway Quick Start Guide
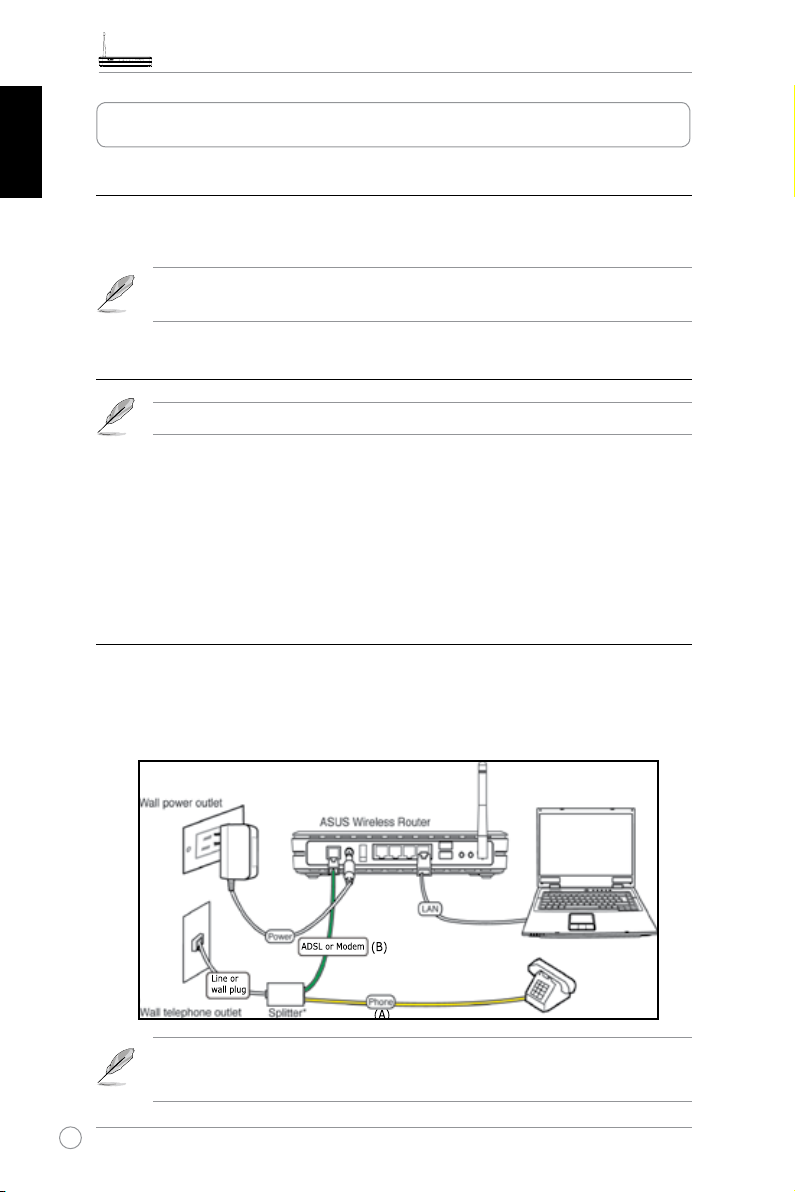
Hardware Setup
Connecting ADSL splitter to your phone outlet
NederlanEnglish Español
Insert the Line connector or the plug of the supplied splitter into the phone outlet and
connect your telephone set to the phone port of the splitter (A).
The format of the connector on the supplied splitter (line or plug) may differ
by region.
Connecting the splitter to WL-600g
Incorrect splitter connection can block your ADSL service.
Русский
Română Italiano Português Français
a. Turn off your computer.
b. Connect the ADSL port of WL-600g to the ADSL or modem port on the splitter (B),
c. Connect the power adapter to the power port on WL-600g's rear panel and to a
power outlet. Make sure the power LED indicator is ON after turning on the router. If
the ADSL link LED is solid green, it means ADSL link is established.
Connecting your computer to WL-600g via Ethernet
a. Use the supplied Ethernet cable (RJ45) to connect your computer to one of the LAN
ports of WL-600g.
b. Turn on your computer.
Splitter *: The name or the location of the ports on the supplied splitter may
vary by region.
6
Page 10
WL-600g All-in-1 Wireless ADSL2/2+ Home Gateway Quick Start Guide
Quick Setup
Quick setup
Before you start
With Quick setup, you need to set up ADSL link rst then wireless setup. Depending on
your ISP's requirements, you may need to acquire some of the information listed below
to set up Internet connection on WL-600g.
• Virtual Path Identifier (VPI)
• Virtual Channel Identifier (VCI)
• Host name
• ISP logiin username and password
• ISP Domain Name System (DNS) server address
• Static IP address (For static IP subscribers)
Nederlan EnglishEspañol
Login to the WL-600g conguration page
1. Input
2. A login window appears for user name and password. The default username is
3. After logging in, you can see the WL-600g conguration page.
admin
192.168.1.1
, password is
into the URL of your Web browser and press
(in lower case).
admin
Enter
.
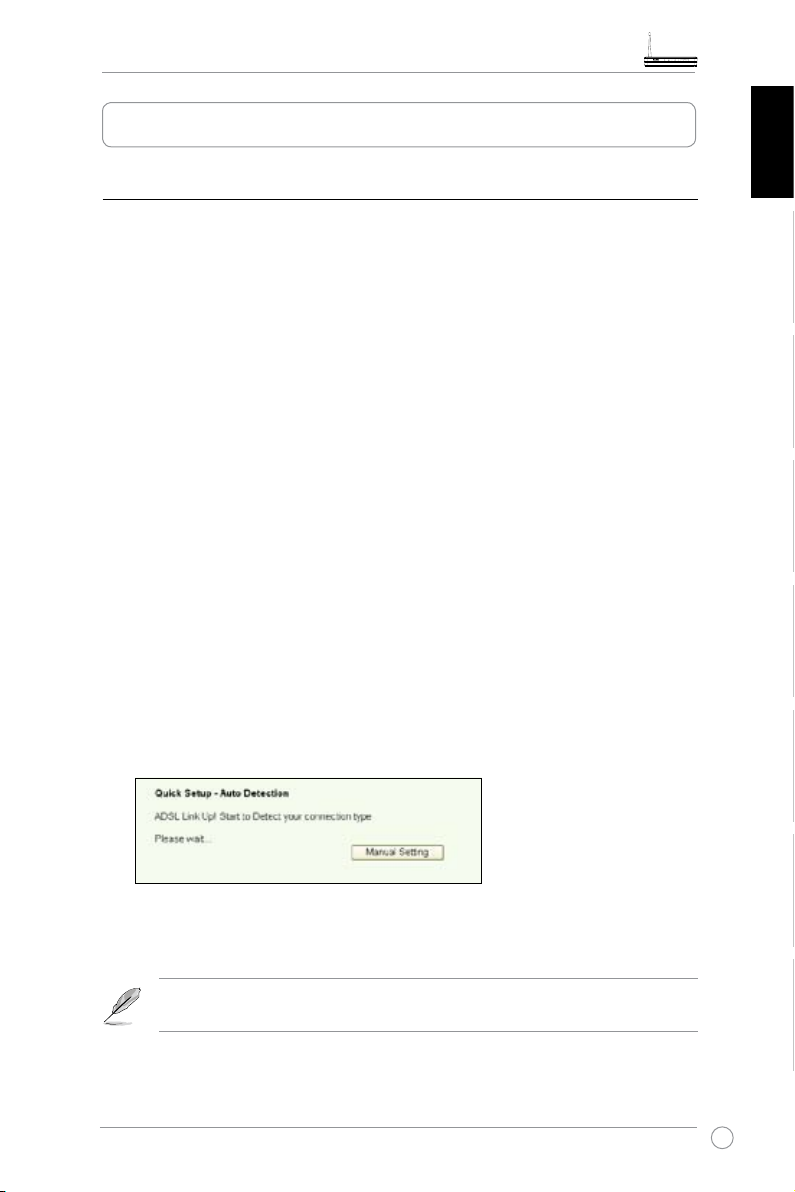
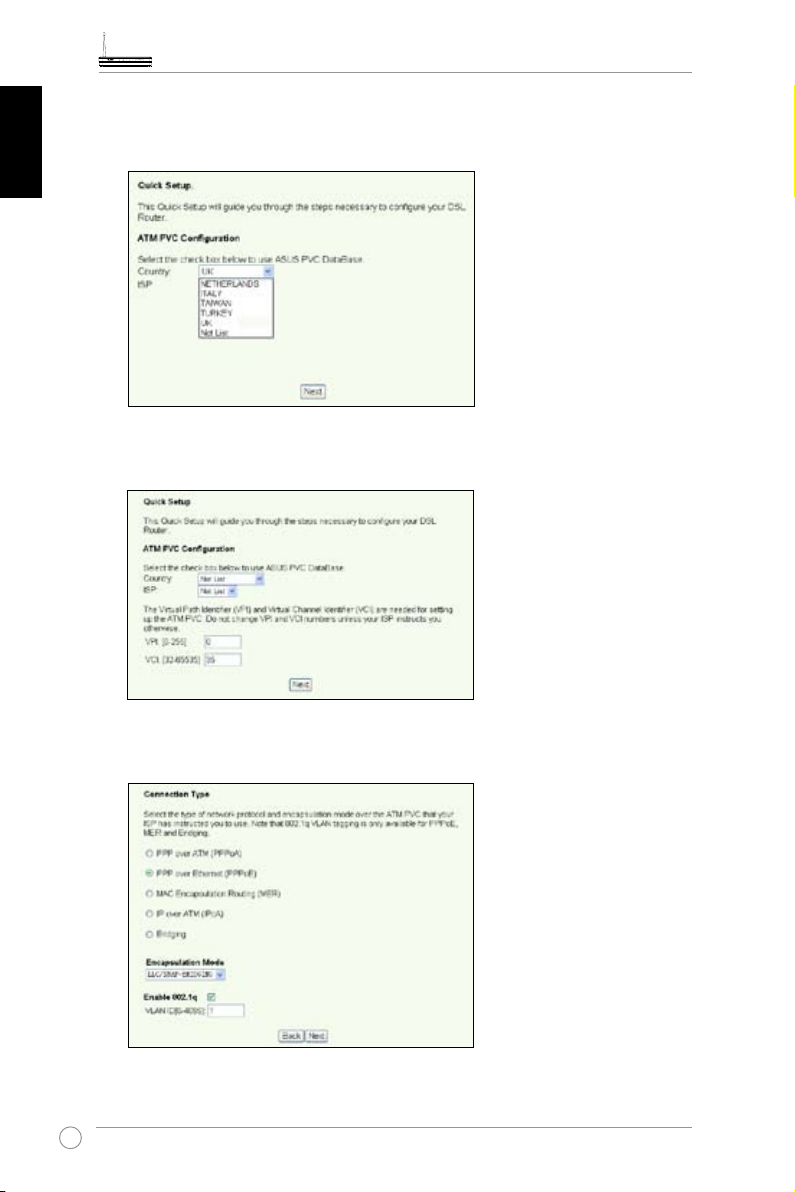
ADSL setup
1. By default, the Quick Setup page pops up. The Quick Setup Wizard automatically
detects your ADSL connection type.
2. If ADSL connection is detected, the next page shows your ADSL connection type
(PPPoE/PPPoA or MER).
If your ADSL connection is not detected, click
set up WL-600g. Refer to Page 9-11 for manual setting instructions.
Manual Setting
to manually
Русский
RomânăItalianoPortuguêsFrançais
7
Page 11
WL-600g All-in-1 Wireless ADSL2/2+ Home Gateway Quick Start Guide
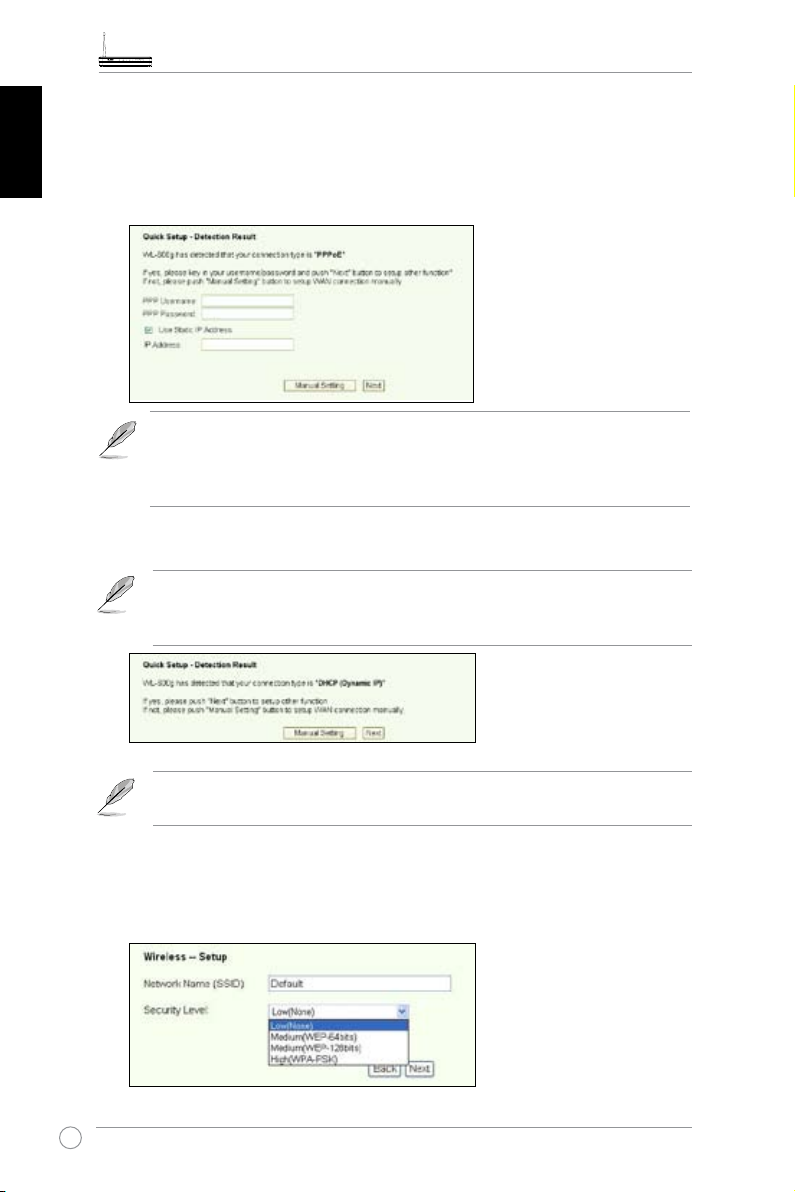
-- If it shows your connection type is PPPoE or PPPoA
For dynamic IP users, input your username and password then click Next.
For static IP users, check Use Static IP Address and input your IP address,
then click
Next.
NederlanEnglish Español
If your actual connection is not PPPoE or PPPoA, click Manual Setting to
manually set up WL-600g. Refer to Page 9-11 for manual setting instruc-
Русский
tions.
-- If it shows your connection type is “MER”(DHCP)
Click Next if your connection type is MER (DHCP).
If your actual connection is not MER(DHCP), click
Română Italiano Português Français
to manually set up WL-600g. Refer to Page 9-11 for manual setting
Manual Setting
instructions.
Your ADSL connection setup is nished here. Please continue for wireless
setup.
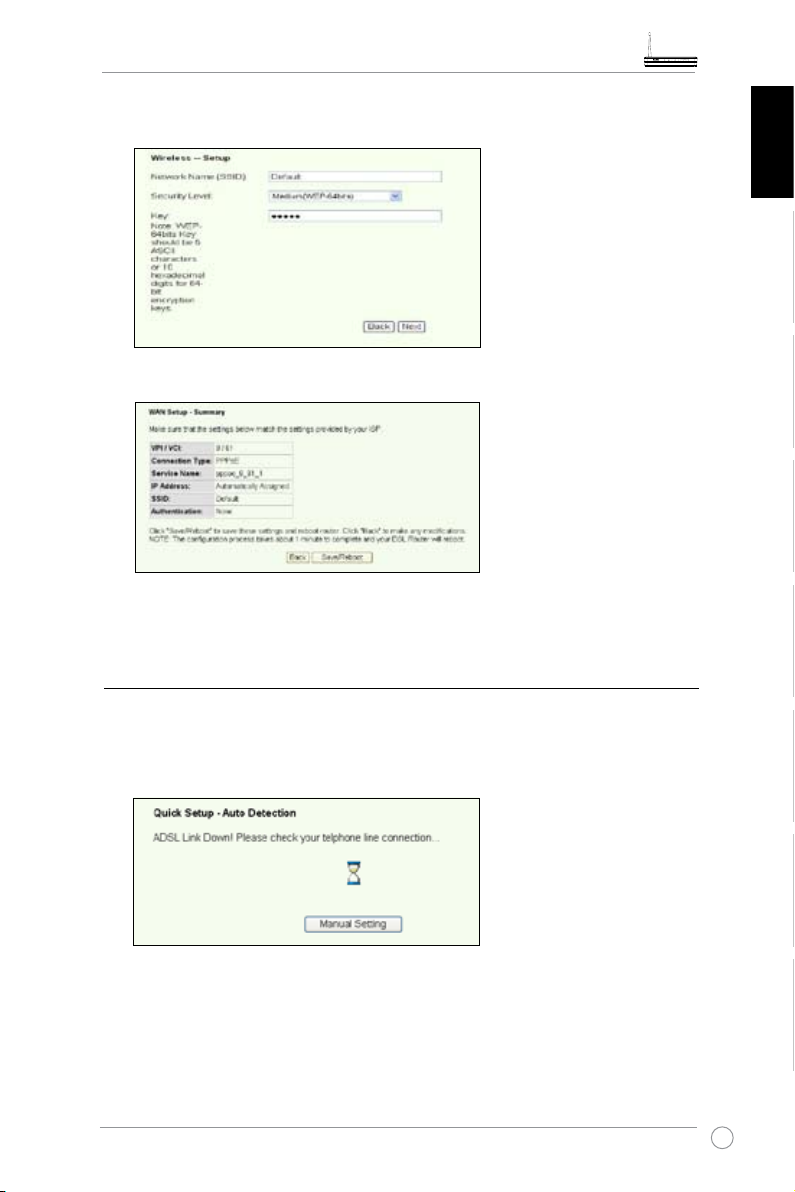
Wireless setup
1. Choose
8
security level
the user manual on your support CD.
. For detailed security descriptions, refer to Page 21-22 in
Page 12
WL-600g All-in-1 Wireless ADSL2/2+ Home Gateway Quick Start Guide
2. Input a key in the
eld. The number of digit for the key depends on the security
Key
level you choose.
3. The summary page then shows up. If the information displayed is correct, click
Save/Reboot
to nish the setup. Otherwise, click
to modify the settings.
Back
4. Setup is completed. Wait for about 50 seconds to reboot. The Web page will refresh
to show the device information after reboot.
Manual Setup
Nederlan EnglishEspañol
Русский
RomânăItalianoPortuguêsFrançais
If you encounter difculty when conguring ADSL connection with Quick Setup, click
Manual Setting to manually set up the ADSL connection.
9
Page 13
WL-600g All-in-1 Wireless ADSL2/2+ Home Gateway Quick Start Guide
ADSL Setup
1. Select your
Country
and
, then click
ISP
NederlanEnglish Español
Next
.
2. If your country and ISP are not on the list, select
VCI then click
. You may ask your ISP for VPI/VCI values.
Next
and key in your VPI and
Not list
Русский
Română Italiano Português Français
3. Select your connection type and click
. You can get connection type from your
Next
ISP.
10
Page 14
WL-600g All-in-1 Wireless ADSL2/2+ Home Gateway Quick Start Guide
-- If your connection type is PPPoA or PPPoE
For dynamic IP users, input your PPP username, password, and service name
then click Next.
For static IP users, check Use Static IP Address then key in your IP address,
then click
Next.
Nederlan EnglishEspañol
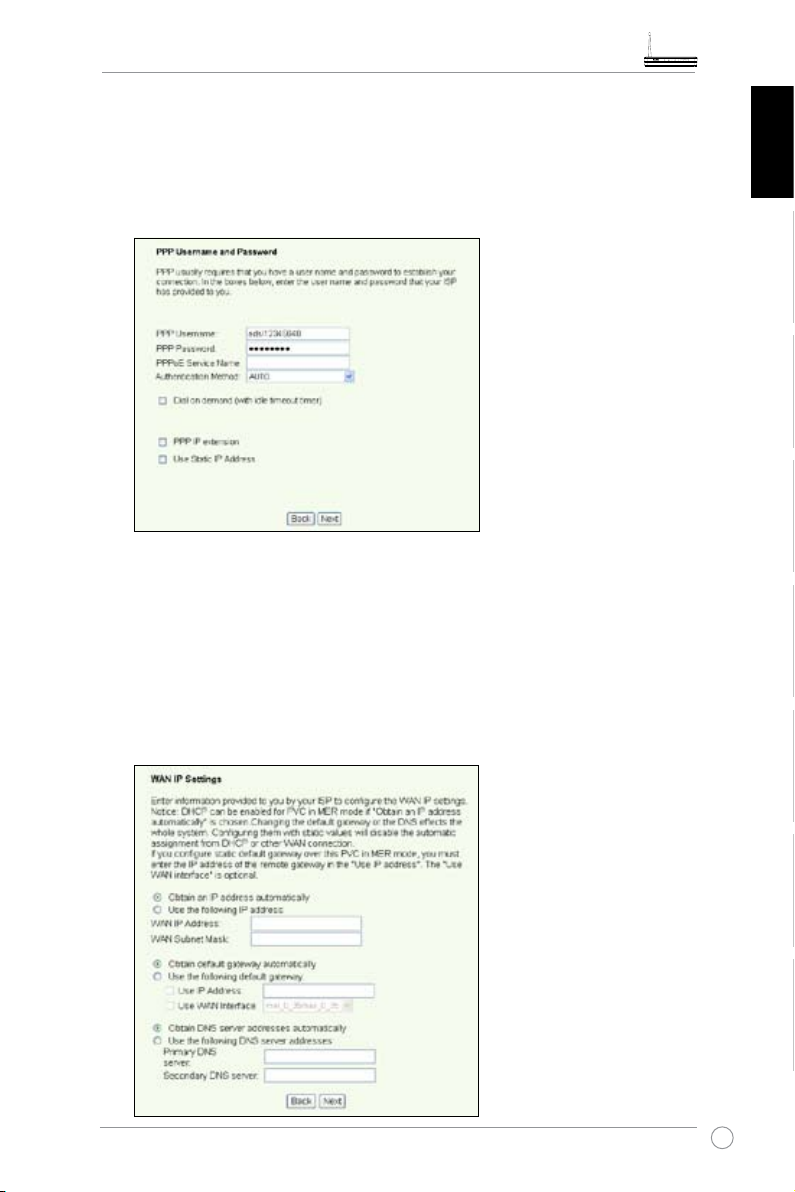
-- If your connection type is MER
For
dynamic IP
users, check
Obtain an IP address automatically
Obtain default gateway automatically
automatically
For
static IP
, then click
users, check
default gateway
, and
.
Next
Use the following IP Address, Use the following
Use the following DNS server address
addresses in corresponding elds.
, and
Obtain DNS server address
Русский
,
RomânăItalianoPortuguêsFrançais
then input the
11
Page 15
WL-600g All-in-1 Wireless ADSL2/2+ Home Gateway Quick Start Guide
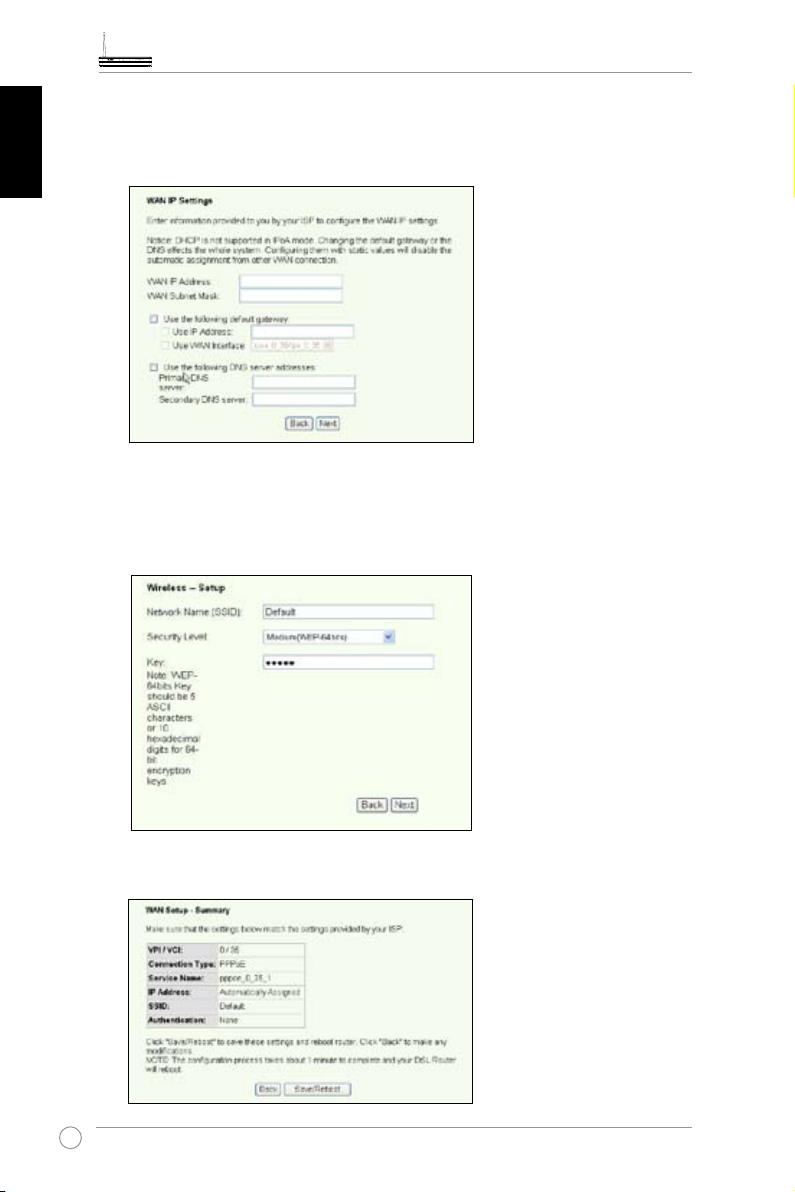
-- If your connection type is IPoA
Static IP user only. Input the WAN IP address assigned by your ISP, then click
Next.
NederlanEnglish Español
Русский
Română Italiano Português Français
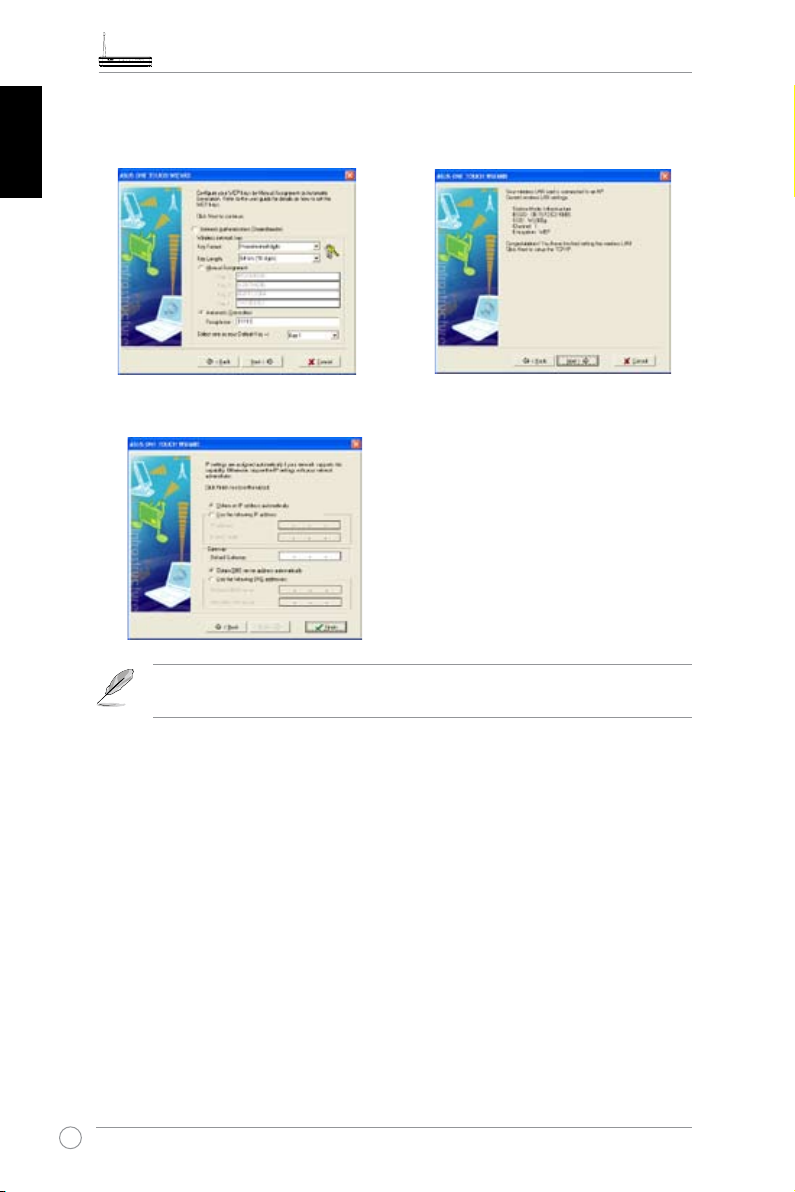
1. Designate an SSID (network name) for WL-600g. Choose the security level then
input a key. The number of digit of your key depends on the security level you
choose. Refer to the note on the web page. When nished, click
Next
.
2. This page provides a summary of WL-600g WAN and wirelss conguration. Click
Save/Reboot
to save and activate your conguration.
Wireless Setup
12
Page 16

WL-600g All-in-1 Wireless ADSL2/2+ Home Gateway Quick Start Guide
3. Setup is completed. WL-600g reboots in about 50 seconds. The green bar shows
the current rebooting status. After reboot, the web page will automatically refresh to
display the settings.
Connecting to WL-600g from ASUS WLAN Card
Conguring ASUS WLAN Card with One Touch Wizard™
We recommend you use ASUS WLAN card (WL-100gD, WL-100gE, WL-107g,
WL-167g, WL169gE) for better wireless connection. If you have installed ASUS wireless
card together with its utilities and drives on your PC, click
ASUS Utility-> WLAN Card -> One Touch Wizard
utility.
Start -> All Programs ->
to launch the One Touch Wizard
Nederlan EnglishEspañol
Русский
1. Select Connect to an existing wireless
LAN (Station) radio button and click
Next to continue.
RomânăItalianoPortuguêsFrançais
2. One Touch Wizard searches and displays
the available APs in the Available
Networks list. Select WL-600g and press
Next to continue.
13
Page 17
WL-600g All-in-1 Wireless ADSL2/2+ Home Gateway Quick Start Guide
3. Set the authentication and encryption of
your WLAN card the same with those at
WL-600g. Click Next to continue.
4. It takes several seconds for the wireless
card to associate with WL-600g. Press
Next to setup TCP/IP.
NederlanEnglish Español
5. Setup the IP address of the WLAN Card according to your network condition. After the
setup is complete, click Finish to exit the One Touch Wizard.
Русский
Română Italiano Português Français
The setup screens and steps are for reference only and may be different
from actual products.
14
Page 18
WL-600g All-in-1 Wireless ADSL2/2+ Home Gateway Quick Start Guide
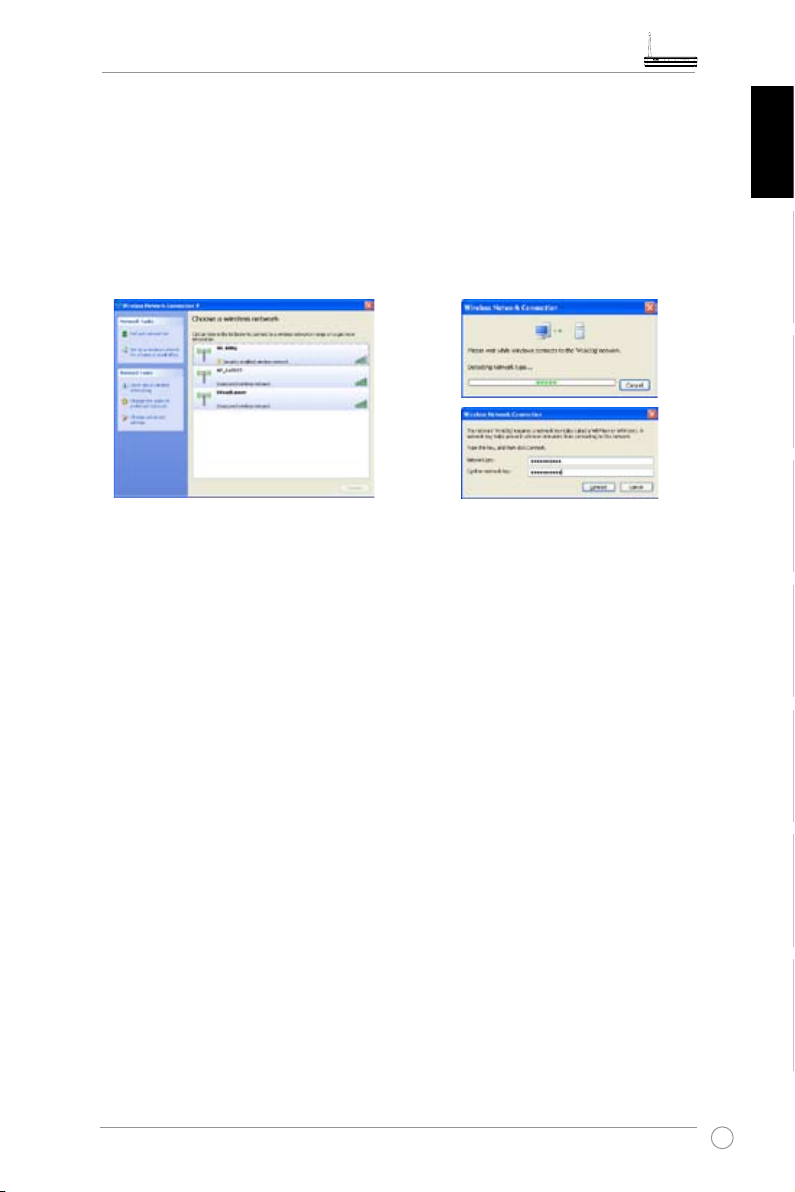
Conguring WLAN card with Windows® WZC service
You can also use Windows® Wireless Zero Conguration service to set up the wireless
connection with WL-600g.
1. Double-click the wireless network
icon on the task bar to view available
networks. Select your wireless router
and click
Connect
.
2. Input the key you have set on the
WL-600g and click
Connect
. The
co n n ection is c o mpleted with i n
several seconds.
Nederlan EnglishEspañol
Русский
RomânăItalianoPortuguêsFrançais
15
Page 19
WL-600g All-in-1 Wireless ADSL2/2+ Home Gateway Quick Start Guide
USB application
WL-600g offers two USB2.0 ports for setting up FTP server and sharing USB printer.
NederlanEnglish Español
FTP server function
Before setup, you need to prepare a USB disk for FTP storage.
If the format of your external hard disk is
readable. Uploading les on the FTP server is not allowed. Besides, only
Anonymous User can login. Super User can not login under NTFS FTP
server.
, the FTP server can only be
NTFS
Setting up FTP server
To setup FTP server:
Русский
Română Italiano Português Français
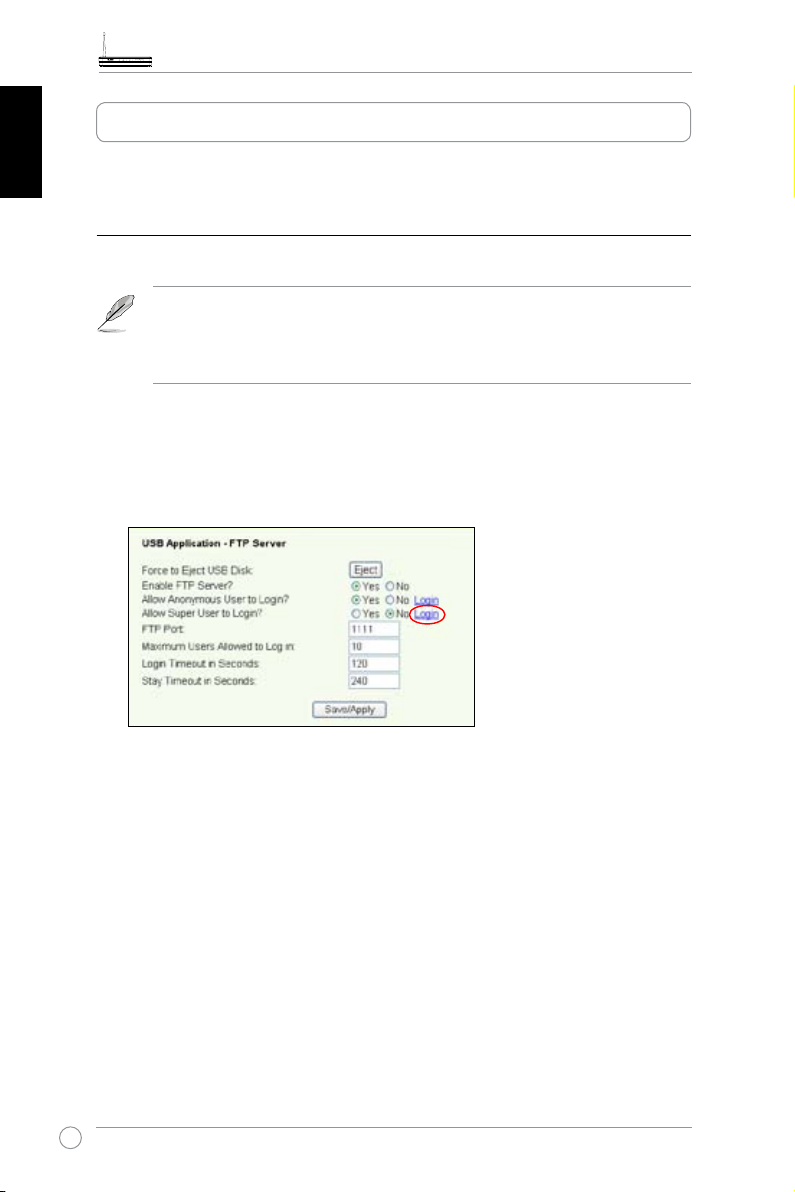
1. Plug your USB storage into the USB2.0 port on the WL-600g rear panel. Then click
USB Application -> FTP Server
2. Set
Enable FTP Server
3.
Allow Anonymous User to Login
your FTP site, select
user, select No.
4.
Allow Super User to Login
server.
5.
FTP Port
is set to 1111, you can access the FTP server by typing
address box of your Web browser (192.168.1.1 is the default IP address of WL-600g).
6.
Maximum User Allowed to Login:
your working environment.
7.
Login Timeout in Seconds:
8.
Stay Timeout in Seconds:
Press
9.
: Set up the port number of the FTP server. For example, if the port number
Save/Apply
Yes
to save and activate the settings.
in the left side menu to open the conguration page.
.
to
Yes
: If you want to allow anonymous user to access
; if you want to protect your data from unauthenticated
: Select
When login times out, the login trail is terminated.
Timeout value for inactive connection.
to allow super user to access the FTP
Yes
ftp://192.168.1.1:1111
set up the maximum login user according to
into the
16
Page 20
WL-600g All-in-1 Wireless ADSL2/2+ Home Gateway Quick Start Guide
If you use web access for Super User Login (as the red circle marks), please
set
Maximum Users Allowed to Log in
"server is busy" will pop up.
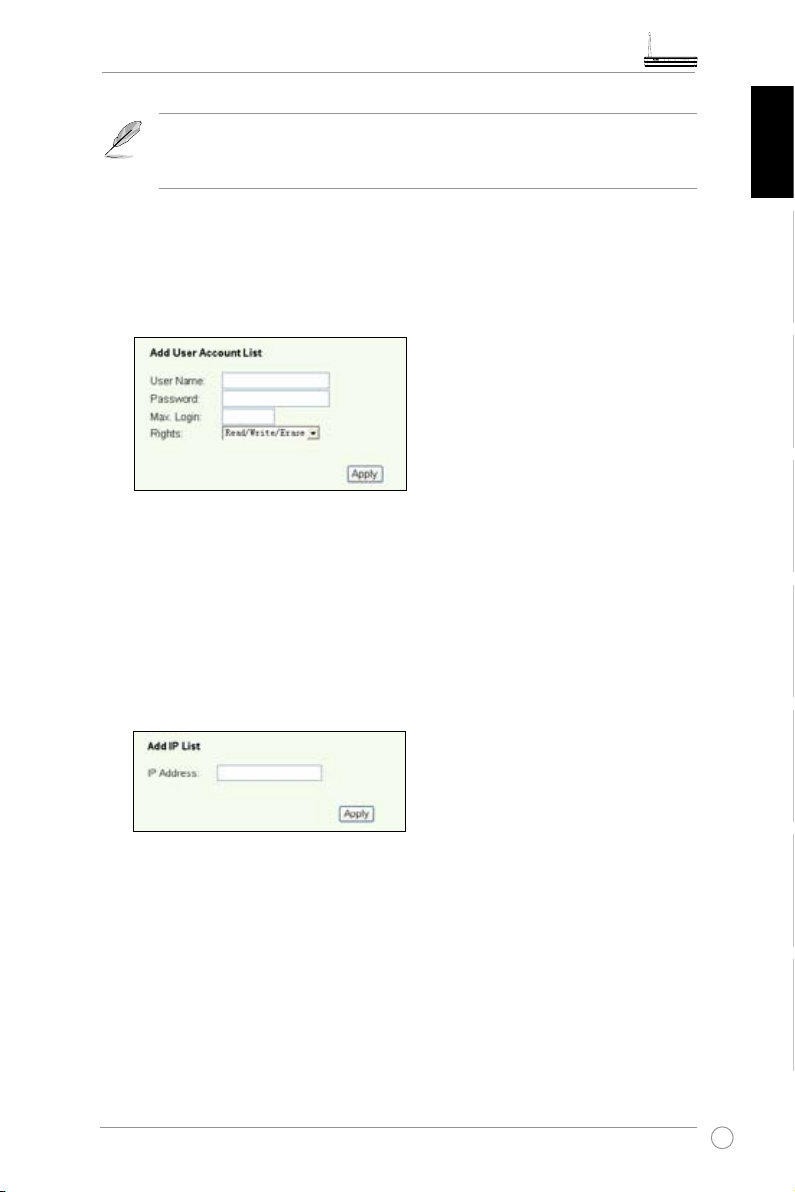
Setting up FTP account
You can set up 12 accounts for your FTP site.
1. Click
USB Application -> FTP Server -> User List
conguration page. Click
to create new FTP account.
Add
to more than 1 or the message
in the left side menu to open the
Nederlan EnglishEspañol
2. Dene the
Username, Password
for the new account. Setup the
restrict the access request. Dene the access right to the account.
3. Click
4. Click
to save the new account.
Apply
to save and activate the settings.
Save
Setting up FTP security
You can deny access request from certain IP address by setting up
1. Click
USB Application -> FTP Server -> Banned IP List
open the conguration page. Click
to create a new rule.
Add
2. Input the IP address of the banned host and click
banned IP must be static.
3. Click
Your FTP site is ready. Type
your Web browser and press
to save and activate the settings.
Save
ftp://192.168.1.1(:port number)
Enter
. When prompted for login, input the username and
password you have set up for FTP account and login.
Apply
in the left side menu to
to save the banned IP. The
into the address box of
Max. Login
Banned IP List
to
Русский
.
RomânăItalianoPortuguêsFrançais
17
Page 21
WL-600g All-in-1 Wireless ADSL2/2+ Home Gateway Quick Start Guide
Sharing USB printer
You can plug your USB printer to the USB2.0 port of WL-600g to share it within your
LAN. After you plug a printer to the USB port, you can see the status of printer by
clicking
USB Application -> Printer Status
NederlanEnglish Español
Setting up printer client under Windows XP
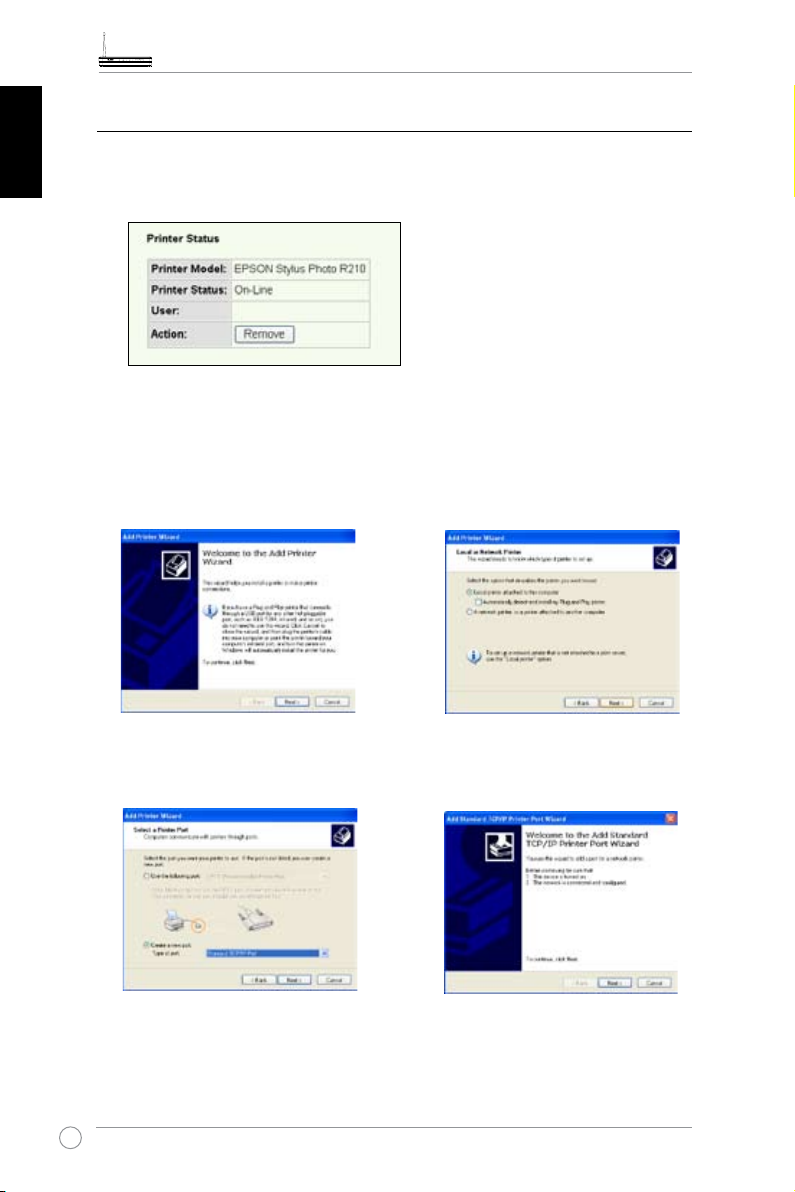
Follow the steps below to install network printer on your clients.
1. Run Add Printer Wizard from
Русский
-> Printers and Faxes -> Add a
.
printer
Română Italiano Português Français
Start
.
2. Select
Local printer attached to
this computer
and click
Next
.
18
3. Select
Type of port to
, then click
Port
Create a new port
Standard TCP/IP
.
Next
and set
4. Click
to setup TCP/IP port for
Next
accessing the network printer.
Page 22
WL-600g All-in-1 Wireless ADSL2/2+ Home Gateway Quick Start Guide
5. Input the IP address of WL-600g in
the
Printer Name of IP Address
eld and click
7. Set
LPRServer
Click
Protocol
Next
.
Next
to
LPR
in
Queue Name
to continue.
and type
field.
6. Select
8. Press
IP port setting.
Custom
Next
and click
to nish standard TCP/
Settings.
Nederlan EnglishEspañol
Русский
RomânăItalianoPortuguêsFrançais
9. Press
t o complete the
Finish
settings and return to Add Printer
Wizard.
10. Install printer driver from the vendormodel list. If your printer is not in
the list, click
Have Disk
to manually
assign the location of driver.
19
Page 23
WL-600g All-in-1 Wireless ADSL2/2+ Home Gateway Quick Start Guide
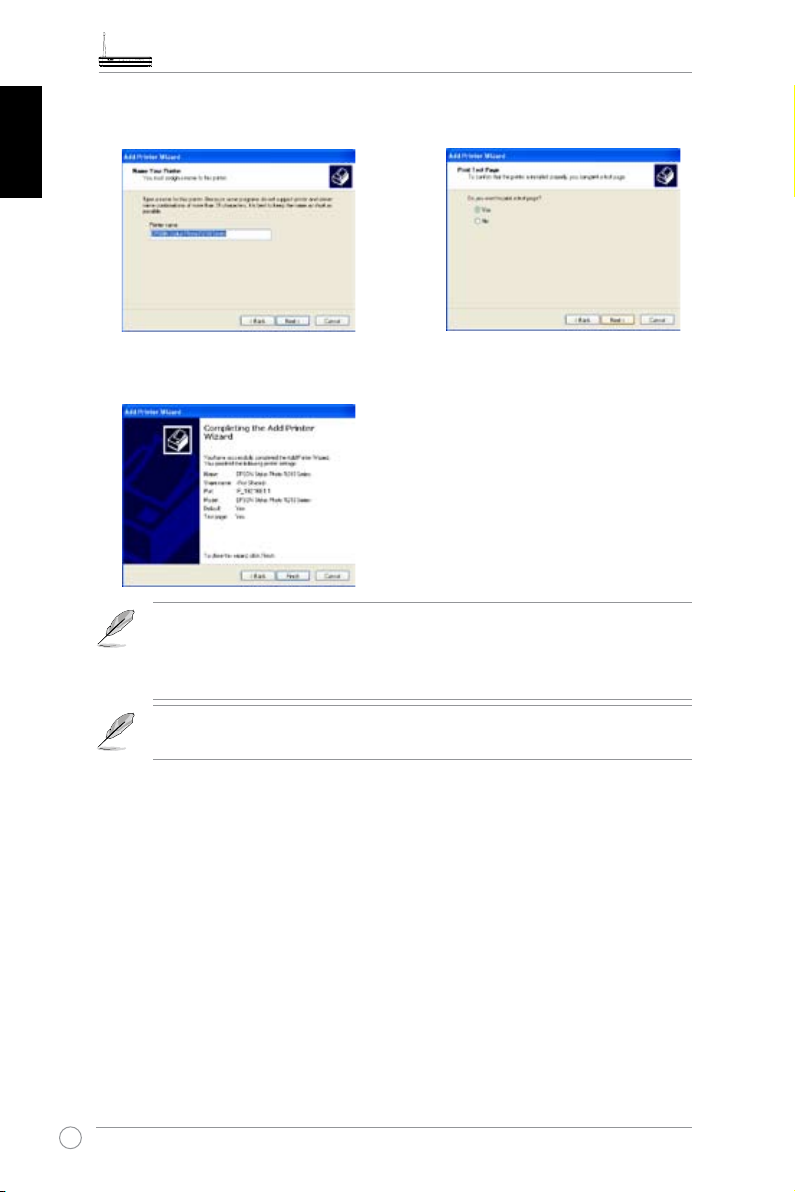
11. Click Next to accept the default name
for the printer.
12. Select Yes to print a test page. Click
Next to print.
NederlanEnglish Español
13. The installation is completed. Click
Finish to quit the Add Printer Wizard.
Русский
Română Italiano Português Français
If you have already installed the printer locally on your computer, right click
the printer icon and select
port. Click
Add Port
then select
Property -> Port
Standard TCP/IP Port
tab to add a standard TCP/IP
and click
New Port
button. Refer to step 5-8 for setting procedures.
If you use Windows® 98 or ME which does not support Standard TCP/IP
port, you need to use Romote Port which is supported by WL-600g.
Compatible printer list
HP Deskjet 5410 Series
HP Deskjet 3940 Series
HP photosmart 8030
HP Photosmart 8230
HP Photosmart 7830
HP Ofcejet 7210
HP PSC 1510
20
HP PSC 1610
HP Deskjet 5652
HP Deskjet 5550
EPSON C60
HP Ofcejet 5610
HP Ofcejet 4255
HP PSC 1410
Page 24
WL-600g All-in-1 Wireless ADSL2/2+ Home Gateway Quick Start Guide
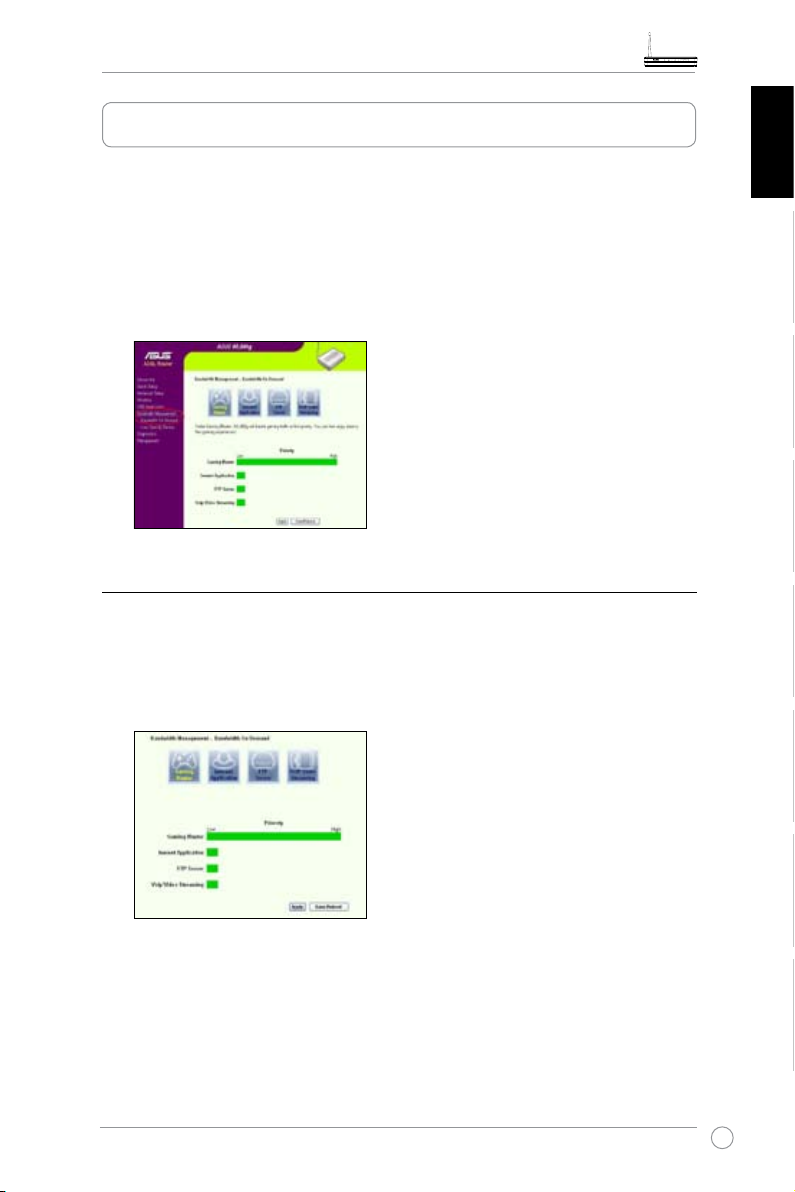
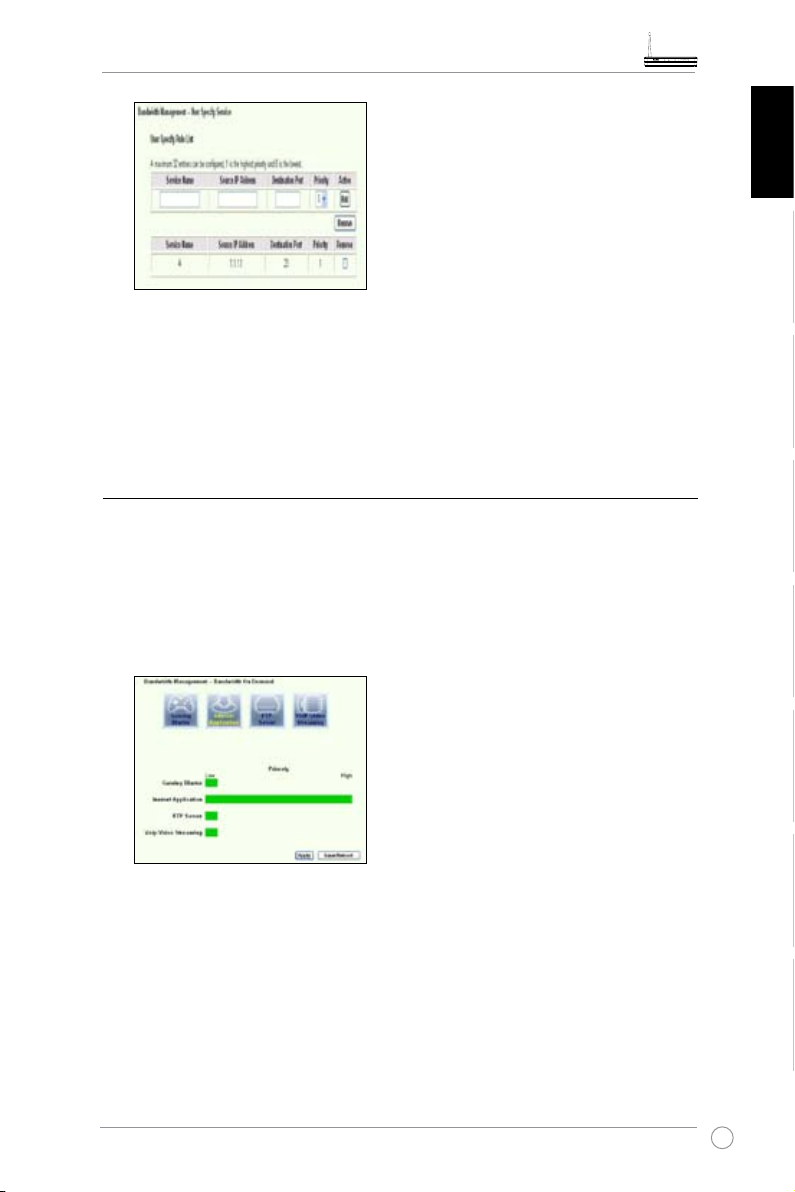
Gaming Blaster
ASUS WL-600g’s “Gaming Blaster” is designed to enhance your online gaming
experience. This technology provides the uninterrupted and latency-free gaming
experience that online gamers expect. It intelligently optimizes network resources and
automatically prioritizes network traffic to better execute time-sensitive applications
including IP phone and multimedia applications.
Go to
Bandwidth Management --> Bandwidth on Demand
are shown on the screen.
Gaming Blaster on WL-600g
. You can see four icons
Nederlan EnglishEspañol
Русский
By default, WL-600g is set on
enhanced gaming power. Just
or disable this function on WL-600g. From the bar chart at the bottom of the web page,
you can see that the gaming application, by default, takes most of WL-600g's network
resource.
Gaming Blaster
click on the Gaming Blaster icon
mode and you can then experience the
and you can enable
User Specied Service
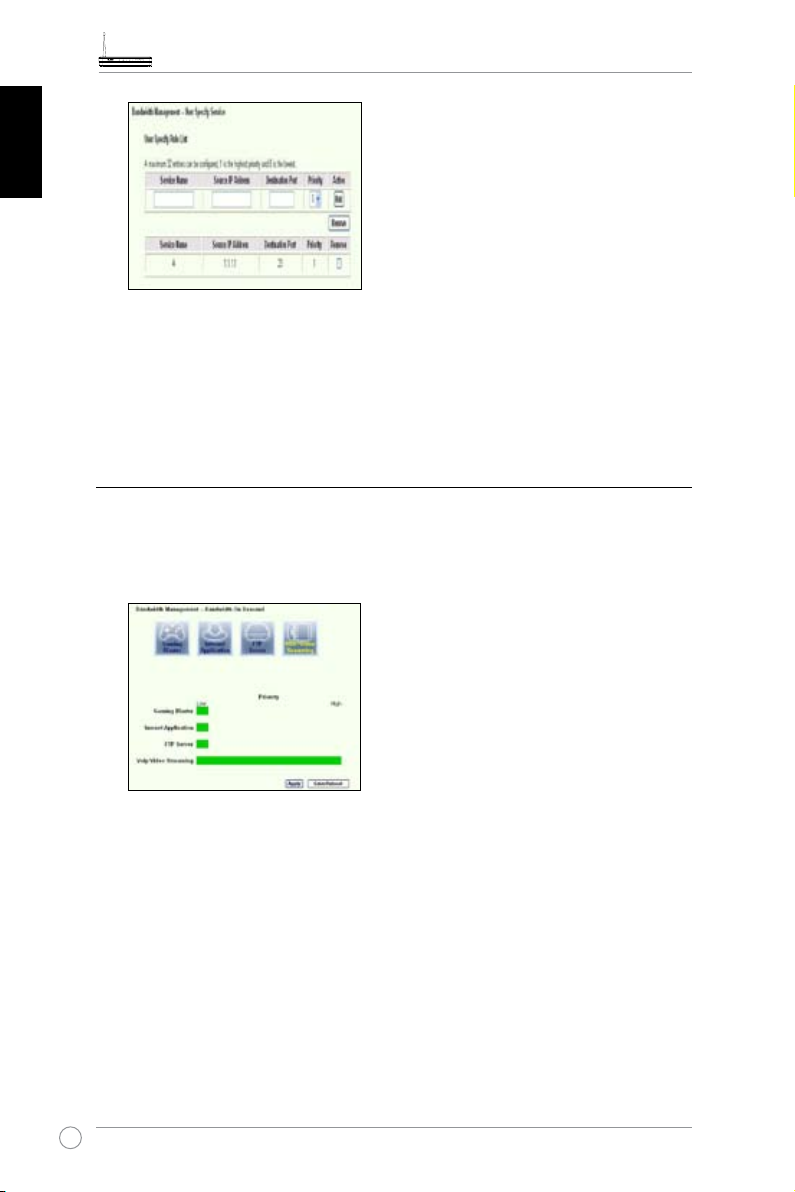
Setting up online gaming priority by indicating ports and IP addresses.
You can also prioritize your online gaming trafc by indicating ports where the online
gaming applications go.
RomânăItalianoPortuguêsFrançais
21
Page 25
WL-600g All-in-1 Wireless ADSL2/2+ Home Gateway Quick Start Guide
NederlanEnglish Español
1. Assign any name for the Service Name. For example, "My game".
2. Put in the IP address and its corresponding port where the application is.
3. Rank the priority (1, 2, 3, ...) of the service (application) according to your preference.
4. If you want to remove the service from the list, just check the
Remove.
Remove box, then press
Русский
IP phone and other A/V applications on WL-600g
If you would like to have better voice over IP and other A/V application quality, just click
on the
VoIP/Video Streaming
icon. You can then enjoy uninterrupted VoIP quality and
smooth multimedia downloading. From the bar chart at the bottom of the web page, you
can see that the VoIP/Video application now takes most of WL-600g’s network resource.
Română Italiano Português Français
User Specied Service
Setting up VoIP / Video application priority by indicating ports and IP
addresses.
You can also reserve available network trafc for your IP phone and A/V downloading
applications by indicating ports where the applications go.
22
Page 26
WL-600g All-in-1 Wireless ADSL2/2+ Home Gateway Quick Start Guide
1. Assign any name for the Service Name. For example, “My IP phone”.
Put in the IP address and its corresponding port where the application is.
3. Rank the priority (1, 2, 3, ...) of the service (application) according to your preference.
4. If you want to remove the service from the list, just check the
Remove.
Remove box, then press
Other trafc control applications on WL-600g
Nederlan EnglishEspañol
Internet application
If you would like to have smooth web browsing and e-mail quality, you can enable the
function by clicking on the
Internet application
icon as well. If you would like to remove
the priority for Internet applications, just click on the icon one more time to disable this
function.
User Specied Service
Setting up Internet application priority by indicating ports and IP addresses
You can also prioritize your web-browsing and e-mail trafc by indicating ports where
the applications go.
Русский
RomânăItalianoPortuguêsFrançais
23
Page 27
WL-600g All-in-1 Wireless ADSL2/2+ Home Gateway Quick Start Guide
NederlanEnglish Español
1. Assign any name for the Service Name. For example, “My E-mail”.
2. Put in the IP address and its corresponding port where the application is.
3. Rank the priority (1, 2, 3, ...) of the service (application) according to your preference.
4. If you want to remove the service from the list, just check the
Remove.
Remove box then press
Русский
Română Italiano Português Français
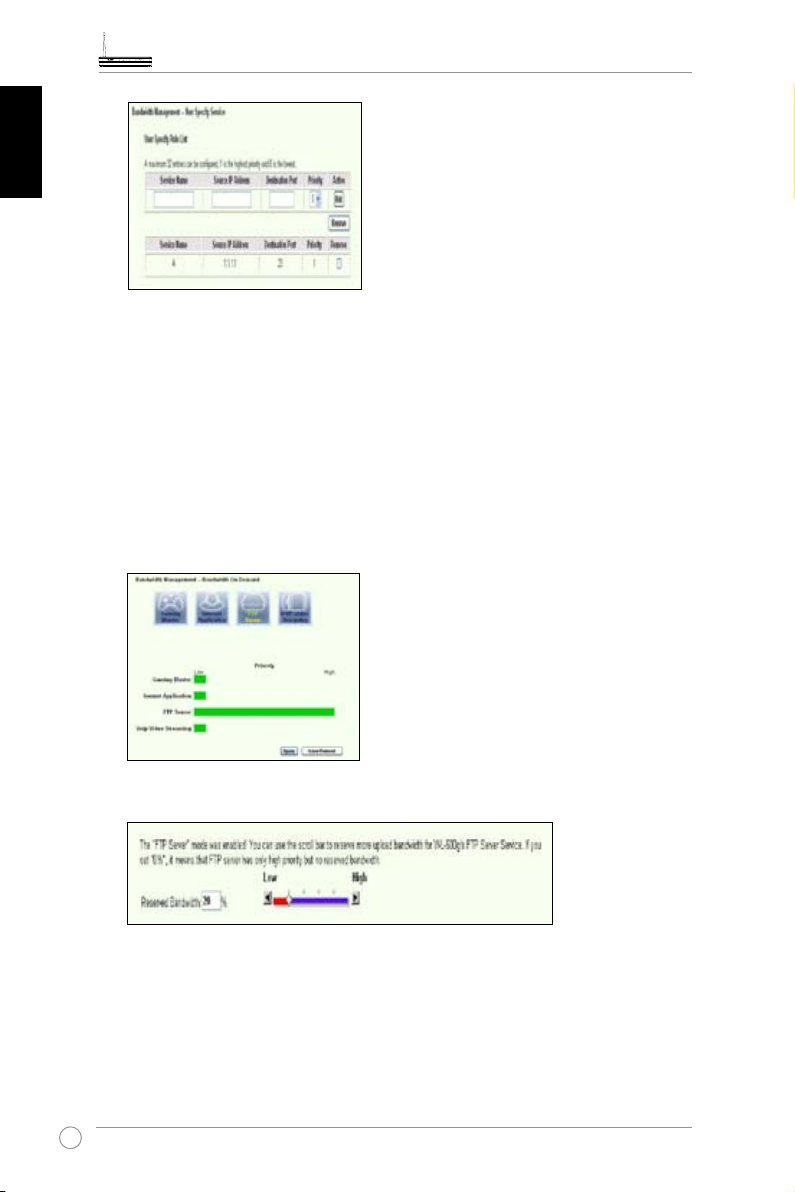
If you would like to have higher priority for FTP server downloading or uploading trafc,
you can:
1. Click on the FTP Server icon.
2. Go to User Specied Service page to reserve absolute more trafc for FTP server.
3. By just moving the scroll bar to High, not only you have higher trafc priority for FTP
application, but you can further reserve certain percentage of your available bandwidth to
dedicate in FTP uploading/downloading.
FTP server
24
Page 28
WL-600g All-in-1 Wireless ADSL2/2+ Home Gateway Quick Start Guide
User Specied Service
Setting up FTP Server application priority by indicating ports and IP
addresses
You can also prioritize your FTP server uploading/downloading trafc by indicating ports
where the applications go.
1. Assign any name for the Service Name. For example, “My FTP Server”.
2. Put in the IP address and its corresponding port where the application is.
3. Rank the priority (1, 2, 3, ...) of the service (application) according to your preference.
4. If you want to remove the service from the list, just check the
Remove.
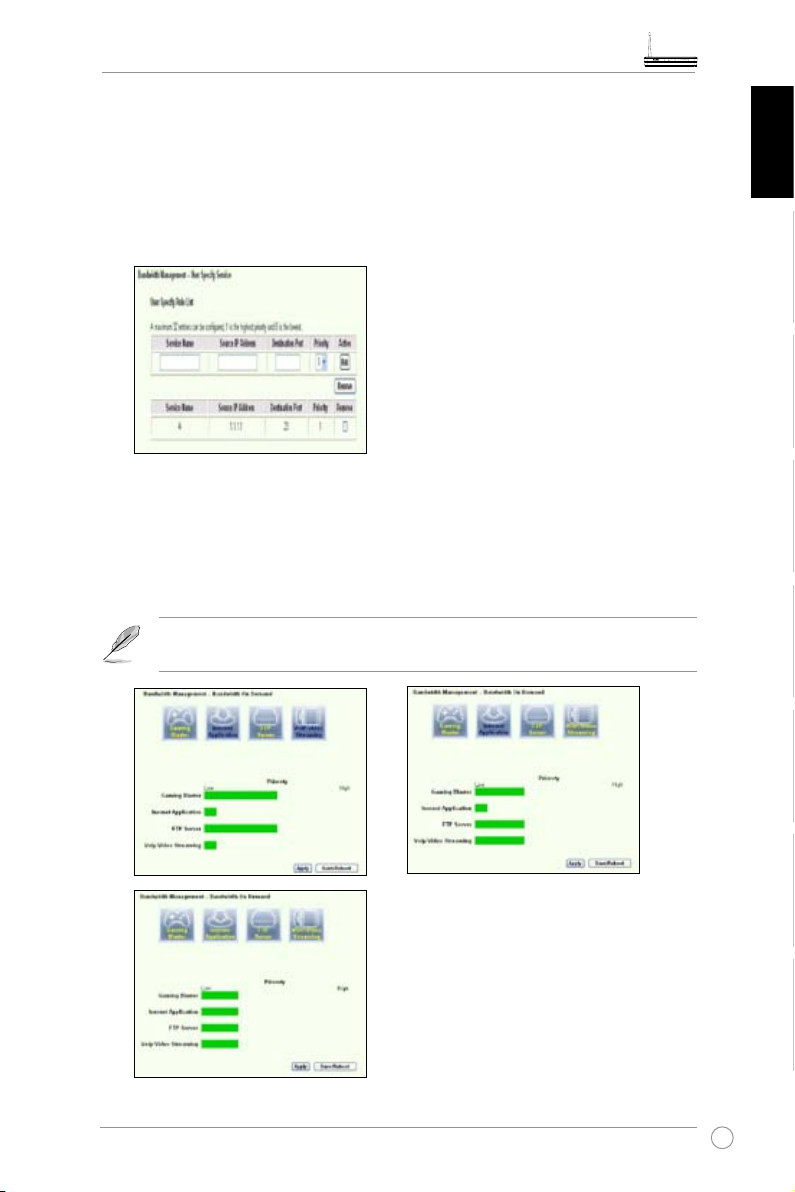
You can choose more than one icons to have priorities on multiple
applications.
Remove box then press
Nederlan EnglishEspañol
Русский
RomânăItalianoPortuguêsFrançais
25
Page 29
WL-600g All-in-1 Wireless ADSL2/2+ Home Gateway Quick Start Guide
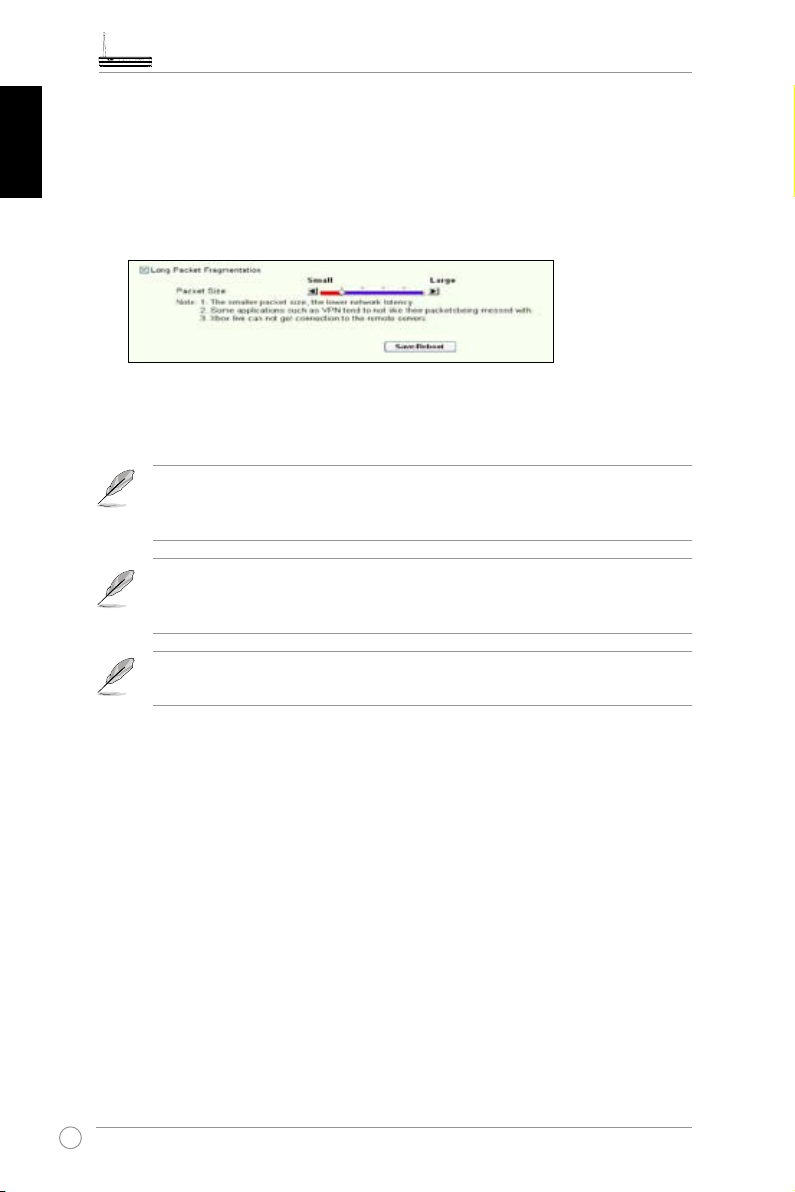
Long Packet Fragmentation
This feature works especially well when there are larger application packets (such as
FTP server packets) as well as smaller packets (such as web, e-mail, or gaming, VoIP
packets) to be sent at the same time. With this function enabled, small application
NederlanEnglish Español
packets like e-mail or web browsing will never be blocked by large packets, such as
FTP uploading.
1. Check Long Packet Fragmentation to enable this function.
2. Drag the scroll bar to your desired packet size. The smaller the packet size, the less
network latency.
With
Русский
Long Packet Fragmentation
enabled, users may have problem
logging onto the XBOX Live or other gaming servers due to the servers’
limitation on their incoming packet size.
Română Italiano Português Français
For more information, refer to the ASUS website at http://www.asus.com
To set up other features and functions of WL-600g, refer to the User Manual
included in the support CD.
26
Page 30
Alles-in-1 draadloze ADSL2/2+ gateway voor thuisgebruik
®
WL-600g
Nederlan EnglishEspañol
Русский
RomânăItalianoPortuguêsFrançais
Quick Start Guide
QDu2458 / Juli 2006
Page 31

Adressen van de fabrikant
ASUSTeK COMPUTER INC. (Azië-Stille Oceaan)
NederlanEnglish Español
Bedrijfsadres: 15 Li-Te Road, Beitou, Taipei 11259
Algemeen (tel): +886-2-2894-3447
Website-adres: www.asus.com.tw
Algemeen (fax): +886-2-2894-7798
Algemene e-mail: info@asus.com.tw
ASUS COMPUTER INTERNATIONAL (Amerika)
Bedrijfsadres: 44370 Nobel Drive, Fremont, CA 94538, USA
Algemeen (fax): +1-510-608-4555
Website-adres: usa.asus.com
Русский
Română Italiano Português Français
Technische ondersteuning
Algemene ondersteuning (tel): +1-502-995-0883
Ondersteuning (fax): +1-502-933-8713
Online ondersteuning: http://vip.asus.com/eservice/techserv.aspx
ASUS COMPUTER GmbH (Duitsland & Oostenrijk)
Bedrijfsadres: Harkort Str. 25, D-40880 Ratingen, Germany
Algemeen (tel): +49-2102-95990
Website-adres: www.asus.com.de
Algemeen (fax): +49-2102-959911
Online contact: www.asus.com.de/sales
Technische ondersteuning
Componentondersteuning: +49-2102-95990
Online ondersteuning: www.asus.com.de/support
Notebookondersteuning: +49-2102-959910
Ondersteuning (fax): +49-2102-959911
Page 32

WL-600g Alles-in-1 draadloze ADSL2/2+ gateway voor thuisgebruik Snelle startgids
Inhoudsopgave
Overzicht van de hardware .........................................................29
Voorzijde ........................................................................................29
Achtezijde ....................................................................................... 30
Eigenschappen van het product .................................................... 30
Overzicht van instellingsproces ................................................31
Hardware-instelling ......................................................................32
Een ADSL-splitter aansluiten op de telefoonlijn ............................. 32
De splitter aansluiten op de WL-600g ............................................ 32
De computer via Ethernet aansluiten op de WL-600g ...................32
Snelle instelling ...........................................................................33
Snelle instelling ..............................................................................33
Voordat u begint ..........................................................................................33
Aanmelden bij de conguratiepagina van de WL-600g ................................33
ADSL-instelling .............................................................................................33
Draadloze instelling ......................................................................................34
Handmatige instelling ..................................................................... 35
ADSL-instelling .............................................................................................36
Draadloze instelling ......................................................................................38
De WL-600g verbinden met een ASUS WLAN-kaart ..................... 39
WLAN-kaart configureren met ASUS One Touch Wizard™ .........................39
Nederlan EnglishEspañol
Русский
RomânăItalianoPortuguêsFrançais
Windows® Wireless Zero Conguratiedienst ................................................41
Usb-toepassing .............................................................................42
Gebruik van FTP-server ................................................................. 42
Een FTP-server instellen ..............................................................................42
Een FTP-account instellen ...........................................................................43
27
Page 33

WL-600g Alles-in-1 draadloze ADSL2/2+ gateway voor thuisgebruik Snelle startgids
Inhoudsopgave
De FTP-beveiliging instellen .........................................................................43
NederlanEnglish Español
Een usb-printer Delen ....................................................................44
Een printerclient instellen onder Windows XP ..............................................44
Lijst van compatibele printers .......................................................................46
Gaming Blaster .............................................................................47
Gaming Blaster op de WL-600g ..................................................... 47
Door de gebruiker gespeciceerde dienst ...................................................47
IP-telefoon en andere A/V-toepassingen met de WL-600g ........... 48
Русский
Română Italiano Português Français
Door de gebruiker gespeciceerde dienst ....................................................48
Andere toepas singen voor he t beheer van hetnetwerkverkeer op de WL-600g
Internettoepassing ........................................................................................49
Door gebruiker gespeciceerde service .......................................................49
FTP-server verwijderen ................................................................................50
Door gebruiker gespeciceerde service .......................................................51
Fragmenteren van lange pakketten ..............................................................52
.. 49
28
Page 34

WL-600g Alles-in-1 draadloze ADSL2/2+ gateway voor thuisgebruik Snelle startgids
Overzicht van de hardware
Voorzijde
De voorzijde van de WL-600g draadloze ADSL2/2+ gateway front panel bevat lampjes
die de toestand van de WL-600g tonen.
PWR ADSL IP USB AIR LAN
Opschrift Activiteit Omschrijving
P W R
(Voeding)
ADSL Aan (Groen) ADSL-verbinding actief
IP Aan (Groen) ADSL is actief en de verbinding is PPP
USB 2.0 Aan Usb-apparaat gedetecteerd
AIR Aan Draadloos LAN gereed
LAN 1-4 Aan Fysiek verbonden met een Ethernetaparaat
Aan Ingeschakeld
Uit Geen netvoeding
Knipperend Fabrieksinstelling wordt hersteld
Knipperend (Groen) ADSL wordt ingesteld
Aan (Rood) ADSL-verbinding inactief
Uit ADSL-verbinding uitgevallen
Aan (Rood) ADSL is actief maar de verbinding is niet PPP
Uit ADSL-verbinding uitgevallen
Uit Geen usb-apparaat gedetecteerd
Knipperend Draadloos gegevens ontvangen en verzenden
Uit Geen voeding of draadloos LAN niet gereed
Knipperend Er worden via het ethernet-netwerk gegevens
ontvangen of verzonden
Uit Geen netvoeding of geen verbinding
Nederlan EnglishEspañol
Русский
RomânăItalianoPortuguêsFrançais
29
Page 35

WL-600g Alles-in-1 draadloze ADSL2/2+ gateway voor thuisgebruik Snelle startgids
Achtezijde
PWRADSL
LAN
USB 2.0
NederlanEnglish Español
Hoofdschakelaar
EZSetup
Reset
Antenne
Van links naar rechts toont de achterzijde van de WL-600g het volgende:
• ADSL-aansluiting
• Voedingsaansluiting
• Hoofdschakelaar
• Vier aansluitingen voor locaal netwerk (LAN)
• Usb 2.0-aansluitingen
Русский
• EZSetup-knop
• Resetknop
• SMA antenne-aansluiting
Română Italiano Português Français
Eigenschappen van het product
De WL-600g draadloze ADSL 2/ 2+ gateway voor thuisgebruik heeft de volgende
eigenschappen:
• Ingebouwde ADSL-modem
• Ingebouwde firewall
• Op de standaard IEEE802.11g gebaseerd draadloos netwerk, achterwaarts
compatibel met 802.11b
• Eenvoudig te gebruiken configuratie-interface met webbrowser: Snelle instelling
voor ADSL-verbinding, draadloze beveiligingsinstellingen
• Uitgebreide ondersteuning voor routingprotocol: RIP v1, v2
• Op inhoud gebaseerd filter
• EZSetup™ programma voor ADSL-verbinding, draadloos netwerk en
beveiligingsinstelling
30
Page 36

WL-600g Alles-in-1 draadloze ADSL2/2+ gateway voor thuisgebruik Snelle startgids
Overzicht van instellingsproces
Hardware-
instelling
Quick Setup ADSL-verbinding
a ut o m a t is c h
gedetecteerd
Verbinding gedetecteerd
en verbindingstype is goed.
ADSL-instelling voltooid.
Qu ic k Set u p
- D r a a d l o z e
instelling
Quick Setup
- Samenvatting
Zie het hardwarediagram op
pagina 4.
Controle in orde Ga naar 192.168.1.1 om de
WL-600g in te stellen.
Handmatige
instelling
Verbinding niet
gedetecte e r d
o f g e t o o nd
verbindingstype
is niet goed.
Draadloze instellingen
veranderen.
Controle mislukt.
ADSL-instellingen veranderen.
Nederlan EnglishEspañol
Русский
RomânăItalianoPortuguêsFrançais
Controle geslaagd
Qu ic k Set u p
Voltooid! WL600g is gereed
voor gebruik.
31
Page 37

WL-600g Alles-in-1 draadloze ADSL2/2+ gateway voor thuisgebruik Snelle startgids
Hardware-instelling
Een ADSL-splitter aansluiten op de telefoonlijn
NederlanEnglish Español
Steek de Line-connector of de stekker van de meegeleverde splitter in de telefoondoos
en sluit de telefoon aan op de telefoonaansluiting van de splitter (A).
Het uiterlijk van de connector van de meegeleverde splitter (lijn of plug) kan
plaatselijk verschillen.
De splitter aansluiten op de WL-600g
Een onjuiste aansluiting van de splitter kan de ADSL-dienst blokkeren.
a. Schakel de computer uit.
Русский
Română Italiano Português Français
b. Verbind de ADSL-aansluitng van de WL-600g met de ADSL- of modemaansluiting
van de splitter (B),
c. Sluit het voedingsapparaat aan op de voedingsaansluiting op het achterpaneel van
de WL-600g en op het stopcontact. Zorg ervoor dat het controlelampje brandt na
het inschakelen van de router. Brandt het lampje ADSL-verbinding constant groen,
dan is er een ADSL-verbinding tot stand gekomen.
De computer via Ethernet aansluiten op de WL-600g
a. Gebruik de meegeleverde Ethernetkabel (RJ45) om verbinding te maken tussen de
computer en een van de LAN-aansluitingen van de WL-600g.
b. Zet de computer aan.
Splitter *: De benaming of de plaatsing van de aansluitingen van de meegeleverde splitter kan plaatselijk verschillen.
32
Page 38

WL-600g Alles-in-1 draadloze ADSL2/2+ gateway voor thuisgebruik Snelle startgids
Snelle instelling
Snelle instelling
Voordat u begint
Met de Snelle instelling moet u eerst een ADSL-verbinding maken voordat u begint
met de draadloze verbinding. Afhankelijk van de eisen van uw ISP, hebt u de volgende
gegevens nodig om een internetverbinding te maken met de WL-600g.
• Virtual Path Identifier (VPI)
• Virtual Channel Identifier (VCI)
• Hostnaam
• ISP login gebruikersnaam en wachtwoord
• Adres van ISP Domain Name System (DNS) server
• Statisch IP-adres (Voor abonnees met een statisch IP)
Nederlan EnglishEspañol
Aanmelden bij de conguratiepagina van de WL-600g
1. Typ
192.168.1.1
2. Er verschijnt een aanmeldingsvenster voor uw gebruikernaam en wachtwoord. De
standaardgebruikersnaam is
3. Na het aanmelden ziet u de conguratiepagina van de WL-600g.
in de adresbalk van de webbrowser en druk op
, en het wachtwoord is
admin
admin
.
Enter
(in kleine letters).
ADSL-instelling
1. De standaard is dat de pagina voor Snelle instelling verschijnt. De Quick Setup
Wizard detecteert automatisch het type van uw ADSL-verbinding.
2. Is er een ADSL-verbinding gedetecteerd, dan toont de volgende pagina het type
van de verbinding (PPPoE/PPPoA of MER).
Wordt er geen ADSL-verbinding gedetecteerd, klik dan op
(Handmatige instelling) om de WL-600g handmatig in te stellen. Zie pagina
6-8 voor verdere instructies.
Manual Setting
Русский
RomânăItalianoPortuguêsFrançais
33
Page 39

WL-600g Alles-in-1 draadloze ADSL2/2+ gateway voor thuisgebruik Snelle startgids
-- Uw verbindingstype is PPPoE of PPPoA
Hebt u een dynamisch IP-adres, geef dan uw gebruikersnaam en wachtwoord
op en klik op Next (Volgende).
Hebt u een statisch IP-adres, markeer dan Use Static IP Address (Statisch IP-adres
NederlanEnglish Español
gebruiken) en geef het IP-adres op. Klik daarna op Next (Volgende).
Is het verbindingstype niet PPPoE of PPPoA, klik dan op
Manual Setting
(Handmatige instelling) om de WL-600g handmatig in te stellen. Zie pagina
Русский
6-8 voor verdere instructies.
-- Uw verbindingstype is “MER”(DHCP)
Klik op Next (Volgende) als het verbindingstype MER (DHCP) is.
Is het verbindingstype niet MER(DHCP), klik dan op
Română Italiano Português Français
(Handmatige instelling) om de WL-600g handmatig in te stellen. Zie pagina
Manual Setting
6-8 voor verdere instructies.
Uw ADSL-verbinding is nu voltooid. GA verder voor de draadloze instelling.
Draadloze instelling
1. Kies het
veiligheidsniveau
pagina 21-22 in de handleiding op de meegeleverde cd.
. Voor gedetailleerde veiligheidomschrijvingen zie
34
Page 40

WL-600g Alles-in-1 draadloze ADSL2/2+ gateway voor thuisgebruik Snelle startgids
2. Geef een sleutel op in het veld
(Sleutel). Het aantal cijfers van de sleutel
Key
bepaalt het gekozen veiligheidsniveau.
3. De pagina met de samenvatting verschijnt. Is de getoonde informatie correct, klik
dan op
Save/Reboot
klik dan op
Back
(Opslaan/Herstarten) om de instelling te voltooien. Zo niet,
(Terug) om de instellingen te veranderen.
4. De instelling is voltooid. Het herstarten duurt ongeveer 50 seconden. De
webbpagina wordt na het herstarten ververst met de apparaatgegevens.
Nederlan EnglishEspañol
Русский
RomânăItalianoPortuguêsFrançais
Handmatige instelling
Zijn er problemen met het congureren van de ADSL-verbinding met de Snelle
instelling, klik dan op Manual Setting (Handmatige instelling) om de ADSL-verbinding
handmatig in te stellen.
35
Page 41

WL-600g Alles-in-1 draadloze ADSL2/2+ gateway voor thuisgebruik Snelle startgids
ADSL-instelling
1. Kies uw land en
NederlanEnglish Español
en klik op
ISP
(Volgende).
Next
2. Staan uw land en/of ISP niet op de lijst, selecteer dan
geef uw VPI en VCI op. Klik op
(Volgende). U kunt uw ISP om de VPI en VCI
Next
(Niet op de lijst) en
Not list
vragen.
Русский
Română Italiano Português Français
3. Kies het verbindingstype en klik op
(Volgende). U krijgt het verbindingstype
Next
van de ISP.
36
Page 42

WL-600g Alles-in-1 draadloze ADSL2/2+ gateway voor thuisgebruik Snelle startgids
-- Uw verbindingstype is PPPoE of PPPoA
Hebt u een dynamisch IP-adres, geef dan uw PPP gebruikersnaam, wachtwoord
en dienstnaam op en klik op Next (Volgende).
Hebt u een statisch IP-adres, markeer dan Use Static IP Address (Statisch
IP-adres gebruiken) en geef het IP-adres op. Klik daarna op Next (Volgende).
Nederlan EnglishEspañol
-- Uw verbindingstype is “MER”(DHCP)
Hebt u een dynamisch IP-adres, markeer dan Obtain an IP address
automatically (Automatisch een IP-adres verkrijgen), Obtain default gateway
automatically (Automaisch een standaardgateway verkrijgen) en Obtain DNS
server address automatically (Automatisch een DNS-serveradres verkrijgen).
Klik daarna op Next (Volgende).
Hebt u een statisch IP-adres, markeer dan Use the following IP Address (Het
volgende IP_adrs gebruiken), Use the following default gateway (De volgende
standaardgateway gebruiken) en Use the following DNS server address (Het
volgende DNS-serveradres gebruiken). Geef in de daarbij corresponderende
velden de adressen op.
Русский
RomânăItalianoPortuguêsFrançais
37
Page 43

WL-600g Alles-in-1 draadloze ADSL2/2+ gateway voor thuisgebruik Snelle startgids
-- Uw verbindingstype is IPoA
Alleen voor Statisch IP-adressen. Geef het WAN IP-adres op dat u krijgt van
uw ISP en klik op Next (Volgende).
NederlanEnglish Español
Русский
Draadloze instelling
1. Ken een
(netwerknaam) toe aan de WL-600g. Kies het veiligheidsniveau
SSID
en geef een sleutel op. Het aantal cijfers is afhankelijk van het gekozen
veiligheidsniveau. Zie de aanwijzingen op de webpagina. Klik ten slotte op
Next
(Volgende).
Română Italiano Português Français
2. Deze pagina toont een samenvatting van de WAN- en draadloze conguratie van
de WL-600g. Klik op
Save/Reboot
(Opslaan/Herstarten) om de conguratie op te
slaan en te activeren.
38
Page 44

WL-600g Alles-in-1 draadloze ADSL2/2+ gateway voor thuisgebruik Snelle startgids
3. De instelling is voltooid. Het herstarten van de WL-600g duurt ongeveer 50
seconden. De groene balk toont de voortgang van het herstarten. Na het herstarten
toont de webpagina automatisch de nieuwe instellingen.
De WL-600g verbinden met een ASUS WLAN-kaart
WLAN-kaart configureren met ASUS One Touch Wizard™
We adviseren u gebruik te maken van een ASUS WLAN-kaart (WL-100gD, WL100gE, WL-107g, WL-167g, WL169gE) voor een beter draadloze verbinding. Hebt
u een ASUS draadloze kaart op de computer geïnstalleerd met hulpprogramma’s en
stuurprogramma’s, klik dan op
WLAN Card -> One Touch Wizard
Start -> Programs (Alle programa’s) -> ASUS Utility->
om het hulpprogramma One Touch Wizard.
Nederlan EnglishEspañol
Русский
1. Selecteer de radiok nop Connect to
an existing wireless LAN (Station)
(Verbinden met een bestaand draadloos
LAN (station) en klik op Next (Volgende)
om verder te gaan.
RomânăItalianoPortuguêsFrançais
2. De One Touch Wizard zoekt en toont
de beschikbare access-poi nts in de
lijst Available Networks (Beschikbare
netwerken). Selecteer de draadloze en klik
op Next (Volgende) om verder te gaan.
39
Page 45

WL-600g Alles-in-1 draadloze ADSL2/2+ gateway voor thuisgebruik Snelle startgids
3. Geef bij de authenticatie en versleuteling van
de WLAN-kaart dezelfde gegevens als bij de
WL-600g. Klik op Next (Volgende) om verder
te gaan.
4. Het duurt een paar seconden voor de
draadloze kaart verbinding heeft gemaakt
met de WL-600g. Druk op Next (Volgende)
om TCP/IP in te stellen.
NederlanEnglish Español
5. Er verschijnt een scherm voor de IP-conguratie. Stel het IP-adres in volgende de situatie
in uw netwerk. Is de instelling voltooid, klik dan op Finish (Voltooien) om de One Touch
Wizard af te sluiten.
Русский
Română Italiano Português Français
De getoonde schermen zijn alleen voor referentie en kunnen van de
werkelijke producten verschillen.
40
Page 46

WL-600g Alles-in-1 draadloze ADSL2/2+ gateway voor thuisgebruik Snelle startgids
Windows® Wireless Zero Conguratiedienst
U kunt ook gebruik maken van Windows® Wireless Zero Configuration om een
draadloze verbinding met de WL-600g te maken.
1.
Du bb e lk li k op he t dr a a d lo z e
netwerkpictogram op de taakbalk om
de beschikbare netwerken te zien.
Selecteer de draadloze router en klik
op
Connect (Verbinden)
.
2. Geef de sleutel op die u op de WL600g hebt opgegeven en klik op
Connect
(Verbinden). De verbinding
komt in een paar seconden tot stand.
Nederlan EnglishEspañol
Русский
RomânăItalianoPortuguêsFrançais
41
Page 47

WL-600g Alles-in-1 draadloze ADSL2/2+ gateway voor thuisgebruik Snelle startgids
Usb-toepassing
De WL-600g heeft twee usb 2.0-aanslutingen voor een FTP-server en het delen van een usb-printer.
NederlanEnglish Español
Русский
Română Italiano Português Français
Voor de installatie moet u een usb-schijf gereedmaken voor FTP-opslag.
Is de externe harde schijf als NTFS geformatteerd, dan is de FTP-server
alleen leesbaar. Het uploaden van bestanden naar de FTP-server is dan
niet mogelijk. Verder is er alleen toegang voor een anonieme gebruiker. Een
superuser heeft geen toegang tot een FTP-server met NTFS.
Een FTP-server instellen
Instellen van een FTP-server:
1. Sluit de usb-schijf aan op de usb 2.0-aansluiting op de achterzijde van de WL-600g.
42
Klik op
USB Application -> FTP Server
linkermenu om de conguratiepagina te openen.
2. Zet
Enable FTP Server
3.
Allow Anonymous User to Login
toestaan): Wilt u anonieme gebruikers toegang geven tot uw FTP-gegevens,
selecteer dan
selecteer dan No (Nee).
4.
Allow Super User to Login
de superuser toegang wilt geven tot de FTP-server.
5.
FTP Port:
nummer 1111, dan hebt u toegang tot de FTP-server door
typen in het adresveld van de webbrowser (192.168.1.1 is het standaard IP-adres
van de WL-600g).
6.
Maximum User Allowed to Login
u, afhankelijk van uw werkomgeving, op hoeveel gebruikers maximaal aangemeld
mogen zijn.
7.
Login Timeout in Seconds
verstreken is, wordt het aanmeldngsproces beëindigd.
8.
Stay Timeout in Seconds
inactieve verbinding verbroken wordt.
9.
Druk op
Yes
Geeft hier het portnummer op van de FTP-server. Kiest u bijvoorbeeld
Save/Apply
(FTP-server inschakelen) op
(Ja). Wilt u uw gegevens beschermen tegen onbevoegd gebruik,
(Superuser mag aanmelden): Selecteer
(Aanmeldingstimeout in seconden): Als deze tijd
(Inactiviteitstimeout in seconden): Tijd waarna een
(Opslaan/Toevoegen) om de instellingen op te slaan en te activeren.
(Usb-toepassing -> FTP-server) in het
(Ja).
Yes
(Aanmelden van anonieme gebruikers
Yes
ftp://192.168.1.1:1111
(Maximaal aan te melden gebruikers): hier geeft
(Ja) als u
te
Gebruik van FTP-server
Page 48

WL-600g Alles-in-1 draadloze ADSL2/2+ gateway voor thuisgebruik Snelle startgids
Gebruikt u webtoegang voor het aanmelden van de superuser (zoals
de rode cirkelmarkeringen) zet dan
Maximum User Allowed to Login
(Maximaal aan te melden gebruikers) op meer dan één, want anders
verschijnt steeds de melding “server is busy” (server is bezet).
Een FTP-account instellen
U kunt voor uw FTP-site 12 accounts opgeven.
1. Klik op
USB Application -> FTP Server -> User List
server ->Gebruikerslijst) in het menu aan de linkerkant om de conguratiepagina te
openen. Klik op
(Toevoegen) om een nieuw FTP-account te maken.
Add
(Usb-toepassing -> FTP-
Nederlan EnglishEspañol
2. Definieer de
Username
nieuwe account. De waarde
(Gebruikersnaam),
Max. Login
(Max aanmeldingen) beperkt de toegang.
Password
*Wachtwoord) voor het
Denieer de toegangsrechten tot het account.
3. Klik op
4. Klik op
(Toepassen) om de nieuwe account op te slaan.
Apply
(Opslaan) om de instellingen op te slaan en te activeren.
Save
De FTP-beveiliging instellen
U kunt de toegang van bepaalde IP-adressen uitsluiten door het maken van een
Banned IP List
1. Klik op
FTP-server -> Lijst van verboden IP-adressen) in het menu aan de linkerkant om
de conguratiepagina te openen. Klik op
maken.
2. Geef het IP-adres van de verboden computer op en klik op
het adres op te slaan. Het moet een statisch IP-adres zijn.
3. Klik op
Uw FTP-site is nu gereed. Typ
de webbrowser en druk op Enter. Wordt er gevraagd om aan te melden, geef dan uw
gebruikersnaam en wachtwoord op dat u hebt ingesteld voor het aanmelden bij het FTPaccount.
(Lijst van verboden IP-adressen).
USB Application -> FTP Server -> Banned IP List
(Toevoegen) om een nieuwe regel te
Add
(Opslaan) om de instelling op te slaan en te activeren.
Save
ftp://192.168.1.1
(:portnummer) in het adresveld van
(Usb-toepassing ->
(Toepassen) om
Apply
Русский
RomânăItalianoPortuguêsFrançais
43
Page 49

WL-600g Alles-in-1 draadloze ADSL2/2+ gateway voor thuisgebruik Snelle startgids
Een usb-printer Delen
U kunt een usb-printer aansluiten op de usb 2.0-aansluiting van de WL-600g zodat u de
printer op uw LAN kunt delen. Na het aansluiten van de printer ziet u de toestand van
de printer door te klikken op
NederlanEnglish Español
Printertoestand).
USB Application -> Printer Status
Een printerclient instellen onder Windows XP
Ga als volgt te werk om een netwerkprinter op de clients in te stellen.
1.
Русский
Start de Add Printer Wizard (Wizard
Printer toevoegen) met
Start ->
Printers and Faxes -> Add a printer
(Start -> Printers en faxapparaten ->
Een printer
toevoegen).
Română Italiano Português Français
2. Selecteer
to this computer
met deze computer is verbonden)
en klik op
(Usb-toepassing ->
Local printer attached
(Lokale printer die
(Volgende).
Next
3. Selecteer
44
Create a new port
(Een
nieuwe port maken) en kies bij
Type of port (Type port)
TCP/IP Port
. Klik daarna op
Standard
Next
(Volgende).
4. Klik op
(Volgende) om een
Next
TCP/IP-port te maken voor toegang
tot de netwerkprinter.
Page 50

WL-600g Alles-in-1 draadloze ADSL2/2+ gateway voor thuisgebruik Snelle startgids
5. Geef het IP-adres van de WL-600g
op in het veld
Address
en klik op
7. Zet het
LPRServer
Name
Printer Name of IP
(Printernaam of IP-adres)
(Volgende).
Next
Protocol
in het veld
op
LPR
en typ
Queue
(Wachtrijnaam). Klik op
Next
(Volgende) om verder te gaan.
6. Selecteer
klik op
Settings
8. Klik op
Next
(Aangepast) en
Custom
(Instellingen).
(Volgende) om de
instelling van de TCP/IP-port te
voltooien.
Nederlan EnglishEspañol
Русский
RomânăItalianoPortuguêsFrançais
9. Klik op
(Voltooien) om de
Finish
instelling te voltooien en terug te
gaan naar de Add Printer Wizard
(Wizard Printer toevoegen).
10. Installeer het stuurprogramma
van de printe r uit de lijst van
leveranciers. Staat uw printer er niet
bij, klik dan op
Have Disk
(Diskette)
om handmatig de locatie van het
stuurprogramma op te geven.
45
Page 51

WL-600g Alles-in-1 draadloze ADSL2/2+ gateway voor thuisgebruik Snelle startgids
11. Kli k o p Next ( Volg e n d e) om d e
st andaardn aam van de printer te
accepteren.
12. Selecteer Yes (Ja) om een testpagina te
printen. Klik op Next (Volgende) om te
printen.
NederlanEnglish Español
13. De instal l atie is voltooid. Klik op
Finish (Voltooien) om de Add Printer
Wizard (Wizard Printer toevoegen) te
voltooien.
Русский
Română Italiano Português Français
Hebt u de printer reeds lokaal op uw eigen computer geïnstalleerd, klik
dan met de rechterknop op het printerpictogram en kies
Property -> Port
(Eigenschappen -> Port) om een standaard-TCP/IP-port toe te voegen.
Klik op
Add Port
en klik op de knop
(Poort toevoegen) en selecteer
New Port
(Nieuwe Port). Volg de stappen 5-8 voor de
Standard TCP/IP Port
instelprocedures.
Gebruikt u Windows® 98 of Me zodat een Standaard-TCP/IP-port niet
wordt ondersteund, dan moet u gebruikmaken van Romote Port dat wordt
ondersteund door WL-600g.
Lijst van compatibele printers
HP Deskjet 5410 Series
HP Deskjet 3940 Series
HP Photosmart 8030
HP Photosmart 8230
HP Photosmart 7830
HP Ofcejet 7210
HP PSC 1510
46
HP PSC 1610
HP Deskjet 5652
HP Deskjet 5550
EPSON C60
HP Ofcejet 5610
HP Ofcejet 4255
HP PSC 1410
Page 52

WL-600g Alles-in-1 draadloze ADSL2/2+ gateway voor thuisgebruik Snelle startgids
Gaming Blaster
De “Gaming Blaster” van de ASUS WL-600g is gemaakt om u on-line meer
spelplezier te bieden. Deze technologie biedt een ononderbroken spelervaring,
zoals spelliefhebbers dat verwachten. Netwerkbronnen worden op intelligente wijze
geoptimaliseerd en aan het netwerkverkeer worden automatisch prioriteiten toegekend,
zodat tijdgevoelige toepassingen, zoals IP-telefoon en mutimediatoepassingen, beter
worden uitgevoerd.
Ga naar “
Bandbreedtebeheer
Gaming Blaster op de WL-600g
De standaard is dat de WL-600g is ingesteld in de “Gaming Blaster”-modus zodat
u direct gebruik kunt maken van de verbeterde spelkracht. Klik op het pictogram
Gaming Blaster
onderaan de webpagina ziet u dat de speltoepassing, standaardmatig, het meest
gebruik maakt van de netwerkbronnen van de WL-600g.
om deze functie op de WL-600g in en uit te schakelen. In de balkkaart
” -- “
Bandbreedte op verzoek
”.
Nederlan EnglishEspañol
Русский
RomânăItalianoPortuguêsFrançais
Door de gebruiker gespeciceerde dienst
Het instellen van prioriteiten voor on-linespellen door ports en IP-adressen
op te geven.
U kunt prioriteiten toekennen aan het spelverkeer door aan te geven op welke ports de
speltoepassingen lopen.
47
Page 53

WL-600g Alles-in-1 draadloze ADSL2/2+ gateway voor thuisgebruik Snelle startgids
NederlanEnglish Español
1. Geef een willekeurige naam op achter Service Name (Dienstnaam). Bijvoorbeeld, “My
game” (Mijn spel).
2. Geef het IP-adres en het portnummer op waar de toepassing zich bevindt.
3. Ken een prioriteit (1, 2, 3, ...) toe aan de dienst (toepassing), afhankelijk van uw voorkeur.
4. Wilt u de dienst uit de lijst verwijderen, markeer dan het vakje
druk op Remove (Verwijderen).
Remove (Verwijderen) en
Русский
IP-telefoon en andere A/V-toepassingen met de WL-600g
Wilt u een betere kwaliteit met VoIP en andere A/V-toepassingen, klik dan op het
pictogram “
VoIP/Video Streaming
”. U profiteert dan van een ononderbroken VoIP-
kwalieit en soepel downloaden van multimedia. In de balkkaart onderop de webpagina
Română Italiano Português Français
ziet u de VoIP/Video de meeste netwerkbronnen van de WL-600g gebruikt.
Door de gebruiker gespeciceerde dienst
Instellen van de prioriteit van VoIP / Video door het opgeven van ports en IPadressen.
U kunt ook prioriteiten toekennen aan IP-telefoon en A/V-downloads door aan te geven
op welke ports de toepassingen lopen.
48
Page 54

WL-600g Alles-in-1 draadloze ADSL2/2+ gateway voor thuisgebruik Snelle startgids
1. Ken een willekeurige naam toe aan de Service Name (Dienstnaam). Bijvoorbeeld “My IP
phone” (Mijn IP-telefoon).
2. Geef het IP-adres en de port op waar de toepassing zich bevindt.
3. Ken een prioriteit (1, 2, 3, ...) toe aan de dienst (toepassing), afhankelijk van uw voorkeur.
4. Wilt u de dienst uit de lijst verwijderen, markeer dan het vakje
druk op Remove (Verwijderen).
Remove (Verwijderen) en
An d e r e t oe p a s s i n ge n v oo r het be h e er va n he t
netwerkverkeer op de WL-600g
Internettoepassing
Wilt u soepel gebruik maken van webbrowsen en e-mail, dan kunt u de functie
inschakelen door te klikken op het pictogram
Internet application
Wilt u de prioriteit voor internettoepasingen verwijderen, klik dan weer op het pictogram
zodat de functie wordt uitgeschakeld.
(Internettoepassing).
Nederlan EnglishEspañol
Русский
RomânăItalianoPortuguêsFrançais
Door gebruiker gespeciceerde service
Instellen van de prioriteiten van de internettoepassingen door ports en IPadressen op te geven
U kunt ook prioriteiten toekennen aan webbrowsing en e-mail door aan te geven op
welke ports de toepassingen lopen.
49
Page 55

WL-600g Alles-in-1 draadloze ADSL2/2+ gateway voor thuisgebruik Snelle startgids
NederlanEnglish Español
1. Ken een naam toe aan de Service Name (Dienstnaam). Bijvoorbeeld “Mijn e-mail”.
2. Vul het IP-adres en het portnummer van de toepassing in.
3. Geef de prioriteit (1, 2, 3, ...) op van de dienst (toepassing) afhankelijk van uw voorkeur.
4. Wilt u de dienst uit de lijst verwijderen, markeer dan het vakje
druk op Remove (Verwijderen).
Remove (Verwijderen) en
Русский
Română Italiano Português Français
Wilt u een hogere prioriteit voor de FTP-server voor het downloaden en uploaden, dan
doet u het volgende:
1. Klik op het pictogram FTP Server (FTP-server).
2. Ga naar de pagina User Specied Service (Door gebruiker gespeciceerde dienst) om
meer absoluut verkeer toe te kennen aan de FTP-server.
3. Door de scrollbar naar omhoog te bewegen, verhoogt u niet alleen de prioriteit voor de
FTP-toepassing, maar u kunt ook een zeker percentage van de beschikbare bandbreedte
reserveren voor het uploaden en downloaden met FTP.
FTP-server verwijderen
50
Page 56

WL-600g Alles-in-1 draadloze ADSL2/2+ gateway voor thuisgebruik Snelle startgids
Door gebruiker gespeciceerde service
De prioriteit van de FTP-server instellen door ports en IP-adressen op te geven
U kunt ook prioriteiten toekennen aan het uploaden en downloaden met de FTP-server
door aan te geven op welke ports de toepassingen lopen.
1. Ken een naam toe aan de Service Name (Dienstnaam). Bijvoorbeeld “Mijn FTP-server”.
2. Vul het IP-adres en het portnummer van de toepassing in.
3. Geef de prioriteit (1, 2, 3, ...) op van de dienst (toepassing) afhankelijk van uw voorkeur.
4. Wilt u de dienst uit de lijst verwijderen, markeer dan het vakje
druk op Remove (Verwijderen).
U kunt meer dan een pictogram kiezen en prioriteiten toekennen aan
meerdere toepassingen.
Remove (Verwijderen) en
Nederlan EnglishEspañol
Русский
RomânăItalianoPortuguêsFrançais
51
Page 57

WL-600g Alles-in-1 draadloze ADSL2/2+ gateway voor thuisgebruik Snelle startgids
Fragmenteren van lange pakketten
Deze functie werkt bijzonder goed als zowel grote toepassingspakketten zijn (zoals van
een FTP-server) als kleinere pakketten (zoals web, e-mail of spel, VoIP) die gelijktijdig
worden verzonden. Met deze functie worden kleinere pakketten, zoals e-mail en
NederlanEnglish Español
Русский
webbrowsen, nooit geblokkeerd door grotere pakketten, zoals FTP-uploads.
1. Markeer Long Packet Fragmentation (Lang pakket fragmenteren) om deze functie in te
schakelen.
2. Sleep de scrollbalk naar de gewenste pakketgrootte. Kleinere pakketten geven minder
netwerkvertraging.
Is het fragmenteren van lange pakketten ingeschakeld, dan kan er een
probleem zijn met het aanmelden bij XBOX Live of andere spelservers,
doordat die spelservers een grens zetten aan de grootte van inkomende
pakketten.
Română Italiano Português Français
Voor meer informatie gaat u naar de website van Asus op http://www.asus.
com
Voor andere kenmerken en functies van de WL-600g leest u de handleiding
op de meegeleverde cd.
52
Page 58

Unidad doméstica Inalámbrica con Puerta de Enlace
®
ADSL2/2+ “Todo-en-Uno”
WL-600g
Nederlan EnglishEspañol
Русский
RomânăItalianoPortuguêsFrançais
Guía de Instalación Rápida
QS2458 / Junio 2006
Page 59

Información de Contacto del Fabricante
SEDE CENTRAL
ASUSTeK COMPUTER INC. (Taiwan)
NederlanEnglish Español
Русский
Tel General: 0800-093-456 (Llamada sin coste solo desde Taiwan)
Fax General: +886-2-2895-9254
Formulario de e-mail: http://vip.asus.com/eservice/techserv.aspx
Sitio Web: http://tw.asus.com
ASUSTeK COMPUTER INC. (Asia Pacíco)
Tel General: +886-2-2894-3447
Fax General: +886-2-2894-7798
Formulario de e-mail: http://vip.asus.com/eservice/techserv.aspx
Sitio Web: http://www.asus.com
SEDE CENTRAL EUROPEA
Română Italiano Português Français
ASUS COMPUTER GmbH (Alemania/Austria)
Tel General (Alemania): +49-(0)2102/9599-10
Tel General (Austria): 0820/240513
Fax General: +1-502-933-8713
Formulario de e-mail: http://vip.asus.de/support/support.htm
Sitio Web: http://www.asus.de
OFICINAS ESPAÑOLAS
ASUS IBÉRICA S.L. (España)
Soporte técnico: +34 934 929 806
902 889 688 (para llamadas locales desde España)
Fax de soporte: +34 934 929 801
Sitio web: http://es.asus.com
Dirección: Plomo, 5-7 4ª Planta. CP 08038. Barcelona, ESPAÑA
E-mail de soporte: tsd_acib@asus.com
Page 60

Guía de Instalación Rápida para la unidad domestica inalámbrica WL-600g
Tabla de Contenidos
Introducción del Hardware ..........................................................55
Panel frontal ...................................................................................55
Panel trasero .................................................................................. 56
Características del producto ..........................................................56
Introducción al Proceso de Conguración ................................57
Conguración del Hardware ........................................................58
Conexión del distribuidor ADSL a su toma telefónica ....................58
Conexión del distribuidor a la unidad WL-600g ............................58
Conexión del PC a la unidad WL-600g vía Ethernet ..................... 59
Conguración rápida ...................................................................60
Conguración rápida ......................................................................60
Antes de comenzar ......................................................................................60
Inicio de sesión en la página de conguración de la unidad WL-600g ........60
Conguración ADSL .....................................................................................60
Conguración inalámbrica ............................................................................62
Conguración manual ....................................................................63
Conguración ADSL .....................................................................................63
Conguración inalámbrica ............................................................................66
Conexión a la unidad WL-600g desde una tarjeta ASUS WLAN ... 67
Conguración de la tarjeta ASUS WLAN con One Touch Wizard™.............67
Nederlan EnglishEspañol
Русский
RomânăItalianoPortuguêsFrançais
Conguración de la tarjeta ASUS WLAN con el servicio Windows® WZC ...68
53
Page 61

Guía de Instalación Rápida para la unidad domestica inalámbrica WL-600g
Tabla de Contenidos
Aplicación USB .............................................................................69
NederlanEnglish Español
Función de servidor FTP ................................................................ 69
Conguración del servidor FTP ....................................................................69
Conguración de cuentas FTP .....................................................................70
Conguración seguridad FTP .......................................................................71
Compartir impresoras USB ............................................................72
Conguración del cliente de impresión con Windows XP ............................72
Lista de impresoras compatibles ..................................................................74
Русский
Gaming Blaster .............................................................................75
Gaming Blaster en WL-600g .......................................................... 75
Servicios especícos para usuarios .............................................................76
Teléfono IP y otras aplicaciones de A/V en WL-600g ....................76
Română Italiano Português Français
Servicios especícos para usuarios .............................................................77
Otras aplicaciones de control de tráco en WL-600g ....................77
Aplicaciones de Internet ...............................................................................77
Servicios especícos para usuarios .............................................................77
Servidor FTP ................................................................................................77
Servicios especícos para usuarios .............................................................79
Fragmentación de paquetes largos ..............................................................80
54
Page 62

Guía de Instalación Rápida para la unidad domestica inalámbrica WL-600g
Introducción del Hardware
Panel frontal
El panel frontal de la unidad WL-600 contiene indicadores LED que muestran su
estado.
PWR ADSL IP USB AIR LAN
Etiqueta Actividad Descripción
P W R
(Alimentación)
ADSL Encendido (Verde) Enlace ADSL en funcionamiento
IP Encendido (Verde) ADSL en funcionamiento con enlace PPP
USB 2.0 Encendido Dispositivo USB detectado
AIR Encendido Red inalámbrica (WLAN) lista
LAN 1-4 Encendido Conectado físicamente a un dispositivo Ethernet
Encendido Encendido
Apagado Sin alimentación
Intermitente Restaurando valores de fábrica
Intermitente (Verde) Comunicación con el proveedor de servicios ADSL
para obtener conexión
Encendido (Rojo) Enlace ADSL desactivado
Apagado Sin ADSL
Encendido (Rojo) ADSL en funcionamiento el enlace no es PPP
Apagado Sin ADSL
Apagado Dispositivo USB no detectado
Intermitente Transmitiendo o recibiendo datos inalámbricamente
Apagado Sin alimentación o WLAN no lista
Intermitente Transmitiendo o recibiendo datos a través de un
cable Ethernet
Apagado Sin alimentación o sin conexión física
Nederlan EnglishEspañol
Русский
RomânăItalianoPortuguêsFrançais
55
Page 63

Guía de Instalación Rápida para la unidad domestica inalámbrica WL-600g
Panel trasero
PWRADSL
LAN
USB 2.0
NederlanEnglish Español
Botón de Encendido
EZSetup
Reset
Antena
El panel trasero de la unidad WL-600g contiene los siguientes elementos (de derecha a
izquierda):
• Puerto ADSL
• Conector de alimentación
• Botón de encendido
• Cuatro puertos para Red de Área Local (LAN)
Русский
• Puertos USB 2.0
• Botón EZSetup
• Botón de reinicio
• Conector para antena SMA
Română Italiano Português Français
Características del producto
La unidad WL-600g proporciona las siguientes funciones:
• Módem ADSL integrado.
• Firewall integrado.
• Red inalámbrica estándar IEEE802.11g, compatible con dispositivos 802.11b.
• Interfaz de configuración basado en Web fácil de usar, con configuración rápida
para conexiones ADSL, conexiones inalámbricas, y configuración de seguridad.
• Soporte extensivo para protocolo de enrutación RIP v1, v2.
• Filtro basado en contenidos.
• Utilidad EZSetup™ para conexiones ADSL, red inalámbrica y configuración
rápida de seguridad.
56
Page 64

Guía de Instalación Rápida para la unidad domestica inalámbrica WL-600g
Introducción al proceso de conguración
Conguración
del Hardware
Conguración
rápida - conexión
y autodetección
ADSL
Conexión detectada con tipo de
conexión correcto.
Conguración ADSL completada.
Conguración
rápida -
Conguración
inalámbrica
Conguración
rápida - página
de sumario
Reérase al diagrama de
hardware en la página 4.
Comprobación realizada con éxito. Inicie una sesión en la dirección
IP 192.168.1.1 para congurar su unidad WL-600g.
Conguración
manual
Conexión no
detectada O
tipo de conexión
mostrado no es
el correcto.
Cambio de
conguración
inalámbrica.
Problemas en la
comprobación.
Cambio de conguración ADSL.
Nederlan EnglishEspañol
Русский
RomânăItalianoPortuguêsFrançais
Comprobación realizada con éxito.
¡Configuración
rápida terminada!
WL-600g esta
listo para ser
usado
57
Page 65

Guía de Instalación Rápida para la unidad domestica inalámbrica WL-600g
Enchufe o toma de corriente
Enrutador inalámbrico ASUS
Toma telefónica
Distribuidor
DSL Phone
Line
Alimentación
Red LAN
Teléfono
ADSL o
Módem
Línea o
conector
en pared
(B)
(A)
Conguración del Hardware
Conexión del distribuidor ADSL a su enchufe telefónico
NederlanEnglish Español
Inserte el conector de línea o el conector del distribuidor suministrado en el
enchufe telefónico y conecte su teléfono al puerto del teléfono del distribuidor (A).
El formato del conector en el distribuidor suministrado (línea o conector)
podría diferir en función de su región geográca.
Conexión del distribuidor a la unidad WL-600g
Una conexión incorrecta del distribuidor puede bloquear su servicio
ADSL.
Русский
Română Italiano Português Français
a. Apague su PC.
b. Conecte el puerto ADSL de la unidad WL-600g al puerto ADSL o módem del
distribuidor (B),
c. Conecte el adaptador de alimentación del puerto de alimentación en la parte
trasera de la unidad WL-600g y a un enchufe o toma de corriente. Asegúrese
de que el indicador LED de encendido esta iluminado tras encender el
enrutador. El LED de enlace ADSL iluminado con luz verde ja indicará que el
enlace ADSL ha sido establecido con éxito.
58
Page 66

Guía de Instalación Rápida para la unidad domestica inalámbrica WL-600g
Conexión de un PC a la unidad WL-600g a través de
Ethernet
a. Utilice el cable Ethernet (RJ45) suministrado para conectar su PC a uno de los
puertos LAN de la unidad WL-600g.
b. Encienda su PC.
Distribuidor *: El nombre y la localización de los puertos del distribuidor
suministrado podría variar según su región.
Nederlan EnglishEspañol
Русский
RomânăItalianoPortuguêsFrançais
59
Page 67

Guía de Instalación Rápida para la unidad domestica inalámbrica WL-600g
Conguración Rápida
Conguración rápida (Quick Setup)
NederlanEnglish Español
Русский
Antes de comenzar
Con Quick setup, deberá congurar en primer lugar el enlace ADSL seguido de la
conguración inalámbrica. Dependiendo de los requerimientos de su ISP, podría
necesitar adquirir algunos o todos los datos listados a continuación para congurar
su conexión a Internet con su unidad WL-600g.
• Identificador de ruta virtual (
• Identificador de canal virtual (
• Nombre del Host
• Nombre de usuario y contraseña del ISP
• Dirección del servidor del sistema de Nombres de Dominio del ISP (Domain
Name System - DNS)
• Dirección IP estática (para subscripciones IP estáticas)
Virtual Path Identifier - VPI)
Virtual Channel Identifier - VCI)
Inicio de sesión en la página de conguración de la unidad WL-600g
Română Italiano Português Français
1. Introduzca la dirección
pulse
2. Una ventana aparecerá para introducir el nombre de usuario y contraseña.
El nombre de usuario por defecto es
minúsculas).
3. Tras el inicio de sesión podrá ver la página de conguración de la unidad WL-
600g.
Entrar
.
192.168.1.1
en el campo URL de su navegador Web y
, y la contraseña es
admin
admin
(en
Conguración ADSL
1. La página “Quick Setup” aparece por defecto. La ventana del asistente de conguración
rápida aparecerá y detectará automáticamente el tipo de conexión ADSL.
60
Page 68

Guía de Instalación Rápida para la unidad domestica inalámbrica WL-600g
2. Si el programa detecta una conexión ADSL, la siguiente página mostrará el
tipo de conexión ADSL (PPPoE/PPPoA o MER).
Si el programa no detecta conexiones ADSL, haga clic en
para congurar la unidad WL-600g de forma manual. Reérase
Setting
Manual
a las páginas 9-11 para instrucciones de conguración manual.
-- Si el programa muestra que su tipo de conexión es PPPoE o PPPoA
Para usuarios de IP dinámica, introduzca su nombre de usuario y contraseña
y haga clic en Next.
Para usuarios de IP dinámica, seleccione la casilla Use Static IP Address e
introduzca su dirección IP. Luego, haga clic en Next.
Si su conexión actual no es PPPoE o PPPoA, haga clic en Manual Setting
para congurar la unidad WL-600g manualmente. Reérase a las páginas
9-11 para instrucciones de conguración manual.
-- Si el programa muestra que su tipo de conexión es “MER”(DHCP)
Haga clic en Next si su tipo de conexión es MER (DHCP).
Si su tipo de conexión actual no es MER (DHCP), haga clic en
para congurar la unidad WL-600g manualmente. Reérase a
Setting
Manual
las páginas 9-11 para instrucciones de conguración manual.
Nederlan EnglishEspañol
Русский
RomânăItalianoPortuguêsFrançais
La conguración de conexión ADSL ha sido completada. Continúe para
congurar la conexión inalámbrica.
61
Page 69

Guía de Instalación Rápida para la unidad domestica inalámbrica WL-600g
Conguración de conexión inalámbrica
1. Seleccione
security level
seguridad, reérase a las páginas 21-22 del manual del usuario incluido en el
CD de soporte.
NederlanEnglish Español
2. Introduzca una clave en el campo Key. El número de dgitos para la clave
dependerá del nivel de seguridad seleccionado.
Русский
Română Italiano Português Français
. Para una descripción detallada de los niveles de
3. La página de sumario aparecerá. Si la información mostrada es correcta, haga
clic en
en
Back
Save/Reboot
para modicar la conguración.
para completar la conguración. De otro modo, haga clic
4. La configuración ha sido completada. Espere unos 50 segundos para reiniciar.
La página Web será refrescada para mostrar la información del dispositivo tras el
reinicio de éste.
62
Page 70

Guía de Instalación Rápida para la unidad domestica inalámbrica WL-600g
Conguración manual
Si tiene dicultades para congurar la conexión ADSL con Quick Setup, haga clic
en Manual Setting para realizar una conguración manual.
Conguración ADSL
1. Seleccione su país en el campo
Country
y su
, y haga clic en
ISP
Next
.
Nederlan EnglishEspañol
Русский
2. Si su país o ISP no se encuentran en la lista, seleccione
su VPI y VCI. Haga clic en
. Podría necesitar consultar con su ISP para
Next
obtener los valores de VPI/VCI.
Not list
RomânăItalianoPortuguêsFrançais
e introduzca
63
Page 71

Guía de Instalación Rápida para la unidad domestica inalámbrica WL-600g
3. Seleccione su tipo de conexión y haga clic en
. Puede consultar su ISP para
Next
obtener el tipo de conexión.
NederlanEnglish Español
-- Si su tipo de conexión es PPPoA o PPPoE
Русский
Para usuarios de
y haga clic en
Para usuarios de
IP dinámica
.
Next
IP dinámica
introduzca su dirección IP. Luego, haga clic en
, introduzca su nombre de usuario y contraseña
, seleccione la casilla
Next
Use Static IP Address
.
e
Română Italiano Português Français
64
Page 72

Guía de Instalación Rápida para la unidad domestica inalámbrica WL-600g
-- Si su tipo de conexión es MER
Para usuarios de
IP dinámica
, seleccione las casillas
automatically, Obtain default gateway automatically
address automatically
Para usuarios de
, y haga clic en
IP estática
, seleccione las casillas
Address, Use the following default gateway
server address
y escriba las direcciones en los campos correspondientes.
Next
.
, y
Obtain an IP address
, y
Obtain DNS server
Use the following IP
Use the following DNS
Nederlan EnglishEspañol
Русский
-- Si su tipo de conexión es IPoA
Solo para usuarios de IP estática. Introduzca la dirección IP WAN asignada por
su ISP, haga clic en Next.
RomânăItalianoPortuguêsFrançais
65
Page 73

Guía de Instalación Rápida para la unidad domestica inalámbrica WL-600g
Conguración inalámbrica
1. Designe un SSID (nombre de red) para la unidad WL-600g. Seleccione el
nivel de seguridad e introduzca una clave. El número de dígitos de la clave
dependerá del nivel de seguridad seleccionado. Reérase a las notas en la
NederlanEnglish Español
página Web. Cuando haya nalizado, haga clic en
Русский
2. Esta página proporciona un sumario de la conguración WAN e inalámbrica
de la unidad WL-600g. Haga clic en
Save/Reboot
conguración.
Română Italiano Português Français
.
Next
para guardar y activar su
3. La conguración ha sido completada La unidad WL-600g será reiniciada en
unos 50 segundos. La barra verde mostrará el estado de reinicio actual. Una
vez reiniciado, la página Web será refrescada automáticamente para mostrar
la conguración.
66
Page 74

Guía de Instalación Rápida para la unidad domestica inalámbrica WL-600g
Conexión de la unidad WL-600g desde la tarjeta ASUS WLAN
Conguración de la tarjeta ASUS WLAN con One Touch Wizard™
Para una mejor conexión inalámbrica, recomendamos el uso de una tarjeta WLAN
ASUS (WL-100gD, WL-100gE, WL-107g, WL-167g, WL169gE). Si instaló la tarjeta
inalámbrica ASUS junto con sus utilidades y controladores en su PC, haga clic en
Inicio -> Programas -> ASUS Utility-> WLAN Card -> One Touch Wizard
ejecutar la utilidad One Touch Wizard.
para
Nederlan EnglishEspañol
1. Ejecute “One Touch Wizard” desde el menú
de inicio y haga clic en Siguiente para
comenzar la conguración
3. Seleccione la autenticación e codicación
para la tarjeta WLAN, de forma que
coincida con WL600g. Haga clic en
Siguiente para continuar.
2. One Touch Wizard buscará las
disponibles
clic en
4. La tarjeta inalámbrica necesitará varios
segundos para asociarse con WL600g.
Haga clic en Siguiente para configurar
TCP/IP
. Seleccione WL600g y haga
Siguiente.
Redes
Русский
RomânăItalianoPortuguêsFrançais
67
Page 75

Guía de Instalación Rápida para la unidad domestica inalámbrica WL-600g
5. Congure la dirección IP de la tarjeta WLAN de acuerdo con las condiciones de red. Una
vez completada la conguración, haga clic en Terminar.
NederlanEnglish Español
Las pantallas y pasos de configuración sólo son para su referencia y
podrían diferir de los productos actuales.
Congurando la tarjeta WLAN con el servicio Windows® WZC
Русский
Puede utilizar el servicio Windows® Wireless Zero Configuration para configurar la
conexión inalámbrica con WL-600g.
Haga doble clic en el icono de redes
1.
inalámbricas de la barra de tareas para
Română Italiano Português Français
68
ver las redes disponibles. Seleccione
su enrutador inalámbrico y haga clic en
Conectar
.
Introdu z c a la clave def i n i da en el
2.
enrutador inalámbrico y haga clic en
Conectar
en segundos.
. La conexión se completará
Page 76

Guía de Instalación Rápida para la unidad domestica inalámbrica WL-600g
Aplicación USB
La unidad WL-600g ofrece dos puertos USB2.0 para congurar el servidor FTP y
compartir una impresora USB.
Función de servidor FTP
Antes de comenzar la configuración necesitará preparar un disco USB para
almacenamiento FTP.
Si el formato de su disco externo es
accesos de solo lectura. No será posible cargar archivos en el servidor
FTP, y solo podrán acceder a éste como usuario anónimo. Super
usuarios no podrán acceder a un servidor FTP NTFS.
, el servidor FTP solo tendrá
NTFS
Conguración del servidor FTP
Para congurar un servidor FTP:
1. Conecte su unidad de almacenamiento USB en el puerto USB2.0 del panel
posterior de la unidad WL-600g. Luego haga clic en
en el menú de la derecha para acceder a la página de conguración.
Server
2. Seleccione
3.
Allow Anonymous User to Login
accedan a su sitio TP, seleccione
autenticados, seleccione No.
4.
Allow Super User to Login
acceder al servidor FTP.
5.
FTP Port
si el número de puerto es 1111, podrá acceder al servidor FTP escribiendo
ftp://192.168.1.1:1111
la dirección IP por defecto de la unidad WL-600g).
Enable FTP Server
: Seleccione el numero de puerto del servidor FTP. Por ejemplo,
en el cuadro de dirección del navegador Web (192.168.1.1 es
como
Yes
: Seleccione
.
Yes
: Si desea permitir que usuarios anónimos
; si desea proteger sus datos de usuarios no
Yes
USB Application -> FTP
para permitir a super usuarios
Nederlan EnglishEspañol
Русский
RomânăItalianoPortuguêsFrançais
69
Page 77

Guía de Instalación Rápida para la unidad domestica inalámbrica WL-600g
6.
Maximum User Allowed to Login:
Seleccione el número máximo de usuarios
conectados al servidor FTP.
7.
Login Timeout in Seconds:
Tras este tiempo, si no ha iniciado la sesión ésta
conexión será terminada.
8.
Stay Timeout in Seconds:
NederlanEnglish Español
inactiva ésta será terminada.
9. Pulse
Save/Apply
para guardar y activar los cambios.
Si tras este tiempo su conexión ha permanecido
Si utiliza acceso Web para hacer inicios de sesión con un super usuario
(marcado con el circulo en rojo), por favor seleccione
Allowed to Log in
como más de 1 o el mensaje "server is busy"
Maximum Users
(servidor ocupado) aparecerá.
Congurando cuentas FTP
Puede congurar hasta 12 cuentas en su sitio FTP.
Русский
1. Haga clic en
USB Application -> FTP Server -> User List
izquierda del menú para abrir la página de conguración. Haga clic en
para crear una nueva cuenta FTP.
Română Italiano Português Français
en la parte
Add
2. Defina el nombre de usuario y contraseña (
nueva cuenta. Configure
Max. Login
peticiones de acceso. Dena también los derechos de la cuenta.
3. Haga clic en
4. Haga clic en
70
para guardar la nueva cuenta.
Apply
para guardar y activar la nueva conguración.
Save
Username, Password
) para la
para restringir el máximo número de
Page 78

Guía de Instalación Rápida para la unidad domestica inalámbrica WL-600g
Congurando seguridad FTP
Puede denegar peticiones de acceso desde ciertas direcciones IP congurando la
lista
Banned IP List
1. Haga clic en
de la parte izquierda para abrir la página de conguración. Haga clic en
para crear una nueva regla.
.
USB Application -> FTP Server -> Banned IP List
en el menú
Add
Nederlan EnglishEspañol
2. Introduzca la dirección IP del Host no permitido y haga clic en
Apply
para
guardar la dirección IP no permitida. Ésta dirección IP debe ser estática.
3. Haga clic en
Su sitio FTP esta listo. Escriba
de dirección de su navegador Web y pulse
para guardar y activar la nueva conguración.
Save
ftp://192.168.1.1 (número de puerto)
. Cuando el programa lo solicite,
Entrar
en el cuadro
introduzca el nombre de usuario y contraseña que conguró en su cuenta FTP e
inicie su sesión.
Русский
RomânăItalianoPortuguêsFrançais
71
Page 79

Guía de Instalación Rápida para la unidad domestica inalámbrica WL-600g
Compartiendo impresoras USB
Puede conectar su impresora USB al puerto USB2.0 de la unidad WL-600g para
compartir ésta en su red. Una vez conectada, puede acceder a su estado haciendo
clic en
USB Application -> Printer Status
NederlanEnglish Español
Congurando un cliente de impresoras en Windows XP
Siga los siguientes pasos para instalar una impresora de red en su cliente.
.
Русский
1. Ejecute el asistente de impresoras desde
Inicio -> Conguración -> Impresoras
y faxes -> Agregar una impresora.
2. Seleccione Impresora local
conectada a este equipo, y haga clic
en Siguiente.
Română Italiano Português Français
3. Seleccione Crear nuevo puerto, con
el tipo de puerto Standard TCP/IP
Port, y haga clic en Siguiente.
4. Haga clic en Siguiente para congurar
el puerto TCP/IP para acceder a la
impresora en red.
72
Page 80

Guía de Instalación Rápida para la unidad domestica inalámbrica WL-600g
5. Introduzca la dirección IP del WL-600g
en el campo Nombre de impresora o
dirección IP, y haga clic en Siguiente.
7. Defina
Protocolo como LPR y tipo
LPRServer en el campo Nombre de cola.
Haga clic en Siguiente para continuar.
6. Seleccione
Personalizar y haga clic en
Ajustes...
8. Haga clic en Siguiente para nalizar la
conguración estándar de puertos TCP/IP.
Nederlan EnglishEspañol
Русский
RomânăItalianoPortuguêsFrançais
9. Haga clic en
Finalizar para completar los
ajustes y volver al asistente para añadir
impresoras.
10. Instale el controlador de impresora
desde la lista de modelos, o desde
Disco... para localizar el controlador de
forma manual.
73
Page 81

Guía de Instalación Rápida para la unidad domestica inalámbrica WL-600g
11. Haga clic en Siguiente para aceptar el
nombre de impresora por defecto.
12. Seleccione Si para imprimir una página
de prueba. Haga clic en Siguiente para
imprimir.
NederlanEnglish Español
13. El proceso de instalación ha sido
completado. Haga clic en Finalizar para
cerrar el asistente para añadir impresora.
Русский
Română Italiano Português Français
Si ya ha instalado una impresora local en su PC, haga clic con el
botón derecho del ratón en el icono de la impresora y seleccione
Propiedades ->
Haga clic en
Ficha
Añadir puerto
haga clic en el botón
Nuevo puerto
para añadir un puerto TCP/IP estándar.
Puerto
y seleccione
Puerto TCP/IP estándar
. Reérase a los pasos 5-8 para los
y
procedimientos de conguración.
Si utiliza Windows® 98 o ME, que no soportan puertos TCP/IP estándar,
necesitará usar un Puerto Remoto soportado por WL-500gP.
Lista de impresoras compatibles
HP Deskjet 5410 Series
HP Deskjet 3940 Series
HP photosmart 8030
HP Photosmart 8230
HP Photosmart 7830
HP Ofcejet 7210
HP PSC 1510
74
HP PSC 1610
HP Deskjet 5652
HP Deskjet 5550
EPSON C60
HP Ofcejet 5610
HP Ofcejet 4255
HP PSC 1410
Page 82

Guía de Instalación Rápida para la unidad domestica inalámbrica WL-600g
Gaming Blaster
La aplicación “Gaming Blaster” ha sido diseñada para mejorar su experiencias en
juegos de red. Esta tecnología proporciona un entorno de juego ininterrumpido
y libre de latencias que los jugadores esperan, con un sistema inteligente que
optimiza los recursos de red y otorga prioridad en tráco de red para una mejor
ejecución de aplicaciones sensibles al tiempo incluyendo aplicaciones de telefonía
IP y aplicaciones multimedia.
Vaya a
Bandwidth Management --> Bandwidth on Demand
iconos en pantalla.
. Podrá ver cuatro
Nederlan EnglishEspañol
Русский
Gaming Blaster en WL-600g
Por defecto, WL-600g esta congurado en modo
haga clic en el icono de Gaming Blaster
en la unidad WL-600g. Desde la barra en el fondo de la página Web, podrá ver
que las aplicaciones de juego, por defecto, usan la mayoría de los recursos de red
de la unidad WL-600g.
Gaming Blaster
para activar o desactivar esta función
. Simplemente
RomânăItalianoPortuguêsFrançais
75
Page 83

Guía de Instalación Rápida para la unidad domestica inalámbrica WL-600g
NederlanEnglish Español
Servicio Especicado por el Usuario (Servicios especícos para usuarios)
Congurando prioridad en juegos online a través de la indicación de puertos
y direcciones IP.
Puede incrementar la prioridad en tráfico de juegos online asignando puertos
donde irán las aplicaciones online.
Русский
1. Asigne cualquier nombre en el campo Service Name. Por ejemplo, "Mi juego".
2. Introduzca la dirección IP y el correspondiente puerto donde esta la aplicación.
3. Seleccione el nivel de prioridad (1, 2, 3, ...) del servicio (aplicación) según sus
preferencias.
Română Italiano Português Français
4. Si desea eliminar un servicio de la lista, simplemente seleccione la casilla
“Remove”, y pulse Remove.
Telefonía IP y otras aplicaciones de audio/vídeo en WL-600g
Si desea mejorar la calidad en sus servicios de voz sobre IP y otras aplicaciones de
audio/vídeo, simplemente haga clic en el icono
función podrá disfrutar de VoIP ininterrumpido y descargas multimedia sin problemas.
Desde la barra en la parte inferior de la página Web podrá ver que las aplicaciones de
VoIP/Vídeo utilizan la mayoría de los recursos de red de la unidad WL-600g.
76
VoIP/Video Streaming
. Con esta
Page 84

Guía de Instalación Rápida para la unidad domestica inalámbrica WL-600g
Servicios especícos para usuarios
Configurando la prioridad en aplicaciones de VoIP / Vídeo a través de la
indicación de puertos y direcciones IP.
Puede incrementar la prioridad en el tráco para su teléfono IP o descargas de
Audio/Vídeo indicando los puertos donde estas aplicaciones se encuentran.
1. Asigne un nombre para Service Name. Por ejemplo, "Mi teléfono IP".
2. Escriba la dirección IP de la aplicación y su puerto correspondiente.
3. 3. Seleccione el nivel de prioridad (1, 2, 3, ...) del servicio (aplicación) según sus
preferencias.
4. Si desea eliminar un servicio de la lista, simplemente seleccione la casilla
“Remove”, y pulse Remove.
Nederlan EnglishEspañol
Русский
Otras aplicaciones de control de tráco en la unidad WL-600g
Aplicaciones de Internet
Si desea disponer de una navegación en Internet y envío y recepción de emails
con velocidad, puede hacer clic en el icono
Internet application
la prioridad en aplicaciones de Internet, simplemente haga clic este icono una vez
mas para desactivar esta función.
. Si desea retirar
RomânăItalianoPortuguêsFrançais
77
Page 85

Guía de Instalación Rápida para la unidad domestica inalámbrica WL-600g
Servicios especícos para usuarios
Configurando la prioridad en aplicaciones de Internet a través de la
indicación de puertos y direcciones IP.
Puede incrementar la prioridad en el tráco para la navegación de Internet e email
NederlanEnglish Español
indicando los puertos donde estas aplicaciones se encuentran.
Русский
1. Asigne un nombre para
Service Name
. Por ejemplo, "
Mi email
".
2. Escriba la dirección IP de la aplicación y su puerto correspondiente.
3. 3. Seleccione el nivel de prioridad (1, 2, 3, ...) del servicio (aplicación) según sus
preferencias.
Română Italiano Português Français
4. Si desea eliminar un servicio de la lista, simplemente seleccione la casilla
“
Remove”
, y pulse
Remove
.
Servidor FTP
Si desea incrementar la prioridad para el tráco en el servidor FTP (descargas y
cargas):
1. Haga clic en el icono FTP Server.
2. Vaya a la página User specic service para reservar tráco en el servidor FTP.
78
Page 86

Guía de Instalación Rápida para la unidad domestica inalámbrica WL-600g
3. Si mueve la barra de desplazamiento a la posición High, no solo tendrá una
prioridad en tráco mayor para aplicaciones FTP, pero también reservará un cierto
porcentaje de su ancho de banda disponible para cargas y descargas FTP.
Servicios especícos para usuarios
Configurando la prioridad en servidor FTP a través de la indicación de
puertos y direcciones IP.
Puede incrementar la prioridad en el tráco para cargas y descargas en el servidor
FTP indicando los puertos donde estas aplicaciones se encuentran.
Nederlan EnglishEspañol
Русский
1. Asigne un nombre para
Service Name
. Por ejemplo, "
Mi servidor FTP
".
2. Escriba la dirección IP de la aplicación y su puerto correspondiente.
3. 3. Seleccione el nivel de prioridad (1, 2, 3, ...) del servicio (aplicación) según sus
preferencias.
4. Si desea eliminar un servicio de la lista, simplemente seleccione la casilla
“
Remove”
, y pulse
Remove
.
Puede selecciona más de un icono para tener prioridad en múltiples
aplicaciones.
RomânăItalianoPortuguêsFrançais
79
Page 87

Guía de Instalación Rápida para la unidad domestica inalámbrica WL-600g
NederlanEnglish Español
Русский
Fragmentación de paquetes largos
Esta función funciona especialmente bien en aplicaciones que usan paquetes largos (como
por ejemplo paquetes en servidores FTP) pero también paquetes pequeños (como por
Română Italiano Português Français
ejemplo Web, e-mail, juegos, o paquetes de VoIP) para que sean enviados al mismo tiempo.
Con esta función activada, paquetes pequeños en aplicaciones como emails o navegadores
de Internet nunca serán bloqueados por paquetes mayores, como cargas FTP.
1. Seleccione la casilla Long Packet Fragmentation para activar esta función.
2. Arrastre la barra de desplazamiento hacia el tamaño de paquete deseado. Cuando
menor sea el tamaño del paquete, menor será la latencia en red.
Con la fragmentación de paquetes largos activada, podría experimentar
problemas iniciando sesiones con XBOX Live u otros servicios de juegos debido
a las limitaciones de los servidores respecto al tamaño de paquetes entrantes.
Para más información, reérase a el sitio Web ASUS (http://www.asus.com)
Para congurar otras características y funciones en la unidad WL-600g,
reérase al manual del usuario en el CD de soporte.
80
Page 88

Универсальный Wireless ADSL2/2+ Home Gateway
®
WL-600g
Nederlan EnglishEspañol
Русский
RomânăItalianoPortuguêsFrançais
Руководство по быстрой установке
QR2458 / Июнь 2006
Page 89

Контактная информация изготовителя
ASUSTeK COMPUTER INC. (Азия-Тихоокеания)
Адрес: 15 Li-Te Road, Beitou, Taipei 11259
Телефон: +886-2-2894-3447 Сайт: www.asus.com.tw
NederlanEnglish Español
Русский
Română Italiano Português Français
Факс: +886-2-2894-7798 Email: info@asus.com.tw
ASUS COMPUTER INTERNATIONAL (Америка)
Адрес: 44370 Nobel Drive, Fremont, CA 94538, USA
Факс: +1-510-608-4555 Сайт: usa.asus.com
Техническая поддержка
Телефон: +1-502-995-0883 Факс: +1-502-933-8713
Онлайн: http://vip.asus.com/eservice/techserv.aspx
ASUS COMPUTER GmbH (Германия и Австрия)
Адрес: Harkort Str. 25, D-40880 Ratingen, Germany
Телефон: +49-2102-95990 Сайт: www.asuscom.de
Факс: +49-2102-959911 Онлайн: www.asuscom.de/sales
Техническая поддержка
Компоненты: +49-2102-95990 Онлайн: www.asuscom.de/support
Ноутбуки: +49-2102-959910 Факс: +49-2102-959911
ASUSTeK COMPUTER INC. (Россия)
Сайт: www.asus.ru
Техническая поддержка
Телефон: +7-(495)-231-1999
Онлайн: http:vip.asus.com/eservice/techserv.aspx
Page 90

Универсальный Wireless ADSL2/2+ Home Gateway WL-600g Руководство по быстрой установке
Содержание
Обзор ..................................................................................................................83
Передняя панель .................................................................................................83
Задняя панель ......................................................................................................84
Возможности .......................................................................................................84
Процесс установки ........................................................................................... 85
Установка аппаратуры .................................................................................... 86
Подключение ADSL сплиттера к телефонной розетке ...................................86
Подключение сплиттера к WL-600g ..................................................................86
Подключение вашего компьютера к WL-600g через Ethernet ........................86
Быстрая установка ..........................................................................................87
Быстрая установка...............................................................................................87
Перед установкой ........................................................................................................87
Вход на страницу конфигурации WL-600g .................................................................87
Установка ADSL ...........................................................................................................87
Установка беспроводной сети
Ручная установка .................................................................................................89
Установка ADSL .................................................................................................................. 90
Установка беспроводной сети
Подключение к WL-600g с помощью ASUS WLAN карты ................................93
Настройка беспроводной карты ASUS с помощью One Touch Wizard™ ........................ 93
Настройка беспроводной карты ASUS с помощью службы Windows® WZC .................95
......................................................................................... 88
......................................................................................... 92
Nederlan EnglishEspañol
Русский
RomânăItalianoPortuguêsFrançais
Применение USB ............................................................................................... 96
Функция FTP сервера ..........................................................................................96
Установка FTP сервера ....................................................................................................... 96
Установка учетной записи FTP........................................................................................... 97
Установка безопасности FTP ............................................................................................. 97
Общий USB принтер ............................................................................................98
81
Page 91

Универсальный Wireless ADSL2/2+ Home Gateway WL-600g Руководство по быстрой установке
Содержание
Установка принтера под Windows XP ................................................................................ 98
NederlanEnglish Español
Список совместимых принтеров....................................................................................... 100
Gaming Blaster .................................................................................................. 101
Gaming Blaster в WL-600g ..................................................................................101
Служба, определяемая пользователем .........................................................................101
IP - телефония и другие A/V приложения в WL-600g ....................................102
Служба, определяемая пользователем .........................................................................103
Управление трафиком для других приложений WL-600g .............................103
Русский
Română Italiano Português Français
Internet - приложение ......................................................................................................... 103
Служба, определяемая пользователем ..........................................................................103
FTP Сервер ........................................................................................................................ 104
Служба, определяемая пользователем ..........................................................................105
Фрагментация длинных пакетов ......................................................................................106
82
Page 92

Универсальный Wireless ADSL2/2+ Home Gateway WL-600g Руководство по быстрой установке
Обзор
Передняя панель
На передней панели WL-600g находятся индикаторы, которые показывают состояние
WL-600g.
ADSLIPUSB AIR LAN
PWR
Метка Активность Описание
PWR
(Питание)
ADSL ВКЛ. (Зеленый) Соединение ADSL
IP ВКЛ. (Зеленый) ADSL подключен и соединение через PPP
USB 2.0 ВКЛ. USB устройство обнаружено
AIR ВКЛ. Беспроводная ЛВС готова
ВКЛ. Включено
ВЫК. Нет питания
Мигает Восстановление заводских параметры по умолчанию.
Мигает
Готовность ADSL
(Зеленый)
ВКЛ. (КРАСНЫЙ) Соединение ADSL отключено
ВЫК. ADSL отключен
ВКЛ. (Красный) ADSL подключен, но соединение не через PPP
ВЫК. ADSL отключен
ВЫК. Нет USB устройства обнаружено
Мигает Передача или прием данных посредством
Nederlan EnglishEspañol
Русский
RomânăItalianoPortuguêsFrançais
беспроводной сети
ВЫК. Нет питания или беспроводная ЛВС не готова
LAN 1-4 ВКЛ. Физическое подключение к устройству Ethernet
Мигает Передача или прием данных через Ethernet
ВЫК. Нет питания или физического соединения
83
Page 93

Универсальный Wireless ADSL2/2+ Home Gateway WL-600g Руководство по быстрой установке
Задняя панель
ADSL
PWR
LAN
USB 2.0
NederlanEnglish Español
Кнопка питания
EZ Установка
Сброс
Обзор слева направо, на задней панели WL-600g находятся следующие элементы:
• ADSL порт
• Разъем питания
• Кнопка питания
• Четыре сетевых порта
Русский
• USB 2.0 порты
• Кнопка EZSetup
• Кнопка сброса
• Разъем SMA антенны
Română Italiano Português Français
Возможности продукта
WL-600g имеет следующие возможности:
• Встроенный ADSL модем
• Встроенный брандмауэр
• Беспроводная сеть на основе стандарта IEEE802.11g , также совместимая с
устройствами 802.11b.
• Легкий в использовании веб-интерфейс конфигурации : Быстрая установка для
подключения ADSL, настройки беспроводной сети и конфигурации безопасности.
• Поддержка протокола маршрутизации: RIP v1, v2
• Фильтр содержимого
• Утилита EZSetup™ для быстрого подключения ADSL, настройки беспроводной
сети и установки безопасности.
84
Page 94

Универсальный Wireless ADSL2/2+ Home Gateway WL-600g Руководство по быстрой установке
Обзор процесса установки
Установка
аппаратуры
Быстрая установка авто-обнаружение
подключения к ADSL
Подключение обнаружено и
тип подключения правильный.
Установка ADSL завершена.
Быстрая установка-
Установка
беспроводной сети
Быстрая
установка-
Итоговая
страница
Обратитесь к диаграмме
аппаратных средств на странице 4.
Проверка удачна. Вход в 192.168.1.1 для
конфигурации вашего WL-600g.
Подключение
не обнаружено
или показано
подключение
неправильного
типа.
Изменение параметров
беспроводной сети.
Проверка не удачна.
Ручная
Установка
Изменение параметров ADSL.
Nederlan EnglishEspañol
Русский
RomânăItalianoPortuguêsFrançais
Проверка удачна
Быстрая
установка
завершена!
WL-600g готов к
использованию.
85
Page 95

Универсальный Wireless ADSL2/2+ Home Gateway WL-600g Руководство по быстрой установке
Установка аппаратуры
Подключение ADSL сплиттера к телефонной розетке
Подключите разъем Line поставляемого в комплекте сплиттера к телефонной розетке и
NederlanEnglish Español
Русский
Română Italiano Português Français
подключите ваш телефон к телефонному порту сплиттера (A).
Разъем поставляемого сплиттера может отличаться в зависимости от региона.
Подключение сплиттера к WL-600g
Неправильное подключение сплиттера может блокировать работу ADSL .
a. Выключите ваш компьютер.
b. Подключите ADSL порт WL-600g к ADSL или модемному порту на сплиттере (B),
c. Подключите блок питания к разъему питания на задней панели WL-600g и к розетке
питания. Убедитесь, что после включения маршрутизатора индикатор питания горит.
Если индикатор соединения ADSL имеет зеленый цвет, это означает, что соединение
ADSL установлено.
Подключение вашего компьютера к WL-600g через Ethernet
a. Используйте поставляемый кабель Ethernet (RJ45) для подключения вашего компьютера
к одному из портов WL-600g.
b. Включите ваш компьютер.
Сплиттер(разветвитель) *: Название или местоположение портов на
поставляемом сплиттере могут отличаться в зависимости от региона.
86
Page 96

Универсальный Wireless ADSL2/2+ Home Gateway WL-600g Руководство по быстрой установке
Быстрая установка
Перед установкой
Для быстрой установки, сначала вы должны настроить соединение ADSL, затем
беспроводную сеть. Для настройки интернет- соединения на WL-600g, в зависимости от
требований вашего провайдера, вам нужно получить следущую информацию.
• Виртуальный маршрут (VPI)
• Виртуальный канал (VCI)
• Имя узла
• Имя пользователя и пароль
• Адрес DNS сервера
• Статический IP адрес (Для статических IP адресов)
Вход на страницу конфигурации WL-600g
Nederlan EnglishEspañol
1. Введите
192.168.1.1 в вашем браузере и нажмите Enter.
2. Появится окно для ввода имени пользователя и пароля. По умолчанию имя
пользователя admin, пароль admin (в нижнем регистре).
3. После входа, вы можете увидеть страницу конфигурации WL-600g.
Установка ADSL
1. По умолчанию появляется страница быстрой установки. Мастер быстрой установки
автоматически обнаруживает тип соединения ADSL.
2. Если соединение ADSL обнаружено, следующая страница показывает тип соединения
вашего ADSL (PPPoE/PPPoA or MER).
Если соединение вашего ADSL не обнаружено, щелкните Manual Setting для
ручной установки WL-600g. Инструкции для ручной установки вы можете найти
на страницах 9-11.
Русский
RomânăItalianoPortuguêsFrançais
87
Page 97

Универсальный Wireless ADSL2/2+ Home Gateway WL-600g Руководство по быстрой установке
-- Если показано, что тип соединения -- PPPoE или PPPoA
Для пользователей с динамическим IP, введите ваше имя пользователя и пароль,
затем щелкните Next.
Для пользователей со статическим IP, установите галочку Use Static IP Address и
NederlanEnglish Español
введите ваш IP адрес, затем щелкните Next.
Если ваше подключение не PPPoE или PPPoA, щелкните Manual Setting для
Русский
ручной установки WL-600g. Инструкции для ручной установки вы можете найти
на страницах 9-11.
-- Если показано, что ваш тип соедиения “MER”(DHCP)
Если тип вашего соединения MER (DHCP), щелкните Next .
Română Italiano Português Français
Если ваше соединение не MER(DHCP), щелкните Manual Setting для ручной
установки WL-600g. Инструкции для ручной установки вы можете найти на
страницах 9-11.
Установка подключения ADSL завершена. Пожалуйста продолжите
установку беспроводной сети .
Установка беспроводной сети
1. Выберите
security level. Подробное описание уровней безопасности смотрите на
страницах 21-22 в руководстве пользователя на компакт-диске поддержки.
88
Page 98

Универсальный Wireless ADSL2/2+ Home Gateway WL-600g Руководство по быстрой установке
2. Введите ключ в поле Key. Количество цифр для ключа зависит от выбранного
уровня безопасности.
Nederlan EnglishEspañol
3. Появится Итоговая страница. Если показанная информация правильна, щелкните
Save/Reboot для завершения установки. Иначе, щелкните Back для изменения
параметров.
4. Установка завершена. Пожалуйста подождите около 50 секунд для перезагрузки.
Web-страница будет обновлена для показа информации об устройстве после
перезагрузки.
Ручная установка
Если вы столкнулись с проблемами при установке ADSL соединения с помощью быстрой
установки, щелкните Manual Setting для ручной установки ADSL соединения.
Русский
RomânăItalianoPortuguêsFrançais
89
Page 99

Универсальный Wireless ADSL2/2+ Home Gateway WL-600g Руководство по быстрой установке
Установка ADSL
1. Выберите вашу
NederlanEnglish Español
страну и провайдера, затем щелкните Next.
2. Если вашей страны и провайдера нет в списке, выберите
Русский
Română Italiano Português Français
VCI затем нажмите Next. Вы можете узнать значения VPI/VCI у провайдера.
Not list и введите ваш VPI и
3. Выберите тип соединения и нажмите Next. Вы можете узнать тип соединения у вашего
провайдера.
90
Page 100

Универсальный Wireless ADSL2/2+ Home Gateway WL-600g Руководство по быстрой установке
-- Если ваш тип соединения - PPPoA или PPPoE
Для пользователей с динамическим IP, вводите ваш PPP имя пользователя, пароль, и
имя услуги затем нажмите Next.
Для пользователей со статическим IP, установите галочку Use Static IP Address,
введите IP адрес, затем нажмите Next.
Nederlan EnglishEspañol
-- Если ваш тип соединения - MER
Для пользователей с динамическим IP, выберите Obtain an IP address automatically,
Obtain default gateway automatically и Obtain DNS server address automatically, затем
нажмите Next.
Для пользователей со статическим IP, выберите Use the following IP Address, Use the
following default gateway и Use the following DNS server address затем вводите адреса
в соответствующих полях.
Русский
RomânăItalianoPortuguêsFrançais
91
 Loading...