

Page 1
Declaration of Conformity
We, the under signed,
Company
ASUSTeK Computer Inc.
Address, City
4Fl., No.150, Li-Te Rd., Peitou, Taipei,
Country
Taiwan 112
Phone number
886-2-28943447
Fax number
886-2-28950113
E-mail
lawrence_yu@asus.com.tw
certify and declare under our sole responsibility that the following equipment:
Product Description / Supplementary Info
ASUS USB WLAN Adapter
Manufacturer
ASUSTeK COMPUTER INC.
Brand
ASUS; SAGEM
Type
WL-167g
is tested to and conforms with the essential radio test suites included in the following standards:
Standard Issue date
ETSI EN 300 328-2
ETSI EN 301 489-1/17
EN 60950
V1.2.1 Dec. 2001
V1.4.1 Aug. 2002 / V1.2.1 Apr. 2002
2000
and therefore complies with the essential requirements and provisions of the R&TTE directive
1999/5/EC of the European Parliament and of the council of 9March 1999 on radio equipment and
Telecommunications Terminal Equipment and the mutual recognition of their conformity and the
requirements of Annex � (conformity Assessment procedure referred to in article 10(4)).
The technical documentation as required by the Conformity Assessment procedure is kept at the
following address:
Company
ASUSTeK Computer Inc.
Address, City
4Fl., No.150, Li-Te Rd., Peitou, Taipei,
Country
Taiwan 112
Phone number
886-2-28943447
Fax number
886-2-28950113
E-mail
lawrence_yu@asus.com.tw
Draw up in
Taiwan
Date
2004/08/13
ASUSTek Computer Inc.
4/F, 150, Li-Te Rd., Peitou, Taipei,
Taiwan 112
Signature & company stamp
Lawrence Yu / Manager
Page 2
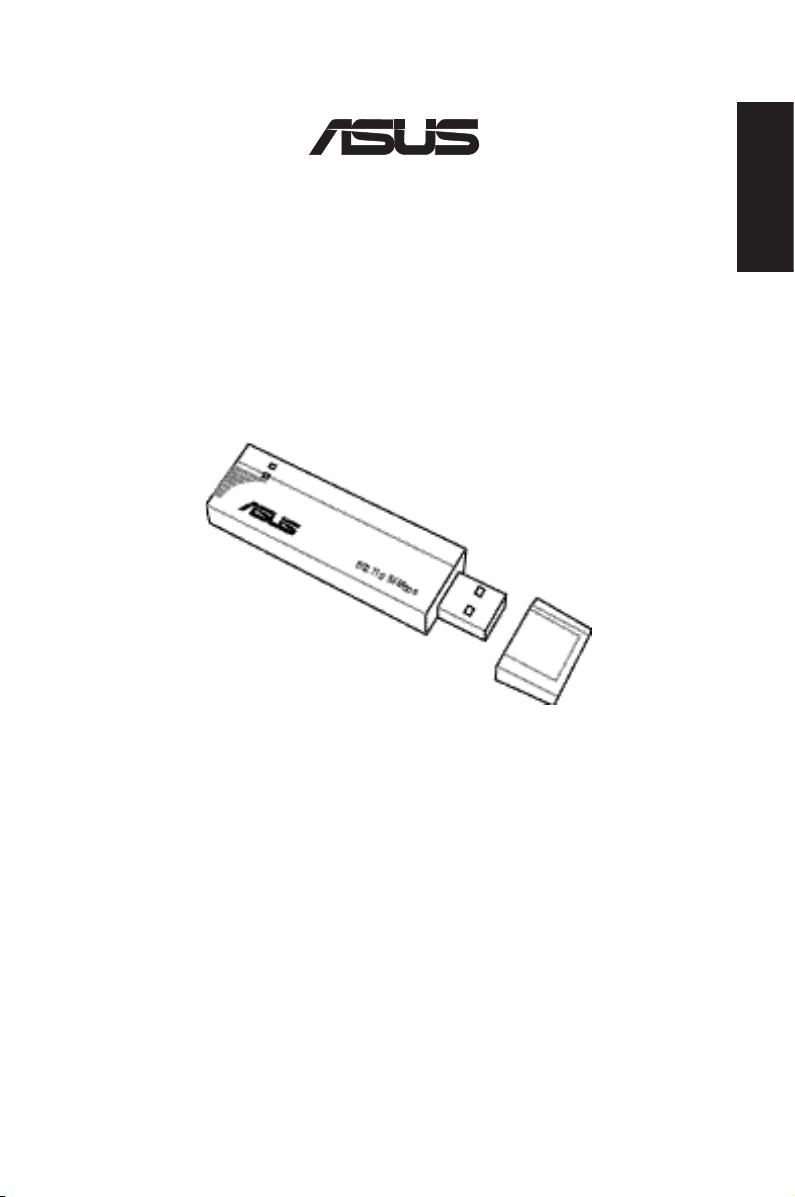
®
54Mbps
USB Wireless LAN Adapter
(WL-167g)
English
Quick Start Guide
Copyright © 2008 ASUSTeK COMPUTER INC. All Rights Reserved.
Page 3
English
802.1
1g 54M
bps
System requirements
Before installing the ASUS USB Wireless LAN Adapter, make sure that
your system meets the following requirements:
• Intel® Pentium® 4 or AMD K7/K8 system
• Minimum 64MB system memory
• Windows® 98SE*/ME/2000/XP operating system
• Optical drive (for software installation)
• An available USB port (USB 2.0 recommended because USB 1.1
cannot achieve maximum wireless performance)
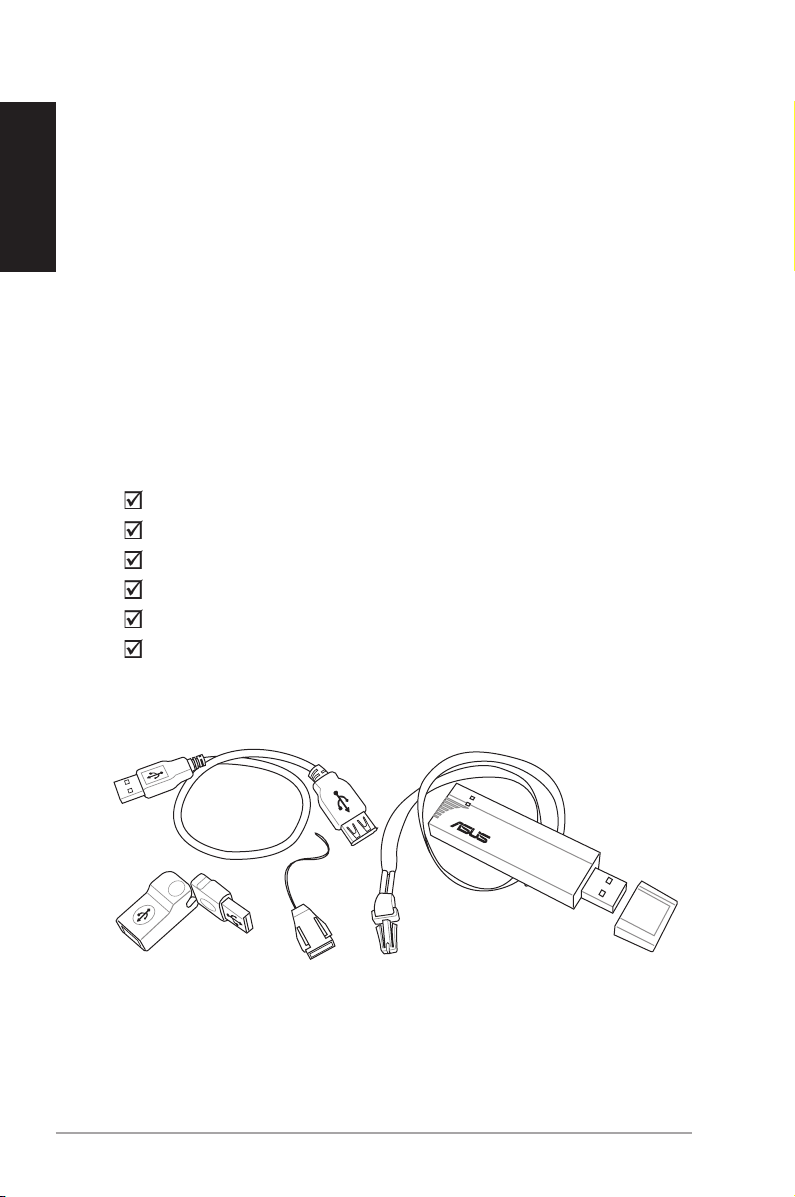
Package contents
Check the following items in your ASUS USB Wireless LAN Adapter
package. Contact your retailer if any item is damaged or missing.
ASUS USB Wireless LAN Adapter (WL-167g)
USB 2.0 extension cable (type A to type A)
USB 2.0 universal joint
Neck lace
Support CD
Quick Start Guide
USB 2.0 Extension Cable Neck lace
USB Universal Joint Neck Strap Quick Release
2 ASUS USB Wireless LAN Adapter
USB WLAN Adapter
(with USB cap)
Page 4
Installation procedures
Follow these instructions to install the ASUS USB Wireless LAN Adapter in
your computer.
1. Install the device drivers and utilities from the support CD.
2. Connect the device to your computer.
NOTE: You must install the ASUS USB Wireless LAN Adapter drivers and
utilities before connecting the device to your computer.
Installing the device drivers and utilities
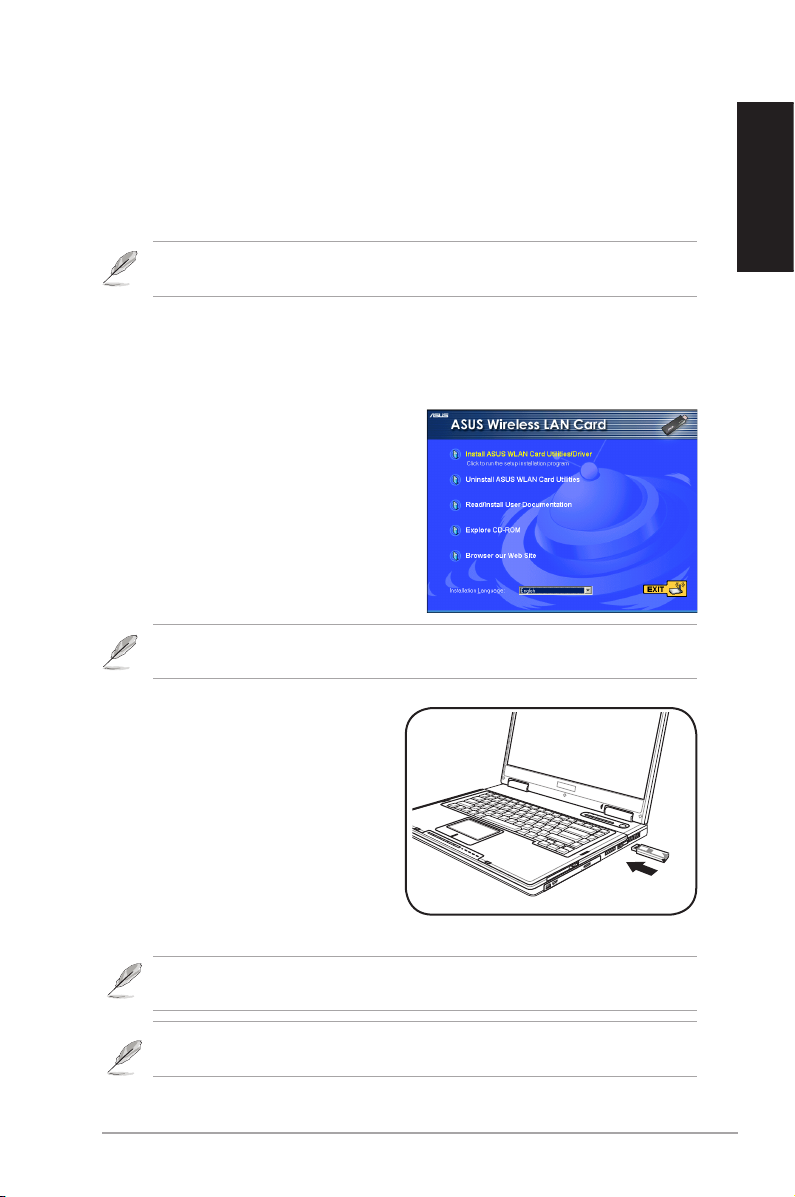
To install the device driver and utilities in your computer:
1. Insert the support CD to the optical
drive.
2. Click “Install ASUS WLAN Card
Utilities/Driver” when the ASUS
Wireless LAN Card installation
window appears.
3. The device drivers and utilities are
copied into your computer.
NOTE: If Autorun is NOT enabled in your computer, browse the contents
of the support CD and double click the Setup.exe le to run the CD.
English
Installing the device
To install the ASUS USB Wireless
LAN Adapter in your computer:
1. Insert to any USB port.
2. When “Found New Hardware”
dialog box appears, select
“Install...automatically” and
follow the instructions.
Windows® 2000 users - A Digital Signature Not Found dialog box may
appear. Click Yes to proceed.
Windows® XP users - A Windows Logo Testing Not Found dialog box
may appear. Click Continue Anyway to proceed.
ASUS USB Wireless LAN Adapter 3
Page 5
English
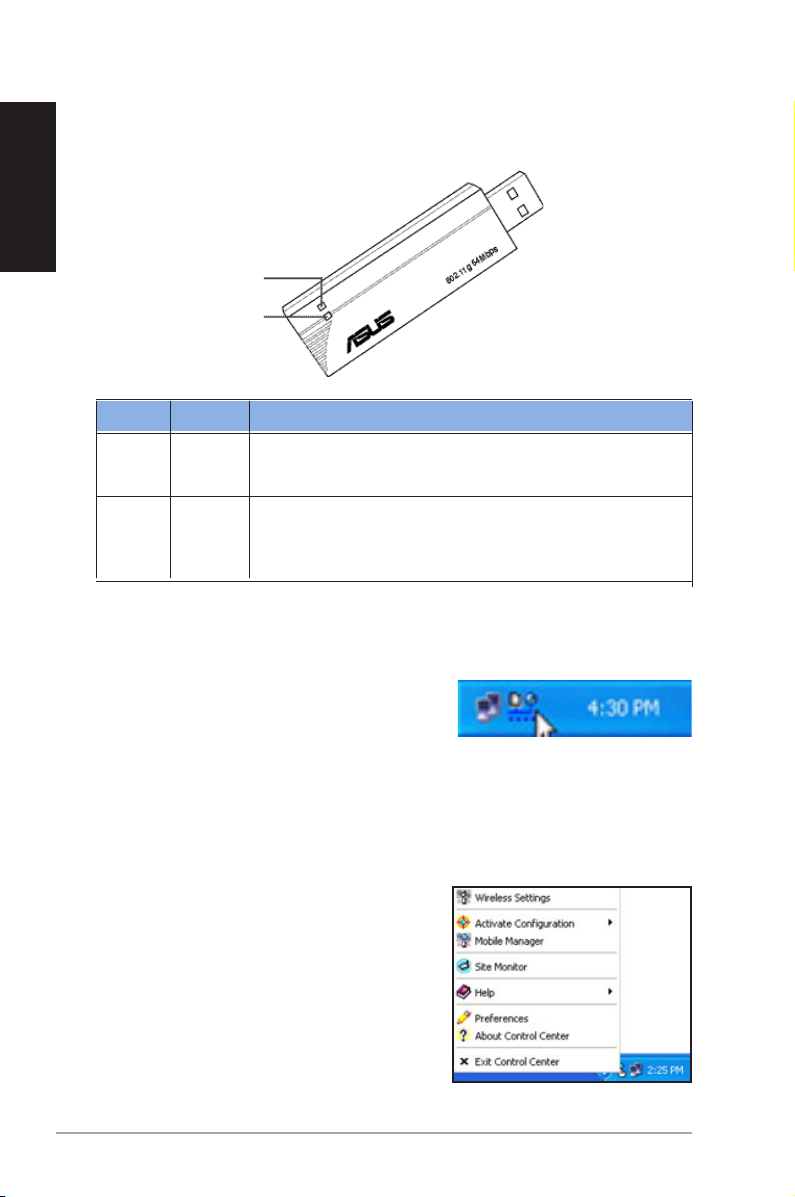
LED indicators
The device comes with a Power, Activity, and Link LED indicators. Refer to
the table below for LED indications.
ACT
PWR
LED Status Indication
ACT Blinking The adapter is transmitting or receiving data packets.
OFF There is no wireless data activity.
PWR ON The adapter is receiving power from the USB port.
OFF The adapter is not receiving power from the USB port.
The adapter may be disconnected or the computer is OFF.
Support Software
Control Center
The Control Center utility is a
management software that launches
applications and congures network
settings. The Control Center starts automatically when the system boots
and displays the Control Center icon in the Windows® taskbar. The Control
Center icon serves as an application launcher, and indicator of signal
quality and Internet connection.
Control Center right-click menu
Right-clicking the Control Center icon
displays the right-click menu. The following
sections describe the right-click menu
utilities.
4 ASUS USB Wireless LAN Adapter
Page 6

Support Software (Cont.)
Wireless Settings
Tabbed property sheets
The Wireless Settings is the
main interface that allows you to
control the ASUS USB Wireless
LAN Adapter. You may use the
Wireless Settings to view the
operational and connection
status, or to modify the device
conguration.
Property window
The Wireless Settings window is
composed of the property window
and tabbed property sheets. Click
an icon in the property window to display its tabbed property sheets.
About
Click the About icon to view the
software version, driver version,
and copyright information.
Link State
Displays the current connection
status of the wireless LAN adapter
to the AP or to other Wi-Fi devices.
An icons represents the Link State
for easy identication. Refer to the
table below for icon indications.
English
Table of Icon Indications
Excellent link quality (Infrastructure) Not linked (Infrastructure)
Good link quality (Infrastructure) Linked (Ad-hoc)
Fair link quality (Infrastructure) Not linked (Ad-hoc)
Poor link quality (Infrastructure) Scanning
ASUS USB Wireless LAN Adapter 5
Page 7
English
Support Software (Cont.)
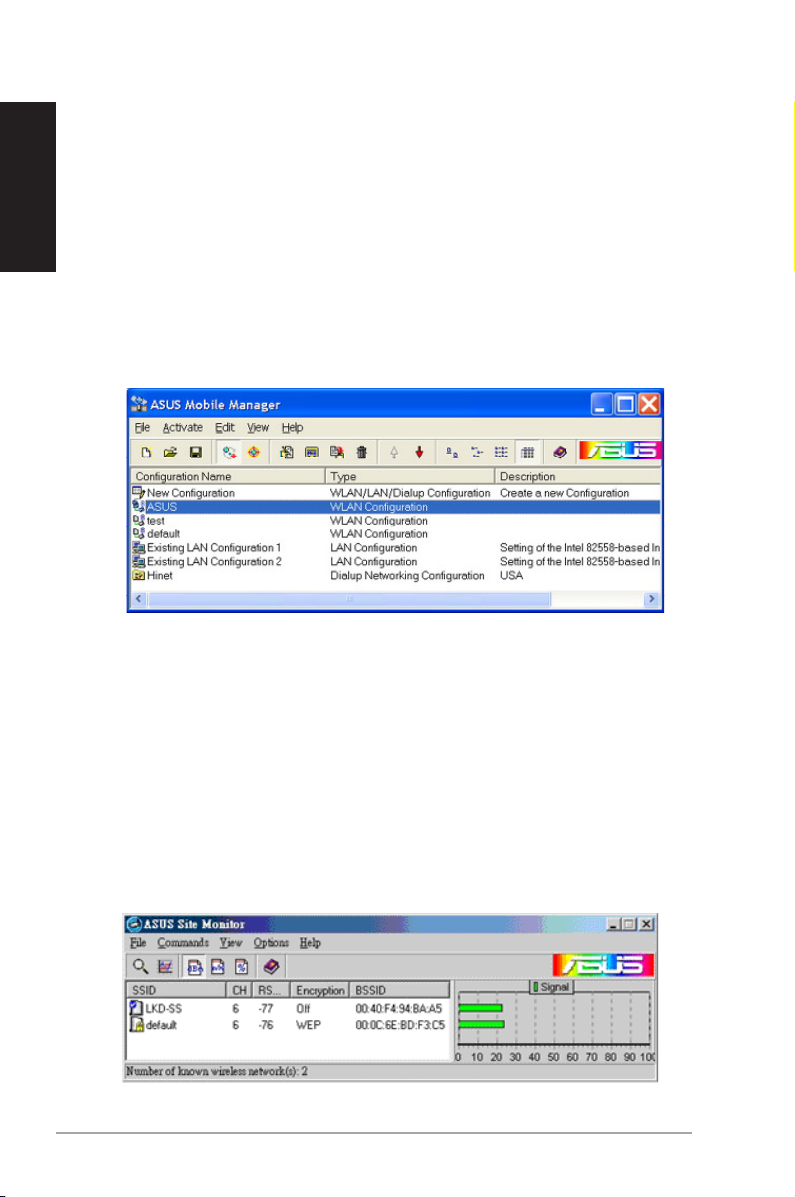
Mobile Manager
The Mobile Manager is a convenient tool to setup and manage network
location settings. This utility allows users to congure multiple alternative
congurations for different locations.
Launch the Mobile Manager utility by:
• Clicking the Windows® Start button. Select Programs > ASUS Utility
> WLAN Card > Mobile Manager, or
• Right-clicking the Control Center icon on the Windows® taskbar, then
select Mobile Manager.
Site Monitor
The Site Monitor utility measures the signal-to-noise (SNR) values of all
available wireless networks. Use this utility to determine the best location
for the ASUS USB Wireless LAN Adapter .
To launch the site monitor:
• Click the Windows® Start button, then select Programs > ASUS Utility
> WLAN Card > Site Monitor, or
• Right-click the Control Center icon on the Windows taskbar, then
select Site Monitor.
6 ASUS USB Wireless LAN Adapter
Page 8
Support Software (Cont.)
TroubleShooter
The TroubleShooter utility provides a owchart on how to connect the
ASUS USB Wireless LAN Adapter to a wireless network.
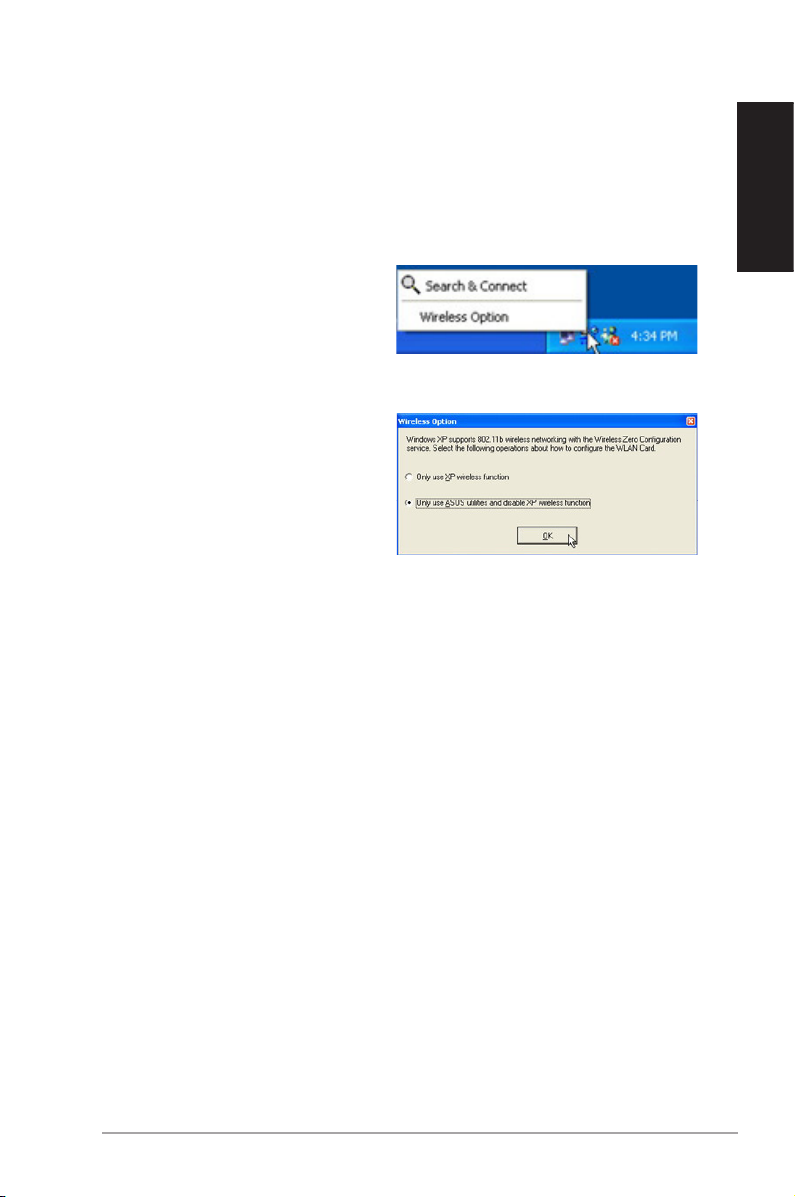
Control Center left-click menu
Left-clicking the Control Center
icon displays the left-click menu.
The options are described below.
Search & Connect – Displays available wireless networks within range.
Wireless Option – Sets your
Windows® XP wireless networking
environment. The Wireless Option
window appears when you select
this option. Select “Only use
ASUS utilities and disable XP
wireless function” to avail all
ASUS USB Wireless LAN adapter
features. Click OK.
English
ASUS USB Wireless LAN Adapter 7
Page 9

English
Wireless Connections
Connecting to Access Points (Infrastructure mode)
The ASUS USB Wireless LAN Adapter is set to Infrastructure mode by
default. In an Infrastructure network, the device connects to an access
point (AP) that serves as the link to other wireless device(s) or to a wired
network.
To connect the ASUS USB Wireless LAN Adapter to an access point.
1. Launch the Wireless Settings utility by double-clicking the Control
Center icon in the Windows® taskbar.
2. Click The Survey button to
scan available APs within the
ASUS USB Wireless LAN
Adapter range. Select the AP
you wish to connect.
4. Click the Encryption tab if your
selected AP has an enabled
encryption ( ).
Obtain the encryption keys from
the network administrator, then
enter them in the Key elds. Click
Apply when nish.
IMPORTANT! The encryption
settings of the device and the
AP must be identical to establish
connection.
8 ASUS USB Wireless LAN Adapter
3. Click the Cong button to
congure the device settings.
Set the Network type to
Infrastructure, then enter the
Network Name (SSID) and
Channel of the AP you wish
to connect. Click Apply when
done.
Page 10

Wireless Connections (Cont.)
English
5. Click the Status button to verify
if the device is connected to the
AP. If connection is established,
the Association State eld
shows “Connected - XX:XX:
XX:XX:XX:XX”.
6. Click the Connection tab to
display the connection strength
and link quality of the device to
the AP.
Connecting to another wireless device (Ad-hoc mode)
The ASUS USB Wireless LAN Adapter when set to Ad-hoc mode connects
to other wireless device(s) in a wireless network.
To connect the ASUS USB Wireless LAN Adapter to another wireless
device:
1. Launch the Wireless Settings utility by double-clicking the Control
Center icon in the Windows® taskbar.
2. Click the Survey button to scan
available wireless device(s)
within the ASUS USB Wireless
LAN Adapter range. Select the
the wireless device you wish to
connect. A wireless device is
indicated by this icon ( ).
ASUS USB Wireless LAN Adapter 9
Page 11

English
Wireless Connections (Cont.)
3. Click the Cong button to
congure the device settings.
Set the Network type to Ad hoc,
then enter the Network Name
(SSID) and Channel of wireless
device you wish to connect.
Click Apply when done.
IMPORTANT! The encryption settings of the ASUS USB Wireless LAN
Adapter and the wireless device must be identical to establish connection.
5. Click the Status button to verify
if the ASUS USB Wireless
LAN Adapter is connected to
the device. If connection is
established, the Association
State eld shows “Connected
- XX:XX:XX:XX:XX:XX”.
4. Click the Encryption tab if your
selected wireless device has an
enabled encryption ( ).
Obtain the encryption keys from
the network administrator, then
enter them in the Key elds.
Click Apply when nish.
6. Click the Connection tab to
display the connection strength
and link quality between the
ASUS USB Wireless LAN
Adapter and the wireless
device.
10 ASUS USB Wireless LAN Adapter
Page 12

®
Беспроводный сетевой адаптер
с интерфейсом USB
(WL-167g)
Русский
Краткое руководство
Copyright © 2008 ASUSTeK COMPUTER INC. All Rights Reserved.
Page 13

Русский
802.1
1g 54M
bps
Системные требования
Перед установкой беспроводного сетевого адаптера ASUS проверьте, отвечает ли
ваша система следующим требованиям:
• Процессор Intel® Pentium® 4 или AMD K7/K8
• Не менее 64Мб оперативной памяти
• ОС Windows® 98SE*/ME/2000/XP
• Дисковод для компакт-дисков (для установки программного обеспечения)
• Свободный порт USB (рекомендуется USB 2.0, поскольку USB 1.1 не позволяет
достичь максимальной производительности беспроводной сети)
Комплект поставки
Убедитесь, что в комплект поставки адаптера беспроводной сети ASUS USB входят
следующие компоненты. В случае отсутствия или повреждения любого из них
свяжитесь с продавцом.
Адаптер беспроводной сети ASUS USB (WL-167g)
Удлинитель USB 2.0 (тип A – тип A)
Универсальный соединитель USB 2.0
Ремешок для крепления на шее
Компакт-диск с ПО
Краткое руководство по началу работы
Универсальный
соединитель USB
12
Удлинитель USB 2.0 Ремешок для крепления на шее
Защелка для крепления на шее
Беспроводный сетевой адаптер ASUS USB
Адаптер беспроводной сети
USB (с крышкой
на USB разъем)
Page 14

Подключение
При подключении беспроводного сетевого адаптера ASUS следуйте следующим
рекомендациям.
1. Установите драйверы и утилиты с компакт-диска, входящего в комплект
поставки.
2. Подключите устройство к компьютеру.
Примечание: обязательно установите драйверы и утилиты для беспроводного
сетевого адаптера ASUS перед его подключением к компьютеру.
Установка драйверов и утилит
Чтобы установить драйверы и утилиты на компьютер:
1. Вставьте компакт-диск в дисковод.
2. В появившемся окне установки выберите
пункт “Install ASUS WLAN Card Utilities/
Driver” (установить утилиты и драйверы
для беспроводного сетевого адаптера
ASUS) .
3. После этого драйверы и утилиты будут
установлены на компьютер.
Примечание: если на вашем компьютере отключен автозапуск, просмотрите
содержимое компакт-диска, найдите файл Setup.exe и запустите его.
Русский
Подключение устройства
Чтобы подключить беспроводный сетевой
адаптер ASUS к компьютеру:
1. Подключите адаптер к любому
свободному порту USB.
2. При появлении диалогового окна
“Обнаружено новое устройство”,
выберите “Установить автоматически”
и следуйте инструкциям на экране.
Пользователи Windows® 2000 - На экране может появиться диалоговое окно Не
найдена цифровая подпись. Нажмите Да для продолжения.
Пользователи Windows® XP - На экране может появиться диалоговое окно
Оборудование не тестировалось. Нажмите Продолжить все равно для
продолжения.
Беспроводный сетевой адаптер ASUS USB
13
Page 15

Светодиодные индикаторы
Устройство имеет следующие индикаторы: “Питание”, “Активность” и “Сеть”.
Расшифровку показаний индикаторов см. в таблице.
ACT
Русский
PWR
Индикатор Состояние Расшифровка показания
ACT Мигает Адаптер передает или принимает данные.
Не горит Беспроводная передача данных не ведется.
PWR Горит Поступает питание с порта USB.
Не горит Питание не поступает с порта USB.
Адаптер может быть отключен от компьютера, или
компьютер может быть выключен.
Вспомогательное программное обеспечение
Control Center (центр управления)
Утилита Control Center предназначена для управления запуском приложений и
настройки сети. Утилита Control Center автоматически запускается при загрузке
системы, а значок Control Center появляется в панели задач Windows
Control Center служит для запуска приложения, а так же для индикации качества
сигнала и подключения к интернету.
®
. Значок
Меню утилиты Control Center, вызываемое правой кнопкой мыши
Нажатием правой кнопки мыши на значке Control Center можно вызвать меню,
показанное на рисунке. Далее описаны функции меню.
14
Беспроводный сетевой адаптер ASUS USB
Page 16

Вспомогательное программное обеспечение
Wireless Settings (настройки беспроводного оборудования)
Wireless Settings - это основной
интерфейс для настройки
беспроводного сетевого адаптера
ASUS. Функцию Wireless Settings можно
использовать для контроля за работой
устройства, проверки состояния
подключения или изменения настроек.
Таблица с закладками
Окно Wireless Settings представляет
собой комбинацию окна свойств и
Окно свойств
таблицы с закладками. Выберите
значок в окне свойств, чтобы вывести
окно с закладками.
About (о программе)
Щелкните значок About для просмотра
информации о версии ПО, версии
драйвера и об авторских правах.
Link State (состояние подключения)
Выводит информацию о состоянии
текущего подключения беспроводного
сетевого адаптера к точке доступа
или другому устройству Wi-Fi.
Для упрощения узнавания значок
представляет собой изображение сети. См. возможные варианты этого значка и их
расшифровку в таблице.
Расшифровка значка состояния подключения
Отличное качество связи (сеть Infrastructure) Отключено (сеть Infrastructure)
Русский
Хорошее качество связи (сеть Infrastructure) Подключено (сеть Ad-hoc)
Неплохое качество связи (сеть Infrastructure) Отключено (сеть Ad-hoc)
Плохое качество связи (сеть Infrastructure) Сканирование
Беспроводный сетевой адаптер ASUS USB
15
Page 17

Русский
Вспомогательное программное обеспечение (прод.)
Mobile Manager
Функция Mobile Manager это удобное средство для управления сетевыми
настройками. Она позволяет пользователю создать несколько альтернативных
настроек для разных подключений.
Чтобы запустить Mobile Manager:
• нажмите на кнопку ”Пуск”. Выберите ”Программы > ASUS Utility > WLAN
Card > Mobile Manager” или
• щелкните правой кнопккой мыши на значке Control Center в панели задач
Windows® и в появившемся меню выберите пункт Mobile Manager.
Site Monitor (контроль за подключением)
При помощи утилиты Site Monitor можно измерить отношение сигнал/шум в любой
доступной сети. Пользуйтесь этой утилтитой для выбора наилучшего положения
беспроводного сетевого адаптера ASUS.
Чтобы запустить site monitor:
• нажмите на кнопку ”Пуск” и выберите “Программы > ASUS Utility > WLAN
Card > Site Monitor” или
• щелкните правой кнопккой мыши на значке Control Center в панели задач
Windows и в появившемся меню выберите пункт Site Monitor.
16
Беспроводный сетевой адаптер ASUS USB
Page 18

Вспомогательное программное обеспечение (прод.)
TroubleShooter (обнаружитель неисправностей)
Утилита TroubleShooter предоставляет блок-схему подключения беспроводного
сетевого адаптера ASUS к сети.
Меню утилиты Control Center, вызываемое левой кнопкой мыши
Нажатием левой кнопки мыши на
значке Control Center можно вызвать
меню, показанное на рисунке. Далее
описаны функции меню.
Search & Connect – вывод информации
обо всех доступных беспроводных
сетях.
Wireless Option – настройка
беспроводного сетевого окружения в
Windows® XP. Окно Wireless Option
появляется после выбора этого
пункта. Чтобы сделать доступными
все функции беспроводного сетевого
адаптера ASUS, выберите пункт “Only use ASUS utilities and disable XP wireless
function” (использовать только функции утилит ASUS и отключить встроенные
функции Windows XP). Нажмите на кнопку “OK”.
Русский
Беспроводный сетевой адаптер ASUS USB
17
Page 19

Русский
Подключение к беспроводной сети
Подключение к точкам доступа (инфраструктурный режим)
Беспроводный сетевой адаптер ASUS по умолчанию установлен в режим Infrastructure. В
сети Infrastructure устройство подключается к точке доступа, которая служит в качестве
связующего звена с другими беспроводными устройствами или обычной сетью.
Чтобы подключить беспроводный сетевой адаптер ASUS к точке доступа:
1. Запустите утилиту Wireless Settings, дважды щелкнув мышкой на значке Control
Center в панели задач Windows®.
3.
2. Нажмите на кнопку Survey (обзор),
чтобы найти точки доступа,
находящиеся в зоне действия
адаптера ASUS. Выберите точку
доступа, к которой желаете
подключиться.
4. Выберите закладку Encryption
(шифрование), если в выбранной
точке доступа включено WEPшифрование ( ).
Получите ключ WEP у сетевого
администратора и введите его в
поля Key. Нажмите на кнопку Apply
(применить).
Нажмите на кнопку Config
(настройка)
устройства. Установите тип сети
Infrastructure, затем введите
Network Name (SSID) и Channel
(канал) точки доступа, к которой
нужно подключиться.
кнопку Apply (применить)
для изменения настроек
Нажмите на
.
18
Важно!
Для установления устойчивого
устройства и точки доступа должны совпадать.
соединения настройки шифрования
Беспроводный сетевой адаптер ASUS USB
Page 20

Подключение к беспроводной сети (прод.)
5. Нажмите на кнопку Status
(состояние), чтобы убедиться,
что устройство подключено к
точке доступа. Если соединение
выполнено, то в поле Association
State будет написано “Connected:
XX:XX:XX:XX:XX:XX”.
6. Выберите закладку Connection
(подключение), чтобы получить
информацию о скорости и качестве
подключения устройства к точке
доступа.
Подключение к другому беспроводному устройству
(одноранговый режим)
При переключении беспроводного сетевого адаптера ASUS в режим Ad-hoc
возможно подключение к другим беспроводным устройствам в беспроводной сети.
Чтобы подключить адаптер ASUS к другим беспроводным устройствам:
1. Запустите утилиту Wireless Settings, дважды щелкнув мышкой на значке Control
Center в панели задач Windows®.
2. Нажмите на кнопку Survey (обзор),
чтобы найти беспроводные
устройства, находящиеся в зоне
действия адаптера ASUS USB
Wireless LAN Adapter. Выберите
устройство, к которому желаете
подключиться. Беспроводное
устройство обозначается значком
).
(
Русский
Беспроводный сетевой адаптер ASUS USB
19
Page 21

Русский
Подключение к беспроводной сети (прод.)
3.
Нажмите на кнопку Config
(настройка)
для изменения настроек
устройства. Установите тип сети
Ad-Hoc, затем введите Network
Name (SSID) и Channel (канал)
устройства, к которому нужно
подключиться.
Apply (применить)
Важно!
и другого беспроводного устройства должны совпадать.
Нажмите на кнопку
.
Для установления устойчивого
4. Выберите закладку Encryption
(шифрование), если в выбранном
устройстве включено WEPшифрование ( ).
Получите ключ WEP у сетевого
администратора и введите его в
поля Key. Нажмите на кнопку Apply
(применить).
соединения настройки шифрования адаптера
5. Нажмите на кнопку Status
(состояние), чтобы убедиться,
что адаптер подключен к другому
беспроводному устройству. Если
соединение выполнено, то в поле
Association State будет написано
“Connected: XX:XX:XX:XX:XX:XX”.
20
6. Выберите закладку Connection
(подключение), чтобы получить
информацию о скорости и качестве
подключения адаптера к другому
беспроводному устройству.
Беспроводный сетевой адаптер ASUS USB
Page 22

Notices
Federal Communications Commission
This device complies with FCC Rules Part 15. Operation is subject to the
following two conditions:
• This device may not cause harmful interference, and
• This device must accept any interference received, including interference
that may cause undesired operation.
This equipment has been tested and found to comply with the limits for a class B
digital device, pursuant to Part 15 of the Federal Communications Commission
(FCC) rules. These limits are designed to provide reasonable protection against
harmful interference in a residential installation. This equipment generates,
uses, and can radiate radio frequency energy and, if not installed and used
in accordance with the instructions, may cause harmful interference to radio
communications. However, there is no guarantee that interference will not occur
in a particular installation. If this equipment does cause harmful interference to
radio or television reception, which can be determined by turning the equipment
off and on, the user is encouraged to try to correct the interference by one or
more of the following measures:
• Reorient or relocate the receiving antenna.
• Increase the separation between the equipment and receiver.
• Connect the equipment into an outlet on a circuit different from that to which
the receiver is connected.
• Consult the dealer or an experienced radio/TV technician for help.
You are cautioned that changes or modications not expressly
approved by the party responsible for compliance could void your
authority to operate the equipment.
Reprinted from the Code of Federal Regulations #47, part 15.193, 1993.
Washington DC: Ofce of the Federal Register, National Archives and Records
Administration, U.S. Government Printing Ofce.
Page 23

Safety statements
Regulatory Information/Disclaimers
Installation and use of this Wireless LAN device must be in strict accordance with
the instructions included in the user documentation provided with the product.
Any changes or modications (including the antennas) made to this device that
are not expressly approved by the manufacturer may void the user’s authority
to operate the equipment. The manufacturer is not responsible for any radio or
television interference caused by unauthorized modication of this device, or
the substitution of the connecting cables and equipment other than manufacturer
specied. It is the responsibility of the user to correct any interference caused by
such unauthorized modication, substitution or attachment. Manufacturer and
its authorized resellers or distributors will assume no liability for any damage
or violation of government regulations arising from failing to comply with these
guidelines.
CAUTION! To maintain compliance with FCC’s RF exposure
guidelines, this equipment should be installed and operated with
minimum distance [20cm] between the radiator and your body. Use
on the supplied antenna. Unauthorized antenna, modication, or
attachments could damage the transmitter and may violate FCC
regulations.
Safety Information
In order to maintain compliance with the FCC RF exposure guidelines, this
equipment should be installed and operated with minimum distance [20cm]
between the radiator and your body. Use only with supplied antenna.
Unauthorized antenna, modication, or attachments could damage the transmitter
and may violate FCC regulations.
CAUTION! Any changes or modications not expressly approved in
this manual could void your authorization to use this device.
MPE Statement
Your device contains a low power transmitter. When device is transmitted it
sends out Radio Frequency (RF) signal.
Page 24

Safety statements
FCC Radio Frequency Exposure
This Wireless LAN radio device has been evaluated under FCC Bulletin OET
65C and found compliant to the requirements as set forth in CFR 47 Sections
2.1091, 2.1093, and 15.247(b)(4) addressing RF Exposure from radio frequency
devices. The radiation output power of this Wireless LAN device is far below
the FCC radio frequency exposure limits. Nevertheless, this device shall be used
in such a manner that the potential for human contact during normal operation
– as a mobile or portable device but use in a body-worn way is strictly prohibit.
When using this device, a certain separation distance between antenna and nearby
persons has to be kept to ensure RF exposure compliance. In order to comply
with the RF exposure limits established in the ANSI C95.1 standards, the distance
between the antennas and the user should not be less than [20cm].
RF Exposure
The antenna(s) used for this transmitter must not be co-located or operating in
conjunction with any other antenna or transmitter.
 Loading...