

Page 1
WL-167G V3
ASUS Wireless Adapter
EC Declaration of Conformity
We, the undersigned,
Manufacturer:
ASUSTek COMPUTER INC.
Address, City:
No. 150, LI-TE RD., PEITOU, TAIPEI 112, TAIWAN R.O.C.
Country:
TAIWAN
Authorized representative in Europe:
ASUS COMPUTER GmbH
Address, City: HARKORT STR. 21-23, 40880 RATINGEN
Country:
GERMANY
declare the following apparatus:
Product name : 802.11b/g/n USB2.0 Adapter
Model name : WL-167G V3
conform with the essential requirements of the following directives:
2004/108/EC-EMC Directive
EN 55022:2006/A1:2007
EN 61000-3-2:2006
EN 55013:2001+A1:2003+A2:2006
EN 61000-4-2:1995/A1:1998 /A2:2001
EN 61000-4-3: 1996 /A1:1998 /A2:2001
EN 61000-4-4: 1995 /A1:2000 /A2:2001
EN 55024:1998/A1:2001/A2:2003
EN 61000-3-3:1995+A1:2001+A2:2005
EN 55020:2007
EN 61000-4-5: 1995 /A1:2001
EN 61000-4-6: 1996 /A1:2001
EN 61000-4-11: 1994 /A1:2001
1999/5/EC-R &TTE Directive
EN 300 328 V1.7.1(2006-10)
EN 300 440-1 V1.4.1(2008-05)
EN 300 440-2 V1.2.1(2008-03)
EN 301 511 V9.0.2(2003-03)
EN 301 908-1 V3.2.1(2007-05)
EN 301 908-2 V3.2.1(2007-05)
EN 301 893 V1.4.1(2005-03)
ETSI EN 62311:2008
EN 50371:2002
EN 301 489-1 V1.8.1(2008-04)
EN 301 489-3 V1.4.1(2002-08)
EN 301 489-4 V1.3.1(2002-08)
EN 301 489-7 V1.3.1(2005-11)
EN 301 489-9 V1.4.1(2007-11)
EN 301 489-17 V2.1.1(2009-05)
EN 301 489-24 V1.4.1(2007-09)
EN 302 326-2 V1.2.2(2007-06)
EN 302 326-3 V1.3.1(2007-09)
2006/95/EC-LVD Directive
EN 60950-1:2001+A11:2004
EN 60950-1:2006
EN60065:2002+A1:2006
2005/32/EC-EuP Directive
Regulation (EC) No. 1275/2008
EN 62301:2005
Regulation (EC) No. 278/2009
EN 62301:2005
CE marking
Declaration Date: Mar. 25, 2010
Year to begin affixing CE marking:2010
Position : CEO
Name : Jerry Shen
Signature : __________
(EC conformity marking)
Quick Start Guide
WL-167G V3
ASUS Wireless Adapter
NOTE:
For more details and advanced conguration instructions, refer to the user
manual included in the support CD.
NOTE: If Autorun is disabled, run setup.exe from the root directory of the support CD.
®
!
Setting up a Home Network
English
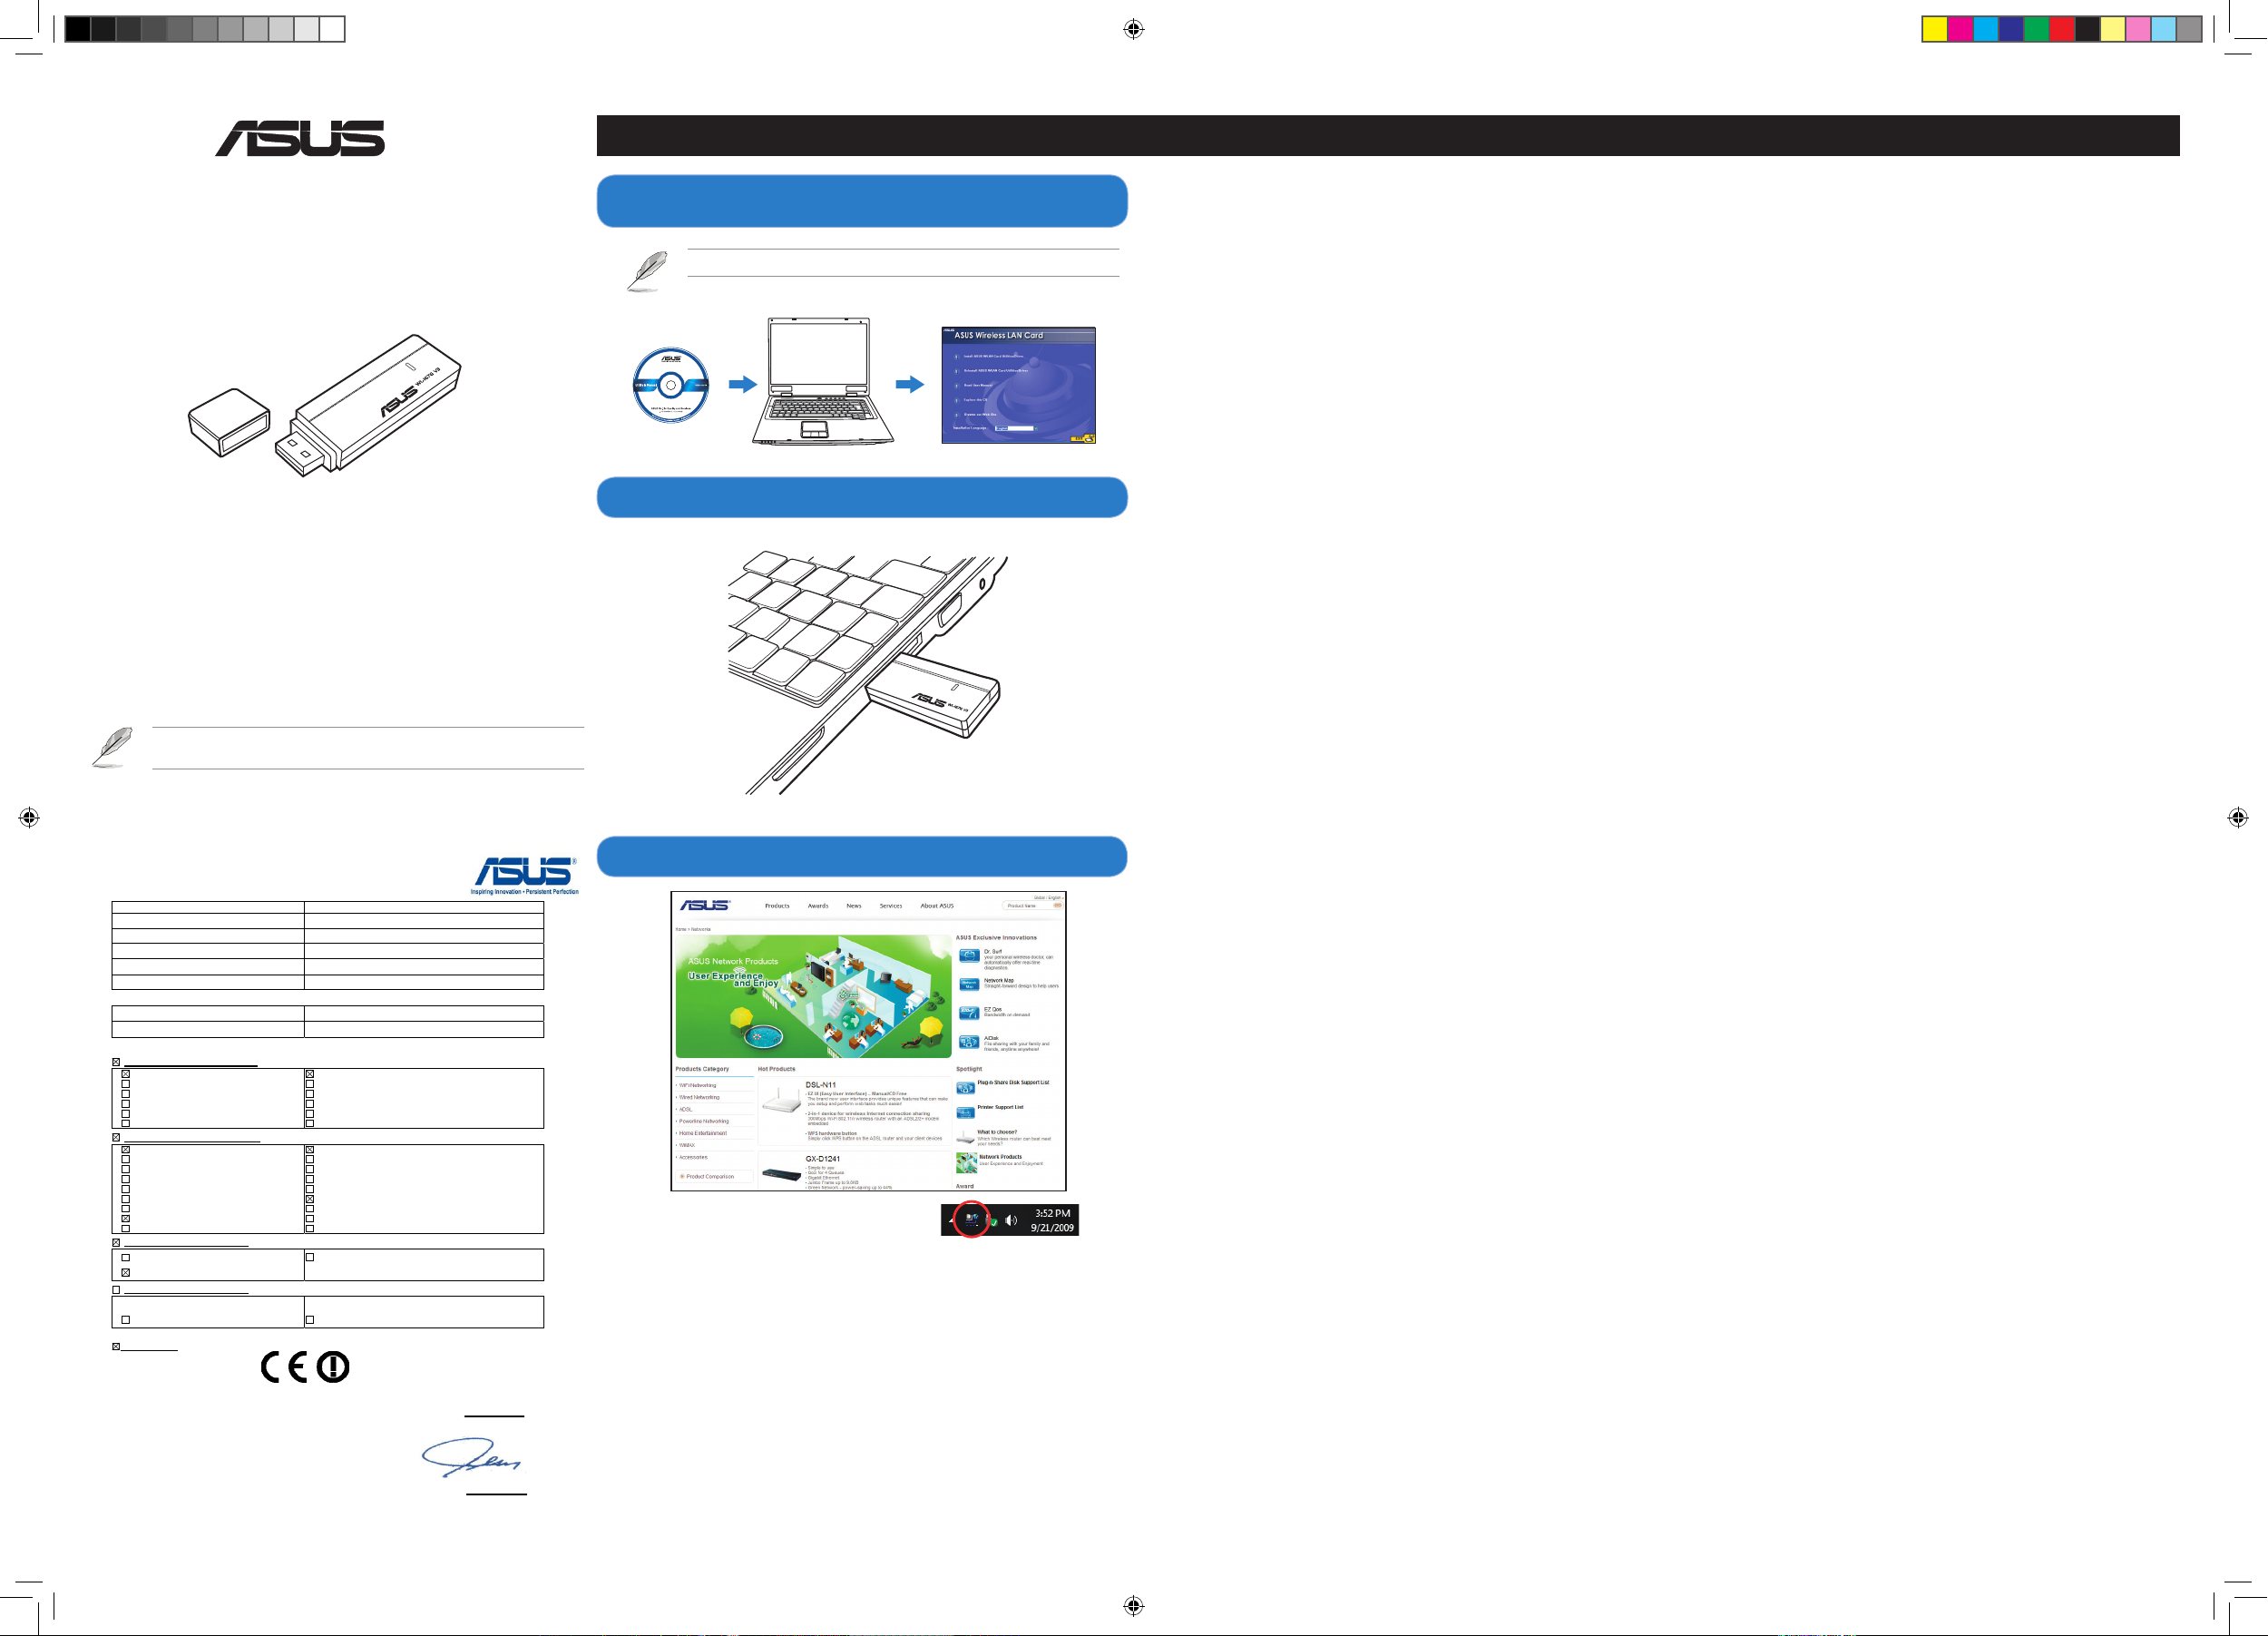
1. Insert the support CD into the optical drive and an autorun screen appears. Follow the
succeeding onscreen instructions to complete the installation.
NOTE: If Autorun is disabled, run setup.exe from the root directory of the support CD.
2. Plug the wireless adapter into your computer's USB port.
3. The installation program is completed.
NOTE: For more details and advanced conguration instructions, refer to the user
manual included in the support CD.
Deutsch
1. Legen Sie bitte die Support-CD in das optische Laufwerk ein. Es erscheint daraufhin
das Autorun-Fenster. Folgen Sie den Bildschirmanweisungen, um die Installation
fertigzustellen.
HINWEIS: Wenn Autorun nicht aktiviert ist, führen Sie die Datei setup.exe im
Hauptverzeichnis der Support-CD aus.
2. Stecken Sie den Wireless-Adapter in einen freien USB-Anschluss Ihres Computers.
3. Das Installationsprogramm ist fertig.
HINWEIS: Für mehr Details und die erweiterten Kongurationsanweisungen beziehen
Sie sich bitte auf das in der Support-CD enthaltenen Benutzerhandbuch.
Italiano
1. Inserire il CD di supporto nell’unità ottica e apparirà la schermata di esecuzione
automatica.Seguire le istruzioni sullo schermo e completare l’installazione.
NOTA: Se la funzione di esecuzione automatica è disattivata, eseguire setup.exe dalla
directory principale del CD di supporto.
2. Inserire l’adattatore wireless nella porta USB del computer.
3. Il programma di installazione è stato completato.
NOTA: Per ulteriori informazioni e per le istruzioni sulla congurazione avanzata,
consultare il manuale utente nel CD di supporto.
Lietuvių
1. Įdėkite pagalbos kompaktinį diską (CD) į optinį diskasukį, ir bus rodomas automatinės
paleisties (Autorun) langas. Norėdami baigti įdiegimo procesą, vadovaukitės nuorodomis
ekrane.
PASTABA: Jei automatinė paleistis (Autorun) neaktyvi, paleiskite setup.exe iš pagalbos
kompaktinio disko (CD) šakninio katalogo.
2. Prijunkite bevielį adapterį prie savo kompiuterio USB prievado.
3. Diegimo programa baigta.
PASTABA: Jei reikia daugiau informacijos ir išplėstinės kongūracijos instrukcijų, žr.
vartotojo vadovą, esantį pagalbos kompaktiniame diske (CD).
Latviski
1. Ievietojiet optiskajā diskdzinī atbalsta CD un parādīsies automātiskās palaišanas
ekrāns. Sekojiet instrukcijām uz ekrāna, lai pabeigtu instalēšanu.
PIEZĪME: Ja automātiskā palaišana ir atspējota, atbalsta CD saknes direktorijā palaidiet
setup.exe.
2. Pievienojiet bezvadu adapteru datora USB portam.
3. Instalēšanas programma ir pabeigta.
PIEZĪME: Detalizētāku informāciju un uzlabotās kongurācijas instrukcijas meklējiet
atbalsta CD esošajā lietotāja rokasgrāmatā.
Português
1. Introduza o CD de suporte na unidade óptica e será exibido o ecrã de execução
automática. Siga as instruções apresentadas no ecrã para concluir a instalação.
NOTA: Se a Execução automática estiver desactivada, execute o cheiro setup.exe no
directório raiz do CD de suporte.
2. Ligue o adaptador de rede sem os à porta USB do seu computador.
3. A instalação do programa está concluída.
NOTA: Para obter mais detalhes e instruções de conguração avançada, consulte o
manual do utilizador incluído no CD de suporte.
Română
1. Introduceţi CD-ul de asistenţă în unitatea optică şi apare un ecran de executare
automată. Urmaţi instrucţiunile de pe ecran pentru a încheia procesul de instalare.
NOTĂ: Dacă opţiunea Autorun (Executare automată) este dezactivată, executaţi setup.
exe din directorul rădăcină de pe CD-ul de asistenţă.
2. Introduceţi adaptorul wireless în portul USB al computerului dvs.
3. Programul de instalare este nalizat.
NOTĂ: Pentru mai multe detalii şi instrucţiuni de congurare complexă, consultaţi
manualul inclus pe CD-ul de asistenţă.
Polski
1. Włożyć płytę CD z oprogramowaniem do napędu optycznego; powinien zostać
automatycznie wyświetlony ekran instalacyjny. W celu skutecznego zakończenia
instalacji postępować zgodnie z instrukcjami na ekranie.
UWAGA: Jeśli funkcja automatycznego uruchamiania jest wyłączona, uruchomić
program setup.exe w katalogu głównym na płycie CD z oprogramowaniem.
2. Włóż kartę bezprzewodową do gniazda USB komputera.
3. Pogram instalacyjny zakończył działanie.
UWAGA: Szczegółowe informacje oraz instrukcje dotyczące zaawansowanej
konguracji znajdują się w podręczniku użytkownika umieszczonym na płycie CD z
oprogramowaniem.
2. Plug the wireless adapter into your computer's USB port.
1. Insert the support CD into the optical drive and an autorun screen appears.
Follow the succeeding onscreen instructions to complete the installation.
Español
1. Inserte el CD de soporte en la unidad óptica. Al hacerlo, aparecerá una pantalla
de ejecución automática. Siga las instrucciones que se mostrarán a continuación
en la pantalla para llevar a cabo la instalación.
NOTA: Si la función Autorun (Ejecución automática) está deshabilitada, ejecute el
archivo setup.exe que encontrará en el directorio raíz del CD de soporte.
2. Conecte el adaptador inalámbrico a un puerto USB de su equipo.
3. El programa de instalación ha nalizado.
NOTA: Si desea obtener más información o instrucciones de conguración avanzada,
consulte el manual del usuario que incluye el CD de soporte.
Українська
1. Вставте компакт-диск підтримки до оптичного дисководу, і з’явиться екран
автозапуску. Виконуйте вказівки на наступних екранах, щоб завершити
інсталяцію.
ПРИМІТКА: Якщо Autorun (Автозапуск) вимкнено, запустіть setup.exe з
кореневої директорії на компакт-диску підтримки.
2. Вставте бездротовий адаптер до порту USB на комп’ютері.
3. Програма інсталяції завершена.
ПРИМІТКА: Більше подробиць та вказівки щодо високотехнологічних
конфігурацій Ви знайдете в керівництві користувача на компакт-диску
підтримки.
Français
1. Insérez le CD de support dans le lecteur optique. L’écran d’exécution automatique
apparaît. Suivez les instructions à l’écran pour terminer l’installation.
NOTE : si l’exécution automatique est désactivée sur votre ordinateur, localisez
puis ouvrez le chier setup.exe situé dans le CD de support.
2. Connectez l’adaptateur réseau sans l à un port USB de votre ordinateur.
3. L’installation est terminée.
NOTE : pour obtenir des instructions détaillées sur les congurations avancées,
consultez le manuel de l’utilisateur situé sur le CD de support.
Nederlands
1. Plaats de ondersteunings-cd in het optische station en het autorun-scherm verschijnt.
Volg de opeenvolgende instructies op het scherm om de installatie te voltooien.
OPMERKING: Als Autorun is uitgeschakeld, moet u setup.exe uitvoeren vanaf de
hoofdmap van de ondersteunings-cd.
2. Sluit de draadloze adapter aan op de USB-poort van uw computer.
3. Het installatieprogramma is voltooid.
OPMERKING: Raadpleeg de handleiding op de ondersteunings-cd voor meer
informatie en geavanceerde conguratierichtlijnen.
Ελληνικά
1. Εισάγετε το CD υποστήριξης στη μονάδα οπτικού δίσκου και θα εμφανιστεί
η οθόνη αυτόματης εκτέλεσης. Ακολουθήστε τις οδηγίες που θα
εμφανιστούν στην επόμενη οθόνη για να ολοκληρώσετε την εγκατάσταση.
ΣΗΜΕΙΩΣΗ: Αν η δυνατότητα Αυτόματης εκτέλεσης είναι απενεργοποιημένη,
εκτελέστε το αρχείο setup.exe στο ριζικό κατάλογο του CD υποστήριξης.
2. Συνδέστε τον ασύρματο προσαρμογέα στη θύρα USB του υπολογιστή.
3. Η εγκατάσταση ολοκληρώθηκε.
ΣΗΜΕΙΩΣΗ: Για περισσότερες λεπτομέρειες και οδηγίες διαμόρφωσης για
προχωρημένους, ανατρέξτε στο εγχειρίδιο χρήστη που παρέχεται στο CD
υποστήριξης.
Pyсский
1. Вставьте support CD в оптический привод Вашего компьютера, программа
запустится автоматически. Следуйте инструкциям на экране для
завершения установки.
ПРИМЕЧАНИЕ: Если автозапуск отключен, запустите setup.exe в корневой
директории компакт-диска.
2. Подключите беспроводный адаптер к USB порту Вашего компьютера.
3. Установка программы завершена.
ПРИМЕЧАНИЕ: Дополнительную информацию и инструкции смотрите в
руководстве пользователя на компакт-диске.
Eesti
1. Sisestades tugi-CD optilisse seadmesse, kuvatakse ekraan autorun. Installi
lõpetamiseks järgige edasisi ekraanijuhiseid.
MÄRKUS: Kui funktsioon autorun on keelatud, siis käivitage fail setup.exe tugi-CD
juurkataloogist.
2. Ühendage traadita adapter arvuti USB porti.
3. Installimine on lõpule viidud.
MÄRKUS: Täiendavat teavet ja täpsemaid kongureerimisjuhiseid leiate
kasutusjuhendist, mis sisaldub seadmega kaasnenud tugi-CD-l.
Magyar
1. Helyezze be a támogató CD-lemezt az optikai meghajtóba, amire megjelenik az
automatikus futtatás képernyő. Kövesse a képernyőn megjelenő utasításokat a
telepítés befejezéséhez.
MEGJEGYZÉS: Ha az automatikus lejátszást letiltották, futtassa a setup.exe fájlt
a támogató CD gyökérkönyvtárában.
2. Csatlakoztassa a vezeték nélküli adaptert a számítógép USB-csatlakozójához.
3. A telepítés ezzel befejeződött.
MEGJEGYZÉS: A további részleteket és a speciális konguráció utasításait
illetően tekintse meg a támogató CD-n lévő felhasználói útmutatót.
3. The installation program is completed.
Q5391_WL-167G V3 QSG.indd 1 7/7/10 10:57:42 AM
Page 2
REACH
Complying with the REACH (Registration, Evaluation, Authorisation, and Restriction of
Chemicals) regulatory framework, we published the chemical substances in our products at
ASUS REACH website at http://green.asus.com/english/REACH.htm.
Manufacturer
ASUSTeK Computer Inc.
Tel: +886-2-2894-3447
Address: No. 150, LI-TE RD., PEITOU, TAIPEI 112, TAIWAN
Authorised representative in Europe
ASUS Computer GmbH
Address: HARKORT STR. 21-23, 40880 RATINGEN, GERMANY
Authorised distributors in Turkey
BOGAZICI BIL GISAYAR SAN. VE TIC. A.S.
Tel: +90 212 3311000
Address: AYAZAGA MAH. KEMERBURGAZ CAD. NO.10 AYAZAGA/ISTANBUL
INDEX BILGISAYAR SISTEMLERI MUHENDISLIK SAN. VE TIC. A.S.
Tel: +90 212 3312121
Address: AYAZAGA MAH. CENDERE YOLU NO.9 AYAZAGA/ISTANBUL
EEE Yönetmeliğine Uygundur.
Industry Canada Statement:
This device complies with RSS-210 of the Industry Canada Rules. Operation is subject to
the following two conditions: (1) This device may not cause harmful interference, and (2)
This device must accept any interference received, including interference that may cause
undesired operation.
IMPORTANT NOTE:
Radiation Exposure Statement:
This equipment complies with IC radiation exposure limits set forth for an uncontrolled
environment. End users must follow the specic operating instructions for satisfying
RF exposure compliance. To maintain compliance with IC RF exposure compliance
requirements, please follow operation instruction as documented in this manual.
Offer to Provide Source Code of Certain Software
This product contains copyrighted software that is licensed under the General
Public License (“GPL”), under the Lesser General Public License Version (“LGPL”)
and/or other Free Open Source Software Licenses. Such software in this product is
distributed without any warranty to the extent permitted by the applicable law. Copies
of these licenses are included in this product.
Where the applicable license entitles you to the source code of such software and/or
other additional data, such data should have been shipped along with this product.
You may also download it for free from http://support.asus.com/download.
The source code is distributed WITHOUT ANY WARRANTY and licensed under the
same license as the corresponding binary/object code.
ASUSTeK is eager to duly provide complete source code as required under various
Free Open Source Software licenses. If however you encounter any problems in
obtaining the full corresponding source code we would be much obliged if you give us
a notication to the email address gpl@asus.com, stating the product and describing
the problem (please do NOT send large attachments such as source code archives
etc to this email address).
簡體中文
1.將驅動程序與應用程序光盤放入光驅,自動安裝畫面會出現。請按照屏幕提示完成
安裝。
注意:若自動安裝畫面未出現,請運行驅動程序與應用程序光盤根目錄下的Setup.
exe程序。
2.將無線網卡連接到電腦的USB接口。
3.安裝完成。
注意:更多關於高級配置的說明,請參考驅動程序與應用程序光盤中的用戶手冊。
한국어
1.지원CD를옵티컬드라이브에넣으면자동실행화면이나타납니다.이어지는화
면의지시에따라설치를진행해주십시오.
참고:자동실행화면이나타나지않을경우지원CD의루트폴더를검색하여
setup.exe파일을실행해주십시오.
2.무선어댑터를컴퓨터의USB포트에연결해주십시오.
3.설치프로그램을완료했습니다.
참고:자세한설명및고급구성정보는지원CD에포함된사용설명서를참고해
주십시오.
日本語
1.IサポートCDを光学ドライブに入れます。続いて表示される画面の指示に従い、
インストールを実行します。
注:自動再生が無効になっている場合は、サポートCDのコンテンツを参照し、
「setup.exe」ファイルをダブルクリックし、インストールを実行してください。
2.無線アダプターをコンピューターのUSBポートに接続します。
3.インストール完了です。
注:詳細はサポートCDに収録のユーザーマニュアルをご参照ください。
Bahasa Malaysia
1. Masukkan CD sokongan ke dalam pemacu optik dan skrin autorun akan muncul.
Ikuti arahan pada skrin yang berikutnya untuk melengkapkan pemasangan.
NOTA: Jika Autorun dinyahdayakan, jalankan setup.exe dari direktori punca CD
sokongan.
2. Pasang penyesuai wayarles ke dalam port USB komputer anda.
3. Atur cara pemasangan selesai.
NOTA: Untuk mendapatkan butiran lanjut dan arahan kongurasi lanjutan, rujuk
manual pengguna yang disertakan dalam CD sokongan.
Federal Communications Commission Statement
This device complies with Part 15 of the FCC Rules. Operation is subject to the
following two conditions:
• This device may not cause harmful interference.
• This device must accept any interference received, including interference that
may cause undesired operation.
This equipment has been tested and found to comply with the limits for a class
B digital device, pursuant to part 15 of the FCC Rules. These limits are designed
to provide reasonable protection against harmful interference in a residential
installation.
This equipment generates, uses and can radiate radio frequency energy and, if
not installed and used in accordance with the instructions, may cause harmful
interference to radio communications. However, there is no guarantee that
interference will not occur in a particular installation. If this equipment does cause
harmful interference to radio or television reception, which can be determined
by turning the equipment off and on, the user is encouraged to try to correct the
interference by one or more of the following measures:
• Reorient or relocate the receiving antenna.
• Increase the separation between the equipment and receiver.
• Connect the equipment into an outlet on a circuit different from that to which the
receiver is connected.
• Consult the dealer or an experienced radio/TV technician for help.
CAUTION:
Any changes or modications not expressly approved by the party
responsible for compliance could void the user’s authority to operate the equipment.
Prohibition of Co-location
This device and its antenna(s) must not be co-located or operating in conjunction
with any other antenna or transmitter.
IMPORTANT NOTE:
Radiation Exposure Statement:
This equipment complies with FCC radiation exposure limits set forth for an
uncontrolled environment. End users must follow compliance with FCC RF exposure
compliance requirements, please follow operation instruction as documented in this
manual.
Declaration of Conformity for R&TTE directive 1999/5/EC
Essential requirements – Article 3
Protection requirements for health and safety – Article 3.1a
Testing for electric safety according to EN 60950-1 has been conducted. These are
considered relevant and sufcient.
Protection requirements for electromagnetic compatibility – Article 3.1b
Testing for electromagnetic compatibility according to EN 301 489-1 and
EN 301 489-17 has been conducted. These are considered relevant and sufcient.
Effective use of the radio spectrum – Article 3.2
Testing for radio test suites according to EN 300 328- 2 has been conducted. These
are considered relevant and sufcient.
CE Mark Warning
This is a Class B product, in a domestic environment, this product may cause radio
interference, in which case the user may be required to take adequate measures.
Operation Channels: Ch1~11 for N. America, Ch1~14 Japan, Ch1~13 Europe (ETSI)
IC Warning
The Class B digital apparatus meets all requirements of the Canadian InterferenceCausing Equipment Regulation.
Cet appareil numerique de la class B respecte toutes les exigences du Reglement
sur le materiel brouilleur du Canada.
NCC Warning
Slovensky
1. Do optickej mechaniky vložte CD s podporou; zobrazí sa obrazovka
automatického spustenia. Pre dokončenie inštalácie postupujte podľa ďalších
pokynov na obrazovke.
POZNÁMKA: Pokiaľ je neaktívna funkcia automatického spustenia, spustite súbor
setup.exe, ktorý nájdete v koreňovom adresári na CD s podporou.
2. Pripojte adaptér bezdrôtovej komunikácie k USB portu počítača.
3. Týmto je inštalácia dokončená.
POZNÁMKA: Viac podrobností a pokyny pre rozšírenú konguráciu nájde v
návode na obsluhu na CD s podporou.
Česky
1. Po vložení podpůrného disku CD do optické jednotky se zobrazí obrazovka
automatického spuštění. Dokončete instalaci podle dalších zobrazených pokynů.
POZNÁMKA: Není-li aktivována funkce automatického spuštění, spusťte soubor
setup.exe v kořenovém adresáři podpůrného disku CD.
2. Připojte bezdrátový adaptér k portu USB počítače.
3. Instalační program je dokončen.
POZNÁMKA: Podrobnější informace a pokyny pro upřesňující konguraci viz
uživatelská příručka na podpůrném disku CD.
Suomi
1. Aseta tuki-CD-levy optiseen asemaan ja näkyviin tulee automaattinen
käynnistysruutu. Suorita asennus loppuun noudattamalla ruudun ohjeita.
Huomautus: Jos automaattinen käynnistys on pois päältä, suorita setup.exe tuki-
CD-levyn juurihakemistosta.
2. Liitä langaton sovitin tietokoneen USB-porttiin.
3. Asennus on valmis.
Huomautus: Voit katsoa tarkempia tietoja ja lisämääritysten ohjeita tuki-CD-levyllä
olevasta käyttöoppaasta.
Български
1. Сложете CD диска в оптичното устройство и ще се появи екранът за
автоматично зареждане. Следвайте следващите инструкции на екрана, за
да завършите инсталацията.
ЗАБЕЛЕЖКА: Ако Autorun (Автоматично зареждане) е деактивирано,
изпълнете setup.exe от основната директория на помощния CD диск.
2. Включете безжичния адаптер в USB порта на компютъра.
3. Инсталацията приключи.
ЗАБЕЛЕЖКА: За повече информация и инструкции за разширени настройки,
вижте ръководството на потребителя намиращо се на помощния CD диск.
Bahasa Indonesia
1. Masukkan CD pendukung ke dalam drive optik, kemudian layar autorun akan
tampil. Ikuti petunjuk berikutnya di layar untuk menyelesaikan penginstalan.
CATATAN: Jika Autorun dinonaktifkan, jalankan setup.exe dari direktori akar CD
pendukung.
2. Pasang adapter nirkabel ke port USB komputer Anda.
3. Program penginstalan selesai.
CATATAN: Untuk informasi lebih rinci dan petunjuk kongurasi lanjutan, lihat
panduan pengguna yang tersedia di CD pendukung.
ไทย
1. ใส่แผ่นซีดี CD สนับสนุนลงในออปติคัลไดรฟ์ และหน้าจอ autorun จะปรากฏขึ้น
ปฏิบัติตามขั้นตอนบนหน้าจอให้เสร็จ เพื่อทำการติดตั้งให้สมบูรณ์
หมายเหตุ: ถ้าคุณสมบัติ Autorun ปิดทำงาน, ให้รัน setup.exe
จากไดเรกทอรีรากของแผ่น CD สนับสนุน
2. เสียบไวร์เลส อะแดปเตอร์ลงในพอร์ต USB ของคอมพิวเตอร์ของคุณ
3. โปรแกรมการติดตั้งก็จะสมบูรณ์
หมายเหตุ:สำหรับรายละเอียดเพิ่มเติมและขั้นตอนการกำหนดค่าขั้นสูง ให้ดูคู่มือผู้ใช้ที่ให้
มาในแผ่น CD สนับสนุน
Türkçe
1. Yardım CD’sini optik sürücüye yerleştirin, otomatik çalıştırma ekranı görüntüye
gelir. Kurulumu tamamlamak için takip eden ekran üstü talimatlara uyun.
NOT: Otomatik çalışma etkin değilse, yardım CD’sinin kök dizininden setup.exe‘yi
çalıştırın.
2. Kablosuz adaptörü bilgisayarın USB bağlantı noktasına takın.
3. Kurulum programı tamamlandı.
NOT: Daha fazla bilgi ve gelişmiş yapılandırma talimatları için, yardım CD’sinde
bulunan kullanma kılavuzuna bakınız.
繁體中文
1.將驅動程式與應用程式光碟放入光碟機,自動安裝畫面會出現。請依螢幕提示完成
安裝。
注意:若自動安裝畫面未出現,請執行驅動程式與應用程式光碟根目錄下的Setup.
exe程式。
2.將無線網路卡連接到電腦的USB連接埠。
3.安裝完成。
注意:更多關於進階設定的說明,請參考驅動程式與應用程式光碟中的使用手冊。
Q5391_WL-167G V3 QSG.indd 2 7/7/10 10:57:44 AM
 Loading...