


Asus ROG Strix Carry Manual
|
Contents |
English ......................................................................................... |
2 |
...................................................................................... |
6 |
...................................................................................... |
8 |
Português do Brasil................................................................... |
10 |
Čeština ......................................................................................... |
12 |
Nederlands .................................................................................. |
14 |
Français ......................................................................................... |
16 |
Suomi ......................................................................................... |
18 |
Deutsch......................................................................................... |
20 |
Magyar ......................................................................................... |
22 |
Italiano ......................................................................................... |
24 |
Norsk ......................................................................................... |
26 |
Polski ......................................................................................... |
28 |
Română......................................................................................... |
30 |
Pyccкий......................................................................................... |
32 |
Español ......................................................................................... |
34 |
ةيبرعلا |
|
Arabic ......................................................................................... |
36 |
Svenska ......................................................................................... |
38 |
Українська................................................................................... |
40 |
......................................................................................... |
42 |
......................................................................................... |
44 |
Türkçe ......................................................................................... |
46 |
Slovenský ..................................................................................... |
48 |

Package contents
• 1 x ROG STRIX CARRY Gaming Mouse |
• 1 x ROG logo sticker |
||
• 2 x AA batteries |
• 1 x ROG travel pouch |
||
• |
1 x USB dongle |
• |
1 x ROG switch tweezer |
• |
2 x Japanese-made Omron mouse switches |
• |
User documentation |
Device features
English
2 |
Quick Start Guide |
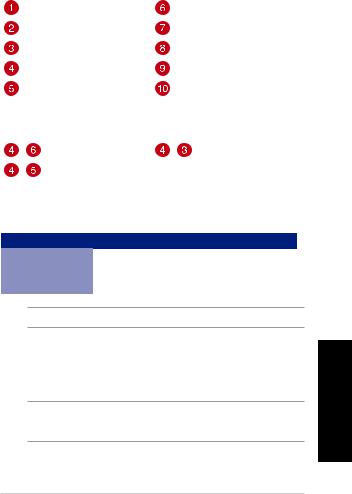
Left button |
Backward button |
Right button |
LED indicator |
Scroll wheel |
Mouse foot |
DPI button |
Optical sensor |
Forward button |
Connection mode switch |
Profile switching
+ |
Switch to Profile 1 |
+ |
Switch to Profile 3 |
+ |
Switch to Profile 2 |
|
|
Specifications
Profile |
Default DPI 1 |
Default DPI 2 |
|
|
|
Profile 1 |
1600 DPI |
400 DPI |
|
|
|
Profile 2 |
2200 DPI |
600 DPI |
|
|
|
Profile 3 |
3200 DPI |
800 DPI |
|
|
|
NOTE: The minimum DPI is 50 DPI, and increments at 50 DPI per interval.
Customizing with ROG Armoury
For more programmable buttons, performance settings, surface calibration, and sleep mode settings, download and install the ROG Armoury from www.asus.com.
NOTE: ROG Armoury does not support Bluetooth mode when customizing your gaming mouse. Ensure your gaming mouse is set to the RF 2.4G Wireless mode when using ROG Armoury.
English
ROG STRIX CARRY Gaming Mouse |
3 |
English
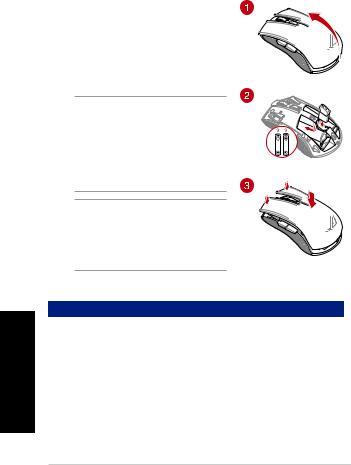
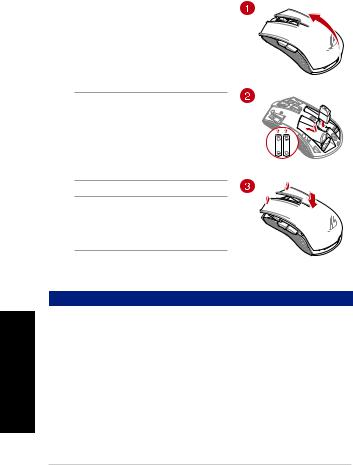
Getting started
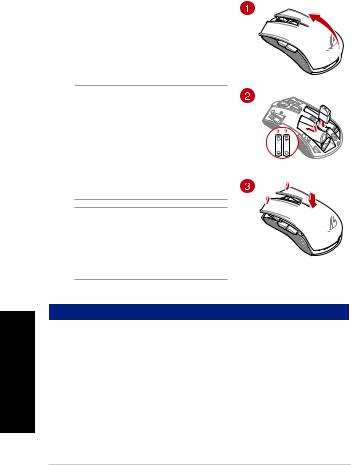
Installing the batteries to your gaming mouse:
1. Lift the top cover from the rear of your gaming mouse to remove the top cover.
2. Install the two (2) bundled AA batteries into the battery compartment of your ROG STRIX CARRY Gaming Mouse.
3. Replace the cover on top of your gaming mouse, then push down on the left and right mouse buttons to secure the top cover.
CAUTION!
• Ensurethebatteriesareinstalledinthecorrect orientation, refer to the direction indicated in the battery compartment.
• Ifyouwishtoreplacethedongle,ensurethatit is inserted in the correct orientation.
•Thebundledbatteriesarenon-rechargeable.
• DONOTmixnewbatterieswitholdbatteries.
IMPORTANT
• Onlyusealkalinebatterieswheninstalling batteries to your gaming mouse.
• Werecommendyouremovethebatteriesfrom your gaming mouse if the gaming mouse will not be in use for a prolonged period of time.
Refer to the table below for the battery status of your ROG STRIX CARRY Gaming Mouse.
LED color |
Duration |
Description |
|
|
|
|
|
Green* |
Lights up for 5 seconds |
Battery Power 25% - 100% |
|
|
|
|
|
Red |
Blinks twice every 0.5 seconds |
Battery Power under 25% |
|
*The LED indicator will light green only when you set the connection mode to RF 2.4G Wireless mode, or when setting to Bluetooth mode after the gaming mouse has already been paired.
To connect your ROG STRIX CARRY Gaming Mouse:
Using the RF 2.4G Wireless mode
1.Connect the bundled USB dongle to your computer’s USB port.
2.Set the connection switch to the RF 2.4G Wireless mode.
3.Your gaming mouse should automatically start pairing. Once your gaming mouse has been successfully paired, the LED indicator on your gaming mouse will light up green for 5 seconds.
4 |
Quick Start Guide |
Pairing your gaming mouse via Bluetooth
1.Set the connection switch to the Bluetooth connection mode.
2.Set up your PC to begin pairing. Click on Start > Control Panel > Devices and Printers, then click on Add a device and select ROG STRIX CARRY to begin pairing.
NOTE: The steps to set up your PC are the same for both Windows® 7 and Windows® 10.
3.Press and hold the Left button, Right button, and DPI button for approximately 3 seconds to start pairing. Once the LED indicator starts to blink blue you may release the buttons.
4.Once your gaming mouse has been successfully paired, the LED indicator on your gaming mouse will light up blue for 3 seconds.
IMPORTANT! If you encounter problems reconnecting your mouse after it has already been paired, remove the device from the device list, then follow steps 1 - 4 to reconnect it.
NOTE: To pair your gaming mouse to a different device, repeat step 3. This will reset the Bluetooth pairing and allow you to pair your gaming mouse to a different device.
Updating your gaming mouse and dongle
1.Connect the USB dongle to your computer’s USB port, then set your gaming mouse to the RF 2.4G Wireless mode .
2.Launch ROG Armoury, then update the firmware of your gaming mouse. Please refer to the ROG Armoury manual for more details on updating firmware.
NOTE: The LED indicator will blink red while the firmware is updating.
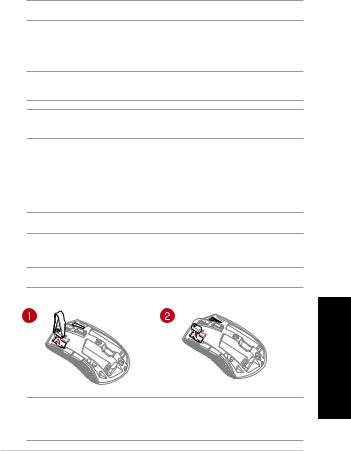
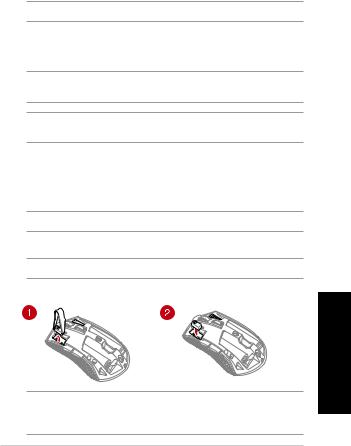
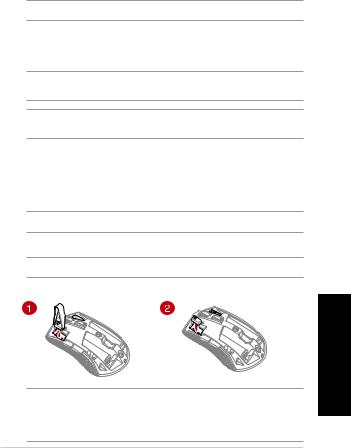
Replacing the switches
NOTE: Refer to www.asus.com for the list of compatible switches.
If you want to replace the switches, follow the steps below:
English
IMPORTANT!
•Ensuretoinstalltheswitchwithitsbuttonfacingthefrontofthemouse.
•Ensurethattheswitchesareseatedproperlyontheswitchsockets.
ROG STRIX CARRY Gaming Mouse |
5 |
1.
2. 2 AA ROG STRIX CARRY
3.
•
•
•
•
ROG STRIX CARRY
LED |
|
|
|
|
|
* |
5 |
25% - 100% |
|
|
|
|
0.5 2 |
25% |
*RF 2.4G LED
ROG STRIX CARRY
RF 2.4G
1.USB USB
2.RF 2.4G
3.LED
5
6 |
|

2.> > ROG STRIX
CARRY
Windows® 7 Windows® 10
3.DPI 3 LED
4.LED 3
1-4
3
1.USB USB RF 2.4G
2.ROG ArmouryROG Armoury
LED
https://www.asus.com/tw
ROG STRIX CARRY |
7 |
1.
2. 2 AA ROG STRIX CARRY
3.
•
•
•
•
ROG STRIX CARRY
LED |
|
|
|
|
|
* |
5 |
25% - 100% |
|
0.5 2 |
25% |
*RF 2.4G LED
ROG STRIX CARRY
RF 2.4G
1.USB USB
2.RF 2.4G
3.LED5
8 |
|
1.“ ”
2.> >“ROG STRIX CARRY”
Windows® 7 Windows® 10
3.DPI 3 LED
4.LED 3
複步驟1-4
3
1.USB USB RF 2.4G
2.ROG Armoury
ROG Armoury
LED
https://www.asus.com.cn
ROG STRIX CARRY |
9 |
Brasil do Português
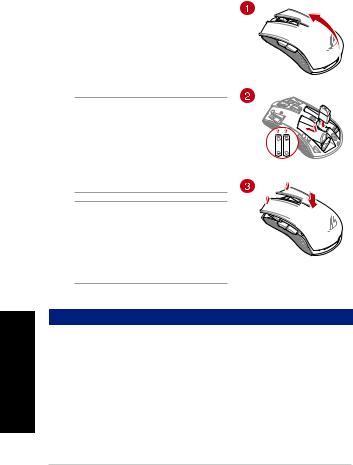
Iniciando
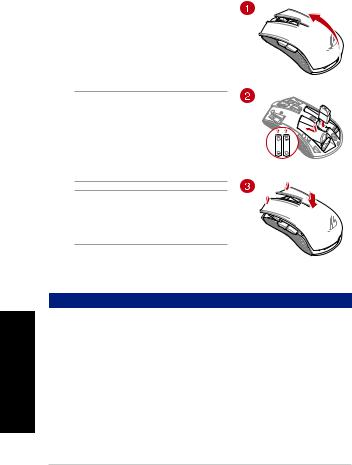
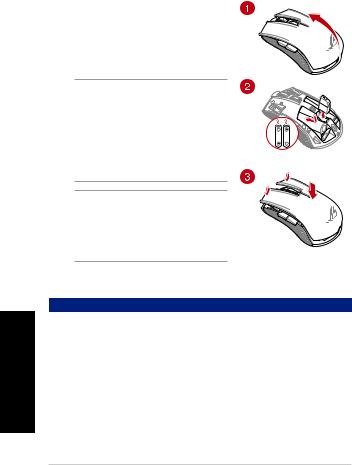
Instalando as baterias no seu mouse para jogos:
1. Eleve a tampa superior da parte traseira do seu mouse parajogospararemoveratampasuperior.
2. Instaleasduas(2)pilhasAAincluídasno compartimento da bateria do seu Mouse para Jogos ROG STRIX CARRY.
3. Recoloqueatampanapartesuperiordomousepara jogose,emseguida,pressioneosbotõesesquerdoe direitodomouseparafixaratampasuperior.
CUIDADO!
• Verifiqueseaspilhasestãoinstaladasna direçãocorreta,consulteadireçãoindicadano compartimento da bateria.
• Casodesejesubstituirodongle,assegureque eleestejainseridonanaorientaçãocorreta.
•Aspilhasincluídasnãosãorecarregáveis.
• NÃOmisturepilhasnovascompilhasvelhas.
IMPORTANTE!
• Utilizeapenaspilhasalcalinasaoinstalá-lasno seumouseparajogos.
• Recomendamosquevocêremovaaspilhasdo seumouseparajogosseomouseparajogos nãoestiveremusoporumperíodoprolongado de tempo.
Consulte a tabela abaixo para status da pilha do seu Mouse para Jogo ROG STRIX CARRY.
Cor do LED |
Duração |
Descrição |
|
|
|
|
|
Verde* |
Acende por 5 segundos |
Energia da Bateria 25% - 100% |
|
Vermelho |
Pisca duas vezes a cada 0,5 segundos |
Bateria com Menos de 25% |
|
*O indicador de LED acenderá em verde somente quando você definir o modo de conexão para o modo Sem Fio 2.4G RF ou ao configurar para o modo Bluetooth depois que o mouse para jogos já tiver sido emparelhado.
Para conectar o seu Mouse de Jogo ROG STRIX CARRY:
Usando o modo sem fio RF 2.4G
1.ConecteodongleUSBintegradoàportaUSBdocomputador.
2.DefinaachavedeconexãoparaomodoSemFioRF2.4G.
3.Seumouseparajogosdeveiniciarautomaticamenteoemparelhamento.Umavezqueomouse tenhasidoemparelhadocomsucesso,oindicadorLEDdomouseparajogoficaráverdepor5 segundos.
10 |
Guia de Início Rápido |
Emparelhando seu mouse de jogo via Bluetooth
1.DefinaachavedeconexãoparaomododeconexãoBluetooth.
2.ConfigureoseuPCparacomeçaroemparelhamento.CliqueemIniciar > Painel de Controle > Dispositivos e Impressoras,cliqueemAdicionar um dispositivo e selecione ROG STRIX CARRY para iniciar o emparelhamento.
NOTA: AsetapasparaconfiguraroseuPCsãoasmesmasparaoWindows®7eoWindows®10.
3.Pressione e segure o botão Esquerda, o botão Direito e o botão DPI por aproximadamente 3 segundosparainiciaroemparelhamento.QuandooindicadorLEDcomeçarapiscaremazul,você poderásoltarosbotões.
4.Umavezqueomousetenhasidoemparelhadocomsucesso,osLEDsdomousedejogoficarão acesos em azul por 3 segundos.
IMPORTANTE! Sevocêencontrarproblemasparareconectaromousedepoisqueelejátiver sidoemparelhado,removaodispositivodalistadedispositivosesigaasetapas1a4para reconectá-lo.
NOTA: Paraemparelharoseumouseparajogoaumdispositivodiferente,repitaopasso3. IssoredefiniráopareamentoBluetoothepermitiráquevocêemparelheseumouseparaum dispositivodiferente.
Atualização do seu mouse e emulador para jogos
1.ConecteodongleUSBàportaUSBdocomputadoredefinaomouseparaomodoRF2.4GWireless.
2.InicieoROGArmoryedepoisatualizeofirmwaredoseumouseparajogos.Porfavor,consulteo manualdaROGArmoryparamaisdetalhessobreatualizaçãodefirmware.
NOTA: OindicadorLEDpiscaráemvermelhoenquantoofirmwareestiveratualizando.
Substituindo os interruptores
NOTA: Consulte www.asus.comparaalistadeopçõescompatíveis.
Sevocêquisersubstituirosbotões,sigaospassosabaixo:
IMPORTANTE!
•Certifique-sedeinstalarointerruptorcomseubotãoparafrentedomouseparaa tomada do interruptor.
•Certifique-sedequeosinterruptoresestãoposicionadoscorretamentenastomadas.
Português do Brasil
Mouse de Jogo ROG STRIX CARRY |
11 |
Čeština
Začínáme
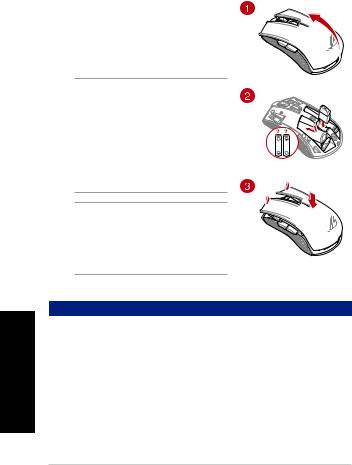
Vložení baterií do herní myši:
1. Zvednětehorníkrytzezadnístranyhernímyšia sejmětejej.
2. DobateriovépřihrádkyhernímyšiROGSTRIXCARRY vložtedvě(2)přiloženébaterieAA.
3. Nasaďte horní kryt na horní stranu herní myši a potom jejstisknutímlevéhoapravéhotlačítkamyšizajistěte.
POZOR!
• Zajistěte,abybylybaterienainstaloványve správné orientaci, která je uvedena v bateriové přihrádce.
• Chcete-liznovupřipojitadaptérdongle,dejte pozor, abyste jej zasunuli ve správné orientaci.
• Přiloženébaterienejsounabíjecí.
•NEKOMBINUJTEnovéastarébaterie.
DůLEžIté!
• Dotétohernímyšivkládejtepouzealkalické
baterie.
• Nebudete-litutohernímyšdelšídobu
používat,doporučujemevyjmoutbaterie.
V následující tabulce jsou uvedeny stavy baterií v herní myši ROG STRIX CARRY.
Barva |
Doba |
Popis |
||
indikátoru LED |
||||
|
|
|
||
|
|
|
||
Zelený* |
Svítí 5 sekund |
Nabití baterie 25 - 100 % |
|
|
|
|
|
||
červený |
Blikne dvakrát za 0,5 sekundy |
Nabití baterie pod 25 % |
|
|
*Indikátor LED svítí zeleně, pouze když nastavíte režim bezdrátového připojení RF 2.4G nebo nastavíte režim Bluetooth po spárování herní myši.
Pokyny pro připojení herní myši ROG StRIX CARRY:
Pomocí bezdrátového radiofrekvenčního režimu 2,4 G
1.PřipojtedodanýkabelUSBadaptérkportuUSBpočítače.
2.Nastavtepřepínačpřipojenínabezdrátovýradiofrekvenčnírežim2,4G.
3.Hernímyšbysemělaautomatickyzačítpárovat.Poúspěšnémspárováníhernímyšibude indikátorLEDnamyšisvítit5sekundzeleně.
12 |
Rychlý průvodce |
Párování herní myši přes Bluetooth
1.NastavtepřepínačpřipojenídorežimupřipojeníBluetooth.
2.Spusťtepárovánívnastavenípočítače.KliknětenamožnostStart > Ovládací panely > Zařízení a tiskárny,potékliknětenaPřidat zařízení a vyberte ROG StRIX CARRY.
POZNÁMKA: PostupnastavenípočítačejestejnýproWindows®7aWindows®10.
3.Stisknutímapodrženímlevého, pravého a DPI tlačítka přibližně3sekundyzahajtepárování. JakmileindikátorLEDzačneblikatmodře,můžetetlačítkauvolnit.
4.PoúspěšnémspárováníhernímyšiseLEDkontrolkynahernímyširozsvítímodřepodobu3 sekund.
DůLEžIté! Pokudzaznamenáteproblémysopětovnýmpřipojenímmyši,kterábylajiž spárována,odebertezařízenízeseznamuapotéjejznovupřipojtepodlefázípostupu1až4.
POZNÁMKA: Chcete-li spárovat herní myš s jiným zařízením, zopakujte krok 3. Tím se resetuje spárování Bluetooth a nyní lze spárovat herní myš s jiným zařízením.
Aktualizace herní myši a hardwarového klíče
1.PřipojteUSBadaptérkportuUSBpočítačeapotomnastavtehernímyšnabezdrátovýrežimRF 2.4G.
2.SpusťteROGArmoury,potéaktualizujtefirmwarehernímyši.Podrobnéinformaceoaktualizaci firmwarunajdetevpříručceROGArmoury.
POZNÁMKA: BěhemaktualizovánífirmwarubudeindikátorLEDblikatčerveně.
Vyměňte spínače
POZNÁMKA: Seznamkompatibilníchspínačůnajdetenawebuwww.asus.com.
Přivýměněspínačůpostupujtepodlenásledujícíchkroků:
Čeština
DůLEžIté!
•Spínačjetřebadopozicenainstalovattak,abyjehotlačítkosměřovalokpřednístraně myši.
•Spínačemusíbýtřádněusazenévpozicích.
Herní myši ROG STRIX CARRY |
13 |
Nederlands
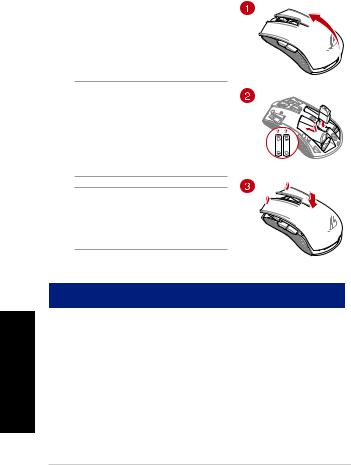
Aan de slag
De batterijen in uw gamemuis installeren:
1. Tildebovenklepvanafdeachterkantvanuwgamemuis op om de bovenklep te verwijderen.
2. Installeer de twee (2) meegeleverde AA-batterijen in het batterijvak van uw ROG STRIX CARRY gamemuis.
3. Plaats de klep terug op de bovenkant van de gamemuis en druk dan op de linkeren rechtermuisknoppen om de bovenklep vast te maken.
VOORZICHTIG!
• Controleerofdebatterijenindecorrecte richting zijn geïnstalleerd en volg hiervoor de richting die is aangegeven in het batterijvak.
• Alsudedonglewiltvervangen,moetu controlerenofdezeindejuistestandis geplaatst.
•Demeegeleverdebatterijenzijnniet oplaadbaar.
• NieuwebatterijenNIETcombinerenmetoude.
BELANGRIJK!
• Gebruikalleenalkalinebatterijenvooruw gamemuis.
• Wijradenuaandebatterijenuitdegamemuis te verwijderen als u de muis niet zult gebruiken gedurende langere tijd.
Raadpleeg de onderstaande tabel voor de batterijstatus van uw ROG STRIX CARRY gamemuis.
Led-kleur |
Duur |
Omschrijving |
|
|
|
|
|
Groen* |
Licht op gedurende 5 seconden |
Batterijvermogen 25% - 100% |
|
|
|
|
|
Rood |
Knippert twee keer elke 0,5 seconden |
Batterijvermogen minder dan 25% |
|
*De LED-indicator zal alleen groen oplichten als u de verbindingsmodus op RF 2.4G draadloze modus instelt of als u de Bluetooth-modus instelt nadat de gamemuis al is gekoppeld.
Uw ROG STRIX CARRY gamingmuis aansluiten:
Met de RF 2.4G draadloze modus
1.Sluit de meegeleverde USB-dongle aan op de USB-poort van uw computer.
2.Stel de verbindingsschakelaar in op de RF 2.4G draadloze modus.
3.Uw gamemuis zou het koppelen automatisch moeten starten. Zodra uw gamemuis is gekoppeld, lichtdeLED-indicatoropuwgamemuisgroenopgedurende5seconden.
14 |
Beknopte handleiding |

Uw gamingmuis koppelen via Bluetooth
1.Stel de aan/uit schakelaar in op de Bluetooth.
2.Stel uw pc in om het koppelen te starten. Klik op Start > Configuratiescherm > Apparaten en printers, en klik dan op Een apparaat toevoegen en selecteer ROG STRIX CARRY om het koppelen te starten.
OPMERKING: DestappenvoorhetinstellenvanuwpczijndezelfdealsvoorWindows®7en
Windows®10.
3.Houd de linkerknop, rechtsknop en DPI-knop circa 3 seconden ingedrukt om het koppelen te starten.ZodradeLED-indicatorbegintblauwteknipperen,magudeknoppenloslaten.
4.Zodrauwgamingmuisisgekoppeld,lichtendeLED’sopuwgamingmuisblauwopgedurende3 seconden.
BELANGRIJK! Als u problemen ondervindt bij het opnieuw verbinden van uw muis nadat deze al werd gekoppeld, verwijdert u het apparaat uit de apparaatlijst en volgt u de stappen 1 - 4 om opnieuw te verbinden.
OPMERKING: Omuwgamemuistekoppelenmeteenanderapparaat,herhaaltustap3.Dit zal het koppelen via Bluetooth resetten waardoor u uw gamemuis kunt koppelen met een ander apparaat.
Uw gamingmuis en dongle bijwerken
1.Sluit de USB-dongle aan op de USB-poort van uw computer en stel dan uw gamemuis in op de RF 2.4G draadloze modus.
2.Start ROG Armoury en werk dan de firmware van uw gamingmuis bij. Raadpleeg de ROG Armoury-handleiding voor meer details over het bijwerken van de firmware.
OPMERKING: DeLED-indicatorzalroodknipperenterwijldefirmwarewordtbijgewerkt.
Vervang de schakelaars
OPMERKING: raadpleeg www.asus.com voor een lijst van compatibele switches. Volg de onderstaande stappen als u de switches wilt vervangen:
BELANGRIJK!
•Zorgdatudeswitchinstalleertmetdeknopnaardevoorkantvandemuisnaarde switch-socket gericht.
•Controleerofdeswitchesgoedindeswitch-socketszitten.
Nederlands
ROG STRIX CARRY gamingmuise |
15 |
Français
Mise en route
Installer les piles sur votre souris gaming :
1. Soulevezlacoqueàpartirdel'arrièredelasourispourlaretirer.
2. Installez les deux (2) piles AA fournies dans le
compartiment à piles de votre souris gaming ROG STRIX CARRY.
3. Remettezenplacelacoquesurvotresourisgaming, puis appuyez sur les boutons gauche et droit de la souris pourfixerlacoque.
ATTENTION !
• Assurez-vousquelespilessontinstalléesdansle bonsens,reportez-vousàladirectionindiquée dans le compartiment à piles.
• Sivoussouhaitezremplacerledongle,assurezvousqu’ilestinsérédanslebonsens.
•Lespilesfourniesnesontpasrechargeables.
•NEPASmélangerdespilesneuvesavecdespiles
usagées.
IMPORTANT !
• Utilisezuniquementdespilesalcalineslorsque vous installez des piles sur votre souris gaming.
• Ilestrecommandéderetirerlespilesdevotre souris gaming si celle-ci n'est pas utilisée pendant une période prolongée.
Consultez le tableau ci-dessous pour connaître les différents états de charge de votre souris gaming ROG STRIX CARRY.
Couleur du voyant |
Durée |
Description |
Vert* |
S'allume pendant 5 secondes |
Batterie chargée à 25% - 100% |
|
|
|
Rouge |
Clignote deux fois toutes les 0,5 secondes |
Batterie chargée à moins de 25% |
*Le voyant ne s'allume en vert que lorsque vous définissez le mode de connexion sur le mode sans fil RF 2.4G ou lorsque vous passez en mode Bluetooth après que la souris gaming a déjà été associée.
Pour connecter votre souris gaming ROG STRIX CARRY :
Utiliser le mode sans fil RF 2.4G
1.InsérezledongleUSBfournisurl'undesportsUSBdevotreordinateur.
2.Réglez l'interrupteur de connexion sur le mode sans fil RF 2.4G.
3.Votresourisgamingdevraitautomatiquementdébuterl'association.Unefoisvotresourisgaming associéeavecsuccès,levoyantlumineuxdevotresourisgamings'allumeenvertpendant5 secondes.
16 |
Guide de démarrage rapide |

Associer votre souris gaming via le Bluetooth
1.Réglez l'interrupteur de connexion sur le mode de connexion Bluetooth.
2.Configurezvotreordinateurpourdébuterl'association.CliquezsurDémarrer > Panneau de configuration > Périphériques et imprimantes,puiscliquezsurAjouter un périphérique et sélectionnez ROG STRIX CARRY pour débuter l'association.
REMARQUE : LesétapesdeconfigurationdevotreordinateursontlesmêmespourWindows 7etWindows10.
3.MaintenezleBoutongauche,BoutondroitetBoutonDPIenfoncéspendantenviron3secondespour démarrerl'association.Unefoisquelevoyantcommenceàclignoterenbleu,vouspouvezrelâcherlesboutons.
4.Unefoisvotresourisgamingassociéeavecsuccès,levoyantlumineuxdevotresourisgaming s'allume en bleu pendant 3 secondes.
IMPORTANT ! Sivousrencontrezdesproblèmeslorsdelareconnexiondevotresourisaprès l'avoirassociée,retirezlepériphériquedelalistedespériphériques,puissuivezlesétapes1à4 pour le reconnecter.
REMARQUE : Pourassociervotresourisgamingàunautrepériphérique,répétezl'étape3.
Cela réinitialisera l'association Bluetooth et vous permettra d'associer votre souris gaming à un autrepériphérique.
Mettre à jour votre souris gaming et le dongle
1.ConnectezledongleUSBauportUSBdevotreordinateur,puisréglezvotresourisgamingsurle mode sans fil RF 2.4G.
2.LancezROGArmoury,puismettezàjourlefirmwaredevotresourisgaming.Veuillezconsulterle manueldeROGArmourypourplusdedétailssurlamiseàjourdufirmware.
REMARQUE : Levoyantclignoteenrougependantlamiseàjourdufirmware.
Remplacer les interrupteurs
REMARQUE : Rendez-vous sur le site www.asus.compour consulter la liste des interrupteurs compatibles.
Si vous souhaitez remplacer les interrupteurs de votre souris :
Français
IMPORTANT !
•Assurez-vousd'installerl'interrupteuravecleboutonorientéversl'avantdelasouris.
•Assurez-vousquelesinterrupteurssontcorrectementenclenchéssurleurinterfacede connexion.
Souris gaming ROG STRIX CARRY |
17 |
Suomi
Näin pääset alkuun
Paristojen asentaminen pelihiireen:
1. Nostayläkansipelihiirentakaayläkannenirrottamiseksi.
2. Asennakaksi(2)toimitukseenkuuluvaaAA-paristoa
ROG STRIX CARRY -pelihiiren paristolokeroon.
3. Aseta kansi takaisin pelihiiren päälle, paina sitten alasvasentajaoikeaahiiripainikettayläkannen kiinnittämiseksi.
VAARA!
• Varmista,ettäparistotonasennettuoikein suunnattuinaparistolokeronmerkintöjen mukaisesti.
• Joshaluatvaihtaakäyttöavaimen,varmista, ettäseonliitettyoikeansuuntaisesti.
• Toimitukseenkuuluvatparistoteivätole uudelleenladattavia.
•ÄLÄsekoitauusiajavanhojaparistoja
keskenään.
TÄRKEÄÄ!
• Käytäainoastaanalkaliparistoja,kunasennat paristot pelihiireen.
• Onsuositeltavaa,ettäpoistatparistot pelihiirestä,jossitäeitullakäyttämäänpitkään aikaan.
Katso alla olevasta taulukosta ROG STRIX CARRY -pelihiiren akun tila.
LED-merkkivalon väri |
Kesto |
Kuvaus |
|
|
|
Vihreä* |
Palaa 5 sekuntia |
Akkuteho 25–100 % |
|
|
|
Punainen |
Vilkkuu kahdesti 0,5 sekunnin välein |
Akkuteho alle 25 % |
*LED-merkkivalo palaa vihreänä vain, kun asetat yhteystilaksi RF 2,4 G -langattoman tilan, tai kun asetat laitteen Bluetooth-tilaan, kun pelihiiri on jo pariutettu.
ROG STRIX CARRY -pelihiiren liittäminen:
RF 2.4G Wireless -tilan käyttö
1.LiitätoimitukseenkuuluvaUSB-käyttöavaintietokoneenUSB-porttiin.
2.AsetaliitäntäkytkinRF2,4G-tilaan.
3.Pelihiirentulisialoittaapariutusautomaattisesti.Kupelihiirenpariuttaminenononnistunut, pelihiirenLED-merkkivalopalaavihreänä5sekuntia.
18 |
Pikaopas |
 Loading...