


ASUS P4T-CM User Manual

®
P4T-CM
Intel® 850 Micro-ATX Motherboard
USER’S MANUAL
ASUS P4T-CM User’s Manual 1

USER'S NOTICE
No part of this manual, including the products and software described in it, may be reproduced, transmitted, transcribed, stored in a retrieval system, or translated into any language in
any form or by any means, except documentation kept by the purchaser for backup purposes,
without the express written permission of ASUSTeK COMPUTER INC. (“ASUS”).
ASUS PROVIDES THIS MANUAL “AS IS” WITHOUT WARRANTY OF ANY KIND,
EITHER EXPRESS OR IMPLIED, INCLUDING BUT NOT LIMITED T O THE IMPLIED
WARRANTIES OR CONDITIONS OF MERCHANT ABILITY OR FITNESS FOR A PARTICULAR PURPOSE. IN NO EVENT SHALL ASUS, ITS DIRECTORS, OFFICERS,
EMPLOYEES OR AGENTS BE LIABLE FOR ANY INDIRECT, SPECIAL, INCIDENTAL, OR CONSEQUENTIAL DAMAGES (INCLUDING DAMAGES FOR LOSS OF
PROFITS, LOSS OF BUSINESS, LOSS OF USE OR DATA, INTERRUPTION OF BUSINESS AND THE LIKE), EVEN IF ASUS HAS BEEN ADVISED OF THE POSSIBILITY
OF SUCH DAMAGES ARISING FROM ANY DEFECT OR ERROR IN THIS MANUAL
OR PRODUCT.
Product warranty or service will not be extended if: (1) the product is repaired, modified or
altered, unless such repair, modification of alteration is authorized in writing by ASUS; or (2)
the serial number of the product is defaced or missing.
Products and corporate names appearing in this manual may or may not be registered trademarks or copyrights of their respective companies, and are used only for identification or
explanation and to the owners’ benefit, without intent to infringe.
• Adobe and Acrobat are registered trademarks of Adobe Systems Incorporated.
• Intel, LANDesk, and Pentium are registered trademarks of Intel Corporation.
• Trend and ChipAwayVirus are trademarks of Trend Micro, Inc.
• Windows and MS-DOS are registered trademarks of Microsoft Corporation.
The product name and revision number are both printed on the product itself. Manual revi-
sions are released for each product design represented by the digit before and after the period
of the manual revision number . Manual updates are represented by the third digit in the manual
revision number.
For previous or updated manuals, BIOS, drivers, or product release information, contact ASUS
at http://www.asus.com.tw or through any of the means indicated on the following page.
SPECIFICATIONS AND INFORMATION CONTAINED IN THIS MANUAL ARE FURNISHED FOR INFORMATIONAL USE ONLY, AND ARE SUBJECT TO CHANGE AT
ANY TIME WITHOUT NOTICE, AND SHOULD NOT BE CONSTRUED AS A COMMITMENT BY ASUS. ASUS ASSUMES NO RESPONSIBILITY OR LIABILITY FOR
ANY ERRORS OR INACCURACIES THA T MAY APPEAR IN THIS MANUAL, INCLUDING THE PRODUCTS AND SOFTWARE DESCRIBED IN IT.
Copyright © 2001 ASUSTeK COMPUTER INC. All Rights Reserved.
Product Name: ASUS P4T-CM
Manual Revision: 1.00 E795
Release Date: July 2001
2 ASUS P4T-CM User’s Manual

ASUS CONTACT INFORMATION
ASUSTeK COMPUTER INC. (Asia-Pacific)
Marketing
Address: 150 Li-Te Road, Peitou, Taipei, Taiwan 112
Telephone: +886-2-2894-3447
Fax: +886-2-2894-3449
Email: info@asus.com.tw
Technical Support
MB/Others (Tel): +886-2-2890-7121 (English)
Notebook (Tel): +886-2-2890-7122 (English)
Desktop/Server (Tel):+886-2-2890-7123 (English)
Fax: +886-2-2893-7775
Email: tsd@asus.com.tw
WWW: www.asus.com.tw
FTP: ftp.asus.com.tw/pub/ASUS
ASUS COMPUTER INTERNATIONAL (America)
Marketing
Address: 6737 Mowry Avenue, Mowry Business Center, Building 2
Newark, CA 94560, USA
Fax: +1-510-608-4555
Email: tmd1@asus.com
Technical Support
Fax: +1-510-608-4555
Email: tsd@asus.com
WWW: www.asus.com
FTP: ftp.asus.com/Pub/ASUS
ASUS COMPUTER GmbH (Europe)
Marketing
Address: Harkortstr. 25, 40880 Ratingen, BRD, Germany
Fax: +49-2102-442066
Email: sales@asuscom.de (for marketing requests only)
Technical Support
Hotline: MB/Others: +49-2102-9599-0 Notebook: +49-2102-9599-10
Fax: +49-2102-9599-11
Support (Email): www.asuscom.de/de/support (for online support)
WWW: www.asuscom.de
FTP: ftp.asuscom.de/pub/ASUSCOM
ASUS P4T-CM User’s Manual 3

CONTENTS
1. INTRODUCTION ............................................................................. 7
1.1 How This Manual Is Organized .................................................. 7
1.2 Item Checklist ............................................................................. 7
2. FEATURES ........................................................................................ 8
2.1 The ASUS P4T -CM .................................................................... 8
2.2 P4T-CM Motherboard Components.......................................... 12
3. HARDWARE SETUP ...................................................................... 14
3.1 P4T-CM Motherboard Layout .................................................. 14
3.2 Layout Contents ........................................................................ 15
3.3 Getting Started .......................................................................... 16
3.4 System Memory ........................................................................ 17
3.5 Central Processing Unit (CPU) ................................................. 19
3.5.1 CPU Installation ............................................................ 19
3.5.2 CPU Heatsink Retention Module Installation ............... 20
3.6 Expansion Cards ....................................................................... 22
3.7 External Connectors.................................................................. 24
3.9 Starting Up the First Time ........................................................ 35
4. BIOS SETUP..................................................................................... 37
4.1 Managing and Updating Your BIOS ......................................... 37
4.1.1 Upon First Use of the Computer System....................... 37
4.1.2 Updating BIOS Procedures ........................................... 38
4.2 BIOS Setup Program ................................................................ 41
4.2.1 BIOS Menu Bar ............................................................. 42
4.2.2 Legend Bar .................................................................... 42
4.3 Main Menu................................................................................ 44
4.3.1 Primary & Secondary Master/Slave .............................. 45
4.3.2 Keyboard Features ......................................................... 48
4.4 Advanced Menu ........................................................................ 50
4.4.1 Chip Configuration ........................................................ 53
4.4.2 I/O Device Configuration .............................................. 55
4.4.3 PCI Configuration ......................................................... 57
4.4.4 Shadow Configuration ................................................... 59
4.5 Power Menu .............................................................................. 60
4.5.1 Power Up Control.......................................................... 61
4.5.2 Hardware Monitor ......................................................... 62
4 ASUS P4T-CM User’s Manual

CONTENTS
4.6 Boot Menu ................................................................................ 63
4.7 Exit Menu ................................................................................. 65
5. SOFTWARE SETUP ....................................................................... 67
5.1 Install Operating System........................................................... 67
5.2 Start Windows........................................................................... 67
5.3 P4T-CM Motherboard Support CD........................................... 68
6. SOFTWARE REFERENCE ........................................................... 71
6.1 ASUS PC Probe ........................................................................ 71
6.2 ASUS Live Update ................................................................... 76
6.4 CyberLink PowerPlayer SE ...................................................... 77
6.5 CyberLink V ideoLive Mail....................................................... 78
7. APPENDIX....................................................................................... 81
7.1 Glossary .................................................................................... 81
INDEX ................................................................................................... 85
ASUS P4T-CM User’s Manual 5

FCC & DOC COMPLIANCE
This device complies with FCC Rules Part 15. Operation is subject to the following
two conditions:
• This device may not cause harmful interference, and
• This device must accept any interference received, including interference that
may cause undesired operation.
This equipment has been tested and found to comply with the limits for a Class B
digital device, pursuant to Part 15 of the FCC Rules. These limits are designed to
provide reasonable protection against harmful interference in a residential installation. This equipment generates, uses and can radiate radio frequency energy and, if
not installed and used in accordance with manufacturer's instructions, may cause
harmful interference to radio communications. However, there is no guarantee that
interference will not occur in a particular installation. If this equipment does cause
harmful interference to radio or television reception, which can be determined by
turning the equipment off and on, the user is encouraged to try to correct the interference by one or more of the following measures:
• Re-orient or relocate the receiving antenna.
• Increase the separation between the equipment and receiver.
• Connect the equipment to an outlet on a circuit different from that to which the
receiver is connected.
• Consult the dealer or an experienced radio/TV technician for help.
WARNING! Any changes or modifications to this product not expressly ap-
proved by the manufacturer could void any assurances of safety or performance
and could result in violation of Part 15 of the FCC Rules.
Reprinted from the Code of Federal Regulations #47, part 15.193, 1993. Washington DC: Office of the
Federal Register, National Archives and Records Administration, U.S. Government Printing Office.
Canadian Department of Communications Statement
This digital apparatus does not exceed the Class B limits for radio noise emissions
from digital apparatus set out in the Radio Interference Regulations of the Canadian
Department of Communications.
This Class B digital apparatus complies with Canadian ICES-003.
Cet appareil numérique de la classe B est conforme à la norme NMB-003 du Canada.
6 ASUS P4T-CM User’s Manual
1. INTRODUCTION
1.1 How This Manual Is Organized
This manual is divided into the following sections:
1. INTRODUCTION Manual information and checklist
2. FEATURES Production information and specifications
3. HARDWARE SETUP Intructions on setting up the motherboard.
4. BIOS SETUP Intructions on setting up the BIOS
5. SOFTWARE SETUP Intructions on setting up the included software
6. SOFTWARE REFERENCE Reference material for the included software
7. APPENDIX Optional items and general reference
1.2 Item Checklist
Check that your package is complete. If you discover damaged or missing items,
contact your retailer.
Manual / Checklist
1. INTRODUCTION
Package Contents
(1) ASUS Motherboard
(1) 40-pin 80-conductor ribbon
cable for internal UltraDMA33/
66/100 IDE drives
(1) Ribbon cable for (1) 5.25” and (2)
3.5” floppy disk drives
(1) COM Port Bracket and Cable
(1) ASUS 2-port USB connector set
with bracket
(1) I/O port bracket
(1) Bag of spare jumpers
(1) Support drivers and utilities
(1) This Motherboard User’s Manual
(1) CPU Retention Module
(1) CD Audio
Optional Items
ASUS IrDA-compliant infrared
module
ASUS PCI-L101 W ake-On-LAN 10/
1000 ethernet card
ASUS P4T-CM User’s Manual 7

2.1 The ASUS P4T -CM
The ASUS P4T-CM motherboard is carefully designed for the demanding PC user
who wants advanced features processed by the fastest processors.
2.1.1 Specifications
• Intel Processor Support: Intel Socket 423 Pentium® 4 processors.
• Intel 850 Chipset: Features the Intel
2. FEATURES
Performance
• Intel ICH2: The Intel I/O Controller Hub 2 (ICH2) features support for
• PC800 Memory Support: Equipped with two Rambus Inline Memory Module
• Intel
2. FEATURES
®
850 chipset (Memory Controller Hub,
I/O Controller Hub, and Firmware Hub) with support for AGP 4X mode; 400MHz
Front Side Bus (FSB); and dual channel RDRAM.
UltraDMA/100, which allows burst mode data transfer rates of up to 100MB/
sec; and two USB controllers for a total of 4 USB ports.
(RIMM) sockets to support Intel PC800/PC600-compliant Rambus DRAMs
(RDRAMs) (available in 64, 96, 128, 192, 256, 512MB densities) up to 1GB.
These RDRAMs are necessary to meet the increase in processor performance
and multimedia and 3D functions, especially where high bandwidth is required.
®
Accelerated Hub Architecture: Features a dedicated high speed hub
link between the ICH2 and MCH with a bandwidth of 266MB/sec – twice the
maximum bandwidth of the PCI bus.
• AGP 4X Slot: Comes with an Accelerated Graphics Port 4X slot that supports
AGP cards for high performance, component level interconnect targeted at 3D
graphical applications using a 4X mode bus. The slot is keyed to support only
the latest 1.5 volt AGP cards: i.e.: ASUS V3800 and newer versions.
• UltraDMA/100 Support: Comes with an onboard PCI Bus Master IDE controller
with two connectors that support four IDE devices on two channels. Supports
UltraDMA/100, UltraDMA/66, UltraDMA/33, PIO Modes 3 & 4 and Bus Master
IDE DMA Mode 2, and Enhanced IDE devices, such as DVD-ROM, CD-ROM,
CD-R/R W, LS-120, and Tape Backup drives.
• More USB Ports: Supports a total of 4 USB ports for more peripheral connec-
tivity options.
• Wake-Up Support: Supports Wake-On-LAN, Keyboard Wake-Up, and BIOS
Wake-Up.
• PC Health Monitoring: An easy way to examine and manage system status
information, such as CPU and systerm voltages, temperatures, and fan status
through the onboard hardware and the bundled ASUS PC Probe or Intel LDCM
software.
• Legacy Free: Provides three 32-bit PCI (PCI 2.2 compliant) with no ISA, elimi-
nating bottlenecks and system memory management issues. All PCI slots can
support Bus Master PCI cards, such as SCSI or LAN cards. (PCI supports up to
133MB/s maximum throughput.)
8
ASUS P4T-CM User’s Manual

2. FEATURES
• Low Pin Count (LPC) Multi-I/O: Provides two high-speed UAR T compatible
serial ports and one parallel port with EPP and ECP capabilities. UART2 can
also be directed from COM2 to the Infrared Module for wireless connections.
• Enhanced ACPI & Anti-Boot Virus Protection: Programmable BIOS (Flash
EEPROM), offering enhanced ACPI for Windows 98/2000/Millenium compatibility, built-in firmware-based virus protection, and autodetection of most devices for virtually automatic setup.
• Smart BIOS: 2Mbit firmware gives a new easy-to-use interface which provides
more control and protection over the motherboard. Provides Vcore and CPU/
RDRAM frequency adjustments, boot block write protection, and HD/SCSI/MO/
ZIP/CD/Floppy boot selection.
• IrDA: Supports an optional infrared port module for a wireless interface.
• Concurrent PCI: Concurrent PCI allows multiple PCI transfers from PCI mas-
ter bus to the memory and processor.
2.1.2 Optional Components
2. FEATURES
Optional Components
• Realtek RTL8139C Ethernet: (optional) Single chip fast ethernet controller
for 100/10 Mbps data transfer capacity. (See 4.4.2: I/O Device Configuration
in BIOS setup).
• IEEE 1394 Controller Interface: (optional) Integrated 3 Port TI
capable link-layer controller and 400Mbps physical layer controller provides
the fastest available digital interface for throughput intensive consumer
electronics devices like: DV camcorders, digital cameras, scanners, and
printers. The IEEE-1394 supports traditional asynchronous data transfer as well
as isochronous (real-time) data transfer. Up to 63 peripheral devices may be
connected simultaneously. The IEEE 1394 is the fastest available interface for
the latest consumer electronics devices.
• AC’97 Codec: (optional) The latest high-performance mini-chipset supports
hi-fidelity 18-bit stereo, full duplex audio performance. The chipset supporst up
to four analog line inputs, two stereo outputs, and one mono output channel.
Added featuers include 3D stereo enhancement, and extra true line-level out for
headphones and speaker amplifiers.
®
400Mbps
ASUS P4T-CM User’s Manual 9

2.1.3 Performance Features
• High-Speed Data T ransfer Interface: Onboard IDE Bus Master controller with
2. FEATURES
Specifications
• RDRAM Optimized Performance: This motherboard supports the new gen-
• ACPI Ready: ACPI (Advanced Configuration and Power Interface) is also imple-
2. FEATURES
two connectors that support four IDE devices in two channels. Supports
UltraDMA/100/66, UltraDMA/33 (IDE DMA Mode 2), PIO Modes 3 & 4, and
supports Enhanced IDE devices, such as DVD-ROM, CD-ROM, CD-R/RW,
LS-120, and Tape Backup drives. UltraDMA/100 is backward compatible with
DMA/66, DMA/33, and DMA and with existing DMA devices and systems so
there is no need to upgrade current EIDE/IDE drives and host systems.
(UltraDMA/66/100 requires a 40-pin 80-conductor cable to be enabled.)
eration memory , Rambus Dynamic Random Access Memory (RDRAM). While
PC100 SDRAM modules operate at 100MHz with a peak bandwidth of 0.8GB/s,
MCH dual channel Rambus DRAMs can operate at up to 400 MHz with a peak
bandwidth of 3.2GB/s.
mented on all ASUS smart series motherboards. ACPI provides more Energy
Saving Features for future operating systems (OS) supporting OS Direct Power
Management (OSPM) functionality . W ith these features implemented in the OS,
PCs can be ready around the clock, yet satisfy all the energy saving standards.
To realize the benefits of ACPI, an ACPI-supported OS, such as Windows 98/
2000/Millenium, must be used.
• Suspend and Go: Suspend-to-RAM (STR) provides maximum power savings
as an alternative to leaving the computer ON and QuickStart™ so that you do
not have to wait for a long time for system bootup.
• New Compliancy: Both the BIOS and hardware levels of the motherboard meet
the stringent requirements for PC 99 certification. The new PC 99 requirements
for systems and components are based on the following high-level goals: support for Plug and Play compatibility and power management for configuring
and managing all system components, and 32-bit device drivers and installation
procedures for W indows 95/NT and later. Color-coded connectors and descriptive icons make identification easy as required by PC 99.
10
ASUS P4T-CM User’s Manual

2. FEATURES
2.1.4 Intelligence
• Auto CPU Throttling Function: Incorporated into this motherboard is a new
technology to enable Pentium 4 processors auto throttling function. When auto
throttling is enabled, the CPU with throttle down to 50% of its duty cycle when
the CPU temperature reaches the threshold and return to 100% of its duty cycle
when temperature lowers to normal level. This function ensures the best
performance and reliability.
• Fan Status Monitoring and Alarm: To prevent system overheat and system
damage, the CPU, PWR, and CHASSIS fans can be monitored for RPM and
failure. All the fans are set for its normal RPM range and alarm thresholds.
• T emperature Monitoring and Alert: T o prevent system overheat and system dam-
age, this motherboard supports processor thermal sensing and auto-protection.
• Voltage Monitoring and Alert: System voltage levels are monitored to ensure
stable current to critical motherboard components. Voltage specifications are
more critical for future processors, so monitoring is necessary to ensure proper
system configuration and management.
Intelligence
2. FEATURES
• System Resources Alert: Today’s operating systems, such as Windows 98/
Millenium, and W indows NT/2000, require much more memory and hard drive
space to present enormous user interfaces and run large applications. The onboard
hardware ASUS ASIC in conjunction with either the bundled ASUS PC Probe
or Intel LDCM will warn the user before the system resources are used up to
prevent possible application crashes. Suggestions will give the user information
on managing their limited resources more efficiently.
• Dual Function Power Button: Through BIOS, the power button can be defined
as the “Stand by” (ie.: Suspend or Sleep) button or as the Soft-Off (see ATX
Power / Soft-Off Switch Lead in 3.8 Connectors for more information) button.
Regardless of the setting, pushing the power button for more than 4 seconds will
enter the Soft-Off mode.
• Peripheral Power Up: Keyboard or Mouse power up can be enabled or dis-
abled through BIOS setup to allow the computer to be powered ON using your
keyboard or mouse click.
ASUS P4T-CM User’s Manual 11

2.2 P4T-CM Motherboard Components
See opposite page for locations.
Processor Support Socket 423 for Pentium 4 Processors ....................................... 1
2. FEATURES
MB Components
Main Memory Maximum 1GB support
Expansion Slots 3 PCI Slots .............................................................................. 17
2. FEATURES
Location
Chipsets Intel 850 Memory Controller Hub (MCH) ............................... 2
Intel I/O Controller Hub 2 (ICH2) ......................................... 11
4Mbit Firmware Hub (FWH) ................................................... 9
2 RIMM Sockets ...................................................................... 3
Dual Channel PC800/PC600 RDRAM support
1 Accelerated Graphics Port (AGP 4X) Slot .......................... 12
System I/O 2 IDE Connectors (UltraDMA33/66/100 support) ................... 5
1 Floppy Disk Drive Connector ............................................... 7
1 USB Header (supports 2 USB ports)................................... 10
1 IEEE 1394 Controller Interface........ (optional) (Bottom) 20
1 Parallel Port Connector ............................................. (Top) 20
1 Serial COM1 Port Connector .............................. (Bottom) 21
1 Serial COM2 Header ........................................................... 13
2 USB Port Connectors .......................................... (Bottom) 22
1 PS/2 Mouse Connector .............................................. (Top) 23
1 PS/2 Keyboard Connector ................................... (Bottom) 23
Audio AC’97 Audio CODEC ............................................................ 16
1 Game/MIDI Connector.............................................. (Top) 19
1 Line Out Connector ............................................. (Bottom) 19
1 Line In Connector................................................ (Bottom) 19
1 Line Microphone Connector ............................... (Bottom) 19
Network Features Realtek LAN Chip Controller ............................... (optional) 18
LAN (RJ-45) Connector ............................. (optional) (Top) 22
Wake-On-LAN Connector...................................................... 14
Hardware Monitoring Low Pin Count (LPC) Winbond Multi-I/O Chipset ................. 4
Power ATX Power Supply Connector ................................................. 6
ATX 12V Power Supply Connector ......................................... 6
Special Feature 1 iPanel Header ........................................................................ 8
Form Factor MicroATX
12
ASUS P4T-CM User’s Manual
2. FEATURES
2.2.1 Component Locations
23
22
21
20
19
14
63
725
2. FEATURES
Component Locations
18
17
16
12
11
10 913
814
ASUS P4T-CM User’s Manual 13
3. HARDWARE SETUP
3.1 P4T-CM Motherboard Layout
24.4cm (9.60in)
PS/2KBMS
T: Mouse
B: Keyboard
Top:
Bottom:
RJ-45
Motherboard Layout
3. H/W SETUP
USB1
USB2
COM1
Line
Out
Line
In
Mic
In
GAME_AUDIO
PARALLEL PORT
CPU_FAN
Socket 423
Intel 850
Memory
Controller
Hub (MCH)
P4T-CM
Accelerated Graphics Port (AGP)
Multi
I/O
ATX12V
PWR_FAN
ATX Power Connector
RIMMA1 (16/18 bit, 184-pin module)
®
RIMMB1 (16/18 bit, 184-pin module)
24.4cm (9.6in)
1
11
FLOPPY
Realtek
RTL8139C
Audio
Codec
AUX_CON
WOLCON
CD_IN
PCI1
PCI2
PCI3
COM2
CR2032 3V
Lithium Cell
CMOS Power
Intel I/O
Controller
Hub
(ICH2)
USB2
JP20
CHA_FAN
2Mbit
Firmware
HDLED
Hub
IR
AFPANEL
PRIMARY IDE
SECONDARY IDE
BUZ
PANEL
Grayed components are available only on certain models at the time of purchase.
14
ASUS P4T-CM User’s Manual

3. HARDWARE SETUP
3.2 Layout Contents
Memory, CPU and Expansion
1) RIMM A1 / B1 p.17 184-Pin System Memory Support
2) CPU p.19 Central Processing Unit (CPU)
3) Heatsink p.20 CPU Heatsink Retention Module Installation
4) PCI1/2/3 p.22 32-bit PCI Bus Expansion Slots
5) AGP 4X p.23 Accelerated Graphics Port (AGP 4X) Slot
Connectors
1) PS2KBMS p.24 PS/2 Mouse Connector (6 pin female)
2) PS2KBMS p.24 PS/2 Keyboard Connector (6 pin female)
3) PRINTER p.25 Parallel Port Connector (25 pin female)
4) COM1 p.25 Serial Port Connector (One 9 pin male)
5) USB p.26 Universal Serial Bus Ports (Two 4 pin female)
6) RJ45 p.26 Fast Ethernet Port Connector (optional)
7) IEEE 1394 p.26 IEEE-1394 Controller Con.(6 pin male) (optional)
8) GAME_AUDIO p.27 Joystick/MIDI Connector (15 pin female)
9) LINE-IN, -OUT, MIC p.27 Audio Port Connectors (Three 1/8” Female)
10) FLOPPY p.27 Floppy Disk Drive Connector (34-1pin)
11) PRIMARY/SECONDAR Y IDE p.28 Primary/Secondary IDE Connectors (Two 40-1 pin)
12) IA p.29 Internal Audio (4 pi n CD_IN, AUX)
13) 1394_CON p.29 IEEE-1394 Controller Header (Two 8 pin) (optional)
14) CHA_F AN, CPU_FAN p.30 CHA, CPU, PWR Fan Connectors (Three 3 pin)
PWR_FAN
15) WOLCON p.31 Wake-On-LAN Connector (3 pin)
16) USB2 p.31 USB Header (10-1 pin)
17) IR p.32 Standard Infrared (SIR) Module Connector (10-1 pin)
18) AFPANEL p.32 iPanel Connector (24-1 pin)
19) ATXPWR, ATX12V p.33 Power Supply (20 pin AC power) (4 pin 12V)
20) HDLED p.33 IDE Activity LED (2 pin HDLED)
21) PWRLED (PANEL) p.34 System Power LED Lead (3 -1 pin)
22) KEYLOCK (PANEL) p.34 Keyboard Lock Switch Lead (2 pin)
23) SPEAKER (PANEL) p.34 System Warning Speaker Connector (4 pin)
24) MSG.LED (PANEL) p.34 System Message LED (2 pin)
25) SMI (PANEL) p.34 System Management Interrupt Switch Lead (2 pin)
26) PWRSW (PANEL) p.34 ATX Power / Soft-Off Switch Lead (2 pin)
Layout Contents
3. H/W SETUP
27) RESET (PANEL) p.34 Reset Switch Lead (2 pin)
ASUS P4T-CM User’s Manual
15

3.3 Getting Started
IMPORTANT: Due to Pentium 4 CPU’s power consumption requirement, an
ATX12V power supply is recommended for this motherboard. For typical system
configurations, an ATX12V power supply that can supply at least 230W and at least
8.5A on the +12V lead is required. For heavily-loaded configurations, an ATX12V
power supply that can supply at least 300W is required.
Before using your computer, you must complete the following steps:
• Check Motherboard Settings
• Install Memory Modules
• Install the Central Processing Unit (CPU)
• Install Expansion Cards
• Connect Ribbon Cables, Panel Wires, and Power Supply
3. H/W SETUP
Getting Started
3. HARDWARE SETUP
WARNING! Computer motherboards and expansion cards contain very delicate
Integrated Circuit (IC) chips. To protect them against damage from static electricity, you should follow some precautions whenever you work on your computer.
1. Unplug your computer when working on the inside.
2. Use a grounded wrist strap before handling computer components. If you do
not have one, touch both of your hands to a safely grounded object or to a metal
object, such as the power supply case.
3. Hold components by the edges and try not to touch the IC chips, leads or connectors, or other components.
4. Place components on a grounded antistatic pad or on the bag that came with the
component whenever the components are separated from the system.
5. Ensure that the ATX power supply is switched off before you plug in or
remove the ATX power connector on the motherboard.
WARNING! Make sure that you unplug your power supply when adding or
removing system components. Failure to do so may cause severe damage to
your motherboard, peripherals, and/or components.
16 ASUS P4T-CM User’s Manual

3. HARDWARE SETUP
3.4 System Memory
NOTE: No hardware or BIOS setup is required after adding or removing memory.
This motherboard has two 184-pin Rambus Inline Memory Modules (RIMM) sockets.
These sockets support 64Mbit, 128Mbit, and 256Mbit Direct RDRAM technologies.
Location Memory Module Subtotal
RIMMA1
(Rows 0&1)
RIMMB1
(Rows 2&3)
IMPORTANT
1. The memory configuration of channel A (RIMMA1 ) and channel B
(RIMMB1) must be identical.
RDRAM x 1
RDRAM x 1
TOT AL SYSTEM MEMORY =
(1GB Max)
128MB RDRAM
128MB RDRAM
RIMMB1
RIMMA1
System Memory
3. H/W SETUP
ASUS P4T-CM User’s Manual
17

3.4.1 Installing Memory
The memory module (RIMM) will fit in only one orientation.
IMPORTANT: Do not touch the memory module’s connectors. Handle the mod-
ule only by the edges.
3. H/W SETUP
System Memory
3. HARDWARE SETUP
P4T-CM
®
P4T-CM 184-Pin RIMM Sockets
RIMM Sockets
RIMM with Heat Spreader
1. Make sure that the notch keys in the module are aligned with the small ribs
inside the RIMM sockets.
NOTCH KEYS
CONNECTORS
(TOP VIEW)
EJECTOR
RDRAM (with heat spreader)MOUNTING NOTCH
RIBS (inside socket)
2. With the ejectors in the open position (as shown), push down gently but firmly
on the memory module until it snaps into place. The guides on the socket’s
ejectors should go through the two mounting notches on the module and the
ejectors should close. If necessary, push the ejectors inward to secure the mod-
ule in place.
Removing Memory
T o release a memory module, push both ejectors outward and pull the module straight
up and out of the RIMM sockets.
WARNING! RIMM modules become extremely hot during operation. To re-
duce the risk of personal injury from hot surfaces, allow the modules to cool off
before removing them.
18 ASUS P4T-CM User’s Manual
3. HARDWARE SETUP
3.5 Central Processing Unit (CPU)
The motherboard provides a ZIF Socket for the P4 Socket 423 CPU. The CPU that
came with the motherboard should have a fan attached to it to prevent overheating.
If not, then purchase a fan before turning on the system.
Socket 423 Pentium 4
Gold Arrow
P4T-CM
®
P4T-CM Socket 423
3.5.1 CPU Installation
1. Locate the P4 Socket 423 and
open it by pulling the lever gently sideways away from the
socket. Then lift the lever upwards. The socket lever must be
fully opened (90 to 100 degrees).
2. Insert the CPU with the correct
orientation. The gold arrow of
the CPU must be oriented toward the outer corner of the
socket base nearest to the tip of
the lever handle.
Gold Arrow
CPU
3. H/W SETUP
3. Once completely inserted, press the CPU firmly and close the socket
lever until it snaps into its locked position.
CAUTION! The CPU fits in one orientation and should drop easily into
place. Do not force the CPU into the socket to avoid bending the pins. If
the CPU does not fit, check its alignment and look for bent pins.
ASUS P4T-CM User’s Manual
19
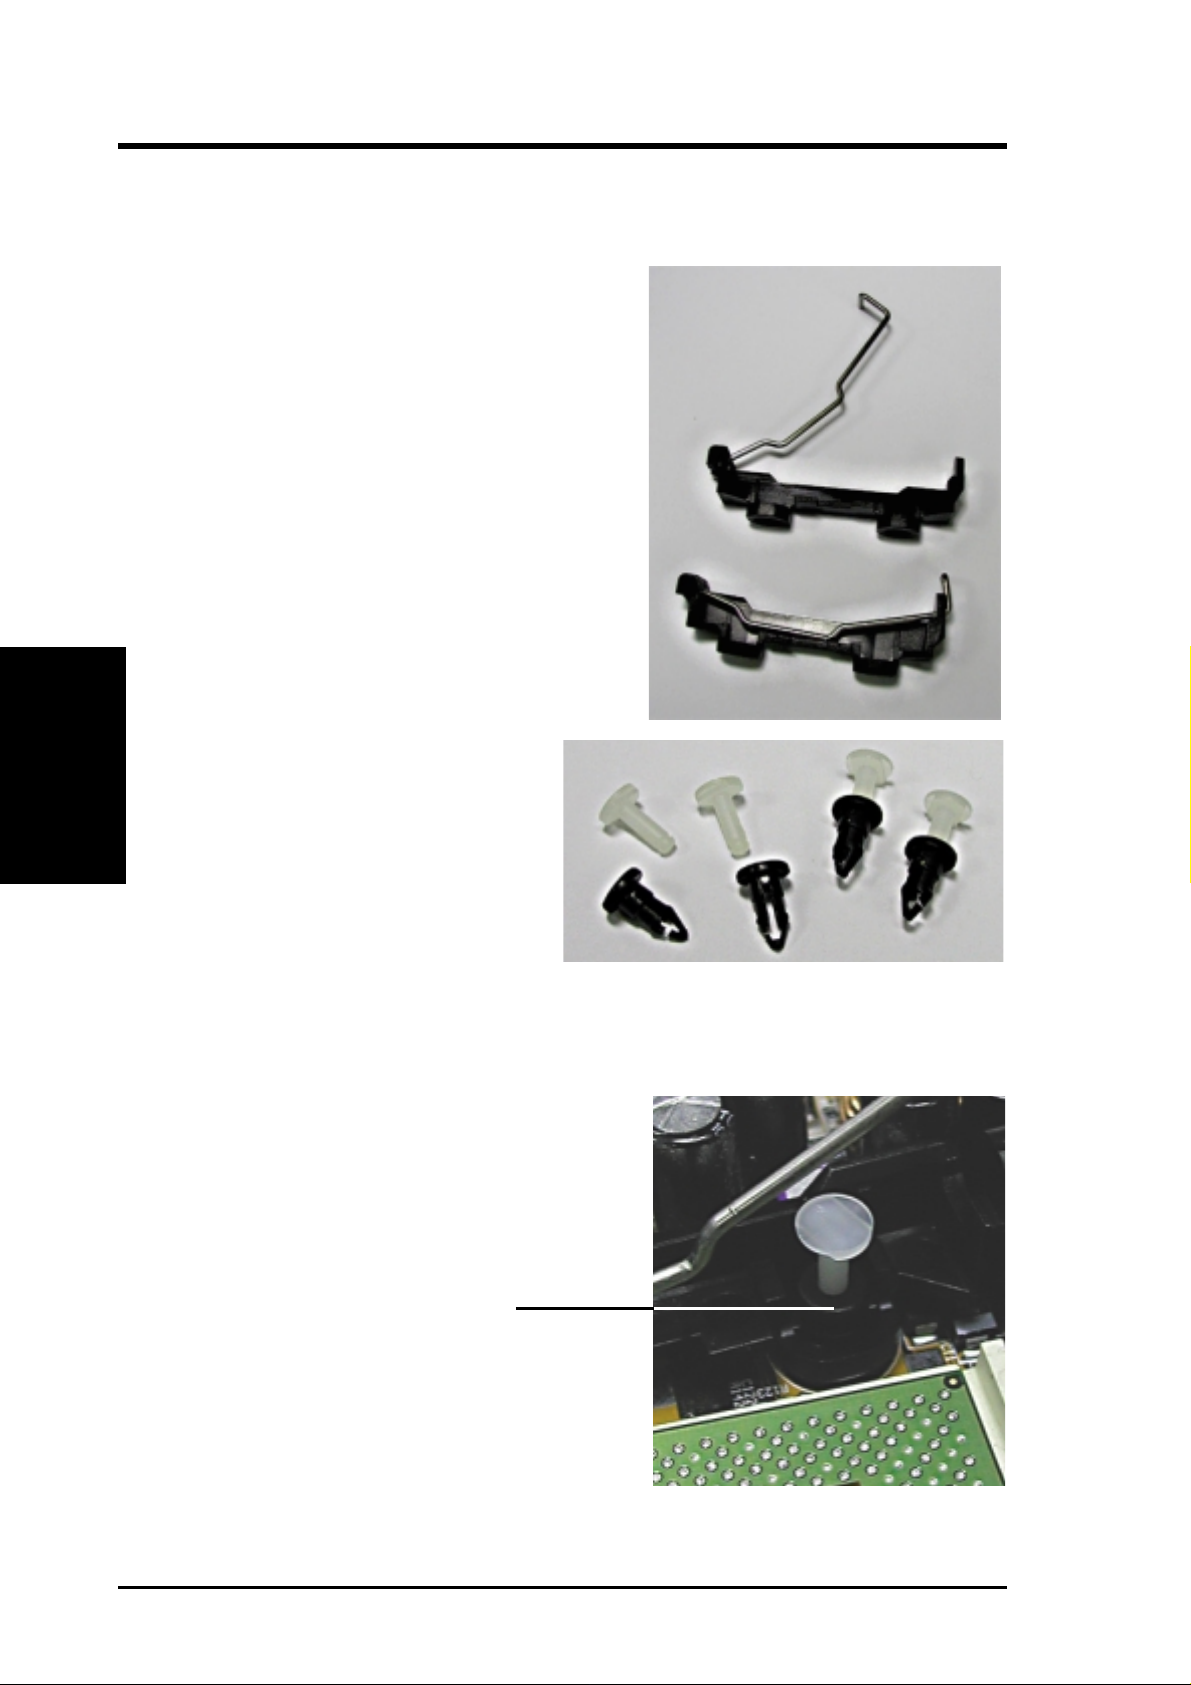
3.5.2 CPU Heatsink Retention Module Installation
Parts Inventory:
1. Two black plastic heatsink support
3. H/W SETUP
CPU Heatsink
3. HARDWARE SETUP
braces have built-in retaining clips.
2. Four black plastic collars and
four white plastic plugs.
Step 1: Mount the Heatsink Support Braces:
1. Mount the heatsink support braces:
insert the four black plastic collars from
the top through to the bottom of the
motherboard. Insert the white plastic
plugs into the middle of the black
plastic collars and pop them firmly out
the bottom of the motherboard.
20 ASUS P4T-CM User’s Manual
3. HARDWARE SETUP
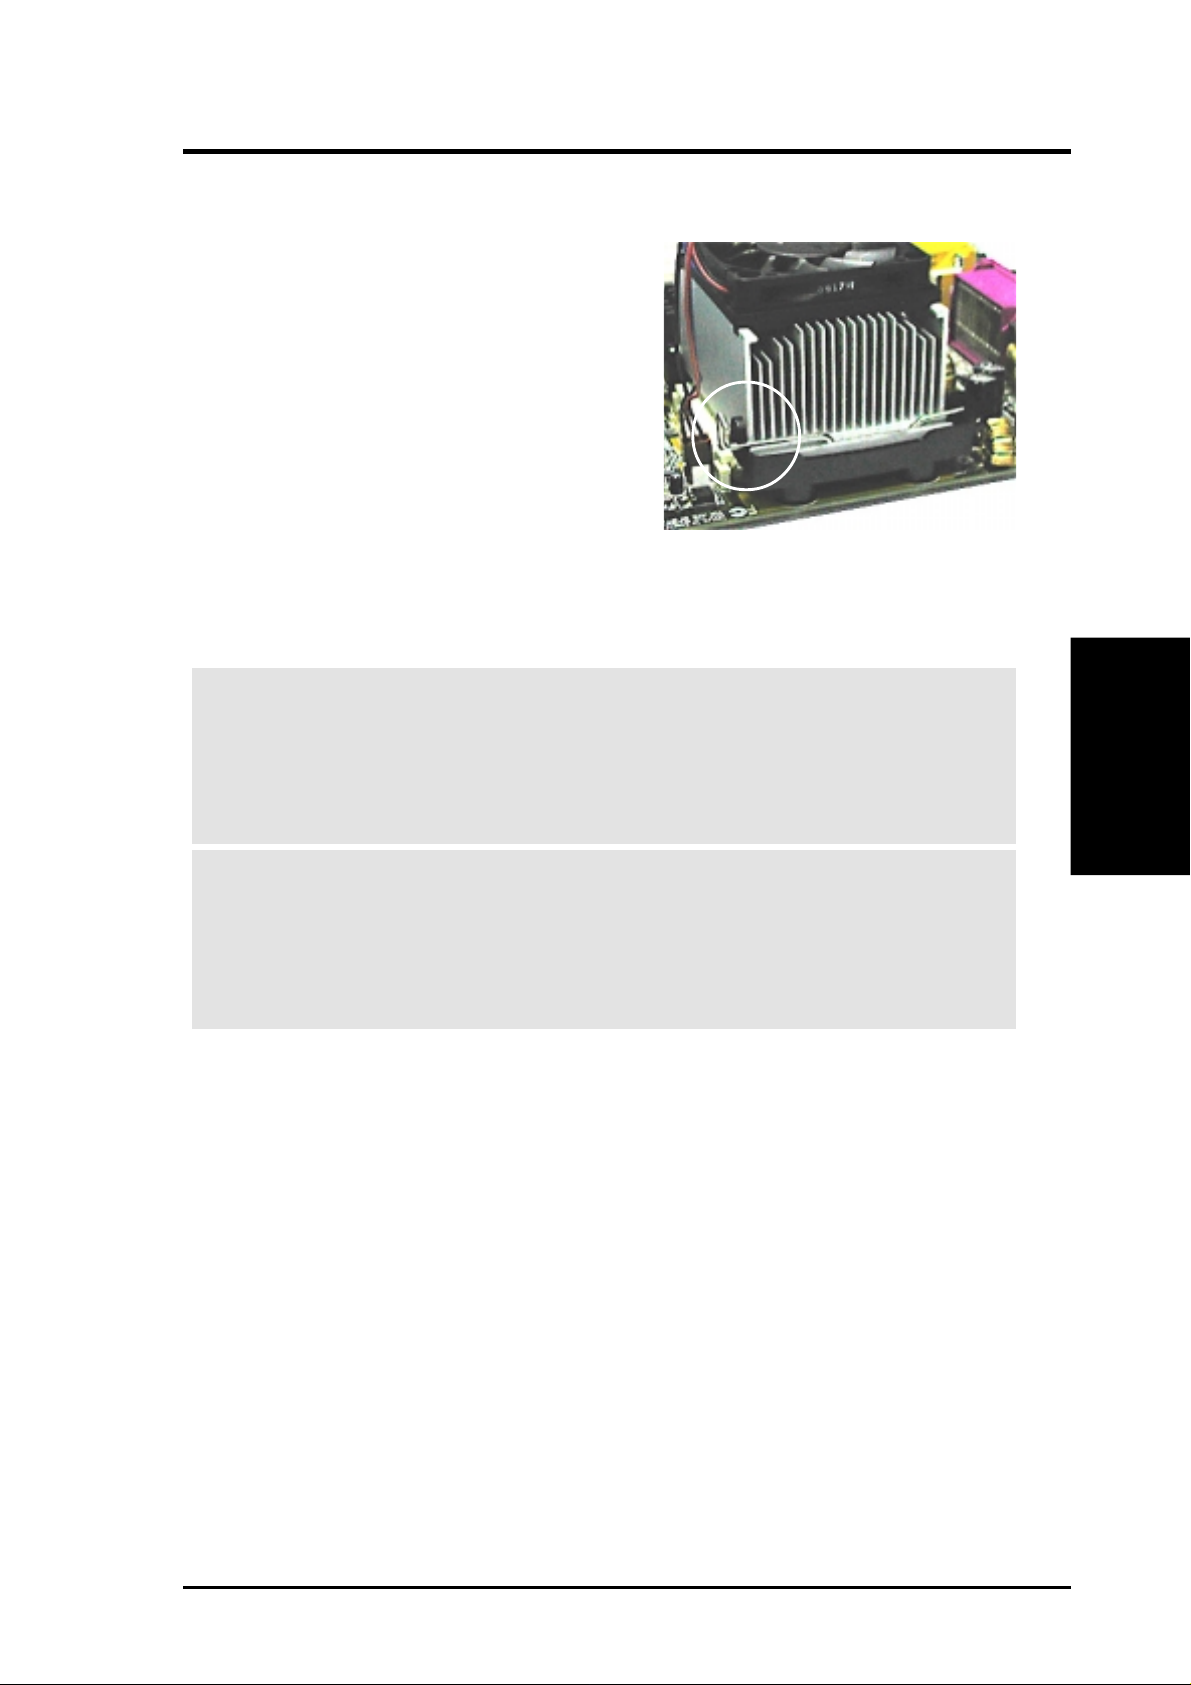
Step 2: Mount the Heatsink:
1. Open the retaining clips. Place the
heatsink on the CPU. The heatsink
should entirely cover the CPU. Then
close and snap the clips into the locked
position plastic heatsink support braces
have built-in retaining clips, right. With
the added weight of the CPU fan and
heatsink locking brace, no extra force is
required to keep the CPU in place.
2. Connect the CPU fan cable to the fan connector. (See 3.1 Motherboard
Layout / 3.8 Connectors).
CAUTION! Take care not to scrape the motherboard surface when
mounting a clamp-style processor fan, or else damage may occur . When
mounting a heatsink onto your CPU, make sure that exposed CPU
capacitors do not touch the heatsink, or else damage may occur! Refer
to heatsink/CPU documentation.
CPU Heatsink
3. H/W SETUP
WARNING! Be sure that there is sufficient air circulation across the
processor’s heatsink by regularly checking that your CPU fan is working. Without sufficient circulation, the processor could overheat and
damage both the processor and the motherboard. You may install an
auxiliary fan, if necessary.
ASUS P4T-CM User’s Manual
21

3.6 Expansion Cards
WARNING! Unplug your power supply when adding or removing expansion
cards or other system components. Failure to do so may cause severe damage to
both your motherboard and expansion cards (see 3.3 Hardware Setup Proce-
dure for more information).
3.6.1 Expansion Card Installation Procedure
1. Read the documentation for your expansion card and make any necessary hardware or software settings for your expansion card, such as jumpers.
2. Remove your computer system’s cover and the bracket plate on the slot you
intend to use. Keep the bracket for possible future use.
3. Carefully align the card’s connectors and press firmly.
4. Secure the card on the slot with the screw you removed above.
5. Replace the computer system’s cover.
Expansion Cards
3. H/W SETUP
6. Set up the BIOS if necessary
(such as IRQ xx Used By ISA: Yes in PNP AND PCI SETUP)
7. Install the necessary software drivers for your expansion card.
3. HARDWARE SETUP
3.6.2 Assigning IRQs for Expansion Cards
Some expansion cards need an IRQ to operate. Generally, an IRQ must be exclusively assigned to one use. In a standard design, there are 16 IRQs available but
most of them are already in use, leaving 6 IRQs free for expansion cards. If your
motherboard has PCI audio onboard, an additional IRQ will be used. If your moth-
erboard also has MIDI enabled, another IRQ will be used, leaving 4 IRQs free.
Standard Interrupt Assignments
IRQ Priority Standard Function
0 1 System Timer
1 2 Keyboard Controller
2 N/A Programmable Interrupt
3* 11 Communications Port (COM2)
4* 12 Communications Port (COM1)
5* 13 Sound Card (sometimes LPT2)
6 14 Floppy Disk Controller
7* 15 Printer Port (LPT1)
8 3 System CMOS/Real Time Clock
9* 4 ACPI Mode when enabled
10* 5 IRQ Holder for PCI Steering
11* 6 IRQ Holder for PCI Steering
12* 7 PS/2 Compatible Mouse Port
13 8 Numeric Data Processor
14* 9 Primary IDE Channel
15* 10 Secondary IDE Channel
*These IRQs are usually available for ISA or PCI devices.
22 ASUS P4T-CM User’s Manual
3. HARDWARE SETUP
Interrupt Request Table for this Motherboard
INT-A INT-B INT-C INT-D INT-E INT-F INT-G INT-H
PCI slot 1 —— ———shared ——
PCI slot 2 —————— used —
PCI slot 3 —————— —shared
AGP slot used ———————
USB HC0 ———used —— ——
USB HC1 —————— —shared
SMB — shared ——————
AC’97 — shared ———— ——
LAN —————shared ——
IEEE 1394 ——used ——— ——
IMPORTANT: If using PCI cards on shared slots, make sure that the drivers sup-
port “Share IRQ” or that the cards do not need IRQ assignments. Conflicts will arise
between the two PCI groups that will make the system unstable or cards inoperable.
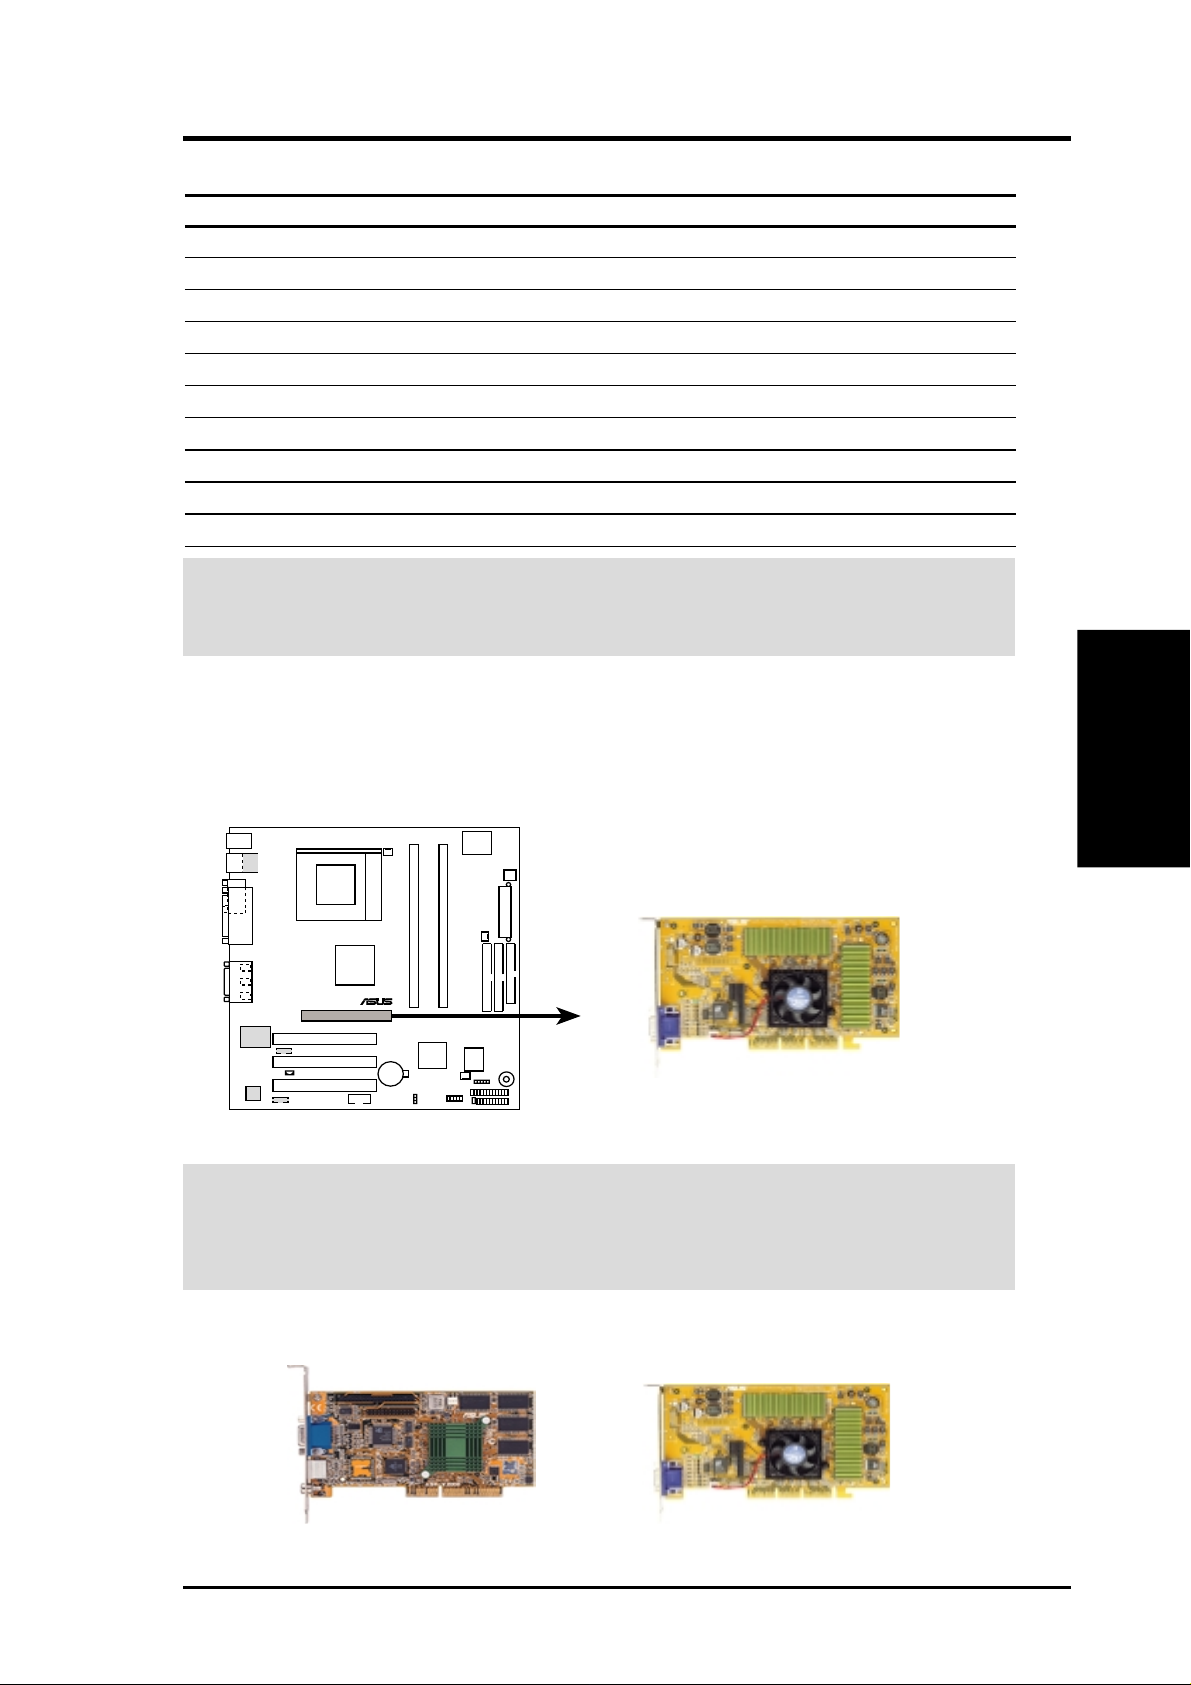
3.6.3 Accelerated Graphics Port (AGP 4X)
This motherboard provides an accelerated graphics port (AGP 4X) to support a new
generation of AGP graphics cards with ultra-high memory bandwidth.
P4T-CM
®
P4T-CM Accelerated Graphics Port (AGP)
IMPORTANT: Only 1.5V AGP cards are supported. ASUS® AGP 4X cards are
rated for both 1.5 and 3.3 Volts. Early AGP cards only operate at 3.3 volts and will
not fit properly into the new AGP 4X slots. See examples of both types below:
3. H/W SETUP
Expansion Cards
An early 3.3V AGP card:
Do not use.
ASUS P4T-CM User’s Manual 23
A new 1.5 / 3.3V AGP card:
OKAY to use.
3.7 External Connectors
WARNING! Some pins are used for connectors or power sources. These are
clearly distinguished from jumpers in the Motherboard Layout. Placing jumper
caps over these connector pins will cause damage to your motherboard.
IMPORTANT: Ribbon cables should always be connected with the red stripe to
Pin 1 on the connectors. Pin 1 is usually on the side closest to the power connector on hard drives and CD-ROM drives, but may be on the opposite side on
floppy disk drives. Check the connectors before installation because there may
be exceptions. IDE ribbon cables must be less than 46 cm (18 in.), with the
second drive connector no more than 15 cm (6 in.) from the first connector.
3. H/W SETUP
Connectors
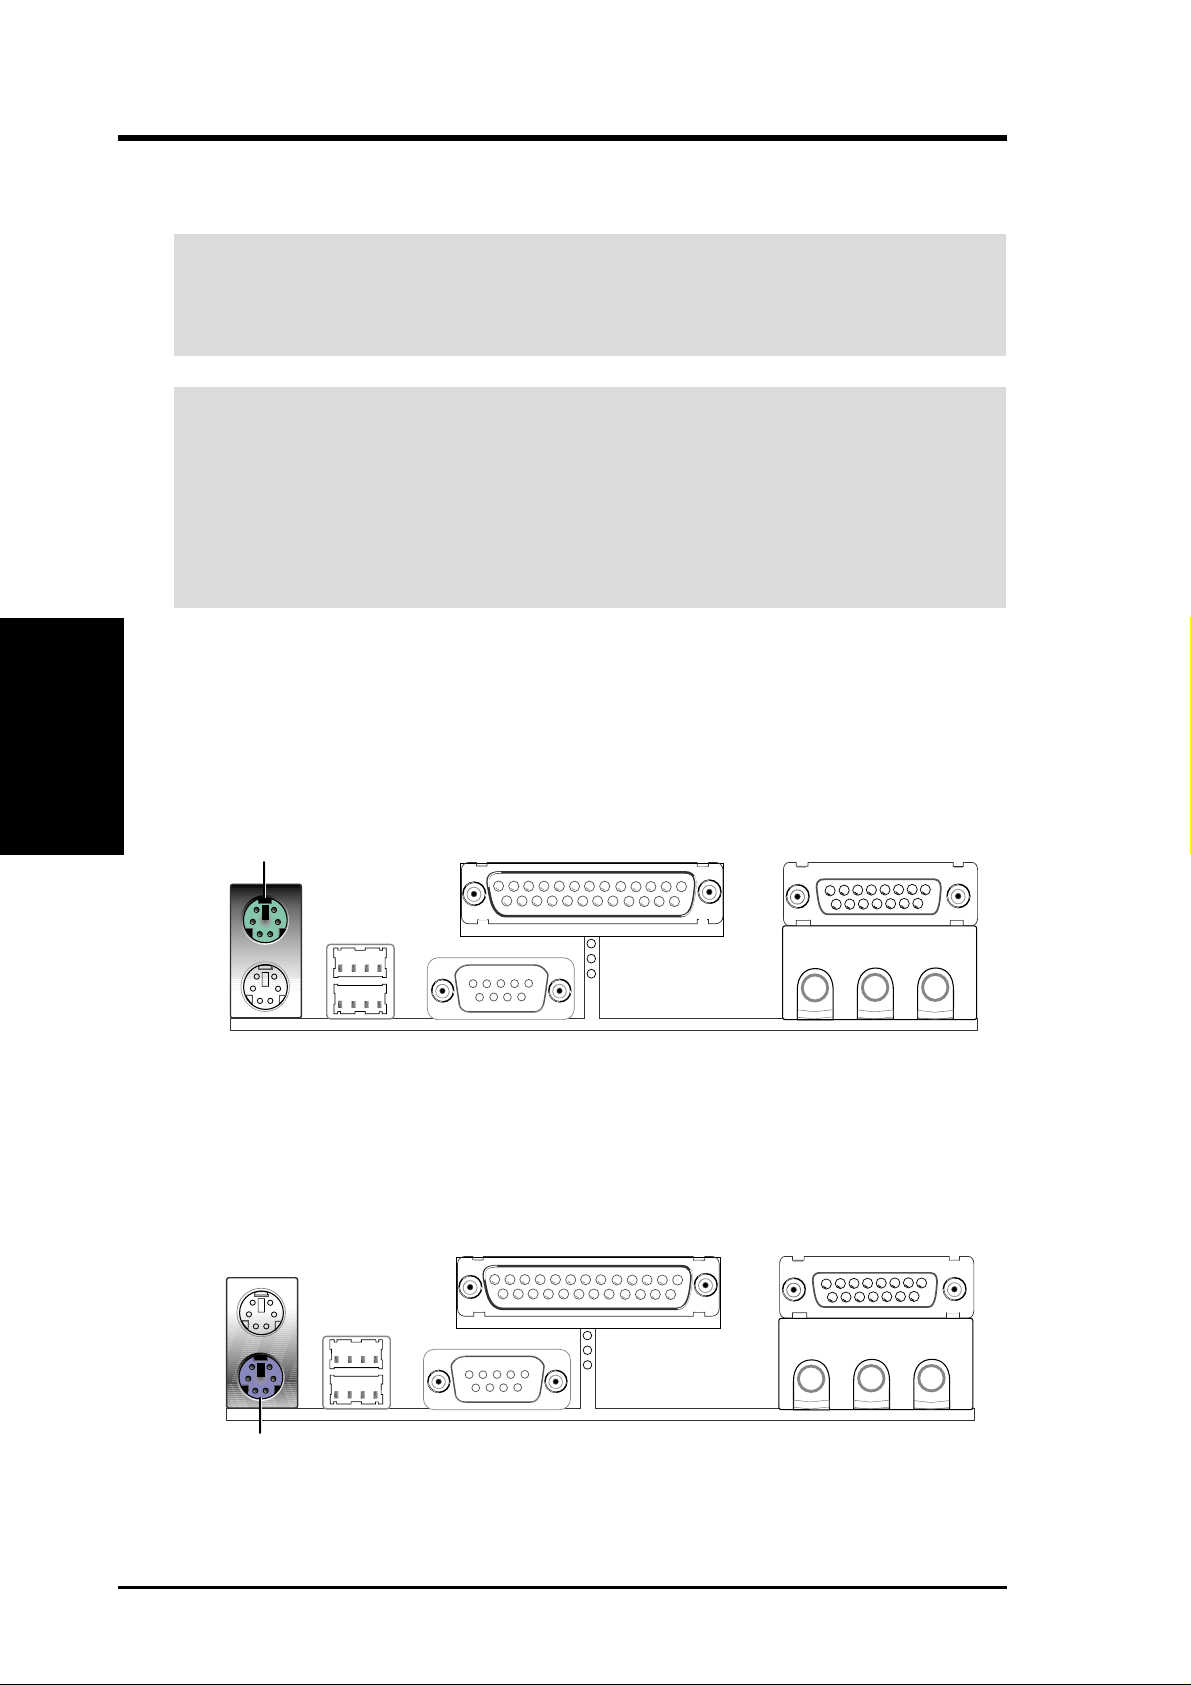
1) PS/2 Mouse Connector (Green 6-pin PS2KBMS)
3. HARDWARE SETUP
The system will direct IRQ12 to the PS/2 mouse if one is detected. If one is not
detected, expansion cards can use IRQ12. See PS/2 Mouse Function Control
in 4.4 Advanced Menu.
PS/2 Mouse (6-pin female)
2) PS/2 Keyboard Connector (Purple 6-pin PS2KBMS)
This connection is for a standard keyboard using an PS/2 plug (mini DIN). This
connector will not allow standard AT size (large DIN) keyboard plugs. You
may use a DIN to mini DIN adapter on standard AT keyboards.
PS/2 Keyboard (6-pin female)
24 ASUS P4T-CM User’s Manual
3. HARDWARE SETUP
3) Parallel Port Connector (Burgundy 25-pin PRINTER)
You can enable the parallel port and choose the IRQ through Onboard Parallel
Port (see 4.4.2 I/O Device Configuration).
NOTE: Serial printers must be connected to the serial port.
Parallel (Printer) Port (25-pin female)
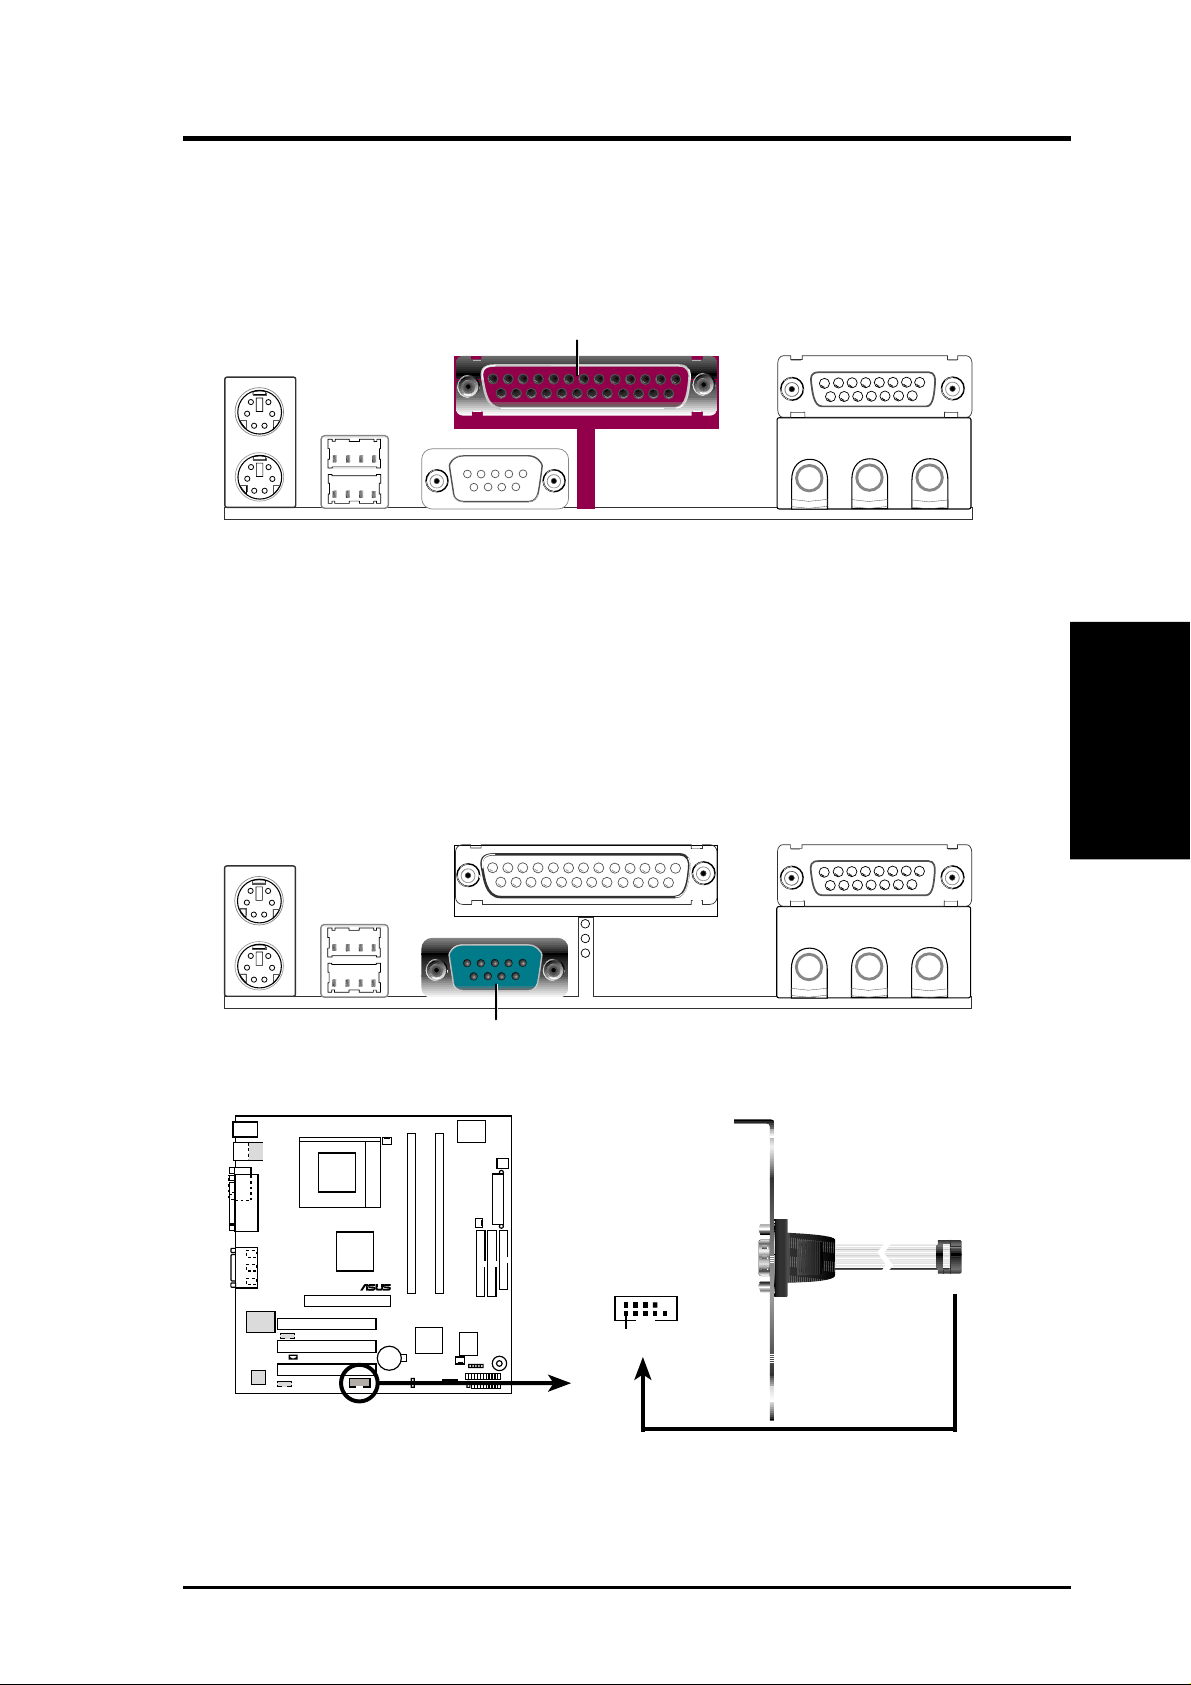
4) Serial Port Connectors (Teal/Turquoise 9-pin COM1, 10-1 pin COM2)
One serial port is ready for a mouse or other serial devices. A second serial
header is available using a serial port bracket connected from the motherboard
to an expansion slot opening. See Onboard Serial Port 1/2 in 4.4.2 I/O Device
Configuration for settings.
Connectors
3. H/W SETUP
COM 1
Serial Port (9-pin male)
P4T-CM
®
P4T-CM Serial COM2 Bracket
COM2
PIN 1
ASUS P4T-CM User’s Manual 25
3. HARDWARE SETUP
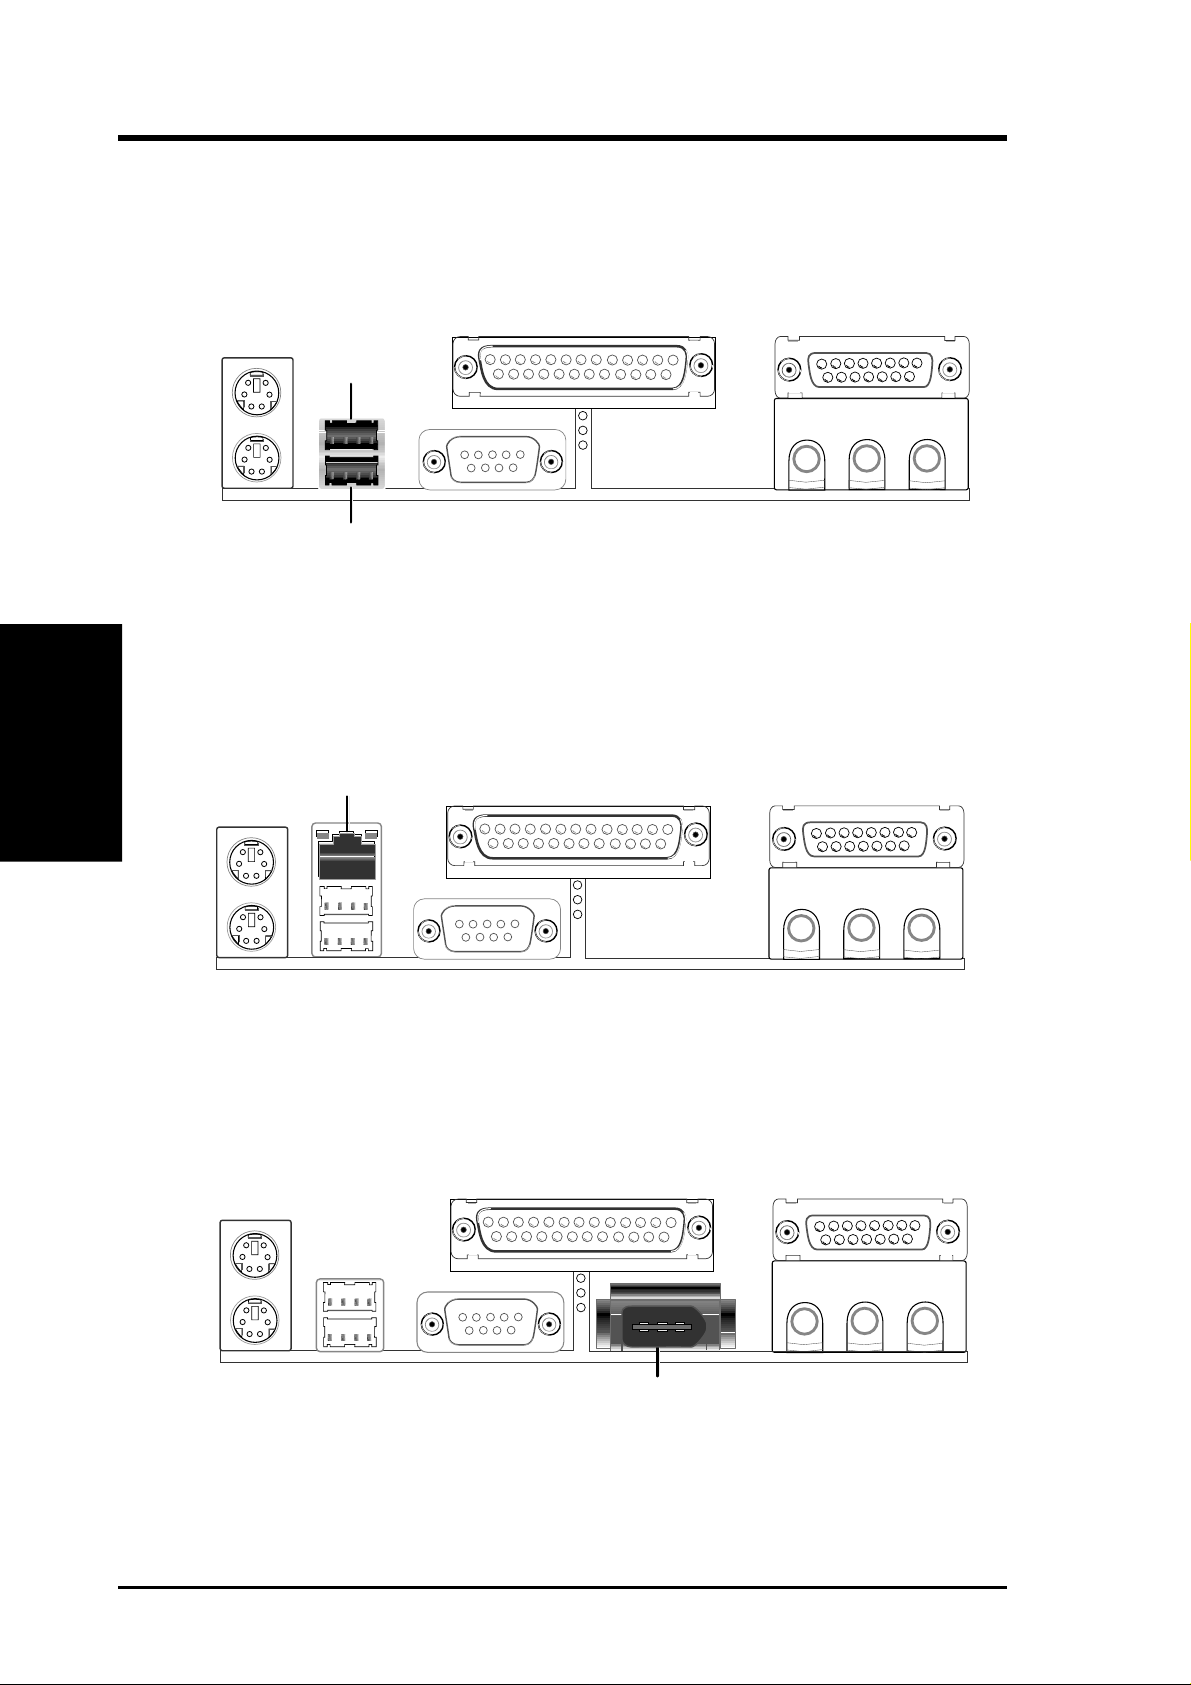
5) Universal Serial Bus Ports (Black two 4 pin USB)
Two USB ports are available for connecting USB devices. For additional USB
ports, you can use the USB headers (see USB Headers later in this section).
NOTE: USB Function (see 4.4.3 PCI Configuration) must be Enabled to use
these ports.
USB 1
Universal Serial Bus (USB) 2
3. H/W SETUP
6) Fast-Ethernet Port Connector (RJ45) (optional)
Connectors
7) IEEE-1394 Controller Interface Connector (6 pin 1394_CON) (optional)
The RJ45 connector is optional at the time of purchase and is located on top of
the USB connectors. The connector allows the motherboard to connect to a Local Area Network (LAN) through a network hub.
RJ-45
This connector supports external digital devices.
IEEE-1394 (6 pins)
26 ASUS P4T-CM User’s Manual
3. HARDWARE SETUP
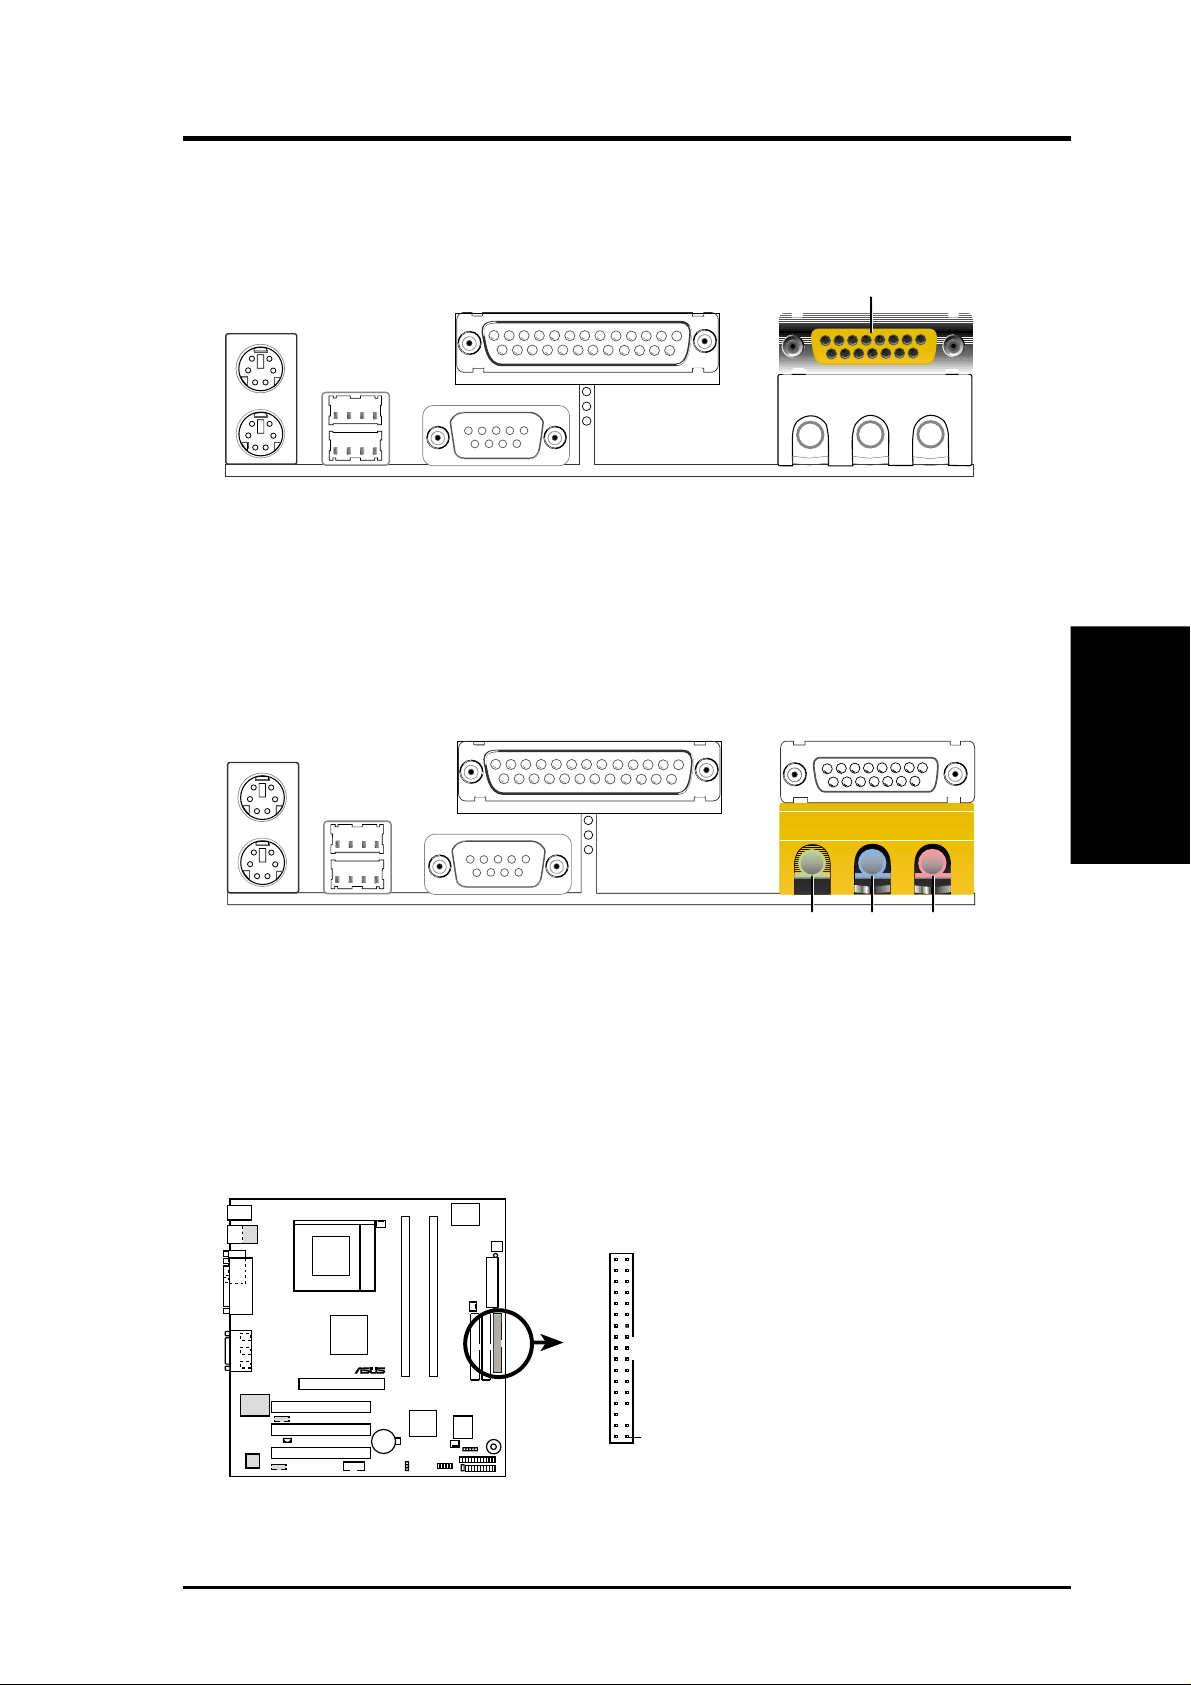
8) Joystick/MIDI Connector (15 pin Female GAME_AUDIO)
You may connect game joysticks or game pades to this connector for playing
games. Connect MIDI devices for playing or editing audio.
Game/MIDI (15-pin Female)
9) Audio Port Connectors (Three 1/8” Female LINE IN, LINE OUT, MIC)
Line Out can be connected to headphones or preferably powered speakers.
Line In allows tape players or other audio sources to be recorded by your com-
puter or played through the Line Out. Mic allows microphones to be connected
for inputting voice.
MicLine InLine Out
1/8" Stereo Audio Connectors
10) Floppy Disk Drive Connector (34-1pin FLOPPY)
This connector supports the provided floppy drive ribbon cable. After connecting the single end to the board, connect the two plugs on the other end to the
floppy drives. (Pin 5 is removed to prevent inserting the cable into the wr ong
orientation).
FLOPPY
NOTE: Orient the red markings on
P4T-CM
®
the floppy ribbon cable to PIN 1.
Connectors
3. H/W SETUP
P4T-CM Floppy Disk Drive Connector
ASUS P4T-CM User’s Manual 27
PIN 1
 Loading...