


E14986
First Edition / December 2018
User Guide
|
|
|
|
|
|
|
|
|
|
|
|
|
|
|
|
|
|
|
|
|
|
|
|
|
|
|
|
|
|
|
|
|
|
|
|
|
|
|
|
|
|
|
|
|
|
|
|
|
|
|
|
|
|
|
|
|
|
|
|
|
|
|
|
|
|
|
|
|
|
|
|
E14986_X403FA_UM_12pages.indd 1 |
|
|
2018/12/21 03:41:47 |
||||||||

Top View
NOTE: The keyboard's layout may vary per region or country. The top view may also vary in appearance depending on the Notebook PC model.
Array microphones
Camera indicator
Camera
Display panel
Air vents
Power button |
Capital lock indicator |
Keyboard |
Function key lock |
indicator |
Touchpad |
2 |
Notebook PC User Guide |
E14986_X403FA_UM_12pages.indd 2 |
2018/12/21 03:41:47 |
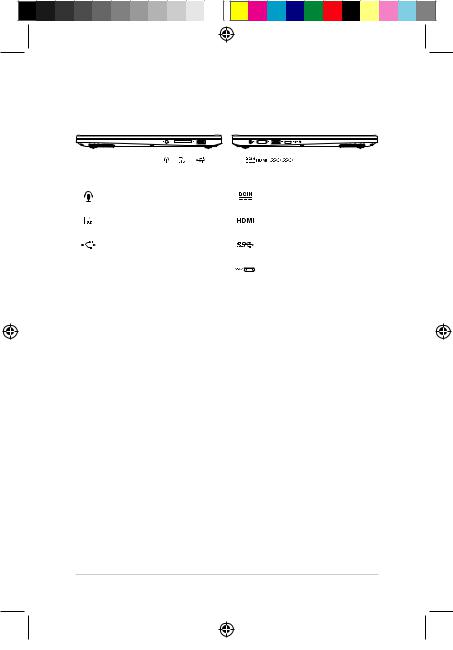
I/O ports and slots
|
|
|
|
|
|
|
|
|
|
|
|
|
|
|
|
|
|
|
|
|
|
|
|
Headphone/Headset/Microphone jack |
|
|
|
Power (DC) input port |
|||||||
Memory card reader |
|
|
|
HDMI port |
|||||||
USB 2.0 port |
|
|
|
USB 3.1 Gen 1 port |
|||||||
|
|
|
|
|
|
|
|
|
USB 3.1 Gen 1 Type-C™ port |
||
|
|
|
|
|
|
|
|
||||
Notebook PC User Guide |
3 |
E14986_X403FA_UM_12pages.indd 3 |
2018/12/21 03:41:48 |

Getting started
1.Charge your Notebook PC
A.Connect the DC power connector into your Notebook PC’s power (DC) input port.
B.Plug the AC power adapter into a 100V~240V power source.
IMPORTANT! Use only the bundled power adapter to charge the battery pack and supply power to your Notebook PC.
NOTE: The power adapter may vary in appearance, depending on models and your region.
2.Lift to open the display panel
3.Press the power button
Charge the Notebook PC for 3 hours before using it in battery mode for the first time.
4 |
Notebook PC User Guide |
E14986_X403FA_UM_12pages.indd 4 |
2018/12/21 03:41:48 |
 Loading...