

Page 1
Operating Instructions
OVEN
GB
English,1
PT
Portuges, 49
OS 99D P IX
FR
Français, 17
ES
Espanol, 33
Contents
GB
Installation, 2-3
Positioning
Electrical connection
Technical data
Description of the appliance, 4
Overall view
Control panel
Display
Oven structure, 5
Start-up and use, 6-12
Setting the clock
Setting the timer
ExtraLarge Space
Small Space
Main Space
Using the Small Space and Main Space at the same
time
Programming cooking
Practical cooking advice
Cooking advice table for ovens with the ExtraLarge
Space feature
Cooking advice table for the Small Space feature
Cooking advice table for the Main Space feature
Cooking advice table for using the Small Space and
Main Space at the same time
Precautions and tips, 13
General safety
Disposal
Respecting and conserving the environment
Care and maintenance, 14-15
Switching the appliance off
Cleaning the appliance
Cleaning the oven door
Replacing the light bulb
Automatic cleaning with the FAST CLEAN function
Assistance, 16
Page 2
Installation
560 mm.
45 mm.
GB
! Before operating your new appliance please read
this instruction booklet carefully. It contains
important information concerning the safe operation,
installation and maintenance of the appliance.
! Please keep these operating instructions for future
reference. Pass them on to any new owners of the
appliance.
Positioning
! Keep all packaging material out of reach of
children. It may present a choking or suffocation
hazard (see Precautions and tips).
! The appliance must be installed by a qualified
professional in accordance with the instructions
provided. Incorrect installation may damage
property or cause harm to people or animals.
Built-in appliance
Use a suitable cabinet to ensure that the appliance
functions properly.
• The panels adjacent to the oven must be made of
heat-resistant material.
• Cabinets with a veneer exterior must be
assembled with glues which can withstand
temperatures of up to 100°C.
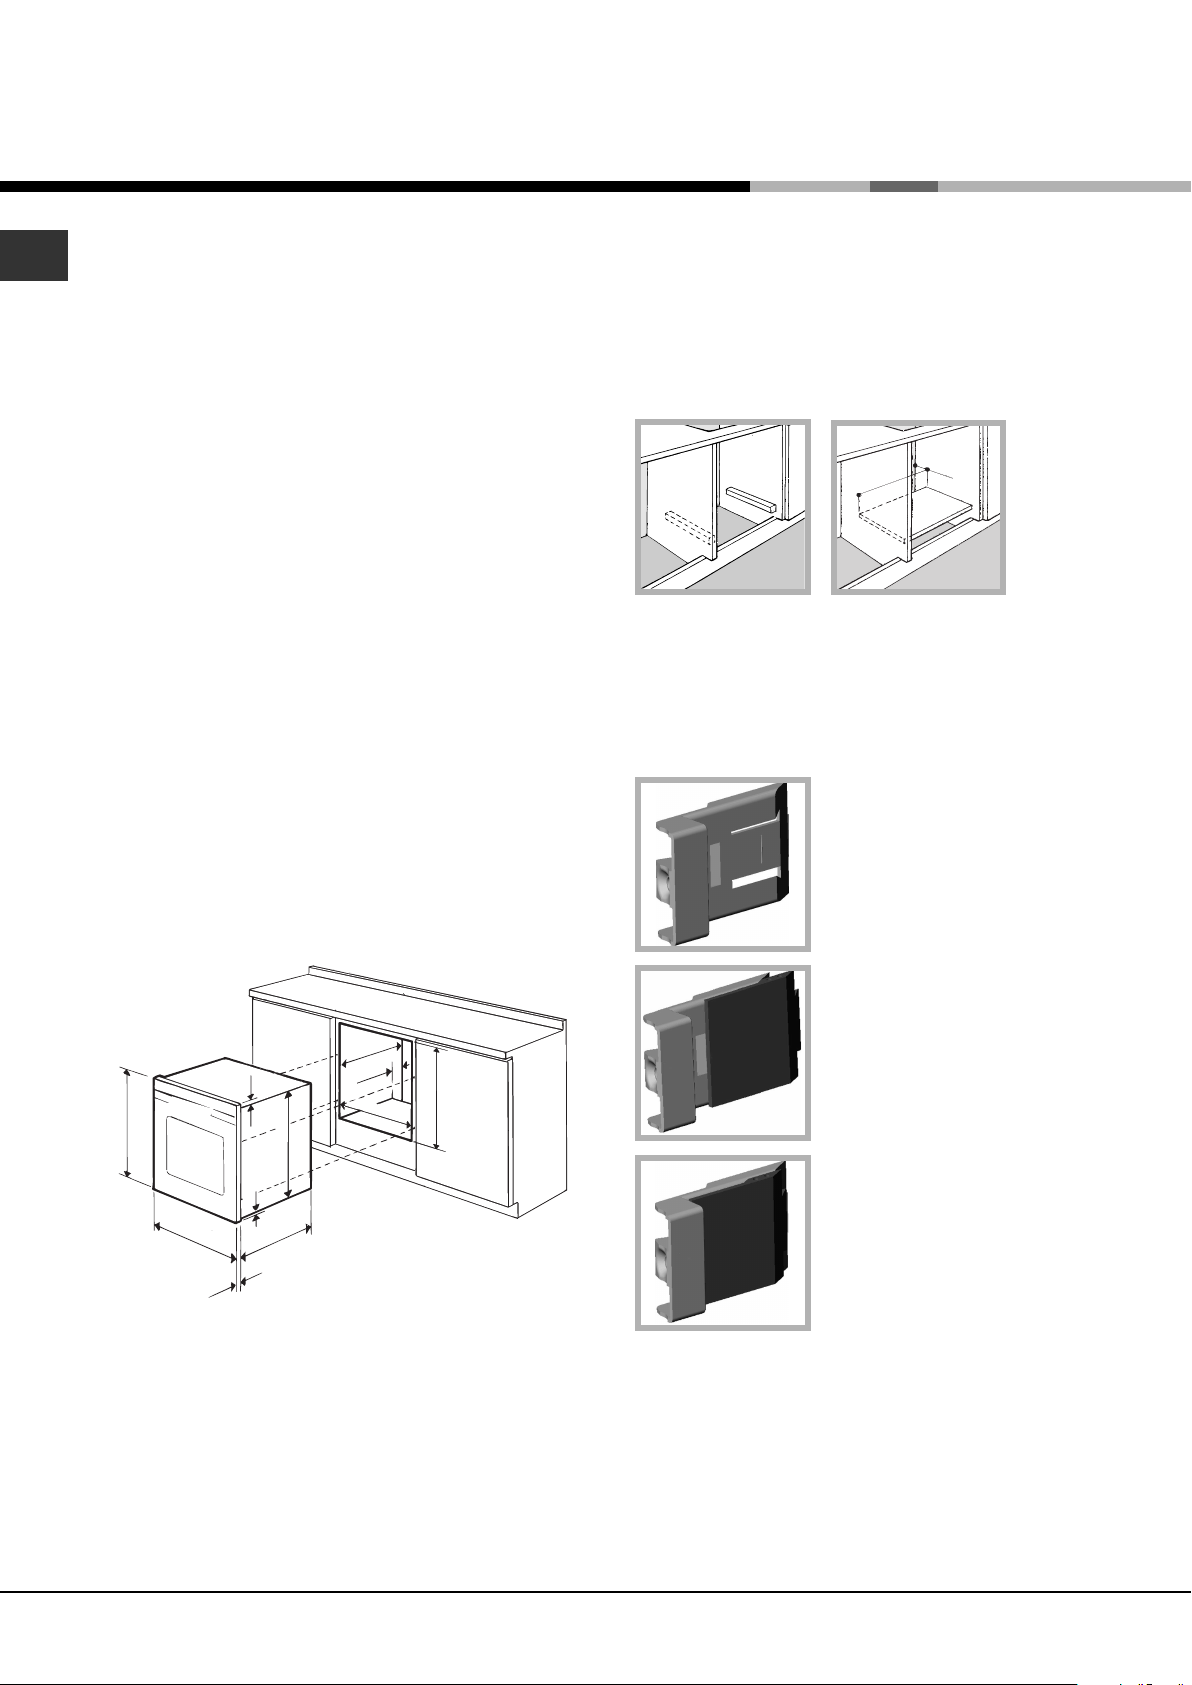
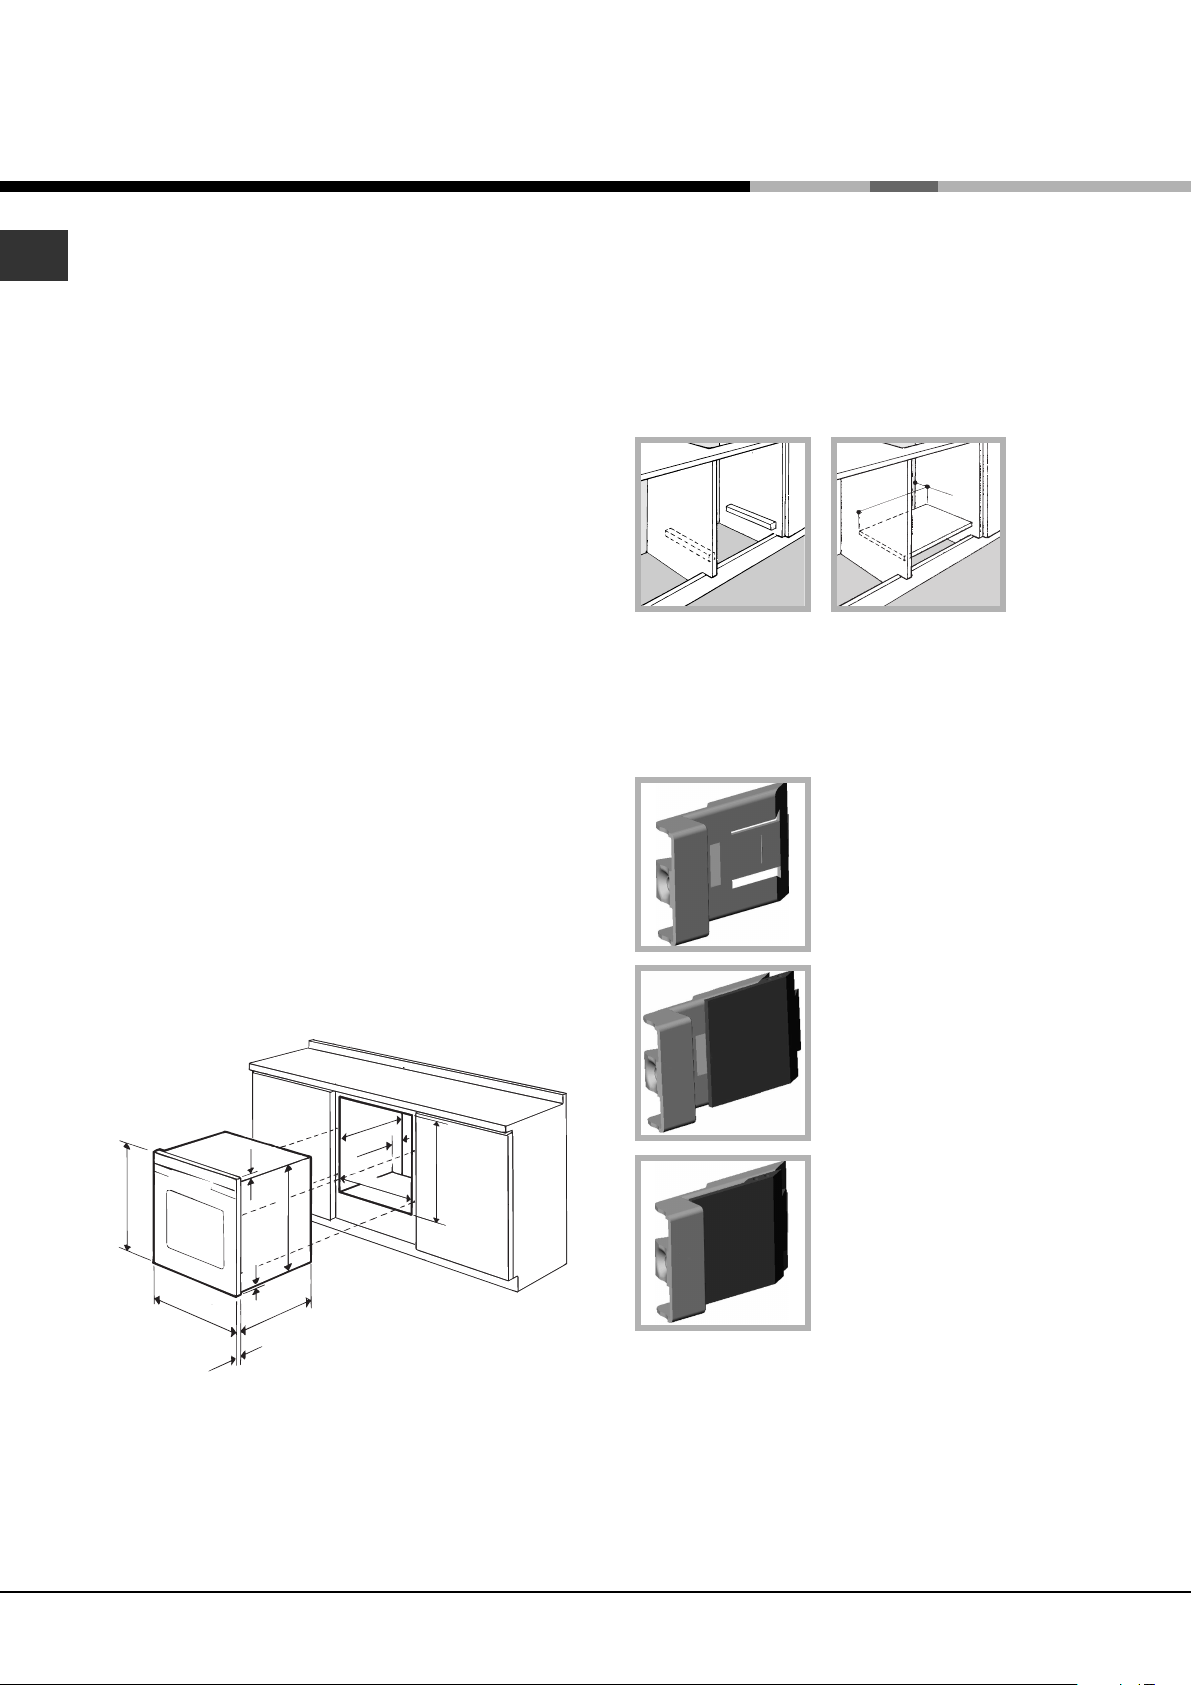
• To install the oven under the counter (see
diagram) or in a kitchen unit, the cabinet must
have the following dimensions:
Ventilation
To ensure adequate ventilation is provided, the back
panel of the cabinet must be removed. It is
advisable to install the oven so that it rests on two
strips of wood, or on a completely flat surface with
an opening of at least 45 x 560 mm (see diagrams).
Centring and fixing
Position the 4 tabs on the side of the oven so that
they are aligned with the 4 holes on the outer frame.
Adjust the tabs in accordance with the thickness of
the cabinet side panel, as shown below:
20 mm thick: take off the
removable part of the tab (see
diagram).
.
in
. m
m
m
7
4
5
.
m
m
5
595 mm.
595 mm.
m
4
2
23 mm.
5 mm.
m
5
4
5
.
m
576 mm.
.
m
4
558 mm.
593 mm.
! The appliance must not come into contact with
electrical parts once it has been installed.
The indications for consumption given on the data
plate have been calculated for this type of
installation.
18 mm thick: use the first
groove, which has already
been set in the factory (see
diagram).
16 mm thick: use the second
groove (see diagram).
Secure the appliance to the cabinet by opening the
oven door and inserting 4 screws into the 4 holes on
the outer frame.
! All parts which ensure the safe operation of the
appliance must not be removable without the aid of
a tool.
2
Page 3
Electrical connection
N
L
! Ovens equipped with a three-pole power supply
cable are designed to operate with alternating
current at the voltage and frequency indicated on
the data plate located on the appliance (see below).
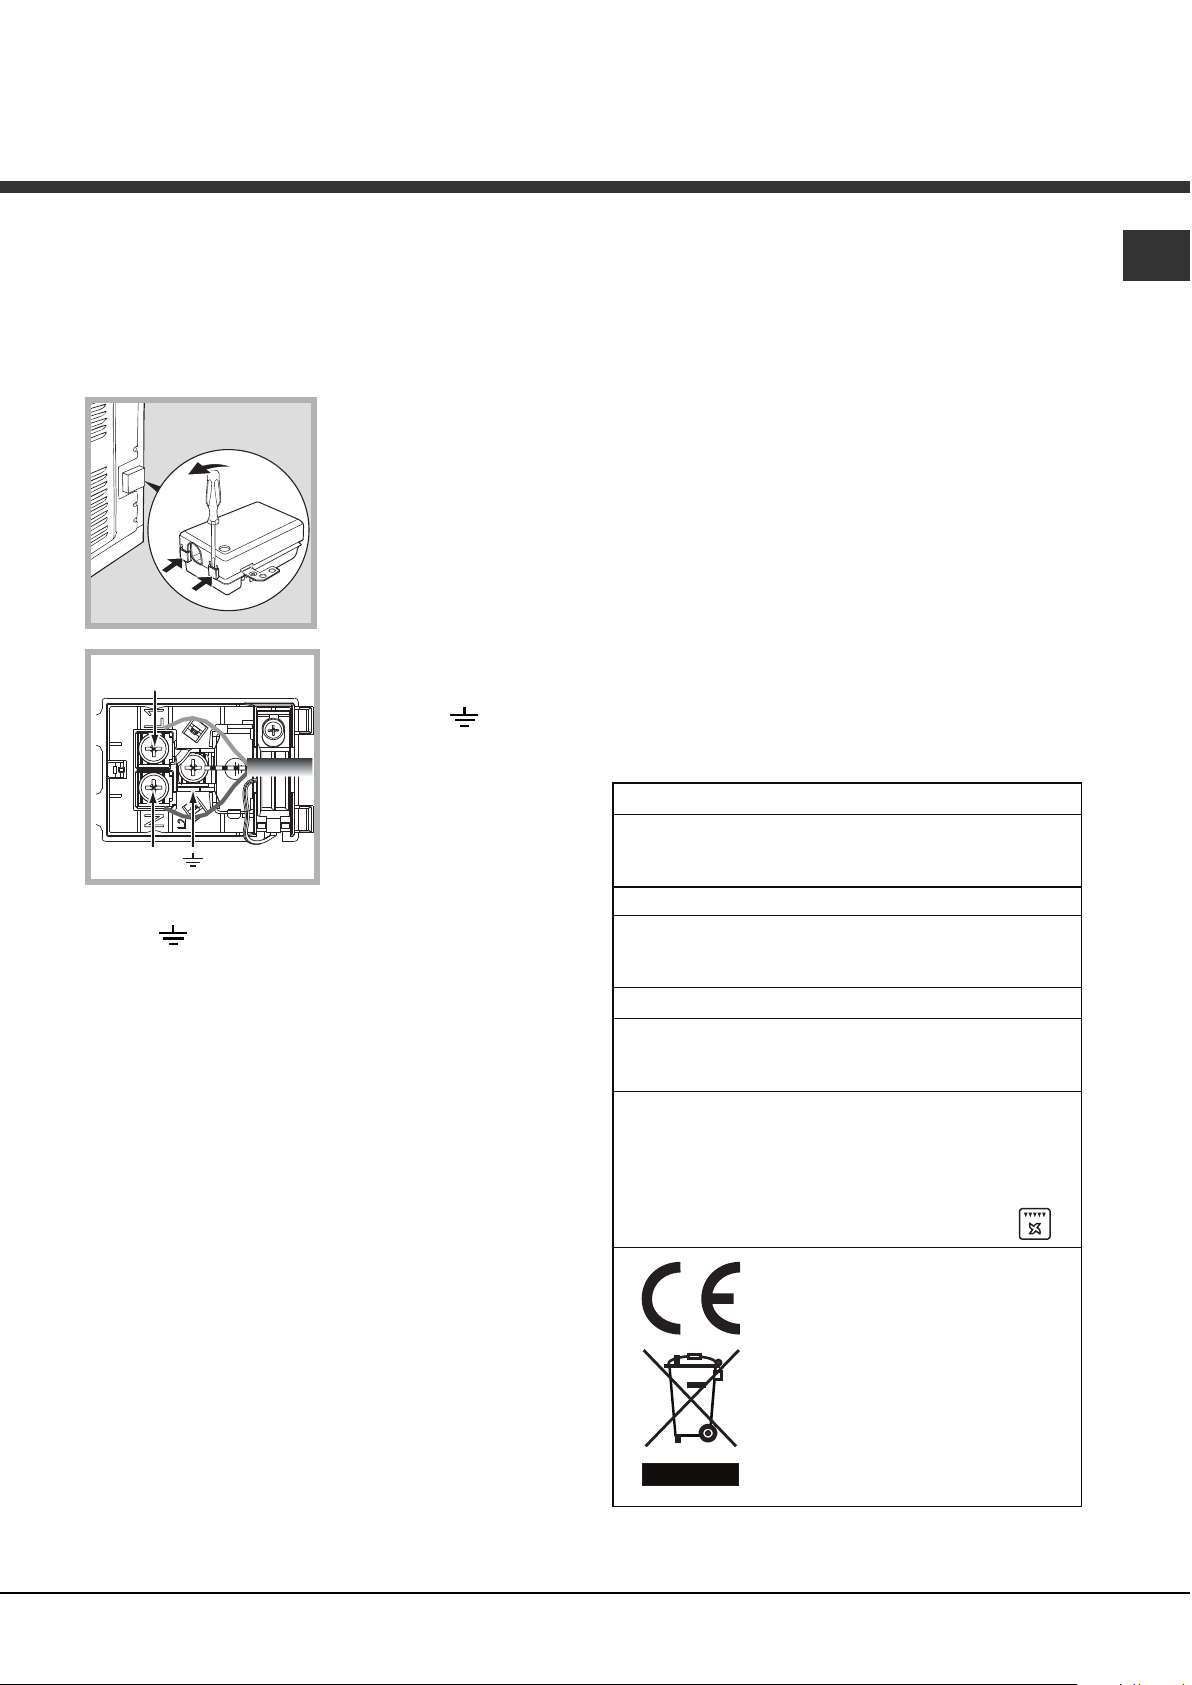
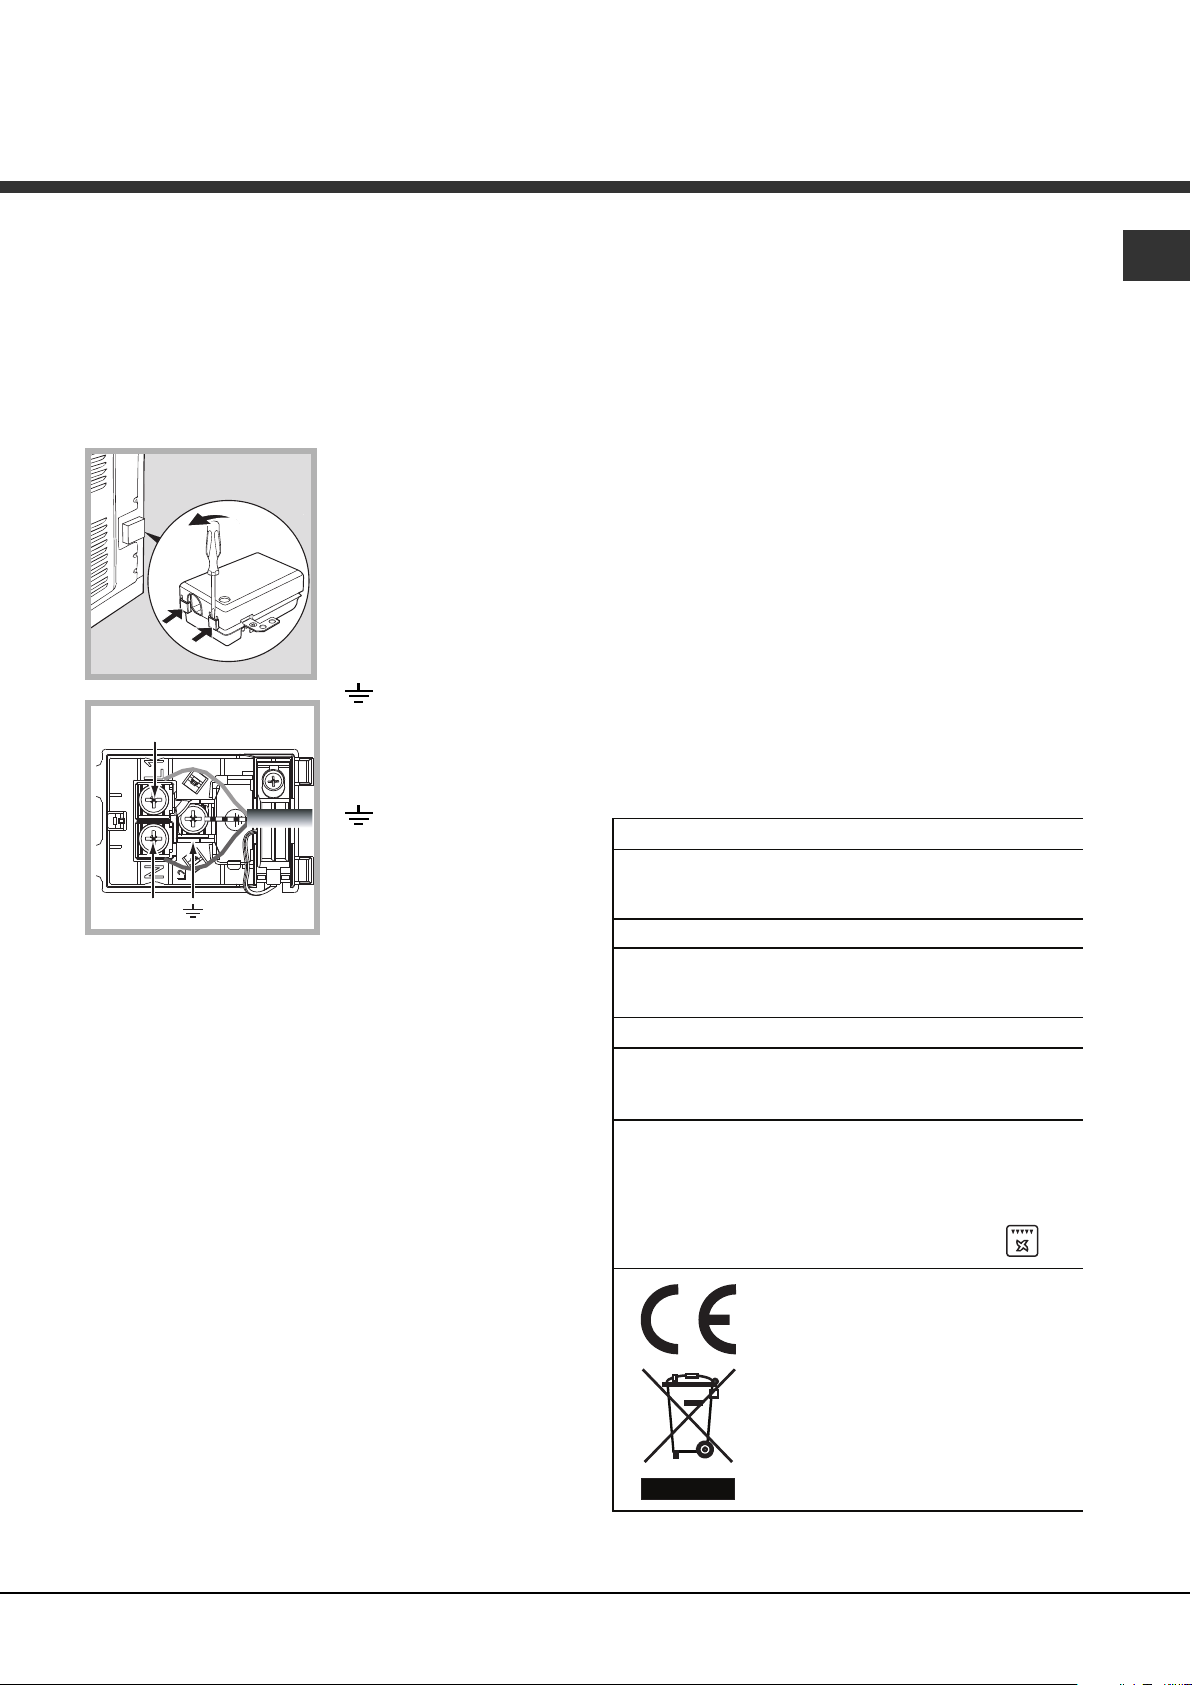
Fitting the power supply cable
1. Open the terminal
board by inserting a
screwdriver into the
side tabs of the cover.
Use the screwdriver as
a lever by pushing it
down to open the cover
(see diagram).
2. Install the power
supply cable by
loosening the cable
clamp screw and the
three wire contact
screws L-NConnect the wires to
the corresponding
terminals: the Blue wire
to the terminal marked
(N), the Brown wire to
the terminal marked (L)
and the Yellow/Green
wire to the terminal
marked
(see diagram).
3. Secure the cable by fastening the clamp screw.
4. Close the cover of the terminal board.
Connecting the electricity supply cable to the
mains
Install a standardised plug corresponding to the
load indicated on the data plate (see table).
The appliance must be directly connected to the mains
using an omnipolar switch with a minimum contact
opening of 3 mm installed between the appliance and
the mains. The switch must be suitable for the charge
indicated and must comply with current electrical
regulations (the earthing wire must not be interrupted
by the switch). The supply cable must be positioned
so that it does not come into contact with temperatures
higher than 50°C at any point.
! The installer must ensure that the correct electrical
connection has been made and that it is fully
compliant with safety regulations.
Before connecting the appliance to the power
supply, make sure that:
• The appliance is earthed and the plug is compliant
with the law.
.
• The socket can withstand the maximum power of
the appliance, which is indicated on the data
plate (see below).
• The voltage is in the range between the values
indicated on the data plate (see below).
• The socket is compatible with the plug of the
appliance. If the socket is incompatible with the
plug, ask an authorised technician to replace it.
Do not use extension cords or multiple sockets.
! Once the appliance has been installed, the power
supply cable and the electrical socket must be
easily accessible.
! The cable must not be bent or compressed.
! The cable must be checked regularly and replaced
by authorised technicians only (see Assistance).
The manufacturer declines any liability shouldThe manufacturer declines any liability should
!
The manufacturer declines any liability should
The manufacturer declines any liability shouldThe manufacturer declines any liability should
these safety measures not be observed.these safety measures not be observed.
these safety measures not be observed.
these safety measures not be observed.these safety measures not be observed.
APPLIANCE SPECIFICATIONS
Dimension*
Volume*
Dimension**
Volume**
Electrical
connections
ENERGY
LABEL
* Only for models with drawn rails.
** Only for models with wire rails.
width 43.5 cm
height 41 cm
depth 41 cm
74 l
width 45.6 cm
height 41 cm
depth 41 cm
77 l
voltage: 220 - 240 V~ 50Hz
maximum power absorbed
3400 W (see data plate)
Directive 2002/40/EC on the label
of electric ovens.
Standard EN 50304
Declared energy consumption for
Forced convection Class –
heating mode: Gratin
This appliance conforms to the
following European Economic
Community directives:
2006/95/EEC dated 12/12/06 (Low
Voltage) and subsequent amendments
– 2004/108/EEC dated 15/12/04 and
subsequent amendments
- 93/68/EEC dated 22/07/93 and
subsequent amendments
- 2002/96/EC and subsequent
amendments.
1275/2008 Standby/off mode
GB
3
Page 4
Description of
the appliance
GB
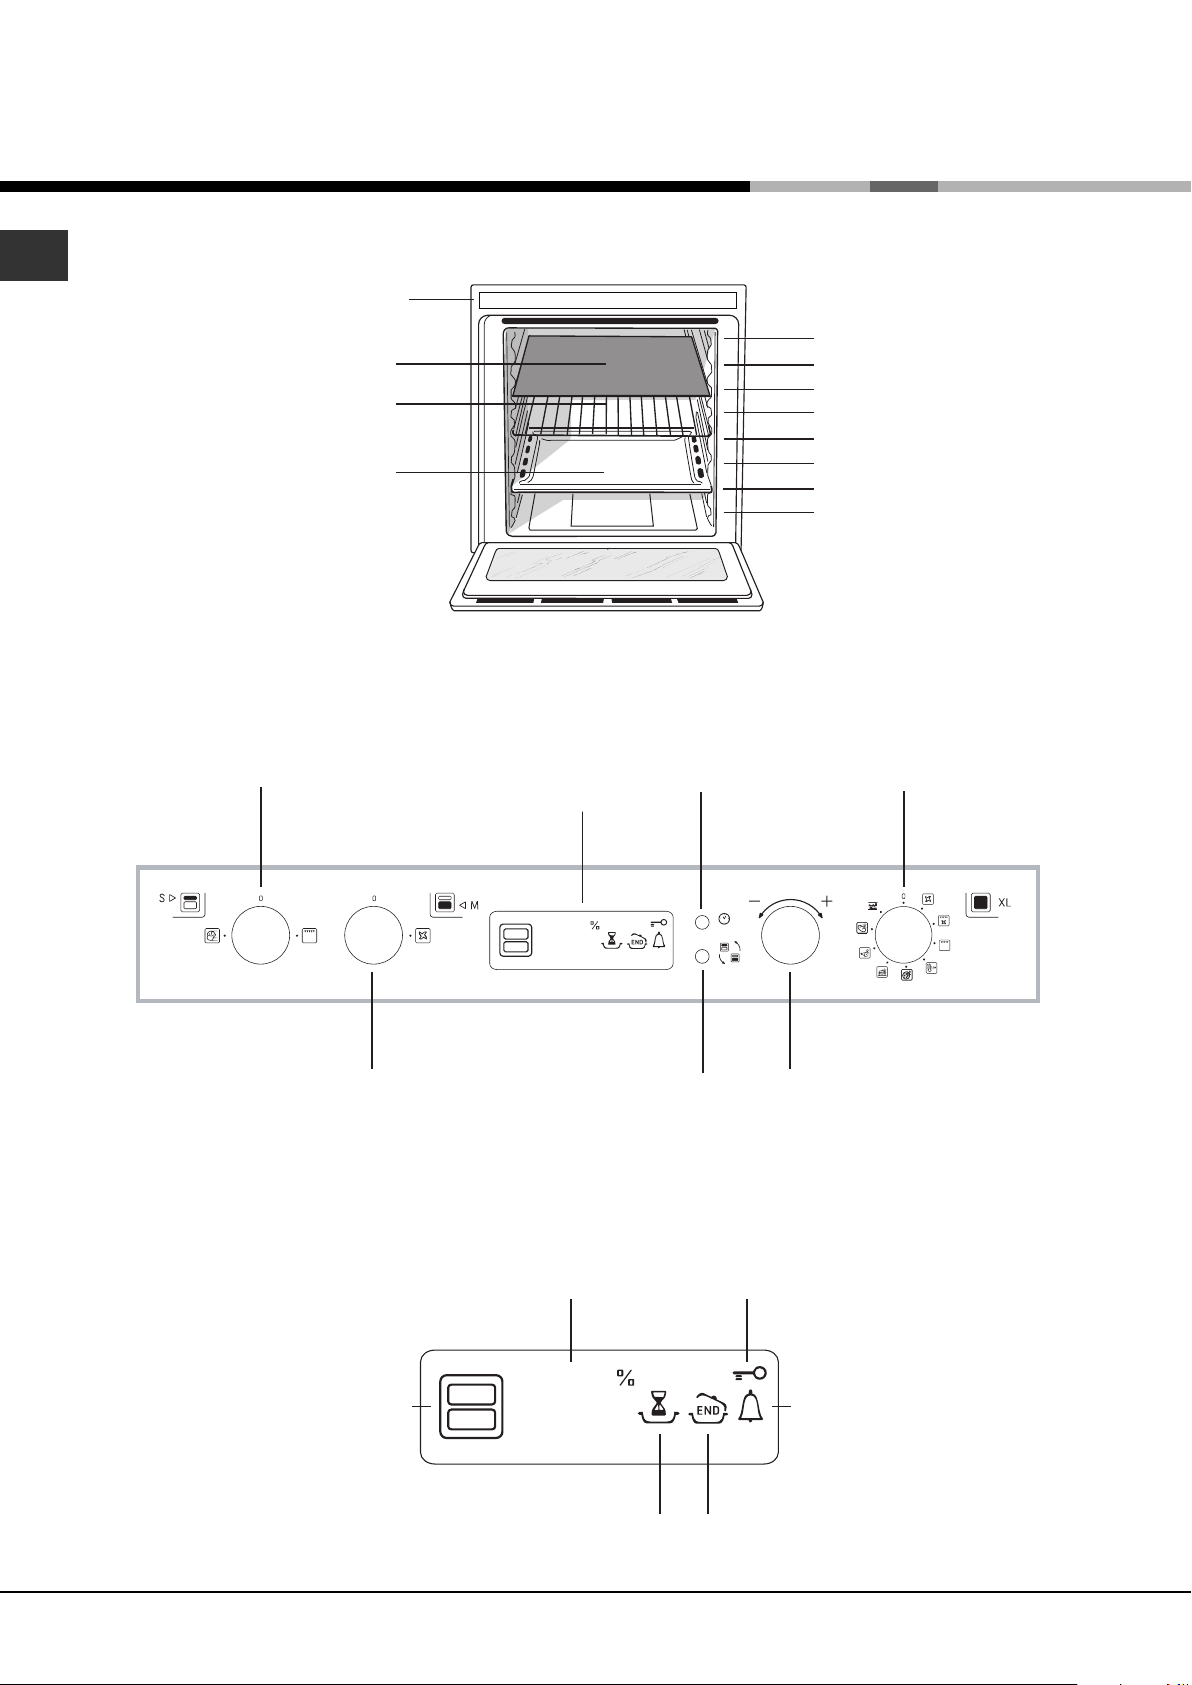
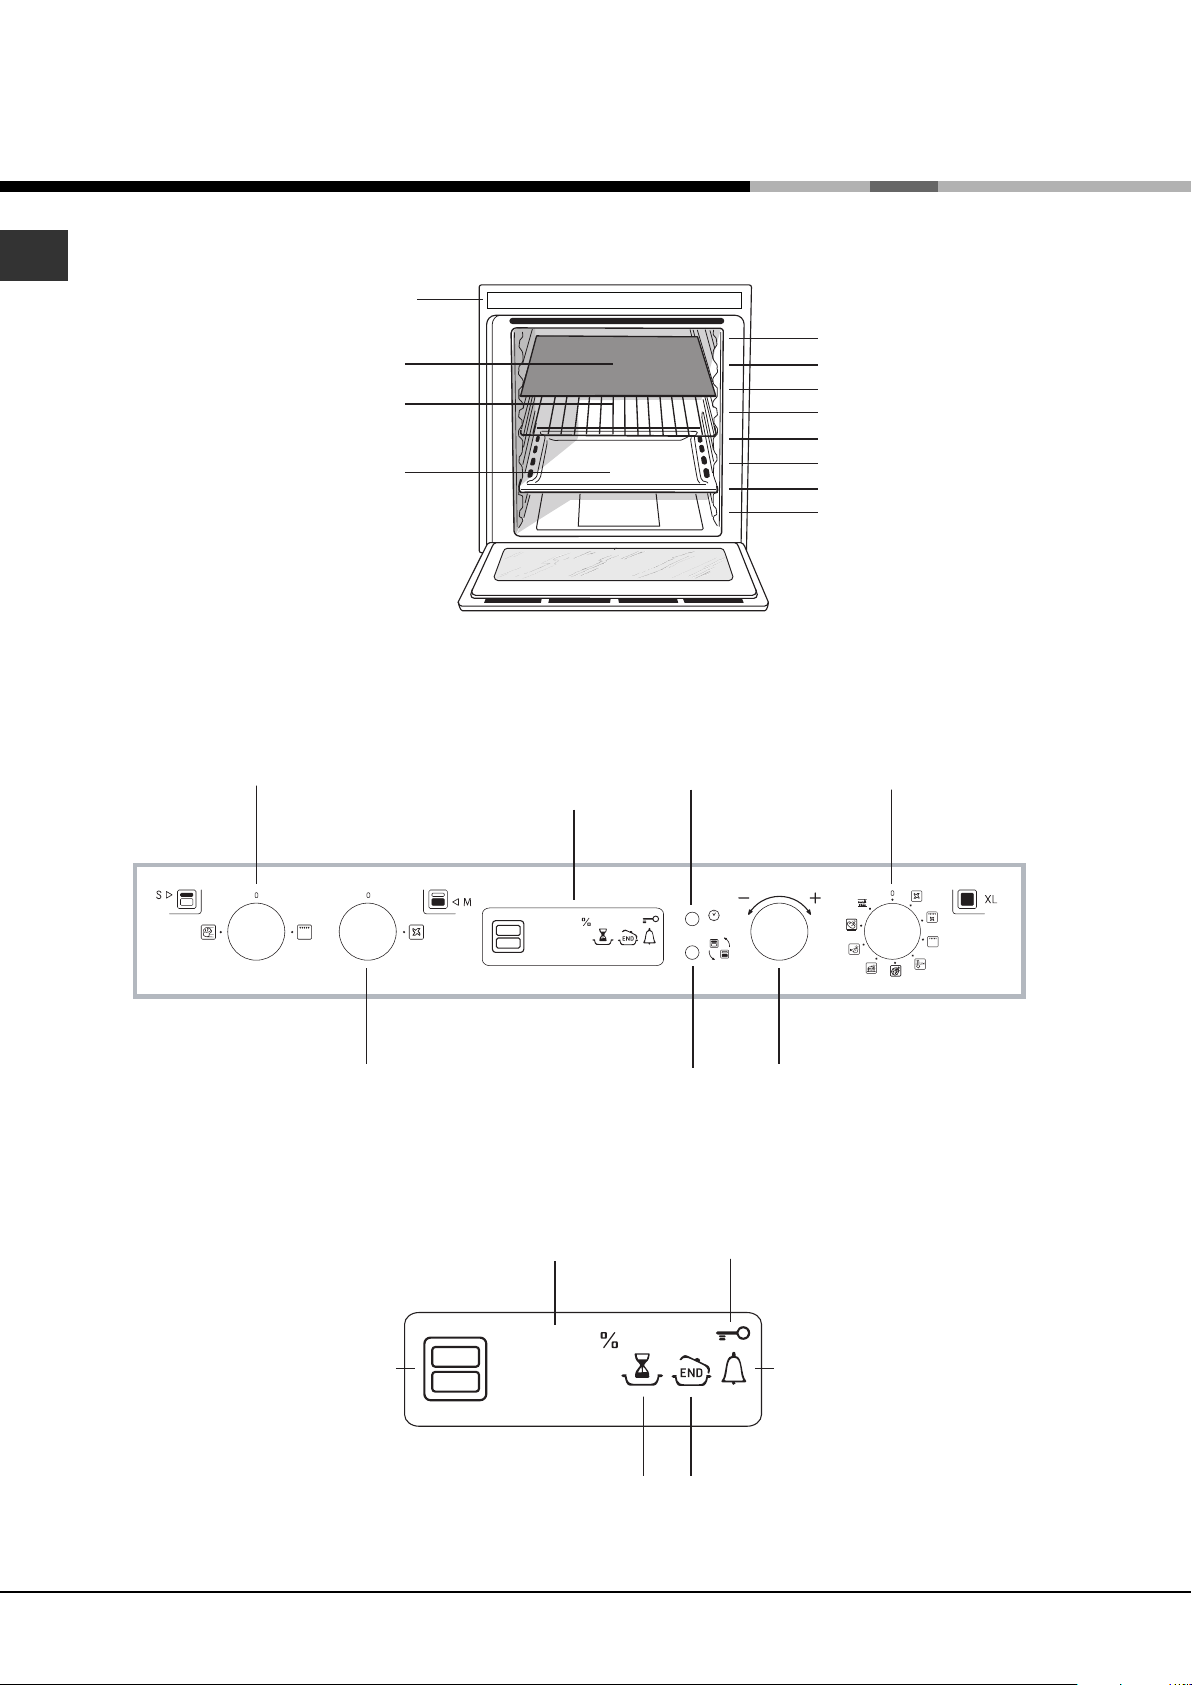
Overall view
DRIPPING PAN shelf
Control panel
Control panel
DIVIDER shelf
RACK shelf
SMALL SPACE
FUNCTION
knob
DISPLAY
SET TIMER
button
GUIDE RAILS
for the sliding racks
position 7
position 6
Divider "D" position
position 5
position 4
position 3
position 2
position 1
EXTRALARGE
SPACE FUNCTION
knob
Display
MAIN SPACE
FUNCTION
knob
RECESS
SELECTED
TEMPERATURE and
TIME numerical digits
icon
¡•OC
:
•• ••
SELECT RECESS
button
¡•OC
:
•• ••
DURATION
icon
SET
TEMPERATURE/TIMER
knob
DOOR LOCK
icon
TIMER icon
END OF COOKING
icon
4
Page 5

Oven structure
The Openspace oven has a capacity of 70 litres and
offers users the option of cooking on 4 shelves at
the same time or cooking large quantities, which
would not necessarily be possible in a traditional
oven.
Thanks to the ExtraLarge Space, Openspace offers
10 cooking functions, 6 of which are universal and
suitable for any type of cooking, while the remaining
4 are automatic programmes which can be used to
achieve perfect results for any recipe.
Openspace also offers maximum comfort for all
requirements, with 4 different operating options: the
oven is one large compartment but can be divided
into separate spaces of various sizes, each with its
ExtraLarge Space: cooking on 4 shelf levels
RACK
EXTRALARGE
SPACE
RACK
RACK
DRIPPING PAN
own independent temperature and duration controls.
This is made possible thanks to the heat-insulating
DIVIDER, which divides the whole ExtraLarge Space
into two different-sized spaces: the Main Space and
the Small Space.
The two Main and Small Space compartments may
be used at the same time to cook different dishes
more quickly, or they may be used separately so
that only the space necessary is used.
When the two compartments are used at the same
time, the cooking temperature of each may be
adjusted to a value between 50° and 250°. There
may be a difference in temperature of 100° between
the two zones, which means it is possible to cook
very different dishes without any flavours or aromas
intermingling.
Main and Small Space: simultaneous operation
SMALL
SPACE
MAIN
SPACE
RACK or DRIPPING PAN
Divider "D" (fixed position)
RACK (cooking on 3 shelves)
RACK (cooking on 3 shelves)
DRIPPING PAN
(cooking on 3 shelves)
GB
Cooking using the Small Space only
SMALL
SPACE
MAIN
SPACE
RACK or DRIPPING PAN
Divider "D"
(fixed position)
The table below lists the possible temperature
values which may be set. The intelligent display will
Temperature in the first cavity
(Main or Small Space)
Cooking using the Main Space only: cooking on 3 shelf levels
SMALL
SPACE
MAIN
SPACE
Divider "D" (fixed position)
RACK (cooking on 3 shelves)
RACK (cooking on 3 shelves)
DRIPPING PAN
(cooking on 3 shelves)
guide you through the correct procedure used to
adjust the temperature of the two recesses.
Temperature in the second cavity
(Small or Main Space)
Between 40°C and 150°C The temperature difference in relation to the first recess
selected is no greater than 50°C
For example: if you set one recess to 90°C,
you may set a value of between 40°C (90°C-50°C) and 140°C (90°C+50°C) for the other.
Between 155°C and 200°C The temperature difference in relation to the first recess
selected is no greater than 70°C
For example: if you set one recess to 180°C,
you may set a value of between 110°C (180°C-70°C) and 250°C (180°C+70°C) for the other.
Between 205°C and 250°C The temperature difference in relation to the first recess
selected is no greater than 100°C
For example: if you set one recess to 210°C,
you may set a value of between 110°C (210°C-100°C) and 250°C (maximum temperature setting) for the other.
To cancel any of the settings, simply turn the Small Space or Main Space function knob to the "0"
position.
5
Page 6

Start-up and use
GB
! The first time you use your appliance, heat the empty
oven with its door closed at its maximum temperature for
at least half an hour. Make sure that the room is well
ventilated before switching the oven off and opening the
oven door. The appliance may emit a slightly unpleasant
odour caused by protective substances used during the
manufacturing process burning away.
! Never put objects directly on the bottom of the oven; this
will prevent the enamel coating from being damaged.
! Always place cookware on the racks provided.
! During use, we suggest removing any crockery or
delicate foodstuffs from the recesses not in function.
! We suggest not opening the door when cooking
foodstuffs which require leavening, so as to not
compromise cooking results.
! If the door is subject to repeated jerking, the divider may
come out of its housing. If this happens, the time will
appear on the display. Make sure that the divider is
correctly installed then re-start cooking.
Cooling ventilation
In order to cool down the external temperature of the oven,
a cooling fan blows a stream of air between the control
panel and the oven door.
! Once cooking is completed, the cooling fan activates
and deactivates automatically until the oven has cooled
down sufficiently.
Setting the clock
! This may only be set while the oven is switched off.
1. Press the
on the display and the
off.
2. Turn the TIMER KNOB towards “+” and “-” to adjust
the hour value.
3. Press the
numerical digits on the DISPLAY begin to flash.
4. Turn the TIMER KNOB towards “+” and “-” to adjust
the minute value.
5. Press the
button until the first numerical digit flashes
, and icons are switched
button again so that the other two
button again to confirm.
Setting the timer
! This function does not interrupt cooking and does not
affect the oven; it is simply used to activate the buzzer
when the set amount of time has elapsed.
1. Press the
digits on the DISPLAY begin to flash.
2. Turn the TIMER KNOB towards “+” and “-” to adjust
the minute value.
button until the icon and the three
3. Press the
The display will then show the time as it counts down.
When this period of time has elapsed the buzzer will be
activated.
button again to confirm.
ExtraLarge Space
Starting the oven
1. Select the desired cooking function by turning the
EXTRALARGE SPACE FUNCTION knob. If the
on the display is lit, this indicates that the ExtraLarge
Space has been selected and therefore that only the
settings corresponding to the ExtraLarge Space may be
used.
2. The oven will begin its preheating stage. The
temperature may be changed by turning the
TEMPERATURE knob. The
during the pre-heating stage.
3. Once the pre-heating stage is completed, the
stops flashing (becomes fixed) and a buzzer sounds. It is
now possible to introduce foodstuffs into the oven.
4. During cooking it is always possible to:
- Change the cooking function by turning the
EXTRALARGE SPACE FUNCTION knob.
- Adjust the temperature using the TEMPERATURE knob
(for the universal cooking functions only).
- Set a duration (for universal cooking functions only) and
the cooking end time.
- Stop cooking by turning the EXTRALARGE SPACE
FUNCTION knob to the “0” position.
5. If a blackout occurs while the oven is already in
operation, an automatic system within the appliance will
reactivate the cooking function from the point at which it
was interrupted, as long as the temperature has not
dropped below a certain level. Programmed cooking
modes which have not started will not be restored and
must be reprogrammed.
! When using the oven in its ExtraLarge configuration, it
will not be possible to use the Main and Small Space
features: the SMALL SPACE and MAIN SPACE
FUNCTION knobs will be disabled.
Universal cooking functions
! All functions have a default cooking temperature which
may be adjusted manually to a value between 40°C and
250°C as desired.
For the BARBECUE function, the default power level value
is indicated as a percentage (%) and may also be
adjusted manually.
indicator light flashes
icon
icon
6
Page 7

MULTILEVEL function
All heating elements and the fan are activated. Since the heat
remains constant throughout the oven, the air cooks and
browns food in a uniform manner. A maximum of four racks
may be used at the same time. If you are using several
racks at the same time, we recommend you place the
dripping pan on the lower rack. If you are cooking on 4 levels
at the same time, we recommend you place the shelves on
racks 3, 5 and 6 and the dripping pan on rack 1.
2. Place the rotisserie
support in position 3 and
insert the spit in the hole
provided on the back
panel of the oven.
3. Begin spit roast
operation by selecting the
or functions.
GB
GRATIN function
The top heating element and the rotisserie spit (where
present) are activated and the fan begins to operate.
During part of the cycle the circular heating element is
also activated. This combination of features increases the
effectiveness of the unidirectional thermal radiation
provided by the heating elements through the forced
circulation of the air throughout the oven.
This helps prevent food from burning on the surface and
allows the heat to penetrate right into the food. Always
cook in this mode with the oven door closed.
BARBECUE function
The top heating element and the rotisserie spit (where
present) are activated. By turning the TEMPERATURE
knob, the different power levels which may be set will
appear on the display; these range between 5% and
100%. The high and direct temperature of the grill is
recommended for food which requires a high surface
temperature. Always cook in this mode with the oven door
closed.
LOW TEMPERATURE function
This type of cooking can be used for proving, defrosting,
preparing yoghurt, heating dishes at the required speed
and slow cooking at low temperatures. The temperature
options are: 40, 65 and 90 °C.
FAST CLEAN mode
This mode cleans the oven automatically and thoroughly
by pyrolysis (see Maintenance and care).
! The default setting is 90 minutes.
Spit roast (only available in certain models)
To operate the spit roast function (see diagram) proceed as
follows:
1. Place the dripping pan in position 1.
Automatic cooking functions
temperaturetemperature
! The
temperature and cooking duration are
temperaturetemperature
values, guaranteeing a perfect result every time automatically. These values are set using the
Programmed Optimal CookingProgrammed Optimal Cooking
(
Programmed Optimal Cooking) system. The cooking
Programmed Optimal CookingProgrammed Optimal Cooking
cycle stops automatically and the oven indicates when
the dish is cooked. The cooking duration may be modified
by a period of several minutes, as specified in the
description of the individual functions below.
ROAST function
Use this function to cook veal, pork, lamb and beef. Place
the food inside the oven while it is still cold. The dish may
also be placed in a preheated oven. It will only be
possible to adjust the duration by -10/+10 minutes.
BAKED CAKES function
This function is ideal for baking cakes. Place the food
inside the oven while it is still cold. The dish may also be
placed in a preheated oven. It will only be possible to
adjust the duration by -10/+15 minutes.
BREAD function
Use this function to make bread. Please see the following
chapter for the recipe and further details.
To achieve the best possible results, we recommend that
you carefully observe the instructions below:
• Follow the recipe.
• Remember to pour 150 g (150 ml) of cold water into
the baking tray, which should be placed in position
7.
Place the food inside the oven while it is still cold. If you
wish to place the food in the oven after it has been
preheated, immediately following a high-temperature
cooking programme, the text “Hot” will appear on the
display until the temperature of the oven has fallen to 40°.
At this point it will be possible to place the bread in the
oven.
pre-setpre-set
pre-set
pre-setpre-set
C.O.P.®C.O.P.®
C.O.P.®
C.O.P.®C.O.P.®
PIZZA function
Use this function to make pizza. Please see the following
chapter for further details. It will only be possible to adjust
7
Page 8

GB
the duration by -5/+12 minutes.
To achieve the best possible results, we recommend that
you carefully observe the instructions below:
• Follow the recipe.
• The weight of the dough should be between 350 g and
500 g.
• Lightly grease the dripping pan and the baking trays.
Place the food inside the oven while it is still cold. If you
wish to place the food in the oven after it has been
preheated, immediately following a high-temperature
cooking programme, the text “Hot” will appear on the
display until the temperature of the oven has fallen to
120°. At this point it will be possible to place the pizza in
the oven.
Recipe for PIZZA:
Makes 3 or 4 pizzas: 1000 g flour, 500 ml water, 20 g salt,
20 g sugar, 100 ml olive oil, 20 g fresh yeast (or 2 sachets
of powder yeast)
• Leavening at room temperature: 1 hour, or LOW
TEMPERATURE manual function set to 40°. Leave to
rise for approximately 30-45 minutes.
• Place the food inside the oven while it is still cold.
• Start the
Recipe for BREAD (maximum amount of dough):
Ingredients:
• 1.3 kg flour
• 700 g water
• 25 g salt
• 50 g fresh baker’s yeast or 4 sachets dried yeast
powder.
Method:
• Mix the flour and salt in a large bowl.
• Dilute the yeast in lukewarm water (approximately 35
degrees).
• Make a small well in the mound of flour.
• Pour in the water and yeast mixture.
• Knead the dough by stretching and folding it over itself
with the palm of your hand for 10 minutes, until it has a
uniform consistency and is not too sticky.
• Form the dough into a ball shape, place it in a large
bowl and cover it with transparent plastic wrap to
prevent the surface of the dough from drying out. Place
the bowl in the oven, set to 40° using the LOW
TEMPERATURE manual function, and leave to rise for
approximately 30–45 minutes. Alternatively, leave at
room temperature for approximately 1 hour (until the
dough has doubled in volume).
• Break up the dough, kneading gently, and divide it to
create several loaves.
• Place them on a sheet of baking paper (cut to the same
size as the inside of the dripping pan) on top of the
rack (or on 2 or 3 racks if you wish to cook the loaves
PIZZA cooking mode.
on different shelves) and dust them lightly with flour.
• Make a few incisions in the top using a sharp blade.
• Place the rack in the oven, on shelf level 2 if using only
one level, or place two racks on shelf levels 1 and 4 if
using two levels, or place three racks on shelf levels 1,
3 and 5 if using three levels.
• Place the dripping pan on shelf level 7 and pour in
150 g cold water.
• Place the food inside the oven while it is still cold.
• Start the automatic function
• When the cooking process has finished, leave the
loaves to rest on the rack until they have completely
cooled.
BREAD.
Small Space
Starting the oven
1. Fit the DIVIDER to the DIVIDER shelf “D” using the pin,
with the arrows turned towards the rear part of the oven.
After it has been fitted correctly, you will be able to read
the text “OPENSPACE” on the front part of the DIVIDER
frame. A buzzer will sound to confirm that the DIVIDER
has been fitted correctly; it will then be possible to use the
two Main and Small space compartments separately or at
the same time.
! The EXTRALARGE SPACE FUNCTION knob will be
disabled.
2. Select the desired cooking function by turning the
SMALL SPACE FUNCTION knob.
3. The oven will begin its preheating stage. The
temperature may be changed by turning the
TEMPERATURE knob. The
during the pre-heating stage.
4. Once the pre-heating stage is completed, the
stops flashing (becomes fixed) and a buzzer sounds. It is
now possible to introduce foodstuffs into the oven.
5. During cooking it is always possible to:
- Change the cooking function by turning the SMALL
SPACE FUNCTION knob.
- Change the temperature by turning the TEMPERATURE
knob.
- Set the cooking duration in addition to the cooking end
time.
- Stop cooking by turning the SMALL SPACE FUNCTION
knob to the “0” position.
6. If a blackout occurs while the oven is already in
operation, an automatic system within the appliance will
reactivate the cooking function from the point at which it
was interrupted, as long as the temperature has not
dropped below a certain level. Programmed cooking
indicator light flashes
icon
8
Page 9
modes which have not started will not be restored and
must be reprogrammed.
Cooking functions
GRILL function
The top heating element is activated. By turning the
TEMPERATURE knob, the different power levels which
may be set will appear on the display; these range
between 5% and 100%. The high and direct temperature
of the grill is recommended for food which requires a high
surface temperature. This function is particularly suitable
for browning food, cooking gratins, colouring meringues,
making toasted sandwiches and grilling small quantities
of thin, lean meat. Always cook in this mode with the oven
door closed.
FAST COOKING function
This function requires the oven to be preheated. This
function is particularly suitable for cooking pre-packed
food quickly (frozen or pre-cooked).
Main Space
Starting the oven
1. Fit the DIVIDER to the DIVIDER shelf “D” using the pin,
with the arrows turned towards the rear part of the oven.
After it has been fitted correctly, you will be able to read
the text “OPENSPACE” on the front part of the DIVIDER
frame. A buzzer will sound to confirm that the DIVIDER
has been fitted correctly; it will then be possible to use the
two Main and Small space compartments separately or at
the same time.
! The EXTRALARGE SPACE FUNCTION knob will be
disabled.
2. Select the desired cooking function by turning the
MAIN SPACE FUNCTION knob.
3. The oven will begin its preheating stage. The
temperature may be changed by turning the
6. If a blackout occurs while the oven is already in
operation, an automatic system within the appliance will
reactivate the cooking function from the point at which it
was interrupted, as long as the temperature has not
dropped below a certain level. Programmed cooking
modes which have not started will not be restored and
must be reprogrammed.
Cooking functions
UNIVERSAL function
All heating elements and the fan are activated. Since the
heat remains constant throughout the oven, the air cooks
and browns food in a uniform manner. A maximum of
three racks may be used at the same time. If you are using
several racks at the same time, we recommend you place
the dripping pan on shelf level 1. If you are cooking on 3
levels at the same time, we recommend you place the
shelves on racks 3 and 5, and the dripping pan on rack 1.
Using the Small Space and Main Space at the
same time
Starting the oven
1. Fit the DIVIDER to the DIVIDER shelf “D” using the pin,
with the arrows turned towards the rear part of the oven.
After it has been fitted correctly, you will be able to read
the text “OPENSPACE” on the front part of the DIVIDER
frame. A buzzer will sound to confirm that the DIVIDER
has been fitted correctly; it will then be possible to use the
two Main and Small space compartments separately or at
the same time.
! The EXTRALARGE SPACE FUNCTION knob will be
disabled.
! In order to improve the oven’s energy efficiency, the preheating time of the SMALL SPACE cavity lasts about 15
minutes.
! If the MAIN SPACE is set at a temperature below 150°C,
in order to safeguard the cooking results, the grill function
will not start: the display will visualise “OFF.”
2. Select the desired cooking function for each recess by
turning the SMALL SPACE FUNCTION and/or MAIN
GB
TEMPERATURE knob. The
during the pre-heating stage.
4. Once the pre-heating stage is completed, the
stops flashing (becomes fixed) and a buzzer sounds. It is
now possible to introduce foodstuffs into the oven.
5. During cooking it is always possible to:
- Change the temperature by turning the TEMPERATURE
knob.
- Set the cooking duration in addition to the cooking end
time.
- Stop cooking by turning the MAIN SPACE FUNCTION
knob to the “0” position.
indicator light flashes
icon
SPACE FUNCTION knobs. The
Small Space has been selected and that it is therefore
possible to adjust the Small Space settings; the
lit up on the display indicates that the Main Space has
been selected and that it is therefore possible to adjust
the Main Space settings.
3. Both ovens will begin the preheating stage. The
temperature may be changed by turning the
TEMPERATURE knob. The
during the pre-heating stage.
icon indicates that the
icon
indicator light flashes
9
Page 10

GB
4. Once the pre-heating stage is completed, the
stops flashing (becomes fixed) and a buzzer sounds. It is
now possible to introduce foodstuffs into the oven.
5. The digits on the display become brighter to indicate
which recess you are adjusting. To modify the settings for
the other recess, press the
and Main Space settings may actually be changed during
simultaneous cooking:
- Change the cooking function by turning the SMALL
SPACE FUNCTION and/or MAIN SPACE FUNCTION
knob.
- Change the temperature by turning the TEMPERATURE
knob.
- Set the cooking duration in addition to the cooking end
time.
- Stop cooking by turning the SMALL SPACE FUNCTION
and/or MAIN SPACE FUNCTION knob to the “0” position.
6. If a blackout occurs while the oven is already in
operation, an automatic system within the appliance will
reactivate the cooking function from the point at which it
was interrupted, as long as the temperature has not
dropped below a certain level. Programmed cooking
modes which have not started will not be restored and
must be reprogrammed.
button. The Small Space
icon
Programming cooking
! A cooking function must be selected before
programming can take place.
Programming is possible in all oven configurations:
EXTRALARGE, MAIN and SMALL SPACE, even if the
latter two are being used simultaneously.
Programming the cooking duration
1. Press the
the three digits on the DISPLAY begin to flash.
2. Turn the TIMER KNOB towards “+” and “-” to adjust the
duration.
3. Press the
4. When the set time has elapsed, the text END appears
on the DISPLAY, the oven will stop cooking and a buzzer
sounds.
• For example: it is 9:00 a.m. and a time of 1 hour and 15
minutes is programmed. The function will stop
automatically at 10:15 a.m.
Setting the end time for a cooking mode
! A cooking duration must be set before the cooking end
time can be scheduled.
1. Follow steps 1 to 3 to set the duration as detailed
above.
button several times until the icon and
button again to confirm.
2. Next, press the button until the icon and the
three numerical digits on the DISPLAY begin to flash.
3. Turn the TIMER KNOB towards “+” and “-” to adjust
the hour value.
4. Press the
numerical digits on the DISPLAY begin to flash.
5. Turn the TIMER KNOB towards “+” and “-” to adjust
the minute value.
6. Press the
7. When the set time has elapsed, the text END appears
on the DISPLAY, the oven will stop cooking and a buzzer
sounds.
Programming has been set when the
flash. The DISPLAY shows the cooking end time and the
cooking duration alternately.
To cancel programming, turn the FUNCTION knob to the
“0” position.
button again so that the other two
button again to confirm.
and icons
Practical cooking advice
MULTILEVEL
• Use positions 1, 3, 5 and 6.
• Place the dripping pan at the bottom and the rack at
the top.
BARBECUE
• Preheat the oven for 5 minutes.
• Keep the oven door closed when cooking in this mode.
• Place the dripping pan on shelf level 3. Place the rack
in a position between 4 and 7, depending on how bulky
the food is, and make sure the food is in the centre of
the rack. Examples: beef ribs should be cooked on
shelf level 4 and bacon on shelf level 6 or 7.
PIZZA or FOCACCIA
• Use a light aluminium tray with a maximum diameter of
30 cm, placing it on top of the rack supplied.
• If the pizza has a lot of toppings, we recommend
adding the mozzarella cheese on top of the pizza
halfway through the cooking process.
GRILL
• Preheat the oven for 5 minutes.
• Fit the DIVIDER to the DIVIDER rack “D”.
• Keep the oven door closed when cooking in this mode.
• Place the rack in position 7. Position the food in the
centre of the rack. Position the dripping pan on shelf
level 6.
• This function is particularly suitable for browning food,
cooking gratins, colouring meringues, making toasted
10
Page 11
sandwiches and grilling small quantities of thin, lean
yog
FAST COOKING
meat.
• We recommend that the power level is set to
maximum. The top heating element is regulated by a
thermostat and may not always operate constantly.
• Preheat the oven, making sure the dripping pan is on
shelf level 6.
• When cooking frozen foods, always follow the
instructions on the packaging.
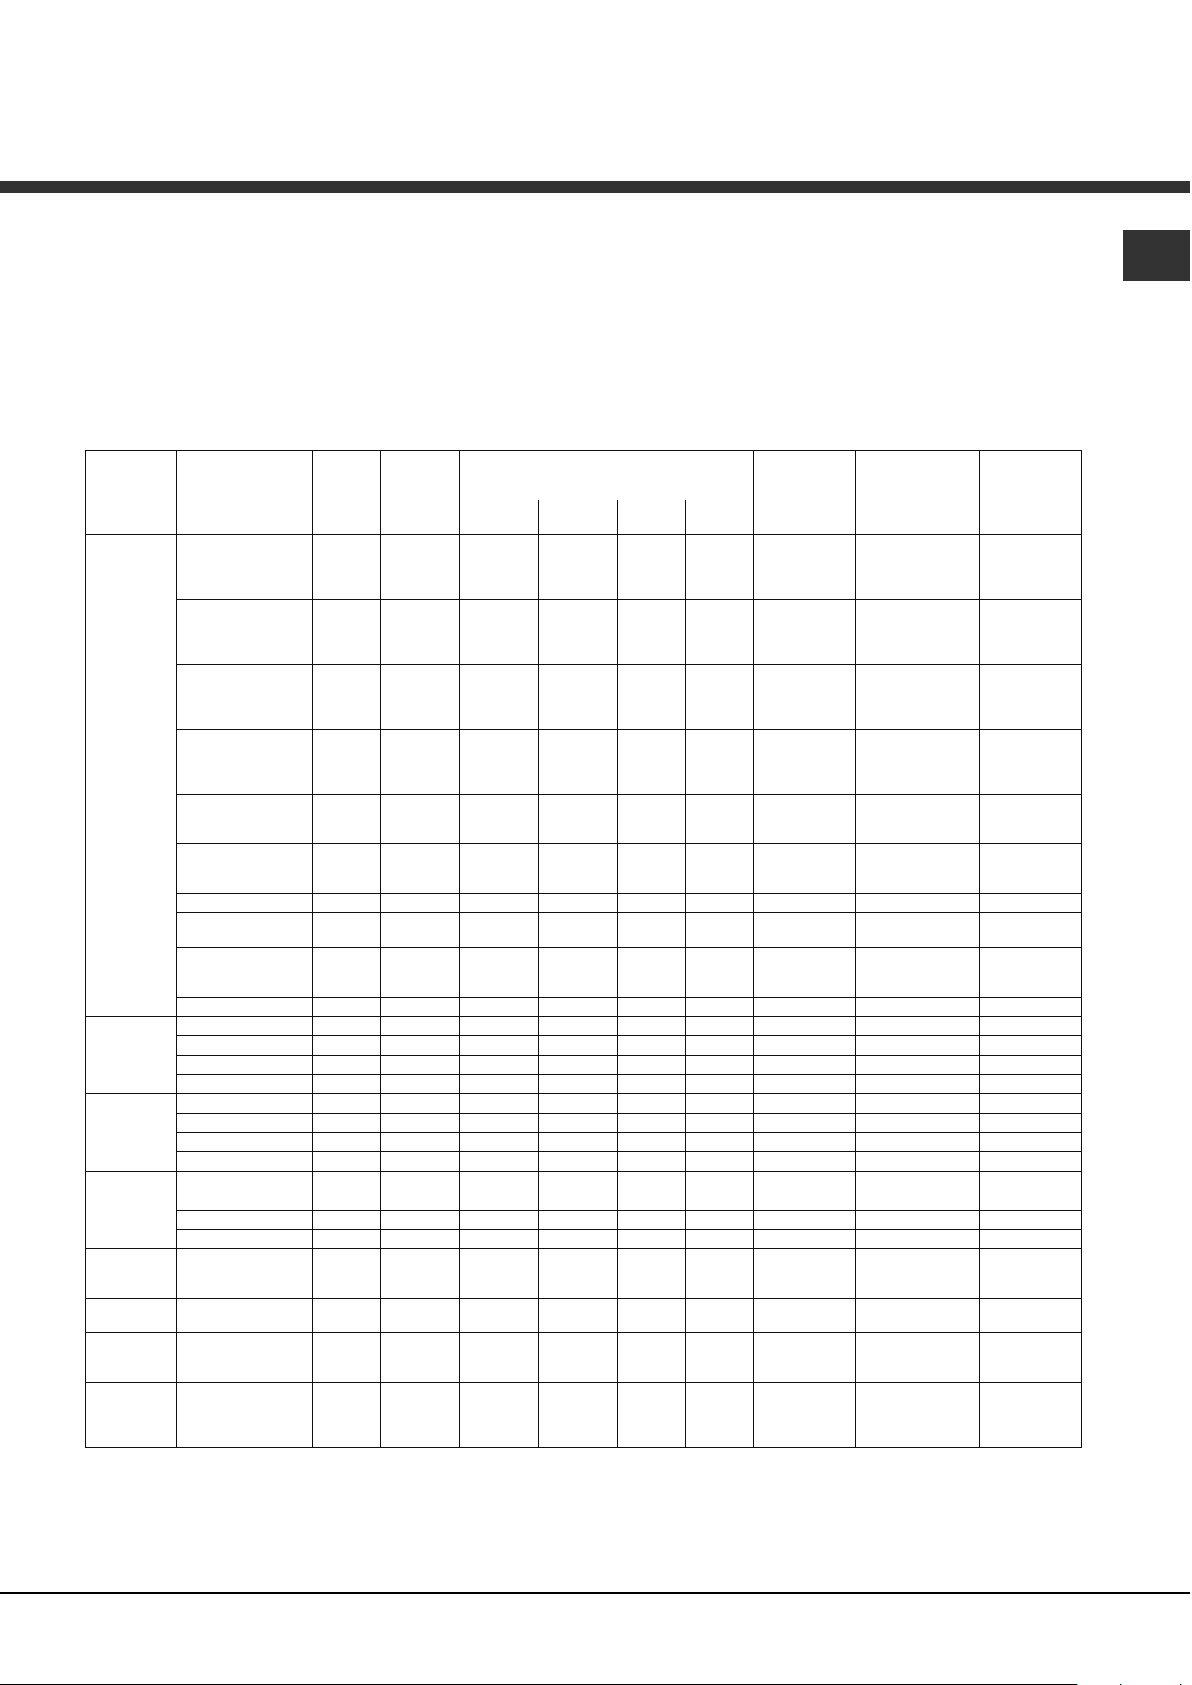
Cooking advice table for ovens with an ExtraLarge Space cavity
Function Foods Weight
Multilevel*
Pies / Tarts
Cream puffs
Pizza
Biscuits
Pastries
Crème caramel
(bain-marie)
Panettone 1 1 or 2 Yes 160 45-60
Sponge cake made
with
hurt
Sponge cake
Gratin*
Barbecue*
Low
temperature
Automatic
bread
Automatic
roast
Automatic
baked
cakes
Automatic
pizza
Large cut of meat 1 1 2 Yes 160 90-240
Rotisserie 1 2 3 No 200 35-75
Gratin 1 3 or 4 No 190 40-60
Large roast 1 1 2 No 200 90-120
Large roast game 1 1 2 No 200 90-120
Beef ribs 1 3 4 or 5 Yes 100% 20-30
Sausages 1 3 5 to 7 Yes 100% 10-20
Pork ribs 1 3 5 to 7 Yes 100% 15-25
Bacon 1 3 5 to 7 Yes 100% 3-6
Proving / Defrosting
White meringues 4 1 3 5 6 No 65 8-12 hours**
Meat / Fish 3 1 3 5 No 90 90-180**
Bread (see recipe)
Roasts
Desserts
Pizza (see recipe)
(in kg)
* The cooking times listed above are intended as guidelines only and may be modified according to personal tastes. Oven preheating times are set
as standard and may not be modified manually.
** The duration of the automatic cooking functions are set by default. The values in the table refer to the minimum and maximum duration, which
may be modified by the user, taking the default value as a starting point.
*** As stated in the recipe, pour 150 g water into the dripping pan.
Cook on
no. of
shelves
No.
1
1
1
1
1
1
1 2 2 or 3
1
1 2 No 40
2
2
2
1 2 3 No 60-90**
1 2 2
1
Dripping
pan
2 or 3
2
3
4
2
3
4
2
3
4
2
3
4
2
3
2
3
2
3
1
2
3
2
3
4
1 to 2
1
1
2 or 3
1 to 2
1
1
2 or 3
1 to 2
1
1
2 or 3
1 to 2
1
1
2 or 3
2
1
2 or 3
2
1
1
2 or 3
2
1
7***
7***
7***
2
2
2
1
1
Rack position Preheating Recommended
Rack 1 Rack 2 Rack 3
3 to 5
3
3
3 to 5
3
3
3 to 5
3
3
3 to 5
3
3
5
4
5
4
4 or 5
5
4
2
1
1
5
5
3
3
5
5
5
5
5
5
5
5
6
6
Yes
6
4
3
No
5
5
6
6
6
6
Yes
Yes
Yes
5
6
Yes
Yes
Yes
Yes
Yes
Yes
Yes
Yes
Yes
Yes
Yes
Yes
Yes
Yes
Yes
Yes
Yes
Yes
Yes
Yes
Yes
Yes
Yes
No
No
No
No
No
No
No
No
temperature
(°C)
180
180
180
180
190
190
190
190
220
220
220
220
180
180
180
180
200
200
200
170
170
170
160
160
190
190
190
35-60**
23-30**
Cooking
duration
(minutes)
30-40
35-45
40-50
45-55
25-35
25-35
30-40
30-40
15-25
20-30
25-35
30-40
15-25
15-25
20-30
20-30
30-40
35-45
40-50
35-45
35-45
40-50
60-75
60-75
30-35
35-40
40-45
35-60**
25-35**
30-35**
35-40**
GB
11
Page 12
GB
)
yog
g j
)
g
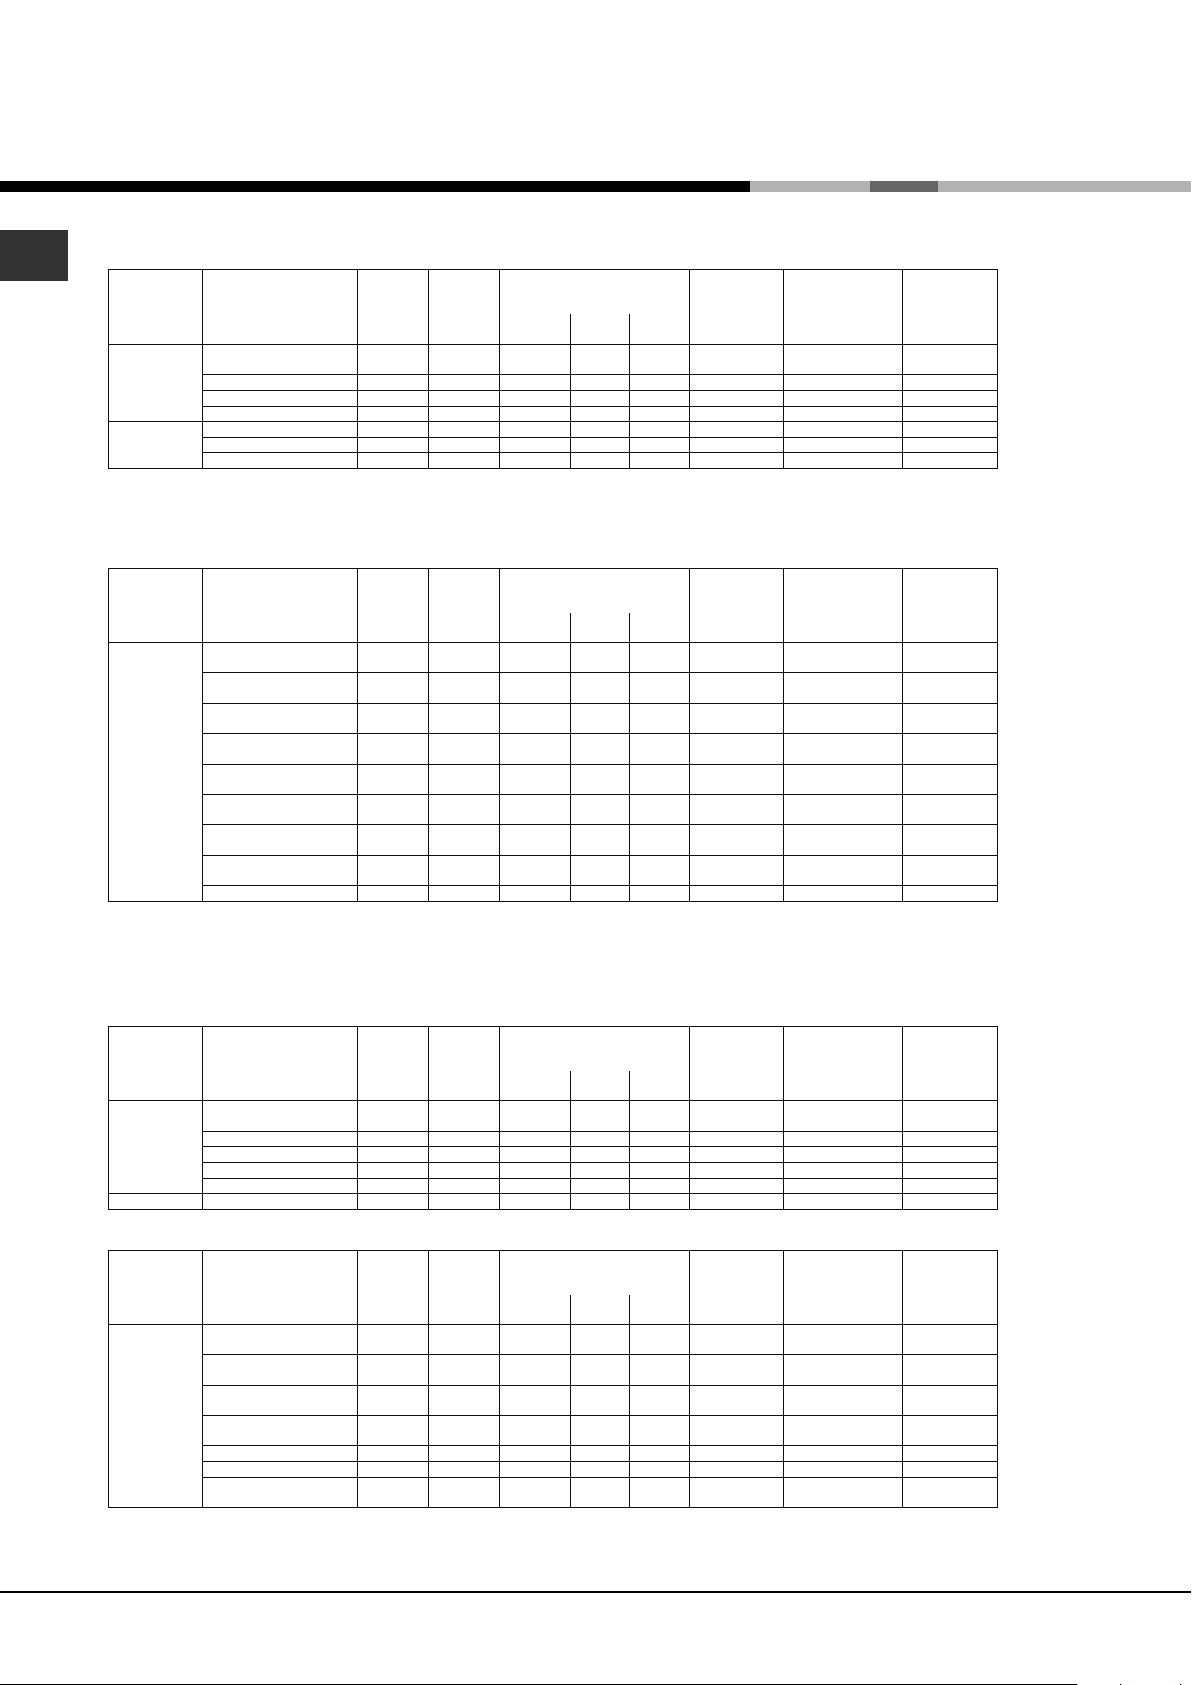
Cooking advice table for the Small Space feature
Function Foods Weight
Fast
cooking*
Grill
* The cooking times listed above are intended as guidelines only and may be modified in accordance with personal tastes. Oven preheating times
are set as standard and may not be modified manually.
No. Dripping
Fish fillets 1 6 D Yes 180-200 20-30
Meat fillets 1 6 D Yes 180-200 30-40
Frozen pizza 1 6 D Yes
Frozen prepared foods 1 6 D Yes
Toast 1 - 6-7 D Yes 100% 3-5
Bacon 1 6 7 D Yes 100% 3-6
Pork steaks 1 6 7 D Yes 100% 15-25
(in kg)
Cook on
no. of
shelves
Rack position Preheating Recommended
Rack 1 Divider
pan
temperature
(°C)
Cooking
duration
(minutes)
Cooking advice table for the Main Space feature
Function Foods Weight
Universal*
* The cooking times listed above are intended as guidelines only and may be modified in accordance with personal tastes. Oven preheating times
are set as standard and may not be modified manually.
No. Dripping
Pies / Tarts 1
Cream puffs 1
Pizza 1
Biscuits 1 2 2
Pastries 1 2 2
Crème caramel (bainmarie
Sponge cake made
with
hurt
Sponge cake 1
Small roastin
oints 1 2 3 D Yes 210 30-60
(in kg)
1 2 D Yes 170 35-45
1 2 D Yes 160 60-75
Cook on
no. of
shelves
2
2
2
2
Rack position Preheating Recommended
Rack 1 Divider
pan
2
1
2
1
2
1
1
1
2
1
D
3
3
3
3
3
3
Yes
D
Yes
D
Yes
D
Yes
D
Yes
D
Yes
D
Yes
D
Yes
D
Yes
D
Yes
D
Yes
D
Yes
200
200
190
190
220
220
180
180
200
200
190
190
temperature
(°C)
Cooking
duration
(minutes)
30-40
35-45
25-35
25-35
15-25
20-30
15-25
15-25
30-40
35-45
30-35
35-40
Cooking advice table for using the Small Space and Main Space at the same time
Small Space
Function Foods Weight
Fast
cooking*
Grill
No. Dripping
Fish fillets 1 6 D Yes 200-220 20-30
Meat fillets 1 6 D Yes 200-220 30-40
Frozen pizza 1 6-7 D Yes
Frozen prepared foods 1 6-7 D Yes
“Pilaf” rice 1 6 D Yes 180-200 30-45
Browning 1 6-7 D Yes 100% 3-6
(in kg)
Cook on
no. of
shelves
Rack position Preheating Recommended
Rack 1 Divider
pan
temperature
(°C)
Cooking
duration
(minutes)
Main Space
Function Foods Weight
Universal*
* The cooking times listed above are intended as guidelines only and may be modified in accordance with personal tastes. Oven preheating times
are set as standard and may not be modified manually.
No. Dripping
Cakes, pies / tarts 1
Biscuits 1 2 2
Crème caramel (bainmarie
Pizza 1
ratin 1 2 D Yes 200 60
Potato
Roasting joint 1 2 D Yes 200 60-90
Dishes with pastry
crust
(in kg)
1 2 D Yes 160 45
1 2 D Yes 200 35-45
Cook on
no. of
shelves
2
2
Rack position Preheating Recommended
Rack 1 Divider
pan
2
1 and 2 3 to 5 D D
1 and 2 3 to 5 D D
2
1 and 2 3 to 5 D D
Yes
Yes
Yes
Yes
Yes
Yes
200
200
180
180
220
220
temperature
(°C)
Cooking
duration
(minutes)
30-40
35-45
15-25
15-25
15-25
20-30
12
Page 13

Precautions and tips
! This appliance has been designed and
manufactured in compliance with international safety
standards. The following warnings are provided for
safety reasons and must be read carefully.
General safety
• The appliance was designed for domestic use
inside the home and is not intended for
commercial or industrial use.
• The appliance must not be installed outdoors, even
in covered areas. It is extremely dangerous to
leave the appliance exposed to rain and storms.
• When moving or positioning the appliance, always
use the handles provided on the sides of the
oven.
• Do not touch the appliance with bare feet or with
wet or damp hands and feet.
• The appliance must be used by adults only for the
preparation of food, in accordance with the
instructions provided in this booklet.
• Do not touch the heating elements or certain parts of
the oven door when the appliance is in use; these
parts become extremely hot. Keep children well
away from it and do not touch the hot parts yourself.
• Make sure that the power supply cables of other
electrical appliances do not come into contact
with the hot parts of the oven.
• The openings used for the ventilation and
dispersion of heat must never be covered.
• Always grip the oven door handle in the centre:
the ends may be hot.
• Always use oven gloves when placing cookware
in the oven or when removing it.
• Do not use aluminium foil to line the bottom of the
oven.
• Do not place flammable materials in the oven: If
the appliance is switched on accidentally, the
materials could catch fire.
• Always make sure the knobs are in the “”/“
position when the appliance is not in use.
• When unplugging the appliance, always pull the
plug from the mains socket; do not pull on the
cable.
• Never perform any cleaning or maintenance work
without having disconnected the appliance from
the electricity mains.
• If the appliance breaks down, under no
circumstances should you attempt to perform the
repairs yourself. Repairs carried out by
inexperienced individuals may cause injury or
further malfunctioning of the appliance. Contact a
Service Centre (see Assistance).
• Do not rest heavy objects on the open oven door.
• The appliance should not be operated by people
(including children) with reduced physical, sensory
”
or mental capacities, by inexperienced individuals
or by anyone who is not familiar with the product.
These individuals should, at the very least, be
supervised by someone who assumes responsibility
for their safety or receive preliminary instructions
relating to the operation of the appliance.
• Do not let children play with the appliance.
Disposal
• When disposing of packaging material: observe
local legislation so that the packaging may be
reused.
• The European Directive 2002/96/EC relating to
Waste Electrical and Electronic Equipment
(WEEE) states that household appliances should
not be disposed of using the normal solid urban
waste cycle. Exhausted appliances should be
collected separately in order to optimise the cost
of re-using and recycling the materials inside the
machine, while preventing potential damage to
the atmosphere and to public health. The
crossed-out dustbin is marked on all products to
remind the owner of their obligations regarding
separated waste collection. For further information
relating to the correct disposal of exhausted
household appliances, owners may contact the
relevant public service or their local dealer.
Respecting and conserving the
environment
• You can help to reduce the peak load of the
electricity supply network companies by using the
oven in the hours between late afternoon and the
early hours of the morning. The cooking mode
programming options, the “delayed cooking”
mode (see Cooking modes) and “delayed
automatic cleaning” mode (see Care and
Maintenance) in particular, enable the user to
organise their time efficiently.
• Always keep the oven door closed when using the
BARBECUE and GRATIN modes: this will achieve
improved results while saving energy
(approximately 10%).
• Check the door seals regularly and wipe them
clean to ensure they are free of debris so that
they adhere properly to the door, thus avoiding
heat dispersion.
! This product complies with the requirements of the
latest European Directive on the limitation of power
consumption of the standby mode. If no operations
are carried out for a period of 2 minutes, the
appliance automatically switches to the standby
mode. The standby mode is visualised by the high
luminosity "Watch Icon". As soon as interaction with
the machine resumes, the system's operating mode
is restored.
GB
13
Page 14

Care and maintenance
F
Glass cover
Lamp
Lamp Holder
compartment
GB
Switching the appliance off
Disconnect your appliance from the electricity
supply before carrying out any work on it.
Cleaning the appliance
• The stainless steel or enamel-coated external
parts and the rubber seals may be cleaned using
a sponge that has been soaked in lukewarm water
and neutral soap. Use specialised products for
the removal of stubborn stains. After cleaning,
rinse and dry thoroughly. Do not use abrasive
powders or corrosive substances.
• The inside of the oven should ideally be cleaned
after each use, while it is still lukewarm. Use hot
water and detergent, then rinse well and dry with
a soft cloth. Do not use abrasive products.
• All accessories can be washed like everyday
crockery, and are even dishwasher safe.
! Never use steam cleaners or pressure cleaners on
the appliance.
Cleaning the oven door
Clean the glass part of the oven door using a
sponge and a non-abrasive cleaning product, then
dry thoroughly with a soft cloth. Do not use rough
abrasive material or sharp metal scrapers as these
could scratch the surface and cause the glass to
crack.
For more thorough cleaning purposes, the oven door
may be removed:
1. Open the oven door fully (see diagram).
2. Use a screwdriver to lift up and turn the small
F F
levers
F located on the two hinges (see diagram).
F F
Inspecting the seals
Check the door seals around the oven at regular
intervals. If the seals are damaged, please contact
your nearest After-sales Service Centre (see
Assistance). We recommend that the oven is not
used until the seals have been replaced.
Replacing the light bulb
To replace the oven light bulb:
1. Remove the
glass cover of the
lamp-holder.
2. Remove the
light bulb and
replace it with a
similar one:
halogen lamp
voltage 230 V,
wattage 25 W,
cap G 9.
3. Replace the glass cover (see diagram).
! Do not touch the light bulb directly with your
hands.
3. Grip
the door on the two outer
sides and close it
approximately half way. Pull
the door towards you lifting it
out of its seat (see diagram).
To replace the door, reverse
this sequence.
14
Page 15
Automatic cleaning with the FAST
CLEAN function
With the FAST CLEAN mode, the internal
temperature of the oven reaches 500°C. The
pyrolytic cycle is activated, burning away food and
grime residues. Dirt is literally incinerated.
Keep children away from the appliance during the
automatic cleaning cycle as surfaces may become
very hot. Particles may ignite inside the oven due to
the combustion process. There is no cause for
concern: this process is both normal and hazardfree.
Safety devices
• The
that the oven door was automatically locked as soon
as the temperature reached a high value.
• If a malfunction occurs, the heating elements will
be switched off.
• Once the oven door has been locked, you cannot
change the duration and cycle end time settings.
Programming the automatic cleaning end time
icon on the display, when lit, indicates
GB
Before initiating the FAST CLEAN mode:
• Remove large or coarse food residues from the
inside of the oven using a damp sponge. Do not use
detergents.
• Remove all accessories.
• Remove the DIVIDER.
• Do not place tea towels or pot holders over the
oven handle.
! If the oven is too hot, the pyrolytic cycle may not
start. Wait for the oven to cool down.
! The programme may only be started once the oven
door has been closed.
To enable the FAST CLEAN cycle, turn the
EXTRALARGE SPACE FUNCTION knob to
Press the
used to select the desired cleaning level; there are
three default time settings which cannot be
modified.
1. Economy (ECO): turn the knob towards “-”.
Duration 1 hour.
2. Normal (NOR): initial level. Duration 1 hour and 30
minutes.
3. Intensive (INT): turn the knob towards “+”.
Duration 2 hours.
4. Press the
button. The TIMER KNOB may be
button to confirm.
.
1. Press the
digits on the DISPLAY begin to flash.
2. Turn the TIMER KNOB towards “+” and “-” to
adjust the hour value.
3. Press the
digits on the DISPLAY begin to flash.
4. Turn the TIMER KNOB towards “+” and “-” to
adjust the minute value.
5. Press the
6. When the set time has elapsed, the text END
appears on the display and a buzzer sounds.
• For example: it is 9:00 a.m. and the Economy
(ECO) FAST CLEAN level has been selected, with
the default duration of 1 hour. 12:30 is scheduled as
the end time. The programme will start automatically
at 11:30 a.m.
Programming has been set when the
buttons are illuminated. The display shows the FAST
CLEAN end time and duration alternately.
Once the automatic cleaning cycle is over
You will have to wait until the temperature inside the
oven has cooled down sufficiently before you can
open the oven door. You will notice some white dust
deposits on the bottom and the sides of your oven;
remove these deposits with a damp sponge once
the oven has cooled down completely. Alternatively,
you can make use of the already heated oven, in
which case it is not necessary to remove the
deposits, they are completely harmless and will not
affect your food in any way.
button until the icon and the two
button again until the other two
button again to confirm.
and
An end time for the FAST CLEAN cycle (as for a
normal cooking cycle) may be programmed (see
Programming the automatic cleaning end time).
15
Page 16

Assistance
GB
Warning:
The appliance is fitted with an automatic diagnostic system which detects any malfunctions. Malfunctions are
displayed by messages of the following type: “F”, followed by numbers.
Call for technical assistance should a malfunction occur.
! Never use the services of an unauthorised technician.
Please have the following information to hand:
• The type of problem encountered.
• The appliance model (Mod.).
• The serial number (S/N).
The latter two pieces of information can be found on the data plate located on the appliance.
ARISTON
PRIORITY SERVICE
If you are not completely satisfied with your appliance
or require service call:
Australia
Phone: 1300 815 589
New Zealand
Phone: (09) 306 1020
AUSTRALIA
ARISIT PTY LIMITED
40-44 Mark Anthony Drive, Dandenong South,
VIC 3175, Australia
Fax: Service & Sales (03) 9768 0838
Email: consumer.care@arisit.com
16
GENUINE ACCESSORIES
& SPARE PARTS
A wide range of genuine
accessories are available for your appliance call:
Australia
Phone: 03 9768 0888
New Zealand
Phone: (09) 306 1020
NEW ZEALAND
ARISIT PTY LIMITED
PO Box 68-140 Newton, Auckland
1145, New Zealand
Fax: (09) 302 0077
Email: sales@aristonappliances.co.nz
Page 17
Mode d’emploi
FOUR
GB
English,1
PT
Portuges, 49
OS 99D P IX
FR ES
Français, 17 Espanol, 33
Sommaire
FR
Installation, 18-19
Positionnement
Raccordement électrique
Caractéristiques techniques
Description de l’appareil, 20
Vue d’ensemble
Tableau de bord
Afficheur
Structure du four, 21
Mise en marche et utilisation, 22-28
Mise à l’heure de l’horloge
Programmer la minuterie
ExtraLarge Space
Small Space
Main Space
Utilisation simultanée de Small Space et Main
Space
Comment programmer une cuisson
Conseils de cuisson
Tableau de cuisson ExtraLarge Space
Tableau de cuisson Small Space
Tableau de cuisson Main Space
Tableau de cuisson simultanée Small Space et Main
Space
Précautions et conseils, 29
Sécurité générale
Mise au rebut
Economies et respect de l’environnement
Nettoyage et entretien, 30-31
Mise hors tension
Nettoyage de l•fappareil
Nettoyage de la porte
Remplacement de l’ampoule d’éclairage
Nettoyage automatique avec la fonction FAST
CLEAN
Assistance, 32
Page 18
Installation
560 m
m.
4
5
m
m
.
FR
! Conserver ce mode d’emploi pour pouvoir le
consulter à tout moment. En cas de vente, de
cession ou de déménagement, veiller à ce qu•fil
suive l•fappareil pour informer le nouveau
propriétaire sur son fonctionnement et lui fournir les
conseils correspondants.
! Lire attentivement les instructions : elles
contiennent des conseils importants sur l’installation,
l’utilisation et la sécurité de cet appareil.
Positionnement
! Les emballages ne sont pas des jouets pour
enfants, il faut les mettre au rebut en respectant la
réglementation sur le tri sélectif des déchets (voir
Précautions et conseils).
! L’installation doit être effectuée par un
professionnel du secteur conformément aux
instructions du fabricant. Une mauvaise installation
peut causer des dommages à des personnes, des
animaux ou des biens.
Encastrement
Pour garantir le bon fonctionnement de l’appareil, il
faut que le meuble possède des caractéristiques
bien précises :
• les panneaux adjacents doivent être fabriqués
dans un matériau résistant à la chaleur;
• dans le cas notamment de meubles plaqués bois,
il faut que les colles résistent à une température
de 100°C;
• la cavité du meuble pour encastrement du four,
tant sous plan (voir figure) qu’en colonne, doit
avoir les dimensions suivantes :
Aération
Pour garantir une bonne aération, la cavité
d’encastrement doit être dépourvue de paroi arrière.
Il est conseillé d’installer le four de manière à ce
qu’il repose sur deux cales en bois ou bien sur un
plan d’appui continu qui ait une découpe d’au moins
45 x 560 mm (voir figures).
Centrage et fixation
Positionner les 4 taquets situés sur les côtés du four
en face des 4 trous pratiqués sur le cadre et les
régler selon l’épaisseur de la joue du meuble:
épaisseur 20 mm : enlever la
partie amovible du taquet (voir
figure) ;
épaisseur 18 mm : utiliser la
première rainure, comme
prévu par le fabricant (voir
figure) ;
.
in
. m
m
m
7
4
5
.
m
m
5
595 mm.
595 mm.
m
4
2
23 mm.
5 mm.
m
5
4
5
.
m
576 mm.
.
m
4
558 mm.
593 mm.
! Après encastrement de l’appareil, il ne doit plus y
avoir possibilité de contact avec les parties
électrifiées.
Les déclarations de consommation indiquées sur
l’étiquette des caractéristiques ont été mesurées
pour ce type d’installation
18
épaisseur 16 mm : utiliser la
deuxième rainure (voir figure).
Pour fixer l’appareil au meuble : ouvrir la porte du
four et visser 4 vis à bois dans les 4 trous du cadre.
! Toutes les parties qui servent de protection doivent
être fixées de manière à ne pouvoir être enlevées
qu’avec l’aide d’un outil.
Page 19
Raccordement électrique
N
L
!!
!Les fours munis d’un câble d’alimentation tripolaire
!!
sont prévus pour un fonctionnement au courant
alternatif à la tension et à la fréquence indiquées sur
la plaque signalétique apposée sur l’appareil (voir
ci-dessous).
Montage du câble d’alimentation
1. Pour ouvrir le bornier, faire pression à l’aide d’un
tournevis sur les
languettes latérales du
couvercle : tirer et ouvrir
le couvercle (voir
figure).
2. Montage du câble
d’alimentation :
dévisser la vis du serrecâble ainsi que les trois
vis des contacts L-N-
puis fixer les fils
sous les têtes de vis
en respectant les
couleurs Bleu (N)
Marron (L) Jaune-Vert
(voir figure).
3. Fixer le câble dans
le serre-câble prévu.
4. Fermer le couvercle
du bornier.
Branchement du câble d’alimentation au réseau
électrique
Monter sur le câble une prise normalisée pour la
charge indiquée sur l’étiquette des caractéristiques
(voir ci-contre).
En cas de raccordement direct au réseau, il faut
intercaler entre l’appareil et le réseau un interrupteur
à coupure omnipolaire ayant au moins 3 mm
d’écartement entre les contacts, dimensionné à la
charge et conforme aux normes en vigueur (le fil de
terre ne doit pas être interrompu par l’interrupteur).
Le câble d’alimentation ne doit atteindre, en aucun
point, une température dépassant de 50 °C la
température ambiante.
! L’installateur est responsable du bon raccordement
électrique de l’appareil et du respect des normes de
sécurité.
Avant de procéder au branchement, s’assurer que :
• la prise est bien munie d’une terre conforme à la loi ;
• la prise est bien apte à supporter la puissance
maximale de l’appareil, indiquée sur la plaque
signalétique (voir ci-dessous) ;
• la tension d’alimentation est bien comprise entre
les valeurs indiquées sur la plaque signalétique
(voir ci-dessous) ;
• la prise est bien compatible avec la fiche de
l’appareil. Si ce n’est pas le cas, remplacer la
prise ou la fiche, ne pas utiliser de rallonges ni de
prises multiples.
! Après installation de l’appareil, le câble électrique
et la prise de courant doivent être facilement
accessibles
! Le câble ne doit être ni plié ni excessivement
écrasé.
! Il doit être contrôlé périodiquement et ne peut être
remplacé que par un technicien agréé (voir
Assistance).
Nous déclinons toute responsabilité en cas deNous déclinons toute responsabilité en cas de
!
Nous déclinons toute responsabilité en cas de
Nous déclinons toute responsabilité en cas deNous déclinons toute responsabilité en cas de
non respect des normes énumérées ci-dessus.non respect des normes énumérées ci-dessus.
non respect des normes énumérées ci-dessus.
non respect des normes énumérées ci-dessus.non respect des normes énumérées ci-dessus.
PLAQUE SIGNALÉTIQUE
Dimensions*
Volume*
Dimensions**
Volume**
Raccordements
électriques
ÉTIQUETTE
ÉNERGIE
* Uniquement pour les modèles avec glissières embouties.
** Uniquement pour les modèles avec glissières en fil.
largeur 43,5 cm
hauteur 41 cm
profondeur 41 cm
L. 74
largeur 45,6 cm
hauteur 41 cm
profondeur 41 cm
L. 77
tension 220-240V~ 50Hz
puissance maximum absorbée 3400W
(voir plaque signalétique)
Directive 2002/40/CE sur l'étiquette
des fours électriques
Norme EN 50304
Consommation énergie déclaration
Classe convection Forcée
– fonction four : Gratin
Cet appareil est conforme aux
Directives Communautaires suivantes :
2006/95/CEE du 12/12/06 (Basse Tension)
et modifications successives
- 2004/108/CEE du 15/12/04
et modifications successives
- 93/68/CEE du 22/07/93
et modifications successives
- 2002/96/CE
et modifications successives.
1275/2008 Stand-by/off mode
FR
19
Page 20
È
Description de
l’appareil
FR
Vue d’ensemble
Tableau de bord
Support SÉPARATEUR
Support GRILLE
Support LÈCHEFRITE
Tableau de bord
Bouton
FONCTIONS
SMALL SPACE
AFFICHEUR
Touche
SÉLECTION
TEMPS
GLISSI
de coulissement
niveau 7
niveau 6
niveau Séparateur "D"
niveau 5
niveau 4
niveau 3
niveau 2
niveau 1
RES
Bouton
FONCTIONS
EXTRALARGE SPACE
Afficheur
Bouton
FONCTIONS
MAIN SPACE
TEMPERATURE et TEMPS
Icône
ENCEINTE
SÉLECTIONNÉE
¡•OC
:
•• ••
Touche
SÉLECTION ENCEINTE
Chiffres
¡•OC
:
•• ••
Icône
DURÉE
Bouton
SÉLECTION
TEMPÉRATURE/TEMPS
Icône
PORTE VERROUILLEE
Icône
FIN DE CUISSON
Icône
MINUTEUR
20
Page 21

Structure du four
Le four Openspace a une capacité de 70lt et permet
de cuisiner simultanément les plats sur 4 niveaux ou
de cuire des pièces de grande taille, qui ne
rentreraient pas dans un four traditionnel.
Grâce à l’ExtraLarge Space, Openspace vous
permet de choisir entre 10 fonctions de cuisson,
dont 6 universelles, que vous pourrez utiliser pour
n’importe quelle préparation et 4 programmes
automatiques, qui vous permettront de réussir
toutes vos recettes.
En outre, Openspace assure un excellent confort
d’utilisation pour toutes les exigences, grâce à 4
différentes possibilités de cuisson : le four est
unique mais il peut être divisé en espaces de
dimensions différentes, chacun permettant un
réglage indépendant de la température et du temps
ExtraLarge Space : cuisson sur 4 niveaux
GRILLE
EXTRALARGE
SPACE
GRILLE
GRILLE
LÈCHEFRITE
de cuisson.
Ceci est possible grâce au DIVIDER calorifugé, qui
permet de diviser l’ExtraLarge Space en deux
espaces distincts de grandeur différente : Main
Space et Small Space.
Les deux Main et Small Space peuvent être utilisés
en même temps, pour cuisiner plus rapidement
différentes préparations, ou séparément, pour
utiliser seulement l’espace nécessaire.
Quand les deux enceintes sont utilisées ensemble, il
est possible de régler les températures de cuisson
entre 50°C et 250 °C, et obtenir une différence de
température pouvant aller jusqu’à 100 °C entre les
deux zones, ce qui permet de réaliser des recettes
même très différentes sans mélanger les saveurs et
les odeurs.
Main et Small Space : cuisson simultanée
SMALL
SPACE
MAIN
SPACE
GRILLE OU LÈCHEFRITE
Séparateur "D" (position fixe)
GRILLE (cuisson sur 3 niveaux)
GRILLE (cuisson sur 3 niveaux)
LÈCHEFRITE
(cuisson sur 3 niveaux)
FR
ExtraLarge Space : cuisson sur 4 niveaux
SMALL
SPACE
MAIN
SPACE
GRILLE OU LÈCHEFRITE
Séparateur "D"
(position fixe)
Le tableau ci-dessous décrit les valeurs de
température qu'il est possible de programmer.
SMALL
SPACE
MAIN
SPACE
réglage des températures à l'intérieur des deux
enceintes.
ExtraLarge Space : cuisson sur 4 niveaux
Séparateur "D" (position fixe)
GRILLE (cuisson sur 3 niveaux)
GRILLE (cuisson sur 3 niveaux)
LÈCHEFRITE
(cuisson sur 3 niveaux)
L'afficheur intelligent vous aidera à trouver le juste
Température dans la première enceinte
(Main ou Small Space)
Température dans la deuxième enceinte
(Small ou Main Space)
Entre 40 °C et 150 °C La différence de température par rapport à la première
enceinte sélectionnée est de 50 C maximum
Exemple: vous sélectionnez 90°C dans une enceinte;
dans l'autre vous pouvez sélectionner une valeur comprise entre 40°C (90 C-50 C) et 140 C (90°C+50°C).
Entre 155°C et 200°C La différence de température par rapport à la première
enceinte sélectionnée est de 70 C maximum
Exemple: vous sélectionnez 180°C dans une enceinte;
dans l'autre vous pouvez sélectionner une valeur comprise entre 110°C (180°C-70°C) et 250 C (180°C+70°C).
Entre 205°C et 250 C La différence de température par rapport à la première
enceinte sélectionnée est de 100 C maximum
Exemple: vous sélectionnez 210 C dans une enceinte;
dans l'autre vous pouvez sélectionner une valeur comprise entre 110°C (210°C-100 C) et 250 C température maxi
programmable.
Pour annuler une sélection il vous suffira de tourner le bouton Fonctions Small Space ou Main Space sur 0.
21
Page 22

Mise en marche et
utilisation
FR
! Lors de son premier allumage, faire fonctionner le four
à vide, porte fermée, pendant au moins une heure en
réglant la température à son maximum. Puis éteindre le
four, ouvrir la porte et aérer la pièce. L’odeur qui se
dégage est due à l’évaporation des produits utilisés
pour protéger le four.
! Ne jamais poser d’objets à même la sole du four,
l’émail risque de s’abîmer.
! Il faut toujours enfourner les plats sur les grilles
fournies avec l’appareil.
! Pendant l’usage, veillez à retirer la vaisselle ou les
aliments délicats de l’enceinte éteinte.
! Pour les cuissons de pâte levée, nous conseillons de
ne pas ouvrir la porte pour éviter qu’elle ne retombe.
! Si la porte est soumise à plusieurs reprises à de
fortes sollicitations, il se pourrait que le divider sorte
de son logement. Dans ce cas, l’heure s’affiche sur
l’écran. Assurez-vous que le divider soit correctement
inséré et relancez la cuisson.
Système de refroidissement
Pour obtenir un abaissement des températures
extérieures, un système de refroidissement souffle de
l’air à l’extérieur par une fente située entre le bandeau
et la porte du four.
! Le ventilateur se met en marche et s’arrête
automatiquement après l’arrêt du four jusqu’à ce que
ce dernier se soit suffisamment refroidi.
Régler l’horloge
! Le réglage n’est possible que lorsque le four est
éteint.
1. Appuyer sur la touche
chiffre se mette à clignoter sur l’AFFICHEUR et que les
icônes
2. tourner le bouton SÉLECTION TEMPS pour l’amener
sur “+” ou “-” et régler l’heure ;
3. appuyer à nouveau sur la touche
les deux autres chiffres numériques de l’AFFICHEUR
se mettent à clignoter ;
4. tourner le bouton SÉLECTION TEMPS pour l’amener
sur “+” ou “-” et régler les minutes ;
5. appuyer à nouveau sur la touche
, , s’éteignent ;
jusqu’à ce que le premier
jusqu’à ce que
pour confirmer.
Programmer le minuteur
! Cette fonction ne stoppe pas la cuisson et est
indépendante du fonctionnement du four ; elle sert
uniquement à déclencher un signal sonore à
l’expiration des minutes sélectionnées.
et les trois chiffres de l’AFFICHEUR se mettent à
clignoter ;
2. tourner le bouton SÉLECTION TEMPS pour l’amener
sur “+” ou “-” et régler les minutes ;
3. appuyer à nouveau sur la touche
L’affichage du compte à rebours suivra. Un signal
sonore indiquera la fin du décompte.
pour confirmer.
ExtraLarge Space
Mise en marche du four
1. Sélectionner la fonction de cuisson souhaitée à
l’aide du bouton FONCTIONS EXTRALARGE SPACE.
L’icône
l’ExtraLarge Space est sélectionnée et que seuls les
réglages de l’ExtraLarge Space peuvent être modifiés.
2. Le four se place en préchauffage. Pour modifier la
température, tourner le bouton TEMPÉRATURE.
Pendant le préchauffage, l’icône
3. Une fois le préchauffage terminé, l’icône
fixe et un signal sonore retentit. Il est maintenant
possible d’enfourner les plats;
4. En cours de cuisson, il est possible à tout moment
de:
- modifier la fonction de cuisson à l’aide du bouton
FONCTIONS EXTRALARGE SPACE ;
- modifier la température à l’aide du bouton
TEMPÉRATURE (seulement pour les cuissons
universelles) ;
- programmer la durée (seulement pour les cuissons
universelles) et l’heure de fin de cuisson ;
- interrompre la cuisson en ramenant le bouton
FONCTIONS EXTRALARGE SPACE sur “0”.
5. En cas de coupure de courant, si la température du
four n’est pas trop redescendue, un dispositif spécial
fait repartir la fonction à partir du moment où elle a été
interrompue. Les programmations en attente de
démarrage ne sont par contre pas rétablies et doivent
être reprogrammées dès rétablissement du courant.
! La configuration ExtraLarge ne permet pas d’utiliser
les Main et Small Space : les boutons FONCTIONS
SMALL SPACE et MAIN SPACE sont désactivés.
Fonctions de cuisson universelles
! Toutes les fonctions ont une température de cuisson
présélectionnée. Il est possible de la régler
manuellement, entre 40 °C et 250 °C au choix.
Pour la fonction BARBECUE, la valeur présélectionnée
est un niveau de puissance exprimé en %. Il peut lui
aussi être réglé manuellement.
éclairée sur l’afficheur indique que
clignote.
devient
1. Appuyer sur la touche
22
jusqu’à ce que l’icône
Page 23

Fonction MULTICUISSON
Mise en marche de tous les éléments chauffants ainsi
que de la turbine. La chaleur est constante et bien
répartie à l’intérieur du four, l’air cuit et dore de façon
uniforme en tous points. Il est possible de cuire au
maximum sur quatre niveaux en même temps. Si vous
cuisez sur plusieurs niveaux en même temps, nous
recommandons de toujours placer la lèchefrite sur le
niveau du bas. En cas de cuisson simultanée sur 4
niveaux, nous recommandons de placer les grilles aux
niveaux 3, 5 et 6 et la lèchefrite au niveau 1.
Fonction GRATIN
Mise en marche de la résistance de voûte, de la
résistance circulaire (pendant un certain temps) et de
la turbine et du tournebroche (si l’appareil en est
équipé). L’irradiation thermique unidirectionnelle
s’ajoute au brassage de l’air pour une répartition
uniforme de la chaleur dans l’enceinte du four.
Plus de risque de brûler les aliments en surface et plus
grande pénétration de la chaleur. Cuisson porte du four
fermée.
Fonction BARBECUE
Mise en marche de la résistance de voûte et du
tournebroche (si l’appareil en est équipé). Tourner le
bouton TEMPÉRATURE, l’afficheur indique les niveaux
de puissance sélectionnables qui vont de 5 % à 100
%. La température élevée et directe du gril est
conseillée pour tous les aliments qui exigent une haute
température en surface. Cuisson porte du four fermée.
Fonction BASSE TEMPÉRATURE
Ce type de cuisson permet de faire lever les pâtes, de
décongeler, de préparer du yaourt, de réchauffer plus ou
moins rapidement et de cuire lentement à basse
température. Températures sélectionnables : 40, 65, 90 °C.
Fonction FAST CLEAN
Il s'agit du programme de nettoyage automatique et
intégral du four par pyrolyse (voir Nettoyage et
entretien).
! Durée du cycle fixée à 90 minutes.
Tournebroche (n’existe que sur certains modèles)
Pour actionner le
tournebroche (voir figure)
procéder comme suit :
1. placer la lèchefrite au
niveau 1 ;
2. placer le berceau au
niveau 3 et encastrer le
bout arrière de la broche
dans le trou situé au
fond de l’enceinte ;
3. pour actionner le tournebroche, sélectionner les
fonctions
Fonctions de cuisson automatiques
températuretempérature
! La
température et la durée de cuisson sont
températuretempérature
présélectionnéesprésélectionnées
présélectionnées et ne peuvent pas être modifiées à
présélectionnéesprésélectionnées
l’aide du système
ProgramméeProgrammée
Programmée) qui garantit automatiquement un
ProgramméeProgrammée
résultat parfait. La cuisson s’arrête automatiquement et
le four signale que le plat est cuit. La durée de cuisson
peut être modifiée de quelques minutes, comme
indiqué ci-dessous dans la description des différentes
fonctions.
Choisir cette fonction pour cuisiner de la viande de
veau, de porc, d’agneau et de bœuf. Enfourner à froid.
Il est aussi possible d’enfourner à chaud. Seule la
durée peut être modifiée, à raison de -10/+10 minutes.
Cette fonction est idéale pour la cuisson des gâteaux.
Enfourner à froid. Il est aussi possible d’enfourner à
chaud. Seule la durée peut être modifiée, à raison de 10/+15 minutes.
C’est la fonction idéale pour la cuisson du pain. Se
reporter au paragraphe suivant pour une recette
détaillée.
Pour obtenir de meilleurs résultats, nous
recommandons de suivre attentivement les conseils
suivants :
• suivre la recette à la lettre ;
• ne pas oublier de verser 150 gr (1.5 dl) d’eau
froide dans la lèchefrite au niveau 7;
Enfourner à froid. Au cas où vous souhaiteriez
enfourner à chaud, après une cuisson à haute
température, l’afficheur visualisera le message “Hot”
jusqu’à ce que la température du four aura atteint 40
°C. Vous pouvez alors enfourner le pain.
C’est la fonction idéale pour la cuisson des pizzas. Se
reporter au paragraphe suivant pour une recette
détaillée. Seule la durée peut être modifiée, à raison de
-5/+12 minutes.
Pour obtenir de meilleurs résultats, nous
recommandons de suivre attentivement les conseils
suivants :
• suivre la recette à la lettre ;
• le poids de la pâte doit être compris entre 350g et
500g.
• graisser légèrement la lèchefrite et les plats à rôti.
Enfourner à froid. Au cas où vous souhaiteriez
ou .
C.O.P.®C.O.P.®
C.O.P.® (
C.O.P.®C.O.P.®
Fonction VIANDE
Fonction GÂTEAUX
Fonction PAIN
Fonction PIZZA
Cuisson OptimaleCuisson Optimale
Cuisson Optimale
Cuisson OptimaleCuisson Optimale
FR
23
Page 24

FR
enfourner à chaud, après une cuisson à haute
température, l’afficheur visualisera le message “Hot”
jusqu’à ce que la température du four aura atteint 120
°C. Vous pouvez alors enfourner la pizza.
Recette PIZZA :
Recette pour 3 ou 4 pizzas : 1.000g de farine, 500g
d’eau, 20g de sel, 20 g de sucre, 10 cl d’huile d’olive,
20g de levure de boulanger fraîche (ou bien 2 sachets
en poudre)
• Levage à température ambiante : 1 heure ou
fonction manuelle BASSE TEMPÉRATURE à 40°C et
laisser lever environ 30/45 minutes.
• Enfourner à froid.
• Démarrer la cuisson
Recette du PAIN (quantité de pâte maximum):
Ingrédients :
• 1,3 Kg de farine
• 700 gr d’eau
• 25 gr de sel
• 50 gr de levure fraîche de boulanger ou 4 sachets
de levure en poudre.
Préparation :
• Mélanger la farine et le sel dans un grand récipient.
• Dissoudre la levure dans de l’eau légèrement tiède
(35 degrés environ).
• Disposer la farine en fontaine.
• Verser le mélange d’eau et de levure.
• Mélanger et pétrir jusqu’à obtenir une pâte
homogène et peu collante, l’étirer avec la paume de
la main et la replier sur elle-même pendant 10
minutes.
• Former une boule, la placer dans un bol et couvrir
d’un film plastique pour éviter que la surface de la
pâte ne sèche. Mettre le bol dans le four,
sélectionner la fonction manuelle BASSE
TEMPÉRATURE à 40 °C et laisser lever environ 30 à
45 minutes ou à température ambiante pendant
environ 1 heure (la pâte doit doubler de volume).
• Reprendre la pâte et la pétrir délicatement; la diviser
pour obtenir plusieurs pains.
• Les disposer sur la grille (ou sur 2 ou 3 grilles si
vous souhaitez cuire les pains sur plusieurs
niveaux) recouverte de papier sulfurisé (découpé en
fonction de la taille du lèche-frite) et les saupoudrer
de farine.
• Pratiquer des entailles à l’aide d’une lame de rasoir.
• Enfourner la grille sur le niveau 2 pour la cuisson sur
un seul niveau ou les deux grilles sur les niveaux 1
et 4 pour la cuisson sur deux niveaux et 1-3-5 pour
la cuisson sur trois niveaux.
• Positionner la lèchefrite au niveau 7 et y verser
150 gr d’eau froide.
• Enfourner à froid.
PIZZA.
• Démarrer la fonction automatique
• En fin de cuisson, laisser reposer les pains sur la
grille jusqu’à ce qu’ils aient complètement refroidi.
PAIN.
Small Space
Mise en marche du four
1. Insérer le DIVIDER sur le support DIVIDER "D", la
cheville et les flèches étant tournées vers la paroi
arrière du four. Le message “OPENSPACE” qui
s’affiche sur la partie avant du cadre du DIVIDER
confirme que l’insertion a été effectuée correctement.
Le four émet un signal sonore pour confirmer que
l’insertion du DIVIDER a été correctement exécutée et
qu’il est possible d’utiliser les deux Main et Small
Space séparément ou en même temps.
! Le bouton FONCTIONS EXTRALARGE SPACE est
désactivé.
2. Sélectionner la fonction de cuisson souhaitée à
l’aide du bouton FONCTIONS SMALL SPACE.
3. Le four se place en préchauffage. Pour modifier la
température, tourner le bouton TEMPÉRATURE.
Pendant le préchauffage, l’icône
4. Une fois le préchauffage terminé, l’icône
fixe et un signal sonore retentit. Il est maintenant
possible d’enfourner les plats.
5. En cours de cuisson, il est possible à tout moment
de :
- modifier la fonction de cuisson à l’aide du bouton
FONCTIONS SMALL SPACE ;
- modifier la température à l’aide du bouton
TEMPÉRATURE ;
- programmer la durée et l’heure de fin de cuisson ;
- interrompre la cuisson en ramenant le bouton
FONCTIONS SMALL SPACE sur “0”.
6. En cas de coupure de courant, si la température du
four n’est pas trop redescendue, un dispositif spécial
fait repartir la fonction à partir du moment où elle a été
interrompue. Les programmations en attente de
démarrage ne sont par contre pas rétablies et doivent
être reprogrammées dès rétablissement du courant.
Fonctions de cuisson
Fonction GRIL
La résistance de voûte est branchée. Tourner le bouton
TEMPÉRATURE, l’afficheur indique les niveaux de
puissance sélectionnables qui vont de 5 % à 100 %.
La température élevée et directe du gril est conseillée
pour tous les aliments qui exigent une haute
température en surface. Cette fonction est indiquée
pour : saisir la viande, gratiner, donner une coloration
aux meringues, préparer des croque-monsieur, cuire
clignote.
devient
24
Page 25

les petites grillades de viandes maigres et fines.
Cuisson porte du four fermée.
Fonction FAST COOKING
La fonction nécessite un préchauffage. Cette fonction
est tout particulièrement recommandée pour les
cuissons rapides de plats préparés (surgelés ou
précuits).
recommandons de toujours placer la lèchefrite sur le
niveau 1. En cas de cuisson simultanée sur 3 niveaux,
nous recommandons de placer les grilles aux niveaux
3 et 5 et la lèchefrite au niveau 1.
Utilisation simultanée de Small Space et
Main Space
FR
Main Space
Mise en marche du four
1. Insérer le DIVIDER sur le support DIVIDER "D", la
cheville et les flèches étant tournées vers la paroi
arrière du four. Le message “OPENSPACE” qui
s’affiche sur la partie avant du cadre du DIVIDER
confirme que l’insertion a été effectuée correctement.
Le four émet un signal sonore pour confirmer que
l’insertion du DIVIDER a été correctement exécutée et
qu’il est possible d’utiliser les deux Main et Small
Space séparément ou en même temps.
! Le bouton FONCTIONS EXTRALARGE SPACE est
désactivé.
2. Sélectionner la fonction de cuisson Universelle à
l’aide du bouton FONCTIONS MAIN SPACE.
3. Le four se place en préchauffage. Pour modifier la
température, tourner le bouton TEMPÉRATURE.
Pendant le préchauffage, l’icône
4. Une fois le préchauffage terminé, l’icône
fixe et un signal sonore retentit. Il est maintenant
possible d’enfourner les plats.
5. En cours de cuisson, il est possible à tout moment
de :
- modifier la température à l’aide du bouton
TEMPÉRATURE ;
- programmer la durée et l’heure de fin de cuisson ;
- interrompre la cuisson en ramenant le bouton
FONCTIONS MAIN SPACE sur “0”.
6. En cas de coupure de courant, si la température du
four n’est pas trop redescendue, un dispositif spécial
fait repartir la fonction à partir du moment où elle a été
interrompue. Les programmations en attente de
démarrage ne sont par contre pas rétablies et doivent
être reprogrammées dès rétablissement du courant.
Fonctions de cuisson
Fonction UNIVERSELLE
Mise en marche de tous les éléments chauffants ainsi
que de la turbine. La chaleur est constante et bien
répartie à l’intérieur du four, l’air cuit et dore de façon
uniforme en tous points. Il est possible de cuire au
maximum sur trois niveaux en même temps. Si vous
cuisez sur plusieurs niveaux en même temps, nous
clignote.
devient
Mise en marche du four
1. Insérer le DIVIDER sur le support DIVIDER "D", la
cheville et les flèches étant tournées vers la paroi
arrière du four. Le message “OPENSPACE” qui
s’affiche sur la partie avant du cadre du DIVIDER
confirme que l’insertion a été effectuée correctement.
Le four émet un signal sonore pour confirmer que
l’insertion du DIVIDER a été correctement exécutée et
qu’il est possible d’utiliser les deux Main et Small
Space séparément ou en même temps.
! Le bouton FONCTIONS EXTRALARGE SPACE est
désactivé.
! Pour améliorer l’efficience énergétique, le temps de
préchauffage de l’enceinte SMALL SPACE est
d’environ 15 minutes.
! Si la MAIN SPACE est réglée sur une température
inférieure à 150 °C, le gril ne se met pas en marche.
Ce, afin de préserver le résultat de la cuisson :
l’inscription OFF s’affiche alors sur l’écran.
2. Sélectionner la fonction de cuisson souhaitée pour
chaque enceinte à l’aide des boutons FONCTIONS
SMALL SPACE et/ou FONCTIONS MAIN SPACE.
L’icône
sélectionnée et qu’il est donc possible de procéder
aux réglages de la Small Space, l’icône
sur l’afficheur indique que la Main Space est
sélectionnée et qu’il est donc possible de procéder
aux réglages de la Main Space.
3. Les deux fours se placent en phase de
préchauffage. Pour modifier la température, tourner le
bouton TEMPÉRATURE. Pendant le préchauffage,
l’icône
4. Une fois le préchauffage terminé, l’icône
fixe et un signal sonore retentit. Il est maintenant
possible d’enfourner les plats.
5. Une plus intense luminosité des chiffres sur
l’afficheur indique l’enceinte sur laquelle on est en train
d’effectuer les réglages. Pour modifier ceux de l’autre
enceinte, appuyer sur la touche
cuisson simultanée il est en effet possible de modifier
les réglages tant de la Small Space que de la Main
Space :
indique que la Small Space est
éclairée
clignote.
devient
. Au cours de la
25
Page 26

FR
- modifier la fonction de cuisson à l’aide du bouton
FONCTIONS SMALL SPACE et/ou FONCTIONS MAIN
SPACE ;
- modifier la température à l’aide du bouton
TEMPÉRATURE ;
- programmer la durée et l’heure de fin de cuisson ;
- interrompre la cuisson en ramenant le bouton
FONCTIONS SMALL SPACE et/ou FONCTIONS MAIN
SPACE sur “0”.
6. En cas de coupure de courant, si la température du
four n’est pas trop redescendue, un dispositif spécial
fait repartir la fonction à partir du moment où elle a été
interrompue. Les programmations en attente de
démarrage ne sont par contre pas rétablies et doivent
être reprogrammées dès rétablissement du courant.
7. à expiration de la durée sélectionnée, l’AFFICHEUR
affiche END, le four stoppe la cuisson et un signal
sonore retentit.
Les icônes
programmation a été lancée. L’AFFICHEUR affiche à
tour de rôle l’heure de fin de cuisson et la durée.
Pour annuler une programmation, amener le bouton
FONCTIONS sur “0”.
et éclairées signalent qu’une
Conseils de cuisson
MULTICUISSON
• Utiliser les niveaux 1-3-5-6.
• Placer la lèchefrite en bas et les grilles en haut.
Comment programmer une cuisson
! La programmation n’est possible qu’après avoir
sélectionné une fonction de cuisson.
La programmation est activable depuis toutes les
configurations : EXTRALARGE, MAIN et SMALL
SPACE même en fonctionnement simultané.
Programmer la durée de cuisson
1. Appuyer plusieurs fois de suite sur la touche
jusqu’à ce que l’icône et les trois chiffres
numériques de l’AFFICHEUR se mettent à clignoter ;
2. tourner le bouton SÉLECTION TEMPS pour l’amener
sur “+” ou “-” et régler la durée désirée ;
3. appuyer à nouveau sur la touche
4. à expiration de la durée sélectionnée, l’AFFICHEUR
affiche END, le four stoppe la cuisson et un signal
sonore retentit.
• Exemple : il est 9h00 et la durée programmée est
de 1h15. La fonction s’arrête automatiquement à
10h15.
Programmer la fin d’une cuisson
! La programmation d’une fin de cuisson n’est possible
qu’après avoir sélectionné une durée de cuisson.
1. Suivre la procédure de 1 à 3 décrite pour la durée ;
2. Appuyer sur la touche
et les deux chiffres de l’AFFICHEUR se mettent à
clignoter ;
3. tourner le bouton SÉLECTION TEMPS pour l’amener
sur “+” ou “-” et régler l’heure ;
4. appuyer à nouveau sur la touche
les deux autres chiffres numériques de l’AFFICHEUR
se mettent à clignoter ;
5. tourner le bouton SÉLECTION TEMPS pour l’amener
sur “+” ou “-” et régler les minutes ;
6. appuyer à nouveau sur la touche
jusqu’à ce que l’icône
pour confirmer ;
jusqu’à ce que
pour confirmer ;
BARBECUE
• Préchauffer le four pendant 5 minutes.
• Fermer la porte du four pendant la cuisson.
• Placer la lèchefrite sur le niveau 3. Insérer la grille
sur les niveaux de 4 à 7 en fonction de l’épaisseur
de la pièce à cuire ; placer les aliments au milieu de
la grille. Exemples : côte de bœuf sur le niveau 4 et
bacon sur le niveau 6 ou 7.
PIZZAS ou FOUGASSES
• Utiliser un plat en aluminium léger de 30 cm de
diamètre maximum, le poser sur la grille du four.
• Si les pizzas sont bien garnies, n’ajouter la
mozzarelle qu’à mi-cuisson.
GRIL
• Préchauffer le four pendant 5 minutes.
• Insérer le DIVIDER sur le support DIVIDER “D”.
• Fermer la porte du four pendant la cuisson.
• Placer la grille au niveau 7, enfourner les plats au
milieu de la grille. Placer la lèchefrite au niveau 6.
• Cette fonction est indiquée pour : saisir la viande,
gratiner, donner une coloration aux meringues,
préparer des croque-monsieur, cuire les petites
grillades de viandes maigres et fines.
• Nous conseillons de sélectionner le niveau d’énergie
maximum. Ne pas s’inquiéter si la résistance de
voûte n’est pas allumée en permanence : son
fonctionnement est contrôlé par un thermostat.
26
Page 27
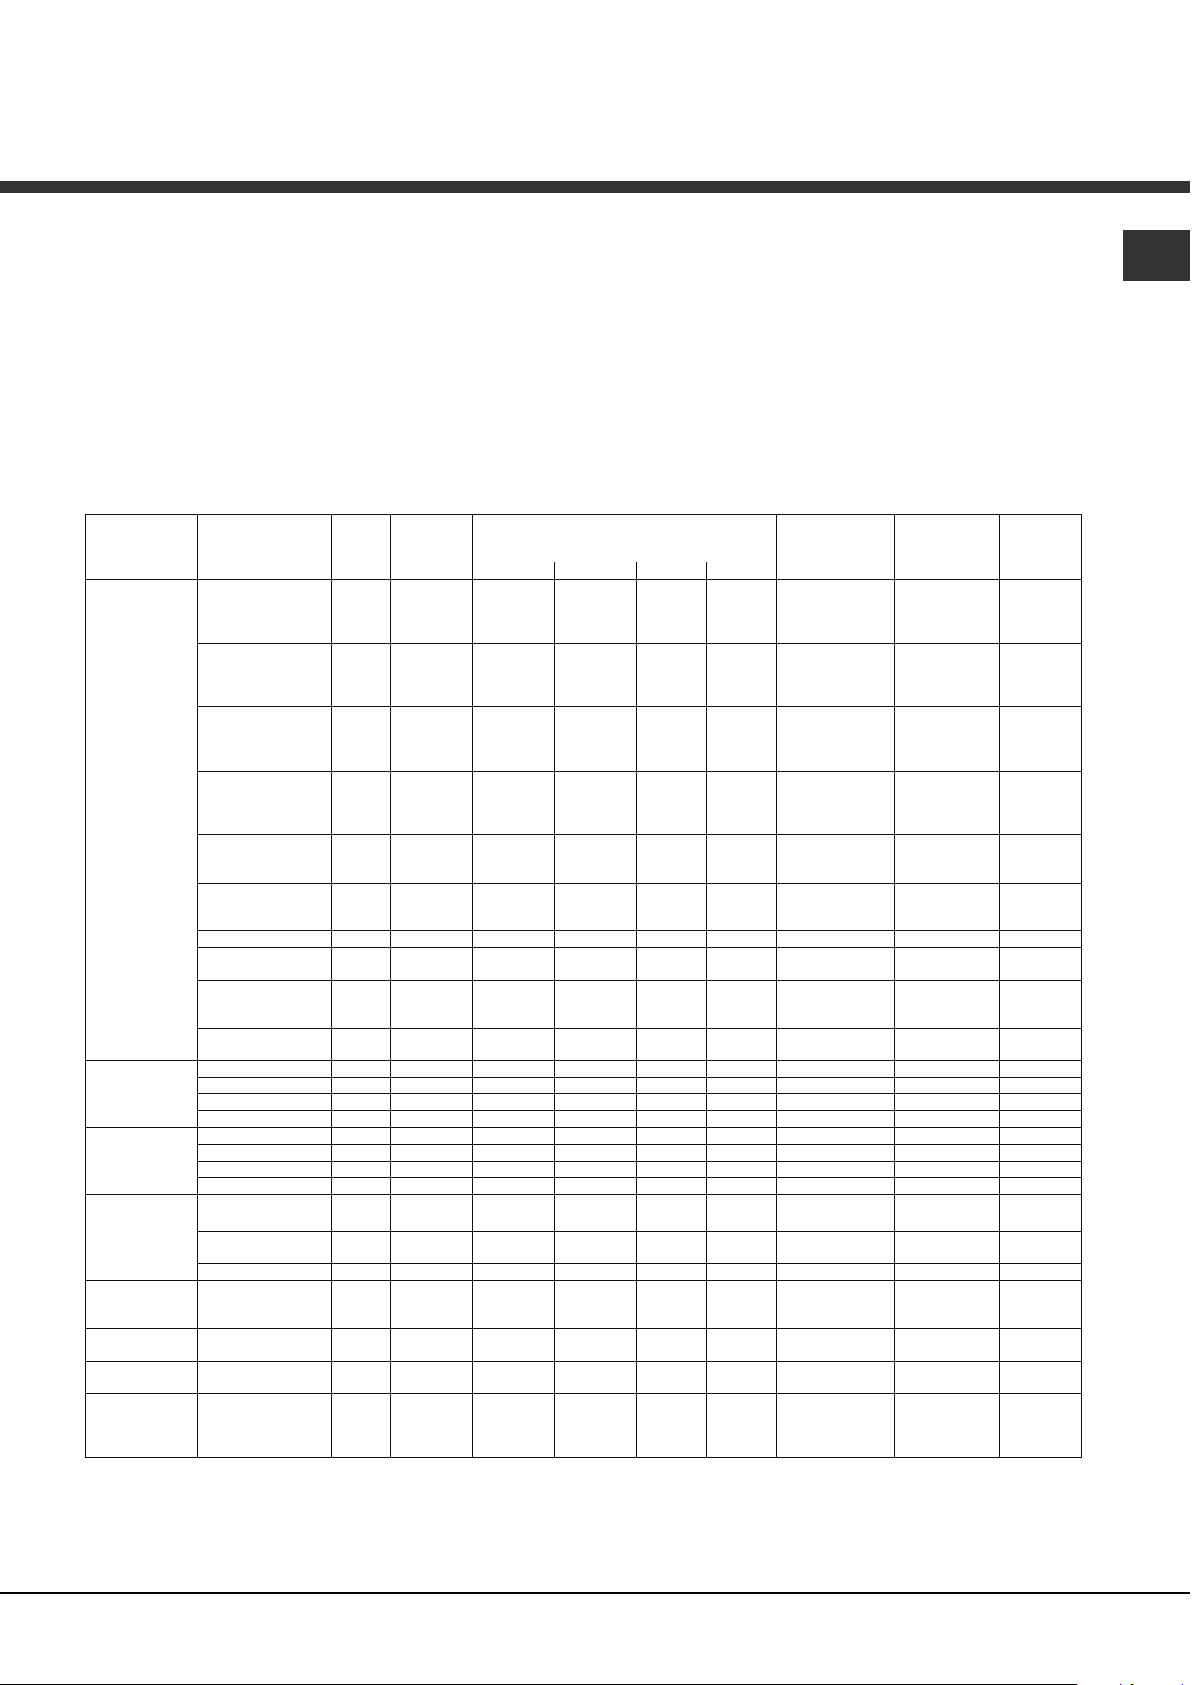
FAST COOKING
• Préchauffer le four avec la lèchefrite au niveau 6.
• Pour les cuissons de plats surgelés, se reporter aux
indications figurant sur l’emballage.
Tableau de cuisson enceinte ExtraLarge Space
Fonctions Aliments Poids
Multicuisson*
Tartes
Petits choux
Pizza
Biscuits
Terrines
Crème Caramel
(bain-marie)
Panettone 1 1 ou 2 Oui 160 45-60
Cake
Génoise
Grosse pièce de
Gratin*
Barbecue*
Basse
température
Pain
automatique
Viande
automatique
Gâteaux
automatique
Pizza
automatique
* Les temps de cuisson sont purement indicatifs et peuvent être modifiés selon les goûts de chacun. Les temps de préchauffage du four sont présélectionnés et ne
sont pas modifiables manuellement.
** Les durées des cuissons automatiques sont présélectionnées. Les valeurs figurant dans le tableau se réfèrent à la durée minimale et maximale, pouvant être
modifiée par l'utilisateur à partir de la durée présélectionnée.
*** Comme indiqué dans la recette, ajouter 150 gr d'eau dans la lèchefrite.
viand e
Rôtisserie 1 2 3 Non 200 35-75
Gratin 1 3 ou 4 Non 190 40-60
Gros rôti 1 1 2 Non 200 90-120
Grosse volaille rôtie 1 1 2 Non 200 90-120
Côte de bœuf 1 3 4 ou 5 Oui 100% 20-30
Saucisses 1 3 5 à 7 Oui 100% 10-20
Côte de porc 1 3 5 à 7 Oui 100% 15-25
Bacon 1 3 5 à 7 Oui 100% 3-6
Étuve /
Décongélation
Meringues
blanches
Viande/Poisson 3 1 3 5 Non 90 90-180**
Pain (voir recette)
Rôtis
Gâteaux
Pizza (voir recette)
Cuisson
(Kg)
1
1
1
1
1
1
1 2 2 ou 3
1
1 1 2 Oui 160 90-240
1 2 Non 40
4 1 3 5 6 Non 65 8-12
2
2
2
1 2 3 Non 60-90**
1 2 2
1
sur
niveaux
N. Lèchefrite Grille 1 Grille 2 Grille 3
2
3
4
2
3
4
2
3
4
2
3
4
2
3
2
3
2
3
1
2
3
2
3
4
Niveau enfournement Préchauffage Température
2 ou 3
1 à 2
1
1
2 ou 3
1 à 2
1
1
2 ou 3
1 à 2
1
1
2 ou 3
1 à 2
1
1
2 ou 3
2
1
2 ou 3
2
1
1
2 ou 3
2
1
7***
7***
7***
2
2
2
1
1
3 à 5
3
3
3 à 5
3
3
3 à 5
3
3
3 à 5
3
3
5
4
5
4
4 ou 5
5
4
2
1
1
5
5
3
3
5
5
5
5
5
5
5
5
6
6
Oui
6
4
3
Non
5
5
6
6
6
6
Oui
Oui
Oui
5
6
Oui
Oui
Oui
Oui
Oui
Oui
Oui
Oui
Oui
Oui
Oui
Oui
Oui
Oui
Oui
Oui
OUI
Oui
Oui
Oui
Oui
Oui
Oui
Non
Non
Non
Non
Non
Non
Non
Non
préconisée
(°C)
180
180
180
180
190
190
190
190
220
220
220
220
180
180
180
180
200
200
200
170
170
170
160
160
190
190
190
35-60**
23-30**
Durée
cuisson
(minutes)
30-40
35-45
40-50
45-55
25-35
25-35
30-40
30-40
15-25
20-30
25-35
30-40
15-25
15-25
20-30
20-30
30-40
35-45
40-50
35-45
35-45
40-50
60-75
60-75
30-35
35-40
40-45
heures**
35-60**
25-35**
30-35**
35-40**
FR
27
Page 28

FR
g
Fast cooking*
Filets de poisson
1 6 D Oui 200-220
20-30
(
)
Tableau de cuisson Small Space
Fonctions
Fast cooking*
* Les temps de cuisson sont purement indicatifs et peuvent être modifiés selon les goûts de chacun. Les temps de préchauffage du four sont présélectionnés et
ne sont pas modifiables manuellement.
Aliments Poids
N. Lèchefrite Grille 1 Séparateur
Filets de poisson 1 6 D Oui 180-200 20-30
Gril
Filets de viande
Pizza surgelée
Préparation sur
Croque-monsieur 1 - 6-7 D Oui 100 % 3-5
Bacon
Côte de porc
1 6 D Oui 180-200 30-40
elés 1 6 D Oui
1 6 7 D Oui 100 % 3-6
1 6 7 D Oui 100 % 15-25
Cuisson
(Kg)
sur
1 6 D
niveaux
Niveau enfournement Préchauffage Température
préconisée
(°C)
Oui
Durée
cuisson
(minutes)
Tableau de cuisson Main Space
Fonctions
Universelle*
* Les temps de cuisson sont purement indicatifs et peuvent être modifiés selon les goûts de chacun. Les temps de préchauffage du four sont présélectionnés et
ne sont pas modifiables manuellement.
Aliments Poids
N. Lèchefrite Grille 1 Séparateur
Tartes
Petits choux
Pizza
Biscuits
Terrines
Crème Caramel
(bain-marie)
Cake
Génoise
Petits rôtis
1
1
1
1 2 D Oui 160 60-75
1
1 2 3 D Oui 210 30-60
Cuisson
(Kg)
sur
niveaux
1 2 2
1 2 2
2
2
1 2 D Oui 170 35-45
2
2
Niveau enfournement Préchauffage Température
1
1
2
1
2
1
2
1
2
1
3
3
3
3
3
3
D
D
D
D
D
D
D
D
D
D
D
D
Oui
Oui
Oui
Oui
Oui
Oui
Oui
Oui
Oui
Oui
Oui
Oui
préconisée
(°C)
200
200
190
190
220
220
180
180
200
200
190
190
Durée
cuisson
(minutes)
30-40
35-45
25-35
25-35
15-25
20-30
15-25
15-25
30-40
35-45
30-35
35-40
Tableau de cuisson simultanée Small Space et Main Space
Small Space
Fonctions Aliments Poids
N. Lèchefrite Grille 1 Séparateur
Filets de viande
Pizza surgelée
Préparations
surgelés
Gril
Riz pilaf
Saisir les aliments
1 6 D Oui 200-220 30-40
1 6-7 D Oui
1 6 D Oui 180-200 30-45
Cuisson
(Kg)
sur
niveaux
1 6-7 D Oui
1 6-7 D
Niveau enfournement Préchauffage Température
Oui
préconisée
(°C)
100 % 3-6
Durée
cuisson
(minutes)
Main Space
Fonctions Aliments Poids
N. Lèchefrite Grille 1 Séparateur
Universelle*
* Les temps de cuisson sont purement indicatifs et peuvent être modifiés selon les goûts de chacun. Les temps de préchauffage du four sont présélectionnés et
ne sont pas modifiables manuellement.
Gâteaux, tartes 1 2 2
Biscuits
1
Crème caramel
bain-marie
Pizza
Gratin dauphinois
Rôti
Tourtes
1
1 2 D Oui 200 60-90
1 2 D Oui 200 35-45
Cuisson
(Kg)
sur
1 2 D Oui 160 45
1 2 D
niveaux
2
2
Niveau enfournement Préchauffage Température
1 et 2
2
1 et 2
2
1 et 2
3 à 5
3 à 5
3 à 5
D
D
D
D
D
D
Oui
Oui
Oui
Oui
Oui
Oui
Oui
préconisée
Durée
(°C)
200
200
180
180
220
220
200 60
cuisson
(minutes)
30-40
35-45
15-25
15-25
15-25
20-30
28
Page 29

Précautions et conseils
! Cet appareil a été conçu et fabriqué conformément
aux normes internationales de sécurité. Ces
consignes de sécurité sont très importantes et
doivent être lues attentivement.
Sécurité générale
• Cet appareil a été conçu pour un usage familial,
de type non professionnel.
• Cet appareil ne doit pas être installé en extérieur,
même dans un endroit abrité, il est en effet très
dangereux de le laisser exposé à la pluie et aux
orages.
• Pour déplacer l’appareil, se servir des poignées
prévues à cet effet sur les côtés du four.
• Ne pas toucher à l’appareil pieds nus ou si les
mains ou les pieds sont mouillés ou humides
• Cet appareil qui sert à cuire des aliments ne doit
être utilisé que par des adultes conformément aux
instructions du mode d’emploi.
• En cours de fonctionnement, les éléments
chauffants et certaines parties de la porte
peuvent devenir très chauds. Attention à ne pas
les toucher et à garder les enfants à distance.
• Éviter que le cordon d’alimentation d’autres
électroménagers touche à des parties chaudes du
four.
• Les orifices ou les fentes d’aération ou
d’évacuation de la chaleur ne doivent pas être
bouchés
• Toujours saisir la poignée en son milieu : elle
risque d’être très chaude à ses extrémités.
• Utiliser toujours des gants de protection pour
enfourner ou sortir les plats du four.
• Ne jamais tapisser la sole du four de papier
aluminium.
• Ne pas ranger de matériel inflammable à l’intérieur
du four : si l’appareil était par inadvertance mis en
marche, il pourrait prendre feu.
• Toujours s’assurer que les boutons sont bien dans
la position “”/“
utilisé.
• Ne pas tirer sur le câble pour débrancher la fiche
de la prise de courant.
• N’effectuer aucune opération de nettoyage ou
d’entretien sans avoir auparavant débranché la
fiche de la prise de courant.
• En cas de panne, n’essayer en aucun cas
d’accéder aux mécanismes internes pour tenter
de réparer l’appareil. Contacter le service
d’Assistance (voir Assistance).
• Ne pas poser d’objets lourds sur la porte du four
ouverte.
• Il n’est pas prévu que cet appareil soit utilisé par
des personnes (enfants compris) présentant des
capacités physiques, sensorielles ou mentales
” quand l’appareil n’est pas
réduites ou qui n’ont pas l’expérience ou les
connaissances indispensables, à moins qul’elles
ne le fassent sous la surveillance de quelqul’un
responsable de leur sécurité ou qul’elles aient été
dûment formées sur l’utilisation de l’appareil.
• Éviter que les enfants ne jouent avec l’appareil.
Mise au rebut
• Mise au rebut du matériel d’emballage : se
conformer aux réglementations locales, les
emballages pourront ainsi être recyclés.
• La directive européenne 2002/96/CE relative aux
déchets d’équipements électriques et
électroniques (DEEE), prévoit que les
électroménagers ne peuvent pas être traités
comme des déchets solides urbains courants.
Les appareils usagés doivent faire l’objet d’une
collecte séparée pour optimiser le taux de
récupération et de recyclage des matériaux qui
les composent et empêcher tout danger pour la
santé et pour l’environnement. Le symbole de la
poubelle barrée est appliqué sur tous les produits
pour rappeler qu’ils font l’objet d’une collecte
sélective.
Pour de plus amples renseignements sur la mise
au rebut des électroménagers, les possesseurs
peuvent s’adresser au service public prévu à cet
effet ou aux commerçants.
Économies et respect de
l’environnement
• Pour faire des économies d’électricité, utiliser
autant que possible le four pendant les heures
creuses. Les options de programmation des
cuissons et plus particulièrement la “cuisson
différée” (voir Programmes) et le “nettoyage
automatique différé” (voir Nettoyage et entretien),
permettent de s’organiser en ce sens.
• Pour les cuissons au BARBECUE et au GRATIN,
nous conseillons de garder la porte du four
fermée : les résultats obtenus sont meilleurs et la
consommation d’énergie est moindre (environ
10% d’économie).
• Garder les joints propres et en bon état pour qu’ils
adhèrent bien à la porte et ne causent pas de
déperdition de chaleur.
! Ce produit est conforme à la nouvelle Directive
Européenne sur la réduction de la consommation
d'énergie en mode standby.
Sans opérations pendant 2 minutes, l'appareil se
place automatiquement en mode veille.
Le mode standby est signalé par l'intense luminosité
de l'"icône horloge".
A la moindre intervention sur l'appareil, le système
se remet en mode de fonctionnement normal.
FR
29
Page 30

Nettoyage et entretien
F
hublot
lampe
cavité
FR
Mise hors tension
Avant toute opération de nettoyage ou d’entretien
couper l’alimentation électrique de l’appareil.
Nettoyage de l’appareil
• Nettoyer l’extérieur émaillé ou inox et les joints en
caoutchouc à l’aide d’une éponge imbibée d’eau
tiède additionnée de savon neutre Si les taches
sont difficiles à enlever, utiliser des produits
spéciaux. Il est conseillé de rincer abondamment
et d’essuyer après le nettoyage. Ne pas utiliser
de poudres abrasives ni de produits corrosifs.
• Nettoyer l’enceinte après toute utilisation, quand
le four est encore tiède. Utiliser de l’eau chaude et
du détergent, rincer et essuyer avec un chiffon
doux. Eviter tout produit abrasif.
• Tous les accessoires peuvent être lavés
normalement comme de la vaisselle courante et
passent au lave-vaisselle.
! Ne jamais nettoyer l’appareil avec des nettoyeurs
vapeur ou haute pression.
Nettoyage de la porte
Nettoyer la vitre de la porte à l’aide d’éponges et de
produits non abrasifs ; essuyer ensuite avec un
chiffon doux. Ne pas utiliser de matériaux abrasifs
ou de racloirs métalliques pointus qui risquent de
rayer la surface et de briser le verre.
Pour nettoyer plus à fond, il est possible de
démonter la porte du fou :
1. ouvrir la porte complètement (voir figure) ;
2. à l’aide d’un tournevis, soulever et faire pivoter les
leviers
F F
F situés sur les deux charnières (voir figure);
F F
Contrôle des joints
Contrôler périodiquement l’état du joint autour de la
porte du four. S’il est abîmé, s’adresser au service
après-vente le plus proche de son domicile (voir
Assistance). Mieux vaut ne pas utiliser le four tant
qu’il n’est pas réparé.
Remplacement de l’ampoule d’éclairage
Pour changer l’ampoule d’éclairage du four :
1. Enlever le
couvercle en verre
du boîtier de la
lampe.
2. Retirer
l’ampoule et la
remplacer par une
autre de même
type : ampoule
halogène tension
230V, puissance
25 W, culot G 9.
3. Remettre le couvercle à sa place (voir figure).
! Ne touchez surtout pas l’ampoule les mains nues.
3. saisir la porte par les côtés,
la refermer lentement mais
pas complètement. Tirer
ensuite la porte vers soi en la
dégageant des charnières
(voir figure). Remonter la porte
en refaisant en sens inverse
les mêmes opérations.
30
Page 31

Nettoyage automatique avec la fonction
FAST CLEAN
Avec le programme FAST CLEAN, la température
interne du four atteint les 500 C. Le cycle de
pyrolyse s'active alors et brûle les résidus de
nourriture et la saleté. Les salissures sont
littéralement incinérées.
Pendant le nettoyage automatique, éloignez les
enfants de l'appareil car les surfaces peuvent
devenir très chaudes. Des particules peuvent brûler
dans le four en raison du processus de combustion.
Ne vous inquiétez pas. Ce processus est normal et
ne présente aucun risque.
Les sécurités
• Lorsque l'icône
indique le verrouillage automatique de la porte du
four dès que la température a atteint des valeurs
élevées.
• En cas d'anomalie de fonctionnement,
l'alimentation des résistances est automatiquement
coupée.
• Une fois que la porte est verrouillée, aucune
modification de sélection de durée et de fin de cycle
n'est possible.
s'allume sur l'afficheur, cela
FR
Avant de lancer les programmes FAST CLEAN :
• Enlevez avec une éponge humide les résidus de
nourriture importants dans le four. N'utilisez pas de
détergents.
• Enlevez tous les accessoires.
• Retirez le SEPARATEUR.
• Ne placez pas de serviettes ou de maniques sur
la poignée du four.
! Si le four est excessivement chaud, la pyrolyse
pourrait ne pas démarrer. Attendez que le four
refroidisse.
! Le programme ne peut démarrer qu'après la
fermeture de la porte du four.
Pour activer le cycle FAST CLEAN, amenez le
bouton FONCTION EXTRALARGE SPACE sur
Appuyez sur la touche
TEMPS peut être utilisé pour sélectionner le niveau
de nettoyage désiré. Les délais prédéfinis et non
modifiables sont au nombre de trois :
1. Economique (ECO) : tournez le bouton vers "- ".
Durée : 1 heure.
2. Normal (NOR) : niveau initial. Durée : 1 heure 30.
3. Intensif (INT) : tournez le bouton sur "+". Durée : 2
heures.
4. Appuyer sur la touche
Vous pouvez programmer le cycle FAST CLEAN
comme s'il s'agissait d'un cycle de cuisson normal
(voir Programmation fin de nettoyage automatique).
Le bouton SELECTION
pour confirmer.
Programmer la fin du nettoyage automatique
1. Appuyez sur la touche
et les deux premiers chiffres de l'afficheur se
mettent à clignoter.
2. Tournez le bouton SÉLECTION TEMPS pour
l'amener sur "+" ou "-" et réglez l'heure.
3. Appuyez à nouveau sur la touche
que les deux autres chiffres de l'afficheur se mettent
à clignoter.
4. Tournez le bouton SÉLECTION TEMPS pour
l'amener sur "+" ou "-" et réglez les minutes.
5. Appuyer à nouveau sur la touche
confirmer.
6. Un signal sonore indique que le temps est écoulé
et l'afficheur affiche END.
• Par exemple : il est 9 h, choix du cycle FAST
CLEAN niveau Economique (ECO) avec une durée
de 1 heure. La fin du cycle est prévue pour 12 h 30.
Le programme commencera automatiquement à 11 h
.
30.
La sélection de la programmation est effectuée quand
les icônes
tour de rôle l'heure de fin du cycle FAST CLEAN et sa
durée.
A la fin du nettoyage automatique
il convient d'attendre que la température à l'intérieur
du four ait suffisamment baissé avant d'ouvrir la
porte. Vous constaterez la présence de dépôts de
poussière blancs sur le fond et les parois du four :
nettoyez-les à l'aide d'une éponge humide une fois
que le four aura totalement refroidi. Si vous
souhaitez utiliser la chaleur résiduelle du four, il n'est
pas nécessaire d'enlever les dépôts de poussière.
Ils sont totalement inoffensifs et ne présentent
aucun danger pour les aliments.
et s'allument. L'AFFICHEUR affiche à
jusqu'à ce que l'icône
jusqu'à ce
pour
31
Page 32

Assistance
FR
Attention :
L’appareil est équipé d’un système d’autotest qui permet de détecter toute anomalie de fonctionnement. Ces
anomalies sont affichées sous la forme : “F” suivi de chiffres.
Contacter alors un service d’assistance technique.
! Ne jamais faire appel à des techniciens non agréés.
Lui indiquer:
• le type d’anomalie ;
• le modèle de l’appareil (Mod.) ;
• Son numéro de série (S/N).
Ces informations figurent sur la plaque signalétique apposée sur l’appareil
32
Page 33

Manual de instrucciones
HORNO
GB
English,1
PT
Portuges, 49
OS 99D P IX
FR
Français, 17 Espanol,
ES
33
Sumario
ES
Instalación, 34-35
Montaje
Conexión eléctrica
Datos técnicos
Descripción del aparato, 36
Vista de conjunto
Panel de control
Display
Estructura del horno, 37
Puesta en funcionamiento y uso, 38-44
Poner en hora el reloj
Programar el temporizador
ExtraLarge Space
Small Space
Main Space
Uso simultáneo de Small Space y Main Space
Programar la cocción
Consejos prácticos para cocinar
Tabla de cocción para ExtraLarge Space
Tabla de cocción para Small Space
Tabla de cocción para Main Space
Tabla de cocción simultánea de Small Space y
Main Space
Precauciones y consejos, 45
Seguridad general
Eliminación
Ahorrar y respetar el medio ambiente
Mantenimiento y cuidados, 46-47
Interrumpir el suministro de corriente eléctrica
Limpiar el aparato
Limpiar la puerta
Sustituir la bombilla
Limpieza automática con la función FAST CLEAN
Asistencia, 48
Page 34

Instalación
560 mm.
45 mm.
ES
! Es importante conservar este manual para poder
consultarlo en cualquier momento. En el caso de
venta, de cesión o de mudanza, verifique que
permanezca junto al aparato para informar al nuevo
propietario sobre su funcionamiento y sobre las
advertencias correspondientes.
! Leer atentamente las instrucciones: Contiene
importante información sobre la instalación, el uso y
la seguridad.
Colocación
! Los embalajes no son juguetes para niños y se
deben eliminar según las normas para la recolección
diferenciada de desechos (ver Precauciones y
consejos).
! La instalación se debe realizar siguiendo estas
instrucciones y por personal profesionalmente
calificado. Una instalación incorrecta puede producir
daños a personas, animales o cosas.
Empotrado
Para garantizar un buen funcionamiento del aparato
es necesario que el mueble tenga las características
adecuadas:
• Los paneles adyacentes al horno deben ser de
materiales resistentes al calor
• En el caso de muebles de madera chapeada, las
colas deben ser resistentes a una temperatura de
100°C
• Para empotrar el horno, tanto cuando se instala
bajo encimera (ver la figura) como en columna, el
mueble debe tener las siguientes dimensiones:
Aireación
Para garantizar una buena aireación es necesario
eliminar la pared posterior del compartimiento. Es
preferible instalar el horno apoyado sobre dos
listones de madera o sobre una superficie continua
que tenga una abertura de 45 x 560 mm como
mínimo (ver las figuras).
Centrado y fijación
Regular los 4 tacos ubicados en la parte lateral del
horno en coincidencia con los 4 orificios que se
encuentran en el marco, según el espesor del
costado del mueble:
Espesor de 20 mm: Quitar la
parte móvil del taco (ver la
figura);
Espesor de 18 mm: Utilizar la
primera ranura, ya
predispuesta por el fabricante
(ver la figura);
.
in
. m
m
m
7
4
5
.
m
m
5
595 mm.
595 mm.
m
4
2
23 mm.
5 mm.
m
5
4
5
.
m
576 mm.
.
m
4
558 mm.
593 mm.
! Una vez empotrado el aparato no se deben
permitir contactos con las partes eléctricas.
El consumo declarado en la placa con las
características ha sido medido en una instalación de
este tipo.
34
Espesor de 16 mm: Utilizar la
segunda ranura (ver la figura).
Para fijar el aparato al mueble: Abrir la puerta del
horno y enroscar 4 tornillos para madera en los 4
orificios del marco.
! Tutte le parti che assicurano la protezione debbono
essere fissate in modo tale da non poter essere tolte
senza l’aiuto di qualche utensile.
Page 35

Conexión eléctrica
N
L
! Los hornos dotados de cable de alimentación
tripolar, están fabricados para funcionar con
corriente alterna a la tensión y frecuencia indicadas
en la placa de características que se encuentra en el
aparato (ver a continuación).
Montaje del cable de alimentación eléctrica
1. Abrir el panel de bornes haciendo palanca con un
destornillador sobre las lengüetas laterales de la
tapa: Tirar y abrir (ver la
figura).
2. Instalar el cable de
alimentación eléctrica:
Aflojar el tornillo de la
mordaza de terminal de
cable y los tres tornillos
de los contactos L-N-
y luego fijar los
cables debajo de las
cabezas de los tornillos
respetando los colores
Azul (N), Marrón (L) y
Amarillo-Verde
la figura).
3. Fijar el cable en el
correspondiente
sujetacable.
4. Cerrar la tapa del
panel de bornes.
Conexión del cable de alimentación eléctrica a la
red
Instalar en el cable un enchufe normalizado para la
carga indicada en la placa de características (ver al
costado).
En el caso de conexión directa a la red, es
necesario interponer entre el aparato y la red, un
interruptor omnipolar con una distancia mínima entre
los contactos de 3 mm., dimensionado para esa
carga y que responda a las normas vigentes (el
cable a tierra no debe ser interrumpido por el
interruptor). El cable de alimentación eléctrica se
debe colocar de modo tal que no alcance en ningún
punto una temperatura que supere en 50°C la
temperatura ambiente.
! El instalador es responsable de la correcta
conexión eléctrica y del cumplimiento de las normas
de seguridad.
Antes de efectuar la conexión verifique que:
• La toma tenga conexión a tierra y que esté en
conformidad con la normativa de ley;
• La toma sea capaz de soportar la carga máxima
(ver
de potencia de la máquina indicada en la placa
de características (ver más abajo);
• La tensión de alimentación eléctrica esté
comprendida dentro de los valores indicados en
la placa de características (ver más abajo);
• La toma sea compatible con el enchufe del
aparato. Si no es así, cambiar la toma o el
enchufe; no utilizar prolongaciones ni conexiones
múltiples.
! Una vez instalado el aparato, el cable eléctrico y la
toma de corriente deben ser fácilmente accesibles.
! El cable no debe doblarse ni comprimirse.
! El cable debe ser revisado periódicamente y
sustituido sólo por técnicos autorizados (ver
Asistencia).
L’azienda declina ogni responsabilità qualoraL’azienda declina ogni responsabilità qualora
!
L’azienda declina ogni responsabilità qualora
L’azienda declina ogni responsabilità qualoraL’azienda declina ogni responsabilità qualora
queste norme non vengano rispettate.queste norme non vengano rispettate.
queste norme non vengano rispettate.
queste norme non vengano rispettate.queste norme non vengano rispettate.
PLACA DE CARACTERÍSTICAS
Dimensiones*
Volumen*
Dimensiones**
Volumen**
Conexiones
eléctricas
ENERGY
LABEL
ancho 43,5 cm
altura 41 cm
profundidad 41 cm
litros 74
ancho 45,6 cm
altura 41 cm
profundidad 41 cm
litros 77
voltaje 220-240V~ 50Hz
potencia máxima absorbida 3400W
(ver la placa de características)
Norma 2002/40/CE en la etiqueta de
los hornos eléctricos.
Norma EN 50304
Clase Consumo de energía para
funcionamiento por convección Forzada
- función de calentamiento: Gratin
Este aparato es conforme con las
siguientes Normas Comunitarias:
2006/95/CEE del 12/12/06 (Baja Tensión)
y posteriores modificaciones
- 2004/108/CEE del 15/12/04
y posteriores modificaciones
- 93/68/CEE del 22/07/93
y sucesivas modificaciones
- 2002/96/CE
y posteriores modificaciones.
1275/2008 modos "preparado"
y "desactivado"
* Sólo para modelos con guías embutidas.
** Sólo para modelos con guías a ras.
ES
35
Page 36

Í
Descripción del
aparato
ES
Vista de conjunto
Panel de control
Nivel DIVIDER
Nivel PARRILLA
Nivel GRASERA
Panel de control
Mando
FUNCIONES
SMALL SPACE
DISPLAY
GU
de deslizamiento
de los niveles
Botón
FIJACIÓN
DE TIEMPO
AS
posición 7
posición 6
posición Divider "D"
posición 5
posición 4
posición 3
posición 2
posición 1
Mando
FUNCIONES
EXTRALARGE SPACE
Display
Mando
FUNCIONES
MAIN SPACE
TEMPERATURA y TIEMPOS
Icono
CAVIDAD
SELECCIONADA
¡•OC
:
•• ••
Botón
SELECCIÓN CAVIDAD
Cifras
¡•OC
:
•• ••
Icono de
DURACIÓN
Mando
FIJACIÓN
TEMPERATURA/TIEMPOS
Icono
PUERTA BLOQUEADA
Icono
CONTADOR
de MINUTOS
Icono de
FIN DE COCCIÓN
36
Page 37

Estructura del horno
El horno Openspace tiene una capacidad de 70 l y
permite la cocción de alimentos en 4 niveles
simultáneamente o cocinar porciones abundantes
que no cabrían en un horno convencional.
Debido al ExtraLarge Space, Openspace posee 10
funciones de cocción, de las cuales 6 universales
que pueden emplearse en cualquier tipo de
preparación y 4 programas automáticos que
aseguran los excelentes resultados con cualquier
receta.
Openspace brinda el máximo confort para todo tipo
de requerimientos y lo hace con 4 posibilidades de
uso diferentes: El horno es único pero divisible en
espacios de tamaños diferentes, cada uno con
ExtraLarge Space: Cocción en 4 niveles
REJILLA
EXTRALARGE
SPACE
REJILLA
REJILLA
GRASERA
regulaciones independientes de temperatura y
tiempos.
Esto es posible gracias a la presencia del DIVIDER
termoaislante, este dispositivo permite dividir el
ExtraLarge Space en dos espacios de tamaños
diferentes: Main Space y Small Space.
Los dos Main y Small Space pueden utilizarse de
forma simultánea, para cocinar distintos alimentos
en menor tiempo, o de forma separada para utilizar
solamente el espacio necesario.
Quando le due cavità sono utilizzate insieme è
possibile regolare le temperature di cottura tra 50° e
250°, ed avere una differenza di temperatura fino a
100° tra le due zone, per realizzare ricette anche
molto diverse tra loro senza che sapori ed odori si
mescolino.
Main y Small Space: Cocción simultánea
SMALL
SPACE
MAIN
SPACE
REJILLA o GRASERA
Divider "D" (en posición fija)
REJILLA (cocción en 3 niveles)
REJILLA (cocción en 3 niveles)
GRASERA (cocción en 3 niveles)
ES
Cocción sólo en Small Space
SMALL
SPACE
MAIN
SPACE
REJILLA o GRASERA
Divider "D"
(en posición fija)
La tabla siguiente describe los valores posibles de
temperatura que pueden programarse. El display
Temperatura en la primera cavidad
(Main o Small Space)
SMALL
SPACE
SPACE
Cocción sólo en Small Space: Cocción en 3 niveles
Divider "D" (en posición fija)
REJILLA (cocción en 3 niveles)
MAIN
REJILLA (cocción en 3 niveles)
GRASERA (cocción en 3 niveles)
inteligente te guía para efectuar la regulación
correcta de las temperaturas en ambas cavidades.
Temperatura en la segunda cavidad
(Small o Main Space)
De 40°C a 150°C La diferencia de temperatura con respecto a la primera
cavidad seleccionada es como máximo de 50°C
Ejemplo: cuando se programa a 90°C una cavidad
la otra puede programarse a un valor de entre 40°C (90°C-50°C) y 140°C (90°C+50°C).
De 155°C a 200°C La diferencia de temperatura con respecto a la primera
cavidad seleccionada es como máximo de 70°C
Ejemplo: cuando se programa a 180°C una cavidad
la otra puede programarse a un valor de entre 110°C (180°C-70°C) y 250°C (180°C+70°C).
De 205°C a 250°C La diferencia de temperatura con respecto a la primera
cavidad seleccionada es como máximo de 100°C
Ejemplo: cuando se programa a 210°C una cavidad
la otra puede programarse a un valor de entre 110°C (210°C-100°C) y 250°C, que es la temperatura máxima a la que
puede programarse.
Para anular cualquier programación basta girar el mando Funciones Small Space o Main Space hasta la
posición 0.
37
Page 38

Puesta en
funcionamiento y uso
ES
! La primera vez que se encienda el horno, hacerlo
funcionar vacío, durante una hora aproximadamente, con
el termostato al máximo y con la puerta cerrada. Luego
apagarlo, abrir la puerta y airear el ambiente en el que se
encuentra. El olor que se advierte se debe a la
evaporación de las sustancias utilizadas para proteger el
horno.
! No apoyar nunca objetos en el fondo del horno porque
se puede dañar el esmalte.
! Coloque siempre los recipientes de cocción sobre las
rejillas suministrada con el aparato.
! Durante el uso se aconseja quitar la vajilla o los
alimentos delicados de las cavidades apagadas.
! Si dentro de la programación de cocción se prevé el
leudado se recomienda no abrir la puerta para evitar
alterar el resultado.
! Si la puerta se fuerza repetidamente el divider podría
salir de su asiento. En este caso en el visor aparecerá la
hora. Asegurarse que el divider esté conectado
correctamente y recomenzar la cocción.
Ventilación de enfriamiento
Para lograr una disminución de la temperatura externa, un
ventilador de enfriamiento genera un chorro de aire que
sale entre el panel de control y la puerta del horno.
! Al final de la cocción, el ventilador se activa y desactiva
automáticamente hasta que el horno esté suficientemente
frío.
Programar el reloj
! Se puede programar solamente cuando el horno está
apagado.
1. Presionar la tecla
dígito numérico en el DISPLAY y los iconos
estén apagados;
2. Girar el mando de FIJACIÓN DE TIEMPOS hacia “+” y
“-” para regular la hora;
3. Presionar de nuevo el botón
los otros dos números en el DISPLAY;
4. Girar el mando FIJACIÓN DE TIEMPOS hacia “+” y “-”
para regular los minutos;
5. Pulsar nuevamente el botón
operaciones realizadas.
hasta que parpadee el primer
, ,
hasta que centelleen
para confirmar las
Programar el contador de minutos
! Esta función no interrumpe la cocción y prescinde del
uso del horno; permite sólo accionar la señal sonora
cuando se cumplen los minutos fijados.
2. Girar el mando FIJACIÓN DE TIEMPOS hacia “+” y “-”
para regular los minutos;
3. Pulsar nuevamente el botón
operaciones realizadas.
Continuará la visualización de la cuenta al revés, al final
de la cual se accionará la señal sonora.
para confirmar las
ExtraLarge Space
Poner en funcionamiento el horno
1. Seleccionar la función de cocción deseada girando el
mando FUNCIONES EXTRALARGE SPACE. El icono
encendido en el display indica que se ha seleccionado
ExtraLarge Space y por lo tanto se pueden utilizar sólo las
programaciones de ExtraLarge Space.
2. El horno entrará en la fase de precalentamiento. Es
posible modificar la temperatura girando el mando
TEMPERATURA.Durante la fase de precalentamiento el
icono
3. Al finalizar la fase de precalentamiento, el icono
permanece fijo y se advierte una señal acústica. Ahora es
posible introducir los alimentos.
4. Durante la cocción es posible:
- Modificar la función de cocción utilizando el mando
FUNCIONES EXTRALARGE SPACE
- Modificar la temperatura con el mando TEMPERATURA
(solamente para las cocciones universales)
- Planificar la duración (en las cocciones universales) y la
hora de finalización
- Interrumpir la cocción llevando el mando FUNCIONES
EXTRALARGE SPACE hasta la posición “0”.
5. El aparato posee un sistema que, en caso de
interrupción de la corriente eléctrica, si la temperatura del
horno no descendió demasiado, activa nuevamente la
función desde el punto en el cual fue interrumpido. En
cambio, las programaciones que están esperando
comenzar, no se restablecen cuando retorna la corriente y
deben volver a ser programadas.
! En la configuración ExtraLarge no se pueden emplear
Main o Small Space: Los mandos FUNCIONES SMALL
SPACE y MAIN SPACE se encuentran deshabilitadas.
Funciones de cocción universales
! Todas las funciones tienen una temperatura de cocción
prefijada. La misma se puede modificar manualmente
eligiendo un valor entre 40°C y 250°C.
En la función BARBACOA el valor prefijado es un nivel de
potencia expresado en %. Dicho valor también puede ser
regulado manualmente.
centellea;
1. Presionar el botón
y las dos cifras en el DISPLAY;
38
hasta que centelleen el icono
Page 39

Función MULTICOCCIÓN
Se activan todos los elementos calentadores y se pone
en funcionamiento el ventilador. Debido a que el calor es
constante en todo el horno, el aire cocina y dora la comida
de modo uniforme. Se pueden utilizar hasta un máximo
de cuatro niveles simultáneamente. Si se emplea más de
un nivel al mismo tiempo se recomienda colocar la
grasera siempre en el nivel inferior. Si se realiza la cocción
empleando los 4 niveles se recomienda colocar las rejillas
en los niveles 3, 5 y 6, mientras que la grasera se
dispone en el nivel 1.
2. Colocar el soporte del
asador rotativo en la
posición 3 e introducir el
espetón en el orificio
correspondiente ubicado
en la pared posterior del
horno;
3. Accionar el asador
automático seleccionando
los programas
Funciones de cocción universales
ES
o .
Función GRATIN
Se enciende el elemento calentador superior y, durante
una parte del ciclo, también se ponen en funcionamiento
el elemento calentador circular, el ventilador y el asador
automático (cuando existe). Une a la irradiación térmica
unidireccional la circulación forzada de aire en el interior
del horno.
Esto impide que se quemen superficialmente los
alimentos aumentando el poder de penetración del calor.
Utilice el horno con la puerta cerrada.
Función BARBACOA
Se enciende el elemento calentador superior y el asador
automático (si está presente). Girando el mando
TEMPERATURA, el display indicará los posibles niveles
de potencia que van desde 5% hasta 100%. La
temperatura elevada y directa del grill es aconsejada para
los alimentos que necesitan una temperatura superficial
alta. Utilice el horno con la puerta cerrada.
Función BAJA TEMPERATURA
Este tipo de cocción permite leudar, descongelar,
preparar yogurt, calentar más o menos rápidamente y
cocinar lentamente a baja temperatura. Las temperaturas
que se pueden seleccionar son: 40, 65 y 90 °C.
Función FAST CLEAN
Es el programa de limpieza automática e integral del
horno mediante pirólisis (ver Mantenimiento y cuidados).
! El ciclo del programa está prefijado en 90 minutos.
El asador automático (sólo en algunos modelos)
Para accionar el asador rotativo (ver la figura) proceder del
siguiente modo:
1. Colocar la grasera en la posición 1;
temperaturatemperatura
! La
temperatura y la duración de la cocción se
temperaturatemperatura
utilizando el sistema
ProgramadaProgramada
Programada) que garantiza automáticamente un
ProgramadaProgramada
resultado perfecto. La cocción se interrumpe
automáticamente y el horno avisa cuando la comida está
lista. La duración de la cocción se puede modificar unos
minutos, como se describe a continuación para cada
función.
Función CARNE
Utilice esta función para cocinar carnes de ternera, cerdo,
cordero o vaca. Coloque en el horno cuando está frío.
También es posible enhornar cuando está caliente. Es
posible modificar la duración de la cocción en -10/+10
minutos.
Función TORTAS
Esta función es ideal para la cocción de pasteles. Coloque en
el horno cuando está frío. También es posible enhornar
cuando está caliente. Es posible modificar la duración de la
cocción en -10/+15 minutos.
Función PAN
Utilice esta función para cocinar pan. Consulte el capítulo
siguiente para conocer la receta y los detalles.
Para obtener los mejores resultados, le aconsejamos
seguir atentamente las siguientes indicaciones:
• Seguir los pasos de la receta
• No olvidarse de colocar 150gr (1.5 dl) de agua fría
en la grasera en la posición 7;
Coloque en el horno cuando está frío. Si se desea
enhornar con el horno en caliente después de otra cocción
a alta temperatura, el display mostrará la palabra “Hot”
hasta que la temperatura del horno alcance los 40°. Una
vez alcanzada será posible enhornar el pan.
Función PIZZA
Utilice esta función para cocinar la pizza. Consulte el
capítulo siguiente para conocer la receta y los detalles. Es
posible modificar sólo duración de la cocción en -5/+12
minutos.
Para obtener los mejores resultados, le aconsejamos
C.O.P.®C.O.P.®
C.O.P.® (
C.O.P.®C.O.P.®
Cocción ÓptimaCocción Óptima
Cocción Óptima
Cocción ÓptimaCocción Óptima
prefijanprefijan
prefijan
prefijanprefijan
39
Page 40

ES
seguir atentamente las siguientes indicaciones:
• Seguir los pasos de la receta
• El peso de la masa debe ser de 500 g a 350g.
• Untar ligeramente la grasera y las bandejas.
Coloque en el horno cuando está frío. Si se desea
enhornar con el horno en caliente después de otra cocción
a alta temperatura, el display mostrará la palabra “Hot”
hasta que la temperatura del horno alcance los 120°. Una
vez alcanzada será posible enhornar la pizza.
Receta para la PIZZA:
Receta para 3 o 4 pizzas: 1000g de Harina, 500g de
Agua, 20g de Sal, 20g de Azúcar, 10cl de Aceite de
oliva, 20g de levadura fresca (o 2 sobrecitos de levadura
en polvo)
• Leudado a temperatura ambiente: 1 hora o función
manual BAJA TEMPERATURA a 40° dejar leudar
durante 30/45 minutos.
• Coloque en el horno cuando está frío.
• Poner en marcha el programa de cocción
PIZZA.
si se desea cocer en dos niveles o bien en 1, 3 y 5
para una cocción en tres niveles.
• Colocar la grasera en el nivel 7 y verter 150 gr de
agua fría.
• Colocar con el horno frío.
• Iniciar la función automática
• Al terminar la cocción, dejar reposar los panes en la
rejilla hasta que se enfríen totalmente.
PAN.
Small Space
Poner en funcionamiento el horno
1. Introducir el DIVIDER en el nivel DIVIDER “D” con lo
perno y las flechas dirigidas hacia la parte posterior del
horno. Después de introducir correctamente se puede leer
“OPENSPACE” en la parte delantera del marco del
DIVIDER. El horno emite una señal acústica que confirma
la introducción correcta del DIVIDER y permite el uso de
Main y de Small Space por separado o simultáneamente.
Receta para el PAN (cantidad máxima de masa):
Ingredientes:
• 1,3 kg de harina
• 700 gr de agua
• 25 gr de sal
• 50 gr de levadura fresca para panificación o 4
sobrecitos de levadura en polvo.
Preparación:
• Mezclar la harina y la sal en un recipiente grande.
• Diluir la levadura en el agua ligeramente tibia
(aproximadamente 35 grados).
• Hacer un hueco en el medio de la harina.
• Verter dentro la mezcla de agua y levadura.
• Trabajar la masa hasta obtenerla homogénea y poco
pegajosa, estirándola con la palma de la mano y
volviendo a plegarla sobre sí misma durante 10
minutos.
• Forme una bola, colocar la masa en una escudilla y
cubrirla con una película transparente para evitar que la
superficie se seque. Colocar la escudilla en el horno
con la función manual BAJA TEMPERATURA a 40° y
dejar leudar aprox. 30/45 minutos o a temperatura
ambiente alrededor de 1 hora (la masa deberá duplicar
su volumen).
• Romper la masa trabajándola con delicadeza y
dividirla formando los panes.
• Disponerlos sobre la rejilla (o en 2 o 3 rejillas si desea
cocer el pan en varios niveles) sobre papel de horno
(de la misma medida interna de la grasera) y
espolvorearlos con harina.
• Realizar cortes en la superficie con un cuchillo afilado.
• Hornear sobre la rejilla en el nivel 2 si la cocción se
realiza en un nivel, o en dos rejillas en los niveles 1 y 4
! El mando FUNCIONES EXTRALARGE SPACE queda
deshabilitada.
2. Seleccionar la función de cocción deseada girando el
mando FUNCIONES SMALL SPACE.
3. El horno entrará en la fase de precalentamiento. Es
posible modificar la temperatura girando el mando
TEMPERATURA. Durante la fase de precalentamiento el
icono
4. Al finalizar la fase de precalentamiento, el icono
es posible introducir los alimentos.
5. Durante la cocción es posible:
- Modificar la función de cocción utilizando el mando
FUNCIONES SMALL SPACE
- Modificar la temperatura con el mando TEMPERATURA;
- Programar la duración y la hora de finalización de la
cocción
- Interrumpir la cocción llevando el mando FUNCIONES
SMALL SPACE hasta la posición “0”.
6. El aparato posee un sistema que, en caso de
interrupción de la corriente eléctrica, si la temperatura del
horno no descendió demasiado, activa nuevamente la
función desde el punto en el cual fue interrumpido. En
cambio, las programaciones que están esperando
comenzar, no se restablecen cuando retorna la corriente y
deben volver a ser programadas.
Funciones de cocción
Se enciende el elemento calentador superior. Girando el
mando TEMPERATURA, el display indicará los posibles
centellea;
permanece fijo y se siente una señal acústica. Ahora
Función GRILL
40
Page 41

niveles de potencia que van desde 5% hasta 100%. La
temperatura elevada y directa del grill es aconsejada para
los alimentos que necesitan una temperatura superficial
alta. Esta función se aconseja para: Dorado, gratin, tostar
merengues, tostadas, pequeños asados con carne sin
grasa o de poco espesor. Utilice el horno con la puerta
cerrada.
Función COCCIÓN RÁPIDA
La función requiere el precalentamiento. Esta función es
particularmente indicada para cocciones veloces de
alimentos congelados o precocidos.
Funciones de cocción
ES
Función UNIVERSAL
Se activan todos los elementos calentadores y se pone
en funcionamiento el ventilador. Debido a que el calor es
constante en todo el horno, el aire cocina y dora la comida
de modo uniforme. Se pueden utilizar hasta un máximo
de tres niveles simultáneamente. Si se utilizan más de un
nivel al mismo tiempo le recomendamos colocar la
grasera siempre en el nivel 1. En el caso de cocción en
los 3 niveles simultáneamente le recomendamos disponer
las rejillas en los niveles 3 y 5 colocando la grasera en el
nivel1.
Main Space
Poner en funcionamiento el horno
1. Introducir el DIVIDER en el nivel DIVIDER “D” con lo
perno y las flechas dirigidas hacia la parte posterior del
horno. Después de introducir correctamente se puede leer
“OPENSPACE” en la parte delantera del marco del
DIVIDER. El horno emite una señal acústica que confirma
la introducción correcta del DIVIDER y permite el uso de
Main y de Small Space por separado o simultáneamente.
! El mando FUNCIONES EXTRALARGE SPACE queda
deshabilitado.
2. Seleccionar la función de cocción Universal girando el
mando FUNCIONES MAIN SPACE.
3. El horno entrará en la fase de precalentamiento. Es
posible modificar la temperatura girando el mando
TEMPERATURA.Durante la fase de precalentamiento el
icono
4. Al finalizar la fase de precalentamiento, el icono
permanece fijo y se siente una señal acústica. Ahora es
posible introducir los alimentos.
5. Durante la cocción es posible:
- Modificar la temperatura con el mando TEMPERATURA;
- Programar la duración y la hora de finalización de la
cocción
- Interrumpir la cocción llevando el mando FUNCIONES
MAIN SPACE hasta la posición “0”.
6. El aparato posee un sistema que, en caso de
interrupción de la corriente eléctrica, si la temperatura del
horno no descendió demasiado, activa nuevamente la
función desde el punto en el cual fue interrumpida. En
cambio, las programaciones que están esperando
comenzar, no se restablecen cuando retorna la corriente y
deben volver a ser programadas.
centellea;
Uso simultáneo de Small Space y Main
Space
Poner en funcionamiento el horno
1. Introducir el DIVIDER en el nivel DIVIDER “D” con lo
perno y las flechas dirigidas hacia la parte posterior del
horno. Después de introducir correctamente se puede leer
“OPENSPACE” en la parte delantera del marco del
DIVIDER. El horno emite una señal acústica que confirma
la introducción correcta del DIVIDER y permite el uso de
Main y de Small Space por separado o simultáneamente.
! El mando FUNCIONES EXTRALARGE SPACE queda
deshabilitado.
! Para mejorar la eficiencia energética, el tiempo de
precalentamiento de la cavidad SMALL SPACE es de
aprox. 15 minutos.
! Si el MAIN SPACE se encuentra programado a una
temperatura inferior a los 150°C, para proteger el resultado
de la cocción, el grill no entrará en funcionamiento: en el
display aparecerá OFF.
2. Seleccionar la función de cocción deseada para cada
cavidad girando los mandos FUNCIONES SMALL SPACE
y/o FUNCIONES MAIN SPACE. El icono
se ha seleccionado Small Space y por lo tanto se pueden
utilizar las programaciones de Small Space, el icono
encendido en el display indica que se ha seleccionado
Main Space y por lo tanto se pueden utilizar las
programaciones de Main Space.
3. Ambos hornos entrarán en la fase de precalentamiento.
Es posible modificar la temperatura girando el mando
TEMPERATURA. Durante la fase de precalentamiento el
icono
4. Al finalizar la fase de precalentamiento, el icono
permanece fijo y se siente una señal acústica. Ahora es
posible introducir los alimentos.
centellea;
indica que
41
Page 42

ES
5. Una luminosidad mayor de los dígitos del display
indica la cavidad que se está utilizando. Para modificar
las programaciones de la otra cavidad presionar la tecla
. Durante la cocción simultánea se pueden modificar
las programaciones tanto de Small Space como de Main
Space:
- Modificar la función de cocción utilizando el mando
FUNCIONES SMALL y/o FUNCIONES MAIN SPACE
- Modificar la temperatura con el mando TEMPERATURA;
- Programar la duración y la hora de finalización de la
cocción
- Interrumpir la cocción llevando el mando FUNCIONES
SMALL SPACE y/o FUNCIONES MAIN SPACE hasta la
posición “0”.
6. El aparato posee un sistema que, en caso de
interrupción de la corriente eléctrica, si la temperatura del
horno no descendió demasiado, activa nuevamente la
función desde el punto en el cual fue interrumpida. En
cambio, las programaciones que están esperando
comenzar, no se restablecen cuando retorna la corriente y
deben volver a ser programadas.
Programar la cocción
“-” para regular la hora;
4. Presionar de nuevo el botón
los otros dos números en el DISPLAY;
5. Girar el mando FIJACIÓN DE TIEMPOS hacia “+” y “-”
para regular los minutos;
6. Pulsar nuevamente el botón
operaciones realizadas;
7. Una vez cumplido ese tiempo, en el DISPLAY
aparecerá la palabra END, la cocción finalizará y se
emitirá una señal sonora.
Los iconos
realizado una programación. En el DISPLAY se visualizan
alternativamente la hora de finalización de la cocción y la
duración.
Para anular una programación, girar el mando
FUNCIONES hasta la posición “0”.
y encendidos indican que se ha
hasta que centelleen
para confirmar las
Consejos prácticos para cocinar
MULTICOCCIÓN
• Utilizar las posiciones 1-3-5-6.
• Colocar la grasera debajo y las rejillas arriba.
! La programación puede realizarse solamente después
de haber seleccionado un programa de cocción.
La programación se puede activar en todas las
configuraciones posibles: EXTRALARGE, MAIN y SMALL
SPACE incluso con funcionamiento simultáneo.
Programar la duración de la cocción
1. Presione varias veces el botón
el icono
2. Girar el mando de FIJACIÓN DE TIEMPOS hacia “+” y
“-” para regular el tiempo deseado;
3. Pulsar nuevamente el botón
operaciones realizadas;
4. Una vez cumplido ese tiempo, en el DISPLAY
aparecerá la palabra END, la cocción finalizará y se
emitirá una señal sonora.
• Ejemplo: Son las 9:00 horas y se programa una
duración de 1 hora y 15 minutos. La función se detiene
automáticamente a las 10:15 horas.
Programar el final de una cocción
! La programación del final de una cocción es posible sólo
después de haber fijado la duración de la cocción.
1. Siga el procedimiento de 1 a 3 descrito para la
duración;
2. Luego presionar el botón
icono
3. Gire el mando de FIJACIÓN DE TIEMPOS hacia “+” y
y las tres cifras en el DISPLAY;
y las dos cifras en el DISPLAY;
hasta que centelleen
para confirmar las
hasta que centelleen el
BARBACOA
• Calentar antes el horno durante 5 minutos, como
mínimo
• Realizar la cocción con la puerta cerrada.
• Colocar la grasera en la posición 3. Introducir la rejilla
en la posición 4 a 7 en base al espesor del alimento,
disponer los alimentos en el centro de la rejilla.
Ejemplos: Costillas de vaca en el nivel 4 y tocino en el
nivel 6 o 7.
PIZZA o FOCACCIA
• Utilizar la bandeja de aluminio liviano con un diámetro
máximo de 30cm, disponiéndola sobre la rejilla.
• En el caso de pizzas muy condimentadas, es
aconsejable colocar la mozzarella (queso típico de
Italia) en la mitad de la cocción.
GRILL
• Calentar antes el horno durante 5 minutos, como
mínimo
• Colocar el DIVIDER en el nivel DIVIDER “D”.
• Realizar la cocción con la puerta cerrada.
• Introduzca la parrilla en la posición 7 y coloque los
alimentos en el centro de la parrilla. Colocar la grasera
en la posición 6.
• Esta función se aconseja para: Dorado, gratin, tostar
merengues, tostadas, pequeños asados con carne sin
grasa o de poco espesor.
• Se aconseja fijar el nivel de energía en el valor máximo.
No se alarme si la resistencia superior no permanece
42
Page 43

g
g
constantemente encendida: Su funcionamiento es
controlado por un termostato.
FAST COOKING
• Precalentar el horno con la grasera en el nivel 6.
• Para la cocción de alimentos congelados seguir las
indicaciones del envase.
Tabla de cocción para ExtraLarge Space
Funciones Alimentos Peso
Multicocción*
Tartas
Hojaldre con
crema
Pizza
Bizcochos
Pasteles
Flan (baño María
Pan dulce 1 1 o 2 Si 160 45-60
Bizcocho con
uvas
Bizcocho
Pieza de carne
Gratin*
Barbacoa*
Baja
temperatura
Pan
automático
Carne
automático
Tortas
Automático
Pizza
automática
grande
Rostizados 1 2 3 No 200 35-75
Gratinado 1 3 o 4 No 190 40-60
Carne asada
rande
Asado de ave
rande
Còte de boeuf 1 3 4 o 5 Si 100% 20-30
Salchichas 1 3 5 a 7 Si 100% 10-20
Cote de porc 1 3 5 a 7 Si 100% 15-25
Tocino 1 3 5 a 7 Si 100% 3-6
Leudado/
descongelación
Merengues
blancos
Carne/Pescado 3 1 3 5 No 90 90-180**
Pan (ver la
receta)
Asados
Pasteles
Pizza (ver la
receta)
* Los tiempos de cocción son indicativos y se pueden modificar en base a los gustos personales. La duración del precalentamiento del horno está
prefijada y no se puede modificar manualmente.
** La duración de la cocción automática se programa. Los valores de la tabla están referidos a valores de duración mínima y máxima que pueden
ser modificados por el usuario en la duración programada.
*** Según la receta, añadir 150 gr de agua en la grasera.
Cocción
(kg)
en n° de
niveles
1
1
1
1
1
1
1 2 2 o 3
1
1 1 2 Si 160 90-240
1 1 2 No 200 90-120
1 1 2 No 200 90-120
1 2 No 40
4 1 3 5 6 No 65 8-12
2
2
2
1 2 3 No 60-90**
1 2 2
1
N. Grasera Rejilla 1 Rejilla 2 Rejilla 3
2
3
4
2
3
4
2
3
4
2
3
4
2
3
2
3
2
3
1
2
3
2
3
4
Posición de las bandejas Precalentamiento Temperatura
2 o 3
1 a 2
1
1
2 o 3
1 a 2
1
1
2 o 3
1 a 2
1
1
2 o 3
1 a 2
1
1
2 o 3
2
1
2 o 3
2
1
1
2 o 3
2
1
7***
7***
7***
2
2
2
1
1
3 a 5
3
3
3 a 5
3
3
3 a 5
3
3
3 a 5
3
3
5
4
5
4
4 o 5
5
4
2
1
1
5
5
3
3
5
5
5
5
5
5
5
5
6
6
Si
6
4
3
No
5
5
6
6
6
6
Si
Si
Si
5
6
Si
Si
Si
Si
Si
Si
Si
Si
Si
Si
Si
Si
Si
Si
Si
Si
SI
Si
Si
Si
Si
Si
Si
No
No
No
No
No
No
No
No
aconsejada
(°C)
180
180
180
180
190
190
190
190
220
220
220
220
180
180
180
180
200
200
200
170
170
170
160
160
190
190
190
35-60**
23-30**
Duración
de la
cocción
(minutos)
30-40
35-45
40-50
45-55
25-35
25-35
30-40
30-40
15-25
20-30
25-35
30-40
15-25
15-25
20-30
20-30
30-40
35-45
40-50
35-45
35-45
40-50
60-75
60-75
30-35
35-40
40-45
horas**
35-60**
25-35**
30-35**
35-40**
ES
43
Page 44
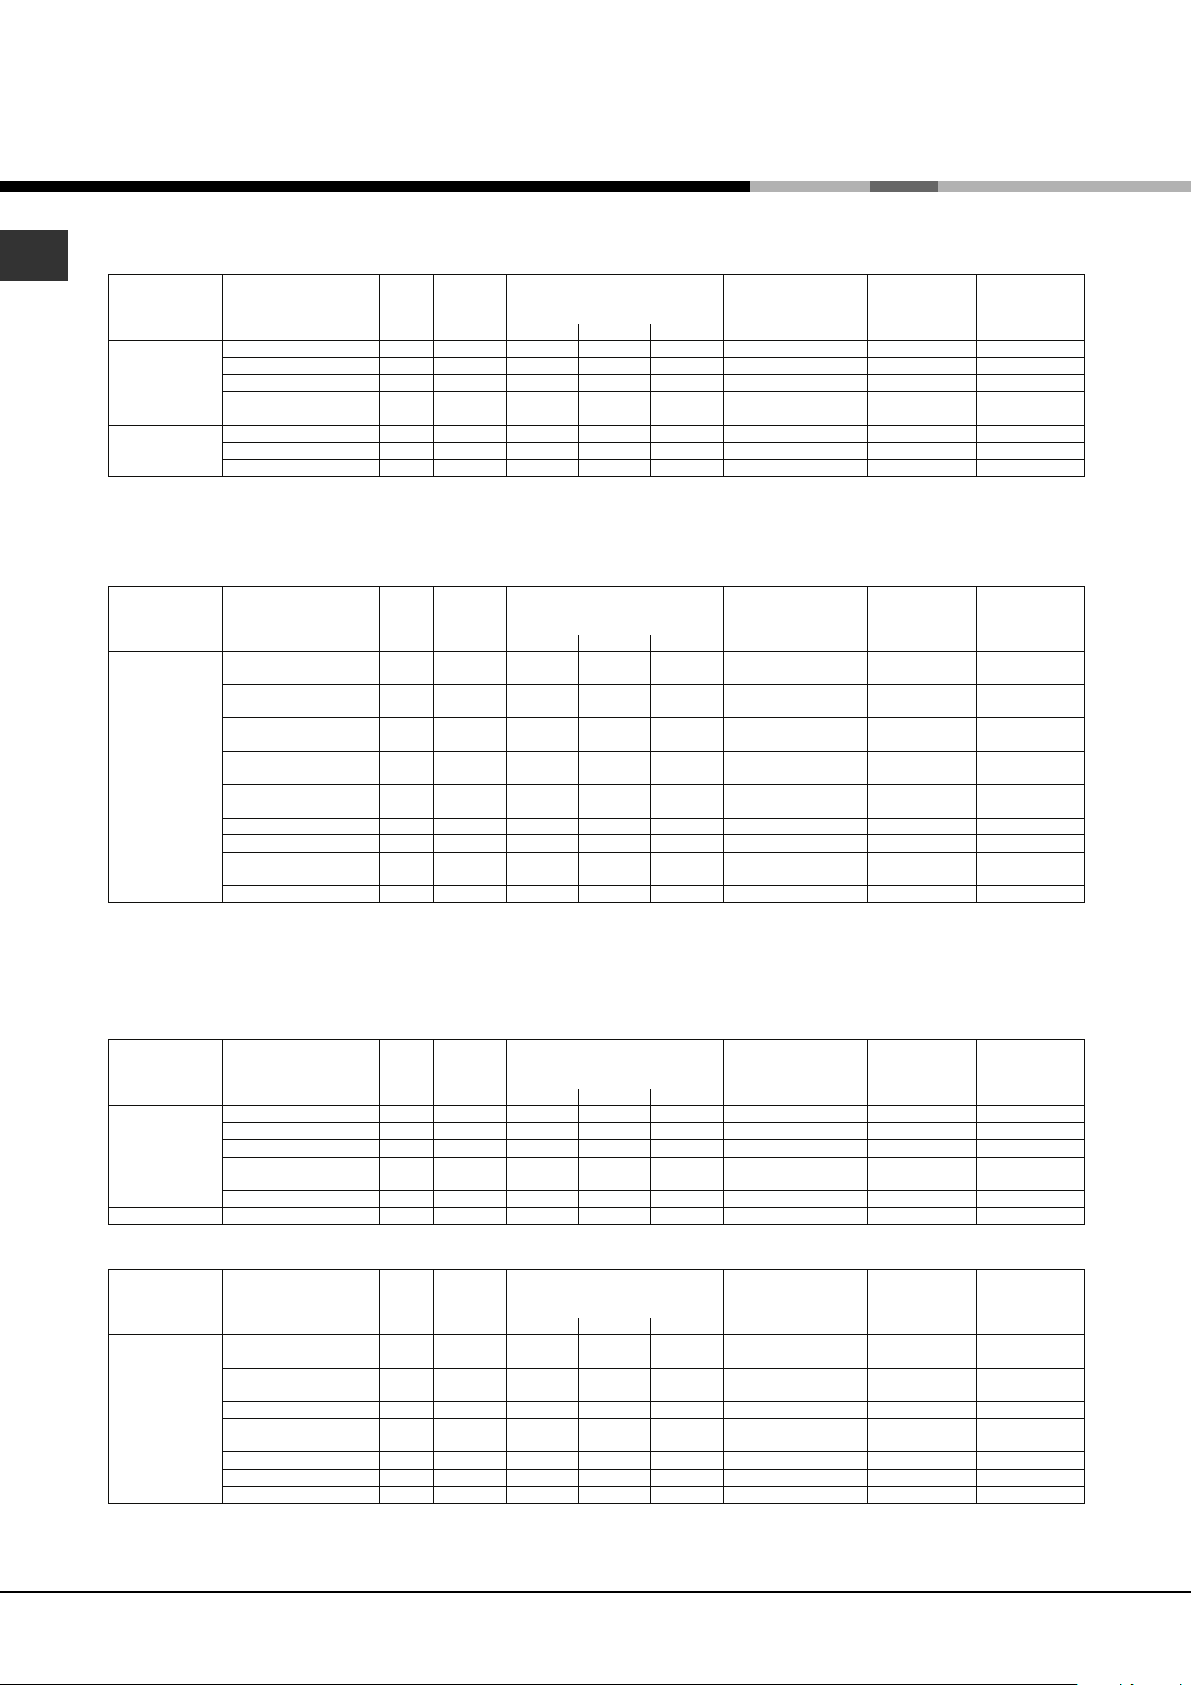
ES
(
(
y
Tabla de cocción para Small Space
Funciones Alimentos Peso
N. Grasera Rejilla 1 Divider
Fast cooking* Filetes de pescado 1 6 D Si 180-200 20-30
Filetes de carne 1 6 D Si 180-200 30-40
Pizza congelada 1 6 D Si
Preparación
Grill Tostadas 1 - 6-7 D Si 100% 3-5
Tocino 1 6 7 D Si 100% 3-6
Bistec de cerdo 1 6 7 D Si 100% 15-25
* Los tiempos de cocción son indicativos y se pueden modificar en base a los gustos personales. La duración del precalentamiento del horno está prefijada y
no se puede modificar manualmente.
congelados
Cocción
(kg)
en n° de
niveles
1 6 D Si
Posición de las bandejas Precalentamiento Temperatura
aconsejada
(°C)
Duración de
la cocción
(minutos)
Tabla de cocción para Main Space
Funciones Alimentos Peso
N. Grasera Rejilla 1 Divider
Universal* Tartas 1 2 2
Hojaldre con crema 1 2 2
Pizza 1 2 2
Bizcochos 1 2 2
Pasteles 1 2 2
Flan
Bizcocho con uvas 1 2 D Si 160 60-75
Bizcocho 1 2 2
Asados pequeños 1 2 3 D Si 210 30-60
* Los tiempos de cocción son indicativos y se pueden modificar en base a los gustos personales. La duración del precalentamiento del horno está prefijada y
no se puede modificar manualmente.
baño María 1 2 D Si 170 35-45
(kg)
Cocción
en n° de
niveles
Posición de las bandejas Precalentamiento Temperatura
1
1
1
1
1
1
3
3
3
3
3
3
D
D
D
D
D
D
D
D
D
D
D
D
Si
Si
Si
Si
Si
Si
Si
Si
Si
Si
Si
Si
aconsejada
(°C)
200
200
190
190
220
220
180
180
200
200
190
190
Duración de
la cocción
(minutos)
30-40
35-45
25-35
25-35
15-25
20-30
15-25
15-25
30-40
35-45
30-35
35-40
Tabla de cocción simultánea de Small Space y Main Space
Small Space
Funciones Alimentos Peso
N. Grasera Rejilla 1 Divider
Fast cooking* Filetes de pescado 1 6 D Si 200-220 20-30
Filetes de carne 1 6 D Si 200-220 30-40
Pizza congelada 1 6-7 D Si
Preparaciones
Arroz “pilaf” 1 6 D Si 180-200 30-45
Grill Dorado 1 6-7 D Si 100% 3-6
congelados
Cocción
(kg)
en n° de
niveles
1 6-7 D Si
Posición de las bandejas Precalentamiento Temperatura
aconsejada
(°C)
Duración de
la cocción
(minutos)
Main Space
Funciones Alimentos Peso
N. Grasera Rejilla 1 Divider
Universal* Tortas, tartas saladas 1 2 2
Bizcochos 1 2 2
Flan
Pizza 1 2 2
Gratin de patatas 1 2 D Si 200 60
Asado 1 2 D Si 200 60-90
Comidas en corteza 1 2 D Si 200 35-45
* Los tiempos de cocción son indicativos y se pueden modificar en base a los gustos personales. La duración del precalentamiento del horno está prefijada y
no se puede modificar manualmente.
baño María 1 2 D Si 160 45
(kg)
Cocción
en n° de
niveles
Posición de las bandejas Precalentamiento Temperatura
1 y 2 3 a 5
1 y 2 3 a 5
1
2 3 a 5
D
D
D
D
D
D
Si
Si
Si
Si
Si
Si
aconsejada
(°C)
200
200
180
180
220
220
Duración de
la cocción
(minutos)
30-40
35-45
15-25
15-25
15-25
20-30
44
Page 45

Precauciones y consejos
! El aparato ha sido proyectado y fabricado en
conformidad con las normas internacionales sobre
seguridad. Estas advertencias se suministran por
razones de seguridad y deben ser leídas
atentamente.
Seguridad general
• El aparato ha sido fabricado para un uso de tipo
no profesional en el interior de una vivienda.
• El aparato no se debe instalar al aire libre,
tampoco si el espacio está protegido porque es
muy peligroso dejarlo expuesto a la lluvia y a las
tormentas.
• Para mover el aparato utilice siempre las manijas
correspondientes ubicadas en los costados del
horno.
• No toque el aparato descalzo o con las manos y
pies mojados o húmedos.
• El aparato debe ser utilizado para cocinar
alimentos, sólo por personas adultas y siguiendo
las instrucciones contenidas en este manual.
• Mientras se utiliza el aparato, los elementos
calentadores y algunas partes de la puerta del
horno se calientan mucho. Tenga cuidado de no
tocarlos y mantenga a los niños alejados de ellos.
• Evite que el cable de alimentación eléctrica de
otros electrodomésticos entre en contacto con
partes calientes del horno.
• No obstruya las aberturas de ventilación y de
eliminación del calor.
• Tome la manija de apertura de la puerta en el
centro: en los costados podría estar caliente.
• Utilice siempre guantes para horno para introducir
o extraer recipientes.
• No cubra el fondo del horno con hojas de
aluminio.
• No coloque materiales inflamables en el horno: si
el aparato se pone en funcionamiento
inadvertidamente, podría incendiarse.
• Cuando el aparato no se utiliza, controle siempre
que los mandos estén en la posición “”/“
• No desconecte el aparato de la toma de corriente
tirando del cable sino sujetando el enchufe.
• No realice la limpieza o el mantenimiento sin
haber desconectado primero el aparato de la red
eléctrica.
• En caso de avería, no acceda nunca a los
mecanismos internos para intentar una
reparación. Llame al Servicio de Asistencia
Técnica (ver Asistencia).
• No apoye objetos pesados sobre la puerta del
horno abierta.
• No está previsto que el aparato sea utilizado por
personas (incluidos los niños) con capacidades
físicas, sensoriales o mentales disminuidas, por
”.
personas inexpertas o que no tengan familiaridad
con el producto, salvo que estén vigiladas por
una persona responsable de su seguridad, o que
no hayan recibido instrucciones preliminares
sobre el uso del aparato.
• Evite que los niños jueguen con el aparato.
Eliminación
• Eliminación del material de embalaje: Respete las
normas locales, de esta manera los embalajes
podrán ser reutilizados.
• La norma europea 2002/96/CE sobre la
eliminación de aparatos eléctricos y electrónicos
(RAEE), establece que los electrodomésticos no
se deben eliminar de la misma manera que los
desechos sólidos urbanos. Los aparatos en
desuso se deben recoger separadamente para
optimizar la tasa de recuperación y reciclaje de
los materiales que los componen e impedir
potenciales daños para la salud y el medio
ambiente. El símbolo de la papelera tachada se
encuentra en todos los productos para recordar la
obligación de recolección separada.
Para obtener mayor información sobre la correcta
eliminación de electrodomésticos, los poseedores
de los mismos podrán dirigirse al servicio público
responsable o a los revendedores.
Ahorrar y respetar el medioambiente
• Utilizando el horno en los horarios que van desde
las últimas horas de la tarde hasta las primeras
horas de la mañana, se colabora en la reducción
de la carga de absorción de las empresas
eléctricas. Las opciones de programación, en
especial, la “cocción retrasada” (ver Programas) y
la “limpieza automática retrasada” (ver
Mantenimiento y cuidados), permiten organizarse
en ese sentido.
• Se recomienda efectuar siempre las cocciones en
BARBACOA y GRATIN con la puerta cerrada: Se
obtendrán así mejores resultados y también un
sensible ahorro de energía (10%
aproximadamente).
• Mantenere efficienti e pulite le guarnizioni, in
modo che aderiscano bene alla porta e non
procurino dispersioni di calore.
! Este producto satisface los requisitos establecidos
por la nueva Directiva europea sobre la limitación de
los consumos energéticos en standby.
Si no se realizan operaciones durante 2 minutos, el
aparato se dispone de modo automático en
standby.
El modo standby se indica con el "Icono Reloj" con
intensidad luminosa elevada.
Cuando el aparato se utiliza nuevamente, el sistema
vuelve al modo operativo.
ES
45
Page 46

Mantenimiento y cuidados
F
Vidrio
Lampara
Horno
ES
Interrumpir el suministro de corriente
eléctrica
Antes de realizar cualquier operación, desconecte el
aparato de la red de alimentación eléctrica.
Limpiar el aparato
• Las partes externas esmaltadas o de acero
inoxidable y las juntas de goma se pueden
limpiar con una esponja empapada en agua tibia
y jabón neutro. Si las manchas son difíciles de
eliminar use productos específicos. Se aconseja
enjuagar abundantemente y secar después de la
limpieza. No utilice polvos abrasivos ni
sustancias corrosivas.
• El interior del horno se debe limpiar
preferentemente cada vez que se utiliza, cuando
todavía está tibio. Utilice agua caliente y
detergente, enjuague y seque con un paño suave.
Evite el uso de productos abrasivos.
• Los accesorios se pueden lavar como cualquier
vajilla, incluso en lavavajillas.
! No utilice nunca limpiadores a vapor o de alta
presión para la limpieza del aparato.
Limpiar la puerta
Limpie el vidrio de la puerta con esponjas y
productos no abrasivos y séquelo con un paño
suave; no utilice materiales ásperos abrasivos o
raederas metálicas afiladas que puedan rayar la
superficie y quebrar el vidrio.
Para realizar una limpieza más profunda es posible
extraer la puerta del horno:
1. Para ello, abra completamente la puerta (ver la
figura);
2. Con un destornillador, levantar y girar las
palancas
figura);
F F
F dispuestas en las dos bisagras (ver
F F
Controlar las juntas
Controle periódicamente el estado de la junta que
rodea la puerta del horno. Si se encontrara dañada
llame al Centro de Asistencia Técnica más cercano
(ver Asistencia). Es aconsejable no usar el horno
hasta que no haya sido reparada.
Sustituir la bombilla
Para sustituir la bombilla de iluminación del horno:
1. Quitar la tapa
de vidrio del
portalámpara.
2. Extraiga la
bombilla y
sustitúyala con
una similar:
Lámpara
halógena tensión
230V, potencia 25
W, casquillo G 9.
3. Vuelva a colocar la tapa (ver la figura).
! No tocar la lámpara directamente con las manos.
3. Sujetar la puerta de los
costados y cerrarla lenta pero
no completamente. Luego tire
la puerta hacia afuera,
sacándola de la bisagra (ver
la figura). Vuelva a colocar la
puerta siguiendo el mismo
46
procedimiento pero en sentido
contrario.
Page 47

Limpieza automática con la función
FAST CLEAN
Con el programa FAST CLEAN la temperatura interna
del horno alcanza los 500°C. Se activa el ciclo de
pirólisis que quema los residuos de alimentos y de
suciedad. Más precisamente, la suciedad se
incinera. Mantener alejados a los niños del aparato
durante el ciclo de limpieza automático, ya que las
superficies pueden volverse muy calientes. Particles
may ignite inside the oven due to the combustion
process. Dentro del horno las partículas pueden
prenderse fuego debido al proceso de combustión.
No hay porqué alarmarse: se trata de un proceso
normal y que non conlleva riesgos.
Antes de activar el programa FAST CLEAN:
Dispositivos de seguridad
• Cuando se ilumina el icono
significa que la puerta del horno se ha bloqueado
automáticamente apenas la temperatura ha
alcanzado un valor elevado.
• Si se produce un malfuncionamiento, la
alimentación de los elementos calentadores se
interrumpe.
• Cuando la puerta del horno se bloquea, no es ya
posibles modificar las programaciones de duración
y de final de ciclo.
Programar el final de la limpieza automática
en el display,
ES
• Quitar de dentro del horno los residuos más
consistentes utilizando una esponja húmeda. No
utilizar detergentes.
• Extraer todos los accesorios.
• Quitar el elemento SEPARADOR.
• No dejar paños de cocina o manoplas en la
manija del horno.
! Si el horno está excesivamente caliente, el ciclo de
pirólisis podría no comenzar. Espere hasta que el
horno se enfríe.
! El programa puede comenzar solamente después
del cierre de la puerta del horno.
Para comenzar el ciclo FAST CLEAN, girar el mando
FUNCIÓN EXTRALARGE SPACE a
Presionar el botón
TIEMPOS se puede utilizar para elegir el nivel de
limpieza deseado. Los tiempos con duración
prefijados y que no pueden modificarse son tres:
1. Económico (ECO): girar el mando hacia "-".
Duración: 1 hora.
2. Normal (NOR): nivel inicial. Duración: 1 hora y 30
minutos.
3. Intensivo (INT): girar el mando hacia "+".
Duración: 2 horas.
4. Presionar el botón
Se puede programar el final del ciclo FAST CLEAN
como para un ciclo de cocción normal (ver
Programación final limpieza automática).
. El mando FIJACIÓN
para confirmar.
.
1. Presionar el botón
dos cifras en el DISPLAY comienzen a parpadear.
2. Girar el mando de FIJACIÓN DE TIEMPOS hacia
"+" y "-" para regular la hora.
3. Presionar nuevamente el botón
dos cifras numéricas en el DISPLAY comienzen a
parpadear.
4. Girar el mando FIJACIÓN DE TIEMPOS hacia "+"
y "-" para regular los minutos.
5. Presionar nuevamente el botón
6. Una vez pasado el tiempo fijado, en el DISPLAY
aparece END y se emite una señal acústica.
• Por ejemplo: Es la hora 9:00 y se elige el nivel
FAST CLEAN Económico (ECO) con una duración
prefijada de 1 hora. El final del ciclo está
programado para la hora 12:30. El programa
comenzará automáticamente a la hora 11:30.
Si la programación ha sido fijada, los botones
estarán encendidos. El DISPLAY muestra
alternativamente la duración y la hora de finalización de
FAST CLEAN.
Al finalizar el ciclo de limpieza automática
es necesario esperar que la temperatura dentro del
horno haya descendido como para permitir la
abertura de la puerta. Se notará la presencia de
depósitos de polvo en el fondo y en las paredes del
horno: quitar con una esponja húmeda después que
el horno se ha enfriado completamente. Si por el
contrario se desea utilizar el calor residual del horno,
no es necesario quitar los depósitos de polvo ya
que éstos son absolutamente inocuos y no
constituyen un peligro para los alimentos.
hasta que el icono y las
hasta que las
para confirmar.
y
47
Page 48

Asistencia
ES
Atención:
El aparato está dotado de un sistema de diagnóstico que permite detectar problemas de funcionamiento. Los
mismos se comunican en el display mediante mensajes como: “F” seguido por números.
En esos casos es necesaria la intervención del servicio de asistencia técnica.
! Nunca solicitar la asistencia de técnicos no autorizados.
Comunique:
• El tipo de anomalía;
• El modelo del aparato (Mod.)
• El número de serie (S/N)
Esta información se encuentra en la placa con las características colocada en el aparato.
La siguiente información es válida solo para España
Para otros países de habla hispana consulte a su vendedor
Ampliación de garantía
Llame al 902.363.539 y le informaremos sobre el fantástico plan de ampliación de garantía hasta 5 años.
Consiga una cobertura total adicional de
· Piezas y componentes
· Mano de obra de los técnicos
· Desplazamiento a su domicilio de los técnicos
Y NO PAGUE AVERIAS NUNCA MAS
Servicio de asistencia técnica (SAT)
Llame al 902.133.133 y nuestros técnicos intervendrán con rapidez y eficacia, devolviendo el electrodoméstico
a sus condiciones óptimas de funcionamiento.
En el SAT encontrará recambios, accesorios y productos específicos para la limpieza y mantenimiento de su
electrodoméstico a precios competitivos.
ESTAMOS A SU SERVICIO
48
Page 49
Instruções de utilização
FORNO
GB
English,1
PT
Portuges, 49
OS 99D P IX
FR
Français, 17 Espanol, 33
ES
Índice
PT
Instalação, 50-51
Posicionamento
Ligação eléctrica
Dados técnicos
Descrição do aparelho, 52
Vista de conjunto
Painel de comandos
Visor
Estrutura do forno, 53
Início e utilização, 54-60
Regule o relógio
Programe o contador de minutos
ExtraLarge Space
Small Space
Main Space
Uso contemporâneo de Small Space e Main Space
Programação da cozedura
Conselhos práticos para a cozedura
Tabela de cozedura ExtraLarge Space
Tabela de cozedura Small Space
Tabela de cozedura Main Space
Tabela de cozedura contemporânea Small Space e
Main Space
Precauções e conselhos, 61
Segurança geral
Eliminação
Economia e respeito do meio ambiente
Manutenção e cuidados, 62-63
Desligar a corrente eléctrica
Limpeza do aparelho
Limpeza da porta
Substituição da lâmpada
Limpeza automática com a função FAST CLEAN
Assistência técnica, 64
Page 50

Instalação
560 mm.
4
5
m
m
.
PT
! É importante guardar este folheto para poder
consultá-lo a qualquer momento. No caso de venda,
cessão ou mudança, assegure-se que o mesmo
permanece com o aparelho para informar o novo
proprietário sobre o funcionamento e sobre as
respectivas advertências.
! Leia com atenção as instruções: há informações
importantes sobre a instalação, a utilização e a
segurança.
Posicionamento
! As embalagens não são brinquedos para as
crianças e devem ser eliminadas em conformidade
com as regras de colecta diferenciada (veja em
Precauções e Conselhos).
! A instalação deve ser realizada segundo estas
instruções e por pessoal profissional qualificado.
Uma instalação errada pode causar danos a
pessoas, animais ou objectos.
Encaixe
Para garantir um bom funcionamento do aparelho é
necessário que o móvel seja de características
adequadas.
• os painéis adjacentes ao forno devem ser de
material resistente ao calor;
• no caso de móveis de madeira contraplacada, as
colas devem ser resistentes à temperatura de
100°C.
• para encaixar o forno, quer no caso de instalação
sob uma banca (veja a figura) quer em coluna, o
móvel deve ter as seguintes medidas:
Ventilação
Para garantir uma boa ventilação é necessário
eliminar a parede traseira do vão. É preferível
instalar o forno de maneira que se apoie sobre duas
ripas de madeira, ou sobre uma tábua com uma
abertura de pelo menos 45 x 560 mm. (veja as
figuras).
Colocar no centro e prender
Regule os 4 calços situados aos lados do forno, em
correspondência aos 4 furos na moldura ao redor,
em função da espessura da lateral do móvel:
20 mm de espessura: retire a
parte móvel do calço (veja a
figura);
18 mm de espessura: utilize a
primeira cavidade, da maneira
já preparada pelo fabricante
(veja a figura);
.
in
. m
m
m
7
4
5
.
m
m
5
595 mm.
595 mm.
m
4
2
23 mm.
5 mm.
m
5
4
5
.
m
576 mm.
.
m
4
558 mm.
593 mm.
! Depois de ter encaixado o aparelho, não deve ser
possível contacto com as partes eléctricas.
As declarações de consumo indicadas na placa das
características foram medidas com este tipo de
instalação.
50
16 mm de espessura: utilize a
segunda cavidade (veja a
figura).
Para prender o aparelho no móvel: abra a porta do
forno e atarraxe 4 parafusos na madeira, nos 4 furos
situados na moldura ao redor.
! Todos os componentes de garantia da protecção
precisam estar presos de modo que não possam
ser tirados sem o emprego de uma ferramenta.
Page 51

Ligação eléctrica
N
L
! Os fornos equipados com cabo de fornecimento
com três pólos, são preparados para funcionar com
corrente alternada na tensão e frequência de
fornecimento indicadas na placa de identificação
situada no aparelho (veja a seguir).
Montagem do cabo de fornecimento
1. Para abrir a caixa de
terminais faça alavanca
com uma chave de
parafuso nas linguetas
aos lados da tampa:
puxe e abra a tampa
(veja a figura).
2. Instale o cabo de
alimentação:
desatarraxe o parafuso
do grampo do cabo e
os três parafusos dos
contactos L-Nem seguida, prenda os
fios embaixo das
cabeças dos parafusos
a obedecer as cores:
Azul (N) Castanho (L)
Amarelo-Verde
(veja a figura).
3. Prenda o cabo no
respectivo grampo.
4. Feche a tampa da caixa dos terminais.
Ligação do cabo de alimentação à rede
Monte no cabo uma ficha em conformidade com as
normas para a carga indicada na placa de
identificação (veja ao lado).
No caso de uma ligação directa à rede, será
necessário interpor, entre o aparelho e a rede, um
interruptor omnipolar com abertura mínima entre os
contactos de 3 mm na dimensão certa para a carga
e em conformidade com as normas em vigor (a
ligação à terra não deve ser interrompida pelo
interruptor). O cabo de alimentação deve ser
colocado de maneira que em nenhum ponto
ultrapasse de 50°C a temperatura do ambiente.
! O técnico instalador é responsável pela realização
certa da ligação eléctrica e da obediência das
regras de segurança.
Antes de efectuar a ligação, certifique-se que:
• a tomada tenha uma ligação à terra e seja em
conformidade com a legislação;
• a tomada tenha a capacidade de suportar a carga
máxima de potência da máquina, indicada na
e,
placa de identificação (veja a seguir);
• a tensão de alimentação seja entre os valores da
placa de identificação (veja a seguir);
• a tomada seja compatível com a ficha do
aparelho. Em caso contrário, substitua a tomada
ou a ficha; não empregue extensões nem
tomadas múltiplas.
! Depois de ter instalado o aparelho, o acesso ao
cabo eléctrico e à tomada da corrente deve ser
fácil.
! O cabo não deve ser dobrado nem comprimido.
! O cabo deve ser verificado periodicamente e
substituído somente por técnicos autorizados (veja
a Assistência técnica).
! A empresa exime-se de qualquer
responsabilidade se estas regras não forem
obedecidas.
PLACA DAS CARACTERÍSTICAS
Dimensões*
Volume*
Dimensões**
Volume**
Ligações
eléctricas
ETIQUETA
DE ENERGIA
largura 43,5 cm
altura cm 41
profundidade 41 cm
lt. 74
largura 45,6 cm
altura cm 41
profundidade 41 cm
lt. 77
tensão de 220/240V~ 50Hz
potência máxima absorvida 3400W
(veja a placa das características)
Directiva 2002/40/CE relativa aos
fornos eléctricos.
Norma EN 50304
Consumo de energia da declaração
de Classe com convecção Forçada
- função de aquecimento: Gratin
Este aparelho está em conformidade
com as seguintes Directivas da
Comunidade Europeia: 2006/95/CEE
de 12/12/06 (Baixa Tensão) e
modificações seguintes
- 2004/108/CEE de 15/12/04
modificações seguintes
- 93/68/CEE de 22/07/93
e modificações seguintes
- 2002/96/CE e posteriores
modificações.
1275/2008 Stand-by/off mode
* Apenas para modelos com guias integradas.
** Apenas para modelos com guias em fio.
PT
51
Page 52

Descrição do
aparelho
PT
Vista de conjunto
Painel de comandos
Prateleira DIVISOR
Prateleira GRELHA
Prateleira
BANDEJA PINGADEIRA
Painel de comandos
Selector
FUNÇÕES
SMALL SPACE
VISOR
Tecla de
PROGRAMAÇÃO
dos TEMPOS
GUIAS
de deslizamento
das prateleiras
posição 7
posição 6
posição Divider "D"
posição 5
posição 4
posição 3
posição 2
posição 1
Selector
FUNÇÕES
EXTRALARGE SPACE
Visor
Selector
FUNÇÕES
MAIN SPACE
TEMPERATURAS e TEMPOS
Ícone
CAVIDADE
SELECCIONADA
SELECÇÃO CAVIDADE
Dígitos numéricos de
¡•OC
•• ••
¡•OC
:
•• ••
:
Ícone
DURAÇÃO
Botão
Ícone
PORTA TRANCADA
Ícone do
FIM DA COZEDURA
Selector de
PROGRAMAÇÃO
TEMPERATURA/TEMPOS
Ícone
CONTADOR DE MINUTOS
52
Page 53

Estrutura do forno
O forno Openspace tem uma capacidade de 70
litros e oferece a possibilidade de cozinhar
alimentos em 4 níveis contemporaneamente, ou
cozinhar porções abundantes, que não caberiam
num forno tradicional.
Graças ao ExtraLarge Space, Openspace oferece 10
funções de cozedura, 6 das quais universais,
utilizáveis para qualquer tipo de preparação, e 4
programas automáticos que garantem o resultado
perfeito para qualquer receita.
Openspace proporciona também o máximo conforto
para qualquer exigência e com 4 diferentes
possibilidades de uso: o forno é único, mas pode
ser dividido em espaços de diferentes dimensões,
cada uma com regulações independentes de
ExtraLarge Space: cozedura em 4 níveis
GRELHA
EXTRALARGE
SPACE
GRELHA
GRELHA
BANDEJA
PINGADEIRA
temperatura e tempo.
Isto é possível graças ao DIVISOR termoisolante,
que consente dividir toda a ExtraLarge Space em
dois espaços de dimensões diferentes: Main Space
e Small Space.
As duas Main e Small Space podem ser utilizadas
contemporaneamente, para cozinhar diversos
alimentos em menos tempo, ou separadamente,
para utilizar somente o espaço que serve.
Quando as duas cavidades forem utilizadas juntas,
é possível regular a temperatura de cozedura entre
50ºC e 250ºC, e ter uma diferença de temperatura de
até 100ºC entre as duas áreas, para realizar receitas
mesmo muito diferentes entre si, sem que os
sabores e os odores se misturem.
Main e Small Space: cozedura contemporânea
SMALL
SPACE
MAIN
SPACE
GRELHA ou
BANDEJA PINGADEIRA
Divisor "D" (posição fixa)
GRELHA (cozedura em 3 níveis)
GRELHA (cozedura em 3 níveis)
BANDEJA PINGADEIRA
(cozedura em 3 níveis)
PT
Cozedura apenas na Small Space
SMALL
SPACE
MAIN
SPACE
GRELHA ou
BANDEJA PINGADEIRA
Divisor "D"
(posição fixa)
A tabela a seguir descreve os possíveis valores de
temperatura configuráveis. O visor inteligente
Temperatura na primeira cavidade
(Main ou Small Space)
Cozedura apenas na Main Space: cozedura em 3 níveis
SMALL
SPACE
MAIN
SPACE
Divisor "D" (posição fixa)
GRELHA (cozedura em 3 níveis)
GRELHA (cozedura em 3 níveis)
BANDEJA PINGADEIRA
(cozedura em 3 níveis)
indicará a correcta regulação das temperaturas nas
duas cavidades.
Temperatura na segunda cavidade
(Small ou Main Space)
De 40°C a 150°C A diferença de temperatura respeito à primeira cavidade
seleccionada é de no máximo 50ºC.
Exemplo: configura 90ºC numa cavidade;
na outra, pode configurar um valor entre 40°C (90°C-50°C) e 140°C (90°C+50°C).
De 155°C a 200°C A diferença de temperatura respeito à primeira cavidade
seleccionada é de no máximo 70ºC.
Exemplo: configura 180ºC numa cavidade;
na outra, pode configurar um valor entre 110°C (180°C-70°C) e 250°C (180°C+70°C).
De 205°C a 250°C A diferença de temperatura respeito à primeira cavidade
seleccionada é de no máximo 100ºC.
Exemplo: configura 210ºC numa cavidade;
na outra, pode configurar um valor entre 110°C (210°C-100°C) e 250°C máxima temperatura configurável.
Para cancelar qualquer configuração, é suficiente girar o selector Funções Small Space ou Main Space
na posição “0”.
53
Page 54
Início e utilização
PT
! Quando o acender pela primeira vez, aconselhamos de
fazer funcionar o forno vazio pelo menos durante uma
hora, com o termóstato posto à temperatura máxima e
com a porta fechada. Em seguida, pode apagar, abrir a
porta do forno e ventilar a sala. O odor que se sente
deve-se à evaporação das substâncias empregadas para
proteger o forno.
! Nunca encoste objectos no fundo do forno, para evitar
riscos de danos ao esmalte.
! Coloque sempre os recipientes de cozedura sobres as
grelhas fornecidas.
! Durante o uso, recomenda-se remover eventuais louças
ou alimentos delicados das cavidades desligadas.
! No caso de cozeduras para as quais é prevista a
levedação, recomenda-se não abrir a porta do forno para
não comprometer o resultado.
! Se a porta for solicitada com força repetidamente, o
divisor poderia sair da sua posição. Neste caso, no visor
aparecerá a hora. Certifique-se de que o divisor esteja
correctamente inserido e reinicie a cozedura.
Ventilação de arrefecimento
Para obter uma redução das temperaturas externas, uma
ventoinha de arrefecimento gera um jacto de ar que sai
entre o painel de comandos e a porta do forno.
! No final da cozedura, a ventoinha activa-se e desactivase automaticamente até o forno arrefecer suficientemente.
Acertar o relógio
! Pode-se configurar somente quando o forno estiver
apagado.
1. Pressione a tecla
no VISOR e os ícones
2. rode o selector de CONFIGURAÇÃO de TEMPOS para
“+” ou “-” para regular a hora;
3. pressione de novo a tecla
algarismos começarem a piscar no VISOR;
4. rode o selector de CONFIGURAÇÃO de TEMPOS para
“+” ou “-” para regular os minutos;
5. pressione outra vez a tecla
até que o primeiro dígito numérico
, , estiverem desligados;
até os outros dois
para confirmar.
Programe o contador de minutos
! Esta função não interrompe a cozedura e prescinde do
uso do forno; permite apenas accionar o sinal acústico
quando terminarem os minutos programados.
1. Pressione a tecla
primeiros algarismos piscarem no VISOR;
2. rode o selector de CONFIGURAÇÃO de TEMPOS para
“+” ou “-” para regular os minutos;
3. pressione outra vez a tecla
até os ícones e os três
para confirmar.
Seguirá a visualização da contagem regressiva, ao fim da
qual o aparelho emitirá um sinal acústico.
ExtraLarge Space
Início do forno
1. Para seleccionar a função de cozedura que desejar,
rode o selector das FUNÇÕES EXTRALARGE SPACE. O
ícone
ExtraLarge Space e portante é possível actuar somente
nas configurações da ExtraLarge Space.
2. O forno entra na fase de aquecimento prévio. É
possível modificar a temperatura se rodar o selector da
TEMPERATURA. Durante a fase de pré-aquecimento, o
ícone
3. No fim da fase de pré-aquecimento, o ícone
aceso fixo e será ouvido um sinal acústico. Agora é
possível introduzir os alimentos;
4. Durante a cozedura é sempre possível:
- modificar a função de cozedura mediante o selector
FUNÇÕES EXTRALARGE SPACE;
- modificar a temperatura actuando no selector da
TEMPERATURA (somente para cozeduras universais);
- programar a duração (somente para as cozeduras
universais) e a hora de final da cozedura;
- interromper a cozedura colocando o selector FUNÇÕES
EXTRALARGE SPACE na posição “0”.
5. No caso de uma interrupção do fornecimento eléctrico,
se a temperatura do forno não baixar demais, o aparelho
é equipado com um sistema que reactiva a função desde
o ponto em que tiver sido interrompida. Por outro lado, as
programações para início posterior não serão reiniciadas
quando a alimentação eléctrica for restabelecida, mas
deverão ser programadas novamente.
! Na configuração ExtraLarge não é possível utilizar as
Main e Small Space: os selectores FUNÇÕES SMALL
SPACE e MAINS SPACE estão desabilitados.
Funções de cozedura universais
! Todas as funções têm uma temperatura de cozedura
predefinida. Esta temperatura poderá ser regulada
manualmente, defina como desejar entre 40°C e 250°C.
Na função de BARBECUE o valor pré-configurado é um
nível de potência expresso em %. Também pode ser
regulado manualmente.
Ligam-se todos os elementos aquecedores e entra em
funcionamento a ventoinha. Como o calor é constante e
uniforme em todo o forno, o ar coze e cora os alimentos
aceso no visor indica que foi seleccionada a
irá piscar;
ficará
Função de COZEDURA MÚLTIPLA
54
Page 55

de maneira uniforme. É possível utilizar até no máximo
quatro prateleiras contemporaneamente. Caso deseje
utilizar várias prateleiras contemporaneamente,
aconselhamos posicionar sempre a bandeja pingadeira na
prateleira inferior. No caso da cozedura em 4 níveis
contemporaneamente, aconselhamos posicionar as grelhas
nas prateleiras 3, 5 e 6 e a bandeja pingadeira na prateleira
1.
Função GRATIN
Activa-se o elemento aquecedor superior e durante uma
parte do ciclo também o elemento aquecedor circular,
começam a funcionar a ventoinha e o espeto rotativo (se
houver). Une a irradiação térmica unidireccional com a
circulação forçada do ar no interior do forno.
Deste modo impede-se a queimadura da superfície dos
alimentos ao aumentar-se o poder de penetração do calor.
Coza com a porta do forno fechada.
Função de BARBECUE
Activa-se o elemento aquecedor superior e o espeto
rotativo (se houver). Se rodar o selector TEMPERATURA, o
visor indicará os níveis de potência que podem ser
configurados, que vão desde 5% até 100%. Uma
temperatura alta e directa do grill é aconselhada para os
alimentos que necessitarem de uma alta temperatura
superficial. Coza com a porta do forno fechada.
Função BAIXA TEMPERATURA
Este tipo de cozedura consente levedar, descongelar,
preparar iogurte, aquecer mais ou menos rapidamente,
cozer lentamente com baixa temperatura. As temperaturas
seleccionáveis são: 40, 65, 90 °C.
Função FAST CLEAN
É o programa de limpeza automática e integral do forno,
mediante pirólise (veja a Manutenção e cuidados).
! O ciclo do programa é predefinido em 90 minutos.
3. accione o espeto rotativo seleccionando as funções
ou ;
Funções de cozedura automáticas
! A temperatura e a duração da cozedura podem ser
predefinidaspredefinidas
predefinidas mediante o sistema
predefinidaspredefinidas
Óptima ProgramadaÓptima Programada
Óptima Programada) que automaticamente assegura um
Óptima ProgramadaÓptima Programada
resultado perfeito. A cozedura interrompe-se
automaticamente e o forno avisa quanto o alimento está
cozido. A duração da cozedura pode ser modificada de
alguns minutos, como especificado a seguir na descrição de
cada função.
Função CARNE
Utilizar esta função para assar carne de vitela, porco,
borrego e vaca. Enfornar a frio. É também possível
colocar os alimentos no forno já quente. É possível
modificar somente a duração de -10/+10 minutos.
Função BOLOS
Esta função é ideal para cozer doces. Enfornar a frio. É
também possível colocar os alimentos no forno já quente.
É possível modificar somente a duração de -10/+15
minutos.
Função PÃO
Utilizar esta função para preparar o pão. Para as receitas
e os pormenores, consulte o capítulo seguinte.
Para obter os melhores resultados, aconselhamos seguir
atentamente as indicações abaixo:
• respeitar a receita;
• não esqueça de colocar 150 g (1,5 dl) de água fria
na bandeja pingadeira na posição 7;
Enfornar a frio. Se desejar enfornar a quente, após uma
cozedura que alcançou uma temperatura elevada, o visor
visualizará a escrita “Hot” até quando a temperatura do
forno alcançar os 40ºC. A esta altura será possível
enfornar o pão.
C.O.P.®C.O.P.®
C.O.P.® (
C.O.P.®C.O.P.®
CozeduraCozedura
Cozedura
CozeduraCozedura
PT
Espeto rotativo (somente em alguns modelos)
Para accionar o espeto
rotativo (veja a figura) realize
as seguintes operações:
1. coloque a bandeja
pingadeira na posição 1;
2. coloque o suporte do
espeto rotativo na
posição 3 e enfie o
espeto no respectivo furo,
situado na parede traseira
do forno;
Função PIZZA
Utilizar esta função para preparar pizzas. Para as receitas
e os detalhes, consulte o capítulo seguinte. É possível
modificar somente a duração de -5/+12 minutos.
Para obter os melhores resultados, aconselhamos seguir
atentamente as indicações abaixo:
• respeitar a receita;
• o peso da massa deve ser entre 350 g e 500g.
• untar um pouco a bandeja pingadeira e as formas.
Enfornar a frio. Se desejar enfornar a quente, após uma
cozedura que alcançou uma temperatura elevada, o visor
visualizará a escrita “Hot” até quando a temperatura do
forno alcançar os 120ºC. A esta altura será possível
55
Page 56

PT
enfornar a pizza.
Receita para PIZZA:
Receita para preparar 3 ou 4 pizzas: 1000g Farinha, 500g
água, 20g Sal, 20g Açúcar, 10cl Azeite de Oliva, 20g
lêvedo fresco (ou 2 envelopes em pó)
• Levedação no ambiente: 1 hora ou função manual
BAIXA TEMPERATURA a 40ºC e deixar levedar por
aproximadamente 30/45 minutos.
• Enfornar a frio.
• Iniciar a cozedura
Receita para o PÃO (empaste máximo):
Ingredientes:
• 1,3 Kg de farinha
• 700 g de água
• 25 g de sal
• 50 g de lêvedo fresco para pão ou 4 envelopes de
lêvedo em pó.
PIZZA
Small Space
Início do forno
1. Insira do DIVISOR na prateleira DIVISOR “D” com o
pino e as flechas viradas para a parte traseira do forno.
Após a correcta introdução, será possível ler a escrita
“OPENSPACE” na parte anterior da moldura do DIVISOR.
O forno emite um sinal acústico para confirmar a correcta
introdução do DIVISOR e consente o uso das duas
cavidades, Main e Small Space, separadamente ou
contemporaneamente.
! O selector FUNÇÕES EXTRALARGE SPACE é
desabilitado.
2. Para seleccionar a função de cozedura que desejar,
rode o selector das FUNÇÕES SMALL SPACE.
3. O forno entra na fase de aquecimento prévio. É
possível modificar a temperatura se rodar o selector da
TEMPERATURA. Durante a fase de pré-aquecimento, o
Preparação:
• Misturar a farinha e o sal em um grande recipiente.
• Diluir o lêvedo na água levemente morna
(aproximadamente 35 graus).
• Abra a farinha.
• Deite a mistura de água e lêvedo.
• Amasse até obter uma massa homogénea e pouco
pegajosa, alisando-a com a palma da mão e
dobrando-a sobre si mesma por 10 minutos.
• Forme uma bola, coloque a massa numa tigela e
cubra-a com uma película transparente para evitar que
a superfície da massa se seque. Coloque a tigela no
forno na função manual BAIXA TEMPERATURA a 40ºC
e deixe fermentar por aproximadamente 30/45 minutos
ou à temperatura ambiente por aproximadamente uma
hora (o volume da massa deve dobrar).
• Quebre a massa trabalhando-a delicadamente e
dividindo-a para obter diversos pães.
• Disponha-os sobre as grelhas (ou em duas ou três
grelhas, se decidir cozer os pães em vários níveis)
com o papel de forno (cortado na mesma medida
interna da bandeja pingadeira) e espalhe a farinha.
• Efectue alguns cortes sobre os pães com uma faca
afiada.
• Enforne a grelha na prateleira 2 para uma cozedura em
apenas um nível, ou as duas grelhas nas prateleiras 1
e 4 para uma cozedura em dois níveis, e 1-3-5 para a
cozedura em 3 níveis.
• Posicione a bandeja pingadeira na prateleira 7 e
coloque dentro 150 g de água fria.
• Enfornar a frio.
• Iniciar a função automática
• No fim da cozedura, deixe repousar os pães sobre uma
grelha até que esfriem completamente.
PÃO.
ícone
4. No fim da fase de pré-aquecimento, o ícone
aceso fixo e será ouvido um sinal acústico. Agora é
possível introduzir os alimentos.
5. Durante a cozedura é sempre possível:
- modificar a função de cozedura mediante o selector
FUNÇÕES SMALL SPACE;
- modificar a temperatura mediante o selector da
TEMPERATURA;
- programar a duração e a hora de final da cozedura;
- interromper a cozedura colocando o selector FUNÇÕES
SMALL SPACE na posição “0”.
6. No caso de uma interrupção do fornecimento eléctrico,
se a temperatura do forno não baixar demais, o aparelho
é equipado com um sistema que reactiva a função desde
o ponto em que tiver sido interrompida. Por outro lado, as
programações para início posterior não serão reiniciadas
quando a alimentação eléctrica for restabelecida, mas
deverão ser programadas novamente.
Funções de cozedura
Activa-se o elemento aquecedor superior. Se rodar o
selector TEMPERATURA, o visor indicará os níveis de
potência que podem ser configurados, que vão desde
5% até 100%. Uma temperatura alta e directa do grill é
aconselhada para os alimentos que necessitarem de uma
alta temperatura superficial. Esta função é indicada para:
doirar, gratin, coloração dos merengues, tostas,
pequenas grelhadas com carne magra e fina. Cozer com
a porta do forno fechada.
irá piscar.
ficará
Função GRILL
56
Page 57

Função FAST COOKING
A função necessita de aquecimento prévio. Esta função é
especificamente indicada para cozeduras rápidas de
alimentos previamente preparados (congelados ou
previamente cozidos).
Main Space
posicionar sempre a bandeja pingadeira na prateleira 1.
No caso de cozedura em 3 níveis contemporaneamente,
aconselhamos posicionar as grelhas nas prateleiras 3 e 5
e a bandeja pingadeira na prateleira 1.
Uso contemporâneo de Small Space e Main
Space
PT
Início do forno
1. Insira do DIVISOR na prateleira DIVISOR “D” com o
pino e as flechas viradas para a parte traseira do forno.
Após a correcta introdução, será possível ler a escrita
“OPENSPACE” na parte anterior da moldura do DIVISOR.
O forno emite um sinal acústico para confirmar a correcta
introdução do DIVISOR e consente o uso das duas
cavidades, Main e Small Space, separadamente ou
contemporaneamente.
! O selector FUNÇÕES EXTRALARGE SPACE é
desabilitado.
2. Para seleccionar a função de cozedura Universal, rode
o selector das FUNÇÕES MAIN SPACE.
3. O forno entra na fase de aquecimento prévio. É
possível modificar a temperatura se rodar o selector da
TEMPERATURA. Durante a fase de pré-aquecimento, o
ícone
4. No fim da fase de pré-aquecimento, o ícone
aceso fixo e será ouvido um sinal acústico. Agora é
possível introduzir os alimentos.
5. Durante a cozedura é sempre possível:
- modificar a temperatura mediante o selector da
TEMPERATURA;
- programar a duração e a hora de final da cozedura;
- interromper a cozedura colocando o selector FUNÇÕES
MAIN SPACE na posição “0”.
6. No caso de uma interrupção do fornecimento eléctrico,
se a temperatura do forno não baixar demais, o aparelho
é equipado com um sistema que reactiva a função desde
o ponto em que tiver sido interrompida. Por outro lado, as
programações para início posterior não serão reiniciadas
quando a alimentação eléctrica for restabelecida, mas
deverão ser programadas novamente.
Funções de cozedura
irá piscar.
ficará
Início do forno
1. Insira do DIVISOR na prateleira DIVISOR “D” com o
pino e as flechas viradas para a parte traseira do forno.
Após a correcta introdução, será possível ler a escrita
“OPENSPACE” na parte anterior da moldura do DIVISOR.
O forno emite um sinal acústico para confirmar a correcta
introdução do DIVISOR e consente o uso das duas
cavidades, Main e Small Space, separadamente ou
contemporaneamente.
! O selector FUNÇÕES EXTRALARGE SPACE é
desabilitado.
! Para melhorar a eficiência energética, o tempo de préaquecimento da cavidade SMALL SPACE é de
aproximadamente 15 minutos.
! Se a cavidade MAIN SPACE for configurada a uma
temperatura inferior aos 150ºC, o grill, para proteger o
resultado da cozedura, não irá entrar em funcionamento:
no visor aparecerá a escrita OFF.
2. Seleccione a função de cozedura desejada para cada
cavidade, girando os selectores FUNÇÕES SMALL
SPACE e/ou FUNÇÕES MAIN SPACE. O ícone
que foi seleccionada a Small Space e portanto é possível
actuar nas configurações da Small Space, o ícone
aceso no visor indica que foi seleccionada a Main Space
e portanto é possível actuar nas configurações da Main
Space.
3. Ambas as cavidades do forno entram na fase de
aquecimento prévio. É possível modificar a temperatura
se rodar o selector da TEMPERATURA. Durante a fase de
pré-aquecimento, o ícone
4. No fim da fase de pré-aquecimento, o ícone
aceso fixo e será ouvido um sinal acústico. Agora é
possível introduzir os alimentos.
5. A maior luminosidade dos dígitos no visor indica a
cavidade na qual se está a actuar; para modificar as
irá piscar.
indica
ficará
Função UNIVERSAL
Ligam-se todos os elementos aquecedores e entra em
funcionamento a ventoinha. Como o calor é constante e
uniforme em todo o forno, o ar coze e cora os alimentos
de maneira uniforme. É possível utilizar até no máximo
três prateleiras contemporaneamente. Caso deseje utilizar
várias prateleiras contemporaneamente, aconselhamos
configurações da outra cavidade, carregue na tecla
Durante a cozedura contemporânea é de facto possível
modificar as configurações tanto da Small Space quanto
da Main Space:
- modificar a função de cozedura mediante o selector
FUNÇÕES SMALL SPACE e/ou FUNÇÕES MAIN SPACE;
- modificar a temperatura mediante o selector da
.
57
Page 58

PT
TEMPERATURA;
- programar a duração e a hora de final da cozedura;
- interromper a cozedura colocando o selector FUNÇÕES
SMALL SPACE e/ou FUNÇÕES MAIN SPACE na posição
“0”.
6. No caso de uma interrupção do fornecimento eléctrico,
se a temperatura do forno não baixar demais, o aparelho
é equipado com um sistema que reactiva a função desde
o ponto em que tiver sido interrompida. Por outro lado, as
programações para início posterior não serão reiniciadas
quando a alimentação eléctrica for restabelecida, mas
deverão ser programadas novamente.
Para anular uma programação rodar o selector FUNÇÕES
até a posição “0”.
Conselhos práticos para cozedura
COZEDURA MÚLTIPLA
• Utilize as posições 1-3-5-6.
• Coloque a bandeja pingadeira embaixo e as grelhas
em cima.
BARBECUE
Programação da cozedura
! É possível programar somente depois de ter
seleccionado uma função de cozedura.
A programação pode ser activada com todas as
configurações possíveis: EXTRALARGE, MAIN e SMALL
SPACE também com o funcionamento contemporâneo.
Programação da duração da cozedura
1. Carregue várias vezes na tecla
primeiros três algarismos piscarem no VISOR;
2. gire o selector PROGRAMAÇÃO DOS TEMPOS em “+”
e “-” para acertar o tempo desejado;
3. premir outra vez a tecla
4. depois que terminar o prazo, no VISOR aparecerá
escrito END e tocará um sinal acústico.
• Exemplo: São 9:00 horas e é programada uma duração
de cozedura de 1 hora e 15 minutos. A função irá
terminar automaticamente às 10:15.
Programar o fim de uma cozedura
! A programação do fim da cozedura é possível somente
depois de ter definido uma duração para a cozedura.
1. Realize as operações de 1 a 3 descritas para a
duração;
2. em seguida, prima várias vezes a tecla
e os dois primeiros algarismos piscarem no VISOR;
3. rode o selector de CONFIGURAÇÃO de TEMPOS para
“+” ou “-” para regular a hora;
4. pressione de novo a tecla
algarismos começarem a piscar no VISOR;
5. rode o selector de CONFIGURAÇÃO de TEMPOS para
“+” ou “-” para regular os minutos;
6. premir outra vez a tecla
7. depois que terminar o prazo, no VISOR aparecerá
escrito END e tocará um sinal acústico.
Os ícones
uma programação. No VISOR são mostradas a hora de
final de cozedura e a duração alternadas.
e acesos indicam que foi efectuada
até o ícone e os
para confirmar.
até o ícone
até os outros dois
para confirmar.
• Aqueça previamente o forno por 5 minutos.
• Coza com a porta do forno fechada.
• Coloque a bandeja pingadeira na posição 4. Insira a
grelha na posição de 4 a 7 conforme a espessura do
alimento, disponha os alimentos no centro da grelha.
Exemplos: costelas de vaca na prateleira 4 e bacon na
prateleira 6 ou 7.
PIZZA ou FOGAÇAS
• Utilize uma forma de alumínio leve com diâmetro
máximo de 30 cm e apoie-a na grelha do forno.
• No caso de pizzas com muita cobertura é
aconselhável colocar o queijo mozzarella na metade da
cozedura.
GRILL
• Aqueça previamente o forno por 5 minutos.
• Insira o DIVISOR na prateleira DIVISOR “D”.
• Coza com a porta do forno fechada.
• Coloque a grelha na posição 7, disponha os alimentos
no centro da grelha. Coloque a bandeja pingadeira na
posição 6;
• Esta função é indicada para: doirar, gratin, coloração
dos merengues, tostas, pequenas grelhadas com
carne magra e fina.
• É aconselhável configurar o nível de energia no
máximo. Não se alarme se a resistência superior não
permanecer constantemente acesa: o seu
funcionamento é controlado por um termóstato;
FAST COOKING
• Aqueça previamente o forno com a bandeja pingadeira
na prateleira 6.
• Para a cozedura de alimentos congelados, siga as
indicações na embalagem dos produtos.
58
Page 59

Tabela cozedura cavidade Extra Large Space
Funções Alimentos Peso
Cozedura
Múltipla
Gratin*
Barbecue*
Temperatura
baixa
Pão
automático
Carne
automático
Sobremesas
Automático
Pizza
automático
* Os tempos de cozedura são indicativos e podem ser modificados a gosto. Os tempos de pré-aquecimento do forno são pré-configurados e não podem ser
modificados manualmente.
** Os tempos de duração das cozeduras automáticas são pré-configurados. Os valores na tabela referem-se aos valores de duração mínima e máxima, que podem
ser modificados pelo utilizador a partir da duração pré-configurada. ***Conforme a receita, acrescentar 150 g de água na bandeja pingadeira.
Tortas doces
Bignés
Pizza
Biscoitos
Pastichos
Créme Caramel
(banho maria)
Panettone 1 1 ou 2 Sim 160 45-60
Plumcake
Pão-de-ló
Grande pedaço
de carne
Rotisserie 1 2 3 Não 200 35-75
Gratin 1 3 ou 4 Não 190 40-60
Grande pedaço
de carne assada
Grande ave
assada
Còte de boeuf 1 3 4 ou 5 Sim 100% 20-30
Chouriços 1 3 5 a 7 Sim 100% 10-20
Cote de porc 1 3 5 a 7 Sim 100% 15-25
Bacon 1 3 5 a 7 Sim 100% 3-6
Levedação/Desc
ongelamento
Suspiros
brancos
Carne/Peixe 3 1 3 5 Não 90 90-180**
Pão (vide a
receita)
Assados
Sobremesas
Pizza (vide a
receita)
Cozedura
(Kg)
sobre n.º
prateleiras
N.º Bandeja
1
1
1
1
1
1
1 2 2 ou 3
1
1 1 2 Sim 160 90-240
1 1 2 Não 200 90-120
1 1 2 Não 200 90-120
1 2 Não 40
4 1 3 5 6 Não 65 8-12 horas**
2
2
2
1 2 3 Não 60-90**
1 2 2
1
2
3
4
2
3
4
2
3
4
2
3
4
2
3
2
3
2
3
1
2
3
2
3
4
pingadeira
Posição das prateleiras Pré-
Grade 1 Grade 2 Grade 3
2 ou 3
1 a 2
1
1
2 ou 3
1 a 2
1
1
2 ou 3
1 a 2
1
1
2 ou 3
1 a 2
1
1
2 ou 3
2
1
2 ou 3
2
1
1
2 ou 3
2
1
7***
7***
7***
2
2
2
1
1
3 a 5
3
3
3 a 5
3
3
3 a 5
3
3
3 a 5
3
3
5
4
5
4
4 ou 5
5
4
2
1
1
5
5
3
3
5
5
5
5
5
5
5
5
6
6
Sim
6
4
3
Não
5
5
aquecimento
6
6
6
6
Sim
Sim
Sim
5
6
Sim
Sim
Sim
Sim
Sim
Sim
Sim
Sim
Sim
Sim
Sim
Sim
Sim
Sim
Sim
Sim
sim
Sim
Sim
Sim
Sim
Sim
Sim
Não
Não
Não
Não
Não
Não
Não
Não
Temperatura
aconselhada
(ºC)
180
180
180
180
190
190
190
190
220
220
220
220
180
180
180
180
200
200
200
170
170
170
160
160
190
190
190
35-60**
23-30**
Duração da
cozedura
(minutos)
30-40
35-45
40-50
45-55
25-35
25-35
30-40
30-40
15-25
20-30
25-35
30-40
15-25
15-25
20-30
20-30
30-40
35-45
40-50
35-45
35-45
40-50
60-75
60-75
30-35
35-40
40-45
35-60**
25-35**
30-35**
35-40**
PT
59
Page 60

PT
g
g
g
Tabela de cozedura Small Space
Funções Alimentos Peso
N.º Bandeja
Fast cooking*
Grill
* Os tempos de cozedura são indicativos e podem ser modificados a gosto. Os tempos de pré-aquecimento do forno são pré-configurados e não podem ser
modificados manualmente.
Filés de peixe 1 6 D Sim 180-200 20-30
Filés de carne 1 6 D Sim 180-200 30-40
Pizza con
Preparação
congelados
Tostas 1 - 6-7 D Sim 100% 3-5
Bacon 1 6 7 D Sim 100% 3-6
Bife de porco 1 6 7 D Sim 100% 15-25
elada 1 6 D Sim
(Kg)
Cozedura
sobre n.º
prateleiras
1 6 D Sim
Posição das prateleiras Pré-
pingadeira
Grelha 1 Divisor
aquecimento
Temperatura
aconselhada
(ºC)
Duração da
cozedura
(minutos)
Tabela de cozedura Main Space
Funções Alimentos Peso
N.º Bandeja
Universal*
* Os tempos de cozedura são indicativos e podem ser modificados a gosto. Os tempos de pré-aquecimento do forno são pré-configurados e não podem ser
modificados manualmente.
Tortas doces 1
Bignés 1 2 2
Pizza 1 2 2
Biscoitos 1 2 2
Pastichos 1 2 2
Créme Caramel
(banho maria)
Plumcake 1 2 D Sim 160 60-75
Pão-de-ló 1 2 2
Pequenos
assados
(Kg)
Cozedura
sobre n.º
prateleiras
2
1 2 D Sim 170 35-45
1 2 3 D Sim 210 30-60
Posição das prateleiras Pré-
pingadeira
Grelha 1 Divisor
2
1
1
1
1
1
1
3
3
3
3
3
3
D
D
D
D
D
D
D
D
D
D
D
D
aquecimento
Sim
Sim
Sim
Sim
Sim
Sim
Sim
Sim
Sim
Sim
Sim
Sim
Temperatura
aconselhada
(ºC)
200
200
190
190
220
220
180
180
200
200
190
190
Duração da
cozedura
(minutos)
30-40
35-45
25-35
25-35
15-25
20-30
15-25
15-25
30-40
35-45
30-35
35-40
Tabela de cozedura contemporânea Small Space e Main Space
Small Space
Funções Alimentos Peso
N.º Bandeja
Fast cooking*
Grill
Filés de peixe 1 6 D Sim 200-220 20-30
Filés de carne 1 6 D Sim 200-220 30-40
Pizza con
Preparação
con
Arroz “pilaf” 1 6 D Sim 180-200 30-45
Doirar 1 6-7 D Sim 100% 3-6
elada 1 6-7 D Sim
elados
(Kg)
Cozedura
sobre n.º
prateleiras
1 6-7 D Sim
Posição das prateleiras Pré-
pingadeira
Grelha 1 Divisor
aquecimento
Temperatura
aconselhada
(ºC)
Duração da
cozedura
(minutos)
Main Space
Funções Alimentos Peso
N.º Bandeja
Universal*
* Os tempos de cozedura são indicativos e podem ser modificados a gosto. Os tempos de pré-aquecimento do forno são pré-configurados e não podem ser
modificados manualmente.
Bolos, tortas
doces
Biscoitos 1 2 2
Créme Caramel
(banho maria)
Pizza 1 2 2
Gratin de batatas 1 2 D Sim 200 60
Carne assada 1 2 D Sim 200 60-90
Alimentos em
crosta
(Kg)
Cozedura
sobre n.º
prateleiras
1 2 2
1 2 D Sim 160 45
1 2 D Sim 200 35-45
Posição das prateleiras Pré-
pingadeira
1 e 2
1 e 2
1 e 2
Grelha 1 Divisor
3 a 5 D D
3 a 5 D D
3 a 5 D D
aquecimento
Sim
Sim
Sim
Sim
Sim
Sim
Temperatura
aconselhada
(ºC)
200
200
180
180
220
220
Duração da
cozedura
(minutos)
30-40
35-45
15-25
15-25
15-25
20-30
60
Page 61

Precauções e conselhos
! Este aparelho foi projectado e fabricado em
conformidade com as normas internacionais de
segurança. Estas advertências são fornecidas por
razões de segurança e devem ser lidas com atenção.
Segurança geral
• Este aparelho foi concebido para a utilização de
tipo não profissional no âmbito de moradas.
• Este aparelho não deve ser instalado ao ar livre,
mesmo num sítio protegido, porque é muito
perigoso deixá-lo exposto a chuva e temporais.
• Para deslocar o aparelho pegue-o sempre pelos
específicos manípulos, situados aos lados do
forno.
• Não toque na máquina se estiver descalço, ou se
as suas mãos ou pés estiverem molhados ou
húmidos.
• Este aparelho deve ser empregado para cozer
alimentos, somente por pessoas adultas e
segundo as instruções apresentadas neste
folheto.
• Durante o uso deste aparelho, os elementos
aquecedores e algumas das partes da porta do
forno esquentam-se muito. Tome cuidado para
não tocar nos mesmos e mantenha as crianças
afastadas.
• Evite que o cabo de alimentação de outros
electrodomésticos encoste-se em partes quentes
do forno.
• Não tape as aberturas de ventilação e de
eliminação de calor.
• Pegue pelo centro a maçaneta de abertura da
porta: os lados podem estar quentes.
• Utilize luvas de forno para colocar e tirar
recipientes.
• Não forre o fundo do forno com folhas de alumínio.
• Não guarde material inflamável no forno: se o
aparelho for inadvertidamente colocado a
funcionar, poderia incendiar-se.
• Assegure-se sempre que os selectores estejam
na posição “”/“
aparelho.
• Não puxe pelo cabo para desligar a ficha da
tomada eléctrica, pegue pela ficha.
• Não realize limpeza nem manutenção sem antes
ter desligado a ficha da rede eléctrica.
• Se houver avarias, em nenhum caso mexa nos
mecanismos internos para tentar repará-las.
Contacte a Assistência Técnica (veja a
Assistência técnica).
• Não coloque objectos pesados sobre a porta do
forno aberta.
• Não é previsto que este aparelho seja utilizado por
pessoas (incluso crianças) com reduzidas
capacidades físicas, sensoriais ou mentais, por
” quando não estiver a utilizar o
pessoas inexperientes ou que não tenham
familiaridade com o produto, a não ser que seja
vigiadas por uma pessoa responsável pela sua
segurança ou que tenham recebido instruções
preliminares sobre o uso do aparelho.
• Evite que as crianças brinquem com o aparelho.
Eliminação
• Eliminação do material de embalagem: obedeça
as regras locais, de maneira que as embalagens
possam ser reutilizadas.
• A directiva Europeia 2002/96/CE relativa aos
resíduos de equipamentos eléctricos e
electrónicos (REEE) prevê que os
electrodomésticos não devem ser eliminados no
normal fluxo dos resíduos sólidos urbanos. Os
aparelhos não mais utilizados devem ser
recolhidos separadamente para optimizar a taxa
de recuperação e reciclagem dos materiais que
os compõem e impedir potenciais danos à saúde
e ao meio ambiente. O símbolo da lixeira
cancelada está indicado em todos os produtos
para lembrar o dever de colecta selectiva.
Para maiores informações sobre a correcta
eliminação dos electrodomésticos, os
proprietários poderão contactar o serviço de
colecta público ou os revendedores.
Economia e respeito do meio ambiente
• Utilizando o forno nos horários a partir do fim da
tarde, até as primeiras horas da manhã, estará
contribuindo para reduzir a carga de absorção
das empresas de fornecimento de electricidade.
As opções de definição dos programas,
especialmente a “cozedura posterior” (vide os
Programas) e a “limpeza automática posterior”
(vide Manutenção e cuidados), possibilitam
organizar-se para isto.
• É recomendável realizar as cozeduras de
BARBECUE e GRATIN sempre com a porta
fechada: quer para obter melhores resultados,
quer para uma sensível economia de energia
(aproximadamente 10%).
• Mantenha as guarnições eficientes e limpas, para
poderem aderir bem na porta e não causar
dispersão de calor.
! Este produto satisfaz os requisitos impostos pela
nova Directiva Europeia sobre a limitação dos
consumos energéticos em stand-by.
Se não se efectuarem operações por 2 minutos, o
aparelho coloca-se automaticamente na modalidade
stand-by. A modalidade stand-by é indicada com o
"Ícone Relógio" em alta luminosidade.
Assim que se efectuar novamente alguma operação
no aparelho, o sistema voltará para a modalidade
operativa.
PT
61
Page 62
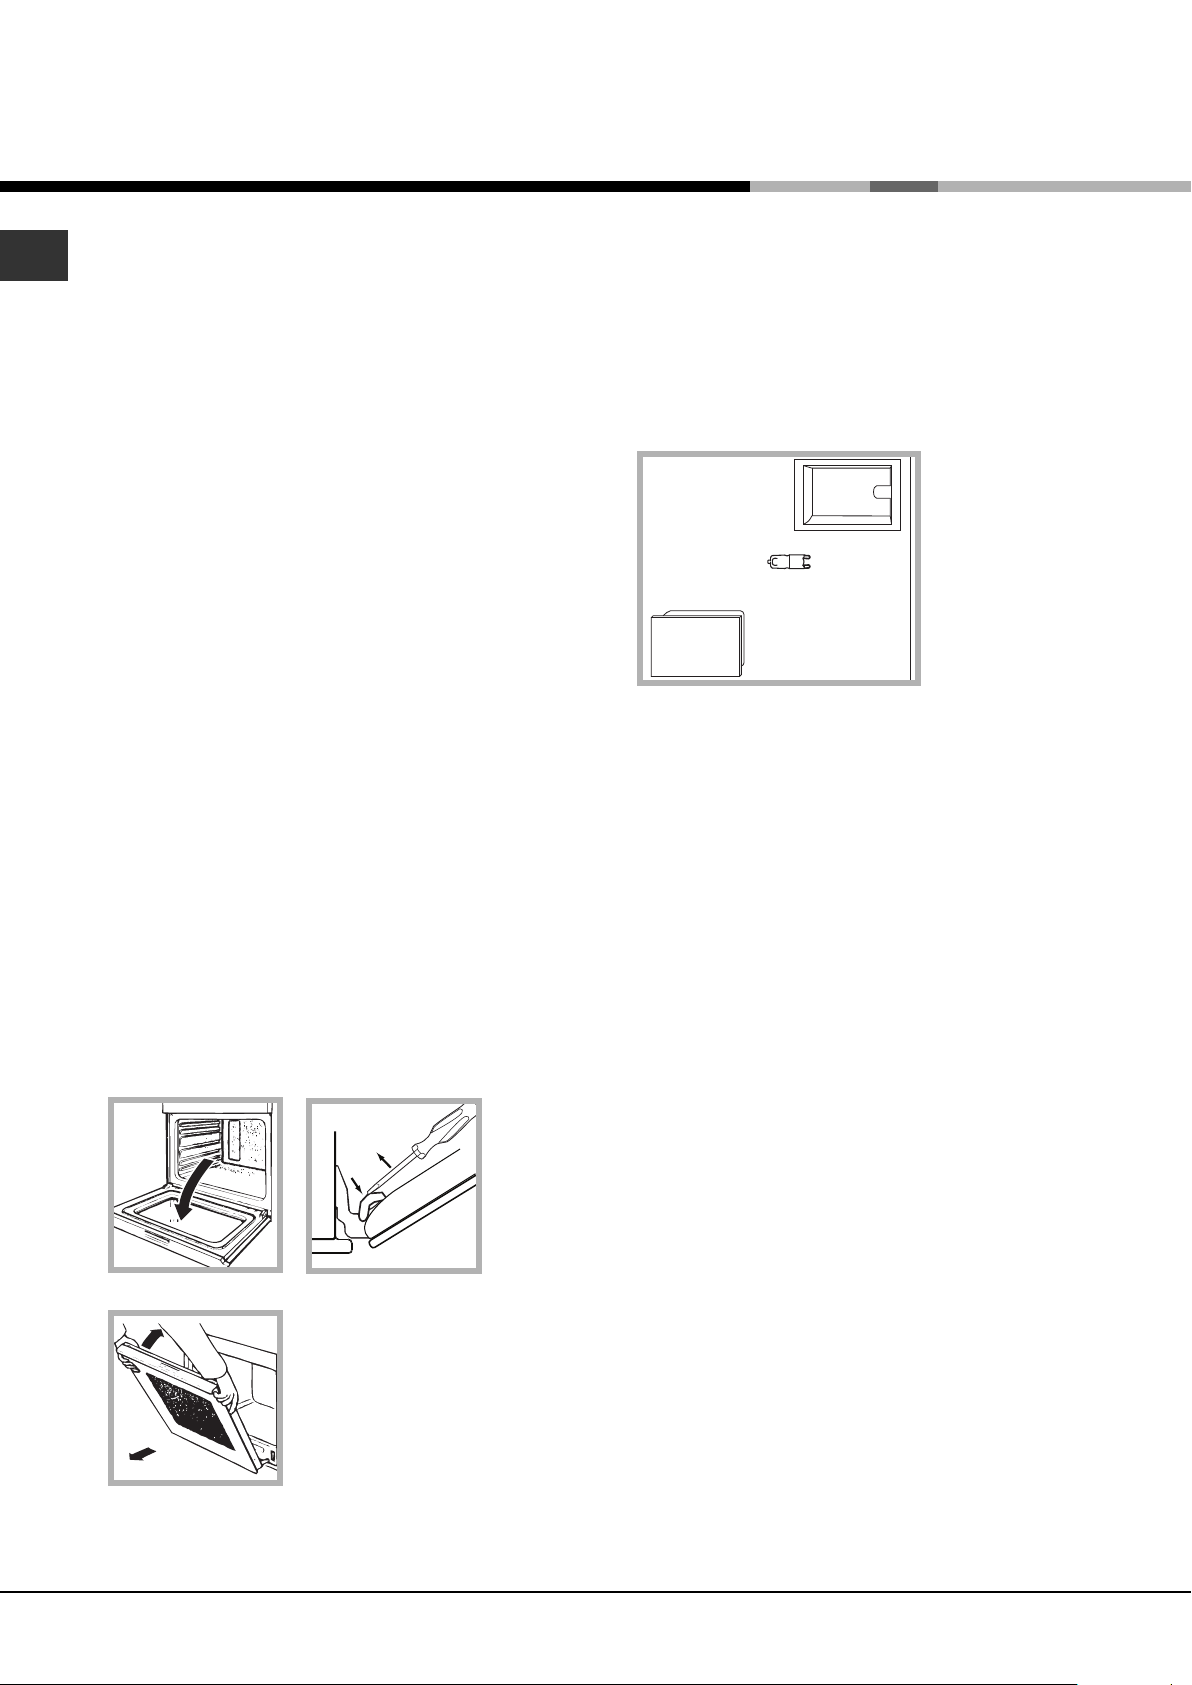
Manutenção e cuidados
F
Vidro
Lãmpada
Compartimento
do forno
PT
Desligar a corrente eléctrica
Antes de realizar qualquer operação, desligue o
aparelho da alimentação eléctrica.
Limpeza do aparelho
• As partes externas esmaltadas ou inoxidáveis e
as guarnições de borracha podem ser limpas
com uma esponja molhada com água morna e
sabão neutro. Se for difícil remover as manchas,
empregue produtos específicos. É aconselhado
enxaguar com água abundante e enxugar depois
da limpeza. Não empregue pós abrasivos nem
substâncias corrosivas.
• O interior do forno deve ser sempre limpo de
preferência depois de cada utilização, enquanto
ainda estiver morno. Utilize água quente e
detergente, enxagúe e enxugue com um pano
macio. Evite abrasivos.
• Os acessórios podem ser lavados como
quaisquer utensílios, inclusive numa máquina de
lavar loiça.
! Nunca utilize equipamento de limpeza a vapor ou
de alta pressão para limpar a aparelhagem.
Limpeza da porta
Limpe o vidro da porta com esponjas e produtos
não abrasivos e enxugue com um pano macio; não
use materiais ásperos, abrasivos ou espátulas
metálicas afiadas que podem arranhar a superfície e
quebrar o vidro.
Para uma limpeza mais cuidadosa, é possível retirar
a porta do forno.
1. abra a porta inteiramente (veja a figura);
2. utilizando uma chave de fendas, levante e rode
as alavancas
a figura);
F F
F situadas nas duas dobradiças (veja
F F
Verificação das guarnições
Verifique periodicamente o estado da guarnição ao
redor da porta do forno. Se houver danos, contacte
o Centro de Assistência Técnica mais próximo (veja
a Assistência técnica). É aconselhável não usar o
forno antes do mesmo ter sido reparado.
Substituição da lâmpada
Para substituir a lâmpada de iluminação do forno:
1. Remova a
tampa em vidro
do bocal da
lâmpada.
2. Retire a
lâmpada e
substitua-a por
outra análoga:
lâmpada
halógena de 230
V. de tensão, 25
W. de potência, engate G 9.
3. Monte novamente a tampa (veja a figura).
! Não toque a lâmpada directamente com as mãos.
3. segure a porta dos dois
lados exteriores e feche-a
novamente devagar mas não
inteiramente; Em seguida puxe
a porta para a frente e retire-a
das dobradiças (veja a figura).
62
Para montar novamente a porta
realize, na ordem contrária, as
mesmas operações.
Page 63

Limpeza automática com a função FAST
CLEAN
Com o programa FAST CLEAN a temperatura interna
do forno alcança os 500ºC. Activa-se o ciclo de
pirólise que queima os resíduos de alimentos e
sujidade. A sujidade é literalmente incinerada.
Mantenha as crianças afastadas do aparelho
durante o ciclo de limpeza automática, pois as
superfícies podem tornar-se muito quentes. Particles
may ignite inside the oven due to the combustion
process. Dentro do forno, as partículas podem
incendiar-se após o processo de combustão. There
is no cause for concern: this process is both normal
and hazard-free. Não se assuste: Trata-se de um
processo normal e sem riscos.
Dispositivos de segurança
• Quando no visor ilumina-se o ícone
que a porta do forno trancou-se automaticamente
assim que a temperatura alcançou um valor
elevado.
• Em caso de um mau funcionamento, a
alimentação dos elementos aquecedores será
interrompida.
• Quando a porta do forno tiver sido bloqueada,
não será mais possível modificar as configurações
de duração e fim do ciclo.
Programar o fim da limpeza automática
indica
PT
Antes de activar o programa FAST CLEAN:
• Remova do interior do forno os resíduos de
alimento maiores, usando uma esponja húmida. Não
use detergentes.
• Retire todos os acessórios.
• Retire o elemento DIVISÓRIO.
• Não deixe panos de prato nem pegas de tecido
na maçaneta do forno.
! Se o forno estiver excessivamente quente, o ciclo
de pirólise poderia não se pôr em funcionamento.
Deixar arrefecer o forno.
! O programa pode iniciar somente quando a porta
do forno estiver fechada.
Para iniciar o ciclo FAST CLEAN, gire o selector
FUNÇÃO EXTRALARGE SPACE no
Carregue na tecla
DOS TEMPOS pode ser utilizado para escolher o
nível de limpeza desejado. Os tempos com duração
pré-configurada e não modificável são três:
1. Económico (ECO): rodar o selector para "-".
Duração: 1 hora.
2. Normal (NOR): nível inicial. Duração: 1 hora e 30
minutos.
3. Intensivo (INT): rodar o selector para "+".
Duração: 2 horas.
4. Premir a tecla
É possível programar o fim do ciclo FAST CLEAN
como para um normal ciclo de cozedura (veja
Programação do fim da limpeza automática).
O selector PROGRAMAÇÃO
para confirmar.
.
1. Carregue na tecla
primeiros dois algarismos no VISOR começarem a
piscar.
2. Rode o selector de CONFIGURAÇÃO de TEMPOS
para "+" ou "-" para regular a hora.
3. Carregue novamente na tecla
outros dois algarismos comecem a piscar no
VISOR.
4. Rode o selector de CONFIGURAÇÃO de TEMPOS
para "+" ou "-" para regular os minutos.
5. Pressione outra vez a tecla
6. Uma vez passado o tempo configurado, no
VISOR aparecerá a escrita END e será emitido um
sinal acústico.
o Por exemplo: São 9:00 horas e escolhe-se o nível
FAST CLEAN Económico (ECO) com uma duração
pré-configurada de uma hora. O fim do ciclo está
programado para as 12:30. O programa começará
automaticamente às 11:30.
Se a programação tiver sido configurada, as teclas
e estarão acesas. O VISOR mostra
alternativamente a duração e a hora do fim do ciclo
FAST CLEAN.
No fim do ciclo de limpeza automática
será necessário aguardar até que a temperatura
dentro do forno esteja suficientemente baixa, antes
de poder abrir a porta. Irá notar a presença de
depósitos de pó branco no fundo e nas paredes do
forno: Remova-os com uma esponja húmida depois
que o forno estiver completamente arrefecido. Se,
ao contrário, desejar utilizar o calor resíduo do forno,
não será necessário remover os depósitos de pó,
pois são totalmente inofensivos e não constituem
algum perigo para os alimentos.
até o ícone e os
até que os
para confirmar.
63
Page 64

PT
Assistência técnica
03/2012 - 195071002.03
XEROX FABRIANO
Atenção:
Este aparelho é equipado com um sistema de diagnóstico que possibilita detectar eventuais mau
funcionamentos. Estes são comunicados no visor mediante mensagens do seguinte tipo: “F” seguido por
números.
Nestes casos será necessária uma intervenção da assistência técnica.
! Nunca recorra a técnicos não autorizados.
Comunique:
• tipo de avaria;
• modelo da máquina (Mod.)
• número de série (S/N).
Estas últimas informações encontram-se na placa de identificação situada no aparelho.
64
 Loading...