


Ariston OK 999E LDP X AUS S, OK 999EL S D P AUS, OK 999E LDP AUS S, OK 999EL S D P X AUS, OK 997E LDP AUS S User Manual
...OK 997E LDP X AUS S OK 997E LDP AUS S OK 999E LDP AUS S OK 999E LDP X AUS S OK 999EL S D P X AUS OK 999EL S D P AUS
 English
Operating Instructions
OVEN
Contents
Operating Instructions,1
Warnings,2
Assistance,3
Description of the appliance,4
Installation,6
Electrical Connection,7
Oven structure,8
Start-up and use,9
Cooking modes,10
Precautions and tips,17
Maintenance and care,17
Troubleshooting,20

AUS Warnings
WARNING: The appliance and its accessible parts become hot during use. Care should be taken to avoid touching heating elements. Children less than 8 years of age shall be kept away unless continuously supervised. This appliance can be used by children aged from 8 years and above and persons with reduced physical, sensory or mental capabilities or lack of experience and knowledge if they have been given supervision or instruction concerning use of the appliance in a safe way and understand the hazards involved. Children shall not play with the appliance. Cleaning and user maintenance shall not be made by children without supervision.
Do not use harsh abrasive cleaners or sharp metal scrapers to clean the oven door glass since they can scratch the surface, which may result in shattering of the glass.
“Before initiating the automatic cleaning cycle:
•clean the oven door;
•remove large or coarse food residues from the inside of the oven using a damp sponge. Do not use detergents;
•remove all accessories and the sliding rack kit (where present);
•do not place tea towels”
Keep children away from the appliance during the automatic cleaning cycle as surfaces may become very hot.
Never use steam cleaners or pressure cleaners on the appliance.
WARNING: Ensure that the appliance is switched off before replacing the lamp to avoid the possibility of electric shock
! When you place the rack inside, make sure that the stop is directed upwards and in the back of the cavity.
2

AUS
Assistance
! Never use the services of an unauthorised technician.
Please have the following information to hand:
•The type of problem encountered.
•The appliance model (Mod.).
•The serial number (S/N).
The latter two pieces of information can be found on the data plate located on the appliance.
ARISTON |
|
GENUINE ACCESSORIES |
PRIORITY SERVICE |
|
& SPARE PARTS |
|
† † |
|
|
|
” |
|
|
|
• |
|
•Š• |
• • |
|
• • |
• •• • |
|
• •• • |
AUSTRALIA |
NEW ZEALAND |
|
ARISIT PTY LIMITED |
ARISIT PTY LIMITED |
|
- €--‚ƒ „ … „ † ‡ … |
• – Œ •€ -• … ƒ |
|
ˆ ‰ Š … |
-… • • |
|
‹ Œ ‡ Ž ‡ • • •Š• |
‹ Œ • •• ŠŠ |
|
‘ ’ “ ’ |
‘ “ ’ ’ — |
|
3
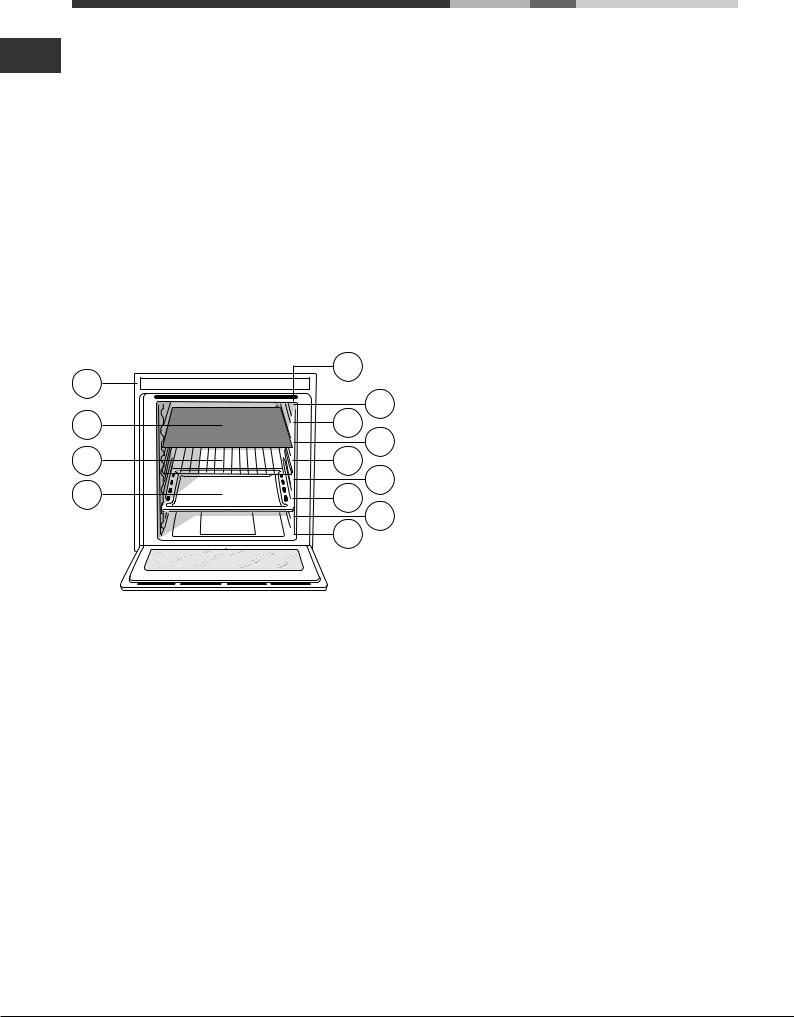
AUS Description of the appliance
Overall view
1.POSITION 1
2.POSITION 2
3.POSITION 3
4.POSITION 4
5.POSITION 5
6.DIVIDER “D” POSITION
7.POSITION 6
8.POSITION 7
9.GUIDES for the sliding racks
10.DRIPPING PAN
11.RACK shelf
12.DIVIDER shelf
13.Control panel
13 |
9 |
|
8 |
||
|
||
12 |
7 |
|
|
6 |
|
11 |
5 |
|
10 |
4 |
|
3 |
||
|
2 |
|
|
1 |
4
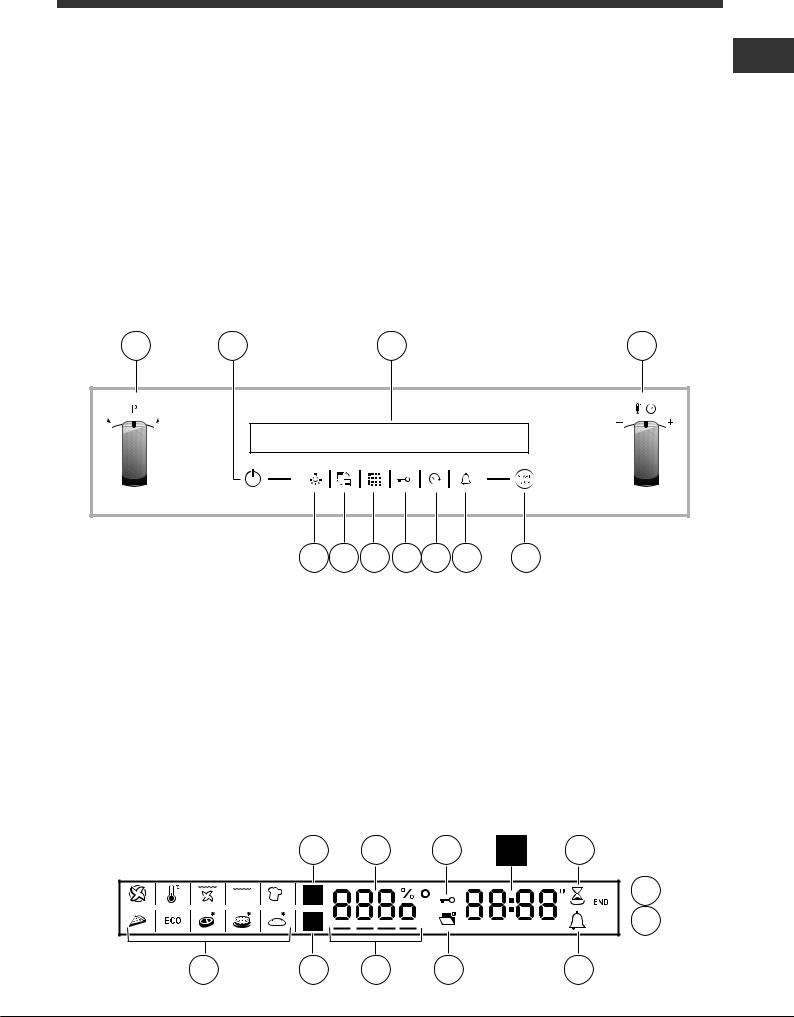
Control panel
AUS
14.SELECTOR knob
15.CONTROL PANEL POWER icon
16.DISPLAY
17.THERMOSTAT / TIMER knob
18.START / STOP
19.MINUTE MINDER icon
20.TIMER icon
21.DOOR / CONTROL PANEL LOCK icon
22.FAST CLEAN icon
23.SELECT CAVITY icon
24.LIGHT icon
14 |
15 |
16 |
17 |
24 |
23 |
22 |
21 20 |
19 |
18 |
Display
25.SMALL CAVITY icon
26.CAVITY TEMPERATURE display
27.CONTROL PANEL LOCK indicator
28.TIME display
29.DURATION icon
30.END OF COOKING icon
31.CLOCK icon
32.MINUTE MINDER icon
33.DOOR LOCK indicator
34.CAVITY PREHEATING / RESIDUAL HEAT indicator
35.MAIN CAVITY icon
36.MODE icons
25 |
26 |
27 |
28 |
29 |

 30
30

 31
31
36 |
35 |
34 |
33 |
32 |
5

AUS Installation
! Please keep this instruction booklet in a safe place for future reference. If the appliance is sold, given away or
moved, please make sure the booklet is also passed on to the new owners so that they may benefit from the advice
contained within it.
! Please read this instruction manual carefully: it contains important information concerning the safe operation, installation and maintenance of the appliance.
Positioning
!Do not let children play with the packaging material; it should be disposed of in accordance with local separated waste collection standards (see Precautions and tips).
!Theappliancemustbeinstalledbyaqualifiedprofessional in accordance with the instructions provided. Incorrect installation may damage property or cause harm to people or animals.
Built-in appliances
Use an appropriate cabinet to ensure that the appliance operates properly:
•The panels adjacent to the oven must be made of heatresistant material.
•Cabinets with a veneer exterior must be assembled with glues which can withstand temperatures of up to 100°C.
•To install the oven under the counter (see diagram) or in a kitchen unit, the cabinet must have the following dimensions:
Ventilation |
To ensure adequate ventilation, the back panel of the cabinet must be removed. It is advisable to install the oven so that it rests on two
strips of wood, or on a completely flat surface with an opening of at
least 45 x 560 mm (see diagrams).
. |
45 |
mm |
. |
mm |
|
||
560 |
|
|
|
. 20 mm |
FAN ASSISTED |
MODE |
min. 45 mm |
Centring and fixing
Secure the appliance to the cabinet:
•Open the oven door.
•Slide out the side gaskets at the top until the 2 fixing holes are exposed;
•Fix the oven to the cabinet using the 2 wood screws.
•Reposition the 2 gaskets.
|
|
|
. |
|
|
|
mm |
mm.590 |
20 mm. |
mm.570 |
550 . |
585-575mm. |
|||
|
|
|
min |
560 |
. |
|
mm |
||
|
595 |
mm. |
|
|
. |
|
550 |
mm |
||
|
. |
|||
|
|
|
|
|
|
|
|
mm |
|
|
|
20,5 |
|
.* |
|
|
|
mm |
|
|
|
22,5 |
|
|
* Stainless steel models only
! The appliance must not come into contact with electrical parts once it has been installed.
The indications for consumption given on the data plate have been calculated for this type of installation.
! All parts which ensure the safe operation of the appliance must not be removable without the aid of a tool.
6
 Loading...