

Page 1
La ringraziamo per aver scelto un prodotto Ariston, sicuro e davvero facile da usare. Per conoscerlo, utilizzarlo al
meglio e a lungo, le consigliamo , prima di utilizzare l’apparecchio, di leggere attentamente le a vvertenze contenute nel
presente libretto, in quanto f orniscono importanti indicazioni riguardanti la sicurezza di installazione, d’uso e di manutenzione. Conservare con cura questo libretto per ogni ulteriore consultazione. Grazie.
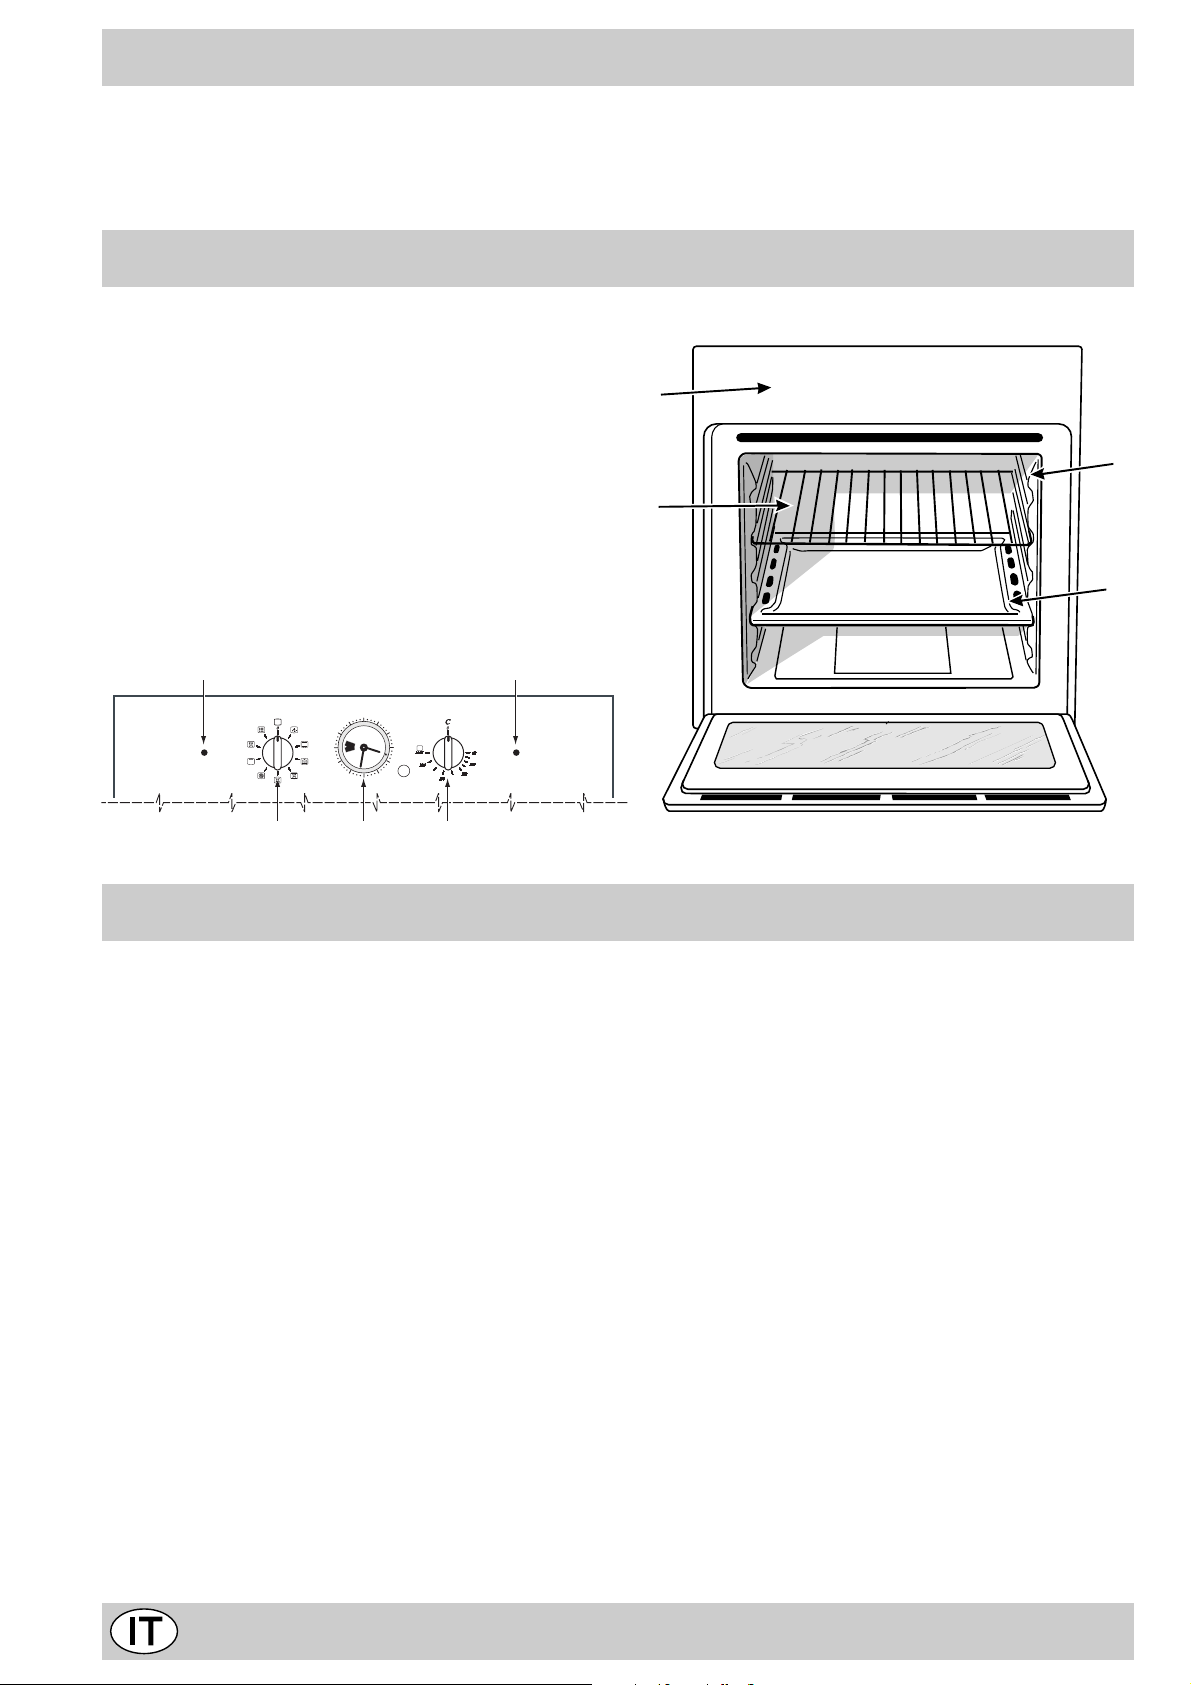
Visto da vicino
A. Cruscotto comandi
B. Manopola di selezione funzioni di cottura
C. Manopola per la temperatura di cottura
E. Indicatore preriscaldamento (lampeggiante) o cot-
tura (accesa fissa) in corso
F. Leccarda o piano di cottura
G. Griglia ripiano del forno
H. Guide di scorrimento di leccarde e griglie
I. Spia blocco porta (presente solo su alcuni modelli) -
Se accesa indica che l’apertura della porta forno è bloccata
O. Programmatore analogico inizio/fine cottura (pre-
sente solo su alcuni modelli)
A
G
F
H
E
12
3
9
6
B
O
C
I
Come utilizzarlo
Il
7 Cuochi
zionali forni a convezione naturale: “statici” a quelli dei moderni forni a convezione forzata: “v entilati”.
E’ un apparecchio estremamente versatile che permette di
scegliere in modo facile e sicuro fra 7 diversi metodi di cottura. La selezione delle diverse funzioni offerte si ottiene agendo
sulle manopole di selezione “B” e del termostato “C” presenti sul cruscotto.
Ventilazione di raffreddamento
Al fine di ottenere una riduzione delle temperature esterne, alcuni modelli sono dotati di una ventola di raffreddamento che si attiva automaticamente a f orno caldo.
Quando la ventola è in funzione è possibile sentire un
getto d’aria che esce tra frontalino e porta forno.
Nota: A fine cottura la ventola rimane attiva finchè il
forno non sarà sufficentemente freddo.
Attenzione: Alla prima accensione consigliamo di far fun-
zionare il forno a vuoto per circa mezz’ora con il termostato
al massimo e a porta chiusa. Quindi trascorso tale tempo
spegnerlo, aprite la porta ed areare il locale. L’odore che
talvolta si avverte durante questa operazione è dovuto all’evapor azione delle sostanze usate per proteggere il f orno
durante l’intervallo di tempo che intercorre tra la produzione
e l’installazione del prodotto.
riunisce in un unico apparecchio i pregi dei tradi-
Attenzione: Utilizzare il primo r ipiano dal basso, posizionandoci la leccarda in dotazione per raccogliere sughi e/o
grassi, solamente nel caso di cotture al grill o con girarrosto
(presente solo su alcuni modelli). Per le altre cotture non
utilizzate mai il primo ripiano dal basso e non appoggiate
mai oggetti sul fondo del forno mentre state cuocendo perchè
potreste causare danni allo smalto. Ponete sempre i Vostri
recipienti di cottura (pirofile, pellicole di alluminio, ecc. ecc.)
sulla griglia in dotazione con l’apparecchio, appositamente
inserita nelle guide del forno.
La luce forno
Si accende ruotando la manopola “B” sul simbolo 8. Illumina il forno e resta accesa quando sia messo in funzione un
qualsivoglia elemento elettrico riscaldante del forno.
Forno T radizionale a
Posizione manopola termostato “C”: Tra 60°C e Max.
In questa posizione si accendono i due elementi riscaldanti
inferiore e superiore. E’ il classico forno della nonna che è
stato però portato ad un eccezionale livello di distribuzione
della temperatura e di contenimento dei consumi. Il forno
tradizionale resta insuperato nei casi in cui si debbano
cucinare piatti i cui ingredienti risultano composti da due o
più elementi che concorrono a formare un piatto unico come
ad esempio: cavoli con costine di maiale, baccalà alla
spagnola, stoccafisso all’anconetana, teneroni di vitello con
2
Page 2

riso etc... Ottimi risultati si ottengono nella preparazione di
piatti a base di carni di manzo o vitello quali: brasati,
spezzatini, gulasch, carni di selvaggina, cosciotto e lombo
di maiale etc... che necessitano di cottura lenta con costante
aggiunta di liquidi. Resta comunque il miglior sistema di
cottura per i dolci, per la frutta e per le cotture con recipienti
coperti specifici per le cotture al forno. Nella cottur a al forno
tradizionale utilizzate un solo ripiano, in quanto su più ripiani
si avrebbe una cattiva distribuzione della temperatura.
Usando i diversi ripiani a disposizione potrete bilanciare la
quantità di calore tra la parte superiore ed inferiore. Se la
cottura necessita di maggior calore dal basso o dall’alto,
utilizzate rispettivamente i ripiani inferiori o superiori.
Forno Pasticceria u
Posizione manopola termostato “C”: Tra 60°C e Max.
Si attiva l’elemento riscaldante posteriore ed entra in funzione la ventola garantendo un calore delicato ed uniforme all’interno del forno. L’assorbimento elettrico di questa funzione è di soli 1600 W.
Questa funzione è indicata per la cottura dei cibi delicati, in
particolare i dolci che necessitano di levitazione ed alcune
preparazioni “mignon” su 3 ripiani contemporaneamente.
Alcuni esempi: bignè, biscotti dolci e salati, salatini in sf oglia,
biscotto arrotolato e piccoli tranci di verdure gratinate , ecc....
Forno “Fast cooking” v
Posizione manopola termostato “C”: Tra 60°C e Max.
Si attivano gli elementi riscaldanti ed entra in funzione la
ventola garantendo un calore costante ed unif orme all’interno del forno.
Questa funzione è particolarmente indicata per cotture veloci (non necessita di preriscaldamento) di cibi
preconfezionati (esempio: surgelati o precotti) e per alcune
“preparazioni casalinghe”.
Nella cottura “Fast cooking” i risultati migliori si ottengono
utilizzando un solo ripiano (il 2° partendo dal basso), vedi
tabella “Consigli pratici per la cottura”.
Forno Multicottura b
Posizione manopola termostato “C”: T r a 60°C e Max.
Si attivano gli elementi riscaldanti ed entra in funzione la
ventola. Poichè il calore è costante ed uniforme in tutto il
forno, l’aria cuoce e rosola il cibo in modo uniforme in tutti i
punti. Potete cuocere contemporaneamente anche pietanze diverse tra loro, purchè le temperature di cottura siano
simili. E’ possibile utilizzare fino ad un massimo di 2 ripiani
contemporaneamente seguendo le avvertenze riportate nel
paragrafo “Cottura contemporanea su più ripiani”.
Questa funzione è particolarmente indicata per piatti che
necessitano di gratinatura o per piatti che necessitano di
cottura abbastanza lunga ad esempio: lasagne , maccheroni
pasticciati, pollo e patate arrosto etc... Notevoli vantaggi si
ottengono nella cottura degli arrosti di carne in quanto la
migliore distribuzione della temperatura consente di utilizzare
temperature più basse che riducono la dispersione degli
umori mantenendo la carne più morbida con minor calo di
peso. Il Multicottura è particolarmente apprezzato per la
cottura dei pesci che possono essere cucinati con pochissima
aggiunta di condimenti mantenendo così inalterato l’aspetto
e il sapore. Per i contorni, eccellenti risultati si ottengono
nelle cotture di verdure brasate quali zucchine, melanzane,
peperoni, pomodori ecc..
Dessert: risultati sicuri si ottengono cuocendo torte lievitate.
La funzione “Multicottura” può anche essere usata per uno
scongelamento rapido carne bianca o rossa, pane, impostando una temperatura di 80 °C. Per scongelare cibi più
delicati potete impostare 60°C o usare la sola circolazione
di aria fredda impostando la manopola termostato a 0°C.
Forno Pizza w
Posizione manopola termostato “C”: Tra 60°C e Max.
Si attivano gli elementi riscaldanti inferiore e circolare ed entra
in funzione la ventola. Questa combinazione consente un
rapido riscaldamento del forno grazie alla notevole potenza
erogata (2800 W), con un forte apporto di calore in prevalenza dal basso.
La funzione forno pizza è particolarmente indicata per cibi
che richiedono una elevata quantità di calore, ad esempio:
la pizza e gli arrosti di grandi dimensioni. Utilizzate una sola
leccarda o griglia alla volta, nel caso queste siano più di una
è necessario scambiarle tra loro a metà cottura.
Grill d / 2
Posizione manopola termostato “ C”: Max.
Si accende l’elemento riscaldante superiore centrale e si
mette in funzione il girarrosto (ove presente).
La temperatura assai elevata e diretta del grill consente la
immediata rosolatura superficiale dei cibi che, ostacolando
la fuoriuscita dei liquidi, li mantiene più teneri internamente.
La cottura al grill è particolarmente consigliata per quei piatti
che necessitano di elevata temperatura superficiale:
bistecche di vitello e manzo, entrecôte, filetto, hamburger
etc...
Effettuare le cotture con la porta forno semiaperta tranne
nel caso di cottura con girarrosto.
Alcuni esempi di utilizzo sono riportati al paragrafo “Consigli
pratici per la cottura”.
Gratin e / x
Posizione manopola termostato “C”: Tra 60°C e 200°C.
Si accende l’elemento riscaldante superiore centrale e si
mette in funzione la ventola ed il girarrosto (ov e presente).
Unisce all’irradiazione termica unidirezionale la circolazione
forzata dell’aria all’interno del forno. Ciò impedisce la bruciatura superficiale degli alimenti aumentando il potere di
penetrazione del calore. Risultati eccellenti si ottengono utilizzando il grill ventilato per spiedini misti di carne e verdura,
salsicce, costine di maiale, costolette di agnello, pollo alla
diavola, quaglie alla salvia, filetto di maiale etc...
Effettuare le cotture al “gratin” con porta del forno chiusa.
Il “gratin” è insuperabile nella cottura di tranci di cernia, di
tonno, di pesce spada, seppioline ripiene etc...
Pulizia automatica mediante fast clean
È la funzione di pulizia integrale del forno. Per le
informazioni riguardanti il fast clean, vedere il paragrafo
“La pulizia automatica mediante fast clean”.
V
3
Page 3
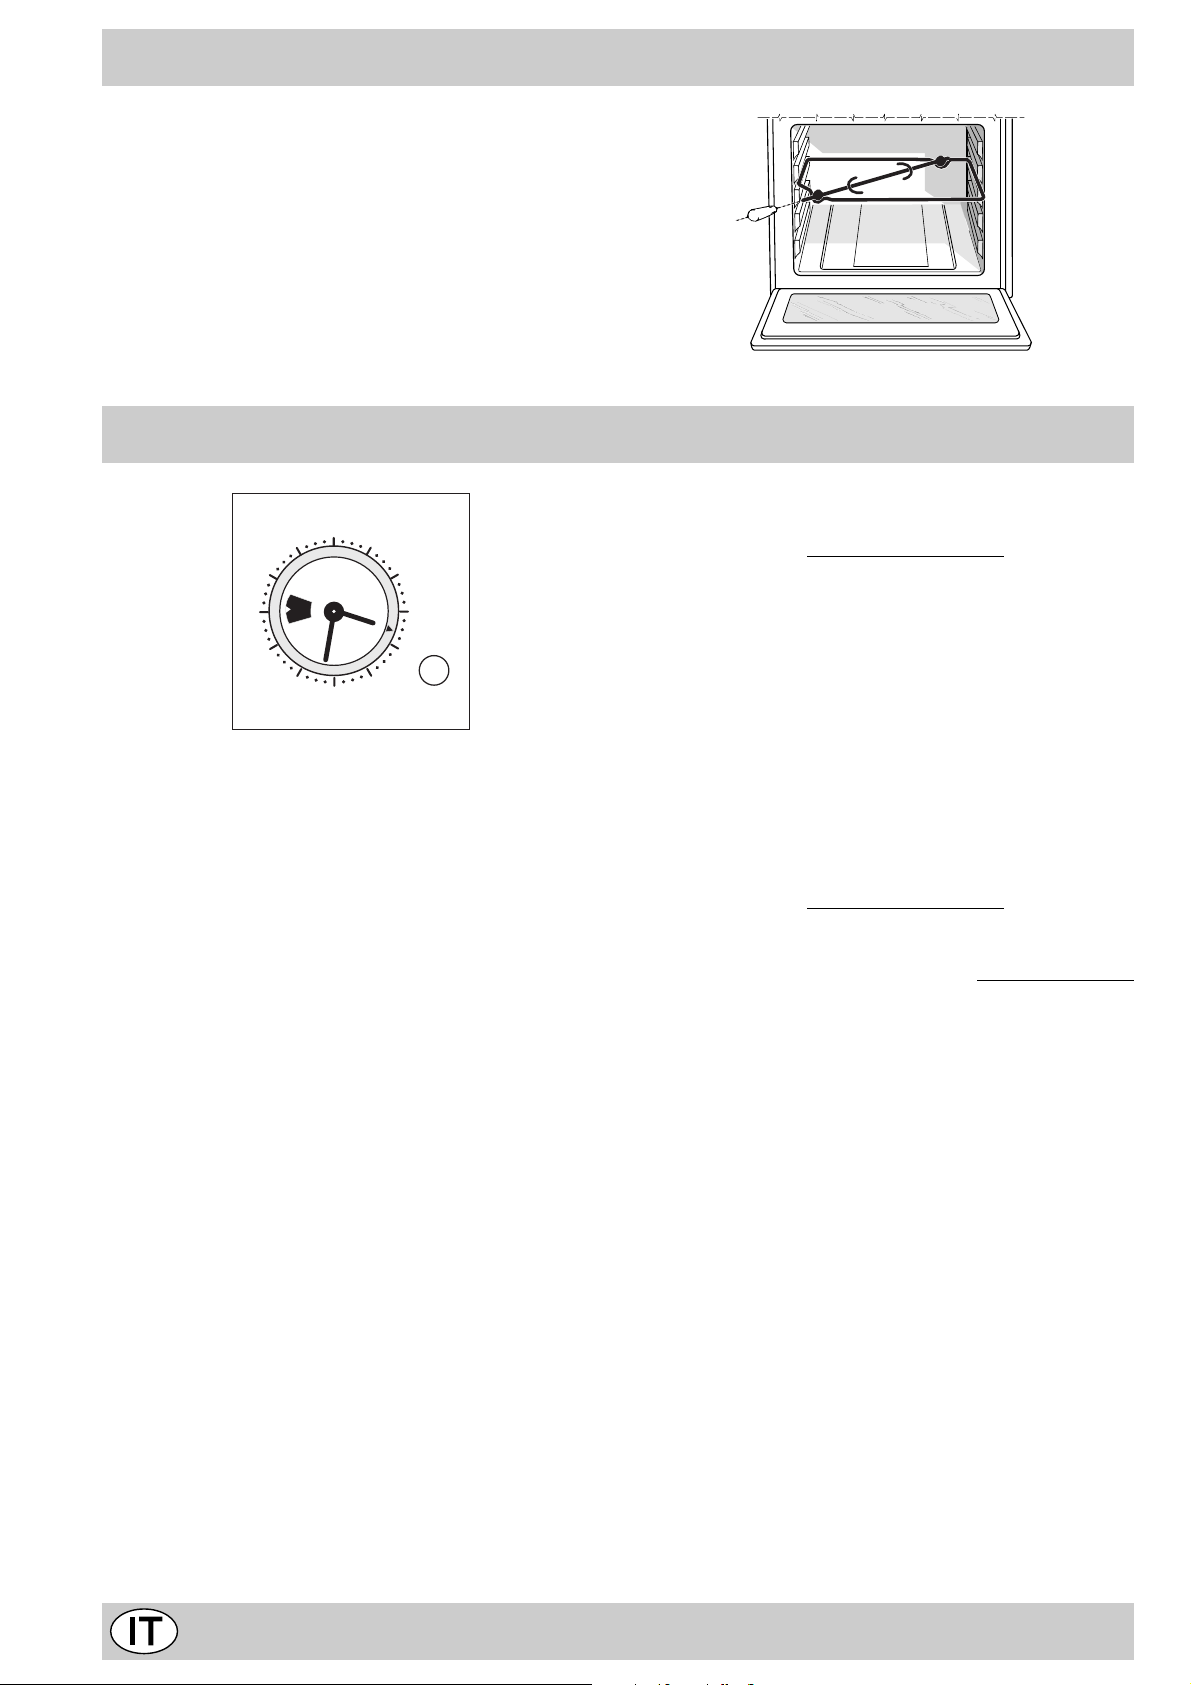
Il girarrosto (solo su alcuni modelli)
Per azionare il girarrosto procedere nel modo seguente:
a) posizionare la leccarda al 1° ripiano;
b) inserire l’apposito sostegno del girarrosto al 3° ripiano e
posizionare lo spiedo inserendolo, attraverso l’apposito
foro , nel girarrosto posizionato nel retro del f orno;
c) azionare il girarrosto selezionando con la manopola “B”
la posizione 2 / x.
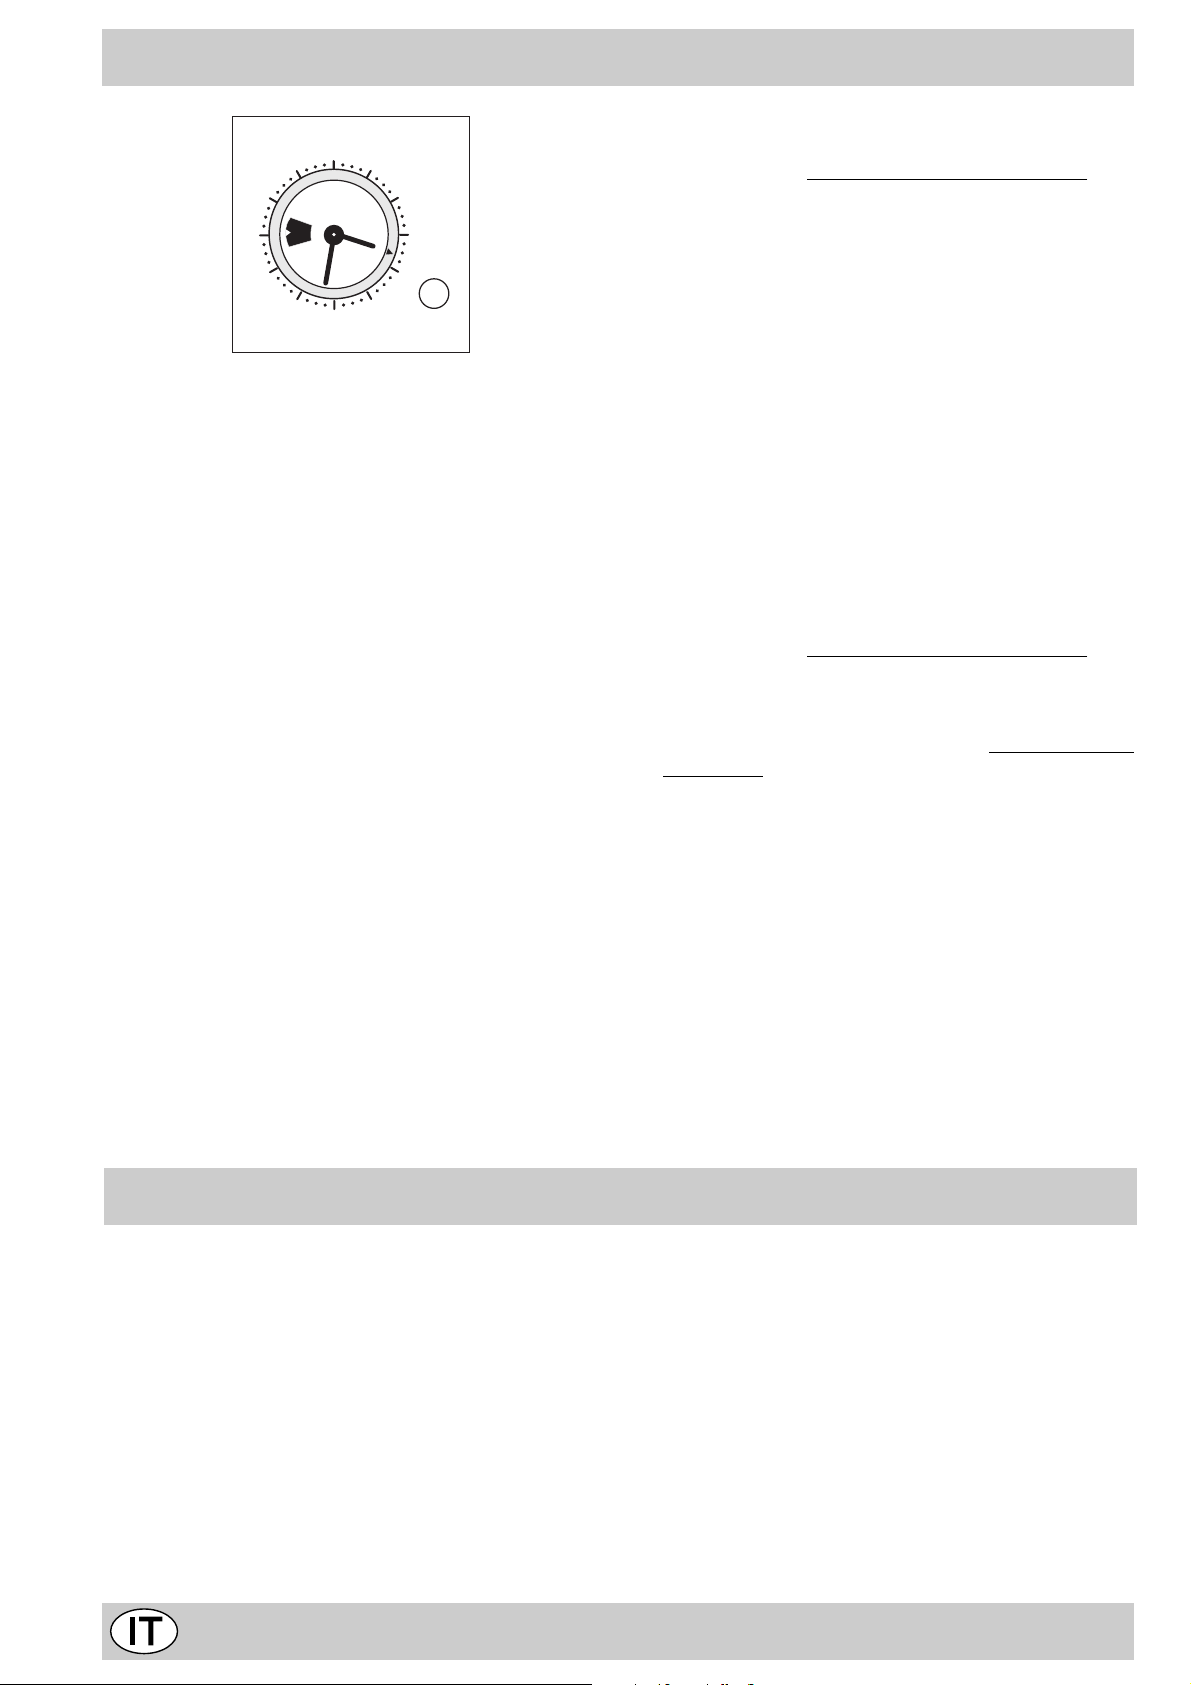
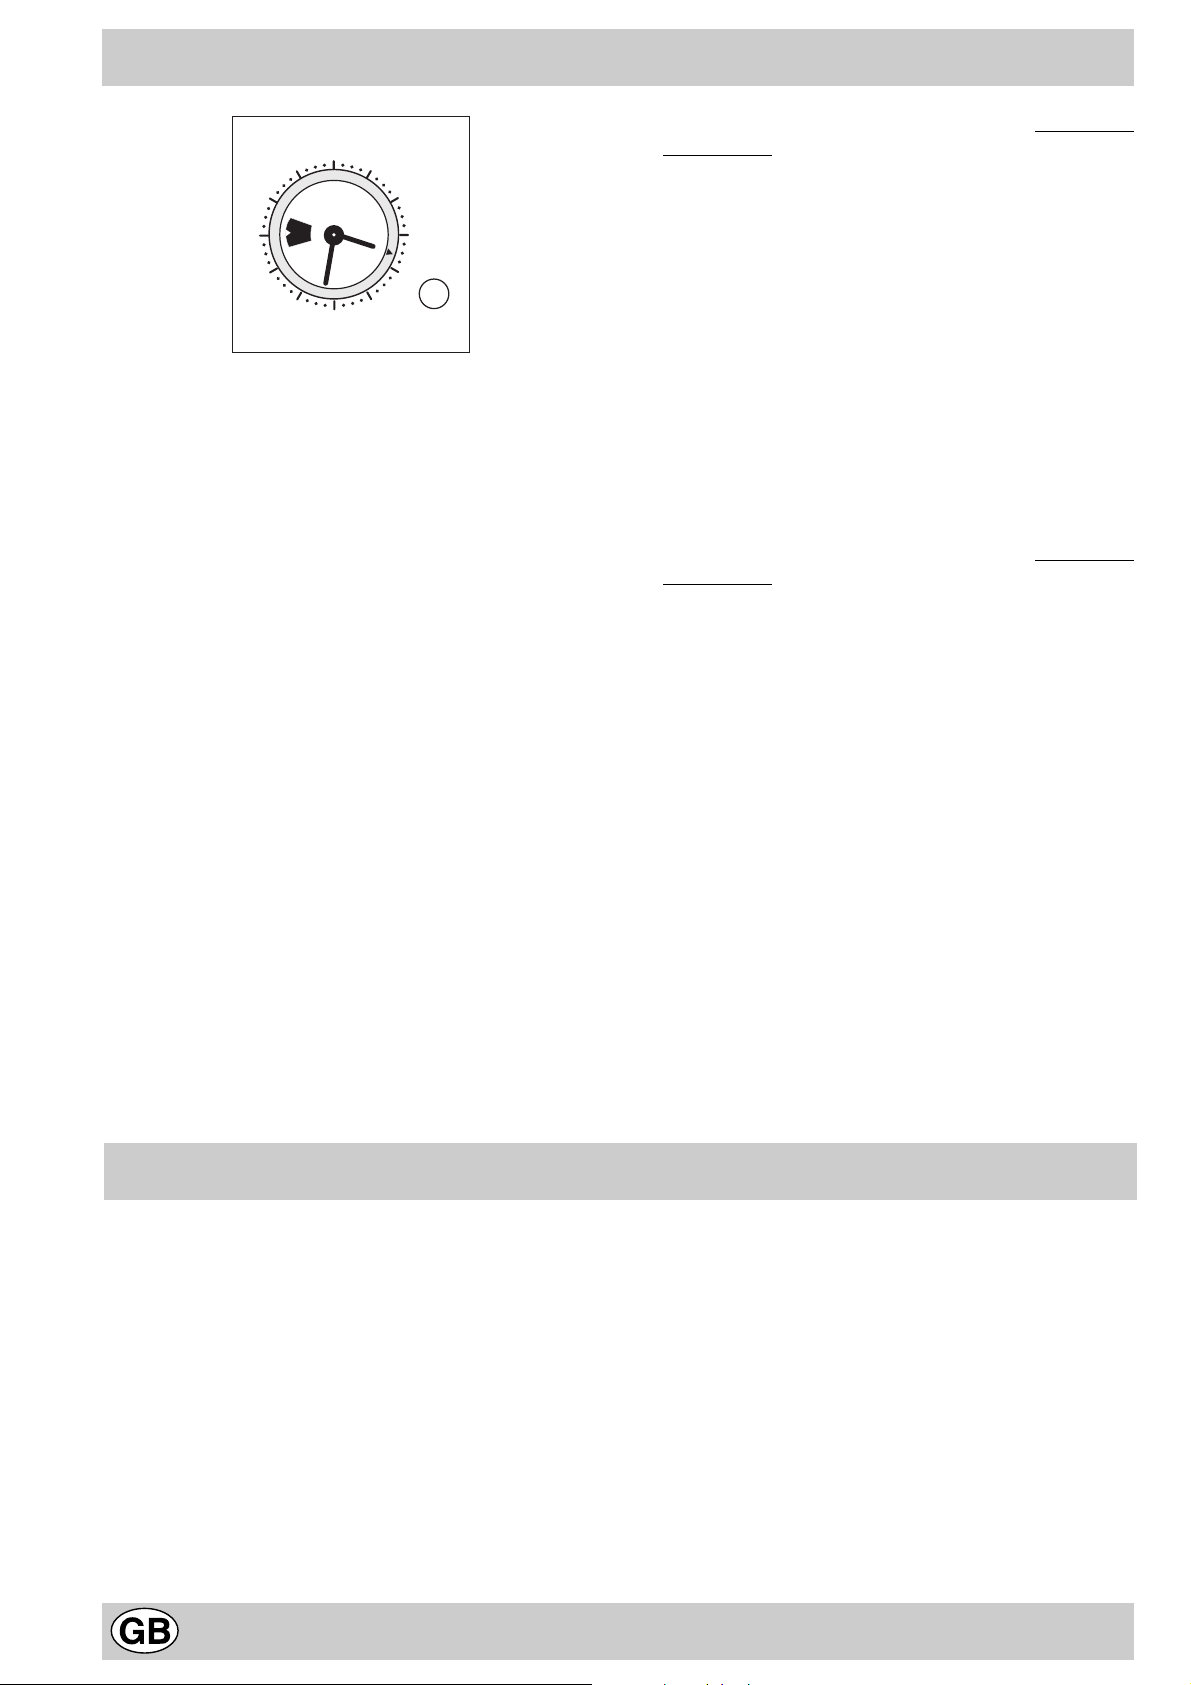
Il programmatore analogico inizio / fine cottura
12
9
Come rimettere l’ora corrente
Il forno deve essere collegato elettricamente.
Premere la manopola e ruotarla in senso anti-orario fino ad
impostare l’ora esatta.
N.B.: Il programmatore funziona elettricamente, quindi in caso
di mancanza di corrente si fermerà per tutta la durata della
mancanza stessa. Dopodiché sarà necessario ripetere l’operazione di impostazione dell’ora corrente.
Funzionamento manuale
N.B.: Da utilizzarsi in tutti i casi dove non necessitano cotture programmate.
1 Ruotare la manopola in senso antiorario fino a far com-
parire sulla finestrella il simbolo 9
2 Tirare la manopola e ruotarla in senso antiorario fino a
portare l’indice mobile in corrispondenza dell’ora corren-
te. Uno scatto indicherà la fine dell’operazione.
Con la manopola di selezione del forno scegliere il programma di cottura desiderato. Per spegnere il forno riportare la
stessa in posizione “0”.
3
6
Programmazione cottura con inizio immediato
1 Ruotare la manopola in senso antiorario fino a visualizzare
sulla finestrella il tempo di durata cottura desiderato.
2 Tirare la manopola e ruotarla in senso antiorario fino a
portare l’indice mobile in corrispondenza dell’ora corren-
te. Uno scatto indicherà la fine dell’operazione.
Con la manopola di selezione del forno scegliere il programma di cottura desiderato.
Il forno si accende immediatamente e funziona per tutto il
tempo di durata cottura impostato. Un segnale acustico avvertirà dello spegnimento del forno.
Per interromperlo ruotare la manopola in senso antiorario
fino a far comparire, sulla finestrella, il simbolo 9
Programmazione cottura con inizio ritardato
1 Durata cottura:
Ruotare la manopola in senso antiorario fino a visualizzare
sulla finestrella il tempo di durata cottura desiderato.
2 Inizio cottura:
Tirare la manopola e ruotarla in senso antiorario fino a
far corrispondere l’indice mobile con l’ora di inizio cottura
desiderata.
Con la manopola di selezione del forno scegliere il programma di cottura desiderato.
Il forno si accenderà all’ora di inizio cottura e funzionerà per
tutto il tempo di durata impostato. Un segnale acustico avvertirà dello spegnimento del forno.
Per interromperlo ruotare la manopola in senso antiorario
fino a far comparire, sulla finestrella, il simbolo 9
4
Page 4

La pulizia automatica mediante fast clean
Attivando la funzione fast clean, la temperatura interna del
vano forno raggiunge i 500 °C necessari per la
carbonizzazione dei residui. Attraverso il vetro della porta
forno è possibile notare alcune particelle che si illuminano
durante la loro carbonizzazione per pirolisi entrando in
contatto con le resistenze: si tratta di una combustione
istantanea, fenomeno assolutamente normale, c he non
comporta alcun pericolo.
Alcuni utili accorgimenti prima della pulizia
automatica
1- Cercare di eliminare i residui di sostanze alimentari più
consistenti con una spugna umida. Evitare rigorosamente
di utilizzare detergenti o qualsiasi altro prodotto consigliato
per la pulizia dei forni.
2- Estrarre tutti gli accessori, i quali, infatti, non sono
concepiti per resistere a temperature così elevate. Inoltre,
alcuni accessori potrebbero alterare l’esito della pulizia
automatica ostacolando la circolazione del calore su tutte le
pareti. Gli accessori possono essere lav ati facilmente come
normali stoviglie (anche in lavastoviglie).
3- Non lasciare strofinacci da cucina sulla maniglia.
Attenzione: durante la pulizia automatica, le superfici
possono diventare molto calde. Tenere i bambini a
distanza.
Come attivare la fast clean
– Chiudere la porta.
– Posizionare la manopola di selezione su V
– Per programmare la durata e/o l’ora di fine f ast clean,
seguire le istruzioni riportate nel paragrafo “Programmare la Fast clean”.
Dispositivi di sicurezza
Data l’alta temperatura, il forno è dotato di alcuni dispositivi
di sicurezza:
• la porta si blocca automaticamente non appena la
temperatura raggiunge valori elevati, per evitare ogni
rischio di ustioni;
• gli elementi riscaldanti non sono più alimentati elet-
tricamente, a titolo preventivo nel caso in cui sopraggiungesse un evento anomalo .
• la durata massima consentita è di 120 minuti al termine della quale il forno si spegne automaticamente.
• se il forno è eccessivamente caldo , la pirolisi potrebbe
non avviarsi. Aspettare che il forno si raffreddi.
Cosa accade al termine della “ Fast c lean” con inizio
immediato e con durata preimpostata?
Lo spegnimento della spia “E” vi segnalerà il termine della “Fast clean”.
Per poter aprire la porta del forno sarà necessario attendere che la temperatura al suo interno sia scesa a un
livello accettabile. Lo spegnimento della spia “I” segnalerà lo sblocco della porta.
A questo punto sarà possibile constatare la presenza di alcuni
depositi di polvere bianca sul fondo e sulle pareti del f orno;
rimuoverle con una spugna umida una volta che il forno si
sarà completamente raffreddato.
Se invece si desiderasse approfittare del calore
immagazzinato per avviare una cottura, le polveri potranno
anche restare, in quanto non comportano alcun pericolo per
gli alimenti da cucinare.
Cosa accade al termine della “ Fast c lean” con durata
impostata e con inizio immediato/ritardato?
Lo spegnimento della spia “E” e l’emissione di un segnale
acustico vi comunicherà il termine della “Fast clean”. Per
disattivare la suoneria ruotare la manopola del programmatore in senso antiorario fino a far comparire, sulla
finestrella, il simbolo 9.
Per poter aprire la porta del forno sarà necessario attendere che la temperatura al suo interno sia scesa a un
livello accettabile. Lo spegnimento della spia “I” segnalerà lo sblocco della porta.
A questo punto sarà possibile constatare la presenza di alcuni
depositi di polvere bianca sul fondo e sulle pareti del f orno;
rimuoverle con una spugna umida una volta che il forno si
sarà completamente raffreddato.
Se invece si desiderasse approfittare del calore
immagazzinato per avviare una cottura, le polveri potranno
anche restare, in quanto non comportano alcun pericolo per
gli alimenti da cucinare.
Ripristino dopo black-out elettrico
Nel caso in cui la temperatura all’interno del forno non sia
scesa sotto un valore troppo basso , l’apparecchio è dotato di un sistema che consente di riprendere una cottura/
pirolisi (ove presente) dal punto in cui si era interrotta al
momento del black-out elettrico. Ricordatevi di aggiornare l’ora qualora lo vogliate.
NOTA
Tenete presente che, per motivi di sicurezza, le programmazioni relative a cotture in attesa di avvio non v engono
ripristinate al ritorno della corrente elettrica.
5
Page 5
Programmare la Fast clean
12
9
Fast clean con inizio immediato e con durata
preimpostata
La durata della “F ast clean” è di 120 min uti e tale modalità
di funzionamento è da utilizzarsi in tutti i casi in cui non
c’è necessità di programmare la durata e l’ora d’inizio della
“Fast clean”.
1 Ruotare la manopola in senso antiorario fino a far com-
parire sulla finestrella il simbolo 9
2 Tirare la manopola e ruotarla in senso antiorario fino a
portare l’indice mobile in corrispondenza dell’ora corrente. Uno scatto indicherà la fine dell’operazione.
Con la manopola di selezione del forno scegliere il programma V. E’ possibile spegnere il forno in qualunque momento
riportando la stessa in posizione “0”.
Programmazione durata Fast clean con inizio
immediato
La durata massima della “Fast clean” è di 120 minuti e
pertanto regolazioni superior i a 2 ore non avrebbero effetto in quanto il forno si spegnerebbe automaticamente
3
6
trascorso tale tempo.
1 Ruotare la manopola in senso antiorario fino a visualizzare
sulla finestrella il tempo di durata della “Fast clean” desiderato.
2 Tirare la manopola e ruotarla in senso antiorario fino a
portare l’indice mobile in corrispondenza dell’ora corrente. Uno scatto indicherà la fine dell’operazione.
Con la manopola di selezione del forno scegliere il programma V.
La “F ast clean” si avvia immediatamente e funziona per tutto
il tempo impostato. Un segnale acustico segnalerà il suo
scadere: per interromperlo ruotare la manopola in senso
antiorario fino a far comparire, sulla finestrella, il simbolo 9
Programmazione durata Fast clean cottura con inizio
ritardato
La durata massima della “Fast clean” è di 120 minuti e
pertanto regolazioni superior i a 2 ore non avrebbero effetto in quanto il forno si spegnerebbe automaticamente
trascorso tale tempo.
1 Durata “Fast clean”:
Ruotare la manopola in senso antiorario fino a visualizzare
sulla finestrella il tempo di durata della “Fast clean” desiderato.
2 Inizio “Fast clean”:
Tirare la manopola e ruotarla in senso antiorario fino a
far corrispondere l’indice mobile con l’ora di inizio della
“Fast clean” desiderata.
Con la manopola di selezione del forno scegliere il programma V.
La “F ast clean” si a vvierà all’ora di inizio impostata e funzio-
nerà per tutto il tempo di durata scelto ma comunque non
superiore alle 2 ore. Un segnale acustico segnalerà il suo
scadere: per interromperlo ruotare la manopola in senso
antiorario fino a far comparire, sulla finestrella, il simbolo 9
NON TI ALLARMARE SE
1 all’inizio del ciclo fast clean la ventola di raffreddamento
funziona a bassa velocità;
2 durante l’utilizzo del Fast Clean salta il limitatore del-
l’impianto elettrico: si è verificato un so vraccarico della rete (concomitanza con l’uso di altri apparecchi elettrici);
3 trovi la porta del forno bloccata durante il programma
Fast Clean: è una sicurezza del prodotto; la porta si
aprirà solo dopo il completo raffreddamento del forno;
4 dopo il ciclo Fast Clean rimangano delle piccole mac-
chie sulla superficie interna del forno: è bene eliminare i residui di cibo più consistenti prima dell’autopulizia
e di impostare una durata del programma compatibile
con la quantità di sporco presente nel forno;
5 a fine cottura esce ancora aria ventilata dal forno per
un certo tempo: è la normale fase di raffreddamento
della cavità del forno;
6 nel funzionamento “grill” la resistenza superiore non
rimane sempre accesa (colore rosso): il funzionamento è controllato da un termostato;
7 fuoriesce una vampata di vapore, aprendo la porta
durante la cottura;
8 si formano delle gocce di acqua o del vapore all’inter-
no del forno, lasciando i cibi nel f orno, dopo la cottura;
6
Page 6
Come tenerlo in forma
Prima di ogni operazione disconnettere l’apparecchio dall’ alimentazione elettrica.
Per una lunga durata del forno è indispensabile eseguire
frequentemente una accurata pulizia generale, tenendo
presente che:
• per la pulizia non utilizzare apparecchi a vapore
• le parti esterne smaltate o inox vanno lav ate con acqua tiepida senza usare polveri abrasive e sostanze corrosive che
potrebbero rovinarle. L ’acciaio inox può rimanere macchiato .
Se le macchie sono difficili da asportare usare prodotti specifici normalmente in commercio. Si consiglia di sciacquare
abbondantemente ed asciugare dopo la pulizia.
• l’interno del forno va pulito, preferibilmente ogni volta dopo
l’uso, quando è ancora tiepido usando acqua calda e detersivo, risciaquando e asciugando poi accuratamente con un
panno morbido. Evitare l’uso di detersivi abrasivi (ad esempio le polveri, ecc...) e di spugne abrasive per piatti oppure
acidi (ad esempio anticalcare, ecc...), perchè potrebberto
rovinare lo smalto. Se lo sporco è particolarmente duro da
togliere, usare un prodotto specifico per la pulizia del forno ,
secondo le istruzioni riportate sulla confezione.
• se usate il forno per un tempo prolungato ci potrebbe essere
formazione di condensa. Asciugatela usando un panno
morbido.
• attorno all’aper tura del forno, una guarnizione in gomma
garantisce il suo corretto funzionamento. Controllate quindi
periodicamente lo stato di questa guarnizione. Se necessario pulitela evitando di usare prodotti o oggetti abrasivi. In
caso risulti danneggiata rivolgetevi al Centro Assistenza più
vicino. E’ consigliabile non usare il f orno fino all’avvenuta riparazione.
• non rivesta mai il fondo forno con fogli di alluminio, poichè
l’accumulo di calore conseguente comprometterebbe la cottura danneggiando anche lo smalto.
• pulire il vetro della porta forno utilizzando prodotti e
spugne non abrasive ed asciugare con un panno morbido.
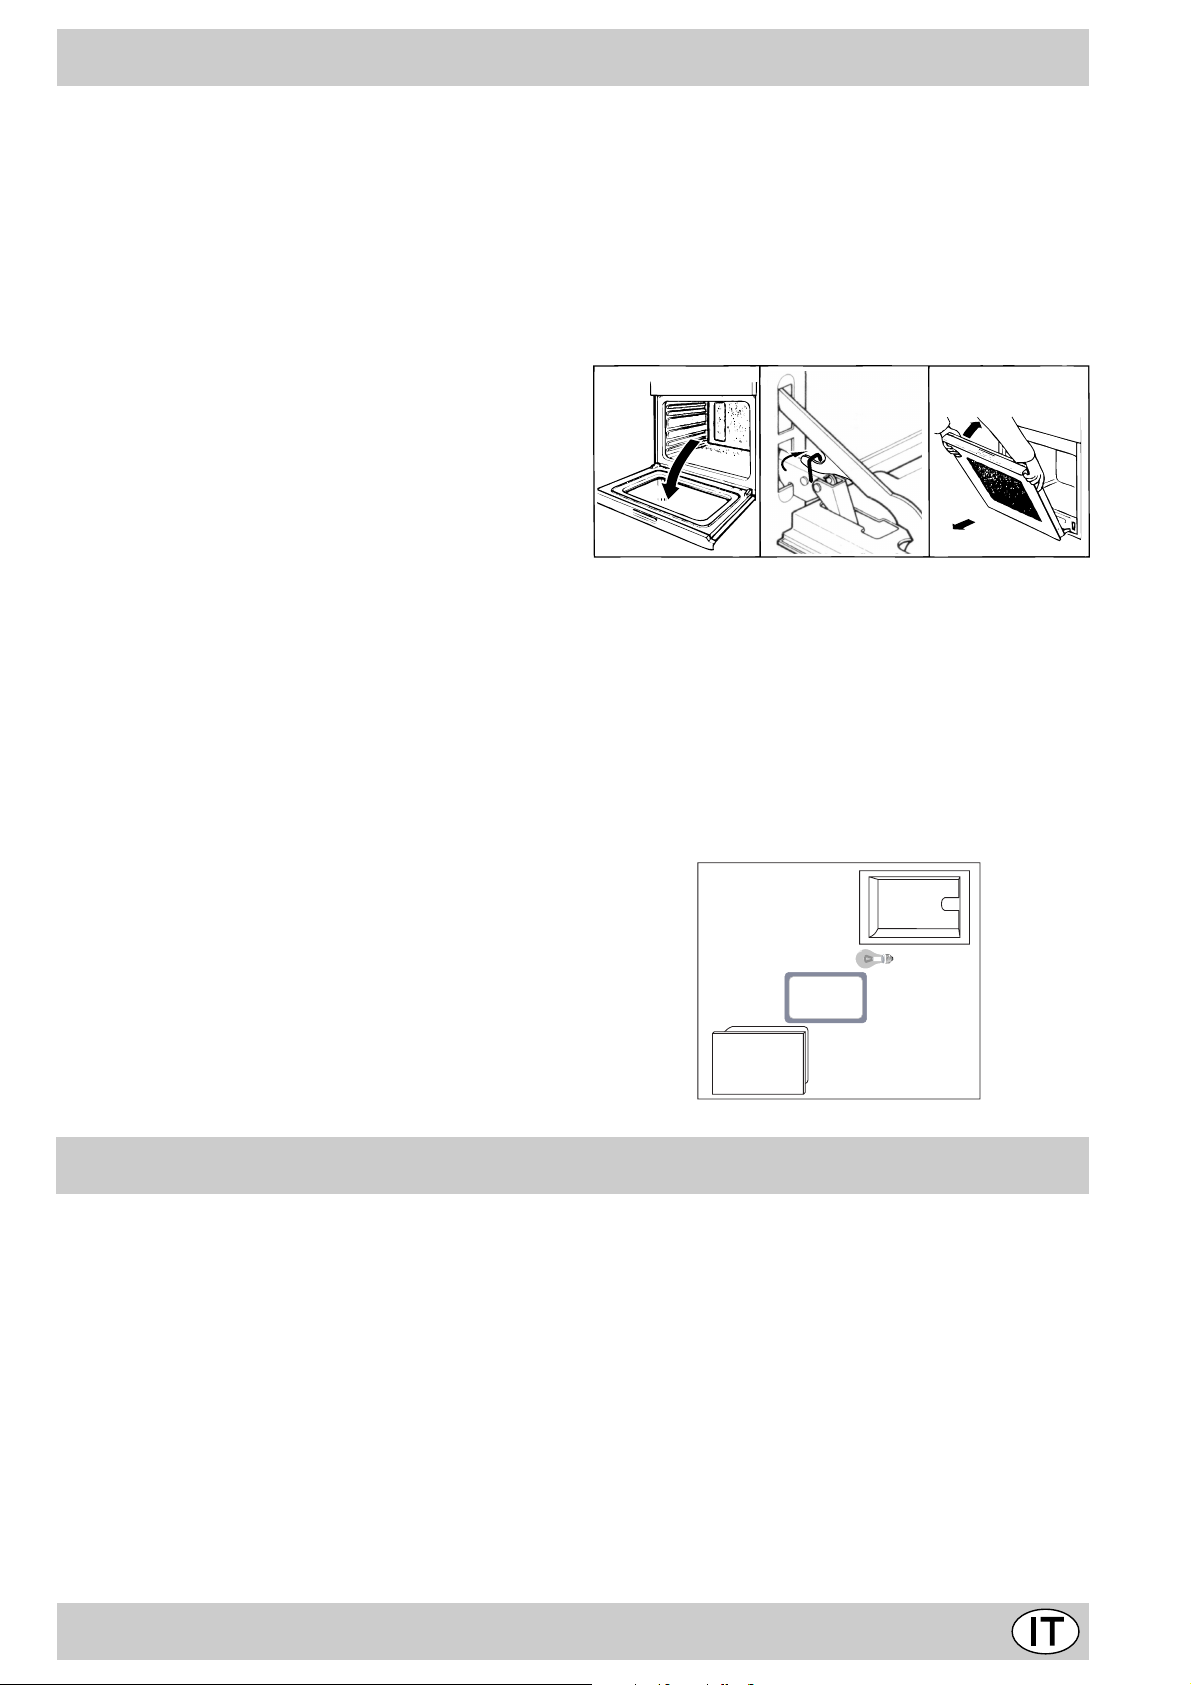
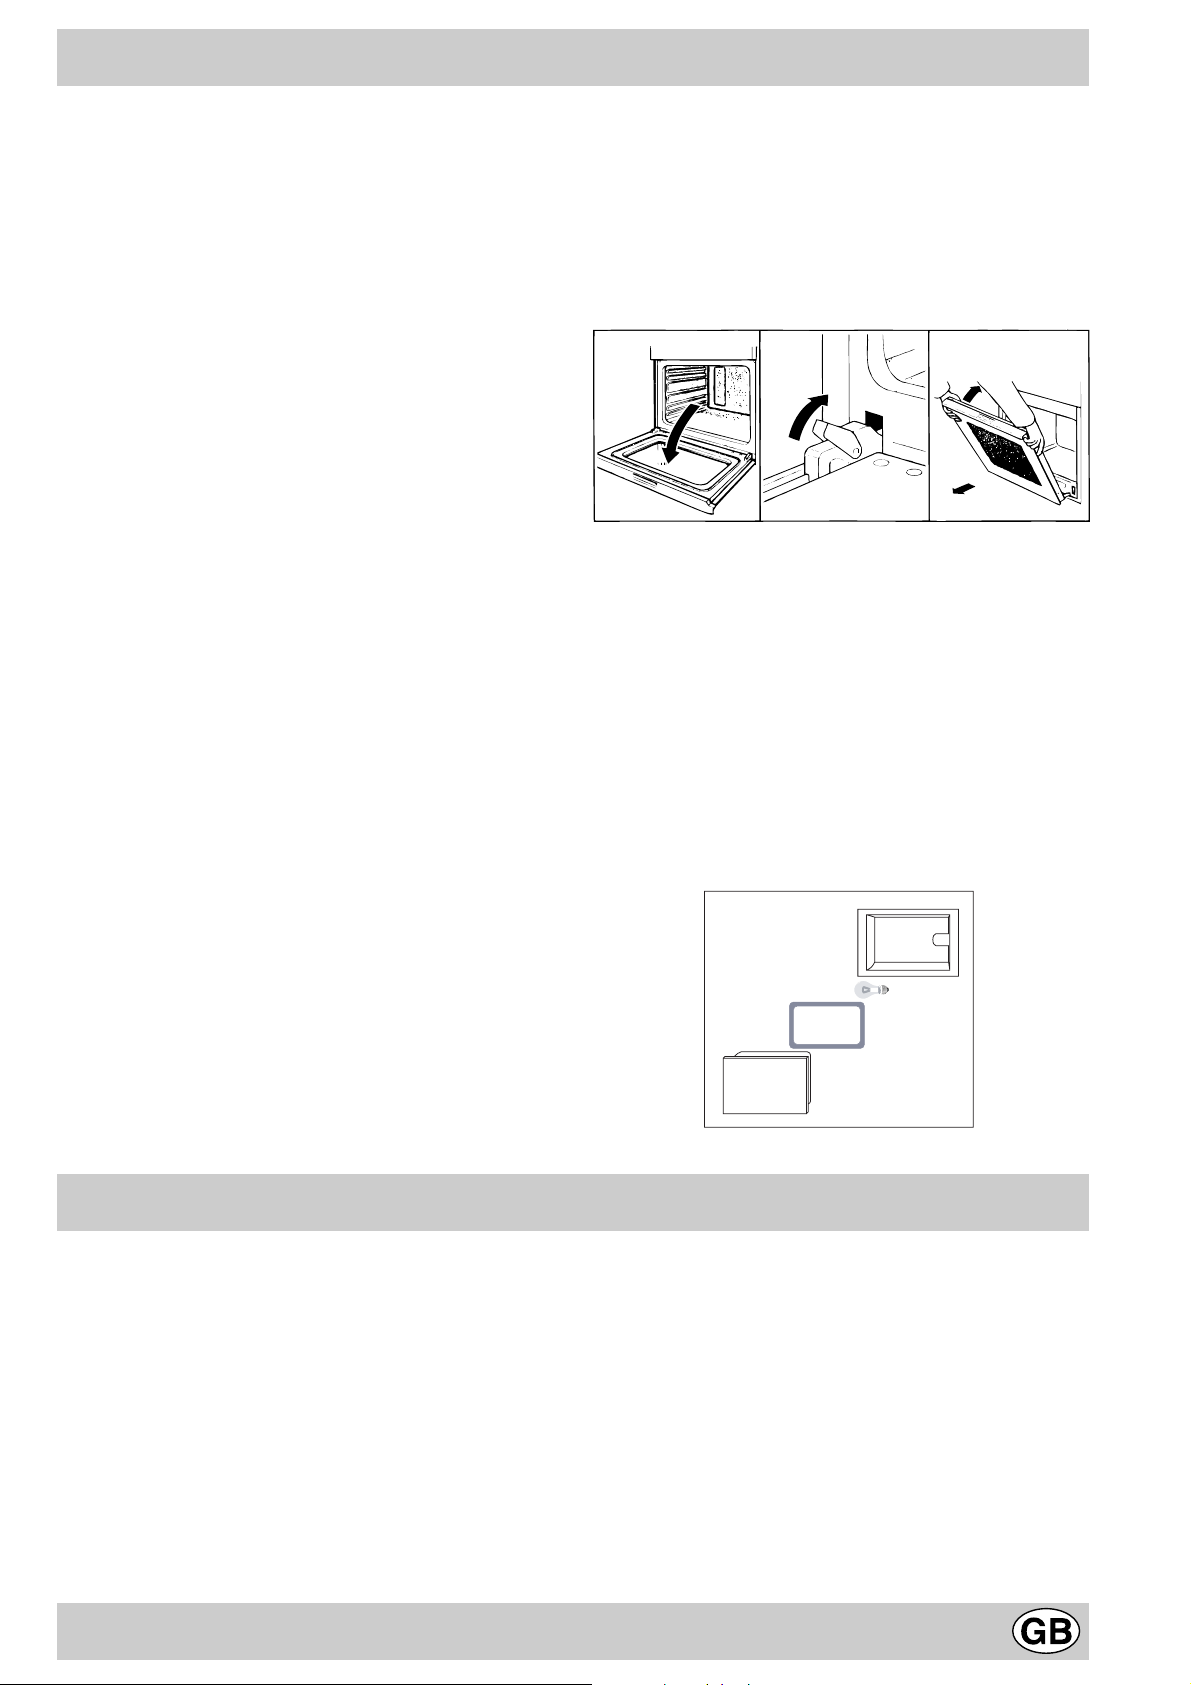
Come togliere la porta forno
Per una pulizia più accur ata è possibile togliere la porta del forno. Procedere nel seguente modo:
• aprite completamente la porta;
• alzate e ruotate le levette poste sulle due cerniere;
• afferrate la porta ai due lati esterni, richiudetela lentamente
ma non completamente;
• tirate la porta verso di voi estraendola dalla sua sede;
Rimontare la porta seguendo il procedimento sopra descritto in
senso contrario.
132
Sostituzione della lampada nel vano forno
• Togliere l’alimentazione al forno tramite l’interruttore
omnipolare utilizzato per il collegamento del forno all’impianto elettrico, o scollegare la spina, se accessibile;
• Svitare il coperchio in vetro del portalampada;
• Svitare la lampada e sostituirla con una resistente ad alta
temperatura (300°C) con queste caratteristiche:
- Tensione 230/240 V
- Potenza 25W
- Attacco E14
• Rimontare il coperchio in vetro e ridate alimentazione al forno.
cavità
lampadina
guarnizione
Consigli pratici per la cottura
Il forno mette a vostra disposizione una vasta gamma di
possibilità che consentono di cuocere ogni cibo nella maniera migliore. Con il tempo potrete sfruttare al meglio questo versatile apparecchio di cottura, pertanto le note riportate di seguito sono solamente delle indicazioni di massima che potrete ampliare con la vostra esperienza personale.
Preriscaldamento
Nel caso in cui sia necessario preriscaldare il forno, in
linea di massima tutte le volte in cui si cuocciano cibi lie-
vitati, è possibile utilizzare la funzione w “forno pizza”
che consente di raggiungere la temperatura desiderata in
breve tempo e con consumi ridotti.
Una volta infornato si può passare alla funzione di cottura
più indicata.
coperchio
Cottura contemporanea su più ripiani
Se dovete cuocere su più ripiani potete utilizzare o la funzione “pasticceria” u o la funzione b “Multicottura”,
le uniche che consentono tale possibilità.
Per la cottura di cibi delicati su più ripiani, utilizzare la
funzione “pasticceria” u che consente di cuocere contemporaneamente 3 ripiani (1°, 3° e 5°). Alcuni esempi
sono riportati nella tabella “Consigli pratici per la cottura”.
Per le altra cottura su più ripiani utilizzate la funzione b
“Multicottura” tenendo conto dei seguenti suggerimenti:
• Il forno è dotato di 5 ripiani. Nella cottur a v entilata uti-
lizzate due dei tre ripiani centrali, il primo in basso e
l’ultimo in alto sono investiti direttamente dall’aria cal-
7
Page 7

da che potrebbe provocare delle bruciature sui cibi delicati;
• Normalmente utilizzate il 2° ed il 4° ripiano dal basso,
inserendo nel 2° ripiano i cibi che richiedono maggior
calore. Ad esempio nel caso della cottura di arrosti di
carne contemporaneamente ad altri cibi, inserite l’arrosto al 2° ripiano, lasciando il 4° a cibi più delicati;
• Nella cottura contemporanea di cibi che hanno tempi
e temperature di cottura diversi impostate una temperatura intermedia tra le due, infornate il cibo più delicato al 4° ripiano ed estraete dal forno prima l’alimento
con tempo di cottura più brev e;
• Utilizzate la leccarda al ripiano inferiore e la griglia a
quello superiore;
Utilizzo della funzione “Fast cooking”
Funzionale, veloce e pratica per coloro che utilizzano prodotti “preconfezionati” (esempio: surgelati o precotti) e non
solo, comunque utili suggerimenti sono riportati nella tabella “Consigli pratici per la cottura”.
Utilizzo del grill
Il forno “7 Cuochi” mette a vostra disposizione diverse
possibilità di grigliare.
Utilizzate la funzione d / 2 “grill”, a porta semiaperta,
posizionando il cibo al centro della griglia (posta al 3° o 4°
ripiano partendo dal basso), dato che risulta accesa solamente la parte centrale della resistenza superiore.
Per raccogliere sughi e/o grassi, posizionare la leccarda
in dotazione al 1°ripiano.
Quando si utilizza tale funzione, si raccomanda di
impostare il termostato al massimo. Si possono anche
impostare temperature inferiori semplicemente regolando la manopola del termostato su quella desiderata.
Nei modelli provvisti di girarrosto 2, nella funzione “grill”
è possibile utilizzare il kit spiedo in dotazione. In questo
caso, effettuare la cottura con la porta del forno chiusa,
posizionando il kit spiedo al 3° ripiano (partendo dal basso)
e la leccarda al 1° per raccogliere sughi e/o grassi.
La funzione e / x “Gratin”, esc lusivamente con porta
forno chiusa, è utilissima per grigliature veloci, si distri-
buisce il calore emesso dal grill consentendo contemporaneamente alla doratura superficiale anche una cottura
nella parte inferiore.
Potete anche usarla nella parte finale della cottura dei
cibi che abbiano bisogno di doratura superficiale, ad esempio è l’ideale per dorare la pasta al forno a fine cottura.
Nell’utilizzo di tale funzione disponete la griglia sul 2° o 3°
ripiano partendo dal basso (vedi tabella cottura)
dopodiché, per raccogliere i grassi ed evitare la f ormazione
di fumo, disponete una leccarda nel 1° ripiano dal basso.
Importante: effettuare la cottura al “Gratin” con porta
del forno chiusa, ciò per ottenere migliori risultati ed un
sensibile risparmio di energia (10% circa).
Quando si utilizza tale funzione, si raccomanda di
impostare il termostato a 200 °C, perchè questa è la
condizione di rendimento ottimale, che si basa
sull’irraggiamento ai raggi infrarossi. Questo, però, non
significa che non si possano utilizzare temperature
inferiori, semplicemente regolando la manopola del
termostato sulla temperatura desiderata.
Nei modelli provvisti di girarrosto x, nella funzione “ gratin”
è possibile utilizzare il kit spiedo in dotazione. In questo
caso, posizionare il kit spiedo al 3° ripiano (partendo dal
basso) e la leccarda al 1° per raccogliere sughi e/o grassi.
Pertanto i migliori risultati nell’utilizzo delle funzioni
grill si ottengono disponendo la griglia sugli ultimi
ripiani partendo dal basso (vedi tabella cottura)
dopodiché, per raccogliere i grassi ed evitare la formazione di fumo, disponete la leccarda in dotazione
nel primo ripiano dal basso.
Cottura dei dolci
Nella cottura dei dolci infornate sempre a forno caldo, attendete la fine di preriscaldamento, indicata dallo spegnimento della spia rossa “E ”. Non aprite la porta durante la
cottura, per evitare un abbassamento del dolce. In generale:
Dolce troppo secco
La prossima volta impo state u na temp eratu ra di1 0°C
superiore e riducete il t empo di c ottur a.
Dolce si abbassa
Usate meno liquido o ab bassa te la tem pera tura d i
10°C.
Dolce scuro superiormente
Inseritelo ad altezz a infer iore, i mpost ate u na
temperatura più bas sa e prolu ngate la cott ura.
Buona cottura esterna, ma interno colloso
Usate meno liquido, riducete la temperatura,
aumentate il tem po di co ttura.
Dolce non si stacca dallo stampo
Ungete bene lo stampo e cos pargetel o anche con un
pò di farina oppure util izza te carta forno .
Ho cotto su più ripiani (nella funzione "ventilato")
e non tutti sono allo stesso avanzamento di
cottura
Impostate una tem per atura in feri ore.
Non necessariamente ripiani inse riti
contemporanea mente debbono ess ere to lti in siem e.
Cottura della pizza
Per una buona cottura della pizza utilizzate la funzione
w “forno pizza”:
• Preriscaldare bene il forno per almeno 10 minuti
• Utilizzare una teglia in alluminio leggero appoggiandola sulla griglia in dotazione. Utilizzando la leccarda
si allungano i tempi di cottura e difficilmente si ottiene
una pizza croccante
• Non aprite frequentemente il forno durante la cottura
8
Page 8

• Nel caso di pizze molto farcite (capricciosa, quattro
stagioni) è consigliabile inserire la mozzarella a metà
cottura.
• Nel caso di cottura contemporanea su più ripiani (fino
a 2) è preferibile utilizzare la funzione forno Multicottura
b in quanto la funzione forno pizza w cuocerebbe di
più il 1° ripiano in basso.
Cottura del pesce e della carne
Per le carni bianche, i volatili ed il pesce utilizzate temperature da 180 °C a 200 °C.
Per le carni rosse che si vuole siano ben cotte all’esterno
conservando all’interno il sugo, è bene utilizzare una temperatura iniziale alta (200°C-220°C) per brev e tempo, per
poi diminuirla successivamente.
In generale, più grosso è l’arrosto , più bassa do vrà essere la temperatura e più lungo il tempo di cottura. P onete la
carne da cuocere al centro della griglia ed inserite sotto
la griglia la leccarda per raccogliere i grassi.
Inserite la griglia in modo che il cibo si trovi al centro del
forno. Se volete più calore da sotto, utilizzate i ripiani più
bassi. P er ottenere arrosti saporiti (in particolare anatra e
selvaggina) bardate la carne con lardo o pancetta e posizionatela in modo che sia nella parte superiore.
9
Page 9
Impostazione
selezionata
1 Tradizionale
a
2 Pastic ceria
u
3 Fast
cooking
v
4 M u ltic o ttu r a
b
5 Pizza
w
6 G rill
d 2
7 Gratin
e x
NB:
i tem pi di cottura sono indicativi e possono essere mod ificati in base ai propri gusti personali. Nelle cotture al
Grill o G ratin, la leccarda va posta sem pre al 1° ripiano a partire dal basso.
Anatra
Arrosto di vitello o m anzo
A rr o s to d i m a ia le
B isc o tti (d i frolla )
Crostate
Crostate
T or ta di fru tta
Plum-cake
Pan di spagna
Creps fa rcite (su 2 ripiani)
Cake piccoli (su 2 ripiani)
S a la tin i d i s fo g lia a l
formaggio (su 2 ripiani)
Bignè (su 3 ripiani)
Biscotti (su 3 ripiani)
M ering he (su 3 ripiani)
Surgelati
Pizza
M isto zucchine e gam beri
in pastella
Torta rustica di spinaci
Panzerotti
Lasagne
Panetti dorati
Bocconcin i di pollo
Precotti
Ali di pollo dorate
Cibi Freschi
B isc o tti (d i frolla )
Plum-cake
S a la tin i d i s fo g lia a l
formaggio
Pizza
Lasagne
Agnello
Pollo arrosto + patate
Sgombro
Plum-cake
Bignè
Biscotti
Pan di spagna
ripian o
Pan di spagna
Torte salate
Pizza
Arrosto di vitello o m anzo
Pollo
Sogliole e seppie
Spiedini di calam ari e
gam beri
F ile tto d i m e r lu zz o
Verdure alla g riglia
Bistecca di vitello
C o to le tte
Ham burger
Sgombri
Toast
C on g irarro sto (o ve
presente)
Vitello allo spiedo
P o llo a llo s p ie d o
Agnello allo spiedo
P o llo a lla g r igl ia
Seppie
C on g irarro sto (o ve
presente)
Vitello allo spiedo
Agnello allo spiedo
P o llo (a llo sp ie d o ) +
patate (sulla leccarda)
Tipo di cibo Peso
(su 2 ripiani)
(su 2 ripia ni)
(su 2 ripia ni
)
)
(su 1
(su 2 ripia ni)
(Kg )
n.° 4
Posizione
della griglia
rispetto al
fondo del
fo rno
1
1
1
-
1
0.5
1
0.7
0.5
1.2
0.6
0.4
0.7
0.7
0.5
0.3
0.4
0.5
0.3
0.5
0.4
0.4
0.4 2 - 200 20-25
0.3
0.6
0.2
1
1
1
1+1
1
1
0.5
0.5
0.5
1.0
1.5
0.5
1
1
1
1
1
1
1
1
1
1
1.0
1.5
1.0
1.5
1.5
1.5
1.5
1.5
-
3
3
3
3
3
3
2/3
3
3
2-4
2-4
2-4
1-3-5
1-3-5
1-3-5
2
2
2
2
2
2
2
2
2
2
2-4
3
2
2-4
2
2
2-4
2-4
2
2-4
3
3
2
2/3
4
4
4
3/4
4
4
4
4
4
-
-
-
2
2
-
-
-
2
Tempo di
preriscaldamento
(min.)
15
15
15
15
15
15
15
15
15
15
15
15
15
15
15
-
-
-
-
-
-
-
-
-
-
15
10
10
15
10
10
10
10
10
10
15
15
10
10
5
5
5
5
5
5
5
5
5
5
5
5
5
5
5
5
5
5
Impostazione
ter m o stato
200
200
200
180
180
180
180
180
160
200
190
210
180
180
90
Max
200
220
200
200
180
220
200
180
210
230
180
180
200
180
170
190
180
170
170
200
220
220
180
Max
Max
Max
Max
Max
Max
Max
Max
Max
Max
Max
Max
200
200
200
200
200
200
Durata
della
cottura
(min.)
65-75
70-75
70-80
15-20
30-35
20-30
40-45
40-50
25-30
30-35
20-25
15-20
20-25
20-25
180
12
20
30-35
25
35
25-30
15-20
15-18
45
10-12
15-20
30-35
40-45
60-70
30-35
40-50
20-25
10-15
15-20
20-25
25-30
15-20
25-30
60-70
8-10
6-8
10
10-15
15-20
15-20
7-10
15-20
2-3
80-90
70-80
70-80
55-60
30-35
70-80
70-80
70-75
70-75
10
Page 10

La sicurezza una buona abitudine
Per garantire l’efficienza e la sicurezza di questo elettr odomestico:
• rivolgetevi esclusiv amente a centri di assistenza tecnica autorizzati
• richiedete sempre l’utilizzo di parti di ricambio originali
• Per movimentare l’apparecchio, onde evitare dan-
ni a persone e al prodotto stesso, servirsi sempre
delle apposite maniglie ricavate sulle fiancate del
forno.
• L ’apparecchio è concepito per uso non prof essionale nelle
abitazioni e le sue caratteristiche non vanno modificate.
• Le istruzioni sono valide solo per i paesi di destinazione
i cui simboli figurano sul libretto e sulla targa matricola.
• La sicurezza elettrica di questo apparecchio è assicurata soltanto quando lo stesso è correttamente collegato
ad un efficiente impianto di messa a terra come previsto
dalle vigenti norme di sicurezza.
• Durante l’uso dell’apparecchio gli elementi riscal-
danti e alcune parti della porta forno diventano
molto calde. Fare attenzione a non toccarle e tenere i bambini a distanza.
T rattandosi di fonti di pericolo, e vitare che bambini e
incapaci abbiano contatti con:
- i comandi e l’apparecchio in genere;
- gli imballaggi (sacchetti, polistirolo, chiodi ecc.);
- l’apparecchio, durante e subito dopo il funzionamento del
forno e del grill, visto il surriscaldamento;
- l’apparecchio inutilizzato (in questo caso vanno rese innocue le parti che potrebbero essere pericolose).
Vanno e vitate le seguenti operazioni:
- toccare l’apparecchio con parti del corpo umide;
- l’uso quando si è a piedi nudi;
- tirare l’apparecchio o il cavo di alimentazione per staccarlo dalla presa di corrente;
- operazioni improprie e pericolose;
- ostruire le aperture di ventilazione o smaltimento calore;
- che il cavo di alimentazione di piccoli elettrodomestici finisca su parti calde dell’apparecchio;
- l’esposizione ad agenti atmosferici (pioggia, sole);
- l’utilizzo del forno come ripostiglio;
- l’utilizzo di liquidi infiammabili nei pressi;
- l’impiego di adattatori, prese multiple e/o prolunghe;
- tentativi di installazione o riparazione senza l’intervento
di personale qualificato.
Occorre assolutamente rivolgersi a personale
qualificato nei seguenti casi:
- installazione (secondo le istruzioni del costruttore);
- quando si hanno dubbi sul funzionamento;
- sostituzione della presa in caso di incompatibilità con la
spina dell’apparecchio.
Occorre rivolgersi a centri di assistenza autorizzati dal
costruttore nei seguenti casi:
- in caso di dubbio sull’integrità dell’apparecchio dopo aver
tolto l’imballaggio;
- danneggiamento o sostituzione del cavo di alimentazione;
- in caso di guasto o cattivo funzionamento, richiedendo i
ricambi originali.
È opportuno effettuare le seguenti operazioni:
- solo la cottura dei cibi evitando altre operazioni;
- verificare l’integrità dopo aver tolto l’imballaggio;
- disconnettere l’apparecchio dalla rete di alimentazione
elettrica in caso di cattivo funzionamento e prima di qualsiasi operazione di pulizia o manutenzione;
- quando inutilizzato, disinserire l’apparecchio dalla rete
elettrica e chiudere il rubinetto del gas (se previsto);
- utilizzare guanti da forno per inserire o estrarre recipienti;
- impugnare sempre la maniglia della porta al centro dato
che all’estremità potrebbe essere più calda a causa di
eventuali uscite d’aria;
- controllare sempre che le manopole siano nella posizione “•”/”o” quando l’apparecchio non è utilizzato;
- tagliare il cavo di alimentazione dopo averlo disconnesso
dalla rete elettrica quando si decide di non utilizzare più
l’apparecchio.
• Il costruttore non può essere considerato responsabile
per eventuali danni derivanti da: errata installazione, usi
impropri, erronei ed irragionevoli.
11
Page 11

Installazione
L’installazione deve essere effettuata secondo le istruzioni del costruttore da personale professionalmente
qualificato. Una errata installazione può causare danni a
persone, animali o cose, nei confronti dei quali il costruttore
non può essere considerato responsabile.
Importante: qualsiasi intervento di regolazione, manutenzione etc. deve essere eseguito con il forno elettricamente disinserito.
Installazione dei forni da incasso
Per garantire un b uon funzionamento dell’apparecchio da
incasso è necessario che il mobile sia di caratteristiche
adatte. Nella figura sottostante vengono ripor tate le dimensioni del vano del mobile nell’inserimento sottotavolo
ed a colonna.
567 mm.
45 mm.
558 mm.
593 mm.
45 mm.
min.
23 mm.
595 mm.
5 mm.
595 mm.
545 mm.
24 mm.
N.B.: Installazione per dichiarazione consumi
I pannelli dei mobili adiacenti il forno dovranno essere in
materiale resistente al calore. In particolare nel caso di
mobili in legno impiallicciato le colle dovranno essere resistenti alla temperatura di 100 °C.
In conformità alle norme di sicurezza, una volta incassato
l’apparecchio, non debbono essere possibili e ventuali contatti con le pareti elettriche.
T utte le parti che assicurano la protezione debbono essere fissate in modo tale da non poter essere tolta senza
l’aiuto di qualche utensile.
Fissaggio del forno al mobile
1. Posizionare le staffe “A” a battuta sull’appoggio del
forno “B”.
2. Posizionare i tacchetti “C” a battuta nelle staffe “A” .
In particolare se lo spessore della fiancata del mobile:
• è di 16 mm: montare il tacchetto in modo che il nume-
ro 16 riportato sullo stesso sia rivolto verso di voi;
• è di 18 mm: montare il tacchetto in modo che la parte
senza scritte sia rivolta verso di voi;;
• è di 20 mm: non montare il tacchetto .
3. Fissare le staffe ed i tacchetti sul bordo fiancata mobile tramite le viti “D”.
4. Fissare il forno al mobile tramite le viti e le rondelle in
plastica “E”.
16
16
D
C
16
16
C
D
A
C
D
E
E
595 mm.
23 mm.
567 mm.
5 mm.
595 mm.
545 mm.
24 mm.
558 mm.
595 mm.
575-585 mm.
45 mm.
min.
Per garantire una b uona areazione è necessario eliminare la parete posteriore del vano, è preferibile installare il
forno in modo che appoggi su due listelli in legno; nel caso
in cui sia presente un piano continuo di appoggio questo
deve a vere un’apertura di almeno 45 x 560 mm.
45 mm.
560 mm.
B
Collegamento elettrico
I forni dotati di cavo di alimentazione tripolare, sono predisposti per il funzionamento con corrente alternata alla
tensione e frequenza di alimentazione indicate sulla
targhetta caratteristiche (posta sull’apparecchio) e sul libretto istruzioni. Il conduttore di terra del cavo è
contraddistinto dai colori giallo-verde.
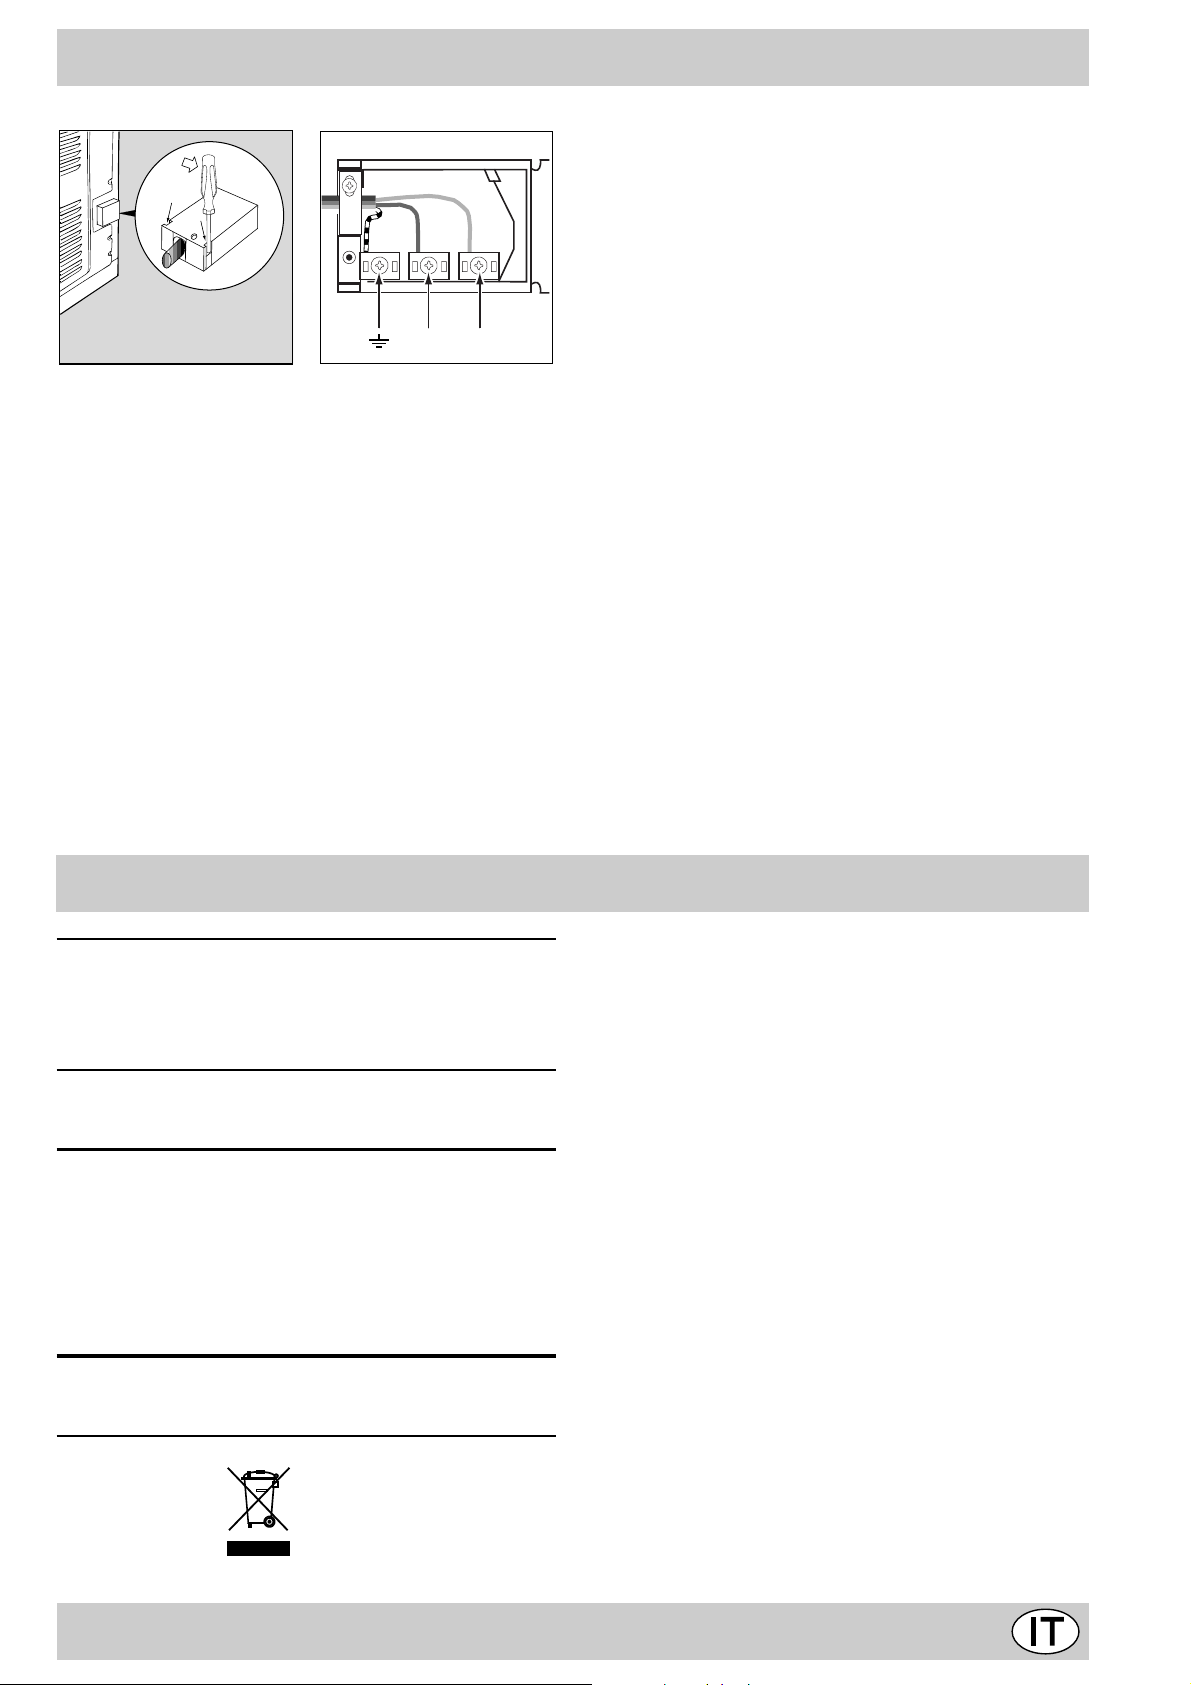
Montaggio cavo di alimentazione
Apertura morsettiera:
• Servendosi di un cacciavite, fare leva sulle linguette
laterali del coperchio della morsettiera;
• Tirare ed aprire il coperchio della morsettiera.
Per la messa in opera del cav o eseguire le seguenti operazioni:
• svitare la vite del serracavo e le tre viti dei contatti LN-6
• fissare i cavetti sotto le teste delle viti rispettando i
colori: Blu (N) Marrone (L) Giallo-Verde 6
• fissare il cavo di alimentazione nell’apposito fermacavo
e chiudere il coperchio
12
Page 12
NL
Allacciamento del cavo di alimentazione alla rete
Montare sul cavo una spina normalizzata per il carico indicato sulla targhetta caratteristiche, nel caso di collegamento diretto alla rete è necessario interporre tra l’apparecchio e la rete un interruttore omnipolare con apertura
minima fra i contatti di 3 mm. dimensionato al carico e
rispondente alle norme in vigore (il filo di terra non deve
essere interrotto dall’interruttore).
Il cavo di alimentazione de ve essere posizionato in modo
che non raggiunga in nessun punto una temperatura superiore di 50°C a quella ambiente.
Prima di effettuare l’allacciamento accertarsi che:
• La sicurezza elettrica di questo apparecchio è assicurata soltanto quando lo stesso è correttamente collegato ad un efficiente impianto di messa a terra come
previsto dalle vigenti norme di sicurezza elettrica. E’
necessario verificare questo fondamentale requisito di
sicurezza e, in caso di dubbio , richiedere un controllo
accurato dell’impianto da parte di personale profes-
sionalmente qualificato. Il costruttore non può essere
considerato responsabile per eventuali danni causati
dalla mancanza di messa a terra dell’impianto.
• Prima di collegare l’apparecchio accertarsi che i dati
di targa (posti sull’apparecchio e/o sull’imballo) siano
rispondenti a quelli della rete di distribuzione elettrica
e gas.
• Verificare che la portata elettrica dell’impianto e delle
prese di corrente siano adeguate alla potenza massima dell’apparecchio indicata in targa. In caso di dubbio rivolgersi ad una persona professionalmente qualificata.
• In caso di incompatibilità tra la presa e la spina dell’apparecchio fare sostituire la presa con altra di tipo
adatto da personale professionalmente qualificato.
Quest’ultimo, in particolare, dovrà anche accertare che
la sezione dei cavi della presa sia idonea alla potenza
assorbita dall’apparecchio. In generale è sconsigliabile
l’uso di adattatori, prese multiple e/o prolunghe. Qualora il loro uso si rendesse indispensabile è necessario utilizzare solamente adattatori semplici o multipli e
prolunghe conformi alle vigenti norme di sicurezza,
facendo però attenzione a non superare il limite di portata in valore di corrente, marcato sull’adattatore semplice e sulle prolunghe, e quello di massima potenza
marcato sull’adattatore multiplo. La spina e la presa
devono essere facilmente accessibili.
Caratteristiche tecniche
Dimensioni utili del forno:
larghezza cm. 43,5
profondità cm. 40
altezza cm. 32
Volume utile del forno:
litri 56
ENERGY LABEL
Direttiva 2002/40/CE sull’etichetta dei forni elettrici
Norma EN 50304
Consumo energia convezione Naturale
funzione di riscaldamento: a Tradizionale
Consumo energia dichiarazione Classe convezione F orzata
funzione di riscaldamento: u P asticceria
Tensione e frequenza di alimentazione:
220-240V ~ 50Hz 2560-3050W
Questa apparecchiatura è conforme alle seguenti
Direttive Comunitarie:
- 73/23/CEE del 19/02/73 (Bassa Tensione) e successive modificazioni;
- 89/336/CEE del 03/05/89 (Compatibilità Elettromagnetica) e successive modificazioni;
- 93/68/CEE del 22/07/93 e successive modificazioni.
- 2002/96/CE
La direttiva Europea 2002/96/CE sui rifiuti di
apparecchiature elettriche ed elettroniche (RAEE), prevede che gli elettrodomestici non debbano essere smaltiti
nel normale flusso dei rifiuti solidi urbani. Gli apparecchi
dismessi devono essere raccolti separatamente per
ottimizzare il tasso di recupero e riciclaggio dei materiali
che li compongono ed impedire potenziali danni per la
salute e l’ambiente. Il simbolo del cestino barrato è riportato su tutti i prodotti per ricordare gli obblighi di raccolta
separata.
Per ulteriori informazioni, sulla corretta dismissione degli
elettrodomestici, i detentori potranno rivolgersi al servizio
pubblico preposto o ai rivenditori.
7
13
Page 13
Congratulations on choosing an Ariston appliance, which you will find is dependable and easy to use. We recommend
that you read the instructions in this owner’ s manual carefully before use f or the best performance and to extend the lif e
of your appliance, as it will provide you with all the instructions you require to ensure its safe installation, use and
maintenance. Always k eep this owner’ s manual close to hand since you ma y need to refer to it in the future. Thank you.
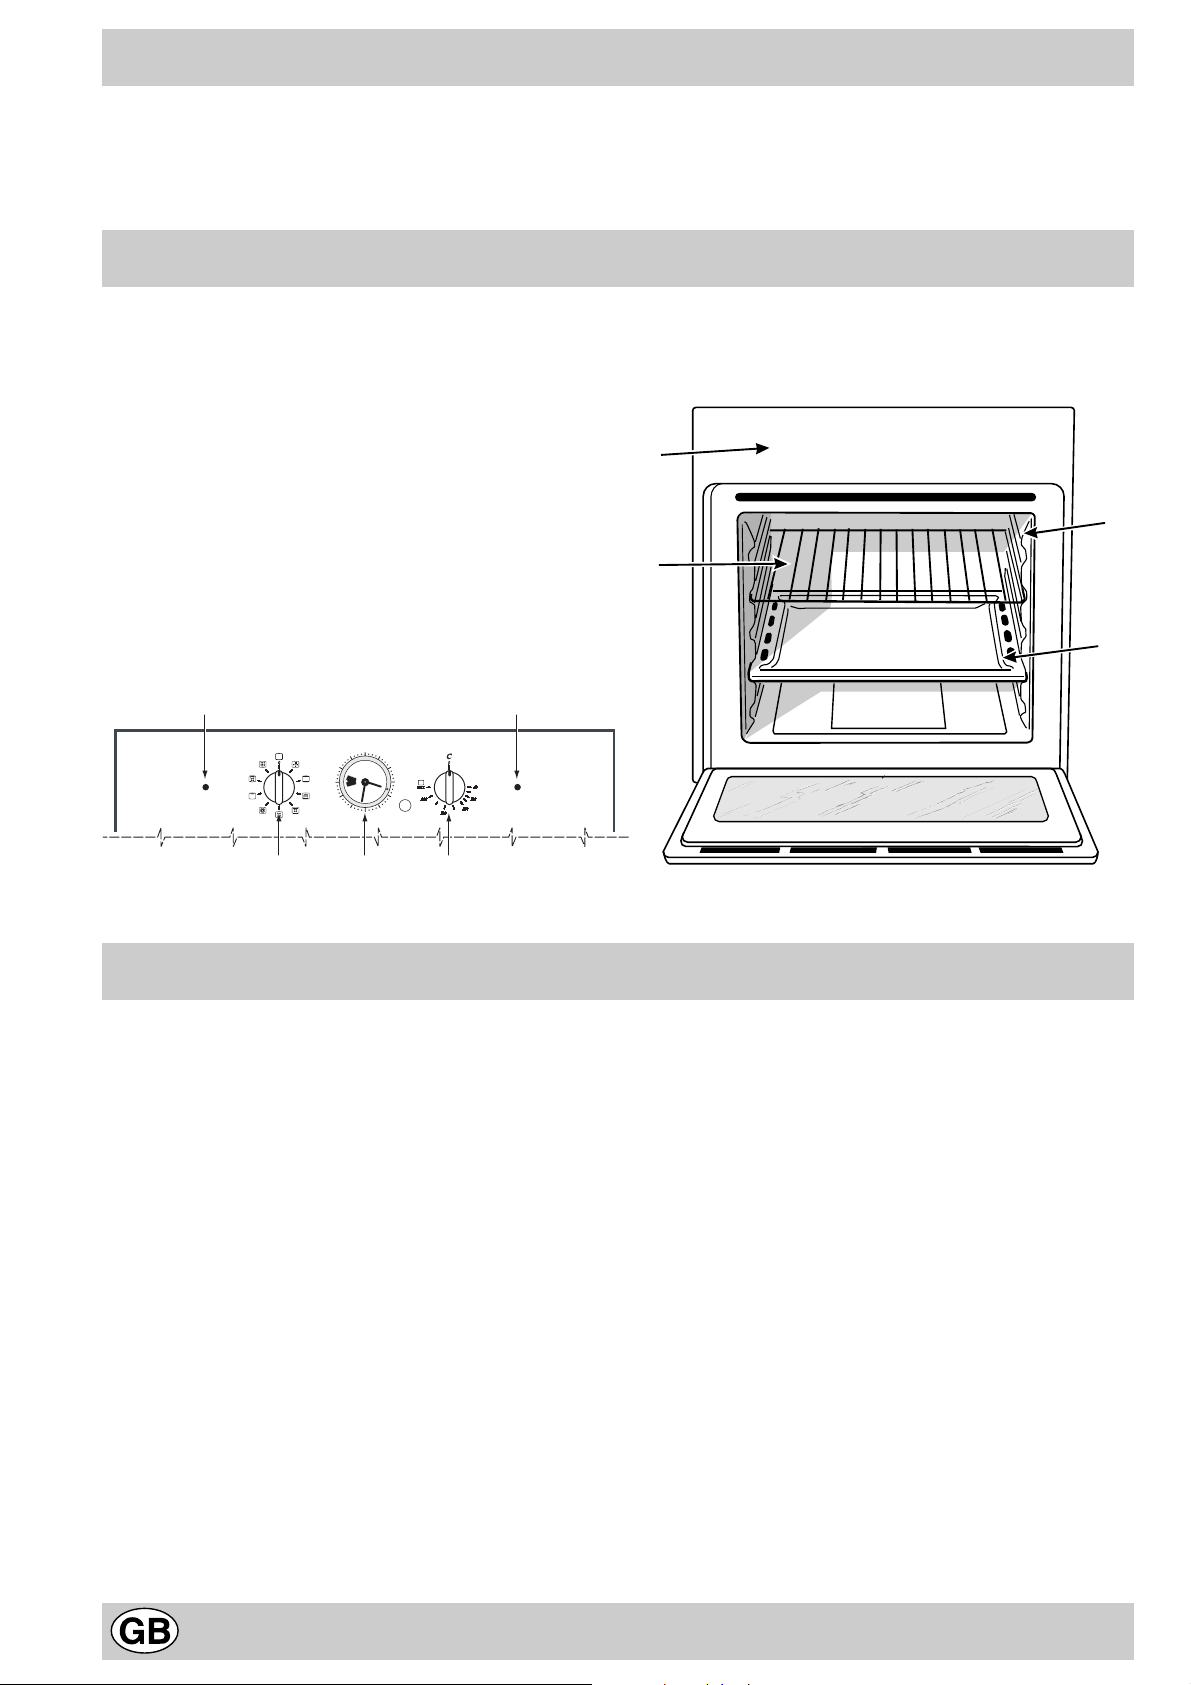
Close-up view
A. Control Panel
B. Cooking mode selection knob
C. Cooking temperature selection knob
E. Pre-heating (flashing) or cooking (always on) under
way indicator
F. Dripping Pan or Baking Sheet
G. Oven Rack
H. Guides for sliding the racks or dripping pan in and
out
I. Door lock indicator light (only on some models) - If it
is on, it indicates that the oven door has been locked
and may not be opened.
O. Analogue Pr ogrammer for Start/End Cooking Time
(only available on certain models)
A
H
G
F
E
12
3
9
6
B
O
C
I
How to use your oven
The 7 Cuoc hi oven combines the advantages of traditional
convection ovens with those of the more modern fan
assisted models in a single appliance.
It is an extremely versatile appliance that allows you to
choose easily and safely between 7 different cooking
modes. The various features offered by the oven are
selected by means of selector knob “B” and ther mostat
“C” situated on the control panel.
Cooling ventilation
In order to cool down the exterior of the appliance, some
models are equipped with a cooling fan which comes on
automatically when the oven is hot.
When the fan is on, a normal flow of air can be heard
exiting between the ov en door and the control panel.
Note: When cooking is done, the fan stays on until
the oven cools down sufficiently.
Notice: The first time y ou use your appliance, we recom-
mend that you set the thermostat to the highest setting
and leave the ov en on f or about half an hour with nothing
in it, with the oven door shut. Then, open the oven door
and let the room air. The odour that is often detected during this initial use is due to the evaporation of substances
used to protect the oven during storage and until it is in-
stalled.
Notice: Place the dripping pan provided on the bottom
shelf of the oven to prev ent any sauce and/or grease from
dripping onto the bottom of the oven only when grilling
food or when using the rotisserie (only available on certain models). F or all other types of cooking, nev er use the
bottom shelf and never place anything on the bottom of
the oven when it is in operation because this could damage the enamel. Alw ays place your cookware (dishes , aluminium foil, etc. etc.) on the gr id provided with the appliance inserted especially along the oven guides.
The oven light
Set knob “B” to the 8 symbol to turn it on. It lights the
oven and stays on when any of the electrical heating elements in the oven come on.
T raditional a
Position of thermostat knob “C”: between 60°C and Max.
On this setting, the top and bottom heating elements come
on. This is the classic, traditional type of oven which has
been perfected, with exceptional heat distribution and re-
14
Page 14

duced energy consumption. The convection oven is still
unequalled when it comes to cooking dishes made up of
several ingredients , e.g. cabbage with ribs, Spanish style
cod, Ancona style stockfish, tender veal strips with rice,
etc. Excellent results are achieved when preparing veal
or beef-based dishes as well (braised meats, stew, goulash, wild game, ham etc.) which need to cook slowly and
require basting or the addition of liquid. It nonetheless remains the best system for baking cakes as well as fruit
and cooking using covered casserole dishes for o ven baking. When cooking in Traditional, only use one dripping
pan or cooking rack at a time, otherwise the heat distribution will be uneven. Using the different rack heights available, you can balance the amount of heat between the
top and the bottom of the oven. Select from among the
various rack heights based on whether the dish needs
more or less heat from the top.
Baking u
Position of thermostat knob “C”: betw een 60°C and Max.
The rear heating element and the fan come on,
guaranteeing delicate heat distributed uniformly throughout
the oven. The electricity absorption in this cooking mode
is only 1600 W.
This mode is ideal for baking and cooking delicate foods especially cakes that need to rise - and for the preparation
of certain tartlets on 3 shelves at the same time. Here are
a few e xamples: cream puffs, s weet and sav oury biscuits,
savoury puffs, Swiss rolls and small portions of vegetables
au gratin, etc…..
“Fast cooking” Mode v
Position of thermostat knob “C”: betw een 60°C and Max.
The heating elements and the fan come on, guaranteeing
constant heat distributed uniformly throughout the oven.
This mode is especially recommended for cooking prepacked food quickly (as pre-heating is not necessary),
such as for example: frozen or pre-cooked food) as well
as for a fe w “home-made” dishes.
The best results when cooking using the “Fast cooking”
mode are obtained if you use one cooking rack only (the
second from the bottom), please see the table entitled
“Practical Cooking Advice”.
Multi-cooking Mode b
Position of thermostat knob “ C”: betw een 60°C and Max.
The heating elements, as well as the fan, will come on.
Since the heat remains constant and uniform throughout
the oven, the air cooks and browns f ood uniformly over its
entire surface. With this mode , you can also cook v arious
dishes at the same time, as long as their respective cooking temperatures are the same. A maximum of 2 racks
can be used at the same time, following the instructions in
the section entitled: “Cooking On More Than One Rack”.
This Multi-cooking mode is particularly recommended for
dishes requiring a gratin finish or for those requiring considerably prolonged cooking times, such as for example:
lasagne, pasta bakes, roast chic ken and potatoes, etc…
Moreover, the excellent heat distribution makes it possible to use lower temperatures when cooking roasts. This
results in less loss of juices, meat which is more tender
and a decrease in the loss of weight for the roast. The
Multi-cooking mode is especially suited for cooking fish,
which can be prepared with the addition of a limited amount
of condiments, thus maintaining their flav our and appearance.
Desserts: the Multi-cooking mode is also perfect f or baking leavened cak es.
Moreover, this mode can also be used to thaw quickly
white or red meat and bread by setting the temperature to
80 °C. T o tha w more delicate f oods, set the thermostat to
60°C or use only the cold air circulation feature by setting
the thermostat to 0°C.
Pizza Mode w
Position of thermostat knob “C”: betw een 60°C and Max.
The bottom and circular heating elements, as well as the
fan, will come on. This combination rapidly heats the o ven
due to the large amounts of power used by the appliance
(2800 W), which results in the production of considerab le
heat coming prevalently from the bottom.
The pizza mode is ideal for foods requiring high
temperatures to cook, like pizzas and large roasts. Only
use one dripping pan or rack at a time. However, if more
than one is used, these must be switched halfwa y through
the cooking process.
Grill d / 2
Position of thermostat knob “C ”: Max.
The top central heating element and the rotisserie (where
present) come on.
The extremely high and direct temperature of the grill
makes it possible to brown the surf ace of meats and roasts
while locking in the juices to keep them tender . The grill is
also highly recommended for dishes that require a high
temperature on the surface: beef steaks, veal, rib steak,
filets, hamburgers etc...
Always leave the o ven door ajar during cooking, except
when using the rotisserie.
Some grilling examples are included in the “Practical Cooking Advice” paragraph.
Gratin e / x
Position of thermostat knob “C”: between 60°C and 200°C .
The top central heating element, the fan and the rotisserie (where present) come on.
This combination of features increases the eff ectiv eness
of the unidirectional thermal radiation of the heating elements through forced circulation of the air throughout the
oven. This helps prevent food from burning on the surface, allowing the heat to penetrate right into the food.
Excellent results are achieved with kebabs made with
meats and vegetables, sausages, ribs, lamb chops,
chicken in a spicy sauce, quail, pork chops, etc.
All cooking using the “Gratin” must be done with the
oven door shut.
This mode is also ideal for cooking fish steaks, lik e swordfish, tuna, grouper , stuff ed cuttlefish etc.
Automatic cleaning with the fast c lean function
This function is designed to clean your oven thoroughly.
For details on the fast clean function, please refer to the
paragraph entitled “Automatic cleaning with the fast clean
function”.
V
15
Page 15
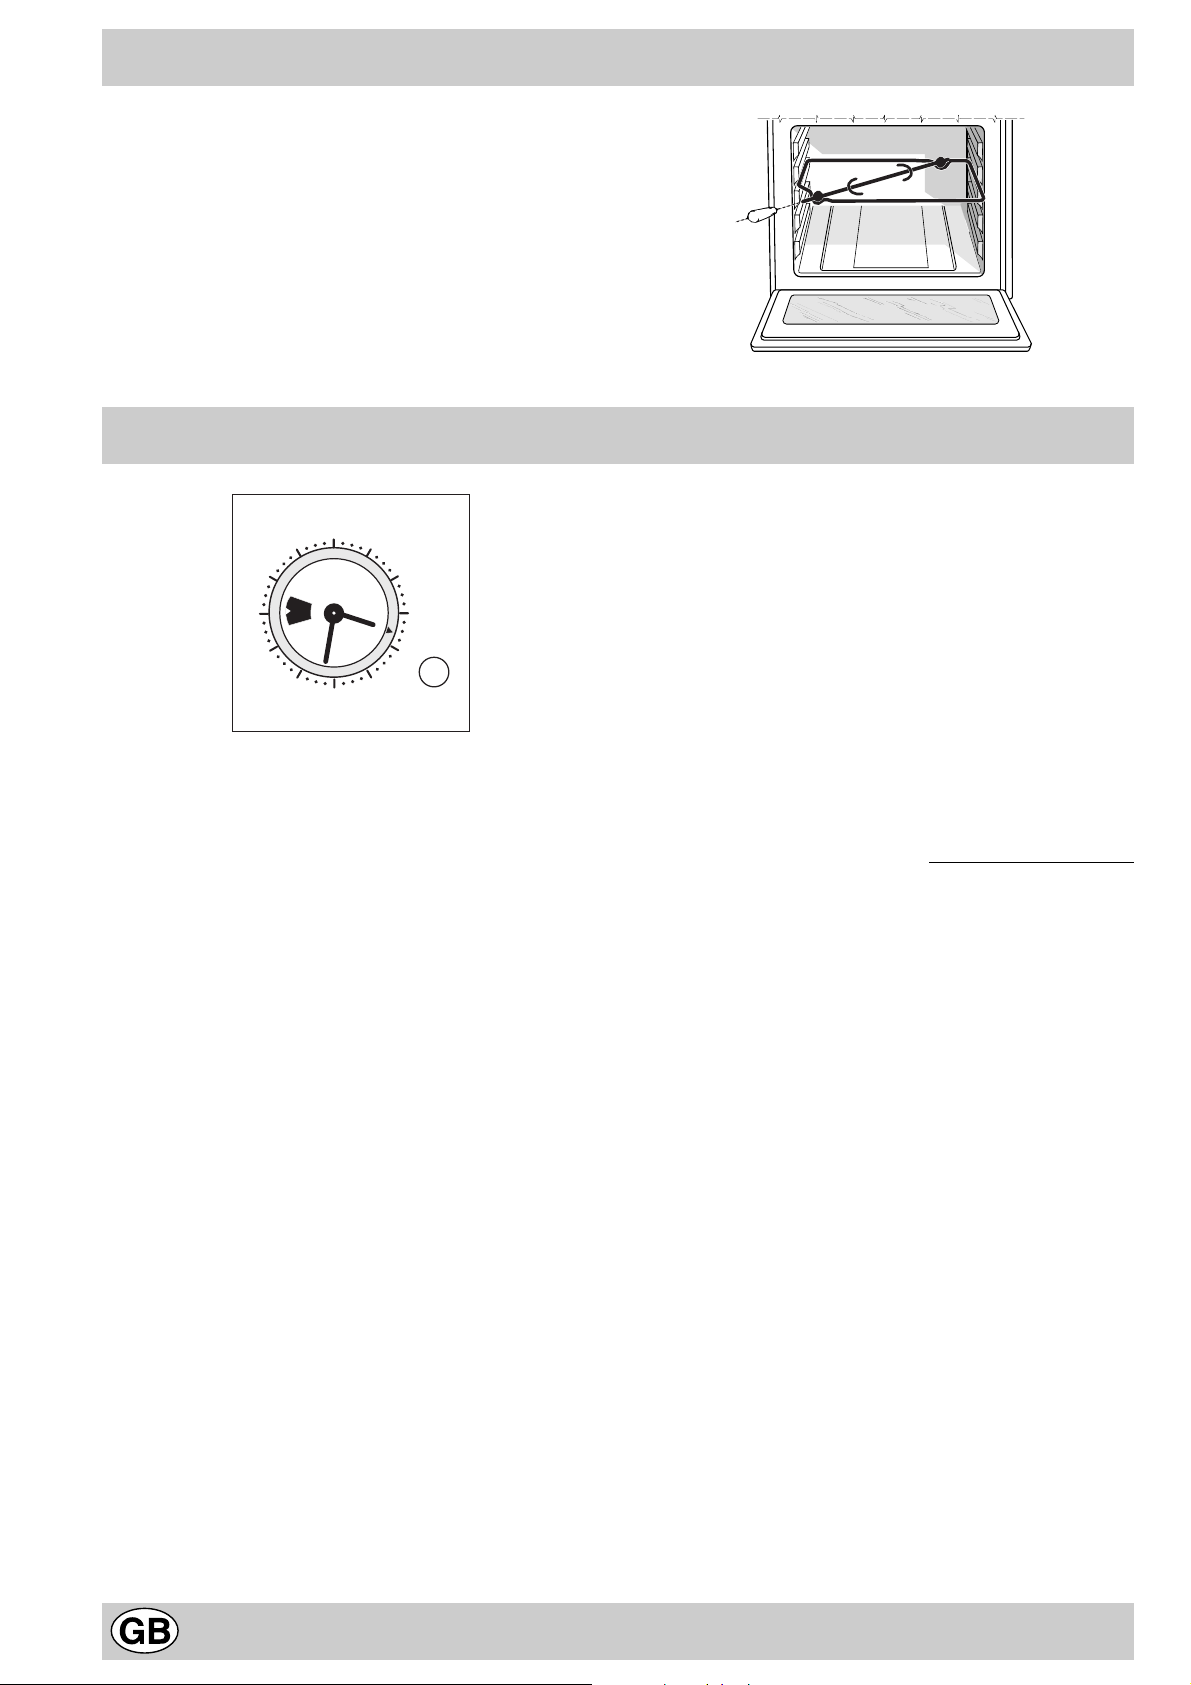
The rotisserie (only av ailab le on certain models)
To start the rotisserie, proceed as follows:
a) place the dripping pan on the 1st rack;
b) insert the special rotisserie suppor t on the 3rd rack
and position the spit by inserting it through the special
hole into the rotisserie at the back of the oven;
c) start the rotisserie using knob “B” to select setting
.
2 /x
THE ANALOGUE PROGRAMMER FOR START/END COOKING TIME
Programming cooking with immediate start
1 T urn the knob anticlockwise until the desired cooking time
12
9
How to reset the correct time
The oven must be plugged in.
Press the knob and turn it anticlockwise until you set the
correct time.
NB: The clock is electrically pow ered, therefore in the e vent
of a power shortage, it will stop working for the entire duration of the same. Following this power failure, the correct
time will have to be reset.
Manual operation
NB.: T o be used in all cases where programmed
cooking is not necessary .
1 T urn the knob anticlockwise until the symbol 9 appears
in the window .
2 Pull the knob and tur n it anticlockwise until the knob
marker lines up with correct time. A click will indicate the
operation is over .
With the oven selector knob , select the desired cooking mode.
To turn the oven off, set the same back to the “0” position.
3
6
is displayed in the window.
2 Pull the knob and tur n it anticlockwise until the knob
marker lines up with the correct time. A click will indicate
the operation is over .
With the oven selector knob , select the desired cooking mode.
The oven comes on immediately and sta ys on for the entire
duration of the set cooking time. A buzzer will sound to inform you the oven has come off .
To interrupt it, turn the knob anticlockwise until the symbol
9 appears in the window.
Programming cooking with delayed start
1 Cooking time:
T urn the knob anticlockwise until the desired cooking time
is displayed in the window.
2 Cooking start:
Pull the knob and turn it anticlockwise until the knob
marker lines up with the desired time for cooking to start.
With the oven selector knob , select the desired cooking mode.
The oven will come on at the desired cooking start time and
will stay on for the entire duration of the set cooking time . A
buzzer will sound to inf orm you the oven has come off .
To interrupt it, turn the knob anticlockwise until the symbol
9 appears in the window.
16
Page 16

Automatic cleaning with the fast clean function
When the fast clean function has been enabled, the
temperature inside the oven reaches 500 °C, which is
necessary to burn all food residue that has built up inside it.
If you look through the oven glass, you may notice some
particles that light up as they are destroyed by pyrolysis
upon contact with the heating elements: this is simply
spontaneous combustion: it is perfectly normal and hazard-
free.
A few useful tips before automatic c leaning begins
1- Try to remove large scraps of food and caked-on dirt with
a damp sponge. Avoid using detergents or any other special
products recommended for ov en cleaning.
2- Remove all the accessories from the oven, as these
are not designed to withstand such high temperatures. In
addition, some accessories could affect the efficiency of the
automatic cleaning cycle by obstructing the circulation of heat
along all the interior walls of the oven. The accessories can
easily be washed like everyday crockery (even in your
dishwasher).
3- Do not place tea towels ov er the ov en handle.
Warning: during the automatic cleaning cycle, the
surfaces may become very hot. Keep children a way from
these.
How to enable the fast clean function
– Shut the oven door .
– Set the selector knob to V
– To programme the fast clean cycle time and/or cycle
end time, follow the instructions provided in the
paragraph entitled “F ast clean prog ramming”.
Safety devices
Given the high temperatures reached inside it, the oven is
fitted with sever al safety de vices:
• the door is locked automatically as soon as the tem-
perature exceeds a certain value, to avoid all risk of
burns;
• the heating elements are no longer electrically
powered, as a precautionary measure, should a fault
occur.
• the maximum time permitted is 120 minutes, after which
the oven s witches off automatically.
• if the oven is too hot, pyrolysis may not start. Wait for
the oven to cool down.
What happens at the end of the “Fast clean” function
with immediate start and with default time?
When the indicator light “E” goes off, the “Fast clean”
function has been completed.
To open the oven door, y ou will hav e to wait until the temperature inside it has dropped to a suitable value. When
the indicator light “I” goes off , the door is unloc ked.
You will notice some white dust deposits on the bottom
and sides of your ov en; remov e them with a damp sponge
once the oven has cooled down completely.
You may on the other hand prefer to take advantage of
the heat accumulated to start cooking immediately; in this
case the dust can stay where it is: it is completely harmless
and will not affect your f ood in an y way.
What happens at the end of the “Fast clean” function
with immediate/delayed start and with default time?
When the indicator light “E” goes off and you hear the
buzzer, the “Fast clean” function has been completed. To
disable the buzzer, tur n the knob anticlockwise until the
symbol 9 appears in the window.
To open the oven door, y ou will hav e to wait until the temperature inside it has dropped to a suitable value. When
the indicator light “I” goes off , the door is unloc ked.
You will notice some white dust deposits on the bottom
and sides of your ov en; remov e them with a damp sponge
once the oven has cooled down completely.
You may on the other hand prefer to take advantage of
the heat accumulated to start cooking immediately; in this
case the dust can stay where it is: it is completely harmless
and will not affect your f ood in an y way.
Resetting after a power failure
Provided that the temperature inside the oven has not
fallen too low, the appliance is equipped with a system
which allows it to resume cooking/pyrolysis (if present)
from the point at which it was interrupted at the moment
of the power failure . Remember to reset the time if required.
NOTE
Bear in mind that, for saf ety reasons, programming relating
to cooking which is scheduled to happen is not reinstated
when the power supply is restored.
17
Page 17
Fast clean programming
1 T urn the knob anticlockwise until the desired “F ast clean”
function time is displayed in the window.
12
9
3
6
2 Pull the knob and turn it anticlockwise until the knob
marker lines up with the correct time. A click will indicate
the operation is over .
With the oven selector knob , select programme V.
The “F ast clean” function will start immediately and it operates
for the entire time that has been set. A buzzer will signal
when the time is up. to interrupt it, turn the knob anticlockwise
until the symbol 9 appears in the windo w.
Fast clean with immediate start and with default time.
The duration of the “Fast clean” function is 120 minutes
and this operating mode must be used in all cases in which
it is not necessary to programme the duration and starting
time of the “F ast clean” function.
1 T urn the knob anticlockwise until the symbol 9 appears
in the window .
2 Pull the knob and turn it anticlockwise until the knob
marker lines up with the correct time. A click will indicate
the operation is over .
Using the oven selector knob, select programme V. The
oven ma y be switched off at an y time by turning the knob to
the “0” position.
Programming the Fast clean function duration with
immediate start
The maximum duration of the “F ast clean” function is 120
minutes and therefore any attempts to set it f or more than
2 hours would have no effect because the oven would
switch off automatically once this time period is up.
Programming the Fast clean cooking function
duration with delayed start
The maximum duration of the “F ast clean” function is 120
minutes and therefore any attempts to set it f or more than
2 hours would have no effect because the oven would
switch off automatically once this time period is up.
1 “Fast clean” function duration.
T urn the knob anticlockwise until the desired “Fast clean”
function time is displayed in the window.
2 “Fast clean” function start.
Pull the knob and turn it anticlockwise until the knob
marker lines up with the desired “Fast clean” function
starting time.
With the oven selector knob , select programme V.
The “Fast clean” function will star t on the set star ting time
and it will operate for the entire duration that has been
selected, but it will not exceed 2 hours. A buzzer will signal
when the time is up. to interrupt it, turn the knob anticlockwise
until the symbol 9 appears in the windo w .
DO NOT WORRY IF
1 the cooling fan is operating at low speed at the start of
the fast clean cycle;
2 the electrical system limiter blows when Fast Clean is
in use: this is due to a mains ov erload (too many electric
household appliances used at the same time);
3 the oven door is locked during the Fast Clean
programme: this is an appliance saf ety device; the door
will only open when the oven has cooled completely;
4 small stains are left on the interior surface of the oven
after the Fast Clean cycle: we recommend you remo ve
the toughest grease spots and large scraps of food
before the self-cleaning cycle and that you set the cycle
time in accordance with the degree of soil in your oven;
5 you see ventilated air exiting the o ven f or a while when
cooking is complete: it is due to the normal cooling
phase of the oven interior;
6 when using the “grill” mode, the top heating element
isn’t always on (red in colour): its operation is controlled
by a thermostat;
7 a blast of hot steam exits the ov en when you open the
door during cooking;
8 drops of water or steam form inside the oven if you
leave f ood inside the o ven after cooking is complete;
18
Page 18
How to Keep Your Oven in Shape
Glass door
Seal
Lamp
Oven
compartment
Before cleaning your oven, or performing maintenance,
disconnect it from the power supply.
To extend the life of your oven, it must be cleaned
frequently, keeping in mind that:
• Do not use steam equipment to clean the appliance.
• the enamelled or stainless steel parts should be
washed with lukewarm water without using any abrasive powders or corrosiv e substances which could ruin
them; Stainless steel could get stained. If these stains
are difficult to remove, use special products available
on the market. After cleaning, it is advisable to rinse
thoroughly and dry .
• the inside of the oven should preferably be cleaned
immediately after use, when it is still warm, with hot
water and soap; the soap should be rinsed away and
the interior dried thoroughly. Avoid using abrasiv e detergents (for example cleaning powders, etc…) and
abrasive sponges for dishes or acids (such as
limescale-remover , etc…) as these could damage the
enamel. If the grease spots and dir t are particularly
tough to remove, use a special product f or ov en cleaning, following the instructions provided on the packet.
• if you use your oven for an extended period of time,
condensation may form. Dry it using a soft cloth.
• there is a rubber seal surrounding the oven opening
which guarantees its perfect functioning. Check the
condition of this seal on a regular basis. If necessary,
clean it and avoid using abrasive products or objects
to do so. Should it become damaged, please contact
your nearest After-sales Service Centre. We recommend you avoid using the oven until it has been repaired.
• never line the o ven bottom with aluminium foil, as the
consequent accumulation of heat could compromise
the cooking and even damage the enamel.
• clean the glass door using non-abrasive products or
sponges and dry it with a soft cloth.
• open the door fully;
• lift up and turn the small levers situated on the two
hinges;
• grip the door on the two external sides, shut it slowly
but not completely;
• pull the door towards you, pulling it out of its seat;
Reassemble the door by follo wing the abov e procedures
backwards.
123
Replacing the Oven Lamp
• Disconnect the oven from the power supply b y means
of the omnipolar switch used to connect the appliance
to the electrical mains; or unplug the appliance if the
plug is accessible;
• Remove the glass cover of the lamp-holder;
• Remove the lamp and replace with a lamp resistant to
high temperatures (300°C) with the following characteristics:
- Voltage: 230/240 V
- Wattage 25W
- Type E14
• Replace the glass cover and reconnect the oven to
the mains power supply.
How to remove the oven door
For a more thorough clean, you can remove the oven
door. Proceed as follows:
Practical Cooking Advice
The oven off ers a wide range of alternatives which allow
you to cook any type of food in the best possib le wa y . With
time you will learn to make the best use of this versatile
cooking appliance and the following directions are only a
guideline which may be varied according to your o wn personal experience.
Preheating
If the oven must be preheated (this is generally the case
when cooking leavened f oods), the “ Pizza Mode” w can
be used to reach the desired temperature as quickly as
possible in order to save on energy.
Once the food has been placed in the oven, the most
appropriate cooking mode can then be selected.
Cooking on More Than One Rack
If you have to cook food using several racks, use either
the “baking” mode u or the b “Multi-cooking” mode,
as these are the only modes that allow you to do so .
When cooking delicate food on more than one rack, use
the “baking” mode, u which allows you to cook on 3
racks at the same time (the 1st, 3rd and 5th from the bot-
tom). Some examples are included in the “Practical Cooking Advice” tab le.
When cooking other food on sev eral racks , use the “Multi-
cooking” mode b keeping the follo wing suggestions in
mind:
19
Page 19
• The oven is fitted with 5 rack s. During fan assisted
cooking, use two of the three central racks; the lowest
and highest racks receive the hot air directly and therefore delicate f oodstuffs could be burnt on these racks .
• As a general rule, use the 2nd and 4th rack from the
bottom, placing the foodstuffs that require greater heat
on the 2nd rack from the bottom. For example, when
cooking meat roasts together with other food, place
the roast on the 2nd rack from the bottom and the more
delicate food on the 4th rack from the bottom.
• When cooking foodstuffs that require differing times
and temperatures, set a temperature that is somewhere
between the two temperatures required, place the more
delicate food on the 4th rac k from the bottom and take
the food requiring less time out of the oven first.
• Use the dripping pan on the lower rack and the grid on
the upper;
Using the “Fast Cooking” Mode
Functional, fast and practical for those of you who use
pre-packed products (such as f or e xample: froz en or precooked food) along with other f ood items. Y ou will find useful
suggestions in the “Practical Cooking Advice” tab le.
Using the Grill
The “7 Cuochi” oven offers you several different grilling
modes.
Use the d / 2 “grill” mode, with the oven door ajar,
placing the food under the centre of the grill (situated on
the 3rd or 4th rack from the bottom) because only the
central part of the top heating element is turned on.
T o catch an y fat and/or grease that ma y drip from the rack,
place the dripping pan provided on the first rack from the
bottom.
When using this mode, we recommend you set the thermostat to the highest setting. Lo wer temperatures can also
be set, simply by setting the thermostat knob to the temperature required.
In models fitted with a rotisserie 2, you can use the spit
kit provided when using the “grill” mode. In this case, cook
with the oven door shut, placing the spit kit on the third
oven rack from the bottom and the dripping pan on the
bottom rack to collect any sauce and /or dripping fat.
Setting e / x “Gratin”, only with the o ven door shut,
is extremely useful for grilling foods rapidly, as the distri-
bution of heat makes it possible not only to brown the
surface, but also to cook the bottom part.
Moreover, it can also be used for browning foods at the
end of the cooking process, such as adding that gratin
finish to pasta bakes, for example.
When using this mode, place the grid on the 2nd or 3rd
oven rack from the bottom (see cooking table) then, to
prevent fat and grease from dripping onto the bottom of
the oven and thus smoke from f orming, place a drippingpan on the 1st rack from the bottom.
Important: always cook in “Gratin” mode with the oven
door shut. This will allow y ou both to obtain e xcellent re-
sults and to save on energy (approximately 10%).
When using this mode, we advise you to set the thermostat to 200°C, as it is the most efficient way to use the
grill, which is based on the use of infrared rays. Ho we v er ,
this does not mean you cannot use lower temperatures,
simply by adjusting the thermostat knob to the desired
temperature.
In models fitted with a rotisserie x, you can use the spit
kit provided when using the “gratin” mode. In this case,
place the spit kit on the third oven rack from the bottom
and the dripping pan on the bottom rack to collect any
sauce and /or dripping fat.
Therefore the best results when using the grill modes
are obtained by placing the grid on the lower racks
(see cooking table) then, to prevent fat and grease
from dripping onto the bottom of the oven and smoke
from forming, place a dripping-pan on the 1st oven
rack from the bottom.
Baking Cakes
When baking cakes, always place them in a preheated
oven. Make sure you wait until the oven has been
preheated thoroughly (the red light “E” will turn off). Do
not open the oven door during baking to prev ent the cake
from dropping. In general:
Pastry is too dry
Increase the tem peratur e by 10°C and r educ e the
cooking time.
Pastry dropped
Use less liquid or lower t he temp eratu re by 10° C.
Pastry is too dark on top
Place it on a lower rack , lower the t emper atur e, and
increase the coo king time .
Cooked well on the inside but sticky on the
outside
Use less liquid, lowe r the te mperat ure, a nd incr ease
the cooking time.
The pastry sticks to the pan
Grease the pan well and sprink le it with a dusting o f
flour or use greaseproo f paper .
I used more than one level (in the function
"ventilated oven") and they are not all at th e same
cooking point
Use a lower temperature s ettin g. It is not nec essa ry to
remove the food from all the ra cks at t he sam e time.
Cooking Pizza
For best results when cooking pizza, use setting w for “
Pizza Mode”:
• Preheat the oven f or at least 10 minutes
• Use a light aluminium pizza pan, placing it on the rack
supplied with the oven. If the dripping pan is used, this
will extend the cooking time, making it difficult to get a
crispy crust;
• Do not open the oven door frequently while the pizza
is cooking;
20
Page 20

• If the pizza has a lot of toppings (three or four), we
recommend you add the mozzarella cheese on top
halfway through the cooking process .
• If cooking on more than one rack (up to 2), we advise
you to use the Multi-cooking Mode b as the Pizza
Mode w would heat the bottom rack more than the
others.
Cooking Fish and Meat
When cooking white meat, fowl and fish, use temperature
settings from 180 °C to 200 °C.
For red meat that should be well done on the outside while
tender and juicy in the inside, it is a good idea to start with
a high temperature setting (200°C-220°C) for a short time,
then turn the oven down afterwards.
In general, the larger the roast, the lower the temperature
setting. Place the meat on the centre of the grid and place
the dripping pan beneath it to catch the fat.
Make sure that the grid is inserted so that it is in the centre
of the oven. If you would like to increase the amount of
heat from below, use the low rack heights. For savour y
roasts (especially duck and wild game), dress the meat
with lard or bacon on the top.
21
Page 21
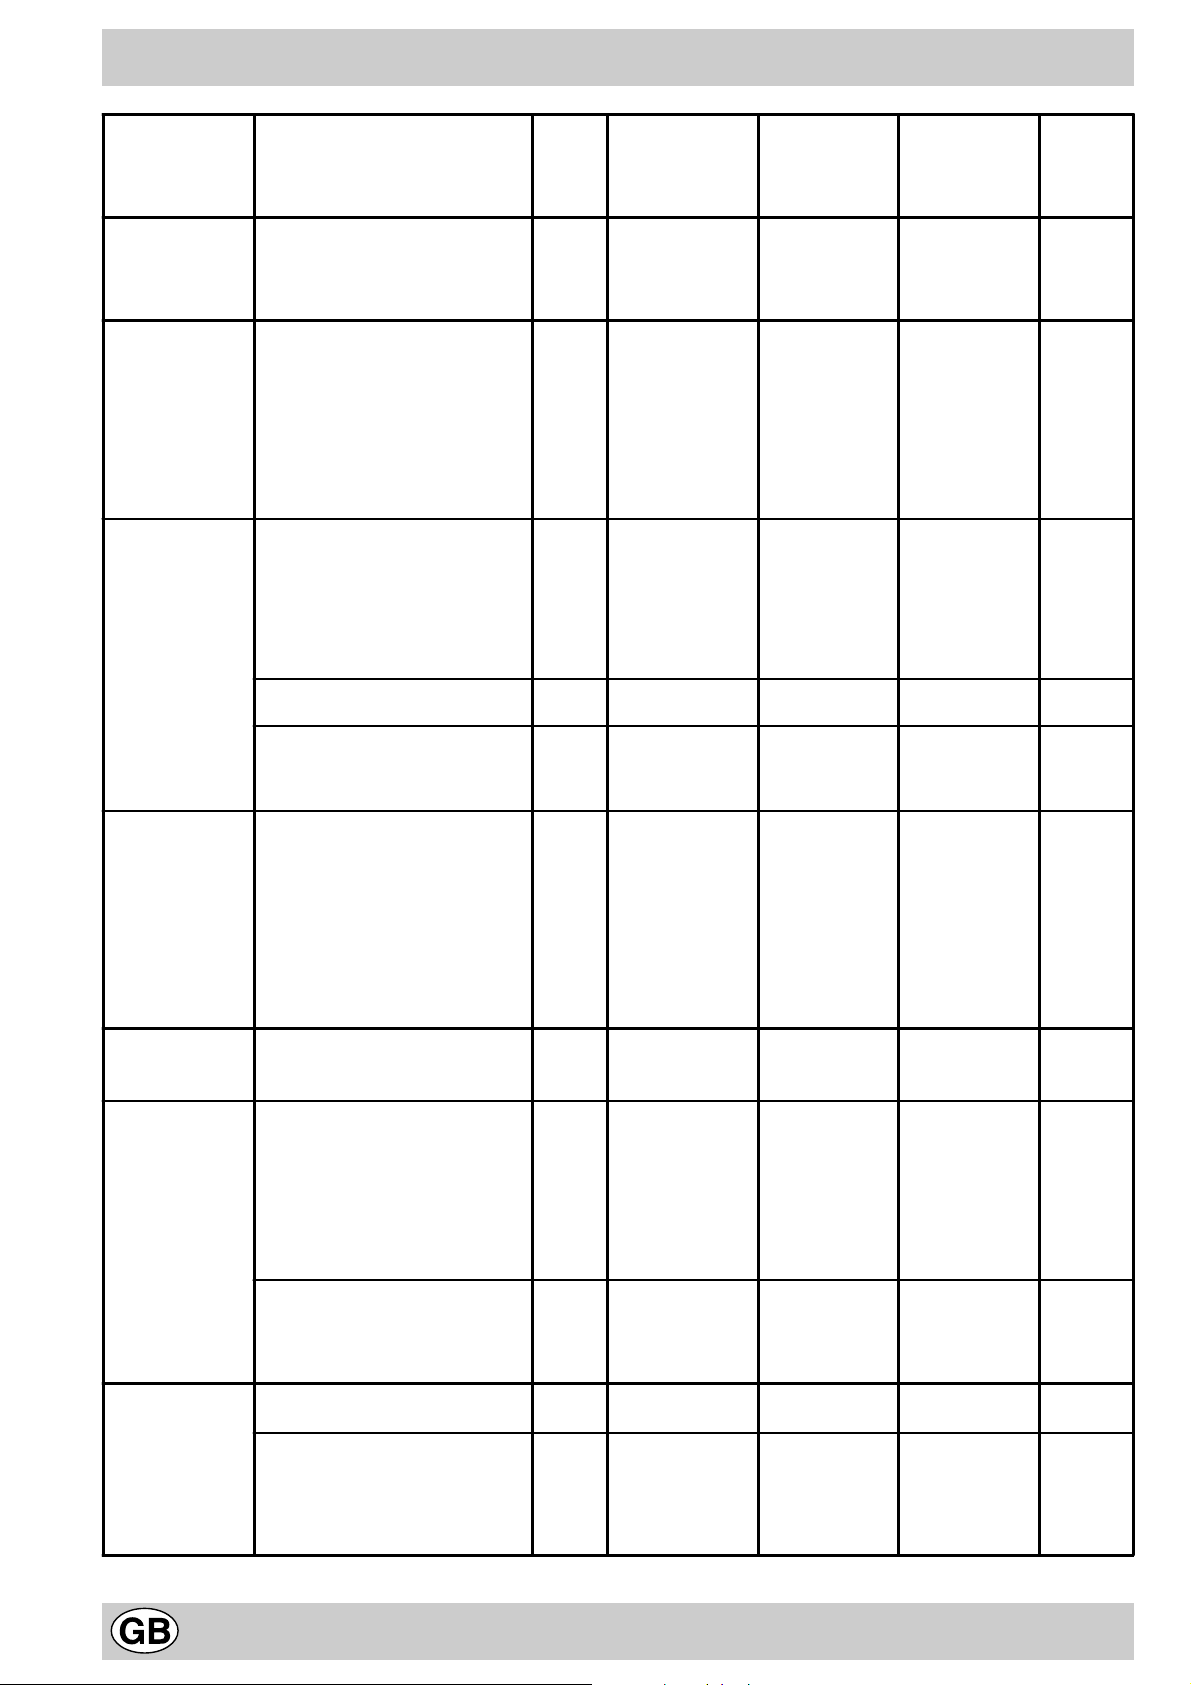
Setting m ade Type of food Weig-
ht (in
kg)
Position of
the rack from
the oven
bottom
Preheating
tim e (m in .)
Thermostat
se tting
Cooking
tim e
(m in .)
1 Traditional
a
2 Baking
u
3 Fast
cooking
v
4 M u lticooking
b
5 Pizza
w
Duck
Roast veal or beef
Pork roast
Biscuits (short pastry)
Tarts
Tarts
Fruit cakes
Plum cake
Sponge cake
Stuffed pancakes
Sm all cakes (on 2 racks)
Cheese puffs (on 2 racks)
Cream puffs (on 3 racks)
Biscuits (on 3 racks)
M eringues (on 3 racks)
Frozen food
Pizza
Courgette and prawn pie
Country style spinach pie
Turnovers
Lasagne
Golden Rolls
Chicken morsels
Pre-cooked food
Golden chicken wings
Fresh Food
Biscuits (short pastry)
Plum cake
Cheese puffs
Pizza (on 2 racks)
Lasagne
Lam b
Roast chicken + potatoes
M ackerel
Plum cake
Cream puffs (on 2 racks)
Biscuits (on 2 racks)
Sponge cake (on 1 rack)
Sponge cake (on 2 racks)
Savo ury pies
Pizza
Roast veal or beef
Chicken
(on 2 racks)
1
1
1
-
1
0.5
1
0.7
0.5
1.2
0.6
0.4
0.7
0.7
0.5
0.3
0.4
0.5
0.3
0.5
0.4
0.4
0.4 2 - 200 20-2 5
0.3
0.6
0.2
1
1
1
1+1
1
1
0.5
0.5
0.5
1.0
1.5
0.5
1
1
3
3
3
3
3
3
2/3
3
3
2-4
2-4
2-4
1-3-5
1-3-5
1-3-5
2
2
2
2
2
2
2
2
2
2
2-4
3
2
2-4
2
2
2-4
2-4
2
2-4
3
3
2
2/3
15
15
15
15
15
15
15
15
15
15
15
15
15
15
15
15
10
10
15
10
10
10
10
10
10
15
15
10
10
200
200
200
180
180
180
180
180
160
200
190
210
180
180
90
-
-
-
-
-
-
-
-
-
-
Max
200
220
200
200
180
220
200
180
210
230
180
180
200
180
170
190
180
170
170
200
220
220
180
65-75
70-75
70-80
15-20
30-35
20-30
40-45
40-50
25-30
30-35
20-25
15-20
20-25
20-25
180
12
20
30-35
25
35
25-30
15-20
15-18
45
10-12
15-20
30-35
40-45
60-70
30-35
40-50
20-25
10-15
15-20
20-25
25-30
15-20
25-30
60-70
6 G rill
d 2
7 Gratin
e x
N.B.: cooking tim es are approxim ate and may vary according to personal taste. When cooking using the grill o r
gratin, the dripping pan m ust alw ays be placed on the 1st oven rack from the bottom .
Soles and cuttlefish
Squid and prawn kebabs
Cod filet
Grilled vegetables
Veal stea k
Cutlets
Ham burgers
M ackerels
Toasted sandwiches
W ith rotis se rie (where
present)
Veal on the spit
Chicken on the spit
Lam b on the spit
Grilled chicken
Cuttlefish
W ith rotis se rie (where
present)
Veal on the spit
Lam b on the spit
Chicken (on the spit) +
potatoes (roasted)
1
1
1
1
1
1
1
1
n.° 4
1.0
1.5
1.0
1.5
1.5
1.5
1.5
1.5
-
4
4
4
3/4
4
4
4
4
4
-
-
-
3
3
-
-
-
2
5
5
5
5
5
5
5
5
5
5
5
5
5
5
5
5
5
5
Max
Max
Max
Max
Max
Max
Max
Max
Max
Max
Max
Max
200
200
200
200
200
200
8-10
6-8
10
10-15
15-20
15-20
7-10
15-20
2-3
80-90
70-80
70-80
55-60
30-35
70-80
70-80
70-75
70-75
22
Page 22

Safety Is A Good Habit To Get Into
To maintain the efficiency and safety of this appliance, we recommend that you do the following:
• only call the Service Centres authorised by the manufacturer
• always use original spare parts
• When handling the appliance, we recommend you
always use the purpose provided handles recessed
into the sides of the oven to prevent harming
people or damaging the appliance itself.
• This appliance is designed for non-professional, household use and its functions must not be changed.
• These instructions are only valid for the countries
whose symbols appear on the manual and the serial
number plate.
• The electrical system of this appliance can only be used
safely when it is correctly connected to an efficient
earthing system in compliance with current safety
standards.
• When the appliance is in use, the heating elements
and some parts of the oven door become extremely
hot. Make sure you don’t touc h them and keep children well away.
The following items are potentially danger ous, and
therefore appropriate measures must be taken to
prevent children and the disabled from coming into
contact with them:
- Controls and the appliance in general;
- Packaging (bags, polystyrene , nails, etc.);
- The appliance itself, immediately after use of the oven
or grill due to the heat generated;
- The appliance itself, when no longer in use (potentially
dangerous parts must be made safe).
Av oid the following:
- Touching the appliance with wet parts of the body;
- Using the appliance when barefoot;
- Pulling on the appliance or the supply cable to unplug
it from the electrical outlet;
- Improper or dangerous operations;
- Obstructing the ventilation or heat dissipation slots;
- Allowing power supply cables of small appliances to
come into contact with the hot parts of the appliance;
- Exposing the appliance to atmospheric agents such
as rain, or sunlight;
- Using the oven for storage purposes;
- Using flammable liquids near the appliance;
- Using adapters, multiple sockets and/or extension
leads;
- Attempting to install or repair the appliance without the
assistance of qualified personnel.
Qualified personnel must be contacted in the
following cases:
- Installation (following the manuf acturer’ s instructions);
- When in doubt about operating the appliance;
- Replacing the electrical socket when it is not compatible with the appliance plug.
Service Centres authorised by the manufacturer
must be contacted in the follo wing cases:
- If in doubt about the soundness of the appliance after
removing it from its packaging;
- If the power supply cable has been damaged or needs
to be replaced;
- If the appliance breaks down or functions poorly; ask
for original spare parts.
It is a good idea to do the following:
- Only use the appliance to cook food and nothing else;
- Check the soundness of the appliance after it has been
unpacked;
- Disconnect the appliance from the electrical mains if it is
not functioning properly and before cleaning or performing maintenance;
- When left unused, unplug the appliance form the electricity mains and turn off the gas tap (if foreseen);
- Use oven gloves to place cookware in the o ven or when
removing it;
- Always grip the oven door handle in the centre as the
extremities of the same may be hot due to any hot air
leaks;
- Make sure the knobs are in the “•”/”o” position when the
appliance is not in use.
- Cut the power supply cable after disconnecting it from
the mains when you decide not to use the appliance any
longer.
• The manufacturer may not be held responsible for any
damage due to: incorrect installation, improper , incorrect
and irrational use.
23
Page 23
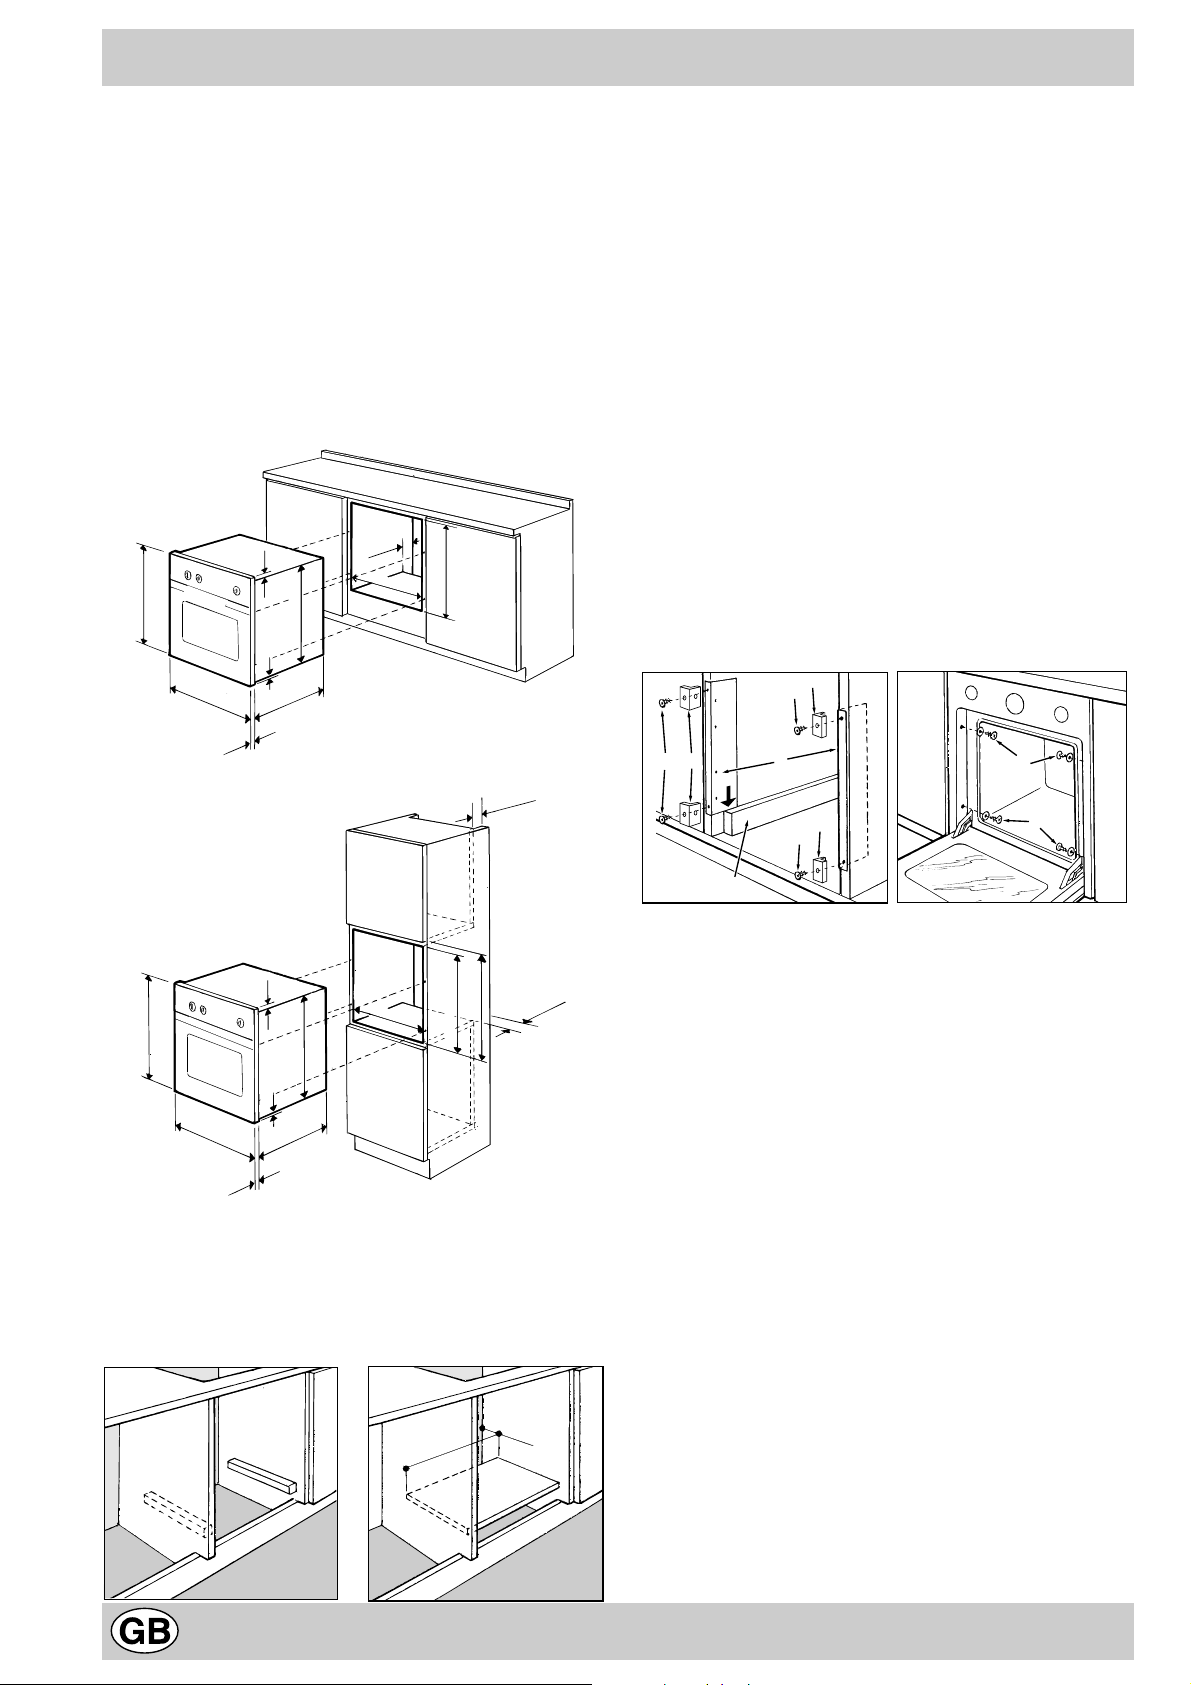
Instalation
The appliance must be installed only by a qualified
person in compliance with the instructions provided.
The manufacturer declines all responsibility f or improper
installation which may harm persons and animals and
damage property.
Important: The power supply to the appliance must be
cut off before any adjustments or maintenance work is
done on it.
Installation of Built-in Ovens
In order to ensure that the built-in appliance functions properly, the cabinet containing it must be appropr iate. The
figure below gives the dimensions of the cut-out f or installation under the counter or in a wall cabinet unit.
567 mm.
45 mm.
558 mm.
593 mm.
23 mm.
595 mm.
5 mm.
595 mm.
545 mm.
The panels of the adjacent cabinets must be made of heatresistant material. In particular, cabinets with a veneer e xterior must be assembled with glues which can withstand
temperatures of up to 100 °C.
In compliance with current safety standards, contact with
the electrical parts of the oven must not be possible once
it has been installed.
All parts which ensure the safe operation of the appliance
must be removable only with the aid of a tool.
Fastening the oven to the cabinet
1. Place brackets “A ” up against the oven support “B”.
2. Place the tabs “C” up against brac kets “A”. In particular,
if the cabinet side panel:
• is 16 mm thick: mount the tab so that the number 16 it
features is facing y ou;
• is 18 mm thick: mount the tab so that the part without
any wording is facing y ou;
• is 20 mm thick: do not mount the tab.
3. Fasten the brac kets and tabs on the oven cabinet side
panel using screws “D”.
4. Fasten the oven to the cabinet using the screws and
plastic washers “E”.
16
16
C
D
24 mm.
N.B.: Installation in compliance with the consumption declaration
45 mm.
min.
595 mm.
23 mm.
567 mm.
5 mm.
595 mm.
545 mm.
24 mm.
558 mm.
595 mm.
575-585 mm.
45 mm.
min.
In order to ensure adequate ventilation, the back panel of
the cabinet unit must be removed. Installing the oven so
that it rests on two strips of wood is preferab le. If the ov en
rests on a continuous, flat surface, there must be an aperture of at least 45 x 560 mm.
45 mm.
560 mm.
D
C
16
16
A
C
D
B
E
E
Electrical Connection
Those ovens equipped with a three-pole power supply
cable are designed to operate with an alternating current
with the voltage and frequency indicated on the data plate
(located on the appliance) and in the instruction manual.
The wire for earthing the appliance is yellow-green in colour.
Fitting on a Power Suppl y Cable
Opening the terminal board:
• Using a screwdriver , prise on the side tabs of the terminal board cover;
• Pull open the cover of the terminal board.
To install the cable, proceed as follows:
• Remove the wire clamp screw and the three contact
screws L-N-6
• Fasten the wires beneath the screwheads using the
following colour scheme: Blue (N) Br own (L) Yellow-
Green 6
• Fasten the supply cable in place with the clamp and
close the cover of the terminal board.
24
Page 24
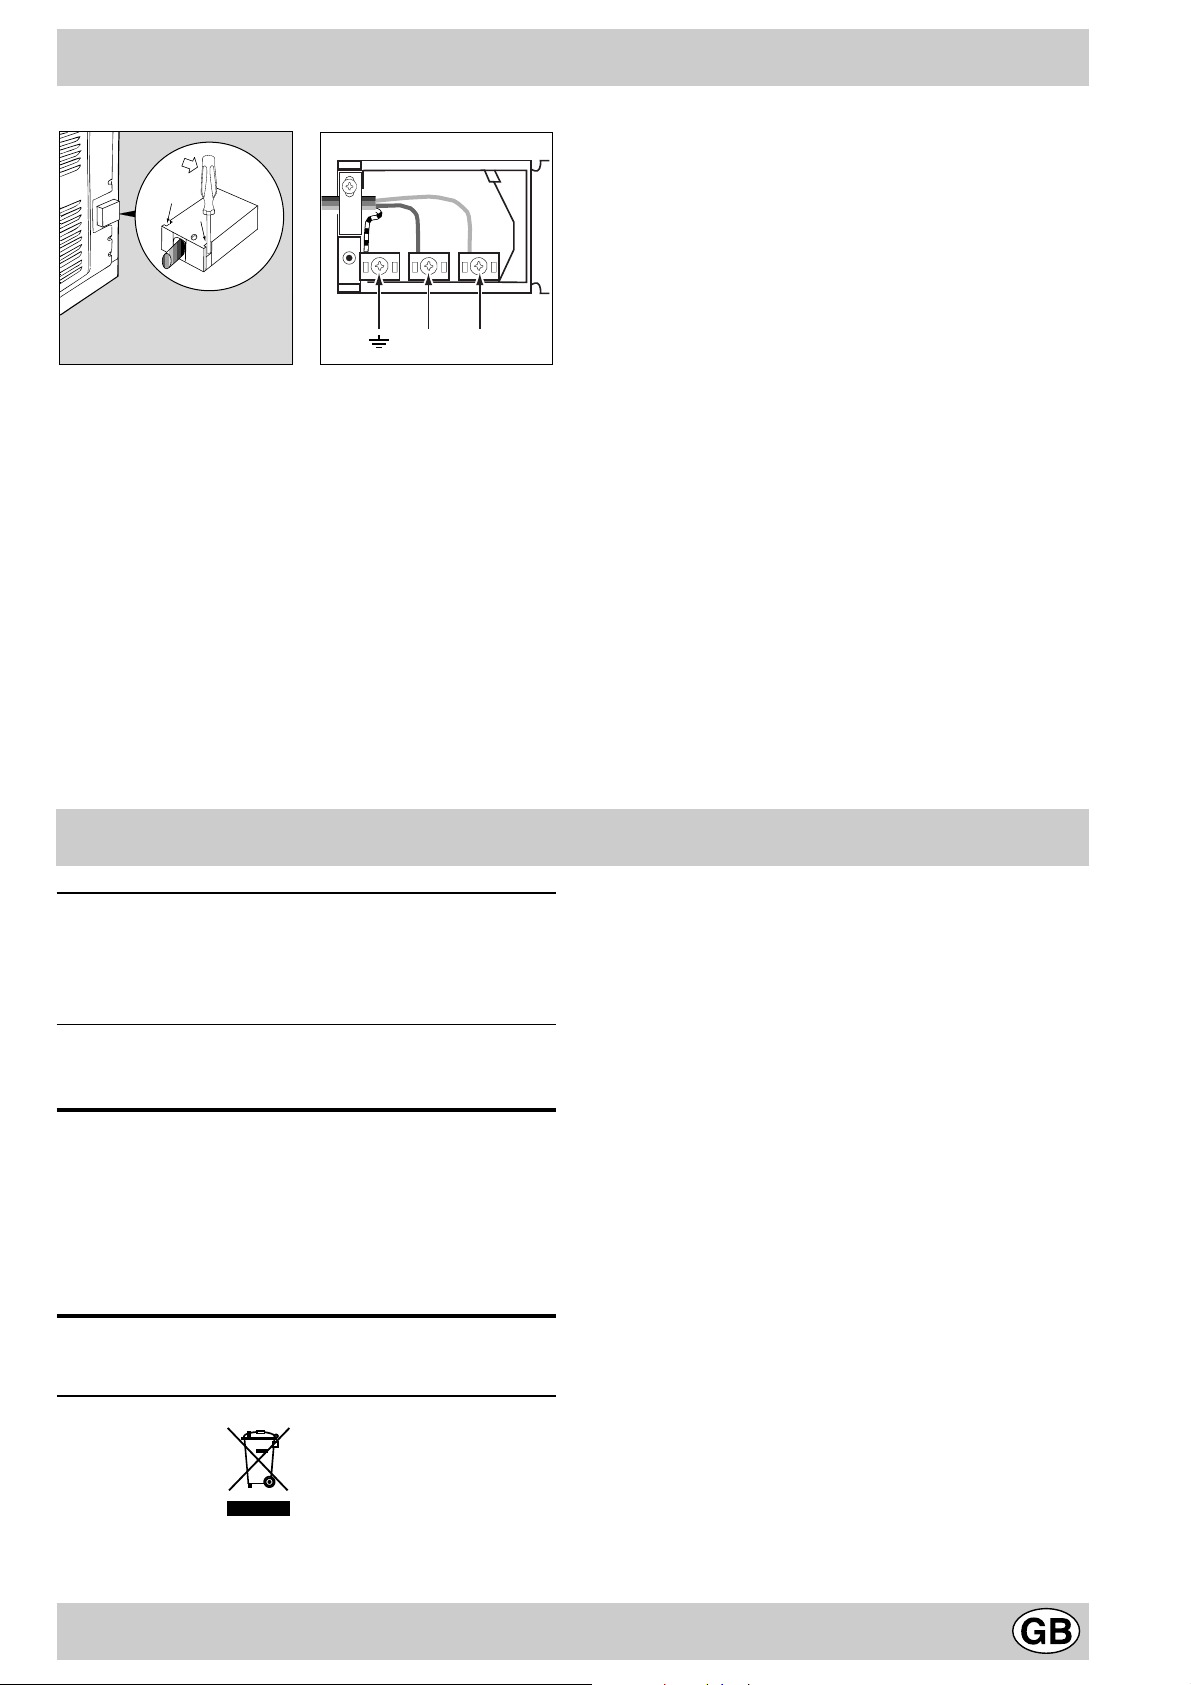
NL
Connecting the supply cable to the mains
Install a standardised plug corresponding to the load indicated on the data plate. When connecting the cable directly to the mains, install an omnipolar circuit-breaker with
a minimum contact opening of 3 mm between the appliance and the mains. The omnipolar circuit break er should
be sized according to the load and should comply with
current regulations (the earth wire should not be interrupted by the circuit breaker).
The supply cable should be positioned so that it does not
reach a temperature of more than 50°C with respect to
the room temperature, anywhere along its length.
Before making the connection, check that:
• The electrical safety of this appliance can only be guaranteed if the cooker is correctly and efficiently earthed,
in compliance with regulations on electrical safety. Always ensure that the earthing is efficient; if you have
any doubts call in a qualified technician to check the
system. The manufacturer declines all responsibility
for damage resulting from a system which has not been
earthed.
• Before plugging the appliance into the mains, check
that the specifications indicated on the date plate (on
the appliance and/or packaging) correspond to those
of the electrical mains system of your home.
• Check that the electrical capacity of the system and
sockets will support the maximum power of the appliance, as indicated on the data plate. If you have any
doubts, call in a qualified technician.
• If the socket and appliance plug are not compatible,
have the socket replaced with a suitable model by a
qualified technician. The latter, in particular, will also
have to ensure that the cross section of the socket
cables are suitable for the po w er absorbed b y the appliance. The use of adapters, multiple sockets and/or
extensions, is not recommended. If their use cannot
be avoided, remember to use only single or multiple
adapters and extensions which comply with current
safety regulations. In these cases, never exceed the
maximum current capacity indicated on the single
adapter or extension and the maximum power indicated
on the multiple adapter. The plug and socket must
be easily accessible.
Technical Specifications
Inner dimensions of the oven:
Width 43.5 cm
Depth 40 cm
Height 32 cm
Inner Volume of the Oven:
56 litres
ENERGY LABEL
Directive 2002/40/EC on the label of electric ovens
Norm EN 50304
Energy consumption for Natural conv ection
heating mode: a Convection
Declared energy consumption for Forced con vection Class
heating mode: u Baking
Voltage and Frequency of Power Supply:
220-240V ~ 50Hz 2560-3050W
This appliance conforms with the following
European Economic Community directives:
- 73/23/EEC of 19/02/73 (Low V oltage) and subsequent
modifications;
- 89/336/EEC of 03/05/89 (Electromagnetic
Compatibility) and subsequent modifications;
- 93/68/EEC of 22/07/93 and subsequent
modifications.
- 2002/96/EC
The European Directive 2002/96/EC on Waste Electrical
and Electronic Equipment (WEEE), requires that old
household electrical appliances must not be disposed of
in the normal unsorted municipal waste stream. Old
appliances must be collected separately in order to
optimise the recovery and recycling of the materials they
contain and reduce the impact on human health and the
environment. The crossed out “wheeled bin” symbol on
the product reminds you of your ob ligation, that when you
dispose of the appliance it must be separately collected.
Consumers should contact their local authority or retailer
for information concerning the correct disposal of their old
appliance.
7
25
Page 25
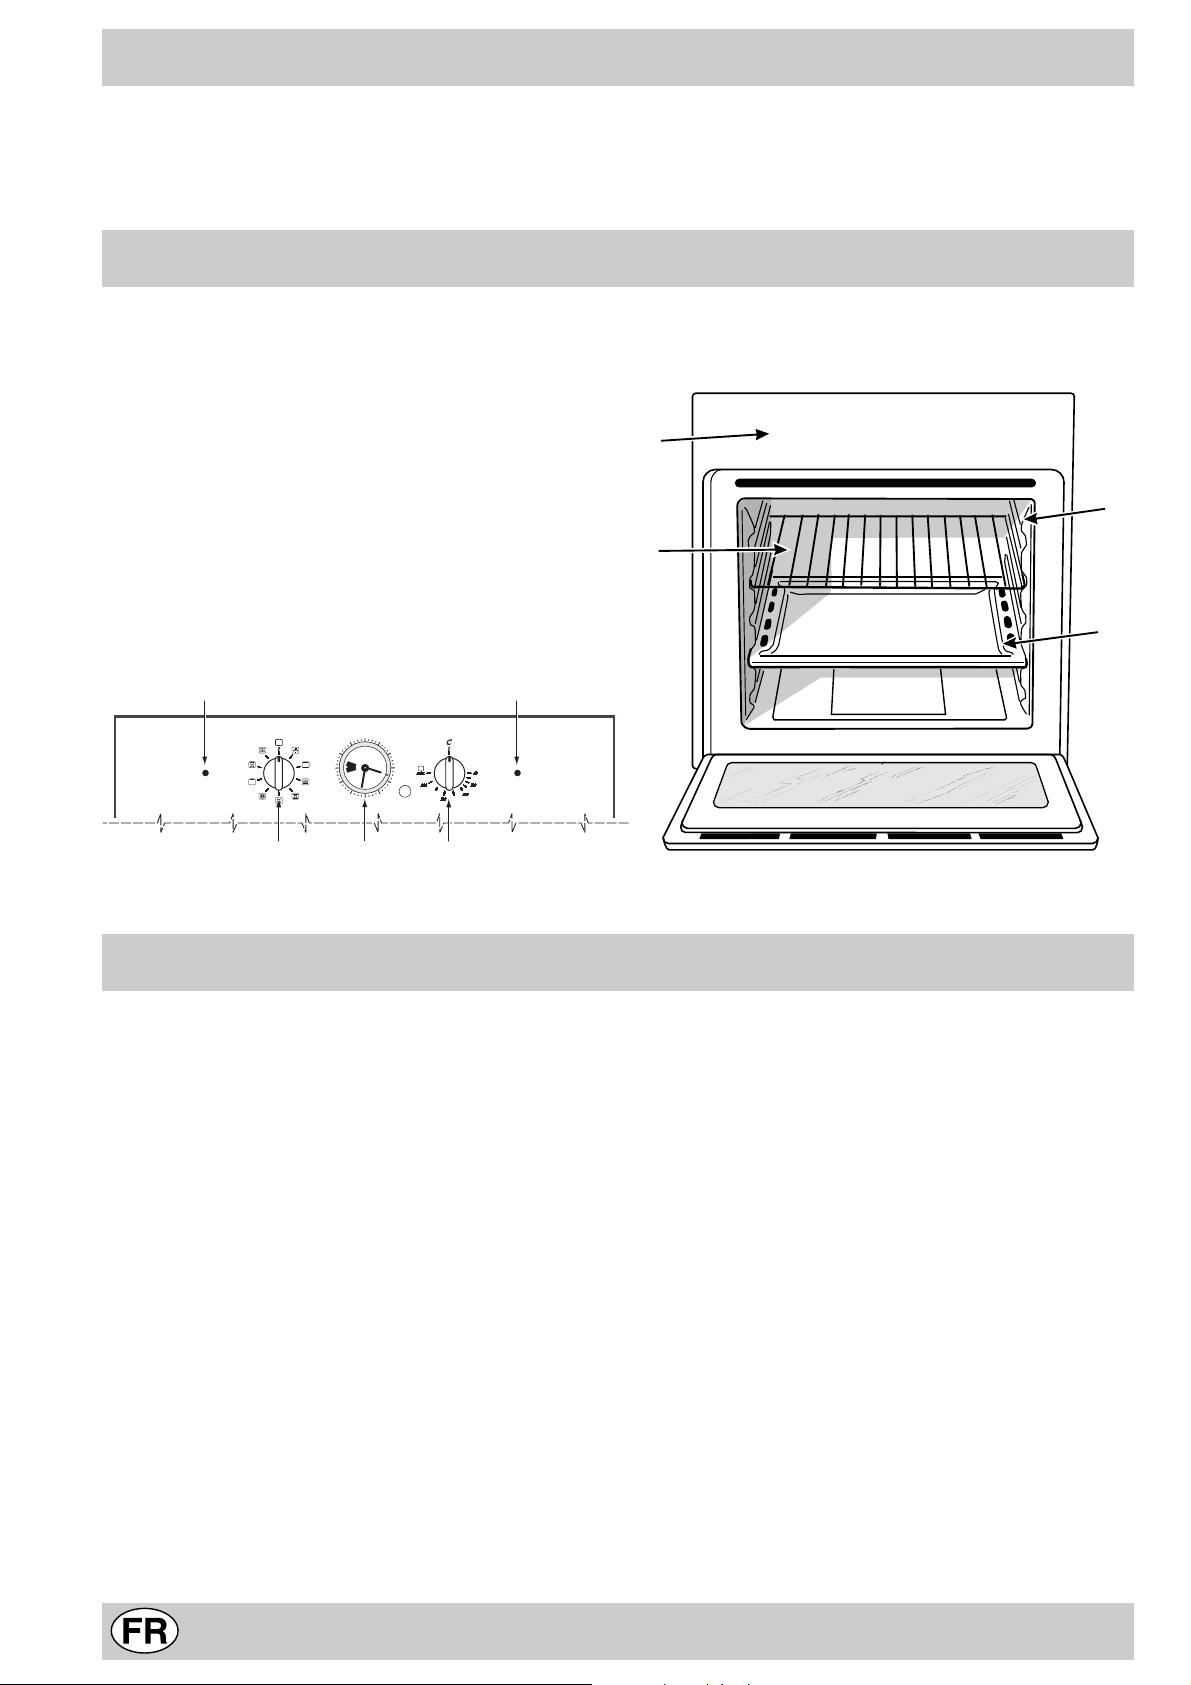
Merci d’avoir choisi un produit Ariston, fiable et facile à utiliser. Pour apprendre à bien connaître votre appareil, à
l’utiliser et à le conserver longtemps, lisez attentivement cette notice av ant toute utilisation car elle contient des instructions
très importantes concernant sa sécurité d’installation, d’usage et d’entretien. Conservez av ec soin cette brochure pour
toute consultation ultérieure. Merci.
Vu de près
A. T a bleau de bor d
B. Sélecteur de fonctions
C. Sélecteur de températures
E. Indicateur préchauffage (clignotant) ou cuisson
(allumé fixe) en cours
F. Lèchefrite ou plateau de cuisson
G. Grille du four
H. Crémaillère pour lèchefrites et grilles
I. Voyant verrouillage de porte (n’existe que sur
certains modèles) - Quand il est allumé, il indique que
la porte du four est verrouillée
O. Le pr ogrammateur analogique début/fin de cuisson
(n’existe que sur certains modèles)
A
H
G
F
E
12
3
9
6
B
O
C
I
Mode d’emploi
Le four “7 Cuochi” réunit en un seul appareil les qualités
des fours traditionnels à con vection naturelle : “statiques”
à celles des fours modernes à convection forcée: “ventilés”.
Il s’agit d’un appareil extrêmement performant qui vous
permet de choisir facilement et sans vous tromper parmi
7 modes de cuisson. Pour sélectionner les fonctions disponibles, utilisez le sélecteur “B” et le sélecteur de tem-
pératures “C” du tab leau de bord.
Système de refroidissement
Pour réduire la température à l’e xtérieur du four , certains
modèles sont équipés d’un ventilateur de refroidissement
qui se met automatiquement en marche quand le four est
chaud.
Pendant son f onctionnement, le ventilateur env oie de l’air
à l’extérieur par une fente située entre le bandeau et la
porte du four.
Remarque : le ventilateur continue à tourner après l’arrêt
du four jusqu’à ce que ce dernier se soit suffisamment
refroidi.
Attention : Lors de son premier allumage, f aites fonctionner
le four à vide, porte fermée, pendant au moins une demiheure en réglant la température à son maximum. Ouvrez
ensuite la porte et ventilez la pièce. L’odeur qui se dégage
parfois pendant cette opération est due à l’évapor ation des
produits utilisés pour protéger le four pendant le laps de temps
qui s’écoule entre la fabrication et l’installation du produit.
Attention : Installez la lèchefrite sur le premier gradin du
bas pour recueillir les graisses et les jus uniquement en cas
de cuissons au gril ou au tournebroche (ce dernier n’est
présent que sur certains modèles). Pour les autres modes
de cuisson n’utilisez jamais le gradin du bas et ne posez
jamais d’objets à même la sole du four , vous risqueriez d’abîmer l’émail. Enfournez toujours vos plats de cuisson (plats
pyrex, papier alu, etc. etc.) sur la grille fournie avec l’appareil
et montée dans les gradins de la crémaillère à l’intérieur de
l’enceinte du four .
Eclairage du four
Pour l’allumer , amenez le bouton “B” en face du symbole 8.
La lampe s’allume et reste allumée chaque fois qu’une
résistance électrique du four se met en marche.
Four T raditionnel a
Position sélecteur des températures “C”: entre 60°C et Max.
En effectuant ce choix, vous obtiendrez le branchement des
deux résistances (sole et voûte) C’est le four traditionnel de
26
Page 26

grand-mère revu pour atteindre un niveau exceptionnel de
diffusion de la chaleur et d’économie d’électricité. Rien n’égale
le four Traditionnel quand il s’agit de cuisiner des plats garnis traditionnels tels que : côtes de porc au chou, morue à
l’espagnole, stockfisch à la mode d’Ancône, v eau au riz etc...
V ous obtiendrez des résultats tout aussi excellents pour vos
plats de viande de bœuf ou de veau tels que : bœuf braisé,
ragoût, goulasch, gibier, jambon et longe de porc etc... qui
exigent une cuisson lente et de fréquents ajouts de liquides.
C’est aussi le mode de cuisson recommandé pour les gâteaux, les fruits et les plats mijotés dans des cocottes avec
couvercle. Lorsque v ous utilisez le f our T raditionnel, ne cuisez que sur un seul niveau pour avoir une meilleure diffusion de la chaleur. Choisissez le niv eau qui vous permettra
de mieux équilibrer la quantité de chaleur provenant de la
voûte et de la sole. Enfournez, au choix, sur les gradins du
haut ou du bas selon que vous désirez plus de chaleur provenant de la voûte ou de la sole .
Four Pâtisserie u
Position sélecteur des températures “C”: entre 60°C et Max.
Mise en marche de l’élément chauffant arrière ainsi que du
ventilateur pour obtenir une chaleur douce et uniforme à
l’intérieur du four. L’absorption électrique de cette fonction
est de 1600 W seulement.
Cette fonction est particulièrement indiquée pour la cuisson
de mets délicats comme les gâteaux levés et certains petitsfours sur 3 niveaux en même temps. Quelques exemples:
choux à la crème, biscuits sucrés et salés, friands, biscuit
roulé et légumes gratinés, etc.....
Four “Fast cooking” (“Cuisson rapide”) v
Position sélecteur des températures “C”: entre 60°C et Max.
Mise en marche des éléments chauffants ainsi que du ventilateur pour obtenir une chaleur constante et uniforme à
l’intérieur du four .
Cette fonction est particulièrement indiquée pour les cuissons
rapides (pas besoin de préchauffage) de plats préemballés
(par exemple: surgelés ou précuits) et pour certaines
«préparations maison».
Avec la cuisson «Fast cooking» («Cuisson rapide») vous
obtiendrez d’excellents résultats en n’utilisant qu’un seul
niveau (le 2ème en partant du bas), voir tableau «Conseils
utiles pour la cuisson».
Four Multicuisson b
Position sélecteur de températures “C”: entre 60°C et Max.
Mise en marche des éléments chauffants ainsi que de la
turbine. La chaleur est constante et bien répartie à l’intérieur
du four , l’air cuit et dore de façon uniforme et en tous points.
Vous pouvez ainsi procéder à une cuisson groupée en enfournant plusieurs plats ensemble à condition qu’ils cuisent
à la même température. P our cuire simultanément sur 2 niveaux, suivez les conseils f ournis dans le paragraphe “Cuisson groupée sur plusieurs niveaux”.
C’est la fonction qui convient le mieux à des plats gratinés
ou à la cuisson prolongée tels que : lasagnes, gratins de
pâtes, poulet rôti et pommes de terre au four etc... Le choix
de températures plus basses, possible grâce à une meilleure
répartition de la chaleur, vous permettra d’obtenir des rôtis
de viande plus juteux et tendres à souhait avec une moindre
perte de poids. Cette f onction convient aussi à merveille à la
cuisson du poisson qui ne subit aucune altération de son
aspect et de son goût car il exige un moindre apport de condiment.
Desserts: vous réussirez à coup sûr vos gâteaux levés.
La fonction «Multicuisson», réglée à une température de 80
°C sert aussi à décongeler rapidement la viande, rouge ou
blanche, le pain. Pour décongeler des mets plus délicats,
sélectionnez une température de 60°C ou n’utilisez que la
circulation d’air froid en amenant le sélecteur de températures sur 0°C.
Four Pizza w
Position sélecteur de tempér atures “C”: entre 60°C et Max.
Mise en marche des éléments chauffants, inférieur et
circulaire ainsi que du ventilateur. Cette combinaison permet
une montée en température rapide grâce à sa très grande
puissance (2800 W), l’apport de chaleur étant dans ce cas
plus important dans le bas du four.
Cette fonction «four pizza» est particulièrement indiquée
pour des plats qui exigent une très grosse quantité de chaleur ,
tels que: pizza et gros rôtis. N’utilisez qu’une lèchefrite ou
qu’une grille à la fois. Sinon, pensez à les changer de place
à mi-cuisson.
Grill d / 2
Position sélecteur de températures “C”: Max.
Mise en marche de l’élément chauffant supérieur central et
du tournebroche (si l’appareil en est équipé).
La température élevée et directe du gril permet de saisir
l’aliment en surface pour qu’il ne perde pas son jus et reste
tendre à souhait. La cuisson au gril est particulièrement recommandée pour les plats qui exigent une température élevée à leur surface : côtes de veau et de boeuf, entrecôtes,
filet, hamburgers, etc....
Cuisinez porte du four entrebâillée sauf dans le cas de
cuisson au tournebroche.
Vous trouverez des exemples d’utilisation dans le paragraphe “Conseils utiles pour la cuisson”.
Gratin e / x
Position sélecteur de tempér atures “C”: entre 60°C et 200°C .
Mise en marche de l’élément chauffant supérieur central, de
la turbine et du tournebroche (si l’appareil en est équipé).
L’irradiation thermique unidirectionnelle s’ajoute au brassage
de l’air pour une répartition uniforme de la chaleur dans l’enceinte du four. Plus de risques de brûler vos aliments en
surface et plus grande pénétration de la chaleur . C’est l’idéal
pour cuire: brochettes de viande et de légumes, saucisses ,
côtelettes de porc, côtelettes d’agneau, poulet à la crapaudine, cailles à la sauge, filet de porc etc...
Pour vos cuissons au «Gratin» gardez la porte du four
fermée.
Quant aux poissons, le Gratin n’a pas son pareil pour la
cuisson de tranches de mérou, de thon, d’espadon, de
sépioles farcies etc...
Nettoya ge automatique par fast clean
C’est le nettoyage intégral du four. Pour tous
renseignements sur fast clean, consultez le paragraphe
“Le nettoyage automatique par f ast clean”.
V
27
Page 27

Le tournebroche (n’existe que sur certains modèles)
Pour activ er le tournebroche, procédez comme suit :
a) placez la lèchefrite sur le 1er gradin ;
b) installez le support du tournebroche sur le 3ème gradin
et introduisez la broche sur le tournebroche positionné
dans le fond du four en la f aisant passer à tra vers le trou
prévu;
c) branchez le tournebroche en amenant le sélecteur «B»
sur la position correspondante 2 / x.
PROGRAMMATEUR ANALOGIQUE DEBUT/FIN DE CUISSON
12
9
Remise à l’heure
Le four doit être sous tension.
Poussez sur le bouton et tournez-le dans le sens inverse
des aiguilles d’une montre pour sélectionner l’heure réelle.
N.B.:En cas de coupure de courant, l’horloge qui est électrique cesse de fonctionner pendant toute la durée de la panne.
Dès retour du courant il faudra par conséquent la remettre à
l’heure.
Fonctionnement manuel
N.B.: à utiliser quand des cuissons pr ogrammées ne
sont pas nécessaires.
1 Tournez la manette dans le sens inverse des aiguilles
d’une montre jusqu’à ce que le symbole 9 apparaisse
dans la fenêtre d’affichage
2 Tirez la manette vers vous et tour nez-la dans le sens
inverse des aiguilles d’une montre pour amener le repère en face de l’heure réelle. Un déclic indiquera la fin
de l’opération.
Sélectionnez le programme de cuisson souhaité à l’aide de
la manette de sélection du four . P our éteindre le f our , ramenez le bouton à «0».
3
6
Programmation départ de cuisson immédiat
1 Amenez le temps de cuisson souhaité dans la fenêtre
d’affichage en tournant la manette dans le sens inverse
des aiguilles d’une montre.
2 Tirez la manette vers vous et tour nez-la dans le sens
inverse des aiguilles d’une montre pour amener le repère en face de l’heure réelle. Un déclic indiquera la fin
de l’opération.
Sélectionnez le programme de cuisson souhaité avec la manette de sélection.
Le four se met aussitôt en marche et fonctionne pendant
toute la durée programmée. Un signal sonore retentit pour
signaler l’arrêt du four.
Pour l’arrêter, tournez la manette dans le sens inverse des
aiguilles d’une montre jusqu’à ce que le symbole 9 apparaisse dans la fenêtre d’affichage.
Programmation départ de cuisson différé
1 Durée cuisson :
Amenez le temps de cuisson souhaité dans la fenêtre
d’affichage en tournant la manette dans le sens inverse
des aiguilles d’une montre.
2 Démarrage cuisson :
Tirez la manette vers vous et tournez-la dans le sens
inverse des aiguilles d’une montre pour amener le re-
père en face de l’heure de départ de cuisson souhaitée.
Sélectionnez le programme de cuisson souhaité à l’aide de
la manette de sélection du four .
Le four démarre automatiquement à l’heure choisie et fonctionne pendant toute la durée programmée. Un signal sonore retentit pour signaler l’arrêt du four.
Pour l’arrêter, tournez la manette dans le sens inverse des
aiguilles d’une montre jusqu’à ce que le symbole 9 apparaisse dans la fenêtre d’affichage.
28
Page 28

Le nettoyage automatique par fast clean
Quand vous activez la f onction fast clean, la température à
l’intérieur du four atteint 500 °C qui est la température
nécessaire pour carboniser les résidus. Vous pouvez v oir à
travers la vitre du f our des particules qui s’illuminent pendant
leur carbonisation par pyrolyse en entrant au contact des
résistances : il s’agit d’une combustion instantanée,
phénomène tout à fait normal et sans danger.
Précautions à prendre avant une pyr olyse
1- V eillez à éliminer les projections alimentaires importantes
avec une éponge humide . Il est vivement déconseillé d’utiliser
des produits détergents ou tout autre produit conseillé pour
le nettoyage des f ours.
2- Sortez tous les accessoires, qui ne sont en effet pas
conçus pour résister à des températures aussi élevées. De
plus, certains d’entre eux altéreraient le résultat de la pyrolyse
en faisant obstacle à la circulation de la chaleur sur toutes
les parois. Les accessoires peuvent être facilement netto yés
comme de la vaisselle courante y compris en lave-v aisselle.
3 - Ne laissez pas de torchon de cuisine sur la poignée.
Attention : au cours du nettoyage automatique, les
surfaces peuvent devenir extrêmement chaudes. Gardez
les enfants à distance.
Comment activer la fonction fast clean
– Fermez la porte.
– Amenez le sélecteur sur V
– Pour programmer la durée et/ou l’heure finale du F ast
clean, suivez les instructions fournies dans le
paragraphe “Programmation du Fast clean”.
Les sécurités
Compte tenu de la température très élevée, le f our est équipé
de dispositifs de sécurité :
• la porte est automatiquement verrouillée dès que la
température atteint des valeurs élevées pour éviter tout
risque de brûlures;
• à titre préventif, au cas où un évènement anormal
viendrait à se produire, les éléments chauffants ne
sont plus sous tension.
• la durée maximale permise est de 120 minutes au bout
desquelles le four s’éteint automatiquement.
• si le four est excessiv ement chaud, la pyrolyse pourrait
ne pas démarrer. Attendez que le four refroidisse.
Que se passe-t-il à la fin d’un cycle de “Fast clean”
avec démarrage immédiat et durée présélectionnée?
Le voy ant “E” s’éteint pour vous signaler la fin du cycle de
“Fast clean”.
Pour pouvoir ouvrir la porte du four , il f aut attendre que la
température à l’intérieur de l’enceinte descende à un
niveau acceptable. Le voyant “I” s’éteint pour signaler le
déverrouillage de la porte.
Vous pourrez alors constater des dépôts de poudre
blanche sur la sole et sur les parois du four; enlevez-les
avec une éponge mouillée une fois que le four aura
complètement refroidi.
Si vous voulez par contre profiter de la chaleur accumulée
pour lancer une cuisson, n’hésitez pas car les poudres
ne présentent aucun danger pour les aliments à cuire.
Que se passe-t-il à la fin du cycle de “Fast clean”
avec durée sélectionnée et démarrage immédiat/
différé?
Le voy ant “E” s’éteint et un signal sonore retentit pour v ous
indiquer que le cycle de “Fast clean” est terminé. Pour
arrêter la sonnerie, tournez la manette du programmateur
dans le sens inverse des aiguilles d’une montre jusqu’à
ce que le symbole 9 apparaisse dans la fenêtre
d’affichage.
Pour pouvoir ouvrir la porte du four , il f aut attendre que la
température à l’intérieur de l’enceinte descende à un
niveau acceptable. Le voyant “I” s’éteint pour signaler le
déverrouillage de la porte.
V ous pourrez alors constater des dépôts de poudre blanche
sur la sole et sur les parois du four; enlevez-les avec une
éponge mouillée une fois que le four aura complètement
refroidi.
Si vous voulez par contre profiter de la chaleur accumulée
pour lancer une cuisson, n’hésitez pas car les poudres ne
présentent aucun danger pour les aliments à cuire.
Remise en service après une coupure de courant
Si la température à l’intérieur du four n’est pas descendue
trop bas, un système spécial permet de faire repartir une
cuisson / pyrolyse (en cas de four pyrolyse) du moment
où elle a été interrompue. Procédez au réglage de l’heure
si vous le désirez.
NOTE
N’oubliez pas que, pour des raisons de sécurité, les
programmations de cuisson en attente de démarrage ne
sont pas rétablies lors du rétablissement du courant.
29
Page 29

Programmation de Fast clean
12
9
Fast clean avec démarra ge immédiat et durée
présélectionnée
Le cycle de “F ast clean” dure 120 minutes et ce mode de
fonctionnement doit être utilisé quand il n’y a pas besoin
de programmer la durée et l’heure de démarrage du “F ast
clean”.
1 Tournez la manette dans le sens inverse des aiguilles
d’une montre jusqu’à ce que le symbole 9 apparaisse
dans la fenêtre d’affichage
2 Tirez la manette vers vous et tour nez-la dans le sens
inverse des aiguilles d’une montre pour amener le repère
en face de l’heure courante. Un déclic indiquera la fin de
l’opération.
Sélectionnez le programme V à l’aide de la manette de
sélection du four . V ous pouvez éteindre le four à tout moment
en ramenant le sélecteur sur “0”.
Programmation de la durée du Fast clean a vec
démarrage immédiat
Le cycle de “F ast clean” dure 120 minutes maxim um, des
réglages supérieurs à 2 heures sont donc inutiles car le
four s’éteint automatiquement passé ce laps de temps.
3
6
1 T ournez le bouton dans le sens inverse des aiguilles d’une
montre pour amener dans la fenêtre d’affichage le temps
correspondant à la durée de “F ast clean” souhaité.
2 Tirez la manette vers vous et tournez-la dans le sens
inverse des aiguilles d’une montre pour amener le repère
en face de l’heure courante. Un déclic indiquer a la fin de
l’opération.
Sélectionnez le programme V à l’aide de la manette de
sélection du four .
Le cycle de “Fast clean” démarre immédiatement et
fonctionne pendant toute la durée sélectionnée. A la fin du
temps fixé, un signal sonore retentit : pour l’arrêter , tournez
la manette dans le sens inverse des aiguilles d’une montre
jusqu’à ce que le symbole 9 apparaisse dans la fenêtre
d’affichage.
Programmation de la durée du Fast clean a vec
démarrage différé
Le cycle de “F ast clean” dure 120 min utes maximum, des
réglages supérieurs à 2 heures sont donc inutiles car le
four s’éteint automatiquement passé ce laps de temps.
1 Durée “Fast clean”:
T ournez le bouton dans le sens inverse des aiguilles d’une
montre pour amener dans la fenêtre d’affichage le temps
correspondant à la durée de “F ast clean” souhaité.
2 Départ “Fast clean” :
Tirez la manette vers vous et tournez-la dans le sens
inverse des aiguilles d’une montre pour amener le repère
en face de l’heure de départ du “Fast clean” souhaitée .
Sélectionnez le programme V à l’aide de la manette de
sélection du four .
Le cycle de “Fast clean” démarrera à l’heure de départ
sélectionnée et fonctionnera pendant toute la durée
sélectionnée qui ne pourra de toute façon jamais dépasser
2 heures. A la fin du temps fixé, un signal sonore retentit :
pour l’arrêter, tournez la manette dans le sens inv erse des
aiguilles d’une montre jusqu’à ce que le symbole 9
apparaisse dans la fenêtre d’affichage.
NE VOUS INQUIETEZ PAS SI
1 au début du cycle fast clean le système de
refroidissement fonctionne à faib le vitesse ;
2 durant l’utilisation du programme Fast Clean, le
disjoncteur de votre installation électrique saute : c’est
qu’il y a surcharge de l’installation électrique (trop
d’appareils électriques en fonctionnement en même
temps);
3 la porte de votre four est verrouillée pendant le
programme F ast Clean : c’est un dispositif de sécurité
supplémentaire; la porte ne se déverrouillera qu’après
refroidissement complet du four;
4 après le cycle de Fast Clean il reste de petites taches
sur l’enceinte du four : il est conseillé d’éliminer les
projections plus importantes avant de lancer
l’autonettoyage et de sélectionner un programme d’une
durée adaptée au degré de salissure du four;
5 une fois la cuisson terminée, il sort encore de l’air
ventilé pendant un certain temps : il s’agit d’une phase
normale de refroidissement de l’enceinte du four;
6 en mode de fonctionnement “grill” la résistance
supérieure ne reste pas allumée en permanence
(rouge) : son fonctionnement est contrôlé par un
thermostat;
7 de la vapeur s’échappe quand vous ouvrez la porte en
cours de cuisson;
8 des gouttes d’eau ou de la vapeur se forment à
l’intérieur du four quand vous laissez v os préparations
dans le four après leur cuisson ;
30
Page 30

Comment le garder en forme
Avant toute opér ation de nettoy age ou d’entretien coupez
l’alimentation électrique de l’appareil.
Pour prolonger la durée de vie de votre appareil, nettoyez-le fréquemment, en n’oub liant pas que:
• pour le nettoyage, ne pas utiliser d’appareils à
vapeur
• les parties extérieures émaillées ou inox doivent être
lavées à l’eau tiède en évitant toute utilisation de poudres abrasives ou de produits corrosifs qui pourraient
les abîmer. L’acier inox peut se tacher. Si les taches
sont difficiles à enlever, utilisez des produits spéciaux
que vous trouverez dans le commerce. Il est conseillé
de rincer abondamment et d’essuyer après le nettoy age.
• l’intérieur du four doit être nettoyé, de préférence après
chaque usage, quand il est encore tiède avec de l’eau
chaude et du détergent, en rinçant et en essuyant ensuite soigneusement avec un chiff on doux. Evitez d’utiliser des produits abrasifs (des poudres par ex emple),
des éponges récurantes ou des acides (détartrants par
ex.) qui pourraient abîmer l’émail. En cas d’incrustations particulièrement difficiles à enlever , utilisez un nettoyant spécial f our en suivant à la lettre les instructions
indiquées sur l’emballage.
• si la durée d’utilisation du four se prolonge, de la buée
peut se former. Essuyez-la avec un chiff on doux.
• un joint en caoutchouc placé sur l’ouverture du four
assure son bon fonctionnement. Contrôlez par conséquent périodiquement l’état de ce joint. A u besoin, nettoyez-le en évitant d’utiliser des produits ou des objets
abrasifs. S’il est abîmé, adressez-vous au service
après-vente le plus proche de votre domicile. Mieux
vaut ne pas utiliser le four tant qu’il n’est pas réparé.
• ne tapissez jamais la sole du four de papier aluminium
car l’accumulation de chaleur qui s’en suivrait pourrait
compromettre la cuisson et détériorer l’émail.
• nettoyez la vitre de la porte du four à l’aide de produits
et d’éponges non abrasifs et séchez avec un chiffon
doux.
• ouvrez la porte complètement ;
• soulevez et f aites pivoter les leviers situés sur les deux
charnières ;
• saisissez la porte par les côtés extérieurs, refermez-la
lentement mais pas complètement ;
• tirez-la vers vous en la sortant de son logement;
Remontez la porte en refaisant en sens inverse les opérations indiquées ci-dessus.
123
Remplacement de la lampe à l’intérieur de l’enceinte
du four
• Déconnectez l’appareil à l’aide de l’interrupteur
omnipolaire reliant le four à l’installation électrique ou
bien débranchez la fiche, si elle est accessible;
• Dévissez le couvercle en verre de la douille;
• Dévissez l’ampoule, remplacez-la par une ampoule résistant à des températures élevées (300°C) et ayant
les caractéristiques suivantes:
- T ension 230/240 V
- Puissance 25W
- Culot E14
• Remontez le couvercle en verre et connectez l’appa-
reil.
cavité
lampe
joint
Dépose de la porte du four
Pour nettoyer plus à fond, vous pouvez déposer la por t e
du four . Procédez comme suit :
Conseils utiles pour la cuisson
Le four vous offre de nombreuses possibilités de cuisson
appropriées à chaque type d’aliment. Les notes qui suiv ent
ne sont par conséquent qu’indicatives, vous pourrez les
enrichir au gré de votre expérience personnelle.
Préchauffage
Quand il faut préchauffer le four, en gros chaque fois que
vous devez enfourner des pâtes levées, vous pouvez utili-
ser la fonction w “four pizza” qui permet d’atteindre la tem-
pérature désirée très rapidement tout en réduisant la con-
sommation d’énergie.
Une fois que vous avez enfourné, vous pouvez passer à la
fonction de cuisson la plus indiquée.
hublot
Cuisson simultanée sur plusieurs niveaux
Seules les fonctions “pâtisserie” u ou la fonction b
“multicuisson” vous permettent de cuire sur plusieurs
niveaux.
Pour la cuisson de v os mets délicats sur plusieurs niv eaux,
utilisez la fonction “pâtisserie” u qui vous permet de cuire
simultanément sur 3 niveaux (1°, 3° et 5°). Vous trouverez
des exemples d’utilisation dans le tableau “Conseils utiles
pour la cuisson”.
Pour les autres cuissons sur plusieurs niveaux, utilisez la
fonction b “Multicuisson” en tenant compte des conseils
suivants:
31
Page 31

• Le four dispose de 5 niveaux. Utilisez deux des trois
niveaux du milieu, ce sont les plus indiqués pour la cuisson
ventilée, le premier du bas et le dernier du haut sont
directement frappés par l’air chaud qui pourrait brûler des
mets délicats;
• Utilisez de préférence le 2° et le 4° niveaux en partant du
bas en enfournant sur le 2° les plats qui exigent plus de
chaleur. Si vous cuisinez par exemple un rôti de viande
en même temps que d’autres plats, enfournez le rôti sur
le 2° niveau et vos plats plus délicats sur le 4°;
• Lors de la cuisson simultanée de plats dont les temps et
les températures de cuisson varient, choisissez une
température intermédiaire, enfournez le plat le plus délicat
sur le 4° niveau et sortez du four , avant les autres, le plat
dont la cuisson est plus rapide;
• Utilisez la lèchefrite sur le niveau du bas et la grille sur
celui du haut;
Utilisation de la fonction “Cuisson rapide”
Fonctionnelle, rapide et pr atique pour tous ceux qui utilisent
des produits “préemballés” (par exemple: surgelés ou
précuits) et pas seulement; v ous trouverez des conseils utiles
dans le tableau “Conseils utiles pour la cuisson”.
Utilisation du gril
Le four “7 Cuochi” vous offre plusieurs modes de cuisson
barbecue.
Utilisez la fonction d / 2 “gril”, porte entrebâillée, en
plaçant vos aliments au milieu de la grille (placée au 3° ou
au 4° niveau en partant du bas) car seule la partie centrale
de la résistance du haut est allumée.
Placez la lèchefrite fournie avec l’appareil sur le 1° niveau
pour recueillir les graisses et/ou le jus.
Quand vous utilisez cette fonction, n’oubliez pas de régler
votre thermostat sur le maximum. Vous pouvez aussi
sélectionner des températures plus basses en réglant le
sélecteur de températures sur la température souhaitée.
Sur les modèles équipés de tournebroche 2, vous pouvez
utiliser en fonction “gril” le kit correspondant. Dans ce cas ,
fermez la porte du four pendant la cuisson et placez la broche
sur le 3e niveau (en partant du bas) et la lèchefrite sur le 1e
pour recueillir les graisses et/ou le jus.
La fonction e / x “Gratin”, uniquement porte fermée, est
extrêmement utile pour des grillades rapides, la chaleur
produite par le gril, bien distribuée, permet de dorer en surface
et de cuire en dessous aussi.
Vous pouvez vous en servir pour parfaire la cuisson
d’aliments ayant besoin de dorer en surf ace, c’est l’idéal par
exemple pour dorer vos gratins de pâtes en fin de cuisson.
Quand vous choisissez cette fonction, placez la grille sur le
2° ou 3° gradin en partant du bas (voir tableau de cuisson)
et placez une lèchefrite sur le premier gradin en partant du
bas pour recueillir les graisses et éviter la f ormation de fumée.
Important : pour la cuisson en fonction “Gratin”, la porte du four doit être fermée, vous obtiendrez de meilleurs
résultats et ferez des économies d’énergie (10% environ).
Quand vous utilisez cette fonction, nous vous conseillons
de régler votre thermostat sur 200 °C, le gril dont le
fonctionnement se base sur l’émission d’infrarouges en sera
d’autant plus performant. Ceci ne vous empêche toutefois
pas d’utiliser des températures plus basses que vous
sélectionnerez à l’aide du bouton du thermostat.
Sur les modèles équipés de tournebroche x, vous pouvez
utiliser en fonction “Gratin” le kit correspondant. Dans ce
cas, positionnez le kit tournebroche sur le 3e niveau (en
partant du bas) et la lèchefrite sur le 1e pour recueillir le jus
et/ou les graisses.
En cuisson barbecue, placez la grille sur les derniers
gradins en partant du bas (voir tableau de cuisson) et
placez la lèchefrite fournie sur le premier gradin en
partant du bas pour recueillir les graisses et éviter la
formation de fumée.
Cuisson de la pâtisserie
Enfournez toujours vos gâteaux à four chaud, attendez que
l’extinction du voyant rouge «E» vous signale que le préchauffage est terminé. N’ouvrez pas la porte en cours de
cuisson, votre gâteau risquerait de s’affaisser . En général :
Pâtisserie trop sèche
La prochaine fois progr amme z une te mpératur e de
10°C supérieure et réduise z le tem ps de c uisson.
Le gâteau s'affaisse
Utilisez moins de liqu ide ou bai ssez la tem pérat ure de
10°C.
Gâteau foncé sur le dessus
Enfournez-le à u n nivea u plu s bas, chois iss ez une
température plus ba sse et prolo ngez la cuis son
Bonne cuisson extérieure, mais intérieur colla nt
Utilisez moins de liqu ide, abai ssez la tem pérat ure,
augmentez le temps de c uisson.
Le gâteau ne se démoule pas
Beurrez bien votr e moul e et far inez-l e un peu ou bien
utilisez du papier s ulfur isé.
"J'ai enfourné sur plusieurs niveaux (en fonction
"ventilé") mais je n'ai pas obtenu sur tous les
mêmes résultats de cuisson".
Sélectionnez une tempé ratur e infér ieure. Il n'est pas
dit que des plats enfour nés en mêm e temp s do ivent
obligatoirement êtr e sortis ensembl e.
Cuisson de la pizza
Pour une bonne cuisson de la pizza utilisez la fonction w
«four pizza»:
• Préchauffez le four pendant au moins 10 minutes
• Utilisez un plat en aluminium léger, posez-le sur la grille
du four. L’utilisation de la lèchefrite prolonge le temps de
cuisson et vous obtiendrez difficilement une pizza
croustillante.
• N’ouvrez pas souvent le four pendant la cuisson
• Si vos pizzas sont bien garnies (“capricciosa”, “quattro
stagioni”) n’ajoutez la mozzarelle qu’à mi-cuisson.
32
Page 32

• Si vous enfournez simultanément plusieurs pizzas (sur 2
niveaux) choisissez de préférence la fonction “four
Multicuisson” b car la f onction “four pizza” w ferait cuire
davantage la pizza placée sur le 1er niveau du bas .
Cuisson du poisson et de la viande
Pour les viandes b lanches, les volailles et le poisson utilisez
des températures entre 180°C et 200 °C.
Pour rissoler les viandes rouges à l’extérieur et les garder
juteuses à l’intérieur, sélectionnez au départ une température élevée (200°C-220°C) pendant un bref laps de temps
puis diminuez-la par la suite.
En général, plus votre rôti est gros, plus v ous de v ez choisir
une température basse et prolonger la durée de cuisson.
Placez la viande au milieu de la grille et placez la lèchefrite
en dessous pour recueillir les graisses.
Enfournez la grille de manière à ce que la viande se trouve
au centre du four. Si vous voulez plus de chaleur en dessous, choisissez les gradins les plus bas. Pour obtenir des
rôtis savoureux (canard et gibier notamment), bardez v otre
viande de lard ou de petit salé en faisant en sorte qu’ils se
trouvent sur le dessus de la viande quand vous l’enf ournez.
33
Page 33

Sélection
choisie
Type d'alim ent Poids
(K g)
Position de la
gr ille p a r
rapport à la
sole du four
Durée du
préchauffage (min.)
Sélection du
thermos tat
Durée de
la
cuisson
(min.)
1 Traditionnel
a
2 Pâtisserie
u
3 Cuisson
rapide
v
4 Multicuisson
b
5 Pizza
w
6 Gril
d 2
Canard
Rôti de veau ou de bœ uf
Rôti de porc
Biscuits (pâte brisée)
Tartes
Tartes
Tarte aux fruits
Plum -cake
Génoise
Crêpes farcies (sur 2 niv.)
P etits g â tea u x (s ur 2 n iv. )
Friands au from age (sur 2
niveaux)
Choux à la crèm e (sur 3 niv)
Biscuits (sur 3 niveaux)
Meringues (sur 3 niveaux)
Surgelés
Pizza
Mélange de courgettes et
crevettes en croûte
Feuilleté aux épinards
Chaussons
Lasagnes
Petits pains dorés
Poulet en morceaux
Précuits
Ailes de poulet dorées
Alim ents Frais
Biscuits (pâte brisée)
Plum -cake
Friands au from age
Pizza (sur 2 niveaux)
Lasagnes
Agneau
Poulet rô ti + pom m es de
terre
Maquereau
Plum -cake
Choux à la crème (su 2niv.)
Biscuits (sur 2 niveaux)
Génoise (sur 1 niveau)
Génoise (sur 2 niveaux)
Tartes salées
Pizza
Rôti de veau ou de bœ uf
Poulet
Soles et seiches
Brochettes de calmars et de
crev e ttes
Tranches de colin
Légumes grillés
Steaks de veau
C ô tele tte s
Ham burgers
Maquereaux
Croque-monsieur
Avec tournebroche
(si
1
1
1
-
1
0.5
1
0.7
0.5
1.2
0.6
0.4
0.7
0.7
0.5
0.3
0.4
0.5
0.3
0.5
0.4
0.4
0.4 2 - 200 20-25
0.3
0.6
0.2
1
1
1
1+1
1
1
0.5
0.5
0.5
1.0
1.5
0.5
1
1
1
1
1
1
1
1
1
1
n.° 4
3
3
3
3
3
3
2/3
3
3
2-4
2-4
2-4
1-3-5
1-3-5
1-3-5
2
2
2
2
2
2
2
2
2
2
2-4
3
2
2-4
2
2
2-4
2-4
2
2-4
3
3
2
2/3
4
4
4
3/4
4
4
4
4
4
15
15
15
15
15
15
15
15
15
15
15
15
15
15
15
-
-
-
-
-
-
-
-
-
-
15
10
10
15
10
10
10
10
10
10
15
15
10
10
5
5
5
5
5
5
5
5
5
200
200
200
180
180
180
180
180
160
200
190
210
180
180
90
Max
200
220
200
200
180
220
200
180
210
230
180
180
200
180
170
190
180
170
170
200
220
220
180
Max
Max
Max
Max
Max
Max
Max
Max
Max
65-75
70-75
70-80
15-20
30-35
20-30
40-45
40-50
25-30
30-35
20-25
15-20
20-25
20-25
180
12
20
30-35
25
35
25-30
15-20
15-18
45
10-12
15-20
30-35
40-45
60-70
30-35
40-50
20-25
10-15
15-20
20-25
25-30
15-20
25-30
60-70
8-10
6-8
10
10-15
15-20
15-20
7-10
15-20
2-3
votre appareil en est
équipé)
7 Gratin
e x
Veau à la broche
Poulet à la broche
Agneau à la broche
Poulet grillé
Seiches
Avec tournebroche
(si
1.0
1.5
1.0
1.5
1.5
-
-
-
3
3
5
5
5
5
5
Max
Max
Max
200
200
80-90
70-80
70-80
55-60
30-35
votre appareil en est
équipé)
Veau à la broche
Agneau à la broche
Poulet (à la broche) +
pom mes de terre (dans
1.5
1.5
1.5
-
-
-
-
2
5
5
5
5
200
200
200
200
70-80
70-80
70-75
70-75
lèchef rite)
N.B.: les tem ps de cuisson sont purem ent indicatifs et peuvent être modifiés selon les goûts de chacun. E n cas de cuisson au
gril ou au gratin placez toujours la lèchefrite sur le 1er gradin en partant du bas.
34
Page 34

La sécurité, une bonne habitude
Pour garantir l’efficacité et la sécurité de ce produit
• adressez-vous exclusivement à des Centres d’assistance tec hnique agréés
• exigez toujours l’utilisation de pièces détachées originales.
• Pour déplacer l’appareil servez-vous toujour s des
poignées prévues sur les côtés du four, vous
éviterez ainsi tout risque de blessure ou
d’endommagement de l’appareil.
• Cet appareil a été conçu pour un usage non professionnel, à domicile, et ses caractéristiques ne peuvent être
modifiées.
• Les instructions fournies ne sont applicables qu’aux pays
dont les symboles sont reportés dans la notice et sur la
plaquette d’immatriculation....
• La sécurité de cet appareil n’est garantie que si ce dernier a été correctement raccordé à une installation de
mise à la terre efficace conforme aux normes de sécurité.
• En cours de fonctionnement, les éléments chauffants
et certaines parties de la porte peuvent devenir très
chauds. Attention à ne pas les toucher et à garder
les enfants à distance.
Ce dernier pouvant représenter un danger , évitez que
des enfants ou des incapables aient accès :
- aux commandes et à l’appareil en général ;
- aux emballages (sachets, polystyrène, clous etc.) ;
- à l’appareil, pendant et tout de suite après l’utilisation du
four et du gril, à cause de la surchauffe;
- à l’appareil inutilisé (dans ce cas il faut rendre inoffensives les parties pouvant s’avérer dangereuses)...
Evitez :
- de toucher l’appareil avec des parties du corps humides
;
- de l’utiliser pieds nus ;
- de tirer sur l’appareil ou sur le cordon d’alimentation pour
le débrancher de la prise de courant ;
- toute opération inappropriée et dangereuse ;
- de boucher les fentes d’aération ou de déperdition de la
chaleur ;
- que le cordon d’alimentation de petits électroménagers
touchent à des parties chaudes de l’appareil ;
- l’exposition aux agents atmosphériques (pluie, soleil) ;
- d’utiliser le four comme rangement ;
- d’utiliser des liquides inflammables à proximité ;
- d’utiliser des adaptateurs, des prises multiples et/ou des
rallonges ;
- toute tentative d’installation ou de réparation sans l’intervention de personnel qualifié.
Faites toujours appel à des techniciens qualifiés dans
les cas suivants :
- installation (conforme aux instructions du fabricant) ;
- quand vous avez des doutes sur son fonctionnement ;
- remplacement de la prise en cas d’incompatibilité avec
la fiche de l’appareil.
Faites appel aux centres de service après-vente
agréés par le fabricant dans les cas suivants :
- en cas de doute sur le bon état de l’appareil lors de son
déballage ;
- endommagement ou remplacement du cordon d’alimentation ;
- en cas de panne ou de mauvais fonctionnement, exigez
des pièces détachées d’origine.
Effectuez les opérations suivantes :
- évitez toute opération autre que la cuisson ;
- vérifiez le bon état de l’appareil lors de son déballage ;
- déconnectez l’appareil en cas de mauvais fonctionnement et avant toute opération de nettoyage ou d’entretien ;
- quand il est inutilisé, débranchez l’appareil de la prise de
courant et fermez le robinet du gaz (s’il y en a un de
prévu) ;
- utilisez des gants de protection pour enfourner ou sortir
des plats du four ;
- saisissez toujours la poignée de porte en son milieu car
à ses extrémités les sorties d’air chaud pourraient la rendre plus chaude ;
- contrôlez toujours si les manettes sont bien sur “•”/”o”
quand l’appareil n’est pas utilisé.
- coupez le cordon d’alimentation après l’avoir débranché
de la prise quand vous décidez de ne plus utiliser votre
appareil.
• Le fabricant décline toute responsabilité en cas de dommages provoqués par : une mauvaise installation, un
usage impropre et erroné.
35
Page 35

INSTALLATION
L’installation doit être effectuée conformément aux
instructions du fabricant et par un professionnel du
secteur. Le f abricant décline toute responsabilité pour tous
dommages causés à des personnes, à des animaux ou à
des choses du fait d’une installation incorrecte de
l’appareil.
Important : déconnectez le four a vant de procéder à toute
opération de réglage, d’entretien etc.
Installation des fours à encastrer
Pour garantir un bon fonctionnement d’un appareil à
encastrer, il faut que le meuble possède des
caractéristiques bien précises. Les dimensions de la niche
à l’intérieur du meuble en cas d’installation sous plan ou
en colonne sont indiquées sur la figure qui suit.
567 mm.
45 mm.
558 mm.
593 mm.
23 mm.
595 mm.
5 mm.
595 mm.
545 mm.
24 mm.
Les panneaux des meubles adjacents doivent être
fabriqués dans un matériau résistant à la chaleur . Dans
le cas notamment de meubles en bois plaqué, il faut que
les colles résistent à une température de 100 °C.
Conformément aux normes de sécurité, après
encastrement de l’appareil, il ne doit plus y avoir possibilité
de contact avec les parties électrifiées.
Toutes les parties qui servent de protection doivent être
fixées de manière à ne pouvoir être enlevées qu’a vec l’aide
d’un outil.
Fixation du four au meuble
1. Positionnez les pattes “A” de manière à ce qu’elles
buttent contre les cales support du four “B”.
2. Positionnez les taquets “C” contre les pattes “A”.
Attention à l’épaisseur des joues du meuble :
• si elle est de 16 mm : montez le taquet de manière à
ce que le chiffre 16 indiqué sur ce dernier soit tourné
vers vous ;
• si elle est de 18 mm : montez le taquet côté dépourvu
d’indication tourné vers vous ,
• si elle est de 20 mm : ne montez pas le taquet.
3. Fixez les pattes et les taquets en bordure de la joue
du meuble à l’aide des vis “D”.
4. Fixez le four au meuble à l’aide des vis et des rondelles
plastique “E”.
16
16
C
D
45 mm.
min.
595 mm.
23 mm.
567 mm.
5 mm.
595 mm.
545 mm.
24 mm.
558 mm.
595 mm.
575-585 mm.
45 mm.
min.
Pour garantir une bonne aération il faut éliminer la paroi
arrière de la niche, il vaut mieux installer le four de manière
à ce qu’il repose sur deux cales en bois; s’il y a par contre
un plan d’appui continu, ce dernier doit avoir une ouverture d’au moins 45 x 560 mm.
45 mm.
560 mm.
D
C
16
16
A
C
D
B
E
E
Raccordement électrique
Les fours munis d’un cordon d’alimentation tripolaire, sont
prévus pour un fonctionnement au courant alternatif à la
tension et à la fréquence d’alimentation indiquées sur la
plaquette des caractéristiques (placée sur l’appareil) et
dans le livret d’instructions. Le conducteur de terre du câb le
est jaune-vert.
Montage du cordon d’alimentation
Ouverture du bornier :
• Faites pression à l’aide d’un tournevis sur les languettes
latérales du couvercle du bornier ;
• Tirez et ouvrez le couvercle du bornier.
Pour monter le cordon d’alimentation, procédez comme suit:
• dévissez la vis du serre-câble de même que les trois vis
des contacts L-N-6
• fixez les fils sous les têtes de vis en respectant les couleurs : Bleu (N) Marr on (L) Jaune-V ert 6
• fixez le câble d’alimentation dans le serre-câble correspondant et fermez le couvercle
36
Page 36

NL
Branchement du câble d’alimentation au réseau
électrique
Montez sur le câble une fiche normalisée pour la charge
indiquée sur la plaquette des caractéristiques; en cas de
branchement direct au réseau, intercalez entre l’appareil et
l’installation électrique un interrupteur omnipolaire ayant au
moins 3 mm d’ouverture entre les contacts, dimensionné à
la charge et conforme aux normes applicables (l’interrupteur ne doit pas interrompre le fil de la terre).
Le câble d’alimentation ne doit atteindre, en aucun point,
des températures dépassant de 50°C la température ambiante.
Av ant de procéder au branchement, vérifiez que :
• La sécurité électrique de cet appareil n’est assurée que
si ce dernier est correctement raccordé à une installation de mise à la terre conformément aux normes applicables en matière de sécurité électrique. Il est indispensable de vérifier si cette condition fondamentale de sé-
curité est bien remplie; en cas de doute, f aites appel à un
professionnel du secteur pour un contrôle minutieux de
l’installation électrique. Le f abricant ne peut en aucun cas
être considéré responsable des dommages pouvant survenir si l’installation de mise à la terre fait déf aut.
• Avant de brancher l’appareil, vérifiez si les caractéristiques techniques reportées sur les étiquettes (apposées
sur l’appareil et/ou sur l’emballage) correspondent bien
à celles de votre installation électrique .
• Vérifiez si la charge électrique de l’installation et des prises de courant est apte à supporter la puissance maximum de l’appareil figurant sur la plaquette. En cas de
doute, faites appel à un prof essionnel du secteur .
• En cas d’incompatibilité entre la prise et la fiche de
l’appareil, faites remplacer cette prise par une autre
appropriée par un professionnel du secteur . Ce dernier
devra aussi vérifier si la section des câbles de la prise
est apte à supporter la puissance absorbée par l’appareil.
En général, il vaut mieux n’utiliser ni adaptateurs, ni prises
multiples ni rallonges. Si leur emploi s’avère indispensable,
n’utilisez que des adaptateurs simples ou multiples et
des rallonges conformes aux normes de sécurité, tout
en veillant à ne pas dépasser la limite de la charge
électrique indiquée sur l’adaptateur simple ou sur les
rallonges et la puissance max. indiquée sur l’adaptateur
multiple. La fiche et la prise doivent être d’un accès
facile.
Caractéristiques T echniques
Dimensions utiles du four:
largeur : cm 43,5
profondeur : cm 40
hauteur : cm 32
Volume utile du four:
litres 56
ETIQUETTE ENERGIE
Directive 2002/40/CE sur l’étiquette des fours électriques
Norme EN 50304
Consommation énergie convection naturelle
fonction four : a T raditionnel
Consommation énergie déclarée pour Classe convection f orcée
fonction four : u Pâtisserie
Tension et fréquence d’alimentation :
220-240V ~ 50Hz 2560-3050W
Cet appareil est conforme aux Directives
Communautaires suivantes :
- 73/23/CEE du 19/02/73 (Basse Tension) et
modifications successives ;
- 89/336/CEE du 03/05/89 (Compatibilité
électromagnétique) et modifications successives ;
- 93/68/CEE du 22/07/93 et modifications
successives.
- 2002/96/EC
La Directive Européenne 2002/96/EC sur les Déchets des
Equipements Electriques et Electroniques (DEEE), exige
que les appareils ménagers usagés ne soient pas jetés
dans le flux normal des déchets municipaux. Les appareils
usagés doivent être collectés séparément afin d’optimiser
le taux de récupération et le recyclage des matériaux qui
les composent et réduire l’impact sur la santé humaine et
l’environnement. Le symbole de la ‘ ‘poubelle barrée’ ’ est
apposée sur tous les produits pour rappeler les obligations
de collecte séparée.
Les consommateurs devront contacter les autorités
locales ou leur revendeur concernant la démarche à suivre
pour l’enlèvement de leur vieil appareil.
7
37
Page 37

Le agradecemos por haber elegido un producto Ariston, seguro y realmente fácil de usar. Para conocerlo y utilizarlo
bien y por mucho tiempo, le aconsejamos, antes de utilizar el aparato, leer atentamente las advertencias contenidas
en el presente manual, ya que suministran importantes indicaciones referidas a la seguridad, la instalación, el uso y el
mantenimiento. Conservar cuidadosamente este manual para posteriores consultas. Gracias.
Visto de cerca
A. Panel de mando
B. Perilla para selección de las funciones de cocción
C. Perilla para la temperatura de cocción
E. Luz indicadora de precalentamiento (centelleante)
o de cocción (encendida fija) en curso
F. Bandeja o placa de cocción
G. Parrilla del horno
H. Guías de deslizamiento bandejas y parrillas
I. Luz testigo de bloqueo de la puerta (presente sólo
en algunos modelos) - Si está encendida indica que la
apertura de la puerta del horno está bloqueada
O. El programador análogico de comienzo / final de
cocción (presente sólo en algunos modelos)
A
H
G
F
E
12
3
9
6
B
O
C
I
Cómo utilizarlo
El horno 7 Cuochi reúne, en un único aparato, las ventajas de
los tradicionales hornos de convección natural: “convencionales” y las de los modernos hornos de convección f orzada: “v entilados”.
Se trata de un aparato sumamente versátil, que permite elegir,
de modo fácil y seguro, entre 7 diferentes métodos de cocción.
La selección de las distintas funciones ofrecidas se obtiene utilizando las perillas de selección «B» y del termostato «C» presentes en el panel de mandos.
Ventilación de enfriamiento
Con la finalidad de obtener una disminución de la temperatura externa, algunos modelos están dotados de un ventilador de enfriamiento que se activa automáticamente
cuando el horno está caliente.
Cuando el ventilador está en funcionamiento se puede
sentir un chorro de aire que sale entre el panel frontal y la
puerta del horno.
Nota: Al final de la cocción el ventilador permanecerá en funcionamiento hasta que el horno esté suficientemente frío.
Atención: Cuando se enciende por primera vez, aconseja-
mos hacer funcionar el horno vacío durante aproximadamente
media hora a la temperatura máxima, y con la puerta cerrada.
Una vez transcurrido dicho tiempo, apáguelo, abra la puerta
del horno y airee el ambiente. El olor que a veces se advierte
durante esta operación es causado por la evapor ación de substancias empleadas para proteger el horno durante el lapso de
tiempo que transcurre entre la fabricación y la instalación del
producto.
Atención: Utilice el primer piso , desde abajo, colocando la bandeja
suministrada con el aparato, para recoger jugos y/o grasa, solamente en el caso de cocciones en el grill o con asador automático
(presente sólo en algunos modelos). Para otras cocciones no utilice nunca el primer piso, desde abajo , y nunca apoye objetos en el
fondo del horno mientras está cocinando, porque podría causar
daños al esmalte. Coloque siempre sus recipientes de cocción
(fuentes para horno, películas de aluminio, etc.) sobre la parrilla
suministrada con el aparato, ubicada en las guías del horno .
La luz del horno
Se enciende girando la perilla «B» hasta el símbolo 8. Ilumina el horno y permanece encendida cuando se pone en
funcionamiento un elemento eléctrico calentador cualquiera del horno.
38
Page 38

Horno T radicional a
Posición de la perilla del termostato “C”: Entre 60°C y Max.
En esta posición se encienden los dos elementos calentadores inferior y superior. Es el clásico horno de la abuela,
pero que se llevó a un excepcional niv el de distribución de la
temperatura y de limitación del consumo. El horno Tradicional es insuperable en los casos en que se deban cocinar
platos cuyos ingredientes estén compuestos por dos o más
elementos que contribuyen a formar un plato único, como
por ejemplo: coles con costillas de cerdo , bacalao a la española, bacalao seco a la anconetana, medallones de ternera
con arroz, etc... Se obtienen óptimos resultados en la preparación de platos a base de carnes de vaca o de ternera
como: estof ados, gulasch, carnes de animales de caza, pierna y lomo de cerdo, etc... que necesitan de cocción lenta
con un constante agregado de líquidos. Sigue siendo el mejor
sistema de cocción para las tortas, para la fruta y para las
cocciones con recipientes tapados, específicos para cocinar al horno. Cuando cocine en el horno Tradicional utilice
un solo piso, ya que si se utilizan más , se tendría una mala
distribución de la temperatura. Usando los distintos pisos
que tiene a disposición podrá balancear la cantidad de calor
entre la parte superior e inferior. Si la cocción necesita mayor calor desde abajo o desde arriba, utilizar los pisos superiores o inferiores.
Pastelería u
Posición de la perilla del termostato “C”: Entre 60°C y Max.
Se activa el elemento calentador posterior y entra en funcionamiento el ventilador garantizando un calor delicado y unif orme en el
interior del horno. La absorción eléctrica de esta función es sólo de
1600 W .
Esta función es aconsejable para la cocción de alimentos delicados, en especial las tortas que necesitan leudado y algunas preparaciones «mignon» en 3 niveles simultáneamente . Algunos ejemplos son: bignè, bizcochos dulces y salados, bizcochitos salados
de hojaldre, bizcocho arrollado, pequeños trozos de verduras al
horno, etc....
Horno «Cocción veloz» v
Posición de la perilla del termostato “C”: Entre 60°C y Max.
Se activan los elementos calentadores y entra en funcionamiento
el ventilador garantizando un calor constante y uniforme en el interior del horno.
Esta función es particularmente aconsejable para cocciones veloces (no necesita precalentamiento) de alimentos envasados (por
ejemplo: congelados o precocidos) y para algunas «preparaciones caseras».
En el horno «Cocción veloz» los mejores resultados se obtienen
utilizando un sólo nivel (el 2° comenzando desde abajo), ver la
tabla «Consejos prácticos para la cocción».
Horno Multicocción b
Posición de la perilla del termostato “C”: Entre 60°C y Max.
Se activan los elementos calentadores y entra en funcionamiento el ventilador. Debido a que el calor es constante y
uniforme en todo el horno, el aire cocina y dora los alimentos de modo uniforme en todos los puntos. También se pueden cocinar simultáneamente comidas diferentes entre sí,
siempre que las temperaturas de cocción sean similares.
Es posible utilizar hasta un máximo de 2 pisos simultáneamente siguiendo las advertencias contenidas en el párrafo
“Cocción simultánea en varios pisos”.
Esta función está particularmente indicada para platos que
necesitan un gratinado o para platos que necesitan de una
cocción bastante larga, por ejemplo: lasañas, macarrones
sazonados, pollo asado con patatas, etc... Se obtienen notables ventajas en la cocción de los asados de carne ya que
la mejor distribución de la temperatura permite utilizar temperaturas más bajas que reducen la dispersión de líquidos
manteniendo la carne más tierna con una menor pérdida de
peso. El horno Multicocción se aprecia particularmente en
la cocción de pescados, porque pueden cocinarse con muy
poco sazonado manteniendo así inalterado su aspecto y
sabor.
Postres: resultados seguros se obtienen cocinando tor tas
con levadura.
La función «Multicocción» se puede también usar para una
descongelación rápida de carnes blancas o rojas y de pan,
seleccionando una temperatura de 80 °C. Para descongelar
alimentos más delicados, puede seleccionar 60°C o usar
sólo la circulación de aire frío ubicando la perilla del termostato en 0°C.
Horno Pizza w
Posición de la perilla del termostato “C”: Entre 60°C y Max.
Se activan los elementos calentadores inferior y circular y entra en
funcionamiento el ventilador . Esta combinación permite un rápido
calentamiento del horno gracias a la notable potencia erogada (2800
W), con un fuerte aporte de calor prevalentemente desde abajo .
La función horno pizza es particularmente aconsejable para comidas que requieren una gran cantidad de calor , por ejemplo: la pizza
y los asados de grandes dimensiones. Utilizar una sola bandeja o
parrilla a la vez, si se utilizara más de una, es necesario
intercambiarlas entre sí en la mitad de la cocción.
Grill d / 2
Posición de la perilla del termostato “C”: Max .
Se enciende el elemento calentador superior central y se
pone en funcionamiento el asador automático (si
disponible).
La temperatura elev ada y directa del grill permite el inmediato dorado superficial de los alimentos que, obstaculizando la salida de los
líquidos, los mantiene más tiernos internamente. La cocción al grill
está particularmente aconsejada para aquellos platos que necesitan de elevada temper atura superficial: bistecs de ternera y vaca,
entrecôte, solomillo, hamb urguesas, etc...
Realice las cocciones con la puerta del horno semiabierta
salvo en el caso de cocción con asador automático.
Algunos ejemplos de uso se encuentran en el párrafo “Consejos
prácticos para la cocción”.
Gratin e / x
Posición de la perilla del termostato “C”: Entre 60°C y 200°C .
Se enciende el elemento calentador superior central y se
pone en funcionamiento el ventilador y el asador automático (si disponible).
Une a la irradiación térmica unidireccional, la circulación forzada del aire en el interior del horno. Esto impide que se
quemen superficialmente los alimentos aumentando el poder de penetración del calor . Utilizando el Gratin se obtienen
resultados excelentes en broquetas mixtas de carne y verdura, salchichas, costillas de cerdo, chuletas de cordero,
pollo a la diabla, codorniz a la salvia, solomillo de cerdo,
39
Page 39

etc...
Realice las cocciones con el «Gratin» con la puerta del
horno cerrada.
Con los pescados, el Gratin es insuperable en la cocción de
lonjas de cherna, de atún, de pez espada, sepias rellenas, etc...
Limpieza automática mediante fast clean
V
Es la función de limpieza integral del horno. P ara obtener
información referida a la limpieza automática mediante
fast clean, consulte el párrafo “La limpieza automática
mediante fast clean”.
El asador automático (sólo en algunos modelos)
Para accionar el asador automático proceda del siguiente
modo:
a) coloque la bandeja par a la grasa en el 1° piso;
b) introduzca el soporte del asador automático en el 3° piso
y coloque el espetón introduciéndolo, a tra vés del orificio
correspondiente, en el asador automático colocado en
la parte posterior del horno;
c) accione el asador automático seleccionando la posición
con la perilla 2 / x.
EL PROGRAMADOR ANALÓGICO DE COMIENZO/FIN DE LA COCCIÓN
12
9
3
6
Cómo poner la hora corriente
El horno debe estar conectado eléctricamente.
Pulse el botón y gírelo en sentido antihorario hasta fijar la
hora exacta.
Nota: El reloj funciona eléctricamente, por lo tanto, en
caso de un corte de corriente se detendrá, y no funcionará
hasta que se restablezca la misma. P osteriormente será
necesario repetir la operación de colocación de la hora
corriente.
Funcionamiento manual
Nota: Utilizarlo en todos los casos en que no se
necesitan cocciones programadas.
1 Gire la perilla en sentido antihorario hasta hacer aparecer,
en la representación visual, el símbolo 9
2 Tire la perilla y gírela en sentido antihorario hasta llevar
el índice móvil a la altura de la hora corriente. Un disparo
indicará el final de la operación.
Con la perilla de selección del horno elija el programa de
cocción deseado. Para apagar el horno lleve dicha perilla
hasta la posición “0”.
Programación de la cocción con comienzo inmediato
1 Gire la perilla en sentido antihorar io hasta observar el
tiempo de cocción deseado en la representación visual.
2 Tire la perilla y gírela en sentido antihorario hasta llevar
el índice móvil a la altura de la hora corriente. Un disparo
indicará el final de la operación.
Con la perilla de selección del horno elija el programa de
cocción deseado.
El horno se enciende inmediatamente y funciona durante
todo el tiempo de cocción seleccionado. Una señal acústica
advertirá que el horno se apaga.
Para interrumpirla gire la perilla en sentido antihorario hasta
hacer aparecer, en la representación visual, el símbolo 9.
Programación de la cocción con comienzo retrasado
1 Duración de la cocción:
Gire la perilla en sentido antihorario hasta observar el
tiempo de cocción deseado, en la representación visual.
2 Comienzo de la cocción:
Tire la perilla y gírela en sentido antihorario hasta hacer
corresponder el índice móvil con la hora de comienzo de
la cocción deseada.
Con la perilla de selección del horno elija el programa de
cocción deseado.
El horno se encenderá a la hora de comienzo de la cocción
y
funcionará durante todo el tiempo de cocción seleccionado.
Una señal acústica advertirá que el horno se apaga.
Para interrumpirla gire la perilla en sentido antihorario hasta
hacer aparecer, en la representación visual, el símbolo 9.
40
Page 40

La limpieza automática mediante fast clean
Activando la función fast clean, la temperatura interna del
horno alcanza los 500 °C necesarios para la carbonización
de los residuos. A través de la puerta del horno, se pueden
notar algunas partículas que se iluminan durante su
carbonización por pirólisis al entrar en contacto con las
resistencias: se trata de una combustión instantánea,
fenómeno absolutamente normal, que no constituye
ningún peligro.
Consejos útiles antes de la limpieza automática
1- Trate de eliminar los residuos de sustancias alimenticias
más consistentes con una esponja húmeda. Evite
estrictamente utilizar detergentes o cualquier otro producto
aconsejado para la limpieza de los hornos.
2- Extraiga todos los accesorios debido a que no pueden
resistir temperaturas tan elevadas. Además, algunos
accesorios podrían alterar el resultado de la limpieza
automática obstaculizando la circulación del calor en todas
las paredes. Los accesorios se pueden lavar fácilmente como
cualquier vajilla (incluso en lav avajilla).
3- No deje paños de cocina en la manija.
Atención: durante la limpieza automática, las superficies
pueden calentarse mucho. Mantenga alejados a los
niños.
Cómo activar la fast clean
– Cierre la puerta.
– Coloque la perilla de selección en V
– Para programar la duración y/o la hor a de finalización
de fast clean, siga las instrucciones contenidas en el
párrafo “Programar la Fast clean”.
Dispositivos de seguridad
Dada la alta temperatura, el horno está dotado de algunos
dispositivos de seguridad:
• la puerta se bloquea automáticamente apenas la
temperatura alcanza valores elevados para evitar
riesgos de quemaduras;
• los elementos calentadores no están más
alimentados eléctricamente, como prevención ante
cualquier evento anómalo .
• la duración máxima permitida es de 120 minutos al
finalizar la cual el horno se paga automáticamente.
• si el horno está excesivamente caliente, podría ocurrir
que la pirólisis no comenzara. Espere hasta que el
horno se enfríe.
Qué sucede al finalizar la “Fast clean” con comienzo
inmediato y con duración preseleccionada?
Cuando se apaga la luz testigo “E” significa que la “Fast
clean” ha finalizado .
Para poder abrir la puerta del horno será necesario
esperar que la temperatura en su interior haya descendido
a un nivel aceptable. Cuando se apaga la luz testigo “I”
significa que se ha desbloqueado la puerta.
En ese momento es posible constatar la presencia de
depósitos de polvo blanco en el fondo y en las paredes
del horno; elimínelos con una esponja húmeda una vez
que el horno se ha enfriado completamente.
Si, en cambio, se desea aprov echar el calor almacenado,
para comenzar una cocción, el polvo puede permanecer
ya que no constituye peligro alguno para los alimentos
que se van a cocinar .
¿Qué sucede al finalizar la “ Fast c lean” con duración
seleccionada y con comienzo inmediato/retrasado?
Cuando se apaga la luz testigo “E” y se emite una señal
sonora, significa que la “Fast clean” ha finalizado. Para
desactivar la señal sonora gire la perilla del programador
en sentido antihorario hasta hacer aparecer, en la
representación visual, el símbolo 9.
Para poder abrir la puerta del horno será necesario
esperar que la temperatura en su interior haya descendido
a un nivel aceptable. Cuando se apaga la luz testigo “I”
significa que se ha desbloqueado la puerta.
En ese momento es posible constatar la presencia de
depósitos de polvo blanco en el fondo y en las paredes
del horno; elimínelos con una esponja húmeda una vez
que el horno se ha enfriado completamente.
Si, en cambio, se desea aprov echar el calor almacenado,
para comenzar una cocción, el polvo puede permanecer
ya que no constituye peligro alguno para los alimentos
Reactivación después de un corte de energía eléctrica
Si la temperatura en el interior del horno no ha descendido
demasiado, el aparato posee un sistema que permite
reanudar la cocción/pirólisis (si existe) a partir del punto
en el cual había sido interrumpida debido al corte de
energía eléctrica. Recuerde que debe actualizar la hora,
si así lo desea.
NOTA
Tenga presente que, por motivos de seguridad, la
programación correspondiente a cocciones que están
esperando la hora de comienzo, no se reactiva al volver
la corriente eléctrica.
41
Page 41

Programar la Fast clean
12
9
Fast clean con comienzo inmediato y con duración
preseleccionada
La duración de la “F ast clean” es de 120 minutos y dicha
modalidad de funcionamiento se debe utilizar siempre que
no sea necesario programar la duración y la hora de
comienzo de la “F ast clean”.
1 Gire la perilla en sentido antihorario hasta hacer aparecer,
en la representación visual, el símbolo 9
2 Tire la perilla y gírela en sentido antihorario hasta llevar
el índice móvil a la altura de la hora corriente. Un disparo
indicará el final de la operación.
Con la perilla de selección del horno elija el programa V. El
horno se puede apagar en cualquier momento llevando dicha
perilla hasta la posición “0”.
Programación de la duración de Fast clean con
comienzo inmediato
La duración máxima de la “F ast clean” es de 120 min utos
y, por lo tanto, regulaciones superiores a 2 horas no
producirían ningún efecto ya que el horno se apagaría
3
6
automáticamente una vez transcurrido dicho tiempo.
1 Gire la perilla en sentido antihorario hasta observar el
tiempo de duración de la “Fast clean” deseado, en la
representación visual.
2 Tire la perilla y gírela en sentido antihorario hasta llevar
el índice móvil a la altura de la hora corriente. Un disparo
indicará el final de la operación.
Con la perilla de selección del horno elija el programa V.
La “Fast clean” comienza inmediatamente y funciona du-
rante todo el tiempo seleccionado. Una señal sonora indicará
que se ha cumplido dicho tiempo: para interrumpirla gire la
perilla en sentido antihorario hasta hacer aparecer, en la
representación visual, el símbolo 9
Programación de la duración de Fast clean con
comienzo retrasado
La duración máxima de la “F ast clean” es de 120 min utos
y, por lo tanto, regulaciones superiores a 2 horas no
producirían ningún efecto ya que el horno se apagaría
automáticamente una vez transcurrido dicho tiempo.
1 Duración de “F ast clean”:
Gire la perilla en sentido antihorario hasta observar el
tiempo de duración de la “Fast clean” deseado, en la
representación visual.
2 Comienzo de “Fast clean”:
Tire la perilla y gírela en sentido antihorario hasta hacer
corresponder el índice móvil con la hora de comienzo de
la “Fast clean” deseada .
Con la perilla de selección del horno elija el programa V.
La “Fast clean” comenzará a la hora seleccionada y
funcionará durante todo el tiempo elegido siempre que no
sea superior a 2 horas. Una señal sonora indicará que se ha
cumplido dicho tiempo: para interrumpirla gire la perilla en
sentido antihorario hasta hacer aparecer, en la
representación visual, el símbolo 9
NO SE ALARME SI:
1 al comienzo del ciclo fast clean, el ventilador de
enfriamiento funciona a baja velocidad;
2 durante el uso del Fast Clean salta el limitador de la
instalación eléctrica: se ha producido una sobrecarga
de la red (debido al uso simultáneo de otros aparatos
eléctricos);
3 encuentra la puerta del hor no bloqueada durante el
programa Fast Clean: es un dispositivo de seguridad
del producto; la puerta se abrirá sólo después del completo enfriamiento del horno;
4 después del ciclo Fast Clean, permanecen pequeñas
manchas en la superficie interna del horno: es importante eliminar los residuos de comida más consistentes
antes de la autolimpieza y seleccionar una duración
del programa compatible con el grado de suciedad del
horno;
5 al finalizar la cocción continúa saliendo aire del horno
durante un cierto tiempo: es la fase de enfriamiento
normal de la cavidad del horno;
6 durante el funcionamiento “grill” la resistencia superior
no permanece siempre encendida (color rojo): su
funcionamiento está controlado por un termostato;
7 al abrir la puerta durante la cocción, se escapa
demasiado vapor;
8 cuando se dejan comidas en el horno después de la
cocción, se forman gotas de agua o de vapor en el
interior del mismo;
42
Page 42

Cómo mantenerlo en buenas condiciones
Vidrio
Junta
Lampara
Horno
Antes de efectuar cualquier operación, desconectar el aparato de la alimentación eléctrica.
Para una duración prolongada del horno es indispensable realizar frecuentemente una cuidadosa limpieza
general, teniendo presente que:
• Para la limpieza no utilice aparatos a vapor.
• las partes externas esmaltadas o de acero inoxidable se
deben lavar con agua tibia sin usar polvos abrasivos ni
sustancias corrosivas que podrían arruinarlas. El acero
inoxidable puede quedar manchado . Si las manchas son
difíciles de eliminar use productos específicos que se
encuentran normalmente en el comercio. Se sugiere un
aclarado abundante y secado inmediato después de la
limpieza.
• El interior del horno se debe limpiar, preferentemente
cada vez que se usa, cuando todavía está tibio , usando
agua caliente y detergente, enjuagando y secando luego cuidadosamente con un paño suave. Evite el uso de
detergentes abrasivos (por ejemplo los polvos, etc...) y
de esponjas abrasivas para platos o ácidos (por ejemplo, anticaliza, etc...), porque podrían arruinar el esmalte. Si la suciedad es particularmente difícil de eliminar,
use un producto específico para la limpieza del horno,
siguiendo las instrucciones contenidas en el paquete.
• si usa el horno por un tiempo prolongado se podría formar líquido de condensación. Séquelo usando un paño
suave.
• una junta de goma alrededor de la apertura del horno
garantiza su correcto funcionamiento. P or lo tanto , controle periódicamente el estado de dicha junta. Si es necesario límpiela evitando usar productos o elementos
abrasivos. Si se encontrara dañada llame al Centro de
Asistencia más cercano. Es aconsejable no usar el horno hasta que no haya sido reparado.
• no revista nunca el fondo del horno con hojas de aluminio, porque la consiguiente acumulación de calor perjudicaría la cocción dañando también el esmalte.
• limpie el vidrio de la puerta del horno utilizando productos y esponjas no abrasivos y séquelo con un paño suave.
Cómo extraer la puerta del horno
Para realizar una limpieza más profunda es posib le extr aer
la puerta del horno. Proceda del siguiente modo:
• abra completamente la puerta;
• alce y gire las palancas ubicadas en las dos bisagras;
• agarre la puerta de los dos lados externos, ciérrela lentamente pero no completamente;
• tire la puerta hacia Ud. extrayéndola de su alojamiento;
Vuelva a montar la puerta siguiendo el procedimiento
descripto arriba pero en sentido contrario.
123
Reemplazo de la lámpara en la bóveda del horno
• Quitar a la cocina la alimentación mediante el interruptor
omnipolar utilizado para la conexión a la instalación eléctrica, o desenchufarlo.
• Aflojar la tapa de vidrio del portalámpara;
• Desenroscar la lámpara y sustituirla con una resistencia
a alta temperatura (300°C) con las siguientes características:
- T ensión 230/240 V
- Potencia 25W
- Casquillo E14
• Colocar de nuevo la tapa de vidrio. V olver a darle alimentación a la cocina.
Consejos prácticos para la cocción
El horno ofrece una amplia gama de posibilidades para
guisar cualquier comida de la mejor manera. Con el tiempo el usuario podrá aprovechar muy bien este aparato
ideal para la cocina, por lo que las advertencias que damos a continuación son solo sugerencias que podrán
ampliarse con la experiencia personal de cada uno.
Precalentamiento
Cuando sea necesario precalentar el horno, en general,
todas las veces que se cocinan comidas leudadas, se
puede utilizar la función w “horno pizza” que permite
alcanzar la temperatura deseada en breve tiempo y con
bajo consumo.
Una vez colocado en el horno, se puede pasar a la función
de cocción más indicada.
Cocción simultánea en distintos niveles.
Si debe cocinar en varios niveles, puede utilizar la función «pastelería» u o la función b «Multicocción»,
que son las únicas que permiten dicha posibilidad.
Para la cocción de comidas delicadas en varios niveles,
utilice la función «pastelería» u que permite cocinar simultáneamente en 3 niveles (1°, 3° y 5°). Algunos ejem-
plos se encuentran en la tabla «Consejos prácticos para
la cocción».
43
Page 43

Para otros tipos de cocción en varios niveles, utilice la
función b «Multicocción» teniendo en cuenta las si-
guientes sugerencias:
• El horno está dotado de 5 niveles. En la cocción ventilada utilizar dos de los tres niveles centrales, el primero de abajo y el último de arriba son los que reciben directamente el embate de aire caliente, que podría provocar quemaduras a las comidas delicadas.
• Por lo general, utilizar el 2° y 4° nivel desde abajo,
colocando en el 2° nivel las comidas que requieren
mayor calor. P or ejemplo, cuando se trate de cocción
de asados de carne simultáneamente con la de otras
comidas, colocar el asado en el 2°nivel, dejando el 4°
nivel para los alimentos más delicados;
• Cuando se trate de la cocción simultánea de comidas
que tienen tiempos y temperaturas de cocción diferentes, seleccionar una temperatura intermedia entre
ellas, colocar en el 4° nivel la comida más delicada y
extraer antes del horno la comida con tiempo de cocción más breve;
• Utilizar la asadera en el nivel inferior y la rejilla en el
superior;
humo, coloque una bandeja en el 1° niv el, desde abajo.
Importante: efectuar la cocción al «Gratin» con la
puerta del horno cerrada, para obtener, los mejores re-
sultados y un sensible ahorro de energía (10% aproximadamente). Cuando se utiliza dicha función, se recomienda colocar el termostato a 200 °C, porque esta es la condición de rendimiento óptimo, que se basa en la radiación
de los rayos infrarrojos. Pero esto no significa que no se
puedan utilizar temperaturas inferiores simplemente llevando la perilla del termostato hasta la temperatura deseada.
En los modelos provistos de asador automático x, en la
función «gratin» es posible utilizar el kit espetón sumi-
nistrado con el equipo. En este caso, colóquelo en el 3°
nivel (comenzando desde abajo) y la bandeja en el 1°
para recoger jugos y/o grasas.
Por lo tanto, al utilizar las funciones grill, los mejores
resultados se obtienen colocando la rejilla en los últimos niveles comenzando desde abajo (ver la tabla
de cocción) luego, para recoger la grasa y evitar la
formación de humo, coloque la bandeja suministrada con el aparato en el primer nivel, desde abajo.
Uso de la función «Cocción rápida»
Funcional, veloz y práctica no solamente para quienes
utilizan productos «envasados previamente» (por ejemplo: congelados o precocidos), en la tab la «Consejos prácticos para la cocción» se encuentran útiles sugerencias.
Uso del grill
El horno «7 Cuochi» pone a su disposición diferentes
posibilidades de asar.
Utilice la función d / 2 “grill», con la puerta
semiabierta, colocando el alimento en el centro de la
parrilla (ubicada en el 3° o 4° nivel comenzando desde
abajo), debido a que resulta encendida solamente la parte central de la resistencia superior.
Para recoger jugos y/o grasas , coloque la bandeja suministrada con el equipo, en el 1º nivel.
Cuando se utiliza dicha función, se recomienda colocar
el termostato al máximo. También se pueden fijar temperaturas inferiores simplemente llevando la perilla del termostato hasta la temperatura deseada.
En los modelos provistos de asador automático 2, en la
función «grill» es posible utilizar el kit espetón suminis-
trado con el equipo. En este caso, realice la cocción con
la puerta del horno cerrada, colocando el kit espetón en
el 3° nivel (comenzando desde abajo) y la bandeja en el
1° para recoger jugos y/o grasas.
La función e / x «Gratin», exclusiv amente con la puer-
ta del horno cerrada es muy útil para asados veloces,
se distribuye el calor emitido por el grill permitiendo junto
con el dorado superficial, obtener también la cocción de
la parte inferior.
Puede usarla también en la parte final de la cocción de
los alimentos que necesiten dorado superficial, por ejemplo, es ideal para dorar la pasta al horno, al final de la
cocción.
Cuando utilice dicha función coloque la rejilla en el 2° o
3° nivel comenzando desde abajo (ver la tabla de cocción) luego, para recoger la grasa y e vitar la formación de
Preparación de postres y repostería en general
Para la cocción de tortas, colóquelas en el horno siempre
con el horno caliente, espere que termine el
precalentamiento, indicado con el apagado de la luz testigo roja «E». No abra la puerta durante la cocción para
evitar que la torta se baje. En gener al:
Masa de dulce muy seca
En la próxima oportunid ad selec cionar tempera tura
con 10°C superior y re ducir el tiempo de cocción.
Cuando el bizcocho no fermenta
Usar menos líquido o bajar la temperatura de 10°C.
Torta oscura en la superficie
Colocar el molde má s abajo , selec cion ar una
temperatura menor y p rolon gar el tiempo de cocci ón
Buen aspecto por fuera, pegadizo por dentro
Usar menos líquido, red ucir la temp eratur a, aumen tar
el tiempo de cocción
La torta no se desprende del molde
Unte bien el molde y espar za sobr e él un poc o de
harina o utilice papel p ara hor no.
"Cociné en varios niveles (en la función
"ventilado") y en todos ellos, la cocción no está
en el mismo estado de avance "
Seleccione una temper atura inf erio r. No
necesariamente aquellos nivel es que se h an
introducido simult ánea mente se de ben e xtraer al
mismo tiempo.
44
Page 44

Cocción de la pizza
Para una buena cocción de la pizza utilice la función w
“horno pizza”:
• Precaliente el horno durante 10 minutos, como mínimo
• Utilice una bandeja para pizza de aluminio liviano
apoyándola sobre la parrilla suministrada con el horno.
Utilizando la bandeja para horno aumenta el tiempo
de cocción y difícilmente se obtiene una pizza crocante.
• No abra frecuentemente el horno durante la cocción.
• En el caso de pizzas muy condimentadas (caprichosa,
cuatro estaciones) es aconsejable colocar la mozzarella (queso típico de Italia) en la mitad de la cocción.
• En el caso de una cocción simultánea en varios niveles
(hasta 2) es preferible utilizar la función horno
Multicocción b ya que la función horno pizza w
cocinaría más en el 1° nivel comenzando desde abajo.
Cocción del pescado y de la carne
Para las carnes blancas , las aves y el pescado utilice temperaturas desde 180 °C a 200 °C.
Para las carnes rojas, que deben estar bien cocidas en la
parte externa, conservando en su interior el jugo, es importante comenzar con una temperatura inicial alta
(200°C-220°C) por un breve tiempo , para después disminuirla.
Por lo general, cuanto más grande es el trozo de asado,
menor será la temperatura y más largo el tiempo de cocción. Colocar los troz os de carne en el centro de la parrilla y colocar la grasera por debajo para recoger el jugo.
Colocar bien la parrilla de manera que la carne ocupe el
centro del horno. Cuando se necesite calor por debajo,
usar el primer nivel inferior. Para obtener asados sabrosos (en particular pato y animales de caza) condimente
la carne con tocino o panceta y colóquela en la parte superior.
45
Page 45

Opción
selec cio n a d a
Tipo de comida Peso
(Kg)
Posición de la
parrilla con
respecto al
fondo del horno
Tiempo de
precalentamiento
(min.)
Ubicación
del
termo s ta to
Duración
de la
cocción
(min.)
1 Tradicional
a
2 Pastelería
u
3 Cocción
rápida
v
4 M ultico c ció n
b
5 Pizza
w
6 Grill
d 2
7 Gratin
e x
Nota: los tiem p os d e co cc ión s on in d ica tivo s y s e pu e de n m o dif ica r e n ba se a su s gu s to s p er so n ale s. E n la s co c cio ne s al g rill o
gratin, la bandeja se coloca siempre en el 1° nivel a partir de abajo.
Pato
Asado de ternera o de vaca
Asado de cerdo
Bizcochos (de pastaflora)
Torta glaseada
Torta glaseada
Torta de fruta
Plum-cake
Bizcocho
Creps rellenos (en 2 niveles)
Tortas pequeñas (en 2 niveles)
Bizcochitos salados de hojaldre y queso
(en 2 niveles)
Hojaldre relleno con crema (en 3 niveles)
Bizcochos (en 3 niveles)
Merengue (en 3 niveles)
Alimentos congelados
Pizza
Mixto de calabacín y
cangrejo
Torta rústica de espinaca
Panzerotti (ravioles grandes italianos)
Lasañas
Pan ec illos d or ado s
Bocaditos de po llo
Precocidos
Alas de pollo doradas
Alimentos Frescos
Bizcochos (de pastaflora)
Plum-cake
Bizcochitos salados de hojaldre y queso
Pizza (en 2 niveles)
Lasañas
Cordero
Pollo asado + patatas
Cab a lla
Plum-cake
Hojaldre relleno con crema (en 2 niveles)
Bizcochos (en 2 niveles)
Bizcocho (en 1 nivel)
Bizcocho (en 2 niveles)
Tortas saladas
Pizza
Asado de ternera o de vaca
Pollo
Lenguados y sepias
Broquetas de calamares y cangrejos
Filete de merluza
Verduras a la parrilla
Bistec de ternera
Chuletas
Hamburguesas
Cab a lla
Tostadas
Con asador automático
(si presente)
Asado de ternera
Pollo asado
Cordero asado
Pollo a la p a rrilla
Sepias
Con asador automático
(si presente)
Asado de ternera
Cordero asado
Pollo (asado) + patatas (en la
bandeja)
1
1
1
-
1
0,5
1
0,7
0,5
1,2
0,6
0,4
0,7
0,7
0,5
0,3
0,4
0,5
0,3
0,5
0,4
0,4
0,4 2 - 200 20-25
0,3
0,6
0,2
1
1
1
1+1
1
1
0,5
0,5
0,5
1,0
1,5
0,5
1
1
1
1
1
1
1
1
1
1
n.° 4
1.0
1.5
1.0
1,5
1,5
1.5
1.5
1.5
-
3
3
3
3
3
3
2/3
3
3
2-4
2-4
2-4
1-3-5
1-3-5
1-3-5
2
2
2
2
2
2
2
2
2
2
2-4
3
2
2-4
2
2
2-4
2-4
2
2-4
3
3
2
2/3
4
4
4
3/4
4
4
4
4
4
-
-
-
3
3
-
-
-
2
15
15
15
15
15
15
15
15
15
15
15
15
15
15
15
15
10
10
15
10
10
10
10
10
10
15
15
10
10
200
200
200
180
180
180
180
180
160
200
190
210
180
180
90
-
-
-
-
-
-
-
-
-
-
5
5
5
5
5
5
5
5
5
5
5
5
5
5
5
5
5
5
Max
200
220
200
200
180
220
200
180
210
230
180
180
200
180
170
190
180
170
170
200
220
220
180
Max
Max
Max
Max
Max
Max
Max
Max
Max
Max
Max
Max
200
200
200
200
200
200
65-75
70-75
70-80
15-20
30-35
20-30
40-45
40-50
25-30
30-35
20-25
15-20
20-25
20-25
30-35
25-30
15-20
15-18
10-12
15-20
30-35
40-45
60-70
30-35
40-50
20-25
10-15
15-20
20-25
25-30
15-20
25-30
60-70
10-15
15-20
15-20
15-20
80-90
70-80
70-80
55-60
30-35
70-80
70-80
70-75
70-75
180
12
20
25
35
45
8-10
6-8
10
7-10
2-3
46
Page 46

La seguridad como una buena costumbre
Para garantizar la eficiencia y la seguridad de este electrodoméstico:
• diríjase exclusivamente a centros de asistencia técnica autorizados
• requiera siempre el uso de repuestos originales
• Para mover el aparato y con el fin de evitar daños
a personas y al mismo aparato, utilice siempre las
manijas especiales que se encuentran en los
costados del horno.
• El aparato está destinado a un uso no profesional en
las viviendas y sus características no se deben modificar.
• Las instrucciones son válidas sólo en los países de
destino cuyos símbolos figuran en el manual y en la
placa de características.
• La seguridad eléctrica de este aparato está garantizada solamente cuando el mismo está correctamente
conectado a una eficiente instalación de puesta a tierra de acuerdo a lo previsto por las normas vigentes
sobre seguridad.
• Durante el uso del aparato los elementos calenta-
dores y algunas partes de la puerta del horno se
calientan mucho. Tenga cuidado de no tocarlos y
mantenga alejados a los niños.
Tratándose de fuentes de peligro, evite que los
niños e incapaces se pongan en contacto con:
- los mandos y el aparato en general;
- los embalajes (bolsitas, poliestireno, cla v os, etc.);
- el aparato, durante e inmediatamente después del funcionamiento del horno y del grill, debido al
sobrecalentamiento;
- un aparato inutilizado (en este caso, se deben proteger las partes que podrían ser peligrosas).
Evite las siguientes operaciones:
- tocar el aparato con partes del cuerpo húmedas;
- el uso cuando está descalzo;
- tirar del aparato o del cable de alimentación eléctrica
para desconectarlo del tomacorriente;
- operaciones impropias y peligrosas;
- obstruir los orificios de ventilación o para eliminación
del calor;
- que el cable de alimentación de pequeños electrodomésticos quede en contacto con las partes calientes
del aparato;
- la exposición a agentes atmosféricos (lluvia, sol);
- el uso del horno como trastero;
- el uso de líquidos inflamables cerca del aparato;
- el uso de adaptadores, tomas múltiples y/o prolongaciones;
- intentos de instalación o reparación sin la intervención de personal calificado.
Es absolutamente necesario llamar a personal
especializado en los siguientes casos:
- instalación (según las instrucciones del fabricante);
- cuando se tienen dudas sobre el funcionamiento;
- sustitución del toma en caso de incompatibilidad con
el enchufe del aparato .
Es necesario llamar a centros de asistencia
autorizados por el fabricante, en los siguientes
casos:
- dudas sobre la integridad del aparato después de haber quitado el embalaje;
- daño o sustitución del cable de alimentación;
- avería o mal funcionamiento, solicitando repuestos
originales.
Es conveniente efectuar las siguientes operaciones:
- sólo la cocción de alimentos evitando otras operaciones;
- verificar la integridad después de haber quitado el embalaje;
- desconectar el aparato de la red de alimentación eléctrica en caso de mal funcionamiento y antes de efectuar
cualquier operación de limpieza o mantenimiento;
- cuando no se utiliza, desconecte el aparato de la red
eléctrica y cierre la llave de gas (si está pre visto);
- utilice guantes para horno para introducir o extraer recipientes;
- tome siempre la manija de la puerta en el centro debido
a que los extremos podrían estar más calientes con motivo de ev entuales salidas de aire;
- controlar siempre que las perillas estén en la posición
«•»/»o» cuando no se utiliza el aparato.
- cortar el cable de alimentación después de haberlo desconectado de la red eléctrica cuando se decide no utilizar más el aparato.
• El fabricante no se puede considerar responsable por
eventuales daños derivados de: errores en la instalación,
usos impropios, erróneos e irracionales.
47
Page 47

Instalación
La instalación debe efectuarse según las instrucciones
del fabricante y por personal profesionalmente calificado. Una incorrecta instalación puede causar daños a perso-
nas, animales o cosas, con relación a los cuales el fabricante no puede ser considerado responsable.
Importante: cualquier intervención de regulación, mantenimiento, etc. se debe realizar con el horno desconectado de
la red de alimentación eléctrica.
Instalación de los hornos empotrables
Para garantizar un b uen funcionamiento del aparato empotrable,
es necesario que el mueble tenga las características adecuadas. En la siguiente figura se indican las dimensiones del espacio en el mueble cuando el horno se instala bajo encimera y en
columna.
567 mm.
45 mm.
558 mm.
593 mm.
23 mm.
595 mm.
5 mm.
595 mm.
545 mm.
24 mm.
Los paneles de los muebles adyacentes al horno deberán
ser de un material resistente al calor. En par ticular, en el
caso de muebles de madera chapeada, las colas deberán
ser resistentes a una temperatura de 100 °C. En conformidad con las normas de seguridad, una vez empotrado el
aparato, no se deben producir contactos con las paredes en
las que hay instalaciones eléctricas. Todas las par tes que
garantizan la protección se deben fijar de modo tal que no
puedan ser quitadas sin la ayuda de una herramienta.
Fijación del horno al mueble
1. Coloque las abrazaderas “A” a presión, en el soporte del
horno “B”.
2. Coloque los tacos “C”, a presión, en las abrazaderas “A”.
En particular, si el espesor del costado del mueble:
• es de 16 mm: coloque el taco de modo tal que el número
16 que se encuentra en el mismo, esté dirigido hacia
Ud.;
• es de 18 mm: coloque el taco de modo tal que la parte
sin nada escrito, esté dirigida hacia Ud.;
• es de 20 mm: no coloque el taco.
3. Fije las abrazaderas y los tacos en el borde del costado
del mueble con los tornillos “D”.
4. Fije el horno al mueble con los tornillos y las arandelas
de plástico “E”.
16
16
C
D
45 mm.
min.
595 mm.
23 mm.
567 mm.
5 mm.
595 mm.
545 mm.
24 mm.
558 mm.
595 mm.
575-585 mm.
45 mm.
min.
Para gar antizar una b uena aireación es necesario eliminar la
pared posterior del espacio para el horno, es preferible instalarlo de modo que apoye sobre dos listeles de mader a; en el caso
de que sea una superficie continua de apoyo, la misma debe
tener una abertura de 45 x 560 mm como mínimo.
45 mm.
560 mm.
D
C
16
16
A
C
D
B
E
E
Conexión eléctrica
Los hornos dotados de cable de alimentación tripolar, están
preparados para el funcionamiento con corriente alterna a
la tensión y frecuencia de alimentación indicadas en la placa de características (ubicada en el aparato) y en el manual
de instrucciones. El conductor de tierra del cable se distingue por los colores amarillo-verde.
Montaje del cable de alimentación
Apertura del tablero de bornes:
• Con la ayuda de un destornillador, haga palanca en las
lengüetas laterales de la tapa del tablero de bornes;
• Tirar y abrir la tapa del tablero de bornes.
Para la colocación del cable, realizar las siguientes operaciones:
• aflojar el tornillo de la mordaza de terminal de cable y los
tres tornillos de los contactos L-N-6
• fijar los cables debajo de las cabezas de los tornillos respetando los colores: Azul (N) Marrón (L) Amarillo-V er-
de 6
• fijar el cable de alimentación en el correspondiente
sujetacable y cerrar la tapa.
48
Page 48

NL
Conexión del cable de alimentación a la red
Instalar, en el cabl e, un enchufe normalizado para la potencia indicada en la placa de características; en caso de conexión directa a la red, es necesario colocar entre el aparato y la red, un interruptor omnipolar con una distancia mínima entre los contactos de 3 mm, adecuado a la potencia y
conforme a las normas en vigencia (el cable a tierra no debe
ser interrumpido por el interruptor).
El cable de alimentación debe colocarse de tal manera que,
en ningún punto alcance una temperatura superior a 50°C
con respecto a la temperatura ambiente.
Antes de efectuar la conexión comprobar que:
• La seguridad eléctrica de este aparato se garantiza sólo
cuando el mismo resulte correctamente conectado a una
eficiente instalación de conexión a tierra confor me a lo
previsto por las normas de seguridad eléctrica. Es necesario verificar este fundamental requisito de seguridad y ,
en caso de duda, solicitar un control cuidadoso de la
instalación por parte de personal profesionalmente especializado. El fabricante no puede ser considerado responsable por los ev entuales daños causados por la falta
de conexión a tierra de la instalación.
• Antes de conectar el aparato, comprobar que los datos
de la placa de características (ubicada en el aparato y/o
en el embalaje) correspondan a los de la red de distribución eléctrica y gas.
• Comprobar que la capacidad eléctrica de la instalación y
la de los tomas de corriente resulten adecuadas a la
potencia máxima del aparato indicada en la placa de
características. En caso de duda, dir igirse a personal
profesionalmente especializado .
• En caso de incompatibilidad entre el toma de corriente y
el enchufe del aparato, llamar a personal técnico para
reemplazar el toma con otro adecuado. El técnico, en
particular, deberá también comprobar que la sección de
los cables del toma de corriente resulte adecuada a la
potencia absorbida por el aparato. En general, no es
aconsejable el uso de adaptadores, tomas múltiples y/o
extensiones. Si su uso fuera indispensable es necesario
utilizar solamente adaptadores simples o múltiples y
prolongaciones conformes a las normas vigentes de
seguridad, teniendo cuidado de no superar el límite de
capacidad de corriente marcado en el adaptador simple
y en las prolongaciones, y el de máxima potencia
marcado en el adaptador múltiple. El enchuf e y el toma
de corriente deben ser fácilmente accesibles.
Características técnicas
Dimensiones útiles del horno:
ancho: 43,5 cm.
profundidad: 40 cm.
altura: 32 cm.
Volumen útil del horno:
litros 56
ENERGY LABEL
Norma 2002/40/CE en la etiqueta de los hornos eléctricos
Norma EN 50304
Consumo de energía por convección Natural
función de calentamiento: a Tradicional
Clase Consumo de energía para funcionamiento por convección
Forzada
función de calentamiento: u Pastelería
Tensión y frecuencia de alimentación:
220-240V ~ 50Hz 2560-3050W
Este aparato ha sido fabricado conforme con las
siguientes Directivas Comunitarias
- 73/23/CEE del 19/02/73 (Baja Tensión) y sucesivas
modificaciones;
- 89/336/CEE del 03/05/89 (Compatibilidad
Electromagnética) y sucesivas modificaciones;
- 93/68/CEE del 22/07/93 y sucesivas
modificaciones.
- 2002/96/CE
En base a la Norma europea 2002/96/CE de Residuos
de aparatos Eléctricos y Electrónicos (RAEE), los
electrodomésticos viejos no pueden ser arrojados en los
contenedores municipales habituales; tienen que ser
recogidos selectivamente para optimizar la recuperación
y reciclado de los componentes y materiales que los
constituyen, y reducir el impacto en la salud humana y el
medioambiente. El símbolo del cubo de basura tachado
se marca sobre todos los productos para recordar al
consumidor la obligación de separarlos para la recogida
selectiva.
El consumidor debe contactar con la autoridad local o
con el vendedor para informarse en relación a la correcta
eleminación de su electrodoméstico viejo.
7
49
Page 49

Agradecemos a sua escolha de um produto Ariston, seguro e realmente fácil de utilizar. P ara conhecê-lo , utilizá-lo da
melhor maneira e durante longo tempo, é aconselháv el, antes de utilizar o aparelho , ler atentamente as advertências
contidas no presente folheto , que f ornecem importantes indicações relativas a segurança na instalação, na utilização
e na manutenção. Guarde cuidadosamente este folheto para consultas futuras. Obrigado
Visto de perto
A. Painel de comandos
B. Selector das funções de cozedura
C. Selector para a temperatura de cozedura
E. Indicador de pré-aquecimento (a piscar) ou de
cozedura (aceso fixo) sendo realizada
F. Bandeja pingadeira ou plano de cozedura
G. Grelha da prateleira do forno
H. Carris de deslizamento para bandejas pingadeiras
e grelhas
I. Indicador luminoso de bloqueio da porta (que há
em apenas alguns modelos) - Se estiver aceso indica
que a abertura da porta do forno está bloqueada.
O. Pr ogramador analógico início/fim da cozedura (pre-
sente somente em alguns modelos)
A
H
G
F
E
12
3
9
6
B
O
C
I
Como utilizar
O forno 7 Cuochi reúne em um único aparelho as vantagens
dos tradicionais fornos convecção naturais: “estáticos” às
dos modernos fornos de convecção forçada: “ventilados”.
Trata-se de um aparelho extremamente versátil que
possibilita escolher de modo fácil e seguro entre 7 diferentes
métodos de cozedura. A selecção das várias funções
proporcionadas é realizada mediante os botões de selecção
“B” e do termostato “C” que há no painel.
Ventilação de refrigeração
A fim de obter uma redução das temperaturas externas,
alguns modelos são equipados com ventoinha de
arrefecimento que se activa automaticamente com o f orno quente.
Quando a ventoinha estiver a funcionar , pode ser que se
ouça um jacto de ar a sair entre o painel frontal e a porta
do forno.
Observação: No final da cozedura, a ventoinha permanece ligada até o forno ter arrefecido suficientemente.
Atenção: A primeira vez que o acendem, aconselhamos
deixar funcionar a vácuo o forno aproximadamente durante
meia hora com o termostato posto à temperatura máxima e
a porta fechada. Logo depois, passado esse tempo , desligá-
lo, abrir a porta do forno e ventilar o local. O cheiro que às
vezes se sente durante esta operação deve-se à evaporação das substâncias usadas para proteger o forno durante
o período entre a produção e a instalação do produto.
Atenção: Utilize a primeira prateleira a partir de baixo, e coloque a bandeja pingadeira fornecida, para a colecta do suco e/
ou gordura derretida, somente se cozer no grill ou com espeto
giratório (presente somente em alguns modelos). P ara as demais coseduras, nunca utilize a primeira prateleira de baixo e
nunca apoie objectos no fundo do forno enquanto estiver a
coser, porque poderá causar danos ao esmalte do f orno. Coloque sempre os recipientes de cosedura (formas, películas de
alumínio etc. etc.) na grelha f ornecida com o aparelho apropriadamente colocada nos carris do forno.
A luz do forno
Acende-se se rodar o selector “B” até o símbolo 8. Ilumina
o forno e permanece acesa enquanto estiver a funcionar
qualquer dos elementos eléctricos de aquecimento do forno.
Forno T radicional a
Posição do selector do termostato “C”: entre 60°C e Max.
Nesta posição acendem-se os dois elementos aquecedo-
50
Page 50

res inferior e superior. É o clássico forno da vó que entretanto foi melhorado a um nível excepcional de distribuição da
temperatura e de diminuição dos consumos. O forno Tradicional continua insuperável se for-se cozer pratos com ingredientes constituídos por dois ou mais elementos que combinem-se para formarem um prato único, como por exemplo: couves com costeleta de porco, bacalhau com hortali-
ças, peixe com hortaliças, carne de vitela com arroz etc. ...
Obtêm-se óptimos resultados na preparação de pratos a
base de carne de vaca ou vitela, tais como: carne na brasa,
febras, gulasch, caça, coxa e lombo de porco etc. ... que
necessitarem de cozedura lenta e frequentemente deitarlhes líquidos. Em todo o caso continua a ser o melhor sistema de cozedura para doces, frutas e para pratos com recipientes tampados específicos para assar no forno. Na cozedura com forno T radicional, utilize apenas uma prateleira,
porque se empregar mais de uma, a distribuição da temperatura será má. Se utilizar mais de uma prateleira, a disposição das prateleiras poderá equilibrar a quantidade de calor
entre a parte superior e a inferior. Se a cozedura precisar de
mais calor por baixo ou por cima, utilize respectivamente as
prateleiras superiores ou inferiores.
Pastéis u
Posição do selector do termostato “C”: entre 60°C e Max.
Activa-se o elemento aquecedor traseiro e entra em
funcionamento a ventoinha para garantir um calor suave e
uniforme no interior do forno. No absorção eléctr ica desta
função é de apenas 1600 W.
Esta função é indicada para a cozedura de comidas
delicadas, especialmente doces que necessitarem de
levitação e algumas preparações “mignon” em 3 prateleiras
simultaneamente. Alguns exemplos: bignés, biscoitos doces
e salgados, salgadinhos esfolhados, biscoitos enrolados.
pequenas fatias de verdur as gratinè etc. ....
Forno “Cozinha Rápida” v
Posição do selector do termostato “C”: entre 60°C e Max.
Activa-se o elemento aquecedor traseiro e entra em
funcionamento a ventoinha para garantir um calor suave e
uniforme no interior do forno.
Esta função é especialmente indicada para cozeduras
rápidas (não necessita pré-aquecimento) de comidas
preparadas (por ex emplo: congelados ou pré-cozidos) e para
algumas “preparações caseiras”.
Na cozedura “Cozinha Rápida” os melhores resultados são
obtidos utilizando apenas uma prateleira (a 2a de baixo para
cima), veja a tabela “Conselhos práticos para a coz edura”.
Forno Cozedura Múltipla b
Posição do selector do termostato “C”: entre 60°C e Max.
Activam-se os elementos de aquecimento e entra em funcionamento a ventoinha. O calor é constante e uniforme no
inteiro forno, o ar coze e cor a os alimentos de modo unif orme em todos os pontos. É possível cozer
contemporaneamente pratos mesmo diferentes, desde que
as temperaturas de cozedura sejam similares. É possível
utilizar até 2 prateleiras contemporaneamente no máximo ,
a obedecer as advertências apresentadas no parágrafo “Cozedura contemporânea em mais de uma prateleira”.
Esta função é especialmente indicada para pratos gratinès
ou para pratos que necessitarem de cozedura durante bastante tempo, como por exemplo: lasanha, macarrão com
molho denso, frango assado com batata etc. ... Obtêm-se
notáveis vantagens ao assar carne porque a melhor distribuição da temperatura possibilita empregar temperaturas
mais baixas que redizem a dispersão da humidade natural
e a carne fica mais macia e diminui menos de peso. O modo
Cozedura Múltipla é especialmente aconselhado para peixe, que pode ser cozido com poucos temperos, mantendo
inalterados o seu aspecto e sabor.
Sobremesas: resultados seguros são obtidos ao assar bolos com levedo .
A função “Cozedura Múltipla” também pode servir para degelar rapidamente carnes brancas ou vermelhas ou pão, se
a temperatura for colocada em 80 °C. Para degelar comidas mais delicadas, coloque a 60° C, ou empregue apenas
a circulação de ar frio com o selector termostato deixado
em 0°C.
Forno para Pizza w
Posição do selector do termostato “C”: entre 60°C e Max.
Activam-se os elementos aquecedores inferior e circular , e
entra em função a ventoinha. Esta combinação possibilita
um rápido aquecimento do forno, graças à notáv el potência
fornecida (2.800 W), com um forte fornecimento de calor
em prevalência por baixo .
A função forno para pizza é especialmente indicada para
pratos que necessitem de grande quantidade de calor , por
exemplo: pizza e assados grandes. Utilize uma única bandeja
pingadeira ou grade de cada vez, se for utilizada mais de
uma será necessário trocá-las de lugar na metade da
cozedura.
Grill d / 2
Posição do selector do termostato “C”: Max.
Liga-se o elemento aquecedor superior central e começa a
funcionar o espeto rotatório (onde for presente).
A temperatura muito alta e directa do grill possibilita corar
imediatamente a superfície dos alimentos que, como obstruem a saída dos líquidos, mantém o interior mais macio. A
cozedura no grill é especialmente aconselhada para os pratos que necessitarem de alta temperatura na superfície: bi-
fes de vitela ou vaca, entrecôte, filés , hambúrgueres etc. ...
Cozer com a porta do forno semiaberta, excepto se
empregar o espeto giratório.
Alguns exemplos de utilização estão apresentados na parágrafo “Conselhos práticos para a cozedur a”.
Gratinado e / x
Posição do selector do termostato “C”: entre 60°C e 200°C.
Liga-se o elemento aquecedor superior central e começam
a funcionar a ventoinha e o espeto rotatório (onde for presente).
Une a irradiação térmica unidireccional com a circulação
forçada do ar no interior do forno . Deste modo impede-se a
queimadura da superfície dos alimentos ao aumentar-se o
poder de penetração do calor. São obtidos excelentes resultados se utilizar o Gratinado para espetinhos mistos de
carne e hortaliças, chouriços, costelas de porco, costeletas
de cordeiro, frango com piripíri, codorna com salva, filé de
porco etc...
Cozer com o “Gratinado” com a porta do forno fechada.
Para peix es, o Gratinado é insuperáv el para coz er fatias de
cherne, de atum, de peixe espada, chocas recheadas etc...
51
Page 51

Limpeza automática com fast clean
V
É a função de limpeza integral do forno. P ara informações
acerca de fast clean, veja o parágrafo “A limpeza
automática com fast clean”.
O espeto rotatório (somente em alguns modelos)
Para accionar o espeto rotatório proceda da seguinte maneira:
a) coloque a bandeja pingadeira na 1a prateleira;
b) coloque o apropriado apoio do espeto rotatório na 3a
prateleira e coloque o espeto enfiado no furo apropriado, no virador do espeto , situado na parte traseira do
forno;
c) para accionar o espeto rotatório, seleccione com o
botão “B” a posição 2 / x.
O PROGRAMADOR ANALÓGICO INÍCIO/FIM DE COZEDURA
12
9
Como acertar a hora actual
É necessário o forno estar ligado à electricidade.
Carregue no selector e rode na direcção antiorária até acertar a hora.
Obs.: O relógio funciona com electricidade, portanto, se houver falta de corrente , pára enquanto durar a interrupção. Posteriormente será necessário repetir a operação para acertar novamente a hora actual.
Funcionamento manual
Obs.: A ser utilizado em todos os casos que forem
necessárias cozeduras programadas.
1 Rode o selector na direcção antiorária até aparecer no
visor o símbolo 9
2 Puxe o selector e rode-o na direcção antiorário até o
indicador móvel chegar à correspondência da hora actual. Sente-se que engata, a indicar o fim da operação.
Mediante o botão de selecção do forno, escolha o programa
de cozedura desejado . P ara desligar o f orno , coloque o
botão na posição “0”.
3
6
Programação de cozedura com início imediato
1 Rode o selector na direcção antiorária até aparecer no
visor o tempo de duração desejado para a cozedura.
2 Puxe o selector e rode-o na direcção antiorária até o
indicador móvel chegar a correspondência da hora actu-
al. Sente-se que engata, a indicar o fim da operação.
Mediante o botão de selecção do forno, escolha o programa
de cozedura desejado.
O forno liga-se imediatamente e funcionará durante todo o
tempo definido para durar a cozedura. Um aviso sonoro infor
mará quSando o forno desligar-se.
Para interrompê-lo rode o selector na direcção antiorária
até aparecer no visor o símbolo 9
Programação da cozedura com início posterior
1 Duração da cozedura:
Rode o selector na direcção antiorária até aparecer no
visor o tempo de duração desejado para a cozedura.
2 Início da cozedura:
Puxe o selector e rode-o na direcção antiorária até o
índice mobile corresponder com a hora desejada para
começar a cozer .
Mediante o botão de selecção do forno escolha o programa
desejado para cozedura.
O forno se ligará na hora de início da cozedura e funcionará
durante todo o tempo definido para duração. Um aviso sonoro comunica quando o forno desligar-se.
Para interrompê-lo rode o selector na direcção antiorário
até aparecer no visor, o símbolo 9
52
Page 52

A limpeza automática com fast clean
Se activar a função fast clean, a temperatura interna do
compartimento do forno chegará aos 500 °C necessários
para carbonizar os resíduos. P elo vidro da porta do forno é
possível observar algumas partículas que se iluminarão
durante a sua carbonização mediante pirólise ao entrar em
contacto com as resistências: trata-se de uma combustão
instantânea, um fenómeno absolutamente normal, que
não implica perigo algum.
Alguns conselhos úteis antes da limpeza automática
1- Procure eliminar os resíduos de substâncias alimentares
maiores com uma esponja húmida. Evite rigorosamente
utilizar detergentes ou quaisquer outros produtos
aconselhados para a limpeza de fornos.
2- Extraia todos os acessórios, que de facto não foram
concebidos para resistir a temperaturas assim tão altas. Além
disso, alguns dos acessórios poderão alterar o resultado da
limpeza automática porque dificultam a circulação do calor
em todas as paredes. Os acessórios podem ser facilmente
lavados como quaisquer utensílios (inclusive na máquina
de lavar loiça).
3- Não deixe panos de prato na pega.
Atenção: durante a limpeza automática, as superfícies
podem ficar muito quentes. Mantenha as crianças
afastadas.
Como activar fast clean
– Feche a porta.
– Coloque o botão selector na posição V
– Para programar a duração e/ou a hora do final de f ast
clean, respeitar as instruções indicadas no parágrafo
“Programar a Fast clean”.
Dispositivos de segurança
Por causa da alta temperatura, o forno é equipado com
alguns dispositivos de segurança:
• a porta tranca-se automaticamente assim que a temperatura chegar à valores altos, para evitar todos os
riscos de queimaduras;
• os elementos aquecedores não serão mais
alimentados de electricidade, para prev enir-se caso
aconteça um evento anómalo .
• a duração máxima consentida é de 120 minutos, no
fim dos quais, o forno se desligará automaticamente.
• se o forno estiver excessivamente quente, a pirólise
poderia não se pôr em funcionamento. Deixar arrefecer
o forno.
O que acontece no final da ‘F ast c lean’ com início
imediato e com duração previamente configurada?
O indicador luminoso ‘E’ apaga-se para avisar que
terminou a ‘F ast clean’.
Para poder abrir a porta do forno, será necessário
aguardar a temperatura interior abaixar até um nível
aceitável. O indicador luminoso ‘I’ apaga-se para avisar
que a porta foi desbloqueada.
Nesta altura será possível observar a presença de alguns
depósitos de pó branco no fundo e nas paredes do forno;
retire-os com uma esponja húmida depois que o forno
tiver arrefecido inteir amente.
Por outro lado, se desejar aproveitar o calor acumulado
para iniciar a assar, é possív el deixar o pó dentro, porque
não causa perigo algum para os alimentos a serem
preparados.
O que acontece no final da ‘F ast c lean’ com duração
configurada e com início imediato/posterior?
O indicador luminoso ‘E’ apaga-se e toca um sinal para
avisar que terminou a ‘Fast clean’ Para desligar o sinal
sonoro rode o selector na direcção contrário aos ponteiros
do relógio até aparecer, no visor, o símbolo 9.
Para poder abrir a porta do forno, será necessário
aguardar a temperatura interior abaixar até um nível
aceitável. O indicador luminoso ‘I’ apaga-se para avisar
que a porta foi desbloqueada.
Nesta altura será possível observar a presença de alguns
depósitos de pó branco no fundo e nas paredes do forno;
retire-os com uma esponja húmida depois que o forno tiver
arrefecido inteiramente.
Por outro lado , se desejar aproveitar o calor acumulado par a
iniciar a assar, é possível deixar o pó dentro, porque não
causa perigo algum para os alimentos a serem preparados.
Restauração depois de black-out eléctrico
No caso em que a temperatura no interior do forno não
tiver descido por baixo de um valor demasiado baixo, o
aparelho está provido de um sistema que permite de
recomeçar uma cozedura/pirólise (onde for presente)
desde o momento no qual se interrompeu ao momento
do black-out eléctrico. Lembrar-se de actualizar a hora,
se o quiserem.
Observação
Lembrar que, por razões de segurança, as prog ramações
relativas a cozeduras à espera de começar não são
restauradas quando voltar a corrente eléctrica.
53
Page 53

Programar a Fast clean
12
9
Fast clean com início imediato e com duração
previamente configurada
A duração da ‘Fast clean’ é de 120 minutos e este modo
de funcionamento deve ser utilizado em todos os casos
em que não houver necessidade de programar a duração
e a hora de início da ‘Fast clean’.
1 Rode o selector na direcção antiorária até aparecer no
visor o símbolo 9
2 Puxe o selector e rode-o na direcção dos ponteiros do
relógio até o indicador móvel chegar à correspondência
da hora actual. Sente-se que engata, a indicar o fim da
operação.
Com o selector do forno seleccione o programa V. É possív el
desligar o forno a qualquer momento, se recolocar o selector
na posição “0”.
Programação da duração da ‘Fast c lean’ com início
imediato
A duração máxima da ‘Fast clean’ é de 120 minutos e,
portanto, as regulações superiores a 2 horas não terão
efeito porque o forno se desligará automaticamente depois
daquele prazo .
3
6
1 Rode o selector na direcção contrária aos ponteiros do
relógio até aparecer no visor o tempo de duração
desejado para a ‘F ast Clean’.
2 Puxe o selector e rode-o na direcção contrária aos
ponteiros do relógio até o indicador móvel chegar à
correspondência da hora actual. Sente-se que engata, a
indicar o fim da operação.
Mediante o botão de selecção do forno escolha o programa
V.
A ‘F ast clean’ inicia imediatamente e funcionará o inteiro prazo
configurado. Um sinal sonoro indicará o final: para interrompêlo rode o selector na direcção contrária aos ponteiros do
relógio até aparecer no visor, o símbolo 9
Programação da duração da ‘F ast clean’ com início
posterior
A duração máxima da ‘Fast clean’ é de 120 minutos e
portanto as regulações superiores a 2 horas não terão
efeito porque o forno se desligará automaticamente depois
deste prazo.
1 Duração ‘Fast clean’:
Rode o selector na direcção contrária aos ponteiros do
relógio até aparecer no visor o tempo de duração
desejado para a ‘F ast clean’.
2 Início da ‘F ast clean’:
Puxe o selector e rode-o na direcção contrária aos
ponteiros do relógio até o índice móvel corresponder à
hora desejada para começar a ‘F ast clean’.
Mediante o botão de selecção do forno escolha o programa
V.
A ‘Fast clean’ iniciará na hora de início configurada e
funcionará todo o tempo de duração seleccionado mas, em
todo o caso, não superior a 2 horas. Um sinal sonoro avisará
o final: Para interrompê-lo rode o selector na direcção
contrário aos ponteiros do relógio até aparecer no visor, o
símbolo 9
NÃO SE ALARMAR SE
1 no começo do ciclo fast clean a ventoinha de
arrefecimento funciona com baixa velocidade;
2 durante a utilização do Fast Clean desconecta-se o
limitador da instalação eléctrica: verificou-se uma
sobrecarga da rede (concomitância com o uso de
outros aparelhos eléctricos);
3 encontras a porta do forno bloqueada durante o
programa F ast Clean: é uma segurança do produto; a
porta irá abrir-se somente depois do completo
arrefecimento do forno;
4 depois do ciclo Fast Clean ficam pequenas manchas
na superfície interna do forno: é bom eliminar os
resíduos de comida mais consistentes antes da
limpeza automática e de estabelecer uma duração do
programa compatível com a quantidade de sujeira presente no forno;
5 no final da cozedura sai ainda ar ventilado do forno
por algum tempo: é a f ase normal de arrefecimento da
cavidade do forno;
6 durante o funcionamento “grill” a resistência superior
não fica sempre ligada (cor vermelha): o funcionamento
é controlado por um termóstato;
7 sai uma baforada de vapor , abrindo a porta durante a
cozedura;
8 formam-se gotas de água ou do vapor no interior do
forno, deixando a comida no f orno, depois da cozedura;
54
Page 54

Como mantê-lo em forma
Vidro
Juntado
Lãmpada
Compartimento
do forno
Antes de cada operação de limpeza, desligue o aparelho
da alimentação eléctrica.
Para uma longa duração do forno é indispensável realizar frequentemente uma cuidadosa limpeza geral,
lembre-se que:
• Para a limpeza não utilizar aparelhos a vapor.
• las peças exteriores esmaltadas ou inoxidáveis de vem
ser lavadas com água morna sem usar pós abrasivas
nem substâncias corrosivas que poderão estragá-las.
O aço inoxidável poderá manchar-se. Se f or difícil tirar
as manchas, empregue produtos específicos a venda
normalmente no comércio. Aconselha-se enxaguar
com muita água e enxugar após a limpeza.
• o interior do forno deve ser limpado, preferivelmente
todas as vezes que terminar de utilizá-lo, enquanto
ainda estiver quente, empregue água quente e detergente, enxagúe e, em seguida, enxugue com cuidado
usando um pano macio. Evite utilizar detersivos
abrasivos (por exemplo produtos em pó etc. ...), es-
ponjas abrasivas de limpeza de loiça e ácidos (por
exemplo contra calcário etc. ...), porque poderão es-
tragar o esmalte. Se a sujidade for muito difícil de tirar ,
use um produto específico para limpeza de forno, segundo as instruções apresentadas na embalagem do
produto.
• se usar o forno durante muito tempo , pode ser que se
forme condensação. Enxugue-a com um pano macio .
• ao redor da abertura do forno, uma guarnição em borracha garante um funcionamento correcto do mesmo.
Portanto periodicamente verifique o estado desta guarnição. Se for necessário, limpe-a mas evite usar produtos ou objectos abrasivos. Se houver danos,
contacte o Centro de Assistência Técnica mais perto.
É aconselhável não usar o forno antes do mesmo ter
sido reparado.
• nunca forre o fundo do forno com folhas de alumínio,
porque a acumulação de calor consequente perturbará a cozedura e também danificará o esmalte.
• limpe o vidro da porta do forno utilizando produtos e
esponjas não abrasivas e enxugue com um pano macio.
Como tirar a porta do forno
Para uma limpeza mais cuidadosa, é possív el tirar a porta do forno. Proceda da seguinte maneira:
• abra inteiramente a porta;
• lev ante e rode as alavancas situadas nas duas dobradiças;
• segure a porta dos dois lados exteriores e feche-a de
novo de v agar mas não inteiramente;
• puxe a porta na direcção de si a tirá-la do lugar;
Monte a porta realizando na ordem contrária as operações
aci ma descritas.
123
Troca da lâmpada no vão do forno
• Desligue o forno da rede de alimentação através do
interruptor omnipolar utilizado para a ligação do forno
ao sistema eléctrico, ou desligue a ficha, se for acessível;
• Desatarraxe a tampa de vidro do porta lâmpada;
• Desatarraxe a lâmpada e substitui-a com uma resistente à alta temperatura (300°C) que tenha as seguintes características:
- Tensão 230/240 V.
- Potência 25 W.
- Bocal E14
• Atarraxe a tampa de vidro e ligue nov amente o forno à
rede.
Conselhos práticos para a cozedura
O forno coloca à sua disposição uma vasta gama de
possibilidades que permitem cozinhar todos os alimentos
da melhor maneira. O tempo e a exper iência permitirão
aproveitar ao máximo este aparelho tão versátil, portanto
as seguintes observações constituem apenas indicações
gerais que poderão ser ampliadas com a experiência
pessoal.
Pré-aquecimento
Se for necessário aquecer previamente o f orno, em geral
todas as vezes que for assar pratos com le vedo, é possív el
utilizar a função w “Forno para Pizza” que possibilita
chegar à temperatura desejada em pouco tempo e com
baixos consumos.
Depois de colocar o que for assar dentro do forno, será
possível passar para a função de cozedur a mais indicada.
Cozedura simultânea em várias prateleiras
Se desejar cozer com mais de uma prateleira, é possível
utilizar a função “pastéis” u ou a função b “cozedura
múltipla”, as únicas que permitem esta possibilidade.
Para cozer pratos delicados em mais de uma prateleira,
utilize a função “pastéis” u que possibilita cozer simul-
taneamente em 3 prateleiras (1a, 3a e 5a). Alguns
55
Page 55

exemplos são apresentados na tabela “Conselhos práticos
para a cozedura”.
Para as demais cozeduras com mais de uma prateleira,
utilize a função b “Cozedura múltipla” e leve em
consideração as seguintes sugestões:
• O forno é equipado com 5 planos. Na cozedura
ventilada utilize duas das três prateleiras, a primeira
de baixo e a última em cima estão atingidas
directamente pelo ar mais quente que poderá provocar queimaduras nos alimentos delicados;
• Utilize normalmente a 2a e a 4a prateleira a partir de
baixo, coloque na 2a prateleira os alimentos que
requerem mais calor. P or exemplo no caso da cozedur a
dum assado de carne simultaneamente com outros
alimentos, coloque o assado na 2a prateleira, e deixe
a 4a para alimentos mais delicados;
• Na cozedura simultânea de alimentos que têm tempos
e temperaturas de cozedura diferentes, marque uma
temperatura intermediária entre as duas, coloque os
alimentos mais delicados na 4a prateleira e tire primeiro
do forno o alimento com tempo de cozedura mais
rápido;
• Utilize a bandeja pingadeira na prateleira de baio e a
grelha na de cima;
Utilização da função “Fast cooking”
Funcional, rápida e prática para quem utilizar produtos já
“preparados” (por exemplo: congelados ou pré-cozidos)
e não somente, em todo o caso úteis sugestões são
apresentadas na tabela “Conselhos práticos para a
cozedura”.
Utilização do grill
O forno põe à disposição 2 possibilidades diferentes de
grelhar.
Utilize a função d / 2 “grill”, com a porta semiaberta,
e coloque a comida no centro da grelha (colocada na 3a
ou na 4a prateleira a partir de baixo), porque fica acesa
somente a parte central da resistência superior.
Para colectar o molho e/ou a gordura, coloque na 1a
prateleira a bandeja pingadeira fornecida.
Quando utilizar-se esta função, é recomendável colocar
o termostato no máximo. Também é possível definir
temperaturas mais baixas, é suficiente regular o selector
do termostato da maneira desejada.
Nos modelos equipados de espeto giratório 2, na função
“grill” é possível utilizar o jogo de espeto f ornecido. Neste
caso, coza com a porta do forno fechada e coloque o
jogo de espeto na 3a prateleira (a partir de baixo) e a
bandeja pingadeira na 1a para colectar o molho e/ou
gordura. Neste caso, coza com a porta do forno fechada
e coloque o jogo de espeto na 3a prateleira (a partir de
baixo) e a bandeja pingadeira na 1a para colectar o molho
e/ou gordura.
A função e / x “Gratinado”, exclusivamente com a
porta fechada, é utilíssima para grelhadas rápidas,
distribui o calor emitido pelo grill e assim possibilita contemporaneamente doirar a superfície e também cozer bem
a parte de baixo.
Também é possível utilizá-la na parte final da cozedura
de pratos que necessitarem doirar a superfície, por
exemplo, é ideal para doirar massa assada no fim da
cozedura.
Ao utilizar esta função, coloque a grelha na 2a ou 3a
prateleira a partir de baixo (veja a tabela de cozedura),
posteriormente, para a colecta da gordura derretida e para
evitar formar fumo, coloque a bandeja pingadeira na 1a
prateleira a partir de baixo.
Importante: efectue a cozedura “Gratinado” com a porta do forno fechada, desta maneira obterá, além de
melhores resultados, uma sensível economia de energia
(aproximadamente 10 %).
Quando utilizar esta função, é recomendável colocar o
termostato em 200 °C, porque esta é a condição de melhor
performance, que se baseia na irradiação de raios
infravermelhos. Entretanto isto não quer dizer que não é
possível utilizar temperaturas mais baixas, é suficiente
colocar o selector do termostato na temperatura desejada.
Nos modelos equipados com espeto giratório x, na
função “gratinado” é possível utilizar o jogo de espeto
fornecido. Neste caso, coloque o jogo de espeto na 3a
prateleira (a partir de baixo) e a bandeja pingadeira na 1a
para colectar o molho e/ou gordura.
Portanto os melhores resultados na utilização das
funções de grill são obtidas se colocar a grelha nas
últimas prateleiras a partir de baixo (veja a tabela de
cozedura) posteriormente, para a colecta da gordura
derretida e para evitar formar fumo, coloque a bandeja
pingadeira fornecida na primeira prateleira a partir de
baixo.
Cozedura de sobremesas
Na cozedura de sobremesas coloque-as sempre no forno já quente, depois de ter aguardado o fim do pré-aquecimento, indicado pela luz vermelha “E” que se apaga.
Não abra a porta durante a cozedura, para evitar que o
doce abaixe-se. Em geral:
Bolo muito seco
A próxima vez au mentar a tem perat ura de 10°C e
reduzir o tempo de coz edura
O bolo abaixou-se
Utilizar menos líqui do ou abai xar a temper atura d e
10°C.
Bolo escuro por cima
Colocá-lo a uma altur a inf erior, se lecc ionar uma
temperatura mais b aixa e d eixá- lo coz er mais temp o.
Boa cozedura por fora mas mole por dentro
Utilizar menos líquido, r eduz ir a temp eratu ra,
aumentar o tempo de coz edura.
O doce não se solta da forma
Unte bem a forma e deite ta mbém n a mesm a um
pouco de farinha ou ut ilize papel de f orno.
56
Page 56

"Assei em várias prat eleir as ( na função
"ventilado") e não tudo assou-se uniformemente"
Regule para uma temperatura mais baixa. As
prateleiras empre gadas c ontem poranea me nte pode m
ser tiradas a medida que fic arem pr onta s.
Cozedura de pizza
Para cozer pizzas utilize a funçãone w “forno para
pizza”:
• Aqueça previamente o forno pelo menos 10 minutos.
• Utilize uma forma de alumínio lev e, apoie-a na g relha
do forno. Se utilizar a bandeja pingadeira aumentará
os tempos de cozedura e dificilmente será obtida uma
pizza crocante.
• Não abra frequentemente o forno durante a cozedura.
• No caso de pizzas com muita cobertura (capricciosa,
quatro estações), é aconselhável colocar o queijo
mozzarella na metade da cozedura.
• No caso de cozedura simultânea em várias prateleiras (até 2) é preferível utilizar a função F orno Cozedu-
ra Múltipla b por que com a função Forno para Pizza
w cozerá mais a prateleira mais embaixo.
Cozedura de peixe ou carne
Para carnes brancas, aves e peixe utilize temperaturas
entre 180 °C e 200 °C.
Para a carne ficar bem cozida por f ora e conservar o suco
por dentro, é melhor começar com uma temperatura alta
(200°C ~ 220°C) por pouco tempo, para depois diminuíla sucessivamente.
Em geral, quanto maior for o pedaço de carne a ser assado, menor de v erá ser a temperatura e mais longo o tempo de cozedura. Coloque a carne a ser cozida no meio da
grelha e o tabuleiro que recolhe a gordura debaixo da
grelha.
Instale a grelha na parte central do forno. Se desejar mais
calor de baixo use a 1a prateleira a partir de baixo. Para
obter assados saborosos (especialmente patos e caça),
coloque uma camada de banha ou toucinho na carne, de
modo que esteja na parte superior.
57
Page 57

Programação
seleccionada
Tipo de cibo Peso
(Kg.)
Posição da grelha
em relação ao
fundo do forno
Tempo de pré-
aquecimento
(min.)
Programação
do
termo stato
Duração
da
cozedura
(min.)
1 Tradicio nal
a
2 Pastéis
u
3 Cozinha
Rápida
v
4 Cozedura
Múltipla
b
5 Pizza
w
6 Grill
d 2
Pato
Carne de vitela ou vaca assada
Carne de porco assada
Biscoitos (de massa tenra)
Tortas doces
Tortas doces
Tortas de frutas
Plum cake
Pão-de-ló
Crêpes recheadas
Queques pequenos
Salgadinhos folhados como queijo
(em 2 prateleiras)
Bignès (em 3 prateleiras)
Biscoitos (em 3 prateleiras)
Merengues (em 3 prateleiras)
Congelados
Pizza
Misto abobrinha e camarão
panado
Torta rústica de espinafre
Panzerotte
Lasanha
Pãezinhos doirados
Bolinhos de frango
Pré-cozidos
Asas de frango doiradas
Com idas Frescas
Biscoitos (de massa tenra)
Plum cake
Salgadinhos folhados de queijo
Pizza (em 2 prateleiras)
Lasanha
Co rd e iro
Frango assado com batatas
Cavala
Plum cake
Bignés (em 2 prateleiras)
Biscoitos (em 2 prateleiras)
Pão-de-ló (em 1 prateleira)
Pão-de-ló (em 2 prateleiras)
Tortas salgadas
Pizza
Carne de vitela ou vaca assada
Frango
Linguado e chocas
Espetinhos de calamares e
cam arão
Filé de bacalhau
Verduras na grelha
B ife d e vi tela
Costeletas
Hambúrgueres
Cavala
Tostas
Com espeto giratório
(em 2 prateleiras)
(em 2 prateleiras)
(se
1
1
1
-
1
0.5
1
0.7
0.5
1.2
0.6
0.4
0.7
0.7
0.5
0.3
0.4
0.5
0.3
0.5
0.4
0.4
0.4 2 - 200 20-25
0.3
0.6
0.2
1
1
1
1+1
1
1
0.5
0.5
0.5
1.0
1.5
0.5
1
1
1
1
1
1
1
1
1
1
n.° 4
3
3
3
3
3
3
2/3
3
3
2-4
2-4
2-4
1-3-5
1-3-5
1-3-5
2
2
2
2
2
2
2
2
2
2
2-4
3
2
2-4
2
2
2-4
2-4
2
2-4
3
3
2
2/3
4
4
4
3/4
4
4
4
4
4
15
15
15
15
15
15
15
15
15
15
15
15
15
15
15
15
10
10
15
10
10
10
10
10
10
15
15
10
10
200
200
200
180
180
180
180
180
160
200
190
210
180
180
90
-
-
-
-
-
-
-
-
-
-
5
5
5
5
5
5
5
5
5
Max
200
220
200
200
180
220
200
180
210
230
180
180
200
180
170
190
180
170
170
200
220
220
180
Max
Max
Max
Max
Max
Max
Max
Max
Max
65-75
70-75
70-80
15-20
30-35
20-30
40-45
40-50
25-30
30-35
20-25
15-20
20-25
20-25
180
12
20
30-35
25
35
25-30
15-20
15-18
45
10-12
15-20
30-35
40-45
60-70
30-35
40-50
20-25
10-15
15-20
20-25
25-30
15-20
25-30
60-70
8-10
6-8
10
10-15
15-20
15-20
7-10
15-20
2-3
houver)
7 Gratin ado
e x
Vitela no espeto
Frango no espeto
Cordeiro no espeto
Frango na grelha
Chocas
Com espeto giratório
(se
1.0
1.5
1.0
1.5
1.5
-
-
-
3
3
5
5
5
5
5
Max
Max
Max
200
200
80-90
70-80
70-80
55-60
30-35
houver)
Vitela no espeto
Cordeiro no espeto
Frango (no espeto) com batatas
(na bandeja pingadeira)
Obs.: os tem pos de cozedura são indicativos e poderão serem modificados em função dos próprios gostos pessoais. Para
cozedura no grill ou no gratinado necessário colocar a bandeja pingadeira sem pre na 1a prateleira a partir de baixo.
1.5
1.5
1.5
-
-
-
-
2
5
5
5
5
200
200
200
200
70-80
70-80
70-75
70-75
58
Page 58

A segurança um bom costume
Para garantir a eficiência e a segurança deste electrodoméstico:
• dirija-se exclusivamente aos centr os de assistência técnica autorizados
• solicite sempre a utilização de peças de reposição originais
• Para deslocar o aparelho, ao fim de evitar prejuízos
a pessoas e ao próprio produto, utilizar sempre
apropriadas empunhaduras criadas aos lados do
forno.
• Este aparelho foi concebido para utilização não profissional nas moradas e as suas características não podem
ser modificadas.
• As instruções são válidas somente para os países de
destino para os quais os símbolos constam no livrete e
na placa de identificação do aparelho.
• A segurança eléctrica deste aparelho é garantida somente quando o mesmo tiver sido correctamente ligado a
um eficiente sistema de ligação à terra da maneira prevista pelas normas de segurança em vigor.
• Durante o uso do aparelho os elementos de aqueci-
mento e algumas partes da porta do forno ficam
muito quentes. Tome cuidado para não tocar nos
mesmos e mantenha as crianças afastadas.
Por serem fontes de perigo, evite que crianças e
incapazes entrem em contacto com:
- os comandos e o aparelho em geral;
- as embalagens (saquinhos, poliestirol, pregos etc.);
- o aparelho, durante e logo após o funcionamento do forno e do grill, por causa do superaquecimento;
- o aparelho inutilizado (neste é preciso tornar inócuos os
componentes que poderão ser perigosos).
É preciso evitar as seguintes operações:
- tocar o aparelho com partes do corpo húmidas;
- utilizá-lo com os pés descalços;
- puxar o aparelho ou o cabo de alimentação eléctrica para
tirar a ficha da tomada de corrente;
- operações impróprias e perigosas;
- tapar as aberturas de ventilação ou de escoamento do
calor;
- que o cabo de alimentação de pequenos electrodomésticos entrem em contacto com partes quentes do aparelho;
- a exposição aos elementos atmosféricos (chuva, sol);
- a utilização do forno para guardar utensílios;
- a utilização de líquidos inflamáveis nas proximidades;
- o emprego de adaptadores, fichas múltiplas e/ou extensões;
- tentativas de instalação ou reparação sem a intervenção de pessoal qualificado.
É absolutamente necessário dirigir-se a pessoal
qualificado nos seguintes casos:
- instalação (segundo as instruções do fabricador);
- quando houver dúvidas sobre o funcionamento;
- troca de tomada eléctrica no caso de incompatibilidade
com a ficha do aparelho.
É preciso dirigir-se aos centros de assistência técnica
autorizados pelo fabricador nos seguintes casos:
- no caso de dúvida sobre o bom estado do aparelho, ao
tirá-lo da embalagem;
- danos ou troca do cabo de alimentação eléctrica;
- anomalia ou mau funcionamento, solicite sempre peças
de reposição originais.
É oportuno efectuar as seguintes operações:
- somente a cozedura de alimentos, evite outras operações;
- verifique o bom estado, logo após tirar da embalagem;
- desligue o aparelho da rede de alimentação eléctrica no
caso de mau funcionamento e antes de quaisquer operações de limpeza ou manutenção;
- quando não for utilizá-lo, desligue o aparelho da rede
eléctrica e feche a torneira do gás (se houver);
- utilize luvas de forno para colocar e tirar recipientes do
forno;
- segure sempre a maçaneta da porta pelo meio, porque
a ponta pode estar mais quente por causa de eventual
saídas de ar;
- controle sempre que os botões estejam na posição “•”/
”o” quando o aparelho não for utilizado.
- cor te o cabo de alimentação eléctrica depois de tê-lo
desligado da rede eléctrica, quando for decidido não mais
utilizar o aparelho.
• O fabricador não poderá ser considerado responsável
por eventuais danos deriv antes de: errada instalação , ou
utilizações impróprias, erradas e não racionais.
59
Page 59

INSTALAÇÃO
A instalação deve ser efectuada conforme as instruções
do fabricador, por pessoal profissionalmente qualificado. Uma instalação errada pode causar danos às pessoas,
animais ou objectos, em relação aos quais o fabricador não
pode ser responsabilizado.
Importante: quaisquer inter venções de regulação, manutenção etc. precisam ser efectuadas com o f orno desligado
da electricidade.
Instalação dos fornos de encaixar
Para garantir um bom funcionamento do aparelho de encaixar é necessário que o móvel seja de características adequadas. Na figura a seguir, são apresentadas as dimensões
do vão do móvel na introdução embaixo de uma mesa ou
numa coluna.
567 mm.
45 mm.
558 mm.
593 mm.
23 mm.
595 mm.
5 mm.
595 mm.
545 mm.
24 mm.
Os painéis dos móveis adjacentes ao forno precisam ser de
material resistente ao calor. Especialmente no caso de móveis de madeira contraplacada, as colas da mesma precisam ser resistentes a temperatura de 100 °C.
Em conformidade com as normas de segurança, depois de
instalar o aparelho encaixado, não dev e ser possível o contacto com componentes eléctricos.
Todos os componentes de garantia da protecção precisam
estar presos de modo que não possam ser tirados sem o
emprego de uma ferramenta.
Fixação do forno no móvel
1. Coloque os suportes “A” encostados no apoio do forno “B”.
2. Coloque os taquinhos “C” encostados nos suportes
“A”. Nomeadamente, se a espessura da lateral do
móvel
• for de 16 mm.: monte o taquinho de maneira que o
número 16 indicado no mesmo fique virado para si;
• for de 18 mm.: monte o taquinho de maneir a que a
parte sem escritas fique virada para si;
• for de 20 mm.: não monte o taquinho.
3. Prenda os suportes e os taquinhos na beira do móvel
com lateral usando os parafusos “D”.
4. Prenda o forno ao móvel usando os parafusos e as
anilhas de plástico “E”.
16
16
C
D
45 mm.
min.
595 mm.
23 mm.
567 mm.
5 mm.
595 mm.
545 mm.
24 mm.
558 mm.
595 mm.
575-585 mm.
45 mm.
min.
Para garantir uma boa ventilação é necessário eliminar o
painel traseiro do vão, é pref erível instalar o f orno de modo
que apoie sobre ripas de madeira; se houver um plano contínuo de apoio, o mesmo precisa possuir uma abertura de
pelo menos 45 x 560 mm.
45 mm.
560 mm.
D
C
16
16
A
C
D
B
E
E
Ligação eléctrica
Os fornos equipados com cabo eléctrico tripolar, são preparados para o funcionamento com corrente alternada na tensão e frequência eléctricas indicadas na placa de identificação (situada no aparelho) e no folheto de instruções. O fio
de ligação à terra do cabo distingue-se pelas cores amarelo-verde.
Montagem do cabo de alimentação
Abertura da caixa de bornes:
• Utilize uma chave de fenda par a f az er ala v anca nas linguetas laterais da tampa da caixa de bornes;
• Puxe e abra a tampa da caixa de bornes.
Para a instalação do cabo ef ectue as seguintes operações:
• desatarraxe o parafuso da braçadeira e os três parafusos dos contactos L-N-6
• prenda os cabinhos embaixo da cabeças dos parafusos, respeite as cores: Azul (N) Marrom (L) Amarelo-
Verde 6
• prenda o cabo de alimentação na apropriada braçadeira
e feche a tampa.
60
Page 60

NL
Ligação do cabo de alimentação à rede
Monte uma ficha normalizada no cabo, apropriada à carga
indicada na placa de características. Em caso de ligação
directa à rede, é preciso interpor entre o aparelho e a rede
um interruptor omnipolar com abertura mínima entre os contactos de 3 mm., dimensionado à carga e de acordo com as
normas em vigor (o fio de terra não deve ser interrompido
pelo interruptor).
O cabo de alimentação deve estar colocado de modo a não
atingir em ponto algum uma temperatura que ultrapasse temperatura ambiente de mais de 50°C.
Antes de efectuar a ligação verificar se:
• A segurança eléctrica deste aparelho está assegurada
somente quando o mesmo estiver ligado a uma instalação com contacto de terra eficiente, conforme as normas de segurança eléctrica em vigor. É necessário verificar este requisito fundamental de segurança e, em caso
de dúvida, mandar efectuar um controle meticuloso da
instalação por pessoal profissionalmente qualificado. O
fabricador não se responsabiliza por danos eventuais
provocados pela f alta de ligação à terra da instalação .
• Antes de ligar o aparelho assegure-se de que os dados
da plaqueta (colocada sobre o aparelho e/ou na embalagem) coincidam com os da rede de distribuição eléctrica e de gás.
• V erifique se a capacidade eléctrica da instalação e das
tomadas de corrente são apropriadas para a potência
máxima do aparelho que está indicada na plaqueta. Em
caso de dúvida dirija-se a pessoal profissionalmente qualificado.
• No caso de incompatibilidade entre a ficha do aparelho,
mande um técnico profissionalmente qualificado trocar
a ficha por outra de tipo adequado. Este técnico deverá
também especificamente certificar-se que o diâmetro dos
cabos da ficha seja idóneo para a potência absorvida
pelo aparelho. Em geral é desaconselhável o uso de
adaptadores, fichas múltiplas e/ou extensões. Se o uso
de adaptadores for indispensável, use somente
adaptadores simples ou múltiplos, e extensões conformes às normas de segurança em vigor, porém tome cuidado para não ultrapassar o limite de capacidade da
corrente, indicado no adaptador simples e nas extensões, nem o limite de potência máxima indicado no
adaptador múltiplo. A ficha e a tomada de vem ser fa-
cilmente acessíveis.
Características técnicas
Medidas úteis do forno:
largura: 43,5 cm.
profundidade: 40 cm.
altura: 32 cm.
Volume útil do forno:
56 litros
ETIQUETA DE ENERGIA
Directiva 2002/40/CE acerca dos fornos eléctricos
Norma EN 50304
Consumo de energia com convecção Natural
função de aquecimento: a Tradicional
Consumo de energia da declaração de Classe com convecção
Forçada
função de aquecimento: u Pastelaria
Tensão e frequência da alimentação eléctrica:
220-240V ~ 50Hz 2560-3050W
Este equipamento é em conformidade com as
seguintes Directivas Comunitárias:
- 773/23/CEE de 19/02/73 (Baixa Tensão) e
sucessivas modificações;
- 89/336/CEE de 03/05/89 (Compatibilidade
Electromagnética) e sucessivas modificações;
- 93/68/CEE de 22/07/93 e sucessivas modificações.
- 2002/96/CE
A directiva Europeia 2002/96/CE referente à gestão de
resíduos de aparelhos eléctricos e electrónicos (RAEE),
prevê que os electrodomésticos não dev em ser escoados
no fluxo normal dos resíduos sólidos urbanos. Os
aparelhos desactualizados devem ser recolhidos
separadamente para optimizar a taxa de recuperação e
reciclagem dos materiais que os compõem e impedir
potenciais danos para a saúde humana e para o ambiente. O símbolo constituído por um contentor de lixo barrado
com uma cruz deve ser colocado em todos os produtos
por forma a recordar a obrigatoriedade de recolha
separada.
Os consumidores devem contactar as autoridades locais
ou os pontos de venda para solicitar inf ormação referente
ao local apropriado onde devem depositar os
electrodomésticos velhos.
7
61
Page 61

Wij danken u dat u een Ariston product heeft gekozen, veilig en gemakk elijk in het gebruik. T eneinde de ov en beter te
leren kennen, beter te gebruiken en er langer plezier van te hebben raden wij u aan de gebruiksaanwijzing aandachtig
te lezen voordat u hem voor de eerste k eer gaat gebruiken, er staan belangerijke aanwijzingen in met betrekking op de
veiligheid van installeren, het gebruik en onderhoud. Bew aar dit boekje zorgvuldig voor e ventuele verdere r aadpleging.
Dank u.
Van dichtbij gezien
A. Bedieningspaneel
B. Keuzeknop kookfuncties
C. Temperatuurknop
E. Indicator voorverwarming (knippert) of kooktijd
(stil) bezig
F. Lekplaat of bakplaat
G. Ovenrek
H. Geleider lekplaat en ovenrek
I. Controlelampje deur geblokkeerd (slechts bij enkele
modellen aanwezig) - Indien dit aan is betekent het
dat de ovendeur niet geopend kan worden
O. Analoge programmeerknop begin/einde kooktijd
(slechts op enkele modellen aanwezig)
A
H
G
F
E
12
3
9
6
B
O
C
I
Het Gebruik
De 7 koks oven verenigt in een enkel apparaat de
voordelen van de traditionele oven met natuurlijke
convectie: “statische oven”, met de moderne oven met
geforceerde conv ectie: “hetelucht”.
Dit is een veelzijdig apparaat waarmee u op eenvoudige
en veilige wijze kunt kiezen tussen 7 verschillende
manieren van koken. Met de keuzeknop “B” en de
thermostaatknop “C” op het bedieningspaneel kiest u de
verschillende functies.
Verk oelingsventilatie
Teneinde de hitte aan de buitenkant van de oven te beperken, zijn enkele modellen voorzien van een verkoelende ventilator die automatisch aan gaat als de o ven
warm wordt..
Als de ventilator aan is kunt u een luchtstroom waarnemen tussen het voorpaneel en de ovendeur.
N.B.: Na het koken blijft de ventilator nog werken totdat de oven voldoende is afgekoeld.
Belangrijk: Wij raden aan bij het eerste gebruik de ov en
ongeveer een half uur leeg te laten functioneren op maximum temperatuur en met de deur dicht. Als deze tijd ver-
lopen is opent u de ovendeur en lucht u het vertrek. De
geur die men soms gedurende deze handeling waarneemt
is te wijten aan het verdampen van de middelen die gebruikt worden om de oven te beschermen gedurende het
tijdsverloop tussen de productie en het installeren van het
product.
Belangrijk: Plaats de bijgeleverde lekplaat voor het opvangen van v et en vleessappen op de laagste stand in de
oven, alleen als u onder de grill bakt of het braadspit
(slechts op enkele modellen aanwezig) gebruikt. Bij alle
andere soorten van koken nooit de laagste stand gebruiken of voorwerpen op de bodem van de oven plaatsen
terwijl de oven aan is, aangezien dit het email kan beschadigen. Plaats altijd uw ovenschotels, aluminiumfolie
en dergelijken op het bijgeleverde rek, dat u in de gleuv en
van de oven steekt.
Ovenlicht
Dit gaat aan door de knop “B” op het symbool 8. te zetten. Dit verlicht de oven en blijft aan als een elektrisch
62
Page 62

verwarmingselement van de oven aan is .
T raditionele oven a
Positie thermostaatknop “C”: tussen 60°C en Max.
In deze positie gaan de twee verwarmingselementen onder en boven werken. Dit is de klassieke oven die echter
is opgevoerd tot een optimale temperatuurverdeling met
zuinig energieverbruik. De Traditionele oven is altijd nog
onovertroffen voor het koken van gerechten die uit twee
of meer ingrediënten bestaan zoals b .v . kool met varkensvlees, stokvis, rijst met kalfsvlees enz… Uitstekende resultaten bij het prepareren van schotels op basis van rundvlees of kalfsvlees zoals: gestoofd vlees, goulash, wild,
lamsbout, varkenshaas enz… die langzaam gekookt en
bedropen moeten worden. Ook voor gebak is dit het beste
systeem, zowel als voor stoofvruchten. Gebruik bij het
koken in de Traditionele versie altijd alleen één ovenrek,
anders is het mogelijk dat de temperatuur niet goed verdeeld wordt. Gebr uik de verschillende standen naar gelang de behoefte. Als meer boven- of onderwarmte vereist is zet u de schotel hoger of lager in de oven.
Gebak-oven u
Positie thermostaatknop “C”: tussen 60°C en Max.
Het verwarmingselement achterin de oven wordt
geactiveerd en de ventilator gaat werken voor het
gelijkmatig verdelen van de temperatuur. Het
energieverbruik v an dez e functie is slechts 1600W.
Deze functie is geschikt voor het koken van fijnere
gerechten, vooral voor cakes die moeten rijzen en voor
koekjes op drie rekken tegelijk. B.V. soesjes, zoete en
zoute hapjes, kaaskoekjes, opgerolde k oekjes enz…
“Fast cooking” oven v
Positie thermostaatknop “C”: tussen 60°C en Max.
De verwarmingselementen gaan werken en ook de
ventilator die zorgt voor een constante en gelijkmatige
warmte in de oven.
Deze functie is vooral aangewezen voor het snel koken
(voorverwarmen niet nodig) van reeds bereide gerechten
(b.v. diepvriesproducten of voorgekookte gerechten). De
beste resultaten bij de functie “Fast cooking” verkrijgt u
door slechts één rek te gebruiken (de tweede stand van
beneden af), zie “Practische aanwijzingen v oor het koken”.
Multikoken b
Positie thermostaatknop “C”: tussen 60°C en Max.
De verwarmingselementen treden in werking zowel als
de ventilator. De warmte is constant en gelijkmatig in de
hele oven, de lucht kookt en bruint de gerechten op gelijkmatige wijze op alle punten. U kunt ook verschillende gerechten tegelijkertijd koken, mits deze dezelfde temperatuur nodig hebben. U kunt maximum 2 standen tegelijk
gebruiken, met in acht neming van de aanwijzingen in de
paragraaf “Tegelijkertijd op meer ovenrekken koken”.
Deze functie is vooral geschikt voor schotels die
gegratineerd moeten worden of voor gerechten die nogal
lang gekookt moeten worden, zoals b.v. lasagna,
macaronischotel, gebraden kip met aardappelen enz…
Bijzonder geschikt ook voor braadstukken aangezien de
uitstekende verdeling van de temperatuur het mogelijk
maakt de temperatuur lager te houden, hetgeen verlies
van vleessappen tegengaat en het vlees dus mals houdt
met weinig gewichtsverlies. De Multikoken is vooral
bijzonder goed voor het stoven van vis, waarbij slechts
weinig kruiden en andere toevoegingen nodig zijn zodat
de vorm en smaak van de vis bewaard blijft. Desserts:
Resultaat verzekerd als u cake wilt bakken.
De functie “hetelucht” kan ook worden gebr uikt voor het
snel ontdooien van vlees, brood, met een temperatuur v an
80 °C. V oor het ontdooien van fijnere gerechten gebruikt
u 60°C of koude lucht met de thermostaatknop op 0°C.
Pizza oven w
Positie thermostaatknop “C”: tussen 60°C en Max.
De verwarmingselementen boven en onder gaan aan en
de ventilator gaat werken. Met deze combinatie wordt de
oven snel warm dankzij het aanzienlijke vermogen (2800
W) dat vooral van onderaf komt.
De functie pizza-oven is vooral aangewezen voor
etenswaren die veel hitte nodig hebben zoals inderdaad
pizza en grote braadstukken. Gebruik één niveau per keer;
indien u op meer niveaus kookt moeten de gerechten op
de helft van de kooktijd onderling van plaats verwisseld
worden.
Grill d / 2
Positie thermostaatknop “ C”: Max.
Het centrale verwarmingselement aan de bov enkant gaat
aan en het braadspit (waar aanwezig) gaat werken.
De hoge en rechtstreekse hitte bruint de oppervlakten van
het vlees onmiddelijk zodat er geen vocht verloren gaat
en de binnenkant mals blijft. Het bakken onder de grill is
vooral geschikt voor etenswaren die een hoge temperatuur aan de buitenkant vereisen: biefstuk, entrecôte, filet,
hamburgers etc...
Houd de ovendeur half open gedurende het koken
behalve als u het braadspit gebruikt.
U vindt een paar voorbeelden in de paragraaf “Praktische
kooktips”.
Au Gratin e / x
Positie thermostaatknop “C”: tussen 60°C en 200°C.
Het centrale verwarmingselement aan de bovenkant gaat
aan en de ventilator en het braadspit (waar aanwezig)
gaan werken.
Hiermee wordt de rechtstreekse bovenhitte van de grill
gecombineerd met de circulatie van de lucht in de oven.
Eventueel verbranden v an de buitenkant wordt zo v ermeden en de warmte dringt gemakkelijker door naar de binnenkant. Uitstek ende resultaten worden bereikt voor vleespennen met stukken vlees en groenten, worstjes,
varkenscoteletten, lamskarbonade, kip, gevogelte,
varkensfilet enz…
Houd gedurende het koken met de “Au Gratin” de
ovendeur dicht.
Ook voor vis is de Au Gratin onovertroffen:tandbaars,
tonijn, zwaardvis, ge vulde inktvis enz…
Automatische reiniging door middel v an Fast Clean
Dit is het reinigingsproces van de oven. Voor informatie
betreffende Fast Clean, zie de paragraaf “ Automatische
reiniging door middel van F ast Clean”.
Het braadspit (slechts op enkele modellen aanwezig)
Ga voor het gebruik van het braadspit als v olgt te w erk:
V
63
Page 63

a) plaats de lekplaat op de 1° stand;
b) plaats de steun van het braadspit op de 3° stand en
plaats het spit door het gat heen in de achterkant van
de oven;
c) activeer het braadspit door met de knop “B” de positie
te kiezen 2 / x.
ANALOGE PROGRAMMEERKNOP BEGIN/EINDE KOOKTIJD
12
9
Gelijkzetten van de tijd
De oven moet elektrisch ingeschakeld zijn.
Druk op de knop en draai hem tegen de klok in tot aan de
juiste tijd
N.B.: De klok functioneert op elektriciteit, als de stroom uitvalt staat hij dus stil. Als de stroom weer terug is moet de
klok weer gelijk gezet worden.
Handmatige functie
N.B.: in alle gev allen waarbij het pr ogrammeren van de
kooktijd niet nodig is.
1 Draai de knop tegen de klok in totdat het symbool 9 op
de display verschijnt.
2 Trek de knop en draai hem tegen de klok in totdat het
moblile wijzertje samenvalt met de juiste tijd. Een klik
kondigt het einde van de handeling aan.
Kies het gewenste programma met de ovenknop. Schakel
de oven uit door de knop op de positie “0” te zetten.
3
6
Kookprogramma met onmiddelijk begin
1 Draai de knop tegen de klok in totdat de gewenste kook-
tijd op de display verschijnt.
2 Trek de knop en draai hem tegen de klok in totdat het
mobile wijzertje samenvalt met de juiste tijd. Een klik
kondigt het einde van de handeling aan. De oven gaat
aan en functioneert gedurende de hele ingestelde kooktijd. Een geluidssignaal k ondigt het uitgaan van de o v en
aan.
V oor het afzetten hiervan draait u de knop tegen de klok in
totdat het symbool 9 op de display v erschijnt.
Programmering uitgestelde start
1 Kooktijd:
Draai de knop tegen de klok in totdat de gewenste kooktijd op de display verschijnt.
2 Begin kooktijd:
T rek de knop en draai hem tegen de klok in totdat het
mobile wijzertje samenvalt met het gewenste uur voor
het begin van de kooktijd.
Kies het gewenste kookprogr amma met de ovenknop .
De oven gaat aan bij het begin van de kooktijd en blijft aan
gedurende de ingestelde tijd. Een geluidssignaal k ondigt het
uitgaan van de ov en aan.
V oor het afzetten hiervan draait u de knop tegen de klok in
totdat het symbool 9 op de display v erschijnt.
64
Page 64

Automatische reiniging door mid del van Fast Clean
Door de functie Fast Clean te activeren bereikt de
temperatuur in de oven de 500°C die nodig zijn voor het
verbranden van voedselrestjes. Door de glasruit van de
ovendeur kunt u enkele deeltrjes zien die oplichten
gedurende het carboniseren door pyrolyse, doordat ze in
contact komen met de verwamingselementen: dit is
momentverbranding, een absoluut normaal fenomeen dat
geen enkel gevaar met zich mee brengt.
Enige nuttige wenken voordat het automatisch
reinigen begint
1- Probeer met een vochtige spons de meest hardnekkige
aangekoekte etensresten te elimineren Gebruik absoluut
geen schoonmaakmiddelen of welk product ook maar dat
wordt aangeraden voor het schoonmak en v an ov ens.
2- V erwijder alle accessoires uit de oven, aangezien deze
niet tegen zulke hoge temperaturen zijn bestand. Bovendien
zouden sommige accessoires de automatische reiniging in
de weg kunnen staan door het verhinderen van de circulatie
van de hete lucht op alle wanden. De accessoires kunnen
gewoon worden afgewassen (ook in de v aatw asser) .
3- Laat geen keukendoek en op het handvat hangen.
Belangrijk: gedurende de automatische reiniging kan
de buitenkant van de oven behoorlijk warm worden.
Houd kleine kinderen op een afstand.
Het activeren van de Fast Clean’
– Sluit de ovendeur .
– Zet de keuzeknop op V
– Voor het prog rammeren van de tijdsduur en/of het einde
van de F ast Clean volgt u de instructies in de paragraaf
“Programmeren Fast Clean”.
Veiligheidssystemen
Gezien de hoge temperatuur die wordt bereikt is de oven
voorzien van enk ele veiligheidssystemen :
• de deur wordt automatisch geblokkeerd zodra de
temperatuur erg hoog oploopt, teneinde ieder risico
van zich branden te v ermijden;
• De verwarmingselementen worden niet meer
elektrisch gevoed, om te voorkomen dat zich een
storing zou kunnen voordoen.
• de maximum toegestane tijdsduur is 120 minuten, aan
het einde waarvan de oven automatisch uitgaat.
• als de oven te heet is kan het gebeuren dat de p yrolyse
niet start. Wacht tot de oven wat is afgekoeld.
Wat gebeurt er aan het einde van de “Fast clean”
met onmiddelijk begin en vastgestelde tijdsduur?
Het einde van de “Fast Clean” wordt aangegeven door
het uitgaan van het controlelampje “E” .
De ovendeur kan pas worden geopend als de temperatuur
tot een acceptabel niveau is gezakt. Het deblokk eren van
de deur wordt aangegeven door het uitgaan van het
controlelampje “I”.
U kunt nu wat wit stof waarnemen op de bodem en op de
wanden van de oven; verwijder dit met een vochtige spons
zodra de ov en helemaal is afgekoeld.
Als u wilt profiteren van de opgehoopte warmte om de oven
voor koken te gebruik en, dan kunt u het witte stof rustig laten
liggen aangezien het geen enkel gevaar oplevert voor het
gerecht dat u van plan bent om te kok en.
Wat gebeurt er aan het einde van de “Fast clean”
met vastgestelde tijdsduur en onmiddelijke/
uitgestelde start?
Het einde van de “Fast Clean” wordt aangegeven door
het uitgaan van het controlelampje “E” en een
geluidssignaal. Voor het uitzetten van het geluidssignaal
draait u de programmeerknop tegen de klok in totdat het
nummer 9. verschijnt op het afleesvenstertje.
De ovendeur kan pas worden geopend als de temperatuur
tot een acceptabel niveau is gezakt. Het deblokk eren van
de deur wordt aangegeven door het uitgaan van het
controlelampje “I” .
U kunt nu wat wit stof waarnemen op de bodem en op de
wanden van de o ven; v erwijder dit met een vochtige spons
zodra de oven helemaal is afgek oeld.
Als u wilt profiteren van de opgehoopte warmte om de
oven voor koken te gebruiken, dan kunt u het witte stof
rustig laten liggen aangezien het geen enkel gevaar
oplevert voor het gerecht dat u van plan bent om te koken.
Herstellen na een black-out
In het geval dat de temperatuur in de o ven niet al te veel
is gezakt, is het apparaat voorzien van een systeem dat
in staat is een kooktijd/pyrolyse (waar aanwezig) weer te
hervatten op het punt waar het was onderbroken op het
moment van de blac k-out. Vergeet niet het klokje weer op
de juiste tijd te zetten wanneer het u uitkomt.
N.B.
Denk eraan dat, voor veiligheidsredenen, de
programmeringen betreffende kooktijden die nog wachten
op hun start niet worden hersteld bij het terugkeren van
de stroom.
65
Page 65

Programmeren van de Fast clean
12
9
Fast clean met onmiddelijke start en vastgestelde
tijdsduur
De tijdsduur van de “Fast clean” is 120 minuten en deze
modus van functioneren wordt in alle gevallen gebr uikt
waar geen behoefte bestaat de tijdsduur en het begin van
de “F ast Clean” te progr ammeren.
1 Draai de knop tegen de klok in totdat het nummer 9
verschijnt op het afleesvenstertje.
2 Trek aan de knop en draai hem tegen de klok in totdat
het wijzertje op de juiste tijd komt te staan. Een klik zal
het einde van de handeling aangev en.
Kies met de keuzeknop van de oven het programma V. U
kunt op ieder moment de oven weer uitdoen door de knop
op “0” te zetten.
Programmeren tijdsduur “F ast Clean” met
onmiddelijke start
De maximum tijdsduur van de “Fast clean” is 120 minuten
en instellingen die langer zijn dan 2 uren hebben dus geen
enkel effect aangezien de oven automatisch uitgaat als
de twee uren op zijn.
3
6
1 Draai de knop tegen de klok in totdat op het
afleesvenstertje de tijdsduur van de gewenste “Fast
Clean” verschijnt.
2 Trek aan de knop en draai hem tegen de klok in totdat
het wijzertje op de juiste tijd komt te staan. Een klik zal
het einde van de handeling aangev en.
Kies met de keuzeknop van de o ven het progr amma V.
De “Fast clean” begint onmiddelijk en blijft functioneren
gedurende de hele vastgestelde tijd. Als de tijd op is hoort u
een geluidssignaal: om dit af te zetten draait u de knop tegen
de klok in totdat het nummer 9 verschijnt op het
afleesvenstertje.
Programmeren tijdsduur “F ast Clean” met uitgestelde
start
De maximum tijdsduur van de “F ast clean” is 120 minuten
en instellingen die langer zijn dan 2 uren hebben dus geen
enkel effect aangezien de oven automatisch uitgaat als
de twee uren op zijn.
1 Tijdsduur “Fast clean”:
Draai de knop tegen de klok in totdat de gewenste
tijdsduur van de “Fast Clean” in het afleesvenstertje
verschijnt.
2 Start “Fast clean”:
T rek aan de knop en draai hem tegen de klok in totdat
het wijzertje overeenkomt met de begintijd van de
gewenste “Fast clean”.
Met de keuzeknop van de o ven kiest u het progr amma V.
De “Fast Clean” begint op het uur dat is ingesteld en blijft
functioneren voor de hele tijdsduur die gekozen is , maar niet
langer dan 2 uren. U hoort een geluidssignaal als de tijd op
is: voor het afz etten hiervan draait u de knop tegen de klok in
totdat het nummer 9 in het afleesv enstertje verschijnt.
WEES NIET ONGERUST ALS
1 aan het begin van de Clean Fast cycle de
verkoelingsventilator op lage snelheid functioneert;
2 gedurende het gebruik van de Fast Clean de ze kering
van het net doorslaat: het net is overbelast (tegelijk
gebruik met andere elektrische apparaten);
3 de ovendeur geblokkeerd is gedurende het F ast Clean
programma: dit is een veiligheidsmaatregel van het
apparaat; de deur kan pas weer open worden gemaakt
als de oven is afgek oeld;
4 na de Fast Clean cycle er nog kleine vlekken op de
binnenwanden van de ov en zijn: het is n uttig om indien
nodig vóór de zelfreiniging de meest hardnekkige
etensresten te verwijderen en een tijdsduur van het
programma in te stellen die overeenk omt met hoe vuil
de oven is;
5 aan het einde van de bereidingstijd nog even
geventileerde lucht uit de o ven komt: dit is de normale
fase voor het afkoelen van de oven;
6 bij de grill-functie de bovenste weerstand niet aldoor
aan blijft (rood): het functioneren wordt door een
thermostaat geregeld;
7 stoom ontsnapt wanneer de deur gedurende het koken
wordt geopend;
8 zich waterdruppels of stoom vormen binnen in de oven
als u na de bereidingstijd het gerecht nog in de oven
laat staan;
66
Page 66

Onderhoud
Glasplaat
Afdichting
Lamp
Ovenruimte
Sluit altijd eerst de stroom af voordat u tot enige handeling ov ergaat.
Het is belangrijk voor de lange duurzaamheid van het apparaat dat u het regelmatig nauwkeurig schoonmaakt, als
volgt:
• Gebruik voor het reinigen geen stoomapparaat.
• de buitenkant, geëmailleerd en roestvrij staal, wordt met
een lauw sopje gewassen, gebruik nooit schuurmiddelen
of oplosmiddelen, die beschadigingen kunnen veroorzaken; roestvrij staal kan permanent gevlekt blijven. Gebruik voor hardnekkige vlekken speciale producten die
normaal in de handel te krijgen zijn. Spoel ze dus na het
reinigen goed af en droog ze af.
• de binnekant van de oven wordt gereinigd als de oven
nog lauw is, liefst na ieder gebruik, met een warm sopje,
dan gespoeld en zorgvuldig gedroogd met een zachte
doek. Gebruik nooit schuurmiddelen (b.v. vim enz…) of
de harde kant van de afwasspons of zuren (b .v . ontkalker
enz…) aangezien die het email kunnen beschadigen. Als
het vuil moeilijk te verwijderen is, gebruik dan een speciaal product voor het schoonmaken v an de oven en volg
de aanwijzingen op de verpakking hiervan.
• als de oven lange tijd gebruikt wordt kan zich
condenswater v ormen. Droog af met een zachte doek.
• de rubber afwerking om de oven heen zorgt voor het goed
functioneren. Controleer dus af en toe de staat waarin
deze afdichting zich bevindt. Maak hem schoon indien
nodig maar vermijd producten of voorwerpen die schuren of scherp zijn. Indien de afdichting beschadigd is moet
u zich wenden tot de installateur. Gebruik de oven pas
weer als dit gerepareerd is.
• bekleed de bodem van de oven nooit met aluminium f olie, aangezien het ophopen van hitte zowel uw gerecht
als het email kan beschadigen.
• reinig de ruit van de ovendeur met niet-schurende
producten en sponzen, en droog hem met een zachte
doek.
Het verwijderen van de ovendeur
V oor een grondige reiniging kunt u de ovendeur verwijderen. Ga
als volgt te werk:
• open de deur helemaal;
• trek omhoog en draai de hendeltjes op de twee scharnieren;
• pak de deur aan beide kanten vast, doe hem langzaam maar
niet helemaal dicht;
• trek de deur naar u toe en uit zijn behuizing.
Monteer de deur weer op tegenovergestelde wijze .
123
Het vervangen van de ovenlamp
• Sluit de stroom van de oven af door middel van de schakelaar die de installatie aan het net verbindt, of door de stekker
uit het stopcontact te trekken, indien deze bereikbaar is.
• Schroef het glazen lampekapje los;
• Schroef het lampje los en vervang het met een nieuw lampje
dat hittebestendig is (300°C) met de volgende kenmerken:
- Spanning 230/240 V
- Vermogen 25W
- Fitting E14
• Monteer het lampekapje en sluit de stroom weer aan.
Kooktips
De oven biedt een grote verscheidenheid van mogelijkheden die het mogelijk maken ieder soort gerecht op de
beste wijze te koken. Met verloop der tijd zult u leren het
fornuis op de beste wijze te gebruiken; de hiervolgende
aanwijzingen zijn dus relatief en zullen door uw persoonlijke ervaringen worden uitgebreid.
V oorverwarmen
Voor het voorverwarmen, vooral te gebruiken voor
gerechten die moeten rijzen, kunt u de functie w “pizza-
oven” gebruiken, die de oven snel op de gewenste
temperatuur brengt met gereduceerd energieverbruik. Als
het gerecht eenmaal in de oven is gezet kunt u de meest
aangewezen functie v oor het k oken instellen.
Tegelijkertijd op meer ovenrekken koken
Als u op meer rekken wilt kok en kunt u de functie “gebak
oven” u gebruiken of de functie b “Multikoken” ; dit
zijn de enigen waarbij deze mogelijkheid bestaat.
V oor het koken van fijne gerechten op meer dan een rek
kunt u het beste de functie “gebak oven” u gebruiken,
die de mogelijkheid biedt om op 3 rekken tegelijkertijd te koken (1°, 3° en 5°). U vindt enkele voorbeelden
in de tabel “Praktische raadge vingen v oor het k o k en”.
V oor andere gerechten op meer rekken gebruikt u de func-
tie b “Multikoken” en houdt u rek ening met de volgende
raadgevingen:
• De oven heeft 5 posities. Bij hetelucht gebruikt u twee
van de drie middelste posities, de laagste van beneden af en de hoogste positie van de oven worden recht-
67
Page 67

streeks door de hete lucht geraakt, hetgeen bij meer
kwetsbare gerechten aanbranden zou kunnen veroorzaken.
• Normaal gesproken gebruikt u het 2° en het 4° rek van
beneden af, en plaatst u op de 2° verdieping het gerecht dat de meeste warmte nodig heeft. Als u b.v.
een braadstuk wilt braden tegelijkertijd met een ander
gerecht, plaats dan het braadstuk op de 2° verdieping
en het andere gerecht op de 4°.i;
• Als u verschillende gerechten tegelijkertijd in de oven
heeft, en deze hebben verschillende k ooktijden en temperaturen nodig, stel dan een gemiddelde temperatuur tussen de twee in, zet het meest kwetsbare gerecht op de 4de positie en haal het gerecht dat de minste tijd nodig heeft het eerste uit de oven.
• Gebruik de lekplaat op de onderste positie en de grill
op de bovenste positie.
Gebruik van de functie “Fast cooking”
Funtioneel, snel en praktisch voor wie “voorgekookte”
producten gebruikt (b.v.: diepvries of kant en klare gerechten) en niet alleen deze; u vindt nuttige raadgevingen
in de tabel “Praktische raadgevingen voor het koken”.
De grill
De “7 K oks ov en” biedt verschillende mogelijkheden v oor
het bakken onder de grill.
Gebruik de functie d / 2 “grill” met de deur half open,
en plaats het gerecht in het midden onder de grill (op de
3° of 4° verdieping van beneden af), aangezien alleen het
middelste gedeelte van het bov enste verwarmingselement
aan gaat.
Plaats de bijgeleverde lekplaat voor het opvangen van
druipend vet op de 1° verdieping.
Zet bij deze functie de thermostaat op maximum. U kunt
natuurlijk ook lagere temperaturen instellen door het regelen van de thermostaatknop.
Bij de modellen met braadspit kunt u in de 2, “grill” functie de bijgeleverde braadspit-set gebruiken. In dit geval
braadt u met de ovendeur dicht en het spit op de 3° verdieping (van beneden af); de lekplaat v oor het opvangen
van druipend vet wordt op de 1° v erdieping geplaatst.
De functie e / x “au gratin” altijd met de ovendeur
dicht, is handig voor snel grillen; de hitte van de grill wordt
verspreid zodat zowel de bovenkant bruin wordt en de
onderkant gaar wordt.
U kunt deze functie ook gebruiken voor gerechten die op
het einde aan de bovenkant gebruind moeten worden,
zoals b.v. een macaronischotel.
Bij gebruik van deze functie plaatst u het gerecht op de 2°
of 3° verdieping van beneden af (zie tabel) en plaats de
lekplaat op de 1° verdieping van beneden af
Belangrijk: houd bij het koken “au gratin” de ovendeur dicht, u krijgt zo betere resultaten en een belang-
rijke energiebesparing (ongeveer 10%).
Bij deze functie wordt aangeraden de thermostaat op
200°C te zetten aangezien dit het beste rendement geeft,
gebaseerd op het uitstralen van de infrarode stralen.
Natuurlijk kunt u ook lagere temperaturen instellen door
de thermostaatknop op de gewenste temperatuur te zetten.
Bij de modellen met braadspit kunt u in de x, “au gratin”
versie de bijgelev erde braadspit-set gebruiken. Plaats de
braadspit-set op de 3° verdieping (v an beneden af) en de
lekplaat op de 1° verdieping.
De beste resultaten bij gebruik van de grill krijgt u
met het rek op de hoogste standen (zie tabel) en de
bijgeleverde lekplaat op de laagste stand.
Desserts
Plaats gebak altijd in een voorverwarmde oven, wacht
op het einde van de voorverwarming dat wordt
aangegeven doordat het rode controlelampje “E” uitgaat.
Open gedurende het bakken de deur van de ov en niet
omdat het gebak kan inzakken. In het algemeen:
Taart te droog
Stel de volgende keer een te mper atuur in die 10 °C
hoger is en maak de baktij d kor ter.
Taart zakt in
Maak deeg minder vloeibaar of verlaag de
temperatuur met 10°C.
Taart te donker bovenop
Plaats hem op een lage re st and in de ove n, ste l een
lagere temperatu ur in en v erleng de bakt ijd.
Buitenkant goed, maar van binnen niet gaar
Maak deeg minder vloeiba ar, v erlaag de t emper atuur,
verleng de baktijd.
De taart komt niet uit de vorm
Boter de vorm goed in en sprink el er wat b loem
overheen, of gebruik ov enpapie r.
"Bakken op meer ovenrekken (in de "hetelucht"
versie) met gerechten die niet in dezelfde tijd gaar
worden"
Stel een lagere temp artuu r in. U k unt de vers chil lende
gerechten op verschi lle nde tijde n ui t de ove n halen.
Pizza
Gebruik voor het bakken van pizza’s de functie w “pizza-oven”:
• verwarm de ov en minstens 10 minuten v oor.
• Gebruik een lichte aluminium vorm en zet hem op het
ovenrek. Bij gebruik van de bakplaat (lekplaat) duur t
het langer en krijgt u geen crocante pizza.
• Open de ovendeur zo weinig mogelijk gedurende het
bakken.
• Bij hoog opgevulde pizza’s (capr icciosa, quattro stagioni) raden wij aan de mozzarella pas halverwege de
kooktijd erbij de doen.
68
Page 68

• Als u op meer dan een rek tegelijkertijd kookt (tot aan
2) kunt u het beste de Multikoken b gebruiken
aangezien de functie pizza-oven w de 1° stand van
benedenaf het meeste zou verwarmen.
Vis en vlees
Gebruik voor wit vlees, gev ogelte en vis temperaturen van
180 °C tot 200 °C.
Bij rood vlees is het goed te beginnen met een hogere
temperatuur (200°C - 220°C) en vervolgens de temperatuur te verlagen.
Over het algemeen geldt de regel: hoe groter het stuk
vlees, hoe lager de temperatuur en hoe langer de tijd van
braden. Zet het vlees in het midden van het ovenrek en
zet er de lekplaat onder.
Plaats het rek zodanig dat het vlees zich midden in de
oven bevindt. Voor meer onderwarmte zet u het rek wat
lager. Voor een heerlijk braadstuk kunt u het met spek of
spekvet bedekken (vooral ook eend en wild) en z o plaatsen dat het zich boven in de oven bevindt.
69
Page 69

Gekozen
ins t e llin g
Gerecht Gew icht
(Kg )
Positie
ovenrek van
benedenaf
gerekend
Voorverw arming-
stij d (min.)
Ins t el lin g
thermostaat
Kooktijd
(min .)
1
Tra d itio n e le
a
2 Gebak
u
3 Fast
cooking
v
4 Multikoken
b
5 Pizza
w
6 Grill
d 2
Eend
Braadstuk
Varkensvlees
Koekjes (kruim eldeeg)
Jamtaart
Jamtaart
Vruchtentaart
Plum-cake
Pan di spagna
Gevulde flensjes (op 2 rek)
Kleine gebakjes (op 2
rekk e n)
Kaaskoekjes (op 2 rekken)
Beignets (op 3 rekken)
Biscuits (op 3 rekken)
Merengue (op 3 rekken)
Diepvries
Pizza
Courgettes en garnalen in
deeg
Spinazie-quiche
Panzerotti
Lasagna
Kip-snacks
Voorgekookte gerechten
Kippenvleugels
Verse etenswaren
Koekjes (kruim eldeeg)
Plum-cake
Kaaskoekjes
Pizza (op 2 rekken)
Lasagna
Lamsvlees
Kip + aardappels
Makreel
Plum-cake
Beignets (op 2 rekken)
Koekjes (op 2 rekken)
Pan di spagna (op 1 rek)
Pan di spagna (op 2
rekk e n )
Quiche
Pizza
Braadstuk
Kip
Tong en inktvis
Garnalen en calamari aan
het spit
K ab elja uw-filet
Groenten onder de grill
Biefstuk
Kote le tten
Hamburgers
Makreel
Toast
Aan het spit
(waar
1
1
1
-
1
0.5
1
0.7
0.5
1.2
0.6
0.4
0.7
0.7
0.5
0.3
0.4
0.5
0.3
0.5
0.4
0.4 2 - 200 20-25
0.3
0.6
0.2
1
1
1
1+1
1
1
0.5
0.5
0.5
1.0
1.5
0.5
1
1
1
1
1
1
1
1
1
1
n.° 4
3
3
3
3
3
3
2/3
3
3
2-4
2-4
2-4
1-3-5
1-3-5
1-3-5
2
2
2
2
2
2
2
2
2
2-4
3
2
2-4
2
2
2-4
2-4
2
2-4
3
3
2
2/3
4
4
4
3/4
4
4
4
4
4
15
15
15
15
15
15
15
15
15
15
15
15
15
15
15
15
10
10
15
10
10
10
10
10
10
15
15
10
10
200
200
200
180
180
180
180
180
160
200
190
210
180
180
90
-
-
-
-
-
-
-
-
-
5
5
5
5
5
5
5
5
Max
200
220
200
200
220
200
180
210
230
180
180
200
180
170
190
180
170
170
200
220
220
180
Max
Max
Max
Max
Max
Max
Max
Max
aanwezig)
7 Au gratin
e x
Kalfsvlees aan het spit
Kip aan het spit
Lamsvlees aan het spit
Gegrilleerde kip
Ink tvis
Aan het spit
(waar
1.0
1.5
1.0
1.5
1.5
-
-
-
3
3
5
5
5
5
5
Max
Max
Max
200
200
aanwezig)
Kalfsvlees aan het spit
Lamsvlees aan het spit
Kip (aan het spit) +
aardappelen (op de
1.5
1.5
1.5
-
-
-
-
2
5
5
5
5
200
200
200
200
lekplaat)
NB:
de kooktijden zijn indicatief en kun nen verschillen naar gelang u w persoonlijke smaak. Bij het bakken onder
de grill of au gratin m oet de lekplaat altijd op de 1° stand van benedenaf worden geplaatst.
65-75
70-75
70-80
15-20
30-35
20-30
40-45
40-50
25-30
30-35
20-25
15-20
20-25
20-25
180
12
20
30-35
25
35
15-20
15-18
45
10-12
15-20
30-35
40-45
60-70
30-35
40-50
20-25
10-15
15-20
20-25
25-30
15-20
25-30
60-70
8-10
6-8
10
10-15
15-20
15-20
7-10
15-20
2-3
80-90
70-80
70-80
55-60
30-35
70-80
70-80
70-75
70-75
70
Page 70

Veiligheid is een goede gewoonte
Voor het garanderen van de efficiëntie en veiligheid van het apparaat:
• Wendt u zich alleen tot een erkend technisc h service center
• Vereis altijd originele onder delen
• Maak gebruik van de handgrepen aan de zijkanten
van de oven als u het apparaat moet verplaatsen,
zo vermijd u schade aan personen en aan de oven
zelf.
• Dit apparaat is geschikt voor niet-professioneel gebruik
thuis en zijn kenmerken mogen niet ver anderd worden.
• De instructies gelden alleen voor de landen van
destinatie waarvan de symbolen in de gebruiksaanwijzing voorkomen en op het registratieplaatje.
• De veiligheid van dit apparaat is slechts dan gegarandeerd als het van een volgens de geldende v eiligheidsnormen aangelegde aarding is voorzien.
• Gedurende het gebruik van de oven worden de
verwarmingselementen en enkele delen van de
ovendeur heet. Raak er niet aan en houd de kinderen op een afstand.
Zorg ervoor dat kinderen en onbekwame personen
niet in contact komen met:
- het bedieningspaneel en het apparaat in het algemeen;
- de verpakking (plastic zakken, piepschuim, spijkers
enz.);
- het apparaat gedurende en direct n gebruik van de
oven of grill, vanwege de hitte;
- het apparaat ongebruikt (in dit geval moeten onderdelen onschadelijk gemaakt worden).
De volgende handelingen moeten vermeden
worden:
- het apparaat met natte handen aanraken;
- het apparaat gebruiken als u blootsvoets bent;
- aan het apparaat trekken of aan de voedingskabel om
de stekker uit te trekken;
- verkeerde en/of gevaarlijke manipulaties uitv oeren;
- ventilatie-openingen verstoppen;
- de elektrische draden van kleine keukenapparaten op
warme delen van het apparaat laten liggen;
- blootstellen aan weersomstandigheden (regen, zon);
- de oven gebruiken als opbergplaats;
- het gebruik van ontvlambare vloeistoffen nabij de oven;
- het gebruik van adapters, verlengsnoeren en/of dubbelstekkers;
- zelf installeren of repareren zonder de hulp van een
erkende installateur.
Het is noodzakelijk zich tot een erkende installateur
te wenden in de volgende gevallen:
- het installeren (volgens de aanwijzingen van de f abrikant);
- als u niet zeker bent of het apparaat wel goed functioneert;
- voor het vervangen van het stopcontact, als de stekker niet past.
Het is noodzakelijk zich tot de technische service
van de fabrikant te wenden in de volgende gev allen:
- als het apparaat na het uitpakken beschadigd lijkt;
- als de voedingskabel beschadigd is en vervangen moet
worden;
- eis bij het vervangen altijd een origineel onderdeel.
Houdt u zich aan het volgende:
- alleen koken, en geen ander gebruik van het apparaat;
- na uitpakken controleren op schade;
- de stroom van het apparaat afsluiten bij storingen en
voordat u tot onderhoud ov ergaat;
- als de oven niet gebruikt wordt moet u de stroom uitschakelen en de gaskraan dicht doen (indien aanwezig);
- gebruik ovenwanten voor het in- en uitladen van gerechten;
- pak het handvat van de deur altijd in het midden aan,
aangezien de uiteinden warm kunnen worden door een
eventuele luchtstroom;
- controleer altijd dat de knoppen in de positie “•”/”o” staan
als het fornuis niet gebruikt wordt.
- als u het apparaat niet meer gaat gebruiken, sluit dan
de stroom af en snijd de voedingskabel door.
• de fabrikant stelt zich niet aansprakelijk v oor eventuele
schade veroorzaakt door: foutief installeren, onjuist,
verkeerd of onredelijk gebruik.
71
Page 71

INSTALLATIE
Het installeren moet uitgevoerd w orden door een bevoegde installateur en volgens de instrukties van de
fabrikant. Een verkeerde aansluiting kan schade veroor-
zaken aan personen, dieren of dingen en voor deze gevallen kan de fabrikant niet verantwoordelijk worden gesteld.
Belangrijk: sluit altijd eerst de stroom af voordat u overgaat tot regelen, onderhoud enz.
Installeren inbouwovens
V oor een goede werking van het apparaat moet het meubel de juiste kenmerken hebben. In de afbeelding vindt u
de afmetingen van de uitspaarruimte voor het plaatsen
onder de aanrecht of stapelbouw.
567 mm.
45 mm.
558 mm.
593 mm.
45 mm.
min.
23 mm.
595 mm.
5 mm.
595 mm.
545 mm.
24 mm.
N.B.: Installatie voor aangifte energieverbruik
De wanden van aangrenzende kastjes moeten v an hittebestendig materiaal zijn. Vooral in het geval van kastjes
met fineer moet de lijm bestand zijn tegen een temperatuur van 100 °C.
V olgens de veiligheidsnormen mogen de elektrische panelen na het installeren niet aanraakbaar zijn.
Alle beschermende onderdelen moeten zodanig zijn bevestigd dat ze niet kunnen worden verwijderd z onder gereedschap te gebruiken.
Bevestigen van de oven aan het kastje
1. Plaats de montageplaatjes “A” op de ovensteun “B”.
2. Plaats de hoekstukken “C” op de montageplaatjes “A”.
Let op dat als de dikte van de wand v an het omringende
kastje:
• 16 mm is: monteer het hoekstuk zodanig dat het
nummer 16 naar u toe is gericht ;
• 18 mm is: monteer het hoekstuk zodanig dat het
onbeschreven gedeelte naar u toe is gericht;
• 20 mm is: monteer het hoekstuk niet.
3. Bevestig de montageplaatjes en de hoekstukken op
de rand van de wand van het kastje met de schroe ven
“D”.
4. Bevestig de ov en aan het kastje met de schroe v en en
plastic sluitringen “E”.
16
16
D
C
16
16
C
D
A
C
D
E
E
595 mm.
23 mm.
567 mm.
5 mm.
595 mm.
545 mm.
24 mm.
558 mm.
595 mm.
575-585 mm.
45 mm.
min.
De achterwand van de uitspaarruimte moet verwijderd
worden voor het luchten Het is het beste als de oven op
twee houten randen steunt. Indien er een door lopende
steunplaat aanwezig is moet deze van een opening w orden voorzien van minstens 45 x 560 mm.
45 mm.
560 mm.
B
Elektrische aansluiting
De ovens die voorzien zijn v an een driepolige voedigskabel
zijn gebruiksklaar voor wisselstroom met voltage en frequentie zoals aangegeven op het typeplaatje (op het apparaat) en in de gebruiksaanwijzing. De aarding van de
kabel is geel/groen.
Monteren voedingskabel
Opening klemmenbord:
• Licht met een schroevendraaier de lipjes aan de zijkant van de deksel van het klemmenbord op;
• trek de deksel van het klemmenbord open.
Het aansluiten van de kabel:
• schroef de schroef van de kabelklem en de drie schroeven van de contacten L-N-6 los
• bevestig de draden onder de k op van de schroefjes en
let op de kleuren: Blauw (N), Bruin (L), Geel/groen
6
• zet de kabel vast in de kabelklem en sluit de deksel
72
Page 72

NL
Het aansluiten van de voedingskabel aan het net
Bevestig een stekker op de voedingskabel, die geschikt
is voor de lading die aangegev en wordt op het typeplaatje.
In het geval er een directe aansluiting aan het net plaatsvindt, moet men tussen het apparaat en het net een
veelpolige schakelaar aanbrengen met een minimum afstand tussen de kontaktpunten van 3 mm. Deze moet aan
de lading aangepast zijn en aan de geldende normen voldoen (de geaarde kabel mag niet door de schakelaar onderbroken worden).
De voedingskabel moet zodanig geplaatst zijn, dat hij nergens een temperatuur bereikt die 50°C hoger is dan de
kamertemperatuur.
V oor het aansluiten moet men k ontroleren dat:
• De electrische veiligheid van dit apparaat is slechts
dan verzekerd als het op de juiste wijze is geaard zoals voorgeschreven door de geldende normen voor
electrische veiligheid. Het is belangrijk zich hiervan te
verzekeren en, in geval van twijfel, een controle te laten uitvoeren door een be voegde electricien. De fabri-
kant kan niet aansprakelijk worden gesteld voor schade
die veroorzaakt is door nalatigheid betreffende het aarden van de installatie.
• V oordat het apparaat wordt aangesloten moet men zich
ervan verzekeren dat de gege vens van het typeplaatje
(op het apparaat en/of de verpakking) overeenk omen
met de kenmerken van het electrische net en de gasleiding.
• Controleer dat het electrische vermogen van het net
en van de stopcontacten voldoende is voor het maximum vermogen van het apparaat zoals aangegeven
op het typeplaatje. In geval van twijfel moet u zich tot
een bevoegde electricien wenden.
• Als de stekker en het stopcontact niet passen, dan
moet de stekker vervangen worden met een passende
stekker door een bevoegde electricien. Deze moet
vooral ook controleren dat de doorsnede v an de kabels
van het stopcontact voldoende is voor het vermogen
van het apparaat. Het is in het algemeen af te raden
adapters, dubbel.stekkers en/of verlengsnoeren te
gebruiken. Als het gebruik hiervan onv ermijdelijk is dan
moet men enkelvoudige of meervoudige adapters en
verlengsnoeren gebruiken die voldoen aan de geldende
veiligheidsnormen. Let echter op de vermogensgrens
van de stroom niet te overschrijden zoals deze is
aangegeven op de enkele adapter en op de
verlengsnoeren, en het maximum vermogen
aangegeven op de meervoudige adapter. Stekker en
stopcontact moeten gemakkelijk te bereiken zijn.
Technische g eg evens
Afmetingen van de oven:
breedte : 43,5 cm
diepte: 40 cm
hoogte: 32 cm
Inhoud van de oven:
56 liters
ENERGY LABEL
Richtlijn 2002/40/CE op etiket van de elektrische ovens
Norm EN 50304
Energieverbruik conv ectie Natuurlijk
verwarmingsfunctie: a Traditionaal
Energieverbruik verklaring Klasse conv ectie Hetelucht
verwarmingsfunctie: u Gebak
Voltage en frekwentie van de stroomverzorging:
220-240V ~ 50Hz 2560-3050W
7
Dit apparaat voldoet aan de volgende EEG
Richtlijnen:
- 73/23/EEG van 19/02/73 (laagspanning) en
successieve lijke modificaties;
- 89/336/
compatibiliteit) en successievelijk e modificaties;
- 93/68/EEG van 22/07/93 en successievelijk e
modificaties;
- 2002/96/EC
De Europese Richtlijn 2002/96/EC over Vernietiging van
Electrische en Electronische Apparatuur (WEEE), vereist
dat oude huishoudelijke electrische apparaten niet mogen
vernietigd via de normale ongesorteerde afvalstroom.
Oude apparaten moeten apart worden ingezameld om zo
het hergebruik van de gebruikte materialen te
optimaliseren en de negatieve in vloed op de gez ondheid
en het milieu te reduceren. Het symbool op het product
van de “afvalcontainer met een kruis erdoor” herinnert u
aan uw verplichting, dat wanneer u het apparaat vernietigt,
het apparaat apart moet worden ingezameld.
Consumenten moeten contact opnemen met de locale
autoriteiten voor informatie over de juiste wijze van
vernietiging van hun oude apparaat.
EEG
van 03/05/89 (elektromagnetische
73
Page 73

Wir danken Ihnen, dass Sie dieses sichere und äußerst leicht zu bedienende Ariston-Gerät gewählt haben. Um sich
mit diesem vertraut zu machen und es auf optimale Art zu gebrauchen lernen, empfehlen wir Ihnen, dieses Handbuch
vor Inbetriebnahme des Gerätes aufmerksam zu lesen, da es wichtige Hinweise hinsichtlich der Sicherheit bei der
Installation, dem Gebrauch und der W artung liefert. Bewahren Sie dieses Handbuch sorgfältig auf , damit Sie es jederzeit
zu Rate ziehen können. Dank e .
Aus der Nähe betrachtet
A. Schalterblende
B. Drehknopf Garfunktionen
C. Drehknopf Gartemperaturen
E. Anzeige Vorheizen (blinkt) oder Garvorgang
(Dauerlicht) läuft ab
F. Fettpfanne bzw. Bac kb lech
G. Backofenrost
H. Gleitführungen für Backblech und Back ofenroste
I. Kontrollleuchte Türsperre (nur bei einigen Modellen
vorgesehen) - Leuchtet sie, so bedeutet dies, dass die
Backof entür nicht geöffnet werden kann.
O. Analog-Uhr zur V orwahl von Start/Ende der Garzeit
(nur an einigen Modellen)
A
H
G
F
E
12
3
9
6
B
O
C
I
Inbetriebnahme des Gerätes
Der
‘7 Cuochi’
die Vorzüge der herkömmlichen Backöfen mit “statischem”-Wärmeübergang und die der modernen “Heißluft”-Backöfen mit Wärmeströmung.
Es handelt sich um ein äußerst vielseitiges Gerät, das es
Ihnen ermöglicht, zwischen 7 einfachen und sicheren Brat/Backmethoden wählen zu können. Eingestellt werden diese verschiedenen Funktionen über den Funktionswähler
„B“ und den Thermostatenknopf „C“ der Schalterblende.
Kühlluftgebläse
Um die Wärmeerzeugung an den äußeren Teilen des
Backof ens herabzusetzen, wurden einige Modelle mit einem Kühlluftgebläse bestückt, das sich bei heißem Bac kofen automatisch einschaltet.
Sobald sich dieses Gebläse in Betrieb setzt, ist zwischen
Frontblende und Backofentür ein austretender Luftstrahl
zu vernehmen.
Anmerkung: Nach Abschluss des Garvorgangs bleibt das
Gebläse solange in Betrieb, bis der Bac kofen ausreichend
abgekühlt ist.
-Backof en vereint in einem einzigen Gerät
Zur Beachtung: Bei erstmaliger Inbetriebnahme sollte der
leere Backof en für etwa 30 Minuten bei eingestellter Höchsttemperatur und geschlossener Backofentür in Betrieb gesetzt werden. Nach Ablauf dieser Zeit schalten Sie den Backofen aus, öffnen die Back ofentür und lüften die Küche. Der
hierbei evtl. entstehende Geruch wird durch das V erdunsten
der zum Schutz des Backofens während des Zeitraums
zwischen Produktion und erster Inbetriebnahme aufgetragenen Stoffe verursacht.
Zur Beachtung: Verwenden Sie bitte die erste (die unterste) Führungsschiene nur für die Fettpfanne, d.h. zum Auffangen des abtropfenden Fleischsaftes und/oder F ettes beim
Grillen oder bei Einsatz des Bratspießes (nur an einigen Modellen). Für alle anderen Gararten ist diese Führungsschiene nicht zu verwenden. Stellen Sie bei in Betrieb befindlichem Backofen auch niemals Kochgeschirr auf den Boden
des eingeschalteten Backofens , Sie könnten hierdurch das
Email beschädigen. Stellen Sie Ihr K ochgeschirr (Auflaufformen, Alufolien, usw.) stets auf die ordnungsgemäß in die
Führungsschienen eingesetzten, mit dem Gerät gelieferten
Backofenroste.
74
Page 74

Backofenbeleuchtung
Diese wird durch Drehen des Knopfes „B“ auf das Symbol
8. eingeschaltet. Sie beleuchtet das Ofeninnere und bleibt
eingeschaltet, solange sich irgendein elektrisches
Backof enheizelement in Betrieb befindet.
T raditionell a
Thermostatenknopf “C”: zwischen 60°C und Max.
Bei dieser Einstellung schalten sich die beiden Heizelemente,
das untere und das obere, ein. Dies ist der klassische Backofen unserer Großmütter , der jedoch, was Wärmeverteilung
und Energieeinsparung anbelangt, auf ein außergewöhnliches Niveau gebracht wurde. Der statische Bac kof en ist unübertrefflich bei der Zubereitung von Eintopfgerichten wie:
Kohl mit Schweinerippchen, Stockfisch auf spanische Art,
Stockfisch mit Tomatensoße, Kalbsgeschnetzeltes mit Reis
usw .... A usgezeichnete Resultate erzielen Sie bei der Zube-
reitung von Rind- und Kalbfleischgerichten wie: Schmorbr aten, Ragout, Gulasch, Wild, Lammkeule , Schweinslende usw.,
die eine lange Garzeit und ständige Hinzugabe von Flüssigkeit erfordern. Der statische Backofen bietet immer noch das
beste System zum Backen von Kleingebäck und Kuchen,
zum Garen von Obst, sowie zum Garen v on Auflaufgerichten
bzw. Gerichten in geschlossenen Backformen. Bei Einsatz
des statischen Backofens schieben Sie bitte jedes Mal nur
ein Backblech ein, da ein gleichzeitiges Garen bzw. Backen
auf mehreren Ebenen keine gleichmäßige Hitzev erteilung gewährleistet. Je nach Einsatz der verschiedenen Einschubhöhen, kann die Unter- bzw. Oberhitze optimal genutzt werden. Verwenden Sie die obere Einschubhöhe, wenn mehr
Oberhitze verlangt wird, und die untere, wenn mehr Unterhitze verlangt wird.
Backen u
Thermostatenknopf “C”: zwischen 60°C und Max.
Das hintere Heizelement schaltet sich ein und das Gebläse
wird in Betrieb genommen, wodurch eine äußerst delikate,
im Backofen gleichmäßig v erteilte Wärme gewährleistet wird.
Der Energieverbr auch dieser Funktion beträgt nur 1600 W .
Diese Funktion eignet sich zum Garen zarter Speisen, insbesondere jedoch zum Backen von Hefeteigen, sowie zur
Zubereitung von Kleingebäck auf 3 Ebenen gleichzeitig. Nachstehend einige Beispiele: Bignè, Kekse, Blätter teiggebäck,
Biskuitrolle, gratiniertes Gemüse (T omaten, Auberginen us w.)
„Intensivbacken“ v
Thermostatenknopf “C”: zwischen 60°C und Max.
Die Heizelemente schalten sich ein und das Gebläse wird in
Betrieb genommen, wodurch eine äußerst delikate, im Backofen gleichmäßig verteilte, konstante Wär me gewährleistet
wird.
Ideal für schnelles Garen (Vorheizen ist nicht erforderlich)
von Tiefkühl-Fertiggerichten oder „Hausgemachtes“.
Beschicken Sie beim „Intensivbacken“ nur eine Ebene (die
2. von unten), dies ermöglicht bessere Resultate, siehe Tabelle „Praktische Back/Brat-Hinw eise.
Multi-Cooking b
Thermostatenknopf “C”: zwischen 60°C und Max.
Die Heizelemente schalten sich ein und das Gebläse wird in
Betrieb genommen. Dank der konstant gehaltenen und im
Backofen gleichmäßig verteilten Heißluft werden die Spei-
sen sehr gleichmäßig gegart bzw. gebacken. Es können auch
gleichzeitig mehrere Gerichte unterschiedlicher Art gegar t
werden, vorausgesetzt es werden keine unterschiedlichen
Gartemperaturen verlangt. Es können bis zu 2 Einschubhöhen gleichzeitig verwendet werden. Beachten Sie hierzu
die Hinweise des Abschnitts “Gleichz eitiges Garen auf mehreren Einschubhöhen”. Diese Funktion eignet sich besonders für Gratin-Gerichte, wie auch für Speisen, die längere
Garzeiten erfordern, wie: Lasagna, Nudelaufläufe, Brathähnchen mit Kartoffeln usw. Bei Fleischgerichten eignen sich
ganz besonders Braten zum Garen im Heißluftbackofen.
Dank der optimalen Hitzev erteilung können niedrigere Temperaturen eingestellt werden, es tritt weniger Fleischsaft aus,
das Fleisch bleibt demnach zarter und der Gewichtsverlust
wird eingeschränkt. Besonders geschätzt wird der Heißluftbackof en bei der Zubereitung von Fisch, der auf diese W eise mit wenig Zutaten gegart werden kann, wodurch Aussehen und Geschmack unv eränderlich erhalten bleiben.
Dessert: Hefekuchen gelingen ganz besonders im Heißluftbackof en.
Die „Heißluft“-Funktion kann auch zum Auftauen von Fleisch
und Brot eingesetzt werden. Stellen Sie hierzu den Thermostaten auf 80°C ein. Zum Auftauen delikater Speisen stellen
Sie jedoch entweder eine Temperatur von 60°C ein, oder
verwenden nur die kalte Umluft (Thermostateneinstellung
demnach auf 0°C).
Pizza-Backofen w
Thermostatenknopf “C”: zwischen 60°C und Max.
Das untere und das runde Heizelement schalten sich ein
und das Gebläse wird in Betrieb genommen. Durch diese
Kombination wird aufgrund der hohen abgegebenen Leistung
(2800 W) mit einer hauptsächlich von unten aufsteigenden
starken Hitzezufuhr der Backof en sehr schnell erhitzt.
Diese Funktion eignet sich besonders für die Speisen, die
hohe Gartemperaturen verlangen, wie eben Pizza, oder auch
für besonders große Fleischbraten. V erwenden Sie bitte nur
ein Backblech oder -rost. Sollte mehr als ein Backrost eingesetzt werden, dann sind ihre Einschubhöhen nach Ablauf
der halben Garzeit auszuwechseln.
Grill d / 2
Thermostatenknopf “C”: Max.
Das mittlere obere Heizelement schaltet sich ein und der
Bratspieß (falls vorhanden) wird in Betrieb gesetzt.
Durch die äußerst hohe Temperatur und die direkt auf das
Grillgut gerichtete Hitze wird das Fleisch auf der Oberseite
rasch gebräunt, somit tritt kein Fleischsaft aus und das
Fleisch bleibt zarter. Die Gr illfunktion eignet sich ganz besonders für solche Speisen, die eine äußerst hohe Oberhitze verlangen: Rinder- und Kalbssteaks, Entrecôte, Fleisch-
filet, Hamburger usw. ...
Grillen Sie bei halb offenstehender Backofentür,
ausgenommen es wird der Bratspieß in Betrieb
genommen.
Der Abschnitt “Praktische Back-/Br athinweis” enthält einige
Beispiele zum Einsatz des Backof ens.
Gratin e / x
Thermostatenknopf “C”: zwischen 60°C und 200°C.
Das mittlere obere Heizelement schaltet sich ein und das
Gebläse und der Bratspieß (falls v orhanden) werden in Be-
75
Page 75

trieb gesetzt.
Außer der einseitigen Strahlungshitze zirkuliert Heißluft im
Innern des Backofens. Hierdurch wird ein Verbrennen der
Speisenoberflächen verhindert, die Hitze dringt tiefer in die
Speisen ein. Der Gratin garantiert ein absolutes Gelingen
von: Fleisch/Gemüsespießen, Bratwürsten, Schweinerippchen, Lammkoteletts, pikantes Huhn, Wachteln mit Salbei,
Schweinefilet usw . ...
Bei Einsatz des „Gratin“ grillen Sie bitte bei
geschlossener Backofentür .
Unübertrefflich ist der Gratin bei der Zubereitung folgender
Fischgerichte: Barsch-, Thunfisch- und Schwertfisch-
schnitten, gefüllte Tintenfische us w . ...
b) Schieben Sie die Bratspießhalterung auf die 3. Führung
(von unten) und stecken Sie den Spieß durch das entsprechende Loch in die auf der Backofenrückwand befindliche V orrichtung.
c) Setzen Sie den Bratspieß, durch Drehen des Drehknopfes
„B“ auf die entsprechende Einstellung, in Betrieb 2 / x.
Automatische Reinigung mittels F ast Clean
Zur vollständigen Reinigung Ihres Backofens.
Informationen zu dieser Funktion entnehmen Sie bitte dem
Abschnitt “A utomatische Reinigung mittels F ast Clean”.
Der Bratspieß (nur an einigen Modellen)
Zur Inbetriebnahme des Bratspießes verfahren Sie wie f olgt:
a) Schieben Sie die Fettpfanne auf die 1. (unterste) Füh-
rung;
V
76
Page 76

ANALOGE UHR ZUR VORWAHL VON START/ENDE DER GARZEIT
V orwahl der Garzeit mit sof ortigem Start
1 Drehen Sie den Drehknopf entgegen dem Uhrzeigersinn,
12
9
3
6
Einstellung der Uhrzeit
Der Backofen m uss am Stromnetz angeschlossen sein.
Drücken Sie den Knopf und drehen Sie diesen gleichzeitig
entgegen dem Uhrzeigersinn bis die genaue Uhrzeit eingestellt ist.
NB: Die elektr ische Uhr muß bei Stromausfall wieder neu
eingestellt werden.
Manuelle Betriebsweise
Diese ist dann zu wählen, wenn die Garzeit nicht
vorprogrammiert wer den soll.
1 Drehen Sie den Drehknopf entgegen dem Uhrzeigersinn,
bis in der Uhr das Symbol 9 erscheint.
2 Ziehen Sie den Drehknopf und drehen Sie diesen gleich-
zeitig entgegen dem Uhrzeigersinn, bis der rotierende
rote Pfeil mit dem Stundenzeiger der eingestellten Uhr
übereinsteht. Ein Einrasten (Klick) zeigt die korrekt ab-
geschlossene Einstellung an.
Wählen Sie mittels des Programmwahlschalters das gewünschte Garprogramm. Durch Drehen desselben auf P osition „0“ schalten Sie den Backof en aus.
bis links der Uhr die gewünschte Garzeit (0 - 180 min.)
ersichtlich ist.
2 Ziehen Sie den Drehknopf und drehen diesen gleichzei-
tig entgegen dem Uhrzeigersinn, bis der rotierende rote
Pfeil mit dem Stundenzeiger der eingestellten Uhr übereinsteht. Die korrekt abgeschlossene Einstellung wird
durch kurzes Einrasten (Klick) angez eigt.
Wählen Sie mittels des Programmwahlschalters das gewünschte Garprogramm.
Der Backofen setzt sich sofort in Betrieb und bleibt für die
gesamte eingestellte Garzeit eingeschaltet. Bei Garzeitende,
ertönt ein akustisches Signal, der Backofen schaltet sich von
selbst aus.
Um das Signal abzustellen, drehen Sie den Drehknopf ent-
gegen dem Uhrzeigersinn, bis links der Uhr das Symbol 9
eingeblendet wird.
V orwahl der Garzeit mit verzögertem Start
1 Garzeit:
Drehen Sie den Drehknopf entgegen dem Uhrzeigersinn,
bis links der Uhr die gewünschte Garzeit (0-180 min.)
erichtlich ist.
2 Garzeitstart:
Ziehen Sie den Drehknopf und drehen Sie diesen gleich-
zeitig entgegen dem Uhrzeigersinn, bis der rotierende,
rote Pfeil auf der gewünschten Uhrz eit vor dem Stunden-
zeiger (in Uhrzeigersinn) der Uhr steht. Bei Erreichung
der Startzeit setzt sich der Backofen für die zuvor be-
stimmte Gardauer selbstständig in Betrieb.
Wählen Sie mittels des Programmwahlschalters das gewünschte Garprogramm.
Der Backof en setzt sich zu der gewünschten Zeit in Betrieb
und bleibt für die eingestellte Garzeit eingeschaltet. Ist die
Zeit abgelaufen, ertönt ein akustisches Signal, der Backofen
schaltet sich von selbst aus..
Um das Signal abzustellen, drehen Sie den Drehknopf ent-
gegen dem Uhrzeigersinn bis links der Uhr das Symbol 9
eingeblendet wird.
77
Page 77

Automatische Reinigung mittels Fast Clean
Bei Aktivierung der Funktion Fast Clean erreicht die
Temperatur im Backofenraum 500ºC. Bei derartigen
Temperaturen verkohlen die im Ofen zurückgebliebenen
Speisereste. Durch das Glas der Ofentür kann beobachtet
werden, wie aufgrund des Pyrolyseverfahrens einige
Speisereste bei Kontakt mit den Heizelementen verkohlen
und aufglimmen: Es handelt sich um eine spontane
Verbrennung, ein völlig normaler V organg, der keinerlei
Risiken birgt.
V orsichtsmaßnahmen:
1- Entfernen Sie größere Speisereste zuerst mit einem
feuchten Schwamm. V erwenden Sie auf k einen Fall Spülmittel
oder spezielle Ofenreinigungsmittel.
2- Nehmen Sie sämtliches Zubehör aus dem Backofen: Es
hält derart hohen T emperaturen nicht stand. Darüber hinaus
könnten einige Zubehörteile das Reinigungsergebnis
beeinträchtigen, indem sie die gleichmäßige Zirkulation der
heißen Luft im Ofeninneren verhindern. Das Zubehör lässt
sich problemlos wie normales Geschirr reinigen (auch in der
Spülmaschine).
3- Hängen Sie keine Geschirrtücher zum Trocknen an den
Griff der Ofentür .
Zur Beachtung: Während der automatischen Reinigung
können einzelne Ofenteile sehr heiß werden. Halten Sie
daher Kinder vom Ofen fern.
So aktivieren Sie den Fast Clean-Reinigungsvorgang
– Schließen Sie die Ofentür .
– Drehen Sie den Funktionswähler auf V
– Zur Programmierung der Dauer und/oder der als Ende
des Fast Clean-Reinigungsprogr ammes vorgesehenen
Uhrzeit befolgen Sie bitte die Hinweise des Abschnittes
“Programmierung der Fast Clean-Reinigung”.
Sicherheitsvorrichtungen
Angesichts der hohen Temperaturen, die während des
Vorgangs erreicht werden, ist der Ofen mit einigen
Sicherheitsvorrichtungen ausgestattet:
• Bei Erreichen hoher Temperaturen wird die Ofentür zur
V ermeidung eventueller V erbrennungen automatisch
gesperrt;
• Bei jedweder Störung wird die Stromversorgung der
Heizelemente sofort unterbrochen;
• Die zulässige Höchstdauer beträgt 120 Minuten; nach
deren Ablauf schaltet sich der Backofen automatisch
aus.
• Ist der Backofen sehr heiß, startet der PyrolyseReinigungsvorgang möglicherweise nicht. Warten Sie
bitte, bis sich der Backof en abgekühlt hat.
Nach Beendigung des “Fast Clean”Reinigungsvorganges mit sofortigem Start und
voreingestellter Dauer
Das Erlöschen der Kontrollleuchte “E” zeigt Ihnen das
Ende des “F ast Clean”-Reinigungsv organges an.
Die Backof entür kann jedoch nicht sofort geöffnet werden,
sondern erst dann, wenn die Temperatur im Inneren des
Backof ens auf ein annehmbares Niveau gesunken ist. Das
Erlöschen der Kontrollleuchte “ I” zeigt die Entsperrung der
Tür an.
An den Ofenwänden und unten im Ofen könnte sich
während der Reinigung etwas weißer Staub abgelagert
haben. Entfernen Sie diesen mittels eines feuchten
Schwamms, nachdem der Of en vollständig erkaltet ist.
Möchten Sie jedoch die noch vorhandene Ofenwärme zum
Garen nutzen, dann ist es nicht erforderlich, diese
Staubablagerungen sofort zu entfernen; sie sind
unschädlich.
Nach Beendigung des “Fast Clean”Reinigungsvorganges mit v oreingestellter Dauer
und sofortigem/verzögertem Start
Das Erlöschen der Kontrollleuchte “E” sowie ein T onsignal
weisen auf das Ende des “Fast Clean”Reinigungsvorganges hin. Um das Läutewerk zu
deaktivieren, drehen Sie den Drehknopf des
Programmierers nach links, bis auf dem Display das
Symbol 9 eingeblendet wird.
Die Backof entür kann jedoch nicht sofort geöffnet werden,
sondern erst dann, wenn die Temperatur im
Backof eninneren auf ein annehmbares Niveau gesunken
ist. Das Erlöschen der Kontrollleuchte “I” weist auf die
Entsperrung der Tür hin.
An den Ofenwänden und unten im Ofen könnte sich
während der Reinigung etwas weißer Staub abgelagert
haben. Entfernen Sie diesen mittels eines feuchten
Schwamms, nachdem der Of en vollständig erkaltet ist.
Möchten Sie jedoch die noch vorhandene Ofenwärme zum
Garen nutzen, dann ist es nicht erforderlich, diese
Staubablagerungen sofort zu entfernen; sie sind
unschädlich.
Wiederherstellung des Backofenzustandes nach Stromausfall
Dank eines speziellen Systems kann ein Garvorgang/eine
Pyrolyse-Selbstreinigung (sofern vorgesehen) an dem
Punkt wiederaufgenommen werden, an dem er/sie zum
Zeitpunkt des Stromausfalls unterbrochen wurde,
vorausgesetzt, die T emperatur im Backofeninneren ist in
der Zwischenzeit nicht zu stark abgesunken. Denk en Sie
daran, die Uhrzeit zu aktualisieren, sofern Sie dies
wünschen.
ANMERKUNG
Aus Sicherheitsgründen werden Programmierungen
bezüglich noch nicht ausgeführter Garvorgänge nach
Rückkehr der Stromversorgung nicht wiederhergestellt.
78
Page 78

Programmierung von Fast Clean
12
9
Fast Clean mit sofortigem Start und voreingestellter
Dauer
Der “F ast Clean”-Reinigungsvorgang dauert 120 Minuten.
Diese Betriebsart ist in all solchen Fällen zu verwenden,
in denen eine Programmierung der Dauer und der Uhrzeit,
zu der mit der Reinigung begonnen wird, nicht erforderlich
ist.
1 Drehen Sie den Knopf nach links, bis auf dem Display
das Symbol 9 erscheint.
2 Ziehen Sie den Drehknopf und drehen Sie ihn gleichzeitig
nach links, bis der bewegliche Zeiger auf der lauf enden
Uhrzeit steht. Die k orrekt abgeschlossene Einstellung wird
durch kurzes Einrasten (klick) angezeigt.
Stellen Sie mit Hilfe des Backofen-Wählschalters das
Programm V. ein. Der Backofen kann jederzeit durch
Rücksetzen des Schalters auf die P osition “0” ausgeschaltet
werden.
Programmierung der Dauer der Fast Clean-Reinigung
mit sofortigem Start
Der “F ast Clean”-Reinigungsvorgang dauert maximal 120
Minuten. Einstellungen, die eine längere Dauer vorsehen,
haben keinerlei Auswirkungen, da sich der Ofen
automatisch nach Ablauf der 2 Stunden abschaltet.
1 Drehen Sie den Drehknopf nach links, bis auf dem Display
die gewünschte Dauer der “Fast Clean”-Reinigung
angezeigt wird.
3
6
2 Ziehen Sie den Drehknopf und drehen Sie ihn gleichzeitig
nach links, bis der bewegliche Zeiger auf der lauf enden
Uhrzeit steht. Die k orrekt abgeschlossene Einstellung wird
durch kurzes Einrasten (klick) angezeigt.
Stellen Sie mit Hilfe des Backofen-Wählschalters das
Programm V ein.
Die “Fast Clean”-Reinigung startet sofort und verfügt über
die eingestellte Dauer. Ein Tonsignal zeigt den Ablauf der
Zeit an: Um das Signal abzustellen, drehen Sie den
Drehknopf nach links, bis auf dem Display das Symbol 9
eingeblendet wird.
Programmierung der Dauer der Fast Clean-Reinigung
mit verzögertem Start
Der “F ast Clean”-Reinigungsvorgang dauert maximal 120
Minuten. Einstellungen, die eine längere Dauer vorsehen,
haben keinerlei Auswirkungen, da sich der Ofen
automatisch nach Ablauf der 2 Stunden abschaltet.
1 Dauer der “Fast Clean”-Reinigung:
Drehen Sie den Drehknopf nach links, bis auf dem Display
die gewünschte Dauer der “Fast Clean”-Reinigung
angezeigt wird.
2 Beginn der “Fast Clean”-Reinigung:
Ziehen Sie den Drehknopf und drehen Sie ihn gleichzeitig
nach links, bis der bewegliche Zeiger auf der für den Start
der “Fast clean”-Reinigung vorgesehenen Uhrzeit steht.
Stellen Sie mit Hilfe des Backofen-Wählschalters das
Programm V ein.
Der “Fast Clean”-Reinigungsv organg startet zur eingestellten
Uhrzeit und verfügt über die gewünschte Dauer, die jedoch
in keinem Fall über 2 Stunden liegt. Ein Tonsignal zeigt den
Ablauf der Zeit an: Um das Signal abzustellen, drehen Sie
den Drehknopf nach links, bis auf dem Display das Symbol
9 eingeblendet wird.
KEINE SORGE WENN
1 bei Beginn des Fast Clean Reinigungsvorgangs das
Kühlluftgebläse nur sehr langsam läuft;
2 während des Fast Clean Reinigungsvorgangs der
Leistungsschutzschalter der Hausanlage anspricht:
das Stromnetz wurde überlastet (bei gleichzeitigem
Einsatz anderer Elektrogeräte);
3 während des Fast Clean Reingungsvorgangs die
Backofentür nicht geöffnet werden kann: die
Backofentür wird dank einer GeräteSicherungsvorrichtung gesperrt und kann nur nach
gänzlichem Erkalten des Backofens geöffnet werden;
4 nach dem Fast Clean Zyklus noch geringfügige Flecken
auf den Innenflächen des Backof ens zurückbleiben: es
empfiehlt sich, gröbere Verkrustungen vor dem
Einstellen des Selbstreinigungszyklus zu entfernen,
und eine dem V erschmutzungsgrad entsprechende Zeit
bzw. Dauer für den Reinigungsvorgang einzustellen;
5 nach Abschluss des Garvorgangs noch für eine kurze
Zeit Luft aus dem Backofen austritt: diese wird durch
die zur Abkühlung des Backofeninnern dienende
Kühlphase erzeugt;
6 bei “Grill”-Betrieb der obere Heizwiderstand nicht
ständig rot glüht: die Betriebsweise wird durch einen
Thermostaten gesteuert;
7 bei Öffnen der Backofentür während des Garvorgangs
starker Dampf austritt;
8 Wassertropfen oder Dampf im Backof en erzeugt wird,
wenn das Gargut nach Abschluss des Garvorgangs
im Backof en belassen wird.
79
Page 79

So halte ich das Gerät in Topform
V or jeder Reinigung und Pflege muß das Gerät vom Stromnetz getrennt werden.
Um eine lange Lebensdauer des Backofens zu gewähr leisten, m uß er regelmäßig gründlich gereinigt werden.
Berücksichtigen Sie hierbei, dass:
• Verwenden Sie zur Reinigung bitte keine
Dampfgeräte.
• die Oberflächen aus Email oder Edelstahl mit lauwarmem W asser zu reinigen sind; v erwenden Sie bitte keine
Scheuermittel oder scharfe Reiniger, die diese hochw ertigen Oberflächen beschädigen könnten. Auf Edelstahl
könnten sich Flecken bilden. Sollten diese nur schwer
zu entfernen sein, empfehlen wir den Einsatz der im Handel erhältlichen Spezialreinigungs- und Pflegemittel. Es
ist ratsam, diese Teile nach der Reinigung gut nachzuspülen und trockenzureiben;
• der noch lauwarme Backofen möglichst nach jedem Gebrauch mit warmem W asser und Spülmittel gereinigt, mit
klarem W asser nachgespült und mit einem weichen Tuch
sorgfältig abgetrocknet werden sollte. V ermeiden Sie den
Einsatz von Scheuermitteln (zum Beispiel Pulver-Reinigern usw .) und Scheuerschwämmen, oder Säuren (z.B.
Antikalklösungen usw .), diese könnten das Email beschädigen. Verwenden Sie bei besonders hartnäckigen Verschmutzungen die üblicherweise zur Reinigung des Bac kofens bestimmten Spezialreiniger . Halten Sie sich jedoch
genau an die auf der Packung angegebenen Gebr auchsanleitungen;
• sich bei längerer Betriebszeit des Backofens Kondenswasser bilden könnte. Reiben Sie dieses mit einem weichen T uch trocken;
• die rund um die Backofenöffnung befindliche Dichtung
die korrekte Funktionsweise des Backofens garantiert.
Der Zustand dieser Dichtung sollte demnach regelmäßig überprüft werden. Gegebenenf alls ist diese zu reinigen, wobei jedoch keine Scheuermittel oder -produkte
zu verwenden sind. Wenden Sie sich im Falle einer Beschädigung dieser Dichtung an Ihre nächstgelegene
Kundendienststelle. Es empfiehlt sich, den Bac kofen bis
zur erfolgten Reparatur nicht in Gebrauch zu nehmen;
• der Backofenboden niemals mit Alufolie ausgelegt werden darf, da der hierdurch verursachte Wärmestau den
Garvorgang gefährden und auch das Email beschädigen würde.
• das Glas des Backofenfensters mit einem milden Reiniger und einem weichen Schwammtuch gereinigt und anschließend mit einem weichen T uch trockengerieben werden muss.
Abnehmen der Backofentür
Um den Backofen mühelos gründlich reinigen zu können,
kann die Backofentür abgenommen w erden. Verfahren Sie
hierzu wie folgt:
• die Tür ganz öffnen;
• klappen Sie die seitlich an den beiden Scharnieren befindlichen Hebel hoch und drehen Sie diese nach links;
• fassen Sie die Tür an den beiden äußeren Seiten und
schließen Sie sie langsam, jedoch nicht ganz;
• ziehen Sie die Tür zu sich hin aus ihrer Lagerung heraus.
In umgekehrter Reihenfolge wird die Tür wieder angebracht.
123
Lampenwechsel im Backofenraum
• Die Stromversorgung des Backofens abschalten, und
zwar entweder mit dem für den Anschluß an die Stromleitung verwendeten allpoligen Schalter , oder durch Herausziehen des Steckers, sof ern dieser zugänglich ist.
• Die Glasabdeckung der Lampenhalterung herausdrehen.
• Die Lampe herausschrauben und durch eine hitzebeständige Lampe (300°C) nachstehender Eigenschaften ersetzen:
- Spannung 230/240 V
- Leistung 25W
- Sockel E14
• Die Glasabdeckung einsetzen und die Stromversorgung
zum Backof en wieder herstellen.
Backofenraum
Lampe
Dichtung
Glasscheibe
80
Page 80

Praktische Back-/Brathinweise
Der Backof en stellt Ihnen eine umf ang reiche Prog rammpalette zur Verfügung, um jede Speise optimal garen zu
können. Im Laufe der Zeit werden Sie dieses vielseitige
Gerät optimal zu nutzen wissen, demnach gelten die nachstehenden Anleitungen nur als Richtlinie, die Sie durch
Ihre persönliche Erfahrung erweitern können.
V orheizen
Sollte sich ein Vorheizen des Backofens als erforder lich
erweisen, wie bei Hefeteigen usw., dann empfiehlt sich
der Einsatz der Funktion w “Pizza-Backofen”, da auf
dieser Einstellung die gewünschte T emperatur in kürz ester
Zeit, und demnach stromsparend, erreicht werden kann.
Nach Einschieben des Backgutes kann der Backof en dann
auf die geeignete Temperatur umgeschaltet werden.
Gleichzeitiges Garen auf mehreren Einschubhöhen
Soll auf mehreren Ebenen gegart werden, dann wählen
Sie die Funktion „Backen“ u oder die Funktion b „Mul-
ti-Cooking“; nur diese ermöglichen ein solches Garen.
Zum Garen empfindlicher Speisen auf mehreren Ebenen,
verwenden Sie die Funktion „Backen“ u diese ermög-
licht ein Garen auf 3 Ebenen (1., 3. und 5.). Der Abschnitt
„Praktische Back-/Brathinweis“ enthält einige Beispiele
zum Einsatz des Backof ens.
Zum Garen aller anderen Speisen verwenden Sie die
Funktion b „Multi-Cooking“. Berücksichtigen Sie jedoch
folgendes:
• Ihr Backofen hat insgesamt 5 Einschubhöhen. Beim
Heißluftgaren verwenden Sie jedoch bitte nur zwei der
mittleren drei Einschubhöhen, die oberste und die unterste sind der Heißluft zu direkt ausgesetzt, wodurch
empfindliche Gerichte leicht verbrennen könnten.
• Allgemein verwenden Sie bitte die 2. und die 4. Einschubhöhe von unten, wobei die 2. für die Speisen
verwendet werden sollte, die mehr Hitze verlangen.
Bereiten Sie zum Beispiel gleichzeitig mit anderen
Speisen einen Fleischbraten zu, dann sollte dieser auf
die 2. Führungsschiene und die zarteren Gerichte auf
die 4. Führungsschiene eingeschoben werden.
• Beim Garen von Speisen, die unterschiedliche Gartemperaturen bzw . -zeiten verlangen, stellen Sie eine
Durchschnittszeit ein, schieben das empfindlichere
Gericht auf die 4. Einschubhöhe und nehmen das
Gericht mit der kürzeren Garzeit zuerst aus dem Backofen.
• Verwenden Sie das Backblech auf der unteren, das
Rost auf der oberen Einschubhöhe.
Einsatz der Funktion “Intensivbac ken”
Eine praktische und schnelle Funktion für all diejenigen,
die Fertiggerichte (tiefgekühlt oder nicht) vorziehen. Ziehen Sie auch in diesem Falle den Abschnitt „Praktische
Back-/Brathinweis“ zu Rate.
Gebrauch des Grills
Ihr „7 Cuochi“-Backofen bietet Ihnen unterschiedliche
Grillmöglichkeiten.
V erwenden Sie die Funktion d / 2 „Grill“ bei halb geöffneter Tür und legen Sie das Grillgut auf die Mitte des
Rostes (3. oder 4. Einschubhöhe von unten), da auf dieser Einstellung nur der mittlere Teil des oberen
Heizwiderstandes eingeschaltet ist.
Schieben Sie die Fettpfanne zum A uff angen der Fleischsoße und/oder des abtropfenden F ettes auf die 1. (unterste) Führung.
Bei Einsatz dieser Funktion sollte der Thermostat auf die
höchste Stufe eingestellt werden. Es können auch niedrigere Temperaturen eingestellt werden. Drehen Sie hierzu den Thermostaten auf die gewünschte T emperatur.
Bei den mit Bratspieß 2, ausgerüsteten Modellen kann
bei Einsatz der „Grill“-Funktion der mitgelieferte Spieß-
satz verwendet werden. In diesem Falle braten Sie bitte
bei geschlossener Backofentür. Verwenden Sie für den
Spießsatz die 3. Führung (von unten) und für die Fettpfanne zum Auffangen des Fleischsaftes und oder des
abtropfenden F ettes die 1. (unterste) Einschubhöhe .
Der Einsatz der Funktion e / x“Gratin“, ausschließ-
lich bei geschlossener Backofentür, ist äußerst prak-
tisch für rasches Grillen, die vom Grill ausgestrahlte Heißluft wird besser verteilt, wodurch gleichzeitig die Oberseite gebräunt und die Unterseite gegart wird.
Auf dieser Einstellung können bereits gegarte Gerichte
noch kurz überbacken werden. (Nudelaufläufe usw .)
Setzen Sie den Grillrost auf die 2. oder 3. Führung (siehe
T abelle), und schieben Sie die F ettpfanne unter das Grillgut, um abtropfendes F ett aufzufangen und Rauchbildung
zu vermeiden.
Wichtig: Garen Sie auf der Funktion „Gratin“ nur bei geschlossener Backofentür, dadurch erzielen Sie nicht nur
optimale Ergebnisse, sondern sparen auch Energie (ca.
10%).
Bei Einsatz dieser Funktion sollte der Thermostat auf
200°C eingestellt werden, nur so arbeitet der Grill, der
mittels Ausstrahlung von Infrarotstrahlen heizt, auf optimale W eise. Dies bedeutet jedoch nicht, dass, falls erforderlich, nicht auch niedrigere Temperaturen eingestellt
werden können. Drehen Sie den Thermostaten ganz einfach auf die gewünschte T emper atur .
Bei den mit Bratspieß x, ausgerüsteten Modellen kann
bei Einsatz der Funktion „Gratin“ der mitgelieferte Spieß-
satz verwendet werden. In diesem Falle verwenden Sie
die 3. Führung (von unten) für den Spießsatz und die 1.
(unterste) für die Fettpfanne , um den Fleischsaft und oder
das abtropfende Fett aufzuf angen.
Die besten Resultate erzielen Sie durch Einschieben
des Grillrostes auf die unteren Führungen (siehe Tabelle); schieben Sie die Fettpfanne unter das Grillgut
(unterste Führung), um abtropfendes Fett aufzufangen und Rauchbildung zu vermeiden.
Backen
Schieben Sie das Backwerk stets in den heißen Backofen; und halten Sie die Vorheizzeit ein. Ist diese abgelaufen, erlischt die rote Kontrolleuchte „E“. Öffnen Sie während des Backens nicht die Backofentür, um ein Zusammenfallen des K uchens zu v erhindern. Was tun wenn:
Der Kuchen zu trocken ist ?
Das nächste Mal stell en Sie eine um 10°C höh ere
Temperatur ein und verk ürzen S ie die Ba ckzeit .
81
Page 81

Der Kuchen zusammenfällt ?
Verwenden Sie wenige r Flüssi gkeit od er st ellen Si e
eine um 10°C niedrigere Temper atur ein .
Der Kuchen an der Oberseite zu dunkel ist ?
Wählen Sie eine niedr igere Ein schubh öhe, eine
niedrigere Temperatur u nd verlän gern Sie di e
Backzeit.
Der Kuchen außen gut gebacken aber innen noch
klebrig ist ?
Verwenden Sie weniger Flüss igkeit, r eduz ieren Sie
die Temperatur, verlän gern Sie di e Backz eit.
Der Kuchen sich nicht aus der Form löst ?
Fetten Sie die Kuchenform gut ein un d bestäuben S ie
sie mit etwas Mehl oder lege n Sie Bac kpapi er in die
Form.
Bei Heißluftbetrieb auf mehreren Ebenen
gebacken bzw. gebraten wurde, und nicht alle
Gerichte gleichförmig gar sind ?
Stellen Sie eine niedr igere Te mper atur ein. E s ist
nicht erforderlich di e auf meh reren Eb enen gegar ten
Speisen gleichzeitig au s d em Of en zu neh men.
Pizza
Zum optimalen Garen einer Pizza wählen Sie die Funktion
w “Pizza-Backofen”:
• Heizen Sie den Backofen mindestens 10 Minuten v or .
• Verwenden Sie eine Leichtmetallform und stellen Sie
diese direkt auf den Backrost. Bei Verwenden des
Backblechs bzw. der Fettpfanne wird die Garzeit
verlängert, und man wird kaum eine knusprige Pizza
erhalten.
• Während des Backens sollte die Backofentür nicht zu
häufig geöffnet werden.
• Bei reich belegten Pizzas (Capricciosa, Quattro Stagioni) ist es ratsam, die Mozzarella erst nach
V erstreichen der halben Bac kzeit hinzuzugeben.
• Bei gleichzeitigem Garen auf mehreren Ebenen
(höchstens 2) empfiehlt sich die Einstellung auf
Funktion “Multi-Cooking” b da auf Funktion “PizzaBackofen” w die Pizza der 1. Ebene (von unten) zu
stark gegart würde.
Fisch und Fleisch
Für Geflügel und Fisch stellen Sie eine Temperatur von
180 °C - 200 °C ein.
Für Rinderbraten, der außen gut angebraten, innen jedoch saftig bleiben soll, empfiehlt es sich, das Fleisch bei
hoher Temperatur (200°C - 220°C) rasch anzubraten, um
dann auf eine niedrigere Temperatur überzugehen.
Als Richtlinie gilt: je größer der Braten, desto niedriger die
T emper atur und um so länger die Bratzeit. Legen Sie den
Braten in die Mitte auf den Rost und schieben Sie die
Fettpfanne unter den Rost, um das abtropf ende F ett aufzufangen.
Den Rost so einschieben, daß sich der Braten auf der
mittleren Einschubhöhe befindet. Wird mehr Unterhitze
gewünscht, muß der Braten auf eine niedrigere Ebene
eingeschoben werden. Belegen Sie das Fleisch (insbesondere bei Entenbraten und Wild) mit Speckscheiben,
das garantiert besonders schmackhafte Braten. Schieben
Sie den Braten so ein, dass er möglichst viel Oberhitze
bekommt.
82
Page 82

Position
Funktionswähler
Gerichte Gew.
(kg )
Einschub-Höhe
von unten
Vorheizdauer
(M in.)
Position
Therm ostate-
Regler
Garzeit
(M in.)
1 Traditionell
a
2 Bac ken
u
3
In ten sivbacke n
v
4 M u lt i-C o o k in g
b
5 Pizza
w
Ente
Kalbs- oder R inderbraten
Schw einebraten
G ebäck
M ürbete igkuchen
M ürbete igkuchen
O bstku chen
Plum cake
Biskuitböden
G efüllte Crêpes
Kleingebäck (auf 2
Ebenen)
M it Käse gefülltes
Blätterteiggebäck (auf 2
Ebenen)
W ind beutel (auf 3
Ebenen)
G ebäck (auf 3 Ebenen)
Baisers (auf 3 Ebenen
Tiefkühlgerichte
Pizza
Zucchini und Kre bse
überbacke n
Quiche
G e fü llte T e ig w a re n
Lasagne
G oldgelbe Brotlaibe
Hühn chen
Fertiggerichte
G eflügel 0.4 2 - 200 20-25
Frische Fertiggerichte
G ebäck
Plum cake
M it Käse gefülltes
Blätterteiggebäck
Pizza (auf 2 E benen)
Lasagne
Lam m
Brathähnchen +
Kartoffeln
Makrelen
Plum cake
W ind beutel (auf 2
Ebenen)
G ebäck (auf 2 Ebenen)
Biskuitböden (auf 1
Ebene)
Biskuitböden (auf 2
Ebenen)
Quiche
Pizza
Kalbs- oder R inderbraten
Hähn chen
1
1
1
-
1
0.5
1
0.7
0.5
1.2
0.6
0.4
0.7
0.7
0.5
0.3
0.4
0.5
0.3
0.5
0.4
0.4
0.3
0.6
0.2
1
1
1
1+1
1
1
0.5
0.5
0.5
1.0
1.5
0.5
1
1
3
3
3
3
3
3
2/3
3
3
2-4
2-4
2-4
1-3-5
1-3-5
1-3-5
2
2
2
2
2
2
2
2
2
2
2-4
3
2
2-4
2
2
2-4
2-4
2
2-4
3
3
2
2/3
15
15
15
15
15
15
15
15
15
15
15
15
15
15
15
15
10
10
15
10
10
10
10
10
10
15
15
10
10
200
200
200
180
180
180
180
180
160
200
190
210
180
180
90
-
-
-
-
-
-
-
-
-
-
Max
200
220
200
200
180
220
200
180
210
230
180
180
200
180
170
190
180
170
170
200
220
220
180
65-75
70-75
70-80
15-20
30-35
20-30
40-45
40-50
25-30
30-35
20-25
15-20
20-25
20-25
180
12
20
30-35
25
35
25-30
15-20
15-18
45
10-12
15-20
30-35
40-45
60-70
30-35
40-50
20-25
10-15
15-20
20-25
25-30
15-20
25-30
60-70
6 G r ill
d 2
7 G ratin
e x
NB: Be i den angegebenen G arzeiten handelt es sich um R ichtw erte, die je nach W unsch geändert werden
können. B ei E insatz des G rills oder des Gratin ist die Fettpfanne auf die unterste Führung zu schieben.
Seezungen und
Tintenfische
Tintenfisch- und
Krebsspieße
Kabeljaufilet
G egrillte G em üse
Kalbsteaks
Kote letts
Ham burger
Makrelen
Toasts
Mit Bratspieß (falls
vorhanden)
Kalbfleisch am Spieß
Hähn chen am S pieß
Lam m am S pieß
G egrilltes H ähnchen
Tintenfische
Mit Bratspieß (falls
vorhanden)
Kalbfleisch am Spieß
Lam m am S pieß
Hähn chen (am Spieß) +
Röstkartoffeln (auf dem
Backblech)
1
1
1
1
1
1
1
1
n.° 4
1.0
1.5
1.0
1.5
1.5
1.5
1.5
1.5
-
4
4
4
3/4
4
4
4
4
4
-
-
-
3
3
-
-
-
2
5
5
5
5
5
5
5
5
5
5
5
5
5
5
5
5
5
5
Max
Max
Max
Max
Max
Max
Max
Max
Max
Max
Max
Max
200
200
200
200
200
200
83
8-10
6-8
10
10-15
15-20
15-20
7-10
15-20
2-3
80-90
70-80
70-80
55-60
30-35
70-80
70-80
70-75
70-75
Page 83

Die Sicherheit - Eine gute Gewohnheit
Um die Leistungsfähigkeit und Sicherheit dieses Gerätes zu gewährleisten, bitte f olgendes beachten:
• wenden Sie sich ausschließlich an unsere anerkannten Kundendienst-Zentren
• verlangen Sie, dass nur Original-Ersatzteile verwendet wer den.
• Bedienen Sie sich zur Positionsveränderung des
Geräts stets der an den Seiten des Ofens
eingekerbten Griffe. Sie vermeiden auf diese W eise
Schäden an Personen oder am Gerät selbst.
• Das Gerät ist für den Einsatz im privaten Haushalt bestimmt; seine Eigenschaften dürfen nicht verändert
werden.
• Die Anweisungen gelten nur für die Bestimmungsländer, deren Symbole im Handb uch und auf dem Typenschild angegeben sind.
• Die elektrische Sicherheit dieses Gerätes wird nur dann
gewährleistet, wenn es sachgemäß und gemäß den
einschlägigen Sicherheitsvorschriften an eine leistungsfähige Erdungsanlage angeschlossen wird.
• Bei in Betrieb befindlichem Gerät werden die
Heizelemente und einige Ofentürteile sehr heiß.
Vermeiden Sie demnach, diese zu berühren und
halten Sie Kinder vom Ofen fern.
Folgende Gefahrenquellen sollten für Kinder und
unfähige Personen nicht zugänglich sein:
- die Bedienungselemente und das Gerät im allgemeinen;
- die Verpackung (Plastikbeutel, Nägel usw.)
- das Gerät während des Gebrauchs und auch sofort
nach dem Gebrauch, da es sehr heiß werden kann;
- das Altgerät (bei einem solchen muss auch dafür gesorgt werden, dass keines seiner Bestandteile mehr
eine Gefahrenquelle darstellen kann).
Vermeiden Sie bitte:
- das Gerät mit feuchten Körperteilen zu berühren;
- das Gerät barfuß zu benutzen;
- den Stecker am Kabel oder am Gerät selbst aus der
Steckdose zu ziehen;
- unsachgemäße und demnach gefährliche Eingriffe;
- die Be- und Entlüftungsschlitze zu verstopfen;
- dass das Kabel kleiner Elektrogeräte mit heißen Teilen des Backof ens in Berührung kommt;
- das Gerät der Witterung (Regen, Sonne usw.) auszusetzen;
- den Backofen als Lagerungsstätte zu verwenden;
- den Gebrauch brennbarer Flüssigkeiten in seiner Nähe;
- den Einsatz von Adaptern, Vielfachsteckdosen und/
oder V erlängerungen;
- Installations- und Reparationsversuche, ohne Fachpersonal anzufordern.
Fordern Sie absolut Fachper sonal an:
- für die Installation (gemäß den Anweisungen des Herstellers);
- bei Zweifeln hinsichtlich der Funktionsweise;
- wenn die Steckdose ausgetauscht werden muss, falls
diese mit dem Gerätestecker nicht übereinstimmen
sollte.
Fordern Sie den Einsatz von Tec hnikern der vom
Hersteller anerkannten Kundendienststellen an bei:
- Zweifeln hinsichtlich der Unversehrtheit des Gerätes
nach Abnahme des Verpackungsmaterials;
- Beschädigung oder Austausch des Zufuhrkabels;
- Störungen oder schlechter Betriebsweise, und verlangen Sie den Einsatz von Original-Ersatzteilen.
Folgendes sollte befolgt werden:
- Verwenden Sie das Gerät für keine anderen Zwecke,
als zum Garen von Speisen.
- Überzeugen Sie sich nach Abnahme der Verpackung,
dass das Gerät auch nicht beschädigt wurde.
- T rennen Sie das Gerät bei Betriebsstörungen, vor der
Wartung und Reinigung vom Stromnetz.
- Schalten Sie das Gerät vom Stromnetz ab, und drehen Sie den Gashahn (wenn vorgesehen) ab, wenn
das Gerät nicht in Betrieb ist.
- Verwenden Sie Bac kof enhandschuhe.
- Fassen Sie den Griff stets in der Mitte an, da die Seitenteile durch eventuellen Heißluftaustritt äußerst heiß
sein könnten.
- Vergewissern Sie sich stets, daß sich die Reglerknöpf e
auf Position “• ”/”o” befinden, wenn sich das Gerät nicht
in Gebrauch befindet.
- Schneiden Sie bitte vor der Entsorgung Ihres Altgerätes
das (vom Stromnetz getrennte!) Elektrokabel ab.
• Der Hersteller kann für eventuelle, durch fehlerhafte
Installation, oder unsachgemäßen, falschen oder unangemessenen Gebrauch nicht haftbar gemacht werden.
84
Page 84

INSTALLIERUNG
Die Installation ist von Fachper sonal und gemäß den Anweisungen des Herstellers durchzuführen. Eine unsach-
gemäße Installation kann zu Schäden an Personen, Tieren
oder Gegenständen führen, für die der Hersteller nicht zur
Verantwortung gezogen werden kann.
Wichtig: Vor jeder Einstellung, Wartung usw . muss der Bac kofen vom Stromnetz getrennt werden.
Installation der Einbaubacköfen
PUm eine einwandfreie Betriebsweise des Gerätes zu gewährleisten, muss der Umbauschrank geeignete Merkmale
aufweisen. A uf nachstehender Abbildung sind die jeweils für
den Einbau in einen Unterbau oder in einen Hochschrank
erforderlichen Abmessungen ersichtlich.
567 mm.
45 mm.
558 mm.
593 mm.
45 mm.
min.
23 mm.
595 mm.
5 mm.
595 mm.
545 mm.
24 mm.
NB: Installation zwecks Energiedeklaration
Die an den Backofen angrenzenden Schrankwände müssen aus hitzebeständigem Material beschaffen sein. Dies
gilt besonders für Möbel aus Furnierholz, deren Leim einer
Temperatur von 100 °C standhalten muss.
Gemäß den Sicherheitsvorschriften muss nach erfolgtem
Einbau die Möglichkeit einer Berührung mit den Elektroteilen
ausgeschlossen sein.
Alle zum Schutz dienenden Teile müssen so befestigt werden, dass ein Entfernen derselben ohne ein Werkzeug zu
Hilfe nehmen zu müssen, nicht möglich ist.
Befestigung des Backofens am Umbauschrank
1. Setzen Sie die Bügel “A” auf die Anschlagfläche “B” des
Backofens.
2. Setzen Sie die Eckstücke “C” in die Bügel “A” ein. Achten
Sie darauf, dass bei einer Stärke der Umbauschrankwand
von:
• 16 mm: das Eckstüc k so angebracht wird, dass die darauf
gedruckte Zahl 16 vor Ihnen liegt;
• 18 mm: das Eckstück so angebracht wird, dass der
unbeschriftete Teil vor Ihnen liegt;
• 20 mm: das Eckstüc k nicht anzubringen ist.
3. Befestigen Sie die Bügel und die Eckstücke an der Kante
der Umbauschrankwand “D”.
4. Befestigen Sie den Backofen mittels der Schr auben und
Kunststoff-Unterlegscheiben “E” am Umbauschrank.
16
16
D
C
C
D
A
E
595 mm.
23 mm.
567 mm.
5 mm.
595 mm.
545 mm.
24 mm.
558 mm.
595 mm.
575-585 mm.
45 mm.
min.
Um eine einwandfreie Belüftung zu gewährleisten, muss die
Rückwand des Schrankumbaus abgenommen werden. Der
Backofen sollte möglichst so installiert werden, dass er auf
zwei Holzleisten aufliegt; sollte eine durchgehende Fläche
als Auflage vorhanden sein, m uss diese mit einem Ausschnitt
von mindestens 45 x 560 mm versehen werden.
45 mm.
560 mm.
16
16
B
C
D
E
Elektroanschluss
Die mit einem Dreileiterkabel ausgerüsteten Backöfen sind
für den Betrieb mit Wechselstrom bei der auf dem Typenschild (befindlich auf dem Gerät) und in der Bedienungsanleitung angegebenen Versorgungsspannung und -frequenz
ausgelegt. Der Erdleiter des Kabels ist gelb/grün.
Verlegen des Netzkabels
Öffnen des Klemmengehäuses:
• Heben Sie unter Zuhilfenahme eines Schraubenziehers
die seitlichen Zungen des Klemmengehäusedeckels an.
• Ziehen Sie den Deckel des Klemmengehäuses ab.
Verlegen Sie nun das Versorgungskabel wie folgt:
• die Schraube der Kabelklemme sowie die drei Schrauben der Kontakte L-N-6 herausschrauben;
• die Drähte unter Beachtung der entsprechenden Farben
unter den Schraubenköpfen bef estigen: Blau (N) Braun
(L) Gelb/Grün
6
• das Versorgungskabel in der entsprechenden Kabelklemme befestigen und den Deckel schließen.
85
Page 85

NL
Anschluß des V ersorgungskabels an das Stromnetz
Versehen Sie das Kabel mit einem Normstecker für die auf
dem Typenschild angegebene Belastung; wird das Gerät
direkt an das Stromnetz angeschlossen, ist ein allpoliger
Schalter mit einer Mindestöffnung von 3 mm, der der Strombelastung und den geltenden Richtlinien entspricht,
zwischenzuschalten (der Erdleiter darf nicht durch den Schalter unterbrochen werden).
Das Versorgungskabel muß so verlaufen, daß es an keiner
Stelle eine Temperatur erreicht, die 50°C über der Raumtemperatur liegt.
Bev or der Anschluß vorgenommen wird, beachten Sie, daß:
• Die elektrische Sicherheit dieses Gerätes nur dann
gewährleistet ist, wenn es sachgemäß und gemäß den
geltenden Sicherheitsvorschriften an eine leistungsfähige
Erdungsanlage angeschlossen wird. Die Gegebenheit
dieser grundlegenden Sicherheitsanforderung muß
überprüft werden, im Zweifelsf alle ist eine Kontrolle durch
Fachpersonal anzuforder n. Der Hersteller kann für
eventuelle durch F ehlen einer Erdungsanlage verursachte
Schäden nicht zur Verantwortung gezogen werden.
• Vor Anschluß des Gerätes k ontrollieren Sie bitte, daß die
auf dem Typenschild (befindlich auf dem Gerät und/oder
auf der V erpackung) angegebenen Daten mit denen des
Stromversorgungsnetzes übereinstimmen.
• Vergewissern Sie sich dav on, daß die elektrische Leistung
der Anlage und der Steckdosen der maximalen, auf dem
Typenschild angegebenen Höchstleistung des Gerätes
entspricht. Im Zweifelsfalle ziehen Sie bitte einen
Fachmann zu Rate.
• Falls Steckdose und Stecker des Gerätes nicht
übereinstimmen sollten, ist die Steckdose von einem
Fachmann durch eine andere geeigneten Typs zu
ersetzen. Derselbe muß bei der Gelegenheit auch
überprüfen, daß der Steckdosen-Kabelquerschnitt der
Leistungsaufnahme des Gerätes entspricht. Allgemein
ist die Verwendung von Adpatern, Vielfachsteckdosen
und/oder Verlängerungen nicht ratsam. Falls deren
Gebrauch jedoch unvermeidlich sein sollte, dürfen nur
Einfach- oder Vielfachadapter und Verlängerungen
verwendet werden, die den geltenden
Sicherheitsvorschriften entsprechen; achten Sie dar auf,
daß die auf dem Einfachadapter und den Verlängerungen
angegebene Stromleistungsgrenze und die auf dem
Vielfachadapter angegebene Höchstleistungsgrenze
nicht überschritten wird. Stecker und Steckdose
müssen leicht zugänglich sein.
86
Page 86

Technische Eigenschaften
Nutzabmessungen des Backofens:
Breite: cm 43,5
Tiefe: cm 40
Höhe: cm 32
Nutzvolumen des Backofens:
Liter 56
ENERGIE-ETIKETT
Richtlinie 2002/40/CE über die Etikettierung von
Elektrobacköfen
Norm EN 50304
Energieverbr auch Natürliche Konv ektion
Heizfunktion: a T raditionell
Deklarierte Energieverbrauchsklasse Erzwungene Kon vektion
Heizfunktion: u Backen
Versor gungsspannung und -frequenz:
220-240V ~ 50Hz 2560-3050W
7
Dieses Gerät entspricht den folgenden EGRichtlinien:
- 73/23/EWG vom19.02.73 (Niederspannung) und
nachfolgenden Änderungen;
- 89/336/EWG vom 03.05.89 (elektromagnetische
V erträglichkeit) und nachfolgenden Änderungen;
- 93/68/EWG vom 22.07.93 und nachfolgenden
Änderungen.
- 2002/96/EC
Gemäß der Europäischen Richtlinie 2002/96/EC über
Elektro- und Elektronik-Altgeräte (WEEE) dürfen
Elektrohaushalts-Altgeräte nicht über den herkömmlichen
Haushaltsmüllkreislauf entsorgt werden. Altgeräte müssen
separat gesammelt werden, um die Wiederverwertung und
das Recycling der beinhalteten Materialien zu optimieren
und die Einflüsse auf die Umwelt und die Gesundheit zu
reduzieren. Das Symbol „durchgestrichene Mülltonne“ auf
jedem Produkt erinnert Sie an Ihre Verpflichtung, dass
Elektrohaushaltsgeräte gesondert entsorgt werden
müssen.
Endverbraucher können sich an Abfallämter der
Gemeinden wenden, um mehr Informationen über die
korrekte Entsorgung ihrer Elektrohaushaltsgeräte zu
erhalten.
87
 Loading...