

Page 1

Instructions for use
WASHING MACHINE
GB
English,1
PT
HU
Magyar, 25
AVF 109
PT
PL
Polski, 13
RO
Românã, 37
Contents
Installation, 2-3
Unpacking and levelling, 2
Electric and water connections, 2-3
The first wash cycle, 3
Technical details, 3
Washing machine description, 4-5
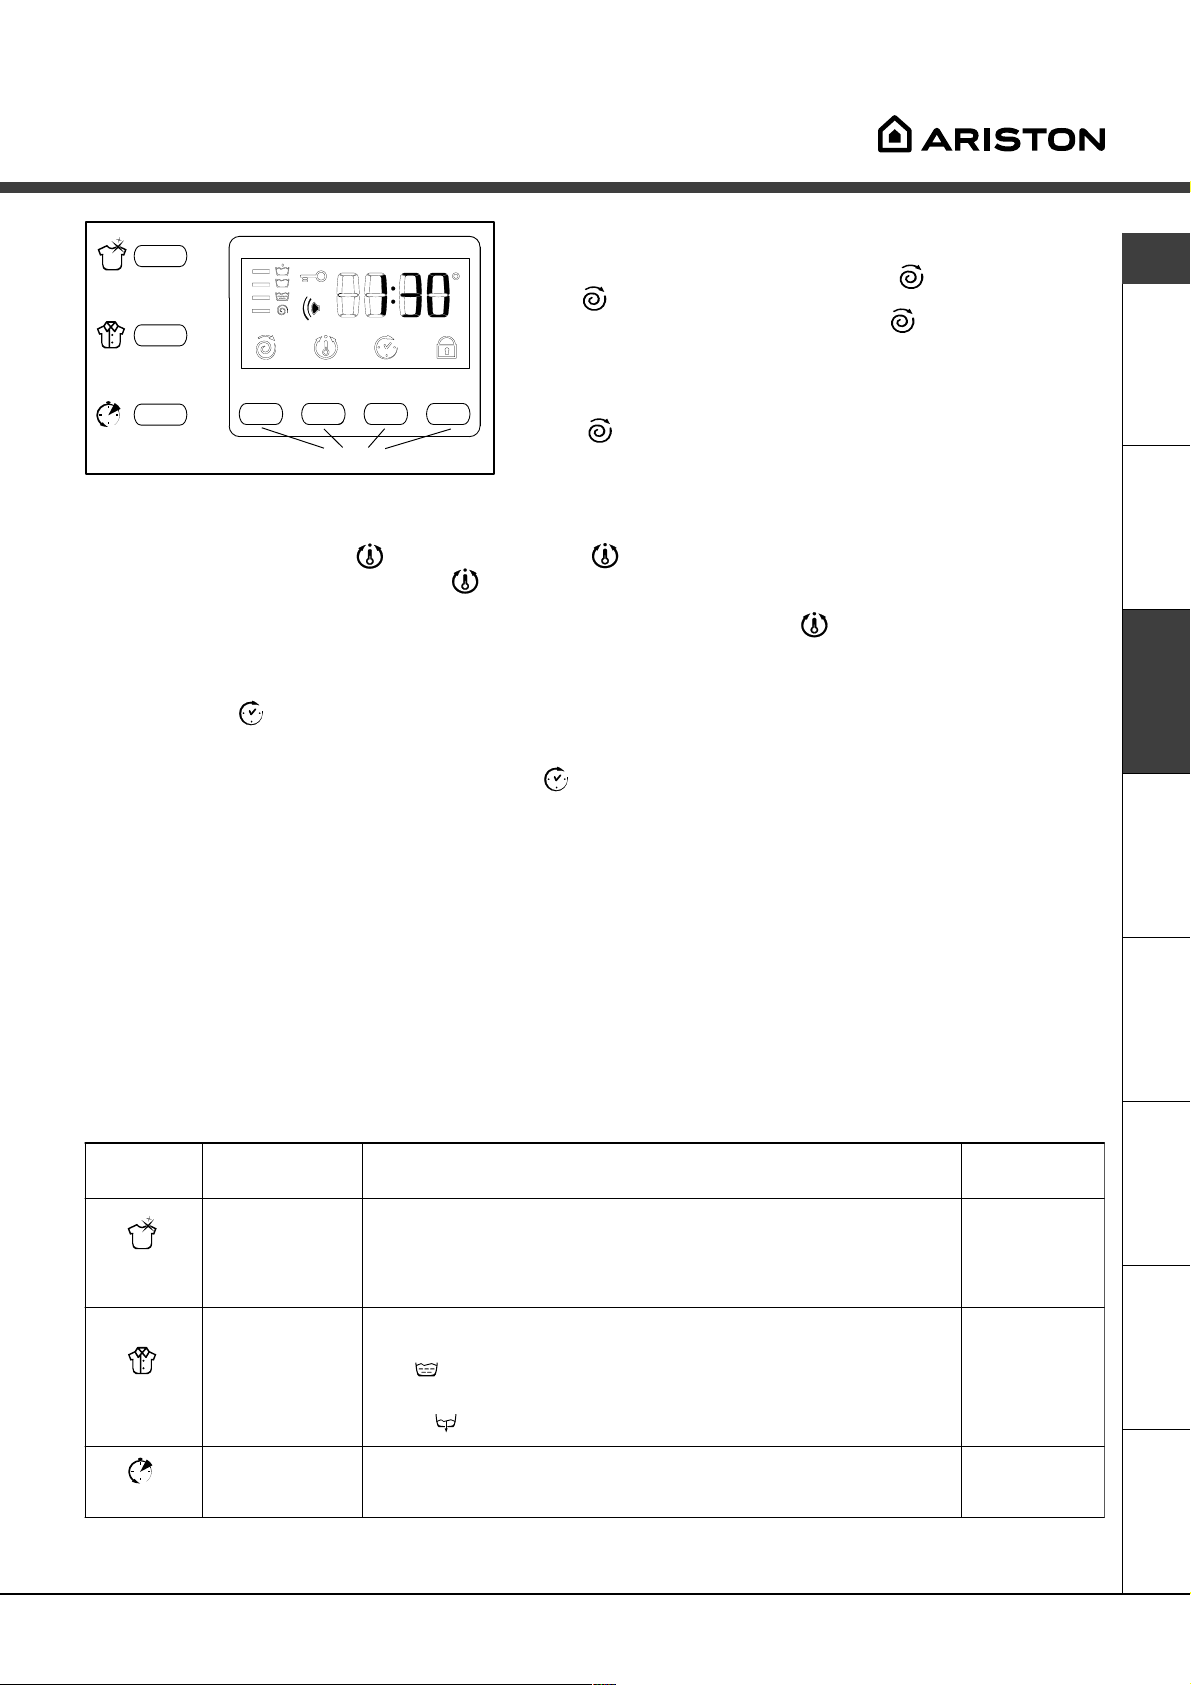
Control panel, 4
Display, 5
Starting and Programmes, 6
Briefly: how to start a programme, 6
Programme table, 6
Personalisations, 7
Setting the spin cycle, 7
Setting the temperature, 7
Setting the Delay Timer, 7
Functions, 7
Detergents and laundry, 8
Detergent dispenser, 8
Preparing your laundry, 8
Special items, 8
Woolmark Platinum Care, 8
GB
Precautions and advice, 9
General safety, 9
Disposal, 9
Saving energy and respecting the environment, 9
Care and maintenance, 10
Cutting off the water or electricity supply, 10
Cleaning your appliance, 10
Cleaning the detergent dispenser, 10
Caring for your appliance door and drum, 10
Cleaning the pump, 10
Checking the water inlet hose, 10
Troubleshooting, 11
Service, 12
Before calling for Assistance, 12
1
Page 2
Installation
GB
Keep this instruction manual in a safe place for
future reference. Should the appliance be sold,
transferred or moved, make sure the instruction
manual accompanies the washing machine to inform
the new owner as to its operation and features.
Read these instructions carefully: they contain vital
information on installation, use and safety.
Unpacking and levelling
Unpacking
1. Unpack the washing machine.
2. Check whether the washing machine has been
damaged during transport. If this is the case, do not
install it and contact your retailer.
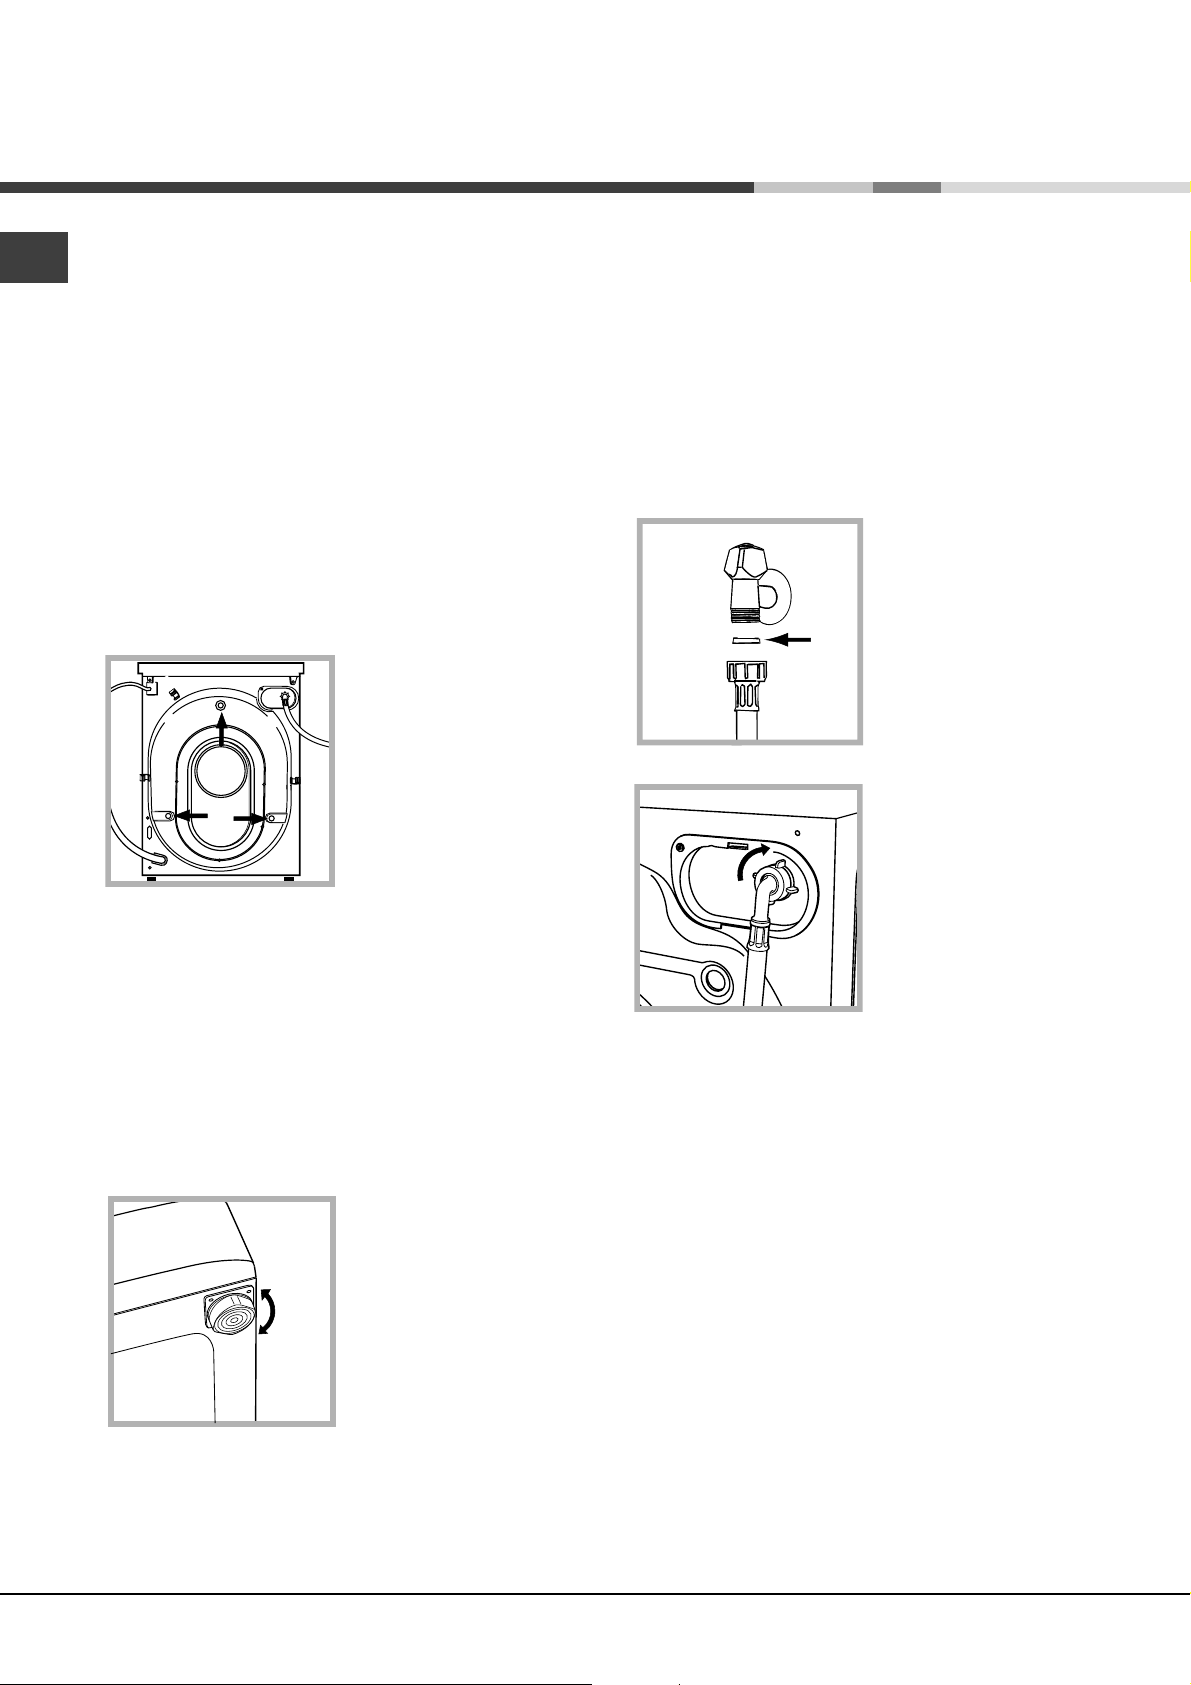
3. Remove the three
protective screws and
the rubber washer with
the respective spacer,
situated on the rear of
the appliance (see
figure).
4. Seal the gaps using the plastic plugs provided.
5. Keep all the parts: you will need them again if the
washing machine needs to be moved to another
location.
Levelling your appliance correctly will provide it with
stability and avoid any vibrations, noise and shifting
during operation. If it is placed on a fitted or loose
carpet, adjust the feet in such a way as to allow
enough room for ventilation beneath the washing
machine.
Electric and water connections
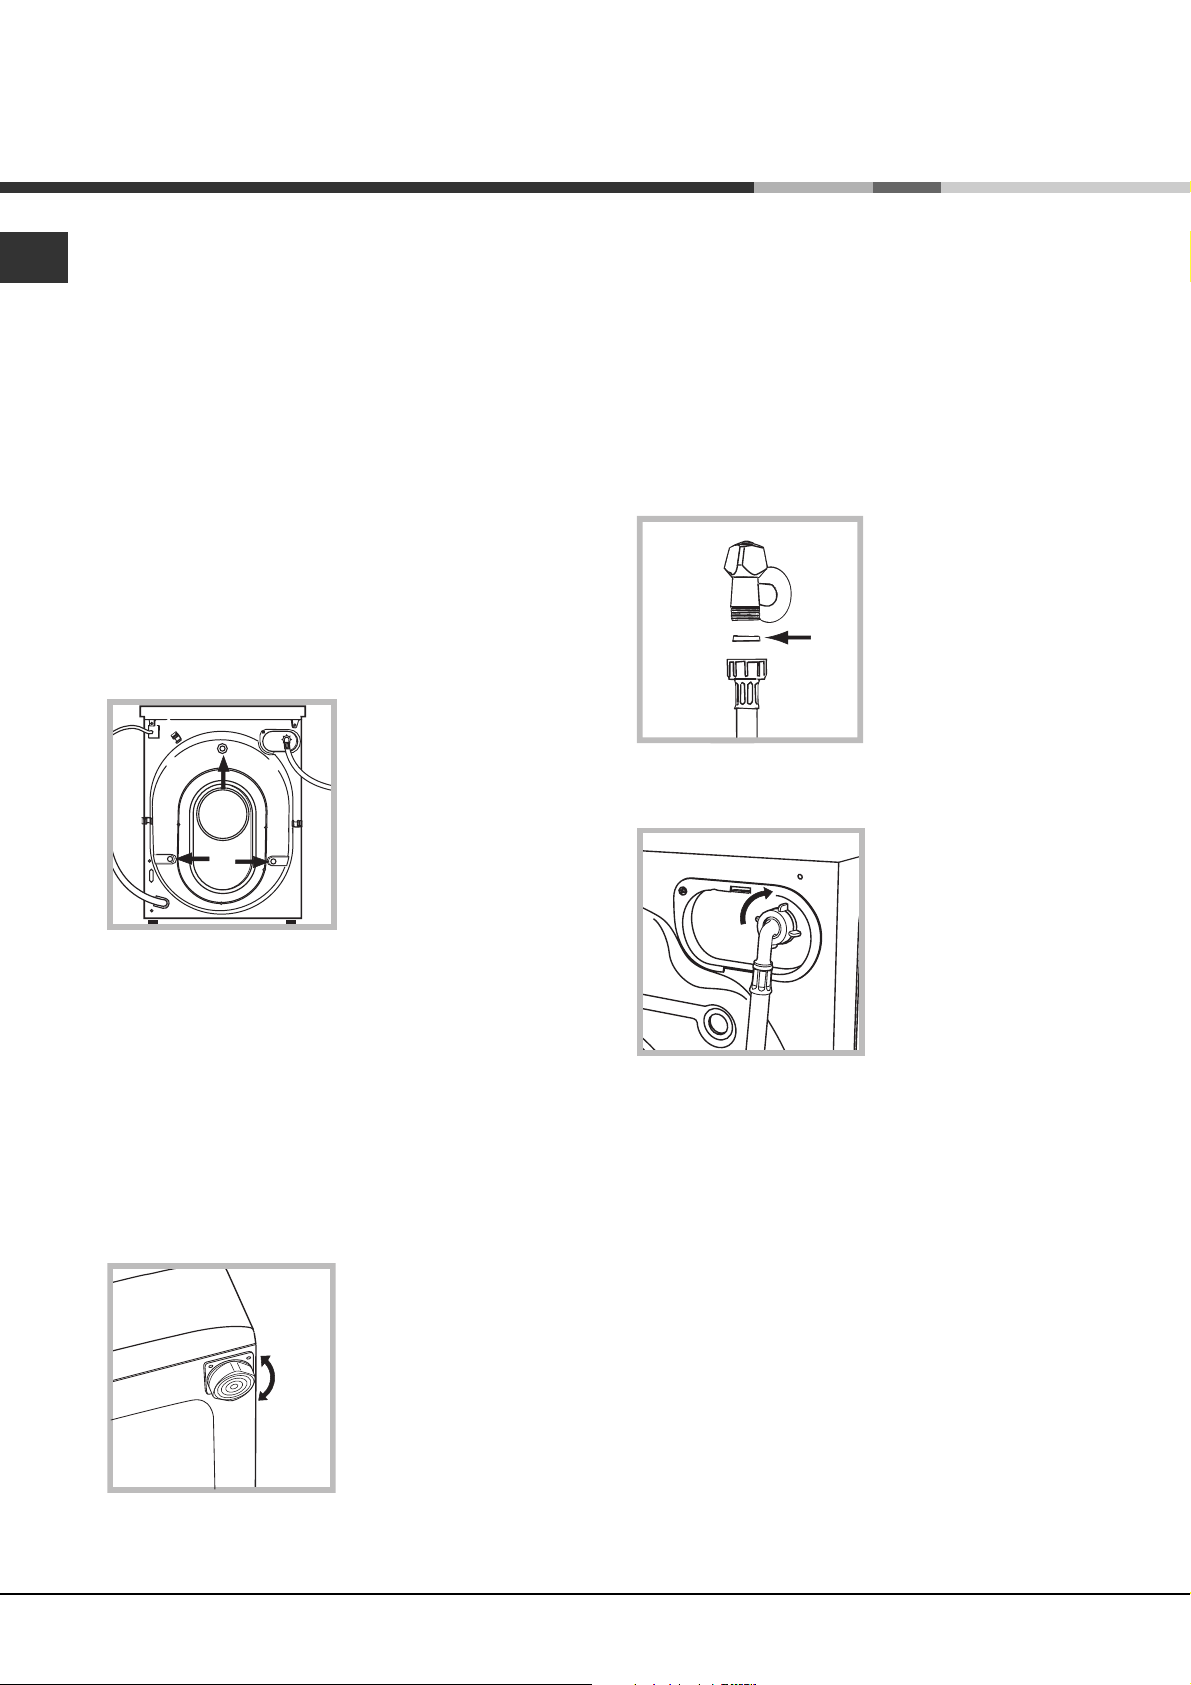
Connecting the water inlet hose
1. Insert seal A into the
end of the inlet hose
and screw the latter
onto a cold water tap
A
with a 3/4 gas threaded
mouth (see figure).
Before making the
connection, allow the
water to run freely until
it is perfectly clear.
2. Connect the other end
of the water inlet hose to
the washing machine,
screwing it onto the
appliance's cold water
inlet, situated on the top
right-hand side on the
rear of the appliance
(see figure).
Packaging materials are not children's toys.
Levelling
Your machine may make a considerable amount of
noise if the two front feet have not been adjusted
correctly.
1. Install the washing
machine on a flat sturdy
floor, without resting it
up against walls,
furniture cabinets or
other.
2. If the floor is not
perfectly level, compensate for any unevenness
by tightening or
loosening the adjustable
front feet (see figure); the angle of inclination,
measured according to the worktop, must not
exceed 2°.
2
3. Make sure there are no kinks or bends in the
hose.
The water pressure at the tap must be within the
values indicated in the Technical details table
(on the next page).
If the water inlet hose is not long enough, contact
a specialist store or an authorised serviceman.
Page 3
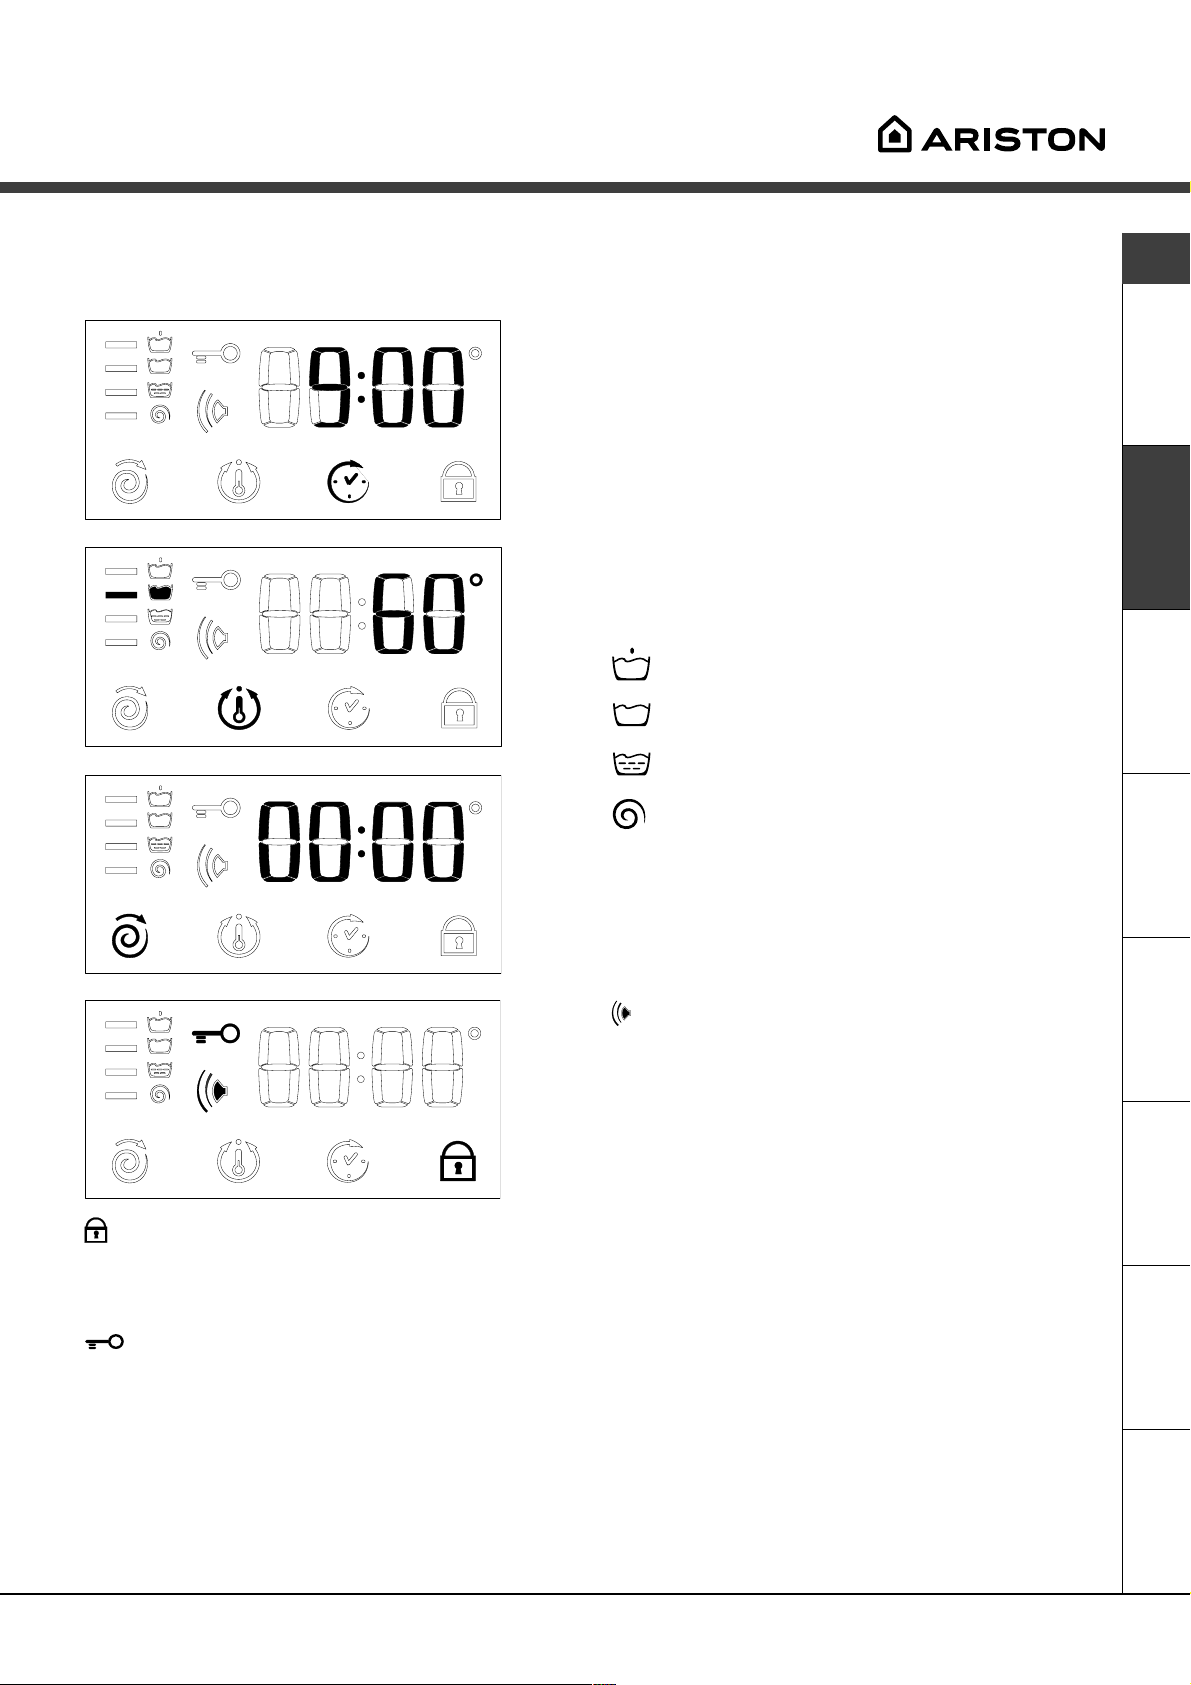
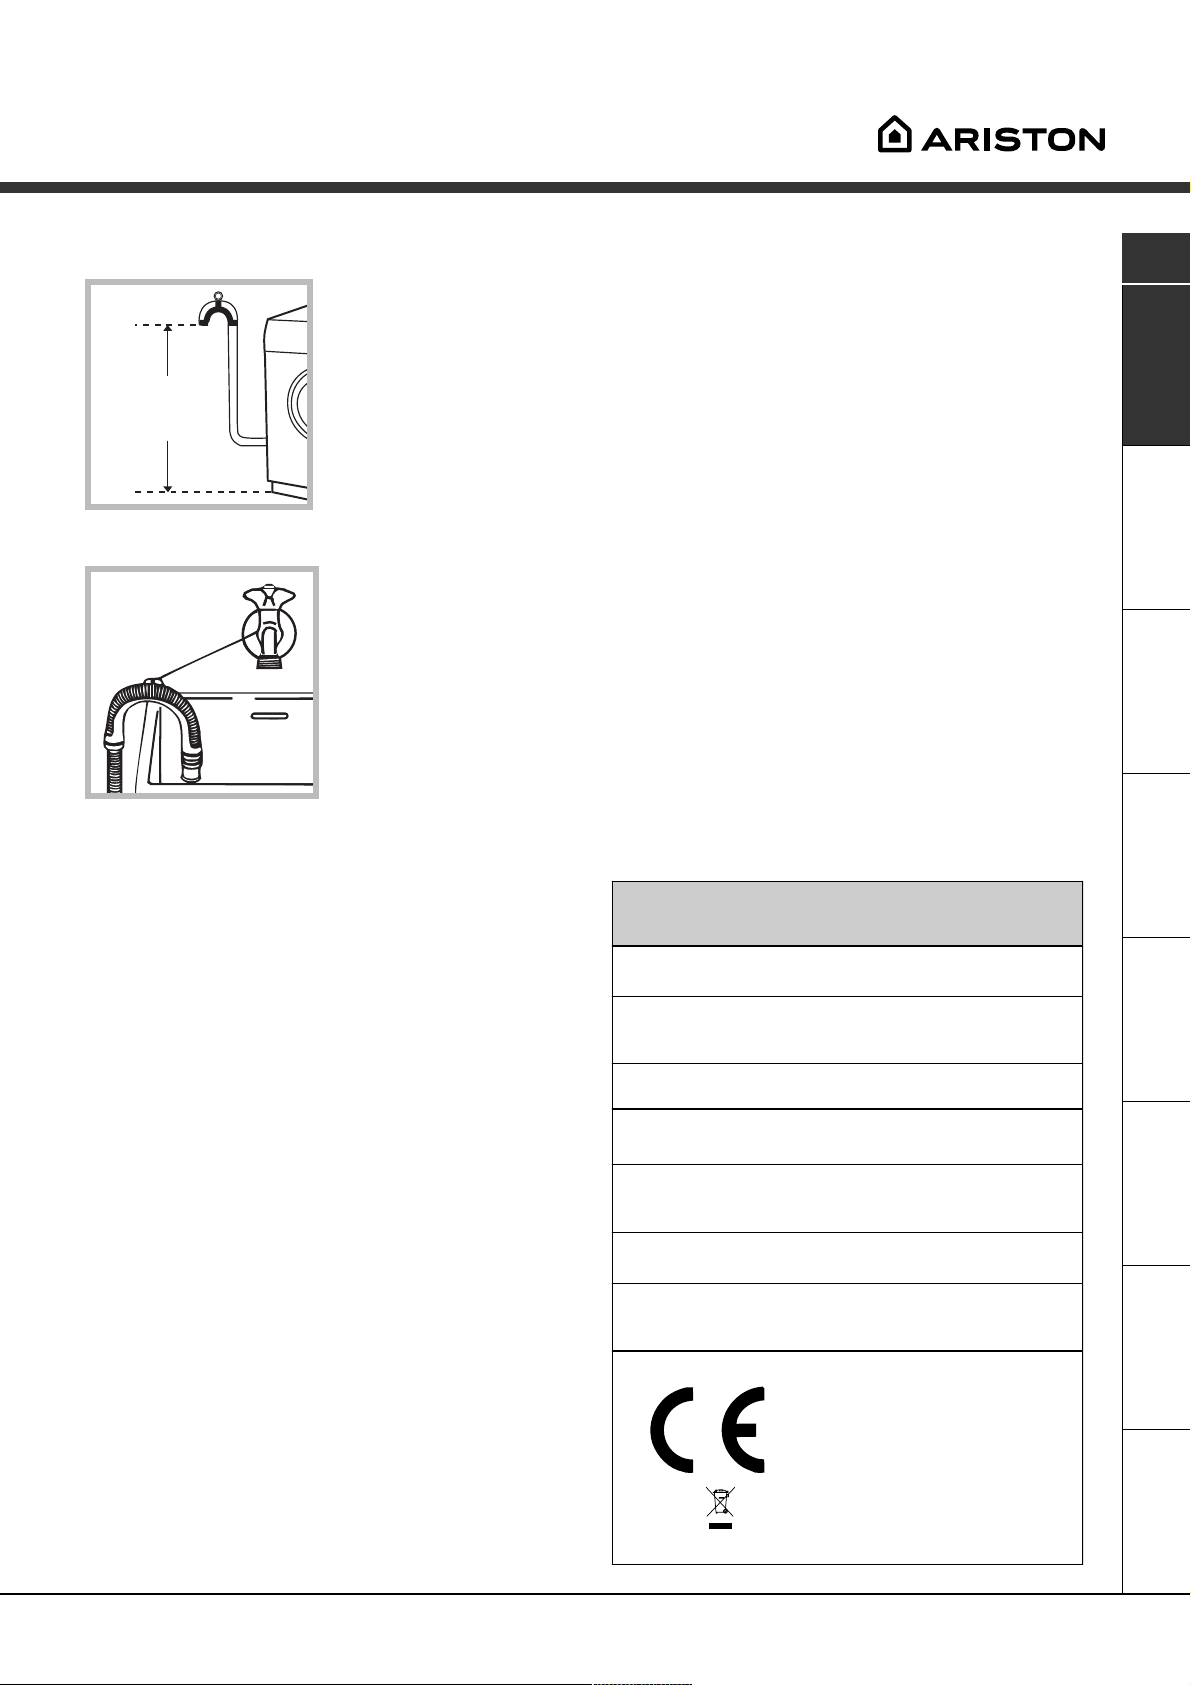
Connecting the drain hose
65 - 100 cm
Connect the drain hose,
without bending it, to a
draining duct or a wall
drain situated between
65 and 100 cm from the
floor;
alternatively, place it
over the edge of a
basin, sink or tub,
fastening the duct
supplied to the tap (see
figure). The free end of
the hose should not be
underwater.
GB
Do not use extensions or multiple sockets.
The power supply cable must never be bent or
dangerously compressed.
The power supply cable must only be replaced by
an authorised serviceman.
Warning! The company denies all liability if and when
these norms are not respected.
The first wash cycle
Once the appliance has been installed, and before
you use it for the first time, run a wash cycle with
detergent and no laundry, setting the 90°C
programme without a pre-wash cycle.
We advise against the use of hose extensions; in
case of absolute need, the extension must have the
same diameter as the original hose and must not
exceed 150 cm in length.
Electric connection
Before plugging the appliance into the mains socket,
make sure that:
the socket is earthed and in compliance with the
applicable law;
the socket is able to sustain the appliance's
maximum power load indicated in the Technical
details table (on the right);
the supply voltage is included within the values i
ndicated on the Technical details table
(on the right);
the socket is compatible with the washing
machine's plug. If this is not the case, replace the
socket or the plug.
The washing machine should not be installed in an
outdoor environment, not even when the area is
sheltered, because it may be very dangerous to
leave it exposed to rain and thunderstorms.
When the washing machine is installed, the mains
socket must be within easy reach.
Technical details
Model
Dimensions
Capacity
Electric
connections
Wate r
connections
Spin speed
Control
programmes
according to
IEC456 directive
AVF 1 09
59.5 cm wide
85 cm high
53.5 cm deep
from 1 to 5 kg
voltage 220/230 Volts 50 Hz
maximum absorbed power 1850 W
maximum pressure 1 MPa (10 bar)
minimum pressure 0.05 MPa (0.5 bar)
drum capacity 46 litres
up to 1000 rpm
programm e 3; temperature 60°C;
run with a load of 5 kg.
This appliance is compliant with the
following European Community
Directives:
- 73/23/CEE of 19/02/73 (Low
Voltage) and subsequent amendments
- 89/336/CEE of 03/05/89
(Electromagnetic Compatibility) and
subsequent amendments
- 2002/96/CE
ServiceTroubleshootingPrecautions CareProgrammes DetergentsInstallation Description
3
Page 4

Washing machine description
GB
Control panel
Programme key
Detergent dispenser
Detergent dispenser to add detergent and fabric
softener (see page 8).
Programme key to consult a straightforward chart
of the different programmes available: pull the grey
tab outwards to open it.
SPIN
FUNCTION
buttons
Display
TEMPERATURE
DELAY TIMER
KEYBOARD LOCK key. To lock all the keys on the
washing machine during operation or during Stand-by
mode (see page 5).
Display to programme the washing machine and
follow the wash cycle progress (see opposite page).
KEYBOARD
LOCK
START/STOP
button
Control knob
START/RESET
button
FUNCTION buttons to select the functions
available. The button corresponding to the function
selected will remain on.
SPIN button to adjust the spin speed or exclude it
altogether (see page 7).
TEMPERATURE button to adjust the wash tempe-
rature (see page 7).
DELAY TIMER button to delay the start of the set
programme for a maximum period of 24 hours
(see page 7).
START/STOP button to turn the washing machine
on and off (see page 6).
START/RESET button to start the programmes or
cancel any incorrect settings (see page 6).
Control knob to select the wash programmes. The
retractable control knob: press the centre of the
knob for it to pop out. The knob stays still during the
cycle (see page 6).
4
Page 5
Display
In addition to being a practical tool to programme your appliance (see page 7), the display provides useful
information concerning the wash cycle and status.
Once you have pressed the START/RESET button to
start the programme, the display will indicate the
amount of time left until the end of the wash cycle. If
a delayed start has been set (using the Delay Timer,
see page 7), the delay time will be indicated on the
display.
The following information is displayed during the
wash cycle:
Cycle phase under way:
Pre-wash
Wash cycle
Rinse
GB
Spin cycle
Customised functions and options:
To select functions and options, see below and on
page 7.
Buzzer:
Your washing machine comes with a buzzer, which
will inform you of the various functions being carried
out, or of any malfunctions: incompatibility, option/
programme keys, start, end of cycle, reset.
Keyboard lock:
For your safety and that of your children, you can block all the keys during the machine's operation or during
waiting position (delayed start - Stand-by) by pressing the function key for 2 seconds.
To disable this function, hold the same button down for 4 seconds.
Door lock:
If the symbol is on, the washing machine door is locked to prevent it from being opened accidentally. To avoid
any damages, wait for the symbol to switch itself off before you open the appliance door.
This model is fitted with a device that allows you to open the appliance door during some of the programme
phases. This is possible when the symbol is not on.
At the end of the programme, the word end is displayed.
In the event of an anomaly, an error code will appear, such as: F-01, (see Troubleshooting page 12).
ServiceTroubleshootingPrecautions CareProgrammes DetergentsInstallation Description
5
Page 6
Starting and Programmes
GB
Briefly: starting a programme
1. Turn the washing machine on by pressing button .
All the icons will light up for a few seconds and
then go off.
2. Load your laundry into the washing machine and
shut the appliance door.
3. Set the knob to the desired programme. The
estimated duration of the selected programme is
displayed. The temperature and spin speed are
automatically set according to the programme
(to change them, see page 7).
4. Add the detergent and any fabric softener
(see page 8).
5. Select any function (see page 7).
6. Start he programme by pressing the START/RESET
button.
To cancel it, keep the START/RESET button
pressed for at least 2 seconds.
7. When the programme has ended, the word end is
displayed. Take out your laundry and leave the
appliance door ajar to allow the drum to dry
thoroughly.
8. Turn the washing machine off by pressing button
Programme table
Type of fabric and degree
of soil
Programmes
Wash
temp .
Detergent
Pre-
wash
Wash
Fabric
softener
Bleaching
option/
bleach
Cotton
Extremely s oiled whites
(sh eets, tablecloths, etc.)
Extremely s oiled whites
(sh eets, tablecloths, etc.)
Heavily soiled whites and
fast colours
Slightly soiled whites and
delicate colours (shirts,
jumpers, etc.)
Slightly soiled delicate
colours
1
2
3
4
5
90°C 160
90°C
60°C
40°C
30°C
Delicate/
Traditi onal
Delicate/
Traditi onal
Delicate/
Traditi onal
Delicate/
Traditi onal
Synthetics
Heavily soiled fast colours
(baby linen, etc.)
Fast colours (all types of
slightly soiled garments)
Heavily soiled fast colours
(baby linen, etc.)
Delicate colours (all types
of slightly soiled garments)
Delicate colours (all types
of slightly soiled garments)
6
6
7
8
9
60°C Delicate 92
40°C Delicate 77
50°C Delicate 86
40°C Delicate 76
30°C 30
Delicate
Wool
Very delicate fabrics
(curtains, silk, viscose, etc.)
PARTIAL PROGR AMMES
Rinse Rinse cycles and spin cycle
Delicate rinse cycle Rinse cycles, anti-crease or draining
Spin cycle Draining and heavy duty spin cycle
Delicate spin cycle Draining and delicate spin cycle
Draining Draining
10
11
40°C Delicate 42
30°C 52
Cycle
length
(minutes)
143
120
85
77
Description of wash cycle
Pre-wash, wash cycle, rinse cycles,
intermediate and final spin cycles
Wash cycle, rinse cycles,
intermediate and final spin cycles
Wash cycle, rinse cycles,
intermediate and final spin cycles
Wash cycle, rinse cycles,
intermediate and final spin cycles
Wash cycle, rinse cycles,
intermediate and final spin cycles
Wash cycle, rinse cycles, anticrease or delicate spin cycle
Wash cycle, rinse cycles, anticrease or delicate spin cycle
Wash cycle, rinse cycles, anticrease or delicate spin cycle
Wash cycle, rinse cycles, anticrease or delicate spin cycle
Wash cycle, rinse cycles and
delicate spin cycl
Wash cycle, rinse cycles and
delicate spin cycle
Wash cycle, rinse cycles, anticrease or drain ing cycle
.
Notes
For the anti-crease function: see Easy iron, opposite page. The information contained in the table is purely indicative.
Special programme
Daily 30' (programme 9 for Synthetics) is designed to wash lightly soiled garments in a short amount of time: it only
lasts 30 minutes and allows you to save on both time and energy. By setting this programme (9 at 30°C), you can
wash different fabrics together (except for woollen and silk items), with a maximum load of 3 kg.
We recommend the use of liquid detergent.
6
Page 7
Personalisations
Setting the spin cycle
If, when the appliance is switched on, the KNOB is positioned
on a programme with a spin cycle, a fixed
Option buttons
button
programme set will be displayed, and the
Press it again and the values lower until they reach OFF, which
indicates that the spin cycle has been excluded (press it again
to go back to the maximum value); stop on the desired speed,
after approximately 2 seconds the setting is accepted: the
symbol
all the programmes except for 11 and the Draining cycle.
and the maximum spin speed allowed for the
remains fixed. The spin cycle setting is enabled with
Setting the temperature
If, when the appliance is switched on, the KNOB is positioned on a programme for which the temperature
needs to be regulated, a fixed appears. Press button and the maximum temperature allowed for the
programme set will be displayed and the icon flashes. Press it again and the temperature lowers until it
reaches OFF, which indicates a cold wash cycle (press it again to go back to the maximum value); stop on the
desired value, after approximately 2 seconds the setting is accepted: the symbol remains fixed.
The temperature adjustment is enabled with all wash programmes.
appears. Press
icon flashes.
GB
Setting the Delay Timer
Press the button and you will see the word OFF on the display, while the relative symbol flashes.
Press the button again and "1h" appears, that is, a delay of one hour (this can reach up to 24h); stop on the
"desired" delay; after approximately 2 seconds the setting is accepted, following which, the time for the set
programme appears on the display and the symbol
If you now press the START/RESET button, the set "delay" appears; this decreases every hour until the start of
the cycle. In this phase, the "delay" can only be modified by decreasing it.
The Delay Timer regulation is enabled with all programmes.
remains on.
Keyboard Lock (see page 5).
Functions
To enable a function:
1. press the button corresponding to the desired function, according to the table below;
2. the function is enabled when the corresponding button is illuminated.
Note: The rapid flashing of the button indicates that the corresponding function cannot be selected for the
programme set.
If you set a function that is incompatible with another function you selected previously, only the last one
selected will be enabled.
Function Effect Comments
Allows for an
impeccable wash,
Su per
wash
visibly whiter than
a standard
wash.
A
Class
This option is incompatible with the RAPID option.
Enabled with
programmes:
1, 2, 3, 4,
5, 6, 7, 8
Eas y iron
Ra pi d
This option
reduces the
amount of
creasing on
fabrics, making
them easier to
iron.
Cuts the duration
of the wash cycle
by 30%.
If you set this option, programmes 6, 7, 8, 11 and Delicate Rinse
will be suspended, leaving the laundry to soak (Anti-crease) and
icon will flash:
- to conclude the cycle, press the START/RESET button;
- to run the draining cycle alone, set the knob to the relative
symbol and press the START/RESET button.
This option is incompatible with the SUPER WASH option.
All
programmes
except for
1, 2, 9, 10
and Draining.
1, 2, 3, 4,
5, 6, 7, 8
7
ServiceTroubleshootingPrecautions CareProgrammes DetergentsInstallation Description
Page 8

Detergents and laundry
Detergent dispenser
GB
Good washing results also depend on the correct
dose of detergent: adding too much detergent won't
necessarily make for a more efficient wash, and may
in fact cause build up on the interior of your appliance
and even pollute the environment.
Open up the detergent
dispenser and pour in the
detergent and fabric
softener, as follows.
1
3
compartment 1: Detergent for pre-wash
(powder)
compartment 2: Detergent for the wash cycle
(powder or liquid)
Liquid detergent should only be poured in immediately
prior to the wash cycle start.
compartment 3: Additives (fabric softeners, etc.)
The fabric softener should not overflow from the grid.
2
Do not use hand wash detergent because it may
form too much foam.
Special items
Curtains: fold curtains and place them in a pillow
case or mesh bag. Wash them separately without
exceeding half the appliance load. Use programme 11
which excludes the spin cycle automatically.
Quilted coats and windbreakers: if they are
padded with goose or duck down, they can be
machine-washed. Turn the garments inside out and
load a maximum of 2-3 kg, repeating the rinse cycle
once or twice and using the delicate spin cycle.
Trainers: remove any mud. They can be washed
together with jeans and other tough garments, but
not with whites.
Wool: for best results, use a specific detergent,
taking care not to exceed a load of 1 kg.
Woolmark Platinum Care
As gentle as a hand wash.
Ariston sets a new standard of superior performance that has been endorsed by The
Woolmark Company with the prestigious
Woolmark Platinum Care brand. Look for the
Woolmark Platinum Care logo on the washing
machine to ensure you can safely and effectively
wash wool garments labelled as "hand wash"
(M.00221):
Set programme 10 for all "Hand wash"
garments, using the appropriate detergent.
Preparing your laundry
Divide your laundry according to:
- the type of fabric/the symbol on the label.
- the colours: separate coloured garments from
whites.
Empty all pockets and check for loose buttons.
Do not exceed the weight limits stated below,
which refer to the weight when dry:
Sturdy fabrics: max 5 kg
Synthetic fabrics: max 2.5 kg
Delicate fabrics: max 2 kg
Wool: max 1 kg
How much does your laundry weigh?
1 sheet 400-500 g
1 pillow case 150-200 g
1 tablecloth 400-500 g
1 bathrobe 900-1,200 g
1 towel 150-250 g
8
Page 9

Precautions and advice
The washing machine was designed and built in
compliance with the applicable international safety
regulations. The following information is provided for
your safety and should consequently be read
carefully.
General safety
This appliance has been designed for non-
professional, household use and its functions must
not be changed.
This washing machine should only be used by
adults and in accordance with the instructions
provided in this manual.
Never touch the washing machine when barefoot
or with wet or damp hands or feet.
Do not pull on the power supply cable to unplug
the appliance from the electricity socket. Pull the
plug out yourself.
Do not open the detergent dispenser while the
appliance is in operation.
Do not touch the drain water as it could reach
very high temperatures.
The crossed out "wheeled bin" symbol on the
product reminds you of your obligation, that when
you dispose of the appliance it must be separately
collected.
Consumers should contact their local authority or
retailer for information concerning the correct
disposal of their old appliance.
Disposing of an old washing machine:
before scrapping your appliance, cut the power
supply cable and remove the appliance door.
Saving energy and respecting the
environment
Environmentally-friendly technology
If you only see a little water through your appliance
door, this is because thanks to the latest technology,
your washing machine only needs less than half the
amount of water to get the best results: an objective
reached to respect the environment.
Saving on detergent, water,
energy and time
To avoid wasting resources, the washing machine
should be used with a full load. A full load instead
of two half loads allows you to save up to 50% on
energy.
GB
Never force the washing machine door: this could
damage the safety lock mechanism designed to
prevent any accidental openings.
In the event of a malfunction, do not under any
circumstances touch internal parts in order to
attempt repairs.
Always keep children well away from the
appliance while in operation.
The appliance door tends to get quite hot during
the wash cycle.
Should it have to be moved, proceed with the
help of two or three people and handle it with the
utmost care. Never try to do this alone, because
the appliance is very heavy.
Before loading your laundry into the washing
machine, make sure the drum is empty.
Disposal
Disposal of old electrical appliances
The European Directive 2002/96/EC on Waste
Electrical and Electronic Equipment (WEEE), requires
that old household electrical appliances must not be
disposed of in the normal unsorted municipal waste
stream. Old appliances must be collected separately
in order to optimise the recovery and recycling of the
materials they contain and reduce the impact on
human health and the environment.
The pre-wash cycle is only necessary on
extremely soiled garments. Avoiding it will save on
detergent, time, water and between 5 and 15%
energy.
Treating stains with a stain remover or leaving
them to soak before washing will cut down the
need to wash them at high temperatures. A
programme at 60°C instead of 90°C or one at
40°C instead of 60°C will save up to 50% on
energy.
Use the correct quantity of detergent depending
on the water hardness, how soiled the garments
are and the amount of laundry you have, to avoid
wastage and to protect the environment: despite
being biodegradable, detergents do contain
ingredients that alter the natural balance of the
environment. In addition, avoid using fabric
softener as much as possible.
If you use your washing machine from late in the
afternoon until the early hours of the morning, you
will help reduce the electricity board's peak load.
The Delay Timer option (see page 7) helps to
organise your wash cycles accordingly.
If your laundry has to be dried in a tumble dryer,
select a high spin speed. Having the least water
possible in your laundry will save you time and
energy in the drying process.
ServiceTroubleshootingPrecautions CareProgrammes DetergentsInstallation Description
9
Page 10
Care and maintenance
GB
Cutting off the water or electricity
supply
Turn off the water tap after every wash. This will
limit the wear of your appliance's water system
and also prevent leaks.
Unplug your appliance when cleaning it and
during all maintenance operations.
Cleaning your appliance
The exterior and rubber parts of your appliance can
be cleaned with a soft cloth soaked in lukewarm
soapy water. Do not use solvents or abrasives.
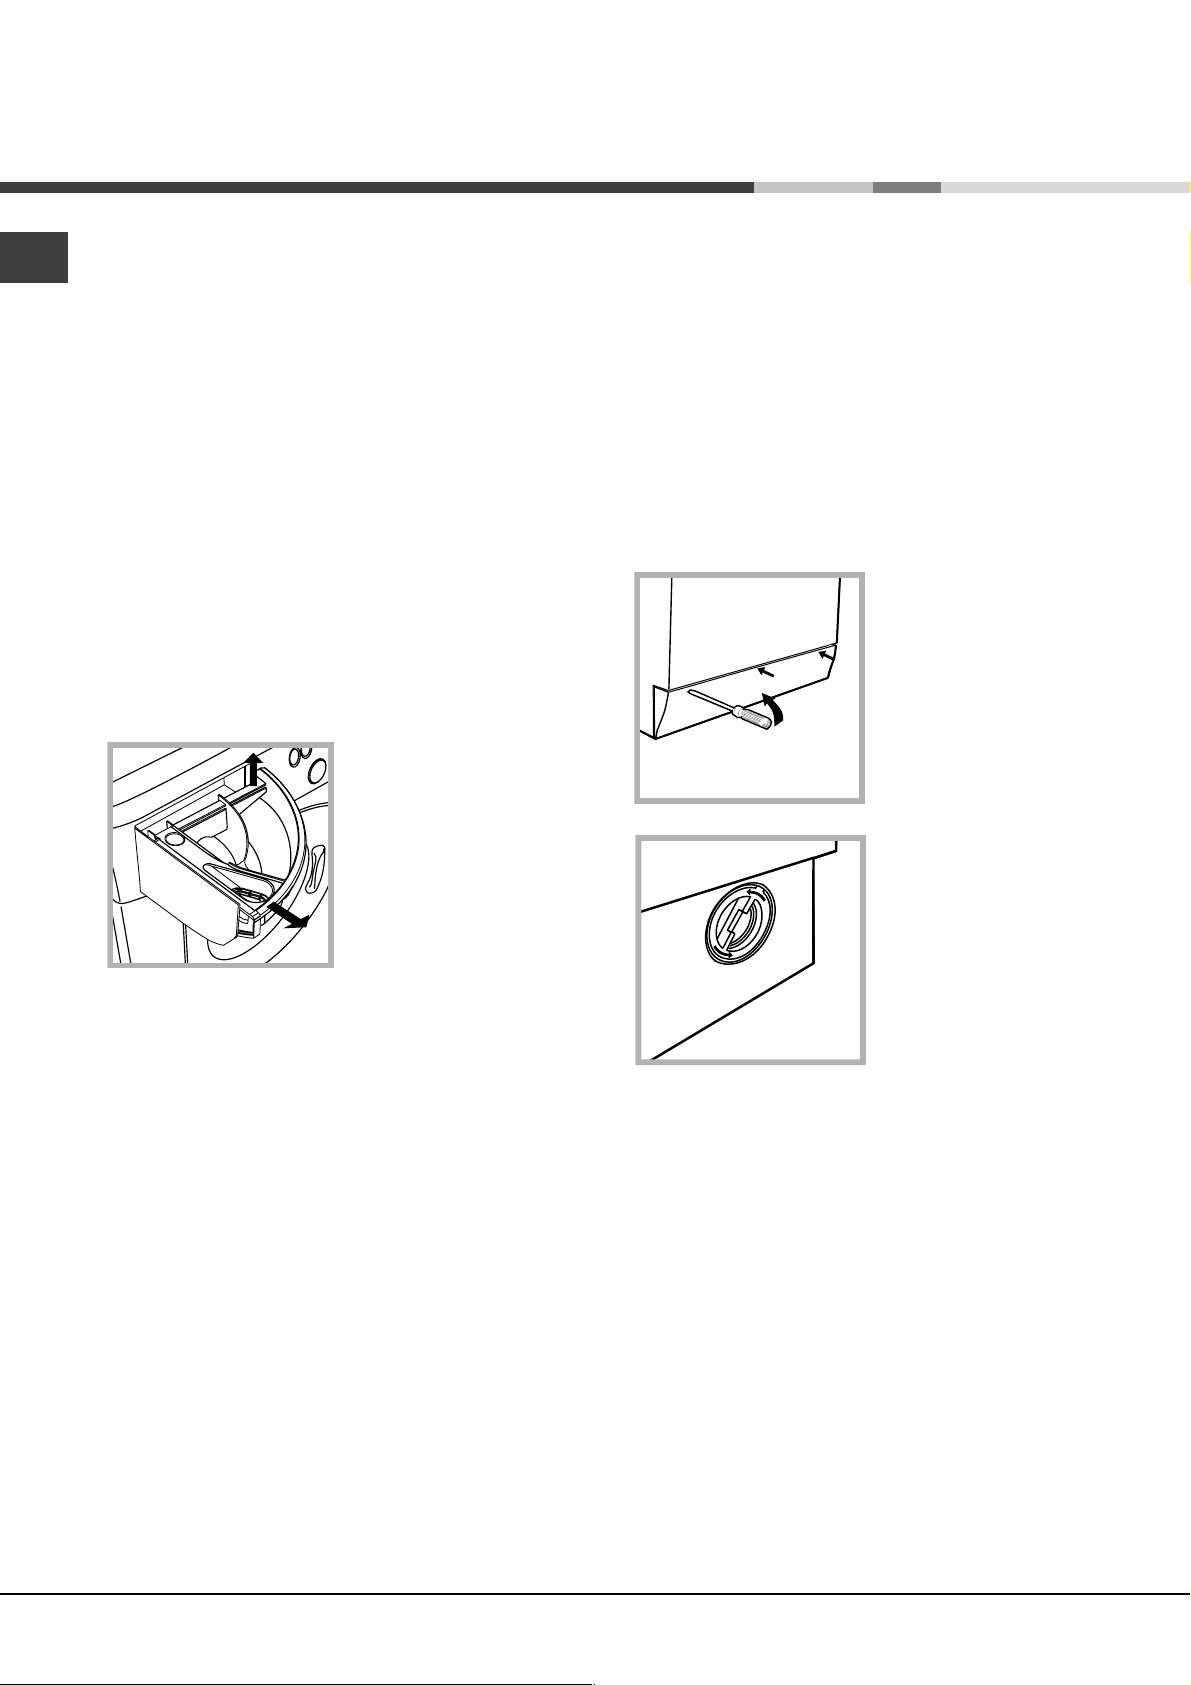
Cleaning the detergent dispenser
1
Remove the dispenser
by raising it and pulling it
out (see figure).
Wash it under running
water; this operation
should be repeated
frequently.
2
Cleaning the pump
The washing machine is fitted with a self-cleaning
pump that does not require any maintenance.
Sometimes, small items (such as coins or buttons)
may fall into the pre-chamber that protects the
pump, situated in the lower part of the same.
Make sure the wash cycle has ended and unplug
the appliance.
To access the pre-chamber:
1. using a screwdriver,
remove the cover panel
on the lower front of the
washing machine (see
figure);
2. unscrew the lid
rotating it anticlockwise (see figure):
a little water may trickle
out. This is perfectly
normal;
Caring for your appliance door and
drum
Always leave the appliance door ajar to prevent
unpleasant odours from forming.
3. clean the interior thoroughly;
4. screw the lid back on;
5. reposition the panel, making sure the hooks are
securely in place before you push it onto the
appliance.
Checking the water inlet hose
Check the water inlet hose at least once a year. If
you see any cracks, replace it immediately: during
the wash cycles, water pressure is very strong and
a cracked hose could easily split open.
Never use hoses that have already been used.
10
Page 11

Troubleshooting
Your washing machine could fail to work. Before calling for Assistance (see page 12), make sure the problem
can't easily be solved by consulting the following list.
GB
Problem
The washing machine won't
start.
The wash cycle won't start.
The washing machine fails to
load water (The wording H2O is
displayed).
The washing machine
continuously loads and unloads
water.
The washing machine does not
drain or spin.
The washing machine vibrates
too much during the spin cycle.
The washing machine leaks.
The machine is locked and the
display flashes, indicating an
error code (e.g. F-01, F- ...) .
There is too much foam.
Possible causes/Solution:
The appliance is not plugged into the socket, or not enough to
make contact.
There has been a power failure.
The appliance door is not shut properly (the word door is
displayed).
The
The START/RESET button has not been pressed.
The water tap is not turned on.
A delayed start has been set (using the Delay Timer, see page 7).
The water inlet hose is not connected to the tap.
The hose is bent.
The water tap is not turned on.
There is a water shortage.
The water pressure is insufficient.
The START/RESET button has not been pressed.
The drain hose is not fitted between 65 and 100 cm from the floor
The free end of the hose is underwater (see page 3).
The wall drainage system doesn't have a breather pipe.
If the problem persists even after these checks, turn off the water tap,
switch the appliance off and call for Assistance. If the dwelling is on one of
the upper floors of a building, there may be drain trap problems causing the
washing machine to load and unload water continuously. In order to avoid
such an inconvenience, special anti-drain trap valves are available in shops.
The programme does not foresee the draining: some programmes
The Easy iron option is enabled: to complete the programme, press
The drain hose is bent (see page 3).
The drain duct is clogged.
When the machine is installed, the locking screws for the oscillating
assembly are still in place. Remove the screws (see page 2).
The washing machine is not level (see page 2).
The washing machine is closed in between furniture cabinets and
The water inlet hose is not screwed on correctly (see page 2).
The detergent dispenser is obstructed (to clean it, see page 10).
The drain hose is not secured properly (see page 3).
This means there is a problem with the machine. Before calling
Assistance, please follow the set of instructions below:
1. Switch off the machine.
2. Remove the plug connecting the appliance to the mains supply and
wait for at least 40 seconds.
3. Place the plug back into the socket.
4. Switch on the machine.
5. If the problem is still evident after this process has been carried out,
contact Assistance.
The detergent is not suitable for machine washing (it should bear
You used too much detergent.
button has not been pressed.
(see page 3).
require enabling the draining manually (see page 6).
the START/RESET button (see page 7).
the wall (see page 2).
the definition "for washing machines" or "hand and machine wash",
or the like).
ServiceTroubleshootingPrecautions CareProgrammes DetergentsInstallation Description
11
Page 12

Service
GB
Before calling for Assistance:
Check whether you can solve the problem on your own (see page 11);
Restart the programme to check whether the problem has been solved;
If this is not the case, contact an authorised Technical Service Centre on the telephone number
provided on the guarantee certificate.
Always request the assistance of authorised servicemen
If the machine has been installed or used incorrectly, you may be charged for the maintenance callout
service.
Notify the operator of:
the type of problem;
the appliance model (Mod.);
the serial number (S/N).
This information can be found on the data plate situated on the rear of the washing machine.
Service
12
Page 13

Instrukcja obs³ugi
PRALKA
PL
Polski
AVF 109
Spis treci
PL
Instalacja, 14-15
Rozpakowanie i wypoziomowanie, 14
Pod³¹czenie do sieci wodnej i elektrycznej, 14-15
Pierwszy cykl prania, 15
Dane techniczne, 15
Opis pralki, 16-17
Panel kontrolny, 16
Wywietlacz (display), 17
Uruchomienie i Programy, 18
Krótko mówi¹c: jak nastawiæ program, 18
Tabela programów, 18
Potrzeby indywidualne, 19
Regulowanie wirowania, 19
Regulowanie temperatury, 19
Programowanie delay timer, 19
Funkcje, 19
rodki pior¹ce i bielizna, 20
Szufladka na rodki pior¹ce, 20
Przygotowanie bielizny, 20
Tkaniny wymagaj¹ce szczególnej dba³oci, 20
Woolmark Platinum Care (Kaszmir Platinum), 20
Zalecenia i rodki ostro¿noci, 21
Ogólne zasady bezpieczeñstwa, 21
Usuwanie odpadów, 21
Oszczêdnoæ i ochrona rodowiska, 21
Konserwacja, 22
Wy³¹czenie wody i pr¹du elektrycznego, 22
Czyszczenie pralki, 22
Czyszczenie szufladki na rodki pior¹ce, 22
Czyszczenie drzwiczek i bêbna, 22
Czyszczenie pompy, 22
Kontrola rury doprowadzania wody, 22
Anomalie i rodki zaradcze, 23
Serwis Techniczny, 24
Przed zwróceniem siê do Serwisu Technicznego, 24
13
Page 14
Instalacja
PL
Nale¿y zachowaæ niniejsz¹ ksi¹¿eczkê instrukcji dla
przysz³ych konsultacji. W razie sprzeda¿y, oddania,
czy przeniesienia pralki w inne miejsce nale¿y
upewniæ siê, by przekazana zosta³a ona razem z
instrukcj¹, aby nowy w³aciciel zapoznaæ siê móg³ z
dzia³aniem urz¹dzenia i odpowiednimi informacjami.
Nale¿y uwa¿nie przeczytaæ instrukcjê obs³ugi, gdy¿
zawiera ona wa¿ne informacje dotycz¹ce instalacji
oraz w³aciwego i bezpiecznego u¿ytkowania pralki.
Rozpakowanie i wypoziomowanie
Rozpakowanie
1. Rozpakowaæ pralkê.
2. Sprawdziæ, czy nie dozna³a ona uszkodzeñ w
czasie transportu. Jeli by³aby ona uszkodzona, nie
pod³¹czaæ jej i powiadomiæ sprzedawcê.
3. Odkrêciæ cztery ruby
ochronne, zamocowane
na czas transportu, oraz
zdj¹æ gumow¹ podk³adkê
z odpowiedni¹ rozpórk¹,
znajduj¹ce siê w tylnej
cianie i (zobacz rysunek).
4. Zatkaæ otwory przy pomocy za³¹czonych do pralki
plastykowych zalepkek.
5. Zachowaæ wszystkie te czêci: gdyby okaza³o siê
konieczne przewiezienie pralki w inne miejsce,
powinny one zostaæ ponownie zamontowane.
Staranne wypoziomowanie pralki zapewnia jej
stabilnoæ i zapobiega wibrowaniu, ha³asom i
przesuwaniu siê urz¹dzenia w czasie pracy. W
razie ustawienia na dywanie lub wyk³adzinie
dywanowej nale¿y tak wyregulowaæ nó¿ki, aby pod
pralk¹ pozostawa³a wolna przestrzeñ niezbêdna dla
wentylacji.
Pod³¹czenie do sieci wodnej i elektrycznej
Pod³¹czenie rury pobierania wody
1. Wsun¹æ uszczelkê A
do koñcówki rury
pobierania wody i
przykrêciæ j¹ do kurka
A
zimnej wody o
gwintowanym otworze
3/4'' (zobacz rysunek).
Przed pod³¹czeniem
upuciæ wodê, a¿
bêdzie zupe³nie czysta
i przeroczysta.
2. Pod³¹czyæ rurê
pobierania wody do
pralki, przykrêcaj¹c j¹
do odpowiedniego
otworu pobierania
wody, znajduj¹cego siê
w tylnej cianie pralki,
z prawej strony u góry
(zobacz rysunek).
Czêci opakowania nie nadaj¹ siê do zabawy dla dzieci
Wypoziomowanie
1. Ustawiæ pralkê na p³askiej i twardej pod³odze;
nie opieraæ jej o ciany, meble itp.
2. Jeli pod³oga nie jest
dok³adnie pozioma,
nale¿y wypoziomowaæ
pralkê, dokrêcaj¹c lub
odkrêcaj¹c przednie
nó¿ki (zobacz rysunek)
K¹t nachylenia,
zmierzony na górnym
blacie pralki, nie
powinien przekraczaæ 2°.
14
3. Zwróciæ uwagê, by na rurze nie by³o zgiêæ ani
ciniêæ.
Cinienie hydrauliczne kurka powinno mieciæ siê
w przedziale podanym w tabeli Danych
technicznych (zobacz na s¹siedniej stronie).
Jeli rura doprowadzania wody okaza³aby siê za
krótka, nale¿y zwróciæ siê do wyspecjalizowanego
sklepu lub do upowa¿nionego fachowca.
.
Page 15
Pod³¹czenie rury usuwania wody
Pod³¹czyæ rurê usuwania
wody, bez zginania jej,
do przewodu ciekowego
lub do cieku w cianie,
które powinny znajdowaæ
65 - 100 cm
siê na wysokoci od 65
do 100 cm od pod³ogi;
Nie u¿ywaæ przed³u¿aczy ani wtyczek
wielokrotnych.
Kabel nie powinien mieæ zgiêæ ani nie powinien byæ
zgnieciony.
Kabel zasilania elektrycznego mo¿e byæ wymieniony
wy³¹cznie przez upowa¿nionego technika specialistê.
Uwaga! Producent uchyla siê od wszelkiej
odpowiedzialnoci, jeli nie przestrzega siê powy¿szych
zasad.
PL
lub oprzeæ j¹ na brzegu
zlewu lub wanny,
przymocowuj¹c do kranu
za³¹czony do pralki
prowadnik (zobacz
rysunek). Wolny koniec
rury usuwania wody nie
powinien pozostawaæ
zanurzony w wodzie.
Odradza siê u¿ywanie rur-przed³u¿aczy; jeli
przed³u¿acz jest jednak konieczny, powinien mieæ on
ten sam przekrój, co rura oryginalna, i nie powinien
przekraczaæ 150 cm d³ugoci.
Pod³¹czenia elektryczne
Przed wprowadzeniem wtyczki do gniazdka nale¿y
upewniæ siê, czy:
gniazdko ma odpowiednie uziemnienie i czy
odpowiada obowi¹zuj¹cym przepisom;
gniazdko jest w stanie wytrzymaæ obci¹¿enie
maksymalnej mocy urz¹dzenia, podanej w tabeli
Danych Technicznych (zobacz obok);
napiêcie pr¹du elektrycznego w sieci zgodne jest
z danymi podanymi w tabeli Danych Technicznych
(zobacz obok);
gniazdko odpowiada wtyczce pralki. W
przeciwnym razie nale¿y wymieniæ gniazdko lub
wtyczkê.
Nie nale¿y instalowaæ pralki na otwartym
powietrzu, nawet jeli miejsce to jest chronione
daszkiem, gdy¿ wystawienie urz¹dzenia na dzia³anie
deszczu i burz, jest bardzo niebezpieczne.
Po zainstalowaniu pralki gniazdko elektryczne
powinno byæ ³atwo dostêpne.
Pierwszy cykl prania
Po zainstalowaniu, zanim zacznie siê u¿ywaæ pralki,
nale¿y wykonaæ jeden cykl prania ze rodkiem pior¹cym,
lecz bez bielizny, nastawiaj¹c program na 90°C bez
prania wstêpnego.
Dane techniczne
Model
Wymiary
Pojemnoæ
Dane pr¹du
elektrycznego
Dane sieci
wodoci¹gowej
Szybkoæ wirowania
Programy kontrolne
zgodnie z przepisami
IEC456
AVF 109
szerokoæ cm 59,5
wysokoæ cm 85
g³êbokoæ cm 53,5
od 1 do 5 kg
Napiêcie 220/230 Volt 50 Hz
maksymalna moc pobierana 1850 W
Maksymalne cinienie 1 MPa (10 barów)
cinienie minimalne 0,05 MPa (0,5 barów)
pojemnoæ bêbna 46 litrów
do 1000 obrotów na minutê
program 3; temperatura 60°C;
wykonane przy 5 kg za³adowanej
bielizny.
Urz¹dzenie to zosta³o w yprodukowane
zgodnie z nastêpuj¹cymi przepisami EWG:
- 73/23/CEE z dn. 19/02/73 (o Niskim
Napiêciu) w raz z kolejnymi zmianami
- 8 9/336/C E E z dn. 03/05/8 9
(o Kompatybilnoci Elektromagnetycznej)
wraz z kolejnymi zmianami
- 2002/96/CE
ostro¿noci
Zasady
KonserwacjaProgramy rodki pior¹ceInstalacja Opis
Nieprawid³owoci
w dzia³aniu
techniczny
Serwis
15
Page 16

PL
Opis pralki
Panel kontrolny
Pulpit
Szufladka rodków pior¹cych
Szufladka na rodki pior¹ce S³u¿y do wsypania
rodków pior¹cych i dodatkowych (zobacz str. 20).
Pulpit s³u¿y do szybkiej konsultacji syntetycznego
schematu programów. Otwiera siê go przez
poci¹gniêcie na zewn¹trz szarego jêzyczka.
Przyciski FUNKCYJNE: s³u¿¹ do wybrania
po¿¹danych funkcji. Przycisk odnosz¹cy siê do
wybranej funkcji zawieci siê po jej nastawieniu.
Przycisk WIROWANIE s³u¿y do regulowania
szybkoci wirowania, a¿ do jego ca³kowitego
wykluczenia (zobacz str. 19).
Przycisk TEMPERATURA s³u¿y do zmienienia
temperatury prania (zobacz str. 19).
Przycisk DELAY TIMER s³u¿y do opónienia
uruchomienia nastawionego programu, a¿ do 24
godzin maksymalnie (zobacz str. 19).
WIROWANIE
Przyciski
FUNKCYJNE
Wywietlacz
(display)
BLOKADA
TEMPERATURA
DELAY TIMER
Przycisk BLOKADA PRZYCISKOW s³u¿y do
zablokowania wszystkich przycisków waszej pralki
w trakcie jej funkcjonowania lub podczas Stand-by.
(zobacz str. 17).
Wywietlacz (display) s³u¿y do programowania
pralki i do kontrolowania stanu zaawansowania
cyklu prania (zobacz s¹siedni¹ stronê).
Przycisk W£¥CZANIE/WY£¥CZANIE s³u¿y do
w³¹czania i wy³¹czania pralki (zobacz str. 18).
Przycisk START/RESET s³u¿y do uruchamiania
programów lub do anulowania b³êdnie
nastawionych (zobacz str. 18).
Pokrêt³o s³u¿y do wybierania programów. Jest ono
typu chowaj¹cego siê: aby je wysun¹æ, nale¿y je
lekko nacisn¹æ. W czasie trwania programu
pokrêt³o pozostaje nieruchome (zobacz str. 18).
PRZYCISKOW
Przycisk
W£¥CZENIE/WY£¥CZENIE
Pokrêt³o
Przycisk
START/RESET
16
Page 17

Wywietlacz (display)
Wywietlacz (display) stanowi narzêdzie pomocne przy programowaniu urz¹dzenia (zobacz str. 19), a ponadto
dostarcza informacji na temat cyklu prania oraz o stanie jego zaawansowania.
Po przyciniêciu przycisku START/RESET w celu
uruchomienia programu na ekraniku pokazywany
bêdzie przybli¿ony czas pozostaj¹cy do zakoñczenia
cyklu prania. Jeli zaprogramowane zosta³o opónione
uruchomienie (Delay Timer, zobacz str. 19), zostanie
to uwidocznione.
W trakcie cyklu prania pokazywane s¹:
Faza w toku:
Pranie wstêpne
Pranie
P³ukanie
PL
Wirowanie
Funkcje i opcje do personalizacji:
Aby wybraæ funkcje i opcje patrz poni¿ej i na str. 19.
Buzzer:
W waszej maszynie zainstalowany zosta³ brzêczyk,
który sygnalizuje postêpowanie poszczególnych
funkcji i ewentualnych anomalii: niezgodnoæ,
przyciski opcji/programów, rozruch, koniec cyklu,
reset.
Blokada przycisków:
Maj¹c na uwadze bezpieczeñstwo wasze i waszych dzieci mo¿ecie zablokowaæ wszystkie przyciski w
trakcie funkcjonowania pralki lub, gdy znajduje siê w fazie oczekiwania (start od³o¿ony -Stand-by),
naciniêciem na 2 sekundy przycisku funkcyjnego. Aby go wy³¹czyæ wcisn¹æ na oko³o 4 sekundy.
Zablokowane drzwiczki pralki:
Zapalony symbol oznacza, ¿e okr¹g³e drzwiczki pralki s¹ zablokowane, by zapobiec przypadkowemu ich otworzeniu.
Aby unikn¹æ uszkodzenia pralki, nale¿y odczekaæ, a¿ symbol ten zganie, zanim przyst¹pi siê do otwierania
drzwiczek pralki.
Po zakoñczeniu programu wywietlony zostaje napis end.
ostro¿noci
Zasady
KonserwacjaProgramy rodki pior¹ceInstalacja Opis
Nieprawid³owoci
w dzia³aniu
techniczny
Serwis
W razie nieprawid³owoci pojawia siê kod b³êdu, na przyk³ad: F-01, który nale¿y podaæ Serwisowi Obs³ugi
Technicznej(zobacz str. 24).
17
Page 18

Uruchomienie i Programy
PL
Krótko mówi¹c: jak nastawiæ program
automatycznie w zale¿noci od wybranego programu
(aby je zmieniæ, zobacz str. 19).
1. W³¹czyæ pralkê, przyciskaj¹c przycisk .
Wszystkie ikony zawiec¹ siê na kilka sekund i
póniej zgasn¹.
2. Za³adowaæ bieliznê i zamkn¹æ drzwiczki pralki.
3. Wybraæ przy pomocy pokrêt³a po¿¹dany program. Na
wywietlaczu pojawi siê przewidywany czas prania.
Temperatura i wirowanie nastawiane s¹
4. Wsypaæ rodek pior¹cy i rodki dodatkowe (zobacz str. 20).
5. Wybraæ ewentualne funkcje (zobacz str. 19).
6. Uruchomiæ program, przyciskaj¹c przycisk START/RESET.
Aby anulowaæ program, nale¿y trzymaæ przyciniêty przycisk
START/RESET przez conajmniej 2 sekundy.
7. Po zakoñczeniu programu pojawia siê napis end. Wyj¹æ
bieliznê i pozostawiæ drzwiczki przymkniête, aby bêben
móg³ wyschn¹æ.
Tabela programów
°
C
°
C
°
C
°
C
°
C
°
C
°
C
°
C
°
C
°
C
°
C
°
C
rodek pior¹cy
Pranie
wstêpne
Pranie
w³a
ciwe
Rodzaj tkaniny oraz stopieñ
zabrudzenia
Bawe³na
Bielizna bia³a silnie zabrudzona
(pociel, o brusy itp.)
Bielizna bia³a silnie zabrudzona
(pociel, o brusy itp.)
Bielizna b ia³a i kolorow a,
wytrzyma³a, mocno zabrudzona
Bielizna bia³a, s³abo
zabrudzona oraz kolorowa
delikatna (koszule, bluzki itp.)
Tkaniny kolorowe, delikatne,
ma³o zabrudzone
Syntetyki
Tkaniny syntetyczne o wytrzyma³ych
kolorach, silnie zabrudzone (bielizna
dla n iemo wl¹ t itp .)
Tkaniny syntetyczne o delikatnych
kolorach (wsz ystkie rodz aje bielizny
osobistej, lekko zabrudzonej)
Tkaniny syntetyczne o wytrzyma³ych
kolorach, silnie zabrudzone (bielizna
dla n iemo wl¹ t itp .)
Tkaniny syntetyczne o delikatnych
kolorach (wszy stkie rod zaje
bielizny, lekko zabrudzonej)
Tkaniny syntetyczne o delikatnych
kolorach (wszy stkie rod zaje
bielizny, lekko zabrudzonej)
Delikatne
We³na
Ubrania i tkaniny wyj¹tkowo
delikatne (firanki, jedwab,
w iskoz a itp.)
PROGRAMY CZÊCIOWE
P³ukanie
P³ukanie delikatne
Odwirowanie
Odwirowanie delikatne
Opró¿nienie z wody Opró¿nienie z wody
Programy
10
11
Temperatura
1
2
3
4
5
6
6
7
8
9
90
90
60
40
30
60
40
50
40
30
40
30
8. Wy³¹czyæ pralkê, przyciskaj¹c przycisk
rodek
zmiêkczaj¹cy
Opcja
Wybielanie/
Wybielacz
Delikatne /
Tradycyjny
Delikatne /
Tradycyjny
Delikatne /
Tradycyjny
Delikatne /
Tradycyjny
Delikatne 92
Delikatne 77
Delikatne 86
Delikatne 76
Delikatne 42
Czas
trw ania
cyklu
(minuty )
160
143
120
85
77
30
52
Opis cyklu prania
Pranie wstêpne, pranie w ³aciwe,
p³ukania, odw irowania porednie i
koñcowe
Pranie, p³ukania, odwirow ania
porednie i koñcow e
Pranie, p³ukania, odwirow ania
porednie i koñcow e
Pranie, p³ukania, odwirow ania
porednie i koñcow e
Pranie, p³ukania, odwirow ania
porednie i koñcow e
Pranie, p³ukania, funkcja
przeciw gnieceniu lub delikatne
odwirowanie
Pranie, p³ukania, funkcja
przeciw gnieceniu lub delikatne
odwirowanie
Pranie, p³ukania, funkcja
przeciw gnieceniu lub delikatne
odwirowanie
Pranie, p³ukania, funkcja
przeciw gnieceniu lub delikatne
odwirowanie
Pranie, p³ukania i delikatne
odwirowanie
Pranie, p³ukania i delikatne
odwirowanie
Pranie, p³ukania, funkcja
przeciw gnieceniu lub
opró¿nienie z wody
P³ukania i odwirowanie
P³ukania, funkcja przeciw
gnieceniu lub opró¿nienie z wody
Opró¿nienie z wo dy i
energiczne odwirow anie
Opró¿nienie z wody i delikatne
odwirowanie
.
Uwagi
Opis funkcji przeciw gnieceniu siê tkanin, zobacz £atwiejsze prasowanie, na nastêpnej stronie. Podane w
tabeli dane maj¹ charakter przybli¿ony.
Program specjalny
Pranie codzienne 30' (program 9 dla tkanin syntetycznych) przeznaczony jest do prania bielizny ma³o zabrudzonej w
krótkim czasie: trwa tylko 30 minut i pozwala dziêki temu na zaoszczêdzenie energii i czasu. Nastawiaj¹c program
(9 o temperaturze 30°C) mo¿na razem wypraæ ró¿nego rodzaju tkaniny (z wyj¹tkiem we³ny i jedwabiu), przy
maksymalnym za³adunku do 3kg. Zalecamy stosowanie p³ynnego rodka pior¹cego.
18
Page 19

Potrzeby indywidualne
Regulowanie wirowania
Jeli w chwili w³¹czenia urz¹dzenia POKRÊT£O ustawione jest na
programie, który przewiduje wirowanie, symbol
Przyciski Opcje
wiat³em. Po przyciniêciu przycisku
maksymalna szybkoæ wirowania dozwolona dla wybranego
programu i symbol
szybkoæ wirowania obni¿a siê a¿ do OFF, co wskazuje ca³kowite
wykluczenie wirowania (przyciskaæ nadal, aby zwiêkszyæ szybkoæ
wirowania); wybraæ po¿¹dan¹ szybkoæ; po oko³o 2 sekundach
wybór zostanie przyjêty przez pralkê: symbol
sta³ym wiat³em. Regulowanie wirowania mo¿liwe jest przy
wszystkich programach z wyj¹tkiem 11 oraz Opró¿nienie z wody.
bêdzie migota³. Przyciskaj¹c go nadal,
pokazana zostanie
Regulowanie temperatury
Jeli w chwili w³¹czenia urz¹dzenia POKRÊT£O ustawione jest na programie, który przewiduje regulacjê temperatury,
symbol zawieci siê sta³ym wiat³em. Po przyciniêciu przycisku pokazana zostanie maksymalna dozwolona
temperatura dla wybranego programu i symbol bêdzie migota³. Przyciskaj¹c go nadal, temperatura obni¿a siê a¿ do
OFF, co wskazuje pranie w zimnej wodzie (przyciskaæ nadal, aby powróciæ do wy¿szej temperatury); zatrzymaæ siê
na po¿¹danej temperaturze; po oko³o 2 sekundach wybór zostanie przyjêty przez pralkê: symbol zapali siê sta³ym
wiat³em. Temperaturê regulowaæ mo¿na przy wszystkich programach prania.
zapali siê sta³ym
bêdzie siê pali³
PL
Programowanie delay timer
Po przyciniêciu przycisku na ekraniku pojawi siê napis OFF i odpowiedni symbol zacznie migotaæ.
Przyciskaj¹c nadal przycisk, pojawi siê napis 1h to znaczy opónienie uruchomienia o jedn¹ godzinê i tak
dalej a¿ do 24h; zatrzymaæ siê na po¿¹danym opónieniu, po oko³o 2 sekundach wybór zostaje przyjêty
przez pralkê, a na ekraniku pojawi siê czas przewidziany dla nastawionego programu i symbol
zapalony. Po przyciniêciu przycisku START/RESET pojawi siê wartoæ wybranego opónienia, które
zmniejsza siê co godzinê, a¿ do uruchomienia siê pralki; na tym etapie mo¿na jeszcze zmieniæ wielkoæ
opónienia, lecz tylko na mniejsze. Delay Timer mo¿e byæ nastawiony przy wszystkich programach.
pozostaje
Blokada przycisków (zobacz str. 17).
Funkcje
Ró¿ne funkcje, w jakie wyposa¿ona jest pralka, pozwalaj¹ na osi¹gniêcie po¿¹danych rezultatów prania. Aby
uaktywniæ poszczególne funkcje, nale¿y postêpowaæ w nastêpuj¹cy sposób:
1. przycisn¹æ odpowiadaj¹cy po¿¹danej funkcji przycisk, zgodnie z poni¿sz¹ tabel¹;
2. zawiecenie siê odpowiedniego przycisku oznacza, ¿e funkcja jest aktywna.
Uwaga: Szybkie migotanie przycisku oznacza, ¿e danej funkcji nie mo¿na nastawiæ przy wybranym programie.
Jeli nastawiona zostanie funkcja sprzeczna z uprzednio wybran¹ inn¹ funkcj¹, tylko jeden wybór bêdzie przyjêty.
Opcja Efekt Uwagi dotycz¹ce u¿ycia
Pozwala na
doskona³e wypranie
bielizny; bielizna
Super
Wash
jest zdecydowanie
bielsza, ni¿ przy
standardowym
praniu w klasie
enegetycznej A.
Nie mo¿e byæ nastawiona razem z opcj¹ PRANIE SZYBKIE.
Opcja
aktywna przy
programach:
1, 2, 3, 4,
5, 6, 7, 8
ostro¿noci
Zasady
KonserwacjaProgramy rodki pior¹ceInstalacja Opis
Nieprawid³owoci
w dzia³aniu
£atwe
prasowanie
Pranie
szybkie
Zmniejsza gniecenie
siê tkanin, u³atwiaj¹c
prasowanie.
Zmniejsza o oko³o
30% czas trwania
cyklu prania.
Po nastawieniu tej opcji programy 6, 7, 8, 11 oraz Delikatne p³ukanie
przerywaj¹ siê, pozostawiaj¹c bieliznê namoczon¹ w wodzie (Funkcja Przeciw
gnieceniu) i zacznie migotaæ symbol :
- aby zakoñczyæ cykl prania, nale¿y przycisn¹æ przycisk START/RESET;
- aby wykonaæ tylko opró¿nienie z wody, ustawiæ pokrêt³o na odpowiednim
symbolu i przycisn¹æ przycisk START/RESET.
Nie mo¿na nastawiæ tej opcji razem z opcj¹ SUPER WASH.
Wszystkie
poza
1, 2, 9, 10,
Opró¿nianie
z wody.
1, 2, 3, 4,
5, 6, 7, 8
19
techniczny
Serwis
Page 20

rodki pior¹ce i bielizna
PL
Szufladka na rodki pior¹ce
Dobre rezultaty prania zale¿¹ równie¿ od
w³aciwego dozowania rodka pior¹cego: wsypuj¹c
go za du¿o, wcale nie poprawia siê wydajnoci
prania, lecz przyczynia siê do odk³adania siê
nalotów na wewnêtrznych czeciach pralki i do
zanieczyszczania rodowiska.
Wysun¹æ szufladkê i
wsypaæ do niej rodki
pior¹ce i dodatkowe w
nastêpuj¹cy sposób
1
3
przegródka 1: rodek pior¹cy do prania
wstêpnego (w proszku)
przegródka 2: rodek pior¹cy do prania w³aciwego
(w proszku lub w p³ynie)
P³ynny rodek do prania wlewa siê tu¿ przed
uruchomieniem.
przegródka 3: rodki dodatkowe (zmiêkczaj¹ce,
itp.)
rodek zmiêkczaj¹cy nie powinien wyp³ywaæ poza
kratkê.
Nie u¿ywaæ rodków do prania rêcznego, poniewa¿
tworz¹ za du¿o piany.
2
Tkaniny wymagaj¹ce szczególnej dba³oci
Firanki: w³o¿yæ je z³o¿one do poszewki lub do
siatkowatego worka. Praæ same, nie przekraczaj¹c
po³owy za³adunku. Stosowaæ program 11, który
automatycznie wyklucza wirowanie.
Poduszki i kurtki: Jeli wype³nione s¹ one pierzem
gêsim lub kaczym, mo¿na je praæ w pralce.
Wywróciæ na lew¹ stronê i za³adowaæ nie wiêcej ni¿
2-3 kg; powtórzyæ p³ukania jeden lub dwa razy i
stosowaæ delikatne odwirowanie.
Tenisówki: oczyciæ z b³ota. Mo¿na je praæ razem z
d¿insami i bielizn¹ wytrzyma³¹, lecz nie bia³¹.
We³na: Aby uzyskaæ dobre rezultaty prania, nale¿y
stosowaæ specjalny rodek pior¹cy i nie przekraczaæ
1 kg za³adunku.
Woolmark Platinum Care
(Kaszmir Platinum)
Program delikatny jak pranie rêczne.
Ariston wprowadzi³ nowy standard prania o
doskona³ych rezultatach, który zdoby³ sobie
uznanie Stowarzyszenia Czystej ¯ywej We³ny
(The Woolmak Company) przez przyznanie
presti¿owej marki Woolmark Platinum Care. Jeli na
Waszej pralce znajduje siê znak firmowy Woolmark
Platinum Care, mo¿na w niej praæ, uzyskuj¹c doskona³e
rezultaty, ubrania we³niane z etykietk¹ Praæ rêcznie
(M.00221):
Nastawiæ program 10 dla wszyskich
ubrañ nosz¹cych etykietkê Praæ
rêcznie, stosuj¹c specjalne rodki pior¹ce.
Przygotowanie bielizny
Podzieliæ bieliznê do prania wed³ug:
- rodzaju tkaniny / symbolu na etykietce.
- kolorów: oddzieliæ bieliznê kolorow¹ od bia³ej.
Opró¿niæ kieszenie i sprawdziæ guziki.
Nie przekraczaæ wskazanego ciê¿aru bielizny
suchej:
Tkaniny wytrzyma³e: max 5 kg
Tkaniny syntetyczne: max 2,5 kg
Tkaniny delikatne: max 2 kg
We³na: max 1 kg
Ile wa¿y bielizna?
1 przecierad³o 400-500 gr.
1 pow³oczka na poduszkê 150-200 gr.
1 obrus 400-500 gr.
1 szlafrok 900-1.200 gr.
1 rêcznik 150-250 gr.
20
Page 21

Zalecenia i rodki ostro¿noci
Pralka zosta³a zaprojektowana i wyprodukowana
zgodnie z miêdzynarodowymi przepisami
bezpieczeñstwa. Podajemy Wam poni¿sze
zalecenia, maj¹c na wzglêdzie Wasze
bezpieczeñstwo, i powinniecie je uwa¿nie
przeczytaæ.
Ogólne zasady bezpieczeñstwa
Pralki powinny u¿ywaæ wy³¹cznie osoby doros³e
i w sposób zgodny z podanymi w niniejszej
ksi¹¿eczce instrukcjami.
Nie dotykaæ pralki, stoj¹c przy niej boso lub
maj¹c rêce czy stopy mokre lub wilgotne.
Nie wyjmowaæ wtyczki z gniazdka, ci¹gn¹c za
kabel, lecz trzymaj¹c za wtyczkê.
Nie otwieraæ szufladki na rodki pior¹ce w
trakcie prania.
Nie dotykaæ usuwanej wody, gdy¿ mo¿e byæ ona
bardzo gor¹ca.
W ¿adnym wypadku nie otwieraæ drzwiczek
pralki na si³ê: móg³by bowiem ulec uszkodzeniu
mechanizm zabezpieczaj¹cy drzwiczki przed
przypadkowym otworzeniem.
W razie usterek nie nale¿y w ¿adnym wypadku
próbowaæ dostaæ siê do wewnêtrznych czêci
pralki, próbuj¹c samemu j¹ naprawiaæ.
Skontrolowaæ zawsze, by dzieci nie zbli¿a³y siê
do pracuj¹cej pralki.
W czasie prania okr¹g³e drzwiczki pralki rozgrzewaj¹
siê.
Jeli trzeba przenieæ pralkê w inne miejsce,
nale¿y to robiæ bardzo ostro¿nie w kilka osób.
Nigdy nie nale¿y tego robiæ samemu, gdy¿
pralka jest bardzo ciê¿ka.
Przed w³o¿eniem bielizny sprawdziæ, czy bêben
jest pusty.
Usuwanie odpadów
Pozbywanie sie starych urzadzen
elektrycznych.
Europejska Dyrektywa 2002/96/EC dotyczaca
Zuzytych Elektrycznych i Elektronicznych
Urzadzen (WEEE) zaklada zakaz pozbywania sie
starych urzadzen domowego uzytku jako
nieposortowanych smieci komunalnych. Zuzyte
urzadzenia musza byc osobno zbierane i
sortowane w celu zoptymalizowania odzyskania
oraz ponownego przetworzenia pewnych
komponentów i materialów. Pozwala to ograniczyc
zanieczyszczenie srodowiska i pozytywnie wplywa
na ludzkie zdrowie. Przekreslony symbol kosza
umieszczony na produkcie przypomina klientowi
o obowiazku specjalnego sortowania.
Konsumenci powinni kontaktowaæ siê z
w³adzami lokalnymi lub sprzedawc¹ w celu
uzyskania informacji dotycz¹cych postêpowania
z ich zu¿ytymi urz¹dzeniami gospodarstwa
domowego.
Pozbycie siê starej pralki:
przed oddaniem jej na z³om nale¿y j¹
uniezdatniæ do u¿ytku odcinaj¹c kabel
elektryczny i wyjmuj¹c drzwiczki.
Oszczêdnoæ i ochrona rodowiska
Technologia w s³u¿bie rodowiska
Jeli przez okr¹g³e drzwiczki pralki widaæ w czasie
prania ma³o wody, to dlatego, ¿e przy nowej
technologii Ariston wystarcza mniej ni¿ po³owa wody
do uzyskania maksymalnych rezultatów prania: zosta³
w ten sposób osi¹gniêty jeden z celów ochrony
rodowiska.
Oszczêdnoæ rodka pior¹cego, wody, energii i
czasu
Aby nie trwoniæ zasobów, nale¿y u¿ywaæ pralki
za³adowanej do pe³na. Jedno za³adowane do
pe³na pranie, zamiast dwóch za³adowanych do
po³owy, pozwala na zaoszczêdzenie a¿ do 50%
energii.
Pranie wstêpne konieczne jest tylko w
przypadku bielizny bardo brudnej. Unikanie
prania wstêpnego pozwala na zaoszczêdzenie
rodka pior¹cego; czasu, wody oraz od 5 do
15% energii.
Wywabiaj¹c plamy odplamiaczem i
pozostawiaj¹c bieliznê namoczon¹ w wodzie
przed praniem, mo¿na zredukowaæ temperaturê
prania. Stosuj¹c program 60°C zamiast 90°C lub
program 40°C zamiast 60°C, mo¿na
zaoszczêdziæ a¿ do 50% energii.
Dok³adne dozowanie rodka pior¹cego w
zale¿noci od twardoci wody, stopnia
zabrudzenia i iloci bielizny pozwala unikn¹æ jego
trwonienia i wychodzi na korzyæ rodowisku:
rodki pior¹ce, mimo ¿e ulegaj¹ biodegradacji,
zawsze zawieraj¹ jednak sk³adniki, które
zak³ócaj¹ rodowisko naturalne. Nale¿y równie¿
unikaæ, gdy jest to mo¿liwe, rodka
zmiêkczaj¹cego.
Dokonuj¹c prania pónym popo³udniem i
wieczorem, a¿ do wczesnych godzin rannych,
przyczynia siê do zmniejszenia obci¹¿enia
energetycznego elektrowni.
Opcja Delay Timer (zobacz str. 19) pomaga przy
takim zaprogramowaniu prania w czasie.
Jeli bielizna ma byæ wyszuszona w suszarce,
nale¿y wybraæ wysok¹ szybkoæ odwirowania.
Dobrze odwirowana z wody bielizna pozwala na
zaoszczêdzenie czasu i energii przy suszeniu.
PL
ostro¿noci
Zasady
KonserwacjaProgramy rodki pior¹ceInstalacja Opis
Nieprawid³owoci
w dzia³aniu
techniczny
Serwis
21
Page 22

Konserwacja
PL
Wy³¹czenie wody i pr¹du elektrycznego
Zamkn¹æ kurek dop³ywu wody po ka¿dym praniu.
Zmniejsza siê w ten sposób zu¿ycie instalacji
hydraulicznej pralki oraz niebezpieczeñstwo
przecieków.
Wyj¹æ wtyczkê z kontaktu przed przyst¹pieniem
do czyszczenia pralki oraz czynnoci
konserwacyjnych.
Czyszczenie pralki
Obudowê zewnêtrzn¹ i gumowe czêci pralki nale¿y
myæ wilgotn¹ ciereczk¹ zmoczon¹ w wodzie z
myd³em. Nie stosowaæ rozpuszczalników ani ostrych
i ciernych rodków czyszcz¹cych.
Czyszczenie szufladki na rodki pior¹ce
1
Wysun¹æ szufladkê,
unosz¹c j¹ lekko ku
górze i wyci¹gaj¹c na
zewn¹trz (zobacz
rysunek).
Wyp³ukaæ j¹ pod bie¿¹c¹
wod¹. Czynnoæ tê
nale¿y powtarzaæ
2
stosunkowo czêsto.
Czyszczenie pompy
Pralka wyposa¿ona jest w pompê samooczyszczaj¹c¹,
która nie wymaga zabiegów konserwacyjnych. Mo¿e
siê jednak zdarzyæ, ¿e ma³e przedmioty (monety,
guziki) wpadn¹ do przedsionka ochronnego pompy,
znajduj¹cego siê w jej dolnej czêci.
Upewniæ siê, by cykl prania by³ zakoñczony i by
wtyczka by³a wyjêta z gniazdka.
Aby dostaæ siê do przedsionka pompy:
1. przy pomocy
rubokrêtu odj¹æ panel
przykrywaj¹cy,
znajduj¹cy siê w
przedniej czêci pralki
(zobacz rysunek)
2. odkrêciæ
przykrywkê, obracaj¹c
j¹ w kierunku
przeciwnym do ruchu
wskazówek zegara
(zobacz rysunek)
¿e wyp³ynie trochê
wody, jest zjawiskiem
normalnym;
;
:
fakt,
Czyszczenie drzwiczek i bêbna
Nale¿y zawsze pozostawiaæ uchylone drzwiczki
pralki, aby zapobiec tworzeniu siê przykrych
zapachów.
22
3. dok³adnie wyczyciæ wnêtrze;
4. ponownie przykrêciæ przykrywkê;
5. ponownie przymocowaæ panel, pamiêtaj¹c o
wsuniêciu zaczepów w odpowiednie otwory przed
dopchniêciem go do urz¹dzenia.
Kontrola rury doprowadzania wody
Przynajmniej raz do roku nale¿y skontrolowaæ rurê
doprowadzania wody. Jeli widoczne s¹ na niej rysy
i pêkniêcia, nale¿y j¹ wymieniæ: w trakcie prania
du¿e cinienie mo¿e bowiem spowodowaæ jej nag³e
rozerwanie siê.
Nigdy nie instalowaæ rur u¿ywanych.
Page 23

Anomalie i rodki zaradcze
Mo¿e siê zdarzyæ, ¿e pralka nie dzia³a. Zanim wezwie siê Serwis Techniczny (zobacz str. 24) nale¿y
sprawdziæ, czy problemu tego nie da siê ³atwo rozwi¹zaæ samemu, pomagaj¹c sobie poni¿szym wykazem.
Nieprawid³owoci w dzia³aniu:
Pralka siê nie w³¹cza.
Cykl prania nie zaczyna siê.
Pralka nie pobiera wody (Na
ekraniku pojawia siê napis H
Pralka pobiera i usuwa wodê
bez przerwy.
2
O).
Mo¿liwe przyczyny/Porady:
Wtyczka nie jest w³¹czona do gniazdka, lub jest wsuniêta
niedostatecznie, tak ¿e nie ma kontaktu.
W domu brak jest pr¹du.
Drzwiczki nie s¹ dobrze zamkniête (na ekraniku pojawia siê napis door).
Nie zosta³ przyciniêty przycisk
Nie zosta³ przyciniêty przycisk START/RESET.
Kurek dop³ywu wody jest zamkniêty.
Nastawione zosta³o opónione uruchomienie (Delay Timer, zobacz str. 19).
Rura pobierania wody nie jest pod³¹czona do kurka.
Rura jest zgiêta.
Kurek dop³ywu wody jest zamkniêty.
W domu brak jest wody.
Cinienie wody nie jest wystarczaj¹ce.
Nie zosta³ przyciniêty przycisk START/RESET.
Rura usuwania wody nie zosta³a zainstalowana na wysokoci od
65 do 100 cm od pod³ogi (zobacz str. 15).
Koñcówka rury usuwania wody jest zanurzona w wodzie (zobacz str. 15).
Usuwanie wody bezporednio w cianie nie posiada odpowietrznika.
.
PL
Pralka nie usuwa wody i nie
odwirowuje.
Pralka mocno wibruje w fazie
odwirowywania.
Z pralki wycieka woda.
Tworzy siê zbyt wiele piany.
Jeli po skontrolowaniu tych pozycji nieprawid³owoæ nadal siê
utrzymuje, nale¿y zamkn¹æ kurek dop³ywu wody, wy³¹czyæ pralkê i
wezwaæ Serwis Techniczny. Jeli mieszkanie znajduje siê na
najwy¿szych piêtrach budynku, mo¿e zaistnieæ efekt syfonu, w
wyniku czego pralka nieustannie pobiera i usuwa wodê. W celu
wyeliminowania tej niedogodnoci w handlu dostêpne s¹ specjalne
zawory.
Program nie przewiduje usuwania wody: przy niektórych
programach nale¿y uruchomiæ je manualnie (zobacz str. 18).
Zosta³a nastawiona funkcja £atwiej prasowaæ: aby zakoñczyæ program,
nale¿y przycisn¹æ przycisk START/RESET (zobacz str. 19).
Rura usuwania wody jest zgiêta (zobacz str. 15).
Rura usuwania wody jest zatkana.
Bêben, w chwili instalacji pralki, nie zosta³ odpowiednio
odblokowany (zobacz str. 14).
Pralka nie jest ustawiona dok³adnie w poziomie (zobacz str. 14).
Pralka jest wciniêta miêdzy meble i cianê (zobacz str. 14).
Rura doprowadzania wody nie jest dobrze przykrêcona (zobacz str. 14).
Szufladka na rodki pior¹ce jest zatkana (aby j¹ oczyciæ, zobacz str. 22).
Rura usuwania wody nie jest dobrze przymocowana (zobacz str. 15).
rodek pior¹cy nie jest odpowiedni do pralek automatycznych (na
opakowaniu musi byæ napisane: do pralek, do prania rêcznego i
pralek lub podobne).
U¿yto za du¿o rodka pior¹cego.
ostro¿noci
Zasady
KonserwacjaProgramy rodki pior¹ceInstalacja Opis
Nieprawid³owoci
w dzia³aniu
techniczny
Serwis
23
Page 24

Serwis Techniczny
PL
Przed zwróceniem siê do Serwisu Technicznego:
Sprawdziæ, czy problemu nie mo¿na rozwi¹zaæ samemu (zobacz str. 13);
Ponownie nastawiæ program i sprawdziæ, czy problem zosta³ rozwi¹zany;
W przypadku negatywnym skontaktowaæ siê z upowa¿nionym orodkiem Serwisu Technicznego
pod numerem podanym na karcie gwarancyjnej.
Nigdy nie zwracaæ siê do nieupowa¿nionych techników.
Nale¿y podaæ:
rodzaj defektu;
model urz¹dzenia (Mod.);
numer seryjny (S/N).
Informacje te znajduj¹ siê na przymocowanej z ty³u pralki tabliczce znamionowej.
Serwis
Techniczny
24
Page 25

Használati utasítás
MOSÓGÉP
HU
Magyar
AVF 109
Összefoglalás
HU
Üzembehelyezés, 26-27
Kicsomagolás és vízszintbe állítás, 26
Víz és elektromos csatlakozás, 26-27
Elsõ mosási ciklus, 27
Mûszaki adatok, 27
Mosógép leírása, 28-29
Vezérlõpanel, 28
Kijelzõ, 29
Indítás és Programok, 30
Röviden: egy program elindítása, 30
Programtáblázat, 30
Program módosítások, 31
Centrifugálás beállítása, 31
Hõmérséklet beállítása, 31
Az idõkésleltetés beállítása, 31
Funkciók, 31
Mosószerek és mosandók, 32
Mosószeradagoló fiók, 32
Mosandó ruhák elõkészítése, 32
Különleges bánásmódot igénylõ darabok, 32
Woolmark Platinum Care (Kasmir Platinum), 32
Óvintézkedések és tanácsok, 33
Általános biztonság, 33
Hulladékelhelyezés, 33
Környezetvédelem, 33
Karbantartás és törõdés, 34
A víz elzárása és az elektromos áram kikapcsolása, 34
A mosógép tisztítása, 34
A mosószertartó tisztítása, 34
Az ajtó és a forgódob gondozása, 34
A szivattyú tisztítása, 34
A vízbevezetõ csõ ellenõrzése, 34
Rendellenességek és elhárításuk, 35
Szerviz, 36
Mielõtt a Szervizhez fordulna, 36
25
Page 26

Üzembehelyezés
HU
E kézikönyv megõrzése azért fontos, hogy bármikor
elõvehesse, és megnézhesse. Ha a mosógépet eladná,
átadná vagy másnál helyezné el, gondoskodjon arról,
hogy e használati utasítás a géppel együtt maradjon,
hogy az új tulajdonos is megismerhesse a mosógép
funkcióit és az ezekre vonatkozó figyelmeztetéseket.
Figyelmesen olvassa el az utasításokat: fontos
információkat tartalmaznak az üzembehelyezésrõl, a
használatról és a biztonságról.
Kicsomagolás és vízszintbe állítás
Kicsomagolás
1. Csomagolja ki a mosógépet.
2. Ellenõrizze, hogy a mosógép nem sérült-e meg a
szállítás során. Ha a gépen sérülést talál, ne
csatlakoztassa, és forduljon a készülék eladójához.
3. Távolítsa el a
hátoldalon található, a
szállításhoz felszerelt 3
védõcsavart, valamint a
gumit a hozzá tartozó
távtartóval (lásd ábra).
4. A furatokat zárja le a tartozékként kapott
mûanyag dugókkal.
5. Minden darabot õrizzen meg: ha a mosógépet
szállítani kell, elõtte ezeket vissza kell szerelni.
A csomagolóanyag nem gyermekjáték
A pontos vízszintezés biztosítja a gép stabilitását,
így az a mûködés során nem fog vibrálni, zajt
okozni vagy elmozdulni. Szõnyegpadló vagy
szõnyeg esetén a lábakat úgy állítsa be, hogy a
mosógép alatt elegendõ hely maradjon a
szellõzésre.
Víz és elektromos csatlakozás
Vízbevezetõ csõ csatlakoztatása
1. Illessze az A
tömítést a vízbevezetõ
csõ végére és
csavarozza fel a 3/4-os
külsõ menettel
A
3. Ügyeljen arra, hogy a csövön ne legyen törés
vagy szûkület.
rendelkezõ hidegvíz
csapra
(lásd ábra)
.
A csatlakoztatás elõtt
eresszen ki a csapból
vizet addig, amíg a víz
teljesen átlátszóvá nem
válik.
2. Csatlakoztassa a
vízbevezetõ csövet a
mosógéphez úgy, hogy
azt a hátul jobboldalon
fent lévõ vízbemeneti
csonkra csavarozza
(
lásd ábra).
Vízszintezés
1. A mosógépet sík és kemény padlóra állítsa,
úgy, hogy ne érjen falhoz, bútorhoz vagy máshoz.
2. Ha a padló nem
tökéletese vízszintes,
az elsõ lábak be-,
illetve kicsavarásával
kompenzálhatja azt
(lásd ábra). A dõlés a
gép felsõ burkolatán
mérve nem lehet több,
mint 2°.
26
A csapnál a víznyomásnak a Mûszaki adatok
táblázatban szereplõ határértékek között kell
lennie (lásd a szemben lévõ oldalt).
Amennyiben a vízbevezetõ csõ nem elég hosszú,
forduljon szaküzlethez vagy megbízott
szakemberhez.
Page 27

A leeresztõcsõ csatlakoztatása
A leeresztõcsövet
csatlakoztassa
lefolyóhoz vagy a
padlótól 65 és 100 cm
közötti magasságban
65 - 100 cm
lévõ fali lefolyószifonhoz
anélkül, hogy megtörné,
Ne használjon hosszabbítót vagy elosztót.
Ne legyen a kábel megtörve vagy összenyomva.
A hálózati kábelt csak megbízott szakember
cserélheti.
Figyelem! A gyártó minden felelõsséget elhárít,
amennyiben a fenti elõírásokat figyelmen kívül
hagyják.
Elsõ mosási ciklus
HU
Üzembehelyezés
Leírás
vagy akassza a mosdó
vagy a kád szélére
úgy, hogy a tartozékok
között lévõ vezetõt a
csaphoz erõsíti (lásd
ábra). A leeresztõcsõ
szabad végének nem
szabad vízbe merülnie.
Toldások használata nem javasolt. Amennyiben
feltétlenül szükséges, a toldás átmérõje egyezzen
meg az eredeti csõével, és semmiképpen se
legyen 150 cm-nél hosszabb.
Elektromos bekötés
Mielõtt a csatlakozódugót az aljzatba dugná,
bizonyosodjon meg arról, hogy:
az aljzat földelése megfelel a törvény által elõírtnak;
az aljzat képes elviselni a gép Mûszaki adatait
tartalmazó táblázatban megadott maximális
teljesítményfelvételt (lásd szemben);
a hálózat feszültsége a Mûszaki adatokat
tartalmazó táblázatban szereplõ értékek közé esik
(lásd szemben);
Az aljzat legyen kompatibilis a gép
csatlakozódugójával. Ellenkezõ esetben cserélje
ki az aljzatot vagy a csatlakozódugót.
A mosógép nem állítható fel nyílt téren, még akkor
sem, ha a tér tetõvel van fedve, mert nagyon veszélyes,
ha a gép esõnek vagy zivataroknak van kitéve.
A csatlakozódugónak könnyen elérhetõ helyen kell
lennie akkor is, amikor a gép már a helyén áll.
Üzembehelyezés után, mielõtt a mosógépet
használni kezdené, végezzen egy 90°-os elõmosás
nélküli mosást mosóporral de mosandó ruha nélkül.
Mûszaki adatok
Modell
Méretek
Ruhatöltet:
Elektromos
csatlakozás
Vízcsatlakozások
Centrifuga
fordulatszám
IEC456 szabvány
Szerinti
vezérlõprogramok
AVF 109
szélesség 59,5 cm
magasság 85 cm
mélység 53,5 cm
1-tõl 5 kg-ig
feszültség 220/230 V o lt 50 H z
max imális felvett teljesítm ény 18 50 W
maximális nyomás 1 MPa (10 bar)
minimális nyomás 0,05 MPa (0,5 bar)
dob ûrtartalma 46 liter
1000 fordulat/perc-ig
°
3-as program; hõmérséklet 60
5 kg ruhatöltettel végezve.
Ez a berendezés megfelel a következõ
Uniós Elõírásoknak:
- 73/02/19-i 73/23/CEE elõírás
(Alacsony feszültség) és annak
módosításai
- 89/05/03-i 89/336/CEE elõírás
(Elektromágneses összeférhetõség) és
annak módosításai
- 2002/96/CE
C;
SzervizRendellenességekÓvintézkedések KarbantartásProgramok Mosószerek
27
Page 28

A mosógép leírása
HU
Vezérlõpanel
Kottatartó
Mosószeradagoló fiók
Mosószeradagoló fiók a mosószerek és
adalékszerek betöltésére (lásd 32. oldal).
Kottatartó, hogy a programok összefoglaló vázlatát
bármikor megnézhesse: a szürke nyelvet kifelé
húzva nyílik.
FUNKCIÓ billentyûk: a lehetséges funkciók
kiválasztására. A kiválasztott funkció billentyûje
világít.
CENTRIFUGA billentyû a centrifugálás
fordulatszámának beállítására illetve a centrifugálás
kikapcsolására (lásd 31. oldal).
CENTRIFUGA
FUNKCIÓ
billentyûk
HÕMÉRSÉKLET
KÉSLELTETÕ
IDÕZÍTÕ
A BILLENTYÛ BLOKK gomb a mosógép
valamennyi billentyûjének zárolására szolgál
mûködés közben vagy Stand-by módban
(lásd 29. oldal).
Kijelzõ a mosógép programozására és a mosási
ciklusok elõrehaladásának ellenõrzésére (lásd
szemben lévõ oldal).
BEKAPCSOLÁS/KIKAPCSOLÁS billentyû a
mosógép be- illetve kikapcsolására (lásd 30. oldal).
START/RESET billentyû a program elindítására
vagy a hibás beállítás törlésére (lásd 6. oldal).
Kijelzõ
BILLENTYÛ
BLOKK
BEKAPCSOLÁS/
KIKAPCSOLÁS billentyû
Tárcsa
START/RESET
billentyû
HÕMÉRSÉKLET billentyû a mosás
hõmérsékletének módosítására (lásd 31. oldal).
KÉSLELTETÕ IDÕZÍTÕ billentyû, a beállított
program indítását késlelteti maximum 24 óráig
(lásd old. 31).
28
Tárcsa a programok kiválasztására. A tárcsa
benyomható: könnyedén nyomja meg a közepét,
és kiugrik. A program során a tárcsa nem mozog.
(lásd 30. oldal).
Page 29

Kijelzõ
Azon túl, hogy hasznos eszköz a gép programozásához (lásd 31. oldal), a kijelzõ fontos információkat nyújt a
mosóciklusokról és azok elõrehaladásáról.
Az után, hogy a program elindításához megnyomta a
START/RESET billentyût, a kijelzõn a ciklus végéig
hátlalévõ idõ látható. Abban az esetben, ha az indító
órán késleltetés van beállítva (Késleltetés idõzítõ,
lásd 31. oldal) ezt megjeleníti.
A mosóciklus során kijelzi:
A folyamatban lévõ fázist:
Elõmosás
Mosás
Öblítés
Centrifuga
HU
Üzembehelyezés
Leírás
Személyre szabható funkciók és opciók:
A funkciók és opciók kiválasztását lásd alább és a
31. oldalon.
Hangjelzés:
A készülék akusztikus jelzõberendezéssel van
felszerelve, ami jelzi a különféle funkciókat, illetve az
esetleges rendellenes funkciókat:
összeférhetetlenség, opció/program gombok, a
mosógép elindulása, ciklus vége, reset.
Billentyû blokk:
Az Ön és gyermekei biztonsága érdekében a mosógép muködési vagy várakozási (késleltetett indítás-Standby) ideje alatt valamennyi billentyut le tudja zárni, ha a funkciógombot 2 másodpercig lenyomva tartja.
Inaktiválásához tartsa lenyomva körülbelül 4 másodpercig.
Ajtózár:
A világító jelzõlámpa jelöli, hogy az ajtó reteszelve van a véletlen kinyitás megakadályozására. A károk
elkerülése érdekében meg kell várni, hogy a jelzõlámpa kialudjon, mielõtt megpróbálná az ajtót kinyitni.
Ez a modell olyan berendezéssel rendelkezik, amely lehetõvé teszi az ajtó nyitását a program elsõ
fázisának során is. Ez akkor lehetséges, ha a szimbólum nem világít.
SzervizRendellenességekÓvintézkedések KarbantartásProgramok Mosószerek
A program végén az end felirat jelenik meg.
Rendellenes mûködés esetén a hiba kódja jelenik meg, például: F-01, amit a Szervizzel közölni kell (lásd 36. oldal).
29
Page 30

Indítás és Programok
HU
Röviden: egy program elindítása
1. Az billentyû megnyomásával kapcsolja be a
mosógépet.
Néhány másodpercre valamennyi ikon kigyullad,
majd kialszik.
2. Rakja be a mosandó ruhát, és csukja be az ajtót.
3. A tárcsával válassza ki a kívánt programot. A
kijelzõn a becsült idõ jelenik meg. A
hõmérsékletet és a centrifugálást a program
alapján automatikusan beállítja (a módosításhoz
4. Töltse be a mosószert és az adalékokat (lásd 32. oldal).
5. A lehetséges funkciók kiválasztása (lásd 31. oldal).
6. A START/RESET billentyû megnyomásával indítsa
el a programot.
A törléshez tartsa nyomva a START/RESET
billentyût legalább 2 másodpercen keresztül.
7. A program végén az end felirat jelenik meg.
Vegye ki a mosott ruhát, és résre hagyja nyitva
az ajtót, hogy a dob kiszáradhasson.
8. Az
billentyûvel kapcsolja ki a mosógépet.
lásd a 31. oldalt).
Programtáblázat
Kelmék és a szennyezõdés
természete
Pamut
Különösen szennyezett fehér
anyagok (lepedõ, asztalterítõ, stb.)
Különösen szennyezett fehér
anyagok (lepedõ, asztalterítõ, stb.)
Nagyon szennyezett tartós fehér
és színes anyagok
Kevéssé szennyezett fehér és kényes
színes anyagok (ingek pulóverek, stb.)
Kevéssé szennyezett kényes
színes anyagok
Szintetikus anyagok
Nagyon szennyezett tartós színes
anyagok (csecsemõruházat, stb.)
Tartós színes anyagok (mindenfajta
enyhén szennyezett ruházat)
Nagyon szennyezett tartós színes
anyagok (csecsemõruházat, stb.)
Kényes színes anyagok (mindenfajta
enyhén szennyezett ruházat)
Kényes színes anyagok (mindenfajta
enyhén szennyezett ruházat)
Kényes anyagok
Gyapjú
Nagyon kényes kelmék
(függönyök, selyem, viszkóz, stb.)
RÉSZLEGES PROGRAMOK
Öblítés
Kíméletes öblítés
Centrifugálás
Kíméletes centrifugálás
Szivattyúzás Szivattyúzás
Programok Hõmérséklet
1
2
3
4
5
6
6
7
8
9
10
11
90
90
60
40
30
60
40
50
40
30
40
30
C
°
C
°
C
°
C
°
C
°
C
°
C
°
C
°
C
°
C
°
C
°
C
°
Mosószer
Elõmosás Mosás
Öblítõszer
Fehérítés /
Fehérítõszer
opció
Kíméletes /
Hagyományos
Kíméletes /
Hagyományos
Kíméletes /
Hagyományos
Kíméletes /
Hagyományos
Kíméletes 92
Kíméletes 77
Kíméletes 86
Kíméletes 76
Kíméletes 42
Megjegyzések
A gyûrõdésgátlás leírásához: lásd Vasalj kevesebbet, szemben lévõ oldal. A táblázatban szereplõ értékek
tájékoztató jellegûek.
Speciális program
Napközbeni 30' (9-es program szintetikus anyagokhoz) programot kevéssé szennyezett ruhák gyors
mosására fejlesztettük ki: mindössze 30 percig tart, így energiát és idõt takarít meg. A 9-es programot 30°C
hõmérsékletre beállítva különbözõ jellegû anyagokat együttesen lehet mosni (kivéve gyapjú és selyem),
maximum 3 kg-os töltéssel. Folyékony mosószer használatát javasoljuk.
Ciklus
idõtartama
(perc)
160
143
120
85
77
30
52
Mosóciklus leírása
Elõmosás, mosás, öblítések, köztes
és végsõ centrifugálások
Mosás, öblítések, köztes és végsõ
centrifugálások
Mosás, öblítések, köztes és végsõ
centrifugálások
Mosás, öblítések, köztes és végsõ
centrifugálások
Mosás, öblítések, köztes és végsõ
centrifugálások
Mosás, öblítések, gyûrõdésgátlás
vagy kíméletes centrifugálás
Mosás, öblítések, gyûrõdésgátlás
vagy kíméletes centrifugálás
Mosás, öblítések, gyûrõdésgátlás
vagy kíméletes centrifugálás
öblítések, gyûrõdésgátlás
Mosás,
vagy kíméletes centrifugálás
öblítések és kíméletes
Mosás,
centrifugálás
öblítések és kíméletes
Mosás,
centrifugálás
Mosás, öblítések, gyûrõdésgátlás
vagy szivattyúzás
Öblítések és centrifugálás
Öblítések, gyûrõdésgátlás vagy
szivattyúzás
Szivattyúzás és erõs
centrifugálás
Szivattyúzás és kíméletes
centrifugálás
30
Page 31

Program módosítások
Centrifugálás beállítása
Ha a mosógép bekapcsolásakor a TÁRCSA olyan programra van
állítva, amelynél a centrifugálást be kell állítani, az ikon
folyamatosan világít. Az
beállított programra vonatkozó maximális centrifugálási sebesség
Opció billentyûk
és az
érték OFF állásig csökken, ami a centrifugálás elhagyását jelenti
(ha vissza szeretne térni magasabb értékhez, nyomja a gombot
tovább); álljon meg a kívánt értéknél, körülbelül 2 másodperc múlva
a kiválasztott értéket a mosógép elfogadja: az
folyamatosan világít. A beállított centrifugálási fordulatszám minden
programra érvényes, kivéve a 11-est és a Szivattyúzást.
ikon villogni kezd. A gomb ismételt megnyomásával az
Hõmérséklet beállítása
Ha a mosógép bekapcsolásakor a TÁRCSA olyan programra van állítva, amelynél a hõmérsékletet be kell
állítani, az ikon folyamatosan világít. Az gomb megnyomásával megjelenik a beállított programra
vonatkozó maximális hõmérséklet és az ikon villogni kezd. A gomb ismételt megnyomásával a hõmérséklet
OFF állásig csökken, ami a hidegmosást jelenti (ha vissza szeretne térni magasabb értékhez, nyomja a
gombot tovább); álljon meg a kívánt értéknél, körülbelül 2 másodperc múlva a kiválasztott értéket a mosógép
elfogadja: az szombólum folyamatosan világít. A beállított hõmérséklet minden mosóprogramra érvényes.
gomb megnyomásával megjelenik a
szimbólum
HU
Üzembehelyezés
Leírás
Az idõkésleltetés beállítása
A kijelzõn az gomb megnyomása után megjelenik az OFF felirat és az ennek megfelelõ szimbólum villogni
kezd.
A gomb újbóli megnyomásásval megjelenik az 1h, azaz egy órás késleltetés, és így tovább, egészen 24
óráig; álljon meg a kívánt késleltetésnél, körülbelül 2 másodperc múlva a kiválasztott értéket a mosógép
elfogadja; ezt követõen a kijelzõn megjelenik a beállított programra vonatkozó késleltetési idõ és az
szimbólum folyamatosan világít. Ha most megnyomja a START/RESET gombot, újra megjelenik a kiválasztott
késleltetési idõ, mely minden órával csökken egészen a ciklus indulásáig, ebben a szakaszban a
késleltetés csak visszafele módosítható. Az Idõkésleltetõ mindegyik programhoz beállítható.
Billentyû blokk (lásd 29. oldal).
Funkciók
A mosógép különféle mosófunkciói lehetõvé teszik a kívánt tisztítás és fehérség elérését. A funkciók bekapcsolásához:
1. nyomja meg a kívánt funkcióhoz tartozó billentyût, az alábbi táblázat szerint;
2. a billentyû világítása azt jelzi, hogy a hozzá tartozó funkció be van kapcsolva.
Megjegyzés: A gyors villogás azt jelenti, hogy a beállított programhoz a billentyûhöz tartozó funkció nem
kapcsolható be.
Abban az esetben, ha egy másik, korábban kiválasztottal össze nem férõ funkciót kapcsol be, csak az utolsóként
választott marad bekapcsolva.
Opció Hatás Megjegyzések a használathoz
Az A Osztályban
szabványosnál
Super
Wash
láthatóan fehérebb,
makulátlan tisztaság
elérését teszi
lehetõvé.
Nem fér össze a GYORS opcióval
A következõ
programokkal mûködik:
1, 2, 3, 4,
5, 6, 7, 8.
Vasalj
kevesebbet
Gyors
Csökkenti az
anyagok gyûrését,
ezzel könnyítve a
vasalást.
Nagyjából 30%-kal
csökkenti a mosási
ciklus idejét.
Ezen opciót beállítva a 6-os, 7-es, 8-as, 11-es programok és a kíméletes
öblítés félbeszakad úgy, hogy a mosott ruha az öblítõvízben marad
(Gyûrõdésgátlás), és az ikon villog;
- a ciklus befejezéséhez nyomja meg a START/RESET billentyût;
- ha csak le akarja szivattyúzni a vizet, a tárcsát állítsa a szivattyúzás
szimbólumára , és nyomja meg a START/RESET billentyût.
Nem fér össze a FEHÉRÍTÉS opcióval.
Nem fér össze a SUPER WASH opcióval.
Mindegyik,
kivéve:
1, 2, 9, 10,
Szivattyúzás.
SzervizRendellenességekÓvintézkedések KarbantartásProgramok Mosószerek
1, 2, 3, 4,
5, 6, 7, 8.
31
Page 32

Mosószerek és mosandók
HU
Mosószeradagoló fiók
A mosás eredményessége függ a mosószer helyes
adagolásától is: ha túl sokat adagol belõle, a mosás
nem lesz hatékonyabb, de hozzájárul ahhoz, hogy
lerakódás képzõdjön a mosógépben, valamint a
környezetet is jobban szennyezi.
Húzza ki a
mosószeradagoló
fiókot, és a
következõképpen tegye
1
3
1-es tartály: Mosószer elõmosáshoz (por)
2-es tartály: Mosószer mosáshoz
(por vagy folyadék)
A folyékony mosószert csak az indítás elõtt lehet
betölteni.
3-as tartály: Adalékok
(öblítõszerek, illatosítók, stb.)
Az öblítõszer ne érjen a rács fölé.
2
bele a mosószret vagy
az adalékot.
Ne használjon kézimosószert, mert túlzottan sok
hab képzõdik.
Mosandó ruhák elõkészítése
Osztályozza a mosandókat a következõk
szerint:
- kelme típusa / címkén lévõ szimbólum.
- színek: válogassa külön a színes ruhákat a
fehérektõl.
Ürítse ki a zsebeket, és vizsgálja meg a
gombokat.
Ne lépje túl a mosandók száraz súlyára
vonatkozóan megadott értékeket:
Tartós anyagok: max. 5 kg
Szintetikus anyagok: max. 2,5 kg
Kényes anyagok: max. 2 kg
Gyapjú: max. 1 kg
Különleges bánásmódot igénylõ
darabok
Függönyök: hajtogatva tegye párnahuzatba
(vászonzsákba) vagy hálós zacskóba. Külön mossa
õket, és ne lépje túl a fél töltésnyi mennyiséget.
használja a 11-es programot, amelyik automatikusan
kikapcsolja a centrifugálást.
Toll/pehely ágynemûk és tollkabátok: ha a benne
lévõ liba vagy kacsatoll mosógépben mosható. Fordítsa
ki a darabokat, és egyszerre legfeljebb 2-3 kg-nyit
mosson úgy, hogy egyszer vagy kétszer megismétli az
öblítést, és kíméletes centrifugálást használ.
Teniszcipõk: tisztítsa meg a sártól. Együtt
moshatók a farmer és más tartós anyagokkal, de
nem a fehér ruhadarabokkal.
Gyapjú: a legjobb eredmény elérése érdekében
használjon speciális mosószert (gyapjúmosószert),
és ne lépje túl az 1 kg ruhatöltetet.
Woolmark Platinum Care
(Kasmir Platinum)
Kímélõ, mint a kézi mosás.
Az Ariston új, igényesebb szabványt
vezetett be, amit a The Woolmark Company
az értékes Woolmark Platinum Care
márkajelzéssel ismert el. Ha a mosógépen
a Woolmark Platinum Care logó látható, kitûnõ
eredménnyel moshatók benne az olyan gyapjú
ruhadarabok is, amelyek címkéjén a Kézzel
mosandó megjelölés olvasható (M.00221):
IAz összes Kézzel mosandó
ruhadarabhoz a 10-es programot állítsa
be, és használjon speciális mosószert.
Milyen nehezek a mosandó ruhák?
1 lepedõ 400-500 g.
1 párnahuzat 150-200 g.
1 asztalterítõ 400-500 g.
1 fürdõköpeny 900-1200 g.
1 törülközõ 150-250 g.
32
Page 33

Óvintézkedések és tanácsok
A mosógépet a nemzetközi biztonsági
szabványoknak megfelelõen tervezték és
gyártották. Ezeket a figyelmeztetéseket biztonsági
okokból írjuk le, és figyelmesen el kell olvasni
õket.
Általános biztonság
A mosógépet csak felnõtt használhatja, és csak
az e használati utasításban megadott utasítások
szerint.
Ne érjen a géphez mezítláb, illetve vizes vagy
nedves kézzel vagy lábbal.
A csatlakozódugót az aljzatból ne a kábelt,
hanem a csatlakozót fogva húzza ki.
Ne nyissa ki a mosószeradagoló fiókot, ha a
mosógép mûködik.
Ne nyúljon a leeresztett vízbe, mert forró lehet.
Semmiképpen ne feszegesse az ajtót:
megsérülhet a véletlen nyitást akadályozó
biztonsági retesz.
Hiba esetén semmiképpen se nyúljon a gép
belsõ részeihez, és ne próbálja megjavítani.
Mindig ügyeljen arra, hogy gyerekek ne
mehessenek a mûködõ gép közelébe.
A mosás során az ajtó meleg lehet.
Amennyiben a gépet át kell helyezni, két vagy
három személy végezze, maximális
figyelemmel. Soha sem egyedül, mert a gép
nagyon súlyos.
A mosandó berakása elõtt ellenõrizze, hogy a
forgódob üres legyen.
Hulladékelhelyezés
A régi elektronikus termékek
megsemmisítése
Az elektromos készülékek megsemmisítésérol szóló
európai direktíva 2002/96/EC eloírja, hogy a régi
háztartási gépeket nem szabad a normál nem
szelektív hulladékgyujtési folyamat során
összegyujteni. A régi gépeket szelektíven kell
összegyujteni, hogy optimalizálni lehessen a bennük
lévo anyagok újrahasznosítását és csökkenteni
lehessen az emberi egészségre és környezetre
gyakorolt hatásukat. Az áthúzott szemeteskuka
jele emlékezteti Önt arra, hogy kötelessége ezeket a
termékeket szelektíven összegyujteni.
A fogyasztóknak a helyi hatóságot vagy
kereskedõt kell felkeresniük a régi háztartási
gépek helyes elhelyezését illetõen.
Öreg mosógép kidobása:
mielõtt a hulladékok közé helyezné, tegye
használhatatlanná úgy, hogy elvágja a hálózati
kábelt, és letépi az ajtót.
Környezetvédelem
Környezetvédelmet szolgáló technológia
Ha az ajtó üvegén keresztül kevés víz látszik, az
azért van, mert az új technológiának köszönhetõen
az Aristonnak a felénél kevesebb víz is elég ahhoz,
hogy maximális tisztítóhatást érjen el: egy olyan
cél, amelyet a környezet megóvása érdekében
tûztünk ki.
Takarítson meg mosószert, vizet, energiát és
idõt
Annak érdekében, hogy ne pazaroljunk az
erõforrásokkal, a mosógépet teljes ruhatöltettel
kell használni. Egy teljes ruhatöltettel való
mosás két féltöltet helyett, akár 50% energia
megtakarítást is lehetõvé tehet.
Az elõmosás csak nagyon szennyezett ruhák
esetén szükséges. Ha nem használja, azzal
mosószert, idõt és 5-15% energiát takarít meg.
Ha a foltokat a mosás elõtt folttisztítóval kezeli,
és beáztatja, kevesebb szükség lesz a magas
hõmérsékletû mosásra. A 60°C-on történõ
mosás a 90°C helyett, vagy 40°C-on 60°C
helyett akár 50% energiamegtakarításhoz is
vezethet.
Ha a mosószert a víz keménysége, a
szennyezettség mértéke és a ruha mennyisége
alapján helyesen adagolja, elkerüli a pazarlást
és nem terheli feleslegesen a környezetet: még,
ha biológiailag lebomló fajtájúak is, a
mosószerek olyan összetevõket tartalmaznak,
amelyek megváltoztatják a természet
egyensúlyát. Ezen kívül, kerülje az öblítõszerek
használatát, amennyire csak lehet.
Ha a késõ délután és a kora hajnal közötti
idõszakban mos, akkor hozzájárul ahhoz, hogy
csökkentse az áramszolgáltató vállalatok
terhelését.
A Késleltetõ idõzítõ (lásd 7. oldal) nagyon
hasznos a mosás idõzítése szempontjából.
Ha a mosott ruhákat utána szárítógépben
szárítja, magas fordulatszámú centrifugálást
válasszon. Ha a mosott ruhában kevés a víz, idõt
és energiát takarít meg a szárítóprogramnál.
HU
Üzembehelyezés
Leírás
SzervizRendellenességekÓvintézkedések KarbantartásProgramok Mosószerek
33
Page 34

Karbantartás és törõdés
HU
A víz elzárása és az elektromos áram
kikapcsolása
Minden mosás után zárja el a vízcsapot. Így
kíméli a mosógép vízrendszerét, és megszünteti a
vízszivárgás kockázatát.
Húzza ki a hálózati csatlakozódugót az aljzatból,
amikor a mosógépet tisztítja vagy karbantartást
végez.
A mosógép tisztítása
A külsõ részeket és a gumi részeket langyos
szappanos vizes ronggyal tisztíthatja. Ne használjon
oldószert vagy súrolószert.
A mosószeradagoló fiók tisztítása
1
Vegye ki a fiókot úgy,
hogy felemeli és kifelé
húzza (lásd ábra).
Folyóvíz alatt mossa ki.
Ezt a tisztítást gyakran
el kell végezni.
2
Az ajtó és a forgódob gondozása
A szivattyú tisztítása
A mosógép öntisztító szivattyúval van felszerelve,
melynek nincs szüksége tisztítási és karbantartási
mûveletekre. Az azonban megtörténhet, hogy kis
tárgyak kerülnek (aprópénz, gomb) a szivattyút
védõ elõkamrába, ami a szivattyú alsó részén
található.
Gyõzõdjön meg róla, hogy a mosóprogram véget
ért, és húzza ki a hálózati csatlakozót.
Hogy hozzáférjen az elõkamrához:
1. egy csavarhúzó
segítségével távolítsa el
a burkolópanelt a
mosógép elejérõl (lásd
ábra);
2. az óra járásával
ellentétes irányban
forgatva csavarja le a
fedelet (lásd ábra)
természetes, hogy egy
kevés víz kifolyik;
:
Az ajtót hagyja mindig résre nyitva, nehogy
rossz szagok keletkezzenek.
34
3. gondosan tisztítsa ki a belsejét;
4. csavarja vissza a fedelet;
5. szerelje vissza a panelt úgy, hogy mielõtt azt a
gép felé nyomná, meggyõzõdik arról, hogy a horgok
a hozzájuk tartozó furatokba illeszkednek.
A vízbevezetõ csõ ellenõrzése
Évente legalább egyszer ellenõrizze a gumicsövet.
Ki kell cserélni, ha repedezett vagy hasadozott: a
mosás során a nagy nyomás hirtelen szakadást
okozhat.
Soha ne alkalmazzon már használt csöveket.
Page 35

Rendellenességek
és elhárírásuk
Megtörténhet, hogy a mosógép nem mûködik. Mielõtt felhívná a Szervizt (lásd 36. oldal) ellenõrizze, hogy
nem olyan problémáról van szó, amely a következõ lista segítségével egyszerûen megoldható.
Rendellenességek:
A mosógép nem kapcsol be.
A mosási ciklus nem indul el.
A mosógép nem vesz fel vizet
(A kijelzõn H
A mosógép folytonosan szívja és
lereszti a vizet.
O olvasható).
2
Lehetséges okok / Megoldás:
A hálózati csatlakozódugó nincs bedugva az aljzatba, vagy nem
eléggé ahhoz, hogy jól érintkezzen.
Nincs áram a lakásban.
Az ajtó nincs jól becsukva (a kijelzõn a door felirat olvasható).
Nem nyomta meg az
Nem nyomta meg a START/RESET billentyût.
A vízcsap nincs nyitva.
Az indítás késletetése van beállítva (Késleltetõ idõzítõ, lásd 31. oldal).
A vízbevezetõ csõ nincs csatlakoztatva a csaphoz.
A csõ meg van törve.
A vízcsap nincs nyitva.
A lakásban nincs víz.
Nincs elegendõ nyomás.
Nem nyomta meg a START/RESET billentyût.
A leeresztõcsõ nem a padlószinttõl 65 és 100 cm közötti
magasságban van felszerelve (lásd 27. oldal).
A leeresztõcsõ vége vízbe merül (lásd 27. oldal).
A fali szifonnak nincs szellõzése.
billentyût.
HU
Üzembehelyezés
Leírás
A mosógép nem ereszti le a
vizet, vagy nem centrifugál.
A mosógép nagyon rázkódik a
centrifugálás alatt.
A mosógépbõl elfolyik a víz.
Sok hab képzõdik.
Ha ezen vizsgálatok után a probléma nem oldódik meg, zárja el a
vízcsapot, kapcsolja ki a mosógépet és hívja ki a szervizszolgálatot.
Ha a lakás egy épület legfelsõbb emeleteinek egyikén található,
lehetséges, hogy a csatorna-szellõzõ eltömõdésének jelensége
(szivornyahatás) lépett fel, ezért a mosógép folytonosan szívja és
leereszti a vizet. Ezen kellemetlenség elkerülésére a kereskedelmi
forgalomban rendelkezésre állnak csatorna-szellõzõ szelepek.
A program nem ereszti le a vizet: némelyik programnál manuálisan
kell elindítani (lásd 30. oldal).
Be van kapcsolva a Vasalj kevesebbet opció: a program befejezéséhez
nyomja meg a START/RESET billentyût (lásd 31. oldal).
A leeresztõcsõ meg van törve (lásd 27. oldal).
A lefolyó el van dugulva.
Az üzembehelyezéskor nem távolították el a forgódob rögzítését
(lásd 26. oldal).
A mosógép nem áll vízszintben (lásd 26. oldal).
A mosógép a bútor és a fal köté van szorítva (lásd 26. oldal).
A vízbevezetõ csõ nincs jól felcsavarva (lásd 26. oldal).
A mosószeradagoló fiók eltömõdött (a tisztítást lásd a 34. oldalon).
A leeresztõcsõ nincs jól rögzítve (lásd 27. oldal).
A mosószer nem mosógépekhez való (kell, hogy szerepeljen rajta,
hogy gépi, kézi vagy gépi mosáshoz, vagy hasonló).
Túl sok mosószert használt.
SzervizRendellenességekÓvintézkedések KarbantartásProgramok Mosószerek
35
Page 36

Szerviz
HU
Mielõtt a Szervizhez fordulna:
Gyõzõdjön meg arról, hogy a hibát nem tudja maga is elhárítani (lásd 35. oldal);
Újból indítsa el a programot, hogy lássa, elhárította-e a hibát;
Ellenkezõ esetben forduljon a megbízott Szakszervizhez: a telefonszámot a garanciajegyen találja.
Soha ne forduljon nem megbízott szerelõhöz.
Közölje:
a meghibásodás jellegét;
a mosógép modelljét (Mod.);
a gyártási számot (Sorsz.).
Ezen információk a mosógép hátsó részére felerõsített táblán találhatók.
Szerviz
36
Page 37

INSTRUCÞIUNI DE FOLOSIREA
MAªINÃ DE SPÃLAT RUFE
RO
Românã
AVF 109
Sumar
RO
Instalare, 38-39
Scoaterea din ambalaj ºi nivelarea, 38
Legãturi hidraulice ºi electrice, 38-39
Primul program de spãlare, 39
Date tehnice, 39
Descrierea maºinii de spãlat, 40-41
Panoul de control, 40
Display-ul, 41
Pornire ºi Programe, 42
Pe scurt: pornirea unui program, 42
Tabel de programe, 42
Personalizãri, 43
Reglarea turaþiei de centrifugare, 43
Reglarea temperaturii, 43
Reglarea delay timerului, 43
Funcþii, 43
Detergenþi ºi rufe albe, 44
Sertarul detergenþilor, 44
Sortarea rufelor, 44
Rufe deosebite, 44
Woolmark Platinum Care (Caºmir Platinum), 44
Precauþii ºi sfaturi, 45
Protecþie generalã, 45
Aruncarea reziduurilor, 45
Protecþia ºi respectarea mediului înconjurãtor, 45
Întreþinere ºi îngrijire, 46
Oprirea apei ºi a curentului electric, 46
Curãþarea maºinii de spãlat, 46
Curãþarea sertarului pentru detergenþi, 46
Îngrijirea hubloului ºi a cuvei, 46
Curãþarea pompei, 46
Controlarea furtunului de alimentare cu apã, 46
Anomalii ºi remedii, 47
Asistenþã, 48
Înainte de a lua legãtura cu Asistenþa, 48
37
Page 38

Instalare
RO
Este important sã se pãstreze acest manual
pentru a-l putea consulta în orice moment. În caz
de vânzare, cesiune sau schimbare a locuinþei,
acesta trebuie pãstrat împreunã cu maºina de
spãlat pentru a informa noul proprietar cu privire la
funcþionare ºi la respectivele avertismente.
Citiþi cu atenþie instrucþiunile: veþi gãsi informaþii
importante cu privire la instalare, folosire ºi
siguranþã.
Scoaterea din ambalaj ºi nivelarea
Scoaterea din ambalaj
1. Scoateþi din ambalaj maºina de spãlat.
2. Controlaþi ca maºina de spãlat sã nu fii fost
deterioratã pe durata transportului. Dacã este
deterioratã, nu o conectaþi ºi luaþi legãtura cu cine v-a
vândut-o.
3. Scoateþi cele 3
ºuruburi de protecþie
pentru transport ºi
cauciucul cu
respectivul distanþator,
situate în partea
posterioarã (a se vedea
figura).
O nivelare precisã conferã stabilitate maºinii ºi
evitã vibraþii, zgomote ºi deplasãri pe durata
funcþionãrii. În cazul mochetelor sau a unui covor,
reglaþi picioruºele astfel încât sã menþineþi sub
maºina de spãlat un spaþiu suficient pentru
ventilare.
Legãturi hidraulice ºi electrice
Conectarea furtunului de alimentare cu apã
1. Introduceþi garnitura A în extremitatea furtunului
de alimentare ºi
înºurubaþi-l la un robinet
filetat de apã rece (a se
vedea figura).
A
Înainte de conectare,
lãsaþi apa sã curgã
pentru a se limpezi.
2. Conectaþi furtunul de
alimentare la maºina
de spãlat,
înºurubându-l la
respectiva prizã de
apã, în partea
posterioarã, sus, în
dreapta (a se vedea
.
figura)
4. Închideþi orificiile cu dopurile de plastic din dotare.
5. Pãstraþi toate piesele: pentru cazul în care maºina de
spãlat va trebui sã fie transportatã, piesele vor trebui
montante din nou.
Ambalajele nu constituie jucãrii pentru copii.
Nivelare
1. Instalaþi maºina de spãlat pe un plan rigid, fãrã
a o sprijini de ziduri, mobilã sau altceva.
2. Dacã podeaua nu este
perfect orizontalã,
compensaþi neregularitãþile
deºurubând sau
înºurubând picioruºele
anterioare (a se vedea
figura); unghiul de
înclinare, mãsurat pe
planul de lucru, nu trebuie
sã depãºeascã 2°.
3. Fiþi atenþi ca furtunul
sã nu fie nici curbat,
nici îndoit.
Presiunea apei trebuie sã fie cuprinsã în valorile
tabelului Date tehnice (a se vedea pagina
alãturatã).
Dacã lungimea furtunului de alimentare nu este
suficientã, adresaþi-vã unui magazin specializat sau
unui tehnician autorizat.
38
Page 39
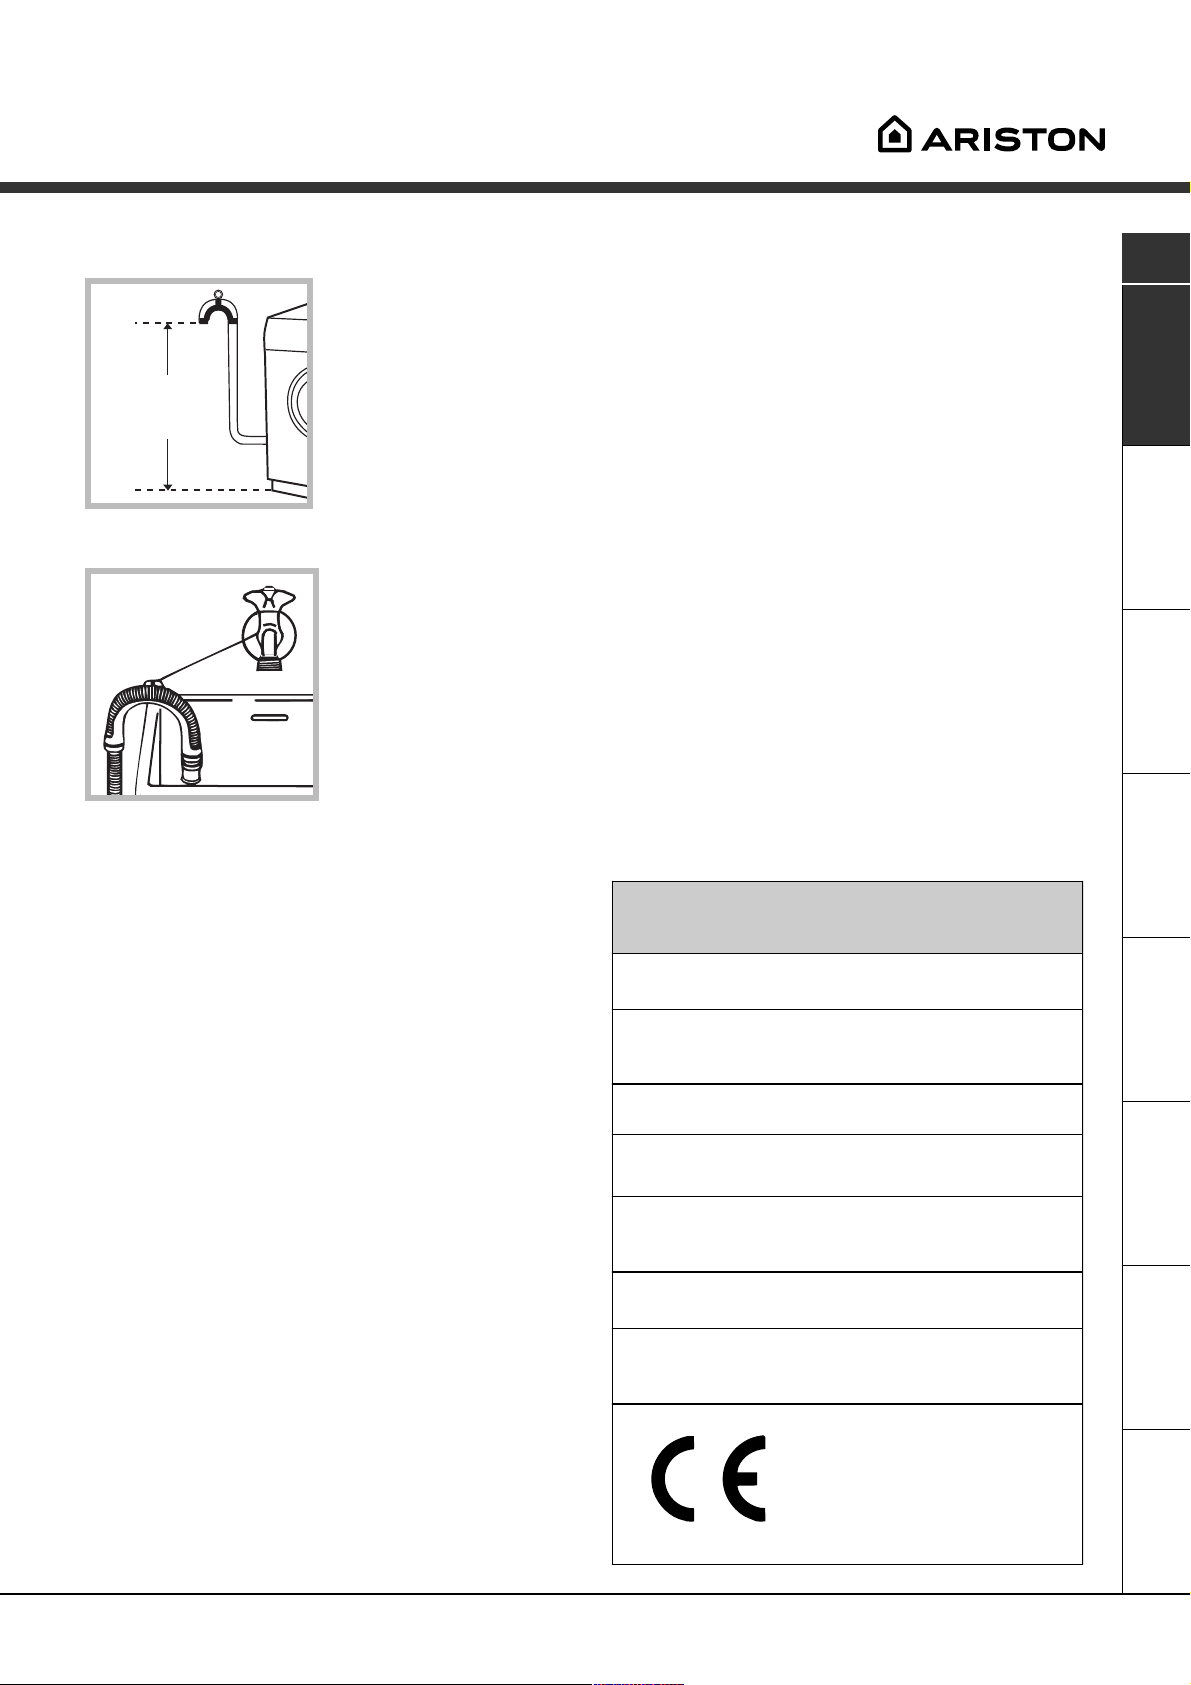
Conectarea furtunului de evacuare
Conectaþi furtunul de
evacuare, fãrã a-l îndoi,
la o conductã de
evacuare sau la o gurã
de evacuare a apei,
65 - 100 cm
situate între 65 ºi 100
cm de pãmânt;
sau sprijiniþi-l pe
marginea unei chiuvete
sau a unei cãzi, legând
ghidajul aflat în dotare,
de robinet (a se vedea
figura). Extremitatea
liberã a furtunului de
evacuare nu trebuie sã
rãmânã cufundatã în
apã.
Dupã instalarea maºinii de spãlat, priza de curent
trebuie sã fie uºor accesibilã.
Nu folosiþi prelungitoare ºi prize multiple.
Cablul nu trebuie sã fie îndoit sau comprimat.
Cablul de alimentare trebuie sã fie înlocuit doar
de tehnicieni autorizaþi.
Atenþie! Producãtorul îºi declinã orice
responsabilitate pentru cazul în care aceste norme
nu se respectã.
Primul program de spãlare
Dupã instalare, înainte de folosire, efectuaþi un
program de spãlare cu detergent ºi fãrã rufe,
selectând programul la 90°C, fãrã prespãlare.
RO
Nu este recomandabilã folosirea furtunurilor de
prelungire; dacã este indispensabil, furtunul de
prelungire trebuie sã aibã acelaºi diametru cu
furtunul original ºi nu trebuie sã depãºeascã 150
cm.
Legãtura electricã
Înainte de a introduce ºtecherul în priza de curent,
asiguraþi-vã ca:
priza sã fie cu împãmântare ºi conform
prevederilor legale;
priza sã poatã suporta sarcina maximã de
putere a maºinii, indicatã în tabelul cu date
tehnice (a se vedea alãturi);
tensiunea de alimentare sã fie cuprinsã în
valorile indicate în tabelul cu date tehnice (a se
vedea alãturi);
priza sã fie compatibilã cu ºtecherul maºinii de
spãlat. În caz contrar, înlocuiþi priza sau
ºtecherul.
! Maºina nu funcþioneazã la temperaturi mai mici
de 16 grade.
Maºina de spãlat nu trebuie instalatã afarã, nici
chiar în cazul în care spaþiul este adãpostit, deoarece
este foarte periculoasã expunerea maºinii la ploi ºi
furtuni.
Date tehnice
Model
Dimensiuni
Capacitate
Legãturi electrice
Legãturi hidrice
Turaþia de
centrifugare
Programe de control
pe baza normei
IEC456
AVF 109
lãrgime: 59,5 cm
înãlþime: 85 cm
profunzime: 53,5 cm
de la 1 la 5 kg
tensiune: 220/230 Volþi 50 Hz
putere maximã absorbitã: 1850 W
presiune maximã: 1 MPa (10 bari)
presiune minimã: 0,05 MPa (0,5 bari)
capacitatea cuvei: 46 litri
pânã la 1000 de rotaþii pe minut
programul 3; temperatura 60°C;
efectuatã cu 5 kg de rufe.
Acest aparat este conform cu
urmãtoarele Directive Comunitare:
- 73/23/CEE din data de 19/02/73
(Tensiuni Joase) ºi modificãri succesive
- 89/336/CEE din data de 03/05/89
(Compatibilitate Electromagneticã) ºi
modificãri succesive
AsistenþãAnomaliiPrecauþii ÎntreþinerePrograme DetergenþiInstalare Descriere
39
Page 40

Descrierea maºinii de spãlat
RO
Panoul de control
Legendã
Sertarul detergenþilor
Sertarul detergenþilor este folosit pentru a încãrca
detergenþi ºi aditivi (a se vedea pag. 44).
Legenda este folositã pentru a consulta în orice
moment o schemã sinteticã a programelor: se
deschide trãgând limba gri spre exterior.
Taste FUNCÞIONARE sunt folosite pentru a selecta
funcþiile disponibile. Butonul corespunzãtor funcþiei
selectate va rãmâne aprins.
Butonul TURAÞIE DE CENTRIFUGARE este folosit
pentru reglarea turaþiei de centrifugare pânã la
excluderea acesteia (a se vedea pag. 43).
Butonul TEMPERATURÃ este folosit pentru
modificarea temperaturii de spãlare (a se vedea pag.
43).
Butonul DELAY TIMER este folosit pentru a întârzia
pornirea programului selectat cu maxim 24 de ore (a se
vedea pag. 43).
TURAÞIE DE
CENTRIFUGARE
Taste/butoane de
FUNCÞIONARE
Display-ul
TEMPERATURÃ
DELAY TIMER
Funcþia BLOCAREA TASTELOR blocheazã tastele
maºinii de spãlat pe durata funcþionãrii sau în
modalitatea de aºteptare (a se vedea pag. 41).
Display-ul este folosit pentru programarea maºinii
de spãlat ºi efectuarea avansãrii programelor de
spãlare (a se vedea pagina alãturatã).
Butonul PORNIRE/OPRIRE este folosit pentru
pornirea ºi oprirea maºinii de spãlat (a se vedea
pag. 42).
Butonul START/RESET este folosit pentru pornirea
programelor sau anularea a ceea a fost selectat
greºit (a se vedea pag. 42).
Selectorul este folosit pentru alegerea
programelor. Selectorul este cu locaº: pentru a-l
extrage apãsaþi-l uºor, în centru. Pe durata
programului, selectorul rãmâne ferm (a se vedea
pag. 42).
BLOCAREA
TASTELOR
Butonul
PORNIRE/OPRIRE
Selectorul
Butonul
START/RESET
40
Page 41

Display-ul
Acesta este un instrument util pentru programarea maºinii (a se vedea pag. 43), furnizând totodatã informaþii cu
privire la programul de spãlare ºi la starea de avansare.
Dupã apãsarea butonului START/RESET pentru a
porni programul, pe display este cronometratã durata
rezidualã pânã la iniþierea programului de spãlare
ales. În cazul în care aþi optat pentru iniþierea
programului de spãlare dupã un anumit interval de
timp (Delay Timer, a se vedea pag. 43), aceasta va fi
vizualizatã.
Pe parcursul programului de spãlare se vizualizeazã:
Faza în curs:
Prespãlare
Spãlare
Clãtire
RO
Turatie de centrifugare
Functii si Optiuni personale:
Pentru a alege funcþiile sau opþiunile personale, urmaþi
indicaþiile ulterioare sau cele de la pag. 43.
Semnalare acusticã:
Maºina de spãlat este dotatã cu un semnalizator
sonor care vã va avertiza cu privire la desfãºurarea
funcþiilor sau la eventualele anomalii, ca de exemplu:
incompatibilitate, taste opþiuni, programe, pornire,
oprire, resetare.
Blocarea tastelor:
Pentru un surplus de siguranþã (a dvs. sau a copiilor dvs.), puteþi bloca tastele când maºina este în funcþiune
sau în modalitatea de aºteptare/Stand-by, þinând apãsatã pentru 2 secunde tasta de funcþii.
Pentru a dezactiva funcþia, þineþi apãsatã tasta timp de 4 secunde.
Hublou blocat:
Simbolul aprins indicã faptul cã hubloul este blocat pentru a împiedica deschideri accidentale.
Pentru a evita daunele ce pot deriva dintr-o funcþionare defectuoasã, este necesar sã aºteptaþi ca simbolul sã
se stingã înainte de a deschide hubloul.
Acest model este echipat cu un dispozitiv care permite deschiderea hubloului chiar ºi pe parcursul primei
faze a programului. Acest lucru este posibil atunci când simbolul nu este aprins.
AsistenþãAnomaliiPrecauþii ÎntreþinerePrograme DetergenþiInstalare Descriere
La încheierea programului se vizualizeazã cuvântul end.
În caz de anomalie apare un cod de eroare, de exemplu: F-01, de transmis Asistenþei Tehnice (a se vedea pag. 48).
41
Page 42

Pornire ºi Programe
RO
Pe scurt: pornirea unui program
1. Porniþi maºina de spãlat apãsând butonul .
Toate ledurile se vor aprinde timp de câteva
secunde, dupã care se vor stinge.
2. Introduceþi rufele ºi închideþi hubloul.
3. Selectaþi, cu ajutorul selectorului programul
dorit. Pe display va apãrea durata estimatã.
Temperatura ºi turaþia de centrifugare se
selecteazã automat, în baza programului (pentru
a le modifica, a se vedea pag. 43).
4. Vãrsaþi detergenþi ºi aditivii (a se vedea pag. 44).
5. Selectaþi eventuale funcþii (a se vedea pag. 43).
6. Porniþi programul, apãsând butonul START/
RESET.
Pentru a-l anula, þineþi apãsat butonul START/
RESET timp de cel puþin 2 secunde.
7. La încheierea programului va apãrea scris end.
Scoateþi rufele ºi lãsaþi hubloul întredeschis
pentru a se putea usca cuva.
8. Opriþi maºina de spãlat apãsând butonul
Tabel de programe
Tipul de þesãturã ºi gradul de
murdãrie
Programe Temperaturã
Detergent
Presp. Spãl.
Aditiv
înmuiere
Opþiu ne
Albire /
Decolorant
Bumbac
Albe extrem de murdare
(cearceafuri, feþe de masã, etc.)
Albe extrem de murdare
(cearceafuri,feþe de masã, etc.)
Albe ºi colorate rezistente
foarte murdare
þin murdare ºi culori
Albe
pu
delicate (cãmãºi, bluze, etc.)
Colorate delicate p
þin murdare
u
1
2
3
4
5
90
90
60
40
30
°
°
°
°
°
°
°
°
°
°
160
Delicatã /
Tradiþionale
Delicatã /
Tradiþionale
Delicatã /
Tradiþionale
Delicatã /
Tradiþionale
Sintetice
Culori rezistente foarte murdare
pentru noi nãscuþi, etc.)
(
articole
Culori rezistente (rufe de toate
tipurile p
Culori rezistente foarte murdare
(
articol
Culori delicate (rufe de toate
tipurile p
Culori delicate (rufe de toate
tipurile p
þin murdare)
u
e pentru noi nãscuþi, etc.)
þin murdare)
u
þin murdare)
u
6
6
7
8
9
60
40
50
40
30
°
°
°
°
°
°
°
°
°
Delicatã 92
Delicatã 77
Delicatã 86
Delicatã 76
30
Delicate
Lânã
Þesãturi foarte delicate
(perdele, mãtase, vâscozã, etc.)
PROGRAME PARÞIALE
Clãtire Clãtiri ºi
Clãtire delicatã
Turaþie de centrifugare
Turaþie de centrifugare
Evacuare Evacuare
delicatã
10
11
40
30
°
°
°
°
Delicatã 42
52
Durata
programului
(minute)
143
120
85
77
Descrierea programului de
spãlare
Prespãlare, spãlare, clãtiri,
centrifu gare
Spãlare, clãtiri,
intermediare ºi finale
Spãlare, clãtiri,
intermediare ºi finale
Spãlare, clãtiri,
intermediare ºi finale
Spãlare, clãtiri,
intermediare ºi finale
Spãlare, clãtiri, antiºifonare sau
turaþie de centrifugar
Spãlare, clãtiri, antiºifonare sau
turaþie de centrifugar
Spãlare, clãtiri, antiºifonare sau
turaþie de centrifugar
Spãlare, clãtiri, antiºifonare sau
turaþie de centrifugar
Spãlare, clãtiri ºi
centrifugar
Spãlare, clãtiri ºi
centrifugar
Spãlare, clãtiri, antiºifonare sau
evacuare
Clãtiri, antiºifonare sau
apã
Evacuare
centrifugar
Evacuare
centrifugar
.
i intermediare ºi finale
turaþii de centrifugare
turaþii de centrifugare
turaþii de centrifugare
turaþii de centrifugare
e delicatã
e delicatã
turaþie de centrifugar
apãºi
e energicã
apãºi
e delicatã
turaþii d e
e delicatã
e delicatã
e delicatã
e delicatã
turaþie de
turaþie de
evacuar
turaþie de
turaþie de
e
e
Note
Antiºifonare-a se vedea calcã mai uºor, pagina alãturatã. Datele specificate în tabel au valoare indicativã.
Program special
Zilnic 30 (programul 9 pentru materiale sintetice) este studiat pentru a spãla rufe puþin murdare într-un
interval scurt de timp: dureazã doar 30 de minute, economisindu-se totodatã energie ºi timp. Selectând
programul (9 la 30°C) este posibilã spãlarea împreunã a þesãturilor de diverse tipuri (excluse lâna ºi mãtasea)
cu o încãrcãturã maximã de 3 kg. Se recomandã folosirea detergentului lichid.
42
Page 43
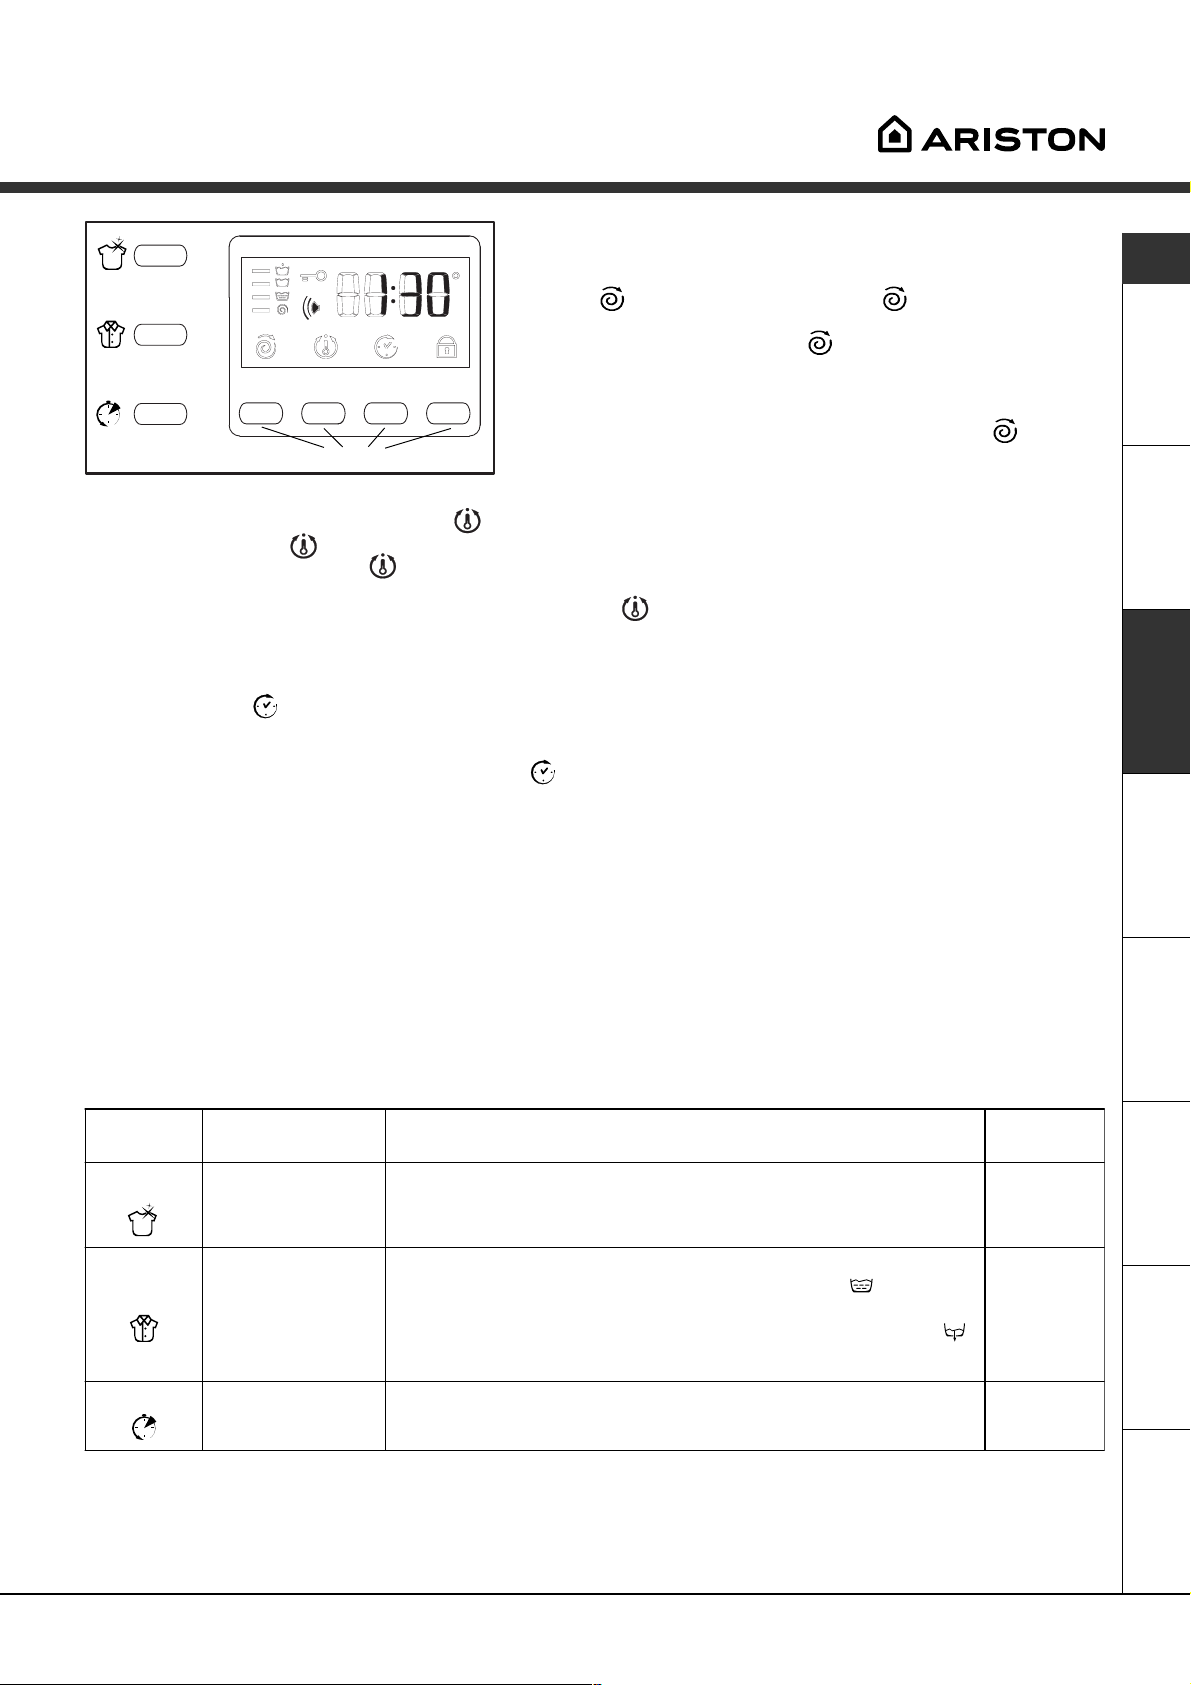
Personalizãri
Reglarea turaþiei de centrifugare
Dacã la pornirea maºinii, SELECTORUL este poziþionat în
dreptul unui program care prevede turaþia de centrifugare,
simbolul
viteza maximã permisã a turaþiei de centrifugare pentru
programul selectat iar simbolul
Apãsând din nou, valorile coboarã pânã la OFF, ceea ce indicã
excluderea turaþiei de centrifugare (apãsaþi din nou pentru a
reveni la valoarea cea mai mare); opriþi-vã la valoarea doritã,
dupã circa 2 secunde selecþia se acceptã: simbolul
Taste Opþiuni
fix. Reglarea turaþiei de centrifugare este activã pentru toate
programele cu excepþia programului 11 ºi a evacuãrii.
Reglarea temperaturii
Dacã la pornirea maºinii, SELECTORUL este poziþionat în dreptul unui program care prevede reglarea
temperaturii, simbolul apare fix. Apãsând butonul se vizualizeazã temperatura maximã permisã pentru
programul selectat iar simbolul lumineazã intermitent. Apãsând din nou, temperatura coboarã pânã la OFF,
care indicã spãlarea la rece (apãsaþi din nou pentru a reveni la valoarea cea mai mare); opriþi-vã la valoarea
doritã, dupã circa 2 secunde selecþia se acceptã: simbolul rãmâne fix.
Reglarea temperaturii este activã cu toate programele de spãlare.
apare fix. Apãsând butonul , se vizualizeazã
lumineazã intermitent.
rãmâne
RO
Reglarea delay timerului
Apãsând butonul , pe display se vizualizeazã scris OFF iar simbolul respectiv lumineazã intermitent.
Apãsând din nou butonul, apare 1h adicã întârziere de o orã ºi aºa mai departe pânã la 24h; opriþi-vã la
întârzierea doritã, dupã circa 2 secunde selecþia se acceptã; ulterior, pe display se vizualizeazã durata
prevãzutã pentru programul selectat iar simbolul
rãmâne aprins.
Apãsând butonul START/RESET apare din nou valoarea întârzierii selectate care se diminueazã în fiecare orã
pânã la pornirea programului; în aceastã fazã se poate modifica valoarea întârzierii doar micºorând-o.
Reglarea Delay Timerului este activã cu toate programele.
Blocarea tastelor (a se vedea pag. 41).
Funcþii
Diferitele funcþii de spãlare prevãzute pentru maºina de spãlat permit obþinerea unor rezultate excepþionale (o
calitate îmbunãtãþitã a spãlãrii-rufe curate, etc.). Pentru a activa aceste funcþii, procedaþi astfel:
1. apãsaþi butonul aferent funcþiei dorite, þinând cont de informaþiile conþinute în tabelul de mai jos;
2. aprinderea butonului respectiv indicã faptul cã funcþia respectivã a fost activatã.
Notã: Intermitenþa rapidã a butonului indicã faptul cã funcþia respectivã nu este selecþionabilã pentru programul ales.
În cazul în care va fi selectatã o funcþie incompatibilã cu cea selectatã mai înainte, doar ultima aleasã va rãmâne activã.
Opþiune Efect Note pentru folosire Activã cu
Super
Wash
Permite o spãlare
impecabilã, evident
îmbunãtãþitã faþã de
standardul în Clasa A.
Nu este compatibil cu opþiunea RAPID.
programele:
1, 2, 3, 4,
5, 6, 7, 8.
Calcã mai
uºor
Rapid
Reduce pliurile la
þesã turi facilitân d
cãlcarea.
Reduce cu 30%
durata programului
de spãlare.
Selectând aceastã opþiune, programele 6, 7, 8, 11 ºi Clãtire delicatã se
întrerup cu rufele la înmuiat (antiºifonare), iar simbolul va lumina
intermitent:
- pentru a completa programul, apãsaþi butonul START/RESET;
- pentru a efectua doar evacuarea, poziþionaþi selectorul în dreptul
simbolului respectiv ºi apãsaþi butonul STAR T/RESET.
Nu este compatibil cu opþiuneaa ALB IRE.
Nu este compatibil cu opþiunea SUPER WASH.
Toate cu
excepþia
1, 2, 9, 10,
Descãrcare.
1, 2, 3, 4,
5, 6, 7, 8.
AsistenþãAnomaliiPrecauþii ÎntreþinerePrograme DetergenþiInstalare Descriere
43
Page 44
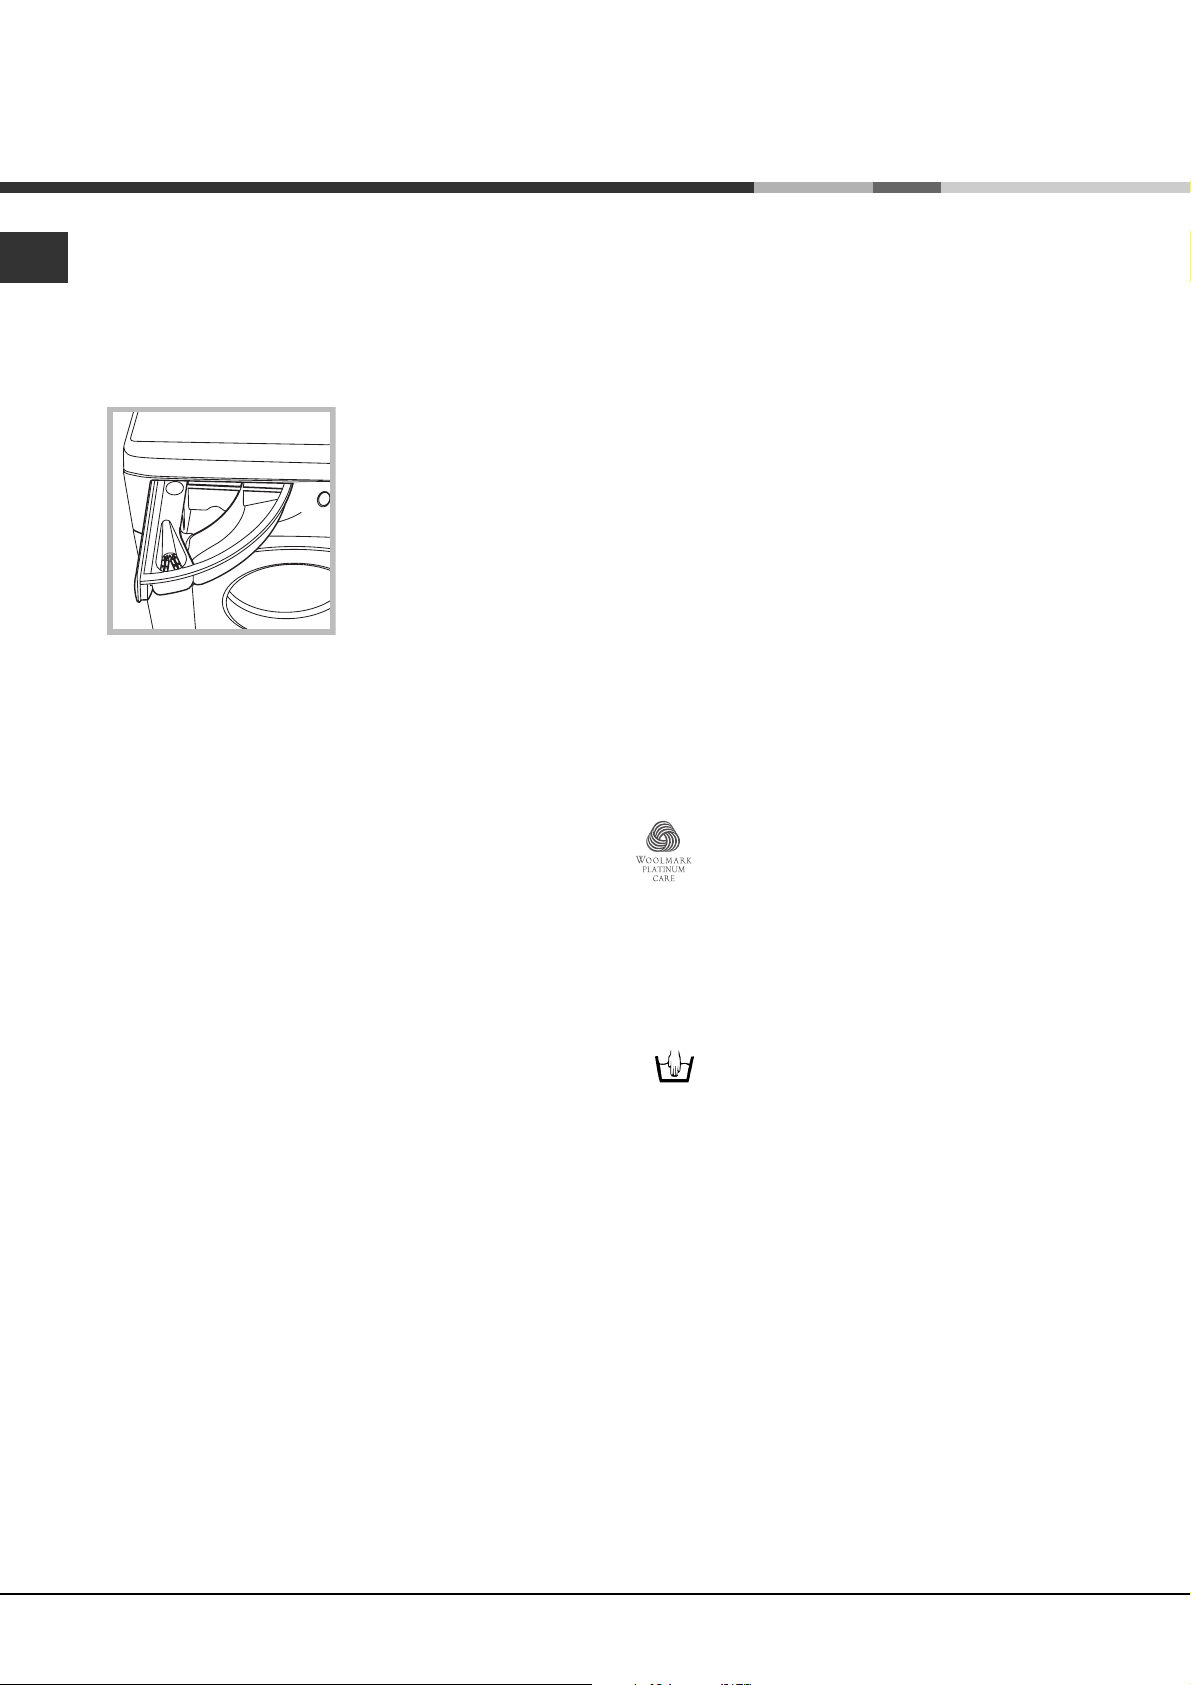
Detergenþi ºi rufe albe
RO
Sertarul detergenþilor
Un rezultat bun la spãlare depinde ºi de dozarea
corectã a detergentului: cu un exces de detergent
nu se spalã mai eficient, ci se contribuie la
încrustarea pãrþilor interne ale maºinii de spãlat ºi
la poluarea mediului înconjurãtor.
Extrageþi sertarul
pentru detergenþi ºi
introduceþi detergentul
sau aditivul, dupã cum
1
3
sertarul 1: Detergent pentru prespãlare
(sub formã de praf)
Î
sertarul 2: Detergent pentru spãlare
(sub formã de praf sau lichid)
Detergentul lichid trebuie vãrsat doar înainte de
pornire.
sertarul 3: Aditivi (soluþie de înmuiat, etc.)
Soluþia de înmuiat nu trebuie sã depãºeascã nivelul
grãtarului.
2
urmeazã:
Nu folosiþi detergenþi pentru spãlare manualã,
deoarece formeazã prea multã spumã.
Sortarea rufelor
Rufe deosebite
Perdele: împãturiþi-le ºi aºezaþi-le într-o faþã de
pernã sau într-un sac de tip plasã. Spãlaþi-le
singure fãrã a depãºi o jumãtate din încãrcãturã.
Folosiþi programul 11 care exclude turaþia de
centrifugare.
Plãpumi ºi haine de vânt: dacã cãptuºeala este
din fulgi de gâscã sau de raþã, se poate spãla în
maºina de spãlat doar câte un articol care sã nu
depãºeascã încãrcãtura maximã de 2-3 kg.
Întoarceþi rufele pe dos ºi repetaþi programul de
clãtire o datã sau de douã ori, utilizând o turaþie de
centrifugare delicatã.
Adidaºi ºi teniºi: curãþaþi-i de noroi. Se pot spãla
împreunã cu blugii ºi cu lucrurile rezistente, însã
nu cu rufele albe.
Lânã: pentru a obþine cele mai bune rezultate,
folosiþi un detergent specific ºi nu depãºiþi 1 kg de
rufe.
Woolmark Platinum Care
(Caºmir Platinum)
Delicat ca ºi spãlarea manualã.
Ariston a introdus un standard nou de
prestaþii superioare recunoscut de The Woolmark
Company cu prestigioasa marcã Woolmark
Platinum Care. Dacã pe obiectele de spãlat gãsiþi
logo-ul Woolmark Platinum Care, se pot spãla, cu
rezultate excelente lucrurile din lânã prevãzute cu
eticheta Spãlare manualã (M.00221):
Selectaþi programul 10 pentru toate
lucrurile prevãzute cu eticheta Spãlare
manualã, utilizând detergenþi specifici.
Subdivizaþi rufele în funcþie de:
- tipul de þesãturã / simbolul de pe etichetã.
- culori: separaþi rufele colorate de cele albe.
Goliþi buzunarele ºi controlaþi nasturii.
Nu depãºiþi valorile indicate, referitoare la
greutatea rufelor uscate:
Þesãturi rezistente: max 5 kg
Þesãturi sintetice: max 2,5 kg
Þesãturi delicate: max 2 kg
Lânã: max 1 kg
Cât cântãresc rufele?
1 cearceaf: 400-500 g.
1 faþã de pernã: 150-200 g.
1 faþã de masã: 400-500 g.
1 halat de baie: 900-1.200 g.
1 prosop: 150-250 g.
44
Page 45

Precauþii ºi sfaturi
Maºina de spãlat a fost proiectatã ºi construitã
conform normelor internaþionale de protecþie.
Aceste avertizãri sunt furnizate din motive de
siguranþã ºi trebuie sã fie citite cu atenþie.
Protecþie generalã
Acest aparat a fost conceput pentru o folosire de
uz casnic, nu profesionalã, iar funcþiile sale nu
trebuie alterate.
Maºina de spãlat trebuie sã fie folositã doar de
persoane adulte ºi respectând instrucþiunile din
acest manual.
Nu atingeþi maºina când sunteþi desculþi sau cu
mâinile sau picioarele ude sau umede.
Nu scoateþi ºtecherul din priza de curent trãgând
de cablu, ci trãgând de ºtecher.
Nu deschideþi sertarul detergenþilor în timp ce
maºina se aflã în funcþiune.
Nu atingeþi apa provenitã din evacuare, care
poate atinge temperaturi ridicate.
Aruncarea maºinii vechi de spãlat :
înainte de a o arunca, faceþi-o inutilizabilã
tãindu-i cablul de alimentare electricã ºi
scoþându-i hubloul.
Protecþia ºi respectarea mediului
înconjurãtor
Tehnologia la dispoziþia mediului înconjurãtor
Dacã prin hublou se vede puþinã apã este pentru
cã, datoritã noii tehnologii Ariston, este suficientã
mai puþin de jumãtate de cantitate de apã pentru a
obþine o curãþare maximã: un scop atins pentru
respectarea mediului înconjurãtor.
Economisirea de detergent, apã, energie ºi
timp
Pentru a economisi detergent, apã, timp folosiþi
încãrcãtura maximã.
O încãrcare totalã în locul a douã jumãtãþi,
permite economisirea de pânã la 50% energie
electricã.
Prespãlarea este necesarã doar pentru rufele
foarte murdare. Evitarea acesteia permite
economisirea de detergent, timp, apã ºi între 5
ºi 15% energie electricã.
RO
Nu forþaþi în nici un caz hubloul: s-ar putea
deteriora mecanismul de siguranþã care
împiedicã deschiderile accidentale.
În cazul defecþiunilor, nu interveniþi în nici un caz
în mecanismele interne pentru a încerca sã
reparaþi maºina de spãlat.
Controlaþi mereu ca în apropierea maºinii aflate
în funcþiune sã nu se afle copii.
Pe durata spãlãrii, hubloul are tendinþa de a se
încãlzi.
Dacã maºina trebuie sã fie deplasatã, faceþi
acest lucru în douã sau trei persoane, cu
maximã atenþie. Niciodatã nu deplasaþi maºina
singuri deoarece aceasta este foarte grea.
Înainte de a introduce rufele, controlaþi ca în
interior sã fie goalã.
Aruncarea reziduurilor
Aruncarea materialelor de ambalare:
respectaþi normele locale, în acest fel ambalajele
vor putea fi reutilizate.
Tratând petele cu o substanþã pentru
îndepãrtarea acestora ºi lãsându-le la înmuiat
înainte se spãlare, se reduce necesitatea de a
spãla la temperaturi mari. Un program la 60°C în
locul unuia la 90°C sau unul la 40°C în locul
unuia la 60°C, permit economisirea de pânã la
50% energie electricã.
Dozaþi bine detergentul în funcþie de duritatea
apei, de gradul de murdãrie ºi de cantitatea de
rufe, pentru a evita risipe ºi pentru a proteja
mediul înconjurãtor: deºi sunt biodegradabili,
detergenþii conþin elemente care altereazã
echilibrul naturii. Mai mult, evitaþi pe cât posibil
aditivul de înmuiere.
Efectuând spãlãri începând de seara ºi pânã la
primele ore ale dimineþii, se colaboreazã pentru
reducerea sarcinii de absorbire a întreprinderilor
electrice. Opþiunea Delay Timer (a se vedea
pag. 43) contribuie la organizarea spãlãrilor în
acest sens.
Dacã rufele trebuie uscate într-un uscãtor,
selectaþi o turaþie mare de centrifugare.
Cantitatea redusã de apã permite economisirea
de timp ºi energie electricã la programul de
uscare.
AsistenþãAnomaliiPrecauþii ÎntreþinerePrograme DetergenþiInstalare Descriere
45
Page 46

Întreþinere ºi îngrijire
RO
Oprirea apei ºi a curentului electric
Închideþi robinetul de apã dupã fiecare spãlare.
Se limiteazã astfel uzarea instalaþiei hidraulice a
maºinii de spãlat ºi se eliminã pericolul
scurgerilor.
Scoateþi ºtecherul din priza de curent atunci
când curãþaþi maºina de spãlat ºi când se
efectueazã lucrãri de întreþinere.
Curãþarea maºinii de spãlat
Partea externã ºi pãrþile din cauciuc pot fi curãþate
cu o cârpã înmuiatã în apã cãlduþã ºi sãpun. Nu
folosiþi solvenþi sau substanþe abrazive.
Curãþarea sertarului pentru detergenþi
1
Scoateþi sertarul,
ridicându-l ºi trãgându-l
spre exterior (a se
vedea figura):
Spãlaþi-l cu apã;
aceastã curãþare
trebuie efectuatã
frecvent.
2
Curãþarea pompei
Maºina de spãlat este echipatã cu o pompã
autocurãþãtoare care nu necesitã întreþinere. Se
poate întâmpla însã ca obiecte mici (monede,
nasturi) sã cadã în precamera care protejeazã
pompa, situatã în partea inferioarã a acesteia.
Verificaþi ca programul de spãlare sã se fii
încheiat ºi scoateþi din prizã.
Pentru a avea acces la precamerã,procedaþi astfel:
1. scoateþi panoul de
acoperire de pe latura
anterioarã a maºinii de
spãlat folosindu-vã de o
ºurubelniþã (a se vedea
:
figura)
2. deºurubaþi capacul,
rotindu-l în sens invers
(a se vedea figura)
este normal sã se
scurgã puþinã apã;
:
Îngrijirea hubloului ºi a cuvei
Lãsaþi mereu hubloul întredeschis pentru a
evita formarea mirosurilor neplãcute.
3.curãþaþi cu grijã interiorul;
4.montaþi din nou capacul;
5.montaþi din nou panoul verificând, înainte de a-l
împinge spre maºinã, de a fi introdus cârligele în
orificiile respective.
Controlarea furtunului de alimentare cu
apã
Controlaþi furtunul de alimentare cel puþin o datã pe
an. Dacã prezintã crãpãturi sau fisuri, trebuie
înlocuit: pe parcursul spãlãrilor, presiunile puternice
ar putea provoca crãpãturi neaºteptate.
Nu folosiþi furtunuri deja folosite.
46
Page 47

Anomalii ºi remedii
Se poate întâmpla ca maºina de spãlat sã nu funcþioneze. Înainte de a telefona la Asistenþã (a se vedea pag.
48), verificaþi dacã aceastã problemã nu poate fi remediatã de dvs., astfel:
Anomalii:
Maºina de spãlat nu porneºte.
Programul de spãlare nu poate
fi activat.
Maºina de spãlat nu încarcã apã
(Pe display este vizualizat scris
O).
H
2
Maºina de spãlat încarcã ºi
evacueazã apã încontinuu.
Cauze posibile / Rezolvare:
ªtecherul nu este introdus sau nu a fost suficient introdus în priza
de curent astfel încât sã existe conexiune electricã.
În casã nu este curent electric.
Hubloul nu este bine închis (pe display se vizualizeazã scris door).
Butonul
Butonul START/RESET nu a fost apãsat.
Robinetul de apã nu este deschis
A fost fixatã o întârziere de pornire (Delay Timer, a se vedea pag. 43).
Furtunul de alimentare cu apã nu este conectat la robinet.
Furtunul este îndoit.
Robinetul de apã nu este deschis
În casã lipseºte apa.
Nu este presiune suficientã.
Butonul START/RESET nu a fost apãsat.
Furtunul de evacuare nu a fost instalat la o distanþã cuprinsã între 65
ºi 100 cm de pãmânt (a se vedea pag. 39).
Extremitatea furtunului de evacuare este cufundatã în apã (a se vedea
pag. 39).
Dacã dupã aceste verificãri problema nu se rezolvã, închideþi robinetul
de apã, opriþi maºina de spãlat ºi chemaþi Asistenþa. Dacã locuinþa se
aflã la ultimele etaje ale unui edificiu, este posibil sã aibã loc fenomene
de sifonare, motiv pentru care maºina de spãlat încarcã ºi evacueazã
apã încontinuu. Pentru a elimina acest inconvenient, se gãsesc în
comerþ supape anti-sifonare.
nu a fost apãsat.
RO
Maºina de spãlat nu evacueazã
sau nu stoarce.
Maºina de spãlat vibreazã foarte
mult pe parcursul turaþiei de
centrifugare.
Maºina de spãlat pierde apã.
Se formeazã prea multã spumã.
Programul nu prevede evacuarea apei: cu unele programe este
necesar sã se porneascã manual (a se vedea pag. 42).
Este activã opþiunea Calcã mai uºor: pentru a completa programul,
apãsaþi butonul START/RESET (a se vedea pag. 43).
Furtunul de evacuare este îndoit (a se vedea pag. 39).
Conducta de evacuare este înfundatã.
Cuva, în momentul instalãrii, nu a fost deblocatã în mod corect (a se
vedea pag. 38).
Maºina de spãlat nu este poziþionatã în plan orizontal (a se vedea pag. 38).
Maºina de spãlat este fixatã foarte puternic între mobilã ºi zid (a se
vedea pag. 38).
Furtunul de alimentare cu apã nu este bine înºurubat (a se vedea
pag. 38).
Sertarul detergenþilor este înfundat (pentru a-l curãþa, a se vedea
pag. 46).
Furtunul de evacuare nu este bine fixat (a se vedea pag. 39).
AsistenþãAnomaliiPrecauþii ÎntreþinerePrograme DetergenþiInstalare Descriere
Detergentul nu este specific pentru maºina de spãlat (trebuie sã fie
scris pentru maºina de spãlat, de mânã sau în maºina de spãlat,
sau ceva asemãnãtor).
Dozajul a fost excesiv.
47
Page 48

Asistenþã
195047086.01
07/2005 - Xerox Business Services
RO
Înainte de a lua legãtura cu Asistenþa:
Verificaþi dacã anomalia poate fi remediatã de dvs. (a se vedea pag. 47);
Porniþi din nou programul pentru a controla dacã inconvenientul a fost eliminat;
În caz contrar, luaþi legãtura cu asistenþa tehnicã autorizatã la numãrul telefonic indicat pe
certificatul de garanþie.
Nu apelaþi niciodatã la tehnicieni neautorizaþi.
Comunicaþi:
tipul de anomalie;
modelul maºinii (Mod.);
numãrul de serie (S/N).
Aceste informaþii se aflã pe eticheta autocolantã aplicatã în partea din spate a maºinii de spãlat.
Asistenþã
48
 Loading...