


Instructions for installation and use
WASHING MACHINE
AUS
English,1
Contents |
AUS |
|
Installation, 2-3
Unpacking and levelling
Connecting the electricity and water supplies
Technical data
AQUALTIS
ADS9D 297
Description of the machine, 4-5
Touch control panel
Auto Dose System, 6-7 Running a wash cycle, 8
Wash cycles and options, 9
Table of wash cycles Wash options
Detergents and laundry, 10
Detergent
Preparing the laundry Washing recommendations
Precautions and advice, 11
General safety
Load balancing system Disposal
Opening the porthole door manually
Care and maintenance, 12
Cutting off the water and electricity supplies Cleaning the machine
Cleaning the detergent dispenser drawer Caring for your appliance drum Cleaning the pump
Checking the water inlet hose
Trouble shooting, 13-14
Assistance, 15
1
Installation
!Thisinstructionmanualshouldbekeptinasafeplaceforfuture AUS reference.Ifthewashingmachineissold,givenawayormoved, please ensure the manual is kept with the machine, so that the
new owner may benefit from the advice contained within it.
!Readtheseinstructions carefully:theycontain vitalinformation relating to the safe installation and operation of the appliance.
!Inside the pack containing this manual, you will also find the guarantee and all the details necessary for installation.
Unpacking and levelling
Unpacking
1. Once you have removed all the packaging from the washing machine, make sure it has not been damaged during transportation.
If it has been damaged, contact the retailer and do not proceed any further with the installation process.
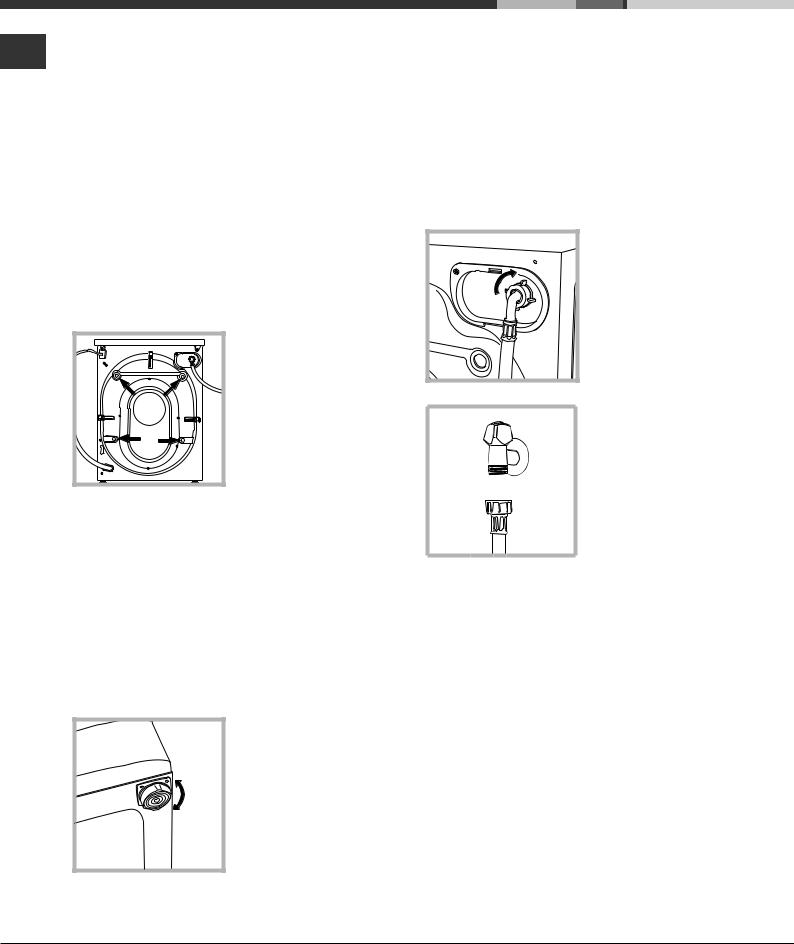
2. Remove the 4 protective screws (used during transportation) and the corresponding spacer, located on the rear part of the appliance (see figure).
3.Close off the holes using the plastic plugs supplied in the pack.
4.Keep all the parts in a safe place; they will be needed again if the washing machine is moved to another location, to prevent the inside of the appliance being damaged.
! Packaging materials should not be used as toys for children.
Levelling
1. Place the washing machine on a flat sturdy floor, without resting it up against walls or cabinets.
2. If the floor is uneven, the front feet of the machine may be adjusted until
it reaches a horizontal position (the angle of inclination must not exceed 2 degrees).
! If the appliance is levelled correctly, it will be more stable and much less likely to cause vibrations and noise while it is operating, particularly during the spin cycle.
! If it is placed on carpet or a rug, adjust the feet in such a way as to allow a sufficient ventilation space underneath the washing machine.
Connecting the electricity and water supplies
Connecting the water inlet hose
! Before connecting the inlet hose to the water supply, run the water until it is perfectly clear.
1. Connect the inlet hose to the machine by screwing it onto the cold water inlet of the appliance, which is situated on the top righthand side of the rear part of the appliance (see figure).
2. Connect the inlet hose by screwing it to a cold water tab using a 3/4 gas threaded connection (see figure).
3. Make sure that the hose is not folded over or bent.
!The water pressure at the tap must fall within the values indicated in the Technical data table (see next page).
!If the inlet hose is not long enough, contact a specialised shop or an authorised technician.
!Never use second-hand or old inlet hoses; use the products supplied with the machine.
2
Connecting the drain hose
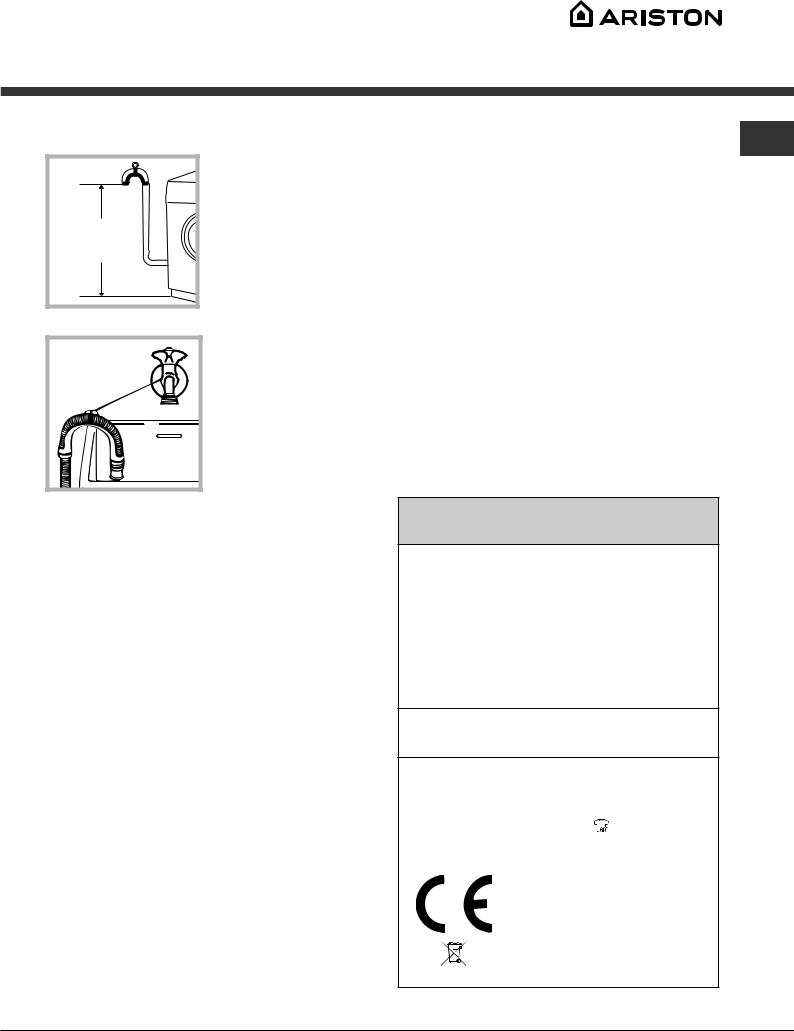
65 - 100 cm |
Connect the drain hose to drain duct piping or a wall drain located between 65 and 100 cm above the floor, makingsureitisnotbentatall.
Alternatively, rest the drain hose on the side of a washbasin or bathtub, fastening the duct supplied to the tap (see figure).
The free end of the hose should not be underwater.
! CAUTION: if this appliance is supplied from a cord
extension set or electrical portable outlet device, the cord AUS extension set or electrical portable outlet device
must be positioned so that it is not subject to splashing or ingress of moisture.
!The cable should not be bent or compressed.
!The cable should be replaced only by authorised technicians.
!If the supply cord is damaged, it must be replaced by the manufacturer, its service agent or similarly qualified persons in order to avoid a hazard.
Warning! The company shall not be held responsible in the event that these regulations are not respected.
! We advise against the use of hose extensions; if it is absolutely necessary, the extension must have the same diameter as the original hose and must not exceed 150 cm in length.
Electrical connections
Before plugging the appliance into the electricity socket, make sure that:
•the socket is earthed and complies with all applicable laws;
•the socket is able to withstand the maximum power load of the appliance as indicated in the Technical data table
(see opposite);
•the power supply voltage falls within the values indicated in the Technical data table (see opposite);
•the socket is compatible with the plug of the washing machine. If this is not the case, replace the socket or the plug.
!The washing machine must not be installed outdoors, even in covered areas. It is extremely dangerous to leave the appliance exposed to rain, storms and other weather conditions.
!Once the machine has been installed, the electricity socket should be easily accessible.
!Avoid using any extension cord or multiple socket outlet.
Technical data
Model |
ADS9D 297 |
|
|
|
width 59.5 cm |
Dimensions |
height 85 cm |
|
depth 64,5 cm |
|
|
Capacity |
from 1 to 8,5 kg |
|
|
Electrical |
please refer to the technical data plate |
connections |
fixed to the machine |
maximum pressure 1 MPa (10 bar) Water connections minimum pressure 0.05 MPa (0.5 bar)
drum capacity 62 litres
Spin speed |
up to 1200 rotations per minute |
||
|
|
|
|
Energy rated |
|
||
programmes |
program Cotton ; temperature 60°C; |
||
according to |
1200 rpm, using a load of 8,5 kg. |
||
AS/NZS 2040.2 |
|
||
|
|
|
|
|
|
|
This appliance conforms to the following |
|
|
|
EC Directives: |
|
|
|
- 2004/108/EC (Electromagnetic Compa- |
|
|
|
tibility) |
|
|
|
- 2006/95/EC (Low Voltage) |
|
|
|
- 2012/19/EU |
|
|
|
|
|
|
|
|
3

Description of the machine
AUS |
|
CONTROL |
|
PORTHOLE DOOR |
PANEL |
|
|
PORTHOLE DOOR
HANDLE
KICK STRIP
ADJUSTABLE FEET
PORTHOLE DOOR |
TOUCH CONTROL PANEL |
Always use the handle to open the porthole door (see figure).
To adjust the settings, gently press the icon inside the sensitive (touch control) area as illustrated in the figure.
DETERGENT DISPENSER DRAWER
The detergent dispenser drawer is located inside the machine and can be accessed by opening the
door.
Refer to the chapter “Auto Dose System” for information
on operation.
Standby mode
This washing machine, in compliance with new energy saving regulations, is fitted with an automatic standby system which is enabled after about 30 minutes if no activity is detected. Press the ON-OFF  button briefly and wait for the machine to start up again.
4
|
|
|
|
|
|
|
|
|
|
|
|
|
|
|
|
|
|
|
|
|
|
|
|
|
|
|
|
|
|
|
|
|
|
|
|
Touch control panel |
SPIN SPEED |
START/PAUSE button |
|
||||||||
with indicator light |
|
|
AUS |
||||||||
WASH CYCLE |
SOFTENER |
button |
|
|
|
WASH CYCLE |
|||||
|
|
|
|
||||||||
button |
|
|
ECO |
|
|
||||||
SELECTOR knob |
|
|
DETERGENT |
TEMPERATURE |
|
|
PHASE icons |
|
|||
|
|
|
|
|
|||||||
|
|
|
indicator light |
|
|
||||||
|
|
|
button |
button |
|
|
|
|
|
||
|
|
|
|
|
|
|
|
|
|
||
|
|
|
|
|
|
|
|
|
|
|
|
|
|
|
|
|
|
|
|
|
|
|
|
|
|
|
|
|
|
|
|
|
|
|
|
|
|
|
|
|
|
|
|
|
|
|
|
|
|
|
|
|
|
|
|
|
|
|
|
|
|
|
|
|
|
|
|
|
|
|
|
DISPLAY
|
|
|
|
|
|
|
|
|
|
|
|
|
|
|
|
|
|
|
|
|
|
|
|
|
|
|
|
|
|
Button with ON/OFF |
|
|
|
OPTION |
|
DELAY |
|
|
CHILD LOCK button |
DETERGENT |
|
|
|
|
|||||
|
buttons |
|
LOCK |
|
with indicator light |
||||
|
|
TIMER button |
|
||||||
indicator light |
DILUTION |
|
|
|
|||||
|
|
|
|
||||||
|
button |
|
|
|
|
indicator light |
|
||
Buttonwith ON/OFF indicator light: press this briefly to switch the machine on or off. The green indicator light indicates that the machine is switched on. To switch off the washing machine during the wash cycle, press and hold the button for approximately 3 seconds; if the button is pressed briefly or accidentally the machine will not switch off. If the machine is switched off during a wash cycle, this wash cycle will be cancelled.
WASH CYCLE SELECTOR knob: may be turned in either direction. To select the most suitable wash cycle, please refer to the “Table of wash cycles”.
The knob will not move during the wash cycle.
TEMPERATURE 
 button: press to modify or exclude the temperature setting; the value selected will appear on the display above (see “Running a wash cycle”).
SPIN SPEED CYCLE button: press to modify or exclude the spin cycle; the value selected will appear on the display above
(see “Running a wash cycle”).
DELAY TIMER  button: press to set a delayed start for the selected wash cycle; the set delay time will appear on the display above (see “Running a wash cycle”).
OPTION buttons with indicator lights: press to select the available options. The indicator light corresponding to the selected option will remain lit (see “Running a wash cycle”).
 DETERGENT and
  SOFTENER buttons : refer to “Modifyingpre-setparameters”inthechapter“AutoDoseSystem”.
 DETERGENT DILUTION button: refer to “Filling the tanks” in the chapter “Auto Dose System”.
WASH CYCLE PHASE icons: these illuminate to indicate the progress of the wash cycle (Wash  – Rinse
  – Spin
  – Drain
  ). The text

 lights up when the cycle is complete.
START/PAUSE button with indicator light: when the green indicator light flashes slowly, press the button to start a wash cycle. Once the cycle has begun the indicator light will remain lit in a fixed manner. To pause the wash cycle, press the button again; the indicator light will flash in an orange colour.
If the “LOCK”  indicator light is switched off, the door may be opened. To start the wash cycle from the point at which it was interrupted, press the button again.
LOCK  indicator light: indicates that the porthole door is locked. To open the door, pause the wash cycle (see “Running a wash cycle”).
CHILD LOCK  button with indicator light: to activate or deactivate the control panel lock, press and hold the button for approximately 2 seconds. when the indicator light is illuminated, the control panel is locked. This means it is possible to prevent wash cycles from being modified accidentally, especially where there are children in the home.
ECO indicator light: the

 icon lights up when, after altering the washing parameters, an energy saving of at least 10% is made. Furthermore, before the machine enters “Standby” mode, the icon will light up for a few seconds; when the machine is switched off the estimated energy saving will be around the 80% mark.
CHANGE LANGUAGE
The first time the machine is switched on, the first language will flash on the display. The
“ “, “OK” and “V” symbols will appear on the display, in line with the 3 buttons on the right-hand side. The languages change automatically every 3”; alternatively, they can be changed by pressing the buttons next to the “
 “ and “V” symbols. Use the “OK” button to confirm the language, which will be set after 2”. If no buttons are pressed, the automatic language change will begin again after 30”.
To change the language, switch the machine on and off again; in the 30” time period after it has been switched off, press and hold the temperature 
 +spin
+spin
+delayed  start buttons simultaneously for 5’’. A short sound alert will be emitted and the set language will flash on the display. Press the buttons next to the “
 “ and “V” symbols to change the language. Use the button next to the “OK” symbol to confirm the language, which will be set after 2”. If no buttons are pressed, the language set previously will be displayed after 30”. Switch on the machine.
5
 Loading...