

Page 1
Aegis NetDock
Quick Start Guide
Page 2
Aegis NetDock Quick Start Guide
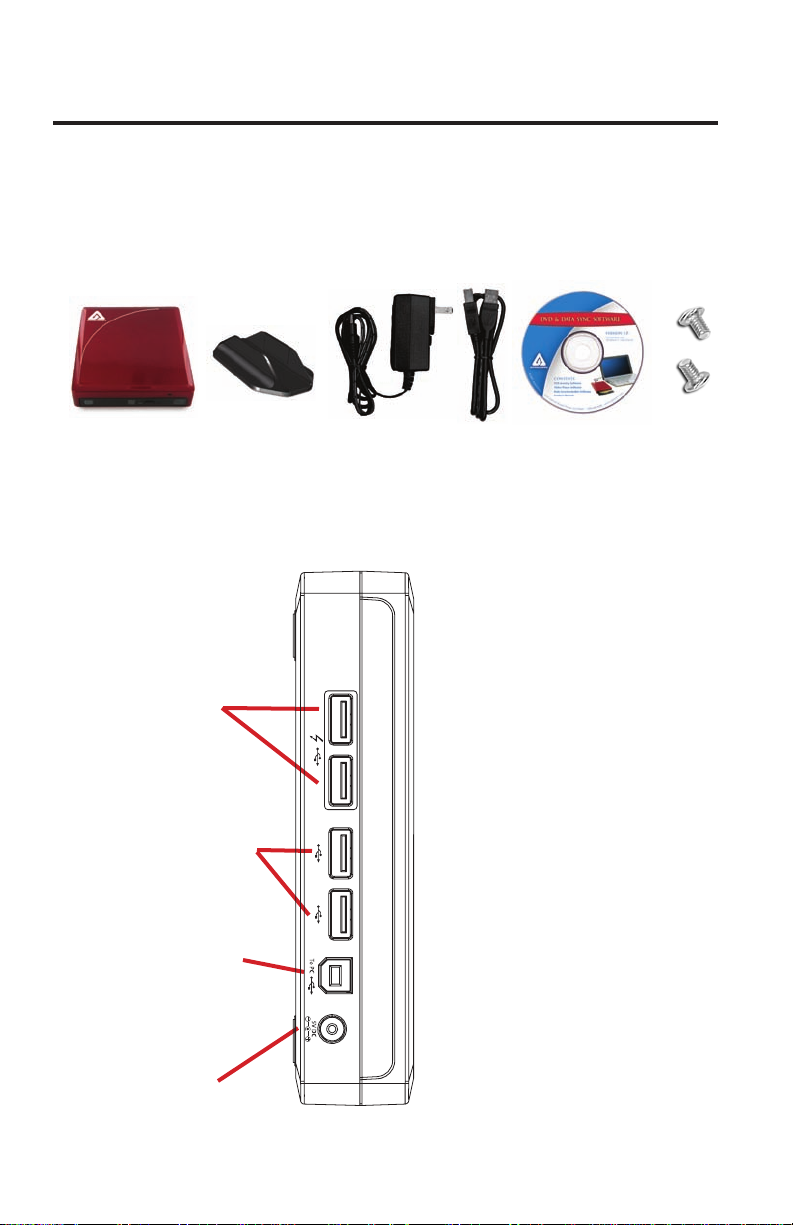
Package Contents
Aegis NetDock
Stand
AC Adapter
USB Cable
Hard Drive Screws
Connecting your Aegis NetDock
Perfect for connecting to all of your USB peripherals, the Aegis NetDock’s 4-port USB
Hub has two regular ports and two ALWAYS ON USB ports, ideal for charging cell
phones or your MP3 player.
Software CD:
BurnAware CD/DVD Burning Software•
VLC Media Player•
MicroSoft SyncToy•
Two ALWAYS ON
USB Ports
Ideal for charging cell
phones & MP3 players
Two regular USB Ports
Great for connecting to
your USB peripherals
Main USB connection
Connects to your
computer via included
USB Cable
Power connection
Connects to the
included AC Adapter
2
Auto “ON” and “OFF” Feature
The Aegis NetDock’s power efcient
design automatically powers the
NetDock when connected to your
computer and powers down when
disconnected.
NOTE: The two ALWAYS ON ports
remain powered even when the
NetDock is powered down as long
as the unit is receiving power from
the included AC Adapter.
www.apricorn.com
Page 3

Hard Drive Installation
Whether you received your Aegis NetDock
with or without a hard drive installed, the
easy open design means that you can change
out your hard drive in a snap.
Please make sure that the Aegis NetDock
is not connected to the AC Adapter or your
computer when attempting the below.
Step 1
Remove the single screw found
on the back side of the case
Step 3
Insert the hard drive by sliding the
drive to meet with the SATA hard
drive connector
Important hard drive handling info
Discharge static electricity by •
touching a grounded bare metal
surface or grounding straps before
handling the hard drive
Install hard drive on a non-•
conductive or anti-static surface
Avoid direct contact with the circuit •
card on the hard drive
Step 2
Turn the NetDock over and slide the
top case away from the bottom case as
shown
Step 4
Secure the hard drive using the
included screws as shown below
Hard
Drive
Step 5
Once the hard drive is secured, slide the
top case back into place
www.apricorn.com
Hard
Drive
Step 6
Once you have replaced the top case, turn
the NetDock over and replace the screw
3
Page 4

Installing the Software CD
The Aegis NetDock comes with three software downloads:
BurnAware CD/DVD Burning Software•
VLC Media Player•
Microsoft SyncToy•
Please note that the included software is compatible with PC only.
The included software is not necessary with Mac systems. The Aegis NetDock hardware
is compatible with all Mac DVD/CD authoring software and media playing software
1.
To install these programs, place the included software CD into your Aegis NetDock.
A software launch window will popup. From here you can click on the BurnAware, 2.
VLC or SyncToy options to download the programs to your computer or download
the latest product manual.
Follow the installation prompts on each of the programs to install on your
3.
computer
Contacting Technical Support
Apricorn provides the following helpful resources for you:
1. Complete Aegis NetDock User Guide on the included software CD.
2. Apricorn’s Website (http://www.apricorn.com)
This gives you the ability to check for up-to-date information.
3. E-mail us at support@apricorn.com.
4. Or call the Technical Support Department at 1-800-458-5448.
Apricorn’s Technical Support Specialists are available from 8:00 a.m.
to 5:00 p.m., Pacic Standard Time from Monday through Friday.
 Loading...