

Page 1
Logic Express 8
User Manual
Page 2

Apple Inc.
© 2007 Apple Inc. All rights reserved.
Under the copyright laws, this manual may not be
copied, in whole or in part, without the written consent
of Apple. Your rights to the software are governed by
the accompanying software licence agreement.
The Apple logo is a trademark of Apple Inc., registered
in the U.S. and other countries. Use of the “keyboard”
Apple logo (Option-Shift-K) for commercial purposes
without the prior written consent of Apple may
constitute trademark infringement and unfair
competition in violation of federal and state laws.
Every effort has been made to ensure that the
information in this manual is accurate. Apple Inc. is not
responsible for printing or clerical errors.
Note: Apple frequently releases new versions and
updates to its system software, applications, and
Internet sites. Images shown in this book may be slightly
different to those displayed on your screen.
Apple Inc.
1 Infinite Loop
Cupertino, CA 95014-2084
408-996-1010
www.apple.com
Apple, the Apple logo, Bonjour, Final Cut, Final Cut Pro,
FireWire, iMovie, iPod, iTunes, Jam Pack, Logic, Mac,
MacBook, Macintosh, Mac OS, PowerBook, QuickTime,
Soundtrack, and Ultrabeat are trademarks of Apple Inc.,
registered in the U.S. and other countries.
Finder, GarageBand, and Safari are trademarks of
Apple Inc.
AppleCare is a service mark of Apple Inc., registered in
the U.S. and other countries.
.Mac and iTunes Store are service marks of Apple Inc.
Adobe, the Adobe logo, Acrobat, the Acrobat logo,
Distiller, PostScript, and the PostScript logo are
trademarks or registered trademarks of Adobe Systems
Incorporated in the U.S. and/or other countries.
Other company and product names mentioned herein
are trademarks of their respective companies. Mention
of third-party products is for informational purposes
only and constitutes neither an endorsement nor a
recommendation. Apple assumes no responsibility with
regard to the performance or use of these products.
Page 3

17
17
23
48
51
55
57
61
63
65
66
68
71
73
74
75
75
77
79
1
Contents
Preface 15 Logic Express 8: Documentation and Resources
16 Logic Express 8 Documentation Conventions
Logic Express Onscreen Help
Apple Websites
Chapter 1 19 An Introduction to Logic Express
20 Creating Music in Logic Express
The Basics: Projects and Regions
Chapter 2 27 Overview of the Logic Express Interface
28 A Tour of the Logic Express Interface
Common Features of Logic Express Windows
Interactions Between Arrange Window Areas
Using Logic Express Interface Elements
Using the Computer Keyboard
Chapter 3 59 Customizing Your Window Setup
59 Window Types
Opening and Closing Windows
Moving and Resizing Windows
Working at Different Hierarchy Levels
Selecting the Working Area
Zooming
Relationships Between Windows
Customizing the Transport Bar
Customizing the Arrange Window Toolbar
Hiding or Revealing the Inspector
Adjusting the Bar Ruler Display
Displaying Global Tracks
Using Screensets
3
Page 4

4
90
98
98
99
Chapter 4 83 Setting Up Your System
83 Designing Your Music Production System
Connecting Your Audio and MIDI Devices
Using External MIDI Devices
Using External Audio Effects
Configuring Your Audio Hardware
Chapter 5 103 Navigating Your Project
10 3 Setting the Playhead Position
10 6 Using the Transport Buttons
10 7 Using Transport Key Commands
10 8 Using Cycle Mode
11 4 Using the Chase Events Function
11 6 Customizing the Transport Bar
Chapter 6 123 Working With Markers
12 4 Opening Marker Areas and Windows
12 5 Creating Markers
12 8 Selecting Markers
12 8 Deleting Markers
12 9 Naming Markers
131 Changing the Appearance of Marker Text
13 2 Editing Markers
13 4 Navigating With Markers
13 5 Customizing the Marker Display in the Marker List
Chapter 7 137 Working With Projects
13 7 Learning About Projects
13 9 Creating Projects
141 Opening Projects
14 3
Opening and Creating Projects Automatically
14 4
Importing Settings From Other Projects
14 5
Checking and Repairing Projects
14 6
Setting Project Properties
15 3
Managing Projects
15 5
Saving Projects
157
Closing and Quitting
Chapter 8 159 Basic Operations
15 9
Using the Mouse
160
Entering Numerical Values
161
Entering Text
162
Working With Key Commands
17 0
Working With Tools
Contents
Page 5

17 6 Working With Help Tags
17 7 Using the Shortcut Menu
17 7 Selection Techniques
183 Working With the Clipboard
18 4 Undoing and Redoing Editing Operations
Chapter 9 187 Working With Tracks
18 9 Configuring the Track Header
19 0 Reclaiming Workspace Used by the Track Header
191 Creating Tracks and Channels
19 8 Deleting Tracks
19 8 Selecting Tracks
19 9 Rearranging Tracks
19 9 Naming Tracks
201 Assigning Tracks to Channels
203 Zooming Individual Tracks
204 Assigning Track Icons
205 Muting Tracks
207 Soloing Tracks
208 Record-Enabling Tracks
208 Freezing Tracks
212 Hiding Tracks
213 Protecting Tracks
214 Using Track Button Slide Activation
Chapter 10 215 Working With Instruments and Effects
216 A Quick Mixer and Channel Strip Primer
220 Inserting, Moving, and Removing Plug-ins
228
Loading and Removing Entire Channel Strip Configurations
232
Using the Plug-in Window
235
Common Plug-in Window Functions
242
Using the Library to Choose Plug-in Settings
243
Learning About Effect Routings
247
Working With Instruments
260
Working With ReWire Applications
261
Working With External Audio Effects
262
Using Plug-ins From Other Manufacturers
Chapter 11 265 Adding Pre-Recorded Media
265
Supported File Formats
266
About Pre-Recorded Media Types Supported by Logic Express
267
Accessing Media Files in the Browser
273
Finding Apple Loops in the Loop Browser
Contents
5
Page 6

281 Adding and Removing Audio Files
290 Adding MIDI and Project Files
Chapter 12 291 Getting to Know Regions
291 What Are Regions?
295 MIDI and Audio Regions Compared
296 Handling Regions in the Audio Bin and Sample Editor
Chapter 13 307 Creating Your Arrangement
309 Making Region Edits Faster and Easier
319 Selecting Regions
320 Selecting Parts of a Region
322 Adding and Recording Regions
322 Removing and Restoring Regions
324 Moving Regions
328 Resizing Regions
334 Cutting, Copying, and Pasting Regions
335 Adding or Removing Song Passages
339 Repeating Regions
346 Dividing, Demixing, and Merging Regions
354 Using Folders
358 Creating Crossfades and Fades on Audio Regions
362 Setting Region Parameters
6
Chapter 14 367 Recording in Logic Express
367 Recording Audio
367 A Quick Overview of the Recording Steps
368 Preparations for Recording
377 Setting Up Track Channels
379 Making an Audio Recording
390 Handling Audio Recordings
391 Creating Comps
394 Managing Take Folders
396 Recording MIDI
396 Recording MIDI Regions in Real Time
402 MIDI Step Input Recording
407 Using the Caps Lock Keyboard
Chapter 15 409 Introduction to MIDI Editing
410 Opening the Editors
412 Hearing MIDI Events When Editing
412 Editing MIDI Events in the Arrange Area
413 Monitoring and Resetting MIDI Events
Contents
Page 7

Chapter 16 415 Editing MIDI Events in the Piano Roll Editor
415 Learning the Piano Roll Editor Interface
418 Creating and Editing Note Events
432 Splitting Chords
433 Using Hyper Draw
434 Customizing the Piano Roll Editor
435 Piano Roll Editor Shortcuts
Chapter 17 437 Editing MIDI in the Hyper Editor
439 Creating and Editing Events in the Hyper Editor
448 Working With Event Definitions
455 Working With Hyper Sets
Chapter 18 459 Editing MIDI Events in the Event List
460 Learning and Using the Event List Interface
463 Selecting and Creating Events
466 Editing Events
468 Deleting and Muting Events
469 Soloing and Renaming Regions or Folders
469 Learning About Event Types
475 The Event Float Window
Chapter 19 477 Quantizing MIDI Events
478 Quantizing Regions
483 Event and Note Quantization
485 Creating Groove Templates
Chapter 20 491 Editing MIDI Events in the Transform Window
492 Choosing and Using Transform Sets
501 Using the Transform Window Parameters
508 Creating Your Own Transform Sets
508 Importing Transform Sets From Other Projects
509 Usage Examples
Chapter 21 515 Editing Audio in the Sample Editor
516 Playing Audio Files
518 Navigating Audio Files
519 Changing the X and Y Axis Scales
521 Displaying the Waveform as Sample Bits
522 Making Selections
523 Copying, Pasting, Deleting, and Cutting
524 Destructive Audio Editing and Processing
529 Adjusting the Project Tempo
530 Sample Loop Functions
Contents 7
Page 8

530 Undoing Editing Steps in the Sample Editor
531 Creating Manual Backups
533 Working With the Digital Factory
548 Using an External Sample Editor
Chapter 22 549 Removing Silent Passages From Audio Regions
549 How You Can Use Strip Silence
551 Using Strip Silence
Chapter 23 553 Adjusting the Tempo of Audio Regions
553 Automatic Tempo Matching
554 Setting the Project Tempo to Match an Audio Region
555 Time Stretching Regions
556 Using the Follow Tempo Function
Chapter 24 559 Managing Audio Files
559 Sorting, Grouping, and Renaming Files in the Audio Bin
564 Moving Audio Files
565 Copying or Converting Audio Files
566 Deleting Audio Files
567 Optimizing Audio Files
567 Saving Regions as Individual Audio Files
568 Exporting Tracks as Audio Files
569 Dealing With SDII Files
569 Finding and Replacing Orphaned Audio Files
Chapter 25 571 Mixing
573 Basic Mixing Steps
575 Channel Strip Elements
576 Setting Channel Strip Levels
579 Setting the Pan or Balance Control
580 Soloing and Muting Channels
582 Adding Effects: Using Inserts
582 Working With Sends
582 Working With Channel Strip Settings
583 Monitoring With Effect Plug-ins
583 Arming Channel Strips
583 Changing the Channel Input Format
583 Setting the Automation Mode
584 Handling Mixer Inputs and Outputs
584 Adjusting Elements of Multiple Channel Strips
586 Adjusting Channel Strips in Record or Playback Mode
587 Working With Groups
590 Channel Strip Types
8 Contents
Page 9

598 Customizing the Mixer
603 Using the I/O Labels Window
Chapter 26 605 Working With Automation
606 Displaying Track Automation
609 Setting an Automation Mode
612 Writing Track Automation Data
613 Editing Track Automation in the Arrange Area
618 Editing Track Automation Data in an Event List
618 Writing Track Automation With External Controllers
620 Using Hyper Draw
624 Conversion of Automation Data
Chapter 27 625 Bouncing Your Project
626 Creating a Bounce
626 Routing Channels to an Output
627 Defining the Bounce Range
627 Using the Bounce Window
636 Setting the Bounce File Name and Folder
637 Bouncing and POW-r Dithering
Chapter 28 639 Creating Apple Loops
640 Creating Apple Loops in Logic Express
642 Creating Apple Loops in the Apple Loops Utility
643 Converting ReCycle Files into Apple Loops
644 Adding Apple Loops to the Loop Browser
645 Global Tracks and Apple Loops
647 Converting Apple Loops to Audio Files
648 Apple Loops and Sample Rates
Chapter 29 649 Project and File Interchange
650 Sharing Logic Express Data Over a Network
654 Backing Up Audio Files
655 Backing Up and Sharing Projects
656 Working With Standard MIDI Files
659 Importing GarageBand Projects
660 Working With OMF Files
661 Working With OpenTL Files
663 Opening, Importing, and Exporting AAF Files
664 Importing and Exporting Final Cut Pro XML Files
665 Exporting Regions
665 Exporting Tracks as Audio Files
Contents 9
Page 10

Chapter 30 667 Advanced Tempo Operations
667 Tempo Display
668 Using the Tempo Track
672 Recording Tempo Changes
673 Adjusting the Tempo to Fit Audio Regions
673 Using the Tempo List
676 Using the Tempo Operations Window
679 Using the Tempo Interpreter
681 Using the Tempo Fader
Chapter 31 683 Beat Mapping Regions
684 Beat Mapping With MIDI Regions
686 Beat Mapping With Audio Regions
687 Beats From Region
688 Beat Mapping to Scene Markers
688 Beat Mapping to Markers
Chapter 32 689 Transposition With the Chord and Transposition Tracks
690 How MIDI Events and Apple Loops Are Transposed
691 Creating and Editing Transposition and Chord Events
693 Analyzing MIDI Regions
Chapter 33 695 Working With Notation
696 Learning About the Score Editor
702 Entering Notes and Symbols in the Score Editor
702 Real Time MIDI Recording
703 Step Input
704 Mouse Input (Using the Part Box)
707 Using Hyper Draw in the Score Editor
708 Working With the Part Box
711 Learning About Part Box Groups
721 Editing Notes and Symbols: Basic Operations
721 Using the Shortcut Menu
721 Changing Several Objects Simultaneously
722 Deleting Objects From the Score Editor
723 Moving or Copying Objects With the Mouse
726 Working With Aliases in the Score Editor
727 Changing the Graphical Position of Objects
728 Resizing Notes and Symbols
729 Editing Notes and Symbols: Advanced Operations
729 Editing Notes
735 Creating and Inserting Rests
736 Editing Clefs
10 Contents
Page 11

738 Editing Slurs and Crescendi
740 Editing Repeat Signs and Bar Lines
742 Working With Text
742 Inserting Text
744 Editing Text
745 Using Musical Symbol Fonts
745 Learning About Text Styles
746 Working With Text Styles
747 Working With Global Text
749 Working With Automatic Text Objects
749 Creating Lyrics
751 Creating Chord Symbols
755 Working With Time and Key Signatures
756 Creating Time Signatures
757 Creating Key Signatures
757 Selecting Signatures
758 Copying Signatures
759 Editing Signatures
759 Deleting Signatures
760 Creating and Choosing Signature Alternatives
761 Transcribing MIDI Recordings
762 Default Settings for New MIDI Regions
763 Selecting Multiple Regions in the Score Editor
763 Display Parameters
769 Hidden MIDI Regions
769 Using Note Attributes to Change Individual Notes
775 Working With Staff Styles
796 Using Score Sets to Create Scores and Parts
804 Printing the Score
804 Preparing the Score Layout for Printing
808 Printing the Score
809 Exporting the Score as a Graphic File
809 Preparing the Export
809 Exporting the Score
810 Customizing the Score Editor’s Appearance
810 Choosing a Color Mode
810 Displaying Folders
811 Displaying Global Tracks
811 Displaying Instrument Names
811 Project Settings for Score Display
812 Global Score Settings
816 Numbers & Names
820 Guitar Tab
Contents 11
Page 12

824 Clefs & Signatures
826 Layout
828 MIDI Meaning
830 Colors
832 Score Preferences
Chapter 34 835 Working With Video
836 Using the Movie Window
837 Using the Video Track
838 Working With Scene Markers
839 Creating Scene Markers
840 Handling QuickTime Movie Audio Tracks
841 Video Project Settings
843 Video Preferences
Chapter 35 845 Synchronizing Logic Express
846 The Synchronization Master and Slave Relationship
846 Using External Synchronization
849 Synchronization Project Settings
859 Displaying and Using SMPTE Positions
861 MIDI Machine Control
863 Synchronization Problems and Solutions
Chapter 36 865 Working With Plug-in Latencies
865 About Latency
866 Working With the Low Latency Mode
867 Working With Plug-in Delay Compensation
Chapter 37 871 Working With Split Channel Audio File Formats
871 Importing Split Channel Files
872 Working With Split Stereo Files
873 Exporting Split Channel Files
Chapter 38 875 Working in the Environment
876 Using the Environment
876 An Introduction to the Environment
877 Working With Layers
880 Customizing the Environment Display
882 Working With Objects
886 The MIDI Signal Path
893 Common Environment Object Parameters
895 Exchanging Environments
899 The Environment Objects
899 Standard Instruments
12 Contents
Page 13

901 Multi Instruments
907 Mapped Instruments
911 GM Mixer
914 MMC Record Buttons
914 Keyboard
915 Monitor Object
915 Channel Splitter Object
916 Arpeggiator
918 Transformer Object
923 Delay Line Object
924 Voice Limiter Object
925 Chord Memorizer Object
927 Touch Tracks Object
930 Physical Input and Sequencer Input Objects
932 MIDI Click Object
933 Internal Objects
934 Alias
935 Ornament
936 Macros
938 Faders
957 Channel Strip Objects
Chapter 39 961 Project Settings and Preferences
962 Saving Project Settings and Preferences
962 Project Settings
962 Synchronization Settings
963 Metronome Settings
965 Recording Settings
967 Tuning Settings
973 Audio Settings
974 MIDI Settings
975 Score Project Settings
975 Video Project Settings
975 Assets Project Settings
976 Preferences
976 Global Preferences
981 Audio Preferences
987 MIDI Preferences
990 Display Preferences
993 Score Preferences
993 Video Preferences
993 Automation Preferences
994 Control Surfaces Preferences
Contents 13
Page 14

994 Sharing Preferences
Appendix 995 Learning More, Service, and Support
996 AppleCare Service and Support Information
Glossary 997
Index 1029
14 Contents
Page 15

Logic Express 8: Documentation and Resources
Logic Express 8 offers an extensive documentation collection
that will help you to learn and make full use of all application
features.
Further information about Logic Express, including data on updated versions and
support texts, can be found on the Apple web site.
Logic Express 8 ships with the following documentation:
 Logic Express 8 User Manual: This book is the final arbiter on all things in
Logic Express, and covers all areas of the program in detail, with the exception of
plug-ins.
 Logic Express 8 Getting Started: This book is designed to quickly get you up and
running with Logic Express.
 Logic Express 8 Control Surfaces Support: This document covers the use of control
surfaces with Logic Express 8.
 Logic Express 8 Working With Apogee Hardware: This document covers the use of
Apogee hardware in Logic Express 8.
 Logic Express 8 Instruments and Effects: This book covers the use of all Logic Express
effect and instrument plug-ins. It does not cover the application-specific use of plugins—only the plug-in functions, parameters, and usage are discussed.
 Late-Breaking News: This document is published online and may be updated as new
versions of Logic Express 8 are released, or new information becomes available
Preface
Important: All topics described in this manual were accurate at the date of writing. For
up to date information on changes or additions made after writing, please refer to the
Late-Breaking News document in the Logic Express Help menu, and to the Update Info,
included with each Logic Express update.
15
Page 16

Logic Express 8 Documentation Conventions
The following section introduces you to conventions used throughout the
Logic Express 8 documentation.
Menu Functions
For functions that can be reached via hierarchical menus, the different menu levels are
illustrated as follows: Menu > Menu entry > Function.
Important Entries
Some text will be shown as follows:
Important: Information on function or parameter.
These entries discuss a key concept or technical information that should, or must, be
followed or taken into account. Please pay special attention to these entries.
Notes
Some sections provide additional information or tips that will assist your use of
Logic Express. These are displayed as shown below:
Note: Information on function or parameter.
Key Commands
Many Logic Express functions can be activated or accessed with key commands—
computer keyboard shortcuts. The key commands mentioned in this guide are based
on the standard key command set.
Tips
A number of shortcuts, alternative methods, or general working tips are included
throughout the documentation. These may help your workflow, or provide additional
information on other uses for functions. Tips are shown as below:
∏ Tip: Information on function or parameter.
Warnings
A few warning messages are included for functions that are destructive, and could
result in irretrievable data loss, or could cause damage to your equipment. Warnings
are displayed as follows:
Warning: Information on function or parameter.
Please pay special attention to these entries, as they can save you from making costly
mistakes.
16 Preface Logic Express 8: Documentation and Resources
Page 17

Logic Express Onscreen Help
The Logic Express Help incorporates the Logic Express 8 user documentation in
electronic form. These documents have the advantage of being at your fingertips
whenever you need them, and are searchable, making it quick to find the information
you need.
 The Logic Express Help menu also provides additional features, including direct
access to the Logic Express pages on the Apple website.
 A comprehensive bookmark list allows you to quickly choose (and tag) what you
want to see, and navigates to the resource when the link is clicked.
Late-Breaking News
This document is published online and may be updated as new versions of
Logic Express 8 are released, or new information becomes available.
To check for recent updates, choose Late-Breaking News from the Help menu. The LateBreaking News PDF file is downloaded. If Safari is the default web browser for your
system, the Late-Breaking News PDF file is displayed directly in Safari. Other web
browsers may not have the ability to display PDF files directly, in which case the PDF
file is downloaded to the default download location.
Apple Websites
There are a variety of discussion boards, forums, and educational resources related to
Logic Express on the web.
Logic Express Websites
The following websites provide general information, updates, and support information
for Logic Express, as well as the latest news, resources, and training materials.
For information about Logic Express go to:
http://www.apple.com/support/logicexpress
For information on Apple Training Programs go to:
http://www.apple.com/training
To provide comments and feedback to Apple about Logic Express, go to the Apple
discussion forums:
http://discussions.apple.com/category.jspa?categoryID=156
Preface Logic Express 8: Documentation and Resources 17
Page 18

Apple Service and Support Website
This is the place to go for software updates and answers to the most frequently asked
questions for all Apple products, including Logic Express. You’ll also have access to
product specifications, reference documentation, plus Apple and third-party product
technical articles.
To access Apple’s Service and Support web page:
m Open your Internet browser, and type in http://www.apple.com/support.
Other Websites
 http://www.apple.com: Start at the Apple home page to find the latest information
on Apple products.
 http://www.apple.com/quicktime: QuickTime is Apple’s industry-standard technology
for handling video, sound, animation, graphics, text, music, and 360-degree virtual
reality (VR) scenes. QuickTime provides a high level of performance, compatibility,
and quality for digital video delivery. Go to the QuickTime website for information on
the types of media supported, a tour of the QuickTime interface, specifications, and
more.
 http://www.apple.com/firewire: FireWire is one of the fastest peripheral standards
ever developed, which makes it great for use with multimedia peripherals, such as
audio interfaces, video camcorders, and the latest high-speed hard disk drives. Visit
this website for information on the benefits of FireWire technology, FireWire software
information, and details on third-party FireWire products.
 http://www.apple.com/pro: This website provides news, information, and other
resources on seminars, events, and third-party tools used in web publishing,
document design and printing, CAD, music and audio, desktop movies, digital
imaging, modelling and animation, and the media arts.
 http://store.apple.com: Go here to buy software, hardware, and accessories direct
from Apple. You can also find special promotions and deals that include third-party
hardware and software products.
18 Preface Logic Express 8: Documentation and Resources
Page 19

1 An Introduction to Logic Express
1
Logic Express is a sophisticated, fully-featured audio and MIDI
application that provides all the tools you need to create
professional-quality music productions.
Logic Express allows you to record audio and MIDI, edit audio loops plus MIDI and
software instrument parts, add high-quality effects, and mix your music in stereo. The
final mix can be exported to a standard audio file, or burned to an audio CD or DVD
that can be played on any computer, home stereo, or imported into other applications
and devices.
Some of the things you can do with Logic Express include:
 Record MIDI information via connected MIDI input devices, such as keyboards, and
play back this information via any connected MIDI device (such as a synthesizer
keyboard or module) or the integrated Logic Express software instruments.
 Create, arrange, and edit MIDI projects, and print out musical notation via a printer
connected to your computer.
 Digitally record acoustic and electric instruments, or vocal performances, into your
projects, and process these audio recordings with a huge array of built-in, real time
effects.
 Make use of the integrated software instruments, including: Ultrabeat, ES1, ES2,
EXS24 mkII, over a dozen high-quality GarageBand instruments, or third-party Audio
Unit instruments.
 Load projects or channel strips from GarageBand, and enhance them with the
additional processing and editing possibilities afforded by Logic Express.
 Mix your MIDI and audio tracks, including effects and software instrument settings,
via a sophisticated total recall mix automation system. Logic Express includes highquality effects that you can use in your projects. You can also install and use thirdparty Audio Unit effects and instruments.
 Bounce (mix down) all audio data, including instruments, effects and mix automation
settings, to a stereo file for mastering or further processing.
19
Page 20

 Work in real time: You can work on Logic Express projects in real time; adding to,
and editing audio and MIDI parts while the project is playing, and hearing the results
of your changes immediately.
 Use existing loop libraries: Logic Express directly supports Apple Loops files, and is
compatible with a wide variety of existing audio file types, including those created in
ReCycle.
 Locate and preview files easily: The Media area, part of the Logic Express interface,
provides powerful file browsing and search features, making it easy to locate audio
files and other supported file types.
Creating Music in Logic Express
Logic Express can be used in a variety of ways, ranging from the simple to the
incredibly sophisticated. The following section outlines a common workflow example
that many projects adhere to. The structure of this manual will follow this basic
workflow, where applicable.
Step 1: Creating a project
You begin working in Logic Express by creating a new project, or opening an existing
one.
A project file contains MIDI data recordings plus information about the audio and other
files used, including pointers to these files.
All files (audio, video, samples, and so on) can be saved in a project folder. All project
files are automatically placed into appropriate sub-folders within the project folder.
More detail can be found in “The Basics: Projects and Regions” on page 23.
Step 2: Creating and importing your musical material
Getting musical material into Logic Express can basically be broken down into two
methods:
 Making new audio or MIDI data recordings (the latter can be played back through
either external MIDI synthesizers or software instruments).
 Importing existing audio recordings (audio files, samples, loops) or MIDI (and other
file data) into your projects. You can import existing audio recordings by simply
dragging them from the Media area, shown at the right of the Arrange window.
Recordings are made through suitable MIDI or audio hardware that is connected to, or
installed in, your Macintosh.
20 Chapter 1 An Introduction to Logic Express
Page 21

MIDI recordings are used to trigger (play back through) either external MIDI devices,
such as synthesizers, or internal software instruments. Software instruments are
calculated on the Macintosh CPU, and played back through your audio interface or the
Macintosh audio outputs. Not only can you record the notes of your performance, but
you can also record and play back information such as synthesizer parameter
changes—all in real time.
Audio recordings can be made by playing an instrument (such as a guitar) or singing
into a microphone, as examples.
Step 3: Arranging and editing
Once your musical material has been imported or recorded into Logic Express, you will
generally organize it into a “song structure”. This is done in the main Logic Express
window, called the Arrange window.
Musical material appears as rectangular blocks, known as regions. These regions run
from left to right across the Arrange area, and are positioned on vertically stacked
lanes, known as tracks. You may freely copy, repeat, loop, move, shorten, lengthen, or
delete regions—either on a track, or across tracks. This grid-like layout and the use of
building blocks (regions) makes it easy to see, and create, the overall song structure.
There will be many occasions where you’ll need to perform more detailed edits to your
MIDI or audio data recordings than is possible at the region level. Logic Express offers a
number of editing windows that allow you to modify your musical material at a variety
of levels. As examples of where this might be useful:
 You have made a recording of a great main vocal performance, but can hear a thud
in the silent passages between two phrases, where the vocalist kicked the
microphone stand. It probably goes without saying that this isn’t a sound you’d like
to have on the finalized CD. No problem. Simply edit the recording by inserting
silence during the thud, or perhaps cut that portion out of the recording entirely.
 You have made a MIDI keyboard recording that is perfect but for one note that
should have been a C, but is a B. No problem. You can simply drag the MIDI note
event from B to C.
More detail can be found in “The Basics: Projects and Regions” on page 23.
Step 4: Mixing, automating, using plug-ins
Following the creation of your arrangement and any edits that may have been
required, you would commonly move on to the mixing phase of your project. Mixing,
as a term, generally refers to balancing the relative levels of each song component. Put
another way, the main vocal needs to be louder than the bass, guitars, drums, and
keyboards, thus allowing the lyrics to be heard.
Chapter 1 An Introduction to Logic Express 21
Page 22

Mixing also entails the use of audio effects, which change, enhance, or suppress
particular song components, adding up to a unified and polished final product.
Logic Express features numerous effects that can be used to turn your basic song into a
professionally finished project.
Logic Express enables you to record, or automate, changes you make to track,
instrument, and effect parameters, such as volume, pan, filters, and other controls. This
can be done in real time or offline—with the mouse or an external MIDI device. These
changes play back when you play the project, and can be edited independently of the
musical material. This is very useful for a number of reasons:
 You can only adjust one level or setting of a playback track, if using the computer
mouse. The ability to record and play back multiple adjustments of all track elements
allows for a sophisticated mix.
 Performances are rarely consistent. To clarify, a vocalist will often sing louder or softer
during different sections of their performance, so you may need to even out these
level changes over the course of the song, or to balance the soft and loud vocal
sections against the musical backing.
 Song dynamics (the loud and soft sections of a song) benefit from animation. In
other words, building the intensity of a song section can often be achieved by
gradual or immediate level changes. Songs that are of a consistent level throughout
tend to sound flat and lifeless.
Step 5: Exporting and bouncing
The final step of the Logic Express music creation process is exporting your final
product. Logic Express allows you to produce a stereo file of your completed mix in a
variety of audio file formats. This is achieved in the Bounce window; simply choose the
desired outcome(s) in the available menus, and press the onscreen Bounce button. You
can even burn a stereo mix directly to CD or DVD with one simple step.
22 Chapter 1 An Introduction to Logic Express
Page 23

The Basics: Projects and Regions
This section will provide you with an introduction to the basic elements and
terminology of a Logic Express project. Detailed, step-by-step instructions on working
with projects, regions, and events are provided in later chapters. If you are an
experienced user, you may wish to skip ahead to “A Tour of the Logic Express Interface”
on page 28.
Projects
You start working in Logic Express by creating a project, or opening an existing one.
This is similar to using a word processing application, that requires a document to be
opened before you can begin typing. Logic Express, like word processors, also allows
you to have multiple documents (projects) open at the same time, and transfer media
and other data between them.
A Logic Express project file contains all MIDI events and parameter settings,
information about the audio and video files to be played, and all edits to MIDI and
audio data.
It is important to note that the project file points to your audio and video files, which
are stored as separate entities on disk. You have the choice of including these, and
other file types, in the project folder.
This approach has two main benefits:
 Saving a project without its “assets” (audio, video, sample files, and so on) minimizes
the memory requirements for project (and project backup) file storage.
 Saving a project with assets simplifies tasks such as archiving and transport to other
Logic Express-based studios.
The Project Folder
A project can consist of the complete collection of files used, including the “song” (the
project document) itself, song backups, all audio, sampler instruments, and samples for
the EXS24 or Ultrabeat, and video.
These are collectively known as the project assets.
When you create a new project, a project folder is generated, named, and a hard disk
location is specified. New recordings are automatically placed into an Audio Files subfolder within the project folder.
If you choose to include the project assets, further sub-folders will be created
automatically. These can include Audio Files, Project Backups, Samples, Video, ReCycle,
and Sampler Instruments folders.
Chapter 1 An Introduction to Logic Express 23
Page 24
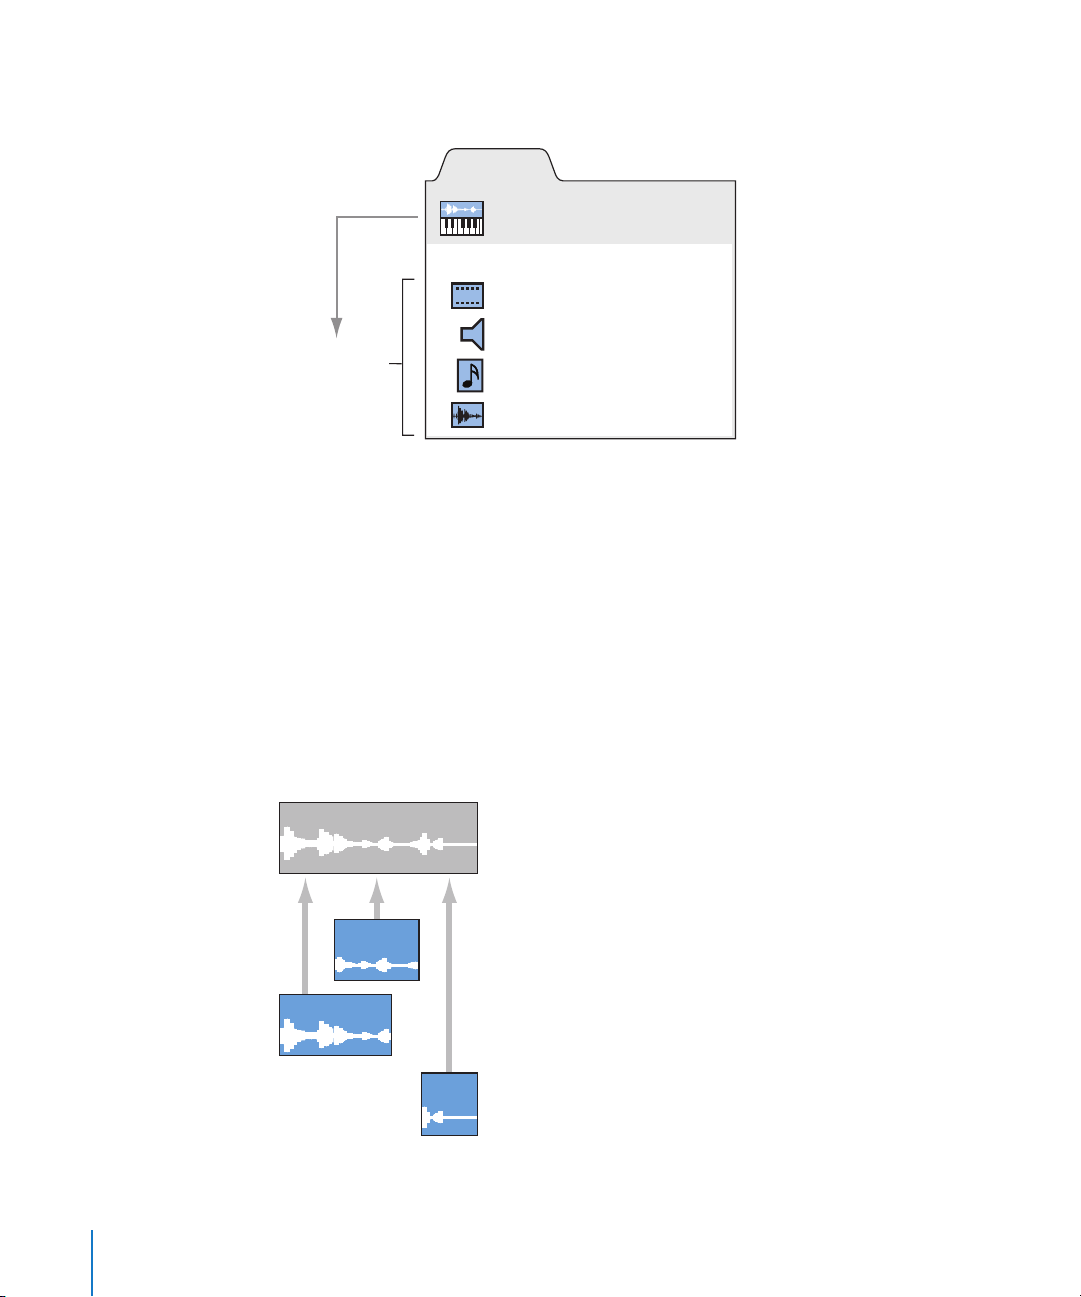
The sub-folder structure of all projects is identical, making it easy and consistent to
navigate both your projects and those of other Logic Express users.
Project Folder
Project file (“song”)
Movie Files folder
Audio Files folder
Project assets
Sampler Instruments folder
Ultrabeat Samples folder
Regions
The main window of Logic Express is known as the Arrange window. This is the window
that you first see when you open the application, and a project is loaded. This is also
the window that is used for recording, editing, and arranging your projects. Your audio
and MIDI files appear in the Arrange window as rectangular areas called regions. Audio
files are represented by audio regions, MIDI files by MIDI regions.
Audio Regions and Audio Files
Audio regions simply refer to (point to) an underlying audio file. Audio regions are used
as playback markers (start and end points) that can be as long as the entire audio file,
or may only be a few seconds long, playing a small portion of the audio file that they
point to.
Audio file
Audio region 1
Audio region 2
Audio
region 3
24 Chapter 1 An Introduction to Logic Express
Page 25

Any audio file used in Logic Express is automatically linked to at least one audio region
that is, by default, the length of the entire audio file.
You can freely create as many audio regions as you require. To give you an example of
where this may be useful, imagine a live stereo drum track that runs for the duration of
your project. During the second chorus, the drummer played perfectly, but was a little
sloppy during all other chorus sections.
Logic Express allows you to create an audio region that points to the second chorus
section of the overall (drum track) audio file, and use this perfect take in multiple
places in the project.
This is achieved by creating one audio region (that points to chorus 2 in the drum track
audio file), and copying it to each position that the chorus occurs in the Arrange area.
A great benefit of working with audio regions, rather than audio files is that they use
very little memory, whereas multiple copies of the same section of the audio file would
require a lot of hard disk storage space.
It is, of course, possible to directly edit, copy, and move audio files. This is achieved in
the Sample Editor and Media area.
MIDI Regions and Events
MIDI regions, by comparison, actually contain MIDI data events. They are not related to
information stored in external files. MIDI regions can be saved as individual files, but
they can also be, and generally are, stored as part of the project.
MIDI region
MIDI note events MIDI controller events
The MIDI data events stored within MIDI regions include; note, controller, program
change, and other information. These data events represent MIDI performances that
you have recorded into Logic Express. MIDI performances are generally created with a
MIDI keyboard, but can certainly be generated with MIDI controllers, MIDI guitars, your
computer keyboard or the mouse.
MIDI data events can be affected as a group by processing the MIDI region that
contains them. Such processing includes; transposition, quantization (timing correction,
which is similar to the spell checker of a word processor, when dealing with the
language of music), timing delays, and more.
Chapter 1 An Introduction to Logic Express 25
Page 26

You can also edit individual events within a MIDI region. This is achieved by opening
the region in one of the MIDI editors. These windows allow you to precisely alter the
position, length, and pitch of MIDI note events. Other MIDI event types can also be
altered in various ways. You may freely enter MIDI data with your MIDI keyboard, the
mouse, and/or computer keyboard in these editors.
More information on MIDI and MIDI event types can be found in Chapter 15,
“Introduction to MIDI Editing,” on page 409.
26 Chapter 1 An Introduction to Logic Express
Page 27

2 Overview of the
Logic Express Interface
2
The Logic Express interface features several areas, each
specialized for particular tasks. The main workspace is the
Arrange window, which can incorporate all areas and editors.
This chapter introduces you to the Arrange window. You’ll learn how it interacts with
other Logic Express windows and editors. Detailed information about these editors and
their functions can be found in cross referenced chapters.
You are encouraged to open Logic Express to view these windows and familiarize
yourself with them. Click and explore the various parts of the Logic Express interface as
they are discussed. This will give you a feel for where things are, a brief overview of
what they do, and how they work with each other.
To open Logic Express:
m In the Finder or Dock, double-click the Logic Express icon in the Applications folder.
When you open Logic Express for the first time, the Templates dialog is displayed,
allowing you to select a template for the project type you want to create (for more
information on the New dialog, see “Creating Projects” on page 139). The layout of the
Logic Express interface depends on the chosen template.
27
Page 28
A Tour of the Logic Express Interface
The following section will introduce you the various elements of the Logic Express
interface. This is principally a “getting to know you” exercise, where the fundamentals of
each area are covered. Full details on all options, functions, and uses are covered in
dedicated chapters that appear later in the user manual.
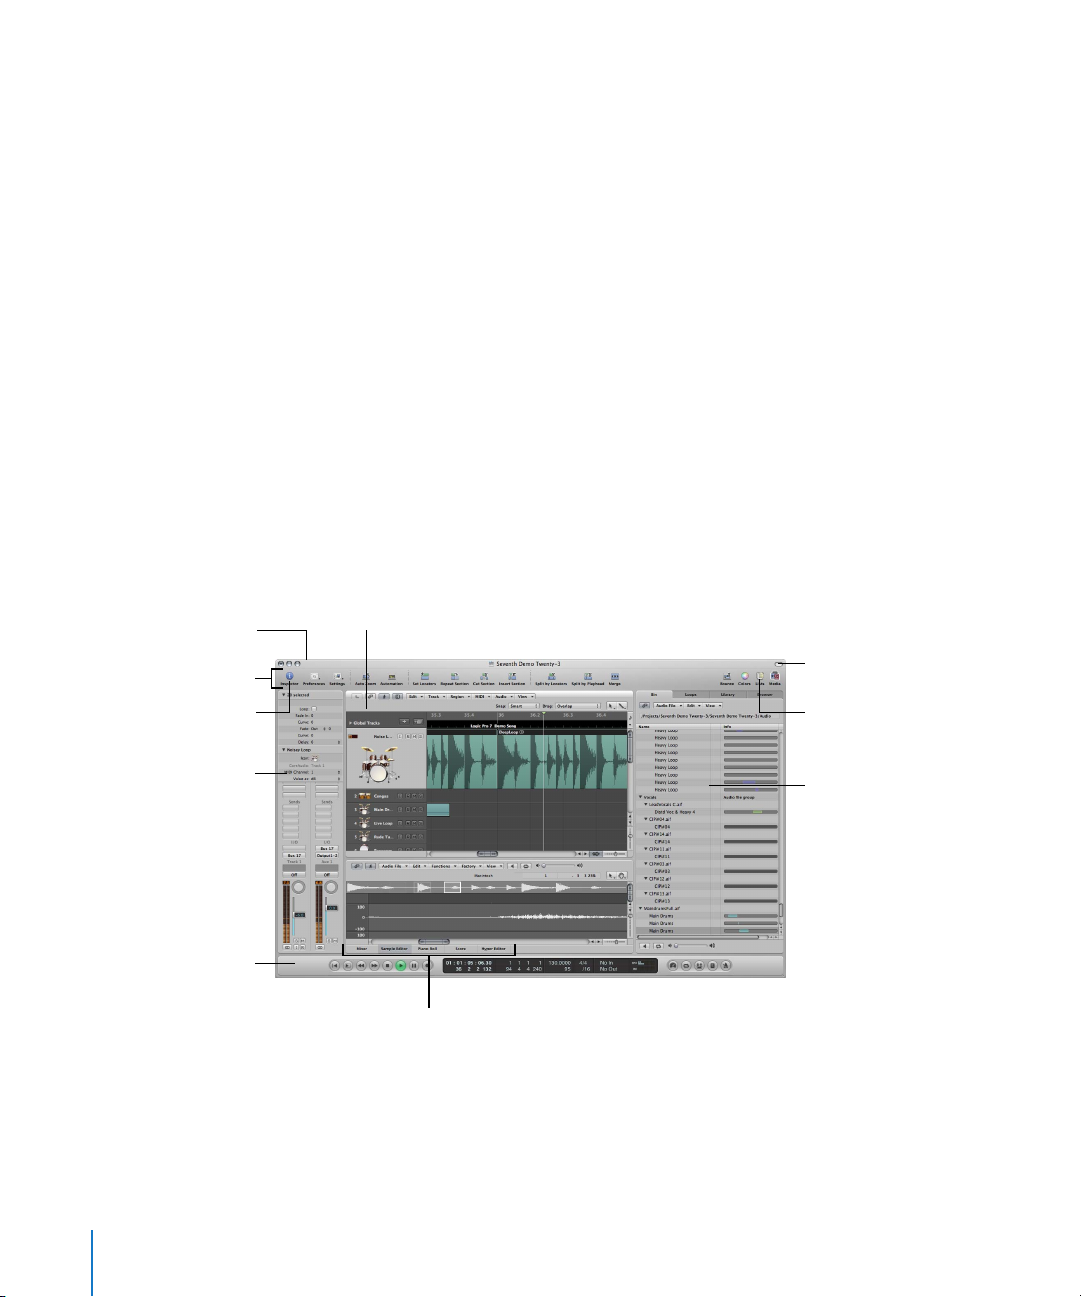
The Arrange Window
The Arrange window can incorporate all working areas and editors. It features a Toolbar
at the top and a Transport bar at the bottom.
You have the choice of displaying additional areas, as follows:
 Editing area, horizontally tiled, below the Arrange area.
 Media or Lists area, vertically tiled, right of the Arrange (and editing) area.
 Inspector, vertically tiled, left of the Arrange (and editing) area.
If an area is not visible, clicking on the appropriate Toolbar or Arrange area button will
open it, and resize any existing areas to accommodate the new area.
∏ Tip: Many of the editor and other areas can also be opened as separate windows,
independent of the Arrange window. This is done in the Window menu (or with the
corresponding key commands).
Arrange window
Toolbar
Click this button to
display the Inspector
Inspector
Transport bar
Arrange area
Click these buttons to
display one of the editors
Click this button to
display the Toolbar
Click this button to
display the Lists area
Media area
 Arrange area: This is where you record audio and instrument parts as regions, and
arrange these audio and MIDI regions into a song structure.
28 Chapter 2 Overview of the Logic Express Interface
Page 29
 Media or Lists area: Use the various tabs to locate and preview audio files (Browser
tab), select effects, instruments, and their settings (Library tab), and more, when the
Media button in the Arrange Toolbar is clicked. When the Lists button is clicked, you
have the choice of viewing MIDI events (Event List), tempo events (Tempo List), and
more. You can also enable the Media or Lists area via the Arrange window View
menu (or use the corresponding key commands).
 Editing area: You can open or close the Mixer, Piano Roll Editor, Hyper Editor, Score
Editor, or Sample Editor directly in the Arrange window by clicking any of the
buttons along the lower edge of the Arrange area. These windows allow you to
precisely modify, delete, or add different types of data.
 Transport bar: Used to navigate through your project. The current playback,
recording, or editing position is indicated by the playhead—the thin, vertical line
that appears in all Logic Express windows that offer real time display of playback—
namely the Arrange and editor windows.
 Inspector: Used to set track and region parameters when working in the Arrange
area, or the parameters of the editing window with key focus. As examples:
 Clicking the Score Editor area at the bottom of the editor area shows all scoring
symbols in the Inspector.
 Clicking the Hyper Editor area displays the parameters of the currently selected
hyper definition (selected row in the Hyper Editor window).
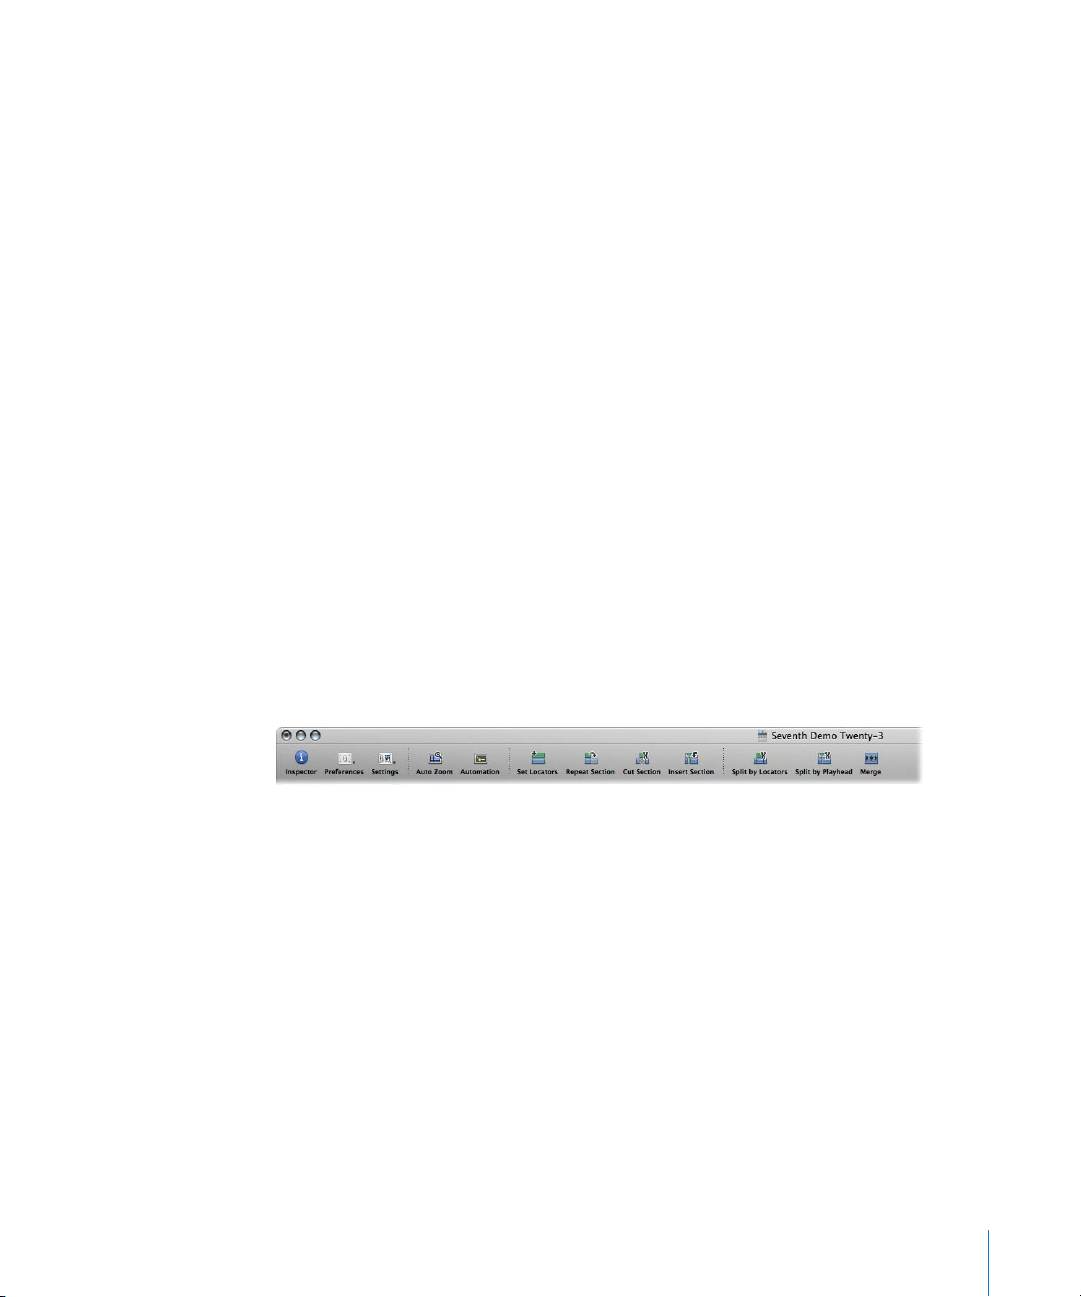
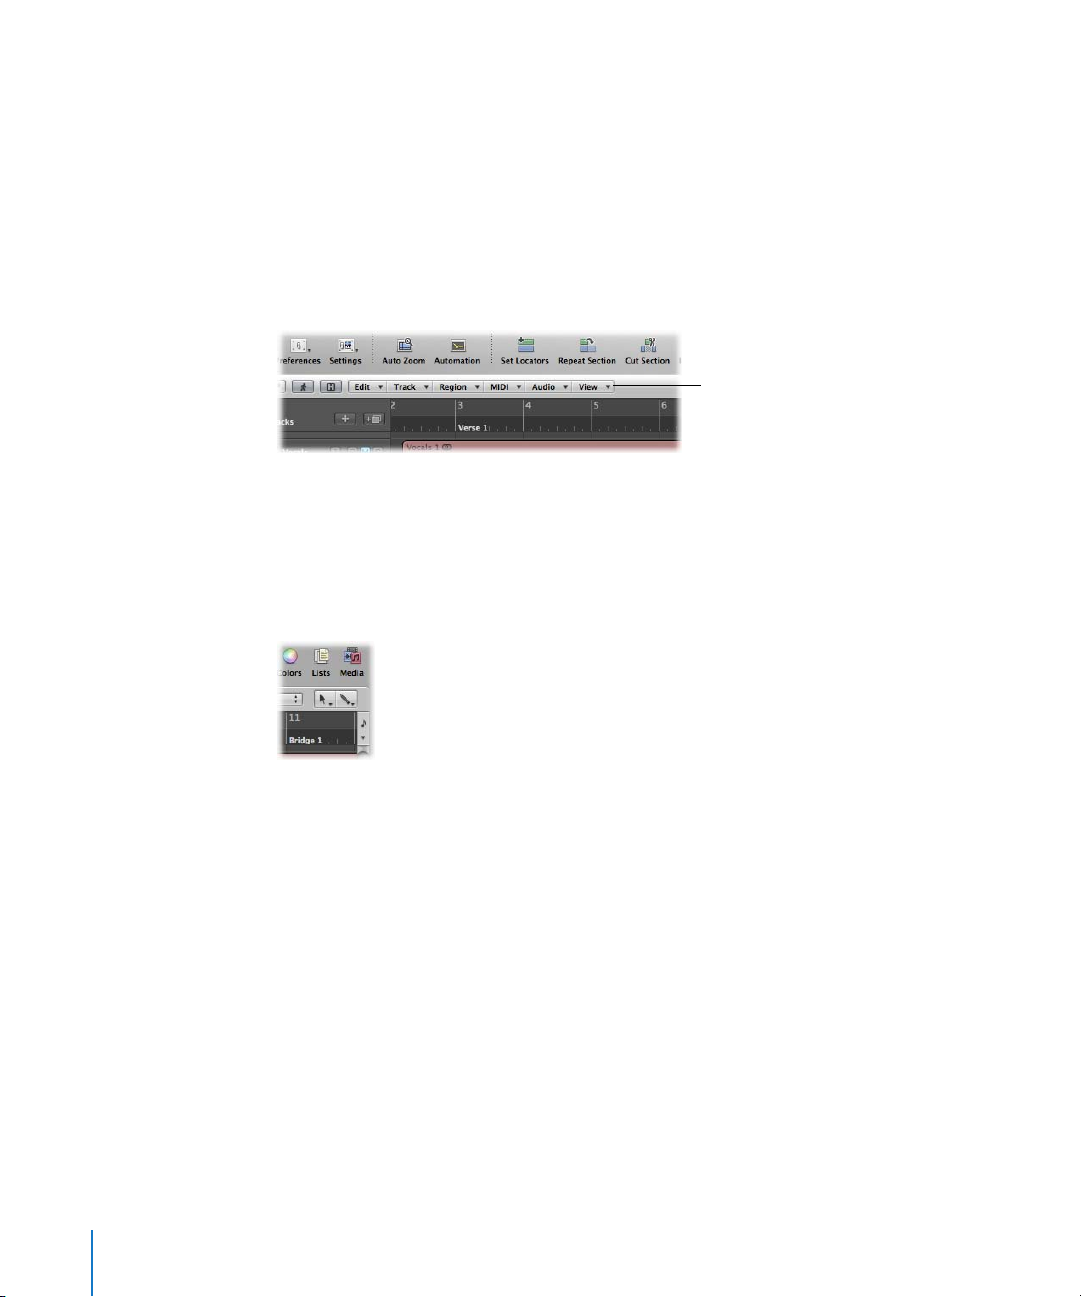
The Arrange Toolbar
The Toolbar appears at the top of the Arrange window. It contains buttons for
frequently used commands.
The Toolbar can be customized to include buttons that show the Inspector, Media, and
Lists areas, create new tracks, add audio files, and other common functions. For more
information, see “Customizing the Arrange Window Toolbar” on page 74.
The Transport Bar
The Transport bar spans the entire lower edge of the Arrange window. You can use it to
move through your project and start recording. It contains buttons that will be
immediately familiar if you’ve used a tape recorder or CD/DVD player, such as Play,
Rewind, Pause, and so on. The Transport bar also incorporates a number of features that
simplify tasks you will perform in Logic Express, such as recording over a repeatedly
cycled section, or listening to a part in isolation.
Chapter 2 Overview of the Logic Express Interface 29
Page 30
Track list
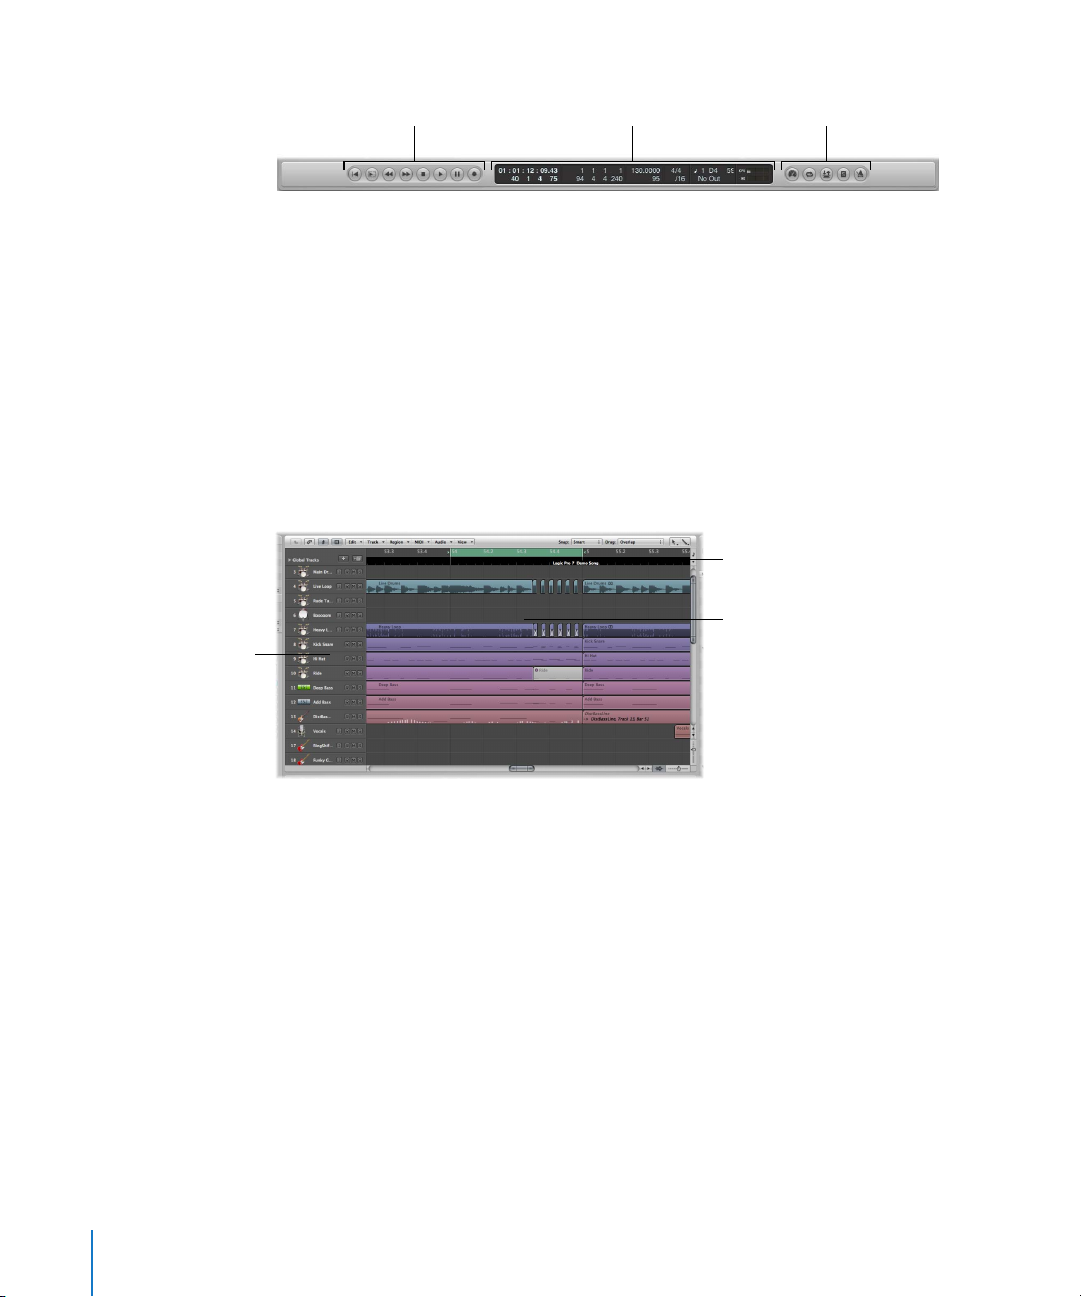
The Transport bar consists of three parts:
Transport buttons Display area Mode buttons
 Transport buttons: Used to navigate your project.
 Display area: Provides information that helps with project navigation.
 Mode buttons: Enable advanced recording and playback functions.
You can alter the Transport bar by adding or removing buttons and displays, providing
faster access to the functions you need most often. You can also open an independent
SMPTE or Bar display window. For more information, see “Customizing the Transport
Bar” on page 73.
Arrange Area
The Arrange area is shown directly below the Toolbar. It is used to record, import,
collate, and organize MIDI and audio data containers, known as regions, in a project.
Bar ruler
Arrange grid
 Bar ruler: A linear bar divided into bar and beat segments. The Bar ruler can also
display time in hours, minutes, seconds, and finer divisions. It offers a number of
facilities that can be used to mark project sections for different playback and
recording tasks. More detail in Chapter 5, “Navigating Your Project,” on page 103.
 Arrange grid: This where all MIDI and audio regions are displayed on horizontal lanes,
called tracks, aligned to time positions in a grid-like layout.
 Track list: This is where you set the destination channel strip for playback of the MIDI
or audio regions on each horizontal track lane. The headers of each track list lane can
display the track name, icons, and several track buttons.
30 Chapter 2 Overview of the Logic Express Interface
Page 31
Media Area
The Media area can be opened or closed by clicking on the Media button in the
Toolbar. The Media area is where you manage all files associated with your project,
including audio, video, and plug-in settings. It has four tabs:
 Audio Bin: Helps you to manage all audio files used in the project.
 Loop Browser: Used to search for loop files (Apple Loops, for example).
 Library This is where you search for (and can directly assign) plug-in, channel strip,
and MIDI instrument settings.
 Browser: Used to search for all Logic Express related files.
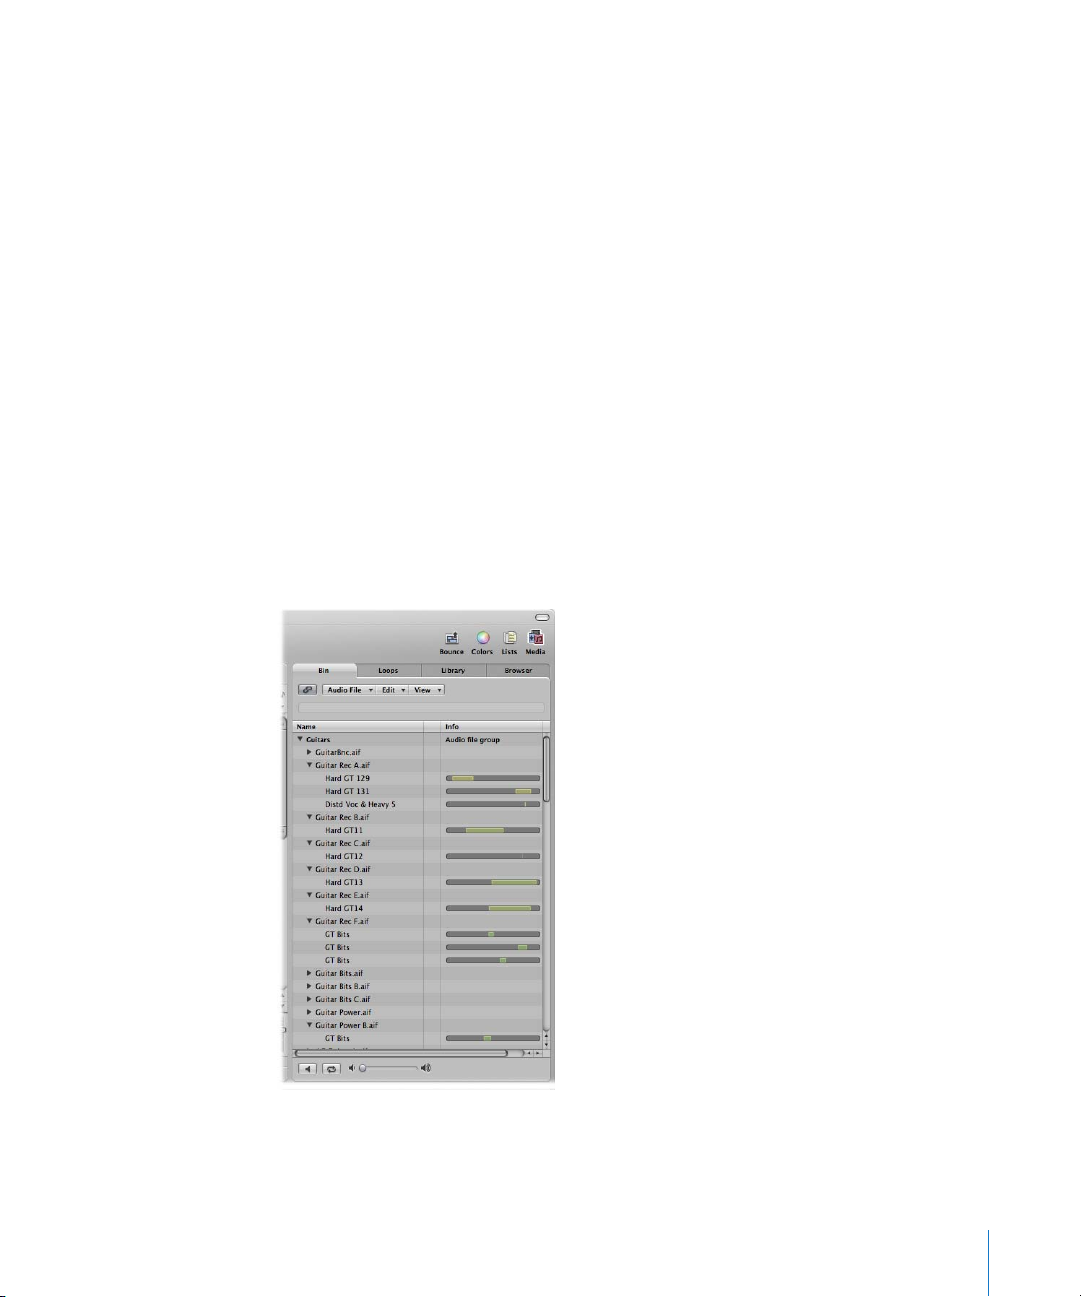
Getting to Know the Audio Bin
The Audio Bin shows all audio files used in the project. You can picture the Audio Bin as
an audio file catalog for the project. It also provides an overview of regions that are
derived from each audio file.
You can define new, edit, delete, or rename existing audio files and regions in the
Audio Bin. All audio files and regions can be dragged directly from the Audio Bin into
the Arrange area, where you can edit, move, and copy them. You can also add files that
aren’t yet used in the arrangement to the Audio Bin, allowing easy access during song
construction.
Chapter 2 Overview of the Logic Express Interface 31
Page 32

 Name column: Displays all audio files in the current project by name. The disclosure
triangle to the left of the file name reveals all regions associated with the selected
audio file.
 Info column: Displays audio file and region information. Horizontal bars indicate the
overall audio file length. Colored sections of these bars indicate the location and size
of regions within the audio file. Additional data, including the sample rate, bit depth,
mono or stereo status, and file size are also shown in the Info column. Mono files are
identified by a single circle symbol, stereo files by a double, interlocked circle symbol.
 Play button: Click to hear the selected audio file or region. Click a second time to
stop playback.
 Loop button: Click to hear the selected audio file or region repeatedly. Click a second
time to stop playback.
When you open the Audio Bin as an independent window, and resize it, the Audio Bin’s
Info column can display waveform overviews of audio files and regions.
32 Chapter 2 Overview of the Logic Express Interface
Page 33

Getting to Know the Loop Browser
The Loop Browser is designed to make finding Apple Loops intuitive and fast.
You can search for loops by using keywords, perform text searches, preview loops, view
information about loops, and limit the display to loops from a specific Jam Pack or loop
library. Matching files are displayed in the Search Results list. When you find files you
want to use, you can add them to your project by dragging them into the Arrange area.
View menu
Volume slider
View buttons
Search field
Category buttons
Click to narrow the
search for appropriate
loops
Search Results list
Displays all loops that
match the set search
criteria
The Loop tab has three views: Column view, Music view, and Sound Effects view. The
default Music view displays 54 buttons, each featuring a musically-related category.
Simply click on the desired buttons in the matrix to narrow your search for appropriate
Apple Loops. Activated buttons are highlighted.
Chapter 2 Overview of the Logic Express Interface 33
Page 34

The Sound Effects view offers effect-related category buttons such as Explosions, Foley,
or People.
Column view offers a standard Mac OS X column file menu that is hierarchically
separated into All, By Genres, By Instruments, By Moods, and Favorites search criteria.
Category columns
 View buttons: Click to switch between the three views. The left button switches to
Column view, the second button (featuring the note icon) switches to Music view,
and the third button (featuring the FX icon) switches to Sound Effects view.
 View pop-up menu: Restricts displayed loops to a specific loop library.
 Search field: Type text in the field to display files with names that contain the search
text string.
 Category buttons (Music and Sound Effects view only): Click to display files which
match the category in the Search Results list.
 Category columns (Column view only): Choose a category column to display its sub-
categories.
 Search Results list: Displays all loops that match the search criteria.
 Volume slider: Adjusts the playback level of the selected file.
34 Chapter 2 Overview of the Logic Express Interface
Page 35

Getting to Know the Library
The Library is a powerful tool that you can use to access the following file types.
 Channel strip settings (.cst)
 Plug-in settings (.pst)
 EXS instruments (.exs)
 Environment instruments, and programs or banks of MIDI instruments created in the
Audio MIDI Setup utility
 ReWire MIDI instruments, and active ReWire hosts
The Library automatically displays setting files that match the selected channel strip
type and section (Channel Strip Settings menu, Insert slot, Instrument slot). A white
frame indicates the selected section of the Arrange channel strips.
You can browse for files by opening folders, or search by performing text searches.
Matching setting files are displayed in the Search Results list. When you find a file you
want to use, you can load it by simply selecting it.
Chapter 2 Overview of the Logic Express Interface 35
Page 36

Getting to Know the Browser
The Browser allows you to navigate to, or search for all file types that can be used in
Logic Express, enabling easy access to (and use) of this data during production. It
displays the following file types on any connected media volume:
 Logic project files
 Song files of older Logic versions
 GarageBand projects
 All project interchange file formats Logic Express is compatible with (OMF, AAF,
OpenTL, XML, MIDI files)
 Audio files
 QuickTime movies
Computer, Home,
Path menu
and Project buttons
View buttons
Back and Forward
buttons
Play button
Search field
Search filters
File list
Action pop-up menuVolume slider
 Back and Forward buttons: Move through previously viewed levels of the folder
hierarchy.
 Path pop-up menu: Displays the levels of the file path to the current location,
allowing you to move back to a previous level.
36 Chapter 2 Overview of the Logic Express Interface
Page 37

 Computer button: Displays the contents of the local hard disk, optical drive, and other
storage media connected to your computer, if applicable.
 Home button: Displays the contents of your home directory.
 Project Folder button: Displays the contents of the current project folder.
 View buttons: Switches the file list between column and list view modes.
 Search field: Type text in the field to display files with a name that contains the
search text. In addition to searching for files by name, you can search by other
criteria (further information stored with your files). Click the plus button to display
additional search filters. Logic Express always searches at the displayed location.
 Search filters: Use the menus to narrow down your search to specific file types, file
formats, date, size, and other criteria.
 File list: Displays Logic-related files and folders at the current location. In column
view, you can browse folder contents by clicking the desired folders.
 Action pop-up menu: Choose menu items to add a selected audio file to the Audio
Bin, or show the file location in the Finder.
 Volume slider: Adjust the playback volume.
 Play button: Click to play the selected audio file.
Lists Area
The Lists area can be opened or closed by clicking the Lists button in the Toolbar. It
provides four independent tabs that show a listing of the following types of data:
 Event List: Displays regions or MIDI events.
 Marker List: Lists all markers in your project.
 Tempo List: Displays all tempo changes.
 Signature List: Shows all time signature and key change events in the project.
The list tabs are well suited for a number of precise editing tasks, and when a complete
view of all data is required.
Chapter 2 Overview of the Logic Express Interface 37
Page 38

Hierarchy button
Create and Filter buttons
Event type buttons
Getting to Know the Event List
The Event List presents a list of all events in your project, such as MIDI note events or
region start events. Use it whenever you need to make precise alterations to recorded
data, and where the graphic display of the other editors is not as well-suited to the
task. You can restrict the types of events that are shown, making it easier to find
specific event types.
The Event List can display two types of data: Region related or event related. The
information that is displayed depends on the current hierarchy level—in other words,
whether you are viewing information at the Arrange level, or looking inside one or
more MIDI regions in the Arrange area. Further information about the display hierarchy
can be found in “Working at Different Hierarchy Levels” on page 65.
Region display Event display
List area
 Hierarchy button: Click to move up one level in the Event List hierarchy. This allows
you to see all regions in the current project.
 Create and Filter buttons: Determine the function of the event type buttons. When
you enable the Create button, clicking the event type button adds the selected event
type. When you activate the Filter button, you can use the event type buttons to
filter specific event types from the display. This merely hides the events from the
display, it does not affect playback.
38 Chapter 2 Overview of the Logic Express Interface
Page 39
Marker Text Area button
Create button
Marker list area
 Event type buttons: Click to filter specific event types from the display, or add them
(depending on the status of the Create and Filter buttons).
 List area: Shows the actual list of events or regions, separated into columns. Details
in Chapter 18, “Editing MIDI Events in the Event List.”
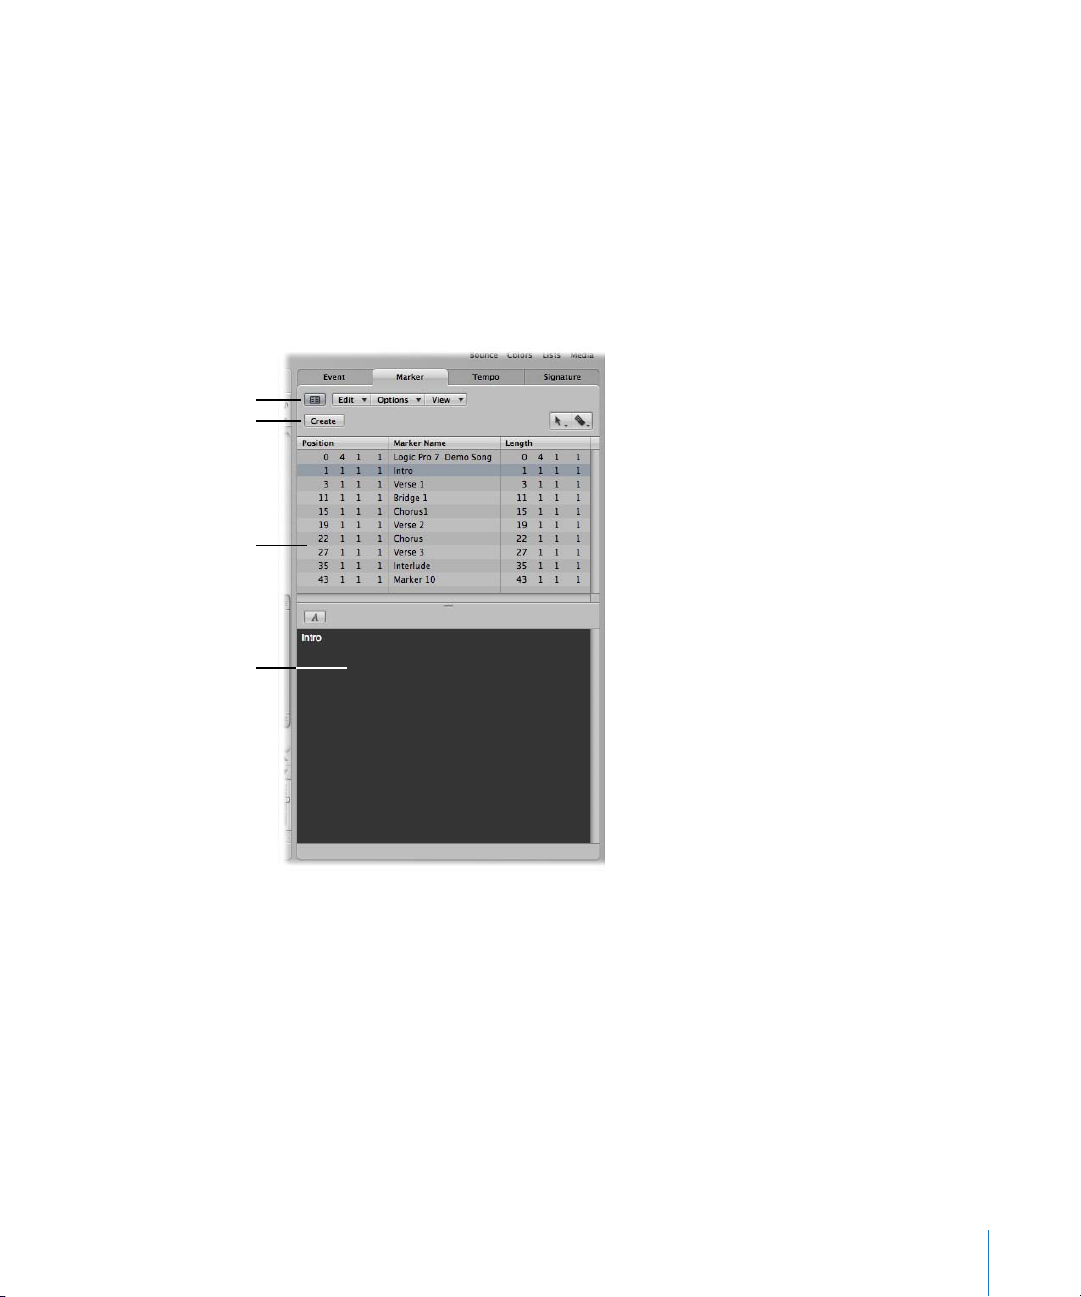
Getting to Know the Marker List
The Marker List displays all markers in the project. You can use it to create new markers,
edit existing ones, and to select markers for text editing. It also serves as a navigation
aid—you can click on a marker name to jump to (move the playhead to) a marker
position.
Marker Text area
 Create button: Creates a new marker.
 Marker list area: Displays all markers in your project.
 Marker Text Area button: Click to display the optional Marker Text area, allowing you
to enter or edit marker text.
 Marker Text area: Enter text for the selected marker here.
Chapter 2 Overview of the Logic Express Interface 39
Page 40

Create button
Tempo list
Getting to Know the Tempo List
The Tempo List displays all tempo changes in the project. You can also use it to create
new tempo events, or to edit existing ones.
 Create button: Click to create a new tempo event.
 Tempo list: Displays all tempo changes, and their positions in the project.
40 Chapter 2 Overview of the Logic Express Interface
Page 41

The initial time and key
signature of the project is
always displayed at the
top of the list, without
bar position indicators.
Getting to Know the Signature List
The Signature List shows all time and key signature events in the project. Score
symbols, if present in the score of the project, are also shown. These include: Repeat
signs and double bar lines (including end of score events), half/short bar lines, hidden
bar lines and manually inserted bar lines.
You can use the Signature List to create, copy, move, and delete time and key signature
events.
Chapter 2 Overview of the Logic Express Interface 41
Page 42

The Inspector
The Inspector can be displayed or hidden by clicking on the Inspector button in the
Toolbar. The Inspector content depends on the area in key focus: Either the Arrange or
one of the editing areas below it. The following screenshot shows the Inspector when
the Arrange area is in key focus.
Region Parameter box
Track Parameter box
Arrange channel strips
 Region Parameter box: Used to set playback parameters, such as transposition and
quantization, for individual regions on track lanes. None of the parameters in the
Region Parameter box actually alter the original data in the region. They only affect
the way the region (and events within the region) are played back. These parameter
alterations occur in real time, as the region is played. Clicking on the small triangle to
the left of the name shows or hides the contents of the box.
 Track Parameter box: Used to alter various aspects of track channel strips. All regions
on the track lane will be affected by any changes made here (as all regions are
routed through this channel strip). Clicking on the small triangle to the left of the
name shows or hides the contents of the box. Closing the box provides room for the
elements below.
42 Chapter 2 Overview of the Logic Express Interface
Page 43

 Arrange channel strips: The left-hand channel strip controls the output of the
selected arrange track. The right-hand channel strip can vary, dependent on actions
performed in the left channel strip. As examples, the right channel strip can display
the first aux or output destination channel strip for the left-hand channel strip. This
facility makes it quick and easy to set up flexible effects and audio routing schemes.
It also provides an at-a-glance view of processing and routing for the selected
arrange track, and you can access all of the mixer channel functions (volume, pan,
sends, inserts, and so on) directly from the Arrange area. Any adjustments you make
to a track’s Arrange channel strip will be reflected in the corresponding Mixer
channel strip, and vice-versa.
Note: The horizontal size of the Inspector can not be altered. In situations where the
area in key focus does not provide a parameter area, the Inspector for the Arrange area
is displayed.
As the Inspector updates to display the parameters of the window with key focus,
usage details are found in the chapters for each window.
Chapter 2 Overview of the Logic Express Interface 43
Page 44

The Editing Area
You can open the Mixer, Sample Editor, Piano Roll Editor, Score Editor, and Hyper Editor
directly in the Arrange window by clicking the corresponding button at the bottom of
the Arrange window. Here’s a brief overview of what each window offers.
Getting to Know the Mixer
The Mixer is where you mix your project. Each track is played back through a channel
strip. You can adjust the level and pan position of a channel strip, add effects, mute and
solo tracks, and send the output of a channel strip to other channel strip types, such as
output and auxiliary channels.
Filter buttonsView buttons
Channel strips
 Channel strips: Use the channel strip controls to adjust the level and other aspects of
the audio signal played through the channel strip.
 View buttons: Switch the Mixer between the Single, Arrange, and All Mixer views,
limiting the Mixer view to channel strips required for the task at hand.
 Filter buttons: Filter the display of specific channel strip types.
Full details can be found in Chapter 25, “Mixing,” on page 571.
44 Chapter 2 Overview of the Logic Express Interface
Page 45

Ruler
Waveform display
Anchor
Getting to Know the Sample Editor
The Sample Editor displays the contents of audio files as waveform graphics. You can
use the Sample Editor to precisely edit audio files (and regions). The Sample Editor also
features a number of useful destructive processing tools—these allow you to time
stretch and pitch shift audio, change sample rates, extract MIDI grooves from the audio,
and even quantize audio.
Info displayWaveform overview
PlayheadRegion area
 Ruler: Shows the position of the region in the arrangement. If you have not yet
added the audio file to the arrangement, the position marker lines are dotted,
indicating no time connection exists.
 Info display: Shows the start point and length of the selected area.
 Waveform overview: Displays a miniature view of the entire waveform. The white
frame shows the extent of the section visible in the waveform display. The dark gray
frame shows the currently selected area.
 Waveform display: Provides a detailed waveform display. If you’re dealing with a
stereo file, both channels are displayed, with the left side on top, and the right side
below. Left of the waveform display is the amplitude scale.
 Playhead: The gray line in the waveform display shows the current position of the
playhead.
 Anchor: Sets a temporal reference point for an audio region. When you move a
region in the Arrange area, Logic Express displays the position of the anchor in the
help tag, and snaps the region’s anchor to the selected Snap menu grid division.
 Region area: Edit this beam to adjust the length of the region.
Chapter 2 Overview of the Logic Express Interface 45
Page 46

Getting to Know the Piano Roll Editor
The Piano Roll Editor displays MIDI notes as beams on a grid. The piano keyboard to the
left is aligned with the note pitches represented by each beam. Note length is
indicated by the relative length of each beam. Note position is displayed from left to
right—a ruler and vertical grid lines make it easy to see where notes begin and end.
Note velocity (how hard a note is struck, and usually how loud) is indicated by color.
Full details can be found in Chapter 16, “Editing MIDI Events in the Piano Roll Editor,” on
page 415.
Getting to Know the Score Editor
The Score Editor uses traditional music notation to display the MIDI note events (plus
pedal and other event types) of MIDI regions. You can insert and edit MIDI note events
in staffs, and use musical symbols to clarify their meaning in this editor. Text, such as
lyrics, titles, and comments, can also be integrated into the score. The Print function
allows you to print complete scores, with staff numbers only limited by the paper size.
46 Chapter 2 Overview of the Logic Express Interface
Page 47

Event Definition
Parameter box
Event definitions
Details on Score Editor use can be found in Chapter 33, “Working With Notation,” on
page 695.
Getting to Know the Hyper Editor
The Hyper Editor displays MIDI note or controller events as vertical beams, placed along
a user-defined time grid. This makes the Hyper Editor the ideal place to:
 Add or edit controller data, such as note velocities. It makes some editing tasks—
such as data scaling—much faster.
 Quickly create and edit MIDI drum parts.
MIDI events
 Event definition: Each horizontal row (or lane) provides an event definition, which
determines the type of event displayed/affected. When you select a row in the name
column, its event definition is shown in the Inspector’s Event Definition Parameter
box.
 MIDI events: Each MIDI event is represented by a vertical beam, aligned with a
particular time position. The value of the controller, or velocity of the note, is
indicated by the height of the beam. Taller beams indicate higher values.
Chapter 2 Overview of the Logic Express Interface 47
Page 48
Common Features of Logic Express Windows
All Logic Express windows, including the Arrange area, feature a number of common
elements. This consistent approach between windows makes your life easier, as you will
find these elements in the same place throughout the application.
Local Menu Bars
A window’s local menu bar contains buttons that access functions which are specific to
the window. As an example, the Score Editor provides an enharmonic shift function,
which is relevant to notation, but not to Piano Roll editing.
Local menu bar
Tool Menus
The tools available in the Tool menus of each window are specific to tasks performed in
the window. As examples: the Arrange area provides tools for different arrangement
tasks, such as cutting or moving regions, and automation editing. The Score Editor
provides tools used for score layout, and tasks such as voice separation.
The left Tool menu assigns the default tool. The right menu assigns a secondary tool. A
further tool menu will appear if the right mouse button is not assigned to other tasks.
For more information, see “Working With Tools” on page 170.
48 Chapter 2 Overview of the Logic Express Interface
Page 49

Catch, Link, and Hierarchy Buttons
Most windows contain Catch, Link, and Hierarchy buttons. These are used to tie or
associate Logic Express windows, and can aid in navigating through different levels of
your song structure. As an example of where this is useful, if you click on a MIDI region
in the Arrange area, the contents of a linked window (the Piano Roll editor, for
example) will update immediately to show the events within the region.
Hierarchy button Link button
Catch button
Scroll Bars
Vertical and horizontal scroll bars are shown at the right and bottom edges of the
window. These enable you to view sections that fall outside the visible display area.
Zoom Sliders
Vertical and horizontal sliders are shown at the bottom right corner of the window.
These allow you to horizontally or vertically resize the contents of the window,
enabling a closer or more distant view of data.
Bar Ruler
All linear editing windows feature a Bar ruler at the top. The position of regions and
events within a project are aligned with Bar ruler positions. The Bar ruler displays
markers and locators, and reflects time signature changes. It also indicates three
important operational modes—solo, recording, or synchronized.
Chapter 2 Overview of the Logic Express Interface 49
Page 50

Global Tracks
All linear editing windows also feature global tracks, which are displayed just below the
Bar ruler, when opened. Click the disclosure triangle to the left of the Bar ruler (labeled
Global Tracks) to view the global tracks.
 Marker track: Contains markers, which are used to identify bar positions and parts of
the project. Their length, text, and color can be edited freely (for details, see
“Working With Markers” on page 123).
 Tempo track: Contains all tempo changes in the project. For further information, see
“Using the Tempo Track” on page 668.
 Beat Mapping track: Allows you to assign the desired bar position to any musical
event (both MIDI notes and distinct accents in audio regions). This makes it possible
to adjust the musical timeline to the original timing of a MIDI or audio region that
has been recorded rubato (free time, including speeding up and slowing down), or
just without a metronome click. The audible outcome remains unchanged, but the
resulting display will fit the musical timeline.
 Signature track: Contains the basic key of the project, along with all time and key
signatures, as they are displayed in the Score Editor.
 Chord track: Contains chord symbols that can be derived from MIDI regions or
created with the mouse. These chord symbols may also be inserted into the score.
The root notes of the chords determine the transposition (pitch shifting) of all Apple
Loops, and can also affect the playback of MIDI regions.
 Transposition track: Shows global transposition events. It is linked to the progression
of the chord root notes in the Chord track: Changing a chord root will be reflected in
the Transposition track, and vice-versa.
 Video track: Displays frames of a QuickTime movie as thumbnails that are perfectly
synchronized with the music, making it ideal for film scoring. Cuts in the movie can
be automatically detected and marked.
50 Chapter 2 Overview of the Logic Express Interface
Page 51

Interactions Between Arrange Window Areas
The Arrange window contains various sections that interact with each other. These
provide you with access to all files, editing methods, track and channel parameters in
one place, making your workflow much faster. Please follow the steps outlined below
to learn how these Arrange window elements work in harmony, to accelerate music
production.
To see how Arrange window areas interact:
1 Open the Media area by clicking the Media Browser button in the Toolbar.
2 Click the Browser tab, then browse to a folder that contains audio files.
3 Click-hold the audio file name, and drag it onto an audio track lane in the Arrange area.
Release the mouse button when the help tag displays position 1 1 1 1. A region will be
created in the Arrange area.
4 Click the Sample Editor button at the bottom of the Arrange area.
Chapter 2 Overview of the Logic Express Interface 51
Page 52

The Sample Editor is shown, displaying the contents of the region you just created in
the Arrange area.
5 Click the Audio Bin tab.
The Audio Bin contains the audio file you just added to the project.
6 Click the Loops tab, then click a category button to see matching loops in the Loops
tab’s Search Results list.
52 Chapter 2 Overview of the Logic Express Interface
Page 53

7 Select a loop with a green icon and drag it to a software instrument track in the
Arrange area.
Release the mouse button when the help tag displays position 1 1 1 1. A MIDI region
will be created in the Arrange area.
∏ Tip: If no software instrument track exists, you can also drag the Apple Loop from the
Loop Browser directly into the blank Arrange area (or below existing tracks). A track
and corresponding channel strip (including instrument and effect settings) are
automatically created, and the Apple Loop is loaded.
8 Click the Piano Roll button at the bottom of the Arrange area.
The Piano Roll Editor is shown, displaying the contents of the region you just created in
the Arrange area.
9 Move the playhead to the beginning of your project by clicking the Go to Beginning
button in the Transport bar.
10 Play your project by clicking the Play button in the Transport bar.
You will hear the audio file and instrument loop you added to the project. You may like
the melody of the software instrument loop, but not its sound. Utilize the Library to
assign another sound to the software instrument track.
Chapter 2 Overview of the Logic Express Interface 53
Page 54

11 Select the software instrument track, then click the Inspector button.
The left channel strip displays the software instrument and effect(s) of the selected
track.
12 Click the Library tab, and browse through the displayed channel strip settings.
As this is a software instrument track/channel strip, only software instrument channel
strip settings are shown in the Library.
13 Select one of the channel strip settings to load it.
14 Start playback again to audition the new sound.
54 Chapter 2 Overview of the Logic Express Interface
Page 55

Using Logic Express Interface Elements
You can access all of the buttons, switches, sliders, and menus discussed above with
the mouse and computer keyboard. Use of these Logic Express interface elements is
outlined below:
Checkboxes and Buttons
Checkboxes are square boxes that are turned on when you click them, in order to
activate an option (or function). Click the checkbox a second time to turn it off, and
deactivate the option.
Some buttons behave in a similar fashion, where the function they represent is
temporarily enabled (while the button is pressed, and usually illuminated).
A second click on the button will disable the function. Good examples of these types of
buttons include the Mute and Solo buttons.
A different type of checkbox is the round radio button. A number of grouped buttons
(each representing a different option) are available, and you need to select one of
them. They differ from checkboxes and other button types in that only one of them can
be activated at any given time. A good example are the Type radio buttons in the New
Tracks dialog.
Chapter 2 Overview of the Logic Express Interface 55
Page 56

Pull-Down and Pop-Up Menus
Pull-down menus open when you click on the desired menu item. Pop-up menus open
when you click on certain input fields or buttons.
In some menus, an arrow is shown beside one or more items, indicating a sub-menu.
To choose an item from a sub-menu, move the mouse in the direction of the arrow,
and then move vertically over the desired item. Click to activate the chosen command
or setting.
If you wish to select an item that is outside the visible section of the menu, move the
mouse over the arrow at the top or bottom edge of the menu. The menu will scroll.
Shortcut Menus
Shortcut menus (also called contextual menus) are accessed by Control-clicking or
right-clicking in different areas of various Logic Express windows. These offer a number
of selection, editing, and other area-specific commands, providing quick access to
commonly used functions.
Note: Right-click functionality is dependent on the Right Mouse Button: Opens
Shortcut Menu option being chosen in the Logic Express > Preferences > Global >
Editing tab.
56 Chapter 2 Overview of the Logic Express Interface
Page 57

Using the Computer Keyboard
You can access most Logic Express functions with key commands. Whenever this
manual mentions a key command, this refers to a function or option that can be
accessed with a computer keyboard keystroke (or keystroke combination, such as
pressing both the Control and W keys on your keyboard).
Use of key commands, rather than the mouse, can greatly accelerate your Logic Express
workflow. Throughout this manual, you will encounter a number of practical usage
examples, often in step form, that include the default key commands for particular
functions.
It is recommended that you follow the steps outlined in the manual, and make use of
these default key commands while familiarizing yourself with Logic Express. Not only
will this help you to remember them, but will also aid you in developing good (and
faster) working practices from the outset.
Once you have a good understanding of Logic Express fundamentals, and how you like
to work, you can freely assign your own set of key commands. Logic Express functions
and options that can be assigned to key commands can also be assigned to MIDI
commands, sent from your MIDI controller. More details on these advanced topics can
be found in “Working With Key Commands” on page 162.
Chapter 2 Overview of the Logic Express Interface 57
Page 58

Page 59

3 Customizing Your Window Setup
3
Logic Express allows you to customize your window setup to
fit both your working style and the task at hand.
While you will perform most of your work in the Arrange, you can open different
combinations of windows (even several of the same type) and adjust each individually.
It is also easy to save different window arrangements (called screensets, discussed in
“Using Screensets” on page 79), and recall them by pressing a key.
All open windows in a project are constantly updated as they follow the position of the
playhead. Alterations made in one window are immediately reflected in all other open
windows. As an example, if the pitch of a note event is changed in the Score Editor, this
change is instantly shown in an open Piano Roll Editor window.
This chapter outlines how you can customize and save your overall window setup. The
display options of individual windows or editors are not covered in this chapter.
Window Types
There are two different types of windows in Logic Express: normal windows and
floating windows.
Normal Windows
You can open as many normal windows as desired, including several of the same type.
Even though the contents of all windows are constantly updated, only one window
ever has the status of being the top, or active window. This is the window that is in the
foreground when several normal windows overlap, or are shown alongside each other.
It is referred to as having “key focus”.
Key focus windows can be recognized by a title bar that is illuminated, and black title
bar text (the project name).
59
Page 60

To assign key focus to a window or area, do one of the following:
m Click on the window title bar, or within the working area.
Take care with the latter, as you may accidentally insert an event or region, if the Pencil
tool is active in the window.
m Choose Window > Cycle Through Windows (or use the corresponding key command).
This assigns key focus to the next open window, if it is fully obscured by other
windows.
The Arrange window can obviously incorporate several other windows in different
areas. These can be given key focus by clicking the background or title bar of the
window (the area of the Arrange you want to use), or by using a tool in the window.
∏ Tip: You can also use Tab or Shift-Tab to cycle through the Arrange window areas: Tab
cycles forward, Shift-Tab cycles backwards.
The main characteristic of the key focus window (or area of the Arrange window) is
that key commands only affect this window, and not any of the others.
Handling Background Windows
Background windows are not fully obscured, and are identified by a dimmed title bar
(they can be positioned next to the top window, or tiled underneath it) and a faded
name.
In background windows, you can not only observe changes, but make almost any kind
of change, without needing to give the window key focus before making alterations.
Independent tool selection is memorized for each window, allowing you to directly edit
the contents of any window, whether it has key focus or not. As soon as any such edits
are made, the window is automatically made the key focus window. As an example, an
Arrange window with Piano Roll and Event List editor visible: the Pointer is active in
the Arrange area, the Pencil tool is active in the Piano Roll, and the Eraser tool is active
in the Event List editor. The tool automatically becomes active as you drag the mouse
cursor across the boundaries of each area in the Arrange window.
60 Chapter 3 Customizing Your Window Setup
Page 61

Floating Windows
Floating windows are so named because they always float in the foreground, even
above the key focus window (opening numerous float windows inevitably leads to
them covering each other—just click on the desired one to move it to the foreground).
In general, most of the Logic Express helper windows, such as the Preferences or
Project Settings windows, are floating windows.
Floating windows are usually recognizable by their narrower, gray title bar (except the
plug-in window, which has a different title bar style). Mouse operations performed in
floating windows behave in the same way as in normal windows.
Opening and Closing Windows
You can open all main Logic Express windows by choosing the window type (Arrange,
Score, and so on) in the Window menu. Each window type has a corresponding key
command that opens the window, without using the mouse. As examples, Command-1
opens the Arrange window, Command-2 opens the Mixer, and so on. The key
command designations are shown beside each window name in the Window menu. It
is highly recommended that you learn and use these key commands, rather than the
mouse, as they will speed up your workflow.
You can open multiple windows of the same type, if required. This may be useful when
you want to individually display and alter the contents of several regions in a particular
editor type.
You can also open all Logic Express editors in the Arrange window by clicking the
buttons at the bottom of the Arrange window.
Chapter 3 Customizing Your Window Setup 61
Page 62
Double-clicking an Arrange audio region opens the Sample Editor at the bottom of the
Arrange window. Double-clicking an Arrange MIDI region opens the default editor at
the bottom of the Arrange window. You can determine the default editor with the
“Double-clicking a MIDI region opens” menu in the Global preferences window.
Option–double-click on a region to open the default editor as a separate window.
The Toggle … Window key commands allow you to define one key command to open
or close the window, or area of the assigned type in the active Arrange window. If the
window is not available as an Arrange window area, it will be opened as an
independent window. As examples in the Arrange window: You can open and close
(toggle) the Lists and Media areas with the Toggle File Browser, Toggle Library, and so
on key commands.
You can close the window with key focus (usually the topmost, or foreground window)
by choosing File > Close in the main menu bar (or by using the Close Window key
command, default: Command-W).
Windows can also be closed by clicking the close symbol at the top left.
Option-click the close symbol to close all windows of the active project.
Note: If you close all open windows of a project, Logic Express assumes that you want
to close the project, and asks if you want to save your changes.
62 Chapter 3 Customizing Your Window Setup
Page 63
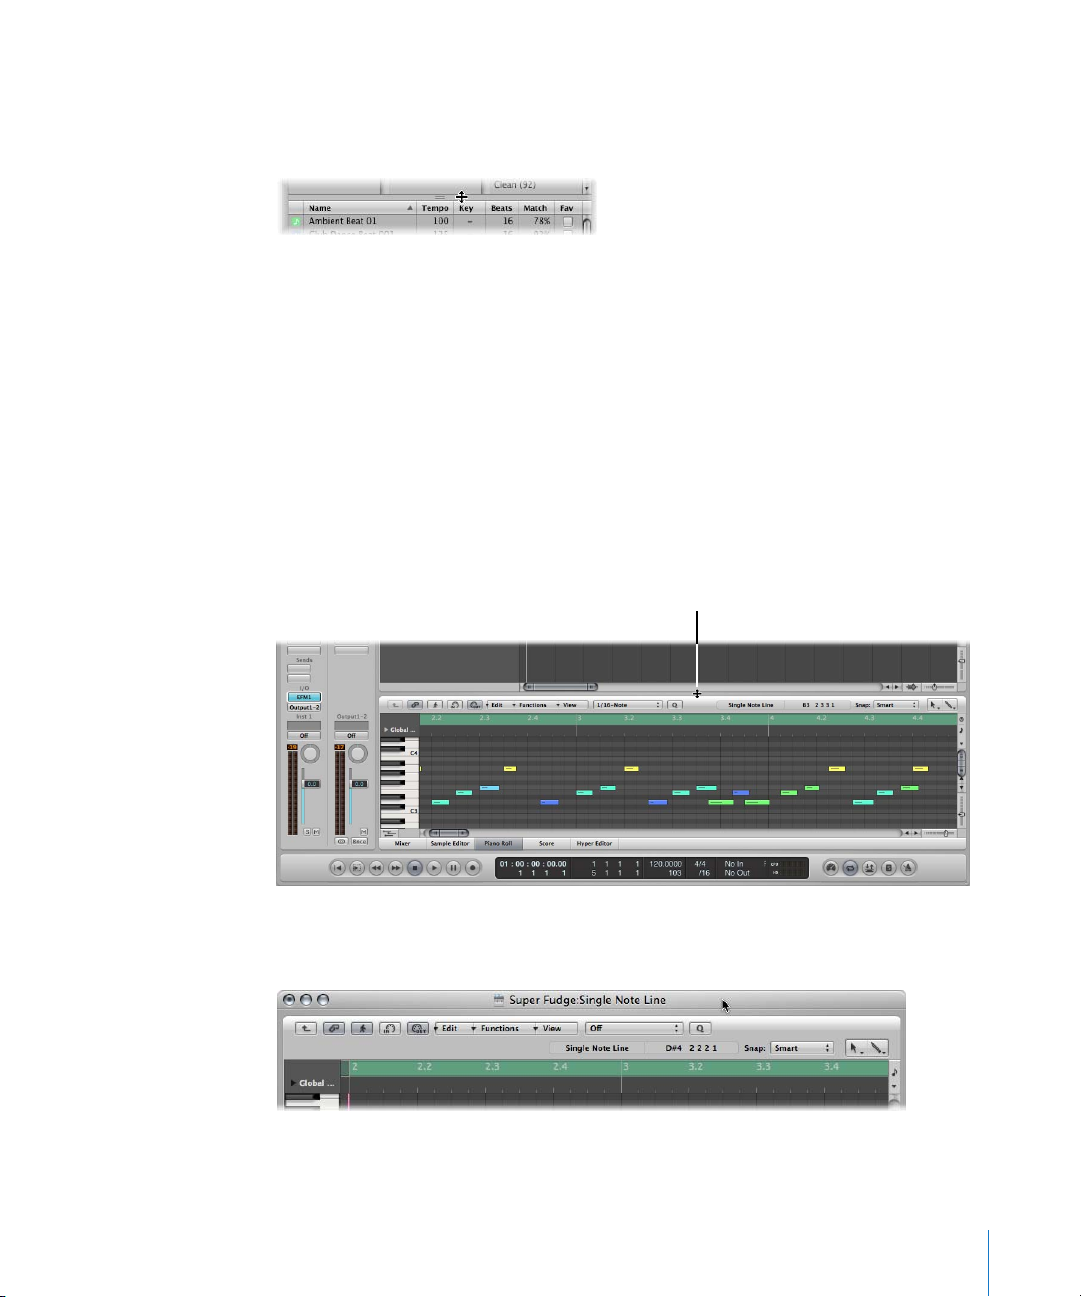
Moving and Resizing Windows
You can move and resize all open windows individually, even across multiple monitors.
You can also alter the size of all window elements that feature the resize bar.
The size relationship of the editing and Arrange areas within the Arrange window can
also be adjusted, by clicking between them, and dragging vertically. The cursor
changes to a Resize pointer. The vertical height of the Mixer area is memorized
independently. All other editing areas share the same height.
You can not resize the other Arrange window elements (the Inspector and Media or
Lists area). You may only open or close these areas.
Here is an example of a possible window setup: Imagine you want to edit the MIDI
notes of various MIDI regions. You may want to increase the height of the Piano Roll
Editor to work at a high zoom level, thus decreasing the height of the Arrange area.
You would then reduce the Arrange area zoom level, as it only needs to be used for
region selection duties.
Resize pointer
To move a window:
m Click-hold the title bar and drag the window to the desired position.
Chapter 3 Customizing Your Window Setup 63
Page 64

To adjust the size of a window, do one of the following:
m Drag the lower right-hand corner of the window, as with any window in the Finder.
m Position the mouse pointer over the window edge. When the mouse pointer turns into
the Resize pointer, drag in the desired direction.
To adjust the size of window elements:
1 Move the mouse over the resize bar.
2 When the mouse pointer turns into the Resize pointer, drag the window element in the
desired direction.
To maximize a window, do one of the following:
m Select the window, the choose Window > Zoom.
m Click the zoom button (the right-most button of the three window controls) in the top
left corner of the window title bar.
A second click on the icon will restore the original window size.
To minimize a window, do one of the following:
m Select the window, then choose Window > Minimize (or use the corresponding key
command, default: Command-M).
m Click the minimize button (the middle button of the three window controls) in the top
left corner of the window title bar.
This places an icon (minimized version of the window) in the Dock. The window can be
restored by clicking on the icon in the Dock.
64 Chapter 3 Customizing Your Window Setup
Page 65

Working at Different Hierarchy Levels
Logic Express allows you to view projects at an overview level (Arrange level) and also
at the microscopic level (editor level). These different hierarchical levels are designed
for different types of tasks, such as arranging project sections or refining instrument
parts, as examples. In many cases, you can switch between these different display levels
directly, without needing to open or access another window.
Clicking the Hierarchy button in the top left corner of a window or window area moves
the displayed view up one level (generally to the Arrange level).
Note: Double-clicking on the background of the editing area of a window also moves
up one display level.
About Display Levels in the Editors
Normally, the editors are at the lowest display level, which shows individual events
within the selected region.
In the Piano Roll and Hyper Editors, a step up the display hierarchy will show the events
of all regions in the Arrange area.
Clicking the Hierarchy button in the Event List moves you up one level in the display
hierarchy, just like the other editors. In the Event List, however, the display remains
much the same but shows a list of regions, rather than a listing of individual events—
along with region positions, names, track numbers, and lengths. The MIDI region that
you were just editing will be selected within the list of region names.
Double-clicking on a MIDI region (or using the Go Into Folder or Region key command)
returns you to the lowest display level, and shows the contents of the MIDI region.
Double-clicking on an audio region opens it in the Sample Editor.
In the Score Editor, clicking on the Hierarchy button takes you to the higher display
level. Unlike the other editors, individual events can also be edited while in higher
display levels in the Score Editor. Double-clicking on a staff (at an empty point), reverts
to a lower display level.
Chapter 3 Customizing Your Window Setup 65
Page 66

Selecting the Working Area
The scroll bars at the right and bottom edges of a window enable you to move
through the working area in either the vertical or horizontal dimension.
Scroll bar
Scroll bar
You can move the visible section by clicking the arrows, or dragging the scroller. There
are two points to note:
 The size relationship of the scroller to the overall scroll bar length corresponds to the
size of the visible section of the window, in relation to the overall window size.
 The visible section changes as you move the scroller.
66 Chapter 3 Customizing Your Window Setup
Page 67

Use the Page Up, Page Down, Page Left, and Page Right key commands to scroll one
page up, down, left, or right, as if you had clicked in the gray area (in the scroll bar)
above or below the vertical scroller, or to the left or right of the horizontal scroller.
Click the gray area below
the vertical scroller to
scroll one page down
The Page Top, Page Bottom, Page Left-Most, and Page Right-Most key commands move
the visible section of the working area to the top, bottom, left, or right, just as if you
had grabbed one of the scrollers, and moved it to one of its extreme positions.
In the Arrange area, Event List, Hyper and Piano Roll Editors, View > Scroll to Selection
moves the visible section of the edit window to the first set of selected events. This
function is available as a key command which works in the key focus window.
To scroll both vertically and horizontally at the same time, do one of the following:
m Press Shift-Control, click-hold the Arrange window background, then drag in the
desired direction.
m Click-hold the Arrange window background with the third mouse button (the mouse
wheel, for example), then drag in the desired direction.
The distance of the mouse pointer position from the initial clicked position determines
the scrolling speed.
Note: This only works if you haven’t assigned the third mouse button to a global
command, such as Expose, for example,
Chapter 3 Customizing Your Window Setup 67
Page 68

Zooming
The zoom controls are used to zoom in and out on the working display area. Selection
of different zoom values reduces or increases the size of events or regions in the
displayed screen section. This allows you to:
 See more events or regions in the same amount of screen space (zoom out).
 See a detailed display of events or regions (zoom in).
While zooming, the top-left (selected) event or region is kept in the visible area of the
screen. In other words, the first selected region or event will be retained in the zoomed
window. If no selected region or event is visible, zooming is centered around the
playhead. It the playhead isn’t visible, the current center of the window will be retained.
The horizontal and vertical zoom controls are located to the bottom-right of the
working area of the window.
Vertical zoom control
Horizontal zoom control
To zoom out:
m Click on the more closely spaced bars to decrease the zoom level.
To zoom in:
m Click on the widely spaced bars to increase the zoom level.
You can drag the zoom sliders to step through several zoom levels. Any relative size
differences between tracks will be retained when zooming.
Command-clicking a value in the zoom control sets the zoom slider to the respective
zoom level.
68 Chapter 3 Customizing Your Window Setup
Page 69

Zooming With the Scroll Bars
The scroll bars not only allow you to move through your arrangement and editing
windows. They can also be used for zooming.
To zoom with the scroll bars:
m Click-hold on the zoom handles at either end of the scroll bar, and drag:
 Up or down on the vertical scroll bar.
 Left or right on the horizontal scroll bar.
As you drag, the window contents will be zoomed.
Zooming the Waveform of Audio Regions
The Arrange area offers a unique Waveform Zoom tool, found to the left of the
horizontal zoom slider. This allows you to visually resize the waveform, making it easier
to determine hit points, which can be useful for some editing tasks.
To zoom the waveform of audio regions:
1 Click-hold on the Waveform Zoom button, and a slider is shown.
2 Drag the slider, and as you do so, the waveform shown in all audio regions is increased
or decreased in size.
An active Waveform Zoom button is displayed in dark gray. Click it to switch off the
Waveform Zoom display.
Note: This is a purely visual function. The amplitude (level) of the waveform is not
affected.
Chapter 3 Customizing Your Window Setup 69
Page 70

Storing and Recalling Zoom Settings
You can store three different zoom settings for each window via use of the Save as
Zoom 1–3 key commands. Use the Recall Zoom 1–3 key commands to recall your
zoomed settings. These commands only apply to the active window or window area.
Zooming in on One Section of the Screen
To enlarge a section of the screen to fill the whole window, rubber band select the
desired area with the Zoom tool.
You can do this repeatedly, if you need to zoom in further.
∏ Tip: You can access the Zoom tool when other tools are selected by holding Control-
Option.
Reverting to the Previous Zoom Setting
Click on the window background with the Zoom tool. This will return the zoom level to
the original setting, or will backtrack through previous zoom steps if the tool was used
multiple times.
Zoom Navigation Key Commands
You can set, and recall, up to thirty zoom level and window scroll-bar positions for each
window. These allow you to navigate through a number of window zoom levels, and
scroll bar positions, making repetitive editing tasks much faster.
You can use the following commands to zoom selected events, or a region defined by
the locators, to fit the screen. The use of all zoom commands creates a new step in the
navigation path.
 Zoom to fit Selection vertically and horizontally, store Navigation Snapshot: Displays the
current selection as large as possible, and saves it in the navigation path.
 Zoom to fit Selection horizontally, store Navigation Snapshot: Displays the current
selection as large as possible horizontally, and saves it in the navigation path.
 Zoom to fit Locators, store Navigation Snapshot: Displays the current locator area as
large as possible, and saves it in the navigation path.
70 Chapter 3 Customizing Your Window Setup
Page 71

The navigate key commands allow you to recall the previous or next zoom settings.
 Store Navigation Snapshot: The current zoom and scroll bar (window position)
settings are saved as a step in the navigation path.
 Navigation: Back: Recalls the previous step in the navigation path.
 Navigation: Forward: Advances to the next step in the navigation path.
As an example of where the navigation path commands could be useful, imagine
cutting and pasting sections of an audio region to several other locations, in a project
with hundreds of tracks. One step in your navigation path would be a zoomed view of
the audio region. Another step could be a vertically zoomed in version of several tracks
(the target tracks for the pasted region sections). A further step could be a horizontally
zoomed out section of the project, allowing you to paste the region segments to a later
position.
Note: There are no default key commands for most of these navigation options, so you
will need to assign them in the Key Commands window. Choose Logic Express >
Preferences > Key Commands and type “nav” in the Find field. This will display the
entries described above. For more information about assigning key commands, refer to
“Assigning Key Commands to Computer Keys” on page 166.
Relationships Between Windows
Logic Express allows you to independently link or unlink windows, providing you with
flexible viewing options. This enables you to set up two Event List windows for
example, with one showing Arrange regions, and the other showing the contents of
the regions. You can simply click on the desired region name to update the contents of
the second event list.
The two buttons at the top left of most windows determine its relationship to:
 The playhead position (Catch)
 Other windows (No Link, Same Level Link, or Content Link)
Chapter 3 Customizing Your Window Setup 71
Page 72

Catch
Enable the Catch button to ensure that the visible section of a window follows the
playhead during playback or recording.
If the button is disabled, the display does not update, even when the playhead moves
past the right edge of the visible portion of the window.
The “Catch when Logic starts” (Logic Express > Preferences > Global > Catch) option
enables Catch mode whenever you press Play or Pause.
The “Catch when moving playhead” preference enables Catch mode whenever you
move the playhead.
Scroll in Play
The View menus of all windows that display time horizontally (Arrange area, Score
Editor, Piano Roll Editor, and Hyper Editor) offer the View > Scroll in Play setting. If the
Catch function of the window is also activated, the playhead will remain in the middle
of the window, while the background scrolls smoothly from right to left.
No Link, Same Level Link, and Content Link Modes
These display options allow you to define how information is shown when working
with related editor windows.
To set any of these modes:
m Control-click (or right-click) the Link button, and choose the required mode from the
menu.
 No Link: Unlinks the window from others.
 Same Level Link: When activated in a given window, this window always displays the
same contents as the key focus window. The display updates whenever the selection
(of data) in the key focus window changes. Here’s an example: Imagine the key focus
window is a Piano Roll Editor. In Same Level Link mode, the Score Editor and Event
List will display the same data in another form.
 Content Link: This mode results in the window always showing the contents of the
region selected in the key focus window. The display is therefore always one level
below that of the top window. Here’s a Content Link example: If the Arrange area is
the active window, any opened MIDI editor window will show the events of the
selected MIDI region. Selecting a different MIDI region in the Arrange area will
update the display of the linked editor to show the contents of the newly-selected
region. You could also use Content Link mode in one Arrange area, to display the
folder contents of another Arrange area.
∏ Tip: You can also quickly switch between these modes by clicking the Link
button: clicking it once switches between No Link and Same Level Link mode. Doubleclicking the Link button switches to Content Link mode.
72 Chapter 3 Customizing Your Window Setup
Page 73

The symbol on the Link button reflects the chosen display mode:
Same Level Link mode Contents Link mode
Content Catch Mode
Content Catch mode is commonly used in the Arrange area, with linked MIDI editor
windows updating to show the events within the MIDI region that is currently being
played (on the selected Arrange track).
Initially, this is equivalent to Content Link mode, but when the playhead reaches the
next region on the same track, the contents of this region are then displayed.
To enable Content Catch mode:
1 Click the Catch button to turn it on.
2 Control-click (or right-click) the Link button, and choose Content Link mode.
Customizing the Transport Bar
You can customize the Transport bar by adding or removing buttons and displays,
allowing access to the functions you need most often. This in turn, has an impact on
the size of the Transport window. You can also open an independent SMPTE or Bar
display window. For more information, refer to “Customizing the Transport Bar” on
page 116.
Chapter 3 Customizing Your Window Setup 73
Page 74
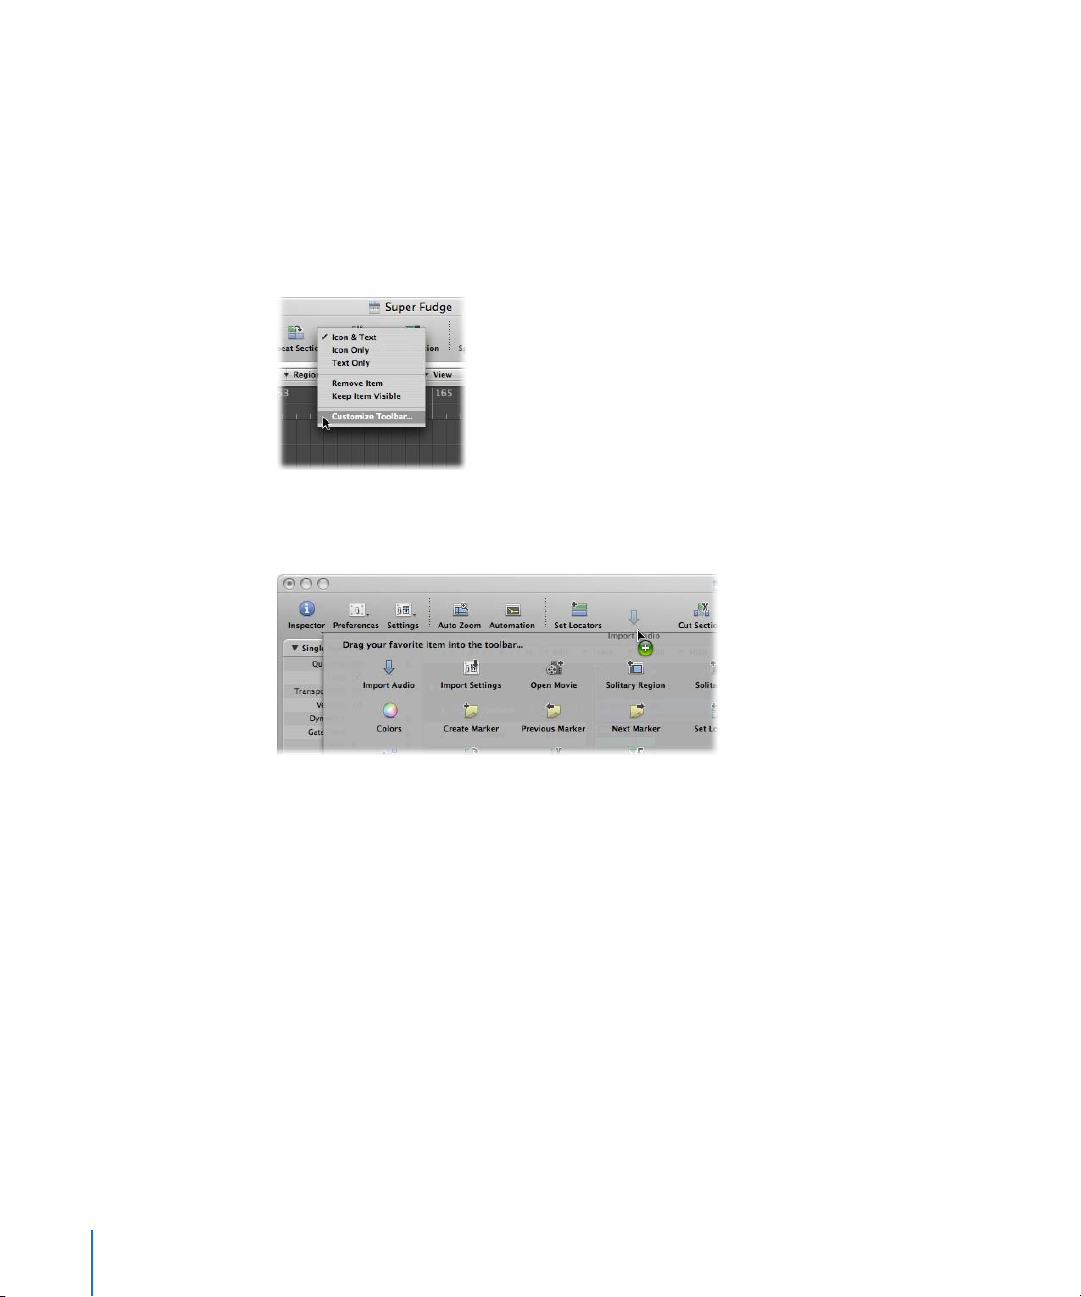
Customizing the Arrange Window Toolbar
You can customize the Toolbar by adding buttons for the commands you use most
often. You can also configure the display to show only the button’s icons, or only their
labels.
To add a button to the Logic Express Toolbar:
1 Control-click (or right-click) the Arrange window Toolbar, and choose Customize
Toolbar from the shortcut menu.
2 Drag the buttons you want to add from the Customize Toolbar dialog to any empty
area along the top of the window.
If you drag a button to a location between two existing buttons, they will move to
make space for the new button.
Note: You may also choose to drag the entire default set from the bottom of the
Customize Toolbar dialog, if your customizations don’t work out as well as you’d hoped.
3 Click Done when finished.
To remove a Toolbar button:
m Control-click (or right-click) the desired button, then choose Remove Item from the
menu.
To change the appearance of Toolbar items:
m The shortcut menu and Show menu in the Customize Toolbar dialog also allow you to
view Toolbar items as Icon & Text, Icon Only, or Text Only. Simply choose the preferred
viewing option.
74 Chapter 3 Customizing Your Window Setup
Page 75
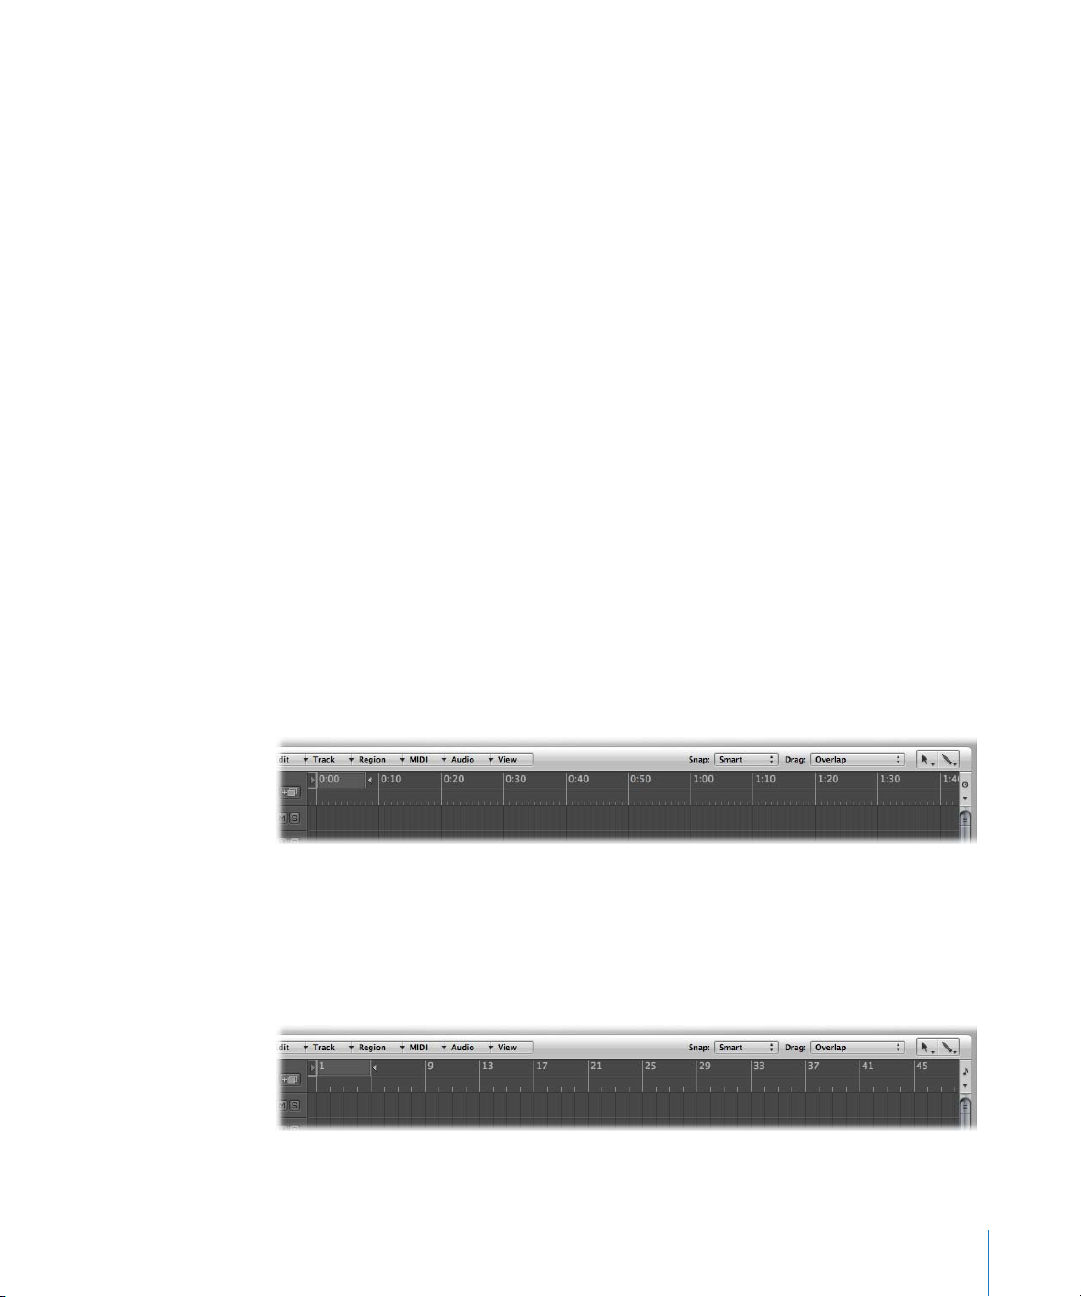
When you resize the Arrange window, the Toolbar may not offer enough space to keep
all buttons visible.
To keep a Toolbar button visible when you resize the Arrange window:
m Control-click (or right-click) the desired button, then choose Keep Item Visible from the
menu.
Hiding or Revealing the Inspector
You can hide the entire Inspector area to the left of the Arrange and editor windows,
providing more workspace for regions, events, and other data.
To hide or show the Inspector in the Arrange window, either:
m Click the Inspector button in the Toolbar.
m Choose View > Inspector (or use the Hide/Show Inspector key command).
To hide or show the Inspector in the editing windows:
m Choose View > Inspector (or use the Hide/Show Inspector key command).
If there is not enough vertical room to display all areas of the Inspector, you can click
the disclosure triangles to hide the individual boxes.
Adjusting the Bar Ruler Display
You can switch the Bar ruler between four display modes:
 Time: Displays a SMPTE time ruler, divided into hours, minutes, seconds, and frames.
 Bar: Displays a Bar ruler, divided into bars, beats, divisions, and ticks. Dependent on
the zoom settings (see “Zooming” on page 68), the bars are shown at the top edge in
units of 1, 4, 8, or 16. Time signature changes are also shown here. In the bottom
third, there is a vertical line for each bar. The shorter lines represent one beat, but are
not always visible (depending on the zoom setting).
Chapter 3 Customizing Your Window Setup 75
Page 76

 Bar and Time: Displays the Bar ruler above the SMPTE ruler.
 Time and Bar: Displays the SMPTE ruler above the Bar ruler.
To set the Bar ruler display mode:
m Click on the small down arrow icon to the right of the Bar ruler, and choose the desired
display mode in the shortcut menu.
The Marquee Stripe setting hides or shows the marquee stripe—a tool used for
selection tasks. For further information see “Selecting Parts of a Region” on page 320.
You can also use the following key commands to switch the ruler display:
 Event Position and Length in SMPTE Units: Switches between the Bar and SMPTE ruler
if one ruler is displayed, and switches the position of the Bar and SMPTE ruler if both
are displayed.
 Secondary Ruler: Switches the display of the second ruler.
76 Chapter 3 Customizing Your Window Setup
Page 77
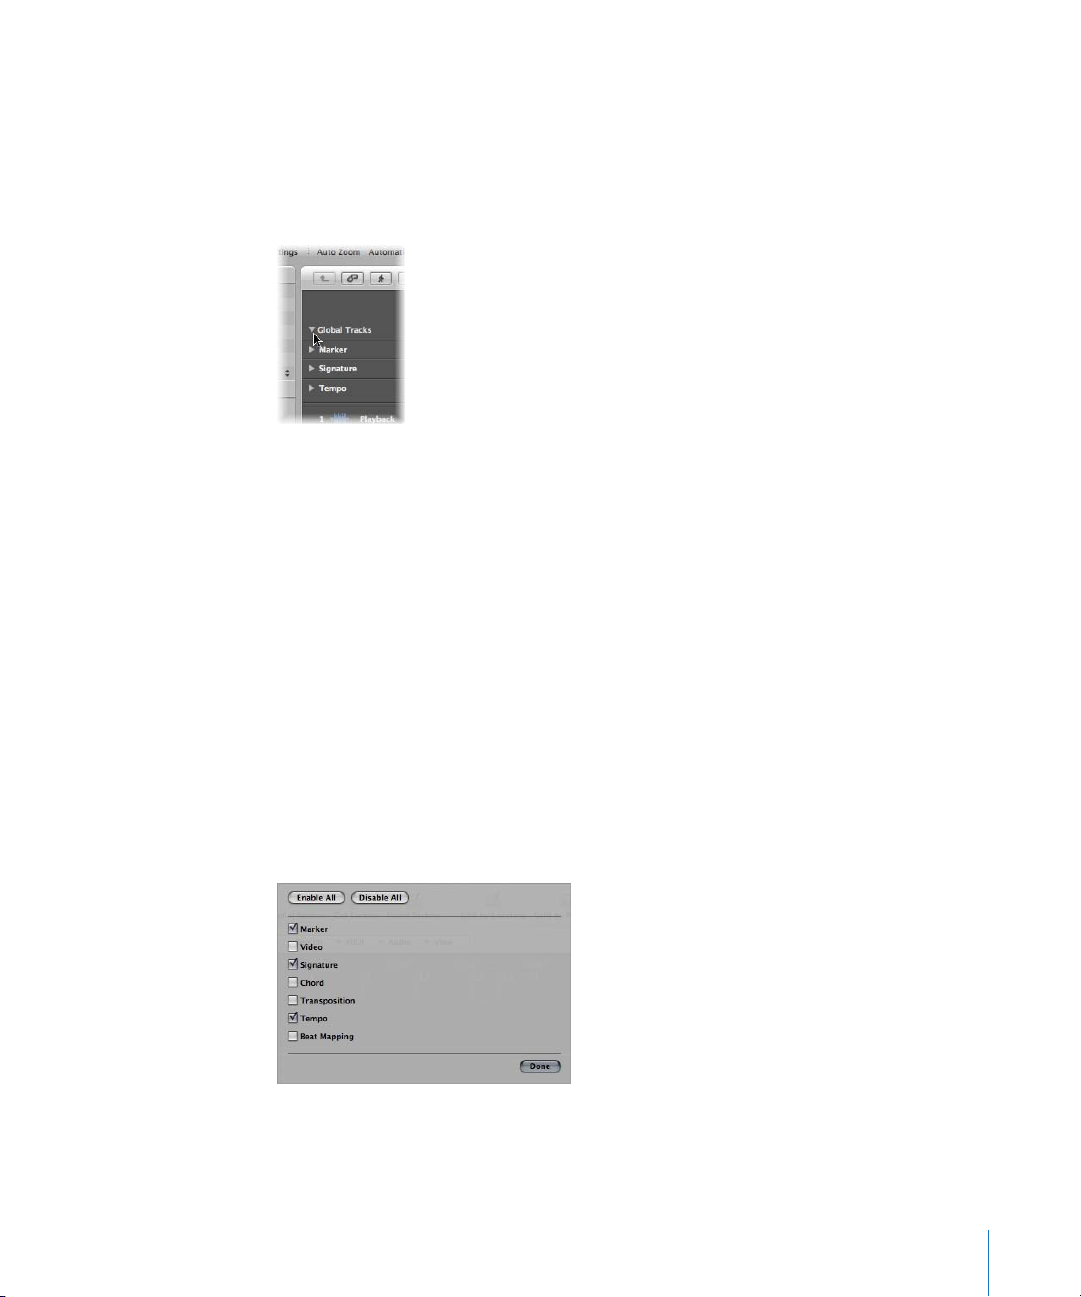
Displaying Global Tracks
All linear editing windows can display global tracks just below the Bar ruler. You can
limit the display to particular global tracks, resize, and move them.
To hide or show global tracks, do one of the following ways:
m Click the Global Tracks disclosure triangle to the left of the Bar ruler.
m Choose View > Global Tracks (or use the Toggle Global Tracks key command).
m Use one of the following key commands:
 Hide All Global Tracks
 Show All Global Tracks
Showing and Hiding Individual Global Tracks
By default, the global Marker, Signature, and Tempo tracks will be visible when you use
any of the methods above to open the global tracks lanes.
To hide or show particular global tracks:
1 Do one of the following:
 Control-click (or right-click) anywhere in the global tracks header area, and choose
Configure Global Tracks from the shortcut menu.
 Choose View > Configure Global Tracks (or use the Configure Global Tracks key
command).
2 Do one of the following in the Configure Global Tracks dialog:
 Click the corresponding checkboxes to display or hide each global track type.
Chapter 3 Customizing Your Window Setup 77
Page 78
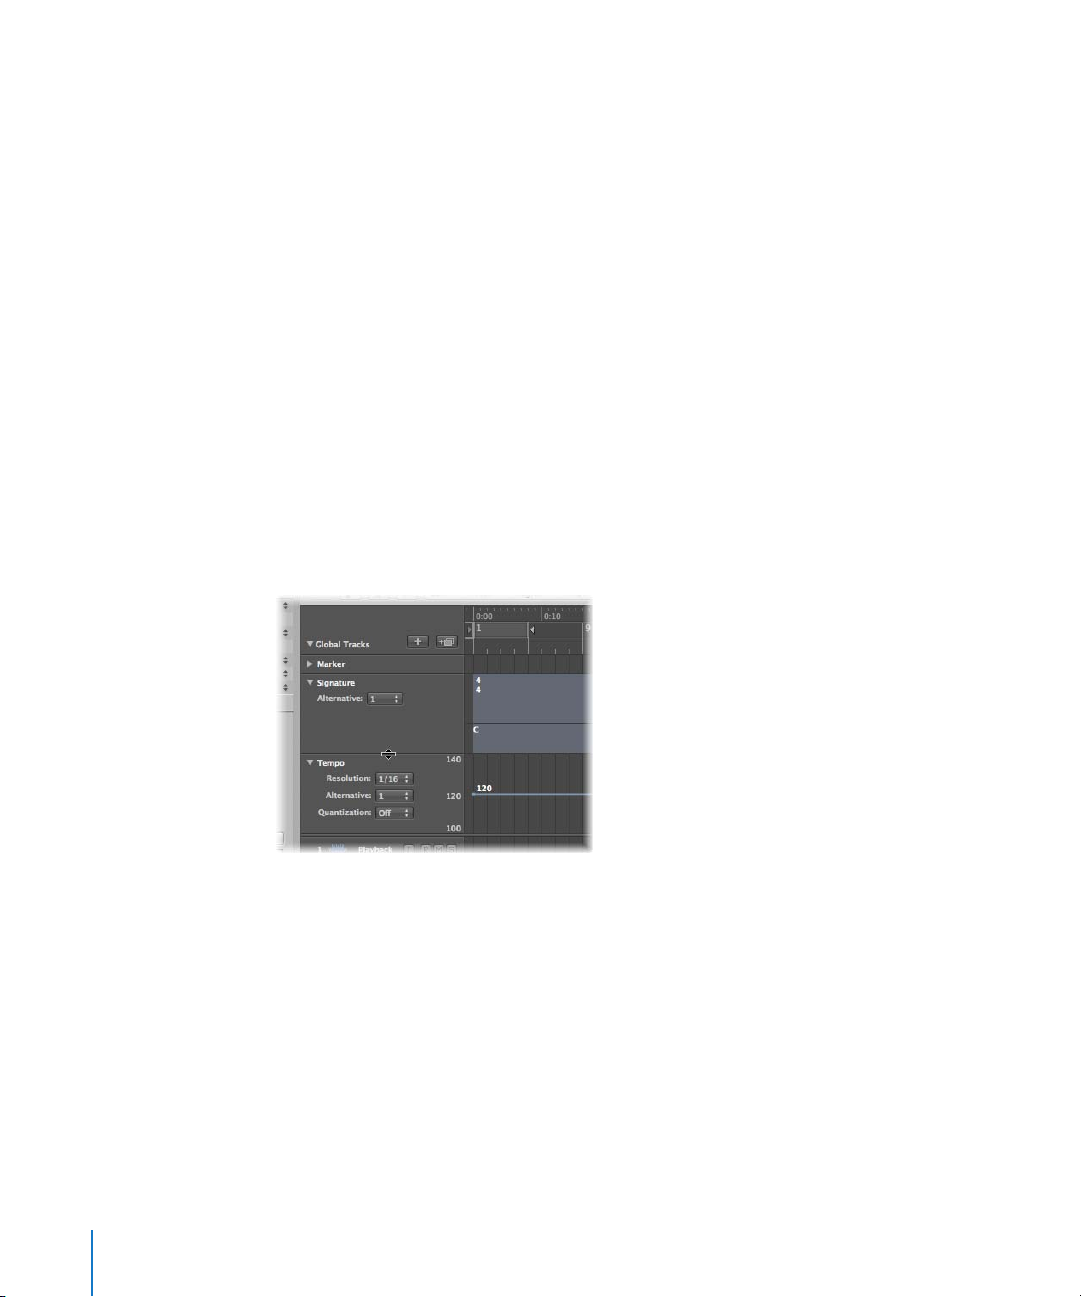
 Click the Enable All or Disable All buttons to show or hide all global tracks,
respectively.
The choices made in the Configure Global Tracks dialog only affect the active window.
Each window can have an independent global track display configuration.
Note: You can also assign, and use, any of the following Toggle key commands for each
individual global track: Marker, Transposition, Chord, Signature, Tempo, Beat Mapping,
and Video. This will have an immediate impact, and will not open the Configure Global
Tracks dialog.
Resizing and Moving Global Tracks
You can resize global tracks individually, and can resize the entire global tracks area.
To resize individual global tracks, do one of the following:
m Click the disclosure triangle in the upper left corner of each global track.
The track height is expanded and additional controls become visible. A further click on
the triangle reduces the track height.
m Position the mouse pointer over the lane dividers between global tracks in the header
area, then drag up or down.
To resize the entire global tracks area:
m Position the mouse pointer over the dividing line between the global tracks and the
Arrange tracks, then drag up or down.
To change the order of global tracks:
m Grab anywhere (except on the control elements) in the header area of the global track
you want to move, and drag up or down.
The display order of global tracks is saved independently for each window.
∏ Tip: If the Track Protect buttons are visible (View > Configure Track Header > Protect
Buttons), you can prevent unintentional changes to individual global tracks by clicking
on the corresponding Protect button.
78 Chapter 3 Customizing Your Window Setup
Page 79

Using Screensets
You will position windows in a way that suits your working methods. This layout of
various windows, including the display size, zoom levels, and position of each window
(and other settings) is called a screenset. Once defined, you can save, and freely switch
between different screensets, much as you might swap between different computer
monitors.
Saving and Recalling Screensets
Screensets are numbered from 1 to 99 (using only the 1 to 9 computer keys—the 0 key
is assigned to the Stop command by default).
You don’t need to save screensets with an explicit command. It happens automatically,
as soon as you switch to another screenset. Thus, without any effort, your current
working view is always stored as the current screenset.
To create a screenset:
1 Press a numerical key, say 7.
For two-digit screensets, hold down Control while entering the first digit.
2 Arrange your windows as desired, including changes to zoom settings, relationship of
the Arrange area and editor areas, open or closed Inspector and Media or Lists areas,
and so on.
Note: When you choose a screenset number that has not been saved, a maximized
Arrange window opens.
To recall, or switch between screensets, do one of the following:
m Input the number of the desired screenset (1 to 9).
For two-digit screensets, hold down Control while entering the first digit.
m Choose the desired screenset from the Screenset menu.
m Use the Next Screenset or Previous Screenset key commands.
Recalling Screensets 1 to 9 via Key Commands
Screensets 1 to 9 can be recalled by freely-defined key commands, not only the
number keys on your computer keyboard. This allows you to use the number keys for
other purposes, such as opening or closing windows. The 1 to 9 key commands are
called Recall Screenset 1 (… 9, respectively) in the Key Commands window.
Sequencer Controlled Screenset Switching
You can automatically switch screensets through the use of meta event # 49—just add
it to a MIDI region in the Event List.
Chapter 3 Customizing Your Window Setup 79
Page 80

To switch a screenset automatically:
1 Select the MIDI region into which you want to insert the meta event.
2 Set the playhead to the point where you’d like the screenset to change.
3 Click the Create button in the Event List, then click the Meta Events button.
The inserted meta event has a default value of 50 (Project Select).
4 Alter the number in the Num column from 50 to 49.
This changes the name to screenset.
5 Input the desired screenset number in the Val column.
You can stop screenset switching by muting the MIDI region that contains the meta 49
event.
Protecting, Copying, Renaming, and Deleting Screensets
Logic Express allows you to protect, copy, rename, and delete a screenset, making it
easy to manage screensets.
To prevent the current screenset from being altered:
m Choose Screensets > Lock Screenset (or use the Lock/Unlock Current Screenset key
command, default: Shift-L).
A bullet appears in front of the screenset number to indicate that it is locked. Reuse the
key or menu command to unlock the screenset.
Important: The File > New command deactivates all screenset locks.
80 Chapter 3 Customizing Your Window Setup
Page 81

To copy screensets:
1 Switch to the screenset you would like to copy, and choose Screensets > Duplicate (or
use the corresponding key command).
2 In the Duplicate Screenset window that opens: Type in the target screenset number
(the screenset number that you want to copy to), and enter a name.
To rename the current screenset:
m Choose Screensets > Rename (or use the corresponding key command), and type the
desired name in the Rename Screenset window.
Click the Auto Name button to automatically name the screenset. This defaults to the
visible window names (“Arrange/Piano Roll” or “Arrange/Mixer” as examples). The name
is automatically updated whenever a window or view is opened or closed.
To delete the current screenset:
m Choose Screensets > Delete (or use the corresponding key command).
Importing Screensets From Another Project
You can import screensets from another project.
To import all screensets from another project:
1 Open the Import Settings window by doing one of the following:
 Choose File > Project Settings > Import Settings (or use the Import Settings key
command).
 Click the Settings Toolbar button, then choose Import Settings from the pop-up
menu.
2 In the Import dialog, click the Screensets option.
3 Browse to, and select, the desired source project (the one that you wish to import
from).
4 Click Open (or double click on the source project name).
The settings are imported into the active project.
Chapter 3 Customizing Your Window Setup 81
Page 82

Reverting to Saved Screensets
The Revert to Saved Screenset (or the corresponding key command) resets your screen
to its original state—prior to changing any aspect of the current screenset.
82 Chapter 3 Customizing Your Window Setup
Page 83

4 Setting Up Your System
4
Logic Express automatically finds and configures supported
audio and MIDI hardware when first installed and run. There
are many circumstances where you may wish to enhance or
extend this basic automatic configuration.
This chapter will help you to optimize your hardware for use with Logic Express. It also
includes a lot of background information about components your music production
system can incorporate. If you’re new to Logic Express, and would like to get “hands on”
with the application, please skip ahead. You can always return to the following sections
when considering the addition of a device to your system, but this isn’t essential to
know before using Logic Express.
Designing Your Music Production System
Your music production system can incorporate far more than your computer and
Logic Express software.
A complete Logic Express studio could conceivably consist of any, or all, of the
following components:
 A Macintosh computer and related peripherals, such as a mouse or other pointing
device, keyboard, displays, and so on
 Audio and MIDI interfaces
 External MIDI sound generators, such as samplers and synthesizers
 External audio devices, such as mixers, audio converters, pre-amplifiers, channel
strips, effects units, and more
 External MIDI control surfaces and keyboards. Even external MIDI-controlled lighting
can be driven by Logic Express.
 Amplification and speakers
83
Page 84

 Additional software that runs alongside, and integrates with, Logic Express. This
includes a range of ReWire applications and audio or MIDI software.
 Additional effect and instrument plug-ins, including those that are DSP-accelerated,
such as PowerCore.
Read this section if considering components that you want to integrate into your
Logic Express music production system. If you already have all components, and their
integration meets your needs, feel free to skip this section.
Computer
This section outlines several computing factors that you should consider for your
Logic Express system. System requirements are covered in the Before You Install
document, found in the Documentation folder of the Logic Express installation discs.
Note: System requirements may change between Logic Express releases, so you should
always check the Apple website and the latest Before Your Install document included
with Logic Express updates.
How Fast Your Computer Should Be
Audio processing is complex, so the general rule is: the more powerful your computer,
the better. This involves not only the speed of the CPU(s) of your Macintosh, but also
includes larger main memory sizes, the speed of busses, and the general efficiency of
communication with connected devices.
A Portable or Fixed Studio?
You may be wavering between a desktop or portable Macintosh as the basis for your
Logic Express system, or perhaps considering the viability of a laptop machine for onthe-road composition. The good news is that portable Macintosh computers are ideal
for Logic Express use. They offer excellent audio and MIDI hardware expansion
capabilities in the form of FireWire and USB connectors, and are fast enough to allow
extensive software instrument and effect use. Due to the power-saving nature of
portable computers, slower hard disk drives are usually included, resulting in a lower
track count than is possible with a desktop equivalent.
Obviously, desktop computers offer additional expansion slots, extending the range of
MIDI and audio hardware possibilities, and can incorporate multiple processors. CPU
and hard disk speeds are generally higher, thus allowing higher track playback counts,
and the simultaneous use of more software instruments and effects.
∏ Tip: If you have both a portable and desktop Macintosh, you can easily transfer
projects and other data between them.
84 Chapter 4 Setting Up Your System
Page 85

Hard Drives and Storage Locations
Music production generates a huge number of large files. These include samples for
audio instruments, loop libraries, audio recordings, video files, and more.
Consider buying a separate, large capacity hard drive (or several) for your audio files
and sample libraries.
You should also look at a reliable, high-capacity backup system, and should automate
your backup routine, preferably as a daily occurrence.
Audio and MIDI Interfaces
An audio interface is required—to get sound signals into, and out of, your computer. A
MIDI interface is required for MIDI input and output signals.
When using optional audio and MIDI interfaces, you should install their drivers before
starting Logic Express. This will allow Logic Express to find and use these devices at
startup.
Audio interfaces should be supported by a Core Audio driver and MIDI interfaces
should be supported by a Core MIDI driver. Check with the manufacturer of your
equipment for details on Mac OS X support.
Audio Interface
When an analog audio signal arrives at the inputs of your audio interface, it must be
converted into digital information before the computer can deal with it. This process is
called analog to digital conversion and is handled by the analog to digital converter of
the audio interface.
There are countless optional audio interfaces available, and at least as many ways that
they can be set up and used with Logic Express and external audio gear. Given the
differing requirements and working methods of people across the world, there is no
one size fits all audio interface solution. In the simplest scenario, you would use the
internal audio interface of your computer to monitor and record audio.
When choosing an audio interface, ensure that it is certified to run on Macintosh
hardware. If the device requires a driver, check that it is compatible with the Mac OS X
version required by Logic Express.
Logic Express supports input from digital audio interfaces up to a maximum sample
rate of 192 kHz, and a maximum bit depth of 24 bits.
Full details on setting up your audio interface hardware, including information on
optimizations, drivers, and more can be found in “Configuring Your Audio Hardware” on
page 99, and the topic areas that follow this section.
Chapter 4 Setting Up Your System 85
Page 86

MIDI Interface
Your Macintosh computer does not provide MIDI in or outputs. If you want to use MIDI
devices equipped with MIDI ports, a MIDI interface is required for communication with
your computer. MIDI interfaces are generally connected to your Macintosh USB ports.
Some MIDI interfaces require the installation of driver software, and others are
automatically recognized by your Macintosh.
Note: Many modern MIDI devices, particularly keyboards, include a USB or FireWire
connection port that enables MIDI (and audio, in some cases) communication with
your computer. Such devices do not require an additional MIDI (or audio) interface.
Some require the installation of driver software, and others are automatically
recognized by Mac OS X. Check the websites of MIDI device manufacturers for further
information.
Types of MIDI Devices
A vast array of MIDI equipped devices exist. These include MIDI keyboards and sound
modules, control surfaces, effect processors, mixers, lighting controllers, and more.
MIDI Keyboard
The most likely candidate for inclusion in your Logic Express system will be a MIDI
keyboard. MIDI keyboards are used to input note (and controller) information into
Logic Express. Some MIDI keyboards are simply input devices (often called controller
keyboards) and some also include their own synthesis engines (synthesizer and
sampling keyboards). Logic Express can be used to record keyboard performances as
MIDI data, and can play them back through any connected MIDI device or internal
software instrument.
If you don’t have a MIDI keyboard handy, don’t fret! Logic Express offers the Caps Lock
Keyboard, which allows you to use the computer keyboard for MIDI note entry. See
“Using the Caps Lock Keyboard” on page 407.
Control Surfaces
Control surfaces are hardware devices that feature a variety of controls, which can
include faders, rotary knobs, switches, and displays. These controls can be mapped to
functions in Logic Express, allowing you to change parameters with more precision and
speed than is possible when using your mouse and computer keyboard. You can also
control multiple parameters at the same time. Detailed information on the setup and
use of control surfaces can be found in the Control Surfaces Support manual.
86 Chapter 4 Setting Up Your System
Page 87

Synthesizers and MIDI Controlled Effects
Logic Express provides plenty of software instruments and effects, and can also act as a
host for Audio Unit plug-ins from other manufacturers. More information on the use of
plug-in instruments and effects can be found in Chapter 10, “Working With Instruments
and Effects,” on page 215.
You can also incorporate hardware MIDI instruments and MIDI controlled effects units
to your Logic Express music production system. These are connected via a MIDI
interface, using MIDI cables (see “Connecting Your Audio and MIDI Devices” on
page 90).
MIDI controlled effects units do not process MIDI data. Rather, they are audio
processors (such as reverb or multi-effect devices) that can be controlled via MIDI
messages. This allows you to automate the parameters of these devices—such as delay
time or flanger speed—from Logic Express.
Typically, you would connect all external devices, such as synthesizers and MIDI
controlled effects units, to either your audio interface or a hardware mixing console.
MIDI controlled effects units would be connected in a send/return loop, using either:
 A pair of audio ins and outs (or auxiliary in/out, if available) on your audio interface
 An auxilliary in/out (sometimes called FX send/return) pair on your mixing console
Both methods allow the use of Logic Express’s In/Out plug-in, enabling you to freely
route audio information through the external effects unit—and the MIDI connection
provides control over the effects parameters. In many ways, this is much like using one
of Logic Express’s internal effect plug-ins.
Note: It is only practical to use the In/Out plug-in for external device routing when
you’re using an audio interface equipped with multiple in and out ports.
Both MIDI instruments and effects will allow remote patch (preset) selection from
Logic Express. This (and control) information can be stored as part of Logic Express
project files, ensuring perfect playback from your MIDI devices the next time the
project is loaded.
Chapter 4 Setting Up Your System 87
Page 88

Ancillary Audio Devices
No discussion of a Logic Express audio system would be complete without covering a
number of options that you should seriously consider, in order to make the most of the
application.
Audio Playback System
Your audio interface provides inputs and outputs between the real world and your
computer. When performing audio playback, the audio interface translates computer
data into something you can hear and understand—sound and music.
To facilitate this, an amplifier and speakers are required. You can certainly use
headphones, connected to the headphone jack of your audio interface, or the home hifi to monitor Logic Express playback, but this is not recommended in the long term.
You should look at a dedicated set of reference monitors (speakers), and a matching
reference amplifier. Many monitoring systems today have powered speakers, negating
the need for a separate amplifier.
Note: Reference monitors are specially designed speakers that offer a flat frequency
response across a wide range (usually 20 Hz to 20 kHz). These are not your average
home hi-fi speakers, and are usually only available from professional music and studio
equipment dealers.
This type of system is recommended due to the precision it offers. Logic Express is
capable of delivering CD or higher quality audio, and creating your mixes on a home
hi-fi will generally result in music that is not properly balanced.
Put another way, most home hi-fi speakers tend to enhance particular areas of the
frequency spectrum, resulting in mixes that have too much bass, mid, or treble
frequency when played back on other systems. Reference monitors and amplifiers are
designed to provide a flat frequency response, avoiding emphasis of particular areas of
your mix. This translates to a final product that will sound good (or at least, passable)
on most monitoring systems—car stereos, home hi-fis, portable players, and so on.
Headphones
A good set of studio headphones is handy for particular tasks, such as precise EQ-ing
and sample editing. Given the design of most headphones, and the fact that they’re
used so close to the ears, most people find that headphone mixes tend to be too
bright or too bass-heavy.
As such, they are not recommended for general monitoring duties, but they are useful
tools nonetheless. If you are recording groups of people, you will probably need several
pairs of headphones, a headphone distribution amplifier, and a mixing console.
∏ Tip: You should not use headphones for longer than ten or twenty minutes at a time,
as they can cause listening fatigue, resulting in you making poor choices for your mix.
88 Chapter 4 Setting Up Your System
Page 89

Audio Mixing Consoles
The inclusion of an audio mixer—analog or digital—is heavily based on your typical
studio use. It is also dependent on the number of inputs and outputs provided by your
audio interface and your working preferences.
To explain, if you are most likely to record bands, several MIDI synthesizers, or drum kits
in your studio, you will need numerous microphone and line-level inputs to
simultaneously record the performances of the musicians and vocalists in the group.
Microphone inputs differ from line level inputs in that they provide power (known as
phantom power), which is used to amplify the incoming signal from condenser
microphones.
Multiple mixer outputs and a headphone distribution amplifier are also beneficial in
group recording situations, as different signals can be sent to each performer. As
examples: a click track to the drummer, a light drum mix and click track to the bass
player, a composite mix to the vocalist and guitarist, with a touch of reverb for the
singer, and so on. This different strokes approach is commonly used, as it facilitates the
best performances from each group member.
Mixers can also include several auxiliary or bus channels that can be used to simplify a
number of jobs. As examples, sending different signals (or mixes, if you like) to multiple
locations—such as a front of house P.A. and a multitrack recorder, adding individual
effects to multiple channels, re-routing processed audio back to a different position in
the signal path and much more.
Many of these mixing tasks can be performed with a multi input/output audio
interface—using Logic Express (and the interface control software, if applicable) to
adjust levels and routings. The catch-22 with this is twofold: it is not as immediate as
physically moving a slider or knob on a mixing console, and your computer generally
needs to be turned on, to allow control. To balance the equation, you can add a control
surface to your Logic Express system, enabling hands-on operation. On the latter point,
a number of current audio interfaces can be used in standalone mode, but the problem
of level control remains unless the computer is turned on.
Microphones
If you are recording acoustic performances—spoken, sung, or played—into
Logic Express, you need one or more microphones. The array of microphones available
these days is mind-boggling, but to simplify things, they basically fall into two
categories: condenser and dynamic.
 In general terms, condenser microphones are more sensitive, and are commonly
used for vocal recording. They are also used for ambience recording, and for
instruments such as guitars and woodwinds.
 Dynamic microphones are often used for recordings with high sound pressure levels
(loud signals, in other words), such as drums and percussion.
Chapter 4 Setting Up Your System 89
Page 90

Ultimately, either microphone type can be used for any recording job, but each will
offer a distinct advantage—sonically—in different recording situations. To further
clarify, both condenser and dynamic microphones come in a variety of forms, with
many specifically designed for the recording of certain instruments. As such, there’s no
one size fits all microphone for every recording you will make, so purchasing or hiring
several microphones for different projects is advisable.
Note: Condenser microphones require power to function. This can be provided by a
separate pre-amplifier or a phantom powered mixing console.
Connecting Your Audio and MIDI Devices
You need to connect your external audio and MIDI devices to your computer to allow
communication between Logic Express and the devices. The following section
introduces you to Macintosh expansion capabilities, audio and MIDI cabling, and other
things you should consider when connecting audio and MIDI interfaces to your system.
Computer Expansions
Current Macintosh computers offer the following expansion capabilities, which can be
used for audio and MIDI interfaces:
 FireWire
 USB
 PCI
 ExpressCard
Note: Data transfer rates discussed in the following sections are theoretical maximums.
In real-world use, this will be reduced due to system overheads. In general, protocols
with faster theoretical maximums will deliver data more quickly than slower protocols.
FireWire (IEEE 1394)
FireWire is a professional and consumer standard that can be used for both audio and
MIDI devices, plus hard disks and other peripherals. It combines fast data-transfer rates,
high storage capacities, and plug-and-play connection. All current Macintosh
computers offer FireWire connectors, and a number of FireWire audio and MIDI
interfaces are available. FireWire 1.0 transfers data at 400 MBits per second. FireWire 2.0
transfers data at 800 MBits per second.
90 Chapter 4 Setting Up Your System
Page 91
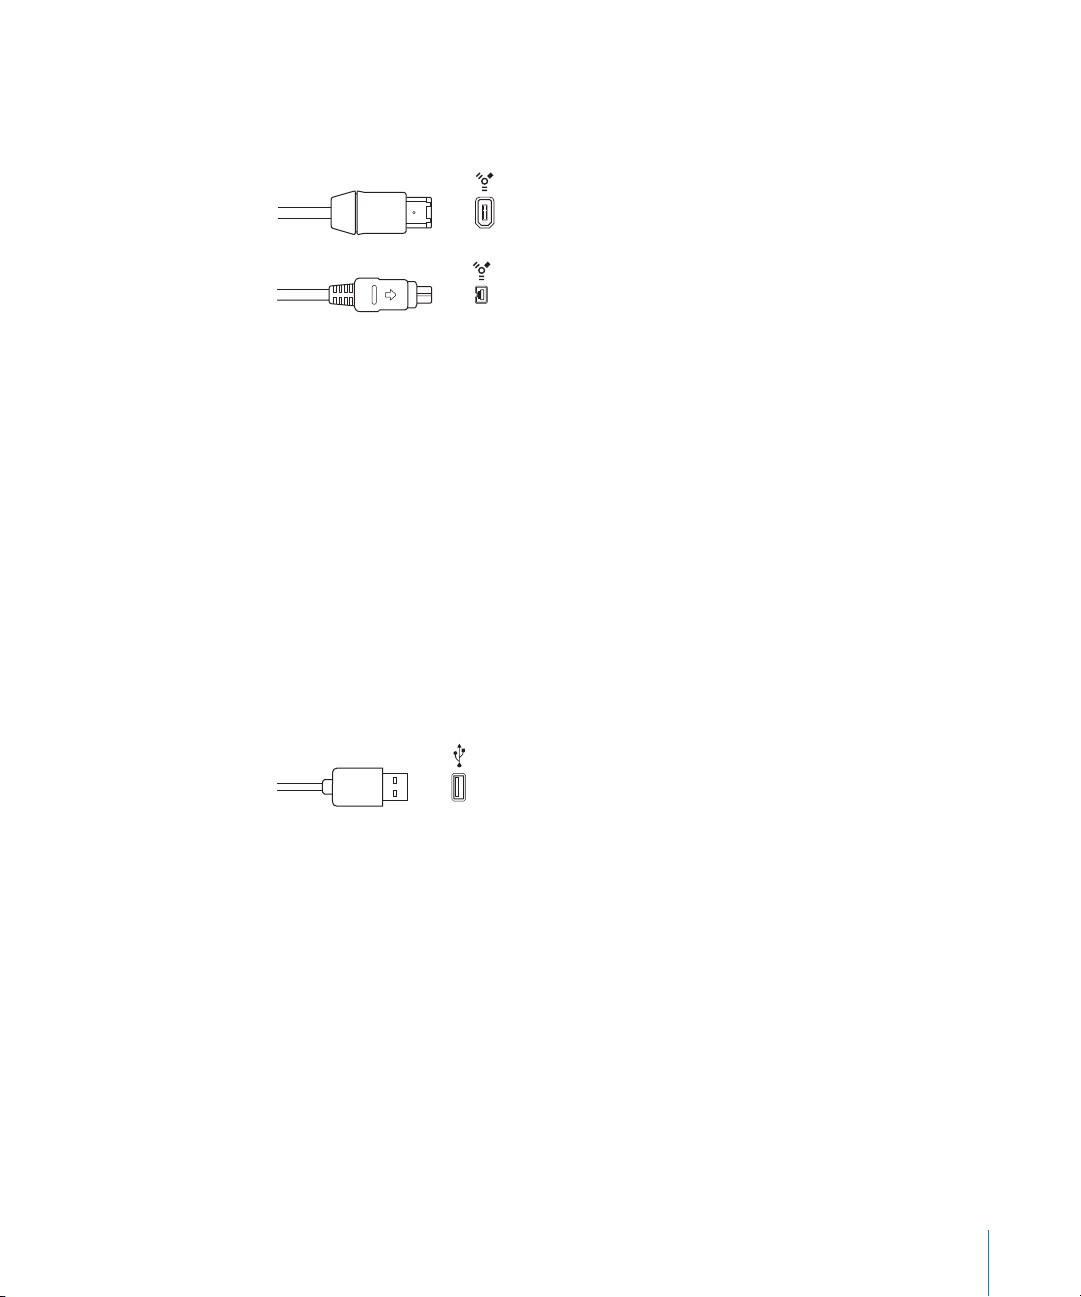
There are two kinds of FireWire connectors: a 4-pin connector (typically found on
video equipment, such as camcorders) and a 6-pin connector (used for computer and
audio equipment).
FireWire 400 (6-pin)
(Sometimes labeled iLINK)
FireWire 400 (4-pin)
USB (Universal Serial Bus)
USB is a consumer standard used for computer peripherals and other devices. USB 1.1
offers a much lower data-transfer rate than FireWire (11 Mbits per second). USB 2.0,
however, transfers data at 480 MBits per second. It supports plug-and-play operation
and the ability to connect several devices in sequence (daisy-chaining). Some USB
devices draw their power over the USB cable, while others require a separate power
connection. USB 2.0 ports are included on all current Macintosh computers.
There are two kinds of USB connectors:
 A connector, typically used to connect a device to a USB hub.
 B connector, typically used to connect devices together, and also to connect a device
to a computer.
Note: USB audio interfaces should always be directly connected to your computer, not
via a hub or to the computer’s display, keyboard, or another peripheral.
USB (Universal Serial Bus)
PCI
PCI (Peripheral Component Interconnect) interfaces, unlike FireWire and USB interfaces,
require the installation of a dedicated card in your computer. PCI provides extremely
high bandwidth and fast data-transfer rates, allowing you to record and play back large
numbers of files at the highest possible sample rates and bit depths.
ExpressCard
ExpressCard is an updated version of PC Card (PCMCIA) or CardBus, found on MacBook
Pro computers. ExpressCard is much like the PCI interfaces described above, but the
cards slide into a slot on the outside of your notebook. Express Cards and PC Cards
available include audio interfaces, hard disks, networking, and SCSI interfaces, wireless
adapters, and more.
Chapter 4 Setting Up Your System 91
Page 92

Audio Cabling
The following types of audio cables and connectors are usually used on professional
and consumer audio equipment:
 XLR
 1/4-Inch audio and 1/8-Inch miniplug
 RCA (Cinch)
 Toslink
 AES-EBU, S/PDIF, ADAT
XLR
XLR cables and connectors are used on professional-quality microphones, monitors,
and other musical equipment. They provide a high-quality, balanced signal at a +4 dB
level.
XLR connector (balanced)
1/4-Inch Audio
1/4-inch connectors (sometimes called phono or phone plugs) are used on a wide
variety of professional and consumer musical equipment, including musical
instruments and amplifiers, speakers, and external effects devices. They can be either
balanced or unbalanced. Some devices require Tip-Ring-Sleeve (TRS) connectors. These
three-contact connectors are used for balanced mono signals and unbalanced stereo
signals.
1/8-Inch Miniplug
Miniplug connectors are used for audio input and output to computers, and on some
consumer electronic devices, particularly portable ones.
RCA (Cinch)
RCA connectors are used on consumer audio equipment such as home stereo systems
and video cassette recorders.
92 Chapter 4 Setting Up Your System
1/4-inch Tip-Ring Sleeve (TRS) connector
1/4-inch Tip-Sleeve (TS) connector
Stereo miniplug connector (unbalanced)
RCA connector (unbalanced)
Page 93
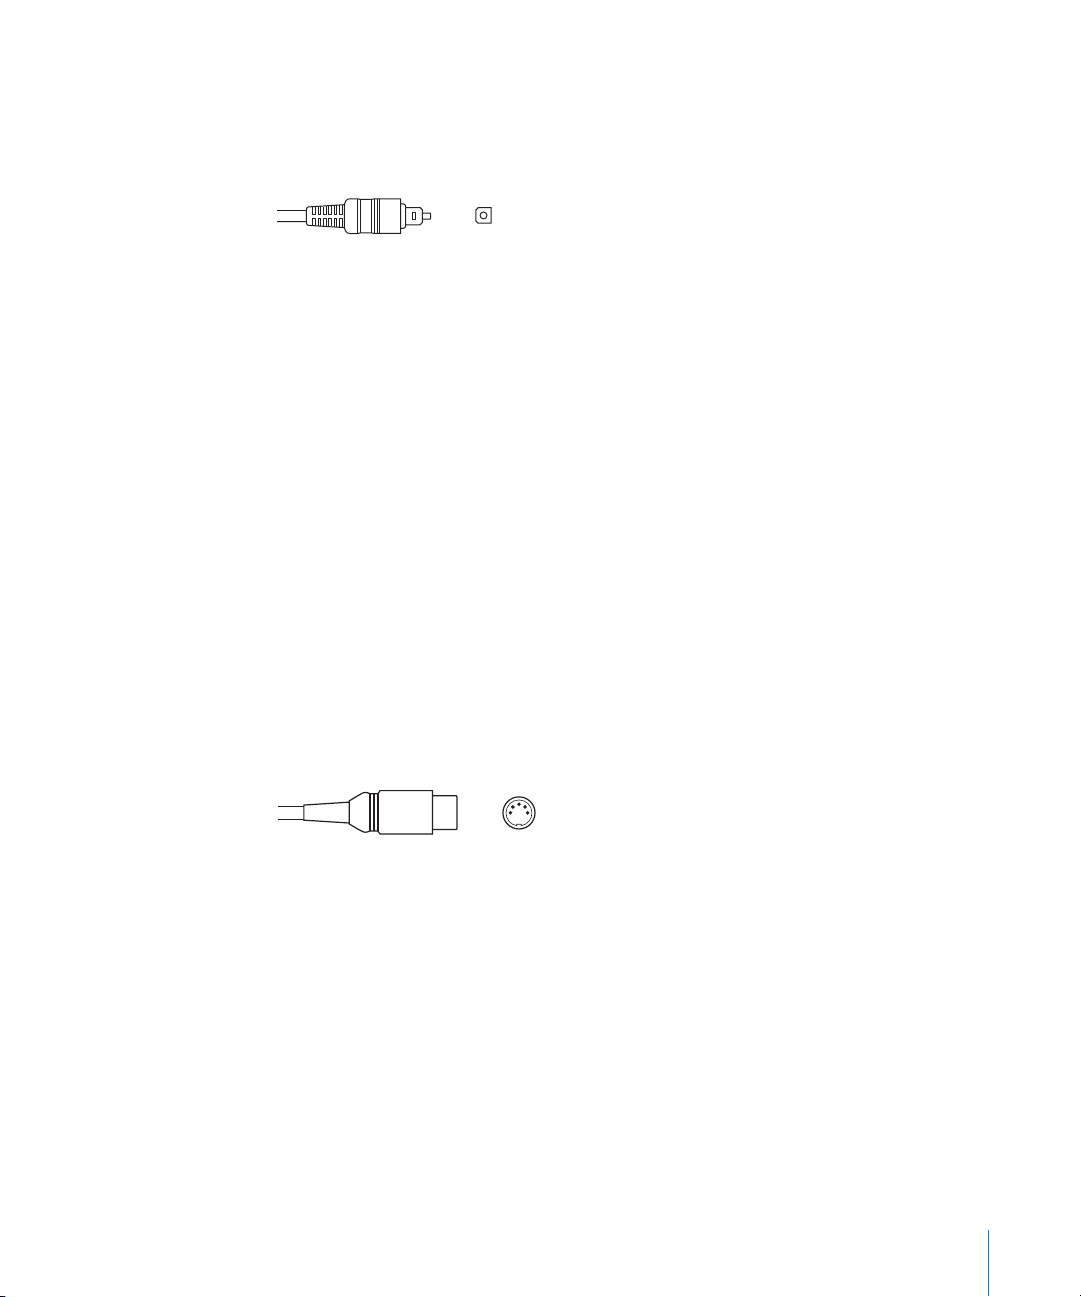
AES/EBU, S/PDIF, and ADAT
The AES/EBU, S/PDIF, and ADAT protocols provide a digital connection between
professional and consumer audio equipment, including audio interfaces, DAT (digital
audio tape) machines, mixing consoles, hardware samplers, and more.
Toslink optical digital connector
S/PDIF and AES/EBU provide two channels of audio, and ADAT optical provides eight
channels of audio. You can use optical TOSLINK connectors to carry digital audio
streams between S/PDIF and ADAT components.
Connecting Your Audio Interface
Logic Express supports plug and play for audio interfaces, making it possible to
connect and switch on a new audio interface while Logic Express is running. An alert
appears when you connect a new device, and will prompt you to select and confirm
the audio interface and driver that you would like to use.
All digital audio interfaces can be susceptible to latency—a noticeable delay between
the time the audio signal is produced, and when you hear it. You should always attach
your audio interface directly to the computer, rather than through a hub, or daisychaining it through another device. Doing so can cause an unacceptable amount of
latency, particularly with slower USB 1.1 devices.
MIDI Cabling
MIDI is an abbreviation for Musical Instrument Digital Interface—a universal 5-pin
connection standard and computer language—that allows communication between
MIDI devices.
MIDI Connector
Chapter 4 Setting Up Your System 93
Page 94
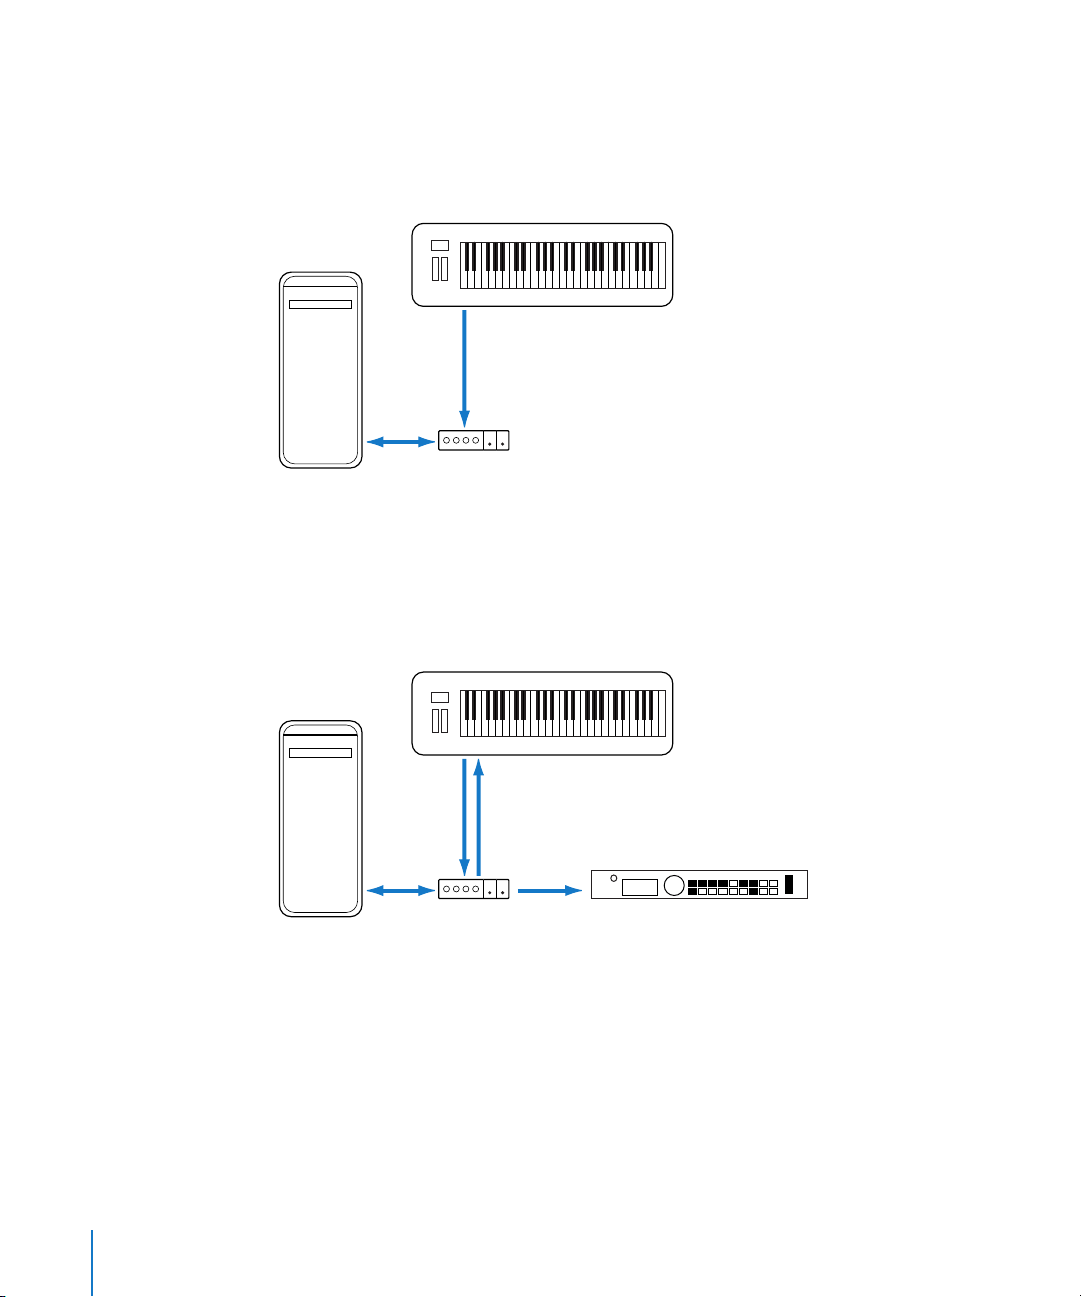
Connecting Your MIDI Keyboard and Modules
If using a simple MIDI master keyboard, without internal tone generation facilities, you
only need to connect the MIDI Out port of the keyboard to a MIDI In port on your MIDI
interface—using a MIDI cable.
Keyboard
Out port
In port
Computer
MIDI interface
If the keyboard can generate its own sounds, you should also connect the MIDI Out
port of the MIDI interface to the keyboard MIDI In port. If your MIDI interface offers
more than one MIDI output, connect any other tone generators (or other MIDI devices,
such as control surfaces that require bi-directional MIDI communication) to these.
Keyboard
Out port
In port
Computer
In port
Out port
In port
MIDI interface Tone generator
94 Chapter 4 Setting Up Your System
Page 95
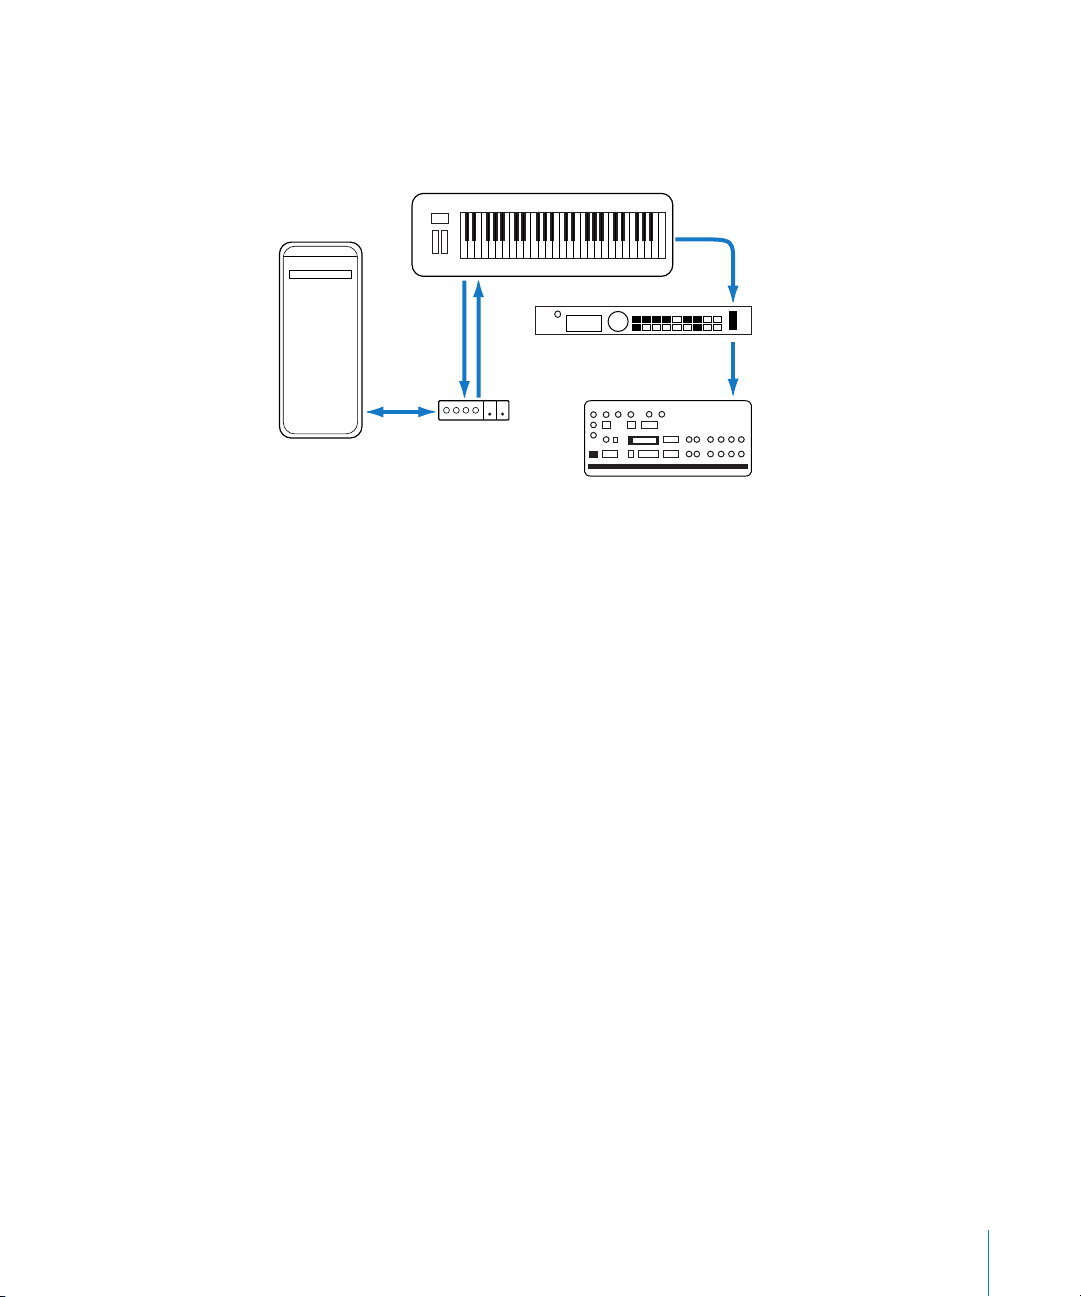
If the MIDI interface connected to your computer only offers one MIDI output, you
need to connect the MIDI In of the second tone generator to the keyboard MIDI Thru
port. A third device can be connected to the MIDI Thru of the second unit, and so on.
Keyboard
MIDI Thru port
Out port
In port
Computer
In port
Out port
MIDI interface
In port
Tone generator 2
In port
Tone generator 3
The MIDI Thru port replicates the signals coming into the MIDI In port of the device. It
is preferable to use a direct connection from the computer MIDI Out to a device, rather
than chaining too many units, one after the other. Doing so can cause timing problems
in the chain, if numerous MIDI commands are sent quickly. This is due to the slight
delays introduced by each MIDI In to MIDI Thru transaction. As such, a multi input/
output MIDI interface is recommended in studios with several MIDI tone generators
and controllers.
Using Multi-Channel MIDI Devices
Most modern MIDI tone generators can simultaneously receive MIDI data on multiple
MIDI channels (multi-timbral MIDI devices). Each MIDI channel can be assigned a tone/
sound, such as piano, strings, bass, and so on.
To take full advantage of the capabilities of each connected multi-timbral device, you
need to use separate MIDI Out ports (from the computer MIDI interface to the MIDI In
ports) for each device. To explain further, imagine a scenario where:
 There are four MIDI tone generators that are capable of receiving data on multiple
channels.
 All devices can receive on all 16 MIDI channels
 There is only one MIDI Out from the computer, and all devices are daisy-chained via
MIDI Thru to MIDI In connections
Logic Express is capable of channelizing MIDI data (routing it to MIDI channels 1 to 16)
and is also capable of sending this channelized data to specific MIDI Out ports.
Unfortunately, in the scenario above, there is only one MIDI Out port available.
Chapter 4 Setting Up Your System 95
Page 96

As such, all data sent on MIDI channel 1 will be sent to all four of the daisy-chained
MIDI tone generators. Each MIDI tone generator will play the incoming data with the
sound assigned to channel 1, which may be:
 Bagpipes on module 1
 A drumkit on module 2
 A helicopter effect on module 3 and so on
While this would be colorful, it would hardly be musical, unless your tastes lean
towards the avante-garde. The same applies to the other 15 MIDI channels.
MIDI, as you can see from the example, can be separated onto 16 different channels,
but it can’t be separated between devices, unless a multi output MIDI interface is used.
Using the scenario above, but substituting a single output MIDI interface with a 4
output MIDI interface—connected from MIDI Out ports A, B, C, and D—to the
respective MIDI In ports of each device. There are no MIDI Thru connections, which
allows Logic Express to assign and send:
 A recording/performance on MIDI channel 1 to port A/module 1.
 A separate recording/performance—also on MIDI channel 1—can be sent to port B/
module 2.
 A further recording/performance on MIDI channel 1 to port C/module 3, and so on
with subsequent channels and modules.
In effect, having a multi output MIDI interface is somewhat like having more MIDI
channels. In this scenario, it would be like having 64 independent MIDI channels—with
16 channels per port (A, B, C, and D).
Not only does this allow you to play up to 64 different sounds simultaneously through
your tone generators, it also allows full MIDI control for each channel of each device.
This becomes increasingly important when arranging and orchestrating such a large
number of instrument parts.
If your computer offers several MIDI inputs, you can connect the MIDI outputs of other
MIDI expanders and controllers to it.
USB MIDI Keyboards
If using a MIDI keyboard fitted with a USB connector, you don’t require a separate MIDI
interface, as it is already built into the keyboard. Just be sure to install the driver, if
needed, and connect the keyboard to your computer with a USB cable. Some modern
USB keyboards and controllers are automatically recognized by Mac OS X.
96 Chapter 4 Setting Up Your System
Page 97

Separating a MIDI Keyboard From Its Sound Generator
If your MIDI keyboard has an internal sound source, it is important that you stop the
keyboard from generating sounds directly from its own keyboard.
To explain: If you buy a new keyboard that is to be used without a sequencer, and
connect it to an amplifier, you would expect the device to make a sound when you
press its keys—in other words, the keyboard is directly connected to the sound
generator.
When using the MIDI keyboard with Logic Express, however, this is not desirable. In this
situation, the keyboard is used as a computer input device, and Logic Express will pass
the incoming performance information back to the keyboard’s sound generator (or to
an internal software instrument or another connected sound module, if you wish).
If the direct connection between the keyboard and its tone generator isn’t cut, this will
result in a doubling of each note—one played directly from the keyboard to the
internal tone generator, and another sent through Logic Express back to the tone
generator.
Not only does this cause a phased sound, but it also halves the polyphony of the
keyboard’s tone generator. In situations where you want to control or record another
sound module or software instrument with your keyboard, you would hear both the
keyboard sound (due to the direct keyboard to tone generator connection) and the
sound of the software or MIDI instrument. This is why the keyboard must be separated
from its own internal sound generator.
This function is known as Local Off, and is set directly on your keyboard. Don’t worry
about losing the ability to use the tone generator of your keyboard. Logic Express will
still be able to communicate with your keyboard tone generator just like any other
connected, keyboardless, sound module or software instrument.
Note: If you cannot find the Local Off function in the MIDI menu of your keyboard,
consult its manual on sequencer use. Some keyboards allow you to select from: Local,
MIDI, or Both for each of their Parts (individual MIDI channels/sounds in multi-timbral
MIDI devices). The MIDI setting, if applicable to your keyboard, is the equivalent of Local
Off.
Chapter 4 Setting Up Your System 97
Page 98

Using External MIDI Devices
Logic Express recognizes all MIDI devices set up in the Audio MIDI Setup (AMS) utility,
the integrated audio and MIDI configuration tool of Mac OS X. You can find the AMS
utility in the Applications/Utilities folder. For more information on use, see the AMS
Help.
The Library tab displays all MIDI devices found by the AMS utility (separated into MIDI
channels, if multi-channel devices) when an External MIDI track is selected. You can
simply select the desired MIDI device/sub-channel to assign it to the track.
You can configure external MIDI devices in the Inspector. For more information, see
“Standard Instruments” on page 899, “Multi Instruments” on page 901, and “Mapped
Instruments” on page 907.
Using External Audio Effects
If you want to send audio to an external (MIDI controlled) audio effect device, you need
to insert the In/Out plug-in into one of the Insert slots of the audio channel you want
to process. For further information, see “Working With External Audio Effects” on
page 261.
Note: It is only practical to use the In/Out plug-in for external device routing when you
have an audio interface equipped with multiple in and out ports.
98 Chapter 4 Setting Up Your System
Page 99

Configuring Your Audio Hardware
To use particular audio interfaces with Logic Express, the driver for the device needs to
be installed, activated, and configured correctly. Drivers are software programs that
enable various pieces of hardware and software to be used with Mac OS X. This allows
the device to be recognized by applications, such as Logic Express, and enables data
routing between software and hardware, in a format understood by both.
Selecting, activating, and configuring a particular audio driver in Logic Express is
achieved in the Audio Devices preferences.
To open the Audio Devices preferences, do one of the following:
m Choose Logic Express > Preferences > Audio (or use the Open Audio Preferences key
command), then click the Devices tab.
m Click the Preferences Toolbar button, choose Audio from the pop-up menu, then click
the Devices tab.
In Mac OS X, all audio devices are accessed via Core Audio, an integral part of the
operating system. Core Audio is a high-performance, low-latency audio system that
allows audio interface hardware to be used by several applications at the same time.
Logic Express is compatible with all audio hardware that offers a Core Audio driver.
Chapter 4 Setting Up Your System 99
Page 100

Setting Up Core Audio Devices
Logic Express automatically recognizes any installed Core Audio hardware, and will use
the default settings—as defined in the Audio MIDI Setup utility (Applications/Utilities/
Audio MIDI Setup). It can, however, be advantageous to optimize the settings for your
individual hardware setup, particularly if you use several audio interfaces or a multiple
input/output device. This is done in the Logic Express > Preferences > Audio > Core
Audio tab.
Enabled
Click this box to enable the Core Audio driver.
Note: In situations where the preferred hardware is unavailable, such as when your
audio interface is not connected (or is turned off), Logic Express will automatically
select the built-in audio hardware of your Macintosh.
System Memory Requirement
The amount of free RAM required (outside the memory assigned to Logic Express) is
indicated here. The requirement value changes as you alter the parameters described
below.
Device
Allows you to choose between any installed Core Audio device, including the internal
sound hardware. This also includes aggregate audio devices, consisting of several audio
interfaces. See the Audio MIDI Setup Help for information on aggregate devices.
I/O Buffer Size
This parameter determines the size of the buffer used by the audio hardware—for both
input and output. The smaller the buffer size, the less latency you will encounter when
monitoring while recording, or using software instruments.
Some points to note:
 As this parameter value is reduced, it places a higher strain on the CPU(s) of the
system.
 There may be a point where the selected I/O Buffer Size is too small for your system,
and begins to affect playback. This usually takes the form of clicks, pops, and crackles
in your audio.
 You should, therefore, aim for the lowest possible I/O Buffer Size value that doesn’t
introduce these types of artefacts.
∏ Tip: If you find a higher I/O Buffer Size setting provides suitably low latency during
record monitoring and software instrument playback, you should use it. This will
minimize the impact on the CPU(s) of your system.
100 Chapter 4 Setting Up Your System
 Loading...