

Page 1

Getting Started With Logic
Page 2

Apple Computer, Inc.
© 2004 Apple Computer, Inc. All rights reserved.
Under the copyright laws, this manual may not be
copied, in whole or in part, without the written consent
of Apple. Your rights to the software are governed by
the accompanying software licence agreement.
The Apple logo is a trademark of Apple Computer, Inc.,
registered in the U.S. and other countries. Use of the
“keyboard” Apple logo (Option-Shift-K) for commercial
purposes without the prior written consent of Apple
may constitute trademark infringement and unfair
competition in violation of federal and state laws.
Every effort has been made to ensure that the
information in this manual is accurate. Apple Computer,
Inc. is not responsible for printing or clerical errors.
Apple Computer, Inc.
1 Infinite Loop
Cupertino, CA 95014-2084
408-996-1010
www.apple.com
Apple, the Apple logo, Aqua, Final Cut, Final Cut Pro,
FireWire, iBook, iMac, iPod, iTunes, Logic, Mac,
Macintosh, Mac OS, PowerBook, Power Mac, Power
Macintosh, and QuickTime are trademarks of Apple
Computer, Inc., registered in the U.S. and other
countries.
Finder and GarageBand are trademarks of Apple
Computer, Inc.
AppleCare is a service mark of Apple Computer, Inc.
Helvetica is a registered trademark of Heidelberger
Druckmaschinen AG, available from Linotype Library
GmbH.
Other company and product names mentioned herein
are trademarks of their respective companies. Mention
of third-party products is for informational purposes
only and constitutes neither an endorsement nor a
recommendation. Apple assumes no responsibility with
regard to the performance or use of these products.
Page 3

Contents
1
Preface 5 An Introduction to Logic
5 What Is Logic?
6 About This Guide
Chapter 1 9 Setting Up Logic
9 MIDI and Audio Connections
11 The Logic Setup Assistant
12 Templates
Chapter 2 13 Getting Started With Logic
13 What Is Logic?
14 Loading and Starting the Tutorial Song
15 Getting to Know Logic’s Arrange Window
17 Tracks and Regions
19 The Arrange Area
20 Parameters Area
28 Key Commands
Chapter 3 31 Navigating the Song
31 The Transport Window
Chapter 4 37 Editing Regions
37 Resizing Regions
38 Moving Regions
39 Undo/Redo
40 Copying Regions
40 Cutting Regions
41 Loops
42 The Loop Browser
Chapter 5 45 MIDI Regions
45 Transposing MIDI Regions
46 Quantize
47 MIDI Recording
3
Page 4

49 Saving the Song
49 MIDI Event Editing
Chapter 6 57 Audio Regions
58 Creating Audio Tracks in the Arrangement
59 Sample Editor
61 The Audio Window
62 Making Your Own Audio Recordings
Chapter 7 65 Mixer, Instruments, and Effects
65 Track Mixer
66 Mixer and Audio Objects in the Environment
70 Using the Mixer and Plug-ins
77 Automated Mixing
80 Bounce—the Final Mix
Chapter 8 83 The Environment Concept
83 The MIDI Artery
85 External Control
86 From Arpeggiators to Step Sequencers
Appendix A 87 Audio and MIDI Basics
87 MIDI
90 Audio
Appendix B 95 Audio and MIDI in Mac OS X
95 Core Audio
97 Core MIDI
Appendix C 99 Connecting Logic to a Mixer
99 Using Logic as a Mixer
101 Mixing Desk Without Sub Groups
102 Mixing Desk With Sub Groups
102 Software Monitoring Function
Appendix D 103 Optimizing Your Audio Computer System
105 Troubleshooting
Glossary 111
Index 12 9
4
Contents
Page 5

An Introduction to Logic
Recent years have seen a revolution in the use of
personal computers for creating music.
Music projects that until recently would have required an array of professional studio
equipment can now be completed in a home or project studio, using a personal
computer and readily available resources. A personal computer with a fast processor
and enough RAM can now serve as a workstation for recording, arranging, mixing, and
producing complete music projects, which can be played back on the computer,
burned on a CD or DVD, or distributed over the Internet.
What Is Logic?
Logic is an integrated system for composing, producing, and scoring music, built
specifically for Mac OS X. Musicians can create professional sounding original music
compositions, royalty-free soundtracks for Final Cut Pro video projects, and more.
Logic allows you to build musical arrangements using MIDI and software instruments
alongside audio recordings of acoustic instruments, vocal performances and
prerecorded audio files.
You can freely combine and arrange audio and MIDI data in Logic’s Arrange window,
add professional-quality effects, mix your music in stereo or Surround (Logic Pro), and
export the final mix to one or more standard audio file(s) or an audio CD that can be
played on any multimedia-equipped computer, home stereo or imported into Final Cut
Pro or other applications.
Preface
Logic includes the following features, amongst many others:
•
Record MIDI information via connected MIDI input devices, such as keyboards, and
play back this information via any connected MIDI device or Logic’s integrated
software instruments.
•
Create, arrange, and edit MIDI projects, and print out musical notation via a printer
connected to your computer.
•
Digitally record acoustic and electric instruments or vocal performances into your
projects, and process these audio recordings with Logic’s in-built real-time effects.
5
Page 6

Make use of the integrated software instruments, or third-party Audio Unit
•
instruments.
•
Load songs or channel strips from Apple’s
GarageBand
application, and edit them,
making use of the additional processing and editing possibilities afforded by Logic.
•
Mix your MIDI and audio tracks, including effects and software-based instrument
settings, via a sophisticated total recall mix automation system. Logic includes highquality effects plug-ins that you can use in your projects. You can also install thirdparty effects in the Audio Units plug-in format.
•
Bounce all audio data, including effects and mix automation settings, to a stereo (or
multiple Surround format, in Logic Pro) file(s) for mastering or further processing.
•
Work in real time: You can work on Logic songs in real time, adding and editing
audio and MIDI parts while the project is playing, and hear the results of your
changes immediately.
•
Use existing loop libraries: Logic directly supports Apple Loop files, and is
compatible with a wide variety of existing audio file types, including those created in
ReCycle.
Locate and preview files easily: The Project Manager (only Logic Pro) and Apple Loop
•
Browser, parts of the Logic interface, provide powerful file browsing and search
features, making it easy to locate loops by instrument, genre, mood, or other search
criteria.
•
Mix Apple Loops recorded at different tempos and keys: Logic automatically
matches loops to the project tempo and key, allowing you to freely combine loops
from different sources in a single project.
About This Guide
This book is designed to get you up and running with Logic quickly. It is not the final
arbiter on all things in Logic, and does not cover all areas of the program in detail.
You will find descriptions of the most essential aspects of Logic’s interface, commands,
and menus. These descriptions are generally paired with step-by-step instructions for
accomplishing specific tasks. We suggest that you follow these instructions, making use
of the included Tutorial song. The Tutorial song and this guide will assist you in quickly
learning how to handle MIDI and audio information via a series of exercises and
examples.
Chapter 1 covers the set-up of Logic. If you are ready to jump right in and start using
the application, skip ahead to Chapter 2, “Getting Started With Logic”. The following
chapters will provide you with a brief introduction to many Logic concepts and
facilities.
This guide is not designed to be a complete guide to creating music with your
computer. Commonly used technical terms are covered in the Appendixes, as
appropriate to their use with the application.
6 Preface
An Introduction to Logic
Page 7

If you wish to learn more about digital audio and the elements of a music project, read
Appendix A , “Audio and MIDI Basics,”. Appendix B provides information about Audio
and MIDI in Mac OS X. Appendix C will guide you through the connection of Logic to a
mixer and using Logic as a mixer. Appendix D will help you to optimize your computer
for music production.
Additional, more comprehensive information can be found in the reference manuals
and in Logic’s Online Help system. We recommend that you read the relevant portions
of the reference manuals that interest you, in addition to this guide.
The Onscreen Help system—accessible from Logic’s Help menu—is fundamentally the
reference manuals in electronic form. It has the advantage of being at your fingertips
when you need it, and is also searchable.
Even if you’re the type who just doesn’t like reading manuals, we ask that you read the
next section. It will provide you with essential information on the copy protection
hardware used by Logic, the XSKey.
Please note that all topics described herein were accurate at the date of printing. For
up to date information on changes or additions made after printing, please refer to the
Late Breaking News
on the Logic DVD, and/or to the
Update Info,
included with each
Logic update.
Conventions of This Guide…
Before we ask you to load the Tutorial song from the DVD, we’d like to cover the
following conventions used in this Guide.
Menu Functions
For functions that can be reached via hierarchical menus, the different menu levels are
described as follows:
Important Entries
Some text will be shown as follows:
Important:
Information on function or parameter.
These entries discuss a key concept or technical information that should, or must, be
followed or taken into account. Please pay special attention to these entries.
Notes
Some sections provide additional information or tips that will assist your use of Logic.
These are displayed as shown below:
Note:
Information on function or parameter.
Menu > Menu entry > Function
.
Preface
An Introduction to Logic
7
Page 8

Key Commands
Many Logic functions can be activated or accessed with key commands—computer
keyboard shortcuts. The key commands mentioned in this guide are based on the
standard Key Command Set, assigned by the Logic Setup Assistant. Where possible, we
have also included the standard key commands for PowerBook users. These are based
on the PowerBook Key Command Set, assigned in the Logic Setup Assistant.
8 Preface
An Introduction to Logic
Page 9

Setting Up Logic
1
1
Setting up Logic is easy: When you launch Logic for the
first time, the Logic Setup Assistant automatically starts.
The Logic Setup Assistant will guide you through the process of setting up Logic for
use with your
information on MIDI and audio hardware setup. Further to this, the initial settings that
can be specified—with the aid of the Logic Setup Assistant—are explained.
MIDI and Audio Connections
Prior to launching Logic for the first time, you will need to set up your MIDI and audio
hardware. You should install the drivers of any optional audio interface(s) and your MIDI
interface(s) before starting Logic. This will allow Logic to find and use these devices at
startup. In order to be usable in Mac OS X, audio interfaces should support the Core
Audio API and MIDI interfaces should support the Core MIDI API.
installed
audio and MIDI hardware. The following section provides
Connecting a MIDI Keyboard
If using a simple MIDI master keyboard, without internal tone generation facilities, you
only need to connect the MIDI Out port of the keyboard to a MIDI In port on your MIDI
interface—using a MIDI cable.
If using a MIDI keyboard fitted with a USB connector, you don’t require a separate MIDI
interface as it is already built into the keyboard. Just be sure to install the driver, if
needed, and connect the keyboard to your computer with a USB cable.
Note:
More detailed information and tips on MIDI can be found in the Appendices of
this guide and in the Logic reference.
9
Page 10
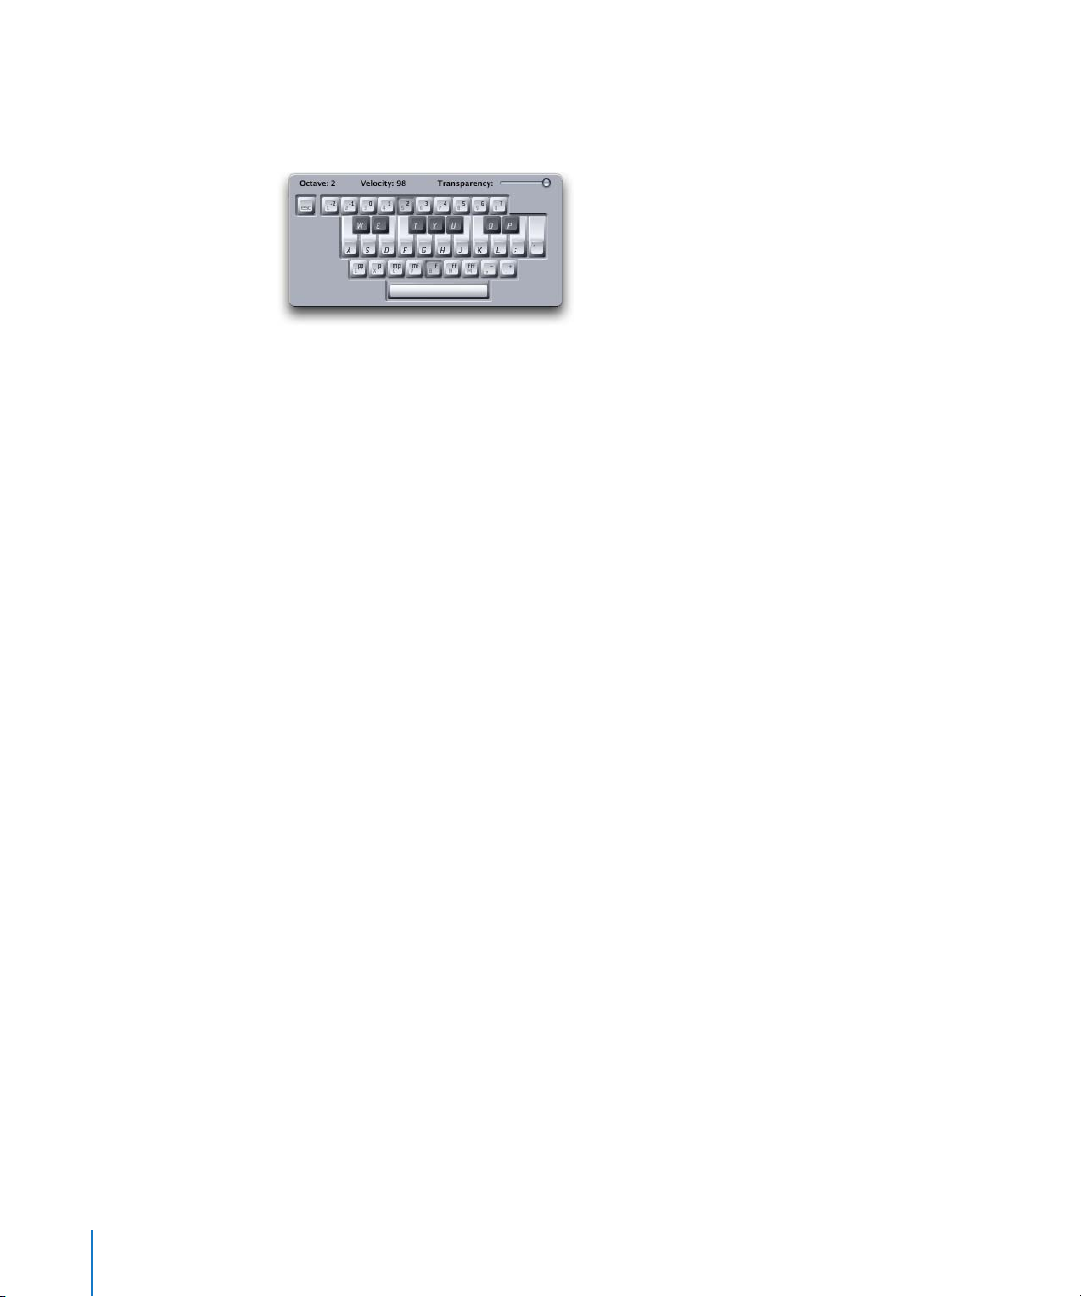
If you don’t have a MIDI keyboard handy, Logic allows you to use the computer
keyboard for MIDI note entry. Just press the Caps Lock key to activate this mode, and to
display this onscreen keyboard.
Connecting Audio
There are countless optional audio interfaces available, and at least as many ways that
they can be set up and used with Logic and external audio gear. Given the differing
requirements and working methods of people across the world, there is no one size fits
all solution for connecting an audio interface.
Note:
Tips on setting up Logic with an audio interface and external mixer can be found
in the Appendices of this guide, and in the Logic reference.
In the simplest scenario, you would use the internal audio interface of your computer
for monitoring and recording audio. In order to avoid sending audio to the built-in
speaker, you should connect the audio out of the computer to a hi-fi system, external
amplifier or a mixer. You will require an appropriate cable to do so. Such cables can be
obtained from your local music or electronics shop.
The computer is equipped with a 3.5 mm stereo jack connector for audio output, so
you’ll need a cable with a 3.5 mm stereo jack plug at one end and plugs that fit your hifi system, your amp or your mixer inputs at the other end. Connections on most hi-fi
systems are Cinch (RCA) plugs. Most mixers are equipped with either Cinch or 6.3 mm
Jack (phono or 1/4 inch) plugs.
Note:
The Appendices contain further information on Mac OS X audio options, driver-
specific options and related Logic parameters.
10 Chapter 1
Setting Up Logic
Page 11

The Logic Setup Assistant
Note:
As a tip, we recommend that you write down the MIDI input and output
connections of all of your MIDI devices before launching Logic/the Logic Setup
Assistant for the first time.
You can start Logic by double-clicking on the Logic icon in the
The first time Logic is launched, the Logic Setup Assistant will run. It will guide you
through the process of setting up Logic for use with your
hardware.
There is little point in describing each page, as the Logic Setup Assistant is extremely
easy to use. Simply follow the onscreen prompts, and select the desired options via the
sliders, checkboxes, and pull-down menus.
You will be asked to…
select the audio interface that you would like to use with Logic,
•
•
determine the number of channels (tracks, busses, instruments, inputs, and outputs)
you’d like to have in your mixer,
define the inputs that you will usually use for recording your audio tracks,
•
•
choose the initial Key Command Set for your keyboard (you can also import your key
commands from the Logic 6 preferences file),
•
select the monitors you wish to use with Logic,
add all connected MIDI devices.
•
Applications
installed
folder.
audio and MIDI
Once you have completed the Logic Setup Assistant steps, relaunch Logic. The default
song features nine useful Screensets and also contains the MIDI devices that you set up
in the Logic Setup Assistant, allowing you to begin using the software immediately!
Note:
Don’t worry if you’re not sure about some of these options (we’ll discuss many of
these terms shortly). Your decisions aren’t forever here, and you can change all settings
later, if you wish. You may start the Logic Setup Assistant several times via
Preferences > Start Logic Setup Assistant
to create differently configured songs as starting
Logic >
points for your work with Logic.
Templates
Logic offers a number of song templates. These templates serve as a starting point in
different recording situations, each of which has special requirements. As an example, if
you want to use Logic to record real instruments, you can open a recording template,
that is customized to meet the needs of a recording project. Use of templates can save
a great deal of time.
To open a template:
1
Choose
Chapter 1
File > New
Setting Up Logic
in Logic’s main menu bar.
11
Page 12

2
Check the
3
Select the desired template from the Template pull-down menu.
Use song template
option in the dialog that appears.
Logic also allows you to save your own songs as templates:
m
Simply choose
File > Save as Template
and type the desired song name in the Name
field.
Note:
Please take a look at the supplied templates. They might provide you with some
ideas on possible Logic song customizations that will best meet your needs for future
projects.
Autoload Song
Logic allows you to define one template that is automatically loaded each time Logic is
booted. This template is called the Autoload Song.
To create your personal Autoload Song:
1
Customize a song to meet your requirements (more on this is discussed in the
following chapters).
2
Choose
3
Ensure that the Song Templates folder is selected in the dialog box that launches.
4
Type “Autoload” into the Name field.
File > Save As Template
in Logic’s main menu bar.
Your Autoload Song will be opened automatically the next time you launch Logic.
12 Chapter 1
Setting Up Logic
Page 13

Getting Started With Logic
2
2
This chapter provides a basic overview of Logic’s main
working window and the tools that are used for data
interaction and editing.
Before beginning, we’d like to briefly cover what Logic will bring to your computer.
What Is Logic?
Logic incorporates the functionality normally found in an entire professional audio
production studio. All within an intuitive user interface, and all within your computer. It
is an integrated system for composing and producing music. With Logic, you can:
Record MIDI information via connected MIDI input devices, such as keyboards, and
•
play back this information via any connected MIDI device or Logic’s integrated
software instruments.
•
Create, arrange, and edit MIDI songs, and print out musical notation via a printer
connected to your computer.
•
Digitally record acoustic and electric instruments or vocal performances into your
songs, and process these audio recordings with Logic’s in-built real-time effects.
Make use of the integrated software instruments, including; Sculpture, Ultrabeat, ES1,
•
ES2, EVP88, EVB3, EVD6, and EXS24, or add third-party Audio Unit instruments to
Logic.
•
Load songs or Channel Strip settings from Apple’s
them, making use of the additional processing and editing possibilities afforded by
Logic.
Mix your MIDI and audio tracks, including effects and software-based instrument
•
settings, via a sophisticated total recall mix automation system.
•
Bounce all audio data, including effects and mix automation settings, to a stereo (or
multiple Surround format) file(s) for mastering or further processing.
GarageBand
application, and edit
13
Page 14

Loading and Starting the Tutorial Song
Copy the “Tutorial” song file and “Tutorial ƒ” folder from the Logic DVD to your hard
disk, if you haven’t already done so.
To open the Tutorial song:
1
Launch Logic.
2
Choose
3
Choose the
Logic Songs appear in the file selector.
4
Browse to the location of the Tutorial song, select it, and press the Open button.
Alternately, you double-click on the Tutorial song icon (in the file selector of the Open
dialog, or in the Finder).
To navigate through the Tutorial song:
1
Simply press Return or Enter on the numeric keypad of your computer keyboard, to
play the song.
2
To stop the song, press 0 on the numeric keypad; on PowerBooks, use the Return key.
3
To return to the beginning of the song, push the 0 key again.
Note:
File > Open
Alternatively, you can use the Space bar to toggle Start and Stop operations.
. The Open dialog appears.
Logic Songs
item in the
Open File Type
pop-up menu, to ensure that only
14 Chapter 2
Getting Started With Logic
Page 15
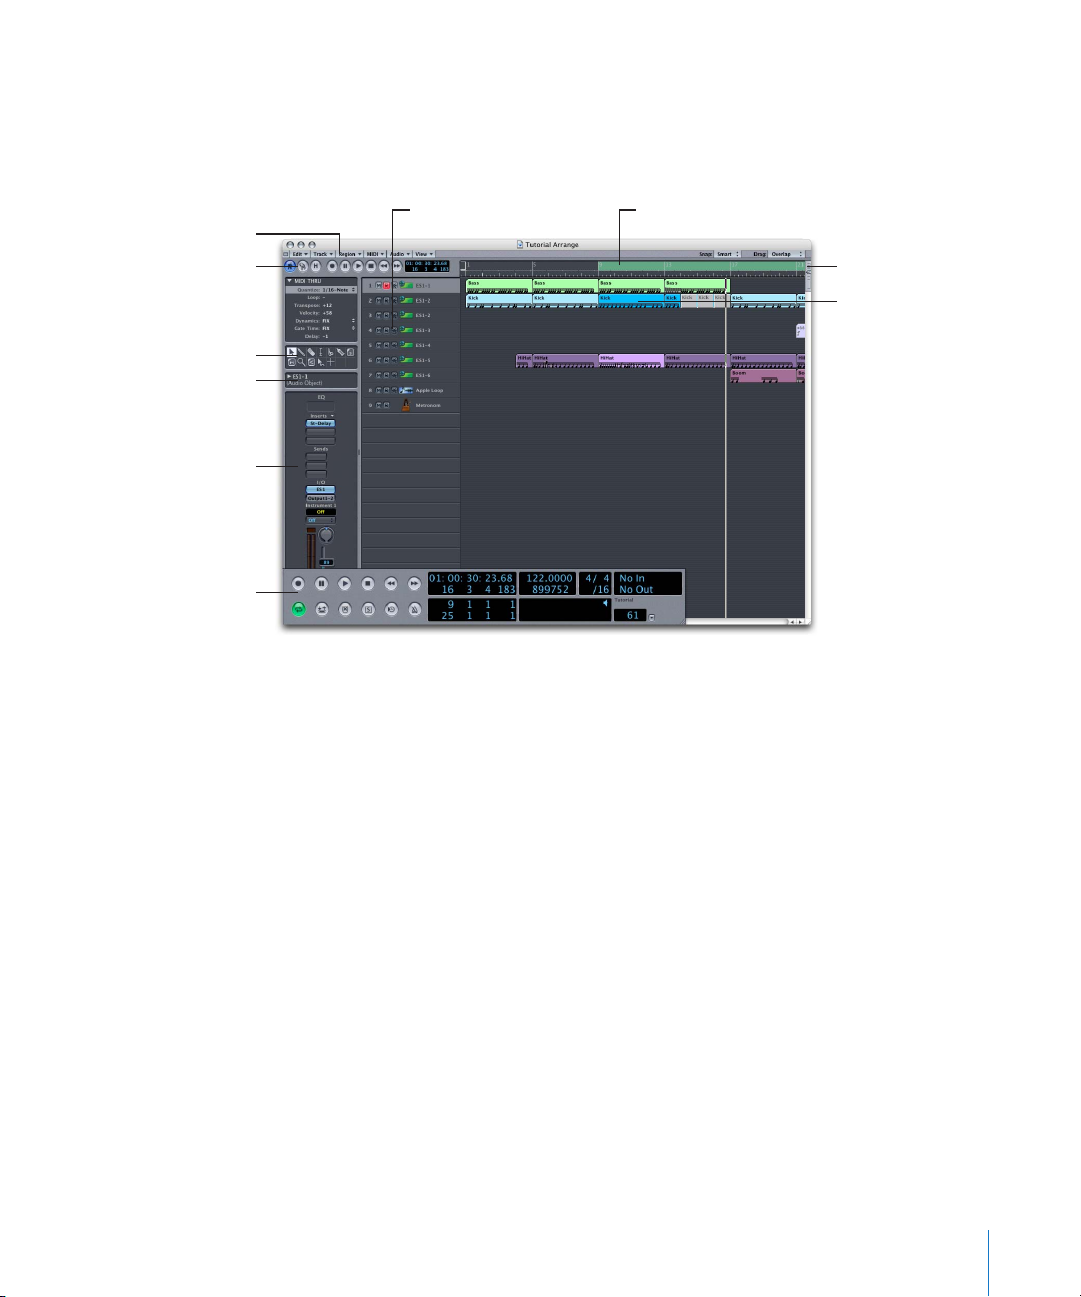
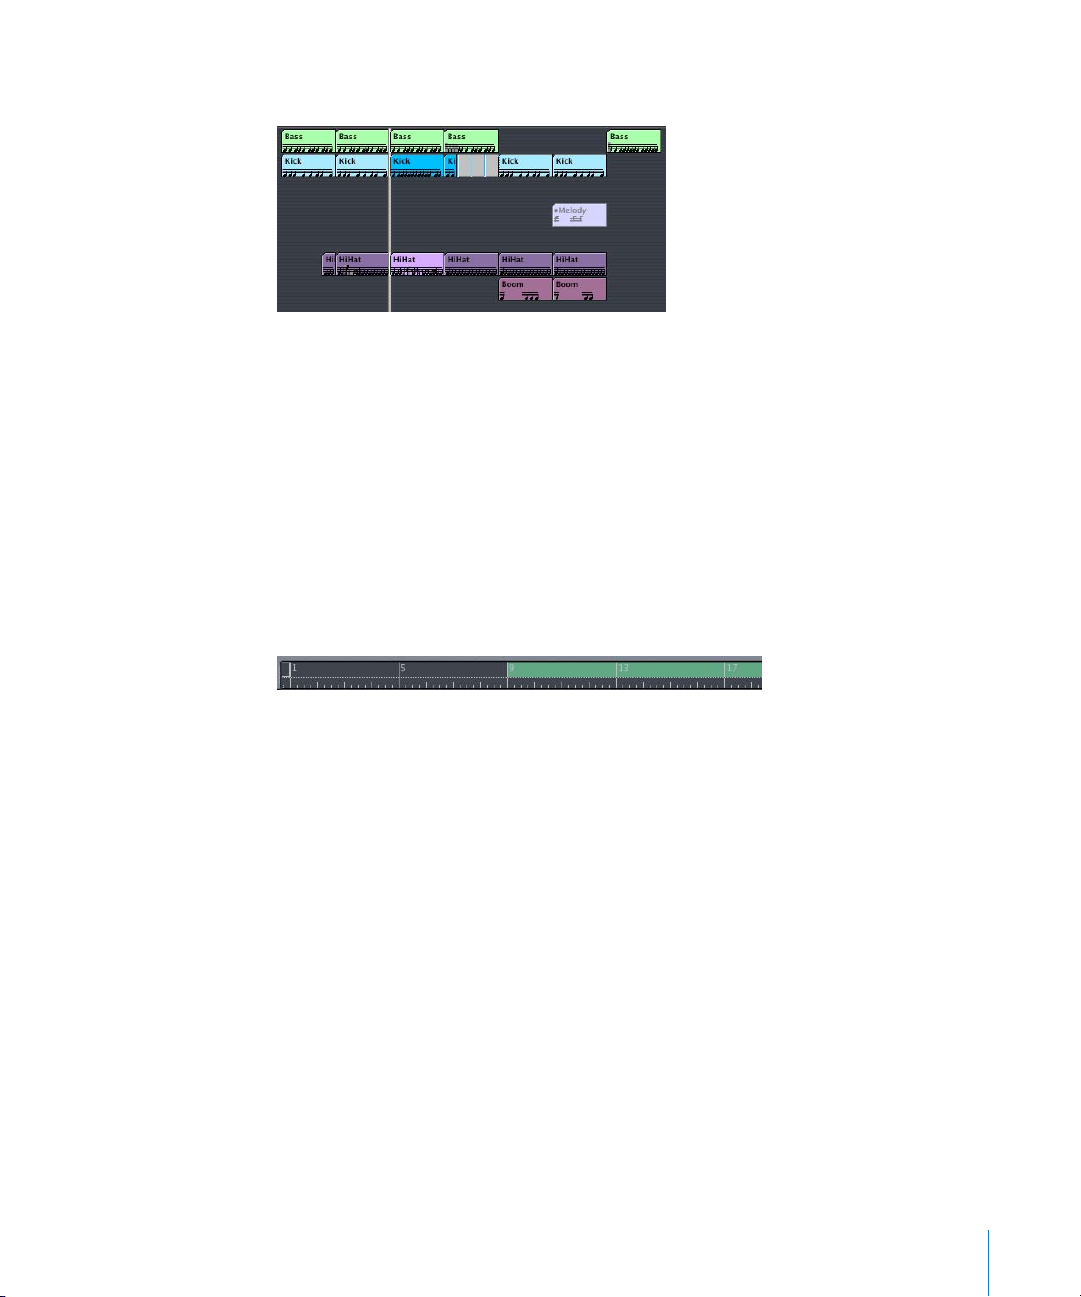
Getting to Know Logic’s Arrange Window
The Tutorial song is compact and only contains a small arrangement fragment. It is
principally intended to introduce you to some important elements of Logic. After
loading the Tutorial song, you will see the following onscreen:
Local menu bar
Transport field
Toolbox
Region Parameter box
Arrange channel strip
Transport window
Track List
Bar Ruler
Zoom control
Arrange area with
Regions
Transport Field
This is where you control the operation of Logic. You can start and stop playback, turn
on Cycle (a cycle is a looped portion of the song), set drop in/out points for recording,
adjust synchronization settings, and adjust several other options. This field can be
shown/hidden via the
View > Transport
menu option.
Local Menu Bar
Given Logic’s extensive range of functions, it would be impractical to display all of them
in the main menu bar. Therefore all many Logic windows provide a local menu bar,
ensuring that only relevant functions are available in each window.
Bar Ruler
The
Bar Ruler
displays Logic’s time axis. Here, you can set the Cycle area graphically with
the mouse (in our Tutorial song the Cycle area runs from bar 9 to bar 25), set markers,
or jump to any desired song position by clicking in the lower part of the ruler.
Chapter 2
Getting Started With Logic
15
Page 16

Arrange Area with Regions
This is the workspace when arranging with Logic. It may contain MIDI and/or audio
tracks with any number of MIDI or Audio Regions, respectively. MIDI Regions contain
notes and controllers, used for playing MIDI and software-based instruments. Audio
Regions are pointers to underlying audio files that are played back from the hard disk
of your computer.
Zoom Control
Dragging the
Zoom control’s sliders
allows you to alter the horizontal and vertical
magnification factor of the active window’s contents, and adapt them to your screen
resolution.
Transport Window
The
Transport window
performs the same functions as the Transport Field, but can be
located anywhere onscreen, and is variable in size and content. The slider enables quick
jumps to any song position.
Track List
Is where you determine the destination for each track, swap, insert, or delete tracks.
Toolbox
The tools contained in this box enable you to edit Regions, notes or other data in a
variety of ways.
Region Parameter Box
The Region Parameter box is where various aspects of MIDI Region or Audio Region
playback can be adjusted. The parameters available in the box will change, dependent
on the current selection. As an example, where one or more MIDI Region(s) or Audio
Region(s) have been selected.
Arrange Channel Strip
The channel strip of the selected track is displayed, and can be adjusted.
As you can see, the Arrange window is divided into three basic areas—from left to
right. These are: the Parameters area, the Track List and the Arrange area. Above the
Arrange area, you’ll find the Bar Ruler.
While reading the information in this section, you’ll learn how these various areas
interact with each other, and will also discover how similar the handling of both MIDI
Regions and Audio Regions is in Logic.
16 Chapter 2
Getting Started With Logic
Page 17
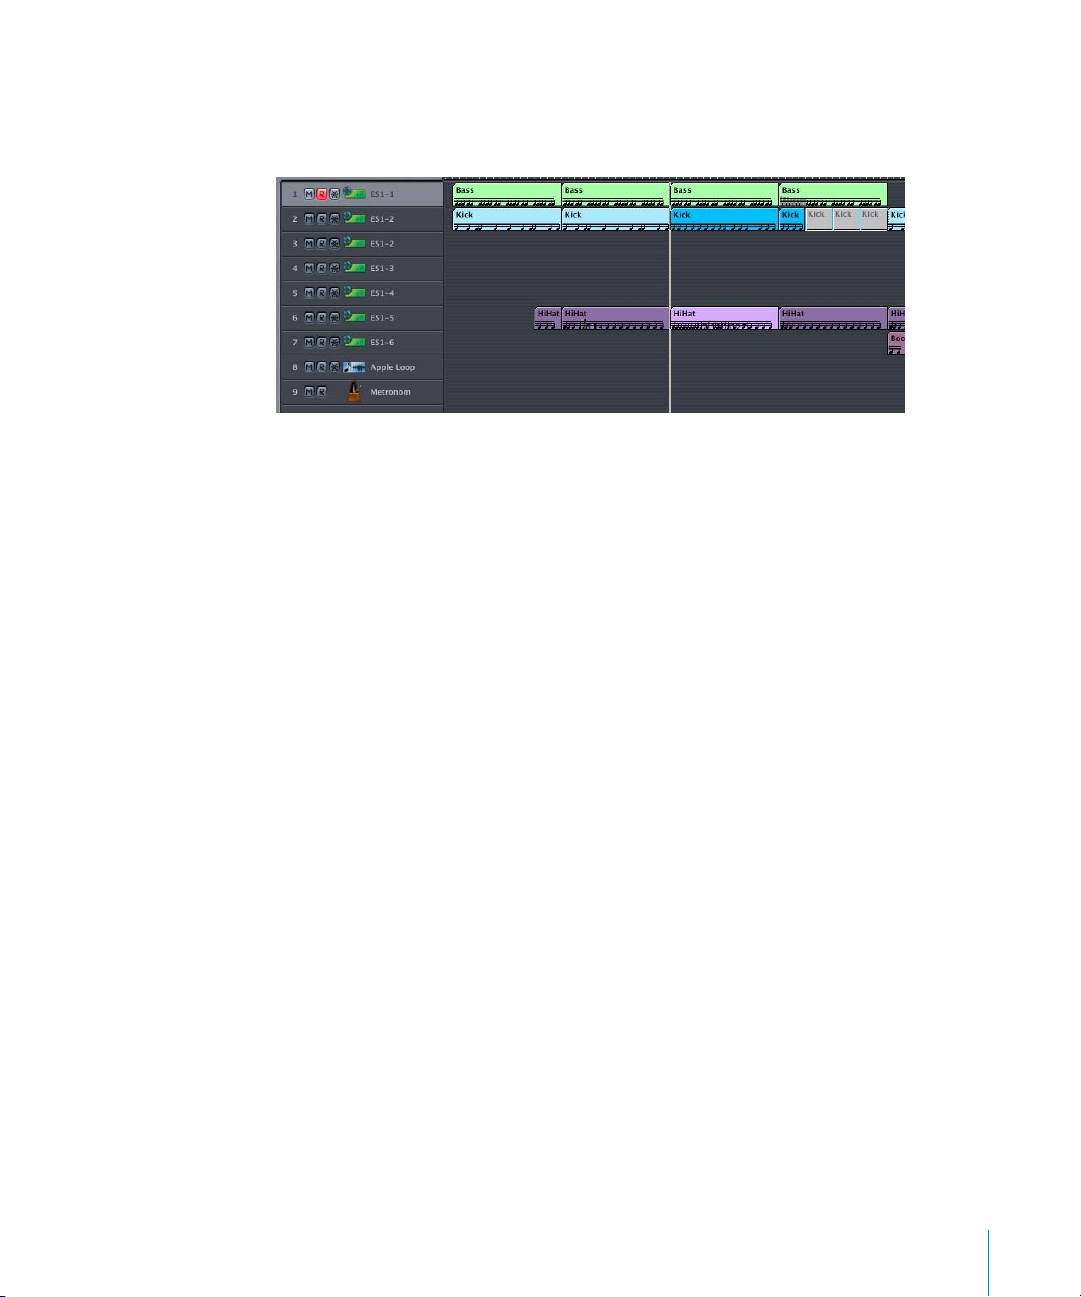
Tracks and Regions
Logic works on the basis of tracks, much like a multitrack tape machine. You can see
and access these tracks in the Arrange window’s Track List—shown below.
Narrow rectangles known as MIDI Regions or Audio Regions appear in the Arrange
area—horizontally aligned with the tracks listed in the Track List. An Audio Region
represents an underlying audio file. A MIDI Region represents an individual recording,
or take of MIDI data. Each time you record, a MIDI Region or Audio Region will be
created on the selected track.
You can consider the MIDI Region a container for the actual MIDI data. This data can
include—either individually or in combination—note events, control data, program
changes, or even SysEx data for your MIDI tone generators or the integrated tone
generators in Logic. To explain:
• Note data is derived from the notes played on your MIDI keyboard. It includes
information about the time (bar/beat position) the note was played, how long the
note was held and the velocity at which (how fast) the key was struck.
• Controller data (continuous controllers) includes volume and pan position settings
and changes, plus any other controllers that you may use, and that your synthesizer
responds to.
• Program changes allow you to select different sounds (or patches) from your MIDI
synthesizer or module.
• SysEx (short for System Exclusive) is a part of the MIDI language that can be used to
store the entire memory of your MIDI devices, amongst other things.
Note that one of the tracks in the list is always highlighted. A selected MIDI track is
automatically armed for recording—indicated by the red Record Enable button.
Any MIDI input received by Logic, when in record mode, will be recorded to this track.
This recording will then appear as a MIDI Region in the Arrange area.
Chapter 2 Getting Started With Logic 17
Page 18
The illuminated M on a track indicates that all Regions on the track are muted—all
Regions aligned horizontally on this track are silent. Muting/unmuting of MIDI or audio
tracks is achieved by clicking the Mute button on each track in the Track List, or by use
of the Mute Track key command (Control-M) on a selected track. Give both a try.
The orange indicator you see to the left of a track is a level/activity meter. Such meters
appear on all active tracks, and are useful aids for keeping an eye on what tracks
contain Regions that are currently playing, and their relative levels.
Recording on audio tracks is a little different to that of MIDI tracks. Audio tracks must
first be armed, which is achieved by clicking on the Record Enable button on the
desired track. Once armed, pressing the Record button on the Transport Bar (or the
Record key command, default *, on PowerBooks #) will start recording audio data to the
selected track.
Before any audio can be recorded, you must first set a recording path and file name—a
location on your computer’s hard disk, and a name for your recorded audio files. We’ll
take a closer look at this in the “Making Your Own Audio Recordings” section on
page 62.
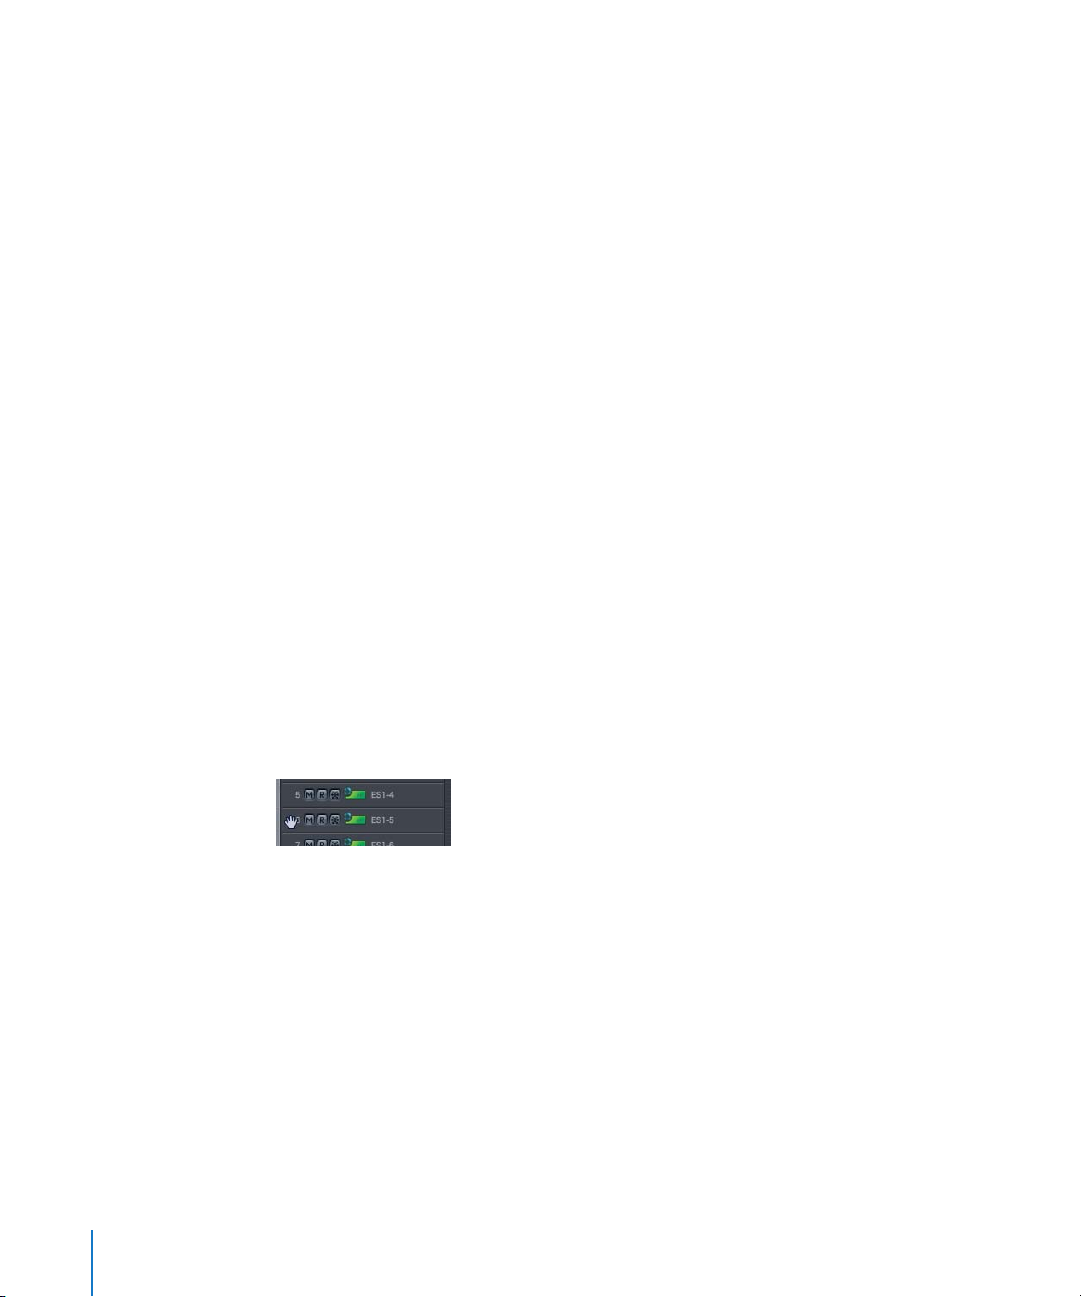
Reorganizing Your Tracks
You may want to reorganize your tracks to keep things neat onscreen, or to group
audio tracks or particular instruments together.
To reorganize your tracks:
1 Move your mouse pointer over the number of the track you wish to move.
2 When the appearance of the mouse pointer changes to a hand icon, click-hold the
track.
3 With the mouse button held down, drag the track up or down the Track List to the
desired location, then release the mouse button. This will change your track order, and
will also move all of the Regions associated (aligned) with the track in the Arrange area.
18 Chapter 2 Getting Started With Logic
Page 19
The Arrange Area
The large gray area next to the Track List is the Arrange area. This is where your Regions
are arranged into a song. You can freely drag and drop your Regions from position to
position, make loops, copies, and more.
Audio and MIDI data can be recorded directly into the Arrange area, as mentioned
earlier. You can add Audio Regions—in AIFF, WAV, SDII, MP3, ReCycle, or Apple Loops
formats—directly to the Arrange area by dragging and dropping audio files from any
folder on your hard disk.
Above the Arrange area, you’ll see the Bar Ruler. This is used for a number of functions
performed in the Arrange area, including song navigation. Much of the Bar Ruler’s
functionality is tied to the Transport window, which we will discuss in the next chapter.
Just above the Bar Ruler—to the top right of the window—you’ll see the Drag and
Snap (only Logic Pro) pull-down menus. These affect how Regions behave when edited
or moved. More information can be found in the Logic reference and Onscreen Help.
Chapter 2 Getting Started With Logic 19
Page 20
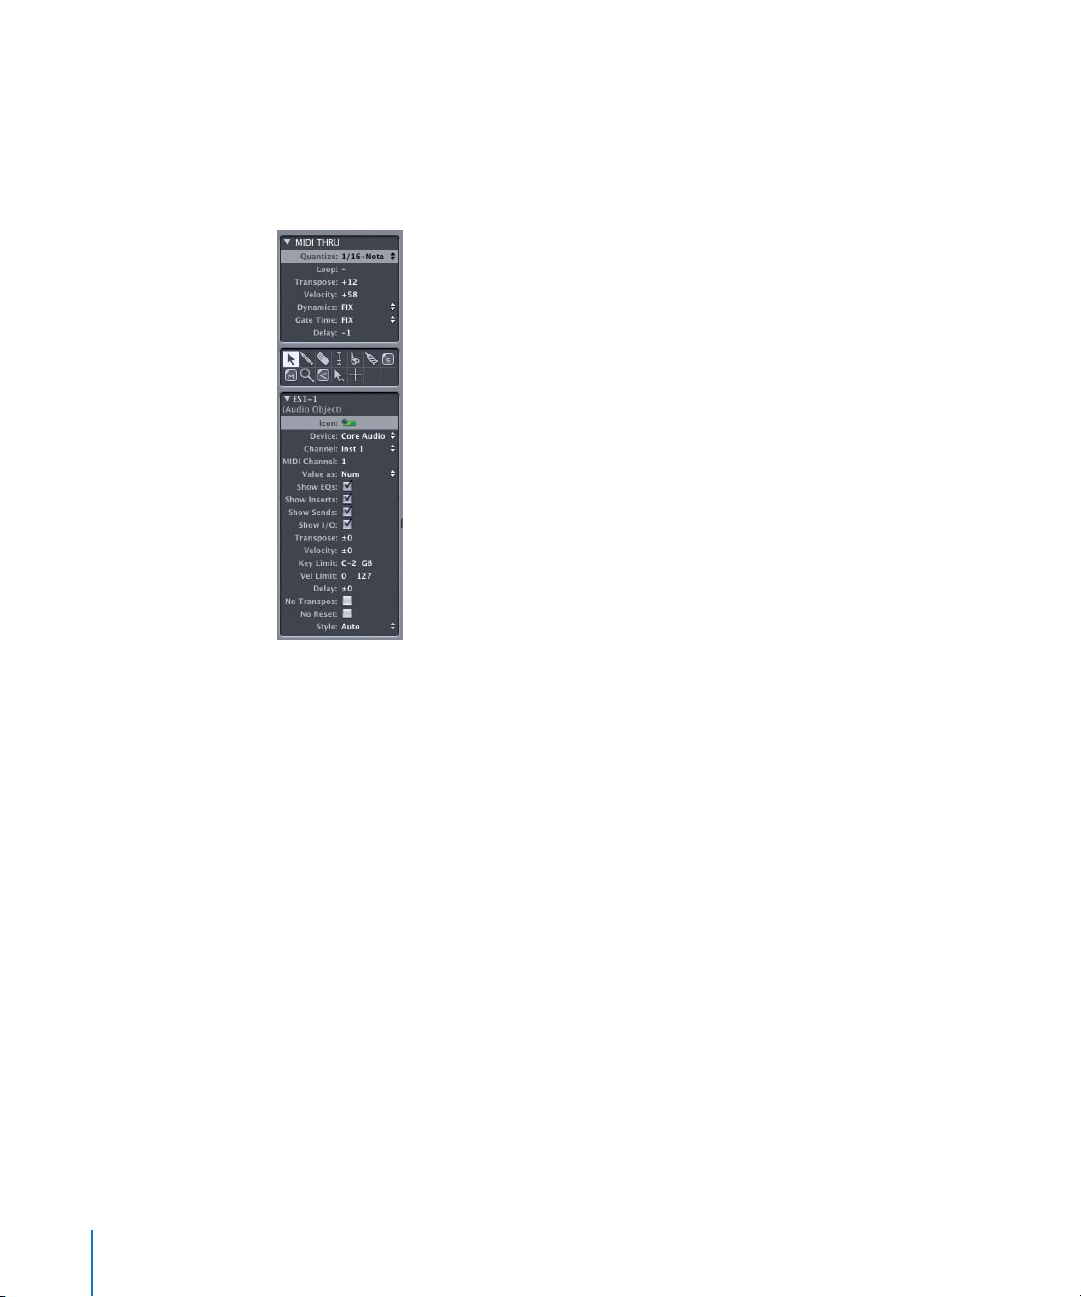
Parameters Area
There are three boxes in the Parameters area to the left of the Arrange area. They are,
from top to bottom, the Region parameters, the Toolbox and the Track/Instrument
parameters. You’ll also see the Arrange window’s channel strip—a mixer fader for the
selected track.
Region Parameters
This Parameter box is directly related to the Regions which appear as rectangles in the
Arrange area to the right of the Track List. When either a MIDI or Audio Region is
selected—by clicking once on it with the mouse—this Parameter box will update to
reflect the parameters assigned to that particular Region. Give it a try on several
Regions, and pay attention to the changes that occur in the Region Parameter box.
Each Region in the Arrange area may have its own parameter settings, allowing
independent transposition, quantization, and more. The parameters available for MIDI
and Audio Regions are different. The reasons for these parameter differences are due to
the very nature of MIDI and audio. Audio Regions don’t offer a transposition parameter,
for example.
Note: An exception to this rule are Apple Loops, used in Apple’s GarageBand
application. These special audio files can be transposed, and also allow for tempo
changes without alteration of their pitch.
20 Chapter 2 Getting Started With Logic
Page 21

To change a parameter value, simply click-hold to the extreme right of the Region
Parameter box—alongside the desired entry. This will open a pull-down menu for some
parameters, and for others will change the cursor to act as a slider. Drag the mouse on
the vertical axis (up and down) to change the value of these parameters. Please select a
Region, and give this a try for each parameter—to familiarize yourself with the
methods used to interact with each of them.
Some Extra Tips
• In the Region Parameter box of a MIDI Region, the Transpose, Dynamics, Gate Time,
and Delay functions have a couple of click zones to the right of the text. If you click to
the extreme right of the box, you will be able to increment/decrement values in
individual steps. If you click about a half centimeter in from the right hand edge of
the box beside the Delay parameter, a pull-down menu of mathematical variables will
be displayed—1/8th, 1/16th and so on—allowing you to select one, if appropriate to
the task at hand. Why not give it a try?
• On a program-wide level. Double-clicking on numerical values in almost all
Parameter boxes, editors, on the Transport Bar and so on will allow you to directly
type in a value. This method of direct numerical entry can be used for quantizing,
program changes, many effects parameters, and more, thereby accelerating your
workflow. To make use of this facility, double-click on the numerical values within the
various parameter fields, and use your computer keyboard to type in a new value,
followed by the Return key. Once again, give it a try.
Important: It should be noted that the Region parameters are available as real-time
processes, meaning that changing these parameter values—Quantize, Transpose, and so
on—can occur while Logic is running. These processes occur on playback and do not
actually alter the underlying MIDI or audio data. To undo any changes, simply select the
target MIDI or Audio Region, and change the parameters back to their former settings
using the techniques described above.
The Toolbox
Key to selecting, and altering, MIDI and audio information in the Arrange window and
Logic’s other editing windows is the Toolbox. This contains a Pointer (Arrow), Pencil,
Eraser, Scissor, and Glue tools (plus others) that allow you to select, draw, delete, cut,
merge, copy, paste, and crossfade (Audio Regions only) Regions. There is also an
Automation tool.
Chapter 2 Getting Started With Logic 21
Page 22

The Toolbox is context-sensitive. This means that different tools will appear for
particular tasks in the various individual edit windows. As an example, there is no
Crossfade tool in the Score window as audio is not handled in this editor. There is,
however, a Voice Separation tool in the Score window, which would be of no use in the
Arrange window, for example.
You can change the currently active tool by clicking on the appropriate tool in the
Toolbox. The mouse pointer will adopt the shape of the selected tool, making it simple
to know what function is currently assigned to the mouse by looking at the cursor. The
Eraser is used for deleting, the Scissors for cutting and the Glue tool for merging
Regions.
You can also select a second tool for use via a Command-mouse click. This second tool
is available when the Command key is pressed while editing Regions. You can assign
the right mouse button (if using a three-button mouse) to a third tool, allowing the use
of three assignable tools:
• left-click
• Command-click
• right-click
When you want to select any of the tools, you can also press the Esc key on your
computer keyboard. The Toolbox will float at the location your mouse pointer currently
occupies onscreen. When the floating Toolbox appears, simply select the appropriate
tool with your mouse cursor. As usual, try it out.
If a Toolbox is opened at the mouse position (Key Command: Show Tools, Default: Esc)
you can also use a numerical key to choose a tool. Tools are numbered from the top
left to the bottom right.
To select a tool numerically:
1 Press the Esc key.
2 Press any of the 1 to 9 keys to assign a tool to the (left) mouse button—the number 2
will select the Pencil tool, the number 3 will select the Eraser tool, the number 5 will
select the Scissors tool and so on. Note that this functionality is limited to the first nine
tools available in any Toolbox.
3 To undo your tool selection, press the Esc key again, switch to the Pointer tool, and
close the Toolbox.
Effective Range of the Tools
• Tools are only effective in the working area of the editing window in which they
were selected. Individual tools can be defined for each open window.
• A tool basically affects the Region you click on. If multiple Regions are selected, the
tool will operate on all of them.
22 Chapter 2 Getting Started With Logic
Page 23

About the Tools
There are additional tools to those outlined below, found in specific editing windows.
The following are the primary tools used in song construction and editing. The
window-specific tools are discussed in the Logic reference, in conjunction with topics
and examples covering their use.
Pointer
The Pointer is the default tool. The mouse cursor also takes on this shape outside the
working area when you are selecting from a menu or entering a value. Within the
working (active) area, the Pointer is used for:
• selecting (by clicking on Regions).
• moving (by click-holding and dragging).
• copying (by holding down the Option key and dragging).
• editing lengths (by click-holding the bottom right or left corner, and dragging).
• click-holding and dragging anywhere on the window’s background allows you to
“rubber-band select” multiple Regions.
Pencil
The Pencil is used to add new Regions. You can also select, drag, and alter the length of
Regions with this tool.
Eraser
The Eraser deletes Regions. This is done by clicking on them once. When you click on a
selected Region, all other currently selected Regions are also deleted (as if you had
used the Backspace/Delete key).
Tex t Tool
The Text tool is used to name Regions and Environment Objects or to add text to a
musical score.
Chapter 2 Getting Started With Logic 23
Page 24

Scissors
The Scissors are used to split Regions—before copying or moving individual sections,
for example.
Glue Tool
The Glue tool performs the reverse action of the Scissors tool: all selected Regions are
merged into a single Region, which is given the name and track position of the first
Region on the time axis.
Solo Tool
Click-holding with the Solo tool allows you to isolate and listen to selected Regions.
This function works during playback or when the sequencer is stopped. Soloed Regions
are outlined in yellow.
Mute Tool
Clicking on a Region with the Mute tool prevents it from playing. A bullet is placed in
front of the Region’s name, to indicate that it is muted. The background of the Region
will also change to a more subtle shading of the Region color, and will display a
number of diagonal lines (if the Muted Regions are textured parameter is active—see
below), making it easier to recognize in an arrangement. You can unmute the Region
by clicking on it again with the tool. If multiple Regions are selected, the mute tool will
affect them all.
Note: The “Melody” MIDI Region on the ES1-3 track of the Tutorial song is muted. If you
click on this MIDI Region with the Mute tool, the bullet and the background shading
will disappear, and the melody can be heard.
Note: You may also wish to activate the Muted Regions are textured parameter in the
Logic > Preferences > Display > Arrange preferences, to further highlight muted Regions.
This is particularly useful on gray (non-colored) Regions.
24 Chapter 2 Getting Started With Logic
Page 25

Magnifying Glass
The Magnifying Glass allows you to zoom in on a section by rubber-band selecting it,
right up to the maximum possible window size. To revert to a non-zoomed view, click
on the background of the active window with the Magnifying Glass tool.
Crossfade Tool
In the Arrange window, the Crossfade tool allows you to simply click-hold and drag
across the section where two Audio Regions meet. A crossfade will automatically be
created between the Audio Regions.
Velocity Tool
In the Matrix and Score editors, you can use the Velocity tool to change the velocity of
notes. To do so, click-hold on the desired notes and move your mouse vertically.
Moving up increases velocity, and down, decreases velocity.
Automation Tool
When editing mixer automation data, this tool has various functions which are
dependent on the setting shown in the pull-down menu just below the Toolbox.
Note: View > Track Automation must be active for this pull-down menu to be visible.
The two pull-down menu options are Curve and Select.
• Curve—You can bend the line between two nodes or any selection. There are four
different curve types available: convex, concave, and two different types of S-curves.
• Select—You can rubber band select any lines and/or nodes in the Automation track.
If the Region is clicked once, all currently visible automation events that fall within the
Region borders will be selected. Once a selection has been made, you can freely
adjust the Automation data levels, copy, move them, and so on.
Note: The Automation Tool is only available in Logic Pro, not in Logic Express.
Chapter 2 Getting Started With Logic 25
Page 26

Marquee Tool
In the Arrange window, you can use the Marquee tool (looks like a crosshair, or plus
sign) to select a portion of an individual Region, or a horizontal selection of multiple
Regions. To use the Marquee tool, select it from the Toolbox and drag from left to right
across the desired Regions. As you do so, you will see a Marquee box (shaded area)
appear onscreen, indicating the range of the Marquee selection. All data that falls
within the Marquee area will be affected by parameter changes or functions.
Note: Obviously, some parameters are only relevant to either Audio Regions or MIDI
Regions. If such parameter changes are applied when both Audio Regions and MIDI
Regions are selected, there will be no change with one type of data, while the desired
change is made to the selection. As an example, if a portion of an Audio Region and
MIDI Region are selected, and the Transpose parameter is used, only the MIDI Region
will be affected.
The Track/Instrument Parameters
The parameters in this area are linked to the Track List. They vary in accordance with
the type of track selected (audio, Audio Instrument, MIDI, and so on) and affect all
Regions on this track.
Note: Track type is determined by the Audio Object it is assigned to. The parameters of
a track or instrument simply mirror the parameters of the corresponding Audio Object.
Given this relationship, the Parameter box below the Toolbox to the left of the Arrange
window, is known as the Object Parameter box.
The Object Parameter box (Instrument Parameter box) will update each time a new
track is selected in the Track List. Please select a few tracks in the Track List with the
mouse, or by using the up/down arrow keys on your computer keyboard. While doing
so, watch the changes in the Object Parameter box.
26 Chapter 2 Getting Started With Logic
Page 27
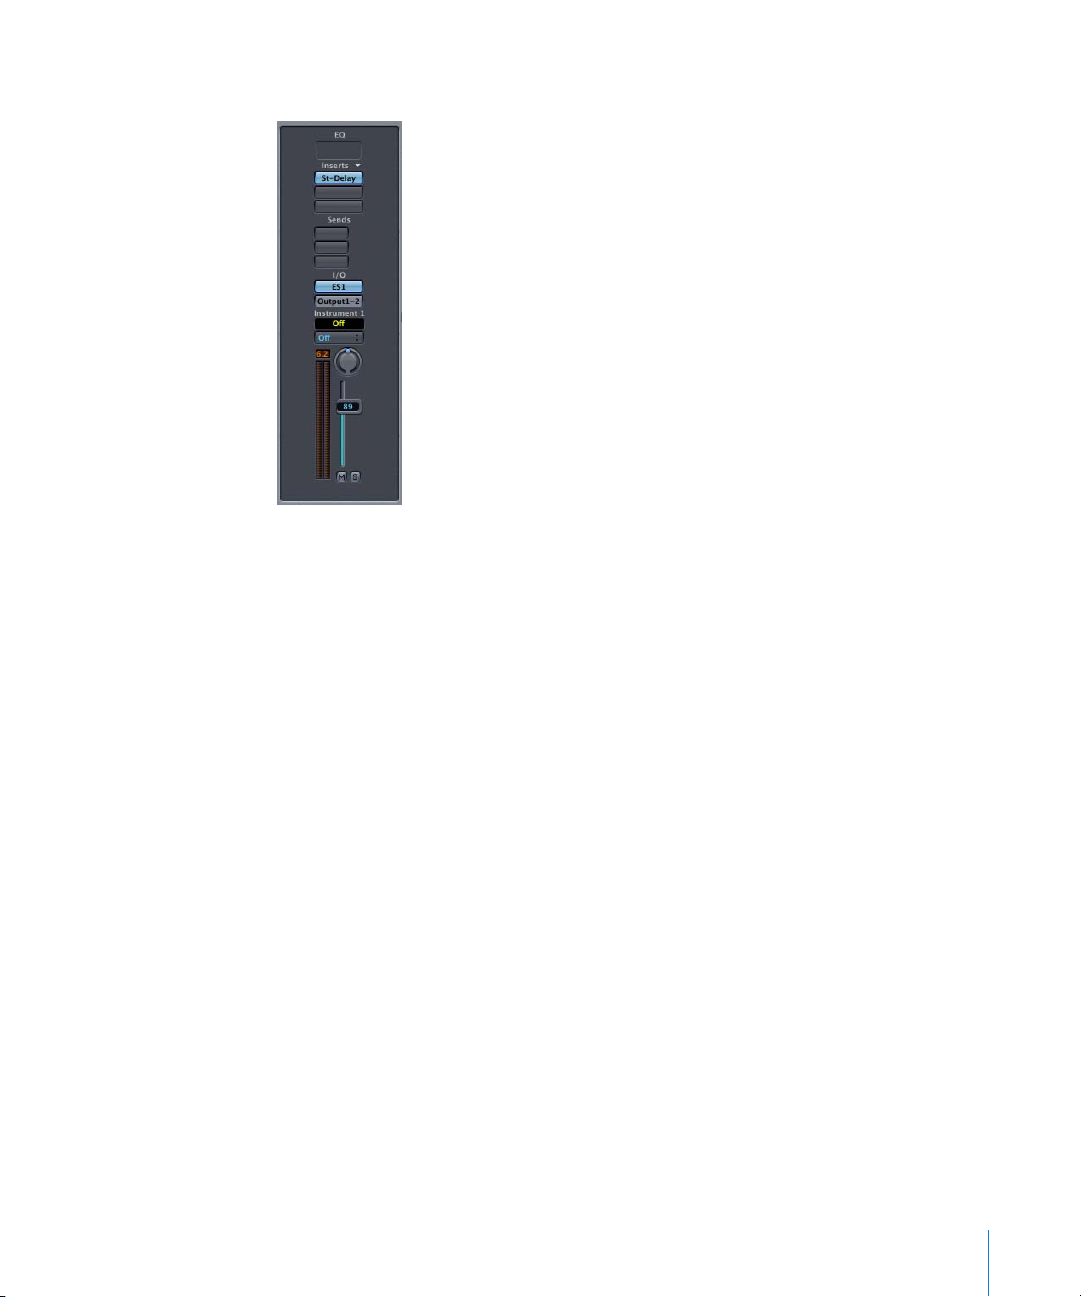
The Channel Strip of the Selected Track
At the lower left border of the Arrange window, a mixer channel strip is displayed. This
channel strip corresponds to the selected track in the Arrange window’s Track List.
If the lower portion of the channel is obscured, you can click on the small arrowheads
at the top left of the Region and Object Parameter boxes to collapse one, or both, of
these panels. This will allow you view the entire channel strip.
The Arrange channel strip is identical to the channel strips found in the Track Mixer and
Environment windows. Changes made in any of these windows/mixers will instantly be
reflected on their counterparts in other windows.
Note: The advantage of having the channel strip accessible from the Arrange window
is that it saves a visit to another window in order to make a quick adjustment to a
sound. It also allows you to insert plug-ins and instruments and change routings
directly from the Arrange window, thus saving you time.
Chapter 2 Getting Started With Logic 27
Page 28
Key Commands
You can activate most of Logic’s functions via key commands. A key command is a
computer keyboard shortcut for a function or task in Logic. A number of functions are
only available as key commands. The Key Commands window is used for the
assignment of key commands to your computer’s keyboard. The use of key commands
allows you to customize Logic to suit your own working style, and will speed up your
use of the program.
Your personal key commands are stored (along with settings made in the Preferences
window) in ~/Library/Preferences/com.apple.Logic (“~” denotes the path to your user
folder: hard disk/users/username/, for example).
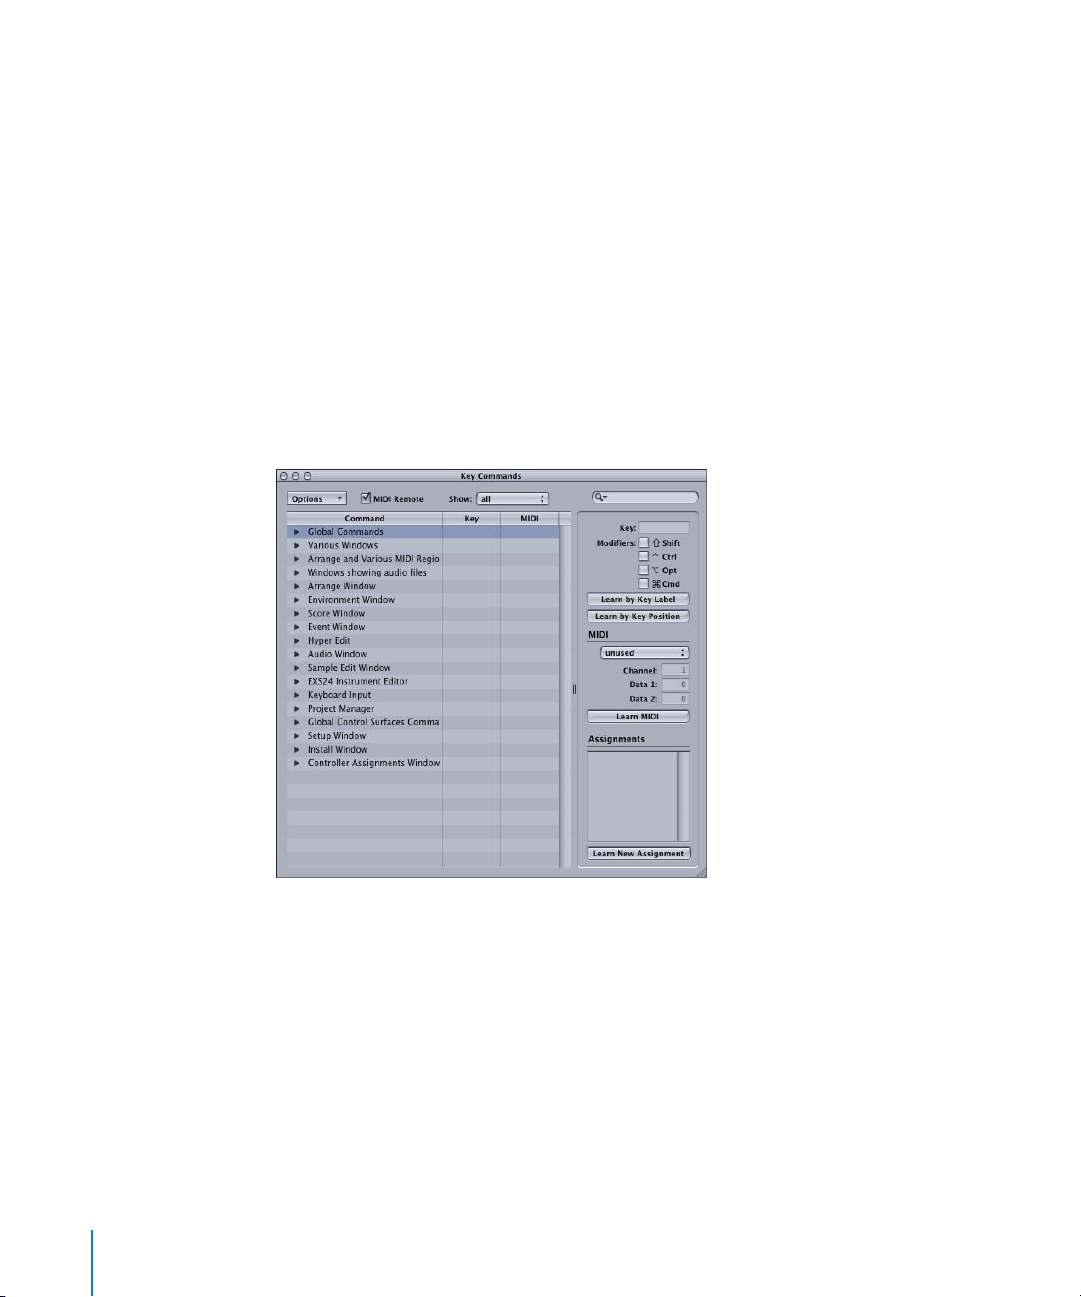
Key Commands Window
The Key Commands window can be opened via the Logic > Preferences > Key
Commands menu option or with the Option-K key command—give it a try!
The list of key commands (arranged in groups) appears to the left of the window, and
the Properties Box is to the right.
In the List shown to the left of the Key Command window, the following applies:
• Groups can be extended or collapsed by clicking on the arrow to the left.
• When the list has keyboard focus, physically pressing a key command (or key
command combination) selects the appropriate key command.
• If the triggered key command is located in a collapsed group, the group will
automatically be expanded.
28 Chapter 2 Getting Started With Logic
Page 29

To assign a function to a key:
1 Click on the Learn by Key Label button.
2 Select the desired function in the list by clicking once on it with the mouse.
3 Press the desired key on your computer keyboard, plus any modifier key(s)—
Command, Shift, Control, and Option—that you wish to use as part of the key
command.
4 To create further key commands, repeat steps 2 and 3.
5 Deactivate the Learn by Key Label button!
To delete key command assignments:
1 Click on the Learn by Key Label button.
2 Use the mouse to select the function with a key assignment that you wish to delete.
3 Press Backspace.
4 To erase more assignments, repeat the second and third steps.
5 Deactivate the Learn by Key Label button.
To check the function of a key:
1 Deactivate the Learn by Key Label button.
2 Press the key command (or combination of keys) that you want to check. The
associated function will be highlighted, and displayed in the middle of the window.
Special Keys
Some keys have special functions:
• The Control, Command, Shift, and Option modifier keys can only be used in
conjunction with other keys.
• The Backspace key has the fixed Delete selected Objects function. It can only be
assigned to another function in conjunction with the modifier keys.
The Plus and Minus keys increase or decrease any selected parameter value in single
units. They can, however, be assigned different functions which override this default
behavior.
Chapter 2 Getting Started With Logic 29
Page 30

Controlling Windows—Screensets
Every song created in Logic can have up to 90 Screensets. Screensets are window
combinations that can be customized by you, and stored to a specific numeric key/
combination of keys on your computer keyboard. To recall a Screenset, you simply
need to press the appropriate key or key combination. Each Screenset remembers the
type of edit or Arrange window(s) opened plus their individual size, position, and zoom
settings. This facility accelerates your workflow massively, and allows you to tailor Logic
to fit your needs and tastes.
To set up a Screenset:
1 Press any of the numeric keys above your computer keyboard (you can also use a
numeric keypad, if using a PowerBook or iBook).
2 Open the desired windows by selecting them from the Windows menu, or by using the
appropriate Key Commands.
3 Resize, zoom, and reposition your selected windows to meet your needs. Resizing and
repositioning of windows is as per any Macintosh application. Zooming of individual
windows is achieved with the Zoom sliders.
4 Press the numeric key again.
Note: This will only work for keys/Screensets 1 to 9.
To set up more than nine Screensets:
m
Press Control while typing in the desired numeric key combination.
Important: You can not use the number 0 for any of your Screenset combinations. The
reason is that number 0 is assigned for the Transport Bar Play function, using the
computer’s keyboard.
To lock Screensets:
m
If you want to ensure that your Screensets remain as you intended, you should always
lock your Screensets by pressing Shift-L. The lock also includes zoom settings, catch
mode and the visible area.
30 Chapter 2 Getting Started With Logic
Page 31

3 Navigating the Song
3
In this chapter, you will learn how to move to different
parts of the song, start and limit passages, and to isolate
and audition specific portions and components within
the song.
In short, you’ll learn how to navigate through the song. As you’re reading, follow the
steps and try out the functions. You can’t break anything.
Please load the Tutorial song, if you haven’t already done so.
The Transport Window
The second, smaller window—displayed after loading the song—is the floating
Transport window. It is laid out like the control surface of a tape machine, with the top
row of buttons used for operating the Record, Pause, Play, Stop, Rewind, and Forward
functions. In addition, you can use the Transport window for operations such as Solo,
Synchronization or Cycle, which we’ll cover shortly.
You can start the song by clicking on the Play button (see picture below) on the
Transport bar, or by pressing Enter on your numeric keypad.
Try out the buttons in the upper row of the Transport bar. You should be pretty familiar
with them as they are identical to the functions found on tape machines and cassette
recorders.
Here’s an overview of the Transport window elements:
31
Page 32

Note: Clicking on the downwards pointing arrow beside the Song End box will open a
menu of Transport bar display options, which allow you to customize the appearance
of the Transport bar to meet your requirements. We suggest that you select the Legend
menu option, which will turn on the function titles, as shown in the image above, while
learning Logic.
• The SMPTE/Bar Position area indicates the current bar number occupied by the Song
Position Line (more on this in the next section). In the figure above, the display
shows 132181, which means: first bar, third beat, second 16th, and 181st clock
pulse. The time position, 01:00:01:05:38 means—1 hours, 0 minutes, 1 seconds, 5
milliseconds/38 frames.
• The lower two sets of numbers, from top to bottom, are the left and right Locators,
used for setting cycle area points, which will be discussed shortly.
• The Tempo display indicates the tempo accurate to 1/10,000th of a Beat Per Minute.
• Beneath the Tempo, the maximum number of MIDI events that it would be possible
to record on this particular computer is indicated.
• The /16 below the Time Signature of 4/4 indicates the Format of the note and bar
display, so that any edits performed on your MIDI or audio data can be carried out
with more precision. The /16 refers to the number of divisions in the bar.
• The MIDI Activity display shows all MIDI input and output and also serves as a Panic
button. If you have hung notes, you can click once in the MIDI Activity Window to
send a MIDI reset message, or double-click to send a Full Panic Reset which
systematically works through all MIDI channels and ports and resets all connected
MIDI devices. This guarantees absolute silence.
• The Song End box displays the bar number that the song will end at, and sets a
maximum song length. By default this is set to 201 bars.
Note: You can resize the Transport window by dragging the lower right corner to the
left or right.
Transport Key Commands
By default, there are several key commands assigned to the transport functions. They
are assigned to the numeric keypad of your computer keyboard. See the following
chart for these commands, and try to remember and use them while working through
the guide.
Key Command PowerBook Key
0 Stop (if stopped: Return to Zero) Return
Enter Play (if playing: play again) Enter
* Record (if recording: record again) Backslash
, Pause (toggle) Shift-Return
Space bar Play/Stop (toggle) Space bar
/ Cycle (toggle) /
32 Chapter 3 Navigating the Song
Page 33

Moving to Different Song Positions
There are several ways to “jump” to specific song positions. At the top of the Arrange
window, you can see the Bar Ruler.
• Click at various spots in the lower half of this ruler and you’ll immediately jump to
that position. As you click, a vertical light gray line will appear in the Arrange area
aligned with the point selected on the Bar/Beat Ruler. This is the Song Position Line
(SPL).
• Engage Play via the Transport bar or by pressing Enter.
• Now click on the Bar/Beat Ruler, and hold down the mouse button. Take note of the
SPL, which moves to align itself with the mouse position in the Bar/Beat Ruler. You
can move to any position in the Bar/Beat Ruler, and hear different sections of your
song instantly, by moving the SPL in this way. Play must be engaged for this live
auditioning (hearing the music or audio) to occur.
If you would like to jump directly to a specific position when the sequencer is not in
Play mode (press the Stop button now, if Logic is presently running), you can also take
advantage of Logic’s Locators. To the right of the Transport buttons, the current song
position—in both absolute time (that’s hours, minutes, seconds, in plain language) and
as musical measures (bars/beats/sub-beats)—is displayed.
• Click-hold on the Song Position indicator, and drag the mouse on the vertical axis (up
and down) until the song position displays 17 1 1 1, and start playback—you know
the key command. Logic will begin playing at measure 17. Take note of the SPL as
you’re doing so.
• Another way of doing the same thing is to double-click on the current Song Position
locator on the Transport Bar. This will open a numeric entry dialog box, where you
can directly type in 17. Give it a try.
If you need to enter sub-divisions of the bar, seperate each number with a space or
colon. As an example, 17 3 2 1 (don’t forget the Space between each numeric entry),
which translates to bar 17, beat 3, sub-beat 2, clock tick 1.
Note: The resolution of the sub-beat is determined by the Format value, set in the
Transport window (see page 31).
Chapter 3 Navigating the Song 33
Page 34

Display Current Song Position
If you manually enter and jump to positions, the song overview displayed can, on
occasion, not correspond to what you hear.
To ensure that the current song position is always displayed:
m
Activate the Catch button (see picture below) found to the upper left of the Arrange
window. The song overview will update to follow the SPL.
This facility ensures that when the SPL exits the visible portion of the song overview,
the display will update to follow it. In general, Catch mode should be activated while
using the program.
Note: Please remember that you can always use the two Zoom controls to change the
horizontal and the vertical zoom ratios as you like, allowing you to see more of your
arrangement.
Cycle Mode
In Cycle mode, you can endlessly repeat a section of the song as long as Play is
engaged. This is useful for editing Regions “live”—as the song is playing—or for
recording new tracks to a specific section of the song. Two Locators can be used for
setting cycles. These are position markers that define the left and right boundaries of a
song segment. They are found directly to the right of the bottom row of the Transport
window’s control buttons.
To activate Logic’s Cycle functions:
m
Turn on Cycle mode by clicking on the Cycle button in the Transport window or by
pressing the Cycle key command. When active, the Cycle button will turn green.
This visual representation of the cycle (the highlighted section) can be interacted with
directly in the Bar/Beat Ruler.
You can adjust it in the following ways:
34 Chapter 3 Navigating the Song
Page 35

• Move it by grabbing it in the middle, and dragging your mouse to the left or right.
• You can also change the area borders by grabbing either the bottom left or right
corners of the highlighted section on the Bar/Beat Ruler, and moving the mouse left
or right.
• By clicking anywhere in the upper part of the Bar/Beat Ruler, the cycle can be
deactivated. Another click reactivates it.
Press Play and allow the area to cycle over the selected song section. You can even
resize the cycle while it is playing, using the technique mentioned above. When Cycle
mode is engaged, pressing Stop twice will move the SPL to the beginning of the cycle,
rather than the beginning of the song, which is its default behavior. Give it a try.
Selecting and Soloing
In order to edit any data type in Logic—be it notes, MIDI or Audio Regions—you first
need to select them. All functions and operations will only affect items that are selected.
We will demonstrate this with the Solo function:
To solo a Region:
1 Turn on the Solo function by clicking on the Solo button in the Transport Bar, or by
pressing the S key. The Solo button and the Bar/Beat Ruler at the top of the Arrange
window will turn yellow.
2 Extend the cycle boundaries from bar 9 through 13, and enable Cycle mode. We will be
working with the MIDI Regions between these bars.
3 Start playback, and click once on the “Kick” MIDI Region to highlight it. A black bar at
the top of the MIDI Region indicates that it is selected. You will hear the kick drum part
in isolation, because when Solo is active, only selected MIDI Regions will play.
4 Click on the other MIDI Regions in the cycled section, one at a time, to solo them.
You can also solo several selected MIDI Regions:
1 Select the “Kick” MIDI Region again.
2 Hold the Shift key down, and click on the “Bass” MIDI Region. This will also be selected
and played.
3 While still pressing the Shift button, click just below the “HiHat” MIDI Region, and keep
the mouse button depressed. Now, drag a lasso over all of the MIDI Regions in the
cycled section. Your previous selection will now be reversed, and you will hear the
remaining HiHat MIDI Region.
Try out the selection functions with other MIDI Regions, individually and grouped
(using the Shift key), if you’d like more practice.
Chapter 3 Navigating the Song 35
Page 36

Oh … and congratulations are in order!
You’ve just mastered the most essential of Logic’s techniques—the selection of MIDI
Regions, notes, Audio Regions … you name it!
36 Chapter 3 Navigating the Song
Page 37

4 Editing Regions
4
In this chapter, you will learn how to edit Regions with
Logic’s tools. We will also introduce you to Logic’s Loop
function and the Loop Browser.
Try everything described below with the Tutorial song Regions. Should something
unexpected happen while you’re experimenting, you can easily restore the song to it’s
original state by reloading it. Simply select File > Revert to Saved from the main menu
bar to do so.
Resizing Regions
In the Arrange window, the Pointer tool can be used to resize each Region.
To change the length of a MIDI Region in the Tutorial song:
1 Choose the Pointer in the Toolbox.
2 Move the Pointer over the bottom left or right hand corner of a MIDI Region.
3 When the cursor turns into two small arrows/a hand with an upwards pointing finger
(left/right corner of the MIDI Region) you can resize the MIDI Region, thereby changing
its length. You can do this while Logic is in Play (or Record) mode, or stopped.
Note: When adjusting the length of Audio Regions, dragging (to the right) from the
bottom left hand corner will also move the Anchor point. The Anchor is the start point
of the audio file that the Region is based on. Dragging from the right hand corner to
the left will simply shorten the Audio Region. No Audio Region can be longer than the
underlying audio file that it is based on.
37
Page 38

Moving Regions
In the Arrange window, the Pointer tool can be used to move Regions onto other tracks,
or to other positions.
To move a Region in the Tutorial song:
1 Choose the Pointer in the Toolbox.
2 Position the cursor over the middle area of a Region. When it changes to a hand with
five outstretched fingers (see figure below), click once, hold the mouse button, and
drag the Region to the desired position.
To move multiple Regions simultaneously:
1 Click-hold the mouse button, and rubber-band select the “HiHat” and “Boom” MIDI
Regions: (near the end of the arrangement).
2 Once all are highlighted, grab and drag them four measures (bars) to the right. Make
use of the position display on the help tag (shown during this operation) as your
reference. It should read 25 1 1 1 when you release the mouse button.
Important: You should always refer to the help tags appearing when carrying out any
of the following operations in Logic: move, copy or cut/divide. This will help you when
editing and arranging, and can aid in avoiding disastrous mistakes (also see the Undo
section below).
The help tags automatically appear
whenever you are performing an edit.
38 Chapter 4 Editing Regions
Page 39

Undo/Redo
Did you make a mistake, such as not selecting all of the MIDI Regions, or perhaps you
moved them to the wrong place?
If so, this would be a good time to become acquainted with one of the most important
functions in Logic—the Undo. The Undo function allows you to undo the previous
editing step, should things go wrong.
To use the Undo function,
m
Select Edit > Undo “edit function name”. If we were to undo the example above, the MIDI
Regions would be reset to their original positions, and you could re-attempt your edit.
Give it a try, even if you got the edit right!
To reverse the Undo:
m
Select Edit > Redo.
To undo more than one editing action:
1 Select Edit > Undo History.
2 A listing of all previous editing actions will open. You can go “back in time” to any of
these edit operations. Click on one to see what happens.
3 To return to the most recent editing step, click on the most recent entry—namely, the
one at the bottom of the list. Cool huh?
Important: It is vital that you make the distinction between what can be undone and
what can’t. As an example of this—the Quantize or Transpose playback parameters do
not actually alter data. They simply change the way it is played back.
Realtime playback parameters such as these do not involve an edit operation (such as a
cut, copy or paste), and therefore the Undo function (and thus the Undo History) has
no effect on them. To undo a playback parameter, simply select the affected MIDI
Region, and adjust/reset the appropriate parameter to its former (or default) value.
Chapter 4 Editing Regions 39
Page 40

Copying Regions
In the Arrange window, you can use the Pointer tool to copy MIDI and Audio Regions.
The procedure is quite similar to moving Regions.
To copy one or more Regions:
1 Select one or more Tutorial song Regions (using the rubber-band or shift-click methods
discussed earlier).
2 Press and hold the Option key while moving these Regions to a new position, and
release the mouse button. A copy of the Regions is placed at the target position. These
newly-created Regions retain the names of the originals, with the text “*copied” added
to the end of the name.
Note: You can decide whether or not this extension should appear in the Region’s
name by opening the Logic > Preferences > Global > Editing preferences dialog. Click in
the checkbox to the left of the Add Last Edit Function to Region Name option if you want
a description of any edit operations to appear on edited Regions. If not, uncheck the
box.
Note: Remember to keep an eye on the displayed help tag while copying Regions! If
something goes wrong, or you decide to reverse the copy operation, you can use the
Undo function (or Undo History) to do so.
Cutting Regions
You can use the Scissors tool to cut a Region.
To do so:
1 Select the Scissors tool from the Toolbox. This will change the appearance of the mouse
cursor to a pair of scissors.
2 Click-hold on the last “Kick” MIDI Region in the ES1 2 track, and move the mouse left or
right. While doing so, constantly refer to the displayed help tag.
3 When position 24 1 1 1 is reached, release the mouse button. This will cut the selected
Region(s) at the beginning of bar 24.
4 Following the cut, you could delete the last bar with the Eraser tool, or by pressing the
Backspace key. This will wipe out the kick drum upbeat in the last measure.
You can also divide multiple selected Regions simultaneously this way. Give it a try, and
reverse the results with the Undo function.
40 Chapter 4 Editing Regions
Page 41

Loops
The Loop function enables you to repeat a Region automatically, without needing to
copy it. The Loop switch can be found in the Region Parameter box.
In the Tutorial song, you can see a looped MIDI Region on the ES1-2 track, between
measures 13 and 17. The loops are displayed as gray segments, following the original
MIDI Region. These loop repetitions are always the same length as the original MIDI
Region.
To switch off looping:
1 Select the original MIDI Region.
2 Click the On option, found beside the Loop entry in the Region Parameter box. The gray
loop repetitions disappear.
3 Reactivate the loop by clicking beside the Loop entry again.
4 Click on the bright blue “Kick” MIDI Region that follows the loop repetitions, and press
the Backspace key. The gap is immediately filled with further repetitions of the original
MIDI Region.
Note: A looped Region is repeated until it encounters another Region on the same
track (or the song ends). To turn off the repetitions at a desired position, simply insert
an empty Region onto the track with the Pencil tool (or by copy/pasting another blank
Region). In the following, we will use the term Stop Region to refer to this kind of
Region.
To increase the length of a loop:
m
Grab the lower right corner of the original MIDI Region, and drag to the right to
increase its length by one bar. As you can see, the loop repetitions change their length
accordingly. This can be done while Logic is running, allowing you to immediately
listen to the results in the context of the arrangement.
Chapter 4 Editing Regions 41
Page 42

To copy a looped Region:
1 While pressing Shift, click on the original MIDI Region, and—if used and desired—the
Stop Region for the repetitions.
2 When both have been selected, release the Shift key.
3 Press and hold the Option key, click on the original Region, and drag the entire section
to the desired position. Release the mouse button and Option key. The entire passage,
including the Stop Region, will be copied, and you’re done!
Note: If the Stop Region is not copied, the original MIDI Region—with the Loop
playback parameter active—will be copied to the desired location. This will create a
MIDI Region copy with loop repetitions that continue to the song end point, or to the
next Region on the destination track.
Important: Loop repetitions are merely pointers to the original Region. They can not
be transposed and don’t have any playback parameters in the Region Parameter box.
Only a “real” Region (or a copy) may be transposed and offers playback parameters. If
you’d like to use different playback settings for each of the loop repetitions, you’ll need
to turn them into real copies first.
To turn a loop into a real copy:
1 Select the original Region.
2 Choose MIDI > Alias > Turn Loops to Real Copy. New Regions will now replace the gray
loop repetitions.
The Loop Browser
Logic ships with a number of Apple Loops. These are musical phrases that can be
repeated seamlessly. In comparison to standard audio loops, Apple Loops have a
significant advantage: they can be transposed and (automatically) time stretched.
When you add an Apple Loop to a song in Logic, it will automatically be matched to
the tempo and key of the song. This function allows you to use several loops together,
even if they are of different speeds and keys.
Note: You can use Logic’s Loop function (in the Region Parameter box), to repeat an
Apple Loop for any desired period of time in a song.
42 Chapter 4 Editing Regions
Page 43

So let’s add an Apple Loop to our Tutorial song:
1 Choose Audio > Loop Browser to launch the Loop Browser.
In the Loop Browser, you can use the buttons in the upper half of the window to show
your loops by category, by instrument, genre, or mood.
2 As an example: to add an electronic drum loop to our Tutorial song, simply click on the
Drums button and then on the Electronic button. All Apple Loops that match these
criteria are shown in the lower half of the Loop Browser.
As you scroll down the list, you’ll see that there are two types of Apple Loops: those
featuring a blue soundwave icon and others with a green note icon. The Apple Loops
that feature the blue icon can be added to audio tracks, and can be edited like other
Audio Regions. As mentioned earlier, they have the major advantage of automatic
tempo and key matching to that of the song tempo and key.
The Apple Loops that feature the green icon can also be added to audio tracks, where
they behave exactly like their blue icon counterparts. They can also be added to all
Audio Instrument and MIDI tracks. On such tracks, these files can be edited like other
MIDI Regions, including individual note editing.
Another interesting thing about the green Apple Loops is that if dragged onto a
“blank” Audio Instrument track (one with an empty channel strip), the corresponding
instrument and effect setting are automatically inserted. Try this:
Chapter 4 Editing Regions 43
Page 44

3 Drag a green Apple Loop to the Apple Loop track. Place the left edge of the loop at the
point in the timeline where you want the loop to start playing. The appropriate
instrument, effect, and input settings are automatically loaded into the empty channel
strip. You can check this out further by pressing Control-2. The Track Mixer will open,
with one channel strip selected (highlighted), and configured to match the original
Apple Loop settings.
Note: You can also perform text searches, and further refine your searches in several
other ways in the Loop Browser.
44 Chapter 4 Editing Regions
Page 45

5 MIDI Regions
5
MIDI Regions are containers for MIDI events. They offer a
number of additional editing possibilities over Audio
Regions.
In the following chapter we will look at these more flexible aspects of MIDI Regions. We
will also explore Logic’s event editors.
Transposing MIDI Regions
Transposition is a pitch change of either a MIDI event or Region by a number of
semitones. The Transpose parameter is found in the Region Parameter box. It can be
used to change the transposition of the selected Regions.
Note: Audio Regions can not be transposed with the Transpose function. This isn’t true
of Apple Loops, however. These loops may be transposed, and can also be played back
at varying speeds.
To transpose a MIDI Region:
1 Select the last of the four “Bass” MIDI Regions in the first track.
2 Click-hold to the right of the Transpose parameter in the Region Parameter box.
3 In the menu that is displayed, select a value of +12 by carefully dragging your mouse
upwards.
4 Release the mouse button. The selected Bass MIDI Region will be transposed up 12
semitones (an octave). Listen to the result.
∗
When multiple MIDI Regions are selected, an asterisk (
value for the Transpose parameter in the Region Parameter box. This indicates that the
selected MIDI Regions each have different transposition values.
45
) may be shown instead of a
Page 46

A nice feature of Logic is that global adjustments made to multiple MIDI Regions work
relatively. In other words, this means that individual transposition differences (the
relative pitches) between MIDI Regions are maintained, even if all MIDI Regions are
transposed. As an example, if you were to rubber-band select the transposed “Bass”
MIDI Region and the preceding “Bass” MIDI Region, and transpose both of them up five
semitones, the originally transposed MIDI Region would be playing back eight
semitones higher (three semitones plus five semitones), and the other MIDI Region
would be playing back five semitones higher than their original pitches. Try it out.
Quantize
Quantizing is the rhythmic correction of notes, aligned to positions on a grid. When
quantization is applied to any selected event or MIDI Region, Logic will move all note
events to align perfectly with the nearest grid positions.
In the image above, the first four beats show unquantized note events. In the second
four beats, the notes have been quantized, and now align to the nearest beat positions
on the grid.
In the Tutorial song, Logic’s Quantize function is used on the brighter colored “HiHat”
MIDI Region between measures 9 and 13. The timing of note data in this MIDI Region
was intentionally left slightly off the beat. As Quantize is activated and set to 16th Note,
you cannot hear these timing errors.
To deactivate the Quantize function:
1 To best illustrate how quantization affects MIDI note timing, you should activate the
metronome. To do so, click on the Metronome button found toward the lower right end
of the Transport Bar.
2 Select the bright “HiHat” MIDI Region.
3 Set a cycle from measure 9 to measure 13 by choosing the Region > Set Locators by
Regions menu entry (this function is also available as a key command), and activating
the Cycle button in the Transport Bar.
46 Chapter 5 MIDI Regions
Page 47

4 In the Region Parameter box, click on the 16th note text alongside the Quantize entry. In
the pull-down menu which opens, select the Off setting. This quantize value will then
be displayed as the Quantize value. As the MIDI Region continues to play, you’ll discover
that it now sounds out of time, rhythmically, as this is a less than perfect recording.
5 Try out other quantization values such as 1/8 Note and 1/4 Note on this MIDI Region,
and listen to the results of the hihat notes being forced to different grid values.
Quantize parameter values followed by an alphabetic character will introduce a “swing”
feel to the quantization. On the HiHat MIDI Region, this is most obvious with 1/8th note
quantize values. The letter A represents the lightest swing effect, the letter F the
strongest. Judicious use of these different groove factors can make your choruses
sound like they swing more than verses do, for example.
Note: Another thing to consider, while experimenting with different Quantize settings,
is that this operation happens in real-time, while the sequencer is playing. As you’ve
also discovered, you can jump to different song positions, solo tracks and change cycle
areas while Logic is playing. This real-time functionality is available for most Logic
operations.
MIDI Recording
If you have a MIDI keyboard connected to your computer, you can now try the MIDI
recording function of Logic. We suggest that you play a little solo over the last eight
bars of the arrangement. We have already prepared a suitable sound on the ES1-4 track.
As you may not play the solo perfectly on your first attempt, and to introduce you to a
nice Logic feature, we’ll set things up so that you can record several takes automatically
in Cycle mode. Once you’ve finished recording, you can then select your favorite
version of the solo.
To prepare the song for recording:
1 Open the File > Song Settings > Recording window.
Chapter 5 MIDI Regions 47
Page 48

2 Check the Auto Mute in Cycle Record box.
Selecting this setting causes each previous take to be automatically muted when the
cycle repeats. This way, you can record one passage after another, without being
distracted by (that is hearing) your previous takes.
3 If you would like to hear the metronome while recording, you should enable it now in
the Transport window.
To start recording:
1 Select the ES1-4 Track List entry by clicking on it. Simply selecting the track will arm it
for recording.
2 Play your MIDI keyboard; you should hear the lead sound. You can start playing the
cycle, and do a little experimenting on the keyboard while listening.
3 If you don’t like the current key, you can transpose it in the Region Parameter box as
desired.
Note: MIDI THRU always appears in place of a Region name in the Region Parameter box,
when no Region is selected in the Arrange window. Any changes made to the MIDI
THRU settings, in the Region Parameter box, affect the notes received at Logic’s MIDI
Input, and will be applied to any subsequently recorded MIDI Regions.
4 When you’re confident enough to record the solo, begin recording by clicking * on the
numeric keypad, or by pressing the Record button on the Transport window.
5 Anything you play will now be recorded, and a MIDI Region will be created on the
selected track.
6 Allow Logic to continue running. After reaching the right cycle boundary, the SPL will
jump back to the left cycle boundary.
Allow the section to repeat, recording on each pass, until you feel that you have one or
two good takes. Logic will create a new track automatically, for every cycle repetition,
and will move previously recorded tracks down the Track List.
48 Chapter 5 MIDI Regions
Page 49

7 Press Stop when you’re done.
To select the best take:
1 Press Play, and use the Mute tool, to audition the individual takes, one by one.
Once you’ve decided on a favorite take, simply delete the unwanted takes by clicking
on the corresponding tracks in the Track List. Once selected, use the Track > Delete
menu option repeatedly, until all unwanted tracks are removed.
2 If you accidentally delete the good take, don’t forget the Undo function.
Saving the Song
To save the Tutorial song, featuring your new solo:
1 Choose File > Save As.
2 Enter a new name—not “Tutorial”—for the song to be saved as in the ensuing file
dialog. This way, you will save a copy and retain the original version for further
experimentation.
Note: The File > Save as Project menu option allows you to also save songs as Projects in
Logic. Projects provide intelligent management of all additional files that are associated
with a song. More information regarding Projects can be found in the Onscreen Help
system and/or the Logic reference.
MIDI Event Editing
This section briefly discusses the use of Logic’s various MIDI editing windows.
The Score Editor
The Score Editor offers extensive score layout and printing facilities, allowing
everything from simple melody lines to full symphonic scores to be transcribed. A
detailed description of the Score Editor can be found in the Logic reference.
Chapter 5 MIDI Regions 49
Page 50

The Matrix Editor
Although it looks very different, the Matrix Editor is quite similar to the Arrange
window. Unlike the Arrange window—MIDI note events, rather than MIDI Regions—are
displayed as horizontal bars in the Matrix editor. Editing, you’ll discover, is quite similar.
The illustration above shows a MIDI Region with chords displayed in the Matrix Editor.
The keyboard along the left edge of the Matrix Editor indicates the pitch of the notes/
keys played in the display. A chord is represented by a group of overlapping bars.
As you can see, the position and length of notes are clearly visible in the Matrix Editor.
The display can be zoomed horizontally and vertically with the two Zoom controls, just
as in the Arrange window.
Note: When making changes in the Matrix—or any other Logic editor—you can hear
the changes in real-time. This is achieved by activating the MIDI Out button found
towards the top left of each editor window (see picture below). We suggest that you
activate this button by clicking on it. It is illuminated when active.
To change note lengths in the Matrix Editor:
1 In the Matrix Editor, you can change the length of single notes or multiple notes.
Highlight the desired note(s) by clicking on it/them (with Shift held) or by rubber-band
selecting it/them.
2 Grab the lower right corner of one of the selected notes, and drag it to the desired
length. Release the mouse button.
50 Chapter 5 MIDI Regions
Page 51

If you change the length of multiple notes simultaneously, they will retain their relative
length differences. It is possible to override this behavior, and force all notes to have
the same end point by pressing Shift, while dragging the right corner. This method will
even work on note events selected across multiple bars.
You can also adjust the start point of any selected notes by click-holding and dragging
the bottom left corner. Note that the Shift function used to align note endpoints does
not work on the beginning of notes.
To change note pitches in the Matrix Editor:
1 Select the Pointer tool from the Toolbox.
2 Choose any note event, or group of notes, by rubber-band (or Shift) selecting them.
3 Grab the center of the note(s) and drag it/them up or down. As you do so, you will hear
the pitch(es) change.
4 When the desired pitch(es) is/are reached, release the mouse button.
To delete note events in the Matrix Editor:
1 Select the Eraser from the Toolbox.
2 Click on the note you want to delete. The note will disappear. As an alternative method
for deletion of the note—or any other selected event—simply press the Backspace key.
Velocities (how fast the note was struck—and usually how loud it is) of notes are
indicated by color—with “hot” colors, such as reds, used for higher values and “cool”
colors, such as blues, used for lower velocities. A further indicator of velocities is the
line within the note event bar, with higher velocities indicated by a longer line.
Velocities of selected note events can be adjusted with the Velocity tool.
To change the velocity of notes in the Matrix Editor:
1 Select the Velocity tool from the Toolbox, as shown.
2 Click-hold on a note, and drag the mouse up and down. As you do so, you’ll note that
the color of the selected note event changes, and the line within the note changes
length.
You can also change the velocity of multiple selected notes simultaneously. You’ll see
that the velocity of the note that you edited individually retains its relative distance
(level) from the other selected events. As you drag the mouse up and down, you’ll
discover that when maximum or minimum values are reached for any of the selected
events, no further increase or decrease in any of the other events’ values is possible.
Chapter 5 MIDI Regions 51
Page 52

In all versions of Logic, you can make volume and panning changes using the Hyper
Draw function, within the Matrix and Score Editors. Logic Pro also allows the drawing of
controller curves for other types of continuous controllers.
In the illustration above, you see the Matrix Editor with Hyper Draw volume curve.
Using Hyper Draw in the Matrix Editor
1 To access the Hyper Draw function within the Matrix Editor, select View > Hyper Draw >
Volume (or Pan, or another controller type in Logic Pro). As an alternative method, you
can press F8 to activate Hyper Draw. F9 will switch back to the standard Matrix Editor
view, without the Hyper Draw display being visible.
More information about the Matrix Editor can be found in the Logic reference and
Onscreen Help system.
52 Chapter 5 MIDI Regions
Page 53

The Event List
The Event List shows all data contained within a selected MIDI Region as an
alphanumerical (a collection of numbers and letters) listing.
To open the Event List:
1 Select the last “Bass” MIDI Region—between bars 25 and 29, on track 1.
2 Select Windows > Event List or press the E key.
Note: You can close the Event List by pressing the E key again (Toggle Event Editor key
command). The Windows > Event List menu command (or the separate Open Event Editor
key command) allows you to open multiple Event Lists, if desired. You may also open
the Event List by double-clicking on a note in the Matrix Editor.
The Status column displays the event type. You can hide/show specific event types by
using the Filter buttons to the left of the list, which may help you to get a better view of
the data that you’re looking for. A click on the button featuring the note icon, for
example, will hide all note events, with the Event List display restricted to other event
types. A second click on the note button will re-display the note events.
The left-most column of the Event List indicates the position of each event. To the right
of the event type, the MIDI channel number is displayed, followed by (depending on
the event type) the note/controller number, the (event) value and length. All data—
with the exception of the event type—can be edited using the usual methods.
More information about the Event List can be found in the Logic reference and
Onscreen Help system.
Chapter 5 MIDI Regions 53
Page 54

The Hyper Editor
The Hyper Editor is useful as a graphically-based drum grid editor, and also for the
graphic input, and editing, of MIDI controller data.
There are two predefined Hypersets that can be selected from the pull-down menu
below the Toolbox (GM Drum Kit and MIDI Controller). You can freely alter these
Hypersets, and can also define completely new ones. Here’s a brief explanation on the
use of the Hyper Editor.
To insert note or controller information:
1 Select the Pencil tool.
2 Click, or click and drag horizontally on a row with your mouse. Higher note velocities/
controller values appear as taller vertical bars. Note events are only added when
inserting them in the Velocity row.
To adjust existing note or controller information:
m
Click on an individual event, and drag vertically with your mouse (this can be done
with the Pencil or Arrow tools). Alternately, you can draw over the existing curve.
Note: Select the “Kick” MIDI Region, and open the Hyper Editor via the Windows menu
(or by pressing Command-5) and experiment with these techniques, making use of
each of the tools. While in the Hyper Editor, click-hold on the MIDI Controls pull-down
menu and select the GM Drum Kit entry. You’ll see a very different view of the “Kick”
drum part. Once again, please experiment with the various tools on the individual
parts.
More information about the Hyper Editor can be found in the Logic reference and
Onscreen Help system.
54 Chapter 5 MIDI Regions
Page 55

The Transform Window
The Transform window is a very powerful editor that can be customized to build your
own preset transform operations. It can be used for dramatic MIDI data changes, or for
subtle alterations. As an example of the latter, it could be used to reduce the amount of
filter modulation—with values ranging between 97 and 105 —by a fixed percentage.
While this type of change could be performed in other editors, it would need to be
done on each individual modulation event. The Transform window allows you to
quickly achieve the same result on multiple events.
To best illustrate how the Transform window can be used:
1 Please select the “Bass” MIDI Region (between bars 25 and 29) on track 1.
2 Create a cycle from bar 25 to bar 29.
3 Open the Transform window via the Windows menu, or by pressing Command-4.
4 Select the Reverse Pitch preset from the pull-down menu, to the top left of the
Transform window.
5 Press the Play button on the Transport window or use the key command, and listen to
the part a couple of times.
6 While the MIDI Region is cycling, press the Select and Operate button in the Transform
window, and listen to the results.
7 Use the Undo function to return the MIDI Region to its former state.
8 Please experiment with the other presets and buttons, ensuring that you Undo
between each process.
More information about the Transform window can be found in the Logic reference
and Onscreen Help system.
Chapter 5 MIDI Regions 55
Page 56

Page 57

6 Audio Regions
6
Logic allows you to record not only MIDI data, but also
audio parts. This enables you to integrate acoustic
instrument or vocal performances into your songs. More
on this can be found in the following chapter.
As with MIDI recordings, audio recordings are made and displayed in the Arrange
window on tracks. These are Audio, rather than MIDI tracks. Once captured, audio
recordings can be mixed and processed with realtime effects.
Important: Audio recordings are referred to as Audio Regions in the Arrange window,
and they look very similar to MIDI Regions. Audio Regions are actually visible portions
of audio files. When you cut or resize an Audio Region in the Arrange window, the
audio file itself is not cut or resized. The Audio Region that you see is a visual
representation of a part (or all) of the audio file, and changes that you make to it in the
Arrange window simply instruct Logic on how to play the audio file. In other words, the
Audio Regions are simply “pointers” to the underlying audio file.
Although the handling of Audio Regions and MIDI Regions is similar in Logic, it is not
exactly the same. As a result, the editing and parameter options available for MIDI and
Audio Regions are slightly different.
Note: Audio Regions are, in general, less flexible than MIDI Regions. As examples, they
can not be transposed, and have a fixed playback speed. This isn’t true for Apple Loops
files, however. These types of audio files may be transposed and played back at varying
speeds, without pitch alterations.
Please reload the Tutorial song for more exercises.
57
Page 58

Creating Audio Tracks in the Arrangement
In the following section, you will learn how you create a new audio track in the Arrange
window, and how to import an audio file into audio tracks.
To create an audio track in the Arrange window:
1 In the Arrange window, select the ES1-6 track in the Track List, and create a new track
via the Track > Create menu option, or by pressing Shift-Enter. A new track will appear
below the previously selected track in the Track List.
2 Click-hold on the ES1-6 entry of the newly-created track in the Track List, and a
hierarchical menu will open.
3 Browse to Audio > Audio Track > Audio 1, and release the mouse button. This will assign
the track to the first Audio channel.
Important: It should be noted that a Track Audio Object must exist within the
Environment to allow its selection as an audio track from the Track List hierarchical pulldown menu. We have set up only two Track Audio Objects in the Tutorial song. You
may use many more, however. Information on setting up Audio Objects for use as extra
audio tracks can be found in the “Creating Audio Objects” section on page 68.
You can rename this audio track by clicking on Audio 1 in the Object Parameter box. It
may make more sense to you if you were to name it “Drums”, for example.
To import an audio file:
1 Select the Pencil tool, and Shift-click at measure 17 of the audio track. Logic will now
ask for the file location via the standard operating system file dialog.
2 Browse to the drive and folder that contains the “Drumloop.aif” tutorial audio file.
3 Double-click on this file, and it will appear at the beginning of bar 5 in the Arrange
window.
4 As an alternative method, you can simply drag’n drop the file from the desktop to the
desired location in the Arrange window.
58 Chapter 6 Audio Regions
Page 59

If you enlarge the display through use of the Zoom controls, you will see a waveform
display in the Audio Region that was just imported. The audio file name is displayed
above this waveform overview. A symbol indicating whether the file is mono or stereo
will be shown at the end of the file name. Stereo files are indicated by two interlocked
rings and Mono files, by a single ring.
Start playback from measure 17. At this point, you should be hearing the audio file, and
will notice that the speed of the MIDI tracks and the drum loop are out of time with
each other. You can fix this by adjusting the speed of the song: The drum loop has a
tempo of 120 bpm, the song a tempo of 122 bpm. Reduce the song tempo in the
Transport window to 120 bpm, and the drum loop and MIDI arrangement will play in
sync.
You can move, cut, and copy the Audio Region in the Arrange window, just as with
MIDI Regions. Please experiment with this, making use of the Undo function as you go.
Note: The Matrix and Score Editors, plus a number of MIDI-specific functions are not
applicable to Audio Regions.
Sample Editor
Double-clicking on the “Drumloop” Audio Region in the Arrange window (or using the
Toggle Sample Editor key command—default key command is W—on a selected Audio
Region) opens the Sample Editor. If you want to precisely edit audio files, this is the
window to use!
To listen to the audio file in the Sample Editor:
m
Press the button featuring the loudspeaker symbol. Pressing the button that features
the Loop symbol will repeatedly play the selected portion of the file.
Chapter 6 Audio Regions 59
Page 60

Below the waveform display, you can see three markers that can be dragged with the
mouse.
These are:
The S arrow pointing to the right indicates the start point of the Audio Region. If you
move it from, say, the kick drum at the beginning of the drum loop to a snare beat, the
loop will start with the snare when the arrangement is played back. When you move
the S marker, you will also move the upwards-pointing black triangle. You can also grab
the triangle directly, and move it separately.
The black triangle represents the Anchor point of the Audio Region. If it isn’t placed at
the same position as the S marker, the Region will be positioned (snapped) in
accordance with the triangle when moved in the Arrange window—rather than the
position of the S marker.
You can, for example, place the triangle at the downbeat of a recording, but also
include an upbeat by shifting the S marker to the left. If you move the Audio Region in
the Arrange window, its position will snap according to the downbeat, rather than the
beginning of the upbeat. This facility makes accurate Region placement much easier.
Note: The Anchor point can not be positioned before or after the Sample Start and End
points, respectively.
60 Chapter 6 Audio Regions
Page 61

The E to the right of the other two markers represents the end of the Audio Region. If
moved, you will also alter the Region’s length in the Arrange window.
The Audio Window
Put simply, the Audio window allows to you to manage all audio files used in the open
song. Press Command-9 to open this window, or browse to it via the Audio > Audio
Window menu option. Alternately, you can switch to Screenset 7 in the default song
created by the Logic Setup Assistant.
Quickly Resizing Audio Regions
You can define Audio Region start and end points in either the Audio window, or
directly in the Arrange window. Either method is useful for roughly defining an Audio
Region’s size. If you need precise control over the Audio Region or file start and end
points (for loops and so on), please make use of the Sample Editor.
Chapter 6 Audio Regions 61
Page 62

Audio File Menu
This menu provides a range of file handling tools, including delete, backup, conversion,
and more. These tools can aid you in housekeeping tasks for all of the audio files used
in the song. Please refer to the Logic reference or Onscreen Help system for detailed
information on each function.
Making Your Own Audio Recordings
First, connect the sound source—a mixer, CD player, or microphone, for example—to
the audio inputs of your system. Create a new audio track, if necessary.
Arming Tracks
Unlike MIDI tracks, audio tracks must be manually armed before recording, just as the
tracks on a tape recorder must first be armed. There is a small R (Record Enable) button
to the left of each audio track in the Track List. Clicking on this button prepares the
audio track for recording. The Record Enable button will turn red, indicating that the
track is armed. You can also click on the Record Enable button on an audio channel in
the Track Mixer (or Arrange channel strip), in order to arm the appropriate audio fader/
track.
Setting a Record Path
When you press the Record Enable button for the first time, a Finder dialog will open
automatically, prompting you to set a record path. You can change this record path via
Audio > Set Audio Record Path.
Note: You can also convert your song into a new project via the File > Save As Project
menu option. A Finder dialog will open, prompting you for a project location and
name. All audio files, including existing and new recordings, will be saved into the
Audio folder within the project folder.
Projects can also include other file types associated with a particular song. These may
be: QuickTime Video files, EXS Instruments and Samples, plug-in settings and Space
Designer Impulse Responses.
As projects have an identical internal folder structure, the transport and archiving of all
files associated with your songs is both consistent and easier. Projects also make
collaborations with other Logic users simpler as an entire project can be burnt to CD or
DVD and sent to a colleague. If your networking or Internet access is fast enough,
projects can also be shared in this way. Further information about projects can be
found in the Onscreen Help or Logic reference.
62 Chapter 6 Audio Regions
Page 63

Stereo Recording
To make a stereo recording, you must first configure the selected track’s Arrange
window channel strip as stereo. The symbol on the button indicates the current status
as follows: A single circle—mono. A pair of interlocked circles—stereo.
The level meter will also divide into two discrete meters, when a channel strip is set for
stereo operation.
Levels
As soon as you arm an audio track, you will hear any signal being sent to the audio
inputs of your system. The audio track’s channel strip in the Track Mixer controls the
level of the monitored signal—what you’re hearing.
Important: The fader always controls the playback level, not the recording level.
Recording levels must be set externally—on your mixer, or at the original sound source.
Care must be taken when setting input levels, as digital audio will “clip” when
overloaded. Clipping results in a particularly harsh, metallic distortion, so unless you
have a penchant for heavier musical styles, we don’t recommend overloading the
inputs!
Starting to Record
Start recording by pressing the Record button on the Transport window, or by pressing
* on the numeric keypad. You will notice that a waveform is drawn, in realtime, in the
Arrange window during recording.
Keep an eye on the level meter on the audio faders. In the event that the clip indicator
(top, red LED) is illuminated, you will need to make the recording again, using a lower
level. To avoid constantly watching the level meter, the overload indicator remains lit
until it is clicked. If your recording level was too high, ensure that you click on the
overload indicator to reset it.
Once you’ve finished recording, press Stop on the Transport Bar or by pressing 0 on the
numeric keypad.
Congratulations, you’ve recorded your first audio file.
Chapter 6 Audio Regions 63
Page 64

Important: Please do not forget to disarm the track after recording has finished. Do this
by clicking on the illuminated (red) Record Enable button which will then turn gray. If
the track is not disarmed, you will not be able to listen to the Audio Region on this
track.
64 Chapter 6 Audio Regions
Page 65

7 Mixer, Instruments, and Effects
7
This chapter provides an overview of Logic’s mixing
facilities and the use of software-based instruments and
effects.
Logic offers three ways to view and access mixer channels, where you can set volume,
pan, instrument, and effect parameters. The fastest way to access the mixer channel of
a track is by simply selecting the desired track in the Arrange window. This will update
the mixer channel strip displayed to the lower left of the Arrange window, just below
the various Parameter boxes. Only one mixer channel can be seen and used at a time
here. Should you wish to view and access multiple channels, you can use the Track
Mixer.
Track Mixer
More channels can be seen in the Track Mixer, which is accessible via the Windows >
Track Mixer menu option, or Command-2. The Track Mixer horizontally reflects the track
order as displayed—from top to bottom—in the Arrange window’s Track List.
65
Page 66

Note: The updating of Track Mixer channels is entirely automatic, so as you add or
delete tracks from the Arrange window’s Track List, the Track Mixer will show or hide
the corresponding MIDI or audio channel faders.
To the left of the Track Mixer window, you will see a collection of buttons, as shown.
These buttons will toggle (hide/show) the display of particular classes of channel strips.
The button on the top—Global—toggles the display between channels which
correspond to those that exist in the Arrange window’s Track List, and all defined MIDI
Instrument and Audio Objects that exist in the song’s Environment (more on this in a
moment).
The other buttons can be clicked individually, in order to display all channels of the
selected class. Multiple classes can be selected for display in the Track Mixer by holding
Shift while clicking on the individual buttons.
Please try the various Track Mixer display modes with the Tutorial song to get a feel for
how this view functionality works.
Mixer and Audio Objects in the Environment
Another mixer view is offered by Logic’s Environment. You can access the Environment
via the Windows > Environment menu option, or Command-7. If you don’t see any mixer
channels in the new window, please select the Audio option shown in the Layer pulldown menu to the left of the Environment window.
The Environment Mixer looks very similar to the Track Mixer. However, there are two
important differences:
• This Mixer does not change its look dynamically to reflect the Arrange window’s track
order. Rather, it shows all Audio Objects in user-defined order.
• In the Environment Mixer, additional channels can be inserted by creating and
configuring new Audio Objects.
Various Audio Objects
A number of tracks, instruments, busses, and so on were created when you ran the
Logic Setup Assistant. These different types of Audio Objects are based around the same
fundamental Environment Object—namely the Audio Object—but each was
configured differently, and has distinct facilities.
66 Chapter 7 Mixer, Instruments, and Effects
Page 67

The cabling between Audio Objects—which deals with the audio signal flow—is
automatically and invisibly connected by Logic, as new Audio Objects are created and
assigned. This invisible cabling follows a fairly standard signal path, normally found on
a mixing console with audio channels, busses, master faders, and so on. As such, the
Logic mixer will immediately be familiar if you’ve had any experience with mixing
consoles.
This section describes the most important Audio Object types, and what they are used
for.
Audio Track Object
The Audio Track Object is, as mentioned, the fundamental Object used for audio
functionality in Logic’s Environment. By default, any Audio Object created will be
assigned to the first available playback channel, or Audio Track. An Audio Track Object
is used to record and play back Audio Regions on the corresponding track in the
Arrange window.
Audio Instrument
This Audio Object supports the use of software-based instrument plug-ins. These plugins include those that are built into Logic, plus third-party Audio Unit instruments.
Although the Audio Instrument Object looks similar to Logic’s other Audio Objects, it
supports MIDI note input, which the others do not. This enables appropriate plug-ins to
be played via MIDI, just like an external MIDI synthesizer, sampler or module. The
corresponding Audio Instrument tracks in the Arrange window allow you to record and
play back MIDI Regions.
Bus Object
Signals from various Audio Objects can be mixed to a Bus Object, which is the software
equivalent of a bus/group on a hardware mixing console. One or more effects are often
inserted in a bus. In this scenario, the bus acts as both an effect unit and a return
channel strip simultaneously.
A Bus Object also acts as a “group” fader, where multiple audio channels can be routed
to it, allowing volume or pan to be globally adjusted for all grouped channels by
adjusting these parameters on the Bus channel strip. Busses can be routed to Output
Objects (Master Faders) or to other Bus Objects.
Output Object
This is Logic’s Master Output Object, equivalent to the master output faders on a
mixing desk. If your audio interface features multiple outputs, you can set up an Output
Object for each physical output—or output pair. This fader type features a Bounce
button (labeled Bnce) which is used to bounce (digitally combine, or mix) any incoming
audio—from the other fader types—to a mono, stereo or multiple Surround (Logic Pro
only) format audio files.
Chapter 7 Mixer, Instruments, and Effects 67
Page 68

Master Object
This, as the name suggests, is a Master Volume control for the entire mixer. It is Logic’s
equivalent to the Control Room fader on a mixing desk.
Note: The Master Object is only available in Logic Pro, not in Logic Express.
In the illustration above, you see some different Audio Objects in the Environment
view.
Creating Audio Objects
If you need more Audio Objects than the Logic Setup Assistant created, you can add
them manually. Each Audio Object, regardless of type, is created in the same way.
To create Audio Objects manually:
1 Open the Environment window by using Command-7.
2 Select the Audio Layer from the Layers menu to the left.
3 Create an Audio Object by selecting New > Audio Object. This will generate a small
waveform icon onscreen.
4 Double-click on the icon to change its appearance to a blank audio fader.
68 Chapter 7 Mixer, Instruments, and Effects
Page 69

5 Clicking on the Channel entry in the Object Parameter box will allow you to select the
Audio Object type via a hierarchical menu, as shown in the following diagram.
Important: It is vital that no two Audio Objects are assigned to the same Track,
Instrument, and so on. In other words, don’t create two Audio Objects that are assigned
to Track 1, or Instrument 3, for example.
The MIDI Channel entry determines the channel used by the Audio Object. By default,
this will match the Audio Object’s Track number—as examples, Track 1 will be set to
MIDI channel 1, Track 2 to channel 2, and so on. Again, ensure that no two Objects of
the same type are assigned to the same MIDI channel. There is no need to concern
yourself too much with this parameter. It is of little consequence to Logic’s Track
Automation system, and is primarily of use for compatibility with songs created in older
Logic versions.
You should only set up as many Audio Objects as you think you will reasonably need. In
other words, don’t set up 64 audio playback channels if you are only likely to use 16
tracks for audio playback in your day to day use of Logic. The reasons for this:
• Each channel (Audio Object) occupies an amount of onscreen space, and when
dealing with an Environment that has, say 40 Audio Objects, you will find yourself
scrolling endlessly through faders when using the Environment’s Audio Mixer (Audio
> Audio Mixer).
• Each Audio Object uses system resources, even when not in use.
You can return to the Environment (or run the Logic Setup Assistant again) and simply
create (or delete) additional Audio Objects at any time. Note that the maximum
number of each Audio Object type that can be created is primarily determined by the
version of Logic you are using.
Chapter 7 Mixer, Instruments, and Effects 69
Page 70

Using the Mixer and Plug-ins
Logic offers two types of plug-ins: software instruments and effects.
Software Instruments
Audio Instrument Objects are designed for use with software-based synthesizers such
as those delivered with Logic and/or Audio Units instruments from other
manufacturers.
Note: Coverage of all Logic instruments can be found in the Logic Pro 7 Plug-In
Reference or Logic Express 7 Plug-In Reference (depending on where you are using Logic
Pro or Logic Express).
If an Audio Instrument Object already exists within the Environment it can simply be
selected from the hierarchical pull-down menu in the Arrange window Track List. If no
such Object exists, it can easily be created as described in the “Creating Audio Objects”
section on page 68.
The Tutorial song makes use of several ES1 instances.
Please select one of the ES1 tracks, and take a look at the Arrange channel strip to the left
of the Arrange window. Below the I/O text on the channel, you will see a blue ES1 label.
• Click-holding on this label will allow you to select one of the available instruments
from the hierarchical menu that launches. Just browse to the desired instrument
name, and release the mouse button. A Plug-in window, containing the selected
instrument, will launch.
70 Chapter 7 Mixer, Instruments, and Effects
Page 71

• Double-clicking on the label opens a closed Plug-in window, allowing access to the
plug-in’s parameters.
Recording software instruments is just like recording MIDI instruments:
1 Simply select the desired Audio Instrument track in the Arrange window, and press
Record in the Transport Bar (or use the * key).
2 Start playing your MIDI keyboard.
3 Once you’re done, press the Stop button in the Transport Window, or use the 0 key
command.
Software instruments generally use more CPU resources than traditional effects, so you
need to be judicious about their use, particularly if your computer isn’t a cutting-edge
machine.
Note: Logic Pro includes a Freeze function—accessed via the “snowflake” buttons on
Audio and Audio Instrument tracks in the Arrange window’s Track List—which reduces
the amount of processing power required for software instrument and effect playback.
This is a more advanced function that is covered in the Logic reference, but should you
find that your CPU can’t cope with the demands being placed on it, consider the Freeze
or Bounce functions. More on Bouncing is found in the “Bounce—the Final Mix” section
on page 80.
Using the Channel Equalizer
Double-clicking on the EQ button at the top of each channel will automatically insert
the Channel EQ into the first available Insert slot, and will launch the Channel EQ Plugin window. It can also be inserted by click-holding on the top Insert slot (or others, if
you wish). Browse through the hierarchical menu that opens, and select the Stereo >
Logic > EQ > Channel EQ.
Note: Equalization (EQ) is the process of boosting or cutting certain frequencies in an
audio signal. EQ is used to make individual instruments or frequencies stand out (or the
reverse) in an overall mix.
Chapter 7 Mixer, Instruments, and Effects 71
Page 72

Each audio channel in Logic features a number of parametric (and other) EQ options.
You may also insert further EQ’s in other available Insert slots, if desired. All EQ
parameters can be automated.
If the Track Mixer or the Arrange channel strip is visible, you’ll notice a small thumbnail
graphic of the Channel EQ at the top of the strip. This provides an instant overview of
the Channel EQ settings.
Note: Please note that in cases where multiple instances are inserted, only the topmost
Channel EQ settings are displayed by the thumbnail graphic.
Setting EQ Parameters
The Band Type buttons, above the Channel EQ’s main display panel, turn individual EQ
bands on or off.
You can set/adjust the band parameters either directly in the central EQ display, or in
the parameter area below it. As you move the mouse horizontally over the display,
pivot marks for individual bands appear on the frequency axis, while the parameter
area of the same band is highlighted. You can change the parameters of any band by:
• Moving the mouse cursor horizontally over the display until the desired band is
highlighted. Now, click-hold on the display background (not directly on a pivot
point): vertical mouse movements change the Gain, horizontal movements change
the Frequency of this band.
• Click-holding directly on the (illuminated) pivot point of the desired band: vertical
movements (up/down) change the Q value. The direction required to increase or
decrease the Q value depends on whether you are above or below the zero line (this
ensures that “up” increases, and “down” decreases the volume in this band—you will
find this intuitively correct). Again, horizontal movements (left/right) change the
Frequency of the band.
72 Chapter 7 Mixer, Instruments, and Effects
Page 73

• Click-holding on the desired parameter in the parameter area below the graphic
display (Frequency, Gain/Slope or Q): Moving up increases, and down decreases, the
value. In order to prevent accidental changes, this is the only way to change the
Slope value of the high and lowpass filters.
As long as your mouse cursor is in the access area of a band, its individual curve will be
graphically inserted over the resulting curve of the entire equalizer.
The Bypass button is used to bypass or activate the EQ.
Inserting Audio Effects
The internal audio effects of Logic can be inserted into the individual audio channelsby
selecting the desired effect from the hierarchical menu, accessed via the Insert slot(s)
found on each audio channel strip.
To insert an effect:
1 Open the Track Mixer, or launch the Audio layer of the Environment (Screenset 3 of the
default Song). Alternately, use the Arrange channel strip.
2 Once a mixing surface is open, click-hold on any of the Insert slots on the desired audio
channel.
3 A hierarchical pull-down menu will open, displaying the various effects, grouped in
categories. Usually, you would insert effects from the top slot down.
4 Highlight the category, then the effect name from the menu listing, and release the
mouse button. The Insert slot will turn blue, with the name of the selected effect
displayed, and a Plug-in window will launch.
5 To remove a plug-in from an Insert slot, click-hold on the desired slot and select No
Effect from the menu.
Note: Further information about Inserts and the use of plug-ins can be found in the
first part of the Logic Pro/Express 7 Plug-In Reference .
Chapter 7 Mixer, Instruments, and Effects 73
Page 74

How Effects Are Grouped
Logic hierarchically groups effects as follows:
• Audio Channel Type—either Stereo, Mono/Stereo or Mono. To explain:
• Stereo: Stereo in, stereo out (True stereo). Both input signals are processed
separately, so the stereo qualities of the signal remain unchanged—this is
important for summed or stereo bus signals used as inserts.
• Mono/Stereo: Mono in/Stereo out. For use with mono signals only, but the effect
output is stereo. Commonly used on the following mono signals: Chorus for bass,
Reverb for lead vocal.
• Mono: Mono in, mono out. Should only be used on mono signals. Typical
applications are for EQ’s or dynamics processing (Kick, Snare, Bass).
• By origin (Logic or third-party): Logic, Audio Units. Grouping of effects in this fashion
makes the selection of effects simpler.
• By effect definition—Dynamic, Modulation, Reverb, Filter, and so on. The effect
definition groups effects of a particular type together.
Logic automatically limits the available effect types shown in the plug-in menus to
match the Audio Object’s signal I/O settings. In other words, if an Audio Object is
mono, then only mono (and mono/stereo) effects will be available in the Plug-in menu.
This also applies to stereo Audio Objects with only stereo plug-ins being available. It is
possible to override these settings by pressing and holding Option before selecting the
Plug-in menu on an Audio Object.
If you choose to use a plug-in that does not match the Audio Objects’ signal I/O flow, Logic will be forced to do a data stream conversion, which places a greater strain on the CPU, resulting in fewer effects and/or tracks.
Channel Strip Setting
Logic’s Mixer windows allow you to save and load multiple plug-ins (inclusive of their
settings files) via the arrow pull-down menu alongside the word Inserts on channel
strips. The entire channel strip can be stored and recalled for use on any suitable Audio
Object, allowing common chains of effects such as Reverb, Chorus, and Delay to be
loaded far more quickly than individually inserting each plug-in.
To load a Channel Strip setting:
m
Click on the word Insert on any channel strip. The Channel Strip Settings menu opens,
offering you a list of all available Channel Strip settingsand menu functions.
The Channel Strip Settings menu also offers you all GarageBand channel strips.
74 Chapter 7 Mixer, Instruments, and Effects
Page 75

The Plug-in Windows and their Parameters
You can edit the effect’s parameters by double-clicking on the (active) Insert slot, which
will launch the Plug-in window. Many of Logic’s effects feature an enhanced graphical
interface—as you’ve already discovered with the Channel EQ.
Note: By default, the Plug-in window will automatically launch as soon as any plug-in is
inserted. A double-click on the Insert slot will reopen the window if you have closed it.
Please refer to the Logic reference or Onscreen Help system for specific information on
the parameters and use of each effect.
Plug-in Settings
Settings are used to store all parameter adjustments you make in the Plug-in window of
each effect (and instrument). Every Logic and third-party plug-in allows the storage
and recall of settings. settings are accessible by click-holding on the Settings pull-down
menu (the downwards-pointing arrow) below the Bypass button at the top of the Plugin window.
Settings pull-down menu
• Within the Settings pull-down menu you can load an effect (or instrument) preset via
the Load Setting option.
• To save your own personalized plug-in settings, adjust the parameters of the effect
(or instrument) as desired, then click hold on the Settings pull-down menu and select
Save Setting. In the ensuing operating system file dialog window, type in an
appropriate name for your Setting, and press the Save button.
• You can also use the Settings pull-down menu to copy and paste parameters
between Settings.
Note: Logic automatically creates a folder called “Plug-In Settings” when first installed.
Within this folder, a separate sub-folder is created for each effect. When you use the
Save/Load Preset functions in the Settings pull-down menu, Logic will automatically
save/load the Setting file to/from the corresponding effect folder. As each effect Setting
is stored in its own associated folder, you should find it easy to manage hundreds of
presets. This feature is applicable to all Logic and third-party effects.
Important: It is recommended that you do not attempt to change the folder structure
within the Plug-In Settings folder.
Chapter 7 Mixer, Instruments, and Effects 75
Page 76

Additional Plug-in Window Options
The gray area at the top of the Plug-in window displays a Link button and a Bypass
button.
Follow these steps to see how the Link button can be used:
1 Insert a plug-in into the first Insert slot of the first Audio channel, if you have not
already done so. This will launch the Plug-in window.
2 If the Plug-in window doesn’t automatically launch, double click on the illuminated
Insert slot.
3 Activate the Link button to the left of the gray Plug-in window area.
4 Now insert a different plug-in into the second Insert slot of the audio channel. You will
notice that the open Plug-in window updates to show you the newly selected plug-in.
5 Deactivate the Link button to the left of the gray Plug-in window area.
6 Now insert a different plug-in into the third Insert slot of the audio channel. You will
notice that a new Plug-in window is automatically spawned for the newly selected
plug-in.
These two Plug-in window behaviors may be useful for different tasks, when assigning
effects and mixing in Logic.
The Bypass button is used to bypass the effect. This is useful for allowing comparisons
of an audio signal with, and without, the effect. Bypassing an effect is achieved by
simply clicking on the Bypass button when in the Plug-in window.
If you wish to bypass an effect when no Plug-in window is opened, press Option and
click on the desired channel’s Insert slot(s).
Channel or Bus Effect?
Certain effects are often inserted into Buses rather than individual channels, allowing
multiple tracks to make use of a single effect “unit”, thus saving CPU power. As the Send
Level knobs on each audio channel can be used to control the amount of signal sent to
the Busses, the amount of effect applied to each channel’s signal can be varied.
To send audio from an Audio track to a Bus:
1 Click-hold on any of the Send slots of an Audio channel, and a menu will open,
displaying all available Busses.
2 Select the desired Bus. The Send slot turns blue, with the name of the selected Bus
displayed. A small knob appears to the right of the Send slot. This is the Send Level
control. It determines the amount of signal which is sent from the Audio channel to the
Bus channel.
76 Chapter 7 Mixer, Instruments, and Effects
Page 77

3 To adjust the amount of send level, click-hold on the knob and drag your mouse to the
right. You may also press Option and click on the knob which will automatically set it to
a value of 0.0 dB.
Insertion of an effect on a Bus channel works in the same way as inserting an effect in
one of the other audio channel types.
Dynamics processing and equalization is generally applied on a per-channel basis.
Other effect types, such as reverbs or modulation processes—chorus, flanging, and
others—can be used in either the Bus or channel Insert slots, but are generally used on
Busses. Delays are commonly used on Busses—except when special settings are
required for a single channel. Filter effects are usually channel-based.
Automated Mixing
Logic’s Mixer can be fully automated. This automation allows a full “flying-fader”
mixdown of all audio channels, output faders, busses, software instruments, and
effects.
Note: Everything that you’ll learn in this section (on an individual channel basis) also
applies to the channel strip you can see on the left-hand side of the Arrange window.
Here’s a quick guide to using Logic’s automation system:
1 Open the Track Mixer and the Arrange window. Resize both windows if necessary, so
that you can see the Track List and a few of the channel strips in the Track Mixer.
Although you can make use of the Arrange channel strip in isolation, having the Track
Mixer open will allow you to see multiple channels—so keep an eye on both, and
watch what happens when one or the other is changed.
2 Select View > Track Automation in the Arrange window’s local menu. The Arrange
window will zoom in vertically (select Current Track when prompted).
3 Now click on any track in the Track List—MIDI or audio—and pay attention to the Track
Mixer window. You will see that as you select a track in the Track List, the
corresponding fader in the Track Mixer will be outlined (and the fader to the left of the
Arrange window also updates to reflect the selection).
4 Select the Touch option by click-holding on the panel above the Pan knob on the
outlined fader—keep an eye on the Arrange window fader while doing so.
5 To record changes to the volume, press Play on the Transport Bar (or use the Key
Command) and move the highlighted fader up and down in the Track Mixer. As you do
so, you’ll see a curved line being created on a gray bar in the Arrange window (and the
miniature fader on the Track List will move).
6 Once done, press Stop.
Chapter 7 Mixer, Instruments, and Effects 77
Page 78

7 Return to the beginning of the newly-recorded automation track, using any of the
navigation methods you learned earlier, and press Play. Note that the fader on the Track
Mixer (and the Arrange window fader—assuming the same track is still selected) is
now replaying your recorded automation movements. This automatic playback of
changes to the Track Mixer’s channel parameters is often referred to as flying fader
automation.
The same automation method can be used for controlling the volume of additional
channels, automating Pan knob positions, EQ, and plug-in parameter automation.
Editing Automation Data
You’ll probably want to edit your recorded automation data at some stage or another,
or perhaps to create some automation more precisely. The following paragraphs offer a
brief overview of automation editing techniques. More information can be found in the
Onscreen Help system or Logic reference.
Before we start, we’d like to cover a couple of concepts. Namely, those of “nodes” and
“lines” in the Automation data.
• Nodes are dots on an automation track that represent a particular value and time
position for the defined automation type.
• Lines connect the dots, and represent a linear (straight) or curved transition of
automation values over time. A ramp up in volume between two nodes, for example.
Inserting Nodes
A short click anywhere in the automation track will insert a node at that position, and
value. A short click on, or just outside, a line will insert a node on the line.
Deleting Nodes
To delete a node, simply click on it quickly (a short click). The position of the node will
determine what happens to the automation data. Try these and use the Undo or Revert
to Saved functions between each.
• Click on the first node, and it will be deleted. This will, in turn, make the second node
the first node. A click on this node will delete it and make the (original) third node,
the first node and so on.
• The same also applies to the last node, but works backwards from the last, second to
last, third to last nodes and so on.
• Clicking on a node which falls between two other nodes will delete it, and the nodes
which surrounded it will be joined directly by a recalculated line.
Moving Nodes
It is possible to select one, or multiple nodes (and therefore the lines which connect
them). You can move adjacent nodes—nodes that are beside each other—or you can
move non-contiguous nodes—nodes that are separated by other nodes. Select noncontiguous nodes with the Shift key depressed.
78 Chapter 7 Mixer, Instruments, and Effects
Page 79

Handling Lines
Lines are created automatically between nodes. The following node functions are
pertinent to lines.
• a short click on, or just outside, a line (not on an existing node) will add a new node
on the line.
• a long click on a line allows you to move the line, along with its two endpoints—the
nodes that encompass the line.
• a long click outside a line will create and select a new node, allowing you to move
this new node immediately.
Curves
There may be occasions where you wish to create non-linear automation data.
• Linear means a straight line.
• Non-linear means curved.
Click-holding on a line or a selection (of several lines and/or nodes), with CommandControl depressed, allows you to set various curves on a line or the current selection.
Various automation curves
Chapter 7 Mixer, Instruments, and Effects 79
Page 80

Bounce—the Final Mix
Bounce is a realtime or offline (faster than realtime) digital process. The entire song—or
a section of it defined by the left and right Locators—is combined into a single mono
or stereo file.
Note: In Logic Pro it is also possible to Bounce to a number of discrete files for Surround
sound purposes. Please consult the Logic reference for further information.
To bounce all tracks routed to Output 1-2:
1 Choose File > Bounce from the main menu bar. The Bounce dialog will launch. (The
screenshot below shows the Bounce dialog of Logic Pro. The Logic Express Bounce
dialog looks slightly different.)
2 Check that the Start and End positions are correct. By default, they will encompass the
area from the beginning of the first Audio Region to the end of the last Audio Region.
You may wish to add an extra bar or so to the End position, to ensure that you capture
any Reverb tails or Delay repeats, if applicable.
3 Select the other parameters—File Format, Resolution, Sample Rate, Stereo File Type,
Surround Bounce, Dithering, and Bounce Mode (Realtime or Offline) as desired, by click-
holding in each pull-down menu panel. Further information on these parameters is
available in the Logic reference and Onscreen Help system.
Note: You may select between various audio file formats when bouncing (MP3, for
example) and may also burn a CD directly from the Bounce dialog.
4 Press the Bounce button and an operating system File Save dialog window will open.
Browse to the desired folder, and name the file.
5 Press Save and the bounce will commence.
80 Chapter 7 Mixer, Instruments, and Effects
Page 81

Note: If the Offline Bounce mode is selected, you will not hear the audio being played
during the process.
6 Once completed, the bounced file will be available for your use in CD-burning
programs, Logic itself or other applications.
Note: If you have audio hardware with more than one output pair, you can also bounce
the signal routed to the other Output Objects. Logic features a Bounce (labeled Bnce)
button in the lower left corner of Output Objects. If you click this button of the desired
Output Object, the Bounce dialog opens.
Chapter 7 Mixer, Instruments, and Effects 81
Page 82

Page 83

8 The Environment Concept
8
Logic’s Environment window—accessible from the
Windows menu—is Logic’s “brain”. Its primary purpose is
to get MIDI and audio information into, and out of, Logic.
You were introduced to the Environment when you defined and configured new Audio
Objects for use as audio tracks, busses, and instruments (see the “Mixer and Audio
Objects in the Environment” section on page 66). As you know, these Objects can show
up as tracks in the Arrange window. This illustrates a basic and important principle of
Logic:
The Environment has a direct relationship to the Arrange window’s Track List: Each
track has a destination, and this destination is an Object in the Environment. The
reverse is not true, however, because not every Object in the Environment needs to be
displayed in the Arrange window.
The MIDI Artery
Although the possibilities of the Environment go far beyond what we’ll be covering in
this guide, there are several key concepts that are essential to know, in order to
understand and operate Logic. These things are quite well illustrated in the
Environment of the Tutorial song.
So, to simplify things, you should open the Layer shown in the graphic.
1 Select the Windows > Environment menu option, or press Command-8.
83
Page 84

2 Choose the Click & Ports layer from the pull-down menu to the left, and take a close
look at the Objects shown.
On the left-hand side you can see an Object named Physical Input. Only one of these
Objects exists in the Environment. It represents the inputs of your MIDI interface, and is
where the MIDI data from your keyboard is received and fed into Logic’s Environment.
If you play a few notes on your MIDI keyboard: the onscreen Keyboard should reflect
the notes being entered. Take a closer look, and you’ll see that there is a connection
between the Physical Input Object and the onscreen Keyboard. The data is fed from the
onscreen Keyboard into a Monitor Object, where the incoming note names are
displayed. The Monitor Object is followed by a Switch that feeds the data—either
unaltered or altered by a Transformer Object—to a second Monitor Object.
Play some notes, click on the Switch and listen to the results. The second Monitor shows
what’s happening to the notes: They are transposed, made louder or left unchanged.
This is a very simple example of what can be done with the Environment.
The last Object in this chain, named “To Recording & MIDI Thru”, is very important. It
represents Logic’s actual MIDI input. The Physical Input Object and dataflow example
that we looked at in the preceding paragraphs is “in front of the door”, so to speak. Only
MIDI data that is fed into the Sequencer Input Object can be recorded by Logic.
Note: Like the Physical Input Object, there is only one Sequencer Input Object in the
Environment.
So, what does this all mean to me?
Well, basically three things:
• It is possible to intercept the data coming into the MIDI interface, and to manipulate
and route it to specific MIDI instruments or outputs, while bypassing the actual
sequencing part of Logic completely.
84 Chapter 8 The Environment Concept
Page 85

• You can insert Objects between the Physical Input Object and the Sequencer Input
Object, alter the MIDI data and record the results (as shown by the note transposition
and velocity increase in the example above).
• You can also deactivate Logic’s MIDI input completely (although you’ll want to avoid
this): If you cut the connection between the Physical Input and the Sequencer Input
Object (by clicking on a cable and pressing Backspace, for example) you will not be
able to receive and record MIDI data with the sequencer.
Note: You can quickly check if Logic is receiving data by playing a few notes on your
MIDI keyboard while looking at the small MIDI Activity display in the Transport Bar.
Cutting the Sequencer Input connection:
1 Select the cable running from the second Monitor Object into the Sequencer Input
(named to recording & MIDI Thru) by clicking on it, and pressing Backspace. Ensure that
no other Object is selected/highlighted.
2 Play your MIDI keyboard, and you’ll see that the onscreen Keyboard and Monitor
Objects continue to display the incoming data, but the MIDI Activity display in the
Transport Bar will indicate no data reception.
To make the shortest possible connection between the Physical Input Object
and the Sequencer Input Object:
1 Click-hold on the small triangle at the top right of the Physical Input Object. As you
move the mouse cursor, you’ll note an onscreen cable.
2 Move the cable’s “plug” (at the mouse cursor position) over the Sequencer Input Object
until it is highlighted/selected, and release the mouse button. This replaces the old
connection (broken in the previous exercise) with a new one.
3 Play a few notes on your MIDI keyboard. You’ll note that the onscreen Keyboard and
Monitor Objects do not display the incoming data, but the MIDI Activity display in the
Transport Bar does indicate data reception.
External Control
If you have connected a MIDI device such as a MIDI keyboard or sound module to your
computer, you can use the Environment to control this MIDI instrument from Logic.
The following example shows you how to control an external, mono timbral
MIDI instrument from Logic:
1 Select a new, blank layer from the Layers menu by selecting the **Create** entry.
2 Select New > Instrument from the Environment’s local menu. A new Instrument Object
is created. The Instrument Object transmits data on a single MIDI channel, making it
perfect for connecting an external mono-timbral instrument.
3 Click the Instrument’s Name field in the Object Parameters box. Type the name of the
MIDI device that this Instrument Object represents.
Chapter 8 The Environment Concept 85
Page 86

4 To connect the Instrument directly to one of your computer’s MIDI ports, you need to
define the Instrument Object’s Port setting. To do so, click on the All menu option in the
Object Parameter box Port setting, and select the MIDI port that connects this
Instrument Object to the actual hardware MIDI device. As mono-timbral MIDI devices
can only receive data on one MIDI channel at a time, you must set the Instrument
Object’s MIDI channel to match the MIDI channel of the device it represents.
5 Double-click on the number 1 beside the Object Parameter box MIDI Channel setting
(Cha), and enter the MIDI channel that your mono-timbral MIDI device is set to receive
on.
6 Create a new track in the Arrange window (or click-hold on the name of one of the
existing tracks), and select the newly-created MIDI Instrument Object as the “target”,
from the hierarchical track menu. If you can’t see the new Object, click the show in
menu checkbox beside the icon in the Object Parameter Box.
7 If you select this track, and play, or perhaps record, some notes, the MIDI data is sent
from the Arrange window track to the MIDI Instrument Object (the target), and from
there to the MIDI output that the external instrument is connected to.
Note: Logic sees all data received at the Sequencer Input and this data—recorded as a
MIDI Region in the Arrange window—can be routed to any target Object that exists in
the Environment. While it is possible to create several MIDI Out Objects that represent
your physical MIDI Out ports, and cable Instrument Objects into them, this step is
unnecessary as the MIDI Out port and MIDI Channel (or channels, in the case of Multi
Instrument Objects) can be addressed directly from the Instrument (or Multi
Instrument) Object.
From Arpeggiators to Step Sequencers
Beyond the audio and MIDI Objects that you’ve been introduced to, the Environment
offers a large number of other Objects that can be used for MIDI data manipulation.
These include: arpeggiators, MIDI delays, transformers, chord memorizers, and more.
These Objects can be connected freely with virtual cables, enabling the creation of
various (from the simple to the very complex) MIDI processors.
There are, in fact, so many creative possibilities waiting for you here that you can even
build step sequencers, drum computers and random pattern generators in the
Environment. This tutorial, however, is not the place to discuss all of the possibilities
afforded by the Environment—extensive information can be found in Logic’s Onscreen
Help system and the Logic reference.
86 Chapter 8 The Environment Concept
Page 87

A Audio and MIDI Basics
A
This appendix offers a brief overview of MIDI and digital
audio basics.
If you want to know what an audio file is, how audio is converted into and from
computer information and what this MIDI thing is all about, you’ll find it here.
MIDI
MIDI is an acronym for Musical Instrument Digital Interface. To break this down
further—the “Musical Instrument” part of MIDI refers to electronic musical instruments
such as synthesizers, samplers, and even MIDI guitars. The “Digital Interface” part
sounds technical, but really isn’t.
Basically, MIDI’s “Digital Interface” is broken down into two components.
• MIDI is a computer-based language—and as you probably know, computers talk
digitally. MIDI keyboards, modules, and cards are actually computers in disguise.
• MIDI’s “Interface” is just that. MIDI is a hardware standard which consists of a set of
physical connectors labeled IN, OUT, and THRU. You will find one or more of these
connectors on all MIDI devices, such as keyboards or modules.
The MIDI Language
The “language” of MIDI is understood by all MIDI devices. The purpose of the language
is to translate your musical performance into information that can be understood by a
computer. (Don’t forget that MIDI keyboards and modules are actually computers in
disguise).
When you play your keyboard, or Logic is playing a MIDI song file, MIDI information
which describes your performance is transmitted as a string of MIDI messages. These
instructions tell any connected synthesizer or sound module how to play a piece of
music. The synthesizer or module receiving the MIDI data actually generates the
sounds that you hear.
Important: MIDI does not send sounds. It only sends instructions.
87
Page 88

The MIDI Connection
MIDI, as mentioned, is also a hardware “interface” which consists of a standardized set
of connectors labeled IN, OUT, and THRU.
MIDI connectors consist of a round socket with 5 holes arranged in a semicircle. MIDI
cables, used for connecting MIDI devices, have a matching plug that features 5 pins.
Only three of the pins actually carry information.
MIDI only works in one direction on each connector. If you want your MIDI keyboard to
send messages to, and receive messages from Logic, you must connect two cables.
Here’s the way your MIDI connections must be made, in order to work:
• MIDI OUT sockets must be connected to MIDI IN sockets on the receiving device.
• MIDI IN sockets must be connected to MIDI OUT sockets.
Important: If you connect a MIDI OUT to another MIDI OUT or a MIDI IN to another
MIDI IN, no communication will happen, and your MIDI system won’t work.
The MIDI THRU connector is not found on all MIDI devices. It simply mirrors the MIDI
messages arriving at the MIDI IN socket, and allows you to “daisy-chain” more MIDI
devices. Before doing this, read the section on MIDI channels, which is very important
when chaining MIDI keyboards or modules.
MIDI messages are sent from a MIDI controller such as a keyboard or sequencer—such
as Logic—via the MIDI OUT connector. The device (MIDI synthesizer or sound module)
receiving the MIDI messages at its MIDI IN socket, responds to these messages by
playing sounds.
Important: Remember, MIDI does not send sounds. It sends instructions on how, what
and when to play.
Note: Many MIDI keyboards include both the keyboard controller and MIDI sound
module functions within the same unit. In such devices, there’s an internal MIDI link
between the keyboard and sound module. This internal link can be enabled or disabled
by setting LOCAL ON or OFF—on the keyboard itself.
When using your MIDI keyboard with Logic, and the keyboard is acting as both
controller and sound module, you should set LOCAL to OFF. Doing so avoids “it sounds
like my notes are doubled or flanging” types of problems.
If your keyboard is simply acting as an input device, and you don’t want to use its
sounds (or it doesn’t have any, as is the case with controller keyboards), you simply
need to connect its MIDI OUT to the MIDI IN on your computer. Logic will take care of
the “channels”, which we’re just about to take a look at.
88 Chapter A Audio and MIDI Basics
Page 89

MIDI Channels
MIDI is divided into 16 logical “channels”. Each channel is identified by a special channel
number message that is sent with the other MIDI messages. Most keyboards can
generally be set to transmit on any one of the 16 MIDI channels. A MIDI sound
source—such as your synthesizer or sound module—can be set to receive on a specific,
or multiple, MIDI Channel(s).
Devices capable of receiving on multiple MIDI channels simultaneously are said to be
“multi-timbral”. The term literally means “many sounds”, which can be a little confusing,
as most synthesizers are obviously capable of producing many sounds. Not all
synthesizers, however, are capable of producing many sounds at the one time. This
capability means that a suitably-equipped MIDI keyboard or module could be used to
produce all of the drum, bass, piano, string, and brass sounds in a performance.
In this scenario, each part, or instrument—drums, piano, strings, and so on—will be
assigned to a specific MIDI channel. Given the 16 logical MIDI channels available to
each MIDI port and a multi-timbral synthesizer, up to 16 different “instruments” can be
played simultaneously. Most modern MIDI keyboards and sound modules are multitimbral.
Important: In all MIDI systems, the sound module must be set to receive on the
channel (or channels in multi-timbral devices) which match the channel(s) that the
keyboard controller (or Logic) is transmitting on, in order to play sounds. If the
channels do not match, the receiving device will not play.
As an example: Imagine a 4-way multi-timbral device (a device capable of receiving on
4 MIDI channels simultaneously) is receiving song data from Logic—with tracks
assigned to channels 1, 2, 4, and 5.
The device itself is set to receive on channels 4 to 8. In this case, only the song’s MIDI
data sent on channels 4 and 5 would be “seen” by the device, and subsequently played.
The MIDI data sent on channels 1 and 2 would be ignored.
As you can see from the above example, each channel needs to be “tuned in” to a
corresponding channel sent from Logic. This, if you use a little imagination, is not unlike
tuning in a TV or radio channel. If the channel isn’t tuned properly, you won’t see or
hear anything … and neither will your sound module!
Chapter A Audio and MIDI Basics 89
Page 90

Audio
Audio, as a term, basically refers to any sound that you can hear. In the physical, as
opposed to computer world, this is known as Analog Audio. When Logic records analog
audio signals via an audio interface connected to, or installed in, your computer, the
audio is converted into digital information. This information is stored as a Digital Audio
file on your computer’s hard disk.
As with MIDI, the Digital Audio part sounds technical, but really isn’t. As discussed
earlier, computers talk “digitally”, and need to deal with analog audio signals as digital
information.
Important: Unlike MIDI, digital audio files are actually recordings of sounds, not an
instruction language.
Digital and Analog Recording
While digital audio recording is similar in concept to analog recordings made on tape,
the technical differences are significant. For much of the 20th century and into the 21st,
analog tape recordings have been used for the storage of audio performances—
spoken, sung, and played.
The analog tape medium is a thin plastic strip coated in tiny metal particles. It is usually
stored on a roll or spool, or as a cassette tape, which you’re probably familiar with.
The process of analog tape recording involves the transmission of small electrical
charges, sent to the magnetic “heads” of a tape recorder. Changes to the strength of
these charges alter the magnetic fields generated by the heads, and rearrange the
positions of the metal particles on the tape. Needless to say, this is a less than precise
science. Due to the randomness involved in the rearrangement of magnetic particles
on tape (and other technical reasons), the recordings are said to be “analogous”—
similar to the actual performance.
Digital recording, on the other hand, is much less random. Analog signals are
converted into digital audio signals via the ADC (Analog to Digital Converter) of the
audio interface. The digital audio signal, can be are stored “digitally” on your computer’s
disk—as a series of ones and zeroes. Provided this file remains consistent, digital
recordings will be virtually identical each time they are played back.
In a copying situation—tape to tape—there is no comparison between analog and
digital recordings. Each subsequent copy of an analog recording becomes noisier and
less like the source material. This is the “random” factor of the magnetic particles
becoming less like the original each time a copy is made.
Digital audio files, on the other hand, can be copied any number of times, with each
subsequent copy adding no noise.
90 Chapter A Audio and MIDI Basics
Page 91

On a more practical level, digital audio files stored on hard disk have the following
advantages over analog audio stored on tape.
• Digital audio can be cut, copied, and pasted freely from location to location. Could
you imagine physically cutting a stereo analog recording stored on tape into even
four or five segments and splicing them back together? Not much fun!
• You can move to any spot in a digital audio file almost instantly rather than waiting
for the tedious mechanical rewinding and fast forwarding of an analog tape
machine.
• You can process digital audio in ways that are simply impossible with analog audio.
As one example, it is possible to adjust the pitch of a digital audio file without
changing its speed.
Digital Conversions
When an analog audio signal arrives at the inputs of your computer’s audio interface, it
must be converted into digital information before the computer can deal with it. This
process is called analog to digital conversion and is handled by the Analog to Digital
Converter (ADC) of your audio interface.
At the other end of the signal path, the digital signal needs to be reconverted into an
analog signal, so that it can be listened to through analog audio playback systems—an
amplifier and speakers. This process is called digital to analog conversion and is dealt
with by the Digital to Analog Converter (DAC) of your audio interface.
About Bits and Sampling Rates
When recording a sound into your computer, the ADC of your audio interface takes a
“sample” of the sound source, a specific number of times per second. This is known as
the “sample rate”, which is measured in kHz (kilohertz—kilo means thousand) or “x”
thousand samples per second. The higher the rate, the more samples the AD converter
takes, and the more accurate the digital representation of the sound will be.
Put another way, imagine each sample to be a photograph of a concert that you were
trying to describe to a friend. If you had taken one photo every 10 minutes, you’d find it
hard to describe the great light show. If you took a thousand photos during that 10
minutes, your friend could easily see what happened. This increased “rate”, or number of
photos (samples), delivers a far more accurate overall picture of what happened. This is
how sampling works. The more “sonic photos” taken, the more accurately the sound is
represented over time. A videotape recording of the concert—running at 25 frames
(samples) a second, would give an even more accurate idea of the light show.
Common sample rates used in audio production include: 44.1 kHz or 48 kHz, and highend systems may use rates from 96 kHz up to 192 kHz.
Chapter A Audio and MIDI Basics 91
Page 92

The sampling resolution—expressed as bit values—determines the precision of the
measuring scale used to store (the numbers of) each sample. Remember that
computers store audio files as digital information—a series of ones and zeroes. There
are three audio file resolutions commonly in use: 8, 16, and 24 bits. 24 bit systems are
more expensive and are used extensively in DVD audio and film production.
To give you an idea of the relevance of the sampling resolution, imagine two people
are building a house. One is using a tape measure marked to the nearest foot. The
other has a tape measure marked to the nearest inch. Although the house built with
the tape measure accurate to the nearest foot may not fall down, the one using the
finer scale will build a more accurate house.
About File Formats
Continuing on from the 24 bit and 16 bit resolution discussed above, Logic can record
and play back 16 and 24 bit audio files. You can even use both 16 and 24 bit files in the
same song. The advantage of the higher resolution 24 bit files in Logic is most apparent
when mixing.
Every mixing operation in Logic—a volume change, panning, effects processing, and so
on involves some sort of mathematical calculation. In digital systems, where everything
is represented by ones and zeroes, there are (often) occasions where the calculations
don’t result in a nice, round number. To handle this, Logic will “round off” the value
resulting from the calculation to the nearest suitable value. This is known as a roundoff
correction in digital audio terminology.
If you begin with a 24 bit file, the sample is represented by around 16 million little slices,
whereas the 16 bit file of the same audio is represented by 64 thousand slices—note
that slices is not a technical term, in any way!
As you can see, the higher resolution 24 bit file has far more slices that could be used as
possible values during a roundoff correction. The end result of all of this?
24 bit files retain more of the original character of the sound after processing/mixing,
making your mixes more precise, and largely avoiding coloration of the sound.
About MIDI and Audio File Sizes
Digital audio files consume a great deal of hard disk space. “CD quality” audio with 16bit dynamic resolution and 44.1 kHz frequency resolution requires 5 megabytes (MB) of
hard disk space for 1 minute of monophonic audio. For a stereo recording, this
requirement is doubled, with a one minute audio file using 10 MB of storage space.
MIDI file data, on the other hand, is tiny. An average MIDI song file, three minutes in
length and containing a dozen or more tracks will be about 20 kB in size.
92 Chapter A Audio and MIDI Basics
Page 93

The reason for this huge difference in size is that MIDI is, as discussed earlier, a
language that describes what notes to play. The actual sounds themselves are
generated by a connected MIDI device.
Chapter A Audio and MIDI Basics 93
Page 94

Page 95

B Audio and MIDI in Mac OS X
B
This chapter covers the audio and MIDI facilities of
Mac OS X.
You will learn how to set up, and optimize, your audio and MIDI hardware for use in
Mac OS X.
Core Audio
All audio devices are accessed via Core Audio in Mac OS X. Core Audio is a flexible,
high-performance, low-latency audio system. Logic is compatible with any audio
hardware that is supported by a Core Audio driver.
Sound Preference Pane
From Mac OS X 10.2 onwards, the Sound preference pane is only required for switching
the system’s Sound Effects (“Sosumi”, “Ping” and others…).
If you are on the road with your PowerBook, and want to fix a musical idea quickly, you
might want to use the PowerBook’s internal microphone for recording with Logic.
Select > System Preferences > Sound, and then Input. Switch between Line In and
the Internal microphone in this pane.
Select > System Preferences > Sound, and then Output. This preference pane
determines the default output device. This output device is used for system alert beeps,
and for some audio applications, such as iTunes and iMovie. If you would prefer your
system beeps and playback of iTunes and iMovie audio to be output via your external
Core Audio hardware, select your device here.
You should always select the maximum possible volume level in order to make full use
of the entire dynamic range, when working with applications that use the default
output.
Note: Reduce the level setting of your amplification system when adjusting the Volume
setting to avoid any speaker damage.
95
Page 96

Please note that you can set an independent level for the alert beep. It is
recommended that you reduce this to the minimum level, or even deactivate alert
beeps entirely, when working on compositions.
Audio MIDI Setup (AMS)
Apple’s Audio MIDI Setup application is integrated into the operating system. It was
introduced in Mac OS X, version 10.2. The AMS application is found in the Applications
> Utilities menu.
Note: You may find it useful to move the AMS application into the Dock.
As AMS mirrors the parameters of the Sound preference pane (except for Sound Effects),
it should be used for almost all adjustments that you wish to make to your audio
interface settings.
The AMS application is useful for selecting a default setting for your Core Audio
hardware. You will require this “default” setting for all audio applications (iTunes, for
example) that are incapable of directly selecting a setting. For more capable audio
applications, such as Logic, it is possible to set all parameters from within the host itself.
Note: The appearance of the AMS application may vary, dependent on the version of
Mac OS X in use.
96 Chapter B Audio and MIDI in Mac OS X
Page 97

Core MIDI
MIDI data is handled by the Core MIDI system of Mac OS X. Compatible MIDI interfaces
for connecting a keyboard, MIDI fader unit or external sound generators are recognized
and activated automatically.
The MIDI Page of AMS
The AMS application offers a MIDI page that allows you to see all installed MIDI
interfaces, and make connections between them, if necessary.
Please note, however, that you don’t need to change any settings in this page if you
want to use the MIDI interface(s) with Logic. All MIDI parameters and connection
options can be accessed directly in Logic’s Environment.
A Brief Guide to Connecting MIDI Hardware
If you use a simple master keyboard—without an integrated sound generator or fancy
master keyboard functions—you’ll only need one cable to connect the master
keyboard’s MIDI Out with the MIDI In of the MIDI interface.
If the keyboard can generate its own sounds, connect the computer’s MIDI Out to the
keyboard’s MIDI In. If your computer (or the MIDI device) offers more than one MIDI
output, connect any other tone generators to these.
If the computer only has one MIDI output, you need to connect the second tone
generator’s MIDI In to the keyboard’s MIDI Thru port. A third device can be connected
to the second’s MIDI Thru, and so on. The MIDI Thru port always delivers a copy of the
signals coming into the device’s MIDI In. It is preferable, however, to use a direct
connection from a computer’s MIDI Out to a device, rather than chaining too many
devices, one after the other. This is because timing problems may occur in the chain, if
numerous MIDI commands are sent in a short time period. This is due to the slight
delays introduced by each MIDI In to MIDI Thru transaction.
If your computer offers several MIDI inputs, you can connect the MIDI outputs of other
MIDI expanders to it.
MIDI Local Off
If your keyboard has an internal sound source, it is important that you stop the
keyboard from generating sounds directly from its own keyboard. If you buy a new
keyboard that is to be used without a sequencer, and connect it to an amplifier, you
would expect the device to make a sound when you press its keys—in other words, the
keyboard is directly connected to the sound generator.
Chapter B Audio and MIDI in Mac OS X 97
Page 98

When using the keyboard with a sequencer, however, this is not desirable. In this
scenario, the keyboard is used as the computer’s input device, and the computer will
play the various connected tone generators, be they the keyboard’s own sound
generator or any other connected sound modules. If you wanted to control and record
another sound module with your keyboard, its own sounds would get in the way—
which is why the keyboard must be separated from its own internal sound generator.
This function is known as “Local Off”, and can be set directly on your keyboard. The
sequencer will speak to your keyboard’s tone generator just like any other connected,
keyboardless sound module.
Note: If you cannot find the “Local” function in your keyboard’s MIDI menu, consult its
manual as to how best to proceed for sequencer use. Some keyboards allow you to
select from: “Local”, “MIDI” or “Both” for each of their “Parts”. The “MIDI” setting, if
applicable, is the equivalent of “Local Off”.
Tape Synchronization
Details on synchronizing Logic with digital or analog tape machines, multi-trackers or
video editing systems, and their cabling requirements, can be found in the Logic
reference.
98 Chapter B Audio and MIDI in Mac OS X
Page 99

C Connecting Logic to a Mixer
C
Dependent on your audio hardware and working
routines, there are a number of possibilities available for
the use of Logic in conjunction with a mixing board or on
its own.
The following section introduces three approaches to setting up your Logic system. The
first, using Logic as a mixer and the others discussing the use of an analog mixing
console with Logic.
Using Logic as a Mixer
It is possible to completely bypass the use of a Mixing console with Logic. Key to this is
a suitable audio interface, equipped with as many audio inputs and outputs as your
recording situation demands.
If you are primarily a keyboard player, who uses Logic’s internal instruments, and
occasionally records some vocal parts, you may not need any external hardware—
making do with the audio ins and outs of your Macintosh. Most users will require an
audio interface that is better equipped, however.
Audio interfaces come in a huge variety of shapes and sizes, with an equally diverse
range of facilities and potential interfacing possibilities. All interfaces that offer a Core
Audio driver, regardless of features, can be controlled with Logic—effectively making
Logic your system’s mixer.
Here’s an example recording scenario:
• a FireWire audio interface, equipped with: two mic/line inputs (phantom powered),
six line inputs, a digital input, two master outputs, a digital output and a headphone
output.
• two stereo MIDI synthesizers
• a guitar
• a condenser microphone
• a DAT machine
99
Page 100

Given that the audio interface has sufficient inputs to handle all of the studio’s
equipment, you would connect your devices as follows:
• input 1—microphone (phantom power active)
• input 2—guitar (phantom power active)
• input 3—synthesizer 1 left output
• input 4—synthesizer 1 right output
• input 5—synthesizer 2 left output
• input 6—synthesizer 2 right output
• input 7—unused
• input 8—unused
• digital input—DAT digital output
• digital output—DAT digital input
• master output—into your amplifier and speakers
• headphone output—headphones
In Logic, you would set up six discrete Audio Input Objects on the Audio layer of your
Environment, as follows:
• Audio Input 1—mono
• Audio Input 2—mono
• Audio Input 3—stereo (for control of synthesizer 1’s left and right channels,
connected to inputs 3 and 4 of the audio interface)
• Audio Input 4—stereo (for control of synthesizer 2’s left and right channels,
connected to inputs 5 and 6 of the audio interface)
• Audio Input 5—stereo (for control of the left and right channels, connected to inputs
7 and 8 of the audio interface)
• Audio Input 6—stereo (for control of the left and right channels of the audio
interface’s digital input)
The outputs of the audio interface are addressed by the Output faders in the Audio
layer of the Environment.
To adjust the incoming levels of the external synthesizers, the microphone, guitar, and
DAT machine, you can simply change the level of the corresponding Audio Input
Object.
Important: The Audio > Audio Hardware & Drivers > Software Monitoring preference
must be active in order to hear incoming audio via the Audio Input Objects.
100 Chapter C Connecting Logic to a Mixer
 Loading...