

Page 1
LiveType 2
User Manual
Page 2

K
Apple Inc.
Copyright © 2005 Apple Inc. All rights reserved.
Your rights to the software are governed by the
accompanying software license agreement. The owner
or authorized user of a valid copy of Final Cut Studio
software may reproduce this publication for the purpose
of learning to use such software. No part of this
publication may be reproduced or transmitted for
commercial purposes, such as selling copies of this
publication or for providing paid for support services.
The Apple logo is a trademark of Apple Inc., registered
in the U.S. and other countries. Use of the “keyboard”
Apple logo (Shift-Option-K) for commercial purposes
without the prior written consent of Apple may
constitute trademark infringement and unfair
competition in violation of federal and state laws.
Every effort has been made to ensure that the
information in this manual is accurate. Apple is not
responsible for printing or clerical errors.
Note:
Because Apple frequently releases new versions
and updates to its system software, applications, and
Internet sites, images shown in this book may be slightly
different from what you see on your screen.
Apple Inc.
1 Infinite Loop
Cupertino, CA 95014–2084
408-996-1010
www.apple.com
Apple, the Apple logo, AppleWorks, Final Cut,
Final Cut Pro, Final Cut Studio, FireWire, Keynote,
LiveType, Mac, Macintosh, and QuickTime are trademarks
of Apple Inc., registered in the U.S. and other countries.
Finder is a trademark of Apple Inc. AppleCare is a
service mark of Apple Inc., registered in the U.S. and
other countries.
Helvetica is a registered trademark of Heidelberger
Druckmaschinen AG, available from Linotype
Library GmbH.
Other company and product names mentioned herein
are trademarks of their respective companies. Mention
of third-party products is for informational purposes
only and constitutes neither an endorsement nor a
recommendation. Apple assumes no responsibility with
regard to the performance or use of these products.
Page 3

1
Contents
Preface 7 An Introduction to LiveType
7
How Does Titling Work?
8
A Realm of Creative Possibilities
9
Workflow for Creating Titles
10
About This Manual
10
LiveType Onscreen User Manual
11
Apple Websites
Chapter 1 13 The LiveType Interface
14
Canvas
20
Inspector
25
Media Browser
26
Timeline
28
LiveType Media Files
Chapter 2 31 Setting Up a Project
31
Templates
33
Starting a New Project and Setting Defaults
34
Setting Project Properties
Chapter 3 41 Adding a Background
41
Setting a Background Color
42
Adding a Background Texture
43
Importing a Background Movie or Still Image
45
Considerations for Rendering the Background
Chapter 4 47 Working With Tracks
48
Positioning Tracks in the Canvas
49
Creating Angles and Curves
51
Linking Endpoints
52
Adding, Copying, and Deleting Tracks
Working With Tracks in the Timeline
53
3
Page 4

Chapter 5 57 Working With Text
57
Inserting Text
60
Adjusting the Timing of LiveFonts
62
Formatting Text
68
Enhancing Text With Styles
72
Creating a Matte
77
Modifying Individual Characters
78
Disabling Fonts in Mac OS X
Chapter 6 79 Working With Objects, Textures, and Imported Elements
80
Working With LiveType Objects
81
Working With LiveType Textures
82
Importing Graphics, Images, and Movies
83
Transforming Objects, Textures, and Imported Elements
Chapter 7 87 Working With Effects and Keyframe Animation
88
Preset Effects
88
Applying Preset Effects
90
Adjusting the Timing of an Effect
93
Changing the Order of Effects
93
Duplicating Effects and Tracks
93
Modifying a Preset Effect
10 3
Creating a New Effect From Scratch
Chapter 8 109 Previewing and Fully Rendering Your Titling Movie
10 9
Previewing Your Work
112
Optimizing Preview Performance
113
Rendering, Saving, and Exporting Your Titling Movie
Chapter 9 117 Advanced Design Techniques
117
Words Within Words
Warping Shadows and Glows
11 9
121
Track Curves
12 3
Creative Use of Special Characters
12 6
LiveFonts and Layers
12 8
Creating Scrolls and Crawls
4
Contents
Page 5

Appendix A 131 Solutions to Common Problems and Customer Support
131
Frequently Asked Questions
13 3
Apple Applications Page for Pro Apps Developers
13 4
Calling AppleCare Support
Appendix B 135 Creating and Editing EffectScripts
13 5
Header
13 5
Default Timing
13 6
Keyframes
14 0
Sample EffectScripts
Glossary 14 3
Index 14 9
Contents
5
Page 6

Page 7

An Introduction to LiveType
Welcome to LiveType, a special-effects titling application
that’s powerful, easy to use, and completely versatile—
whether you’re creating movie titles and credits,
broadcast ads, or web banners.
Producing dynamic video titles—titles that really pop—can be a painstaking process,
fraught with manual adjustments and keyframe stacks daunting even to experienced
animators. With LiveType, you can create phenomenal results, in the output format you
require, with a fraction of the effort.
How Does Titling Work?
Traditionally, titling was the term for adding text to film. The evolution of digital
graphics and video technologies has expanded the definition, which now includes just
about any combination of text and images you want to add to a movie. Titling is the
process of creating a digital overlay, which is added to edited footage in your nonlinear
editor (NLE), or compositing program. LiveType is the design studio where you
generate titles to import into Final Cut Pro.
Preface
Alpha channel technology is the basis of titling. Most compositing and animation
programs allow you to create art with an alpha channel. In addition, most NLEs use
alpha channels they detect in an image or movie to properly lay the element over video.
An alpha channel represents eight bits of grayscale pixel information in a 32-bit file. The
eight grayscale bits determine which portions of the image to superimpose over other
layers. White alpha-channel pixels make the superimposed image completely opaque,
while black pixels make the overlay completely transparent, or invisible. Gray levels
represent varying levels of opacity.
LiveType automatically creates an alpha channel for your project when you render it
with a transparent background.
7
Page 8

A Realm of Creative Possibilities
LiveType has revolutionized titling in two major ways. First, it introduced 32-bit
LiveFonts, a new approach to text animation in which every character of a font is a
separate, animated movie. Second, LiveType handles effects and animation with greater
ease than any other titling application.
Animated Fonts, Objects, and Textures
Three types of animated media are included in LiveType:
Â
LiveType objects
Â
LiveType textures
Â
LiveFonts
All of these elements move inherently, even before you apply motion paths and special
effects to them.
LiveType comes with dozens of LiveFonts and hundreds of objects and textures. What’s
more, you can create your own animated fonts using the LiveType FontMaker utility,
building characters using virtually any graphical object—from 3D animations and
images created in Photoshop to video clips—and apply effects to them, just as you
would to words.
are animated graphics.
are moving images used to fill backgrounds, text, or objects.
are complete, animated character sets.
Effects Handling
Effects in LiveType are handled as separate entities—“packages” encompassing
movement, transformation, and timing parameters—that can be applied to any
number of elements in the Canvas. You can take advantage of more than 100
customizable effects that come with LiveType, including fades, zooms, rotations, and
motion paths. Or you can create your own styles by adjusting existing effects or
building them from scratch.
From an animation standpoint, LiveType is easier to work with than other titling
applications, since one keyframe marker contains all the parameters for an element at a
point in time, eliminating the complexity of long keyframe stacks.
And powerful timing features allow you to control every aspect of your animation. In
addition to basic functions such as loop, speed, and duration, LiveType allows you to
sequence your effects. Sequencing lets you animate characters in a line of text
individually, with their own timing elements, so you’re not constrained to blocks of text
that fly around the screen as a unit.
Whether you’re combining prebuilt elements or generating all the pieces yourself, you
can create wholly original, eye-catching compositions with surprisingly little effort.
8 Preface
An Introduction to LiveType
Page 9

Workflow for Creating Titles
Video production is typically approached in layers from back to front, starting with
shooting and editing the footage, then building in effects, then applying titles and
sound. Likewise, your approach to title creation should be loosely approached from
back to front. Of course, because the design process is fluid, there is no hard-and-fast
prescription, but the following steps give you a sense of what’s involved for a
typical project.
Step 1: Configure the working environment
Â
Set the output resolution, frame rate, and other project properties.
Â
Set up the grid, guides, and rulers in the Canvas, according to your working
preferences.
Step 2: Apply a background, if any
Step 3: Create elements (text or objects) in the Canvas, one by one
Â
Position and shape a track for the element.
Â
Add an element to the track.
Â
Select a font.
Â
Adjust attributes and apply styles to the element.
Step 4: Animate the elements
Â
Define the movie duration.
Â
Apply effects and adjust the timing.
Â
Customize the animation with keyframe adjustments.
Step 5: Preview and fine-tune the movie
Step 6: Render the final movie for compositing into your video
Step 7: Export the movie to an alternative format, if needed
You may be able to save considerable time by taking advantage of LiveType
templates—project files provided with the software that offer many examples of titling
formats. One might suit your needs with few changes, or you may find that certain
elements within a template are useful, which you can copy into your own project. More
about templates can be found in Chapter 2, “Setting Up a Project,” on page 31.
Preface
An Introduction to LiveType
9
Page 10

About This Manual
Because LiveType is a creative tool, documentation can only go so far in describing its
potential. This manual provides a detailed description of the LiveType interface,
features, and functionality, and introduces you to the built-in resources and templates
to give you a sense of the versatility of this product. In the end, you are limited only by
your own creative vision, and the way to push the limits of LiveType is to jump in and
start creating.
This manual begins with a description of the interface, followed by a series of chapters
that explain the tasks you’ll need to perform, as well as advanced techniques.
Note:
This user manual is written for people with a rudimentary understanding of film
or video production. Experienced users will be quite familiar with all such terminology
herein. Others will find that most terms are defined in context, and the glossary at the
end of this manual may be helpful as well.
LiveType Onscreen User Manual
The LiveType onscreen user manual allows you to access information directly onscreen
while you’re working in LiveType. To view the onscreen user manual, choose Help >
LiveType User Manual. The onscreen user manual is a fully hyperlinked version of the
user manual, enhanced with many features that make locating information quick
and easy.
Â
The home page provides quick access to various features, including Late-Breaking
News, the index, and the LiveType website.
Â
A comprehensive bookmark list allows you to quickly choose what you want to see
and takes you there as soon as you click the link.
In addition to these navigational tools, the onscreen user manual gives you other
means to locate information quickly:
Â
All cross-references in the text are linked. You can click any cross-reference and jump
immediately to that location. Then, you can use the navigation bar’s Back button to
return to where you were before you clicked the cross-reference.
Â
The table of contents and index are also linked. If you click an entry in either of these
sections, you jump directly to that section of the user manual.
Â
You can also use the Find dialog to search the text for specific words or a phrase.
LiveType Help also contains information about issues with third-party software and
known bugs. This information is found in the Late-Breaking News section of
LiveType Help.
10 Preface
An Introduction to LiveType
Page 11

To access Late-Breaking News:
m
Choose Help > Late-Breaking News.
Note:
You must be connected to the Internet to download the Late-Breaking News file.
Additionally, LiveType Help contains a link to the Creating LiveFonts PDF file. This
document details the process of creating custom LiveFonts for use with LiveType.
To access the Creating LiveFonts PDF file:
m
Choose Help > Creating LiveFonts.
Apple Websites
There are a variety of discussion boards, forums, and educational resources related to
LiveType on the web.
LiveType Website
For general information and updates, as well as the latest news on LiveType, go to:
Â
http://www.apple.com/finalcutpro/livetype.html
Apple Service and Support Website
For software updates and answers to the most frequently asked questions for all Apple
products, including LiveType, go to:
Â
http://www.apple.com/support
You’ll also have access to product specifications, reference documentation, and Apple
and third-party product technical articles.
For LiveType support information, go to:
Â
http://www.apple.com/support/livetype/index.html
Other Apple Websites
Start at the Apple homepage to find the latest and greatest information about Apple
products:
Â
http://www.apple.com
QuickTime is industry-standard technology for handling video, sound, animation,
graphics, text, music, and 360-degree virtual reality (VR) scenes. QuickTime provides a
high level of performance, compatibility, and quality for delivering digital video. Go to
the QuickTime website for information on the types of media supported, a tour of the
QuickTime interface, specifications, and more:
Â
http://www.apple.com/quicktime
Preface
An Introduction to LiveType
11
Page 12

FireWire is one of the fastest peripheral standards ever developed, which makes it great
for use with multimedia peripherals, such as video camcorders and the latest highspeed hard disk drives. Visit this website for information about FireWire technology and
available third-party FireWire products:
Â
http://www.apple.com/firewire
For information about seminars, events, and third-party tools used in web publishing,
design and print, music and audio, desktop movies, digital imaging, and the media arts,
go to:
Â
http://www.apple.com/pro
For resources, stories, and information about projects developed by users in education
using Apple software, including LiveType, go to:
Â
http://www.apple.com/education
Go to the Apple Store to buy software, hardware, and accessories direct from Apple
and to find special promotions and deals that include third-party hardware and
software products:
Â
http://www.apple.com/store
12 Preface
An Introduction to LiveType
Page 13
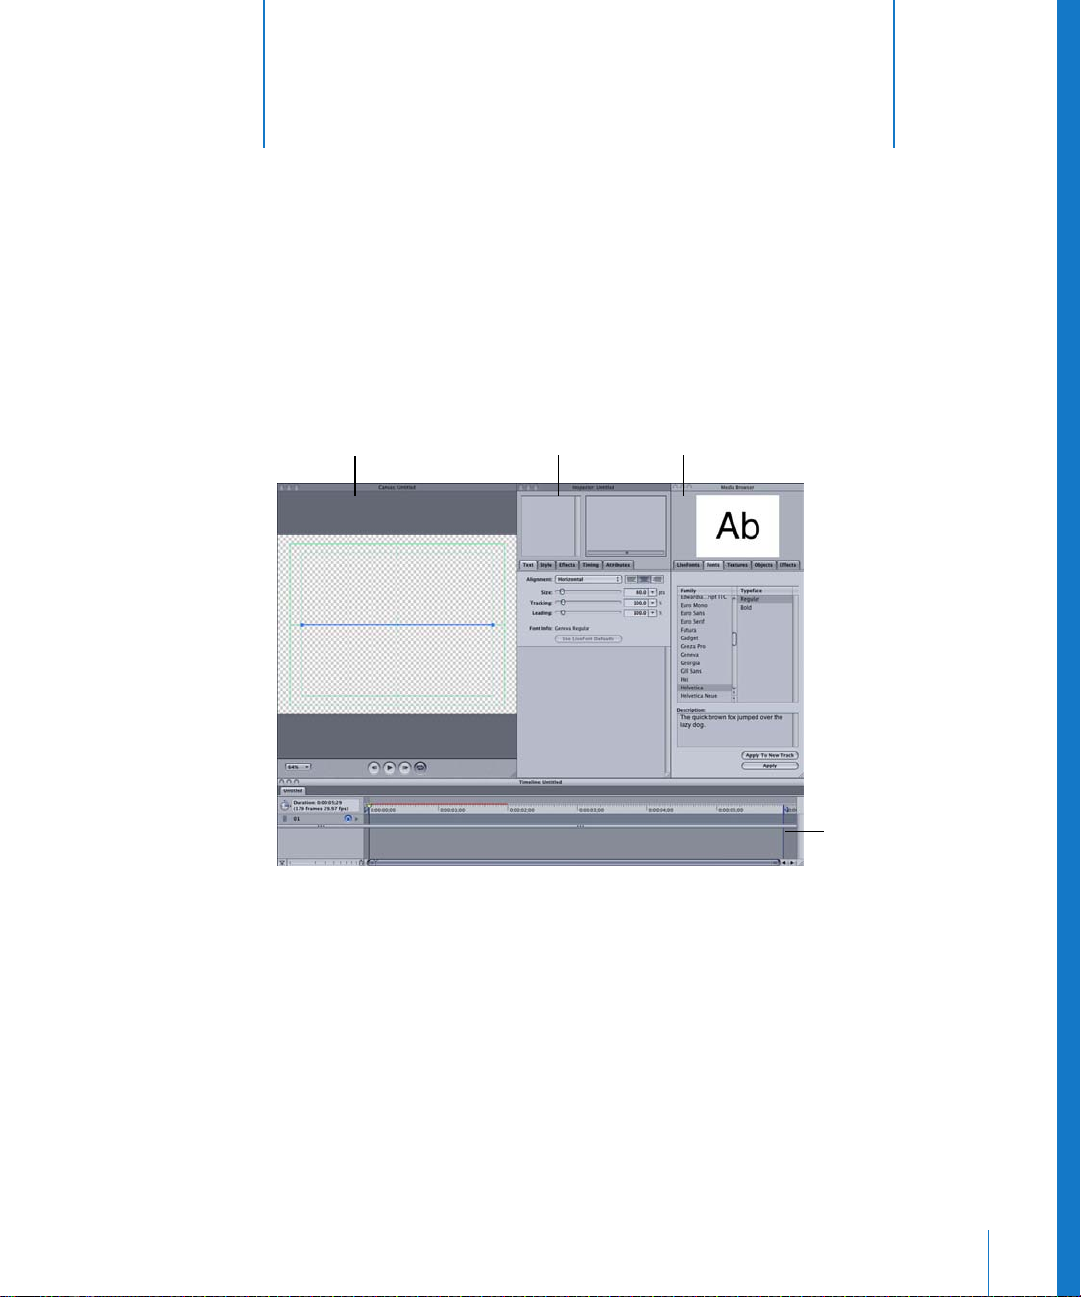
1 The LiveType Interface
The LiveType interface consists of four primary
windows—the Canvas, the Inspector, the Media Browser,
and the Timeline.
1
Canvas
 Canvas: This is where projects take shape. You use it to position text and objects,
create motion paths, and view the results as you design.
 Inspector: A toolbox of settings and parameters, including virtually every option for
building and customizing your titling creations.
 Media Browser: This area provides access to all the fonts, textures, objects, and effects
you’ll use to create your titles.
 Timeline: This is where you manage the frame-by-frame action of your titling
projects. Animation keyframes are created and adjusted in the Timeline, allowing you
to orchestrate the movement of your titling elements.
Inspector
Media Browser
Timeline
13
Page 14
The four windows float freely, and can be moved and resized to suit your
working preferences.
To restore the default layout of LiveType:
m Choose Window > Apply Default Layout.
Canvas
The Canvas is your creative working environment, reflecting the output dimensions you
configure in the Project Properties dialog. (See “Setting Project Properties” on page 34.)
Whether you are working in HDTV, NTSC, PAL, or any other format, the Canvas is
designed to help you lay out and view your titling project easily.
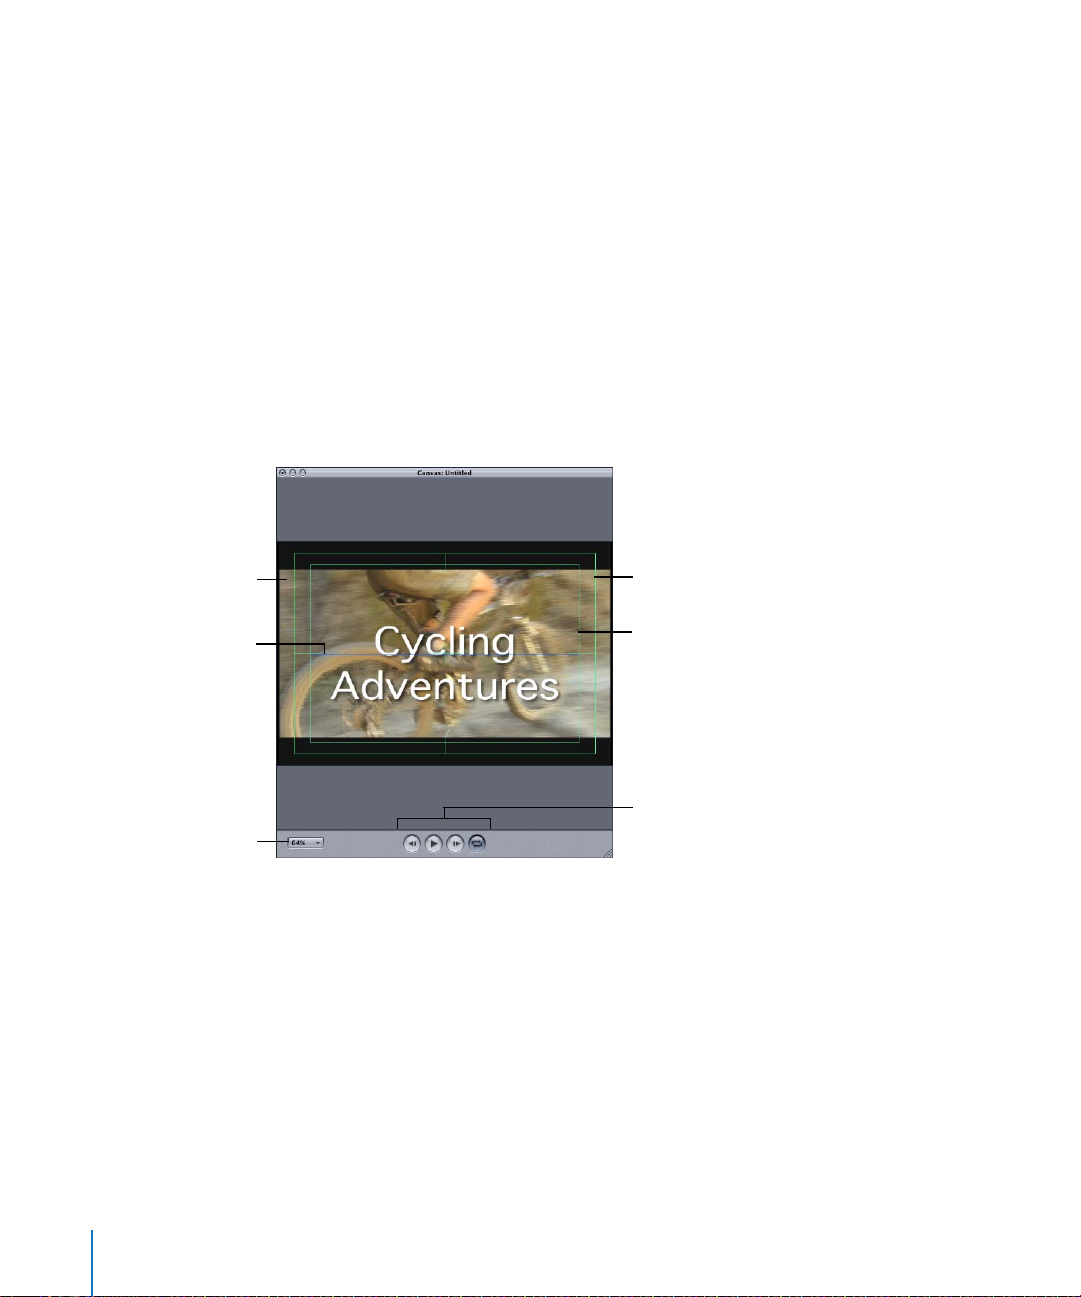
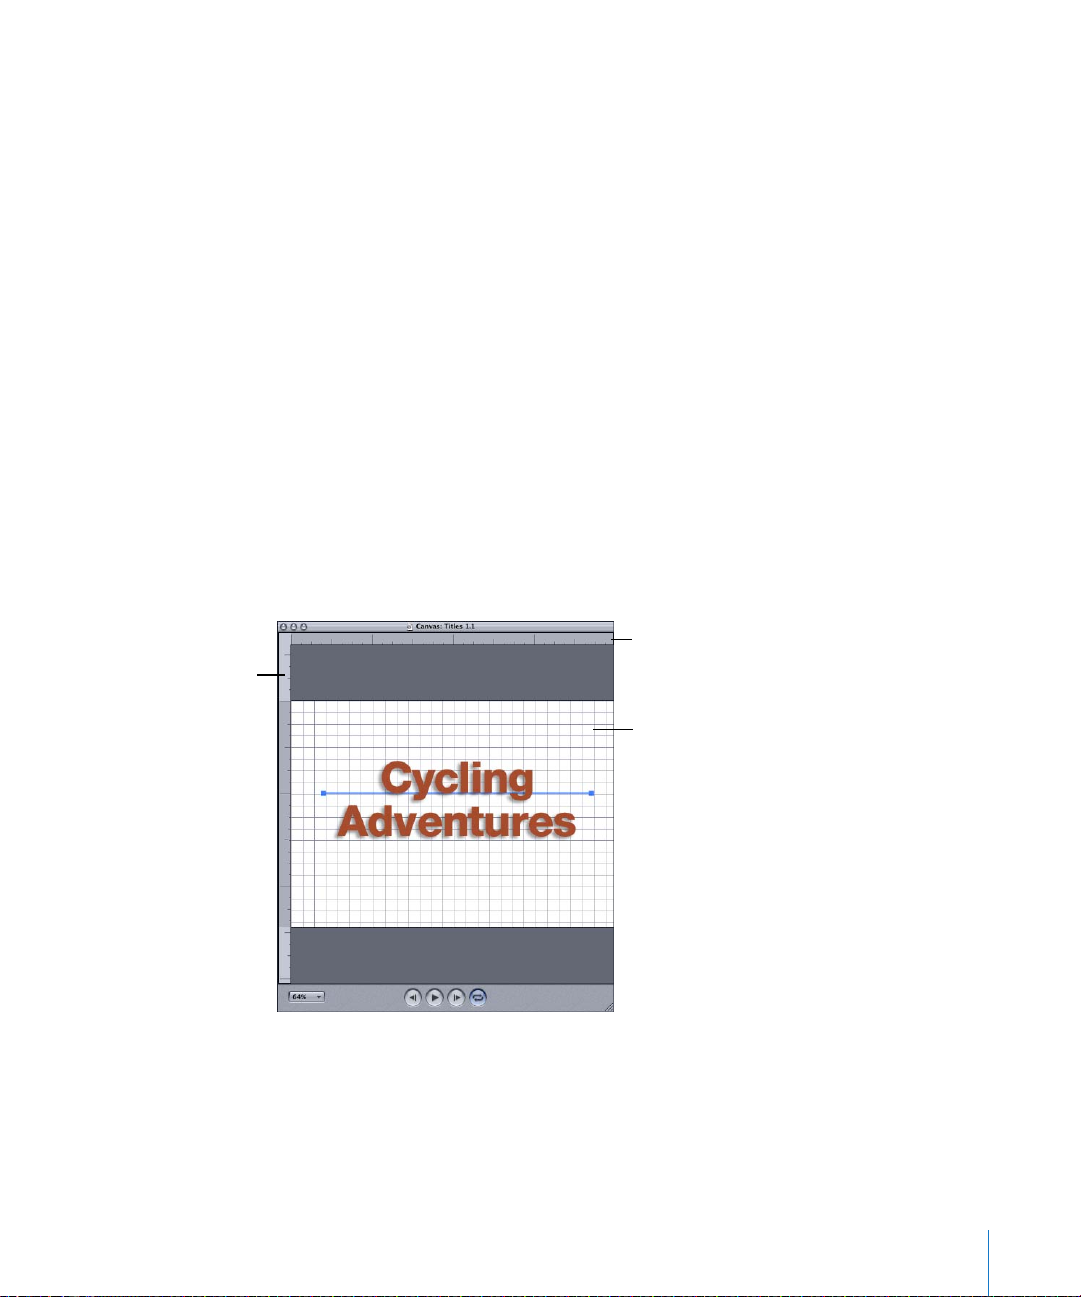
About the Canvas Interface
There are various interface elements and controls in the Canvas, outlined below.
Background (transparent)
Track, showing multiple
lines of text on one track
Zoom pop-up menu
Action safe guidelines
Title safe guidelines
Transport controls
Background
When you first open LiveType, the default checkerboard pattern in the Canvas
represents a transparent background, allowing alpha channel titles to overlay video
footage when composited in a nonlinear editor (NLE) such as Final Cut Pro. You can set
the background as any combination of the following:
 Transparent
 Solid color
 Animated texture or object
 Still image
 Movie
14 Chapter 1 The LiveType Interface
Page 15

Backgrounds often cover the entire Canvas. However, when used with the matte
feature in the Attributes tab of the Inspector, an element can appear to “punch
through” an underlying element to reveal the background color, image, or movie. See
“Creating a Matte” on page 72 for more about creating mattes.
Tracks
The dark blue horizontal line that appears in the default Canvas is a track. Tracks are the
foundation of any LiveType composition. Every element of a project resides on a track.
Tracks define:
 The position of text and objects in the Canvas
 The layering of elements
 In some cases, the path taken by moving elements
Tracks have two endpoints, and can have any number of “control points,” which are
nodes that create angles and curves in the track. When more than one track is in the
Canvas, only the endpoints of the selected, or active, track are visible. This identification
is helpful when you’re applying attributes to a track.
Action Safe and Title Safe Guidelines
The green hairline boxes in the Canvas represent the “action safe” and “title safe” areas.
The action safe area, defined by the outer line, is the extent of the screen where the
image is readily visible, given the curvature of the cathode-ray tube (CRT). The title safe
area, represented by the inner line, is the boundary beyond which text is not easily read.
To turn the action safe and title safe guidelines off or on:
m Choose View > Title Safe.
Chapter 1 The LiveType Interface 15
Page 16
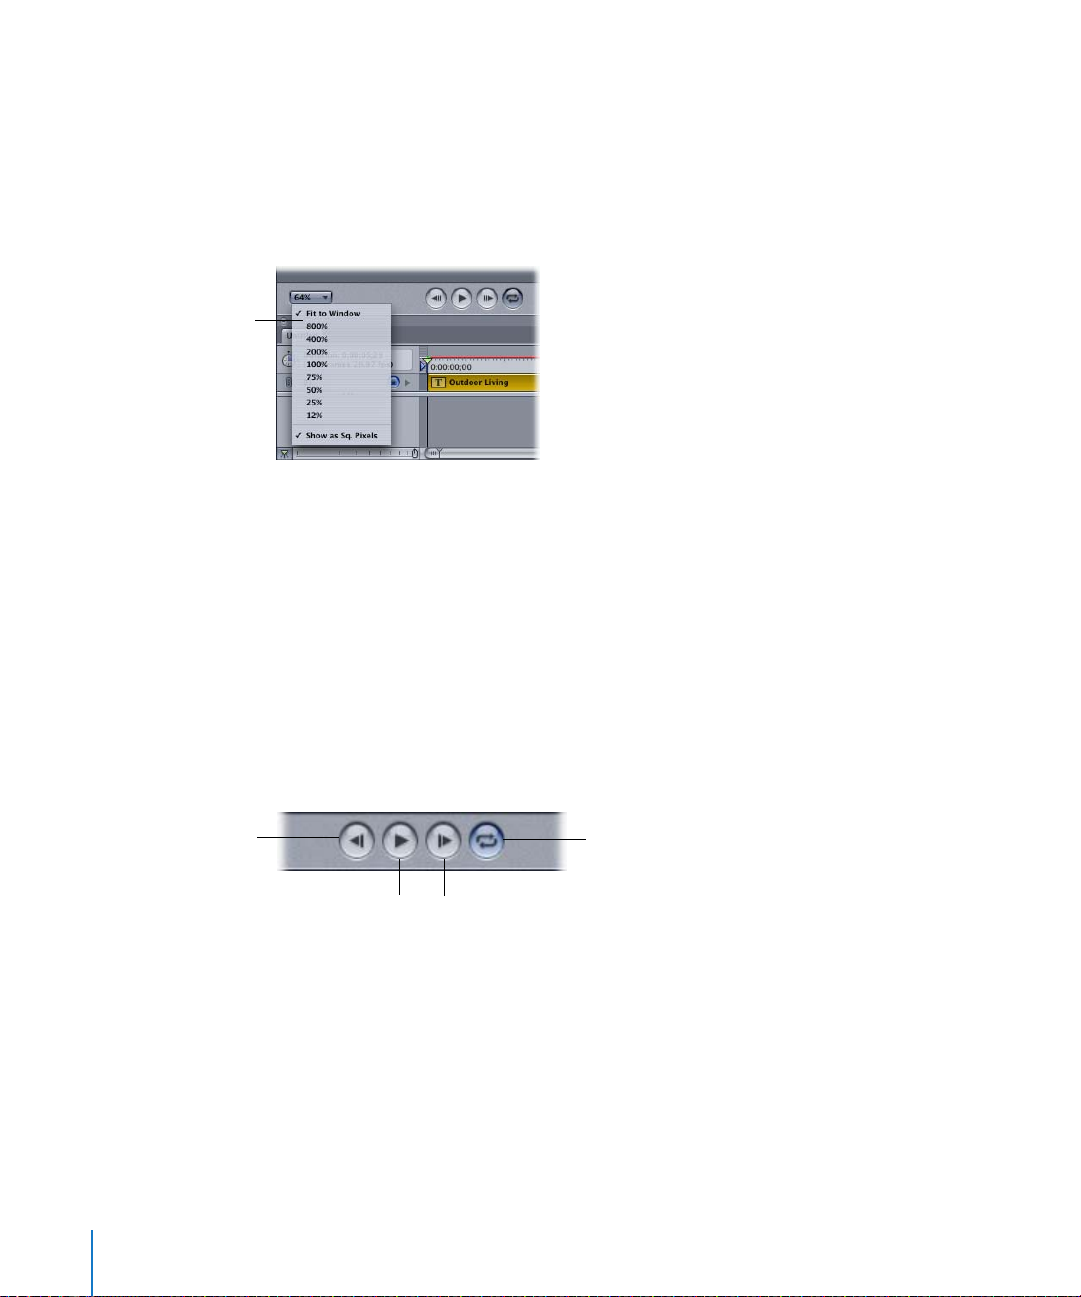
Canvas Zoom Pop-up Menu
At the bottom of the Canvas is a pop-up menu for changing the magnification of the
Canvas.
To change the Canvas zoom, do one of the following:
m Open the Canvas zoom pop-up menu at the bottom of the Canvas and choose one of
the magnification options.
Canvas Zoom
pop-up menu
m Choose Fit to Window from the Canvas Zoom pop-up menu, then resize the Canvas
window to a new magnification.
m Choose View > Zoom In or Zoom Out.
m With the Canvas active, use the Command-Z keyboard shortcut for Fit to Window.
m With the Canvas active, use the Command-+ or Command-– keyboard shortcut to
zoom in or out.
Transport Controls
The transport controls allow you to generate a RAM preview of your project so you can
preview your titling movie right in the Canvas. When you click the Play button, LiveType
renders each frame into RAM memory. This feature is referred to as a RAM preview.
Previous frame
Play
16 Chapter 1 The LiveType Interface
Next Frame
Loop
Page 17
To render a RAM preview of your project in the Canvas:
1 Click the Play button (or press the Space bar when the Canvas or Timeline is active).
The preview renders each frame, then runs through the preview in real time.
2 Stop the preview by clicking anywhere in the Canvas.
The Play icon turns into a Pause icon when the RAM preview is playing. The Loop
button is a toggle that gives you the choice of a single run-through or repeating the
preview in a continuous loop.
See Chapter 8, “Previewing and Fully Rendering Your Titling Movie,” on page 109 for
more about previewing your work.
Customizing the Canvas
Most Canvas settings can be customized from the View menu, allowing you to
configure guidelines and magnification, and choose which elements appear in the
Canvas. The grid, rulers, and guides are helpful for precisely aligning and positioning
elements in the Canvas.
To show the rulers or the grid:
m Choose View > Rulers.
m Choose View > Grid.
Ruler for
horizontal guides
Ruler for
vertical guides
Grid
You can set the number of pixels between each grid line in the Project Properties dialog.
Chapter 1 The LiveType Interface 17
Page 18

To customize the grid:
1 Choose Edit > Project Properties.
2 In the Ruler and Grid Settings area at the bottom, enter a new value in the Grid Width
field.
To add a guide to the Canvas:
m Click inside one of the rulers to insert a guide marked by its horizontal or vertical
pixel position.
To add crosshairs to the Canvas:
m Click inside one of the rulers and drag the pointer onto the Canvas.
Guide marker showing
pixel position
Crosshair guide
To remove guides from the Canvas, do one of the following:
m Drag guide markers off either end of the ruler.
m Choose View > Clear Guides, which removes all guides.
You can isolate a single track and display all other elements as bounding boxes—
rectangles that roughly show the size, position, and orientation of an element. This
option is useful for cleaning up the Canvas as you work on a single track, and it saves
preview-rendering time, because only one item of your composition is being rendered.
18 Chapter 1 The LiveType Interface
Page 19
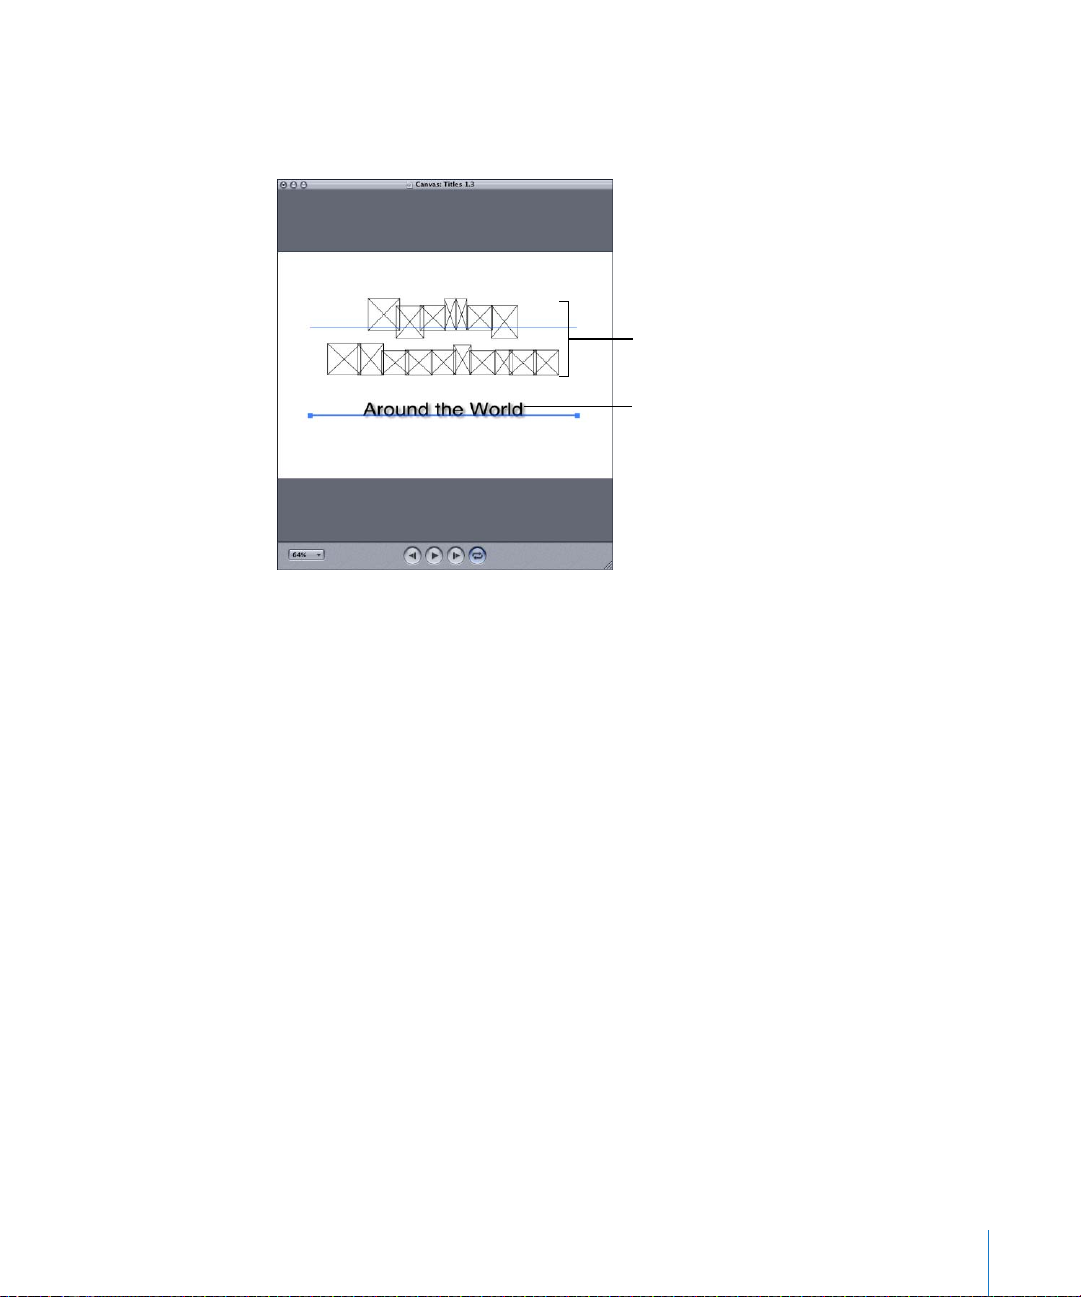
To isolate a single track in the Canvas:
m Select the track you want to continue working on, then choose View > Selected Only.
Revert to the normal view by choosing View > Selected Only again.
Bounding boxes show the size
and position of deselected
elements.
Choose View > Selected Only
to view only the contents of
the selected track.
The Proxy Frame Only option in the View menu–which applies only when you’re using
installed LiveType media—renders LiveFonts, textures, and objects as proxy frames in
the Canvas, essentially freezing their inherent animation.
Particularly when the animated element has highly variable content from frame to
frame (such as Particles objects, which contain few if any pixels in the beginning and
ending frames), the proxy frame is easier to work with, because it shows a more
representative shape of the object regardless of the playhead position.
Chapter 1 The LiveType Interface 19
Page 20
Inspector
The Inspector is your toolbox for transforming elements—text, objects, or images.
There are unlimited combinations of parameters and attributes you can use to make
your titles dynamic and original.
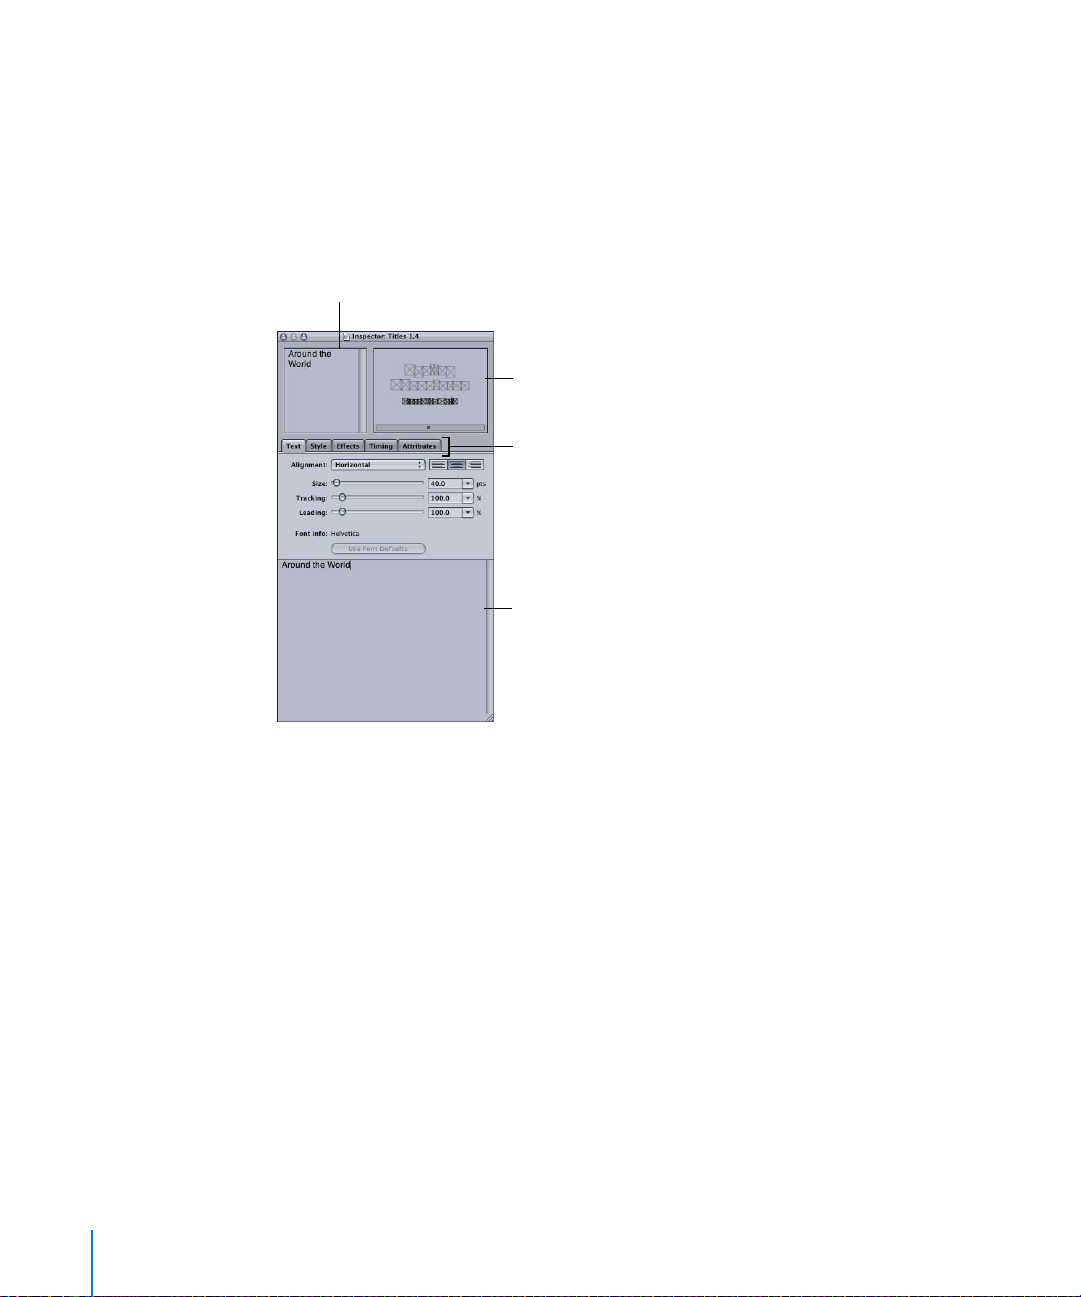
The Inspector consists of a text-entry box and Live Wireframe Preview at the top of the
window, and five tabs of parameters. Inspector settings always apply to the track,
character, or effect that is currently selected in the Canvas or Timeline.
Text-entry box
Live Wireframe
Preview
Inspector tabs
Text-entry box
(in the Text tab only)
Text-Entry Boxes
There are two areas in the Inspector where you can add text to a track. One of these is
in the upper-left corner of the Inspector. Because this text-entry box is visible no matter
which Inspector tab is selected, it is a convenient way to identify the active track, as
well as to add or change the text on a track, as you can type directly into it. The textentry box at the bottom of the Text tab is larger, making it easier to insert and edit
larger amounts of text.
The text-entry boxes also allow you to select individual letters or words on a track.
When you highlight text in the text-entry box, those characters are selected in the
Canvas. This is particularly useful when the text you want to modify is obscured in the
Canvas by other elements.
20 Chapter 1 The LiveType Interface
Page 21
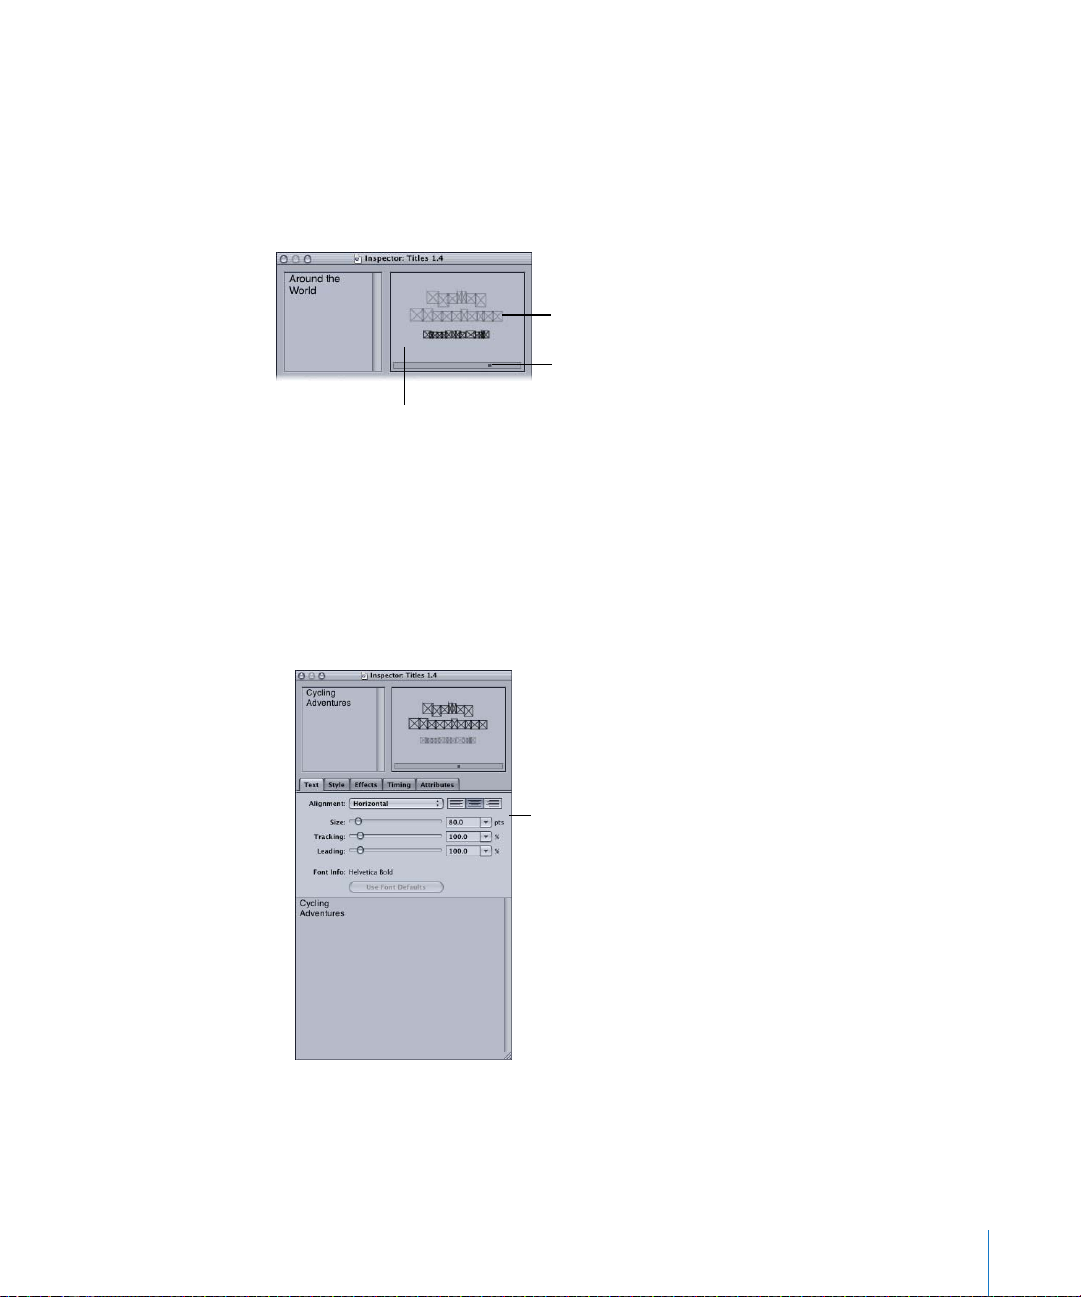
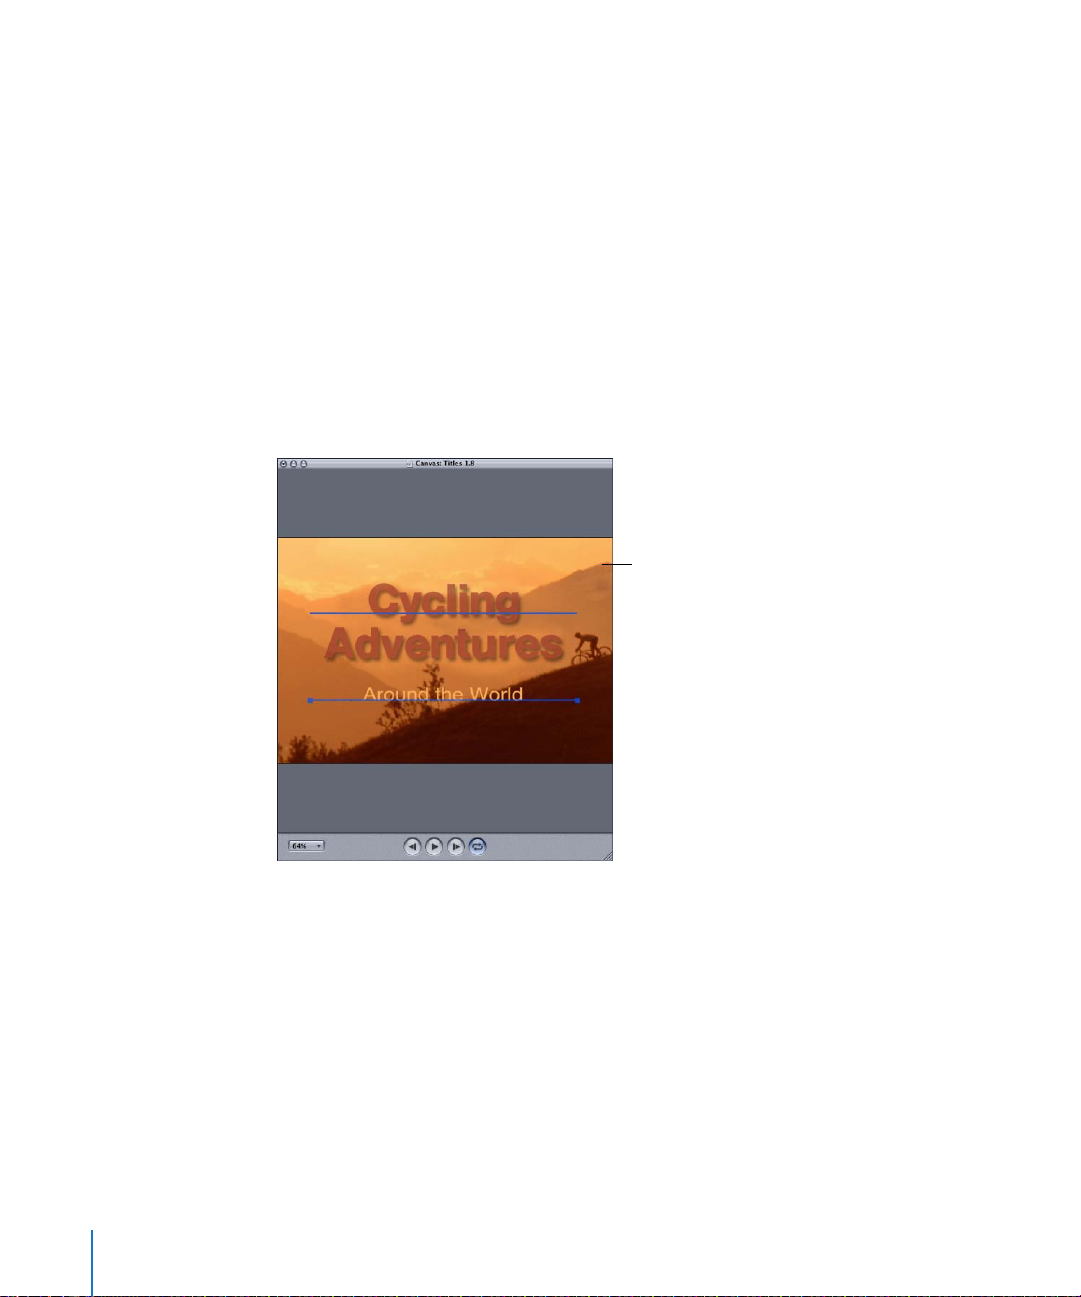
Live Wireframe Preview
In the upper-right corner of the Inspector, the Live Wireframe Preview continually plays
your titling movie, with small bounding boxes indicating the movement of each
character or object. This feature gives you a quick indication of how your adjustments
have changed the overall animation, without rendering a full preview with every
change you make.
Small bounding boxes
depict the movement of
the Canvas elements.
Preview playhead
Click to turn the
preview on or off.
To freeze or unfreeze the Live Wireframe Preview:
m Click inside the preview area.
Inspector Tabs
There are five tabs in the Inspector.
 Text tab: This is where you enter text and adjust the size, alignment, and spacing of
text on the active track.
Text tab settings
Chapter 1 The LiveType Interface 21
Page 22
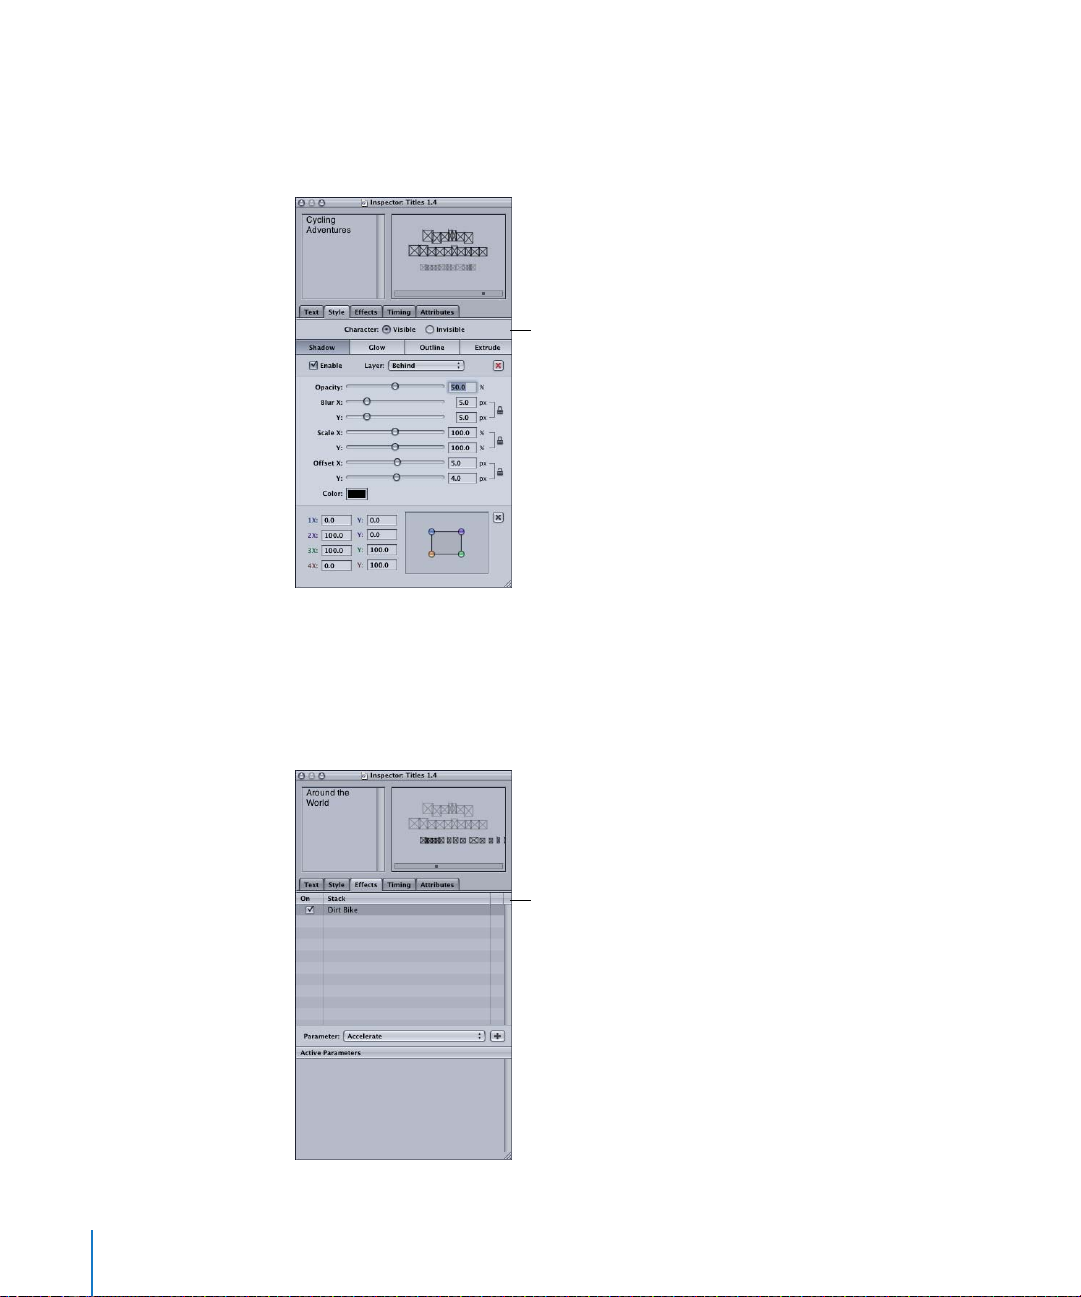
 Style tab: This tab provides options for the Shadow, Glow, Outline, and Extrude
treatments, which can be applied to text or objects. These are often used to add
depth and highlight the text or object, although a wide variety of graphical
outcomes are possible.
Style tab settings
 Effects tab: This tab lists the effects that have been applied to the active track, and is
used to view and change effect parameters at any point in your titling movie. Effects
are combinations of movement and transformation that can be applied to any track.
The On column of the Effects tab allows you to turn an effect off or on for individual
characters on the track.
Effects tab
22 Chapter 1 The LiveType Interface
Page 23
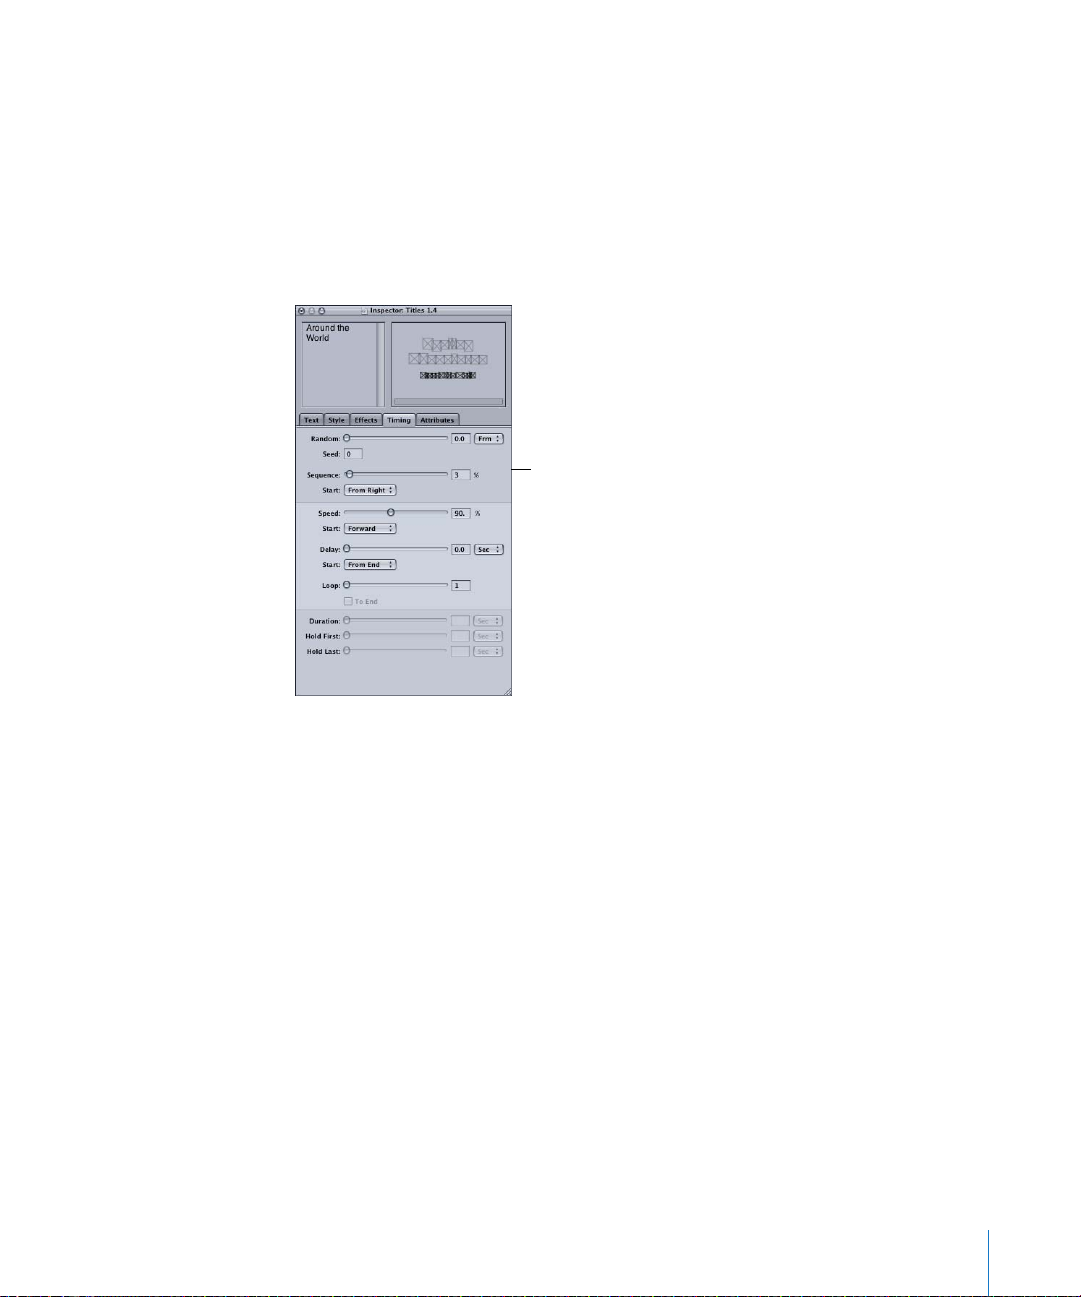
 Timing tab: Timing parameters for tracks and effects are controlled in this tab. While
the Timeline provides a frame-by-frame diagram of tracks and effects with their
associated keyframes, the Timing tab is a single pane that allows you to adjust the
overall timing and modify the parameters of your animation.
Some timing adjustments are made more easily by moving elements in the Timeline,
rather than entering values in the Timing tab. However, the Timing tab gives you
access to the full range of timing variables, as well as effect parameters that let you
fine-tune your animation, creating exactly the look you want.
Timing tab
Chapter 1 The LiveType Interface 23
Page 24
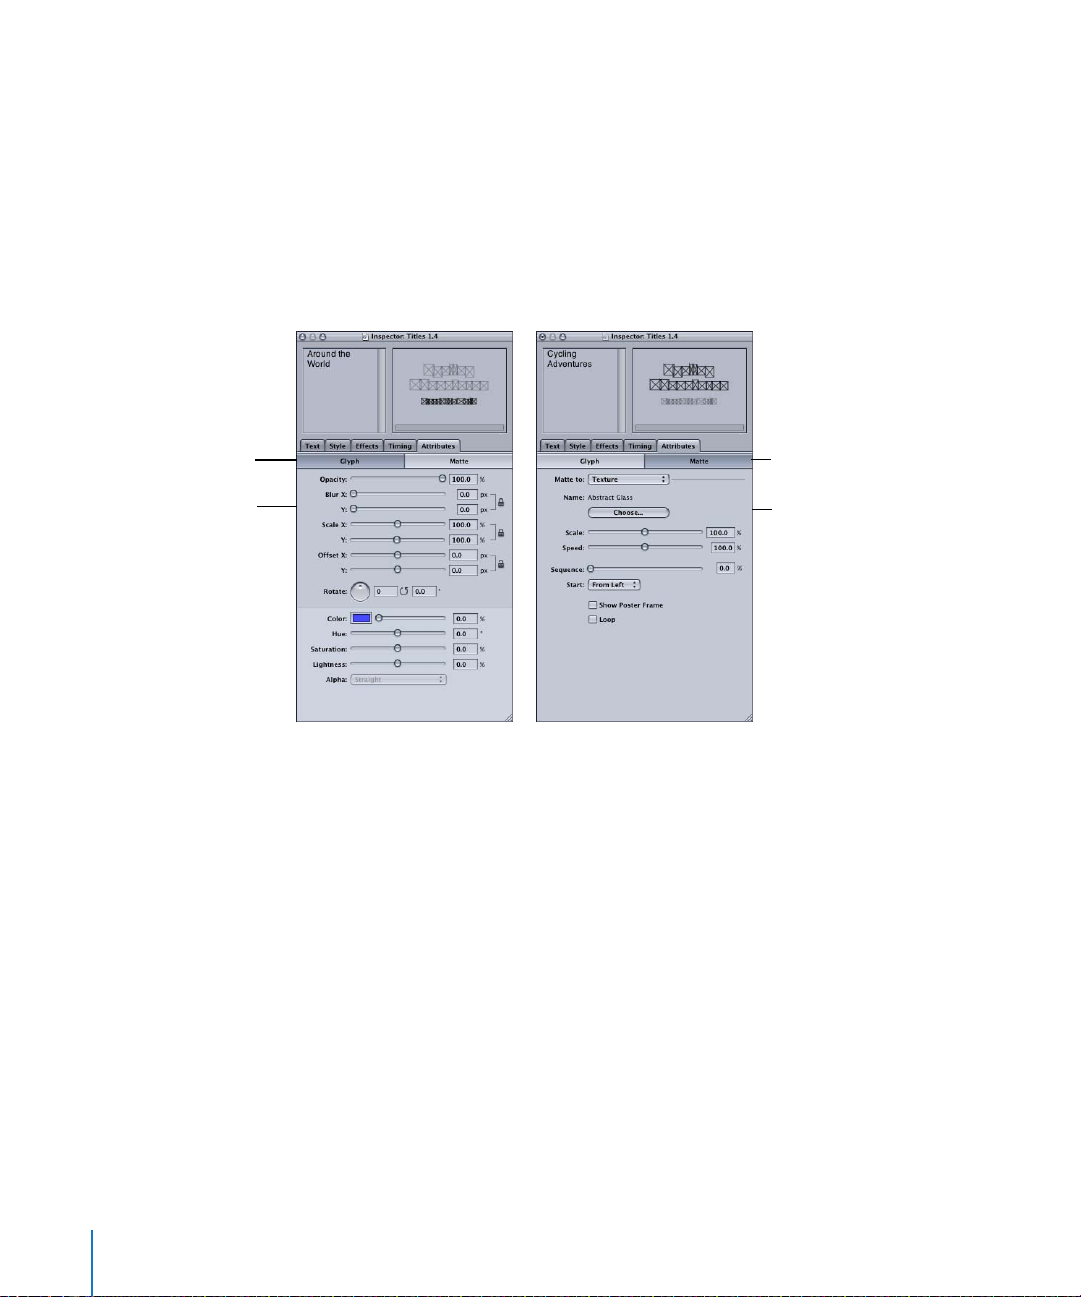
 Attributes: This is where you assign a variety of attributes—opacity, blur, scale, offset,
rotation, and color—to elements in the Canvas. Attributes can be applied to entire
tracks or individual characters on a track.
The Attributes tab also contains options for creating a matte effect, in which an
element appears as a cut-out window that reveals the element below it. A simple
line of text, for example, can be matted to a movie clip, which essentially “fills” the
text. The Matte to Texture option lets you fill track contents—even individual
characters—with an animated texture, without having to add the texture to your
project as a separate element.
Attributes tab in the
Glyph pane
Glyph settings include
attributes such as the
shape, color, and position
of text and objects.
Attributes tab in the
Matte pane
Matte settings are variables
for creating cutouts and
textured fills.
24 Chapter 1 The LiveType Interface
Page 25
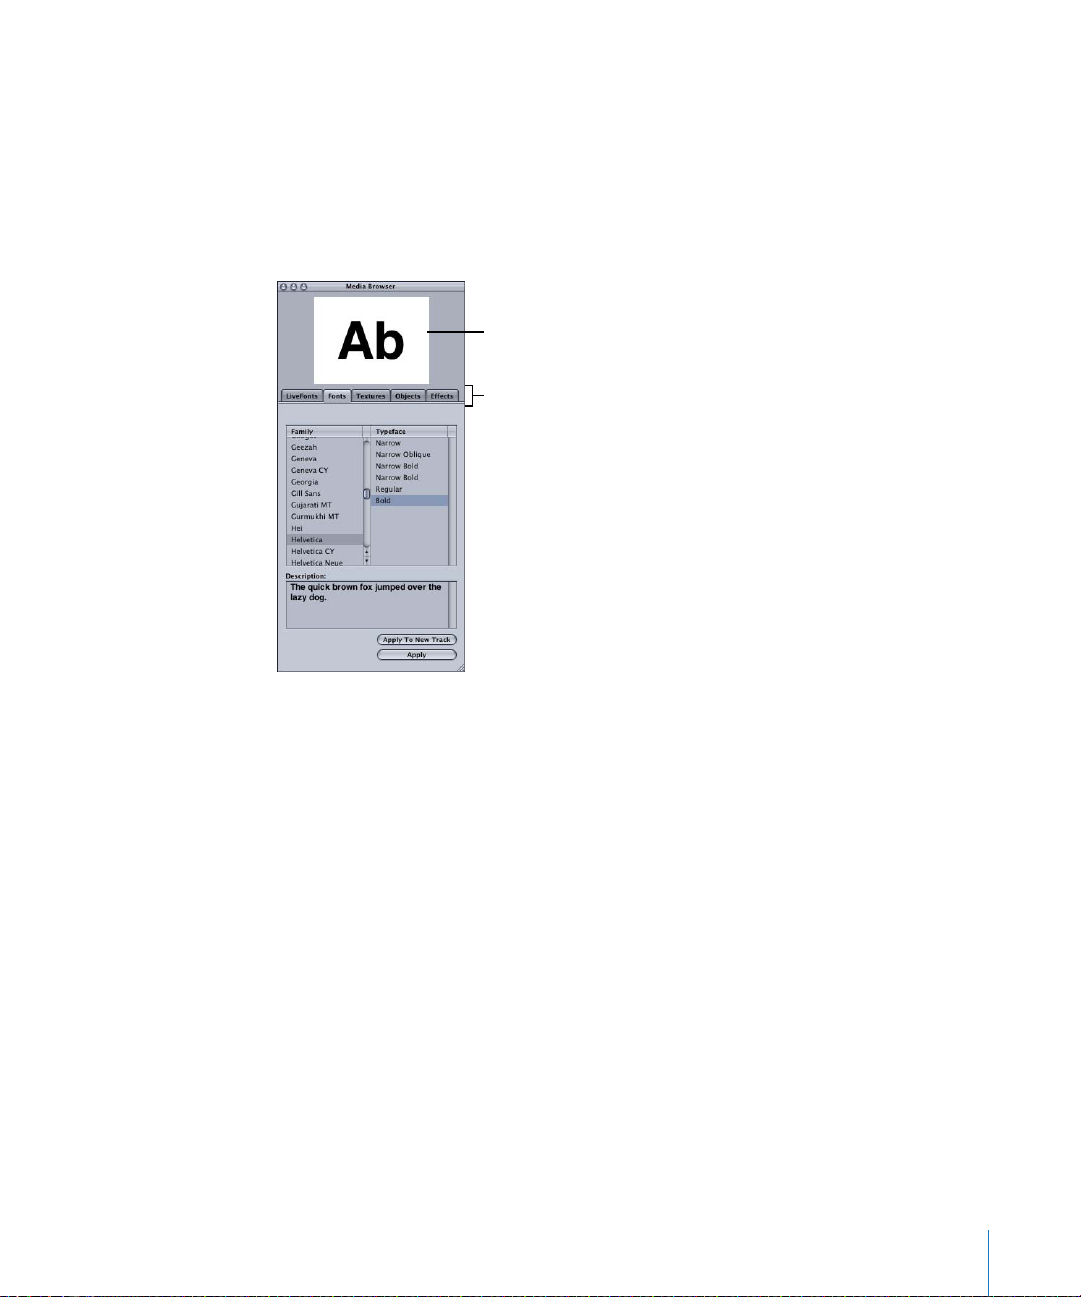
Media Browser
Most of the installed resources available for your titling projects are available through
the Media Browser—except for LiveType templates and images and movies you import
from other sources. There are various tabs representing different elements installed on
your computer: LiveFonts, system fonts, textures, objects, and effects. Using the
Media Browser, you can scroll through and view representations of all these elements
before you apply them to your project.
Browser preview
Tabs of media and effects
The Media Browser preview is the only way to see how LiveType media—LiveFonts,
textures, and objects—move and transform until you install the full data file onto
your computer. When you first apply one of these elements to the Canvas, a single
representative frame is displayed, not the entire animated sequence. Installing the
data component allows you to see a true representation of the LiveFont in each
frame of your movie. See “LiveType Media Files” on page 28 for more about LiveType
file management.
Chapter 1 The LiveType Interface 25
Page 26
Timeline
The Timeline depicts the frame-by-frame orchestration of your titling project, and
provides many tools for designing the movement and timing of your titles. The
Timeline allows you to do the following:
 Set the timing and duration of tracks and effects
 Manage the track order, or layers
 Group tracks to maintain their relative position
 Enable and disable tracks and effects
 Work with keyframes to customize your animation
 Select specific frames to view or adjust
 Set markers to render only a portion of your movie for previews or final output
About the Timeline Interface
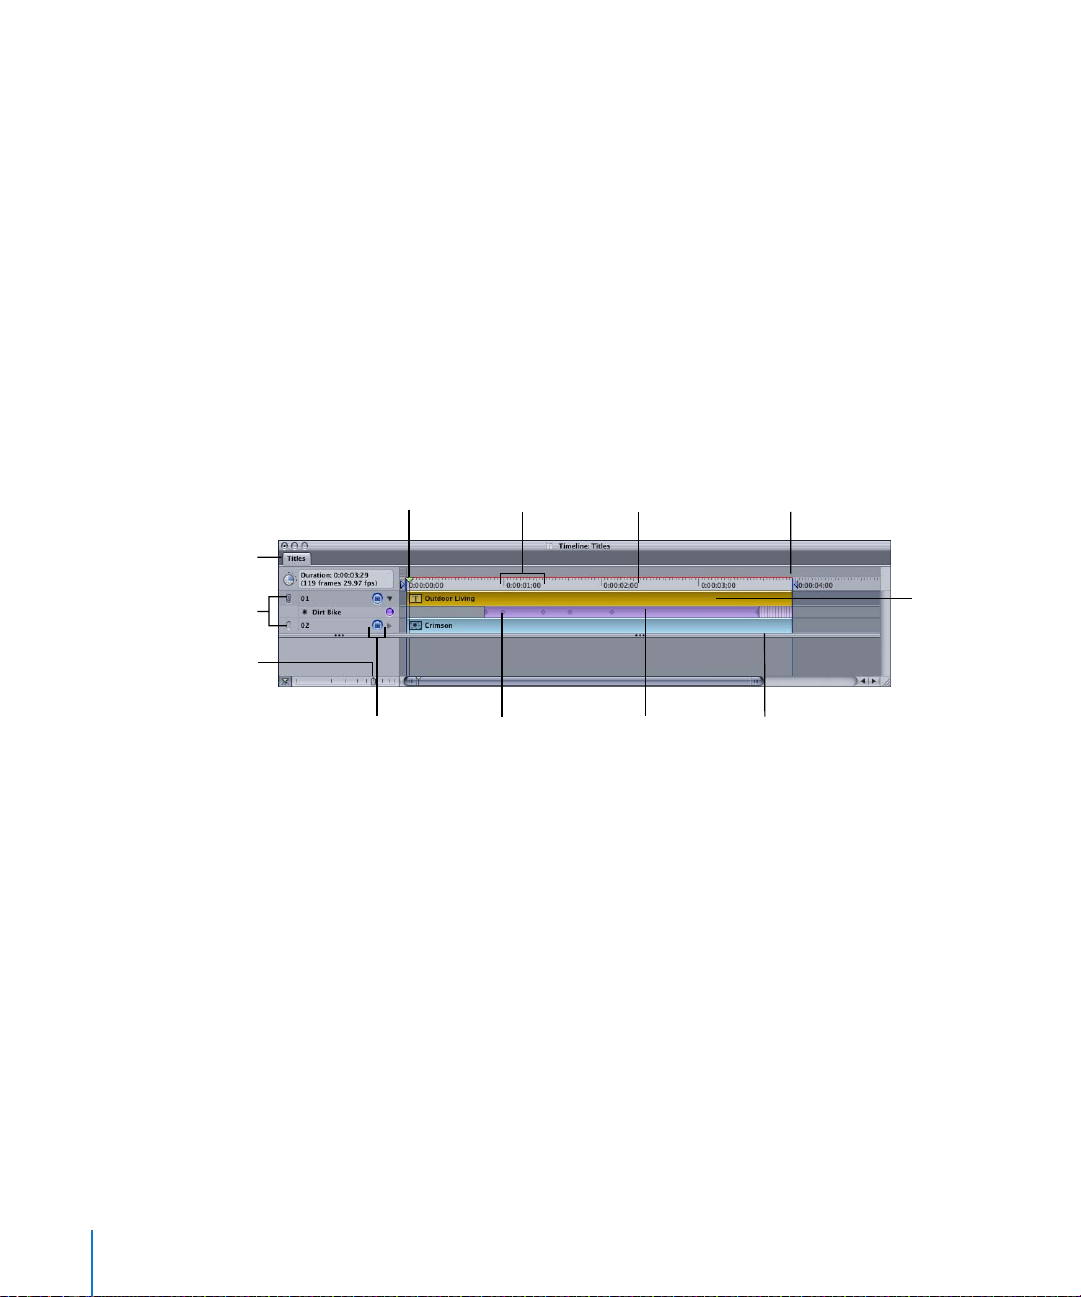
The following are the interface elements and controls in the Timeline.
Project tab
Grouping buttons
Timeline zoom slider
Playhead
Enable/Disable
buttons
Timecode
Frame ruler
Keyframe
Render Selection
Effect
Out point
Track
Background bar
Project Tabs
Tabs at the upper-left corner of the Timeline indicate which projects are currently open,
and which one is active.
Playhead, Timecode, and Frame Ruler
The playhead and timecode on the frame ruler indicate which frame is showing in the
Canvas. The playhead moves along the frame ruler when you play your project, and it
can be dragged to any given frame.
To view a specific frame, do one of the following:
m Drag the playhead to the desired frame.
m Click a frame in the frame ruler.
The Canvas always reflects the frame under the playhead.
26 Chapter 1 The LiveType Interface
Page 27

Render Selection Markers
The In Point and Out Point markers in the frame ruler allow you to determine the
portion of your movie you want to render. Using these markers, you can:
 Save time rendering previews when you don’t need to see the entire movie
 Choose the precise number of frames you want to include in your final output
To change the render selection, do one of the following:
m Drag the In Point and Out Point markers in the frame ruler.
m Position the playhead and press the I key on your keyboard to set the Render Selection
In Point, or the O key to set the Render Selection Out Point. The Timeline must be
active for these hot keys to work.
As you constrain the range of frames to be rendered, the information box in the upperleft corner of the Timeline reflects the modified duration and number of frames.
Note: To quickly locate the Out Point marker when it is beyond the end of the visible
Timeline, move the Timeline zoom slider all the way to the right.
Tracks and Effects
Tracks are numbered according to their layer position in the left column of the
Timeline, and Track 1 is always the top layer.
Effects are depicted as separate bars underneath the track they apply to. An effect may
extend for the entire duration of the track, or only a portion of it. One track may have
several effects applied to it, in sequence or overlapping.
Background Bar
Any item that falls below the background bar is a background element. You can drag
the background bar up or down to any position between tracks in the Timeline. For
more information, see “About the Background Bar” on page 43.
Keyframes
The basis of most digital animation, keyframes contain the parameters that elements in
the Canvas reflect at a specific point in time. When a movie is rendered, LiveType
interpolates the movement of the elements in between keyframes for smooth,
continuous motion. When an effect is increased in duration, or stretched, the keyframes
spread out with it, and the effect takes longer to complete. See Chapter 7, “Working
With Effects and Keyframe Animation,” on page 87 to learn more about keyframes.
Grouping Buttons
Grouping buttons let you group tracks together in the Canvas, locking their relative
position while allowing you to move the group as a unit.
Chapter 1 The LiveType Interface 27
Page 28

Enable/Disable Buttons
The Enable/Disable buttons turn tracks and effects off or on. When a track is disabled, its
contents are removed from the Canvas, although the blue track line remains. Disabled tracks
are not rendered in previews or movies. Similarly, effects can be disabled.
Timeline Zoom Controls
Typically you use the zoom controls to adjust the amount of time represented in the
Timeline window. This is helpful to do while working with timing a long or complex
composition.
The main zoom control is the Timeline zoom slider, which zooms in and out around the
playhead as you drag.
You can also use the Command-+ or Command-– keyboard shortcut to zoom in or
zoom out on the playhead when the Timeline is active. Another helpful command is
Shift-Z, which adjusts the Timeline to show the entire project at once.
Shortcuts and Hot Keys
The LiveType interface includes numerous menu items and shortcuts to help you use
the application easily and efficiently. It’s important to note that the function of these
options depends on which LiveType window is active.
For example, when the Canvas is active, the arrow keys nudge the active track in
small increments. However, when the Timeline is active, the right and left arrow keys
advance the playhead or move it back one frame.
LiveType Media Files
LiveType includes hundreds of media and effects files, which are the resources available
to you within the Media and Template Browsers. Animated files include LiveFonts,
objects and textures. Preset effects and templates, as well as various other LiveType
resources, are also included with the application. These files are collectively known as
LiveType media files.
LiveType now uses a single file format for media such as LiveFonts, textures, and
objects, but media using the earlier “pair format” is still supported.
28 Chapter 1 The LiveType Interface
Page 29
Locating LiveType Media Files
When you install LiveType, a folder hierarchy is placed in the following location:
Library Application Support/LiveType/. This is where LiveType looks first for media files
such as LiveFonts, objects, textures, effects, images, movies and templates. LiveType
media files can also be installed on other hard disks including a network server. You can
assign any location for media files from the Preferences dialog.
Media file types Media filenames Media file contents
Effects LTFX Contains effects files and sample
movies for each effect.
LiveFonts LTLF Animated font characters
Objects .LTOB Pre-rendered animations with
an alpha channel
Templates LTTM LiveType projects
Textures LTTX Full screen animated
backgrounds. These animations
can also be matted to any font
character or element on the
LiveType Canvas.
About Installing LiveType Media Files
The LiveType installation process allows you to install LiveType media files in any
location. For more details concerning installing LiveType and the LiveType media files,
see the Installing Your Software document that is enclosed with the installation discs.
Managing LiveType Media Files
Any element in the LiveFonts, Textures, Objects, and Effects tabs of the Media Browser
has a corresponding media file, which contains the components needed to work with
LiveType. Once these media files are installed in the /Library/Application Support/
LiveType folder, you can move them to a different disk.
To use LiveType media that is located outside the application support folder:
m Assign the location of the media files from within LiveType using the Preferences
dialog. Choose LiveType > Preferences.
Note: To use LiveType media that is located outside the application support folder,
assign its location from within LiveType using the Preferences dialog. If you have media
installed from a previous version of LiveType, the Media Browser reads “Yes” or “No” in
the Installed column for that media which indicates whether or not the media files are
installed. This convention only applies to earlier “file pair” formats. New content comes
in the form of media files that appear in the Media Browser with a double dash in the
Installed column indicating they are installed. The Install and Uninstall buttons in the
lower-left corner of the Media Browser do not apply to the newer content, only to
LiveType media files from previous versions of the application.
Chapter 1 The LiveType Interface 29
Page 30

Creating Custom Categories for LiveType Media files
You can create custom categories for LiveType Media by simply creating a new folder
within the Media folder, such as LiveFont/My folder/My font.
LiveType only recognizes one folder level after the original media category.
You can move “file pair” media files from previous versions of LiveType to another disk,
but they must be in the same folder hierarchy that they were previously located in.
Using Imported Files
When you use graphics or movies from other sources in your project, LiveType needs
to refer to the source files for these external elements. Therefore, once you’ve placed an
image or movie, it’s best not to move or rename the source file. The Images folder in
the LiveType folder hierarchy is a convenient place to store images associated with
your projects.
30 Chapter 1 The LiveType Interface
Page 31

2 Setting Up a Project
2
The most important step as you begin any LiveType
project is to configure the project properties.
As tempting as it may be to jump right in and start designing, you should define your
output parameters and save the project to disk at the outset, to be sure your titles are
generated at the size and resolution you need.
If you go ahead and generate a titling movie without initially configuring the project,
you’re bound to run into trouble. Although these settings can be changed at any time,
a titling composition created for standard broadcast, for example, will fill only a portion
of the screen if it’s changed to high definition format after the fact.
First, you need to open a new project. You have two options:
 Start with a LiveType template.
 Start with an existing LiveType project you’ve already created.
Templates
LiveType includes dozens of templates, which are LiveType project files organized by
category. You can use templates in several ways:
 As the starting point for your own creations
 As repositories of preconfigured elements you can paste into your own projects
 As a resource for sparking ideas and seeing what’s possible with LiveType
The templates comprise many types of prebuilt projects, all of which you can revise for
your own purposes.
31
Page 32

To open a template:
1 Choose File > Open Template.
2 Browse the categories of templates in the Template Browser.
The Template Browser
3 In the Template Browser, choose NTSC, PAL, or HD from the Format pop-up menu.
4 Choose a template, then click OK.
Whenever you open a template, make sure to set your project properties immediately.
See “Setting Project Properties” on page 34.
You can save your own projects as templates, so they’re accessible through the
Template Browser.
To save your project as a template:
1 Place the project file (.ipr) in a folder in this location: /Library/Application Support/
LiveType/Templates.
2 Generate a short QuickTime movie of the project (with the same name but an
appropriate movie extension, such as .mov or .mp4).
Once you do this, the template will appear in the preview window of the
Template Browser.
32 Chapter 2 Setting Up a Project
Page 33

Starting a New Project and Setting Defaults
When you open LiveType, an untitled default project appears in the interface.
If you want to start a new project when LiveType is already open, you need to open a
new default project.
To open a new project:
m Choose File > New.
A new project with an empty Canvas appears and an “Untitled” project tab is added to
the Timeline.
Note: At least one LiveType project must be open at any time, so if you close the only
open project, a new default project automatically opens.
You can configure your LiveType interface and save your settings as the default. Default
settings include project properties, font and media choices, Canvas options, the tabs
that are revealed, and various other settings. This is particularly useful for saving your
preferred output format, so you don’t have to reconfigure the project properties each
time you open a project.
To save your default settings:
1 Set up a LiveType project with the settings and configuration you want.
2 Choose LiveType > Settings > Remember Settings.
Every time you subsequently open a new project or open LiveType, the current default
settings apply. Content elements in the original project are not saved as part of the
default project.
It is possible to find yourself with a default configuration that’s undesirable and
difficult to get out of. You can easily wipe clean your settings and revert to the original
LiveType settings.
To erase your project settings:
m Choose LiveType > Settings > Clear Settings.
Chapter 2 Setting Up a Project 33
Page 34

Setting Project Properties
Once you’ve opened a new project and saved it to disk, you need to define the output
you want to create. All of the essential project settings are accessed through the
Project Properties dialog.
To open the Project Properties dialog:
1 Choose Edit > Project Properties.
2 Make the desired changes, then click OK.
For detailed information, see the next section, “Settings in the Project Properties
Dialog.”
The Project Properties dialog
34 Chapter 2 Setting Up a Project
Page 35

Settings in the Project Properties Dialog
There are various pop-up menus, colors, and settings you can select when specifying
the properties for your project.
Presets
Presets establish the width, height, frame rate, and pixel aspect defined by the
selected standard.
 Presets: This pop-up menu lists the most common output formats. After you select a
different preset, you’ll notice how the settings change. You can also see how
selecting different presets affects the shape and size of the Canvas.
Preset properties automatically
set the project resolution, frame
rate, and so on, for the most
common output formats.
If none of the presets conform to your project, you can configure the dimensions and
frame rate manually. “Custom” will then automatically appear in the Presets field.
Note: Web banner and multimedia options are included among the presets, since
LiveType is effective for building animations for the web or for Keynote, for example,
which imports QuickTime movies directly. Keep in mind that web banners are
typically created in GIF format. To create a GIF, you need to use another program to
translate your LiveType output.
 Width: This is the width, in pixels and inches.
 Height: This is the height, in pixels and inches.
 Frame Rate: This is the frame rate, in frames per second.
Chapter 2 Setting Up a Project 35
Page 36

 Field Dominance: When your project is intended for interlaced video output, choose
either Upper (Odd) or Lower (Even) for the smoothest animation. After the proper
option is chosen, LiveType renders fields with either the upper or the lower field first.
Choose None for footage that is non-interlaced. DV footage is typically Lower Field
First, while certain video capture cards may need to be rendered with the Upper
(Odd) option chosen. In all cases, use the fielding option that matches your video
system settings. For more about this, see “Choosing a Field Order” on page 38.
Time Format options
 Pixel Aspect: The ratio of width to height of a single pixel, or pixel aspect, can differ
from format to format. The pixel aspect is set by preset properties, or you can enter a
custom pixel aspect value.
 Start Time: You can map the start time of your project to a precise point in your
edited video, making it easy to overlay your video at the compositing stage. Start
Time units reflect the time format entered in the field to the right.
 Time Format: This setting defines how the position of audio or video is marked in
time. There are several choices—Frames, SMPTE, and SMPTE Drop.
Description Field
The description field is a useful place to store notes about the project, as well as
a description of any nonstandard output parameters you’ve configured, for
future reference.
Quality Settings
Quality settings can have a big impact on the amount of time you invest in a project.
As you design your titling animation and try out different effects, you will preview
your movie many times. And each time, your system has to render the movie, frame
by frame.
Quality options for the
Canvas, movie renders,
and preview movies
36 Chapter 2 Setting Up a Project
Page 37

These settings in this area allow you to configure the quality of three different items:
 Canvas: A RAM preview in the Canvas
 Movie Render: A full movie render
 Preview: A standard preview accessed via the File menu
How you preview your movie depends on where you are in the design process. You
may find yourself changing these settings several times as you design your titles,
particularly if it’s a complex composition that takes considerable time to render.
A Wireframe preview, which displays rectangular bounding boxes representing each
character, renders very quickly. When you’re focusing on the motion of your Canvas
elements, not their visual attributes, previewing in Wireframe mode is highly efficient.
The Wireframe, Draft, and Normal settings render your project at increasing
resolution levels.
Background Settings
These settings allow you to select a Canvas color and its opacity level.
 Color: This allows you to choose a background color in the Canvas.
 Opacity: This setting reflects the opacity of the color selected above. An opacity level
of 0 equates to no background color, and the Canvas shows the checkerboard
pattern indicating a transparent background.
 Render Background: When this checkbox is selected, any background color, as well as
other background elements, render in previews or final movies.
Important: The Render Background checkbox applies to all elements that fall below
the background bar in the Timeline, as well as the background color, which is not
represented in the Timeline. If the checkbox is not selected, the background color
and other background elements are not rendered in previews or final movie renders.
For more information, see Chapter 3, “Adding a Background,” on page 41 which
presents a complete explanation of working with backgrounds in LiveType.
Ruler and Grid Settings
You can display or hide the Canvas rulers and grid, and set the space between gridlines
at the bottom of the Project Properties dialog. See “Customizing the Canvas” on
page 17 for more about the rulers and grid.
The gridline frequency, or grid
width, is set in the Project
Properties dialog.
Chapter 2 Setting Up a Project 37
Page 38

Choosing a Field Order
You can run a simple test to determine the proper field order for your system.
When you make a movie, the rendering order (upper field first or lower field first)
should correspond to the method used by your equipment, or your movie will
appear distorted.
Note: The field order with which you record to video equipment can be altered by
changes in the hardware or software of your production setup. For example, changing
your video board, device control software, or VCR after setting the field order can
reverse your fields. Therefore, any time you make a change to your setup, you should
run this test for field rendering order.
To test your system, render two LiveType projects, one rendered with upper field first
and one with lower field first.
Important: You may need to familiarize yourself with the basic functions of LiveType
before you go through these steps.
To test the field rendering order:
1 Start a new LiveType project.
2 Choose Edit > Project Properties.
3 In the Project Properties dialog, do the following:
a Choose an NTSC or PAL setting from the Presets pop-up menu.
b Choose Lower (Even) from the Field Dominance pop-up menu.
Do not choose Upper (Odd). In this case, you are rendering the lower field first.
4 In the Inspector, do the following:
a Type a capital “O” in a system font on Track 1.
b Increase its size to fill most of the Canvas.
c Color the letter red, then choose black as your background color.
5 Apply a fast-moving effect to the track, such as Jumpy, in the Caricature effect category
in the Media Browser.
6 In the Timing tab, set the speed of the effect to 100 percent.
7 Choose File > Render Movie.
8 Enter lower.mov as the filename in the Save As field, then click Save.
The movie renders to your chosen location.
9 Now change the color of the capital “O” to blue. Select Upper (Odd) in the Project
Properties dialog.
10 Save the file, naming it upper.mov.
11 Render the second movie.
38 Chapter 2 Setting Up a Project
Page 39

12 Import the rendered files into Final Cut Pro, then play back both movies on an
NTSC monitor.
One of the two movies will look distorted; the other movie will play correctly, with
sharply defined edges. Whenever you render a LiveType movie for that system, use the
settings you used for the undistorted output.
Chapter 2 Setting Up a Project 39
Page 40

Page 41

3 Adding a Background
3
Backgrounds in LiveType generally serve one of two
purposes: Either they are an integral part of the titling
composition, or they are used as an aid to position
elements and key the timing of the titling movie.
Although anything can be a background, a background is usually a uniform color,
animated texture, still image, or movie that fills the Canvas. While background images,
movies, and textures tend to fill the Canvas and aren’t extensively manipulated, they
can be sized, positioned, and transformed in many ways. For more information, see
Chapter 6, “Working With Objects, Textures, and Imported Elements,” on page 79.
Setting a Background Color
The most basic kind of background is a background color, which covers the Canvas and
cannot be manipulated except for its opacity level. It’s best to think of the background
color as a project property, not an element that can be moved or changed.
Background settings in the
Project Properties dialog
The default background has an opacity of 0 percent, which means the Canvas displays
a transparent background, represented by the white and gray checkerboard pattern.
41
Page 42

To choose a background color:
1 Choose Edit > Project Properties.
2 Click the Color button in the Project Properties dialog.
3 In the Colors window, choose a color, then close the window.
Note: Make sure you always close this window after you have selected a color.
4 Drag the opacity slider or enter a value in the field greater than 0 percent. Click OK.
The background color appears in the Canvas.
Adding a Background Texture
LiveType textures make vibrant, animated backgrounds. They are also frequently used
with the matte feature, which allows you to apply a textured fill to text or an object.
See Chapter 5, “Working With Text,” on page 57 for information about creating a matte.
To create a textured background:
1 Click the Textures tab in the Media Browser.
2 Browse the texture categories and select a texture.
3 Click the Apply To New Track button.
The texture fills the Canvas and appears as a background track in the Timeline.
42 Chapter 3 Adding a Background
Category pop-up menu
Selected texture
Background texture
(colored and lightened)
Page 43

About the Background Bar
The background color is different from background elements in your project.
Background elements are represented in the Timeline and can be manipulated in
various ways. A project can have many background elements, or none. The only
definitive way to distinguish a background element, be it a LiveType object or texture,
a movie, or an image, is that it falls below the background bar in the Timeline.
Background bar
Background texture
You can drag the background bar up or down to any position between tracks in the
Timeline. Any element below the background bar is subject to the Render
Background checkbox in the Project Properties dialog.
Importing a Background Movie or Still Image
You can import images or movies from other sources and use them as backgrounds for
your titling project. For any given project, you might choose to use the following:
 A single frame or movie clip as a temporary background, to accurately position and
time the action of your titles
 A movie to embed as part of your titles
 A static image or graphic
LiveType can import background elements in a variety of formats:
 AVI
 BMP
 DV
 GIF
 JPEG
 MPEG-2 and MPEG-4
 Photoshop
 PICS
 PICT
 PLS
Chapter 3 Adding a Background 43
Page 44
 PNG
 QuickTime image file
 QuickTime movie
 SGI
 Targa
 TIFF
To import a background movie:
1 Choose File > Place Background Movie.
2 Locate the movie file you want to place, then click Open.
Note: When you import a background movie, the project dimensions and frame rate
adjust automatically to conform. It’s a good idea to review your project properties
when you import a new background movie.
Placed background movie
To import a background image:
1 Choose File > Place.
2 Locate the file you want to place in the Canvas, then click Open.
3 In the Timeline, do one of the following:
 Drag the image track below the background bar.
 Drag the background bar above the image track.
Note: Placing an image or movie using File > Place does not affect the resolution or
frame rate of the project. That is, the image or movie conforms to the project settings.
44 Chapter 3 Adding a Background
Page 45

Importing a Background Movie With Timing Markers
Final Cut Pro allows you to save movies that include timing markers, which can be
useful when setting the precise timing of your titles. When you place a Final Cut Pro
movie in LiveType, the markers appear in the frame ruler of the Timeline. Markers
cannot be repositioned in the Timeline. Clicking them, however, moves the playhead to
the marked frame.
Marker imported as part of
a Final Cut Pro movie
Considerations for Rendering the Background
You have the option of rendering or not rendering the background in your project. The
background settings in the Project Properties dialog—Color, Opacity, and Render
Background—provide several options that affect your working environment and the
final result of your project.
If you’re creating a standalone animation, web banner, or multimedia component, for
example, you might want to include a full background as part of your movie output. If
you’re creating a titling overlay, you won’t want to render the background in most cases.
Consider these options:
 To include a background image, movie, or animated texture in your final output, leave
the background color opacity at 0 percent and select the Render Background
checkbox.
 If you want an opaque or semitransparent solid color background in your final output,
choose a color and opacity level, and select the Render Background checkbox.
 If you don’t want background elements in your final output, deselect the Render
Background checkbox. This option allows you to do the following:
 Import a background movie or image for placement and timing reference only,
without incorporating it into your titling output.
 Define a Canvas color other than the default checkerboard pattern, according to
your working preferences.
Chapter 3 Adding a Background 45
Page 46

Page 47

4 Working With Tracks
4
To create anything in LiveType, you need to be familiar
with tracks. Every element of a titling composition is part
of a track, and each track can contain one or more lines of
text, an image, a movie, or an animated object or texture.
Tracks are “containers” of content, represented by dark blue lines in the Canvas with
corresponding bars in the Timeline. A track comprises all of the information about its
content:
 Position, shape, and baseline
 Attributes such as color, shadow, font, and spacing
 Effects and timing
This chapter explains how tracks are moved and shaped in the Canvas, and how they
can be manipulated in the Timeline. The next three chapters describe in detail how to
apply text, objects, and effects to tracks to assemble your composition.
Empty track
47
Page 48

Positioning Tracks in the Canvas
When you first open LiveType, the default Canvas contains a single empty track with
two endpoints.
The shape of a track defines the default baseline on which its contents sit. Tracks can
be manipulated at any time, whether or not they contain an element. If you’re creating
a track along which to slide text, or if you want your text to conform to a specific shape,
you might want to shape and position the track before you add text to it.
Endpoint
Active track, extending off the Canvas
White Canvas
background
Tracks
Canvas Zoom pop-up
menu set to 50 percent
Action safe boundary
Title safe boundary
To position a track:
m Drag a track to move it anywhere in the Canvas, or partially off the Canvas.
Tracks can extend beyond the boundaries of the Canvas, allowing elements to slide in
and out of the viewable area.
To create a sloping track or to resize it:
m Drag one of the track’s endpoints.
Note: Hold down the Shift key when you position an item in the Canvas to constrain its
horizontal, diagonal, or vertical position. This applies to tracks, endpoints, objects,
and characters.
48 Chapter 4 Working With Tracks
Page 49

Creating Angles and Curves
Tracks can take any linear path. You can even link the endpoints of a track so that an
element can flow around it in a continuous loop.
To add an angle to a track, you must add a control point to it. A track can have any
number of control points.
To create an angle on a track:
1 Hold down the Control key and click the track anywhere between the endpoints, then
choose Add Control Point from the shortcut menu.
2 Drag the new control point and the endpoints to create the angle you want.
Control points are also necessary for creating curves. If you’re familiar with Bezier
curves, this will be a snap. If not, it may take a bit of experimentation.
Chapter 4 Working With Tracks 49
Page 50

To create a curved track:
1 Follow steps 1–2 above to create an angle on a track.
2 Hold down the Control key and click the control point, then choose Curve In from the
shortcut menu.
3 Drag the Bezier handle to adjust the curve.
A Bezier handle appears
as a small point on
the track near the
control point.
4 Hold down the Control key and click the same control point, then choose Curve Out
from the shortcut menu.
Another Bezier handle appears, and the curve is smooth at the control point.
50 Chapter 4 Working With Tracks
Page 51

Note: You can apply a curve to an endpoint as well, but clicking an endpoint brings up
only the Curve In or Curve Out option—not both—since the track extends in only one
direction away from the endpoint.
Linking Endpoints
The Slide parameter, used in several preset effects, allows text to move along a track. If
the endpoints are linked, the text can move around the track on a continuous path. See
Chapter 7, “Working With Effects and Keyframe Animation,” on page 87 for more about
effects and motion paths.
To create a motion path that is a continuous loop, you need to link the endpoints of a
track. The endpoints do not need to overlap. In fact, they can be positioned at opposite
ends of the Canvas, and still be linked. Linking the endpoints allows text or objects to
loop immediately from the end to the beginning of the track when an effect using the
Slide parameter is applied to them.
To link the endpoints of a track:
m Control-click one of the endpoints of any track, then choose Link Endpoints from the
shortcut menu.
You can unlink endpoints using the same method.
Chapter 4 Working With Tracks 51
Page 52

Adding, Copying, and Deleting Tracks
There are numerous ways to add a track to the Canvas.
To add a new, empty track, do one of the following:
m Choose Track > New Text Track (or press Command-T).
m Choose a font in the Media Browser, then select Apply To New Track.
Sometimes it’s useful to create a duplicate track, with the identical position, shape,
contents, timing, and effects as a track you’ve already built.
To duplicate a track:
1 Select the track you want to duplicate.
2 Choose Track > Duplicate Track (or press Command-D).
The duplicate overlays the original track precisely, so at first, you can only tell that a
duplicate has been made by the addition of a new track in the Timeline. Overlaying
tracks with identical elements but different effects and parameters is a great way to
produce sophisticated title animations. Drag the duplicate off the original to see
both tracks.
To delete a track:
1 Select the track you want to delete.
2 Do one of the following:
 Choose Track > Delete Track.
 Press the Delete key.
You can also copy a track from another project, such as a LiveType template or a
project you’ve created previously, into your current project.
To copy a track from one project to another:
1 Open both the source and destination projects.
A tab for each of the projects appears in the Timeline.
2 In the source project, select the track you want to copy, then choose Edit > Copy.
3 Click the tab of the destination project in the Timeline, then choose Edit > Paste.
52 Chapter 4 Working With Tracks
Page 53

Working With Tracks in the Timeline
As you add tracks to the Canvas, they appear as numbered bars in the Timeline. As you
apply effects to each track, they appear as unnumbered bars below the track.
Track 1
Track 2
Track 1
Track 2
Adjusting the Timing of a Track
When you add a track to the Canvas, by default it begins at the frame indicated by the
playhead. The duration of a track varies, depending on its contents. A track containing
text in a system font or a static image defaults to a duration of two seconds. The
duration of a track containing LiveType media or any imported movie depends on the
length of the movie.
These basic timing parameters are easily changed in the Timeline window by stretching
and moving the track bars. Delay and duration can also be defined in the Timing tab of
the Inspector, as can many other timing parameters.
Chapter 4 Working With Tracks 53
Page 54

To adjust the duration of a track, do one of the following:
m Drag either edge of the track bar to the right or left.
Note: Changing the duration of tracks that contain movies or LiveType media changes
the speed at which the movie plays. If you shorten the duration of a LiveFont track, for
instance, it plays faster.
m Select the track and do one of the following:
 For static content, adjust the Duration parameter in the Timing tab of the Inspector.
 For movies and animated content, adjust the Speed parameter in the Timing tab.
Playhead
Drag a track to adjust
its starting time.
Drag either end of a track to
adjust its duration or speed.
If you like, you can make the track contents appear later than the first frame.
To delay the appearance of a track, do one of the following:
m Click inside the track bar and drag it to the right.
m Select the track and adjust the Delay slider in the Timing tab of the Inspector.
You can also reposition more than one track at the same time, which is a useful way to
maintain the relative position of tracks as you change their delay times. This is known
as a ripple drag.
To move two or more tracks in the Timeline at once:
m Press the Option key, and drag the left-most track (the track with the earliest starting
time) of the group you want to move.
All tracks to the right of the selected track (tracks with later starting times), including
their associated effects, move as a block with the selected track.
54 Chapter 4 Working With Tracks
Page 55

Layers and Track Order
Elements in the Canvas invariably overlap, which is why it’s important to manage track
layers. When you create a new track, it is always the top layer. Any content you add to
that track is in front of all other elements in the Canvas.
Note: In the Timeline, tracks are displayed in front-to-back order, with Track 1 in front.
To change a track’s front-to-back position, do one of the following:
m Click inside the track bar in the Timeline and drag it up or down, to a new position.
m Select the track you want to move, either in the Canvas or in the Timeline, then choose
one of the options from the Layout menu: Bring to Front, Send to Back, Bring Forward
[one layer], and Send Backward.
The tracks renumber to accommodate the new order.
Track 1 (top layer)
Enable/Disable buttons
Disabling Tracks
You can disable tracks, as well as effects applied to tracks, in the Timeline window. This
can be useful in reducing clutter in the Canvas, and it saves preview-rendering time
when you only need to preview one or a few elements. Deactivating elements is also
useful for comparing different design choices.
To disable a track or effect:
m Click the Enable/Disable button immediately to the left of a track or effect in the
Timeline.
While the blue baseline of a disabled track remains in the Canvas, its contents no
longer appear in the Canvas, are not represented in the Inspector’s Live Wireframe
Preview, and do not render when you generate a preview or final movie.
Chapter 4 Working With Tracks 55
Page 56

Grouping Tracks
It is often useful to group two or more tracks together, to maintain their relative
position in the Canvas. Grouped tracks can be moved in the Canvas, but they stay
together as a group. When tracks are stacked on top of each other, grouping is the
only way to move the stack as a unit.
For example, you might want to create a two-layer effect where a word fades out to
nothing, revealing the same word underneath with an animated texture applied to it.
To do this, you have to create a track that precisely overlays the original using the
Duplicate Track command in the Track menu. Now, if you want to reposition the tracks
in the Canvas, you need to group them together.
To group two or more tracks:
1 Make sure you have more than one track in the Canvas.
2 Select a track in the Canvas or Timeline.
This is now the active track, and the grouping button to the far left of the track bar is
dimmed.
3 Click the grouping button of a different track.
The link icon appears, indicating that the track is grouped with the active track (the
track you selected in Step 2).
Grouping button
Active track
4 In the Canvas, move either of the grouped tracks, and notice that they move together.
5 In the Timeline, click the grouping button of a third track.
Now three tracks are grouped together.
To ungroup tracks:
m Select one of the grouped tracks, then click the grouping button of the track you want
to ungroup.
The link icon disappears, and the tracks can now be moved independently.
Note: Grouped tracks maintain their relative position, but their contents can still be
altered and moved. If you drag a grouped track, other tracks belonging to the group
move too. However, if you drag a glyph that resides on one of the grouped tracks, the
glyph moves independently. Its Offset parameter is being changed while the track
itself stays put.
56 Chapter 4 Working With Tracks
Page 57

5 Working With Text
Titles can incorporate all kinds of visual elements, but
their traditional function is to display text. This chapter
describes how to insert and format text, including
manipulating individual characters on the same track.
Adding movement to text—that is, beyond the inherent animation of LiveFonts—is
covered in Chapter 7, “Working With Effects and Keyframe Animation,” on page 87.
Inserting Text
Like any Canvas element, text must reside on a track. There are three approaches to
adding text, in a particular font, to the Canvas:
 Create a track, select a font, and then add text to the track.
 Create a track, add text to it, and then apply a font.
 Choose a font first, click the Apply To New Track button in the Media Browser, and
type in the text.
5
57
Page 58

The steps below describe the first approach.
To add text to the Canvas:
1
Create a new track by choosing Track > New Text Track (or press Command-T).
Note:
A corresponding track in the Timeline appears.
2
Choose a font:
a
Click either the LiveFonts or Fonts tab in the Media Browser.
LiveType comes with a variety of LiveFonts. Click the Category pop-up menu to
access different sets of LiveFonts, including third-party and custom LiveFonts that
you can create.
LiveFonts tab
System Fonts tab
Options for
applying fonts
b
Select a system font or LiveFont.
c
Click the Apply button.
3
Enter text onto the active track by doing one of the following:
Â
Type into one of the text-entry boxes in the Inspector.
Â
Cut and paste text from another application into a text-entry box. (Formatting from
other applications does not carry over into LiveType.)
Note:
If you add text to a track before selecting a font, the new text appears in the
Canvas in the default font, size, color, and spacing.
58 Chapter 5
Working With Text
Page 59

To change the font of an existing text track:
1 Select the text track.
2 Choose a font from the LiveFonts or Fonts tab of the Media Browser.
3 Do one of the following:
 Click the Apply button.
 Double-click the font name.
Note: The Apply option does not cross genres of track content. That is, you cannot
apply a texture or object to a track that already has text on it. Likewise, you cannot
apply a font to a track that contains a texture, object, image, or movie.
Multiple lines of text can exist on a single track. This enables you to create a long text
element governed by one set of parameters. If you’re designing credits, for example,
you can generate the copy in another program, cut and paste it into the text-entry box,
and apply the font and attributes along with a scrolling effect.
LiveFonts vs. System Fonts
The two kinds of fonts available in LiveType are very different. LiveFonts have more
“life” to them, because they are fully designed animations. System fonts, on the other
hand, are more like blank slates you can modify to achieve a wide range of
appearances. Both kinds of fonts can be transformed using all the parameters
described in this chapter, but keep in mind that some parameters will not make
much visual sense when applied to LiveFonts.
Note: The Use LiveFont Defaults button in the Text tab of the Inspector restores the
original attributes of LiveFonts, objects, and textures, including timing, color, and
other characteristics. This can be a valuable way to revert to the original design of
these LiveType elements when you’re experimenting with different formatting
combinations.
LiveFonts and system fonts also have several practical differences in LiveType:
 You can apply two or more system fonts to the same track, while only one LiveFont
can be applied to a track.
 LiveFonts are digital movies, and therefore have timing options you can control
through the Timing tab of the Inspector. See “Adjusting the Timing of LiveFonts” on
page 60.
 System fonts are always vector-based, while LiveFonts can either be raster-based or
vector-based. So it is possible to use LiveFonts at such a large size (in excess of 500
point) that the edges begin to degrade.
 LiveFonts have a much greater impact on previewing and rendering time.
Chapter 5 Working With Text 59
Page 60

A
Á
To apply a second system font to text on a track:
1 Create a text track with one or two words on it, in a system font.
2 Select one or more characters on the track by highlighting them in the text-entry box
or selecting them in the Canvas.
3 In the Fonts tab of the Media Browser, choose a system font different from the one
you’ve already used.
4 Click the Apply button at the bottom of the Fonts tab.
LiveFont Character Set
The LiveFonts included in LiveType consist of 127 characters, which include all standard
English, French, German, and Spanish characters:
a Bb Cc Dd Ee Ff Gg Hh Ii Jj Kk Ll Mm Nn Oo Pp Qq Rr Ss Tt Uu Vv Ww Xx Yy Zz
! # $ % & ( ) , . < > @ + = : ; _ - ? “ ‘/ * 0 1 2 3 4 5 6 7 8 9
á Àà Ââ Ää Çç Èè Éé Êê Ëë Îî Íí Ïï Ññ Ôô Öö Óó ß Üü Úú Ùù Ûû €
To access characters that aren’t represented on your keyboard, use the Keyboard
Viewer feature, which you can select in the Input Menu pane in the International pane
of System Preferences.
Adjusting the Timing of LiveFonts
When you create a system font track, its default duration is always two seconds.
LiveFonts, on the other hand, have various durations, as shown in the middle column in
the LiveFonts tab of the Media Browser.
60 Chapter 5 Working With Text
Page 61
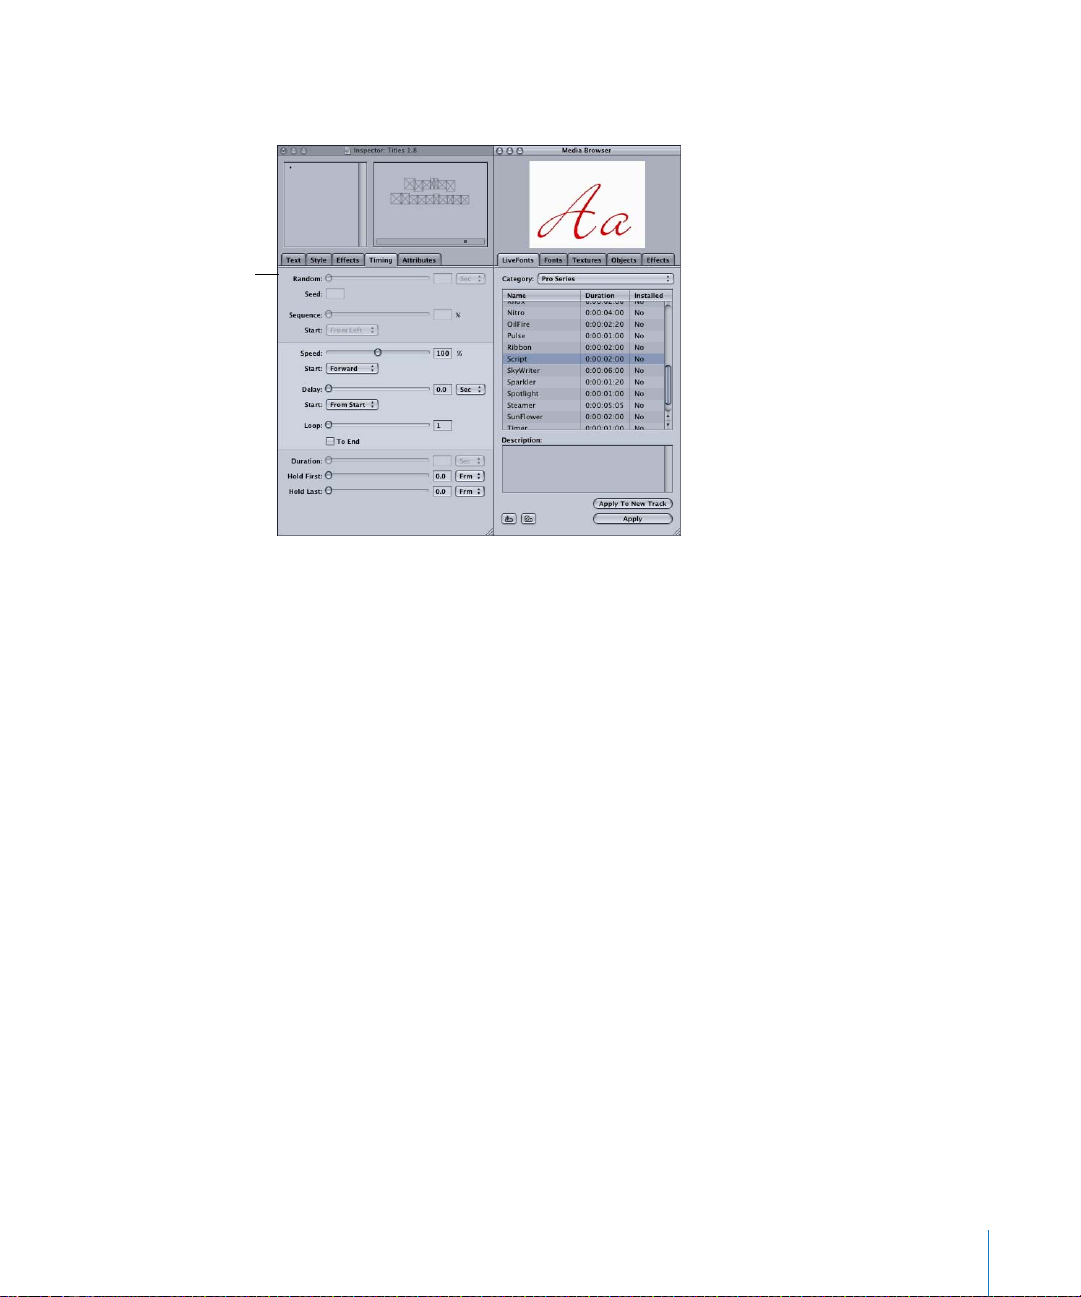
Because they are movies, LiveFonts are subject to several timing parameters, available
in the Timing tab of the Inspector.
Settings in the
Timing tab
Settings for LiveFonts in the Timing Tab
 Random and Sequence: Let you apply the LiveFont movie to each character on the
track in a different order, with a variable delay between each letter.
 Speed: Allows you to play the LiveFont movie more quickly or slowly. Notice that as
you change the speed, the duration of the track in the Timeline increases or
decreases. Likewise, if you change the duration of the track in the Timeline, the speed
parameter changes in the Timing tab.
 Delay: Allows you to set the starting time of the track.
 Loop: Determines how many times the LiveFont movie plays through. The default
setting is 1, meaning that the LiveFont plays one time. A value of 2 means that it
plays through twice. The duration of the track doubles with a Loop value of 2, in
most cases.
Note: Several LiveFonts, including Burn Barrel, Cool, and Gutter, take advantage of
“segmented animation,” which defines beginning, middle, and ending segments of
the movie. When you adjust the Loop parameter for these fonts, only the middle
segment of the animation is looped.
 Duration: Does not apply to LiveFont tracks.
 Hold First and Hold Last: Allow you to have the first frame of the LiveFont appear for a
designated amount of time before the movie begins to play. Likewise, Hold Last
perpetuates the last frame.
Chapter 5 Working With Text 61
Page 62

Formatting Text
After you’ve selected the font, you have countless formatting options, available
through the Inspector, to change the appearance of the text. As you adjust formatting
parameters, the contents of the active track change dynamically in the Canvas, making
it easy to see what you’re doing. These options can apply to the entire track or to one
or more individual characters on a track.
To format any element in the Canvas, you must first select its track.
To select the entire track, do one of the following:
m Click the blue track line in the Canvas.
m Click the corresponding track in the Timeline.
Note: If you click the text itself, a bounding box appears around the character you
clicked, and your modifications affect only that character. See “Modifying Individual
Characters” on page 77.
After you have selected the track you want to format, use the Text, Style, and
Attributes tabs of the Inspector to specify options such as alignment, size, tracking,
leading, and color.
Alignment, Size, Tracking, and Leading
In the Text tab of the Inspector, you can adjust the size, tracking, and leading of a text
track, as well as its horizontal and vertical alignment. Size values are in points, and
tracking and leading values are percentages of the font’s default spacing.
62 Chapter 5 Working With Text
Formatting options in the
Text tab of the Inspector
Page 63

 Alignment: With the alignment options, text can be set to run horizontally as well as
vertically on a track. The Left, Center, and Right Alignment buttons apply to both text
orientations. The position of the track itself is not affected by alignment settings. The
alignment options are also important to position text appropriately when the track is
used with an effect that uses the Slide parameter.
For example, if you want to slide text onto the screen from left to right, create a track
that begins to the left of the Canvas. The text should be left-aligned, so that it starts
from the left end of the track, off the Canvas. Then apply the Slide Right effect from
the Motion Path category.
 Size: Text size is adjusted by dragging the slider, clicking within the slider track, or
entering a value in the box to the right of the slider.
Note: Because LiveFonts are raster images made up of pixels, their edges will start to
degrade at very large sizes, usually 500 point and larger. System fonts are vectorbased, and therefore retain their integrity at any size.
 Tracking: Character spacing is adjusted with the tracking setting. The value for
normal character spacing is 100 percent. A setting of 110 percent adds a modest
amount of space between letters. When tracking is set to 0 percent, all characters
overlay each other.
 Leading: Leading sets the amount of space between the baseline of one line of text
and the next. This setting only applies to tracks with more than one line of text, not
to the spacing between different tracks. The default leading value is 100 percent. At
0 percent, all lines of text on a track overlay each other.
Chapter 5 Working With Text 63
Page 64

Color
Color options are in the Glyph pane of the Inspector’s Attributes tab. The lower portion
of the tab contains the color controls.
Color settings in the Glyph
pane of the Attributes tab
 Color: The Color parameter replaces existing pixels of color in the selected element
with the color indicated in the Color box, while keeping the luminosity values intact.
A setting of 100 percent completely replaces the existing colors, whereas a Color
setting of 20 percent combines some of the new color with the original. Click the
Color box to choose a different color.
Note: Once you have selected a color, close the Colors window. You need to reopen
the Colors window to make any subsequent color choices.
 Hue, Saturation, and Lightness (HSL): These three sliders work together to establish
the color of the selected element. Hue defines the shift in color value, in degrees, on
a 360-degree spectrum. Saturation defines the intensity or vividness of the color, in
percentage points. Lightness defines the intensity along the black and white axis, in
percentage points.
The default color of a system font is black, which renders the Hue, Saturation, and
Lightness sliders ineffective. HSL and Color are useful for adjusting raster-based
elements such as LiveFonts while, as a rule of thumb, system fonts and other vectorbased elements should be colored using the Color feature.
 Alpha pop-up menu: When you have a clip or imported graphic in a LiveType
composition, you can choose a type of alpha channel from this menu. Choose from
Premultiply White, Premultiply Black, or Straight.
64 Chapter 5 Working With Text
Page 65

To change the color of a system font:
1 Select a track that contains a black system font.
2 In the Attributes tab, in the Glyph pane, click inside the Color box and choose a color
from the Colors window (preferably a bright, primary color).
3 Set Color to 100 percent.
The contents of the track change to this color.
LiveFonts are typically built using primary colors, which means that the Hue, Saturation,
and Lightness sliders can be used effectively, in addition to the Color parameter.
Transforming Text
Beyond basic text formatting, LiveType gives you many additional treatments with
which to stretch, blur, fade, reposition, and rotate your text. These features are all in the
Glyph pane of the Attributes tab.
Glyph parameters in the
Attributes tab of the Inspector
 Opacity: Opacity defines how much of the underlying content shows through. An
opacity setting of 0 makes text completely transparent and, in most instances, a
setting of 100 makes it opaque. When the blur attribute is off (set to 0), a 50 percent
opaque character has sharp edges and is somewhat transparent.
Note: LiveType allows opacity values to be higher than 100 percent. This can be
desirable when you’re working with glow parameters (Style tab), or LiveFonts and
elements that are blurred or partially transparent. For example, the Charge LiveFont
still reveals some of the background at 100 percent opacity. At 150 percent (which
you must enter in the opacity field), the font reveals very little background.
Chapter 5 Working With Text 65
Page 66
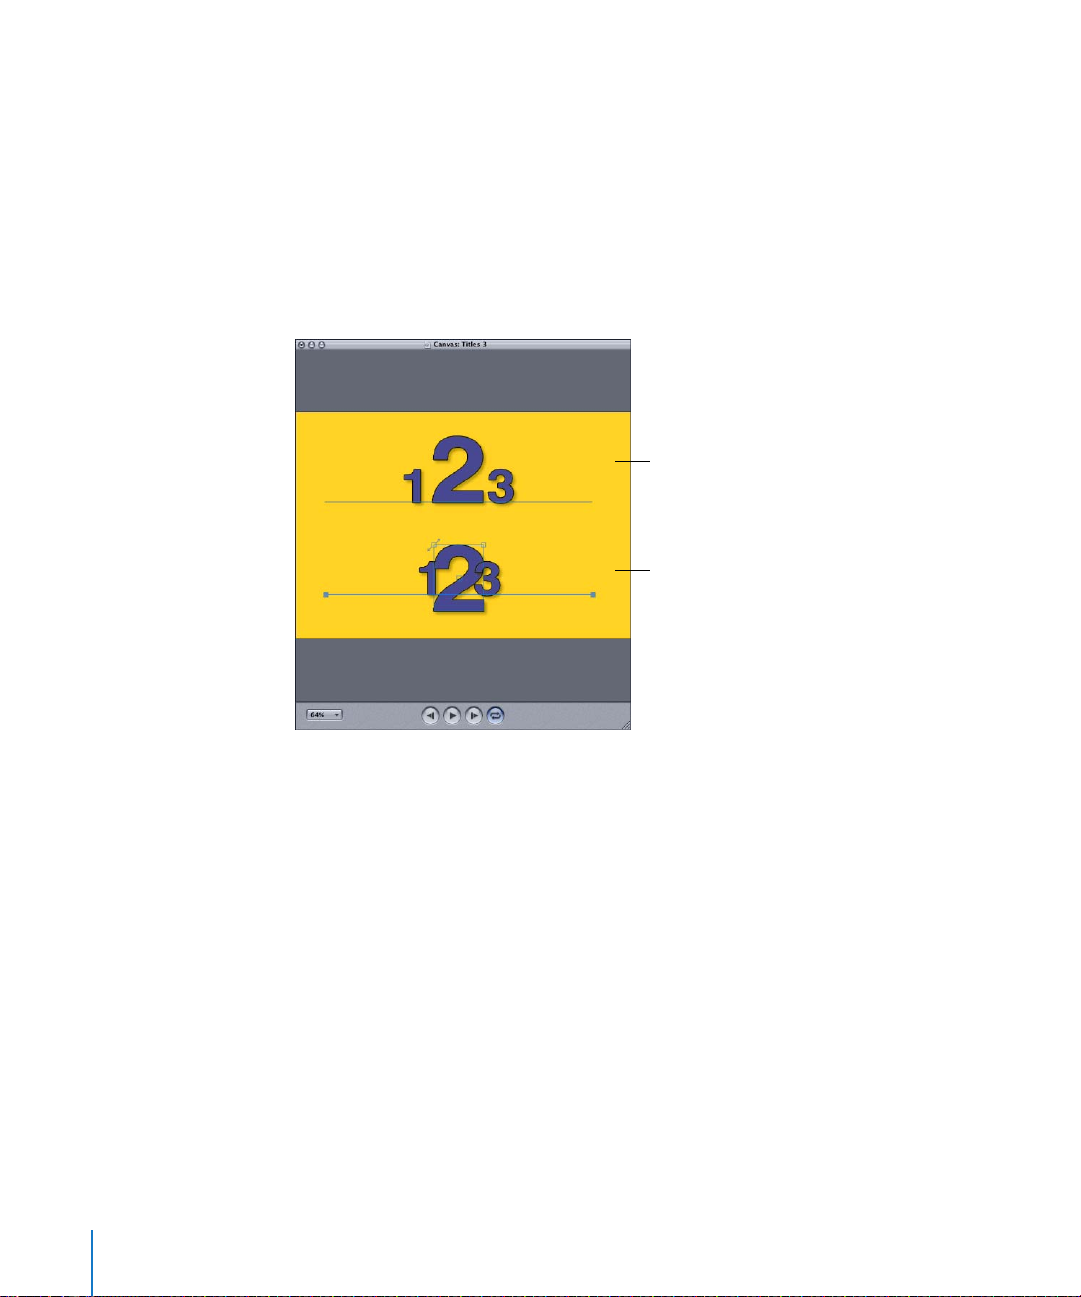
 Blur: The blur attribute is similar to opacity, but it fades and expands the outer edges
as if the text is out of focus. Blur can be applied equally to the X and Y axes or
unequally, for different outcomes. A blur setting of 0 is off, with no blurring effect.
The maximum blur setting is 25.
 Scale: Scale stretches or squeezes text on the X and Y axes, with 100 being the same
size as the original text. Note that scale parameters are applied independently to
each character around its pivot point, not to the entire track as a unit.
Note: Unlike the Scale parameter, the Size parameter in the Text tab scales text from
the baseline, and also takes text tracking into consideration.
A glyph sized using the Size parameter
keeps its original baseline and tracks
with adjacent characters.
A glyph sized using the Scale parameter
expands around its pivot point without
affecting the position of other glyphs
on the track.
 Offset: Offset repositions the text relative to its original position on the track. An
offset of 0 indicates no position shift on that axis.
 Rotate: With the rotation dial, you can position an element not only in the 360
degree range, but configure any number of revolutions in the context of an effect.
66 Chapter 5 Working With Text
Page 67

For example, you can set an early keyframe at 45 degrees and set a later keyframe at
four revolutions plus 180 degrees. When you play the movie, the element spins
clockwise four times plus an additional 135 degrees between those two keyframes.
Positive values reflect clockwise motion, and negative values reflect counterclockwise
motion. Working with keyframes is defined fully in Chapter 7, “Working With Effects
and Keyframe Animation.”
Text example set at 35 percent
opacity in the Attributes tab
Text example using the blur
and scale options in the
Attributes tab
Text example with the
default shadow
Solid background color
Chapter 5 Working With Text 67
Page 68

Enhancing Text With Styles
The Style tab in the Inspector offers four options for enhancing your text. Styles allow
you to add depth and emphasis to text—as well as to objects—mostly by altering the
space around each character.
The Shadow, Glow, Outline, and Extrude buttons in the Style tab each reveal the
settings applicable to that treatment.
Reset all
Shadow parameters in
the Style tab of the
Inspector
Reset Warp parameters
Shadow and Glow
The Shadow and Glow styles are essentially two “flavors” of the same style, using
identical parameters to create quite different looks.
 Character: The character setting allows you to make the original element invisible,
isolating the style treatment in the Canvas. This can be a helpful way to eliminate
clutter as you compose your treatment, or you may choose to leave the original
element invisible in the finished product.
 Enable: The Enable checkbox allows you to turn a style on or off, without affecting
the settings you’ve established. Again, this is a helpful tool for eliminating clutter as
you design, or as you compare different styles and combinations of styles.
 Layer: The Layer pop-up menu allows you to place the shadow or glow treatment in
front of or behind the original element. The In Front Only setting restricts the shadow
or glow effect to the boundaries of the original element, without extending beyond
the edges of the letters or object.
68 Chapter 5 Working With Text
Page 69

 Opacity: Opacity sets the intensity of the shadow or glow. An opacity setting of 0
makes the shadow or glow completely transparent, that is, invisible, and completely
opaque at 100, with no background showing through. If blur is turned off (set to 0), a
50 percent opaque shadow has sharp edges that match the original element, but
whatever lies behind the shadow shows through it.
 Blur: The blur parameter is similar to the opacity setting, but fades and expands the
outer edges as if the glow or shadow is out of focus. A blur setting of 0 is off, with no
blurring effect. The maximum blur setting is 25. Blur can be applied independently to
the x and y axes. A y-direction blur creates the look of an up and down motion, even
in a static image.
 Scale: Scale stretches or squeezes the glow or shadow on the X and Y axes, with 100
being the same size as the original element. Note that scale parameters are applied
independently to each character of text on a track, not to the entire shadow or glow
as a unit.
 Offset: Offset repositions the shadow or glow relative to the original element. An
offset of 0 indicates no position shift on that axis.
 Color: The Color box lets you select the color of the shadow or glow.
 Warp: The warp area allows you to stretch and reshape the shadow or glow by
dragging the four corner points, or inserting x and y coordinates for each corner. A
simple application of the warp feature is to stretch shadows to represent different
lighting situations.
Text example using glow
options in the Style tab
Text example with an
outline and an enlarged, offset shadow
Text example using the
Extrude style
Solid background color
Chapter 5 Working With Text 69
Page 70

Outline
This style adds an outline to the contents of any track. See the preceding section for a
definition of the opacity, blur, color, and warp parameters. Click the Outline button at
the top of the tab to adjust the outline settings.
Outline parameters in the
Style tab of the Inspector
 Weight: The weight value, which defines the thickness of the outline, is set in pixels.
 Show Outline Only: Show Outline Only eliminates the original element, creating an
outline effect that allows the background to show through.
Note: The Show Outline Only setting is used with the character parameter set to
Visible. Otherwise, the outline will be rendered invisible along with the character itself.
70 Chapter 5 Working With Text
Page 71

 Outline Extrusion: When the text has been extruded (see below), selecting this
checkbox extends the outline around the extrusion.
Text example using the Show
Outline Only and Outline Extrusion
options in the Style tab
Text example using X and Y scaling
options in the Attributes tab, with
an outline
Text example using the invisible
character option with the Shadow
and Glow styles in the Style tab
Solid background color
Extrude
Extrude settings consist of direction, length, and color. The direction setting determines
which way to “pull” the extrusion and the length determines how far to pull it.
 Length: The length value is set in pixels.
 Direction: The direction value is set in degrees, from 0 to 360.
 Color: The Color box lets you select the color of the extrusion.
Chapter 5 Working With Text 71
Page 72

Creating a Matte
The matte feature in LiveType allows you to reveal a background element in the area
defined by a foreground element, seemingly cutting a hole through any layers in
between. When you create a matte, every pixel of the foreground element is replaced
by a corresponding pixel in the background element. In other words, a matte acts as a
window into another layer.
In LiveType, you have three options for creating mattes, available in the Matte pane of
the Attributes tab in the Inspector. The first option—Matte to Background—allows you
either to fill the foreground element with a background element, or to create an empty
window, which can remain transparent when you render your titling movie.
To create a matte with two project elements:
1 Create the background element by placing a texture, image, movie, or object as the
bottom layer reflected in the Timeline.
See Chapter 3, “Adding a Background,” on page 41 and Chapter 6, “Working With
Objects, Textures, and Imported Elements,” on page 79 for information about placing
these kinds of elements in the Canvas.
2 Make sure the background is beneath the background bar in the Timeline, and that no
other elements are below the background bar.
Background bar
3 Create a texture or any other element that obscures the background.
4 Create a foreground element, that is, the text or object you want the background to “fill.”
5 With the foreground track selected, click the Matte button in the Attributes tab of
the Inspector.
72 Chapter 5 Working With Text
Background texture
Page 73

6 Choose Background from the “Matte to” pop-up menu.
The background image appears to fill the foreground element.
To create a window into a transparent background:
1 Create a texture or any combination of elements that covers the Canvas.
For information about placing textures and other elements in the Canvas, see
Chapter 3, “Adding a Background,” on page 41 and Chapter 6, “Working With Objects,
Textures, and Imported Elements,” on page 79.
2 Create a foreground element, that is, the text or object that defines the shape of
your window.
3 If any elements are below the background bar in the Timeline, drag the bar below all
elements.
4 With the foreground track selected, click the Attributes tab of the Inspector, then click
the Matte button.
5 Choose Background from the “Matte to” pop-up menu.
Chapter 5 Working With Text 73
Page 74

The transparent Canvas (or background color if defined in the Project Properties dialog)
appears to fill the foreground element.
Transparent
Canvas background
Texture scaled
down on the y axis
Text track matted to the
transparent background
The other two matte options, Matte to Movie or Image and Matte to Texture, differ
because the background doesn’t appear as a discrete project element that’s reflected in
the Timeline. And, there’s no need for a layer that the matte has to “punch through.”
Instead, the track contents are simply filled with the designated image.
These two matte alternatives have scale, speed, and sequencing options in the Matte
pane. Scale adjusts the size of the background image, speed adjusts the speed of the
background movie or texture, and sequencing allows you to offset the timing of the
background for each letter residing on the foreground track.
Note: When you matte a word to a movie or image, LiveType calculates which portion
of the image “underlies” each letter, imitating a true window into a lower layer. When
you reposition the letters on the track, they retain the same image content. This feature
can create an interesting look as you apply movement to the text, particularly when
the matte is with a movie.
74 Chapter 5 Working With Text
Page 75

To fill the track contents with an image or movie:
1 Select a track that contains the text or object you want to fill with an image or movie.
2 Click the Attributes tab of the Inspector.
3 In the Matte pane, choose Movie or Image from the “Matte to” pop-up menu.
4 Locate the file in the Choose Movie or Image dialog, then click Open.
The track contents fill with the background movie or image.
Text track matted
to a movie
Note: If you want to reveal a specific portion of the image or movie within your
foreground element, you may find that this matte option is not appropriate, since you
cannot adjust the relative position of the image and your foreground element. If this is
the case, you must use the Matte to Background option described above, which allows
you to position the two components independently.
Chapter 5 Working With Text 75
Page 76

To fill the track contents with a texture:
1 Select a track that contains the text or object you want to fill with a texture.
2 Choose a texture from the Media Browser, then click the Apply to Matte button.
The default texture fills the contents of the active track.
Note: A variety of mattes is available for use in the Objects tab of the Media Browser
from the Category pop-up menu. The blue areas of a LiveType matte define the area
where the texture will play back. Text or glyphs from the character palette may also be
used as mattes.
Note: Individual characters on the same track can be matted to different textures,
movies, or images. See “Modifying Individual Characters,” next.
You can get a nice effect by combining the matte function with the outline style.
To fill an invisible element’s outline:
1 Create or select a text track.
2 In the Style tab of the Inspector, click the Visible button.
3 In this case, make sure the Enable checkbox is deselected for the Shadow, Glow, and
Extrude styles.
4 Click the Outline button in the Style tab, and select the Enable checkbox.
5 Select the Show Outline Only checkbox, and increase the weight of the outline, so it’s
fairly thick.
6 Choose a texture to fill the outline, then click the Apply to Matte button.
The outline is now filled with the texture.
76 Chapter 5 Working With Text
Page 77

Modifying Individual Characters
You can also assign attributes to individual characters on a track. All of the attributes
discussed in this chapter can apply to only one, or more than one, character on the
same track.
This is a powerful option in LiveType, particularly because it allows you to reposition
individual characters, or glyphs, without breaking their relationship to the track.
For example, with individual character adjustments, you could make one word in a
phrase float above the track, expand and glow, and then return to the track. This would
take only a few moments to animate. Or you could make a series of characters do
similar transformations, one after the other.
Rotation handle
Sizing handle
Glyph bounding box
All of the characters
reside on a single track.
To modify one or more characters on a track, try the following steps:
1 Select or create a track that contains some text.
2 Select one or more letters by doing one of the following:
 Select one of the letters in the Canvas and, to modify more than one character at a
time, hold down the Shift key while selecting additional, contiguous letters. A
bounding box appears around the selected letter(s), with a handle in each of the
upper corners.
 Highlight one or more letters in one of the text-entry areas of the Inspector.
Bounding boxes appear around the selected letters in the Canvas.
 Marquis-select one or more letters in the Canvas by dragging a box with the cursor.
Any letter that touches the marquis area is selected, and reveals its bounding box.
3 Click inside the bounding box and drag the letter anywhere in the Canvas.
4 Drag the upper-left handle to rotate the letter.
Chapter 5 Working With Text 77
Page 78

5 Drag the upper-right handle to change the letter’s size.
Note: You can restore a letter to its original size and placement by choosing
Layout > Reset Position.
6 Change the letter’s attributes in the Attributes tab or the Style tab of the Inspector.
7 Click in the Canvas away from the track.
The bounding box around the character disappears, but the track is still selected.
8 Reposition the track in the Canvas and modify its attributes.
Note: These adjustments affect the entire track, including the letter you’ve just
modified.
Disabling Fonts in Mac OS X
In Mac OS X v10.3, you can use the Font Book application to disable fonts. However,
LiveType requires that certain fonts—Geneva and Helvetica—are always available, so
these two fonts should not be disabled. If you disable these fonts, you may experience
unpredictable behavior in LiveType.
78 Chapter 5 Working With Text
Page 79

6 Working With Objects, Textures,
and Imported Elements
6
Titling compositions often center around words, but all
kinds of additional elements are used to frame, enhance,
and accompany them.
For the purpose of this manual, these elements fall into three categories:
 Objects included with LiveType
 Textures included with LiveType
 Static images and movies originating from other sources
All of these elements are modified and moved around in the Canvas in the same way.
They do not rest on a linear track, as text does, unless you add multiple, identical
objects to a track (see “Creating Strings or Stacks of Elements” on page 84). Instead,
when selected, they display a bounding box, like a single character selected on a text
track. At the upper-right and upper-left corners of the bounding box are scale and
rotation handles.
79
Page 80

Working With LiveType Objects
Objects in LiveType are graphical elements with an alpha channel, designed to frame or
emphasize text. Most of them are animated and, much like LiveFonts, can be sized,
rotated, colored, and stretched. You can add a shadow, glow, or an extrusion. And you
can apply effects to them.
Objects placed in the Canvas are represented as tracks in the Timeline, like any other
titling element.
To add a LiveType object to the Canvas:
1 Click the Objects tab in the Media Browser.
LiveType objects available
in the Media Browser
2 Browse the categories of objects displayed in the Category pop-up menu, and select an
object in the Name column of the Objects tab.
3 Click the Apply To New Track button.
The object appears in the Canvas, and a corresponding track appears in the Timeline.
80 Chapter 6 Working With Objects, Textures, and Imported Elements
Page 81

Working With LiveType Textures
Textures in LiveType are colorful animated patterns that can be used as full-screen or
partial backgrounds, or as animated fills when used with the matte function, described
in Chapter 5, “Working With Text,” on page 57. Textures are versatile, and can be
transformed in the same ways an object is transformed, particularly if the texture is
reduced in size to take up only a portion of the Canvas.
To add a texture to the Canvas:
1 Click the Textures tab in the Media Browser.
Textures available in the Media Browser
2 Browse the categories of textures displayed in the Category pop-up menu, and select a
texture in the Name column of the Textures tab.
3 Click the Apply To New Track button at the bottom of the Textures tab.
The texture fills the Canvas, and a track appears in the Timeline, just above the
background bar.
Chapter 6 Working With Objects, Textures, and Imported Elements 81
Page 82

Importing Graphics, Images, and Movies
Graphical elements in a wide range of formats can be incorporated into a LiveType
project. Scanned images, photos, and illustrations, as well as movies and animations,
can be used as part of your titling composition. And, like objects and textures, they can
be modified and placed in numerous ways.
LiveType can import elements in a variety of formats.
LiveType import formats
AVI JPEG PICT QuickTime movie
BMP MPEG-2 and MPEG-4 PLS SGI
DV Photoshop PNG Targa
GIF PICS QuickTime image file TIFF
To import a graphic, image, or movie:
1 Choose File > Place.
2 Locate the file, then click Open.
The element appears in the Canvas, and a corresponding track appears in the Timeline.
LiveType texture, scaled
and rotated
Imported movie, scaled
and rotated
82 Chapter 6 Working With Objects, Textures, and Imported Elements
Page 83

Transforming Objects, Textures, and Imported Elements
Imported elements can be positioned, changed, and animated as easily as text. A
photo can be made to bounce around the Canvas, fade in and out, grow and shrink, or
take on a purple hue, for example.
Sizing and Positioning Objects, Textures, and Imported Elements
When you first place a movie or texture in the Canvas, its position is locked by default.
These types of elements are frequently used as full-screen background elements that
don’t need to be sized or moved. However, you can unlock them easily.
To unlock the position of a texture or imported movie:
1 Select the track you want to unlock. (Sometimes this is easiest to do in the Timeline.)
2 Choose Layout > Lock Position.
The checkmark next to Lock Position disappears, and the bounding box handles on the
element are now active.
When you select a non-text element in the Canvas, a bounding box appears around it,
the same as an individual character on a text track. If you select a full-screen element,
it’s easier to see the bounding box if you zoom out in the Canvas.
To resize, rotate, and reposition a non-text element in the Canvas:
m Drag the bounding box and its upper-left and upper-right handles.
Non-text elements can also be transformed with any of the attributes available to text
characters: shadow, color, blur, and so on.
Chapter 6 Working With Objects, Textures, and Imported Elements 83
Page 84

Creating Strings or Stacks of Elements
In a way, LiveType looks at textures, objects, and imported elements as special kinds of
glyphs, or text characters. More to the point, individual elements are treated like fonts
whose character set consists of only one glyph.
This allows you to do an unusual thing in LiveType: You can create strings, or multiple
copies, of these elements on what, for all intents and purposes, amounts to a text track.
Anything you can do with one letter of a text font, you can do with objects, textures,
and imported elements.
Note: Objects cannot, however, be formatted as multiple lines on one track.
One imported graphic
duplicated on one track
To create a string of elements on one track:
1 Add an object, texture, or imported element to the Canvas.
2 Make the object a reasonably small size to duplicate in the Canvas:
a Click the Attributes tab of the Inspector, then click the Glyph button.
b Make sure the lock icon next to the Scale sliders is closed, or locked, for proportional
scaling. If it appears to be unlocked, click the icon to lock it.
c Adjust the Scale sliders, or enter a value in one of the Scale fields.
3 Click inside the text-entry box in the upper-left corner of the Inspector. Note that a
single bullet is in the window, representing the object as a single glyph.
84 Chapter 6 Working With Objects, Textures, and Imported Elements
Page 85

4 With the blinking cursor in the text-entry box, press the Space bar or type any key.
A second bullet appears in the text-entry box, and now two identical objects are on a
linear track in the Canvas. Add as many objects as you like.
5 Adjust the tracking and alignment in the Text tab of the Inspector, and any other
attributes that you might apply to a string of letters, including formatting individual
elements on the track separately.
Changing Attributes and Styles
Just as non-text elements can be treated as glyphs, they can take on all of the same
styles and attributes available to text. Chapter 5, “Working With Text,” on page 57
describes all the transformations available in the Inspector.
You might want to try the following for a digital image or movie:
 Reduce the size of the image, position it in the Canvas, and rotate it 20 degrees,
using the Scale, Offset, and Rotate controls in the Glyph pane of the Attributes tab in
the Inspector.
 Add a shadow, outline, or extrusion to the image, using Style functions.
 Shift the color of the image using the Color controls in the Glyph pane of the
Attributes tab in the Inspector.
 Apply a preset effect to the image, or animate it yourself by building your own effect.
Chapter 7, “Working With Effects and Keyframe Animation,” on page 87 explains how
to do this.
Other imported elements—logos, line art, or simple graphical elements—are even
more versatile. They might lend themselves to a matte treatment, glow or blur, or an
outline with the original element rendered invisible. There’s no end to the possibilities.
Replacing Media in a Track
You can easily replace any movie or image in a track on the Timeline at any time.
To replace any movie or image with new content:
1 Control-click the chosen track, then choose > Reconnect Media from the shortcut
menu.
2 Navigate to the new file in the Open dialog, then click Open.
The existing media is replaced with a new movie or image.
Chapter 6 Working With Objects, Textures, and Imported Elements 85
Page 86

Page 87

7 Working With Effects
and Keyframe Animation
7
Effects are what make your Canvas elements move
and transform. They are “packages” of animation,
encapsulating the parameters that govern motion
and timing, as well as an element’s attributes in any
given frame.
The key ideas about effects are as follows:
 All motion and transformations built into your titling movie are controlled by effects,
whether you create your own or take advantage of the preconfigured effects in
LiveType.
 Effects are applied to tracks. They appear in the Timeline as bars underneath the
track they’re applied to.
 More than one effect can be applied to the same track, even at the same time.
 You can change an effect once it is applied to a track, and you can save the modified
effect so it’s available to use on other tracks and in other projects.
 When a track and an effect have conflicting parameters, the effect parameter
overrides the track parameter. For example, if an effect specifically turns the Glow
style off, the track’s glow settings are irrelevant.
 When a track and an effect have complementary parameters, the two values are
combined. For example, if a track has an opacity of 50 percent, applying an effect
with 50 percent opacity will result in an opacity of 25 percent in the Canvas, or half of
the track’s 50 percent opacity.
 You can edit or build an effect outside of the LiveType interface. Instructions for
writing EffectScript code are in Appendix B, “Creating and Editing EffectScripts,” on
page 135.
 Effects can be applied to individual characters on a track and managed from the
Effects tab in the Inspector.
87
Page 88

Preset Effects
Following is a table listing all of the 41 available preset effects found in LiveType. These
effects are located in the Effects tab of the Media Browser.
LiveType effects
Caricature
 Baffle
 Bounce Track
 Bounce
 Bouncy
 Elastica
 Quick Twist
Fades
 Cluster
 Foreground
 Pile Up
Fantasy
 Chatter Out
 Dispersion
 Expand
 Ideas
 Invent
 Send Off
 Z Space
Glows
 Blue Light
 Combustible
 Exhale
 Follower
 Impression
 Light Beam In
 Light Beam Out
 Morph
 Peace
 Rising Sun
 Slider
 Spectral
 Zapper
Grunge
 Text Static
Mechanical
 Assembly
 Buzz Saw
 TV Off
Motion Path
 Departing
 Escape
 Parting
 Random Drop
 Slide Hang
 Vent
Shadows
 Pit Stop
Zooms
 Viewpoint
Applying Preset Effects
The preset effects in LiveType add personality to your titles and can be used to set the
tone of your composition. Browse through the available effects in the Media Browser to
get a sense of what they can do.
To apply a preset effect to a track:
1 Create a track that contains text or any other kind of element. Make sure it is the
active track.
2 Click the Effects tab in the Media Browser.
The Category pop-up menu reveals the categories of installed effects, corresponding
to the subfolders on your computer located at
/Library/Application Support/LiveType/Effects.
88 Chapter 7 Working With Effects and Keyframe Animation
Page 89

3 Choose an effect in the Name column of the Effects tab.
The Browser preview depicts how the effect works, the Duration column shows the
default effect length, and the Description field contains notes about how best to apply
the effect.
The Effects tab
of the Media Browser
4 Do one of the following:
 Select the effect name and click Apply.
 Double-click the effect.
 Drag the effect into the Effects tab of the Inspector.
When you apply an effect, a bar appears under the active track in the Timeline, labeled
with the effect name.
If the effect includes motion, you immediately see the movement reflected in the Live
Wireframe Preview in the Inspector.
Depending on the position of the playhead in the Timeline, the Canvas itself may or
may not change noticeably. Move the playhead to see how the track elements change
at different points in time, or click the Play button in the Canvas to view a RAM render.
The effect also appears in the Effects tab of the Inspector. The Effects tab shows a list of
the effects that have been applied to a track. The stack order does not affect the
sequence, or timing, of any effect.
To disable an effect:
m Click the Enable/Disable button in the Timeline next to the effect.
Chapter 7 Working With Effects and Keyframe Animation 89
Page 90

To disable an effect for one or more glyphs on a track:
1 Select the track.
2 Select the character(s) that you don’t want the effect to apply to, either by highlighting
them in the text-entry box or selecting them in the Canvas.
Because you cannot select noncontiguous characters at the same time, you may have
to do these steps more than once.
3 In the Effects tab of the Inspector, deselect the checkbox next to the effect you want to
turn off for the selected characters.
Adjusting the Timing of an Effect
All of the timing parameters applicable to tracks that contain LiveType media elements
also apply to effects.
Canvas elements reflect the
current frame, as determined
by the playhead position.
Playhead
The Effects tab of the
Inspector shows the effects
applied to the active track.
Preset effects are applied
from the Effects tab of
the Media Browser.
TrackEffects
Just as you can drag a track in the Timeline to adjust its starting point and duration,
you can do the same with an effect. Settings in the Timing tab of the Inspector
determine how an effect is applied to each letter on a track, how fast it runs, and how
many times the effect repeats.
The Timing tab includes an array of options that allow you to orchestrate the
movement of your Canvas elements. Timing tab settings apply to the effect that is
selected in the Timeline.
90 Chapter 7 Working With Effects and Keyframe Animation
Page 91

To adjust an effect’s timing parameters:
1 In the Timeline, select an effect that has been applied to a track.
2 Click the Timing tab in the Inspector.
The current timing parameters for the selected effect are reflected.
The Timing tab
of the Inspector
The Timing tab contains the following timing options:
 Random: A randomized effect treats each character on a track separately, as opposed
to applying the effect parameters to the entire track at once. With this setting, the
effect transforms each character in a random order, separated by the designated
number of frames or seconds. The Seed field allows you to select alternative random
orders, up to 255, if the order doesn’t look quite right.
 Sequence: A sequenced effect starts by transforming one character, then moves to
the next adjacent character, and so on. A sequence value of 0 indicates that the
effect plays simultaneously for all characters. With a value of 25, the effect begins to
transform the first character, then when the effect is 25 percent into the
transformation, it begins to transform the next character, and so on. The Start pop-up
menu below the Sequence slider defines the direction from which the sequence
begins.
 Speed: You can change the speed of an effect, as a percentage of its default speed.
Increasing an effect’s speed decreases its duration. The Start pop-up menu below the
Speed slider allows you to run the effect in reverse.
 Delay: The delay setting sets the start or end time of the effect in relation to the
beginning or endpoint of the track. Using this setting is an alternative to positioning
an effect directly in the Timeline.
Chapter 7 Working With Effects and Keyframe Animation 91
Page 92

 Loop: The loop setting determines how many times the effect will repeat. A loop
value of two doubles the duration of the effect. The To End checkbox makes the
effect loop continuously for the duration of the track.
 Duration: This setting governs the duration of a track containing system font text or
any other static element. The duration of effects, as well as tracks containing dynamic
elements such as a movie clip or LiveFont, is adjusted with the Speed slider.
 Hold First: With this option, the parameters for the first frame of an effect are
maintained for the designated period of time before the effect kicks in. For example,
if you want a track to fade in after two seconds, you can choose Hold First for two
seconds, during which time the track is invisible (or 0 percent opaque), before the
Fade In effect begins.
 Hold Last: This works the same way as Hold First, but at the end of the effect, to
extend the final-frame parameters of the effect for a designated amount of time.
To adjust the timing of an effect in the Timeline, do one of the following:
 Drag in the middle of the effect bar (but not on a keyframe) to position the effect
without changing its speed. This affects the effect’s Delay value, as seen in the Timing
tab of the Inspector.
Note: You can position an effect so that it extends beyond the boundaries of the
track, in which case the extraneous effect parameters aren’t used.
 Drag either edge of the effect to adjust its speed. An effect that is shorter in duration
runs through its motions more quickly.
Resizing from the left edge of an effect whose Delay Start value is set “From Start”
changes the effect’s speed and delay. The same is true when resizing the right edge
of a “From End” effect.
Repositioning Groups of Effects Within a Track to Adjust Timing
If you have multiple effects in a single track, you can move them in unison to adjust
their timing.
To reposition groups of effects within a track:
m In a track with multiple effects, hold down the Option key as you drag any single effect.
The effects move up and down the Timeline in unison. All effects in the track maintain
their relative positions but occur at an earlier or later point in time.
92 Chapter 7 Working With Effects and Keyframe Animation
Page 93

Changing the Order of Effects
In a track with more than one effect, you can change the order (precedence) of an
effect by dragging it vertically. If the effect has timing information, its position in the
new track may be adjusted.
To change the order an effect:
m Drag the effect up or down within the track.
The order of the effects has now been changed.
Duplicating Effects and Tracks
You can easily duplicate effects and tracks, including duplicating an effect from one
track to another.
To duplicate an effect or track:
In the Timeline, Option-drag an effect or track to the new location or track. Holding
down the Option key while dragging an effect makes a copy of the effect in a new
effects track.
Modifying a Preset Effect
In addition to adjusting the timing parameters of an effect, you can change what the
effect actually does; that is, how it transforms the track it’s applied to.
Altering an effect used in your project does not alter the original preset effect. Once
you have applied the effect, you are free to adjust it, and the changes you make are
saved as part of your project.
Chapter 7 Working With Effects and Keyframe Animation 93
Page 94

Keyframes and Sequencing Markers
Computer animation is based on the concept of keyframes. Animators define a
graphical element’s parameters—position, color, size, shape, and so on—at periodic
intervals, and the software interpolates the parameters for each frame in between.
Keyframes are represented in the Timeline as diamond-shaped markers in effects. When
you select a keyframe, the playhead moves to that frame, and the Canvas reveals the
state of the project elements at that point in time.
Sequencing marker
Keyframe
To view the parameters defined by a keyframe:
1 Select the keyframe in the Timeline.
2 Click the Effects tab in the Inspector.
The parameters defined by that keyframe appear in the Active Parameters window.
The Clockwise effect, for example, only has one active parameter for its keyframes.
Regardless of the track attributes or other effects that may affect the track, the
Clockwise effect is concerned only with making the letters on the track spin. The
sequence timing parameter for the effect applies the rotation to each character on the
track one after the other, from left to right.
Sequencing markers, vertical lines in the light purple area of an effect bar, show when
each glyph starts to be acted on by the effect. The number of sequencing markers,
including the first frame of the effect and the beginning keyframe of the effect
(depicted by half diamonds), always equals the number of glyphs on the track.
Note: Not all effects are sequenced or randomized; therefore, not all effects have
sequencing markers.
94 Chapter 7 Working With Effects and Keyframe Animation
Page 95

Adjusting Keyframe Parameters
To change what an effect does, you have to alter its keyframes. While you can change
an effect’s parameters through the Effects tab by entering numeric values, it is usually
easier to make changes in a more visual way, using the full LiveType interface.
To adjust a keyframe by changing parameters in the Inspector:
1 Select a keyframe in the Timeline.
The playhead moves over the keyframe and the Canvas reflects the appearance of the
composition at that frame.
Note: If you change an effect parameter when the playhead is not over a keyframe, a
new keyframe is added at the current playhead position.
2 Adjust the attributes of the track.
The LED indicators in the Inspector indicate which attributes can be changed in the
context of an effect—they are all in the Text, Style, and Attributes tabs of the Inspector.
LED indicators appear
when an effect is
selected.
3 Click the Play button in the Canvas to see the results of your modification.
Chapter 7 Working With Effects and Keyframe Animation 95
Page 96

To adjust a keyframe by changing parameters in the Canvas:
1 Select a keyframe in the Timeline.
2 Click a letter or the object to reveal its bounding box.
3 Manipulate the selected glyph to change its position, rotation, or scale.
When you drag the glyph, the entire word moves with it, and a motion path with small
incremental dots appears. Each dot on the motion path represents the pivot point of
the selected letter at every frame of the movie. Notice that if you select a different
letter, a slightly different motion path appears, representing the center position of that
letter for each frame.
4 Click the Play button in the Canvas to see the results of your modification.
LED Indicators in the Inspector
When you select an effect or keyframe, the Text, Style, and Attributes tabs in the
Inspector reveal small round lights, or LEDs, to the left of all attributes that can be
modified in an effect. The LEDs serve three purposes:
 They indicate which parameters in the tab are active in the selected effect, allowing
you to see the pertinent values at a glance.
 They allow you to activate a new parameter for an effect.
 They let you apply an attribute evenly across all keyframes in the effect. This is a very
useful feature, as it lets you make global changes to an effect without having to
select and modify each keyframe.
To apply an attribute evenly across all keyframes in an effect:
1 Select the effect.
2 Change an attribute in the Text, Style, or Attributes tab.
3 Hold down the Option key and click the LED indicator next to the attribute you
just changed.
96 Chapter 7 Working With Effects and Keyframe Animation
Page 97

Active Parameters
The Active Parameters area of the Effects tab of the Inspector is a valuable resource for
identifying which parameters are active in an effect, and what their values are at any
point in time, as defined by the playhead position.
Active parameters are displayed with the values associated with the current frame.
Parameter variables are further described in Appendix B, “Creating and Editing
EffectScripts,” on page 135.
To change a parameter value in the Effects tab:
1 Select a keyframe.
2 Double-click a parameter in the Active Parameters stack.
3 Enter a value in the parameter dialog, then click OK.
Note: If you change a parameter when the playhead is not at a keyframe, a keyframe is
added to the effect at the playhead position.
The Parameter pop-up menu lists all of the keyframe parameters.
To add a new parameter to the Active Parameters stack of an effect:
1 Select the effect.
2 Do one of the following:
 Click the LED next to the parameter in the Text, Style, or Attributes tab of the
Inspector. The selected LED illuminates.
 In the Effects tab of the Inspector, make a selection from the Parameter pop-up
menu and click the + button. The parameter appears in the Active Parameters stack.
 Change the parameter for one keyframe in the Text, Style, or Attributes tab of
the Inspector.
 Add Offset, Rotation, or Scale to the stack by modifying a glyph of the active track
using the bounding box handles or dragging the glyph to a new position.
Chapter 7 Working With Effects and Keyframe Animation 97
Page 98

Example: Modifying an Effect
The following example shows how easy it is to change an effect and create a
dramatically different look. In this case, you want to add motion to the Fade In effect.
1 Set up a new project as follows:
a Choose File > New.
b Type “Adventure” into one of the text-entry boxes in the Inspector to add the word to
the track.
c Apply any system font to the track, for simplicity.
For this example, start
with a simple text track
in a system font.
d Set the Render Selection Out Point by positioning the playhead at one second, then
pressing the O key.
2 Apply the Fade In effect to the track, which is in the Fades category in the Effects tab of
the Media Browser. Notice the following changes:
 The effect is immediately represented in the Live Wireframe Preview of the Inspector.
 If your playhead is on the first frame, the text disappeared in the Canvas when you
applied the effect. That’s because the Fade In effect begins with an opacity of 0.
3 If your playhead is not at the first frame, move it there.
98 Chapter 7 Working With Effects and Keyframe Animation
Page 99

4
In the text-entry box of the Inspector, highlight the “A” of Adventure.
Even though the text is invisible in the Canvas, a bounding box appears, allowing you
to adjust the glyph. Notice also that the first keyframe of the effect is now at the first
frame, with the sequencing markers behind, representing the other letters in the word.
Make sure the
playhead is on
the first frame.
Position the Render Selection
Out Point at one second.
Resize, rotate,
and reposition the
bounding box of
the “A” glyph.
Duration of the
Fade In effect on
the “A” glyph
5
Modify the glyph in the Canvas as follows, and watch the results in the Live Wireframe
Sequencing markers representing the
end of the effect for each remaining
letter in the word.
Preview as you go:
a
Drag the sizing handle in the upper-right corner of the bounding box to make the
glyph quite large, about one-third of the width of the Canvas.
b
Using the rotation handle in the upper-left corner of the bounding box, tilt the glyph
about 45 degrees counterclockwise.
c
Drag the glyph so its pivot point is in the lower-left corner of the Canvas, allowing
part of the glyph to extend off the Canvas.
Chapter 7
Working With Effects and Keyframe Animation
99
Page 100

The stack (in the Effects tab of the Inspector) has been changed automatically. The
Scale, Rotate, and Offset parameters now apply to this effect, in addition to the original
Opacity parameter.
6 Click the Play button in the Canvas or press the Space bar to play a RAM preview.
Moving, Deleting, Adding, and Copying Keyframes
The more you experiment with effects, the more you’ll want to create and change
them to suit your own tastes. For example, you can change the placement of keyframes
in an effect to make it play out differently. Or you can add or delete a keyframe entirely.
To move the position of a keyframe in the Timeline:
m Drag the keyframe marker left or right within the effect bar.
To delete a keyframe:
1 Select the keyframe you want to remove.
2 Choose Track > Delete Keyframe.
Note: If you select a keyframe and press the Delete key, the entire effect is deleted.
100 Chapter 7 Working With Effects and Keyframe Animation
 Loading...