

Page 1

iPod touch
User Guide
Page 2

Contents
5 Chapter 1: Getting Started
5 What You Need
5 Registering iPod touch
6 Syncing with iTunes
10 Mail, Contacts, and Calendar Accounts
12 Installing Conguration Proles
13 Disconnecting iPod touch from Your Computer
14 Chapter 2: Basics
14 iPod touch at a Glance
16 Home Screen
18 Buttons
20 Touchscreen
22 Onscreen Keyboard
26 Connecting to the Internet
27 Battery
28 Cleaning iPod touch
29 Restarting and Resetting iPod touch
2
30 Chapter 3: Music and Video
30 Getting Music, Video, and More
32 Music and Other Audio
37 Videos
40 Setting a Sleep Timer
40 Changing the Browse Buttons
41 Chapter 4: iTunes and App Store
41 iTunes Wi-Fi Music Store
46 App Store
52 Syncing Purchased Content
52 Verifying Purchases
52 Updating Your Account
Page 3

54 Chapter 5: Safari
54 Viewing Webpages
57 Searching the Web
57 Bookmarks
58 Web Clips
59 Chapter 6: Mail
59 Setting Up Email Accounts
59 Sending Email
60 Checking and Reading Email
63 Organizing Email
65 Chapter 7: More Applications
65 Maps
71 YouTube
73 Photos
77 Calendar
81 Contacts
82 Stocks
83 Weather
84 Notes
85 Calculator
87 Clock
89 Nike + iPod
90 Chapter 8: Settings
90 Wi-Fi
91 VPN
91 Fetch New Data
92 Brightness
92 General
97 Music
98 Video
98 Photos
99 Mail, Contacts, Calendars
101 Safari
103 Nike + iPod
104 Appendix A: Troubleshooting
104 General
105 iTunes and Syncing
107 Sound, Music, and Video
108 iTunes Stores
Contents 3
Page 4

108 Safari, Mail, and Contacts
109 Backing Up iPod touch
111 Updating and Restoring iPod touch Software
111 iPod touch Accessibility Features
113 Appendix B : Other Resources
113 Safety, Software, and Service Information
11 4 iPod touch-Optimized User Guide
11 4 Disposal and Recycling Information
11 6 Index
4 Contents
Page 5

Getting Started
1
·
WARNING: To avoid injury, read all operating instructions in this guide
and safety information in the Important Product Information Guide at
www.apple.com/support/manuals/ipodtouch before using iPod touch.
What You Need
To use iPod touch, you need:
A Mac or a PC with a USB 2.0 port and one of the following operating systems: Â
Mac OS X version 10.4.10 or later Â
Windows XP Home or Professional with Service Pack 2 or later Â
Windows Vista Home Premium, Business, Enterprise, or Ultimate edition Â
Display resolution on your computer set to 1024 x 768 or higher Â
iTunes 8.0.2 or later, available at  www.itunes.com/download
An iTunes Store account (for purchases from the iTunes Wi-Fi Music Store or App Â
Store)
An Internet connection for your computer (broadband recommended) Â
Registering iPod touch
Before you can use any of the iPod touch features, you must use iTunes to set up
iPod touch. You can also register iPod touch and create an iTunes Store account
(available in most countries) if you don’t already have one.
Register iPod touch:
1 Download and install the latest version of iTunes from www.itunes.com/download.
5
Page 6

2 Connect iPod touch to a USB 2.0 port on your Mac or PC using the cable that came
with iPod touch.
3 Follow the onscreen instructions in iTunes to register iPod touch and sync iPod touch
with your contacts, calendars, and bookmarks on your computer.
Syncing with iTunes
With iPod touch, it’s easy to have instant access to your music, video, downloaded
applications, and other iTunes library content. iTunes can sync all this information to
iPod touch, and your contacts, calendars, and your browser bookmarks as well.
Setting Up Syncing
You can set iTunes to sync any or all of the following:
Music and audiobooks Â
Movies Â
TV Shows Â
Podcasts Â
Photos Â
Contacts—names, phone numbers, addresses, email addresses, and more Â
Calendars—appointments and events Â
Email account settings Â
Webpage bookmarks Â
Applications purchased or downloaded from the iTunes Store Â
You can adjust sync settings whenever iPod touch is connected to your computer.
6 Chapter 1 Getting Started
Page 7

Music, audiobooks, podcasts, video content, and purchased applications are synced
from your iTunes library. If you don’t already have content in iTunes, the iTunes Store
(available in some countries) makes it easy to purchase or subscribe to content and
download it to iTunes. You can also add music to your iTunes library from your CDs. To
learn about iTunes and the iTunes Store, open iTunes and choose Help > iTunes Help.
Contacts, calendars, and webpage bookmarks are synced with applications on your
computer, as described in the following section. Contacts and calendars are synced
both ways between your computer and iPod touch. New entries or changes you make
on iPod touch are synced to your computer, and vice versa. Webpage bookmarks are
also synced both ways. Photos can be synced from an application or from a folder.
Email account settings are only synced from your computer’s email application to
iPod touch. This allows you to customize your email accounts on iPod touch without
aecting email account settings on your computer.
Note: You can also set up email accounts directly on iPod touch. See “Mail, Contacts,
and Calendar Accounts” on page 10.
Purchases made on iPod touch from the iTunes Wi-Fi Music Store or the App Store
are synced back to your iTunes library. You can also purchase or download music
and applications directly from the iTunes Store on your computer, then sync them to
iPod touch.
If you like, you can set iPod touch to sync with only a portion of what’s on your
computer. For example, you might want to sync only certain music playlists, or only
unwatched video podcasts.
Important: You can connect and sync with only one iPod touch at a time. Disconnect
one before connecting another. You should be logged in to your own computer user
account before connecting iPod touch. On a PC, if you sync more than one iPod touch
or iPod to the same computer user account, you must use the same sync settings for
each.
Set up iTunes syncing:
1 Connect iPod touch to your computer, and open iTunes (if it doesn’t open
automatically).
2 In iTunes, select iPod touch in the sidebar.
3 Congure the sync settings in each of the settings panes.
See the following section for descriptions of the panes.
Note: If you set up iPod touch to sync contacts, calendars, or bookmarks with
MobileMe or Microsoft Exchange, syncing for those items is turned o in iTunes. See
“Setting Up Accounts” on page 10 .
Chapter 1 Getting Started 7
Page 8
4 Click Apply in the lower-right corner of the screen.
By default, “Open iTunes when this iPod is connected” is selected.
iPod touch Settings Panes in iTunes
The following sections provide an overview of each of the iPod touch settings panes.
For more information, open iTunes and choose Help > iTunes Help.
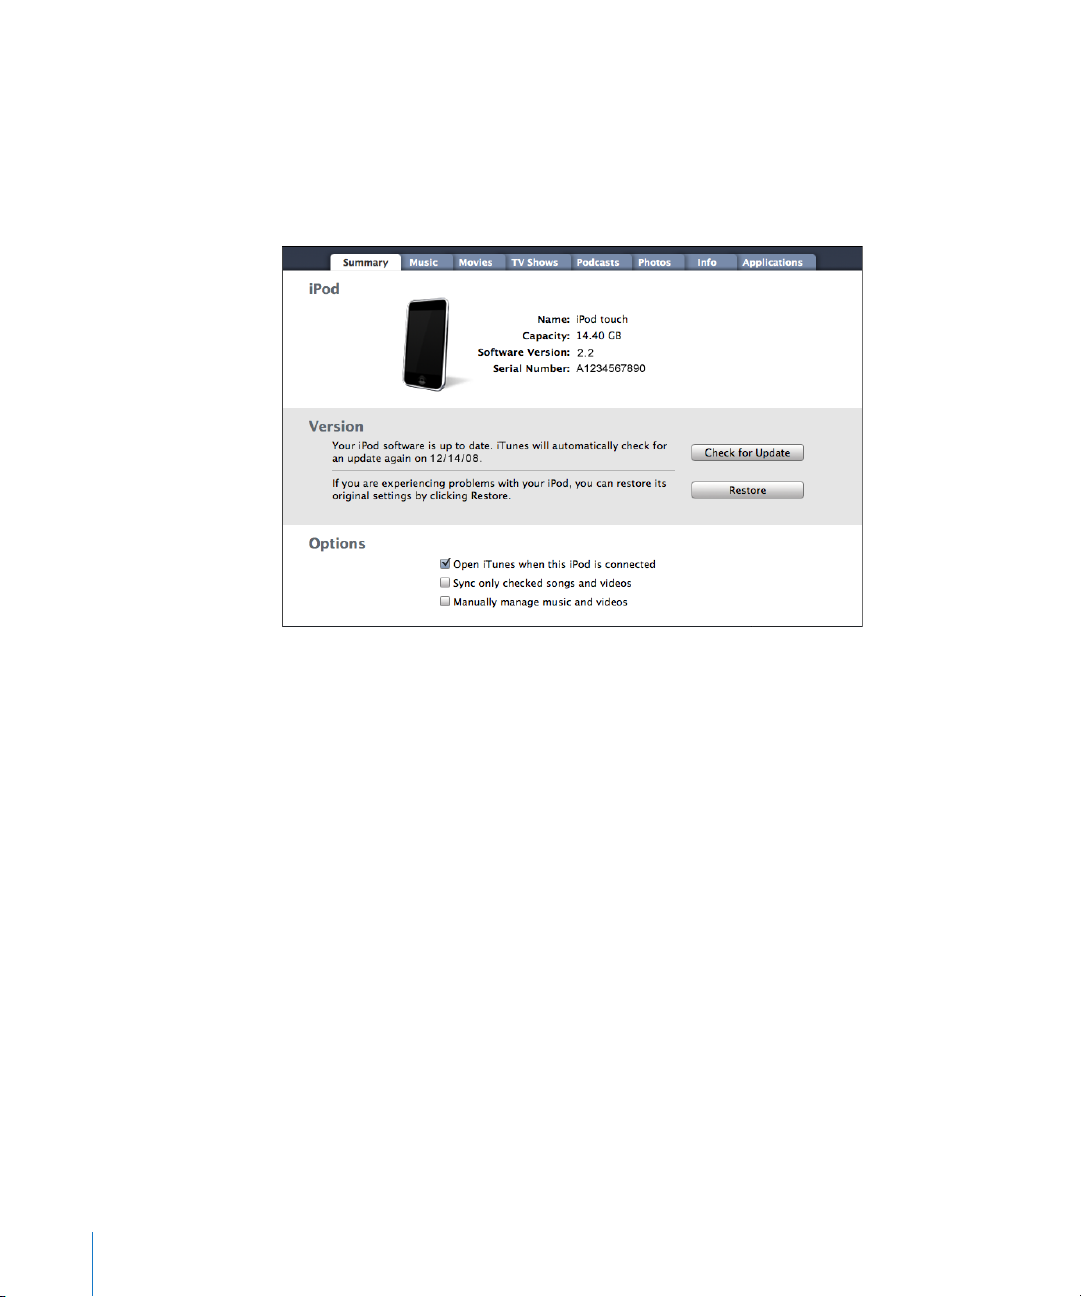
Summary Pane
Select “Open iTunes when this iPod is connected” to have iTunes open and sync
iPod touch automatically whenever you connect it to your computer. Deselect
this option if you want to sync only by clicking the Sync button in iTunes. For
more information about preventing automatic syncing, see “Preventing Automatic
Syncing” on page 10 .
Select “Sync only checked songs and videos” if you want to sync only items that are
individually checked in your iTunes library.
Select “Manually manage music and videos” to turn o automatic syncing in the Music
and Video settings panes. See “Manually Managing Content” on page 31.
Music, Movies, TV Shows, and Podcasts Panes
Use these panes to specify the media you want to sync. You can sync all music, movies,
TV shows, and podcasts, or select the playlists and items you want on iPod touch.
If you want to watch rented movies on iPod touch, transfer them to iPod touch using
the Movies pane in iTunes.
8 Chapter 1 Getting Started
Page 9

If there’s not enough room on iPod touch for all the media you’ve specied, iTunes
asks if you want to create a special playlist. iTunes creates the playlist for you, and sets
it to sync with iPod touch.
Photos Pane
You can sync photos with iPhoto 4.0.3 or later, or Aperture on a Mac; or with Adobe
Photoshop Album 2.0 or later, or Adobe Photoshop Elements 3.0 or later on a PC. You
can also sync photos in any folder on your computer that contains images.
Info Pane
The Info pane lets you congure the sync settings for your contacts, calendars, email
accounts, and web browser.
Contacts Â
You can sync contacts with applications such as Mac OS X Address Book, Microsoft
Entourage, Yahoo! Address Book, and Google Address Book on a Mac, or with Yahoo!
Address Book, Google Address Book, Windows Address Book (Outlook Express),
Vista Contacts, or Microsoft Outlook 2003 or 2007 on a PC. (On a Mac, you can sync
contacts with multiple applications. On a PC, you can sync contacts with only one
application at a time.)
If you sync with Yahoo! Address Book, you only need to click Congure to enter your
new login information when you change your Yahoo! ID or password after you’ve
set up syncing.
Calendars Â
You can sync calendars from applications such as iCal and Microsoft Entourage on
a Mac, or from Microsoft Outlook 2003 or 2007 on a PC. (On a Mac, you can sync
calendars with multiple applications. On a PC, you can sync calendars with only one
application at a time.)
Mail Accounts Â
You can sync email account settings from Mail on a Mac, and from Microsoft
Outlook 2003 or 2007 or Outlook Express on a PC. Account settings are only
transferred from your computer to iPod touch. Changes you make to an email
account on iPod touch don’t aect the account on your computer.
Note: The password for your Yahoo! email account isn’t saved on your computer,
so it can’t be synced and must be entered on iPod touch. In Settings, choose “Mail,
Contacts, Calendars,” tap your Yahoo! account, and enter the password.
Web Browser Â
You can sync bookmarks from Safari on a Mac, or from Safari or Microsoft Internet
Explorer on a PC.
Advanced Â
These options let you replace the information on iPod touch with the information
on your computer during the next sync.
Chapter 1 Getting Started 9
Page 10

Applications Pane
Use the Applications pane to specify which App Store applications you want installed
on iPod touch. Any applications downloaded directly to iPod touch are automatically
backed up to your iTunes library when you sync. If you manually delete an application
on iPod touch, you can reinstall it from this pane as long as it was previously synced.
Preventing Automatic Syncing
You may want to prevent iPod touch from syncing automatically when you connect
iPod touch to a computer other than the one you usually sync with.
Turn o automatic syncing for iPod touch: Connect iPod touch to your computer. In
iTunes, select iPod touch in the sidebar, then click the Summary tab. Deselect “Open
iTunes when this iPod is connected.” You can always sync by clicking the Sync button.
Prevent automatic syncing for all iPhones and iPods: In iTunes choose iTunes >
Preferences (on a Mac) or Edit > Preferences (on a PC), click Devices, and select “Disable
automatic syncing for all iPhones and iPods.”
If this checkbox is selected, iPod touch won’t sync automatically, even if “Open iTunes
when this iPod is connected” is selected in the Summary pane.
Prevent automatic syncing one time, without changing settings: Open iTunes. Then,
as you connect iPod touch to your computer, press and hold Command-Option (on a
Mac) or Shift-Control (on a PC) until you see iPod touch appear in the sidebar.
Sync manually: In iTunes, select iPod touch in the sidebar, then click Sync in the lowerright corner of the window. Or, if you’ve changed any sync settings, click Apply.
Mail, Contacts, and Calendar Accounts
iPod touch works with MobileMe, Microsoft Exchange, and many of the most popular
email systems.
Setting Up Accounts
MobileMe and Microsoft Exchange provide not only email, but contact and calendar
information that can be synced to iPod touch automatically, over the air. MobileMe
can also sync your bookmarks on iPod touch with Safari on a Mac, or with Safari or
Microsoft Internet Explorer on a PC. You set up MobileMe, Exchange, and other email
accounts directly on iPod touch.
iPod touch uses the Exchange ActiveSync protocol to sync email, calendars, and
contacts with the following versions of Microsoft Exchange:
Exchange Server 2003 Service Pack 2 Â
Exchange Server 2007 Service Pack 1 Â
For many of the popular email accounts, iPod touch automatically enters most of the
settings for you.
10 Chapter 1 Getting Started
Page 11

If you don’t have already have an email account, you can get a free account online at
www.yahoo.com, www.google.com, or www.aol.com. You can also try MobileMe, free
for 60 days. Go to www.me.com.
Add an account on iPod touch:
1 From iPod touch’s Home screen, tap Settings.
2 Tap “Mail, Contacts, Calendars,” then tap Add Account.
3 Tap an account type:
Microsoft Exchange Â
MobileMe Â
Google email Â
Yahoo! Mail Â
AOL Â
Other Â
4 Enter your account information and tap Save.
Your service provider or system administrator can provide the account settings you
need.
Exchange accounts: Enter your complete email address, domain (optional), user name,
password, and a description. The description can be whatever you like.
iPod touch supports Microsoft’s Autodiscovery service, which uses your user name
and password to determine the address of the Exchange server. If the server’s address
can’t be determined, you’re asked to enter it. (Enter the complete address in the Server
eld.) Once you connect to the Exchange server, you may be prompted to change your
passcode to match the policies set on the server.
5 If you’re setting up an Exchange or MobileMe account, tap the items you want to
sync—mail, contacts, calendars, and bookmarks (MobileMe only). For Exchange
accounts, you can also set how many days of email you want to sync to iPod touch.
Then tap Save.
Important: If you sync contacts or calendars using your Exchange or MobileMe
account, syncing for contacts or calendars in iTunes is turned o. Any contact or
calendar information on iPod touch is replaced by the contacts and calendars from
your Exchange or MobileMe account.
Chapter 1 Getting Started 11
Page 12

Push Accounts
MobileMe, Microsoft Exchange, and Yahoo! Mail are known as “push” accounts. When
new information is available, such as the arrival of an email message, the information
is automatically delivered (pushed) to iPod touch. (In contrast, “fetch” services require
your email software to periodically check with your service provider to see if new
messages have arrived, and then request them to be delivered.) MobileMe and
Exchange also use push to sync your contacts, calendars, and bookmarks (MobileMe
only) if you have those items selected in the account settings.
Synced information is transferred automatically over your wireless connection; you
don’t need to connect iPod touch to your computer to sync. iPod touch can receive
pushed data over a Wi-Fi connection only when iPod touch is awake (the screen is on,
or iPod touch is connected to your computer or a power adapter).
Installing Conguration Proles
If you’re in an enterprise environment, you may be able to set up accounts and
other items on iPod touch by installing a conguration prole. Conguration proles
provide a way for system administrators to quickly set up your iPod touch to work
with the information systems at your company, school, or organization. For example, a
conguration prole might set up your iPod touch to access the Microsoft Exchange
servers at work, enabling iPod touch to access your Exchange email, calendars, and
contacts.
Conguration proles can congure multiple settings on iPod touch all at once. For
example, a conguration prole can set up your Microsoft Exchange account, VPN
account, and certicates for secure access to your company’s network and information.
A conguration prole may turn on the Passcode Lock, requiring you to create and
enter a passcode for using iPod touch.
Your system administrator may distribute conguration proles by email or by putting
them on a secure webpage.
Install a conguration prole:
1 Using iPod touch, open the email message or download the conguration prole from
the website provided by your system administrator.
2 When the conguration prole opens, tap Install.
3 Enter passwords and other information as requested.
Important: You may be asked to verify that the conguration prole is trusted. If in
doubt, consult your system administrator before installing a conguration prole.
12 Chapter 1 Getting Started
Page 13

Settings provided by a conguration prole cannot be altered. If you want to change
these settings, you must rst remove the conguration prole or install an updated
conguration prole.
Remove a prole: In Settings, choose General > Prole, then select the conguration
prole and tap Remove.
Removing a conguration prole deletes the settings and all other information
installed by the conguration prole from iPod touch.
Disconnecting iPod touch from Your Computer
Unless iPod touch is syncing with your computer, you can disconnect it from your
computer at any time.
When iPod touch is syncing with your computer, iPod touch shows “Sync in progress.”
If you disconnect iPod touch before it nishes syncing, some data may not get
transferred. When iPod touch nishes syncing, iTunes shows “iPod touch sync is
complete.”
Cancel a sync: Drag the slider on iPod touch.
Chapter 1 Getting Started 13
Page 14
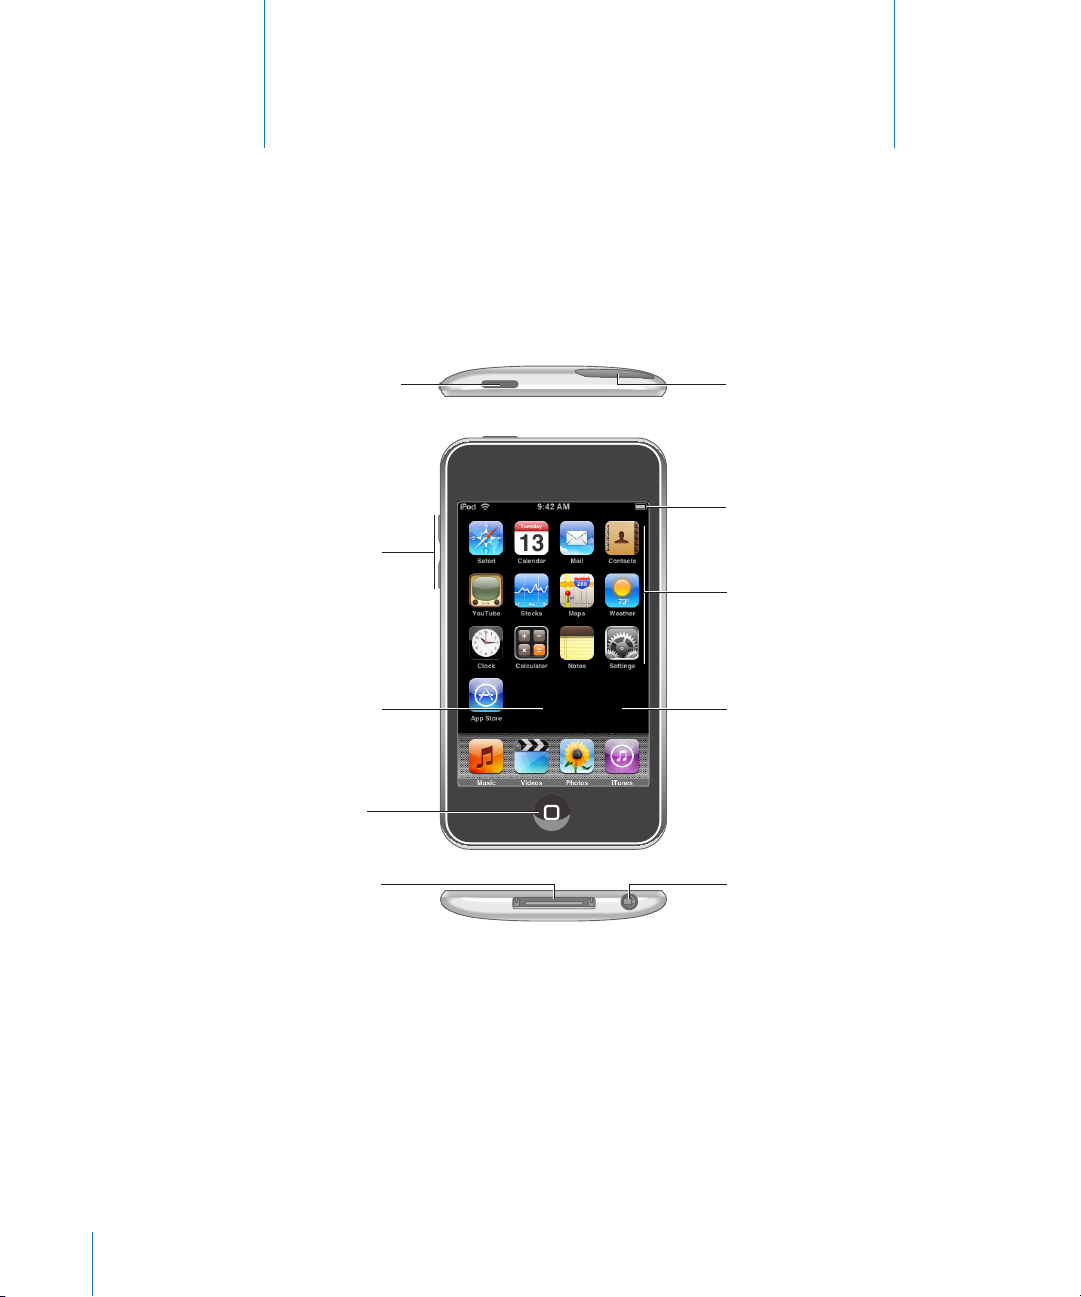
Sleep/Wake button
Volume buttons
Headphones
port
Dock connector
Wi-Fi antenna
Home button
Internal speaker
Touchscreen
Application
icons
Status bar
Basics
iPod touch at a Glance
2
14
Page 15

iPod touch Included Accessories
Dock Connector to USB Cable
Stereo headphones
Polishing cloth
iPod
Item What you can do with it
Stereo headphones Listen to music, audiobooks, podcasts, and videos.
Dock Connector to USB Cable Use the cable to connect iPod touch to your
computer to sync and charge, or to the power
adapter to charge. The cable can be used with
the optional dock or plugged directly into
iPod touch.
Polishing cloth Wipe the iPod touch screen.
Status Icons
The icons in the status bar at the top of the screen give information about iPod touch:
Status icon What it means
Wi-Fi Shows that iPod touch is connected to the
Internet over a Wi-Fi network. The more
bars, the stronger the connection. See
page 26.
Network activity Indicates network activity. Some third
party applications may also use this icon
to indicate an active process.
VPN Shows that you are connected to a
network using VPN. See “Network” on
page 93.
Lock Shows that iPod touch is locked. See
page 18 .
Play Shows that a song, audiobook, or podcast
is playing. See page 32.
Alarm Shows that an alarm is set. See page 88.
Chapter 2 Basics 15
Battery Shows battery level or charging status. See
page 27.
Page 16
Home Screen
Press the Home button at any time to go to the Home screen, which contains your
iPod touch applications. Tap any application icon to get started.
iPod touch Applications
The following applications are included with iPod touch:
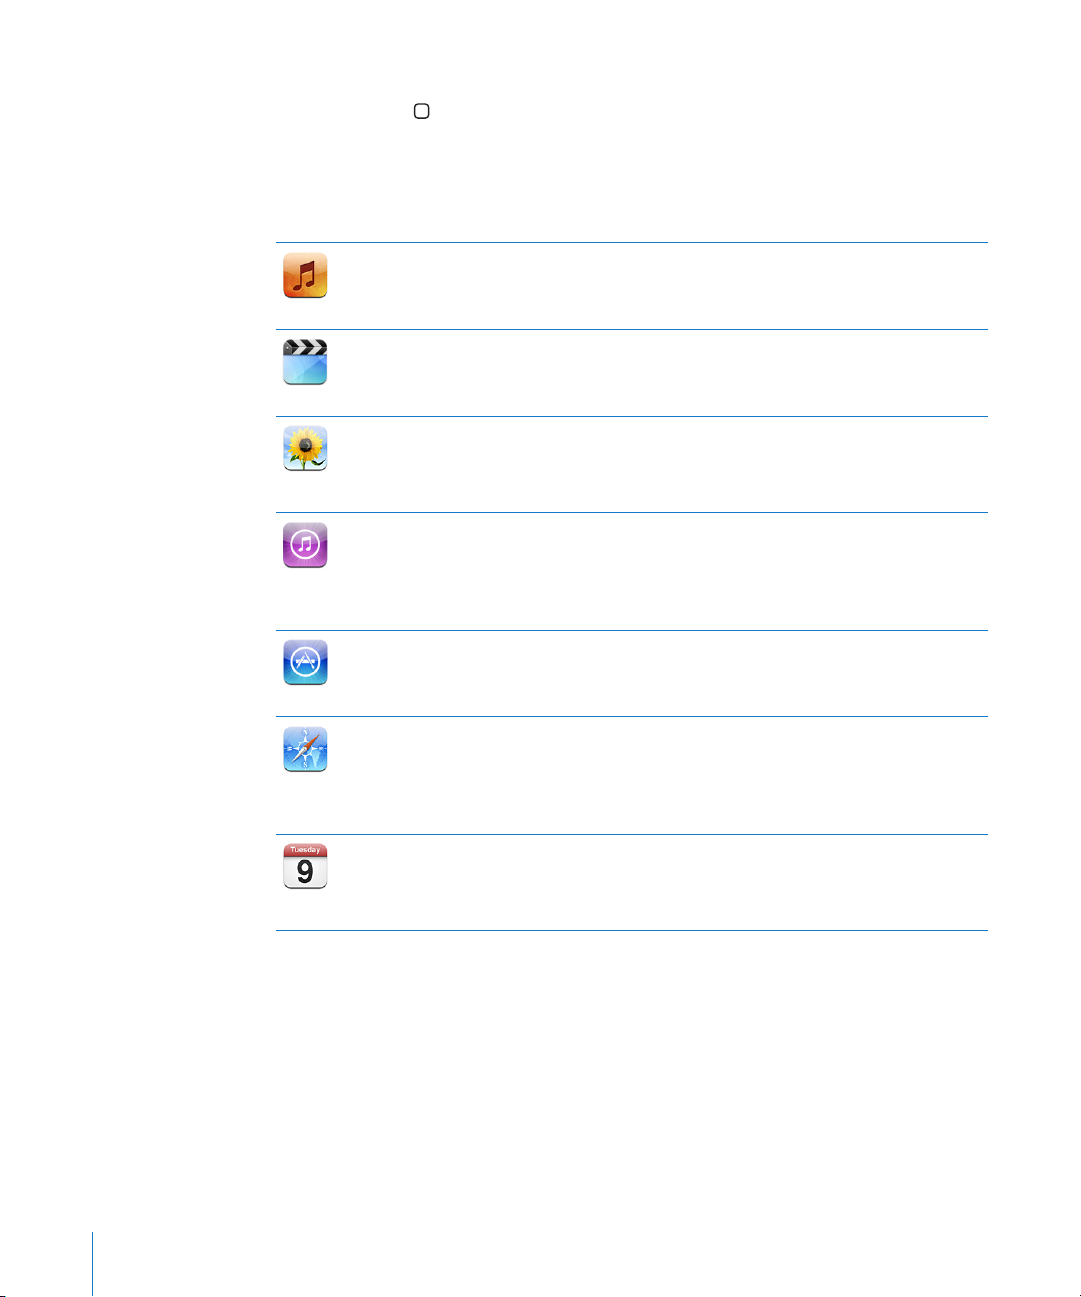
Listen to your songs, audiobooks, and podcasts. Create on-the-go playlists or use the
Genius feature to automatically create a playlist with songs from your library that go
Music
Videos
Photos
iTunes
App Store
Safari
Calendar
great together.
Watch purchased or rented movies, music videos, video podcasts, and TV shows on
the go. Or connect iPod touch to your TV to watch on a larger screen (TV connection
requires cable available for purchase separately).
View photos and images transferred from your computer or saved on iPod touch. View
them in portrait or landscape mode. Zoom in on any photo for a closer look. Watch a
slideshow. Email photos, add them to a MobileMe gallery, assign them to contacts, and
use them as wallpaper.
Search the iTunes Wi-Fi Music Store music catalog, or browse, preview, and purchase
new releases, top-ten songs and albums, and more. Stream and download podcasts.
In select Starbucks locations, nd out what song is playing in the café, then buy
it instantly. Browse, preview, and purchase other songs from featured Starbucks
Collections.
Search the App Store for iPod touch applications you can purchase or download
using your Wi-Fi connection. Read or write your own reviews for your favorite apps.
Download and install the applications on your Home screen.
Browse websites over Wi-Fi. Rotate iPod touch sideways for widescreen viewing.
Double-tap to zoom in or out—Safari automatically ts the webpage column to the
iPod touch screen for easy reading. Sync bookmarks with Safari or Microsoft Internet
Explorer on your computer. Add Safari web clips to the Home screen for fast access to
favorite websites. Save images from websites to your Photo Library.
View your MobileMe, iCal, Microsoft Entourage, Microsoft Outlook, or Microsoft
Exchange calendars. Enter events on iPod touch and they get synced back to the
calendar on your computer. Set alerts to remind you of events, appointments, and
deadlines.
16 Chapter 2 Basics
Page 17
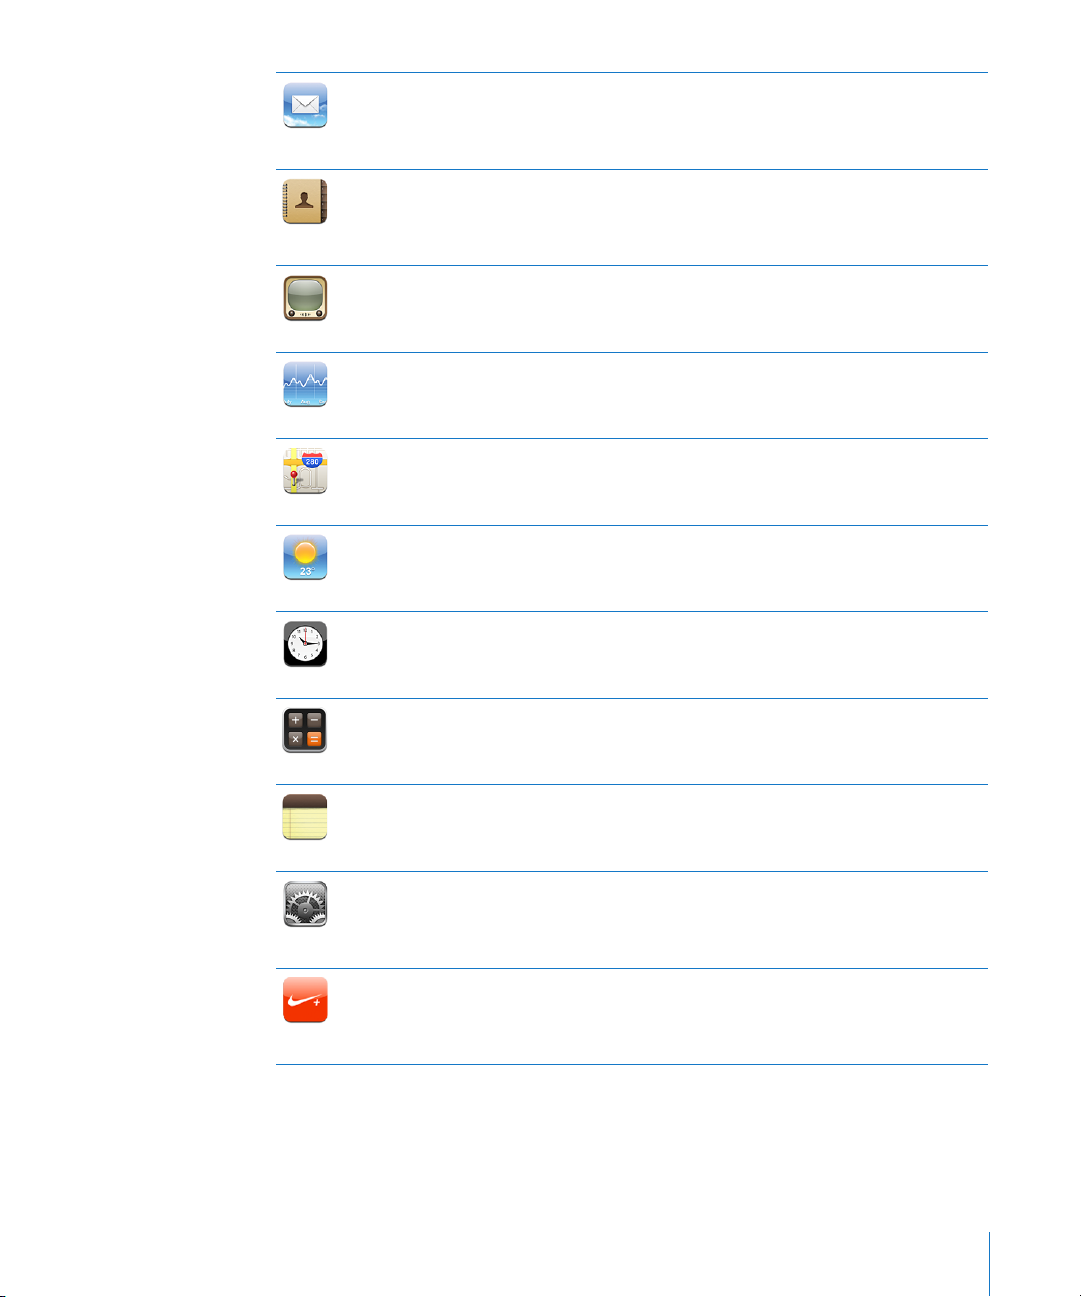
Mail
Contacts
YouTube
Stocks
Maps
Weather
Clock
Calculator
iPod touch works with MobileMe, Microsoft Exchange, and many of the most popular
email systems—including Yahoo! Mail, Google email, and AOL—as well as most
industry-standard POP3 and IMAP email systems. View PDFs and other attachments
within Mail. Save attached photos and graphics to your Photo Library.
Get contact information synced from MobileMe, Mac OS X Address Book, Yahoo!
Address Book, Google Address Book, Windows Address Book (Outlook Express),
Microsoft Outlook, or Microsoft Exchange. Search, add, change, or delete contacts,
which get synced back to your computer.
Play videos from YouTube’s online collection. Search for any video, or browse featured,
most viewed, most recently updated, and top-rated videos.
Watch your favorite stocks, updated automatically from the Internet.
See a street map, satellite view, or hybrid view of locations around the world. Zoom in
for a closer look. Find your current approximate location. Get detailed driving directions
and see current highway trac conditions. Find businesses in the area.
Get current weather conditions and a six-day forecast. Add your favorite cities for a
quick weather report anytime.
View the time in cities around the world—create clocks for your favorites. Set one or
more alarms. Use the stopwatch, or set a countdown timer.
Add, subtract, multiply, and divide. Rotate iPod touch sideways to use expanded
scientic functions.
Jot notes on the go—reminders, grocery lists, brilliant ideas. Send them in email.
Notes
Adjust all iPod touch settings in one convenient place. Set your own volume limit for
listening comfort. Set your wallpaper, screen brightness, and settings for network, mail,
Settings
Nike + iPod
web, music, video, photos, and more. Set auto-lock and a passcode for security. Restrict
access to explicit iTunes content and certain applications. Reset iPod touch.
When activated in Settings, Nike + iPod turns your iPod touch into a workout
companion. Track your pace, time, and distance from one workout to the next and
choose a song to power through your routine. (Requires select Nike shoes and Nike +
iPod Sensor, sold separately. Not available on rst generation iPod touch.)
Note: Application functionality may vary depending on the country or region where
you purchase and use iPod touch.
Chapter 2 Basics 17
Page 18

Customizing the Home Screen
You can customize the layout of icons on the Home screen—including the Dock
icons along the bottom of the screen. If you want, arrange them over multiple Home
screens.
Rearrange icons:
1 Touch and hold any Home screen icon until the icons begin to wiggle.
2 Arrange the icons by dragging them.
3 Press the Home button to save your arrangement.
You can also add links to your favorite webpages on the Home screen. See “Web
Clips” on page 58.
Create additional Home screens: While arranging icons, drag an icon to the right
edge of the screen until a new screen appears. You can ick to return to the original
screen and drag more icons to the new screen.
You can create up to nine screens. The number of dots above the Dock shows the
number of screens you have, and indicates which screen you are viewing.
Switch to another Home screen: Flick left or right, or tap to the left or right of the row
of dots.
Go to the rst Home screen: Press the Home button.
Reset your Home screen to the default layout: Choose Settings > General > Reset
and tap Reset Home Screen Layout.
Buttons
A few simple buttons make it easy to turn iPod touch on and o, and adjust the
volume.
18 Chapter 2 Basics
Page 19
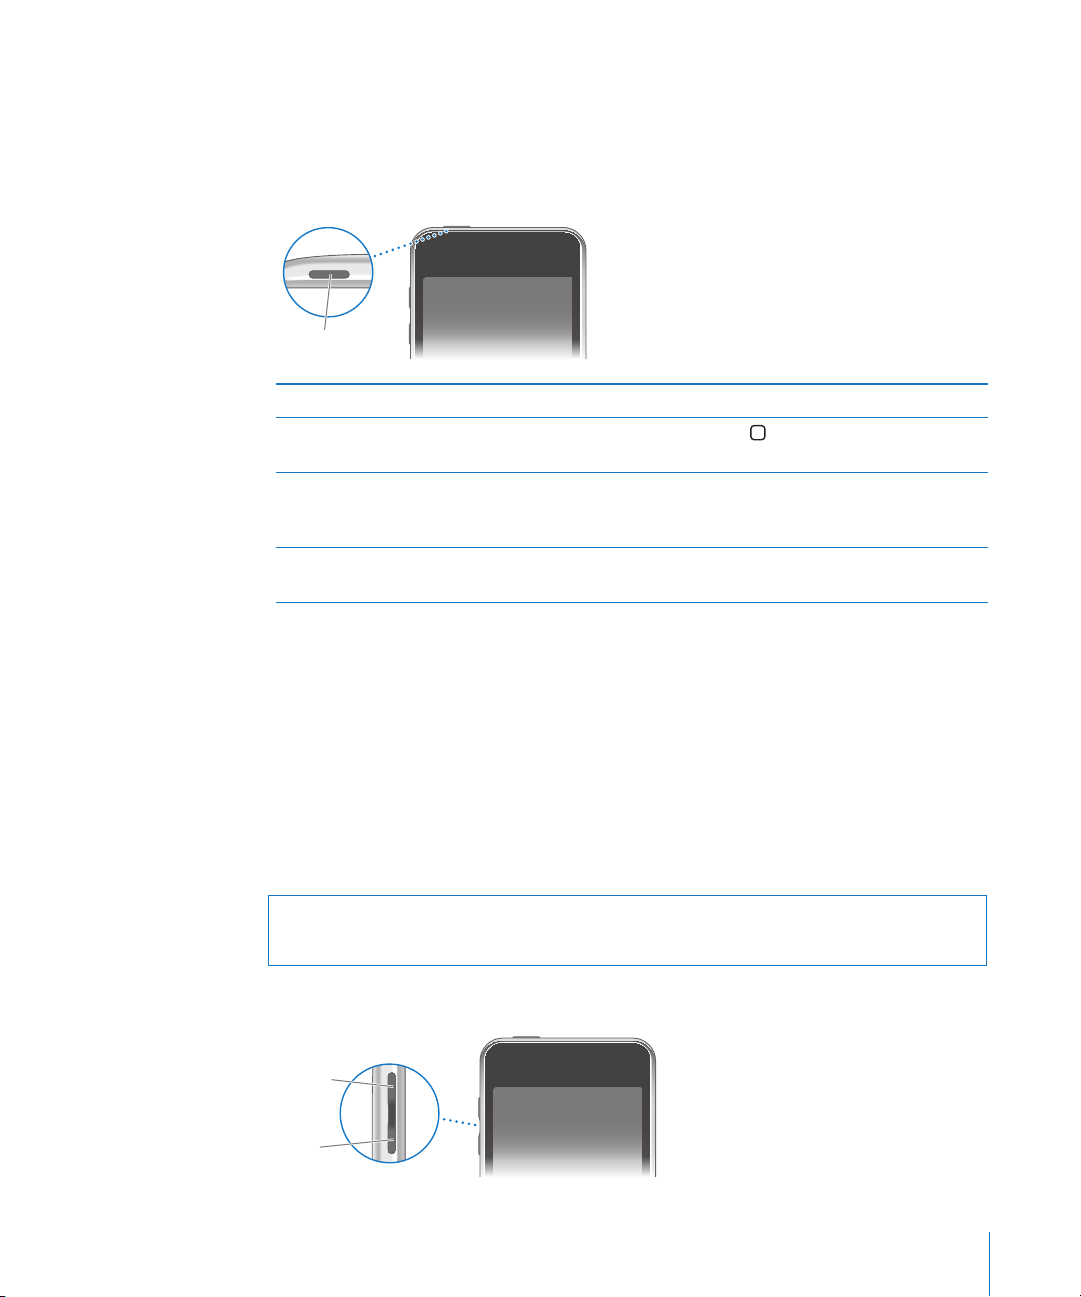
Sleep/Wake Button
Sleep/Wake
button
Volume
up
Volume
down
When you’re not using iPod touch you can lock it.
When iPod touch is locked, nothing happens if you touch the screen.
By default, if you don’t touch the screen for a minute, iPod touch locks automatically.
Lock iPod touch Press the Sleep/Wake button.
Unlock iPod touch Press the Home
button, then drag the slider.
Turn iPod touch completely o Press and hold the Sleep/Wake button for a few
seconds until the red slider appears, then drag
the slider.
Turn iPod touch on Press and hold the Sleep/Wake button until the
Apple logo appears.
For information about changing how long before iPod touch locks, see “Auto-Lock” on
page 94. For information about setting iPod touch to require a passcode to unlock it,
see “Passcode Lock” on page 94.
button or the Sleep/Wake
Volume Buttons
When you’re listening to songs, movies, or other media, the buttons on the side of
iPod touch adjust the audio volume. Otherwise, the buttons control the volume for
alerts and other sound eects.
Note: Volume buttons aren’t included on the rst generation iPod touch.
WARNING: For important information about avoiding hearing loss, see the Important
Product Information Guide at www.apple.com/support/manuals/ipodtouch.
To adjust the volume, use the buttons on the side of iPod touch.
Chapter 2 Basics 19
Page 20
To set a volume limit for music and videos on iPod touch, see “Music” on page 97.
Touchscreen
The controls on the iPod touch touchscreen change dynamically depending on the
task you are performing.
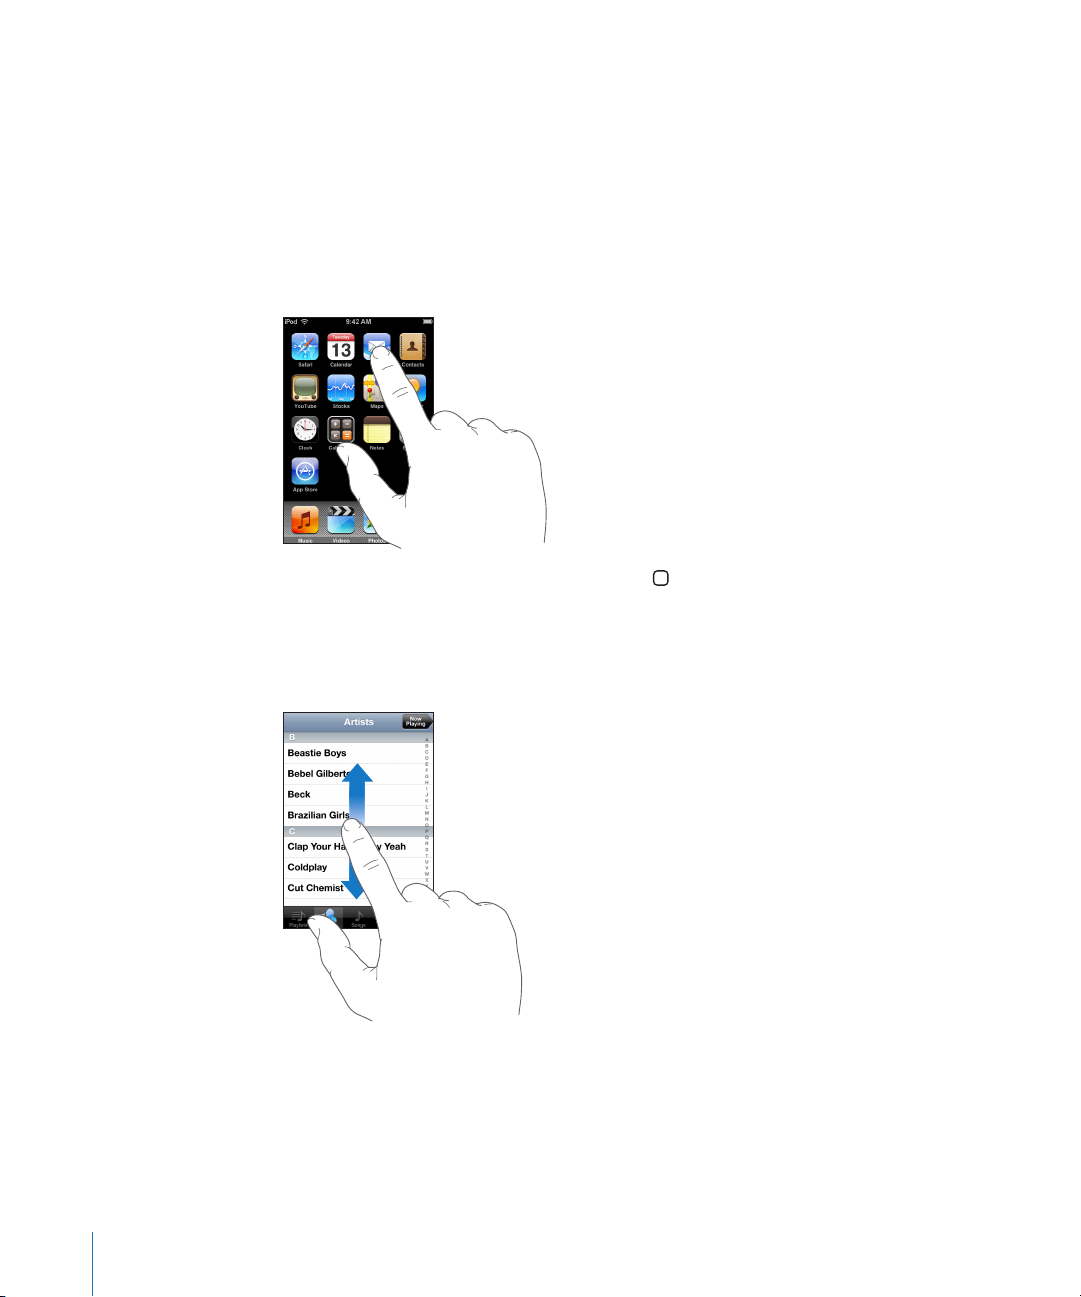
Opening Applications
Open an application: Tap an icon.
Return to the Home screen: Press the Home button below the display.
Scrolling
Drag up or down to scroll. On some screens such as webpages, you can also scroll side
to side.
Dragging your nger to scroll won’t choose or activate anything on the screen.
20 Chapter 2 Basics
Page 21

Flick to scroll quickly.
Index
You can wait for the scrolling to come to a stop, or tap or touch anywhere on the
screen to stop it immediately. Tapping or touching to stop scrolling won’t choose or
activate anything on the screen.
To quickly scroll to the top of a list, webpage, or email, just tap the status bar.
Lists
Some lists have an index along the right side.
Find items in an indexed list: Tap a letter to jump to items starting with that letter.
Drag your nger along the index to scroll quickly through the list.
Choose an item: Tap an item in the list.
Depending on the list, tapping an item can do dierent things—for example, it may
open a new list, play a song, open an email, or show someone’s contact information.
Return to a previous list: Tap the back button in the upper-left corner.
Chapter 2 Basics 21
Page 22

Zooming In or Out
When viewing photos, webpages, email, or maps, you can zoom in and out. Pinch your
ngers together or apart. For photos and webpages, you can double-tap (tap twice
quickly) to zoom in, then double-tap again to zoom out. For maps, double-tap to zoom
in and tap once with two ngers to zoom out.
Onscreen Keyboard
Use the onscreen keyboard to enter text, such as contact information, text messages,
or web addresses.
Typing
Depending on the application you’re using, the intelligent keyboard may automatically
suggest corrections as you type to help prevent mistyped words.
Enter text:
1 Tap a text eld, such as in a note or new contact, to bring up the keyboard.
2 Tap keys on the keyboard.
Start by typing with just your index nger. As you get more procient, you can type
more quickly using two thumbs.
22 Chapter 2 Basics
Page 23

As you type, each letter appears above your thumb or nger. If you touch the wrong
key, you can slide your nger to the correct key. The letter isn’t entered until you
release your nger from the key.
Type uppercase Tap the Shift key before tapping a letter.
Quickly type a period and space Double-tap the space bar. ( You can turn
this feature on or o in Settings > General >
Keyboard.)
Turn caps lock on Double-tap the Shift
blue, and all letters you type are uppercase. Tap
the Shift key again to turn caps lock o. (You can
turn this feature on or o in Settings > General >
Keyboard.)
Show numbers, punctuation, or symbols Tap the Number
to see additional punctuation and symbols.
Type letters or symbols that aren’t on the
keyboard
Press and hold the related letter or symbol, then
slide to choose a variation.
key. The Shift key turns
key. Tap the Symbol key
International Keyboards
iPod touch provides keyboards that allow you to enter text in many
dierent languages. For a complete list of supported keyboards, go to
www.apple.com/ipodtouch/specs.html.
Turn international keyboards on or o:
1 In Settings, choose General > International > Keyboards.
2 Turn on the keyboards you want. Languages with more than one keyboard, such as
Japanese and Chinese, indicate the number of keyboards available. Tap to choose a
keyboard for that language.
Chapter 2 Basics 23
Page 24

Switch keyboards if more than one keyboard is
turned on
Enter Japanese Kana Use the Kana keypad to select syllables. For more
Enter Japanese QWERTY Use the QWERTY keyboard to input code for
Enter Korean Use the 2-Set Korean keyboard to type Hangul
Enter Simplied Chinese Pinyin Use the QWERTY keyboard to enter Pinyin for
Enter handwritten Simplied or Traditional
Chinese
Tap to switch keyboards. When you tap
the symbol, the name of the newly activated
keyboard appears briey.
syllable options, tap the arrow key and select
another syllable or word from the window.
Japanese syllables. As you type, suggested
syllables appear. Tap the syllable to choose it.
letters. To type double consonants or compound
vowels, press and hold the letter, then slide to
choose the double letter.
Chinese characters. As you type, suggested
Chinese characters appear. Tap a character to
choose it, or continue entering Pinyin to see
more character options.
Use the touchpad to enter Chinese characters
with your nger. As you write character strokes,
iPod touch recognizes them and shows matching
characters in a list, with the closest match at the
top. When you choose a character, its related
characters appear in the list as additional choices.
You can enter some complex characters by
combining two or more characters. For example,
if you enter 魚 (sh), then 巤 (bristle), 鱲 (partial
name of Hong Kong International Airport)
appears in the character list with an arrow next
to it. Tap the character to replace the characters
you entered.
24 Chapter 2 Basics
Page 25

When Simplied or Traditional Chinese handwriting formats are turned on, you can
Suggested word
enter Chinese characters with your nger, as shown:
Dictionary
For many languages, iPod touch has dictionaries to help you type. The appropriate
dictionary is activated automatically when you select a supported keyboard.
For a list of supported languages, see www.apple.com/ipodtouch/specs.html.
iPod touch uses the active dictionary to suggest corrections or complete the word
you’re typing. You don’t need to interrupt your typing to accept the suggested word.
Accept or reject dictionary suggestions:
 To reject the suggested word, nish typing the word as you want it, then tap the
“x” to dismiss the suggestion before typing anything else. Each time you reject a
suggestion for the same word, iPod touch becomes more likely to accept your word.
 To use the suggested word, type a space, punctuation mark, or return character.
Turn Auto-Correction on or o: Choose General > Keyboard and turn Auto-Correction
on or o. Auto-Correction is on by default.
Note: If you are entering Chinese or Japanese, tap one of the suggested alternatives.
Chapter 2 Basics 25
Page 26

Edit text: Touch and hold to see a magnied view, then drag to position the insertion
point.
Connecting to the Internet
iPod touch connects to the Internet via Wi-Fi networks. iPod touch can join AirPort
and other Wi-Fi networks at home, at work, or at Wi-Fi hotspots around the world.
When joined to a Wi-Fi network that is connected to the Internet, iPod touch connects
to the Internet automatically whenever you use Mail, Safari, YouTube, Stocks, Maps,
Weather, the App Store or iTunes Wi-Fi Music Store.
Joining a Wi-Fi Network
The Wi-Fi settings let you turn on Wi-Fi and join Wi-Fi networks.
Turn on Wi-Fi: Choose Settings > Wi-Fi and turn Wi-Fi on.
Join a Wi-Fi network: Choose Settings > Wi-Fi, wait a moment as iPod touch detects
networks in range, then select a network (fees may apply to join some Wi-Fi networks).
If necessary, enter a password and tap Join (networks that require a password appear
with a lock icon).
Once you’ve joined a Wi-Fi network manually, iPod touch automatically connects to
it whenever the network is in range. If more than one previously used network is in
range, iPod touch joins the one last used.
When iPod touch is connected to a Wi-Fi network, the Wi-Fi icon in the status bar at
the top of the screen shows connection strength. The more bars you see, the stronger
the connection.
For information about conguring Wi-Fi settings, see “Wi-Fi” on page 90.
26 Chapter 2 Basics
Page 27

Battery
Charging Charged
iPod touch has an internal rechargeable battery.
Charging the Battery
WARNING: For important safety information about charging iPod touch, see the
Important Product Information Guide at www.apple.com/support/manuals/ipodtouch.
Charge the battery and sync iPod touch: Connect iPod touch to your computer using
the included USB cable.
Important: The iPod touch battery may drain instead of charge if iPod touch is
connected to a computer that’s turned o or is in sleep or standby mode. iPod touch
cannot be charged from a FireWire-based power source.
An icon in the upper-right corner of the screen shows battery charging status.
Chapter 2 Basics 27
If you charge the battery while syncing or using iPod touch, it may take longer to
charge. You can also charge iPod touch using the Apple USB Power Adapter, available
separately.
Page 28

Important: If iPod touch is very low on power, it may display one of the following
or
images, indicating that iPod touch needs to charge for up to ten minutes before you
can use it. If iPod touch is extremely low on power, the display may be blank for up to
two minutes before one of the low-battery images appears.
Maximizing Battery Life
iPod touch uses lithium-ion batteries. To learn more about how to maximize the
lifespan and battery life of your iPod touch, go to www.apple.com/batteries.
Replacing the Battery
Rechargeable batteries have a limited number of charge cycles and may eventually
need to be replaced. The iPod touch battery isn’t user replaceable; it can only
be replaced by an authorized service provider. For more information, go to
www.apple.com/support/ipod/service/battery.
Cleaning iPod touch
To clean iPod touch, unplug all cables and turn o iPod touch (press and hold the
Sleep/ Wake button, then slide the onscreen slider). Use a soft, slightly damp, lint-free
cloth. Avoid getting moisture in openings. Don’t use window cleaners, household
cleaners, aerosol sprays, solvents, alcohol, ammonia, or abrasives to clean iPod touch.
28 Chapter 2 Basics
Page 29

Restarting and Resetting iPod touch
If something is not working right, restarting or resetting iPod touch will likely solve the
problem.
Restart iPod touch: Press and hold the Sleep/Wake button until the red slider appears.
Slide your nger across the slider to turn o iPod touch. To turn iPod touch back on,
press and hold the Sleep/Wake until the Apple logo appears.
Reset iPod touch: Press and hold the Sleep/Wake button and the Home button at the
same time for at least ten seconds, until the Apple logo appears.
For more troubleshooting suggestions, see Appendix A, “ Troubleshooting,” on
page 104.
Chapter 2 Basics 29
Page 30

Music and Video
3
iPod touch syncs with iTunes on your computer to get songs, videos, and other
content you’ve collected in your iTunes library. For information about adding music
and other media to your iTunes library, open iTunes and choose Help > iTunes Help.
Getting Music, Video, and More
To get music, video, and podcasts onto iPod touch, you can set up iTunes on your
computer to sync content in your library, or you can manually manage the media you
put on iPod touch.
30
Syncing Content from iTunes
You can get music, video, and more onto iPod touch by syncing content from iTunes.
You can sync all of your media, or you can select specic songs, videos, and podcasts.
Set iTunes to sync iPod content:
1 Connect iPod touch to your computer.
2 In iTunes, select iPod touch in the sidebar.
3 On the Music, Movies, TV Shows, and Podcasts tabs, select the content you want
to transfer to iPod touch. For example, you could set iTunes to sync selected music
playlists and the three most recent episodes of your favorite video podcast.
4 Click Apply.
Only songs and videos encoded in formats that iPod touch supports are transferred
to iPod touch. For information about which formats iPod touch supports, see “Song,
Video, or Other Items Won’t Play” on page 107.
If there are more songs in your iTunes library than can t on your iPod touch, iTunes
oers to create a special playlist to sync with iPod touch. iTunes lls the playlist with
selections from your library. You can add or delete songs from the playlist and sync
again.
Page 31

If you listen to part of a podcast or audiobook, your place in the story is included if you
sync the content with iTunes. If you started listening to the story on iPod touch, you
can pick up where you left o using iTunes on your computer—or vice versa.
For more information about using iTunes to get music and other media onto your
computer, see “What You Need” on page 5.
Manually Managing Content
The manually managing feature lets you choose just the music, video, and podcasts
you want to have on iPod touch.
Set up iPod touch for manually managing content:
1 Connect iPod touch to your computer.
2 In iTunes, select iPod touch in the sidebar.
3 Click the Summary tab and select “Manually manage music and videos.”
4 Click Apply.
Add items to iPod touch: Drag a song, video, podcast, or playlist in your iTunes library
to iPod touch (in the sidebar). Shift-click or Command-click to select multiple items to
add at the same time.
iTunes syncs the content immediately. If you deselect “Manually manage music and
videos,” the content you added manually is removed from iPod touch the next time
iTunes syncs content.
Remove items from iPod touch: With iPod touch connected to your computer, select
the iPod touch icon in the iTunes sidebar. Click the disclosure triangle to the left of the
icon to show the contents. Select a content area, such as Music or Movies, then select
the items you want to delete and press the Delete key on the keyboard.
Removing an item from iPod touch doesn’t delete it from your iTunes library.
Important: If you delete an item from iTunes, it will also be deleted from iPod touch
the next time you sync.
Downloading Music and Podcasts
You can use the iTunes Wi-Fi Music Store on iPod touch to purchase and download
songs and albums directly to iPod touch. You can also stream and download audio and
video podcasts. See “iTunes Wi-Fi Music Store” on page 41.
Transferring Purchased Content to Another Computer
You can transfer content on iPod touch that was purchased using iTunes on one
computer to an iTunes library on another authorized computer. The computer must be
authorized to play content from your iTunes account. To authorize the computer, open
iTunes on the computer and choose Store > Authorize Computer.
Chapter 3 Music and Video 31
Page 32

Transfer purchased content: Connect iPod touch to the other computer. iTunes asks if
you want to transfer purchased content.
Converting Videos for iPod touch
You can add videos other than those purchased from the iTunes Store to iPod touch,
such as videos you create in iMovie on a Mac or videos you download from the
Internet and then add to iTunes.
If you try to add a video from iTunes to iPod touch and a message says the video can’t
play on iPod touch, you can convert the video.
Convert a video to work with iPod touch: Select the video in your iTunes library and
choose Advanced > “Create iPod or iPhone Version.” Then add the converted video to
iPod touch.
Music and Other Audio
The high-resolution Multi-Touch display makes listening to songs on iPod touch as
much a visual experience as a musical one. You can scroll through your playlists, or use
Cover Flow to browse through your album art.
You can listen to audio from the internal speaker (iPod touch second generation only),
or on headphones attached to the headphones port. When headphones are attached,
no sound comes out of the speaker.
WARNING: For important information about avoiding hearing loss, see the Important
Product Information Guide at www.apple.com/support/manuals/ipodtouch.
Playing Songs
Browse your collection: Tap Playlists, Artists, or Songs. Tap More to browse Albums,
Audiobooks, Compilations, Composers, Genres, or Podcasts.
Play a song: Tap the song.
32 Chapter 3 Music and Video
Page 33

Next/Fast-forward
Play/Pause
Track List
Back
Previous/Rewind
Volume
Controlling Song Playback
When you play a song, the Now Playing screen appears.
Pause a song Tap or press the mic button on the iPod touch
headset.
Resume playback Tap
Raise or lower the volume Drag the volume slider or use the buttons on the
Restart a song or a chapter in an audiobook or
podcast
Skip to the next or previous song or chapter in
an audiobook or podcast
Rewind or fast-forward Touch and hold
Return to the iPod browse lists Tap
Return to the Now Playing screen Tap Now Playing.
Display a song’s lyrics Tap the album cover when playing a song. (Lyrics
or press the mic button on the iPod touch
headset.
side of iPod touch.
.
Tap
twice to skip to the previous song. Tap
Tap
to skip to the next song, or press the mic button
on the iPod touch headset twice quickly.
or . The longer you hold
the control, the faster the song rewinds or fastforwards.
. Or swipe to the right over the album
cover.
appear only if you’ve added them to the song
using the song’s Info window in iTunes.)
You can display playback controls at any time when you’re listening to music and
using another application—or even when iPod touch is locked—by double-clicking
the Home button.
Chapter 3 Music and Video 33
Page 34

If you’re using an application, the playback controls appear on top of the application.
Scrubber bar
Repeat
Playhead
Shuffle
Genius
After using the controls, you can close them or tap Music to go to the Now Playing
screen. If iPod touch is locked, the controls appear onscreen, then disappear
automatically after you nish using them.
Additional Controls
From the Now Playing screen, tap the album cover.
The repeat, Genius, and shue controls and the scrubber bar appear. You can see
elapsed time, remaining time, and the song number. The song’s lyrics also appear, if
you’ve added them to the song in iTunes.
Set iPod touch to repeat songs Tap . Tap again to set iPod touch to repeat
only the current song.
= iPod touch is set to repeat all songs in the
current album or list.
= iPod touch is set to repeat the current song
over and over.
= iPod touch isn’t set to repeat songs.
Skip to any point in a song Drag the playhead along the scrubber bar.
Make a Genius playlist Tap
Set iPod touch to shue songs Tap
Shue the tracks in any playlist, album, or other
list of songs
. The Genius playlist appears. See “Using
Genius on iPod touch” on page 36.
. Tap again to set iPod touch to play
songs in order.
= iPod touch is set to shue songs.
= iPod touch is set to play songs in order.
Tap Shue at the top of the list. For example, to
shue all the songs on iPod touch, choose Songs
> Shue.
Whether or not iPod touch is set to shue, if you
tap Shue at the top of a list of songs, iPod touch
plays the songs from that list in random order.
34 Chapter 3 Music and Video
Page 35

Browsing Album Covers in Cover Flow
When you’re browsing music, you can rotate iPod touch sideways to see your iTunes
content in Cover Flow and browse your music by album artwork.
See content in Cover Flow Rotate iPod touch sideways.
Browse album covers Drag or ick left or right.
See the tracks on an album Tap a cover or
.
Play any track Tap the track. Drag up or down to scroll through
the tracks.
Return to the cover Tap the title bar. Or tap
Play or pause the current song Tap
Chapter 3 Music and Video 35
or . Or, if you’re using the included stereo
headset, press the mic button.
again.
Page 36

Viewing All Tracks on an Album
Rating bar
Back to Now
Playing screen
Album tracks
See all the tracks on the album that contains the current song: From the Now
Playing screen tap . Tap a track to play it. Tap the album cover thumbnail to return to
the Now Playing screen.
In track list view, you can assign ratings to songs. You can use ratings to create smart
playlists in iTunes that dynamically update to include, for example, your highest rated
songs.
Rate a song: Drag your thumb across the ratings bar to give the song zero to ve
stars.
Using Genius on iPod touch
Genius automatically creates a playlist of songs from your library that go great
together with the song you’re playing. It’s like having a built-in DJ who knows your
tastes well enough to make the right mix just for you. To use Genius on iPod touch,
you rst need to set up Genius in iTunes, then sync iPod touch with iTunes. Genius is
a free service, but it requires an iTunes Store Account. You can make Genius playlists
in iTunes and sync them to iPod touch. You can also make Genius playlists directly on
iPod touch.
Make a Genius playlist on iPod touch:
1 Tap Playlists and tap Genius.
2 Tap a song in the list. Genius creates a playlist with additional songs based on that
song.
You can also make a Genius playlist based on the song you’re playing. From the Now
Playing screen, tap the album cover to display additional controls, then tap .
Save a Genius playlist: In the playlist, tap Save. The playlist is saved in Playlists with
the title of the song you picked.
You can make and save as many Genius playlists as you want. If you save a Genius
playlist created on iPod touch, it’s synced back to iTunes the next time you connect.
Refresh a Genius playlist: In the playlist, tap Refresh.
Refreshing a playlist creates a playlist of dierent songs based on the song you picked.
You can refresh any Genius playlist, whether it was created in iTunes and synced to
iPod touch, or created directly on iPod touch.
36 Chapter 3 Music and Video
Page 37

Base the Genius playlist on a new song: In the playlist, tap New, then pick a new
song.
Delete a saved Genius playlist: In a playlist that you saved directly on iPod touch, tap
Edit, then tap Delete Playlist.
Once a Genius playlist is synced back to iTunes, you won’t be able to delete it directly
from iPod touch. You can use iTunes to edit the playlist name, stop syncing, or delete
the playlist.
Making On-The-Go Playlists
Make an on-the-go playlist:
1 Tap Playlists and tap On-The-Go.
2 Browse for songs using the buttons at the bottom of the screen. Tap any song or video
to add it to the playlist. Tap Add All Songs at the top of any list of songs to add all the
songs in the list.
3 When you nish, tap Done.
When you make an on-the-go playlist and then sync iPod touch to your computer, the
playlist is saved on iPod touch and in your iTunes library, then deleted from iPod touch.
The rst is saved as “On-The-Go 1,” the second as “On-The-Go 2,” and so on. To put a
playlist back on iPod touch, select iPod touch in the iTunes sidebar, click the Music tab,
and set the playlist to sync.
Edit an on-the-go playlist: Tap Playlists, tap On-The-Go, tap Edit, then do one of the
following:
 To move a song higher or lower in the list, drag next to the song.
 To delete a song from the playlist, tap next to a song, then tap Delete. Deleting a
song from the on-the-go playlist doesn’t delete it from iPod touch.
 To clear the entire playlist, tap Clear Playlist.
 To add more songs, tap .
Videos
With iPod touch, you can view video content such as movies, music videos, and video
podcasts. If a video contains chapters, you can skip to the next or previous chapter,
or bring up a list and start playing at any chapter that you choose. If a video provides
alternate language features, you can choose an audio language or display subtitles.
Playing Videos
Play a video: Tap Videos and tap the video.
Display playback controls: Tap the screen to show the controls. Tap again to hide
them.
Chapter 3 Music and Video 37
Page 38

Controlling Video Playback
Scale
Play/Pause
Fast-forwardRestart/Rewind
Playhead
Volume
Scrubber bar
Run by Gnarls Barkley is available
on iTunes in select countries
Videos play in widescreen to take full advantage of the display.
Play or pause a video Tap or .
Raise or lower the volume Drag the volume slider.
Start a video over Drag the playhead on the scrubber bar all the
way to the left, or tap
contain chapters.
Skip to the previous or next chapter (if
available)
Start playing at a specic chapter (if available) Tap
to skip to the previous chapter. Tap to
Tap
skip to the next chapter.
, then choose a chapter from the list.
Rewind or fast-forward Touch and hold
Skip to any point in a video Drag the playhead along the scrubber bar.
Stop watching a video before it nishes playing Tap Done. Or press the Home
if the video doesn’t
or .
button.
38 Chapter 3 Music and Video
Page 39

Scale a video to ll the screen or t to the
screen
Select an alternate audio language (if available) Tap
Show or hide subtitles (if available) Tap
Tap to make the video ll the screen. Tap
to make it t the screen.You can also double-tap
the video to toggle between tting and lling the
screen.
When you scale a video to ll the screen, the
sides or top may be cropped from view. When
you scale it to t the screen, you may see black
bars on the sides or above and below the video.
, then choose a language from the Audio
list.
, then choose a language, or O, from the
Subtitles list.
Watching Rented Movies
You can rent movies from the iTunes Store and watch them on iPod touch. You use
iTunes to rent the movies and transfer them to iPod touch. (Rented movies are not
available in all regions.)
Rented movies are playable only for a limited time. The time remaining in which you
must nish watching a rented movie appears near its title. Movies are automatically
deleted when they expire. Check the iTunes Store for the expiration times before
renting a movie.
Transfer rented movies to iPod touch: Connect iPod touch to your computer. Then
select iPod touch in the iTunes sidebar, click Movies, and select the rented movies you
want to transfer. Your computer must be connected to the Internet.
View a rented movie: Choose Videos and select a movie.
Watching Videos on a TV
You can connect iPod touch to your TV and watch your videos on the larger screen.
Use the Apple Component AV Cable, Apple Composite AV Cable, or other authorized
iPod touch compatible cable. You can also use these cables with the Apple Universal
Dock to connect iPod touch to your TV. (The Apple Universal Dock includes a remote,
which allows you to control playback from a distance.) Apple cables and docks are
available for purchase separately at www.apple.com/ipodstore.
Deleting Videos from iPod touch
You can delete videos from iPod touch to save space.
Delete a video: In the videos list, swipe left or right over the video, then tap Delete.
When you delete a video (other than rented movies) from iPod touch, it isn’t deleted
from your iTunes library and you can sync the video back to iPod touch later. If you
don’t want to sync the video back to iPod touch, set iTunes to not sync the video. See
“What You Need” on page 5.
Chapter 3 Music and Video 39
Page 40

Important: If you delete a rented movie from iPod touch, it is deleted permanently
and cannot be transferred back to your computer.
Setting a Sleep Timer
You can set iPod touch to stop playing music or videos after a period of time.
Set a sleep timer: From the Home screen choose Clock > Timer, then ick to set the
number of hours and minutes. Tap When Timer Ends and choose Sleep iPod, tap Set,
then tap Start to start the timer.
When the timer ends, iPod touch stops playing music or video, closes any other open
application, and then locks itself.
Changing the Browse Buttons
You can replace the Playlists, Artist, Songs, or Videos browse buttons at the bottom
of the screen with ones you use more frequently. For example, if you often listen
to podcasts and don’t watch many videos, you can replace the Videos button with
Podcasts.
Change the browse buttons: Tap More and tap Edit, then drag a button to the
bottom of the screen, over the button you want to replace.
You can drag the buttons at the bottom of the screen left or right to rearrange them.
Tap Done when you nish. Tap More at any time to access the buttons you replaced.
40 Chapter 3 Music and Video
Page 41

iTunes and App Store
4
iTunes Wi-Fi Music Store
You can search for, browse, preview, purchase, and download songs and albums from
the iTunes Wi-Fi Music Store directly to iPod touch. You can listen to audio or watch
video podcasts from the iTunes Wi-Fi Music Store, either by streaming them from the
Internet or by downloading them directly to iPod touch.
To use the iTunes Wi-Fi Music Store for songs and albums, iPod touch must join a Wi-Fi
network that is connected to the Internet. Podcasts can be streamed and downloaded
over both cellular and Wi-Fi connections. See “Connecting to the Internet” on page 26.
You’ll also need an iTunes Store account to purchase songs over Wi-Fi (the iTunes WiFi Music Store is available in some countries only). If you don’t already have an iTunes
Store account, open iTunes on your computer and choose Store > Create Account to
set one up.
You don’t need an iTunes Store account to play or download podcasts.
Finding Songs, Albums, and Podcasts
Browse the featured selections to see new releases and iTunes Wi-Fi Music Store
recommendations. Browse Top Tens to see the most popular songs and albums in
each of several categories. Browse Podcasts to see a list of featured podcasts. If you’re
looking for a specic song, album, artist, or podcast, use Search.
41
Page 42

Browse featured songs and albums: Tap Featured, then choose a category at the top
of the screen.
Browse top ten songs and albums: Tap Top Tens, then choose a category and tap Top
Songs or Top Albums.
42 Chapter 4 iTunes and App Store
Page 43

Browse podcasts: Tap Podcasts. Video podcasts are indicated by the icon. To see a
list of episodes, tap a podcast.
Search for songs, albums, and podcasts: Tap Search, tap the search eld and enter
one or more words, then tap Search. Search results are grouped by Albums, Songs, and
Podcasts.
See the songs on an album: Tap the album.
See the album a song is on: Double-tap the song.
See podcast episode information: Tap the podcast title.
Browsing Starbucks Selections
If you join a Starbucks Wi-Fi network in select Starbucks locations (available in the U.S.
only), the Starbucks icon appears at the bottom of the screen next to Featured. Tap
the Starbucks icon to nd out what song is playing in the café and browse featured
Starbucks Collections.
Chapter 4 iTunes and App Store 43
Page 44

For a list of select Starbucks locations, go to www.apple.com/itunes/starbucks.
Find out what song is playing: Tap Starbucks. The currently playing song appears at
the top of the screen. Tap the song to see the album the song is on, along with the
other songs on the album.
View Recently Played and other Starbucks playlists: Tap Starbucks, then choose
Recently Played or one of the Starbucks playlists.
Purchasing Songs and Albums
When you nd a song or album you like in the iTunes Wi-Fi Music Store, you can
purchase and download it to iPod touch. You can preview a song before you purchase
it to make sure it’s a song you want. In select Starbucks locations (available in the U.S.
only), you can also preview and purchase the currently playing and other songs from
featured Starbucks Collections.
Preview a song: Tap the song.
Purchase and download a song or album:
1 Tap the price, then tap Buy Now.
If you were signed in to your iTunes Store account in iTunes the last time you synced
iPod touch, you don’t have to enter your account ID. Otherwise, you are prompted to
enter your account ID.
2 Enter your password and tap OK.
Your purchase is charged to your iTunes Store account. For additional purchases made
within the next fteen minutes, you don’t have to enter your password again.
An alert appears if you’ve previously purchased one or more songs from an album.
Tap Buy if you want to purchase the entire album including the songs you’ve already
purchased, or tap Cancel if you want to purchase the remaining songs individually.
44 Chapter 4 iTunes and App Store
Page 45

Some albums include bonus content, which is downloaded to your iTunes library on
your computer. Not all bonus content is downloaded directly to iPod touch.
See the status of downloading songs and albums: Tap Downloads.
To pause a download, tap .
While downloading purchases, it’s okay to turn o iPod touch or leave the area of your
Wi-Fi connection. iPod touch starts the download again the next time iPod touch joins
a Wi-Fi network with an Internet connection. Or, if you open iTunes on your computer,
iTunes completes the download to your iTunes library (if your computer is connected
to the Internet).
Purchased songs are added to a Purchased playlist on iPod touch. If you delete the
Purchased playlist, iTunes creates a new one when you buy an item from the iTunes
Wi-Fi Music Store.
Streaming or Downloading Podcasts
You can listen to audio podcasts or watch video podcasts streamed over the Internet
from the iTunes Wi-Fi Music Store. You can also download audio and video podcasts
to iPod touch. Podcasts you download to iPod touch are synced to your iTunes library
when you connect iPod touch to your computer.
Stream a podcast: Tap the podcast title. Audio podcasts appear in a new window with
playback controls.
Video podcasts appear in widescreen with playback controls.
Download a podcast: Tap the Free button, then tap Download. Downloaded podcasts
appear in the podcasts list in Music.
Listen to or watch a podcast you’ve downloaded: In Music, tap Podcasts at the
bottom of the screen (you may need to tap More rst), then tap the podcast. Video
podcasts also appear in your list of videos.
Chapter 4 iTunes and App Store 45
Page 46

Get more episodes of the podcast you’ve downloaded: In the podcasts list in Music,
tap the podcast, then tap Get More Episodes.
Delete a podcast: In the podcasts list in Music, swipe left or right over the podcast,
then tap Delete.
See the status of downloading podcasts: Tap Downloads.
To pause a download, tap .
While downloading podcasts, it’s okay to turn o iPod touch or leave the area of your
Wi-Fi connection. iPod touch starts the download again the next time iPod touch joins
a Wi-Fi network with an Internet connection.
App Store
You can search for, browse, review, purchase, and download applications from the App
Store directly to iPod touch. Applications you download and install from the App Store
on iPod touch are backed up to your iTunes library the next time you sync iPod touch
with your computer. You can also install applications you’ve purchased or downloaded
through iTunes on your computer when you sync with iPod touch.
To use the App Store, iPod touch must join a Wi-Fi network that is connected to the
Internet. See “Connecting to the Internet” on page 26. You’ll also need an iTunes Store
account (available in many countries) to download applications. If you don’t have
an iTunes Store account, open iTunes on your computer and choose Store > Create
Account to set one up.
Browsing and Searching
Browse the featured selections to see new releases and App Store recommendations.
Browse Top 25 to see the most popular applications. If you’re looking for a specic
application, use Search.
46 Chapter 4 iTunes and App Store
Page 47

Browse featured applications: Tap Featured, then choose a featured category at the
top of the screen.
Browse by category: Tap Categories, then choose a category. Within a category,
choose a sorting method.
Chapter 4 iTunes and App Store 47
Page 48

Browse the top 25 applications: Tap Top 25, then scroll through the list of
applications.
Search for applications: Tap Search, tap the search eld and enter one or more words,
then tap Search.
48 Chapter 4 iTunes and App Store
Page 49

Info Screen
Tap any application in a list to see more information, such as the application’s price,
reviews, and other information.
If you’ve already installed the application, “Installed” appears instead of the price on
the Info screen.
Email a link to the application’s Info page in iTunes: Tap “Tell a Friend” near the
bottom of the Info screen.
Read reviews: Tap Reviews near the bottom of the Info screen.
Report a problem: Tap “Report a Problem” near the bottom of the Info screen. Select a
problem from the list or type optional comments, then tap Report.
Chapter 4 iTunes and App Store 49
Page 50

Downloading Applications
When you nd an application you want in the App Store, you can purchase and
download it to iPod touch. If the application is free, you can download it without
charge after providing your iTunes account information.
Once you download an application, it is immediately installed on iPod touch.
Purchase and download an application:
1 Tap the price (or tap Free), then tap Buy Now.
If you were signed in to your iTunes Store account in iTunes the last time you synced
iPod touch, you don’t have to enter your account ID. Otherwise, you are prompted to
enter your account ID.
2 Enter your password and tap OK.
Downloads for purchase are charged to your iTunes Store account. For additional
downloads made within the next fteen minutes, you don’t have to enter your
password again.
See the status of downloading applications: After you begin downloading an
application, its icon appears on your Home screen and shows the status of the
download and installation.
While downloading purchases, it’s okay to turn o iPod touch or leave the area of your
network connection. iPod touch starts the download again the next time iPod touch
joins a network with an Internet connection.
Deleting App Store Applications
You can delete applications you’ve installed from the App Store. If you delete an
application, data associated with the application will no longer be available to
iPod touch, even if you reinstall the application.
You can reinstall any application and any associated data from your iTunes library
as long as you backed up the application by syncing to your computer. If you try to
delete an application that hasn’t been backed up to your computer, an alert appears.
Delete an App Store application:
1 Touch and hold any application icon on the Home screen until the icons start to
wiggle.
2 Tap the “x” in the corner of the application you want to delete.
3 Tap Delete, then press the Home button to save your arrangement.
50 Chapter 4 iTunes and App Store
Page 51

To overwrite the data associated with an application, use “Erase All Content and
Settings” in iPod touch settings. See “Resetting iPod touch” on page 97.
Writing Reviews
You can write and submit your own application reviews directly on iPod touch.
Write a review:
1 Tap Reviews near the bottom of the Info screen.
2 On the Review screen, tap “Write a Review.”
3 Select the number of stars (1–5) for your rating of the application, title for the review,
and optional review comments. If you’ve written reviews before, the nickname eld is
already lled in. Otherwise, you’re asked to create a reviewer nickname.
4 Tap Send.
You must be signed into your iTunes Store account in order to submit reviews.
Updating Applications
Whenever you access the App Store, it checks for updates to applications you’ve
installed. By default, the App Store also automatically checks for updates every week.
The App Store icon shows the total number of application updates available.
If an update is available and you access the App Store, the Updates screen appears
immediately. Application updates are free and are downloaded and automatically
installed when you choose to update them. Application upgrades are new releases
that can be purchased or downloaded through the App Store on iPod touch or the
iTunes Store on your computer.
Update an application:
1 At the bottom of the screen, tap Updates.
2 Tap an application to see more information about the update.
3 Tap Update.
Update all applications: At the bottom of the screen, tap Updates, then tap Update
All.
If you try to update an application purchased from a dierent iTunes Store account,
you are prompted for that account’s ID and password in order to download the
update.
Chapter 4 iTunes and App Store 51
Page 52

Syncing Purchased Content
iTunes automatically syncs songs, albums, podcasts, and applications you’ve
downloaded or purchased on iPod touch to your iTunes library when you connect
iPod touch to your computer. This lets you listen to the downloads on your computer
and provides a backup if you delete applications or purchased content from
iPod touch.
Songs are synced to the “Purchased on <name of your iPod touch>” playlist. iTunes
creates the playlist if it doesn’t exist. iTunes also copies your purchases to the
Purchased playlist that iTunes uses for purchases you make on your computer, if that
playlist exists and is set to sync with iPod touch.
Downloaded podcasts are synced to the Podcast list in your iTunes library.
Downloaded applications are backed up the next time you sync with iTunes.
Afterwards, only application data is backed up when you sync with iTunes.
Applications are synced to the Applications list in your iTunes library. iTunes creates
the list if it doesn’t exist.
Verifying Purchases
You can use iTunes to verify that all the music, videos, applications, and other items
you bought from the iTunes Wi-Fi Music Store or App Store are in your iTunes library.
You might want to do this if a download was interrupted.
Verify your purchases:
1 Make sure your computer is connected to the Internet.
2 In iTunes, choose Store > Check for Available Downloads.
3 Enter your iTunes Store account ID and password, then click Check.
Purchases not yet on your computer are downloaded.
The Purchased playlist displays all your purchases. However, because you can add or
remove items in this list, it might not be accurate. To see all your purchases, make sure
you’re signed in to your account, choose Store > View My Account, and click Purchase
History.
Updating Your Account
iPod touch gets your iTunes Store account information from iTunes. You can view and
change your iTunes Store account information using iTunes on your computer.
View and change your iTunes Store account information: In iTunes, choose Store >
View My Account.
52 Chapter 4 iTunes and App Store
Page 53

You must be signed in to your iTunes Store account. If “View My Account” doesn’t
appear in the Store menu, choose Store > Sign in.
Purchase music or applications from another iTunes Store account: Sign in to that
account when you connect to the iTunes Wi-Fi Music Store or when you purchase or
download an application from the App Store.
Chapter 4 iTunes and App Store 53
Page 54

Safari
5
Safari lets you surf the web and view webpages on iPod touch in the same way as
if you were on your computer. You can create bookmarks on iPod touch and sync
bookmarks with your computer. Add web clips for quick access to your favorite sites
directly from the Home screen.
To use Safari, iPod touch must join a Wi-Fi network that is connected to the Internet.
See “Connecting to the Internet” on page 26.
Viewing Webpages
You can view webpages in either portrait or landscape orientation. Rotate iPod touch
and the webpage rotates too, automatically adjusting to t the page.
54
Page 55

Opening Webpages
Open a webpage: Tap the address eld (on the left side of the title bar), then type the
web address and tap Go. If the address eld is not visible, tap the status bar at the top
of the screen to quickly scroll to the address eld at the top of the webpage.
As you type, web addresses that start with those letters appear. These are bookmarked
or recent pages you’ve opened. Tap an address to go to that page. Keep typing if you
want to enter a web address that’s not in the list.
Erase the text in the address eld: Tap the address eld, then tap .
Zooming and Scrolling
Zoom in or out: Double-tap a column on a webpage to expand the column. Double-
tap again to zoom out.
You can also pinch to zoom in or out manually.
Scroll around a webpage Drag up, down, or sideways. When scrolling,
you can touch and drag anywhere on the page
without activating any links.
Scroll within a frame on a webpage Use two ngers to scroll within a frame on a
webpage. Use one nger to scroll the entire
webpage.
Scroll quickly to the top of a webpage Tap the status bar at the top of the iPod touch
screen.
Navigating Webpages
Links on webpages typically take you to another place on the web.
Follow a link on a webpage: Tap the link.
Links on iPod touch can also display a location in Maps or create a preaddressed Mail
message. To return to Safari after a link opens another application, press the Home
button and tap Safari.
Chapter 5 Safari 55
Page 56

See a link’s destination address Touch and hold the link. The address pops up
next to your nger. You can touch and hold an
image to see if it has a link.
Stop a webpage from loading Tap
Reload a webpage Tap
Return to the previous or next page Tap
Return to a recently viewed page Tap
Send a webpage address via email Tap
Save an image or photo to your Photo Library Press and hold the image, then tap Save Image.
.
.
or at the bottom of the screen.
and tap History. To clear the history list,
tap Clear.
and tap “Mail Link to this Page.”
Opening Multiple Pages
You can have up to eight pages open at a time. Some links automatically open a new
page instead of replacing the current one.
The number inside the pages icon at the bottom of the screen shows how many
pages are open. If there’s no number inside, just one page is open. For example:
= one page is open
= three pages are open
Open a new page: Tap and tap New Page.
Go to another page: Tap and ick left or right. Tap the page you want to view.
Close a page: Tap and tap . You can’t close a page if it’s the only one open.
56 Chapter 5 Safari
Page 57

Entering Text and Filling Out Forms
Some webpages have text elds and forms to ll out.
Bring up the keyboard Tap inside a text eld.
Move to another text eld Tap another text eld, or tap the Next or Previous
button.
Submit a form Once you nish lling out a form, tap Go or
Search. Most pages also have a link you can tap
to submit the form.
Close the keyboard without submitting the
form
Tap Done.
Searching the Web
By default, Safari searches using Google. You can search using Yahoo!, instead.
Search the web:
1 Tap the search eld (on the right side of the title bar).
2 Type a word or phrase that describes what you’re looking for, then tap Google.
3 Tap a link in the list of search results to open a webpage.
Set Safari to search using Yahoo!: From the Home screen choose Settings > Safari >
Search Engine, then choose Yahoo!.
Bookmarks
You can bookmark webpages you want to return to later.
Bookmark a webpage: Open the page and tap . Then tap Add Bookmark.
When you save a bookmark you can edit its title. By default, bookmarks are saved at
the top level of Bookmarks. Tap Bookmarks to choose another folder.
If you use Safari on a Mac, or Safari or Microsoft Internet Explorer on a PC, you can sync
bookmarks with the web browser on your computer.
Sync bookmarks with your computer:
1 Connect iPod touch to your computer.
2 In iTunes, select iPod touch in the sidebar.
3 Click the Info tab, select “Sync … bookmarks” under Web Browser, then click Apply.
See “Syncing with iTunes” on page 6.
Sync bookmarks with MobileMe: In iPod touch’s Settings, select Bookmarks in your
MobileMe account. See “Setting Up Accounts” on page 10 .
Chapter 5 Safari 57
Page 58

Open a bookmarked webpage: Tap , then choose a bookmark or tap a folder to
see the bookmarks inside.
Edit a bookmark or bookmark folder: Tap , choose the folder that has the
bookmark or folder you want to edit, then tap Edit. Then do one of the following:
 To make a new folder, tap New Folder.
 To delete a bookmark or folder, tap , then tap Delete.
 To reposition a bookmark or folder, drag .
 To edit the name or address, or to put it in a dierent folder, tap the bookmark or folder.
When you’re nished, tap Done.
Web Clips
Add web clips to the Home screen for fast access to your favorite webpages. Web clips
appear as icons on the Home screen, and you can arrange your web clips along with
the other icons. See “iPod touch Applications” on page 16.
Add a web clip: Open the webpage and tap . Then tap “Add to Home Screen.”
When you open a web clip, Safari automatically zooms and scrolls to the area of the
webpage that was displayed when you saved the web clip. The displayed area is also
used to create the icon for the web clip on your Home screen, unless the webpage
comes with its own custom icon.
When you add a web clip, you can edit its name. If the name is too long (more than
about 10 characters), it may appear abbreviated on the Home screen.
Web clips are not bookmarks, and aren’t synced by MobileMe or iTunes.
Delete a web clip:
1 Touch and hold any icon on the Home screen until the icons start to wiggle.
2 Tap the “x” in the corner of the web clip you want to delete.
3 Tap Delete, then press the Home button to save your arrangement.
58 Chapter 5 Safari
Page 59

Mail
6
Mail works with MobileMe, Microsoft Exchange, and many of the most popular email
systems—including Yahoo! Mail, Google email, and AOL—as well as other industrystandard POP3 and IMAP email systems. You can send and receive embedded photos
and graphics, and view PDFs and other attachments.
To download and send messages in Mail, iPod touch must join a Wi-Fi network that is
connected to the Internet. See “Connecting to the Internet” on page 26.
Setting Up Email Accounts
You can set up email accounts on iPod touch in either of the following ways:
In iTunes, use the iPod touch preference panes to sync email accounts settings from Â
your computer. See “Syncing with iTunes” on page 6.
Set up an account directly on iPod touch. See “ Â Setting Up Accounts” on page 10 .
Sending Email
You can send an email message to anyone who has an email address.
Compose and send a message:
1 Tap .
2 Type a name or email address in the To eld, or tap to add a name from your
contacts.
As you type an email address, matching email addresses from your contacts list appear
below. Tap an address to add it. To add more names, tap Return or .
Note: If you’re composing a message from your Microsoft Exchange account and
have access to your enterprise Global Address List (GAL), matching addresses from the
contacts on iPod touch will appear rst, then matching GAL addresses will appear.
59
Page 60

3 Tap Cc/Bcc/From if you want to copy or blind copy the message to others, or change
Number of unread
emails in your inboxes
the account you send the message from. If you have more than one email account,
you can tap the From eld to change the account you’re sending from.
4 Enter a subject, then your message.
You can tap Return to move from one eld to another.
5 Tap Send.
Send a photo in a message In Photos, choose a photo, tap , then tap Email
Photo.
The photo is sent using your default email
account (see “Mail” on page 100).
Save a draft of a message to complete later Tap Cancel, then tap Save. The message is saved
in the Drafts mailbox.
Reply to a message Tap
Forward a message Open a message and tap
. Tap Reply to reply only to the sender
or tap Reply All to reply to the sender and all
recipients. Type your return message, then tap
Send.
Files or images attached to the initial message
aren’t sent back.
, then tap Forward.
Add one or more email addresses, type your
message, then tap Send.
When you forward a message, you can include
the les or images attached to the original
message.
Checking and Reading Email
The Mail icon shows the total number of unread messages in all your inboxes. You may
have other unread messages in other mailboxes.
60 Chapter 6 Mail
Page 61

On each account screen, you can see the number of unread messages in each mailbox.
Number of unread
messages
Tap to see all your
email accounts
Unread messages
Tap a mailbox to see its messages. Unread messages have a blue dot next to them.
When you open a mailbox, Mail loads the number of most recent messages specied
in your Mail settings, if the messages haven’t already been loaded automatically. (See
“Mail” on page 100.)
Load additional messages: Scroll to the bottom of the list of messages and tap “Load
More Messages.”
Read a message: Tap a mailbox, then tap a message. Within a message, tap or to
see the next or previous message.
Zoom in on part of a message Double-tap an area of the message to zoom in.
Double-tap again to zoom out.
Resize any column of text to t the screen Double-tap the text.
Resize a message manually Pinch to zoom in or out.
Chapter 6 Mail 61
Page 62

Follow a link Tap the link.
Tap attachment
to download
Text links are typically underlined and blue.
Many images are also links. A link can take you
to a webpage, open a map, or open a new
preaddressed email message.
Web and map links open Safari or Maps on
iPod touch. To return to your email, press the
Home button and tap Mail.
See a link’s destination address Touch and hold the link. The address pops up
next to your nger.
iPod touch displays most picture attachments (JPEG, GIF, and TIFF) inline with the text
in email messages. iPod touch can play many audio attachments (such as MP3, AAC,
WAV, and AIFF). You can download and view les (such as PDF, webpage, text, Pages,
Keynote, Numbers, and Microsoft Word, Excel, and PowerPoint documents) attached to
messages you receive.
Open an attached le: Tap the attachment. It downloads to iPod touch and then
opens.
You can view attachments in portrait or landscape orientation. If the format of an
attached le isn’t supported by iPod touch, you can see the name of the le but you
can’t open it. iPod touch supports the following document types:
.doc Microsoft Word
.docx Microsoft Word (XML)
.htm webpage
.html webpage
.key Keynote
.numbers Numbers
.pages Pages
62 Chapter 6 Mail
Page 63

.pdf Preview, Adobe Acrobat
.ppt Microsoft PowerPoint
.pptx Microsoft PowerPoint (XML)
.txt text
.vcf contact information
.xls Microsoft Excel
.xlsx Microsoft Excel (XML)
Save a photo attachment to your Photo Library: Press and hold the image, then tap
“Save Image.”
Check for new messages Choose a mailbox or tap at any time.
See all the recipients of a message Tap Details.
Tap a name or email address to see the recipient’s
contact information. Then tap an email address,
or text message to contact the person. Tap Hide
to hide the recipients.
Add an email recipient to your contacts list Tap the message and, if necessary, tap Details
to see the recipients. Then tap a name or email
address and tap Create New Contact or “Add to
Existing Contact.”
Mark a message as unread Open the message and tap “Mark as Unread.”
A blue dot
mailbox list until you open it again.
appears next to the message in the
Open a meeting invitation: Tap the invitation.
You can get contact information for the organizer and other attendees, set an alert,
add notes to the event, and add comments that are included in your response emailed
to the organizer. You can accept, tentatively accept, or decline the invitation. See
“Responding to Meeting Invitations” on page 79.
Turn “Push” on or o: In Settings, choose Fetch New Data, then tap Push. See “Fetch
New Data” on page 91.
Organizing Email
You can delete messages one at a time, or select a group to delete all at once. You can
also move messages from one mailbox or folder to another.
Chapter 6 Mail 63
Page 64

Delete a message: Open the message and tap . Or tap Edit, then tap next to the
To show the Delete button, swipe
left or right over the message.
message.
You can also delete a message directly from the mailbox message list by swiping left
or right over the message title, then tapping Delete.
Delete multiple messages: When viewing a list of messages, tap Edit, select the
messages you want to delete, then tap Delete.
Move a message to another mailbox or folder: When viewing a message, tap , then
choose a mailbox or folder.
Move multiple messages: When viewing a list of messages, tap Edit, select the
messages you want to move, then tap Move and select a mailbox or folder.
64 Chapter 6 Mail
Page 65

More Applications
7
Maps
Maps provides street maps, satellite photos, and hybrid views of locations in many of
the world’s countries. You can get detailed driving directions and trac information.
Find your current (approximate) location, and use your current location to get driving
directions to or from another place.
To use Maps, iPod touch must join a Wi-Fi network that is connected to the Internet.
See “Connecting to the Internet” on page 26.
WARNING: For important information about driving and navigating safely, see the
Important Product Information Guide at www.apple.com/support/manuals/ipodtouch.
1
Finding and Viewing Locations
Find a location and see a map:
1 Tap the search eld to bring up the keyboard.
2 Type an address, intersection, area, landmark, bookmark, contact, or zip code.
3 Tap Search.
1 Maps, directions, and location information depend on data collected and services provided by third parties. These data
services are subject to change and may not be available in all geographic areas, resulting in maps, directions, or location
information that may be unavailable, inaccurate, or incomplete. For more information, see www.apple.com/ipodtouch. In
order to provide your location, data is collected in a form that doesn’t personally identify you. If you don’t want such data
collected, don’t use the feature. Not using this feature won’t impact the functionality of your iPod touch.
65
Page 66

A pin marks the location. Tap the pin to see the name or description of the location.
Tap to get information about
the location, get directions, or add
the location to your bookmarks or
contacts list
Zoom in to a part of a map Pinch the map with two ngers. Or double-tap
the part you want to zoom in on. Double-tap
again to zoom in even closer.
Zoom out Pinch the map. Or tap the map with two ngers.
Tap with two ngers again to zoom out further.
Pan or scroll to another part of the map Drag up, down, left, or right.
Find your current location: Tap .
iPod touch uses Location Services to determine your current (approximate) location.
Location Services uses available information from local Wi-Fi networks (if you have WiFi turned on). The more accurate the information, the more precisely your location is
indicated. This feature is not available in all areas.
If Location Services is turned o, you’ll be prompted to turn it on. You can’t nd your
current location if Location Services is turned o. See “Location Services” on page 93.
A circle is used to show your approximate location. The size of the circle depends on
how precisely your location can be determined. If you drag the map and tap again,
iPod touch centers the map back to your location.
66 Chapter 7 More Applications
Page 67

Note: To conserve battery life, turn Location Services o when you’re not using it. In
Settings, choose General > Location Services.
Use the dropped pin: Tap , then tap Drop Pin.
A pin drops down on the map, which you can then drag to any location you choose.
Quickly move the pin to the area currently displayed: Tap , then tap Replace Pin.
Chapter 7 More Applications 67
Page 68

See a satellite or hybrid view: Tap , then tap Satellite or Hybrid to see just a satellite
view or a combined street map and satellite view.
To return to map view, tap Map.
See the location of someone’s address in your
contacts list
Add a location to your contacts list Find a location, tap the pin that points to it, tap
Tap in the search eld, then tap Contacts
and choose a contact.
To locate an address in this way, the contact must
include at least one address. If the contact has
more than one address, you must choose the one
you want to locate. You can also nd the location
of an address by tapping the address directly in
Contacts.
next to the name or description, tap “Add to
Contacts,” then tap “Create New Contact” or “Add
to Existing Contact.”
Bookmarking Locations
You can bookmark locations that you want to nd again later.
Bookmark a location: Find a location, tap the pin that points to it, tap next to the
name or description, then tap “Add to Bookmarks” at the bottom of the Info screen.
See a bookmarked location or recently viewed location: Tap in the search eld,
then tap Bookmarks or Recents.
Getting Directions
You can get step-by-step driving directions for a destination.
Get directions:
1 Tap Directions.
2 Enter starting and ending locations in the Start and End elds. By default, iPod touch
starts with your current approximate location (if available). Tap in either eld to
choose a location in Bookmarks (including your current approximate location and the
dropped pin, if available), Recents, or Contacts.
68 Chapter 7 More Applications
Page 69

For example, if a friend’s address is in your contacts list, you can tap Contacts and tap
your friend’s name instead of having to type the address.
To reverse the directions, tap .
3 Tap Route (if you entered locations manually).
4 Do one of the following:
 To view directions one step at a time, tap Start, then tap to see the next leg of the
trip. Tap to go back.
 To view all the directions in a list, tap , then tap List. Tap any item in the list to see
a map showing that leg of the trip. Tap Route Overview to return to the overview
screen.
The approximate distance and travel time appear at the top of the screen. If trac data
is available, the driving time is adjusted accordingly.
You can also get directions by nding a location on the map, tapping the pin that
points to it, tapping , then tapping Directions To Here or Directions From Here.
Switch start and end points, for reverse directions: Tap .
If you don’t see , tap List, then tap Edit.
See recently viewed directions: Tap in the search eld, then tap Recents.
Showing Trac Conditions
When available, you can show highway trac conditions on the map.
Show or hide trac conditions: Tap , then tap Show Trac or Hide Trac.
Chapter 7 More Applications 69
Page 70

Highways are color-coded according to the ow of trac:
Gray = No data currently available
Red = less than 25 miles per hour
Yellow = 25–50 miles per hour
Green = more than 50 miles per hour
Get directions
Visit website
Tap to show
contact info
If you don’t see color-coded highways, you may need to zoom out to a level where you
can see major roads, or trac conditions may not be available for that area.
Finding and Contacting Businesses
Find businesses in an area:
1 Find a location—for example, a city and state or country, or a street address—or scroll
to a location on a map.
2 Type the kind of business in the text eld and tap Search.
Pins appear for matching locations. For example, if you locate your city and then type
“movies” and tap Search, pins mark movie theatres in your city.
Tap the pin that marks a business to see its name or description.
Find businesses without nding the location rst: Type things like:
restaurants san francisco ca Â
apple inc new york Â
Contact a business or get directions: Tap the pin that marks a business, then tap
next to the name.
70 Chapter 7 More Applications
Page 71

From there, you can do the following:
Tap an email address to send email to, or a web address to visit. Â
For directions, tap Directions To Here or Directions From Here. Â
To add the business to your contacts list, scroll down and tap Create New Contact or Â
“Add to Existing Contact.”
See a list of the businesses found in the search: From the Map screen, tap List.
Tap a business to see its location. Or tap next to a business to see its information.
YouTube
YouTube features short videos submitted by people from around the world. (Not
available in all languages, and may not be available in all locations.)
To use YouTube, iPod touch must join a Wi-Fi network that is connected to the Internet.
See “Connecting to the Internet” on page 26.
Finding and Viewing Videos
You can browse YouTube or search for videos you want to watch.
Browse videos: Tap Featured, Most Viewed, or Bookmarks. Or tap More to browse by
Most Recent, Top Rated, or History.
 Featured: Videos reviewed and featured by YouTube sta.
 Most Viewed: Videos most seen by YouTube viewers. Tap All for all-time most viewed
videos, or Today or This Week for most-viewed videos of the day or week.
 Bookmarks: Videos you’ve bookmarked.
 Most Recent: Videos most recently submitted to YouTube.
 Top Rated: Videos most highly rated by YouTube viewers. To rate videos, go to
www.youtube.com.
 History: Videos you’ve viewed most recently.
Search for a video:
1 Tap Search, then tap the YouTube search eld.
2 Type a word or phrase that describes what you’re looking for, then tap Search. YouTube
shows results based on video titles, descriptions, tags, and user names.
Play a video: Tap the video.
The video begins to download to iPod touch and a progress bar appears. When
enough of the video has downloaded, it begins to play. You can also tap to start the
video.
Chapter 7 More Applications 71
Page 72

Next/Fast-forward
Play/Pause
Email
Scale
Download progress
Volume
Previous/rewind
Bookmark
Playhead
Scrubber bar
Controlling Video Playback
When a video starts playing, the controls disappear so they don’t obscure the video.
Show or hide video controls: Tap the screen.
Play or pause a video Tap or .
Raise or lower the volume Drag the volume slider. Or use the volume
buttons on the side of iPod touch.
Start a video over Tap
Skip to the next or previous video Tap
Rewind or fast-forward Touch and hold
Skip to any point in a video Drag the playhead along the scrubber bar.
Stop watching a video before it nishes playing Tap Done. Or press the Home
Toggle between scaling a video to ll the screen
or t to the screen
Bookmark a video Tap
Email a link to the video Tap
See details about a video and browse related
videos
.
twice to skip to the previous video. Tap
to skip to the next video.
or .
button.
Double-tap the video. You can also tap
make the video ll the screen, or tap
to
to make
it t the screen.
next to a video and tap Bookmark. Or
start playing a video and tap
. Tap Bookmarks
to see your bookmarked videos.
next to a video and tap Share. Or start
playing a video and tap
.
Play the whole video, tap Done while a video is
playing, or tap
next to any video in a list.
iPod touch shows the video’s rating, description,
date added, and other information. You also see a
list of related videos that you can tap to view.
72 Chapter 7 More Applications
Page 73

Changing the Browse Buttons
You can replace the Featured, Most Viewed, Bookmarks, and Search buttons at the
bottom of the screen with ones you use more frequently. For example, if you watch
top rated videos often but don’t watch many featured videos, you could replace the
Featured button with Top Rated.
Change the browse buttons: Tap More and tap Edit, then drag a button to the
bottom of the screen, over the button you want to replace.
You can drag the buttons at the bottom of the screen left or right to rearrange them.
When you nish, tap Done.
When you’re browsing for videos, tap More to access the browse buttons that aren’t
visible.
Add Your Own Videos to YouTube
For information about adding your own videos to YouTube, go to www.youtube.com
and tap Help.
Photos
iPod touch lets you carry your photos with you, so you can share them with your
family, friends, and associates.
Chapter 7 More Applications 73
Page 74

Syncing Photos with Your Computer
iTunes can sync your photos with the following applications:
 Mac: iPhoto 4.0.3 or later, or Aperture
 PC: Adobe Photoshop Album 2.0 or later, or Adobe Photoshop Elements 3.0 or later
See “What You Need” on page 5.
Viewing Photos
Photos synced from your computer can be viewed in Photos.
View photos:
1 In Photos:
Tap Photo Library to see all your photos. Â
Tap any photo album, or tap an album to see just those photos. Â
2 Tap a thumbnail to see the photo at full screen.
Show or hide the controls: Tap the full screen photo to show the controls. Tap again
to hide them.
74 Chapter 7 More Applications
Page 75

View a photo in landscape orientation: Rotate iPod touch sideways. The photo
reorients automatically and, if it’s in landscape format, expands to t the screen.
Zoom in on part of a photo: Double-tap where you want to zoom in. Double-tap
again to zoom out. You can also pinch to zoom in or out.
Pan around a photo: Drag the photo.
See the next or previous photo: Flick left or right. Or tap the screen to show the
controls, then tap or .
Chapter 7 More Applications 75
Page 76

Slideshows
You can view your photos as a slideshow, complete with background music.
View photos in a slideshow: Choose a photo album, then tap .
You can also tap to start a slideshow when viewing an individual photo. If you don’t
see , tap the photo to show the controls.
Stop a slideshow: Tap the screen.
Set slideshow settings: In Settings, choose Photos and set the following options:
 To set the length of time each slide is shown, tap Play Each Slide For and choose a time.
 To set transition eects when moving from photo to photo, tap Transition and choose a
transition type.
 To set whether slideshows repeat, turn Repeat on or o.
 To set whether photos are shown in random order, turn Shue on or o.
Play music during a slideshow: In iPod, play a song, then choose Photos from the
Home screen and start a slideshow.
Wallpaper
You see a wallpaper background picture as you unlock iPod touch.
Set a photo as wallpaper:
1 Choose any photo and tap , then tap Use As Wallpaper.
2 Drag the photo to pan, or pinch the photo to zoom in or out, until it looks the way you
want.
3 Tap Set Wallpaper.
You can also choose from several wallpaper pictures included with iPod touch by
choosing Settings > Wallpaper > Wallpaper from the Home screen.
Saving Images from an Email Message or Webpage
You can add images attached to an email message or webpage to your Photo Library.
Add a photo to your Photo Library: Press and hold the photo, then tap Save Image.
The image is added to the Photo Library. You can upload your pictures to your
computer’s photo application by connecting iPod touch to your computer.
Emailing a Photo
Email a photo: Choose any photo and tap , then tap Email Photo.
iPod touch must be set up for email and join a Wi-Fi network that is connected to the
Internet. See “Setting Up Email Accounts” on page 59.
76 Chapter 7 More Applications
Page 77

Sending a Photo to a MobileMe Gallery
If you have a MobileMe account, you can send photos directly from iPod touch to a
gallery you’ve created. You can also send photos to someone else’s MobileMe gallery if
that person has enabled email contributions.
Before you can send photos to a gallery, you must:
Set up your MobileMe account on iPod touch Â
Publish a MobileMe gallery, and allow photo uploading by email Â
Join a Wi-Fi network that is connected to the Internet Â
For more information about creating a gallery, see MobileMe Help.
Send a photo to your gallery: Choose any photo and tap , then tap “Send to
MobileMe.”
Assigning a Photo to a Contact
You can assign a photo to a contact.
Assign a photo to a contact:
1 Choose any photo on iPod touch and tap .
2 Tap Assign to Contact and choose a contact.
3 Position and size the photo until it looks the way you want.
Drag the photo to pan, and pinch to zoom in or out.
4 Tap Set Photo.
You can also assign a photo to a contact in Contacts by tapping Edit and then tapping
the picture icon.
Calendar
Calendar lets you view your events in a continuous list, by day, or by month. Sync
iPod touch with the calendars on your computer. Make, edit, or cancel appointments
on iPod touch, and have them synced back to your computer. If you have a Microsoft
Exchange account, you can receive and respond to meeting invitations.
Chapter 7 More Applications 77
Page 78

Syncing Calendars
You can sync Calendar in either of the following ways:
In iTunes, use the iPod touch preference panes to sync with iCal or Microsoft Â
Entourage on a Mac, or Microsoft Outlook 2003 or 2007 on a PC when you connect
iPod touch to your computer. See “Syncing with iTunes” on page 6.
In iPod touch’s Settings, select Calendar in your MobileMe or Microsoft Exchange Â
accounts to sync your calendar information over the air. See “Setting Up
Accounts” on page 10 .
To sync calendars, iPod touch must join a Wi-Fi network that is connected to the
Internet. See “Connecting to the Internet” on page 26.
Adding Calendar Events to iPod touch
You can also enter and edit calendar events directly on iPod touch.
Add an event: Tap and enter event information, then tap Done.
You can enter any of the following:
Title Â
Location Â
Starting and ending times (or turn on All-day if it’s an all-day event) Â
Repeat times—none, or every day, week, two weeks, month, or year Â
Alert time—from ve minutes to two days before the event Â
When you set an alert, the option to set a second alert appears. When an alert goes
o, iPod touch displays a message. You can also set iPod touch to play a sound (see
below).
Important: If you’re traveling, iPod touch may not alert you at the correct local time.
To manually set the correct time, see “Date and Time” on page 95.
Notes Â
To select which calendar to add the event to, tap Calendar. Read-only calendars don’t
appear in the list.
Edit an event Tap the event, then tap Edit.
Delete an event Tap the event, tap Edit, then scroll down and tap
78 Chapter 7 More Applications
Delete Event.
Page 79

Responding to Meeting Invitations
Number of
meeting invitations
If you have a Microsoft Exchange account set up on iPod touch with Calendars
enabled, you can receive and respond to meeting invitations from people in your
organization. When you receive an invitation, the meeting appears in your calendar
with a dotted line around it. The icon in the lower-right corner of the screen
indicates the total number of new invitations you have, as does the Calendar icon on
the Home screen. To receive and respond to meeting invitations, iPod touch must join
a Wi-Fi network that is connected to the Internet.
Respond to an invitation in Calendar:
1 Tap a meeting invitation in the calendar, or tap to display the Event screen and tap
an invitation.
Chapter 7 More Applications 79
Page 80

Tap “Invitation from” to get contact information for the meeting organizer. Tap the Â
email address to send a message to the organizer.
Tap Attendees to see the other people invited to the meeting. Tap a name to see Â
an attendee’s contact information. Tap the email address to send a message to the
attendee.
Tap Alert to set iPod touch to sound an alert before the meeting. Â
Tap Add Comments to add comments in the email response to the meeting Â
organizer. You comments will also appear in your Info screen for the meeting.
Notes are made by the meeting organizer.
2 Tap Accept, Maybe, or Decline.
When you accept, tentatively accept, or decline the invitation, a response email that
includes any comments you added is sent to the organizer.
If you accept or tentatively accept the meeting, you can change your response later.
Tap Add Comments if you want to change your comments.
Exchange meeting invitations are also sent in an email message, which lets you open
the meeting’s Info screen from Mail.
Open a meeting invitation in an email message: Tap the invitation.
Alerts
Set calendar alerts: In Settings, choose General > Sounds, then turn Calendar Alerts
on. If Calendar Alerts is o, iPod touch displays a message when an event is about to
occur but makes no sound.
Sounds alerts for invitations: In Settings, choose “Mail, Contacts, Calendar.” Under
Calendars, tap New Invitation Alert to turn it on.
Viewing Your Calendar
You can view your calendar events in a list, by day, or by month. The events for all of
your synced calendars appear in the same calendar on iPod touch.
Switch views: Tap List, Day, or Month.
 List view: All your appointments and events appear in a scrollable list.
 Day view: Scroll up or down to see the events in a day. Tap or to see the
previous or next day’s events.
80 Chapter 7 More Applications
Page 81

 Month view: Tap a day to see its events. Tap or to see the previous or next
Days with dots have
scheduled events
Add an event
Switch views
Events for selected day
Go to today
Respond to calendar
invitation
month.
See the details of an event: Tap the event.
Contacts
Chapter 7 More Applications 81
Importing and Syncing Contacts
You can add contacts to iPod touch in the following ways:
In iTunes, sync contacts with applications on your computer (see “ Â Syncing with
iTunes” on page 6)
Set up MobileMe or Microsoft Exchange accounts on iPod touch, with Contacts Â
enabled (see “Setting Up Accounts” on page 10 )
Install a prole that sets up an Exchange account, with Contacts enabled (see Â
“Installing Conguration Proles” on page 12 )
Enter contacts directly on iPod touch Â
Searching Contacts
You can search the rst, last, and company names in your contacts on iPod touch. If
you have a Microsoft Exchange account set up on iPod touch, you may also be able to
search your enterprise Global Address List (GAL) for contacts in the organization.
Page 82

When you enter search information, contacts with matching information appear
immediately as you start to type.
Search contacts: In Contacts, tap the search eld at the top of any list of contacts and
enter a rst, last, or company name.
Search a GAL: Tap Groups, tap Directories at the bottom of the list, then enter a rst,
last, or company name.
You can’t edit GAL contacts or save them to iPod touch.
Managing Contacts on iPod touch
Add a contact on iPod touch: Tap Contacts and tap .
Delete a contact In Contacts, choose a contact, than tap Edit. Scroll
down and tap Delete Contact.
Add a contact from the keypad Tap Keypad, enter a number, then tap
Create New Contact and enter information, or tap
“Add to Existing Contact” and choose a contact.
Edit contact information In Contacts, choose a contact, then tap Edit. To
add an item, tap
Enter a pause in a number Tap
Assign a photo to a contact:
1 Tap Contacts and choose a contact.
2 Tap Edit and tap Add Photo, or tap the existing photo.
3 Tap Choose Photo and choose a photo.
4 Drag and scale the photo as desired.
5 Tap Set Photo.
, then tap Pause. Pauses appear as
commas when the number is saved.
. Tap
. To delete an item, tap .
Stocks
Stocks lets you see the latest available quotes for your selected stocks. To use
Stocks, iPod touch must join a Wi-Fi network that is connected to the Internet. See
“Connecting to the Internet” on page 26.
82 Chapter 7 More Applications
Page 83

Viewing Stock Quotes
Quotes are updated every time you open Stocks while connected to the Internet.
Quotes may be delayed by up to 20 minutes.
Add a stock, index, or fund to the stock reader:
1 Tap , then tap .
2 Enter a symbol, company name, index, or fund name, then tap Search.
3 Choose an item in the search list.
Show a stock’s progress over a longer or shorter time period: Tap a stock symbol,
then tap 1d, 1w, 1m, 3m, 6m, 1y, or 2y. The chart adjusts to show progress over one day,
one week, one, three, or six months, or one or two years.
Delete a stock: Tap and tap next to a stock, then tap Delete.
Reorder stocks: Tap . Then drag next to a stock to a new place in the list.
Display monetary or percentage change: Tap the number showing the change. Tap it
again to switch back. Or tap and tap % or Numbers.
Getting More Information
See information about a stock at Yahoo.com: Select the stock and tap .
You can see news, information, websites related to the stock, and more.
Weather
Use Weather to get the current temperature and six-day forecast for one or more
cities around the world. To use Weather, iPod touch must join a Wi-Fi network that is
connected to the Internet. See “Connecting to the Internet” on page 26.
Chapter 7 More Applications 83
Page 84

Viewing Weather Summaries
Six-day forecast
Current temperature
Current conditions
Today’s high and low
Add and delete cities
Number of cities stored
Tap Weather from the Home screen to see the current weather for the selected city.
If the weather board is light blue, it’s daytime in that city—between 6:00 a.m. and 6:00
p.m. If the board is dark purple, it’s nighttime—between 6:00 p.m. and 6:00 a.m.
Add a city:
1 Tap , then tap .
2 Enter a city name or zip code, then tap Search.
3 Choose a city in the search list.
Switch to another city: Flick left or right, or tap to the left or right of the row of dots.
The number of dots below the weather board shows how many cities are stored.
Reorder cities: Tap , then drag next to a city to a new place in the list.
Delete a city: Tap and tap next to a city, then tap Delete.
Display temperature in Fahrenheit or Celsius: Tap , then tap °F or °C.
Getting More Weather Information
You can see a more detailed weather report, news and websites related to the city, and
more.
See information about a city at Yahoo.com: Tap .
Notes
Writing and Reading Notes
Notes are listed by date added, with the most recent note at the top. You can see the
rst few words of each note in the list.
84 Chapter 7 More Applications
Page 85

Add a note: Tap , then type your note and tap Done.
Read a note: Tap the note. Tap or to see the next or previous note.
Edit a note: Tap anywhere on the note to bring up the keyboard.
Delete a note: Tap the note, then tap .
Emailing Notes
Email a note: Tap the note, then tap .
To email a note, iPod touch must be set up for email. See “Setting Up Email
Accounts” on page 59.
Calculator
Using the Calculator
Tap numbers and functions in Calculator just as you would with a standard calculator.
When you tap the add, subtract, multiply, or divide button, a white ring appears
around the button to let you know the operation to be carried out. Rotate iPod touch
to get an expanded scientic calculator.
Standard Memory Functions
 C: Tap to clear the displayed number.
 MC: Tap to clear the memory.
 M+: Tap to add the displayed number to the number in memory. If no number is in
memory, tap to store the displayed number in memory.
 M-: Tap to subtract the displayed number from the number in memory.
 MR: Tap to replace the displayed number with the number in memory. If the button
has a white ring around it, there is a number stored in memory.
The stored number remains in memory when you switch between the standard and
scientic calculators.
Chapter 7 More Applications 85
Page 86

Scientic Calculator Keys
Rotate iPod touch to landscape orientation to display the scientic calculator.
2nd Changes the trigonometric buttons (sin, cos, tan, sinh, cosh, and tanh) to their inverse
functions (sin
x
2
. Tap 2nd again to return the buttons to their original functions.
-1
, cos-1, tan-1, sinh-1, cosh-1, and tanh-1). It also changes ln to log2, and ex to
( Opens a parenthetical expression. Expressions can be nested.
) Closes a parenthetical expression.
% Calculates percentages, adds markups, and subtracts discounts. To calculate a
percentage, use it with the multiplication (x) key. For example, to calculate 8% of 500,
enter
500 x 8 % =
which returns 40.
To add a markup or subtract a discount, use it with the plus (+) or minus (–) key. For
example, to compute the total cost of a $500 item with an 8% sales tax, enter
500 + 8 % =
which returns 540.
1/x Returns the reciprocal of a value in decimal format.
2
x
3
x
x
y
Squares a value.
Cubes a value.
Tap between values to raise the rst value to the power of the second value. For
example, to compute 3
x
4 =
3 y
4
, enter
which returns 81.
x! Calculates the factorial of a value.
√ Calculates the square root of a value.
x
√y Use between values to calculate the x root of y. For example to compute 4√81, enter
81
x
√y 4 =
which returns 3.
86 Chapter 7 More Applications
Page 87

log Returns the log base 10 of a value.
sin Calculates the sine of a value.
sin
-1
Calculates the arc sine of a value. (Available when the 2nd button is tapped.)
cos Calculates the cosine of a value.
cos
-1
Calculates the arc cosine of a value. (Available when the 2nd button is tapped.)
tan Calculates the tangent of a value.
tan
-1
Calculates the arc tangent of a value. (Available when the 2nd button is tapped.)
ln Calculates the natural log of a value.
log2 Calculates the log base 2. (Available when the 2nd button is tapped.)
sinh Calculates the hyperbolic sine of a value.
sinh
-1
Calculates the inverse hyperbolic sine of a value. (Available when the 2nd button is
tapped.)
cosh Calculates the hyperbolic cosine of a value.
cosh
-1
Calculates the inverse hyperbolic cosine of a value. (Available when the 2nd button is
tapped.)
tanh Calculates the hyperbolic tangent of a value.
tanh
-1
Calculates the inverse hyperbolic tangent of a value. (Available when the 2nd button is
tapped.)
x
e
Tap after entering a value to raise the constant “e” (2.718281828459045...) to the power
of that value.
x
2
Calculates 2 to the power of the displayed value. For example, 10 2x = 1024. (Available
when the 2nd button is tapped.)
Rad Changes mode to express trigonometric functions in radians.
Deg Changes mode to express trigonometric functions in degrees.
π Enters the value of π (3.141592653589793...).
EE An operator that multiplies the currently displayed value by 10 to the power of the next
value you enter.
Rand Returns a random number between 0 and 1.
Clock
Clock lets you see the time in dierent places, set an alarm, use a stopwatch, and set a
timer.
Chapter 7 More Applications 87
Page 88

World Clocks
You can add clocks to show the time in other major cities and time zones around the
world.
View clocks: Tap World Clock.
If the clock face is white, it’s daytime in that city. If the clock face is black, it’s nighttime.
If you have more than four clocks, ick to scroll through them.
Add a clock:
1 Tap World Clock.
2 Tap , then type the name of a city.
Cities matching what you’ve typed appear below.
3 Tap a city to add a clock for that city.
If you don’t see the city you’re looking for, try a major city in the same time zone.
Delete a clock: Tap World Clock and tap Edit. Then tap next to a clock and tap
Delete.
Rearrange clocks: Tap World Clock and tap Edit. Then drag next to a clock to a new
place in the list.
Alarms
You can set multiple alarms. Set each alarm to repeat on days you specify, or to sound
only once.
Set an alarm:
1 Tap Alarm and tap .
2 Adjust any of the following settings:
 To set the alarm to repeat on certain days, tap Repeat and choose the days.
 To choose the ringtone that sounds when the alarm goes o, tap Sound.
 To set whether the alarm gives you the option to hit snooze, turn Snooze on or o. If
Snooze is on and you tap Snooze when the alarm sounds, the alarm stops and then
sounds again in ten minutes.
 To give the alarm a description, tap Label. iPod touch displays the label when the
alarm sounds.
If at least one alarm is set and turned on, appears in the iPod touch status bar at the
top of the screen.
Turn an alarm on or o: Tap Alarm and turn any alarm on or o. If an alarm is turned
o, it won’t sound again unless you turn it back on.
If an alarm is set to sound only once, it turns o automatically after it sounds. You can
turn it on again to reenable it.
88 Chapter 7 More Applications
Page 89

Change settings for an alarm: Tap Alarm and tap Edit, then tap next to the alarm
you want to change.
Delete an alarm: Tap Alarm and tap Edit, then tap next to the alarm and tap
Delete.
Stopwatch
Use the stopwatch to time an event:
1 Tap Stopwatch.
2 Tap Start to start the stopwatch.
 To record lap times, tap Lap after each lap.
 To pause the stopwatch, tap Stop. Tap Start to resume.
 To reset the stopwatch, tap Reset when the stopwatch is pause.
If you start the stopwatch and go to another iPod touch application, the stopwatch
continues running in the background.
Timer
Set the timer: Tap Timer, then ick to set the number of hours and minutes. Tap Start
to start the timer.
Choose the sound: Tap When Timer Ends.
Set a sleep timer: Set the timer, then tap When Timer Ends and choose Sleep iPod.
When you set a sleep timer, iPod touch stops playing music or video when the timer
ends.
If you start the timer and go to another iPod touch application, the timer continues
running in the background.
Nike + iPod
When activated in Settings, the Nike + iPod application appears on the Home screen
for controlling the Nike + iPod Sensor, sold separately. Nike + iPod is not available
on the rst generation iPod touch. See the Nike + iPod documentation for specic
instructions on activating and using Nike + iPod.
Chapter 7 More Applications 89
Page 90

Settings
8
Settings allows you to customize iPod touch applications, set the date and time,
congure your network connection, and enter other preferences for iPod touch.
Wi-Fi
Wi-Fi settings determine whether iPod touch uses local Wi-Fi networks to connect to
the Internet.
Turn Wi-Fi on or o: Choose Wi-Fi and turn Wi-Fi on or o.
Join a Wi-Fi network: Choose Wi-Fi, wait a moment as iPod touch detects networks
in range, then select a network. If necessary, enter a password and tap Join. (Networks
that require a password appear with a lock icon.)
Once you’ve joined a Wi-Fi network manually, iPod touch automatically joins it
whenever the network is in range. If more than one previously used network is in
range, iPod touch joins the one last used.
90
When iPod touch is joined to a Wi-Fi network, the Wi-Fi icon in the status bar at
the top of the screen shows signal strength. The more bars you see, the stronger the
signal.
Set iPod touch to ask if you want to join a new network: Choose Wi-Fi and turn “Ask
to Join Networks” on or o.
When you are trying to access the Internet, by using Safari or Mail for example, and
you are not in range of a Wi-Fi network you have previously used, this option tells
iPod touch to look for another network. iPod touch displays a list of all available Wi-Fi
networks that you can choose from. (Networks that require a password appear with a
lock icon.) If “Ask to Join Networks” is turned o, you must manually join a network to
connect to the Internet when a previously used network isn’t available.
Page 91

Forget a network, so iPod touch doesn’t join it automatically: Choose Wi-Fi and tap
next to a network you’ve joined before. Then tap “Forget this Network.”
Join a closed Wi-Fi network: To join a Wi-Fi network that isn’t shown in the list of
scanned networks, choose Wi-Fi > Other and enter the network name. If the network
requires a password, tap Security, tap the type of security the network uses, and enter
the password.
You must already know the network name, password, and security type to connect to
a closed network.
Some Wi-Fi networks may require you to enter or adjust additional settings, such as a
client ID or static IP address. Ask the network administrator which settings to use.
Adjust settings to connect to a Wi-Fi network: Choose Wi-Fi, then tap next to a
network.
VPN
This setting appears when you have VPN congured on iPod touch, allowing you to
turn VPN on or o. See “Network” on page 93.
Fetch New Data
This setting lets you turn Push on or o for MobileMe, Microsoft Exchange, Yahoo!
Mail, and any other “push” accounts you have congured on iPod touch. Push accounts
automatically deliver new information to iPod touch when new information appears
on the server (some delays may occur). To fetch or sync pushed data, iPod touch must
join a Wi-Fi network that is connected to the Internet. You might want to turn Push o
to suspend delivery of email and other information, or to conserve battery life.
When Push is o and with accounts that do not support push, data can still be
“fetched”—that is, iPod touch can check with the server and see if new information is
available. Use the Fetch New Data setting to determine how often data is requested.
For optimal battery life, don’t fetch too frequently.
Turn Push on: Tap Fetch New Data, then tap to turn Push on.
Set the interval to fetch data: Tap Fetch New Data, then choose how often you want
to fetch data for all accounts.
To conserve battery life, fetch less frequently.
Set fetch or push settings for individual accounts: In Fetch New Data, tap Advanced,
then tap an account.
Setting Push to OFF or Fetch to Manually in the Fetch New Data screen overrides
individual account settings.
Chapter 8 Settings 91
Page 92

Brightness
Screen brightness aects battery life. Dim the screen to extend the time before you
need to recharge iPod touch, or use Auto-Brightness.
Adjust the screen brightness: Choose Brightness and drag the slider.
Set whether iPod touch adjusts screen brightness automatically: Choose Brightness
and turn Auto-Brightness on or o. If Auto-Brightness is on, iPod touch adjusts the
screen brightness for current light conditions using the built-in ambient light sensor.
General
The General settings include date and time, security, network, and other settings that
aect more than one application. This is also where you can nd information about
your iPod touch, and reset iPod touch to its original state.
About
Choose General > About to get information about iPod touch, including:
Number of songs, videos, and photos Â
Total storage capacity Â
Space available Â
Software version Â
Serial and model numbers Â
Wi-Fi addresses Â
Legal information Â
Wallpaper
You see a wallpaper background picture when you unlock iPod touch. You can
select one of the images that came with iPod touch, or use a photo you’ve synced to
iPod touch from your computer.
Set wallpaper: Choose Wallpaper and choose a picture.
Sounds
Adjust alerts volume: Choose General > Sounds and drag the slider. Or, if no song or
video is playing use the volume buttons on the side of iPod touch.
Note: On the rst generation iPod touch, choose General > Sounds and select whether
you want sound eects to play over the internal speaker, through the headphones, or
both.
92 Chapter 8 Settings
Page 93

Set alert and eects sounds: Choose General > Sounds and turn items on or o.
You can set iPod touch to play a sound whenever you:
Get an email message Â
Send an email message Â
Have an appointment that you’ve set up to alert you Â
Lock iPod touch Â
Type using the keyboard Â
Network
Use the Network settings to congure a VPN (virtual private network) connection, or
access Wi-Fi settings.
Add a new VPN conguration: Choose General > Network > VPN > Add VPN
Conguration.
VPNs used within organizations allow you to communicate private information
securely over a non-private network. You may need to congure VPN, for example, to
access your work email on iPod touch.
iPod touch can connect to VPNs that use the L2TP, PPTP, or Cisco IPSec protocols. VPN
works over both Wi-Fi and cellular data network connections.
Ask your network administrator which settings to use. In most cases, if you’ve set up
VPN on your computer, you can use the same VPN settings for iPod touch.
Once you’ve entered VPN settings, a VPN switch appears at the top level of the
Settings menu that you can use to turn VPN on or o.
Change a VPN conguration: Choose General > Network > VPN and tap the
conguration you want to update.
Turn VPN on or o: Tap Settings and turn VPN on or o.
Delete a VPN conguration: Choose General > Network > VPN, tap the blue arrow
to the right of the conguration name, and tap Delete VPN at the bottom of the
conguration screen.
Use Wi-Fi: See “Wi-Fi” on page 90.
Location Services
Location Services allows applications such as Maps to gather and use data indicating
your location. Location Services does not correlate the data it collects with your
personally identiable information. Your approximate location is determined using
available information from local Wi-Fi networks (if you have Wi-Fi turned on).
You can turn Location Services o if you don’t want to use this feature. If you turn
Location Services o, you’ll be prompted to turn it back on again the next time an
application tries to use this feature.
Chapter 8 Settings 93
Page 94

Turn Location Services on or o: Choose General > Location Services and turn
location services on or o.
To conserve battery life, turn Location Services o when you’re not using it.
Auto-Lock
Locking iPod touch turns o the display to save your battery and to prevent
unintended operation of iPod touch.
Set the amount of time before iPod touch locks: Choose General > Auto-Lock and
choose a time.
Passcode Lock
By default, iPod touch doesn’t require you to enter a passcode to unlock it.
Set a passcode: Choose General > Passcode Lock and enter a 4-digit passcode,
then enter the passcode again to verify it. iPod touch then requires you to enter the
passcode to unlock it or to display the passcode lock settings.
Turn passcode lock o: Choose General > Passcode Lock, enter your passcode, and
tap Turn Passcode O, then enter your passcode again.
Change the passcode: Choose General > Passcode Lock, enter your passcode, and
tap Change Passcode. Enter your passcode again, then enter and reenter your new
passcode.
If you forget your passcode, you must restore the iPod touch software. See “Updating
and Restoring iPod touch Software” on page 111.
Set how long before your passcode is required: Choose General > Passcode Lock and
enter your passcode. Tap Require Passcode, then select how long iPod touch can be
idle before you need to enter a passcode to unlock it.
Erase data after ten failed passcode attempts: Choose General > Passcode Lock,
enter your passcode, and tap Erase Data to turn it on.
After ten failed passcode attempts, your settings are reset to their defaults and all your
information and media on your iPod touch is removed by overwriting the data stored
on iPod touch.
Important: You can’t use iPod touch while data is being overwritten. This can take one
to four hours or more, depending on the storage capacity of your iPod touch.
94 Chapter 8 Settings
Page 95

Restrictions
You can set restrictions for iPod content for the use of some applications on
iPod touch. For example, parents can restrict explicit music from being seen on
playlists, or turn o YouTube access entirely.
Explicit music or video content purchased from the iTunes Store will be hidden. Explicit
content is marked as such by content providers (such as record labels) when sold
through the iTunes Store.
Safari is disabled and its icon is removed from the Home screen. You cannot browse the
web or access web clips.
YouTube is disabled and its icon is removed from the Home screen.
The iTunes Wi-Fi Music Store is disabled and its icon is removed from the Home screen.
You cannot preview, purchase, or download content.
The App Store is disabled and its icon is removed from the Home screen. You cannot
install applications on iPod touch.
Set restrictions:
1 Choose General > Restrictions, then tap Enable Restrictions.
2 Enter a four-digit passcode.
3 Reenter the passcode.
4 Set the restrictions you want by tapping individual controls on or o. By default, all
controls are on (not restricted). Tap an item to turn it o and restrict its use.
Turn o all restrictions: Choose General > Restrictions, then enter the passcode. Tap
Disable Restrictions, then reenter the passcode.
If you forget your passcode, you must restore your iPod touch software from iTunes.
See “Updating and Restoring iPod touch Software” on page 111 .
Date and Time
These settings apply to the time shown in the status bar at the top of the screen, and
in world clocks and calendars.
Set whether iPod touch shows 24-hour time or 12-hour time: Choose General > Date
& Time and turn 24-Hour Time on or o. (Not available in all countries.)
Set the date and time: Choose General > Date & Time. Tap Time Zone and enter the
name of a major city in your time zone. Tap the “Date & Time” return button, then tap
“Set Date & Time” and enter the date and time.
Chapter 8 Settings 95
Page 96

Keyboard
Turn Auto-Correction on or o: Choose General > Keyboard and turn Auto-Correction
on or o.
By default, if the default keyboard for the language you select has a dictionary,
iPod touch automatically suggests corrections or completed words as you type.
Turn Auto-Capitalization on or o: Choose General > Keyboard and turn Auto-
Capitalization on or o.
By default, iPod touch automatically capitalizes words after you type sentence-ending
punctuation or a return character.
Set whether caps lock is enabled: Choose General > Keyboard and turn Enable Caps
Lock on or o.
If caps lock is enabled and you double-tap the Shift key on the keyboard, all letters
you type are uppercase. The Shift key turns blue when caps lock is on.
Turn the “.” shortcut on or o: Choose General > Keyboard and turn “.” Shortcut on or
o.
The “.” shortcut lets you double-tap the space bar to enter a period followed by a space
when you’re typing. It is on by default.
Turn international keyboards on or o: Choose General > Keyboards > International
Keyboards and turn on the keyboards you want.
If more than one keyboard is turned on, tap to switch keyboards when you’re
typing. When you tap the symbol, the name of the newly active keyboard appears
briey. See “International Keyboards” on page 23.
International
Use the International settings to set the language for iPod touch, turn keyboards for
dierent languages on or o, and set the date, time, and telephone number formats for
your region.
Set the language for iPod touch: Choose General > International > Language, choose
the language you want to use, and tap Done.
Turn international keyboards on or o: Choose General > International > Keyboards,
and turn on the keyboards you want.
If more than one keyboard is turned on, tap to switch keyboards when you’re
typing. When you tap the symbol, the name of the newly active keyboard appears
briey. See “International Keyboards” on page 23.
Set date, time, and telephone number formats: Choose General > International >
Region Format, and choose your region.
96 Chapter 8 Settings
Page 97

Resetting iPod touch
Reset all settings: Choose General > Reset and tap Reset All Settings.
All your preferences and settings are reset. Information, such as your contacts and
calendars, and media, such as your songs and videos, are not deleted.
Erase all content and settings: Connect iPod touch to your computer or a power
adapter. Choose General > Reset and tap “Erase All Content and Settings.”
This feature resets all settings to their defaults and removes all your information and
media on your iPod touch by overwriting the data stored on iPod touch.
Important: You can’t use iPod touch while data is being overwritten. This can take one
to four hours or more, depending on the storage capacity of your iPod touch.
Reset the keyboard dictionary: Choose General > Reset and tap Reset Keyboard
Dictionary.
You add words to the keyboard dictionary by rejecting words iPod touch suggests
as you type. Tap a word to reject the correction and add the word to the keyboard
dictionary. Resetting the keyboard dictionary erases all words you’ve added.
Reset network settings: Choose General > Reset and tap Reset Network Settings.
When you reset network settings, your list of previously used networks and your VPN
settings are removed. Wi-Fi is turned o and then back on, disconnecting you from any
network you’re on. The Wi-Fi and “Ask to Join Networks” settings are left turned on.
Reset the Home screen layout: Choose General > Reset and tap Reset Home Screen
Layout.
Reset the location warnings: Choose General > Reset and tap Reset Location
Warnings.
Location warnings are the requests made by applications (such as Maps) to use
Location Services with those applications. iPod touch stops presenting the warning for
an application the second time you tap OK. Tap Reset Location Warnings to resume the
warnings.
Music
The Music settings apply to songs, podcasts, and audiobooks.
Set iTunes to play songs at the same sound level: In iTunes, choose iTunes >
Preferences if you’re using a Mac, or Edit > Preferences if you’re using a PC, then click
Playback and select Sound Check.
Set iPod touch to use the iTunes volume settings (Sound Check): Choose Music and
turn Sound Check on.
You can set audiobooks to play faster than normal so you can hear them more quickly,
or slower so you can hear them more clearly.
Chapter 8 Settings 97
Page 98

Set audiobook play speed: Choose Music > Audiobook Speed, then choose Slower,
Normal, or Faster.
Use the equalizer to change the sound on iPod touch to suit a particular sound or
style: Choose Music > EQ and choose a setting.
Set a volume limit for music and videos: Choose Music > Volume Limit and drag the
slider to adjust the maximum volume.
Tap Lock Volume Limit to assign a code to prevent the setting from being changed.
WARNING: For important information about avoiding hearing loss, see the Important
Product Information Guide at www.apple.com/support/manuals/ipodtouch.
Video
Video settings apply to video content, including rented movies. You can set where to
resume playing videos that you previously started, turn closed captioning on or o,
and set up iPod touch to play videos on your TV.
Set where to resume playing: Choose Video > Start Playing, then select whether
you want videos that you previously started watching to resume playing from the
beginning or where you left o.
Turn closed captioning on or o: Choose Video and turn Closed Captioning on or o.
TV Out
Use these settings to set up how iPod touch plays videos on your TV. For more
information about using iPod touch to play videos on your TV, see “Watching Videos
on a TV” on page 39.
Turn widescreen on or o: Choose Video and turn Widescreen on or o.
Set TV signal to NTSC or PAL: Choose Video > TV Signal and select NTSC or PAL.
NTSC and PAL are TV broadcast standards. iPod touch displays NTSC 480p/PAL 576p
when attached to a TV using a component cable, or NTSC 480i/PAL 576i using a
composite cable. Your TV might use either of these, depending on where you bought
it. If you’re not sure which to use, check the documentation that came with your TV.
Photos
Use Photos settings to specify how slideshows display your photos.
Set the length of time each slide is shown: Choose Photos > Play Each Slide For and
select the length of time.
Set a transition eect: Choose Photos > Transition and select a transition eect.
Set whether to repeat slideshows: Choose Photos and turn Repeat on or o.
Set photos to appear randomly or in order: Choose Photos and turn Shue on or o.
98 Chapter 8 Settings
Page 99

Mail, Contacts, Calendars
Use Mail, Contacts, Calendars settings to set up and customize accounts for iPod touch:
Microsoft Exchange Â
MobileMe Â
Google email Â
Yahoo! Mail Â
AOL Â
Other POP and IMAP mail systems Â
Accounts
The Accounts section lets you set up accounts on iPod touch. The specic settings
that appear depend on the type of account you’re setting up. Your service provider or
system administrator should be able to provide the information you need to enter.
For more information about adding accounts, see “Setting Up Accounts” on page 10 .
Change an account’s settings: Choose “Mail, Contacts, Calendars,” choose an account,
then make the changes you want.
Changes you make to an account’s settings are not synced to your computer, so you
can congure your accounts to work with iPod touch without aecting the account
settings on your computer.
Stop using an account: Choose “Mail, Contacts, Calendars,” choose an account, then
turn Account o.
If an account is o, iPod touch doesn’t display the account and doesn’t send or check
email from or sync other information with that account, until you turn it back on.
Adjust advanced settings: Choose “Mail, Contacts, Calendars,” choose an account,
then do one of the following:
 To set whether drafts, sent messages, and deleted messages are stored on iPod touch or
remotely on your email server (IMAP accounts only), tap Advanced and choose Drafts
Mailbox, Sent Mailbox, or Deleted Mailbox.
If you store messages on iPod touch, you can see them even when iPod touch isn’t
connected to the Internet.
 To set how long before messages are removed permanently from Mail on iPod touch, tap
Advanced and tap Remove, then choose a time: Never, or after one day, one week, or
one month.
 To adjust email server settings, tap Host Name, User Name, or Password under
Incoming Mail Server or Outgoing Mail Server. Ask your network administrator or
Internet service provider for the correct settings.
 To adjust SSL and password settings, tap Advanced. Ask your network administrator or
Internet service provider for the correct settings.
Chapter 8 Settings 99
Page 100

Delete an account from iPod touch: Choose “Mail, Contacts, Calendars,” choose an
account, then scroll down and tap Delete Account.
Deleting an account means you can no longer access the account with your
iPod touch. All email and the contacts, calendar, and bookmark information synced
with the account are removed from iPod touch. However, deleting an account doesn’t
remove the account or its associated information from your computer.
Mail
The Mail settings, except where noted, apply to all accounts you have set up on
iPod touch.
To turn alerts sounds for new or sent mail on or o, use the General > Sounds settings.
Set the number of messages shown on iPod touch: Choose “Mail, Contacts,
Calendars” > Show, then choose a setting.
Choose to see the most recent 25, 50, 75, 100, or 200 messages. To download additional
messages when you’re in Mail, scroll to the bottom of your inbox and tap Load More
Messages.
Note: For Microsoft Exchange accounts, choose “Mail, Contacts, Calendars” and choose
the Exchange account. Tap “Mail days to sync” and choose the number of days of mail
you want to sync with the server.
Set how many lines of each message are previewed in the message list: Choose
“Mail, Contacts, Calendars” > Preview, then choose a setting.
You can choose to see up to ve lines of each message. That way, you can scan a list of
messages in a mailbox and get an idea of what each message is about.
Set a minimum font size for messages: Choose “Mail, Contacts, Calendars” > Minimum
Font Size, then choose Small, Medium, Large, Extra Large, or Giant.
Set whether iPod touch shows To and Cc labels in message lists: Choose “Mail,
Contacts, Calendars,” then turn Show To/Cc Label on or o.
If Show To/Cc Label is on, To or Cc next to each message in a list indicates whether
the message was sent directly to you or you received a copy.
Set whether iPod touch conrms that you want to delete a message: Choose “Mail,
Contacts, Calendars” and turn Ask Before Deleting on or o.
If Ask Before Deleting is on, to delete a message you must tap , then conrm by
tapping Delete.
Set whether iPod touch sends you a copy of every message you send: Choose “Mail,
Contacts, Calendars,” then turn Always Bcc Myself on or o.
Set the default email account: Choose “Mail, Contacts, Calendars” > Default Account,
then choose an account.
10 0 Chapter 8 Settings
 Loading...