

Page 1
Exploring Aperture
Page 2

K
Apple Inc.
Copyright © 2008 Apple Inc. All rights reserved.
The owner or authorized user of a valid copy of Aperture
software may reproduce this publication for the purpose
of learning to use such software. No part of this
publication may be reproduced or transmitted for
commercial purposes, such as selling copies of this
publication or for providing paid for support services.
Every effort has been made to ensure that the
information in this manual is accurate. Apple is not
responsible for printing or clerical errors. Because Apple
frequently releases new versions and updates to its
system software, applications, and Internet sites, images
shown in this book may be slightly different from what
you see on your screen.
The Apple logo is a trademark of Apple Inc., registered
in the U.S. and other countries. Use of the “keyboard”
Apple logo (Shift-Option-K) for commercial purposes
without the prior written consent of Apple may
constitute trademark infringement and unfair
competition in violation of federal and state laws.
Apple, the Apple logo, and iTunes are trademarks of
Apple Inc., registered in the U.S. and other countries.
Aperture and Safari are trademarks of Apple Inc.
MobileMe is a service mark of Apple Inc., registered in
the U.S. and other countries.
Other company and product names mentioned herein
are trademarks of their respective companies. Mention
of third-party products is for informational purposes
only and constitutes neither an endorsement nor a
recommendation. Apple assumes no responsibility with
regard to the performance or use of these products.
Page 3

Contents
7 Chapter 1: Exploring Aperture
8
Opening Aperture
10
Try This: Exploring the Main Window
14
Try This: Exploring Basic Procedures
16
Learning About the Projects Inspector
19
Basic Concepts You Should Know
21 Chapter 2: Importing Basics
22
Try This: Exploring Import Options
28
Learning About Where Your Image Files Reside
29
Try This: Selecting Version Names for Imported Images
33
Basic Concepts You Should Know
35 Chapter 3: Learning About the Browser
36
Try This: Exploring the Browser
39
Try This: Stacking Images
41
Try This: Displaying the Images You Want to Work With
44
Learning About Masters and Versions
47
Basic Concepts You Should Know
3
Page 4

49 Chapter 4: Learning About the Viewer
50
Try This: Exploring the Viewer
53
Try This: Exploring Adjustment Tools
55
Try This: Displaying Metadata with Images
57
Learning About the Metadata Inspector
59
Learning About Badges
60
Basic Concepts You Should Know
63 Chapter 5: Adjusting Images in Full Screen View
64
Try This: Exploring Full Screen View
69
Try This: Adjusting Exposure with the Adjustments Pane of the Inspector HUD
73
Try This: Enhancing an Image
74
Try This: Adjusting White Balance
76
Learning About the Adjustments in the Inspector HUD and Adjustments Inspector
79
Basic Concepts You Should Know
81 Chapter 6: Applying Keywords to Images
82
Try This: Exploring the Keywords HUD
86
Try This: Working with Keywords in the Keywords HUD
88
Learning About the Lift & Stamp HUD
91
Basic Concepts You Should Know
4
Contents
Page 5

93 Chapter 7: Presenting Your Images
94
Try This: Exploring Slideshows
97
Try This: Exploring Aperture Webpages
10 6
Try This: Exploring Aperture Books
111
Learning About Books
115
Basic Concepts You Should Know
117 Chapter 8: Printing Images
118
Try This: Exploring Printing
121
Basic Concepts You Should Know
12 3 Chapter 9: Backing Up Your Images
12 3
Learning About Making Backups
12 5
Try This: Exploring the Vault Pane
12 9
Basic Concepts You Should Know
131 Chapter 10: Getting Answers
131
Try This: Exploring Aperture Help
13 2
What’s Next?
Contents
5
Page 6
Page 7

1
Exploring Aperture
1
Welcome to Aperture. If you’re new to the Aperture digital
image workflow, this guide is for you. Here you’ll open sample
projects and learn by doing.
Each chapter of this book presents major features and guides you in trying things out.
Feel free to explore on your own. Have fun learning the basics. Later, when you feel
comfortable, you can bring in your own photos and begin serious work with Aperture.
This book assumes that you’ve installed Aperture on your computer and that you have
the Aperture installation disc in your computer’s drive.
Â
If you haven’t installed Aperture yet:
Â
If you haven’t inserted the Aperture installation disc in your drive:
installation disc in your Aperture box and insert it in your disc drive now.
Â
If you prefer to start by reading in-depth explanations of concepts and procedures used
with Aperture:
Open Aperture, then choose Help > Aperture User Manual.
See the
Installing Your Software
booklet.
Locate the Aperture
7
Page 8
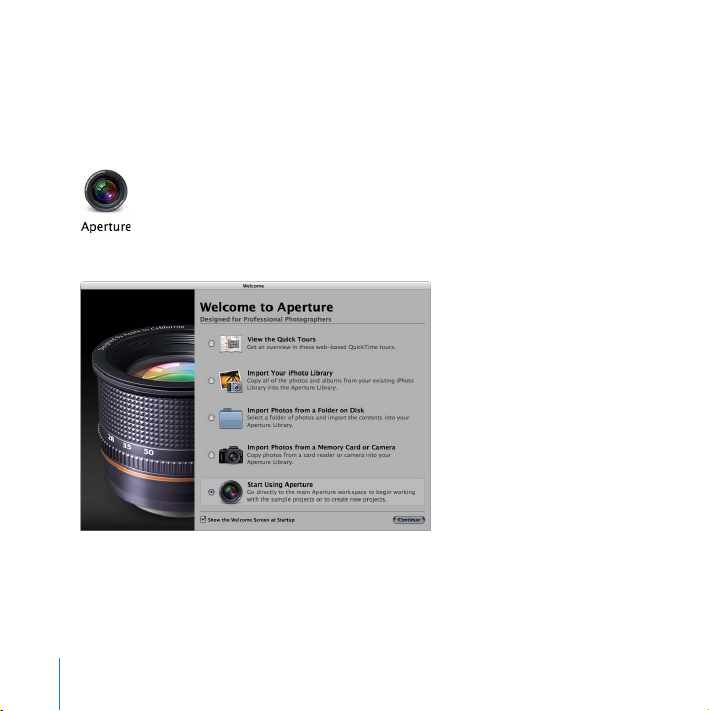
Opening Aperture
You’ll start by opening Aperture and using a sample project.
To open Aperture:
1
Double-click the Aperture icon in your Applications folder.
The first time you open Aperture, you have several choices.
2
Click the Start Using Aperture button.
3
Click Continue.
4
When a dialog appears asking whether you want to import sample projects, click Import.
8 Chapter 1
Exploring Aperture
Page 9

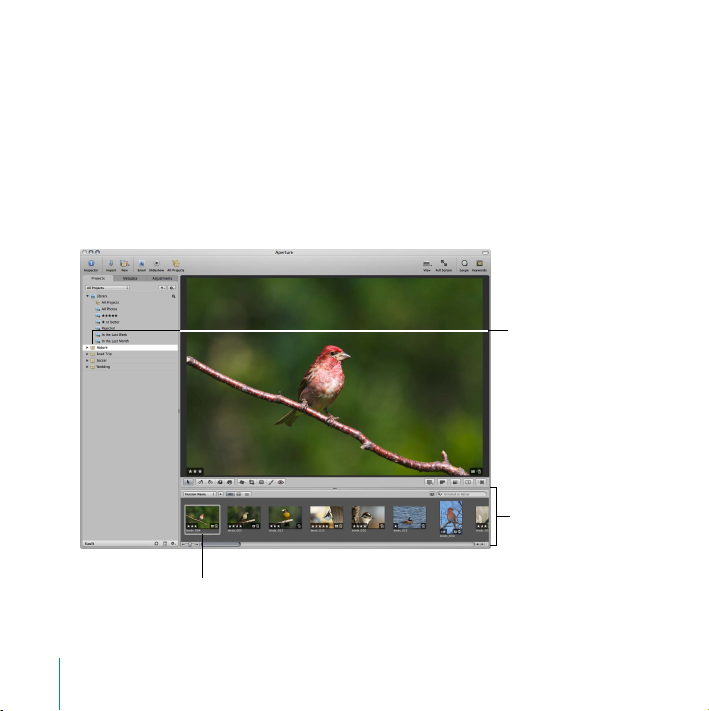
After Aperture takes a few moments to import the sample projects, your screen will
look similar to this:
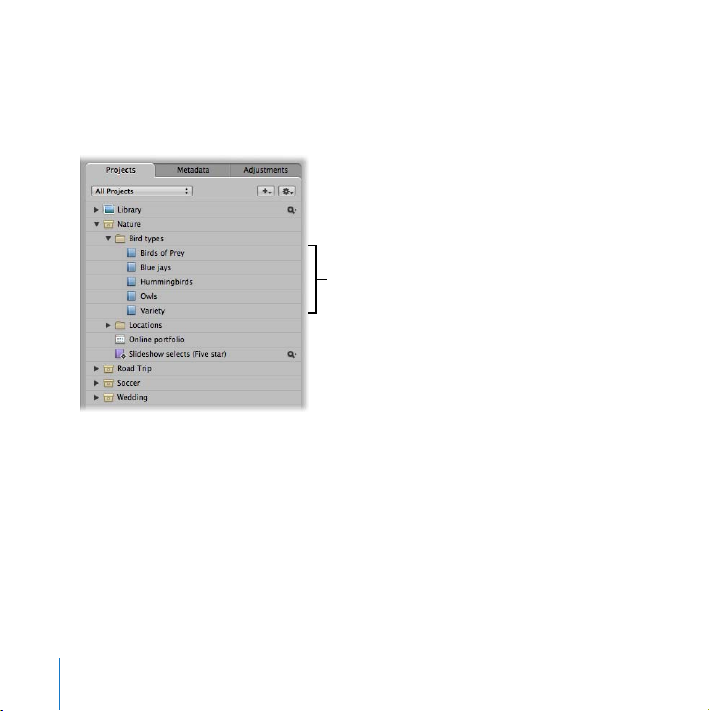
These sample projects
hold sample images and
albums. Click a project or
Inspector button
Projects inspector
album to see its images
in the Browser.
Toolbar
Viewer
Browser
On the left you see the Projects inspector, where you create and work with projects
that hold your images. Now you’re ready to explore the main window.
Chapter 1
Exploring Aperture
9
Page 10
Try This: Exploring the Main Window
First you’ll look at some images, and then you’ll explore some important parts of the
Aperture interface.
Remember, you first select a project or album in the Projects inspector to display the
images it contains.
Getting Ready
m
Select the Nature project in the Projects inspector.
Click the
Nature project here
to select it.
The project’s images
appear in the Browser.
A selected image appears
in a white border.
10 Chapter 1
Exploring Aperture
Page 11
Jumping In
Feel free to try out any of the following to see what happens.
Select images:
m
Click an image in the Browser. Press the arrow keys.
m
Shift-click images in the Browser.
m
Holding down the Shift key, press the arrow keys.
Change main window views:
m
Choose View > Browser Only to display the Browser only. Press the arrow keys.
m
Choose View > Viewer Only to display a selected image in the Viewer only. Press the
arrow keys.
m
Press V (for
view, and Viewer Only view.
m
Choose View > Browser Only from the View pop-up menu in the toolbar.
m
Double-click an image in the Browser to display it in Viewer Only view. Double-click the
image in the Viewer to change back to the Browser Only view.
Chapter 1
view
) several times to switch between Browser Only view, Browser & Viewer
Exploring Aperture
11
Page 12
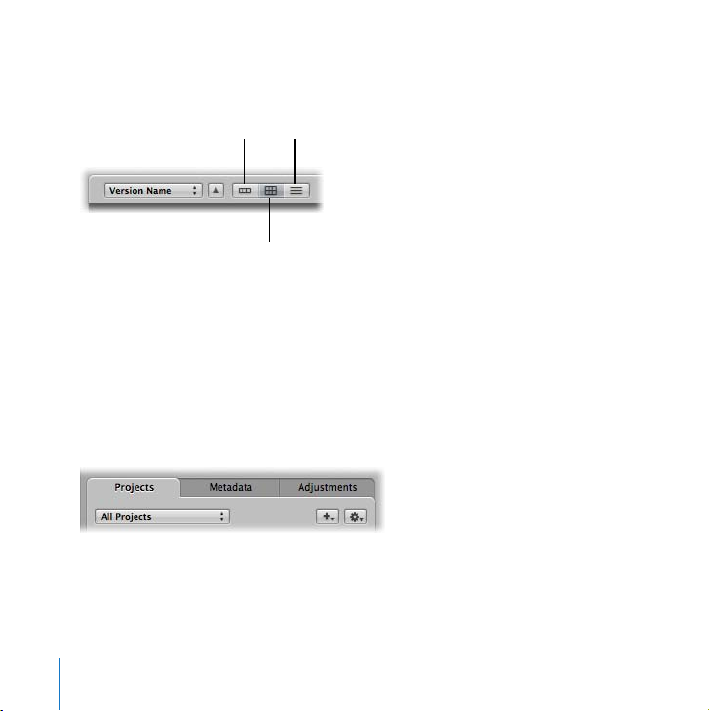
Change Browser views:
m
Choose View > Browser & Viewer. Click the List View button to see images in the
Browser in list view.
Filmstrip View button
m
Click the Grid View button to see images in the Browser in grid view again.
m
Click the Filmstrip button to see images in the Browser in filmstrip view, a single row of
List View button
Grid View button
images that you can use to navigate through images.
m
Press I to hide the Inspector pane. Press I again to show the Inspector pane.
Get to know the Metadata inspector:
m
Click the Metadata tab at the top of the Inspector pane. Select different images to see
information about them. Enter a caption or keyword in the metadata fields. (You’ll learn
more about this later.)
12 Chapter 1
Exploring Aperture
Page 13

Get to know the Adjustments inspector:
m
Click the Adjustments tab at the top of the Inspector pane. Click the disclosure
triangle of an adjustment to see its options. Select an adjustment’s checkbox and try
making changes. Deselect the checkbox to turn off the changes. Press I to close the
Inspector pane.
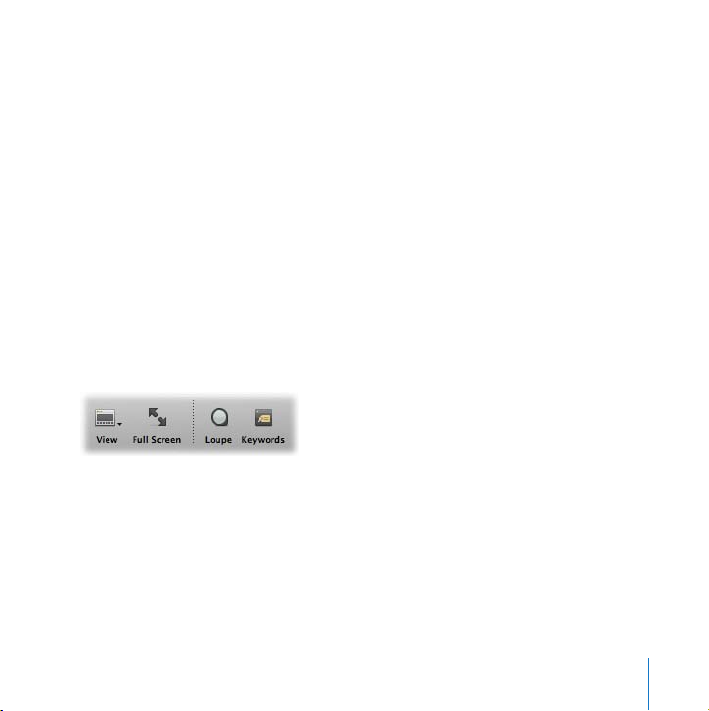
Get to know the Keywords heads-up display (HUD):
m
Click the Keywords button in the toolbar. Use the HUD scroll bar to scroll through the
keywords in the HUD. Click the disclosure triangles in the Keywords HUD to see the
keywords associated with the different categories. Drag keywords to a selected image.
Press Shift-H to close the Keywords HUD.
Switch to Full Screen view:
m
Click the Full Screen button in the toolbar (or press F for
full screen
). Position the
pointer centered at the bottom of the screen to display the filmstrip. Select images in
the filmstrip. Press the arrow keys.
Get to know the Inspector HUD:
m
Press H (for
HUD
). Drag the HUD to a convenient position. Click the Projects, Metadata,
and Adjustments buttons at the top of the HUD to see the panes. Notice that this
movable HUD provides the same options as the inspectors. Press H to close the
Inspector HUD. Press F to exit Full Screen view. (You’ll learn more about Full Screen
view later.)
Chapter 1
Exploring Aperture
13
Page 14

Display the contents of albums in a project:
m
Press I to display the Inspector pane. Click the Projects tab to display the Projects
inspector. Click the disclosure triangle beside the Nature project name to see all the
folders and albums in the project. Open the folders and click the albums in the project
to see the different albums.
Create a new album to hold a selection of images:
m
Shift-click five or six images in the Browser to select them. Choose File > New from
Selection > Album. Give the new album any name you like.
You’ll learn more about many of these features later in this guide. Just explore and get
accustomed to the different parts of the main window for now.
Try This: Exploring Basic Procedures
You probably have questions about how to do fundamental procedures. This section
helps you try out some basic tasks yourself. The following list gives pointers to help you
start a procedure without providing full explanations. If you prefer to know the details
before trying something, you can find comprehensive explanations in Aperture Help.
Jumping In
m
Create a new empty project:
project using the import commands, or you can drag images from the Aperture
Browser after selecting another project or album. A project is a basic container of your
images and all versions of them.
14 Chapter 1
Exploring Aperture
Choose File > New Project. You can import images into the
Page 15
m
Import images from a camera or card reader:
Connect your camera or card reader to
your computer. The Import dialog appears, allowing you to select the images you want
to import. Select your new project in the Projects inspector. Your images will now be
imported into this project. Select and import a few practice photos, if you want, or click
Cancel to close the Import dialog. (You’ll learn the details of importing images in the
next chapter.)
m
Rate images:
In the Browser, select an image you want to rate and press a number key
from 1 to 5 to apply a rating from one to five stars. Press 0 (zero) to remove a rating.
Press 9 to reject an image. Press plus sign (+) to increase the rating by one star, or press
minus sign (–) to decrease the rating by one. Rate several images five stars. (You’ll learn
more about rating later.)
m
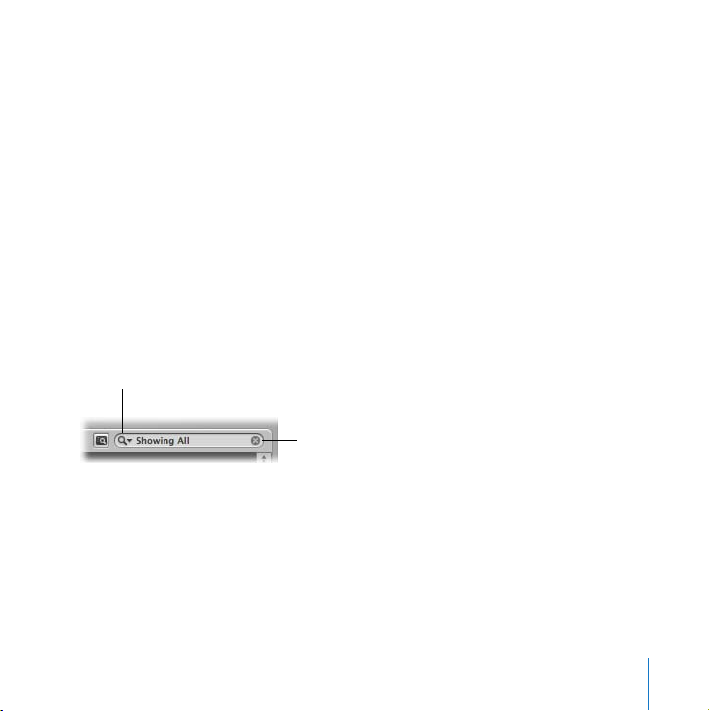
Display a selection of images based on their rating:
Choose a rating level from the search
field pop-up menu. Aperture shows only those images with the rating you chose.
Choose Show All to show all the images again.
Search field pop-up menu
Search field
m
Delete a project:
Select the project that you created. Choose File > Delete Project.
(Don’t delete the sample projects, which you’ll be using throughout this guide. If you
already deleted one, reimport it from the Aperture Installation disc by choosing File >
Import > Projects.)
Chapter 1
Exploring Aperture
15
Page 16
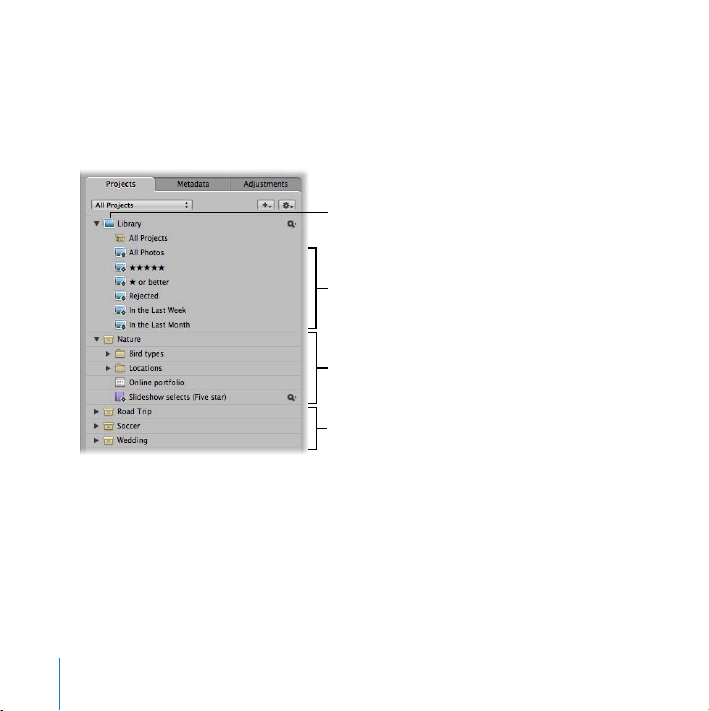
Learning About the Projects Inspector
Now, take a look at the Projects inspector, where your library of images, projects, and
albums resides.
At the top of the Projects inspector, you see the Library icon.
Library
Predefined Smart Albums
Selected project opened to
show its folders and
albums
Projects
The Aperture library tracks every project, album, and image, no matter whether the
images are stored in the Aperture library or in other hard disk or storage media
locations. When you imported the sample projects, all the project information, images,
and albums were placed in the library.
16 Chapter 1
Exploring Aperture
Page 17

Aperture creates a library in the Pictures folder on your hard disk the first time you
open Aperture. You can choose to import images into the library or have Aperture
access them from other locations on different hard disks.
When you click the disclosure triangle beside the Library icon, you see predefined
Smart Albums that gather images automatically based on specified criteria. For
example, the Smart Album named “5-star” displays all images rated five stars. The
Smart Album named In the Last Week gathers all the images taken in the last week.
You can create your own Smart Albums that gather images based on any criteria you
want. For example, you might create a Smart Album that automatically gathers all
images that have the keyword
Portrait
or
Headshot
.
You organize your images into projects. A project is a container that holds digital
master files, called
masters
, and their corresponding image versions. A master is the
original image imported from your camera or other source.
As you work with and change images, Aperture creates versions from the master. A
version file is much smaller than the master that it’s based on. This means that creating
new versions doesn’t fill up your hard disk by duplicating all the information in the
master. As you work with Aperture, you are always working with versions; you never
change masters. Your original masters are always preserved just as you shot them.
A project can hold tens of thousands of masters and even more versions, and you can
create as many projects as you wish up to the limitations of your disk space. For
example, you can create a new project for each of your shoots. Projects are the most
fundamental component of Aperture because they contain your masters.
Chapter 1
Exploring Aperture
17
Page 18
An album is a container in a project or in the Projects inspector that organizes versions
of your images. You create albums for a specific purpose. For example, you might
create an album of photos of a specific type of bird. You use albums to organize
images, making your selections of versions easier to manage.
Albums
To place a version into an album, drag the image from the Browser into an album in
the Projects inspector.
18 Chapter 1
Exploring Aperture
Page 19

Basic Concepts You Should Know
Â
Masters:
The original image files imported from your camera, memory card,
computer, or external storage media. The masters are never changed by Aperture, so
that the original image is preserved and can be used again.
Â
Versions:
The images you see and change in Aperture are called
based on the original master, and you can change, copy, and adjust them any way
you want.
Â
Projects:
Containers used to hold masters, versions, and albums. When project files
are moved, the contents are moved with them.
Â
Albums:
Containers used to organize versions for a specific purpose. You can create
albums within projects or outside them. Types of albums include Smart Albums, Light
Table albums, webpage albums, web journal albums, and book albums.
Â
Library:
A database that manages your files from import to image adjustments and
final distribution. Once you import images, the library records and tracks your
masters and corresponding versions. The library also tracks projects and albums you
create to organize your images. Changes that you make to images, including
adjustments and metadata, are stored in the library no matter whether the master is
stored in the library or another disk location.
 Heads-up display (HUD): A floating window that you can move to a convenient
position on the screen and use to change images.
Next, you’ll learn more about importing images into Aperture.
Chapter 1
Exploring Aperture
versions
. Versions are
19
Page 20

Page 21

2 Importing Basics
2
Aperture provides a variety of import options designed to suit
the needs of advanced photographers.
In this chapter, you’ll experiment with importing selected images and familiarizing
yourself with basic import features. You’ll create a test project and import images into
it, trying out different methods of assigning names and preparing images for import.
After you’ve had some basic experience importing sample images, you can begin
envisioning how to import your own images.
Important: Make sure to get acquainted with the Aperture import methods and plan
the structure of your Aperture library before you begin importing your images in
earnest. You’ll be building an organized system for tracking thousands of images, and
planning ahead can make file management easier in the long run. For a detailed
explanation of planning an import strategy and setting up an Aperture system, see the
Aperture User Manual in the Aperture Help menu.
21
Page 22
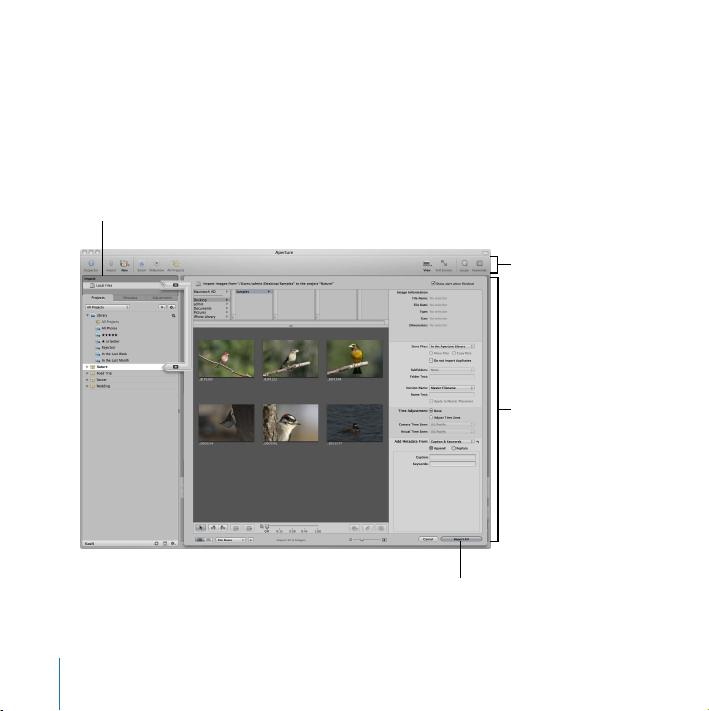
Try This: Exploring Import Options
Aperture provides easy ways of selecting images to import, naming files, assigning
identifying information called metadata, and storing images.
When you connect a camera or insert a card of images into a card reader connected to
your computer, the Import pane and Import dialog appear. You then select the images
you want to import and specify import options.
Import pane
Toolbar
Import dialog
Import Images button
22 Chapter 2 Importing Basics
Page 23

Getting Ready
Rather than importing images from a camera or card reader, for now you’ll just import
some sample images from a folder on your hard disk. If you have five or six images of
your own that you feel comfortable experimenting with, place them in a folder on
your desktop.
If you’d prefer to experiment with images from the Aperture sample projects, export
five or six images to a folder on your desktop.
To export sample images to a folder on your desktop:
1 Select the Nature project in the Projects inspector.
2 Select five or six images in the Browser.
3 Choose File > Export > Masters. Press Command-D to select the desktop as the
destination for your exported images.
4 Click the New Folder button, type Samples as a folder name, and click Create.
5 Click the Export Masters button.
Aperture exports the selected images to the folder on your desktop. Now you can
import these images again, trying out Aperture filenaming and other import options.
Chapter 2 Importing Basics 23
Page 24
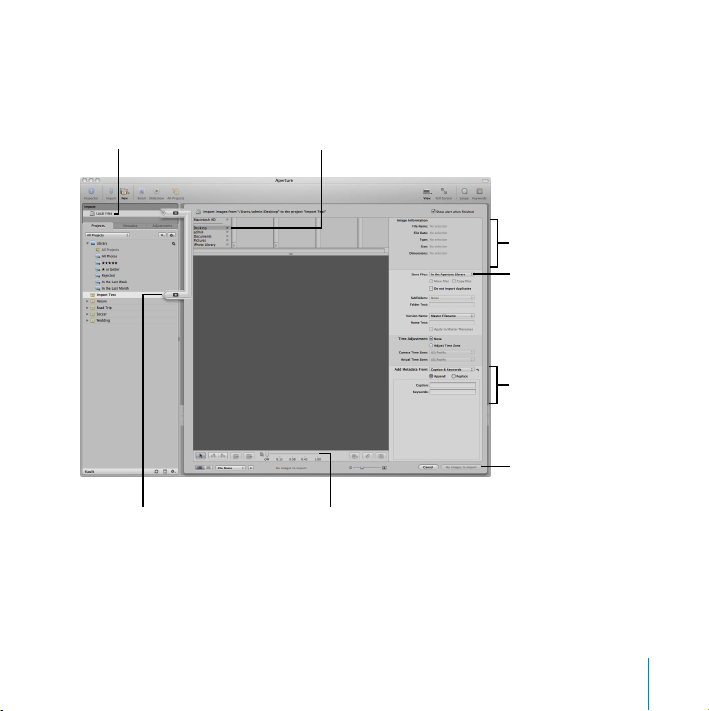
To open the Import dialog and get ready to import sample images:
1 Choose File > New Project to create an empty project. Give the project a name such as
Import Test, then press Return.
2 Click the new project in the Projects inspector to select it, if necessary.
3 Click the Import button in the toolbar to open the Import pane.
4 Click Local Files in the Import pane.
24 Chapter 2 Importing Basics
Page 25
The Import dialog appears.
Select a camera, card
reader, hard disk, or other
storage device that holds
your images.
Select disk and folder icons
to navigate to the images
you want.
Image file information
Select the destination
of the image files here.
You can place them in
the library or leave
them in another hard
disk location.
Specify the types of
metadata you want
added here.
Import Images button
The Import arrow points to
the selected project, where
the images will be stored.
Chapter 2 Importing Basics 25
Auto-Stack slider
Page 26

Jumping In
Navigate to your images:
m Click Desktop in the Import pane and select the folder that holds your sample images.
You see the sample images appear as thumbnails.
Select images to import:
m Click a thumbnail to select it. Inspect the Image Information area to see information
about the image. Press the Right Arrow or Left Arrow key to select other images.
m Hold down the Shift key and press the arrow keys to select multiple images.
Command-click specific images to select or deselect them. To select all the images again,
choose Edit > Select All, or click the gray area between images to deselect everything.
Select a project to hold your images:
m Click the Soccer project in the Projects inspector. Notice that the Import arrow moves
to indicate that images will be imported into this project. Click the new empty project
that you created in the Projects inspector to select it again.
Choose where masters will reside on your hard disks:
m Select five or six images in the Import dialog. Open the Store Files pop-up menu to see
its options. Choose In the Aperture Library to store the files in the Aperture library on
your hard disk. You can also choose to store files in a different location on your hard
disk, or, if the files already reside on a hard disk, you can choose to leave the files in
their current location.
26 Chapter 2 Importing Basics
Page 27
Choose an image-naming convention:
m Choose Custom Name with Index from the Version Name pop-up menu. Type a name
that you want applied to each image in the Name Text field. Aperture will give each
newly imported image that custom version name and add an index number. Look at
the red Adjusted File Name field in the Image Information area to see how the version
names will appear. Applying custom names to imported images is optional; you can
also simply accept the filenames the images currently have.
Add metadata:
m Choose General from the Add Metadata From pop-up menu. Fields appear that allow
you to specify metadata to be recorded about the imported images.
m Type the caption “Import test” in the Caption field. This caption will be added to each
imported image.
m Type “Test, Sample” (no quotation marks, but separated by a comma) in the Keywords
field. All imported images will now have these two keywords automatically assigned.
m Add any other metadata you like in the other fields.
Import the images and review them in the Browser:
m Click the Import Images button in the lower-right corner of the Import dialog to import
the selected images.
Import Images button
m Select the imported images in the Browser. Press Control-D to display the Metadata
inspector, and examine the metadata you assigned. Notice that you can change the
metadata if you want.
Chapter 2 Importing Basics 27
Page 28

Learning About Where Your Image Files Reside
When you import images, you can choose whether to store the masters in the
Aperture library or store them on a hard disk outside the library.
Managed images are physically placed in the Aperture Library file on your hard disk,
and the files and all information about them are managed and backed up by Aperture.
Referenced images are images whose masters are not stored in the library. They are
located elsewhere on a hard disk or other media, and Aperture merely refers to the
masters in that location. The advantage of using referenced images is that you can
import your portfolio of legacy images as they are currently stored on disk, without
having to physically copy or move them into the Aperture library. You can also give
Aperture access to images on different hard disks. You can simply allow Aperture to
refer to the files, using your current file organization and image filenames. Aperture
doesn’t back up or change referenced images; you must maintain them yourself.
It’s important to plan how you want to import your existing portfolio of digital images.
The Aperture library can easily track any mix of managed and referenced images.
Because you may have many thousands of images previously stored on disk, you can
decide which images to import into the Aperture library and which to import as
referenced images, leaving them in their current hard disk locations. You can also copy
or move images into a different hard disk location when importing them.
28 Chapter 2 Importing Basics
Page 29

After importing images as referenced images, you can work with versions of those
images just as you can with the managed images in the Aperture library. All
adjustments and metadata applied to referenced images are tracked in the Aperture
library just the same way they are for managed images.
Important: If you remove or disconnect a hard disk drive or other media that contains
referenced masters, Aperture can still display and track the versions of those images
that you’ve created. However, if you want to make adjustments to those images, you
must reconnect the hard disk or media to give Aperture access to the masters. Aperture
can automatically find and access the files when you reconnect the hard disk or media.
Try This: Selecting Version Names for Imported Images
Now it’s time to look a little deeper into how you assign names to your images.
When you import images, you can have Aperture use the original name assigned by
the camera, or use a filenaming convention that you choose or create. Aperture
provides a number of preset name formats, and you can also create your own naming
conventions to suit the different types of shoots you do. You can choose a preset name
format when you import new photos.
Chapter 2 Importing Basics 29
Page 30

Aperture provides the following preset name formats.
Preset name format Example
Master Filename IMG001
Image Date/Time 2005-10-14 09.03.25 PM
Version Name IMG001
Version Name and Date/Time IMG001 - 2005-10-14 09.03.25 PM
Version Name with Sequence IMG001 (1 of 2), IMG002 (2 of 2), and so on
Version Name with Index IMG001 1, IMG002 2, and so on
Custom Name with Index Thailand 1, Thailand 2, and so on
Custom Name with Counter Thailand 001, Thailand 002, and so on
You can apply names to your image files when you import them and when you export
them. For example, when you import images from your camera, you can specify that a
name format be applied to each image version that Aperture creates. You can also
apply the same names to the masters as they are stored in the library or on a hard disk.
Next, try importing the same images several times, applying a different filenaming
convention each time.
Note: Aperture provides a “Do not import duplicates” option in the Import dialog that
you can select to prevent importing duplicate photos. Leave this option deselected to
try out importing images in this section.
30 Chapter 2 Importing Basics
Page 31

Jumping In
m Assign a version name and index number: Press Command-I to open the Import dialog.
Shift-click to select the first six images in the Import dialog to import. Choose Version
Name with Index from the Version Name pop-up menu. Click the Import Images
button in the lower-right corner of the Import dialog. Inspect the version names by
selecting the images in the Browser. (Press Control-D to show the Metadata inspector, if
necessary.) After examining the images, choose Edit > Select All to select the images
and then delete them by choosing File > Delete Versions. In the Delete Master Images
and All Versions dialog, click Delete.
m Assign a version name and sequence number: Press Command-I to open the Import
dialog. Shift-click to select the first six images again. Choose Version Name with
Sequence from the Version Name pop-up menu. Click the Import Images button in the
lower-right corner of the Import dialog. Inspect the names of the imported files. After
examining the images, choose Edit > Select All to select the images and then delete
them by choosing File > Delete Versions. In the Delete Master Images and All Versions
dialog, click Delete.
Chapter 2 Importing Basics 31
Page 32

m Assign the image date and time as a version name: Press Command-I to open the Import
dialog. Shift-click to select the first six images again. Choose Image Date/Time from the
Version Name pop-up menu. Click the Import Images button in the lower-right corner of
the Import dialog. Inspect the names of the imported files. After examining the images,
choose Edit > Select All to select the images and then delete them by choosing File >
Delete Versions. In the Delete Master Images and All Versions dialog, click Delete.
You can create your own custom name formats, called preset name formats. When you
create your own preset name format, it appears as a choice in the Version Name
pop-up menu in the Import dialog.
Tethered Shooting
You can now connect certain types of cameras to your computer and have images
imported automatically into Aperture, where they appear immediately on your
computer display. Ideal for studio shoots, tethered shooting allows you to
immediately inspect full-resolution images in Aperture. For more information about
tethered shooting and the types of cameras supported, see the chapter on importing
in the Aperture User Manual, available from the Aperture Help menu.
32 Chapter 2 Importing Basics
Page 33

Basic Concepts You Should Know
 Managed image: An image whose master resides in the Aperture library.
 Referenced image: An image whose master resides outside the Aperture library in
another disk location. Aperture simply refers to the file in its current location, and the
hard disk drive or media holding the file must be accessible for Aperture to make
adjustments to the image.
 Preset name format: A name format that you can create and save. You can then use it
to assign version names and master names to imported images. You can also use
preset name formats to assign names to exported files.
 Metadata: Data that describes information about an image and how it was collected
and formatted. Aperture can record and track many different types of metadata
commonly used by photographers to identify and track their images, including both
Exchangeable Image File (EXIF) and International Press Telecommunications Council
(IPTC) metadata. You can view and change metadata using the Metadata inspector.
Next, you’ll explore using the Browser to discover more of its features.
Chapter 2 Importing Basics 33
Page 34

Page 35

3 Learning About the Browser
The Browser provides efficient ways to review and select
images in your projects.
In this chapter, you’ll explore some of the features of the Browser.
Images displayed in grid
view in the Browser
3
35
Page 36

Try This: Exploring the Browser
When you select a project or album in the Projects inspector, thumbnails of its images
appear in the Browser. You select images in the Browser to work with them. You can
then move and rearrange the images, rotate images, make new versions, and delete
images from the project.
Sorting pop-up menu
Sort Direction button
Shuttle control
Thumbnail Resize slider
36 Chapter 3 Learning About the Browser
Page 37

Getting Ready
1 Select the Nature project in the Projects inspector.
2 Choose View > Browser Only, if necessary, to switch to Browser Only view.
Use the illustration above to locate the Browser items you want to try next.
Jumping In
Select images to display:
m Command-click images that are not adjacent to select them. Command-click to
deselect selected images.
m Choose Edit > Select All to select all images in the Browser. Choose Edit > Deselect All
to deselect all images.
Change the image order:
m Drag an image in the Browser to a new location. Drag until you see a green bar appear
where you want the image to be located. Notice that the Sorting pop-up menu now
indicates that you’ve created a custom image order.
m Use the Sorting pop-up menu to sort images by image date, rating, or keywords. Click
the Sort Direction button to sort images in ascending or descending order.
Change the Browser display:
m Drag the Thumbnail Resize slider to change the size of the thumbnails.
m Choose Aperture > Preferences, then click Appearance. Drag the Browser Background
Brightness slider to the background brightness you prefer. You can always change this
later. Close the Preferences window.
Chapter 3 Learning About the Browser 37
Page 38

Rotate images:
m Select an image in the Browser and then click the Rotate Left or Rotate Right button
to rotate the image in 90 degree increments. Select several images and click the
rotate buttons.
Rotate buttons
Find images:
m Click the Reset button (with an X) in the search field and enter text, such as a keyword,
to display only images associated with that text. Try typing the words “owl”, “jay”, and
“hawk” one at a time to locate images in the Nature project. Delete the text in the field
to see the rest of the images again.
Reset button
in the search field
38 Chapter 3 Learning About the Browser
Page 39

Try This: Stacking Images
Aperture can automatically group related photos into stacks when you import them
and as you work with them in the Browser.
For example, if you shoot a series of images in quick succession (such as at a sports
event) or if you bracket images to allow for differences in lighting or exposure, you
most likely will want to view those images together. Aperture can automatically stack
those images based on the time interval in which they were captured by the camera.
This stack shows a series
of images taken in quick
succession.
Click this button to open
or close the stack.
Chapter 3 Learning About the Browser 39
Page 40

You can also manually select images in the Browser and stack them. The image that
represents the stack, called the pick, is displayed on the left of the open stack. You can
drag the images in a stack into any order, changing the pick image when you want. The
Stack button, in the upper-left corner of the pick image in the stack, indicates the
number of images in the stack.
The Stack button indicates
the number of images in
the stack. This stack is
shown expanded, or open.
Getting Ready
m Select the Wedding project in the Projects inspector.
40 Chapter 3 Learning About the Browser
Page 41

Jumping In
m Automatically stack images: Choose Stacks > Auto-Stack. In the Auto-Stack Images HUD,
drag the slider to specify the maximum length of time for a series of shots. Inspect the
stacks to determine if the time interval should be shortened or lengthened.
m Create a stack manually: In the Browser, select the images you want to stack. Choose
Stacks > Stack.
m Select the pick: Drag the image you want into the pick (or leftmost) position in the
stack. When you see a green bar appear, release the mouse button.
m Rearrange images in a stack: Drag images in the stack to change their order. Add
images to or remove images from the stack by dragging them into or out of the stack.
m Unstack a selection of images: Select a stack, then choose Stacks > Unstack.
Try This: Displaying the Images You Want to Work With
You can set the Browser to display only those images that you want to work with. For
example, you can display images taken on a specific date, images that have a specific
rating, or images that have specific metadata such as keywords associated with them.
To set the Browser to display specific images, you click the Query HUD button and
specify the search criteria you want. You can search by text, rating, keyword, date, IPTC
information, EXIF information, export session, other metadata, file status, or a
combination of any of the above.
Chapter 3 Learning About the Browser 41
Page 42

Getting Ready
1 Select the Nature project in the Projects inspector.
2 Click the Query HUD button beside the search field in the Browser.
Query HUD button
The Query HUD appears.
Match pop-up menu
Search field
Add Filter pop-up menu
Query HUD Action
pop-up menu
New Smart Album
button
New Album With
Current Images button
The Query HUD is preset to display all images that are unrated or better. This means
that images that have a rating from five stars down to no stars (unrated) appear in the
Browser. Images that have been rejected, which have an “X” rating, are hidden. These
hidden images have not been deleted. You can display them again by choosing Show
All from the search field pop-up menu.
42 Chapter 3 Learning About the Browser
Page 43

Jumping In
m Display only images with a specific rating in the project: In the Query HUD, select the
Rating checkbox, change the Rating pop-up menu to “is,” and drag the Rating slider to
the four-star position. Now all images that are rated four stars appear in the Browser.
m Display images that are unrated or better in the project: Change the Rating pop-up menu
to “is greater than or equal to,” and drag the Rating slider to the Unrated position. Now
only images that are unrated or better appear in the Browser. Rejected images are
hidden. Deselect the Rating checkbox to turn off the rating search criteria.
m Display images taken on a specific date: In the Query HUD, select the Calendar
checkbox. Display the month of December 2006 and click different dates to display
images taken on that date. For example, click December 8. Hold down the Shift key
and click another date to specify a range of dates. You can also Command-click
nonadjacent dates to select them. Deselect the Calendar checkbox to turn off the date
search criteria.
m Display images that have a specific keyword: In the Query HUD, select the Keywords
checkbox. A list of keywords used in the project appears. Select a keyword checkbox to
display images with that keyword. Deselect the Keywords checkbox to turn off the
keyword search criteria. Close the Query HUD by clicking the Close (X) button in the
upper-left corner.
For a complete explanation of the Query HUD and specifying search criteria, see the
Aperture User Manual in the Aperture Help menu.
Chapter 3 Learning About the Browser 43
Page 44

Learning About Masters and Versions
When you import a photo into Aperture, the original file is the master. You never work
directly with or change the master. Instead, Aperture always displays a version of the
master onscreen for you to work with. Any changes or adjustments you make are
applied to the version. A version is not a copy of the master; it’s a smaller file that
derives most of its information from the underlying master. So when you create
multiple versions of a photo, you are not filling up your hard disk with repeated copies
of the larger master.
Although you never work with it directly, the master is associated with the project into
which you first imported it. You can change the location of the master by dragging a
version from one project to another project. The master and all versions of the image
are transferred to the new project destination. At the same time, Aperture keeps
versions of the image wherever they appeared in other albums, so no versions
disappear from albums that you’ve created.
Creating Multiple Versions
Occasionally, you may want to create multiple versions of an image. For example, you
might copy an image to apply different exposure settings or change it for a specific
use, such as for placement in a webpage or print book. When you create a new version,
you have a choice of starting from the original master or from the currently selected
version with any changes you’ve made. For example, if you’ve made adjustments to an
image and now you’d like to start over from the master and make different
adjustments, you can copy the appearance of the master image and start with a fresh,
unchanged version.
44 Chapter 3 Learning About the Browser
Page 45

To create a new version based on the master:
1 Select the image whose master you want to copy.
2 Choose Images > New Version From Master.
You can also duplicate a selected version and make more changes.
To duplicate a selected image version:
1 Select the image you want to duplicate.
2 Choose Images > Duplicate Version.
When you create multiple versions of an image, Aperture places the versions in a stack.
You can open a stack and see the different versions you’ve created for an image. You
can also remove an image from the stack, deleting it or placing it elsewhere.
About Deleting Images
You can remove individual versions of an image from an album or project. You can also
delete the master, removing the master and all versions from the Aperture library.
To remove a version from an album (not a project):
m Select a version in an album and press the Delete key.
The version is removed from the album, and all other versions of the image and master
are left unchanged in the Aperture library.
Chapter 3 Learning About the Browser 45
Page 46

To delete a version from a project:
m Select a version in a project, then hold down the Command key and press Delete.
If the selected image is one of several versions of a master, the selected version is
deleted immediately, leaving all other versions unaffected.
If the selected image is the only version of a master, a dialog appears asking if you
want to delete the master as well. Clicking Delete removes the master and its version
from your Aperture system.
What Happens to Deleted Image Files?
When you delete a version, that version and all the information about it, including
metadata and adjustments, is deleted from the library. You can choose Edit > Undo to
restore the deleted version. If you have copied the library to a vault, the version
information still exists in the vault until the next time the vault is updated.
When you delete a managed master that resides in the library, the master is moved to
the Trash. You can open the Trash and recover the file, if necessary. You’ll find it in a
folder named for the project that contained the image.
When you delete a referenced master that resides outside the library, you can choose
to leave the original image file unchanged in its disk location. Although the file has
been removed from the Aperture system, it’s not deleted from your hard disk unless
you specifically direct Aperture to do so.
46 Chapter 3 Learning About the Browser
Page 47

Basic Concepts You Should Know
 Stack: A group of images that can be collapsed or expanded in the Browser. Aperture
can automatically create stacks based on the time interval in which a group of images
is shot, and you can manually create stacks by selecting and grouping them yourself.
 Query HUD: An Aperture HUD that allows you to specify search criteria that
determine which images appear in the Browser. You can display a selection of images
within a project based on any metadata associated with the images, including
ratings, keywords, IPTC information, EXIF information, and combinations of metadata.
Next, you’ll explore using the Viewer to work with images in detail.
Chapter 3 Learning About the Browser 47
Page 48

Page 49

4 Learning About the Viewer
4
You can use the Viewer to view an image in incredible detail
or view several images at once.
Next, you’ll use the Viewer to inspect details of images, compare images, and rate images
as you display them. You’ll also use simple tools to rotate, crop, and straighten images.
The Viewer shows the
selected image.
You can set the Viewer
to show metadata such
as the version name,
rating, and keywords.
49
Page 50

Try This: Exploring the Viewer
You can set Aperture to display images in both the Browser and the Viewer or in the
Viewer only. When you select images in the Browser, the Viewer immediately displays a
detailed view of your selection. You can display one image at a time, three images at a
time, or a selection of multiple images. You can also use a software loupe like a
magnifying glass to examine enlarged portions of images.
Toolbar
Loupe button
Tool strip
50 Chapter 4 Learning About the Viewer
Page 51

Getting Ready
1 Select the Nature project in the Projects inspector.
2 Choose View > Browser & Viewer.
Use the illustration above to locate the Viewer items you want to use.
Jumping In
Change the number of images displayed in the Viewer:
m Choose View > Main Viewer > Three Up to display up to three images at a time. Select
different images.
m Choose View > Main Viewer > Show One to display single images only, even when
multiple images are selected in the Browser.
m Choose View > Main Viewer > Show Multiple to display multiple images when you
select them. Select several images. Shift-click and Command-click images to view and
compare them in the Viewer.
Compare two images side by side:
m To compare images, select an image and press Return. Press the arrow keys to display
different images next to the compare image. Press Return to change the compare
image. To stop comparing images, press Command-Return.
Chapter 4 Learning About the Viewer 51
Page 52

Inspect images using the Loupe:
m Click the Loupe button in the toolbar. Drag the Loupe to different locations. Choose
Focus on Cursor from the pop-up menu in the lower-right corner of the Loupe. Move
the pointer over the portions of an image that you want to inspect. To change the
Loupe magnification, choose different zoom percentages from the Loupe pop-up
menu. To show color values, choose Color Values from the Loupe pop-up menu. To
change the Loupe size, drag the lower-right corner of the Loupe. To hide the Loupe,
choose View > Hide Loupe.
Show images at full resolution:
m Select an image and press Z to see the image at full resolution. To navigate within an
image that is too large for the screen, drag the red rectangle within the small gray box
that appears on the image in the Viewer. Hold down the Space bar and drag the image
in the Viewer to reposition the image. Press Z again to turn off full-resolution display.
52 Chapter 4 Learning About the Viewer
Page 53

Display images quickly in Quick Preview mode:
m Choose View > Quick Preview. Press the arrow keys quickly to rapidly display images in
the Viewer. In Quick Preview mode, Aperture displays JPEG previews instead of loading
all the master and version information. You can use Quick Preview mode when you
want to rapidly navigate through many images. For example, you can use Quick
Preview mode to quickly select and rate images. When Aperture is in Quick Preview
mode, some features that require access to the masters, such as making adjustments,
are turned off. So be sure to turn off Quick Preview mode when you need to use those
features. To turn off Quick Preview mode, choose View > Quick Preview again. You can
also press the P key to turn Quick Preview mode on or off.
Try This: Exploring Adjustment Tools
Now you’re ready to try making some simple changes to images, such as straightening
and cropping them. To perform these changes, you’ll use the following tools in the
tool strip.
Straighten tool
Selection tool Crop tool
Chapter 4 Learning About the Viewer 53
Page 54

Jumping In
m Straighten an image that’s framed at an undesirable angle: Select the Straighten tool.
Position the tool over the image in the Viewer and drag slightly until the yellow grid
lines appear. Using the grid lines as a guide, drag slowly to rotate the image. Release
the mouse button when you have the orientation you want.
Press Control-A to show the Adjustments inspector. Notice that the checkbox of the
Straighten adjustment is selected to show that the image has been straightened. Click
the disclosure triangle of the Straighten adjustment to see the straightening options
and settings. Try using these straightening options to change the amount of rotation
applied to the image. (You must have the Straighten tool selected to change these
settings.) Deselect the Straighten checkbox to remove the adjustment.
m Crop an image to a specific size: Select the Crop tool. The Crop HUD appears, and you
can select a specific size and orientation for the final cropped image. Drag a rectangle
over the image to indicate the area that you want included within the cropped image.
Choose different crop sizes and orientations from the “Constrain cropping tool to”
pop-up menu to see how different options affect the cropping rectangle. When the
cropping rectangle has the size and position you want, press Return or close the Crop
HUD. The cropped image appears in the Viewer at the size and aspect ratio you
selected. If you want, you can select the Crop tool again to adjust the crop.
To show the Adjustments inspector, press Control-A or press W several times until the
Adjustments pane appears. Notice that the checkbox of the Crop adjustment is
selected to show that the image has been cropped. Click the disclosure triangle of the
Crop adjustment to see the cropping options and settings. Try using these options to
change the size and positioning of the crop applied to the image. Deselect the Crop
checkbox to remove the crop.
54 Chapter 4 Learning About the Viewer
Page 55

Try This: Displaying Metadata with Images
You can quickly display specific types of information with your images. For example,
you can have Aperture show the EXIF or IPTC metadata associated with your images.
You use the Metadata pane of the Preferences window to specify the information
shown with images in the Viewer and Browser.
The Viewer’s
metadata display
settings appear here.
The Browser’s
metadata display
settings appear here.
Chapter 4 Learning About the Viewer 55
Page 56

Jumping In
Set the display of metadata in the Viewer and Browser:
1 Choose Aperture > Preferences, or press Command-Comma (,).
2 Click the Metadata button.
3 Select the Viewer checkbox to specify Viewer settings.
4 Click the Set 1 button and choose General from the Set 1 pop-up menu.
5 Choose Below from the Placement pop-up menus.
6 Select the Browser checkbox to specify Browser settings.
7 Click the Set 1 button and choose General from the Set 1 pop-up menu.
8 Choose Below from the Placement pop-up menus.
9 Close the Preferences window.
Inspect the images in the Viewer and Browser to see the combination of metadata now
displayed there.
56 Chapter 4 Learning About the Viewer
Page 57

Learning About the Metadata Inspector
You can view and change specific metadata for a selected image in the Metadata
inspector. To show the Metadata inspector, press I to display the Inspector pane and
then click the Metadata tab.
Choose a metadata view
for the inspector from
the Metadata View
pop-up menu.
Edit and arrange your
metadata views using
this pop-up menu.
Metadata inspector
Chapter 4 Learning About the Viewer 57
Page 58

You can change the combination of metadata that appears in the Metadata inspector
by choosing a metadata view from the Metadata View pop-up menu. You can change
those metadata items that are editable, and you can also customize the metadata
views, adding or deleting metadata fields as you like. Click the buttons at the bottom
of the inspector to customize the metadata used in a metadata view.
You can also add the actual metadata you want applied to your images to the fields of
a metadata view. For example, you can add your name to the Credit field and have it
appear automatically on all the images that you import. To do so, you click the IPTC
button at the bottom of the Metadata inspector. You then enter your name in the
Credit metadata field.
After customizing the metadata fields with the information that you routinely use, you
can save the metadata view and the information you entered as a metadata preset. You
can then use that metadata preset to apply combinations of metadata to images
whenever you want. For example, if there is a specific combination of metadata that a
stock photography service always requires, you can create a metadata preset for that
service. Then whenever you import images destined for that service or prepare images to
send to that service, you can apply the metadata you need using the preset you created.
58 Chapter 4 Learning About the Viewer
Page 59

Learning About Badges
When you apply adjustments, keywords, or other changes to an image, Aperture marks
the image with an icon, called a badge, to indicate a change.
These badges indicate
that keywords and
adjustments have been
applied to this image.
Rating
Chapter 4 Learning About the Viewer 59
Page 60

For example, here are a few of the badges that may appear on your images.
Badge Definition
or
One or more adjustments have been applied to the image.
One or more keywords have been applied to the image.
Images are contained in a stack. The number indicates the
number of images in the stack.
The image has been changed using an external editor.
Indicates the number of times an image has been placed in the
Light Table and in book pages and webpages.
Badge visibility is determined by the metadata view that is displayed. You can control
whether badges are visible by choosing a metadata view that includes badges in the
Metadata pane of the Preferences window.
Important: Badges appear only in the Aperture application; they do not appear on
images exported or printed from Aperture.
Basic Concepts You Should Know
 Adjustment: Any change to the appearance of an image.
 Adjustments inspector: A pane in the Inspector pane that lists the adjustments and
adjustment options for a selected image. To display the Adjustments inspector,
choose Window > Show Inspector and click the Adjustments tab.
60 Chapter 4 Learning About the Viewer
Page 61

 Compare image: An image selected to be compared against other images in the
Viewer. To select a compare image, select an image and press Return. Press
Command-Return to turn off the comparison feature.
 Metadata inspector: A pane in the Inspector pane that lists the metadata and
metadata options for a selected image. To display the Metadata inspector, choose
Window > Show Inspector and click the Metadata tab.
 Metadata view: Aperture organizes the display of specific combinations of metadata
in sets called metadata views. By choosing a specific metadata view, you specify what
combination of metadata appears with your images. For example, one metadata view
may display IPTC field information, and another view may display version name,
rating, and caption information. Aperture provides dozens of metadata views to
choose from, and you can also create your own.
 Metadata preset: A customized metadata view that also records specific metadata
information. For example, a metadata preset might include a specific combination of
IPTC fields and the actual IPTC data you want to appear with your images. You can
use metadata presets to apply combinations of metadata to images.
 Badges: Small icon identifiers that appear on images to indicate that an image has
been changed or that it has a certain status. For example, if an image has had an
adjustment made to it, the adjustment badge appears. Badges appear only when
you’ve set Aperture to use a metadata view that displays badges.
Next, you’ll explore working with your images in Full Screen view.
Chapter 4 Learning About the Viewer 61
Page 62

Page 63

5 Adjusting Images
in Full Screen View
You can view and work with your images in Full Screen view.
Full Screen view provides a broad workspace and a detailed view of your images that
makes working with them easy.
Full Screen view
5
63
Page 64

Try This: Exploring Full Screen View
Full Screen view displays your images on a simple black background and can be used
with one or two displays.
Full Screen view includes a toolbar and filmstrip to help you view, organize, and adjust
your images.
Toolbar available in
Full Screen view
Filmstrip available
in Full Screen view
In this chapter, you’ll view images in Full Screen view and use the filmstrip, the toolbar
tools, and the Adjustments pane of the Inspector HUD.
64 Chapter 5 Adjusting Images in Full Screen View
Page 65

Getting Ready
1 Select the Nature project in the Projects inspector, if necessary.
2 Press F to switch to Full Screen view.
You can turn Full Screen view on or off by pressing F.
Search field
Query HUD button
Images shown
in the filmstrip
Scroll bar
Shuttle control
Thumbnail Resize slider
Use the filmstrip illustration above to locate the items you want to use.
Chapter 5 Adjusting Images in Full Screen View 65
Page 66

Jumping In
Use the filmstrip to display images:
m Click an image in the filmstrip. (Position the pointer at the bottom of the screen to
display the filmstrip, if necessary.)
m Press the Left Arrow and Right Arrow keys.
m Hold down the Shift key and press an arrow key several times. Command-click images
that are not adjacent in the filmstrip to select them.
m Drag the Shuttle control left or right to shuttle through images in the filmstrip.
m Press L or J to shuttle through images. Press K to stop shuttling. You can press L and J
multiple times to increase the shuttling rate.
m Drag the Thumbnail Resize slider to change the size of images in the filmstrip.
Work with the filmstrip:
m Choose Turn Hiding Off from the Filmstrip Action pop-up menu to keep the filmstrip
always displayed.
Filmstrip Action
pop-up menu
m Choose the filmstrip position you want from the Filmstrip Action pop-up menu. You
can position the filmstrip on the left or right of the screen or at the bottom.
66 Chapter 5 Adjusting Images in Full Screen View
Page 67

Compare and rate images:
m Click an image, then press Return. Press the arrow keys to compare the original image
against another image. Press Return to select another compare image. Press
Command-Return to stop comparing images.
m Select an image. Click the rating buttons to rate the image. You can also press the
number keys and the plus sign (+) or minus sign (–) to change ratings.
Search field
Query HUD button
Rotate buttons
Rating buttons
Rotate images:
m Select an image and click the rotate buttons.
Find images:
m Click the Query HUD button and search for images based on keywords. Type the
keyword “heron” in the Query HUD search field. Delete the word “heron” from the search
field. Select the Keywords checkbox, then select the checkboxes of the keywords you
want to search by. Deselect the Keywords checkbox and close the Query HUD.
Chapter 5 Adjusting Images in Full Screen View 67
Page 68

Use the toolbar and select tools:
m Position the pointer at the top of the screen until the toolbar appears, if necessary.
Choose Three Up from the Viewer Mode pop-up menu. Choose Multi from the Viewer
Mode pop-up menu, then select a group of images in the filmstrip.
Viewer Mode
pop-up menu
Zoom Viewer button
Inspector HUD button
Loupe button
m Select a single image and click the Zoom Viewer button to enlarge the image to a 100
percent pixel-for-pixel view. Navigate within the image by dragging the red rectangle
in the gray inset box, or hold down the Space bar and drag the image. Click the Zoom
Viewer button again to reduce the image to its original size.
m Click the Loupe button in the toolbar to open the Loupe. Try using the Loupe. Click the
Loupe button again to hide the Loupe.
68 Chapter 5 Adjusting Images in Full Screen View
Page 69

Try This: Adjusting Exposure with the Adjustments Pane
of the Inspector HUD
Full Screen view is ideal for making changes and adjustments using Aperture heads-up
displays (HUDs). One of the main HUDs used with Aperture is the Inspector HUD. In this
section, you’ll use the Adjustments pane of the Inspector HUD to change exposure.
HUDs are available
for use in Full Screen
view and can make
adjusting images
easier.
Chapter 5 Adjusting Images in Full Screen View 69
Page 70

You use the Exposure adjustment controls to set exposure, recover highlight details,
and adjust the blacks of images in shadow. You can also correct the exposure of images
shot in difficult lighting conditions. Feel free to make any adjustments you like to the
sample images; you can always simply turn off or remove the adjustments later.
Thoroughly teaching the use of Aperture adjustments is beyond the scope of this short
guide. For now, just experiment with adjustment options, knowing you can learn the
details later.
Getting Ready
1 Click the Inspector HUD button to show the Inspector HUD.
Inspector HUD button
70 Chapter 5 Adjusting Images in Full Screen View
Page 71

2 Click the Adjustments button in the Inspector HUD.
Auto Exposure button
Use the Adjustments
pane in Full Screen view
to remove flaws and make
adjustments to your
images.
Auto Levels Combined
and Auto Levels Separate
buttons
Exposure slider
Click the disclosure triangle to
see an adjustment’s controls.
3 Drag the HUD to a convenient position onscreen where you can select and change
options while viewing their effect on an image.
Chapter 5 Adjusting Images in Full Screen View 71
Page 72

Jumping In
m Automatically adjust images: Select an image that needs an exposure adjustment. Click
the Auto Levels Combined button and Auto Levels Separate button to see how
Aperture can automatically adjust images for you.
m Change exposure manually: Click the disclosure triangle of the Exposure adjustment to
display the Exposure controls, and select the Exposure checkbox. Drag the Exposure
slider. You can also click a location along the slider control to move the slider to that
point. Click the left arrow or right arrow in the Exposure value slider to change the
exposure of the image by tenths of an f-stop, or drag in the value field.
m Change brightness: Drag the Brightness slider.
m Recover lost detail in highlights: Select an image that has overexposed highlights. Click
the disclosure triangle of the Exposure adjustment to display its controls, and select the
Exposure checkbox. Drag the Recovery slider to the right to change the highlight areas
of the image, and drag the slider back to the left to reduce the effect in the highlights.
Use the Recovery slider
and value slider to recover
lost detail in the image’s
highlights.
72 Chapter 5 Adjusting Images in Full Screen View
Page 73

m Recover details in shadows: Select an image with shadows. Click the disclosure triangle
of the Exposure adjustment to display its controls, and select the Exposure checkbox.
Drag the Black Point slider to change the look of details in the shadows.
Use the Black Point slider
and value slider to adjust
the brightness values in
the image’s shadows.
Note: You can also use the Highlights & Shadows adjustment controls in conjunction
with the Recovery and Black Point controls to correct the exposure in images shot in
complex lighting conditions.
m Turn your exposure adjustments on or off: Select or deselect the Exposure checkbox.
Try This: Enhancing an Image
You can use the Enhance adjustment to change contrast, clarity, saturation, vibrancy,
and the tint of an image. Experiment with these adjustments to see how they work.
Chapter 5 Adjusting Images in Full Screen View 73
Page 74

Getting Ready
m Select an image. In the Adjustments pane of the Inspector HUD, click the disclosure
triangle of the Enhance adjustment to display the Enhance controls, and select the
Enhance checkbox.
Jumping In
m Change contrast: Drag the Contrast slider.
m Change definition: Drag the Definition slider.
m Change saturation: Drag the Saturation slider.
m Change vibrancy: Drag the Vibrancy slider.
m Turn your Enhance adjustments on or off: Select or deselect the Enhance checkbox.
Try This: Adjusting White Balance
You use the White Balance adjustment controls to change the color temperature and
color tint of an image. If an image has pixels that are supposed to be pure white, you
can use the White Balance eyedropper to automatically adjust the color temperature
and tint, or you can adjust the color temperature and tint manually.
Although Aperture can set the white balance of the image with great accuracy,
sometimes you have to use a combination of these two methods to have the image
appear with the warm or cool tonality you intended.
Getting Ready
m Select an image that could use a white-balance adjustment. In the Adjustments pane
of the Inspector HUD, click the disclosure triangle of the White Balance adjustment to
display the White Balance controls, and select the White Balance checkbox.
74 Chapter 5 Adjusting Images in Full Screen View
Page 75

Jumping In
m Use the White Balance eyedropper to change color balance: Select the White Balance
eyedropper. The Loupe opens, and positioning the pointer shows a magnified view of
the target area. Position the eyedropper over the pixels in the image that represent a
neutral gray, then click.
Select the White Balance
eyedropper tool to activate
the Loupe.
m Change the color temperature settings manually: Drag the Temp slider to the left to cool
the tonality of the image, or drag it to the right to warm the tonality.
Use the Temp slider and value
slider to adjust the color
temperature of the image.
m Change the Tint setting manually: Drag the Tint slider to the left to add a green tint to
the image, or drag it to the right to add a magenta tint.
Use the Tint slider and value
slider to adjust the tint
of the image.
Chapter 5 Adjusting Images in Full Screen View 75
Page 76

Learning About the Adjustments in the Inspector HUD and Adjustments Inspector
You’ve now experimented a bit with using the adjustments in the Adjustments pane of
the Inspector HUD. The Adjustments pane has exactly the same adjustment options as
the Adjustments inspector in the main window.
Add Adjustments
pop-up menu
Adjustment Action
pop-up menu
Histogram
(set to show red, green,
and blue channels)
Available adjustments
Each adjustment in the Inspector HUD or Adjustments inspector contains individual
properties, called parameters, for which you can specify a range of values.
76 Chapter 5 Adjusting Images in Full Screen View
Page 77

Some adjustments always appear in the Adjustments pane of the Inspector HUD and
the Adjustments inspector, whereas others are added as you need them. For example,
as you straighten an image with the Straighten tool, the Straighten adjustment
controls are added to the Adjustments inspector or the Adjustments pane of the
Inspector HUD. You can also add adjustments to the inspector or HUD by choosing
adjustments from the Add Adjustments pop-up menu.
Aperture provides the following adjustments in the Add Adjustments pop-up menu.
Adjustment Function
Retouch Retouches imperfections in an image by applying brushed
Red Eye Correction Reduces red-eye in the eyes of the subjects in your images.
Spot & Patch Retouches imperfections in an image, such as sensor dust.
Devignette Removes vignette shading on an image.
Straighten Levels the image’s horizon. Used in conjunction with the
Crop Trims the image. Used in conjunction with the Crop tool.
White Balance Sets an image’s white balance by adjusting its color temperature
Flip Inverts the composition of the image horizontally and vertically.
Exposure Adjusts the exposure, highlight recovery, shadow black point
Chapter 5 Adjusting Images in Full Screen View 77
effects. Used in conjunction with the Retouch tool.
Used in conjunction with the Red Eye tool.
Used in conjunction with the Spot & Patch tool.
Straighten tool.
and tint.
setting, and brightness of images.
Page 78

Adjustment Function
Enhance Adjusts the contrast, definition, saturation, and vibrancy of an
image, as well as black, gray, and white tints.
Levels Selectively adjusts the tonal range of an image.
Highlights & Shadows Selectively adjusts the exposure in the shadows and highlights
of an image.
Color Adjusts hue, saturation, and luminance on a color-by-color basis,
as well as chromatic range.
Monochrome Mixer Selectively controls the source red, green, and blue color
channels when a color image is converted to grayscale.
Color Monochrome Desaturates the image and applies a color tint of your choosing
to the midtones.
Sepia Tone Changes a color image to sepia. Allows you to desaturate the
color image and to apply the level of sepia coloring you want.
Noise Reduction Reduces digital noise in an image.
Sharpen Sharpens the image.
Edge Sharpen Sharpens the image based on luminance using multiple
sharpening passes.
Vignette Places vignette shading on an image.
78 Chapter 5 Adjusting Images in Full Screen View
Page 79

Basic Concepts You Should Know
 Adjustment: Any change to the appearance of an image.
 Inspector HUD: A HUD that provides project, metadata, and adjustment options. It
contains the same options and controls as the inspectors.
 Value slider: Value sliders are controls commonly used for changing parameter
settings, either by clicking arrows that increase or decrease a value, dragging the
slider, or entering the precise values you want in the value field.
Next, you’ll explore the Aperture methods for applying keywords.
Chapter 5 Adjusting Images in Full Screen View 79
Page 80

Page 81

6 Applying Keywords to Images
Aperture allows you to efficiently assign keywords to images.
A once time-consuming task, assigning keywords is remarkably simplified using a
Keywords HUD. You can easily select keywords and assign them to individual images
and groups of images. In this chapter, you’ll try out Aperture keyword options.
Keywords HUD
6
81
Page 82

Try This: Exploring the Keywords HUD
You can quickly add keywords to images using the Keywords HUD.
Close button
Search field
Keyword list
Keyword group
Disclosure triangle
Add Keyword button
Lock
button
Remove Keyword
button
The Keywords HUD contains a library of predefined keywords that you can assign to
images. You can easily browse and search for keywords in the Keywords HUD, and you
can also add your own keywords as well as remove keywords.
The Keywords HUD is automatically updated with any keywords you add. For example,
when you enter a new keyword in the Metadata inspector, that keyword also appears in
the Keywords HUD. When you change a keyword, for example, by changing its spelling
or capitalization, the keyword is updated on all images that have that keyword assigned.
82 Chapter 6
Applying Keywords to Images
Page 83

Getting Ready
1 Press F to exit Full Screen view, if necessary.
2 Select the Nature project in the Projects inspector, if necessary.
3 Close the Inspector HUD.
4 Click the Metadata tab in the Inspector pane.
5 Select an image, then click the Keywords HUD button in the toolbar.
Jumping In
Get to know the Keywords HUD:
m Drag the Keywords HUD to a convenient location on the screen.
m Press Shift-H twice to hide and show the Keywords HUD.
m Scroll to view keywords in the HUD. Click the disclosure triangles to see keywords
grouped by category.
Chapter 6 Applying Keywords to Images 83
Page 84

Select and apply keywords:
m Drag a keyword from the Keywords HUD to the image in the Viewer. Notice that the
keyword now appears in the Metadata inspector and on the image in the Viewer.
Keywords
Drag a keyword from
the Keywords HUD
to an image in the
Viewer or Browser.
Keywords applied
to the image
m Drag a keyword from the Keywords HUD to an image in the Browser. Select the image
to see that the keyword now appears in the Metadata inspector and on the image in
the Viewer.
m Click the Keywords HUD and press the Up Arrow and Down Arrow keys to select
different keywords.
84 Chapter 6 Applying Keywords to Images
Page 85

m Hold down the Shift key while pressing the Up Arrow or Down Arrow key to select several
keywords. Drag the keywords to a selected image. You can also Shift-click keywords.
m Command-click keywords that aren’t adjacent. Drag the keywords to the selected image.
m Shift-click or Command-click several images in the Browser. Drag a keyword from the
Keywords HUD to one of the selected images in the Browser. Notice that Aperture
assigns the keyword to all the selected images.
m Command-click several keywords in the Keywords HUD and drag the selection to one
of the selected images in the Viewer or Browser.
Find keywords:
m Type the letters “haw” in the Keywords HUD search field. Notice that as you type, the
Keywords HUD displays keywords that use those letters. Delete the “haw” and type
“wil,” then drag the keyword Wildlife to the selected images. Delete the “wil” to see all
the keywords again.
Remove all keywords from an image:
m Select a single image in the Browser. Press Shift-Option-9 to remove all the keywords
from the image. Choose Edit > Undo to restore the deleted keywords.
Add keywords using the Metadata inspector:
m In the Metadata inspector, type a new keyword in the Keywords field and press Enter (if
there are already keywords assigned, separate your entry by first typing a comma and
then typing your entry). For example, type your name. Notice that the keyword is
automatically added to the Keywords HUD. You can drag keywords into different
categories in the Keywords HUD.
Chapter 6 Applying Keywords to Images 85
Page 86

Try This: Working with Keywords in the Keywords HUD
You can add new keywords to the keyword library and organize keywords in keyword
groups. Now that you’re familiar with the Keywords HUD, you can try adding and
removing keywords in the keyword library.
Jumping In
m Add a new keyword to the keyword library: Click the Add Keyword button. Type the new
keyword and press Return.
A new, untitled keyword
appears in the keyword list.
Click this button to add
a new keyword.
86 Chapter 6 Applying Keywords to Images
Page 87

m Remove a keyword from the keyword library: In the Keywords HUD, select the keyword
you want to remove and press Delete (or click the Remove Keyword button). Confirm
that you want to remove the keyword. Close the Keywords HUD.
Click this button to remove
a keyword.
Important: Removing a keyword from the keyword library removes it from any images
to which it’s already applied.
Note: You can also apply keywords by clicking keyword buttons in the control bar. For
more information about using the control bar, see the Aperture User Manual in the
Aperture Help menu.
Chapter 6 Applying Keywords to Images 87
Page 88

Learning About the Lift & Stamp HUD
If you have images that share many of the same keywords, you can use the Lift and
Stamp tools to quickly apply all or some of the keywords to images. Using the Lift and
Stamp tools is an efficient way to quickly transfer keywords to a large number of images.
If you like, you can try these techniques for lifting keywords from one image and
stamping them on another image or group of images.
Jumping In
Lift the keywords from one image and stamp them on other images:
1 Select the image from which you want to lift metadata.
2 Select the Lift tool in the tool strip.
Lift tool
The Lift & Stamp HUD appears.
88 Chapter 6 Applying Keywords to Images
Page 89

The image information, including applied metadata, adjustments, and keywords,
appears in the Lift & Stamp HUD.
All information for
the selected image
appears here.
3 To apply just the image’s keywords, deselect all image information checkboxes except
the Keywords checkbox.
Make sure the Keywords
checkbox is the only
one selected.
Chapter 6 Applying Keywords to Images 89
Page 90

4 Select the images that you want to stamp with the metadata.
5 Click the Stamp Selected Images button.
The keywords from the first image are applied to the selected images. You can
continue to select images and use the Lift & Stamp HUD to apply the lifted keywords
to other images.
6 Close the Lift & Stamp HUD.
In many cases, you may not want to copy all keywords from one image and paste them
onto other images. For this reason, you can lift a subset of keywords from an image
and stamp just those keywords onto other images. To lift a subset of keywords from an
image, remove any keywords you don’t want by selecting them in the Lift & Stamp
HUD keyword list and pressing the Delete key.
90 Chapter 6 Applying Keywords to Images
Page 91

Basic Concepts You Should Know
 Keywords HUD: The Keywords HUD is used to quickly apply keywords. The HUD
provides a list of preset keywords, and you can customize the keyword library with
any additional keywords you need. You can apply keywords to individual images and
to groups of images.
 Lift and Stamp tools: The Lift and Stamp tools allow you to easily select keywords and
ratings from a selected image and apply them to other images. For example, you can
repeatedly stamp different images with the same set of keywords using these tools.
 Lift & Stamp HUD: The Lift & Stamp HUD is used to select the metadata, adjustments,
and keywords that will be transferred to images using the Lift and Stamp tools.
Next, you’ll explore some of the things you can do using special features in Aperture,
such as creating slideshows, webpages, and books.
Chapter 6 Applying Keywords to Images 91
Page 92

Page 93

7 Presenting Your Images
7
With Aperture, you can present images in slideshows, create
webpages for viewing over the Internet, and create books that
you can have professionally printed and bound.
Next, you’ll display a slideshow and work with Aperture webpages and a book.
Because Aperture provides many professional-level options, this chapter provides
only brief introductions to the features—refer to the Aperture User Manual in the
Aperture Help menu for complete information about working with the slideshows,
webpages, and books.
93
Page 94

Try This: Exploring Slideshows
When you create an Aperture slideshow, you can choose how many images to display on
the screen, how they are arranged, how long each image is displayed, and much more.
Getting Ready
1 Click the Projects tab in the Inspector pane.
2 Click the disclosure triangle beside the Nature project in the Projects inspector. Select
the “Slideshow selects (Five Star)” album.
Jumping In
Display a slideshow:
m Click the Slideshow button in the toolbar. Click Start.
m Press the Space bar to pause the slideshow. Press the Space bar to resume playing.
m Press the Right Arrow or Left Arrow key to move forward or backward through the
slideshow.
m Press Esc (Escape) to stop the slideshow.
You can also simply select images in the Browser and click the Slideshow button, and
Aperture displays the images in a slideshow. To change the order of slides in a
slideshow, drag the images into a different order in the Browser, select the images, and
click the Slideshow button.
94 Chapter 7 Presenting Your Images
Page 95

Try playing your slideshow several times, choosing different slideshow presets from the
Slideshow Preset pop-up menu.
 Dissolve: Displays each image for 3 seconds, with a 2-second cross fade.
 Fade through Black: Displays each image on a black background for 3 seconds, with a
2-second cross fade.
 Manual: You control this slideshow’s progression with the Right Arrow and Left
Arrow keys.
 Slow Dissolve: Displays each image for 5.1 seconds, with a 5-second cross fade.
 4-Up Slow: Successively displays four images one at a time, showing each image for 3
seconds and then transitioning with a 2-second cross fade. The first image is replaced
with the fifth, and so on.
 4-Up Fast: Successively displays four images one at a time, showing each image for
1 second. The first image is replaced with the fifth, and so on.
Chapter 7 Presenting Your Images 95
Page 96

Learning About Slideshow Presets
You use the Slideshow Presets dialog to create and modify slideshow presets. Take a
look at some of the slideshow options that are available. You don’t need to master these
options; for now, just understand that they are available to you when you need them.
To open the Slideshow Presets dialog:
m
Choose Aperture > Presets > Slideshow.
The Slideshow Presets dialog appears.
Choose how the slideshow
duration is determined.
Select a preset
to change here.
Drag the slider to
determine the amount of
time each image will be
shown.
Select a button to specify
image quality.
Adjust the fade time
between images by
dragging this slider.
Select a track from your
iTunes library to
accompany your slideshow.
Click this button to add
a new preset.
96 Chapter 7
Drag these sliders to set the number
of rows and columns of images.
Presenting Your Images
Page 97

You can now select a preset to change, or you can create a new one by clicking the
Add (+) button. Specify the slideshow options you want in the right side of the dialog.
Once you create a new preset, it appears in the Slideshow Preset pop-up menu in the
Run Slideshow dialog the next time you begin a slideshow.
Try This: Exploring Aperture Webpages
Photographers around the world benefit from web distribution of their works,
providing clients with online access to galleries of their best images.
Using Aperture, you can create webpages and web journals. Both are based on themes,
or page designs, are easily editable, and can be posted to the web.
Important: You can also use Aperture to publish photos easily in a web gallery through
your MobileMe account. Be sure to refer to the MobileMe online help for more
information about creating web galleries.
Chapter 7 Presenting Your Images 97
Page 98

Webpages are designed to display images without your having to lay out pages by
hand. Aperture automatically creates the appropriate number of webpages and
populates them with the selected images. You can then adjust the pages to make the
images appear as you want them. You can also choose the metadata information that
appears next to each image, such as captions, names, and ratings.
98 Chapter 7 Presenting Your Images
Page 99

Web journal pages allow you to mix images and text manually on the page. Web
journals are ideal for projects in which you show photos with narrative to support
them. When working with web journals, you manually add pages, images, and text to
your web journal. You can choose a theme to apply to all your pages, and you can
change the layout of images and text on your web journal pages.
Chapter 7 Presenting Your Images 99
Page 100

To create a webpage or web journal, you first create a webpage or web journal album.
When you select the album in the Projects inspector, the Webpage Editor appears
above the Browser. The Webpage Editor is where you design your webpages, including
changing the theme, positioning images, and adding text.
Webpage album in the
Projects inspector
100 Chapter 7 Presenting Your Images
 Loading...