

Page 1

Follow the instructions in this
chapter to set up your computer
and learn the basics.
1
Getting Started
The illustration on the facing page shows all the equipment you will need to
set up your computer and begin using it. Place your equipment on a sturdy,
flat surface near a grounded wall outlet. Before following the setup
instructions in this chapter, you may want to read “Arranging Your Office”
in Appendix A (in the section on health-related information) for tips on
adjusting your work furniture so that you’re comfortable when using
the co mputer.
If you used the setup poster: The poster included with your Macintosh
Performa computer was designed to help you start using your computer as
quickly as possible. This chapter contains more detailed information than the
poster. If you have already set up your computer using the poster, you may
want to turn to the section “What’s Next?” later in this chapter.
1
Page 2
Pluggin g in the computer
Before you plug your Macintosh into a wall socket, carefully read all the
setup instructions in this chapter. Then, before you connect anything to your
Macintosh, follow the instructions in this section on how to plug it in. The
plug grounds the computer and protects it from electrical damage while you
are setting up.
When you are ready to begin, follow these steps:
1Place the computer where you want it—either on the floor or on a sturdy desk.
If your computer came with a modem, you may want to set your computer
near a phone jack (if possible) so that you can connect your modem later.
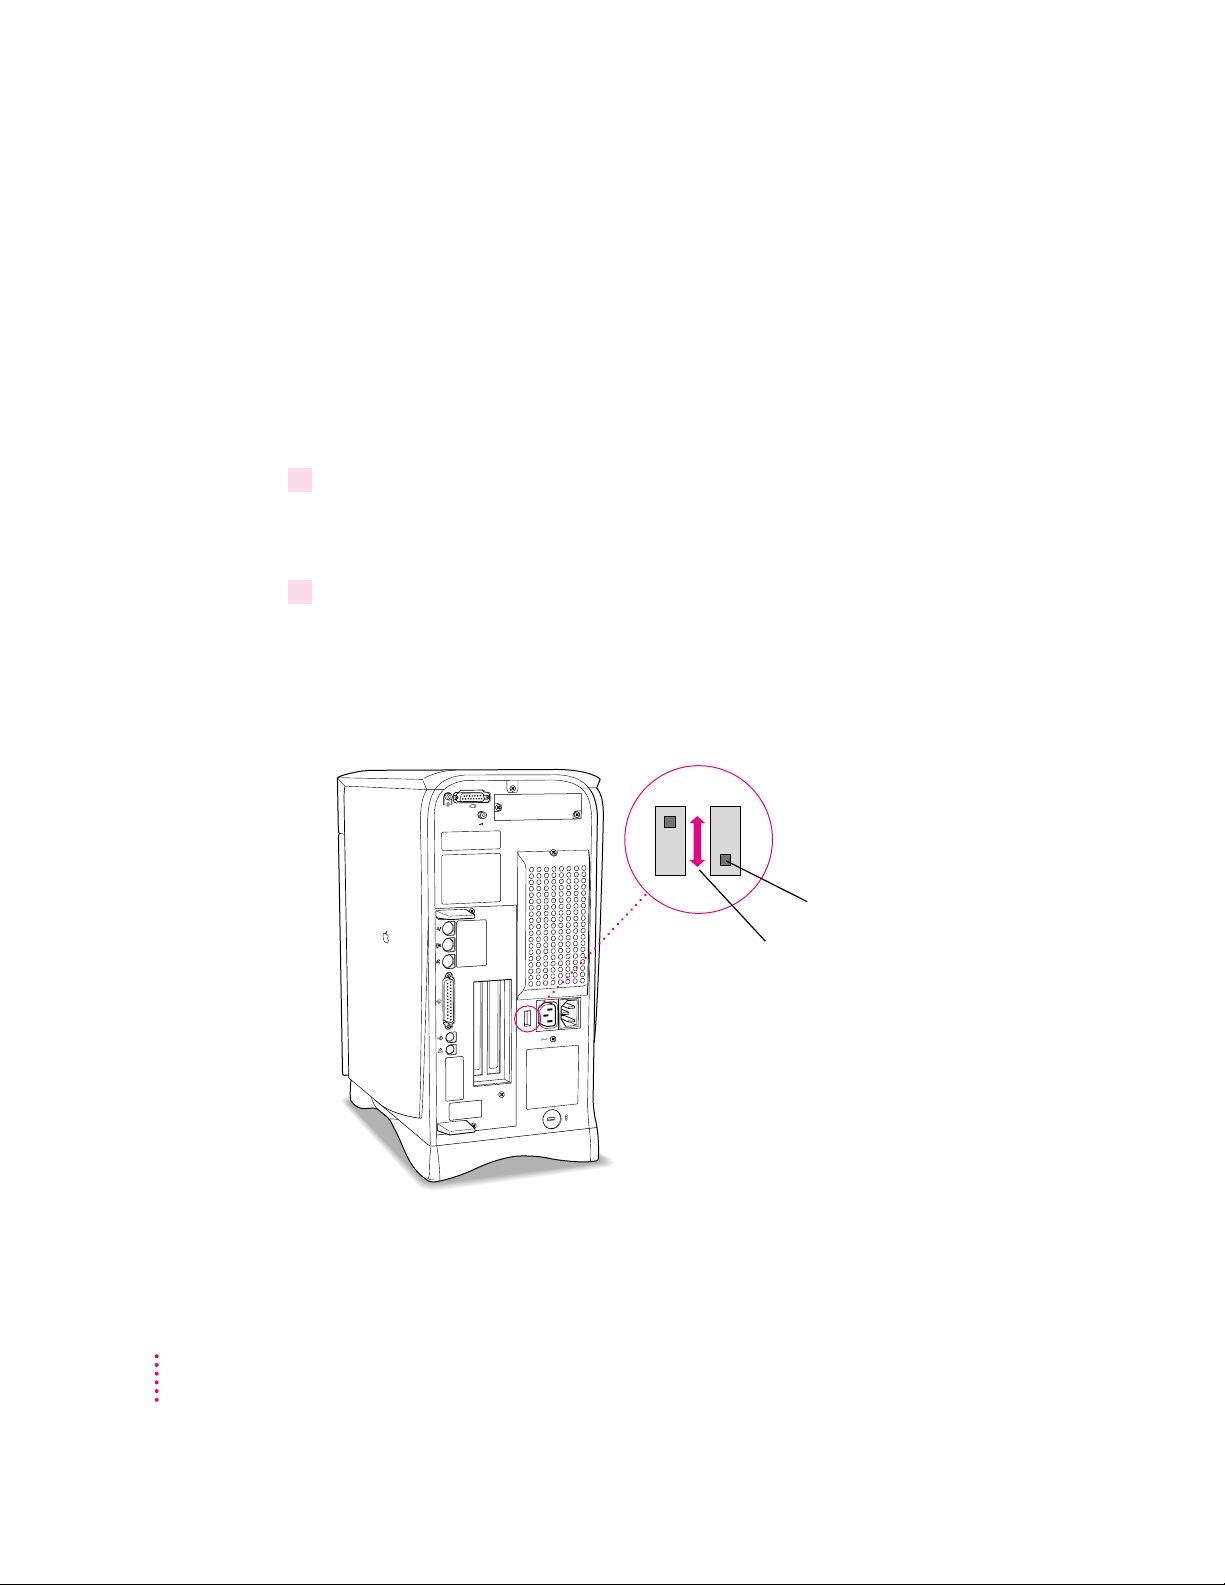
2Make sure the voltage switch on the back of the computer is set for the kind of voltage
system you will be connecting to.
The voltage switch must be set correctly to avoid damaging your computer.
If you don’t know the voltage used in the country you’re in, refer to the table
“Voltages for Different Locations” later in this chapter.
Before you plug your computer in,
check to see that the voltage
switch on the back is
properly set. If you need
to change the setting,
insert a small screwdriver
here and slide the switch.
2
Set the switch to show “115” for
voltages in the 100–130V range.
Set the switch to show “230” for
voltages in the 200–270V range.
Chapter 1
Page 3

Voltages for different locations
For any voltages between 100 and 130 in the chart below, set the voltage
switch on the back of your computer to “115.” Set the switch to show “230”
for a voltage between 200 and 270.
IMPORTANT
In some countries, you may have one of two voltages. If you’re not
sure which of the two voltages you have, check with your electricity supply
company before plugging in your computer.
Country Voltage
Japan 100
Algeria, Indonesia, Lebanon, Libya, Peru, S. Korea, Vietnam 100 or 220
Ecuador, Jamaica, Philippines, Taiwan 110
Bermuda, Canada, Puerto Rico, United States, Venezuela 120
Colombia, Mexico, Saudi Arabia 127
Brazil 127 or 220
Hong Kong 200
India, South Africa 220–250
Israel, Pakistan, Singapore 230
Australia, Kuwait, Malta, New Zealand, Northern Ireland,
Papua New Guinea, Oman, Qatar, United Kingdom 240
Austria, Belgium, Denmark, Finland, France, Germany, Greece,
Italy, Luxembourg, Netherlands, Norway, Portugal, Spain,
Sweden, Switzerland 220–230
Bahrain, Chile, China (People’s Republic), Czechoslovakia, Egypt,
Greenland, Hungary, Iceland, Iran, Jordan, Liechtenstein, Nepal,
Paraguay, Poland, Romania, United Arab Emirates, Russia and the
Commonwealth of Independent States (CIS),Yemen, Yugoslavia 220
Getting Started
3
Page 4
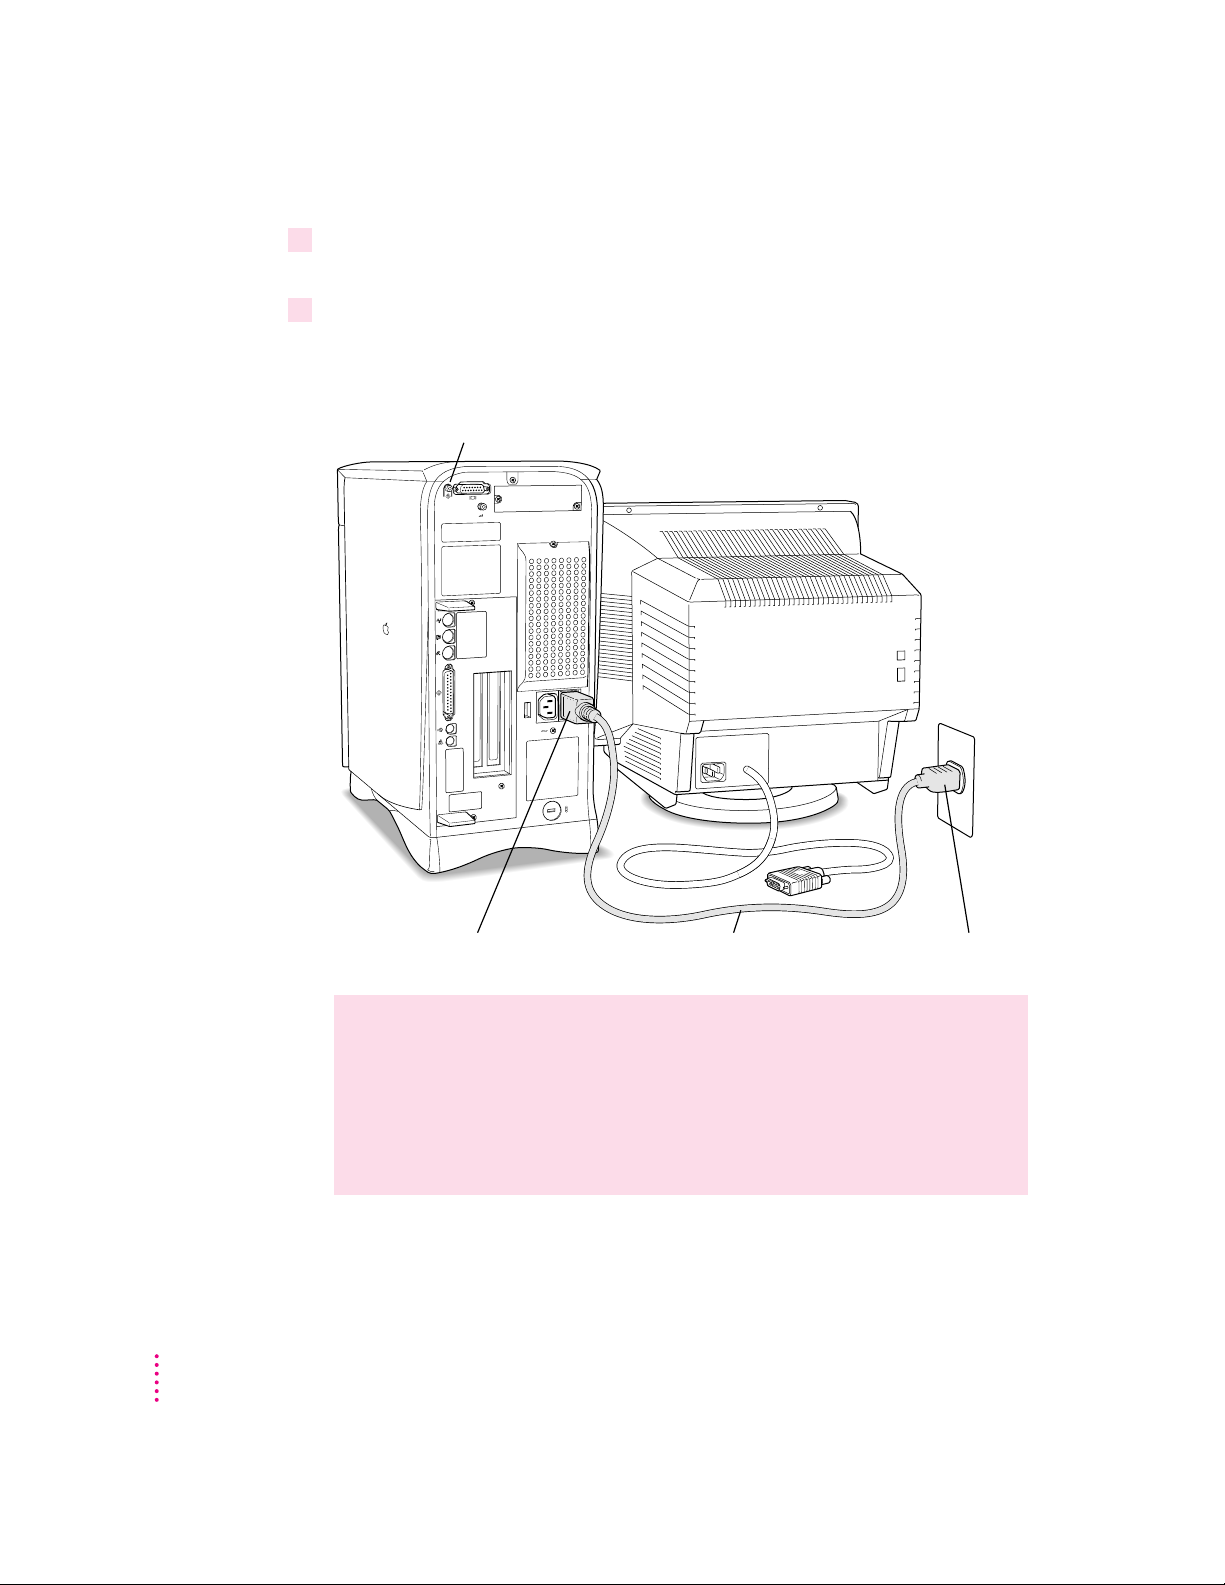
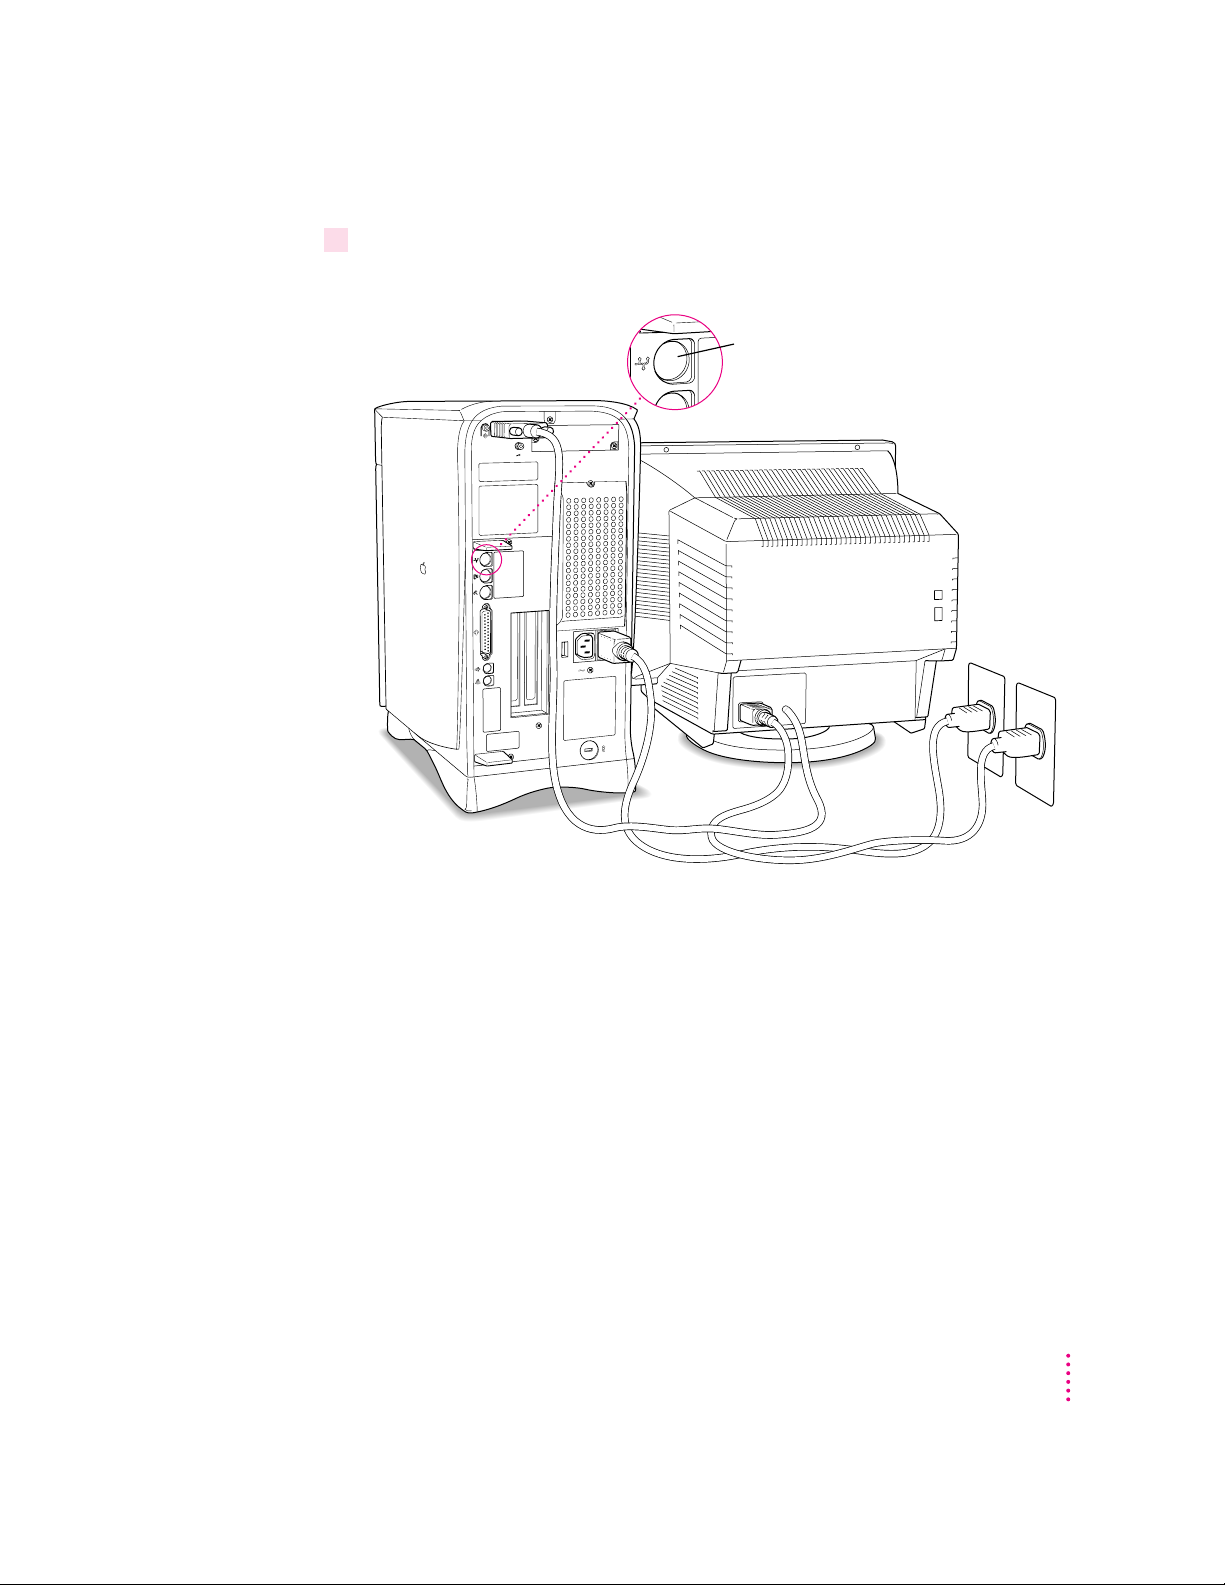
3Plug the socket end of the computer’s power cord into the power cord socket on the
back of the computer.
4Plug the other end of the power cord into a three-hole grounded outlet or power strip.
Make sure at least one end of the power cord is within reach so that when you
need to unplug the computer you can do so easily.
Standby power button
4
Chapter 1
Power cord socket Computer power cord
WARNING
This equipment is intended to be electrically grounded. Your
Power cord plug
Macintosh is equipped with a three-wire grounding plug—a plug that
has a third (grounding) pin. This plug will fit only a grounded AC outlet.
This is a safety feature. If you are unable to insert the plug into the
outlet, contact a licensed electrician to replace the outlet with a properly
grounded outlet. Do not defeat the purpose of the grounding plug!
If the computer starts up: If you hear a tone, the computer has started up and
you need to turn it off before proceeding. Press the standby power button (®)
located on the back of the computer to turn it off.
Page 5

Installing an expansion card
If you purchased an expansion card (such as a special video card) for your
Macintosh, install it now. See Chapter 9, “Installing Expansion Cards,” for
instructions. If you don’t have an expansion card, continue with the next
section, “Connecting a Monitor.”
Connectin g a monitor
You can connect many types of monitors to your Macintosh. To connect a
monitor, refer to the instructions that came with it, in addition to the
instructions here.
Connecting the monitor p o wer cord
Monitors have two cords to connect: a monitor power cord and a monitor
video cable.
To connect the monitor power cord, follow these steps:
1Place the monitor where you’ll be using it.
Keep these considerations in mind:
m Allow a few inches for air circulation around the computer and monitor.
m Position the monitor with the top of the screen at slightly below eye level
whe n you sit at the keyboard.
m Position the monitor to minimize glare and reflections on the screen from
overhead lights and windows.
m Consult “Arranging Your Office” in Appendix A for suggestions on
locating your computer equipment.
Getting Started
5
Page 6
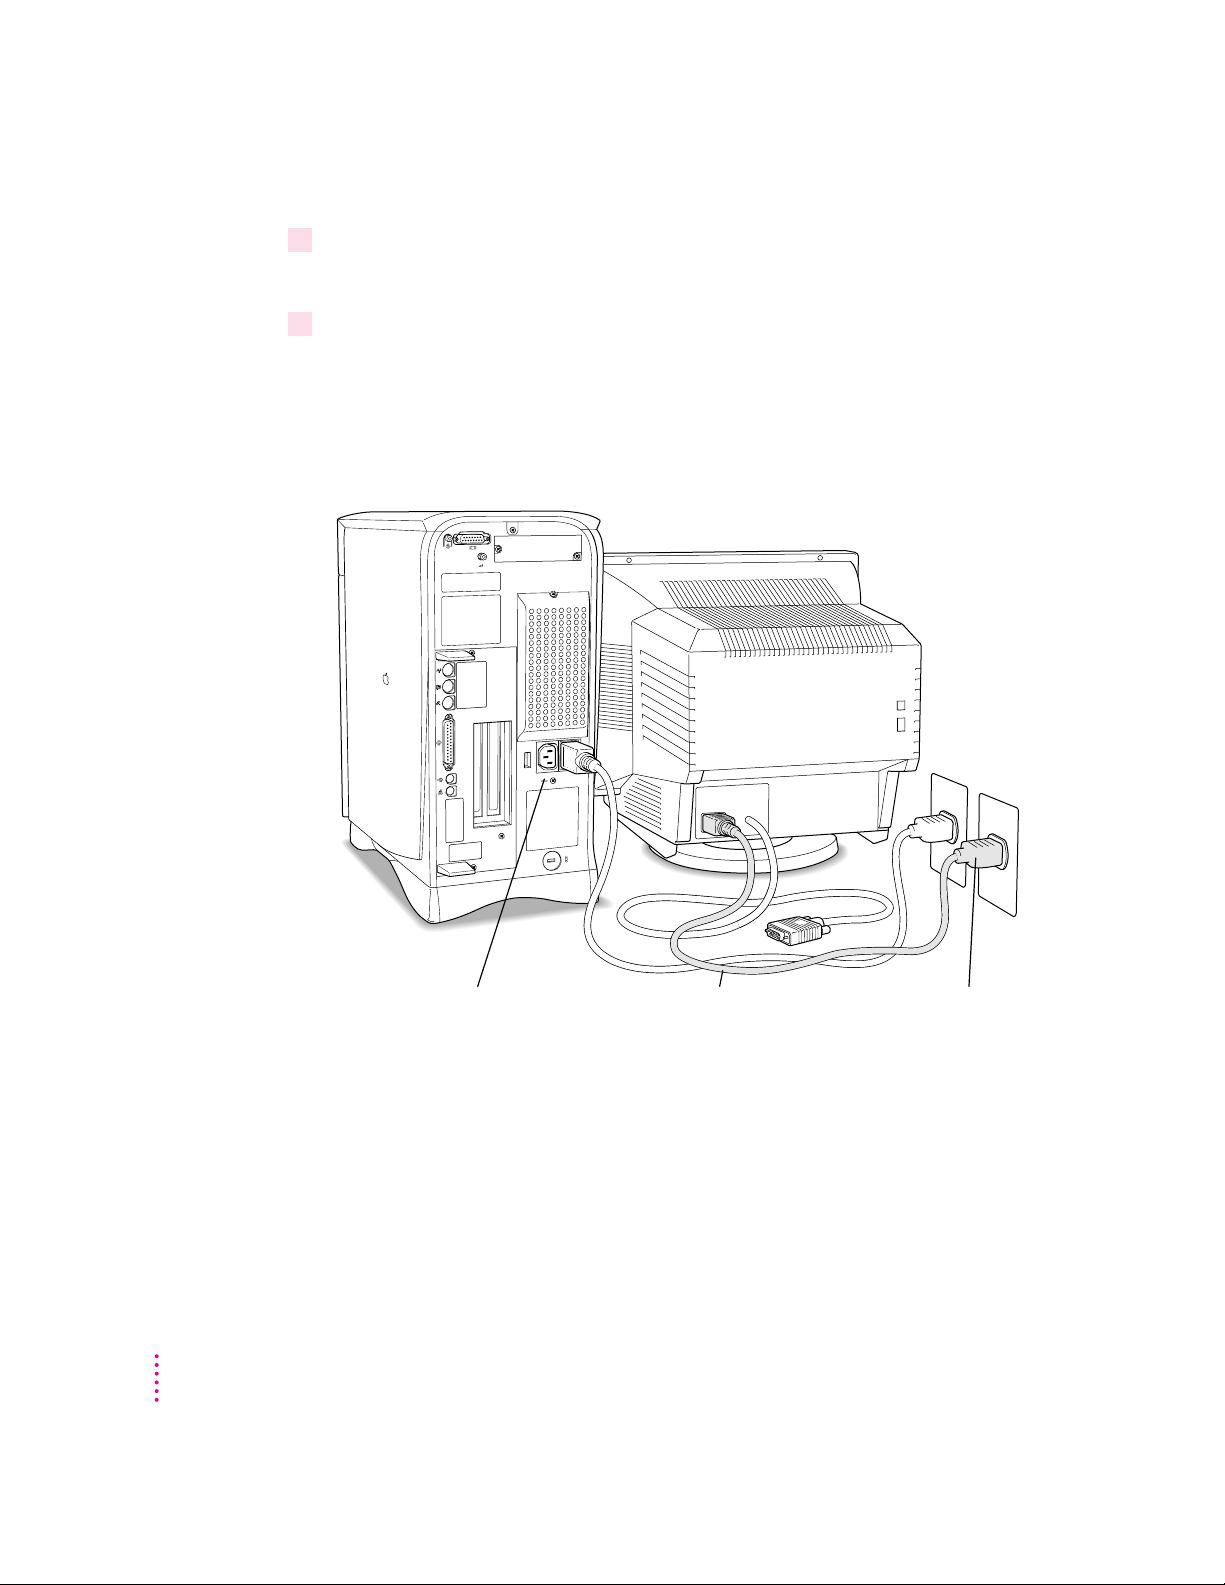
2Connect the monitor power cord to the monitor.
On some monitors, the cord is already attached.
3Plug in the monitor power cord.
Some monitor power cords are designed to plug into the back of your
computer.
Some monitor power cords must be connected to a grounded electrical outlet,
not to the computer. Check the information that came with the monitor.
6
Chapter 1
Monitor power socket Monitor power cord
Monitor power cord plug
Page 7
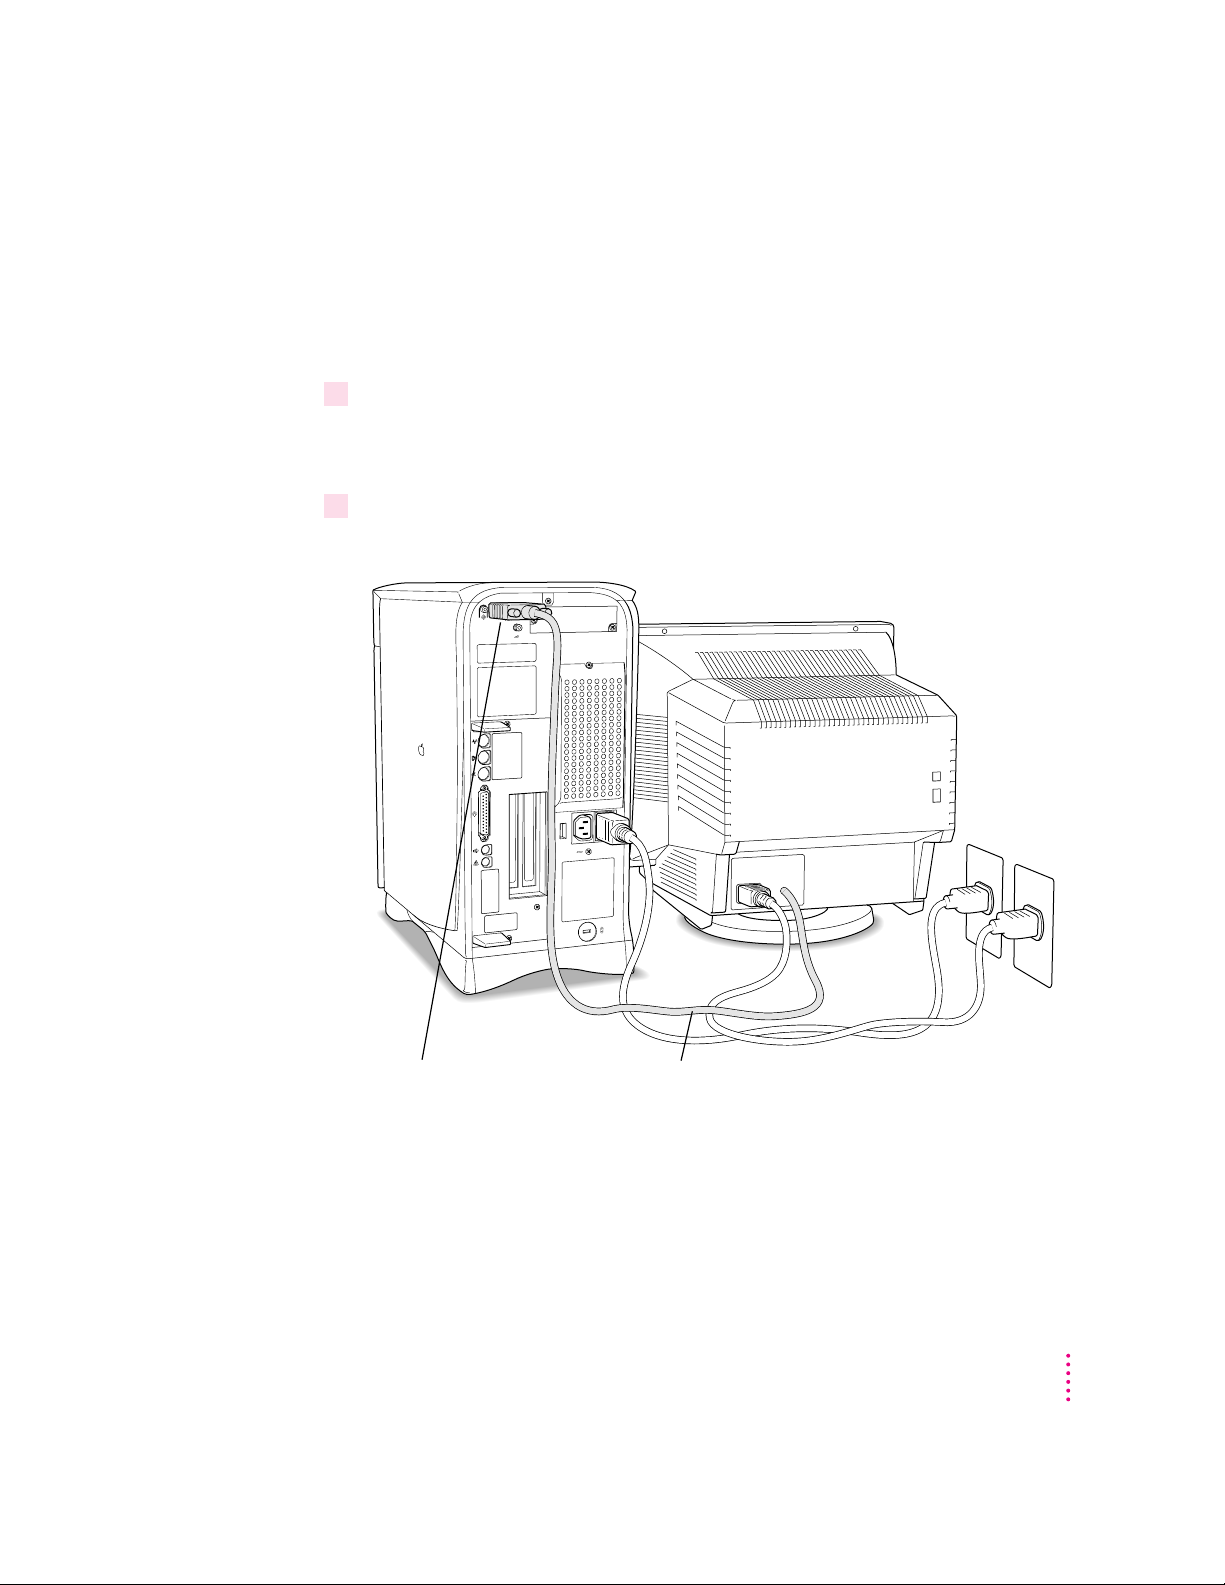
Connecting the monitor video cable
After you plug in the monitor power cord, connect the monitor video cable to
the co mputer’s monitor video port.
To connect the monitor video cable, follow these steps:
1Attach the monitor video cable to the monitor so that it appears as shown in the
illustration.
On some monitors, the cable is already attached.
2Attach the monitor video cable to the monitor video port on the back of the computer so
that it appears as shown in the illustration.
™
Monitor video port Monitor video cable
If your monitor has a microphone or speakers, you may need to connect
additional cables. See the documentation that came with the monitor.
Getting Started
7
Page 8

Connectin g the mouse and keyboard
1Plug the mouse cable into the recessed port on the back of the keyboard.
The plug and the port are marked with the ◊ icon (symbol). The positions of
the port and icon on your keyboard may be different from those pictured.
By the way: A port marked with the ◊ icon is called an Apple Desktop Bus
(ADB) port.
Plug the mouse cable into the recessed port
on the keyboard. The flat part of the plug
should be pointing down, as shown here.
8
Chapter 1
This cable plugs into the Apple Desktop Bus (ADB) port,
◊
marked with the
icon, on the back of the computer.
Page 9
2Plug the keyboard cable into the ADB port marked with the
◊
icon on the back of
the computer.
V
ADB port
Some monitors also have a port to which you can connect the keyboard or
mouse. See the information that came with the monitor.
Getting Started
9
Page 10
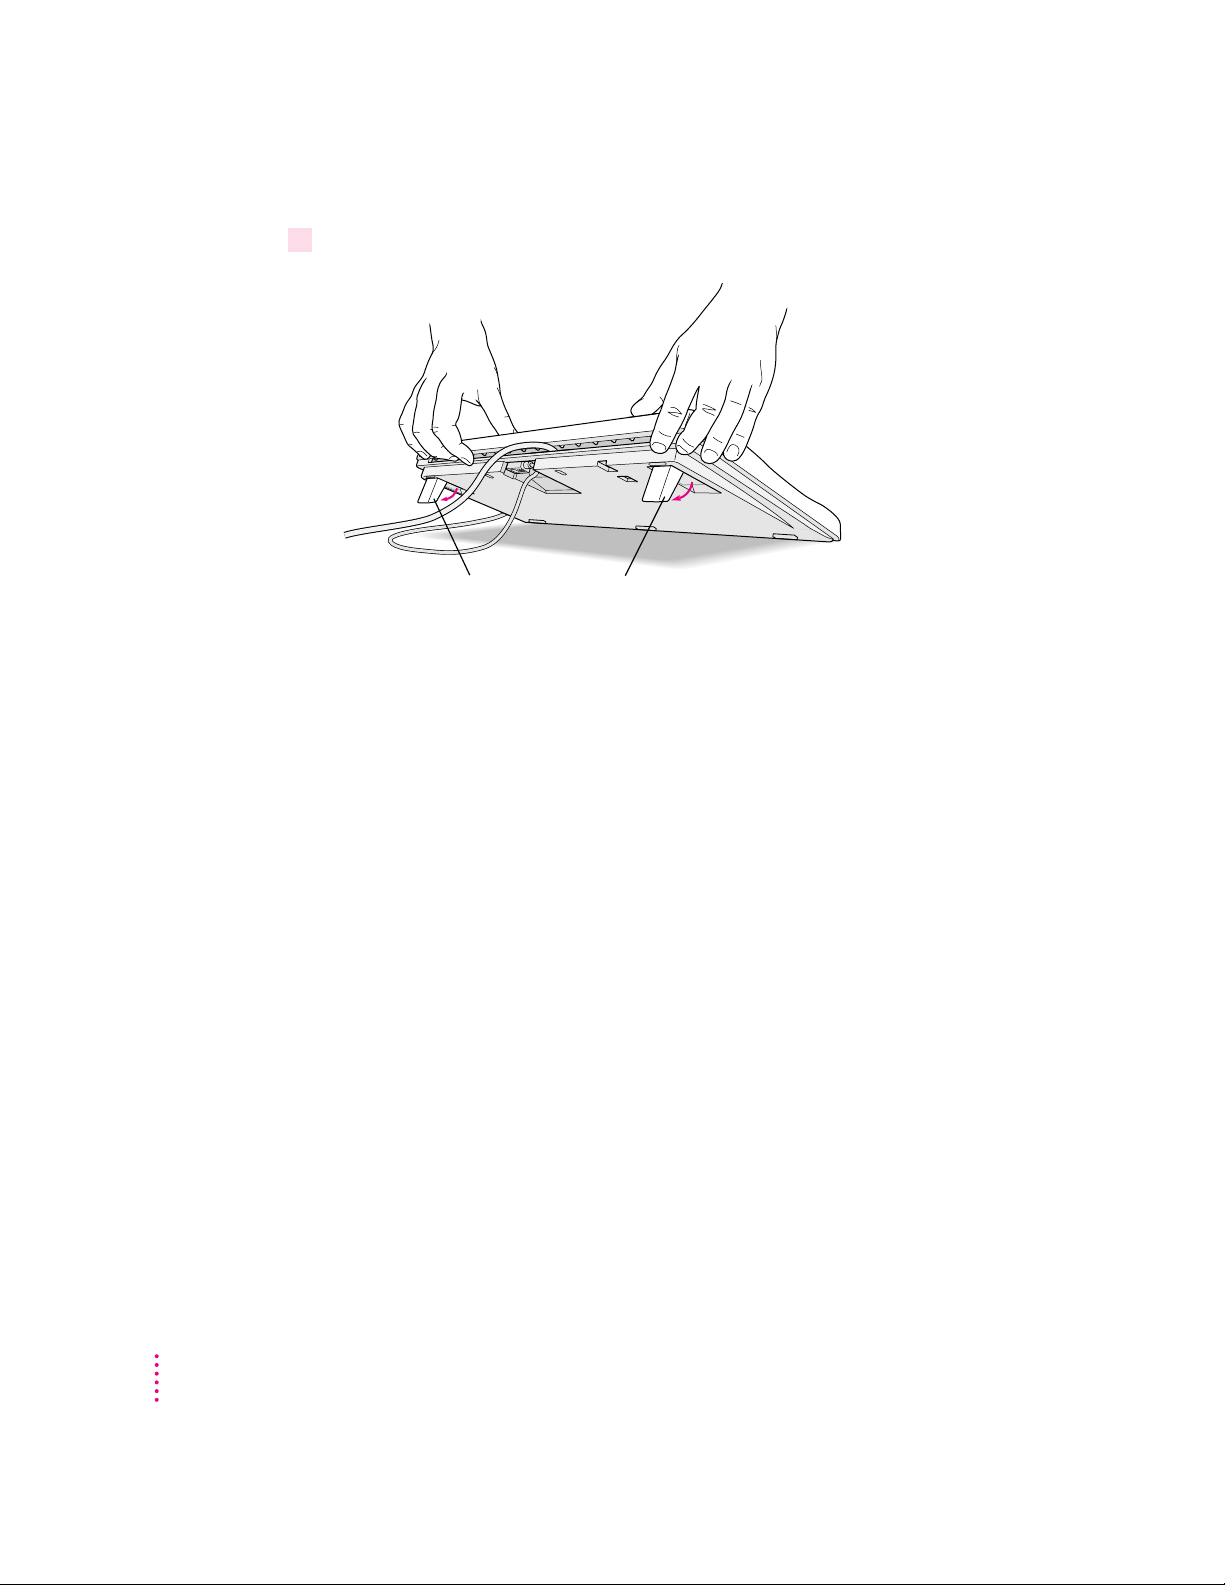
3If you want to adjust the keyboard angle, lower the feet on the keyboard.
To adjust the keyboard angle, lower the feet until they snap into position.
Connectin g the mod em
A modem is hardware that may already be installed inside your computer. The
modem enables your computer to send and receive faxes and telephone calls,
to connect to the Internet, to access online services, and to communicate with
other computer users. (You use the modem through the appropriate software
already installed on your Performa. See your modem documentation for
information on how to use the modem and software.) You can confirm whether
you have an internal modem by seeing if you have an internal modem
connector on the back of your computer, as shown in the next illustration.
(Also, a standard telephone cord will have come with your computer.)
10
Chapter 1
If your computer came with an internal modem and you want to connect the
modem now, follow the next illustration. If your computer came with an
external m odem, connect it to the external modem port and follow the
instructions in the modem manuals that came with your computer or with
the modem.
IMPORTANT
When connecting a modem, make sure you connect the modem to
an analog phone line—the kind used typically in homes. (A digital phone
line could damage the modem.) If you’re connecting the modem at home, you
probably have an analog phone line. Your modem manuals contain more
information about using your modem.
Page 11
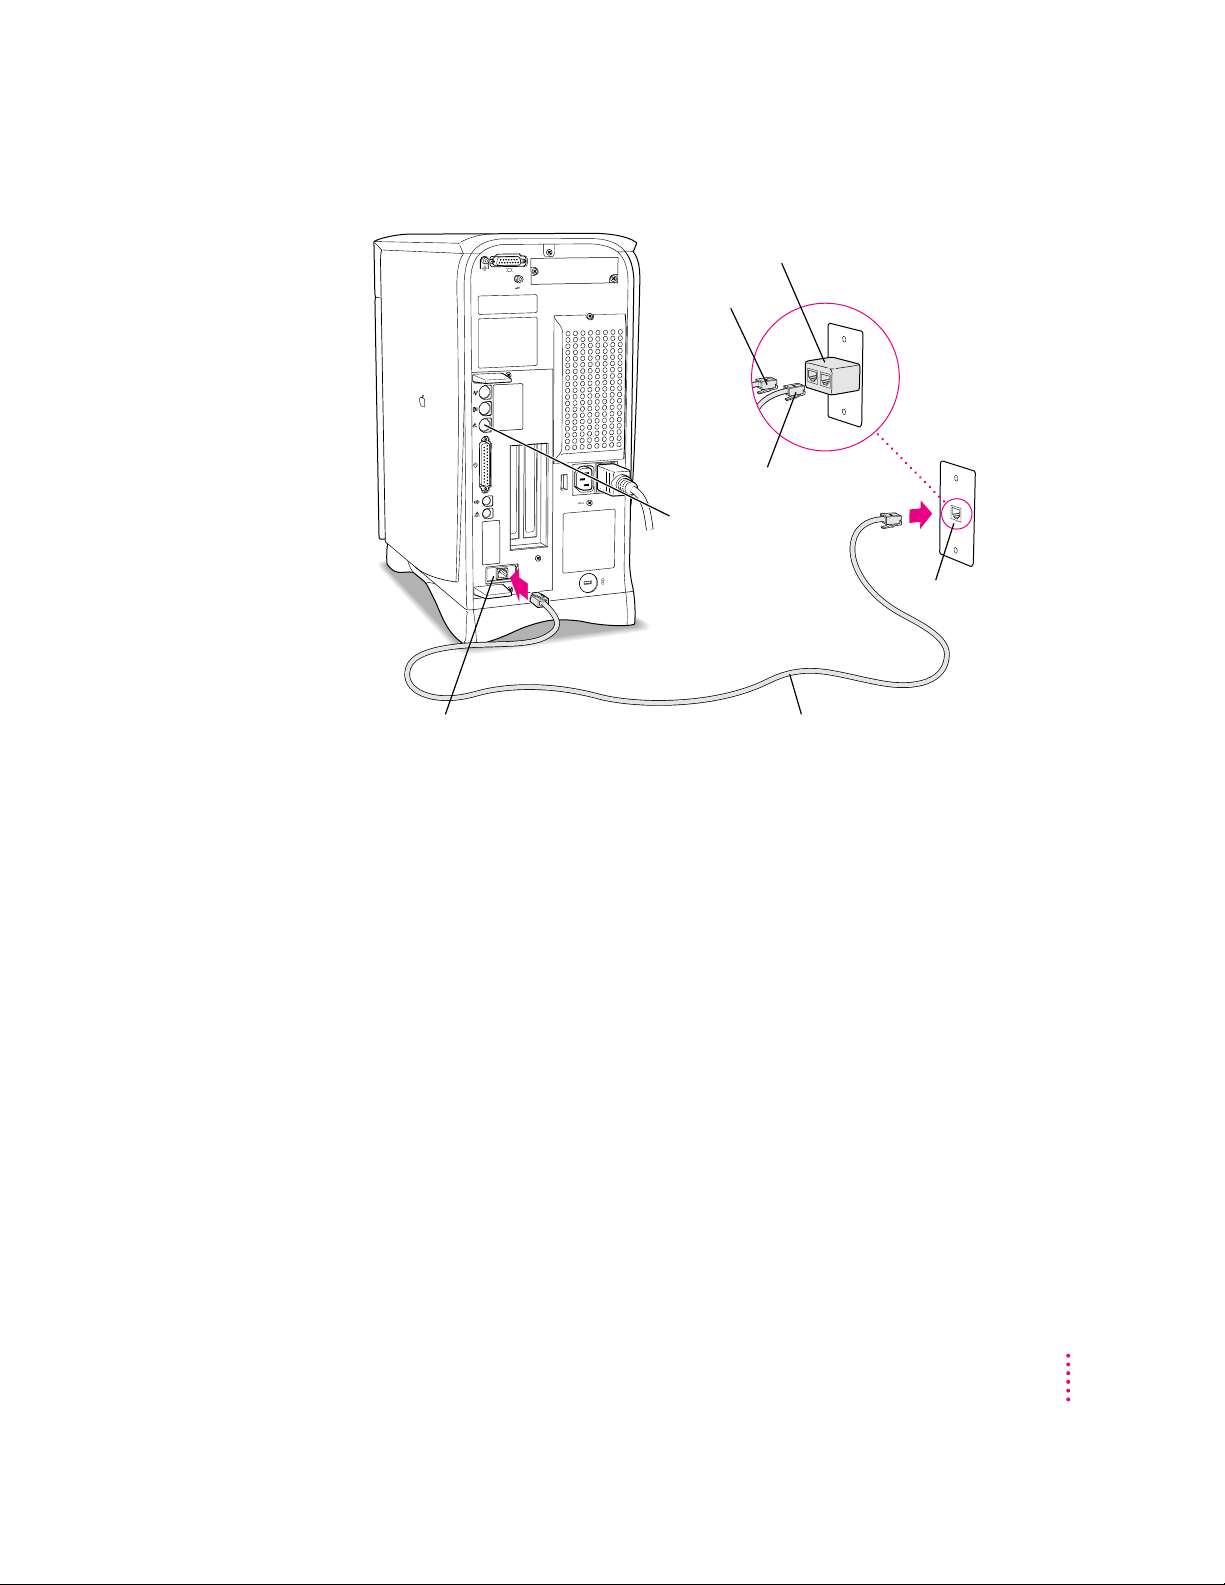
Line splitter (purchased separately)
To telephone
To internal modem
External modem port
(This port is covered
if an internal modem is
installed. If it is covered,
do not remove the cover
or plug anything into the
external modem port.)
Internal modem connector Phone cord
Phone jack in wall
You can use any standard phone cord to connect your internal modem
connector to a phone jack. If you have only one phone jack, consider
purchasing a line splitter at an electronics supply store. A line splitter enables
you to plug your phone and your modem into the same jack at the same time.
Keep in mind that when your phone and your modem share a single phone
line, you will not be able to use both pieces of equipment at the same time,
even if they are attached to separate phone jacks. While you use your modem,
outside callers will get a busy signal and you cannot call out. When your
phone is in use, you cannot use the modem. (By the way, you can keep your
answering machine connected to your phone, even if your phone and modem
share the same telephone line.)
IMPORTANT
During lightning storms, disconnect your modem by unplugging its
phone cord from the phone jack. This helps avoid accidental voltage overload.
Getting Started
11
Page 12
Connecting other equipment
If you are new to the Macintosh, it’s a good idea to get some experience using
your computer before you connect other equipment, such as a printer or
scanner. To learn basic Macintosh skills, continue with the instructions in
this cha p ter.
When you’re ready to connect other equipment to your Macintosh, see the
instructions in Chapter 3.
Turning the computer on for the first time
To tu r n the computer on for the first time, follow these steps:
1Turn on your monitor.
Note: You may not see the monitor power come on until you turn on the
computer in the next step. Also, larger monitors can take several seconds to
turn on if you have extra DRAM installed in your computer.
See the information that came with your monitor for the location of the power
switch. On newer Apple monitors, the power switch is located on the front of
the unit.
12
By the way: Dep endi ng on the type of monitor you have, you may only need
to turn it on once. Some monitors turn off automatically when you shut
down the computer, and turn on automatically when you start up the
computer. Other monitors have to be turn ed on separately each time you
turn on the computer.
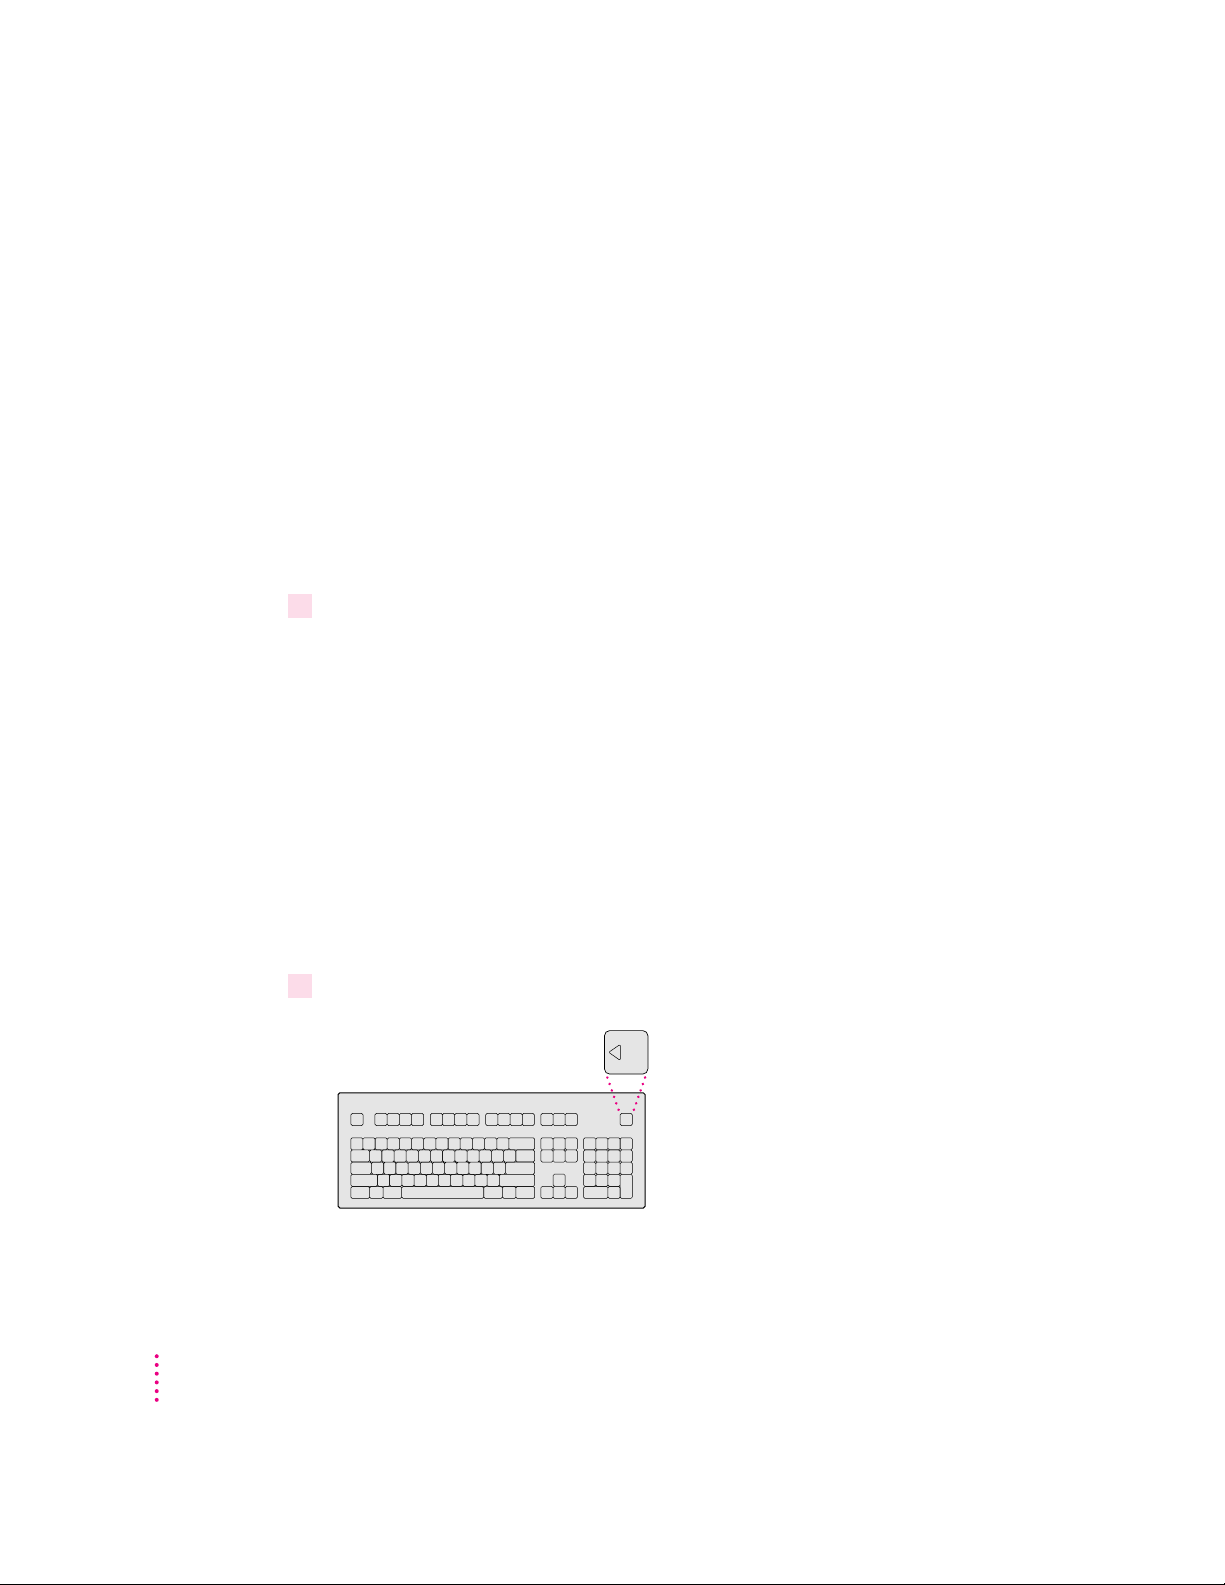
2Press the Power key (marked with a triangle) on your keyboard.
You hear a tone from the computer as it starts up.
Chapter 1
Page 13
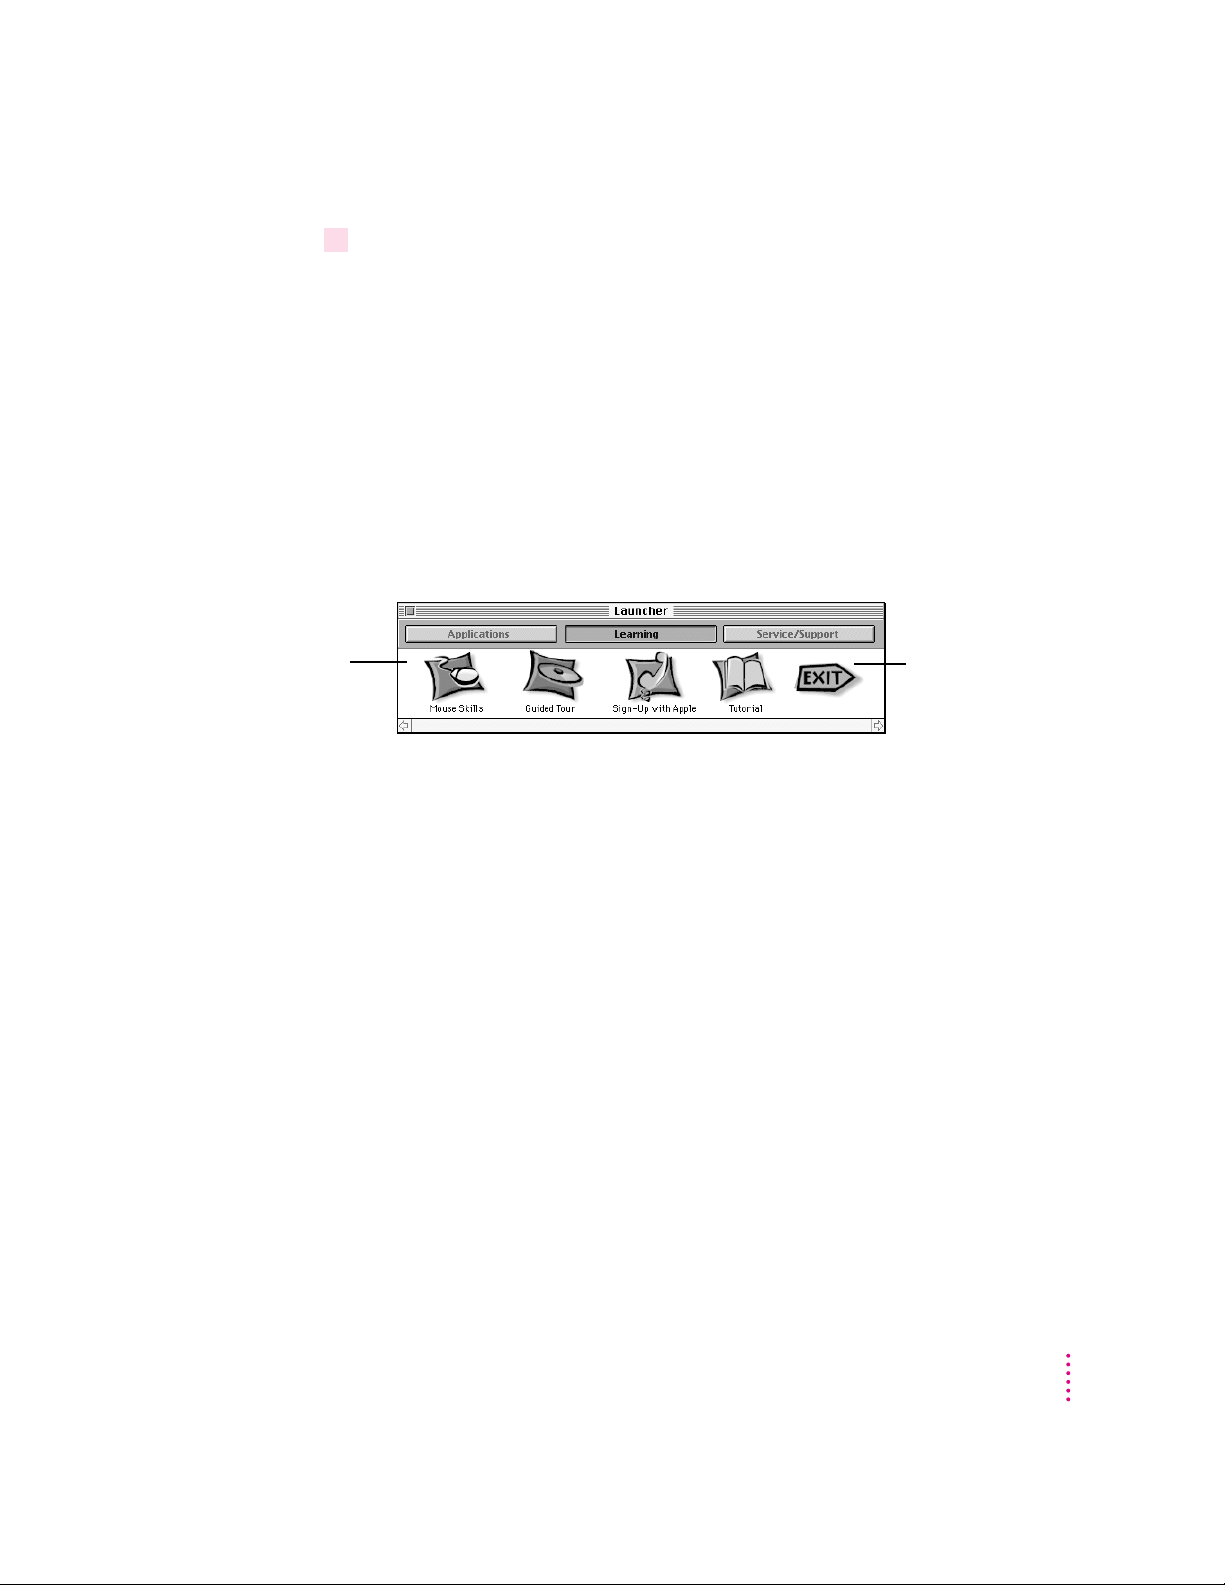
3 Follow the instructions on your screen.
You will see a “welcome screen” with a Launcher (shown below) that you use
to choose what you want to do next.
m If you don’t know how to use a mouse, press the letter M on your keyboard
for an on-screen program that teaches you how to use the mouse.
m If you’re new to the Macintosh but familiar with how to use a mouse, click
the Tutorial button to go through the Performa Tutorial, a program that
teaches you how to use your computer.
m If you want to learn more about the capabilities of your Macintosh (not
how you can use the Macintosh but more about what the Macintosh can
do), click one of the other buttons on your screen.
Click one of these
buttons. (The buttons
on your screen may
be different.)
Click Exit when you’re
finished exploring to
go to the Macintosh
desktop.
Note: If you see a blinking question mark or nothing at all, see the next
section, “Problems Turning On Your Computer?”
Getting Started
13
Page 14
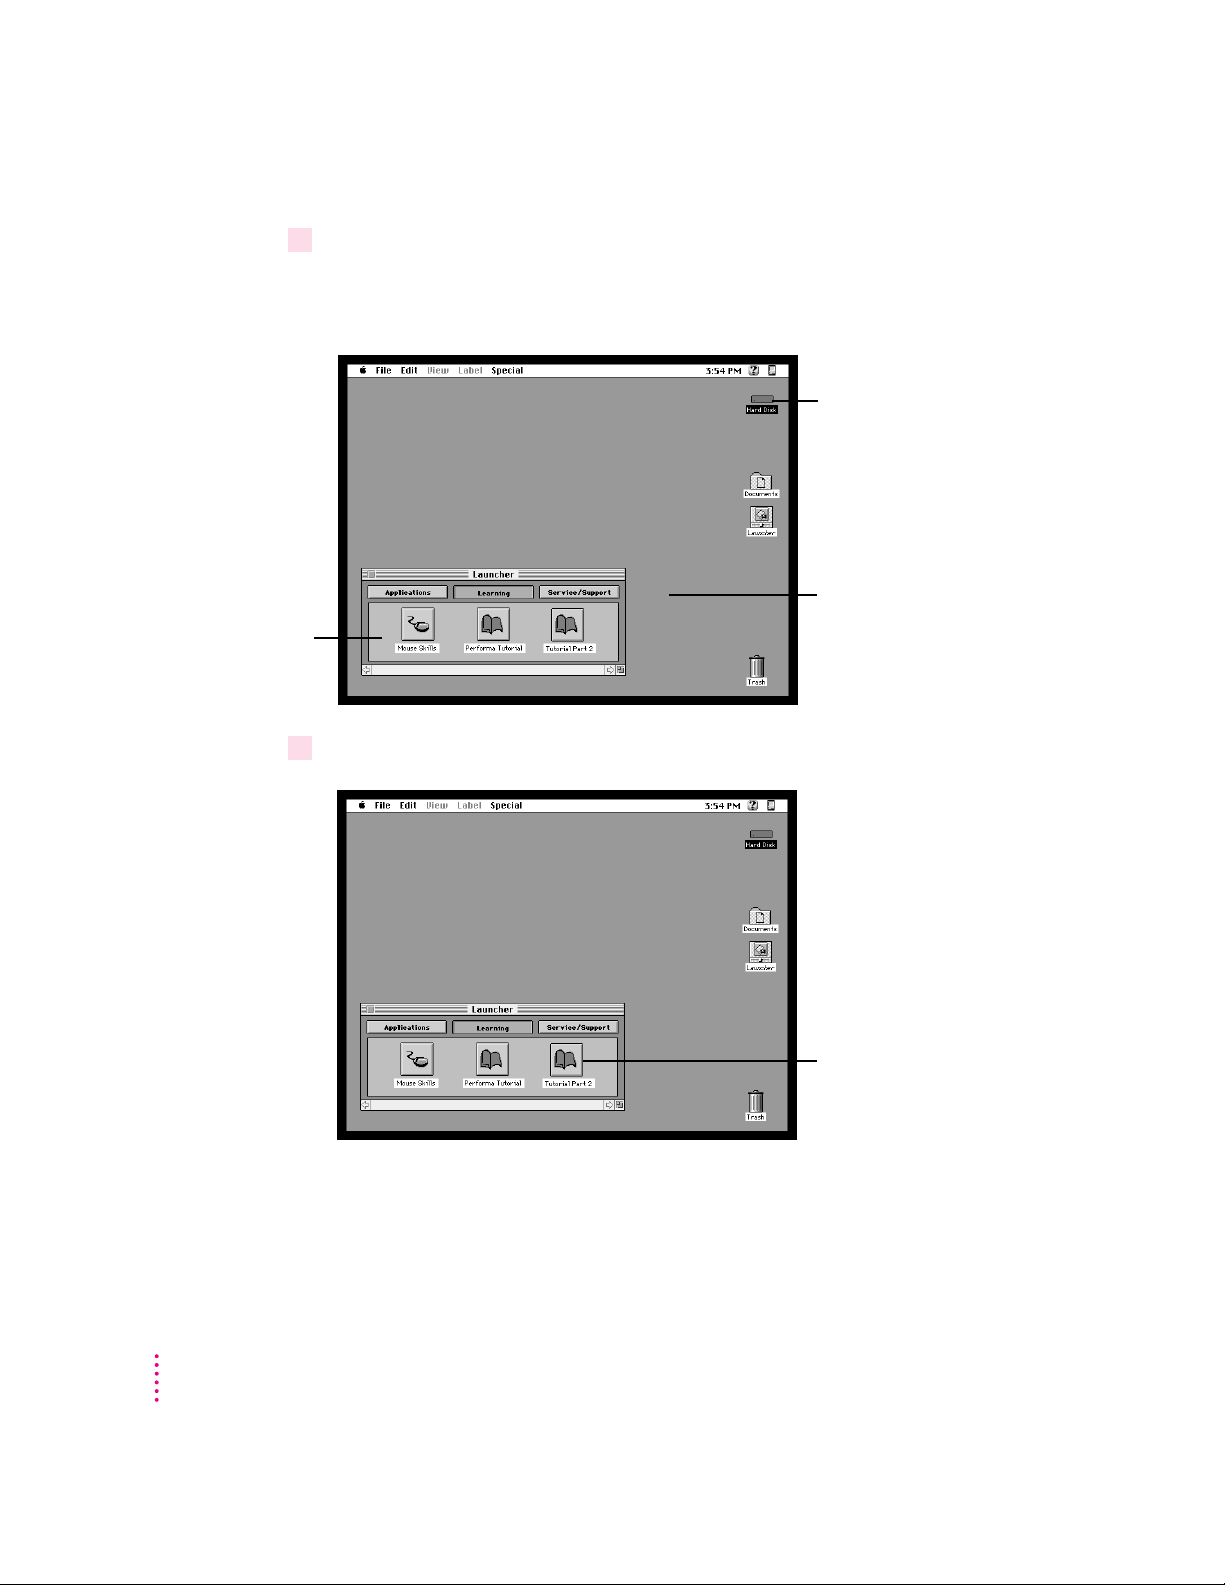
4When you’re finished exploring the items on your screen, click Exit.
Your Launcher has
more—and perhaps
different—items in it
than are shown in
this illustration.
5Take Part 2 of the Tutorial or skip to the section “What’s Next?” later in this chapter.
Yo u’ ll see the Macintosh desktop as pictured below. (Note: Most computer
screens have a slight black border around them.)
Hard disk icon
Macintosh desktop, after you
exit the welcome screen
14
Click the Tutorial Part 2
button to continue learning
the basics of your computer.
(Your Launcher has more
items in it than are shown
in this illustration.)
Chapter 1
Page 15

Problem s turnin g on your compu ter?
If the screen is dark, check these items to see if you can identify
the problem:
m Is the computer plugged into a power source? If it is plugged into a
power strip, is the power strip turned on?
m Is the computer turned on? The power-on light on the front panel
should be on. If it isn’t, press the standby power button (marked with
the symbol ®) on the back of the computer.
m Are the keyboard and mouse cables connected correctly? (Don’t
disconnect the keyboard or mouse cable while the computer is on.
You could damage your equipment.)
m Is the monitor power cord plugged in?
m Is the monitor turned on? (Check the power-on light on the front of
the monitor.)
m Is the monitor video cable—the one connected to the monitor video
port (™) on your computer—attached firmly to both the monitor
and computer?
m Is the brightness control on the monitor adjusted correctly? (On most
monitors, the brightness control is marked with the symbol ¤.)
If you see a blinking question mark on the screen, turn to “Solutions to
Common Problems With Your Computer” in Chapter 6.
Getting Started
15
Page 16
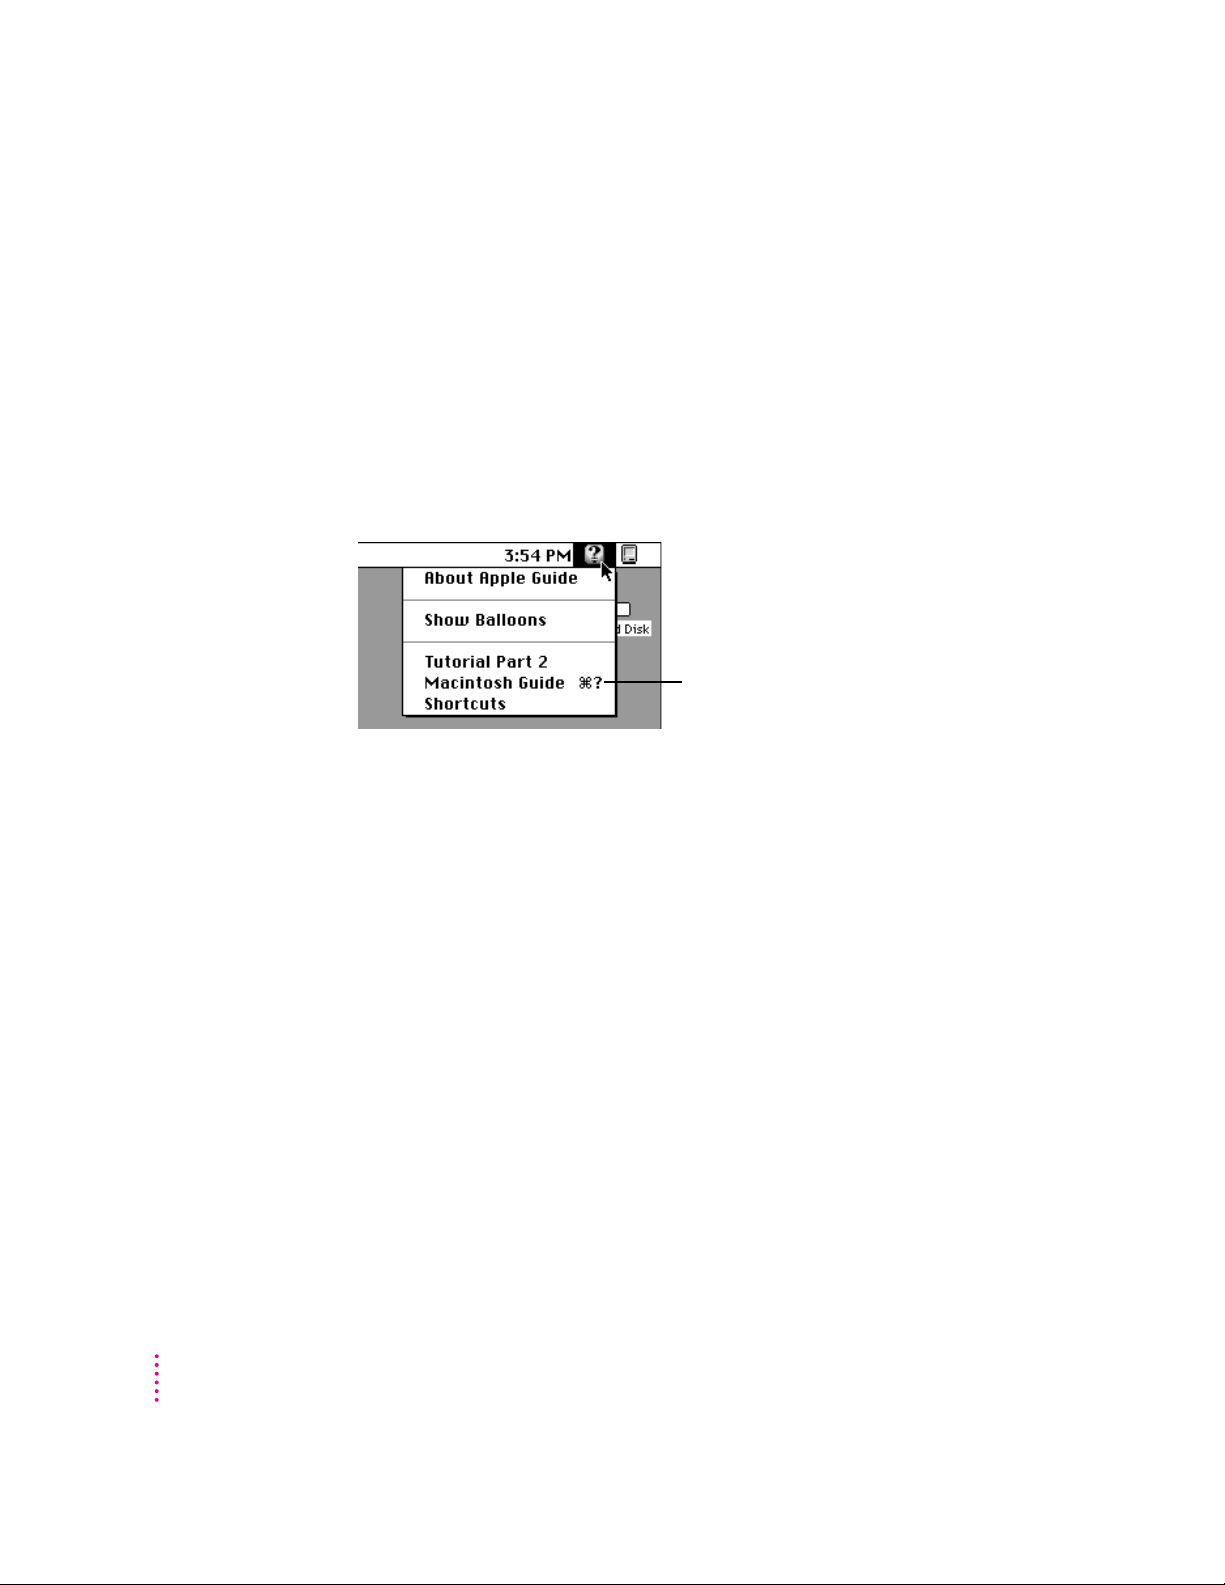
What’s next?
Congratulations! You’ve finished setting up your computer. Now continue
with one of the following steps:
m If you are new to the Macintosh, see the next section, “Learning the Basics
in the Performa Tutorials.”
m If you are an experienced Macintosh user, turn to Chapter 2, “Getting
Help,” to learn about Macintosh Guide. Or select Macintosh Guide from
the Guide menu (h) in the upper-right corner of your screen and explore
it yourself.
What you can’t find in this manual you can find
in Macintosh Guide, your main source of
information when working with your computer.
m If you want to connect other equipment, such as a printer, to your computer,
see Chapter 3, “Connecting Equipment and Expanding Your Computer.”
16
Chapter 1
m If you want to install application software on your computer, see
Chapter 4, “Using Programs and Backing Up Disks.” The chapter contains
information on setting up your programs and managing memory. You’ll
need this information to properly set up any programs specifically designed
for computers with PowerPC microprocessors.
m If you want to turn off your computer, see “Turning the Computer Off ”
later in this ch apter.
IMPORTANT
If you need to turn off your computer at any point, please see
“Turning the Computer Off ” later in this chapter. It is very important to use
the correct procedure for shutting down your Macintosh before turning it off.
Before you begin working with your computer, be sure to read the important
health and safety information in Appendix A.
Page 17

Learning the basics in th e Performa tutorials
Read this section if you haven’t already gone through Mouse Skills or the
Performa Tutorial that appeared on your screen when you first turned on your
computer, or if you want to go on to Part 2 of the Performa Tutorial. These
programs teach you the basic skills you’ll need to use your computer.
To st art th e Performa Tutorial, Tutorial Part 2, or Mouse Skills once you are
past the introductory “welcome screens,” follow these steps:
1Slide your mouse along your mouse pad or desk.
Hold the mouse as shown, with the cable pointing away from you. Don’t press
the mouse button (under your index finger). Notice that the arrow (8) on the
screen moves in the same direction that you move the mouse.
Mouse button
If the arrow doesn’t move, make sure that the cables connecting the mouse
and keyboard are secure and that your mouse is positioned as shown in the
illustration.
Getting Started
17
Page 18
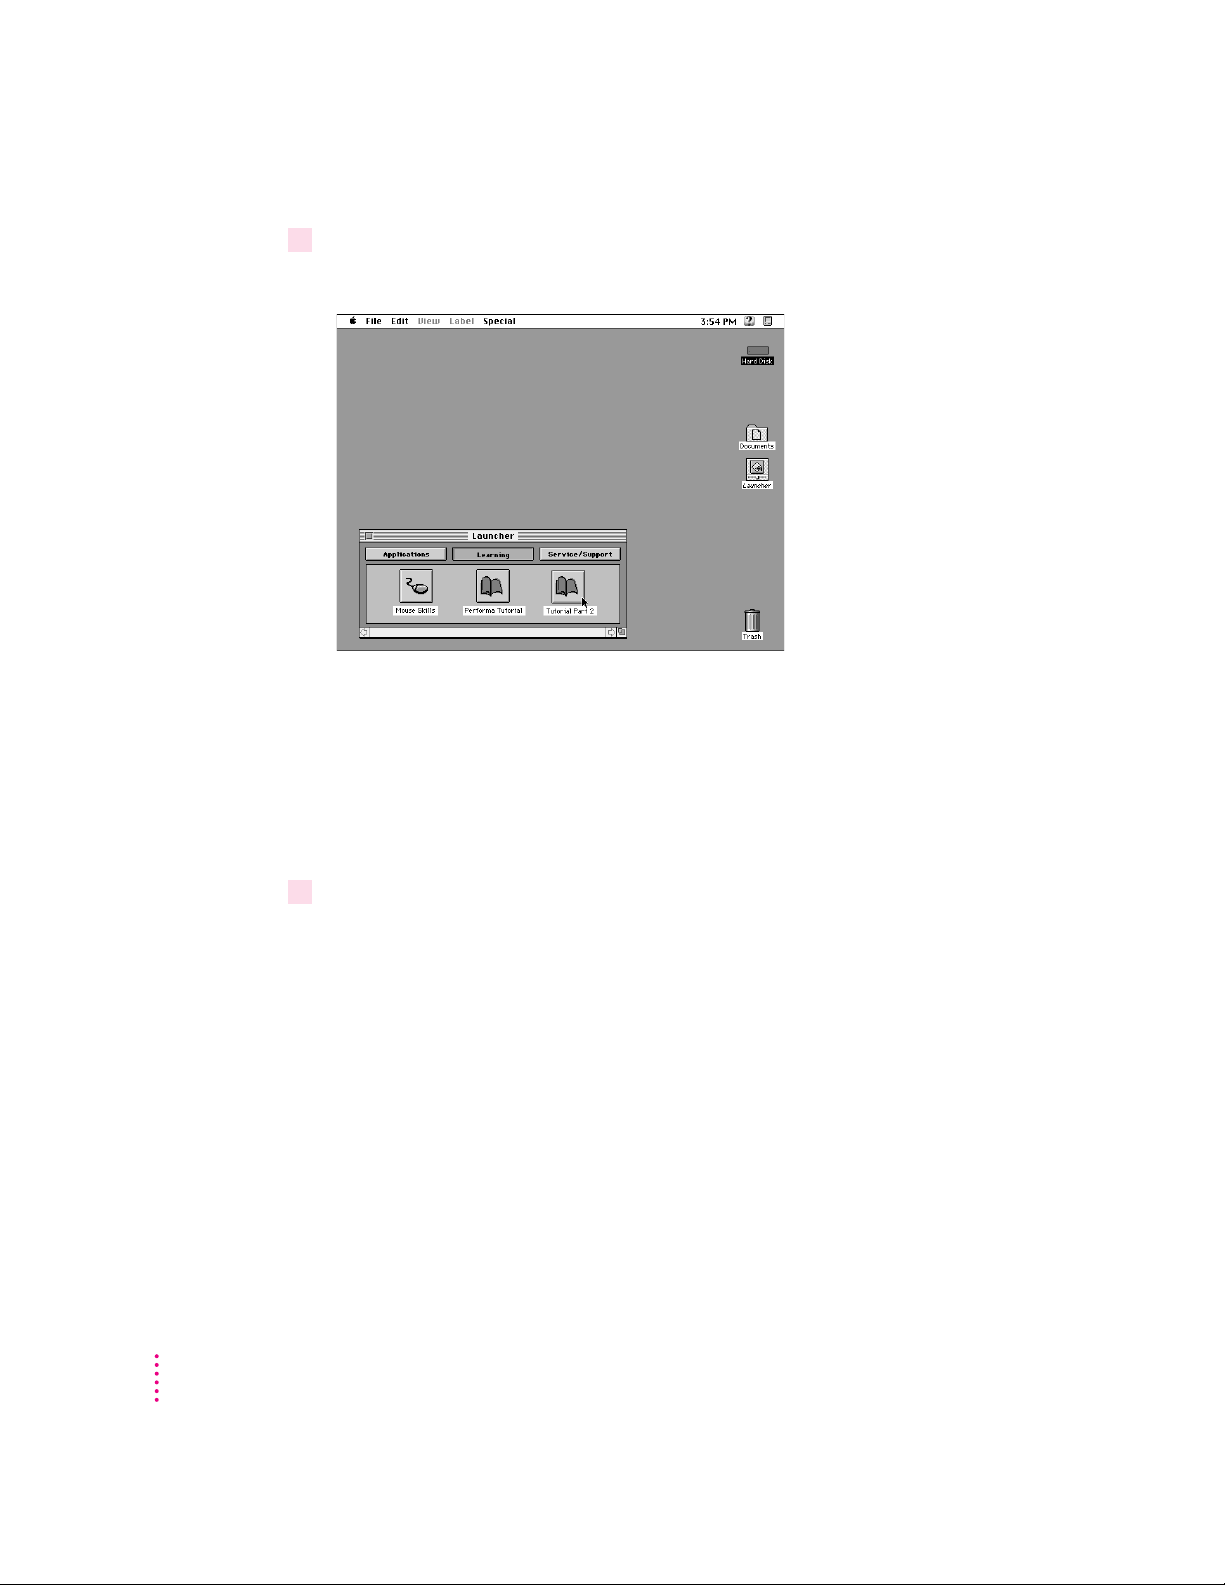
2Move the mouse so that the arrow (
want to take.
8
) is over the picture of the particular tutorial you
If you don’t see the Performa Tutorial, Tutorial Part 2, or Mouse Skills
pictures on your screen, put the arrow on the word “Learning” and click
(press and release) the mouse button.
If you run out of room on your mouse pad or desk while moving the mouse,
pick up the mouse and place it where there’s more room. (The ar row on the
screen moves only when the mouse is in contact with the mouse pad or desk.)
18
3Click the mouse button on the picture of the tutorial you want to take.
A window appears welcoming you to the tutorial. You can set this book aside
for now and follow the instructions on the screen. When you have completed
both parts of the tutorial, return to this book.
Chapter 1
Page 19
Reviewing th e basics
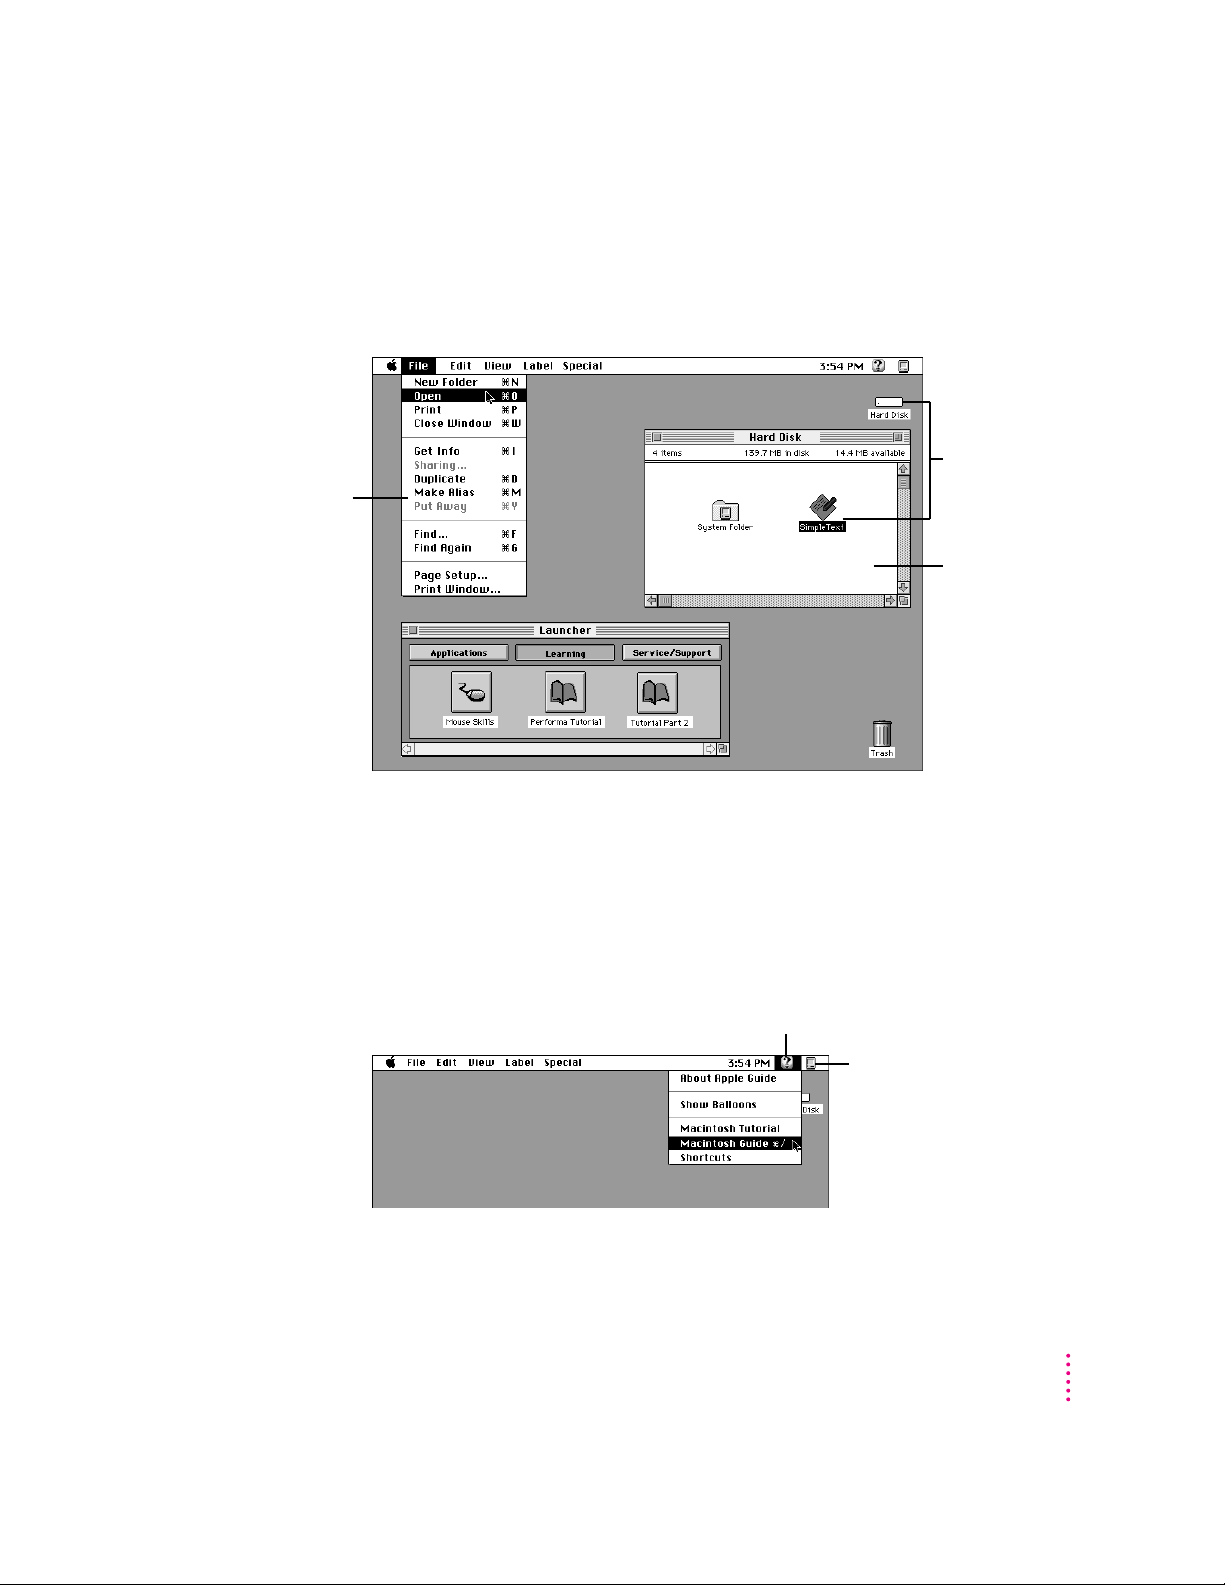
Use the following illustrations to review the elements on your screen with
which you work on your computer.
Menu
Icons
Window
Menus
The strip across the top of the screen is called the menu bar. The symbols and
words in it represent “menus” (lists) of commands. To open a menu, place the
pointer on the symbol or word for the menu and press the mouse button.
Guide menu
To find an answer to a question,
look in the Guide (
) menu.
h
Application menu
You can have several
applications open at once.
To see which program is active
or to switch from one program
to another, use this menu
(called the Application menu).
Getting Started
19
Page 20
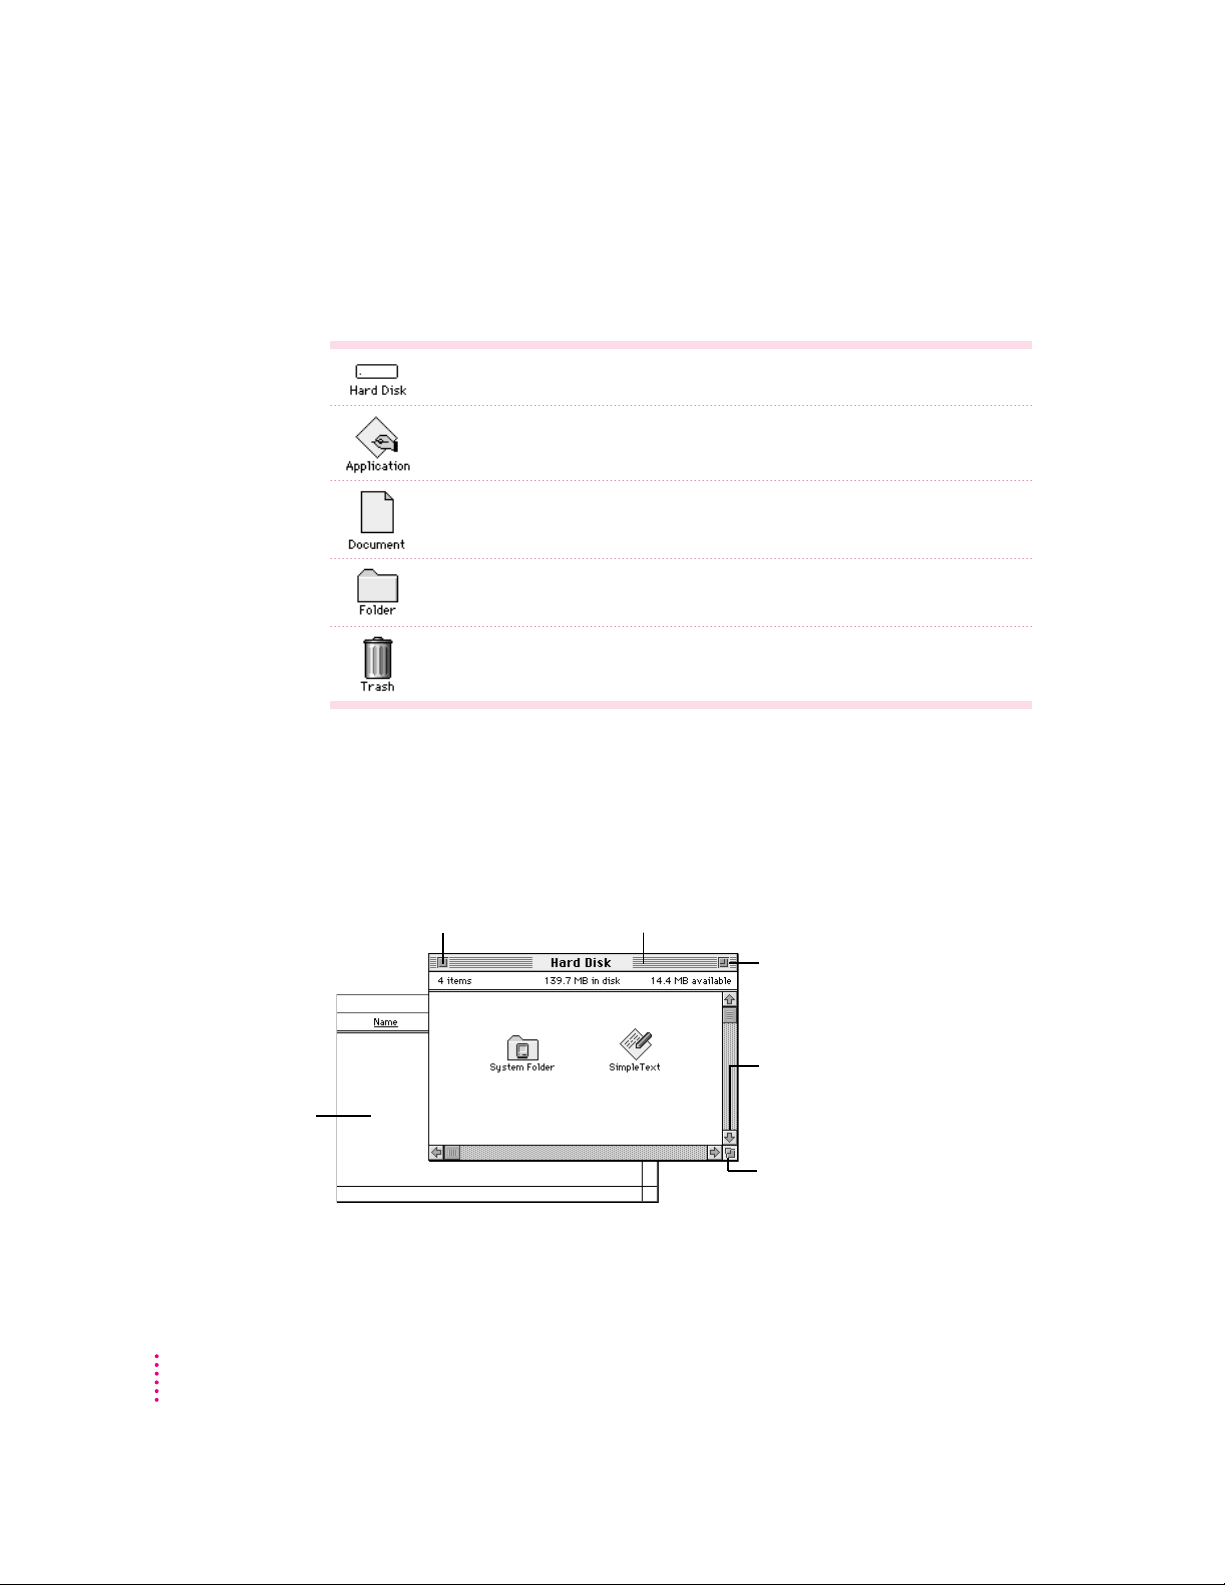
Icons
Icons are small pictures that represent disks, programs, documents, and
folders. You can double-click any icon to open it and see what it contains.
This icon represents your computer’s internal hard disk.
Icons like this one represent application programs, which you use to create
documents and do other work.
Icons like this one represent documents, which you can create and edit.
Icons like this represent folders. A folder contains other icons.
To throw away an item you no longer want, drag it to the Trash icon and choose
Empty Trash from the Special menu.
Windows
Windows are boxes that display text, graphics, and icons. To change the shape
or position of a window, or to close the window, use the elements shown here.
20
To bring a partially
covered window
to the front, click
anywhere in it.
Chapter 1
Close box
To close a window,
click the close box.
Title bar
To move a window, drag it by the middle of the title bar
(anywhere in the bar except the small box on each end).
Zoom box
To make the window bigger, click
once here. Click again to return the
window to its original size.
Scroll arrow
To bring hidden portions of a window’s
contents into view, click one of the
four scroll arrows.
Size box
To change the shape or size of a
window, drag the size box.
Page 21
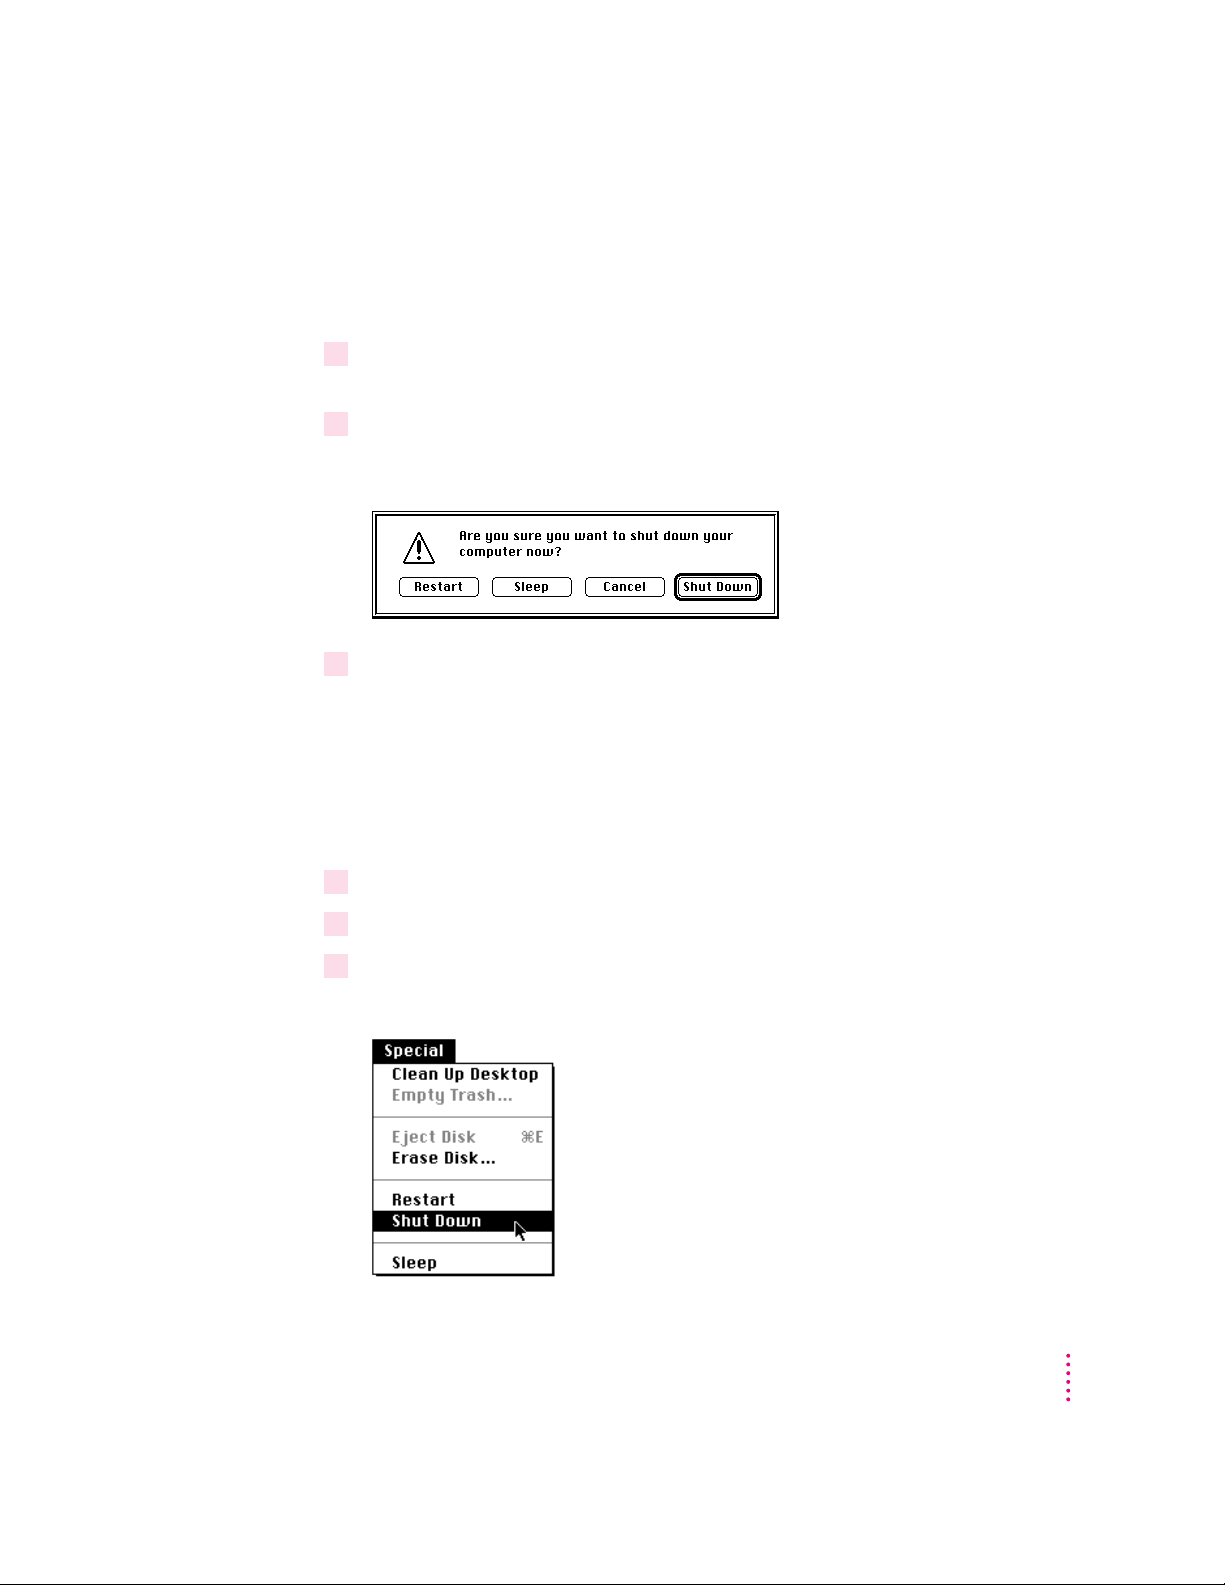
Turning the computer off
To tu r n the computer off using the Power key on the keyboard, follow these
instructions:
1If the computer is in sleep mode (the monitor is on but the screen is dark), press any key
except Caps Lock to wake it.
2Press and hold the Power key on the keyboard for about 2 seconds.
The following dialog box appears on the screen:
3Press the Return key on the keyboard (or click the Shut Down button in the dialog box).
You can also turn off your computer by choosing Shut Down from the Special
menu. Detailed instructions follow.
Note: If you are still in the welcome screens (the introductory screens that
appeared when you turned on your computer for the first time), use the Power
key to turn off your computer, as described above.
1Move the tip of the arrow (8) to the Special menu at the top of the screen.
2With the tip of the arrow on the word “Special,” press and hold down the mouse button.
3While holding down the mouse button, move the arrow down the list of choices until the
words “Shut Down” are highlighted, then release the mouse button.
Getting Started
21
Page 22

If you can’t shut down your computer
If a problem with the computer prevents you from using the Power key on
the keyboard or choosing Shut Down—for example, if the computer “freezes”
so that the pointer does not respond to the mouse—you can turn off the
computer by pressing the standby power button (®) on the back of
the co mputer.
IMPORTANT
button on the back of the computer to turn it off. Only use the standby
power button when there is a problem that prevents the computer from being
turned off with the Power key on the keyboard or the Shut Down command.
To make sure your work is saved, use the Power key on the keyboard or the
Shut Down command.
Turning the computer on
To tu r n on the computer after you’ve shut it down (using either the Power key
on the keyboard or the Shut Down command):
m
Press the Power key (marked with a
Note: Your monitor may have to be turn ed on separately each time you turn
on the computer. If you have trouble turning on your computer, see the
section “Problems Turning On Your Computer?” earlier in this chapter.
You could lose unsaved work if you use the standby power
π
) on the keyboard.
22
Chapter 1
Page 23
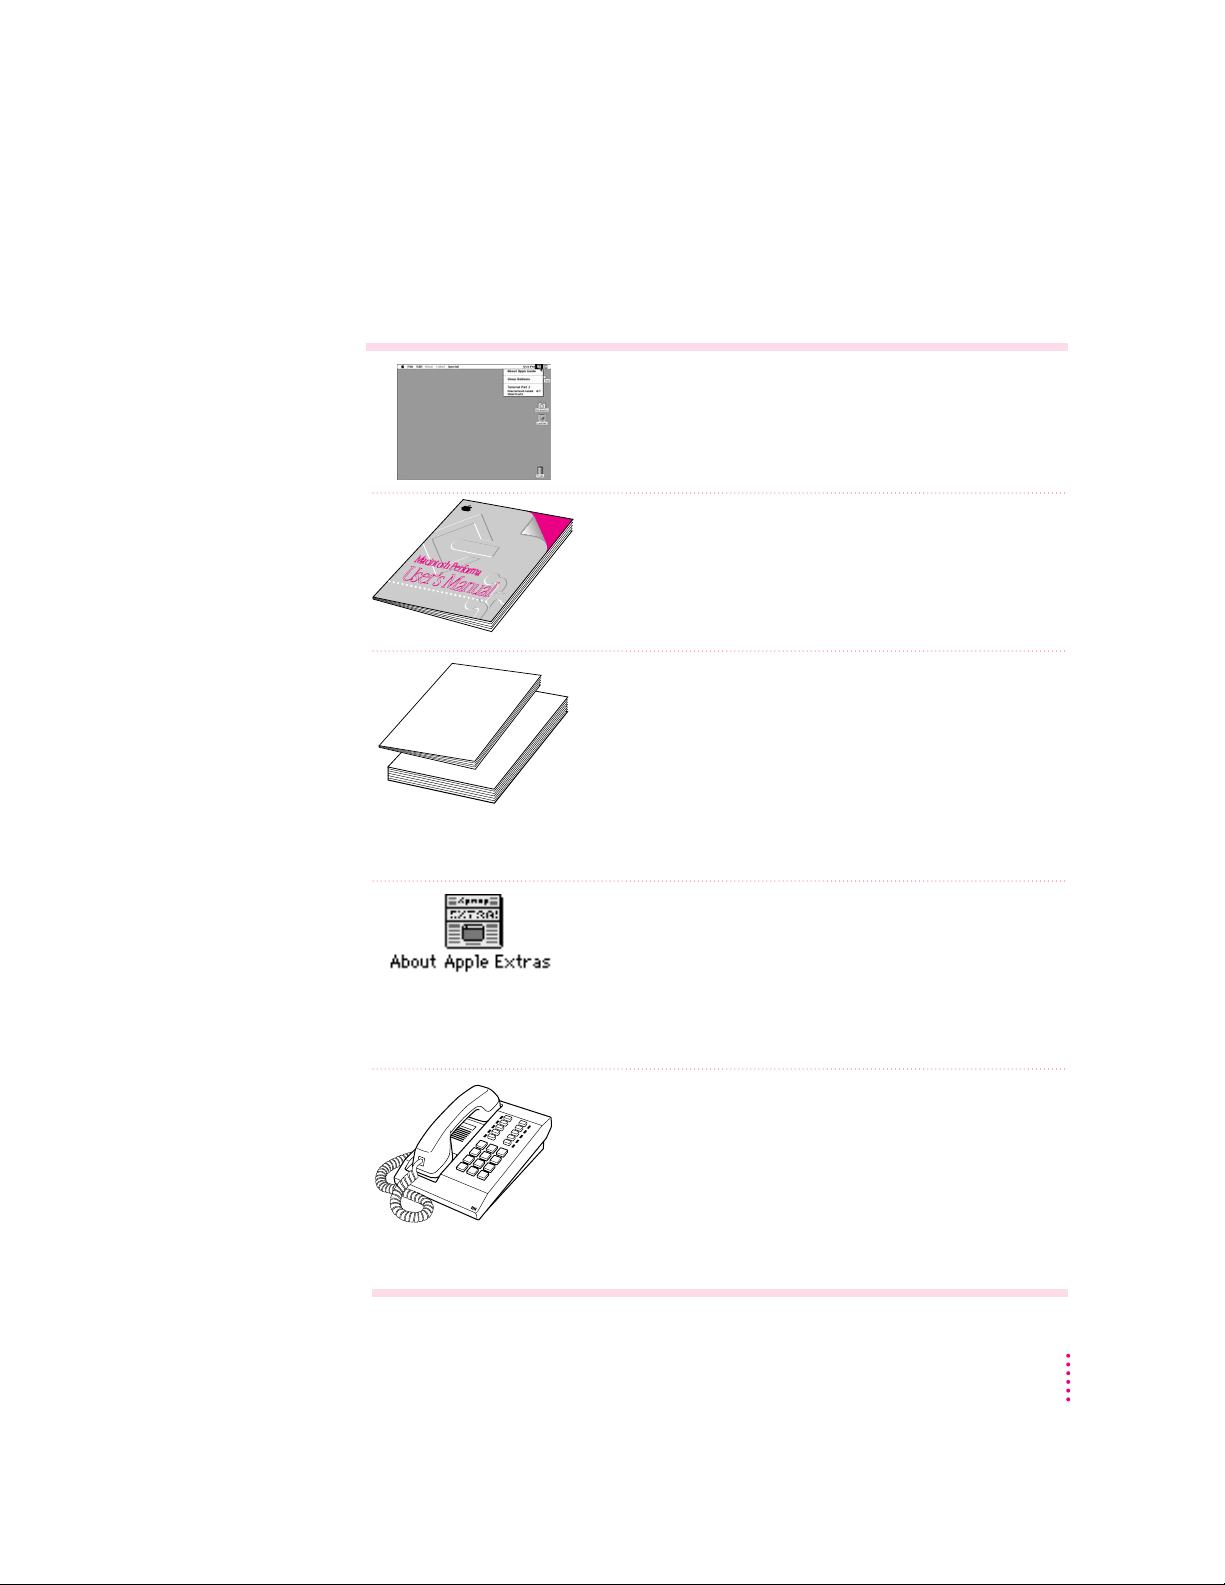
Where to find answers
When you have questions about using your Macintosh, there are several
places where you can look for answers.
In the Guide menu
The Guide menu (marked with the hicon) is your main source of
information about the Macintosh. To learn how to get different kinds
of help from the Guide menu, see Chapter 2 in this book.
In this book
Macintosh Performa
User’s Manual
Use this book to help you set up your computer and learn about it,
or to find solutions to problems with your equipment.
In other manuals
Some of the programs that already came installed on your
computer have separate manuals. Most of these manuals came in
the box with your computer. Some come online. (You can find them
as clickable buttons in the Applications section of the Launcher,
next to their application buttons.) For answers to questions about
other equipment or about application programs you have
purchased, see the manuals that came with the equipment or
programs.
From the Read Me files in the Apple Extras folder
The Apple Extras folder (in your System Folder) on your hard disk
contains SimpleText documents, called About Apple Extras with
important information about some of the application programs
included with your computer. Similar files called Read Me files can
also be found inside application folders and in the Documents folder
on your desktop.
From Apple’s customer support hotline
If you can’t find an answer in any of the materials provided, call the
customer support hotline. The phone number for the hotline is in the
service and support information that came with your computer.
Note:
If you have problems with an application program not
published by Apple, call the program’s publisher. Click the Phone
Numbers button in the Service/Support area of the Launcher to get
a software publisher’s phone number.
Getting Started
23
Page 24

Page 25
Use the instructions in this
chapter to learn about the help
available to you in the Guide menu.
2
Getting Help
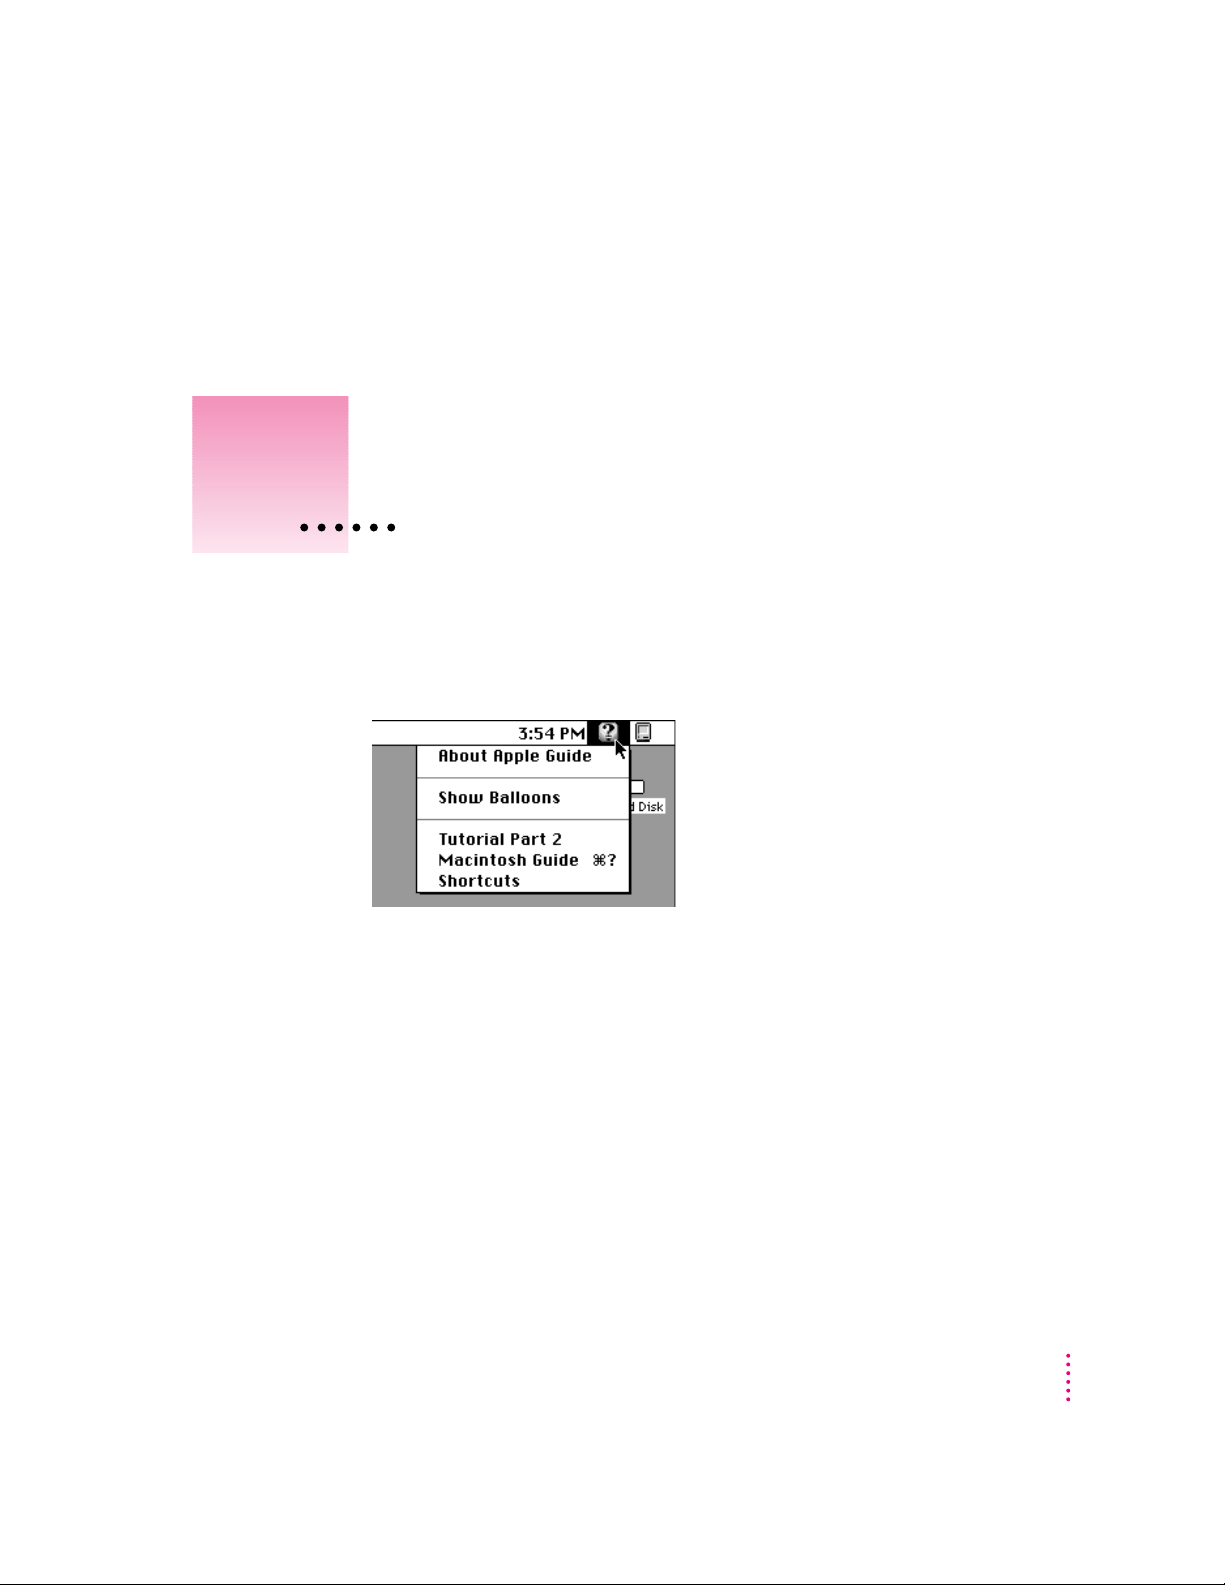
The Guide menu is your main source of information when you’re working
with your computer. The menu is identified by a question mark (h) in the
upper-right corner of the screen.
25
Page 26
Getting answers to your questions
When you have a question while working with your computer, you can get the
answer by choosing Macintosh Guide from the Guide menu.
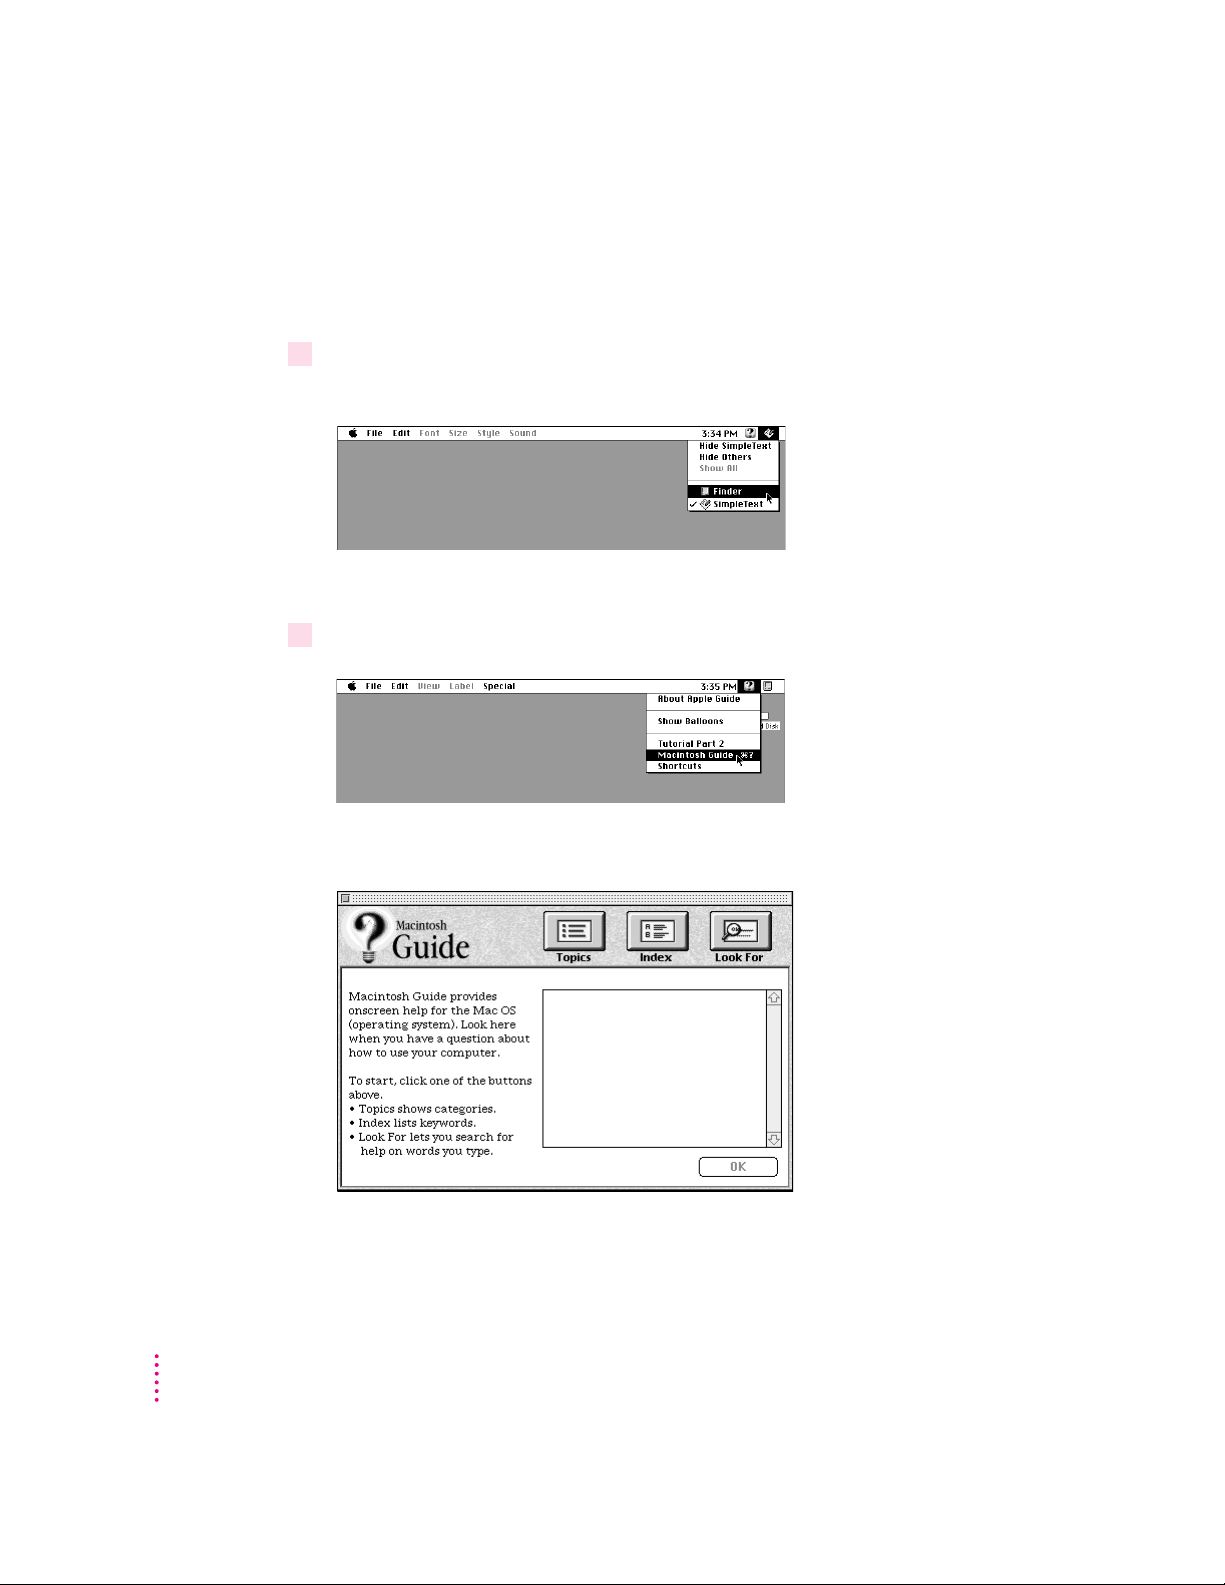
1Pull down the Application menu (in the upper-right corner of the screen) and choose
Finder to make it the active application program.
A checkmark in the menu indicates that the Finder is the active program.
2Pull down the Guide menu (marked with the
h
icon) and choose Macintosh Guide.
The Macintosh Guide window appears.
26
Whenever you use Macintosh Guide, its window remains in front of other
windows. If the window gets in your way, you can move it by dragging its
title ba r (the gray bar across the top of the window).
Chapter 2
Page 27
3Notice the three buttons at the top of the window: Topics, Index, and Look For.
Macintosh Guide gives you three ways of finding information:
m
Topics
lets you choose from a list of general subjects; it is like the table of
contents in a book.
m
Index
lets you choose from an alphabetical list of more specific subjects; it
is like the index in a book.
m
Look For
lets you search for information related to a specific word or phrase
that you type.
In the following sections you will practice using each method.
If you have problems while using Macintosh Guide, see “Tips for Using
Macintosh Guide” later in this chapter.
Getting answers with the Topics button
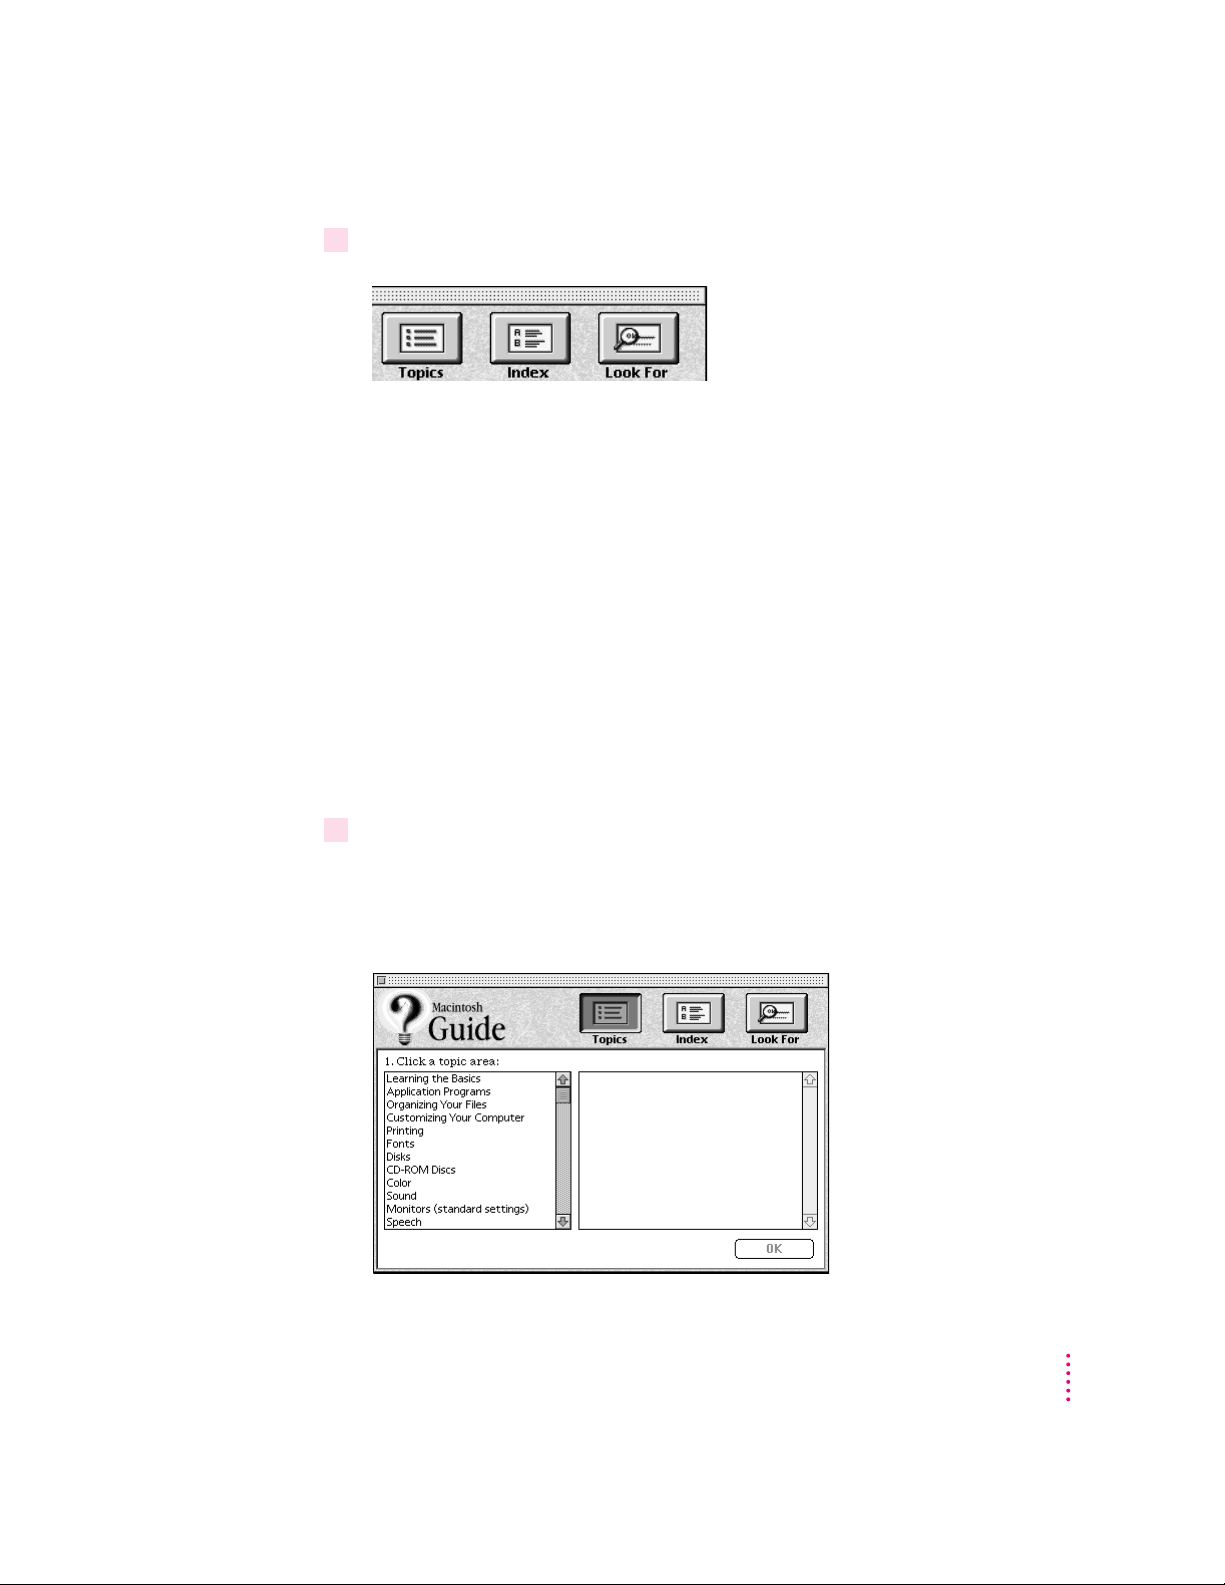
1 In the Macintosh Guide window, click the Topics button.
A list of general topics appears on the left side of the Macintosh Guide
window. (Depending on the hardware and software you have, the list of topics
may look different.)
Getting Help
27
Page 28
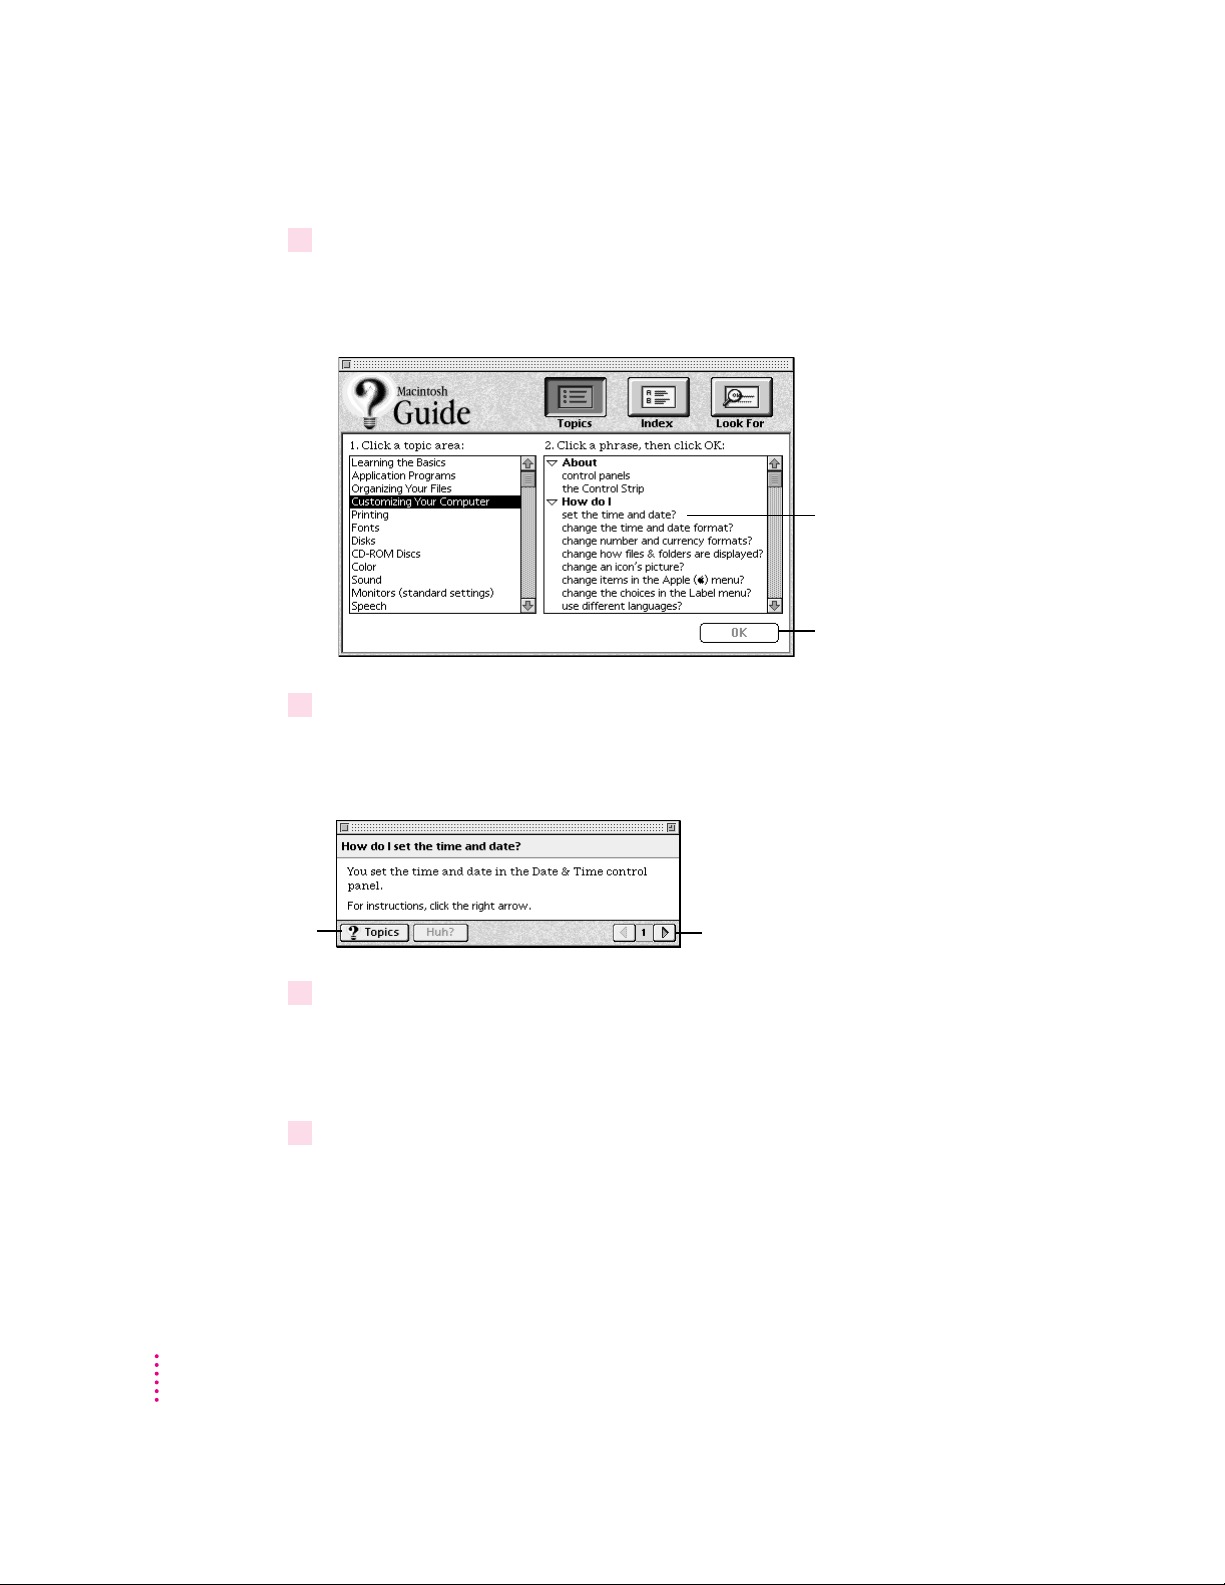
2 In the list of topics, click “Customizing Your Computer.”
When you click any topic area, a list of related questions appears on the right
side of the Macintosh Guide window.
To get instructions,
click a question…
…and then click OK.
3Click the question “How do I set the time and date?” and then click OK. Or double-click
the question.
A small window appears with instructions for you to follow.
28
If you want to
return to the main
Macintosh Guide
window, click
this button.
4 Read and follow the instructions in this window.
5When you have completed all the steps, click the Topics button in the lower-left corner to
Chapter 2
Click here to see the next
step (if there is one).
Macintosh Guide provides step-by-step instructions to answer the question
you selected. When you have completed each step, click the right arrow in the
lower-right corner to see the next step.
return to the main Macintosh Guide window.
Now continue with the next section.
Page 29
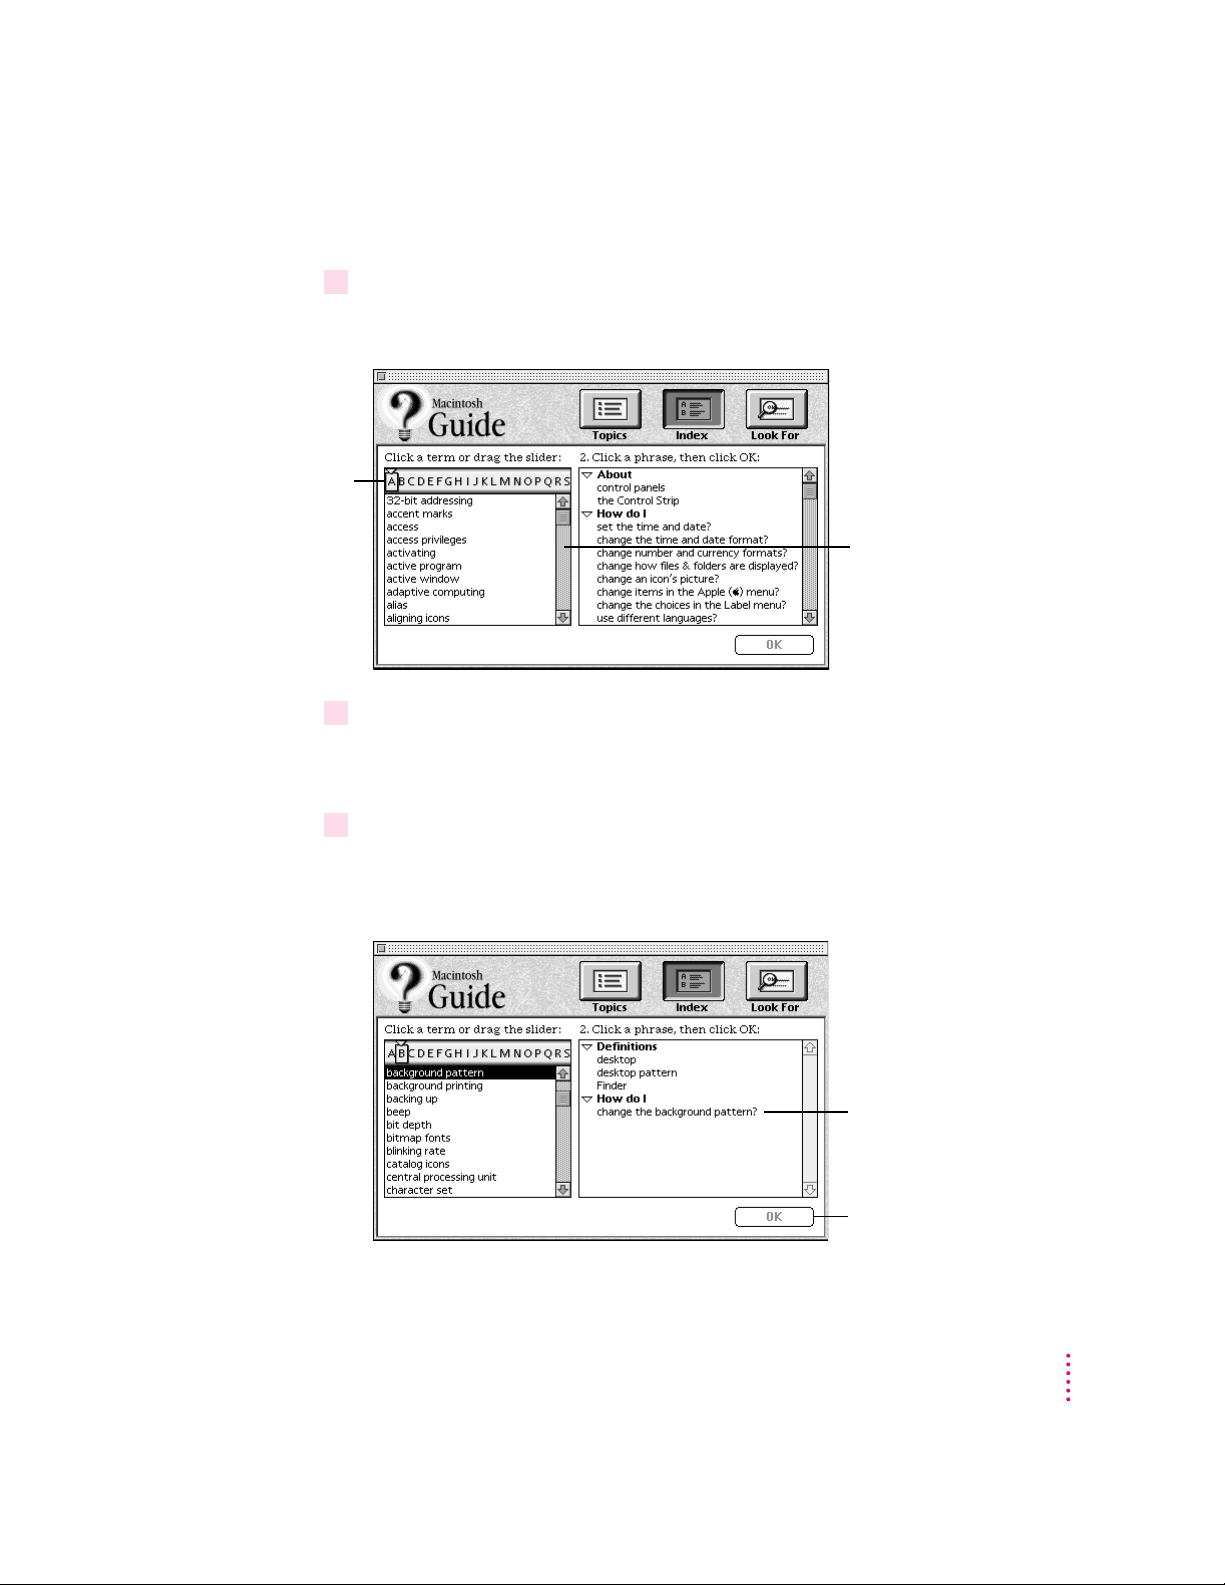
Getting answers with the Index button
1 In the Macintosh Guide window, click the Index button.
An alphabetical list of subjects appears on the left side of the window.
Slider
Scroll bar
2Scroll through the alphabetical list until the phrase “background pattern” is visible.
You can scroll through the list either by dragging the slider to the letter B or
by using the scroll bar at the right of the list.
3Click the phrase “background pattern” in the alphabetical list.
When you click any index entry, a list of related questions appears on the
right side of the Macintosh Guide window.
To get instructions,
click a question…
…and then click OK.
Getting Help
29
Page 30
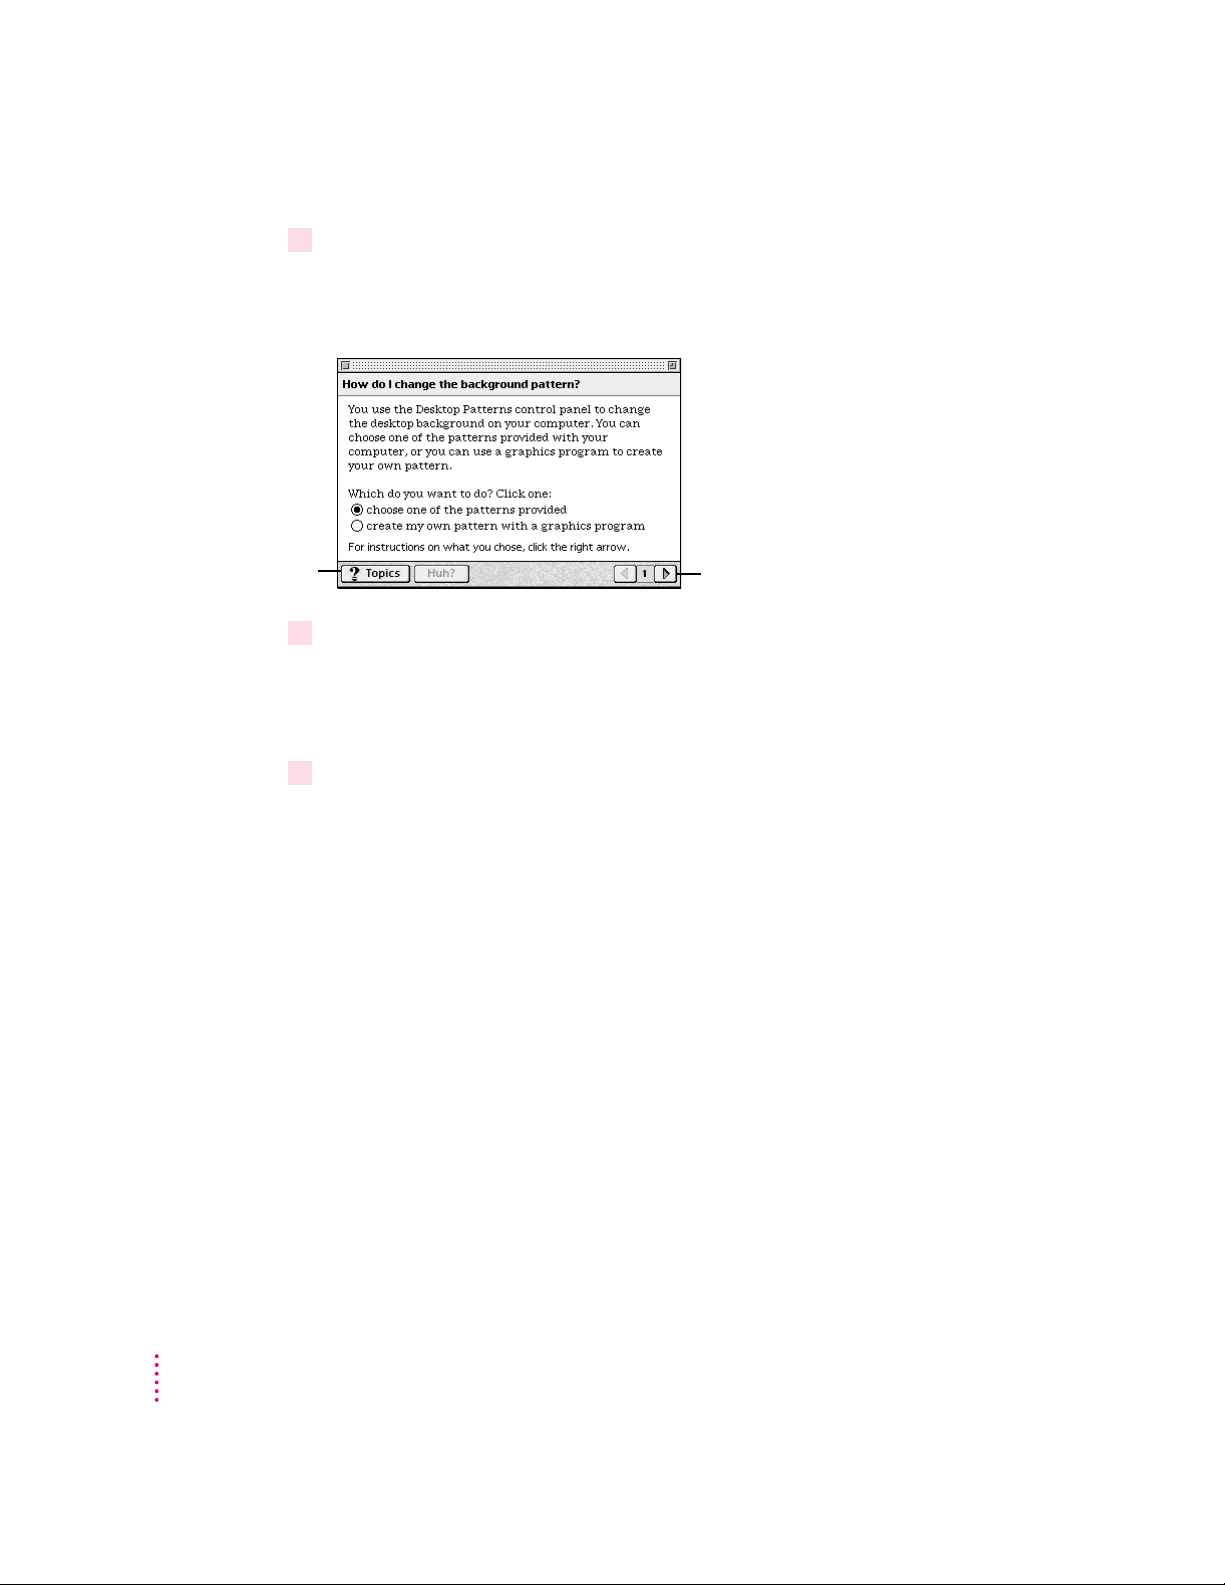
4Click the question “How do I change the background pattern?” and then click OK.
If you want to
return to the main
Macintosh Guide
window, click
this button.
5 Read and follow the instructions in the window.
6When you have completed all the steps, click the Topics button in the lower-left corner to
Or double-click the question.
A small window appears with instructions for you to follow.
Click here to see the next
step (if there is one).
Macintosh Guide provides step-by-step instructions to answer the question
you selected. When you have completed each step, click the right arrow in the
lower-right corner to see the next step.
return to the main Macintosh Guide window.
30
Now continue with the next section.
Chapter 2
Page 31

1 In the Macintosh Guide window, click the Look For button.
To activate the text
box, click here.
Type a word or phrase
in the text box…
…and then click here.
2Click the arrow button to activate the text box.
3Type “sound” in the text box and then click Search.
Getting answers with the Look For button
A small box appears on the left side of the window, where you can type text.
When you click Search, a list of questions related to the word or phrase you
typed appears on the right side of the Macintosh Guide window.
To get instructions,
click a question…
…and then click OK.
Getting Help
31
Page 32

4Click the question “How do I change the alert (beep) sound?” and then click OK. Or
If you want to close
Macintosh Guide,
click here.
5 Read and follow the instructions in the window.
6When you have completed all the steps, click the close box in the upper-left corner to
double-click the question.
A small window appears with instructions for you to follow.
Click here to see the next
step (if there is one).
Macintosh Guide provides step-by-step instructions to answer the question
you selected. When you have completed each step, click the right arrow in the
lower-right corner to display the next step.
close Macintosh Guide.
32
Chapter 2
Page 33

Tips for using Macintosh Guide
Here are a few tips for using Macintosh Guide effectively:
m Macintosh Guide is available only when you are in the Finder—the
desktop area where you can see the icons of disks, folders, and files.
(Other programs may also have help available in the Guide menu,
however.) If you don’t see Macintosh Guide in the Guide menu, pull
down the Application menu (to the right of the Guide menu) and
choose Finder.
m Foll o w the steps when you’re instructed to; don’t skip ahead or read
ahead. That way the computer can check to make sure you’ve done a
step correctly.
m Unlike most windows, the Macintosh Guide window stays in front of
other windows on the screen so that your instructions are never
covered. If you need to move the Guide window out of the way, drag
it by the title bar at the top of the window.
You can also move the window out of the way by clicking the zoom
box. Click the box once to shrink the window; click it a second time
to expand the window to its original size.
m If you need more information about an instruction or a term, click the
button labeled “Huh?” to get a further explanation. (The “Huh?”
button is dimmed when no additional information is available.)
m If you want to return to the main Macintosh Guide window, click the
Topics button in the lower-left corner of the Guide window.
m When you’re finished using Macintosh Guide, click the close box in
the upper-left corner of the window.
Close box
Topics button
Title bar
Zoom box
Right arrow
“Huh?” button
Getting Help
33
Page 34

Identifying what’s on your computer screen
Sometimes you’ll see an unfamiliar item on the screen and ask yourself,
“What’s that?” You can get an answer by using a Macintosh feature known as
Balloon Help.
Using balloons like those you see in comic strips, Balloon Help explains the
function of icons, menus, commands, and other items on the Macintosh
screen.
Follow these steps to use Balloon Help:
1Pull down the Guide menu (marked with the
2Point to any object on the screen that you want to identify.
h
icon) and choose Show Balloons.
A balloon appears next to the object. In the following illustration, for
example, pointing to the Trash displays a balloon that explains how to use the
Trash to throw items away.
34
Although balloons appear next to items when you point to them, the way
you work does not change; you can still select icons, choose commands, and
so on.
3When you’re finished using Balloon Help, pull down the Guide menu again and choose
Hide Balloons.
Chapter 2
Page 35

Learning useful shortcuts
You can perform many tasks in the Finder more quickly if you use keyboard
or mouse shortcuts. For example, instead of clicking an icon and choosing
Open from the File menu, you can simply double-click the icon to open it.
Foll o w these steps to learn keyboard a nd mouse shortcuts:
1Pull down the Guide menu (marked with the
2Click one of the category buttons.
If you want to
close the window,
click here.
h
icon) and choose Shortcuts.
The main Macintosh Shortcuts window appears.
Another window appears, describing shortcuts for that category.
Click the Topics
button to return to the
main Macintosh
Shortcuts window for
more categories.
Click here to see the next
window (if there is one).
Getting Help
35
Page 36

3 Read about the shortcuts available for the category you selected.
Click the right arrow in the lower-right corner of the window to display the
next window (if there is one).
4When you finish reading about the shortcuts for your category, click the Topics button
in the lower-left corner to return to the main Macintosh Shortcuts window. Or click the
close box in the upper-left corner to close the window.
36
Chapter 2
Page 37

Con necti n g Equipment
Read this chapter for information
on expanding your computer system
with additional hardware.
3
and Expanding Your Computer
Read this chapter to learn how to connect your Macintosh to additional
equipment, such as a printer, a scanner, or sound equipment. Specifically, this
chap ter contains:
m A view of your computer at a glance, showing where on the back of your
computer you can connect equipment. (Consult the manuals that came with
the other equipment for complete instructions.)
m Information about your computer’s sound capabilities.
m Information about connecting other specialized equipment, called
“SCSI” devices.
For information on connecting equipment for even more specialized
purposes, such as connecting to a network or to a TV or video equipment,
see Chapter 8.
WARNING
sure that your computer is plugged in (in order to ground the computer)
and turned off. If you connect equipment with the computer turned on,
you can damage your computer and your equipment.
Before you connect any equipment to your computer, make
37
Page 38

Expansion bay
Behind the front panel
there is an expansion
bay for an optional
5.25-inch storage device
(1.7 inches high).
CD-ROM drive Open/Close button
C
Monitor
CD-ROM drive (optional)
Floppy disk drive
Remote control sensor
Sound
-
control buttons
Use this button to
change the volume of
the computer’s sound.
Power-on light
A green light indicates
that the computer is on.
Internal hard disk drive
Ports and connectors on the back of your computer
Standby power button
Monitor video port
Apple Desktop Bus
(ADB) port keyboard or a trackball.
Headphone jack
f
Power key
P
Use this key
to turn your
computer on
and off.
Keyboard Mouse
®
Turns your computer on or off when you can’t use the Power
key on the keyboard or the Shut Down command.
™
Connects your monitor to your Macintosh.
V
Connects your Macintosh to an input device, such as a
38
Chapter 3
Printer port
External modem port
SCSI port
Sound input port
Sound output port
[
Connects your Macintosh to a printer, LocalTalk network, or
GeoPort device.
W
Connects an external modem or GeoPort adapter to your
Note:
Macintosh. (
port is covered. Don’t remove the cover or connect anything to
this port if you have an internal modem.)
g
Connects your Macintosh to SCSI equipment, such as
external hard disk drives and scanners.
≈
Connects your Macintosh to another audio source, such as a
microphone, compact disc, or audio cassette player.
-
Connects your Macintosh to sound output equipment, such as
externally powered (amplified) speakers.
If your computer has an internal modem, this
Page 39

Standby power button
®
Monitor video port
™
TV tuner card (optional)
Ï
Subwoofer balance control
Apple Desktop Bus
V
(ADB) port
Printer port
[
External modem port
W
SCSI port
g
Sound input port
≈
-
Sound output port
TV tuner card Connects your Macintosh to an external TV antenna or cable
Note:
(optional) TV service. (
have a card installed, may look different.)
Ï
Subwoofer balance
control if external speakers (including a monitor with built-in speakers)
Adjusts subwoofer balance in relation to external speakers,
are attached. (If external speakers are not attached, the
balance control does not affect the subwoofer volume.)
The TV tuner card on your computer, if you
Video input card (optional)
≤
Power socket
Monitor power socket
PCI card access covers (2)
Internal modem card
(optional)
Security lock port
F
Video input card Connects your Macintosh to a video camera, VCR, or other
(optional) video input equipment.
PCI card access covers (2) Cover ports for optional 6.88-inch PCI (peripheral component
interconnect) slot expansion cards (such as a video-editing
card).
Internal modem Covers port for optional communication card (such as an
card (optional) internal modem card or Ethernet card). You may have a
modem card installed in this slot already.
F
Security lock port
Enables you to attach a security lock to your Macintosh. See
your computer products retailer for security lock devices that
work with your computer.
Connecting Equipment and Expanding Your Computer
39
Page 40

Using your computer’s sound features
Your Macintosh can play and record stereo sound from a variety of sources.
By connecting audio equipment to the sound input and output por ts on the
computer, you can listen to or reproduce stereo sound. If it has an inter nal
CD-ROM player, your computer can also play and record sound from audio
compact discs (CDs). For information on using Macintosh system software
to choose audio input and output options, record an alert sound, or play
audio CDs, see the “Sound” topic of Macintosh Guide, available in the
Guide (h) menu.
About your computer’s sound ports an d fea tures
The sound input port is marked with an icon of a microphone (≈). T h e sound
output port is marked with an icon of a speaker (-). Your computer’s builtin speaker functions as a subwoofer when external speakers (or a monitor
with built-in speakers) are attached. For more information on the subwoofer,
see the next section, “Using the Built-in Subwoofer.” For more information
on the sound input and sound output ports, see the section “Connecting
Audio Equipment.”
40
Chapter 3
Page 41

Subwoofer balance control
Sound input port
Sound output port
Headphone jackInternal speaker
(functions as a subwoofer when
external speakers or a monitor
with built-in speakers is attached)
Connecting Equipment and Expanding Your Computer
41
Page 42

Using the built-in subwoofer
Your computer comes with a built-in speaker that produces full-range,
monophonic sound. When you attach external speakers, this speaker changes
mode and functions as a subwoofer, adding bass sound to augment the
speakers’ stereo sound.
Follow these tips about your computer’s subwoofer:
m You adjust your computer’s volume with the volume controls on the front
of the computer or with the Monitors & Sound control panel in the
computer’s software. (For more information, see “Adjusting Volume and
Sound” later in this section.) However, when you attach external speakers
(or if your monitor has built-in speakers), you adjust the subwoofer volume
independently of the speaker volume. You do this by adjusting the
subwoofer balance control (Ï) on the back of the computer. (The
subwoofer balance control affects the subwoofer volume only when
external sp eakers are attached.)
m If your monitor has a headphone jack and you plug your headphones into
it, the subwoofer sound might continue to come from the computer rather
than through the headphones. To avoid this, plug the headphones into the
jack on the front of the computer. If you prefer to keep the headphones
plugged into your monitor, manually lower the subwoofer volume by
turning the subwoofer balance control (Ï) counterclockwise. Remember
to tur n it back up again when you are finished using the headphones.
42
Adjusting volume and sound
There are several ways to adjust the volume on your computer:
m Use the volume controls on the front of the computer (marked with the -
icon, above the power-on light).
m Use the volume controls on the front of your monitor if your monitor
comes with built-in speakers.
m Use the volume control slider in the AppleCD Audio Player if you are
playing an audio CD. T he AppleCD Audio Player can be found in the
Apple (K) menu.
Chapter 3
Page 43

m Use the volume control sliders in the Monitors & Sound control panel,
which i s in the Control Panels folder in the Apple (K) menu.
1 Click here to view
sound controls.
2 Adjust the volume
slider.
For more information
about your computer’s
sound, click here.
Note: Some monitors also place a “Monitor Sound” icon at the top of the
Monitors & Sound control panel.
Tip: You may prefer to set the Sound Out Level slider in the Monitors &
Sound control panel to the middle of the slider bar. This makes it easier for
you to gauge the adjustments you make with other volume controls.
For more information about sound, see the “Sound” topic of Macintosh
Guide, available in t he Guide (h) menu.
Listening wit h 3D Surround Sound
The 3D Surround Sound technology broadens the sound you hear
if you attach external speakers or if your monitor has built-in speakers.
3D Surround Sound makes the speakers sound as if they are set wider
apart, and you can hear many “points” of sound around you. (3D Surround
Sound may not work through headphones. Click to remove the checkbox
next to “Enabled” in the Monitors & Sound control panel to disable
3D Surround Sound.)
Connecting Equipment and Expanding Your Computer
43
Page 44

Using a m oni tor with b uilt -in speakers
If you have a monitor with built-in speakers, you can adjust the amount of
bass sound you hear coming from the computer’s subwoofer by adjusting the
subwoofer balance control (Ï) on the back of your computer.
Connecting audio equipment
To play or record sound with your Macintosh, you can attach a microphone,
amplifier, tape recorder, or a pair of speakers.
For instructions on connecting specific equipment, see the sections that
follow:
m “Connecting the Apple PlainTalk Microphone”
m “Connecting External Stereo Speakers”
m “Connecting Headphones”
The computer’s sound input port (≈) accepts the 3.5-mm audio connectors
below. The sound output port (-) (where you might connect external
speakers) accepts only the stereo miniplug.
44
Chapter 3
Stereo miniplug
(plugs into sound input port
or sound output port)
Extended miniplug
(plugs into sound input port)
The stereo miniplug is found most often on stereo equipment (such as
external sp eakers). The extended miniplug, which is slightly longer and is
found on voice quality microphones (such as the Apple PlainTalk
Microphone), works only in your computer’s sound input port (≈). (Even
though it will fit into the sound output port, it won’t work there.) If your
equipment has a different type of connector than those shown here, you can
purchase an adapter at an electronics supply store.
Page 45

Foll o w these ge neral instructions when connecting audio equipment to
the Macintosh:
1Make sure that the audio equipment has a cable with a stereo miniplug connector.
If it does not, attach an adapter that has a stereo miniplug.
Stereo miniplug
2Place the audio equipment near the Macintosh.
3Shut down the Macintosh and turn off the audio equipment.
4Attach the cable to the audio equipment and to the appropriate sound port on the
Macintosh.
To record incoming sound on the computer, connect the audio equipment to
the sound input por t (≈).
To record the sound produced by the computer or play that sound through
external speakers, connect the audio equipment to the sound output port (-).
5 Turn on the computer and the audio equipment.
Yo u’re now ready to begin listening to and working with sound.
You can adjust the volume using the sound control buttons on the front of the
computer or by using the Monitors & Sound control panel, which uses
software inside your computer to adjust sound. See “Adjusting Volume and
Sound” in the previous section, “Using Your Computer’s Sound Features.”
Connecting Equipment and Expanding Your Computer
45
Page 46

Connecting the Apple PlainTalk microphone
Your computer has a sound input port (≈), which you can use to connect an
Apple PlainTal k Microphone. The Apple PlainTalk Microphone is included
with some computer models. If your computer did not include an Apple
PlainTal k Microphone, you can purchase one at an Apple-authorized dealer.
You cannot connect non-Apple microphones.
Note: The sound input port does not support the Apple Omni microphone
(the round microphone shipped with some earlier models of Macintosh) or
the attenuated RCA adapter provided with some models of Macintosh.
Apple PlainTalk Microphone
To connect and position the external microphone, follow the steps below.
Note: If you want to record sound using a microphone built in to a monitor,
see the “Sound” topic of Macintosh Guide, available in the Guide (h) menu.
Then select the subtopic, “How do I record or remove a sound?”
46
1Shut down the Macintosh.
2Plug the microphone’s connector into the sound input port (≈) on the back of the
computer.
Chapter 3
Page 47

3Place the microphone at the top center of the monitor, so that the microphone’s
Apple (K) icon is facing you.
If you can’t place it on top of the monitor, position the microphone according
to these guidelines:
m The microphone should be between 1 and 3 feet away from you.
m The microphone should be directly in front of you to minimize the
effect of background noises.
4 Turn on the computer.
Next, you need to make sure the Sound Input source in your computer is set
to “External Microphone.”
5 Open the Monitors & Sound control panel in the Apple (
Sound icon.
Connecting Equipment and Expanding Your Computer
K
) menu and click the
47
Page 48

6Click the Sound Input pop-up menu and select “External Microphone.”
1 Click here to view
sound controls.
2 Select External Microphone
from the pop-up menu.
For more information
about your computer’s
sound, click here.
7Click the close box in the upper-left corner of the Monitors & Sound control panel to
close it. (The control panel does not have to remain open while you’re recording.)
Yo u’re now ready to begin using your microphone.
48
See the “Sound” topic of Macintosh Guide, available in the Guide (h) menu,
for instructions on recording.
Chapter 3
Page 49

Connecting external ster eo s peakers
You can take advantage of your computer’s stereo sound output by attaching
externally powered (amplified) speakers. When you attach external speakers,
the speaker in your computer changes mode and functions as a subwoofer.
The subwoofer produces bass sound to complement the stereo sound coming
from the speakers.
Subwoofer (internal)
Externally powered speakers
Connecting Equipment and Expanding Your Computer
49
Page 50

1 Assemble the speakers and the cable you need.
You need a cable with a stereo miniplug at one end to connect one or both
speakers to the computer.
Stereo miniplug
Some speakers require a dual-plug adapter. Others, like those shown in the
next illustration, accept a single stereo miniplug and are joined by standard
speaker wires. See the documentation that came with your speakers for more
information.
2Turn off the Macintosh.
3Plug the stereo miniplug into the sound output port (-) on the Macintosh.
4Connect the speakers together with speaker wires, if necessary.
50
Chapter 3
Your finished connections should look something like this:
Ï
Subwoofer
balance control
-
Sound
output port
Externally
powered
speakers
Audio In port
Page 51

5 Turn on the computer.
Now you’re ready to hear full-range stereo sound coming from the speakers
and bass sound coming from the computer’s inter nal subwoofer.
To adjust the overall volume, use the sound control buttons on the front of
the computer or use the Monitors & Sound control panel, which uses
software inside your computer to adjust volume. (For more information, see
“Adjusting Volume and Sound” in the previous section, “Using Your
Computer’s Sound Features.”)
To adjust th e subwoofer volume independently of the speaker volume, use the
subwoofer balance control (Ï) on the back of the computer. (The subwoofer
balance control works only when external speakers or a monitor with built-in
speakers is attached.)
Subwoofer balance control
For more information about using speakers attached to your computer, see
the “Sound” topic of Macintosh Guide, available in the Guide (h) menu.
Connecting Equipment and Expanding Your Computer
51
Page 52

Connecting headphones
You connect headphones to the headphone jack (f) on the front of the
computer or to your monitor if it has a headphone jack.
If you use the headphone jack on your monitor: When you plug headphones
into the headphone jack on your monitor (if your monitor has one), sound
comes through your headphones but, depending on the type of monitor you
have, it may also continue to come out of the subwoofer. To stop this,
plug your headphones into the headphone jack (f) on the front of the
computer, not the headphone jack on the monitor. However, if you prefer to
plug the headphones into the monitor, silence the subwoofer by manually
turning down the subwoofer balance control (Ï) on the back of the computer
all the way. Also, when you’re finished using the headphones, remember to
turn it back up.
Note: You may also want to disable 3D Surround Sound in the
Monitors & Sound control panel if you are listening through headphones.
3D Surround Sound does not always work through headphones. To disable
3D Surround Sound, open the Monitors & Sound control panel in the Control
Panels fol der in the Apple (K)menu and click the checkbox to remove the
checkmark next to “Enabled.”
52
Adjust headphone
volume here.
Chapter 3
For more information
about your computer’s
sound, click here.
You may need to
disable 3D Surround
Sound when listening
through headphones.
For more information on listening with headphones, see the “Sound” topic of
Macintosh Guide, available in the Guide (h)menu.
Page 53

Connecting external SCSI devices, such as a scanner or external hard disk
Your computer has a port for connecting devices that use the Small Computer
System Interface (SCSI, pronounced “skuh-zee”). SCSI devices commonly
used with the Maci n tosh i nclude hard disk drives, CD-ROM drives, scanners,
tape or cartridge backup drives, and some printers. The SCSI port permits
high-speed communication between the computer and the device. The SCSI
icon appears to the left of the port on the computer’s back panel.
SCSI port
SCSI icon
You can connect SCSI devices to the SCSI port in a chain. The first device in
the chain plugs into the SCSI port; the second device plugs into the first
device, and so on. You can attach up to six external SCSI devices to the SCSI
port. All SCSI devices connected to this chain must have their own unique ID
number (no two devices can use the same ID number). If your computer came
with a CD-ROM drive installed, this drive is also part of the SCSI chain and
uses SCSI ID numb er 3. The computer itself (the main logic board inside it)
uses SCSI ID numb er 7.
IMPORTANT
The material that follows—“Before You Connect a Device” and
“Connecting a SCSI Device”—contains general instructions for attaching
SCSI devices to your computer. Make sure you also follow the specific
instructions that came with the SCSI device you are connecting to your
Macintosh.
Connecting Equipment and Expanding Your Computer
53
Page 54

Before you connect a device
Before you connect a SCSI device to your Macintosh, complete these tasks:
m Make sure each SCSI device connected to your Macintosh has its own
unique ID number from 0 to 6. The computer itself (the main logic board
inside it) has the ID number 7 and the internal CD-ROM drive has the
ID number 3, making the ID numbers 0, 1, 2, 4, 5, and 6 available for
additional SCSI devices. Make sure other SCSI devices you add to the
chain do not use ID numbers 3 or 7. See the instructions that came
with each SCSI device for information on checking and setting its SCSI
ID number.
IMPORTANT
If you use two or more devices attached to the same SCSI
interface with the same ID number, your equipment could malfunction and
you could lose data as a result.
m Make sure you have the appropriate cable for attaching the SCSI device to
your Macintosh.
If the device is the first or only one you’re connecting, use a SCSI system
cable to connect it to the computer’s SCSI port:
SCSI system cable
If the device is not the first one, use a SCSI peripheral interface cable to
connect it to the last device in the chain:
54
SCSI peripheral interface cable
Chapter 3
Page 55

IMPORTANT
The total length of the cables in a SCSI chain should not exceed
6 meters (20 feet). SCSI cables must have a 110-ohm impeda nce. For best
results, use SCSI cables manufactured by Apple Computer.
m Make sure that the last (or only) device in the SCSI chain has a terminator.
Make sure that no other external SCSI device has a terminator.
To ensure accurate transmission of information, a terminator must be at
each end of a SCSI chain. Your computer’s main logic board, which is the
first device in the chain, has a built-in terminator.
Some externa l SCSI devices from manufacturers other than Apple have
built-in terminators. (Check the information that came with the device.) If
the device at the end of the SCSI chain does not have a built-in termi nator,
you need to attach an external terminator.
SCSI terminator
If your SCSI device has a built-in terminator, use it as your last device in the
chain or have your Apple-authorized service provider remove the extra builtin terminator. You can attach or remove external terminators yourself.
Connecting Equipment and Expanding Your Computer
55
Page 56

Connecting a SCSI device
Be sure to read the previous section, “Before You Connect a Device,” before
followin g the instructions in this one.
Use these general instructions in conjunction with the instructions that came
with your SCSI device:
1Turn off your Macintosh.
2Make sure the SCSI device is switched off.
WARNING
Do not connect or disconnect any device while the device or
your Macintosh is turned on. Doing so could damage the device, your
computer, or both.
3 Use a SCSI cable to connect the device either to the computer’s SCSI port or to the last
SCSI device already in the chain.
IMPORTANT
Make sure that the last (or only) device in the SCSI chain has a
terminator and that no other external SCSI device has a terminator.
Otherwise, the computer may not be able to start up.
4Turn on all devices in your SCSI chain.
IMPORTANT
Always turn on any external SCSI devices connected to your
Macintosh before turning on the computer itself. Otherwise, your computer
won’t be able to recognize that the SCSI devices are connected to it and your
computer may not be able to start up.
5 Install any necessary device drivers (software that makes a device work with your
computer).
Drivers, software needed for a SCSI device, usually come on a floppy disk
with the device. (If no drivers come with the device, contact the device
manufacturer.)
56
Note: If you experience problems after connecting a SCSI device, see the
troubleshooting information in Chapter 6 for possible solutions.
Chapter 3
Page 57

Expanding memory
For information on increasing your computer’s memory, see Appendix B,
“Installing Additional Memory.”
Replacing or adding internal storage devices
Your Macintosh comes with three internal storage devices—a floppy disk
drive, a CD-ROM (compact disc read-only memory) drive, and a hard disk
drive (several capacities are available). If you want to replace any of these
internal drives, see your Apple-authorized dealer.
Your computer also has an expansion bay—just behind the front panel, above
the CD-ROM drive—for an additional, optional 5.25-inch storage device
(1.7 inches high). Examples of storage devices include a second CD-ROM
drive, a tape storage backup system, or a second internal hard disk. If you
want to install another storage device inside your computer, see your Appleauthorized dealer.
Connecting Equipment and Expanding Your Computer
57
Page 58

Page 59

Read this chapter to learn how to work
with application programs and protect
the information on your disks.
4
Using Programs and Backing Up Disks
Your computer came with several application programs already installed. You
open these programs by clicking their buttons in the Launcher. The Apple
Extras folder on your hard disk also contains additional programs.
Backup copies of all preinstalled programs exist on the CD-ROM disc
Macintosh Performa CD: Performa Software, whi ch is included in the box with
your computer. If you ever need to restore one or more of the preinstalled
programs, see the section “Copying Files From the Per forma Soft wa re CDROM Disc to Your Hard Disk” in Chapter 7. If you ever need to restore all of
the prei nstalled programs, start at the beginning of that chapter.
59
Page 60

Installing application programs
You may want to buy and install additional application programs. See the
manuals you receive with these programs for instructions on installing and
using them.
To use your programs most effectively, follow these guidelines:
m Read the manuals you received with the program if you have problems
using it.
m Put only one copy of each program on your hard disk. Having more than
one copy can cause errors.
m Whenever you copy a program disk to your hard disk, be careful not to
copy a System Folder.
m If a program malfunctions consistently, try installing a fresh copy. If that
doesn’t help, find out from the software manufacturer whether your version
of the program is compatible with your computer model and the system
software you’re using.
Note: You may want to put your application programs in the Launcher. This
way the y are easier to find than when they are stored in the Applications
folder on your hard disk and they can be accessed by a simple click of a
Launcher button. To put a program in the Launcher, drag the program’s icon
(or its alias) into the Launcher window or onto the Applications category
button in the Launcher. (If you need detailed instructions, see the “Tips &
Features” topic of Macintosh Guide, available in the Guide [h] menu, and
select “How do I use the Launcher?”)
60
Chapter 4
Page 61

Installing program s from a floppy disk
In most cases, you install application programs on your internal hard disk
from floppy disks. The following illustration shows how to insert a floppy
disk into your computer’s floppy disk drive.
Insert the floppy disk, metal
end first, into the floppy disk
drive of your computer.
For instructions on how to eject floppy disks, see the “Disks” topic of
Macintosh Guide, available in the Guide (h) menu.
Installing programs from a CD-ROM disc
Sometimes you’ll install a n application program on your internal hard disk
from a CD-ROM disc that contains the program. (For instructions on
inserting and ejecting CD-ROM discs, see “Inserting a CD-ROM Disc” and
“Ejecting a CD-ROM Disc” in Chapter 5.)
IMPORTANT
Never copy an entire CD-ROM disc to your hard disk. (Don’t drag
the CD-ROM disc’s icon to your hard disk.) Wh en you open programs on
some of the CD-ROM discs that came with your computer, you may get a
message telling you to copy or install the program onto your hard disk. If you
get this message, double-click the CD-ROM disc’s icon to open it, and then
copy the CD-ROM disc’s program to your hard disk. Look for any “read me”
or “information” files on the CD-ROM disc for instructions. Copying the
CD-ROM disc itself will take up a lot of memory on your hard disk.
Using Programs and Backing Up Disks
61
Page 62

Working with several programs at a time
You can open as many application programs and desk accessories as your
computer’s memory allows.
All open programs are listed in the Application menu at the right end of the
menu bar. You can find out which program is active and which other
programs are open by pulling down the Application menu. The name of the
active program (the one you’re using right now) has a checkmark next to it,
and its icon appears in the menu bar.
The Finder icon
Commands to hide or
display open windows
A checkmark
indicates the
active program.
Programs that are open
Switching program s
You can switch to another open program or desk accessory by choosing its
name from the Application menu.
If a program’s icon is dimmed in the Application menu, that means its
windows are hidden. You can still choose the program from the menu,
however, to display the program’s windows.
You can also switch to another program by clicking in a window that belongs
to an op en program, by double-clicking a program icon, or by double-clicking
the icon of a document that was created with the program.
Hiding and showing windows on the desktop
You can hide all windows except those of the active program by opening the
Application menu and choosing Hide Others.
The other programs remain open even though their windows are hidden.
When you switch to another program, its windows become visible again.
62
If you want to see all the open windows, open the Application menu and
choose Show All.
Chapter 4
Page 63

Incre a sing memory available to run ap plications
A computer function called virtual memory allows you to open several
applications and windows at the same time by creating extra random-access
memory (RAM) on your computer’s hard disk. Virtual memory, however, can
also result in slightly slower performance. See the “Memory” topic of
Macintosh Guide, available in the Guide (h) menu, for more information.
Also see the document titled “About Virtual Memory” in the Documents
folder on your desktop.
IMPORTANT
shouldn’t use virtual memory unless you need to keep several applications
open at once, and you should turn it off when you no longer need it.
(Virtual memory may keep some applications from running at their best
speed.) You can turn virtual memory on or off by using the Memory control
panel in the Control Panels folder in the Apple (K) menu.
Your computer comes with virtual memory turned off. You
Protecting the information on a disk
When you have a valuable paper document like a birth cer tificate, you
probably make an extra copy of it for safekeeping. Similarly, you should make
copies of the documents you create on your computer. T he extra copy is
called a backup, and the process of making the copy is called backing up.
Once you have a backup, you’re protected from accidentally losing the
information on your hard disk. In the unlikely event that something happens
to your hard disk, you can easily get the information back.
Making backup copies of your documents
Follow these tips for making backup copies of the documents on your
computer:
m Regularly make copies of the documents you create.
m You can back up files stored on your hard disk by copying them to
floppy disks.
m You can back up an entire floppy disk by copying it to another floppy disk
of the sa m e capacity or larger, or by copying it to a hard disk.
Using Programs and Backing Up Disks
63
Page 64

m If a file is too large to fit onto a single floppy disk, you need to use a
commercial backup program to copy the file onto multiple floppy disks.
m You can use a commercial backup program to copy new and changed files
from a hard disk to another hard disk, to a tape drive, or to a series of
floppy disks.
m If your computer is on a network, you may be able to back up files by
copying them to a shared disk on the network.
Ahelpful tip: A good way to remember which documents you have stored
where is to print a copy of the items you’ve stored in a folder. For instr uctions
on printing the contents of a folder, see the “Printing” topic of Macintosh
Guide, available in t he Guide (h) menu.
Restoring the information on your hard disk
Your computer’s hard disk comes with valuable information already stored
on it, including system software and some application programs. If
information on your hard disk becomes damaged or lost, you can restore it
if you have a backup copy of the information. The Macintosh Performa CD:
Perfor m a Soft wa re contains copies of all the system software and application
programs that came with your computer. See Chapter 7, “Reinstalling Your
Computer’s Software,” for instructions on using the Macintosh Performa CD:
Perfor m a Soft wa re to reinstall software.
64
It is also helpful to keep a printed copy of the items in your System Folder.
For instructions on printing the contents of a folder, see the “Printing” topic
of Macintosh Guide, available in the Guide (h) menu.
Chapter 4
Page 65

Using app li cation pro grams designed for the PowerPC microprocessor
Your Macintosh is compatible with most application programs intended for
use with Macintosh computers, but certain programs are designed especially
for computers that have the PowerPC microprocessor. (These programs are
sometimes called “native” applications.) These programs take best advantage
of your computer’s speed.
Special me mory require ments
Some native applications may be slightly larger than other programs and may
take up more memory. If you find that you are running out of memory when
you use one of these programs, you can use space on your computer’s hard
disk as additional memory, which is called virtual memory. For instructions
on how to use virtual memory, see the “Memory” topic of Macintosh Guide,
available i n the Guide (h) menu.
You can also add more memory to your computer, as described in
Appendix B, “Installing Additional Memory.”
Using older Macintosh programs
If you experience problems using an older Macintosh program, it may be
incompatible with your Macintosh. You may be able to use your older
program if you turn off Modern Memory Manager. To do this, pull down the
Apple (K) menu, open the Control Panels submenu, and select the Memory
control panel. Then turn off Modern Memory Manager.
Using Programs and Backing Up Disks
65
Page 66

Page 67

Read this chapter for information about
your computer’s built-in CD-ROM drive.
5
Using the Built-in CD-ROM Drive
This chapter provides information on the CD-ROM drive (also called a
CD-ROM player). Refer to Appendix A, “Health, Safety, and Maintenance
Tips,” for information on the proper handling of these discs.
With your internal CD-ROM (compact disc read-only memory) drive, you
have access to large amounts of information. The CD-ROM drive can read the
contents of CD-ROM discs, standard audio compact discs (CDs), and singlesession or multisession Photo CDs. However, you cannot use the drive to save
information on CD-ROM discs. ROM stands for read-only memory, meaning
that the drive cannot “write” information onto CD-ROM discs.
A wide selection of CD-ROM discs is available for entertainment,
education, and business. A typical disc can hold over 650 megabytes (MB) of
information—the equivalent of 270,000 pages of text, up to 8 hours of speech
or music (depending on the sound quality), hundreds of high-resolution
images, or any combination of text, sound, and graphics.
67
Page 68

Inserting a CD-ROM disc
Follow these instructions to insert a CD-ROM disc into your CD-ROM drive.
Then follow the instructions provided with your disc, as well as the
instructions in this manual.
1 Start up your Macintosh computer, if it’s not already on.
2Press the Open/Close button to open the tray of the CD-ROM drive.
The tray opens.
3Place a CD-ROM disc in the tray, with the disc label facing up.
Make sure the disc is lying flat and centered in the tray.
If you are using a small (8 cm) disc, make sure the disc is centered within the
inside ring on the tray.
Open/Close button
68
Chapter 5
Page 69

4Push the tray in, or press the Open/Close button, to close the tray.
In a few moments, an icon for the CD-ROM disc appears on your screen.
Ejecting a CD-ROM disc
Foll o w these instructions to open the tray and eject a CD-ROM disc from
your computer.
IMPORTANT
You may not be able to eject a disc if it is being shared. To tur n
off file sharing, use the Sharing Setup control panel.
1 Open the tray.
There are several ways to open the tray of your CD-ROM drive.
If a CD-ROM disc icon appears on your screen:
m Select the disc icon on your screen and drag the icon to the Trash.
(Note: You won’t lose information on the CD-ROM disc by dragging its
icon to the Trash.)
IMPORTANT
Don’t select the disc icon and then choose Eject Disk from the
Special menu. If you do this, the computer still remembers the CD-ROM disc
in its memory and keeps asking you to reinsert it.
m Click the disc icon, then choose the Put Away command in the File menu.
m While the AppleCD Audio Player window is active, choose Eject CD from
the File menu, or simultaneously press the x and E keys. (AppleCD Audio
Player is a program that allows you to control your CD-ROM player and is
available i n the Apple [K] menu.)
Using the Built-in CD-ROM Drive
69
Page 70

If no CD-ROM disc icon appears on your screen:
m Press the Open/Close button for your CD-ROM drive.
2Take the CD-ROM disc out of the tray.
Store your disc in a safe place, away from heat, dust, and moisture.
3Push the tray in, or press the Open/Close button, to close the tray.
To avoid possible damage to the tray and the CD-ROM drive, keep the tray
closed when you are not using it.
Using the CD-ROM discs that came with your computer
Some of the CD-ROM discs that came with your computer—and some
CD-ROM discs in general—require you to copy one or several items from
the disc to your hard disk before you can view them. Other discs let you view
the CD-ROM disc’s contents directly from the CD-ROM disc itself. If you
have a CD-ROM disc that requires you to copy some items to your hard disk,
you’ll get a message telling you so when you try to open a program on the
CD-ROM disc.
IMPORTANT
Never copy an entire CD-ROM disc to your hard disk. (Don’t drag
the CD-ROM disc’s icon to your hard disk.) Copying the CD-ROM disc itself
will take up too much memory on your hard disk. If you get a message telling
you to copy or install items from the CD-ROM disc to your hard disk, doubleclick the CD icon to open it and copy those items—not the CD-ROM disc
icon itself—to your hard disk. Look for any “read me” or “information” files
on the CD-ROM disc for instructions.
Types of compact discs you can use
Not a ll CD-ROM discs store information in the same way. A disc stores and
displays information according to a particular file format. Your computer’s
system software must understand the file format in order to use the contents
of the disc.
70
Chapter 5
Page 71

Standard file formats
You can use CD-ROM discs with these standard file formats:
m HFS (Hierarchical File System)—the standard format used by the
Macintosh.
m ISO 9660—the Inter national Standards Organization’s file format for
CD-ROM discs. This format has been adopted by many CD manufacturers
to make their discs compatible with a variety of computers. It is also the
format that allows you to use Photo CDs in your CD-ROM drive.
m The High Sierra format, a predecessor of the ISO 9660 format.
m Photo CDs.
m Audio CDs.
The software that lets you use discs with these file formats is already installed
on your computer.
Other CD-ROM formats
Your CD-ROM drive also works with file formats other than the ones listed
above (for example, CD-ROM XA) if you install the appropriate software on
your Macintosh. To find out about the availability of Macintosh software for
additional file formats, contact the publisher of a particular disc.
Audio CDs
Your CD-ROM drive can play audio CDs and audio tracks on CD-ROM
discs using your computer’s built-in speaker. You can also attach
headphones or speakers to your computer for stereo sound. For further
information, see the “CD-ROM Discs” topic of Macintosh Guide, available
in the Guide (h) menu.
Photo CDs
With your CD-ROM drive, you can use QuickTime to open digitized images
stored on Photo CDs.
For more information on Photo CDs, see the “CD-ROM Discs” topic of
Macintosh Guide, available in the Guide (h) menu.
Using the Built-in CD-ROM Drive
71
Page 72

Playing audio CDs
With your CD-ROM drive and your computer’s built-in speaker, you can play
audio compact discs (CDs) or audio tracks on CD-ROM discs. You can also
attach headphones or speakers to the computer to listen to audio tracks. See
Chapter 3 for information on connecting sound equipment to your computer.
To st art, stop, and otherwise control audio discs, use the AppleCD Audio
Player program, available in the Apple (K) menu. Your audio CD software
will only play tracks that contain audio information. With the AppleCD
Audio Player program, you can listen to an audio CD or audio tracks while
doing other work on your computer. For more information about playing
audio CDs, see the “CD-ROM Discs” topic of Macintosh Guide, available in
the Guide (h) menu.
Working with Photo CDs
You can use your CD-ROM drive to open Photo CD images stored on Photo
CDs. A Photo CD image is a digitized version of a standard photograph that
you can open and view on your computer screen.
72
Chapter 5
Page 73

You can do many things with the images on your Photo CDs:
m Open and view the images individually on your computer screen.
m View the images on your computer screen in a series, as you would view
a slide presentation.
m Copy and save the images, print them, paste them into word-processing
documents or other documents that accept graphics, and edit them with
a graphics application program.
Photo CD images are an excellent source of graphics for desktop
publishing, multimedia presentations, business documents, and
professional-quality graphic design. For more information on working with
Photo CD images, see the “CD-ROM Discs” topic of Macintosh Guide,
available i n the Guide (h) menu.
Obtaining Photo CDs
Your own photographs can be recorded as Photo CD images on a Photo CD.
To obtain a Photo CD of your own photographs, take your standard 35-mm
film to a photofinisher who has a Photo CD system. The photofinisher
develops your film, digitizes the photographs, and gives you back a Photo CD
containing your images. A single Photo CD can hold approximately one
hundred images.
If your Photo CD isn’t full, you can take it back to the photofinisher and
have more photos added until the disc is full. Such discs are called
multisession discs because they contain images added after the first session.
Your CD-ROM drive can read both single-session and multisession Photo
CDs. (Other CD-ROM drives can read only single-session discs and are
unable to read the additional images placed on a multisession disc.)
Using the Built-in CD-ROM Drive
73
Page 74

Before viewing th e contents of a Photo CD
Normally, you open Photo CD images with the SimpleText program that came
with your computer. If you wish, you can use a graphics or image-editing
program instead of SimpleText. For instructions, see the “CD-ROM Discs”
topic of Ma cintosh Guide, available in the Guide (h) menu. If you use
SimpleText to view high-resolution images, you should increase the amount of
memory that SimpleText uses. For more information on memory, see the
“Memory” topic of Macintosh Guide, available in the Guide (h) menu.
A note about resolution
When a Photo CD image is created, it’s recorded at five different levels of
resolution. The higher the resolution, the more information is recorded about
the image, and the sharper the image appears when displayed or printed at
larger sizes. However, high-resolution images take up a lot of memory—up to
18 MB of data for one photograph—which affects file size, as well as the
amount of time it takes to display or print an image.
It’s best to work with a resolution appropriate for your monitor or
printer. Some monitors and printers cannot display or print very highresolution images.
For most work, a resolution of 768 x 512 pixels or smaller is suitable. For
detailed work or very high-quality reproductions, you may want to use a
higher resolution.
Make sure to open high-resolution images with application programs designed
to handle large image files. SimpleText cannot open very large files.
Sharing a CD-ROM disc over a network
You can share a CD-ROM disc using the file-sharing feature of System 7.5. If
the disc has audio portions, you will be able to hear the audio yourself, but
other people on the network will not. Likewise, you cannot hear the audio
portions of discs you access over a network.
For further information about file sharing in System 7.5, see the “Sharing
Files” topic of Macintosh Guide, available in the Guide (h) menu.
74
Chapter 5
Page 75

Consult this chapter if you experience
problems using your computer.
6
Troubleshooting
Whe n you have questions
If you want to know how to do a particular task with your computer, refer
to Ma cintosh Guide in the Guide (h) menu. For instructions on using
Macintosh Guide, see Chapter 2 of this manual.
If you have trouble
While you’re using your computer, you may occasionally see a bomb icon
or an error message, or the pointer (8) may “freeze” on the screen. If you have
trouble with your computer, take a few minutes to read the information in this
chapter. If your problem is related to a particular procedure, you should also
look for information on that procedure in Macintosh Guide, available in the
Guide (h) menu. For additional troubleshooting information and a list of
common questions relating to your system software, see the “Troubleshooting”
topic of Ma cintosh Guide.
If you are unable to access Macintosh Guide (for example, if your screen
is “frozen”), refer to this chapter to see if you can resolve the problem.
75
Page 76

WARNING
If you have a problem with your computer and nothing
presented in this chapter solves it, consult the service and support
information that came with your computer for instructions on how to
contact an Apple-authorized service provider or Apple for assistance. If
you attempt to repair the computer yourself, any damage you may cause
to the computer will not be covered by the limited warranty on your
computer. Contact an Apple-authorized dealer or service provider for
additional information about this or any other warranty question.
Take your time
When you see an error message, you don’t have to take action immediately.
The message stays on the screen until you click the OK (or Restart) button or
turn off the Macintosh.
To help diagnose and correct the problem, follow the suggestions in this
subsection. Gather as much information on the situation as you can. Then
follow the instructions in the next subsection, “Start Over by Restarting
Your Computer.”
m Make a note of exactly what you were doing when the problem occurred.
Write down the message on the screen. List the programs you were using
and the names of any items you know have been added to the System
Folder since the system software was installed. This information will help
a service person diagnose the problem. (It is helpful to keep a printed copy
of the items in your System Folder. For instr uctions on printing the
contents of a folder, see the “Printing” topic of Macintosh Guide, available
in the Guide [h] menu.)
76
m Check the screen for any clues. Is a menu selected? What programs and
document icons are open? Note anything else that seems relevant.
m If you were typing text and were not able to save it before the problem
occurred, you can write down the parts of the text still visible on the
screen so that some of your work will be easy to replace.
m Ask other Macintosh users about the problem you’re having; they may have
a solution for it.
Chapter 6
Page 77

If you need repair service, consult the service and support information that
came with your computer for instructions on how to contact an Appleauthorized service provider or Apple for assistance.
If you know the problem is with a program not published by Apple, call the
program’s publisher. Click the Phone Numbers button in the Service/Support
area of the Launcher to get a software publisher’s phone number.
Start over by restarting your computer
Often you can eliminate a problem simply by clearing the computer’s memory
and starting over.
If you can, save any open documents before restarting your Macintosh. If
your system is frozen and does not respond to anything you do, or if you have
a “bomb” message on the screen, saving may not be possible. You can try
pressing x-Option-Esc to quit the program in use when the problem
occurred; if this works, you can then save the documents open in other
programs before restarting. Restart the computer immediately after you save
your documents—quitting a program using x-Option-Esc may leave
corrupted data in the computer’s memory. This corrupted data is erased when
you restart the computer.
Note: Us e this key combination to force a program to quit only when you
can’t choose Quit from the File menu.
To restart your Macintosh, try the following steps:
1If you can, choose Restart from the Special menu or from the dialog box that’s on screen.
Dialog boxes contain messages from the computer. If something goes wrong,
a message may appear on the screen asking you to restart the computer.
2If you can’t choose Restart, press the Power key (marked with a
3If the Power key on the keyboard doesn’t work, hold down the
you press the Power key (π).
π
) on the keyboard.
x
and Control keys while
This key combination restarts the computer. (Use this key combination only
when you can’t choose Restart from the Special menu or restart the computer
using the Power key.)
Troubleshooting
77
Page 78

4If your computer still doesn’t restart, to turn it off press the power button (
back of the computer, wait at least 10 seconds, and turn it on again.
®
) on the
If you suspect that the problem is with other equipment, such as a printer or
an external hard disk that’s attached to your computer, turn that equipment off
for 10 seconds or longer, then turn it on again and restart the Macintosh.
Rebuild your desktop
A process known as “rebuilding the desktop” helps your Macintosh keep
track of data on your startup disks. (Although the hard disk in your computer
is usually the startup disk, you can start up from any other disk that has
system software installed.) It’s a good idea to rebuild your desktop once a
month or so.
Rebuilding your desktop can solve a number of problems. For example, when
application documents are no longer represented by application-specific icons
(and are instead represented by generic icons on the desktop), rebuilding the
desktop fixes the problem. Afterward, appropriate icons should appear for
all documents.
Some extensions may interfere with rebuilding your desktop. To prevent
problems, you’ll need to tur n off all extensions except Macintosh Easy Open
before you rebuild your desktop. When you finish rebuilding the desktop, turn
the extensions you normally use back on.
78
Chapter 6
To rebuild the desktop of a startup disk, follow these steps:
1 Open the Extensions Manager control panel by choosing Extensions Manager from the
Control Panels submenu of the Apple (
2From the Sets pop-up menu, choose Save Set.
3 In the Save Set dialog box, type a name for your currently selected extensions (for
example, “My Extensions”) and click OK. The name of your set is added to the Sets
pop-up menu.
K
) menu.
This saves your current set of extensions.
Page 79

4Choose All Off from the Sets pop-up menu to turn off all extensions.
5 Turn on Macintosh Easy Open by clicking it in the list so that a checkmark appears
beside it.
You can find Macintosh Easy Open by scrolling down the list of extensions.
Macintosh Easy Open appears under the heading “Control Panels.”
6 Restart your computer while holding down the Command (
x
) and Option keys.
Hold down the x and Option keys until you see the dialog box that asks if
you’re sure you want to rebuild your desktop file. When the dialog box
appears, you can release the keys.
7Click OK.
The desktop is rebuilt.
IMPORTANT
Do not stop the desktop-rebuilding process. Doing so could
damage your system files.
8 Open the Extensions Manager control panel by choosing Control Panels from the
Apple (K) menu. When the Control Panels window appears, double-click the Extensions
Manager icon.
9From the Sets pop-up menu, choose the name you gave your set of extensions in step 3.
This turns your original set of extensions back on.
10 Restart your computer to activate the extensions.
Troubleshooting
79
Page 80

Solutions to common problems with your computer
This section contains descriptions of problems you could experience with
your computer. Some problems may be caused by your CD-ROM drive, so if
you don’t find your problem included here, be sure to check the section
“Solutions to CD-ROM Problems” later in this chapter.
The computer is turned on but the screen is dark.
One of the following is probably the cause:
m You have a screen saver program that darkens the screen when the
computer has not been used for a certain period of time.
Press a key or move the mouse to turn off the screen saver.
m Your computer has gone to sleep due to inactivity. “Wake it up” by pressing
the power key (marked with a triangle) on the keyboard.
m The monitor’s brightness control (¸) is not adjusted properly.
Check the monitor’s brightness control and turn it up if necessary.
m The Macintosh or the monitor is not getting power.
Check that the computer’s power cord is firmly connected to the computer
and plugged into a grounded electrical outlet, and that the outlet has power.
Check that the monitor is plugged in and turn ed on, a nd that the monitor
cable i s firmly c onnected to both the computer and the monitor.
80
Chapter 6
If you are displaying video from your computer on a television screen, it is
normal for your computer monitor to be dark.
The computer’s clock keeps time inaccurately.
Your computer has a clock that runs continuously. When the computer is
turned off, a battery keeps the clock running. If your clock begins to keep
time inaccurately, have your Apple-authorized service provider replace
the ba ttery.
WARNING
Do not attempt to replace the clock battery yourself. If the
clock begins to lose accuracy, see your Apple-authorized dealer or
service provider for a battery replacement.
Page 81

You inadvertently delete a program from your computer’s hard disk.
m You can replace any of the software that came with your computer by
dragging it from the Macintosh Performa CD: Performa Software to your
hard disk. See the section “Copying Files From the CD-ROM Disc to Your
Hard Disk” in Chapter 7.
When you start up, a disk icon with a blinking question mark appears in the middle of
the screen.
This icon indicates that your Macintosh cannot find the system software it
needs to start up. One of the following is probably the cause:
m Your computer may be having a problem recognizing external SCSI (Small
Computer System Interface) equipment, such as hard disks, CD-ROM
drives, and scanners that you may have connected to your computer.
Shut down your computer, turn off all external SCSI equipment, and
disconnect the first SCSI device in the chain from your computer’s SCSI
port. Th en restart the computer. If the computer starts up after you
disconnect your SCSI equipment, refer both to the manuals that came with
the equipment and Chapter 3 of this manual, which has information on the
proper way to connect SCSI equipment and assign SCSI ID numbers.
If you have a printer connected to your computer’s SCSI port, make sure
your printer is connected properly. Most printers connect to the printer
port, not the SCSI port. Check the manuals that came with your printer for
information on how to connect it properly.
m Syst em s of tware is not i nstalled on the startup hard disk, the system
software is damaged, or the hard disk is not working properly.
Star t up your computer using the Macintosh Performa CD: Performa
Software. Do this by inserting the CD-ROM disc into the CD-ROM drive
and holding down the C key while you restart the computer. (See the
section “Starting Up From the Macintosh Performa CD: Performa Software”
later in this chapter if you need more help.) Th en follow the instr uctions in
“Repairing a Damaged Disk” later in this chapter to test your startup hard
disk and repair any damage.
Troubleshooting
81
Page 82

If repairing the disk doesn’t help, follow the instructions in Chapter 7,
“Reinstalling Your Computer’s Software,” to reinstall system software on
your startup hard disk.
A disk icon with an X appears in the middle of the screen and a floppy disk is ejected
from the disk drive.
This icon indicates that the floppy disk you tried to start up from is not a
startup disk. (When you turn on your computer, it looks first in the floppy
disk drive for a disk containing system software. If the disk in the drive does
not contain system software, the computer ejects the disk and looks on its
internal hard disk for system software.)
Wait a few seconds. The computer should start up from its internal hard
disk. Make sure you insert floppy disks only after the computer has begun
starting up.
A “sad Macintosh” icon appears and the computer won’t start up.
82
This icon indicates that your Macintosh cannot start up because of a problem
with the system software or the computer hardware.
Eject any floppy disks by turning off the computer and then holding down the
mouse button while you turn the computer on again. Try starting up with the
Macintosh Performa CD: Performa Software. Do this by inserting the CD-ROM
disc into the CD-ROM drive and holding down the C key while you restart
the co mputer. (See the section “Starting Up From the Macintosh Performa CD:
Perfor m a Soft wa re ” later in this chapter if you need more help.) If the “sad
Macintosh” icon appears again, consult the service and support information
that came with your computer for information on contacting an Appleauthorized service provider or Apple for assistance.
Chapter 6
Page 83

The hard disk icon does not appear on the desktop.
If you don’t see a hard disk icon on the desktop, try the following:
m Use the Drive Setup program to make the disk available. Drive Setup is on
the Macintosh Performa CD: Performa Software th a t came with your
computer. For instructions on using Drive Setup, follow the instructions in
“Checking For Damage On Your Hard Disk” in the section “Repairing a
Damaged Di sk” later in this chapter.
m If the hard disk is internal, shut down your computer, wait at least 10
seconds, and then turn it on again.
m If the hard disk is external, make sure that it is turned on and that its cable
is connected firmly; then restart the Macintosh.
m Check the ID numbers of all SCSI equipment (anything connected to the
SCSI port [g]) connected to your computer. Each SCSI device must have
its own unique ID number. If your computer came with the optional
CD-ROM drive installed, it has SCSI ID number 3. See the manuals that
came with your SCSI equipment, in conjunction with Chapter 3 in this
manual, for information on setting SCSI ID numbers.
m If the hard disk is your startup disk, start your computer with the Macintosh
Perfor m a CD : Perform a So f t ware. Do this by inserting the CD-ROM disc
into the CD-ROM drive and holding down the C key while you restart the
computer. (See the section “Starting Up From the Macintosh Performa CD:
Perfor m a Soft wa re ” later in this chapter if you need more help.) Then
follow th e instruct ions in “Repairing a Damaged Disk” later in this chapter
to test your startup hard disk and repair any damage.
If repairing the disk doesn’t help, follow the instructions in Chapter 7,
“Reinstalling Your Computer’s Software,” to reinstall system software on
your startup hard disk.
Icons do not appear correctly on your screen.
You need to rebuild the desktop—a process that helps your Macintosh keep
track of files and folders on your hard disk. For instructions, see “Rebuild
Your Desktop” in the section “If You Have Trouble” earlier in this chapter.
If icons do not appear correctly after you rebuild the desktop, try rebuilding a
second time.
Troubleshooting
83
Page 84

Your Macintosh can’t read a floppy disk.
If you see a message that a floppy disk is unreadable, try one of the following:
m If the disk has never been used, you may simply need to initialize it—that
is, prepare it for use. For instructions, see the “Disks” topic of Macintosh
Guide, available in t he Guide (h) menu.
m The disk may be damaged. See “Repairing a Damaged Disk” later in this
chapter for information on testing and repairing disks.
m The disk may have been formatted for use on another kind of computer.
You may be able to use a program that lets you work with such disks on
your Macintosh.
If you are trying unsuccessfully to use a DOS floppy disk, consider the
following:
m When formatting floppy disks on a DOS computer for use in a Macintosh,
you need to format standard double-sided disks as 720K disks and highdensity disks as 1440K disks. Double-sided disks formatted in 1440K
format and high-density disks formatted in 720K format may not work in
a Macintosh.
If you think your DOS floppy disk might have a format that doesn’t work
in a Macintosh, use a DOS computer to copy the contents of the disk onto
a properly formatted disk.
84
m Make sure the PC Exchange control panel is in the Control Panels folder
(in the Apple [K] menu) and that it is enabled. To enable PC Exchange,
open the Extensions Manager control panel and click the PC Exchange
item (under the Control Panels heading) to make a checkmark appear.
Then restart your computer.
Chapter 6
Page 85

Your computer starts up and you see large folder-shaped areas, containing labeled
pictorial buttons, instead of the usual Macintosh desktop.
m Your computer may have started up from a CD-ROM disc containing
At Ease, an alternative to the Macintosh desktop. You n eed to have the
Macintosh desktop on your screen before you can use any of the software
installation instructions in this manual.
To return to the Macintosh desktop, choose Shut Down from the Special
menu. When your computer is off, restart the computer, then press the
Open/Close button of your CD-ROM drive to open the tray. Remove the
CD-ROM disc. Close the tray. Then start up your computer again.
To avoid having the computer start up from a CD-ROM disc, rememb er to
remove any disc in the drive before you shut down your computer.
You can’t eject a floppy disk.
If you can’t eject a floppy disk in the usual way, by selecting the disk’s icon
and choosing Eject Disk from the Special menu or by dragging the disk’s icon
to the trash, try the following in order:
m Hold down the x and Shift keys and press the number 1 key on your
keyboard to eject a disk in the internal disk drive.
m Tur n off the computer. If the disk isn’t ejected, then hold down the button
on your mouse or other pointing device while you turn the computer
on again.
m Locate the small hole near the disk drive’s opening, and carefully insert the
end of a large straightened paper clip into it. Push gently until the disk is
ejected. Do not use excessive force.
If none of these solutions works, take the computer or disk drive to your
Apple-authorized service provider to have the disk removed.
Troubleshooting
85
Page 86

You can’t start an application program or it quits unexpectedly. Or, when you try to open
a program, you see a message that not enough memory is available.
One of the following is probably the cause:
m The Macintosh ran out of memory.
Quit the programs that you have open and then open the program you want
to use, or restart your Macintosh.
Use the Memory control panel to turn on virtual memory. For more
information on virtual memory, see the “Memory” topic of Macintosh
Guide, available in t he Guide (h) menu.
m The program needs more memory.
Use the program’s I nfo window to give it more memory. For more
information on increasing a program’s memory, see the “Memory” topic of
Macintosh Guide, available in the Guide (h) menu.
86
m Sometimes incom patible system extensions or control panels can cause
software problems. Restart while holding down the Shift key to temporarily
turn off all system extensions.
If your program works normally after you do this, use the Extensions
Manager control panel (in the Control Panels folder in the Apple [K]
menu) to turn on individual extensions and control panels. Restart after you
turn on each extension. This procedure should identify incompatible
extensions and control panels. (If you just added new software to your
computer, its system extension is the most probable cause of the problem.)
For detailed instructions, see the information about managing system
extensions in the “Customizing Your Computer” topic of Macintosh Guide,
available i n the Guide (h) menu.
If your program performs better when a particular extension or control
panel is turned off, contact the software’s manufacturer for information or
an upgrade.
Chapter 6
Page 87

A dialog box with a bomb appears.
There is a software problem.
m Write down what you were doing when the message appeared, and write
down the text of the message.
m Restart your Macintosh. (See “Start Over by Restarting Your Computer” in
the s e ction “If You Have Trouble” earlier in this chapter.) Most software
problems are temporary, and restarting usually corrects the problem.
m If the problem recurs, check the startup disk and application program you
were using when the dialog box appeared. Make sure that all programs,
desk accessories, and system extensions you’re using are compatible with
the system software (as described in the next paragraph). Reinstalling the
system software may correct the problem. See Chapter 7, “Reinstalling
Your Computer’s Software.”
m Sometimes incom patible system extensions or control panels can cause
system software problems. Restart while holding down the Shift key; this
temporarily turns off all system extensions. If your computer works
normally after you do this, use the Extensions Manager control panel (in
the Control Panels folder in the Apple [K] menu) to turn on extensions and
control panels one at a time. Restart after you turn on each extension. This
procedure should identify incompatible extensions and control panels. (If
you just added new software to your computer, its system extension is the
most probable cause of the problem.) For detailed instructions, see the
information about managing system extensions in the “Customizing Your
Computer” topic of Macintosh Guide, available in the Guide (h) menu.
If your computer performs better when a particular extension or control
panel is turned off, contact the software’s manufacturer for information or
an upgrade.
Troubleshooting
87
Page 88

m If the problem recurs, you may need to reinstall system software. See
Chapter 7, “Reinstalling Your Computer’s Software,” for instructions.
m If the bomb only occurs in one application program, try reinstalling the
program from the original disks. If reinstalling doesn’t solve the problem,
contact the manufacturer of the program.
The pointer (8) doesn’t move when you move the mouse.
One of the following situations is probably the cause.
m There is a software problem. Try the following:
Press x-Option-Esc to quit the application program i n use when the
problem occurred. If this works, you can save the documents open i n other
programs before restarting.
Restart your Macintosh. See “Start Over by Restarting Your Computer” in
the s e ction “If You Have Trouble” earlier in this chapter for instructions.
m Foll o w the suggestions in the previous entry, “A Dialog Box With a
Bomb Appears.”
m The mouse or keyboard is not connected properly.
Tur n off the computer by pressing the power key (and then press return
to choose Shut Down), or if that doesn’t work, press the standby power
button (®) at the back of the computer. With the computer off, check
that th e mouse and keyboard cables are connected properly. Then restar t
the co mputer.
88
Chapter 6
IMPORTANT
Do not connect or disconnect the mouse while the computer is
turned on. You may damage your computer.
m Signals from the mouse are not reaching the computer, either because the
mouse needs cleaning or because there is something wrong with it.
Clean the mouse according to the instructions in Appendix A of this book.
If you have another mouse or pointing device, try connecting and using it.
(Turn the computer off before connecting it.) If the new device works, there
is probably something wrong with the mouse you replaced.
If none of these procedures solves the problem, consult the service and
support information that came with your computer for instructions on how to
contact an Apple-authorized service provider or Apple for assistance.
Page 89

Typing on the keyboard produces nothing on the screen.
One of the following is probably the cause:
m You haven’t selected any text or set the insertion point (i).
Make sure the program you want to type in is the active program. Then
place the pointer (8
) in the active window and click to set an insertion point
(i) or drag to select text (if you want to replace the text with your typing).
m If the computer beeps every time you press a key, Easy Access is probably
turned on. Op en the Extensions Manager control panel in the Control
Panels fol der in the Apple (K) menu. Click the checkmark next to Easy
Acce s s to remove the checkmark and to turn off Easy Access. Then restart
your computer.
m The keyboard is not connected properly.
Tur n off the computer by pressing the standby power button (®) at the
back of t he computer. With the computer off, check that the keyboard cable
is connected properly at both ends.
m Some system software features are turned on that affect the way the
keyboard works.
Open Easy Access from the control panels listed under the Apple (K)
menu and turn off Sticky Keys, Slow Keys, and Mouse Keys.
m There is a software problem.
Restar t your Macintosh. For instructions, see “Start Over by Restarting Your
Computer” in the section “If You Have Trouble” earlier in this chapter.
Check the startup disk and application program you were using when the
problem occurred. To check that the programs and the system extensions
you’ re using are compatible with the system software, restart while holding
down the Shift key; this temporarily turns off all system extensions. If your
computer works normally after you do this, use the Extensions Manager
control panel to turn on extensions and control panels one at a time.
Rest art after you turn on each extension. This procedure should identify
incompatible extensions and control panels that may be causing the
problem. (If you just added new software to your computer, its system
extension is the most probable cause of the problem.) For detailed
instructions, see the information about managing system extensions in the
“Customizing Your Computer” topic of Macintosh Guide, available in the
Guide (h) menu.
Troubleshooting
89
Page 90

If the problem recurs, you may need to reinstall system software. See
Chapter 7, “Reinstalling Your Computer’s Software,” for instructions.
m The keyboard is damaged.
If you have access to another keyboard, try using it instead. (Turn the
computer off before connecting it.) If the new keyboard works, there is
probably something wrong with the one you replaced.
If none of these procedures solves the problem, consult the service and
support information that came with your computer for instructions on how to
contact an Apple-authorized service provider or Apple for assistance.
You can’t open a document, or you see a message that an application program can’t
be found.
m Some documents can be op ened by more than one application program.
Try starting a program that you think might be able to open the document,
then choose Open from the program’s File menu to try to open the
document.
m Purchase and install the correct software to use the document, or find out
if the creator of the document can convert it to a form that one of your
programs can use.
m Don’t try to open the files in your System Folder. Most of the files in your
System Folder are used by your computer for internal purposes and are not
intended to be opened.
90
m Rebuild your desktop. Follow the instr uctions in “Rebuild Your Desktop” in
the s e ction “If You Have Trouble” earlier in this chapter.
m If the document is from a DOS computer, use the PC Exchange control
panel (in the Control Panels folder in the Apple [K] menu) to specify
which Macintosh program will open the document. For information
about working with DOS documents on your Macintosh, see the
information about DOS in Macintosh Guide, available in the
Guide (h) menu.
Your computer won’t restart, and a CD-ROM disc is in the CD-ROM drive.
m Your computer may be trying to start up from the CD-ROM disc. Press the
Open/Close button of your CD-ROM drive to open the tray, and remove
the CD-ROM disc. Close the tray, then restart your computer.
Chapter 6
Page 91

You experience problems using a document from a DOS computer.
If you can’t op en a DOS document using a Macintosh program, try the
following:
m Open the document from within the program by choosing Open in the
program’s File menu.
m Use the PC Exchange control panel (in the Control Panels folder in the
Apple [K] menu) to specify which Macintosh program will open the
document.
If a DOS document is displayed incorrectly, or you see strange codes or
characters in the document, try one of the following:
m Your application program may have special procedures for opening and
saving documents with different file formats. See the information that
came with your program, or call the program’s publisher.
m Try opening the document in another program.
Note: Some ch aracters that can be displayed on the Macintosh are not
accurately displayed on DOS computers.
For more information about working with DOS documents on your
Macintosh, see the information about using DOS in Macintosh Guide,
available i n the Guide (h) menu.
You see a message that your application program can’t be opened because a file can’t
be found.
Macintosh programs designed specifically for the PowerPC microprocessor
(also called “native” applications) use special files called shared libraries. Any
necessary shared libraries should be installed automatically when you install
these s pecial Macintosh programs.
Follow the directions that came with your program to reinstall the program. If
the shared library is still missing, contact the software program’s manufacturer
for assistance.
Troubleshooting
91
Page 92

You experience problems using an older Macintosh program.
Some older Macintosh programs are not completely compatible with
Macintosh computers that have the PowerPC microprocessor.
m Open the Memory control panel (in the Control Panels folder in the
Apple [K] menu) and turn off Modern Memory Manager.
m If that doesn’t work, contact the program’s publisher to see if an upgrade
is available.
You plug headphones into your monitor, but still hear sound coming out of your
computer.
m Plug your headphones into the headphone jack (f) on the front of the
computer.
m If you want to keep the headphones connected to the monitor, manually
turn down the subwoofer. Turn the knob i n the subwoofer balance control
port (Ï) counterclockwise to turn off the subwoofer volume. Remember to
turn it back up the next time you want to hear the subwoofer.
You’re listening through headphones, but the sound is odd.
You may have 3D Surround Sound turned on. To tur n it off, open
the Monitors & Sound control panel, which can be found in the Apple (K)
menu, and click the Sound icon. Then click the checkbox to remove the
checkmark next to
“Enabled.” 3D Surround Sound doesn’t work well
through headphones.
92
The subwoofer balance control (Ï) on the back of your computer is not affecting
the volume.
The subwoofer balance control affects the subwoofer volume only when the
computer has external speakers attached or the monitor has built-in speakers.
Otherwise, the subwoofer balance control (Ï) has no effect on your
computer’s overall volume. Adjust your computer’s volume with the sound
controls on the front of the computer or monitor, with the volume control
sliders i n the Monitors & Sound control panel (in the Apple [K] menu), or
with the volume controls in AppleCD Audio Player (if you’re listening to an
audio CD).
Chapter 6
Page 93

You can’t record sound using an external microphone or the microphone built in to
your monitor.
m Any time you want to record sound, you need to make sure your sound
input source is set to “External Microphone.” O pen the Monitors & Sound
control panel in the Apple (K) menu, click the Sound icon, and choose
“External Microphone” from the Sound Input pop-up menu.
m If you’re using your monitor’s built-in microphone to record, use the
Monitors & Sound control panel to make the monitor’s speakers mute. In
the same control panel, make sure that the sound input is set to the
monitor’s built-in microphone.
For additional help, see the “Sound” topic of Macintosh Guide, available in
the Guide (h)menu in the upper-right corner of your screen.
You can’t quit (get out of) one of the programs you opened in the Launcher.
Some programs in the Learning section of the Launcher (when you press the
Learning category button) are self-running demos. If you can’t get out of one
of the programs or demos, try the following:
m Look again to see if you can find a quit button or other quitting option.
m Hold down the x key on your keyboard, and then, while keeping this key
held down, press the period key.
m While holding down the x key on your keyboard, press the letter Q.
m Press the Power key (marked with a π) on your keyboard to shut down.
m Restart your computer by holding down the x and Control keys while you
press the Power key (marked with a triangle).
Your screen displays a right-angle-bracket prompt (>).
If you inadvertently press the x and Power keys at the same time, you may get
a right-angle-bracket prompt on your screen. To retur n to the desktop, type
the letter G and press Return.
Troubleshooting
93
Page 94

Solutions to CD-ROM problems
Problem s us ing th e CD-ROM drive
The CD-ROM drive icon does not appear on the screen.
m If you have SCSI devices (anything connected to the SCSI port [g])
attached to your computer, make sure that each device has a unique
SCSI ID number (your CD-ROM drive has SCSI ID 3). Refer to the
documentation that came with your SCSI devices if you need to reset
SCSI ID numbers.
m If you reinstalled the CD-ROM software, make sure to restart your
computer afterward.
m Make sure that the Apple CD-ROM extension is turned on in the
Extensions Manager control panel. Open the Extensions Manager control
panel in the Control Panels folder in the Apple (K) menu. Click to put a
checkmark next to “Apple CD-ROM.” Then restart your computer.
m If you installed a CD-ROM drive after you bought your computer, make
sure the CD-ROM software that came with the drive is installed. See the
manual that came with the CD-ROM drive for software installation
instructions. (The CD-ROM software is already installed on Macintosh
computers that come with CD-ROM drives.)
94
You’ve just ejected a CD, but the computer keeps asking you to reinsert it.
m The right way to eject a CD-ROM disc is either to select the CD-ROM disc
and choose Put Away from the File menu or to drag the CD-ROM disc’s
icon to the trash. If you select the CD-ROM disc and choose Eject Disk
from the Special menu, the computer remembers the CD-ROM disc in its
memory and keeps asking you to reinsert the disc. Reinsert the CD-ROM
disc, then drag its icon to the trash. (You won’t lose information on the
CD-ROM disc by dragging its icon to the trash.)
Your computer starts up and you see large folder-shaped areas, containing labeled
pictorial buttons, instead of the usual Macintosh desktop.
m Your computer may have started up from a CD-ROM disc containing
At Ease, an alternative to the Macintosh desktop. You n eed to have the
Macintosh desktop on your screen before you can use any of the software
installation instructions in this manual.
Chapter 6
Page 95

To return to the Macintosh desktop, choose Shut Down from the Special
menu. After your computer has shut down, restart it. Then press the
Open/Close button of your CD-ROM drive to open the tray. Remove the
CD-ROM disc, close the tray, and star t up your computer again.
To avoid having the computer start up from a CD-ROM disc, rememb er to
remove any disc in the drive before you shut down your computer.
The tray of your CD-ROM drive won’t open.
If a CD-ROM disc icon appears on your screen:
m Drag the disc icon to the Trash, or select it and choose Put Away from the
File menu. (Note: You won’t lose information on the CD-ROM disc by
dragging its icon to the Trash. Don’ t select the disc icon and then choose
Eject D i sk from the Special menu.)
If the AppleCD Audio Player is active, choose Eject CD from the File menu.
If you see a message that a disc can’t be put away because it is being
shared, turn off file sharing, then try again to put away the disc.
If no CD-ROM disc icon appears on your screen:
m Press the Open/Close button of your CD-ROM drive.
m The signal to open the tray may not be reaching the computer. Turn off
your computer, then do the following: Locate the small pinhole to the
lower right of the CD-ROM tray opening, insert the end of a large
straightened paper clip firmly and horizontally into the pinhole, push
gently until the tray is released, then carefully pull the tray open. Do not
force the tray open; wait until the paper clip has dislodged it or you may
break the front of the tray.
WARNING
Turn off your computer before you attempt to eject the tray
using a paper clip. If you don’t, you may damage the CD-ROM drive.
If neither of these suggestions works, your CD-ROM drive may be damaged.
Contact an Apple-authorized service provider or Apple for further assistance.
Troubleshooting
95
Page 96

Your computer won’t restart, and a CD-ROM disc is in the CD-ROM drive.
m Your computer may be trying to start up from the CD-ROM disc. Press the
Open/Close button of your CD-ROM drive to open the tray, and remove
the CD-ROM disc. Close the tray, then restart your computer.
Prob lem s u s ing CD-ROM discs
You insert a CD-ROM disc, but its icon doesn’t appear on the Macintosh desktop.
m Make sure that the disc label is facing up and the disc is centered in the
tray. If you are using a small (8 cm) disc, make sure your computer is as
level as possible and the disc is centered within the inside ring on the tray.
m Make sure the tray is closed all the way.
m Try restarting your computer.
m Try starting your computer from the Macintosh Performa CD: Performa
Software while holding down the C key. (See the section “Starting Up From
the Macintosh Performa CD: Performa Software” later in this chapter). If
only the hard disk icon appears on the desktop, then there may be a
hardware problem with your CD-ROM drive. If the CD-ROM disc icon
appears above the hard disk icon, reinstall your CD-ROM software. The
easiest way to do this is by reinstalling your system software, following the
instructions in Chapter 7, “Reinstalling Your Computer’s Software.”
96
CD-ROM software is already installed on Macintosh computers that come
with CD-ROM drives. You can reinstall it by reinstalling your system
software, following the instructions in Chapter 7, “Reinstalling Your
Computer’s Software.”
m Make sure that the Apple CD-ROM extension is turned on in the
Extensions Manager control panel. Open the Extensions Manager control
panel in the Control Panels folder in the Apple (K) menu. Click to put a
checkmark next to “Apple CD-ROM,” then restart your computer.
m If you installed the CD-ROM drive after you bought your computer, make
sure the CD-ROM software is installed. Refer to the documentation that
came with the C D -ROM drive. (The CD-ROM software is already installed
on Macintosh computers that come with CD-ROM drives.)
Chapter 6
Page 97

Your computer displays the message “This is not a Macintosh disk: Do you want to
initialize it?” when you insert a CD-ROM disc in the CD-ROM drive.
m Make sure that the Foreign File Access and Audio CD Access CD-ROM
extensions are i nstalled a nd turned on. You can find them in your
Extensions folder in the System Folder on your hard disk. If they are not
turned on, use the Extensions Manager control panel in the Control Panels
folder in the Apple (K) menu to turn them on. (Click to put checkmarks
beside them.) Then restart your computer.
m Make sure the CD-ROM software is installed. (The CD-ROM software is
already installed on Macintosh computers that come with CD-ROM drives.)
If you installed a CD-ROM drive after buying your computer, see the
manual that came with the drive.
m The disc may use a format that the Macintosh cannot recognize. Ask the
disc’s manufacturer for a disc that a Macintosh can recognize.
Your computer ejects a CD-ROM disc without giving you any error message.
m Make sure the disc is flat in the tray and the disc label is facing up.
IMPORTANT
If you’re using a small (8 cm) disc, make sure it’s centered within
the tray’s in ner ring and the computer is absolutely level. An improperly
seated small disc in your computer may result in damage to the disc, the
CD-ROM drive, or both.
m The disc may need to be cleaned. (See “Handling CD-ROM Discs” in the
section “Handling Your Computer Equipment” in Appendix A.) If there are
visib le sc ratches on the shiny side of the disc, you may be able to remove
them with a CD-ROM disc polishing kit (available from your audio CD
dealer). If the scratches can’t be removed, you need to replace the disc.
m The disc may be damaged. Try a nother disc in the drive, and try the
original disc in another drive. If the original drive reads other discs or if
the original disc also doesn’t work in another drive, the disc is probably
damaged. You need to replace it.
You can’t open a document on a CD-ROM disc.
m Try opening the application program first; then open the document.
m Read the manual that came with your CD-ROM disc. Some discs come with
software that you need to install on your computer before using the disc.
Troubleshooting
97
Page 98

You can’t save changes you make to information on a CD-ROM disc.
m A CD-ROM disc is a read-only medium. This means that information can
be read (retrieved) from it, but not written (stored) on it. You can save the
cha nged informati on on a hard disk or floppy disk.
Prob lem s u s ing ISO 9660 or High Sierra discs
You cannot access files on a CD-ROM disc that uses the ISO 9660 or High Sierra format.
m Discs in the ISO 9660 and High Sierra disc formats have version numbers
attached to file names. Some application programs need these version
numbers in order to work with files. To make the version numbers
available to programs on your computer, follow these instructions.
Drag the CD-ROM disc icon to the Trash. When the tray opens, hold down
the Option key and push the tray back in. Continue to hold down the
Option key until the disc is in the drive. The program you are using should
now be able to locate file names on that CD-ROM disc.
m Make sure that Foreign File Access, ISO 9660 File Access, and High Sierra
File Access are present in the Extensions folder in your System Folder on
your hard disk.
98
Problem s playing a udio CDs
You don’t hear any sound when you play an audio CD or an audio track on a CD-ROM
disc using the AppleCD Audio Player.
m If you have headphones or speakers connected to the computer, adjust the
connectors to make sure they are firmly connected. Make sure the volume
control on your headphones or speakers is not turned down too low.
m If you do not have headphones or speakers connected to the computer,
make sure that nothing else is plugged into the sound output port (-) on
the back of your computer.
m If you are using a CD-ROM disc over a network, you won’t be able to hear
the audio por tion.
m Make sure the volume is turned up in the AppleCD Audio Player. With the
Audio Player open, drag the volume control slider up, use the volume
controls on your computer, or press the Up Ar row key on your keyboard.
Chapter 6
Page 99

m The CD may have been paused. Click the Play/Pause button in the
AppleCD Audio Player once or twice.
m If your CD-ROM drive was installed after you bought your computer, make
sure the audio cable is properly connected. See the documentation that
came with the CD-ROM drive.
While playing an audio track on a CD-ROM disc that combines audio tracks and data,
you double-click the disc icon and the audio track stops playing.
m You can’t open data files on a CD-ROM disc and listen to audio tracks on
that disc at the same time.
You are unable to record sound from an audio CD.
m Check your computer’s sound input port to see if a microphone or other
device is connected.
m You may need to reset the sound options in the Monitors & Sound control
panel. Refer to the “Sound” topic of Macintosh Guide, available in the
Guide (h) menu.
Problem s us ing Photo CDs
You insert a Photo CD disc, but its icon doesn’t appear on the desktop.
m Reinstall the CD-ROM and QuickTime software. The easiest way to do
this is by reinstalling your system software, following the instructions in
Chapter 7, “Reinstalling Your Computer’s Software.”
Your computer does not display color icons for individual images on a Photo CD.
m Your computer may be low on memory. To view color icons, restart your
computer and then reopen the Photos folder. See the “Memory” topic of
Macintosh Guide, available in the Guide (h) menu, for more information
on managing memory.
After you open an image file on a Photo CD, the image is scrambled, colors are displayed
incorrectly, or no image appears in the window.
m The program you are using may not be designed to work with large (high-
resolution) image files. You can open the image with another program or
you can assign more memory to the program. (See the “Memory” topic of
Macintosh Guide, available in the Guide [h] menu, for more information
on managing memory.)
Troubleshooting
99
Page 100

After you open an image on a Photo CD, your system is “frozen” and does not respond
to any input, or you have a “bomb” message on your screen.
m Restart your Macintosh. (If you need help restarting your computer, see
“Start Over by Restarting Your Computer” in the section “If You Have
Trouble” at the beginning of this chapter.) Th e program you are using may
not be designed to work with large (high-resolution) image files. You can
open the image with another program or you can assign more memory to
the program. See the “Memory” topic of Macintosh Guide, available in the
Guide (h) menu, for more information on managing memory.
If your computer’s per formance decreases
If you notice a decrease in your computer’s speed and general performance
after you install special software (a control panel, system extension, or custom
utility), it may be because the software is not compatible with Macintosh
computers built with the PowerPC microprocessor.
m To fi nd out if a system extension or control panel is the problem, hold
down the Shift key while you restart the computer. This temporarily turns
off control panels and extensions. If the computer performs better without
these software items, one of them is likely to be the problem. (If you just
added new software, its system extension, control panel, or custom utility is
the mos t probable cause of the problem.)
100
To fi nd out which software is the problem, use the Extensions Manager
control panel (in the Control Panels folder in the Apple [K] menu) to turn
off a system extension or set of extensions. (If you just added new software
to your computer, its system extension is the most probable cause of the
problem.) For detailed instructions, see the information about managing
system extensions in the “Customizing Your Computer” topic of Macintosh
Guide, available in t he Guide (h) menu. If the computer performs better
whe n an exte nsion is turned off, contact the extension’s manufacturer for
information or an upgrade.
Chapter 6
 Loading...