

Page 1

How to use this manual
This manual describes how to upgrade your system software and AppleShare
Client software and also provides instructions on how to use your AppleShare
Client software. Print a copy of this manual so that it is available for easy
reference.
System requirements
You’ll get the best performance from your AppleShare network and be able to
use new AppleShare IP features (such as using TCP/IP to connect to a file
server) by installing the following software:
m System 7.5.3 or later
m Open Transport 1.1.2 or later
m AppleShare Client 3.7
Note: You cannot use MacTCP to make a TCP connection to an AppleShare
IP Web & File Server.
AppleShare Client User’s Manual
1
Page 2

Updating your system software
To take advantage of performance improvements and n ew AppleShare IP
features, you need to upgrade your system software. You should upgrade to
system software version 7.5.3 or later.
To deter mine the version of system software your computer is running,
choose About This Macintosh from the Apple (K) menu.
Contact your AppleShare administrator for more information about upgrading
your system software.
After you upgrade to System 7.5.3 or later, you need to install Open
Transport 1.1.2. Contact your AppleShare administrator for information about
installing it.
Note: After you upgrade the system software of a NuBus
™
-based computer,
you need to turn on Open Transpor t by using the Network Software Selector
in the Apple Extras folder on your startup disk. If your computer has a small
amount of memory, you must enable virtual memory before you can turn on
Open Tra nsport. Use the Memory control panel to enable virtual memory.
Once you’ve completed the installation of Op en Transport 1.1.2, you’ll need to
configure your AppleTalk and TCP/IP control panels. Contact your
AppleShare administrator for information that is specific for your network.
2 AppleShare Client User’s Manual
Page 3
Updating your AppleShare Client software
After you have upgraded to system software version 7.5.3 or later and
Open Tra nsport 1.1.2 or later, you are ready to update your AppleShare Client
software by installing AppleShare Client 3.7. You can perform the update by
logging on to a file server that is shari ng the folder that contains the
AppleShare Client 3.7 software.
To i nstall AppleShare Client 3.7, follow these steps:
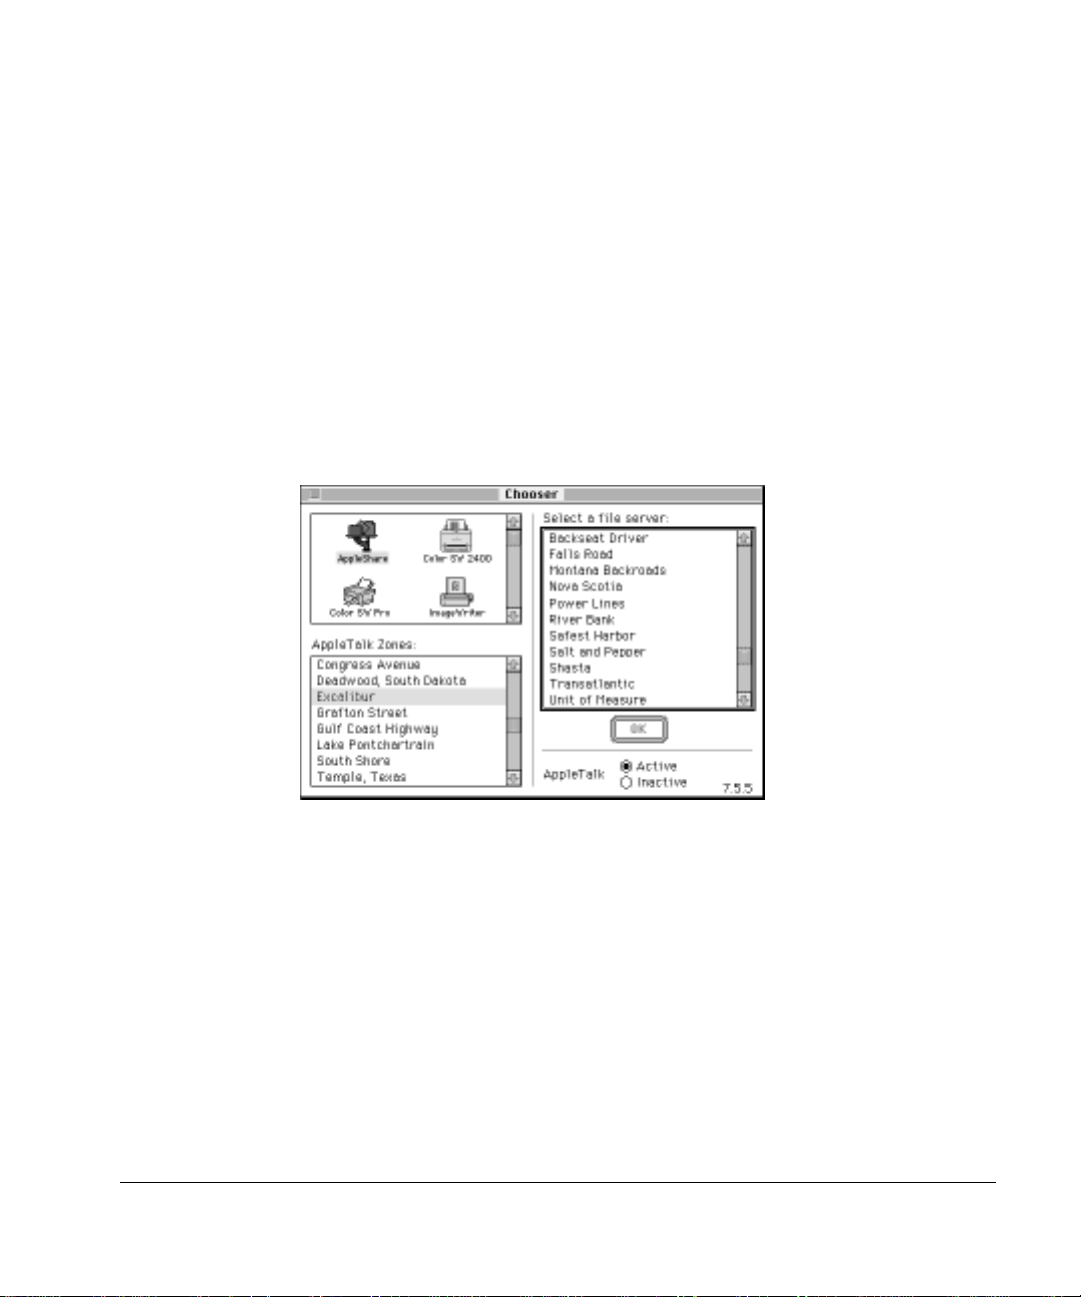
1 Open the Chooser and select the AppleShare icon in the upper-left corner of the window.
If your network is divided i nto zones, they are listed in the lower-left corner
of the window. When you select a zone, a ny AppleShare file servers in that
zone are listed in the upper-right corner of the window.
2 Select the name of the file server that is sharing the AppleShare Client 3.7 software.
Your network administrator should tell you the name of the zone (if any) and
the file server to select.
Updating your AppleShare Client software 3
Page 4

3 Click OK.
A dialog box similar to the following appears.
4 If you have a password, type it in the Password box.
5 Click OK.
A dialog box similar to the following appears.
6 Select the volume that contains the AppleShare Client 3.7 software and click OK.
Your network administrator should tell you the name of the volume to select.
The icon for the selected volume appears on your desktop.
4 AppleShare Client User’s Manual
Page 5

7 Double-click the icon for the volume you selected in step 6 and open the AppleShare
Client 3.7 folder.
8 Double-click the Installer icon.
A dialog box containing a license appears.
9 To display the license agreement in the language that is appropriate for you, select a
language from the pop-up menu.
10 Read the license agreement and if you agree to its terms, click Agree.
The following dialog box appears.
11 Verify that your computer’s startup disk is named in the Installer window as the
destination disk.
If the wrong disk is shown, click Switch Disk until the name of your startup
disk appears.
12 Click Install.
13 When you see a dialog box telling you that installation is complete, restart your
computer.
Updating your AppleShare Client software 5
Page 6

AppleShare Client quick reference
This quick reference provides at-a-glance directions for the most common
AppleShare tasks.
Connecting to a server
1 Choose the Chooser from the Apple (
K
) menu.
2 Select the AppleShare icon in the upper-left corner of the window.
If your network contains zones, they are listed in the lower-left corner of the
window. Wh en you select a zone, AppleShare file servers in that zone are
listed in the upper-right portion of the window.
3 Select the name of the zone (if any) and the file server you want to connect to.
IMPORTANT
A file server may be available in more than one zone. For best
performance, connect to the server that is in the same zone as your own
computer. (Your computer’s zone is displayed in the “Current zone” pop-up
menu in the AppleTalk control panel.)
6 AppleShare Client User’s Manual
Page 7

If your computer is set up for TCP and if the file server you selected is set up
for TCP, the connection is made over TCP automatically. Otherwise, the
connection is made over AppleTalk.
Note: If AppleTalk is not active or if you are trying to connect to a file server
over a network segment on which AppleTalk is not active, the server you want
to connect to may not appear in the “Select a file server” list. To connect,
click the Server IP Address button and enter the server’s IP address in the
dialog box that appears. Then click OK.
4 Click OK.
A dialog box similar to the following appears.
5 Click Guest to log on as a guest user (if guest access is permitted on the file server
you’re connecting to). Or click Registered User and enter your name and password
(if you have one).
AppleShare Client quick reference 7
Page 8

6 Click OK.
7 In the window that appears, select the name of the volume or volumes you want to use.
If you click the checkbox next to the name of a volume, you can connect to
the volume automatically the next time (and any time) you start up your
computer.
8 Click OK and close the Chooser.
The selected volumes app ear on your desktop. To see the files and folders it
contains, double-click a volume’s icon.
To deter mine whether you have connected to a server over TCP or AppleTalk,
select a volume’s icon and choose Get Info from the Finder’s File menu.
Disconnecting from a file server
To disconnect from a file server, drag the icon of the ser ver volume to the
Trash.
You are disconnected automatically from the server when you shut down your
computer. Th e administrator can also disconnect you from the file server.
WARNING
Be especially cautious when connecting to volumes with the
same name in different zon es; the volumes may actually represent the
same volume that is located on a server that can be accessed in several
zones. If you log on to the same server in two zones and you attempt to
copy the same files or folders from one icon representing a volume on
the server to another icon representing the same volume, data loss will
occur.
8 AppleShare Client User’s Manual
Page 9

Selecting a print server
1 Choose the Chooser from the Apple (
K
) menu.
2 Make sure that AppleTalk is active (the Active button should be selected).
3 Select a LaserWriter icon in the upper-left corner of the window.
You can select the LaserWriter or the LaserWriter 8 icon.
If your network contains zones, they are listed in the lower-left corner of the
window. Wh en you select a zone, available printers in that zone are listed in
the upper-right portion of the window.
4 Select the name of a printer (actually a print queue) you want to use.
5 Close the Chooser.
To print any document, open the document and choose Print from its File
menu.
AppleShare Client quick reference 9
Page 10

About access privileges
Access privileges govern what you and other users of a file server ca n see or
alter. The following lists the access privileges (See Folders, See Files, or
Make Changes) that you must have in order to perform the listed actions:
m Copy a file to a folder—Make Changes
m Copy a file from a folder—See Folders, See Files
m Copy a folder to a folder—See Folders, Make Changes
m Copy a folder from a folder—See Folders
m Create a file—See Folders, See Files, Make Changes
m Create a folder—See Folders, Make Changes
m Delete a file—See Files, Make Changes
m Delete a folder—See Folders, Make Changes
m Move a folder to a folder—See Folders, Make Changes
m Move a folder from a folder—See Folders, Make Changes
m Open and use a file—See Files
m Save changes to a file—See Files, Make Changes
Finding out what privileges you have
There are three ways to find out your access privileges:
m Look at the folder icons; icons are displayed differently according to your
privileges for each folder.
Tabbed folder—You are the owner of the folder.
Plain folder—You have some access privileges to the folder.
10 AppleShare Client User’s Manual
Page 11

Locked folder—You do not have any access privileges to the folder.
Locked folder with arrow—You only have the Make Changes privilege to the
folder.
m Look at the access privilege icons in the top-left corner of the directory
window of a folder. They can tell you what privileges you do not have.
A crossed-out file icon—You can’t see files.
A crossed-out folder icon—You can’t see folders.
A crossed-out pencil—You can’t make changes.
AppleShare Client quick reference 11
Page 12

m Select a folder and choose Shari ng from the File menu of the Finder. A
window similar to the following one appears, showing you who owns the
folder a nd what privileges you have for the folder.
Setting access privileges
1 Select a folder that you own on the file server and choose Sharing from the File menu.
2 In the window that appears, click the checkboxes of the privileges you want to assign.
When a checkbox has an X in it, that privilege is selected. To copy the privileges you
selected to all folders within the folder, click the “Make all currently enclosed folders like
this one” checkbox.
Note: If you are connected to an AppleShare IP file server, you can select any
combination of access privileges, but the only combinations that take effect
are See Folders and See Files; See Folders, See Files, and Make Changes; and
Make Changes.
3 Close the window and, in the alert box that appears, click Save.
©
1997 Apple Computer, Inc. All rights reserved. Apple, the Apple logo, AppleShare, AppleTalk, LaserWriter,
Macintosh, and MacTCP are trademarks of Apple Computer, Inc., registered in the United States and other
countries. Finder is a trademark of Apple Computer, Inc. NuBus is a trademark of Texas Instruments.
007-3495
 Loading...