

Page 1

1
Setting Up Your Printer
This chapter introduces the Apple Color StyleWriter 2500 printer a nd
explains how to set it up. After you follow the instructions in this chapter,
you’ll be ready to print.
Before you begin
know the basics of its operation.
Important safety instructions
Always take the following precautions:
m Keep the printer cover closed when printing.
m Always turn off the pri nter before unplugging it.
m Keep the in k tanks and ink cartridges away from children.
m Keep the printer away from sources of liquid, such as wash basins,
bathtubs, and shower stalls.
m Protect the printer from dampness or wet weather, such as rain and snow.
m Read all the installation instructions carefully before you plug the printer
into a wall socket.
m Keep these instructions handy for reference by you and others.
m Follow all instructions and warnings dealing with your computer system.
Make sure that your computer is already set up and that you
1
Page 2

m Don’t use d evices that produce open flames, such as Bunsen burners, near
the printer.
m Don’t use alcohol-based or ammonia-based cleaners on or around the
printer.
m Always unplug the printer before cleaning it. (Use only the cleaning
procedure recommended in Chapter 4.)
m Clean the outside of the printer with only a damp cloth and, if necessary, a
mild soap or detergent. Be careful not to get liquid into the printer or the
power cord receptacle.
IMPORTANT
The only way to disconnect power completely is to unplug the
power cord. Make sure at least one end of the power cord is within easy reach
so th at you can unplug the Color StyleWriter 2500 when you need to.
Watch for these situations, and if one occurs pull the plug!
m the power cord or plug becomes frayed or otherwise damaged
m you spill something into the printer
m the printer is exposed to rain or any other excess moisture
m the printer has been dropped or otherwise damaged
m you suspect that your printer needs service or repair
WARNING
of this product, or similar products, must always be supervised by an
adult. Do not allow children access to the interior of any electrical
product and do not permit them to handle any cables.
Electrical equipment may be hazardous if misused. Operation
2
Chapter 1
Page 3
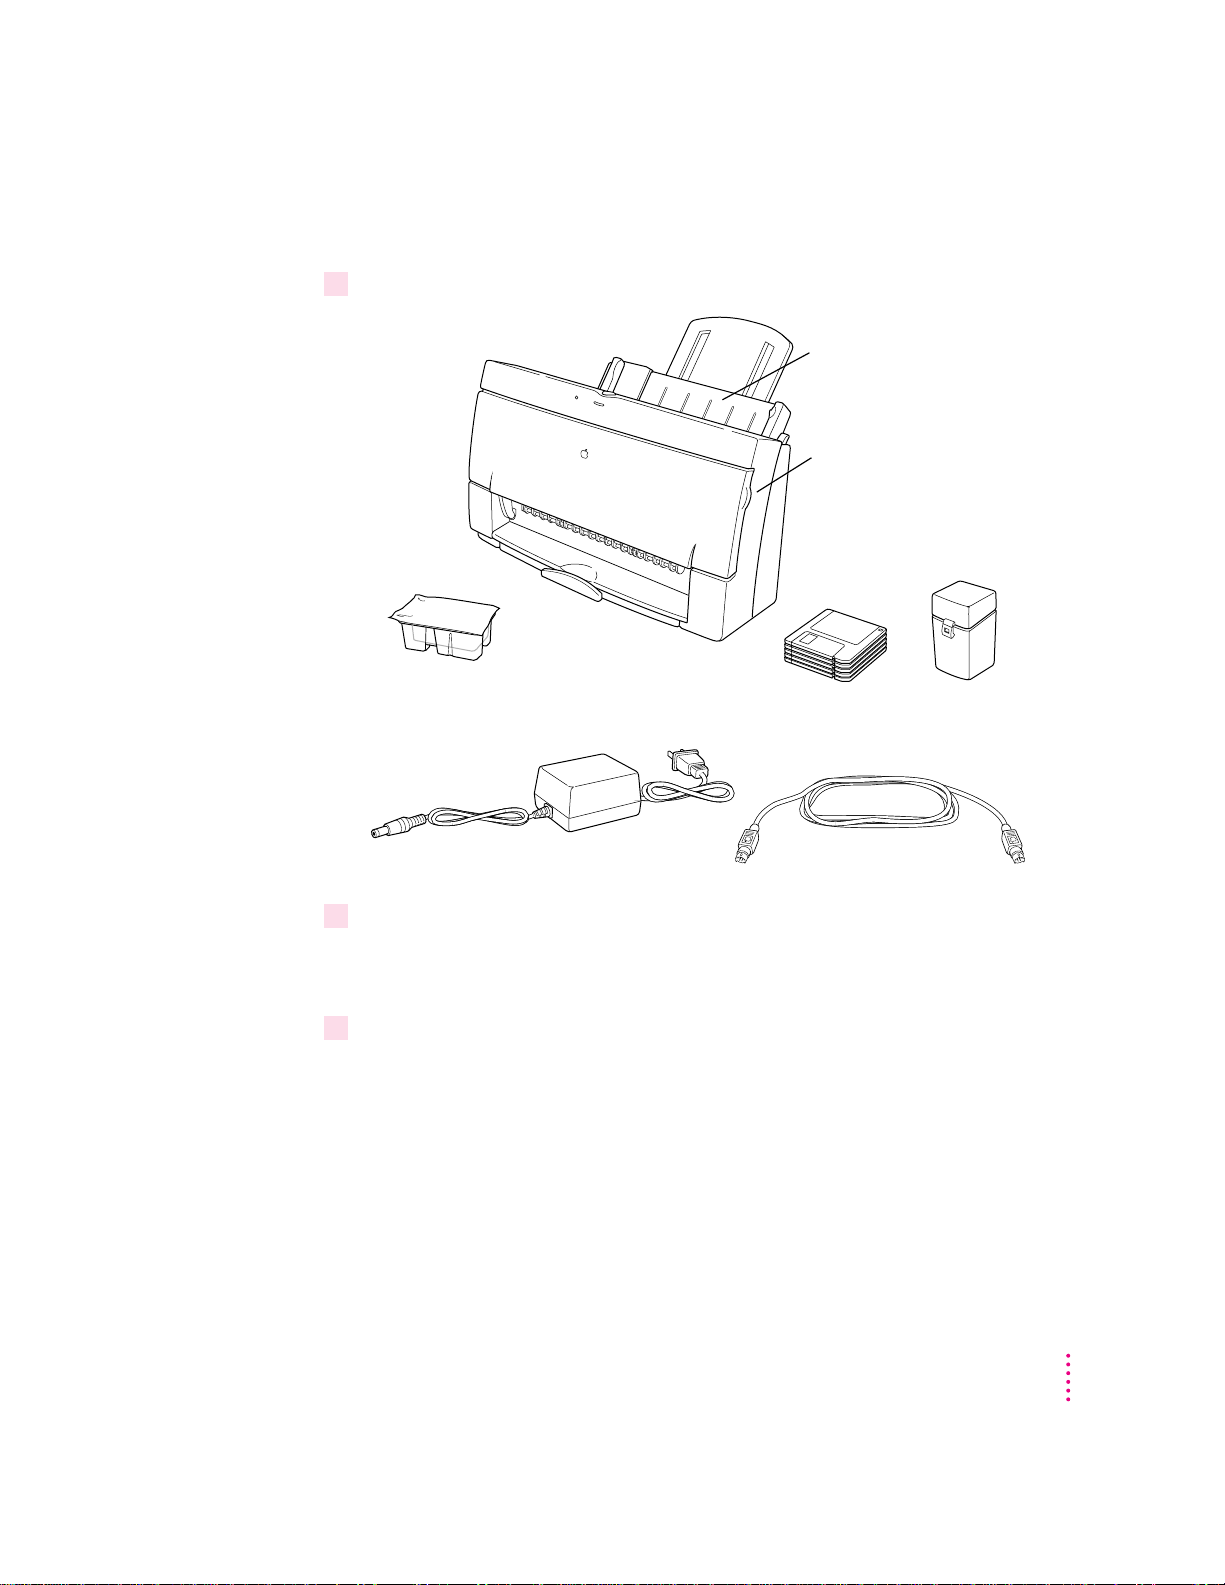
Unpacking t he printer
1 Remove everything from the shipping box, but leave the ink cartridge in its package.
Be sure to remove packing
material from the sheet feeder.
Be sure to open the printer’s
cover and remove the packing
tape from inside.
Ink cartridge
(Leave it in the
plastic tub for now.)
Color StyleWriter 2500
Power adapter
Software disks
Apple System/Peripheral-8 cable
Storage case
for ink cartridges
2 Remove the tape and packing material from the inside and outside of the printer.
Save the carton and the packing material in case you ever need to ship the
printer. (See Appendix G, “Packing and Moving the Printer.”)
3Close the printer’s cover.
Setting Up Your Printer
3
Page 4

4Place the printer in your work area.
Choose a location near your computer that has a grounded electrical outlet
and good ventilation, is out of direct sunlight, never gets damp or very hot or
very cold, and is away from devices that could cause electromagnetic
interference, such as stereo speakers or cordless telephone transmitters. Do
not place the printer on a slanted surface. See Appendix A, “Technical
Information,” for specific information about the physical requirements of your
printer.
IMPORTANT
Don’t accidentally discard the ink cartridge storage case. You need
it to store an opened cartridge that you’re not using in the printer. The case
keeps the print head from drying out and prevents accidents with ink stains.
If you print only a few color images, and most of your printing is in black,
you can purchase a high-performance black ink cartridge and use it as an
alternative to the color ink cartridge. Wh en either cartridge is not in the
printer, keep the cartridge in the storage case.
You can use the same ink cartridge in both a Color StyleWriter 2400 a nd a
Color StyleWriter 2500.
Power M acintos h users and Virtual Memory
If you are using a Power Macintosh computer, be sure to turn on Virtual
Memory before you try to print on the Color StyleWriter 2500. Then choose a
setting that’s at least 1 MB higher than your “Available built-in memory.” (You
can set it higher without any ill effects.) With this setting, you will avoid some
potential printing problems. Turning on Vir tual Memory also reduces the
amount of memory needed by many applications. For instructions on turni ng
on Virtual Memory, see the documentation that came with your computer.
4
Chapter 1
Page 5
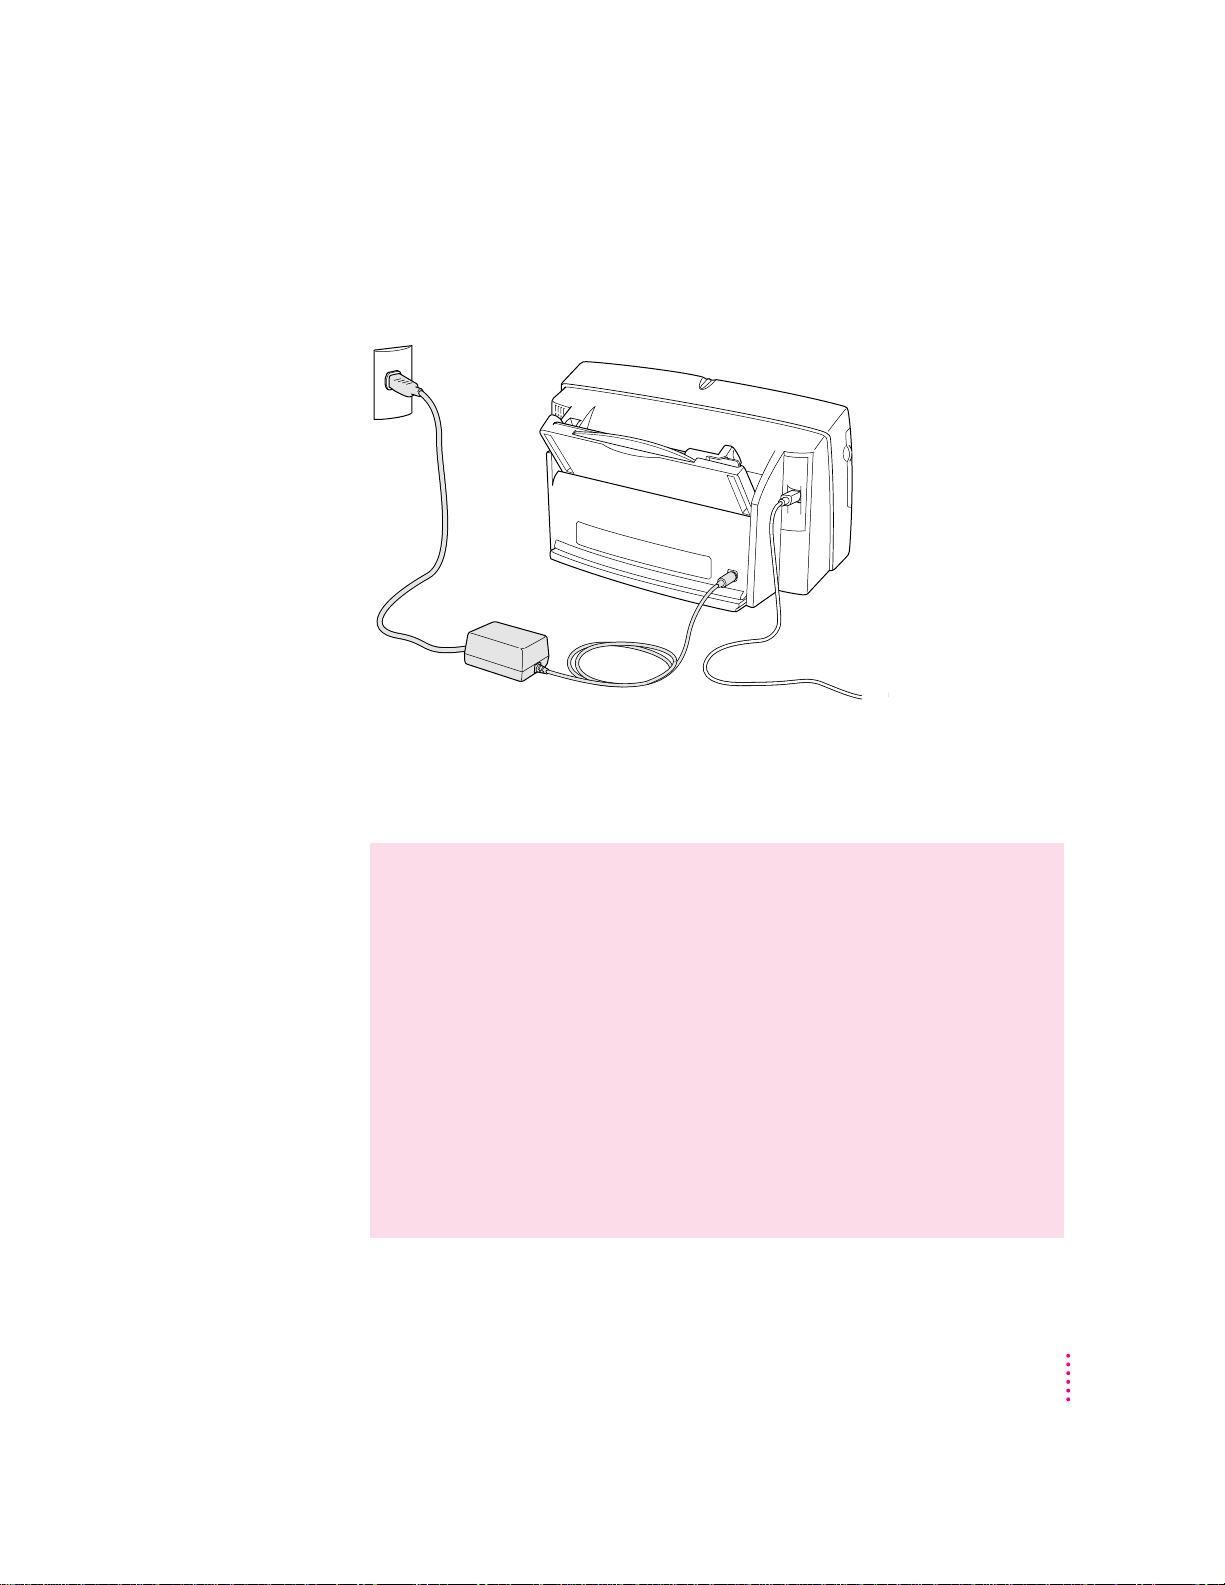
Pluggin g in the printer
Plug th e connector end of the power adapter into the printer and then plug the
other end of the adapter into an outlet.
IMPORTANT
The only way to disconnect power completely is to unplug the
power cord. Make sure that at least one end of the power cord is within easy
reach so that you can unplug the printer in an emergency.
WARNING
This Color StyleWriter is designed to work with the electrical
system of the region in which you purchased it. It works with only one
frequency of electricity, either 50 or 60 Hz. Th e label on the adapter you
received with your printer indicates the frequency required.
The label on the adapter also indicates the voltage required. If you are
using the printer i n a region with a different voltage but the same
frequency as that listed on the adapter, you must use a voltage converter
to provide the voltage value indicated on the adapter label.
Serious damage to the printer will result from using the Color StyleWriter
adapter with an improper electrical frequency or improper voltage
converter. Damage resulting from such misuse of the printer is not
covered under warranty.
Setting Up Your Printer
5
Page 6
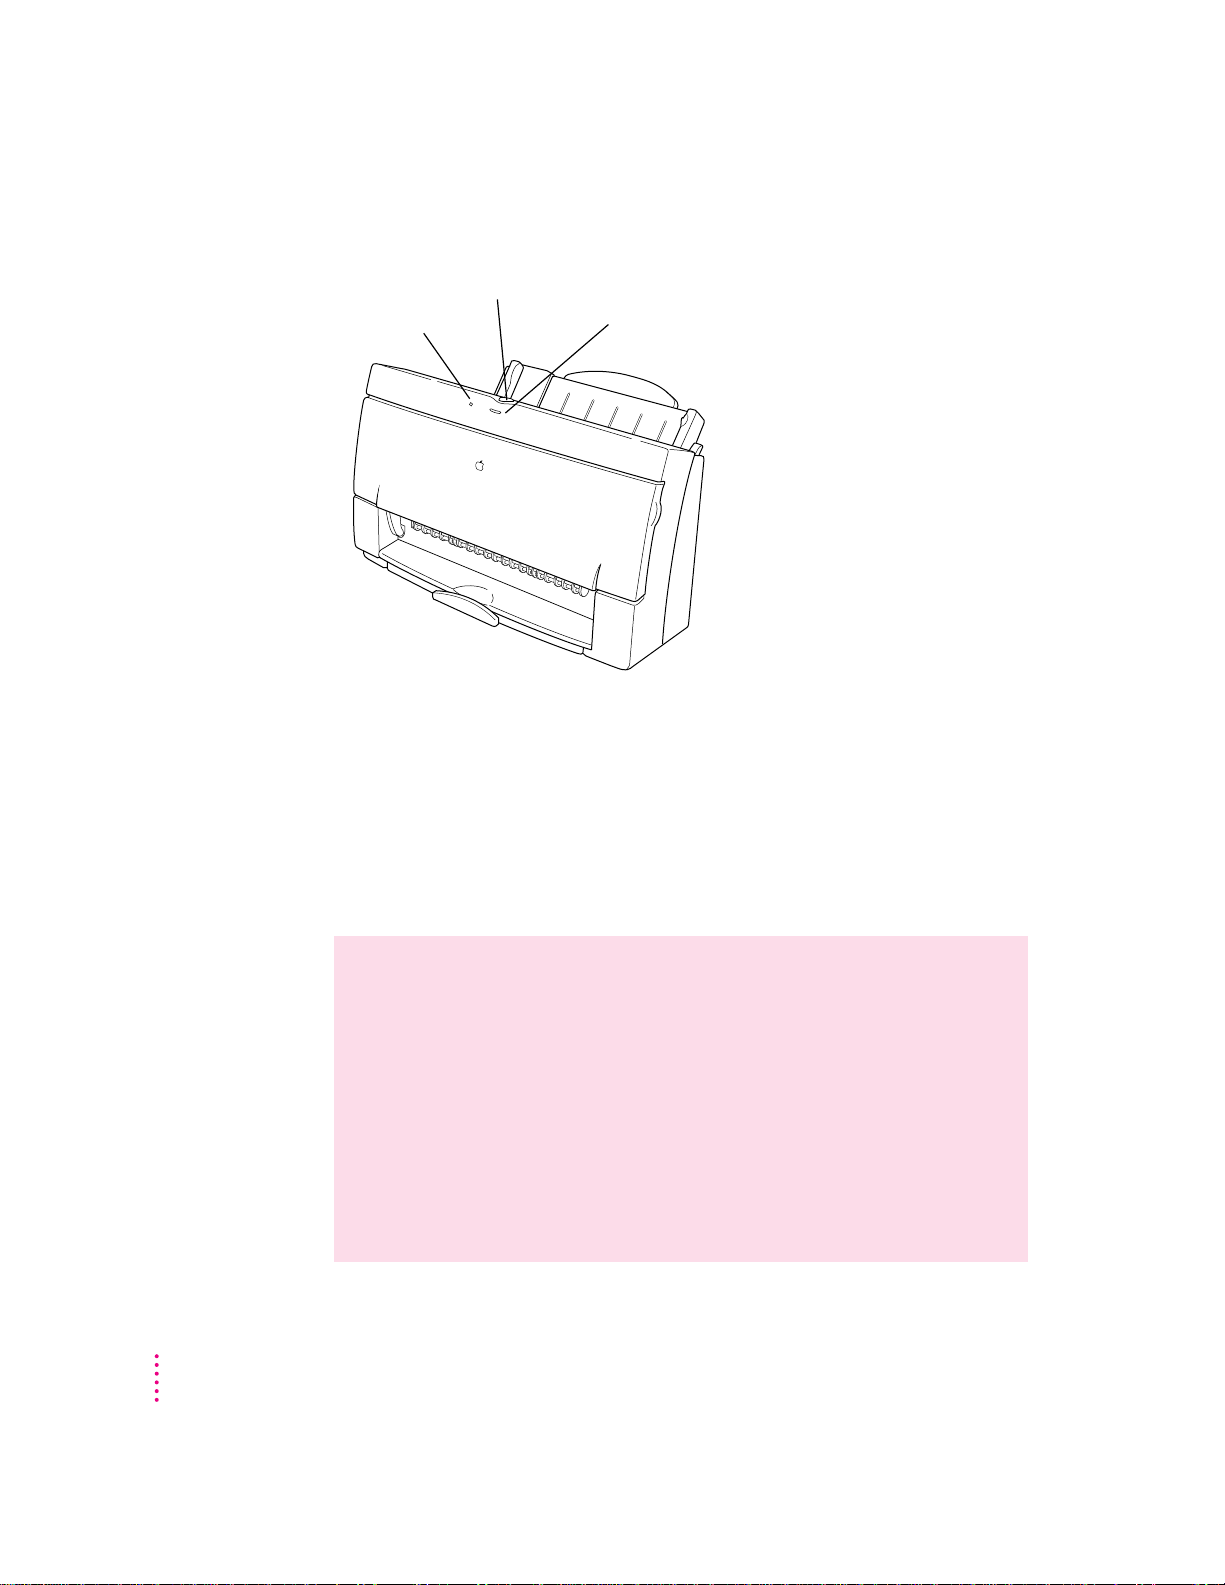
Turning the printer on and off
To turn the printer on (and off), press this button.
This light blinks.
This light glows
while the printer is on.
The first time you turn on the printer, the green power light glows and the
yellow error l ight blinks because you haven’t installed an in k cartridge yet.
Saving energy
To save power, the printer turns itself off after sitting unused for about 5
minutes. As long as you leave it plugged into an active power outlet, the
printer turns itself on automatically when you print something.
6
Chapter 1
WARNING
Except in an emergency, make sure the printer is turn ed off
before you unplug it. (When the power light is off, the power is off.) If
the printer is plugged into a power strip, never turn off the power strip
unless you’ve already turned the printer off.
Each time you turn off the printer, or the printer turns itself off, it
automatically moves the ink cartridge to the right, where it caps the
nozzles to keep the ink cartridges from drying out. If you unplug the
printer or discontinue power before turning it off, the printer can’t
position the cartridge in the capped position, the print head may dry out,
and you’ll have to replace the cartridge.
Page 7
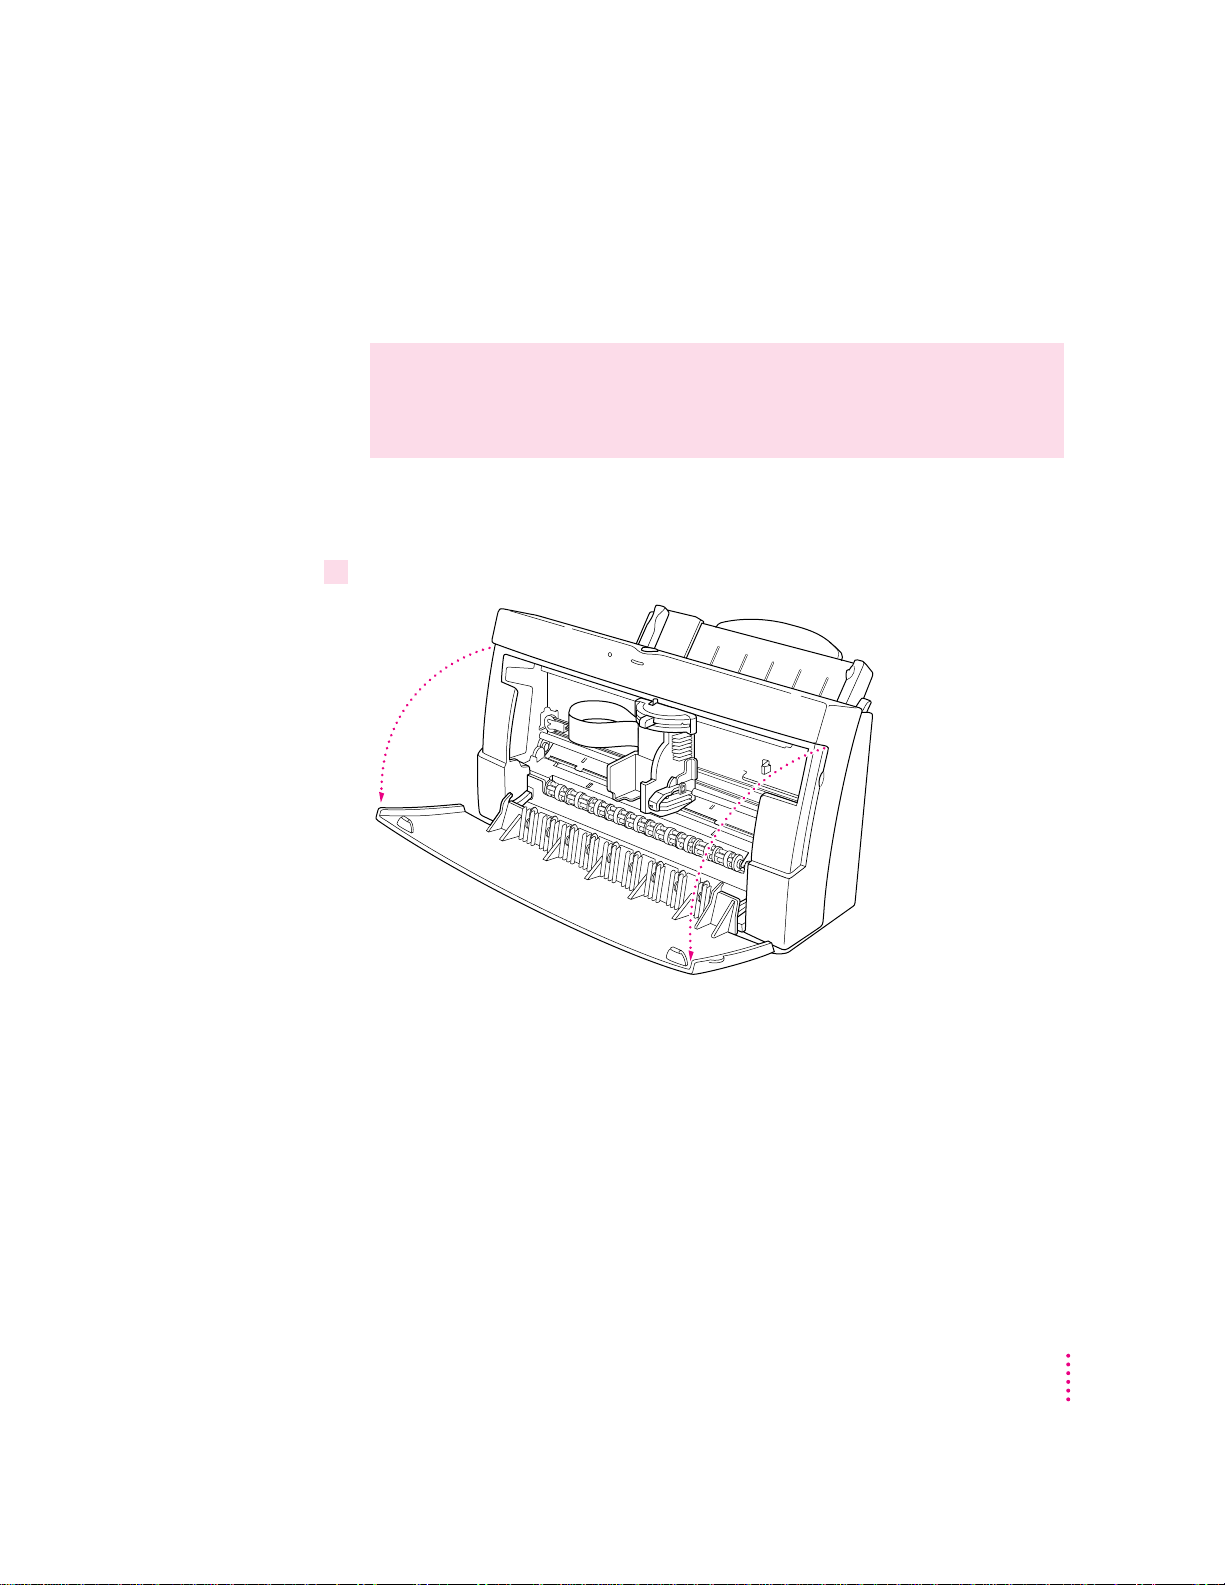
Installing the i nk cartridge
The ink cartridge contains the print h ead, which sprays the ink onto the
paper. Treat it gently so you don’t damage its tiny nozzles.
WARNING
The carrier holds the ink cartridge and moves it back and
fort h when you are printing a document. When the printer is plugged in,
don’t slide the carrier by hand or you may damage the printer.
Before you start, make sure the printer is tur n ed on. (The green light glows,
and the yellow light blinks.)
1 Open the printer by pulling down its front cover.
Setting Up Your Printer
7
Page 8
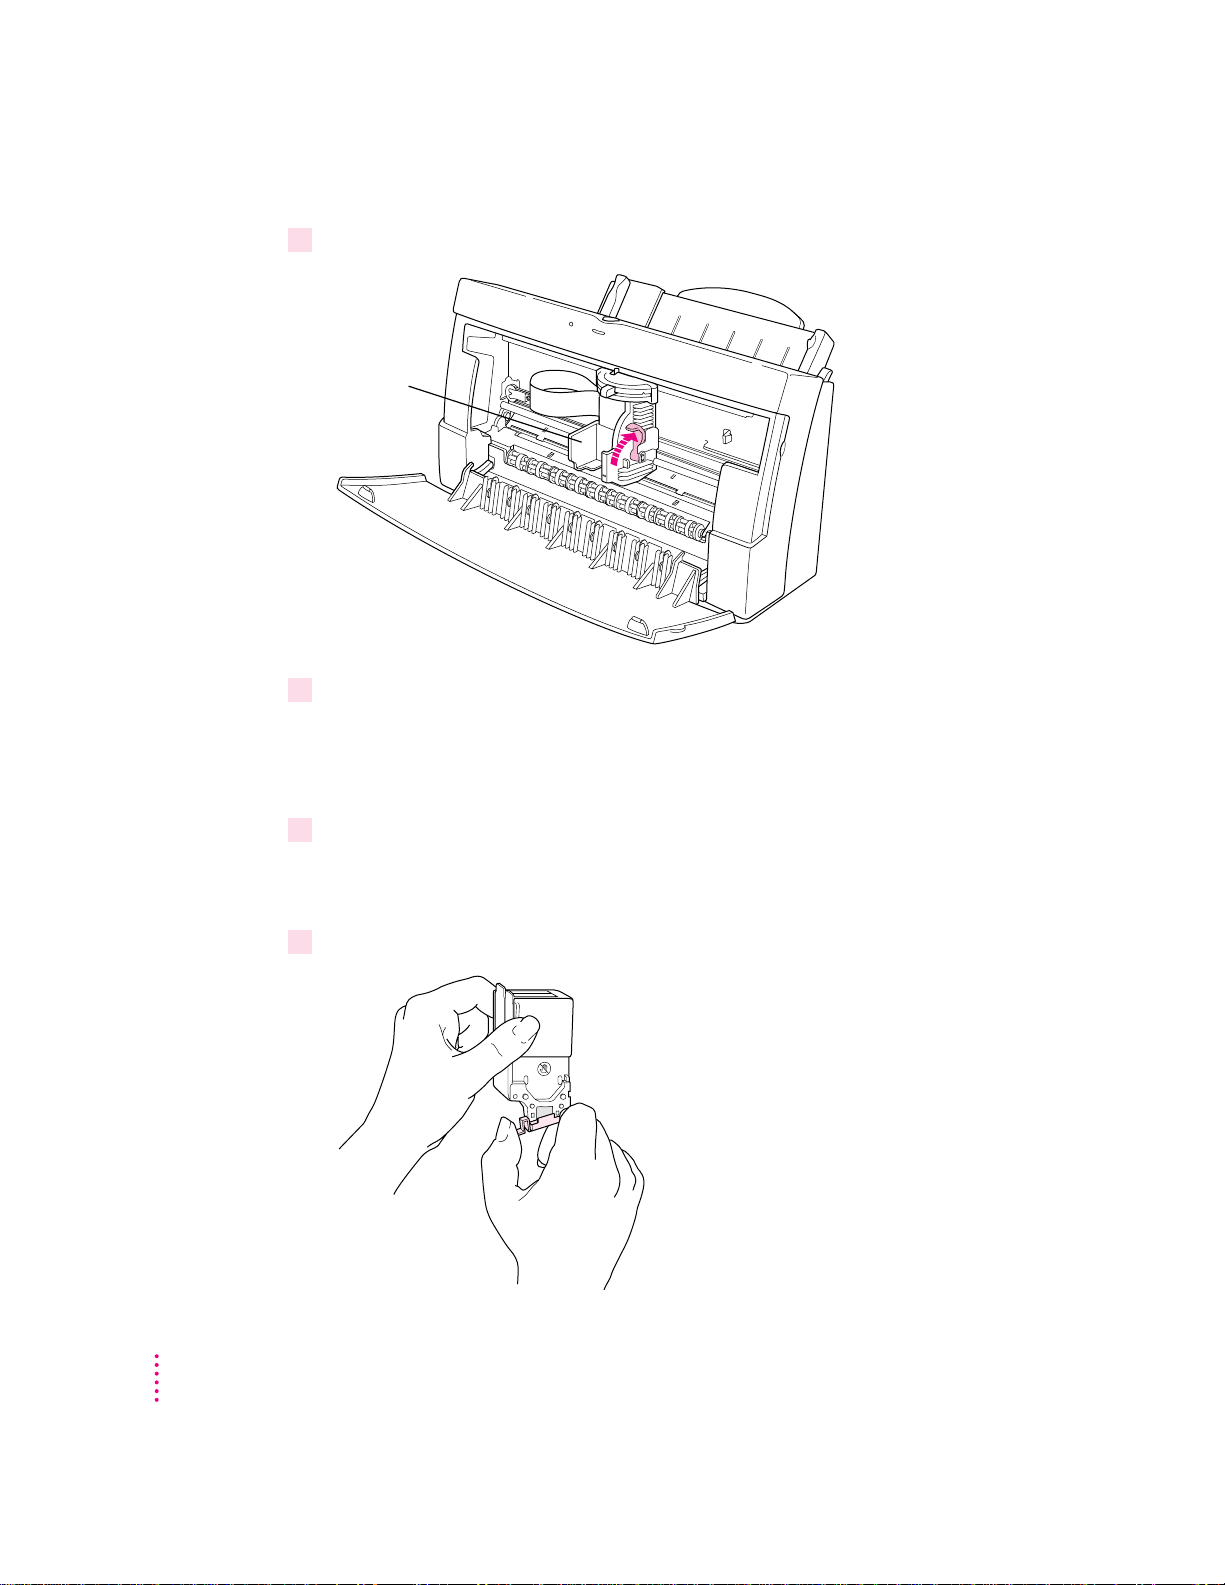
2 Raise the bright blue lever on the carrier.
Carrier
3 Remove the cover from the plastic tub that contains the ink cartridge.
These instructions show the four-color cartridge being installed, but the
process is the same for either cartridge. (You can buy a high-performance
black ink cartridge in addition to the color cartridge.)
8
4Grasp the ink cartridge by its sides and remove it from the plastic tub.
You may safely touch the black plastic, but be careful not to touch any other
part.
5 Remove the bright orange cap from the cartridge’s print head.
After you snap it off,
dispose of the cap.
Chapter 1
Page 9
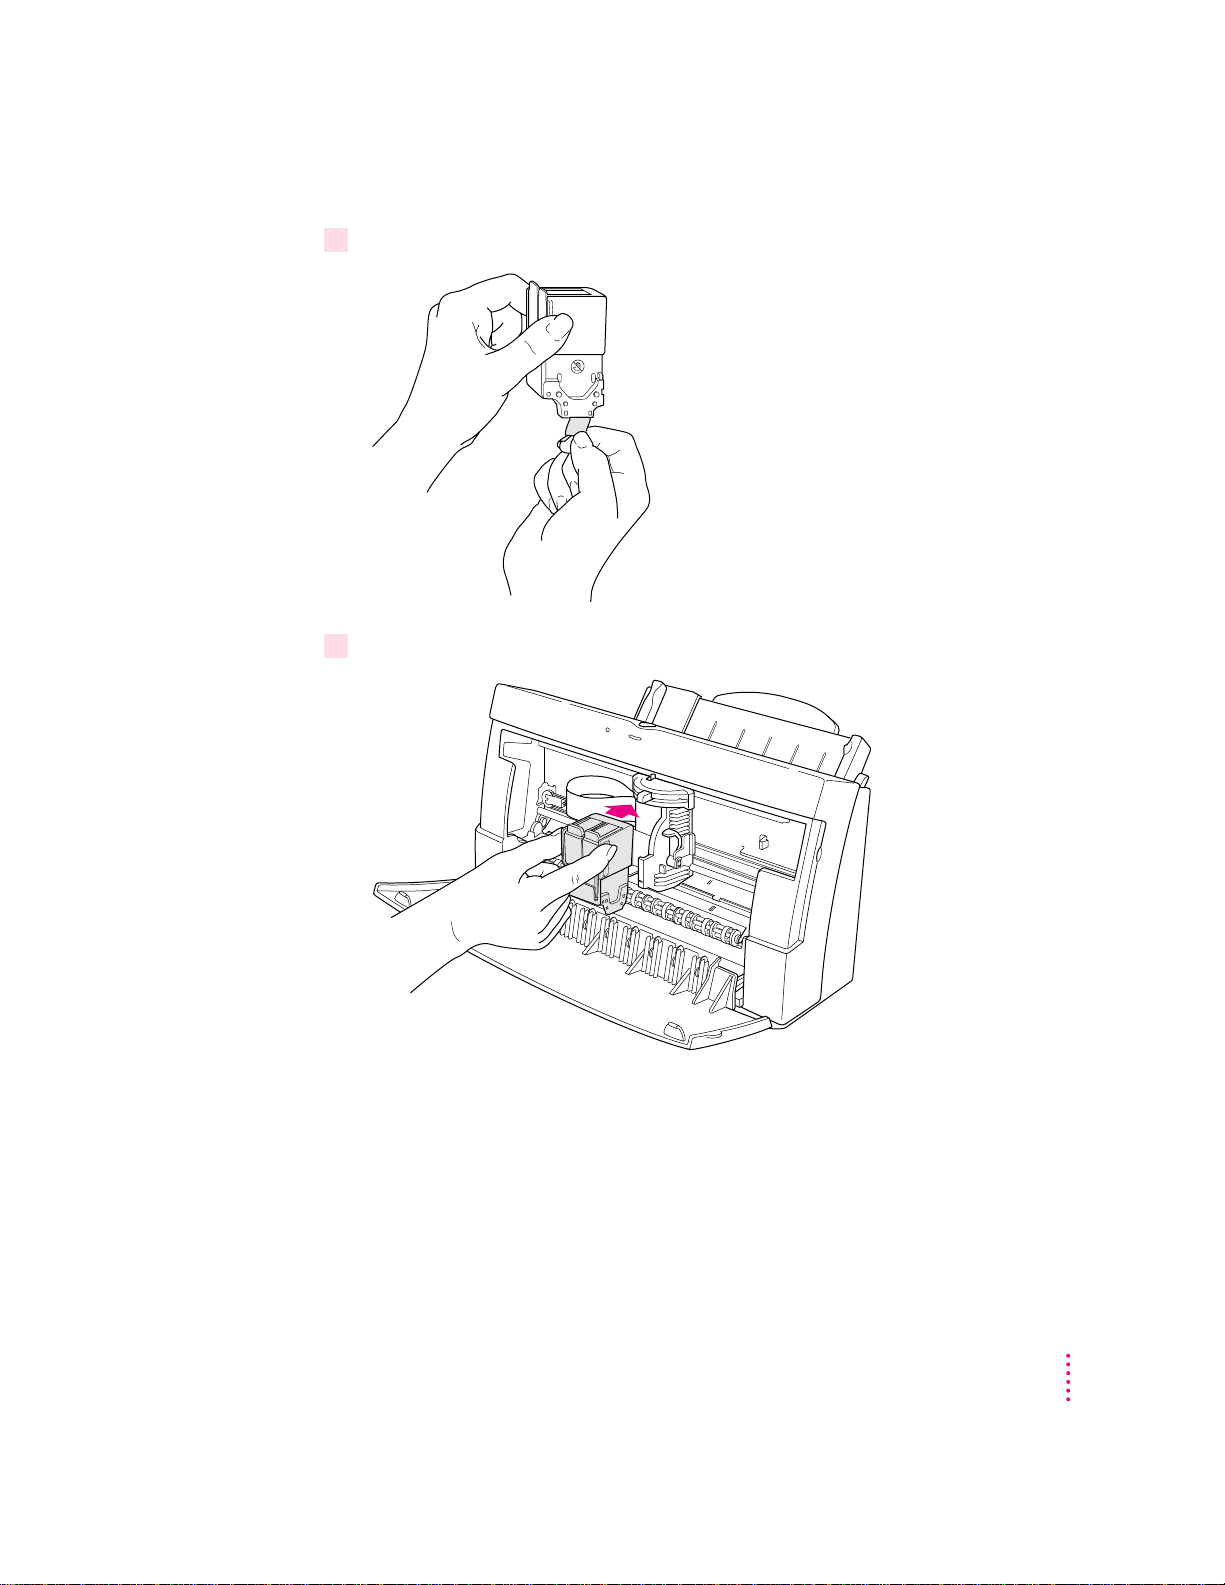
6Peel the orange tape off the print head.
7Slide the ink cartridge into its place in the printer.
Note: There are instructions inscribed inside the printer cover to remind you
how to install either the color or optional high-performance black ink
cartridge.
Setting Up Your Printer
9
Page 10

8Lower the bright blue lever on the carrier to secure the ink cartridge in place.
9Close the printer’s front cover.
10
Chapter 1
Page 11

Connecting the printer to your M acintosh
IMPORTANT
Even if you’re planning to share the printer over a network, the
serial cable must connect the printer directly to the computer. Use only the
cable that comes with the printer or a similar replacement. Do not use a
LocalTalk cable unless you purchased the LocalTalk Option for this printer
(in which case you should see the instructions that came with the option).
Connect this cable to either the
printer port or the modem port,
which are labeled with these icons.
Some Macintosh computers have a
combined serial port with two icons.
If your computer is connected to a network, a network cable may already be
connected to the printer port ([). In that case, use the modem port (W).
Remem ber whi ch port you use. Later you must tell the printer software where
to look for the printer.
Some PowerBook computers that have an internal modem installed cannot
tell that the printer is plugged in. You must change a setting in the PowerBook
Setup or Express Modem control panel. For details, see “Special Information
for PowerBook Owners” in the section “Telling Your Computer to Use the
Color StyleWriter 2500,” later in this chapter.
Setting Up Your Printer
11
Page 12
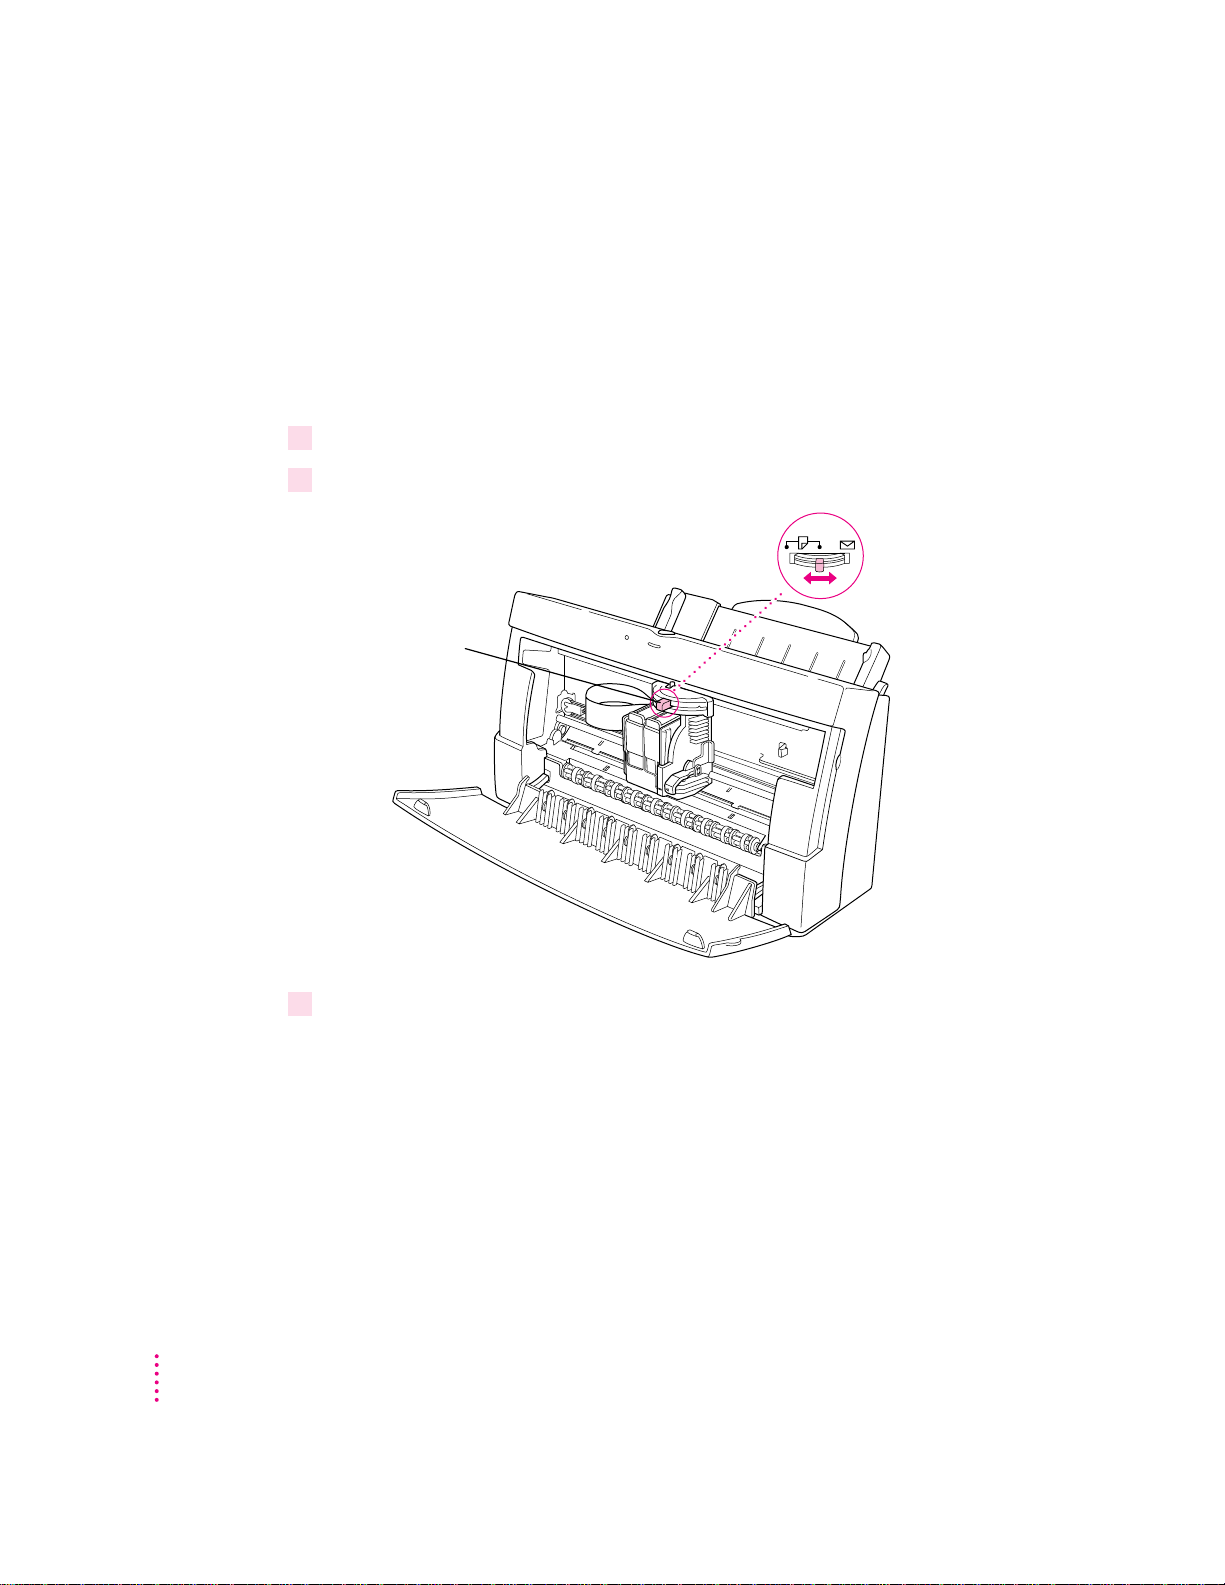
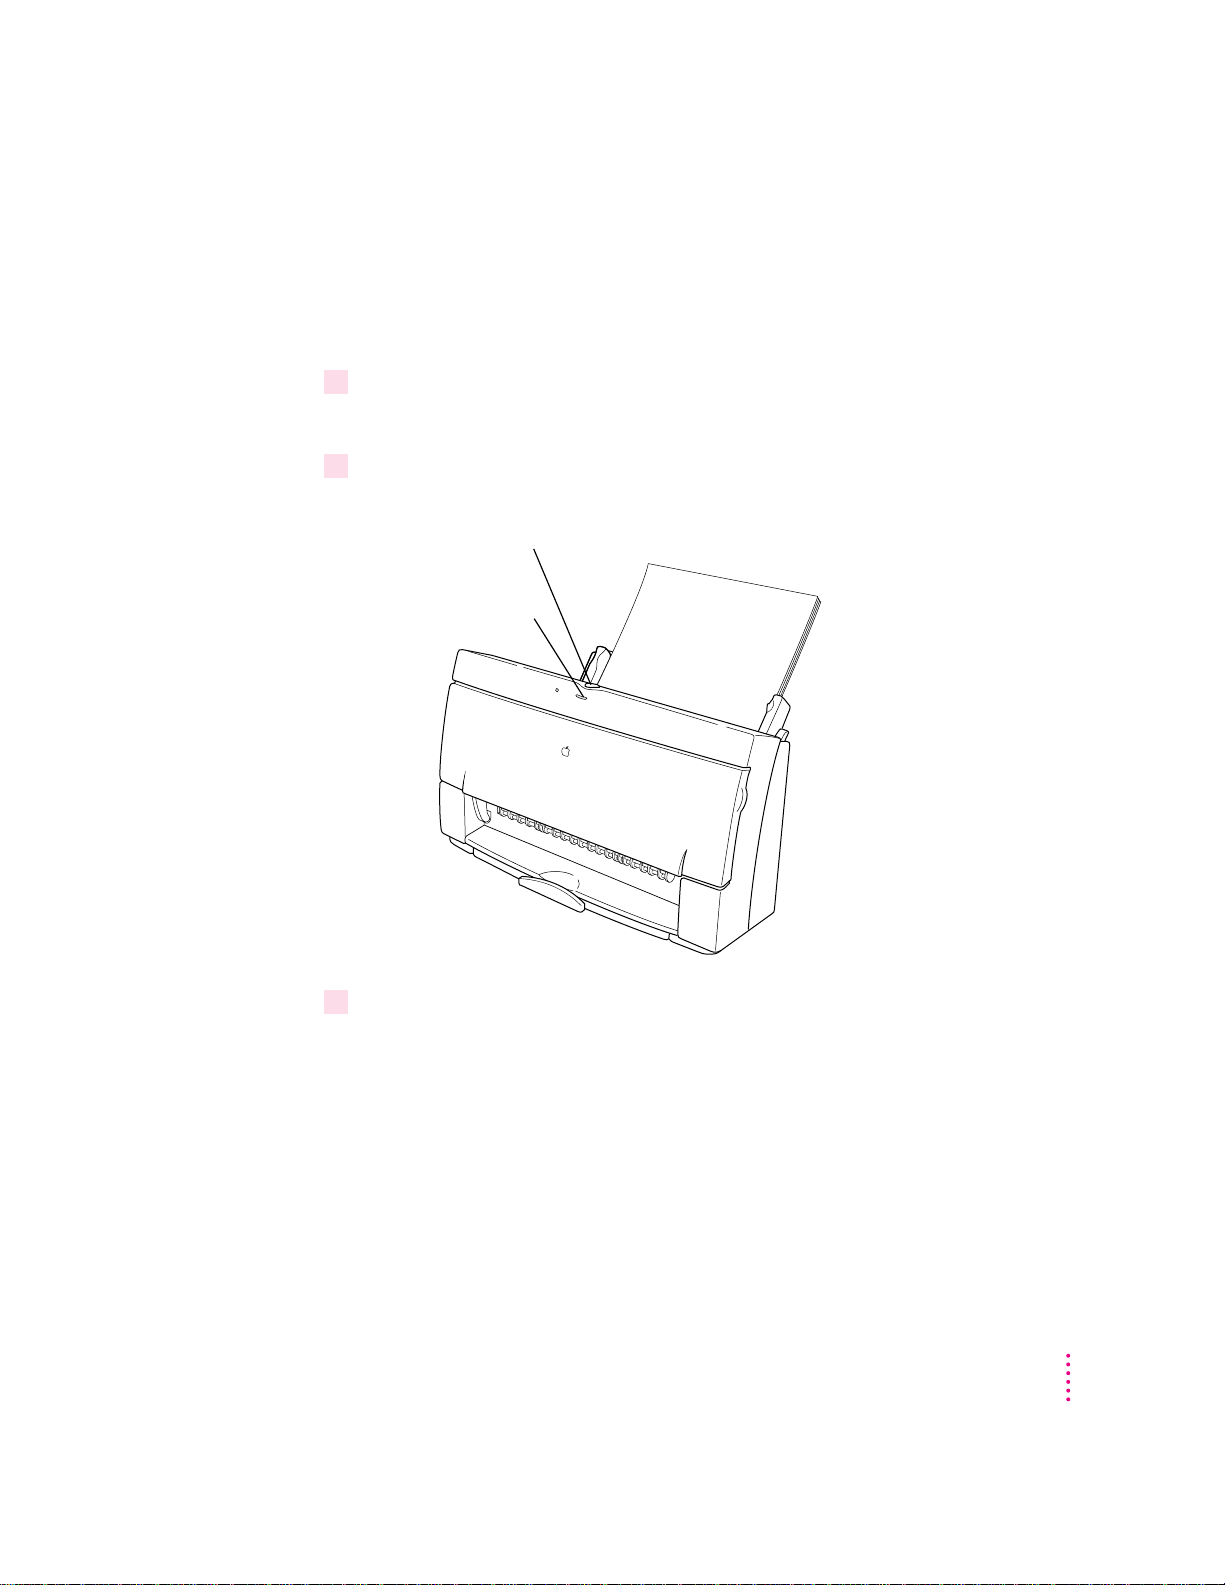
Loading paper into the sheet feeder
The sheet feeder holds up to 100 sheets of 20-pound paper and feeds the
paper automatically into the printer. You can load many sizes of paper and
other media into the sheet feeder as described in Chapter 2, but to do a nozzle
check, as described in the n ext section, you must use U.S. letter-size or A4
paper. To load paper into the sheet feeder, follow these steps:
1 Open the printer cover.
2Adjust the internal paper selector.
Put the selector in
the center position.
Internal paper selector
12
3Close the printer cover.
Chapter 1
Page 13
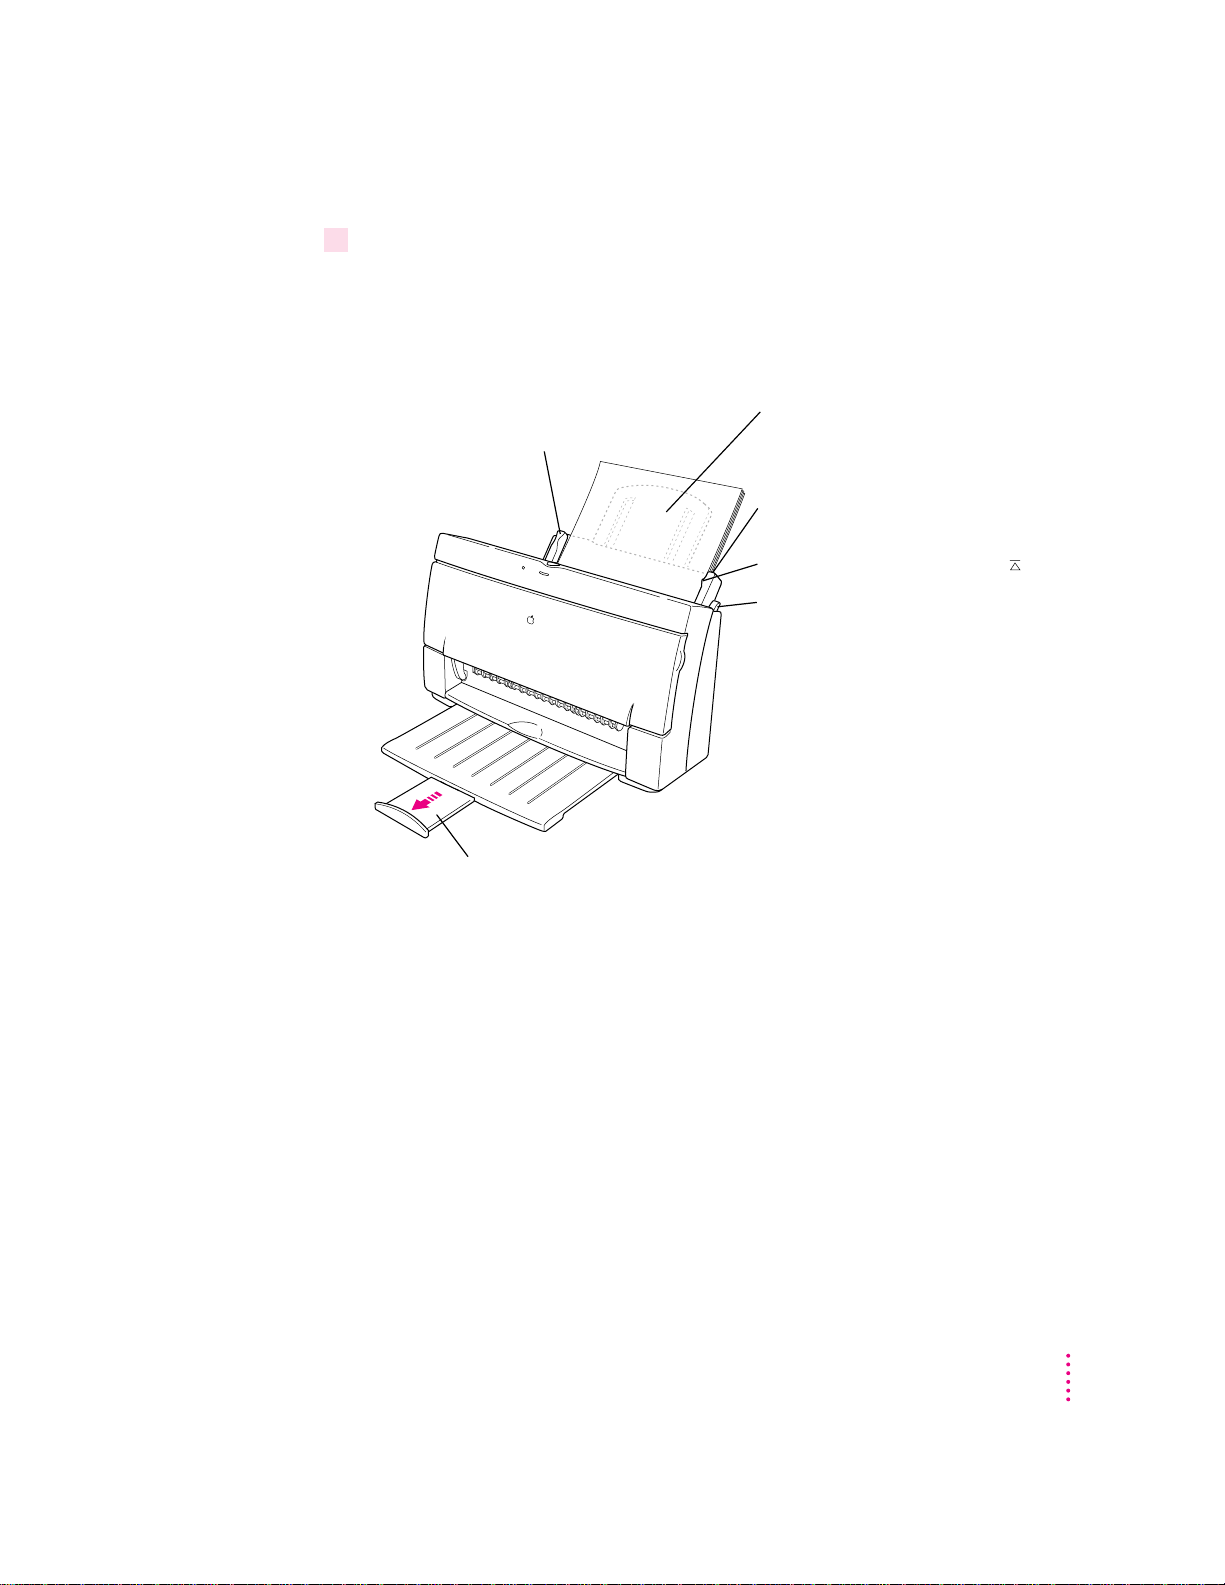
4 Load a stack of U.S. letter-size or A4 paper into the sheet feeder.
Instructions for loading paper correctly appear on the paper support.
Information on the back of the paper tray shows you where to set the guide
for different paper sizes.
Slide this guide so it just
touches the edge of the paper.
If the stack of paper bows out
even slightly, the guide is too tight.
Extend this paper support.
Make sure the paper extends
above the support (and doesn’t
slide down inside the printer).
Make sure the paper lines up evenly
at this side of the feeder.
Do not stack paper above this line ( ).
Make sure the external paper selector
is next to the « icon.
To open the output tray, pull here. Be sure to pull it out all the way.
If you’re printing on legal-size paper, don’t open the tray.
Setting Up Your Printer
13
Page 14

Installing yo ur printer software
Before you can print your documents, you need to install the printer software
on your Macintosh. The disks that come with the Color StyleWriter 2500
contain the printer software and an Installer program.
The Installer program installs the new printing software you need, plus any
fonts that come with the printer (see Appendix C for a list of available fonts).
If you use Apple’s special QuickDraw GX software, it will also install new
QuickDraw GX software for the Color StyleWriter 2500.
Note: If you ever upgrade your system software (for example, from System 7.1
to System 7.5), you must reinstall the Color StyleWriter 2500 software.
Step-by-step installation instructions
These instr uctions tell you how to restart your computer with the extensions
turned off (which prevents incompatible software from interfering with the
installation) and how to use the Installer program.
Before you begin
Lock all the disks by turni ng each one over and sliding the
small, square plastic tab in the corner so you can see through the hole. (The
disks may already be locked.)
1 Quit any programs you are running.
2While holding down the Shift key on the keyboard, choose Restart from the Special
menu. Don’t release the Shift key until you see the “Extensions off” message on your
screen.
3After you see the Macintosh desktop, insert
disk drive.
4To start the Installer program, double-click its icon.
Color StyleWriter 2500 Disk 1
into a floppy
You may have to open the disk icon to see the Installer icon.
14
Chapter 1
Page 15
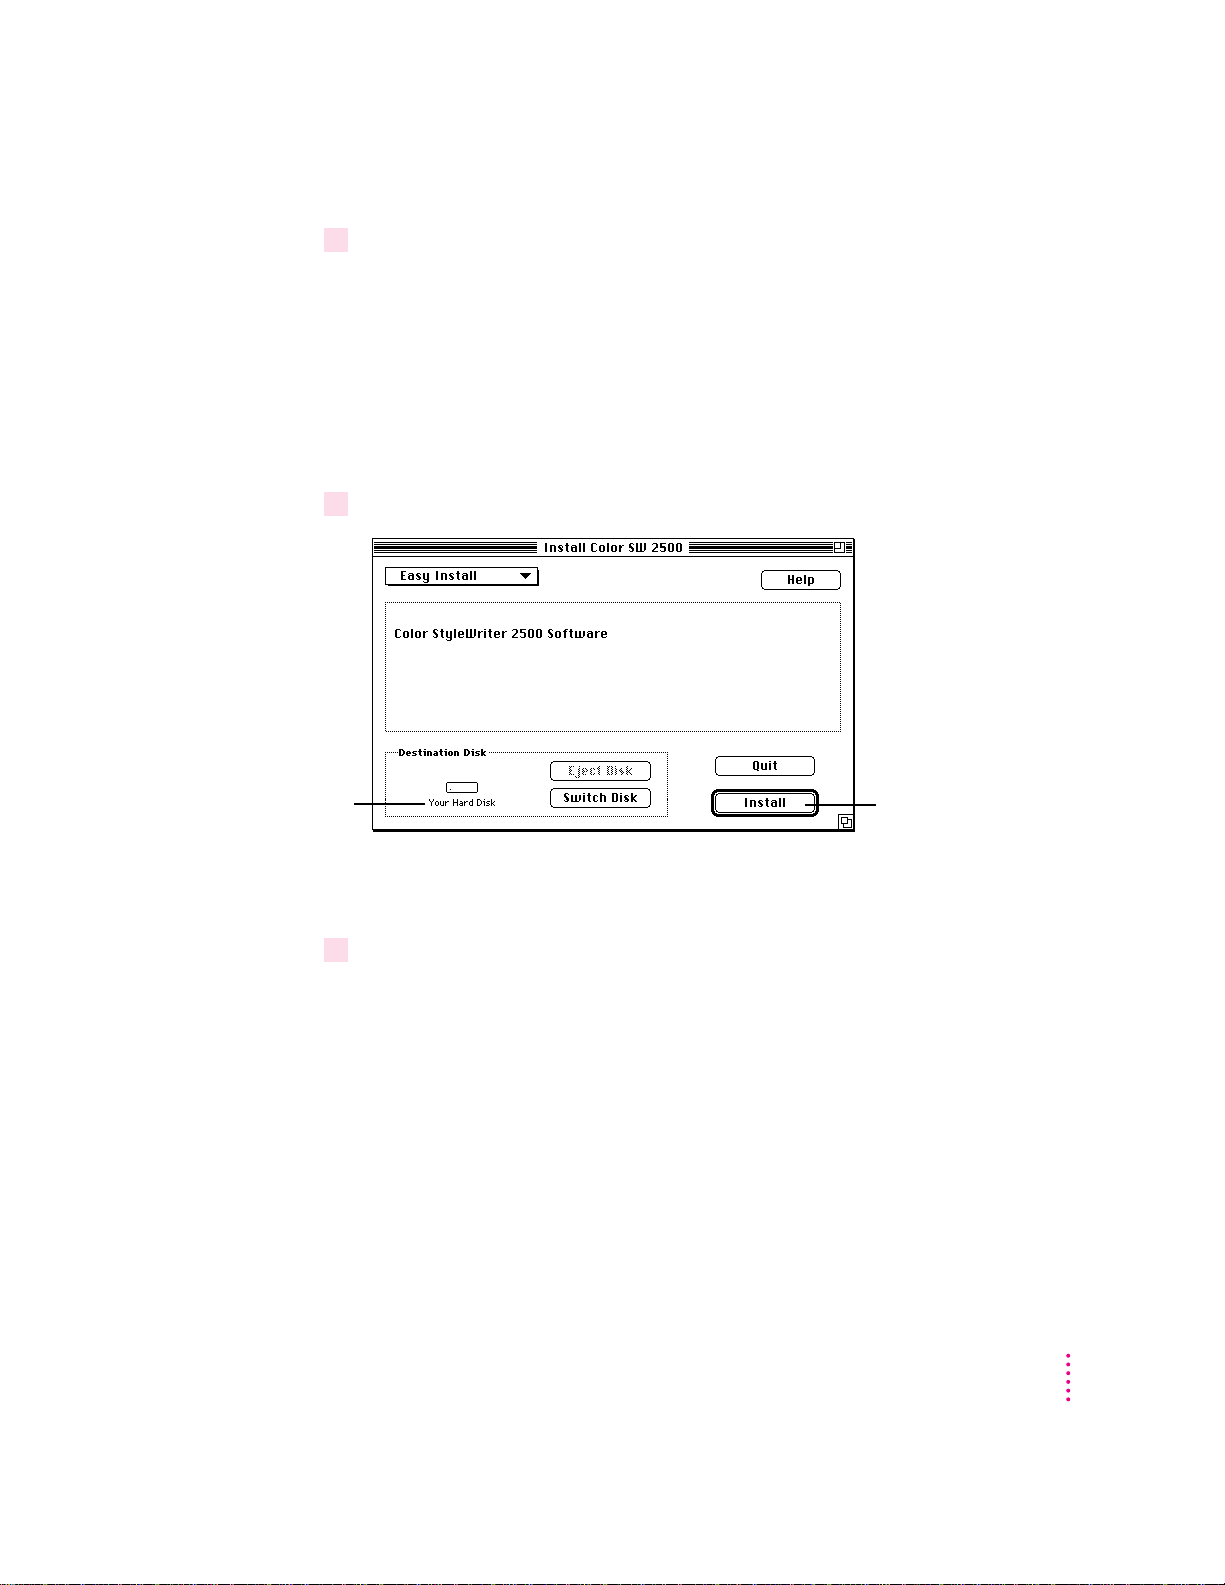
5 In the Welcome dialog box that appears, click Continue.
6 In the Installer dialog box, click Install.
Make sure the disk
named here is the
one on which you
want to install the
printer software.
(If not, click Switch
Disk until the correct
name appears.)
IMPORTANT
The Installer determines whether you have the correct system
software, and enough memory and hard disk space to use this printer. If you
don’t, the Installer displays a message telling you what you need. You won’t be
able to install the printer software until you correct the system software or
memory problem. If the message reports a problem, you can purchase new
system software or memory from an Apple-authorized dealer, or make space
available on your hard disk by throwing away files you don’t need.
When you’re ready to
begin, click Install.
After a few moments, the Installer begins to install the printer software. A
status box keeps you informed of progress during installation.
7When you see a message on your screen, follow the directions and insert the next disk.
The Installer ejects disks and asks you to insert others. Keep following the
instructions on the screen until the installation is complete.
Setting Up Your Printer
15
Page 16
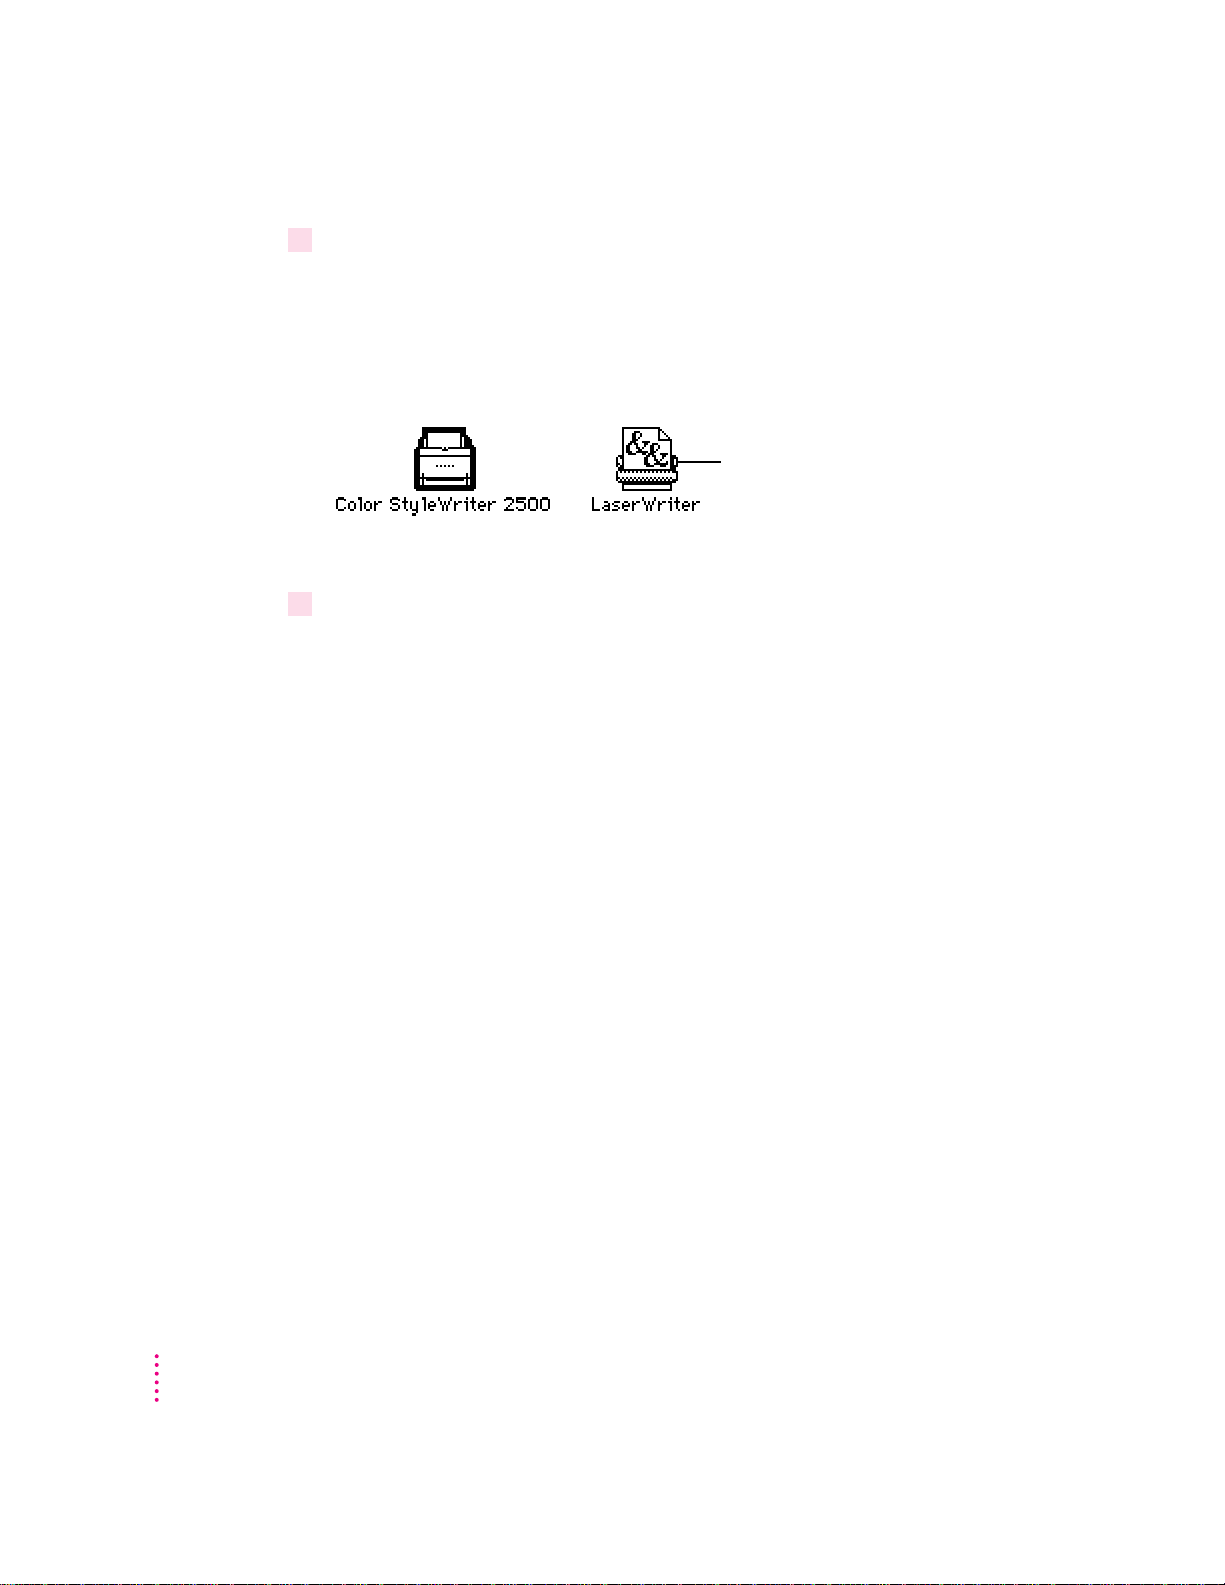
8When you see a message reporting that installation was successful, click Restart.
The Installer restarts your computer. After you restart, you may notice on
your desktop, a new icon that represents a printer. It’s called a desktop printer,
and it looks like this. For information about desktop printers, see “Desktop
Printing” in the sections “Printing a Document ” and “Monitoring and
Controlling Background Printing” in Chapter 2.
Examples of desktop printer icons
(a bold outline indicates the
selected printer)
If this is your first printer, you won’t see a desktop printer icon yet.
9After the computer restarts, you must select the printer in the Chooser, as described in
the next major section, “Telling Your Computer to Use the Color StyleWriter 2500.”
Installation trouble sh o oting
If the Installer can’t complete the installation, it will issue a warning message.
Here are some ways to fix common problems:
m You may not have the correct hardware or system software for this printer.
If so, the Installer will tell you what you’re missing.
16
m You may have forgotten to turn off your software extensions as described in
the previous section.
m You may have some corr upted fonts on your hard disk. To solve this
problem, see “Installation Is Unsuccessful” in Chapter 5.
More information about the Installer program
In the procedure just described the Installer copies all the software you need
to your hard disk. In rare circumstances you may want to copy only a subset
of the software. I n that case choose Custom Install from the pop-up menu in
the Installer. When a list of choices appears, select the items you wish to
install, then click the Install button. (Click the letter i to the right of any of
the choices for information.)
Chapter 1
Page 17
Telling your computer to u se the Color Styl eWriter 2500
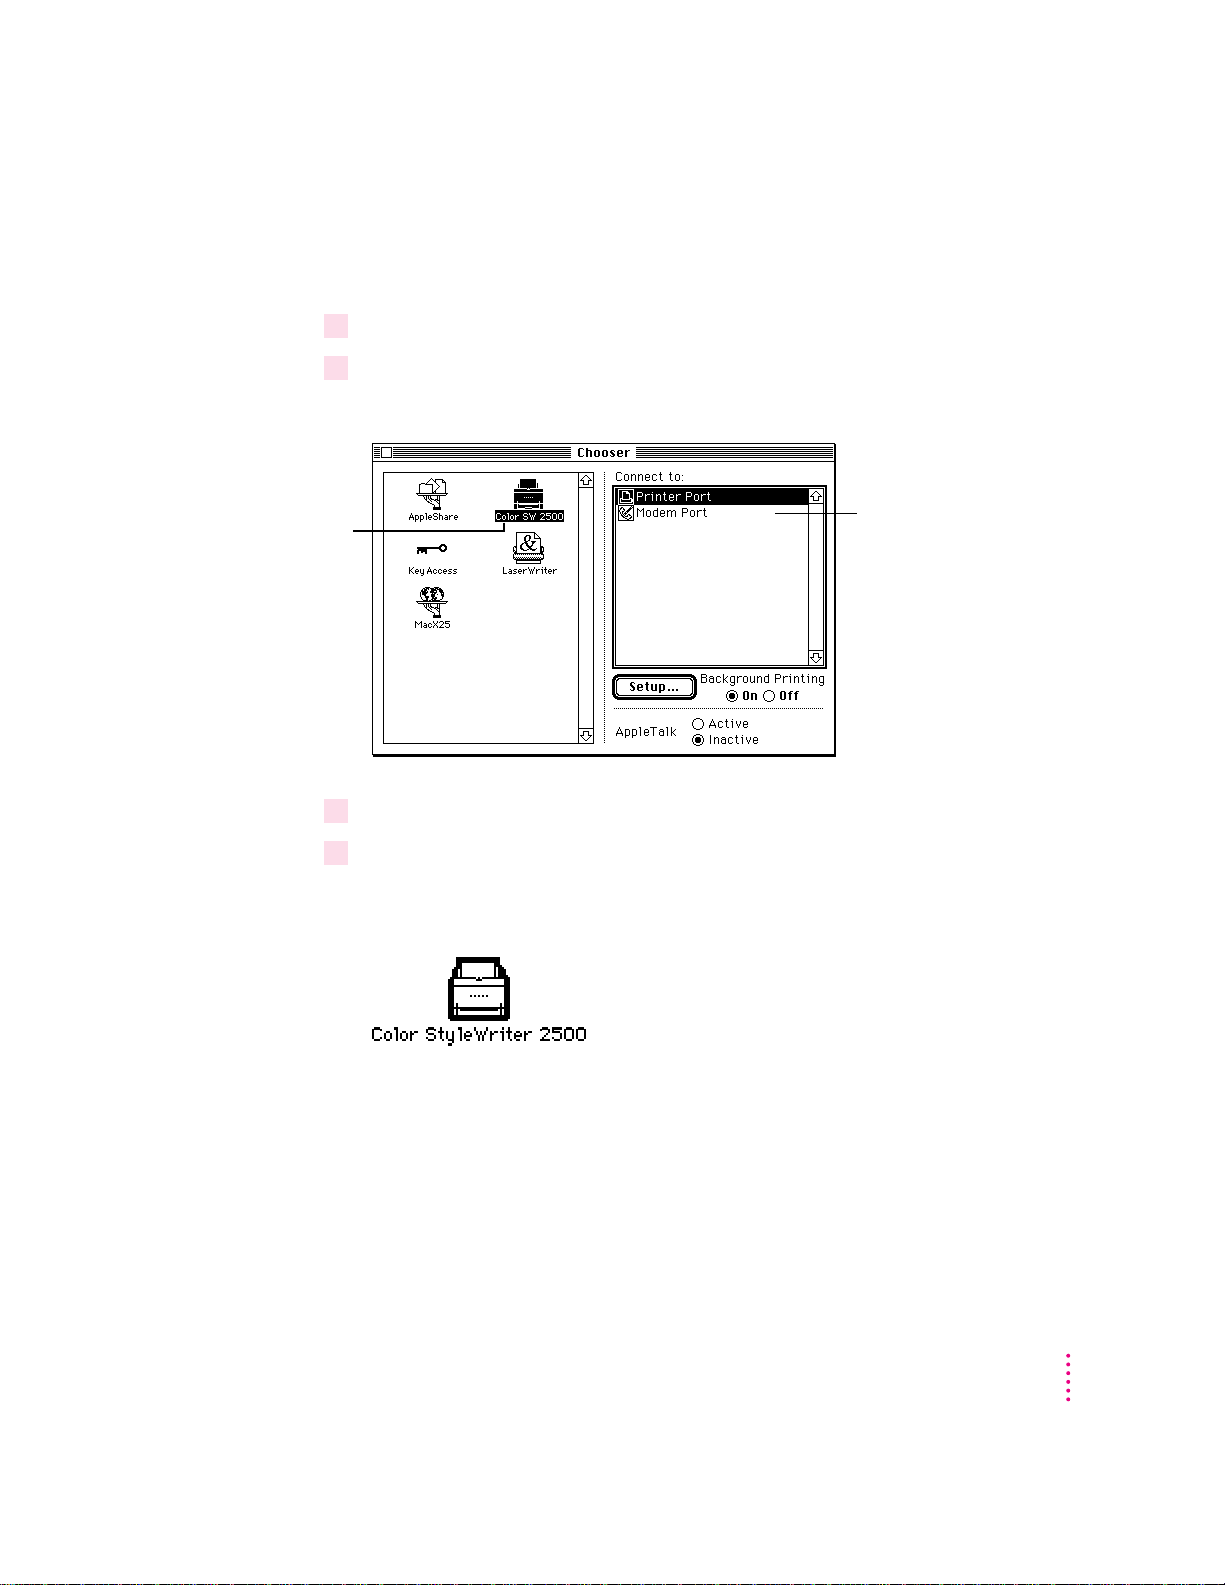
Before using your printer, you must select it in the Chooser.
1Select Chooser from the Apple (K) menu.
2 In the Chooser dialog box, click the appropriate items to select them.
On most Macintosh computers, the Chooser looks like this:
First, click this icon.
(If you don’t see the
icon, use the scroll
bar and arrows
to find it.)
If your computer is
connected to a
network, the Chooser
may look different,
but you can still follow
these steps.
3Close the Chooser by clicking the close box in its upper-left corner.
4Notice the new desktop printer icon for the Color StyleWriter 2500.
Then click one of these
items to indicate which port
you connected the printer to:
W
) or the
[
).
the printer port (
modem port (
If no port is available
and your computer is a
PowerBook, see “Special
Information for PowerBook
Owners,” later in this chapter.
After you close the Chooser, a desktop printer icon for the Color StyleWriter
2500 appears on the desktop.
This icon cannot be moved off the desktop (unless you throw it away);
however, you can place it anywhere on the desktop that you like.
Setting Up Your Printer
17
Page 18

Special information for Po werBook owners
PowerBook computers that have inter nal modems may require special setups.
What you do depends on whether the Powerbook has one or two serial ports
on its back panel.
PowerBook computers with one serial port
Some PowerBook computers have a single serial port identified by a
combination pri nter/modem icon ([/W). If an internal modem is installed on
one of these PowerBook computers, the serial port may be in use even though
it looks available. Wh en you plug in the Color StyleWriter 2500, the
PowerBook may not be able to communicate with the printer.
To make the port available for printing, make sure the serial port setting is
Normal or External. To check the setting, open the PowerBook, PowerBook
Setup, or Express Modem control panel. (If you have another kind of internal
modem, you may have a different control panel. The control panel and the
setting you use depend on which PowerBook you have and which internal
modem you have.) If you have a PowerBook Express Modem, it is best to
leave the serial port setting as Normal or External unless the modem
programs you use require another setting for compatibility reasons.
PowerBook computers with two serial ports
18
Even when a PowerBook has two serial ports, if it also has an internal
modem, the modem port (W) may look available but actually be in use. If the
printer port ([) is available, connect the Color StyleWriter 2500 to it. If the
printer port is unavailable and you must use the modem port, make sure the
modem serial port setting is Normal or External. To check the setting, open
the PowerBook, PowerBook Setup, or Express Modem control panel. (If you
have another kind of internal modem, you may have a different control panel.
The control panel and the setting you use depend on which modem and
system software version you have.) If you have a PowerBook Express Modem,
it is best to leave the serial port setting as Normal or External.
For more information, see the instructions that came with your PowerBook.
Chapter 1
Page 19

Printing a do cum e nt to make s u re everything’s working
The best way to see if your printer is set up correctly is to try printing
some t hing. The following ste ps describe how to print the Color SW 2500Troubleshooting file that was installed on your hard disk, but you can print
any document you want.
1 Find the Color SW 2500-Troubleshooting file.
2 Open the file by double-clicking its icon.
3Choose the Page Setup command from the File menu.
4 Indicate what paper size you’re using.
First, use this pop-
up menu to indicate
the size of the paper
loaded in the printer.
Before you begin
Return to the Finder by quitting any programs you’re running.
Unless you moved it, you can find the file by double-clicking your hard disk
icon.
A dialog box opens.
Then, click OK.
You don’t need to choose the Page Setup command every time you print—you
only need to use it when you wa nt to change the normal settings. Look at the
dialog box on your screen to note what the normal settings are. For
information about the options in this dialog box, see “Printing a Document”
and “Creating Special Effects on the Color StyleWriter 2500” in Chapter 2.
Setting Up Your Printer
19
Page 20
5Choose the Print command from the File menu.
6 In the dialog box that appears, click the Print button.
Click here.
After a few moments, the printer begins printing the page or pages. If there’s a
problem, see Chapter 5 for suggestions. (The most common problem is failing
to follow the instructions in “Telling Your Computer to Use the Color
StyleWriter 2500,” earlier in this chapter.)
For information about all the choices you can make in the Print dialog box,
see “Printing a Document” and “Creating Special Effects on the Color
StyleWriter 2500” in Chapter 2.
7Choose Quit from the File menu to leave the Color SW 2500-Troubleshooting file.
20
Chapter 1
Page 21
Checking the print nozzles
The Color StyleWriter 2500 prints by spraying ink onto the paper through
tiny nozzles. Sometimes these small nozzles get clogged after sitting unused
for a long time. To make sure all the nozzles are working, follow these steps:
1If necessary, turn off the printer.
The green power light should be off.
2Press and hold down the power button for about 5 seconds, until the yellow error light
goes out.
Press the power button.
When the yellow error
light goes out, release
the button.
3 Release the button and wait for the test page to print.
Setting Up Your Printer
21
Page 22
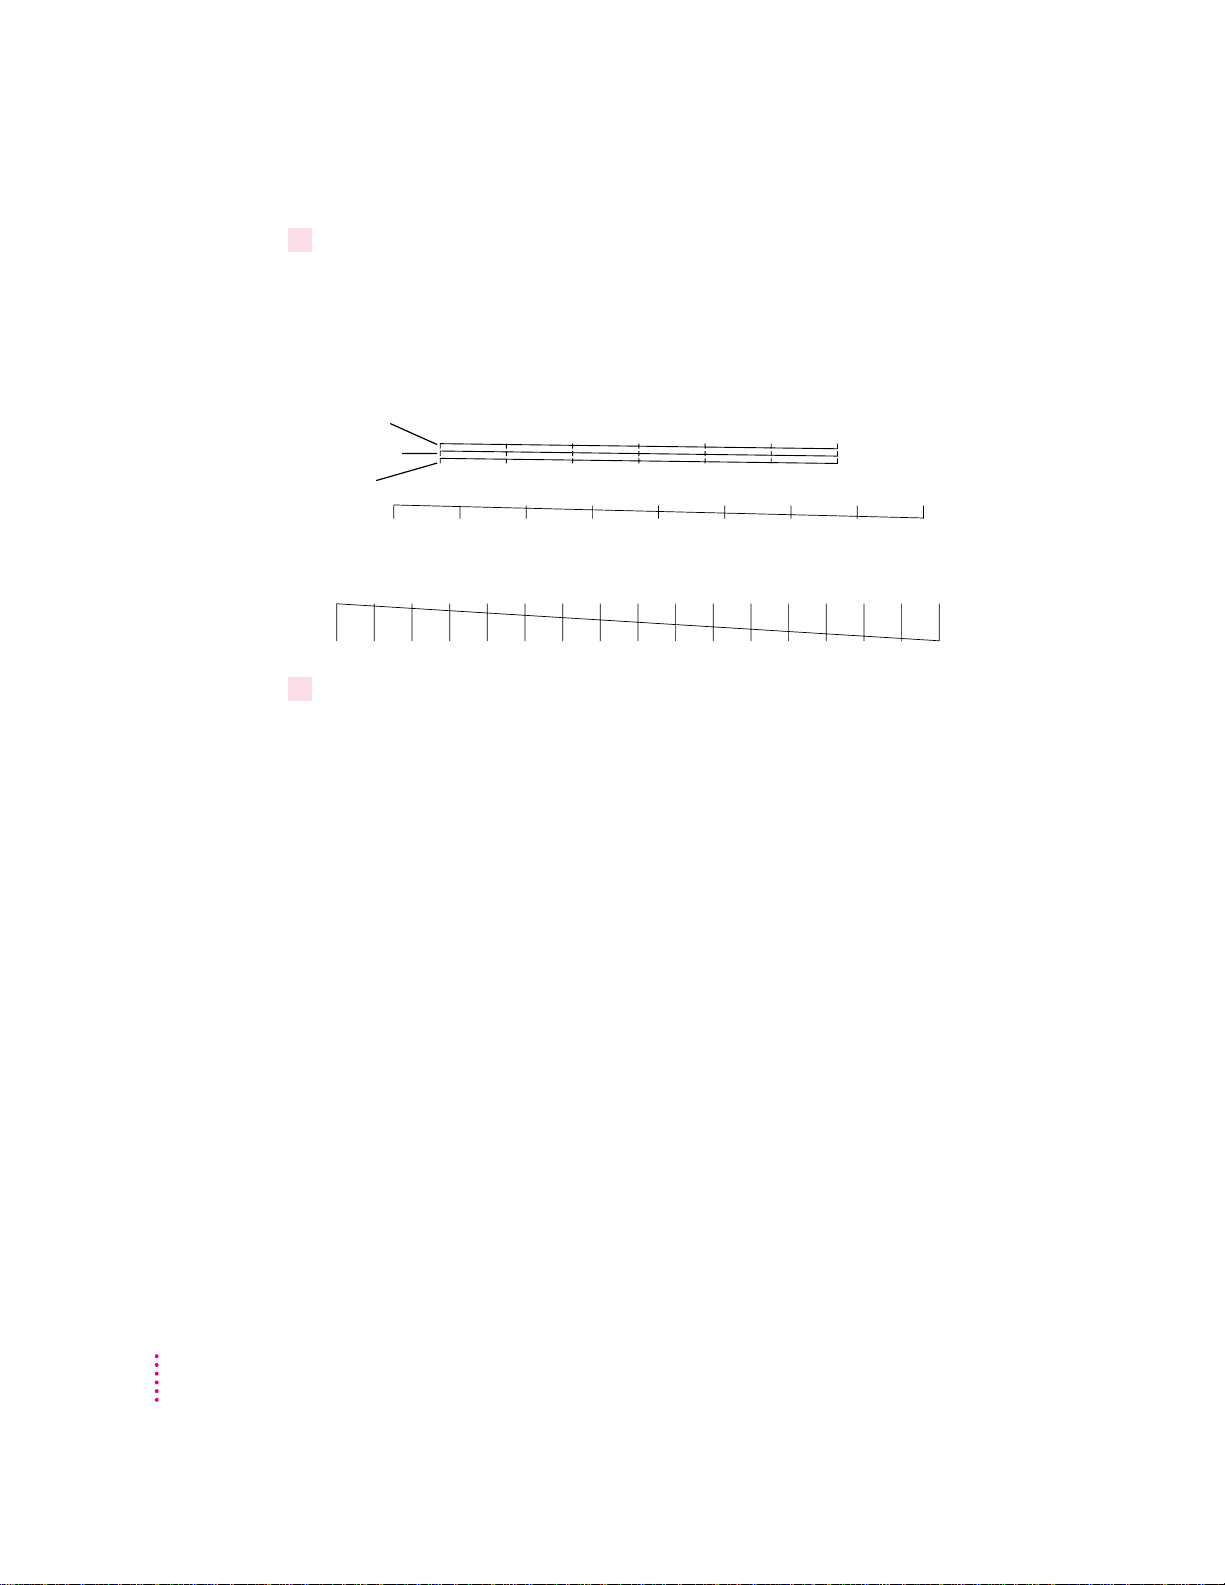
4Examine the nozzle test pattern for broken or missing horizontal lines.
The nozzle test pattern appears near the bottom of the test page. The test
pattern for the four-color ink cartridge looks like this:
What’s next?
A broken line means a nozzle on
the print head needs to be cleaned.
Yellow
Magenta
Cyan
Black
A missing color means you need to
replace an ink tank (or the black-only cartridge).
The test pattern for the optional black-only ink cartridge looks like this:
5If you see a broken line, one or more nozzles may be clogged. See the section “Cleaning
the Print Head” in Chapter 5.
Yo u’re now ready to start using your printer.
m If you want to share the printer with others on your network, see “Sharing
Your Printer With Other Users” and “Printing on a Shared Color
StyleWriter 2500” in Chapter 2. If you purchased the LocalTalk option for
this printer, see “Connecting a Color StyleWriter 2500 to a LocalTalk or
EtherTalk Network” in Chapter 2.
22
m If you have installed QuickDraw GX and turned it on, see Appendix E.
Chapter 1
Page 23

2
Printing
This chapter explains how to use the Color StyleWriter 2500 for everyday
tasks. Before you follow the instructions in this chapter, make sure the printer
is set up and working, as described in Chapter 1.
Note: If you use QuickDraw GX, not all of the instructions in this chapter
will apply to your software. See Appendix E for more information.
Planning documents with the Color S tyleWriter 2500 in mind
Many pri nter options affect how much can fit on a page. Before you spend a
lot of time laying out a document, set it up as you plan to print it:
1Select the printer you plan to use.
See “Switching Between Printers,” later in this chapter.
2With the document active on your computer screen, choose Page Setup from the File
menu and select the options you like.
The key areas that affect page layout are paper size, orientation, and scaling
percentage. When you’ve finished setting your options, click the OK button to
return to your document. You can now format it as you like. Since you’ve
already set your printing options, the document will print as you see it on
your screen.
23
Page 24

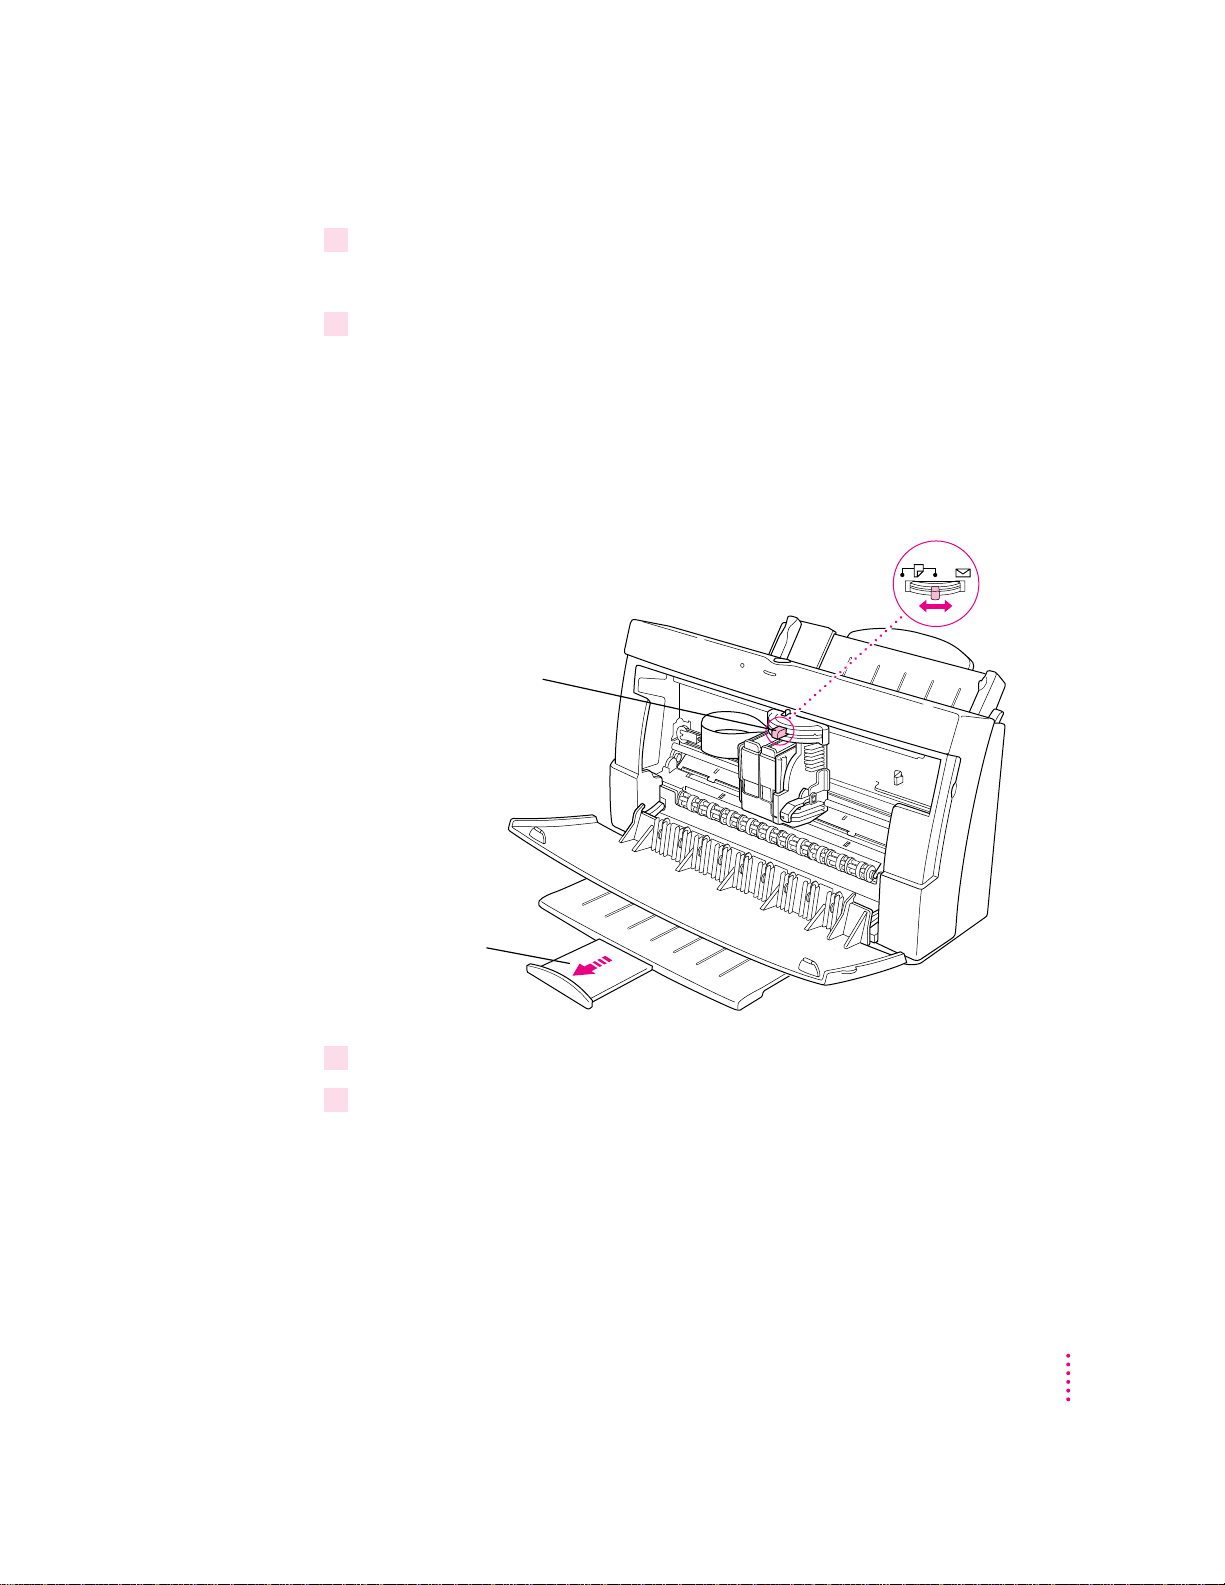
Loading the sheet feede r
The sheet feeder holds paper, envelopes, or other materials and feeds them
automatically into the printer. To load the sheet feeder, follow these steps:
1 Remove any paper or other materials that you don’t want to use.
2Adjust the external paper selector, as shown in the next step.
It’s important to adjust the selector before loading the new material into the
sheet feeder.
3Load the paper or other materials.
IMPORTANT
Insert letterhead paper face up
with the top of the page pointing
downward.
Slide this guide so
it just touches the
edge of the paper.
If the stack of paper bows
out even slightly,
the guide is too tight.
Don’t mix envelopes with paper in the feeder.
Extend this paper support.
Make sure the paper extends
above the support (and doesn’t
slide down inside the printer).
Insert envelopes this way.
(Make sure the flap is
smoothed flat.)
Insert three-hole punched paper so
that the holes line up along this side.
Make sure the paper lines up
evenly at this side of the feeder.
Don’t stack paper above this line ( ).
Before inserting the material,
move the paper selector lever
to the envelope icon (
envelopes and to the paper
icon (
«
) for everything else.
E
) for
24
Chapter 2
Page 25
4 Open the printer’s front cover.
Wait while the carrier moves to the center position.
5Adjust the internal paper selector and extend the output tray.
The lever has three positions (two for paper, one for envelopes). In the paper
(«) positions, the lever lowers the ink cartridge, bringing it closer for thin
materials; in the envelope (E) position, the lever raises the cartridge to leave
room for thick materials. The far-left position is best for black-and-white text
on 20-pound paper; the center position is best for color printing, for heavy
black ink coverage, or for heavier paper.
Internal paper selector
For paper, start with the
selector in the center
position. For envelopes,
move the selector
to the right.
To open the output
tray, pull here. (For
legal-size paper, leave
the tray closed.)
6Close the printer cover.
7 Before you print, make sure that you set the software options to indicate the size and
kind of material you’re using.
m In the Page Setup dialog box, indicate the size of the page.
m In the Print dialog box, indicate the paper type.
Printing
25
Page 26

Here are details about the kinds of materials you can use in your
Color StyleWriter 2500 printer.
Print material Maximum Special instructions
m
Plain paper 100 sheets
Premium coated paper 50 sheets
Premium Plus 50 sheets
Coated Paper
Glossy paper 20 sheets
Transparencies 20
Use 16- to 24-pound paper.
m
Use only paper designed for this printer.
m
The whiter side should face you.
m
Use only paper designed for this printer.
m
The whiter side should face you.
m
Use only paper designed for this printer.
m
To prevent misfeeds, put one sheet of plain paper at
the back of the stack.
m
The shinier side should face you.
m
Use only transparencies designed for this printer.
m
The shiny side should face you.
m
The edge where the paper and transparency are
joined should point downward.
Back-print film 20 sheets
Envelopes 15
Labels 20 sheets
m
Use only film designed for this printer.
m
To prevent misfeeds, put one sheet of plain paper
at the back of the stack.
m
The chalky side should face you.
m
Make sure the envelope flap is folded down flat.
m
To prevent misfeeds, put one sheet of plain paper
at the back of the stack.
m
The labels should face you.
m
In the Print dialog box, specify Plain as the paper
type.
The Color StyleWriter 2500 supports only the following sizes of materials:
U.S. L etter, U.S. Legal, A4 Letter, Executive, #6 envelopes, and #10 envelopes.
Don’t attempt to use other size materials, or printing errors may result.
For more information about the kinds of materials you can use with the Color
StyleWriter 2500, see Chapter 3, “Tips on Paper, Quality, Speed, and Cost.”
26
Chapter 2
Page 27

Notes about envelopes
See the instructions that came with the programs you use to see if they offer
special, easy ways to format and print envelopes. If not, choose the envelope
size you’re using in the Page Setup dialog box and format the envelope text as
you like.
Printing a document
The next three sections explain the different ways you can print a document:
m
Quick instructions for printing standard documents.
To print documents that
don’t require any special options, see this section. (The section describes
what a “standard document” is.)
Detailed instructions for printing other documents.
m
To print documents that
require any of the nonstandard options, see this section.
m
Desktop printing.
To print documents without leaving the Finder, see this
section. Desktop printing allows you to quickly send multiple documents to
multiple printers.
Quick instructions for printing standard documents
Foll o w the instructions in this section to print a standard document:
m standard paper size (8.5" by 11" in the United States)
m plain paper
m portrait page orientation (so when you look at the printed page, it is longer
than it is wide)
m no special effects and normal print quality
Assuming you have already selected the printer in the Chooser as described
in Chapter 1, and that the pri nter is filled with standard paper, you need only
follow th ese steps:
1While the document is in an active window, choose the Print command from the
File menu.
The Print dialog box opens on your screen.
Printing
27
Page 28

2Click the Print button.
If the printer is off, it automatically turns itself on and, after a few moments,
the document star ts to print. If background printing is turned on, you can
continue working while the document is printing. You can also monitor and
control the documents that are waiting to print. (See “Printing While You Use
Your Computer” and “Monitoring and Controlling Background Printing,”
later i n this chapter.)
Detailed instructions for printing other documents
If your document is not standard (as defined in the previous section), follow
these steps:
1If you haven’t already selected the Color StyleWriter 2500 in the Chooser, do so now.
You already selected the Color StyleWriter 2500 in Chapter 1, and if it’s the
only printer you ever use, you won’t need to do it again. If you do need to
switch, see “Switching Between Printers,” later in this chapter.
2Load the paper, envelopes, or other materials into the printer, as described in “Loading
the Sheet Feeder,” earlier in this chapter.
Remember to adjust the external paper selector before filling the sheet feeder.
28
Chapter 2
Page 29
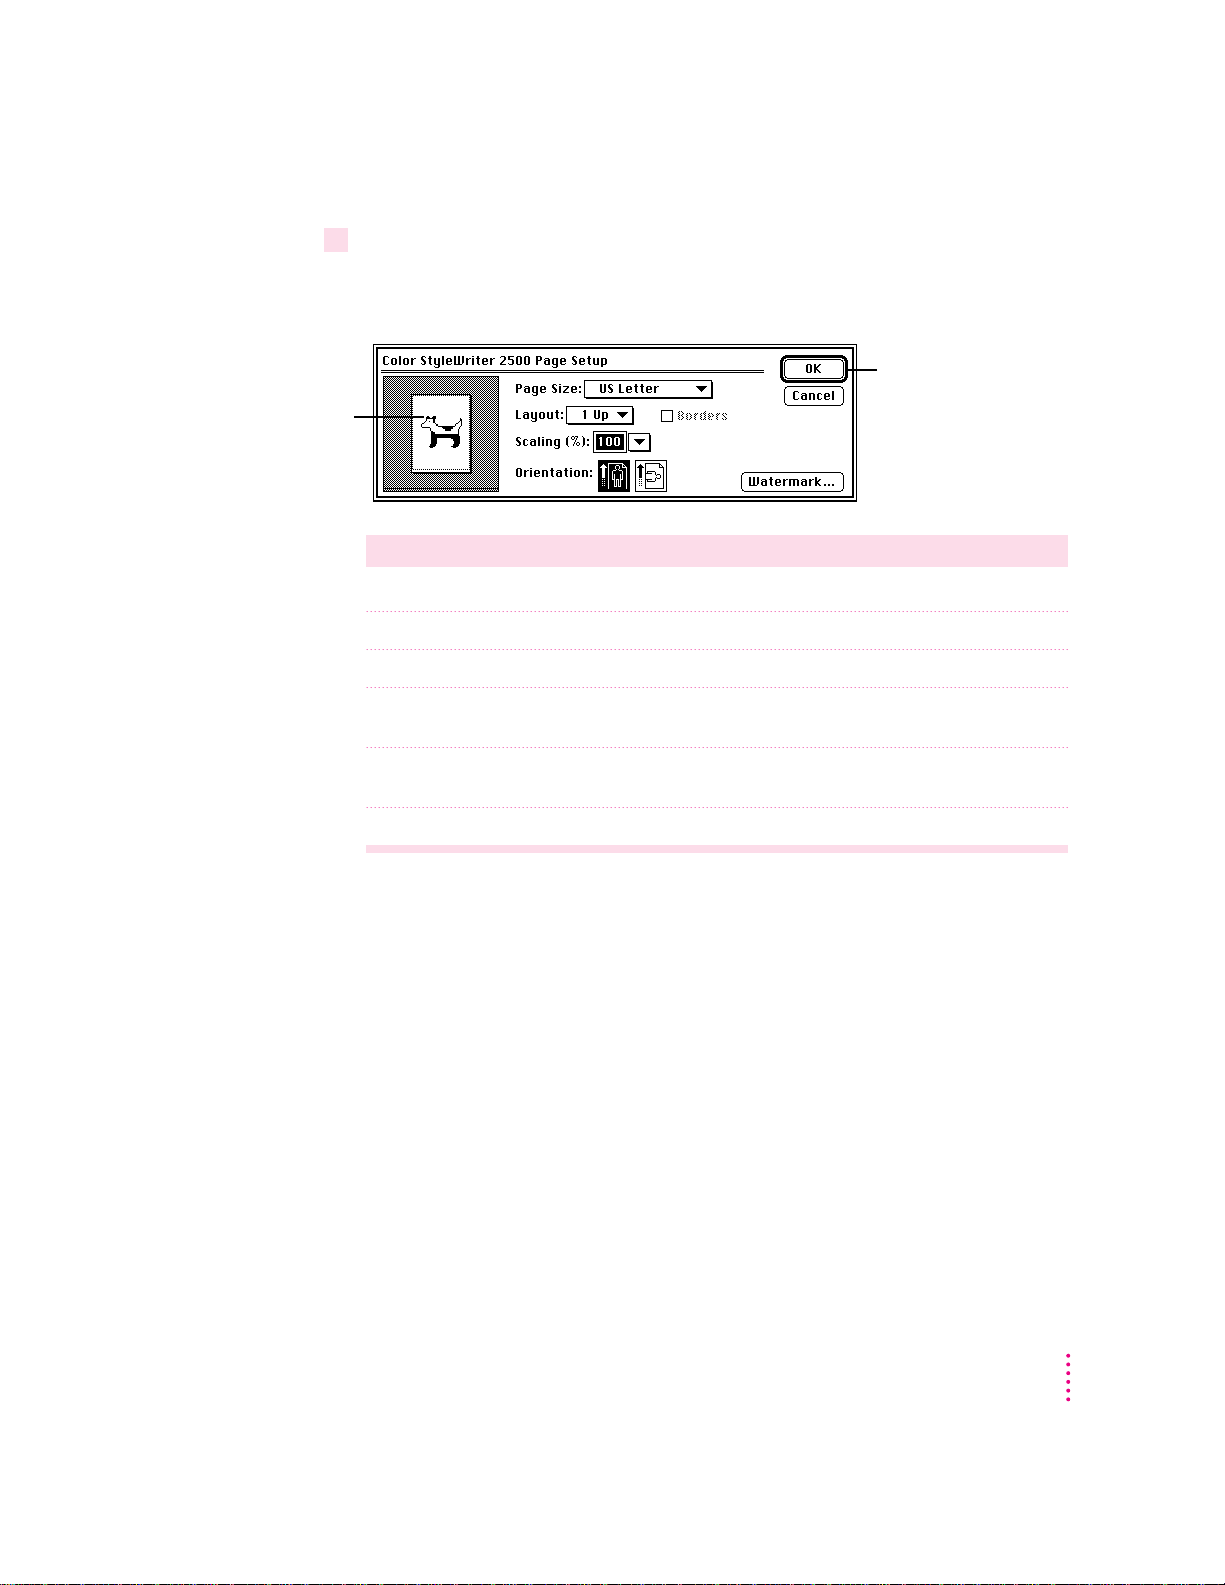
3While the document is active on your screen, choose Page Setup from the File menu and
Look here to see the
effects of the options
you choose.
make adjustments in the dialog box that opens.
If the default settings shown here are satisfactory, you can skip this step.
Set the options,
then click OK.
Item in dialog box What you use it for
Page Size Indicate the size of paper in the sheet feeder.
Layout Print 2 or 4 mini pages per sheet of paper.
Borders Put a border around the mini pages.
Scaling Enlarge or reduce the printed image. Type a number between 5 and
999 or choose a number from the pop-up menu.
Orientation Indicate whether the image on the page should be in portrait (normal)
or landscape (sideways) orientation.
Watermark Specify a background image to be printed on every page.
For more information about the layout, borders, scaling, and watermark
features, see “Creating Special Effects on the Color StyleWriter 2500,” later in
this cha p ter.
IMPORTANT
Make sure you correctly indicate the size of the paper, envelopes,
or other material you have in the sheet feeder. If you change the page size in
this dialog box, you might also want to look over your document to see if any
of the page breaks have changed.
Printing
29
Page 30
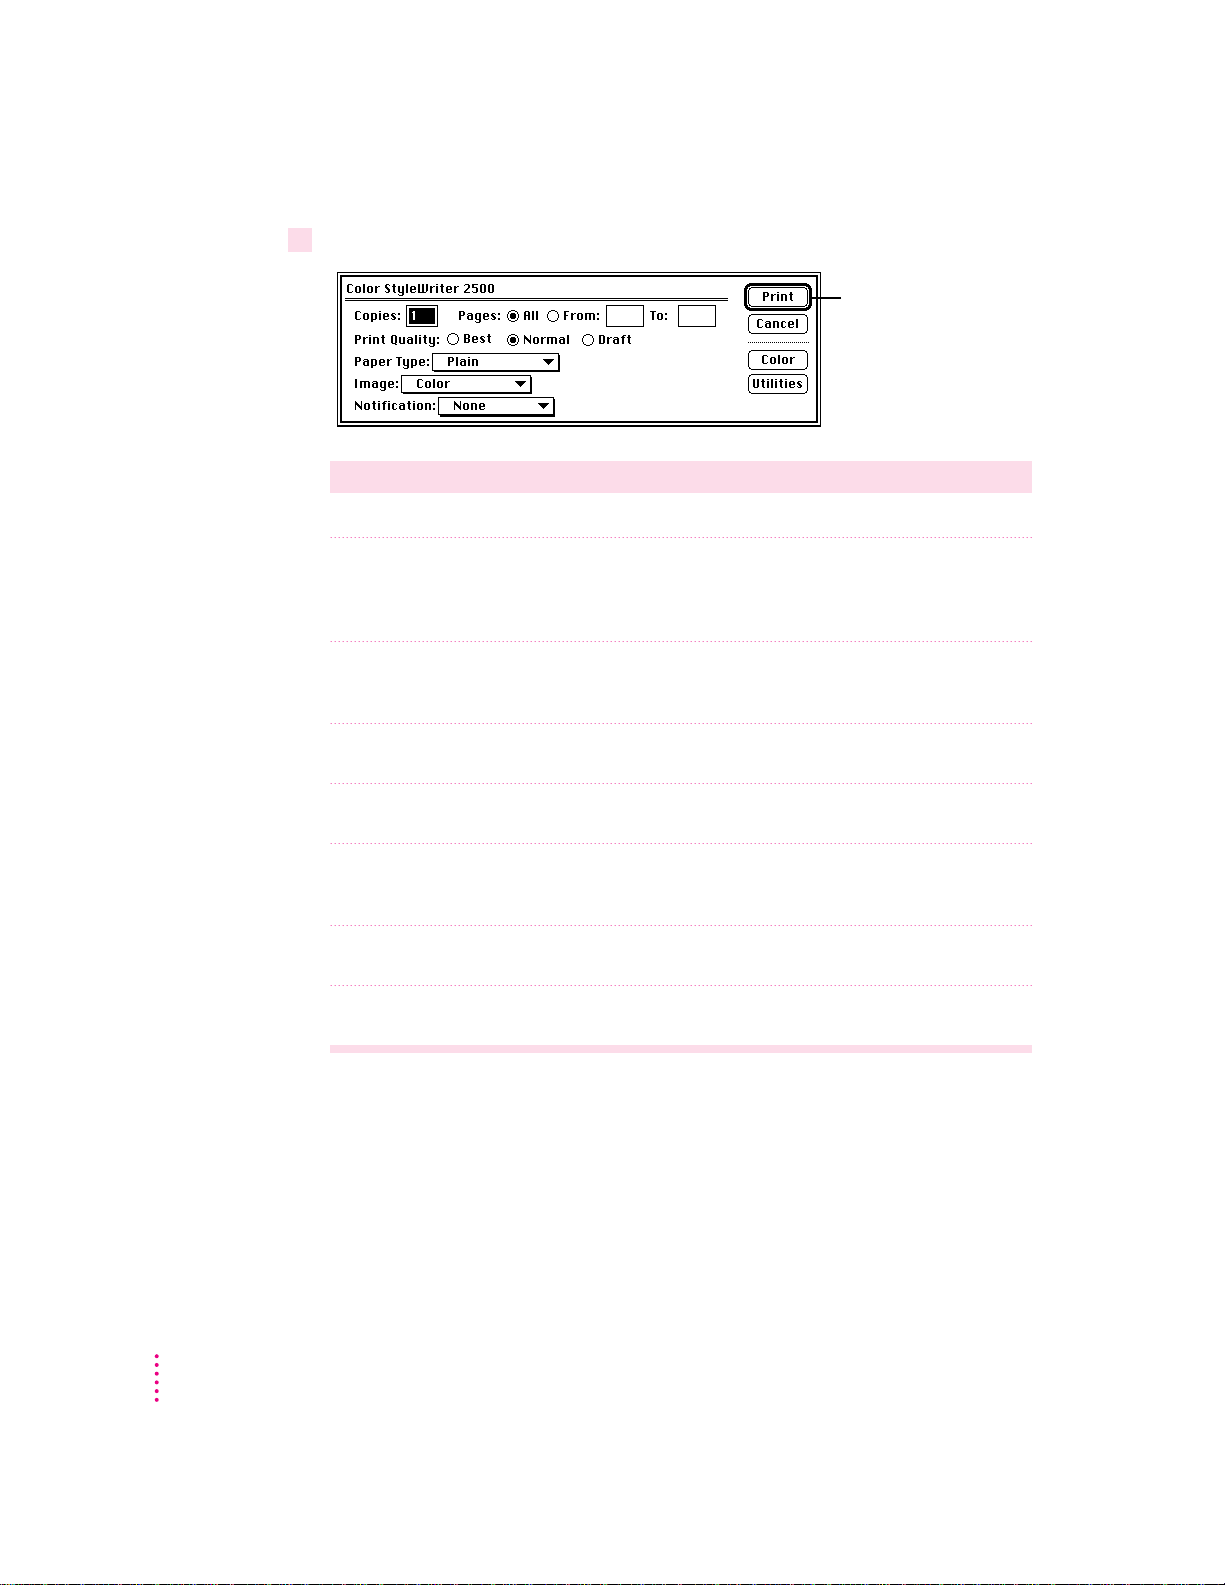
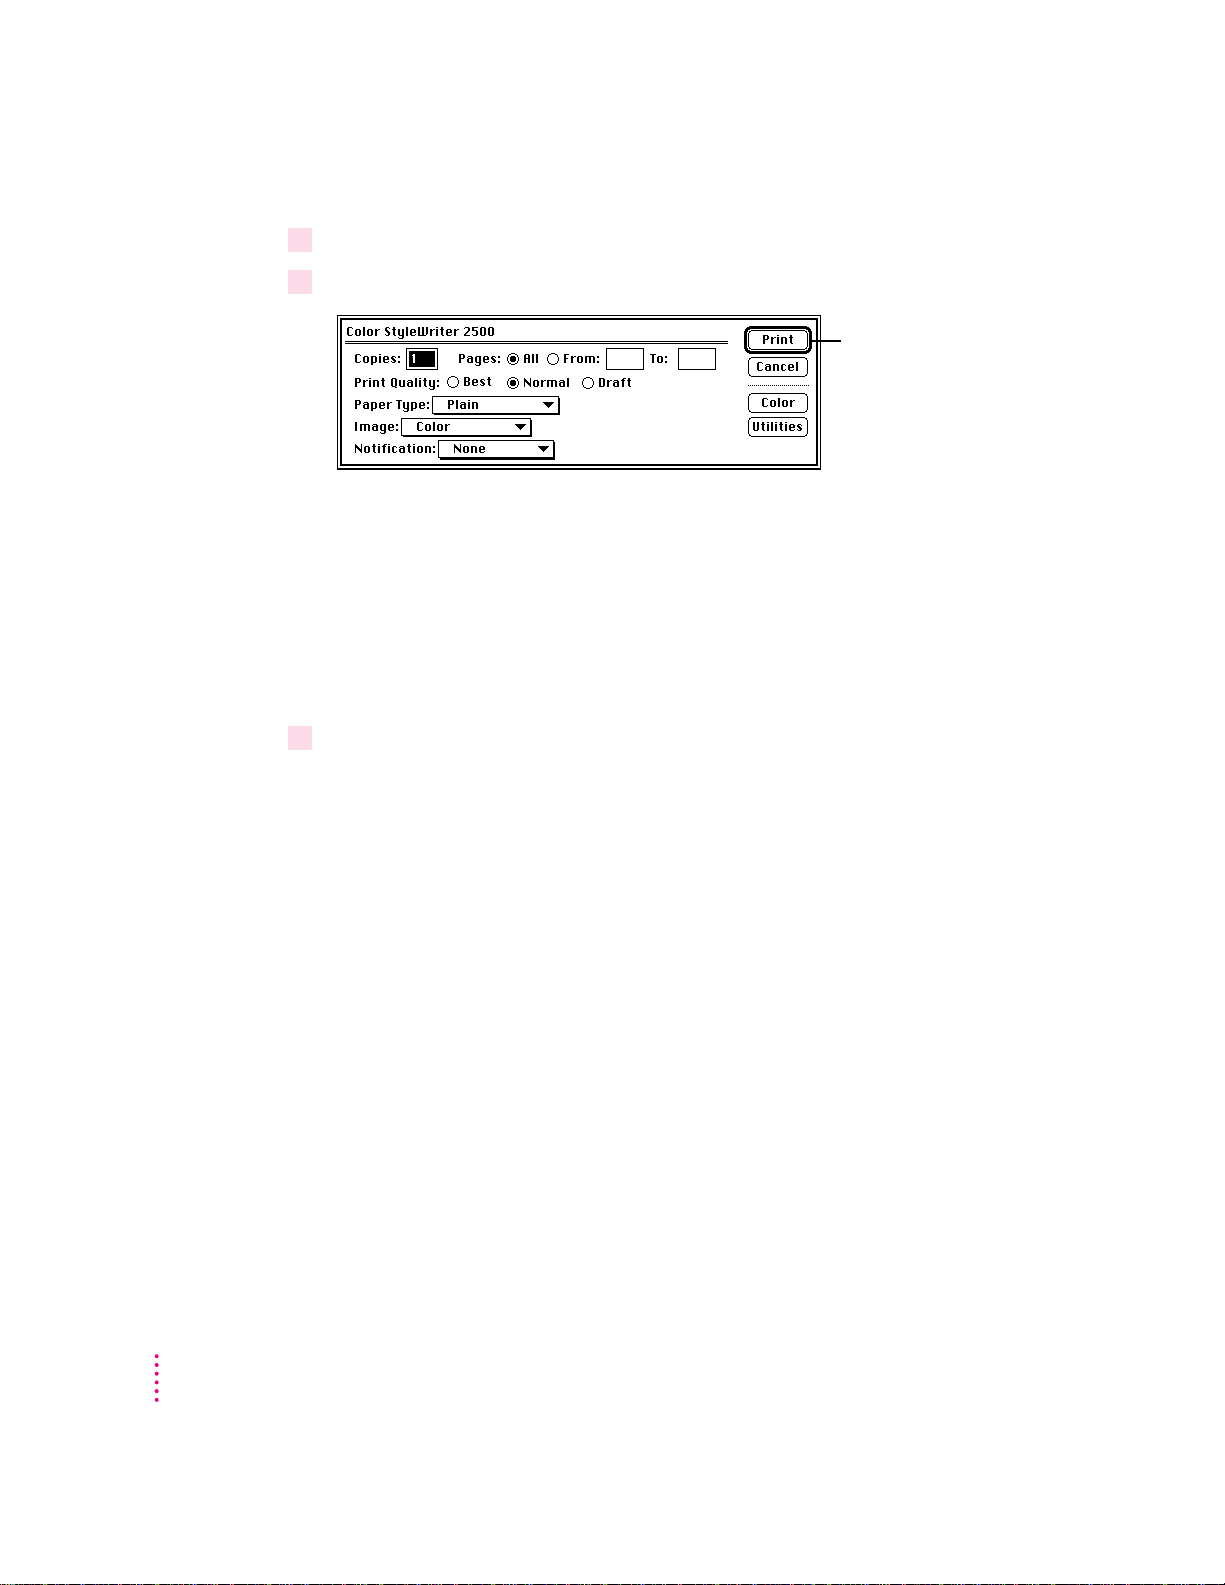
4Choose Print from the File menu and make adjustments in the dialog box that opens.
Set the options,
then click Print.
Item in dialog box What you use it for
Copies Type how many copies of the document you want.
Pages Indicate how many pages of the document to print. To print the whole
document, click All. To print a range of pages, type the beginning and end
page numbers. As a shortcut, you can indicate the first page by leaving the
“From” box blank or the last page by leaving the “To” box blank.
Print Quality Select which level of quality you want. Generally, the higher the quality, the
longer the document will take to print. The Draft option is available only
when you use Plain or Coated paper.
Paper Type Indicate what type of material is loaded in the sheet feeder. For labels
and envelopes, choose Plain.
Image Indicate whether you want the document to print: in color, grays, or
black and white.
30
Chapter 2
Notification Choose how (if at all) to be notified when the document is finished printing.
For a visual alert, choose Message from the pop-up menu. For an audio
alert, choose a sound.
Color Open another dialog box, in which you can adjust color options, as
explained in ”Adjusting Color Options,” later in this chapter.
Utilities Open another dialog box, in which you can set options to clean the
print head.
IMPORTANT
Make sure the Paper Type pop-up menu accurately indicates what
you installed in the sheet feeder.
Page 31

5Click the Print button.
If the printer is off, it automatically turns itself on and, after a few moments,
the document star ts to print. If background printing is turned on, you can
continue working while the document is printing. You can also monitor and
control the documents that are waiting to print. (See “Printing While You Use
Your Computer” and “Monitoring and Controlling Background Printing” later
in this chapter.)
Desktop printing
Use one of the two methods described here to print documents without
leaving the Finder. Desktop printing is particularly efficient when you have a
number of documents you want to print at once or when you have a
document that you have already formatted.
m Drag the icons of the documents you want to print to the desktop icon of
the printer you want to use.
or
m Select the icons of the documents you want to print then choose the Print
command from the File menu. The documents will be printed on the
default printer. (See “Switching Between Printers” later in this chapter.)
In either case the computer will show you the Print dialog box so you can
choose printing options. Make your choices, then click the Print button.
If the printer is off, it automatically turns itself on, and after a few moments,
the document star ts to print. If background printing is turned on, you can
continue working while the document is printing. You can also monitor and
control the documents that are waiting to print. (See “Printing While You Use
Your Computer” and “Monitoring and Controlling Background Printing” later
in this chapter.)
Printing
31
Page 32

Adjusting color options
To adjust the way colors are printed, follow these steps:
1Choose Print from the File menu.
2 In the dialog box that appears, click Color.
Some programs provide a checkbox you must click in order to print. See the
Read Me file for information about printing in color with specific programs.
3Select your color options.
To turn on color
matching, click the
ColorSync box so
there’s an X in it.
Click Color.
The printer blends the four ink colors in either a
repeating pattern of dots or a random scattering of
dots. Many people prefer the look of the Scatter
option. Choose the halftoning method you prefer.
32
The ColorSync color-matching system makes sure that colors look as
consistent as possible no matter what device you use to view them—monitor
or printer. In addition, ColorSync helps give you the best possible colors
whe n you export the image to another Macintosh computer with ColorSync
installed or print it on another color printer.
For more information on ColorSync, see Appendix D.
Note: The 13" monitor uses the default system profile. If you are using a
different monitor, you should open the ColorSync control panel and select the
correct system profile for your monitor or PowerBook display.
Chapter 2
Page 33

With ColorSync turned on a nd the Automatic matching method selected, the
Macintosh chooses the best matching method for the contents of the
document you are printing. If you are not satisfied with the results, you can
choose the option you want from the Matching Method pop-up menu. Most
of the time, however, the Automatic setting is best.
Automatic lets the Macintosh
choose the best color-matching
method for your document.
If you have obtained additional printer profiles from other software
companies, you can use the Printer Profile pop-up menu to choose the one
you want. (The additional profiles should come with instructions telling you
how to choose the appropriate one.)
If you don’t have additional printer profiles,
leave this set to Automatic.
4When you’ve made your choices, click OK to return to the Print dialog box.
5Click Print.
6 To save the ColorSync settings with this document, choose Save from the File menu.
Color printing quirks
Here is some additional information about color printing.
m Different programs may define colors in different ways. When you choose
a red in one program, you may not be able to find an exact match in
another program. You can adjust the color in the second program until
you’ re satisfied with the printed results. To see how different programs
define color, consult the manuals that came with your programs.
m Color printing takes longer than black-and-white printing. The printer must
sort th r ough more data and use more ink to complete the job, and this
takes time.
Printing
33
Page 34

Creating special effects on the Color StyleWriter 2500
You can create a number of special effects on the Color StyleWriter 2500 by
selecting options in the Page Setup, Pri nt, and Color Options dialog boxes.
Enlarging or reducing the printed image
You can enlarge or reduce the image on the Color StyleWriter 2500, much as
you can on many photocopying machines. Re d ucing the printed image by a
small amount is a popular way to fit a little extra onto each page.
1Choose Page Setup from the File menu.
2Enter a scaling percentage.
You can type a number from 5 to 999 or use the pop-up menu. Numbers
smaller than 100 reduce the image; numbers greater than 100 enlarge it.
Note: Changing the scaling may also change the pagination of your
document.
Printing a watermark on each page of your document
Traditionally a watermark is a translucent image impressed on a piece of
paper that you can see only by holding the paper up to the light. The Color
StyleWriter 2500 can’t do that, but it can put an image on each page of your
document, creating the illusion of a watermark. The Color StyleWriter 2500
comes with a number of watermarks already installed, and you can create
more, as described in the next section.
34
To print a document with a watermark in the background, follow these steps:
1With your document on the screen, choose Page Setup from the File menu.
2 In the Page Setup dialog box, click the Watermark button.
Another dialog box opens.
Chapter 2
Page 35

3Choose the watermark you want from the pop-up menu.
4Adjust the Density and Scaling.
Look here to see the
effects of the scaling
option you choose.
5Click OK to return to the Page Setup dialog box.
Move this slider to adjust
how dark the watermark
should print.
Use this pop-up menu to
position the watermark.
When the Density slider is all the way to the right, the watermark will print as
dark as it is in the original watermark file.
Note the different effects of the scaling options:
m
Centered
scales the image the same amount in both the horizontal and the
vertical directions, then centers it on the page.
m
Align Top Left
places the image at the upper-left corner of the page without
scaling the image at all.
m
Stretch to Fit
scales the image so it fills the page, even if the horizontal and
vertical directions have to be scaled by different amounts. This may distort
the image.
The settings you choose are remembered by this document but do not affect
other documents.
Printing
35
Page 36

Creating your own watermarks
You can use any program that can save PICT or PICT2 format files to create
your own watermarks. For example, you can create a watermark with your
company’s logo on it.
1 Create the file with a drawing program or any program that can save PICT or PICT2 files.
Here are some tips for making effective watermarks:
m Make the watermark with saturated colors. Wh en you print a document,
you can use the Density control to make the watermark lighter.
m As you draw the image, keep in mind how the watermark scaling options
affect the placement of the image when it is printed.
Watermark file Printed with
Align Top Left
option
Printed with
Centered option
Printed with
Stretch to Fit
option
m The printing software determines the placement of the watermark based on
where it calculates the upper-left and lower-right corners of the image are.
If you want to have more control over the placement, you can use your
drawing program to place a dot above and to the left of the image in the
watermark file to define a new upper-left corner. If you don’t want the dot
to be visible in your printed document, make the dot white.
Dot
Watermark file
Printed with
Align Top Left
option
Printed with
Centered option
Printed with
Stretch to Fit
option
36
Chapter 2
Page 37

2Save the PICT file inside the Printing Prefs folder.
1With your document on the screen, choose the Page Setup command from the File
2Choose how many pages you want to appear on each sheet of paper from the Layout
Look here to see the
effects of the option
you choose.
To find the Printing Prefs folder, open the System Folder on your hard disk,
then open the Preferences folder. The name you save your file as will be the
name that appears in the Watermark dialog box.
Note: If you send the watermark to someone, they also need any fonts that
it uses.
Printing 2 or 4 mini pages on each sheet of paper
One of the most popular reasons to print mini pages is to save paper when
printing long drafts or to make a compact printout of a reference document,
such as an address book.
menu.
pop-up menu.
3If you’d like a border around each mini page, click to put an X in the Borders checkbox.
Printing
37
Page 38

Selecting a halftoning method
Halftoning is a process in which colors are blended by using an arrangement
of different-colored dots. The Color StyleWriter 250 0 blends colors by using
either a rep eating patter n or a ra ndom scattering of dots. The ra ndom method
generally produces a smoother appearance, though it takes longer to print.
The default choice is random scattering.
To change the halftoning method, follow these steps:
1When you are ready to print, choose Print from the File menu.
The Print dialog box opens.
2Click the Color button to open another dialog box.
3Click Pattern or Scatter.
4To return to the Print dialog box, click OK.
Switching between printers
If you have more than one printer available, you must select which printer you
want to use. The printer you select is called the default printer.
38
A bold outline around a desktop printer icon indicates that
it is the default printer, where all your documents will print
until you indicate otherwise.
A plain outline around a desktop printer icon indicates that
it is not the default printer.
To change the default printer, use one of these three methods, as described in
the next sections.
m Drag the document you want to print to a desktop printer icon.
m Select the printer by using its desktop printer icon.
m Select the printer by using the Chooser.
Note: Switching between printers may change how much information you
can fit on a page. It’s best to choose a printer before you spend much time
paginating the document.
Chapter 2
Page 39

Drag the document you want to print to a desktop printer icon
You can switch to a new default printer by dragging the icon of any document
you want to print to the icon of the printer you want to use. (See “Desktop
Printing” in the section “Printing a Document” earlier in this chapter.)
Select the printer by using its desktop printer icon
If you already have a desktop printer icon for the printer you want to use,
follow these steps to select a new default printer without immediately printing
anything on it:
1Click the icon of the desktop printer you want to use.
A Printing menu appears on the menu bar at the top of the screen.
2Choose the Set Default Printer command from the Printing menu.
Until you choose another printer, the Print command will send your
documents to this printer.
Select the printe r by us ing th e C hoose r
If you don’t have a desktop printer icon for the printer you want to use, you
must select the printer by using the Chooser. The Chooser will then create a
desktop icon for the printer that you select and make it the default printer.
1Select the Chooser from the Apple (
2Select the printer that you want by clicking its icon.
3Close the Chooser by clicking the close box in its upper-left corner.
K
) menu.
When you close the Chooser, it creates a desktop printer icon for the printer
you selected.
Printing
39
Page 40

Creating, throwing away, and manipulating desktop printer icons
To create a desktop printer, select the printer i n the Chooser. After you close
the Chooser, the icon will appear on your desktop. See “Select the Printer by
Using the Chooser,” in the section “Switching Between Printers,” earlier in
this cha p ter.
You can also do the following with desktop printer icons:
Throw away the icon.
m
Drag the icon to the Trash. You can’t throw away a
desktop printer icon while the printer is printing a document. (You can
create another desktop printer icon for that printer whenever you like.)
Note: You must always have at least one printer icon on your desktop. If
you throw away the last icon, it will immediately be created again.
Rename the icon.
m
Rename the icon as you would any other Finder icon.
Click the n a me to highlight it, then type the new name. This changes the
name of the icon, not the name of the printer.
Move the icon.
m
You can drag the icon anywhere you like on the desktop.
However, you cannot move it off the desktop.
m
Create an alias for the icon.
You can create an alias for a desktop printer as
you would for any Finder icon by selecting the icon and choosing the
Make Alias command from the File menu. You can move the alias
anywhere on or off the desktop.
Determining the status of a printer by looking at its icon
You can tell the status of a printer by looking at its desktop icon:
Plain icon indicates a printer
that is not currently chosen
for printing.
Stopped icon indicates you have
stopped the print queue.
40
Chapter 2
Default icon indicates the printer
you have currently chosen to
print on.
Printing icon indicates a
document is printing on this
printer.
Error icon indicates there is an
error on this printer. Double-click
the icon to see a message.
Disabled icon indicates this
desktop printer is not available.
See Chapter 5.
Page 41

Printing while you use your computer
You can continue to work on your computer while printing on the
Color StyleWriter 2500. The feature that gives you this ability is called
background printing and is automatically turned on when you install the
Color StyleWriter 2500 software. (If you use QuickDraw GX, background
printing is always turned on.)
To turn background printing on or off, follow these steps:
1Select Chooser from the Apple (K) menu.
The Chooser opens.
2Click the Color SW 2400 icon in the Chooser.
Click this icon.
3Click to turn background printing on or off.
4Click the close box in the upper-left corner of the Chooser.
If you don’t see the
icon, click this arrow
until it appears.
Click On or Off.
Once background printing is turned on, it is in effect whenever you print,
until you turn it off. When you click Print in the Print dialog box, a message
appears for a moment to tell you the document is being prepared. Once the
message disappears, you can continue other work. Your computer may pause
occasionally while it processes the document for printing. See “Monitoring
and Controlling Background Printing,” next, for more information.
Printing
41
Page 42

Monitoring and controlling backgrou nd printing
If you are using background printing, you can use the desktop printer features
to monitor and control your print requests. To learn how to turn background
printing on and off, see “Printing While You Use Your Computer,” earlier in
this cha p ter.
To monitor or control a print request, follow these steps:
1Double-click the desktop printer icon you’re interested in.
A window opens listing the documents that are printing or waiting to print:
Column titles (click to sort)
The document that’s
currently printing
Documents waiting to print
42
Chapter 2
About print requests to shared printers: If you use ColorShare to print a
document on a printer that is not directly connected to your computer, your
print request will be visible in this window for only a few moments. Then the
print request moves to the desktop printer on the computer that is directly
connected to the printer.
2 Decide what you’d like to do.
m
To delete a print request,
select its title or icon (by clicking it), then click the
Remove button. (You can select more than one item at a time by holding
down the Shift key while clicking.) You can also drag the icon for the print
request to the Trash. Note that these methods delete only the print request,
not the document itself.
Page 43

m
To put a print request on hold,
select its title or icon (by clicking it), then click
the Hold button. The print request will stay on hold until you select its title
again and click the Resume button. You can also put the print request that’s
currently printing on hold by dragging it to the list of documents waiting to
print.
To indicate that a print request is urgent,
m
select its title or icon (by clicking it),
then choose Set Print Time from the Printing menu. In the dialog box that
opens, click Urgent. This moves the print request to the top of your list.
To indicate that a print request should not print until a future time,
m
select its title or
icon (by clicking it), then choose Set Print Time from the Printing menu.
In the dialog box that opens, click At Time, then set the time you want.
To sort the list of items waiting to print,
m
click th e title of the column you want to
sort by. For example, to sort by the name of the document, click Document
Name. (You can also sort by choosing the commands in the View menu.)
The column title you sorted by is underlined. Sorting the items does not
change the order in which they will print. To see and change that order,
sort by Print Tim e.
To change the order of the items waiting to print,
m
click th e word s Print Time, a nd
then change the items’ place in the list by dragging their titles.
m
To temporarily stop all your items from printing on this printer,
choose Stop Print
Queue from the Printing menu. To resume using the printer, choose Start
Print Queue from the Printing menu. If you’re using a PowerBook, this can
be a good way to save print requests while you’re on the road until you get
back to your printer.
Shortcut: The commands to start and stop the print queue are available
without opening the window for the printer, if the printer’s icon is selected
on the desktop.
To move a print request from one printer to another printer
m
of the sa m e type, drag
the icon for the print request to the icon of the printer where you want to
move it. If you’re not sure whether the two printers are of the same type,
try moving the print request anyway—the printer software won’t let you
move a print request to an incompatible printer.
Printing
43
Page 44

Sharing your printer wit h other users
If your computer is connected to other computers over an AppleTalk network,
you can allow others on the network to print on your Color StyleWriter 2500.
The technology that lets you do this is called ColorShare.
Note: Before you can share the printer, other users must install the Color
StyleWriter 2500 printer software. In addition, everyone who shares the
printer must first open the Chooser and select the Color SW 2500 icon.
Note the following points about ColorShare:
m Even though you are sharing the printer over a network, the printer must
still be connected directly to a single computer with the provided cable, as
described in “Connecting the Printer to Your Macintosh” in Chapter 1.
m For others to be able to use the shared Color StyleWriter 2500 printer, your
Macintosh must be turned on.
m When other users print on a printer connected to your Macintosh, you may
notice that your computer pauses occasionally while you work. Because the
printer is attached to your Macintosh, you can see what’s being printed by
opening the desktop printer icons, as described in “Monitoring and
Controlling Background Printing,” earlier in this chapter.
m These instr uctions work only if you do not use QuickDraw GX software,
and only others who do not have QuickDraw GX can share the printer.
(QuickDraw GX users can share a printer only with other QuickDraw GX
users. They share the printer by clicking its icon, and then choosing
Sharing from the File menu.)
44
Chapter 2
Page 45

1Select Chooser from the Apple (K) menu.
2 In the Chooser dialog box, do the following:
First, click this icon.
(If you don’t see the
icon, use the scroll
bar and arrows to
find it.)
3 In the Setup dialog box, make the changes you want.
To share your printer,
click to place an X in
this box.
Type a name for
your printer here.
(To avoid
confusion, give it
a unique name.)
To share the printer with other non–QuickDraw GX users, follow these steps:
Then click Setup.
To make your printer available
only to people you choose, type
a password here.
To use your printer, others must type
the password exactly as you have, so
remember how you typed the word,
including where you used uppercase
and lowercase letters or spaces before
or after the word.
The name you give the printer is the name others will use to select the printer
in the Chooser.
Printing
45
Page 46

4To keep a record of what’s printed on your printer, click the “Keep Log of Printer Usage”
checkbox to put an X in it.
You can open and print the log with SimpleText, TeachText, or another wordprocessing program. To find the log file, open your System Folder; then open
the Preferences folder and the Printing Prefs folder. The file is called Color
StyleWriter 2500 Log.
Note: You can keep a log even if your printer is not shared.
5Click OK to close the Setup dialog box.
Sharing works only if background printing is turned on. If it is not turned on,
ColorShare turns it on.
6Close the Chooser by clicking the close box in its upper-left corner.
If the Color StyleWriter 2500 software has been installed on their Macintosh
computers, other users connected to the network can now use your
Color StyleWriter 2500, as described in the next section.
46
Chapter 2
Page 47

Printing on a share d Color StyleWriter 2500
After you turn on ColorShare (as described in the previous section), others on
your network can share your printer.
1Select Chooser from the Apple (K) menu.
2Make the following selections in the Chooser:
First, click this icon.
(If necessary, use the
scroll bar and arrows
to find the icon.)
Second, if the
network has zones,
click the one
containing the printer
you want to use.
IMPORTANT
People on the network who wa nt to print on your shared printer
must install the Color StyleWriter 2500 software on their computers as
described in Chapter 1. After the new software is installed, network users
must follow these steps:
The Chooser opens.
Third, click the name
of the printer you
want to use. If the
printer requires a
password, a dialog
box appears asking
you to type it.
3Close the Chooser by clicking the close box in its upper-left corner.
After you close the Chooser, a desktop printer icon for the Color StyleWriter
2500 appears.
Anyone who completes these steps can print on the shared printer.
When you print a document to a shared StyleWriter, your computer transfers
the request to the computer directly connected to the printer. As soon as the
transfer is complete, your computer thinks the document has finished
printing. You can continue monitoring the print request on the computer that
is di rectly connected to the printer.
Printing
47
Page 48

Connecting a Color StyleWriter 2500 to a LocalTalk or EtherTalk network
If you have the optional Color StyleWriter LocalTalk Mod ule or EtherTalk
Adapter, you can connect a Color StyleWriter 2500 printer directly to a
LocalTalk or EtherTalk n etwork. (Make sure you use the model that works
with the Color StyleWriter 250 0.)
To attach the LocalTalk Mod ule or EtherTalk Adapter and connect your Color
StyleWriter 2500 to the network, follow the instructions that come with the
module. Once the printer is on the network, its name appears in the Chooser
just like the names of other network printers.
48
If you want to change the name, click Rename. In the dialog box that appears,
type a new name for the Color StyleWriter 2500 printer. (Note: Anyone on
the network can change the name.)
Type a new name, then
click Rename (or press Return).
Chapter 2
Page 49

3
Tips on Paper, Quality, Speed, and Cost
This chapter explains how to use different materials and printing options to
meet your needs.
Choosing print materials
Here are some tips on when and how to use different print materials.
Plain paper
Use plai n paper for everyday printing.
m Print quality may vary depending on the manufacturer of the paper.
If you’re not happy with one kind of paper, try a different brand. For
consistent results, use one of the special papers designed for the
Color StyleWriter 2500 printer.
m You can use any plain paper, including plain copier paper. Paper weight
can ra nge from 16 to 24 pounds, though 20-pound paper is recommended.
m Don’t use erasable typing paper, damaged or wrinkled paper, stapled paper,
or multipart forms (“carbonless carbons”).
m Plain paper almost always has one side that is better for printing than the
other. See the package label to determine which side is better, and load that
side so that it faces you.
49
Page 50

Premium coated paper
Use premium coated paper for exceptional print quality—for example, for a
final draft, a colorful notice, or the master copy of a presentation. Colors
appear richer and more vibrant on such paper.
m Use only coated paper designed for use with the Color StyleWriter 2500.
m One side of the paper is a little whiter than the other and is better for
printing. See the package label on the coated paper to determine which
side is better, and load that side so that it faces you.
Premium Plus Coated Paper
Use Premium Plus Coated Paper for exceptional image quality—for example,
when printing a photographic picture. Images look smoother on such paper.
m Use only Apple’s Premium Plus Coated Paper designed for use with the
Color StyleWriter 2500 printer mechanism and the printer’s inks.
m One side of the paper is a little whiter than the other and is better for
printing. See the package label on the coated paper to determine which
side is better, and load that side so that it faces you.
Glossy paper
50
Use glossy paper for the highest print quality you can get on opaque paper—
for example, for color proofs.
m Use only glossy paper designed for use with the Color StyleWriter 250 0.
m When loading a stack of glossy paper into the sheet feeder, put a single
sheet of plain paper at the back of the stack to prevent misfeeding.
Chapter 3
Page 51

Back-print film
Use back-print film for the highest print quality of all—for example, for
digitized photographs or important client presentations. Back-print film has a
shiny surface and works exceptionally well when displayed by backlighting.
m Use only back-print film designed for use with the Color StyleWriter 2500.
m Load back-print film so that the chalky side faces you.
m When loading a stack of back-print film into the sheet feeder, put a single
sheet of plain paper at the back of the stack to prevent misfeeding.
m In the Print dialog box, be sure to select Back Print as the paper typ e.
m The printer automatically reverses the image and prints it on the film’s
chalky side so that the image looks correct when viewed from the
shiny side.
Transparencies
Use transparencies when you want to present your document on an overhead
projector.
m Use only transparencies designed for use with the Color StyleWriter 2500.
These special transparencies have a sheet of paper attached to them; leave
the paper attached until after printing.
m Load the transparencies so that the shiny side faces you and the edge
where the paper and the tra nsparencies are attached points downward.
Tips on Paper, Quality, Speed, and Cost
51
Page 52

Quality
Select Best quality.
Best quality takes
longer to print, but
you get better
quality—even on plain
paper.
To turn on color
matching and get the
best-quality color
printing, click to
put an X in the
ColorSync check box.
For highest-quality printing, choose Best quality and print on coated or
glossy paper, back-print film, or transparencies.
Also use t he following selections in the Color Options dialog box. (To display
the dialog box, click the Color button in the Print dialog box.)
Many people prefer the
look of the Scatter
halftoning method.
For more information on color matching, see “Adjusting Color Options” in
Chapter 2.
52
Chapter 3
Page 53

Speed
Select Normal or
Draft. Draft is faster
than Normal.
Cost
For faster printing, change the Print Quality setting in the Print dialog box.
(To display the dialog box, choose Print from the File menu.)
Color printing takes longer than black-only printing.
The optional high-performance black ink cartridge is designed for efficient,
high-speed, black and grayscale printing.
To reduce the amount of ink you use, select Draft quality in the Print dialog
box whenever possible.
Leave the printer’s cover shut. (Every time you open and shut the cover, the
printer uses ink as it cleans the print head.)
Don’t unplug the printer unnecessarily or connect it to a power strip that you
turn off occasionally. When reconnect the power, it uses ink as it cleans the
print head.
Switching cartridges between the color cartridge and an optional highperformance black cartridge uses extra ink. Don’t switch cartridges
unnecessarily. If you plan to print many pages in black or grayscale (for a
cumulative total of 20 or more pages), use the optional high-performance
black cartridge.
Tips on Paper, Quality, Speed, and Cost
53
Page 54

Page 55

4
Maintaining Your Printer
It doesn’t take much effort to keep your Color StyleWriter 2500 printer in
good working condition. You simply have to replace the ink ta nks when they
run out of ink a nd clean the printer or pri nt h ead if you notice a problem.
(And occasionally, you should replace a worn-out ink cartridge.)
For other service, see the information about service and support that comes
with your Color StyleWriter 2500.
IMPORTANT
Chapter 1.
Foll o w all the safety instructions given at the beginning of
Replacing ink tanks in th e four-color ink cartridge
The four-color ink cartridge contains two separate ink ta nks, one for black
ink and one for cyan, magenta, and yellow inks. This means that when you
run out of black ink, you don’t have to replace both tanks. (Most people use
more black ink than a ny other color.)
WARNING
and 2400. The wrong ink can damage the print head and the printer,
and such damage is not covered under the warranty.
Use only ink designed for use with the Color StyleWriter 2500
55
Page 56

When to c hange ink tanks
Look carefully at your printed documents to see if a color is missing or faded.
Sometimes it’s obvious—such as when you run out of black ink. At other
times you may notice that the colors seem wrong—such as when you’re
printing a nature scene and you run out of yellow.
The best way to verify that ink is running low is to print the test page. (For
details, see “Checking the Print Nozzles” in Chapter 1.)
How to change ink tanks
1Turn on the printer.
2 Open the printer’s front cover.
Wait while the carrier moves to the center position.
3 Remove and discard the old ink tank.
56
Chapter 4
IMPORTANT
You can use the same ink tan ks and ink cartridges in both the
Color StyleWriter 2500 and Color StyleWriter 2400.
Page 57

4 Remove the new ink tank from its packaging.
5 Remove the plastic cap from the bottom of the ink tank.
Don’t let anything touch
the openings. The ink
may cause stains, and
any contaminants may
diminish the print quality.
6Slide the tank into the cartridge, and push it down so it snaps into place.
IMPORTANT
Make sure you put the color ink tank on the left and the black ink
tank on the right.
7Close the printer cover.
Maintaining Your Printer
57
Page 58

Replacing t he ink cartridge
The ink cartridge contains the print h ead, the device that takes the ink and
sprays it on the paper. The Color StyleWriter 2500 pri nter comes with a fourcolor cartridge with replaceable ink tanks. You can also purchase an optional
high-performance, black-only cartridge. The black-only cartridge has enough
ink to print about 900 pages at 5% coverage—when ink covers 5% of the
page. (A typical double-spaced page has about 5% coverage.) The four-color
cartridge lasts about twice as long, because you can replace its ink tanks.
When to replace the four-color cartridge
Age is t he primary factor in determining when a four-color cartridge wears
out. If you’ve done a lot of printing with your cartridge and notice a gradual
deterioration in print quality, it may be time to install a new four-color ink
cartridge. Before you do, try printing the test page in case a clogged nozzle is
the problem. (See “Checking the Print Nozzles” in Chapter 1.)
Note: A new four-color ink cartridge comes with fresh ink ta nks already
installed.
When to replace the optional black-only ink cartridge
58
Knowing when to replace the black-only cartridge is fairly simple. When it
runs out of ink, it stops printing.
Note: If you see other problems with black-only print quality, such as
unwanted white lines in a document, try printing the test page. (See
“Checking the Print Nozzles” in Chapter 1.)
How to find ink cartridges
You should be able to find cartridges, ink ta nks, and other supplies for your
Color StyleWriter 2500 printer at a ny Apple-authorized dealer.
Chapter 4
Page 59

How to replace th e ink cartridge
IMPORTANT
Before replacing the cartridge, try printing the test page. (See
“Checking the Print Nozzles” in Chapter 1.)
1 Turn on the printer.
2 Open the printer’s cover.
Wait while the carrier moves to the center position.
3 Raise the bright blue lever on the carrier and remove the cartridge.
Dispose of the cartridge.
IMPORTANT
Be careful not to touch the print head, or you may temporarily
stain your fingers with ink.
Carrier
4 Remove the cover from the plastic tub that contains the new cartridge.
5Grasp the ink cartridge by its sides and remove it from the plastic tub.
You may safely touch the black plastic, but be careful not to touch any
other part.
Maintaining Your Printer
59
Page 60

6 Remove the bright orange cap from the cartridge’s print head.
After you snap it off,
dispose of the cap.
7Peel the orange tape off the print head.
60
Chapter 4
Page 61

8Slide the cartridge into its place in the printer.
9 Lower the bright blue lever on the carrier to secure the cartridge in place.
10 Close the printer cover.
Now you can open any document you wa nt and print it as usual.
Maintaining Your Printer
61
Page 62

Storing the ink cartridge you aren’t using
The Color StyleWriter 2500 comes with a four-color cartridge. In addition,
you can purchase the optional high-performance black cartridge. While they
are sealed in their original packaging, the in k cartridges are protected. If you
open both packages and switch ink cartridges for printing different
documents, be sure to store the one you’re not using in the storage case
supplied with your Color StyleWriter 2500. The storage case keeps the print
head from drying out and prevents accidents with ink stains.
Be careful not to touch this area on the ink
cartridge, or you may stain your fingers with ink.
62
Chapter 4
Once you’ve removed both cartridges from their original packages, always
keep one inside the printer and the other in the storage case.
IMPORTANT
If you have only one ink cartridge, leave it inside the printer.
Page 63

Cleaning the outside of the printer
Before you clean the printer, turn it off and unplug the power cord. Then
wipe the outside of the printer with a clean, soft cloth dampened with water.
If necessary, you can use a mild soap or detergent. Be careful not to get any
liquid in the power cord receptacle.
WARNING
Don’t use ammonia-based or alcohol-based cleaners on or
around the printer—they may react with the plastic.
Cleaning the inside of th e printer
Occasionally you may need to wipe off paper dust or drops of ink inside the
printer. Turn the printer off and unplug it. Then open the printer and carefully
clean the rollers and platen with a soft, dry cloth.
If necessary, you
can clean the rollers
and platen with a
soft, dry cloth.
WARNING
Don’t use any liquid cleaners inside the printer.
Maintaining Your Printer
63
Page 64

Page 65

5
Troubleshooting
This chapter provides solutions to some problems that you may encounter
while using your Color StyleWriter 2500 printer.
As long as you follow the maintenance instructions in Chapter 4, you’re not
likely to have any problems with your printer. The most common source of
trouble is faulty software installation. To avoid these problems, follow the
software i nstallation instructions in Chapter 1.
WARNING
printer and nothing presented in this chapter solves it, consult the
service and support information that came with the printer for
instructions on how to contact an Apple-authorized service provider or
Apple for assistance. If you attempt to repair the Color StyleWriter 2500
yourself, any damage you may cause to the printer will not be covered
by the limited warranty on your printer. Contact an Apple-authorized
dealer or service provider for additional information about this or any
other warra nty question.
If you have a problem with your Color StyleWriter 2500
65
Page 66

Safety precautions
To prevent damage to the Color StyleWriter 2500 printer and harm to yourself
and other users, follow these safety tips.
m Don’t touch anything inside the printer except as described in the
instructions in this manual. Otherwise, you may damage delicate
mechanical parts.
m Don’t sha ke i nk tanks or hold them with the ink opening pointing down.
Ink can leak out and cause stains.
m Don’t touch the ink opening on an i nk tank.
m Don’t oil the inside of the printer.
m Don’t attempt to disassemble the printer.
m Before you unplug the printer, make sure it is turned off. (The green power
light should be off.) Turning the power off ensures that the carrier has
returned securely to its home position and the cartridge has been capped.
The Chooser do esn’t show the Color SW 2500 icon
If you open the Chooser and don’t see the Color SW 2500 icon, you probably
need to install the appropriate printer software. For instructions, see
“Installing Your Printer Software” in Chapter 1.
Installation is unsuccessful
If a message tells you that installation was not successful—or if you have to
repeatedly swap between the same two disks—check to make sure you
restarted your computer with all your software extensions off as explained i n
Chapter 1. If that doesn’t work, try removing corrupted fonts or performing a
custom installation, as described in the next two sections.
66
Chapter 5
Page 67

Removing items from your Fonts folde r to solve installation problem s
Items in your current Fonts folder can interfere with successful installation of
the printer software. To correct the problem, follow these steps:
1 Quit all programs you are currently running.
2 Open the Fonts folder (inside the System Folder) on your Macintosh.
3 Drag the following files out of the Fonts folder. (Look for files with exactly these names.)
m Avant Gar de
m Bookman
m Delphian
m Garamond Narrow
m Helvetica Black and Helvetica Compressed
m Luba li n Graph
m Lucida Bright
m Machine
m N Helvetica Narrow
m Nadianne
m New Century Schlbk
m Old E ngl ish Text
m Onyx
m Oxford
m Swing
m Zapf Chancery
m Zapf Dingbats
m Zeal
You can put the fonts temporarily into a new folder and drag the folder to
your desktop. Then, after you install the Color StyleWriter 2500 software
(including these fonts), you can drag the temporary folder to the Trash.
4 Repeat the software installation procedure in Chapter 1.
For more details about fonts, see Appendix B.
Troubleshooting
67
Page 68

Using the Custom Installer to solve installation problems
For another way to work around problems with corrupted fonts, you can
install the printer software without installing the fonts that come with the
printer. (The disadvantage is that you won’t be able to use these fonts if you
don’t already have them.)
1 Insert
2To start the Installer program, double-click its icon.
3 In the Welcome dialog box that appears, click Continue.
4 In the Installer dialog box, choose Custom Install.
Choose
Custom Install
from this
pop-up menu.
Color StyleWriter 2500 Disk 1
If necessary, open the disk icon.
into a floppy disk drive.
68
Chapter 5
Page 69

5 In the Custom Install dialog box, click the QuickDraw Printer Software checkbox.
First, click this
checkbox. (An X
appears to show it’s
selected.)
Second, make sure
the disk named here
is the one on which
you want to install the
printer software.
(If not, click Switch
Disk until the correct
name appears.)
6When you see a message on your screen, follow the directions and insert the next disk.
7When you see a message reporting that installation was successful, click Restart.
Finally, when you’re
ready to begin, click
Install.
The Installer ejects disks and asks you to insert others. Keep following the
instructions on the screen until the installation is complete.
The Installer restarts your Macintosh.
The computer crashes while attempting to print
When a computer suddenly stops working—either a message on the screen
tells you a system error has occurred, or the mouse and keyboard act as if
they’re disconnected—the computer has crashed.
If your computer often crashes after you tell it to print a document, your
printing software may have become corrupted. Reinstall the printer software
by following the instructions in “Installing Your Printer Software” and
“Telling Your Computer to Use the Color StyleWriter 2500” in Chapter 1.
Troubleshooting
69
Page 70

The computer doesn’t recognize the Color StyleWriter 2500
If you have selected the Color StyleWriter 2500 in the Chooser but nothing
prints, or you get a message that no Color StyleWriter 2500 is connected, one
of the conditions in the list that follows may be the cause.
Note: Before you try to solve the problem, open the Color StyleWriter 2500
desktop printer icon to see if there are any error messages and to check how
many print requests are waiting. If you repeatedly tried to print a document,
there may be multiple copies waiting to print. You can delete anything you
don’t want by selecting its title, and then clicking the Remove button. See
“Monitoring and Controlling Background Printing” in Chapter 2.
m A plug may be loose. To make sure that all cables are securely connected,
turn off the computer and the printer, then unplug each end of each cable
you want to test and plug it back in. For connection instructions, see
Chapter 1.
m You may have indicated the wrong port in the Chooser. Open the Chooser
and change the port selection. (Look at the back of the computer to see
whe t her you plugged the printer into the computer’s printer por t [[] or
modem port [W].)
m If you are trying to use a shared printer connected to another computer and
the printer name isn’t listed in the Chooser, make sure that the other
Macintosh is turn ed on and connected to the network. Also make sure that
the printer is set up to be shared. Then try again to select the printer in the
Chooser. (Note: QuickDraw GX users can share a printer only with other
QuickDraw GX users and non–QuickDraw GX users can share only with
other non–QuickDraw GX users.) See the instructions in “Sharing Your
Printer With Other Users” in Chapter 2.
70
m You may be using the wrong printer software. Make sure you installed the
software as described in Chapter 1 and that you have selected the printer as
described in “Telling Your Computer to Use the Color StyleWriter 2500,”
also in Chapter 1.
m If you’re using a PowerBook computer with an internal modem, change the
serial port setting to Normal or External. For details, see “Special
Information for PowerBook Owners” in the section “Telling Your
Computer to Use the Color StyleWriter 2500” in Chapter 1.
Chapter 5
Page 71

m If your computer is not connected to a network, turn off AppleTalk in
the Chooser.
m The printer may need to be reset. Turn the printer off, count to five, then
turn it back on.
If you still can’t resolve the problem, the printer may not be working properly.
See the information about service and support that came with your printer.
Desktop printer icon proble m s
A desktop printer icon appears again as soon as I drag it to the Trash.
You must always have at least one desktop printer icon. If you drag your last
desktop printer icon to the Trash, the computer instantly creates another one
just like it.
If you don’t want to use desktop printers at all and you have System 7.5 or
later, you can use the Extensions Manager control panel to turn off Desktop
PrintMonitor, Desktop Printer Extension, and Desktop Printer Spooler. Or
you can use the Installer’s Custom Remove feature to remove the desktop
printing software, as described in Appendix F.
An X appears over the desktop printer icon.
When a desktop printer is not working, its icon appears with an X over it.
m You may have started the computer with a different startup disk or
temporarily turned off all the software extensions. When you restart the
computer as usual, the icon will return to normal.
m You may have removed the desktop printing software that created the
printer icon. If you meant to do so, you can drag the icon to the Trash. If
not, you can reinstall the software as explained in Chapter 1.
A Power Bo o k has trouble pr inting to the Color Style Writer 2500
Some PowerBook computers have special requirements for printing. See
“Special Information for PowerBook Owners” in the section “Telling Your
Computer to Use the Color StyleWriter 2500” in Chapter 1.
Troubleshooting
71
Page 72

The lights indic ate a problem
Error light (‘)
Power button (I)
Power light
Sometimes the lights on the printer signal a problem.
m
Both lights are off.
To conser ve energy, the printer turns itself off if it’s left
idle for some time (usually about 5 minutes). If you suspect a problem,
press the power button. If the lights remain off, check to make sure the
power cord is plugged in properly and the outlet has power. If you can’t
turn the printer lights on, see the information about service and support
that comes with the printer.
72
Chapter 5
The error light glows steadily.
m
Either the printer is out of paper or the paper
has misfed. Check your computer screen for messages. See Chapter 2 for
instructions on loading the sheet feeder, or “Paper Is Jammed” and “Paper
or Envelopes Feed Improperly” later in this chapter.
The error light blinks.
m
The ink cartridge may not be seated properly. Op en the
printer’s cover. Make sure the cartridge is inserted properly, and that the
bright blue lever is firmly lowered to secure the cartridge in place. For
instructions, see “Installing the In k Car tridge” in Chapter 1.
Page 73

The printer seems slow
See the suggestions under “Speed” in Chapter 3.
If you have a Macintosh IIfx, Macintosh Quadra 900, or Quadra 950
computer, check the Serial Switch control panel. Make sure it is set to
Compatible.
Note: The printer automatically takes a few moments to clean the print head
when it is plugged back in or after more than three days of inactivity.
Paper is jammed
Occasionally a piece of paper may get stuck inside the printer during the
printing process. To clear a paper jam, follow these steps:
1If necessary, open the printer to see where the jam is.
2Gently pull the paper free.
Troubleshooting
73
Page 74

More than one piece of paper passes through the printer at a time
Foll o w these steps:
1 Remove all the paper from the sheet feeder.
2Turn off the printer.
3Turn the printer back on.
4Put the paper back in.
Paper or envelopes feed improperly
If paper tears, gets skewed, or comes through the printer crumpled, it may not
be entering the printer properly. Try the following:
m
Make sure you have loaded the paper correctly, paying special attention to both
paper selectors.
For instructions on loading paper, see “Loading the Sheet Feeder” in
Chapter 2.
m
Do not overload the sheet feeder.
The feeder holds up to 15 envelopes or up to 100 sheets of 20-pound paper.
If you use heavier paper, fewer sheets will fit in the feeder.
74
Chapter 5
m
Do not force paper into the sheet feeder.
Page 75

m
Try to remove any torn or damaged pieces of paper from the printer.
See “Paper Is Jammed,” earlier in this chapter.
m
Take the paper out of the sheet feeder and check it.
Make sure none of the sheets is curled, bent, or dog-eared.
Make sure the edges of the stack line up evenly.
Make sure the left paper guide isn’t too snug or too loose. The stack should
lie flat (not bowed).
Make sure the paper doesn’t slide down into the printer.
Load either envelopes or paper (not both) into the sheet feeder.
Make sure you have inserted envelopes correctly. The flaps should lie flat
agains t the envelope, the edges should be smoothed flat, and no air should
be trapped in the envelopes.
When loading back-print film, put a sheet of plain paper at the back of
the stack.
When loading transparencies, the shiny side should face you. The edge
where the paper and the tra nsparency are joined should point downward.
Troubleshooting
75
Page 76

The Color StyleWriter 2500 won’t print a particular document
If you attempt to print a document and no page is printed—not even a blank
one—try the following:
m Check for messages on your Macintosh screen. Also, open the window for
your printer by double-clicking its desktop icon.
m Your computer may be low on memory. See “Memory Is Low,” later in this
chapter.
m Tur n the printer off, then on again. (This resets the printer.)
m Repeat the printing process.
Sometimes problems disappear when you try to print your document again.
m Printing problems can often be caused by errors in your programs. If you
can pri nt from the SimpleText or TeachText program but not from another
program, it’s probably a problem with that program. Contact the publisher
of that program for help.
m Restart your Macintosh.
The printer acts as if it’s working, but nothing is printed on the page
76
If your printer takes the paper, but doesn’t actually print anything, try the
following:
m If the ink cartridge is new, make sure that you removed the orange tape
from its print head.
m Make sure the ink cartridge and the ink tanks in the four-color cartridge
are correctly installed. (For instructions, see “Replacing Ink Tan ks in the
Four-Color Ink Cartridge” a nd “Replacing the Ink Cartridge” in Chapter 4).
m The printer may be out of ink. You can check by seeing whether the test
page prints. To print a test page, see “Checking the Print Nozzles” in
Chapter 1.
Chapter 5
Page 77

Messages appear on your computer screen
Most messages that appear on your screen are self-explanatory. For example,
they may tell you that the printer is out of paper or that the paper is jammed.
Once you correct the problem, the message goes away.
Here are some other problems that on-screen messages might report:
Serial port in use by another application
Restart your computer before trying to print again.
The waste ink container in the printer is full.
From time to time, the printer deposits some ink into a waste container. In the
rare event that the container becomes full, Apple recommends that you take
the printer to an Apple-authorized service provider.
There is an error in the printer.
Check to make sure the cable is still connected to the printer and the
computer. Also, make sure the ink cartridge is seated properly. Turn on the
printer and open the printer’s cover. Make sure the cartridge is inserted
properly, and that the blue lever on the side of the carrier is firmly lowered to
secure the cartridge in place.
The printer detects an end of paper error.
Make sure that you are using a valid size of paper, and that you indicate the
size in the Page Setup dialog box. Valid sizes for the Color StyleWriter 2500
are: U.S. Letter, U.S. Legal, A4 Letter, Executive, #6 envelopes, and #10
envelopes. Other sizes may not work correctly.
No Paper orWrong Paper Size
These messages usually mean what they say. Occasionally they appear when
you have the wrong port indicated in the Chooser. See “Telling Your
Computer to Use the Color StyleWriter 2500” and “Special Information for
PowerBook Owners” in Chapter 1.
Memory is low.
See the next section.
Troubleshooting
77
Page 78

Memory is low
Once in a while, your computer may be temporarily low on random-access
memory (RAM).
Symptoms that indicate a memory problem.
m Some documents do not pri nt.
m Some text incorrectly appears in the Geneva font.
m Characters look jagged.
m An “out of memory” message appears on your screen.
If you have a memory problem, try th e following:
m Run only one program at a time; quit the ones you’re not using.
m If memory has been severely fragmented, you should quit all open
applications, then reopen just the one you’re using.
m Increase the amount of memory you give to the program you’re printing
from by using the Get Info command (as explained in the i nstructions that
came with your Macintosh).
m Turn off background printing. See “Printing While You Use Your
Computer” in Chapter 2.
78
m In the Page Setup dialog box, choose Portrait (normal) orientation instead
of La ndscape (sideways) orientation.
m Don’t print your documents with watermarks.
m Choose “Black and White” from the Image pop-up menu in the Print
dialog box. Printing in black and white takes the least memory.
m When you print in the background, if you often get a message that there is
not enough memory to print on a certain desktop printer, you can give that
desktop printer more memory by selecting its icon and choosing the Get
Info command. Then i ncrease the number in the Preferred Size box. (For
more information on increasing a program’s memory, see the
documentation that came with your Macintosh.)
m Remove desktop printing. See Appendix F.
Chapter 5
Page 79

m Turn on virtual memory in the Memory control panel. Virtual memory is
described in the instructions that came with your computer. (Note: Using
virtual memory can slow down your computer.)
m As long as there are any print requests waiting to be printed, Desktop
PrintMonitor (the desktop printing software) remains active in memory,
even when background printing is off. If you are not printing in the
background, you can remove all print requests from your desktop printer
queues to reduce memory requirements by 16 0K.
m Obtaining additional RAM for your computer can solve some of these
problems and improve printing speed.
Documents did not print as expected
If the quality of printing is OK—not smeared or incomplete—but the result is
not as you expected, you may have made a mistake in using the printer
software. Check the subsections that follow for suggestions.
Text appears in the Geneva font or prints jagged
When your Macintosh computer is low on memory, it may display and print
certain fonts in the Geneva font.
have jagged edges. To fix low-memory problems, see the preceding section,
“Memory Is Low.”
(Geneva looks like this.)
Some text may also
If you’re printing to a shared StyleWriter that is not directly connected to your
™
computer and you use Adobe
Type Ma nager, the PostScript™version of your
fonts must be installed on the computer that is directly connected to the
StyleWriter.
For more information about fonts, see Appendix B, “Using Fonts With the
Color StyleWriter 2500.”
Some rota ted text may print jagged if you apply a style that has not been
defined for the font. Try applying plain style to the text.
Troubleshooting
79
Page 80

Text prints, but pictures do not
Some advanced page layout and art programs use the PostScript page
description language, a language that the Color StyleWriter 2500 does not
understand. If your programs have a PICT preview option, you can print the
file on a Color StyleWriter 2500.
Page breaks change unexpectedly
Most programs determine where to break pages by evaluating the information
you provide in the Page Setup dialog box. Also, different types of printers
space text in slightly different ways. The following actions can cause page
breaks to change:
m changing from one type of printer to another
m changing the page size in the Page Setup dialog box
m scaling the document in the Page Setup dialog box
m changing the orientation in the Page Setup dialog box
It’s best to choose the printer you want and the Page Setup options you need
before working on your page breaks.
80
A page prints off center
This problem may result from one of the following conditions:
m You have selected the wrong page size in the Page Setup dialog box.
m The margins are set incorrectly in the document you are printing.
m Paper is not placed properly in the sheet feeder. See “Paper or Envelopes
Feed Improperly” earlier in this chapter.
m You are not using recommended printing materials.
Chapter 5
Page 81

Text lines up in columns on the screen but not when it prints
You may have used spaces (rather than tabs) to line up the text. Because
printers interpret spaces differently than the screen does, the text may fail to
line up when you print it. Try replacing the spaces with tabs.
You can also make columns by using spaces with a monospace font—such as
Courier or Monaco—instead of tabs. A monospace font is one in which every
character has the same width.
Everyt h i ng pr ints backwards
Choose the Print command and check what paper type you’ve selected in the
dialog box that opens. If you indicate that you’re printing on back-print film,
the printer reverses the image.
There are watermark problems
The wrong watermark printed.
If you selected one watermark, but a different one printed, you can fix it by
changing the modification date and time of one of the watermark files. To
cha nge the modification date, open one of the files, then save it using the Save
As command. (The watermark files are stored in the Printing Prefs folder,
which i s in the Preferences folder inside the System Folder.) When asked if
you want to replace the file, say yes.
I created a new watermark, but it doesn’t show up in the dialog box.
m Make sure the watermark was saved as a PICT or PICT2 file.
m Make sure the file was saved in the Printing Prefs folder, which is in the
Preferences folder inside the System Folder.
Troubleshooting
81
Page 82

Print quality is poor
Most image problems are caused by problems with an ink cartridge or with
your choice of paper. Don’t use the following types of paper:
m erasable typing paper
m damaged, wrinkled, or stapled paper
m multipart forms (“carbonless carbons”)
m glossy paper, unless its especially designed for StyleWriter printers
For best print quality, use coated or glossy paper or back-print film. If you
use plain paper, use 16- to 24-pound copier paper; 20-pound paper is
recommended. Plain papers can vary widely. If you’re not happy with one
kind of paper, try a different brand.
Colors skip or streak at the b ottom of the page
If you’re not happy with the quality of printing near the bottom of a page,
cha nge the setting for the bottom margin to 0.8 inch.
82
Chapter 5
Page 83

The image is too light or too dark
If printing looks fuzzy because it’s too light or too dark, try the following:
m Check the nozzles in the print h ead. See “Checking the Print Nozzles” in
Chapter 1 for instructions. If this doesn’t help, replace one or both ink
tanks in the four-color ink cartridge, or replace the black-only cartridge.
See “Replacing Ink Tanks in the Four-Color Ink Car tridge” and “Replacing
the Ink Cartridge” in Chapter 4 for instructions.
m Make sure you’ve chosen the correct paper type in the Print dialog box.
m If you’re using plain paper, try flipping the stack of paper in the paper tray.
Most paper has one side that’s better for printing. If you’re using other
material, make sure you have it loaded in the correct orientation. See
“Loadi ng the Sheet Feeder” in Chapter 2.
m Try printing on a different kind of paper.
m Try choosing Best print quality in the Print dialog box.
m Make sure that both paper selectors (one inside the printer, the other on the
sheet feeder) are set to the correct position. See “Loading the Sheet
Feeder” in Chapter 2.
Thin lines fade or break up
Pick a darker color for the affected object, or try printing with the Pattern
halftoning option selected. (In the Print dialog box, click the Options button,
then click the Pattern button.)
The ink smears when rubbed
Don’t ha ndle pages before the printer ejects them from the printer and
delivers them into the output tray. This allows all the time needed for the ink
to dry.
Pages l eave th e printer smeared, blurred, or smudged
The print head may be too close to the paper it’s printing on. Move the
internal paper selector to the envelope (=) position. See “Loading the Sheet
Feeder” in Chapter 2.
Troubleshooting
83
Page 84

Printing a ppears on only part of the paper
Check the selections in the Page Setup dialog box.
Check the nozzles in the print h ead. See “Checking the Print Nozzles” in
Chapter 1 for instructions. If this doesn’t help, replace one or more ink tanks
in the four-color ink cartridge, or replace the black cartridge. See “Replacing
Ink Tanks in the Four-Color Ink Cartridge” and “Replacing the Ink Cartridge”
in Chapter 4 for instructions.
Colors don’t look right on the printed page
Try the following:
m Print a test page to see if you’ve run out of ink. For instructions, see
“Checking the Print Nozzles” in Chapter 1.
m Try printing the image with ColorSync turned on. For instructions, see
“Adjusting Color Options” in Chapter 2.
m Use a different type of paper.
Unwanted hor izontal white lines or stripes appear
Problems with print quality, especially horizontal white lines in your
document, may mean a nozzle on the print head is clogged or your ink
cartridge is running out of ink. There are two ways to solve the problem:
84
Chapter 5
m Cleaning the print h ead is the faster method. It forces a nozzle cleaning as
part of a print job. In other words, you can tell the printer to clean the print
head before it starts printing the next document.
m Printing a test page also cleans the print head. It gives you a test pattern
you can evaluate, but it takes a bit longer.
IMPORTANT
Cleaning the print head consumes a small amount of ink. If you
repeat the procedure unnecessarily, you reduce the life of your cartridge.
Explanations of both procedures follow.
Page 85

Cleaning the print head
To clean the print head, follow these steps:
1When you are about to print a document, click Utilities in the Print dialog box.
Note: If the printer is being shared by using ColorShare, you must print the
document from the computer that is directly connected to the printer.
Click this button.
The Utilities dialog box opens.
First, click to
place an X here.
2 In the Print dialog box, click Print.
Then click OK.
The Utilities dialog box closes, and the Print dialog box reappears.
The printer cleans the print head before printing your document.
Note: After the printer cleans the print head and pri nts your document, the
cleaning option is automatically turned off. You don’t have to turn it off before
printing again.
Troubleshooting
85
Page 86

Printing the test page
To print the test page, follow these steps:
1Turn off the printer.
2Make sure you’ve loaded U.S. letter-size or A4 paper into the printer.
3Press and hold down the power button until the power light starts to blink.
4 Release the power button and wait for the test page to print.
5Examine the nozzle test pattern for broken or missing horizontal lines.
The nozzle test pattern appears near the bottom of the test page. The test
pattern for the four-color ink cartridge looks like this:
A broken line means a nozzle on
the print head needs to be cleaned.
Yellow
Magenta
Cyan
Black
A missing color means you need to
replace an ink tank (or the black-only cartridge).
The test pattern for the black-only ink cartridge looks like this:
6If you see a broken line, try the following:
m If you see a missing color, replace the ink ta nk containing the missing
color. (Or replace the black-only ink cartridge if that’s what you used to
print the test page.)
m If you see a broken line, clean the print head. (For instr uctions, see the
previous section, “Cleaning the Print Head.”)
86
Chapter 5
Page 87

The image prints wavy or distorte d
Make sure that you are using a recommended type of paper. Check the setting
of the i nte rn al pap er selector above the ink cartridge. If the problem persists,
see the information about service and support that comes with the printer.
Stains appear on printed pages
Stains on the backs or tops of printed pages may mean that ink has spilled
inside the printer. If so, the ink can transfer to the rollers and from there to
the paper.
Tur n the printer off and unplug it. Then open the pri nter a nd carefully clean
the rollers and platen with a soft, dry cloth.
If necessary, you
can clean the rollers
and platen with a
soft, dry cloth.
Troubleshooting
87
Page 88

Ink tanks and cartridges run out of ink too quickly
To extend the life of your ink cartridges, try the following:
m Select Draft print quality in the Print dialog box whenever you can.
m Don’t clean the print head unless necessary.
m Don’t print solid background colors unless necessary.
m Don’t op en the printer’s cover unnecessarily. (After you shut the cover, the
printer cleans the print head, which uses up ink.)
m Don’t unplug the printer or otherwise discontinue power frequently.
m Don’t print the test page unless necessary.
m If you print mostly black and white documents, use the optional high-
performance black ink cartridge.
88
Chapter 5
Page 89

Appendix A
Technical Information
General specifications
Marking engine
m Thermal ink jet engine
Resolution
The resolution differs according to the quality of printing you select. It is
expressed in horizontal by vertical dots per inch (dpi).
m Best: 720 x 360 dpi, with optimal ink density (automatically chosen for
the p a per you’ve selected)
m Normal: 360 x 360 dpi
m Draft: 180 x 180 dpi
Engine speed
m Printing speed depends on the images printed and on the Macintosh
computer used.
89
Page 90

Connector cable
m Apple System/Peripheral-8 cable
Interface
m High-speed serial (RS-422)
m Optional LocalTalk
m Optional EtherTalk
Fonts
m TrueType font support
m 64 TrueType fonts available, consisting of the 43 that come with the
Color StyleWriter 2500 and the 21 that come with Macintosh system
software (see Appendix C for a list of available fonts)
m Adobe PostScript font support when used with Adobe Type Manager
software (sold separately by Adobe Systems Incorporated)
Sheet feeder
m Holds up to 100 sheets of 20-pound (75 grams/meter2) paper or
15 envel opes.
Printing materials
90
m Plain paper: Use 16-pound (60-g/m2) to 24-pound (90-g/m2) paper.
m Accepts most letterhead and colored stock.
m Accepts medium-weight sheets of labels.
m Use #6 or #10 envelopes.
m Apple recommends back-print film, transparency film, coated paper,
Premium Plus Coated Paper, and glossy paper especially designed for the
Color StyleWriter 2500 printer. See your Apple-authorized dealer.
Appendix A
Page 91

Paper sizes in millimeters (mm) and inches (")
m U.S. L etter: 215.9 mm x 279.4 mm (8.5" x 11")
m U.S. L egal: 215.9 mm x 355.6 mm (8.5" x 14")
m A4: 210 mm x 297 mm (8.3" x 11.7")
m Executive: 184.15 mm x 266.7 mm (7.25" x 10.5")
m #6 envelopes: 165.1 mm x 92.1 mm (6.5" x 3.625")
m #10 envelopes: 241.3 mm x 104.8 mm (9.5" x 4.125")
Printable area in millimeters (mm) and inches (")
m Maximum printable line in portrait (normal) orientation: 206.0 mm (8.11")
m Minimum margins
Left and right: 5 mm (0.20")
Top: 3 mm (0.12")
Bottom: 8 mm (0.31")
Dimensions in millimeters (mm) and inches (")
m Height: 211 mm (8.3")
m Width: 365 mm (14.4")
m Depth: 234 mm (9.2")
Weight
m Approximately 3.2 kilograms (6.9 pounds)
Technical Information
91
Page 92

Operating environment
Temperature
m 15° to 30°C (59° to 86° F)
Relative humidity
m 10 percent to 80 percent, noncondensing
Storage environment
Temperature
m 0° to 35° C (32° to 95° F)
Humidity
m 5 percent to 95 percent, noncondensing
Power cons umpti on
Operating
m 20 watts maximum
Power requirements for AC power adapter
92
The electrical requirements vary depending on the country for which your
model was manufactured
Power supply
m AC power adapter
Appendix A
Page 93

Apple part numbers
If you have trouble finding any of the following products, the part numbers
may help you describe them to the dealer. Note, however, that part numbers
sometimes change a s products are enhanced.
Replacement ink tanks for four-color ink cartridge
m Blac k in k tank: M3330G/A
m Color in k tank: M3329G/A
Ink cartridges
m Color in k cartridge: M3328G/A
m High-performance black ink cartridge: M3240G/A
Connector cable
m Apple System/Peripheral-8 cable: M0197LL
Printing materials
m Apple Color Ink-Jet Transparency Film, Letter-size: M2658G/A
m Apple Color Ink-Jet Transparency Film, A4-size: M1959G/A
m Apple Color Ink-Jet Premium Coated Paper, Letter-size: M2952G/A
m Apple Color Ink-Jet Premium Coated Paper, A4-size: M2951G/A
m Apple Color Ink-Jet Premium Plus Coated Paper, Letter-size: M4792G/A
m Apple Color Ink-Jet Premium Plus Coated Paper, A4-size: M4791G/A
m Apple Color Ink-Jet Glossy Paper, Letter-size: M3655G/A
m Apple Color Ink-Jet Glossy Paper, A4-size: M3656G/A
m Apple Color Ink-Jet Back-Print Film, Letter-size: M2953G/A
m Apple Color Ink-Jet Back-Print Film, A4-size: M2954G/A
Technical Information
93
Page 94

Available Options
m Color StyleWriter LocalTalk Module: M4615ZM
m StyleWriter EtherTalk Adapter
North America–style plug: M4775LL
Japan-style plug: M4775J
Continental Europe–style plug: M4775ZM
United Kingdom–style plug: M4775B
Australia-style plug: M4775X
94
Appendix A
Page 95

Kinds of fonts
Appendix B
Using Fonts With the Color StyleWriter 2500
A font is a collection of letters, numbers, and symbols in a distinctive
typographic design. Your Macintosh computer and Color StyleWriter 2500
printer come with a variety of fonts that look great both on your monitor and
on paper.
Fonts come in such a variety of formats that problems can sometimes arise.
This appendix provides the information you need to avoid such problems and
to solve them if they come up.
The Macintosh works with three main kinds of fonts: TrueTyp e, bitmapped,
and PostScript fonts.
Apple provides two kinds of fonts with your Macintosh and the
Color StyleWriter 2500 printer: TrueType and bitmapped. However,
your system can use PostScript fonts as well when it has the proper
software i nstalled.
95
Page 96

TrueType fonts
A TrueType font is scalable, describing a typeface without rigidly specifying a
size. So it looks good whatever size you choose. Tr ueType fonts provide sharp
text at any size on screen or on paper. You can mix and match TrueType fonts
from various font vendors.
TrueType fonts store individual text characters as mathematical descriptions
of lines and cur ves, rather than as groups of pixels (a bitmap). When a
program asks for a character in a particular size, such as 33 points, the
Macintosh uses mathematical calculations to enlarge the character’s outline
to 33 points and fill in the dots for the monitor or printer output.
Sometimes you’ll still get jagged edges when you print a document, even
whe n you use a TrueType font. In nearly all cases, this is because there isn’t
enough memory available to scale the font properly for printing. This may
happen, for example, when you’re running several programs at the same time.
Because you don’t need a separate font for each character size in order for
your printing to look good (as you do with bitmapped fonts), TrueType font
names don’t have numbers in them.
96
How does a font look? To see what a TrueType or bitmapped font looks like
on your screen, double-click the font’s icon to open it. A sample of that font
appears (in three sizes for TrueType fonts and in the size you opened for
bitmapped fonts).
Appendix B
Page 97

You can also use the Key Caps desk accessory to examine fonts. See the
documentation that came with your computer for instructions.
Bitmapped fonts
Bitmapp ed fonts consist of “pictures” of a typeface at specific sizes. For
example, you might have bitmapped fonts at 10-, 12-, and 18-point sizes
installed in your Macintosh computer. For best results you need a separate
font file for each size of character you want to use.
The icon of a bitmapped font (also called a fixed-size font or screen font) has
the si ngle letter A on it. The font’s point size appears at the end of its name.
When you request a bitmapped character, your Macintosh looks for an
installed bitmapped font in the size you specified. (See “How the Macintosh
Looks for Fonts” later in this appendix.) If it can’t find that font, your
Macintosh tries to construct one by scaling a size that it does find.
In most cases, scaled bitmapped fonts don’t look nearly as good as
preinstalled ones. Such scaling is one reason for the jagged edges (sometimes
called “jaggies”) you’ll see on your screen or in a printed document when you
request an uninstalled size (for example, 17-point Gen eva).
Bitmappe d fonts are designed on grids of 72 dots per inch (dpi)—the
standard Macintosh screen resolution. Because of their correspondence to the
standard screen resolution, bitmapped fonts in preinstalled sizes always look
great on your display.
When you print a bitmapped font, it prints at a resolution of 72 dpi. Because
most modern printers can print at resolutions far better than this (your
Color StyleWriter 2500 prints at 360 dpi or better), printed bitmapped fonts
almost always have jagged edges or stairstep sides.
Fortunately, the Macintosh can use bitmapped fonts in combination with
other font formats, reserving bitmaps for the screen and other kinds of fonts
for the printer.
Using Fonts With the Color StyleWriter 2500
97
Page 98

PostScript fonts
PostScript is a page-description language that defines the characters, symbols,
and images that appear on each page of a document. A PostScript font comes
as a pair of fonts: an outline font for the printer and a corresponding
bitmapped font for displaying type on your screen.
No bitmapped font, no menu entry: If your system doesn’t have the bitmapped
font, the PostScript font name won’t appear in your font menu.
Certain printers are designed specifically to work with PostScript fonts.
While your Color StyleWriter 2500 is not a PostScript printer, it can use
PostScript fonts if you have Adobe Type Manager software installed. Adobe
Type Manager uses printer fonts to generate clean-looking screen text at any
size. (This software is included with some installations of system software 7.5.
It is available from your local Apple-authorized dealer for version 7.1.)
IMPORTANT
Adobe Type Manager is not an Apple product. It is made and
supported by Adobe Systems Incorporated. Only the version that comes with
Apple Macintosh system software version 7.5 is supported by Apple.
PostScript pri nter fonts have no numbers associated with their names,
because a single font can be scaled to any size. Many companies make
PostScript fonts; the following illustration shows icons for Adobe, Bitstream,
and Fontek PostScript fonts, plus a generic PostScript font icon.
QuickDraw GX imaging technology
A QuickDraw GX font is a Tr ueType or PostScript font with an additional set
of sophisticated features. These features include extremely accurate
typographic elements such as ligatures and kerning, plus the ability to skew,
rotate, and add perspective to text in extremely flexible ways.
98
Appendix B
Page 99

How TrueType fonts work with other kinds of fonts
Although TrueType fonts offer distinct advantages, your Color StyleWriter
2500 printer can also use other kinds of fonts.
TrueType and bitmapped fonts
Macintosh computers running System 7 come with both bitmapped (screen)
fonts and TrueType fonts installed. This maintains consistency with
documents created on Macintosh systems that don’t have TrueType fonts.
Bitmapp ed fonts look better displayed on the monitor, while TrueType fonts
look better on a high-resolution printer such as the Color StyleWriter 2500.
So, if you have both versions of the font available, the Macintosh uses the
bitmapped version when displaying the font on the screen (provided that the
size you’re using is available) and the TrueType version when printing the font
on the Color StyleWriter 2500. To force the Macintosh to use only TrueTyp e
fonts everywhere, you must remove the bitmapped fonts.
®
For example, if a document uses 12-point Times
, available in that size as a
bitmapped font and as a TrueType font, the system uses the bitmapped font on
the screen and the TrueTyp e font on the printer. If a document uses 4-point
Times, the sys tem scales the TrueType font to that size for both the screen and
the printer, because a bitmapped version isn’t available.
Using Fonts With the Color StyleWriter 2500
99
Page 100

Using only TrueType fonts produces a closer match between the appearance
of type on the screen and on paper. However, a document you’ve already
created with bitmapped fonts will be reformatted with the corresponding
TrueType fonts, and line breaks in the document may change. Similarly, if a
document is created on a system that has TrueType fonts or Adobe Type
Manager software i nstalled, it may have different spacing, kerning, and so on,
when op ened on a system that doesn’t have TrueType fonts or Adobe Type
Manager software.
Ke epi ng tw o font versions available
If you have a TrueType version of a font, you don’t need a bitmapped version.
However, although keeping both versions of a font takes up more disk space,
there are several advantages to doing so.
Bitmapp ed fonts are hand-designed: a graphic artist planned each character
in each font to look good on a screen. TrueType fonts are scaled by the
computer to match what you request. At smaller point sizes, the bitmaps may
appear shar per.
Additionally, scaling fonts takes time—sometimes up to several seconds in
slower Macintosh computers—but all Macintosh computers can display a
bitmapped font instantly.
100
TrueType and PostScript fonts
PostScript fonts were designed as fonts for PostScript printers. The Color
StyleWriter 2500 wasn’t designed to use PostScript. However, if you have
Adobe Type Manager software installed, your computer can both display and
print PostScript fonts.
Use different names: To avoid confusing the printer software, be sure that you
don’t install both TrueType and PostScript versions of the same font. For
example, do not have a PostScript font file called Times and a TrueType font
file called Times installed in your system at the same time.
Appendix B
 Loading...