

Page 1

Share-UPS™
AP9207
Page 2

Thank You!
Thank you for selecting APC Share-UPS (AP9207). It has been designed for many years
of reliable, maintenance-free service in combination with your American Power Conversion (APC) uninterruptible power supply (UPS). APC is dedicated to the development of
high-performance electrical power conversion and control products. We hope that you
will find this product a valuable, convenient addition to your computing system.
Please read this manual!
tions that will help you get the most from your Share-UPS unit.
Save this manual! It includes instructions for obtaining warranty service.
It provides important safety, installation, and operating instruc-
Radio frequency interference
WARNING: Changes or modifications to this unit not expressly approved by the party
responsible for compliance could void the user’s authority to operate this equipment.
NOTE: This equipment has been tested and found to comply with the limits for a Class A
digital device pursuant to Part 15 of the FCC rules. These limits are designed to provide
reasonable protection against harmful interference when the equipment is operated in a
commercial environment. This equipment generates, uses, and can radiate radio frequency
energy and, if not installed and used in accordance with this user manual, may cause
harmful interference to radio communications.
Shielded communications cables must be used with this
unit to ensure compliance with the Class A FCC limits.
This digital apparatus does not exceed the Class A limits for radio noise emissions from
digital apparatus set forth in the Radio Interference Regulations of the Canadian Department of Communications.
Le présent appareil numérique n’émet pas de bruits radioélectriques dépassant les limits
applicables aux appareils numériques de la Class A prescrites dans le Règlement sur le
brouillage radioélectrique édicté par le ministère des Communications du Canada.
Page 3

Contents
Chapter 1—Preliminary Information . . . . . . . . . . . .1
Introduction . . . . . . . . . . . . . . . . . . . . . . . . . . . . . . . . . . . . . . 1
Overview 1
Features of Share-UPS 2
Hardware and software requirements 3
Choosing simple signaling cables 4
Safety warning 4
Product Description . . . . . . . . . . . . . . . . . . . . . . . . . . . . . . . . 5
Share-UPS inventory 5
Share-UPS rear panel 6
Basic monitoring ports 6
Advanced monitoring port 7
Management port 7
LEDs 8
Configuration DIP switches 8
To UPS cable 9
Optional Power input 9
Key Concepts . . . . . . . . . . . . . . . . . . . . . . . . . . . . . . . . . . . . 10
Simple versus smart signaling 10
Master server versus other servers 11
Configuring PowerChute plus for simple signaling 12
Low Battery signal 13
Scheduled shutdowns 13
Setup overview 14
i
Page 4

Contents
continued
Chapter 2—Setting Up Share-UPS. . . . . . . . . . . . .15
Installing Multiple Accessories . . . . . . . . . . . . . . . . . . . . . . . . 15
Introduction 15
Multiple Share-UPS units 15
Priority of APC accessories 16
Expanding SmartSlot capacity 17
Installing Share-UPS . . . . . . . . . . . . . . . . . . . . . . . . . . . . . . . 18
Planning a location for Share-UPS 18
Warning 18
Reminder 18
Installation options 18
Please recycle 18
Mounting Share-UPS in a NetShelter 19
Mounting Share-UPS on a wall 20
After installation 20
Connecting Share-UPS . . . . . . . . . . . . . . . . . . . . . . . . . . . . . 21
Connection procedure 21
After connecting Share-UPS 22
Configuring Share-UPS . . . . . . . . . . . . . . . . . . . . . . . . . . . . . 23
Shutdown modes 23
DIP switches 23
Confirmed shutdown mode 24
Behavior of Confirmed shutdown mode 24
plus
PowerChute
Confirmed shutdown mode and the Advanced port 25
Until Low Battery shutdown mode 26
Timer shutdown mode 26
Soft timer 27
Completing the configuration 27
Testing Share-UPS 28
support for Confirmed shutdown mode 25
ii
Page 5

Contents
continued
Chapter 3—Using the Share-UPS Menus . . . . . . . .29
Using the Management Port . . . . . . . . . . . . . . . . . . . . . . . . . 29
Introduction 29
Out-of-band notification 29
UPS status display 30
UPS control 30
Share-UPS configuration 30
Connecting to the Management port (local) 30
Connecting to the Management port (via modem) 31
Logging on to Share-UPS 31
Main Menu . . . . . . . . . . . . . . . . . . . . . . . . . . . . . . . . . . . . . . 32
Main menu 32
Navigating through the menus 32
Menu description 33
Main menu definitions 34
UPS Status Display . . . . . . . . . . . . . . . . . . . . . . . . . . . . . . . . 35
Menu description 35
UPS Status display 35
UPS Status display definitions 35
UPS Control Menu . . . . . . . . . . . . . . . . . . . . . . . . . . . . . . . . 38
Menu description 38
UPS Control menu 38
UPS Control menu definitions 39
Share-UPS Settings Menu . . . . . . . . . . . . . . . . . . . . . . . . . . . 40
Menu description 40
Share-UPS Settings menu 40
Share-UPS Settings menu definitions 40
iii
Page 6

Contents
Paging Setup Menu . . . . . . . . . . . . . . . . . . . . . . . . . . . . . . . 42
continued
Paging and Share-UPS 42
Format of reported events 42
Share-UPS modem command string 42
Typical paging sequence 43
Paging Setup menu 44
Common modem commands 44
Paging Setup menu definitions 45
Chapter 4—Product Information . . . . . . . . . . . . .47
Warranty Information . . . . . . . . . . . . . . . . . . . . . . . . . . . . . . 47
Limited warranty 47
Obtaining service 47
Warranty limitations 48
Troubleshooting . . . . . . . . . . . . . . . . . . . . . . . . . . . . . . . . . . 49
If you have problems with your Share-UPS 49
Troubleshooting 49
If problems persist 52
Life-Support Policy . . . . . . . . . . . . . . . . . . . . . . . . . . . . . . . . 53
General policy 53
Examples of life-support devices 53
Specifications . . . . . . . . . . . . . . . . . . . . . . . . . . . . . . . . . . . . 54
Basic port pin assignments 54
Advanced port pin assignments 56
Management port pin assignments 58
Product specifications 59
Index. . . . . . . . . . . . . . . . . . . . . . . . . . . . . . . . . . . . . . . . . . . 61
iv
Page 7

Chapter 1 Preliminary Information
Introduction
Overview
Share-UPS
APC
(
interface ports for your
(AP9207)
is an American Power Conversion
) accessory that provides seven additional computer
APC UPS
. It allows the
UPS
to work
in conjunction with your power management software to
provide safe system shutdown in extended power outages
for up to eight network servers or other devices. If necessary, Share-UPS can shut down the UPS when all attached
devices have confirmed OS shutdown.
The first interface port makes it possible to provide
UPS
advanced
and power management functions to all pro-
tected devices. You can provide power management with
APC
PowerChute©
APC
as the
Web/
network connectivity and the Call-
plus
software and
SNMP
Management Card (
UPS
UPS
accessories such
AP9606
©
II
AP9608
(
) for
) remote
management device.
Share-UPS draws power from the Computer Interface
port of the
UPS
or, with an optional AC power adapter
(AP9505[i]) not included), from an external source. It monitors the
UPS
and reports power conditions (e.g., On
Battery, Low Battery, On Line) to all attached devices.
Continued on next page
1
Page 8

Introduction
continued
Features of
Share-UPS
The following list shows some of the features of ShareUPS. Your Share-UPS unit…
• Can be used as a freestanding desktop unit or
mounted on a wall, in an
or other 19" rack.
• Works well in a heterogeneous network. Servers running different operating systems can monitor the
UPS
same
• Supports advanced or simple signaling on its
Advanced port.
• Can delay shutdown of the
shut down gracefully.
• Can be connected to a modem or terminal for sending
and receiving status and control information between
the UPS and Share-UPS. See “Using the Share-UPS
Menus,” on page 29.
• Allows you to restart hung servers.
• Has operating modes that cause the
after confirmation from all protected devices or after
an interval set by the user. See “Configuring ShareUPS” on page 23.
• Does not depend on the operation of the network to
protect connected devices. As a hard-wired accessory, Share-UPS reliably conveys important status
messages during poor power conditions.
simultaneously.
APC
NetShelter enclosure,
UPS
until all servers have
UPS
to shut down
Continued on next page
2
Page 9

Introduction
continued
Hardware and
software
requirements
Share-UPS requires:
APC UPS
•An
–Smart-
AP600, AP900, AP1250, AP2000, SUVS420,
SUVS650, SUVS1000, SUVS1400, SU620
–Matrix-
less than x
– Symmetra
APC
•
PowerChute software (simple signaling) or
of one the following models:
®
UPS
, except models
™
UPS
, except models with serial numbers
9412
.
™
PowerArray™.
AP250, AP400,
PowerChute plus (advanced or simple signaling) software. See “Simple versus smart signaling: Table 3”
on page 10.
• A communications cable (for each connected device)
that monitors shutdown signals. See “Choosing simple signaling cables: Table 1” on page 4.
Continued on next page
.
3
Page 10
Introduction
continued
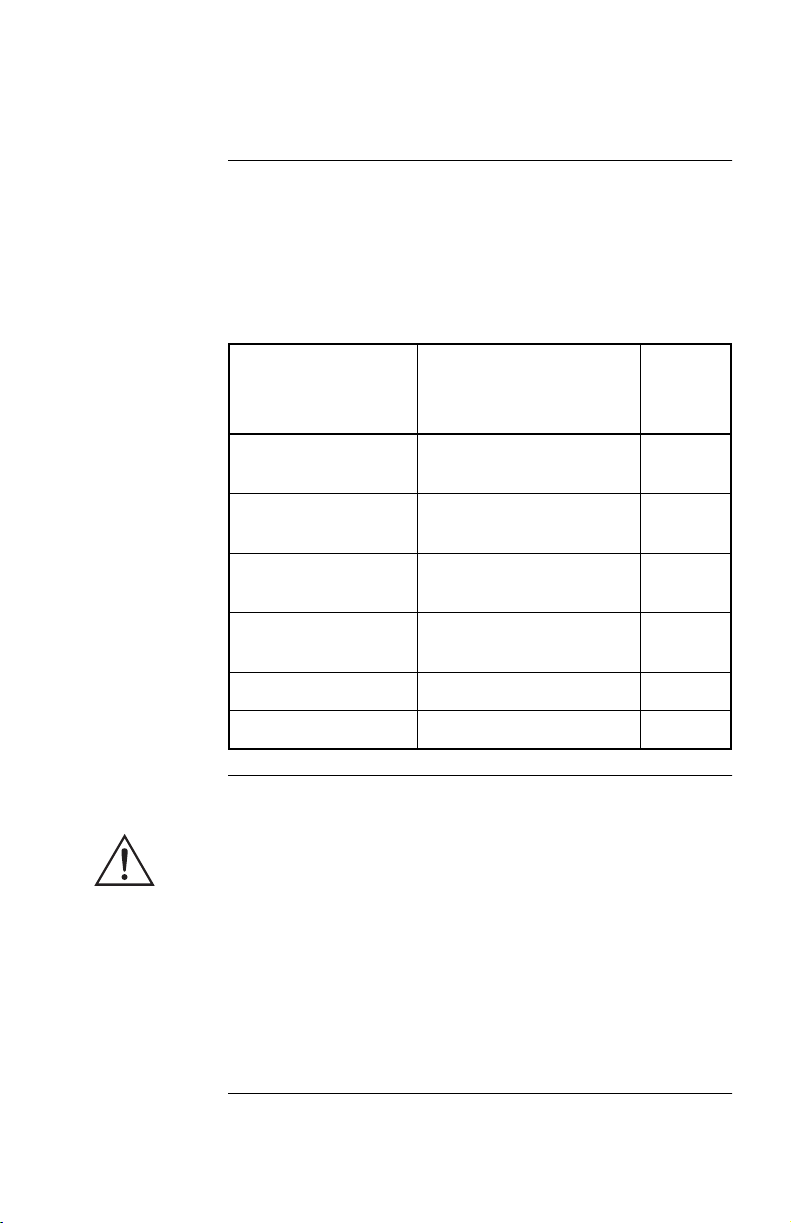
Choosing simple
signaling cables:
Table 1
This table lists the simple signaling cables for use with the
systems supported by Share-UPS. When ordering a cable,
provide the Part Number. See
Note:
For smart signaling on the Advanced port, use the
cable supplied with your APC UPS (940-0024).
IF you want to
connect Share-UPS
to a(n)…
Windows or NetWare
server
UNIX
server
IBM AS/400
Macintosh AppleShare server
15-ft extension cable UPS Interface Extension
50-ft extension cable Isolated Extension Cable
Table 1: Choosing simple signaling cables
THEN order…
UPS LAN
UNIX
Cable
AS/400
9404
PowerChute for Macintosh
(software and cable)
Manager Cable
Basic Signaling
Cable Model
9402/
Part
Number
940-0020
AP9823
940-0006
AP9001
AP9815
AP9825
Safety warning
4
Share-UPS is to be used only in conjunction with an
UPS
. Use only
APC UPS
monitoring cables. Do not connect
APC
a computer to any Share-UPS port using a “straightthrough” wired extending cable. Connections using a
UPS
or cable made by any other manufacturer may cause damage or improper operation of the Share-UPS unit, the
UPS
,
or the computer.
Do not operate Share-UPS where the ambient temperature
or humidity is outside the limits listed in “Product specifications: Table 14” on page 59.
Page 11

Product Description
Share-UPS
inventory:
Figure 1
Share-UPS consists of the parts shown in the figure below.
Figure 1:Share-UPS inventory
Continued on next page
5
Page 12
Product Description
Basic Ports
LEDs
UPS
Connection
Cable
P
O
W
E
R
TO
UPS
MANAGEMENTPORT
12
BASIC PORTS
ADVANCEDPORT
S
T
A
T
U
S
O
N
B
A
T
T
L
O
B
A
T
T
4321
01
..
OPTIONAL
POWER
24VDC
P
O
W
E
R
TO
UPS
1
ADVANCED PORT MANAGEMENT PORT
S
T
A
T
U
S
O
N
B
A
T
T
L
O
B
A
T
T
4321
01
. .
OPTIONAL
POWER
24VDC
}
345678
continued
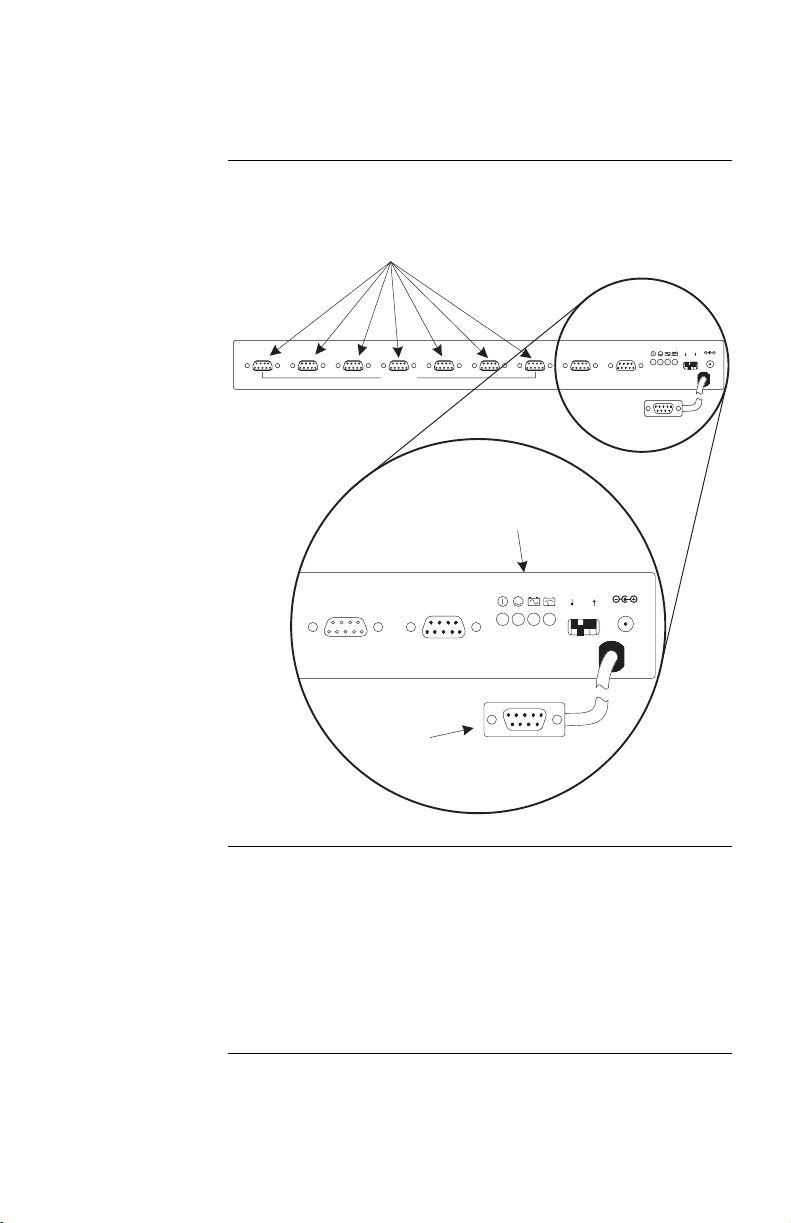
Share-UPS rear
panel:
Figure 2
The following figure shows the rear panel of Share-UPS.
Basic
monitoring
ports
6
Figure 2:Share-UPS rear panel
Ports 2–8 on the rear panel of Share-UPS are called Basic
ports because they supply simple UPS signaling for On Battery and Low Battery conditions in the UPS. For further
information see “Simple versus smart signaling: Table 3,”
on page 10. For Basic port specifications, see “Basic port
pin assignments,” on page 54.
Continued on next page
Page 13

Product Description
continued
Advanced
monitoring port
Management
port
Port 1 is called the Advanced port because it supplies smart
signaling, which provides the advanced capabilities available to a server running PowerChute plus software. The
Advanced port provides full access to the Computer Interface port of the UPS.
The Advanced port can also function as a Basic port (see
“Basic monitoring ports,” on page 6).
The Management port allows you to connect a modem or
terminal to configure the Share-UPS unit and the connected
UPS. With a modem, you can configure Share-UPS to dial a
pager for out-of-band management. (See “Using the ShareUPS Menus,” on page 29.)
For direct connection to the Management port, you must use
the Management cable supplied with the Share-UPS unit
(APC P/N 940-0103).
Continued on next page
7
Page 14

Product Description
p
g
g
y
g
g
g
g
continued
LEDs:
Table 2
The Share-UPS
LEDs
provide important information concerning operation of the unit. Refer to the table below for a
description of the conditions indicated by the
IF the LED
labeled…
Power
Status
On Batt
Lo Batt
Table 2: LEDs
is… THEN Share-UPS…
on is
flashin
on
off
flashin
on
off
on
off
owered on.
is not working properly.
has established communication
with the UPS.
has lost (or has not established)
communication with the UPS.
failed the self-test.
is detecting an On Battery condition
in the UPS (unless the UPS is on batter
during a self-test or is perform-
a run time calibration).
in
is not detectin
dition in the UPS.
is detectin
tion in the UPS.
is not detectin
dition in the UPS.
a Low Battery condi-
LED
.
an On Battery con-
a Low Battery con-
Configuration
DIP switches
8
The Share-UPS Configuration DIP switches control the
shutdown operation of the unit. See “Configuring ShareUPS” on page 23.
Continued on next page
Page 15

Product Description
continued
To UP S cabl e
Optional Power
input
The cable labeled “T o UPS” connects the Share-UPS unit to
the UPS. The cable connector normally plugs into the Computer Interface port on an APC UPS.
Share-UPS normally receives its power from the UPS
through the T o UPS cable. The Optional Power input allows
you to power the Share-UPS unit from an external source,
using a standard 24V AC/DC power adapter (AP9505[i]),
available from APC. Use the Optional Power input if you
are using several UPS accessories, and the expected draw
will exceed the capability of the UPS.
Share-UPS passes power from the Optional Power input to
the Advanced port, allowing you to power multiple accessory devices from an external source of power.
9
Page 16

Key Concepts
g
g
grap
g
g
g
g
y
g
p
pag
Simple versus
smart signaling:
Table 3
The communication between an APC UPS and a connected
server can be of two types: simple signaling or smart signaling. This table provides information that distinguishes the
two types.
Communication Types
Item
Simple Signaling Smart Signaling
UPS monitorin
features
Software
used
Port type Basic or Advanced Advanced
UPS
models
supported
–On Battery signal
–Low Battery signal
PowerChute
(or PowerChute
confi
signaling)
–Smart-UPS
–Matrix-UPS
†
–S
ured for simple
PowerArray
mmetra
plus
–On Battery signal
–Low Battery signal
–Continuous advanced
monitorin
PowerChute
PowerChute
confi
ured for smart sig-
nalin
–Smart-UPS,
–Matrix-UPS, and
–Symmetra
hs
plus
PowerArray
visible in
plus
Communication
cables
Table 3: Simple versus smart signaling
Cables in the interface
kit associated with each
OS. See “Choosin
le signaling cables:
Table 1” on
sim-
e 4.
Cable supplied with
PowerChute
plus
† See “Hardware and software requirements,” on page 3
for a listin
of APC UPSs supported by Share-UPS.
Continued on next page
10
Page 17

Key Concepts
continued
Master server
versus other
servers
A “master” server is a server or other device connected to
port 1, the Advanced port of Share-UPS. This server uses
PowerChute plus, configured for smart signaling, to monitor and control the UPS. Although the Advanced port on
Share-UPS can provide simple signaling, we strongly recommend using it for smart signaling with the advanced
capabilities of PowerChute plus.
Servers connected to the Basic ports of Share-UPS use simple signaling with PowerChute or PowerChute plus to
provide UPS shutdown capabilities and advanced notification features. If you are running PowerChute plus on these
servers, you must configure it for simple signaling. See
“Configuring PowerChute plus for simple signaling,” on
page 12.
Continued on next page
11
Page 18

Key Concepts
continued
Configuring
PowerChute
for simple
signaling
To configure PowerChute plus for simple signaling. Use
either
one
of these procedures. Note that steps 4–8 are com-
plus
mon to both procedures.
1 (Re)install PowerChute plus. When the installation
program prompts for the UPS Type, select “BackUPS” and continue with the installation, including
a reboot of the system.
2 Run PowerChute plus and connect to the UPS.
3 Verify that the status line on the PowerChute plus
screen shows “On Line.” Proceed with step 4.
OR
1 With PowerChute plus running, select
cation Parameters
from the
Configuration
menu.
2Click
Simple Signalling
. Click OK.
3 Close PowerChute plus.
4 If the UPS had previously been connected using
smart signaling:
a Unplug the UPS.
b Turn off the UPS output by pressing the Off
button for at least 5 seconds.
c Change communication cables, using the sim-
ple signaling cable from the interface kit. (See
“Choosing simple signaling cables: T able 1” on
page 4.)
5 Restart PowerChute plus and attach the server to
the UPS.
6 Verify that the status of the UPS on the
PowerChute plus screen shows “On Line.”
7 Simulate a utility power failure.
8 Confirm that the On Batt LED of Share-UPS is on,
indicating that Share-UPS is sending an On Bat-
tery signal to the server. See “LEDs: Table 2” on
page 8.
Communi-
12
Continued on next page
Page 19

Key Concepts
continued
Low Battery
signal
Scheduled
shutdowns
Share-UPS generates a Low Battery signal when it detects a
Low Battery condition at the UPS. Share-UPS generates a
Low Battery signal under certain other conditions according
to the configured shutdown mode (see “Configuring ShareUPS” on page 23), when it may force a Low Battery signal
and an On Battery signal, causing the servers to shut down.
The duration of the Low Battery signal is defined in the
UPS configuration. (Refer to the UPS documentation for
information on setting the duration of the Low Battery
signal.)
When a server connected to the (Advanced) Computer
Interface port on Share-UPS is running UPS-monitoring
software such as PowerChute plus, you can execute scheduled or supervised UPS shutdowns for the servers
connected to Share-UPS. Share-UPS receives the shutdown
signal and sends the following messages to all attached
servers or devices:
• On Battery and Low Battery signals (for the Low
Battery signal duration set in the UPS)
• Shutdown commands (e.g., Sleep, Turnoff, etc., as
requested by PowerChute plus)
The servers connected to the Basic ports shut down gracefully before they lose power when the UPS output is turned
off.
Continued on next page
13
Page 20

Key Concepts
continued
Setup overview
To set up Share-UPS, you will be required to perform the
following procedures as applicable:
1 If you are using Share-UPS with other APC acces-
sories: Determine where to install Share-UPS with
respect to other accessories. See “Installing Multiple Accessories” on page 15.
2 Install Share-UPS. See “Installing Share-UPS” on
page 18.
3 Connect the protected devices. See “Connecting
Share-UPS” on page 21.
4 Configure Share-UPS for automatic shutdown:
a Set the Configuration DIP switches. See “Con-
figuring Share-UPS” on page 23.
b Access the Share-UPS menus through the Man-
agement port to complete configuration. See
“Using the Share-UPS Menus” on page 29.
5 Test the operation of Share-UPS. See “Testing
Share-UPS” on page 28.
14
Page 21

Chapter 2 Setting Up Share-UPS
Installing Multiple Accessories
Introduction
Multiple
Share-UPS units
If your UPS configuration uses more than one APC accessory, you must install them in the correct order for them to
work together properly. Connect the Share-UPS unit to the
Computer Interface port of the UPS, installing only a Measure-UPSII device in a SmartSlot accessory slot of the UPS.
Install all accessories according to priority , referring to “Priority of APC accessories: Table 4,” on page 16.
Note: SmartSlot accessories fit into APC UPSs and acces-
sories equipped with a SmartSlot accessory slot.
External accessories connect to the Computer Interface port of the UPS or to the Advanced port of other
APC accessories (including Share-UPS).
If you need more than the eight ports available with
Share-UPS, you can daisy-chain up to 5 Share-UPS units
together, provided that the total number of accessories
(including Share-UPS units and APC’s PowerView™) does
not exceed 10.
Note: When daisy-chaining Share-UPS units, you may need
to use a power adapter (see “Optional Power input,”
on page 9). Y ou may also need to lengthen the timeout
delay in PowerChute plus by editing the [ ups ] section of
pwrchute.ini
to include “TimeoutFactor = 100”
(or greater) to keep the softwar e from interrupting the
daisy chain’s communications.
Each added Share-UPS unit provides seven more Basic
ports. Only one Advanced port in the daisy chain is available for connection to the master server. For connection
instructions, see step 2 of “Connection procedure” on page
21.
Continued on next page
15
Page 22

Installing Multiple Accessories
p
g
g
g
g
y
g
p
continued
Priority of APC
accessories:
Table 4
Install SmartSlot accessories as dictated by the following
table. An accessory with higher priority is to be placed in
the accessory slot with the higher number.
Note:
Share-UPS has the same priority as the SmartSlot
Interface Expander.
Accessory P/N Priority Position
ter
AP9605
AP9603
AP9606
AP9608
AP9610
Highest Highest-numbered
slot.
Secondhi
hest
Thirdhighest
Second-hi
numbered slot (hi
est if no PowerNet
SNMP or Web/
SNMP
Card is present.)
Any slot numbered
lower than PowerNet
SNMP
Web/
agement Card &
Callhi
UPS, Shareand Measure-
hest-
Management
Adapter,
SNMP
Man-
UPSII
, and
her than Share-
UPS
UPS II
,
PowerNet
SNMP Ada
SNMP
or Web/
Mana
ement
Card
UPS®II
Call-
Rela
I/O
Module
h-
.
®
AP9607
AP9207
AP9612T
AP9612TH
Second
lowest
Lowest In the UPS accessory
Slot higher than
Measure-
lower than all others
slot.
UPSII and
.
Interface
Ex
ander
Measure-
II
Table 4: Priority of APC accessories
UPS
Continued on next page
16
Page 23

Installing Multiple Accessories
continued
Expanding
SmartSlot
capacity
If you need additional SmartSlot capacity between the
Share-UPS unit and the master server, you can purchase an
APC Expansion Chassis (AP9600) or Triple Chassis
(AP9604). For installation instructions, refer to the user
documentation supplied with each of these products.
17
Page 24

Installing Share-UPS
Planning a
location for
Share-UPS
War ning
Reminder
Installation
options
You may install Share-UPS in any protected environment;
the location should be central to all servers powered by the
UPS.
Do not operate Share-UPS where the ambient temperature
or humidity is outside the limits listed in “Product specifications: Table 14,” on page 59.
Before you install Share-UPS, install any required power
management software (PowerChute, PowerChute
plus
, or
software required by your operating system). If you plan to
use PowerChute
plus
on servers connected to the Basic
ports of Share-UPS, see “Master server versus other servers” on page 11 and “Configuring PowerChute plus for
simple signaling” on page 12.
You can install Share-UPS in one of three ways:
• Place on a desktop.
• Mount in a NetShelter or other 19" rack. For mounting instructions, see “Mounting Share-UPS in a NetShelter: Figure 3,” on page 19.
• Mount on a wall. For mounting instructions, see
“Mounting Share-UPS on a wall: Figure 4,” on page
20.
Please recycle
18
The shipping materials for Share-UPS are recyclable. Please
reuse or dispose of them appropriately.
Continued on next page
Page 25

Installing Share-UPS
continued
Mounting
Share-UPS in
a NetShelter:
Figure 3
To mount Share-UPS in a NetShelter or other 19" rack:
1 Fasten the mounting brackets (supplied) to the
Share-UPS unit as shown, using the self-tapping
screws (supplied).
2 Attach the Share-UPS assembly to the rack, using
mounting hardware supplied with your NetShelter
enclosure or other rack.
Figure 3:Mounting Share-UPS in a NetShelter
Continued on next page
19
Page 26

Installing Share-UPS
continued
Mounting
Share-UPS
on a wall:
Figure 4
To mount Share-UPS on a wall:
1 Fasten the mounting brackets (supplied) to the
Share-UPS unit as shown, using the self-tapping
screws (supplied).
2 Attach the Share-UPS assembly to the wall, using
appropriate mounting hardware (not supplied).
After installation
20
Figure 4:Mounting Share-UPS on a wall
After installing Share-UPS, proceed with “Connecting
Share-UPS” on page 21.
Page 27

Connecting Share-UPS
Connection
procedure
To connect the devices, perform the following steps in the
order given.
1 Verify that all protected loads are powered by the
same UPS to which the Share-UPS unit will be
connected.
2 Verify that no shutdown software is running.
3 Connect the To UPS cable of the Share-UPS unit
to the Computer Interface port on the back of your
UPS. Fasten securely.
If daisy-chaining multiple Share-UPS units
4
:
Connect the To UPS cable of each subsequent
Share-UPS unit to port 1, the Advanced port, of
the previous unit.
Note: When connecting multiple Share-UPS units,
you must configure all units identically. See
“Configuring Share-UPS,” on page 23.
If using Optional Power input (see “Optional
5
Power input” on page 9)
: Plug the external power
adapter into the UPS and into the Optional Power
input on the rear panel of the Share-UPS unit (or
the first unit in a daisy chain).
Continued on next page
21
Page 28

Connecting Share-UPS
continued
Connection
procedure,
continued
6 Connect the master server to port 1, the Advanced
port of Share-UPS, using the smart-signaling cable
(940-0024) supplied with your UPS. (See “Master
server versus other servers” on page 11.)
Note
: A server not supported by PowerChute plus
must use simple signaling with the appropriate cable. (See “Choosing simple signaling
cables: Table 1” on page 4.)
If an accessory, such as Measure-
an Expansion Chassis
, is already using the
UPS II or
(Advanced) Computer Interface port of the
UPS
, connect the master server to the
UPS
Monitoring port on the accessory. (Accessories label this port in different ways, but the
function—replicating the Computer Interface port of the
UPS
—is the same.)
7 Connect the other server(s) to the Basic ports on
Share-UPS, using
APC
cables. See “Choosing
simple signaling cables: Table 1” on page 4.
Note
: Servers connected to the Basic ports of
Share-UPS use simple signaling for monitoring the UPS. If these servers use
PowerChute plus, this software must be
configured for simple signaling. See “Configuring PowerChute plus for simple
signaling” on page 12.
After
connecting
Share-UPS
22
After you have completed the connection procedure, continue with “Configuring Share-UPS” on page 23.
Page 29

Configuring Share-UPS
y
Shutdown
modes
DIP switches:
Table 5
To configure Share-UPS, you must choose one of the three
available modes of automatic shutdown of the UPS. Each
shutdown mode is described in this section.
• Confirmed
• Until Low Battery
•Timer
Select the shutdown mode by using the DIP switches as
described in the following table. (An abbreviated form of
this table also appears on the top panel of Share-UPS.)
Switch Setting (
Shutdown Mode
4321
Confirmed 0 0 0 *
Until Low Batter
2 min. 0 1 0
5 min. 0 1 1
10 min. 1 0 0
Timer
15 min. 1 0 1
001
=0, ↑ =1)
↓
N/A
N/A
N/A
N/A
N/A
30 min. 1 1 0
Soft Timer 1 1 1
Await
* Server on
Advanced Port
Table 5: DIP switches
Confirmation
Treat as
Confirmed
0000
0001
N/A
N/A
Continued on next page
23
Page 30

Configuring Share-UPS
continued
Confirmed
shutdown mode
Behavior of
Confirmed
shutdown mode
In Confirmed mode, Share-UPS shuts down the
UPS
after
all connected servers have signaled that they have completed shutdown of the operating system.
Note
: Do not use Confirmed mode if any server connected
to Share-UPS Basic ports is incapable of sending a
shutdown confirmation signal. See “PowerChute plus
support for Confirmed shutdown mode,” on page 25.
Unoccupied ports and ports connected to unpowered servers
are considered to have confirmed shutdown.
If utility power returns before any connected server has signaled shutdown of the operating system, Share-UPS returns
to On Line status.
If Share-UPS detects a Low Battery condition in the UPS
before all connected servers have signaled shutdown of the
operating system, it notifies the servers that the UPS battery
is exhausted, shutting down the UPS after the Low Battery
Signal Time has elapsed.
If utility power returns after at least one server has confirmed shutdown of the operating system, but before all
servers have confirmed system shutdown, Share-UPS forces
On Battery and Low Battery signals so that the remaining
servers shut down as well. Share-UPS sends the forced Low
Battery signal for a period of time equal to the Low Battery
Signal Time and then shuts down the
UPS
, which cycles
power to restart the servers.
24
If none of the Share-UPS ports are connected to a powered
server, Share-UPS operates in Until Low Battery shutdown
mode, as described in “Until Low Battery shutdown mode,”
on page 26.
Continued on next page
Page 31

Configuring Share-UPS
continued
PowerChute
support for
Confirmed
shutdown mode
Confirmed
shutdown mode
and the
Advanced port
plus
Some versions of PowerChute plus do not support Confirmed shutdown mode when set up for simple signaling.
Other versions require some editing of the
pwrchute.ini
in the PowerChute plus installation directory. To find out
whether your version of PowerChute plus supports Confirmed shutdown mode, go to http://support.apcc.com/ and
find the link to “What Versions of PowerChute plus Support
Confirmed Shutdown Mode?” under
mation|Share-UPS|Installation Planning
Preinstallation Infor-
.
If you configure Share-UPS in Confirmed shutdown mode
by setting DIP switches 2, 3, and 4 in the down (0) position,
you must set DIP switch #1 to determine the behavior of the
server or device connected to the Advanced port.
When Share-UPS is configured for Confirmed mode, DIP
switch #1 behaves as follows:
• With DIP switch #1 in the 0 (down) position, the
Advanced port operates normally , awaiting shutdown
confirmation in the Confirmed shutdown mode.
• With DIP switch #1 in the 1 (up) position, Share-UPS
treats the Advanced port as always confirmed. Use
this setting when the Advanced port will not be
receiving a shutdown confirmation signal.
Note
:When the shutdown mode of Share-UPS is set to Until
Low Battery or Timer, the position of DIP switch #1 has no
effect.
file
Continued on next page
25
Page 32

Configuring Share-UPS
continued
Until Low
Battery
shutdown mode
Timer shutdown
mode
Until Low Battery shutdown mode is similar to the standard
operation of the
allows the
UPS
. During a utility failure, Share-UPS
UPS
to run on battery until utility power is
restored, or until the battery is exhausted. If Share-UPS
detects a
UPS
Low Battery condition, it sends a Low Battery signal on all ports for a period of time equal to the Low
Battery Signal Time and then shuts down the
UPS
.
If utility power returns after the Low Battery timer has
begun, Share-UPS will continue the countdown and force
the UPS to cycle power.
This mode is useful for applications which require maximum run time from the UPS.
In Timer shutdown mode, Share-UPS allows the UPS to
operate on battery for a user-specified length of time before
shutting down the
UPS
. See “DIP switches: Table 5” on
page 23 for the available timer settings.
If power returns before the timer has run out, Share-UPS
returns to On Line status. When the timer runs out or when
Share-UPS detects a Low Battery condition in the
UPS
,
Share-UPS sends a Low Battery signal for a period of time
equal to the Low battery signal time and then shuts down
UPS
the
Note
.
: If you are using PowerChute software, set the shut-
down delay for a time longer than Share-UPS timer
setting. Otherwise, if the power returns after the
server shuts down, the server may not restart. To set
the shutdown delay, go to
Actions
and select UPS On Battery from the Event
Configuration|Event
list and Shut Down Server in the Action box. Click
Options
Sequence in __ Seconds. Click
and enter a setting for Begin Shutdown
OK
.
26
Continued on next page
Page 33

Configuring Share-UPS
continued
Soft timer
Completing the
configuration
The soft timer allows you to set a custom duration for the
timer, from 0 to 99 minutes. One of the DIP switch settings
in Timer shutdown mode enables the soft timer, whose
default is 60 minutes. T o change the soft timer duration, use
the Share-UPS Settings menu. See “Share-UPS Settings
menu: Figure 8,” on page 40.
After you set the DIP switches, perform the following steps
in the order given.
1 If you want to change Share-UPS settings: Com-
plete the configuration of Share-UPS by accessing
the Share-UPS Settings menu. For information on
how to connect to the Share-UPS menu system,
see “Using the Management Port” on page 29.
2 If configuring multiple Share-UPS units: repeat
step 2 for each unit, if applicable. You must configure each Share-UPS unit identically.
3 Test the configuration. See “Testing Share-UPS,”
on page 28.
Continued on next page
27
Page 34

Configuring Share-UPS
continued
Test i ng
Share-UPS
To test the operation of Share-UPS, perform the following
steps in the order given. If Share-UPS fails this test, see
“Troubleshooting: Table 12” on page 48.
1 Confirm that the UPS in on and that the battery is
fully charged.
2 Verify that Share-UPS has been installed, con-
nected, and configured.
3 Start the power management software on the serv-
ers, with power management screens visible, if
applicable.
4 Confirm that the Power and Status LEDs on
Share-UPS are on, indicating normal operation.
5 Simulate a utility power failure.
6 Confirm that the On Batt LED of Share-UPS is on,
indicating that Share-UPS is sending an On Bat-
tery signal to the connected servers or devices. See
“LEDs: Table 2” on page 8.
7 Confirm that all connected servers and devices
have received the On Battery message from Share-
UPS.
8 Restore utility power.
9 Confirm that all connected servers and devices
have received the message that utility power has
been restored.
Note
: To check the shutdown mode of your config-
uration, keep the utility power off long
enough to allow all connected servers and
devices to shut down. After all connected
servers and devices have shut down, restor e
power and verify that they all restart.
28
Page 35

Chapter 3 Using the Share-UPS Menus
Using the Management Port
Introduction
Out-of-band
notification
The Management port of Share-UPS allows you to connect
a modem or DTE (data terminating equipment—a dumb
terminal or a computer running terminal emulation software) to the Advanced port (port 1) of Share-UPS. Upon
establishing communications with Share-UPS through the
Management port (see “Logging on to Share-UPS” on page
31), you will access the Share-UPS menus. The Share-UPS
menus provide the following features:
• Out-of-band notification
• UPS status display
• UPS control
• Share-UPS configuration
The next paragraphs in this section describe these features.
When you use Share-UPS with an external modem and a
pager, Share-UPS can notify system administrators of problems, such as:
• UPS is operating on battery
• UPS has returned to On Line status (utility power
restored)
• UPS has a low battery
• UPS has been shut down
• Battery needs replacement
• Abnormal UPS conditions or faults
Continued on next page
29
Page 36

Using the Management Port
continued
UPS status
display
UPS control
Share-UPS
configuration
Using a dumb terminal or a computer and terminal emulation software, you can access the UPS remotely. The
password-protected menu interface allows you to view
information concerning UPS manufacture, the connected
load, battery conditions, and current UPS status.
Using a dumb terminal or a computer and terminal emulation software, you can perform certain control functions of
the UPS on demand:
•Self-test
• Reboot all servers
• Turn UPS on
• Turn UPS off
Using a dumb terminal or a computer and terminal emulation software, you can configure the Share-UPS unit.
Settings include:
• Device ID string
• Password
• Soft timer
•Baud
• Dial string and trouble codes for pager notification
Connecting to
the Manage-
ment port (local)
30
To connect locally to Share-UPS, use the Management
cable (940-0103) supplied with Share-UPS. Connect one
end of the cable to the Management port of Share-UPS and
the other end to the computer or dumb terminal.
Continued on next page
Page 37

Using the Management Port
continued
Connecting to
the
Management
port (via
modem)
Logging on to
Share-UPS
To connect a modem to Share-UPS, use a standard serial
cable. Connect one end to the Management port of ShareUPS and the other end to the serial port of the modem.
When Share-UPS is powered on, it configures the connected modem by sending modem AT setup commands.
If your modem requires an external power adapter, plug it
into the UPS so that it will operate during power failures.
To log on to Share-UPS, perform the following steps in the
order given.
1 Set the communication parameters of the modem
or DTE to 8 data bits, no parity , 1 stop bit, no flow
control. When logging on for the first time, set the
baud to 9600 bps, the Share-UPS default. (ShareUPS supports 1200, 2400, 9600, and 19200 baud.)
2Press
CTRL
+ P. Share-UPS then prompts you for
the password.
3 Enter the password for Share-UPS. The default
APC
password from the factory is
(upper case).
The Share-UPS Main menu appears.
Note
: The password may be as many as eight
characters long, and is case-sensitive.
Share-UPS hangs up the modem, if connected, after three unsuccessful password
entries.
For security, change the password as soon
as possible. See “Share-UPS Settings
Menu,” on page 40.
31
Page 38

Main Menu
---------------------- SMART-UPS 700 ----------------------
Share-UPS by American Power Conversion Corp
(c) Copyright 1994,97 All Rights Reserved
Site ID: 12345678
Location: Physical Location of This UPS
------------------------ MAIN MENU -------------------------
s- UPS Status
c- UPS Control
d- Share-UPS Settings
p- Paging Setup
m- Measure-UPS Status
<CR> Display Menu
<ESC> End Session
>
Main menu:
The following figure shows the Main menu.
Figure 5
Figure 5:Main menu
Note: The model of the UPS connected to Share-UPS is
indicated in the header of some screens. Smart-UPS
700 shown.
Navigating
through the
menus
To navigate through the Share-UPS menus, note the
following:
• “>” is your prompt.
• To access a menu or status display, type the letter
associated with the menu item. Selections are not
case-sensitive.
• The menus display directions for navigation.
• Status displays do not leave the Main menu. At these
displays, press
ESC
to quit the session
If you are using a modem
32
•
Share-UPS hangs up, sends the modem configuration
commands, and changes the baud setting, if it has
been changed using the Share-UPS Settings menu.
ENTER
to redraw the Main menu, or
: when you quit the session,
Continued on next page
Page 39

Main Menu
continued
Menu
description
All Share-UPS functions are available through the Main
menu. A description of each function appears in the following sections of this manual.
Note
: The Measure-UPS Status selection appears on the
Main menu only if Share-UPS has detected an APC
Measure-UPS environmental monitoring accessory.
For a description of the Measure-UPS Status screen,
refer to the user guide supplied with the MeasureUPS accessory.
Continued on next page
33
Page 40

Main Menu
ging
pag
g
pag
y
play (pag
pag
g
ging
p
y
g
y
y
p
g
y
continued
Main menu
definitions:
Table 6
The following table describes the items that appear on the
Main menu.
Item Description Behavior
SITE ID
LOCATION
UPS STATUS
UPS CONTROL
SHARE-UPS
SETTINGS
Identifies the ShareUPS unit (for paging).
The physical location of
the Share-UPS unit.
Factory information
about the UPS and batter
. Current status of
the UPS.
For sending commands
to the UPS.
For setting various con-
figuration parameters of
Share-UPS.
A string of up to 8 digits, changeable from the
Pa
Setup menu
(
e 42).
A string of up to 40
characters, settable
from the Share-UPS
Settin
s menu
(
e 40).
Goes to the UPS Status
dis
Goes to the UPS Control menu (page 38).
Goes to the Share-UPS
Settings menu
(
e 35).
e 40).
PAGING SETUP
MEASURE-UPS
STATUS
Table 6: Main menu definitions
For enabling paging
durin
certain UPS
events.
Temperature and
humidit
alarm settin
connected MeasureUPS accessor
readings and
s of the
.
Goes to the Pa
Setu
menu (page 42).
Item does not appear on
the menu if MeasureUPS accessor
resent.
Goes to the MeasureUPS Status display.
(See the user
the Measure-UPS
accessor
.)
is not
uide for
34
Page 41

UPS Status Display
------------------------- MATRIX 5000 -----------------------
Utility Line: 213.1 VAC Battery Info
UPS Output: 248.7 VAC -----------------------
UPS Load: 013.0 % Voltage: 55.62 VDC
Run Time: 0113 min Capacity: 100.0 %
Load Power: 015.4 VA Smart Cells: 002
Load Current: 04.26 A Bad Cells: 000
UPS Temp: 024.3 C Batt Date: 04/28/97
Freq: 60.00 Hz Self Test: NO
UPS ID: UPS_IDEN Manuf Date: 04/28/97
UPS S/N: 80033718 F/W Rev: 5ZI
Status: On-Line
>
p
Menu
description
UPS Status
display:
Figure 6
UPS Status
display
definitions:
Table 7
The UPS Status display provides factory information on the
connected UPS, output and load readings, battery information, and Measure-UPS accessory readings (if attached). To
access the UPS Status display, type s from the Main menu.
The following figure shows the UPS Status display.
Figure 6:UPS Status display
The following table describes the items that appear on the
UPS Status display.
Item Description
Utility Line
UPS Output
The input voltage from the utility, in volts AC.
The output voltage to the load from the UPS,
in volts AC.
UPS Load
The connected load (in watts) as a percentage
of the rated ca
Table 7: UPS Status display definitions
acity of the UPS.
Continued on next page
35
Page 42

UPS Status Display
y
p
p
g
p
g
play
y
y
UPS Status
display
definitions:
Table 7,
continued
Item Description
Run Time
continued
An estimate of the total run time currently
available from the UPS, based on present load
and batter
, in minutes.
Load Power
Load Current
UPS Temp
Freq
Voltage
Capacity
Smart Cells
Bad Cells
Batt Date
The amount of power being drawn by the load,
in volt-am
The amount of current being drawn by the
load, in am
The current temperature inside the UPS, in
de
The output frequency setting of the UPS, in
hertz.
The total voltage for the UPS batteries, in volts
DC.
The batteries’ charge as a percentage of capacity.
The number of SmartCell battery packs connected to the UPS. (Not supported by all UPS
models.)
The number of connected SmartCell battery
acks that are bad. (Not supported by all UPS
models.)
The date of the last battery change, settable
throu
s (if supported by the UPS).
s (if supported by the UPS).
rees Celsius.
h PowerChute plus.
Self Test
The results of the latest UPS self-test, dis-
ed as one of the following:
OK
–Good batter
BT
–Battery failed; insufficient capacit
NG
–Invalid test because of overload
NO
–Test results not available
Continued on next page
36
Page 43

UPS Status Display
g
g
g
y
y
p
g
yp
g
UPS Status
display
definitions:
Table 7,
continued
Item Description
UPS ID
Manuf Date
continued
The internal identifier for the UPS, settable
throu
The date the UPS was manufactured.
h PowerChute plus.
UPS S/N
F/W Rev
Status
Fault
The UPS electronic serial number, pro-
rammed at the factory.
The revision number of the UPS firmware.
The current status of the UPS, displayed as
one or more of the followin
Waiting to Power Load
In Bypass
On-Line
On-Battery
Replace Battery
Low Battery
Abnormal Condition (see Fault
item below)
The current abnormal conditions, when Status
= Abnormal Condition. Some abnormal conditions are:
Low Batt Shutdown
Overload
Main Relay
Batt Charger
Bypass Relay
Internal Temp
hi
h
Elec Fan Unit
ure
Iso Unit Fan
Bypass Supply
Voltage Select
ure
DC Imbalance
–main rela
–batter
–bypass relay failure
–internal tem
–electronics unit fan fail-
–isolation unit fan failure
–b
.
failure
charger failure
ass supply failure
–volta
e selection fail-
erature too
37
Page 44

UPS Control Menu
----------------------- CONTROL MENU -----------------------
t- UPS Self Test
r- Re-Boot All Servers
n- Turn UPS ON
f- Turn UPS OFF
<CR> Display Menu
<ESC> Return to Main Menu
>
Menu
description
UPS Control
menu:
Figure 7
The UPS Control menu allows you to perform control functions on demand through Share-UPS. To access the UPS
Status display, type c from the Main menu.
The following figure shows the UPS Control menu.
Figure 7:UPS Control menu
Continued on next page
38
Page 45

UPS Control Menu
g
y
y
y
y
y
y
y
pp
g
g
continued
UPS Control
menu
definitions:
Table 8
The following table describes the items that appear on the
UPS Control menu.
Item Description
UPS Self
Test
Re-Boot All
Servers
Turn UPS ON
Turn UPS
OFF
The results of the latest UPS self-test (also shown
on the UPS Status display page 36), displayed as
one of the followin
OK
–Good batter
BT
–Battery failed; insufficient capacit
NG
–Invalid test because of overload
NO
–Test results not available
Reboots all servers connected to the Share-UPS
unit. For safety, Share-UPS prompts you to confirm
this command. To confirm the reboot command,
ou must enter
forces the On Battery and Low Battery signals for
the duration of the Low Batter
UPS to c
Note
Immediately turns on the UPS, providing power to
any equipment connected to the UPS.
Turns off the UPS, dropping the connected load.
For safety, Share-UPS prompts you to confirm this
command. To confirm the Turn UPS OFF
command,
Share-UPS then immediatel
Note
cle power to the loads.
: Your modem will lose power during reboot if
it is connected to the UPS.
: Y our modem will lose power if it is connected
to the UPS when it is turned off.
.
YES
(upper case). Share-UPS then
signal, causing the
ou must enter
YES
(upper case).
turns off the UPS.
Toggle
Bypass Mode
Table 8: UPS Control menu definitions
Switches the UPS in and out of bypass mode, if
bypass capability exists in the UPS. The results of
this command a
BYP
–UPS has
INV
–UPS has
ERR
–UPS cannot execute request
ear as one of the following.
one into bypass mode
one into normal mode
39
Page 46

Share-UPS Settings Menu
-------------------- SHARE-UPS SETTINGS -------------------Model Number: AP9207 H/W Rev: C3
Serial Number: WA9715696075 F/W Rev: L
Manuf. Date: 4/15/97
------------------------------------------------------------
1- Baud Rate: 9600
2- Set Password: ********
3- Answer Ring: 0
4- Location: Physical Location of this UPS
------------------------------------------------------------
5- Soft Timer: 75 min
Shutdown Mode: Confirmed
------------------------------------------------------------
6- Reset Share-UPS to Default Settings
<CR> Display Menu
<ESC> Return to Main Menu
>
Menu
description
Share-UPS
Settings menu:
Figure 8
Share-UPS
Settings menu
definitions:
Table 9
The Share-UPS Settings menu allows you to configure the
way Share-UPS operates. T o access the Share-UPS Settings
menu, type d from the Main menu.
The following figure shows the Share-UPS Settings menu.
Figure 8:Share-UPS Settings menu
The following table describes the items that appear on the
Share-UPS Settings menu.
Item Description
Model Number
Serial Number
Manuf Date
The model number of the Share-UPS unit.
The serial number of the Share-UPS unit.
The date on which the Share-UPS unit was
manufactured.
40
H/W Rev
F/W Rev
Table 9: Share-UPS Settings menu definitions
The hardware revision number of the ShareUPS unit.
The firmware revision number of the ShareUPS unit.
Continued on next page
Page 47

Share-UPS Settings Menu
g
y
y
pp
p
p
p
y
g
g
g
g
Share-UPS
Settings menu
definitions:
Table 9,
continued
Baud rate
Password
continued
Transfer rate to be used for Share-UPS
communications (0 = 1200, 1 = 2400, 2 =
9600, 3 = 19200). The chan
when
ou quit the session.
The password to use when logging onto
the Share-UPS Main menu. The factor
default is
The
characters, and is case-sensitive.
Write down the
secure
contact APC b
the back cover of this manual.
APC
(u
er case).
assword may be up to eight printable
assword and keep it in a
lace. If you forget your password,
one of the means listed on
e takes effect
Answer
Location
Soft Timer
Shutdown Mode
Reset ShareUPS Default
Settings
The number of rings after which ShareUPS answers a call. The ran
answering) through 9.
A character string describing the physical
location of the Share-UPS unit.
A value from 0-99 minutes for the Soft
Timer duration (see “Soft timer ,” on page
27).
The current setting for the shutdown
mode, based on the confi
switch settin
Clears any changes you have made,
returnin
tory defaults. Share-UPS will prompt you
to confirm this command.
s of Share-UPS.
all device settings to their fac-
e is 0 (no
uration DIP
41
Page 48

Paging Setup Menu
ATDT9,18005551212@12345678*1;
Attention
Command
Issued by
Share-UPS
Dial Type
Command
Modem
Commands
Phone Number
Site ID
Space Character
Event Code
Return to Command Mode
Issued by Share-UPS
Dial String
Pager Display
†
†
†
†
Paging and
Share-UPS
Format of
reported events
Share-UPS
modem
command
string:
Figure 9
When used in conjunction with a modem connected to the
Management port (see “Connecting to the Management port
(via modem),” on page 31), Share-UPS can be set up to dial
a pager to report UPS problem events, such as on-battery
operation or problems with the UPS. To use paging, access
the Paging Setup menu by typing p from the Main menu,
and change the settings to work with your modem and
pager.
When paging is enabled and a UPS problem event occurs,
Share-UPS reports the condition by sending a code that
appears on the pager’s display:
[Site ID][space][event code]
For example, a pager displaying:
12345678 1
tells you that the UPS whose Site ID you have assigned as
“12345678” is reporting the event whose code you have
chosen to be represented by “1.”
When a reportable event occurs, Share-UPS issues a modem
command string like the one in the following figure.
Figure 9:Share-UPS modem command string
†
42
To be set using the Paging Setup menu.
Continued on next page
Page 49

Paging Setup Menu
continued
Typical paging
sequence:
Table 10
The following figure shows a typical sequence of events
during a utility power outage when Share-UPS is configured for paging.
Power failure occurs:
UPS goes on battery
Share-UPS transmits
modem command string
Pager displays Site ID
and Event Code for
UPS On Battery
Power is restored:
UPS goes on line
Share-UPS transmits
modem command string
Pager displays Site ID
and Event Code for
UPS On Line
Figure 10:Typical paging sequence
Continued on next page
43
Page 50

Paging Setup Menu
----------------------- PAGING SETUP -----------------------
1- Paging: ON
2- Dial String: DT9,18005551212@
3- Site ID: 12345678
4- Space Char: *
------- EVENT -------------- CODE (0=Disabled) -------------
a- UPS ON-BATTERY 1
b- ON & LOW BATTERY 2
c- UPS SHUT DOWN 3
d- UPS ON-LINE 4
e- REPLACE BATTERY 5
f- UPS FAULT 6
g- ENV-ALARM 7
------------------------------------------------------------
<CR> Display Menu
<ESC> Return to Main Menu
>
y
continued
Paging Setup
menu:
Figure 11
Common
modem
commands:
Table 10
The following figure shows the Paging Setup menu.
Figure 11:Paging Setup menu
The following table lists some common modem commands
that you may include in your dial string (see “Share-UPS
modem command string: Figure 9,” on page 42). For further
information, see the documentation supplied with the
modem.
Command Description
DP
DT
W
, (Comma)
44
@
|
;
(Semicolon)
Table 10: Common modem commands
Pulse dialing method.
Tone dialing method.
Wait for second dial tone.
Pause. Pause duration is typically 2 seconds.
Wait for quiet answer (5 seconds of silence).
Inserts a new line and a 3-second delay.
Returns modem to command state after dialing.
(Share-UPS inserts this command automaticall
.)
Continued on next page
Page 51

Paging Setup Menu
p
y
yp
g
g
y
pag
g
y
paging y
pp
g
continued
Paging Setup
menu
definitions:
Table 11
The following table describes the items that appear on the
Paging Setup menu.
Setting Description
Paging
Dial String
Site ID
Space Char
Table 11: Paging Setup menu definitions
Turns paging on or off.
A string of up to 40 characters (letters, numbers,
or
unctuation) that Share-UPS sends to the
modem in order to contact
String must contain the following items.
• The dial t
be
inning of the strin
•The phone number of the pager
•An
waiting for dial tone, outside line access,
er PIN number, etc.
For an example of a dial string, see “Share-UPS
modem command strin
A string of up to 8 numeric (0–9) characters that
will allow
unit is
The character that Share-UPS uses to separate the
Site ID from the Event Code. This character
a
ears as a space on the pager. Change this set-
tin
only if your pager requires a different space
character.
e command (DT or DP) at the
modem commands needed for timing,
ou to determine which Share-UPS
ou during an event.
our pager. The Dial
: Figure 9,” on page 42.
Continued on next page
45
Page 52

Paging Setup Menu
pag
p
y
p
g
p
y
p
y
p
y
p
g
Paging Setup
menu
definitions:
Table 11,
continued
Setting Description
Event
continued
A one-digit code that you associate with each of
the events reportable by Share-UPS. If Paging
is turned on and Share-UPS detects an event, it
transmits the code to the
assigned 0 does not trigger paging and is thus
not re
orted.
You ma
events. (For exam
battery-related events.) However, it may prevent confusion to assi
event.
Each event is described below.
UPS ON BATTERY
ter
ON & LOW BATTERY
battery output due to a loss of utility power, and
the UPS batter
UPS SHUT DOWN
down by command or a low-battery condition.
UPS ON-LINE
online o
ter
REPLACE BATTERY
Replace Battery alarm.
UPS FAULT
fault.
ENV-ALARM
issued an alarm (tem
in
sure).
assign the same digit to multiple
le, you could assign 3 to all
output due to a loss of utility power.
is nearly exhausted.
–the UPS has been shut
–the UPS has returned to
eration after an on-battery, low-bat-
, or shutdown condition.
–the UPS has detected an internal
–a Measure-UPS device has
outside established limits, or contact clo-
er. An event
n a unique code to each
–the UPS is
–the UPS is
–the UPS has issued a
erature or humidity read-
roviding bat-
roviding
46
Page 53

Chapter 4 Product Information
Warranty Information
Limited
warranty
Obtaining
service
American Power Conversion (APC) warrants Share-UPS to
be free from defects in materials and workmanship for a
period of two years from the date of purchase. Its obligation
under this warranty is limited to repairing or replacing, at its
own sole option, any such defective products. This warranty
does not apply to equipment which has been damaged by
accident, negligence, or misapplication or has been altered
or modified in any way. This warranty applies only to the
original purchaser.
To obtain service under warranty you must obtain a
Returned Material Authorization (RMA) number from APC
or a designated APC service center. Products must be
returned to APC or an APC service center with transportation charges prepaid and must be accompanied by a brief
description of the problem encountered and proof of date
and place of purchase.
Continued on next page
47
Page 54

Warranty Information
continued
Warranty
limitations
Except as provided herein, American Power Conversion
makes no warranties, express or implied, including warranties of merchantability and fitness for a particular
purpose
exclusion of implied warranties; therefore, the aforesaid
limitation(s) or exclusion(s) may not apply to the purchaser.
Except as provided above, in no event will APC be liable
for direct, indirect, special, incidental, or consequential
damages arising out of the use of this product, even if
advised of the possibility of such damage
Specifically, APC is not liable for any costs, such as lost
profits or revenue, loss of equipment, loss of use of equipment, loss of software, loss of data, costs of substitutes,
claims by third parties, or otherwise. This warranty gives
you specific legal rights and you may also have other rights
which vary from state to state.
. Some jurisdictions do not permit limitation or
.
48
Page 55

Troubleshooting
g
g
p
g
g
p
p
y
y
g
pag
p
p
p
p
pag
y
p
p
p
p
pag
If you have
problems with
your Share-UPS
Trouble-
shooting:
Table 12
The troubleshooting chart (Table 12) covers many of the
problems that might arise with Share-UPS. If you encounter
a problem with your Share-UPS unit, refer to the troubleshooting chart first. There may be a simple solution you are
overlooking.
The following table shows the solution to common problems with the operation of Share-UPS.
Problem Possible Cause Solution
Cannot lo
Share-UPS
menus via the
Mana
ort.
A server connected to a Basic
ort does not
acknowledge On
Batter
onto
ement
signal.
Incompatible terminal settin
The wrong cable is
being used.
There is an internal
Share-UPS.
s.
roblem with
e settings to
Chan
match the Share-UPS
baud (the default is
9600), with 8 data bits,
no
arity, and no hand-
shaking.
Verify that the cable is
the one supplied with
our interface kit. See
“Choosin
naling cables: Table 1”
on
Disconnect Share-UPS
tem
UPS and reconnect. If
the
see “If
sist,” on
simple sig-
e 4.
orarily from the
roblem persists,
roblems per-
e 52.
The Power LED
flashes continuousl
.
Table 12: Trouble-shooting
There is an internal
roblem with
Share-UPS.
Disconnect Share-UPS
tem
orarily from the
UPS and reconnect. If
the
roblem persists,
see “If
sist,” on
roblems per-
e 52.
Continued on next page
49
Page 56

Troubl esho otin g
p
p
g
y
pp
g
pag
p
pag
p
p
y
p
p
p
g
g
y
p
y
pp
pag
y
Trouble-
shooting:
Table 12,
continued
continued
Problem Possible Cause Solution
The UPS is off. Normal Share-UPS
o
eration when the
UPS is off.
The Power LED
is on but the Status LED is off.
One or more
servers shuts
down when the
UPS is on batter
, but does not
restart when
ower returns.
The UPS is not
ca
able of smart
si
naling.
There is a
with the UPS.
Timer mode: the
o
erating system
shutdown time as
set in PowerChute
plus is too short.
Confirmed mode:
Share-UPS did not
receive shutdown
confirmation from
servers that shut
down, and utilit
ower was restored.
The server shut
down but the UPS
did not shut down.
roblem
Verif
that your UPS
su
orts smart signal-
in
. See “Hardware
and software requirements,” on
“Sim
le versus smart
signaling: Table 3,” on
e 10.
Contact APC Technical Support at one of
the
hone number or
address on the back
cover of this manual.
The
ower management software shutdown time must be set
lon
er than ShareUPS Timer shutdown
mode settin
Verif
that the servers
can confirm
shutdown. See “PowerChute plus su
for Confirmed shutdown mode” on
20. If not, configure
Share-UPS for Timer
or Until Low Batter
shutdown mode.
e 3 and
.
ort
e
Continued on next page
50
Page 57

Troubl esho otin g
p
prop
y
g
g
y
g
y
y
y
y
p
g
g
pag
g
pp
g
pp
pag
p
g
pag
g
g
pag
Trouble-
shooting: Table
12, continued
continued
Problem Possible Cause Solution
The communication cable is not
erly fastened.
cable connec-
Verif
tions.
The Status LED
is on but the
server on the
Advanced
cannot communicate with the
UPS.
The
receives incom-
lete or incorrect
codes.
ort
er
The wron
bein
The port on the
master server is
bein
another a
The modem is dialin
the
cable is
used.
used by
lication.
too quickly for
er system.
ou are using smart
If
si
naling, verify that
ou are using the
cable supplied with
our APC UPS (940-
0024). If
simple signaling, verif
the correct sim
nalin
“Choosing simple signalin
1” on
Close the offendin
a
Confi
modem for slower
dialin
commands. See
“Common modem
commands: Table 10,”
on
ou are using
that you are using
le sig-
cable. (See
cables: Table
e 4.)
lication.
ure your
, using modem
e 44.
51
Page 58

Troubl esho otin g
continued
If problems
persist
For problems not covered in the troubleshooting chart (see
“Troubleshooting: Table 6” on page 26), or if the problem
persists, follow this procedure:
1 Note the serial number and date of purchase of the
Share-UPS unit. Contact Technical Support at the
phone number or address on the back cover of this
manual.
2 Be prepared to provide a description of the prob-
lem. A technician will help solve the problem over
the phone, if possible, or will give you a return
material authorization (RMA) number.
3 If the Share-UPS unit is under warranty, repairs
are free of charge. If the warranty has expired,
there will be a nominal charge for repair.
4 Pack the Share-UPS unit carefully in its original
packaging, if possible. Do not use polystyrene
beads for packing. Damage sustained in transit is
not covered under the warranty . Enclose a letter in
the package with your name, address, RMA number, a copy of the sales receipt, daytime phone
number, and check (if applicable).
5 Mark the RMA number clearly on the outside of
the shipping carton. The factory will not accept
any materials without this marking.
6 Return the Share-UPS unit by insured, prepaid car-
rier to the U.S. address on the back cover of this
manual.
52
Page 59

Life-Support Policy
General policy
Examples of life-
support devices
As a general policy,
APC
does not recommend the use of
any of its products in life support applications where failure
or malfunction of the
APC
product can be reasonably
expected to cause failure of the life support device or to
affect significantly its safety or effectiveness.
APC
does not
recommend the use of any of its products in direct patient
APC
care.
will not knowingly sell its products for use in
such applications unless it receives in writing assurances
satisfactory to
APC
that (a) the risks of injury or damage
have been minimized, (b) the customer assumes all such
risks, and (c) the liability of American Power Conversion is
adequately protected under the circumstances.
Examples of devices considered to be life support devices
are neonatal oxygen analyzers, nerve stimulators (whether
used for anesthesia, pain relief, or other purposes),
autotransfusion devices, blood pumps, defibrillators,
arrhythmia detectors and alarms, pacemakers, hemodialysis
systems, peritoneal dialysis systems, neonatal ventilator
incubators, ventilators for both adults and infants, anesthesia ventilators, and infusion pumps as well as any other
devices designated as “critical” by the
U.S. FDA
.
Hospital-grade wiring devices and leakage current may be
ordered as options on many
APC UPS
systems.
APC
does
not claim that units with this modifications are certified or
listed as Hospital Grade by APC or any other organization.
Therefore these units do not meet the requirements for use
in direct patient care.
53
Page 60

Specifications
Basic port pin
assignments
The following limitations and capabilities apply to the Basic
ports of Share-UPS:
• Pins 3, 5, and 6 are open collector outputs which must
be pulled up to a common referenced supply no
greater than +40 Vdc. The transistors are capable of a
maximum non-inductive load of 25 mAdc. Use only
Pin 4 as the common.
• The output at Pin 2 generates a low-to-
high RS-232
level when the device is signaling an On Battery condition. The pin is normally at a low RS-232 level.
• Share-UPS may be signaled to shut down the
UPS
by
applying a high RS-232 level to Pin 1 for 4.5 seconds. Shutdown is also dependent on the
UPS
status
and the Share-UPS shutdown mode (see “Configuring Share-UPS,” on page 23).
Continued on next page
54
Page 61

Specifications
continued
Basic port pin
assignments:
Figure 12
The following figure shows the Basic port
pin
assignments.
Figure 12:Basic port pin assignments
Continued on next page
55
Page 62

Specifications
continued
Advanced port
pin assignments
The Advanced port of Share-UPS has the same limitations
and capabilities as the Basic port (see “Basic port pin
assignments,” on page 54). The following additional limitations and capabilities apply to the Advanced port:
• Applying a momentary (approximately 1 second)
high RS-232 level to Pin 7 turns on the UPS and its
loads. A momentary low RS-232 level turns off the
UPS and its loads. Pin 7 should normally be unconnected. This signal is passed through Share-UPS.
• DC operating voltage is available on Pin 8 of the
Advanced port. This voltage may be the UPS battery
voltage or the voltage from an external adapter,
whichever is greater.
Continued on next page
56
Page 63

Specifications
6 7 8 9
1 2 3 4 5
9
1
7
2
8
4
6
5
3
UPS Shut Down RS-232 Input or
Advanced Mode RS-232 Data Rx In
Line Fail RS-232 Output or
Advanced Mode RS-232 Data Tx Out
Unregulated
+24 VDC Output
UPS Turn On/Turn Off Input
Chassis
Common
Normally Closed
Line Fail Signal
Normally Open
Low Battery Signal
Normally Open
Line Fail Signal
HI
4.5 s
continued
Advanced port
pin
assignments:
Figure 13
The following figure shows the Advanced port
assignments.
pin
Figure 13:Advanced port pin assignments
Continued on next page
57
Page 64

Specifications
p
p
q
continued
Management
port pin
assignments
Management
port pin
assignments:
Table 13
The Management port is a standard 9-pin RS-232 serial
communications port. The port is configured as data terminating equipment (DTE) with no handshaking, and supports
bauds of 1200, 2400, 9600, and 19200. The data format is 8
data bits with 1 start bit, 1 stop bit, and no parity.
The Management port pin assignments are listed in the following table.
Pin Function
1 Unused
2 Receive Data in
3 Transmit Data out
4 +12 Vdc (through a 1-kΩ resistor)
5Ground
6 Unused
7Re
8 Clear To Send input
uest To Send output
ut
ut
9 Unused
Table 13: Management port pin assignments
Continued on next page
58
Page 65

Specifications
g
g
g
p
g
p
g
y
g
g
g
continued
Product
specifications:
Table 14
The following table shows the product specifications for
Share-UPS.
Item Specification
Power
Turn on voltage: > 22 Vdc
Turn off volta
Current draw (normal operation): 45 mAdc
Current draw (volta
Physical
Size (H × W × D): 1.75 × 17.0 × 5.0 in
Wei
ht: 3.5 lb (1.6 kg)
Shipping weight: 5.75 lb (2.6 kg)
Environmental
Elevation (above
O
eratin
Storage
e: < 16 Vdc
e < 16 Vdc): < 1 mAdc
(4.4 × 43.2 × 12.7 cm)
MSL
):
0 to 10,000 ft (0 to 3000 m)
0 to 50,000 ft (0 to 15 000 m)
Tem
erature:
Operatin
Storage
Relative humidit
Operatin
Storage
Electromagnetic immunity: EN50082-1 verified
Table 14: Product specifications
:
32 to 149°F (0 to 65°C)
-4 to 158°F (-20 to 70°C)
0 to 95%, non-condensin
0 to 95%, non-condensin
Continued on next page
59
Page 66

Specifications
Product
specifications:
Table 14,
continued
continued
Approvals
EMC
verification:
Item Specification
FCC/DOC
Class A, VDE/EN
50022 Class B verified
Other:
CE, C-Tick (AS/NZS 3538)
60
Page 67

Index
p
p
y
g
g
g
g
g
g
g
g
g
y
g
y
g
y
g
Symbols
@,44
|
44
,
A
Abnormal UPS conditions,37
Accessories, multiple installation
of
Advanced port
in assignments,56–
Answer
AS/400 Cable
AT commands
,15–
41
,
17
7
,
4
,
,42,
57
44
B
Bad Cells,36
Basic port
in assignments,
Batt Date
Batter
Baud Rate
6
,
54
36
,
packs, SmartCell,36
41
,
Behavior of Confirmed shutdown
mode
24
,
C
Cable, To UPS,9
Cables
choosing,
one required for each device,
Call-UPS II
Capacity
Communications cables, choosin
Computer Interface port
Confi
Confi
Confi
4
3
16
,1,
36
,
21
,
uration DIP switches,8, 23
uring PowerChute plus for
simple si
nalin
12
,
uring Share-UPS,23–28, 30
Confirmed shutdown mode
Advanced port,
behavior of,
PowerChute plus support for,
Connectin
Connectin
30
local,
modem,
25
24
Share-UPS,21–22
to the Management port
31
D, E
Default settings, resettin
Dela
shutdown,26
Dial String
DIP switches
,
45
,8,
23
DP (modem command)
DT (modem command)
Env-Alarm
Events
Expandin
Expansion Chassis
Extension cables
46
,
46
,
SmartSlot capacit
4
,
,
F, G, H
F/W Rev
Share-UPS,
UPS,
Fault
,
37
40
37
Features of Share-UPS
Firmware revision number
Freq
36
,
H/W Rev
40
,
Hardware requirements
4
,
Hardware revision number
Hospitals, usa
Humidit
e of APC UPS in,53
limits,18
I
IBM AS/400, cable for connecting to
Share-UPS
Increasin
run time,26
4
,
17
,
,
,1–
,
,
44
44
,37,
3
,
,
41
2
40
24
25
,
17
40
61
Page 68

Index
g
g
p
g
y
y
g
gging
y
g
g
g
p
g
g
g
g
g
p
g
g
g
continued
Installing multiple accessories,15
17
Installin
Installin
Interface Expander
Interface kits, choosin
Inventor
Isolated Extension Cable
multiple Share-UPS
units
15
,
Share-UPS,18–20
options,
18
lanning location,
5
,
18
16
,
4
,
4
,
J, K, L
Key concepts,10–14
LEDs
8
,
Life-support devices
Life-support polic
Lo Batt LED
Load Current
Load Power
Location
,34,
,
,
36
,
41
8
36
53
,
53
,
Location of Share-UPS, plannin
Lo
Low Batter
on to Share-UPS,31
signal,13
M, N, O
Macintosh AppleShare Server,
cable for connectin
Share-UPS
Main menu
accessing,29–
definitions,
description,
ement cable,5
Mana
Mana
ement port,7, 29–31
establishing communication with,
introduction,
navigating through the Share-UPS
menus,
in assignments,
,32–
34
33
29
32
,
34
31
4
to
58
Manuf Date
–
Share-UPS,
UPS,
40
37
Master server versus other
servers
11
,
Matrix-UPS
models supported by Share-UPS,
Maximizin
Measure-UPS
Measure-UPS Status
run time,26
II
16
,
34
,
Measure-UPS Status screen
3
33
,
Menus
Main,32–
definitions
description
Navigating,
Paging Setup,42–
definitions
Share-UPS Settings,40–
definitions
description
UPS Control,38–
18
,
definitions
description
Model Number
34
32
34
,
,
45
,
40–41
,
,
39
,
,
40
,
33
45
41
40
39
38
Modem
commands,
using with Share-UPS,
Modem command strin
Modem confi
Mountin
Mountin
in a NetShelter,
on a wall,
44
uration,42, 44–45
brackets,5
Share-UPS
19
20
29
,
42
Multiple accessories
osition,
Multiple Share-UPS units,
31
Navi
NetShelter
Obtainin
16
installin
15
,
ating through the Share-UPS
menus
32
,
19
,
service,47
62
Page 69

Index
y
g
g
ging
g
g
y
y
g
y
g
g
g
g
g
y
continued
On & Low Battery
On Batt LED
On-demand operation
Optional power input
Out-of-band notification
Output frequenc
Overview of Share-UPS
46
,
8
,
30
,
9
,
29
,
36
,
4
,1–
P, Q
Package recyclin
Pa
er notification,42
Pa
Paging
29
,
Paging Setup menu,42–
typical sequence of events,
45
,
Paging Setup
Password
41
,
Password, default
Pin assi
nments
Advanced port,56–
Basic port,
Management port,
Port
Advanced,
pin assignments
6
Basic,
pin assignments
Management,
introduction
pin assignments
Power Adapter
Power input, optional
Power LED
,
PowerChute for Macintosh (software
and cable
PowerChute
configuring for simple signaling,
support for Confirmed shutdown
mode,
support for simple and advanced
si
naling,
,
54
7
8
plus
,
34
,
25
18
,
45
43
31
,
57
58
56–57
,
54
,
7
29
,
58
,
9
9, 21
,
4
12
3
PowerNet SNMP Adapter
Priorit
of APC accessories,16
,
Problems with Share-UPS,
persistent
Product description
Product specifications
52
,
9
,5–
59
,
R
Rear panel,6
Re-Boot All Servers
Rec
cling Share-UPS packagin
Rela
I/O Module,16
Replace Battery
Reported events, format of
39
,
46
,
,
Requirements, hardware and
software
3
,
Reset Share-UPS Default
Settings
Run Time
Run time, maximizin
41
,
36
,
26
,
S
Safety warnin
Scheduled shutdowns
Self Test
,
Serial Number
Serial number (UPS)
Server, master
Service, obtainin
Setup overview
Share-UPS Settin
Share-UPS Settin
definitions,40–
description,
Shutdown dela
Shutdown Mode
Shutdown modes
Confirmed,24–
Timer,
Until Low Battery,
36
26
4
,
13
,
40
,
37
,
11
,
47
,
14
,
s,34
s menu,40–41
41
40
26
,
41
,
23
,
25
26
16
42
18
,
63
Page 70

Index
g
g
g
g
g
y
y
y
y
g
g
y
g
y
g
y
y
g
g
continued
Shutdowns, scheduled,13
Simple si
Site ID
Smart Cells
Smart si
SmartSlot, expandin
,34,
for
nalin
nalin
17
,
,
45
36
,
,
10
10
capacity
Smart-UPS, models of, supported b
Share-UPS
Soft Timer
Soft timer
,
,
Software requirements
Space Char
Specifications
Status
(UPS)
Status (UPS), displa
menu definitions,35–
Status LED
Switches, DIP
S
mmetra
PowerArray
b
Share-UPS,3
41
27
45
,
,54, 57–
37
,
8
,
,8,
3
,
,30,
23
3
,
59
35
37
, support of,
T, U, V
Temperature limits,18
Testin
Share-UPS,28
Timer shutdown mode
Timer, soft
To UPS cable
27
,
9
,
Toggle Bypass Mode
Triple Chassis
Troubleshootin
Turn UPS OFF
Turn UPS ON
T
pical paging sequence,43
UNIX Basic Si
17
,
,49–
,
39
,
naling Cable,4
39
26
,
39
,
52
Until Low Batter
mode
26
,
UPS Control menu
definitions,
description,
UPS Fault
UPS ID
UPS Interface Extension
39
38
46
,
37
,
UPS LAN Mana
UPS Load
35
,
UPS On Battery
UPS On-Line
UPS Output
UPS S/N
UPS Self Test
,
35
,
37
,
,
UPS Shut Down
UPS Status
UPS Status
37
,
34
,
UPS Status displa
definitions,35–
description,
UPS Temp
Utility Line
Voltage
W
(modem command)
35
36
,
35
,
36
,
W, X, Y, Z
Warning, installation,18
Warrant
limitations,
Web/SNMP Mana
Windows server, cable for
47
,
16
connectin
48
shutdown
,34, 38–
4
,
er Cable,4
46
,
46
39
46
,
,30, 35–
37
44
,
ement Card,1
to Share-UPS,4
39
37
,
64
Page 71

Page 72

www.apcc.com
Toll free technical support:
U. S. & Canada 1-800-800-4272
Austria 0660 6480
Belgium 0800 15063
Czech Republic 0 800 102063
Denmark 800 18 153
Finland 9800 13 374
France 0 800 906 483
Germany 01300818907
Holland 0800 0224655
Hungary 00800 12221
Ireland 1 800 702000 x 2045
Israel 177 353 2206
Italy 1678 74731
Japan 0120-80-60-90
Luxembourg 0800 2091
Norway 800 11 632
Poland 00800 353 1202
Portugal 050 553182
South Africa 0800 994206
Spain 900 95 35 33
Sweden 020 795 419
Switzerland 0800 556177
Turkey 0800 35390275
U. K. 0800 132990
Areas without toll free numbers:
+1 401 789 5735 (USA) or
+353 91 702020 (Ireland)
+7095 916 7166 (Russia)
Serial number:
E-mail technical support:
Australia anztech@apcc.com
Europe apceurtech@apcc.com
India isbtech@apcc.com
Japan jsupport@apcc.com
Latin America apctchla@apcc.com
SE Asia asetech@apcc.com
Online Technical Support
U.S. & Canada http://support.apcc.com/
Addresses:
American Power Conversion Corporation
132 Fairgrounds Road
P. O. Box 278
West Kingston, Rhode Island 02892
USA
APC Ireland
(A. P. C.) b. v.
Ballybritt Business Park
Galway
Ireland
APC Japan
BR Gotanda 7
th
Floor
2-30-4 Nishi-gotanda,
Shinagawa-ku
Tokyo 141 Japan
APC Europe
143 Bis Avenue de Verdun
92442 Issy les Moulineaux Cedex
France
Entire contents copyright © 1999 American Power Conversion. All rights reserved.
Reproduction in whole or in part without permission is prohibited.
All trademarks are the property of American Power Conversion.
990-0097B 3/99
 Loading...