


AMANO→
PIX-21
Electronic Time Recorder
Operation Manual

Thank you…
for purchasing another fine product from Amano Cincinnati, Inc.
Important
Note that the government standard for Daylight Saving Time (DST) is subject to change. Your clock is factory-set for correct DST based upon when it was manufactured, but any revision to DST begin or end dates may require updating the system-set DST calendar.
If you live in Arizona, Hawaii, parts of Indiana, or any other area that does not use DST, refer to this document’s DST settings instruction for details regarding disabling the DST function.
Do not return this clock to the retailer. If you have any questions or need assistance, please call us toll free at:
1-800-253-9836
Proprietary Notice
This document contains proprietary information and such information may not be reproduced in whole or part without the written permission from Amano Cincinnati, Inc. 140 Harrison Ave., Roseland, New Jersey 07068. Amano Cincinnati, Inc. reserves the right to make equipment changes and improvements, which may not be reflected in this document.
We recommend that this document be read in its entirety before any attempt is made to operate the equipment.
Need Ribbons, Keys and Accessories?
Visit
www.amano.com
or
Call - (800)-253-9836

Page 1
External View
Removing the Cover & Packing Materials
1.Lift the printer block and remove the spacer.
2.Insert the key provided and turn clockwise to open the case. Lift the cover to remove
Amano Cincinnati, Inc. |
PIX-21 Operation Manual |
Page 2
3.Remove the spacer between the Ribbon Cartridge and the Printer Carriage.
4.Re-install the cover. Your PIX-21 is ready for use!
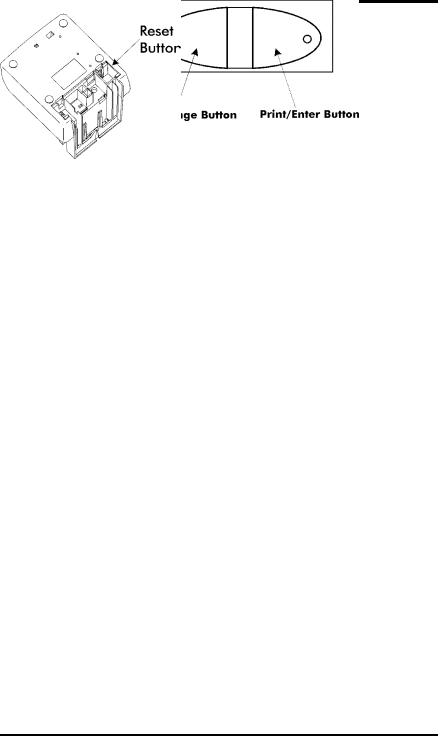
Front Panel Description
The RESET Button is located on the bottom of the clock. It is used with the CHANGE or ENTER Button to start the Program mode. Lift the printer block and remove the spacer.
When in the Program mode, press the PRINT/CHANGE Button to change data, or advance to the next menu selection.
When in the Program mode, press the PRINT/ENTER Button to accept a value or enter a selection into memory.
When in the Normal mode, the PIX-21 by default will automatically print when a time card, or piece of paper is inserted. This default can be changed in the Program mode to require both PRINT buttons to be pressed simultaneously in order to print.
PIX-21 Operation Manual |
Amano Cincinnati, Inc. |

Page 3
Mounting the Clock
1.Remove the mounting bracket from the clock by pushing forward on the top tabs “A” and then pushing the tabs down “B” (See below).
2.If you are using the Mobile Mounting Unit gooseneck and special mounting bracket (P/N AJR-208800), mount the gooseneck to the vehicle in the desired location first. Mount the special mounting bracket to the gooseneck using the three #M5 acorn nuts and washers provided.
You may discard the original PIX mounting bracket if you wish.
3.If you are not using the Mobile Mounting Unit, securely mount the PIX mounting bracket on the wall using three #10 wood screws or equivalent.
4.Refer to the illustration below to plug the appropriate power cord into the bottom rear of the clock.
If you are using the DC power cord, locate the rubber grommet on the power cord and install the grommet into the notch in the housing. The power cord will exit the clock through the opening on the bottom. Refer to page 15 for more information about using the DC power cord.
Amano Cincinnati, Inc. |
PIX-21 Operation Manual |
Page 4
Program Modes
The PIX-21 has two programming modes, Normal and Quick. Either mode can be accessed by simply entering a specific 4-digit code.
The Quick Program Mod allows the user to change the following features: date, time, daylight saving time start/end dates, and print style. To enter the Quick Program Mode use the appropriate code listed in Chart 1, which correlates to the print style of your choice.
In the Normal Program Mode, the user can change the following features: Date, Time, Daylight saving time begin/end dates, print style, language, print direction, auto print, and leading zeros. Addionally, there is a diagnostic menu to test the LCD segments, reset the number of punches, and clear memory. To enter the Normal programming mode, use the code “8088” and follow the instructions to program all the items. Refer to page 9 to enter the Normal mode code.
For a quick setup of a particular item in the PIX-21, use the alternate code, which correlates to the print style of choice. (See Chart 1 on page 5.) The “Quick” mode shortens the print style setup. Refer to page 6 to enter the Quick Program mode.
Quick Program Mode
1. Plug In the Power Cord and Make a Test Print
Insert a piece of paper or time card into the PIX-21. The clock automatically will print a 4-digit YEAR, MONTH, DATE, and TIME with AM or PM.
Note: The PIX-21 will automatically adjust for Daylight Saving Time. If these conditions are unsatisfactory, you must change the program settings.
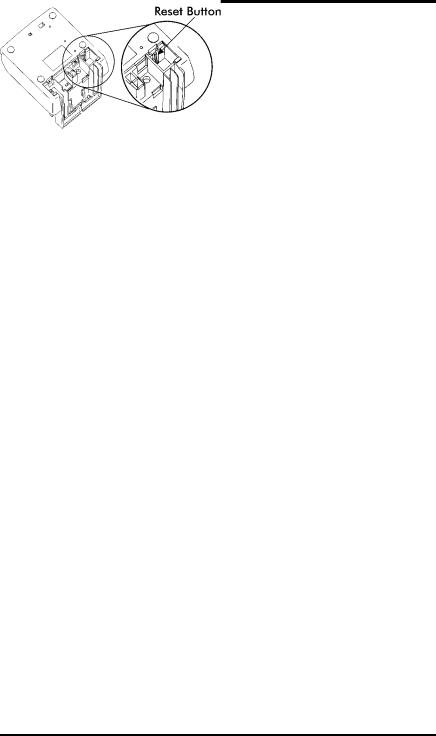
2. The Reset Button
Press the RESET button to exit the programming mode at any time and return to the time display.
The RESET Button (which is long) is located in the right lower corner on the bottom of the clock.
Please Note:
You do not need the key to set the time or to program the clock!! However, you do need the key to change the ribbon, or mount the clock.
If you have any questions, please call 1-800-253-9836.
PIX-21 Operation Manual |
Amano Cincinnati, Inc. |
 Loading...