


7-INCH DIGITAL MEDIA STATION
iLX-705D
EN
HALO9 9-INCH DIGITAL MEDIA STATION
iLX-F905D
HALO11 11-INCH DIGITAL MEDIA STATION
iLX-F115D
9-INCH SEPARATE DIGITAL MEDIA STATION
i905
QUICK REFERENCE GUIDE
KURZANLEITUNG
GUIDE DE RÉFÉRENCE RAPIDE
GUÍA DE REFERENCIA RÁPIDA
GUIDA RAPIDA
КРАТКОЕ СПРАВОЧНОЕ РУКОВОДСТВО
DE
FR
ES
IT
RU


Contents
WARNING................................................................................................................................................................2
CAUTION .................................................................................................................................................................3
Getting Started .....................................................................................................................................................4
Apple CarPlay Operation (Optional)..............................................................................................................8
Android Auto™ (Optional).................................................................................................................................8
Radio/RDS Operation .........................................................................................................................................9
DAB/DAB+/DMB Operation .............................................................................................................................9
USB Flash drive Operation (Optional).........................................................................................................10
iPod mode on iPhone (Optional)..................................................................................................................11
Hands-Free Phone Control.............................................................................................................................12
Installation............................................................................................................................................................13
Connections.........................................................................................................................................................18
Specifications ......................................................................................................................................................21
IMPORTANT
Please record the serial number of your unit in the space provided below and keep it as a permanent record.
SERIAL NUMBER:
ISO SERIAL NUMBER: AL
INSTALLATION DATE:
INSTALLATION TECHNICIAN:
PLACE OF PURCHASE:
For details on all functions, refer to the Owner’s Manual published on our website at
https://www.alpine-europe.com/alpine-europe.html If required, an ALPINE dealer will readily
provide you with a print out of the Owner’s Manual published on the website.
1-EN

WARNING
WARNING
This symbol means important instructions. Failure
to heed them can result in serious injury or death.
INSTALL THE PRODUCT CORRECTLY SO THAT THE DRIVER
CANNOT WATCH TV/VIDEO UNLESS THE VEHICLE IS STOPPED
AND THE PARKING BRAKE IS APPLIED.
It is dangerous for the driver to watch TV/Video while driving a vehicle.
Installing this product incorrectly enables the driver to watch TV/Video
while driving. This may cause a distraction, preventing the driver from
looking ahead, thus causing an accident. The driver or other people
could be severely injured.
DO NOT WATCH VIDEO WHILE DRIVING.
Watching the video may distract the driver from looking ahead of the
vehicle and cause an accident.
DO NOT OPERATE ANY FUNCTION THAT TAKES YOUR
ATTENTION AWAY FROM SAFELY DRIVING YOUR VEHICLE.
Any function that requires your prolonged attention should only be
performed after coming to a complete stop. Always stop the vehicle in a
safe location before performing these functions. Failure to do so may
result in an accident.
KEEP THE VOLUME AT A LEVEL WHERE YOU CAN STILL HEAR
OUTSIDE NOISES WHILE DRIVING.
Excessive volume levels that obscure sounds such as emergency vehicle
sirens or road warning signals (train crossings, etc.) can be dangerous
and may result in an accident. LISTENING AT LOUD VOLUME
LEVELS IN A CAR MAY ALSO CAUSE HEARING DAMAGE.
MINIMIZE DISPLAY VIEWING WHILE DRIVING.
Viewing the display may distract the driver from looking ahead of the
vehicle and cause an accident.
DO NOT DISASSEMBLE OR ALTER.
Doing so may result in an accident, fire or electric shock.
USE ONLY IN CARS WITH A 12 VOLT NEGATIVE GROUND.
(Check with your dealer if you are not sure.) Failure to do so may result
in fire, etc.
KEEP SMALL OBJECTS SUCH AS SCREWS OUT OF THE REACH
OF CHILDREN.
Swallowing them may result in serious injury. If swallowed, consult a
physician immediately.
USE THE CORRECT AMPERE RATING WHEN REPLACING
FUSES.
Failure to do so may result in fire or electric shock.
DO NOT BLOCK VENTS OR RADIATOR PANELS.
Doing so may cause heat to build up inside and may result in fire.
USE THIS PRODUCT FOR MOBILE 12V APPLICATIONS.
Use for other than its designed application may result in fire, electric
shock or other injury.
MAKE THE CORRECT CONNECTIONS.
Failure to make the proper connections may result in fire or product
damage.
BEFORE WIRING, DISCONNECT THE CABLE FROM THE
NEGATIVE BATTERY TERMINAL.
Failure to do so may result in electric shock or injury due to electrical
shorts.
DO NOT ALLOW CABLES TO BECOME ENTANGLED IN
SURROUNDING OBJECTS.
Arrange wiring and cables in compliance with the manual to prevent
obstructions when driving. Cables or wiring that obstruct or hang up on
places such as the steering wheel, gear lever, brake pedals, etc. can be
extremely hazardous.
DO NOT SPLICE INTO ELECTRICAL CABLES.
Never cut away cable insulation to supply power to other equipment.
Doing so will exceed the current carrying capacity of the wire and result
in fire or electric shock.
DO NOT DAMAGE PIPE OR WIRING WHEN DRILLING HOLES.
When drilling holes in the chassis for installation, take precautions so as
not to contact, damage or obstruct pipes, fuel lines, tanks or electrical
wiring. Failure to take such precautions may result in fire.
DO NOT USE BOLTS OR NUTS IN THE BRAKE OR STEERING
SYSTEMS TO MAKE GROUND CONNECTIONS.
Bolts or nuts used for the brake or steering systems (or any other
safety-related system), or tanks should NEVER be used for installations
or ground connections. Using such parts could disable control of the
vehicle and cause fire etc.
DO NOT INSTALL IN LOCATIONS WHICH MIGHT HINDER
VEHICLE OPERATION, SUCH AS THE STEERING WHEEL OR
SHIFT LEVER.
Doing so may obstruct forward vision or hamper movement etc. and
results in serious accident.
2-EN

CAUTION
This symbol means important instructions. Failure
to heed them can result in injury or material
property damage.
HALT USE IMMEDIATELY IF A PROBLEM APPEARS.
Failure to do so may cause personal injury or damage to the product.
Return it to your authorized Alpine dealer or the nearest Alpine Service
Center for repairing.
HAVE THE WIRING AND INSTALLATION DONE BY EXPERTS.
The wiring and installation of this unit requires special technical skill
and experience. To ensure safety, always contact the dealer where you
purchased this product to have the work done.
USE SPECIFIED ACCESSORY PARTS AND INSTALL THEM
SECURELY.
Be sure to use only the specified accessory parts. Use of other than
designated parts may damage this unit internally or may not securely
install the unit in place. This may cause parts to become loose resulting
in hazards or product failure.
ARRANGE THE WIRING SO IT IS NOT CRIMPED OR PINCHED
BY A SHARP METAL EDGE.
Route the cables and wiring away from moving parts (like the seat rails)
or sharp or pointed edges. This will prevent crimping and damage to the
wiring. If wiring passes through a hole in metal, use a rubber grommet
to prevent the wire’s insulation from being cut by the metal edge of the
hole.
DO NOT INSTALL IN LOCATIONS WITH HIGH MOISTURE OR
DUST.
Avoid installing the unit in locations with high incidence of moisture or
dust. Moisture or dust that penetrates into this unit may result in
product failure.
3-EN

Owner’s manual Location of Controls, Turning Power On or Off
Getting Started
Controls Position
The screen design used in the Quick Reference Guide may differ from the actual screen.
iLX-705D
iLX-F905D/iLX-F115D
4-EN

Dimmer Sensor
Sense the brightness of the car interior.
button
Activate Siri function or voice recognition mode while
Apple CarPlay or Android Auto is connected.
/ (DOWN/UP) button
Adjusts the volume.
(MUTE) button
Activates/deactivates MUTE mode.
Press and hold this button for at least 2 seconds to turn
off the screen/button illumination.
(Audio) button
Displays the Audio playback screen.
Audio sources can be switched while the Audio
playback screen is displayed.
Power indicator
(HOME) button
Activates the HOME screen.
The Sound Setup screen is displayed while the HOME
screen is displayed.
Press and hold this button for at least 2 seconds to turn
the power off.
Turning Power On or Off
1 Turn the ignition key to the ACC or ON position.
The system is turned on.
• When using the system for the first time, the HOME screen is displayed.
(CAM) button
Displays the image of Camera2 (Front/Side/Other) or
Camera1 (Rear).
Press for 1 second or more to return to the previous
screen.
/ button
Press to seek up/down a station in radio mode or up/
down a track, etc., in other audio/visual sources.
(MAP) button
Displays the map screen for Apple CarPlay /
Android Auto when Apple CarPlay or Android Auto
is connected.
Remote Sensor
Point the remote control transmitter towards the
remote sensor within a range of 2 meters.
CAUTION (iLX-F905D/iLX-F115D only)
To adjust the display angle, hold the center of the
top and bottom of the display to move it.
To protect the display, do not hold the left and
right ends to move it.
5-EN

About the HOME Screen
Select the audio source on the HOME screen to perform various settings and operations of the function.
1 Press the (HOME) button.
The HOME screen is displayed.
Normal mode screen example
Enhanced Text mode screen example
6-EN
Touch to display the Sound Setup screen.
Touch to change the page.
Pages can also be changed by swiping the HOME
screen horizontally with your finger.
Setup button
Displays the Setup screen.
Audio source select area
Touch your desired source icon to change the audio
source.
Android Auto button
Displays the Android Auto screen, high light displayed
when an Android Smartphone installed Android Auto
App is connected.
Apple CarPlay button
Displays the Apple CarPlay screen, high light displayed
when Apple CarPlay is turned on and an iPhone 6s or
later is connected.
HOME screen navigation
Phone button
Displays the Phone menu screen.
The Device List screen is displayed when a Hands-free
Phone, Apple CarPlay or Android Auto device is not
connected.
Thumbnail window for the current source
Source name, artwork and title information are
displayed. Touch the artwork to display the source
screen. Touch [
] to play/pause a track or video.

Setting the Home Screen Type
The Home screen can be changed to the Enhanced Text mode.
1 Press the (HOME) button.
The HOME screen is displayed.
2 Touch [Setup].
The Setup screen is displayed.
3 Touch [System].
4 Touch [Home Screen Type].
5 Touch [Normal] or [Enhanced Text].
7-EN

Owner’s manual Apple CarPlay (Optional)
Apple CarPlay Operation (Optional)
Apple CarPlay is a smarter, safer way to use your iPhone in the car. Apple CarPlay takes the things you want to do
with your iPhone while driving and puts them right on this unit. You can get directions, make calls, send and
receive messages, and listen to music, all in a way that allows you to stay focused on the road.
1 Press the (HOME) button.
The HOME screen is displayed.
2 Touch [Apple CarPlay].
The Apple CarPlay screen is displayed.
• Refer to “Apple CarPlay” in the Owner’s Manual for information on how to operate Apple CarPlay.
Owner’s manual Android Auto™ (Optional)
Android Auto™ (Optional)
Android Auto brings your favorite smartphone apps into one place, making it easier for drivers to access their
favorite navigation, media, and communication apps on the road while minimizing the distractions. Talk to Google
on Android Auto™ and get things done with your voice so you can keep your eyes on the road and hands on the
wheel. Easily send messages, get directions, control media and more. Just short-press or long-press the voice
control button on your steering wheel.
1 Press the (HOME) button.
The HOME screen is displayed.
2 Touch [Android Auto].
The Android Auto screen is displayed.
• Refer to “Android Auto” in the Owner’s Manual for information on how to operate Android Auto.
8-EN

Radio/RDS Operation
Displays the Phone screen
The Device List screen is
displayed when a Phone, CarPlay
or Android Auto device is not
connected.
Preset button
Displays the preset stations with a
short touch.
Touch for at least 2 seconds to
memorise the current station as a
preset station.
Owner’s manual Radio/RDS
TP/EON indicator
Switches band
Information display
Increases frequency
Touch and hold to change the
frequency continuously.
Switches a Seek mode
Touch for at least 1 second
to memorises stations
automatically
• The patterns of some keys in the Quick Reference Guide may differ from the actual screen.
Owner’s manual DAB/DAB+/DMB
DAB/DAB+/DMB Operation
Slide Show
Displays the Phone screen
The Device List screen is
displayed when a Phone, CarPlay
or Android Auto device is not
connected.
Preset button
Displays the preset stations with a
short touch.
Touch for at least 2 seconds to
memorize the current station as a
preset station.
Displays the Radio setting
screen
Decreases frequency
Touch and hold to change
the frequency continuously.
Traffic Information mode On/Off
Signal Strength indicator
TP indicator
Switches band
Information display
Increases frequency
Switches a Seek mode
Displays the search screen
• The patterns of some keys in the Quick Reference Guide may differ from the actual screen.
Displays the Radio setting
screen
Decreases frequency
Traffic Information mode On/Off
9-EN

Owner’s manual USB Flash drive Operation (Optional)
USB Flash drive Operation (Optional)
You can play back music files (MP3/WMA/AAC/FLAC/WAV/APE) and video files (MP4/MOV/FLV/MKV ) stored in a
USB flash drive on the internal player of this system.
USB Audio main screen example
Displays the Phone screen
The Device List screen is displayed
when a Phone, CarPlay or Android
Auto device is not connected.
Finds the beginning of the current
file/Finds a previous file within 3
seconds after playback starts/
Fast-reverses when touched for at
least 1 second
Artwork display
Pause and Play
Repeat playback
Shuffle play
Time Bar (Elapsed time/Total time for playing)
• The patterns of some keys in the Quick Reference Guide may differ from the actual screen.
Searching for a Music File
3 Touch the desired artist’s name.
For example: Searching by Artist name
1 Touch [ (Search)] during playback.
2 Touch [Artists].
Information display
Switches to USB Video mode
Finds the beginning of next
chapter/Fast-forwards when
touched for at least 1 second
Next song information display
Hi-Res icon display
Displays the USB Setup Menu
screen
Current track number/
Total track number
Displays the search screen
10-EN
4 Touch the desired album’s name.
5 Touch the desired song’s name.
The selected song is played back.

Owner’s manual iPod mode on iPhone (Optional)
iPod mode on iPhone (Optional)
A separately sold Lightning to USB cable is required depending on the type of iPhone.
Displays the Phone screen
The Device List screen is displayed
when a Phone, CarPlay or Android
Auto device is not connected.
Finds the beginning of the current
file/Finds a previous file within 3
seconds after playback starts/
Fast-reverses when touched for at
least 1 second
Artwork display
Information display
Finds the beginning of the next
file/Fast-forwards when
touched for at least 1 second
Next song information display
Pause and Play
Repeat playback
Shuffle play
Time Bar (Elapsed time/Total time for playing)
• This unit supports iPhone (iPhone 6s or later) only. For using music playback only, set the “Apple CarPlay” setting to “Off”
before connecting with your iPhone.
• The patterns of some keys in the Quick Reference Guide may differ from the actual screen.
Searching for a Music File
3 Touch the desired artist’s name.
Displays the iPod Setup Menu
screen
Current track number/
Total track number
Displays the search screen
For example: Searching by Artist name
1 Touch [ (Search)] during playback.
2 Touch [Artists].
4 Touch the desired album’s name.
5 Touch the desired song’s name.
The selected song is played back.
11-EN

Owner’s manual Bluetooth Setup, Bluetooth Operation
Hands-Free Phone Control
The unit can connect with up to two hands-free phones.
How to connect to a Bluetooth
compatible device (Pairing)
To display the Setup HOME screen:
• Bring your vehicle to a complete stop at a safe location.
Engage the parking brake.
1 Touch [Setup] on the HOME screen.
2 Touch [Device].
3 Touch [Device List].
4 Touch [Add New Device] to search for a new
device.
6 When a code is displayed on the device,
check that the code is the same as the one
on the screen of the unit, and touch [Yes].
7 When the device connection is complete, a
message appears and the device returns to
normal mode.
• You can register up to 10 Bluetooth compatible mobile
phones.
Answering a Call
1 An incoming call triggers the ringtone and
an incoming call display.
The Select Function screen is displayed.
5 Select the function of the connecting
device on the Select Function screen, and
touch [OK].
A check mark is displayed for the selected function.
• Hands Free1: The device is used as the first
hands-free phone.
• Hands Free2: The device is used as the second
hands-free phone.
• Bluetooth Audio: The device is used as an
Bluetooth Audio device.
• Apple CarPlay*: The device is used as Apple
CarPlay.
* If you want to use Apple CarPlay mode without
displaying [Apple CarPlay] on the Select Function
screen, select [Hands Free1] or [Hands Free2] to
connect your device.
12-EN
2 Touch [ ].
The call starts.
Hanging up the Telephone
1 Touch [ ] (End Call).
The call finishes.

Installation
Owner’s manual Installation
Note on installation
• Install at an angle between horizontal and 30°.
Note that installing at an angle outside of this
range will result in a loss of performance and
possible damage.
<iLX-705D>
0 - 30°
<iLX-F905D/iLX-F115D>
0 - 30°
• Do not block the unit’s heat sink, which would
prevent air circulation. If blocked, heat will
accumulate inside the unit and may cause a fire.
Air ventilation hole
Mounting the Microphone
For safe use, make sure of the following:
• Location is stable and firm.
• Driver’s view and operations are not obstructed.
• Microphone is located where the driver’s voice can
be easily picked up.
When you speak into the microphone, you should not
have to change your driving posture. This may cause a
distraction, taking your attention away from safely
driving your vehicle. Carefully consider direction and
distance while mounting the microphone. Confirm
that the driver’s voice can be easily picked up at the
selected location.
Microphone
Microphone base
Adhesive tape
Steering column
Mounting the GPS Antenna inside the
vehicle
Rear of the Unit
• When installing the display unit and main unit, do
not touch the connectors with your hands.
(iLX-F905D/iLX-F115D only)
<Main unit><Display unit>
Connectors
1 Clean the mounting location.
2 Put on the GPS Antenna mounting plate.
3 Mount the GPS Antenna.
GPS Antenna
Antenna mounting plate
This unit
• Do not mount the GPS Antenna inside the centre
console.
– Mount the GPS Antenna on a flat plane of the dash board or
rear tray.
– Make sure the GPS Antenna is not covered (obstructed) by any
metallic surface or object.
13-EN

• If the GPS Antenna is mounted near the unit, the
reception becomes poor, and the location of your vehicle
may not be displayed correctly.
– Mount the GPS Antenna far away enough from the unit.
– Bundle the GPS Antenna cable away from the rear of the unit.
• Some thermal reflection type or thermal absorption type
glass may interrupt high frequency waves. If reception is
poor with the antenna installed inside the car, try to
mount the antenna outside the car.
1 Remove 4 hexagon bolts from both sides of
the unit.
Note on using HDMI Connection Cables
When using HDMI connection cables, secure the
cables to the HDMI Terminals with the supplied HDMI
Fixation Bracket.
1 Secure the HDMI Fixation Bracket with the
screw (A).
HDMI Terminal
HDMI Fixation Bracket
(Included)
Adjusting the display position
(iLX-F905D/iLX-F115D)
Depending on the vehicle, the front-back display
position differs. To adjust the front-back position, set
the slider to the forward position.
Default setting: Back position
Front-back position
<Forward position> <Back position>
51.5 mm 31.5 mm
(A)
Hexagon bolts ×4
2 Pull out the slider to the forward position.
(To return the slider to the back position,
push it in.)
Slider
3 Install 4 hexagon bolts to secure the slider.
Installing the Unit (iLX-705D)
1 Mount the original mounting bracket to
the unit using the supplied screws.
If you do not have the original mounting bracket,
mount the Double din KIT* (provided with the side
mounting bracket), etc. to the main unit.
* Sold separately.
14-EN
Screws (M5 × 8)
(included)
Original Mounting
Bracket
Face plate (Included)

2 Connect all other leads of the unit
according to details described in the
“Connections” (page18).
3 Mounting the unit in a car.
• Fix the cables carefully. Do not damage them by tucking
them into movable parts, such as a seat rail, or by
locating them against sharp or pointed edges.
Installing the Unit (iLX-F905D/
iLX-F115D)
Adjust the up-down position of the
Display unit (iLX-F905D/iLX-F115D)
Adjust the up-down position of the display according
to the mounting position on the vehicle before
mounting the display unit.
Default setting: 0 mm
1 Remove the 4 screws on the rear of the
display unit, then adjust the up-down
position.
1 Mount the original mounting bracket to the
main unit using the supplied screws.
• If you do not have the original mounting bracket,
mount the Double din KIT* (provided with the
side mounting bracket), etc. to the main unit.
* Sold separately.
Original Mounting
Bracket
Screws (M5 × 8)
(included)
2 Connect all other leads of the main unit
according to details described in the
“Connections” (page18).
3 Mount the unit in a car.
• Fix the cables carefully. Do not damage them by
mounting them into movable parts, such as the seat rail,
or by locating them against sharp or pointed edges.
Screws (M2.6× 8)
2 Attach the Sheet Rear in a position that
aligns with the up-down position of the
display unit.
Sheet Rear
(Included)
2×50 mm: for up-down position 0 mm or -60mm
2×35 mm: for up-down position -15 mm or -45mm
2×20 mm: for up-down position -30 mm
0 mm
Sheet Rear
(2×50 mm)
-30 mm
Sheet Rear
(2×20 mm)
up-down position
-15 mm
Sheet Rear
(2×35 mm)
-45 mm
Sheet Rear
(2×20 mm)
Sheet Rear
(2×35 mm)
15-EN

-60 mm
Sheet Rear
(2×50 mm)
3 Attach the Cover Rear to the rear of the
display unit using 2 screws (M2.6×6).
Secure the screws, then attach the Sheet
caps.
Sheet caps (Included)
Screws
(M2.6× 6)
(Included)
Cover Rear (Included)
Install the display unit (iLX-F905D/
iLX-F115D)
1 Fix the Display unit to the slider of the main
unit using 4 screws (M5×8).
CAUTION
Do not adjust the display angle when the display
unit is not fixed to the slider of the main unit using
4 screws (M5 × 8). Doing so may not turn power
on.
2 Mount the Power Plate.
Power Plate (Included)
• If the Power Plate is not mounted, the display unit
may not be turned power on. Make sure to
mount it.
3 Mount the Cover Hinge using 2 screws
(M3×4).
Secure the screws, then attach the Sheet
Hinges.
Sheet Hinges
(Included)
Screws (M3×4)
(Included)
Cover Hinge
(Included)
16-EN
Screws (M5×8) (Included)

Connection Diagram of SPST Switch (sold separately)
(If the ACC power supply is not available)
iLX-705D
iLX-F905D
iLX-F115D
i905
• If your vehicle has no ACC power supply, add an SPST (Single-Pole, Single-Throw) switch (sold separately) and fuse (sold
separately).
• The diagram and the fuse amperage shown above are in the case when the unit is used individually.
• If the switched power (ignition) lead of the unit is connected directly to the positive (+) post of the vehicle’s battery, the unit
draws some current (several hundred milliamperes) even when its switch is placed in the OFF position, and the battery
may be discharged.
ACC
(Red)
BATTERY
(Yellow)
SPST SW (Optional)
FUSE (20A) (Optional)
FUSE (5A) (Optional)
Battery
17-EN

Connections
Connection 1
Owner’s manual Connections
Antenna
Power cable
PRE OUT cable
REMO
(Blue/White)
REVERSE
(Orange/White)
PARKING BRAKE
(Yellow/Blue)
ACC
(Red)
GND
(Black)
P. ANT
(Blue)
BAT T
(Yellow)
MIC IN
STEERING REMOTE
HDMI-REMO-OUT
(Brown)
AUX-REMO-OUT
(Gray)
REMOTE cable
SUBW
FRONT OUT
REAR OUT
(Green)
(Green/Black)
(White)
(White/Black)
(Gray/Black)
(Gray)
(Violet/Black)
(Violet)
Microphone (included)
To steering remote control interface
To HDMI Selector Interface
To AUX device (TV Tuner, etc.)
To input terminal of amplifier when
adding an external amplifier
Rear Left
Front Left
Speakers
Front Right
Rear Right
To amplifier or equalizer
To plus side of the back lamp signal lead of the car
To the parking brake signal lead
To power antenna
Ignition key
Battery
18-EN

Connection 2
CAMERA cable
USB cable 2.4A (Black)
USB cable 1.5A (Gray)
REAR CAMERA
FRONT CAMERA
CONNECT2 I/F (UART I/F)
LIN
DRIVE RECODER IN
SPEED SENSOR
(Green/White)
To USB flash drive, iPhone or Android smartphone.
To iPhone or Android smartphone (For charging
only).
To Rear camera
To Front or Side camera
To CAN Interface box
To Dash Cam
To the vehicle speed pulse line
GPS Antenna (Included)
HDMI Input Connector
HDMI Output Connector
CAMERA Connector
GPS Antenna Receptacle
Connect to GPS antenna (Included).
AUX Input Connector
Input lead for AUX audio signal.
Power Supply Connector
PRE OUT Connector
REM Connector
DAB Antenna Connector
To DAB Antenna (sold separately).
Radio Antenna Receptacle
ISO/JASO Antenna Adapter (sold separately)
ISO/JASO Antenna Adapter may be required,
depending on the vehicle.
MIC Input Connector
To microphone (included).
Steering Remote Control Interface Connector
To steering remote control interface.
For details about connections, consult your nearest
Alpine dealer.
HDMI-REM-OUT Lead (Brown)
Connect this lead to the remote input lead of your
HDMI Selector Interface.
AUX-REM-OUT Lead (Gray)
Connect this lead to the remote input lead of your
AUX device.
19-EN

Subwoofer RCA Connectors
RED is right and WHITE is left.
Front Output RCA Connectors
Can be used as Front Output RCA Connectors. RED is
right and WHITE is left.
Rear Output RCA Connectors
Can be used as Rear Output RCA Connectors. RED is
right and WHITE is left.
ISO Connector (Speaker Output)
Left Rear (+) Speaker Output Lead (Green)
Left Rear (–) Speaker Output Lead (Green/Black)
Left Front (+) Speaker Output Lead (White)
Left Front (–) Speaker Output Lead (White/Black)
Right Front (–) Speaker Output Lead (Gray/Black)
Right Front (+) Speaker Output Lead (Gray)
Right Rear (–) Speaker Output Lead (Violet/Black)
Right Rear (+) Speaker Output Lead (Violet)
Remote Turn-On Lead (Blue/White)
Connect this lead to the remote turn-on lead of your
amplifier or signal processor.
Reverse Lead (Orange/White)
Parking Brake Lead (Yellow/Blue)
Connect this lead to the power supply side of parking
brake switch to transmit the parking brake status
signals to the unit.
ISO Power Supply Connector
Switched Power Lead (Ignition) (Red)
Connect this lead to an open terminal on the vehicle’s
fuse box or another unused power source that
provides (+) 12V only when the ignition is turned on or
in the accessory position.
Ground Lead (Black)
Connect this lead to a good chassis ground on the
vehicle.
Make sure the connection is made to bare metal and is
securely fastened using the sheet metal screw
provided.
Power Antenna Lead (Blue)
Connect this lead to the +B terminal of your power
antenna, if applicable.
• This lead should be used only for controlling the
vehicle’s power antenna. Do not use this lead to turn
on an amplifier or a signal processor, etc.
Battery Lead (Yellow)
Connect this lead to the positive (+) post of the
vehicle’s battery.
Fuse Holder (15A)
USB Connector (2.4A)
To USB flash drive, iPhone or Android smartphone.
USB Connector (1.5A)
To iPhone or Android smartphone (For charging only).
REAR CAMERA Input Connector
Use when connecting a rear camera.
FRONT CAMERA Input Connector
Use when connecting a front camera or side camera.
Connect2 (UART) Connector
To Interface Box.
LIN Connector
Connect this lead to the LIN connector of the Dash
Cam.
Drive Recoder Input Connector
Input lead for Dash Cam video signal.
Speed Sensor Lead (Green/White)
Improper connection of the speed pulse line may
cause important safety features of the vehicle to fail
(such as the brakes or air bags). Such failures may result
in an accident and loss of life. We strongly recommend
that the installation be performed by a trained,
authorized Alpine dealer.
20-EN

Specifications
Owner’s manual Specifications
MONITOR SECTION
Screen Size 7” (iLX-705D)
Operation System TFT active matrix
Number of Picture Elements 2,764,800 pcs.
Effective Number of Picture Elements
99% or more
Color system NTSC / PAL
Illumination System LED
9” (iLX-F905D)
11” (iLX-F115D)
9” (i905)
(1280 × 720 × RGB)
FM TUNER SECTION
Tuning Range 87.5 – 108.0 MHz
Mono Usable Sensitivity 8.1 dBf (0.7 µV/75 ohms)
50 dB Quieting Sensitivity 12 dBf (1.1 µV/75 ohms)
Alternate Channel Selectivity 80 dB
Signal-to-Noise Ratio 65 dB
Stereo Separation 35 dB
AM TUNER SECTION
Tuning Range 531 – 1,602 kHz
Usable Sensitivity 25.1 μV/28 dBf
DAB SECTION
Tuning Range 174.928 – 239.2 MHz
Usable Sensitivity -100 dBm
Signal-to-Noise Ratio 90 dB
USB1 SECTION
USB requirements USB 2.0
Max. Power Consumption 2,400 mA
USB Class USB (Mass Storage Class)
File System FAT16 / 32, exFAT
Number of Channels 2-Channels (Stereo)
Frequency Response*
Total Harmonic Distortion 0.005% (at 1 kHz)
Dynamic Range 95 dB (at 1 kHz)
Signal-to-Noise Ratio 95 dB
Channel Separation 90 dB (at 1 kHz)
*1 Frequency response may differ depending on the encoder
software/bit rate.
1
5 – 40,000 Hz (±1 dB)
USB2 SECTION
Max. Power Consumption 1,500 mA (CDP Support)
USB Class Charge only
HDMI SECTION
Input Format 720p / 480p / VGA
Output Format 720p / 480p
Bluetooth SECTION
Bluetooth Specification Bluetooth V4.2 (2,402 - 2,480 MHz)
Output Power +4.0 dBm/2.51 mW Ave.
(Power class 2)
Profile HFP (Hands-Free Profile)
OPP (Object Push Profile)
PBAP (Phone Book Access Profile)
SPP (Serial Port Profile)
A2DP (Advanced Audio
Distribution Profile)
AVRCP (Audio/Video Remote
Control Profile)
GPS SECTION
Reception Frequency 1575.42 + / - 1.023 MHz
Reception sensitivity (Search) -136 dB max.
Wi-Fi SECTION
Frequency Ranges IEEE 802.11 b/g/n (2.4 GHz)
IEEE 802.11 a/n/ac (5 GHz)
Channels 1 – 13 ch (2.4 GHz)
149 – 165 ch (5 GHz)
Frequency Band 2401 – 2483 MHz (2.4 GHz)
5725 – 5850 MHz (5 GHz)
Output Power (2.4 GHz) Max. 18 dBm
Output Power (5 GHz) Max. 13 dBm (11 a)
Max. 12 dBm (11 n/ac)
Security Protocols WPA3 / WPA2-PSK (TKIP, AES)
GENERAL
Power Requirement 14.4 V DC
(11–16 V allowable)
Operating temperature -20°C to + 60°C
Power Output 50 W × 4
Maximum Current Consumption
15 A
Audio output level
Preout (Front, Rear): 4V/10k ohms (max.)
Preout (Subwoofer): 4V/10k ohms (max.)
Weight 1.4 kg (iLX-705D)
2.3 kg (iLX-F905D)
2.6 kg (iLX-F115D)
1.7 kg (i905)
CHASSIS SIZE
iLX-705D iLX-F905D iLX-F115D i905
Width 178 mm 178 mm 178 mm 178 mm
Height 50 mm 50 mm 50 mm 50 mm
Depth 149.6 mm 149.6 mm 149.6 mm 142 mm
DISPLAY SIZE
iLX-705D iLX-F905D iLX-F115D i905
Width 171 mm 232.5 mm 268.9 mm 214.7 mm
Height 96 mm 151.1 mm 178 mm 136.6 mm
Depth 17.7 mm 54.7 mm 54.7 mm 29.9 mm
21-EN

• Due to continuous product improvement, specifications
and design are subject to change without notice.
• The LCD panel is manufactured using an extremely high
precision manufacturing technology. Its effective pixel
ratio is over 99.99%. This means that there is a
possibility that 0.01% of the pixels could be either always
ON or OFF.
• Windows Media, and the Windows logo are trademarks,
or registered trademarks of Microsoft Corporation in
the United States and/or other countries.
• Apple, iPhone, iPod, Lightning and Siri are trademarks
of Apple Inc., registered in the U.S. and other countries.
App Store is a service mark of Apple Inc.
• Use of the Made for Apple and Works with Apple
badges means that an accessory has been designed to
connect specifically to the Apple product(s) identified
in the Made for Apple badge and to work specifically
with the technology identified in the Works with Apple
badge, and has been certified by the developer to
meet Apple performance standards. Apple is not
responsible for the operation of this device or its
compliance with safety and regulatory standards.
Please note that the use of this accessory with an Apple
product may affect wireless performance.
• Use of the Apple CarPlay logo means that a vehicle
user interface meets Apple performance standards.
Apple is not responsible for the operation of this
vehicle or its compliance with safety and regulatory
standards. Please note that the use of this product with
iPhone may affect wireless performance.
• Google, Android, Google Play and Android Auto are
trademarks of Google LLC.
To use Android Auto on your car display, you’ll need an
Android phone running Android 6.0 or higher, an active
data plan, and the Android Auto app.
• The terms HDMI and HDMI High-Definition Multimedia
Interface, and the HDMI Logo are trademarks or
registered trademarks of HDMI Licensing Administrator,
Inc. in the United States and other countries.
• The Bluetooth® word mark and logos are registered
trademarks owned by the Bluetooth SIG, Inc. and any
use of such marks by ALPS ALPINE CO., LTD. is under
license.
• The Wi-Fi CERTIFIED™ Logo is a registered trademark of
Wi-Fi Alliance®.
• LDAC and LDAC logo are trademarks of Sony
Corporation.
• The product with this logo is conformed to High-
Resolution Audio standard defined by Japan Audio
Society. This logo is used under license from Japan
Audio Society.
Made for iPhone SE (2nd generation), iPhone 11 Pro Max,
iPhone 11 Pro, iPhone 11, iPhone XS Max, iPhone XS,
iPhone XR, iPhone X, iPhone 8 Plus, iPhone 8, iPhone 7
Plus, iPhone 7, iPhone SE, iPhone 6s Plus, iPhone 6s.
22-EN

Inhalt
WARNUNG..............................................................................................................................................................2
VORSICHT................................................................................................................................................................ 3
Erste Schritte.......................................................................................................................................................... 4
Bedienen von Apple CarPlay (Option)..........................................................................................................8
Android Auto™ (Option)....................................................................................................................................8
Radio/RDS-Betrieb...............................................................................................................................................9
DAB/DAB+/DMB-Betrieb................................................................................................................................... 9
USB-Flash-Laufwerksbetrieb (Option)........................................................................................................10
iPod-Modus auf iPhone (Option)..................................................................................................................11
Steuerung der Freisprechfunktion...............................................................................................................12
Installation............................................................................................................................................................13
Anschlüsse............................................................................................................................................................18
Technische Daten...............................................................................................................................................21
WICHTIG!
Notieren Sie sich die Seriennummer des Geräts bitte an der unten angegebenen Stelle und bewahren Sie die
Notiz auf.
SERIENNUMMER:
ISO-SERIENNUMMER: AL
EINBAUDATUM:
EINGEBAUT VON:
GEKAUFT BEI:
Detaillierte Erläuterungen zu allen Funktionen finden Sie in der auf unserer Website
veröffentlichten Bedienungsanleitung unter https://www.alpine-europe.com/alpine-europe.html
Bei Bedarf erhalten Sie bei Ihrem ALPINE-Händler einen Ausdruck der auf der Website
veröffentlichten Bedienungsanleitung.
1-DE

WARNUNG
WARNUNG
Dieses Symbol weist auf wichtige Anweisungen
hin. Bei Nichtbeachtung besteht die Gefahr von
schweren Verletzungen oder Todesfällen.
DAS GERÄT SO EINBAUEN, DASS DER FAHRER DIE TV-/
VIDEOANZEIGE WÄHREND DER FAHRT NICHT SEHEN KANN,
BIS DAS FAHRZEUG STEHT UND DIE HANDBREMSE
ANGEZOGEN WIRD.
Es ist gefährlich, während der Fahrt fernzusehen oder Videos
anzuschauen. Wenn das Gerät nicht gemäß unseren Richtlinien
eingebaut wird, kann der Fahrer beim Fahren die TV-/ Videoanzeige
sehen und dadurch vom Verkehr abgelenkt werden. Sie können dadurch
vom Verkehr abgelenkt werden und einen Unfall verursachen. In diesem
Fall besteht hohe Unfallgefahr. Der Fahrer und andere Personen können
dabei schwer verletzt werden.
BEIM FAHREN DIE VIDEOANZEIGE AUSSCHALTEN.
Sie können dadurch vom Verkehr abgelenkt werden und einen Unfall
verursachen.
KEINE BEDIENUNG AUSFÜHREN, DIE VOM SICHEREN LENKEN
DES FAHRZEUGS ABLENKEN KÖNNTE.
Führen Sie Bedienungen, die Ihre Aufmerksamkeit längere Zeit in
Anspruch nehmen, erst aus, nachdem das Fahrzeug zum Stillstand
gekommen ist. Halten Sie das Fahrzeug immer an einer sicheren Stelle
an, bevor Sie solche Bedienungen ausführen. Andernfalls besteht
Unfallgefahr.
DIE LAUTSTÄRKE NUR SO HOCH STELLEN, DASS SIE
WÄHREND DER FAHRT NOCH AUSSENGERÄUSCHE
WAHRNEHMEN KÖNNEN.
Übermäßige Lautstärkepegel, die Geräusche wie die Sirenen von
Notarztwagen oder Warnsignale (an einem Bahnübergang usw.)
übertönen, können gefährlich sein und zu einem Unfall führen. HOHE
LAUTSTÄRKEPEGEL IN EINEM AUTO KÖNNEN AUSSERDEM
GEHÖRSCHÄDEN VERURSACHEN.
WÄHREND DER FAHRT MÖGLICHST WENIG AUF DEN
BILDSCHIRM SCHAUEN.
Sie können dadurch vom Verkehr abgelenkt werden und einen Unfall
verursachen.
GERÄT NICHT ÖFFNEN.
Andernfalls besteht Unfallgefahr, Feuergefahr oder die Gefahr eines
elektrischen Schlages.
NUR IN FAHRZEUGEN MIT 12-VOLT-BORDNETZ UND
NEGATIVER MASSE VERWENDEN.
Fragen Sie im Zweifelsfall Ihren Händler. Andernfalls besteht
Feuergefahr usw.
KLEINE GEGENSTÄNDE WIE SCHRAUBEN VON KINDERN
FERNHALTEN.
Werden solche Gegenstände verschluckt, besteht die Gefahr
schwerwiegender Verletzungen. Suchen Sie unverzüglich einen Arzt auf,
wenn ein Kind einen solchen Gegenstand verschluckt.
SICHERUNGEN IMMER DURCH SOLCHE MIT DER RICHTIGEN
AMPEREZAHL ERSETZEN.
Andernfalls besteht Feuergefahr oder die Gefahr eines elektrischen
Schlages.
LÜFTUNGSÖFFNUNGEN UND KÜHLKÖRPER NICHT
ABDECKEN.
Andernfalls kann es zu einem Wärmestau im Gerät kommen und es
besteht Feuergefahr.
DAS GERÄT NUR AN EIN 12-V-BORDNETZ IN EINEM
FAHRZEUG ANSCHLIESSEN.
Andernfalls besteht Feuergefahr, die Gefahr eines elektrischen Schlages
oder anderer Verletzungen.
AUF KORREKTE ANSCHLÜSSE ACHTEN.
Bei fehlerhaften Anschlüssen besteht Feuergefahr und es kann zu
Schäden am Gerät kommen.
VOR DEM ANSCHLUSS DAS KABEL VOM MINUSPOL DER
BATTERIE ABKLEMMEN.
Andernfalls besteht die Gefahr eines elektrischen Schlages oder
Verletzungsgefahr durch einen Kurzschluss.
DAFÜR SORGEN, DASS SICH DIE KABEL NICHT IN
GEGENSTÄNDEN IN DER NÄHE VERFANGEN.
Verlegen Sie die Kabel wie im Handbuch beschrieben, damit sie beim
Fahren nicht hinderlich sind. Kabel, die sich im Lenkrad, im Schalthebel,
im Bremspedal usw. verfangen, können zu äußerst gefährlichen
Situationen führen.
ELEKTRISCHE KABEL NICHT SPLEISSEN.
Kabel dürfen nicht abisoliert werden, um andere Geräte mit Strom zu
versorgen. Andernfalls wird die Strombelastbarkeit des Kabels
überschritten und es besteht Feuergefahr oder die Gefahr eines
elektrischen Schlages.
BEIM BOHREN VON LÖCHERN LEITUNGEN UND KABEL NICHT
BESCHÄDIGEN.
Wenn Sie beim Einbauen Löcher in das Fahrzeugchassis bohren, achten
Sie unbedingt darauf, die Kraftstoffleitungen und andere Leitungen, den
Benzintank und elektrische Kabel nicht zu berühren, zu beschädigen
oder zu blockieren. Andernfalls besteht Feuergefahr.
BOLZEN UND MUTTERN DER BREMSANLAGE NICHT ALS
MASSEPUNKTE VERWENDEN.
Verwenden Sie für Einbau oder Masseanschluß NIEMALS Bolzen oder
Muttern der Brems- bzw. Lenkanlage oder eines anderen
sicherheitsrelevanten Systems oder des Benzintanks. Andernfalls besteht
die Gefahr, dass Sie die Kontrolle über das Fahrzeug verlieren oder ein
Feuer ausbricht.
DAS GERÄT NICHT AN EINER STELLE EINBAUEN, AN DER ES
BEIM FAHREN HINDERLICH SEIN KÖNNTE, WEIL ES Z. B. DAS
LENKRAD ODER DEN SCHALTHEBEL BLOCKIERT.
Andernfalls ist möglicherweise keine freie Sicht nach vorne gegeben,
oder die Bewegungen des Fahrers sind so eingeschränkt, dass
Unfallgefahr besteht.
2-DE

VORSICHT
Dieses Symbol weist auf wichtige Anweisungen
hin. Bei Nichtbeachtung besteht die Gefahr von
Verletzungen bzw. Sachschäden.
DAS GERÄT NICHT WEITERBENUTZEN, WENN EIN PROBLEM
AUFTRITT.
Andernfalls kann es zu Verletzungen oder Schäden am Gerät kommen.
Geben Sie das Gerät zu Reparaturzwecken an einen autorisierten AlpineHändler oder den nächsten Alpine-Kundendienst.
VERKABELUNG UND EINBAU VON FACHPERSONAL
AUSFÜHREN LASSEN.
Die Verkabelung und der Einbau dieses Geräts erfordern technisches
Geschick und Erfahrung. Zu Ihrer eigenen Sicherheit sollten Sie
Verkabelung und Einbau dem Händler überlassen, bei dem Sie das Gerät
erworben haben.
NUR DAS VORGESCHRIEBENE ZUBEHÖR VERWENDEN UND
DIESES SICHER EINBAUEN.
Verwenden Sie ausschließlich das vorgeschriebene Zubehör. Andernfalls
wird das Gerät möglicherweise beschädigt oder es lässt sich nicht sicher
einbauen. Wenn sich Teile lösen, stellen diese eine Gefahrenquelle dar
und es kann zu Betriebsstörungen kommen.
DIE KABEL SO VERLEGEN, DASS SIE NICHT GEKNICKT ODER
DURCH SCHARFE KANTEN GEQUETSCHT WERDEN.
Verlegen Sie die Kabel so, dass sie sich nicht in beweglichen Teilen wie
den Sitzschienen verfangen oder an scharfen Kanten oder spitzen Ecken
beschädigt werden können. So verhindern Sie eine Beschädigung der
Kabel. Wenn Sie ein Kabel durch eine Bohrung in einer Metallplatte
führen, schützen Sie die Kabelisolierung mit einer Gummitülle vor
Beschädigung durch die Metallkanten der Bohrung.
DAS GERÄT NICHT AN STELLEN EINBAUEN, AN DENEN ES
HOHER FEUCHTIGKEIT ODER STAUB AUSGESETZT IST.
Bauen Sie das Gerät so ein, dass es vor hoher Feuchtigkeit und Staub
geschützt ist. Wenn Feuchtigkeit oder Staub in das Gerät gelangen, kann
es zu Betriebsstörungen kommen.
3-DE

Bedienungsanleitung Lage und Funktion der Teile und Bedienelemente, Ein- und Ausschalten
Erste Schritte
Position und Funktion der Teile und Bedienelemente
Die Bildschirmabbildungen in der Kurzanleitung können von den tatsächlichen Bildschirmen abweichen.
iLX-705D
iLX-F905D/iLX-F115D
4-DE

Dimmersensor
Erkennt die Helligkeit im Fahrzeuginnenraum.
Taste
Aktivieren der Siri-Funktion oder des
Spracherkennungsmodus, während eine Verbindung
mit Apple CarPlay oder Android Auto besteht.
Taste / (AB/AUF)
Zum Einstellen der Lautstärke.
Taste (STUMMSCHALTUNG)
Zum Aktivieren/Deaktivieren des Stummschaltmodus.
Halten Sie diese Taste mindestens 2 Sekunden lang
gedrückt, um die Bildschirm-/Tastenbeleuchtung
auszuschalten.
Taste (Audio)
Zum Aufrufen des Audiowiedergabebildschirms.
Die Tonquellen können umgeschaltet werden, solange
der Audiowiedergabebildschirm angezeigt wird.
Netzanzeige
Taste (START)
Zum Aufrufen des START-Bildschirms.
Der Bildschirm mit Klang-Einstellungen wird angezeigt,
solange der START-Bildschirm angezeigt wird.
Halten Sie diese Taste mindestens 2 Sekunden lang
gedrückt, um das Gerät auszuschalten.
Ein- und Ausschalten
Taste (CAM)
Zeigt das Bild von Kamera2 (Vorn/Seite/Andere) oder
Kamera1 (Hinten) an.
Halten Sie die Taste mindestens 1 Sekunde lang
gedrückt, um zum vorherigen Bildschirm
zurückzuschalten.
Taste /
Mit dieser Taste können Sie im Radiomodus einen
Sender oder bei anderen Audio-/Videoquellen einen
Titel usw. nach oben/unten suchen.
Taste (MAP)
Zeigt den Kartenbildschirm für Apple CarPlay /
Android Auto an, wenn Apple CarPlay oder Android
Auto verbunden ist.
Fernbedienungssensor
Richten Sie die Fernbedienung innerhalb von
2Metern auf den Fernbedienungssensor.
1 Drehen Sie den Zündschlüssel in die Stellung ACC oder EIN.
Das System schaltet sich ein.
• Bei der ersten Inbetriebnahme des Geräts wird der START-Bildschirm angezeigt.
VORSICHT (nur iLX-F905D/iLX-F115D)
Um den Displaywinkel anzupassen, halten Sie die
Mitte und Unterseite des Displays fest, um es zu
bewegen.
Um das Display zu schützen, halten Sie nicht die
linke und rechte Seite fest, um es zu bewegen.
5-DE

Informationen zum START-Bildschirm
Wählen Sie die Audioquelle auf dem START-Bildschirm, um die entsprechenden Einstellungen und Funktionen auszuführen.
1 Drücken Sie die Taste (START).
Der START-Bildschirm wird angezeigt.
Bildschirmbeispiel für Normal-Modus
Bildschirmbeispiel für Hervorhebung-Modus
6-DE
Berühren, um den Bildschirm mit KlangEinstellungen aufzurufen.
Berühren, um die Seite zu wechseln.
Sie können die Seiten auch wechseln, indem Sie horizontal
mit dem Finger über den START-Bildschirm wischen.
Einstellungen-Taste
Ruft den Einstellungen-Bildschirm auf.
Bereich zum Auswählen der Tonquelle
Berühren Sie das gewünschte Quellensymbol, um die
Tonquelle zu wechseln.
Android Auto-Taste
Ruft den Android Auto-Bildschirm auf, der mit einer
Hervorhebung angezeigt wird, wenn ein AndroidSmartphone verbunden ist, auf dem die App Android
Auto installiert ist.
Apple CarPlay-Taste
Ruft den Apple CarPlay-Bildschirm auf, der mit einer
Hervorhebung angezeigt wird, wenn Apple CarPlay
eingeschaltet wird und ein iPhone6s oder höher
verbunden ist.
Navigieren auf dem START-Bildschirm
Telefon-Taste
Ruft das Telefon-Menü auf.
Der Geräteliste-Bildschirm wird angezeigt, wenn kein
Telefon mit Freisprecheinrichtung, Apple CarPlay- oder
Android Auto-Gerät verbunden ist.
Miniaturbildfenster für die aktuelle Tonquelle
Quellenname, Symbol und Titelinformationen werden
angezeigt. Berühren Sie das Symbol, um den
Quellenbildschirm aufzurufen. Berühren Sie [
einen Titel oder ein Video wiederzugeben/anzuhalten.
], um

Einstellen des Startbildschirmtyps
Sie können für den Startbildschirm den Hervorhebung-Modus wählen.
1 Drücken Sie die Taste (START).
Der START-Bildschirm wird angezeigt.
2 Berühren Sie [Einstellungen].
Der Einstellungen-Bildschirm wird angezeigt.
3 Berühren Sie [System].
4 Berühren Sie [Startbildschirmtyp].
5 Berühren Sie [Normal] oder [Hervorhebung].
7-DE

Bedienungsanleitung Apple CarPlay (Option)
Bedienen von Apple CarPlay (Option)
Apple CarPlay ist eine intelligentere und sicherere Möglichkeit, um Ihr iPhone im Auto zu verwenden. Apple
CarPlay überträgt die gewünschten Funktionen auf Ihrem iPhone während der Fahrt direkt auf das Gerät. Sie
können das Navigationssystem nutzen, Anrufe tätigen, Nachrichten senden und empfangen, sowie Musik hören,
und das auf eine Weise, die Ihre Aufmerksamkeit nicht vom Geschehen auf der Straße ablenkt.
1 Drücken Sie die Taste (START).
Der START-Bildschirm wird angezeigt.
2 Berühren Sie [Apple CarPlay].
Der Apple CarPlay-Bildschirm wird angezeigt.
• Weitere Informationen zum Bedienen von Apple CarPlay finden Sie unter „Apple CarPlay“ in der Bedienungsanleitung.
Bedienungsanleitung Android Auto™ (Option)
Android Auto™ (Option)
Mit Android Auto haben Sie Ihre am häufigsten genutzten Smartphone-Apps zentral an einem Ort, so dass Sie als
Fahrer einfacher auf Ihre gewohnten Navigations-, Medien- und Kommunikations-Apps auf der Fahrt zugreifen
können, ohne zu sehr abgelenkt zu werden. Sprechen Sie mit Google auf Android Auto™ und erledigen Sie die
Dinge mit Ihrer Stimme, damit Sie Ihre Augen auf der Straße und Ihre Hände am Lenkrad behalten können. Sie
können einfach Nachrichten verschicken, eine Wegbeschreibung erhalten, Ihre Medien steuern und vieles mehr.
Drücken Sie kurz oder etwas länger auf die Sprachsteuerungstaste an Ihrem Lenkrad.
1 Drücken Sie die Taste (START).
Der START-Bildschirm wird angezeigt.
2 Berühren Sie [Android Auto].
Der Bildschirm Android Auto wird angezeigt.
• Weitere Informationen zum Bedienen von Android Auto finden Sie unter „Android Auto“ in der Bedienungsanleitung.
8-DE

Bedienungsanleitung Radio/RDS
Radio/RDS-Betrieb
TP-/EON-Anzeige
Ruft den Telefon-Bildschirm auf
Der Geräteliste-Bildschirm wird
angezeigt, wenn kein Telefon,
CarPlay- oder Android Auto-Gerät
verbunden ist.
Speichertaste
Durch kurzes Antippen wird der
entsprechende Festsender eingestellt.
Wenn Sie den momentan
eingestellten Sender als Festsender
speichern möchten, berühren Sie
diese Taste mindestens 2Sekunden
lang.
Wechselt den Suche-Modus
Zum automatischen
Speichern von Sendern
mindestens 1Sekunde lang
berühren
• Die Abbildungen einiger Tasten in der Kurzanleitung können von den tatsächlichen Bildschirmen abweichen.
Bedienungsanleitung DAB/DAB+/DMB
Wechselt das Frequenzband
Informationsanzeige
Erhöht die Frequenz
Länger berühren, damit die
Frequenz kontinuierlich wechselt.
Ruft den RadioEinstellbildschirm auf
Verringert die Frequenz
Länger berühren, damit die
Frequenz kontinuierlich wechselt.
Verkehrsinformationsmodus
ein/aus
DAB/DAB+/DMB-Betrieb
Diashow
Ruft den Telefon-Bildschirm auf
Der Geräteliste-Bildschirm wird
angezeigt, wenn kein Telefon,
CarPlay- oder Android Auto-Gerät
verbunden ist.
Speichertaste
Durch kurzes Antippen wird der
entsprechende Festsender eingestellt.
Wenn Sie den momentan
eingestellten Sender als Festsender
speichern möchten, berühren Sie
diese Taste mindestens 2Sekunden
lang.
Wechselt den Suche-Modus
Ruft den Suchbildschirm auf
• Die Abbildungen einiger Tasten in der Kurzanleitung können von den tatsächlichen Bildschirmen abweichen.
Anzeige für die Signalstärke
TP-Anzeige
Wechselt das Frequenzband
Informationsanzeige
Erhöht die Frequenz
Ruft den RadioEinstellbildschirm auf
Verringert die Frequenz
Verkehrsinformationsmodus
ein/aus
9-DE

Bedienungsanleitung USB-Flash-Laufwerksbetrieb (Option)
USB-Flash-Laufwerksbetrieb (Option)
Sie können Musikdateien (MP3/WMA/AAC/FLAC/WAV/APE) und Videodateien (MP4/MOV/FLV/MKV), die auf
einem USB-Flash-Laufwerk gespeichert sind, mit dem internen Player dieses Systems wiedergeben.
Beispiel für den USB Audio-Hauptbildschirm
Ruft den Telefon-Bildschirm auf
Der Geräteliste-Bildschirm wird angezeigt,
wenn kein Telefon, CarPlay- oder Android
Auto-Gerät verbunden ist.
Springt zum Anfang der aktuellen
Datei/Springt zum Anfang der
vorherigen Datei, wenn innerhalb
von 3 Sekunde nach
Wiedergabebeginn angetippt/
Startet den schnellen Rücklauf,
wenn mindestens 1 Sekunde lang
berührt
Anzeige des Coverbilds
Informationsanzeige
Wechselt zum USB-Video-Modus
Springt zum Anfang des
nächsten Kapitels/Startet den
schnellen Vorlauf, wenn
mindestens 1Sekunde lang
berührt
Informationsanzeige für
nächsten Song
Anzeige für hohe Auflösung
Pause und Wiedergabe
Wiederholte Wiedergabe
Zufallswiedergabe
Zeit-Leiste (Verstrichene Dauer/Gesamtdauer der Wiedergabe)
• Die Abbildungen einiger Tasten in der Kurzanleitung können von den tatsächlichen Bildschirmen abweichen.
Suchen nach einer Musikdatei
Zum Beispiel: Suchen nach Interpretenname
3 Wählen Sie den Namen des gewünschten
Interpreten.
Ruft das USB EinstellungenMenü auf
Nummer des aktuellen Titels/
Gesamtzahl der Titel
Ruft den Suchbildschirm auf
1 Tippen Sie während der Wiedergabe [
(Suche)].
2 Wählen Sie [Interpreten].
4 Tippen Sie den Namen des gewünschten
Albums.
5 Wählen Sie den Namen des gewünschten
Titels.
Der ausgewählte Titel wird wiedergegeben.
10-DE

Bedienungsanleitung iPod-Modus auf iPhone (Option)
iPod-Modus auf iPhone (Option)
Je nach dem verwendeten iPhone-Modell ist ein separat erhältliches Lightning-zu-USB-Kabel erforderlich.
Ruft den Telefon-Bildschirm auf
Der Geräteliste-Bildschirm wird
angezeigt, wenn kein Telefon,
CarPlay- oder Android Auto-Gerät
verbunden ist.
Springt zum Anfang der aktuellen
Datei/Springt zum Anfang der
vorherigen Datei, wenn innerhalb
von 3 Sekunde nach
Wiedergabebeginn angetippt/
Startet den schnellen Rücklauf,
wenn mindestens 1 Sekunde lang
berührt
Anzeige des Coverbilds
Informationsanzeige
Springt zum Anfang der
nächsten Datei/Startet den
schnellen Vorlauf, wenn
mindestens 1 Sekunde lang
berührt
Informationsanzeige für
nächsten Song
Pause und Wiedergabe
Wiederholte Wiedergabe
Zufallswiedergabe
Zeit-Leiste (Verstrichene Dauer/Gesamtdauer der
Wiedergabe)
• Dieses Gerät unterstützt ausschließlich iPhone (iPhone 6s oder höher). Wenn Sie lediglich die Musikwiedergabe nutzen
wollen, setzen Sie „Apple CarPlay“ auf „Aus“, bevor Sie die Verbindung mit Ihrem iPhone herstellen.
• Die Abbildungen einiger Tasten in der Kurzanleitung können von den tatsächlichen Bildschirmen abweichen.
Suchen nach einer Musikdatei
Zum Beispiel: Suchen nach Interpretenname
3 Wählen Sie den Namen des gewünschten
Interpreten.
Ruft das iPod EinstellungenMenü auf
Nummer des aktuellen Titels/
Gesamtzahl der Titel
Ruft den Suchbildschirm auf
1 Tippen Sie während der Wiedergabe
[ (Suche)].
2 Wählen Sie [Interpreten].
4 Tippen Sie den Namen des gewünschten
Albums.
5 Wählen Sie den Namen des gewünschten
Titels.
Der ausgewählte Titel wird wiedergegeben.
11-DE

Bedienungsanleitung Bluetooth Einstellungen, Bluetooth-Betrieb
Steuerung der Freisprechfunktion
Das Gerät kann mit bis zu zwei Telefonen mit Freisprechfunktion verbunden werden.
Herstellen der Verbindung zu einem
Bluetooth-kompatiblen Gerät (Pairing)
So rufen Sie den START-Bildschirm für das Setup auf:
• Bringen Sie das Fahrzeug an einer sicheren Stelle zum
Stillstand. Betätigen Sie die Feststellbremse.
1 Berühren Sie [Einstellungen] auf dem
START-Bildschirm.
2 Wählen Sie [Gerät].
3 Berühren Sie [Geräteliste].
4 Berühren Sie [Neues Gerät], um nach einem
neuen Gerät zu suchen.
Der Bildschirm „Funktion auswählen“ wird
angezeigt.
5
Wählen Sie die Funktion des verbundenen
Geräts auf dem Bildschirm „Funktion
auswählen“ aus und berühren Sie [OK].
Die ausgewählte Funktion wird mit einem Häkchen
gekennzeichnet.
• Freisprechen 1: Das Gerät wird als erstes
Freisprechtelefon verwendet.
• Freisprechen 2: Das Gerät wird als zweites
Freisprechtelefon verwendet.
• Bluetooth Audio: Das Gerät wird als Bluetooth
Audio-Gerät verwendet.
• Apple CarPlay*: Das Gerät wird für Apple CarPlay
verwendet.
* Wenn Sie den Modus Apple CarPlay verwenden
möchten, ohne dass [Apple CarPlay] auf dem
Bildschirm „Funktion wählen“ angezeigt wird,
wählen Sie [Freisprechen 1] oder [Freisprechen 2],
12-DE
um eine Verbindung mit dem Gerät herzustellen.
6 Wenn auf dem anderen Gerät ein Code
angezeigt wird, überprüfen Sie, ob der Code
mit dem auf dem Bildschirm dieses Geräts
übereinstimmt, und berühren Sie [Ja].
7 Wenn die Geräteverbindung zustande
gekommen ist, erscheint eine Meldung und
das Gerät wechselt wieder in den normalen
Modus.
• Sie können bis zu 10 Bluetooth-kompatible Mobiltelefone
registrieren.
Annehmen eines Anrufs
1 Ein eingehender Anruf löst den Klingelton
aus und wird auf dem Bildschirm angezeigt.
2 Berühren Sie [ ].
Das Gespräch beginnt.
Auflegen des Telefons
1 Tippen Sie [ ] (Anruf beenden).
Das Gespräch endet.

Installation
Bedienungsanleitung Installation
Hinweis zur Installation
• Installieren Sie das Gerät in einem Winkel zwischen
null (horizontal) und 30°. Bitte beachten Sie, dass es
zu Funktionseinbußen und möglicherweise zu
Schäden kommt, wenn Sie das Gerät in einem
Winkel außerhalb dieses Bereichs installieren.
<iLX-705D>
0 - 30°
<iLX-F905D/iLX-F115D>
0 - 30°
• Blockieren Sie die Wärmeableitung des Geräts
nicht. Andernfalls wird die Luftzirkulation
verhindert. Bei einer Blockierung staut sich die
Wärme im Gerät und es besteht Feuergefahr.
Lüftungsöffnung
Anbringen des Mikrofons
Achten Sie aus Sicherheitsgründen auf Folgendes:
• Die Montagestelle muss stabil und robust sein.
• Die Sicht bzw. Bewegungsfreiheit des Fahrers darf
nicht beeinträchtigt werden.
• Das Mikrofon muss sich an einer Stelle befinden, an
der die Stimme des Fahrers gut aufgenommen
werden kann.
Der Fahrer sollte beim Sprechen ins Mikrofon seine
Fahrhaltung nicht ändern müssen. Andernfalls wird er
möglicherweise abgelenkt und kann sich nicht voll auf
das sichere Lenken des Fahrzeugs konzentrieren.
Bedenken Sie beim Anbringen des Mikrofons
unbedingt die Ausrichtung und die Entfernung.
Überprüfen Sie, ob die Stimme des Fahrers an der
ausgewählten Stelle gut aufgenommen werden kann.
Mikrofon
Mikrofonbasis
Klebeband
Lenksäule
Montieren der GNSS-Antenne im
Fahrzeug
Rückseite des Geräts
• Berühren Sie beim Installieren von Display und
Hauptgerät die Anschlüsse nicht mit den Händen.
(nur iLX-F905D/iLX-F115D)
<Hauptgerät><Display>
Anschlüsse
1 Reinigen Sie die Montageposition.
2 Bringen Sie die Montageplatte für die
GNSS-Antenne an.
3 Montieren Sie die GNSS-Antenne.
GNSS-Antenne
Antennenmontageplatte
Dieses Gerät
13-DE

• Montieren Sie die GNSS-Antenne nicht in der
Mittelkonsole.
– Montieren Sie die GNSS-Antenne auf einer ebenen Fläche am
Armaturenbrett oder auf der Hutablage.
– Achten Sie darauf, dass die GNSS-Antenne nicht von einer
Metallfläche oder einem Metallgegenstand abgedeckt
(blockiert) wird.
• Wenn die GNSS-Antenne nahe am Gerät montiert wird,
verschlechtert sich der Empfang und der Standort des
Fahrzeugs wird möglicherweise nicht korrekt angezeigt.
– Montieren Sie die GNSS-Antenne weit genug vom Gerät
entfernt.
– Bündeln Sie das Kabel der GNSS-Antenne nicht an der
Rückseite des Geräts.
• Bei wärmereflektierenden oder wärmeabsorbierenden
Scheiben kann es vorkommen, dass die
Hochfrequenzwellen gestört werden. Wenn der Empfang
bei im Fahrzeug installierter Antenne schlecht ist,
montieren Sie die Antenne außen am Fahrzeug.
Hinweis zur Verwendung von HDMIVerbindungskabeln
Bei Verwendung von HDMI-Verbindungskabeln
sichern Sie die Kabel mit der mitgelieferten HDMIBefestigungshalterung an den HDMI-Anschlüssen.
1 Sichern Sie die HDMI-
Befestigungshalterung mit der Schraube
(A).
HDMI-Anschluss
Vor-Rück-Position
<Position vorne> <Position hinten>
51,5mm 31,5mm
1 Entfernen Sie die vier Sechskantschrauben
an beiden Seiten des Geräts.
Sechskantschrauben ×4
2 Ziehen Sie den Schieber in die vordere
Position. (Um den Schieber in die hintere
Position zurückzuführen, schieben Sie ihn
hinein.)
HDMI-Befestigungshalterung
(mitgeliefert)
(A)
Anpassen der Displayposition
(iLX-F905D/iLX-F115D)
Abhängig vom Fahrzeug variiert die Vor-RückDisplayposition. Um die Vor-Rück-Position anzupassen,
schieben Sie den Schieber in die vordere Position.
Standardposition: Position hinten
14-DE
Schieber
3 Setzen Sie die vier Sechskantschrauben
ein, um den Schieber zu sichern.
Installieren des Geräts (iLX-705D)
1 Montieren Sie die
Originalmontagehalterung mit den
mitgelieferten Schrauben am Gerät.
Wenn Sie keine Originalmontagehalterung haben,
montieren Sie das Doppel-DIN-Einbauset* (mit
seitlicher Montagehalterung) o. Ä. am Hauptgerät.
* Separat erhältlich.

Einstellen der Höhe des Displays
(iLX-F905D/iLX-F115D)
Stellen Sie die Höhe des Displays vor dem Montieren
des Displays je nach Montageposition am Fahrzeug
ein.
Standardeinstellung: 0 mm
Originalmontagehalterung
Schrauben (M5 × 8)
(mitgeliefert)
Dekorahmen (mitgeliefert)
2 Schließen Sie alle anderen Kabel des Geräts
gemäß den Angaben unter „Anschlüsse“
(Seite18) an.
3 Montieren Sie das Gerät im Fahrzeug.
• Befestigen Sie die Kabel sorgfältig. Achten Sie darauf, sie
nicht zwischen beweglichen Teilen wie z.B. Sitzschienen
einzuklemmen oder an scharfen oder spitzen Kanten zu
verlegen; andernfalls können sie beschädigt werden.
Installieren des Geräts (iLX-F905D/
iLX-F115D)
1 Montieren Sie die
Originalmontagehalterung mit den
mitgelieferten Schrauben am Hauptgerät.
• Wenn Sie keine Originalmontagehalterung
haben, montieren Sie das Doppel-DIN-Einbauset*
(mit seitlicher Montagehalterung) o. Ä. am
Hauptgerät.
* Separat erhältlich.
Schrauben (M5 × 8)
(mitgeliefert)
1 Entfernen Sie die 4Schrauben an der
Rückseite des Displays und stellen Sie dann
die Einbauhöhe ein.
Schrauben
(M2.6× 8)
2 Bringen Sie die Blechstreifen je nach der
Einbauhöhe des Displays an.
Blechstreifen
(mitgeliefert)
2×50 mm: für Einbauhöhe 0mm oder -60mm
2×35 mm: für Einbauhöhe -15mm oder -45mm
2×20 mm: für Einbauhöhe -30mm
0 mm
Blechstreifen
(2×50 mm)
Einbauhöhe
-15mm
Blechstreifen
(2×35 mm)
Originalmontagehalterung
2 Schließen Sie alle anderen Kabel des
Hauptgeräts gemäß den Angaben unter
„Anschlüsse“ (Seite18) an.
3 Montieren Sie das Gerät im Fahrzeug.
• Befestigen Sie die Kabel sorgfältig. Achten Sie darauf, sie
nicht zwischen beweglichen Teilen wie z.B. Sitzschienen
einzuklemmen oder an scharfen oder spitzen Kanten zu
verlegen; andernfalls können sie beschädigt werden.
-30mm
Blechstreifen
(2×20mm)
Blechstreifen
(2×20mm)
-45mm
Blechstreifen
(2×35 mm)
15-DE

-60mm
Blechstreifen
(2×50 mm)
VORSICHT
Passen Sie den Displaywinkel nicht an, während
die Displayeinheit nicht am Schieber des
Hauptgeräts mit den vier Schrauben (M5 × 8)
fixiert ist. Andernfalls lässt sich das Gerät
möglicherweise nicht einschalten.
3 Bringen Sie die Abdeckung mit 2 Schrauben
(M2.6×6) an der Rückseite des Displays an.
Befestigen Sie die Schrauben und bringen
Sie dann die Blechkappen an.
Blechkappen (mitgeliefert)
Schrauben
(M2.6× 6)
(mitgeliefert)
Hintere Abdeckung (mitgeliefert)
Installieren des Displays (iLX-F905D/
iLX-F115D)
1 Befestigen Sie das Display mit 4 Schrauben
(M5×8) am Schieber am Hauptgerät.
2 Montieren Sie die Stromversorgungsplatte.
Stromversorgungsplatte (mitgeliefert)
• Wenn die Stromversorgungsplatte nicht montiert
ist, schaltet sich die Displayeinheit
möglicherweise nicht ein. Stellen Sie sicher, dass
sie montiert wurde.
3 Befestigen Sie die Scharnierabdeckung mit
2 Schrauben (M3×4).
Befestigen Sie die Schrauben und bringen
Sie dann die Schraubenkappen an.
Schraubenkappen
Schrauben
(M3×4)
(mitgeliefert)
(mitgeliefert)
Scharnierabdeckung
(mitgeliefert)
16-DE
Schrauben (M5×8) (mitgeliefert)

Anschlussdiagramm des SPST-Schalters (separat erhältlich)
(Wenn keine ACC-Stromversorgung verfügbar ist)
iLX-705D
iLX-F905D
iLX-F115D
i905
• Wenn das Fahrzeug nicht über eine ACC-Stromversorgung verfügt, bauen Sie zusätzlich einen SPST-Schalter (Single-Pole,
Single-Throw) (separat erhältlich) und eine Sicherung (separat erhältlich) ein.
• Das Diagramm und der oben angegebene Ampere-Wert der Sicherung beziehen sich auf den Fall, dass das Gerät allein
verwendet wird.
• Wenn die geschaltete Stromleitung (mit dem Zündschaltkreis verbunden) dieses Geräts direkt am positiven (+) Pol der
Fahrzeugbatterie angeschlossen ist, entzieht das Gerät der Batterie geringfügig Strom (einige Hundert Milliampere), auch
wenn der Schalter in der Position AUS steht, und die Batterie wird unter Umständen entladen.
ACC
(rot)
BATTERIE
(gelb)
SPST-Schalter (Option)
SICHERUNG (20A) (Option)
SICHERUNG (5A) (Option)
Batterie
17-DE

Anschlüsse
Anschluss 1
Bedienungsanleitung Anschlüsse
Antenne
Netzkabel
PRE OUT-Kabel
REMO
(blau/weiß)
REVERSE
(orange/weiß)
PARKING BRAKE
(gelb/blau)
ACC
(rot)
GND
(schwarz)
P. ANT
(blau)
BAT T
(gelb)
MIC IN
STEERING REMOTE
HDMI-REMO-OUT
(braun)
AUX-REMO-OUT
(grau)
REMOTE-Kabel
SUBW
FRONT OUT
REAR OUT
(grün)
(grün/schwarz)
(weiß)
(weiß/schwarz)
(grau/schwarz)
(grau)
(violett/schwarz)
(violett)
Mikrofon (mitgeliefert)
an Interface für Lenkradfernbedienung
an Interface für HDMI Umschalter
an AUX-Gerät (Fernsehtuner usw.)
zum Eingang eines optionalen Verstärkers
Hinten links
Vorne links
Vorne rechts
Hinten rechts
an Verstärker oder Equalizer
an Plusseite der Rückfahrleuchtenleitung des
Fahrzeugs
an Feststellbremsenleitung
an Motorantenne
Lautsprecher
Zündschloss
Batterie
18-DE

Anschluss 2
CAMERA-Kabel
USB cable 2.4A (schwarz)
USB cable 1.5A (grau)
REAR CAMERA
FRONT CAMERA
CONNECT2 I/F (UART I/F)
LIN
DRIVE RECODER IN
SPEED SENSOR
(grün/weiß)
an USB-Flash-Laufwerk, iPhone oder
Android-Smartphone
an iPhone oder Android-Smartphone (nur zum
Laden)
an Rückfahrkamera
an Kamera vorn oder an der Seite
an CAN Interface-Box
an Dash Cam
an Tachoimpulsleitung
GNSS-Antenne (mitgeliefert)
HDMI-Eingangsanschluss
HDMI-Ausgangsanschluss
CAMERA-Anschluss
Buchse für GNSS-Antenne
Zum Anschließen einer GNSS-Antenne
(mitgeliefert).
AUX-Eingangsanschluss
Eingangsleitung für AUX-Audiosignal.
Stromversorgungsanschluss
PRE OUT-Anschluss
REM-Anschluss
DAB-Antennenanschluss
an DAB-Antenne (separat erhältlich)
Radioantennenbuchse
ISO/JASO-Antennenadapter (separat erhältlich)
Je nach Fahrzeug ist unter Umständen ein ISO/
JASO-Antennenadapter erforderlich.
MIC-Eingangsanschluss
an Mikrofon (mitgeliefert)
Schnittstellenanschluss für
Lenkradfernbedienung
an Interface für Lenkradfernbedienung
Einzelheiten zu den Anschlüssen erhalten Sie bei
Ihrem Alpine-Händler.
HDMI-REM-OUT-Leitung (braun)
Verbinden Sie diese Leitung mit der
Fernsteuerungseingangsleitung des Interface für
HDMI Umschalter.
AUX-REM-OUT-Leitung (grau)
Verbinden Sie diese Leitung mit der
Fernsteuerungseingangsleitung des AUX-Geräts.
19-DE

20-DE
RCA-Anschlüsse für Subwoofer
ROT ist rechts und WEISS ist links.
RCA-Anschlüsse für Ausgang vorne
Können als RCA-Anschlüsse für einen vorderen
Ausgang genutzt werden. ROT ist rechts und WEISS ist
links.
RCA-Anschlüsse für Ausgang hinten
Können als RCA-Anschlüsse für einen hinteren
Ausgang genutzt werden. ROT ist rechts und WEISS ist
links.
ISO-Stecker (Lautsprecherausgang)
Leitung für linken hinteren Lautsprecherausgang
(+) (grün)
Leitung für linken hinteren Lautsprecherausgang
(–) (grün/schwarz)
Leitung für linken vorderen Lautsprecherausgang
(+) (weiß)
Leitung für linken vorderen Lautsprecherausgang
(–) (weiß/schwarz)
Leitung für rechten vorderen
Lautsprecherausgang (–) (grau/schwarz)
Leitung für rechten vorderen
Lautsprecherausgang (+) (grau)
Leitung für rechten hinteren
Lautsprecherausgang (–) (violett/schwarz)
Leitung für rechten hinteren
Lautsprecherausgang (+) (violett)
Fernsteuerungseinschaltleitung (blau/weiß)
Verbinden Sie diese Leitung mit der
Fernsteuerungseinschaltleitung des Verstärkers oder
Signalprozessors.
Leitung für Rückwärtsgang (orange/weiß)
Leitung für Feststellbremse (gelb/blau)
Verbinden Sie diese Leitung mit der
Stromversorgungsseite des Feststellbremsenschalters,
um die Statussignale für die Feststellbremse an das
Gerät zu übermitteln.
ISO-Stromversorgungsanschluss
Geschaltete Stromleitung (Zündung) (rot)
Falls Ihr Fahrzeug über keinen ISO-Anschluss verfügt,
verbinden Sie diese Leitung mit einem offenen
Anschluss an der Sicherungsbox des Fahrzeugs oder
einer anderen nicht verwendeten Stromquelle, die
(+) 12 V nur dann bereitstellt, wenn die Zündung
eingeschaltet ist oder in der Zubehörposition (ACC)
steht.
Masseleitung (schwarz)
Falls Ihr Fahrzeug über keinen ISO-Anschluss verfügt,
verbinden Sie diese Leitung mit einer geeigneten
Karosseriemasse am Fahrzeug.
Achten Sie darauf, sie mit blankem Metall zu verbinden
und mit der mitgelieferten Blechschraube sicher zu
befestigen.
Motorantennenleitung (blau)
Verbinden Sie diese Leitung mit dem +B-Anschluss
Ihrer Motorantenne, sofern vorhanden.
• Diese Leitung darf nur zum Steuern der
Motorantenne des Fahrzeugs genutzt werden.
Verwenden Sie sie nicht zum Einschalten eines
Verstärkers oder Signalprozessors o.Ä.
Batterieleitung (gelb)
Falls Ihr Fahrzeug über keinen ISO-Anschluss verfügt,
verbinden Sie diese Leitung mit dem positiven (+) Pol
der Fahrzeugbatterie.
Sicherungshalterung (15 A)
USB-Anschluss (2,4 A)
an USB-Flash-Laufwerk, iPhone oder AndroidSmartphone
USB-Anschluss (1,5 A)
an iPhone oder Android-Smartphone (nur zum Laden)
REAR CAMERA-Eingangsanschluss
Zum Anschließen einer Rückfahrkamera.
FRONT CAMERA-Eingangsanschluss
Zum Anschließen einer Kamera vorn oder an der Seite.
Connect2 (UART)-Anschluss
zum CAN Interface
LIN-Anschluss
Verbinden Sie diese Leitung mit dem LIN-Anschluss der
Dash Cam.
Drive-Recorder-Eingangsanschluss
Eingangsleitung für Dash Cam-Videosignale.
Leitung für Geschwindigkeitssensor (grün/weiß)
Wenn die Tachoimpulsleitung nicht korrekt
angeschlossen wird, können wichtige
Sicherheitsfunktionen des Fahrzeugs versagen (z.B.
Bremsen oder Airbags). Bei solchen Ausfällen besteht
die Gefahr von Unfällen oder sogar tödlicher
Verletzungen. Es empfiehlt sich dringend, die
Installation von einem geschulten, autorisierten AlpineHändler vornehmen zu lassen.

Technische Daten
Bedienungsanleitung Technische Daten
MONITOR
Bildschirmgröße 7” (iLX-705D)
Funktionsprinzip TFT-Aktivmatrix
Anzahl der Bildelemente 2.764.800 Stück
Effektive Bildelemente Mindestens 99 %
Farbsystem NTSC/PAL
Beleuchtung LED
9” (iLX-F905D)
11” (iLX-F115D)
9” (i905)
(1.280 × 720 × RGB)
UKW-TUNER
Empfangsbereich 87,5 – 108,0 MHz
Mono-Empfindlichkeit 8,1dBf (0,7µV/75Ohm)
50dB Geräuschunterdrückung 12dBf (1,1µV/75Ohm)
Trennschärfe 80 dB
Störabstand 65 dB
Stereokanaltrennung 35 dB
AM-TUNER
Empfangsbereich 531 – 1.602 kHz
Nutzbare Empfindlichkeit 25,1 μV/28 dBf
DAB
Empfangsbereich 174,928 – 239,2MHz
Nutzbare Empfindlichkeit -100dBm
Störabstand 90dB
USB1
USB-Anforderungen USB 2.0
Max. Leistungsaufnahme 2.400mA
USB-Klasse USB (Massenspeicherklasse)
Dateisystem FAT16 / 32, exFAT
Anzahl der Kanäle 2 Kanäle (Stereo)
Frequenzgang*
Gesamtklirrfaktor 0,005% (bei 1kHz)
Dynamikumfang 95 dB (bei 1 kHz)
Störabstand 95dB
Kanaltrennung 90dB (bei 1kHz)
*1 Frequenzgang kann je nach Codierungssoftware/Bitrate
abweichen.
1
5 – 40.000Hz (±1dB)
USB2
Max. Leistungsaufnahme 1.500 mA (CDP-Unterstützung)
USB-Klasse Nur Laden
HDMI
Eingangsformat 720p / 480p / VGA
Ausgangsformat 720p / 480p
Bluetooth
Bluetooth-Spezifikation Bluetooth V4.2 (2.402 - 2.480MHz)
Ausgangsleistung +4,0dBm/2,51mW Durchschn.
(Leistungsklasse 2)
Profile HFP (Hands-Free Profile)
OPP (Object Push Profile)
PBAP (Phone Book Access Profile)
SPP (Serial Port Profile)
A2DP (Advanced Audio
Distribution Profile)
AVRCP (Audio/Video Remote
Control Profile)
GNSS
Empfangsfrequenz 1.575,42 + / - 1,023MHz
Empfangsempfindlichkeit (Suche)
-136dB max.
Wi-Fi
Frequenzbereiche IEEE 802.11 b/g/n (2,4GHz)
IEEE 802.11 a/n/ac (5GHz)
Kanäle 1 – 13 Kanal (2,4GHz)
149 – 165 Kanäle (5GHz)
Frequenzband 2.401 – 2.483 MHz (2,4GHz)
5.725 – 5.850 MHz (5GHz)
Ausgangsleistung (2,4GHz) max. 18dBm
Ausgangsleistung (5GHz) max. 13dBm (11 a)
max. 12dBm (11 n/ac)
Sicherheitsprotokolle WPA3 / WPA2-PSK ( TKIP, AES)
ALLGEMEINES
Spannungsversorgung 14,4 V Gleichspannung
(11–16 V zulässig)
Betriebstemperatur -20 °C bis +60°C
Ausgangsleistung 50 W × 4
Maximale Stromaufnahme 15A
Audioausgangspegel
Vorverstärkerausgang (Vorn, Hinten):
4 V/10k Ohm (max.)
Vorverstärkerausgang (Subwoofer):
4 V/10k Ohm (max.)
Gewicht 1,4kg (iLX-705D)
2,3kg (iLX-F905D)
2,6kg (iLX-F115D)
1,7kg (i905)
GEHÄUSEGRÖSSE
iLX-705D iLX-F905D iLX-F115D i905
Breite 178mm 178mm 178mm 178mm
Höhe 50mm 50mm 50mm 50mm
Tiefe 149,6mm 149,6mm 149,6mm 142mm
DISPLAYGRÖSSE
iLX-705D iLX-F905D iLX-F115D i905
Breite 171mm 232,5mm 268,9mm 214,7mm
Höhe 96mm 151,1mm 178mm 136,6mm
Tiefe 17,7mm 54,7mm 54,7mm 29,9mm
21-DE

• Aufgrund ständiger Produktverbesserungen bleiben
Änderungen an technischen Daten und Design ohne
Vorankündigung vorbehalten.
• Das LCD-Display (Flüssigkristallbildschirm) wird mit
hochpräzisen Fertigungsverfahren hergestellt. Der Anteil
der effektiven Bildpunkte beträgt mehr als 99,99 %. Dies
wiederum bedeutet, dass bis zu 0,01% der Bildpunkte unter
Umständen dauerhaft aktiviert oder deaktiviert sind.
• Windows Media und das Windows-Logo sind Marken
oder eingetragene Marken der Microsoft Corporation
in den Vereinigten Staaten und/oder anderen Ländern.
• Apple, iPhone, iPod, Lightning und Siri sind Marken von
Apple Inc. und in den USA und in anderen Ländern
eingetragen. Apple CarPlay ist eine Marke von Apple
Inc.
• „Made for Apple“ und „Works with Apple“ bedeutet,
dass ein Zubehör speziell für die Apple Produkte
hergestellt wurde, die mit dem „Made for Apple“-Logo
gekennzeichnet sind und speziell mit der im „Works
with Apple“-Logo verbundenen Technologie
funktionieren und vom Entwickler entsprechend den
Leistungsstandards von Apple getestet wurden. Apple
übernimmt keine Garantie für die Funktionsfähigkeit
dieses Geräts bzw. die Einhaltung von
Sicherheitsstandards.
Bitte beachten Sie, dass die Verwendung dieses
Zubehörs mit einem Apple-Produkt die Qualität der
Funkverbindung beeinträchtigen kann.
• Die Verwendung des Apple CarPlay-Logos bedeutet,
dass eine Fahrzeugbenutzerschnittstelle den
Apple-Leistungsstandards entspricht. Apple
übernimmt keine Verantwortung für den Betrieb dieses
Fahrzeugs oder dessen Einhaltung von Sicherheits- und
gesetzlichen Standards. Bitte beachten Sie, dass die
Verwendung dieses Produkts mit einem iPhone die
drahtlose Leistungsfähigkeit beeinträchtigen kann.
• Google, Android, Google Play und Android Auto sind
Marken von Google LLC.
Um Android Auto im Fahrzeug-Display nutzen zu
können, benötigen Sie ein Android-Smartphone mit
Android 6.0 oder höher, einen aktiven Datenplan und
die App Android Auto.
• Die Begriffe HDMI und HDMI High-Definition
Multimedia Interface sowie das HDMI-Logo sind
Marken oder eingetragene Marken von HDMI Licensing
Administrator, Inc. in den Vereinigten Staaten und
anderen Ländern.
• Der Bluetooth®-Schriftzug und die Logos sind
eingetragene Marken von Bluetooth SIG, Inc., und jede
Nutzung solcher Marken durch ALPS ALPINE CO., LTD.,
erfolgt in Lizenz.
• Das Wi-Fi CERTIFIED™-Logo ist eine eingetragene Marke
der Wi-Fi Alliance®.
• LDAC und das LDAC-Logo sind Marken der Sony
Corporation.
• Ein Produkt mit diesem Logo entspricht dem
High-Resolution Audio-Standard, der durch die Japan
Audio Society definiert wurde. Dieses Logo wird unter
Lizenz von der Japan Audio Society verwendet.
Hergestellt für iPhone SE (2. Generation), iPhone 11 Pro
Max, iPhone 11 Pro, iPhone 11, iPhone XS Max, iPhone XS,
iPhone XR, iPhone X, iPhone 8 Plus, iPhone 8, iPhone 7
Plus, iPhone 7, iPhone SE, iPhone 6s Plus, iPhone 6s.
22-DE

Table des matières
AVERTISSEMENT...................................................................................................................................................2
ATTENTION............................................................................................................................................................. 3
Mise en route......................................................................................................................................................... 4
Fonctionnement d’Apple CarPlay (en option)...........................................................................................8
Android Auto™ (en option)...............................................................................................................................8
Fonctionnement de Radio/RDS......................................................................................................................9
Fonctionnement de DAB/DAB+/DMB.......................................................................................................... 9
Utilisation d’un périphérique de mémoire flash USB (en option)....................................................10
Mode iPod sur l’iPhone (en option).............................................................................................................11
Utilisation de la fonction Téléphone mains libres..................................................................................12
Installation............................................................................................................................................................13
Raccordements...................................................................................................................................................18
Spécifications ......................................................................................................................................................21
IMPORTANT
Notez le numéro de série inscrit sur votre appareil dans l’espace ci-dessous prévu à cet effet et conservez-le
pour toute référence ultérieure.
NUMÉRO DE SÉRIE:
NUMÉRO DE SÉRIEISO: AL
DATE D’INSTALLATION:
TECHNICIEN D’INSTALLATION:
LIEU D’ACHAT:
Pour plus d’informations sur l’ensemble des fonctions, reportez-vous au mode d’emploi publié sur
notre site Web : https://www.alpine-europe.com/alpine-europe.html Si nécessaire, un revendeur
ALPINE peut facilement vous fournir un exemplaire du mode d’emploi publié sur le site Web.
1-FR

AVERTISSEMENT
AVERTISSEMENT
Ce symbole désigne des instructions importantes.
Le non-respect de ces instructions peut entraîner
de graves blessures, voire la mort.
INSTALLER L’APPAREIL CORRECTEMENT DE FACON A CE QUE
LE CONDUCTEUR NE PUISSE PAS REGARDER LA TV/VIDEO
TANT QUE LA VOITURE N’EST PAS A L’ARRET ET LE FREIN A
MAIN ACTIONNE.
Il est dangereux de regarder la télévision/ vidéo tout en conduisant un
véhicule. Si le produit n’est pas correctement installé, le conducteur sera
en mesure de regarder la télévision/vidéo pendant la conduite du
véhicule, ce qui risque de le distraire et de causer un accident. Le
conducteur ainsi que d’autres personnes risquent d’être blessées.
NE PAS REGARDER DE VIDEO PENDANT LA CONDUITE.
Le visionnage d’un enregistrement vidéo peut distraire le conducteur de
la conduite du véhicule et causer un accident.
N’ACTIVER AUCUNE FONCTION SUSCEPTIBLE DE
DETOURNER VOTRE ATTENTION DE LA CONDUITE DU
VEHICULE.
Les fonctions requérant une attention prolongée ne doivent être
exploitées qu’à l’arrêt complet du véhicule. Toujours arrêter le véhicule à
un endroit sûr avant d’activer ces fonctions. Il y a risque de provoquer un
accident.
GARDER LE VOLUME À FAIBLE NIVEAU DE MANIÈRE À
POUVOIR ENTENDRE LES BRUITS EXTÉRIEURS PENDANT LA
CONDUITE.
Des niveaux de volume excessifs qui couvrent les sirènes des ambulances
ou les signaux routiers (passages à niveau, etc.) peuvent être dangereux
et provoquer un accident. UN NIVEAU DE VOLUME TROP ÉLEVÉ À
L’INTÉRIEUR DU VÉHICULE PEUT ÉGALEMENT AVOIR DES
EFFETS IRRÉVERSIBLES SUR VOTRE AUDITION.
MINIMISER L’AFFICHAGE EN COURS DE CONDUITE.
La visualisation de l’affichage peut distraire le conducteur de la conduite
du véhicule et, partant, de provoquer un accident.
NE PAS DESASSEMBLER NI MODIFIER L’APPAREIL.
Il y a risque d’accident, d’incendie ou de choc électrique.
A UTILISER UNIQUEMENT SUR DES VOITURES A MASSE
NEGATIVE DE 12 VOLTS.
(Vérifiez auprès de votre concessionnaire si vous n’en êtes pas certain.) Il
y a risque d’incendie, etc.
GARDER LES PETITS OBJETS, COMME LES VIS, HORS DE LA
PORTÉE DES ENFANTS.
L’ingestion de tels objets peut entraîner de graves blessures. En cas
d’ingestion, consulter immédiatement un médecin.
UTILISER DES FUSIBLES DE L’AMPERAGE APPROPRIE.
Il y a risque d’incendie ou de décharge électrique.
NE PAS OBSTRUER LES SORTIES D’AIR NI LES PANNEAUX DU
RADIATEUR.
Une surchauffe interne peut se produire et provoquer un incendie.
UTILISER CET APPAREIL POUR DES APPLICATIONS MOBILES
DE 12 V.
Toute utilisation autre que l’application désignée comporte un risque
d’incendie, de choc électrique ou de blessure.
EFFECTUER CORRECTEMENT LES CONNEXIONS.
Il y a risque de blessures ou de dommages à l’appareil.
AVANT TOUTE CONNEXION, DEBRANCHER LE CABLE DE LA
BORNE NEGATIVE DE LA BATTERIE.
Il y a risque de choc électrique ou de blessure par courts-circuits.
NE PAS COINCER LES CABLES AVEC DES OBJETS VOISINS.
Positionner les câbles conformément au manuel de manière à éviter
toute obstruction en cours de conduite. Les câbles qui obstruent ou
dépassent à des endroits tels que le volant, le levier de changement de
vitesses, la pédale de frein, etc., peuvent s’avérer extrêmement dangereux.
NE PAS DENUDER LES CABLES ELECTRIQUES.
Ne jamais enlever la gaine isolante pour alimenter un autre appareil. Il y
a risque de dépassement de la capacité de courant et, partant, d’incendie
ou de choc électrique.
NE PAS ENDOMMAGER DE CONDUITES NI DE CABLES LORS
DU FORAGE DES TROUS.
Lors du forage de trous dans le châssis en vue de l’installation, veiller à
ne pas entrer en contact, endommager ni obstruer de conduites, de
tuyaux à carburant ou de fils électriques. Le non-respect de cette
précaution peut entraîner un incendie.
NE PAS UTILISER DES ECROUS NI DES BOULONS DU CIRCUIT
DE FREINAGE OU DE DIRECTION POUR LES CONNEXIONS DE
MASSE.
Les boulons et les écrous utilisés pour les circuits de freinage et de
direction (ou de tout autre système de sécurité) ou les réservoirs ne
peuvent JAMAIS être utilisés pour l’installation ou la liaison à la masse.
L’utilisation de ces organes peut désactiver le système de contrôle du
véhicule et causer un incendie, etc.
NE PAS INSTALLER A DES ENDROITS SUSCEPTIBLES
D’ENTRAVER LA CONDUITE DU VEHICULE, COMME LE
VOLANT OU LE LEVIER DE VITESSES.
La vue vers l’avant pourrait être obstruée ou les mouvements gênés, etc.,
et provoquer un accident grave.
2-FR

ATTENTION
Ce symbole désigne des instructions importantes.
Le non-respect de ces instructions peut entraîner
des blessures ou des dommages matériels.
INTERROMPRE TOUTE UTILISATION EN CAS DE PROBLEME.
Le non-respect de cette précaution peut entraîner des blessures ou
endommager l’appareil. Retourner l’appareil auprès du distributeur
Alpine agréé ou un centre de service après-vente Alpine en vue de la
réparation.
FAIRE INSTALLER LE CABLAGE ET L’APPAREIL PAR DES
EXPERTS.
Le câblage et l’installation de cet appareil requiert des compétences
techniques et de l’expérience. Pour garantir la sécurité, faire procéder à
l’installation de cet appareil par le distributeur qui vous l’a vendu.
UTILISER LES ACCESSOIRES SPECIFIES ET LES INSTALLER
CORRECTEMENT.
Utiliser uniquement les accessoires spécifiés. L’utilisation d’autres
composants que les composants spécifiés peut causer des dommages
internes à cet appareil ou son installation risque de ne pas être effectuée
correctement. Les pièces utilisées risquent de se desserrer et de
provoquer des dommages ou une défaillance de l’appareil.
FAIRE CHEMINER LE CABLAGE DE MANIERE A NE PAS LE
COINCER CONTRE UNE ARETE METALLIQUE.
Faire cheminer les câbles à l’écart des pièces mobiles (comme les rails
d’un siège) et des arêtes acérées ou pointues. Cela évitera ainsi de coincer
et d’endommager les câbles. Si un câble passe dans un orifice métallique,
utiliser un passe-cloison en caoutchouc pour éviter que la gaine isolante
du câble ne soit endommagée par le rebord métallique de l’orifice.
NE PAS INSTALLER A DES ENDROITS TRES HUMIDES OU
POUSSIEREUX.
Eviter d’installer l’appareil à des endroits soumis à une forte humidité ou
à de la poussière en excès. La pénétration d’humidité ou de poussière à
l’intérieur de cet appareil risque de provoquer une défaillance.
3-FR

Mode d’emploi Emplacement des commandes, Mise sous (On) ou hors tension (Off )
Mise en route
Position des commandes
L’apparence de l’écran utilisé dans le Guide de référence rapide peut différer de l’écran actuel.
iLX-705D
iLX-F905D/iLX-F115D
4-FR

Capteur de variateur d’éclairage
Capte la luminosité de l’intérieur du véhicule.
Bouton
Active la fonction Siri ou le mode reconnaissance
vocale lorsque Apple CarPlay ou Android Auto est
connecté.
Bouton / (BAS/HAUT)
Règle le volume.
Bouton (SOURDINE)
Active/désactive le mode SOURDINE.
Maintenez ce bouton enfoncé pendant 2 secondes au
moins pour éteindre l’éclairage de l’écran/du bouton.
Bouton (Audio)
Affiche l’écran de lecture Audio.
Il est possible de commuter les sources audio lorsque
l’écran de lecture Audio s’affiche.
Indicateur d’alimentation
Bouton (ACCUEIL)
Ce bouton permet d’activer l’écran ACCUEIL.
L’écran Réglages du son s’affiche lorsque l’écran
ACCUEIL s’affiche.
Maintenez ce bouton enfoncé pendant 2secondes au
moins pour mettre l’appareil hors tension.
Mise sous (On) ou hors tension (Off)
Bouton (CAM)
Affiche l’image de la caméra 2 (Avant/Coté/Autre) ou
de la caméra 1 (Arrière).
Appuyez pendant 1seconde au moins pour revenir à
l’écran précédent.
Bouton /
Appuyez pour rechercher vers l’avant ou vers l’arrière
une station en mode radio ou une piste etc., dans
d’autres sources audio/visuelles.
Bouton (MAP)
Affiche l’écran de la carte pour Apple CarPlay /
Android Auto lorsque Apple CarPlay ou Android
Auto est connecté.
Capteur de télécommande
Dirigez l’émetteur de la télécommande en option
vers le capteur de télécommande à moins de
2mètres.
1 Placez la clé de contact en position ACC ou ON.
Le système est mis sous tension.
• Lors de la première utilisation du système, l’écran ACCUEIL s’affiche.
ATTENTION (iLX-F905D/iLX-F115D
uniquement)
Pour régler l’inclinaison de l’écran, faites-le pivoter
en le maintenant par le milieu en haut et en bas.
Pour protéger l’écran, ne placez pas vos mains sur
les bords droit et gauche de l’écran.
5-FR

À propos de l’écran ACCUEIL
Sélectionnez la source audio sur l’écran ACCUEIL pour effectuer divers réglages et opérations de la fonction.
1 Appuyez sur le bouton (ACCUEIL).
L’écran ACCUEIL s’affiche.
Exemple d’écran en mode normal
Exemple d’écran en mode texte amélioré
6-FR
Appuyez pour afficher l’écran Réglages du son.
Appuyez pour changer de page.
Vous pouvez également changer de page en balayant
l’écran ACCUEIL horizontalement avec votre doigt.
Bouton Réglages
Affiche l’écran Réglages.
Zone de sélection de la source audio
Appuyez sur l’icône de la source souhaitée pour
modifier la source audio.
Bouton Android Auto
Ce bouton (en surbrillance lors de la connexion d’un
smartphone Android sur lequel l’application Android
Auto est installée) permet d’afficher l’écran Android
Auto.
Bouton Apple CarPlay
Ce bouton (en surbrillance lorsqu’Apple CarPlay est
activé et qu’un iPhone6s ou un modèle plus récent est
connecté) permet d’afficher l’écran Apple CarPlay.
Navigation sur l’écran ACCUEIL
Bouton Téléphone
Affiche l’écran du menu Téléphone.
L’écran Liste des périphériques s’affiche lorsqu’un
téléphone mains libres, un appareil Apple CarPlay ou
Android Auto est connecté.
Fenêtre des miniatures pour la source sélectionnée
Le nom de la source, une illustration et des
informations sur le titre s’affichent. Appuyez sur
l’illustration pour afficher l’écran de la source. Appuyez
] pour lire/mettre en pause la lecture d’une
sur [
piste ou d’une vidéo.

Configuration du type d’écran d’accueil
L’écran d’accueil peut être modifié pour passer en mode texte amélioré.
1 Appuyez sur le bouton (ACCUEIL).
L’écran ACCUEIL s’affiche.
2 Appuyez sur [Réglages].
L’écran Réglages s’affiche.
3 Appuyez sur [Système].
4 Appuyez sur [Type d’écran d’accueil].
5 Appuyez sur [Normal] ou [Texte amélioré].
7-FR

Mode d’emploi Apple CarPlay (en option)
Fonctionnement d’Apple CarPlay (en option)
Apple CarPlay vous permet d’utiliser intelligemment votre iPhone dans votre véhicule, en toute sécurité. Apple
CarPlay prend en charge toutes les fonctionnalités de votre iPhone que vous souhaitez utiliser en conduisant et
vous y donne accès directement sur l’appareil. Vous pouvez obtenir des itinéraires, passer des appels, envoyer et
recevoir des messages, et écouter de la musique, tout en restant concentré sur la route.
1 Appuyez sur le bouton (ACCUEIL).
L’écran ACCUEIL s’affiche.
2 Appuyez sur [Apple CarPlay].
L’écran Apple CarPlay s’affiche.
• Reportez-vous à la section « Apple CarPlay » du Mode d’emploi pour en savoir plus sur le mode d’utilisation de Apple
CarPlay.
Mode d’emploi Android Auto™ (en option)
Android Auto™ (en option)
Android Auto regroupe toutes vos applications de smartphone favorites pour aider les conducteurs à accéder sur
la route à leurs applications multimédia, de navigation et de communication préférées, tout en réduisant les
distractions. Parlez à Google sur Android Auto™ et travaillez avec votre voix pour garder les yeux sur la route et les
mains sur le volant. Vous pouvez facilement envoyer des messages, obtenir des itinéraires, commander les
contenus multimédia et plus encore. Il suffit d’appuyer brièvement ou longuement sur le bouton de commande
vocale de votre volant.
1 Appuyez sur le bouton (ACCUEIL).
L’écran ACCUEIL s’affiche.
2 Appuyez sur [Android Auto].
L’écran Android Auto s’affiche.
• Reportez-vous à la section « Android Auto » du Mode d’emploi pour en savoir plus sur le mode d’utilisation de Android
Auto.
8-FR

Mode d’emploi Radio/RDS
Fonctionnement de Radio/RDS
Indicateur TP/EON
Affichage de l’écran Téléphone
L’écran Liste des périphériques
s’affiche lorsqu’un téléphone, un
appareil CarPlay ou Android Auto
est connecté.
Touche de présélection
Cette touche permet d’afficher les
stations préréglées à l’aide d’un
appui bref.
Appuyez sur cette touche pendant
au moins 2secondes pour
mémoriser la station en cours en
tant que station préréglée.
Permet de modifier le mode Chercher
Appuyez dessus pendant au
moins 1 seconde pour que le
système mémorise les
stations automatiquement
• Les motifs de certaines touches dans le Guide de référence rapide peuvent différer de l’écran actuel.
Mode d’emploi DAB/DAB+/DMB
Changement de bande
Zone d’informations
Augmentation de la fréquence
Appuyez longuement sur cette
touche pour changer la fréquence
continuellement.
Affichage de l’écran de
configuration Radio
Réduction de la fréquence
Appuyez longuement sur cette
touche pour changer la fréquence
continuellement.
Mode Informations trafic
activé/désactivé
Fonctionnement de DAB/DAB+/DMB
Diaporama
Affichage de l’écran Téléphone
L’écran Liste des périphériques
s’affiche lorsqu’un téléphone, un
appareil CarPlay ou Android Auto est
connecté.
Touche de présélection
Cette touche permet d’afficher les
stations préréglées à l’aide d’un
appui bref.
Appuyez sur cette touche pendant
au moins 2secondes pour
mémoriser la station en cours en
tant que station préréglée.
Permet de modifier le mode Chercher
Affichage de l’écran de recherche
• Les motifs de certaines touches dans le Guide de référence rapide peuvent différer de l’écran actuel.
Indicateur de la puissance du
signal
Indicateur TP
Changement de bande
Zone d’informations
Augmentation de la fréquence
Affichage de l’écran de
configuration Radio
Réduction de la fréquence
Mode Informations trafic
activé/désactivé
9-FR

Mode d’emploi Utilisation d’un périphérique de mémoire flash USB (en option)
Utilisation d’un périphérique de mémoire flash USB (en option)
Vous pouvez lire les fichiers musicaux (MP3/WMA/AAC/FLAC/WAV/APE) et les fichiers vidéo (MP4/MOV/FLV/MKV )
stockés sur un périphérique de mémoire flash USB sur le lecteur interne du système.
Exemple d’écran principal USB Audio
Affichage de l’écran Téléphone
L’écran Liste des périphériques s’affiche
lorsqu’un téléphone, un appareil
CarPlay ou Android Auto est connecté.
Trouve le début de fichier en cours/
un fichier antérieur en 3secondes
après le début de la lecture/ Active
le retour rapide en cas
d’effleurement pendant au moins
1seconde
Affichage des illustrations
Pause et lecture
Répétition de la lecture
Lecture aléatoire
Barre de progression (temps écoulé/temps de lecture total)
• Les motifs de certaines touches dans le Guide de référence rapide peuvent différer de l’écran actuel.
Recherche d’un fichier de musique
3 Appuyez sur le nom de l’artiste choisi.
Zone d’informations
Permet de basculer sur le
mode Vidéo USB
Trouve le début du fichier
suivant / Active l’avance rapide
en cas d’effleurement pendant
au moins 1 seconde
Affichage des informations
sur la chanson suivante
Affichage de l’icône Hi-Res
Affichage de l’écran du menu
Configuration USB
Numéro de la piste en cours/
nombre total de pistes
Affichage de l’écran de
recherche
Par exemple: recherche par nom d’artiste
1 Appuyez sur [ (Recherche)] pendant la
lecture.
2 Appuyez sur [Artistes].
10-FR
4 Appuyez sur le nom de l’album choisi.
5 Appuyez sur le nom du morceau choisi.
La lecture du morceau sélectionné commence.

Mode d’emploi Mode iPod sur l’iPhone (en option)
Mode iPod sur l’iPhone (en option)
Un câble Lightning vers USB vendu séparément est requis selon le type d’iPhone.
Affichage de l’écran Téléphone
L’écran Liste des périphériques s’affiche
lorsqu’un téléphone, un appareil
CarPlay ou Android Auto est connecté.
Trouve le début de fichier en
cours/ un fichier antérieur en
3secondes après le début de la
lecture/ Active le retour rapide en
cas d’effleurement pendant au
moins 1seconde
Affichage des illustrations
Zone d’informations
Trouve le début du fichier
suivant / Active l’avance rapide
en cas d’effleurement pendant
au moins 1 seconde
Affichage des informations
sur la chanson suivante
Pause et lecture
Répétition de la lecture
Lecture aléatoire
Barre de progression (temps écoulé/temps de lecture total)
• Cet appareil prend uniquement en charge l’iPhone (iPhone 6s ou modèle plus récent). Pour utiliser uniquement la
fonction de lecture audio, réglez « Apple CarPlay » sur « Désactivé » avant de connecter votre iPhone.
• Les motifs de certaines touches dans le Guide de référence rapide peuvent différer de l’écran actuel.
Recherche d’un fichier de musique
3 Appuyez sur le nom de l’artiste choisi.
Affichage de l’écran du menu
Configuration de l’iPod
Numéro de la piste en cours/
nombre total de pistes
Affichage de l’écran de
recherche
Par exemple: recherche par nom d’artiste
1 Appuyez sur [ (Recherche)] pendant la
lecture.
2 Appuyez sur [Artistes].
4 Appuyez sur le nom de l’album choisi.
5 Appuyez sur le nom du morceau choisi.
La lecture du morceau sélectionné commence.
11-FR

Mode d’emploi Configuration Bluetooth, Utilisation du système Bluetooth
Utilisation de la fonction Téléphone mains libres
L’appareil peut se connecter à deux téléphones mains libres.
Comment raccorder l’appareil à un
périphérique compatible Bluetooth
(jumelage)
Pour afficher l’écran ACCUEIL Réglages :
• Garez votre véhicule dans un endroit sûr et assurez-vous
qu’il est complètement à l’arrêt. Actionnez le frein à
main.
1 Appuyez sur la touche [Réglages] sur
l’écran ACCUEIL.
2 Appuyez sur [Appareil].
3 Appuyez sur [Liste des périphériques].
4 Appuyez sur [Aj nouvel appareil] pour
rechercher un nouvel appareil.
6 Lorsqu’un code s’affiche sur l’appareil,
vérifiez que ce code correspond à celui
affiché sur l’écran de l’appareil et appuyez
sur [Oui].
7 Lorsque la connexion de l’appareil est
terminée, un message s’affiche et l’appareil
revient en mode normal.
• Vous pouvez enregistrer jusqu’à 10téléphones portables
compatibles Bluetooth.
Prendre un appel
1 Un appel entrant déclenche la sonnerie,
puis s’affiche sur le moniteur.
L’écran Sélectionnez la fonction s’affiche.
5 Sélectionnez la fonction de l’appareil
connecté sur l’écran Sélectionnez la
fonction et appuyez sur [OK].
Une coche s’affiche pour la fonction sélectionnée.
• Mains libres 1: l’appareil est utilisé en tant que
premier téléphone mains libres.
• Mains libres 2: l’appareil est utilisé en tant que
second téléphone mains libres.
• Audio Bluetooth: l’appareil est utilisé en tant
qu’appareil Audio Bluetooth.
• Apple CarPlay*o: l’appareil est utilisé en tant
qu’Apple CarPlay.
* Si vous voulez utiliser le mode Apple CarPlay sans
afficher [Apple CarPlay] sur l’écran Sélectionnez la
fonction, sélectionnez [Mains libres 1] ou [Mains
12-FR
libres 2] pour connecter votre appareil.
2 Appuyez sur la touche [ ].
L’appel démarre.
Raccrocher le téléphone
1 Appuyez sur la touche [ ] (Terminer
appel).
L’appel se termine.

Installation
Mode d’emploi Installation
Remarque relative à l’installation
• Installez à un angle compris entre 30° et
l’horizontale. Remarquez que l’installation à un
angle non compris dans cette plage aboutira à une
perte de performance et éventuellement des
dommages.
<iLX-705D>
0 - 30°
<iLX-F905D/iLX-F115D>
0 - 30°
• N’obstruez pas le ventilateur ou le dissipateur
thermique de l’appareil, car cela empêcherait l’air
de circuler. En cas d’obstruction, de la chaleur
s’accumule à l’intérieur de l’appareil et peut
provoquer un incendie.
Orifice de ventilation d’air
Montage du microphone
Pour une utilisation en toute sécurité, vérifiez ce qui
suit :
• La position est stable et rigide.
• La vision et les opérations du conducteur ne sont
pas gênées.
• Le microphone est positionné pour capter
facilement la voix du conducteur.
Lorsque vous parlez dans le microphone, vous ne
devriez pas avoir à changer votre posture de conduite.
Cela peut causer une distraction, vous divertir d’une
conduite en toute sécurité de votre véhicule.
Considérez avec soin l’orientation et la distance du
microphone lors du montage. Vérifiez que la voix du
conducteur peut facilement être captée à
l’emplacement choisi.
Microphone
Base du microphone
Ruban adhésif
Colonne de direction
Installation de l’antenne GNSS à
l’intérieur du véhicule
Vue arrière de l’appareil
• Lorsque vous installez l’unité d’affichage et l’unité
principale, ne touchez pas les connecteurs avec
vos mains. (iLX-F905D/iLX-F115D uniquement)
<Unité principale><Unité d’affichage>
Connecteurs
1 Nettoyez la surface d’installation.
2 Installez la plaque de montage de l’antenne
GNSS.
3 Fixez l’antenne GNSS.
Antenne GNSS
Plaque de montage de l’antenne
Cet appareil
13-FR

• Ne montez pas l’antenne GNSS dans la console centrale.
– Montez l’antenne GNSS sur une surface plane du tableau de
bord ou de la plage arrière.
– Vérifiez que l’antenne GNSS n’est pas couverte (obstruée) par
une surface ou un objet métallique.
• Si l’antenne GNSS est montée près de l’appareil, la
réception peut se dégrader et la position de votre véhicule
peut ne pas s’afficher correctement.
– Montez l’antenne GNSS à l’écart de l’appareil.
– Rassemblez le câble de l’antenne GNSS et éloignez-le de la
partie arrière de l’appareil.
• Certains types de verre qui résistent ou absorbent la
chaleur peuvent interrompre les ondes haute fréquence.
Si la réception est faible après l’installation de l’antenne à
l’intérieur du véhicule, essayez d’installer l’antenne à
l’extérieur du véhicule.
Remarque concernant l’utilisation des
câbles de connexion HDMI
Lorsque vous utilisez des câbles de connexion HDMI,
fixez les câbles aux bornes HDMI à l’aide du support
de fixation HDMI fourni.
1 Fixez le support de fixation HDMI à l’aide
de la vis (A).
Bornes HDMI
Position avancée
<Position avancée> <Position reculée>
51,5mm 31,5mm
1 Retirez les 4vis à tête hexagonale des deux
côtés de l’unité principale.
Vis à tête hexagonale ×4
2 Sortez la glissière pour la placer dans sa
position avancée. (Pour remettre la
glissière dans sa position reculée,
poussez-la pour l’insérer.)
Support de fixation HDMI
(fournis)
(A)
Réglage de la position de l’unité
d’affichage (iLX-F905D/iLX-F115D)
La position vers l’avant/arrière de l’unité d’affichage
varie en fonction du véhicule. Pour changer la position
par défaut, placez la glissière dans sa position avancée.
Réglage par défaut: position reculée
14-FR
Glissière
3 Fixez la glissière à l’aide des 4vis à tête
hexagonale.
Installation de l’appareil (iLX-705D)
1 Montez le support de montage d’origine
sur l’appareil en utilisant les vis fournies.
Si vous ne disposez pas du support de montage
d’origine, , installez le KIT double DIN* (fourni avec
le support de montage latéral), etc., sur l’unité
principale.
* Vendu séparément.

Vis (M5 × 8)
(fournies)
Support de
montage d’origine
Façade (fournie)
Réglez la position haute/basse de
l’unité d’affichage (iLX-F905D/iLXF115D)
Réglez la position haute/basse de l’écran en fonction
de l’emplacement choisi pour le montage dans le
véhicule avant d’installer l’unité d’affichage.
Réglage par défaut: 0mm
1 Retirez les 4vis à l’arrière de l’unité
d’affichage, puis réglez la position haute/
basse.
2 Raccordez tous les autres fils de l’appareil
selon les indications de la section
«Raccordements» (page18).
3 Montage de l’appareil dans un véhicule.
• Fixez les câbles avec précaution. Ne les endommagez pas
en les rentrant dans des pièces mobiles comme un rail de
siège, ou en les plaçant sur des arêtes acérées ou pointues.
Installation de l’appareil (iLX-F905D/
iLX-F115D)
1 Montez le support de montage d’origine
sur l’unité principale en utilisant les vis
fournies.
• Si vous ne disposez pas du support de montage
d’origine, , installez le KIT double DIN* (fourni avec
le support de montage latéral), etc., sur l’unité
principale.
* Vendu séparément.
Support de
montage d’origine
Vis (M5 × 8)
(fournies)
2 Connectez tous les autres fils de l’unité
principale selon les indications de la
section «Raccordements» (page18).
Vis (M2.6 × 8)
2 Fixez la plaque arrière en l’alignant sur la
position haute/basse de l’unité d’affichage.
Plaque arrière
(fournis)
2×50mm:
2×35mm:
2×20mm:
0mm
Plaque arrière
(2×50mm)
-30mm
Plaque arrière
(2×20mm)
Position haute/basse
pour une position haute/basse de 0mm
ou -60mm
pour une position haute/basse de
15mm ou -45mm
pour une position haute/basse de
-30mm
-15mm
Plaque arrière
(2×35mm)
-45mm
3 Installez l’unité dans un véhicule.
• Fixez les câbles avec précaution. Ne les endommagez pas
en les installant dans des pièces mobiles comme un rail
de siège, ou en les plaçant sur des arêtes acérées ou
pointues.
Plaque arrière
(2×20mm)
Plaque arrière
(2×35mm)
15-FR

-60mm
Plaque arrière
(2×50mm)
ATTENTION
Ne réglez pas l’inclinaison de l’écran si l’unité
d’affichage n’est pas fixée à la glissière de l’unité
principale à l’aide des 4prévues à cet effet
(M5×8). Vous risqueriez sinon de ne pas pouvoir
mettre l’unité d’affichage sous tension.
3 Fixez le cache arrière sur l’arrière de l’unité
d’affichage à l’aide de 2vis (M2.6×6).
Serrez les vis, puis fixez les cache-vis.
Cache-vis (fournies)
Vis
(M2.6 × 6)
(fournies)
Cache arrière (fourni)
Installation de l’unité d’affichage
(iLX-F905D/iLX-F115D)
1 Fixez l’unité d’affichage dans la glissière de
l’unité principale à l’aide de 4vis (M5×8).
2 Montez la plaque d’alimentation.
Plaque d’alimentation (fournie)
• Si vous omettez de le faire, vous risquez de ne pas
pouvoir mettre l’unité d’affichage sous tension.
Veillez donc à installer la plaque d’alimentation.
3 Montez la charnière du cache à l’aide de
2vis (M3×4).
Serrez les vis, puis fixez les cache-vis.
Cache-vis
(fournis)
Vis (M3×4)
(fournis)
Charnière du cache
(fournis)
16-FR
Vis (M5 × 8) (fournies)

Schéma de raccordement de l’interrupteur SPST (vendu séparément)
(Si l’alimentation ACC n’est pas disponible)
iLX-705D
iLX-F905D
iLX-F115D
i905
• Si votre véhicule est dépourvu d’alimentation ACC, installez un interrupteur SPST (Single-Pole, Single-Throw) (vendu
séparément) et un fusible (vendu séparément).
• Le schéma et l’ampérage des fusibles indiqués ci-dessus s’appliquent lorsque l’unité est utilisée seule.
• Si le fil de l’alimentation commutée (allumage) de l’unité est directement raccordé à la borne positive (+) de la batterie du
véhicule, l’unité consomme du courant (plusieurs centaines de milliampères) même lorsqu’elle est hors tension, ce qui
risque de décharger la batterie.
ACC
(Rouge)
BATTERIE
(Jaune)
SPST SW (en option)
FUSIBLE (20 A) (en option)
FUSIBLE (5 A) (en option)
Batterie
17-FR

Raccordements
Raccordement1
Mode d’emploi Raccordements
Antenne
Câble
d’alimentation
Câble PRE OUT
REMO
(Bleu/Blanc)
REVERSE
(Orange/Blanc)
PARKING BRAKE
(Jaune/Bleu)
ACC
(Rouge)
GND
(Noir)
P. ANT
(Bleu)
BAT T
(Jaune)
MIC iN
STEERING REMOTE
HDMI-REMO-OUT
(Marron)
AUX-REMO-OUT
(Gris)
Câble REMOTE
SUBW
FRONT OUT
REAR OUT
(Vert)
(Vert/Noir)
(Blanc)
(Blanc/Noir)
(Gris/Noir)
(Gris)
(Violet/Noir)
(Violet)
Microphone (fourni)
À l’interface de la télécommande au volant
À l’interface du sélecteur HDMI
À l’appareil AUX (Tuner TV, etc)
À la borne d’entrée de l’amplificateur lors
de l’ajout d’un amplificateur externe
Arrière gauche
Avant gauche
Enceintes
Avant droite
Arrière droite
Vers l’amplificateur ou l’égaliseur
Vers côté positif du fil du signal du feu de recul du
véhicule
Vers le fil du signal du frein à main
Vers l’antenne électrique
Clé de contact
Batterie
18-FR

Raccordement2
Câble de la CAMÉRA
USB cable 2.4A (Noir)
USB cable 1.5A (Gris)
REAR CAMERA
FRONT CAMERA
CONNECT2 I/F (UART I/F)
LIN
DRIVE RECODER IN
SPEED SENSOR
(Vert/Blanc)
Au périphérique de mémoire flash USB, à l’iPhone
ou au smartphone Android.
À l’iPhone ou au smartphone Android (pour le
chargement uniquement).
À la caméra arrière
À la caméra avant ou de côté
Au boîtier d’interface CAN (CAN Box)
À la Dash Cam
Vers la ligne du capteur de vitesse du véhicule
Antenne GNSS (fournie)
Connecteur d’entrée HDMI
Connecteur de sortie HDMI
Connecteur de la CAMÉRA
Boîtier de l’antenne GNSS
Connectez à l’antenne GNSS (fournie).
Connecteur d’entrée AUX
Fil d’entrée pour signal audio AUX.
Connecteur d’alimentation
Connecteur PRE OUT
Connecteur REM
Connecteur de l’antenne DAB
À l’antenne DAB (vendue séparément).
Boîtier de l’antenne radio
Adaptateur d’antenne ISO/JASO (vendu
séparément)
L’adaptateur d’antenne ISO/JASO peut être
nécessaire, selon le véhicule.
Connecteur d’entrée MIC
Au microphone (fourni).
Connecteur d’interface de la télécommande au
volant
À l’interface de la télécommande au volant.
Pour plus de détails sur les raccordements,
adressez-vous à votre revendeur Alpine.
Fil HDMI-REM-OUT (Marron)
Raccordez ce fil au fil d’entrée de la télécommande
de l’interface de votre sélecteur HDMI.
Fil AUX-REM-OUT (Gris)
Raccordez ce fil au fil d’entrée de la télécommande
de votre appareil AUX.
19-FR

Connecteurs RCA du subwoofer
Le connecteur ROUGE correspond à l’enceinte droite et
le BLANC à l’enceinte gauche.
Connecteurs RCA de sortie des enceintes avant
Ils peuvent être utilisés comme connecteurs RCA de
sortie des enceintes avant. Le connecteur ROUGE
correspond à l’enceinte droite et le BLANC à l’enceinte
gauche.
Connecteurs RCA de sortie des enceintes arrière
Ils peuvent être utilisés comme connecteurs RCA de
sortie des enceintes arrière. Le connecteur ROUGE
correspond à l’enceinte droite et le BLANC à l’enceinte
gauche.
Connecteur ISO (sortie haut-parleur)
Fil de sortie de l’enceinte arrière gauche (+) (Vert)
Fil de sortie de l’enceinte arrière gauche (–) (Vert/
Noir)
Fil de sortie de l’enceinte avant gauche (+) (Blanc)
Fil de sortie de l’enceinte avant gauche (–) (Blanc/
Noir)
Fil de sortie de l’enceinte avant droite (–) (Gris/
Noir)
Fil de sortie de l’enceinte avant droite (+) (Gris)
Fil de sortie de l’enceinte arrière droite (–) (Violet/
Noir)
Fil de sortie de l’enceinte arrière droite (+) (Violet)
Fil de mise sous tension à distance (Bleu/Blanc)
Raccordez ce fil au fil de mise sous tension à distance
de l’amplificateur ou du processeur de signaux.
Fil de recul (Orange/Blanc)
Fil du frein à main (Jaune/Bleu)
Raccordez ce fil au côté de l’alimentation de
l’interrupteur du frein à main pour transmettre les
signaux d’état du frein à main à l’appareil.
Connecteur d’alimentation ISO
Fil d’alimentation commutée (allumage) (Rouge)
Raccordez ce fil à une borne ouverte du boîtier de
fusibles du véhicule ou à une autre source
d’alimentation inutilisée qui fournit une tension
positive (+) de 12 V uniquement lorsque la clé de
contact est enclenchée ou sur la position accessoire.
Fil de terre (Noir)
Raccordez ce fil à une masse correcte du châssis du
véhicule.
Veillez à effectuer la connexion sur du métal nu et fixezla fermement à l’aide de la vis à tôle fournie.
Fil d’antenne à commande électrique (Bleu)
Raccordez ce fil à la borne +B de votre antenne à
commande électrique, le cas échéant.
• Ce fil doit uniquement être utilisé pour commander
l’antenne électrique du véhicule. N’utilisez pas ce fil
pour mettre sous tension un amplificateur ou un
processeur de signaux, etc.
Fil de la batterie (Jaune)
Raccordez ce fil à la borne positive (+) de la batterie du
véhicule.
Porte-fusibles (15A)
Connecteur USB (2,4A)
Au périphérique de mémoire flash USB, à l’iPhone ou
au smartphone Android.
Connecteur USB (1,5A)
À l’iPhone ou au smartphone Android (pour le
chargement uniquement).
Connecteur d’entrée de la CAMÉRA ARRIÈRE
Utilisez lors du raccordement d’une caméra arrière.
Connecteur d’entrée de la CAMÉRA AVANT
Utilisez lors du raccordement d’une caméra avant ou
d’une caméra de côté.
Connecteur Connect2 (UART)
Au boîtier d’interface.
Connecteur LIN
Connectez ce fil au connecteur LIN de la Dash Cam.
Connecteur d’entrée de l’enregistreur de conduite
Fil d’entrée pour le signal vidéo de la Dash Cam.
Fil du capteur de vitesse (Vert/Blanc)
Une connexion incorrecte de la ligne du capteur de
vitesse peut entraîner la défaillance des principales
fonctions de sécurité du véhicule (telles que les freins
ou les air bags). Ces défaillances risquent de provoquer
un accident, voire la mort. Nous vous recommandons
vivement de confier l’installation à un revendeur agréé
Alpine.
20-FR

Spécifications
Mode d’emploi Spécifications
MONITEUR
Taille de l’écran 7” (iLX-705D)
Système de fonctionnement Matrice ac tive TFT
Nombre d’éléments d’image 2764800pièces
Nombre d’éléments d’image effectifs
99% ou plus
Système de couleur NTSC / PAL
Système d’éclairage LED
9” (iLX-F905D)
11” (iLX-F115D)
9” (i905)
(1280 × 720 × RGB)
TUNER FM
Plage de syntonisation 87,5 – 108,0MHz
Sensibilité utilisable en mode mono
Seuil de sensibilité à 50dB 12dBf (1,1µV/75ohms)
Sélectivité de canal alternatif 80dB
Rapport signal sur bruit 65dB
Séparation Stereo 35dB
8,1dBf(0,7µV/75ohms)
TUNER AM
Plage de syntonisation 531 – 1602kHz
Sensibilité utilisable 25,1μV/28dBf
DAB
Plage de syntonisation 174,928 – 239,2MHz
Sensibilité utilisable -100dBm
Rapport signal sur bruit 90dB
SECTION USB1
Version USB USB 2.0
Consommation maximale 2400mA
Classe USB USB (stockage de masse)
Système de fichiers FAT16/32, exFAT
Nombre de canaux 2 canaux (stéréo)
Réponse en fréquence*
Distorsion harmonique totale 0,005% (à 1kHz)
Gamme dynamique 95dB (à 1kHz)
Rapport signal sur bruit 95dB
Séparation des canaux 90dB (à 1kHz)
*1 La réponse en fréquence peut différer selon le logiciel
d’encodage ou le débit binaire.
1
5 – 40000Hz (±1dB)
SECTION USB2
Consommation d’énergie max. 1500mA (prise en charge CDP)
Classe USB Chargement uniquement
HDMI
Format d’entrée 720p/480p/VGA
Format de sortie 720p/480p
Bluetooth
Spécification Bluetooth BluetoothV4.2 (2402 - 2480MHz)
Puissance de sortie +4.0dBm/2,51mWAve.
(puissance de classe 2)
Profil HFP (profil mains libres)
OPP (profil d’envoi d’objet)
PBAP (profil d’accès à l’annuaire)
SPP (profil de port série)
A2DP (profil de distribution audio
avancée)
AVRCP (profil de télécommande
audio/vidéo)
SECTION GPS
Fréquence de réception 1575,42 +/- 1023MHz
Sensibilité de réception (recherche)
-136dB max.
SECTION Wi-Fi
Gammes de fréquence IEEE 802.11b/g/n (2,4GHz)
IEEE 802.11a/n/ac (5GHz)
Canaux 1 – 13canaux (2,4GHz)
149 – 165canaux (5GHz)
Bande de fréquences 2 401 – 2 483MHz (2,4GHz)
5 725 – 5 850MHz (5GHz)
Puissance de sortie (2,4GHz) Max. 18dBm
Puissance de sortie (5GHz) Max. 13dBm (11a)
Max. 12dBm (11n/ac)
Protocoles de sécurité WPA3/WPA2-PSK ( TKIP, AES)
GÉNÉRALITÉS
Alimentation 14,4Vc.c. (11 – 16V autorisés)
Température de fonctionnement
-20°C à +60°C
Puissance de sortie 50W × 4
Intensité de courant maximale 15A
Niveau de sortie audio
Présortie (avant, arrière): 4V/10k ohms (max.)
Présortie (subwoofer): 4V/10k ohms (max.)
Poids 1,4kg (iLX-705D)
2,3kg (iLX-F905D)
2,6kg (iLX-F115D)
1,7kg (i905)
DIMENSIONS DU CHÂSSIS
iLX-705D iLX-F905D iLX-F115D i905
Largeur 178mm 178mm 178mm 178mm
Hauteur 50mm 50mm 50mm 50mm
Profondeur 149,6mm 149,6mm 149,6mm 142mm
DIMENSIONS DE L’ÉCRAN
iLX-705D iLX-F905D iLX-F115D i905
Largeur 171mm 232,5mm 268,9mm 214,7mm
Hauteur 96mm 151,1mm 178mm 136,6mm
Profondeur 17,7mm 54,7mm 54,7mm 29,9mm
21-FR

• En raison des améliorations que nous apportons
continuellement à nos produits, les caractéristiques
techniques et la conception peuvent être modifiées sans
avis préalable.
• L’affichage à cristaux liquides (LCD) a été fabriqué avec
des technologies de très haute précision. Sa résolution
effective est supérieure à 99,99%. Il est donc possible que
0,01% des pixels soit toujours ACTIVÉ ou DÉSACTIVÉ.
• Windows Media et le logo Windows sont des marques
de commerce ou des marques déposées de Microsoft
Corporation aux États-Unis et/ou dans d’autres pays.
• Apple, iPhone, iPod, Lightning, et Siri sont des marques
commerciales d’Apple Inc., déposées aux États-Unis et
dans d’autres pays. Apple CarPlay est une marque de
commerce d’Apple Inc.
• L’utilisation des badges Made for Apple et Works with
Apple signifie qu’un accessoire a été conçu pour se
connecter spécifiquement aux produits Apple
identifiés par le badge Made for Apple et pour
fonctionner spécifiquement avec la technologie
identifiée par le badge Works with Apple, et a été
certifié par le développeur pour répondre aux normes
de performance d’Apple. Apple n’est pas responsable
du fonctionnement de cet appareil ou de sa conformité
aux normes de sécurité et de réglementation.
Veuillez noter que l’utilisation de cet accessoire avec un
produit Apple peut affecter les performances sans fil.
• L’utilisation du logo Apple CarPlay signifie que
l’interface utilisateur du véhicule répond aux normes
de performances d’Apple. Apple n’est pas responsable
du fonctionnement de ce véhicule ni de sa conformité
à la législation ou aux normes de sécurité en vigueur.
Veuillez noter que l’utilisation de ce produit avec un
iPhone peut affecter les performances de
communication sans fil.
• Google, Android, Google Play et Android Auto sont des
marques de commerce de GoogleLLC.
Pour utiliser Android Auto sur l’écran de votre voiture,
vous aurez besoin d’un téléphone Android
fonctionnant sous Android 6.0 ou version ultérieure,
d’un forfait de données actif et de l’application Android
Auto.
• Les termes HDMI et High-Definition Multimedia
Interface ainsi que le logo HDMI sont des marques
commerciales ou des marques déposées de HDMI
Licensing Administrator, Inc. aux États-Unis et dans
d’autres pays.
• La marque et les logos Bluetooth® sont des marques
déposées qui appartiennent à Bluetooth SIG, Inc., et
leur utilisation par ALPS ALPINE CO., LTD., fait l’objet
d’une licence.
• Le logo Wi-Fi CERTIFIED™ est une marque commerciale
déposée de Wi-Fi Alliance®.
• LDAC et le logo LDAC sont des marques commerciales
de Sony Corporation.
• Le produit avec ce logo est conforme à la norme audio
haute résolution définie par Japan Audio Society. Ce
logo est utilisé sous licence de Japan Audio Society.
Conçu pour iPhone SE (2e génération), iPhone 11 Pro Max,
iPhone 11 Pro, iPhone 11, iPhone XS Max, iPhone XS,
iPhone XR, iPhone X, iPhone 8 Plus, iPhone 8, iPhone 7
Plus, iPhone 7, iPhone SE, iPhone 6s Plus, iPhone 6s.
22-FR

Contenido
ADVERTENCIA........................................................................................................................................................2
PRUDENCIA ............................................................................................................................................................3
Primeros pasos...................................................................................................................................................... 4
Funcionamiento de Apple CarPlay (opcional)...........................................................................................8
Android Auto™ (opcional).................................................................................................................................8
Funcionamiento de Radio/RDS.......................................................................................................................9
Funcionamiento de DAB/DAB+/DMB...........................................................................................................9
Funcionamiento de unidad flash USB (opcional)...................................................................................10
Modo iPod en iPhone (opcional)..................................................................................................................11
Control del teléfono manos libres................................................................................................................12
Instalación ............................................................................................................................................................13
Conexiones...........................................................................................................................................................18
Especificaciones..................................................................................................................................................21
IMPORTANTE
Anote el número de serie de la unidad en el espacio proporcionado a continuación y consérvelo como
registro permanente.
NÚMERO DE SERIE:
NÚMERO DE SERIE ISO: AL
FECHA DE INSTALACIÓN:
INSTALADOR:
LUGAR DE ADQUISICIÓN:
Para obtener más información sobre todas las funciones, consulte el manual de operación
publicado en nuestro sitio web en https://www.alpine-europe.com/alpine-europe.html.
Si es necesario, un distribuidor ALPINE puede ofrecerle una copia impresa del manual de
operación disponible en el sitio web.
1-ES

ADVERTENCIA
ADVERTENCIA
Este símbolo indica que las instrucciones son
importantes. De no tenerse en cuenta, podrían
ocasionarse heridas graves o la muerte.
INSTALE LA UNIDAD CORRECTAMENTE PARA QUE EL
CONDUCTOR NO PUEDA VER EL VIDEO/TELEVISOR A MENOS
QUE EL VEHÍCULO SE ENCUENTRE PARADO Y SE HAYA
ACCIONADO EL FRENO DE MANO.
Ver el vídeo/televisor mientras se conduce se considera peligroso. Si la
unidad no se instala correctamente, el conductor podrá ver el vídeo/
televisor y distraerse mientras conduce, incrementando el riesgo de
accidente. Esto podría causar heridas graves al conductor y a otras
personas.
NO MIRE EL VÍDEO MIENTRAS CONDUCE.
El conductor puede distraer su atención de la carretera mientras mira el
vídeo y ocasionar un accidente.
NO REALICE NINGUNA OPERACIÓN QUE PUEDA DISTRAER
SU ATENCIÓN Y COMPROMETER LA SEGURIDAD DURANTE
LA CONDUCCIÓN DEL VEHÍCULO.
Las operaciones que requieren su atención durante más tiempo sólo
deben realizarse después de detener completamente el vehículo.
Estacione el vehículo en un lugar seguro antes de realizar dichas
operaciones. De lo contrario, podría ocasionar un accidente.
MANTENGA EL VOLUMEN A UN NIVEL QUE NO LE IMPIDA
ESCUCHAR LOS SONIDOS DEL EXTERIOR MIENTRAS CONDUCE.
Los niveles de volumen demasiado altos que reducen la percepción de
otros sonidos como las sirenas de emergencia o posibles señales
acústicas de advertencia en carretera (cruces de trenes, etc.) podrían ser
peligrosos y provocar un accidente. LOS NIVELES DE VOLUMEN
ALTOS EN EL VEHÍCULO TAMBIÉN PUEDEN DAÑAR EL SISTEMA
AUDITIVO DE LOS PASAJEROS.
REDUZCA AL MÁXIMO LA VISUALIZACIÓN DE LA PANTALLA
MIENTRAS CONDUCE.
El conductor puede distraer su atención de la carretera mientras mira la
pantalla y ocasionar un accidente.
NO DESMONTE NI ALTERE LA UNIDAD.
Si lo hace, podrá ocasionar un accidente, un incendio o una descarga
eléctrica.
UTILICE LA UNIDAD SOLAMENTE EN VEHÍCULOS QUE
TENGAN 12 VOLTIOS CON NEGATIVO A MASA.
(Consulte a su distribuidor en caso de duda.) De no ser así, podría
ocasionar un incendio, etc.
MANTENGA LOS OBJETOS PEQUEÑOS, COMO TORNILLOS,
FUERA DEL ALCANCE DE LOS NIÑOS.
La ingestión de estos objetos puede provocar lesiones graves. Si esto
ocurre, consulte con un médico inmediatamente.
UTILICE EL AMPERAJE CORRECTO CUANDO CAMBIE FUSIBLES.
De lo contrario, puede producirse un incendio o una descarga eléctrica.
NO OBSTRUYA LOS ORIFICIOS DE VENTILACIÓN O LOS
PANELES DEL RADIADOR.
Si los bloquea, el calor podría acumularse en el interior y producir un
incendio.
UTILICE ESTE PRODUCTO CON APLICACIONES MÓVILES DE
12 V.
Si se emplea para otra aplicación distinta de la prevista, podría
producirse un incendio, una descarga eléctrica u otras lesiones.
REALICE LAS CONEXIONES CORRECTAMENTE.
Una conexión incorrecta puede producir un incendio o dañar el equipo.
ANTES DE EFECTUAR EL CABLEADO, DESCONECTE EL CABLE
DEL TERMINAL NEGATIVO DE LA BATERÍA.
De no hacerlo así, podría ocasionar una descarga eléctrica o heridas
debido a cortocircuitos eléctricos.
IMPIDA QUE LOS CABLES SE ENREDEN CON LOS OBJETOS
SITUADOS ALREDEDOR.
Disponga la instalación eléctrica y los cables conforme a lo descrito en el
manual para evitar obstáculos durante la conducción. Los cables que
obstaculizan la conducción o que cuelgan de partes del vehículo como el
volante de dirección, la palanca de cambios, los pedales de freno, etc., se
consideran extremadamente peligrosos.
NO EMPALME CABLES ELÉCTRICOS.
Nunca corte el aislamiento de un cable para suministrar energía a otro
equipo. Esto hace que la capacidad portadora del cable se supere y puede
ser la causa de incendios o descargas eléctricas.
EVITE DAÑAR LOS TUBOS Y EL CABLEADO CUANDO
TALADRE AGUJEROS.
Si taladra agujeros en el chasis durante la instalación, tome las
precauciones necesarias para no rozar, dañar u obstruir los tubos, las
tuberías de combustible, los depósitos o el cableado eléctrico. De lo
contrario, podría provocar un incendio.
NO UTILICE TUERCAS O PERNOS EN EL SISTEMA DE FRENOS
O DE DIRECCIÓN PARA REALIZAR LAS CONEXIONES A MASA.
Los pernos o tuercas empleados en los sistemas de freno o de dirección
(o en cualquier otro sistema relacionado con la seguridad del vehículo),
o los depósitos, NUNCA deben utilizarse para instalaciones de cableado
o conexión a masa. Si utiliza tales partes podrá incapacitar el control del
vehículo y provocar un incendio, etc.
NO INSTALE EL EQUIPO EN LUGARES QUE PUEDAN
INTERFERIR CON LA OPERACIÓN DEL VEHÍCULO, COMO EL
VOLANTE DE DIRECCIÓN O LA CAJA DE CAMBIOS DE
VELOCIDAD.
Esto podría obstaculizar la visibilidad y dificultar el movimiento, etc. y
provocar accidentes graves.
2-ES

PRUDENCIA
Este símbolo indica que las instrucciones son
importantes. De no tenerse en cuenta, podría
ocasionarse heridas graves o daños materiales.
DEJE DE USAR LA UNIDAD INMEDIATAMENTE SI APARECE
ALGÚN PROBLEMA.
Su uso en estas condiciones podría ocasionar lesiones personales o
daños al producto. Lleve la unidad a un distribuidor Alpine autorizado o
al Centro de servicio Alpine más próximo para repararla.
CONFÍE EL CABLEADO Y LA INSTALACIÓN A
PROFESIONALES.
El cableado y la instalación de este equipo requieren una competencia y
experiencia técnica confirmada. Para garantizar la seguridad, póngase
siempre en contacto con el distribuidor al que ha comprado el equipo
para confiarle estas tareas.
UTILICE LOS ACCESORIOS ESPECIFICADOS E INSTÁLELOS
CORRECTAMENTE.
Asegúrese de utilizar los accesorios especificados solamente. La
utilización de otras piezas no designadas puede ser la causa de daños en
el interior de la unidad o de una instalación incorrecta. Las piezas
pueden aflojarse, lo que, además de ser peligroso, puede provocar
averías.
DISPONGA EL CABLEADO DE FORMA QUE LOS CABLES NO
SE DOBLEN, NO SE CONTRAIGAN NI ROCEN UN BORDE
METÁLICO AFILADO.
Aleje los cables y el cableado de piezas móviles (como los raíles de los
asientos) o de bordes puntiagudos o afilados. De esta forma evitará
dobleces y daños en el cableado. Si los cables se introducen por un
orificio de metal, utilice una arandela de goma para evitar que el borde
metálico del orificio corte el aislamiento del cable.
NO INSTALE LA UNIDAD EN LUGARES MUY HÚMEDOS O
LLENOS DE POLVO.
Evite instalar la unidad en lugares con altos índices de humedad o polvo.
Si entra polvo o humedad, el equipo puede averiarse.
3-ES

Manual de operación Ubicación de los controles, Encendido (On) y apagado (Off )
Primeros pasos
Posición de los controles
El diseño de pantalla utilizado en el Guía de referencia rápida puede diferir del utilizado en la pantalla actual.
iLX-705D
iLX-F905D/iLX-F115D
4-ES

Sensor de atenuación/Sensor Remoto
Detecta el nivel de iluminación del interior del coche.
Botón
Active la función de Siri o el modo de reconocimiento
de voz mientras esté conectado Apple CarPlay o
Android Auto.
Botón / (BAJAR/SUBIR)
Ajusta el volumen.
Botón (MUTE)
Activa/desactiva el modo MUTE.
Mantenga pulsado este botón durante, al menos, 2
segundos para apagar la pantalla/la iluminación de los
botones.
Botón (Audio)
Muestra la pantalla de reproducción de audio.
Las fuentes de audio pueden cambiarse mientras se
esté mostrando la pantalla de reproducción de audio.
Indicador de encendido
Botón (INICIO)
Activa la pantalla INICIO.
La pantalla de ajustes de sonido aparece mientras se
esté mostrando la pantalla INICIO.
Mantenga pulsado este botón durante, al menos, 2
segundos para apagar el dispositivo.
Encendido (On) y apagado (Off)
Botón (CAM)
Muestra la imagen de la cámara 2 (delantera/lateral/
otra) o la cámara 1 (trasera).
Mantenga pulsado un segundo o más para volver a la
pantalla anterior.
Botón /
Pulse para pasar adelante y atrás una emisora en el
modo de radio o para subir/bajar una pista, etc. en
otras fuentes de audio o visuales.
Botón (MAPA)
Muestra la pantalla del mapa para Apple CarPlay/
Android Auto cuando está conectado Apple
CarPlay o Android Auto.
Sensor remoto
Oriente el transmisor del control remoto hacia el
sensor remoto dentro de un rango de dos metros.
1 Gire la llave de contacto a la posición ACC u ON.
El sistema se enciende.
• Al usar el sistema por primera vez, se abrirá la pantalla HOME.
CUIDADO (iLX-F905D/iLX-F115D solo)
Para ajustar el ángulo de visualización, sostenga el
centro de la parte superior e inferior de la pantalla
al moverla.
Para proteger la pantalla, no la sujete de los
extremos izquierdo y derecho al moverla.
5-ES

Acerca de la pantalla de INICIO
Seleccione la fuente de audio en la pantalla de INICIO para realizar distintos ajustes y operaciones de la función.
1 Pulse el botón (INICIO).
Aparece la pantalla INICIO.
Ejemplo de pantalla en modo normal
Ejemplo de pantalla en modo texto mejorado
6-ES
Toque para mostrar la pantalla de ajustes de
sonido.
Toque para cambiar la página.
Las páginas también pueden cambiarse deslizando la
pantalla INICIO horizontalmente con el dedo.
Botón de ajustes
Muestra la pantalla de ajustes.
Área de selección de fuente de audio
Toque el icono de fuente que desee para cambiar la
fuente de audio.
Botón Android Auto
Muestra la pantalla Android Auto, que se muestra
resaltada cuando se conecta un smartphone Android
con la aplicación Android Auto instalada.
Botón Apple CarPlay
Muestra la pantalla Apple CarPlay, que se muestra
resaltada cuando se activa Apple CarPlay y se conecta
un iPhone 6s o posterior.
Navegación de la pantalla INICIO
Botón Teléfono
Muestra la pantalla del menú del teléfono.
La pantalla de Lista de dispositivos se muestra cuando
no haya conectado un teléfono manos libres o un
dispositivo Apple CarPlay/Android Auto.
Ventana de la miniatura para la fuente actual
Se muestran el nombre de la fuente, las imágenes
artísticas y la información de título. Toque las imágenes
artísticas para mostrar la pantalla de la fuente. Toque
] para reproducir/pausar una pista o un vídeo.
[
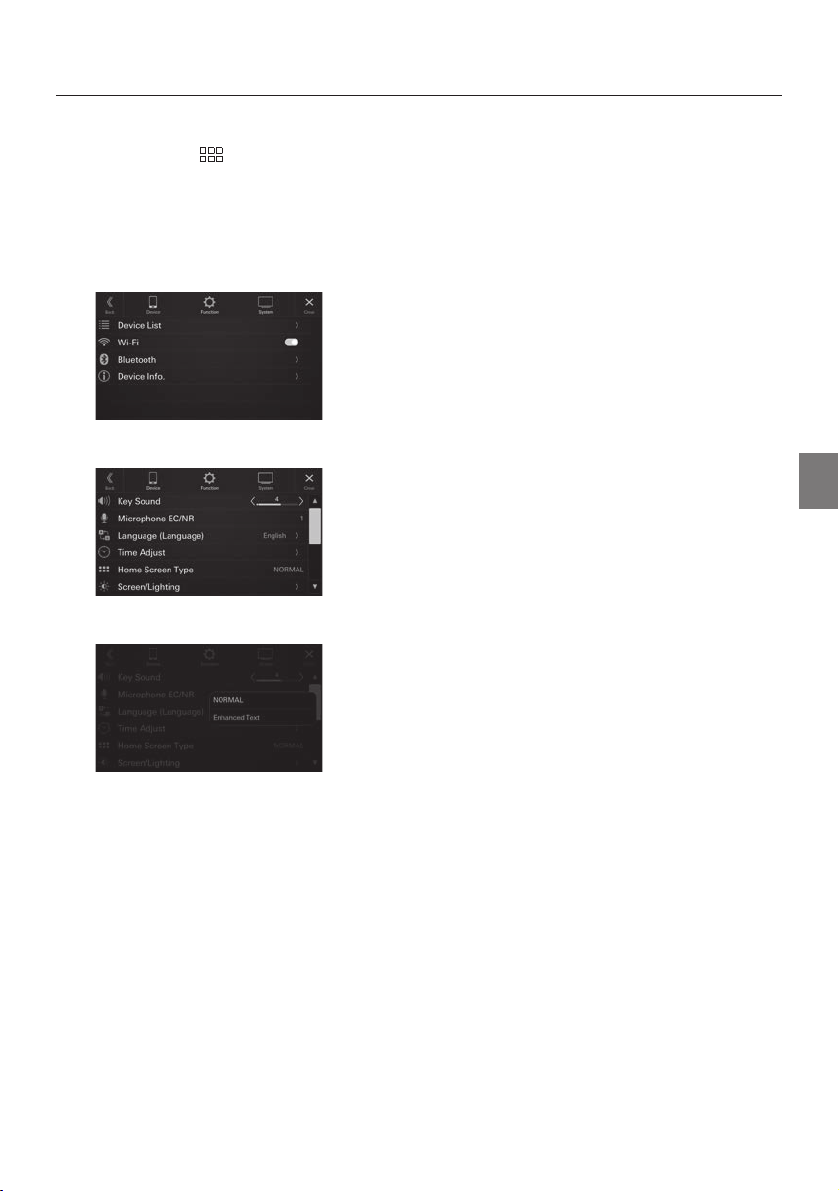
Ajuste del tipo de pantalla de inicio
La pantalla de inicio puede cambiarse al modo de Texto mejorado.
1 Pulse el botón (INICIO).
Aparece la pantalla INICIO.
2 Toque [Ajustes].
Aparece la pantalla Ajustes.
3 Toque [Sistema].
4 Toque [Tipo pantalla de inicio].
5 Toque [Normal] o [Texto mejorado].
7-ES

Manual de operación Apple CarPlay (opcional)
Funcionamiento de Apple CarPlay (opcional)
Apple CarPlay es una forma más segura, inteligente de utilizar su iPhone en el coche. Apple CarPlay se ocupa de
las cosas que desea hacer con su iPhone mientras conduce y las pone en orden en la unidad. Puede obtener
direcciones, realizar llamadas, enviar y recibir mensajes y escuchar música, en conjunto, lo que le permite
permanecer centrado al volante.
1 Pulse el botón (INICIO).
Aparece la pantalla INICIO.
2 Toque [Apple CarPlay].
Aparecerá la pantalla de Apple CarPlay.
• Consulte la sección “Apple CarPlay” en el Manual de operación para obtener información sobre el funcionamiento de
Apple CarPlay.
Manual de operación Android Auto™ (opcional)
Android Auto™ (opcional)
Android Auto unifica sus aplicaciones de teléfono inteligente favoritas en un solo lugar, facilitando a los
conductores acceder a sus aplicaciones favoritas de navegación, multimedia y comunicación mientras conducen,
lo que minimiza las distracciones al volante. Hable con Google en Android Auto™ y realice tareas con la voz para
así mantener los ojos en la carretera y las manos en el volante. Envíe mensajes fácilmente, reciba direcciones,
medios de control, etc. Simplemente realice una pulsación larga del botón de control de voz de su volante.
1 Pulse el botón (INICIO).
Aparece la pantalla INICIO.
2 Toque [Android Auto].
Aparecerá la pantalla de Android Auto.
• Consulte la sección “Android Auto” en el Manual de operación para obtener información sobre el funcionamiento de
Android Auto.
8-ES

Funcionamiento de Radio/RDS
Muestra la pantalla del teléfono
La pantalla de Lista de dispositivos se
muestra cuando no haya conectado
un teléfono o un dispositivo CarPlay/
Android Auto.
Botón de Predeterminado
Muestra las emisoras memorizadas
con un toque corto.
Tóquelo durante al menos 2
segundos para memorizar la emisora
actual como emisora memorizada.
Manual de operación Radio/RDS
Indicador TP/EON
Cambia la banda
Información
Aumenta la frecuencia
Toque y mantenga para cambiar la
frecuencia continuamente.
Cambia al modo de búsqueda
Toque durante al menos 1 segundo
para memorizar automáticamente
las emisoras
• Las pautas de algunas teclas del Guía de referencia rápida pueden diferir de la pantalla actual.
Manual de operación DAB/DAB+/DMB
Funcionamiento de DAB/DAB+/DMB
Presentación de diapositivas
Muestra la pantalla del teléfono
La pantalla de Lista de dispositivos se
muestra cuando no haya conectado
un teléfono o un dispositivo CarPlay/
Android Auto.
Botón de Predeterminado
Muestra las emisoras memorizadas
con un toque corto.
Tóquelo durante al menos 2
segundos para memorizar la emisora
actual como emisora memorizada.
Muestra la pantalla de
configuración de la radio
Reduce la frecuencia
Toque y mantenga para cambiar
la frecuencia continuamente.
Activación/desactivación del
modo de información de tráfico
Indicador de potencia de la señal
Indicador TP
Cambia la banda
Información
Aumenta la frecuencia
Cambia al modo de búsqueda
Visualiza la pantalla de búsqueda
• Las pautas de algunas teclas del Guía de referencia rápida pueden diferir de la pantalla actual.
Muestra la pantalla de
configuración de la radio
Reduce la frecuencia
Activación/desactivación del
modo de información de tráfico
9-ES

Manual de operación Funcionamiento de unidad flash USB (opcional)
Funcionamiento de unidad flash USB (opcional)
Puede reproducir archivos de música (MP3/WMA/AAC/FLAC/WAV/APE) y archivos de vídeo (MP4/MOV/FLV/MKV)
guardados en una unidad flash USB en el reproductor interno de este sistema.
Ejemplo de la pantalla principal de USB Audio
Muestra la pantalla del teléfono
La pantalla de Lista de dispositivos se
muestra cuando no haya conectado un
teléfono o un dispositivo CarPlay/
Android Auto.
Va al principio del archivo actual/
Va al archivo anterior si se toca en
menos de tres segundos tras el
inicio de la reproducción/Retrocede
rápidamente si se toca durante al
menos 1 segundo
Visualización de
imágenes artísticas
Pausa y reproducción
Repetir reproducción
Reproducción aleatoria
Barra de tiempo (Tiempo transcurrido/tiempo
total de reproducción)
• Las pautas de algunas teclas del Guía de referencia rápida pueden diferir de la pantalla actual.
Búsqueda de un archivo de música
3 Toque el nombre del artista que desee.
Por ejemplo: Búsqueda por nombre de artista
1 Toque [ (Buscar)] durante la
reproducción.
Información
Cambia al modo de vídeo USB
Va al inicio del siguiente
archivo/Avanza rápidamente si
se toca durante al menos 1
segundo
Pantalla de información de la
siguiente canción
Pantalla de icono Hi-Res (Alta
resolución)
Muestra la pantalla del menú
de ajustes USB
Número de pista actual/número
de pistas totales
Visualiza la pantalla de
búsqueda
2 Toque [Artistas].
10-ES
4 Toque el nombre del álbum que desee.
5 Toque el nombre de la canción que desee.
Se reproducirá la canción seleccionada.

Manual de operación Modo iPod en iPhone (opcional)
Modo iPod en iPhone (opcional)
En función del tipo de iPhone es necesario un cable de Lightning a USB, que se vende por separado.
Muestra la pantalla del teléfono
La pantalla de Lista de dispositivos se
muestra cuando no haya conectado
un teléfono o un dispositivo CarPlay/
Android Auto.
Va al principio del archivo actual/
Va al archivo anterior si se toca en
menos de tres segundos tras el
inicio de la reproducción/
Retrocede rápidamente si se toca
durante al menos 1 segundo
Visualización de
imágenes artísticas
Información
Va al inicio del siguiente
archivo/Avanza rápidamente si
se toca durante al menos 1
segundo
Pantalla de información de la
siguiente canción
Pausa y reproducción
Repetir reproducción
Reproducción aleatoria
Barra de tiempo (Tiempo transcurrido/tiempo
total de reproducción)
• Esta unidad solo admite dispositivos iPhone (iPhone 6s o posterior). Si quiere usar solo la reproducción, ajuste la opción
“Apple CarPlay” en “Off ” antes de conectar el iPhone.
• Las pautas de algunas teclas del Guía de referencia rápida pueden diferir de la pantalla actual.
Búsqueda de un archivo de música
3 Toque el nombre del artista que desee.
Muestra la pantalla del menú
de ajustes iPod
Número de pista actual/número
de pistas totales
Visualiza la pantalla de
búsqueda
Por ejemplo: Búsqueda por nombre de artista
1 Toque [ (Buscar)] durante la
reproducción.
2 Toque [Artistas].
4 Toque el nombre del álbum que desee.
5 Toque el nombre de la canción que desee.
Se reproducirá la canción seleccionada.
11-ES

Manual de operación Ajustes Bluetooth, Funcionamiento de Bluetooth
Control del teléfono manos libres
La unidad puede conectar con hasta dos teléfonos manos libres.
Cómo conectar un dispositivo
compatible con Bluetooth
(emparejamiento)
Para mostrar la pantalla del INICIO Ajustes:
• Detenga por completo el vehículo en un lugar seguro.
Eche el freno de mano.
1 Toque [Ajustes] en la pantalla INICIO.
2 Toque [Dispositivo].
3 Toque [Lista de dispositivos].
4 Toque [Añadir dispositivo] para buscar un
nuevo dispositivo.
6 Cuando se muestra un código en el
dispositivo, compruebe que el código sea el
mismo que el de la pantalla de la unidad y
toque [Sí].
7 Cuando se completa la conexión del
dispositivo, aparecerá un mensaje y el
dispositivo volverá al modo normal.
• Es posible registrar hasta 10 teléfonos móviles
compatibles con Bluetooth.
Atender una llamada
1 Una llamada entrante activa el tono y se
muestra una pantalla de llamada entrante.
Verá la pantalla Seleccionar función..
5 Seleccione la función del dispositivo de
conexión en la pantalla Seleccionar función
y toque [OK].
Verá una marca de verificación para la función
seleccionada.
• Manos libres 1: el dispositivo se usa como el
primer teléfono manos libres.
• Manos libres 2: el dispositivo se usa como el
segundo teléfono manos libres.
• Bluetooth Audio: el dispositivo se utiliza como
dispositivo de Bluetooth Audio.
• Apple CarPlay*: el dispositivo se utiliza como
Apple CarPlay.
* Si quiere usar el modo Apple CarPlay sin mostrar
[Apple CarPlay] en la pantalla Seleccionar función,
seleccione [Manos libres 1] o [Manos libres 2]
para conectar su dispositivo.
12-ES
2 Toque [ ].
La llamada se inicia.
Colgar el teléfono
1 Toque [ ] (Colgar).
La llamada finaliza.

Instalación
Manual de operación Instalación
Nota sobre la instalación
• Instale el equipo en un ángulo que se encuentre
entre horizontal y 30°. Tenga en cuenta que si lo
instala en un ángulo fuera de este rango podría
provocar la pérdida de rendimiento y causar
posibles daños.
<iLX-705D>
0 - 30°
<iLX-F905D/iLX-F115D>
0 - 30°
• No bloquee el disipador de calor de la unidad, ya
que impediría la circulación de aire. Si dichos
elementos están bloqueados, el calor se acumulará
dentro de la unidad y ello puede provocar un
incendio.
Orificio de ventilación de aire
Instalación del micrófono
Para un uso seguro, asegúrese de cumplir con lo
siguiente:
• La ubicación debe ser estable y firme.
• La vista del conductor y las operaciones no pueden
quedar obstruidas.
• El micrófono debe estar colocado en un lugar que
permita capturar fácilmente la voz del conductor.
Cuando hable en el micrófono, no debe de cambiar su
postura de conducción. De lo contrario podría
distraerle, desviando su atención de la conducción
segura de su vehículo. Considere cuidadosamente la
dirección y la distancia al instalar el micrófono.
Confirme que la voz del conductor sea captada
fácilmente en la ubicación seleccionada.
Micrófono
Base del micrófono
Cinta adhesiva
Columna de dirección
Montaje de la antena GNSS dentro del
vehículo
Parte trasera de la unidad
• Al instalar la unidad de visualización y la unidad
principal, no toque los conectores con las manos.
(iLX-F905D/iLX-F115D solo)
<Unidad principal><Unidad de visualización>
Conectores
1 Limpie la ubicación de montaje.
2 Ponga la placa de montaje de la antena
GNSS.
3 Monte la antena GNSS.
Antena GNSS
Placa de montaje de la antena
Esta unidad
13-ES

• No monte la antena GNSS dentro de la consola central.
– Monte la antena GNSS de forma nivelada en el salpicadero o la
bandeja trasera.
– Asegúrese de que la antena GNSS no queda cubierta
(obstruida) por ninguna superficie u objeto metálico.
• Si la antena GNSS se monta cerca de la unidad, la
recepción será mala y puede que la ubicación de su
vehículo no se muestre correctamente.
– Monte la antena GNSS lo suficientemente lejos de la unidad.
– Agrupe el cable de la antena GNSS lejos de la parte trasera de
la unidad.
• Algunos tipos de reflejos térmicos o cristales de tipo
absorción térmica pueden obstaculizar las ondas de alta
frecuencia. Si la recepción es mala con la antena
instalada dentro del coche, pruebe a montarla fuera.
Nota sobre el uso de cables de
conexión HDMI
Al utilizar cables de conexión HDMI, asegure los cables
a los terminales HDMI con el soporte de fijación HDMI
suministrado.
1 Retire los cuatro pernos hexagonales de
ambos lados de la unidad.
Pernos hexagonales ×4
2 Tire hacia fuera del botón deslizante y
colóquelo en su posición hacia delante.
(Para volver a poner el botón deslizante en
su posición hacia atrás, empújelo.)
1 Asegure el soporte de fijación HDMI con el
tornillo (A).
Terminal HDMI
Soporte de fijación HDMI
(incluido)
Ajuste de la posición de visualización
(iLX-F905D/iLX-F115D)
En función del vehículo, la posición frontal-trasera de
la visualización puede variar. Para ajustar la posición
frontal-trasera de la visualización, ajuste el control
deslizante hacia delante.
Ajuste estándar: posición hacia atrás
Posición frontal-trasera
<Posición hacia delante> <Posición hacia atrás>
51,5mm 31,5mm
(A)
Botón deslizante
3 Instale los cuatro pernos hexagonales para
fijar el botón deslizante.
Instalación de la unidad (iLX-705D)
1 Monte el soporte de montaje original en la
unidad usando los tornillos suministrados.
Si no tiene el soporte de montaje original, monte el
doble din KIT* (suministrado con el soporte de
montaje lateral), etc. en la unidad principal.
* Se vende por separado.
14-ES

Ajuste la posición vertical de la unidad
de visualización (iLX-F905D/iLX-F115D)
Ajuste la posición vertical de la pantalla de acuerdo
con la posición de montaje en el vehículo antes de
montar la unidad de visualización.
Ajuste predeterminado: 0mm
Soporte de
Tornillos (M5 × 8)
(Incluidos)
montaje original
Placa frontal (incluida)
2 Conecte todos los demás cables de la
unidad siguiendo las indicaciones de la
sección “Conexiones” (página18).
3 Monte la unidad en un coche.
• Fije los cables con cuidado. Procure que no sufran daños
al ponerlos en contacto con piezas móviles, como las
guías de los asientos, u objetos afilados o puntiagudos.
Instalación de la unidad (iLX-F905D/
iLX-F115D)
1 Monte el soporte de montaje original en la
unidad principal usando los tornillos
suministrados.
• Si no tiene el soporte de montaje original, monte
el doble din KIT* (suministrado con el soporte de
montaje lateral), etc. en la unidad principal.
* Se vende por separado.
Tornillos (M5 × 8)
(Incluidos)
1 Retire los 4 tornillos de la parte trasera de
la unidad de visualización y, a
continuación, ajuste la posición vertical.
Tornillos (M2.6× 8)
2 Conecte la chapa trasera en una posición
que quede alineada con la posición vertical
de la unidad de visualización.
Chapa trasera
(incluido)
2×50mm: para la posición vertical: 0mm o –60mm
2×35mm:
2×20mm: para la posición vertical: –30mm
0mm
para la posición vertical: –15mm o
Chapa trasera
(2×50mm)
posición vertical
–15mm
Chapa trasera
(2×35mm)
–45mm
Soporte de
montaje original
2 Conecte todos los demás cables de la
unidad principal siguiendo las indicaciones
de la sección “Conexiones” (página18).
3 Monte la unidad en un coche.
• Fije los cables con cuidado. Procure que no sufran daños
al ponerlos en contacto con piezas móviles, como las
guías de los asientos, u objetos afilados o puntiagudos.
–30mm
Chapa trasera
(2×20mm)
Chapa trasera
(2×20mm)
–45mm
Chapa trasera
(2×35mm)
15-ES

–60mm
Chapa trasera
(2×50mm)
3 Conecte la cubierta trasera a la parte
trasera de la unidad de visualización
usando 2 tornillos (M2.6×6).
Asegure los tornillos y luego instale las
tapas de la chapa.
Tapas de la chapa (incluidas)
Tornillos
(M2,6× 6)
(incluido)
Cubierta trasera (incluida)
Instalación de la unidad de
visualización (iLX-F905D/iLX-F115D)
CUIDADO
No ajuste el ángulo de visualización si la unidad
no está fija en el botón deslizante de la unidad
principal con los cuatro tornillos (M5 × 8). Si lo
hace, puede que no encienda.
2 Instale la placa de placa de alimentación.
Placa de alimentación (incluida)
• Si la placa de alimentación no está montada,
puede que la unidad de visualización no se
encienda. Asegúrese de montarla.
3 Monte la bisagra de la cubierta usando 2
tornillos (M3×4).
Asegure los tornillos y luego instale las
bisagras de la chapa.
Bisagras de la chapa
(incluido)
Tornillos (M3×4)
(incluido)
Bisagra de la cubierta
(incluido)
1 Fije la unidad de visualización en el botón
deslizante de la unidad principal usando 4
tornillos (M5×8).
Tornillos (M5 × 8) (incluidos)
16-ES

Diagrama de conexión del interruptor SPST (vendido por separado)
(Si la fuente de alimentación de ciclo combinado ACC no está disponible)
iLX-705D
iLX-F905D
iLX-F115D
i905
• Si su vehículo no tiene fuente de alimentación de ciclo combinado ACC, agregue un interruptor SPST (Single-Pole,
Single-Throw) (vendido por separado) y un fusible (vendido por separado).
• El diagrama y el amperaje de los fusibles que se muestran arriba corresponden a los casos en los que la unidad se utiliza
sola.
• Si el cable de alimentación conmutado (contacto) de la unidad se conecta directamente al polo positivo (+) de la batería
del vehículo, la unidad absorbe parte de la corriente (unos cientos de miliamperios) incluso cuando el interruptor está
apagado (posición OFF) y la batería podría descargarse.
ACC
(Rojo)
BATERÍA
(Amarillo)
SPST SW (opcional)
FUSIBLE (20 A) (opcional)
FUSIBLE (5 A) (opcional)
Batería
17-ES

Conexiones
Conexión 1
Manual de operación Conexiones
Antena
Cable de
alimentación
Cable PRE OUT
REMO
(Azul/Blanco)
REVERSE
(Naranja/Blanco)
PARKING BRAKE
(Amarillo/Azul)
ACC
(Rojo)
GND
(Negro)
P. ANT
(Azul)
BAT T
(Amarillo)
MIC IN
STEERING REMOTE
HDMI-REMO-OUT
(Marrón)
AUX-REMO-OUT
(Gris)
Cable REMOTO
SUBW
FRONT OUT
REAR OUT
(Verde)
(Verde/Negro)
(Blanco)
(Blanco/Negro)
(Gris/Negro)
(Gris)
(Violeta/Negro)
(Violeta)
Micrófono (Incluido)
A la interfaz del control remoto del volante
A la interfaz del selector HDMI externo
Al dispositivo AUX (sintonizador TV, etc.)
Al terminal de entrada del amplificador si
se conecta un amplificador externo
Posterior izquierdo
Frontal izquierdo
Altavoces
Frontal derecho
Posterior derecho
Al amplificador o al ecualizador
Al polo positivo del cable de señal de la luz trasera
del coche
Al cable de señal del freno de mano
A la antena eléctrica
Llave de contacto
Batería
18-ES

Conexión 2
Cable CAMERA
USB cable 2.4A (negro)
USB cable 1.5A (gris)
REAR CAMERA
FRONT CAMERA
CONNECT2 I/F (UART I/F)
LIN
DRIVE RECODER IN
SPEED SENSOR
(Verde/Blanco)
A la unidad flash USB, iPhone o smartphone
Android.
Al iPhone o smartphone Android (solo para carga).
A la cámara trasera
A la cámara delantera o lateral
A la caja de la interfaz CAN
A la Dash Cam
A la línea de impulsos de velocidad del vehículo
Antena GNSS (incluida)
Conector de entrada HDMI
Conector de salida HDMI
Conector CAMERA
Receptáculo de la antena GNSS
Conecte a la antena GNSS (incluida).
Conector de entrada AUX
Cable de entrada para la señal de audio AUX.
Conector de alimentación de energía
Conector PRE OUT
Conector REM
Conector de antena DAB
A la antena DAB (Se vende por separado).
Receptáculo de la antena de la radio
Adaptador de antena ISO/JASO (Se vende por
separado)
Puede que sea necesario un adaptador de antena
ISO/JASO, en función del vehículo.
Conector de entrada MIC
Al micrófono (incluido).
Conector de la interfaz del control remoto del
volante
A la interfaz del control remoto del volante.
Para obtener más información sobre las conexiones,
consulte a su distribuidor Alpine más cercano.
Cable HDMI-REM-OUT (Marrón)
Conecte este cable al cable de entrada remoto de
su interfaz del selector HDMI externo.
Cable AUX-REM-OUT (gris)
Conecte este cable al cable de entrada remoto de
su dispositivo AUX.
19-ES

Conectores RCA Subwoofer
ROJO (derecha) y BLANCO (izquierda).
Conectores RCA de salida delanteros
Se puede utilizar como conectores RCA delanteros de
salida. ROJO (derecha) y BLANCO (izquierda).
Conectores RCA de salida traseros
Se puede utilizar como conectores RCA traseros de
salida. ROJO (derecha) y BLANCO (izquierda).
Conector ISO (Salida de altavoz)
Cable de salida de altavoz izquierdo trasero (+)
(Verde)
Cable de salida del altavoz trasero izquierdo (–)
(Verde/Negro)
Cable de salida de altavoz izquierdo delantero (+)
(Blanco)
Cable de salida del altavoz delantero izquierdo (–)
(Blanco/Negro)
Cable de salida del altavoz delantero derecho (–)
(Gris/Negro)
Cable de salida del altavoz delantero derecho (+)
(Gris)
Cable de salida del altavoz trasero derecho (–)
(Violeta/Negro)
Cable de salida de altavoz derecho trasero (+)
(Violeta)
Cable de conexión remota (Azul/Blanco)
Conecte este cable al cable del control remoto del
amplificador o del procesador de señal.
Cable de la marcha atrás (Naranja/Blanco)
Cable del freno de mano (Amarillo/Azul)
Conecte este cable al extremo de alimentación del
interruptor del freno de mano para transmitir las
señales de estado del freno de mano a la unidad.
Conector de alimentación de energía ISO
Cable de alimentación con interruptor (Contacto)
(Rojo)
Conecte este cable a un terminal abierto de la caja de
fusibles del vehículo o a otra fuente de alimentación no
utilizada que genere una potencia de (+)12 V solo
cuando el contacto esté encendido o en posición
auxiliar.
Cable de tierra (Negro)
Conecte este cable a una buena toma de tierra del
vehículo.
Asegúrese de realizar la conexión solo en el metal y de
que quede perfectamente sujeto utilizando el tornillo
de chapa de metal incorporado.
Cable para antena eléctrica (Azul)
Si es necesario, conecte este cable al terminal +B de la
antena eléctrica.
• Este cable solo se debe utilizar para controlar la
antena del vehículo. No utilice este cable para
encender un amplificador, un procesador de señales,
etc.
Cable de la batería (Amarillo)
Conecte este cable al borne positivo (+) de la batería
del vehículo.
Portafusible (15 A)
Conector USB (2.4A)
A la unidad flash USB, iPhone o smartphone Android.
Conector USB (1.5A)
Al iPhone o smartphone Android (solo para carga).
Conector de entrada CÁMARA TRASERA
Utilícelo cuando conecte una cámara trasera.
Conector de entrada FRONT CAMERA
Utilícelo cuando conecte una cámara delantera o una
cámara lateral.
Conector Connect2 (UART)
A la caja de la interfaz.
Conector LIN
Conecte este cable al conector LIN de la Dash Cam.
Conector de entrada de recodificador de disco
Cable de entrada para la señal de vídeo de Dash Cam.
Cable del sensor de velocidad (Verde/Blanco)
Un fallo de conexión de la línea de impulsos de
velocidad puede hacer que las funciones importantes
de seguridad del vehículo fallen (como los frenos o el
airbag). Estos fallos pueden derivar en un accidente y la
muerte. Recomendamos encarecidamente que la
instalación la realice un proveedor de Alpine
autorizado y cualificado.
20-ES

Especificaciones
Manual de operación Especificaciones
SECCIÓN DEL MONITOR
Tamaño de la pantalla 7” (iLX-705D)
Sistema de funcionamiento Matriz activa TFT
Número de elementos de la imagen
Número efectivo de elementos de la imagen
99% o más
Sistema de color NTSC / PAL
Sistema de iluminación LED
9” (iLX-F905D)
11” (iLX-F115D)
9” (i905)
2.764.800 pcs.
(1.280 × 720 × RGB)
SECCIÓN DEL SINTONIZADOR FM
Rango de sintonización 87,5 – 108,0 MHz
Sensibilidad útil en mono 8,1dBf (0,7µV/75ohmios)
Umbral de sensibilidad 50 dB 12dBf (1,1µV/75ohmios)
Selectividad de canal alternativo
Relación de señal/ruido 65 dB
Separación estéreo 35 dB
80 dB
SECCIÓN DEL SINTONIZADOR AM
Rango de sintonización 531 – 1.602kHz
Sensibilidad útil 25,1 μV/28 dBf
SECCIÓN DAB
Rango de sintonización 174,928 – 239,2 MHz
Sensibilidad útil -100 dBm
Relación señal-ruido 90dB
SECCIÓN USB1
Requisitos USB USB 2.0
Consumo de energía máx. 2.400mA
Clase USB USB (Clase de almacenamiento
Sistema de archivos FAT16/32, exFAT
Número de canales 2 canales (estéreo)
Respuesta de frecuencia*
Distorsión armónica total 0,005% (a 1kHz)
Rango dinámico 95 dB (a 1 kHz)
Relación señal-ruido 95dB
Separación de canales 90dB (a 1 kHz)
*1 La respuesta de frecuencia puede variar en función del software
de codificación o la velocidad de bits.
masivo)
1
5 – 40.000Hz (±1dB)
SECCIÓN USB2
Consumo máx. energía 1.500 mA (Soporte CDP)
Clase USB solo carga
SECCIÓN HDMI
Formato de entrada 720p/480p/VGA
Formato de salida 720p/480p
SECCIÓN Bluetooth
Especificación de Bluetooth Bluetooth V4.2 (2.402 - 2.480 MHz)
Potencia de salida +4,0dBm/2,51mW prom.
(Clase 2)
Perfil HFP (Hands-Free Profile)
OPP (Object Push Profile)
PBAP (Phone Book Access Profile)
SPP (Serial Port Profile)
A2DP (Advanced Audio
Distribution Profile)
AVRCP (Audio/Video Remote
Control Profile)
SECCIÓN GPS
Frecuencia de recepción 1575,42 + / - 1.023 MHz
Sensibilidad de recepción (búsqueda)
–136dB máx.
SECCIÓN Wi-Fi
Rangos de frecuencia IEEE 802.11 b/g/n (2,4GHz)
IEEE 802.11 a/n/ac (5GHz)
Canales 1 – 13 canales (2,4GHz)
149 – 165 canales (5GHz)
Banda de frecuencia 2.401 – 2.483MHz (2,4GHz)
5.725 – 5.850MHz (5GHz)
Potencia de salida (2,4GHz) Máx. 18dBm
Potencia de salida (5GHz) Máx. 13dBm (11 a)
Máx. 12dBm (11 n/ac)
Protocolos de seguridad WPA3 / WPA2-PSK (TKIP, AES)
GENERAL
Alimentación 14,4 V CC
(11 – 16 V margen permisible)
Temperatura de funcionamiento
de –20°C a +60°C
Salida de potencia 50W × 4
Consumo de corriente máximo 15A
Nivel de salida de audio
Salida previa (delantera, trasera):
4V/10 kohmios (máx.)
Salida previa (subwoofer): 4V/10 kohmios (máx.)
Peso 1,4kg (iLX-705D)
2,3kg (iLX-F905D)
2,6kg (iLX-F115D)
1,7kg (i905)
TAMAÑO DEL CHASIS
iLX-705D iLX-F905D iLX-F115D i905
Anchura 178mm 178mm 178mm 178mm
Altura 50mm 50mm 50mm 50mm
Profundidad 149,6mm 149,6mm 149,6mm 142mm
TAMAÑO DE PANTALLA
iLX-705D iLX-F905D iLX-F115D i905
Anchura 171mm 232,5mm 268,9mm 214,7mm
Altura 96mm 151,1mm 178mm 136,6mm
Profundidad 17,7mm 54,7mm 54,7mm 29,9mm
21-ES

• Debido a la mejora continua del producto, las
especificaciones y el diseño están sujetos a cambios sin
previo aviso.
• El panel LCD se fabrica utilizando una tecnología de
fabricación de una precisión extremadamente alta. Su
ratio de píxel efectivo es superior al 99,99%. Ello significa
que existe una posibilidad de que el 0,01% de los píxeles
estén siempre ENCENDIDOS o APAGADOS.
• Windows Media y el logotipo de Windows son marcas
comerciales o marcas registradas de Microsoft
Corporation en Estados Unidos y/o en otros países.
• Apple, iPhone, iPod, Lightning y Siri son marcas de
Apple Inc., registradas en Estados Unidos y otros países.
Apple CarPlay es una marca registrada de Apple Inc.
• “Made for Apple” y “Works with Apple” significa que un
accesorio ha sido diseñado específicamente para
conectarse a los productos Apple identificados como
“Made for Apple” y operar específicamente con la
tecnología identificada como “Works with Apple”, y su
fabricante ha certificado que cumple con el estándar
de rendimiento de Apple. Apple no es responsable del
funcionamiento de este dispositivo ni de su
cumplimiento con las normas y regulaciones de
seguridad.
Tenga en cuenta que el uso de este accesorio con un
producto Apple puede afectar al rendimiento
inalámbrico.
• El uso del logotipo de Apple CarPlay significa que la
interfaz de usuario del vehículo cumple las normas de
funcionamiento de Apple. Apple no se hace
responsable del funcionamiento de este vehículo o el
cumplimiento con los requisitos normativos y de
seguridad. Tenga en cuenta que el uso de este
producto con un iPhone puede afectar el rendimiento
inalámbrico.
• Google, Android, Google Play y Android Auto son
marcas comerciales de Google LLC.
Para usar Android Auto en la pantalla de su automóvil,
necesitará un teléfono Android con Android 6.0 o
superior, un plan de datos activo y la aplicación
Android Auto.
• Los términos HDMI y HDMI High-Definition Multimedia
Interface, y el Logotipo HDMI son marcas comerciales o
marcas registradas de HDMI Licensing Administrator,
Inc. en los Estados Unidos y en otros países.
• La marca y los logotipos de Bluetooth® son marcas
comerciales registradas propiedad de Bluetooth SIG,
Inc. y cualquier uso que de ellos hace ALPS ALPINE CO.,
LTD. siempre es bajo licencia.
• El logotipo de Wi-Fi CERTIFIED™ es una marca comercial
registrada de Wi-Fi Alliance®.
• LDAC y el logotipo de LDAC son marcas comerciales de
Sony Corporation.
• El producto con este logotipo es conforme con la
norma High-Resolution Audio definida por Japan
Audio Society. Este logotipo se utiliza con licencia de
Japan Audio Society.
Conçu pour iPhone SE (2e génération), iPhone 11 Pro Max,
iPhone 11 Pro, iPhone 11, iPhone XS Max, iPhone XS,
iPhone XR, iPhone X, iPhone 8 Plus, iPhone 8, iPhone 7
Plus, iPhone 7, iPhone SE , iPhone 6s Plus, iPhone 6s.
22-ES

Sommario
AVVERTENZA..........................................................................................................................................................2
ATTENZIONE ..........................................................................................................................................................3
Informazioni preliminare...................................................................................................................................4
Funzionamento di Apple CarPlay (opzionale)........................................................................................... 8
Android Auto™ (opzionale)...............................................................................................................................8
Funzionamento della Radio/RDS ...................................................................................................................9
Funzionamento di DAB/DAB+/DMB............................................................................................................. 9
Utilizzo di un’unità Flash USB (opzionale).................................................................................................10
Modalità iPod su iPhone (opzionale)..........................................................................................................11
Controllo del telefono in vivavoce...............................................................................................................12
Installazione.........................................................................................................................................................13
Connessioni..........................................................................................................................................................18
Specifiche..............................................................................................................................................................21
IMPORTANTE
Riportare il numero di serie dell’unità nello spazio sottostante e conservarlo come riferimento per il futuro.
NUMERO DI SERIE:
NUMERO DI SERIE ISO: AL
DATA DI INSTALLAZIONE:
TECNICO DI INSTALLAZIONE:
LUOGO DI ACQUISTO:
Per informazioni dettagliate su tutte le funzioni, consultare le Istruzioni per l’uso pubblicate sul
nostro sito web all’indirizzo
https://www.alpine-europe.com/alpine-europe.html Se necessario, un rivenditore ALPINE fornirà
prontamente una stampa delle Istruzioni per l’uso pubblicate sul sito web.
1-IT

AVVERTENZA
AVVERTENZA
Questo simbolo indica istruzioni importanti. Se
vengono ignorate, possono verificarsi lesioni
gravi o mortali.
INSTALLARE IL PRODOTTO CORRETTAMENTE IN MODO CHE
IL CONDUCENTE NON POSSA GUARDARE LA TV SE NON
DOPO AVERE ARRESTATO IL VEICOLO E TIRATO IL FRENO A
MANO.
Durante la guida, osservare la TV è pericoloso; il conducente potrebbe
distrarsi e causare incidenti. Se il prodotto non viene installato
correttamente, il conducente sarà in grado di guardare la TV durante la
guida aumentando così il rischio di danni alla propria persona o a terzi.
DURANTE LA GUIDA EVITARE DI GUARDARE A LUNGO IL
VIDEO.
Ciò potrebbe distogliere l’attenzione del conducente dalla guida e
causare incidenti.
NON EFFETTUARE ALCUNA OPERAZIONE CHE POSSA
DISTOGLIERE L’ATTENZIONE DALLA GUIDA DEL VEICOLO.
Qualsiasi operazione che necessita di attenzione prolungata deve essere
effettuata solo dopo il completo arresto del veicolo. Arrestare sempre il
veicolo in un luogo sicuro prima di effettuare queste operazioni. In caso
contrario si potrebbero causare incidenti.
TENERE IL VOLUME AD UN LIVELLO CHE PERMETTA DI UDIRE
I RUMORI ESTERNI DURANTE LA GUIDA.
Livelli eccessivi di volume, in grado di coprire suoni quali le sirene dei
mezzi di soccorso o segnali stradali di attenzione (ad esempio, passaggi a
livello, ecc.), possono essere pericolosi e provocare incidenti. INOLTRE,
L’ASCOLTO DI AUDIO AD ALTO VOLUME IN AUTO PUÒ
PROVOCARE DANNI ALL’UDITO.
DURANTE LA GUIDA EVITARE DI GUARDARE A LUNGO IL
MONITOR.
Ciò potrebbe distogliere l’attenzione del conducente dalla guida e
causare incidenti.
NON SMONTARE O MODIFICARE.
Tale azione potrebbe causare incidenti, incendi o scosse elettriche.
UTILIZZARE SOLO IN VEICOLI CON TERRA NEGATIVA A
12VOLT.
(se non si è sicuri, controllare con il proprio rivenditore.) Diversamente
si potrebbero causare incendi o altri danni.
TENERE LE PARTI PICCOLE QUALI LE BATTERIE FUORI DALLA
PORTATA DEI BAMBINI.
Se ingeriti potrebbero causare gravi danni. In caso di ingerimento,
consultare immediatamente un medico.
USARE FUSIBILI DI RICAMBIO DELL’AMPERAGGIO
CORRETTO.
Altrimenti potrebbero derivarne incendi o scosse elettriche.
NON BLOCCARE LE FESSURE O I PANNELLI DI IRRADIAZIONE.
Bloccandoli si potrebbe causare un surriscaldamento interno
dell’apparecchio che potrebbe dare luogo a incendi.
UTILIZZARE IL PRODOTTO IN VEICOLI CON BATTERIA DA
12V.
Un utilizzo diverso da quello indicato potrebbe causare incendi, scosse
elettriche o altri incidenti.
ESEGUIRE CORRETTAMENTE I COLLEGAMENTI.
Altrimenti ne potrebbero derivarne incendi o danni al prodotto.
PRIMA DI ESEGUIRE I COLLEGAMENTI, SCOLLEGARE IL CAVO
DEL TERMINALE NEGATIVO DELLA BATTERIA.
Altrimenti potrebbero derivare scosse elettriche o altre lesioni dovute a
cortocircuiti.
EVITARE CHE I CAVI SI IMPIGLINO AGLI OGGETTI
CIRCOSTANTI.
Effettuare i collegamenti seguendo le istruzioni in modo che i cavi non
interferiscano con la guida. I cavi o i fili che interferiscono o si
impigliano in parti quali lo sterzo, la leva del cambio, i pedali, ecc.
potrebbero essere pericolosi.
NON UTILIZZARE I CAVI PER EFFETTUARE ALTRI
COLLEGAMENTI.
Non eliminare mai le parti isolanti dei cavi per alimentare altri
apparecchi. Diversamente la capacità di trasporto di corrente del cavo in
questione viene superata causando incendi o scosse elettriche.
NELL’EFFETTUARE I FORI, NON DANNEGGIARE I TUBI O I
CAVI.
Nell’effettuare i fori nel telaio per l’installazione, fare attenzione a non
entrare in contatto, danneggiare o ostruire i tubi, i condotti della
benzina, i serbatoi o i cavi elettrici. La non osservanza di queste
precauzioni potrebbe causare incendi.
PER ESEGUIRE I COLLEGAMENTI DI TERRA, NON UTILIZZARE
BULLONI O DADI DEI SISTEMI DI FRENATA O DI STERZO.
Non utilizzare MAI bulloni o dadi dei sistemi di frenata e di sterzo (o di
qualsiasi altro sistema di sicurezza), o dei serbatoi per eseguire
l’installazione o per i collegamenti di terra. L’utilizzo di queste parti
potrebbe inibire il controllo del veicolo e causare incendi o altro.
NON INSTALLARE IN LUOGHI CHE POTREBBERO INTERFERIRE
CON LE OPERAZIONI DI GUIDA QUALI LO STERZO O LA LEVA
DEL CAMBIO.
Diversamente si potrebbe ostruire la visuale della strada o interferire con
i movimenti del conducente e causare gravi incidenti.
2-IT

ATTENZIONE
Questo simbolo indica istruzioni importanti. La
mancata osservanza di tali istruzioni può causare
lesioni alle persone o danni agli oggetti.
INTERROMPERE IMMEDIATAMENTE L’USO IN CASO DI
PROBLEMI.
Diversamente si potrebbero causare danni alla persona o al prodotto. Per
riparazioni, rivolgersi ad un rivenditore autorizzato Alpine o al più
vicino centro di assistenza Alpine.
I COLLEGAMENTI E L’INSTALLAZIONE DEVONO ESSERE
EFFETTUATI DA PERSONALE QUALIFICATO.
I collegamenti e l’installazione dell’apparecchio richiedono conoscenze
tecniche ed esperienza particolari. Per ragioni di sicurezza, contattare
sempre il rivenditore presso il quale è stato acquistato il prodotto per
eseguire l’installazione.
UTILIZZARE LE PARTI ACCESSORIE SPECIFICATE E
INSTALLARLE IN MODO CORRETTO.
Assicurarsi di utilizzare solo parti accessorie specificate. L’utilizzo di altri
componenti potrebbe danneggiare l’apparecchio all’interno o
determinare in un’installazione non corretta. I componenti potrebbero
non rimanere collegati in modo saldo e provocare problemi di
funzionamento o pericoli.
SISTEMARE I CAVI IN MODO CHE NON VENGANO PIEGATI O
COMPRESSI DA PARTI METALLICHE TAGLIENTI.
Per evitare che vengano danneggiati o piegati, sistemare i cavi e i fili
lontano da parti mobili (quali le guide dei sedili) o da parti taglienti o
aguzze. Questo eviterà l’arricciatura e il danneggiamento dei cavi. Se i
cavi vengono fatti passare attraverso un foro metallico, utilizzare un
anello di gomma per evitare che l’isolante dei cavi venga tagliato dal
bordo metallico del foro.
NON INSTALLARE IN LUOGHI ECCESSIVAMENTE UMIDI O
POLVEROSI.
Evitare di installare l’apparecchio in luoghi eccessivamente umidi o
polverosi. La presenza di umidità o polvere all’interno del prodotto
potrebbe causare problemi di funzionamento.
3-IT

Istruzioni per l’uso Posizione dei comandi, accensione o spegnimento
Informazioni preliminare
Posizione dei comandi
La configurazione dello schermo utilizzata nella Guida rapida potrebbe essere diversa da quella dello schermo
effettivo.
iLX-705D
iLX-F905D/iLX-F115D
4-IT

Sensore dimmer
Percepisce la luminosità dell’abitacolo.
Tasto
Attiva la funzione Siri o la modalità di riconoscimento
vocale mentre è connesso Apple CarPlay o Android
Auto.
Tasto / (DOWN/UP)
Regola il volume.
Tasto (MUTE)
Attiva/disattiva la modalità MUTE.
Tenere premuto questo tasto per almeno 2 secondi per
spegnere lo schermo/illuminazione tasto.
Tasto (Audio)
Visualizza la schermata di riproduzione audio.
Le sorgenti audio possono essere cambiate mentre è
visualizzata la schermata di riproduzione audio.
Indicatore di alimentazione
Tasto (HOME)
Attiva la schermata HOME.
La schermata di configurazione audio si visualizza
mentre è visualizzata la schermata HOME.
Tenere premuto questo tasto per almeno 2 secondi per
spegnere l’unità.
Accensione e spegnimento (On/Off )
Tasto (CAM)
Visualizza l’immagine di Camera2 (anteriore/laterale/
altro) o Camera1 (posteriore).
Premere per almeno 1 secondo per tornare alla
schermata precedente.
Tasto /
Premerlo per cercare in avanti/indietro una stazione
nella modalità Radio o un brano, ecc. in altre sorgenti
audio/video.
Tasto (MAP)
Visualizza la schermata della mappa per Apple
CarPlay/Android Auto quando è connesso Apple
CarPlay o Android Auto.
Sensore remoto
Puntare il trasmettitore del telecomando verso il
sensore remoto entro un raggio di 2 metri.
1 Portare la chiavetta di avviamento in posizione ACC o ON.
Il sistema si attiva.
• Quando si utilizza il sistema per la prima volta, viene visualizzata la schermata HOME.
ATTENZIONE (per iLX-F905D/iLX-F115D)
Per regolare l’angolazione del display, prendere il
centro della parte superiore e inferiore del display
per spostarlo.
Per proteggere il display, non prendere le
estremità sinistra e destra per spostarlo.
5-IT

Informazioni sulla schermata HOME
Selezionare la sorgente audio nella schermata HOME per eseguire varie impostazioni e operazioni della funzione.
1 Premere il tasto (HOME).
Viene visualizzata la schermata HOME.
Esempio di schermata in modalità normale
Esempio di schermata in modalità Testo evidenziato
6-IT
Toccare per visualizzare la schermata di
configurazione audio.
Toccare per cambiare pagina.
Le pagine possono essere modificate anche scorrendo
la schermata HOME orizzontalmente con il dito.
Pulsante Impostazioni
Visualizza la schermata Impostazioni.
Area di selezione della sorgente audio
Toccare l’icona della sorgente desiderata per cambiare
la sorgente audio.
Tasto Android Auto
Visualizza la schermata di Android Auto, una spia
luminosa visualizzata quando è connesso uno
smartphone Android con app Android Auto installata.
Tasto Apple CarPlay
Visualizza la schermata di Apple CarPlay, una spia
luminosa visualizzata quando Apple CarPlay è attivato
e un iPhone 6s o successivo è collegato.
Navigazione nella schermata HOME
Tasto Telefono
Visualizza la schermata del menu Telefono.
La schermata Lista dispositivi viene visualizzata quando
non è collegato un telefono vivavoce, un dispositivo
Apple CarPlay o Android Auto.
Finestra di anteprima per la sorgente corrente
Vengono visualizzati il nome della sorgente, la grafica e
le informazioni sul titolo. Toccare la grafica per
visualizzare la schermata della sorgente. Toccare [
per riprodurre/mettere in pausa un brano o un video.
]

Impostazione del tipo di schermata iniziale
La schermata iniziale può essere modificata nella modalità Testo evidenziato.
1 Premere il tasto (HOME).
Viene visualizzata la schermata HOME.
2 Toccare [Impostazioni].
Viene visualizzata la schermata Impostazioni.
3 Toccare [Sistema].
4 Toccare [Tipo di Schermata Iniziale].
5 Toccare [Normal] o [Testo evidenziato].
7-IT

Istruzioni per l’uso Apple CarPlay (opzionale)
Funzionamento di Apple CarPlay (opzionale)
Apple CarPlay è un modo intelligente e sicuro per utilizzare il proprio iPhone in un veicolo. Apple CarPlay prende
le cose che un utente desidera fare col proprio iPhone mentre si trova alla guida e le colloca sull’unità. È possibile
ottenere indicazioni stradali, effettuare chiamate, inviare e ricevere messaggi e ascoltare musica, in una modalità
che permette di restare concentrati sulla strada.
1 Premere il tasto (HOME).
Viene visualizzata la schermata HOME.
2 Toccare [Apple CarPlay].
Viene visualizzata la schermata Apple CarPlay.
• Fare riferimento a ’Apple CarPlay’ nelle Istruzioni per l’uso per informazioni su come utilizzare Apple CarPlay.
Istruzioni per l’uso Android Auto™ (opzionale)
Android Auto™ (opzionale)
Android Auto riunisce le tue app preferite per smartphone in un unico posto, rendendo più facile per i conducenti
accedere ad app di navigazione, multimediali e di comunicazione lungo il percorso, riducendo al minimo le
distrazioni. Parla con Google su Android Auto™ ed esegui le operazioni con la tua voce in modo da poter tenere
gli occhi sulla strada e le mani sul volante. Invia facilmente messaggi, ricevi indicazioni stradali, controlla i media e
altro ancora. Basta premere brevemente o premere a lungo il pulsante di comando vocale sul volante.
1 Premere il tasto (HOME).
Viene visualizzata la schermata HOME.
2 Toccare [Android Auto].
Viene visualizzata la schermata Android Auto.
• Fare riferimento a ’Android Auto’ nelle Istruzioni per l’uso per informazioni su come utilizzare Android Auto.
8-IT

Funzionamento della Radio/RDS
Visualizza la schermata
Telefono
La schermata Lista dispositivi viene
visualizzata quando non è collegato
un telefono, un dispositivo CarPlay
o Android Auto.
Pulsante di preselezione
Toccare brevemente per
visualizzare le stazioni
preselezionate.
Toccare per almeno 2 secondi per
memorizzare la stazione corrente
tra le stazioni preselezionate.
Istruzioni per l’uso Radio/RDS
Indicatore TP/EON
Per cambiare banda di
frequenza
Visualizzazione delle
informazioni
Per passare a frequenze più alte
Toccare e tenere premuto per
modificare la frequenza in modo
continuo.
Passa alla modalità Ricerca
Toccare per almeno
1secondo per memorizzare
automaticamente le stazioni
• I modelli di alcuni tasti nella Guida rapida potrebbero differire da quelli dello schermo effettivo.
Istruzioni per l’uso DAB/DAB+/DMB
Funzionamento di DAB/DAB+/DMB
Presentazione
Visualizza la schermata
Telefono
La schermata Lista dispositivi viene
visualizzata quando non è
collegato un telefono, un
dispositivo CarPlay o Android Auto.
Pulsante di preselezione
Toccare brevemente per
visualizzare le stazioni
preselezionate.
Toccare per almeno 2 secondi per
memorizzare la stazione corrente
tra le stazioni preselezionate.
Visualizza la schermata
impostazione Radio
Per passare a frequenze più basse
Toccare e tenere premuto per
modificare la frequenza in modo
continuo.
Per attivare/disattivare la
modalità Informazioni sul
traffico
Indicatore di forza del segnale
Indicatore TP
Per cambiare banda di
frequenza
Visualizzazione delle
informazioni
Per passare a frequenze più alte
Passa alla modalità Ricerca
Visualizza la schermata di ricerca
• I modelli di alcuni tasti nella Guida rapida potrebbero differire da quelli dello schermo effettivo.
Visualizza la schermata
impostazione Radio
Per passare a frequenze più basse
Per attivare/disattivare la
modalità Informazioni sul
traffico
9-IT

Istruzioni per l’uso Utilizzo di un’unità Flash USB (opzionale)
Utilizzo di un’unità Flash USB (opzionale)
Il lettore interno del sistema consente di riprodurre file musicali (MP3/WMA/AAC/FLAC/WAV/APE) e file video
(MP4/MOV/FLV/MKV) memorizzati in una chiavetta USB.
Esempio di schermata principale USB Audio
Visualizza la schermata Telefono
La schermata Lista dispositivi viene
visualizzata quando non è collegato un
telefono, un dispositivo CarPlay o
Android Auto.
Per passare all’inizio del file
corrente/Per passare al file
precedente entro 3 secondi
dall’inizio della riproduzione/Per
tornare indietro in modo rapido
se viene toccato per almeno
1secondo
Visualizzazione
della grafica
Pausa e Riproduzione
Riproduzione ripetuta
Riproduzione casuale
Barra temporale (tempo trascorso/tempo
totale per la riproduzione)
• I modelli di alcuni tasti nella Guida rapida potrebbero differire da quelli dello schermo effettivo.
Ricerca di un file musicale
3 Toccare il nome dell’artista di interesse.
Per esempio: ricerca per Nome artista
1 Durante la riproduzione, toccare
[ (Cerca)].
Visualizzazione delle
informazioni
Passa alla modalità USB Video
Per passare all’inizio del capitolo
successivo/Per avanzare in
modo rapido se viene toccato
per almeno 1secondo
Visualizzazione delle
informazioni sul brano successivo
Visualizzazione dell’icona di
alta risoluzione
Visualizza la schermata del menu
di configurazione USB Setup
Numero della traccia corrente/
Numero totale del brano
Visualizza la schermata di
ricerca
2 Toccare [Artista].
10-IT
4 Toccare il nome dell’album di interesse.
5 Toccare il nome della canzone di interesse.
Viene riprodotta la canzone selezionata.
 Loading...