

Page 1
FOR CAR USE ONLY/NUR FÜR AUTOMOBIL GEBRAUCH/POUR APPLICATION AUTOMOBILE UNIQUEMENT/PARA USO EN
R
AUTOMÓVILES/SOLO PER L’UTILIZZO IN AUTOMOBILE/ENDAST FÖR BILBRUK/ALLEEN VOOR GEBRUIK IN DE AUTO/
/
ДЛЯ ИСПОЛЬЗОВАНИЯ В АВТОМОБИЛЯХ
DO UŻYCIA TYLKO W SAMOCHODZIE/ΓΙΑ ΧΡΗΣΗ ΜΟΝΟ ΣΕ ΑΥΤΟΚΙΝΗΤΟ
ТОЛЬКО
EN
Digital Media Receiver
iDA-X311/iDA-X311RR
• OWNER’S MANUAL
Please read before using this equipment.
• BEDIENUNGSANLEITUNG
Lesen Sie diese Bedienungsanleitung
bitte vor Gebrauch des Gerätes.
• MODE D’EMPLOI
Veuillez lire avant d’utiliser cet appareil.
• MANUAL DE OPERACIÓN
Léalo antes de utilizar este equipo.
• ISTRUZIONI PER L’USO
Si prega di leggere prima di utilizzare il
attrezzatura.
iDA-X313
(iDA-X313 only)
• ANVÄNDARHANDLEDNING
Innan du använder utrustningen bör du läsa
igenom denna användarhandledning.
• GEBRUIKERSHANDLEIDING
Lees deze aanwijzingen aandachtig alvorens
dit toestel te gebruiken.
• РУКОВОДСТВО ПО ЭКСПЛУАТАЦИИ
Прочтите настоящее руководство перед
началом использования оборудования.
• INSTRUKCJA OBSŁUGI
Prosimy zapoznać się z tą instrukcją przed
przystąpieniem do użytkowania urządzenia.
• ΕΓΧΕΙΡΙΔΙΟ ΧΡΗΣΤΗ
Παρακαλούμε διαβάστε το πριν
χρησιμοποιήσετε τη συσκευή.
EN
DE
FR
ES
IT
SE
NL
RU
ALPINE ELECTRONICS MARKETING, INC.
1-1-8 Nishi Gotanda,
Shinagawa-ku,
Tokyo 141-0031, Japan
Phone 03-5496-8231
ALPINE ELECTRONICS OF AMERICA, INC.
19145 Gramercy Place, Torrance,
California 90501, U.S.A.
Phone 1-800-ALPINE-1 (1-800-257-4631)
ALPINE ELECTRONICS OF CANADA, INC.
777 Supertest Road, Toronto,
Ontario M3J 2M9, Canada
Phone 1-800-ALPINE-1 (1-800-257-4631)
ALPINE ELECTRONICS OF AUSTRALIA PTY. LTD.
161-165 Princes Highway, Hallam
Victoria 3803, Australia
Phone 03-8787-1200
ALPINE ELECTRONICS GmbH
Wilhelm-Wagenfeld-Str. 1-3, 80807 München,
ALPINE ELECTRONICS OF U.K. LTD.
Fletchamstead Highway, Coventry CV4 9TW, U.K.
ALPINE ELECTRONICS FRANCE S.A.R.L.
(RCS PONTOISE B 338 101 280)
98, Rue de la Belle Etoile, Z.I. Paris Nord Il,
B.P. 50016, 95945 Roissy Charles de Gaulle
Germany
Phone 089-32 42 640
Alpine House
Phone 0870-33 33 763
Cedex, France
Phone 01-48638989
ALPINE ITALIA S.p.A.
Viale C. Colombo 8, 20090 Trezzano
Sul Naviglio (MI), Italy
Phone 02-484781
ALPINE ELECTRONICS DE ESPAÑA, S.A.
Portal de Gamarra 36, Pabellón, 32
01013 Vitoria (Alava)-APDO 133, Spain
Phone 945-283588
ALPINE ELECTRONICS (BENELUX) GmbH
Leuvensesteenweg 510-B6,
1930 Zaventem, Belgium
Phone 02-725-13 15
Designed by ALPINE Japan
68-16909Z01-A
PL
GR
Page 2

Page 3

ENGLISH
Contents
Operating Instructions
WARNING
WARNING ................................................. 3
CAUTION .................................................. 3
PRECAUTIONS ........................................ 3
Double Action Encoder Operation
(iDA-X313 only)
Getting Started
Accessory List .................................................. 6
Turning Power On and Off ............................... 6
Detaching and Attaching the Front Panel ........ 6
Initial System Start-Up ..................................... 6
Adjusting Volume ............................................. 6
Radio
Listening to Radio ............................................ 7
Presetting Stations Manually ............................ 7
Presetting Stations Automatically .................... 7
Tuning to Preset Stations .................................. 7
Frequency Search Function .............................. 7
RDS
Setting RDS Reception Mode and Receiving
RDS Stations ................................................. 8
Receiving RDS Regional (Local) Stations ....... 8
PI SEEK Setting ............................................... 8
Setting PTY31 (Emergency Broadcast)
reception ........................................................ 9
Receiving Traffic Information .......................... 9
PTY (Programme Type) Tuning ....................... 9
Receiving Traffic Information While Playing
iPod or Radio ................................................ 9
Priority News .................................................. 10
Displaying Radio Text .................................... 10
iPhone (iDA-X313 only)/iPod (Optional)
Playback ..........................................................11
Searching for a desired Song/Title ..................11
Percent Skip Function .....................................12
Alphabet Skip Function (iDA-X313 only) ..... 12
Up/Down Function ......................................... 12
Search Position Memory .................................13
Random Play Shuffle (M.I.X.) ........................13
Random Play Shuffle All ................................13
Repeat Play .....................................................13
Changing the Display .....................................13
USB memory/Portable audio player
(iDA-X313 only)/Changer (Optional)
BANK Function (USB memory) ....................14
Playback ..........................................................14
Selecting a Disc (Changer) (Optional) ........... 15
Multi-Changer Selection (Optional) ...............15
Repeat Play .....................................................15
M.I.X. (Random Play) ....................................16
Searching for CD Track Number
(CD changer only) .......................................16
Searching for a desired Song
(USB memory/Portable audio player
(iDA-X313 only)) ........................................16
File/Folder Name Search (MP3 Changer) ...... 17
Switching between Quick Search mode and
Folder up/down mode (MP3 changer)
(iDA-X311/iDA-X311RR only) .................. 17
Quick Search (changer) ..................................17
Select the desired Folder (Folder up/down)
(MP3/WMA/AAC) ......................................18
Changing the Display .....................................18
About MP3/WMA/AAC .................................18
Sound Setting
Adjusting Subwoofer Level/Bass Level/
Treble Level/Balance (Between Left and
Right)/Fader (Between Front and Rear)/
Loudness/Defeat ..........................................20
Setting the Subwoofer/Subwoofer System/
Bass/Treble/High Pass Filter .......................20
Operating the External Audio Processor ........21
1-EN
Page 4

SETUP
BLUETOOTH Setting
Setting the BLUETOOTH Connection ............23
Audio Setting (Only when external audio
processor is connected)
Operating the External Audio Processor
(USER PRESET) .........................................23
Turning Media Xpander ON/OFF ....................23
Setting the MX Level .......................................23
Subwoofer On and Off ..................................... 23
General Setting
Connecting an MP3 Changer
(PLAY MODE) ............................................23
Sound (Beep) Guide Function
(iDA-X313 only) ..........................................23
Turning Mute Mode On/Off (INT MUTE) ......23
Setting the AUX+ Mode ..................................23
Setting the AUX+ NAME Mode .....................23
Setting the AUX Mode (V-Link) .....................23
Setting the External Digital Input
(DIGITAL AUX) ..........................................24
Setting the AUX+ Level (AUX IN GAIN) ...... 24
Connecting to an External Amplifier
(POWER IC) ................................................ 24
Demonstration .................................................. 24
Display Setting
Dimmer Control ...............................................24
Scroll Type Setting ...........................................24
Scroll Setting (TEXT SCROLL) ......................24
Setting the Language (LANGUAGE) ..............25
iPod Setting
iPod Search Mode Setting ................................25
Sound Field Adjustment ..............................27
Adjusting the Parametric Equalizer Curve .......27
Adjusting the Graphic Equalizer Curve ...........27
Adjusting the Time Correction .........................27
Adjusting the Crossover Settings
(X-OVER) ....................................................28
Turning Subwoofer ON/OFF .......................29
Setting the Subwoofer System .....................29
Setting the Subwoofer Phase .......................29
Setting the Subwoofer Channel
(SUBW CHANNEL) ................................29
Setting the Response Slope for the
High Range Speaker (TW Setup) .............29
Setting EQ mode ..........................................29
Setting the Filter type ...................................29
Setting the Time Correction Unit (TCR) .....29
Setting the MX Level ...................................30
About Time Correction ...................................30
About the Crossover ........................................31
Information
In Case of Difficulty ........................................32
Specifications ..................................................35
Installation and Connections
Warning ...................................................36
Caution ...................................................36
Precautions ............................................36
Installation .......................................................37
Connections .....................................................39
TUNER Setting
Adjusting Source Signal Levels .......................25
IMPRINT Operation (Optional)
(iDA-X313 only)
Changing MultEQ mode .................................25
Adjusting Sound Setting in Manual Mode ..... 26
USER PRESET ...........................................26
Storing the Audio Adjustment Level ...............26
Recalling the Audio Adjustment Level ............26
Turning Media Xpander ON/OFF ............... 26
Equalizer Presets (Factory’s EQ)
(FR-EQ) ...................................................26
2-EN
Page 5
Operating Instructions
WARNING
WARNING
This symbol means important instructions.
Failure to heed them can result in serious injury
or death.
DO NOT OPERATE ANY FUNCTION THAT TAKES YOUR
ATTENTION AWAY FROM SAFELY DRIVING YOUR VEHICLE.
Any function that requires your prolonged attention should only be
performed after coming to a complete stop. Always stop the vehicle
in a safe location before performing these functions. Failure to do
so may result in an accident.
KEEP THE VOLUME AT A LEVEL WHERE YOU CAN STILL
HEAR OUTSIDE NOISES WHILE DRIVING.
Excessive volume levels that obscure sounds such as emergency
vehicle sirens or road warning signals (train crossings, etc.) can be
dangerous and may result in an accident. LISTENING AT LOUD
VOLUME LEVELS IN A CAR MAY ALSO CAUSE HEARING
DAMAGE.
MINIMIZE DISPLAY VIEWING WHILE DRIVING.
Viewing the display may distract the driver from looking ahead of
the vehicle and cause an accident.
DO NOT DISASSEMBLE OR ALTER.
Doing so may result in an accident, fire or electric shock.
USE ONLY IN CARS WITH A 12 VOLT NEGATIVE GROUND.
(Check with your dealer if you are not sure.) Failure to do so may
result in fire, etc.
KEEP SMALL OBJECTS SUCH AS BOLTS OR SCREWS OUT
OF THE REACH OF CHILDREN.
Swallowing them may result in serious injury. If swallowed,
consult a physician immediately.
CAUTION
This symbol means important instructions.
Failure to heed them can result in injury or
material property damage.
HALT USE IMMEDIATELY IF A PROBLEM APPEARS.
Failure to do so may cause personal injury or damage to the
product. Return it to your authorized Alpine dealer or the nearest
Alpine Service Centre for repairing.
DO NOT MIX NEW BATTERIES WITH OLD BATTERIES.
INSERT WITH THE CORRECT BATTERY POLARITY.
When inserting the batteries, be sure to observe proper polarity (+
and –) as instructed. Rupture or chemical leakage from the battery
may cause fire or personal injury.
PRECAUTIONS
Product Cleaning
Use a soft dry cloth for periodic cleaning of the product. For more
severe stains, please dampen the cloth with water only. Anything
else has the chance of dissolving the paint or damaging the plastic.
Temperature
Be sure the temperature inside the vehicle is between +60°C
(+140°F) and –10°C (+14°F) before turning your unit on.
Maintenance
If you have problems, do not attempt to repair the unit yourself.
Return it to your Alpine dealer or the nearest Alpine Service
Station for servicing.
Installation Location
Make sure this unit will not be installed in a location subjected to:
• Direct sun and heat
• High humidity and water
• Excessive dust
• Excessive vibrations
USE THE CORRECT AMPERE RATING WHEN REPLACING
FUSES.
Failure to do so may result in fire or electric shock.
DO NOT BLOCK VENTS OR RADIATOR PANELS.
Doing so may cause heat to build up inside and may result in fire.
USE THIS PRODUCT FOR MOBILE 12V APPLICATIONS.
Use for other than its designed application may result in fire,
electric shock or other injury.
Protecting the USB connector
• Only a USB memory, iPhone (iDA-X313 only), iPod or Portable
audio player (iDA-X313 only) can be connected to the USB
connector on this unit. Correct performance using other USB
products cannot be guaranteed. A USB hub is not supported.
• If the USB connector is used, be sure to connect it to the unit by
using a USB extension cable (supplied).
• Depending on the connected USB memory device, the unit may
not function or some functions may not be performed.
• The audio file format that can be played back on the unit is MP3/
WMA/AAC.
• Artist/song name, etc., can be displayed, however characters
may not be correctly displayed.
3-EN
Page 6

CAUTION
Alpine accepts no responsibility for lost data, etc., even if data, etc.,
is lost while using this product.
On Handling USB Memory
• To prevent malfunction or damage, note the following points.
Read the USB memory Owner’s Manual thoroughly.
Do not touch the terminals by hand or metal.
Do not subject USB memory to excessive shock.
Do not bend, drop, disassemble, modify or soak in the water.
• Avoid usage or storage in the following locations:
Anywhere in the car exposed to direct sunlight or high
temperatures.
Anywhere the possibility of high humidity or corrosive
substances are present.
• Fix the USB memory in a location where driver operation will
not be hindered.
• USB memory may not function correctly at high or low
temperature.
• Use only certified USB memory. Note that even certified USB
memory, may not function correctly depending on its type or
state.
• USB memory function is not guaranteed. Use USB memory
according to the terms of agreement.
• Depending on the settings of the USB memory type, memory
state or encoding software, the unit may not play back or display
properly.
• Files that are copy-protected (using some type of DRM, Digital
Rights Management) cannot be played back on this unit. WMA
format files with DRM or AAC format files that have been
purchased from the iTunes Store are included in this restriction.
• USB memory may take time to start playback. If there is a
particular file other than audio in the USB memory, it may take
considerable time before the file is played back or searched.
• The unit can play back “mp3”, “wma” or “m4a” file extensions.
• Do not add the above extensions to a file other than audio data.
This non-audio data will not be recognized. The resulting
playback may contain noise that can damage speakers and/or
amplifiers.
• It is recommended to back up important data on a personal
computer.
• Do not remove the USB device while playback is in progress.
Change SOURCE to something other than USB, then remove the
USB device to prevent possible damage to its memory.
On Handling Portable audio player (iDA-X313 only)
• The unit can control a Portable audio player with the USB
interface. Playable audio file formats are MP3 and WMA.
• Portable audio player function is not guaranteed. Use Portable
audio player according to the terms of agreement. Read the
Portable audio player Owner’s Manual thoroughly.
• Avoid usage or storage in the following locations:
Anywhere in the car exposed to direct sunlight or high
temperatures.
Anywhere the possibility of high humidity or corrosive
substances are present.
• Fix the Portable audio player in a location where driver operation
will not be hindered.
• Portable audio player may not function correctly at high or low
temperature.
• Depending on the settings of the Portable audio player type,
memory state or encoding software, the unit may not play back
or display properly.
If the Portable audio player has an MSC/MTP setting, set to MTP.
•
• A Portable audio player in which data is stored by USB Mass
Storage may not be playable on the unit.
• Depending on the Portable audio player settings, USB Mass
Storage may be supported. For setting, refer to the Owner’s
Manual of the player.
•
The unit can play back MP3/WMA files synchronized by Windows
Media Player (Ver. 7.1, 8, 9, 9.1, 9.2), and are then forwarded to the
player. The “mp3” or “wma” extensions are playable.
• If data is not synchronized by Windows Media Player and is
forwarded in another way, the unit may not be able to correctly
play back the files.
• WMDRM10 is supported by the unit.
• A file that is copy-protected (copyright protection) cannot be
played back.
It is recommended to back up important data on a personal computer.
•
• Do not remove the USB device while playback is in progress.
Change SOURCE to something other than USB, then remove the
USB device to prevent possible damage to its memory.
• Windows Media and the Windows logo are trademarks, or
registered trademarks of Microsoft Corporation in the United
States and/or other countries.
• iPod is a trademark of Apple Inc., registered in the U.S. and
other countries.
• iPhone is a trademark of Apple Inc.
• “Made for iPod” means that an electronic accessory has been
designed to connect specifically to iPod and has been certified by
the developer to meet Apple performance standards.
• “Works with iPhone” means that an electronic accessory has
been designed to connect specifically to iPhone and has been
certified by the developer to meet Apple performance standards.
• Apple is not responsible for the operation of this device or its
compliance with safety and regulatory standards.
• The BLUETOOTH
trademarks owned by the Bluetooth SIG, Inc. and any use of
such marks by Alpine Electronics, Inc. is under license.
• “MPEG Layer-3 audio coding technology licensed from
Fraunhofer IIS and Thomson.”
• “Supply of this product only conveys a license for private, noncommercial use and does not convey a license nor imply any
right to use this product in any commercial (i.e. revenuegeneration) real time broadcasting (terrestrial, satellite, cable
and/or any other media), broadcasting/streaming via internet,
intranets and/or other networks or in other electronic content
distribution systems, such as pay-audio or audio-on-demand
applications. An independent license for such use is required.
For details, please visit http://www.mp3licensing.com”
• Audyssey MultEQ XT is a registered trademark of Audyssey
Laboratories Inc.
®
word mark and logos are registered
4-EN
Page 7
Double Action
Encoder Operation
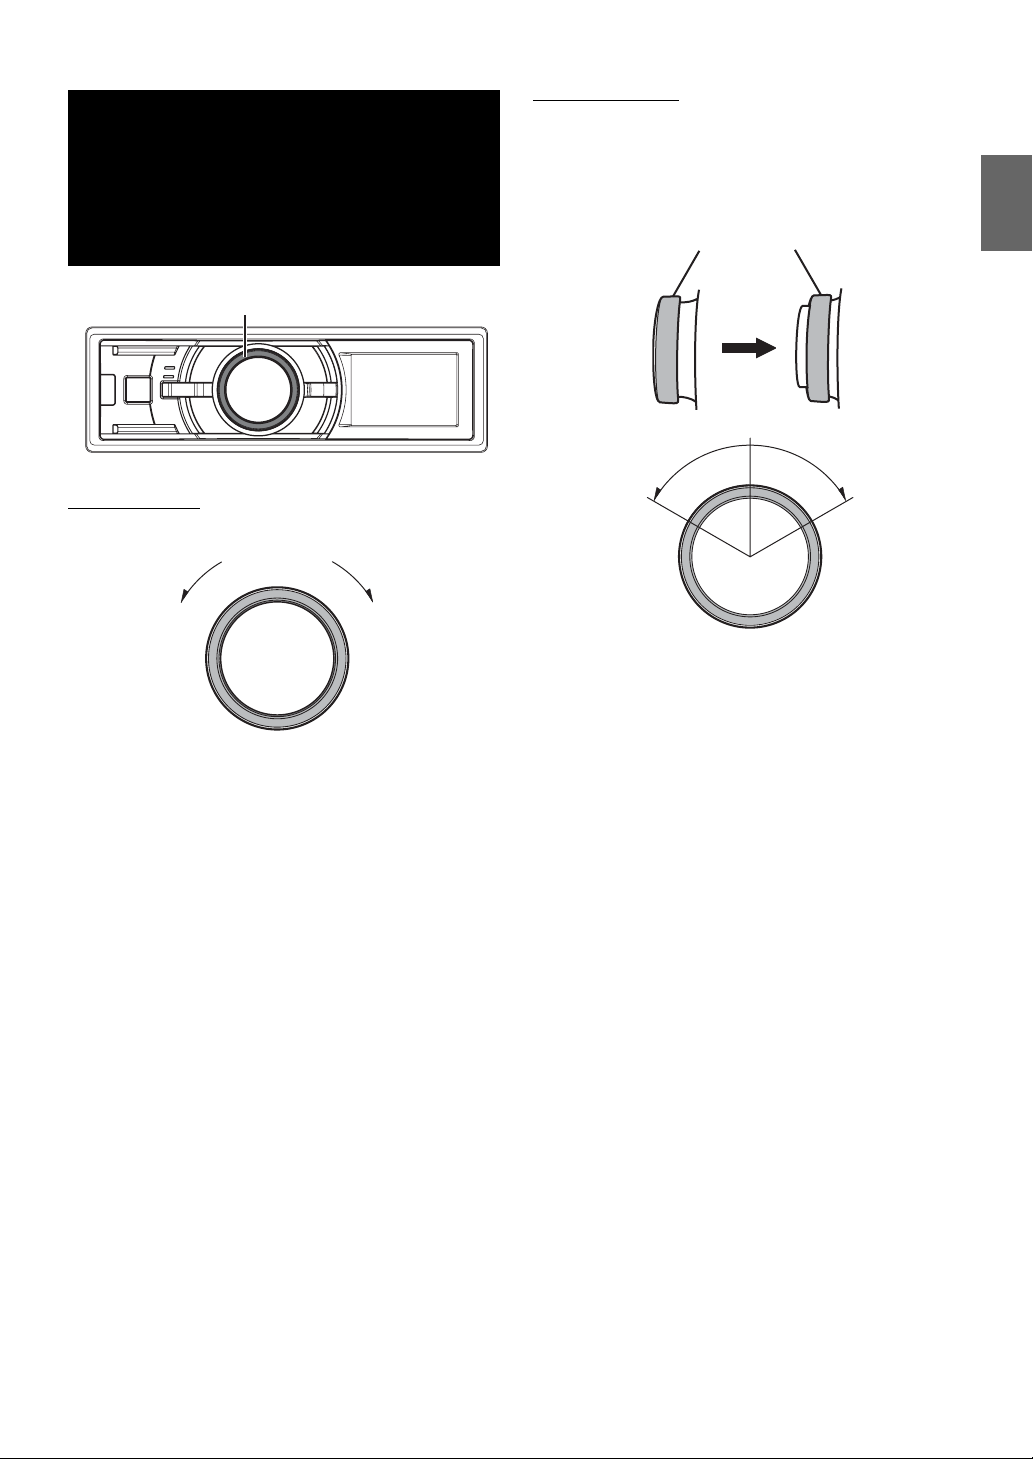
Alternate operation
Press and turn the Double Action encoder to the left
or right.
When you release the Double Action encoder, the display
changes.
(iDA-X313 only)
Double Action encoder
There are 2 ways to operate the Double Action encoder.
Normal operation
Turn t he Double Action encoder to the left or right.
To adjust volume and scroll through a list of items.
Double Action encoder
Push
Depending on the situation, you can change an item or display. If
you press and turn the Double Action encoder to the left or right,
you can change items/displays continuously.
5-EN
Page 8
Getting Started
iDA-X313
(Release)
SOURCE
iDA-X311/iDA-X311RR
(Release)
Double Action encoder
Rotary encoder
• The front panel may become hot in normal usage (especially the
connector terminals on the back of the front panel.) This is not a
malfunction.
• To protect the front panel, place it in the supplied carrying case.
Attaching
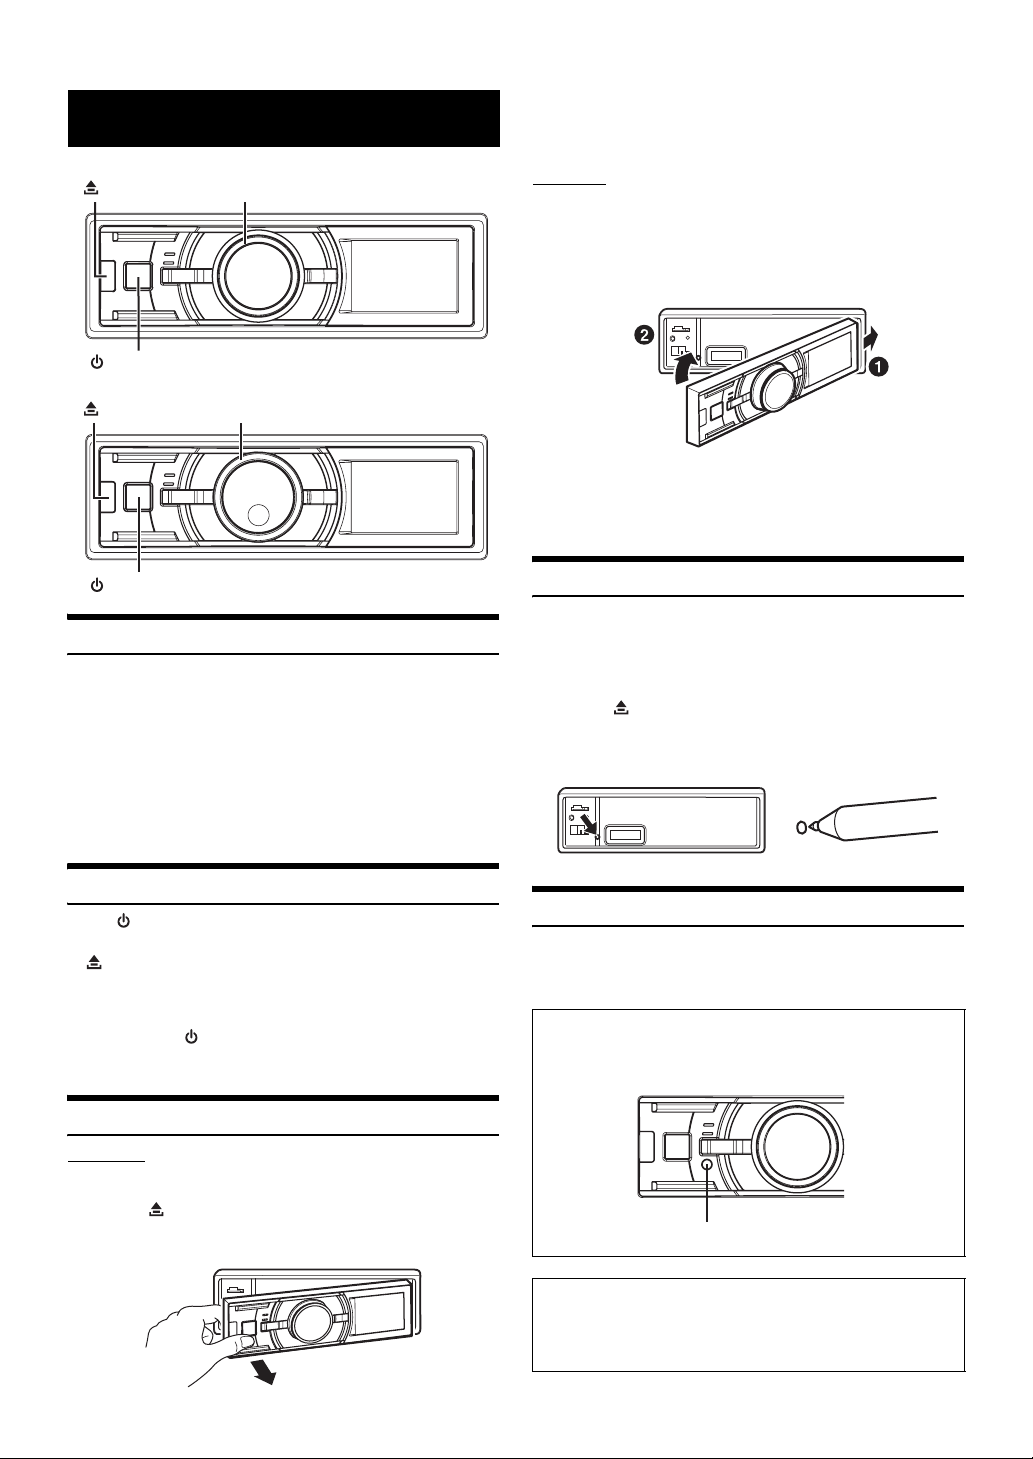
1
Insert the right side of the front panel into the main
unit. Align the groove on the front panel with the
projections on the main unit.
2
Push the left side of the front panel until it locks
firmly into the main unit.
• Before attaching the front panel, make sure that there is no dirt or
dust on the connector terminals and no foreign object between the
front panel and the main unit.
• Attach the front panel carefully. Hold the panel by its sides to avoid
pushing any buttons by mistake.
SOURCE
Accessory List
• Digital Media receiver........................................................1
• Power cable ........................................................................1
• USB Cable ..........................................................................1
• Interface cable for iPod (iDA-X313 only)..........................1
• FULL SPEED Connection Cable
(iDA-X311/iDA-X311RR only) ............................................1
• Mounting sleeve.................................................................1
• Carrying case.....................................................................1
• Rubber Cap ........................................…………………….. 1
• Hex Bolt ........................................ ………………………... 1
• Screw (M5x8)......................................................................4
• Owner’s Manual .......................................................... 1 set
Turning Power On and Off
Press SOURCE to turn on the unit.
• The unit can be turned on by pressing any other button except
(Release) and Double Action encoder (iDA-X313 only). The unit
is also automatically turned on if a USB memory/iPhone*/iPod is
connected to the USB connector.
* iDA-X313 only.
Press and hold SOURCE for at least 2 seconds to turn
off the unit.
• The first time power is turned on, the volume will start from level 12.
Detaching and Attaching the Front Panel
Detaching
1
Turn off the unit power.
2
Press (Release) at the middle left side until the
front panel pops out.
3
Grasp the left side of the front panel and pull it out.
Initial System Start-Up
Be sure to press the RESET switch when using the unit for the first
time, after changing the car battery, etc.
1
Turn off the unit power.
2
Press (Release) to remove the front panel.
3
Press RESET with a ballpoint pen or similar pointed
object.
Adjusting Volume
Turn t he Double Action encoder (iDA-X313 only) or
Rotary encoder (iDA-X311/iDA-X311RR only) until the
desired sound is obtained.
Controllable With Remote Control
Point the optional remote control transmitter at the remote
control sensor.
Remote control sensor
Connectable to Steering Remote Control Interface Box
You can operate this unit from the vehicle’s control unit when
an Alpine Steering Remote Control Interface Box (optional)
is connected. For details, contact your Alpine dealer.
6-EN
Page 9
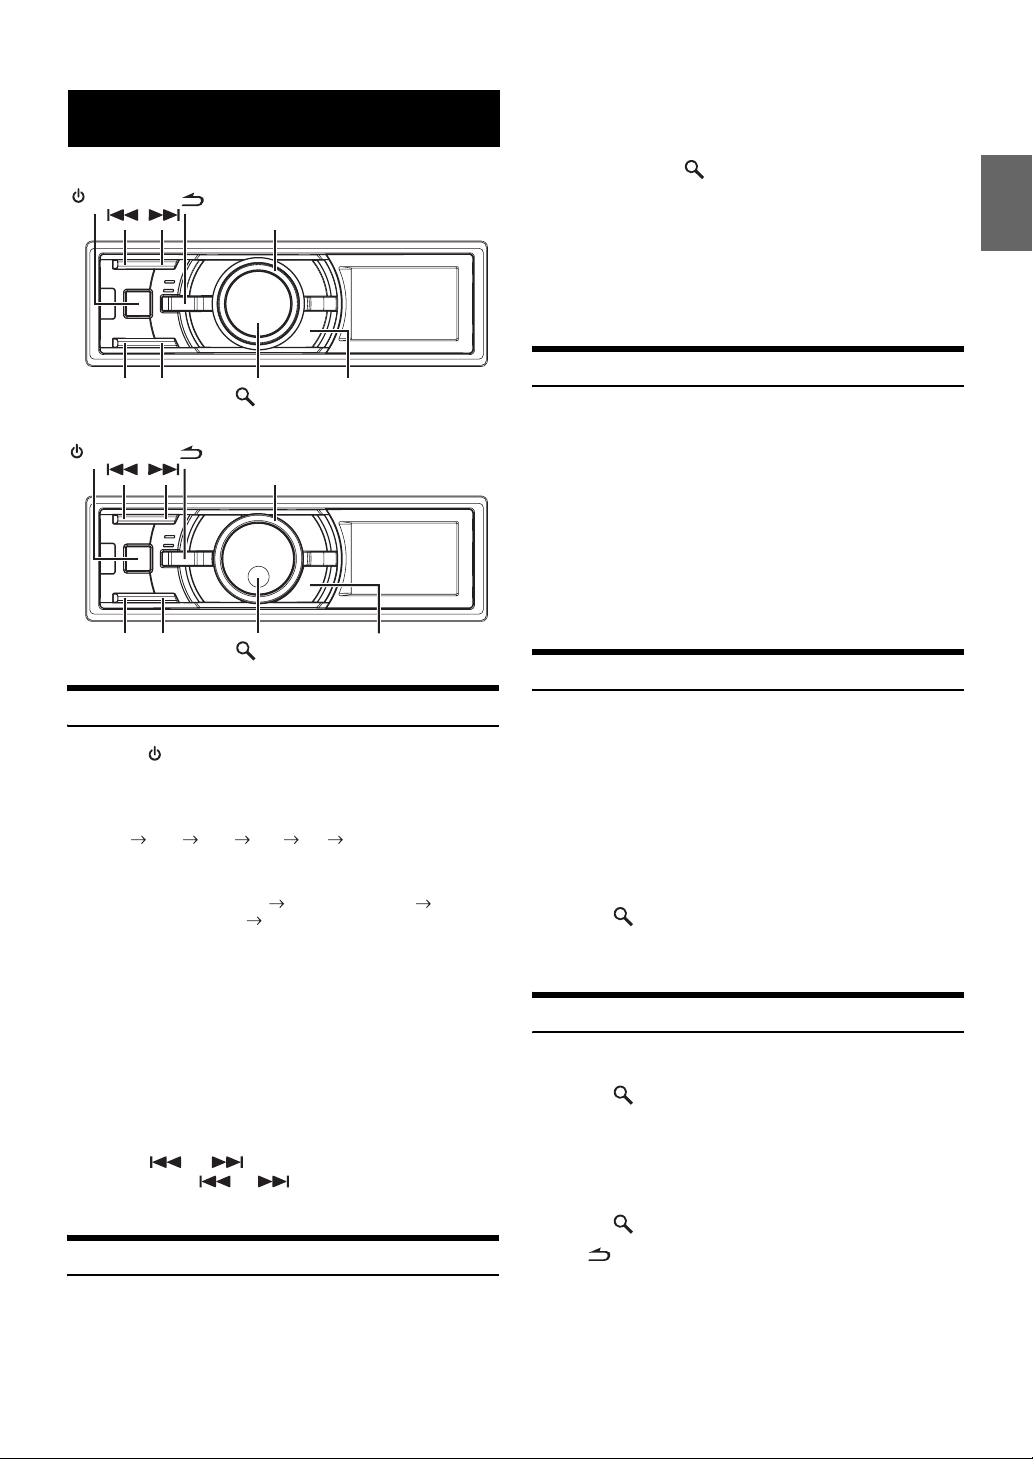
Radio
3
Turn t he Double Action encoder (iDA-X313 only)
or Rotary encoder (iDA-X311/iDA-X311RR only) to
select the preset number.
iDA-X313
SOURCE
BAND/TA
iDA-X311/iDA-X311RR
BAND/TA
TUNE/A.ME
SOURCE
TUNE/A.ME
Double Action encoder
/ENTER
Rotary encoder
/ENTER
PRESET
PRESET
Listening to Radio
1
Press SOURCE to select TUNER mode.
2
Press BAND/TA repeatedly until the desired radio
band is displayed.
FM1 FM2 FM3 MW LW FM1
3
Press TUNE/A.ME to select the tuning mode.
DX SEEK (Distance mode) SEEK (Local mode)
(Blank) (Manual mode) DX SEEK (Distance mode)
• The initial mode is Distance mode.
Distance mode:
Both strong and weak stations will be automatically tuned in
(Automatic Seek Tuning).
Local mode:
Only strong stations will be automatically tuned in (Automatic
Seek Tuning).
Manual mode:
The frequency is manually tuned in steps (Manual tuning).
4
Press or to tune in the desired station.
Holding down or will change the frequency
continuously.
Presetting Stations Manually
1
Select the radio band and tune in a desired radio
station you wish to store in the preset memory.
4
Press and hold /ENTER for at least 2 seconds.
The selected station is stored.
The display shows the band, preset number and station
frequency memorized.
• A total of 30 stations can be stored in the preset memory (6 stations
for each band; FM1, FM2, FM3, MW and LW).
• If you store a station in a preset memory which already has a station,
the current station will be cleared and replaced with the new station.
Presetting Stations Automatically
1
Press BAND/TA repeatedly until the desired radio
band is displayed.
2
Press and hold TUNE/A.ME for at least 2 seconds.
The tuner will automatically seek and store 6 strong stations
in the selected band. They will be stored 1 to 6 in order of
signal strength.
When the automatic memory has been completed, the tuner
goes to the station stored in preset location No.1.
• If no stations are stored, the tuner will return to the original station
you were listening to before the auto memory procedure began.
Tuning to Preset Stations
1
Press BAND/TA repeatedly until the desired band is
displayed.
2
Press PRESET.
The Preset screen is displayed.
3
Turn t he Double Action encoder (iDA-X313 only)
or Rotary encoder (iDA-X311/iDA-X311RR only) to
select a radio station.
4
Press /ENTER.
The display shows the band, preset number and frequency
of the station selected.
Frequency Search Function
You can search for a radio station by its frequency.
1
Press /ENTER in Radio mode to activate
Frequency search mode.
2
Turn t he Double Action encoder (iDA-X313 only)
or Rotary encoder (iDA-X311/iDA-X311RR only) to
select the desired frequency.
3
Press /ENTER to receive the selected frequency.
• Press in the search mode to cancel. Or, the search mode will be
cancelled if no operation is performed for 10 seconds.
2
Press PRESET.
The Preset screen is displayed.
7-EN
Page 10
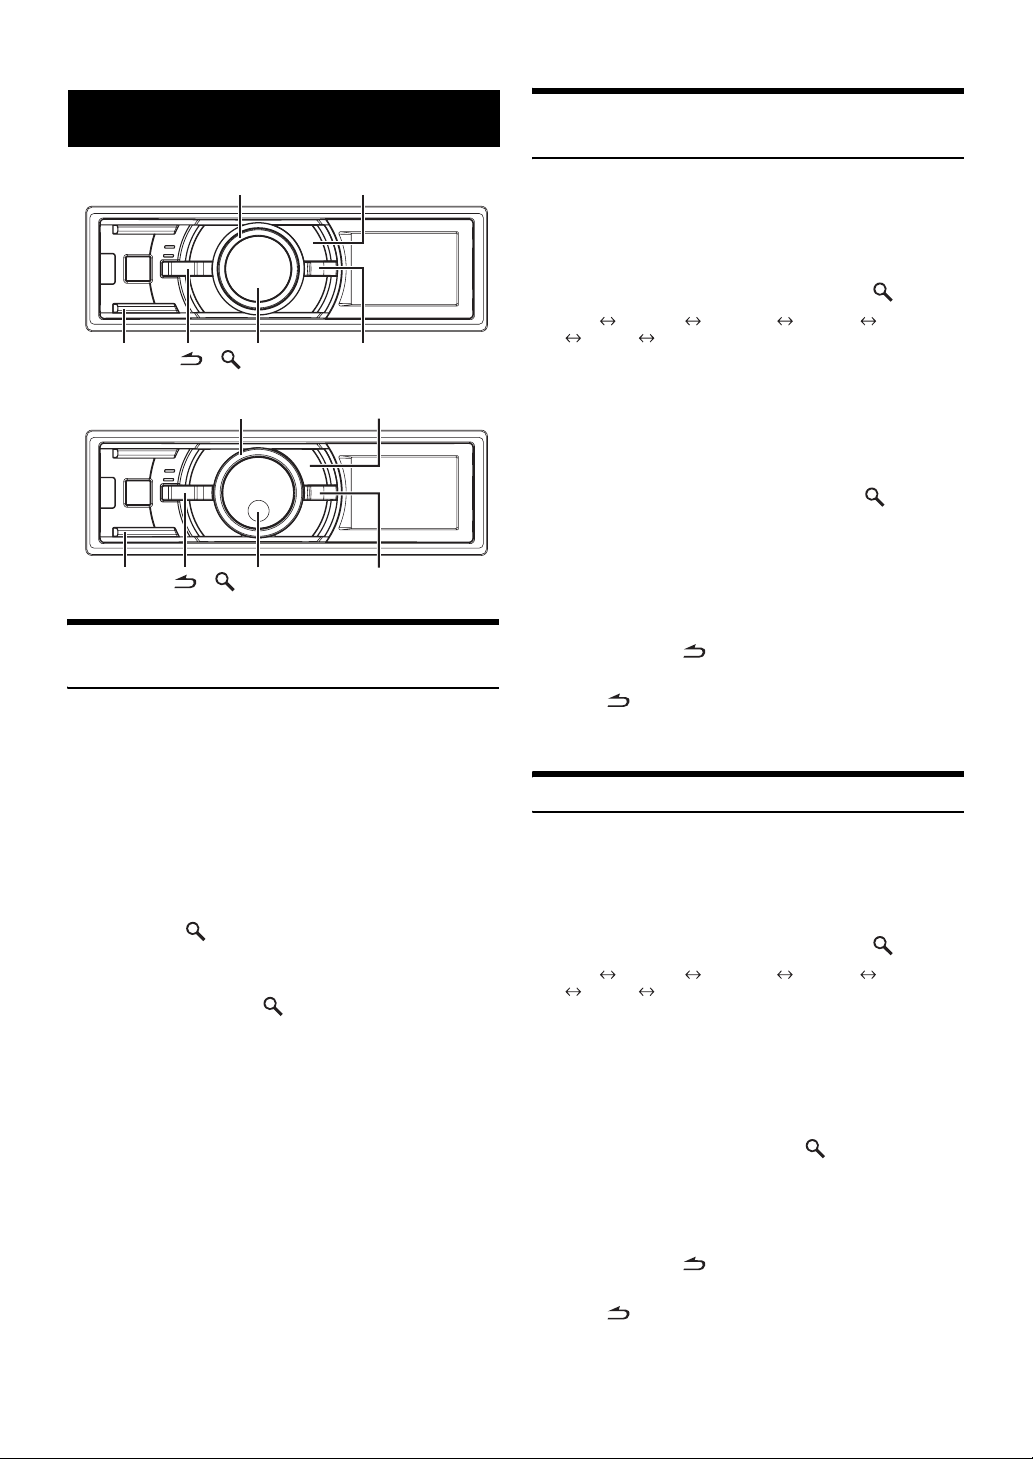
RDS
iDA-X313
BAND/TA
iDA-X311/iDA-X311RR
BAND/TA
Setting RDS Reception Mode and Receiving RDS Stations
The RDS (Radio Data System) is a radio information system using the
57 kHz subcarrier of regular FM broadcast. The RDS allows you to
receive a variety of information such as traffic information, station
names, and to automatically re-tune to a stronger transmitter that is
broadcasting the same programme.
1
Press FUNCTION/SETUP so that the <F> indicator
lights up.
2
Turn t he Double Action encoder (iDA-X313 only)
or Rotary encoder (iDA-X311/iDA-X311RR only) to
select the AF (Alternative Frequency) mode, and
then press
3
Turn t he Double Action encoder (iDA-X313 only)
or Rotary encoder (iDA-X311/iDA-X311RR only) to
select ON, and press
4
Press FUNCTION/SETUP to activate the RDS
mode.
The <F> indicator goes out.
• Operate the unit while the <F> indicator lights up. If no operation is
performed for 10 seconds, the <F> indicator goes out.
• When the “Setting PTY31 (Emergency Broadcast) reception” (refer
to page 9) is set to ON, if the unit receives the PTY31 (Emergency
Broadcast) signal, the unit will show “ALARM” in the display
automatically.
The RDS digital data includes the following:
Double Action encoder FUNCTION/SETUP
/
ENTER
Rotary encoder
/
ENTER
/
ENTER.
/
PI Programme Identification
PS Programme Service Name
AF List of Alternative Frequencies
TP Traffic Programme
TA Traffic Announcement
PTY Programme Type
EON Enhanced Other Networks
VIEW
FUNCTION/SETUP
VIEW
ENTER.
Receiving RDS Regional (Local) Stations
1
Press and hold FUNCTION/SETUP for at least 2
seconds to activate the SETUP selection mode.
2
Turn t he Double Action encoder (iDA-X313 only)
or Rotary encoder (iDA-X311/iDA-X311RR only) to
select the TUNER mode, and then press
BT*1 AUDIO*2 GENERAL DISPLAY IPOD
TUNER
*1Displayed only when INT MUTE is set to OFF, and the mode is set to
other than BT AUDIO.
*2Displayed only when an external audio processor is connected. For
details, refer to the Owner’s Manual of the external audio processor.
3
Turn t he Double Action encoder (iDA-X313 only)
or Rotary encoder (iDA-X311/iDA-X311RR only) to
select RDS REGIONAL, and then press
4
Turn t he Double Action encoder (iDA-X313 only)
or Rotary encoder (iDA-X311/iDA-X311RR only) to
select ON or OFF.
In the OFF mode, the unit automatically keeps receiving the
related local RDS station.
5
Press and hold for at least 2 seconds to return to
normal mode.
• Pressing during the procedure will return to the previous mode.
• If no operation is performed for 60 seconds, the unit will return to
normal mode automatically.
BT
/
ENTER.
/
ENTER.
PI SEEK Setting
1
Press and hold FUNCTION/SETUP for at least 2
seconds to activate the SETUP selection mode.
2
Turn t he Double Action encoder (iDA-X313 only)
or Rotary encoder (iDA-X311/iDA-X311RR only) to
select the TUNER mode, and then press
BT*1 AUDIO*2 GENERAL DISPLAY IPOD
TUNER
*1Displayed only when INT MUTE is set to OFF, and the mode is set to
other than BT AUDIO.
*2Displayed only when an external audio processor is connected. For
details, refer to the Owner’s Manual of the external audio processor.
3
Turn t he Double Action encoder (iDA-X313 only)
or Rotary encoder (iDA-X311/iDA-X311RR only) to
select PI SEEK and then press
4
Turn t he Double Action encoder (iDA-X313 only)
or Rotary encoder (iDA-X311/iDA-X311RR only) to
select ON or OFF.
5
Press and hold for at least 2 seconds to return to
normal mode.
• Pressing during the procedure will return to the previous mode.
• If no operation is performed for 60 seconds, the unit will return to
normal mode automatically.
BT
/
ENTER.
/
ENTER.
8-EN
Page 11

Setting PTY31 (Emergency Broadcast) reception
Turn PTY31 (Emergency Broadcast) reception ON/OFF.
1
Press and hold FUNCTION/SETUP for at least 2
seconds to activate the SETUP selection mode.
2
Turn t he Double Action encoder (iDA-X313 only)
or Rotary encoder (iDA-X311/iDA-X311RR only) to
select the TUNER mode, and then press
BT*1 AUDIO*2 GENERAL DISPLAY IPOD
TUNER
*1Displayed only when INT MUTE is set to OFF, and the mode is set to
other than BT AUDIO.
*2Displayed only when an external audio processor is connected. For
details, refer to the Owner’s Manual of the external audio processor.
3
Turn t he Double Action encoder (iDA-X313 only)
or Rotary encoder (iDA-X311/iDA-X311RR only) to
select ALERT PTY31 and then press
4
Turn t he Double Action encoder (iDA-X313 only)
or Rotary encoder (iDA-X311/iDA-X311RR only) to
select ON or OFF.
If you set to ON, emergency broadcasts are received
regardless of source. “ALARM” is displayed during
reception.
5
Press and hold for at least 2 seconds to return to
normal mode.
When an emergency broadcast is received, the volume
level will be automatically changed to the memorized level
in the traffic information mode. For details, refer to
“Receiving Traffic Information” on page 9.
• Pressing during the procedure will return to the previous mode.
• If no operation is performed for 60 seconds, the unit will return to
normal mode automatically.
BT
/
ENTER.
/
ENTER.
Receiving Traffic Information
1
Press and hold BAND/TA for at least 2 seconds so
that the “TA” indicator lights up.
When a traffic information station is tuned in, the “TP”
indicator lights up.
Traffic information is heard only when it is being broadcast.
If traffic information is not being broadcast, the unit is set in
the standby mode. When a traffic information broadcast
begins, the unit automatically receives it and the TRF-INFO
screen is displayed.
When the traffic information broadcast is over, the unit will
automatically set in the standby mode.
• If the traffic information broadcast signal falls below a certain level,
the unit remains in the receiving mode for 1 minute. If the signal
remains below a certain level for over 1 minute, the “TA” indicator
blinks.
• If you do not want to listen to the traffic information being received,
lightly press BAND/TA to skip that traffic information message. The
TA mode will remain in the ON position to receive the next traffic
information message.
• If the volume level is changed while receiving traffic information, the
changed volume level will be memorized. When traffic information is
received next time, the volume level will be automatically adjusted to
the level memorized.
PTY (Programme Type) Tuning
1
Press FUNCTION/SETUP so that the <F> indicator
lights up.
2
Turn t he Double Action encoder (iDA-X313 only)
or Rotary encoder (iDA-X311/iDA-X311RR only) to
select PTY, and press
Radio (FM receiving) mode.
The PTY Select screen is displayed.
3
Turn t he Double Action encoder (iDA-X313 only)
or Rotary encoder (iDA-X311/iDA-X311RR only) to
choose the desired programme type.
4
Press /ENTER after selecting the programme
type to start searching for a station in the selected
programme type.
The chosen programme type display blinks during
searching and lights when a station is found.
If no PTY station is found, “NO PTY” will be displayed for
10 seconds.
• Operate the unit while the <F> indicator lights up. If no operation is
performed for 10 seconds, the <F> indicator goes out.
/
ENTER, while the unit is in
Receiving Traffic Information While Playing iPod or Radio
1
Press and hold BAND/TA for at least 2 seconds so
that the “TA” indicator lights up.
When a traffic information broadcast starts, the unit
automatically mutes the iPod/USB memory/Portable audio
player (iDA-X313 only)/changer or the regular FM
broadcast.
When the traffic information broadcast finishes, the unit
automatically returns to the original source play before the
traffic information broadcast began.
When traffic information stations cannot be received:
In the tuner mode:
When the TP signal can no longer be received for over 1 minute,
the “TA” indicator blinks.
In the iPod/USB memory/Portable audio player (iDA-X313
/changer mode:
only)
When the TP signal can no longer be received, the traffic
information station of another frequency will be selected
automatically.
• The receiver is equipped with the EON (Enhanced Other Networks)
function in order to keep track of additional alternate frequencies to
the AF list. The “EON” indicator lights up while an RDS EON
station is being received. If the station being received does not
broadcast the traffic information, the receiver automatically tunes in
the related station that broadcasts the traffic information when it
occurs.
2
Press and hold BAND/TA for at least 2 seconds to
deactivate the Traffic Information mode.
The “TA” indicator goes out.
9-EN
Page 12

Priority News
This function allows you to preset to give priority to the News
programme. You will never miss the News programme as the unit
automatically gives priority to the News programme whenever it begins
broadcasting, and interrupts the programme you are currently listening.
This feature is functional when your unit is set to a mode other than the
LW and MW modes.
1
Press FUNCTION/SETUP to activate the Function
mode while the unit is in Radio (FM receiving) mode.
The <F> indicator lights up.
2
Turn t he Double Action encoder (iDA-X313 only)
or Rotary encoder (iDA-X311/iDA-X311RR only) to
select NEWS, and press
3
Turn t he Double Action encoder (iDA-X313 only)
or Rotary encoder (iDA-X311/iDA-X311RR only) to
select ON, and press
4
Press to return to normal mode.
The <F> indicator goes out.
• Operate the unit while the <F> indicator lights up. If no operation is
performed for 10 seconds, the <F> indicator goes out.
• In the NEWS function, unlike in the TA function, the volume does not
increase automatically.
/
ENTER.
/
ENTER.
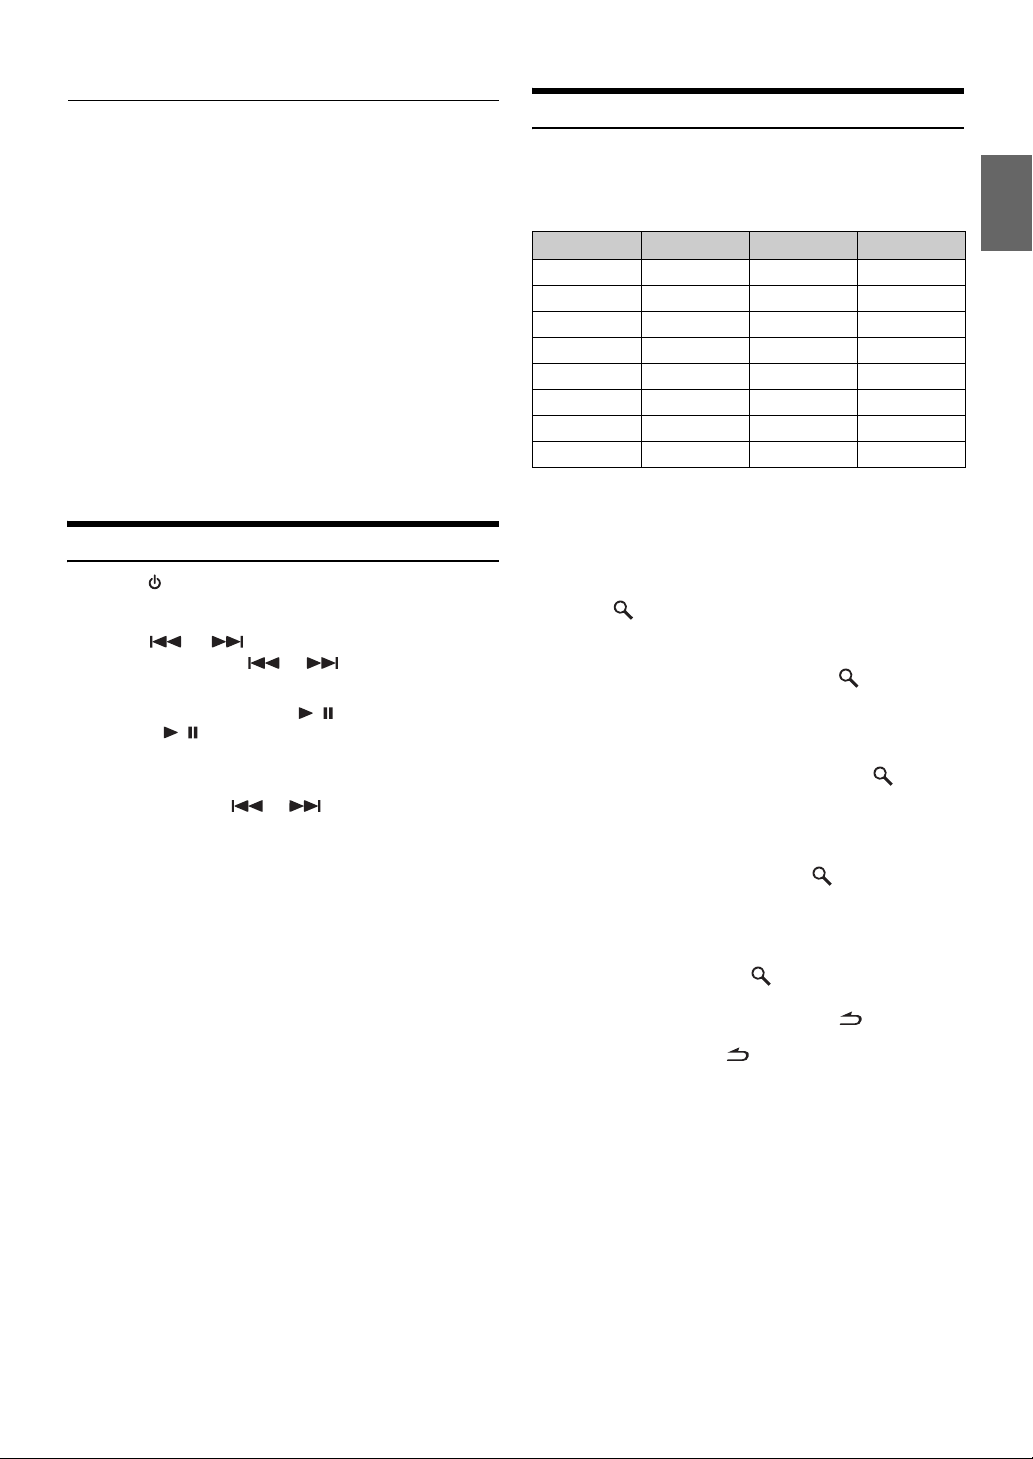
iPhone (iDA-X313
only)/iPod
iDA-X313
SOURCE
iDA-X311/iDA-X311RR
Double Action encoder
/
Rotary encoder
(Optional)
FUNCTION/SETUP
/ENTER
VIEW
FUNCTION/SETUP
Displaying Radio Text
Text messages from a radio station can be displayed.
Press VIEW while receiving FM in the radio mode to
select the Radio Text display.
The display will change every time the button is pressed.
If there is PS (Programme Service Name)
Band
PS (Programme
Service Name)
If there is no PS (Programme Service Name)
Band
Frequency
• If there is no receivable text information or the unit cannot receive
text information properly, “NO TEXT” will be displayed.
Radio Text
Radio Text
Band
PS (Programme
Service Name)
Band
Frequency
SOURCE
An iPhone (iDA-X313 only)/iPod can be connected to this unit. When
this unit is connected, the controls on the iPod are not functional.
Depending on the unit, iPhone (iDA-X313 only)/iPod connection can be
made in two different ways.
iDA-X313 : The iPhone/iPod only can be connected to the
iDA-X311/
iDA-X311RR
• Set AUX+ to OFF when an iPod is connected to iDA-X311/
iDA-X311RR, refer to “Setting the AUX+ Mode” on page 23.
• Internet and telephone functions of iPod touch or iPhone, etc., can
also be used when connecting to the unit. However, using these
functions will stop or pause the playing songs, at this time do not
operate the unit to avoid a malfunction.
• If you connect an iPhone to this unit, it can be used as an iPod. If you
use iPhone as a hands-free phone, you need the optional
BLUETOOTH INTERFACE (KCE-400BT).
• If the BLUETOOTH INTERFACE (KCE-400BT) and an iPod are
connected at the same time, be sure to disconnect the iPod from the
BLUETOOTH INTERFACE (KCE-400BT) while turning ACC to
OFF (only for iDA-X311/iDA-X311RR).
/
: The iPod only can be connected to Full Speed
/ENTER
USB connector by using the Interface cable for
iPod (supplied, iDA-X313 only).
connector by using the proprietary ALPINE
FULL SPEED Connection Cable (KCE-433iV)
(supplied, iDA-X311/iDA-X311RR only).
VIEW
10-EN
Page 13
iPhone (iDA-X313 only)/iPod models usable with this unit
• Confirmed devices regarding Made for iPod. Correct function
of earlier versions cannot be guaranteed.
iPod touch (2nd generation): Ver.2.2
iPod nano (4th generation): Ver.1.0.3
iPod classic (120GB): Ver.2.0.1
iPod touch (1st generation): Ver.2.2
iPod nano (3rd generation): Ver.2.0
iPod classic (80GB, 160GB): Ver.1.1.2
iPod nano (2nd generation): Ver.1.1.3
iPod with video: Ver.1.3
iPod nano (1st generation): Ver.1.3.1
Confirmed devices regarding Works with iPhone. Correct
function of earlier versions cannot be guaranteed.
iPhone 3G: Ver.2.2 (iDA-X313 only)
iPhone: Ver.2.2 (iDA-X313 only)
• For clarity in identifying your model of iPod, please see
Apple’s own document “Identifying iPod models” at
http://support.apple.com/kb/HT1353
• This unit does not support video playback from iPhone/iPod,
even using a video-compatible cable.
Playback
1
Press SOURCE to switch to the IPOD (iDA-X311/
iDA-X311RR only) or USB IPOD (iDA-X313 only)
mode.
2
Press or to select the desired song.
Pressing and holding or will fast backward/fast
forward the current track.
3
To pause playback, press / .
Pressing / again will resume playback.
• If a song is playing on the iPhone (iDA-X313 only)/iPod when it is
connected to this unit, it will continue playing after the connection.
• An episode or audiobook may have several chapters, the chapter can
be changed by pressing
or .
Searching for a desired Song/Title
An iPhone (iDA-X313 only)/iPod can contain hundreds of songs. By
keeping these songs organized in playlists, this unit can use these to ease
song searches.
Using the Playlist/Artist/Album/Podcast/Audiobook/Genre/Composer/
Song search mode’s individual hierarchy, you can narrow down your
search as shown in the table below.
Hierarchy 1 Hierarchy 2 Hierarchy 3 Hierarchy 4
PLAYLISTS SONG — —
ARTISTS* ALBUM* SONG —
ALBUMS* SONG — —
PODCASTS EPISODE — —
AUDIOBOOKS — — —
GENRES* ARTIST* ALBUM* SONG
COMPOSERS* ALBUM* SONG —
SONGS — — —
• You can select your preferred search mode. Refer to “iPod Search
Mode Setting” (page 25).
For example: Searching by Artist name
The following example explains how an ARTISTS search is
performed. Another search mode can be used for the same
operation, although the hierarchy differs.
1
Press /ENTER to activate the Menu Select mode.
2
Turn t he Double Action encoder (iDA-X313 only)
or Rotary encoder (iDA-X311/iDA-X311RR only) to
select the ARTISTS, and then press
The artist search mode is activated and artists names are
displayed.
3
Turn t he Double Action encoder (iDA-X313 only)
or Rotary encoder (iDA-X311/iDA-X311RR only) to
select the desired Artist, and then press
The album search mode is activated and albums names are
displayed.
4
Turn t he Double Action encoder (iDA-X313 only)
or Rotary encoder (iDA-X311/iDA-X311RR only) to
select an album, and then press
The song search mode is activated and songs names are
displayed.
5
Turn t he Double Action encoder (iDA-X313 only)
or Rotary encoder (iDA-X311/iDA-X311RR only) to
select a song and press
The selected song is played back.
• While in the search mode, if you press and hold for at least 2
seconds the search mode is cancelled.
• In the search mode, pressing will return to the previous mode.
• When search is made during M.I.X. play, the M.I.X. play mode will be
cancelled.
• “NO SONG” will be displayed if there are no songs in the selected
playlist in the PLAYLISTS search mode.
• “NO PODCAST” will be displayed if there is no podcast data in the
iPhone (iDA-X313 only)/iPod in the PODCASTS search mode.
• “NO A-BOOK” will be displayed if there is no audiobook data in the
iPhone (iDA-X313 only)/iPod in AUDIOBOOKS search mode.
/ENTER.
/ENTER.
/ENTER.
/ENTER.
11-EN
Page 14
• If “iPod name” stored in the iPhone (iDA-X313 only)/iPod is
selected in the desired playlist search mode and
pressed, you can search for all songs in the iPhone (iDA-X313 only)/
iPod. Also, if you press and hold
all songs in the iPhone (iDA-X313 only)/iPod are played back.
• The display “NO SUPPORT” is scrolled if text information is not
compatible with this unit.
• After selecting [ALL] in the search mode with “*”, press and hold
/ENTER for at least 2 seconds to play back all songs in the
iPhone (iDA-X313 only)/iPod or selected search mode.
• If percent skip function is activated in the search mode, a search can
be made quickly by skipping to the specified location. For details,
“Percent Skip Function” on page 12.
refer to
• If Alphabet Skip Function is activated in the search mode, a search
can be made quickly by Alphabet function to find the desired artist or
song, etc. For details, refer to
only)” on page 12.
• You can scroll the page by pressing and turning the Double Action
encoder (iDA-X313 only).
• If no operation is performed for 60 seconds, the unit will return to
normal mode automatically.
/ENTER for at least 2 seconds,
“Alphabet Skip Function (iDA-X313
/ENTER is
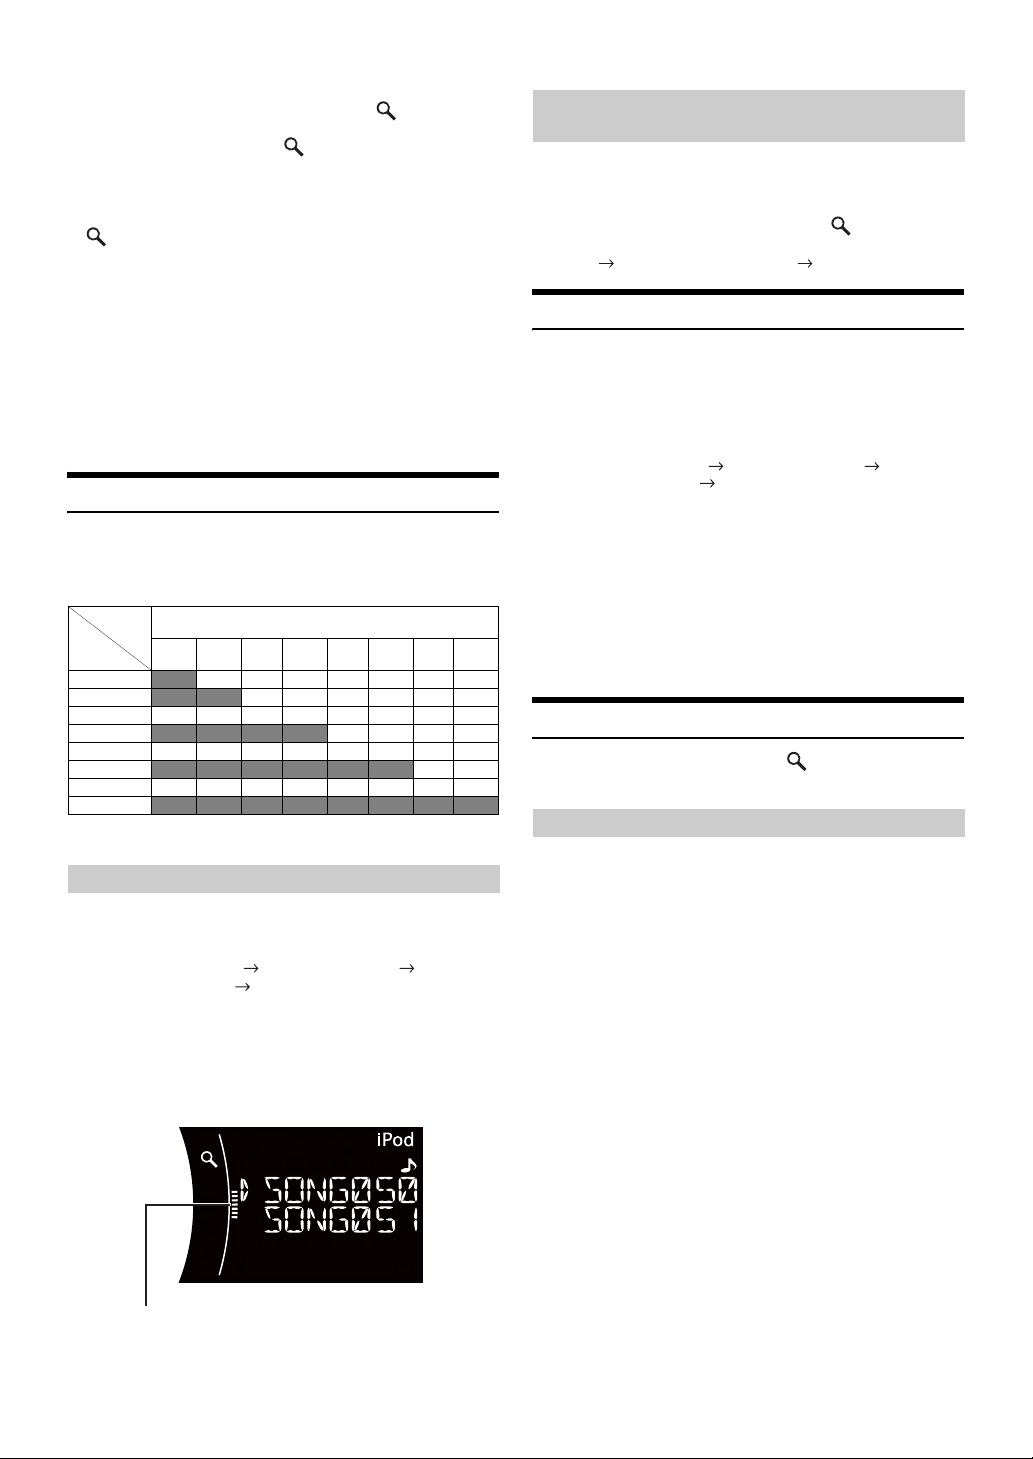
Percent Skip Function
The unit is provided with a percent skip function for effective searching.
When you use this function in the search mode, you can quickly search
an artist or a song, etc.
If there are 100 songs in your iPhone (iDA-X313 only)/iPod, they are
divided into 10 groups using percentages (shown below).
Number of
song
10th
%
10 %
20 %
...
50 %
...
80 %
...
100 %
* You can select to show a percentage of the total stored songs, in 10%
steps.
song
20th
song
By using this function on iDA-X313
1
Press FUNCTION/SETUP repeatedly to choose the
percent skip mode.
Alphabet skip function Percent skip function
Normal search mode Alphabet skip function
2
Press and turn the Double Action encoder.
Each turn of the Double Action encoder to the right will jump
10%, 20% and 100% in ascending order.
Each turn of the Double Action encoder to the left will jump
100%, 90% and 10% in descending order.
Scroll bar display example (if 50% is shown)
All 100 songs
... 50th
song
... 80th
song
... 100th
song
By using this function on iDA-X311/
iDA-X311RR
1
Press FUNCTION/SETUP to activate the percent
selection mode.
2
Turn t he Rotary encoder to select a designated
percent parameter, and then press
The percent skip function jumps to the following selected
10%
20%…50%…80%…100% 10%.
/ENTER.
Alphabet Skip Function (iDA-X313 only)
The initial skip function is skipped to the next number, symbol or letter
such as from A to B, B to C.
You can skip in reverse order such as B to A by turning the Double
Action encoder to the left.
1
In the search mode, press FUNCTION/SETUP
repeatedly to choose the alphabet skip mode.
Alphabet skip function Percent skip function
Normal search mode Alphabet skip function
2
Press and turn the Double Action encoder.
A list is skipped to the next page or next number, symbol or
letter.
• If the Double Action encoder is pressed and turned to the left or
right, the display continuously changes.
• The Alphabet Skip Function in the song search mode is available
only when a song search is selected on the Menu select screen.
• Titles are listed alphabetically, and can be skipped every 200 titles. If
there are fewer than 200 titles, titles beginning with the next
alphabetical character are selected.
Up/Down Function
If you select an album and press and hold /ENTER in the search
mode, this album will be played back repeatedly. To go to the previous
or next Album, use the Up/Down function.
By using this function on iDA-X313
Press and turn the Double Action encoder to the left.
Returns to the previous item.
Press and turn the Double Action encoder to the
right.
Advances to the next item.
scroll bar
12-EN
Page 15
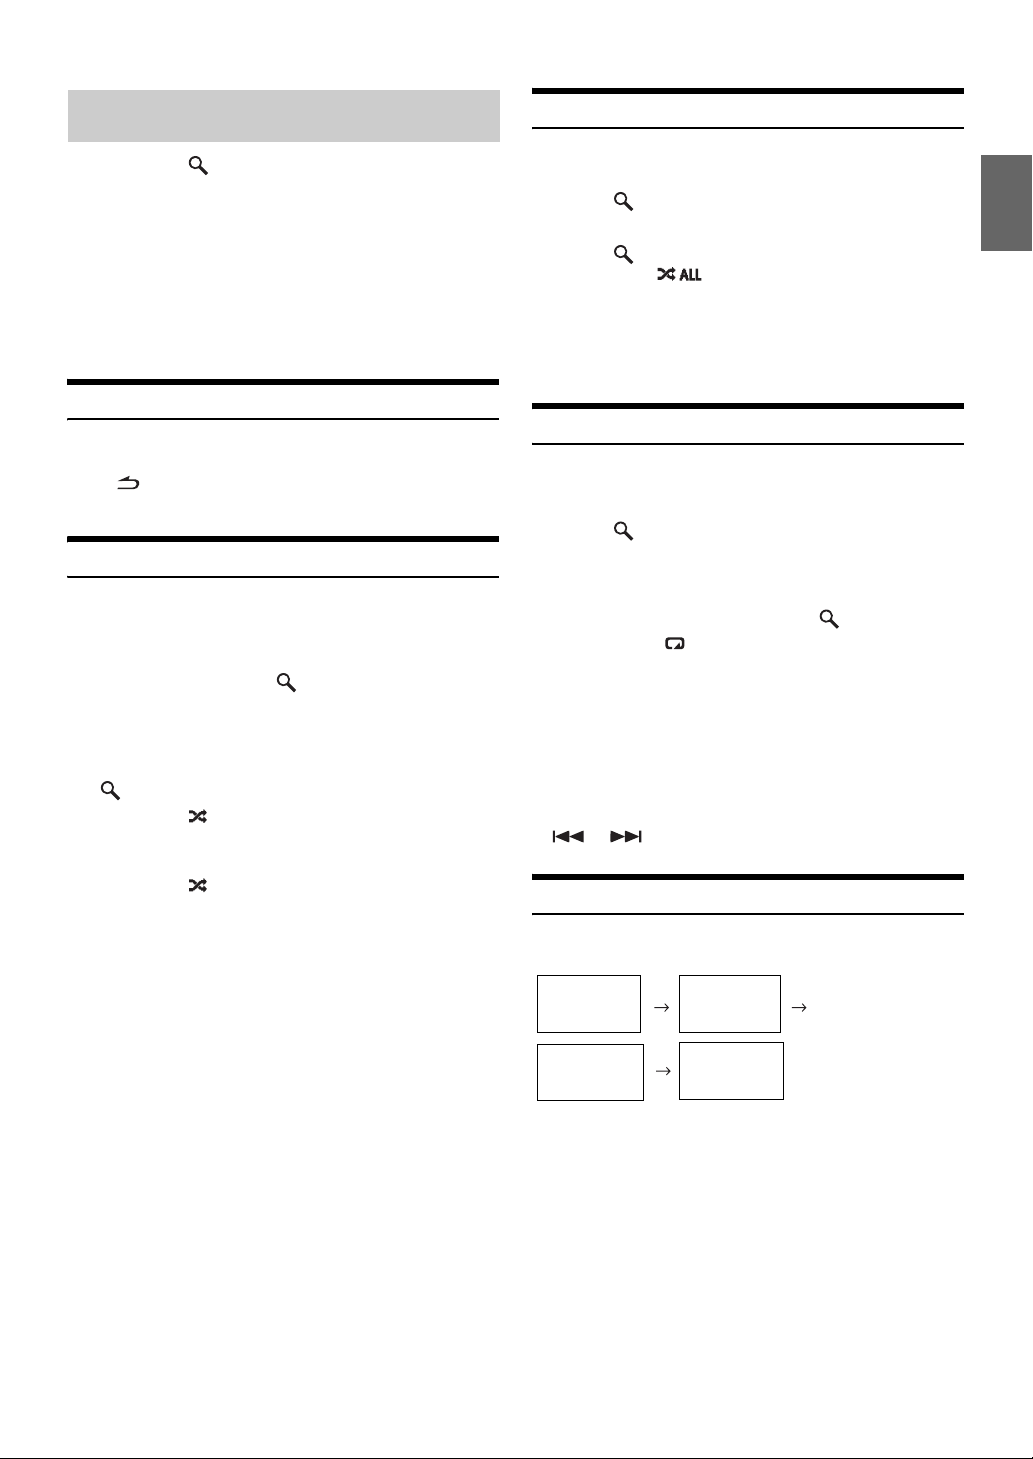
By using this function on iDA-X311/
iDA-X311RR
Press and hold /ENTER for at least 2 seconds, then
turn the Rotary encoder to select the desired Playlist/
Artist/Album/Genre/Composer.
• If you do not perform a search or only search for a song name or
audiobook, this function is not valid.
• During an artist search, albums for that artist can be played.
• If an album is selected during an artist search, the Up/Down function
can be used to play other albums by that artist.
• This function is inactive during shuffle playback.
• This function is also available for the USB/Portable audio player
mode.
Search Position Memory
During iPhone (iDA-X313 only)/iPod playback, you can quickly return
to the last-selected hierarchy level in the search mode.
Press .
The hierarchy you selected last in the search mode is displayed.
Random Play Shuffle (M.I.X.)
1
Press FUNCTION/SETUP.
2
Turn t he Double Action encoder (iDA-X313 only)
or Rotary encoder (iDA-X311/iDA-X311RR only) to
select M I X, and press
The Shuffle mode is activated.
3
Turn the
Rotary encoder
select the M I X (Shuffle) playback mode, and press
M I X ALBUM : An album in the iPhone (iDA-X313
Double Action encoder
/
ENTER
SONG : If you select a song in the search
OFF : Shuffle mode off.
(iDA-X311/iDA-X311RR only) to
.
/ENTER.
(iDA-X313 only) or
only)/iPod is selected at random,
and is played back in the album
song order.
mode, all songs in the selected
mode are played back at random.
Random Play Shuffle All
Shuffle ALL plays all songs in the iPhone (iDA-X313 only)/iPod
randomly.
1
Press /ENTER.
The Menu Select screen is displayed.
2
Press /ENTER while selecting SHUFFLE ALL.
The indicator lights, and the songs will be played
back in random sequence.
• To cancel, set the Shuffle mode to OFF. Refer to “Random Play
Shuffle (M.I.X.)” (page 13).
• If SHUFFLE ALL is selected, the selected ones which are being
played back in the search mode are cancelled.
Repeat Play
1
Press FUNCTION/SETUP.
The Function screen is displayed.
2
Press /ENTER.
The Repeat mode is activated.
3
Turn t he Double Action encoder (iDA-X313 only)
or Rotary encoder (iDA-X311/iDA-X311RR only) to
select REPEAT SONG, and press
REPEAT SONG : A single song is repeatedly played
OFF : Repeat mode off.
4
Press FUNCTION/SETUP.
The song is repeatedly played back.
• If no operation is performed for 10 seconds, the unit returns to
normal mode.
• To cancel, select OFF in the above procedure.
• During repeat playback, no other songs are selectable by pressing
or .
back.
/ENTER.
Changing the Display
Press VIEW.
4
Press FUNCTION/SETUP.
The songs will be played back in random sequence.
• If no operation is performed for 10 seconds, the unit will return to
normal mode.
• To cancel, select OFF in the above procedure.
• Shuffle Album/Shuffle Song works the same way as iPhone
(iDA-X313 only)/iPod Shuffle Albums/Shuffle Songs.
Tra ck N o.
Elapsed Time
Song Name*
Album Name*
*1TAG information
“ARTIST”/“ALBUM”/“SONG” is displayed if there is no tag
information.
• Only alphanumeric characters can be displayed.
• The maximum number of characters is 128 (128 byte).
• Some characters may not be correctly displayed.
• “NO SUPPORT” is displayed when text information is not
compatible with this unit.
1
1
Song Name*1
Artist Name
Tra c k No.
Elapsed Time
*
1
13-EN
Page 16
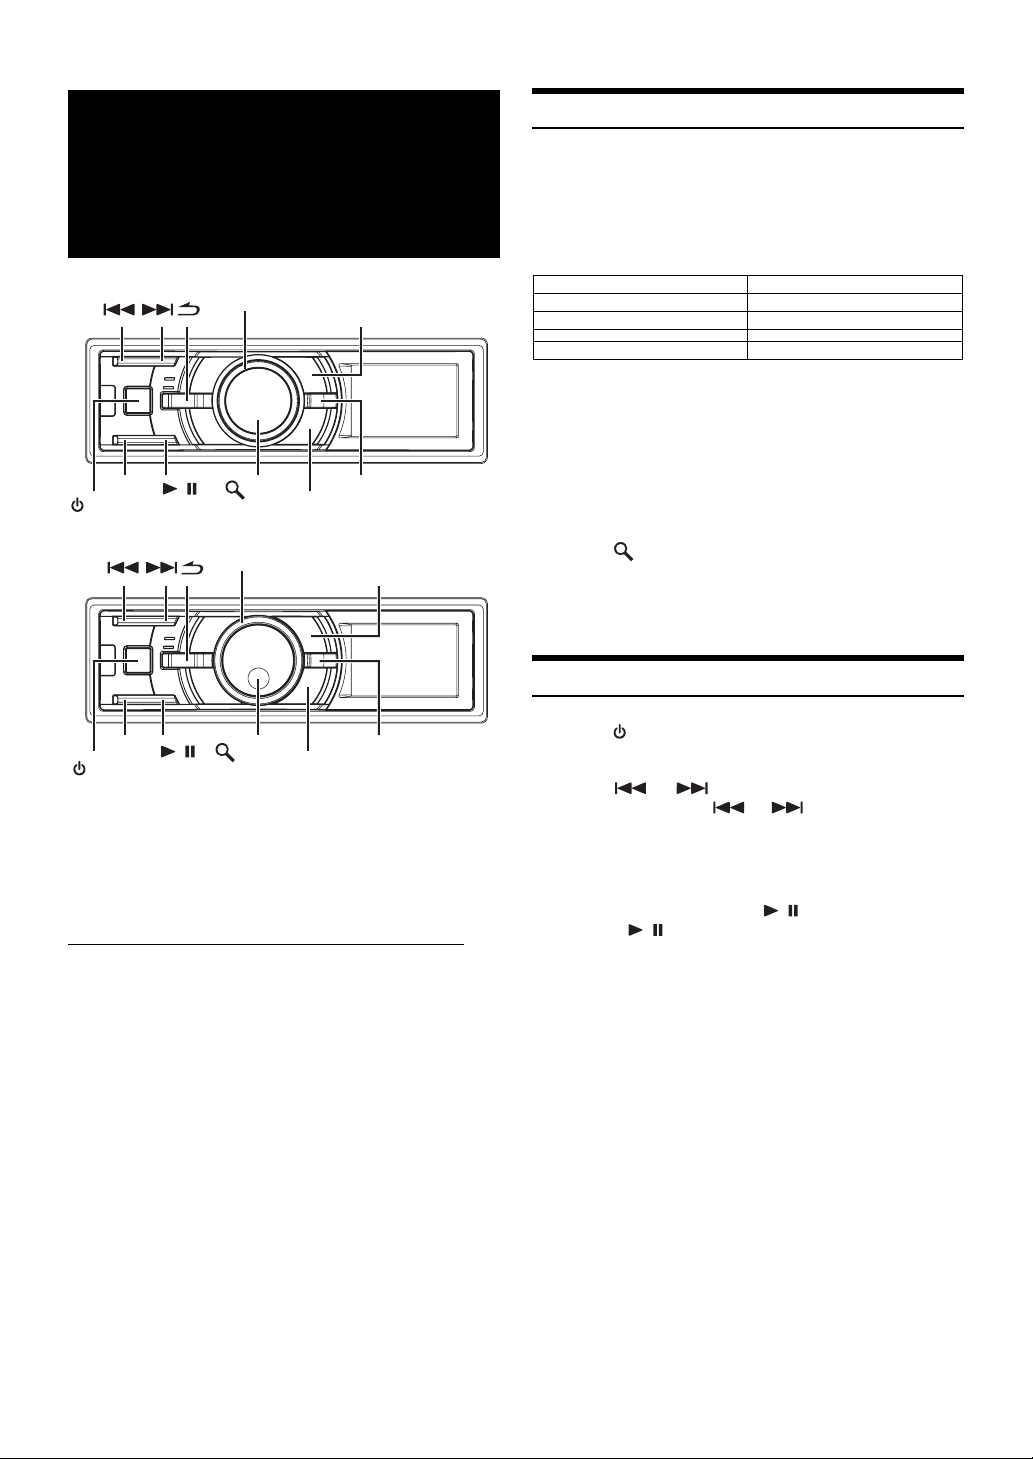
USB memory/Portable audio player (iDA-X313 only)/Changer (Optional)
iDA-X313
BAND/TA
SOURCE
iDA-X311/iDA-X311RR
Double Action encoder
/
/ENTER
PRESET
Rotary encoder
FUNCTION/SETUP
VIEW
FUNCTION/SETUP
BANK Function (USB memory)
This unit has a BANK function that automatically divides every 1,000
songs stored in USB memory into individual banks to make searching
and playing back a song easier. A maximum of 1,000 songs for one
bank can be stored according to the order stored in USB memory. A
maximum of 10 banks (10,000 songs) can be recognized. BANK1
(songs 1 to 1,000) is set as the default. If you want to search beyond
1,000 songs, perform the following operation to select a different bank.
BANK No. Song number
BANK1 1~1,000
BANK2 1,001~2,000
...
BANK10 9,001~10,000
1
Press PRESET.
The BANK selection mode is displayed.
2
Turn t he Double Action encoder (iDA-X313 only)
or Rotary encoder (iDA-X311/iDA-X311RR only).
Select the desired BANK.
You can scroll the page by pressing and turning the Double
Action encoder (iDA-X313 only).
3
Press /ENTER.
Each operation can be performed in the selected bank.
• Even if the files are contained in the same folder, they may be saved
as different BANK.
...
Playback
BAND/TA
SOURCE
If a USB memory device/Portable audio player (iDA-X313 only) or
changer is connected to the unit, MP3/WMA/AAC files can be played
back.
• In the USB mode, when this unit is reset, ACC is switched from OFF
to ON, or when the USB is connected to this unit, “BANKING” is
displayed for several seconds.
/ /ENTER
PRESET
VIEW
Using the USB Memory Banking Function
1. What is a Bank?
A bank is a unit of up to 1,000 songs, which is stored in memory.
“Banking” refers to the grouping of songs available in USB memory, in
banks of 1,000 songs each.
2. About Banking
While a bank is being built up, “BANKING” is displayed. Banking
occurs whenever a USB memory device is connected or after power to
the head unit turns on.
It can take anywhere from a few seconds to up to 10 minutes for
banking to complete. This depends on the number of files and folders in
USB memory.
3. Available operations while Banking
• Search functions, such as album search or tag information (artist
display, etc.) are available. However, during Banking, the
information display changes so the VIEW operation is not available.
• With a song playing, Regular fast-forwarding and next song selection
is available.
• While Banking, the song playback order may differ from the song
order in the USB memory device.
1
Press SOURCE to select the USB AUDIO or
CHANGER mode.
2
Press or to select the desired track (file).
Pressing and holding or will fast backward/fast
forward track continuously.
• When a Portable audio player is connected, fast-forwarding/fast-
reversing is not available.
3
To pause playback, press / .
Pressing / again will resume playback.
• WMA format files that are protected by DRM (Digital Rights
Management), AAC format files that have been purchased from the
iTunes Store and files that are copy-protected (copyright protection)
cannot be played back on this unit.
• The playback time may not be correctly displayed when a VBR
(Variable Bit Rate) recorded file is played back.
• If there is tag information, artist name/album name/track name is
displayed.
• ID3 tag/WMA tag
If an MP3/WMA/AAC file contains ID3 tag/WMA tag information,
the ID3 tag/WMA tag information is displayed (e.g., song name,
artist name, and album name). All other tag data is ignored.
• “NO SUPPORT” is displayed when text information is not
compatible with this unit.
• Before disconnecting USB memory, be sure to change to another
source or set to pause.
14-EN
Page 17
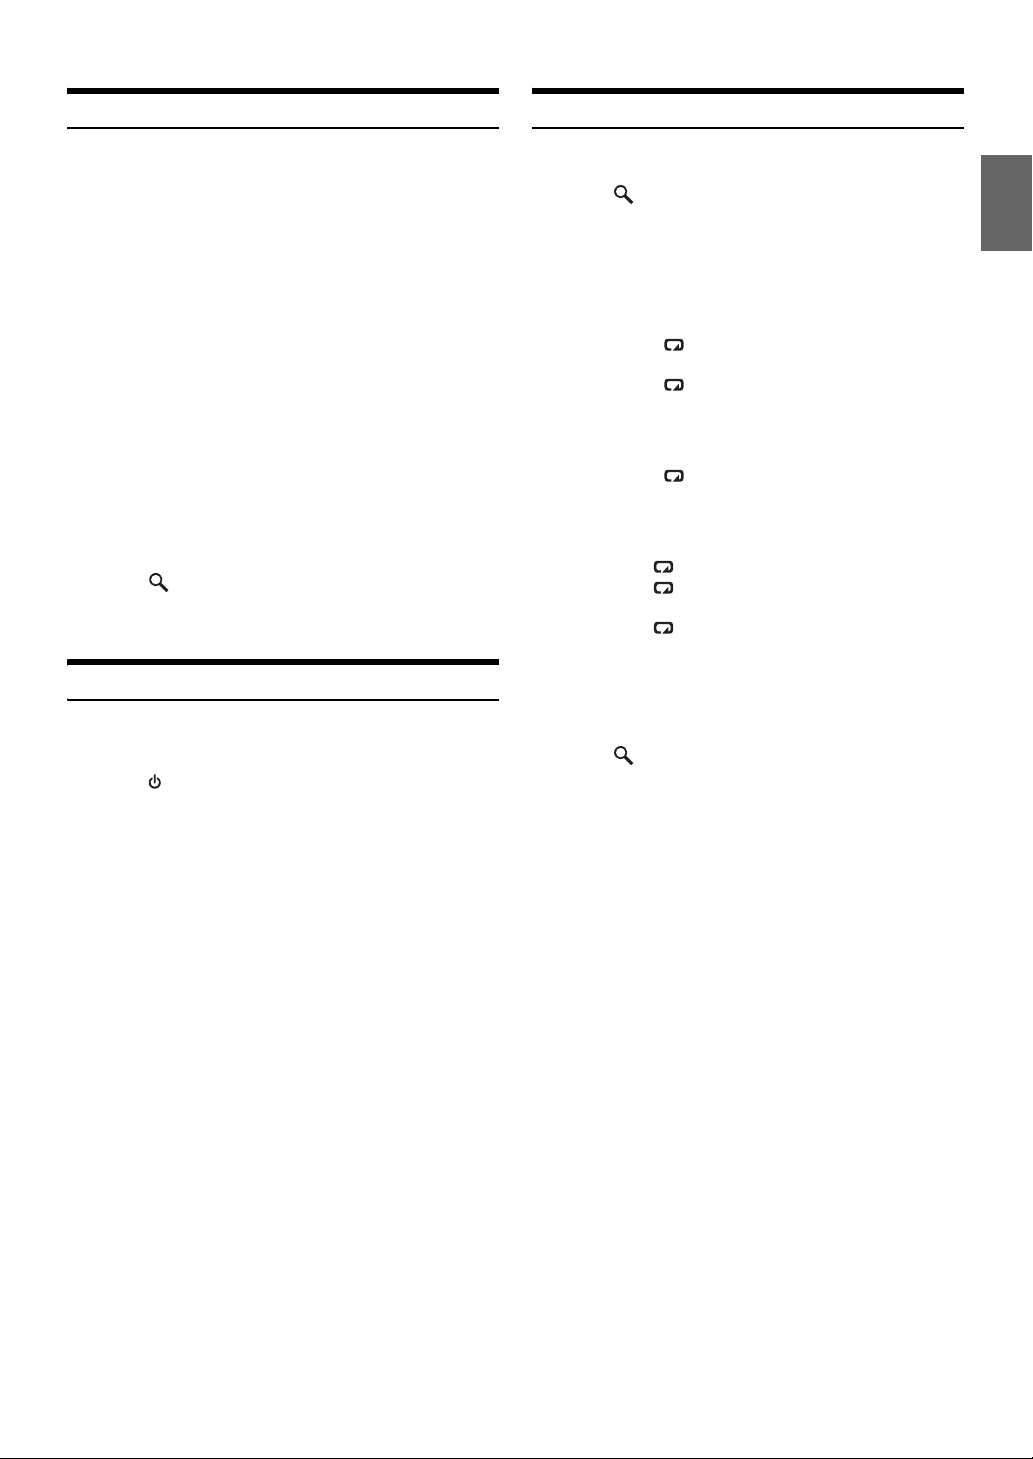
Selecting a Disc (Changer) (Optional)
Repeat Play
An optional 6-disc or 12-disc CD Changer may be connected to this unit
if it is Ai-NET compatible. With a CD Changer connected to the
Ai-NET input of this unit, the CD Changer will be controllable from
this unit.
Using the KCA-410C (Versatile Link Terminal) multiple changers can
be controlled by this unit.
See “Multi-Changer Selection (Optional)” on page 15 for selecting the
CD Changers.
• The controls on this unit for CD Changer operation are operative
only when a CD Changer is connected.
• The DVD changer (optional) is controllable from this unit as well as
the CD changer.
1
Press PRESET.
The DISC CHANGE screen is displayed.
2
Turn t he Double Action encoder (iDA-X313 only)
or Rotary encoder (iDA-X311/iDA-X311RR only) to
select a disc.
You can scroll the page by pressing and turning the Double
Action encoder (iDA-X313 only).
3
Press /ENTER.
The selected disc number appears in the display and
CD/MP3/WMA/AAC playback starts.
Multi-Changer Selection (Optional)
When using KCA-410C (Versatile Link Terminal), you can connect two
changers and two external outputs (AUX).
1
Press SOURCE on this unit to activate the CD
CHANGER mode.
2
Press BAND/TA to activate the CD Changer
Selection mode.
The CD Changer Selection mode remains active for several
seconds.
1
Press FUNCTION/SETUP.
2
Press /ENTER.
The repeat mode is activated.
3
Turn t he Double Action encoder (iDA-X313 only)
or Rotary encoder (iDA-X311/iDA-X311RR only) to
select the Repeat playback mode.
USB memory mode :
REPEAT ONE : Only a track is repeatedly played
FOLDER : Only files in a folder are repeatedly
OFF : Repeat mode is turned off.
Portable audio player mode (iDA-X313 only) :
REPEAT SONG : Only a track is repeatedly played
OFF : Repeat mode is turned off.
CD Changer mode :
REPEAT ONE : Only a file is repeatedly played back.
FOLDER * : Only files in a folder are repeatedly
DISC : A disc is repeatedly played back.
OFF : Repeat mode is turned off.
* When an MP3 compatible CD changer is connected.
• If REPEAT DISC is set to ON during M I X ONE play in CD changer
mode, M.I.X. will apply to the current disc only.
4
Press /ENTER.
5
Press FUNCTION/SETUP.
The track (file) will be played repeatedly.
• If no operation is performed for 10 seconds, the unit returns to
normal mode.
• To cancel, select OFF in the above procedure.
back.
played back.
back.
played back.
3
Press BAND/TA until the desired CD Changer
appears on the display.
• For further details about the external input (AUX) when using
KCA-410C, see “Setting the AUX Mode (V-Link)” on page 23.
15-EN
Page 18
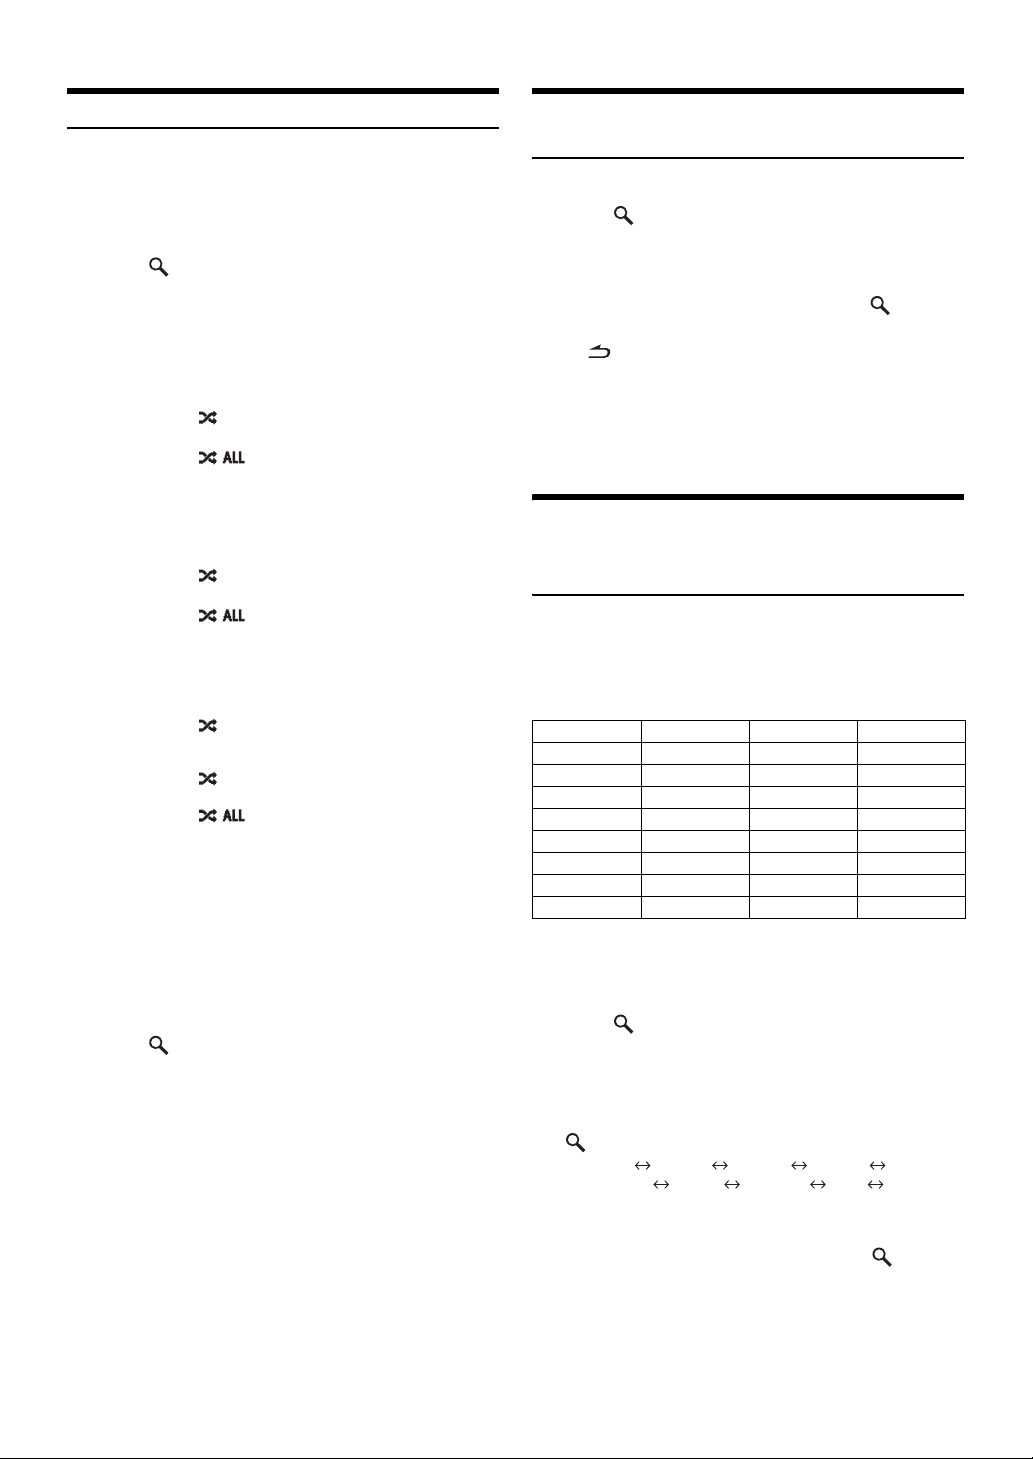
M.I.X. (Random Play)
1
Press FUNCTION/SETUP.
2
Turn t he Double Action encoder (iDA-X313 only)
or Rotary encoder (iDA-X311/iDA-X311RR only) to
select M I X.
3
Press /ENTER.
The M.I.X. mode is activated.
4
Turn t he Double Action encoder (iDA-X313 only)
or Rotary encoder (iDA-X311/iDA-X311RR only) to
select the M I X playback mode.
USB memory mode :
M I X FOLDER : Only files in a folder are played
ALL : All songs in USB memory (current
OFF : M.I.X. mode is turned off.
Portable audio player mode (iDA-X313 only) :
M I X SONG : Only files in a folder are played
ALL : All songs in portable audio player
OFF : M.I.X. mode is turned off.
CD Changer mode :
M I X ONE : All files in a disc are played back in
FOLDER *
*1When an MP3 compatible CD changer is connected.
*2When a CD changer equipped with the ALL M.I.X. function is
connected.
• When a song is played back during Random (M.I.X.) play in the USB
mode, the song can be played back again randomly even if not all
songs on the USB Memory have been played back.
• If M I X ONE is set to ON during REPEAT DISC play in CD changer
mode, M.I.X. will apply to the current disc only.
5
Press /ENTER.
1
2
ALL *
OFF : M.I.X. mode is turned off.
back in random sequence.
Bank) are played back in random
sequence.
back in random sequence.
are played back in random
sequence.
random sequence, and playback
shifts to the next disc.
: Only files in a folder are played
back in random sequence.
: All the tracks on all the CDs in the
current magazine will be played
back in the random sequence.
Searching for CD Track Number (CD changer only)
You can search for a song by track number.
1
Press /ENTER during play.
This will set the search mode.
2
Turn t he Double Action encoder (iDA-X313 only)
or Rotary encoder (iDA-X311/iDA-X311RR only) to
select the desired track, and then press
This will play the selected track.
• Press in the search mode to cancel. Or, the search mode is
cancelled if no operation is performed for 60 seconds.
• During list selection, if you turn the Double Action encoder to the
left or right while pressed, the list screen scrolls screen by screen. If
you turn and hold the Double Action encoder to the left or right
while pressed, the list screen continuously scrolls (iDA-X313 only).
• When CD Track Number Search is made during M.I.X. play, the
M.I.X. play mode will be cancelled.
/ENTER.
Searching for a desired Song (USB memory/Portable audio player (iDA-X313 only))
A USB memory device/Portable audio player can contain hundreds of
songs. By using file tag information and keeping these songs organized
in playlists, this unit’s search functions will ease song searches.
Each music category has its own individual hierarchy. Use the Playlist/
Artist/Album/Genre /Composer/Song/Folder/File sear ch mode to narrow
searches based on the table below.
Hierarchy 1 Hierarchy 2 Hierarchy 3 Hierarchy 4
PLAYLIST SONG — —
ARTIST ALBUM SONG —
ALBUM SONG — —
GENRE ARTIST ALBUM SONG
COMPOSER ALBUM SONG —
SONG — — —
FOLDER FILE — —
FILE — — —
For example: Searching by Artist name
The following example explains how an ARTIST search is
performed. Another search mode can be used for the same
operation, although the hierarchy differs.
1
Press /ENTER to activate the search selection
mode.
6
Press FUNCTION/SETUP.
The tracks (files) will be played back in random sequence.
• If no operation is performed for 10 seconds, the unit returns to
normal mode.
• To cancel, select OFF in the above procedure.
16-EN
2
Turn t he Double Action encoder (iDA-X313 only)
or Rotary encoder (iDA-X311/iDA-X311RR only) to
select the ARTIST search mode, and then press
/ENTER.
PLAYLIST ARTIST ALBUM GENRE
COMPOSER SONG FOLDER FILE PLAYLIST
3
Turn t he Double Action encoder (iDA-X313 only)
or Rotary encoder (iDA-X311/iDA-X311RR only) to
select the desired Artist, and then press
/ENTER.
Page 19
4
Turn t he Double Action encoder (iDA-X313 only)
or Rotary encoder (iDA-X311/iDA-X311RR only) to
select an album, and then press
5
Turn t he Double Action encoder (iDA-X313 only)
or Rotary encoder (iDA-X311/iDA-X311RR only) to
select a song and press
The selected song is played back.
• After pressing and holding /ENTER for at least 2 seconds while
in each hierarchy (except SONG/FILE hierarchy),all songs of the
selected hierarchy are played back.
• Press and hold for at least 2 seconds in the search mode to
cancel.
• While in the Search mode, press to switch to the previous mode.
• When search is made during M.I.X. play, the M.I.X. play mode will be
cancelled.
• “ROOT” is displayed for the root folder which does not have folder
name.
• In the search mode, you can scroll the page by pressing and turning
the Double Action encoder (iDA-X313 only).
• If no operation is performed for 60 seconds, the unit will return to
normal mode automatically.
• In the search mode, when there is no tag information in the searched
files, “NO DATA” will be displayed, it may also be displayed when
searching some files depending on the property of the files.
• In FOLDER/FILE search mode, only the current BANK’s folders/
files can be searched.
/ENTER.
/ENTER.
File/Folder Name Search (MP3 Changer)
Folder and file names may be searched and displayed during playback.
1
During MP3/WMA/AAC playback, press /ENTER
to activate the search mode.
2
Turn t he Double Action encoder (iDA-X313 only)
or Rotary encoder (iDA-X311/iDA-X311RR only) to
select Folder Name Search mode or File Name
Search mode, and then press
/ENTER.
File Name Search mode
3
Select the desired file by turning the Double Action
encoder (iDA-X313 only) or Rotary encoder
(iDA-X311/iDA-X311RR only).
4
Press /ENTER to play back the selected file.
• Press and hold for at least 2 seconds in the search mode to
cancel. Or, the search mode is cancelled if no operation is performed
for 60 seconds.
• Press in the search mode to return to the previous mode.
• When File Name Search is made during M.I.X. play, the M.I.X. play
mode will be cancelled.
Switching between Quick Search mode and Folder up/down mode (MP3 changer) (iDA-X311/iDA-X311RR only)
When an MP3 changer is connected, you can switch between the Quick
Search mode and Folder up/down mode.
1
Press FUNCTION/SETUP.
2
Turn t he Rotary encoder to select the desired
adjust menu.
QUICK SEARCH: Quick Search mode
FOLDER UP/DN: Folder up/down mode (Initial Setting)
3
Press /ENTER.
The ON/OFF screen is displayed.
4
Turn t he Rotary encoder.
Select ON.
When ON is set, either Quick Search mode or Folder up/
down mode can be used.
Folder Name Search mode
3
Tur n t he
or Rotary encoder (iDA-X311/iDA-X311RR only)
select the desired folder.
You can scroll the page by pressing and turning the Double
Action encoder (iDA-X313 only).
4
Press and hold /ENTER for at least 2 seconds to
play back the first file in the selected folder.
• Press and hold for at least 2 seconds in the search mode to
cancel. Or, the search mode is cancelled if no operation is performed
for 60 seconds.
To search for files in the Folder Name Search mode, press
•
• Press to exit Folder Name Search mode in step 3 in order to
select File Name Search mode.
• “ROOT” is displayed for the root folder which does not have folder
name.
• When Folder Name Search is made during M.I.X. play, the M.I.X.
play mode will be cancelled.
Double Action encoder (iDA-X313 only)
to
/ENTER. Files in the folder may be searched.
5
Press /ENTER.
• You cannot set both Quick Search mode and Folder up/down mode to
ON.
• If no operation is performed for 10 seconds, the unit will return to
normal mode automatically.
Quick Search (changer)
You can search for tracks (files).
1
Press and hold /ENTER for at least 2 seconds in
the Changer mode to activate Quick Search mode.
2
Turn th e
Double Action encoder (iDA-X313 only) or
Rotary encoder (iDA-X311/iDA-X311RR only)
select a desired track (file).
The selected track is played back immediately.
• Press in the search mode to cancel. Or, the search mode is
cancelled if no operation is performed for 10 seconds.
• When an MP3 changer is connected, set the Quick Search mode to
ON. For details, refer to
Folder up/down mode (MP3 changer) (iDA-X311/iDA-X311RR
only)” (page 17).
“Switching between Quick Search mode and
to
17-EN
Page 20
Select the desired Folder (Folder up/ down) (MP3/WMA/AAC)
CD Changer mode:
Disc No./Track No.
Elapsed Time
Tra c k Tex t*
Disc Text*
2
3
Disc No./Track No.
Elapsed Time
By using this function on iDA-X313
Press and turn the Double Action encoder to select
the desired folder.
Turning to the right will advance to the next folder.
Turning to the left will return to the previous folder.
The first file in the selected folder is played back.
By using this function on iDA-X311/
iDA-X311RR
1
Press /ENTER for at least 2 seconds.
The Folder up/down mode is activated.
2
Turn t he Rotary encoder.
Turning to the right will advance to the next folder.
Turning to the left will return to the previous folder.
The first file in the selected folder is played back.
• When an MP3 changer is connected, set the Folder up/down mode to
ON. For details, refer to
Folder up/down mode (MP3 changer) (iDA-X311/iDA-X311RR
only)” (page 17).
• If no operation is performed for 10 seconds, the unit will return to
normal mode automatically (iDA-X311/iDA-X311RR only).
• USB Memory/Portable Audio Player (iDA-X313 only)
During playback in normal mode, if you press and turn the Double
Action encoder before you perform a search operation, the FOLDER
UP/DOWN function will become activate. During playback in
normal mode, if you press and turn the Double Action encoder after
you perform a search operation, the Up/Down Function will become
activate.
“Switching between Quick Search mode and
Changing the Display
Press VIEW.
USB/Portable audio player (iDA-X313 only) mode:
Track No.
Elapsed Time
Song Name
Album Name
1
*
1
*
Folder Name
File Name
Track No.
Elapsed Time
Song Name*1
Artist Name
*
1
MP3 Changer mode:
Disc No./Folder No./File No.
Elapsed Time
Song Name*
Album Name*
*1TAG information
“ARTIST”/“ALBUM”/“SONG” is displayed if there is no tag
information.
*2“T TEXT” is displayed if there is no Track Text.
*3“D TEXT” is displayed if there is no Disc Text.
• Only alphanumeric characters can be displayed.
• The maximum number of characters is 128 (128 byte) for USB and
portable audio player.
• The maximum number of characters is 64 (64 byte) for Changer.
• Some characters may not be correctly displayed.
• “NO SUPPORT” is displayed when text information is not
compatible with this unit.
Folder Name
File Name
1
1
Disc No./Folder No./File No.
Elapsed Time
Song Name*
Artist Name*
About MP3/WMA/AAC
CAUTION
Except for private use, duplicating audio data (including MP3/
WMA/AAC data) or distributing, transferring, or copying it,
whether for free or for a fee, without permission of the copyright
holder is strictly prohibited by the Copyright Act and by
international treaty.
What is MP3?
MP3, whose official name is “MPEG-1 Audio Layer 3,” is a
compression standard prescribed by the ISO, the International
Standardization Organization and MPEG which is a joint activity
institution of the IEC.
MP3 files contain compressed audio data. MP3 encoding is
capable of compressing audio data at extremely high ratios,
reducing the size of music files to as much as one-tenth their
original size. This is achieved while still maintaining near CD
quality. The MP3 format realizes such high compression ratios
by eliminating the sounds that are either inaudible to the human
ear or masked by other sounds.
What is AAC?
AAC is the abbreviation for “Advanced Audio Coding”, and is a
basic format of audio compression used by MPEG2 or MPEG4.
What is WMA?
WMA, or “Windows Media™ Audio”, is compressed audio data.
WMA is similar to MP3 audio data and can achieve CD quality
sound with small file sizes.
1
1
18-EN
Page 21

Method for creating MP3/WMA/AAC files
Audio data is compressed by using MP3/WMA/AAC specified
software. For details on creating MP3/WMA/AAC files, refer to
the user’s manual for that software.
MP3/WMA/AAC file extensions that can be played back on the
unit are as follows:
MP3: “mp3”
WMA: “wma” (ver. 7.1, 8, 9, 9.1, 9.2 supported)
AAC: “m4a”
WMA is not supported for the following files, Windows Media
Audio Professional, Windows Media Audio 9 Voice or Windows
Media Audio 9 Pro Lossless.
Depending on the software that is used to create AAC, the file
format may differ from the extension.
Playback of AAC files encoded by iTunes is supported.
Supported playback sampling rates and bit rates
MP3
Sampling rates: 48 kHz, 44.1 kHz, 32 kHz, 24 kHz, 22.05 kHz,
Bit rates: 32 - 320 kbps
WMA
Sampling rates: 48 kHz, 44.1 kHz, 32 kHz, 24 kHz, 22.05 kHz,
Bit rates: 16 - 320 kbps
AAC
Sampling rates: 48 kHz, 44.1 kHz
Bit rates: 8 - 576 kbps
This device may not play back correctly depending on sampling
rates.
The playback time may not be correctly displayed when a VBR
(Variable Bit Rate) recorded file is played back.
ID3 tags/WMA tags
This device supports ID3 tag v1 and v2.2.0, v2.3.0 and WMA
tag. The following files do not support compression, coding,
grouping or non-synchronization.
If tag data is in an MP3/WMA/AAC file, this device can display
the title (track title), artist name, and album name ID3 tag/WMA
tag data.
This device can only display single-byte alphanumeric
characters and the underscore. For non-supported characters,
“NO SUPPORT” is displayed.
If information contains characters other than ID3 tag information,
the audio file may not be played back.
The tag information may not be correctly displayed, depending
on the contents.
16 kHz, 12 kHz, 11.025 kHz, 8 kHz
16 kHz
Terminology
Bit rate
This is the “sound” compression rate specified for encoding. The
higher the bit rate, the higher the sound quality, but also the larger
the files.
Sampling rate
This value shows how many times per second the data is sampled
(recorded). For example, music CDs use a sampling rate of 44.1 kHz,
so the sound is sampled (recorded) 44,100 times per second. The
higher the sampling rate, the higher the sound quality, but also the
larger the volume of data.
Encoding
Converting music CDs, WAVE (AIFF) files, and other sound files into
the specified audio compression format.
Tag
Song information such as track titles, artist names, album names,
etc., written into MP3/WMA/AAC files.
Root folder
The root folder is found at the top of the file system. The root folder
contains all folders and files.
Playing back MP3/WMA/AAC
MP3/WMA/AAC files are prepared, and then written to USB
memory. Or, synchronize an MP3/WMA file using Windows
Media Player (Ver. 7.1, 8, 9, 9.1, 9.2), and then forward to the
Portable audio player.
A USB memory device can hold up to 10,000 files/1,000 folders
(including Root Folders). Playback may not be performed if a
USB memory/Por table audio player device exceeds the
limitations described above.
Do not make a file’s playback time more than 1 hour.
Media supported
This device can play back USB memory/Portable audio player
media.
Corresponding File Systems
This device supports FAT 12/16/32.
19-EN
Page 22
Sound Setting
iDA-X313
Double Action encoder
IMPRINT
iDA-X311/iDA-X311RR
SOUND
Adjusting Subwoofer Level/Bass Level/ Treble Level/Balance (Between Left and Right)/Fader (Between Front and Rear)/ Loudness/Defeat
1
Press IMPRINT (iDA-X313 only) or SOUND
(iDA-X311/iDA-X311RR only) repeatedly to choose
the desired mode.
Each press changes the mode as follows:
SUBW LV*1 BASS LV TREBLE LV BALANCE LV
FAD ER LV*2 LOUD*3 DEFEAT VOLUME
SUBW LV*
Subwoofer: 0 ~ +15
Bass level: –7 ~ +7
Treble level: –7 ~ +7
Balance: –15 ~ +15
Fader: –15 ~ +15
Loudness : ON/OFF
Defeat : ON/OFF
Volume: 0 ~ 35
• If IMPRINT (iDA-X313 only) or SOUND (iDA-X311/iDA-X311RR
only) is not pressed within 5 seconds after selecting the Subwoofer,
Bass, Treble, Balance or Fader mode, the unit automatically returns
to normal mode.
• Loudness introduces a special low-and high-frequency emphasis at
low listening levels. This compensates for the ear’s decreased
sensitivity to bass and treble sound. The function is inoperable when
DEFEAT is set to ON.
*1When the subwoofer mode is set to OFF, its level cannot be adjusted.
*2If you set the 2.2ch (3WAY)/4.2ch (FRONT/REAR/SUBW.) switch of
the IMPRINT audio processor (PXA-H100) to 2.2ch (3WAY), you
cannot adjust the FADER mode. For details, refer to the Owner’s
Manual of PXA-H100.
*3When an external audio processor is connected, this setting cannot
be made.
1
/ENTER
PRESET
Rotary encoder
/ENTER
PRESET
2
Tur n the Double Action encoder (iDA-X313 only)
or Rotary encoder (iDA-X311/iDA-X311RR only)
until the desired sound is obtained in each mode.
• Depending on the connected devices, some functions and display
indications do not work.
Setting the Subwoofer/Subwoofer System/Bass/Treble/High Pass Filter
Use steps 1 to 4 to select one of the setting modes to modify. See the
applicable section below for details about the selected setting item.
For iDA-X313, the following setting can be made only when the
IMPRINT audio processor (PXA-H100) is not connected.
1
Press and hold IMPRINT (iDA-X313 only) or
SOUND (iDA-X311/iDA-X311RR only) for at least 2
seconds to activate the Sound Setting selection
mode.
2
Turn t he Double Action encoder (iDA-X313 only)
or Rotary encoder (iDA-X311/iDA-X311RR only) to
select the desired mode, and then press
/ENTER.
SUBW SUBW SYSTEM* BASS TREBLE
HPF SUBW
* Displayed only when subwoofer is ON.
3
Turn t he Double Action encoder (iDA-X313 only)
or Rotary encoder (iDA-X311/iDA-X311RR only) to
change the setting, and then press
4
Press to return to normal mode.
• If no operation is performed for 15 seconds, the unit will return to
normal mode automatically.
• If is pressed during setting, the unit returns to the previous item.
Turning Subwoofer ON/OFF
When the subwoofer is on, you can adjust the subwoofer output level
(refer to page 20).
Turn t he Double Action encoder (iDA-X313 only) or
Rotary encoder (iDA-X311/iDA-X311RR only) to select
SUBW ON/OFF, and then press
ON OFF
/ENTER.
Setting the Subwoofer System
When the subwoofer is on, you can select either SYS 1 or SYS 2 for the
desired subwoofer effect.
Turn t he Double Action encoder (iDA-X313 only) or
Rotary encoder (iDA-X311/iDA-X311RR only) to select
the SUBW SYS 1 or SUBW SYS 2, and then press
/ENTER.
SYS 1 SYS 2
SYS 1: Subwoofer level changes according to the main volume
setting.
SYS 2: Subwoofer level change is different from the main volume
setting. For example, even at low volume settings, the
subwoofer is still audible.
• This function is inoperable when Subwoofer is set to OFF.
/ENTER.
20-EN
Page 23
Setting the Bass Control Setting the Treble Control
You can change the Bass Frequency emphasis to create your own tonal
preference.
Setting the Bass Level
Turn t he Double Action encoder (iDA-X313 only) or
Rotary encoder (iDA-X311/iDA-X311RR only) to select
the desired bass level (–7~+7), and then press
/ENTER.
You can emphasize or weaken the bass level.
• The adjustment can also be made by pressing IMPRINT (iDA-X313
only) or SOUND (iDA-X311/iDA-X311RR only). Refer to
Subwoofer Level/Bass Level/Treble Level/Balance (Between Left and
Right)/Fader (Between Front and Rear)/Loudness/Defeat” (page 20).
Setting the Bass Bandwidth
Turn t he Double Action encoder (iDA-X313 only) or
Rotary encoder (iDA-X311/iDA-X311RR only) to select
the desired bass bandwidth, and then press
Changes the boosted bass bandwidth to wide or narrow. A wider
setting will boost a wide range of frequencies above and below
the centre frequency. A narrower setting will boost only
frequencies near the centre frequency.
Setting the Bass Centre Frequency
Turn t he
Rotary encoder
the desired bass centre frequency, and then press
80 (Hz) 100 (Hz) 200 (Hz) 60 (Hz) 80 (Hz)
Emphasizes the displayed bass frequency ranges.
• The function is inoperable when DEFEAT is set to ON.
Double Action encoder
(iDA-X311/iDA-X311RR only)
/ENTER.
(iDA-X313 only) or
“Adjusting
/ENTER.
to select
You can change the Treble Frequency emphasis to create your own tonal
preference.
Setting the Treble Level
Turn t he
Rotary encoder
the desired treble level (–7~+7), and then press
You can emphasize the treble level.
• The adjustment can also be made by pressing IMPRINT (iDA-X313
Setting the Treble Centre Frequency
Turn t he
Rotary encoder
the desired treble centre frequency, and then press
10.0 kHz 12.5 kHz 15.0 kHz 17.5 kHz 10.0 kHz
Emphasizes the displayed treble frequency ranges.
• The function is inoperable when DEFEAT is set to ON.
Double Action encoder
(iDA-X311/iDA-X311RR only)
/ENTER.
only) or SOUND (iDA-X311/iDA-X311RR only). Refer to
Subwoofer Level/Bass Level/Treble Level/Balance (Between Left and
Right)/Fader (Between Front and Rear)/Loudness/Defeat” (page 20).
Double Action encoder
(iDA-X311/iDA-X311RR only)
/ENTER.
(iDA-X313 only) or
to select
“Adjusting
(iDA-X313 only) or
to select
Adjusting the High Pass Filter
The High Pass Filter on this unit can be adjusted to suit your personal
taste.
Turn t he Double Action encoder (iDA-X313 only) or
Rotary encoder (iDA-X311/iDA-X311RR only) to select
the desired HPF frequency, and then press
OFF 80 (Hz) 120 (Hz) 160 (Hz)
• The function is inoperable when DEFEAT is set to ON.
/ENTER.
Operating the External Audio Processor
You can call up the preset memory of the external audio processor from
this unit.
1
Press and hold PRESET for at least 2 seconds to
call the external audio processor mode when the
external audio processor is connected.
The AP Preset screen is displayed.
2
Turn t he Double Action encoder (iDA-X313 only)
or Rotary encoder (iDA-X311/iDA-X311RR only) to
select the preset number, and press
• For the operation of external audio processor, refer to the Owner’s
Manual of the external audio processor you purchased.
/ENTER.
21-EN
Page 24
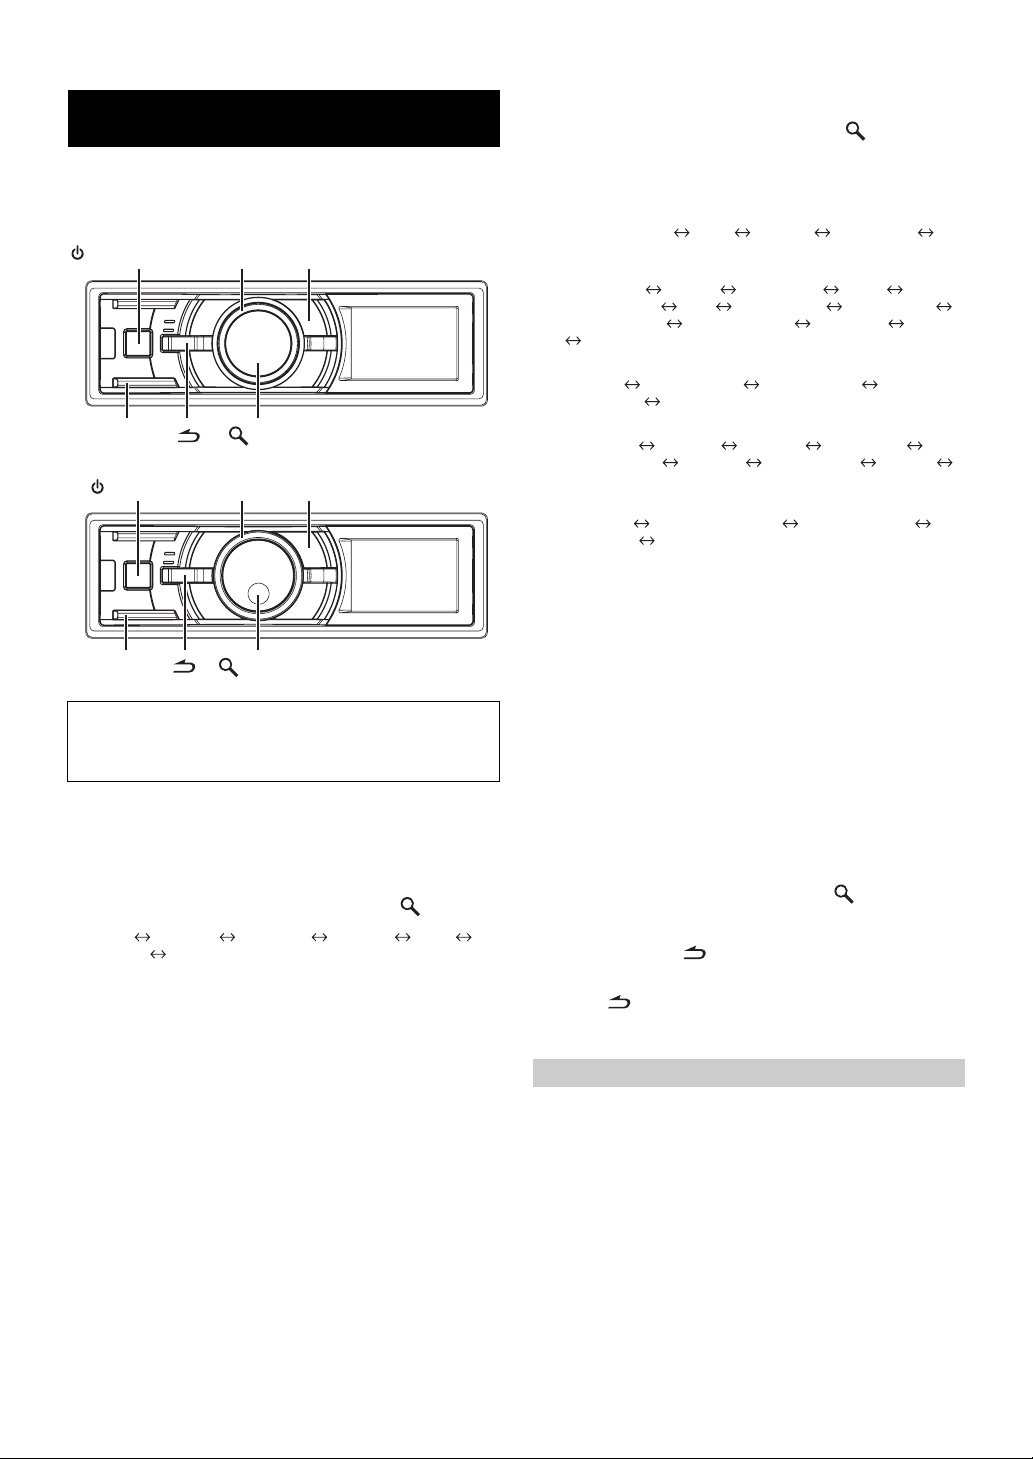
SETUP
Use the SETUP menu to flexibly customize the unit to suit your own
preferences and usage. Choose settings from GENERAL, DISPLAY,
etc., to make the desired changes.
iDA-X313
SOURCE
BAND/TA
Double Action encoder
iDA-X311/iDA-X311RR
SOURCE
BAND/TA
Rotary encoder
/ENTER
Follow steps 1 to 5 to choose an item to change. See
the item descriptions following step 5 for further
details.
1
Press and hold FUNCTION/SETUP for at least 2
seconds to activate the SETUP selection mode.
2
Turn t he Double Action encoder (iDA-X313 only)
or Rotary encoder (iDA-X311/iDA-X311RR only) to
select the desired item, and then press
BT*1 AUDIO*2 GENERAL DISPLAY IPOD
TUNER BT
(e.g. Select GENERAL)
*1Displayed only when INT MUTE is set to OFF, and the mode is set to
other than BT AUDIO.
*2Displayed only when an external audio processor is connected. For
details, refer to the Owner’s Manual of the external audio processor.
FUNCTION/SETUP
/ENTER
FUNCTION/SETUP
/ENTER.
3
Turn t he Double Action encoder (iDA-X313 only)
or Rotary encoder (iDA-X311/iDA-X311RR only) to
select a setting item, and then press
(e.g. Select POWER IC)
BT:
BT IN
AUDIO*3:
USER PRESET*4
USER PRESET
GENERAL:
PLAY MODE BEEP
AUX+ NAME
D-AUX NAME
PLAY MODE
DISPLAY:
DIMMER SCROLL TYPE TEXT SCROLL
LANGUAGE DIMMER
IPOD:
PLAYLISTS ARTISTS ALBUMS PODCASTS
AUDIOBOOKS GENRES COMPOSERS SONGS
PLAYLISTS
TUNER:
FM LEVEL RDS REGIONAL*11 ALERT PTY31*12
PI SEEK*13 FM LEVEL
*3If IMPRINT audio processor is connected, you can make more
detailed settings for the audio setting. For details, refer to
Operation (Optional) (iDA-X313 only)” (page 25).
*4Displayed only when an external audio processor is connected.
*5Displayed only when MX is set to ON and an external audio
processor is connected. (or the IMPRINT audio processor is
connected (iDA-X313 only)).
*6 iDA-X313 only.
*7 Displayed only when BT IN is OFF.
*8The setting can be made only when AUX+/AUX is set to ON.
*9Displayed only when DIGITAL AUX is set to ON.
*10Displayed only when AUX+ is set to ON.
*11Refer to “Receiving RDS Regional (Local) Stations” (page 8).
*12Refer to “Setting PTY31 (Emergency Broadcast) reception” (page 9).
*13Refer to “PI SEEK Setting” (page 8).
4
Turn t he Double Action encoder (iDA-X313 only)
MX*4
4
*
8
*
AUX AUX NAME
9
*
AUX IN GAIN
SUBW*4 MX LEVEL
6
*
INT MUTE
*
*
10
*
POWER IC DEMO
/ENTER.
5
*
7
AUX+
8
DIGITAL AUX
“IMPRINT
or Rotary encoder (iDA-X311/iDA-X311RR only) to
change the setting, and then press
(e.g. Select POWER IC ON or POWER IC OFF.)
5
Press and hold for 2 seconds to return to normal
/ENTER.
mode.
• Pressing during the procedure will return to the previous mode.
• If no operation is performed for 60 seconds, the unit will return to
normal mode automatically.
BLUETOOTH Setting
Select BT from the setup main menu in step 2 above.
If an optional BLUETOOTH INTERFACE (KCE-400BT) is connected,
you can place a hands-free call by a BLUETOOTH- equipped mobile
phone.
Make this setting when the BLUETOOTH INTERFACE (KCE-400BT)
is connected and the BLUETOOTH function is used. For details, refer to
the Owner’s Manual of the optional BLUETOOTH INTERFACE
(KCE-400BT).
Set ADPT when the BLUETOOTH INTERFACE (KCE-400BT) is
connected.
22-EN
Page 25

• The button can be used only when an optional BLUETOOTH
INTERFACE (KCE-400BT) is connected.
• If the mobile phone compatible with the Voice Dial function is
connected, the Voice Dial function can be used.
• When INT MUTE is set to ON, the BLUETOOTH setting cannot be
made. When the BLUETOOTH INTERFACE (KCE-400BT) is
connected, set INT MUTE to OFF. Refer to
Off (INT MUTE)” (page 23).
“Turning Mute Mode On/
Setting the BLUETOOTH Connection
BT IN ADPT / BT IN OFF (Initial Setting)
Audio Setting (Only when external audio processor is connected)
AUDIO is selected on the setup menu in step 2.
Operating the External Audio Processor (USER PRESET)
PRE-1 (Initial Setting) / PRE-2 / PRE-3 / PRE-4 / PRE-5 / PRE-6
Turn the Double Action encoder (iDA-X313 only) or Rotary encoder
(iDA-X311/iDA-X311RR only) to select the desired preset number, and
then press
In normal mode, you can also call up the preset memory of the external
audio processor by pressing and holding “PRESET” for at least 2
seconds. Refer to
• For the operation of external audio processor, refer to the Owner’s
Manual of the external audio processor you purchased.
/ENTER.
“Operating the External Audio Processor” on page 21.
Turning Media Xpander ON/OFF
OFF (Initial setting) / ON
When the Media Xpander is on, and external audio processor is
connected, you can adjust the Media Xpander level.
Setting the MX Level
NON EFFECT / LEVEL 1 / LEVEL 2 / LEVEL 3
MX (Media Xpander) makes vocals or instruments sound distinct
regardless of the music source. The FM radio, CD, USB memory and
iPhone (iDA-X313 only)/iPod, will be able to reproduce the music
clearly even in cars with a lot of road noise. The initial setting is
different depending on the source.
Subwoofer On and Off
SUBW ON (Initial setting) / SUBW OFF
The adjustment can also be made by pressing and holding IMPRINT*
(iDA-X313 only) or SOUND (iDA-X311/iDA-X311RR only) for at
least 2 seconds. Refer to
* For iDA-X313, when connecting IMPRINT audio processor, you
can’t turn the subwoofer ON or OFF by pressing IMPRINT.
“Turning Subwoofer ON/OFF” (page 20).
General Setting
GENERAL is selected on the setup main menu in step 2.
Connecting an MP3 Changer (PLAY MODE)
CD-DA (Initial setting) / CD-DA&MP3
Perform this setting when connecting MP3 changer. MP3 changer can
playback CDs containing both CD and MP3 data. However, in some
situations (some enhanced CDs), playback may be difficult. For these
special cases, you can select playback of CD data only. When a disc
contains both CD or the MP3 data, playback starts from the CD data
portion of the disc.
CD-DA : Only CD data can be played back.
CD-DA&MP3 : Both CD data and MP3 file tracks can be played
• Change discs after performing this setting.
back.
Sound (Beep) Guide Function (iDA-X313 only)
BEEP ON (Initial setting) / BEEP OFF
This function will give audible feedback with varying tones depending
upon the button pressed.
Turning Mute Mode On/Off (INT MUTE)
INT MUTE ON / INT MUTE OFF (Initial setting)
If a device having the interrupt feature is connected, audio will be
automatically muted whenever the interrupt signal is received from the
device.
• When BLUETOOTH is set to ADPT, INT MUTE cannot be set. Refer
“Setting the BLUETOOTH Connection” (page 23).
to
• When the BLUETOOTH INTERFACE (KCE-400BT) is connected,
set INT MUTE to OFF.
Setting the AUX+ Mode
AUX+ ON / AUX+ OFF (Initial setting)
You can input the audio of a connected external device, (such as a
portable player) to the Full Speed connector (iDA-X311/iDA-X311RR
only)/BLUETOOTH interface connector (iDA-X313 only) of this unit,
using a conversion cable (KCE-237B) (optional) for building up the
AUX IN.
An external device and an iPod (iDA-X311/iDA-X311RR only)/
BLUETOOTH INTERFACE (KCE-400BT) cannot be connected at the
same time.
AUX+ ON : Set to ON when an external device is connected. If
AUX+ OF F : Set to OFF when an iPod (iDA-X311/iDA-X311RR
SOURCE is pressed and AUX+ is selected, the
sound of the external device is input to the unit.
only) is connected. When set to OFF, AUX+ source
cannot be selected.
Setting the AUX+ NAME Mode
AUX (Initial setting) / TV / DVD / PORTABLE / GAME
You can change the AUX+ NAME when AUX+ is ON.
Setting the AUX Mode (V-Link)
AUX ON / AUX OFF (Initial setting)
You can input TV/video sound by connecting an optional Ai-NET/RCA
Interface cable (KCA-121B) or Versatile Link Terminal (KCA-410C) to
this component.
You can change the AUX NAME display when AUX is set to ON. Press
/ENTER when AUX is set to ON, and select AUX NAME by
turning the Double Action encoder (iDA-X313 only) or Rotary
encoder (iDA-X311/iDA-X311RR only), then press
After that, turn the Double Action encoder (iDA-X313 only) or Rotary
encoder (iDA-X311/iDA-X311RR only) to select the desired AUX
name.
If the KCA-410C is connected, it is possible to select two AUX names.
• Via KCA-410C, up to 2 external devices with RCA output can be
connected. In this case, press
then press BAND/ TA to select your desired device.
SOURCE to select AUX mode and
/ENTER.
23-EN
Page 26
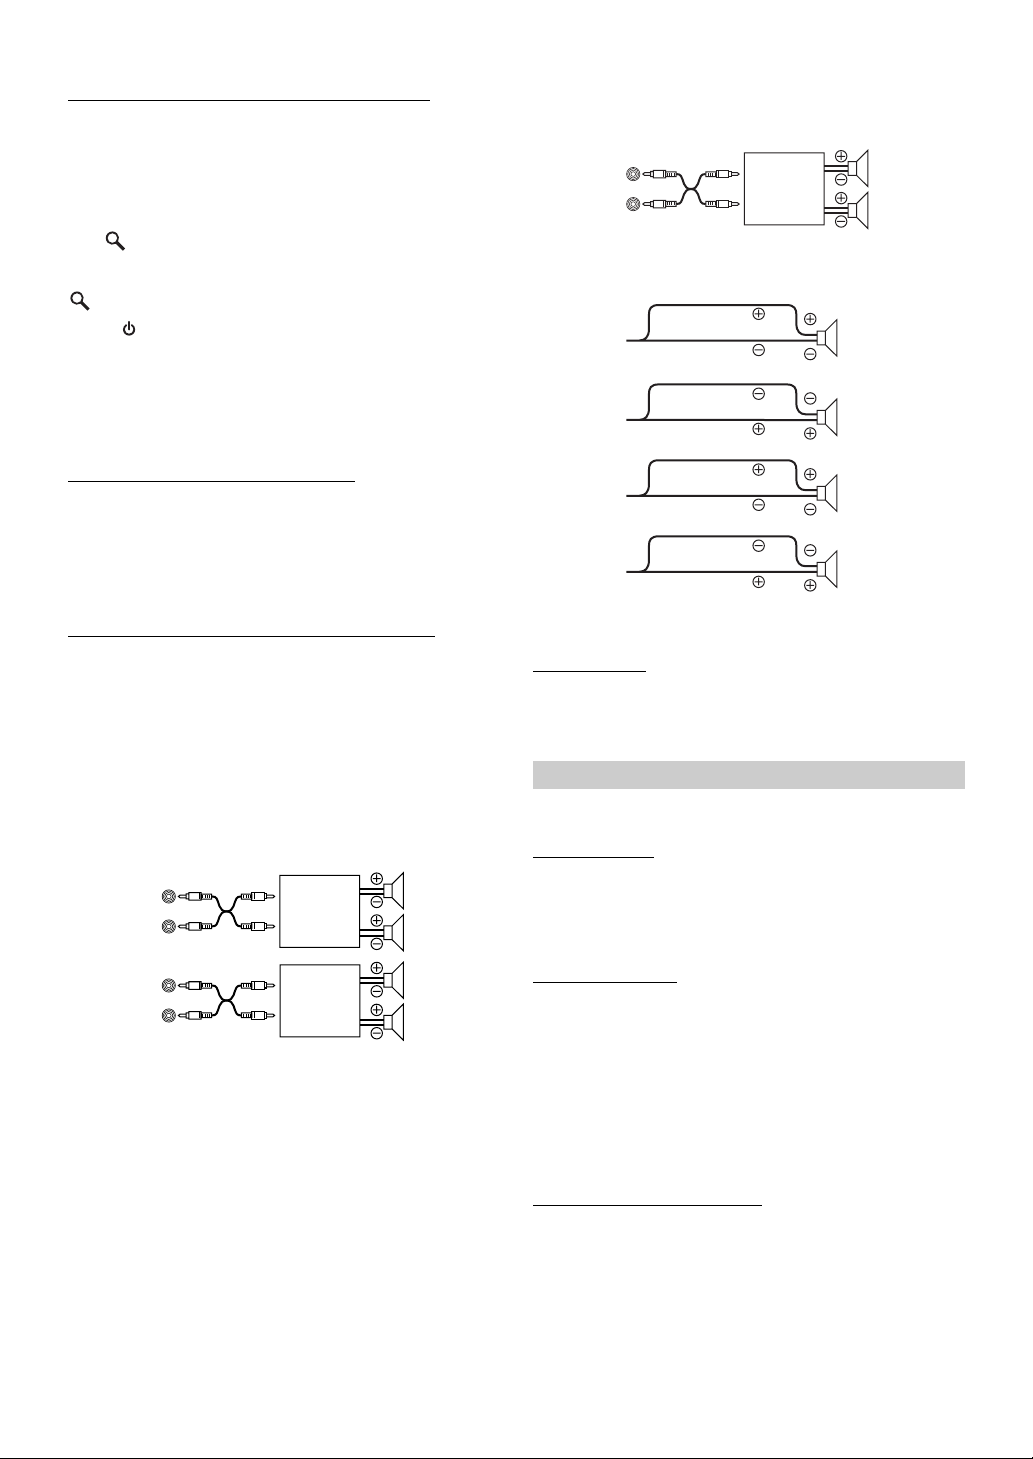
Setting the External Digital Input (DIGITAL AUX)
DIGITAL AUX ON / DIGITAL AUX OFF (Initial setting)
When an ALPINE Ai-NET compatible digital audio processor
(PXA-H701) and a DVD player (DVE-5207) not compatible with
Ai-NET are connected, set DIGITAL AUX to ON to enjoy 5.1-channel
surround sound.
You can change the D-AUX Name when DIGITAL AUX is set to ON.
Press
/ENTER when DIGITAL AUX is set to ON, and select
D-AUX NAME by turning Double Action encoder (iDA-X313 only)
or Rotary encoder (iDA-X311/iDA-X311RR only), then press
/ENTER.
• Press SOURCE, and select the D-AUX mode, and adjust the
volume, etc.
• After input selection is completed, turn the ignition off and back on
again. Setting of the optical digital input switch is completed.
• Depending on the connected audio processor, DVD player sound
may continue to be output, even though the source is changed to
another one. If this occurs, set the DVD player’s power to OFF.
Setting the AUX+ Level (AUX IN GAIN)
LOW (Initial setting) / HI
After setting to ON in “Setting the AUX+ Mode”, this setting can be
carried out.
LOW: Decreases the external input audio level.
HI: Increases the external input audio level.
Connecting to an External Amplifier (POWER IC)
ON (Initial setting) / OFF
When an external amplifier is connected, sound quality can be improved
by stopping the power supply of the built-in amplifier.
POWER IC OFF : Use this mode when the front pre-amplifier of the
iDA-X313 :
unit is used to drive an external amplifier
connected to the speakers. In this setting, the
head unit’s internal amplifier has no output to
drive speakers.
Speakers
Front
Amplifier
Amplifier
left
Front
right
Rear
left
Rear
right
iDA-X311/iDA-X311RR :
Speakers
Rear
Amplifier
POWER IC ON : The speakers are driven by the built-in amplifier.
left
Front
right
Speakers
SPEAKER
RIGHT FRONT
SPEAKER
RIGHT REAR
SPEAKER
LEFT REAR
SPEAKER
LEFT FRONT
Front
right
Rear
right
Rear
left
Front
left
• No sound is produced by the system when the POWER IC is set to
OFF.
Demonstration
DEMO ON / DEMO OFF (Initial setting)
This unit has a Demonstration feature for the display.
• To quit Demo mode, set to DEMO OFF.
Display Setting
DISPLAY is selected on the setup main menu in step 2.
Dimmer Control
MANUAL / AUTO (Initial setting)
Set the Dimmer control to AUTO to decrease the illumination
brightness of the unit with the head lights of the vehicle ON. This mode
is useful if you feel the unit’s backlighting is too bright at night.
Scroll Type Setting
TYPE1 / TYPE2 (Initial setting)
Choose from two scrolling methods.
Select the type you prefer.
TYPE1: The characters scroll from right to left, a single
character at a time.
TYPE2: Words are built up from left to right, a single character
at a time. When the display is filled, it is cleared and
the remaining words are displayed the same way until
all words of the title have been shown.
Scroll Setting (TEXT SCROLL)
AUTO / MANUAL (Initial setting)
You can set a scroll type such as song title or file name on the source
screen. If the search mode screen displays fills with text, the display
scrolls.
TEXT SCROLL AUTO : Text information are scrolled
automatically.
TEXT SCROLL MANUAL : The first display scrolls text
information one time only.
24-EN
Page 27
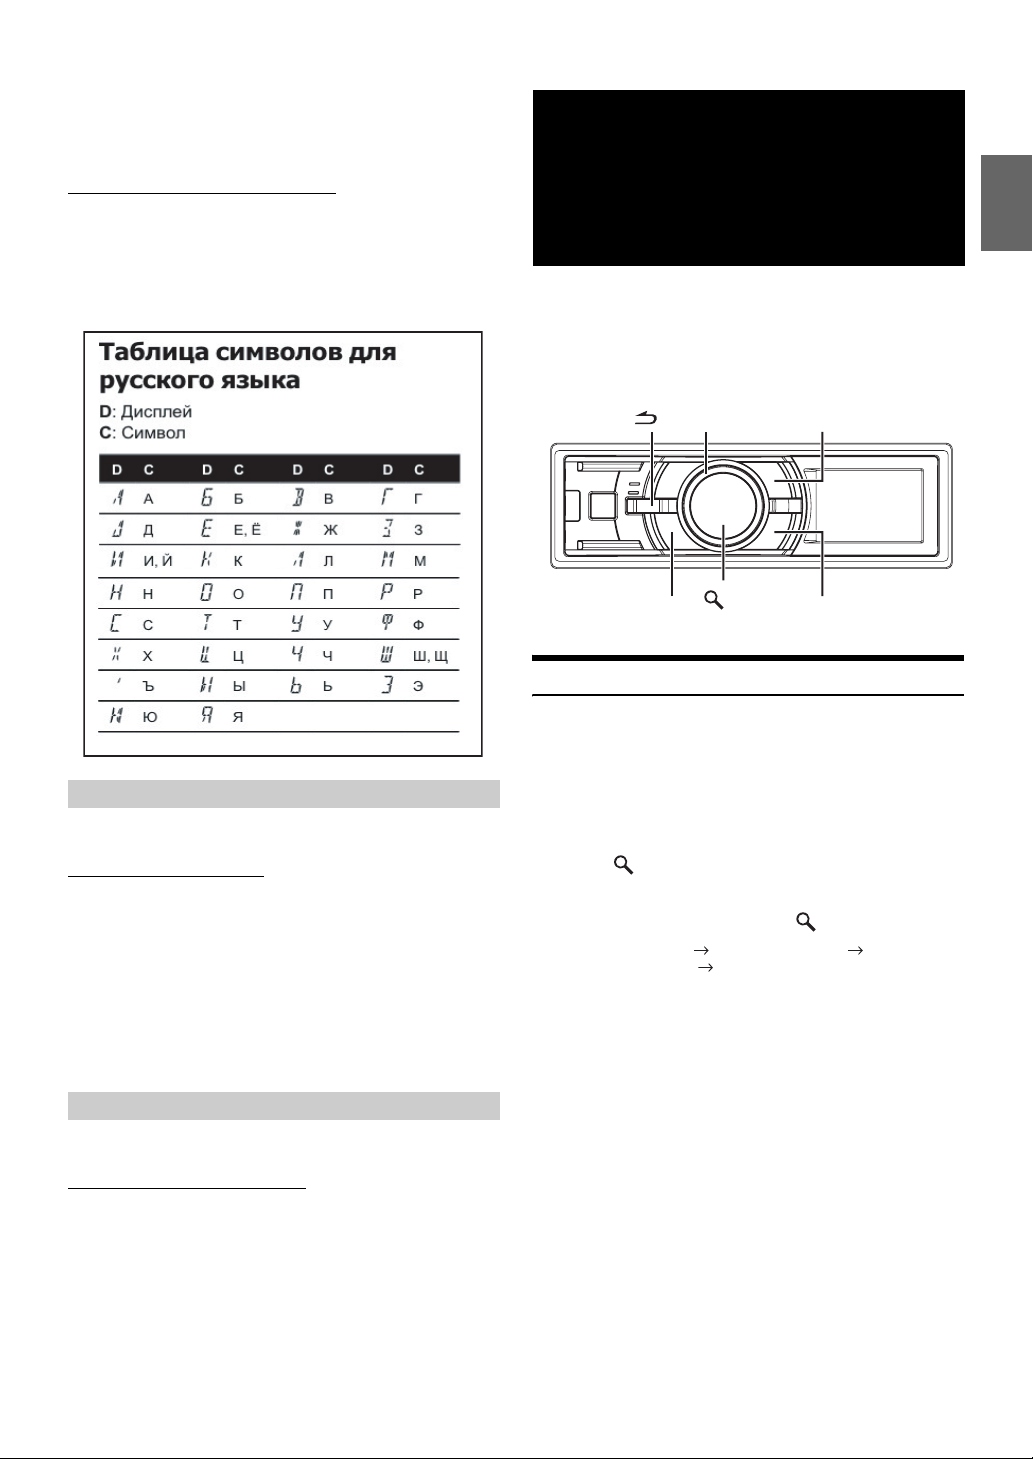
• In parts of the display, scrolling may not occur, or scroll content may
differ.
• Regardless of this setting, if the display is filled with text, the display
scrolls.
IMPRINT Operation
Setting the Language (LANGUAGE)
LAN GUAG E 1 (I nitia l s ettin g) / LANGUAGE 2
Set the language to be displayed on the unit.
LANGUAGE 1 : English, Latin character
LANGUAGE 2 : Russian, English
• Refer to the table below for the Russian display on this unit.
iPod Setting
IPOD is selected on the setup main menu in step 2.
(Optional)
(iDA-X313 only)
Alpine introduces IMPRINT - the world’s first technology that
thoroughly eliminates in-car acoustic problems that normally degrade
sound quality, which enables us to experience music the way the artist
intended. When the IMPRINT audio processor (PXA-H100) (sold
separately) is connected to this unit, MultEQ and the following sound
adjustment can be performed.
Double Action encoder
IMPRINT
/ENTER
Changing MultEQ mode
MultEQ, developed by Audyssey Labs, automatically corrects the audio
for the listening environment. The system is optimized for selected
positions in the vehicle. To accomplish this, MultEQ must take
measurements of the vehicles response characteristics. For details on the
set up procedure, consult your authorized Alpine dealer.
1
Press and hold IMPRINT for at least 2 seconds.
FUNCTION/SETUP
PRESET
iPod Search Mode Setting
ON / OFF
The unit allows you to search for the iPhone (iDA-X313 only)/iPod
using eight different search modes.
When the search mode is in PLAYLISTS/ARTISTS/ALBUMS/
PODCASTS/AUDIOBOOKS, the initial setting is ON, and when the
search mode is in GENRES/COMPOSERS/SONGS, the initial setting
is OFF.
• For search mode details, refer to “Searching for a desired Song/
Title” (page 11).
TUNER Setting
TUNER is selected on the setup main menu in step 2.
Adjusting Source Signal Levels
FM LEVEL HI (Initial setting) / FM LEVEL LOW
If the difference in volume level between the iPod and FM radio is too
great, adjust the FM signal level.
2
Press /ENTER.
3
Turn t he Double Action encoder to select the
MultEQ mode, and then press
OFF (Manual Mode) CURVE 1 (MultEQ-1)
CURVE 2 (MultEQ-2) OFF (Manual Mode)
4
Press and hold IMPRINT for at least 2 seconds to
return to normal mode.
• The Curve mode can be selected only when curve 1 and curve 2 are
stored.
•
When using MultEQ, MX, X-OVER, Time Correction, Factory’s EQ,
SUBW PHASE, SUBW CHANNEL, TW Setup, EQ Mode, Filter Type,
Parametric EQ and Graphic EQ are set automatically. They are no
longer user adjustable.
• When an external audio processor is connected, the MultEQ function
cannot be used.
/ENTER.
25-EN
Page 28
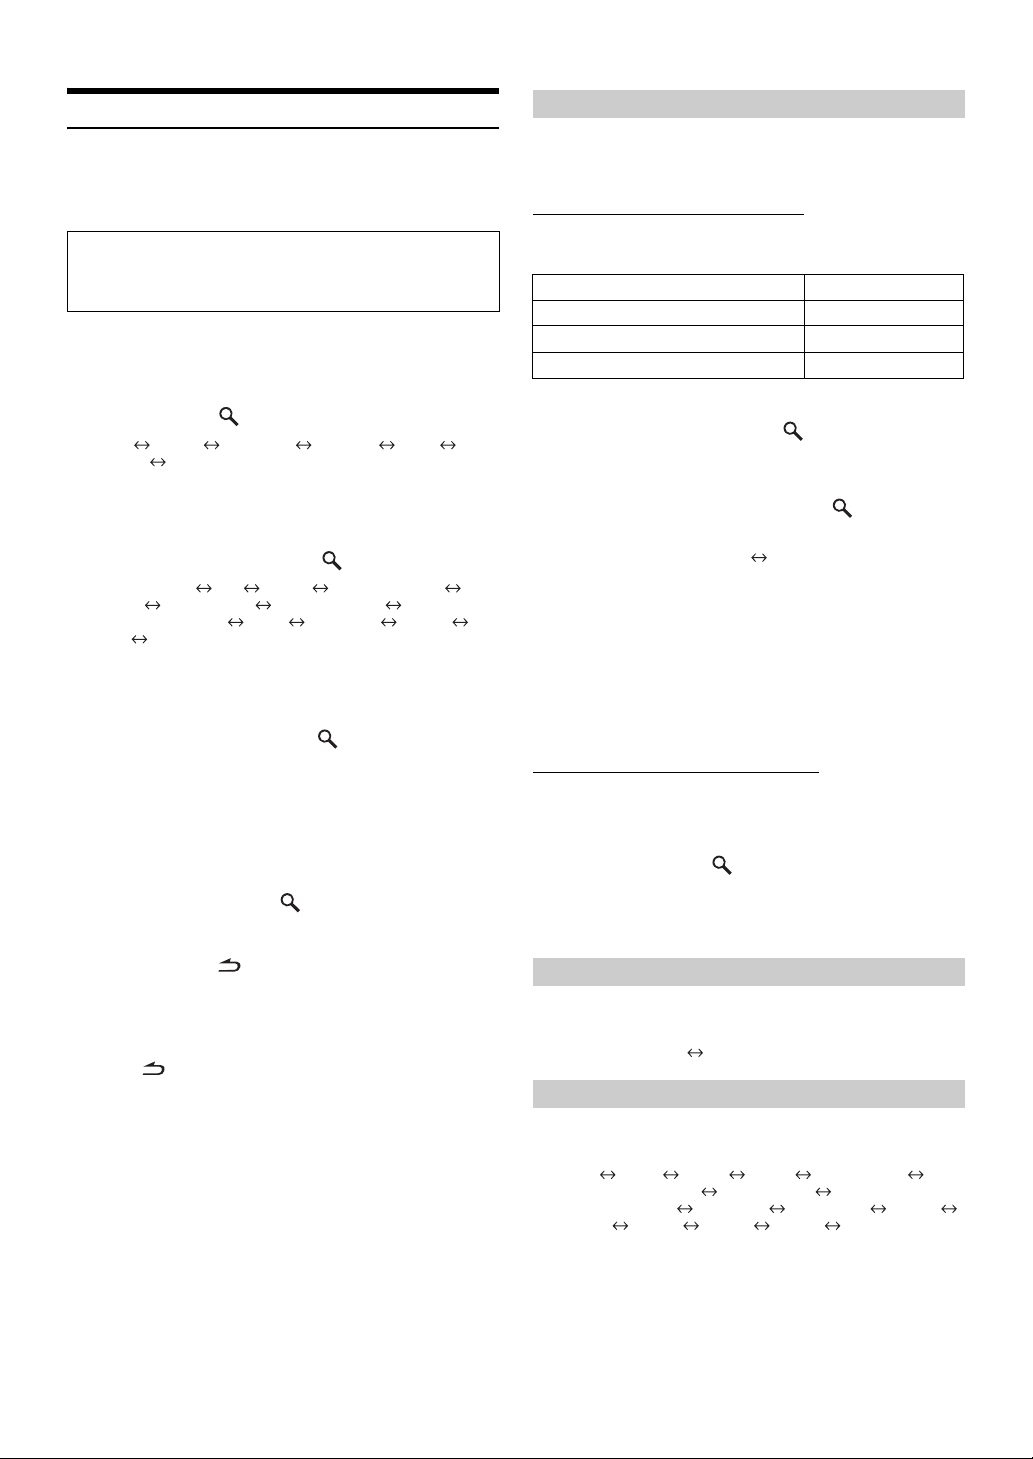
Adjusting Sound Setting in Manual Mode
You can change these sound settings to create your own preference
when the MultEQ mode is set to MultEQ off (Manual Mode).
However, subwoofer in the subwoofer system can be set to ON/OFF
regardless of whether the MultEQ setting is ON or OFF.
Use steps 1 to 5 to select one of the Sound menu
modes to modify. See the applicable section below for
details about the selected item.
1
Press and hold FUNCTION/SETUP for at least 2
seconds to activate the SETUP selection mode.
2
Turn t he Double Action encoder to select AUDIO,
and then press
BT*1
AUDIO
TUNER
*1Displayed only when INT MUTE is set to OFF, and the mode is set to
other than BT AUDIO.
3
Turn t he Double Action encoder to select the
BT
desired item, and then press
USER PRESET MX FR-EQ SOUND FIELD
SUBW SUBW SYS
SUBW CHANNEL
TCR MX LEVEL
(e.g. Select SUBW)
*2In step 3, three sound adjustment items (PARAMETRIC EQ/
GRAPHIC EQ, TIME CORRECTION, X-OVER) can be selected in
Sound Field Adjustment mode, turn the Double Action encoder to
select the desired item, and then press
step 4.
*3These functions are inoperable when Subwoofer is set to OFF.
*4This function can be operable only when PXA-H100 (sold separately)
is connected and 2.2ch (3WAY) mode is set. For details, refer to the
Owner’s Manual of PXA-H100.
*5This function is inoperable when MX is set to OFF.
4
Turn t he Double Action encoder to change the
setting, and then press
(e.g. Select SUBW ON or SUBW OFF)
5
Press and hold for at least 2 seconds to return to
normal mode.
• Media Xpander, Factory’s EQ, Parametric EQ/Graphic EQ
Adjustment, EQ Mode and MX Level Adjustment are inoperable
when DEFEAT is set to ON.
• Pressing returns to the previous Sound menu mode.
• If no operation is performed for 60 seconds, Sound menu mode is
cancelled.
/ENTER.
GENERAL DISPLAY IPOD
/ENTER.
2
*
3
*
SUBW PHASE
3
*
TW
5
*
3
4
*
EQ MODE FILTER
*
/ENTER to continue to
/ENTER.
USER PRESET
• If IMPRINT audio processor is connected, you can make more
detailed settings for the audio setting. For details, refer to
Operation (Optional) (iDA-X313 only)” (page 25).
Storing the Audio Adjustment Level
You can store up to 3 adjusted/set contents on this unit.
All of the following adjusted/set items are stored in a preset memory.
1
Items to be adjusted/set Reference page
EQ ADJ (Parametric EQ/Graphic EQ) page 27 ~ page 27
TCR page 27
X-OVER page 28
Turn t he Double Action encoder to select a preset
number, and press and hold
/ENTER for at least
2 seconds.
2
Turn t he Double Action encoder to select
PROTECT YES/NO, and then press
store the adjusted contents.
PROTECT YES
• If YES is selected, the adjusted contents are protected and stored into
the preset numbers. When you want to store the parameter into a
protected preset number, “REPLACE NO/YES” can be selected.
• If PROTECT NO is selected, the preset is stored.
• While perform this operation, all adjusted contents of Parametric
EQ/Graphic EQ, Time Correction and X-Over will be stored in the
preset number.
• The stored contents are not deleted even when resetting the unit or
disconnecting the battery.
(Initial setting)
PROTECT NO
Recalling the Audio Adjustment Level
You can recall the contents stored in “Storing the Audio Adjustment
Level” (page 26).
1
Turn t he Double Action encoder to select a preset
number, and press
Adjusted/set contents of the selected number are recalled.
• The User Preset screen can also be recalled in normal mode by
pressing and holding PRESET for at least 2 seconds.
/ENTER.
“IMPRINT
/ENTER to
Turning Media Xpander ON/OFF
When the Media Xpander is on, you can adjust the Media Xpander level
(refer to
page 30).
OFF (Initial setting) ON
Equalizer Presets (Factory’s EQ) (FR-EQ)
10 typical equalizer settings are preset at the factory for a variety of
musical source material.
FLAT POPS ROCK NEWS JAZZ&BLUES
ELECTRICAL DANCE HIPHOP&RAP
EASY LISTENING COUNTRY CLASSICAL USER1
USER2 USER3 USER4 USER5 USER6
• By selecting User’s 1 to 6, you can recall the stored preset number in
“Adjusting the Graphic Equalizer Curve” (page 27) or “Adjusting
the Parametric Equalizer Curve” (page 27).
26-EN
Page 29

Sound Field Adjustment
The setting of Parametric EQ/Graphic EQ Adjustment, Time Correction
and X-Over can be adjusted in this mode.
Adjusting the Parametric Equalizer Curve
You can modify the Equalizer settings to create a response curve more
appealing to your personal taste. To adjust the Parametric Equalizer
Curve, set the EQ mode to PARAMETRIC EQ. For details, refer to
“Setting EQ mode” (page 29).
1
After selecting EQ ADJ (Parametric EQ) from the
Sound Field Adjustment mode, turn the Double
Action encoder to select the band adjustment, and
then press
BAND1 BAND2 BAND3 BAND4 BAND5 BAND1
2
Turn t he Double Action encoder to select an item
to adjust, then press
FC LV Q FC
(frequency) (level) (bandwidth) (frequency)
Frequency Adjustment
3
-1 Turn the Double Action encoder to select
frequency bands.
Adjustable frequency bands:
20 Hz to 20 kHz (in 1/3 octave steps)
BAND1: 20 Hz~80 Hz (63 Hz)
BAND2: 50 Hz~200 Hz (150 Hz)
BAND3: 125 Hz~3.2 kHz (400 Hz)
BAND4: 315 Hz~8 kHz (1 kHz)
BAND5: 800 Hz~20 kHz (2.5 kHz)
Level Adjustment
3
-2 Turn the Double Action encoder to adjust the
level.
Adjustable level: -6 to +6 dB
Bandwidth (Q) Adjustment
3
-3 Turn the Double Action encoder to set the
bandwidth (Q).
Adjustable bandwidth: 1, 1.5, 3
4
To adjust another band, repeat steps 1 to 3 and
adjust all bands.
• The frequencies of adjacent bands cannot be adjusted within 4 steps.
• While adjusting the Parametric EQ, you should consider the
frequency response of the connected speakers.
• You can select the next band by pressing and turning the Double
Action encoder.
• The User Preset screen can be recalled in the normal mode by
pressing and holding PRESET for 2 seconds.
/ENTER.
/ENTER.
Adjusting the Graphic Equalizer Curve
You can modify the equalizer settings to create a response curve more
appealing to your personal taste. To adjust the graphic equalizer curve,
set the EQ mode to GRAPHIC EQ. For details, refer to
mode” (page 29).
1
After selecting EQ ADJ (Graphic EQ) from the Sound
Field Adjustment mode, turn the Double Action
encoder to select the band adjustment, and then
press
BAND1 BAND2 BAND3 BAND4 BAND5
BAND6 BAND7 BAND1
BAND-1 (63 Hz) / BAND-2 (150 Hz) / BAND-3 (400 Hz) /
BAND-4 (1 kHz) / BAND-5 (2.5 kHz) / BAND-6 (6.3 kHz) /
BAND-7 (17.5 kHz)
2
Press /ENTER to activate the level adjusting
mode.
3
Turn t he Double Action encoder to adjust the
level.
Adjustable output level: -6 to +6 dB
4
To adjust another band, repeat steps 1 to 3, and then
adjust all bands.
• You can select the next band by pressing and turning the Double
Action encoder.
• The User Preset screen can be recalled in the normal mode by
pressing and holding PRESET for 2 seconds.
/ENTER.
“Setting EQ
Adjusting the Time Correction
Before performing the following procedures, refer to “About Time
Correction” (page 30).
1
After selecting TIME CORRECTION from the Sound
Field Adjustment mode, turn the Double Action
encoder to select the band adjustment, and then
press
/ENTER.
2.2ch (3WAY) System
F-L (Initial setting)
(Mid-L) (Mid-R) (High-L ) (High-R)
SW-L SW-R F-L
4.2ch (FRONT/REAR/SUBW.) System
F-L (Initial setting)
(Front-L) (Front-R) (Rear-L) (Rear-R)
SW-L SW-R F-L
F-R R-L R-R
(Mid-L)
F-R R-L R-R
(Front-L)
2
Press /ENTER to activate the Time Correction
input mode.
3
Turn t he Double Action encoder to adjust the
distance (0.0 to 336.6cm).
L = (distance to farthest speaker) – (distance to other
speakers)
Refer to “Time Correction Value List” on page 31.
27-EN
Page 30

4
Repeat steps 1 to 3 to set another speaker.
By setting these values to make its sound reach the
listening position at the same time as the sound of other
speakers.
• You can select the next band by pressing and turning the Double
Action encoder.
• The User Preset screen can be recalled in the normal mode by
pressing and holding PRESET for 2 seconds.
Adjusting the Crossover Settings (X-OVER)
Before performing the following procedures, refer to “About the
Crossover” (page 31).
2.2ch (3WAY) System
1
After selecting X-OVER from the Sound Field
Adjustment mode, turn the Double Action
encoder to select the band adjustment, and then
press
2
Turn t he Double Action encoder to select an item
to adjust, then press
Cut-off frequency
3
-1 Turn the Double Action encoder to select the
desired cut-off frequency (Crossover Point).
Adjustable frequency bands:
*1When MAKER’S is selected, refer to “Setting the Response Slope for
the High Range Speaker (TW Setup)” (page 29).
*2When USER’S is selected, refer to “Setting the Response Slope for
the High Range Speaker (TW Setup)” (page 29).
Level Adjustment
3
-2 Turn the Double Action encoder to adjust the
output level.
Adjustable output level: -12 to 0 dB.
/ENTER.
2.2ch (3WAY) System / NORMAL (L=R)
Setting items:
LOW / MID-L / MID-H / HIGH
2.2ch (3WAY) System / INDIVIDUAL (L/R)
Setting items:
LOW-L / LOW-R / MID-L-L / MID-L-R / MID-H-L /
MID-H-R / HIGH-L / HIGH-R
/ENTER.
FC
(cut-off (level) (slope) (frequency)
frequency)
2.2ch (3WAY) System
Setting items:
LV SLP FC
LOW / MID-L 20 Hz~200 Hz
MID-H 20 Hz~20 kHz
HIGH (1 kHz~20 kHz)*1/(20 Hz~20 kHz)*
2
Slope Adjustment
3
-3 Turn the Double Action encoder to adjust the
slope.
Adjustable slope: FLAT*, 6 dB/oct., 12 dB/oct., 18 dB/oct.,
* FLAT can be set for the HIGH slope only when USER’S is selected in
“Setting the Response Slope for the High Range Speaker (TW
Setup)” (page 29). Depending on the response characteristics of the
speaker, care should be taken when setting the response slope to
FLAT, as speaker damage may result. With this unit, a message is
displayed when the response slope for the high range speaker is set
to FLAT.
4
Repeat steps 1 to 3 to make adjustment to the other
bands.
24 dB/oct.
4.2ch (FRONT/REAR/SUBW.) System
1
After selecting X-OVER from the Sound Field
Adjustment mode, turn the Double Action
encoder to select the band adjustment, and then
press
2
Turn t he Double Action encoder to select an item
to adjust, then press
Cut-off frequency
3
-1 Turn the
desired cut-off
Adjustable frequency bands:
Level Adjustment
3
-2 Turn the Double Action encoder to adjust the
output level.
Adjustable output level: -12 to 0 dB.
/ENTER.
4.2ch (FRONT/REAR/SUBW.) System / NORMAL
(L=R)
Setting items:
LOW (SUB-W) / MID (REAR) / HIGH (FRONT)
4.2ch (FRONT/REAR/SUBW.) System / INDIVIDUAL
(L/R)
Setting items:
LOW (SUB-W)-L / LOW (SUB-W)-R / MID (REAR)-L /
MID (REAR)-R / HIGH (FRONT)-L / HIGH (FRONT)-R
/ENTER.
FC
(cut-off (level) (slope) (frequency)
frequency)
4.2ch (
Setting items:
LV SLP FC
Double Action encoder
frequency (Crossover Point).
FRONT/REAR/SUBW.
20 Hz~200 Hz
) System
to select the
28-EN
Page 31

Slope Adjustment
3
-3 Turn the Double Action encoder to adjust the
slope.
Adjustable slope: FLAT, 6 dB/oct., 12 dB/oct., 18 dB/oct.,
24 dB/oct.
4
Repeat steps 1 to 3 to make adjustment to the other
bands.
• You can select the next band by pressing and turning the Double
Action encoder.
• While adjusting the X-OVER, you should consider the frequency
response of the connected speakers.
• About the 2.2ch (3WAY)/4.2ch (FRONT/REAR/SUBW.) system
You can switch to 2.2ch (3WAY)/4.2ch (FRONT/REAR/SUBW.)
system mode with the 2.2ch (3WAY)/4.2ch (FRONT/REAR/SUBW.)
switch on the PXA-H100. For details, refer to the Owner’s Manual of
PXA-H100.
• The User Preset screen can be recalled in the normal mode by
pressing and holding PRESET for 2 seconds.
Turning Subwoofer ON/OFF
When the subwoofer is on, you can adjust the subwoofer output level
(refer to
page 20).
OFF ON (Initial setting)
Setting the Subwoofer System
When the subwoofer is on, you can select either SYS 1 or SYS 2 for the
desired subwoofer effect.
1 (Initial setting) 2
SYS 1 : Subwoofer level changes according to the main
SYS 2 : Subwoofer level change is different from the main
volume setting.
volume setting. For example, even at low volume
settings, the subwoofer is still audible.
Setting the Subwoofer Phase
NORMAL (Initial setting) REVERSE
The subwoofer output phase is toggled SUBWOOFER NORMAL (0°)
or SUBWOOFER REVERSE (180°). To adjust the level, turn the
Double Action encoder.
Setting the Subwoofer Channel (SUBW CHANNEL)
You can set the subwoofer output to stereo or monaural. Make sure to
set the correct output for your subwoofer type.
STEREO (Initial setting) MONO
STEREO: Subwoofer stereo (L/R) output
MONO: Subwoofer monaural output
Setting the Response Slope for the High Range Speaker (TW Setup)
Depending on the response characteristics of the speaker, care should be
taken when setting the response slope of the high range speaker to
FLAT in 2.2ch (3WAY) mode (see
(X-OVER)” on page 28), as speaker damage may result.
MAKER’S (Initial setting ) USER’S
MAKER’S: As protection from possible speaker damage, FLAT
cannot be set for the response slope of the high
range speaker in 2.2ch (3WAY) mode.
USER’S: The FLAT setting is possible in 2.2ch (3WAY) mode.
“Adjusting the Crossover Settings
Setting EQ mode
This setting gives you a choice of 5-band parametric, or 7-band graphic
equalizer.
PARAMETRIC (Initial setting) GRAPHIC
Setting the Filter type
NORMAL (Initial setting) INDIVIDUAL
NORMAL (L=R): Left and right speakers are adjusted
INDIVIDUAL (L/R): Left and right speakers are individually
equally.
adjusted.
Setting the Time Correction Unit (TCR)
You can change the unit, (cm or inch) of time correction.
CM (Initial setting) INCH
29-EN
Page 32
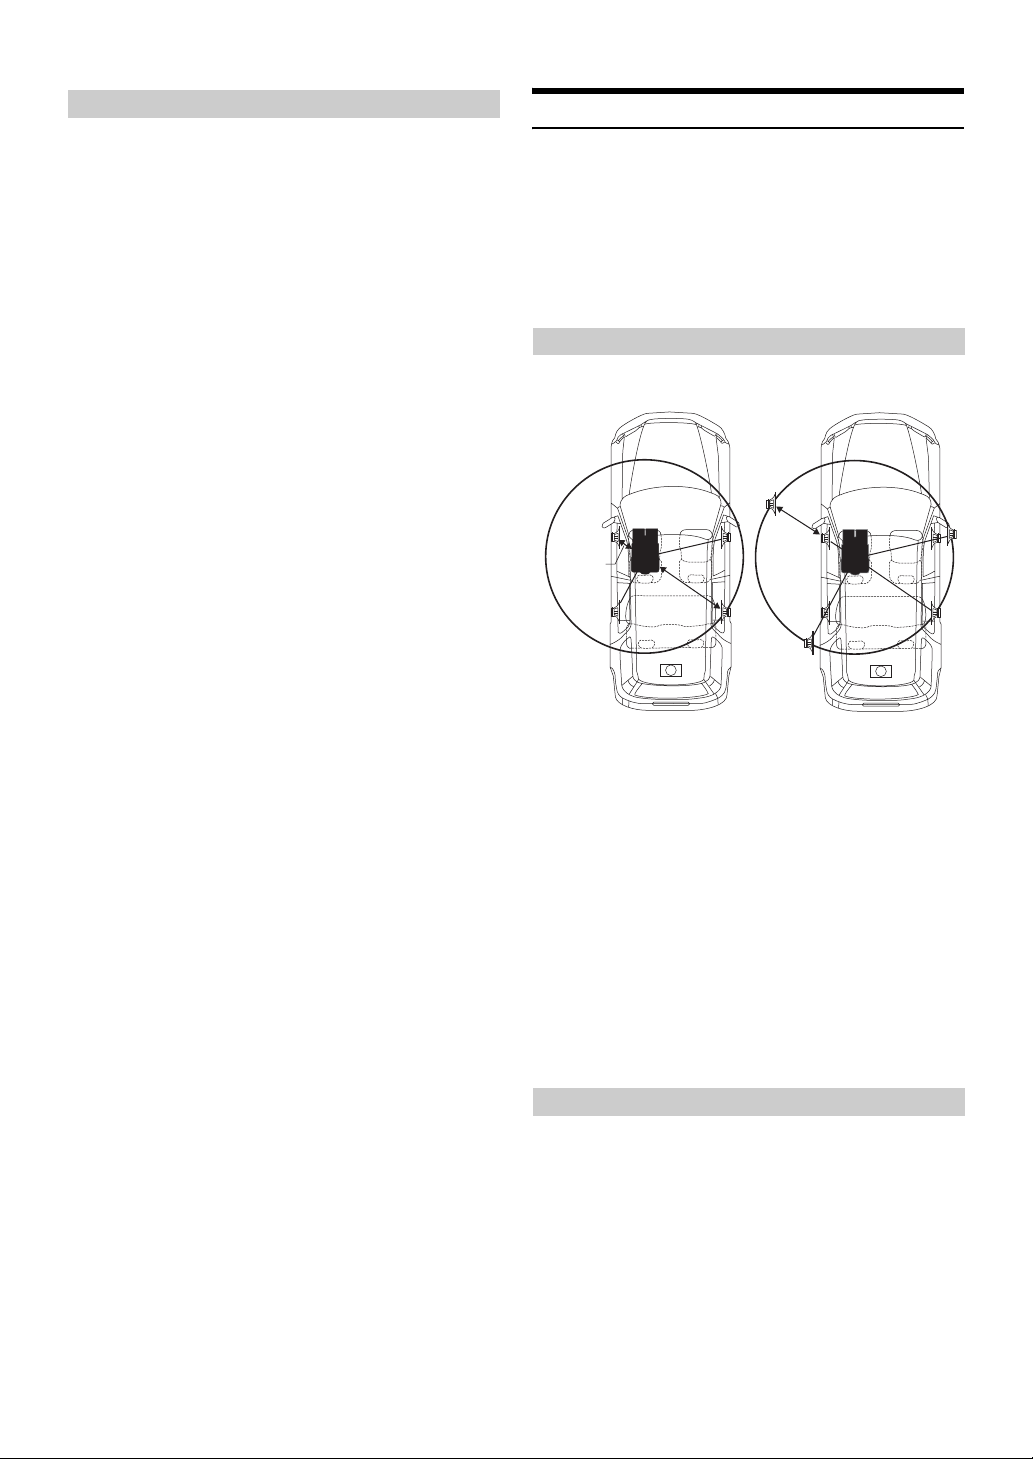
Setting the MX Level
MX (Media Xpander) makes vocals or instruments sound distinct
regardless of the music source. The FM radio, CD, USB memory and
iPod, will be able to reproduce the music clearly even in cars with a lot
of road noise.
Changing the source to which you want to apply Media
Xpander.
FM (MX level 1 to 3):
The medium to high frequencies become clearer, and produces
well balanced sound at all frequencies.
CD (MX level 1 to 3):
CD mode processes a large amount of data during playback.
MX takes advantage of this large data quantity to reproduce a
more clear, clean output.
CMPM (MX level 1 to 3):
This corrects information that was lost at the time of
compression. This reproduces a well-balanced sound close to
the original.
DVD (MX level 1 to 3):
A DVD or Video CD contains a large quantity of data such as
music clip. MX uses this data to reproduce the sound
accurately.
AUX (MX level 1):
Choose the MX mode (CMPM, MOVIE, or MUSIC) that
corresponds to the media connected.
• The initial setting of MX is different depending on the source.
• Each music source, such as FM radio, CD, and MP3/WMA/AAC can
have its own MX setting.
• On disks with both MP3/WMA/AAC and CD-DA, when the source
changes from “MP3/WMA/AAC to CD-DA” or “CD-DA to
MP3/WMA/AAC”, MX-mode switching may delay playback slightly.
• Setting to Non Effect sets MX mode of each music source to OFF.
• The function is inoperable when DEFEAT is set to ON.
• There is no MX mode for MW and LW radio.
• If an audio processor with the MX function (PXA-H701, etc.) is
connected, its own MX processing is applied to the music source.
Since the processor MX settings may not match the head unit, the
audio processor needs to be adjusted. For details, refer to the
Owner’s Manual of the audio processor.
• “CMPM” is applied for MP3/WMA/AAC and iPod.
About Time Correction
The distance between the listener and the speakers in a car vary widely
due to the complex speaker placement. This difference in the distances
from the speakers to the listener creates a shift in the sounds image and
frequency characteristics. This is caused by the time delay between the
sound reaching the listener’s right versus the left ear.
To correct this, this unit is able to delay the audio signal to the speakers
closest to the listener. This effectively creates a perception of increased
distance for those speakers. The listener can be placed at an equal
distance between the left and right speakers for optimum staging.
The adjustment will be made for each speaker in 3.4cm steps.
Example 1. Listening Position: Front Left Seat
Adjust the time correction level of the front left speaker to a high value
and the rear right to zero or a low value.
5.1ms
0.5m
2.25m
The sound is not balanced because the distance between the
listening position and the various speakers is different.
The difference in distance between the front left speaker and the rear
right speaker is 1.75 m (68-7/8").
Here we calculate the time correction value for the front left speaker
in the diagram on the above.
Conditions:
Farthest Speaker – listening position : 2.25 m (88-9/16")
Front left speaker – listening position : 0.5 m (19-11/16")
Calculation: L = 2.25 m – 0.5 m = 1.75 m (68-7/8")
Time correction = 1.75 ÷ 343*1 × 1,000 = 5.1 (ms)
*1Speed of sound: 343 m/s (765 mph) at 20°C
In other words, giving the front left speaker a time correction value of
5.1 ms makes it seem as if its distance from the listener is the same
as the distance to the farthest speaker.
Time correction eliminates the differences in the time required for the
sound to reach the listening position.
The time of the front left speaker is corrected by 5.1 ms so that its
sound reaches the listening position at the same time as the sound of
other speakers.
30-EN
Example 2. Listening Position: All Seats
Adjust the time correction level of each speaker to almost the same level.
1
Sit in the listening position (driver’s seat, etc.) and
measure the distance (in meters) between your head
and the various speakers.
2
Calculate the difference between the distance
correction value to the farthest speaker and the
other speakers.
L = (distance to farthest speaker) – (distance to other
speakers)
Page 33
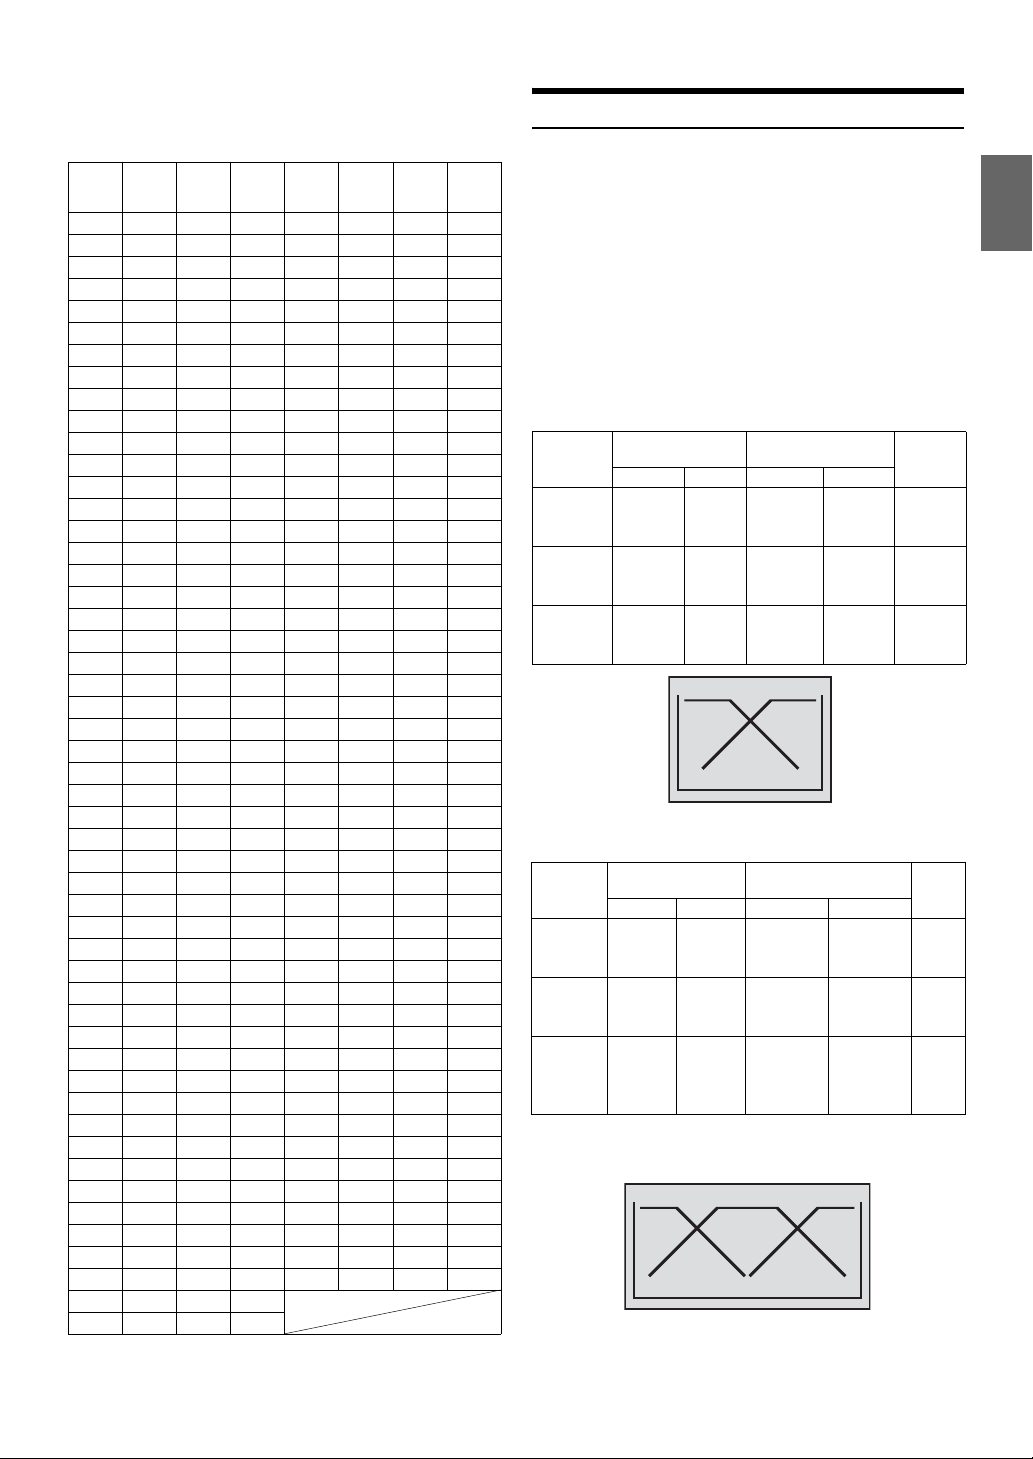
These values are the time correction values for the different
speakers. Setting these values to make each sound reach the
listening position at the same time as the sound of other speakers.
Time Correction Value List
Time
Delay
Number
0 0.0 0.0 0.0 51 5.1 173.4 68.3
1 0.1 3.4 1.3 52 5.2 176.8 69.7
2 0.2 6.8 2.7 53 5.3 180.2 71.0
3 0.3 10.2 4.0 54 5.4 183.6 72.4
4 0.4 13.6 5.4 55 5.5 187.0 73.7
5 0.5 17.0 6.7 56 5.6 190.4 75.0
6 0.6 20.4 8.0 57 5.7 193.8 76.4
7 0.7 23.8 9.4 58 5.8 197.2 77.7
8 0.8 27.2 10.7 59 5.9 200.6 79.1
9 0.9 30.6 12.1 60 6.0 204.0 80.4
10 1.0 34.0 13.4 61 6.1 207.4 81.7
11 1.1 37.4 14.7 62 6.2 210.8 83.1
12 1.2 40.8 16.1 63 6.3 214.2 84.4
13 1.3 44.2 17.4 64 6.4 217.6 85.8
14 1.4 47.6 18.8 65 6.5 221.0 87.1
15 1.5 51.0 20.1 66 6.6 224.4 88.4
16 1.6 54.4 21.4 67 6.7 227.8 89.8
17 1.7 57.8 22.8 68 6.8 231.2 91.1
18 1.8 61.2 24.1 69 6.9 234.6 92.5
19 1.9 64.6 25.5 70 7.0 238.0 93.8
20 2.0 68.0 26.8 71 7.1 241.4 95.1
21 2.1 71.4 28.1 72 7.2 244.8 96.5
22 2.2 74.8 29.5 73 7.3 248.2 97.8
23 2.3 78.2 30.8 74 7.4 251.6 99.2
24 2.4 81.6 32.2 75 7.5 255.0 100.5
25 2.5 85.0 33.5 76 7.6 258.4 101.8
26 2.6 88.4 34.8 77 7.7 261.8 103.2
27 2.7 91.8 36.2 78 7.8 265.2 104.5
28 2.8 95.2 37.5 79 7.9 268.6 105.9
29 2.9 98.6 38.9 80 8.0 272.0 107.2
30 3.0 102.0 40.2 81 8.1 275.4 108.5
31 3.1 105.4 41.5 82 8.2 278.8 109.9
32 3.2 108.8 42.9 83 8.3 282.2 111.2
33 3.3 112.2 44.2 84 8.4 285.6 112.6
34 3.4 115.6 45.6 85 8.5 289.0 113.9
35 3.5 119.0 46.9 86 8.6 292.4 115.2
36 3.6 122.4 48.2 87 8.7 295.8 116.6
37 3.7 125.8 49.6 88 8.8 299.2 117.9
38 3.8 129.2 50.9 89 8.9 302.6 119.3
39 3.9 132.6 52.3 90 9.0 306.0 120.6
40 4.0 136.0 53.6 91 9.1 309.4 121.9
41 4.1 139.4 54.9 92 9.2 312.8 123.3
42 4.2 142.8 56.3 93 9.3 316.2 124.6
43 4.3 146.2 57.6 94 9.4 319.6 126.0
44 4.4 149.6 59.0 95 9.5 323.0 127.3
45 4.5 153.0 60.3 96 9.6 326.4 128.6
46 4.6 156.4 61.6 97 9.7 329.8 130.0
47 4.7 159.8 63.0 98 9.8 333.2 131.3
48 4.8 163.2 64.3 99 9.9 336.6 132.7
49 4.9 166.6 65.7
50 5.0 170.0 67.0
Difference
(ms)
Distance
(cm)
Distance
(inch)
Number
Delay
Time
Difference
(ms)
Distance
(cm)
Distance
(inch)
About the Crossover
Crossover (X-OVER):
This unit is equipped with an active crossover. The crossover limits the
frequencies delivered to the outputs. Each channel is controlled
independently. Thus, each speaker pair can be driven by the frequencies
for which they have been optimally designed.
The crossover adjusts the HPF (high pass filter) or LPF (low pass filter)
of each band, and also the slope (how fast the filter rolls off the highs or
lows).
Adjustments should be made according to the reproduction
characteristics of the speakers. Depending on the speakers, a passive
network may not be necessary. If you are unsure about this point, please
consult your authorized Alpine dealer.
4.2ch (FRONT/REAR/SUBW.) mode
Cut-off frequency
(1/3 octave steps)
HPF LPF HPF LPF
Low range
speaker
Rear high
range
speaker
Front high
range
speaker
20 Hz 200 Hz
20 Hz 200 Hz
----
20 Hz 200 Hz
----
----
Low range High range
(Different from actual display)
2.2ch (3WAY) mode
Cut-off frequency
(1/3 octave steps)
HPF LPF HPF LPF
Low
range
speaker
Mid range
speaker
High
range
speaker
* Only when selecting USER’S in “Setting the Response Slope for the
20 Hz 200 Hz
1 kHz 20 kHz,
(20 Hz ~
20 kHz)*
----
20 Hz 200 Hz
20 Hz 20 kHz
----
High Range Speaker (TW Setup)” (page 29).
Low range Mid range High range
(Different from actual display)
----
FLAT, 6,
12, 18,
24 dB/oct.
FLAT, 6,
12, 18,
24 dB/oct.
----
FLAT, 6,
12, 18,
24 dB/oct.
FLAT*
6, 12, 18,
24 dB/oct.
Slope
FLAT, 6,
24 dB/oct.
Slope
12, 18,
----
----
FLAT, 6,
12, 18,
24 dB/oct.
FLAT, 6,
12, 18,
24 dB/oct.
----
Level
0 to
–12 dB
0 to
–12 dB
0 to
–12 dB
Level
0 to
–12 dB
0 to
–12 dB
0 to
–12 dB
31-EN
Page 34
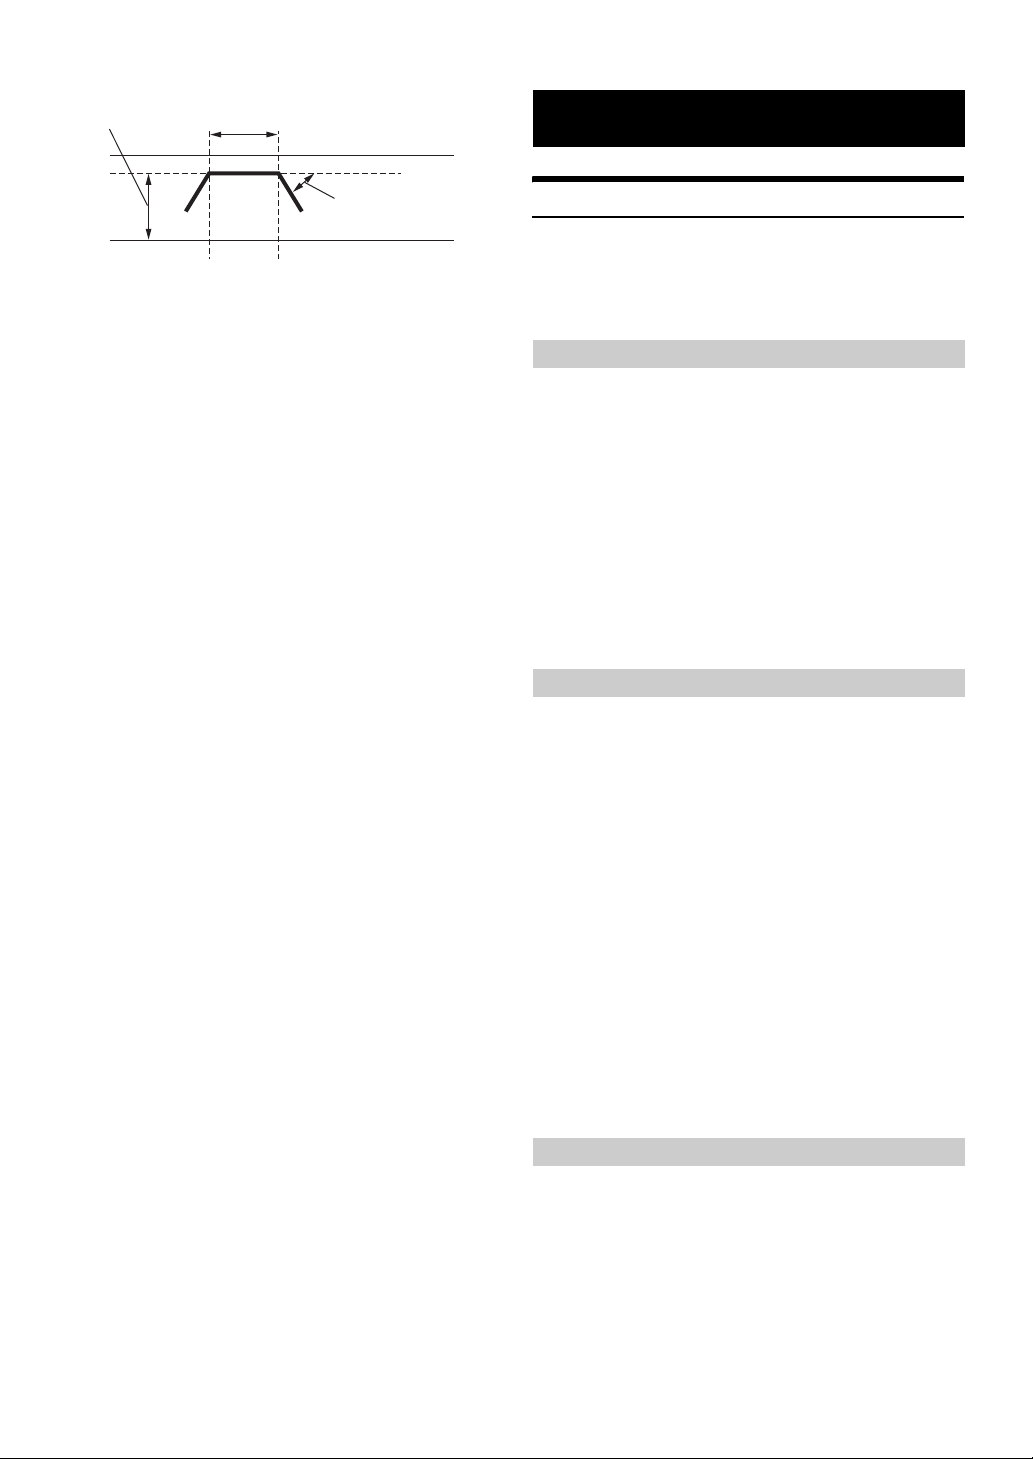
Level adjusting
(0 to –12 dB)
Output frequency range
Slope FLAT
Slope adjusting
Information
In Case of Difficulty
20 Hz
HPF cut-off
frequency
• HPF (high pass filter): Cuts the lower frequencies and allows the
higher frequencies to pass.
• LPF (low pass filter): Cuts the higher frequencies and allows the
lower frequencies to pass.
• Slope: The level change (in dB) for a frequency change of one octave.
• The higher the slope value, the steeper the slope becomes.
• Adjust the slope to FLAT to bypass the HP or LP filters.
• Do not use a tweeter without the HPF on or set to a low frequency, as
it may cause damage to the speaker due to the low frequency content.
• You cannot adjust the crossover frequency higher than the HPF or
lower than the LPF.
• Adjustment should be made according to the recommended crossover
frequency of the connected speakers. Determine the recommended
crossover frequency of the speakers. Adjusting to a frequency range
outside that recommended may cause damage to the speakers.
For the recommended crossover frequencies of Alpine speakers, refer
to the respective Owner’s Manual.
We are not responsible for damage or malfunction of speakers caused
by using the crossover outside the recommended value.
(Different from actual display)
LPF cut-off
frequency
If you encounter a problem, please turn the power off, then on again. If
the unit is still not functioning normally, please review the items in the
following checklist. This guide will help you isolate the problem if the
unit is at fault. Otherwise, make sure the rest of your system is properly
connected or consult your authorized Alpine dealer.
Basic
No function or display.
• Vehicle’s ignition is off.
- If connected following instructions, the unit will not operate
with the vehicle’s ignition off.
• Improper power lead (Red) and battery lead (Yellow)
connections.
- Check power lead and battery lead connections.
•Blown fuse.
- Check the fuse of the unit; replace with the proper value if
necessary.
• Internal micro-computer malfunctioned due to interference noise
etc.
- Press the RESET switch with a ball-point pen or other pointed
article.
Radio
Unable to receive stations.
• No antenna or open connection in cable.
- Make sure the antenna is properly connected;
replace the antenna or cable if necessary.
Unable to tune stations in the seek mode.
• You are in a weak signal area.
- Make sure the tuner is in the DX mode.
• If the area you are in is a primary signal area, the antenna may
not be grounded and connected properly.
- Check your antenna connections; make sure the antenna is
properly grounded at its mounting location.
• The antenna may not be the proper length.
- Make sure the antenna is fully extended; if broken, replace the
antenna with a new one.
Broadcast is noisy.
• The antenna is not the proper length.
- Extend the antenna fully; replace it if it is broken.
• The antenna is poorly grounded.
- Make sure the antenna is grounded properly at its mounting
location.
MP3/WMA/AAC
32-EN
MP3, WMA or AAC is not played back.
• Writing error occurred. The MP3/WMA/AAC format is not
compatible.
- Make sure the MP3/WMA/AAC has been written in a
supported format. Refer to
(pages 18-19), then rewrite in the format supported by this
device.
“About MP3/WMA/AAC”
Page 35
Audio
The sound is not output from the speakers.
• Unit has no output signal of the internal amplifier.
- POWER IC is switched to “ON” (page 24).
iPod
iPod does not play and no sound is output.
• The iPod has not been recognized.
- Reset this unit and the iPod. Refer to “Initial System Start-Up”
(page 6). To reset the iPod, refer to the Owner’s Manual of the
iPod.
Indication for iPod Mode
(USB connection), (iDA-X313 only)
CURRENT
ERROR
• Caused by the iPhone/iPod Software Version not being
compatible with this unit.
- Update the iPhone/iPod Software Version to be compatible
with this unit.
3
• The iPod is not verified.
- Try another iPod.
Indication for iPod Mode
(Direct Connection), (iDA-X311/
iDA-X311RR only)
• Abnormal current is being drawn by the device connected to
USB. An error message may be displayed if the device
connected is not compatible or defective.
- Attempt to connect another iPhone/iPod.
DEVICE
ERROR
• An iPod that is not supported by the unit is connected.
- Connect an iPod that is supported by the unit.
NO USB
DEVICE
• An iPhone/iPod is not connected.
- Make sure the iPhone/iPod is correctly connected and the cable
is not excessively bent.
• There are no songs in the iPhone/iPod.
- Download songs to the iPhone/iPod and connect to this unit.
NO SUPPORT
• Text information that is no supported on the unit has been input.
- Use an iPhone/iPod in which text information is input that is
supported on the unit.
• The iPod is not connected.
- Make sure the iPod is correctly connected (refer to
“Connections”).
Make sure the cable is not bent excessively.
• There are no songs in the iPod.
- Download songs to the iPod and connect to this unit.
• Communication error.
- Turn the ignition key off, and then set to ON again.
- Reset the iPod.
- Check the display by reconnecting between the iPod and this
unit using the FULL SPEED Connection Cable (KCE-433iV).
• Caused by the iPod Software Version not being compatible with
this unit.
-
Update the iPod Software Version to be compatible with this unit.
Indication for USB memory
CURRENT
ERROR
• Abnormal current is run to the USB connector device (an error
message may be displayed if the USB device that is not
compatible with the unit is connected).
USB memory is a malfunction or it is shorted.
- Connect another USB Flash Memory device.
• Communication error.
- Turn the ignition key off, and then set to ON again.
- Reset the iPod.
- Verify in the display after reconnecting the iPhone/iPod to the
Interface cable for iPod and to the USB cable.
DEVICE
ERROR
• A USB device that is not supported by the unit is connected.
- Connect a USB device that is supported by the unit.
NO USB
DEVICE
• A USB memory is not connected.
- Make sure the USB memory device is correctly connected and
the cable is not excessively bent.
33-EN
Page 36
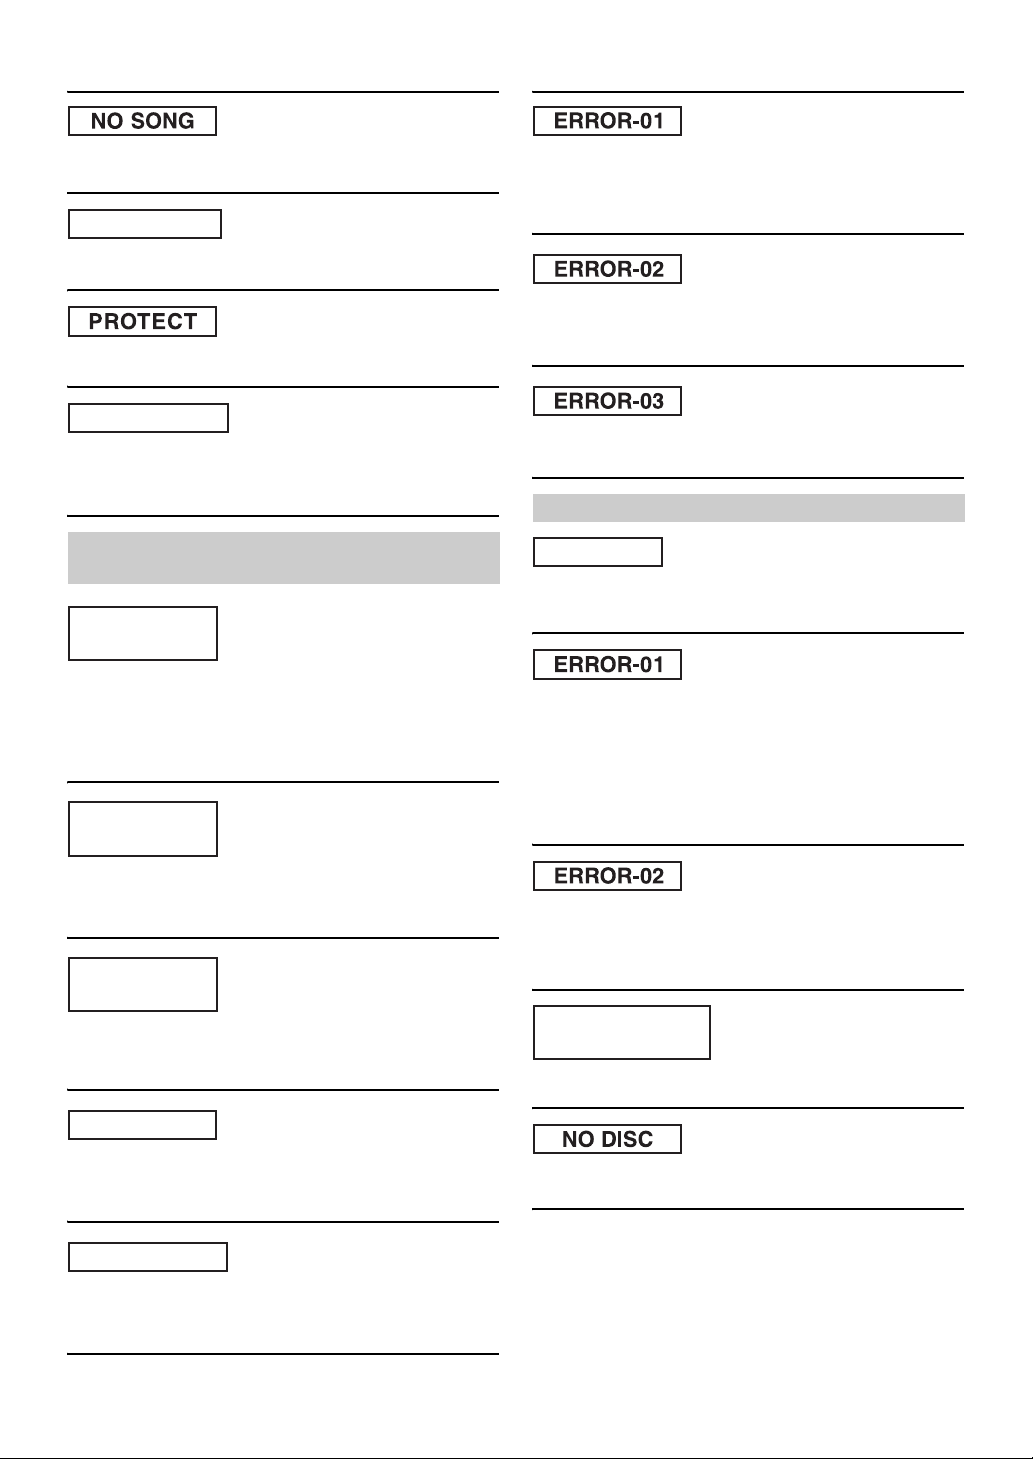
• No song (file) is stored in the USB memory.
- Connect the USB memory device after storing songs (files).
UNSUPORT
• A sampling rate/bit rate not supported by the unit is used.
- Use a sampling rate/bit rate that is supported by the unit.
• A copy-protected WMA file was played back.
- You can only play back non-copy-protected files.
• Communication error.
- Turn the ignition key off, and then set to ON again.
- Verify in the display after reconnecting the Portable audio
player to the connection cable.
• Caused by the Software Version not being compatible with this
unit.
- Update the Portable audio player Software Version.
NO SUPPORT
• Text information that is not recognizable by the unit has been
input.
- Use a USB memory device with input text information that is
supported by the unit.
Indication for Portable audio player Mode
(iDA-X313 only)
CURRENT
ERROR
• Abnormal current is being drawn by the device connected to
USB. An error message may be displayed if the device
connected is not compatible. The USB Flash Memory device
may be defective.
- Attempt to connect another Portable audio player.
DEVICE
ERROR
• A Portable audio player that is not supported by the unit is
connected.
- Attempt to connect another Portable audio player.
NO USB
DEVICE
• A Portable audio player is not connected.
- Make sure the Portable audio player is correctly connected and
the cable is not excessively bent.
• The Portable audio player is not verified.
- Change another Portable audio player.
Indication for CD Changer
HI-TEMP
• Protective circuit is activated due to high temperature.
- The indication will disappear when the temperature returns to
normal operating range.
• Malfunction in the CD Changer.
-
Consult your Alpine dealer. Press the magazine eject button and
pull out the magazine.
Check the indication. Insert the magazine again.
If the magazine cannot be pulled out, consult your Alpine
dealer.
• Magazine ejection not possible.
- Press the magazine eject button. If the magazine does not eject,
consult your Alpine dealer.
• A disc is left inside the CD Changer.
- Press the eject button to activate the eject function. When the
CD Changer finishes the eject function, insert an empty CD
magazine into the CD Changer to receive the disc left inside
the CD Changer.
NO
MAGAZINE
• No magazine is loaded into the CD Changer.
- Insert a magazine.
NO SONG
• There are no songs in the Portable audio player.
- Download songs to the Portable audio player and connect to
this unit.
NO SUPPORT
• Text information that is no supported on the unit has been input.
- Use a Portable audio player in which text information is input
that is supported on the unit.
34-EN
• No indicated disc.
- Choose another disc.
Page 37

Specifications
FM TUNER SECTION
Tuning Range 87.5-108.0 MHz
Mono Usable Sensitivity 0.7 µV
Alternate Channel Selectivity 80 dB
Signal-to-Noise Ratio 65 dB
Stereo Separation 35 dB
Capture Ratio 2.0 dB
MW TUNER SECTION
Tuning Range 531-1,602 kHz
Sensitivity (IEC Standard) 25.1 µV/28 dB
LW TUNER SECTION
Tuning Range 153-281 kHz
Sensitivity (IEC Standard) 31.6 µV/30 dB
USB SECTION
USB requirements USB 1.1/2.0
Max. Power Consumption 500mA
USB Class Mass Storage
File System FAT 12/16/32
MP3 Decoding MPEG-1/2 AUDIO Layer-3
WMA Decoding Windows Media™ Audio
AAC Decoding AAC-LC format “.m4a” file
Number of Channels 2-Channel (Stereo)
Frequency Response* 5-20,000 Hz (±1 dB)
Total Harmonic Distortion 0.008% (at 1 kHz)
Dynamic Range 95 dB (at 1 kHz)
Signal-to-Noise Ratio >105 dB
Channel Separation 85 dB (at 1 kHz)
* Frequency response may differ depending on the encoder
software/bit rate.
GENERAL
Power Requirement 14.4 V DC
(11-16 V allowable)
Maximum Power Output 45 W × 4
Maximum Pre-Output Voltage 2 V/10 k ohms
Bass ±14 dB at 100 Hz
Treb le ±14 dB at 10 kHz
Weight 1.0 kg (2 lbs. 3 oz)
CHASSIS SIZE
Width 178 mm (7")
Height 50 mm (2")
Depth 156 mm (6-1/8")
NOSEPIECE SIZE
Width
iDA-X313 170 mm (6-3/4")
iDA-X311/iDA-X311RR 170 mm (6-3/4")
Height
iDA-X313 46 mm (1-13/16")
iDA-X311/iDA-X311RR 46 mm (1-13/16")
Depth
iDA-X313 28 mm (1-1/8")
iDA-X311/iDA-X311RR 27 mm (1-1/16")
• Due to continuous product improvement, specifications and design
are subject to change without notice.
35-EN
Page 38
Installation and Connections
Before installing or connecting the unit, please read the
following and
for proper use.
pages 3 and 4 of this manual thoroughly
Warning
MAKE THE CORRECT CONNECTIONS.
Failure to make the proper connections may result in fire or product
damage.
USE ONLY IN CARS WITH A 12 VOLT NEGATIVE GROUND.
(Check with your dealer if you are not sure.) Failure to do so may
result in fire, etc.
BEFORE WIRING, DISCONNECT THE CABLE FROM THE
NEGATIVE BATTERY TERMINAL.
Failure to do so may result in electric shock or injury due to
electrical shorts.
DO NOT SPLICE INTO ELECTRICAL CABLES.
Never cut away cable insulation to supply power to other
equipment. Doing so will exceed the current carrying capacity of
the wire and result in fire or electric shock.
DO NOT DAMAGE PIPE OR WIRING WHEN DRILLING HOLES.
When drilling holes in the chassis for installation, take precautions
so as not to contact, damage or obstruct pipes, fuel lines, tanks or
electrical wiring. Failure to take such precautions may result in fire.
Caution
HAVE THE WIRING AND INSTALLATION DONE BY EXPERTS.
The wiring and installation of this unit requires special technical
skill and experience. To ensure safety, always contact the dealer
where you purchased this product to have the work done.
USE SPECIFIED ACCESSORY PARTS AND INSTALL THEM
SECURELY.
Be sure to use only the specified accessory parts. Use of other than
designated parts may damage this unit internally or may not
securely install the unit in place. This may cause parts to become
loose resulting in hazards or product failure.
ARRANGE THE WIRING SO IT IS NOT CRIMPED OR
PINCHED BY A SHARP METAL EDGE.
Route the cables and wiring away from moving parts (like the seat
rails) or sharp or pointed edges. This will prevent crimping and
damage to the wiring. If wiring passes through a hole in metal, use
a rubber grommet to prevent the wire’s insulation from being cut by
the metal edge of the hole.
DO NOT INSTALL IN LOCATIONS WITH HIGH MOISTURE OR
DUST.
Avoid installing the unit in locations with high incidence of
moisture or dust. Moisture or dust that penetrates into this unit may
result in product failure.
DO NOT USE BOLTS OR NUTS IN THE BRAKE OR STEERING
SYSTEMS TO MAKE GROUND CONNECTIONS.
Bolts or nuts used for the brake or steering systems (or any other
safety-related system), or tanks should NEVER be used for
installations or ground connections. Using such parts could disable
control of the vehicle and cause fire etc.
KEEP SMALL OBJECTS SUCH AS BOLTS OR SCREWS OUT
OF THE REACH OF CHILDREN.
Swallowing them may result in serious injury. If swallowed,
consult a physician immediately.
DO NOT INSTALL IN LOCATIONS WHICH MIGHT HINDER
VEHICLE OPERATION, SUCH AS THE STEERING WHEEL OR
SHIFT LEVEL.
Doing so may obstruct forward vision or hamper movement etc.
and results in serious accident.
DO NOT ALLOW CABLES TO BECOME ENTANGLED IN
SURROUNDING OBJECTS.
Arrange wiring and cables in compliance with the manual to
prevent obstructions when driving. Cables or wiring that obstruct or
hang up on places such as the steering wheel, shift lever, brake
pedals, etc. can be extremely hazardous.
IMPORTANT
Please record the serial number of your unit in the space provided
below and keep it as a permanent record. The serial number or the
engraved serial number is located on the bottom of the unit.
Precautions
• Be sure to disconnect the cable from the (–) battery post before
installing your iDA-X313/iDA-X311/iDA-X311RR. This will
reduce any chance of damage to the unit in case of a shortcircuit.
• Be sure to connect the colour coded leads according to the
diagram. Incorrect connections may cause the unit to
malfunction or damage to the vehicle’s electrical system.
• When making connections to the vehicle’s electrical system, be
aware of the factory installed components (e.g. on-board
computer). Do not tap into these leads to provide power for this
unit. When connecting the iDA-X313/iDA-X311/iDA-X311RR
to the fuse box, make sure the fuse for the intended circuit of the
iDA-X313/iDA-X311/iDA-X311RR has the appropriate
amperage. Failure to do so may result in damage to the unit and/
or the vehicle. When in doubt, consult your Alpine dealer.
• The iDA-X313/iDA-X311/iDA-X311RR uses female RCA-type
jacks for connection to other units (e.g. amplifier) having RCA
connectors. You may need an adaptor to connect other units. If
so, please contact your authorized Alpine dealer for assistance.
• Be sure to connect the speaker (–) leads to the speaker (–)
terminal. Never connect left and right channel speaker cables to
each other or to the vehicle body.
SERIAL NUMBER:
INSTALLATION DATE:
INSTALLATION TECHNICIAN:
PLACE OF PURCHASE:
36-EN
Page 39
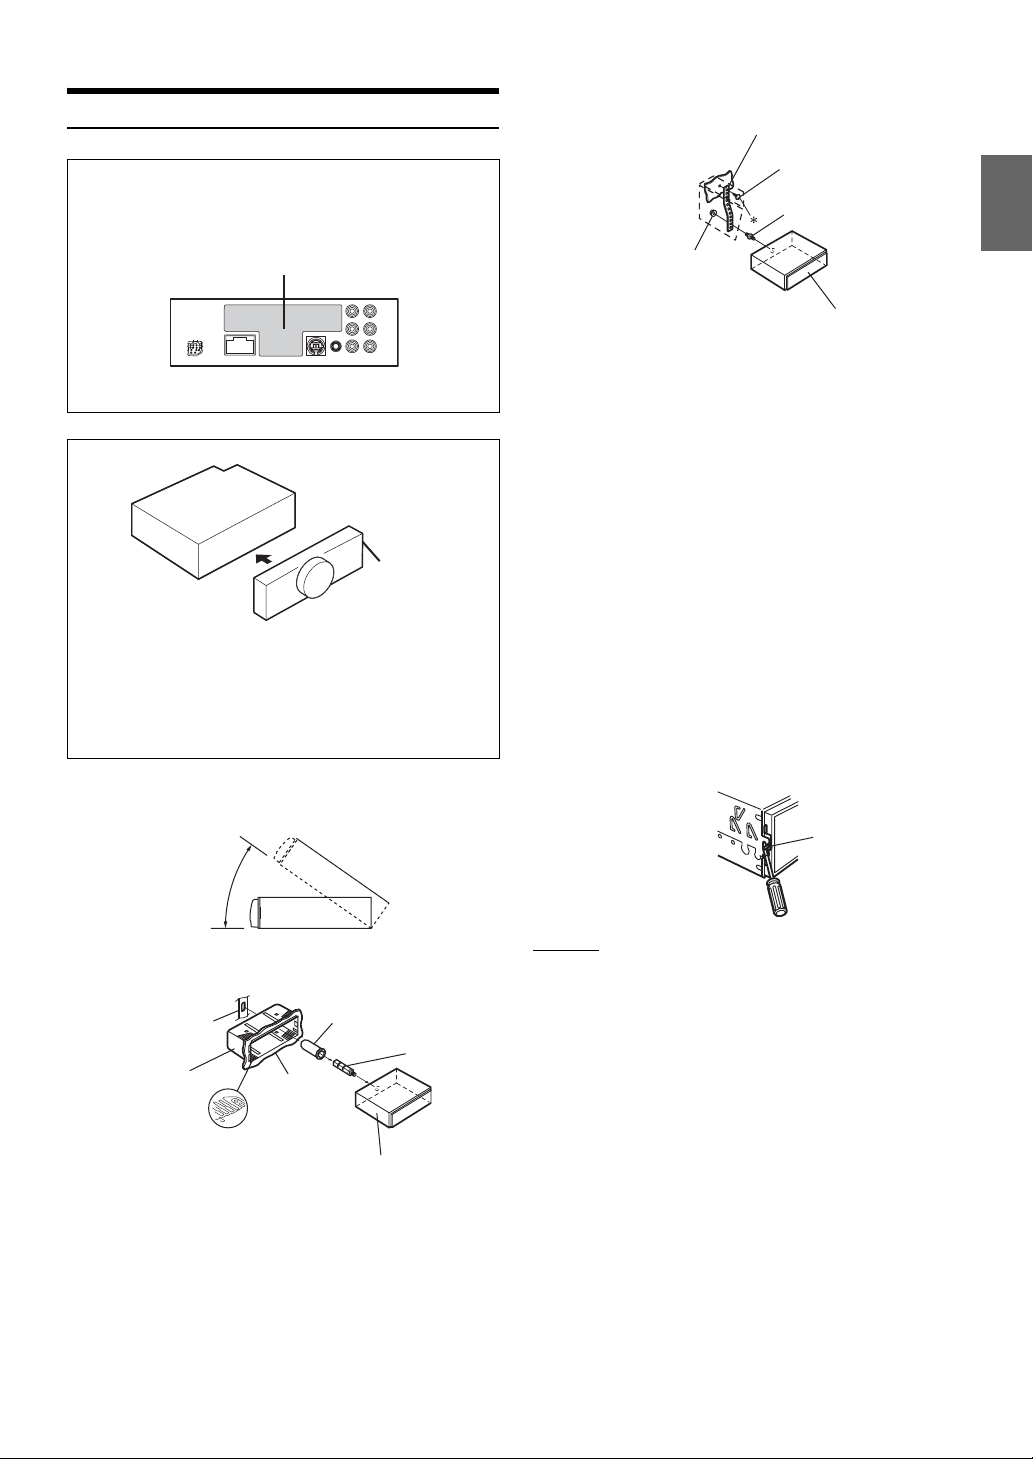
Installation
2
Metal Mounting Strap
Caution
Do not block the unit’s heat sink, thus preventing air circulation.
If blocked, heat will accumulate inside the unit and may cause a
fire.
Heat sink
* The illustrator is for iDA-X313.
Detachable
Front Panel
Caution
When you install this unit in your car, do not remove the
detachable front panel.
If the detachable front panel is removed during installation, you
might press too hard and warp the metal plate that holds it in
place.
• The main unit must be mounted within 35 degrees of the horizontal
plane, back to front.
Screw
Bolt Stud
Hex Nut (M5)
This unit
When your vehicle has the Bracket, mount the
long hex bolt onto the rear panel of the iDA-X313/
iDA-X311/iDA-X311RR and put the Rubber Cap on
the hex bolt. If your vehicle does not have the
Mounting Support, reinforce the head unit with
the metal mounting strap (not supplied). Connect
all the leads of the iDA-X313/iDA-X311/
iDA-X311RR according to details described in the
CONNECTIONS section.
• For the screw *, provide a proper screw to the chassis installing
location.
Slide the iDA-X313/iDA-X311/iDA-X311RR into the
3
dashboard. When the unit is in place, make sure
the locking pins are fully seated in the down
position. This can be done by pressing firmly in
on the unit while pushing the locking pin down
with a small screwdriver. This ensures that the
unit is properly locked and will not accidentally
come out from the dashboard. Install the
detachable front panel.
Less than 35°
1
Bracket
Mounting Sleeve
(Included)
Pressure Plates*
* If the installed mounting sleeve is loose in the main unit, the pressure
plates may be bent slightly to remedy the problem.
Remove the mounting sleeve from the main unit (see
“Removal” on page 37). Slide the mounting sleeve
into the dashboard and fix it with the metal shackles.
Rubber Cap
(Included)
Hex Bolt
(Included)
Dashboard
This unit
Lock pin
Removal
1. Remove the detachable front panel.
2. Use a small screwdriver (or similar tool) to push the
locking pins to the “up” position (see above drawing).
As each pin is unlocked, gently pull out on the unit to
make sure it does not re-lock before unlocking the
second pin.
Pull the unit out, keeping it unlocked as you do so.
37-EN
Page 40
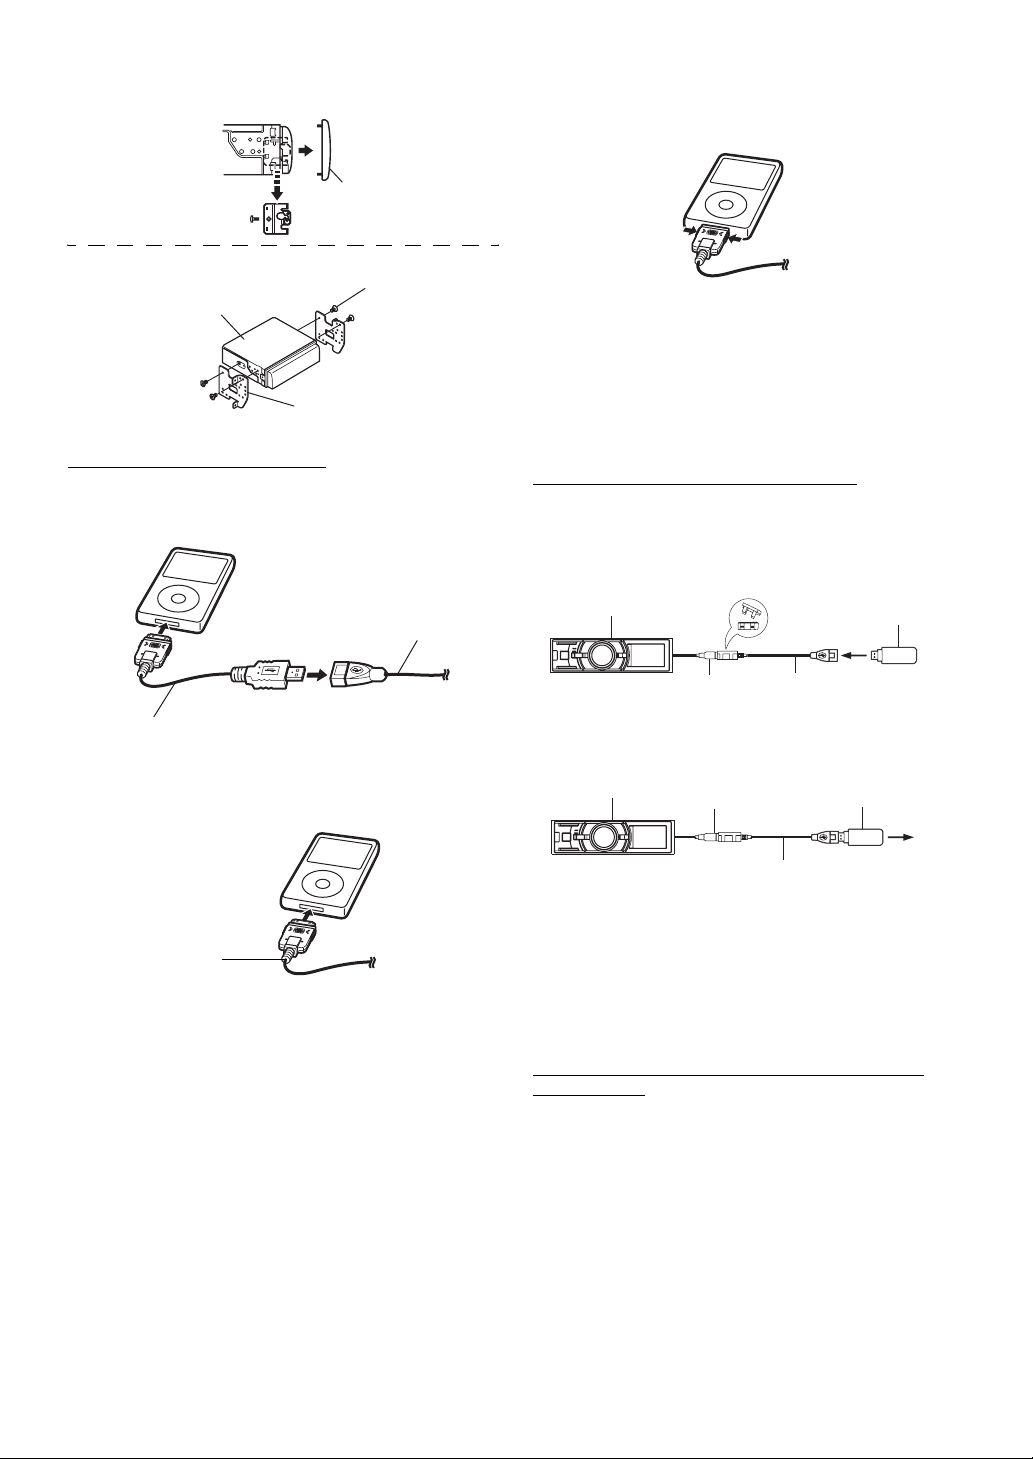
<JAPANESE CAR>
Front Frame
Screws (M5 × 8)
This unit
Mounting Bracket
(Included)
iPod Connection (sold separately)
USB connection (iDA-X313 only)
Connect USB cable to an iPhone (iDA-X313 only)/iPod with
Interface cable for iPod.
USB cable
Remove the iPod
Remove the iPod from FULL SPEED Connection Cable (or
Interface cable for iPod (iDA-X313 only)).
• Remove the iPhone/iPod after the unit has been changed to a source
other than the iPhone/iPod. If the iPhone/iPod is removed while
playing, data may be lost.
• If sound is not output or the iPhone/iPod is not recognized even when
the iPod is connected, remove the iPhone/iPod once, then connect it
again, or reset the iPod.
• Do not leave the iPhone/iPod in a vehicle for a long time. Heat and
humidity may damage the iPhone/iPod and you may not be able to
play it again.
USB memory Connection (sold separately)
Connect USB memory
Connect the USB cable to the USB connector of the unit, and
then secure the connection using the lock case supplied with
USB cable as shown below.
This unit
lock case
USB memory
(sold separately)
Interface cable for iPod (supplied, iDA-X313 only)
Direct connection
Connect iPod direct connector to an iPod with FULL SPEED
connection cable (KCE-433iV).
FULL SPEED
Connection Cable
(KCE-433iV) (supplied,
iDA-X311/iDA-X311RR only)
USB connector
Cable (supplied)
Remove USB memory
Pull out USB memory squarely from the USB cable.
This unit
• When removing USB memory, pull it out straight.
• If sound is not output or USB memory is not recognized even when
USB memory is connected, remove USB memory once, then connect
it again.
• Change to a source other than the USB memory mode, then remove
the USB memory. If the USB memory is removed in the USB memory
mode, data may be damaged.
• Route the USB cable away from other cables.
USB connector
Cable (supplied)
USB memory
(sold separately)
Portable Audio Player Connection (sold separately,
iDA-X313 only)
Connecting a Portable audio player
Connect the cable supplied with a Portable audio player to
the USB cable.
Disconnect the Portable audio player.
Disconnect the cable supplied with the Portable audio
player from the USB cable.
• Refer also to the Owner’s Manual of the Portable audio player.
38-EN
Page 41
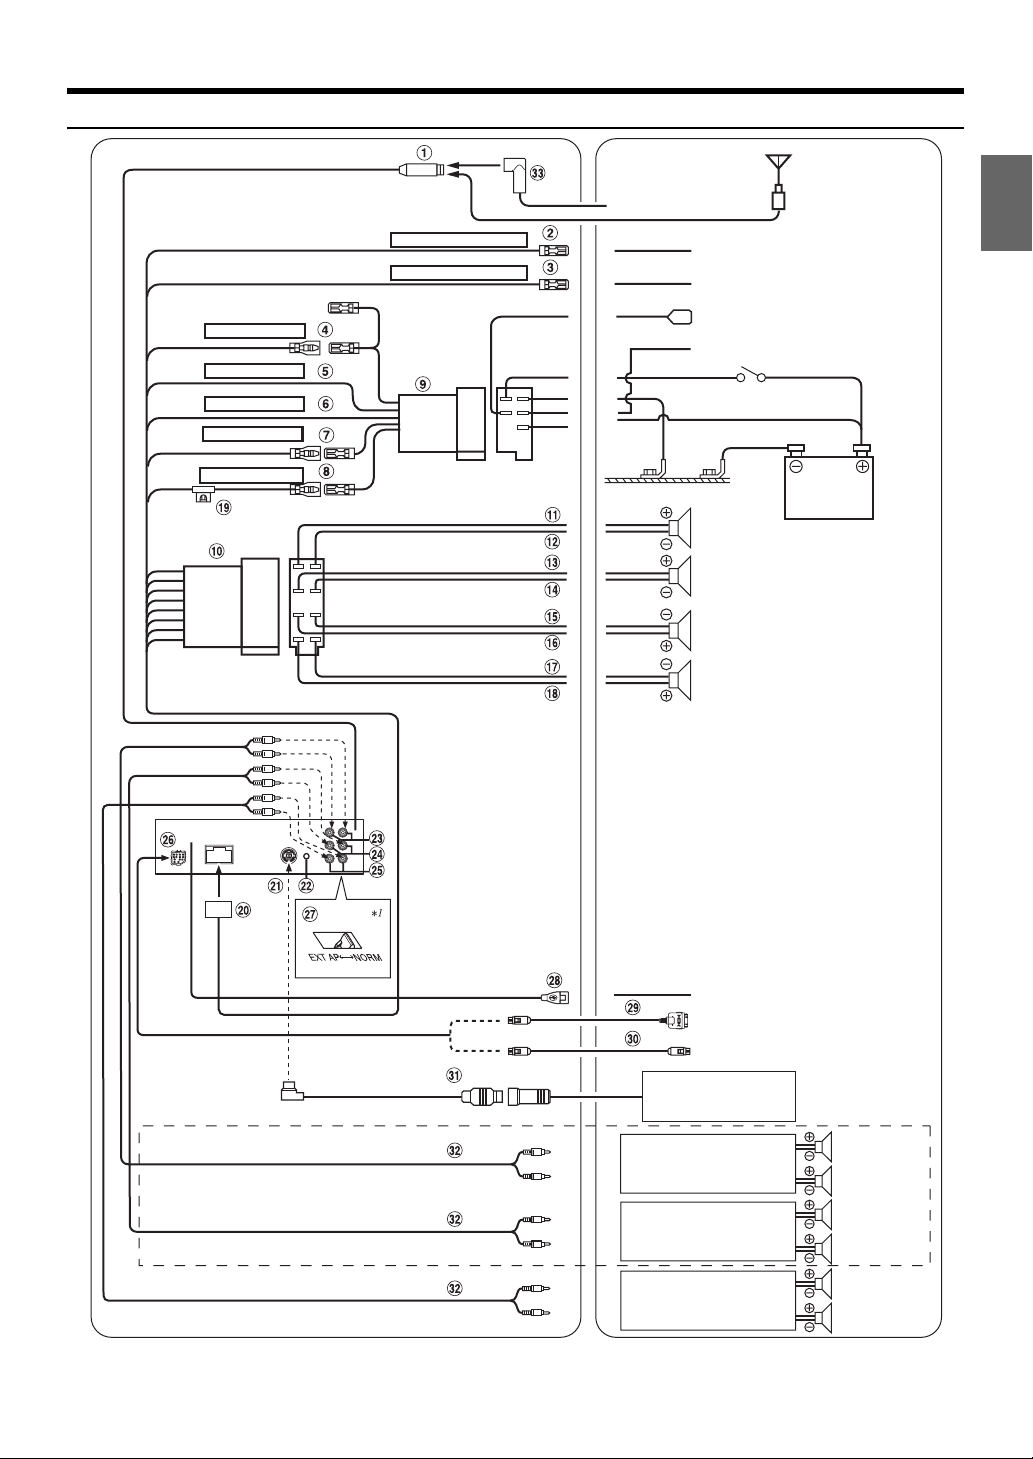
Connections
(Red) IGNITION
(Black)
(Blue)
(Orange)
GND
POWER ANT
DIMMER
(Pink/Black)
(Blue/White)
AUDIO INTERRUPT IN
REMOTE TURN-ON
Antenna
JASO Antenna Plug
To vehicle phone
To amplifier or equalizer
To p owe r an ten na
To the instrument cluster
illumination lead
Ignition Key
ISO Antenna Plug
BATTERY
iDA-X313 only
(Yellow)
(Green)
(Green/Black)
(White)
(White/Black)
(Grey/Black)
(Grey)
(Violet/Black)
(Violet)
Speakers
Battery
Rear left
Front left
Front right
Rear right
To USB memory/portable audio
2
player
*
/iPhone*2/iPod
or
To iPod (iDA-X311/iDA-X311RR only)
To BLUETOOTH INTERFACE
(KCE-400BT) (sold separately)
CD Changer
(Sold Separately)
Amplifier
(Sold Separately)
Speakers
Rear left
Rear right
Amplifier
(Sold Separately)
Amplifier
(Sold Separately)
Front left
Front right
iDA-X313:
Subwoofers
iDA-X311/iDA-X311RR:
Front or Subwoofer
*1The system switch is located on the bottom of the unit.
2
*
iDA-X313 only.
*3When Subwoofer is OFF: Output is for Front speakers. When Subwoofer is ON: Output is for Subwoofer. For details on how to set the Subwoofer
to ON/OFF, see “Turning Subwoofer ON/OFF” on page 20.
3
*
39-EN
Page 42

Antenna Receptacle
Audio Interrupt In Lead (Pink/Black)
Connect this lead to the Audio Interface output of a cellular
phone which provides ground shorting when a call is received.
Remote Turn-On Lead (Blue/White)
Connect this lead to the remote turn-on lead of your
amplifier or signal processor.
Switched Power Lead (Ignition) (Red)
Connect this lead to an open terminal on the vehicle’s fuse
box or another unused power source which provides (+)
12V only when the ignition is turned on or in the accessory
position.
Ground Lead (Black)
Connect this lead to a good chassis ground on the vehicle.
Make sure the connection is made to bare metal and is
securely fastened using the sheet metal screw provided.
Power Antenna Lead (Blue)
Connect this lead to the +B terminal of your power antenna,
if applicable.
• This lead should be used only for controlling the vehicle’s power
antenna. Do not use this lead to turn on an amplifier or a signal
processor, etc.
Dimmer Lead (Orange)
This lead may be connected to the vehicle’s instrument
cluster illumination lead. This will enable the vehicle’s
dimmer control to dim the backlighting of the unit.
Battery Lead (Yellow)
Connect this lead to the positive (+) post of the vehicle’s
battery.
ISO Power Supply Connector
ISO Connector (Speaker Output)
Left Rear (+) Speaker Output Lead (Green)
Left Rear (–) Speaker Output Lead (Green/Black)
Left Front (+) Speaker Output Lead (White)
Left Front (–) Speaker Output Lead (White/Black)
Right Front (–) Speaker Output Lead (Grey/Black)
Right Front (+) Speaker Output Lead (Grey)
Right Rear (–) Speaker Output Lead (Violet/Black)
Right Rear (+) Speaker Output Lead (Violet)
Fuse Holder (10A)
Power Supply Connector
Ai-NET Connector
Connect this to the output or input connector of another
device (CD Changer, Equalizer, etc.) equipped with
Ai-NET.
• Be sure to set “Setting the Connected Head Unit (MODEL SETUP)”
to “CD CHG”, when the DHA-S690 is connected.
• Interface adapter for iPod (KCA-420i) is not recommended for use
with this product.
Steering Remote Control Interface Connector
To steering remote control interface box.
Rear Output/Input RCA Connectors (iDA-X313 only)
It can be used as Rear Output or Input RCA Connectors.
RED is right and WHITE is left.
Front Output/Input RCA Connectors (iDA-X313 only)
It can be used as Front Output or Input RCA Connectors.
RED is right and WHITE is left.
Subwoofer Output RCA Connectors (iDA-X313 only)
Front/Subwoofer Output RCA Connectors
(iDA-X311/iDA-X311RR only).
RED is right and WHITE is left.
BLUETOOTH interface Connector (iDA-X313 only)
Connect this to an optional BLUETOOTH INTERFACE
(KCE-400BT). To use a hands-free mobile phone, an optional
BLUETOOTH INTERFACE (KCE-400BT) connection is
required. For details on connection, refer to the Owner’s
Manual of the BLUETOOTH INTERFACE (KCE-400BT).
You can also connect this to an external device (such as a
portable player) by using a conversion cable (KCE-237B)
(sold separately) for building up the AUX IN.
• Refer to “Setting the AUX+ Mode” (page 23).
AUX+ ON : When the external device is connected.
AUX+ OFF :
When set to OFF, AUX+ source cannot be selected.
Full Speed Connector (iDA-X311/iDA-X311RR only)
Control iPod signals.
Connect this to an iPod or to an optional BLUETOOTH
INTERFACE (KCE-400BT). To use a hands-free mobile phone,
an optional BLUETOOTH INTERFACE (KCE-400BT) connection
is required. For details on connection, refer to the Owner’s
Manual of the BLUETOOTH INTERFACE (KCE-400BT).
You can also connect this to an external device (such as a
portable player) by using a conversion cable (KCE-237B)
(sold separately) for building up the AUX IN.
• Refer to “Setting the AUX+ Mode” (page 23).
AUX+ ON : When the external device is connected.
AUX+ OFF : When an iPod is connected.
System Switch
When connecting a processor or divider using Ai-NET,
place this switch in the EXT AP position. When no device is
connected, leave the switch in the NORM position.
iDA-X313 only:
When switched to NORM, the RCA Connectors and
can be used as Output RCA Connectors.
When switched to EXT AP, the RCA Connectors and
can be used as Input RCA Connectors.
• Be sure to turn the power off to the unit before changing the switch
position.
USB Connector
Connect this to an USB memory/portable audio player* or
iPhone*/iPod*. To use an iPhone/iPod, Interface cable for
iPod connection is required (iDA-X313 only).
* iDA-X313 only.
• Use the supplied USB cable. If a USB cable other than the supplied is
used, correct performance cannot be guaranteed.
• Route the USB cable away from other cables.
FULL SPEED Connection Cable (KCE-433iV)
(supplied, iDA-X311/iDA-X311RR only)
KCE-400BT Connection Cable (Included with
KCE-400BT)
Ai-NET Cable (Included with CD Changer)
RCA Extension Cable (sold separately)
ISO/JASO Antenna Adaptor (sold separately)
An ISO/JASO antenna adapter may be required, depending
on the vehicle.
To prevent external noise from entering the audio system.
• Locate the unit and route the leads at least 10 cm away from the car harness.
• Keep the battery power leads as far away from other leads as possible.
• Connect the ground lead securely to a bare metal spot (remove any paint, dirt or grease if necessary) of the car chassis.
• If you add an optional noise suppressor, connect it as far away from the unit as possible. Your Alpine dealer carries various noise
suppressors, contact them for further information.
• Your Alpine dealer knows best about noise prevention measures so consult your dealer for further information.
40-EN
 Loading...