

Page 1
DVA-5200
DVD/VIDEO CD/AUDIO CD
PLAYER
• OWNER’S MANUAL (Page 2-63)
Please read this manual- to maximize your
enjoyment of the outstanding performance and
feature capabilities of the equipment, then retain
the manual for future reference.
• MODE D’EMPLOI (Page 64-125)
Veuillez lire ce mode d’emploi pour tirer
pleinement profit des excellentes performances et
fonctions de cet appareil, et conservez-le pour
toute référence future.
• MANUAL DE OPERACION (Página 126-187)
Lea este manual, por favor, para disfrutar al
máximo de las excepcionales prestaciones y
posibilidades funcionales que ofrece el equipo,
luego guarde el manual para usarlo como
referencia en el futuro.
R
DIGITAL VIDEO
Page 2
Precautions
The exclamation point within an equilateral triangle and “Warn-
Warning
DO NOT DISASSEMBLE OR ALTER. Doing so may lead to accident, fire or
electric shock.
KEEP SMALL ARTICLES OUT OF THE REACH OF CHILDREN. If swallowed,
consult a physician immediately.
USE THE CORRECT AMPERE RA TING WHEN REPLACING FUSES. Failure
to do so may result in fire or electric shock.
HALT USE IMMEDIATELY IF A PROBLEM APPEARS. When problems occur
such as a lack of sound or video, foreign objects inside the unit, smoke coming
out, or noxious odors, stop use immediately and contact the dealer where you
bought the equipment. Failure to do so may result in an accident or injury.
DO NOT OPERA TE THE EQUIPMENT OR LOOK AT THE SCREEN WHILE
DRIVING THE VEHICLE. Operating the equipment may distract the driver from
looking ahead of the vehicle and cause accident. Always stop the vehicle in a
safe location before operating this equipment.
ing” are intended to alert the user to the presence of important
operating instructions.
Failure to heed the instructions will result in severe injury or
death.
DO NOT MIX NEW BATTERIES WITH OLD BATTERIES. INSERT WITH THE
CORRECT BATTERY POLARITY. When inserting the batteries, be sure to
observe proper polarity (+ and –) as instructed. Rupture or chemical leakage
from the battery may cause fire or personal injury.
DO NOT RAISE THE VOLUME EXCESSIVEL Y. Keep the volume at a level
where you can still hear outside noises while driving. Driving while unable to
hear outside noises could be the cause of accident.
DO NOT USE THIS EQUIPMENT FOR PURPOSES OTHER THAN ST ATED
FOR THE VEHICLE. Failure to do so may result in electric shock or injury.
USE ONL Y VEHICLES WITH A 12 VOLT NEGATIVE (–) GROUND. Check with
your dealer if you are not sure. Failure to do so may result in fire or electric
shock.
2
Page 3
Precautions
The exclamation point within an equilateral triangle and “Cau-
Caution
DO NOT BLOCK VENTS OR RADIA TOR PANELS. Blocking them may cause
heat to build up inside and may result in fire.
STOP THE VEHICLE IF UNIT OPERATION MIGHT INTERFERE WITH DRIVING.
tion” are intended to alert the user to the presence of important
operating instructions.
Failure to heed the instructions will result in severe injury or
death.
3
Page 4

Precautions
Temperature
Be sure the temperature inside the vehicle is between +60°C (+140°F) and –10°C
(+14°F) before turning your unit on.
Moisture Condensation
Y ou may notice the CD playback sound wavering due to condensation. If this happens,
remove the disc from the player and wait about an hour for the moisture to evaporate.
Damaged Disc
Do not attempt to play cracked, warped, or damaged discs. Playing a bad disc could
severely damage the playback mechanism.
Maintenance
If you have problems, do not attempt to repair the unit yourself. Return it to your Alpine
dealer or the nearest Alpine Service Station for servicing.
Never Attempt the Following
Do not grip or pull out the disc while it is being pulled back into the player by the
automatic reloading mechanism.
Do not attempt to insert a disc into the unit when the unit power is off.
Inserting Discs
Y our player accepts only one disc at a time for playback. Do not attempt to load more
than one disc.
Make sure the label side is facing up when you insert the disc. Your player will automatically eject any disc that is inserted incorrectly.
Playing a disc while driving on a very bumpy road may result in skips, but this will not
scratch the disc or damage the player.
Irregular Shaped Discs
Make sure the discs you use in this unit do not have any irregularities. The outer and
inner edges should be round and smooth. Use of irregularly shaped discs may cause
damage to the mechanism.
New Discs
As a protective measure to prevent the CD from jamming, the CD player will automatically eject discs with irregular surfaces or inserted incorrectly. When a new disc is
inserted into the player and ejected after initial loading, using your finger, feel around
the inside of the centre hole and outside edge of the disc. If you feel any small bumps
or irregularities, this could inhibit proper loading of the disc. To remove the bumps, rub
the inside edge of the hole and outside edge of the disc with a ball-point pen or other
such instrument, then insert the disc again.
Installation Location
Make sure the DVA-5200 will not be installed in a location subjected to:
• Direct sun and heat
• High humidity and water
• Excessive dust
• Excessive vibrations
4
Page 5
CONTENTS
Precautions
Warnings and Cautions ............................... 2
Contents ...................................................... 5
Quick Guide
About DVDs................................................. 6
Discs playable on this DVD player ............... 7
Turning the power on and off....................... 8
Loading and unloading discs ....................... 9
Playing discs.............................................. 10
Stopping playback ..................................... 11
Fast-forwarding/fast-reversing ................... 12
Finding the beginnings of chapters or tracks ....
Playing still frames (pausing)..................... 13
Frame-by-frame playback .......................... 13
Slow motion playback ................................ 13
13
Convenient Functions
Searching by title number.......................... 14
Searching directly by chapter or track number ..
Searching by elapsed time ........................ 15
A-B repeat playback .................................. 16
Chapter/track/title repeat playback ............ 17
Programmed playback............................... 18
Editing programs and clearing steps
from programs ........................................... 20
Switching the audio language ................... 22
Switching the angle ................................... 23
Switching the subpicture (subtitle language)...
Displaying the subpicture (subtitles).......... 23
Displaying the disc status .......................... 24
Video Output ON/OFF ............................... 25
15
23
Digital Audio Processor (Optional)
Operating the digital audio processor (optional) ....
Adjusting the parametric equalizer ............ 37
Adjusting the surround settings ................. 38
Storing the surround settings .................... 39
Recalling the surround settings ................. 40
Adjusting the time compensation .............. 41
Using the Pro Logic mode ......................... 41
ADJUST – Setting the speaker mode........ 42
ADJUST – Adjusting the acoustic image... 43
ADJUST – Mixing the rear audio channels .......
ADJUST – Center speaker time compensation .....
ADJUST – Rear speaker time compensation ...
ADJUST – Achieving powerful sound at low volumes ..
ADJUST – Adjusting the speaker level...... 48
MODE – Adjusting the volume, fader and balance .....
MODE – Adjusting the subwoofer ............. 50
MODE – Turning the defeat function on and of f .....
36
44
45
46
47
49
51
Operating from the Head Unit
(MDA-7755)
Operating from the head unit..................... 52
Operating from the head unit’s remote control unit.....
54
Others
Terminology ............................................... 56
List of language codes .............................. 57
In case of difficulty ..................................... 58
Specifications ............................................ 59
Loading batteries in the remote control unit ..
Functions of remote control unit buttons ... 62
60
SET UP
Changing the default settings (setup)........ 26
Changing the language setting.................. 27
Changing the TV screen settings .............. 28
Changing the country code setting............ 29
Setting the rating level (parental lock) ....... 30
Changing the digital output setting ............ 32
Changing the display setting ..................... 33
Custom setting – Changing the F scan setting ......
Custom setting – Changing the Ai-NET settings....
Changing the Default Settings
34
35
5
Page 6
About DVDs
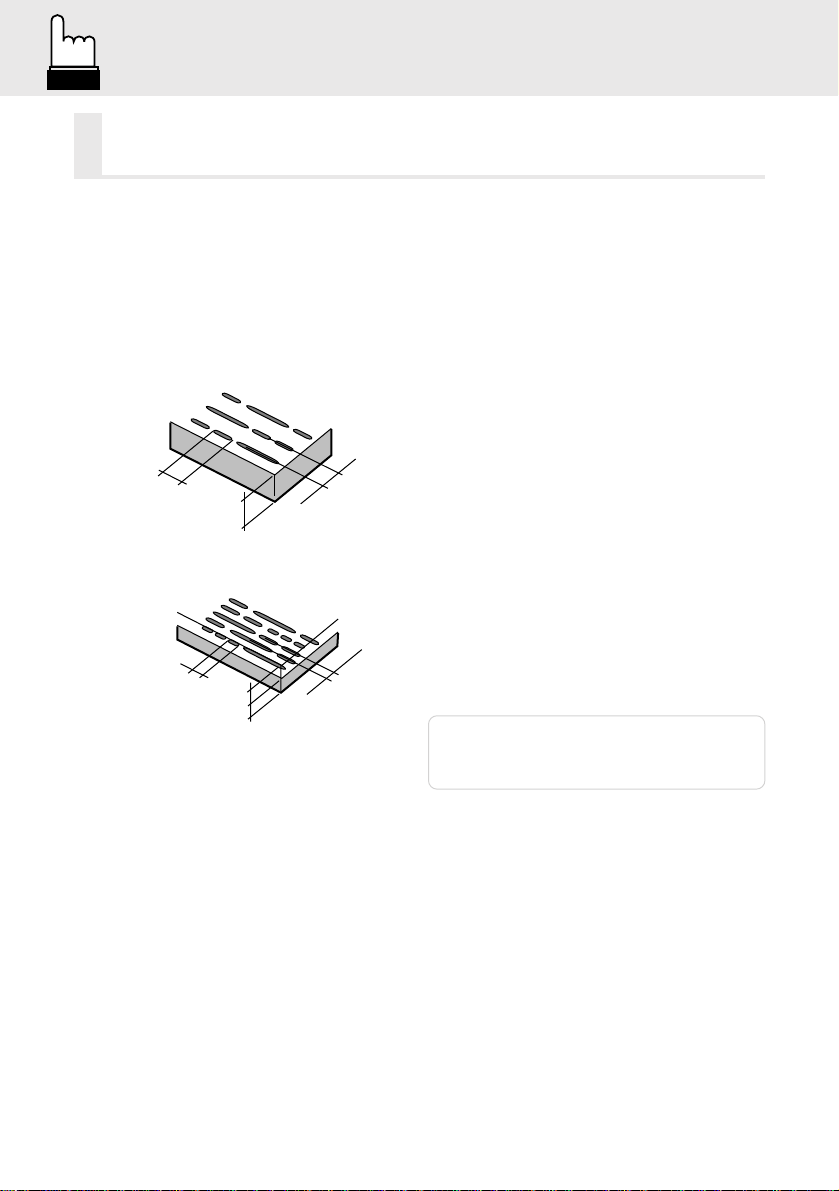
About DVDs
Music CDs and DVDs have grooves (tracks) in
which the digital data is recorded. The data is
represented as microscopic pits recorded into
the track – these pits are read by a laser beam
to play the disc. On DVDs, the density of the
tracks and pits is twice that of CDs, so DVDs
can contain more data in less space.
CD-ROMs
Minimum bit
length
- 0.9 µm
1.2 mm
Track pitch -
1.6 µm
DVDs
Minimum bit
length -
0.9 µm
A 12 cm disc can contain one movie or about
four hours of music.
In addition, DVDs provide sharp picture quality
with vivid colors thanks to a horizontal resolution of over 500 lines (compared to less than
300 for VHS tape). With the addition of an
optional, digital audio processor (PXA-H510),
you can recreate the power and presence of a
movie theater with Dolby Digital 5.1-channel
Surround.
0.6 mm
0.6 mm
Track pitch -
0.74 µm
Moreover, DVDs offer a variety of functions.
• Multiple audio* (page 22)
Movies can be recorded in up to eight
languages. The desired language can be
selected from the remote control unit.
• Subpicture (subtitle) function * (page 23)
Movies can include subtitles in up to 32
languages. The desired subtitle language
can be selected from the remote control unit.
• Multi angle function * (page 23)
When the DVD contains a movie shot from
multiple angles, the desired angle can be
selected from the remote control unit.
• Multi story function *
With this function, a single movie includes
various story lines. Y ou can select dif ferent
story lines to view various versions of the
same movie.
Operation differs from disc to disc. Story line
selection screens including instructions
appear during the movie. Just follow the
instructions.
Note: * The functions audio languages, subtitle
languages, angles, etc., differ from disc to
disc. For details, refer to the disc’s
instructions.
6
Page 7
Discs playable on this DVD player
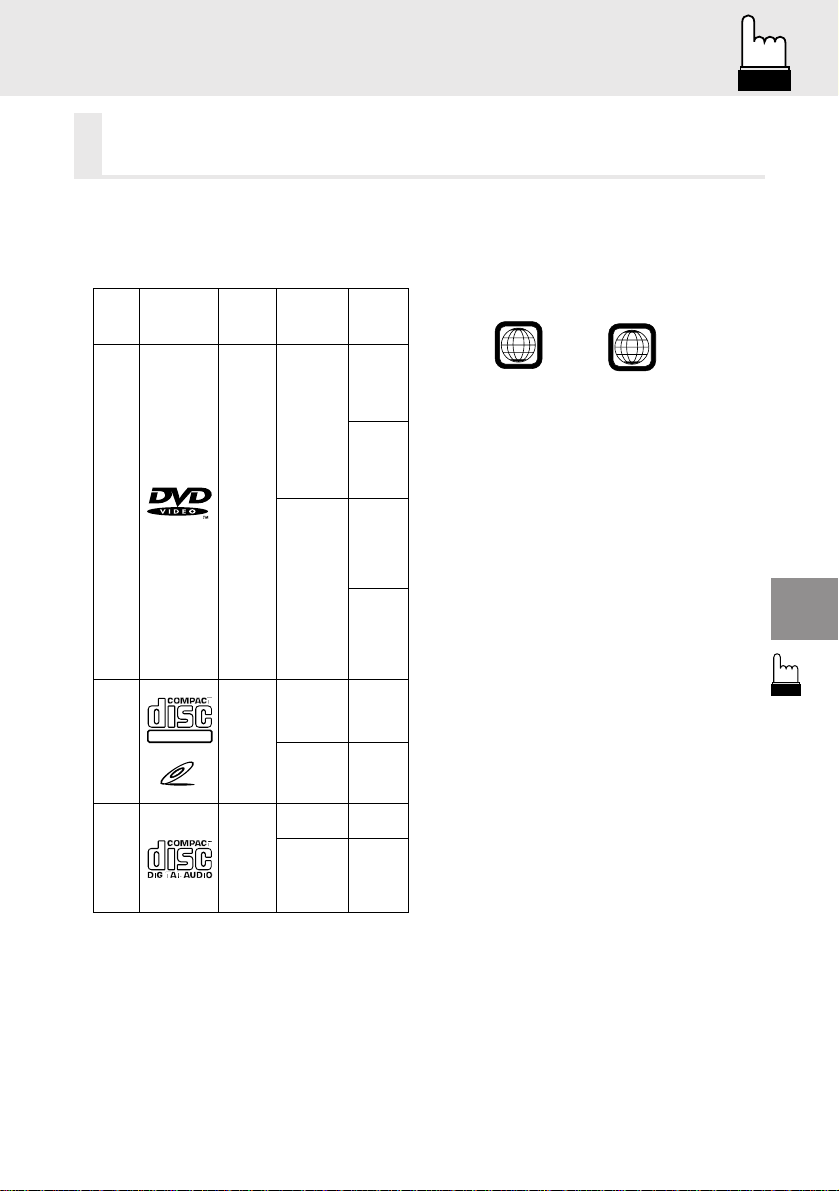
Discs playable on this DVD player
• Playable discs
The discs listed below can be played on this
DVD player. Other discs cannot be played.
Mark (logo) Recorded
DVD
Video
DIGITAL VIDEO
Video
CD
Music
CD
VIDEO CD
content
(Moving
pictures)
(Moving
pictures)
Audio
+
Video
Audio
+
Video
Audio
Disc size
12 cm*
8 cm
12 cm
8 cm
12 cm
8 cm
(CD single)
playing time
*Two-layer DVD disc compatible
• Discs that cannot not be played
DVD-ROMs, DVD-R/DVD-RAMs, CD-ROMs,
CD-R/CD-RWs, photo CDs, etc.
Max.
One-sided
disc
Approx.
4 hours
Two-sided
disc
Approx.
8 hours
One-sided
disc
Approx.
80 Minutes
One-sided
disc
Approx.
160 Minutes
Approx.
74 Minutes
Approx.
20 Minutes
Approx.
74 Minutes
Approx.
20 Minutes
• DVD region number (playable region
number)
This DVD player will play back any disc
whose region number is 1 (or All). DVDs with
a region number other than those listed
below, cannot be played on this DVD player.
1
ALL
• Video CDs
This DVD player is compatible with playback
control (PBC) compatible video CDs (version
2.0).
“PBC” is a function by which you can use
menu screens recorded on the disc to find
the scene you want to watch and view
various types of information in dialog style.
• Disc terminology
Title
If titles are programmed for the DVD, these
are the largest unit of division of the information recorded on the disc.
Chapter
Each Title may also be divided into smaller
divisions called Chapters. These can be
specific scenes or musical selections.
* This product incorporates copyright
protection technology that is protected
by method claims of certain U.S. patents
and other intellectual property rights
owned by Macrovision Corporation and
other rights owners. Use of this copyright protection technology must be
authorized by Macrovision Corporation,
and is intended for home and other
limited viewing uses only unless otherwise authorized by Macrovision Corporation. Reverse engineering of disassembly is prohibited.
* Manufactured under license from
Dolby Laboratories. “Dolby”, “Pro
Logic” and the double-D symbol are
trademarks of Dolby Laboratories.
7
Page 8
Turning the power on and off
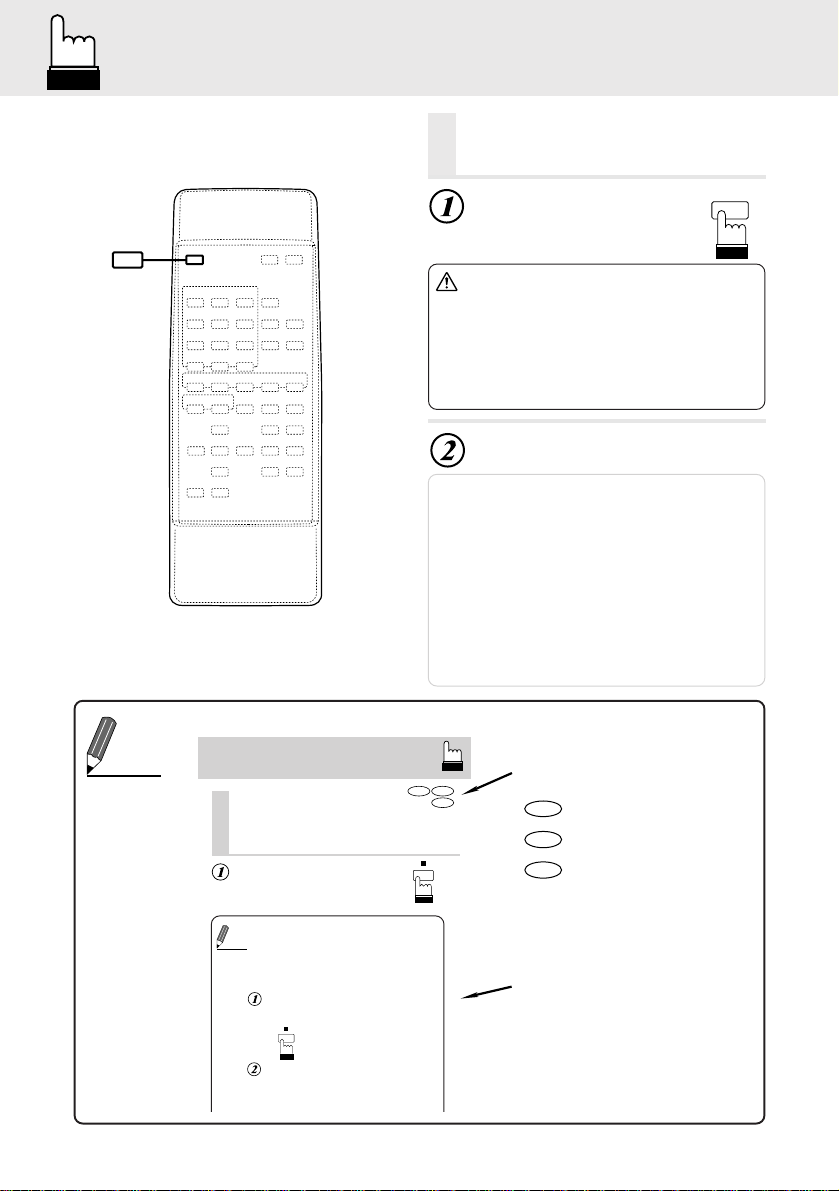
POWER
Turning the power on
and off
Press “POWER”.
The power turns on.
Caution
When connected with an Alpine
head unit
If the DVA-5200 is connected to
anything other than the CVA-1005,
the default DVD setting must be
changed. See page 35, “Custom
setting – Changing the Ai-NET
settings” to change the SETUP to
CD mode before using it.
To turn the power off, press
“POWER” again.
Notes:
• With this unit connected to an Ai-NET compatible
head unit, there will be about a 3 second delay
during power-up from the remote control. This is
caused by the systems communications being
carried out by the various components and is not
a defect.
• When connected with an Ai-NET compatible head
unit, the power cannot be turned off from the
remote control unit. Turn off the DVA-5200’s
power by switching the head unit’s source. For
details, refer to “Operating from the head unit”
(page 52).
POWER
• Reading this manual
Tips
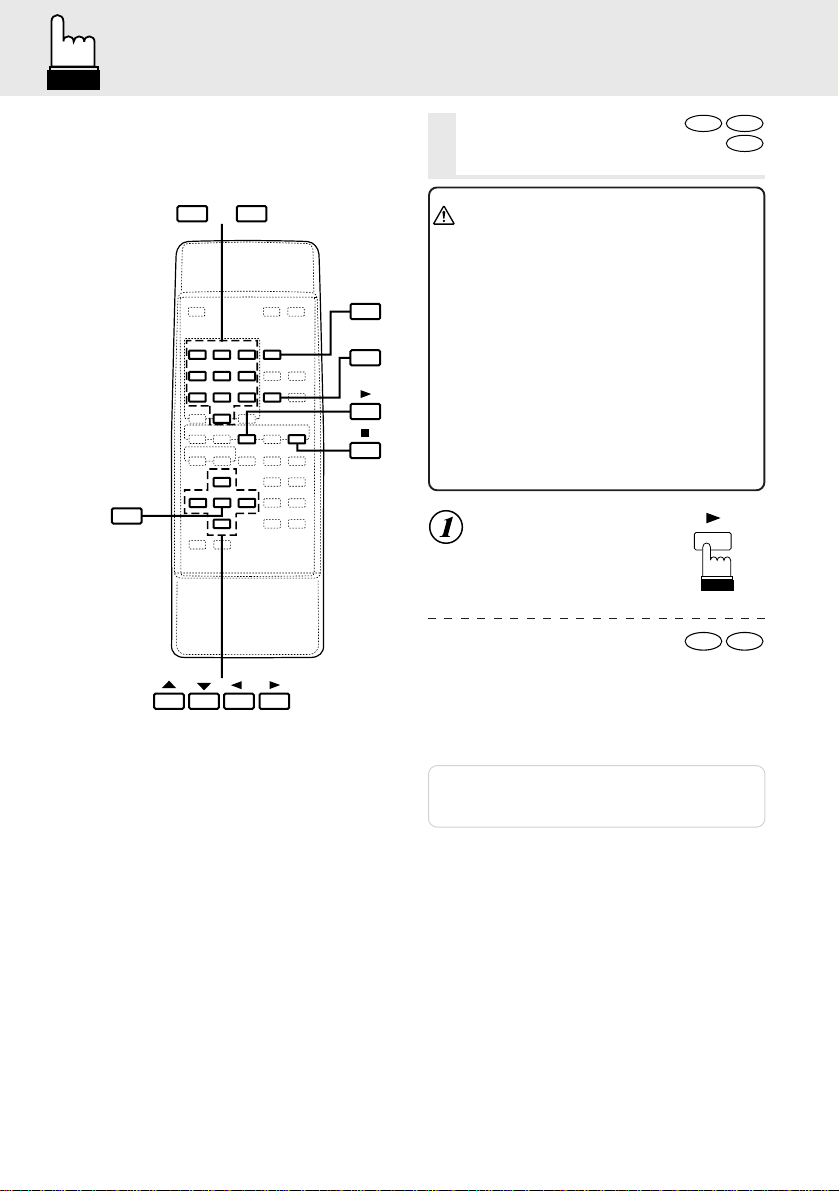
Playing discs
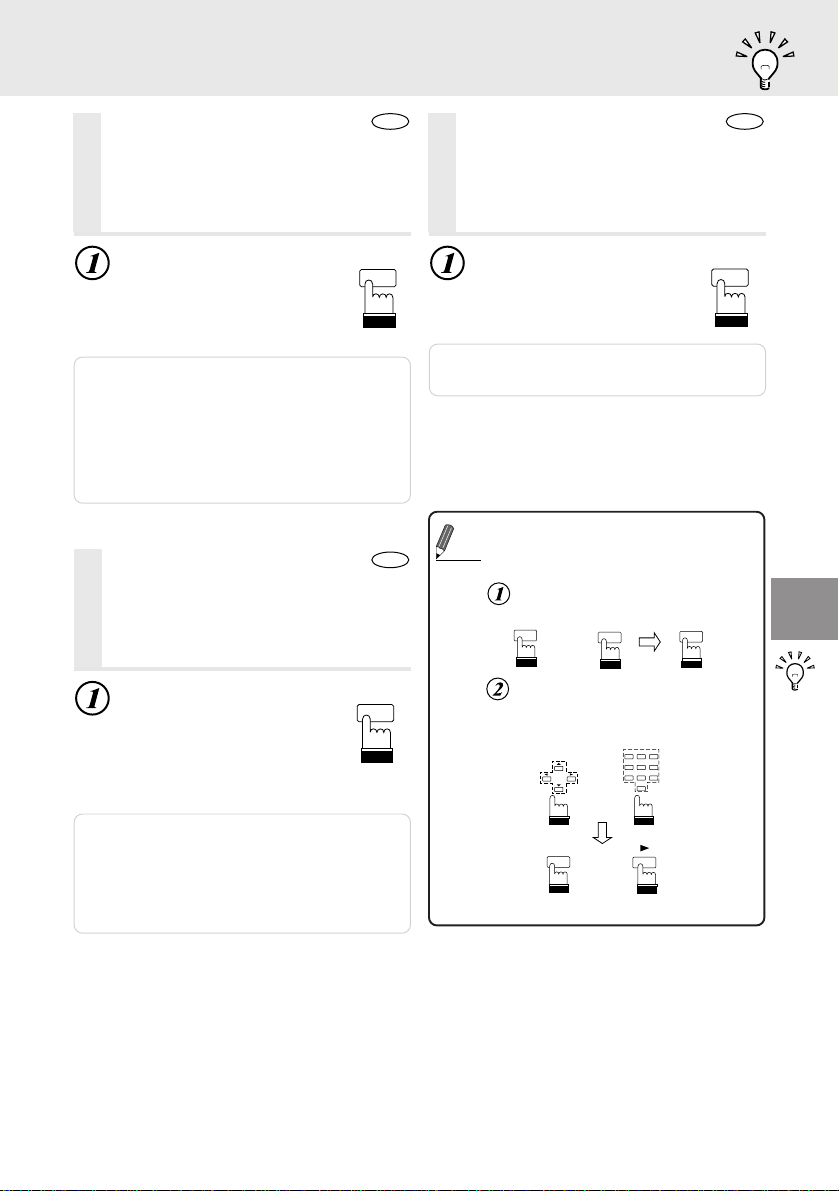
Stopping playback
Stopping playback
Press the stop button during playback to
stop playback . That position is stored in
the memory.
Press “ L ” during playback.
• Using the PRE-STOP function
When the PRE-STOP function is
Tips
used, the position at which playback is
stopped is stored in the memory, and
playback resumes from that position.
LL
Press “
L ” once during
LL
playback.
“PRE-STOP” is displayed.
::
Press “
: ” in the PRE-STOP
::
mode.
Playback starts from the position at
which it was stopped.
DVD
Video CD
CD
These indicate the discs for which
the function can be used.
DVD
...DVDs
Video CD
...Video CDs
CD
...Music CDs
This indicates supplementary
explanation of operation of this
system.
8
Page 9
Loading and unloading discs
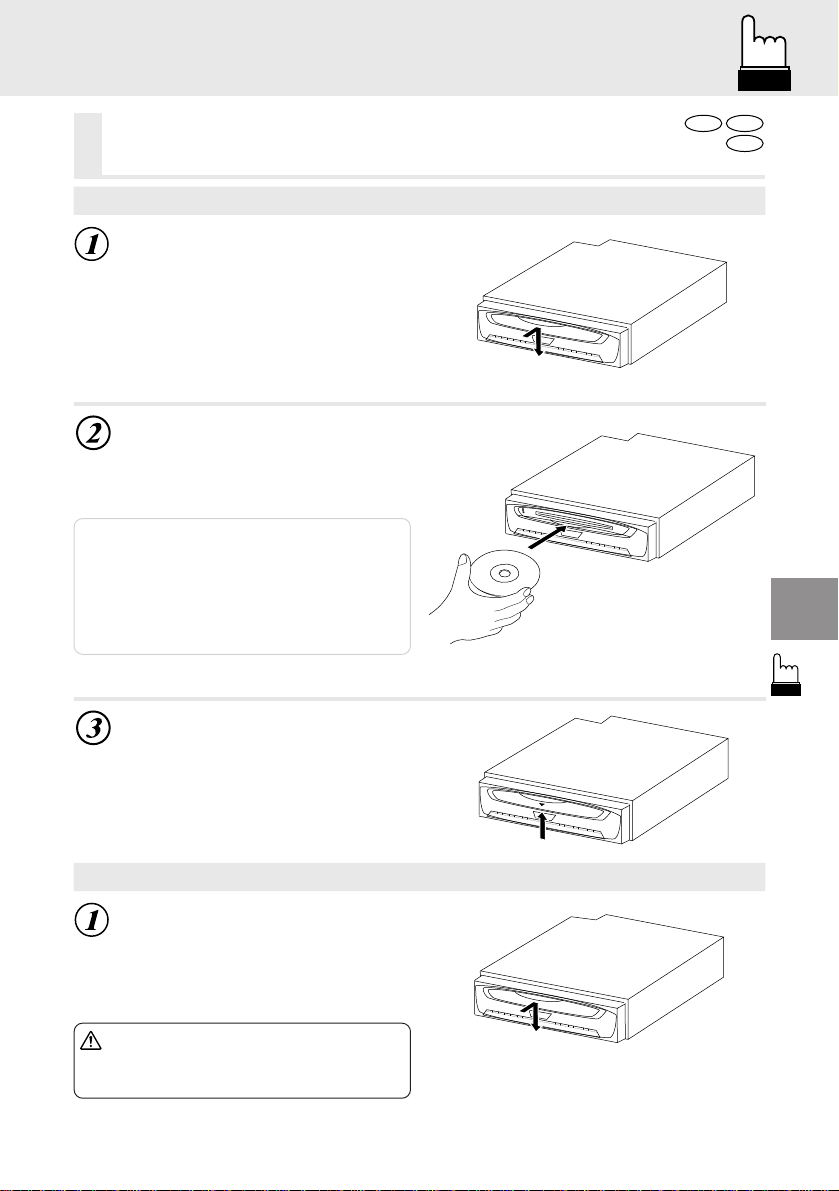
Loading and unloading discs
Turn on the power before loading and unloading discs.
Loading discs
Press the door in gently then
slide it downwards.
Insert the disc with the side
containing words or diagrams
facing upwards.
Once the disc is partially inserted, it is
drawn in automatically.
Notes:
• Never insert a navigation map disc. If inserted it
may cause a failure.
• For two-sided DVDs, play one side of the disc to
the end, then unload the disc, turn it over and
reload it to play the other side.
Refer to the indications on the disc (“Side 1”/”Side
2”).
DVD
Video CD
CD
POWER
OPEN
DVD
DVD
Close the door.
Be sure to close the door to prevent dust
from getting inside.
Unloading discs
Press the door in gently then
slide it downwards. The disc is
automatically ejected part way.
If the disc is not removed, it is automatically drawn back into the player after a
while.
Caution
Never close the door while the disc
is being unloaded. Doing so could
scratch the disc or damage the
player.
POWER
OPEN
DVD
POWER
OPEN
DVD
9
Page 10
Playing discs
Playing discs
DVD
Video CD
CD
ENTER
90
–
MENU
TITLE
Caution
• With some DVDs, certain operations
are disabled. Such operations are
not possible on such DVDs.
• The DVD functions described in this
manual are not supported by all
DVDs. See the individual DVDs
instructions for details on the
features supported.
• Fingerprints on a disc may
adversely affect playback. If a
problem occurs, remove the disc
and check for fingerprints on the
playback side. Clean the disc if
necessary.
• When using the remote control, be
careful to press one button at time.
Pressing multiple buttons at the
same time may cause erroneous
operation.
Press “
::
: ”.
::
Playback starts.
DVD
Video CD
• If a menu screen appears
On DVDs and video CDs with playback control
(PBC), menu screens may appear automatically. If this happens, perform the operation
described below to start playback.
10
Note: For many discs, the menu screen can also
be displayed by pressing “TITLE” or
“MENU”.
Page 11
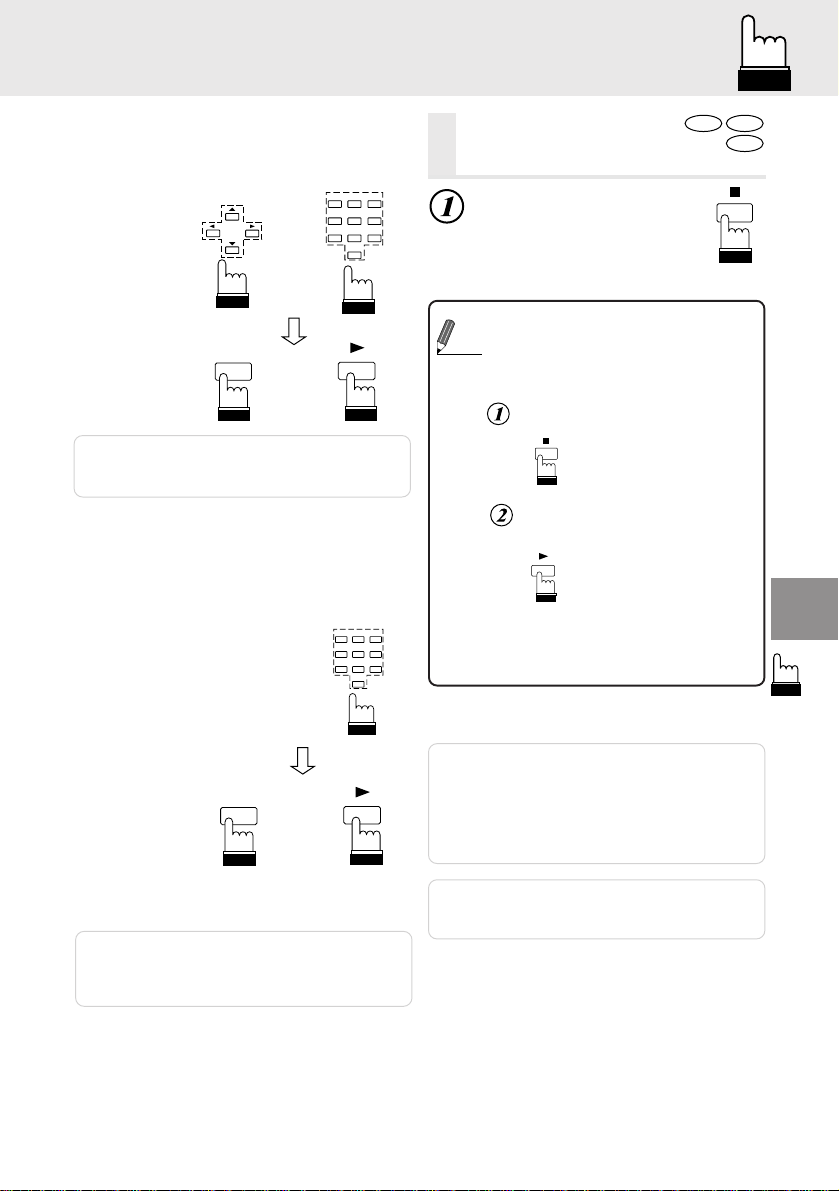
Playing discs
Stopping playback
DVD menu
Use the “ 8 9 ; : ” keys (arrow keys) or the
number keys (“0” to “9”) to select the desired
item, then press “ENTER” or “ : ”.
123
456
789
or
ENTER
0
or
Note: For some discs it is not possible to select
items from the menu screen using the
number keys (“0” to “9”).
Video CD menu
Use the number keys (“0” to “9”) to select the
desired number, then press “ENTER” or “ : ”.
123
456
789
0
Stopping playback
Press the stop button during playback to stop
playback. That position is stored in the memory .
DVD
Press “ L ” during playback.
• Using the PRE-STOP function
When the PRE-STOP function is used, the
Tips
position at which playback is stopped is stored in
the memory, and playback resumes from that
position.
Press “ L ” once during playback.
“PRE-STOP” is displayed.
::
Press “
: ” in the PRE-STOP mode.
::
Playback starts from the position at which it
was stopped.
• Canceling the PRE-STOP function
Either press “ L ” again in the PRE-STOP mode
or eject the disc and turn the power or the ignition
key off to clear the memory.
Video CD
CD
ENTER
or
Note: The menu screen does not appear when the
PBC function is turned off. If this is the
case, press “MENU” to turn on the PBC
function.
Notes:
• The PRE-STOP function cannot be used with
video CDs equipped with playback control (PBC)
when the PBC function is turned on.
The menu screen appears when “
• For some discs, the position at which playback
was stopped may not be accurate.
Note: Playback starts at the beginning of the disc
whenever ignition is turned off or another
Ai-NET source is selected.
L
” is pressed.
11
Page 12
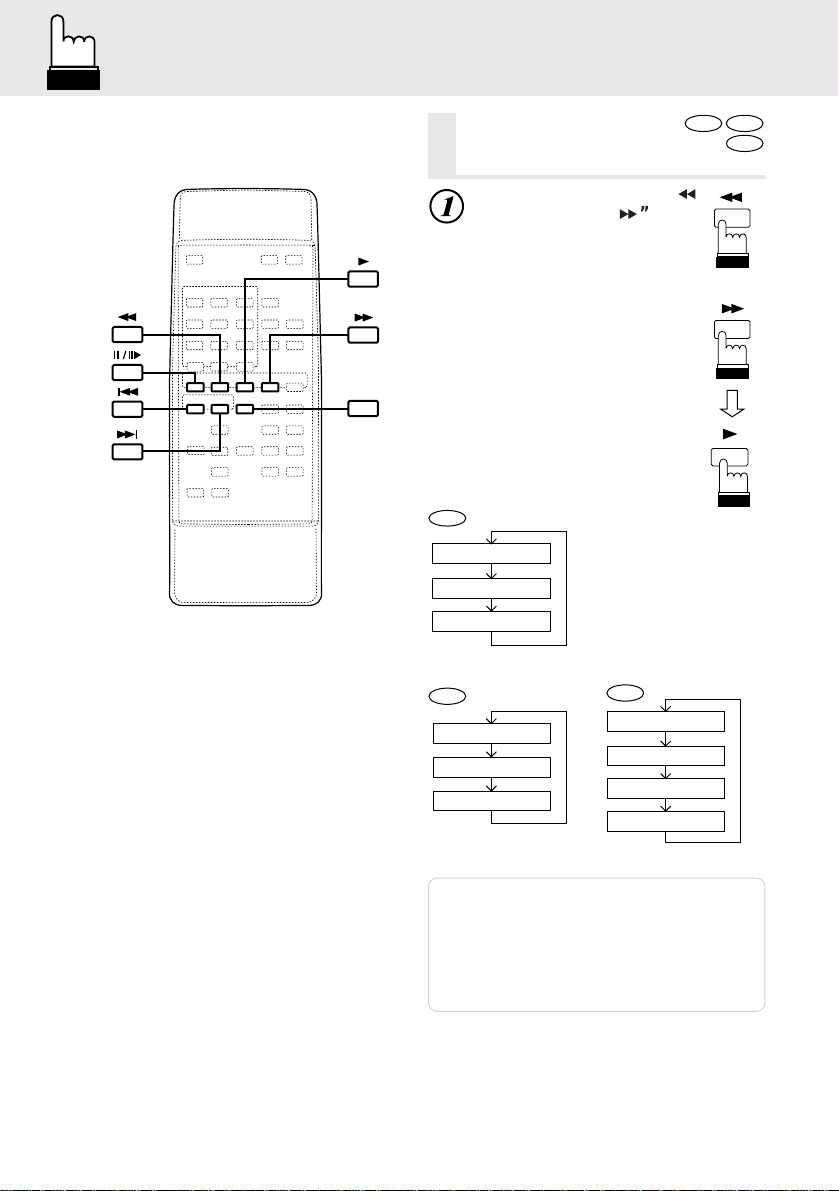
Fast-forwarding/fast-reversing
Fast-forward/fast-reverse x 30
Fast-forward/fast-reverse x 2
Normal playback
Fast-forwarding/
fast-reversing
During playback, press “ b ”
(fast-reverse) or “
forward).
The speed changes each time
the button is pressed.
SLOW
Press “ : ” to return to normal
playback.
DVD
Fast-forward/fast-reverse
Normal playback
Scan*
DVD
Video CD
CD
e
” (fast-
or
* Scan
This is a function for
playing sections of movies
while fast-forwarding/fastreversing.
The fast-forwarding/fastreversing speed is faster.
12
CD
Notes:
• x2, x8 and x30 are approximate speeds.
The actual speed differs from disc to disc.
• No sound or subtitles are played during fastforwarding/fast-reversing.
• For DVDs and video CDs with playback control
(PBC), the menu screen may reappear during
fast-forwarding/fast-reversing.
Video CD
Fast-forward/fast-reverse x 2
Fast-forward/fast-reverse x 8
Fast-forward/fast-reverse x 30
Normal playback
Page 13
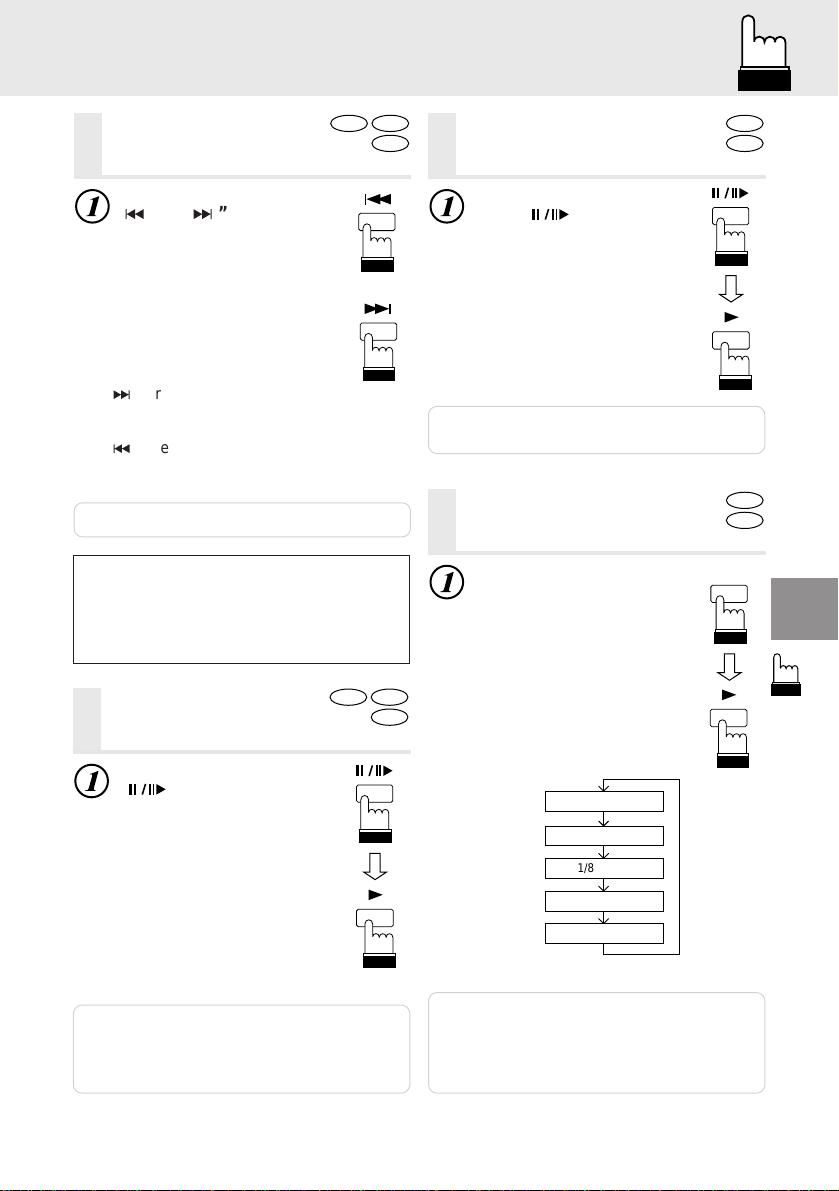
Finding the beginnings of chapters or tracks
DVD
Video CD
1/2 speed
1/4 speed
1/16倍速
1/8 speed
1/16 speed
Normal playback
DVD
Video CD
DVD
Finding the begin-
Video CD
CD
nings of chapters or tracks
During playback, press
“
c
” or “ f ”.
The chapter/track switches each
time the button is pressed, and
playback of the selected chapter/
track starts.
f
: Press this to start playback from the
beginning of the following chapter or
track.
c
: Press this to start playback from the
beginning of the current chapter or
track.
Note: Some DVDs do not have chapters.
Supplementary explanation
“Chapters” are divisions of movies or
musical selections on DVDs.
“Tracks” are divisions of movies or musical
selections on video and music CDs.
or
Playing still frames (pausing)
Frame-by-frame playback
Slow motion playback
Frame-by-frame
playback
In the pause mode,
press “
The picture advances by one
frame each time the button is
pressed.
Press “ : ” to resume normal
playback.
Note: No sound is played during frame-by-frame
”.
playback.
Slow motion
playback
During playback, press
“SLOW”.
The slow motion playing speed
changes each time the button is
pressed.
SLOW
DVD
Playing still
Video CD
frames (pausing)
During playback, press
“
” once.
Press “ : ” to resume playback.
Notes:
• No sound is played during the still frame mode.
• When a playback starts after about 5 minutes of
temporary still (pause), a picture or sound may
stop for an instant period, but this is not a failure.
CD
Press “ : ” to resume normal
playback.
Notes:
• No sound is played during slow motion playback.
• 1/2, 1/4, 1/8 and 1/16 are approximate speeds.
The actual speed differs from disc to disc.
• Slow playback is not available when playing back
a slide show.
13
Page 14
Searching by title number
CLEAR
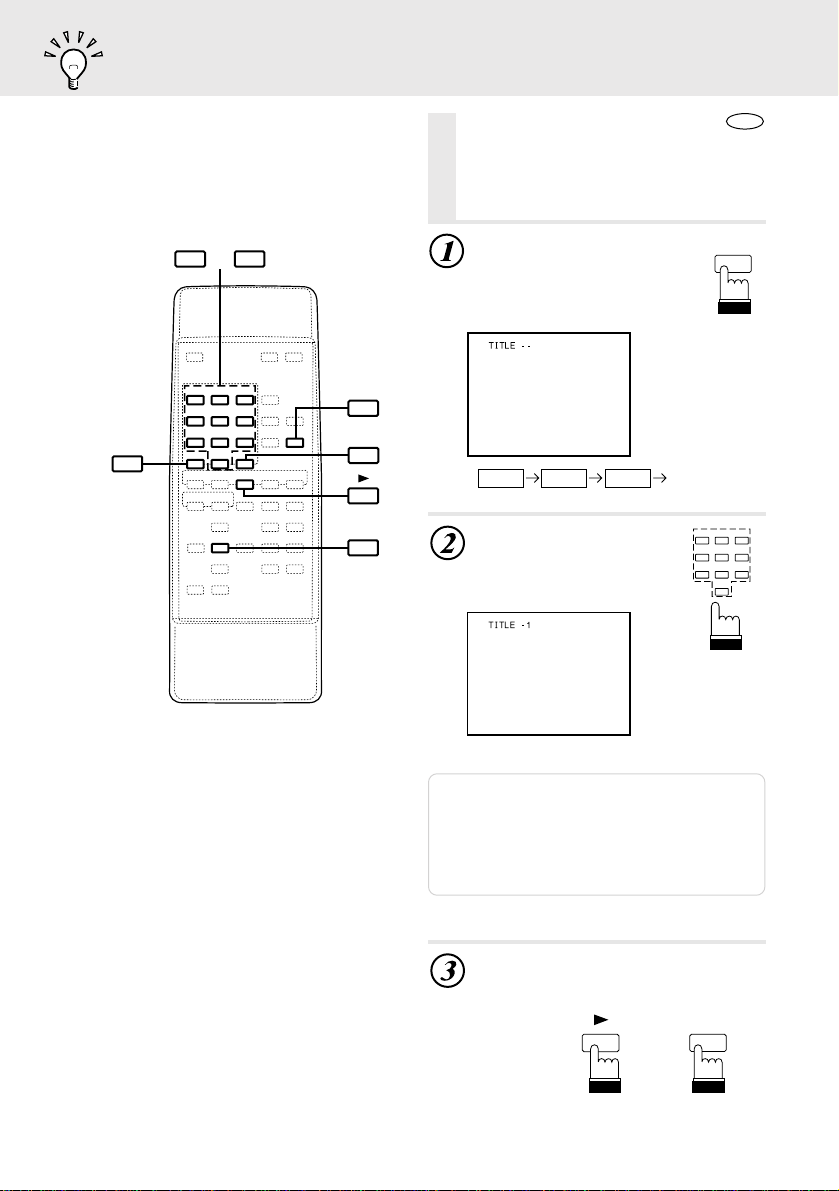
Searching by title
DVD
number
Use this function to easily find positions
on the DVD using the DVD’s title menu.
90
–
GO TO
RETURN
ENTER
During playback, press
“GO TO”.
The mode switches each time the
button is pressed. Select
“TITLE”.
TITLE TIME Normal playbackCHAPT
Input the number of the
title you want to play
using the number keys
(“0” to “9”).
GO TO
123
456
789
0
14
(When title number 1 is input)
Notes:
• This function cannot be used on discs on which
no title numbers are recorded.
• Press “CLEAR” to delete the last digit in the title
number.
• Press “RETURN” to cancel the title search mode
and resume normal playback.
Press “ : ” or “ENTER”.
Playback starts from the selected title
number.
ENTER
or
Page 15
Searching directly by chapter or track number
Searching by elapsed time
DVD
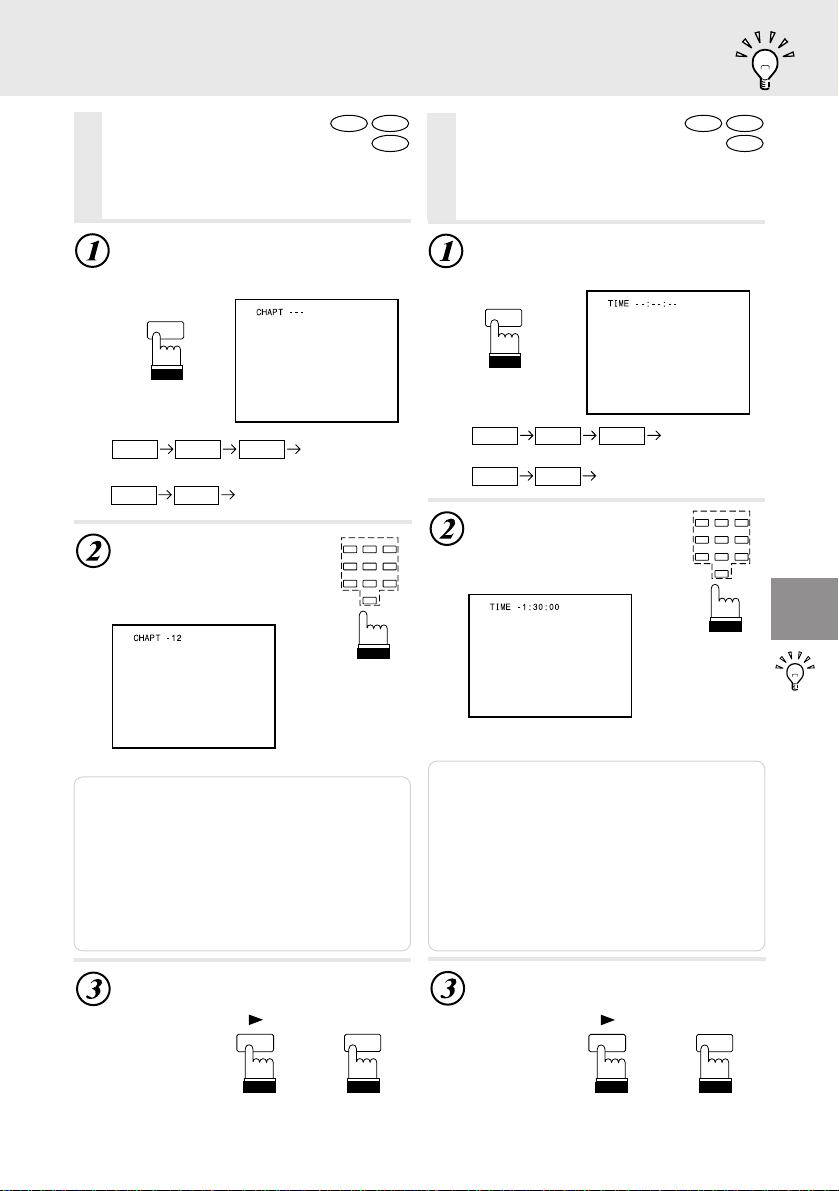
Searching directly by
chapter or track number
Use this function to easily move to the beginnings
of the chapters or tracks on the disc.
During playback, press “GO TO”.
The mode switches each time the button
is pressed. Select “CHAPT” or “TRACK”.
GO TO
Video CD
CD
DVD
Searching by
Video CD
CD
elapsed time
Use this function to search by specifying
the elapsed time.
During playback, press “GO TO”.
The mode switches each time the button
is pressed. Select “TIME”.
GO TO
DVD Video
TITLE TIME
CHAPT
Video-CD/CD
TRACK TIME Normal playback
Input the number of the
chapter
or track you
want to play using the
number
keys (“0” to “9”).
Normal playback
123
456
789
0
(When chapter number 12 is input)
Notes:
• This function cannot be used on discs on which
no chapter numbers are recorded.
• Press “CLEAR” to delete the last digit in the
chapter/track number.
• Press “RETURN” to cancel the chapter/track
search mode and resume normal playback.
• With video discs containing playback control
(PBC), function of “searching directly by track
number” is not available under the PBC ON
status.
Press “ : ” or “ENTER”.
Playback starts from the selected chapter
or track.
ENTER
DVD Video
TITLE TIME
CHAPT
Video-CD/CD
TRACK TIME Normal playback
Input the elapsed time
from which you want to
start playback using the
number
keys (“0” to “9”).
Normal playback
123
456
789
0
(When 1 hour, 30 minutes is input as the
elapsed time)
Notes:
• Input the hours first, followed by the minutes, then
the seconds.
• Press “CLEAR” to delete the last digit in the
elapsed time.
• Press “RETURN” to cancel the elapsed time
search mode and resume normal playback.
• With DVDs, the precision of the time search
function differs from disc to disc.
• With video discs containing playback control
(PBC), function of “searching
available under the PBC ON status.
not
by elapsed time” is
Press “ : ” or “ENTER”.
Playback starts from the specified
elapsed time.
ENTER
or
or
15
Page 16

A-B repeat playback
MENU
A-B RPT
DVD
A-B repeat
Video CD
playback
Use this function to select two points and play the
section between the points repeatedly.
During playback, press
“A-B RPT”.
The A point (the starting point of the
section to be played repeatedly) is set.
A-B RPT
RPT
Press “A-B RPT” again.
A-B RPT
The B point (the end point of the
section to be played repeatedly)
is set, and the section between
the two points is played repeatedly.
To resume normal playback,
A-B RPT
press “A-B RPT” again during
repeat playback.
Note: Set the A-B repeat mode during normal
playback.
DVDs – normal playback (repeat off)
Video CDs – normal playback (disc repeat)
For details, refer to “Chapter/track/title
repeat playback” (page 17).
16
Page 17
Chapter/track/title repeat playback
Video CD
CD
DVD
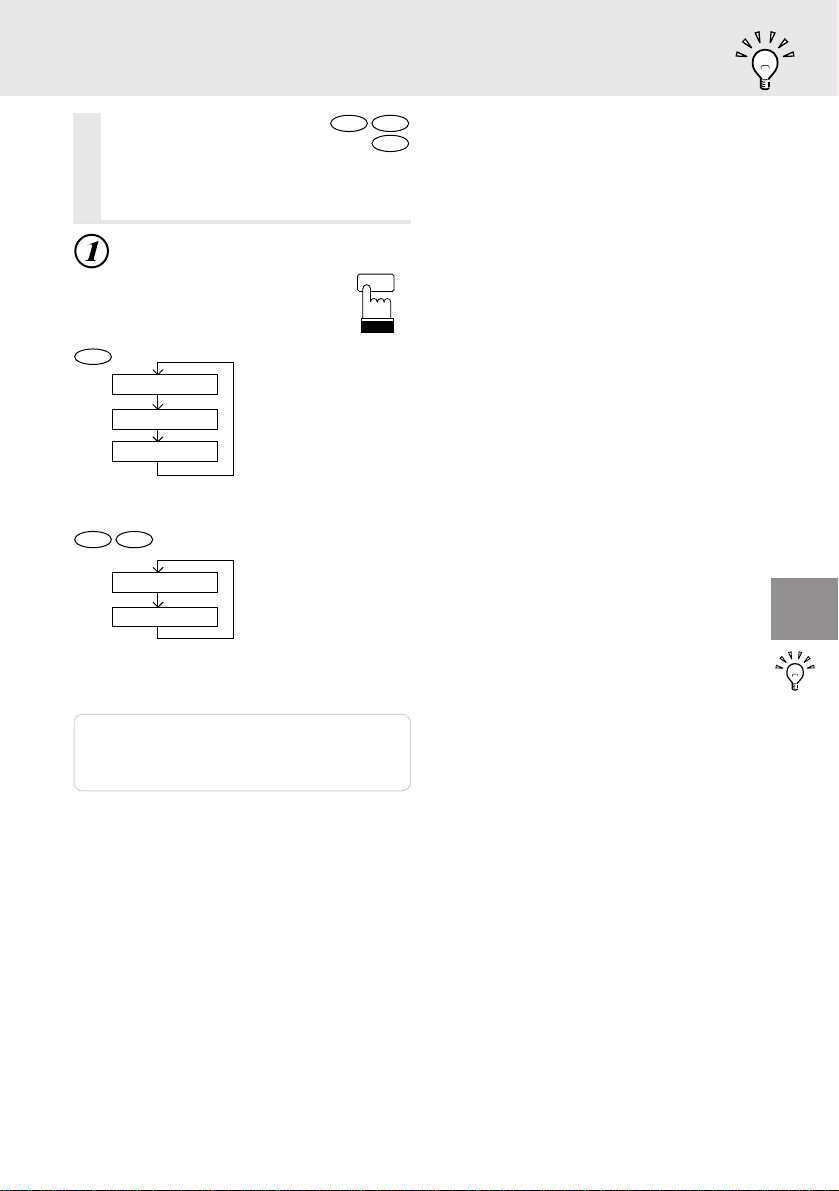
Chapter/track/title
Video CD
repeat playback
Use this function to play the disc’s titles,
chapters or tracks repeatedly.
During playback, press “RPT”.
The repeat mode switches each
time the button is pressed.
RPT
CD
DVD
Chapter
Title
Repeat off
Track
Disc
Note: The track/disc repeat modes cannot be
used on video CDs with playback control
(PBC). Press “MENU” to turn the PBC
function off.
The chapter is
played repeatedly.
The title is
played repeatedly.
The mode returns
to normal playback.
The track is
played repeatedly.
The entire disc is
played repeatedly.
Normal playbackdisc repeat.
(setting at factory
shipping)
17
Page 18
Programmed playback
90
–
ENTER
PROG
RETURN
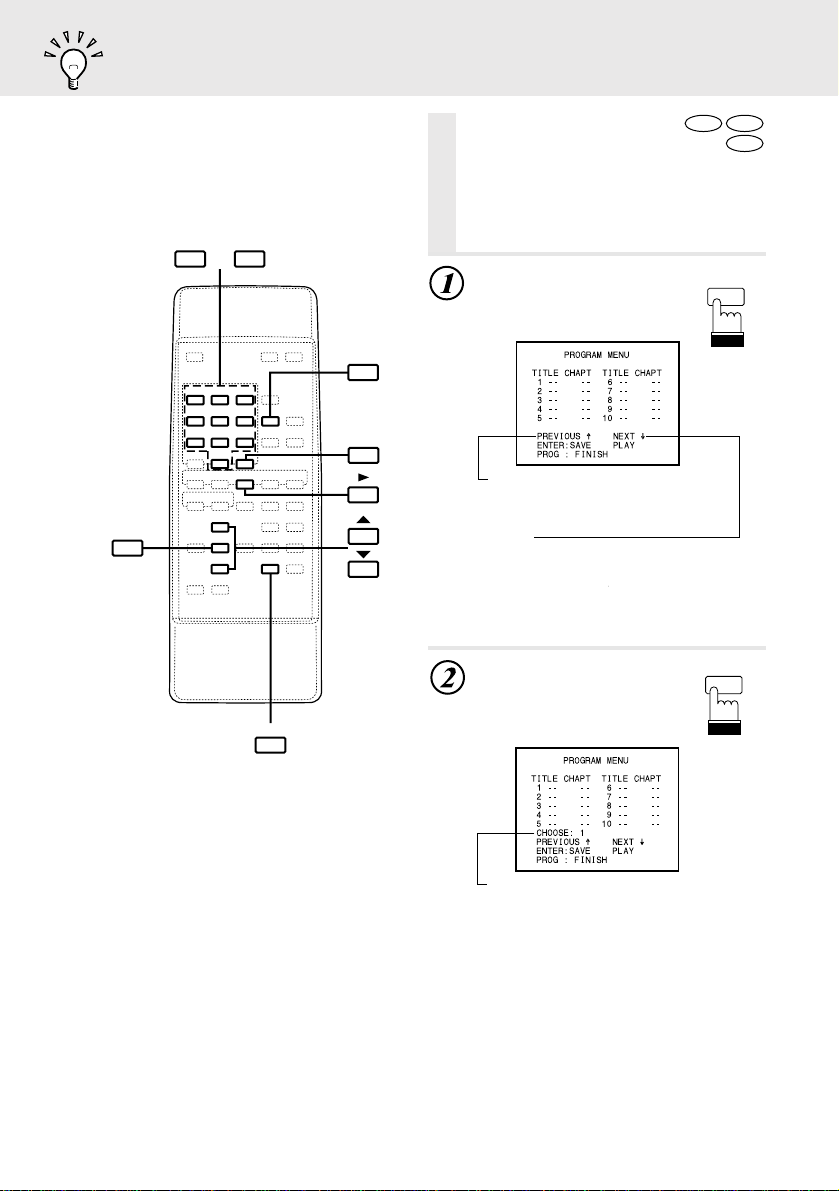
Programmed
DVD
playback
Use this function to select specific titles,
chapters and tracks and play them in the
desired order. Up to 20 titles, chapters and
tracks can be programmed.
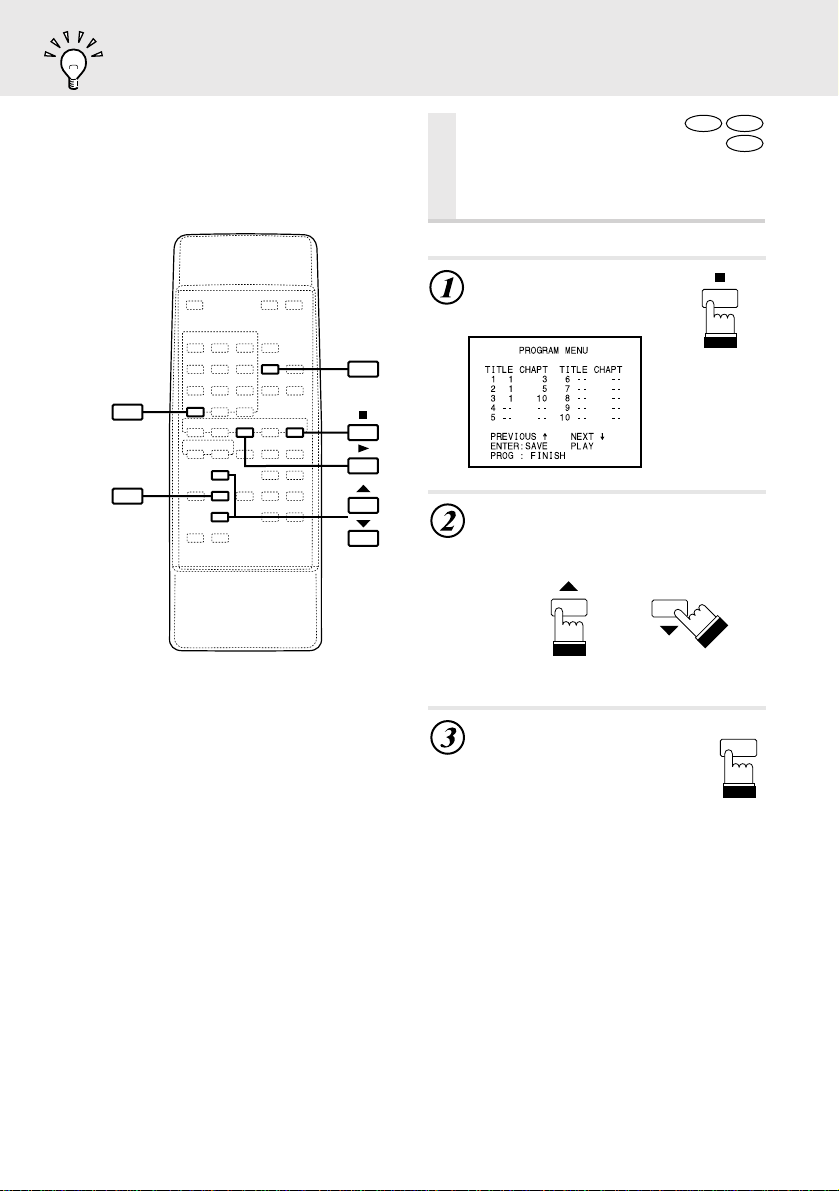
In the stop mode, press
“PROG”.
The program menu appears.
PREVIOUS:
Switched to previous page.
Select by pressing “
NEXT:
Switched to next page (menu to enter
programs 11-20)
Select by pressing “
▲
”, then press ENTER.
▲
▲
”, then press ENTER.
PROG
Video CD
CD
18
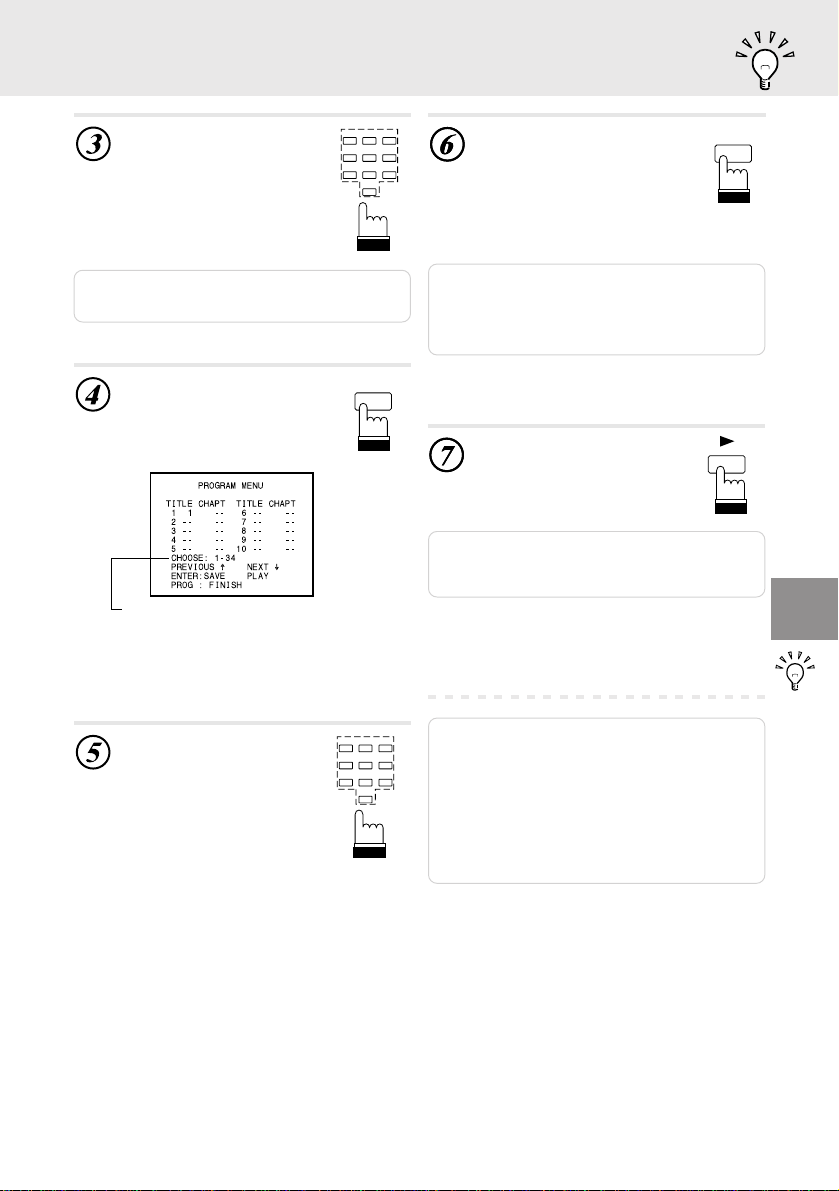
DISP
Press “ENTER”.
The title input mode is set.
Number of title number allowed to input.
(In this case the number of title number
is only one.)
ENTER
Page 19
Programmed playback
Use the number keys
(“0” to “9”) to input the
title number.
Note: Press “RETURN” during this process to
return to the previous mode.
Press “ENTER”.
123
456
789
ENTER
The chapter input mode is set.
Number of chapter number allowed to input.
(In this case the chapter number can be
selected between 1-34.)
Press “ENTER”.
ENTER
The program input mode is
0
ended. To continue programming,
press “ 9 ” to change the program
number, then repeat steps 2 to 5.
Up to 20 titles, chapters and
tracks can be programmed.
Note: If you want to program more than 10 titles,
chapters and tracks, press “
programming the 10
then press “ENTER”. The program menu for
step numbers 11 to 20 appears.
9
th
” after
step to select “NEXT”,
Press “ : ”.
Playback begins in the programmed order.
Note: If “PROG” is pressed after inputting the
program, the program menu turns off, but
the program is stored in the memory.
Use the number keys
(“0” to “9”) to input the
chapter number.
123
456
789
0
Notes:
• For video CDs and CDs, input the track numbers
(in the same way as for DVDs).
• For DVDs, the program menu reappears once
programmed playback is finished. For video CDs
and CDs, the program is played repeatedly.
• The program can be checked during programmed
playback by pressing “DISP” twice. For details,
refer to “Displaying the disc status” (pages 24 and
25).
19
Page 20
Editing programs and clearing steps from programs
Editing programs
and clearing steps
from programs
Use the procedure described below to
change or clear programs.
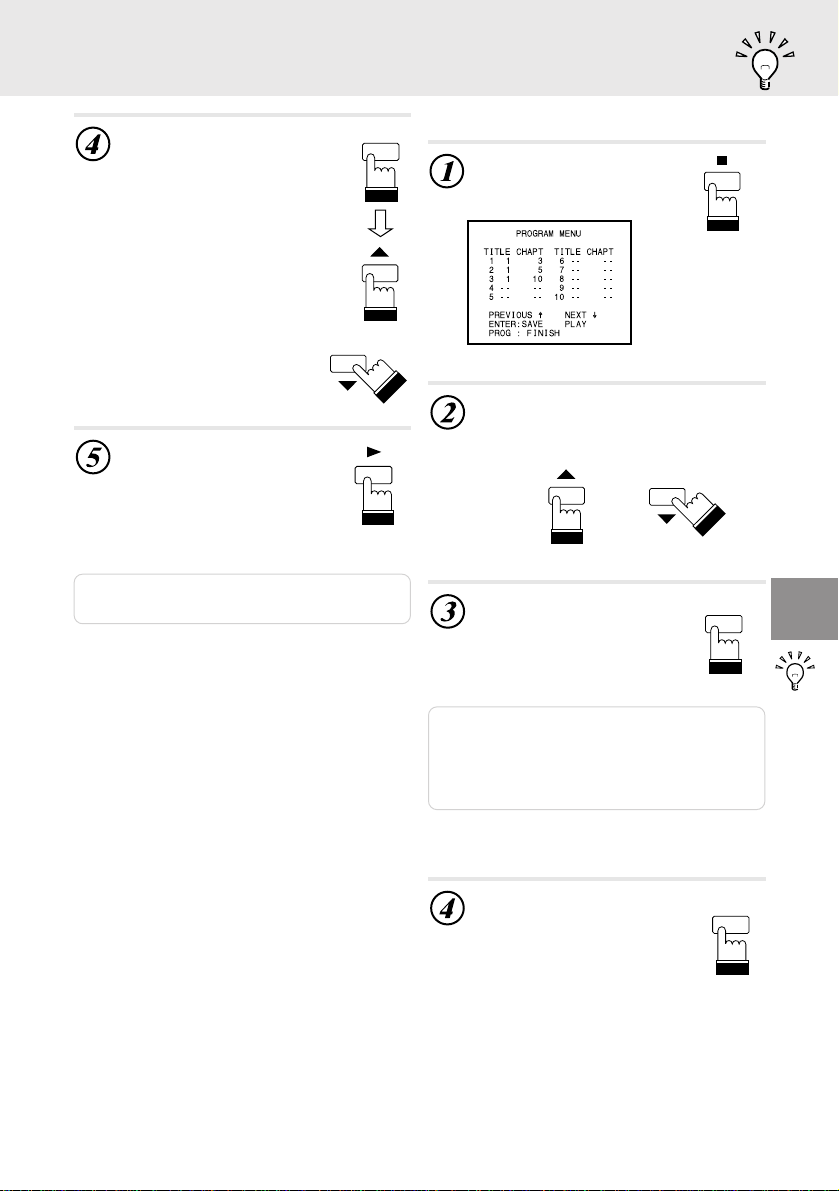
Editing the program
During programmed
playback, press “
The program menu appears.
PROG
CLEAR
ENTER
Use the “ 8 ” or “ 9 ” ke y to select
the number of the step you want
to edit.
L
or
”.
DVD
Video CD
CD
20
Press “ENTER”.
The title number is selected.
Input the new title number.
ENTER
Page 21
Editing programs and clearing steps from programs
Press “ENTER”.
The chapter number is selected.
Input the new chapter number,
then press “ENTER”.
To continue editing, use the “ 8 ”
and “ 9 ” keys to select the number
of the step you want to edit, then
repeat steps 3 and 4.
Press “ : ”.
Programmed playback begins.
Note: For video CDs and CDs, edit the track
numbers (in the same way as for DVDs).
ENTER
or
Clearing steps from programs
During programmed
L
playback, press “
The program menu appears.
”.
Use the “ 8 ” or “ 9 ” key to select
the number of the step you want
to clear.
or
Press “CLEAR”.
The step is cleared from the
program.
CLEAR
Notes:
• Clear one step from the program at a time.
• When a step is cleared, the numbers of the
following steps are all decreased by one.
• To clear the entire program, set the cursor to step
1 and press “CLEAR” repeatedly.
Press “PROG”.
The program menu turns off.
PROG
21
Page 22
Switching the audio language
DVD
Video CD
LL
RR LR
90
–
MENU
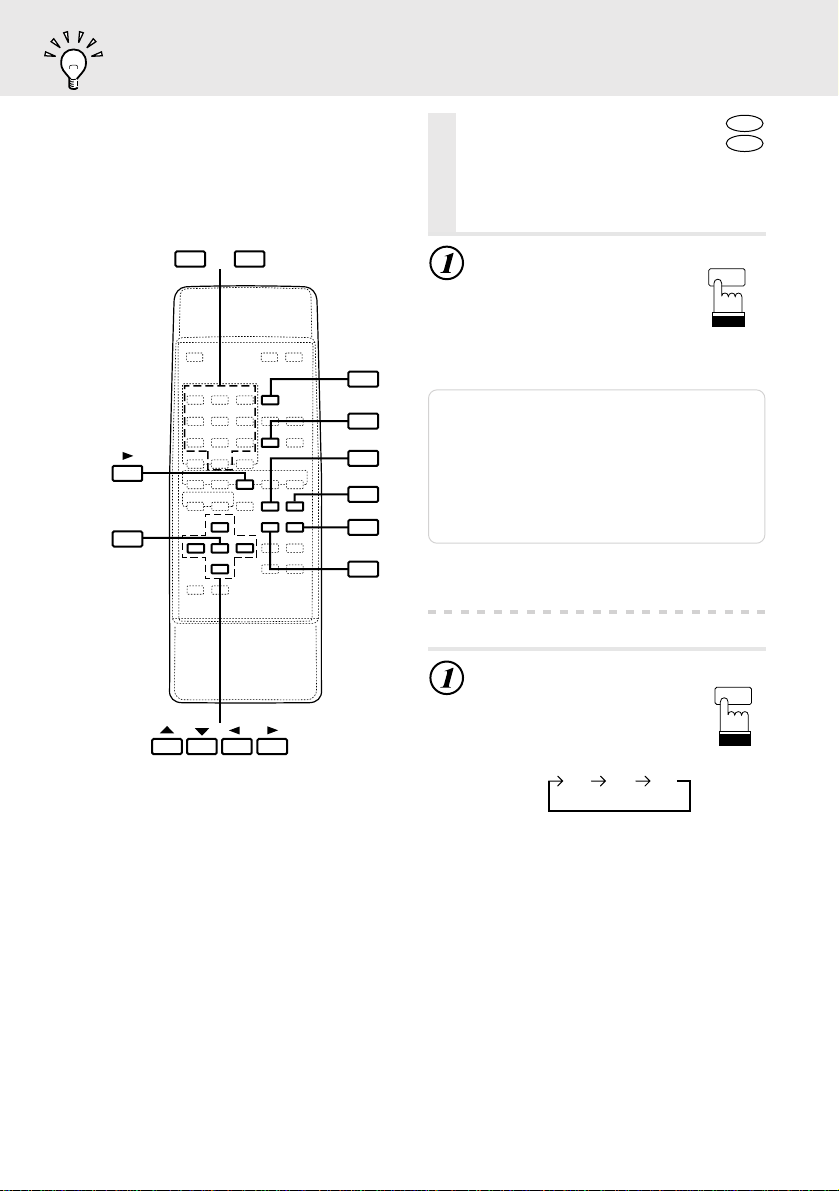
Switching the
audio language
On DVDs including multiple audio modes or
multiple audio languages, the audio
language can be switched during playback.
During playback, press
“AUDIO”.
The sound switches between the
different audio modes recorded
on the disc each time the button
is pressed.
AUDIO
ENTER
TITLE
ANGLE
AUDIO
ON/OFF
SUB P.
Notes:
• The language selected with the default settings is
set when the power is turned on or the disc is
replaced. If the disc does not include that
language, the disc’s default language is set.
• For some discs it is not possible to switch the
audio language during playback.
• Some time may be required for the audio
language to change.
• Video CDs with multiplex audio
During playback, press
“AUDIO”.
The combination of the left and
right channels changes each time
the button is pressed.
AUDIO
22
Page 23
Switching the angle
DVD
Switching the subpicture (subtitle language)
Displaying the subpicture (subtitles)
Switching the angle
With DVDs on which images photographed from multiple angles are
recorded, the angle can be switched
during playback.
During playback, press
“ANGLE”.
The angle switches between the
angles recorded on the disc each
time the button is pressed.
Notes:
• Some time may be required for the angle to
change.
• Depending on the disc, the angle may switch in
one of two ways.
- Seamless : The angle switches smoothly.
- Non-seamless : When the angle is switched, a
still picture is displayed first,
after which the angle switches.
Switching the subpicture
(subtitle language)
With DVDs on which multiple subtitle
languages are recorded, the subtitle
language can be switched during playback.
During playback, press
“SUB P.”
The subtitle language switches
between the languages recorded
on the disc each time the button
is pressed.
ANGLE
SUB P.
DVD
Displaying the
subpicture (subtitles)
With DVDs on which subtitles are recorded,
you can select whether to display the subtitles
or not during playback.
During playback, press
“ON/OFF.”
The currently displayed subtitles
are turned on and off each time
the button is pressed.
Note: For some discs, the subpicture will be
displayed even when this is set to off.
• Switching from the menu
For some discs, the audio language, angle and
Tips
DVD
subpicture can be switched from the disc menu.
Press “MENU” or “TITLE”, select the
item, then press “ENTER”.
MENU
or
Use the “8”, “9 ”, “;” and “:” keys
or the number keys (“0” to “9”) to
select the language or angle, then
press “ENTER” or “:”.
or
TITLE
123
456
789
0
ON/OFF
ENTER
Notes:
• Some time may be required for the subtitle
language to change.
• The language selected with the default settings is
set when the power is turned on or the disc is
replaced. If the disc does not include that
language, the disc’s default language is set.
ENTER
or
23
Page 24
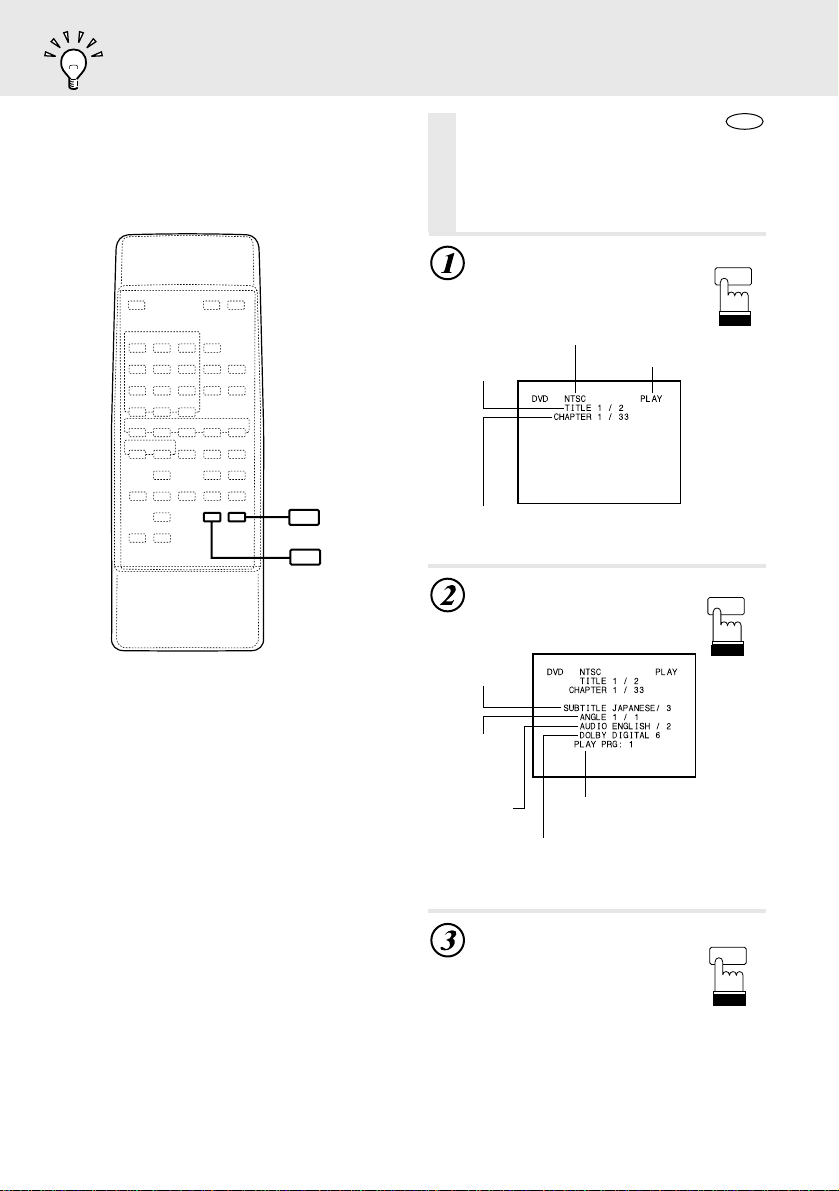
Displaying the disc status
DVD
Displaying the
disc status
Use the procedure described below to display
the status (title number, chapter number, etc.) of
the currently playing DVD on the screen.
During playback, press
“DISP”.
The playback status is displayed.
TV system (NTSC or PAL)
Current title
number
Operating mode
DISP
FUNC
DISP
Current chapter
number
Press “DISP” again.
Current subtitle
language
Current angle
number
Current audio
language
Program play number
(Only during programmed
playback)
Audio recording system
Press “DISP” once more
to turn the display off.
DISP
DISP
24
Page 25
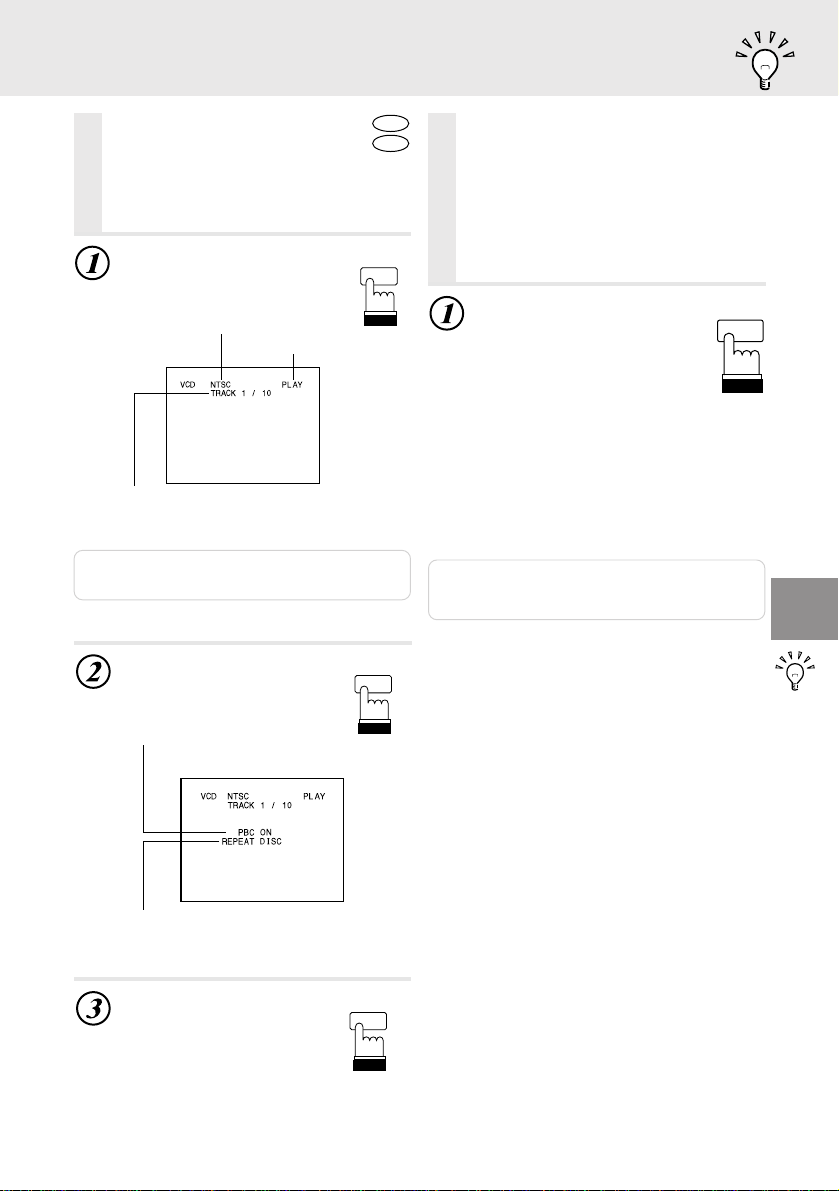
Displaying the disc status
FUNC
Video Output ON/OFF
Displaying the
disc status
Use the procedure described below to display
the status (track number, etc.) of the currently
playing video CD or music CD on the screen.
During playback, press
“DISP”.
The playback status is displayed.
TV system (NTSC or PAL)
Operating mode
Current track
number
Note: For music CDs, the playing status is
displayed even when “DISP” is not pressed.
Press “DISP” again.
Video CD
DISP
DISP
CD
Video Output ON/OFF
(Only when CVA-1005 is connected)
When this unit is used with the CVA-1005
+ the TME-M750 (Extra Monitor for Rear
Seat), the DVD video can be viewed
independently of what’s being viewed on
the CVA-1005.
Press “FUNC” on the
Remote Control while the
DVA-5200 is OFF and the
CVA-1005 is ON.
The DVD’s video will be output to
the Rear Monitor regardless of
what’s being viewed on the CVA-1005. It
will continue to play even when the CVA1005 source is changed. The RCA
connectors mounted just above the
Remote Eye input at the rear of the unit,
may be used to feed audio to the Rear
Monitor or separate Rear audio system.
Note: This output is at a fixed level and requires a
preamp with a volume control to adjust
listening levels.
Playback control (PBC)
ON/OFF (For video CDs only)
Repeat setting (Default setting-disc repeat)
Press “DISP” once more
to turn the display off.
DISP
25
Page 26
SET UP
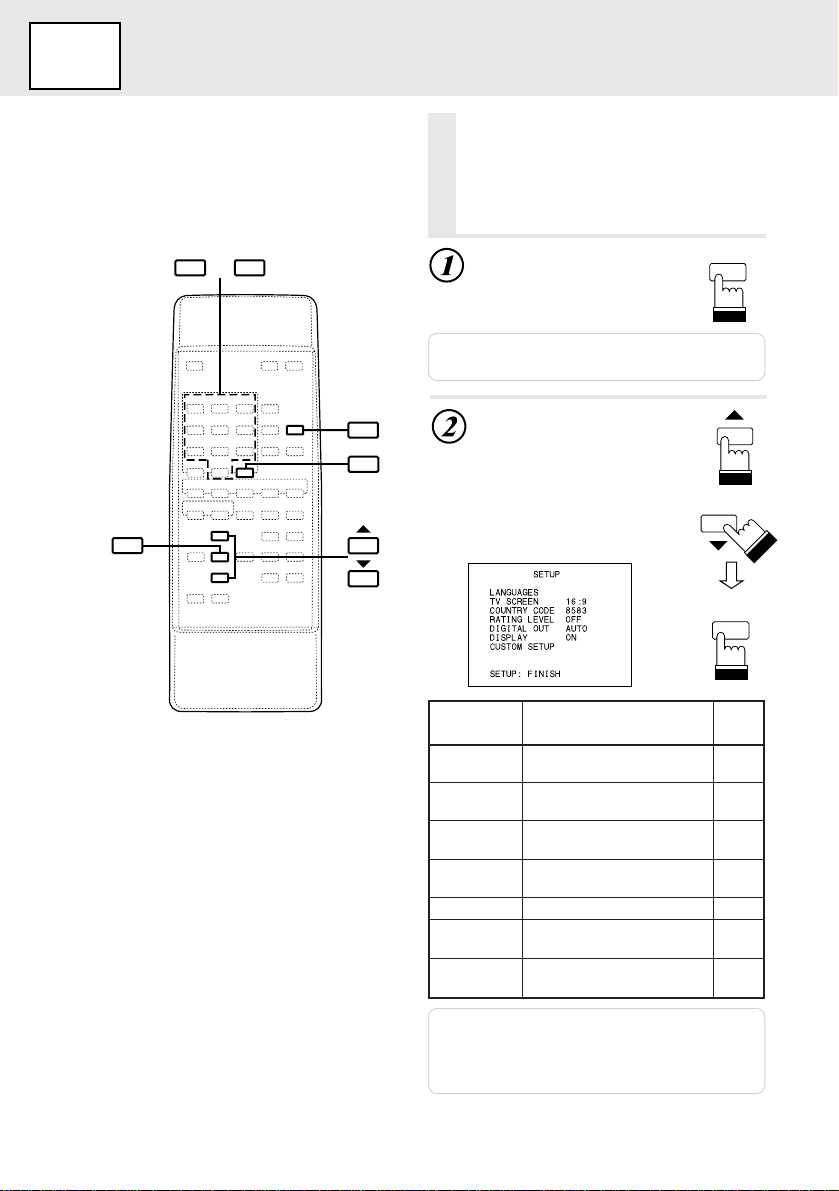
Changing the Default Settings (Setup)
Changing the default
settings (setup)
The factory default settings can be
changed to suit your personal preferences and usage.
90
–
In the stop mode, press
“SET UP”.
The default setting menu
appears.
Note: This operation cannot be performed in the
PRE-STOP mode.
SET UP
ENTER
SET UP
RETURN
Use the “ 8 ” or “ 9 ”
key to make the selection, then press
“ENTER”.
For the procedure after selecting
the setting item, refer to the
pages indicated on the table
below.
Item Description
LANGUAGES
TV SCREEN
COUNTRY
CODE
RATING
LEVEL
DIGITAL OUT
DISPLAY
CUSTOM
SETUP
Set the audio language, subtitle
language and menu language.
Set the screen size according to
the type of TV monitor being used.
Set the country code when
setting the rating level.
Set the rating level (parental
lock).
Set the digital output.
Set whether the front panel’s
LED indicators are on or off.
Set the DVD scan mode and
Ai-NET setting.
or
ENTER
See
page
→P27
→P28
→P29
→P30
→P32
→P33
→P34
26
Note: When the settings are changed, the old
settings are overwritten. Make a note of the
current settings before making changes.
The settings are not cleared even when the
vehicle’s battery is disconnected.
Page 27
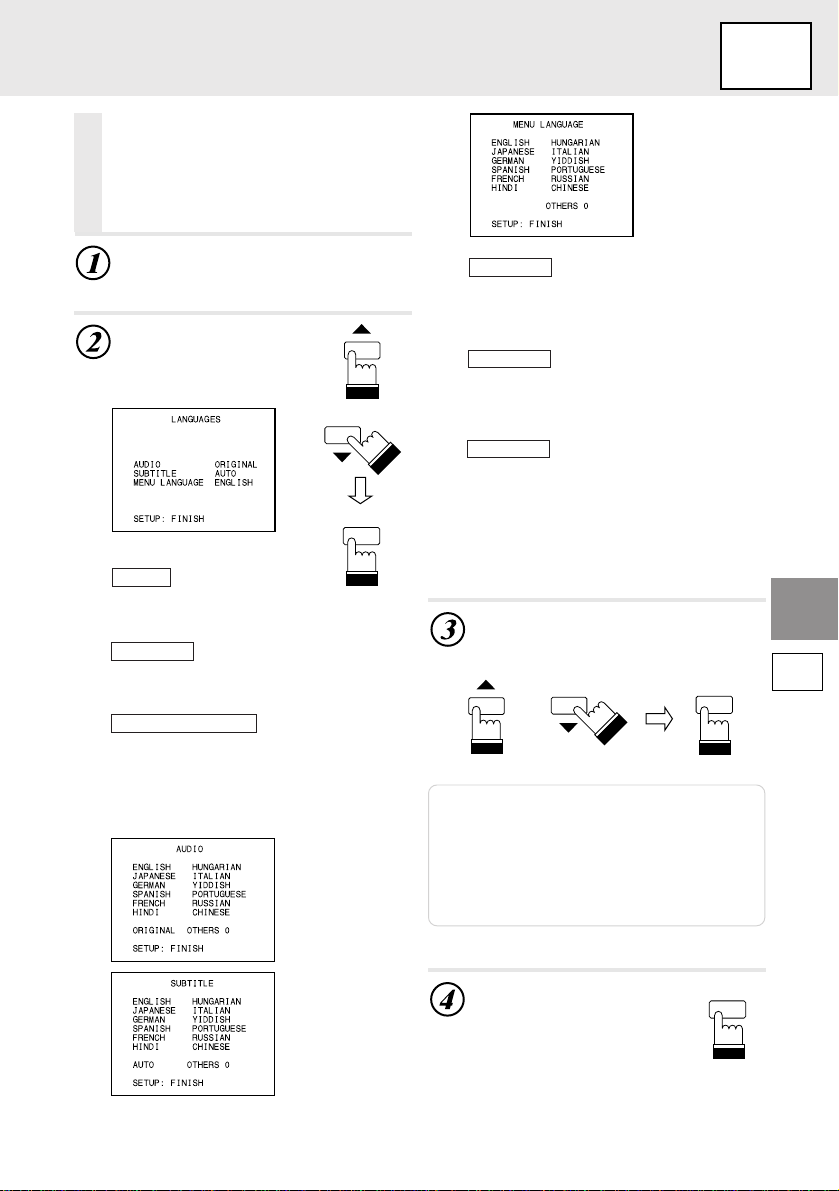
ORIGINAL
AUTO
OTHERS
Changing the language settings
Changing the language settings
The audio language, subtitle language and
menu language can be set according to your
preferences.
Select “LANGUAGES” under
“Changing the default settings
(SET UP)” on page 26.
Use the “ 8 ” or “ 9 ” key
to make the selection,
then press “ENTER”.
or
ENTER
AUDIO
Set the audio language produced from
the speakers.
SUBTITLE
Set the language of the subtitles displayed on the screen.
MENU LANGUAGE
Set the language used for the menus (title
menu, etc.).
SET UP
MENU
LANGUAGE
(menu languages)
The disc is played with the audio
language set as the priority language for
the disc. (AUDIO only)
The disc is played with the subtitle
language set as the priority language for
the disc. (SUBTITLE only)
Set this to play the disc with a language
other than one of the languages displayed. Use the keys “0” to “9” to input
the 4-digit country code, then press
“ENTER”. For the country codes, refer to
“List of language codes” (page 57).
Use the “ 8 ” or “ 9 ” ke y to select
the desired language, then press
“ENTER”.
ENTER
or
SET UP
The setup screen for the selected
language is displayed.
AUDIO
(audio languages)
SUBTITLE
(subtitle languages)
Notes:
• If the disc does not include the selected
language, the disc’s default language is set.
• Languages set upon shipment from the factory:
Audio language : ORIGINAL
Subtitle language : AUTO
Menu language : English
• Press “RETURN” to return to the previous screen.
Press “SET UP”.
The settings are stored and the
set up mode is canceled.
SET UP
27
Page 28
SET UP
ENTER
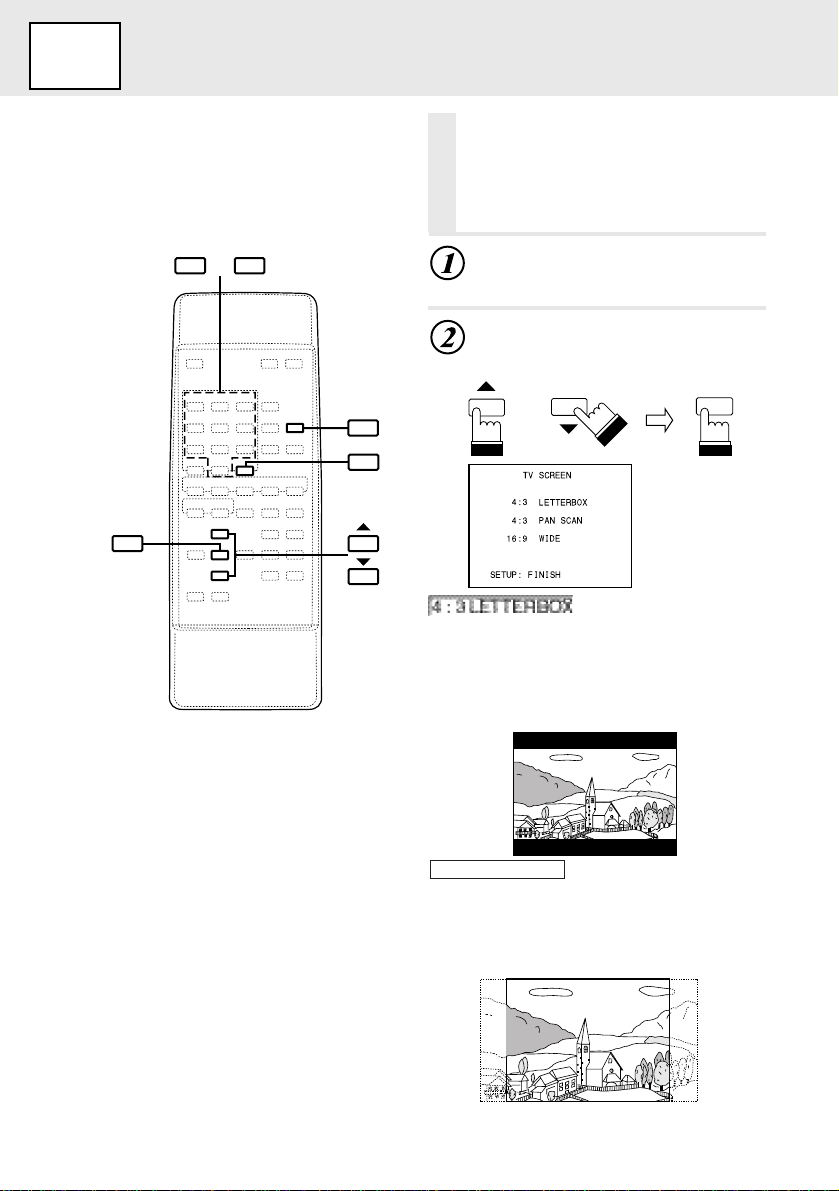
Changing the TV screen settings
Changing the TV
screen settings
Use the procedure described below to set
the output screen according to the type of
TV monitor being used.
90
–
SET UP
RETURN
Select “TV SCREEN” under
“Changing the default settings
(SET UP)” on page 26.
Use the “ 8 ” or “ 9 ” key to make
the selection, then press
“ENTER”.
Select this when connected to a conventional
4:3 size (normal TV aspect ratio) monitor.
There may be black stripes visible at the top
and bottom of the screen. The width of these
stripes will depend upon the original aspect
ratio of the theatrical release of the movie.
ENTER
or
28
4 : 3 PAN SCAN
Select this when connected to a conventional
4:3 size monitor. The picture will fill the entire
TV screen. However, due to the mismatch in
aspect ratio, parts of the movie at the extreme
left and right sides will not be visible.
Page 29

Changing the TV screen settings
Changing the country code setting
SET UP
16 : 9 WIDE
Select this when connected to a wide screen
TV . This is selected upon shipment from the
factory.
Notes:
• For some discs, the picture may not be set to the
selected screen size. (For details, refer to the
explanation on the disc’s jacket.)
• Press “RETURN” to return to the previous screen.
Press “SET UP”.
The settings are stored and the
set up mode is canceled.
SET UP
Changing the country
code setting
Set the country code when setting the
rating level.
Select “COUNTRY CODE” under
“Changing the default settings
(SET UP)” on page 26.
Use keys “0” to “9” to input the
4-digit country code, then press
“ENTER”.
US : 8583
Note: Press “RETURN” to return to the previous
screen.
123
456
789
0
ENTER
SET UP
Press “SET UP”.
The settings are stored and the
set up mode is canceled.
SET UP
29
Page 30
SET UP
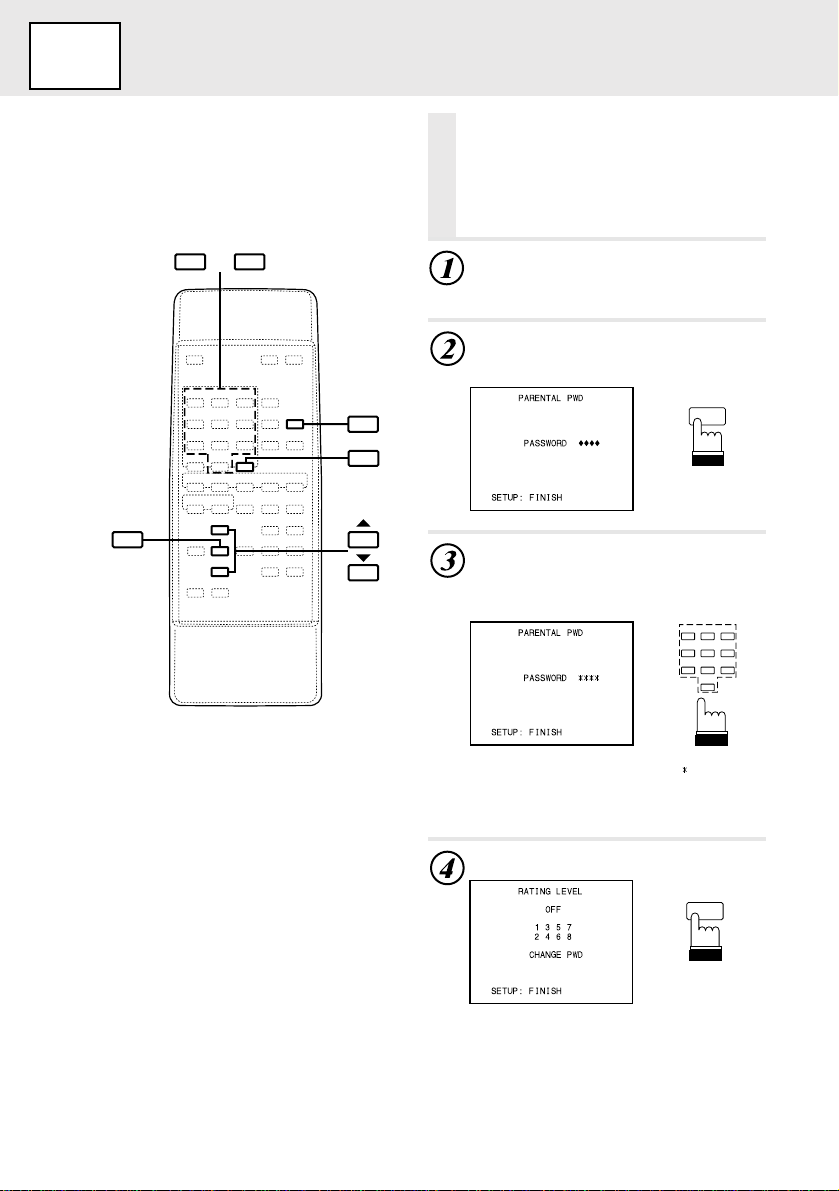
Setting the rating level (parental lock)
Setting the rating
level (parental lock)
Use this function to restrict the viewing
of movies to children of appropriate
90
–
age levels only.
Select “RATING LEVEL” under
“Changing the default settings
(SET UP)” on page 26.
Press “ENTER”.
The password input mode is set.
ENTER
SET UP
RETURN
ENTER
Use keys “0” to “9” to input the 4digit password.
The password is set to 1111 is upon
shipment from the factory.
123
456
789
0
Input numbers are displayed “
”.
Press “ENTER”.
ENTER
30
Page 31

Setting the rating level (parental lock)
SET UP
Use the “ 8 ” or “ 9 ” key to select
the rating level, then press
“ENTER”.
Select “OFF” to cancel the parental lock
or if you do not want to set a rating level.
The higher the number, the higher the
rating level.
ENTER
or
Note: Press “RETURN” to return to the previous
screen.
Press “SET UP”.
The settings are stored and the
set up mode is canceled.
Notes:
• If you want to change the password, select
“CHANGE PWD”, then input the new password
(4 digits).
• Write down the password on a piece of paper and
store the piece of paper somewhere in case you
forget it.
• On unrated DVDs, playback will not be restricted
even if the rating level is set.
• Once set, this rating level remains in memory
until changed. To enable the play of discs of
higher rating levels or to cancel the parental lock,
the setting must be changed.
• Not all DVDs provide a Parental Lock feature. If
you are unsure about a DVD, play it first to
confirm. Do not leave DVDs accessible to young
children for whom you deem them inappropriate.
.
SET UP
• Changing the rating level temporarily
Some discs may request that you change the
Tips
rating level set in the default settings during
playback. In this case, the following message
appears on the screen:
Still picture
Still Picture
When this appears, if you do not input the correct
password either playback does not continue or a
picture for a different rating level is played.
SET UP
31
Page 32

SET UP
Changing the digital output setting
Changing the digital
output setting
Use the following procedure to set the
audio signal output from the DVA-5200.
Select “DIGITAL OUT” under
“Changing the default settings
(SET UP)” on page 26.
ENTER
SET UP
RETURN
Use the “
8
” or “ 9 ” key to make
the selection, then press “ENTER”.
ENTER
or
AUTO
The digital output is switched automatically
according to the type of audio signals being
played.
Be sure to select “AUTO” when you want to
connect a digital audio processor and play
Dolby Digital audio. “AUTO” is selected upon
shipment from the factory.
LPCM
The audio signals recorded on the disc are
converted into 48 kHz/16 bit (for DVDs) or 44.1
kHz (for video CDs and CDs) linear PCM audio
signals for output.
32
Note: Press “RETURN” to return to the previous
screen.
Press “SET UP”.
The set up are stored and the
set up mode is canceled.
SET UP
Page 33

Changing the digital output setting
Changing the display setting
• Audio output/Optical digital audio output
Disc
DVD
Video
CD
Audio recording
format
Dolby Digital
Linear PCM (48 kHz)
Linear PCM (96 kHz)
CD
MPEG
Linear PCM
Digital output
setting
AUTO
LPCM
AUTO
LPCM
AUTO
LPCM
AUTO or LPCM
AUTO or LPCM
Optical digital audio output
(when a DVD sound
processor is connect)
Dolby Digital
LPCM (48kHz)
LPCM (48kHz)
LPCM (48kHz)
x
x
LPCM (44.1kHz)
LPCM (44.1kHz)
SET UP
Analog audio output
(Ai-NET output)
\
\
\
\
\
\
\
\
Changing the display
setting
Use the following procedure to set whether or
not the product’s LED indicators are on or off.
Select “DISPLAY” under “Changing the default settings (SET
UP)” on page 26.
8
Use the “
the “ON” or “OFF”, then press
“ENTER”.
” or “ 9 ” key to select
ENTER
or
ON
The LED indicators are lit, indicating the
product’s operating status. “ON” is selected
upon shipment from the factory.
OFF
The LED indicators are turned off.
When “OFF” is set, the indicators do not light
even when the power is on.
Note: Press “RETURN” to return to the previous
screen.
Press “SET UP”.
SET UP
The settings are stored and the
set up mode is canceled.
SET UP
33
Page 34

SET UP
Custom setting – Changing the F scan setting
ENTER
SET UP
RETURN
Custom setting
–
Changing the F scan setting
Use the following procedure to change the DVD
scan speed.
Select “CUSTOM SETUP” under
“Changing the default settings
(SET UP)” on page 26.
Use the “
“F SCAN MODE”, then press
“ENTER”.
Use the “ 8 ” or “ 9 ” key to select
“IP FR” or “I FR”, then press
“ENTER”.
8
” or “ 9 ” key to select
or
or
ENTER
ENTER
34
RESET Switch
IP FR
The DVD scan speed is slightly slower than
when “I FR” is selected.
“IP FR” is selected upon shipment from the
factory.
I FR
The DVD scan speed is slightly faster than
when “IP FR” is selected.
Note: Press “RETURN” to return to the previous
screen.
Press “SET UP”.
The settings are stored and the
set up mode is canceled.
SET UP
Page 35

Custom setting – Changing the Ai-NET settings
Display the message
Custom setting –
Changing the Ai-NET settings
The Ai-NET settings are used to output the
sound of connected Ai-NET products.
Select “CUSTOM SETUP” under
“Changing the default settings
(SET UP)” on page 26.
SET UP
Use the “
8
” or “ 9 ” key to select
“Ai-NET SETUP”, then press
“ENTER”.
ENTER
or
Use the “ 8 ” or “ 9 ” key to select
“DVD” or “CD”, then press
“ENTER”.
ENTER
or
DVD
Set to “DVD” when connected to the CVA-1005.
Operations can be performed using the CVA1005’s main menu screen.
For details, refer to the operating instructions of
the CVA-1005.
“DVD” is selected upon shipment from the
factory.
CD
Set to “CD” when connected to an Ai-NET
product (head unit) other than the CVA-1005.
Operations can be performed from the head
unit.
For details, refer to “Operating from the head
unit” (page 52).
Notes:
• Press “RETURN” to return to the previous screen.
• Operations cannot be performed using the main
menu screen if the Ai-NET setting is set to “CD”
when connected to the CVA-1005.
• If the Ai-NET setting is set to “DVD” when
connected to an Ai-NET compatible head unit
other than the CVA-1005, the only operation
from the head unit is the volume
possible
adjustment operation.
• When the Ai-NET setting is set to “CD”, the
operable functions and displays may differ
depending on the connected Ai-NET compatible
head unit.
Press “SET UP”.
SET UP
The settings are stored and the
set up mode is canceled.
The message “PLEASE PUSH RESET
SW” is displayed in step 3. Press the
reset switch on the DVA-5200’ s front
panel using the tip of a pen, etc. The DV A5200’s power turns off.
Turn off the vehicle’s ignition, then turn
it on again.
SET UP
35
Page 36

Operating the digital audio processor (optional)
Operating the
digital audio
processor (optional)
When used with a digital audio processor (PXAH510), operation is possible from the remote
control unit included with the DVA-5200. Also
refer to the PXA-H510’s operating instructions.
During playback, press
RETURN
“A.PROC”.
The setting menu appears.
DVD
Video CD
CD
A.PROC
ENTER
A.PROC
BAND
Use the “ 8 ” or “ 9 ” key
to make the selection,
then press “ENTER”.
For the procedure after making a
selection, refer to the pages
indicated on the table below.
Item Description
PARAMETRICEQ
SURROUND
PRIVATEMEMORY
TIME-
CORRECTION
DOLBY
SURROUND
MODE
ADJUST
MODE
Adjust the parametric equalizer’s band frequency,
band width and level.
Select one of six surround modes according to the
music source using DSP (digital signal processing).
Store and recall up to six parametric equalizer
adjustments and settings.
Eliminate time delays resulting from the distance
between the listening position and the speakers.
Switch between the Dolby Digital input and the Pro
Logic input.
Adjust the speaker mode, speaker level, etc.
Adjust the volume, fader, balance, etc.
or
ENTER
See
page
→P37
→P38
→P39
→P41
→P41
→P42
→P49
36
Page 37

Adjusting the parametric equalizer
Adjusting the parametric equalizer
Select “P ARAMETRIC-EQ” under
“Operating the digital audio
processor (optional)” on page 36.
Use the “ 8 ” or “ 9 ” key to select
the band to be set, then press
“ENTER”.
The band whose frequency is indicated in
yellow can be adjusted. The parametric
equalizer’s setting screen consists of two
pages. Press “BAND” to switch between
pages 1 and 2.
ENTER
or
BAND
Press “ : ” to select the band
width (Q-FACT), then press
“ENTER”.
ENTER
Use the “ 8 ” or “ 9 ” key to adjust
the band width, then press
“ENTER”.
ENTER
or
Press “ : ” to select the level (LV),
then press “ENTER”.
ENTER
Use the “ 8 ” or “ 9 ” key to
adjust the level, then press
“ENTER”.
ENTER
or
Use the “ 8 ” or “ 9 ” key to adjust
the frequency, then press “ENTER”.
ENTER
or
Note: Press “RETURN” to return to the previous
screen.
Press “A.PROC” to
A.PROC
close the digital audio
processor screen and
return to the playback
screen.
37
Page 38

Adjusting the surround settings
Adjusting the surround settings
This adjustment is not possible when Dolby
Digital or Pro Logic is turned on for the DVA5200’s audio output.
Select “SURROUND” under
“Operating the digital audio
processor (optional)” on page 36.
ENTER
A.PROC
RETURN
Use the “
8
” or “ 9 ” key to select
the surround mode, then press
“ENTER”.
There are six surround modes.
ENTER
or
Press “ENTER”.
The level (LV) value turns yellow.
ENTER
Use the “ 8 ” or “ 9 ” key to adjust
the level (LV), then press “ENTER”.
ENTER
or
38
Press “ : ” to select the time (echo
time), then press “ENTER”.
ENTER
Page 39

Use the “ 8 ” or “ 9 ” key to
adjust the time, then press
“ENTER”.
or
Adjusting the surround settings
Storing the surround settings
Storing the surround settings
ENTER
Select “PRIVATE-MEMORY” under
“Operating the digital audio
processor (optional)” on page 36.
DVD
Video CD
CD
Note: Press “RETURN” to return to the previous
screen.
Press “A.PROC” to
A.PROC
close the digital audio
processor screen and
return to the playback
screen.
Use the “ 8 ” or “ 9 ” key to
select “WRITE”, then press
“ENTER”.
ENTER
or
Use the “ 8 ” or “ 9 ” key to select
the number at which you want to
store the settings (“PRIVATEMEMORY 1” to “PRIVATEMEMORY 6”), then press “ENTER”.
ENTER
or
Note: Press “RETURN” to return to the previous
screen.
Press “A.PROC” to
A.PROC
close the digital audio
processor screen and
return to the playback
screen.
39
Page 40

Recalling the surround settings
Recalling the
surround settings
Select “PRIVATE-MEMORY” under
“Operating the digital audio
processor (optional)” on page 36.
Use the “ 8 ” or “ 9 ” key to select
the number of the settings you
RETURN
wish to recall (“PRIVATE-MEMORY
1” to “PRIVATE-MEMORY 6”), then
press “ENTER”.
DVD
ENTER
Video CD
CD
ENTER
A.PROC
or
Note: Press “RETURN” to return to the previous
screen.
Press “A.PROC” to
A.PROC
close the digital audio
processor screen and
return to the playback
screen.
40
Page 41

Adjusting the time compensation
DVD
Adjusting the time
Video CD
CD
compensation
Select “TIME-CORRECTION”
under “Operating the digital audio
processor (optional)” on page 36.
Using the Pro Logic mode
Using the Pro
DVD
Logic mode
Select “DOLBY SURROUND
MODE” under “Operating the
digital audio processor (optional)”
on page 36.
Video CD
CD
Use the “ 8 ” or “ 9 ” key to select
the speaker to be adjusted, then
press “ENTER”.
ENTER
or
Use the “ 8 ” or “ 9 ” key to
adjust the time, then press
“ENTER”.
ENTER
or
Note: Press “RETURN” to return to the previous
screen.
Press “A.PROC” to
A.PROC
close the digital audio
processor screen and
return to the playback
screen.
Use the “ 8 ” or “ 9 ” key to make
the selection, then press
“ENTER”.
ENTER
or
DOLBY DIGITAL
“DOLBY DIGIT AL” is set automatically
when the disc is Dolby Digital compatible
and the DVD video player’s audio output
setting is set to “AUTO”.
DOLBY PRO LOGIC
“DOLBY PRO LOGIC” or “OFF” can be
selected when the disc is Dolby Pro Logic
compatible and the DVD video player’s
audio output setting is set to “LPCM”.
When “OFF” is selected, the surround
settings cannot be adjusted.
Note: Press “RETURN” to return to the previous
screen.
Press “A.PROC” to
close the digital audio
processor screen and
return to the playback
screen.
A.PROC
41
Page 42

ADJUST – Setting the speaker mode
FRONT
CENTER
REAR
ADJUST –
Setting the speaker mode
This adjustment cannot be made when
Dolby Pro Logic is set to “OFF”.
Select “ADJUST” under “Operating the digital audio processor
(optional)” on page 36.
Use the “ 8 ” or “ 9 ” key to select
the speaker to be set (“FRONT”,
“CENTER” or “REAR”), then press
RETURN
ENTER
A.PROC
“ENTER”.
Use the “ 8 ” or “ 9 ” key to switch
the mode.
or
DVD
ENTER
Video CD
CD
42
or
LARGE/SMALL
OFF/LARGE/SMALL
OFF/LARGE/SMALL
Note: Press “RETURN” to return to the previous
screen.
Page 43

ADJUST – Setting the speaker mode
ADJUST – Adjusting the acoustic image
Press “A.PROC” to
close the digital audio
A.PROC
Press “ : ” to select the level item,
then press “ENTER”.
processor screen and
return to the playback
screen.
DVD
ADJUST –
Adjusting the acoustic image
This adjustment cannot be made when
Dolby Pro Logic is set to “OFF”.
Video CD
CD
Use the “
adjust the level, then press
“ENTER”.
Select “ADJUST” under “Operating the digital audio processor
(optional)” on page 36.
Use the “ 8 ” or “ 9 ” key to select
“BI-PHANTOM”, then press
Note: Press “RETURN” to return to the previous
screen.
“ENTER”.
ENTER
or
Press “A.PROC” to
close the digital audio
processor screen and
return to the playback
screen.
8
” or “ 9 ” key to
or
ENTER
ENTER
A.PROC
Use the “
8
” or “ 9 ” key to select
the mode (“ON” or “OFF”), then
press “ENTER”.
ENTER
or
Note: The “BI-PHANTOM” setting is automatically
set to “OFF” when the center speaker is set
to “OFF”.
43
Page 44

ADJUST – Mixing the rear audio channels
ADJUST –
Mixing the rear audio channels
Select “ADJUST” under “Operating the digital audio processor
(optional)” on page 36.
Use the “ 8 ” or “ 9 ” key to
RETURN
select “REAR MIX”, then press
“ENTER”.
DVD
ENTER
Video CD
CD
ENTER
A.PROC
or
Use the “
8
” or “ 9 ” key to select
the mode (“ON” or “OFF”), then
press “ENTER”.
ENTER
or
Note: The “REAR MIX” setting is automatically set
to “OFF” when the rear speaker is set to
“OFF”.
Press “ : ” to select the level item,
then press “ENTER”.
ENTER
44
Page 45

ADJUST – Mixing the rear audio channels
ADJUST – Center speaker time compensation
Use the “ 8 ” or “ 9 ” key to
adjust the level, then press
“ENTER”.
ENTER
or
Note: Press “RETURN” to return to the previous
screen.
DVD
ADJUST –
Video CD
CD
Center speaker time compensation
Compensation is not possible when the
center speaker is set to “OFF”.
Select “ADJUST” under “Operating the digital audio processor
(optional)” on page 36.
Use the “ 8 ” or “ 9 ” key to select
“CENTER DELAY”, then press
“ENTER”.
ENTER
Press “A.PROC” to
close the digital audio
processor screen and
return to the playback
screen.
A.PROC
or
Use the “
8
” or “ 9 ” key to adjust
the level, then press “ENTER”.
ENTER
or
Note: Press “RETURN” to return to the previous
screen.
Press “A.PROC” to
A.PROC
close the digital audio
processor screen and
return to the playback
screen.
45
Page 46

ADJUST – Rear speaker time compensation
ADJUST –
Rear speaker time compensation
Compensation is not possible when the
rear speakers are set to “OFF”.
Select “ADJUST” under “Operating the digital audio processor
(optional)” on page 36.
Use the “ 8 ” or “ 9 ” key to select
RETURN
“REAR DELAY”, then press
“ENTER”.
DVD
ENTER
Video CD
CD
ENTER
A.PROC
or
Use the “
8
” or “ 9 ” key to
adjust the level, then press
“ENTER”.
ENTER
or
Note: Press “RETURN” to return to the previous
screen.
Press “A.PROC” to
A.PROC
close the digital audio
processor screen and
return to the playback
screen.
46
Page 47

ADJUST – Achieving powerful sound at low volumes
DVD
ENTER
Video CD
CD
Press “A.PROC” to
close the digital audio
processor screen and
return to the playback
screen.
A.PROC
ADJUST –
Achieving powerful
sound at low volumes
This setting is only possible with Dolby
Digital outputs.
Select “ADJUST” under “Operating the digital audio processor
(optional)” on page 36.
Use the “ 8 ” or “ 9 ” key to select
“LISTENING”, then press “ENTER”.
or
Use the “
8
” or “ 9 ” key to select
the mode.
or
L-NIGHT
For powerful sound at low volumes (to
compensate for high levels of background
noise such as road noise)
STANDARD
For more powerful sound at regular
volumes
MAXIMUM
For the regular sound
Note: Press “RETURN” to return to the previous
screen.
47
Page 48

ADJUST – Adjusting the speaker level
ADJUST –
Adjusting the speaker level
Select “ADJUST” under “Operating the digital audio processor
(optional)” on page 36.
Press “BAND” to switch the
“ADJUST” screen.
RETURN
ENTER
Use the “ 8 ” or “ 9 ” key to select
“TEST TONE”, then press “ENTER”.
A.PROC
BAND
or
DVD
BAND
ENTER
Video CD
CD
48
Use the “ 8 ” or “ 9 ” key to select
“ON”, then press “ENTER”.
Test tones are produced for two seconds
from each speaker.
ENTER
or
Note: Test tones are not produced from the center
and rear speakers when these speakers are
set to “OFF”.
Page 49

ADJUST – Adjusting the speaker level
MODE – Adjusting the volume, fader and balance
Use the “
8
” or “ 9 ” key to
select the speaker, then press
“ENTER”.
Adjust so that the volume level from the
different speakers is the same.
ENTER
or
MODE –
Adjusting the volume,
fader and balance
When a head unit is connected using Ai-NET
connections, adjust the volume, fader and
balance from the head unit.
Select “MODE” under “Operating
the digital audio processor
(optional)” on page 36.
DVD
Video CD
CD
Use the “ 8 ” or “ 9 ” key to
adjust the level, then press
“ENTER”.
ENTER
or
Note: Press “RETURN” to return to the previous
screen.
Once the levels of all the
A.PROC
speakers have been
adjusted, either set
“TEST TONE” to “OFF”
or press “A.PROC” to
close the digital audio
processor screen and
return to the playback
screen.
Use the “ 8 ” or “ 9 ” key to select
the item to be adjusted, then press
“ENTER”.
ENTER
or
Use the “
8
” or “ 9 ” key to
adjust.
or
Note: Press “RETURN” to return to the previous
screen.
Press “A.PROC” to
close the digital audio
processor screen and
return to the playback
screen.
A.PROC
49
Page 50

MODE – Adjusting the subwoofer
RETURN
ENTER
A.PROC
DVD
MODE –
Video CD
CD
Adjusting the subwoofer
Select “MODE” under “Operating
the digital audio processor
(optional)” on page 36.
Use the “ 8 ” or “ 9 ” key to
select “SUB-W”, then press
“ENTER”.
ENTER
or
Use the “
the mode (“ON” or “OFF”), then
press “ENTER”.
8
” or “ 9 ” key to select
ENTER
50
or
Note: The subwoofer cannot be adjusted when set
to “OFF”.
Press “ : ” to select the level item,
then press “ENTER”.
ENTER
Page 51

DVD
CD
Video CD
MODE – Adjusting the subwoofer
MODE – Turning the defeat function on and off
Use the “ 8 ” or “ 9 ” key to
adjust the level, then press
“ENTER”.
ENTER
or
Note: Press “RETURN” to return to the previous
screen.
Press “A.PROC” to
A.PROC
close the digital audio
processor screen and
return to the playback
screen.
MODE –
Turning the defeat function on and off
Select “MODE” under “Operating
the digital audio processor
(optional)” on page 36.
Use the “ 8 ” or “ 9 ” key to
select “DEFEAT”, then press
“ENTER”.
ENTER
or
8
Use the “
the mode (“ON” or “OFF”), then
press “ENTER”.
ON : The response is flat.
OFF : Off
” or “ 9 ” key to select
ENTER
or
Notes:
• When “DEFEAT” is set to “ON”, the “PARAMETRIC-EQ”, “SURROUND”, “PRIVATE-MEMORY”
and “TIME-CORRECTION” settings cannot be
adjusted.
• Press “RETURN” to return to the previous screen.
Press “A.PROC” to
A.PROC
close the digital audio
processor screen and
return to the playback
screen.
51
Page 52

Operating from the head unit
MDA-7755
(head unit)
DVA-5200
(player)
Operating from the head unit
The DVA-5200 can also be operated from the head unit.
This section describes operations from the MDA-7755 (the recommended head unit).
Note that some of the functions cannot be operated from the DVA-5200.
Playing DVDs, video CDs and CDs
Press “SOURCE” and select the
CD (DVA-5200) mode.
The mode switches each time the button
is pressed.
TUNER
The DVA-5200’ s power is on when the CD
mode is selected, off when other modes
are selected.
CD (DVA-5200)
MD
(* only when a changer is connected)
CHANGER *
To set the pause mode, press
”.
“
Press “
” again to resume playback.
Note: Playback starts at the beginning of the disc whenever ignition is turned off or another Ai-NET source
is selected.
52
Page 53

Operating from the head unit
Displaying the CD title
Press “TITLE” to display the CD title, etc., on the head unit’s display .
Press “TITLE” on the head unit.
The display pattern changes each time
the button is pressed.
Operation display
(MDA-7755)
Note: In the TRACK NO./TIME display mode the time display shows 0:00 and does not move.
TRACK NO./TIME*
Title display mode Time display mode
Title display
Time display
<Functions operable from the MDA-7755>
Switch Operation
SOURCE
TITLE
5
f
c
:/
j
V
V
Turns the power on and off.
When pressed again, the source switches.
The DVD player’s power is on when the CD mode is selected, off when other modes
are selected.
Switches the display pattern. / Sets the title input mode.
DVD: Chapter repeat
Video CD/CD: Switches between track repeat and disc repeat
Starts playback from the beginning of the following chapter/track.
When pressed and held in, fast-forwards the disc.
Starts playback from the beginning of the current chapter/track.
When pressed and held in, fast-reverses the disc.
Switches between play and pause.
Adjust the volume.
Notes:
• The functions and operations may differ when using with a head unit other than the MDA-7755.
• For video CDs with playback control (PBC), turn PBC off.
• Titles can be input for video CDs and CDs. For details, refer to the operating instructions of the connected
head unit.
53
Page 54

Operating from the head unit’s remote control unit
Operating from the head unit’s remote control
unit
The DVA-5200 can be operated from the remote control unit included with the head unit.
Remote control operations
Remote Control
Operation
P8
Power on/off
P12
Fast-forward/fast-reverse
P13
Still picture (pause)
P13
Chapter/track search
unit
RUE-4185 RUE-4160
\
\
\
\
\
\
\
\
RUE-4165
\
\
\
\
• There may be restrictions to some of the functions and displays depending on the
Ai-NET compatible product (head unit/remote control unit) being used.
54
Page 55

Operating from the head unit’s remote control unit
ENT
ENT
A.SEL
MENU
AUDIO
ENT
SEL
ENT
SOURCE
RUE-4185 RUE-4160 RUE-4165
Operating DVDs, video CDs and CDs
First see “Remote control operations” (page 54).
Press “SOURCE” , “AUDIO SEL” or “A. SEL”to set the CD (DVA-5200) mode.
1
The DVA-5200’s power is on when the CD mode is selected, off when other modes are
selected.
To set the pause mode, press “
2
Press “ ” or “ENT” again to resume playback.
Press and hold “c” or “f” continuously to make FF or RW operation.
3
(RUE-4185, RUE-4160)
” or “ENT”.
Tilt and hold the joystick in left or right direction to make FF or RW operation. (RUE-4165)
Press “c” or “f” to make a track or chapter skip. (RUE-4185, RUE-4160)
4
Tilt the joystick in left or right direction to make a track or chapter skip.
(RUE-4165)
Notes:
• For adjusting the volume and other basic operations, refer to the head unit’s operating instructions.
• For video CDs with playback control (PBC), turn PBC off.
Warning
Do not operate or view the display while driving.
Drivers should not operate the product or view the display while driving. Doing so
could be distracting, leading to accidents. Always stop the vehicle in a safe place
before operating the product or viewing the display.
55
Page 56

Terminology
Terminology
Dolby Digital (AC-3)
Dolby Digital (AC-3) is a digital audio
compression technology developed by
Dolby Laboratories. It is compatible with
not only stereo (2-channel) sound, but
also 5.1-channel surround sound. The
signals for the different channels are
completely independent, so large quantities of audio data can be recorded
efficiently on discs, and since the sound is
digital there is little loss of sound quality.
Center
speaker
Front
speakers
Rear
speakers
Subwoofer
Dolby Pro Logic
Dolby Pro Logic is a Dolby Surround
format which restores four channels of
signals recorded onto two channels back
to four channels (front left/right, center
and rear surround (monaural)) upon
playback.
* The separately sold digital audio
processor (PXA-H510) is required to
enjoy Dolby Pro Logic sound.
Linear PCM audio (LPCM)
LPCM is a signal recording format used
for music CDs. Whereas music CDs are
recorded at 44.1 kHz/16 bits, DVDs are
recorded at 48 kHz/16 bits to 95 kHz/24
bits, thereby achieving higher sound
quality than music CDs.
Rating levels (parental lock)
This is a function of the DVD for restricting
the viewing age as stipulated by laws in
different countries. The way in which
viewing is restricted differs from DVD to
DVD. Sometimes the DVD cannot be
played at all, other times certain scenes
are skipped, and other times certain
scenes are replaced with other scenes.
Speaker layout for enjoying
Dolby Digital sound
* The separately sold digital audio
processor (PXA-H510) is required to
enjoy Dolby Digital sound.
56
Page 57

List of language codes
(For details, see page 27.)
List of language codes
Abbreviation
AA
AB
AF
AM
AR
AS
AY
AZ
BA
BE
BG
BH
BI
BN
BO
BR
CA
CO
CS
CY
DA
DE
DZ
EL
EN
EO
ES
ET
EU
JA
JI
JW
KA
KK
KL
KM
KN
KO
KS
KU
KY
LA
LN
LO
Code
6565
6566
6570
6577
6582
6583
6589
6590
6665
6669
6671
6672
6673
6678
6679
6682
6765
6779
6783
6789
6865
6869
6890
6976
6978
6979
6983
6984
6985
7465
7473
7487
7565
7575
7576
7577
7578
7579
7583
7585
7589
7665
7678
7679
Language
Afar
Abkhazian
Afrikaans
Amharic
Arabic
Assamese
Aymara
Azerbaijani
Bashkir
Belorussian
Bulgarian
Bihari
Bislama
Bengali, Bangla
Tibetan
Breton
Catalan
Corsican
Czech
Welsh
Danish
German
Bhutani
Greek
English
Esperanto
Spanish
Estonian
Basque
Japanese
Yiddish
Javanese
Georgian
Kazakh
Greenlandic
Cambodian
Kannada
Korean
Kashmiri
Kurdish
Kirghiz
Latin
Lingala
Laotian
Abbreviation
LT
LY
MG
MI
MK
ML
MN
MO
MR
MS
MT
MY
NA
NE
NL
SM
SN
SO
SQ
SR
SS
ST
SU
SV
SW
TA
TE
TG
TH
TI
TK
TL
TN
TO
TR
TS
TT
TW
UK
UR
UZ
VI
VO
WO
Code
7684
7686
7771
7773
7775
7776
7778
7779
7782
7783
7784
7789
7865
7869
7876
8377
8378
8379
8381
8382
8383
8384
8385
8386
8387
8465
8469
8471
8472
8473
8475
8476
8478
8479
8482
8483
8484
8487
8575
8582
8590
8673
8679
8779
Language
Lithuanian
Latvian, Lettish
Malagasy
Maori
Macedonian
Malayalam
Mongolian
Moldavian
Marathi
Malay
Maltese
Burmese
Nauru
Nepali
Dutch
Samoan
Shona
Somali
Albanian
Serbian
Siswati
Sesotho
Sundanese
Swedish
Swahili
Tamil
Telugu
Tajik
Thai
Tigrinya
Turkmen
Tagalog
Setswana
Tongan
Turkish
Tsonga
Tatar
Twi
Ukrainian
Urdu
Uzbek
Vietnamese
Volapuk
Wolof
57
Page 58

In case of difficulty
• If operation freezes, the screen goes black or the unit should otherwise not function properly, try turning
the power off then back on. Alternatively, try the following methods in the order listed until the DVA-5200
returns to normal playbak mode:
1) Change the source from DVD to another source then return to DVD mode.
2) Turn the car’s ignition OFF and back ON again.
3) Press the RESET button on the face of the DVA-5200.
• This guide will help you isolate the problem if the unit is at fault. Otherwise, make sure the rest of your
system is properly connected or consult your authorized Alpine dealer.
Symptom
Unit does not
operate.
Operation is
unstable.
No picture is
produced.
Playback does not
start.
Picture is unclear
or noisy.
Image stops
sometimes.
NO DISC
NOT V ALID
REGIONAL CODE
VIOLATION
VIDEO SIGNAL
SYSTEM IS NOT
CORRECT
PLEASE PUSH
RESET SW
Cause
Fuse is blown.
Monitor’s power is not turned on.
Condensation.
Remote control unit’s batteries
are worn.
Remote control sensor or
transmitter is dirty.
Monitor’s mode is not switched
to the mode you want to see.
Monitor’s parking brake cord is
not connected.
Monitor’s parking brake is not
set.
Disc is loaded upside-down.
Disc is dirty.
A disc not able to playback with
this unit is loaded.
Parental lock is set.
Setup menu is displayed.
Disc is being fast-forwarded or
fast-reversed.
Vehicle’s battery power is weak.
Monitor’s fluorescent tube is
worn.
Disc is scratched.
No disc is loaded.
Disc is dirty.
Remote control operation is not
possible.
Disc does not match regional
code number.
PAL disc is loaded.
When Ai-NET address has been
changed.
Remedy
Replace with a fuse of the specified capacity. (See
installation instructions.)
Turn on the monitor’s power.
Wait a while (about 1 hour) for the condensation to
dry.
Replace the remote control unit’s batteries with new
ones.
Clean the sensor or transmitter.
Switch to the mode you want to see.
Connect the monitor’s parking brake cord and set the
parking brake.
(For details, refer to the monitor’s instructions.)
Check the disc and load it with the labeled side facing
upward.
Clean the disc.
Check if the disc is able to be played back
Cancel the parental lock or change the rating level.
Press “SET UP” to turn the menu off.
The picture may be slightly disturbed, but this is
normal.
Check the battery power and wiring.
(The unit may malfunction if the battery power is
under 11 volts with a load applied.)
Replace the monitor’s fluorescent tube.
Replaced with a non-scratched disc.
Load a disc.
Clean the disc.
For some discs or playing modes, certain operations
are not possible. This is not a malfunction.
Load a disc that matches the regional code number.
Load an NTSC disc.
Press the reset switch on the connected Ai-NET head
unit, or turn the ignition switch off then back on.
58
Page 59

Specifications
Signal system.................................... NTSC
Horizontal resolution ......................... 500 lines or greater
Video output level.............................. 1Vp-p (75 ohms)
Video S/N ratio .................................. DVD: 60 dB
Audio S/ N ratio DVD: 95 dB
Frequency response ......................... DVD: 5 Hz to 22 kHz (±1 dB) (48 kHz sampling)
Dynamic range DVD: 90 dB or greater
Wow & flutter..................................... Below measurable limit
Channel separation ........................... 80 dB
Harmonic distortion ........................... 0.03%
Audio output ...................................... 800 mV
Power supply .................................... DC 14.4V (operating range: 11 to 16V)
Operating temperature range............ –10° to +50°C
Weight ............................................... 1.6 kg (3 lbs. 8 oz)
External dimensions (W x H x D) ...... 178 x 50 x 185 mm (7” x 2” x 7-1/4”)
• For improvement purposes, specifications and design are subject to change without
notice.
• The illustrations in this manual may appear different from the actual product due to
printing conditions.
CD: 93 dB
DVD: 5 Hz to 44 kHz (±1 dB) (96 kHz sampling)
CD: 5 Hz to 20 kHz (±1 dB)
CD: 93 dB or greater
59
Page 60

Loading batteries in the remote control unit
Loading batteries in the remote control unit
Opening the battery cover
1
Press lightly on the arrow on the lid and pull upward.
Replacing the battery
2
Put the batteries in the case as illustrated.
Closing the cover
3
Push the cover as illustrated until a click is heard.
Note: Use two AA size butteries.
Caution
• Point the remote control at the remote sensor within about 2 meter.
• It may not be possible to operate the remote control unit if the remote control sensor
is exposed to direct sunlight.
• The remote control is a small, light weight precision equipment. To avoid damage,
early battery wearing, operations error and deterioration of operation feeling, take
care of the followings.
- Do not apply any shock.
- Do not put in a trouser pocket.
- Keep free from splashing of a drink, moisture and dusts.
- Do not place in direct sunshine.
+
−
−
+
Warning
DO NOT OPERATE THE EQUIPMENT OR LOOK AT THE SCREEN WHILE
DRIVING THE VEHICLE.
Operating the equipment may distract the driver from looking ahead of the vehicle
and cause accident. Always stop the vehicle in a safe location before operating
this equipment.
60
Page 61

Memo
61
Page 62

Functions of remote control unit buttons
1
2
3
4
5
6
7
8
9
p
q
RUE-4126 RUE-4127
POWER button (→P8)
1
Turns the power on and off.
Number buttons
2
(→P11, 14, 15, 19, 23, 27, 29, 30)
Used to select the item to be displayed.
CLEAR button (→P14, 15, 21)
3
Used to clear selections and input
numbers.
b/e
4
5
62
buttons (→P12)
Used to fast-forward/fast-reverse
pictures and music.
button (→P13)
Used for pause, frame-to-frame play
and play.
t
i
a
d
g
w
e
r
y
u
o
;
s
f
h
j
k
1
e
9
o
6
c/f
6
7
8
9
buttons (→P13)
Used to search for the beginnings of
pictures and music.
SLOW button (→P13)
Used for slow motion playback.
Arrow keys (8 9 ; : )
(→P11, 18, 19, 20, 21, 23, 26, 27, 28,
31, 32, 33, 34, 35, 36, 37, 38, 39, 40,
41, 42, 43, 44, 45, 46, 47, 48, 49, 50,
51)
Used to select displayed items.
ENTER (ENT) button
(→P11, 14, 15, 18, 19, 20, 21, 23, 26,
27, 28, 29, 30, 31, 32, 33, 34, 35, 36,
37, 38, 39, 40, 41, 42, 43, 44, 45, 46,
47, 48, 49, 50, 51)
Used to set selected items.
w
8
6
;
Page 63

Functions of remote control unit buttons
A.PROC button
p
(→P36, 37, 39, 40, 41, 43, 45, 46, 47,
49, 51)
Used when using with a DVD sound
processor.
BAND button (→P37, 48)
q
Used when using with a DVD sound
processor.
VOL buttons
w
Used to adjust the volume when not
connected to a head unit.
MENU button (→P10, 11, 17, 23)
e
Used to display the DVD menu.
PROG button (→P18, 21)
r
Used for programmed playback.
SET UP button
t
(→P26, 27, 29, 31, 32, 33, 34, 35)
Used to display the setup (default
settings) screen.
TITLE button (→P10, 23)
y
Used to display the title menu.
GO TO button (→P14, 15)
u
Used to search for the beginnings of
selections (switches between title,
chapter, track, etc.).
RETURN button (→P14, 15, 19, 27,
i
29, 31, 32, 33, 34, 35, 37, 39, 40, 41,
42, 43, 45, 46, 47, 49, 51)
Used to return to the previous selection screen.
L button (→P11, 20, 21)
o
Used to stop playback.
::
: button
::
;
(→P10, 11, 12, 13, 14, 15, 19, 21, 23,
44)
Used to start playback.
AUDIO button (→P22)
a
Used to switch the audio mode.
ANGLE button (→P23)
s
Used to switch the angle.
ON/OFF button (→P23)
d
Used to turn subtitles on and off.
SUB P. button (→P23)
f
Used to switch subtitles.
A-B RPT button (→P16)
g
Used to play a specific section
repeatedly.
RPT button (→P17)
h
Used for repeat playback.
FUNC button (→P25)
j
Video output ON/OFF switching for
Extra Monitor for Rear Seat.
DISP button (→P24, 25)
k
Used to display the playback status on
the screen.
Note: For some discs or playing modes, certain
operations are not possible, in which case
“NOT VALID” is displayed.
63
Page 64

Précautions
Le point d’exclamation dans un triangle équilatéral et la
mention “Avertissement” sont destinés à attirer l’attention
Avertissement
NE PAS DEMONTER NI MODIFIER. Il y a risque d’accident ou de choc
électrique.
NE PAS LAISSER DE PETITES PIECES A PORTEE DES ENFANTS. En cas
d’ingestion, consultez immédiatement un médecin.
UTILISEZ DES FUSIBLES DE L’AMPERAGE APPROPRIE. Il y a risque
d’incendie ou de choc électrique.
ARRETEZ-VOUS IMMEDIATEMENT EN CAS DE PROBLEME. Si un problème
se présente, absence du son ou de l’image, objets tombés dans l’appareil,
dégagement de fumée ou d’odeurs nocives, arrêtez immédiatement l’appareil et
contactez le revendeur où vous l’avez acheté l’appareil. Il y a risque d’accident
et de blessure.
NE PAS FAIRE DE REGLAGES OU REGARDER L’ECRAN PENDANT LA
CONDUITE. Votre attention sera détournée de la route et vous risquez un
accident. A vant de faire fonctionner l’appareil, arrêtez-vous et garez-vous dans
un lieu sûr.
de l’utilisateur sur la présence d’instructions importantes.
Le non respect de ces instructions peut provoquer de
graves blessures, voire la mort.
NE PAS UTILISER EN MEME TEMPS DES PILES USEES ET DES PILES
NEUVES. RESPECTEZ AUSSI LA POLARITE DES PILES. Quand vous
insérez les piles, veillez à respecter la polarité (+) et (–), comme indiqué. Une
rupture ou une fuite des piles peuvent causer un incendie ou des blessures
corporelles.
NE PAS TROP AUGMENTER LE VOLUME. Réglez le volume de manière à
pouvoir entendre les bruits extérieurs pendant la conduite. Si vous ne pouvez
pas entendre les bruits extérieurs quand vous conduisez, vous risquez un
accident.
NE P AS UTILISER L’APPAREIL DANS D’AUTRES BUTS QUE CEUX ENONCES.
Il y a sinon risque de choc électrique ou de blessure.
UTILISEZ LE SYSTEME UNIQUEMENT DANS DES VOITURES AYANT UNE
MASSE NEGATIVE (–) DE 12 VOLTS. Vérifiez avec votre revendeur en cas de
doute. Le non-respect de cette précaution risque de provoquer un incendie ou
un choc électrique.
64
Page 65

Précautions
Le point d’exclamation dans un triangle équilatéral et la mention
“Attention” sont destinés à attirer l’attention de l’utilisateur sur la
Attention
NE PAS OBSTRUER LES SORTIES D’AIR NI LES PANNEAUX DU RADIATEUR. Une surchauffe interne peut se produire et provoquer un incendie.
ARRETEZ LE VEHICULE SI LE FONCTIONNEMENT DE L’APPAREIL GENE
LA CONDUITE.
présence d’instructions importantes.
Le non respect de ces instructions peut provoquer de graves
blessures, voire la mort.
65
Page 66

Précautions
Température
Assurez-vous que la température interne du véhicule est comprise entre +60°C
(+140°F) et –10°C (+14°F) avant de mettre l’appareil sous tension.
Condensation d’humidité
Si le son vacille pendant la lecture de CD, l’humidité s’est probablement condensée.
Dans ce cas, enlever le disque du lecteur et attendre environ une heure pour que
l’humidité s’évapore.
Disque endommagé
Ne pas reproduire un disque craqué, déformé ou endommagé sous peine d’endommager sévèrement le mécanisme de lecture.
Entretien
En cas de problème, n’essayez pas de réparer la panne vous-même. Rapportez
l’appareil à votre revendeur Alpine, ou à défaut, apportez-le dans un centre de réparation Alpine.
Ne jamais tenter d’effectuer les opérations suivantes
Ne pas attraper ni tirer sur le disque pendant qu’il est attiré dans le lecteur par le
mécanisme de recharge automatique. Ne pas essayer d’insérer un disque dans
l’appareil quand celui-ci est hors tension.
Insertion des disques
Ne pas tenter de charger plusieurs disques car le lecteur accepte un seul disque à la
fois pour la lecture.
Insérer le disque avec la face imprimée vers le haut. Le lecteur éjecte automatiquement tout disque incorrectement inséré.
L’écoute d’un disque sur une route très cahoteuse peut provoquer des sauts de son,
mais ne risque pas de rayer le disque ni d’endommager le lecteur.
Disques à forme irrégulière
Veillez à n’utiliser que des disques sans aucune irrégularité avec cet appareil. Les
bords extérieur et intérieur doivent être ronds et unis. L’utilisation de disques à forme
irrégulière pourrait endommager le mécanisme.
Disques neufs
Par mesure de protection, le lecteur éjecte automatiquement un disque qui n’est pas
inséré correctement ou dont la surface est irrégulière. Si le lecteur éjecte un disque
neuf chargé pour la première fois, toucher le contour de l’orifice central et de la
périphérie du disque avec le doigt. Si le disque contient des résidus ou des irrégularités, il ne pourra pas être chargé. Pour enlever les résidus, passer un stylo-bille ou
autre objet similaire sur le contour de l’orifice central et de la périphérie du disque, puis
le réinsérer.
Emplacement de montage
N’installez pas le DVA-5200 dans un endroit exposé:
• directement au soleil ou à la chaleur
• à l’humidité et à l’eau
• à la poussière
• à des vibrations excessives
66
Page 67

Précautions
Avertissements et Attention....................... 64
Table des matières .................................... 67
Guide rapide
Au sujet des DVD ...................................... 68
Disques pouvant être lus sur ce lecteur DVD ...
Mise sous tension et hors tension ............. 70
Chargement et retrait des disques ............ 71
Lecture des disques .................................. 72
Arrêt de la lecture ...................................... 73
Avance rapide/inversion rapide ................. 74
Localisation des débuts de chapitres ou de pistes .....
Arrêt sur image (pause)............................. 75
Lecture image par image........................... 75
Lecture au ralenti....................................... 75
Fonctions pratiques
Recherche par numéro de titre.................. 76
Recherche directe par numéro de
chapitre ou de piste ................................... 77
Recherche par temps écoulé .................... 77
Lecture à répétition A-B............................. 78
Lecture à répétition de chapitre/piste/titre .....
Lecture programmée ................................. 80
Edition de programmes et effacement
d’étapes de programmes........................... 82
Changement de la langue de la bande son ......
Changement de l’angle de prise de vue .... 85
Changement de la langue des sous-titres....
Affichage des sous-titres ........................... 85
Affichage de l’état du disque ..................... 86
Sortie vidéo allumée/éteinte (ON/OFF) ..... 87
SET UP
Modification des réglages par défaut
(paramétrage)............................................ 88
Modification des réglages de langue ......... 89
Modification des réglages de l’écran TV .....
Changement du code de pays .................. 91
Réglage du contrôle parental .................... 92
Modification des réglages de la sortie numérique ...
Modification des réglages de l’affichage .....
Réglage personnalisé – Modification
du réglage F scan...................................... 96
Réglage personnalisé – Modification
des réglages Ai-NET.................................. 97
Modification des paramètres
par défaut
T ABLE DES MATIERES
Processeur audio numérique
Utilisation du processeur audio
numérique (optionnel)................................ 98
Réglage de l’égaliseur paramétrique......... 99
Modification des réglages “surround” ...... 100
Mémorisation des réglages “surround”.... 101
Rappel des réglages “surround” .............. 102
Réglage de la compensation de temps ... 103
Utilisation du mode Pro Logic.................. 103
69
REGLAGE – Réglage des modes des haut-parleurs ....
REGLAGE
REGLAGE
REGLAGE
du haut-parleur central ............................ 107
REGLAGE
75
des haut-parleurs arrière ......................... 108
REGLAGE
puissant à bas niveaux de volume .......... 109
REGLAGE – Réglage du niveau des haut-parleurs ...
MODE – Réglage du volume, de
l’atténuation et de la balance.................... 111
MODE – Réglage du subwoofer............... 112
MODE – Activation et désactivation
de la fonction d’annulation........................ 113
79
Fonctionnement à partir de l’unité principale ..
Fonctionnement à partir de la
télécommande de l’unité principale ..........116
84
85
Terminologie ............................................ 118
Liste des codes de langue....................... 119
En cas de problème................................. 120
Spécifications .......................................... 121
Mise en place des piles dans la
télécommande ......................................... 122
Fonctions des touches de la télécommande...
90
94
95
– Réglage de l’image acoustique ...
– Mélange des canaux audio arrière .
– Compensation de temps
– Compensation de temps
– Obtention d’un son
Fonctionnement à partir de
l’unité principale (MDA-7755)
(optionnel)
104
105
106
110
114
Autres
124
67
Page 68

Au sujet des DVD
Au sujet des DVD
Les CD audio et les DVD comportent des
sillons (pistes) dans lequels les données
numériques sont enregistrées. Les données
sont représentées par des trous
microscopiques gravés dans la pistes – ces
trous sont lus par le faisceau laser pour lire le
disque. Sur les DVD, la densité des pistes et
des trous microscopiques est deux fois plus
importante que celle des CD, donc, les DVD
contiennent plus de données sur moins
d’espace que les CD.
CD-ROM
Longueur de bit
minimale,
0,9 µm
1,2 mm
Pas de piste,
1,6 µm
DVD
Longueur de bit
minimale,
0,9 µm
0,6 mm
0,6 mm
Pas de piste,
0,74 µm
En addition, les DVD offrent toute une palette
de fonctions.
• Audio multiple * (page 84)
Les films peuvent être enregistrés à concurrence de huit langues différentes. La langue
souhaitée peut être choisie à l’aide de la
télécommande.
• Fonction sous-titres * (page 85)
Les films peuvent incorporer des sous-titres
allant jusqu’à 32 langues différentes. La
langue des sous-titres souhaitée peut être
choisie à l’aide de la télécommande.
• Fonction angle de prise de vue * (page 85)
Lorsqu’un DVD contient un film à plusieurs
angles de prise de vues, l’angle souhaité
peut être sélectionné à l’aide de la télécommande.
• Fonction scénarios multiples *
Avec cette fonction, un film unique incorpore
plusieurs scénarios. Il est alors possible de
les sélectionner individuellement pour voir les
versions différentes du même film.
Le fonctionnement diffère d’un disque à
l’autre. La sélection des scénarios et les
instructions apparaissent pendant la
projection. Suivre simplement les instructions.
Un disque de 12 cm peut contenir un film ou
quatre heures de musique.
De plus, les DVD fournissent une finesse
d’image de grande qualité avec des couleurs
éclatantes grâce à une résolution horizontale
supérieure à 500 lignes (en comparaison des
300 lignes maximum d’une cassette vidéo
VHS). En rajoutant un procésseur audio
optionnel (PXA-H510), vous pouvez recréer la
puissance et le rendu d’un cinéma ayant le
Dolby Digital 5.1-channel Surround.
68
Remarque: *Les fonctions langues de bande son,
langues de sous-titres, angles de
prise de vue, etc., diffèrent d’un
disque à l’autre. Pour plus de détails,
se reporter aux instructions sur la
couverture du disque.
Page 69

Disques pouvant être lus sur ce lecteur DVD
Disques pouvant être lus sur ce lecteur DVD
• Disques pouvant être lus
Les disques énumérés ci-dessous peuvent
être lus sur ce lecteur DVD.
Les autres disques ne peuvent être lus.
Durée de
lecture
maximum
Disque à
simple face
Environ
4 heures
Disque à
double face
Environ
8 heures
Disque à
simple face
Environ
80 minutes
Disque à
double face
Environ
160 minutes
Environ
74 minutes
Environ
20 minutes
Environ
74 minutes
Environ
20 minutes
DVD
Vidéo
CD
Vidéo
CD
musicaux
Marque
(logo)
DIGITAL VIDEO
VIDEO CD
Contenu
enregistré
Audio
+
Vidéo
(films
animés)
Audio
+
Vidéo
(films
animés)
Audio
Dimensions
du disque
12 cm*
8 cm
12 cm
8 cm
12 cm
8 cm
(CD simple)
* DVD à double couche compatible disque DVD
• Disques ne pouvant être lus
DVD-ROM, DVD-R/DVD-RAM, CD-ROM,
CD-R/CD-RW, CD photo, etc.
• Numéro de région de DVD (numéro
de région pouvant être lu)
Ce lecteur DVD peut lire tous les disques
dans la région numéro 1 (ou ALL (toutes les
autres)). Les disques DVD provenant d’une
zone différente de celles listées ci-dessous
ne peuvent pas être lus par ce lecteur DVD.
1
ALL
• CD Vidéo
Ce lecteur de DVD est compatible avec les
CD vidéo à commande de lecture PBC
version 2.0.
“PBC” est une fonction permettant d’utiliser les
menus enregistrés sur le disque destinés à la
sélection des scènes que l’on souhaite
regarder et à la visualisation des différentes
informations sous forme de boîtes de dialogue.
• Terminologie des disques
Titre
Si les titres ont été prévus pour le DVD, ils
sont les plus grands blocs d’information
enregistrés sur le disque.
Chapitre
Chaque titre peut aussi être divisé en
d’autres sous-parties appelées Chapîtres
(Chapters). Ces chapîtres peuvent correspondre à des scènes ou à des sélections
musicales spécifiques.
*
Ce produit inclut une technologie de protection
des droits qui est protégée par des garanties
de méthodes de certains brevets américains et
d’autres droits de propriété intellectuelle
appartenant à Macrovision Corporation et
d’autres titulaires de droits. L’utilisation de
cette technologie de protection des droits doit
être autorisé par Macrovision Corporation, et
ne s’adresse qu’à un usage domestique ou
d’autres usages limités uniquement, à moins
qu’il en ait été autrement autorisé par
Macrovision Corporation. Inverser la technique
pour le désassemblage est interdit.
* Fabriqué sous licence de Dolby
Laboratories. “Dolby”, Pro Logic et la
marque au double D sont les marques
déposées de Dolby Laboratories.
69
Page 70

Mise sous tension et hors tension
Mise sous tension et
hors tension
Appuyer sur la touche
“POWER”.
POWER
L’appareil se met sous tension.
POWER
Conseils
• Lire ce manuel
Lecture des disques
Arrêt de la lecture
Arrêt de la lecture
Appuyer sur la touche d’arrêt
pendant la lecture pour l’arrêter. L’emplacement est enregistré en mémoire.
Appuyer sur la touche “L”
pendant la lecture.
DVD
Attention
Lorsque l’appareil est raccordé à
une unité principale Alpine
Si le DVA-5200 est branché à un autre
appareil que le CVA-1005, la configuration
par défaut du DVD doit être changée.
Regardez la page 97, “Réglage
personnalisé – Modification des réglages
Ai-NET” pour changer l’installation du
mode CD avant son utilisation.
Pour mettre l’appareil hors
tension, appuyer à nouveau sur la
touche “POWER”.
Remarques:
Lorsque cet appareil est branché à une unité principale
•
compatible Ai-NET, il y a un délai de 3 secondes pendant la
mise sous tension avec la télécommande. Cela est
provoqué par les systèmes de communications des
différents appareils et ce n’est pas un défaut.
•
Lorsque l’appareil est connecté à une unité principale
compatible Ai-NET, il ne peut être mis hors tension avec la
télécommande. Mettre le DVA-5200 hors tension en coupant
l’alimentation de l’unité principale. Pour plus de détails, voir
“Fonctionnement à partir de l’unité principale” (page 114).
Indiquent les disques avec lesquels
Video CD
CD
la fonction peut être utilisée.
DVD
...DVD
Video CD
...CD vidéo
CD
...CD Musicaux
70
• Utilisation de la fonction
PRE-STOP
Conseils
Lorsque la fonction PRE-STOP est utilisée,
l’emplacement où la lecture a été arrêtée est
enregistré en mémoire et la lecture reprend à
partir de cet emplacement.
Appuyer une fois sur la touche
“L” pendant la lecture.
“PRE-STOP” est affiché.
Appuyer sur la touche “:” en
mode PRE-STOP.
La lecture reprend à partir de
l’emplacement où la lecture a été arrêtée.
Ceci indique une explication
supplémentaire sur le fonctionnement du système.
Page 71

Chargement et retrait des disques
Chargement et retrait des disques
Mettre l’appareil sous tension avant d’introduire ou de retirer les disques.
Chargement de disques
Appuyer doucement sur la porte
et la faire glisser vers le bas.
POWER
Introduire le disque avec l’étiquette portant le texte et les
figures vers le haut.
Une fois que le disque est partiellement
introduit, son chargement se termine
automatiquement.
Remarques:
• Ne jamais insérer un disque de carte de
navigation. S’il y en a un d’inséré, cela peut
provoquer une défaillance.
• Pour les DVD double face, lire une face du
disque jusqu’à la fin, le retirer pour le retourner et
lire l’autre face. Se reporter aux instructions de la
couverture du disque (“Face 1”/“Face 2”).
DVD
Video CD
CD
OPEN
DVD
DVD
Refermer la porte.
Ne pas oublier de refermer la porte pour
éviter que la poussière ne pénètre à
l’intérieur de l’appareil.
Retrait des disques
Appuyer doucement sur la porte
et la faire glisser vers le bas. Le
disque sera automatiquement
éjecté partiellement.
Si le disque n’est pas retiré, il sera
automatiquement rechargé dans
l’appareil après un certain temps.
Attention
Ne jamais fermer la porte
pendant le déchargement d’un
disque. Celui-ci risque d’être
rayé ou l’appareil endommagé.
POWER
OPEN
DVD
POWER
OPEN
DVD
71
Page 72

Lecture des disques
Lecture des
disques
DVD
Video CD
CD
ENTER
90
–
MENU
TITLE
Attention
• Avec certains DVD, certaines opérations
sont invalides. De telles opérations sont
impossibles avec ces DVD.
• Les fonctions DVD décrites dans ce
manuel ne sont pas possibles avec tous
les disques DVD. Regardez les
instructions particulières de chaque
DVD pour des détails sur ses
caractéristiques.
• Des traces de doigts sur un disque
peuvent en affecter la lecture. Si un
problème se produit, enlevez le disque
et vérifier la présence de traces de
doigts sur la face de lecture du disque.
Nettoyez le disque si nécessaire.
• Pendant l’utilisation de la télécommande, veuillez faire attention à
n’appuyer que sur un seul bouton à la
fois. Sinon cela pourrait provoquer des
opérations erronées.
Appuyer sur la
touche “
La lecture commence.
::
:”.
::
DVD
Video CD
• Si un menu apparaît à l’écran
Sur les DVD et CD vidéo avec commande de
lecture PBC, des pages de menu peuvent
apparaître automatiquement. Dans ce cas,
effectuer l’opération décrite ci-après pour que
la lecture commence.
72
Remarque: Avec la plupart des disques, le menu
peut aussi être affiché en appuyant
sur la touche “TITLE” ou “MENU”.
Page 73

Lecture des disques
Conseils
Arrêt de la lecture
Menu de DVD
Utiliser les touches “8 9 ; : ” (touches
fléchées) ou les touches numérotées (“0” à “9”)
pour sélectionner la rubrique souhaitée et
appuyer alors sur la touche “ENTER” ou “:”.
123
456
789
ou
ENTER
0
ou
Remarque: Avec certains disques, il n’est pas
possible de sélectionner les rubriques
de menu à l’aide des touches
numérotées (“0” à “9”).
Menu de CD vidéo
Utiliser les touches numérotées (“0” à “9”) pour
sélectionner le numéro souhaité, appuyer alors
sur la touche “ENTER” ou “:”.
123
456
789
0
DVD
Arrêt de la lecture
Appuyer sur la touche d’arrêt
Video CD
CD
pendant la lecture pour l’arrêter. L’emplacement est enregistré en mémoire.
Appuyer sur la touche “L”
pendant la lecture.
• Utilisation de la fonction
PRE-STOP
Lorsque la fonction PRE-STOP est utilisée,
l’emplacement où la lecture a été arrêtée est
enregistré en mémoire et la lecture reprend à
partir de cet emplacement.
Appuyer une fois sur la touche
“L” pendant la lecture.
“PRE-STOP” est affiché.
Appuyer sur la touche “ : ” en
mode PRE-STOP.
La lecture reprend à partir de
l’emplacement où la lecture a été arrêtée.
• Annulation de la fonction
PRE-STOP
Appuyer de nouveau sur la touche “L ” en
mode PRE-STOP ou éjecter le disque et
mettre l’appareil hors tension ou encore
couper le contact pour effacer la mémoire.
ENTER
ou
Remarque: Le menu n’apparaît pas lorsque la
fonction PBC est désactivée. Dans ce
cas, appuyer sur la touche “MENU”
pour activer la fonction PBC.
Remarques:
• La fonction PRE-STOP ne peut être utilisée avec
les CD vidéo à commande PBC lorsque la
fonction PBC est activée.
Le menu apparaît lorsque l’on appuie sur la
L”.
touche “
• Sur certains disques, la position à laquelle la
lecture a été arrêtée peut manquer de précision.
Remarque: La lecture reprend à partir du début
du disque chaque fois que l’allumage
est coupé ou autre source Ai-NET est
sélectionnée.
73
Page 74

Avance rapide/inversion rapide
Avance rapide/
inversion rapide
Pendant la lecture,
appuyer sur la touche
“b” (inversion rapide) ou
“e” (avance rapide).
La vitesse change à chaque
pression sur la touche.
SLOW
Appuyer sur la touche “:” pour
reprendre la lecture normale.
DVD
Avance rapide/
inversion rapide
Balayage*
Lecture normale
DVD
Video CD
CD
ou
* Balayage
C’est la fonction utilisée
pour la lecture de sections
de film en avance ou
inversion rapide.
La vitesse d’avance ou
d’inversion rapide est plus
élevée.
74
CD
Avance rapide/
inversion rapide x 2
Avance rapide/
inversion rapide x 30
Lecture normale
Remarques:
• x 2, x 8 et x 30 sont des vitesses approximatives.
La vitesse réelle diffère d’un disque à l’autre.
• Le son et les sous-titres ne fonctionnent pas en
avance et inversion rapide.
• Pour les DVD et CD vidéo avec commande PBC,
les menus peuvent apparaître pendant l’avance
rapide et l’inversion rapide.
Video CD
Avance rapide/
inversion rapide x 2
Avance rapide/
inversion rapide x 8
Avance rapide/
inversion rapide x 30
Lecture normale
Page 75

DVD
Video CD
Vitesse 1/2
Vitesse 1/4
1/16倍速
Vitesse 1/8
Vitesse 1/16
Lecture normale
Localisation des débuts de chapitres ou de pistes
DVD
Video CD
Localisation des débuts
DVD
de chapitres ou de pistes
Pendant la lecture, appuyer
sur la touche “c” ou “f”.
Le chapitre ou la piste change à
chaque pression sur la touche et
la lecture du chapitre ou de la
piste sélectionnée commence.
f:Appuyer sur cette touche pour commen-
cer la lecture à partir du début du
chapitre suivant ou de la piste suivante.
c:Appuyer sur cette touche pour commen-
cer la lecture à partir du début du
chapitre actuel ou de la piste actuelle.
Remarque: Certains DVD ne comportent aucun
chapitre.
Video CD
CD
ou
Arrêt sur image (pause)
Lecture image par image
Lecture au ralenti
Lecture image
par image
En mode pause, appuyer
sur la touche “
Le film avance image par image
à chaque pression sur cette
touche.
Appuyer sur la touche “:” pour
reprendre la lecture normale.
Remarque: Il n’y a pas de son en lecture image
par image.
”.
Lecture au ralenti
Explications supplémentaires
Les “chapitres” sont les divisions
correspondantes aux films ou aux albums
musicaux enregistrés sur les DVD.
Les “Pistes” sont les divisions des films ou
morceaux de musiques des CD vidéo et
musicaux.
DVD
Arrêt sur image
Video CD
CD
(pause)
Pendant la lecture,
appuyer une fois sur la
touche “
Appuyer sur la touche “:” pour
reprendre la lecture normale.
Remarques:
• Il n’y a pas de son lors des arrêts sur image.
Lorsque la lecture commence après 5 minutes de pause
•
sur image (pause), l’image ou le son peuvent s’arrêter
un court instant, mais ce n’est pas une défaillance.
”.
Pendant la lecture,
appuyer sur la touche
“SLOW” (Ralenti).
La vitesse de lecture au ralenti
change à chaque pression sur
cette touche.
Appuyer sur la touche “:” pour
reprendre la lecture normale.
Remarques:
• Il n’y a pas de son en lecture au ralenti.
• Les vitesses 1/2, 1/4, 1/8 et 1/16 sont des
vitesses approximatives. La vitesse réelle diffère
d’un disque à l’autre.
• La lecture au ralenti n’est pas disponible
lorsqu’on lit des diapositives.
SLOW
75
Page 76

Recherche par numéro de titre
CLEAR
Recherche par
DVD
numéro de titre
Utiliser cette fonction pour localiser
facilement les emplacements sur le DVD
90
–
GO TO
RETURN
ENTER
à l’aide du menu titre de DVD.
Pendant la lecture, appuyer
sur la touche “GO TO” (Aller à).
Le mode se commute à chaque
pression sur la touche. Sélectionner “TITLE” (Titre).
TITLE TIMECHAPT Lecture normale
Entrer le numéro du titre
souhaité pour la lecture
à l’aide des touches
123
456
789
numérotées (“0” à “9”).
GO TO
0
76
(Lorsque le titre numéro 1 est saisi)
Remarques:
• Cette fonction ne peut être utilisée sur les
disques dont les numéros de titre n’ont pas été
enregistrés.
• Appuyer sur la touche “CLEAR” (Effacer) pour
annuler le dernier chiffre du numéro de titre.
• Appuyer sur la touche “RETURN” pour annuler le
mode recherche de titre et reprendre la lecture
normale.
Appuyer sur la touche “:” ou
“ENTER”.
La lecture commence à partir du titre dont
le numéro a été sélectionné.
ENTER
ou
Page 77

Recherche directe par numéro de chapitre ou de piste
DVD vidéo
TITLE TIME
Lecture normale
CHAPT
TRACK TIME Lecture normale
CD vidéo/CD
Recherche par temps écoulé
DVD
Recherche directe
Video CD
CD
par numéro de
chapitre ou de piste
Utiliser cette fonction pour se placer facilement
aux débuts des chapitres ou des pistes du disque.
Pendant la lecture, appuyer sur
la touche “GO TO” (Aller à).
Le mode se commute à chaque pression
sur la touche. Sélectionner “CHAPT”
(chapitre) ou “TRACK” (piste).
GO TO
Recherche par
temps écoulé
Utiliser cette fonction pour effectuer une
recherche en spécifiant le temps écoulé.
Pendant la lecture, appuyer sur
la touche “GO TO” (Aller à).
Le mode se commute à chaque pression
sur la touche. Sélectionner “TIME”.
GO TO
DVD
Video CD
CD
DVD vidéo
TITLE TIME
CD vidéo/CD
TRACK TIME Lecture normale
Entrer le numéro de chapitre
ou de piste souhaité pour la
lecture à l’aide des touches
numérotées (“0” à “9”).
(Lorsque le chapitre numéro 12 est saisi)
Remarques:
Cette fonction ne peut être utilisée sur les disques
•
dont les numéros de chapitre n’ont pas été
enregistrés.
•
Appuyer sur la touche “CLEAR” (Effacer) pour
annuler le dernier chiffre du numéro de chapitre/piste.
•
Appuyer sur la touche “RETURN” pour annuler le
mode recherche de chapitre/piste et reprendre la
lecture normale.
• Avec les disques vidéo avec commande de
lecture (PBC), la fonction de “recherche directe
par numéro de piste” n’est pas possible avec
l’état PBC ON.
Appuyer sur la touche “:” ou “ENTER”.
La lecture
commence à partir
du chapitre ou piste
dont le numéro a
été sélectionné.
CHAPT
Lecture normale
123
456
789
ENTER
ou
Entrer le temps écoulé à
partir duquel on souhaite
que la lecture commence à
l’aide des touches numéro-
123
456
789
0
tées (“0” à “9”).
0
(Lorsqu’un temps de 1 heure 30 minutes
est saisi comme temps écoulé)
Remarques:
• Saisir d’abord l’heure, suivie des minutes et
ensuite des secondes.
• Appuyer sur la touche “CLEAR” (Effacer) pour
annuler le dernier chiffre du temps écoulé.
• Appuyer sur la touche “RETURN” pour annuler le
mode recherche par temps écoulé et reprendre la
lecture normale.
• Avec les DVD, la précision de la fonction de
recherche par temps écoulé diffère d’un disque à
l’autre.
Avec les disques vidéo avec commande de
•
lecture (PBC), la fonction de “recherche par temps
écoulé” n’est pas possible avec l’état PBC ON.
Appuyer sur la touche “:” ou “ENTER”.
La lecture
commence à
partir du temps
écoulé spécifié.
ENTER
ou
77
Page 78

Lecture à répétition A-B
MENU
A-B RPT
DVD
Lecture à
Video CD
répétition A-B
Utiliser cette fonction pour sélectionner deux points
et lire la section entre ces deux points à répétition.
Pendant la lecture, appuyer sur
la touche “A-B RPT”.
Le point A (point de départ de la section à
lire à répétition) est sélectionné.
A-B RPT
RPT
Appuyer à nouveau sur
la touche “A-B RPT”.
Le point B point (la fin de la
section à lire à répétition) est
sélectionné et la section entre les
deux points est lue à répétition.
Pour reprendre la lecture
normale, appuyer à nouveau
sur la touche “A-B RPT”
pendant la lecture à répétition.
Remarque: Sélectionner le mode lecture à
répétition A-B pendant la lecture
normale.
DVD – lecture normale (lecture à
répétition sur arrêt)
CD vidéo – lecture normale (répétition
de disque)
Pour plus de détails, se reporter à
“Lecture à répétition de chapitre/piste/
titre” (page 79).
A-B RPT
A-B RPT
78
Page 79

Lecture à répétition de chapitre/piste/titre
Video CD
CD
Lecture à
DVD
répétition de
chapitre/piste/titre
Utiliser cette fonction pour lire à répétition les
chapitres, les pistes ou les titres de disques.
Pendant la lecture, appuyer
sur la touche “RPT”.
Le mode de répétition se
commute à chaque pression sur
la touche.
DVD
Video CD
CD
RPT
Chapitre
Titre
Répétition sur arrêt
Piste
Disque
Remarque: Les modes de répétition de piste et de
disque ne peuvent pas être utilisés
avec les CD vidéo avec commande
de lecture PBC. Appuyer sur la
touche “MENU” pour désactiver la
fonction PBC.
Pour lire les
chapitres à répétition.
Pour lire les
titres à répétition.
Pour reprendre
la lecture normale.
Pour lire les
pistes à répétition.
Pour lire les disques
entiers à répétition.
Lecture normale –
Répétition de disque
(réglage par défaut)
79
Page 80

Lecture programmée
90
–
ENTER
PROG
RETURN
DVD
Lecture
Video CD
CD
programmée
Utiliser cette fonction pour sélectionner les
titres, chapitres et pistes spécifiques et les
lires dans l’ordre souhaité. Jusqu’à 20 titres,
chapitres et pistes peuvent être programmés.
Appuyer sur la touche
“PROG” en mode d
Le menu de programmation
apparaît.
PREVIOUS:
Sélectionner cette option pour revenir
à la page précédente.
Appuyer sur la touche
sélectionner
appuyer alors sur la touche
NEXT:
Sélectionner cette option pour aller à la
page suivante (menu de programmation
pour les étapes 11 à 20).
Appuyer sur la touche
sélectionner
alors sur la touche
“PREVIOUS” (précédente)
“
NEXT” (suivante) appuyer
“8” pour
“9”
“
ENTER”.
’arrêt
“ENTER”.
pour
PROG
.
80
DISP
Appuyer sur la touche
“ENTER”.
Le mode saisie de titre est
sélectionné.
Nombre de numéros de titre pouvant être saisis.
(dans ce cas un seul numéro de titre
est disponible)
ENTER
Page 81

Lecture programmée
Utiliser les touches
numérotées (“0” à “9”)
pour saisir le numéro
123
456
789
de titre.
Remarque: Appuyer sur la touche “RETURN”
(Retour) pendant cette procédure
pour revenir dans le mode précédent.
Appuyer sur la touche
ENTER
“ENTER”.
Le mode saisie de chapitre est
sélectionné.
Nombre de numéros de chapitre pouvant être saisis.
(dans ce cas les numéros de chapitre
de 1 à 34 peuvent être sélectionnés)
Utiliser les touches
numérotées (“0” à “9”)
pour saisir le numéro
123
456
789
de chapitre.
Appuyer sur la touche
ENTER
“ENTER”.
0
Le mode saisie de programme est
terminé. Pour continuer à
programmer, appuyer sur la touche
“9” pour changer le numéro de
programme et ensuite répéter les
étapes 2 à 5. Jusqu’à 20 titres,
chapitres et pistes peuvent être
programmés.
Remarque: Si l’on souhaite programmer plus de
10 titres, chapitres et pistes, appuyer
sur la touche “9 ” après avoir effectué
ème
étape pour sélectionner
la 10
“NEXT” (suivante), appuyer alors sur
la touche “ENTER”. Le menu de
programmation des étapes 11 à 20
apparaît.
Appuyer sur la touche “:”.
La lecture commence dans
l’ordre programmé.
Remarque: Si la touche “PROG” est enfoncée
0
après avoir saisi le programme, le
menu de programmation disparaît
mais le programme est enregistré en
mémoire.
Remarques:
• Pour les CD vidéo et audio, saisir les numéros de
piste de la même manière que pour les DVD.
• Pour les DVD, le menu de programmation
réapparaît une fois que la lecture est terminée.
Pour les CD vidéo et audio, le programme est
joué à répétition.
• Le programme peut être vérifié pendant la lecture
programmée en appuyant deux fois sur la touche
“DISP” (Affichage). Pour plus de détails, se
reporter à “Affichage de l’état du disque” (pages
86 et 87).
81
Page 82

Edition de programmes et effacement d’étapes de programmes
DVD
Edition de program-
Video CD
CD
mes et effacement
d’étapes de programmes
Utiliser la procédure ci-dessous pour
modifier ou effacer des programmes.
Edition du programme
Appuyer sur la touche
“L” pendant la lecture
PROG
CLEAR
ENTER
programmée.
Le menu de programmation
apparaît.
Utiliser les touches “8 ” ou “9 ”
pour sélectionner le numéro de
l’étape devant être éditée.
82
ou
Appuyer sur la touche
“ENTER”.
Le numéro du titre est sélectionné.
Saisir le nouveau numéro de titre.
ENTER
Page 83

Edition de programmes et effacement d’étapes de programmes
Appuyer sur la touche
ENTER
“ENTER”.
Le numéro du chapitre est
sélectionné. Saisir le nouveau
numéro de chapitre et appuyer
ensuite sur la touche “ENTER”.
Pour continuer l’édition, utiliser la
touche “8” ou “9 ” pour sélectionner l’étape à éditer et répéter les
étapes 3 et 4.
ou
Appuyer sur la touche “:”.
La lecture programmée commence.
Remarque: Pour les CD vidéo et audio, éditer les
numéros de piste de la même
manière que pour les DVD.
Effacement d’étapes de programmes
Pendant la lecture
programmée, appuyer
sur la touche “L”.
Le menu de programmation
apparaît.
Utiliser la touche “8 ” ou “9 ” pour
sélectionner le numéro de l’étape
à effacer.
ou
Appuyer sur la touche
CLEAR
“CLEAR” (Effacer).
L’étape est effacée du programme.
Remarques:
• Effacer les étapes du programme une par une.
• Lorsqu’une étape est effacée, les numéros des
étapes suivantes sont mis à jour et réduits de un
chacun.
• Pour effacer le programme en totalité, positionner
le curseur sur la première étape et appuyer sur la
touche “CLEAR” (Effacer) plusieurs fois de suite.
Appuyer sur la touche
“PROG”.
Le menu de programmation
disparaît.
PROG
83
Page 84

Changement de la langue de la bande son
DVD
Video CD
LL
RR LR
Changement de
la langue de la
bande son
Sur les DVD comportant plusieurs modes
90
–
audio ou une bande son enregistrée en
plusieurs langues, la langue de la bande
son peut être changée en cours de lecture.
ENTER
MENU
TITLE
ANGLE
AUDIO
ON/OFF
SUB P.
Pendant la lecture, appuyer
AUDIO
sur la touche “AUDIO”.
Le son commute entre les
différents modes audio enregistrés sur le disque à chaque
pression sur la touche.
Remarques:
• La langue sélectionnée par défaut est active lors
de la mise sous tension de l’appareil ou lorsque
le disque est remplacé. Si le disque ne comporte
pas la langue, c’est la langue par défaut de
disque qui est activée.
• Avec certains disques, il est impossible de
changer la langue audio pendant la lecture.
• Le changement de langue peut prendre un
certain temps à se commuter.
• CD vidéo avec audio multiplex
Pendant la lecture, appuyer
sur la touche “AUDIO”.
La combinaison des canaux
gauche (L) et droit (R) change à
chaque pression sur la touche.
AUDIO
84
Page 85

Conseils
Changement de l’angle de prise de vue
DVD
Changement de la langue des sous-titres
Affichage des sous-titres
Changement de
DVD
l’angle de prise
de vue
Avec les DVD dont l’image a été filmée
selon différents angles de prise de vue, il
est possible de changer d’angle pendant
la lecture.
Pendant la lecture, appuyer
sur la touche “ANGLE”.
ANGLE
L’image passe par chacun des
angles de prise de vue enregistrés sur le disque à chaque
pression sur cette touche.
Remarques:
• Le changement d’angle de prise de vue peut
prendre un certain temps à se commuter.
• Suivant les disques, l’angle de prise de vue peut
commuter de deux manières différentes.
- En douceur : Le changement d’angle est
- Sans raccord : Lorsque l’angle commute, une
Changement de la
progressif.
image fixe est d’abord affichée
et ensuite, l’angle change.
DVD
langue des sous-titres
Avec les DVD comportant des sous-titres
en plusieurs langues, la langue des soustitres peut être changée en cours de
lecture.
Pendant la lecture, appuyer
sur la touche “SUB P.”
(Sous-titres).
La langue des sous-titres passe
par chacune des langues
enregistrées sur le disque à
chaque pression sur cette touche.
Remarques:
• Le changement de langue des sous-titres peut
prendre un certain temps à commuter.
• La langue sélectionnée par défaut est active lors
de la mise sous tension de l’appareil ou lorsque
le disque est remplacé. Si le disque ne comporte
pas la langue, c’est la langue par défaut de
disque qui est activée.
SUB P.
Affichage des
sous-titres
Avec les DVD comportant des sous-titres
enregistrés, il est possible de choisir en
cours de lecture de les afficher ou pas.
Pendant la lecture,
appuyer sur la touche
“ON/OFF” (Marche/Arrêt).
Le sous-titrage s’active et se
désactive à chaque pression
sur la touche.
Remarque: Sur certains disques, les sous-titres
s’afficheront même si cette option est
désactivée.
• Commutation à partir du menu
Avec certains disques, il est possible de
changer la langue audio, l’angle de prise de
vue et le sous-titrage à partir du menu du
disque.
Appuyer sur la touche “MENU”
ou “TITLE”, sélectionner la
rubrique et appuyer ensuite sur
la touche “ENTER”.
MENU
Utiliser les touches “8”, “9 ”, “;”
et “: ” ou les touches numérotées (“0” à “9”) pour sélectionner
la langue ou l’angle et appuyer
ensuite sur la touche “ENTER”
ou “:”.
TITLE
ou
ou
ENTER
ou
123
456
789
0
ON/OFF
ENTER
85
Page 86

Affichage de l’état du disque
DVD
FUNC
DISP
Affichage de l’état
du disque
Utiliser la procédure ci-dessous pour
afficher l’état du disque (numéro de titre,
de chapitre, etc.) du DVD en cours de
projection à l’écran.
Pendant la lecture, appuyer
sur la touche “DISP”
(Affichage).
L’état de lecture est affiché.
Système TV (NTSC ou PAL)
Numéro du titre
en cours de lecture
Numéro du chapitre
en cours de lecture
Mode de fonctionnement
DISP
86
Appuyer à nouveau sur la
touche “DISP” (Affichage).
Langue de sous-titres
sélectionnée
Numéro d’angle
sélectionné
Langue audio
sélectionnée
Numéro de lecture de programme
(uniquement en lecture programmée)
Système d’enregistrement audio
Appuyer sur la touche
“DISP” (Affichage) une
nouvelle fois pour
désactiver l’affichage.
DISP
DISP
Page 87

Affichage de l’état du disque
FUNC
Sortie vidéo allumée/éteinte (ON/OFF)
Affichage de l’état
du disque
Utiliser la procédure ci-dessous pour
afficher à l’écran l’état du disque (numéro
de piste, etc.) du CD vidéo ou audio.
Pendant la lecture, appuyer
sur la touche “DISP”
(Affichage).
L’état de lecture est affiché.
Système TV (NTSC/PAL)
Mode de fonctionnement
Numéro de piste
en cours de lecture
Remarque: Avec les CD audio, l’état de lecture
s’affiche même sans appuyer sur la
touche “DISP” (Affichage).
Appuyer à nouveau sur la
touche “DISP” (Affichage).
Commande de lecture PBC
MARCHE/ARRET
(CD vidéo uniquement)
DISP
Video CD
CD
DISP
Sortie vidéo allumée/
éteinte (ON/OFF)
(Uniquement lorsque CVA-1005 est
connecté)
Quand cet appareil est utilisé en conjugaison avec le CVA-1005 et le TME-M750
(moniteur d’appoint pour un siège
arrière), le DVD vidéo peut être visionné
sur un support différent de celui utilisé par
le CVA-1005.
Appuyer sur “FUNC” de la
télécommande pendant
que le DVA-5200 est éteint
et le CVA-1005 allumé.
L’image du DVD sera affichée sur
le moniteur du siège arrière,
sans prendre en considération ce qui est
visionné sur le CVA-1005. La reproduction continuera même lorsque la source
du CVA-1005 est changée. Les connecteurs RCA montés justement au-dessus
de l’entrée de l’émetteur de télécommande (Remote Eye) à l’arrière de
l’unité, peuvent être utilisés pour amener
le son audio au moniteur arrière ou à un
système audio arrière indépendant.
Remarque: Cette sortie est réglée à un niveau
fixe et nécessite un préamplificateur
avec commande de volume pour
régler les niveaux d’écoute.
Réglage de la répétition
(répétition de disque est le réglage par défaut)
Appuyer une nouvelle
fois sur la touche “DISP”
(Affichage) pour désactiver l’affichage.
DISP
87
Page 88

SET UP
Modification des réglages par défaut (paramétrage)
Modification des réglages
par défaut (paramétrage)
La configuration d’usine par défaut peut
90
–
être changée pour correspondre à vos
préférences et habitudes personnelles.
En mode stop, appuyer sur la
SET UP
touche “SET UP”(Paramétrage).
Le menu des réglages par
défaut apparaît.
ENTER
SET UP
Remarque: Cette opération ne peut se faire en
RETURN
mode PRE-STOP.
Utiliser la touche “8 ” ou
“9” pour effectuer la
sélection et appuyer alors
sur la touche “ENTER”.
Pour la procédure à suivre après
avoir sélectionné une rubrique,
se reporter aux pages indiquées
dans le tableau ci-dessous.
Rubrique Description
LANGUAGES
(langues)
TV SCREEN
(écran TV)
COUNTRY CODE
(code de pays)
RATING LEVEL
(contrôle parental)
DIGITAL OUT
(sortie numérique)
DISPLAY
(affichage)
CUSTOM SETUP
(Réglage personnalisé)
Remarque:
Lorsque les réglages sont modifiés, les réglages
précédents enregistrés sont réécris. Noter les réglages en
cours avant toute modification. Les réglages ne sont pas
effacés lorsque la batterie du véhicule est débranchée.
Sélectionner la langue audio, la langue
des sous-titres et celle des menus.
Sélectionner le format de l’écran TV
suivant le type de moniteur TV utilisé.
Régler le code de pays lors du
réglage du contrôle parental.
Effectuer le réglage du contrôle
parental.
Effectuer le réglage de la sortie
numérique.
Activer ou désactiver les LED du
panneau avant.
Régler le mode scan DVD scan et
Ai-NET.
ou
ENTER
Voir
page
→P89
→P90
→P91
→P92
→P94
→P95
→P96
88
Page 89

ORIGINAL
AUTO
OTHERS
Modification des réglages de langue
Modification des réglages de langue
La langue audio, la langue des sous-titres
et celle des menus peut être changée
selon ses préférences.
Sélectionner “LANGUA GES”
(Langues) de la rubrique “Modification des réglages par défaut
(paramétrage)” page 88.
SET UP
MENU
LANGUAGE
(langue des menus)
Le disque est joué dans la langue
prioritaire du disque (uniquement audio).
Utiliser la touche “8 ” ou
“9” pour effectuer la
sélection et appuyer alors
sur la touche “ENTER”.
ou
ENTER
AUDIO
Choisir la langue audio (haut-parleurs).
SUBTITLE
Choisir la langue des sous-titres affichés
à l’écran.
MENU LANGUAGE
Choisir la langue utilisée pour les menus
(menu de titre, etc.).
L’écran d’installation pour la
langue choisie est affiché.
AUDIO
(langue audio)
Le disque est joué avec la langue des
sous-titres réglée comme langue prioritaire
du disque (sous-titres uniquement).
Utiliser ce réglage pour lire un disque
dans une langue autre que celles
affichées. Utiliser les touches numérotées
“0” à “9” pour saisir le code de pays à
quatre chiffres et appuyer alors sur la
touche “ENTER”. Pour les codes de pays,
se reporter à la “Liste des codes de
langue” (page 119).
Utiliser la touche “8 ” ou “9 ” pour
sélectionner la langue souhaitée
et appuyer alors sur la touche
“ENTER”.
ENTER
ou
Remarques:
• Si le disque ne comporte pas la langue
sélectionnée, c’est la langue par défaut du disque
qui sera sélectionnée.
• Langues réglées par défaut en usine:
Langue Audio: ORIGINAL
Langue des sous-titres: AUTO
Langue des menus: anglais
• Appuyer sur la touche “RETURN” pour revenir à
l’écran précédent.
SET UP
SUBTITLE
(langue des
sous-titres)
Appuyer sur la touche
“SET UP” (Paramétrage).
Les réglages sont enregistrés et
le mode de paramétrage est
désactivé.
SET UP
89
Page 90

SET UP
ENTER
Modification des réglages de l’écran TV
Modification des réglages de l’écran TV
Utiliser la procédure décrite ci-dessous
pour régler la sortie écran d’après le type
de moniteur de télévision utilisé.
90
–
SET UP
RETURN
Sélectionner “TV SCREEN”
(Ecran TV) de la rubrique “Modification des réglages par défaut
(paramétrage)” page 88.
Utiliser la touche “8” ou “9” pour
effectuer la sélection et appuyer
alors sur la touche “ENTER”.
ou
ENTER
90
4 : 3 LETTERBOX
Optez pour cela quand vous êtes reliés à un moniteur
habituel de format 4/3 (taille de télévision ordinaire). Il
peut y avoir des bandes noires visibles en haut et en
bas de l’écran. L’épaisseur de ces bandes dépend du
format d’origine utilisé pour l’enregistrement du film.
4 : 3 PAN SCAN
Optez pour cela quand vous êtes reliés à un moniteur
habituel de format 4/3. L’image va remplir tout l’écran
de la télévision. Cependant, en raison des différences
de format d’affichage, certaines parties sur les bords
extrêmes du film ne seront pas visibles.
Page 91

Modification des réglages de l’écran TV
Changement du code de pays
SET UP
16 : 9 WIDE
Sélectionner ce paramètre si l’appareil est
connecté à un écran de télévision large. C’est
le réglage usine par défaut.
Remarques:
• Avec certains disques, l’image ne peut être
réglée en accord avec le format d’écran
sélectionné (pour plus de détails, se reporter aux
explications sur la couverture du disque).
• Appuyer sur la touche “RETURN” pour revenir à
l’écran précédent.
Appuyer sur la touche
SET UP
“SET UP” (Paramétrage).
Les réglages sont enregistrés et
le mode de paramétrage est
désactivé.
Changement du code
de pays
Régler le code de pays lors du réglage du
contrôle parental.
Sélectionner “COUNTRY CODE”
(Code de pays) de la rubrique
“Modification des réglages par
défaut (paramétrage)” page 88.
Utiliser les touches numérotées
“0” à “9” pour saisir le code de
pays à quatre chiffres et appuyer
alors sur la touche “ENTER”.
123
456
789
0
US : 8583
ENTER
Remarque: Appuyer sur la touche “RETURN”
pour revenir à l’écran précédent.
Appuyer sur la touche
SET UP
“SET UP” (Paramétrage).
Les réglages sont enregistrés
et le mode de paramétrage est
désactivé.
SET UP
91
Page 92

SET UP
ENTER
Réglage du contrôle parental
90
–
SET UP
RETURN
Réglage du contrôle
parental
Utilisez cette fonction pour retreindre le
visionnage de certains films aux enfants
trop jeunes.
Sélectionner “RA TING LEVEL ”
(Niveau d’accès) de la rubrique
“Modification des réglages par
défaut (paramétrage)” page 88.
Appuyer sur la touche “ENTER”.
Le mode saisi du mot de passe est
activé.
ENTER
Utiliser les touches numérotées
“0” à “9” pour saisir le mot de
passe à quatre chiffres.
Le mot de passe d’usine est le 1111.
123
456
789
0
92
Les chiffres saisis sont affichés par “ ”.
Appuyer sur la touche “ENTER”.
ENTER
Page 93

Réglage du contrôle parental
Conseils
SET UP
Utiliser la touche “8 ” ou “9 ” pour
sélectionner le niveau d’accès et
appuyer alors sur la touche
“ENTER”.
Sélectionner “OFF” (désactivé) pour
annuler le contrôle parental ou si vous ne
désirez changer le niveau d’accès. Plus
le chiffre est élevé, plus le niveau d’accès
est élevé.
ENTER
ou
Remarque: Appuyer sur la touche “RETURN”
pour revenir à l’écran précédent.
Appuyer sur la touche
SET UP
“SET UP” (Paramétrage).
Les réglages sont enregistrés
et le mode de paramétrage est
désactivé.
Remarques:
• Si l’on souhaite changer le mot de passe,
sélectionner “CHANGE PWD” (Changer le mot de
passe) et saisir ensuite le nouveau mot de passe
(4 chiffres).
• Noter le mot de passe sur un papier et le ranger
en lieu sûr en cas d’oubli.
• Sur les DVD non classés, la lecture ne sera pas
restreinte même si le niveau d’accès a été réglé.
• Une fois installé, le marquage des films reste en
mémoire jusqu’à sa modification. Pour permettre
la lecture de disques pour un public plus âgé ou
pour annuler la censure parentale, la configuration doit être modifiée.
• Tous les disques DVD ne fournissent pas une
option de censure parentale. Si vous n’êtes pas
sûr d’un DVD, visionnez-le d’abord pour
confirmation. Ne laissez pas de disques DVD non
appropriés accessibles aux jeunes enfants.
• Changement temporaire du
niveau d’accès
Certains disques nécessitent que l’on modifie
le niveau d’accès pendant la lecture. Dans ce
cas, le message suivant apparaît à l’écran:
Still Picture (image bloquée)
Still Picture
Lorsque ce message apparaît, si le mot de
passe correct n’est pas saisi, la lecture est
bloquée ou un film de niveau d’accès
inférieur est joué.
SET UP
93
Page 94

SET UP
Modification des réglages de la sortie numérique
Modification des réglages
de la sortie numérique
Utiliser la procédure suivante pour
modifier les réglages de la sortie
numérique du DVA-5200.
Sélectionner “DIGIT AL OUT”
(Sortie numérique) de la rubrique
“Modification des réglages par
défaut (paramétrage)” page 88.
ENTER
SET UP
RETURN
Utiliser la touche “8 ” ou “9 ” pour
pour effectuer la sélection et
appuyer alors sur la touche
“ENTER”.
ENTER
ou
AUTO
La sortie numérique est commutée automatiquement suivant le type de signaux audio
produits à la lecture.
S’assurer que “AUTO” est sélectionné lorsque
l’on souhaite connecter un processeur audio
numérique et traiter des signaux audio Dolby
numériques. “AUTO” est le réglage par défaut
en usine.
LPCM
Les signaux audio enregistrés sur le disque
sont convertis en signaux audio linéaires PCM
de 48 kHz/16 bits (pour les DVD) ou 44,1 kHz
(pour les CD vidéo et audio).
Remarque: Appuyer sur la touche “RETURN”
pour revenir à l’écran précédent.
94
Appuyer sur la touche
“SET UP” (Paramétrage).
Les réglages sont enregistrés et
le mode de paramétrage est
désactivé.
SET UP
Page 95

Modification des réglages de la sortie numérique
Modification des réglages de l’affichage
• Sortie audio/Sortie audio numérique optique
Disque
DVD
CD vidéo
CD
Format d’enregis-
trement audio
Dolby numérique
PCM linéaire (48 kHz)
PCM linéaire (96 kHz)
MPEG
PCM linéaire
Réglages de la
sortie numérique
AUTO
LPCM
AUTO
LPCM
AUTO
LPCM
AUTO ou LPCM
AUTO ou LPCM
Sortie audio numérique
optique (Lorsqu’un processeur
de son de DVD est connecté)
Dolby numérique
LPCM (48kHz)
LPCM (48kHz)
LPCM (48kHz)
x
x
LPCM (44,1kHz)
LPCM (44,1kHz)
SET UP
Sortie audio
analogique
(sortie Ai-NET)
\
\
\
\
\
\
\
\
Modification des réglages de l’affichage
Utiliser la procédure suivante pour activer
ou désactiver les LED de l’appareil.
Sélectionner “DISPLA Y” (Affichage) de la rubrique “Modification des réglages par défaut
(paramétrage)” page 88.
Utiliser la touche “8 ” ou “9 ” pour
sélectionner “ON” (marche) ou
“OFF” (arrêt), appuyer alors sur
la touche “ENTER”.
ENTER
ou
ON
Les LED indicatrices sont allumées et affichent
l’état de fonctionnement de l’appareil. “ON”
(marche) est le réglage par défaut en usine.
OFF
Les LED indicatrices sont éteintes.
Lorsque ce paramètre est réglé sur “OFF”
(arrêt), les LED indicatrices ne s’allument pas
même lorsque l’appareil est sous tension.
Remarque: Appuyer sur la touche “RETURN”
pour revenir à l’écran précédent.
Appuyer sur la touche
SET UP
“SET UP” (Paramétrage).
Les réglages sont enregistrés
et le mode de paramétrage est
désactivé.
SET UP
95
Page 96

SET UP
Réglage personnalisé – Modification du réglage F scan
Réglage personnalisé –
Modification du réglage F scan
Utiliser la procédure suivante pour
changer la vitesse de balayage du DVD.
Sélectionner “CUSTOM SETUP”
(Réglages personnalisés) de la
rubrique “Modification des réglages
par défaut (paramétrage)” page 88.
ENTER
Interrupteur RESET
96
SET UP
RETURN
Utiliser la touche “8” ou “9 ” pour
sélectionner “F SCAN MODE”,
appuyer alors sur la touche “ENTER”.
ENTER
ou
Utiliser la touche “8” ou “9 ” pour
sélectionner “IP FR” ou “I FR”,
appuyer alors sur la touche “ENTER”.
ENTER
ou
IP FR
La vitesse de balayage de DVD est légèrement
inférieure lorsque “I FR” est sélectionné.
“IP FR” est le réglage par défaut d’usine.
I FR
La vitesse de balayage de DVD est légèrement
supérieure que lorsque “IP FR” est sélectionné.
Remarque: Appuyer sur la touche “RETURN”
pour revenir à l’écran précédent.
Appuyer sur la touche
SET UP
“SET UP” (Paramétrage).
Les réglages sont enregistrés et le
mode de paramétrage est désactivé.
Page 97

Réglage personnalisé – Modification des réglages Ai-NET
Affiche le message
Réglage personnalisé –
Modification des réglages Ai-NET
Les réglages Ai-NET sont utilisés pour régler le son
de la sortie audio des produits Ai-NET connectés.
Sélectionner “CUSTOM SETUP”
(Réglages personnalisés) de la
rubrique “Modification des réglages
par défaut (paramétrage)” page 88.
Remarques:
Utiliser la touche “8 ” ou “9 ” pour
sélectionner “Ai-NET SETUP”
(paramétrage Ai-NET) et appuyer
alors sur la touche “ENTER”.
ENTER
ou
• Appuyer sur la touche “RETURN” pour revenir à
l’écran précédent.
• Les opérations ne peuvent être effectuées à partir
de la page du menu principal si le paramètre AiNET est réglé sur “CD” lorsque l’appareil est
connecté à un CVA-1005.
• Si le paramètre Ai-NET est réglé sur “DVD”
lorsque l’appareil est connecté à une unité
principale compatible Ai-NET autre que le CVA1005, l’unique opération possible à partir de
l’unité principale est le réglage du volume.
• Lorsque le paramètre Ai-NET est réglé sur “CD”,
les fonctions disponibles et les messages affichés
peuvent être différents suivant le type d’unité
principale compatible Ai-NET.
SET UP
Utiliser la touche “8” ou “9 ” pour
sélectionner “DVD” ou “CD”, appuyer
alors sur la touche “ENTER”.
ENTER
ou
DVD
Régler sur “DVD” lorsque l’appareil est
connecté à un CVA-1005.
Ces opérations peuvent être effectuées à l’aide
du menu principal du CVA-1005.
Pour plus de détails, se référer au manuel
d’utilisation du CVA-1005.
“DVD” est le réglage par défaut d’usine.
CD
Régler sur “CD” lorsque l’appareil est connecté à un
produit Ai-NET (unité principale) autre que le CVA-1005.
Les opérations peuvent être effectuées à partir de l’unité
principale.
Pour plus de détails, se référer au paragraphe
“Fonctionnement à partir de l’unité principale” (page
114).
Appuyer sur la touche
SET UP
“SET UP” (Paramétrage).
Les réglages sont enregistrés et
le mode
désactivé.
Le message “PLEASE PUSH RESET
SW” (Appuyer sur bouton de réinitialisation “Reset”) est affiché à l’étape 3.
Appuyer sur l”interrupteur de réinitialisation “Reset” sur la face avant du DVA5200 à l’aide de la pointe d’un stylo, etc.
Le DVA-5200 est mis hors tension.
de paramétrage
est
Coupez le contact du véhicule, puis
remettez-le à nouveau.
SET UP
97
Page 98

Utilisation du processeur audio numérique (optionnel)
Utilisation du
DVD
processeur audio
numérique (optionnel)
Lorsque l’appareil est utilisé avec un processeur
audio numérique (PXA-H510), il est possible de
le faire fonctionner à l’aide de la télécommande
incluse avec le DVA-5200. Se reporter aussi au
manuel d’utilisation du PXA-H510.
A.PROC
ENTER
ENTER
A.PROC
BAND
RETURN
Pendant la lecture, appuyer
sur la touche “A.PROC”.
Le menu de réglage apparaît.
Utiliser la touche “8 ” ou
“9” pour effectuer la
sélection et appuyer alors
sur la touche “ENTER”.
Pour la procédure après avoir
fait une sélection,
référez-vous aux pages
indiquées dans le tableau
ci-dessous.
Video CD
CD
ou
98
Rubrique Description
PARAMETRIC-EQ
(égaliseur paramétrique)
SURROUND
PRIVATE-MEMORY
(Mémoire de réglages
personnalisés)
TIME-CORRECTION
(Correction du délai de temps)
DOLBY SURROUND MODE
(Mode Dolby surround)
ADJUST
MODE
Pour régler la fréquence et la largeur des bandes
ainsi que le niveau de l’égaliseur paramétrique.
Pour sélectionner un des six modes surround en
accord avec la source musicale utilisant un DSP
(Processeur de signaux numériques).
Pour enregistrer et rappeler jusqu’à six configurations de réglages de l’égaliseur paramétrique.
Elimine le délai de temps résultant de la distance
entre la position d’écoute et les haut-parleurs.
Pour commuter entre l’entrée Dolby numérique et
l’entrée Pro Logic.
Pour régler le mode, le niveau, etc. du haut-parleur.
Pour régler le volume, l’atténuation, la balance, etc.
Voir
page
→P99
→
P100
→
P101
→
P103
→
P103
→
P104
→P111
Page 99

Réglage de l’égaliseur paramétrique
Réglage de l’égaliseur
paramétrique
Sélectionner “P ARAMETRIC-EQ”
(Egaliseur paramétrique) de la
rubrique “Utilisation du processeur audio numérique (optionnel)” page 98.
Utiliser la touche “8 ” ou “9 ” pour
sélectionner la bande à régler et
appuyer alors sur la touche
“ENTER”.
La bande, dont la fréquence est indiquée
en jaune peut être réglée. Le menu de
réglage de l’égaliseur paramétrique se
compose de deux pages. Appuyer sur la
touche “BAND” pour passer de la page 1
à la page 2.
ENTER
ou
Appuyer sur la touche “:” pour
sélectionner la largeur de bande
et appuyer alors sur la touche
“ENTER”.
ENTER
Utiliser la touche “8 ” ou “9 ” pour
régler la largeur de bande et
appuyer alors sur la touche
“ENTER”.
ENTER
ou
Appuyer sur la touche “:” pour
sélectionner le niveau (LV),
appuyer alors sur la touche
“ENTER”.
ENTER
BAND
Utiliser la touche “8 ” ou “9 ” pour
régler la fréquence et appuyer
alors sur la touche “ENTER”.
ENTER
ou
Utiliser la touche “8 ” ou “9 ” pour
régler le niveau et appuyer alors
sur la touche “ENTER”.
ENTER
ou
Remarque: Appuyer sur la touche “RETURN”
pour revenir à l’écran précédent.
Appuyer sur la touche
A.PROC
“A.PROC” pour fermer
la page de menu du
processeur audio
numérique et revenir à
celle de lecture.
99
Page 100

Modification des réglages “surround”
Modification des réglages “surround”
Ce réglage n’est pas possible lorsque la
sortie audio Dolby numérique ou Pro
Logic est activée sur le DVA-5200.
Sélectionner “SURROUND” de la
rubrique “Utilisation du processeur audio numérique (optionnel)” page 98.
Utiliser la touche “8 ” ou “9 ” pour
RETURN
ENTER
A.PROC
sélectionner le mode surround,
appuyer alors sur la touche
“ENTER”.
Six modes surround sont disponibles.
ENTER
ou
100
Appuyer sur la touche
ENTER
“ENTER”.
La valeur de niveau (LV)
devient jaune.
Utiliser la touche “8 ” ou “9 ” pour
régler le niveau (LV) et appuyer
alors sur la touche “ENTER”.
ENTER
ou
 Loading...