

Page 1
This Package Contains the Following:
G
N
R
D
E
M
+
1
2
V
DPR-RDS1
Interface Unit
iPod dock cable
Antenna
Power Harness
Page 2
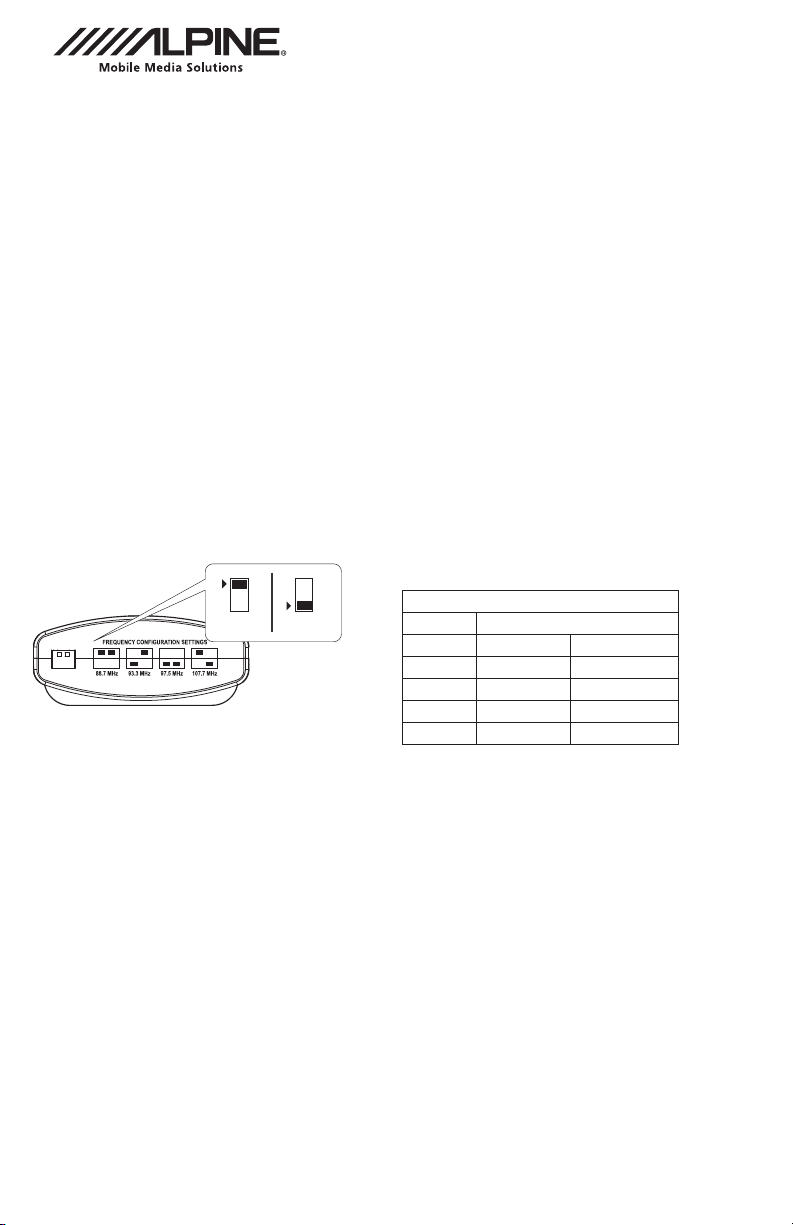
Step 1: Set the DPR-RDS1’s FM transmission frequency
The frequency selector switch is located on the interface unit and is used to set the optimal
transmitting frequency. Incorrect dip switch settings may cause the interface not to work properly or not
to operate at all. Disconnect the vehicle harness from module and cycle ignition off for 5 seconds after
changing the switches!
After making changes to the frequency selector be sure to tune to the correct FM frequency on
which the iPod will be heard.
Step 2: Install the DPR-RDS1 in the vehicle
1. Pull vehicle into the service bay.
2. Make sure that the radio code is available before disconnecting the battery.
Disconnect both battery terminals. These cables must be disconnected during installation for proper
initialization of the module when its connected.
3. Pull out the radio by removing surrounding trims and screws to access the factory antenna
connector. Most trims can be removed by carefully pulling on the piece or using trim removal tools.
trim is usually held in place by snap-in clips. Consult your dealership if additional information is
needed on removing the radio.
Interface Unit
“frequency selector”
ON/OFF Switch Positions
OFF
ON
12
NOTE: Try to select a transmitting frequency that is not
occupied by a local FM radio station.
Frequency configuration settings
Dip switch configuration
FM (MHz)
88.7
93.3
97.5
107.7
Dip switch 1Dip switch 2
OFFOFF
ON OFF
ON ON
OFFON
Intruction d’installation
Phase 1: Ajustez le choix de fréquence
Les commutateurs sont situés sur l'unité et sont utilisés pour placer la meilleure fréquence pour
l'émission. Les arrangements incorrects peuvent faire ne pas fonctionner correctement ou ne pas
fonctionner l'unité du tout. Déconnectez le câble d'alimentation pendant 5 secondes après changement
les positions de commutateur.
Après avoir apporté des modications, accordez à la radiofréquence sur votre radio pour entendre l'iPod
Phase 2: Installez le DPR-RDS1 pour véhicule
1) S’arrêter le véhicule en le aire de réparation
2) Notez le code radio avant de commencer. Déconnectez les bornes de batterie pour s'assurer l'unité
initialise correctement.
3) Enlevez les panneaux de véhicule pour accéder au connecteur de radio et d'antenne.
Enlevez les panneaux en tirant doucement et à l'aide des outils appropriés pour ne pas les
endommager. Consultez votre agence si les informations supplémentaires ou l'aide sont nécessaire.
Page 3

Step 3: Install the DPR-RDS1 in the vehicle (continued)
4. You can access the factory antenna port located on the back of the radio. If the factory
antenna cable is connected, unplug it and plug the universal antenna connector into the
receptacle. Connect +12 volt, ground and remote wire leads to their proper sources.
5. Connect the power/antenna cable and the iPod docking cable to the interface unit.
Apply cable ties to secure the cables.
6. Verify that all connections have been properly made.
7. Reconnect the car’s battery. Test the unit before seating the cables and
reinstalling the panels/trim.
Yellow wire - "+12V" -
connect to +12V
+
1
2
V
Red wire - "REM" - connect to
R
E
M
switched power
Black wire - "GND" -
connect to ground
factory antenna connector
Note: antenna adapters sold separately
may be required with certain radios.
Radio antenna port
universal
antenna
connector
G
N
D
Phase 2: Installez le DPR-RDS1 pour véhicule(suite …)
4) Vous pouvez accéder au connecteur d'antenne derrière la radio. Débranchez l'antenne et
branchez le connecteur universel d'antenne dans la radio. Reliez le 12V+, BATT et de REM à
leurs raccordements corrects
5) Connectez le câble d'antenne /puissance et le câble d' iPod à l'unité et xez l'unité avec des
serres-câble
6) Inspectez que les raccordements sont corrects
7) Connectez la batterie. Test the function of unit before nish the installation of the panels
Page 4

Using the DPR-RDS1
Select the FM radio source on the radio and tune to the frequency that was selected on the interface
unit. As soon as the radio is tuned to the appropriate frequency, audio from the iPod will be heard.
About RDS
Radios with RDS capability allow the currently playing song title and album name to be displayed on
the screen of the radio. To nd out if a radio has RDS, tune to a popular radio station and if the station
name is displayed then the radio has RDS capability.
iPod and iPhone charging
The iPod or iPhone will charge whenever the vehicle’s
ignition is on
Problem Solution
Cannot hear audio from iPod. Make sure to select the FM source on the radio and tune to the correct FM frequency.
Audio from iPod receives high amounts
of static and radio interference.
AMFMCD
TAPE
VOL
PUS
disc
HPWR
FM 80.1 Artist N
SEEK
SKIP
REW1PLAY/PROG2FF3NR4DISC-5DISC+
Check DIP switch settings. With the ignition OFF disconnect vehicle
harness from module for a few seconds and reconnect.
Select an FM frequency that is not already occupied by a radio station. Select a
frequency preset with the least amount of static. It’s best to drive around and
experiment to nd the ideal setting. If problem persists,
professional installation is recommended.
CLOCK
HMR
DISC
TUNE
SCAN
RPT
PUSH
ODE
M
A.SEL
RDM
6
2:42 -1:16
Charging icon will
appear on the upper
right corner of the
iPod screen to
indicate charging.
Song Title
Artist Name
Album Name
1 of 12
MENU
FM frequencyRDS text
Utilisant le RDS1
Choisissez la source de FM sur la radio et veuillez changer de fréquence à la station de préréglage que
vous avez choisie sur l'unité. L'acoustique sera entendue du système audio.
RDS
Les radios capables du RDS montrent l'information de station de radio sur l'écran de la radio. Pour
vérier les possibilités de la radio, choisissez une station de radio populaire et voyez si l'information est
afchée sur l'écran
Chargement de iPod et iPhone
Votre iPod ou iPhone chargera quand votre ingition de véhicule est allumé
Problem Solution
Ne peut pas entendre l’acoustique d’iPod Conrmez la source de la radio est FM et accordé à la fréquence correcte.
L’acoustique a la charge statique ou
l’interférence
Conrmez les positions de commutateur sont corrects. Enlevez le câble
d’alimentation à partir de l’unité pendant cinq secondes et rebranchez
Choisissez la fréquence qui n’a pas d’autres signaux par radio. Choisissez la
fréquence avec le bruit ou la charge statique minimum. Nous recommandons de
conduire pour examiner l’exécution.
 Loading...