

Page 1

User Guide
( 2 – 26 )
Appendix
( 27 – 30 )
Page 2
A
User Guide
Introduction
Thank you for purchasing the Strike Multipad. At Alesis, we know how serious music is to you. That’s why we design our
equipment with only one thing in mind—to make your performance the best it can be.
Box Contents
Strike Multipad
Power Adapter
Software Download Card
Quickstart Guide
Safety & Warranty Manual
Support
For the latest information about this product (system requirements, compatibility information, etc.) and product
registration, visit alesis.com.
For additional product support, visit alesis.com/support.
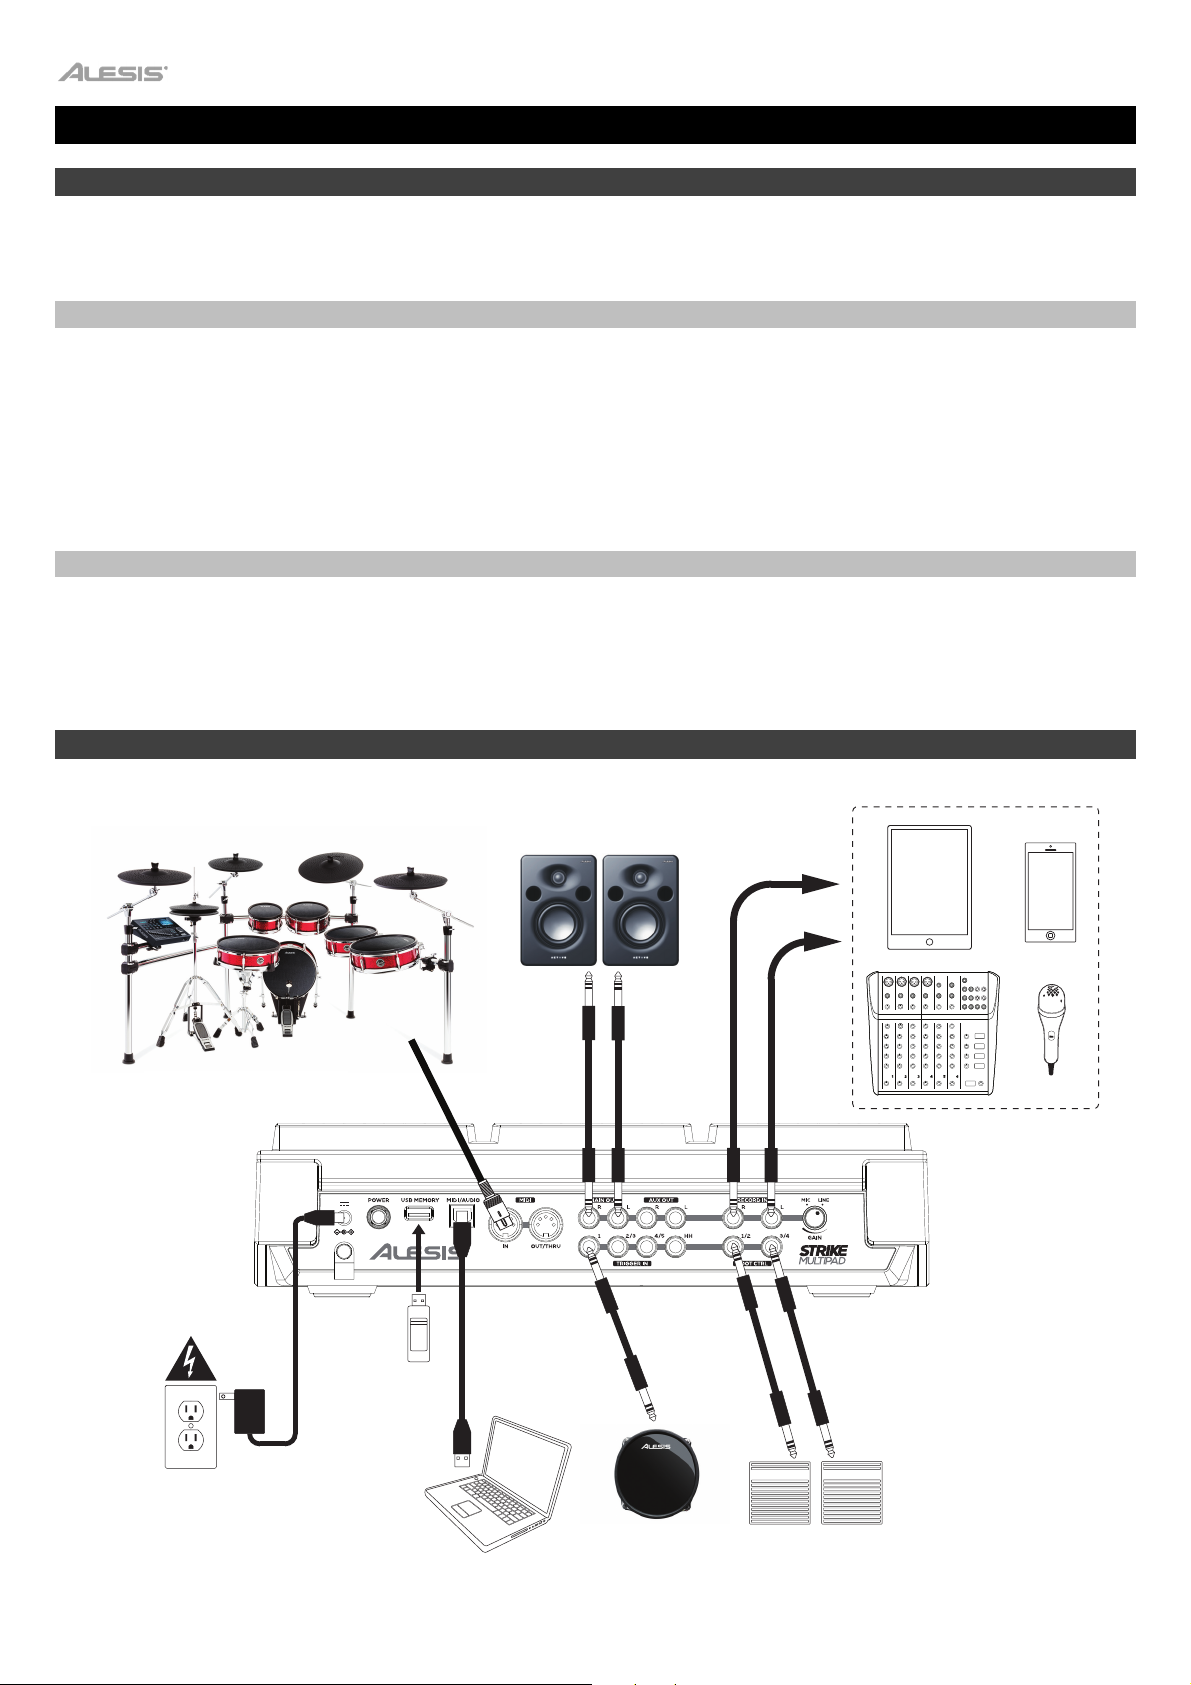
Setup
Items not listed in Introduction > Box Contents are sold separately.
Powered Monitors
MIDI Device
udio Sources
(Mobile Devices,
Mixer,
Microphone, etc.)
Power
2
USB
Flash
Drive
Computer
External
Trigger
Pad
Footswitches
Page 3

Features
Top Panel
1. Pads: Use these pads to trigger samples or perform control functions.
2. Main Knob: Turn this knob to adjust the volume level of the Main Outputs on the rear panel.
3. Aux Knob: Turn this knob to adjust the volume level of the Aux Outputs on the rear panel.
4. Phone Knob: Turn this knob to adjust the volume level of the Headphone Outputs on the front panel.
5. Display: As the center for editing kits, pads, effects, and samples, this full-color display shows the current kit, settings,
and other information. Use the Main Encoder to scroll through available options and change parameter values, and
press it to select. Use the Function Buttons (F1–F6) to select tabs and functions shown at the bottom edge of the
display.
6. Function Buttons (F1 – F6): Press one of these 6 buttons to select the corresponding tab or function shown above it
(at the bottom edge of the display).
3
Page 4

7. Perform: Press this button multiple times to cycle between the three pages of Perform mode: Pad View, Trigger In
View, and Foot Control View. See Basic Operation > Perform Mode for more information.
8. Main Encoder: This knob serves as the main tool for adjusting settings listed on the Display. Turn this knob to scroll
through settings and parameters. To edit a setting, press the encoder to select the setting, turn the encoder to adjust
the value, then press the encoder again to save the changes.
9. BPM: Press this button to bring up the BPM and Time Signature settings pop-up. Use the Main Encoder to adjust
the settings. Alternatively, you can use the F3 or F4 buttons for tap tempo.
10. Click: Briefly press this button to turn the click on or off. When on, this button will flash at the current BPM and the
click will play to the assigned audio output. Press and hold this button to edit the Sound, Level, Pan, Interval and
Output settings for the click.
11. Sample: Press this button to enter Sample Mode, where you can record audio from the Record Inputs or from the
USB MIDI/Audio port connected to a computer. See Basic Operation > Customizing Kits and Sounds > Recording
a Sample for more information.
12. Panic: Press this button to immediately stop all sound playing to all outputs.
13. Kit: Press this button to view a list of kits and to edit kit level settings.
14. Pad: Press this button to edit pad level settings, such as RGB lights, pad response, and output routing.
15. Sound: Press this button to browse and edit the many included sounds included with Strike Multipad, or to import
your own.
16. Utility: Press
this button to edit the global settings and backup your user data.
17. Kit Select: Press these buttons to select a kit.
18. Kit FX: Press this button to enter Kit FX Mode, where you edit the three Kit FX settings and apply them to individual
pads, trigger inputs, or footswitches.
19. MST FX: Press this button to enter the Master FX Mode, where you can apply effects, EQ and compression for all
signals routed to the Main Outputs.
20. Pad Cue: Press this button to audition sounds to the Headphone Outputs only. When active, the button LED will
flash on and off, and any pads triggered will be routed directly to the headphones without interrupting the main audio
output.
21. A-Link Encoders: These knobs can be assigned to control pad parameters or FX parameters. See Other Features
> A-Link
for more information.
22. A-Link Bank Buttons: Press these buttons to select the active bank of assignments for the A-Link Encoders. Press
and hold one of these buttons to edit the encoder assignments for that bank.
Front Panel
1. Headphone Outputs (1/8”/3.5 mm or 1/4”/6.35 mm): Connect your stereo headphones to this input. Adjust the
volume with the Headphone Vol knob.
4
Page 5
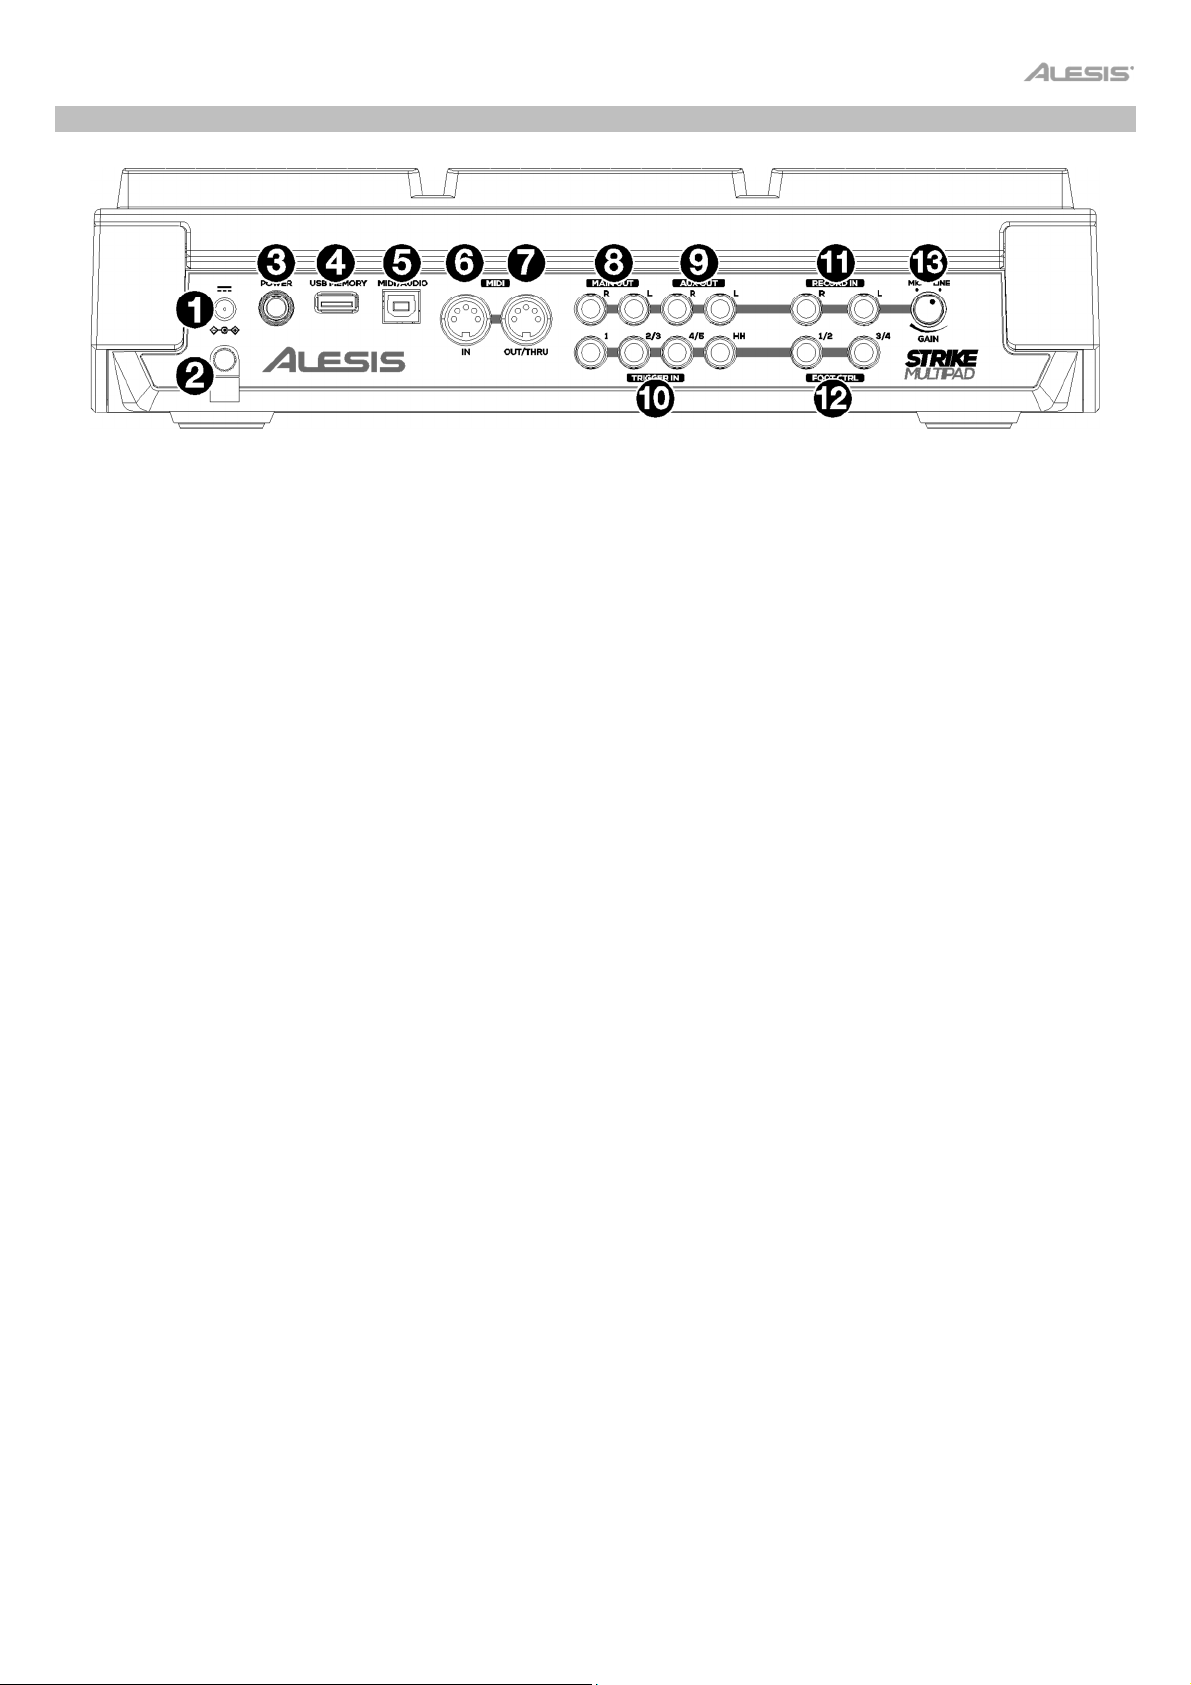
Rear Panel
1. Power Input: Connect the included power adapter (9 V DC, 1,500 mA) to this input.
2. Cable Restraint: You can secure the cable of the power adapter to this restraint to help prevent disconnecting it
accidentally.
3. Power Switch: Press this button to power the drum module on. Power it on only after you have connected all of your
input devices and before you power on any connected loudspeakers. Press and hold this button to power the drum
module off. All of your settings will be saved automatically when powering down. Power off your loudspeakers before
powering off the drum module.
4. USB Memory: Connect a USB flash drive to this port to load and save WAV files, kits, and global settings. See Basic
Operation > Customizing Kits and Sounds > Importing Files from USB for more information.
5. USB MIDI/Audio: Use a standard USB cable to connect this USB port to an available USB port on your computer.
This connection sends and receives MIDI and audio information to and from the computer.
6. MIDI In (5-pin DIN): Connect this input to the MIDI output of an external MIDI device (synthesizer, drum machine,
etc.).
7. MIDI Out/Thru (5-pin DIN): Connect this output to the MIDI input of an external MIDI device (synthesizer, drum
machine, etc.). In Thru mode, MIDI received from the MIDI Input will be sent back out of this output. To enable Thru
mode, go to Utility > MIDI and set the MIDI Thru setting to On.
8. Main Outputs: (1/4”/6.35 mm, TS): Connect these outputs to your loudspeakers, audio interface, etc. Turn the Main
Knob on the top panel to adjust the volume level.
9. Aux Outputs (1/4”/6.35 mm, TS): Connect these outputs to route audio signal to another destination. You can
individually route sounds from each pad, trigger in, or foot control to either the Main Outputs or Aux Outputs by
going to the Edit Pad > Output menu and changing the Audio Output setting.
10. Trigger Inpu
ts (1/4”/6.35 mm, TS and TRS): Connect these inputs to your acoustic or electronic triggers. When
connected, hitting a trigger will send an electric signal to the drum module, which will trigger the corresponding sound.
Trigger In 1 is a single-zone connection and Trigger Ins 2/3 and 4/5 are dual-zone connections. The HH Pedal can
be connected to an on/off control or a variable foot controller.
11. Record Inputs (1/4”/6.35 mm, TS): Connect these inputs to an audio source such as a smartphone, microphone,
instrument or mixer for recording samples which you can then assign to the pads. The sound from these inputs is also
passed to the Main, Aux, or Phones Outputs. To change the routing and volume level, go to the Utility > Audio
menu.
12. Foot Control Inputs (1/4”/6.35 mm, TRS): Connect optional footswitches to these inputs for additional sounds or
control functions.
13. Mic/Line Gain: Turn this knob to set the gain level of the Record Inputs. If you are using a mic-level input, turn the
knob toward the Mic setting. If you are using a line-level input, turn the knob toward the Line setting. Use the signal
meter in Sample mode to evaluate the input level.
5
Page 6

Basic Operation
Perform Mode
Perform Mode is the main mode for Strike Multipad. In this
mode, you can view information about the current kit, select a
new kit, enable or disable effects, and access the built-in
looper.
At the top of Perform Mode, the current kit name and current
BPM are shown.
• To change kits, use the Kit Select -/+ buttons.
• To switch between Preset kits and User kits, press the
F1 function button.
There are three pages in Perform Mode: Pad View, Trigger In View, and Foot Control View. Press the Perform button
multiple times to cycle between these views:
• Pad View: Pad View is the default view when Strike Multipad is powered on and when the Perform button is pressed
while in another mode or menu. This view shows information about the 9 pads. Each pad icon shows the stop color
that has been set for the pad, the current sound file name or control parameter, and the current play mode:
o Control:
o Loop:
o One Shot:
o One Shot Alt:
• Trigger In View: Trigger In View shows the same information as Pad View but for the external Trigger Inputs instead
of the pads.
• Foot Control View: Foot Control View shows the same information as Pad View but for the four Foot Control Inputs
instead of the pads.
Effect View
In Perform Mode, you can also toggle between two different views of Function buttons F2—F5 by pressing F6–View.
Effect View is the default view when Strike Multipad is powered on.
In Effect View, these function buttons are used for the following:
• F2–F4 – FX1 / FX2 / FX3 Toggle: Press these buttons to toggle the respective effects on or off.
• F5 – Master FX Toggle: Press these buttons to toggle the master effects on or off.
To learn more about effects, see Other Features > Effects.
6
Page 7

Looper View
Press the F6–View function button while in Effect View in
Perform Mode to access the built-in Looper.
When the Looper is activated, you can set the following
parameters for your recording:
• Number of Measures: Press the F4 button to cycle
through the lengths of the loop according to the current
global time signature and BPM settings. Select 1–8, 12, or
16. The default setting is 4 measures.
• After Recording: Press the F5 button to open the Settings
popup. Here, you can select the behavior of the looper
once recording is completed. Select Playback for the loop
to enter playback mode, or Overdub for the loop to enter
overdub recording.
• BPM and Time Signature: Displays the current global
BPM and Time Signature settings. To change the values,
press the BPM button.
Recording a Loop
Once you have set the parameters for your loop, you can begin recording.
1. Press the F3–Arm to Record button to arm the recording. You can also press F2–Cancel to return to disarm
recording.
2. Press F3–Start Rec to initiate recording. Once pressed, the click will activate and a one-measure countdown will
begin. The progress bar above the Looper controls will fill according to the number of bars and beats selected in the
Time Signature settings.
3. Once recording begins, the display will show a red progress bar that will fill according to the number of beats and
measures selected, which are also shown to the right of the bar.
During recording, you can press the F3–Recording button to stop recording and enter playback mode on the next
downbeat.
You can also press F2–Cancel to cancel recording and return to the previous page.
4. After you have recorded for the set number of beats and measures, the Looper will enter playback mode. The progress
bar countdown will still be shown, but in green. In playback mode, the options for the Function buttons are as follows:
• F2–Play/Stop: Press this button to start or stop loop playback.
• F3–Start Du
b: Press this button to immediately begin recording on top of the previous recording. The progress
bar will turn red again to indicate recording is active, and the display will show Dubbing above the button. Press
this button again to stop overdubbing, or press F2–Play/Stop.
• F4–Save: Press this button to save the current loop as a WAV file. Saved loops will automatically be stored in the
User > New Sample category.
• F5–Cancel: When playback is stopped, press this button to delete the recording and return to Arm to Record
mode. A confirmation window will appear; use the Main Encoder to select No to return to the previous page, or
Yes to discard the loop.
7
Page 8

Customizing Kits and Sounds
Strike Multipad includes 30 preset kits which can be freely customized. You can also create kits from scratch using
the 70 empty User kits. The
Kit, Pad
controls Strike Multipad's global settings. See
KitFX
and
The
MstFX
menus are used to edit and apply effects. See
and
Sound
Menus
menus are used to create and customize kits. The
to learn more about these pages.
Other Features > Effects to learn more.
Utility
menu
Toolbar
In
the
Kit, Pad
display will show the following information:
• Kit Name: Displays the name of the current kit. To change
kits, press the Kit Select buttons.
• BPM: This shows the current kit BPM. To edit the BPM,
press the BPM button. Turn the Encoder to adjust the
value and press it to confirm. Alternatively, tap the F3 or F4
buttons with the downbeat of the music at least 3 times to
determine the tempo.
• Pad: This shows which pad is currently selected and
displayed (see image).
When P1–P9 is selected, the unit will show the stop color
assigned to each pad LED (colors are assigned in the Pad
Edit menu). The highlighted pad will be shown with a white/
glowing outline.
If T1–T5 or HH is selected, the Pad Select graphic will
change to show the external triggers (all same color), with
the selected one highlighted.
If FS1–FS4 is selected, the Pad select graphic will show the
footswitches with the selected one highlighted.
and
Sound
menus
, the toolbar at the top of the
P7 P8 P9
P4
P5 P6
P1 P2 P3
Pads
Kit Menu
T3
T1
T2
External
Triggers
T5
T4
HH
FS3 FS4
FS1
FS2
Foot-
switches
Browsing and Adding Sounds
1. Press the Kit button to open the Kit menu. Here, you can
select between the Preset and User kit options by pressing
the F1 button.
2. Turn the Main Encoder to select the kit you want to
customize. The kit will automatically be selected, and the
kit name will be shown in the toolbar at the top of the
display.
3. Press the Sound button to open the Sound Menu. The F2–
Browse page is the default view when entering Sound Edit
mode and lets you browse categories and samples.
4. Hit the pad, trigger in, or footswitch where you would like
to add a sound to select it. Each Wave section contains
fields for Sample Name, followed by Library > Category.
5. Start by selecting a Library. Turn the Main Encoder so the
Library field is highlighted blue. Press the encoder to select
the field. When selected, the field will be highlighted white
and you can turn the encoder to choose Factory for builtin sounds. Press the encoder again to select the library.
6. Turn the Main Encoder to highlight the Category field.
Press the encoder to select the field, then turn it to browse
the categories in the currently selected library. Press the
encoder again to select the category.
8
Library
Sound Menu
Sample Name
Category
Page 9
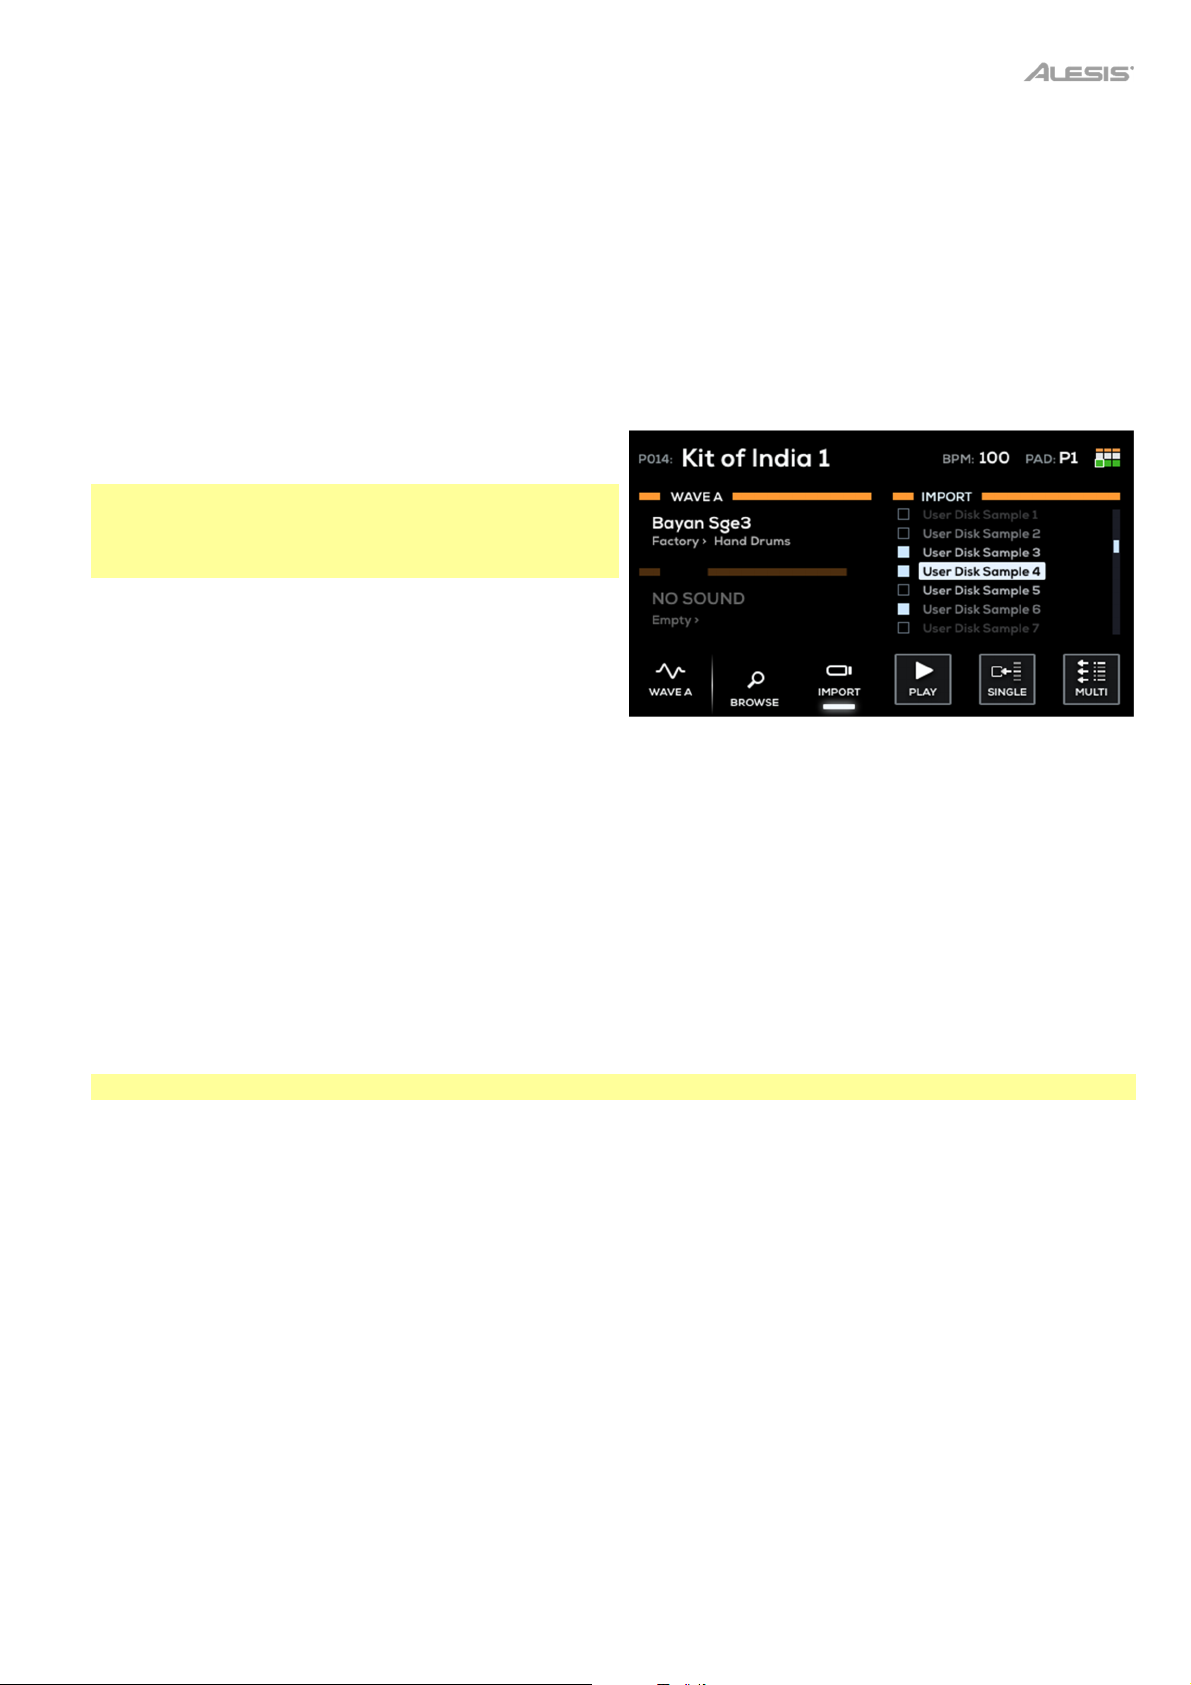
7. Turn the Main Encoder to highlight the Sample Name field. The list of samples in the currently selected category will
be shown on the right side of the display, under Browse. Press the encoder to move the cursor to the Browse field,
then turn it to browse the list of samples. Press the encoder again to load the highlighted sample to the selected
Wave.
8. Once a sample has been added, you can use the F4–Mode and F5–Mix buttons in the Sound menu to adjust the
sample settings, such as Playback Mode, Poly/Mono, Volume, Pan, and more.
Importing Files from USB
In addition to the factory preset sounds, you can import your own sounds to the User Library to add to kits.
1. Start by adding sound files from a computer to a USB flash
drive (mass storage class).
IMPORTANT: Your flash drive must be formatted using
FAT32, and all WAV files must be 44.1 kHz / 16-bit and
located in the root directory of the drive (not in any folder
or sub-folder).
2. Insert the USB flash drive to the USB Memory port on the
rear panel.
3. Press the Sound button to open the Sound Menu, then hit
the pad, trigger in, or foot control where you want to import
the sample.
4. Press the F3–Import button and wait for the USB scanning
Sound Menu
to complete. If Strike Multipad is not able to read your USB
flash drive, an error message will appear on the display and
return to the Browse screen.
5. If WAV files are found on the USB flash drive, they will appear in the Import list. Use the Main Encoder to scroll
through the samples, and press it to select a sample. While browsing, you can press F4–Play/Stop to listen to the
highlighted file.
6. You can quickly import a selected WAV to the currently selected pad by pressing the F5–Single button.
If you want to import multiple samples at once, use the Main Encoder to select the samples, then press the F6–Multi
button to begin importing.
7. When a sample has finished importing, it will automatically be added to Wave A or B of the currently selected pad,
and assigned to the User Library in the New Sample category.
Note: Samples will be automatically added only when Single import is used.
8. To add another sample to another pad, simply select another pad. The Import list will stay the same, so you can
quickly select a pad, select a sample and import it, then select another pad and import another sample.
9. To view all of your newly imported samples, press the F2–Browse button, select the User Library, and the New
Samples Category.
9
Page 10
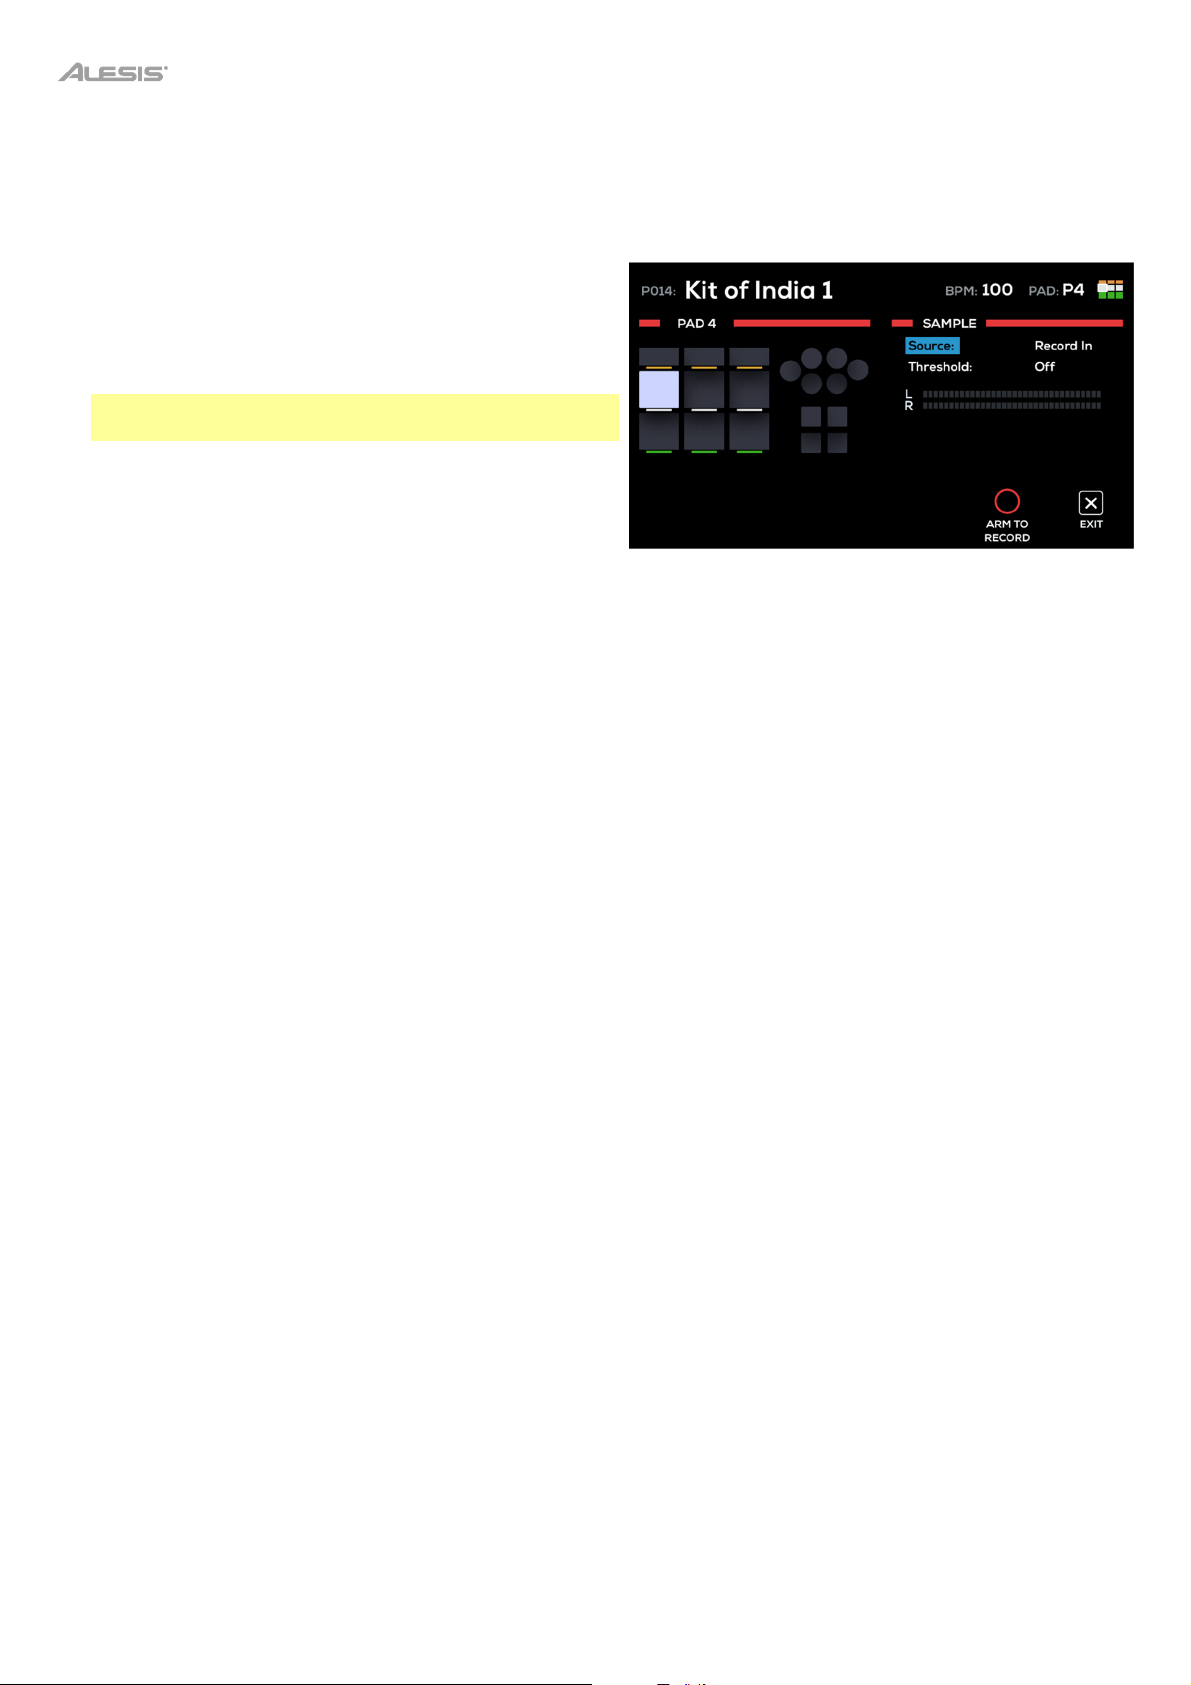
Recording a Sample
You can also use Strike Multipad to create samples from a mobile device, instrument, microphone or other device
connected to the Record Inputs, or directly from your computer using the USB Audio port.
To record a sample to use with Strike Multipad:
1. Press the Sample button to open the Sample menu.
2. Turn the Main Encoder to set the Source to Record In or
USB Audio.
Note: Make sure to select Alesis Strike Multipad as the
audio output option on your computer.
3. If desired, set a threshold level to automatically start
recording with. If you do not want to auto-start recording,
use the Main Encoder to turn the threshold up until it says
0 dB.
4. Press F5–Arm to Record to arm the recording.
5. Adjust your recording source (such as a turntable, mixer, smartphone, or computer) to its optimal output level. If
desired, play the source to view the level in the input meter on the display.
Sample Menu
6. When you are ready to begin recording, press F5–Start Recording. You can also press F6–Exit to unarm recording.
7. When you are finished recording, press F5–Stop Recording. You can also press F6–Exit at any time.
8. To preview the recording, press F4–Play/Stop. If you are happy with the result, press F5–Save to save the sample. It
will automatically be added to the currently selected pad, trigger in, or foot control on the current kit.
10
Page 11

V
r
k
A
A
Menus
Kit Menu
The Kit menu is where you can browse and manage available
kits, as well as edit kit settings.
At any time, press the F1 function button to switch between
viewing the included Preset kits and the User kits. The toolbar
at the top of the display will show the currently selected kit.
Browse
Press the F2–Browse button to open the Browse menu, where
you can search through available kits. Turn the Main Encoder
to scroll through the list, and the highlighted kit will be loaded
automatically.
The left side of the display shows two level meters. The Main level meters show the level coming out of the Main Outs,
and the Aux level meters show the level coming out of the Aux Outputs.
Settings
Press the F3–Settings button to open the Kit Settings menu, where you can edit the following kit parameters:
Parameter Description
Kit Level
Kit Tempo
Kit Time Sig
Logo Colo
Logo Mode
This is the overall volume of the kit.
This is tempo of the kit, in beats per minute (BPM). This
setting will override the Global Tempo setting when the
kit is loaded.
This is the time signature of the kit. This setting will
override the Global Time Sig setting when the kit is
loaded.
This is the color of the Alesis logos on the back and
sides of Strike Multipad. This will also change the color
of the wave bars in all menus, except Utility.
This adjusts the lighting effects for the Alesis logos on
the back and sides of Strike Multipad.
alues/Settings
0–100
(default 90)
30–280 BPM
(default 120 BPM)
1/2 – 9/2, 1/4 – 9/4, 1/8 – 9/8, 1/16 – 9/16
(default 4/4)
Red, Coral, Deep Pin
Purple, Plum, Blue, Sky Blue, Cyan,
quamarine, Lime, Green, Yellow, Orange,
Orange Red, White
Off: Lights are off.
Color Soft: Solid dim color.
Color Medium: Solid medium color.
Color Full: Solid bright color.
Trigger: Lights go from dim to bright when a
sound is triggered.
BPM Pulse: Lights flash in time with the Kit
Tempo.
udio Level: Lights flash according to the
audio output level.
, Light Pink, Magenta,
Logo Beat When Logo Mode is set to BPM Pulse, this determines
the beat division at which the lights flash.
1/2, 1/4, 1/8, 1/16
11
Page 12

Copy
Press the F3–Copy button to open the Kit Copy menu. In this menu, you can perform the following functions:
• Copy Current Kit: Copies the currently selected kit, shown in the top left of the display.
• Paste to Current Kit: Pastes the copied kit (shown above) to the currently selected kit.
• Swap with Current Kit: Exchanges the copied kit with the currently selected kit.
To copy a kit:
1. Use the Kit Select buttons to select the kit you would like to copy. You can press the F1 function button to switch
between Preset and User kits.
2. Use the Main Encoder to highlight Copy Selected Kit and press it to select. The Kit information of the copied kit will
be displayed.
3. Use the Kit Select buttons to select the kit you would like to copy. You can press the F1 function button to switch
between Preset and User kits. The copied kit will be remembered until another kit is copied or Strike Multipad is
powered off.
4. Use the Main Encoder to highlight Paste To Current Kit and press it to replace currently selected kit with the copied
kit.
Alternatively, use the Main Encoder to highlight Swap With Current Kit and press it exchange the copied kit with
the currently selected kit.
After selecting either option, a confirmation window will appear for two seconds.
Rename
Press the F4–Rename button to open the Rename Kit window, which you can use to rename your kits. While this window
is open, the Function Buttons will perform the following functions:
• F1–Type: Press this button to cycle between character types: upper case, lower case, numbers and symbols. Use
the Main Encoder to browse the options and press it to select.
• F2–Insert: Press this button to insert a new character before the highlighted character.
• F3–Delete: Press this button to delete the highlighted character.
• F4–Clear: Press this button to clear all current characters.
• F5–Save: Press this button to save the current kit name.
• F6–Exit: Press this button to exit the Rename Kit window without saving.
12
Page 13

V
–
Pad Menu
The Pad menu is where you can view and edit all pad-related
parameters.
The left side of the display shows the pads, triggers and
footswitches. The currently selected control will be highlighted.
The right side of the display will show the parameters being
edited. See below for more details.
Feel
Press the F1–Feel button to adjust the playing dynamics for the pad.
Parameter Description
Sensitivity
Curve
Threshold
This is the gain control for the pad, trigger or footswitch.
The higher the setting, the easier it’ll be to trigger louder
sounds with lighter hits. When setting this parameter,
strike the trigger listen to the sound. If it’s too loud even
though you are striking the pad lightly, lower this
setting.
This determines how a sound’s volume is affected by
how hard you strike it—that is, how responsive the pad
or trigger’s dynamics are to changes in your playing. All
pads and triggers on your Strike Multipad use Normal
as the default setting, which provides the most accurate
and natural performance.
This determines how much velocity (force) is required
for a voice to sound. At higher settings, you’ll need to
strike the pad or trigger harder to produce a sound. At
lower settings, very light strikes on the pad or trigger will
produce sounds.
One typical use for this setting is when an acoustic
drum trigger is connected to a Trigger In and you find
the bass from a nearby speaker is causing unexpected
triggers. Raise the threshold setting here to help prevent
this.
alues/Settings
01–32
Normal, Exp1, Exp2, Log1, Log2, Loud
32
00
(default 04)
Fixed Level
This setting allows you to have all pads, triggers and
footswitches sound at a specific velocity, no matter how
hard or soft you strike it. If you prefer to have pads and
triggers react to your playing dynamics, leave this
setting at Off.
Off, 001–127
13
Page 14

V
V
A
Control
Press the F2–Control button to edit the control mode for each pad, as well whether a sound will play or not.
Parameter Description
Mode
This setting determines what, if any, control function will
be performed when the pad is triggered.
alues/Settings
Off: Triggering the pad does not perform a
control function.
Next Kit: Triggering the pad loads the next kit.
Previous Kit: Triggering the pad loads the
previous kit.
Click On/Off: Triggering the pad turns the click
on or off.
Tap Tempo: Triggering the pad acts as a tap
tempo.
Panic: Triggering the pad sends a MIDI Panic
message, stopping all notes from sounding.
Looper Rec: Triggering the pad controls the
Looper record state. Note that Loop View must
be active before triggering.
The first trigger will set the Looper from Arm to
Record to Start Record. The next trigger will
set the Looper to start recording, beginning
with a countdown. If triggered again before the
number of measures set have passed, the
Looper will stop recording and enter playback
on the next downbeat. Once playback is
initiated, trigger the pad to start or stop
overdub recording.
Looper Play/Stop: Triggering the pad starts or
stops playback of the loop. Note that a Loop
View must be active and a loop must be
recorded before triggering.
Kit FX 1 On/Off: Triggering the pad turns Kit
FX1 on or off.
Kit FX2 On/Off: Triggering the pad turns Kit
FX2 on or off.
Kit FX 3 On/Off: Triggering the pad turns Kit
FX3 on or off.
MST FX On/Off: Triggering the pad turns the
Master Effect on or off.
Sound
This setting determines whether the pad sound will be
triggered.
Output
Press the F3–Output button to edit the pad output settings.
Parameter Description
udio Output
Kit FX Level
MIDI Note Output
14
This setting determines the audio output routing for
the pad, trigger or footswitch.
This setting determines the output level of effects
applied to the kit.
This setting determines the MIDI note that is sent
when a pad, trigger or footswitch is pressed.
On, Off
alues/Settings
Main+Phone, FX1–3, Aux+Phone, Phone
Only
000–127
000–127
Page 15

V
A
A
A
r
A
Light
Press the F4–Light button to edit the settings for the pad LEDs.
Parameter Description
Play Color
Play Mode
Play Beat For Play Mode settings that are BPM-dependent, this
This setting determines the color of the pad and trigger
LEDs when active.
This setting determines the behavior of the pad and
trigger LEDs when activated.
setting determines the beat division
alues/Settings
Red, Coral, Deep Pink, Light Pink, Magenta,
Purple, Plum, Blue, Sky Blue, Cyan,
quamarine, Lime, Green, Yellow, Orange,
Orange Red, White
Off: Lights remain at the Stop Mode setting
when triggered.
Trigger: Lights go from dim to bright when a
sound is triggered.
udio Meter: Lights represent a signal meter
(left to right) for the pad volume level.
udio Breath: Lights flash from dim to bright
based on the sound volume level.
Fill: Lights move from left to right and back
based on the length of the sound.
BPM Pulse: Lights flash from dim to bright in
time with the Kit Tempo.
BPM Pong: A "dot" of bright color moves from
left to right and back in time with the kit time
signature and tempo.
1/2, 1/4, 1/8, 1/16
Stop Colo
Stop Mode
Stop Beat For Stop Mode settings that are BPM-dependent, this
This setting determines the color of the pad and trigger
LEDs when no sound is being played.
This setting determines the color of the pad and trigger
LEDs when inactive.
determines the beat division
Red, Coral, Deep Pink, Light Pink, Magenta,
Purple, Plum, Blue, Sky Blue, Cyan,
quamarine, Lime, Green, Yellow, Orange,
Orange Red, White
Off: Lights are off.
Solid Dim: Solid dim color.
Solid Medium: Solid medium color
Solid Bright: Solid bright color.
BPM Pulse: Lights flash from dim to bright in
time with the Kit Tempo.
BPM Pong: A "dot" of bright color moves from
left to right and back in time with the kit time
signature and tempo.
1/2, 1/4, 1/8, 1/16
15
Page 16

V
Group
Press the F5–Group button to edit the pad group settings.
Parameter Description
Sync Group
Sync Mode
This setting allows you to trigger multiple pads
Each kit can have up to 16 Sync Groups.
This setting determines how pads in the same Sync
Group are triggered.
alues/Settings
Off, 1–16
Mute: Pads that share a Sync Group will mute
each other when triggered.
Cycle: Pads in the Sync Group will be
triggered in consecutive order, from P1–9, to
T1–6, to FS1–4. This is similar to a "round
robin" function.
Random: Pads in the Sync Group will be
triggered in random order.
Together: Up to 9 pads in the group will play
at the same time.
Copy
Press the F6–Copy button to open the Pad Copy menu. In this menu, you can perform the following functions:
• Copy Selected Pad: Copies the currently selected pad, highlighted to the left.
• Paste With Selected Pad: Pastes the copied pad (shown above) to the currently selected pad.
To copy a pad:
1. Hit or select the pad you would like to copy.
2. Use the Main Encoder to highlight Copy Selected Pad and press it to select. The Kit and Pad information of the
copied pad will be displayed.
3. Hit or select the pad where you want to paste the copied pad. You can select any pad from any kit and the copied
pad will be remembered until another pad is copied or Strike Multipad is powered off.
4. Use the Main Encoder to highlight Paste With Selected Pad and press it to select. The copied pad will be pasted to
the selected pad, and a confirmation window will appear for two seconds.
You can continue to copy the same pad, or start over by copying a new pad.
16
Page 17

Sound Menu
The Sound Menu is where you can select and import WAV files
and assign them to each layer (Wave A or Wave B) for each
pad, trigger or footswitch, edit the settings for the WAV files
and edit the waveform itself.
At any time, press the F1–Wave button to switch between
editing Wave A and Wave B.
Browse
Press the F2–Browse button to open the Browse menu, where
you can search through the included Factory sounds, as well
as sounds you create or import.
The left side of this menu shows the two editable Waves. Each
Wave section contains fields for Sample Name, followed by
Library > Category. Use the Main Encoder to select the field
you would like to edit, then press it to select. Turn the Main
Encoder to browse the sounds, libraries or categories, and
press it to select.
Library
Sample Name
Category
The right side of this menu shows the list of sounds to browse.
Import
Press the F3–Import button to import WAV files from a USB
flash drive (mass storage class, FAT32 formatted) connected to
Strike Multipad. Use the Main Encoder to scroll through
samples from your USB drive on the right side of the display,
and press it to select the sample. When selected, the box to
the left of the sample name will be filled in.
• Press the F2–Browse button to exit the Import menu and
return to Browse.
• Press F4–Play to preview the highlighted sample. To stop
the preview, press F4–Stop during playback.
• Press F5–Single to load a single selected sample. This will
load the selected sample directly to the currently selected
pad, trigger or footswitch.
• Press F6–Multi to load multiple selected samples. All
selected samples will be placed into the User>New
Sample category.
17
Page 18

V
A
V
V
V
V
r
Mode
Press the F4–Mode button to open the Mode menu, where you can adjust the sample playback mode options.
Parameter Description
Playback Mode
Poly/Mono
This setting determines how the wave layer(s) is played.
This setting determines the number of voices available for
sample playback.
Note: When Playback Mode is set to Loop, this will
automatically be set to Mono.
alues/Settings
OneShot: When triggered, the sound plays
until the end and stops.
lter: Hit the pad to start the sample, and
hit it again to stop.
Loop: Hit the pad to start the loop, and hit
it again to stop.
RoundRobin: Each successive hit
alternates between Wave A and Wave B.
When one Wave is set to Round Robin, the
other Wave will also be set to Round Robin
automatically. If one Wave is changed from
the Round Robin mode, the other will
default to One Shot (Mono).
Mono: Only one voice will be active at a
time.
Poly: Multiple voices can be played at one
time.
Mix
Press the F5–Mix button to open the Mix menu, where you can adjust the audio mixing setting for the sample.
Parameter Description
olume
Pan
Fade In
Fade Out
elocity High
elocity Low
Prio
This setting determines the volume level of the pad.
This setting determines the position of the pad's sound in
the stereo field.
This setting adds a fade in to the pad's sound.
This setting adds a fade out to the pad's sound.
This setting determines the high velocity limit to trigger the
sound. Any hits higher than that velocity will not trigger the
sound.
This setting determines the low velocity limit to trigger the
sound. Any hits lower than that velocity will not trigger the
sound.
This setting determines the priority of a sound in Strike
Multipad's polyphony. Up to 32 mono voices or 16 stereo
voices can be active at one time. When this limit is reached,
voices will be stopped to make room for more. Use this
parameter to set the priority of voices to be dropped. At
Low priority, the sound is more likely to be dropped; at
High priority, the sound is less likely to be dropped.
Note: Sounds with Loop playback will not ever be stopped
as a result of polyphony limits.
alues/Settings
000–100
L15–Center–R15
Off, 1–100%
Off, 1–100%
001–127
000–126
Low, Medium, High
18
Page 19

Edit
Press the F6–Edit button to open the Sound Edit menu, where you can perform various non-destructive and destructive
edits to your WAV files.
Factory Samples cannot be destructively edit. If you would like to edit a Factory Sample, you must first copy the sample
to the Edit menu will at first show only one option, Copy to User.
Once the sample has been copied to the User Library, the following options will be available:
• Rename: Select this option to rename the selected Wave.
• Edit Start/End: Select this option to edit the start and end points of the sample. While viewing this page, you can
perform the following functions:
Use the Main Encoder to move both the start and end points at the same time.
Use the A-Link 1 and 2 encoders to adjust the start and end points individually. You can set the level of adjustment
using the A-Link Bank Buttons—press A for coarse adjustment, B for medium and C for fine.
Additionally, use the function buttons to perform the following additional functions:
o F1–Play/Stop: Press this button to play or stop the sample.
o F3–Grid: Press the button to adjust a preset grid of points. Select Free to freely move the start and end points
throughout the sample, or select Grid 4, Grid 8 or Grid 16 to set evenly spaced markers along the waveform
based on the Global BPM value. Moving the A-Link encoders will now snap the start and end markers to these
points.
This is particularly useful when editing loops or selecting a smaller "slice" from a larger sample. Adjust the Global
Tempo using the BPM button to move the grid points in the waveform until they are correctly aligned with the
sample tempo.
o F4–Zoom: Press this button to toggle between zoomed-in and zoomed-out views. Press and hold this button
and turn the Main Encoder to change the zoom level.
o F5–Save: Press this button to save the edited sample.
o F6–Exit: Press this button to exit the trim function without saving.
• Normalize: Select this option to normalize the sample audio. Press F1/F2 to Ov
As New sound file, or F5/F6 to Cancel. New files will be placed in the same User Category as the sample being
edited.
• Pitch: Select this option to adjust the pitch of the sample up to 1200 cents in either direction. Use the Main Encoder
to select the amount of pitch change, and then press F1/F2 to Overwrite the sound file, F3/F4 to Save As New sound
file, or F5/F6 to Cancel. New files will be placed in the same User Category as the sample being edited.
• Reverse: Select this option to reverse the sample audio. Press F1/F2 to Overwrite the sound file, F3/F4 to Save As
New sound file, or F5/F6 to Cancel. New files will be placed in the same User Category as the sample being edited.
• Copy: Select this option to copy the sample to a new file.
• Delete: Select this option to delete the sample file.
erwrite the sound file, F3/F4 to Save
Important: This action does not require confirmation and cannot be undone.
19
Page 20

V
V
A
A
A
Utility Menu
The Utility menu is where you can edit various parameters for Strike Multipad's hardware and firmware functionality.
MIDI
Press the F1–MIDI button to open the MIDI menu, where you can adjust the MIDI settings for Strike Multipad.
Parameter Description
Global MIDI
Channel
MIDI Sync
Local Control
MIDI Thru
Program Change
Switch
5-Pin MIDI to USB
This setting determines the MIDI channel that Strike Multipad sends
messages on.
This setting determines whether Strike Multipad receives external MIDI
Clock signals. When On, MIDI Clock signal will override the Global
Tempo.
This setting determines whether Strike Multipad triggers its internal
sounds.
This setting determines whether MIDI received from the MIDI Input will
be sent back out through the MIDI Output.
This setting determines whether Strike Multipad will change kits when
receiving program change messages. When On, Program Change
Inc/Dec messages will act as the Kit +/- buttons, and Program Change
Number messages will match the Kit Number as shown on the display
(Bank 0 = Presets, Bank 1 = User).
This setting determines whether MIDI received by the 5-pin MIDI DIN
input is passed to USB.
alues/Settings
1–16
On, Off
On, Off
On, Off
On, Off
On, Off
Audio
Press the F2–Audio button to open the Audio menu, where you can adjust the audio settings for Strike Multipad.
Parameter Description
Rec In Vol
USB In Vol
USB Out Vol
Rec In Output
USB In Output
System Gain
FX1 Output
FX2 Output
FX3 Output
This setting determines the digital level for Record In, separate from the
analog gain.
This setting determines the level of the USB audio input.
This setting determines the level of the USB audio output.
This setting determines the audio routing of the analog Record In signal.
This setting determines the audio routing of the digital USB In signal.
This setting determines the additional digital gain for the Main outputs.
This setting determines the audio output routing for FX1.
This setting determines the audio output routing for FX2.
This setting determines the audio output routing for FX3.
alues/Settings
0–100
0–100
0–100
Main, Aux, Phone
Main,
0dB, 6dB, 12dB
Main+Phone,
Main+Phone,
Main+Phone, Aux+Phone
ux, Phone
ux+Phone
ux+Phone
20
Page 21

V
V
k
v
a
a
k
Triggers
Press the F3–Triggers button to open the Triggers menu, where you can adjust the advanced trigger settings for the five
Trigger In connections on the rear panel (1, 2/3, 4/5).
Parameter Description
EXT Trigger
TRIN1
Type
Scan Time When Type is set to Variable, this setting determines how
Retrig-C When Type is set to Variable, this setting helps reduce
Mask Time When Type is set to Variable, this setting works in
This setting determines the Trigger In to be edited. The
additional options available on this page will change
depending on which trigger is selected.
This setting determines the type of trigger control.
long the Strike Multipad firmware scans the voltage to
detect a hit. Lower settings will reduce latency time, but
may lessen dynamic accuracy.
double triggering. Higher settings will make double triggers
less common, but setting the value too high may cause the
trigger to miss hits with faster playing, such as when
performing a buzz roll.
conjunction with Retrig-C to reduce double triggering.
alues/Settings
TRIN 1, TRIN 2, TRIN 3, TRIN 4, TRIN 5
elocity: The trigger will send a variable
range of velocity values.
Switch: The trigger only sends fixed on/off
velocity values.
1–20ms
0–32
1–50ms
X-Tal
When Type is set to Variable, increase this setting to
reduce center hits accidentally triggering rim sounds, or rim
hits triggering center sounds when using a dual-zone drum.
When Type is set to Switch, this setting determines the
Fix Le
fixed velocity level sent by the trigger.
TRIN2–5
Type
Scan Time See description
Retrig-C See description above. 0–32
Mask Time See description
X-Tal
See description above. 0–32
Rim Gain When Type is set to Head+Rim, this determines the
This setting determines the type of trigger control.
bove. 1–20ms
bove. 1–50ms
sensitivity of the rim zone only.
0–32
0–127
2 Trigger: A TRS to dual-TS splitter is
used to connect two drum triggers.
Head+Rim: The connected trigger is a
dual-zone drum trigger.
0–32
21
Page 22

V
V
Pedals
Press the F4–Pedals button to open the Pedals menu, where you can adjust the settings for the three Foot Control
connections on the rear panel (HH, 1/2, 3/4).
Parameter Description
Pedal
Type
HH
Fix Level When Type is set to Switch, this setting determines the
Op Pos / Cl Pos When Type is set to Variable, these settings determine the
FC
Polar
This setting determines the pedal to be edited. The
additional options available on this page will change
depending on which pedal is selected.
This setting determines the type of hi-hat or footswitch
control.
fixed velocity level that is sent.
velocity of the Open Position and Close Position for the hihat.
This setting determines the polarity of the footswitch.
alues/Settings
HH, FC1, FC2, FC3, FC4
ariable: The hi-hat pedal or footswitch
will send a variable range of velocity
values.
Switch: The hi-hat pedal or footswitch
only sends fixed on/off velocity values.
0–127
0–127
Normal, Inverse
22
Page 23

V
A
System
Press the F5–System button to open the System menu, where you can adjust the system settings for Strike Multipad.
Parameter Description
Display
Brightness
uto Power-Off
Firmware Version
This setting determines the brightness level of the
display.
This setting determines after what length of inactivity
will Strike Multipad automatically shut down.
Displays the current firmware version of Strike Multipad.
Visit alesis.com to check for firmware updates.
alues/Settings
1–100
Off, 30min, 60min
Displays current firmware version.
From time to time, Alesis may release new firmware for Strike Multipad that adds new features or fixes issues. Visit
alesis.com
and find the product page for Strike Multipad to check for new firmware. You can see what firmware version
your Strike Multipad is currently running by going to the Utility>System menu.
To update your Strike Multipad firmware:
1. Download the firmware file to your computer.
2. Connect a USB flash drive (mass storage class, FAT32 formatted) to an available USB port on your computer, and
then transfer the firmware file to the root level of the USB drive. Strike Multipad will not read the firmware file correctly
if it is placed in a folder below root level.
3. With Strike Multipad powered off, insert the USB drive into the USB Memory port on the rear panel.
4. Hold down the BPM and Click buttons simultaneously and power on Strike Multipad using the power switch.
5. Strike Multipad will automatically detect the firmware update file and begin the update process. The display will show
the firmware update progress.
Important: Do not power off Strike Multipad during the update process. Doing so may damage the unit or your USB
drive.
6. When the firmware update is finished, the Strike Multipad display will show an update success message and prompt
you to restart the unit. Use the power switch to turn Strike Multipad off and then back on. Your Strike Multipad will
now be updated to the latest firmware!
23
Page 24

Backup
Press the F6–Backup button to open the Backup menu, where you can create and manage backups of your kit data onto
a connected USB flash drive (mass storage class, FAT32 formatted).
• Save All User Kits: Select this option to save all User Kits to your USB flash drive.
1. Make sure you have a USB flash drive connected to the USB Memory port on the rear panel.
2. Highlight Save All User Kits in the Utility>Backup menu, then press the Main Encoder.
3. A window will appear where you can assign the backup file a number, allowing you to keep multiple backups
stored on your USB drive.
4. Press the Main Encoder to continue with saving, or press F6–Exit to exit the window without saving.
5. Once the saving process begins, a window will appear on the display and show the saving progress.
6. When complete, a folder named Strike will be created on your USB drive, and your backup files will appear in a
sub-folder named BackUp.
• Load All User Kits: Select this option to load all User Kit files from a USB flash drive.
1. Make sure you have a USB flash drive connected to the USB Memory port on the rear panel.
2. Highlight Load All User Kits in the Utility>Backup menu, then press the Main Encoder.
3. All available backup files will be shown on the next page. Use the Main Encoder to highlight the backup you
would like to load, then press it to confirm. Press F6–Exit to exit the window without loading.
• Restore Factory Settings: Select this option to restore Strike Multipad's settings to the original factory defaults. Once
the settings have been reset, a window will appear prompting you to reset Strike Multipad. Press the Main Encoder
to confirm, and Strike Multipad will reset automatically.
Important: This action cannot be undone. Restoring factory settings will erase saved User Kits.
24
Page 25

Other Features
Effects
Strike Multipad features up to 3 built-in Kit FX that can be applied to any pad, trigger or footswitch, as well as Master FX
that can be applied to the entire kit.
See Appendix > Effects for a complete list of available effects and their parameters.
Kit FX
Press the Kit FX button to view the Kit FX menu. The left side
of the display will show the pad, trigger and footswitch outlines.
The right side of the display is used for browsing effects and
adjusting their parameters.
• To edit the FX parameters, press the F1–FX1 Edit,
F3–FX2 Edit or F5–FX3 Edit buttons.
• To assign the FX to a pad, trigger or footswitch, press
and hold the F2–FX1 Assign, F4–FX2 Assign or F6–
FX3 Assign buttons and hit the pad, trigger or
footswitch where you would like to assign the effect.
The selected pad, trigger or footswitch will then
become highlight on the left side of the display.
Master FX
Press the MST FX button to view the Master FX menu. There is
one available slot that can be assigned to any effect, as well as
dedicated Compressor and EQ effects.
• To edit the FX parameters, press the F1–FXM Edit,
F3–Comp Edit or F5–EQ Edit buttons.
• To hear the applied effects, use the F2–FXM, F3–
Comp and F4–EQ buttons to toggle the master effects
on and off. Additionally, make sure that the Master FX
slot is set to On by pressing the F5–MFX button in
Perform mode.
25
Page 26

A-Link
The A-Link encoders allow you to freely assign commonly used
parameters for quick and easy access. The two A-Link
encoders can have up to three sets of assignments, which are
accessed using the A-Link Bank buttons. Only one bank can
be active at a time.
Pressing an A-Link Bank button or turning an A-Link encoder
will show a temporary popup on the display indicating the
current parameters and their values.
To edit the A-Link assignments:
1. Press and hold one of the A-Link Bank buttons (A, B or C). The bank button will flash, and the A-Link window will
appear on the display.
2. Use the Main Encoder to highlight the Type for A-Link Encoder 1 or 2, and press it to select.
3. Use the Main Encoder to select the desired A-Link type, MFX, FX1–3, PAD-Wave A, PAD-Wave B or PAD-Output,
and press it to select.
4. Use the Main Encoder to highlight the Param field for A-Link Encoder 1 or 2 and press it to select.
5. Use the Main Encoder to select the desired parameter.
A-Link assignments can be saved with the kit. See Menus > Utility Menu > Backup
for more on saving kits.
Pad Cue
Pad Cue allows you to audition sounds directly to the Headphone Outputs. This is useful for previewing sounds without
playing them out to your audience.
Additionally, when Pad Cue is active, you can use the Main Encoder to select any pad, trigger or footswitch. This is useful
for editing parameters on triggers or footswitches that may not be currently connected to your Strike Multipad.
To enable Pad Cue, press the Pad Cue button. While enabled:
• The Pad Cue button and F1–F5 buttons will flash, and the Pad Cue window will appear on the display.
• Any sound playing to the Main or Aux Outputs prior to enabling Pad Cue will continue to play. Any sounds
triggered after enabling Pad Cue will be sent directly to the Headphones Output.
• While enabled, only one pad will play to the Headphones Output at a time.
To select a sound, hit the pad, trigger or footswitch, or turn the Main Encoder.
To preview the sound, hit the pad or press the F6–Play/Stop button. While the sound is playing, you can press the F6–
Play/Stop button again to stop it.
26
Page 27

Appendix
Preset Categories
• Chinas Acoustic
• Crashes Acoustic
• Crashes Electronic
• Hand Drums
• HiHats Acoustic
• HiHats Electronic
• Hybrid Elements
• Kicks Acoustic
• Kicks Electronic
• Loops Acoustic Guitar
• Loops African Drums
• Loops Arabic
• Loops Dance
• Loops Dance Drums
• Loops DnB
• Loops DnB Drums
• Loops Pop Drums
• Loops RnB
• Loops Rock
• Loops Rock Perc
• Loops SFX
• Melodic
• Multi Samples
• Percussion Electronic
• Mallets
• Percussion Orchestra
• Percussion Toys
• Rides Acoustic
Rides El
•
ectronic
• Snares Acoustic
• Snares Electronic
• Sound Effects
• Loops EDM
• Loops House
• Loops Jazz
• Loops Latin Drums
• Loops Pop
• Splashes Acoustic
• Toms Acoustic
• Toms Electronic
• Timpani
• SFX
27
Page 28

A
Effects
Kit Effects
Effect Name Parameters
Bypass
Basic Hall / Ballad Hall
Echo / Delay LR
Chorus 1 / 2
Flanger 1 / 2
Phaser 1 / 2
Tremolo 1 / 2 / 3
Touch Wah 1 / 2
Pitch Change 1 / 2
Lofi 1 / 2
mp 1 / 2
RFilter 1 / 2
RFlanger 1 / 2
Time Diffuse HPF Frequency LPF Frequency Hi-damp
Time Feedback
Frequency Depth Feedback Phase Difference
Frequency Depth Feedback Phase Difference
Frequency Depth Feedback Phase Difference
Frequency Am Depth Pm Depth Phase Difference
Depth Cutoff Resonance Hi-gain Sensitivity
Pitch Cent Feedback
Sample Rate Hi-cut Filter Resonance
Drive Amp Type Lo-cut Output
Frequency Step Depth Resonance
Frequency Step Depth Feedback
RingMod 1 / 2
Pre-LPF Frequency Depth
28
Page 29

/
r
A
A
A
A
Master Effects
Effect Name Parameters
Bypass
Basic Hall /
Ballad Hall
Chorus 1 / 2
Phaser 1 / 2
Touch Wah 1 / 2
Pitch Change 1 / 2
Lofi 1 / 2
mp 1 / 2
RFilter 1 / 2
RFlanger 1 / 2
RingMod 1 / 2
Filter 1
Flanger 1 / 2 / 3 /
4 / 5 / GM
Dry/Wet Diffuse HPF
Dry/Wet Depth Feedback Phase
Dry/Wet Depth Feedback Phase
Dry
Wet Cutoff Resonance Hi-gain Sensitivity Depth
Dry/Wet Pitch Cent Feedback
Dry/Wet Hi-cut Filte
Dry/Wet
Dry/Wet Step Depth Resonance Frequency
Dry/Wet Step Depth Feedback Frequency
Dry/Wet Frequency Depth Pre-LPF
Mode Slope Cutoff Resonance Rate Depth
Frequency Depth Feedback Phase
LPF
Frequency
Frequency
Difference
Difference
Resonance Sample Rate
mp Type Lo-cut Output Drive
Difference
Time
Frequency
Frequency
Dry/Wet
Rear Slicer /
Manual Slicer /
Fore Slicer
Echo /
LR (Delay) /
LCR 1 (Delay) /
LCR 2 (Delay) /
Cross (Delay) /
Tremolo 1 / 2 / 3
Compressor
EQ
Rt Sync Speed Loop Length Loop Volume Dry/Wet
Time Feedback Dry/Wet
Frequency
m Depth Pm Depth Phase
Difference
Threshold
ttack Release Ratio Level
Low Freq. Low Gain Mid Freq. Mid Gain Mid Q High Freq. High Gain
29
Page 30

A
Technical Specifications
Connectors
(4) 1/4” (6.35 mm) TRS audio outputs
(1) 1/4” (6.35 mm) TRS headphone output
(1) 1/8” (3.5 mm) TRS headphone output
(1) MIDI DIN Output/Thru-port
(2) 1/4” (6.35 mm) TRS audio inputs
(1) 1/4" (6.35 mm) TS trigger input
(2) 1/4" (6.35 mm) TRS trigger inputs
(1) 1/4" (6.35 mm) TRS HH pedal input
(2) 1/4" (6.35 mm) TRS footswitch inputs
(1) MIDI DIN Input
(1) USB Type-B port
(1) USB Type-A port
(1) power adapter input
USB Drive Supported Format: FAT32
Supported File Type: 16-bit, mono or stereo .WAV files, 44.1 KHz Sample Rate
Power
dapter: 9 VDC, 1,500 mA
Voltage: 100–240 V, 50/60 Hz, 1.5 A Max
Dimensions
(width x depth x height)
Weight
13.75" x 14" x 3"
349.25 x 355.6 x 76.2 mm
8.5 lbs.
3.85 kg
Specifications are subject to change without notice.
Trademarks & Licenses
Alesis is a trademark of inMusic Brands, Inc., registered in the U.S. and other countries. All other product names, company
names, trademarks, or trade names are those of their respective owners.
30
Page 31

alesis.com
Manual Version 1.1
 Loading...