

Page 1

User Guide
English ( 3 – 8 )
Guía del usuario
Español ( 9 – 14 )
Guide d’utilisation
Français ( 15 – 20 )
Guida per l’uso
Italiano ( 21 – 26 )
Benutzerhandbuch
Deutsch ( 27 – 32 )
Appendix
English ( 33 – 34 )
Page 2

2
Page 3

User Guide (English)
Introduction
Thank you for purchasing the Strike Amp 12 or Strike Amp 8. At Alesis Drums, we know
how serious music is to you. That’s why we design our equipment with only one thing in
mind—to make your performance the best it can be.
Box Contents
Strike Amp 12 or Strike Amp 8
Power Cable
User Guide
Safety & Warranty Manual
Support
For the latest information about this product (documentation, technical specifications, system
requirements, compatibility information, etc.) and product registration, visit alesis.com.
For additional product support, visit alesis.com/support.
3
Page 4
Setup
Items not listed under Introduction > Box Contents are sold separately.
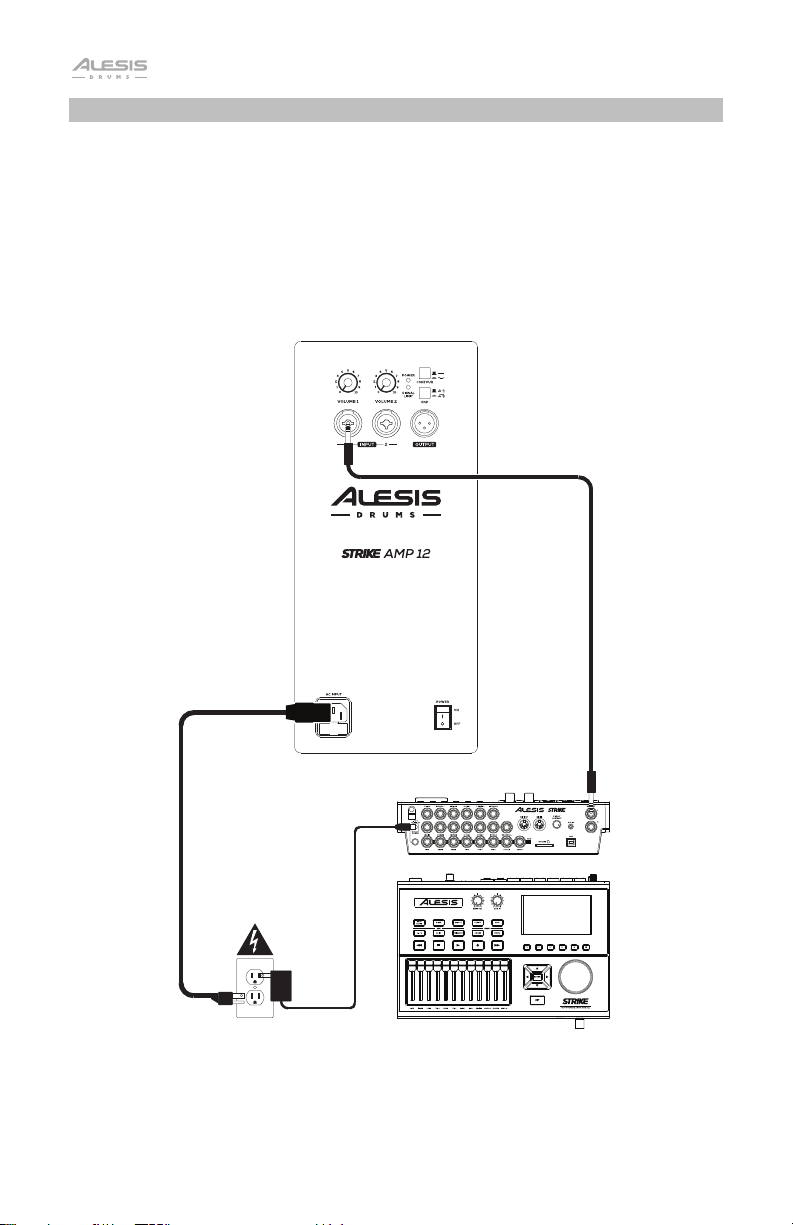
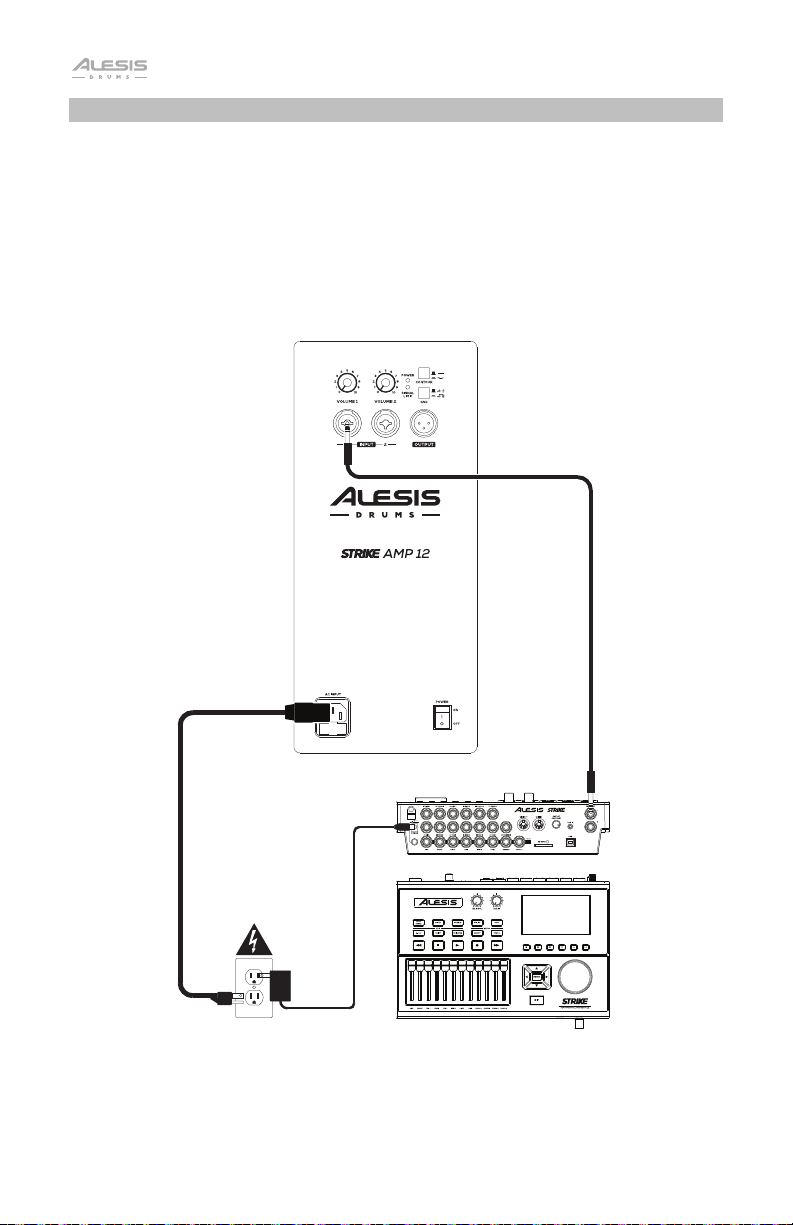
Example A: One Strike Amp (Mono)
Connect the Left (Mono) output of your drum module to the input on a Strike Amp.
Power Outlet Drum Module
4
Page 5
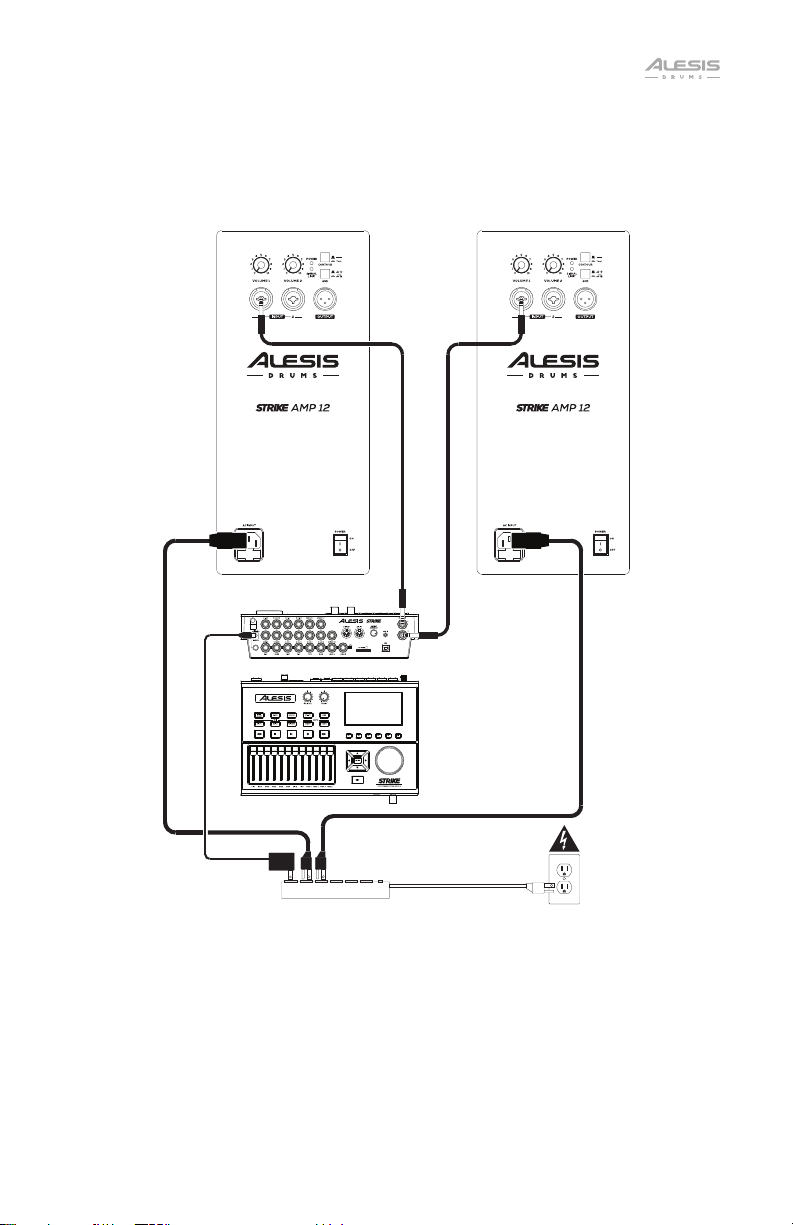
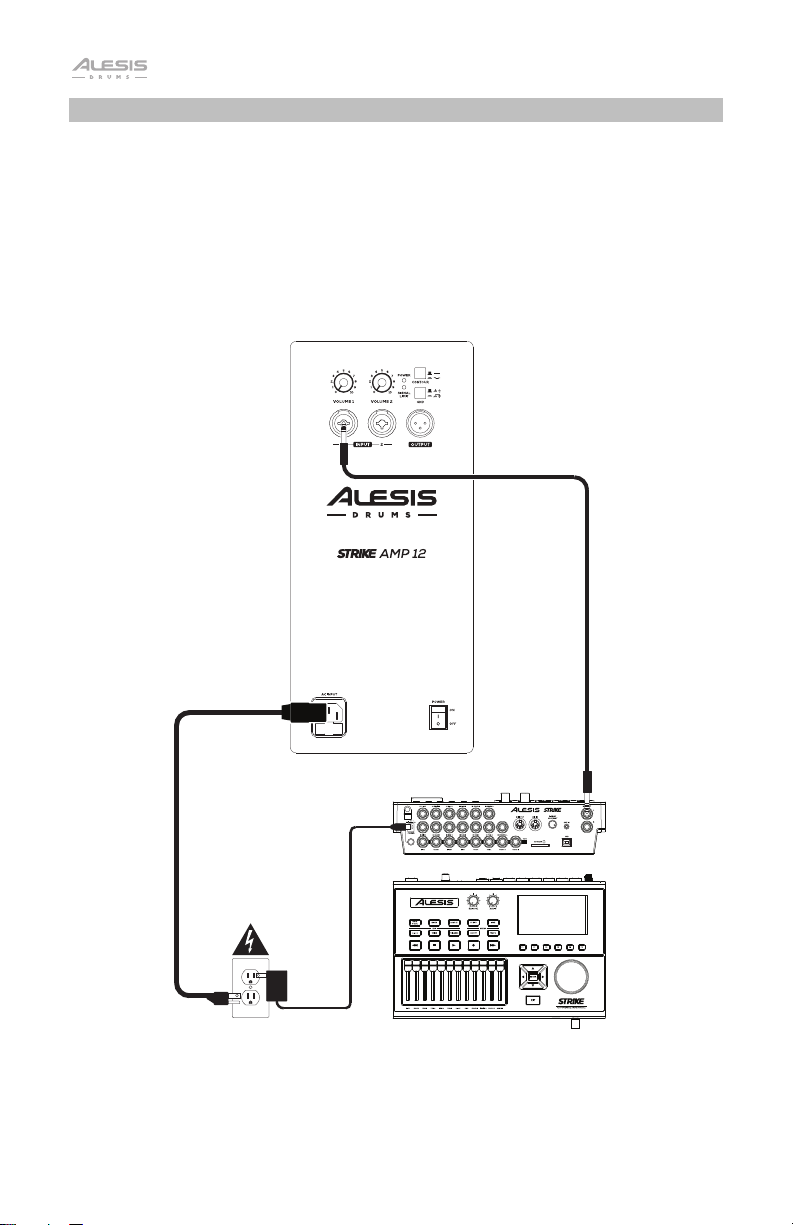
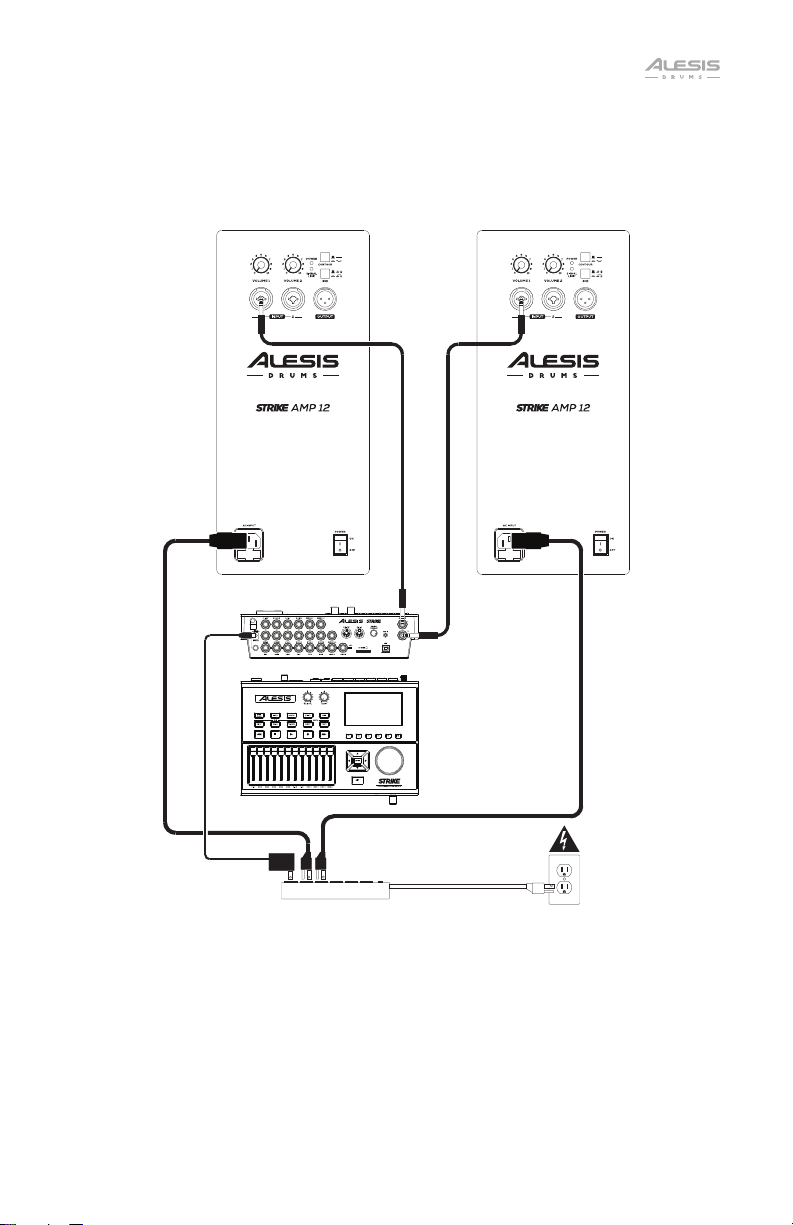
Example B: Two Strike Amps (Stereo)
Connect the Right and Left (Mono) outputs of your drum module to the inputs of your
Strike Amps.
(from Left (Mono)
channel)
Surge Protector
(from Right
channel)
Drum Module
5
Page 6
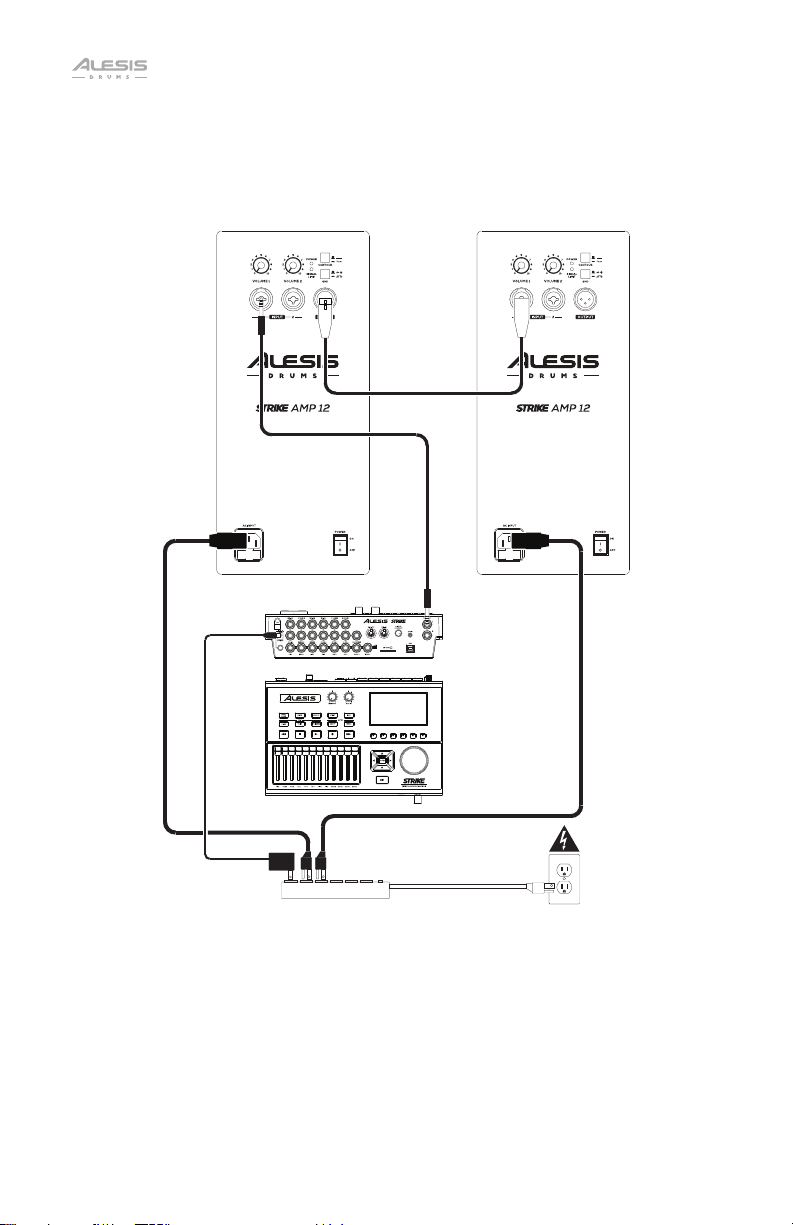
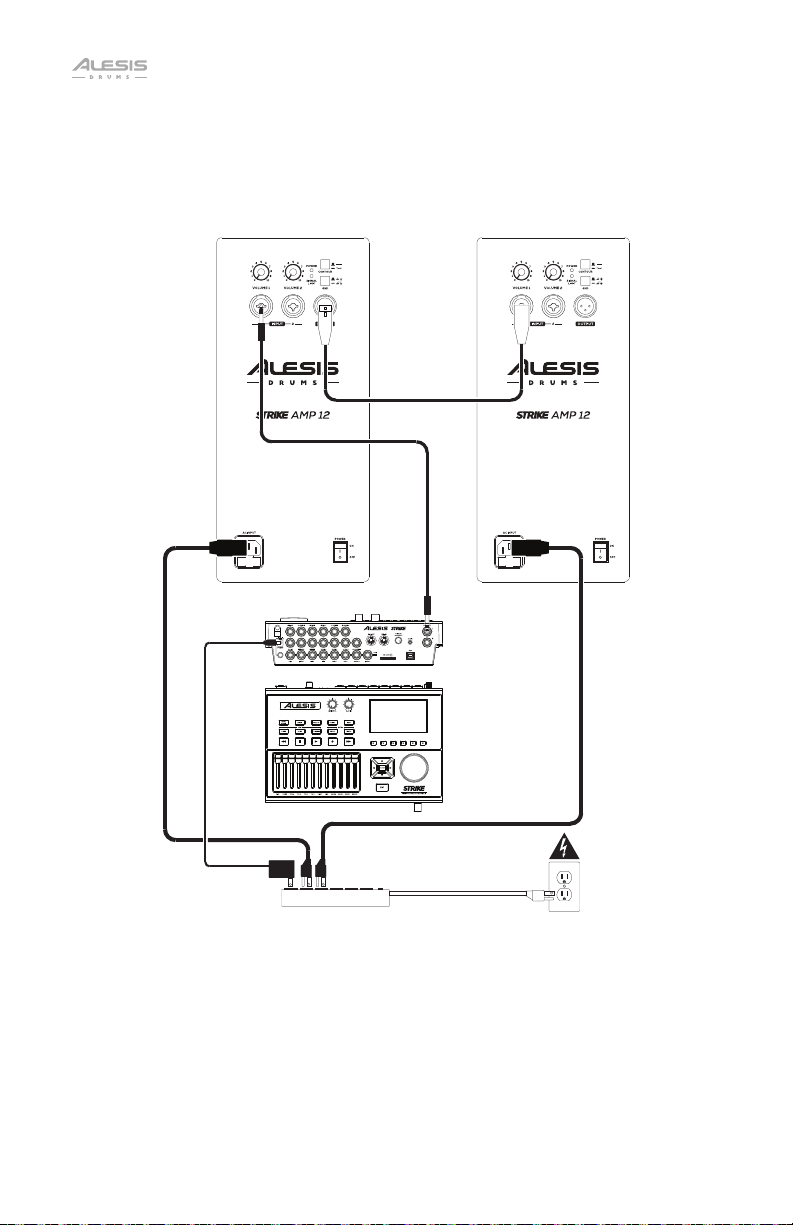
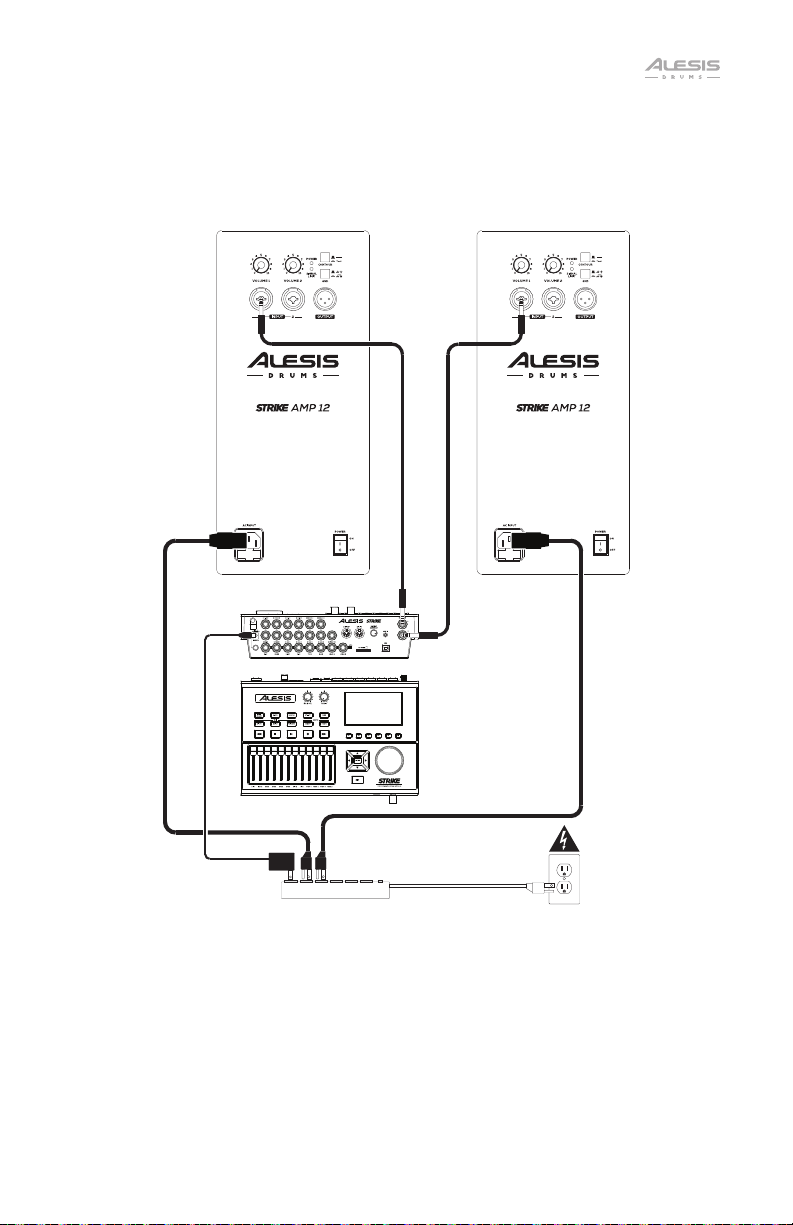
Example C: Two Strike Amps (Mono)
Connect the Left (Mono) output of your drum module to the input of one Strike Amp, and
then connect the output of that Strike Amp to the input of another.
(from Left (Mono)
channel)
Surge Protector
(from Output)
Drum Module
6
Page 7
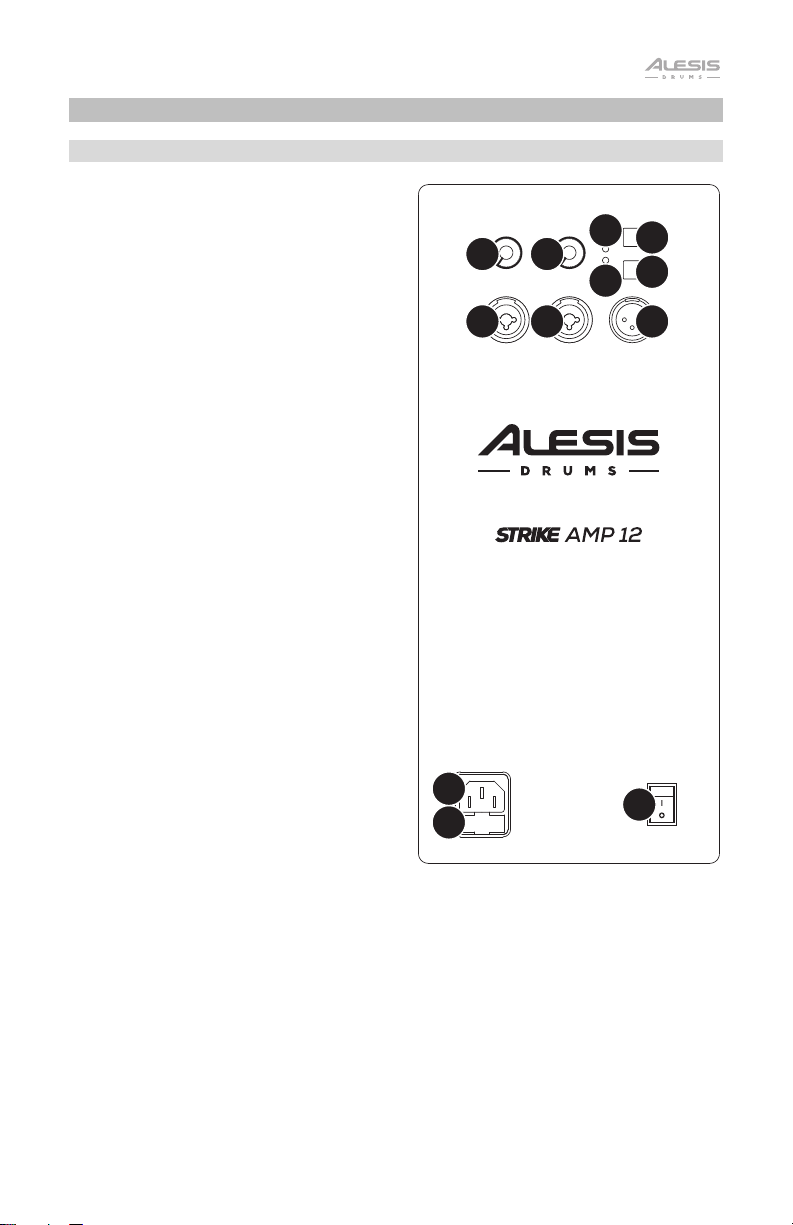
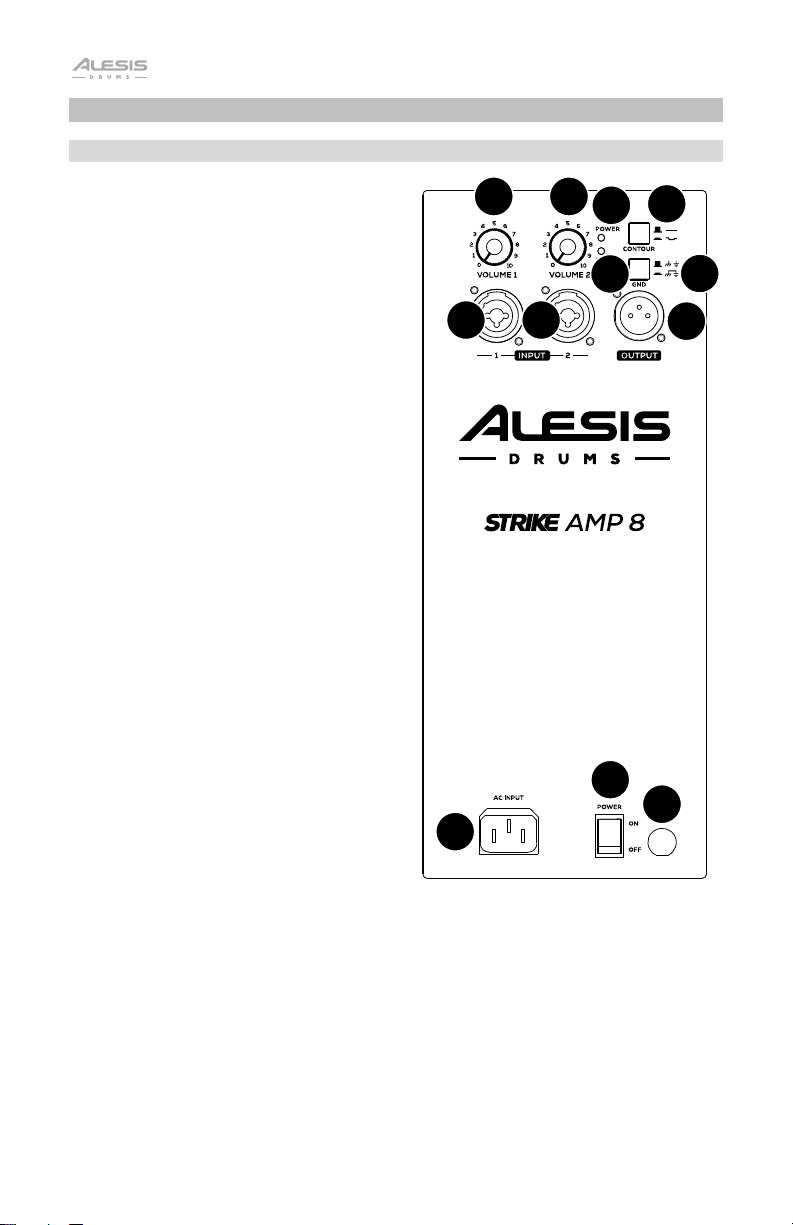
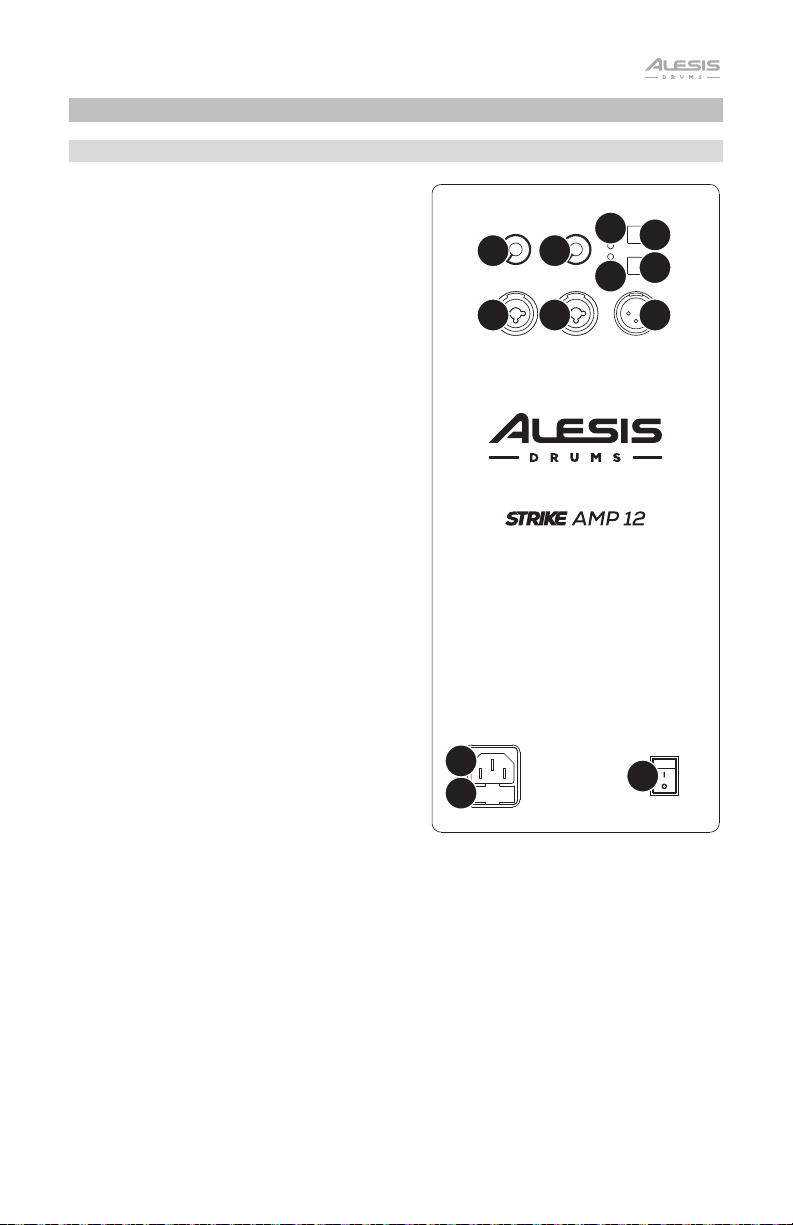
Strike Amp 12 Features
Rear Panel
1. AC Input: Use the included power cable
to connect this input to a power outlet.
Make sure the Power Switch is set to
off when connecting or disconnecting
the cable.
2. Fuse: If the unit’s fuse is broken, lift this
tab to replace the fuse. Replace it with a
fuse with an appropriate rating (printed
under the unit’s power cable input).
Using a fuse with an incorrect rating can
damage the unit and/or fuse.
3. Power Switch: Use this switch to power
the loudspeaker on or off. Make sure the
Volume knob is set to its minimum
(counterclockwise) position before turning
it on.
4. Power LED: This LED lights up when the
loudspeaker is on.
5. Volume: Turn each knob to adjust the
volume of each input.
6. Input: Use a standard XLR cable or 1/4”
(6.35 mm) TRS cable (not included) to
connect your audio source to this input.
7. Output: Use a standard XLR cable (not
included) to connect this output to the
input of another loudspeaker (i.e., another
Strike Amp).
8. Signal Limit LED: This LED lights up
green when an audio signal is sent to the
loudspeaker—it flashes at lower levels
and lights solidly at higher levels. The
LED lights up red when output
limit/protection is active—if the LED is lit
red continuously, reduce the volume of
your audio source.
9. Contour: Engage (depress) this button to
emphasize low and high frequencies by
+3 dB. Disengage (raise) the switch for a
flatter response for live performance or
for maximum output.
10. Ground Switch: Engage (depress) this
switch to reduce hum or noise.
1
2
5
6
5
6
4
8
3
9
10
7
7
Page 8
Strike Amp 8 Features
Rear Panel
1. AC Input: Use the included power cable
to connect this input to a power outlet.
Make sure the Power Switch is set to
off when connecting or discon necting
the cable.
2. Fuse: If the unit’s fuse is broken, lift this
tab to replace the fuse. Replace it with a
fuse with an appropriate rating (printed
under the unit’s power cable input).
Using a fuse with an incorrect rating can
damage the unit and/or fuse.
3. Power Switch: Use this switch to power
the loudspeaker on or off. Make sure the
Volume knob is set to its minimum
(counterclockwise) position before turning
it on.
4. Power LED: This LED lights up when the
loudspeaker is on.
5. Volume: Turn each knob to adjust the
volume of each input.
6. Input: Use a standard XLR cable or 1/4”
(6.35 mm) TRS cable (not included) to
connect your audio source to this input.
7. Output: Use a standard XLR cable (not
included) to connect this output to the
input of another loudspeaker (i.e., another
Strike Amp).
8. Signal Limit LED: This LED lights up
green when an audio signal is sent to the
loudspeaker—it flashes at lower levels
and lights solidly at higher levels. The
LED lights up red when output
limit/protection is active—if the LED is lit
red continuously, reduce the volume of
your audio source.
9. Contour: Engage (depress) this button to
emphasize low and high frequencies by
+3 dB. Disengage (raise) the switch for a
flatter response for live performance or
for maximum output.
10. Ground Switch: Engage (depress) this
switch to reduce hum or noise.
1
6
5
6
5
4
8
3
9
10
7
2
8
Page 9

Guía del usuario (Español)
Introducción
Gracias por comprar el Strike Amp 12 o Strike Amp 8. En Alesis, sabemos que usted se
toma la música en serio. Por eso es que diseñamos nuestros equipos con una sola cosa
en mente—hacer que pueda tocar su mejor interpretación.
Contenido de la caja
Strike Amp 12 o Strike Amp 8
Cable de corriente
Guía del usuario
Manual sobre la seguridad y garantía
Soporte
Para obtener la información más reciente acerca de este producto (documentación,
especificaciones técnicas, requisitos de sistema, información de compatibilidad, etc.) y
registrarlo, visite alesis.com.
Para obtener soporte adicional del producto, visite alesis.com/support.
9
Page 10
Instalación
Los elementos que no se enumeran en Introducción > Contenido de la caja se venden
por separado.
Ejemplo A: Un Strike Amp
Conecte la salida Left (Mono) de su módulo de batería a la entrada de un Strike Amp.
10
Toma de
corriente
Módulo de batería
Page 11
Ejemplo B: Dos Strike Amps (estéreo)
Conecte las salidas Right y Left (Mono) de su módulo de batería a las entradas de sus
Strike Amp.
(desde el canal
Right)
Protector contra
sobrevoltajes transitorios
(desde el canal
Left (Mono))
Módulo de batería
11
Page 12

Ejemplo C: Dos Strike Amps (mono)
Conecte la salida Left (Mono) de su módulo de batería a la entrada de un Strike Amp.
Conecte la salida Output de ese Strike Amp a la entrada de otro Strike Amp.
(desde el canal
Left (Mono))
Protector contra
sobrevoltajes transitorios
(desde la salida
Output)
Módulo de batería
12
Page 13

Características de Strike Amp 12
Panel trasero
1. Entrada de corriente alterna: Utilice el
cable de corriente incluido para conectar
esta entrada a una toma de corriente.
Asegúrese de que el interruptor Power
(Encendido) esté en la posición off
(apagado) cuando conecte o desconecte
el cable.
2. Fusible: Si el fusible de la unidad está
roto, levante esta lengüeta para
reemplazar el fusible. Reemplácelo por
un fusible con especificación apropiada
(impresa debajo de la entrada del cable
de alimentación de la unidad). Si utiliza
un fusible de especificación incorrecta,
puede dañarse la unidad y/o el fusible.
3. Interruptor de encendido: Use este
interruptor para encender y apagar el
altavoz. Asegúrese de que la perilla
Volume esté en su posición mínima
(antihoraria) antes de encenderlo.
4. LED de encendido: Este LED se ilumina
cuando el altavoz está encendido.
5
6
5
6
4
8
9
10
7
5. Volume: Gire esta perilla para ajustar el
volumen de cada entrada.
6. Input: Utilice un cable XLR o TRS de 1/4
pulg. (no incluido) para conectar su
fuente de sonido a esta entrada.
7. Out: Utilice un cable XLR estándar (no
incluido) para conectar esta salida a la
entrada de otro altavoz (por ej. otro
Strike Amp).
8. LED Signal/Limit: Este LED se ilumina con luz verde cuando se envía una señal
hacia el altavoz—parpadea con niveles bajos y se enciende permanentemente a
niveles mayores. El LED se ilumina con luz roja cuando se activa la protección/límite
de salida—si el LED está encendido permanentemente, disminuya el volumen de su
fuente de audio.
9. Contorno: Acople (oprima) este interruptor para resaltar las frecuencias bajas y altas
en +3 dB. Desacople (levante) el interruptor para lograr una respuesta más plana en
actuaciones en vivo o para máxima salida.
10. Interruptor de tierra: Acople (oprima) este interruptor para reducir el zumbido o
ruido.
1
2
3
13
Page 14

Características de Strike Amp 8
Panel trasero
1. Entrada de corriente alterna: Utilice el
cable de corriente incluido para conectar
esta entrada a una toma de corriente.
Asegúrese de que el interruptor Power
(Encendido) esté en la posición off (apagado)
cuando conecte o desconecte el cable.
5
5
4
8
9
10
2. Fusible: Si el fusible de la unidad está roto,
levante esta lengüeta para reemplazar el
fusible. Reemplácelo por un fusible con
especificación apropiada (impresa debajo de
la entrada del cable de alimentación de la
unidad). Si utiliza un fusible de especificación
incorrecta, puede dañarse la unidad y/o el
fusible.
3. Interruptor de encendido: Use este
interruptor para encender y apagar el altavoz.
Asegúrese de que la perilla Volume esté en
su posición mínima (antihoraria) antes de
encenderlo.
4. LED de encendido: Este LED se ilumina
cuando el altavoz está encendido.
5. Volume: Gire esta perilla para ajustar el
volumen de cada entrada.
6. Input: Utilice un cable XLR o TRS de 1/4
pulg. (no incluido) para conectar su fuente de
sonido a esta entrada.
6
6
7
3
2
7. Out: Utilice un cable XLR estándar (no
incluido) para conectar esta salida a la
entrada de otro altavoz (por ej. otro Strike
Amp).
8. LED Signal/Limit: Este LED se ilumina con luz verde cuando se envía una señal
hacia el altavoz—parpadea con niveles bajos y se enciende permanentemente a
niveles mayores. El LED se ilumina con luz roja cuando se activa la protección/límite
de salida—si el LED está encendido permanentemente, disminuya el volumen de su
fuente de audio.
1
9. Contorno: Acople (oprima) este interruptor para resaltar las frecuencias bajas y altas
en +3 dB. Desacople (levante) el interruptor para lograr una respuesta más plana en
actuaciones en vivo o para máxima salida.
10. Interruptor de tierra: Acople (oprima) este interruptor para reducir el zumbido o
ruido.
14
Page 15

Guide d’utilisation (Français)
Présentation
Merci d’avoir fait l’acquisition du Strike Amp 12 ou Strike Amp 8. Chez Alesis, nous
savons à quel point la musique est importante pour vous. C’est pourquoi nous concevons
nos produits avec une seule chose en tête — faire de votre performance la meilleure qui
soit.
Contenu de la boîte
Strike Amp 12 ou Strike Amp 8
Câble d’alimentation
Guide d’utilisation
Consignes de sécurité et informations concernant la garantie
Assistance technique
Pour les toutes dernières informations concernant la documentation, les spécifications
techniques, la configuration requise, la compatibilité et l’enregistrement du produit, veuillez
visiter alesis.com.
Pour de l’assistance supplémentaire, veuillez visiter le site alesis.com/support.
15
Page 16

Installation
Les articles qui ne figurent pas dans la section Présentation > Contenu de la boîte sont
vendus séparément.
Exemple A : Une enceinte Strike Amp
Reliez la sortie Left (Mono) du module de percussion à l’entrée d’une enceinte Strike
Amp.
16
Prise secteur
Module de percussion
Page 17

Exemple B : Deux Strike Amps (stéréo)
Reliez les sorties Right et Left (Mono) du module de percussion aux entrées des
enceintes Strike Amp.
(du canal Right)
Limiteur de surtension
(du canal Left
(Mono))
Module de
percussion
17
Page 18
Exemple C : Deux Strike Amps (mono)
Reliez le sortie Left (Mono) du module de percussion a l’entrée d’une enceinte Strike
Amp. Reliez le sortie Output de cette enceinte Strike Amp a l’entrée d’une autre enceinte
Strike Amp.
(du canal Left
(Mono))
Limiteur de surtension
(de l’entrée
Output)
Module de
percussion
18
Page 19

Caractéristiques de Strike Amp 12
Panneau arrière
1. Entrée d’alimentation CA : Utilisez le
câble d’alimentation inclus pour
brancher cette entrée à une prise
secteur. Veuillez vous assurer que
l’interrupteur d’alimentation soit réglé sur
« Off » lorsque vous branchez/
débranchez le câble d’alimentation.
2. Fusible : Si le fusible de l’appareil est
endommagé, soulevez cette languette
afin de remplacer le fusible. Remplacezle par un fusible de calibre approprié
(imprimé sous l’entrée d’alimentation de
l’appareil). L’utilisation d’un fusible de
calibre inapproprié pourrait endommager
l’appareil et/ou le fusible.
3. Interrupteur d’alimentation : Utilisez
cet interrupteur pour mettre l’enceinte
sous et hors tension. Assurez-vous que
le bouton du volume soit au minimum
(sens horaire) avant de mettre l’enceinte
sous tension.
4. Témoin d’alimentation DEL : Ce témoin
s’allume lorsque l’enceinte est sous
tension.
5. Volume : Tourner chacun des boutons
afin d'ajuster le volume de chacune des
entrées.
6. Input : Utilisez un câble XLR ou TRS
6,35 mm standard (non inclus) pour
brancher une source audio à cette entrée.
7. Out : Utilisez un câble XLR standard (non
inclus) pour relier cette sortie à l'entrée
d'une autre enceinte (p. ex., une autre
Strike Amp).
8. DEL Signal Limit : Cette DEL devient verte lorsqu'un signal audio est envoyé à
l’enceinte — elle clignote à bas niveaux et demeure allumée à des niveaux plus
élevés. La DEL devient rouge lorsque le limiteur de sortie/protection est activé — si le
témoin demeure rouge, diminuez le volume de la source audio.
9. Contour : Enfoncer ce commutateur permet d’accentuer les basses et hautes
fréquences de +3 dB. Relâcher ce commutateur permet d’obtenir un son plus plat
pour les prestations ou afin d’optimiser la puissance de sortie.
10. Interrupteur de mise à la terre : Enfoncez cette touche pour réduire le ronflement
ou les bruits parasitaires.
5
6
1
2
5
6
4
8
9
10
7
3
19
Page 20

Caractéristiques de Strike Amp 8
Panneau arrière
1. Entrée d’alimentation CA : Utilisez le câble
d’alimentation inclus pour brancher cette entrée
à une prise secteur. Veuillez vous assurer que
l’interrupteur d’alimentation soit réglé sur « Off »
lorsque vous branchez/débranchez le câble
d’alimentation.
2. Fusible : Si le fusible de l’appareil est
endommagé, soulevez cette languette afin de
remplacer le fusible. Remplacez-le par un fusible
de calibre approprié (imprimé sous l’entrée
d’alimentation de l’appareil). L’utilisation d’un
fusible de calibre inapproprié pourrait
endommager l’appareil et/ou le fusible.
3. Interrupteur d’alimentation : Utilisez cet
interrupteur pour mettre l’enceinte sous et hors
tension. Assurez-vous que le bouton du volume
soit au minimum (sens horaire) avant de mettre
l’enceinte sous tension.
4. Témoin d’alimentation DEL : Ce témoin
s’allume lorsque l’enceinte est sous tension.
5. Volume : Tourner chacun des boutons afin
d'ajuster le volume de chacune des entrées.
6. Input : Utilisez un câble XLR ou TRS 6,35 mm
standard (non inclus) pour brancher une source
audio à cette entrée.
7. Out : Utilisez un câble XLR standard (non inclus)
pour relier cette sortie à l'entrée d'une autre
enceinte (p. ex., une autre Strike Amp).
8. DEL Signal Limit : Cette DEL devient verte lorsqu'un signal audio est envoyé à
l’enceinte — elle clignote à bas niveaux et demeure allumée à des niveaux plus
élevés. La DEL devient rouge lorsque le limiteur de sortie/protection est activé — si le
témoin demeure rouge, diminuez le volume de la source audio.
9. Contour : Enfoncer ce commutateur permet d’accentuer les basses et hautes
fréquences de +3 dB. Relâcher ce commutateur permet d’obtenir un son plus plat
pour les prestations ou afin d’optimiser la puissance de sortie.
10. Interrupteur de mise à la terre : Enfoncez cette touche pour réduire le ronflement
ou les bruits parasitaires.
5
6
5
6
9
4
8
10
7
3
2
1
20
Page 21

Guida per l’uso (Italiano)
Introduzione
Grazie per aver acquistato il Strike Amp 12 o Strike Amap 8. Noi di Alesis sappiamo che
per te la musica è una cosa seria. Ecco perché progettiamo i nostri dispositivi con un
unico obiettivo in mente: rendere le tue prestazioni le migliori possibili.
Contenuti della confezione
Strike Amp 12 o Strike Amp 8
Cavo di alimentazione
Guida per l’uso
Istruzioni di sicurezza e garanzia
Assistenza
Per le ultime informazioni in merito a questo prodotto (documentazione, specifiche tecniche,
requisiti di sistema, informazioni sulla compatibilità, ecc.) e per effettuarne la registrazione,
recarsi alla pagina alesis.com.
Per ulteriore assistenza sul prodotto, recarsi alla pagina alesis.com/support.
21
Page 22
Configurazione
Gli elementi non elencati sotto Introduzione > Contenuti della confezione sono venduti
separatamente.
Esempio A: Un Strike Amp
Collegare l’uscita Left (Mono) del proprio modulo di batteria all’ingresso di un Strike Amp.
22
alimentazione
Modulo di batteria Presa di
Page 23
Esempio B: Due Strike Amp (stereo)
Collegare le uscite Right e Left (Mono) del proprio modulo di batteria agli ingressi dei Strike
Amp.
(dal canale
Left (Mono))
Dispositivo di protezione
contro i picchi
(dall’uscita
Output)
Modulo di batteria
23
Page 24

Esempio C: Due Strike Amp (mono)
Collegare l’uscita Left (Mono) del proprio modulo di batteria all’ingresso di un
Strike Amp. Collegare l’uscita Output di quel Strike Amp all’ingresso di un altro.
(dal canale Right) (dal canale Left
(Mono))
Modulo di batteria
Dispositivo di protezione
contro i picchi
24
Page 25

Strike Amp 12 Caratteristiche
Pannello posteriore
1. Ingresso CA: servirsi del cavo di
alimentazione in dotazione per collegare
questo ingresso ad una presa di
alimentazione. Assicurarsi che l’interruttore
di alimentazione dell’alto-parlante sia su
“off” al momento di collegare e scollegare il
cavo.
2. Fusibile: se il fusibile dell’apparecchio è
rotto, sollevare questa linguetta per
sostituirlo. Sostituire il fusibile con uno dalla
tensione nominale adeguata (stampata
sotto l’ingresso per il cavo di alimentazione
dell’apparecchio). L’utilizzo di un fusibile
dalla tensione nominale errata può
danneggiare l’apparecchio e/o il fusibile.
3. Interruttore di alimentazione: servirsi di
questo interruttore per accendere e
spegnere l’altoparlante. Assicurarsi che la
manopola Volume sia impostata al minimo
(in senso antiorario) prima di accenderlo.
4. LED di alimentazione: si illumina quando
l’altoparlante è acceso.
5. Volume: girare ciascuna manopola per
regolare il volume di ciascun ingresso.
6. Input: servirsi di un cavo standard XLR o
un cavo TRS da 6,35 mm (1/4”, non in
dotazione) per collegare una fonte audio a
questo ingresso.
7. Out: servirsi di un cavo standard XLR (non
in dotazione) per collegare questa uscita
all'ingresso di un altro altoparlante (ad es.
un altro Strike Amp).
8. LED Signal/Limit: questo LED si illumina di verde quando un segnale audio viene
inviato all'altoparlante; lampeggia a livelli più bassi e si illumina in maniera fissa a livelli
più elevati. Il LED si illumina di rosso quando il limite di uscita/protezione è attivo; se il
LED è illuminato di rosso in maniera fissa, ridurre il volume della fonte audio.
9. Contour: premere questo tasto per enfatizzare le frequenze basse e alte di +3 dB.
Sollevare l’interruttore per una risposta più piatta per prestazioni dal vivo o per il
massimo livello di uscita.
10. Interruttore di messa a terra: premere questo interruttore per ridurre ronzio o rumore.
5
6
1
2
4
5
6
9
10
8
7
3
25
Page 26

Strike Amp 8 Caratteristiche
Pannello posteriore
1. Ingresso CA: servirsi del cavo di
alimentazione in dotazione per collegare
questo ingresso ad una presa di
alimentazione. Assicurarsi che l’interruttore
di alimentazione dell’alto-parlante sia su
“off” al momento di collegare e scollegare il
cavo.
2. Fusibile: se il fusibile dell’apparecchio è
rotto, sollevare questa linguetta per
sostituirlo. Sostituire il fusibile con uno
dalla tensione nominale adeguata
(stampata sotto l’ingresso per il cavo di
alimentazione dell’apparecchio). L’utilizzo
di un fusibile dalla tensione nominale errata
può danneggiare l’apparecchio e/o il
fusibile.
3. Interruttore di alimentazione: servirsi di
questo interruttore per accendere e
spegnere l’altoparlante. Assicurarsi che la
manopola Volume sia impostata al minimo
(in senso antiorario) prima di accenderlo.
4. LED di alimentazione: si illumina quando
l’altoparlante è acceso.
5. Volume: girare ciascuna manopola per
regolare il volume di ciascun ingresso.
6. Input: servirsi di un cavo standard XLR o
un cavo TRS da 6,35 mm (1/4”, non in
dotazione) per collegare una fonte audio a
questo ingresso.
7. Out: servirsi di un cavo standard XLR (non
in dotazione) per collegare questa uscita
all'ingresso di un altro altoparlante (ad es.
un altro Strike Amp).
8. LED Signal/Limit: questo LED si illumina di verde quando un segnale audio viene
inviato all'altoparlante; lampeggia a livelli più bassi e si illumina in maniera fissa a livelli
più elevati. Il LED si illumina di rosso quando il limite di uscita/protezione è attivo; se il
LED è illuminato di rosso in maniera fissa, ridurre il volume della fonte audio.
9. Contour: premere questo tasto per enfatizzare le frequenze basse e alte di +3 dB.
Sollevare l’interruttore per una risposta più piatta per prestazioni dal vivo o per il
massimo livello di uscita.
10. Interruttore di messa a terra: premere questo interruttore per ridurre ronzio o rumore.
26
5
6
1
6
5
4
8
3
9
10
7
2
Page 27

Benutzerhandbuch (Deutsch)
Einführung
Vielen Dank für den Kauf des Strike Amp 12 oder Strike Amp 8. Wir von Alesis wissen, wie
wichtig Ihnen die Musik ist. Darum entwerfen wir unsere Geräte stets nur mit einem einzigen
Ziel vor Augen: Ihre Performance so gut wie möglich zu unterstützen.
Lieferumfang
Strike Amp 12 oder Strike Amp 8
Stromkabel
Benutzerhandbuch
Sicherheitshinweise und Garantieinformationen
Kundendienst
Für die neuesten Informationen zu diesem Produkt (Dokumentation, technische Daten,
Systemanforderungen, Informationen zur Kompatibilität etc.) und für die Produktregistrierung
besuchen Sie alesis.com.
Für zusätzlichen Produkt-Support besuchen Sie alesis.com/support.
27
Page 28

Setup
Teile, die nicht unter Einführung > Lieferumfang angegeben sind, sind separat erhältlich.
Beispiel A: Ein Strike Amp
Verbinden Sie den Left (Mono) Output Ihres Drum-Modul mit dem Input auf einem Strike
Amp.
28
Steckdose
Drum-Modul
Page 29

Beispiel B: Zwei Strike Amp (stereo)
Verbinden Sie die Right und Left (Mono) Outputs Ihres Drum-Modul mit den Inputs Ihres
Strike Amp.
(von Right Kanal) (von Left (Mono)
Kanal)
Drum-Modul
Überspannungsschutz
29
Page 30

Beispiel C: Zwei Strike Amp (mono)
Verbinden Sie den Left (Mono) Output Ihres Drum-Modul mit dem Input eines Strike
Amp. Verbinden Sie den Output dieses Strike Amp mit dem Input eines anderen Strike
Amp.
(von Left (Mono)
Kanal)
Überspannungsschutz
(von Output
Ausgang)
Drum-Modul
30
Page 31
Strike Amp 12 Funktionen
Rückseite
1. AC-Eingang: Verwenden Sie das
mitgelieferte Netzkabel, um diesen Eingang
mit einer Steckdose zu verbinden. Sorgen
Sie dafür, dass der Netzschalter beim
Verbinden oder Trennen des Kabels auf
Aus steht.
2. Sicherung: Wenn die Sicherung des Geräts
beschädigt ist, heben Sie diese Lasche an,
um die Sicherung zu ersetzen. Ersetzen Sie
sie mit einer Sicherung, die einen
geeigneten Sicherungswert besitzt (siehe
Aufdruck unter dem Netzkabeleingang des
Geräts). Die Verwendung einer Sicherung
mit falschem Sicherungswert kann das
Gerät und/oder Sicherung beschädigen.
3. Netzschalter: Verwenden Sie diesen
Schalter, um den Lautsprecher ein- oder
auszuschalten. Stellen Sie sicher, dass der
Lautstärkeregler auf das Minimum eingestellt ist (gegen den Uhrzeigersinn).
4. Power-LED: Diese LED leuchtet auf, wenn
der Lautsprecher eingeschaltet ist.
5. Volume: Drehen Sie zur Anpassung der
Lautstärke den jeweiligen Regler für den
Eingang.
6. Input: Verwenden Sie ein handelsübliches
XLR-Kabel oder ein 6,35 mm TRS-Kabel
(nicht inbegriffen) zur Verbindung Ihrer
Audioquelle mit diesem Eingang.
7. Output: Verwenden Sie ein handelsübliches
XLR-Kabel (nicht inbegriffen) zur Verbindung
dieses Ausagangs mit dem Eingang eines
anderen Lautsprechers (z. B. einem anderen
Strike Amp).
8. Signal/Limit LED: Diee LED leuchetet grün auf, wenn ein Audiosignal an den
Lautsprecher gesendet wird – sie blinkt bei niedrigem Pegel und leuchtet dauerhaft bei
höheren Pegeln. Die LED leuchtet rot auf, wenn Ausgangsbegrenzung/-schutz aktiviert
ist – wenn die LED dauerhaft rot leuchtet, reduzieren Sie das Volumen Ihrer Audioquelle.
9. Contour: Aktivieren (drücken) Sie diese Taste, um niedrige und hohe Frequenzen um
+3 dB zu verstärken. Lösen Sie den Schalter für maximale Leistung oder ein flacheres
Ansprechverhalten bei Live-Auftritten.
10. Erdungsschalter: Aktivieren (drücken) Sie diesen Schalter, um Brummgeräusche
oder Rauschen zu reduzieren.
5
6
1
2
4
5
6
9
10
8
7
3
31
Page 32

Strike Amp 8 Funktionen
Rückseite
1. AC-Eingang: Verwenden Sie das
mitgelieferte Netzkabel, um diesen Eingang
mit einer Steckdose zu verbinden. Sorgen
Sie dafür, dass der Netzschalter beim
Verbinden oder Trennen des Kabels auf Aus
steht.
2. Sicherung: Wenn die Sicherung des Geräts
beschädigt ist, heben Sie diese Lasche an,
um die Sicherung zu ersetzen. Ersetzen Sie
sie mit einer Sicherung, die einen geeigneten
Sicherungswert besitzt (siehe Aufdruck unter
dem Netzkabeleingang des Geräts). Die
Verwendung einer Sicherung mit falschem
Sicherungswert kann das Gerät und/oder
Sicherung beschädigen.
3. Netzschalter: Verwenden Sie diesen
Schalter, um den Lautsprecher ein- oder
auszuschalten. Stellen Sie sicher, dass der
Lautstärkeregler auf das Minimum eingestellt ist (gegen den Uhrzeigersinn).
4. Power-LED: Diese LED leuchtet auf, wenn
der Lautsprecher eingeschaltet ist.
5. Volume: Drehen Sie zur Anpassung der
Lautstärke den jeweiligen Regler für den
Eingang.
6. Input: Verwenden Sie ein handelsübliches
XLR-Kabel oder ein 6,35 mm TRS-Kabel
(nicht inbegriffen) zur Verbindung Ihrer
Audioquelle mit diesem Eingang.
7. Output: Verwenden Sie ein handelsübliches
XLR-Kabel (nicht inbegriffen) zur Verbindung
dieses Ausagangs mit dem Eingang eines
anderen Lautsprechers (z. B. einem anderen
Strike Amp).
8. Signal/Limit LED: Diee LED leuchetet grün auf, wenn ein Audiosignal an den
Lautsprecher gesendet wird – sie blinkt bei niedrigem Pegel und leuchtet dauerhaft bei
höheren Pegeln. Die LED leuchtet rot auf, wenn Ausgangsbegrenzung/-schutz aktiviert
ist – wenn die LED dauerhaft rot leuchtet, reduzieren Sie das Volumen Ihrer Audioquelle.
9. Contour: Aktivieren (drücken) Sie diese Taste, um niedrige und hohe Frequenzen um
+3 dB zu verstärken. Lösen Sie den Schalter für maximale Leistung oder ein flacheres
Ansprechverhalten bei Live-Auftritten.
10. Erdungsschalter: Aktivieren (drücken) Sie diesen Schalter, um Brummgeräusche
oder Rauschen zu reduzieren.
32
1
6
5
6
5
4
8
3
9
10
7
2
Page 33

Appendix (English)
Strike Amp 12 Technical Specifications
Output Power
Drivers Low-Frequency
High-Frequency
Crossover Frequency
Maximum SPL
Frequency Response
Frequency Range
Horn Coverage
Equalization
Connectors
Controls
Indicators
Protection
Power Connection
Input Voltage
Fuse
Consumption
Enclosure
Dimensions
(height x width x depth)
Weight
Specifications are subject to change without notice.
2000 W (peak, 1300 LF + 700 HF)
1000 W (continuous RMS, 650 LF + 350 HF)
12.0” (305 mm) low-frequency driver, 3.0” (76 mm)
high-temperature voice coil
1.4” (35 mm) voice coil, neodymium-magnet
high-frequency driver with precision waveguide
2.0 KHz
131 dB (peak), 128 dB (continuous) (dB-SPL @ 1 m)
53 Hz – 20 kHz (+3 dB)
46 Hz – 22 kHz (-10 dB)
90º horizontal x 60º vertical (nominal)
Contour switch with low- and high-frequency +3 dB boost
(2) XLR/TRS 1/4” (6.35 mm) combo inputs
(1) XLR link output
(1) IEC power cable input
Power switch, (2) volume control knobs
ground-lift switch
(2) power LEDs (1 front-panel, 1 rear-panel), clip limiter LED
Electronic clip, thermal & transducer overdrive
IEC
100 V~, 110–120 V~, 220–240 V~; 50/60 Hz (switchable)
100–120V T10AL AC250V
220–240V T5AL AC250V
800 W
Trapezoidal, injection-molded polypropylene enclosure with perforated
steel grille
23.8” x 13.9” x 13.8”
605 x 354 x 350 mm
35.9 lb.
16.3 kg
(1 per input), EQ contour switch,
33
Page 34

Strike Amp 8 Technical Specifications
Output Power
2000 W (peak, 1300 LF + 700 HF)
1000 W (continuous RMS, 650 LF + 350 HF)
Drivers Low-Frequency
8.0” (203 mm) driver, 2.5” (65 mm) high-temperature
voice coil
High-Frequency
1.4” (35 mm) neodymium driver with precision
waveguide
Crossover Frequency
Maximum SPL
Frequency Response
Frequency Range
Horn Coverage
Equalization
Connectors
2.5 KHz
129 dB
(peak), 126 dB (continuous) (dB-SPL @ 1 m)
62 Hz – 20 kHz
52 Hz – 22 kHz
90º horizontal x 60º vertical
(+3 dB)
(-10 dB)
(nominal)
Contour switch with low- and high-frequency +3 dB boost
(2) XLR/TRS 1/4” (6.35 mm) combo inputs
(1) XLR link output
(1) IEC power cable input
Controls
Power switch, (2) volume control knobs
(1 per input), EQ contour switch,
ground-lift switch
Indicators
Protection
Power Connection
Input Voltage
Fuse
Power LED (rear panel), clip limiter LED
Electronic clip, thermal & transducer overdrive
IEC
100 V~, 110–120 V~, 220–240 V~; 50/60 Hz (switchable)
100–120V T10AL AC250V
220–240V T5AL AC250V
Consumption
Enclosure
Trapezoidal, injection-molded polypropylene enclosure with perforated
800 W
steel grille
Mounting
Dimensions
(height x width x depth)
Weight
Standard 36 mm pole socket
17.1” x 10.1” x 9.6”
434 x 256 x 245 mm
20.2 lb.
9.2 kg
Trademarks & Licenses
Alesis is a trademark of inMusic Brands, Inc., registered in the U.S. and other countries.
All other product or company names are trademarks or registered trademarks of their respective
owners.
34
Page 35

35
Page 36

alesis.com
Manual Version 1.1
 Loading...