

Alcatel-Lucent SPEED TOUCH 350I User Manual

SPEED TOUCH
350i
User's Guide
3EC 36228 AAAA TCZZA Ed. 01

Status
Released
2 / 104
Change Note
Short Title
BD F aa 32433
CD-UG AST350Series
All rights reserved. Passing on and copying of this
document, use and communication of its contents
not permitted without written authorization from Alcatel.
3EC 36228 AAAA TCZZA Ed. 01

Contents
1 Speed Touch Installation Guide 11. . . . . . . . . . . . . . . . . . . . . . . . . . . . . . . . . . . . . . .
1.1 Get Acquainted with your Speed Touch 12. . . . . . . . . . . . . . . . . . . . . . . . . . . .
1.2 Speed Touch Installation 15. . . . . . . . . . . . . . . . . . . . . . . . . . . . . . . . . . . . . . . .
1.2.1 AST350i Wiring 16. . . . . . . . . . . . . . . . . . . . . . . . . . . . . . . . . . . . . .
1.2.2 AST350i Power On/Off Behaviour 19. . . . . . . . . . . . . . . . . . . . . .
2 Speed Touch Configuration Guide 21. . . . . . . . . . . . . . . . . . . . . . . . . . . . . . . . . . . .
2.1 Check your PC Configuration 22. . . . . . . . . . . . . . . . . . . . . . . . . . . . . . . . . . . .
2.2 Check your SP's Service Offerings 23. . . . . . . . . . . . . . . . . . . . . . . . . . . . . . . .
2.3 Speed Touch Configuration 24. . . . . . . . . . . . . . . . . . . . . . . . . . . . . . . . . . . . . .
2.3.1 AST350i Web Interface Access 25. . . . . . . . . . . . . . . . . . . . . . . . . .
2.3.2 AST350i Packet Services 27. . . . . . . . . . . . . . . . . . . . . . . . . . . . . . .
2.3.3 Transparent Bridging Packet Service Configuration 29. . . . . . . .
2.3.4 Bridged PPPoE Packet Service Configuration 30. . . . . . . . . . . . . .
2.3.5 PPPoAtoPPTP Relaying Packet Service Configuration 31. . . . . .
2.3.6 Advanced AST350i Configuration 33. . . . . . . . . . . . . . . . . . . . . . .
Contents
3 Configuration - Bridging and Bridged PPPoE 37. . . . . . . . . . . . . . . . . . . . . . . . .
4 Configuration - PPPoAtoPPTP Relaying 39. . . . . . . . . . . . . . . . . . . . . . . . . . . . .
4.1 MS Windows 98 DialUp Networking 40. . . . . . . . . . . . . . . . . . . . . . . . . . . . .
4.1.1 Create a New DialUp Networking Icon 41. . . . . . . . . . . . . . . . .
4.1.2 Opening and Closing a DialUp Session 44. . . . . . . . . . . . . . . . .
4.2 PPPoA/PPTP Configuration 46. . . . . . . . . . . . . . . . . . . . . . . . . . . . . . . . . . . . . .
5 Networking - ATM 49. . . . . . . . . . . . . . . . . . . . . . . . . . . . . . . . . . . . . . . . . . . . . . . . . .
5.1 The ATM Packet Switching Technology 50. . . . . . . . . . . . . . . . . . . . . . . . . . . .
5.2 The Speed Touch Phonebook 52. . . . . . . . . . . . . . . . . . . . . . . . . . . . . . . . . . . .
5.3 AutoPVC 54. . . . . . . . . . . . . . . . . . . . . . . . . . . . . . . . . . . . . . . . . . . . . . . . . . . . . .
6 Networking Services - IP, DHCP and DNS 55. . . . . . . . . . . . . . . . . . . . . . . . . . . .
6.1 Packet Services and IP 56. . . . . . . . . . . . . . . . . . . . . . . . . . . . . . . . . . . . . . . . . .
6.1.1 Transparent Bridging 57. . . . . . . . . . . . . . . . . . . . . . . . . . . . . . . . . .
6.1.2 PPPoAtoPPTP Relaying 58. . . . . . . . . . . . . . . . . . . . . . . . . . . . . . .
6.2 Speed Touch Addresses 59. . . . . . . . . . . . . . . . . . . . . . . . . . . . . . . . . . . . . . . . .
6.3 Speed Touch DHCP 61. . . . . . . . . . . . . . . . . . . . . . . . . . . . . . . . . . . . . . . . . . . .
6.4 Speed Touch DNS 64. . . . . . . . . . . . . . . . . . . . . . . . . . . . . . . . . . . . . . . . . . . . . .
3EC 36228 AAAA TCZZA Ed. 01
3 / 104

Contents
7 Maintenance - Speed Touch Software 67. . . . . . . . . . . . . . . . . . . . . . . . . . . . . . . .
8 Maintenance - Speed Touch Password 71. . . . . . . . . . . . . . . . . . . . . . . . . . . . . . .
9 Maintenance - Speed Touch ToDefaults 73. . . . . . . . . . . . . . . . . . . . . . . . . . . . . .
9.1 PingofLife 74. . . . . . . . . . . . . . . . . . . . . . . . . . . . . . . . . . . . . . . . . . . . . . . . . . .
9.2 Speed Touch Reset 76. . . . . . . . . . . . . . . . . . . . . . . . . . . . . . . . . . . . . . . . . . . . .
9.2.1 BrowsetoDefaults 77. . . . . . . . . . . . . . . . . . . . . . . . . . . . . . . . . . .
9.2.2 PingtoDefaults 78. . . . . . . . . . . . . . . . . . . . . . . . . . . . . . . . . . . . . .
9.2.3 SwitchtoDefaults 79. . . . . . . . . . . . . . . . . . . . . . . . . . . . . . . . . . . .
Abbreviations 83. . . . . . . . . . . . . . . . . . . . . . . . . . . . . . . . . . . . . . . . . . . . . . . . . . . . . . . . . . . .
AppendixA Speed Touch Troubleshooting 85. . . . . . . . . . . . . . . . . . . . . . . . . . . .
AppendixB Speed Touch Specifications 87. . . . . . . . . . . . . . . . . . . . . . . . . . . . . . .
AppendixC Speed Touch Default Assignments 93. . . . . . . . . . . . . . . . . . . . . . . .
AppendixD Safety and Agency Regulatory Notices 97. . . . . . . . . . . . . . . . . . . .
4 / 104
3EC 36228 AAAA TCZZA Ed. 01
Alcatel Speed Touch 350i
Introduction
The Alcatel Speed Touch350i Ethernet ADSL modem for ISDN provides highspeed
access to the Internet for fastidious home users.
For optimal Local Area Network (LAN) performance the Alcatel Speed Touch350i
includes a comprehensive set of features, as there are static IP routing, a DHCP server and
DNS server.
3EC 36228 AAAA TCZZA Ed. 01
5 / 104

ADSL/ISDN
y
This document describes the Alcatel's Speed Touch 350i
Asymmetric Digital Subscriber Line (ADSL) modem, connecting to
a digital ISDN(*) line (compliant to ETSI and ITU standards).
(*) Integrated Services Digital Network (ISDN)
Terminolog
Safety instructions
CAUTION
WARNING
Trademarks
For readability, the Alcatel Speed Touch350i product will be
referred to as AST350i in this User's Guide.
Prior to connecting the Alcatel Speed Touch350i, read the
Safety Instructions in appendix D.
The following words and symbols mark special messages
throughout this document:
WARNING: indicates that failure to follow the directions could
cause bodily harm or loss of life.
CAUTION: indicates that failure to follow the directions could
result in damage to equipment or loss of information.
The following trademarks are used in this document:
Speed Touch is a trademark of the Alcatel Company
6 / 104
Netscape and Netscape Navigator are registered
trademarks of Netscape Communications Corporation
Windows and Internet Explorer are trademarks of
Microsoft Corporation
Apple and MacOS are registered trademarks of Apple
Computer Inc.
UNIX is a registered trademark of UNIX System
Laboratories, Inc.
Ethernet is a trademark of Xerox Corporation.
Other products may be trademarks or registered trademarks of
their respective manufacturers.
3EC 36228 AAAA TCZZA Ed. 01

Service Provider
For readability, the term Service Provider (SP) will be used to
designate all organizations which provide either DSL connectivity,
Internet access or Corporate access, for example an Internet
Service Provider (ISP).
PC, workstation,
terminal, ...
Disclaimer
User's Guide updates
For readability, PC will refer to all involved computer devices
which are able to interact with the AST350i, i.e. Personal
Computer (PC), Macintosh computer, workstation, (remote)
terminal, etc.
All examples throughout this User's Guide refer to :
Net 10" IP addresses for local network configurations
VPI 0 or VPI 8 to identify the Virtual Path (VP) on the DSL line.
However, your SP might prefer other values.
Due to the continuous evolution of the Alcatel DSL technology,
existing products are regularly upgraded. Alcatel documentation
changes accordingly.
For more information on the newest technological changes and
documents, please consult the Alcatel web site at following
Uniform Resource Locator (URL):
3EC 36228 AAAA TCZZA Ed. 01
http://www.alcatel.com
http://www.alcateldsl.com
7 / 104

8 / 104
3EC 36228 AAAA TCZZA Ed. 01

Alcatel
Speed Touch350i
Quick Guide
3EC 36228 AAAA TCZZA Ed. 01
9 / 104

10 / 104
3EC 36228 AAAA TCZZA Ed. 01

1 Speed Touch Installation Guide
1 Speed Touch Installation Guide
Aim of this Quick Guide
In this chapter
Use this chapter to quickly connect your AST350i.
Topic See
Get Acquainted with your AST350i 1.1
AST350i Installation 1.2
3EC 36228 AAAA TCZZA Ed. 01
11 / 104

k
1 Speed Touch Installation Guide
1.1 Get Acquainted with your Speed Touch
Delivery chec
Damaged or missing
items
Other materials
Check your AST350i package for the following items:
The Alcatel Speed Touch350i
1 Power supply adapter with 2m (6.56ft.) connecting cable
2m Ethernet straightthrough cable (RJ45/RJ45)
2m DSL cable (RJ11/RJ11, RJ14/RJ14)
This User's Guide, either in hard copy format or on CDrom.
In the event of damaged or missing items, contact your local
product dealer for further instructions.
Your AST350i shipping carton may also include release notes,
safety and conformity declarations and other materials.
12 / 104
3EC 36228 AAAA TCZZA Ed. 01

1 Speed Touch Installation Guide
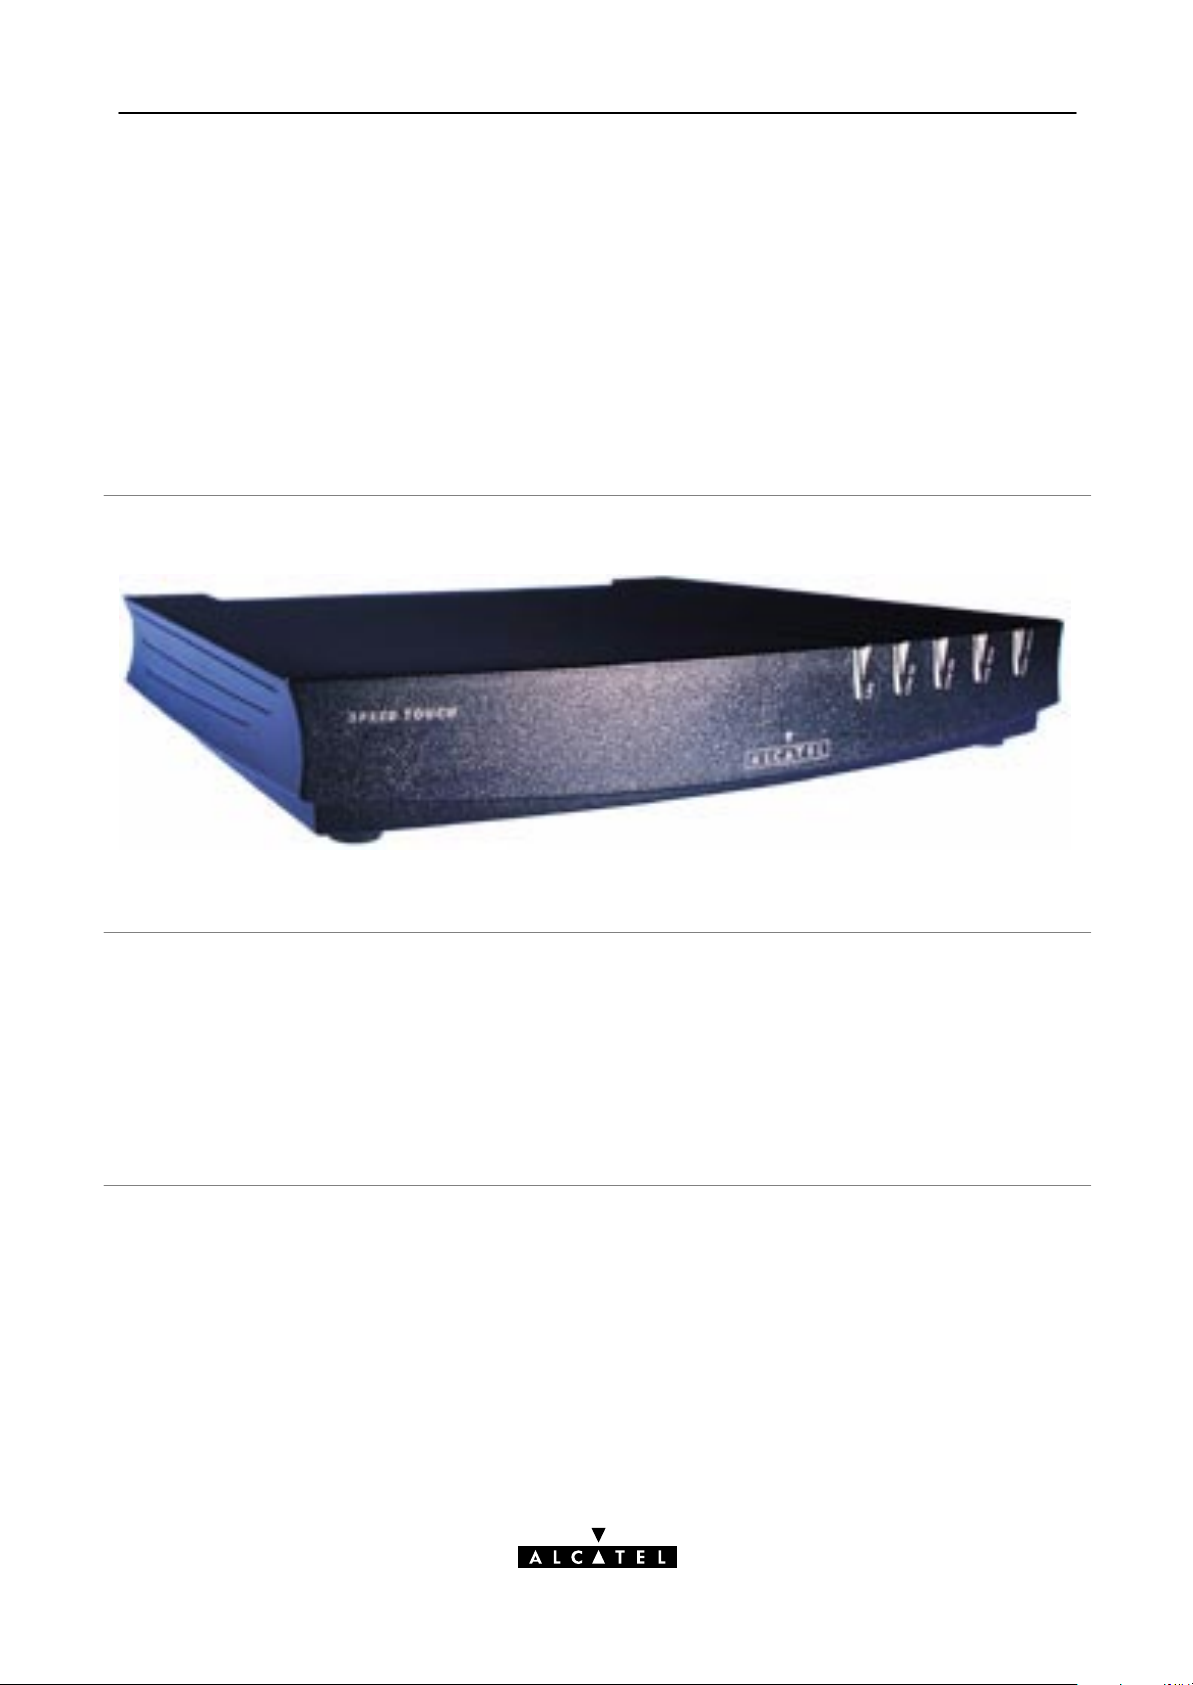
The AST350i
Five front panel LEDs
The AST350i is presented in a slim line box:
The AST350i is equipped with 5 LEDs on its front panel,
indicating the state of the device:
Indicator
Name Color State
LAN Green Flashing Data is flowing from/to the
Off No activity on the Ethernet
Line TX Green Flashing ATM cells are being sent over the
Off No transmission activity.
Description
Ethernet port.
port.
DSL line.
Line RX Green Flashing ATM cells are being received via
the DSL line.
Off No reception activity.
Line Sync Green Flashing During initialization of the DSL
line.
On DSL line synchronization
achieved.
PWR/Alarm Green On Power on, normal operation.
Amber On Power on, startup failed.
Red Flashing Power on, POST(*) pending.
On Power on, POST(*) failed.
(*) Power On Self Test (POST)
3EC 36228 AAAA TCZZA Ed. 01
13 / 104
1 Speed Touch Installation Guide
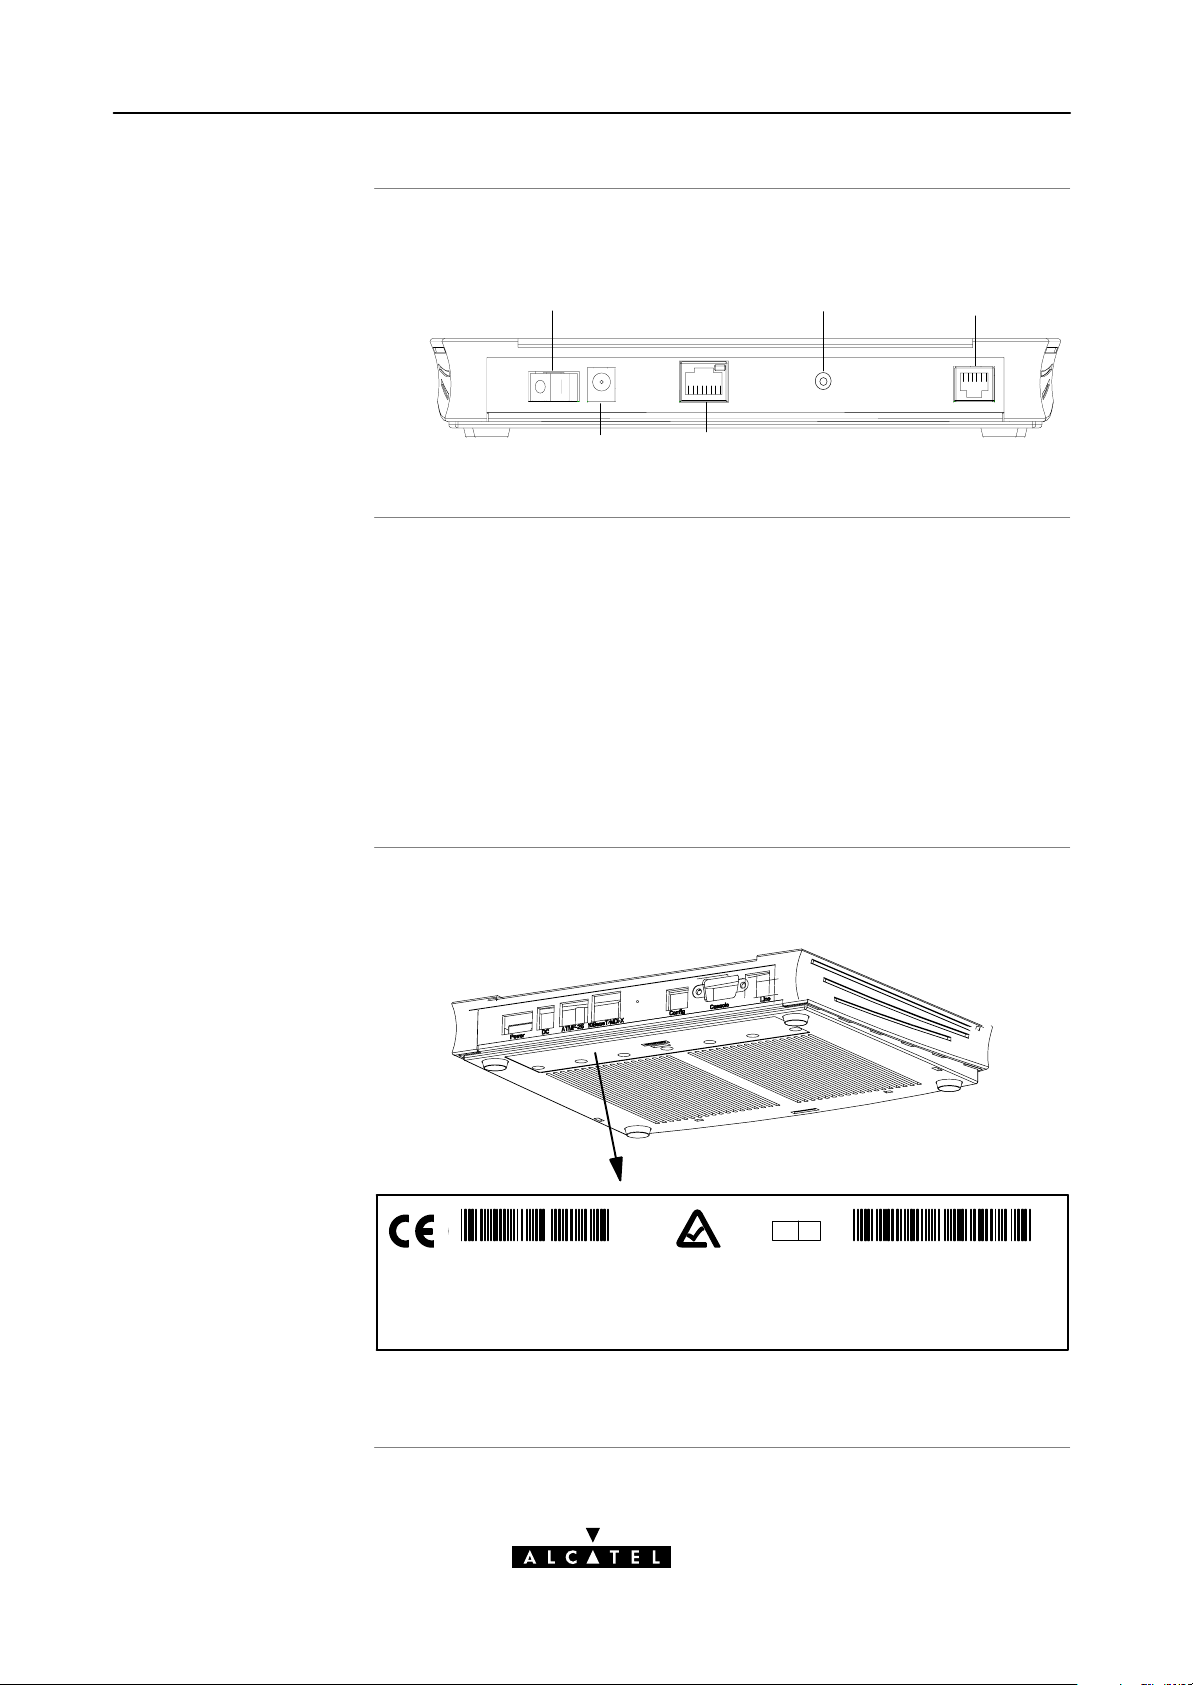
Back panel layout
Back panel parts
The AST350i features the following back panel:
Power
Switch
Power
Socket
The ADSL/ISDN(*) Line" port
The Defaults" push button
The 10BaseT MDIX" Ethernet port
The DC" power socket
The power switch.
Ethernet Port
Push
button
See section 1.2 for more information.
(*) Integrated Services Digital Network (ISDN)
Line
Port
Identify your variant
You can identify the AST350i via the marking label on the
bottom:
Q A
CPYYWWNNNNN
MODEL NUMBER:
3EC18623XXXXxx
ALCATEL SPEED TOUCH 350i
Ethernet ADSL modem for ISDN
Make sure you are using an ADSL/ISDN modem for connectivity.
14 / 104
3EC 36228 AAAA TCZZA Ed. 01

1.2 Speed Touch Installation
1 Speed Touch Installation Guide
Aim of this section
In this section
Use this section to install your AST350i.
Topic See
AST350i Wiring 1.2.1
AST350i Power On/Off Behaviour 1.2.2
3EC 36228 AAAA TCZZA Ed. 01
15 / 104

1 Speed Touch Installation Guide
1.2.1 AST350i Wiring
What you need
Wiring procedure
The appropriate DSL service must be available at your local
premisses:
ADSL service must be enabled on your ISDN telephone line.
As both telephone and ADSL service are simultaneously
available from the same copper pair, you need a central
splitter or distributed filters for decoupling ADSL and
telephone signals.
Contact your SP for more information.
To use the Ethernet port you need at least:
One PC with an Ethernet 10BaseT PCNetwork Interface
Card (NIC) installed
For local networking, a 10BaseT hub and the necessary
connection cables.
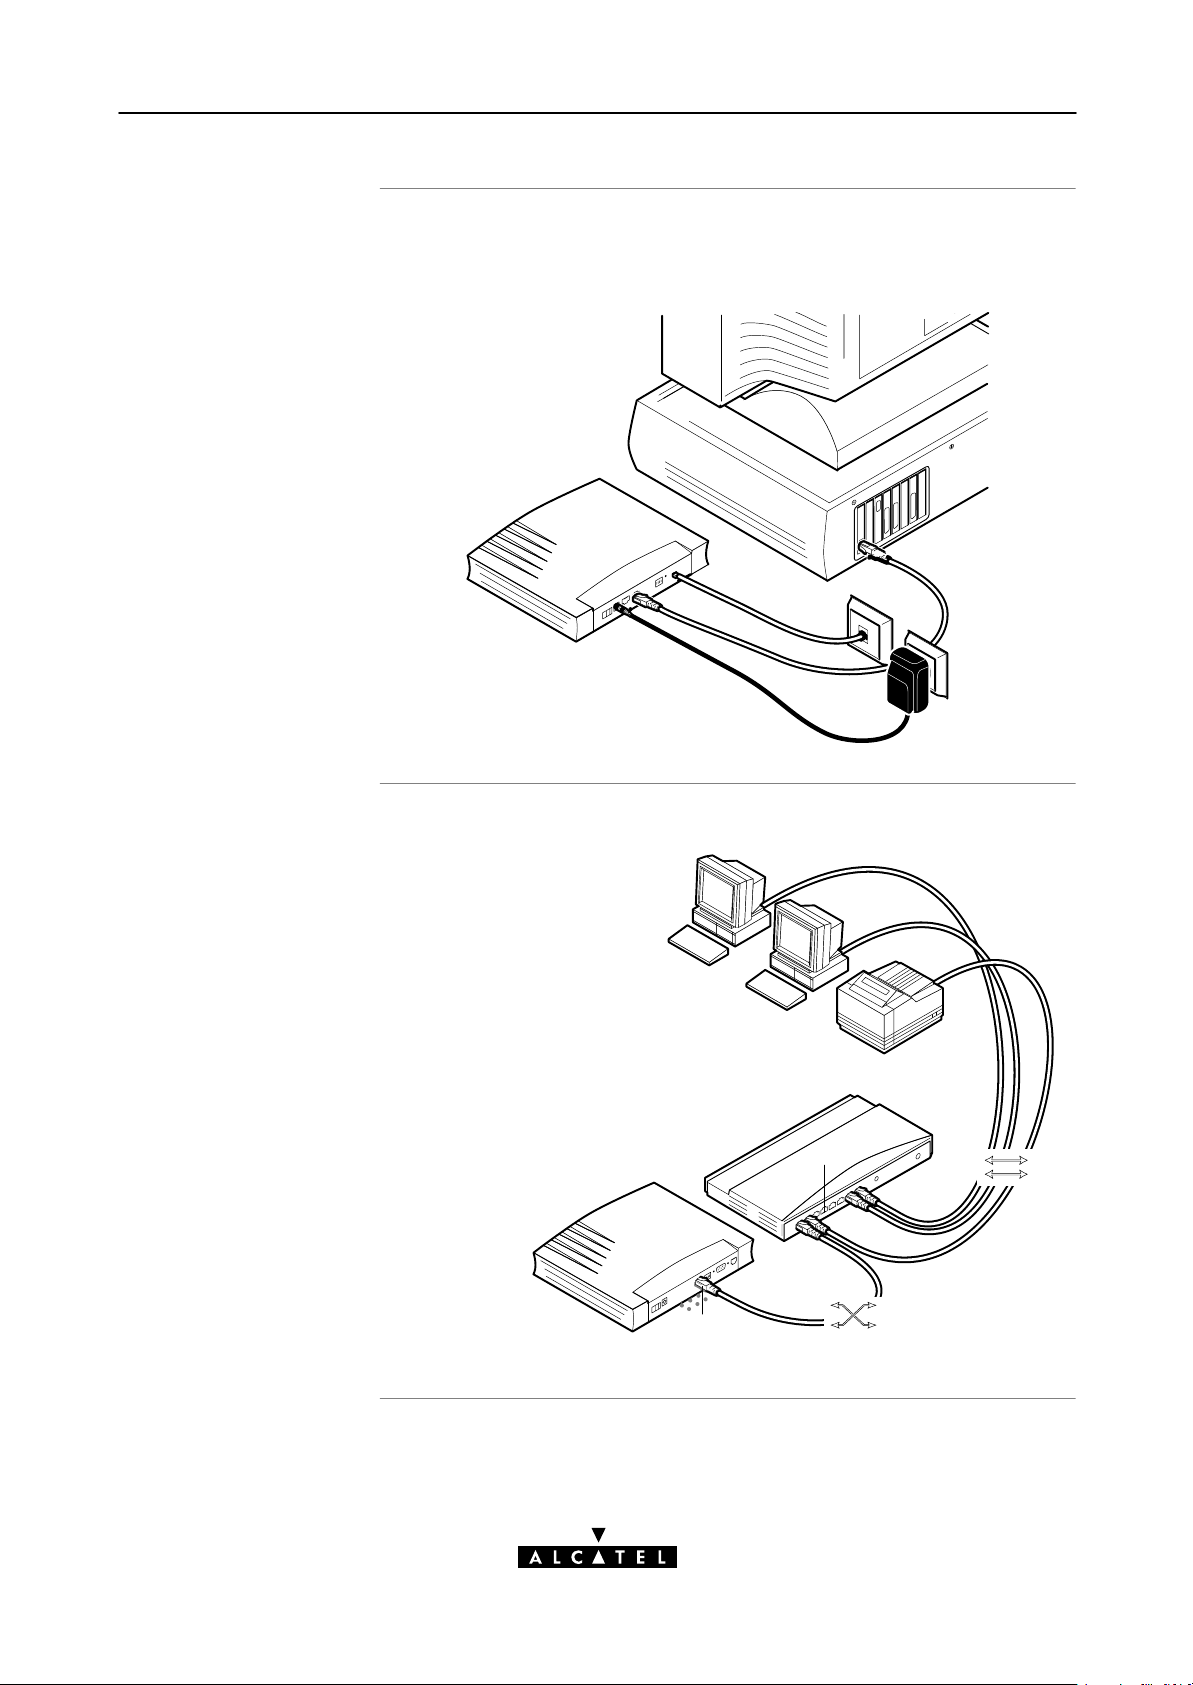
Proceed as follows:
1. Use the included LAN cable to wire your PC's Ethernet port to
AST350i's Ethernet interface.
2. Use the included DSL cable to wire the AST350i's Line port to
your DSL wall outlet.
3. Plug the adapter's coaxial jack into the AST350i's receptacle
marked 'DC'.
Note: Firstly check whether the included mains adapter suits the local
power specifications. If you are not sure of the regional power conditions,
check the adapter's specifications in section B.2 and contact your local
power company.
16 / 104
3EC 36228 AAAA TCZZA Ed. 01
1 Speed Touch Installation Guide
Single PC wiring
Once all connections are made the result should look similar as
below:
LAN wiring
Using a hub you can connect multiple PCs to your AST350i:
MDI
MDI
MDI
Hub
MDIX
10 BaseT
MDIX
3EC 36228 AAAA TCZZA Ed. 01
17 / 104

1 Speed Touch Installation Guide
MDI vs. MDIX hub
ports and the AST350i
CAUTION
CAUTION
In the above figure an MDIX port on the hub connects to the
AST350i. Therefore, a crossover LAN cable is used.
Note: In case the hub's uplink" port is used to wire the AST350i you can use
the included straightthrough LAN cable.
Cascading Repeating Hubs
You may cascade up to four repeating hubs in your LAN
(limitations of Repeating Ethernet V2.0/IEEE802.3 hubs). In case
more hubs need to be cascaded, you must use switching hubs.
10BaseT Half Duplex Interfacing
Make sure the 10BaseT port(s) of your PC(s) are configured for
either Auto Negotiation or Half Duplex.
Never configure the 10BaseT Ports for FullDuplex !
18 / 104
3EC 36228 AAAA TCZZA Ed. 01

1.2.2 AST350i Power On/Off Behaviour
gy
1 Speed Touch Installation Guide
Turn on your AST350i
POST phases
Ethernet port LED
Once all previous steps are completed, you can turn the AST350i
on (
I) or off (O) with the power switch.
As soon your AST350i is turned on, you can check the
PWR/Alarm" LED to see how the Power On Self Test (POST)
progresses.
Phase PWR/Alarm" LED Indication Description
1 Flashing red POST pending
2 Solid amber Startup failed
Solid red POST failed
Solid green Normal operation
The Ethernet port on the back panel has a LED:
Link Integrity LED
10Base T/MDI-X
Indicator
Name Color State
Integrity Green Off No connection on this port.
On Ethernet link up.
Description
If the AST350i and other LAN device(s) are properly connected
and powered on, the particular green LED lights up.
3EC 36228 AAAA TCZZA Ed. 01
19 / 104

1 Speed Touch Installation Guide
20 / 104
3EC 36228 AAAA TCZZA Ed. 01

2 Speed Touch Configuration Guide
2 Speed Touch Configuration Guide
Aim of this Quick Guide
In this chapter
Use this chapter to quickly configure your AST350i for Internet
connectivity.
Topic See
Check your PC configuration 2.1
Check your SP's Service Offerings 2.2
AST350i Configuration 2.3
3EC 36228 AAAA TCZZA Ed. 01
21 / 104

2 Speed Touch Configuration Guide
2.1 Check your PC Configuration
PC requirements
Packet service
requirements
This User's Guide presents typical configurations based on PC(s)
with following basic configuration:
The PC's Operating System (OS) supports the TCP/IP protocol
suite
The PC is configured with a fixed Net10" IP address (*)
A Web browser is installed.
(*) The AST350i DHCP server is by default disabled.
Depending on the supported Packet Service(s) on the VC(s), the
following additional requirements apply:
In case of Transparent Bridging:
The SP might provide static IP address(es) for your PC(s)
or require you to enable DHCP
In case of Bridged PPPoE:
A PPPoE session client application must be readily
installed on your PC
In case of PPPoAtoPPTP Relaying:a PPTP dialin
application(*)
The PC's OS must support PointtoPoint Protocol (PPP)
and PointtoPoint Tunnelling Protocol (PPTP).
Note: All Microsoft Windows OSs support PPP and PPTP.
A PPTP DialUp application must be installed on your PC.
Note: All Microsoft Windows OSs have a PPTP DialUp application
installed per default.
22 / 104
3EC 36228 AAAA TCZZA Ed. 01

2 Speed Touch Configuration Guide
gg
2.2 Check your SP's Service Offerings
Service Offering
The SP provides at least the following information:
The VPI/VCI of the Virtual Channel (VC) to use on the DSL
line
The Packet Service supported on this VC
The Encapsulation Method (if different from the Connection
Service's default encapsulation)
User name and Password for your User Account (if needed).
Your AST350i supports multiple simultaneous VCs on the DSL
line. If your SP exploits this capability, he will provide this
information per VC.
Example 1:
VPI/VCI = 0/35
Packet Service = Transparent Bridging
Encapsulation Method : Bridge default, i.e. LLC/SNAP
Example 2:
VPI/VCI = 8/48
Packet Service = PPPoAtoPPTP Relaying (RFC2364 PPPoA)
Encapsulation Method : pptp default, i.e. VCMUX
User name : John_Doe
Password for this User name : doejohn
Packet Service
configuration
3EC 36228 AAAA TCZZA Ed. 01
As soon as you know the Packet Service supported on a VC, you
can configure your AST350i, if needed.
Following combinations are possible:
Connection Service Packet Service
RFC1483 Bridging bridge - Transparent Bridging
bridge - Bridged PPPoE (*)
RFC2364 PPPoA pptp - Relayed PPPoA (**)
(*) A PPPoE Client application must be installed on your PC.
(**) A PPTP DialUp application must be installed on your PC.
23 / 104

2 Speed Touch Configuration Guide
2.3 Speed Touch Configuration
In this section
Topic See
AST350i Web Interface Access 2.3.1
AST350i Packet Services 2.3.2
Transparent Bridging Packet Service Configuration 2.3.3
Bridged PPPoE Packet Service Configuration 2.3.4
PPPoAtoPPTP Relaying Packet Service Configuration 2.3.5
Advanced AST350i Configuration 2.3.6
24 / 104
3EC 36228 AAAA TCZZA Ed. 01

2.3.1 AST350i Web Interface Access
2 Speed Touch Configuration Guide
AST350i access
Accessing the AST350i
The AST350i features well chosen defaults. Therefore, in most
cases no additional configuration is needed for immediate Internet
connectivity.
In exceptional cases additional or advanced configurations are
desired, the AST350i offers a userfriendly web interface.
Note: You can also configure the AST350i through its Command Line
Interface (CLI), accessible via a Telnet session.
Proceed as follows:
1. Start the Web browser on your PC.
2. Contact the AST350i by entering one of the following:
The AST350i IP address (default 10.0.0.138)
The AST350i DNS hostname (default SpeedTouch.lan).
3. In case the AST350i is protected by a System Password an
authentication window will pop up.
Enter the system password in the 'Password' field.
4. As a result the 'Welcome to the World of DSL' page pops up:
3EC 36228 AAAA TCZZA Ed. 01
25 / 104

2 Speed Touch Configuration Guide
Menu frame
components
Each button on the left side of the AST350i pages represents a
AST350i configuration page, yielding all configurational
possibilities related to the menu subject.
Following buttons are available:
Click this button
...
To ...
Return to the 'Welcome to the World of DSL' page.
Configure user defined AST350i IP parameters.
Set a System password
Perform a BrowsetoDefaults.
Overview the record of all possible, and existing ATM
connections.
Configure the AST350i IP settings.
Configure the PPPoAtoPPTP Relaying packet service.
Configure the Bridging packet service.
View Bridging MAC layer data.
Configure the AST350i DHCP server/client.
Configure the AST350i DNS server/client.
Upgrade AST350i software.
Save all changes made to persistent memory.
Pop up the AST350i help pages.
Note: The following buttons have no functionality on the AST350i:
, and .
26 / 104
3EC 36228 AAAA TCZZA Ed. 01

2.3.2 AST350i Packet Services
2 Speed Touch Configuration Guide
What is a packet
service ?
Three packet services
Multiprotocol
Examples in this User's
Guide
Packet services are the core functions of the AST350i . They provide
that frames or packets get forwarded from the LAN side towards
the DSL line and vice versa.
Transparent Bridging
Bridged PPPoE
PPPoAtoPPTP Relaying.
All examples in this User's Guide are based on the Internet
Protocol (IP) suite.
However, the AST350i DSL modem is a true multiprotocol device:
it can easily handle most other popular protocol suites
This User's Guide presents typical configurations, but as an
experienced user you are free to experiment and to find an
optimal configuration.
Two access methods
3EC 36228 AAAA TCZZA Ed. 01
Direct access
Once initial configuration is done, continuous and immediate
access is available via the DSL line.
For direct access use:
Transparent Bridging
Dialin access
In this mode access must be explicitly established, e.g. by
dialing" into a Remote Access Server (RAS).
For dialin access use either of:
Bridged PPPoE
PPPoAtoPPTP Relaying.
27 / 104

A
2 Speed Touch Configuration Guide
Transparent Bridging
PPPoE
PPPo
The AST350i IEEE802.1D Transparent Bridging packet service
(further referred to as Bridging) offers complete protocol
transparency and has inherent configuration simplicity. Yet it
provides excellent forwarding performance.
PPPoE is one of two popular mechanisms to get in touch with the
SP.
Bridged PPPoE
By installing a PPPoE client application (provided by your SP.)
on your PC(s) and by using the AST350i's bridge, connectivity
can be established.
The other method to get in touch with the SP over the DSL line is
PPPoA.
PPPoAtoPPTP Relaying
Similar to Bridged PPPoE this requires installation of a PPTP
dialin application (*) on your PC(s).
Packet services resumé
(*) Most popular OSs have a PPTP dialin application installed, e.g. Microsoft
DialUp Networking or support PPTP Tunneling software to be installed.
The AST350i packet services can be summarized as follows:
Port Packet
Service
10BaseT Bridging n 1 per user Multiprotocol
Ethernet
(*) The supported protocol(s) depend on the provisioning by the session client
application, e.g. IP, IPX and NETBEUI for Microsoft's DialUp Networking
application for PPPoAtoPPTP Relaying.
Bridged PPPoE n 1 per user Multiprotocol (*)
PPPoA/PPTP 1 1 per user Multiprotocol (*)
User/VC IP Address Protocol
28 / 104
3EC 36228 AAAA TCZZA Ed. 01

2 Speed Touch Configuration Guide
2.3.3 Transparent Bridging Packet Service Configuration
Bridging configuration
Using Bridging
Per default, following Bridging entry is preconfigured:
Br1 (Bridge on 8.35)
In case this Bridging entry does not meet your requirements, you
can configure a new one as follows:
1. If needed, add a Bridging phonebook entry with the correct
VPI/VCI on the 'Phonebook' page.
2. On the 'Bridge' page, select this phonebook entry from the
'Bridge Port' popdown list.
3. For this entry, select the correct encapsulation method.
4. Click
Make sure your AST350i is turned on first.
Turn on your PC(s), start your Web browser and you are on the
Internet.
Although the access method of the bridge is 'Alwayson', the
remote organization might ask for a user name and password.
and to finish the procedure.
CAUTION
Detailed packet service
use description
3EC 36228 AAAA TCZZA Ed. 01
Transparent Bridging and DHCP
If the SP requires you to use DHCP on your local PC(s), you must
disable the AST350i DHCP server.
This is to avoid conflicts between two DHCP servers.
For more information on the configuration and use of the Bridging
packet service, see chapter 3.
29 / 104

2 Speed Touch Configuration Guide
2.3.4 Bridged PPPoE Packet Service Configuration
Bridged PPPoE
configuration
Using Bridged PPPoE
As the Bridged PPPoE packet service implies nothing more than
using the AST350i Transparent Bridging packet service, no
specific configuration for Bridged PPPoE is required on the
AST350i.
However, you may need to configure the Transparent Bridging
packet service of the AST350i in order to meet the requirements
of your SP regarding VC(s) and encapsulation.
For more information on the configuration of the Bridging packet
service, see chapter 3.
To use Bridged PPPoE, a PPPoE client must be installed on your PC.
The SP will provide the PPPoE client software. Contact him for
more information.
30 / 104
3EC 36228 AAAA TCZZA Ed. 01
 Loading...