

Page 1

LCD TV
Service Manual
Page 2

-2 -
MODEL:
LCT-37PBSTP
Model No.: LCT-37PBSTP.doc
Version: 1.0
Page 3

-3 -
CONTENTS
SAFETY PRECAUTION .............................................................................................................4
SPECIFICATION ........................................................................................................................6
APPEARANCE & CONTROL FUNCTION ...............................................................................10
ALIGNMENT INSTRUCTION ...................................................................................................14
SOFTWARE UPGRADING.......................................................................................................23
WORKING PRINCIPAL ANALYSIS ..........................................................................................26
BLOCK DIAGRAM....................................................................................................................27
IC BLOCK DIAGRAM ...............................................................................................................28
WIRING DIAGRAM...................................................................................................................32
ASSEMBLY LIST ......................................................................................................................33
TROUBLE SHOOTING GUIDE ................................................................................................38
APPENDIX ...............................................................................................................................47
CIRCUIT DIAGRAM
PARTS LIST
Model No.: LCT-37PBSTP.doc
Version: 1.0
Page 4
-4 -
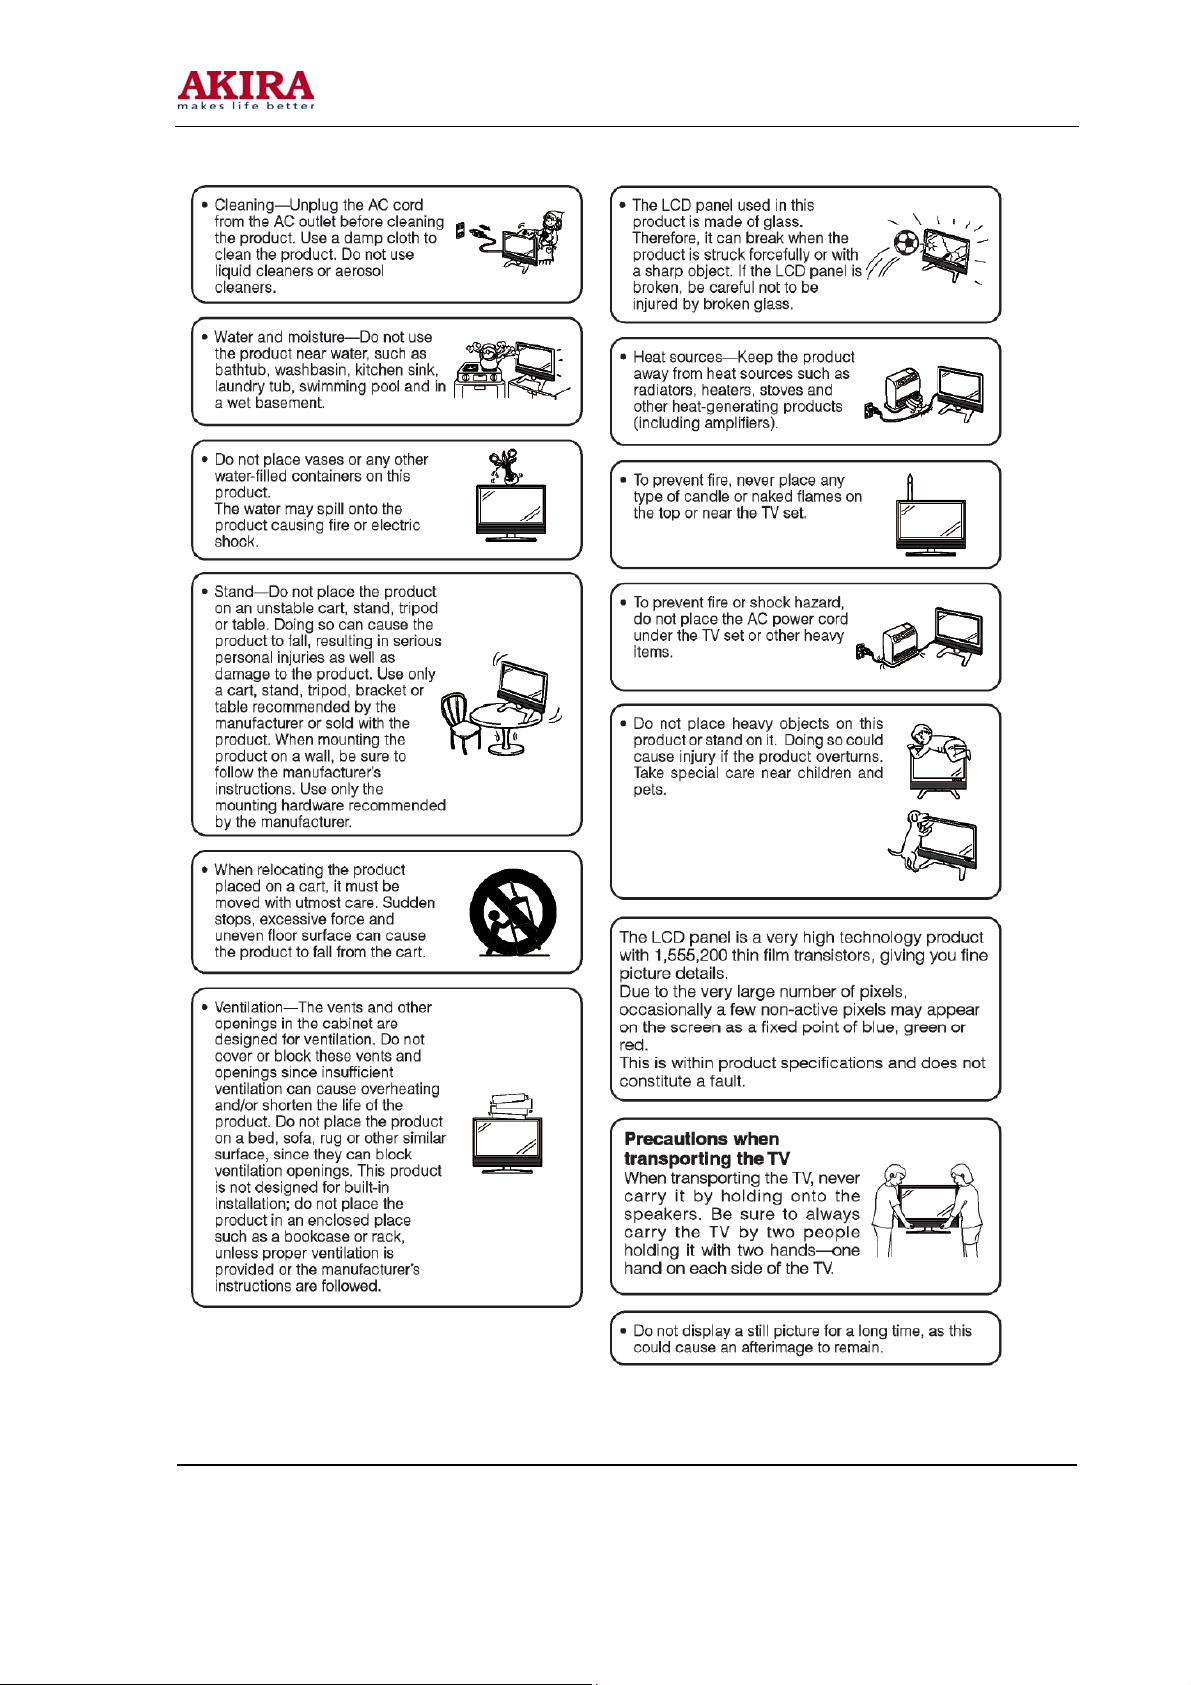
IMPORTANT SAFETY PRECAUTION
Model No.: LCT-37PBSTP.doc
Version: 1.0
Page 5
-5 -
Model No.: LCT-37PBSTP.doc
Version: 1.0
Page 6
-6 -
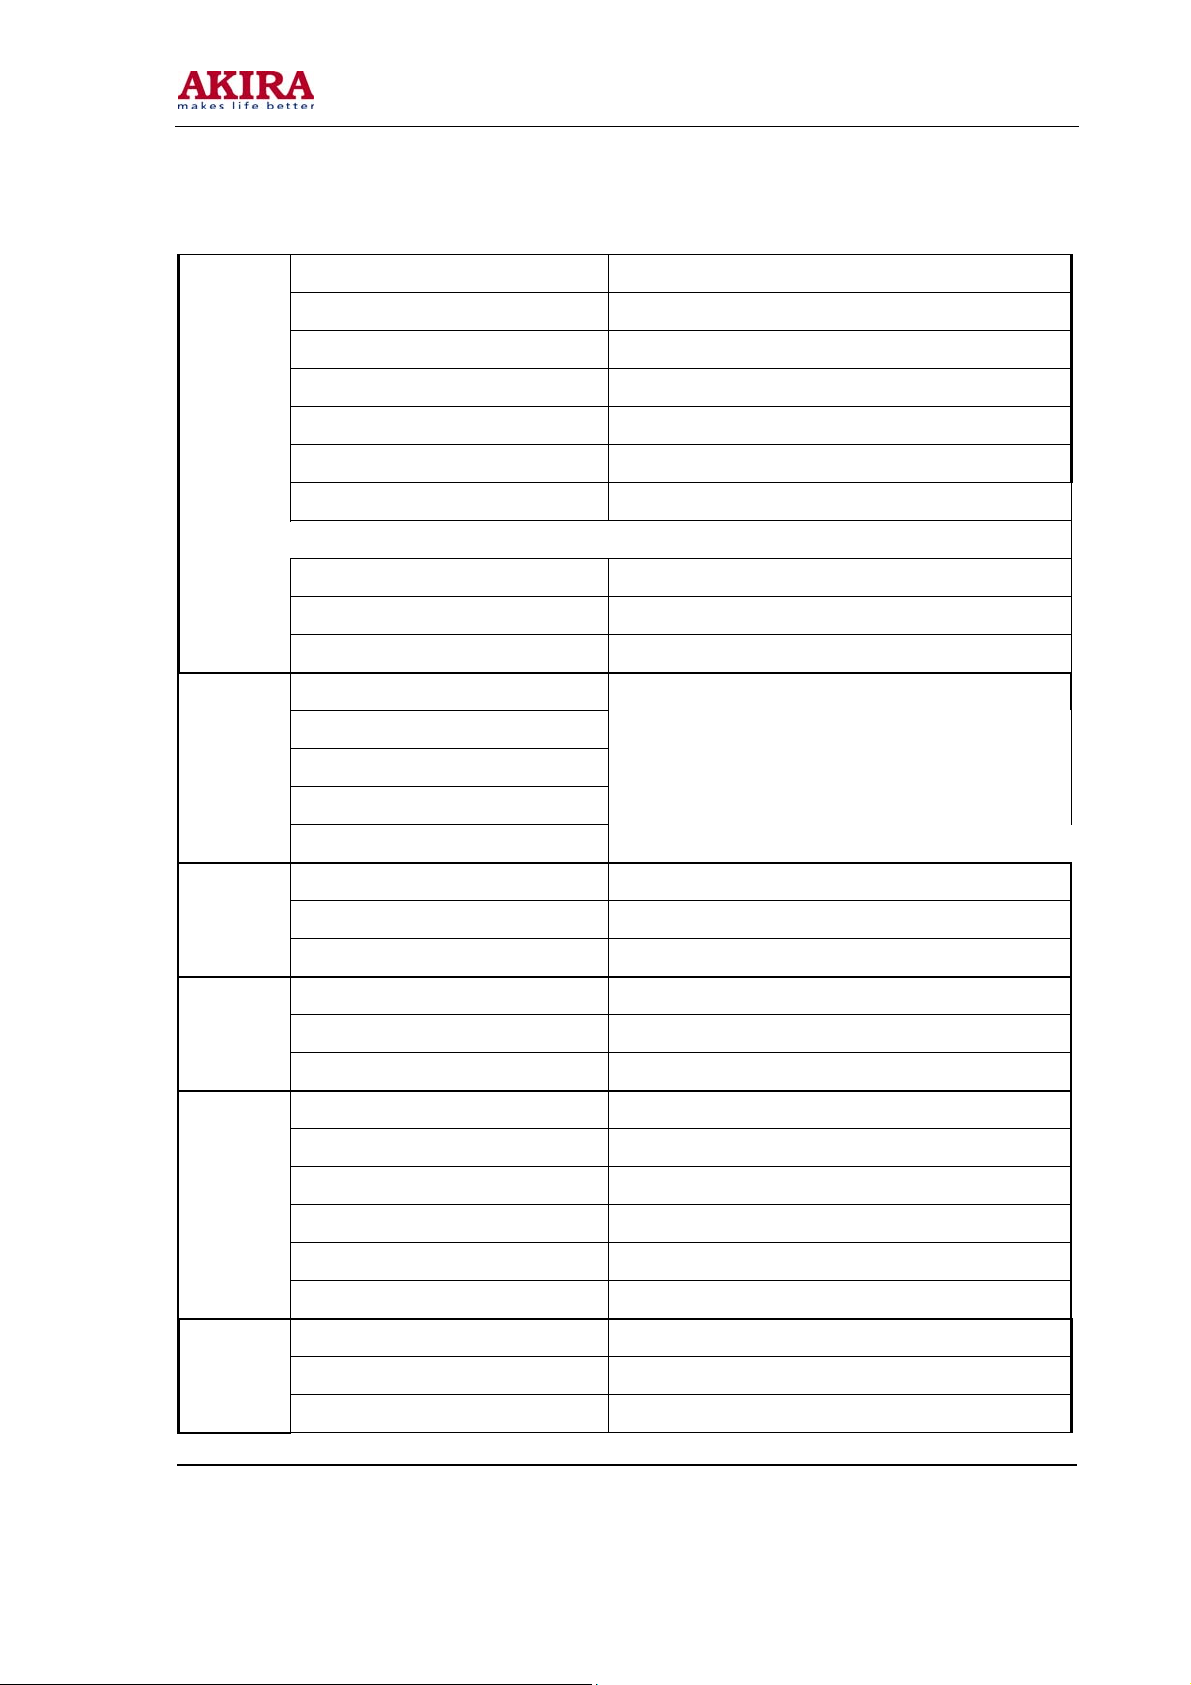
SSPPEECCIIFFIICCAATTIIOONN
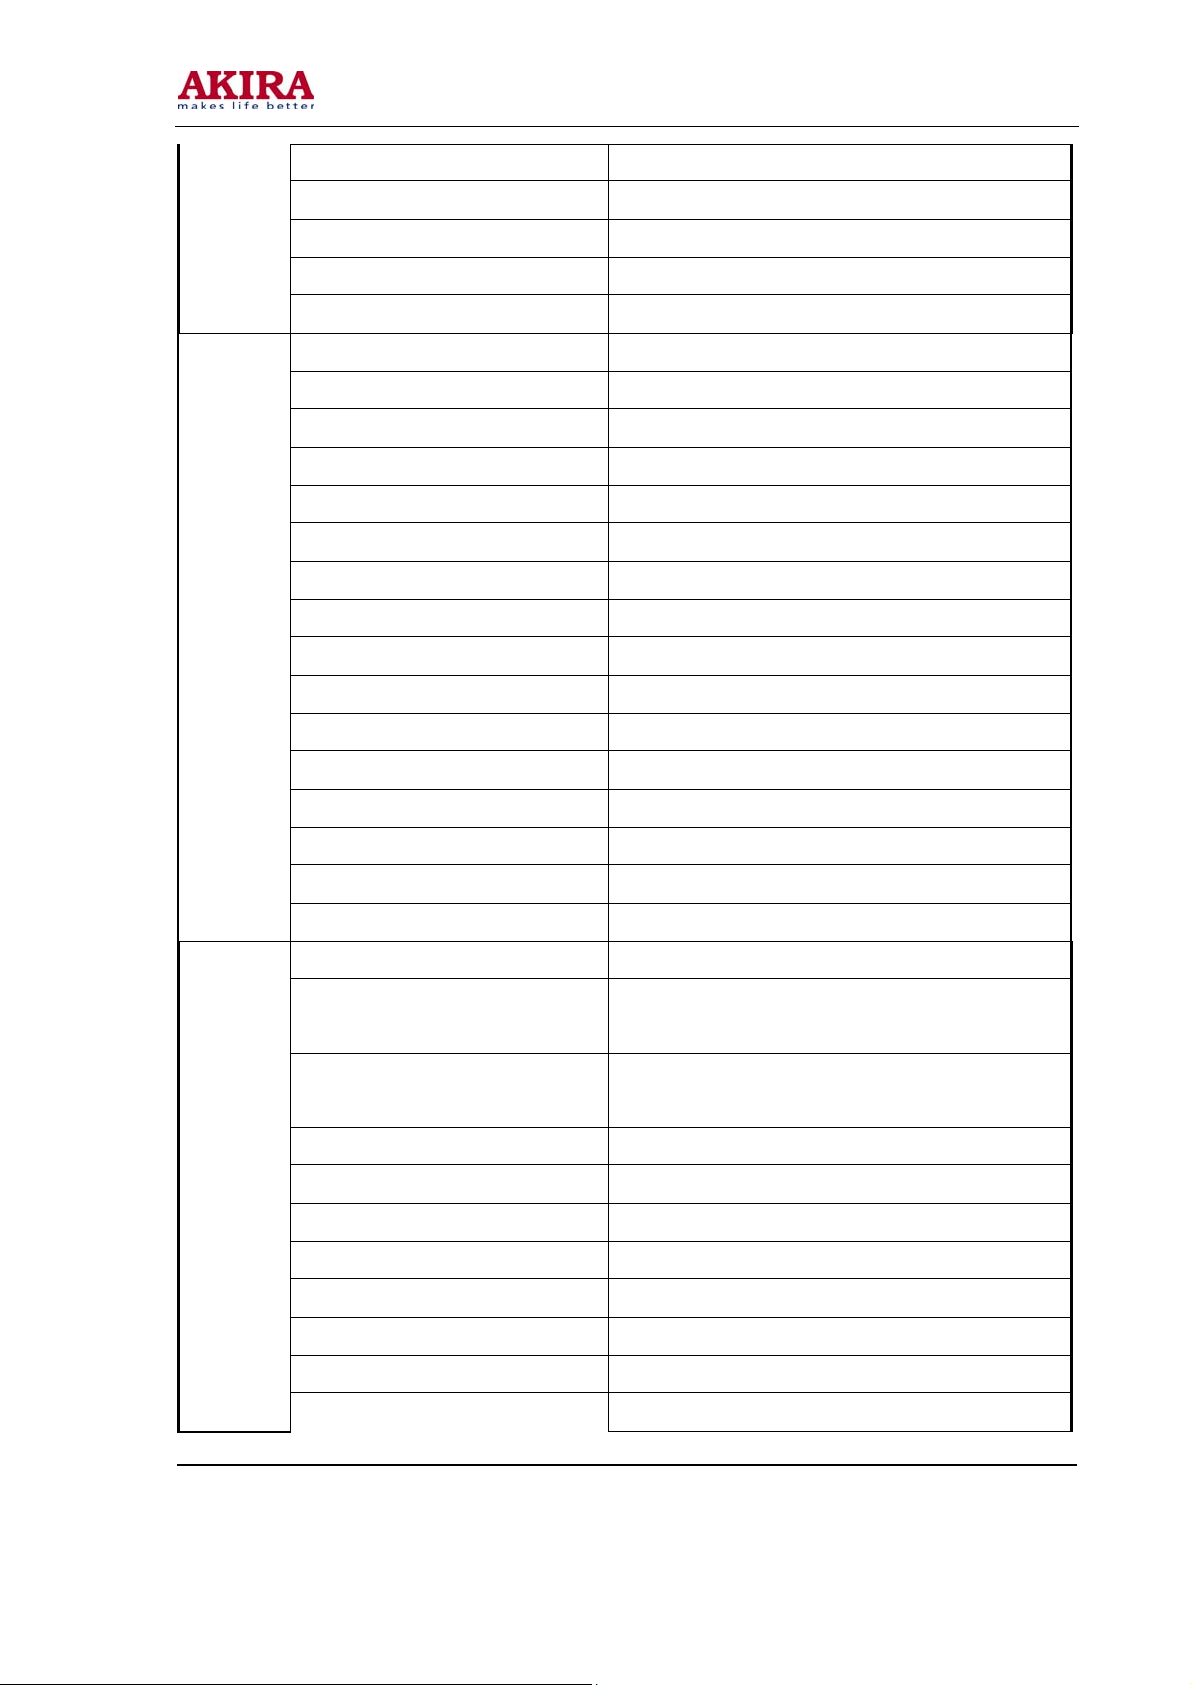
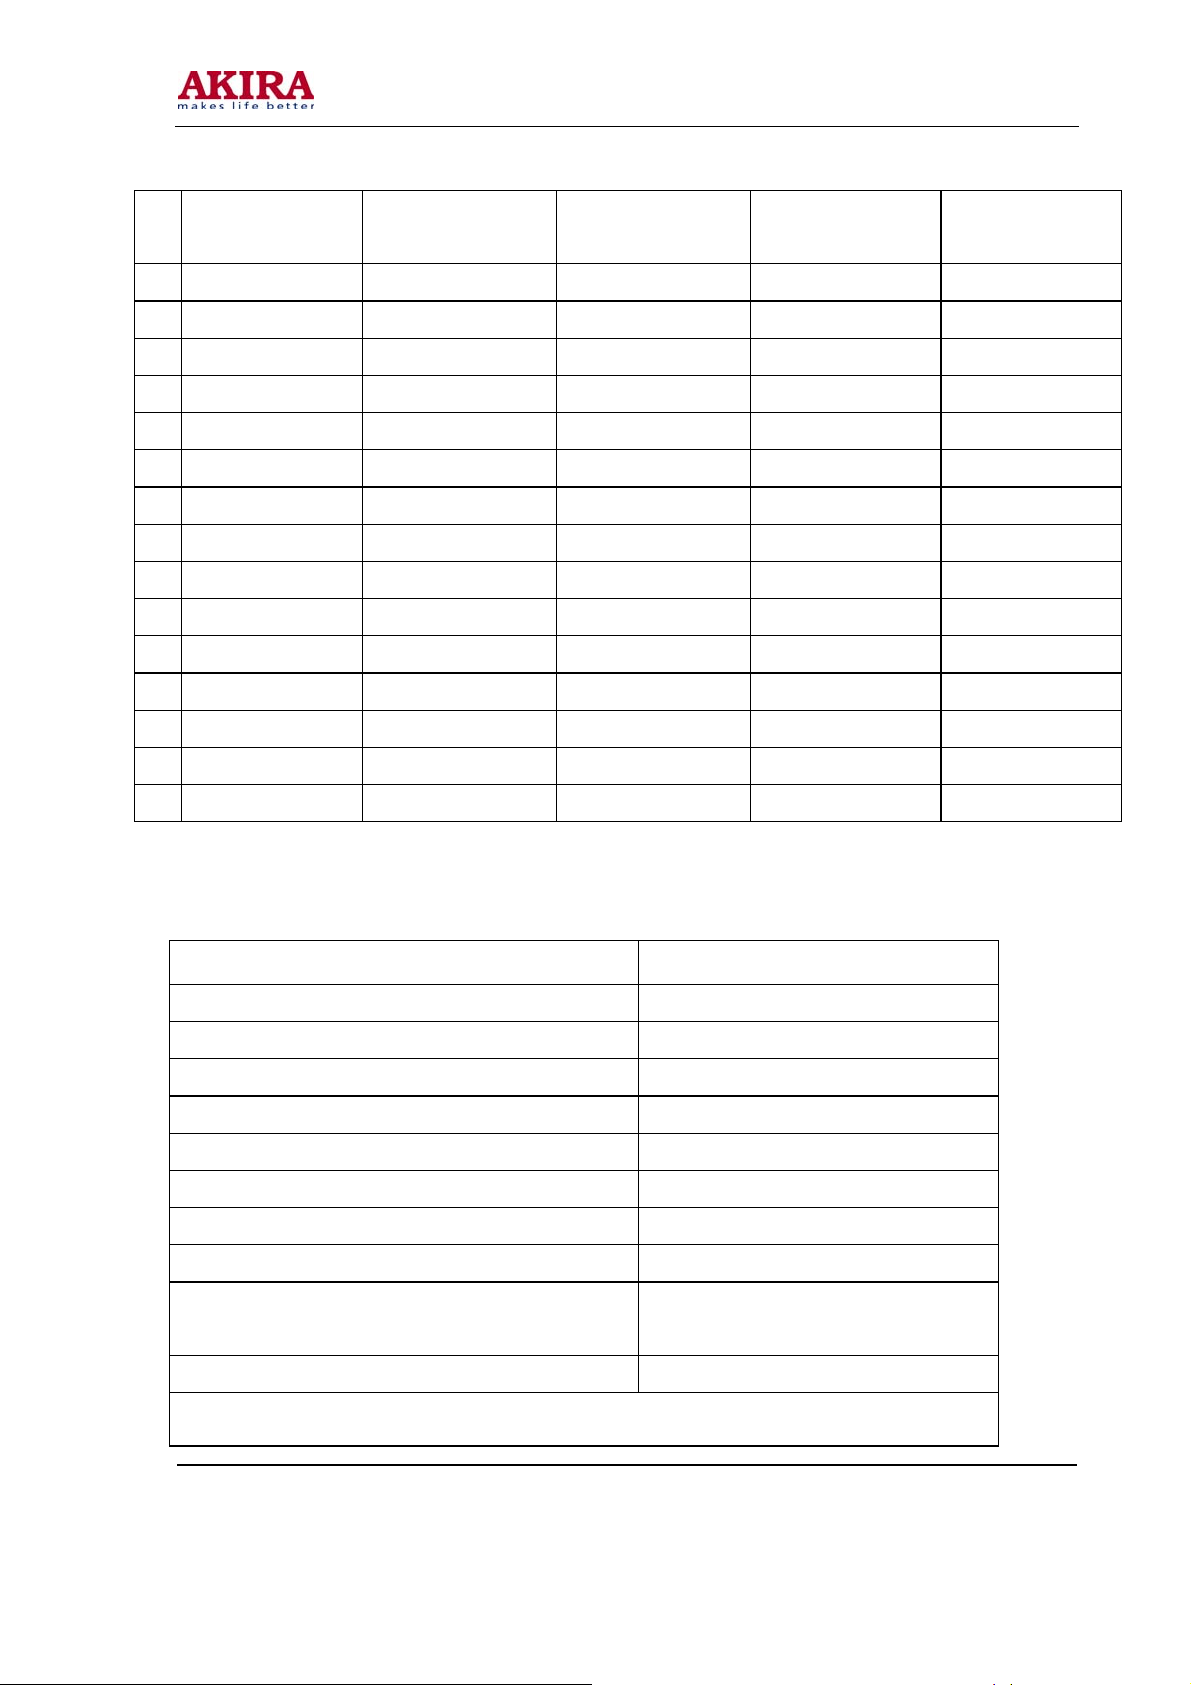
Screen Size & Type 877 x 517 mm
Net TV Dimension 944 x 310 x 733 mm
Gross TV Dimension 1076 x 375 x 845 mm
Net TV Weight 32kg
Gross TV Weight 43kg
Power Consumption (Normal Operation) 200 Watts (MAX)
General
Power Consumption (Standby Operation) 3 Watts (MAX)
Front Cabinet Colour Silver + Black
Back Cabinet Colour Grey 05
Stand Type/Colour Swivel / Black + Silver
Power Adapter Input Voltage
Power Adapter Output Voltage
Power Adapter Output Voltage
No adaptor
Power Adapter
Built-In Power
Operating
Reception & Playback
Panel
Power Plug Type
Certification
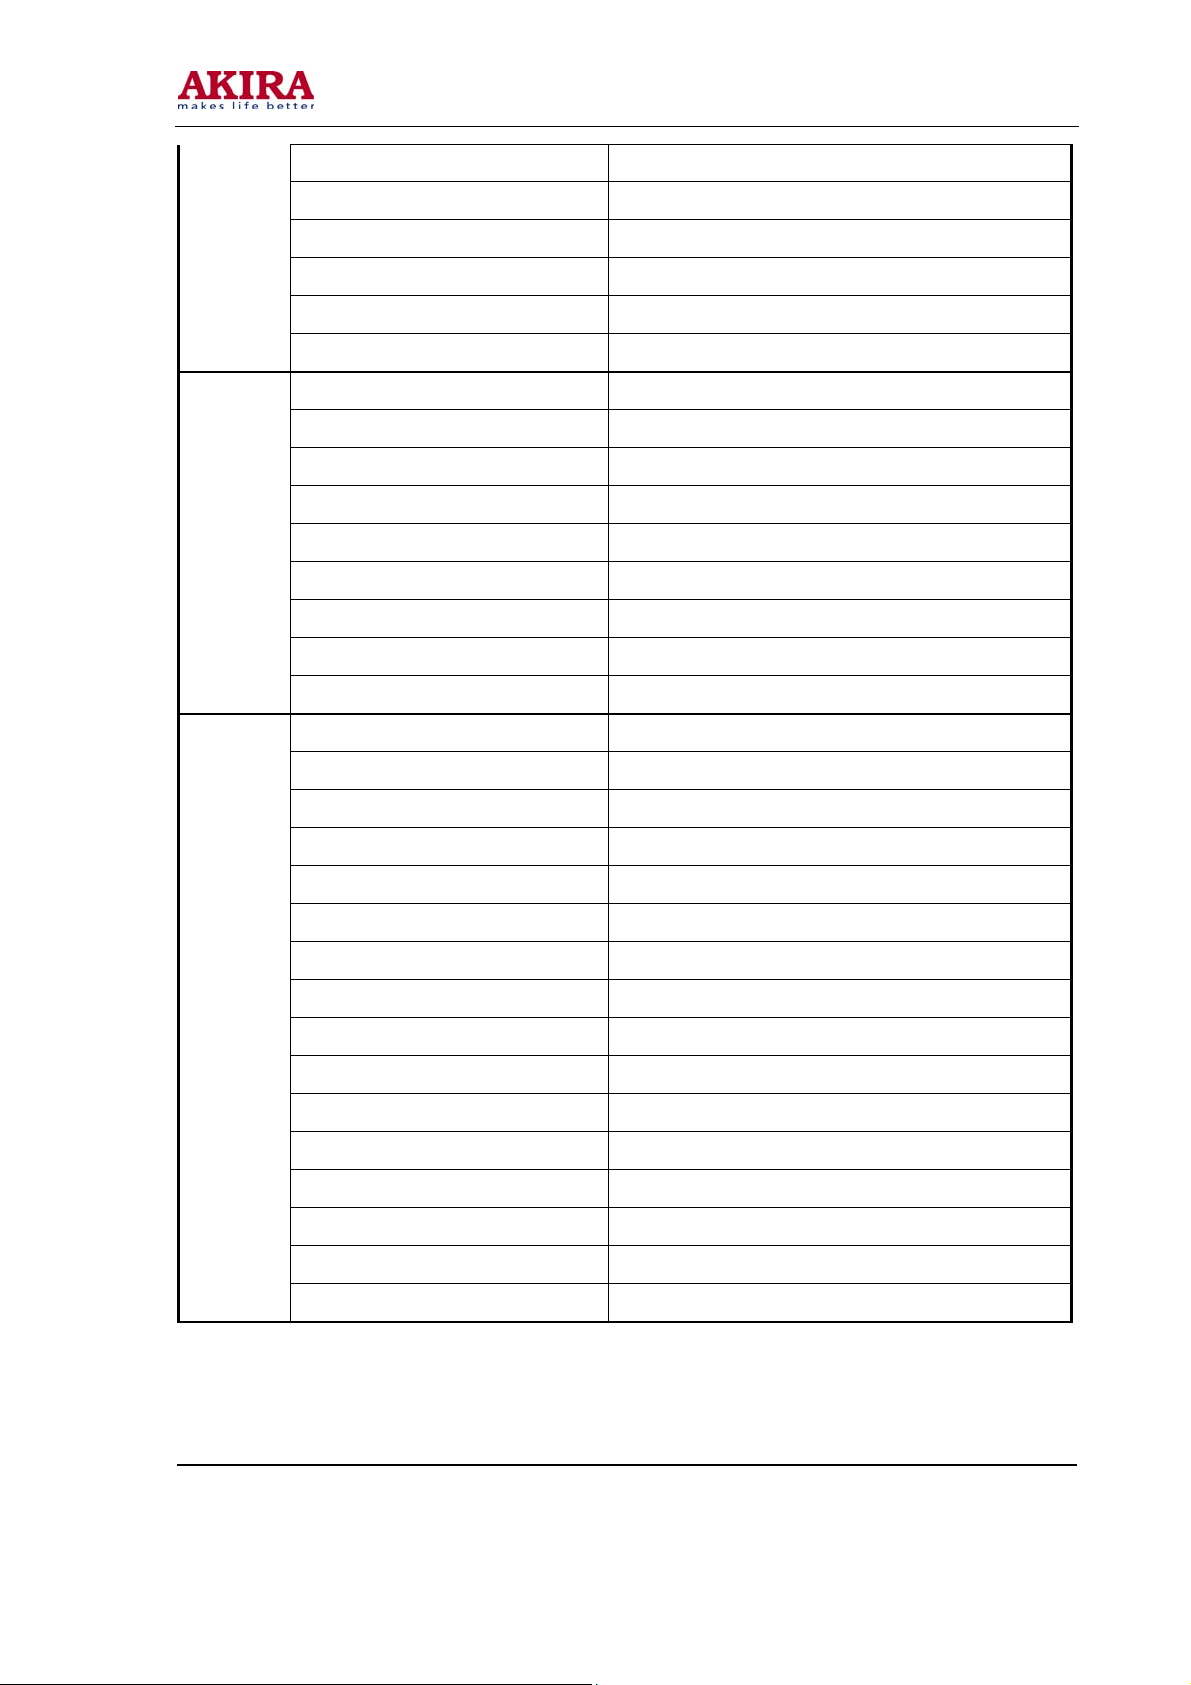
Mains Voltage 100-240V
Mains Frequency 50/60Hz
Supply
Power Plug Type 2.5-Amp round pin(VDE standard)
Operating Temperature 0 - 40 deg C
Storage Temperature -25 - -55degC
Spec
Relative Humidity Level Ta=40 degC,90%RH
RF PAL I , B/G , D/K
RF SECAM B/G , D/K , L/L'
RF NTSC N/A
System
VIDEO PAL Yes
VIDEO SECAM Yes
VIDEO NTSC NTSC PLAYBACK 3.58 / 4.43
Brand & Model LG , L370W01
Resolution 1366 x 768
Displayable Colour 16.7M
Model No.: LCT-37PBSTP.doc
Version: 1.0
Page 7
-7 -
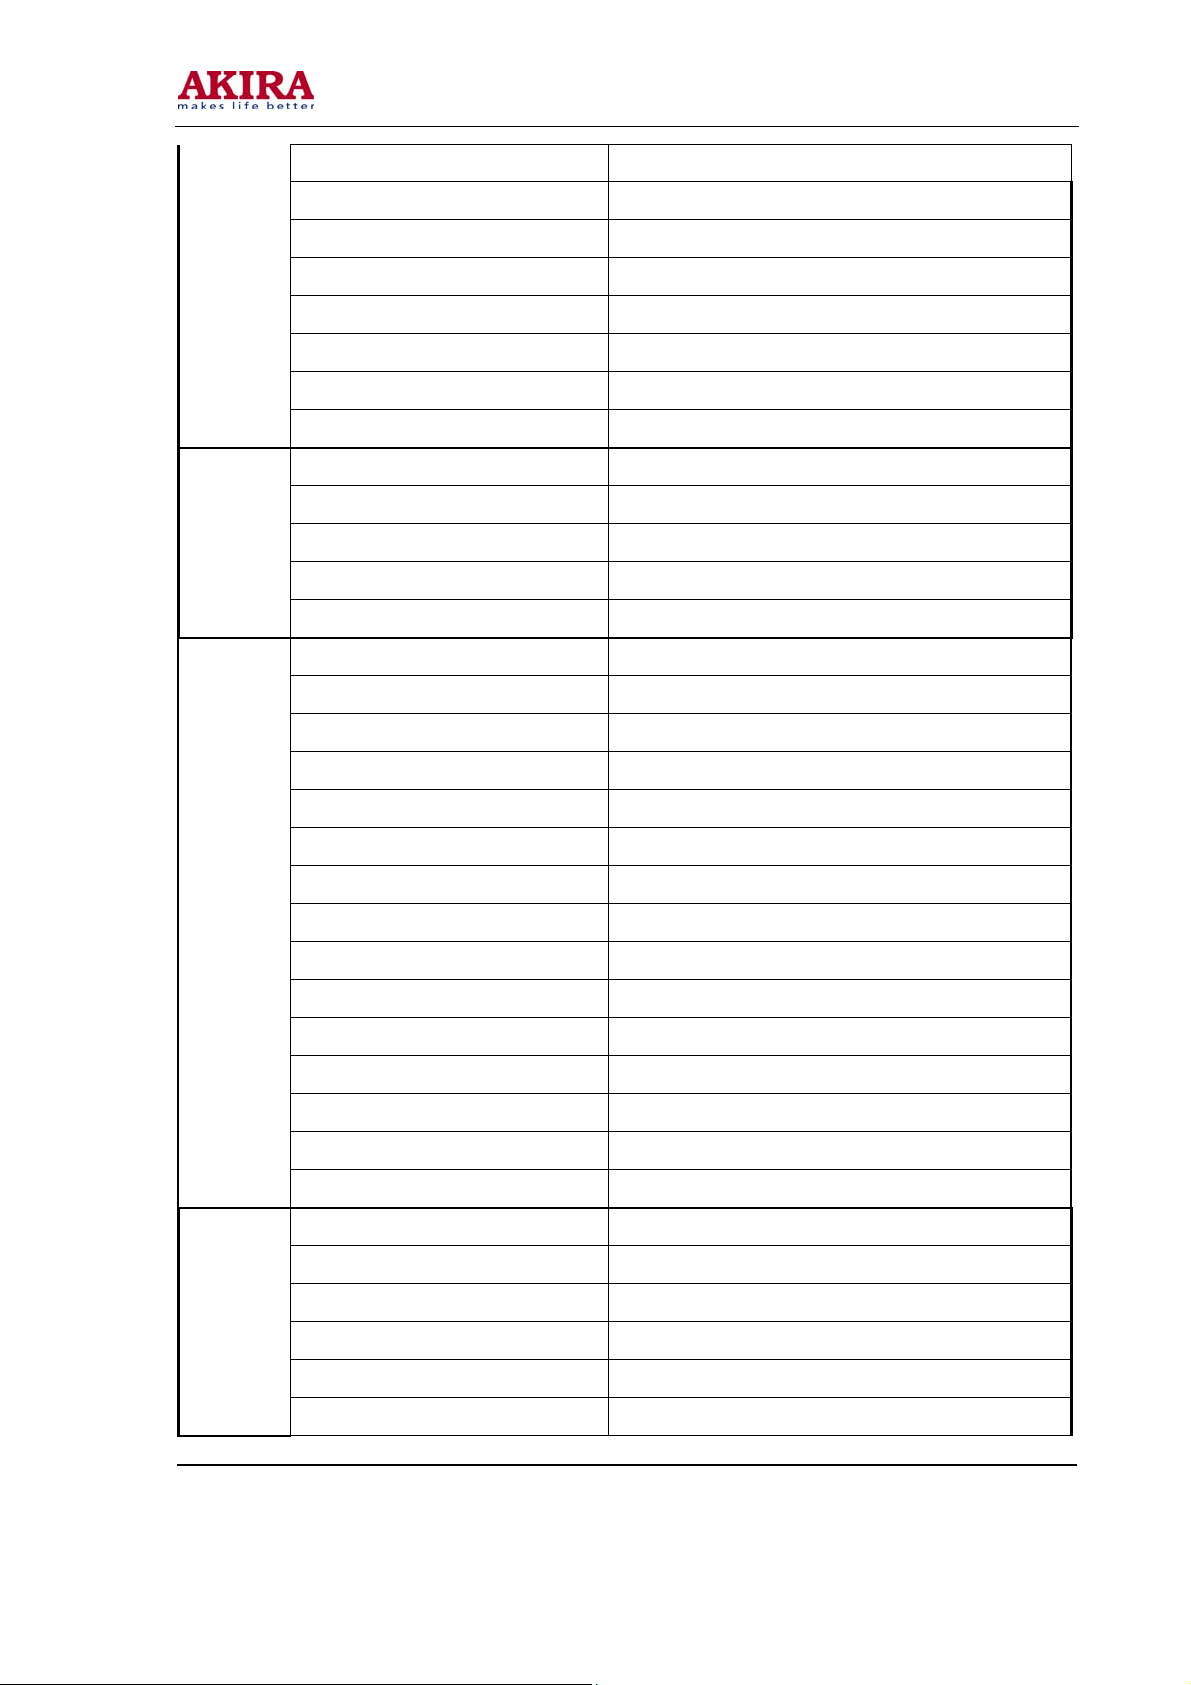
Surface Treatment Hard coating(3H),Anti-glare treatment of the front polarize
Viewing Angle (H/V) 170/170
Display Response Time 16ms
Contrast Ratio 600 : 1
Brightness 500cd/m2
Aspect 16:9
Lamp Life >=50,000
Bad pixels warranty (Bright / Dark / Total) Bright<2, Dark<7, total no more then 7
Channel Coverage 1 to 200
Preset Channels n/a
S + Hyper Band CATV Yes
Tuner
Aerial Input n/a
Detachable n/a
Comb Filter yes 3D
Velocity Modulation n/a
Noise Reduction Weak / Medium / Strong
Film Theater n/a
Detail Enhancer Yes
Super Contrast n/a
Colour Transient Improvement Yes
Picture Mode Option 4 , Vivid / Standard / Mild / Customer
Picture
Brightness Control Range 0 to 100
Contrast Control Range 0 to 100
Colour Control Range 0 to 100
Sharpness Control Range 0 to 100
Hue Control -50 to 50
Colour Temp Selection 3 , Normal / Warm / Cool
Black Stretch Yes
Audio Output 10 Watts x 2
NICAM Stereo Yes
German A2 Stereo Yes
Audio
Surround No
Dual Sound Decoding Yes
Audio Mode Option 4 , Live / Pop / Rock / Customer
Model No.: LCT-37PBSTP.doc
Version: 1.0
Page 8
-8 -
Volume Control 0 to 100
Treble Control -50 to 50
Bass Control -50 to 50
Balance Control -50 to 50
Auto Volume Level n/a
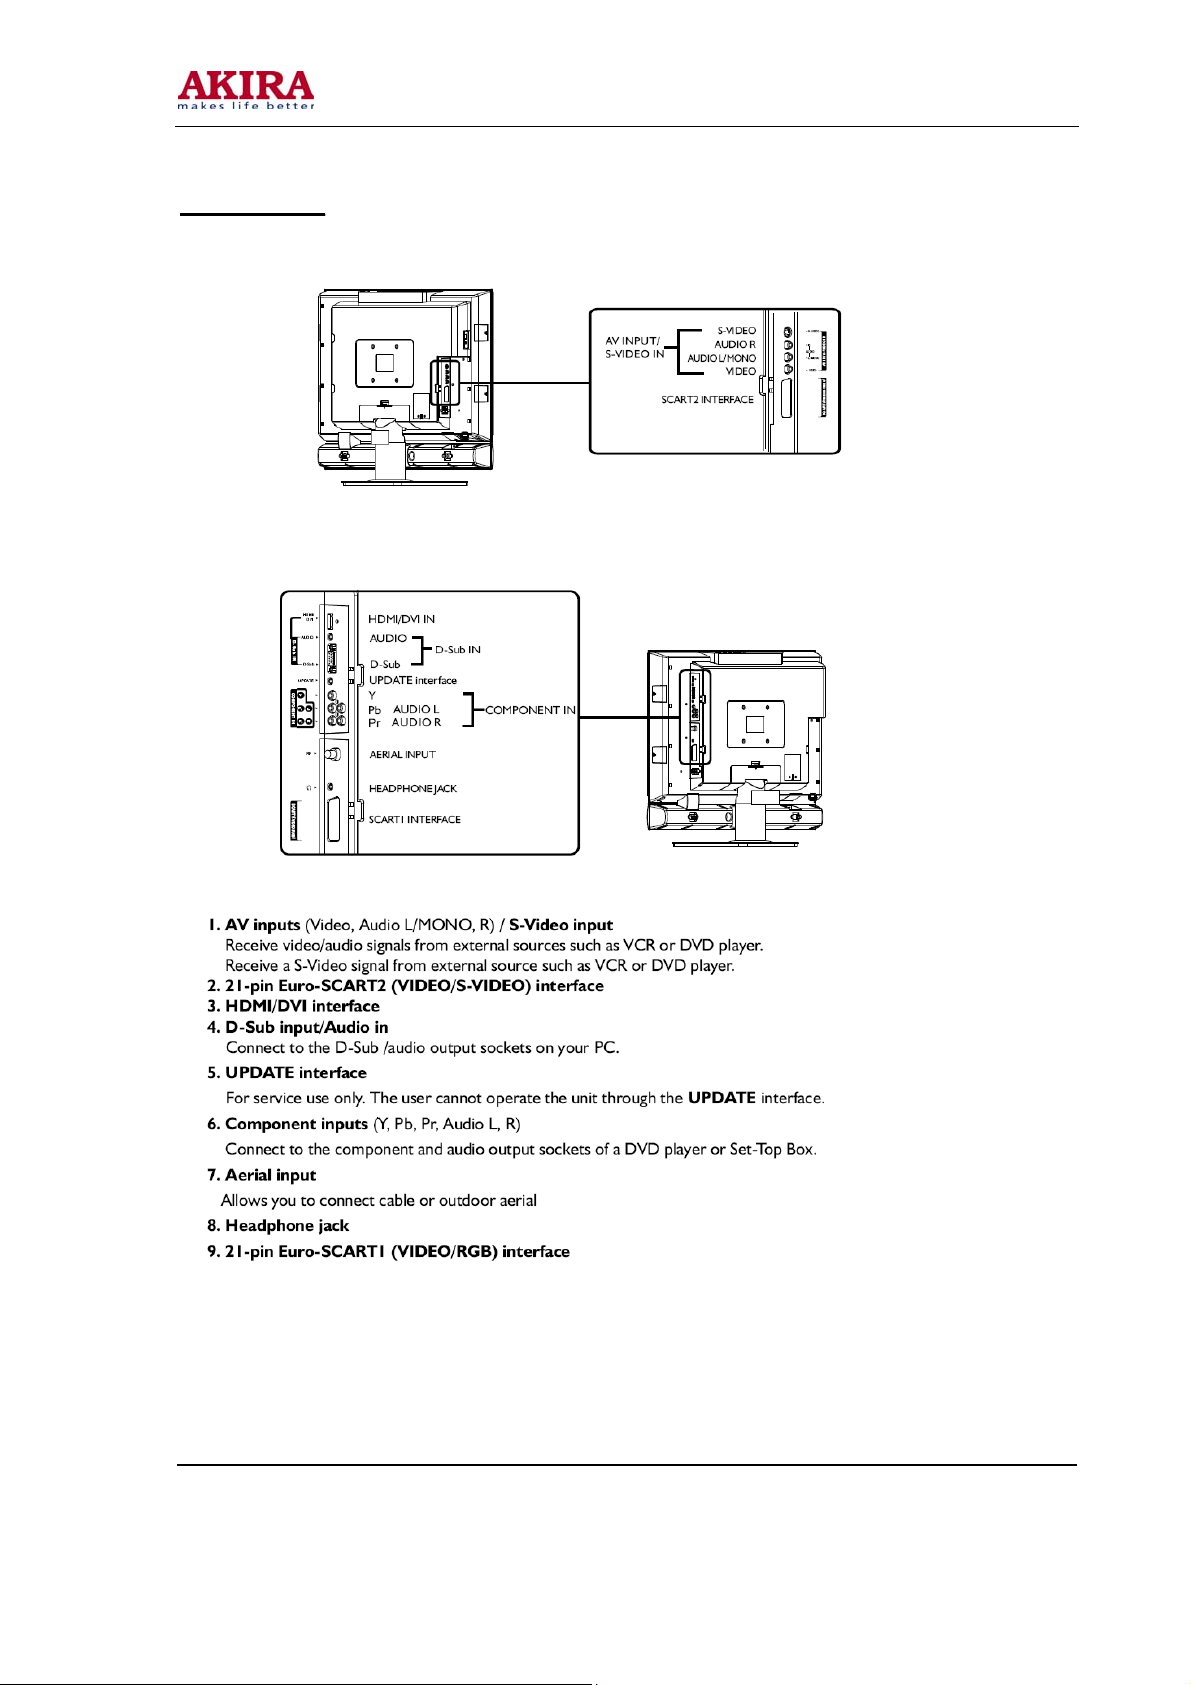
CVBS Input yes/1
S Video Input yes/1
Component YCbCr Input yes/1
Component YCbCr Displayable Modes 480i , 576i , 1080i
Progressive YPbPr Input yes , 1
Component YPbPr Displayable Modes 480p , 576p, 720p
VGA D-15 Input yes ,1
PC Audio L/R Input yes , No,earphone
Scart Input yes , 2
Terminals
Scart Output n/a
CVBS Output n/a
Optical Input n/a
Coaxial Input n/a
DVI Input n/a
Earphones Input yes , 1
HDMI Input yes , 1
Tele-text 1000 pages
Tele-text Language
PinP Type
Number of Tuner 2
Channel Scan auto/manual
Display Aspect Ratio Control auto/16:9/14:9/4:3/zoom/
Other Features
OSD Language OSD with Chinese, English, Russian, Turkish
Other Menu Feature OSD background
Screensaver No
all , (West Europe, East Europe, Turkish / Greek, Cyrillic,
Arabic)
PIP/POP/PBP(4 wins) on all terminal and 9 picture browse on
TV
Timer On Yes
Timer Off Yes
Model No.: LCT-37PBSTP.doc
Version: 1.0
Page 9
-9 -
Sleep Timer yes 15,30,45,60,90,120
Auto Shutdown When No Signal 5 min
Picture Freeze Yes
Child Lock Yes
Local Keys Prog+ , Prog- , Vol+ , Vol- , Menu , TV/AV , Main Switch
Instruction Manual Lang English, Russian
Auto Tuning Yes
Manual Tuning Yes
Manual Fine Tuning Yes
Manual/Auto Colour Sys Both
Manual/Auto Sound Sys Both
Installation
Program Naming Yes
Skip Channel Yes
Exchange Channel Yes
Copy Channel Manual sort program
Remote Control Yes
Batteries for RC Yes
Euro 2 Pin Power Plug No
3 Pin Power Plug No
Instruction Manual Yes
Warrantee Card yes , Russian
RF Cable yes
S-Video Cable no
CVBS Cable no
Accessories
VGA Cable no
Scart Cable no
DVI Cable no
HDMI Cable no
Optical Cable no
Coaxial Cable no
Wall Mounting Bracket yes
SSppeecciiffiiccaattiioonn aarree ssuubbjjeecctt ttoo cchhaannggeess wwiitthhoouutt pprriioorr
nnoottiiccee..
Model No.: LCT-37PBSTP.doc
Version: 1.0
Page 10
-10 -
AAPPPPEEAARRAANNCCEE && CCOONNTTRROOLL FFUUNNCCTTIIOONN
Model No.: LCT-37PBSTP.doc
Version: 1.0
Page 11
-11 -
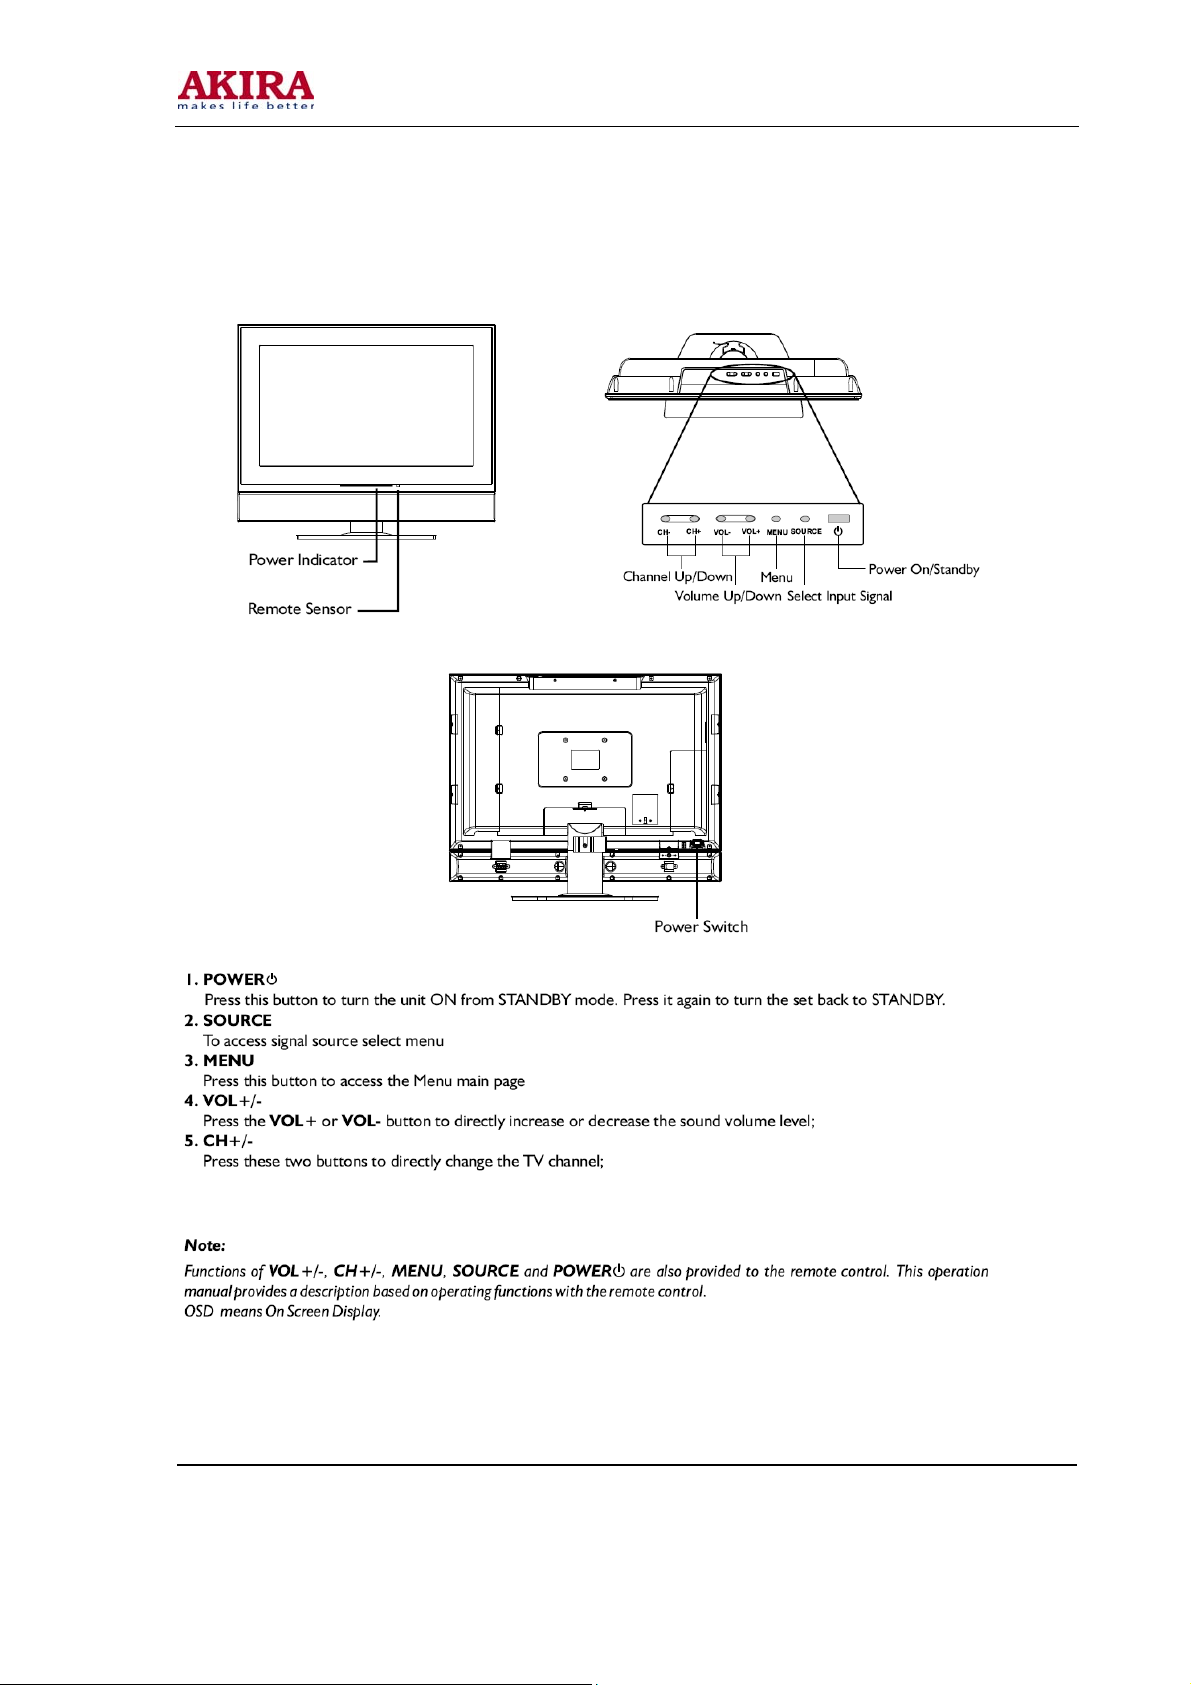
MMAAIINN UUNNIITT
Model No.: LCT-37PBSTP.doc
Version: 1.0
Page 12
-12 -
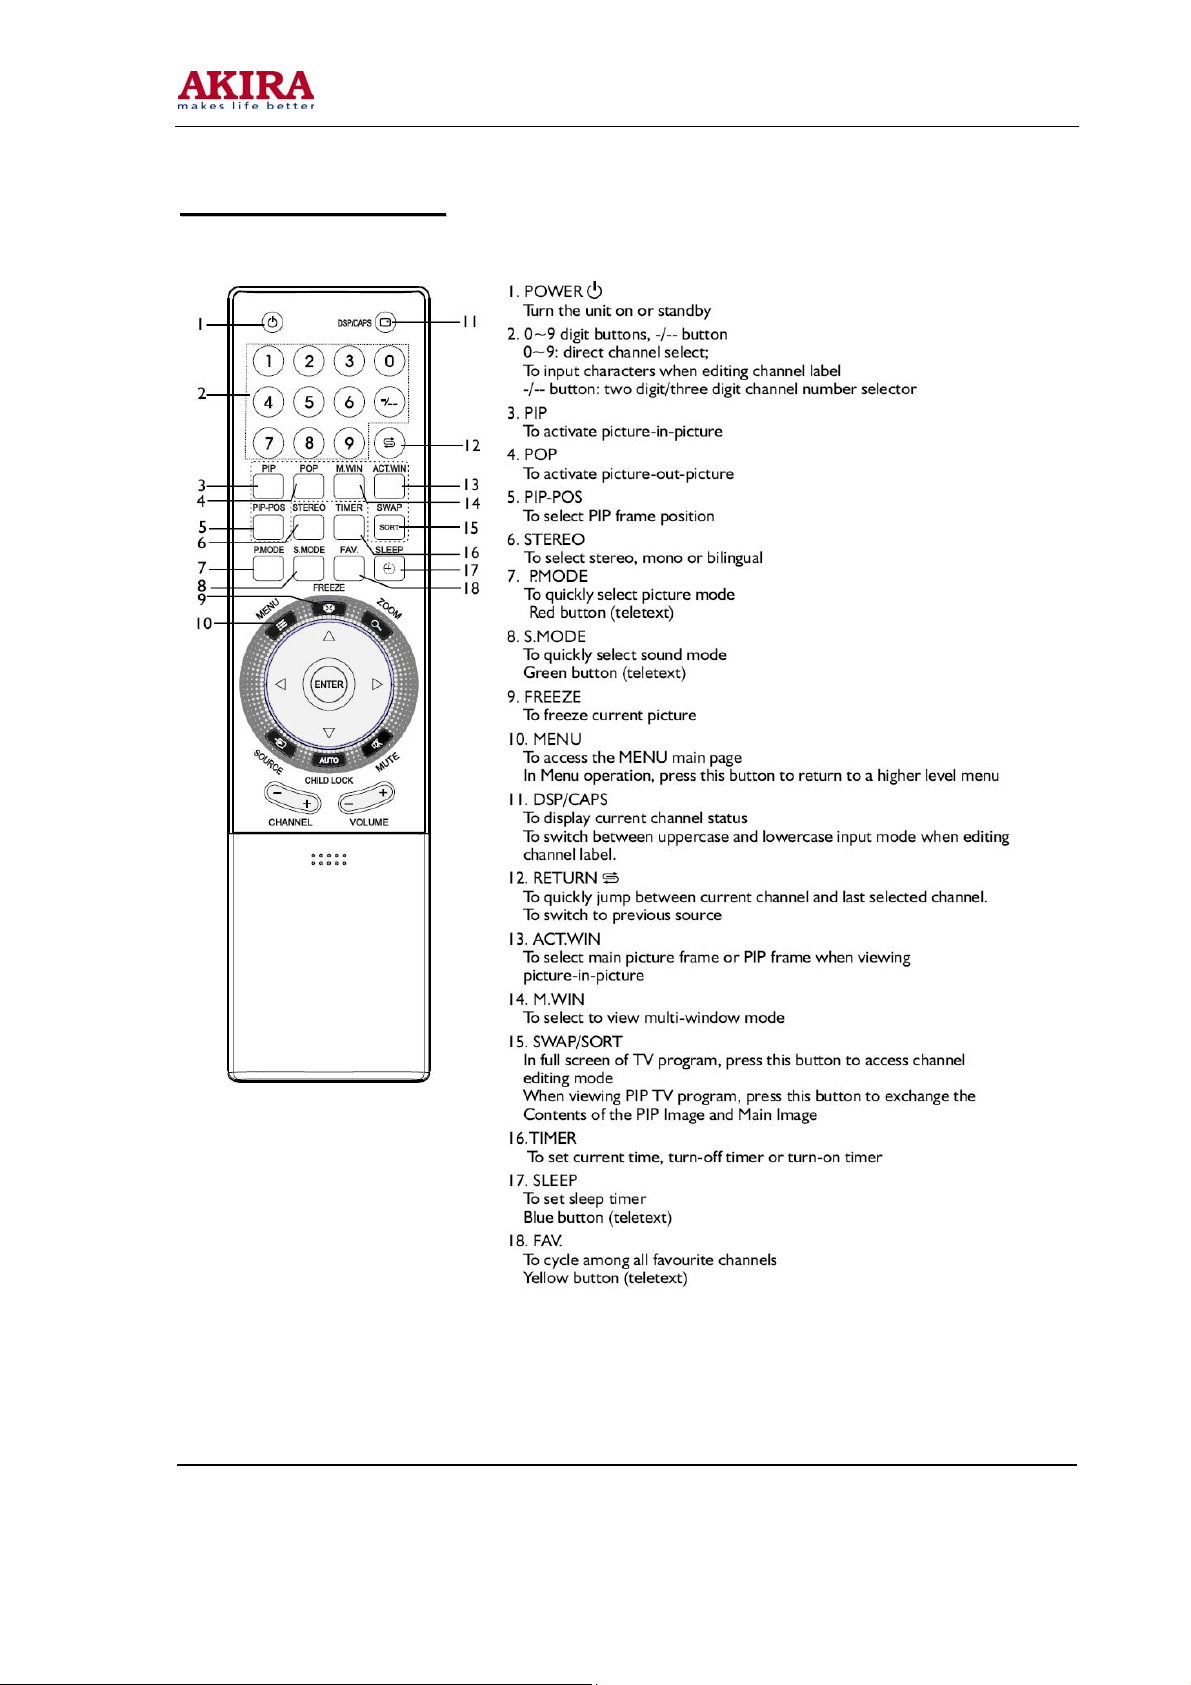
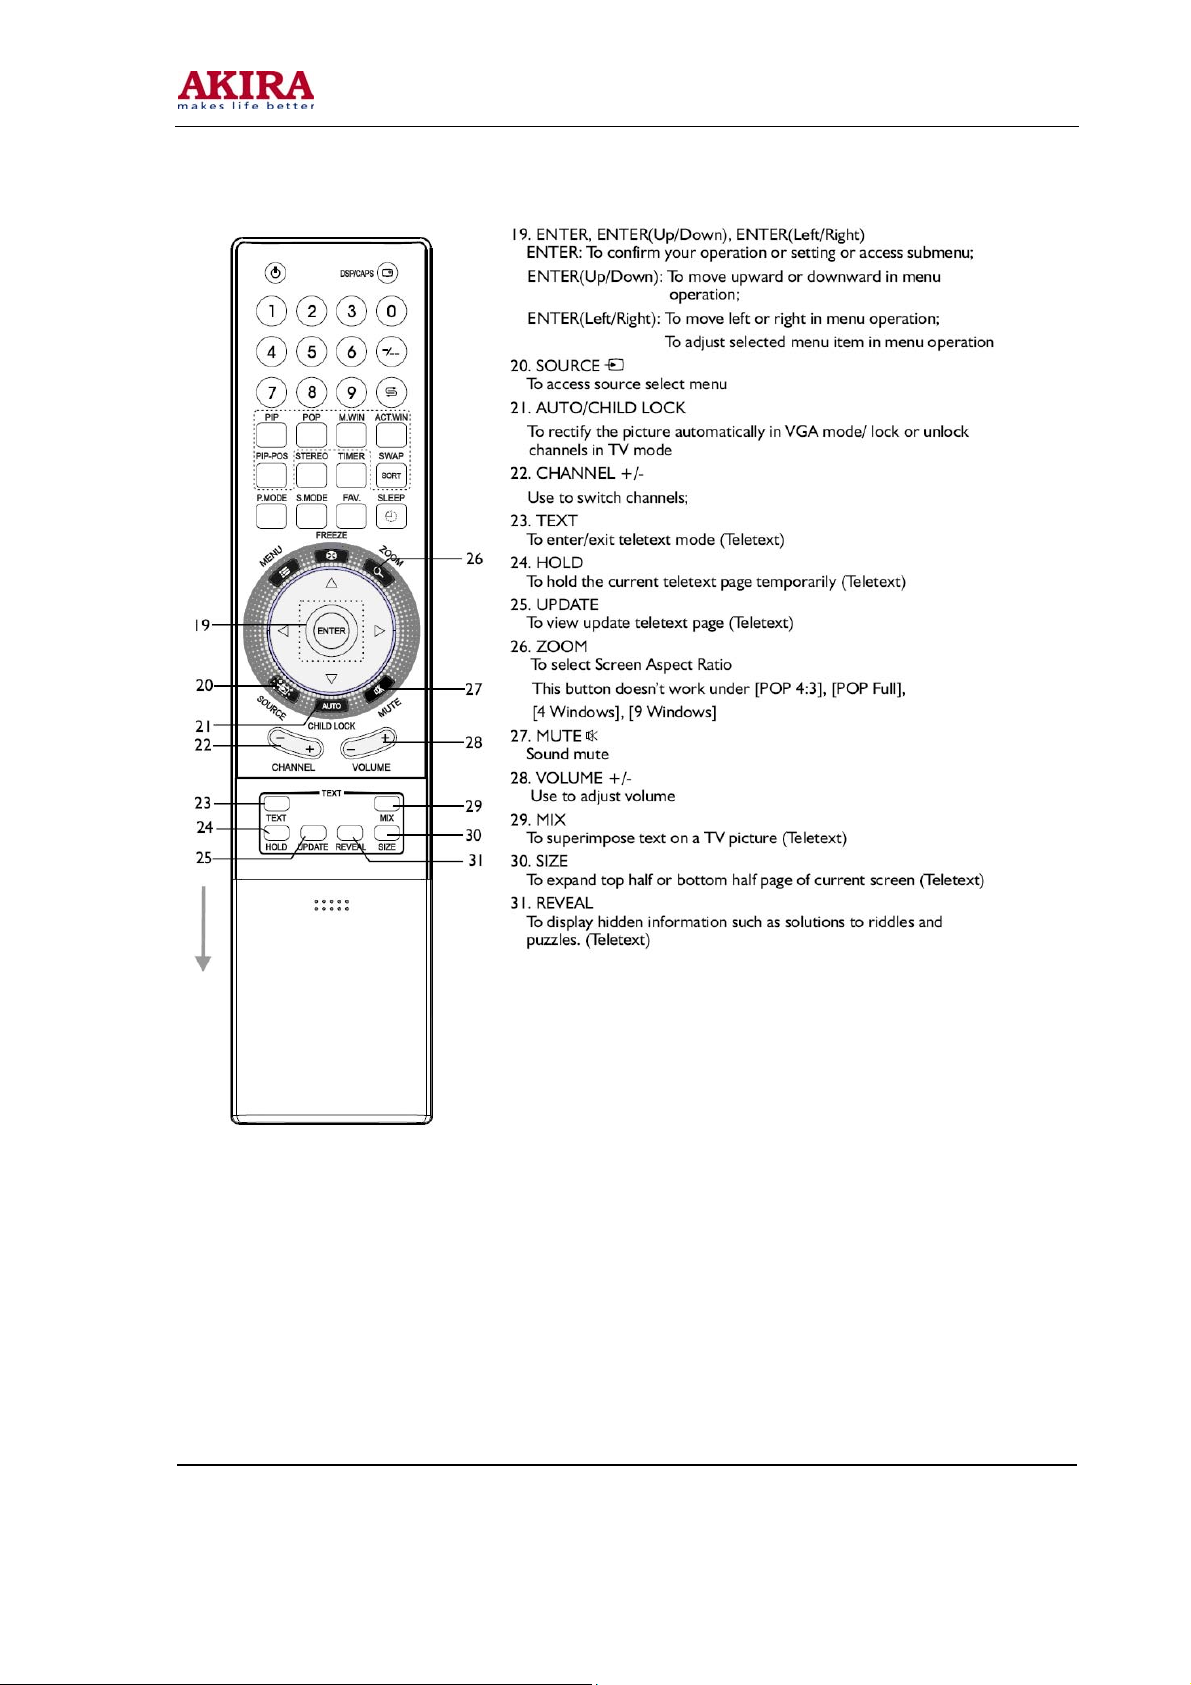
RREEMMOOTTEE CCOONNTTRROOL
L
Model No.: LCT-37PBSTP.doc
Version: 1.0
Page 13
-13 -
Model No.: LCT-37PBSTP.doc
Version: 1.0
Page 14
-14 -
AAlliiggnnmmeenntt IInnssttrruuccttiioonnss
1. Test equipment
PM5515 (Video signal generator)
PM54200(SCART signal generator)
VG-848(YUV, VGA and DVI signal generator)
K-7253 (VGA signal generator)
CA210 (White balancer)
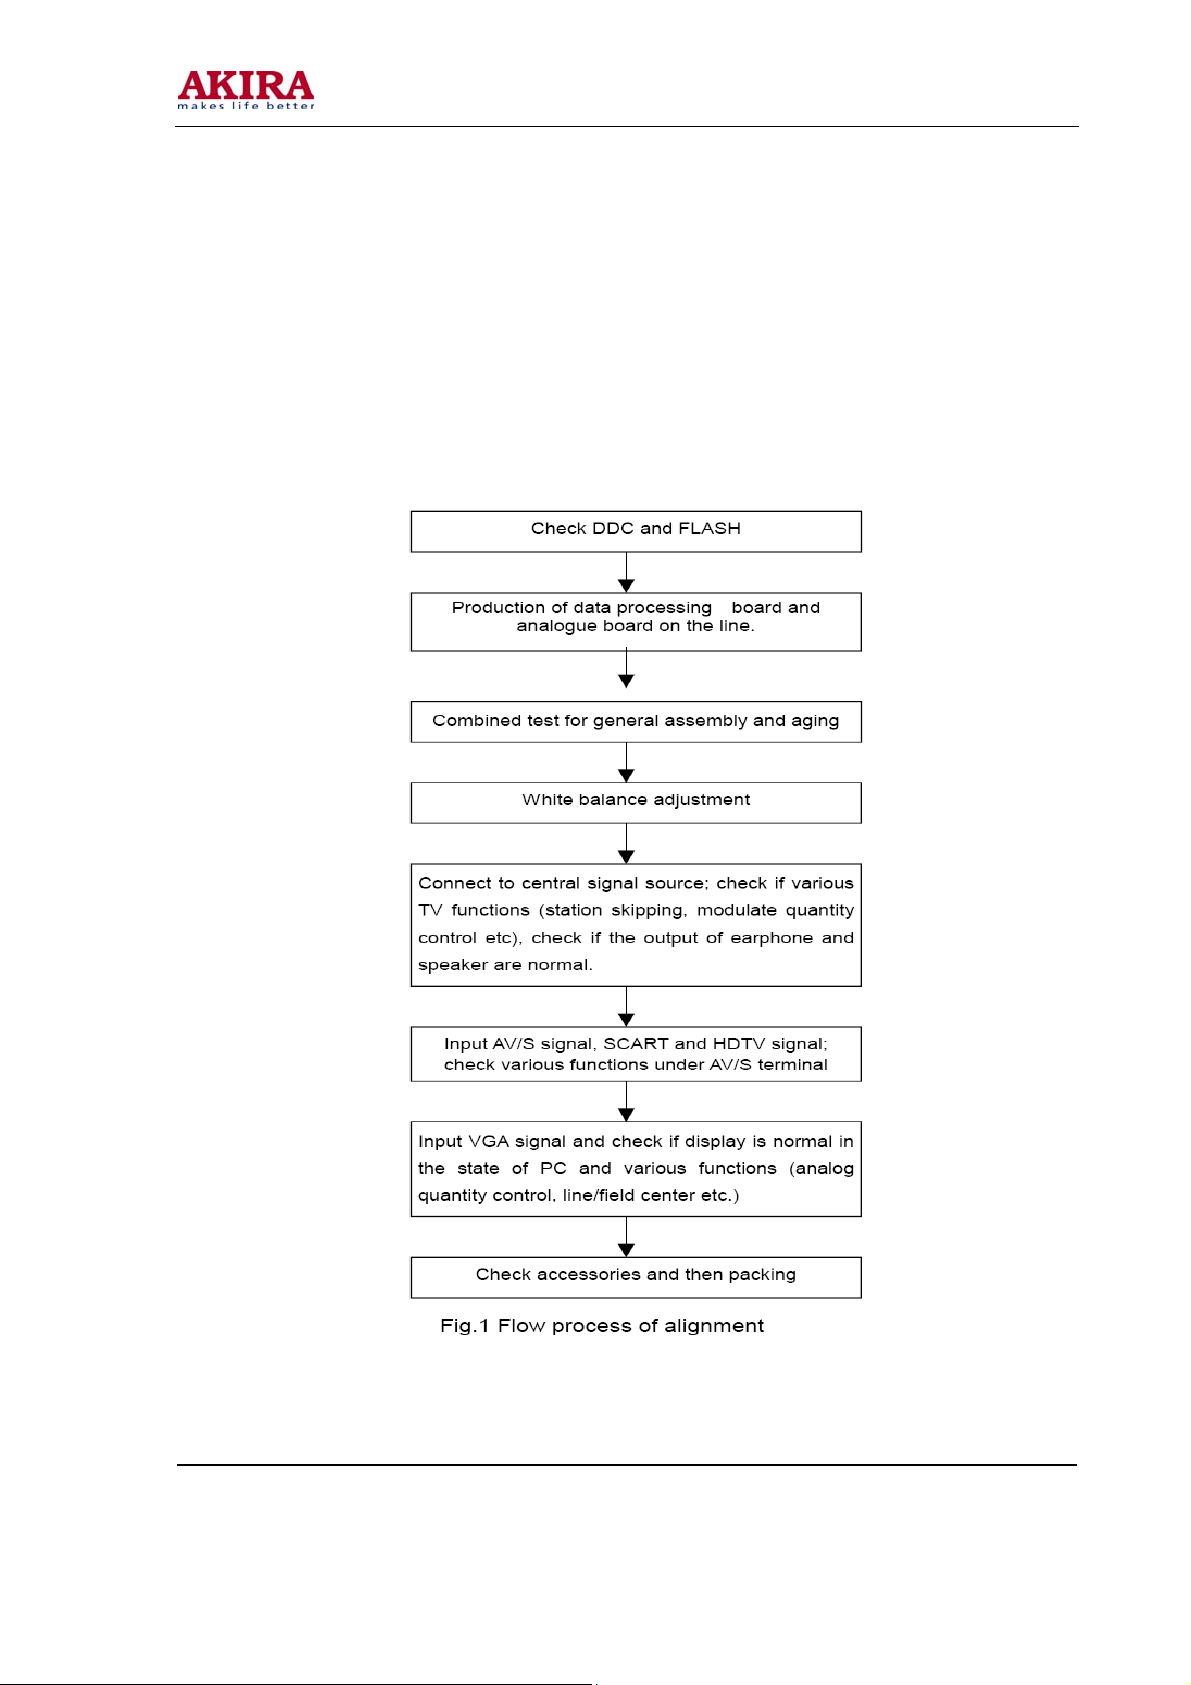
2. The alignment flow chart (see below figure)
Model No.: LCT-37PBSTP.doc
Version: 1.0
Page 15

-15 -
3 Unit adjustments
Method for entering factory menu: Press MENU → -/--→9→1→8 one by one, then enter factory menu,
press the SLEEP button to select adjustment page, exit factory menu to press the MENU button.
4 EEPROM initialization
Enter the first page of factory menu, select “EEPROM INITIALIZE” to be “on”, after turn off the unit,
repeating turn on the unit is over.
5 White balance adjustment
Input PAL signal of 16-level gray-scale (TIMING969 PATTAN921) from VG848 to AV channel, enter
user menu, set color to 0, APL to “off”, enter factory menu white balance adjustment page, select color
temperature, fixed the GGAIN to 50H, adjust BGIAN and RGAIN to 400nits, then the color coordinate
to 284, 299. Fixed the BOFFSET to 50H, adjust GOFFSET and ROFFSET to 5nits, then the color
coordinate to 284, 299. Select cool tint, adjust color coordinate to 270, 283. Select warm tint, adjust
color coordinate to 313, 329.
6. Performance Inspections
6.1 TV function
Enter the search menu → auto search, connect RF-TV terminal to the central signal source, check if
there is station skipping.
6.2 AV/S input terminal
Input AV/S signal, check the picture and sound is normal
6.3 SCART terminal (note: check the SCART terminal, set display mode to AUTO)
6.3.1 Check SCART INPUT special function
6.3.1.1 SCART1 terminal function
a. After turn on the unit, connect the SCART1 to PM54200 signal generator, then the unit auto
select to SCART1 mode.
b. SCART signal generator sends CVBS signal to the unit, check if the image and sound is
normal. It sends image format (16:9 and 4:3) to the unit, check if the unit auto identify is normal.
Change SCART signal to RGB signal, check if the image and sound is normal, It sends image format
(16:9 and 4:3) to the unit, check the unit auto identify is normal. Select the PIP mode, connect
earphone cable, and check if the sound is normal.
6.3.1.2 SCART2 terminal function
a. After turn on the unit, connect the SCART2 to PM54200 signal generator, then the unit auto
select to SCART2 AV mode.
b. SCART signal generator sends CVBS signal to the unit, check if the image and sound is
normal. It sends image format (16:9 and 4:3) to the unit, check if the unit auto identify is normal, and
display the SCART2 AV. Change SCART signal to Y/C signal, select the SCART2 Y/C channel mode,
check if the image and sound is normal, It sends image format (16:9 and 4:3) to the unit, check if the
unit auto identify is normal. Select the PIP mode, connect earphone cable, and check if the sound is
normal.
6.3.2 Check SCART OUTPUT special function
Model No.: LCT-37PBSTP.doc
Version: 1.0
Page 16
-16 -
6.3.2.1 SCART1 terminal function
Input signal in the TV states, connect the SCART1 terminal to the TV. Change the TV program,
check if output signal of SCART1 is TV signal, and the image and sound is normal, change the unit
channel, the CART1 output TV signal, it can not other signal.
6.3.2.2 SCART2 terminal function
Input signal in the TV/AV/S states, connect the SCART2 terminal to the TV. Change the unit channel,
check if output signal of SCART2 is current signal, and the image and sound is normal.
6.4 YPbPr/YPbPr terminal Input the YUV signal (VG-848 signal generator), separate input YUV format
signal of table 1, check if the image and sound is normal. If the image is deflection of the H-field,
select auto sync correction of the SCREEN menu. If the image is slight disturb, adjust the FINE TUNE
correction of the SCREEN menu. Open the PIP mode, connect the earphone, and check if the image
and sound is normal.
Table 1 YUV Signal Format
H-frequency(kHz) V-frenquency(Hz) Signal
1 15.734 59.94 SDTV 480i
2 31.469 59.94 HDTV 480p
4 44.955 59.94 HDTV 720p
6 33.716 59.94 HDTV 1080i
7 15.625 50 SDTV 576i
8 31.25 50 HDTV 576p
9 33.75 50 HDTV 1080i
10 37.50 50 HDTV 720p
6.5 VGA terminal Input the VGA signal (VG-848 signal generator), separate input VGA
format signal of table 1, check if the image and sound is normal. If the image is deflection of the H-field,
select auto sync correction of the SCREEN menu. If the image is slight disturb, adjust the FINE TUNE
correction of the SCREEN menu. Open the PIP mode, connect the earphone, and check if the image
and sound is normal.
6.6 HDMI terminal HDMI signal format receive the three high definition signal: 480P, 576P,720P/50/60
Hz, 1080I/50/60 Hz, except for the table 2 signal. Check if the image (contain HDCP ON and OFF)
and sound is normal. If the image is deflection of the H-field, select auto sync correction of the
SCREEN menu. Open the PIP mode, connect the earphone, and check if the image and sound is
normal.
Model No.: LCT-37PBSTP.doc
Version: 1.0
Page 17
-17 -
TABLE2 VGA Signal Format
Resolution H-Frequency(kHz) V-Frenquency(Hz)
1 720 X 400 31.469 70.086 28.322 IBM
2 640 X 480 31.469 59.94 25.175 IBM
3 640 X 480 37.861 72.809 31.5 VESA
4 640 X 480 37.5 75 31.5 VESA
5 640 X 480 43.269 85.008 36 VESA
6 800 X 600 35.156 56.25 36 VESA
7 800 X 600 37.879 60.317 40 VESA
8 800 X 600 48.077 72.188 50 VESA
9 800 X 600 46.875 75 49.5 VESA
10 800 X 600 53.674 85.061 56.25 VESA
11 1024 X 768 48.363 60.004 65 VESA
12 1024 X 768 56.476 70.069 75 VESA
13 1024 X 768 60.023 75.029 78.75 VESA
14 1280 X 1024 63.98 60.02 108.00 VESA
Point clock pulse
Remark
Frenquency(MHz)
15 1024 X 768 68.667 84.98 94.486 VESA
6.7 Ex-Factory setting see to TABLE 3 -TABLE 9 TABLE 3 Factory Option Menus
Items Ex-Factory setting
IIC Bus-off Off
EEPROM Erase Off
Backlight Adjustable Off
Back Light 100
Menu Timeout 5
Blank switch enable On
ShowLogo On
Auto Program Sort On
TT Char Group
Dynamic Scart Off
West Europe / East Europe / Cyrillic
/ Turkish /Greek/Arabic/Hebrew
Note: the latter 6 items should set according to clients’ require.
Model No.: LCT-37PBSTP.doc
Version: 1.0
Page 18

-18 -
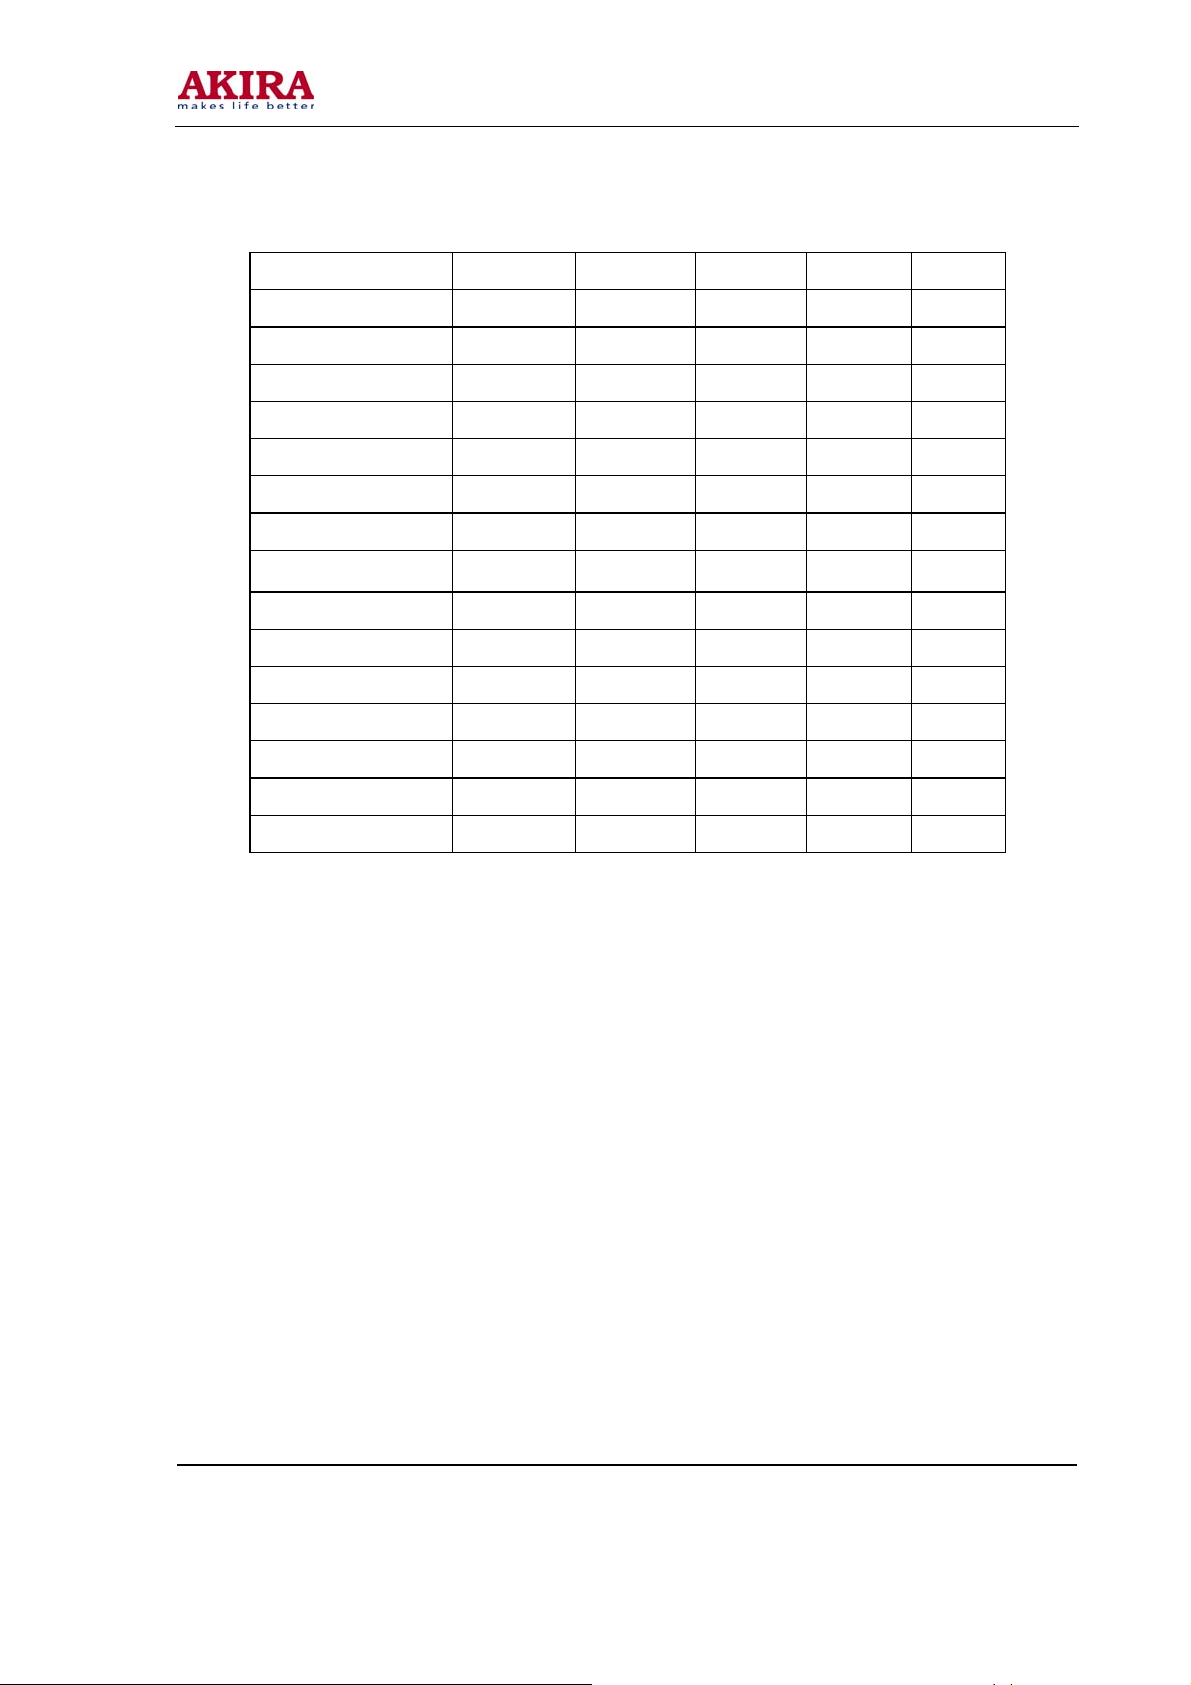
TABLE 4 Factory Audio Setting TABLE 5 Factory Video Limit Setting
Items
LCT-27PBSTP LCT-32PBSTP LCT-37PBSTP LCT-42PBSTP
Volume 1 2CH 2CH 2CH 2CH
Volume 25 55H 57H 5AH 5AH
Volume 50 5CH 5EH 61H 61H
Volume 75 64H 65H 69H 69H
Volume 100 6BH 6DH 72H 72H
HP VOLUME SETTING
Volume 1 64H
Volume 25 96H
Volume 50 A1H
Volume 75 AEH
Volume 100 BEH
MSP Scart1
72H
Volume
Prescale Scart 4CH
Ex-Factory setting
Prescale FM/AM 27H
Prescale Nicam 64H
Scart TV Volume 20H
Scart AV Volume 72H
D/K select HDEV3 Off
AVC Off
Equalizer Bands
Max
Spatial Mode 0
Spatial Strength 00H
60H
Model No.: LCT-37PBSTP.doc
Version: 1.0
Page 19
-19 -
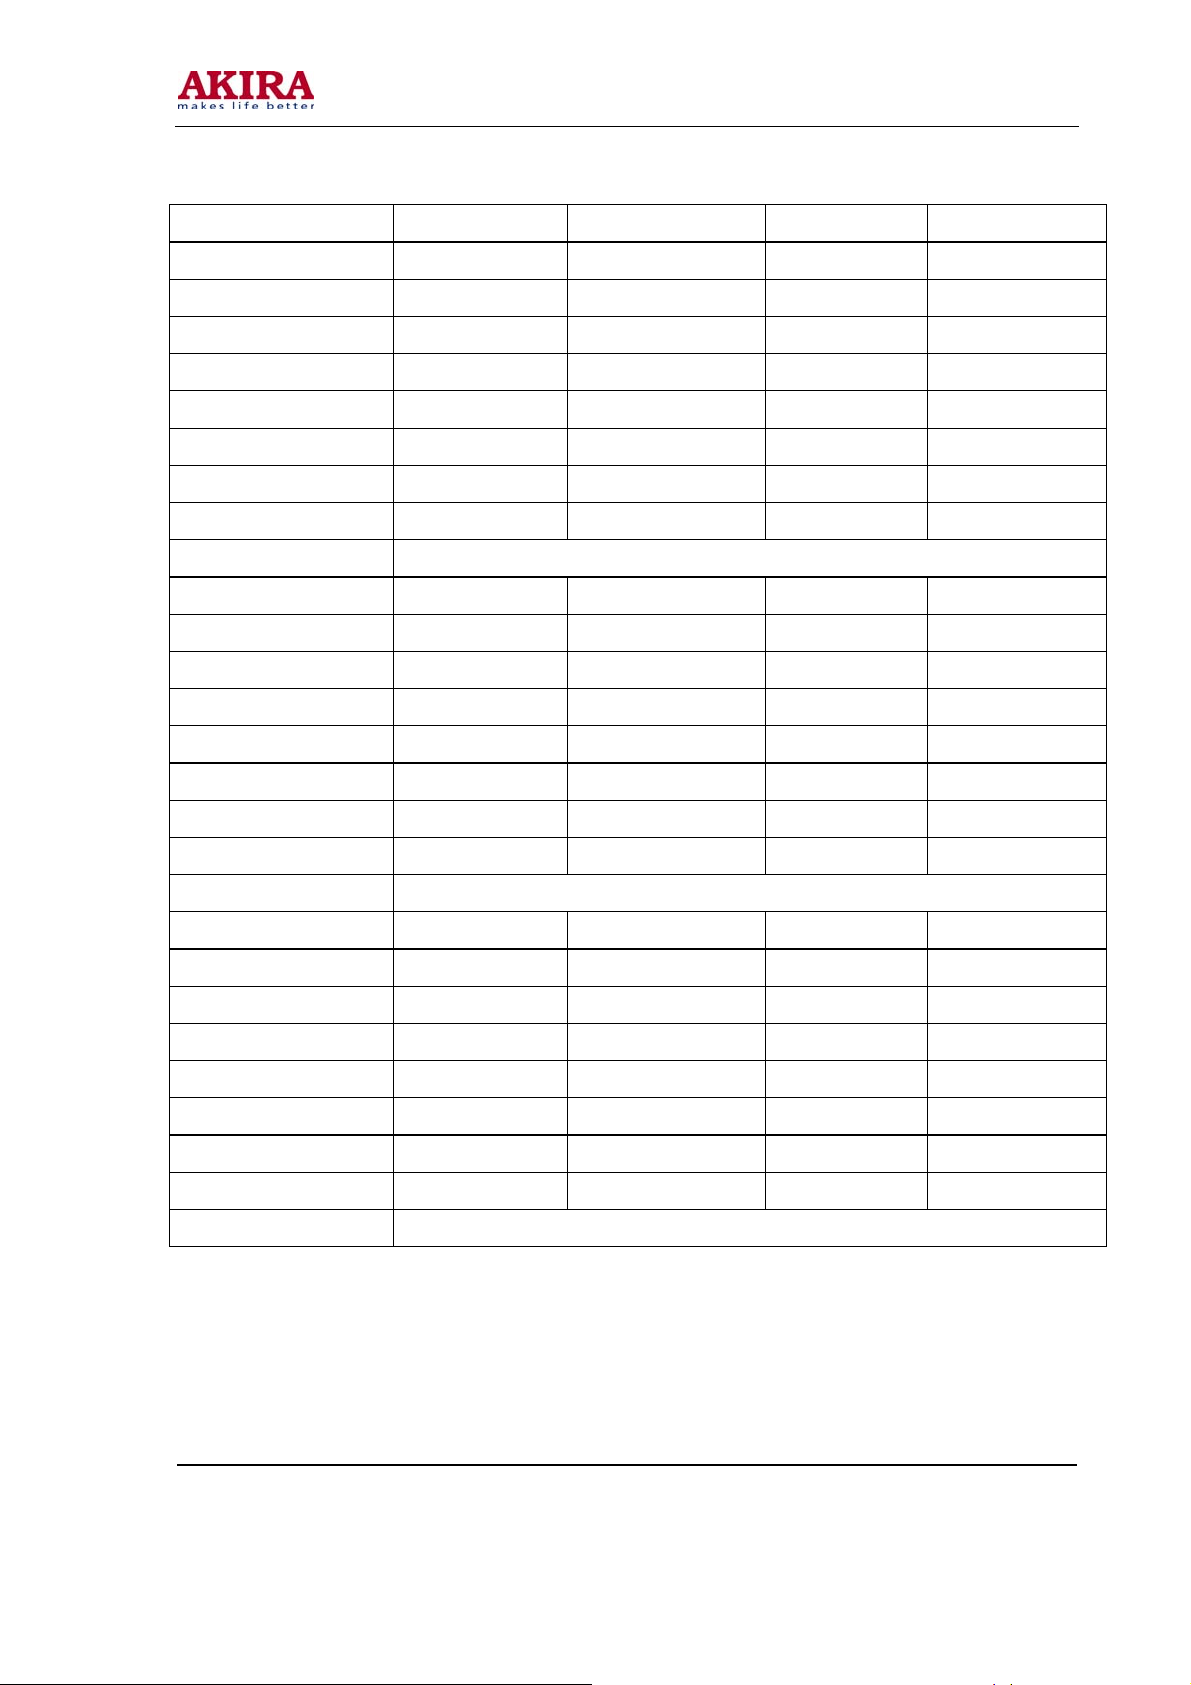
Items CVBS SC-RGB YPBPR D-SUB HDMI
Bright Min D5H CFH C7H CFH D2H
Bright Middle 00H 00H 03H 05H 07H
Bright Max 38H 3DH 34H 3DH 31H
Contrast Min 09H 09H 09H 09H 08H
Contrast Middle 20 25H 20H 25H 23H
Contrast Max 2AH 31H 29H 31H 2CH
Sharpness Min 00H 00H 00H 00H 00H
Sharpness Middle 10H 10H 10H 10H
Sharpness Max 1FH 1FH 1FH 1FH 1FH
Color Min 00H 00H 00H 00H 00H
Color Middle 1DH 1DH 1DH 1DH 1DH
Color Max 2DH 2DH 2DH 2DH 2DH
Hue Min 80H 80H 80H 80H 80H
Hue Middle 20H 20H 20H 20H 20H
Hue Max 7FH 7FH 7FH 7FH 7FH
10H
Model No.: LCT-37PBSTP.doc
Version: 1.0
Page 20
-20 -
TABLE 6 White Balance Adjust TABLE 7 Image analog setting TABLE9 SOUND equilibrium
value setting
ITEMS LCT-27PBSTP LCT-32PBSTP LCT-37PBSTP LCT-42PBSTP
R Offset 55 55 54 53
G Offset 51 53 57 49
B Offset 50 50 50 50
R Gain 42 36 36 37
G Gain 50 50 50 50
B Gain 21 40 51 38
Brightness 51 51 51 51
Contrast 100 100 100 100
Color Temperature Standard
R Offset 60 59 58 55
G Offset 55 55 58 52
B Offset 50 50 50 50
R Gain 35 25 24 32
G Gain 50 50 50 50
B Gain 28 48 61 48
Brightness 51 51 51 51
Contrast 100 100 100 100
Color Temperature Cold
R Offset 55 49 49 44
G Offset 53 51 53 47
B Offset 50 50 50 50
R Gain 62 51 58 66
G Gain 50 50 50 50
B Gain 8 23 33 22
Brightness 51 51 51 51
Contrast 100 100 100 100
Color Temperature Warm
Model No.: LCT-37PBSTP.doc
Version: 1.0
Page 21
-21 -
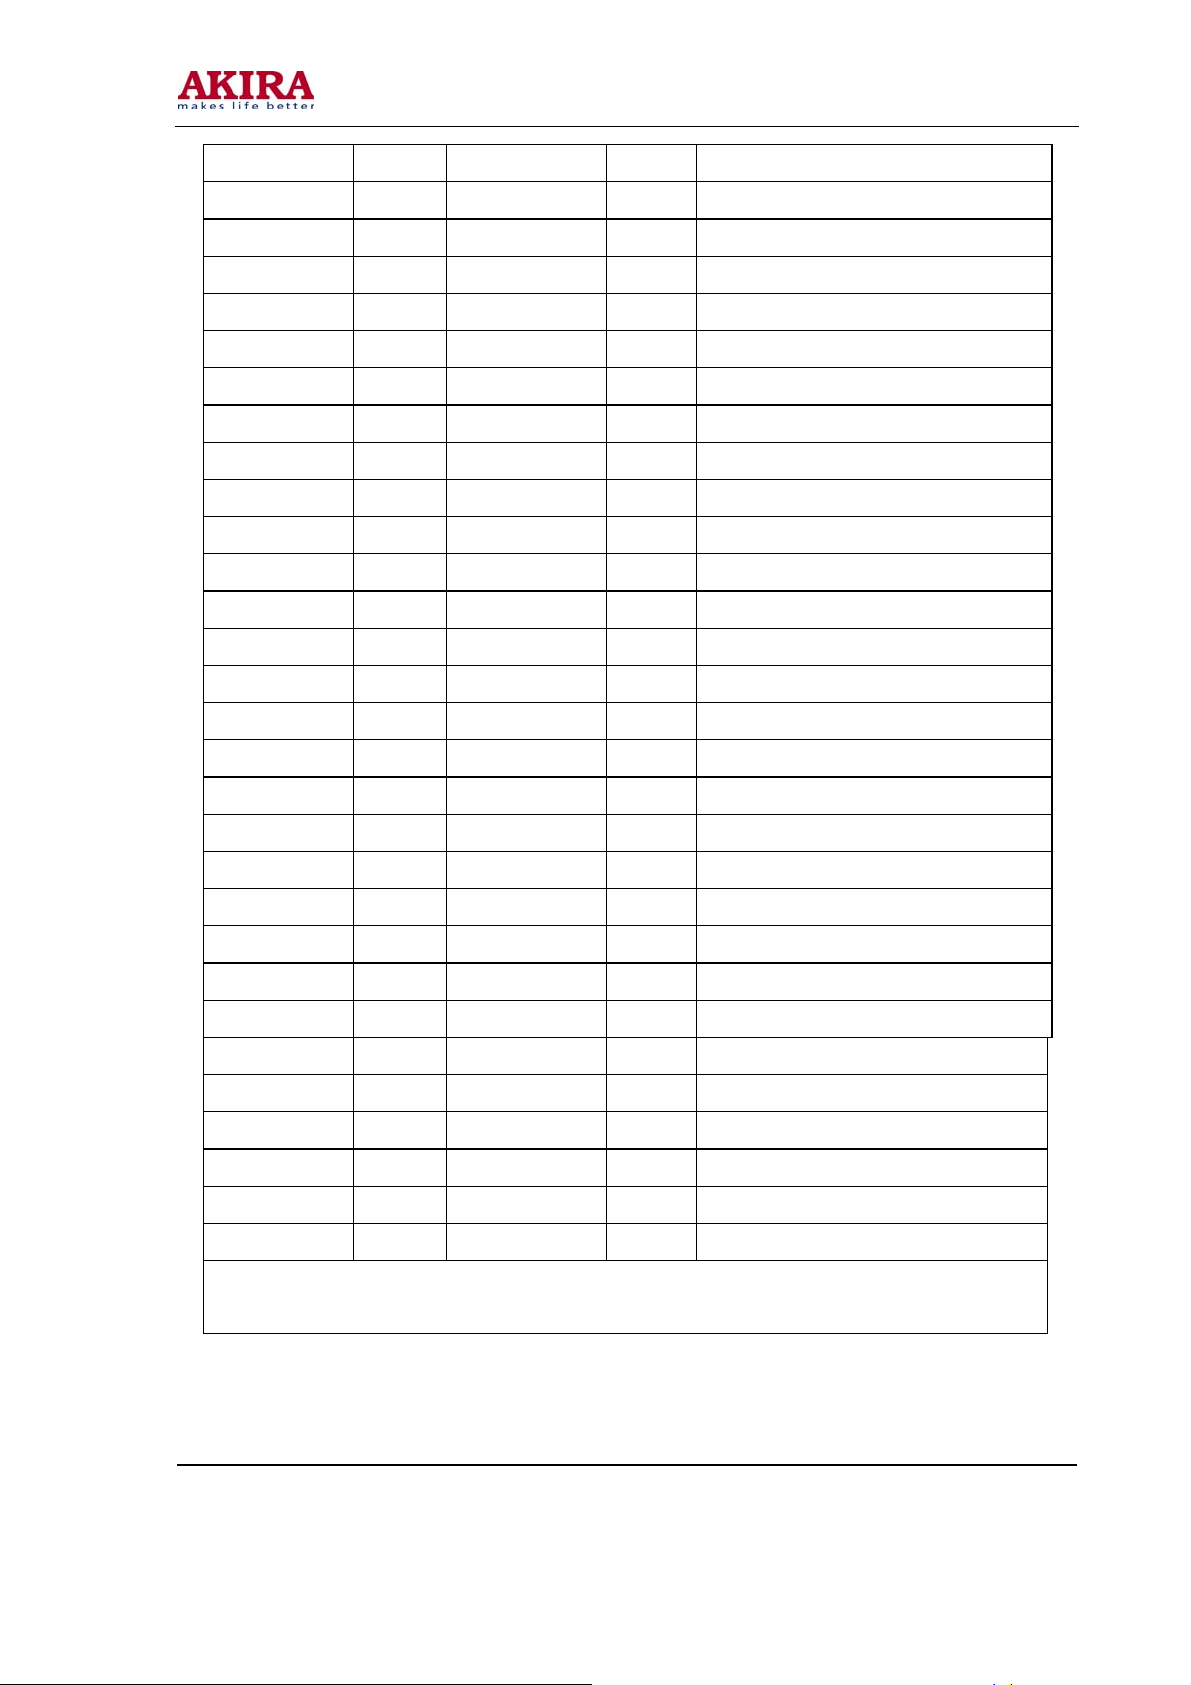
CVBS Vivid Standard Mild Custom
Contrast 90 80 50 80
Brightness 40 35 35 35
Color 70 60 40 60
Hue 00 00 00 00
Sharpness 60 50 30 50
SC-RGB Vivid Standard Mild Custom
Contrast 90 85 50 85
Brightness 60 50 35 50
Color 80 65 40 65
Hue 00 00 00 00
Sharpness 60 50 30 50
YPBPR Vivid Standard Mild Custom
Contrast 90 85 50 85
Brightness 50 40 35 50
Color 80 65 40 65
Hue 00 00 00 00
Sharpness 60 50 30 50
D-SUB Vivid Standard Mild Custom
Contrast 90 80 50 80
Brightness 50 40 35 40
Color 80 65 40 65
Hue 00 00 00 00
Sharpness 60 50 30 50
HDMI Vivid Standard Mild Custom
Contrast 90 80 50 80
Brightness 50 35 35 35
Color 80 70 40 70
Hue 00 00 00 00
Sharpness 60 50 30 50
Note: in factory menu states, it can change the factory mode to value of the image and sound, else select the image
and sound balanced value in the other states.
Model No.: LCT-37PBSTP.doc
Version: 1.0
Page 22

-22 -
Live Pop Rock Custom
120 Hz 50 50 65 50
500 Hz 50 50 55 50
1.5 kHz 50 60 55 50
5 kHz 80 70 55 50
10 kHz 85 70 55 50
6.8 Ex-factory setting of user menu
6.8.1 select TV channel
6.8.2 video menu, Mode: Standard, NR: Medium, APL:ON
6.8.3 sound menu, Volume: 20, Balance: 00, Equalizer: Custom, HP Volume: 20;
6.8.4 edit menu, Color System: Auto, Sound System: DK;
6.8.5 option menu, Default Zoom: Auto, Child Lock: Off, Menu Language: English, Country: UK, WSS:
OFF, Blue Screen: On.
Note: the 6.8.4 and 6.8.5 items should set according to clients require.
Model No.: LCT-37PBSTP.doc
Version: 1.0
Page 23
-23 -
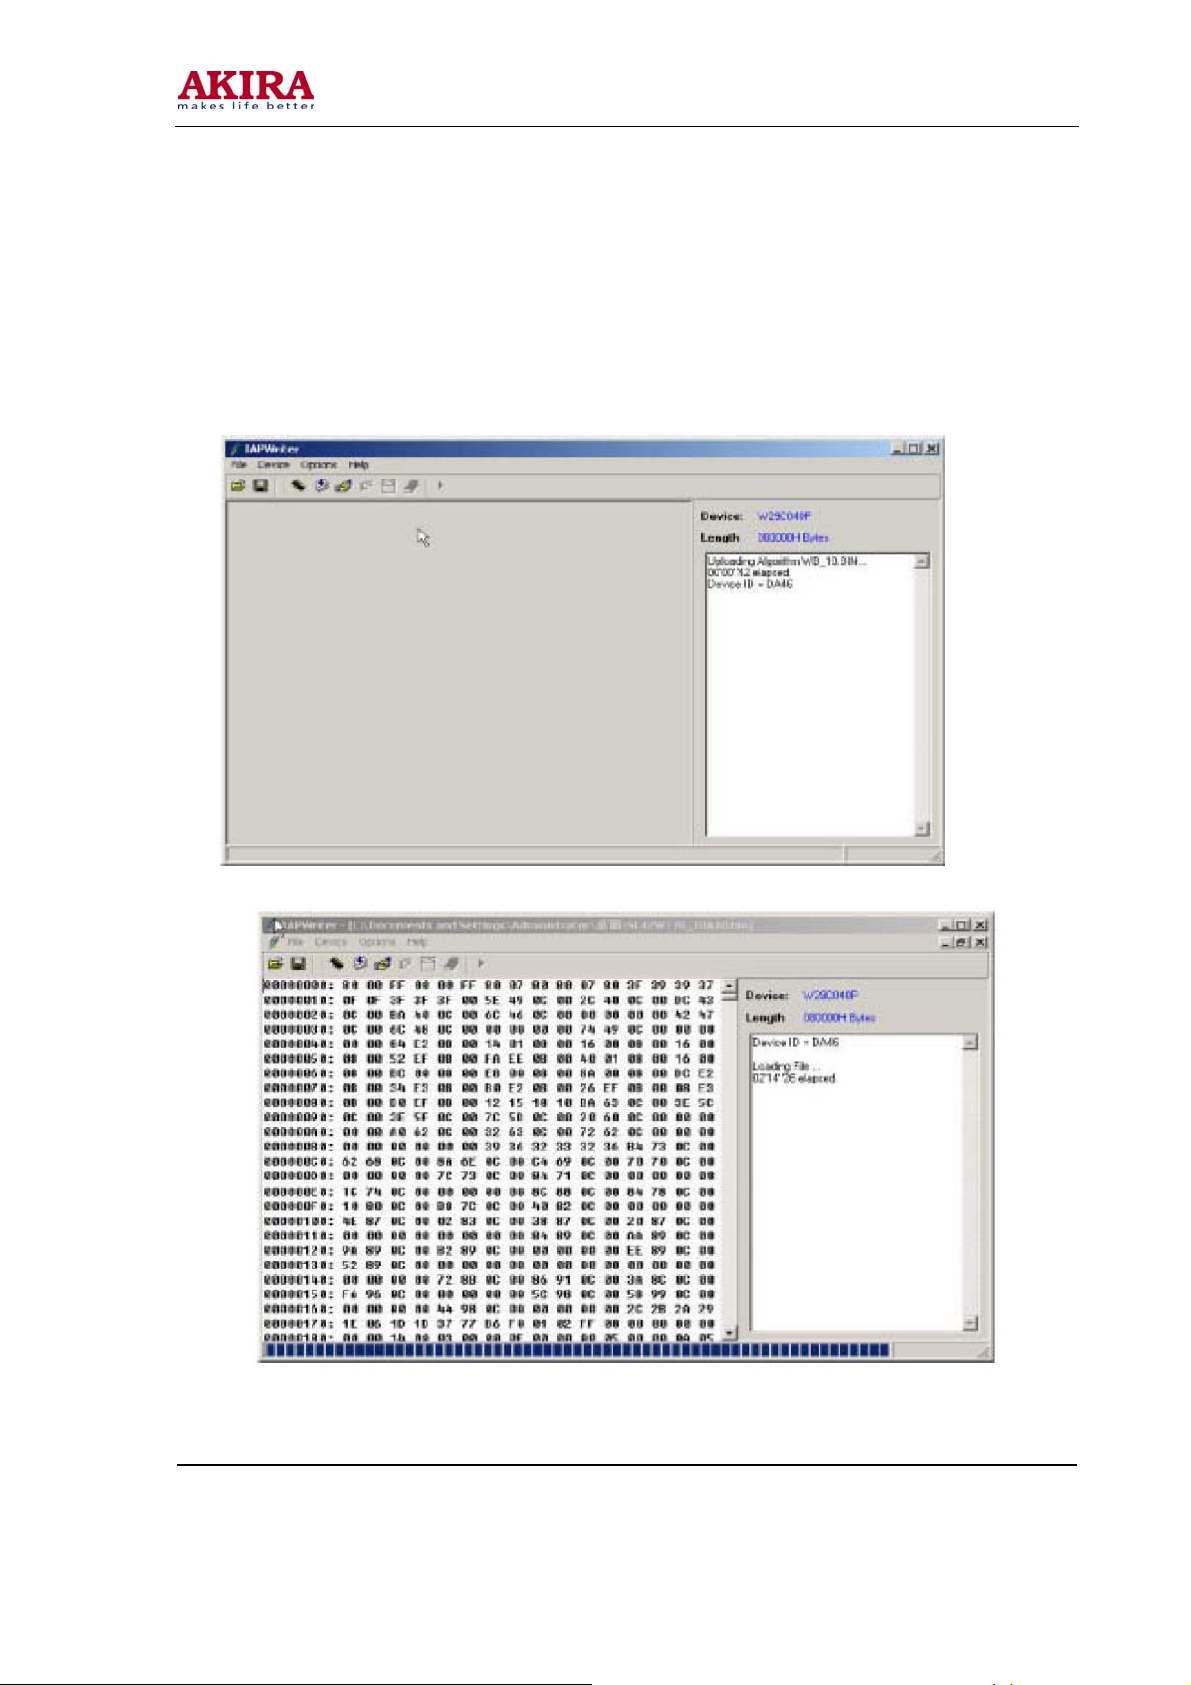
Software Upgrading
1. Enter the software upgrading state of the TV Method 1: press the VOL- button in the unit, turn on
the main power switch, then the screen display black screen, but the indicator to blue. Method 2: Enter
factory menu, select the IIC-BUS OFF item.
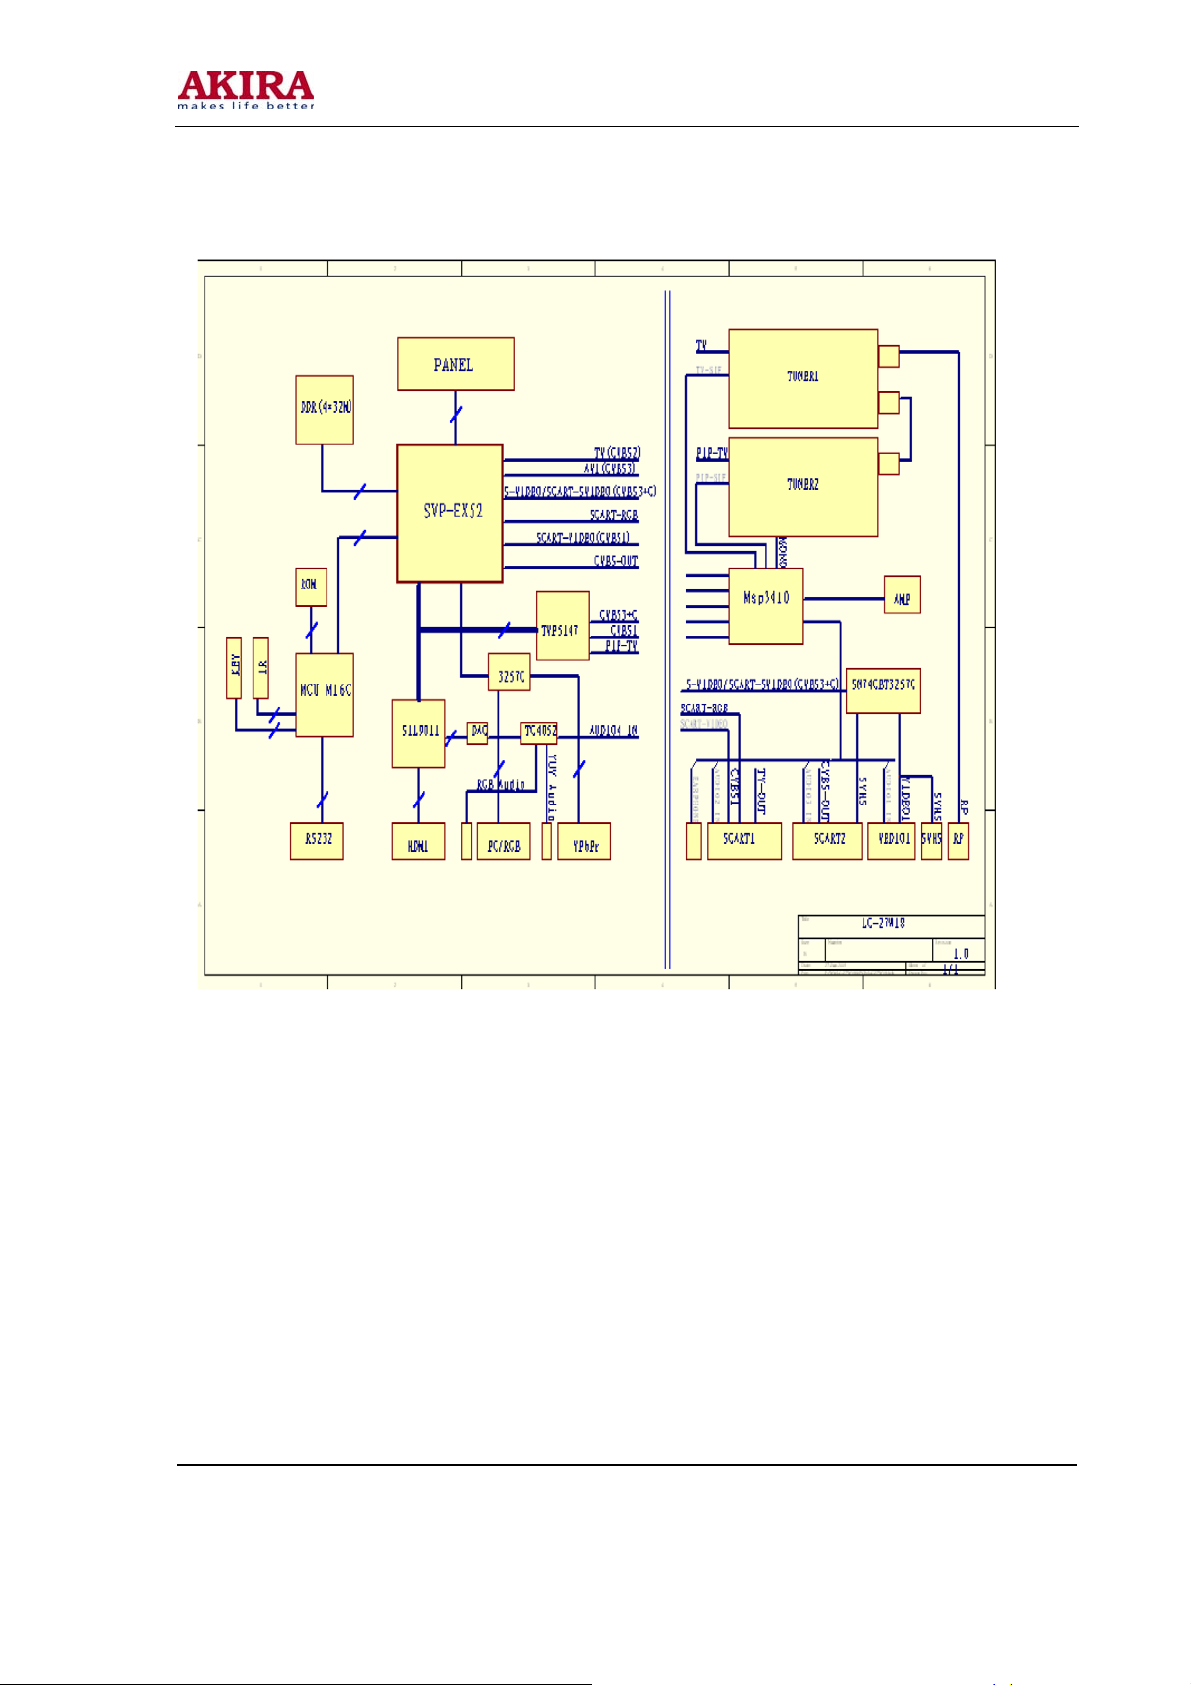
2. Connection upgrading tools with upgrading port.
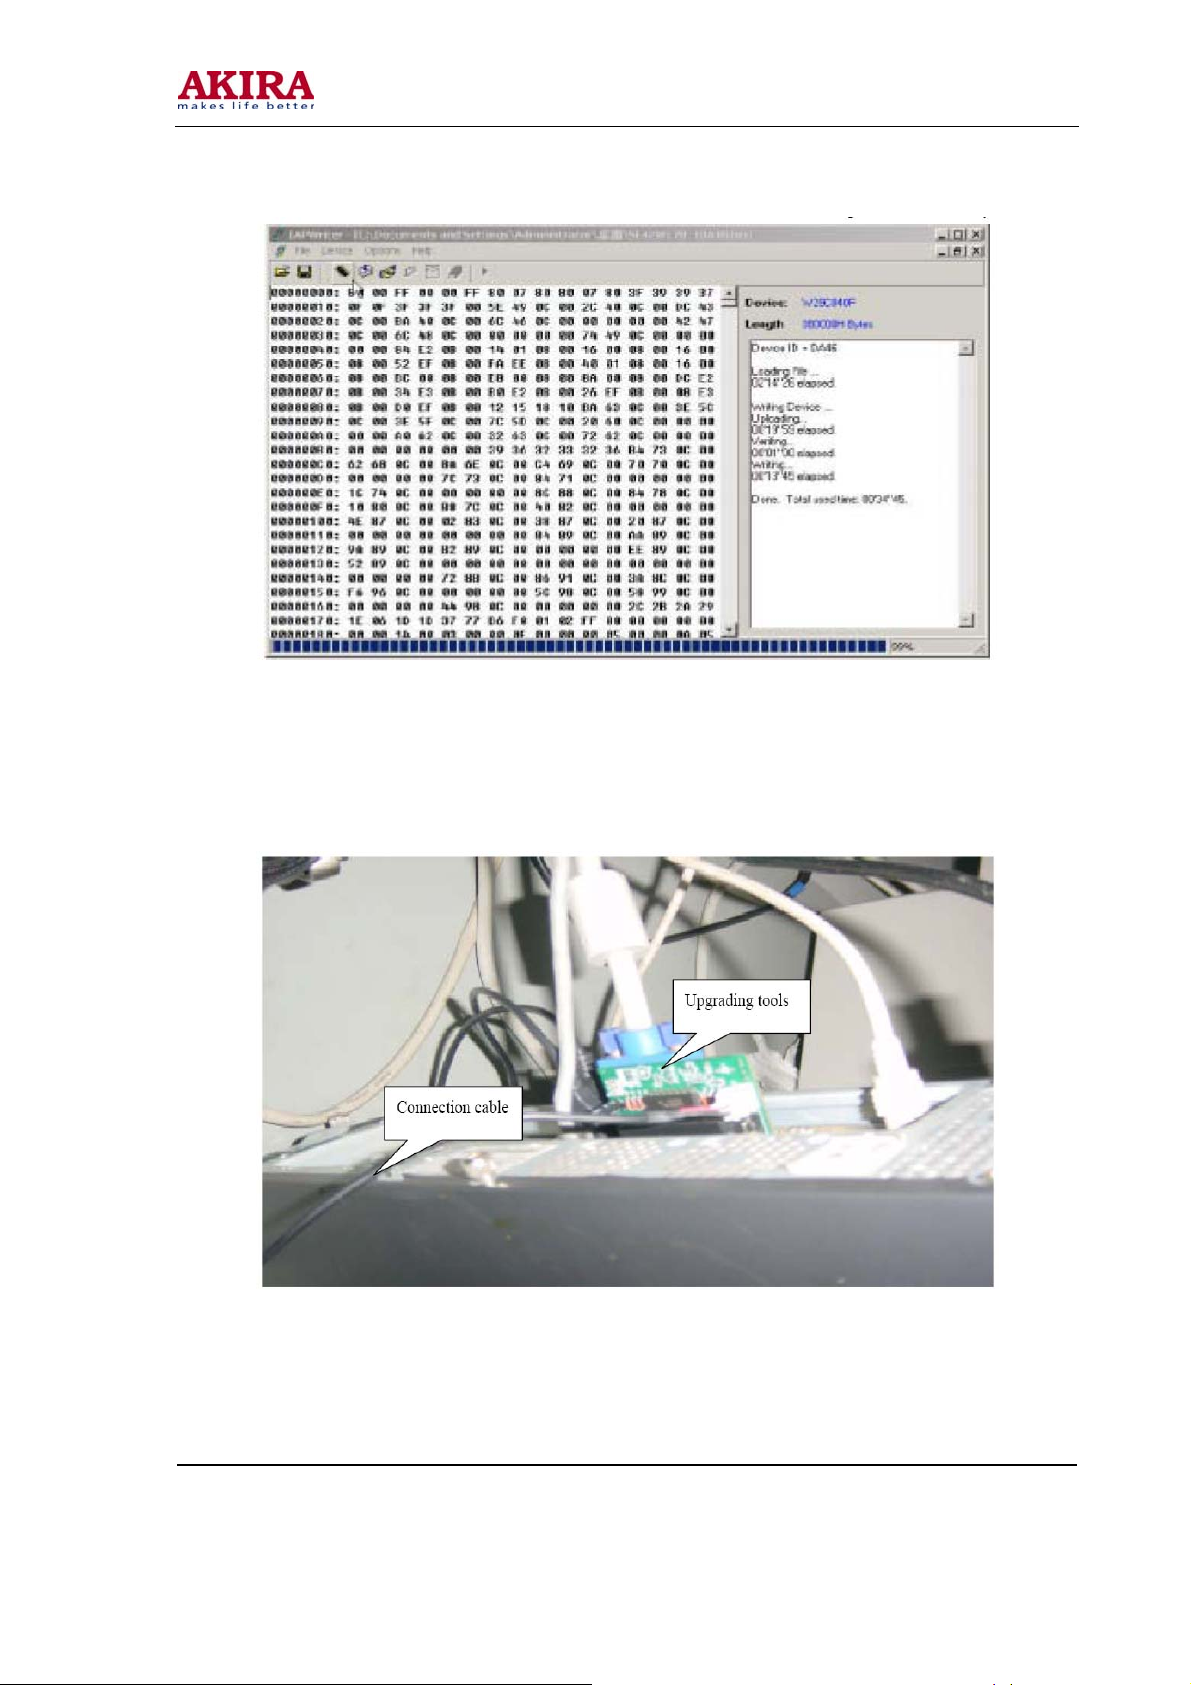
3. Dual- click IAPWriter logo, enter the upgrading states (if the PC and the IIC communication trouble,
it can prompt.
4. Select the file menu load the software follow as:
Model No.: LCT-37PBSTP.doc
Version: 1.0
Page 24
-24 -
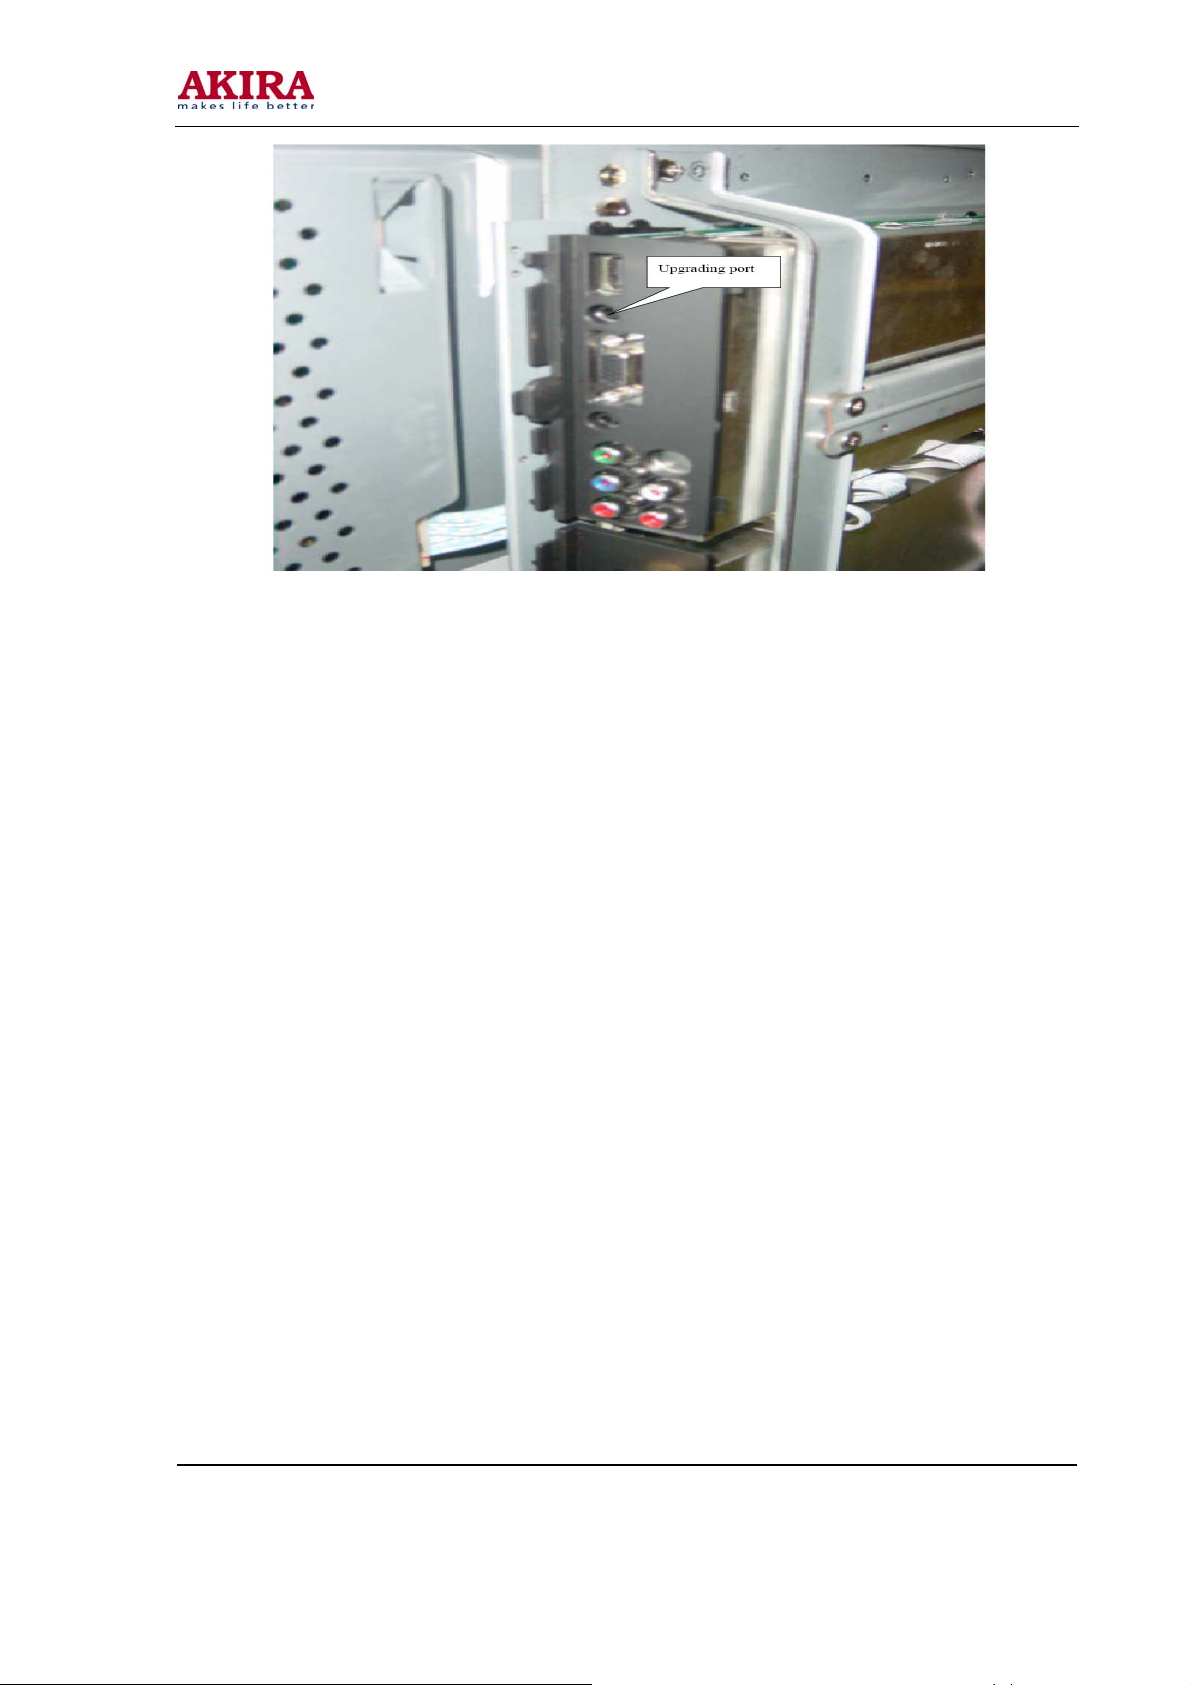
5. Select WRITE DEVICE item of the device menu, till the right screen display “DONE”.
6. Turn off the power , restart the unit.
Note: because of the software, it may be no-stabilization, the software can auto download
and write.
Model No.: LCT-37PBSTP.doc
Version: 1.0
Page 25
-25 -
NOTE: Do not shut the power off or turn the TV set on during the FLASH write.
Otherwise it may lead to no way for flash to rewrite.
Model No.: LCT-37PBSTP.doc
Version: 1.0
Page 26

-26 -
WWoorrkkiinngg PPrriinncciippllee AAnnaallyyssiiss
1. Analog signal flow
Antenna reception signal send to integrative tuner (contain HF and IF amplifier circuit), the tuner is
controlled the command (SDA and SCL) of the MCU N301 (M16C), select appropriate channel to
system switch, via HF amplifier and IF amplifier decode, output video signal of 2VPP and sound signal
of 1VPP.
Sound signal (SCART1, 2 sound, AV sound, YPbPr, HDMI and D-SUB) via N581 HEF4052BT
(sound diverter switch) to output signal, it send to N801(MPS3410 sound processing and volume
control) switch of audio. Select right/left sound channel, their send to digital sound amplifier N803
(TPA3008) amplify, then send to speaker.
After output video signal of tuner, SCART1 video signal and RGB signal via matched resistance, the
signal thought alone channel send to main decode IC(N101 SVP-EX52) video switch, A/D transition,
digital decode, image scale and OSD superposition, then send to LVDS level drive for LCD screen.
AV, S-Video, SCART2 video and Y/C signal thought matched resistance, the signal send to the N506
video switch (SN74CBT3257CDR), via switching to selected signal (EX52_Y and EX52_C) to main
decode IC (N101 SVP-EX52) video switch, A/D transition, digital decode, image scale and OSD
superposition, then send to LVDS level drive for LCD screen.
D-sub and YPbPr signal thought matched resistance, the signal send to the N507 video switch
(SN74CBT3257CDR), via switching to selected signal (EX52_YUV) to main decode IC (N101
SVP-EX52) video switch, A/D transition, digital decode, image scale and OSD superposition, then
send to LVDS level drive for LCD screen.
2. Digital signal flow:HDMI signal thought HDMI reception chip N405 (SiI9011HDMI with HDCP
function), after receive, output digital format signal send to SVP-EX52 PIP channel thought image
scale and OSD superposition, then send to LVDS level drive for LCD screen. The HDMI chip output
audio digital format signal change to analog sound signal from N403 (CS4344 audio DA transfer chip),
then N581 switched to N801 (MPS3410 sound processing and volume control).
3. TELETEXT function
This unit adopt main decode IC N101(SVP-EX52) of Trident company, it has TELETEXT decode
function, after decoded, the teletext information in OSD display.
Model No.: LCT-37PBSTP.doc
Version: 1.0
Page 27
-27 -
BBLLOOCCKK DDIIAAGGRRAAMM
Model No.: LCT-37PBSTP.doc
Version: 1.0
Page 28
-28 -
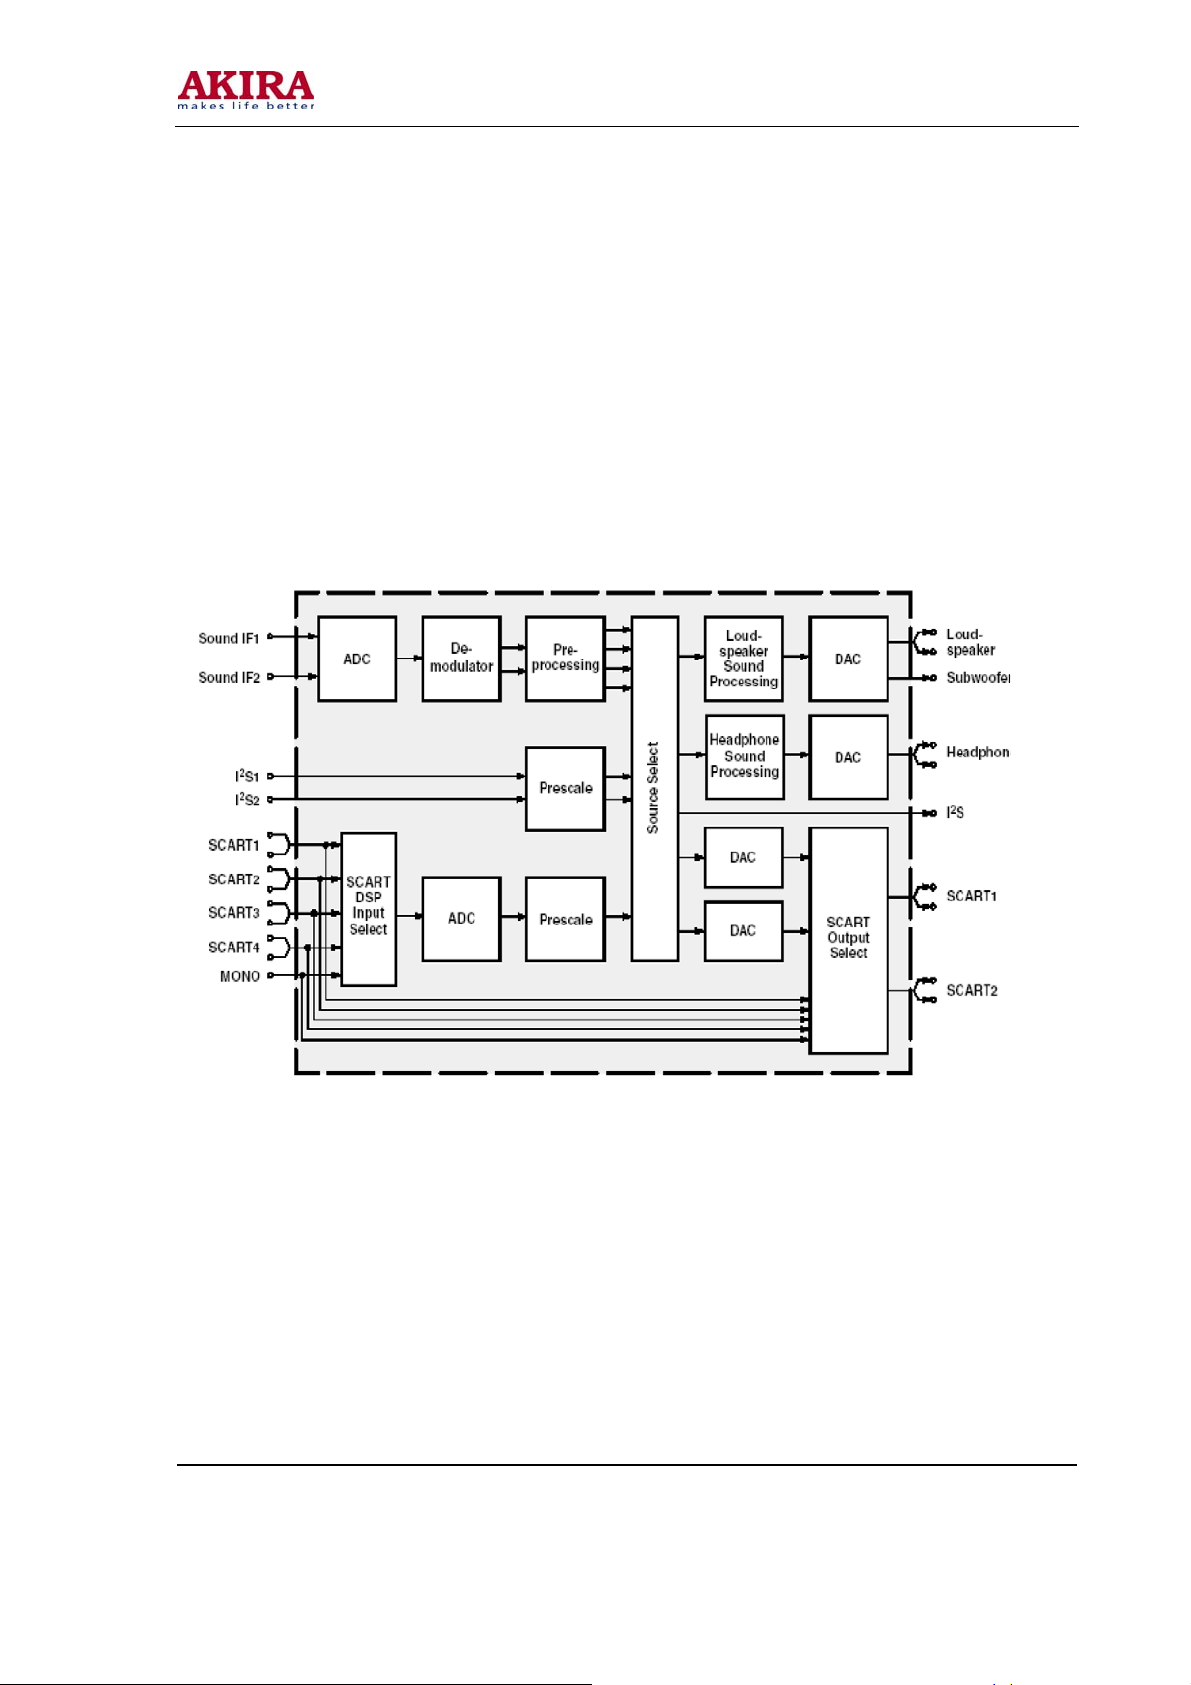
IC Block Diagram
1. Sound processing IC (MSP3410)
Sound signal send to sound processing N801 MSP3410, and dual-circuit tuner has second SIF, it
sends to N801 (stereo decode and auto volume control), N801 has audio channel switch, after
switching in N581 (HEF4052BT), the audio input of VGA/HDMI/YPbPr will be sent to N801 together
with the audio signal of TV and AV to do the switching process. A way signal thought volume and
high-low sound controlled, output the left and right audio send to digital audio amplifier N803
(TPA3008) amplify, then it send to speaker, other way signal output left-right audio send to earphone
amplifier N805 (NJW1109), after audio control and power amplifier, it output to earphone socket.
Other two ways signal output audio of TV out and AV out by SCART terminal of video board.
MSP3410 internal block diagram as follow:
Main pins instructions:
2, 3: SCL, SDA 27, 28: left-right audio of audio power amplification 36, 37: left-right audio of
earphone 24, 25: left-right audio of AV OUT 33, 34: left-right audio of TV OUT 47, 48: left-right audio
from main board 50, 51: left-right audio of SCART2 53, 54: left-right audio of SCART1 56, 57: left-right
audio of AV IN 67, 69: SIF input of sub-channel and main-channel TV
59: MONO input of sub-channel TV
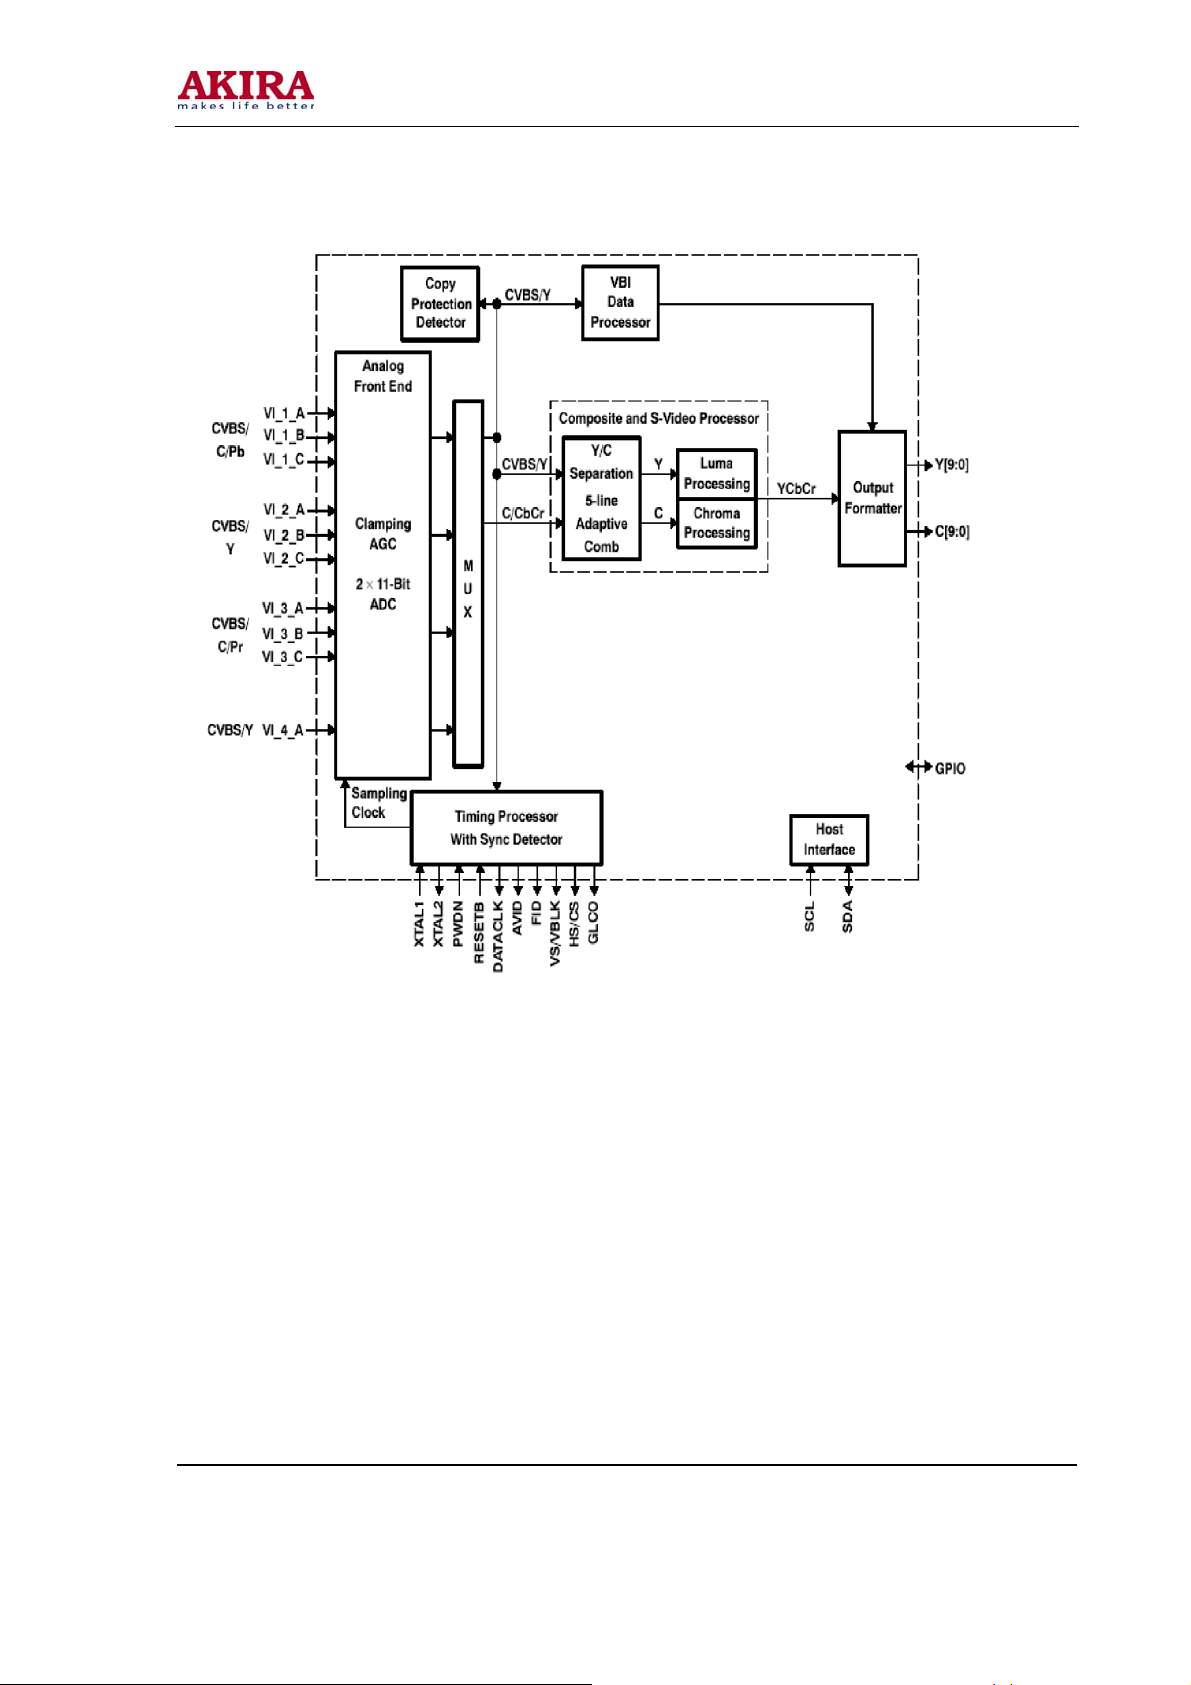
2. Sub-channel and SCART video signal decode IC (TVP5147)
Sub-tuner TUNER202 decode video, AV, S-VIDEO, SCART1 video, SCART2 video and Y/C signal,
after matching impedance, enter decoding IC N601 (TVP5147), so the PIP image of sub-channel can
selecting arbitrary video signal.
Model No.: LCT-37PBSTP.doc
Version: 1.0
Page 29
-29 -
MSP3410 internal block diagram as follow:
TVP5147 main pins instructions:
28, 29: SCL, SDA
22: Video input for SCART1 7, 80: Y/C signal input for SCART2
16: video signal input of sub-tuner
8: Y signal input of AV or S-Video
1: C signal input of S-Video
9, 2, 18: YUV signal input of compatible DTV
Model No.: LCT-37PBSTP.doc
Version: 1.0
Page 30

-30 -
3. Reception HDMI signal (SiI9011)
After differential signal of HDMI send to N405 (SiI9011), then it transform 24bit for video digital signal,
and sent to IC N101 (SVP-EX52) processing.
SiI9011 internal block diagram as follow:
Model No.: LCT-37PBSTP.doc
Version: 1.0
Page 31

-31 -
4. Main decode and processing IC(DPTV-SVP-EX52) SVP-EX52 internal block diagram
as follow:
SVP-EX52 main pins instructions:
14, 16: SCL, SDA
10, 11: VGAHS, VGAVS input,
244, 231: EX52_Y and EX52_C input
243: main tuner video signal input
242: video signal input for Scart1
226, 248, 233: Scart1 RGB input
246, 232, 225: EX52_YUV input
236, 237: video output for SCART2
Model No.: LCT-37PBSTP.doc
Version: 1.0
Page 32

-32 -
WWIIRRIINNGG DDIIAAGGRRAAMM
Model No.: LCT-37PBSTP.doc
Version: 1.0
Page 33

-33 -
AAsssseemmbbllyy LLiisstt
Name Part no. Main IC and no.
Data processing board 667-L37W25-69 N101 DPTV-SVP-EX52 (353-DPTV0-20)
Audio processing board 667-L32W25-15 TUNER201 JS-6B2/122A2-A2 (590-40512-00)
Video processing board 667-L37W25-40
IR reception board 667-L37W18-09
N201 K4D2632838F (353-26323-10)
N302 W29C040P-90B (353-29040-30)
N301 M30620SPGP (353-30620-20)
N601 TVP5147PFP (353-51470-10)
N405 SiI9011CLU (353-90110-10)
N403 CS4344CZZ (353-43440-10)
TUNER202 JS-6B2/121A2 (590-40511-00)
N801 MSP3410G (353-34100-80)
N803 TPA3008D2 (353-30080-10)
N805 NJW1109M (353-11092-20)
(LC-37W18S)
Button board 667-L37W18-05
(LC-37W18S)
667-L37W25-05
(LC-37W25S)
Power supply board 667-L37K5-20C
Model No.: LCT-37PBSTP.doc
Version: 1.0
Page 34

-34 -
Identification criteria for the bright spot and dark spot of the LCD screen
Notes:
1 Definition of defected point (bright spot, dark spot): It is identified as a defected point
if its area exceeds 1/2 of a single picture element (R, G, B).
2 Definition of bright spot: It is identified as a bright spot if it is bright in the state of dark
field and its bright size remains unchanged
3 Definition of dark spot: It is identified as a dark spot if it is dark in the state of white
field and its dark size remains unchanged
4 Definition of two neighboring points: Defects of a group of picture elements (RB,RG,GB).
Model No.: LCT-37PBSTP.doc
Version: 1.0
Page 35

-35 -
TTRROOUUBBLLEE SSHHOOOOTTIINNGG
1. Fault clearance
Before servicing please check to find the possible causes of the troubles according to the table below:
1.1 Antenna (signal):
Picture is out of focus or jumping Bad status in signal receiving Poor signal Check if there are
Fringe in picture Check if the antenna is correctly oriented. Maybe there
Picture is interfered by
stripe shaped bright spots
failures with the electrical connector or the antenna.
Check if the antenna is properly connected.
is electric wave reflected from hilltop or building.
Possibly due to interference from automobile, train, high
voltage transmission line, neon lamp etc. Maybe there is
interference between antenna and power supply line.
Please try to separate them in a longer distance.
Maybe the shielded-layer of signal wire is not connected
There appear streaks or
light color on the screen
properly to the connector.
Check if interfered by other equipment and if interfered
possibly by the equipment like transmitting antenna,
non-professional radio station and cellular phone.
Model No.: LCT-37PBSTP.doc
Version: 1.0
Page 36

-36 -
1.2 TV set:
Symptoms Possible cause
Unable to switch the power on
No picture and sound
Deterioration of color phase or
color tone
Screen position or size is not
proper
Picture is twisted and deformed Check to see if the picture-frame ratio is properly set up.
Picture color changed or colorless
Check to see if the power plug has been inserted properly
into the socket.
Check to see if the power supply of liquid crystal TV has
been switched on. (As can be indicated by the red LED at
the front of the TV set) See if it’s receiving the signal that is
transmitted from other source than the station Check if it’s
connected to the wrong terminal or if the input mode is correct.
Check if the signal cable connection between video frequency
source and the liquid crystal TV set is correct.
Check if all the picture setups have been corrected.
Check is the screen position and size is correctly set up.
Check the “Component” or “RGB” settings of the liquid
Crystal TV set and make proper adjustment according to
Picture too bright and there is
distortion in the brightest area
Picture is whitish or too bright
in the darkest area of the picture
No picture or signal produced
from the displayer if “XXX in
search” appears.
There appears an indication –
“outside the receivable scope)
signal types
Check if the contrast setting is too high. Possibly the output
quality of DVD broadcaster is set too high. It maybe also
due to improper terminal connection of the video frequency
signal in a certain position of the system.
Check if the setting for the brightness is too high Possibly the
brightness grade of DVD player (broadcaster) is set too high.
Check if the cable is disconnected. Check if it’s connected
to the proper terminal or if the input mode is correct.
Check if the TV set can receive input signal. The signal is not
correctly identified and VGA format is beyond the specified
scope.
Model No.: LCT-37PBSTP.doc
Version: 1.0
Page 37

-37 -
Check if the batteries are installed in the reverse order. Check
Remote control cannot work
properly
No picture and sound, but only
hash.
Blur picture
No sound
When playing VHS picture search
tape, there are lines at the top or
bottom of the picture.
if the battery is effective. Check the distance or angle from the
monitor. Check if there is any obstruct between the remote
control and the TV set. Check if the remote control signal-
receiving window is exposed to strong fluorescence.
Check if the antenna cable is correctly connected, or if it has
received the video signal correctly.
Check if the antenna cable is correctly connected. Of if it has
received the right video signal.
Check if the “mute” audio frequency setting is selected. Check
if the sound volume is set to minimum. Make sure the
earphone is not connected. Check if the cable connection is
loose.
When being played or in pause VHS picture search tape
sometimes can’t provide stable picture, which may lead to
incorrect display of the liquid crystal TV, In this case please
press “auto” key on the remote control so as to enable the
liquid crystal TV set to recheck the signal and then to display
correct picture signal
Model No.: LCT-37PBSTP.doc
Version: 1.0
Page 38

-38 -
TTRROOUUBBLLEE SSHHOOOOTTIINNGG GGUUIIDDEE
Model No.: LCT-37PBSTP.doc
Version: 1.0
Page 39

-39 -
Model No.: LCT-37PBSTP.doc
Version: 1.0
Page 40

-40 -
Model No.: LCT-37PBSTP.doc
Version: 1.0
Page 41

-41 -
Model No.: LCT-37PBSTP.doc
Version: 1.0
Page 42

-42 -
Model No.: LCT-37PBSTP.doc
Version: 1.0
Page 43

-43 -
Model No.: LCT-37PBSTP.doc
Version: 1.0
Page 44

-44 -
Model No.: LCT-37PBSTP.doc
Version: 1.0
Page 45

-45 -
Model No.: LCT-37PBSTP.doc
Version: 1.0
Page 46

-46 -
Model No.: LCT-37PBSTP.doc
Version: 1.0
Page 47

-47 -
APPENDIX
Model No.: LCT-37PBSTP.doc
Version: 1.0
Page 48

Page 49

Page 50

Page 51

Page 52

Page 53

Page 54

Page 55

Page 56

Page 57

Page 58

Page 59

Page 60

Page 61

Page 62

Page 63

-63 -
PPAARRTTSS LLIISSTT
Part Code Description Quantity
128-05001-00 CONDUCTIVE FOIL 80X130 1
335-37010-00 Panel LC370W01 ! 1
360-30042-00 POWER SWITCH HF-606 ! 1
364-42201-00 SOCKET WP2-9C 2
485-10183-00
655-B1202-62 (12-PINS) LEAD WITH HOUSING 0.5
655-B1202-62 (12-PINS) LEAD WITH HOUSING 0.5
655-B1202-63 (12-PINS) LEAD WITH HOUSING 0.5
655-B1202-63 (12-PINS) LEAD WITH HOUSING 0.5
655-33901-13 (3-PINS) LEAD WITH HOUSING 1
655-4E301-37 (4-PINS) LEAD WITH HOUSING 1
655-41201-280 (4-PINS) LEAD WITH HOUSING 1
655-6E302-68 (6-PINS) LEAD WITH HOUSING 1
POWER CARD 300 加 FERRITE BEAD VDE !
1
655-61201-24 (6-PINS) LEAD WITH HOUSING 1
655-71202-80
655-71202-84 (7-PINS) LEAD WITH HOUSING 1
655-74302-38 (7)-PINS LEAD WITH HOUSING 0.5
655-74302-38 (7)-PINS LEAD WITH HOUSING 0.5
665-D0002-597 *LVDS WIRE 30-PINS150mm 1
666-12301-00 FERRITE BEAD TY23X13.5X6 0.5
666-12301-00 FERRITE BEAD TY23X13.5X6 0.5
700-60255-100 LED-CONDUCTOR( GRAY 0A) 1
700-60268-00 LED-CONDUCTOR 1
742-30032-00 TIE 2
742-30088-110 TIE 1
742-30090-00
743-1E210-5D1C
780-Y25LHPAF2 BACK CABINET (HIPS GRAY 05,SILK-SCREEN ) 1
785-20023-120 SCREW CAP ( GRAY G05) 4
804-20442-00 PANELCONNECTION STRAP(LG/CMO) 2
(7-PINS) LEAD WITH HOUSING
TIE ( DARK GRAY )
KEY DECORATION PIECE( SILVERY WHITE 拉丝 SILK-SCREEN
1
4
1
808-1A898-AF0
808-1D895-AF0A
Model No.: LCT-37PBSTP.doc
Version: 1.0
AV INTERFACE BOARD ( RIGHT BOTTOM ) GRAY 05
AV INTERFACE BOARD ( LEFT TOP ) GRAY 05
1
1
Page 64

-64 -
Part Code Description Quantity
808-1D899-AF0
808-1F897-AF0
808-10812-AF0 POWER CARD BOARD ( GRAY 05) 1
808-10892-AF0
808-10893-AF0
808-10894-AF0
808-10896-AF0
808-80242-00 CONDUCTIVE GASKET(42X27X60) 2
851-33008-57
851-33008-57
851-33012-57
851-33012-57
851-33012-57
851-33012-57
851-33012-57
851-33012-57
851-34006-51 SCREW B(+)T4X6-D.Zn 12
AV INTERFACE BOARD (BOTTOM ) GRAY 05
AV INTERFACE BOARD ( LEFT BOTTOM ) GRAY 05
BACK CABINET INTERFACE BOARD ( LEFT ) GRAY 05
BACK CABINET INTERFACE BOARD ( RIGHT ) GRAY 05
BACK CABINET INTERFACE BOARD (BOTTOM ) GRAY 05
AV INTERFACE BOARD ( RIGHT TOP ) GRAY 05
SCREW B(+)3X8G-D.Zn (BLACK)
SCREW B(+)3X8G-D.Zn (BLACK)
SCREW B(+)3X12G-D.Zn (BLACK)
SCREW B(+)3X12G-D.Zn (BLACK)
SCREW B(+)3X12G-D.Zn (BLACK)
SCREW B(+)3X12G-D.Zn (BLACK)
SCREW B(+)3X12G-D.Zn (BLACK)
SCREW B(+)3X12G-D.Zn (BLACK)
1
1
1
1
1
1
2
1
4
2
2
2
4
2
851-34010-57
851-34010-57
851-34012-57
851-43012-52 SCREW F(+)T3X12G-DNi 1
851-43014-14 SCREW F(+)T3x14A-Y 2
851-43014-14 SCREW F(+)T3x14A-Y 2
852-33006-87
852-33006-87
852-33006-87
852-33006-87
852-33006-87
852-33008-87
852-33008-87
852-34006-87
852-34006-87
852-34006-87
852-34006-87
SCREW B(+)4X10G-D.Zn (BLACK)
SCREW B(+)4X10G-D.Zn (BLACK)
SCREW B(+)4X12G-D.Zn (BLACK)
SCREW B(+) M3X6-D.Zn (BLACK)
SCREW B(+) M3X6-D.Zn (BLACK)
SCREW B(+) M3X6-D.Zn (BLACK)
SCREW B(+) M3X6-D.Zn (BLACK)
SCREW B(+) M3X6-D.Zn (BLACK)
SCREW B(+) M3X8-D.Zn (BLACK)
SCREW B(+) M3X8-D.Zn (BLACK)
SCREW B(+) M4X6-D.Zn (BLACK)
SCREW B(+) M4X6-D.Zn (BLACK)
SCREW B(+) M4X6-D.Zn (BLACK)
SCREW B(+) M4X6-D.Zn (BLACK)
2
6
22
1
4
4
4
8
16
1
8
8
4
4
852-34006-87
SCREW B(+) M4X6-D.Zn (BLACK)
2
Model No.: LCT-37PBSTP.doc
Version: 1.0
Page 65

-65 -
Part Code Description Quantity
852-34006-87
852-34006-87
852-34006-87
852-34006-87
852-34006-87
852-35008-82 SCREW F(+)M5*8-D.Ni 8
852-43008-87
852-44020-81 SCREW F(+)M4X20-D.Zn 8
852-44020-81 SCREW F(+)M4X20-D.Zn 4
852-45008-82 SCREW F(+)M5X8-D.Ni 8
852-84008-81 COMPOSE SCREW SJ2835 M4X8-DZn 1
862-20039-00A CARTON CLIPS 6
870-1A235-00
870-1A236-00 BOARD CONNECTION LEDGE 1
870-1B231-00
870-1C230-00
870-10237-00
SCREW B(+) M4X6-D.Zn (BLACK)
SCREW B(+) M4X6-D.Zn (BLACK)
SCREW B(+) M4X6-D.Zn (BLACK)
SCREW B(+) M4X6-D.Zn (BLACK)
SCREW B(+) M4X6-D.Zn (BLACK)
SCREW F(+)M3X8-D.Zn(BLACK)
BOARD CONNECTION LEDGE( RIGHT )
PANELCONNECTION LEDGE(BOTTOM )
PANELCONNECTION LEDGE(TOP )
BOARD CONNECTION STRAP(1)
2
2
2
3
2
10
1
1
1
1
870-10238-00
870-10241-00 WALL BRACKET 2
870-10242-00A WALLCONNECTION LEDGE 2
870-10244-00
870-10245-00
870-10249-00 UPRIGHT POST BRACKET 1
870-10289-00 POWER BRACKET 1
870-10298-00A PANELCONNECTOR LEDGE 2
870-10300-00
870-10350-00
870-3B203-AF0A KEY SHUTTER BOARD BRACKET ( GRAY 05) 1
870-30216-00 LED-CONDUCTOR BRACKET 1
886-31756-00 WALLCARTON BOX (LC-37X7) 1
887-21074-00 PALSTIC BAG (100X230) 1
887-21135-00 PALSTIC BAG 230X330X0.1 1
887-21207-P0 PALSTIC BAG 1500X1000 1
364-93222-00 AV JACK EV-021F-AV3 2
BOARD CONNECTION STRAP(2)
LG PANELCONNECTOR(1)
LG PANELCONNECTOR(2)
BRACKET (AV INTERFACE BOARD )
BOARD CONNECTION LEDGE( LEFT )
1
1
3
4
1
485-10183-00
POWER CARD 300 加 FERRITE BEAD VDE !
-1
Model No.: LCT-37PBSTP.doc
Version: 1.0
Page 66

-66 -
Part Code Description Quantity
485-10200-00 POWER CARD SW198+LASR-24+FERRITE BEAD ! 1
488-10012-00 BATTERY 7# 2
604-L37W18S3-01 INSTRUCTION MANAUL 1
605-L27X183-01 SPEAKERS INSTALLATION I/M 1
665-D0002-156 RF Φ9.5(m)-Φ9.5(m) 1
780-Y18L0-1C1
808-10900-AF0 DECORATION SHUTTER BOARD LEFT RIGHT ( GRAY 05) 4
808-10914-AF0
863-81373-00A POLY FOAM LEFT TOP EPE 1
863-81374-00A POLY FOAM RIGHT TOP EPE 1
863-81375-00A POLY FOAM ( LEFT BOTTOM EPE) 1
863-81376-00A POLY FOAM ( RIGHT BOTTOM EPE) 1
880-10813-B1
881-62876-58 BACK PLATE LABEL LCP-37PBSTP,AKIRA 1
881-80847-00 WRRANTY CARD (AKIRA ) 1
886-31906-020W CARTON BOX (LCP-37PBSTP,AKIRA) 1
886-31907-00 CARTON BOX BOTTOM SHUTTER 1
886-31908-00 PAPER SUPPORT POST 4
301-IL27W18-02G RC-I02-0GREMOTE CONTROL UNIT ASS'Y (AKIRA) 1
605-L37X183-00 WALL BRACKET I/M 1
615-10445-00 WALL BRACKET ASS'Y 1
789-70032-00 WALLBRACKET COMPOSE BOLTM6X10 4
FRONT CABINET ( SILVERY WHITE 06/哑 BLACK,SILK-SCREEN
SPEAKERS CONNECTING BOARD (BOTTOM )( GRAY 05)
FRONT LOGO (AKIRA SILVERY BLACK 底 32")
1
2
1
855-A0045-00 WOODEN SCREW GB99-86 4X30 30
855-B0016-00 BOLTM8X72 4
870-10270-00 WALL BRACKET 2
886-31756-02
887-21167-00 PLASTIC BAG FOR ACCESSORIES 1
887-21199-00 PALSTIC BAG (420X350) 2
615-10518-00A ROTATION AXIS ASS'Y 1
742-30098-110 TIE 1
807-20243-AC0A
808-10905-0G0
808-10906-0G0
808-10934-8A0 TV STAND FACE SILVER 06 SILVERY WHITE 1
820-20069-00B COUNTERBALANCE BOARD 1
WALLCARTON BOX )
TV STAND (PIANO BLACK)
UPRIGHT POSTDECORATION SHUTTER ( SILVERY WHITE 06)
UPRIGHT POSTDECORATION SHUTTER ( SILVERY WHITE 06)
1
1
1
1
Model No.: LCT-37PBSTP.doc
Version: 1.0
Page 67

-67 -
Part Code Description Quantity
851-53008-31 SCREW SJ2825 ST3X8FT D.Zn 9
852-33008-82 SCREW B(+) M3X8-D.Ni 1
852-33008-82 SCREW B(+) M3X8-D.Ni 2
852-33012-82 SCREW B(+) M3X12-D.Ni 1
852-34014-82 SCREW B(+) M4X14-D.Ni 9
852-45010-81 SCREW F(+)M5X10-D.Zn 6
852-45016-82 SCREW F(+)M5X16 DNi 6
868-10043-00 WASHER (14X4X1) 9
868-20792-060 CUSHION( GRAY 02) 2
868-20807-00 CUSHION 9
870-4B218-0G0 UPRIGHT POST( SILVERY WHITE 06) 1
384-20528-90 *SPEAKER 5W 28Ω 4
384-21914-G0 *SPEAKER 10W 14Ω 2
665-D0002-624 SPEAK WIRES 1007 22#400mm 2
780-30197-0G0 SPEAKERS FRONG CABINET( SILVERY WHITE 06) 1
780-30198-AF0 SPEAKERS BACK CABINET GRAY 05 1
804-20460-00 SPEAKERS CONNECTORS 2
808-10926-00
808-70240-00
822-10209-00 TIE 2
851-23008-11 SCREW SJ2824 ST3X8C-D.Zn 4
851-23010-14 SCREW SJ2824 ST3X10C-Y 10
851-24010-11 SCREW SJ2824 ST4X10C-D.Zn 16
851-24016-14 SCREW SJ2824 ST4X16C-Y 4
864-10238-0G5 SPEAK GRILL ( SILVERY WHITE 06 1
870-10359-00 SPEAK HOLDER 2
887-21282-00 PALSTIC BAG (200X1200X0.06) 1
329-61805-00 CRYSTAL HC-49U 18.432MHZ 1
340-00003-00 DIODE IN4001 1
352-78090-90 IC TA78L09 (D) 1
364-11212-00 EARPHONE JACK ST-112 1
导声筒盖(底部)
EVA 胶 75X30X1
2
2
364-3A205-00 21 CONNECTORS HJ-2105W 1
364-3B101-00
364-3D101-00
364-33101-00 3-PINS CONNECTORS TJC3-03A 1
十 2-PINS CONNECTORS TJC3-12A
十-PINS CONNECTORS TJC3-10A
1
1
Model No.: LCT-37PBSTP.doc
Version: 1.0
Page 68

-68 -
Part Code Description Quantity
364-34101-00 4-PINS CONNECTORS TJC3-04A 1
364-34101-00 4-PINS CONNECTORS TJC3-04A 1
364-36101-00 6-PINS CONNECTORS TJC3-06A 1
364-36101-00 6-PINS CONNECTORS TJC3-06A 1
364-37101-00 7-PINS CONNECTORS TJC3-07A 1
364-41205-00 ANT SOCKET HR-J2 1
462-90410-H0 POLYESTER CAP 63V-0.1uF-J 1
462-90410-H0 POLYESTER CAP 63V-0.1uF-J 1
464-6D747-M0 ELECTROLYTIC CAP CD110-16V-470uF-M 1
464-6E610-M0 ELECTROLYTIC CAP CD110-25V-10uF-M 1
464-6E610-M0 ELECTROLYTIC CAP CD110-25V-10uF-M 1
464-6F747-M1 ELECTROLYTIC CAP CD110-35V-470uF-M 1
467-1D010-H0 CARBON RESISTOR RT14-1/4W-10Ω-J 1
471-1056H-00 PEAKING COIL EL0606SKI-560J 1
471-1056H-00 PEAKING COIL EL0606SKI-560J 1
471-1056H-00 PEAKING COIL EL0606SKI-560J 1
471-1056H-00 PEAKING COIL EL0606SKI-560J 1
471-1110K-00 PEAKING COIL EL0606SKI-101K 1
471-1110K-00 PEAKING COIL EL0606SKI-101K 1
471-2056H-60 PEAKING COIL LGA0307-56uH-J 1
471-2068K-10 PEAKING COIL LGA0410-68uH-K 1
471-2068K-10 PEAKING COIL LGA0410-68uH-K 1
477-40031-00 FIXED COIL LG750 1
477-40230-00 FIXED COIL LH470-1 1
590-40511-00 TUNER JS-6B2/121A2 1
590-40512-00 *TUNER JS-6B2/122A2-A2 1
615-10511-00B
615-10512-00A
665-N0120-00 COAXIAL CABLE CSYV-2B-120 1
665-N0260-00 *COAXIAL CABLE CSYV-2B-260 1
666-12301-00 FERRITE BEAD TY23X13.5X6 1
TV BOARD ASS'Y (TOP )
TV BOARD ASS'Y (BOTTOM )
1
1
666-13501-0G FERRITE BEAD 3.5X1X6 1
808-70397-00 ISOLATION SHEET 4
852-53006-81 SCREW SJ2830 M3X6-D.Zn 2
859-1A1373-00 TVINTERFACE SPACE PLATE 1
Model No.: LCT-37PBSTP.doc
Version: 1.0
Page 69

-69 -
Part Code Description Quantity
870-10290-00 RF BRACKET 1
340-00001-0S SMD DIODE LL4148 1
340-00001-0S SMD DIODE LL4148 1
340-00001-0S SMD DIODE LL4148 1
340-00001-0S SMD DIODE LL4148 1
342-08470-90 SMD TRANSISTOR BC847AW 1
342-08470-90 SMD TRANSISTOR BC847AW 1
342-08470-90 SMD TRANSISTOR BC847AW 1
342-08570-90 SMD TRANSISTOR BC857 AW 1
342-08570-90 SMD TRANSISTOR BC857 AW 1
342-08570-90 SMD TRANSISTOR BC857 AW 1
353-05050-20 SMD IC PESD5V0L5UY 1
353-05050-20 SMD IC PESD5V0L5UY 1
353-11090-20 SMD ICNJW1109M 1
353-30080-10 SMD ICTPA3008D2 1
353-34100-80 *SMD IC MSP3410G PQFP80(M) 1
455-12000-H0 SMD RESISTOR FTR0603000XR 1
455-12000-H0 SMD RESISTOR FTR0603000XR 1
455-12000-H0 SMD RESISTOR FTR0603000XR 1
455-12000-H0 SMD RESISTOR FTR0603000XR 1
455-12000-H0 SMD RESISTOR FTR0603000XR 1
455-12000-H0 SMD RESISTOR FTR0603000XR 1
455-12000-H0 SMD RESISTOR FTR0603000XR 1
455-12000-H0 SMD RESISTOR FTR0603000XR 1
455-12000-H0 SMD RESISTOR FTR0603000XR 1
455-12075-H0 SMD RESISTOR FTR0603750JR 1
455-12075-H0 SMD RESISTOR FTR0603750JR 1
455-12082-H0 SMD RESISTOR FTR0603820JR 1
455-12110-H0 SMD RESISTOR FTR0603101JR 1
455-12110-H0 SMD RESISTOR FTR0603101JR 1
455-12110-H0 SMD RESISTOR FTR0603101JR 1
455-12110-H0 SMD RESISTOR FTR0603101JR 1
455-12110-H0 SMD RESISTOR FTR0603101JR 1
455-12110-H0 SMD RESISTOR FTR0603101JR 1
455-12110-H0 SMD RESISTOR FTR0603101JR 1
Model No.: LCT-37PBSTP.doc
Version: 1.0
Page 70

-70 -
Part Code Description Quantity
455-12110-H0 SMD RESISTOR FTR0603101JR 1
455-12110-H0 SMD RESISTOR FTR0603101JR 1
455-12110-H0 SMD RESISTOR FTR0603101JR 1
455-12110-H0 SMD RESISTOR FTR0603101JR 1
455-12110-H0 SMD RESISTOR FTR0603101JR 1
455-12110-H0 SMD RESISTOR FTR0603101JR 1
455-12110-H0 SMD RESISTOR FTR0603101JR 1
455-12110-H0 SMD RESISTOR FTR0603101JR 1
455-12110-H0 SMD RESISTOR FTR0603101JR 1
455-12110-H0 SMD RESISTOR FTR0603101JR 1
455-12110-H0 SMD RESISTOR FTR0603101JR 1
455-12110-H0 SMD RESISTOR FTR0603101JR 1
455-12112-H0 SMD RESISTOR FTR0603121JR 1
455-12122-H0 SMD RESISTOR FTR0603221JR 1
455-12122-H0 SMD RESISTOR FTR0603221JR 1
455-12147-H0 SMD RESISTOR FTR0603471JR 1
455-12147-H0 SMD RESISTOR FTR0603471JR 1
455-12147-H0 SMD RESISTOR FTR0603471JR 1
455-12220-H0 SMD RESISTOR FTR0603202JR 1
455-12222-H0 SMD RESISTOR FTR0603222JR 1
455-12227-H0 SMD RESISTOR FTR0603272JR 1
455-12268-H0 SMD RESISTOR FTR0603682JR 1
455-12268-H0 SMD RESISTOR FTR0603682JR 1
455-12268-H0 SMD RESISTOR FTR0603682JR 1
455-12268-H0 SMD RESISTOR FTR0603682JR 1
455-12310-H0 SMD RESISTOR FTR0603103JR 1
455-12310-H0 SMD RESISTOR FTR0603103JR 1
455-12310-H0 SMD RESISTOR FTR0603103JR 1
455-12310-H0 SMD RESISTOR FTR0603103JR 1
455-12310-H0 SMD RESISTOR FTR0603103JR 1
455-12310-H0 SMD RESISTOR FTR0603103JR 1
455-12310-H0 SMD RESISTOR FTR0603103JR 1
455-12310-H0 SMD RESISTOR FTR0603103JR 1
455-12310-H0 SMD RESISTOR FTR0603103JR 1
455-12310-H0 SMD RESISTOR FTR0603103JR 1
Model No.: LCT-37PBSTP.doc
Version: 1.0
Page 71

-71 -
Part Code Description Quantity
455-12310-H0 SMD RESISTOR FTR0603103JR 1
455-12310-H0 SMD RESISTOR FTR0603103JR 1
455-12315-H0 SMD RESISTOR FTR0603153JR 1
455-12322-H0 SMD RESISTOR FTR0603223JR 1
455-12347-H0 SMD RESISTOR FTR0603473JR 1
455-12347-H0 SMD RESISTOR FTR0603473JR 1
455-12347-H0 SMD RESISTOR FTR0603473JR 1
455-12347-H0 SMD RESISTOR FTR0603473JR 1
455-12347-H0 SMD RESISTOR FTR0603473JR 1
455-12347-H0 SMD RESISTOR FTR0603473JR 1
455-12412-H0 SMD RESISTOR FTR0603124JR 1
455-12412-H0 SMD RESISTOR FTR0603124JR 1
455-22000-H0 SMD RESISTOR RC11-1/8W-0-J 1
455-22310-H0 SMD RESISTOR RC11-1/8W-10K-J 1
455-22310-H0 SMD RESISTOR RC11-1/8W-10K-J 1
455-22412-H0 SMD RESISTOR RC11-1/8W-120K-J 1
456-1447R-C3 SMD CAPACITOR C3216Y5V1C474ZT 1
456-1447R-C3 SMD CAPACITOR C3216Y5V1C474ZT 1
456-2215K-B1 SMD CAPACITOR 06032R152K250BA 1
456-2215K-B1 SMD CAPACITOR 06032R152K250BA 1
456-2215K-B1 SMD CAPACITOR 06032R152K250BA 1
456-2410M-C1 SMD CAPACITOR 06032E104M250BA 1
456-2410M-C1 SMD CAPACITOR 06032E104M250BA 1
456-2410M-C1 SMD CAPACITOR 06032E104M250BA 1
456-2410M-C1 SMD CAPACITOR 06032E104M250BA 1
456-2410M-C1 SMD CAPACITOR 06032E104M250BA 1
456-2410M-C1 SMD CAPACITOR 06032E104M250BA 1
456-2410M-C1 SMD CAPACITOR 06032E104M250BA 1
456-2410M-C1 SMD CAPACITOR 06032E104M250BA 1
456-2410M-C1 SMD CAPACITOR 06032E104M250BA 1
456-2410M-C1 SMD CAPACITOR 06032E104M250BA 1
456-2410M-C1 SMD CAPACITOR 06032E104M250BA 1
456-2410M-C1 SMD CAPACITOR 06032E104M250BA 1
456-2410M-C1 SMD CAPACITOR 06032E104M250BA 1
456-2410M-C1 SMD CAPACITOR 06032E104M250BA 1
Model No.: LCT-37PBSTP.doc
Version: 1.0
Page 72

-72 -
Part Code Description Quantity
456-2410M-C1 SMD CAPACITOR 06032E104M250BA 1
456-2410M-C1 SMD CAPACITOR 06032E104M250BA 1
456-2410M-C1 SMD CAPACITOR 06032E104M250BA 1
456-2410M-C1 SMD CAPACITOR 06032E104M250BA 1
456-2422M-C1 SMD CAPACITOR 06032E224M250BA 1
456-2422M-C1 SMD CAPACITOR 06032E224M250BA 1
456-2422M-C1 SMD CAPACITOR 06032E224M250BA 1
456-2422M-C1 SMD CAPACITOR 06032E224M250BA 1
456-2447R-C1 SMD CAPACITOR 06032E474Z250BA 1
456-2447R-C1 SMD CAPACITOR 06032E474Z250BA 1
456-2447R-C1 SMD CAPACITOR 06032E474Z250BA 1
456-2447R-C1 SMD CAPACITOR 06032E474Z250BA 1
456-2447R-C1 SMD CAPACITOR 06032E474Z250BA 1
456-2447R-C1 SMD CAPACITOR 06032E474Z250BA 1
456-2447R-C1 SMD CAPACITOR 06032E474Z250BA 1
456-2447R-C1 SMD CAPACITOR 06032E474Z250BA 1
456-2447R-C1 SMD CAPACITOR 06032E474Z250BA 1
456-2447R-C1 SMD CAPACITOR 06032E474Z250BA 1
456-2447R-C1 SMD CAPACITOR 06032E474Z250BA 1
456-2447R-C1 SMD CAPACITOR 06032E474Z250BA 1
456-2447R-C1 SMD CAPACITOR 06032E474Z250BA 1
456-2447R-C1 SMD CAPACITOR 06032E474Z250BA 1
456-2510R-C2 SMD CAPACITOR 08052E105Z250BA 1
456-2510R-C2 SMD CAPACITOR 08052E105Z250BA 1
456-2510R-C2 SMD CAPACITOR 08052E105Z250BA 1
456-2510R-C2 SMD CAPACITOR 08052E105Z250BA 1
456-2510R-C2 SMD CAPACITOR 08052E105Z250BA 1
456-3018H-11 SMD CAPACITOR 0603CG180J500BA 1
456-3018H-11 SMD CAPACITOR 0603CG180J500BA 1
456-3056H-11 SMD CAPACITOR 0603CG560J500BA 1
456-3056H-11 SMD CAPACITOR 0603CG560J500BA 1
456-3056H-11 SMD CAPACITOR 0603CG560J500BA 1
456-3122H-11 SMD CAPACITOR 0603CG221J500BA 1
456-3122H-11 SMD CAPACITOR 0603CG221J500BA 1
456-3147H-11 SMD CAPACITOR 0603CG471J500BA 1
Model No.: LCT-37PBSTP.doc
Version: 1.0
Page 73

-73 -
Part Code Description Quantity
456-3147H-11 SMD CAPACITOR 0603CG471J500BA 1
456-3147H-11 SMD CAPACITOR 0603CG471J500BA 1
456-3210H-11 SMD CAPACITOR 0603CG102J500BA 1
456-3210H-11 SMD CAPACITOR 0603CG102J500BA 1
456-3210H-11 SMD CAPACITOR 0603CG102J500BA 1
456-3210H-11 SMD CAPACITOR 0603CG102J500BA 1
456-3210H-11 SMD CAPACITOR 0603CG102J500BA 1
456-3210H-11 SMD CAPACITOR 0603CG102J500BA 1
456-3210H-11 SMD CAPACITOR 0603CG102J500BA 1
456-3210H-11 SMD CAPACITOR 0603CG102J500BA 1
456-3210H-11 SMD CAPACITOR 0603CG102J500BA 1
456-3210H-11 SMD CAPACITOR 0603CG102J500BA 1
456-3210H-11 SMD CAPACITOR 0603CG102J500BA 1
456-3210H-11 SMD CAPACITOR 0603CG102J500BA 1
462-90410-H02 POLYESTER CAP 63V-0.1uF-J 1
462-90410-H02 POLYESTER CAP 63V-0.1uF-J 1
464-6C722-M02 ELECTROLYTIC CAP CD110-10V-220uF-M 1
464-6C722-M02 ELECTROLYTIC CAP CD110-10V-220uF-M 1
464-6C722-M02 ELECTROLYTIC CAP CD110-10V-220uF-M 1
464-6D610-M02 ELECTROLYTIC CAP CD110-16V-10uF-M 1
464-6D610-M02 ELECTROLYTIC CAP CD110-16V-10uF-M 1
464-6D610-M02 ELECTROLYTIC CAP CD110-16V-10uF-M 1
464-6D610-M02 ELECTROLYTIC CAP CD110-16V-10uF-M 1
464-6D610-M02 ELECTROLYTIC CAP CD110-16V-10uF-M 1
464-6D610-M02 ELECTROLYTIC CAP CD110-16V-10uF-M 1
464-6D610-M02 ELECTROLYTIC CAP CD110-16V-10uF-M 1
464-6D647-M02 ELECTROLYTIC CAP CD110-16V-47uF-M 1
464-6D647-M02 ELECTROLYTIC CAP CD110-16V-47uF-M 1
464-6D647-M02 ELECTROLYTIC CAP CD110-16V-47uF-M 1
464-6D647-M02 ELECTROLYTIC CAP CD110-16V-47uF-M 1
464-6D647-M02 ELECTROLYTIC CAP CD110-16V-47uF-M 1
464-6D647-M02 ELECTROLYTIC CAP CD110-16V-47uF-M 1
464-6D647-M02 ELECTROLYTIC CAP CD110-16V-47uF-M 1
464-6D647-M02 ELECTROLYTIC CAP CD110-16V-47uF-M 1
464-6D647-M02 ELECTROLYTIC CAP CD110-16V-47uF-M 1
Model No.: LCT-37PBSTP.doc
Version: 1.0
Page 74

-74 -
Part Code Description Quantity
464-6D722-M02 ELECTROLYTIC CAP CD110-16V-220uF-M 1
464-6D722-M02 ELECTROLYTIC CAP CD110-16V-220uF-M 1
464-6D722-M02 ELECTROLYTIC CAP CD110-16V-220uF-M 1
464-6D722-M02 ELECTROLYTIC CAP CD110-16V-220uF-M 1
464-6D722-M02 ELECTROLYTIC CAP CD110-16V-220uF-M 1
464-6D722-M02 ELECTROLYTIC CAP CD110-16V-220uF-M 1
464-6D747-M02 ELECTROLYTIC CAP CD110-16V-470uF-M 1
464-6E610-M02 *ELECTROLYTIC CAP CD110-25V-10uF-M 1
464-6E747-M02 ELECTROLYTIC CAP CD110-25V-470uF-M 1
464-60510-M02 ELECTROLYTIC CAP CD110-50V-1uF-M 1
464-60510-M02 ELECTROLYTIC CAP CD110-50V-1uF-M 1
464-60533-M02 ELECTROLYTIC CAP CD110-50V-3.3uF-M 1
477-40211-00 SMD FIXED INDUCTORSLF12575T-330M3R2 1
477-40211-00 SMD FIXED INDUCTORSLF12575T-330M3R2 1
477-40211-00 SMD FIXED INDUCTORSLF12575T-330M3R2 1
477-40211-00 SMD FIXED INDUCTORSLF12575T-330M3R2 1
477-90003-00 SMD WAVE FILTER LFA20-2A1E103M 1
477-90003-00 SMD WAVE FILTER LFA20-2A1E103M 1
477-90003-00 SMD WAVE FILTER LFA20-2A1E103M 1
477-90003-00 SMD WAVE FILTER LFA20-2A1E103M 1
477-90004-00 SMD WAVE FILTER LFA20-2A1E104M 1
477-90004-00 SMD WAVE FILTER LFA20-2A1E104M 1
477-90004-00 SMD WAVE FILTER LFA20-2A1E104M 1
477-90004-00 SMD WAVE FILTER LFA20-2A1E104M 1
666-13207-00 SMD FERRITE BEAD STPB3216-380PT 1
666-13207-00 SMD FERRITE BEAD STPB3216-380PT 1
666-13207-00 SMD FERRITE BEAD STPB3216-380PT 1
666-13207-00 SMD FERRITE BEAD STPB3216-380PT 1
782-L27W18-150A SOUND-TRANSFER BOARD PCB 1
667-L37K5-20C POWER PCB ASS'Y KAS200-5S241812XLS 1
360-10001-00 TACT SWITCH KFC-A06-4X4.5X5B 1
360-10001-00 TACT SWITCH KFC-A06-4X4.5X5B 1
360-10001-00 TACT SWITCH KFC-A06-4X4.5X5B 1
360-10001-00 TACT SWITCH KFC-A06-4X4.5X5B 1
360-10001-00 TACT SWITCH KFC-A06-4X4.5X5B 1
Model No.: LCT-37PBSTP.doc
Version: 1.0
Page 75

-75 -
Part Code Description Quantity
360-10001-00 TACT SWITCH KFC-A06-4X4.5X5B 1
360-10001-00 TACT SWITCH KFC-A06-4X4.5X5B 1
364-33101-00 3-PINS CONNECTORS TJC3-03A 1
467-1C210-H0 CARBON RESISTOR 1/6W-1K-J 1
467-1C210-H0 CARBON RESISTOR 1/6W-1K-J 1
467-1C220-H0 CARBON RESISTOR 1/6W-2K-J 1
467-1C220-H0 CARBON RESISTOR 1/6W-2K-J 1
467-1C243-H0 CARBON RESISTOR 1/6W-4.3K-J 1
467-1C243-H0 CARBON RESISTOR 1/6W-4.3K-J 1
467-1C330-H0 CARBON RESISTOR 1/6W-30K-J 1
782-L37W18-0500 BUTTON PCB 1
870-30217-00A KEY BRACKET 1
877-50490-0T0
343-18150-10 TRANSISTOR 2SC1815-Y 1
352-51170-00 IC HRM538BB5117 (D) 1
364-33101-00 3-PINS CONNECTORS TJC3-03A 1
364-34101-00 4-PINS CONNECTORS TJC3-04A 1
459-1410M-00 CERAMIC CAPACITOR DD410-SR104M25 1
464-6D622-M0 ELECTROLYTIC CAP CD110-16V-22uF-M 1
467-1C047-H0 CARBON RESISTOR 1/6W-47Ω-J 1
467-1C110-H0 CARBON RESISTOR 1/6W-100Ω-J 1
467-1C151-H0 CARBON RESISTOR 1/6W-510Ω-J 1
467-1C230-H0 CARBON RESISTOR 1/6W-3K-J 1
782-L37W18-0900 IR RECEIVE PCB 1
340-10132-20 LIGHT-EMITTING DIODE HFT5038CPBR 2
655-3K301-02 (3-PINS) LEAD WITH HOUSING 1
364-3A203-00 21-PINS CONNECTORS BW1-024-1 1
364-36104-00 6-PINS CONNECTORS TJC3-06AWT 1
364-36104-00 6-PINS CONNECTORS TJC3-06AWT 1
KEY (PLATE SILVERY W HITE )
1
364-37104-00 7-PINS CONNECTORS TJC3-07AWT 1
364-91202-00 S-VIDEO TERMINAL CKX5-2K-2 1
364-93219-00 AV JACK AV3-14WKD 1
464-6D747-M0 ELECTROLYTIC CAP CD110-16V-470uF-M 1
353-05050-20 SMD IC PESD5V0L5UY 1
353-05050-20 SMD IC PESD5V0L5UY 1
Model No.: LCT-37PBSTP.doc
Version: 1.0
Page 76

-76 -
Part Code Description Quantity
353-05050-20 SMD IC PESD5V0L5UY 1
455-12068-H0 SMD RESISTOR FTR0603680JR 1
455-12268-H0 SMD RESISTOR FTR0603682JR 1
455-12268-H0 SMD RESISTOR FTR0603682JR 1
455-12268-H0 SMD RESISTOR FTR0603682JR 1
455-12268-H0 SMD RESISTOR FTR0603682JR 1
455-12268-H0 SMD RESISTOR FTR0603682JR 1
455-12310-H0 SMD RESISTOR FTR0603103JR 1
455-12347-H0 SMD RESISTOR FTR0603473JR 1
455-12347-H0 SMD RESISTOR FTR0603473JR 1
455-12347-H0 SMD RESISTOR FTR0603473JR 1
455-12347-H0 SMD RESISTOR FTR0603473JR 1
456-2210K-B1 SMD CAPACITOR 06032R102K250BA 1
456-2210K-B1 SMD CAPACITOR 06032R102K250BA 1
456-2410R-C1 SMD CAPACITOR C1608Y5V1E104ZT 1
456-3210H-11 SMD CAPACITOR 0603CG102J500BA 1
456-3210H-11 SMD CAPACITOR 0603CG102J500BA 1
456-3210H-11 SMD CAPACITOR 0603CG102J500BA 1
456-3210H-11 SMD CAPACITOR 0603CG102J500BA 1
477-90003-00 SMD WAVE FILTER LFA20-2A1E103M 1
477-90003-00 SMD WAVE FILTER LFA20-2A1E103M 1
477-90003-00 SMD WAVE FILTER LFA20-2A1E103M 1
477-90003-00 SMD WAVE FILTER LFA20-2A1E103M 1
477-90003-00 SMD WAVE FILTER LFA20-2A1E103M 1
477-90003-00 SMD WAVE FILTER LFA20-2A1E103M 1
477-90004-00 SMD WAVE FILTER LFA20-2A1E104M 1
477-90004-00 SMD WAVE FILTER LFA20-2A1E104M 1
477-90004-00 SMD WAVE FILTER LFA20-2A1E104M 1
477-90004-00 SMD WAVE FILTER LFA20-2A1E104M 1
477-90004-00 SMD WAVE FILTER LFA20-2A1E104M 1
782-L37W25-4000 VIDE PROCESSING PCB 1
329-61003-00 CRYSTAL HC-49/US 10.000MHZ 1
329-61402-00 CRYSTAL HC-49/US 14.31818MHZ 1
329-61402-00 CRYSTAL HC-49/US 14.31818MHZ 1
329-62806-00 CRYSTAL HC-49uS 28.322MHz 1
Model No.: LCT-37PBSTP.doc
Version: 1.0
Page 77

-77 -
Part Code Description Quantity
340-50360-00 ZENER DIODE HZ4A2 1
340-50470-00 ZENER DIODE HZ5B1 1
364-11212-00 EARPHONE JACK ST-112 1
364-11212-00 EARPHONE JACK ST-112 1
364-32101-00 2-PINS CONNECTORS TJC3-02A 1
364-33101-00 3-PINS CONNECTORS TJC3-03A 1
364-36101-00 6-PINS CONNECTORS TJC3-06A 1
364-37101-00 7-PINS CONNECTORS TJC3-07A 1
364-37104-00 7-PINS CONNECTORS TJC3-07AWT 1
364-91204-00 VGA SOCKET 1
364-95209-00 AV JACK AV13-05-501 1
462-B0433-H0 POLYESTER CAP CL21X-50V-0.33uF-J 1
462-B0433-H0 POLYESTER CAP CL21X-50V-0.33uF-J 1
462-B0433-H0 POLYESTER CAP CL21X-50V-0.33uF-J 1
462-B0433-H0 POLYESTER CAP CL21X-50V-0.33uF-J 1
462-B0433-H0 POLYESTER CAP CL21X-50V-0.33uF-J 1
462-B0433-H0 POLYESTER CAP CL21X-50V-0.33uF-J 1
462-B0447-H0 POLYESTER CAP CL21X-50V-0.47uF-J 2
464-6C810-M0 ELECTROLYTIC CAP CD110-10V-1000uF-M 1
464-6F747-M0 ELECTROLYTIC CAP CD110-35V-470uF-M 1
615-10509-00A
615-10510-00A
655-B1202-52 (12-PINS) LEAD WITH HOUSING 1
655-T1202-50
655-31202-121 (3-PINS) LEAD WITH HOUSING 1
655-61202-144 (6-PINS) LEAD WITH HOUSING 1
804-20427-00 DIGITALINTERFACE SPACE PLATE 1
808-70397-00 INSULATION SHUTTER 4
340-00289-00 SMD DIODE BAV99LT1 1
340-00289-00 SMD DIODE BAV99LT1 1
340-00289-00 SMD DIODE BAV99LT1 1
DIGITAL BOARD SHELTER ASS'Y (TOP )
DIGITAL BOARD SHELTER ASS'Y (BOTTOM )
(10-PINS) LEAD W ITH HOUSING
1
1
1
340-00296-00 SMD DIODE SK34 1
340-00296-00 SMD DIODE SK34 1
340-00362-00 SMD DIODE MBRST130LT3 1
340-00372-00 SMD DIODE MMBD1204 1
Model No.: LCT-37PBSTP.doc
Version: 1.0
Page 78

-78 -
Part Code Description Quantity
340-50512-00 SMD ZENER DIODE BZV55-B5V1 1
340-50512-00 SMD ZENER DIODE BZV55-B5V1 1
342-01380-00 *SMD TRANSISTOR BSS138LT1 1
342-08470-90 SMD TRANSISTOR BC847AW 1
342-08470-90 SMD TRANSISTOR BC847AW 1
342-08470-90 SMD TRANSISTOR BC847AW 1
342-08470-90 SMD TRANSISTOR BC847AW 1
342-08470-90 SMD TRANSISTOR BC847AW 1
342-08570-90 SMD TRANSISTOR BC857 AW 1
342-08570-90 SMD TRANSISTOR BC857 AW 1
353-DPTV0-20 SMD IC DPTV-SVP-EX52 1
353-03580-80 SMD IC LM358D (M) 1
353-05040-20 SMD IC PESD5V0L4UG 1
353-05050-20 SMD IC PESD5V0L5UY 1
353-11170-G0 SMD IC AMS1117-1.8 (D) 1
353-11170-G0 SMD IC AMS1117-1.8 (D) 1
353-11170-G0 SMD IC AMS1117-1.8 (D) 1
353-11170-G0 SMD IC AMS1117-1.8 (D) 1
353-11170-10 SMD IC B1117N-2.5 (D) 1
353-11170-10 SMD IC B1117N-2.5 (D) 1
353-11170-20 SMD IC AS1117M-3.3 (M) 1
353-11170-20 SMD IC AS1117M-3.3 (M) 1
353-11170-20 SMD IC AS1117M-3.3 (M) 1
353-11170-20 SMD IC AS1117M-3.3 (M) 1
353-12130-10 SMD ICCM1213-08MS 1
353-15010-50 SMD ICAP1501-50K5 1
353-24020-60 SMD IC 24C02N-10SI27 1
353-24210-50 SMD IC 24LC21A/SN 1
353-24320-50 SMD IC24LC32A/SN 1
353-26323-10 SMD IC K4D2632838F-QC50 1
353-28300-00 SMD ICAS2830AT-3.3 (D) 1
353-29040-30 SMD IC W29C040P-90B 1
353-30620-20 SMD ICM30620SPGP (D) 1
353-32570-10 SMD ICSN74CBT3257CDR 1
353-32570-10 SMD ICSN74CBT3257CDR 1
Model No.: LCT-37PBSTP.doc
Version: 1.0
Page 79

-79 -
Part Code Description Quantity
353-40520-80 SMD IC HEF4052BT (M) 1
353-43440-10 *SMD ICCS4344CZZ 1
353-51470-10 SMD ICTVP5147PFP 1
353-70020-10 SMD IC NDC7002N 1
353-70020-10 SMD IC NDC7002N 1
353-74140-40 SMD ICSN74LVC14AD 1
353-90110-10 SMD ICSiI9011CLU 1
353-99330-00 SMD IC SI9933ADY (O) 1
364-T1904-00 SMD 19-PINSHDMI 1775245-2 1
364-T3001-00 SMD 30-PINSFF-A1255-WRS 1
454-03710-MB SMD ELECTROLYTIC CAP CDPS-10V-100uF-M 1
454-03710-MB SMD ELECTROLYTIC CAP CDPS-10V-100uF-M 1
454-03710-MB SMD ELECTROLYTIC CAP CDPS-10V-100uF-M 1
454-04610-MA SMD ELECTROLYTIC CAP CDPS-16V-10uF-M 1
454-04610-MA SMD ELECTROLYTIC CAP CDPS-16V-10uF-M 1
454-04610-MA SMD ELECTROLYTIC CAP CDPS-16V-10uF-M 1
454-04610-MA SMD ELECTROLYTIC CAP CDPS-16V-10uF-M 1
454-04610-MA SMD ELECTROLYTIC CAP CDPS-16V-10uF-M 1
454-04610-MA SMD ELECTROLYTIC CAP CDPS-16V-10uF-M 1
454-04610-MA SMD ELECTROLYTIC CAP CDPS-16V-10uF-M 1
454-04610-MA SMD ELECTROLYTIC CAP CDPS-16V-10uF-M 1
454-04610-MA SMD ELECTROLYTIC CAP CDPS-16V-10uF-M 1
454-04610-MA SMD ELECTROLYTIC CAP CDPS-16V-10uF-M 1
454-04610-MA SMD ELECTROLYTIC CAP CDPS-16V-10uF-M 1
454-04610-MA SMD ELECTROLYTIC CAP CDPS-16V-10uF-M 1
454-04610-MA SMD ELECTROLYTIC CAP CDPS-16V-10uF-M 1
454-04610-MA SMD ELECTROLYTIC CAP CDPS-16V-10uF-M 1
454-04610-MA SMD ELECTROLYTIC CAP CDPS-16V-10uF-M 1
454-04610-MA SMD ELECTROLYTIC CAP CDPS-16V-10uF-M 1
454-04610-MA SMD ELECTROLYTIC CAP CDPS-16V-10uF-M 1
454-04610-MA SMD ELECTROLYTIC CAP CDPS-16V-10uF-M 1
454-04610-MA SMD ELECTROLYTIC CAP CDPS-16V-10uF-M 1
454-04610-MA SMD ELECTROLYTIC CAP CDPS-16V-10uF-M 1
454-04610-MA SMD ELECTROLYTIC CAP CDPS-16V-10uF-M 1
454-04610-MA SMD ELECTROLYTIC CAP CDPS-16V-10uF-M 1
Model No.: LCT-37PBSTP.doc
Version: 1.0
Page 80

-80 -
Part Code Description Quantity
454-04610-MA SMD ELECTROLYTIC CAP CDPS-16V-10uF-M 1
454-04610-MA SMD ELECTROLYTIC CAP CDPS-16V-10uF-M 1
454-04610-MA SMD ELECTROLYTIC CAP CDPS-16V-10uF-M 1
454-04610-MA SMD ELECTROLYTIC CAP CDPS-16V-10uF-M 1
454-04610-MA SMD ELECTROLYTIC CAP CDPS-16V-10uF-M 1
454-04610-MA SMD ELECTROLYTIC CAP CDPS-16V-10uF-M 1
454-04610-MA SMD ELECTROLYTIC CAP CDPS-16V-10uF-M 1
454-04610-MA SMD ELECTROLYTIC CAP CDPS-16V-10uF-M 1
454-04610-MA SMD ELECTROLYTIC CAP CDPS-16V-10uF-M 1
454-04610-MA SMD ELECTROLYTIC CAP CDPS-16V-10uF-M 1
454-04610-MA SMD ELECTROLYTIC CAP CDPS-16V-10uF-M 1
454-04610-MA SMD ELECTROLYTIC CAP CDPS-16V-10uF-M 1
454-04610-MA SMD ELECTROLYTIC CAP CDPS-16V-10uF-M 1
454-04610-MA SMD ELECTROLYTIC CAP CDPS-16V-10uF-M 1
454-04610-MA SMD ELECTROLYTIC CAP CDPS-16V-10uF-M 1
454-04610-MA SMD ELECTROLYTIC CAP CDPS-16V-10uF-M 1
454-04610-MA SMD ELECTROLYTIC CAP CDPS-16V-10uF-M 1
454-04610-MA SMD ELECTROLYTIC CAP CDPS-16V-10uF-M 1
454-04622-MA SMD ELECTROLYTIC CAP CDPS-16V-22uF-M 1
454-04622-MA SMD ELECTROLYTIC CAP CDPS-16V-22uF-M 1
454-04622-MA SMD ELECTROLYTIC CAP CDPS-16V-22uF-M 1
454-04622-MA SMD ELECTROLYTIC CAP CDPS-16V-22uF-M 1
454-04622-MA SMD ELECTROLYTIC CAP CDPS-16V-22uF-M 1
454-04622-MA SMD ELECTROLYTIC CAP CDPS-16V-22uF-M 1
454-04622-MA SMD ELECTROLYTIC CAP CDPS-16V-22uF-M 1
454-04622-MA SMD ELECTROLYTIC CAP CDPS-16V-22uF-M 1
454-04622-MA SMD ELECTROLYTIC CAP CDPS-16V-22uF-M 1
454-04622-MA SMD ELECTROLYTIC CAP CDPS-16V-22uF-M 1
454-04622-MA SMD ELECTROLYTIC CAP CDPS-16V-22uF-M 1
454-04622-MA SMD ELECTROLYTIC CAP CDPS-16V-22uF-M 1
454-04622-MA SMD ELECTROLYTIC CAP CDPS-16V-22uF-M 1
454-04622-MA SMD ELECTROLYTIC CAP CDPS-16V-22uF-M 1
454-04622-MA SMD ELECTROLYTIC CAP CDPS-16V-22uF-M 1
454-04622-MA SMD ELECTROLYTIC CAP CDPS-16V-22uF-M 1
454-04622-MA SMD ELECTROLYTIC CAP CDPS-16V-22uF-M 1
Model No.: LCT-37PBSTP.doc
Version: 1.0
Page 81

-81 -
Part Code Description Quantity
454-04622-MA SMD ELECTROLYTIC CAP CDPS-16V-22uF-M 1
454-04622-MA SMD ELECTROLYTIC CAP CDPS-16V-22uF-M 1
454-04622-MA SMD ELECTROLYTIC CAP CDPS-16V-22uF-M 1
454-04622-MA SMD ELECTROLYTIC CAP CDPS-16V-22uF-M 1
454-04622-MA SMD ELECTROLYTIC CAP CDPS-16V-22uF-M 1
454-04622-MA SMD ELECTROLYTIC CAP CDPS-16V-22uF-M 1
454-04622-MA SMD ELECTROLYTIC CAP CDPS-16V-22uF-M 1
454-04647-MB SMD ELECTROLYTIC CAP CDPS-16V-47uF-M 1
454-04647-MB SMD ELECTROLYTIC CAP CDPS-16V-47uF-M 1
454-04647-MB SMD ELECTROLYTIC CAP CDPS-16V-47uF-M 1
454-04647-MB SMD ELECTROLYTIC CAP CDPS-16V-47uF-M 1
454-04647-MB SMD ELECTROLYTIC CAP CDPS-16V-47uF-M 1
454-04710-MC SMD ELECTROLYTIC CAP CDPS-16V-100uF-M 1
454-06547-MA SMD ELECTROLYTIC CAP CDPS-25V-4.7uF-M 1
454-08533-MA SMD ELECTROLYTIC CAP CDPS-50V-3.3uF-M 1
454-08533-MA SMD ELECTROLYTIC CAP CDPS-50V-3.3uF-M 1
454-08533-MA SMD ELECTROLYTIC CAP CDPS-50V-3.3uF-M 1
454-08533-MA SMD ELECTROLYTIC CAP CDPS-50V-3.3uF-M 1
455-10015-H9 SMD RESISTOR NCA4R150JR 1
455-10015-H9 SMD RESISTOR NCA4R150JR 1
455-10015-H9 SMD RESISTOR NCA4R150JR 1
455-10015-H9 SMD RESISTOR NCA4R150JR 1
455-10015-H9 SMD RESISTOR NCA4R150JR 1
455-10015-H9 SMD RESISTOR NCA4R150JR 1
455-10015-H9 SMD RESISTOR NCA4R150JR 1
455-10015-H9 SMD RESISTOR NCA4R150JR 1
455-10033-H9 SMD RESISTOR NCA4R330JR 1
455-10033-H9 SMD RESISTOR NCA4R330JR 1
455-10033-H9 SMD RESISTOR NCA4R330JR 1
455-10033-H9 SMD RESISTOR NCA4R330JR 1
455-10033-H9 SMD RESISTOR NCA4R330JR 1
455-10033-H9 SMD RESISTOR NCA4R330JR 1
455-10033-H9 SMD RESISTOR NCA4R330JR 1
455-10033-H9 SMD RESISTOR NCA4R330JR 1
455-10033-H9 SMD RESISTOR NCA4R330JR 1
Model No.: LCT-37PBSTP.doc
Version: 1.0
Page 82

-82 -
Part Code Description Quantity
455-10033-H9 SMD RESISTOR NCA4R330JR 1
455-10033-H9 SMD RESISTOR NCA4R330JR 1
455-10033-H9 SMD RESISTOR NCA4R330JR 1
455-10033-H9 SMD RESISTOR NCA4R330JR 1
455-10033-H9 SMD RESISTOR NCA4R330JR 1
455-10033-H9 SMD RESISTOR NCA4R330JR 1
455-10033-H9 SMD RESISTOR NCA4R330JR 1
455-10033-H9 SMD RESISTOR NCA4R330JR 1
455-10033-H9 SMD RESISTOR NCA4R330JR 1
455-10033-H9 SMD RESISTOR NCA4R330JR 1
455-10033-H9 SMD RESISTOR NCA4R330JR 1
455-10082-H9 SMD RESISTOR NCA4R820JR 1
455-10082-H9 SMD RESISTOR NCA4R820JR 1
455-12000-H0 SMD RESISTOR FTR0603000XR 1
455-12000-H0 SMD RESISTOR FTR0603000XR 1
455-12000-H0 SMD RESISTOR FTR0603000XR 1
455-12000-H0 SMD RESISTOR FTR0603000XR 1
455-12000-H0 SMD RESISTOR FTR0603000XR 1
455-12000-H0 SMD RESISTOR FTR0603000XR 1
455-12000-H0 SMD RESISTOR FTR0603000XR 1
455-12000-H0 SMD RESISTOR FTR0603000XR 1
455-12000-H0 SMD RESISTOR FTR0603000XR 1
455-12000-H0 SMD RESISTOR FTR0603000XR 1
455-12000-H0 SMD RESISTOR FTR0603000XR 1
455-12000-H0 SMD RESISTOR FTR0603000XR 1
455-12000-H0 SMD RESISTOR FTR0603000XR 1
455-12000-H0 SMD RESISTOR FTR0603000XR 1
455-12000-H0 SMD RESISTOR FTR0603000XR 1
455-12000-H0 SMD RESISTOR FTR0603000XR 1
455-12000-H0 SMD RESISTOR FTR0603000XR 1
455-12000-H0 SMD RESISTOR FTR0603000XR 1
455-12000-H0 SMD RESISTOR FTR0603000XR 1
455-12000-H0 SMD RESISTOR FTR0603000XR 1
455-12000-H0 SMD RESISTOR FTR0603000XR 1
455-12000-H0 SMD RESISTOR FTR0603000XR 1
Model No.: LCT-37PBSTP.doc
Version: 1.0
Page 83

-83 -
Part Code Description Quantity
455-12000-H0 SMD RESISTOR FTR0603000XR 1
455-12000-H0 SMD RESISTOR FTR0603000XR 1
455-12000-H0 SMD RESISTOR FTR0603000XR 1
455-12000-H0 SMD RESISTOR FTR0603000XR 1
455-12000-H0 SMD RESISTOR FTR0603000XR 1
455-12000-H0 SMD RESISTOR FTR0603000XR 1
455-12000-H0 SMD RESISTOR FTR0603000XR 1
455-12000-H0 SMD RESISTOR FTR0603000XR 1
455-12000-H0 SMD RESISTOR FTR0603000XR 1
455-12000-H0 SMD RESISTOR FTR0603000XR 1
455-12000-H0 SMD RESISTOR FTR0603000XR 1
455-12000-H0 SMD RESISTOR FTR0603000XR 1
455-12000-H0 SMD RESISTOR FTR0603000XR 1
455-12000-H0 SMD RESISTOR FTR0603000XR 1
455-12000-H0 SMD RESISTOR FTR0603000XR 1
455-12000-H0 SMD RESISTOR FTR0603000XR 1
455-12000-H0 SMD RESISTOR FTR0603000XR 1
455-12000-H0 SMD RESISTOR FTR0603000XR 1
455-12000-H0 SMD RESISTOR FTR0603000XR 1
455-12000-H0 SMD RESISTOR FTR0603000XR 1
455-12015-H0 SMD RESISTOR FTR0603150JR 1
455-12022-H0 SMD RESISTOR FTR0603220JR 1
455-12022-H0 SMD RESISTOR FTR0603220JR 1
455-12022-H0 SMD RESISTOR FTR0603220JR 1
455-12022-H0 SMD RESISTOR FTR0603220JR 1
455-12022-H0 SMD RESISTOR FTR0603220JR 1
455-12022-H0 SMD RESISTOR FTR0603220JR 1
455-12022-H0 SMD RESISTOR FTR0603220JR 1
455-12022-H0 SMD RESISTOR FTR0603220JR 1
455-12022-H0 SMD RESISTOR FTR0603220JR 1
455-12022-H0 SMD RESISTOR FTR0603220JR 1
455-12033-H0 SMD RESISTOR FTR0603330JR 1
455-12033-H0 SMD RESISTOR FTR0603330JR 1
455-12033-H0 SMD RESISTOR FTR0603330JR 1
455-12033-H0 SMD RESISTOR FTR0603330JR 1
Model No.: LCT-37PBSTP.doc
Version: 1.0
Page 84

-84 -
Part Code Description Quantity
455-12033-H0 SMD RESISTOR FTR0603330JR 1
455-12033-H0 SMD RESISTOR FTR0603330JR 1
455-12033-H0 SMD RESISTOR FTR0603330JR 1
455-12033-H0 SMD RESISTOR FTR0603330JR 1
455-12033-H0 SMD RESISTOR FTR0603330JR 1
455-12033-H0 SMD RESISTOR FTR0603330JR 1
455-12033-H0 SMD RESISTOR FTR0603330JR 1
455-12033-H0 SMD RESISTOR FTR0603330JR 1
455-12047-H0 SMD RESISTOR FTR0603470JR 1
455-12051-H0 SMD RESISTOR FTR0603510JR 1
455-12051-H0 SMD RESISTOR FTR0603510JR 1
455-12068-H0 SMD RESISTOR FTR0603680JR 1
455-12068-H0 SMD RESISTOR FTR0603680JR 1
455-12068-H0 SMD RESISTOR FTR0603680JR 1
455-12068-H0 SMD RESISTOR FTR0603680JR 1
455-12075-H0 SMD RESISTOR FTR0603750JR 1
455-12075-H0 SMD RESISTOR FTR0603750JR 1
455-12075-H0 SMD RESISTOR FTR0603750JR 1
455-12075-H0 SMD RESISTOR FTR0603750JR 1
455-12075-H0 SMD RESISTOR FTR0603750JR 1
455-12075-H0 SMD RESISTOR FTR0603750JR 1
455-12075-H0 SMD RESISTOR FTR0603750JR 1
455-12075-H0 SMD RESISTOR FTR0603750JR 1
455-12075-H0 SMD RESISTOR FTR0603750JR 1
455-12075-H0 SMD RESISTOR FTR0603750JR 1
455-12075-H0 SMD RESISTOR FTR0603750JR 1
455-12082-H0 SMD RESISTOR FTR0603820JR 1
455-12082-H0 SMD RESISTOR FTR0603820JR 1
455-12082-H0 SMD RESISTOR FTR0603820JR 1
455-12082-H0 SMD RESISTOR FTR0603820JR 1
455-12082-H0 SMD RESISTOR FTR0603820JR 1
455-12110-H0 SMD RESISTOR FTR0603101JR 1
455-12110-H0 SMD RESISTOR FTR0603101JR 1
455-12110-H0 SMD RESISTOR FTR0603101JR 1
455-12110-H0 SMD RESISTOR FTR0603101JR 1
Model No.: LCT-37PBSTP.doc
Version: 1.0
Page 85

-85 -
Part Code Description Quantity
455-12110-H0 SMD RESISTOR FTR0603101JR 1
455-12110-H0 SMD RESISTOR FTR0603101JR 1
455-12110-H0 SMD RESISTOR FTR0603101JR 1
455-12110-H0 SMD RESISTOR FTR0603101JR 1
455-12110-H0 SMD RESISTOR FTR0603101JR 1
455-12110-H0 SMD RESISTOR FTR0603101JR 1
455-12110-H0 SMD RESISTOR FTR0603101JR 1
455-12110-H0 SMD RESISTOR FTR0603101JR 1
455-12110-H0 SMD RESISTOR FTR0603101JR 1
455-12110-H0 SMD RESISTOR FTR0603101JR 1
455-12110-H0 SMD RESISTOR FTR0603101JR 1
455-12110-H0 SMD RESISTOR FTR0603101JR 1
455-12110-H0 SMD RESISTOR FTR0603101JR 1
455-12110-H0 SMD RESISTOR FTR0603101JR 1
455-12110-H0 SMD RESISTOR FTR0603101JR 1
455-12110-H0 SMD RESISTOR FTR0603101JR 1
455-12110-H0 SMD RESISTOR FTR0603101JR 1
455-12110-H0 SMD RESISTOR FTR0603101JR 1
455-12110-H0 SMD RESISTOR FTR0603101JR 1
455-12110-H0 SMD RESISTOR FTR0603101JR 1
455-12110-H0 SMD RESISTOR FTR0603101JR 1
455-12110-H0 SMD RESISTOR FTR0603101JR 1
455-12110-H0 SMD RESISTOR FTR0603101JR 1
455-12110-H0 SMD RESISTOR FTR0603101JR 1
455-12122-H0 SMD RESISTOR FTR0603221JR 1
455-12133-H0 SMD RESISTOR FTR0603331JR 1
455-12133-H0 SMD RESISTOR FTR0603331JR 1
455-12147-H0 SMD RESISTOR FTR0603471JR 1
455-12147-H0 SMD RESISTOR FTR0603471JR 1
455-12147-H0 SMD RESISTOR FTR0603471JR 1
455-12147-H0 SMD RESISTOR FTR0603471JR 1
455-12147-H0 SMD RESISTOR FTR0603471JR 1
455-12210-H0 SMD RESISTOR FTR0603102JR 1
455-12210-H0 SMD RESISTOR FTR0603102JR 1
455-12210-H0 SMD RESISTOR FTR0603102JR 1
Model No.: LCT-37PBSTP.doc
Version: 1.0
Page 86

-86 -
Part Code Description Quantity
455-12210-H0 SMD RESISTOR FTR0603102JR 1
455-12210-H0 SMD RESISTOR FTR0603102JR 1
455-12210-H0 SMD RESISTOR FTR0603102JR 1
455-12210-H0 SMD RESISTOR FTR0603102JR 1
455-12210-H0 SMD RESISTOR FTR0603102JR 1
455-12210-H0 SMD RESISTOR FTR0603102JR 1
455-12212-H0 SMD RESISTOR FTR0603122JR 1
455-12215-H0 SMD RESISTOR FTR0603152JR 1
455-12222-H0 SMD RESISTOR FTR0603222JR 1
455-12222-H0 SMD RESISTOR FTR0603222JR 1
455-12222-H0 SMD RESISTOR FTR0603222JR 1
455-12222-H0 SMD RESISTOR FTR0603222JR 1
455-12222-H0 SMD RESISTOR FTR0603222JR 1
455-12222-H0 SMD RESISTOR FTR0603222JR 1
455-12222-H0 SMD RESISTOR FTR0603222JR 1
455-12233-H0 SMD RESISTOR FTR0603332JR 1
455-12247-H0 SMD RESISTOR FTR0603472JR 1
455-12247-H0 SMD RESISTOR FTR0603472JR 1
455-12247-H0 SMD RESISTOR FTR0603472JR 1
455-12247-H0 SMD RESISTOR FTR0603472JR 1
455-12247-H0 SMD RESISTOR FTR0603472JR 1
455-12247-H0 SMD RESISTOR FTR0603472JR 1
455-12247-H0 SMD RESISTOR FTR0603472JR 1
455-12247-H0 SMD RESISTOR FTR0603472JR 1
455-12247-H0 SMD RESISTOR FTR0603472JR 1
455-12247-H0 SMD RESISTOR FTR0603472JR 1
455-12247-H0 SMD RESISTOR FTR0603472JR 1
455-12247-H0 SMD RESISTOR FTR0603472JR 1
455-12247-H0 SMD RESISTOR FTR0603472JR 1
455-12247-H0 SMD RESISTOR FTR0603472JR 1
455-12247-H0 SMD RESISTOR FTR0603472JR 1
455-12247-H0 SMD RESISTOR FTR0603472JR 1
455-12247-H0 SMD RESISTOR FTR0603472JR 1
455-12247-H0 SMD RESISTOR FTR0603472JR 1
455-12247-H0 SMD RESISTOR FTR0603472JR 1
Model No.: LCT-37PBSTP.doc
Version: 1.0
Page 87

-87 -
Part Code Description Quantity
455-12247-H0 SMD RESISTOR FTR0603472JR 1
455-12247-H0 SMD RESISTOR FTR0603472JR 1
455-12247-H0 SMD RESISTOR FTR0603472JR 1
455-12247-H0 SMD RESISTOR FTR0603472JR 1
455-12247-H0 SMD RESISTOR FTR0603472JR 1
455-12247-H0 SMD RESISTOR FTR0603472JR 1
455-12247-H0 SMD RESISTOR FTR0603472JR 1
455-12247-H0 SMD RESISTOR FTR0603472JR 1
455-12247-H0 SMD RESISTOR FTR0603472JR 1
455-12247-H0 SMD RESISTOR FTR0603472JR 1
455-12247-H0 SMD RESISTOR FTR0603472JR 1
455-12247-H0 SMD RESISTOR FTR0603472JR 1
455-12247-H0 SMD RESISTOR FTR0603472JR 1
455-12247-H0 SMD RESISTOR FTR0603472JR 1
455-12247-H0 SMD RESISTOR FTR0603472JR 1
455-12247-H0 SMD RESISTOR FTR0603472JR 1
455-12247-H0 SMD RESISTOR FTR0603472JR 1
455-12247-H0 SMD RESISTOR FTR0603472JR 1
455-12247-H0 SMD RESISTOR FTR0603472JR 1
455-12247-H0 SMD RESISTOR FTR0603472JR 1
455-12247-H0 SMD RESISTOR FTR0603472JR 1
455-12282-H0 SMD RESISTOR FTR0603822JR 1
455-12310-H0 SMD RESISTOR FTR0603103JR 1
455-12310-H0 SMD RESISTOR FTR0603103JR 1
455-12310-H0 SMD RESISTOR FTR0603103JR 1
455-12310-H0 SMD RESISTOR FTR0603103JR 1
455-12310-H0 SMD RESISTOR FTR0603103JR 1
455-12310-H0 SMD RESISTOR FTR0603103JR 1
455-12310-H0 SMD RESISTOR FTR0603103JR 1
455-12310-H0 SMD RESISTOR FTR0603103JR 1
455-12310-H0 SMD RESISTOR FTR0603103JR 1
455-12310-H0 SMD RESISTOR FTR0603103JR 1
455-12310-H0 SMD RESISTOR FTR0603103JR 1
455-12310-H0 SMD RESISTOR FTR0603103JR 1
455-12310-H0 SMD RESISTOR FTR0603103JR 1
Model No.: LCT-37PBSTP.doc
Version: 1.0
Page 88

-88 -
Part Code Description Quantity
455-12310-H0 SMD RESISTOR FTR0603103JR 1
455-12310-H0 SMD RESISTOR FTR0603103JR 1
455-12322-H0 SMD RESISTOR FTR0603223JR 1
455-12322-H0 SMD RESISTOR FTR0603223JR 1
455-12347-H0 SMD RESISTOR FTR0603473JR 1
455-12368-H0 SMD RESISTOR FTR0603683JR 1
455-12410-H0 SMD RESISTOR FTR0603104JR 1
455-12410-H0 SMD RESISTOR FTR0603104JR 1
455-12410-H0 SMD RESISTOR FTR0603104JR 1
455-12410-H0 SMD RESISTOR FTR0603104JR 1
455-12415-H0 SMD RESISTOR FTR0603154JR 1
455-12427-H0 SMD RESISTOR FTR0603274JR 1
455-12427-H0 SMD RESISTOR FTR0603274JR 1
455-12510-H0 SMD RESISTOR FTR0603105JR 1
455-12510-H0 SMD RESISTOR FTR0603105JR 1
455-22000-H0 SMD RESISTOR RC11-1/8W-0-J 1
455-22000-H0 SMD RESISTOR RC11-1/8W-0-J 1
455-22000-H0 SMD RESISTOR RC11-1/8W-0-J 1
455-22000-H0 SMD RESISTOR RC11-1/8W-0-J 1
455-22110-H0 SMD RESISTOR RC11-1/8W-100-J 1
456-2247K-B1 SMD CAPACITOR 06032R472K250BA 1
456-2247K-B1 SMD CAPACITOR 06032R472K250BA 1
456-2410M-C1 SMD CAPACITOR 06032E104M250BA 1
456-2410R-C1 SMD CAPACITOR C1608Y5V1E104ZT 1
456-2410R-C1 SMD CAPACITOR C1608Y5V1E104ZT 1
456-2410R-C1 SMD CAPACITOR C1608Y5V1E104ZT 1
456-2410R-C1 SMD CAPACITOR C1608Y5V1E104ZT 1
456-2410R-C1 SMD CAPACITOR C1608Y5V1E104ZT 1
456-2410R-C1 SMD CAPACITOR C1608Y5V1E104ZT 1
456-2410R-C1 SMD CAPACITOR C1608Y5V1E104ZT 1
456-2410R-C1 SMD CAPACITOR C1608Y5V1E104ZT 1
456-2410R-C1 SMD CAPACITOR C1608Y5V1E104ZT 1
456-2410R-C1 SMD CAPACITOR C1608Y5V1E104ZT 1
456-2410R-C1 SMD CAPACITOR C1608Y5V1E104ZT 1
456-2410R-C1 SMD CAPACITOR C1608Y5V1E104ZT 1
Model No.: LCT-37PBSTP.doc
Version: 1.0
Page 89

-89 -
Part Code Description Quantity
456-2410R-C1 SMD CAPACITOR C1608Y5V1E104ZT 1
456-2410R-C1 SMD CAPACITOR C1608Y5V1E104ZT 1
456-2410R-C1 SMD CAPACITOR C1608Y5V1E104ZT 1
456-2410R-C1 SMD CAPACITOR C1608Y5V1E104ZT 1
456-2410R-C1 SMD CAPACITOR C1608Y5V1E104ZT 1
456-2410R-C1 SMD CAPACITOR C1608Y5V1E104ZT 1
456-2410R-C1 SMD CAPACITOR C1608Y5V1E104ZT 1
456-2410R-C1 SMD CAPACITOR C1608Y5V1E104ZT 1
456-2410R-C1 SMD CAPACITOR C1608Y5V1E104ZT 1
456-2410R-C1 SMD CAPACITOR C1608Y5V1E104ZT 1
456-2410R-C1 SMD CAPACITOR C1608Y5V1E104ZT 1
456-2410R-C1 SMD CAPACITOR C1608Y5V1E104ZT 1
456-2410R-C1 SMD CAPACITOR C1608Y5V1E104ZT 1
456-2410R-C1 SMD CAPACITOR C1608Y5V1E104ZT 1
456-2410R-C1 SMD CAPACITOR C1608Y5V1E104ZT 1
456-2410R-C1 SMD CAPACITOR C1608Y5V1E104ZT 1
456-2410R-C1 SMD CAPACITOR C1608Y5V1E104ZT 1
456-2410R-C1 SMD CAPACITOR C1608Y5V1E104ZT 1
456-2410R-C1 SMD CAPACITOR C1608Y5V1E104ZT 1
456-2410R-C1 SMD CAPACITOR C1608Y5V1E104ZT 1
456-2410R-C1 SMD CAPACITOR C1608Y5V1E104ZT 1
456-2410R-C1 SMD CAPACITOR C1608Y5V1E104ZT 1
456-2410R-C1 SMD CAPACITOR C1608Y5V1E104ZT 1
456-2410R-C1 SMD CAPACITOR C1608Y5V1E104ZT 1
456-2410R-C1 SMD CAPACITOR C1608Y5V1E104ZT 1
456-2410R-C1 SMD CAPACITOR C1608Y5V1E104ZT 1
456-2410R-C1 SMD CAPACITOR C1608Y5V1E104ZT 1
456-2410R-C1 SMD CAPACITOR C1608Y5V1E104ZT 1
456-2410R-C1 SMD CAPACITOR C1608Y5V1E104ZT 1
456-2410R-C1 SMD CAPACITOR C1608Y5V1E104ZT 1
456-2410R-C1 SMD CAPACITOR C1608Y5V1E104ZT 1
456-2410R-C1 SMD CAPACITOR C1608Y5V1E104ZT 1
456-2410R-C1 SMD CAPACITOR C1608Y5V1E104ZT 1
456-2410R-C1 SMD CAPACITOR C1608Y5V1E104ZT 1
456-2410R-C1 SMD CAPACITOR C1608Y5V1E104ZT 1
Model No.: LCT-37PBSTP.doc
Version: 1.0
Page 90

-90 -
Part Code Description Quantity
456-2410R-C1 SMD CAPACITOR C1608Y5V1E104ZT 1
456-2410R-C1 SMD CAPACITOR C1608Y5V1E104ZT 1
456-2410R-C1 SMD CAPACITOR C1608Y5V1E104ZT 1
456-2410R-C1 SMD CAPACITOR C1608Y5V1E104ZT 1
456-2410R-C1 SMD CAPACITOR C1608Y5V1E104ZT 1
456-2410R-C1 SMD CAPACITOR C1608Y5V1E104ZT 1
456-2410R-C1 SMD CAPACITOR C1608Y5V1E104ZT 1
456-2410R-C1 SMD CAPACITOR C1608Y5V1E104ZT 1
456-2410R-C1 SMD CAPACITOR C1608Y5V1E104ZT 1
456-2410R-C1 SMD CAPACITOR C1608Y5V1E104ZT 1
456-2410R-C1 SMD CAPACITOR C1608Y5V1E104ZT 1
456-2410R-C1 SMD CAPACITOR C1608Y5V1E104ZT 1
456-2410R-C1 SMD CAPACITOR C1608Y5V1E104ZT 1
456-2410R-C1 SMD CAPACITOR C1608Y5V1E104ZT 1
456-2410R-C1 SMD CAPACITOR C1608Y5V1E104ZT 1
456-2410R-C1 SMD CAPACITOR C1608Y5V1E104ZT 1
456-2410R-C1 SMD CAPACITOR C1608Y5V1E104ZT 1
456-2410R-C1 SMD CAPACITOR C1608Y5V1E104ZT 1
456-2410R-C1 SMD CAPACITOR C1608Y5V1E104ZT 1
456-2410R-C1 SMD CAPACITOR C1608Y5V1E104ZT 1
456-2410R-C1 SMD CAPACITOR C1608Y5V1E104ZT 1
456-2410R-C1 SMD CAPACITOR C1608Y5V1E104ZT 1
456-2410R-C1 SMD CAPACITOR C1608Y5V1E104ZT 1
456-2410R-C1 SMD CAPACITOR C1608Y5V1E104ZT 1
456-2410R-C1 SMD CAPACITOR C1608Y5V1E104ZT 1
456-2410R-C1 SMD CAPACITOR C1608Y5V1E104ZT 1
456-2410R-C1 SMD CAPACITOR C1608Y5V1E104ZT 1
456-2410R-C1 SMD CAPACITOR C1608Y5V1E104ZT 1
456-2410R-C1 SMD CAPACITOR C1608Y5V1E104ZT 1
456-2410R-C1 SMD CAPACITOR C1608Y5V1E104ZT 1
456-2410R-C1 SMD CAPACITOR C1608Y5V1E104ZT 1
456-2410R-C1 SMD CAPACITOR C1608Y5V1E104ZT 1
456-2410R-C1 SMD CAPACITOR C1608Y5V1E104ZT 1
456-2410R-C1 SMD CAPACITOR C1608Y5V1E104ZT 1
456-2410R-C1 SMD CAPACITOR C1608Y5V1E104ZT 1
Model No.: LCT-37PBSTP.doc
Version: 1.0
Page 91

-91 -
Part Code Description Quantity
456-2410R-C1 SMD CAPACITOR C1608Y5V1E104ZT 1
456-2410R-C1 SMD CAPACITOR C1608Y5V1E104ZT 1
456-2410R-C1 SMD CAPACITOR C1608Y5V1E104ZT 1
456-2410R-C1 SMD CAPACITOR C1608Y5V1E104ZT 1
456-2410R-C1 SMD CAPACITOR C1608Y5V1E104ZT 1
456-2410R-C1 SMD CAPACITOR C1608Y5V1E104ZT 1
456-2410R-C1 SMD CAPACITOR C1608Y5V1E104ZT 1
456-2410R-C1 SMD CAPACITOR C1608Y5V1E104ZT 1
456-2410R-C1 SMD CAPACITOR C1608Y5V1E104ZT 1
456-2410R-C1 SMD CAPACITOR C1608Y5V1E104ZT 1
456-2410R-C1 SMD CAPACITOR C1608Y5V1E104ZT 1
456-2410R-C1 SMD CAPACITOR C1608Y5V1E104ZT 1
456-2410R-C1 SMD CAPACITOR C1608Y5V1E104ZT 1
456-2410R-C1 SMD CAPACITOR C1608Y5V1E104ZT 1
456-2410R-C1 SMD CAPACITOR C1608Y5V1E104ZT 1
456-2410R-C1 SMD CAPACITOR C1608Y5V1E104ZT 1
456-2410R-C1 SMD CAPACITOR C1608Y5V1E104ZT 1
456-2410R-C1 SMD CAPACITOR C1608Y5V1E104ZT 1
456-2410R-C1 SMD CAPACITOR C1608Y5V1E104ZT 1
456-2410R-C1 SMD CAPACITOR C1608Y5V1E104ZT 1
456-2410R-C1 SMD CAPACITOR C1608Y5V1E104ZT 1
456-2410R-C1 SMD CAPACITOR C1608Y5V1E104ZT 1
456-2410R-C1 SMD CAPACITOR C1608Y5V1E104ZT 1
456-2410R-C1 SMD CAPACITOR C1608Y5V1E104ZT 1
456-2410R-C1 SMD CAPACITOR C1608Y5V1E104ZT 1
456-2410R-C1 SMD CAPACITOR C1608Y5V1E104ZT 1
456-2410R-C1 SMD CAPACITOR C1608Y5V1E104ZT 1
456-2410R-C1 SMD CAPACITOR C1608Y5V1E104ZT 1
456-2410R-C1 SMD CAPACITOR C1608Y5V1E104ZT 1
456-2410R-C1 SMD CAPACITOR C1608Y5V1E104ZT 1
456-2410R-C1 SMD CAPACITOR C1608Y5V1E104ZT 1
456-2410R-C1 SMD CAPACITOR C1608Y5V1E104ZT 1
456-2410R-C1 SMD CAPACITOR C1608Y5V1E104ZT 1
456-2410R-C1 SMD CAPACITOR C1608Y5V1E104ZT 1
456-2410R-C1 SMD CAPACITOR C1608Y5V1E104ZT 1
Model No.: LCT-37PBSTP.doc
Version: 1.0
Page 92

-92 -
Part Code Description Quantity
456-2447R-C1 SMD CAPACITOR 06032E474Z250BA 1
456-2447R-C1 SMD CAPACITOR 06032E474Z250BA 1
456-2447R-C1 SMD CAPACITOR 06032E474Z250BA 1
456-2447R-C1 SMD CAPACITOR 06032E474Z250BA 1
456-2447R-C1 SMD CAPACITOR 06032E474Z250BA 1
456-2447R-C1 SMD CAPACITOR 06032E474Z250BA 1
456-2447R-C1 SMD CAPACITOR 06032E474Z250BA 1
456-2447R-C1 SMD CAPACITOR 06032E474Z250BA 1
456-2447R-C1 SMD CAPACITOR 06032E474Z250BA 1
456-2447R-C1 SMD CAPACITOR 06032E474Z250BA 1
456-2447R-C1 SMD CAPACITOR 06032E474Z250BA 1
456-2510R-C2 SMD CAPACITOR 08052E105Z250BA 1
456-2510R-C2 SMD CAPACITOR 08052E105Z250BA 1
456-3015H-11 SMD CAPACITOR 0603CG150J500BA 1
456-3015H-11 SMD CAPACITOR 0603CG150J500BA 1
456-3018H-11 SMD CAPACITOR 0603CG180J500BA 1
456-3018H-11 SMD CAPACITOR 0603CG180J500BA 1
456-3020H-11 SMD CAPACITOR C1608CH1H200JT 1
456-3020H-11 SMD CAPACITOR C1608CH1H200JT 1
456-3030H-11 SMD CAPACITOR 0603CG300J500BA 1
456-3033H-11 SMD CAPACITOR C1608CH1H330JT 1
456-3033H-11 SMD CAPACITOR C1608CH1H330JT 1
456-3047H-11 SMD CAPACITOR C1608CH1H470JT 1
456-3068H-11 SMD CAPACITOR C1608CH1H680JT 1
456-3068H-11 SMD CAPACITOR C1608CH1H680JT 1
456-3110H-11 SMD CAPACITOR C1608CH1H101JT 1
456-3110H-11 SMD CAPACITOR C1608CH1H101JT 1
456-3110H-11 SMD CAPACITOR C1608CH1H101JT 1
456-3110H-11 SMD CAPACITOR C1608CH1H101JT 1
456-3210H-11 SMD CAPACITOR 0603CG102J500BA 1
456-3210H-11 SMD CAPACITOR 0603CG102J500BA 1
456-3210H-11 SMD CAPACITOR 0603CG102J500BA 1
456-3210H-11 SMD CAPACITOR 0603CG102J500BA 1
456-3210H-11 SMD CAPACITOR 0603CG102J500BA 1
456-3210H-11 SMD CAPACITOR 0603CG102J500BA 1
Model No.: LCT-37PBSTP.doc
Version: 1.0
Page 93

-93 -
Part Code Description Quantity
456-3210H-11 SMD CAPACITOR 0603CG102J500BA 1
456-3210H-11 SMD CAPACITOR 0603CG102J500BA 1
456-3210H-11 SMD CAPACITOR 0603CG102J500BA 1
456-3210H-11 SMD CAPACITOR 0603CG102J500BA 1
456-3210H-11 SMD CAPACITOR 0603CG102J500BA 1
456-3210H-11 SMD CAPACITOR 0603CG102J500BA 1
456-3210H-11 SMD CAPACITOR 0603CG102J500BA 1
456-3210H-11 SMD CAPACITOR 0603CG102J500BA 1
456-3210H-11 SMD CAPACITOR 0603CG102J500BA 1
456-3210H-11 SMD CAPACITOR 0603CG102J500BA 1
456-3210H-11 SMD CAPACITOR 0603CG102J500BA 1
456-3210H-11 SMD CAPACITOR 0603CG102J500BA 1
456-3210H-11 SMD CAPACITOR 0603CG102J500BA 1
456-3210H-11 SMD CAPACITOR 0603CG102J500BA 1
456-3210H-11 SMD CAPACITOR 0603CG102J500BA 1
456-3210H-11 SMD CAPACITOR 0603CG102J500BA 1
456-3210H-11 SMD CAPACITOR 0603CG102J500BA 1
456-3210H-11 SMD CAPACITOR 0603CG102J500BA 1
456-3210H-11 SMD CAPACITOR 0603CG102J500BA 1
456-3227K-B1 SMD CAPACITOR 06032R272K500BA 1
456-3227K-B1 SMD CAPACITOR 06032R272K500BA 1
456-3227K-B1 SMD CAPACITOR 06032R272K500BA 1
456-3227K-B1 SMD CAPACITOR 06032R272K500BA 1
456-3310H-11 SMD CAPACITOR 0603CG103J500BA 1
456-3310H-11 SMD CAPACITOR 0603CG103J500BA 1
456-3310H-11 SMD CAPACITOR 0603CG103J500BA 1
456-3310H-11 SMD CAPACITOR 0603CG103J500BA 1
456-3310H-11 SMD CAPACITOR 0603CG103J500BA 1
456-3310H-11 SMD CAPACITOR 0603CG103J500BA 1
456-3310H-11 SMD CAPACITOR 0603CG103J500BA 1
456-3310H-11 SMD CAPACITOR 0603CG103J500BA 1
456-3310H-11 SMD CAPACITOR 0603CG103J500BA 1
456-3310H-11 SMD CAPACITOR 0603CG103J500BA 1
456-3310H-11 SMD CAPACITOR 0603CG103J500BA 1
456-3310H-11 SMD CAPACITOR 0603CG103J500BA 1
Model No.: LCT-37PBSTP.doc
Version: 1.0
Page 94

-94 -
Part Code Description Quantity
456-3310H-11 SMD CAPACITOR 0603CG103J500BA 1
456-3310H-11 SMD CAPACITOR 0603CG103J500BA 1
456-3310H-11 SMD CAPACITOR 0603CG103J500BA 1
456-3310H-11 SMD CAPACITOR 0603CG103J500BA 1
456-3347K-B1 SMD CAPACITOR 06032R473K500BA 1
456-3347K-B1 SMD CAPACITOR 06032R473K500BA 1
474-14A22-K0 SMD COIL SGMI3216M2R2KT 1
474-14A22-K0 SMD COIL SGMI3216M2R2KT 1
474-14A22-K0 SMD COIL SGMI3216M2R2KT 1
477-40212-00 SMD FIXED INDUCTORSLF12575T-470M2R7 1
666-12010-00 SMD FERRITE BEAD GB2012D151T 1
666-12010-00 SMD FERRITE BEAD GB2012D151T 1
666-12010-00 SMD FERRITE BEAD GB2012D151T 1
666-12010-00 SMD FERRITE BEAD GB2012D151T 1
666-12010-00 SMD FERRITE BEAD GB2012D151T 1
666-12010-00 SMD FERRITE BEAD GB2012D151T 1
666-12010-00 SMD FERRITE BEAD GB2012D151T 1
666-12010-00 SMD FERRITE BEAD GB2012D151T 1
666-12010-00 SMD FERRITE BEAD GB2012D151T 1
666-12010-00 SMD FERRITE BEAD GB2012D151T 1
666-12010-00 SMD FERRITE BEAD GB2012D151T 1
666-12010-00 SMD FERRITE BEAD GB2012D151T 1
666-12010-00 SMD FERRITE BEAD GB2012D151T 1
666-12010-00 SMD FERRITE BEAD GB2012D151T 1
666-12010-00 SMD FERRITE BEAD GB2012D151T 1
666-12010-00 SMD FERRITE BEAD GB2012D151T 1
666-12010-00 SMD FERRITE BEAD GB2012D151T 1
666-12010-00 SMD FERRITE BEAD GB2012D151T 1
666-12010-00 SMD FERRITE BEAD GB2012D151T 1
666-13204-00 SMD FERRITE BEAD STBL3216-190PT 1
666-13204-00 SMD FERRITE BEAD STBL3216-190PT 1
666-13204-00 SMD FERRITE BEAD STBL3216-190PT 1
666-13204-00 SMD FERRITE BEAD STBL3216-190PT 1
666-13204-00 SMD FERRITE BEAD STBL3216-190PT 1
666-13204-00 SMD FERRITE BEAD STBL3216-190PT 1
Model No.: LCT-37PBSTP.doc
Version: 1.0
Page 95

-95 -
Part Code Description Quantity
666-13206-00 SMD FERRITE BEAD STPB3216-310PT 1
666-13207-00 SMD FERRITE BEAD STPB3216-380PT 1
666-13207-00 SMD FERRITE BEAD STPB3216-380PT 1
666-13207-00 SMD FERRITE BEAD STPB3216-380PT 1
666-13207-00 SMD FERRITE BEAD STPB3216-380PT 1
666-13207-00 SMD FERRITE BEAD STPB3216-380PT 1
782-L37W25-6900 DSP BOARD PCB 1
Model No.: LCT-37PBSTP.doc
Version: 1.0
Page 96

 Loading...