


IPC-W73

SAFETY PRECAUTIONSSAFETY PRECAUTIONS
To achieve the utmost in enjoyment and performance, and in order to become familiar with its features,
please read this manual carefully before attempting to operate the unit.
This safety and operating instruction should be retained for future reference.
Important Notes
*
The apparatus shall not be exposed to dripping or splashing and no objects filled with liquids, such as
*
vases, shall be placed on ap paratus.
Avo id installing the unit in locations described below:
*
- Places exposed to direct sunlight or close to heat radiating appliances such as electric heaters.
- On top of other stereo equipment that radiate too much heat.
- Places blocking ventilation or dusty places.
- Places subject to constant vibration.
- Humid or moist places.
No naked flame sources such as lighted candles should be placed on the unit.
*
Attention should be drawn to the environmental aspects of battery disposal.
*
Make sure not to obstruct the ventilation openings, a minimum of 10cm should be kept around the
*
apparatus for ventilation.
The ventilation should not be impeded by covering the ventilation openings with items such as n ewspaper,
*
table-cloths, curtains, etc.
Use apparatus in moderate climates only.
*
Operate tuning controls and switches as instructed in the manual.
*
Before turning on the power for the first time, make sure the power cord is properly installed.
*
The mains plug is used as the disconnect device and it must rem ain readily operable. To completely
*
disconnect the power inp ut, the mains plug of the apparatus must be disconn ected from the mains.
For safety reasons, do not remove any covers or attempt to gain access to the inside of the product. Refer any
servicing to qualified personnel.
D
o not att empt to remove any screws, or open the casing o f the unit; there are no user serviceable parts inside,
refer all servicing to qualified service personnel.
CA UTION :
TO R ED UCE THE RISK OF ELECTRIC SHO CK DO NOT REM OVE COVER (O R BACK), NO USER
SERVIC EA BL E PAR TS INSIDE, REFER SERV IC IN G TO QUA LI FI ED SERVICE PERSONNEL.
DANGEROUS VOLTAGE
Conductor dangerous voltage, that may be of sufficient magnitude to constitute a risk of e le ct ri c
shock to persons is present within this product's enclosure.
The owner's manual contains important operating and maintenance instructions, for your safety,
it is necessary to refer to the manual.
WA RN IN G :TO P RE VEN T FIRE OR S HOCK HA ZARD, DO NOT E XPOSE T HIS APP LIANC E TO D R I P P I N G O R
Note:
This unit will become warm when used for a long period of time. This is normal and does not indicate a problem
with the unit.
In case of display shows unreadable symbols due to electrostatic discharge, disconnect the power source and
then reconnect it may be nec essary for reset.
SPLAS HING.
UK-1
ATTENTION


ADAPTERS (DOCKING FOR iPod)ADAPTERS (DOCKING FOR iPod)
No.7
Made for iPod mini
(1st generation)4GB, 6GB only
No.2
Made for iPod
( )40GB only
4th g enerati on
Adapter
No.6
Made for iPod nano
( )1GB, 2GB, 4GB only
1st generatio n
(2nd )2GB, 4GB,8GB only
generation
No.3
Made for iPod with video
(5 )60GB,80GB only
th ge ner ation
No.1
No.5
Made for iPod with video
(5 )30GB only
th generation
No.4
(3rd )10GB,15GB,20GB only
( )20GB, 30GB only
(3rd
generation
Made for iPod with
( )40GB, 60GB only
4th g ene ration
Made for iPod
gen era tio n
Made for iPod
(4 )20GB only
th ge ner ation
Made for iPod with color display
4th g ene ration
U2 Special Edition
Made for iPod
)30GB,40GB only
color display
Docking Tray
No te : iP od (3rd g en er ation)30GB,40 GB o nl y; (3rd generatio n) 10 GB, 15GB, 20GB on ly;
(1st+2nd gene ra ti on)5GB, 10GB, 20G B on ly ( Via AUX IN jack).
UK-4

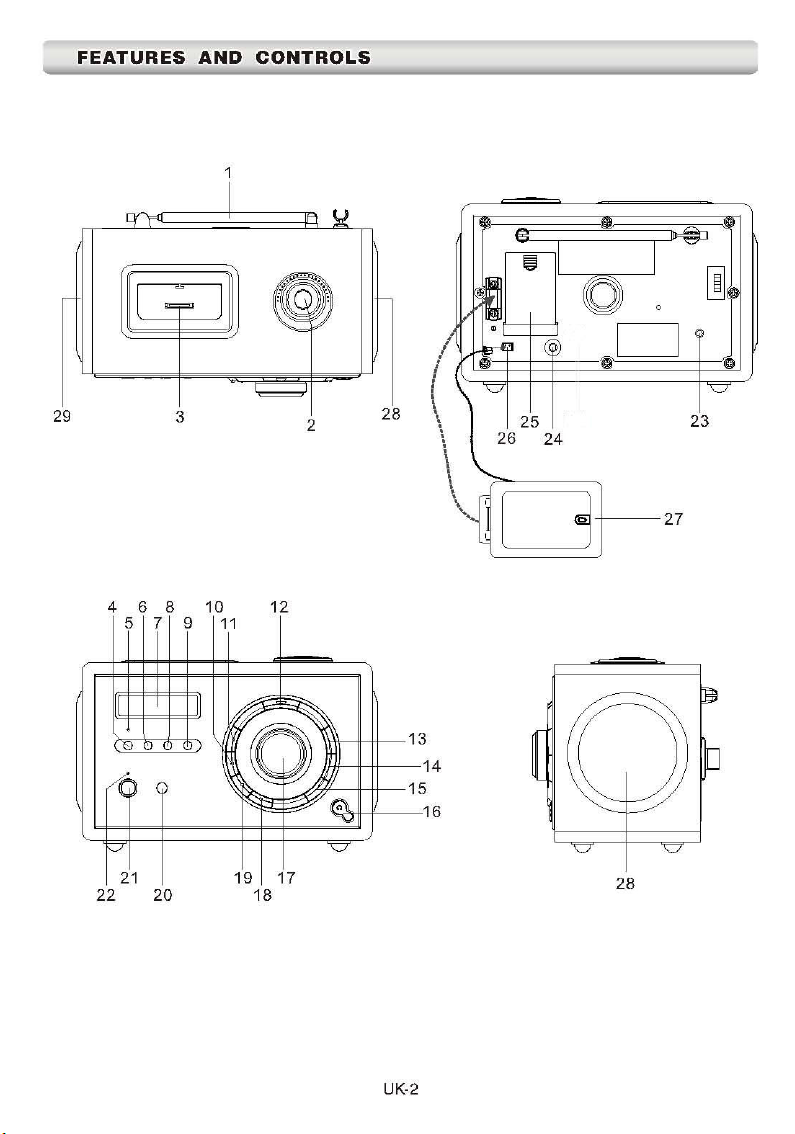
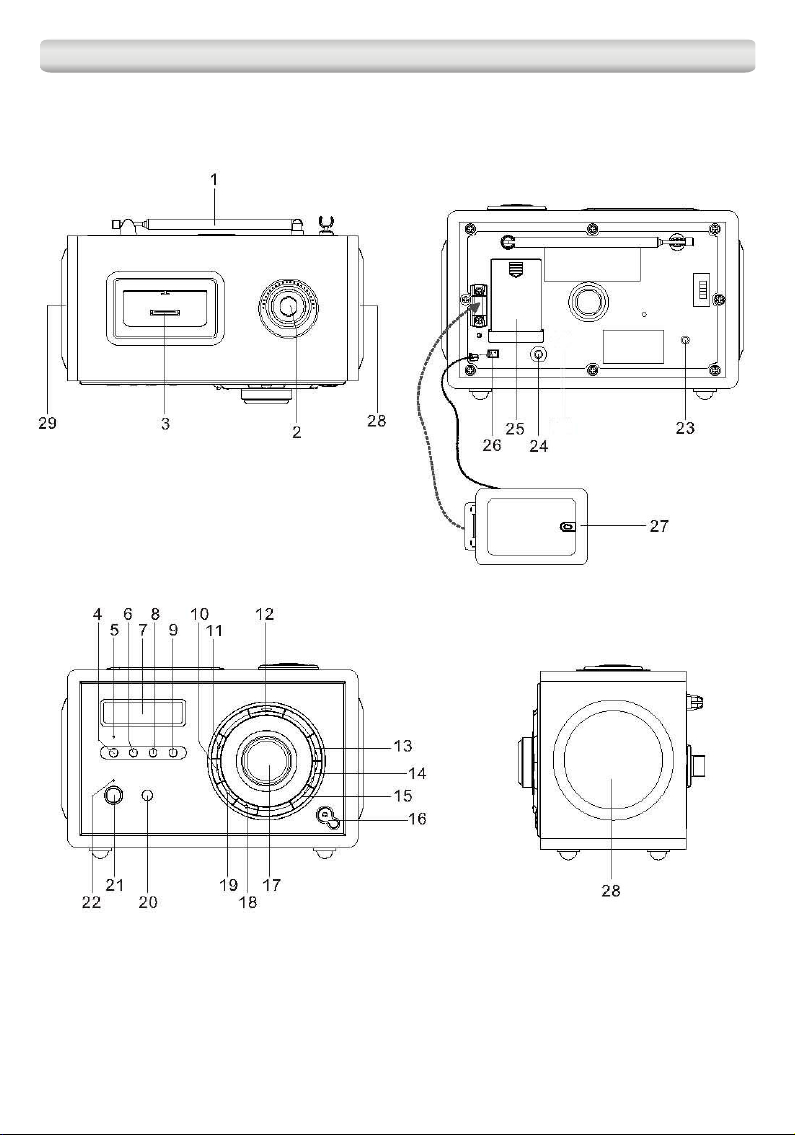
SETTING THE CLOCK SETTING THE CLOCK
When the u nit i s fir st co nnect ed to the AC po wer, it will be i n sta ndby mode (stan dby i ndica tor o n), t he
displ ay will s how “12 :00” (1 2-Hour Ver sion) o r “0:00 ” (24-H our Versio n).
The clock c an b e se t in e ither sta ndby or opera tion mode . The clock wil l be d ispla yed when the radi o is i n
stand by or dur ing AUX o perat ion.
1. To set the clock , pr ess and hold the CLOCK butto n un til the hour digi ts f lash in the displ ay, p ress the
CLO CK + or CLOC K - bu tton to set to the cor rect hou r, then pr ess the CLOCK butto n again to
confi rm. (F. 1)
2. Afte r the hour is set, the min ute digit s will the n fl ash, pres s th e CLOCK + or C LOC K - butt on t o set to
the correc t minut e. (F. 2)
3. When the d isplay sho ws the co rrect time , press t he CLOCK b utton to con firm, t he clock set ting is n ow
complete d.
4. To see t he c lock duri ng R adio an d iPod oper ation , pr ess the CLOCK butt on once , th e cl ock will sh ow
in the di splay f or 5 seco nds.
F1
F2
ALARM FUNCTIONALARM FUNCTION
You can us e t he alarm func tion to wak e y ou to yo ur favou rite rad io stati on , t he songs in yo ur iPod or an
elect ronic b uzzer t one.
Setting up the alarm and the wake-up time
1. Pre ss a nd h ol d the A LA RM button f or l onger t ha n tw o sec on ds t o enter i nt o the a la rm s et up m od e.
Th e al ar m ic on and the hour d ig it s in t he d is play will fla sh .
2. To set the wak e-up ti me, rep eat edl y press the CLOCK + or CLOC K - buttons f ollowed by pre ssi ng the
ALA RM button to confirm – first set the ho ur an d the n the m inute. (F. 3) (F. 4)
3. A fter the alarm wake-u p time is s et. You wil l cont inue t o go fo r the o ther a larm s ettin gs - fi rst se t the
alarm wake- up volum e leve l (0-3 2), then the wa ke-up ra dio st ation (preset 1-10) , and finall y the
buzze r to ne (hig h/low ). (F. 5) (F. 6) (F. 7)
4. Pr ess the CLOC K + or CLOC K - b ut to ns f or th e
se le ction s and p re ss the AL AR M b utton to confirm .
Af te r the c on fi rmati on of the bu zz er ton e s el ection,
th e al arm set ti ng s ar e all don e.
F4
PS
F3
F5
F6
F7
UK-5

Setting the alarm on/off and the wake-up mode
1. Rep ea ted ly pr ess th e AL ARM b ut ton to sele ct the wake -u p mo d e an d se t th e al arm on, the
co rre sp ond in g wak e-u p mo de ic on w ill a pp ear i n th e dis pl ay an d fla sh :
Tuner
Ala rm Of f (wa ke-up time)
2. When the dis pl ay shows your desi red wake- up m od e, r eleas e th e bu tton and the alar m is now set to
on. The a ss ociat ed i con wil l be come st able in the d isplay. (F.8)
3. At t he sele cte d wak e-u p tim e, the desired wake-up mode will be turned on. It wi ll co nti nue f or one hour
and then shut o ff a uto mat ically. To stop the ala rm
soo ner, pre ss the ALARM button once or press the
STANDBY button to sw itc h off t he un it. (F.9)
4. To ch eck t he alarm wake-up time, press the ALARM
but ton once, the wake- up t ime and the alar m ic on will
app ear a nd fl ash in the display for 5 seconds.(F.10 )
iPod
F9
Not e: If alarm wake to iPo d is selected an d n o iPod is docked or re cognized, when t he ala rm arrives, the
buz zer w ill be activated automatically.
Buz zer
F8
F10
Automatic Alarm Repeat
The a larm wi ll au tomat icall y rep eat eac h day at t he sele cted wake- up ti me as l ong a s the alarm icon is
displ ayed (alar m on). To canc el th e ala rm, r epeat edly press t he AL ARM b utton unti l the wake-u p mod e
icon di sappe ars in th e displ ay.
SNOOZE FUNCTIONSNOOZE FUNCTION
Durin g alar m, pre ss the SNO OZE bu tton will te mpora ry
switc h off the a larm fo r 9 minut es. The a larm an d the
wake- up mod e icon wil l flas h and the displa y will sho w
“SNOO ZE”. This is repea table in the one hour alar m
durat ion. (F. 11)
F11
SNOOZE
LISTENING TO THE RADIOLISTENING TO THE RADIO
You sho uld f ully ext end t he an tenna lo cated at the back of the u nit and adjus t i ts po sitio n and di recti on
until y ou find t he best r adio re cepti on .
1. To select radio oper ation , repea tedly p ress th e FUNCT ION but ton unt il “TUN ER ” is disp layed .
2. Press t he BAND but ton to togg le betwe en the AM a nd FM se lec tion, th e display w ill show the wave
band and the f req uency.
UK-6


CHARGING UP YOUR iPodCHARGING UP YOUR iPod
Durin g u nit stan dby, the iPod will be auto matic ally cha rged whe n i t i s d ocked . It can al so be charg ed in
iPo d an d AUX o pe ratio n; to maint ain the b es t perfo rmanc e of r adio re cepti on, there i s no i Pod c ha rging i n
radio o perat ion.
SLEEP FUNCTIONSLEEP FUNCTION
This fu nctio n allow s you to pr ogram the r adio to s witch o ff itse lf afte r a set per iod of ti me.
1. To act iv ate the sleep f uncti on, press t he S LEEP butt on, the d is play will s how the fla sh s leep time a nd
“SLEE P” .
2. Repe at edly pre ss the SL EEP but ton, th e time wi ll chan ge i n seque nce on ev ery pre ss:
90 6 0 4 5 30 20 1 0 00
3. Whe n yo ur d esired time app ears i n th e disp lay, rel ease t he b utton , the disp lay will s how “SLEE P” to
indic ate sle ep func tion on . When th e sl eep tim e count s to zero , the uni t will go o ff.
4. To put t he sleep fu nctio n off, repea tedly pre ss the SL EEP but ton unt il “00” a ppear s in the di splay.
Note: D uring u nit stand by, pr ess the S LEEP bu tton wi ll swit ch the un it to on auto matic ally.
DISPLAY AUTO DIMMERDISPLAY AUTO DIMMER
The b right ness of the display is a utoma tical ly adju sted for t he room ligh t con ditio ns . It will be redu ced
when the ro om light ing is turn ed off so as no t to interf ere with your sle ep. The dis play wil l bright en
autom atica lly in th e dayli ght or wh en t he room l ights a re turn ed on aga in for be tter vi sibil ity.
AUX INPUTAUX INPUT
There is a 3.5m m s tereo AUX in put so cket loc ated a t t he bac k o f the u ni t; ana logue au dio so und si gn als
from ot her sou rces ca n be inpu t to the ra di o throu gh this s ocket .
Repea tedly p ress the FU NCTIO N butto n to s elect A UX func tion, t he d ispla y will sh ow “AUX” an d the audio
will be swit ched to the AUX i nput si gnal an d you can ad just th e vol ume con trol for you r des ir ed so und
outpu t level .
HEADPHONE JACKHEADPHONE JACK
Th e stereo head ph on e ja ck is located o n th e ri ght bottom fr on t. Con ne ct a set of ste re o headphones
(n ot in cl ud ed ) to thi s jack for pri vate li st en ing. Wh en he ad ph on es ar e in use, the spe ak ers wil l be
au to ma tically cut off.
IM PO RT AN T: Whe n using h eadphone, always s et t he vol um e cont ro l to a lo w leve l before you pu t th e
he ad ph on es on, t he n pu t th e head ph on es o n and graduall y increa se the volume to a co mf or table
li st en in g level.
UK-8


Dear Customer,
Thanks you for purchasing this AKIRA™ product and for your confidence in our company.
This product meets applicable safety requirements and has undergone stringent testing during
manufacture.
However, should there occur a defect, the product or its defective part(s) (excluding
accessories and consumables) will be repaired free of charge (labor, parts and transportation
within the boarder of the below mentioned countries) or, at AKIRA™ discretion, exchanged
for a similar item, provided that it has been returned with 24 (twenty four) months from the
date of original purchase (date of receipt), is defective in material and/or workmanship and
has been bought in any of the following countries: France (metropolitan territory), Spain,
Italy, Portugal, Belgium (territory) or in a duty-free shop in named countries.
This guarantee will be granted only upon presentation of the original invoice or cash receipt,
indicating the date of purchase and dealer’s name, and of this guarantee card with the product
type and serial number. The benefit of this guarantee may be refused if the invoice, cash
receipt or guarantee card has been altered in any way, deleted or made illegible after the
original purchase.
Online registration
To expedite warranty service, please register your AKIRA™ product within 30 days of
purchase at http://www.akiraeurope.com
This guarantee does not apply to the following:
1. Damage caused by accidents including, but not limited to, lightening, fire, water.
2. Damage to the product resulting from neglect, misuse, use against the operating
manual instructions, repair and/or install wrongly performed (non exhaustive list).
Especially any burned panel from too long still picture display such as computer
inputs or channel logos, as described in the operating manual, will not be guaranteed.
3. Modification, adaptations or alterations of the product to operate in a country other
than for which it was originally designed and manufactured, or any damage resulting
from such modifications.
4. Usage other than usual consumer home usage.
5. Defect on individual pixels when the number of defective is below the following
numbers: Dark pixel: 7 Bright or flickering pixel: 3 Total
defective pixels: 8
These statements do not affect your statutory rights as a consumer under applicable national
legislation in force, nor your consumer’s rights against the dealer from whom you bought the
product.
If you need service, whether or not under guarantee, please approach the dealer who sold you
the product.
In your own interest, we advise you to read the instruction booklet for your AKIRA™ product
carefully before contacting your dealer or service center.
Should you have any questions which your dealer is unable to answer, please contact AKIRA
hotline (international free phone number: 00 800 800 25 472).
AKIRA™ is a registered trademark of TT International, Inc.

SÉCURITÉSÉCURITÉSÉCURITÉ
Pour profiter pleinement des performances de votre appareil et vous f amiliariser avec son fonctionnement,
veuillez lire attentivement ce manuel avant toute utilisatio n.
Informations importantes
* Conservez soigneusement ces consignes de sécurité et de fonctionnement pour consultation ultérieure.
* Ne pas exposer cet appareil aux gouttes et aux éclaboussures. Les objets contenant du liquide, tels que des
vases, ne doivent pas être posés sur l'appareil.
* Évitez d'installer l'appareil dans les endroits :suivants
- Endroits exposés aux rayons directs du soleil ou proches d'une source de chaleur rayonnante comme un appareil de
chauffage électrique.
- Sur un autre équipement stéréo produisant de la chaleur.
- Endroits bloquant la ventilation ou endroits poussiéreux.
- Endroits sujets à une vibration constante.
- Endroits humides ou moites.
* Ne jamais placer une source de flamme nue (par ex., bougie allumée) sur l'appareil.
* Déposez les piles dans un point de collecte approprié.usagées
* Veillez à ne pas obstruer les un espace minimum de 10 cm doit être respecté autour orifices de ventilation.
de l'appareil pour assurer la ventilation.
* La ventilation ne doit pas être bloquée en couvrant les ouvertures avec des objets tels qu'un journal, des
nappes, des rideaux, etc.
* Utilisez cet appareil seulement sous climats tempérés.
* Actionnez les commandes et les commutateurs comme indiqué dans le manuel.
* assurez-vous que le cordon du secteur est correctement installé.Avant la première utilisation,
* Le cordon d'alimentation est utilisé comme dispositif de et . Pour déconnexion doit demeurer accessible
débrancher complètement , la prise de courant de l'appareil doit être débranchée du l'alimentation électrique
secteur.
Pour des raisons de sécurité, n'enlevez aucun et n'essayez pas d'accéder à l'intérieur de l'appareil. capot
Confiez l'entretien à un personnel qualifié.
N'essayez pas d’enlever les vis et d'ouvrir le boitier ; il n'y a aucune pièce réparable par l'utilisateur à l'intérieur ;
pour toute réparation, contactez le service technique qualifié.
ATTENTION
RISQUE DE DECHARGE
ELECTRIQUE
ATTENTION : Pour réduire le risque d'électrocution, ne pas déposer le capot (ou la face arrière). L'appareil ne contient
AVERTISSEMENT : Pour éviter tout risque d'incendie ou d'électrocution, veillez à ne pas exposer l'appareil aux
Note :
Ce produit chauffera s'il est utilisé pendant une longue période. Cela est normal et n'indique pas un problème.
Dans le cas où l'affichage deviendrait illisible suite à une décharge d'électricité statique, débranchez puis
rebranchez le cordon d'a limentation ; il sera peut-être nécessaire de régler l'appareil à nouveau.
aucune pièce réparable par l'utilisateur. Confiez l'entretien à un personnel technique qualifié.
L'appareil contient de s conducteurs de tensions dangereuses, suffisamment importantes pour
présenter un risque d'électrocution.
La notice d'utilisatio n contient des informations importantes sur l e fonctionnement et l'entretien
de l'appareil ; pour votre s écurité, il est indispensable de lire attentivement la notice.
projections de liquides.
TENSION DANGEREUSE
ATTENTION
FR-1
CARACTÉRISTIQUES ET COMMANDESCARACTÉRISTIQUES ET COMMANDES
CARACTÉRISTIQUES ET COMMANDES
FR-2
 Loading...