


@-KUB
MC-B04W@U
User Manual
Manuel d’Utilisation
Manual del Usuaro
Handkanaaling
www.akiraeurope.com

Dear customer,
Congratulations on purchasing this high-quality product. Like all products, this device has been the result of the latest technical innovations and uses only modern electronic components.
Please take the necessary time to read the following manual carefully before using the device, so that you can enjoy your new device for a long time.
We wish you perfect entertainment with! |
|
TABLE OF CONTENTS |
|
CONTROLS............................................................................................................................................... |
4 |
SAFETY PRECAUTIONS......................................................................................................................... |
7 |
ENVIRONMENTAL PROTECTION......................................................................................................... |
8 |
BEFORE THE FIRST USE......................................................................................................................... |
8 |
Introduction................................................................................................................................................ |
8 |
Unpacking the device.................................................................................................................................. |
8 |
Placement................................................................................................................................................... |
9 |
FIRST USE ............................................................................................................................................... |
9 |
Connecting the loudspeakers...................................................................................................................... |
9 |
PC and Internet Connection oder LAN ....................................................................................................... |
9 |
Internet Connection over Wireless LAN .................................................................................................... |
10 |
Power Requirements / First Boot................................................................................................................ |
10 |
Aearial......................................................................................................................................................... |
11 |
Remote Control ........................................................................................................................................... |
11 |
BASIC FUNCTIONS................................................................................................................................ |
11 |
Powering the Device on / off...................................................................................................................... |
11 |
Headphone Socket....................................................................................................................................... |
11 |
Volume ........................................................................................................................................................ |
12 |
Mute ............................................................................................................................................................ |
12 |
Playback Mode ............................................................................................................................................ |
12 |
Equalizer and Bass...................................................................................................................................... |
12 |
SETTING TIME AND DATE...................................................................................................................... |
13 |
ALARM FUNCTION.................................................................................................................................. |
14 |
Alarm Setup................................................................................................................................................. |
14 |
SLEEP MODE............................................................................................................................................. |
14 |
RADIO MODE........................................................................................................................................... |
15 |
Tining Stations............................................................................................................................................ |
15 |
Station Presets............................................................................................................................................. |
15 |
COMPACT DISC PLAYER OPERATION................................................................................................ |
16 |
Loading and Removing / Compact Discs / MP3 Discs................................................................................ |
16 |
Compact Disc / MP3 Disc Playback............................................................................................................ |
16 |
Track Search (SKIP Function) .................................................................................................................... |
16 |
Selecting an Album (only vor MP3 Discs).................................................................................................. |
17 |
E-2
Recording from CD ....................................................................................................................................... |
17 |
Section Repeat................................................................................................................................................ |
17 |
INTERNET RADIO ...................................................................................................................................... |
18 |
Features .......................................................................................................................................................... |
18 |
Recording Internet Radio............................................................................................................................... |
18 |
USB PORT ..................................................................................................................................................... |
19 |
Features........................................................................................................................................................... |
19 |
Track Search ................................................................................................................................................... |
20 |
SD/MMC CARDS.......................................................................................................................................... |
20 |
Features........................................................................................................................................................... |
20 |
Track Search................................................................................................................................................... |
20 |
EXTERNAL DEVICES (AUX).................................................................................................................... |
20 |
Recording from external devices................................................................................................................... |
21 |
LYRICS DISPLAY.......................................................................................................................................... |
21 |
FILE MANAGER ......................................................................................................................................... |
22 |
UPnP MEDIA SERVER.................................................................................................................................. |
22 |
Supported Media Servers ............................................................................................................................... |
22 |
UPnP Network Connection............................................................................................................................. |
23 |
Preparing the UPnP environment.................................................................................................................... |
24 |
Music Playback on the UPnP Media Server.................................................................................................... |
24 |
NETWORK.................................................................................................................................................... |
25 |
Network Status Display................................................................................................................................... |
25 |
WiFi Connection............................................................................................................................................ |
25 |
Wizard ............................................................................................................................................................ |
26 |
Configuring a static IP..................................................................................................................................... |
27 |
Configuring a DNS (Dynamic Name Server) ............................................................................................... |
27 |
Configuring a Proxy Address ......................................................................................................................... |
28 |
FIRMWARE UPGRADE................................................................................................................................ |
28 |
Upgrade over USB or SD/MMC..................................................................................................................... |
28 |
Upgrade over the Internet ............................................................................................................................. |
29 |
LANGUAGE SETUP..................................................................................................................................... |
29 |
INFORMATIONEN DISPLAY ..................................................................................................................... |
29 |
RESET............................................................................................................................................................ |
30 |
TROUBLESHOOTING ................................................................................................................................. |
30 |
CLEANING AND CARE.............................................................................................................................. |
30 |
General............................................................................................................................................................ |
30 |
Handling Discs................................................................................................................................................ |
31 |
SPECIFICATIONS......................................................................................................................................... |
31 |
COPYRIGHT NOTE...................................................................................................................................... |
32 |
GRACENOTE END USER LICENCE.......................................................................................................... |
33 |
E-3

CONTROLS Front and top panel
Rear panel
E-4
CONTROLS
Front and top panel
1.MUTE/SNOOZE button
2.MENU button
3.Navigation Up K
4.Navigation Down L
5.USB Port
6. /MMC Card slot
7.VOLUME control
8.PLAY/PAUSE X/
9.STOP/ESC /¬
10.MEMORY button
11.SETUP button
12.PHONES jack
13.SELECT/OK button
14.REC button
15.PREVIOUS
16.NEXT
17.Remote control sensor 
18.LCD display
19.STANDBY 
20.Left speaker
21.CD tray
22.OPEN/CLOSE button
23.AC cord and plug
24.Right speaker
Rear panel
25.Speaker terminal for left speaker cable
26.Speaker terminal for right speaker cable
27.USB WiFi Dongle port
28.RCA AUDIO OUT R (red)
29.RCA AUDIO OUT L (white)
30.WOOFER connector for connecting a subwoofer
31.AUX connecter
32.ANTENNA connector
33.RESET hole
34.LAN connector (internet)
35.Aerial plug
36.FM aerial wire
E-5

CONTROLS
Remote control
37. |
Number keys 0-9 |
56. |
DIMMER button |
38. |
AUTOSCAN button |
57. |
MUTE button |
39. |
-/-- button (for two-digit numbers) |
58. |
Battery Compartment (Back Cabinet) |
40. |
USB button (USB storage) |
59. |
P-EQ button (equalizer) |
41. |
i.Radio button (Internet Radio) |
60. |
X-BASS button (extra bass) |
42. UP NP button (Mediaserver) |
61. |
ST.MO button (Mono/Stereo) |
|
43. |
FM button |
62. |
CLOCK button |
44. |
AUX button |
63. |
TIMER button (alarm set) |
45. |
PLAY/PAUSE button |
64. |
SETUP button (setup menu) |
46. |
NEXT button |
65. |
REC button (record) |
47. |
STOP/ESC button |
66. |
OK button |
48. |
Navigation Down d |
67. |
PREVIOUS |
49. |
RANDOM button |
68. |
Navigation Up c |
50. |
REPEAT button |
69. |
MEMORY button |
51. |
A-B Button |
70. |
FileMgr button (file copy, move, delete) |
52. |
INFO button (lyrics) |
71. |
SD/MMC button (for memory cards) |
53. |
VOL+ button |
72. |
CD button (CD player) |
54. |
VOL- button |
73. |
STANDBY button |
55. |
SLEEP button |
74. |
Remote control signal transmitter |
E-6

SAFETY PRECAUTIONS
1.Read all warnings and safety precautions carefully before using the device.
2.This especially includes warnings that can be found on the device or in this manual.
3.Keep the manual in reach in order to use it whenever it is needed.
4.If you hand the device to a third person, please include this manual.
5.Protect the device from extreme heat (over 35°C) and coldness (below 5°C), direct sunlight and dust.
6.This device is intended for use in moderate climates only. Do not use it in tropical or extremely humid areas.
7.Do not place objects with naked flames, such as lit candles on the device.
8.Protect the device from water, including spray water and moisture.
9.Do not place objects filled with liquids, such as vases on the device.
10.Before you connect the device to the mains, make use that the mains voltage and frequency correspond to the specifications given on the rating plate or on the bottom of the device.
11.Do not use near water – e.g. a bathtubs, wash basins, sinks, laundry tubs -, in damp cellars or near a swimming pool. These places constitute a danger of electrocution!
12.Always remove the plug from the outlet, when emergencies situations occur.
13.Avoid damaging the power cord by bending and contact with sharp edges.
14.The device and the power cord should be examined for possible damages regularly. If the power cord or the plug are damaged, ask a technician to replace it, as special tool are required.
15.Do not open the device under any circumstances.
16.Never attempt to repair the device yourself. Consult your dealer of an qualified service agent for maintenance and repairs.
17.Keep a distance to all surrounding objects of at least 5 cm to provide sufficient ventilation.
18.Badly ventilated areas should be generally avoided (e.g. bookcases, behind curtains, between pieces of furniture, etc.).
19.Please unplug the device, if it is not used for a long time.
20.Always unplug the device by pulling at the plug. Never pull at the cord.
21.Turn the device off before pulling the plug.
22.Do not regularly use the headphones at high volume. This can result in hearing loss.
23.Extreme caution is necessary when the device is used by children.
24.The CD player is a class 1 laser product. It employs invisible laser radiation that is harmful for the eyes. This device is equipped with safety mechanisms that prevents laser radiation to leave the device. Do not disable these safety mechanisms.
25.If the power cord is damaged, it must be replaced by the manufacturer or its service agent or a similarly qualified person in order to avoid a hazard.
26.Please dispose of used batteries in an environmentally friendly way.
27.Caution: In the case of faults caused by electrostatic discharge and power surges, reset your USB device by disconnecting it.
28.Caution: In the case of faults caused by electrostatic discharge and power surges, reset your device by disconnecting it from the mains.
29.The device must be connected to an outlet that can be reached easily.
30.The sockets USB Port (5) and Wifi Dongle (27) may only be used with a direct USB connection. Extension cables are not allowed at these sockets (even not in combination with a USB stick/dongle).
E-7

ENVIRONMENTAL PROTECTION
Since 1 Oct 1998, used batteries may NOT be disposed of in the household waste. All batteries must be returned to the retailer or communal collection points.
BEFORE THE FIRST USE
Introduction
This device is suited to playback the following audio sources:
Audio CDs with Gracenote Media Database support for online track information MP3/WMA audio files (with ID3 V1, 2 support)
USB sticks, USD hard discs, USB MP3 players World Stations
SHOUTCast Internet Radio (http://www.shoutcast.com) Local FM Internet Radio
FM radio (88 - 108 MHz) External aux devices
The following network connections / configurations are supported: Ethernet 10/100 Mbps
Wireless LAN IEEE 802.11 b/g Infrastructure / Ad-Hoc
WEP 64/128 and WPA-PSK encryption Proxy configuration
Many functions of this devices can be accessed with the remote control. To make this manual easier to use, all buttons on the remote control are labelled with an F followed by its function number. Example: (F: XX).
The OK button is used to open submenus during menu navigation. The OK button is also used to confirm selections and settings. In many cases the use of the OK button is note further mentioned in this manual. There is only a simple note that asks the user to “confirm” his selection. Please note that the required action in this case is to press the SELECT/OK (13) or the OK (F:66) button.
Note: The sockets USB Port (5) and Wifi Dongle (27) may only be used with a direct USB connection. Extension cables are not allowed at these sockets (even not in combination with a USB stick/dongle).
Unpacking the device
Remove the devices carefully from its packaging. Do not throw the packing materials away. They may come in
E-8

handy if you intend to transport the device to another place or when your need to send the device to a service centre for maintenance of repair.
Placement
The device was designed for vertical placement. For adequate ventilation and easy connection of cables, at least 15 cm space behind the device are required.
The picture shows a placement suggestion of a stereo. The stereo is placed in the middle between the two front loudspeakers.
Please make sure that nothing obstructs the loudspeakers. Place the loudspeakers in a way that you can see them from your seat. The loudspeakers should be at the same height as your ears.
The best stereo effect is achieved in the marked area. If possible, mount the loudspeaker on the wall opposite the seat with a distance that equals the distance to the listener.
Left loudspeaker |
Unit |
Right loudspeaker |
seat
FIRST USE
Connecting the loudspeakers
Connect the right speaker cable to the terminals SPEAKERS (25).
Open the red SPEAKERS terminal. Insert the uninsulated end of the red speaker cable into the hole at the terminal. Close the SPEAKERS terminal.
Now open the black SPEAKERS (25) terminal. Insert the uninsulated end of the red/black speaker cable into the hole at the terminal.
Make sure that both uninsulated speaker cable ends are fully inserted into the holes.
Then connect the left speaker cable in the way to the terminals SPEAKERS (26).
PC and internet connection over LAN
Make sure that all requirements for an internet connections are met (a DSL or other broadband connection is recommended).
The standard configuration of the device uses DHCP (automatic configuration).
Information on further network settings can be found in the section “Settings”.
ADSL/DSL
Cable Modem
E-9

If you intend to playback audio files directly from your PC, a direct connection is recommended.
Audio Cable
Internet connection over Wireless LAN
Insert the USB WiFi Dongle (optional) into the WiFi port (27). Make sure that a WiFi connection to your PC or wireless router is possible.
ADSL/DSL
Cable Modem
Power requirements / First boot
The device requires a mains voltage of 230 V~ 50 Hz. Insert the AC plug (23) into a suitable outlet. The LCD display (18) shows “NETWORK SETTING” followed by date and time. If the device is connected to the mains the first time and an internet connection is available, it tries to establish a network link and configure its IP address automatically. After the internet connection is established the device connects to a time server and puts itself into standby mode. This process takes approx. 6 to 30 seconds. Further information can be found in the section “Network”.
E-10
Aerial
For FM reception the device is equipped with a cable aerial (36). Connect the aerial plug (35) with the socket ANTENNA (32). For optimal reception the aerial should be fully unwinded and directed.
Remote control
Inserting / changing batteries: Open the cover of the battery compartment (F:58) on the rear side of the remote control and remove it. Remove any old batteries and insert two new 1.5V batteries of the type LR3/R3/AAA (not supplied) into the compartment.
Make sure that the batteries are inserted with the correct polarity (+/-). Close the battery compartment.
Always direct the remote control towards the remote control sensor  (17) left of the LCD display (18).
Only used the mentioned or compatible battery types.
Incompatible or new and old batteries together may no be used.
If the devices is not used of a long time, the batteries should be removed.
Remove empty batteries from the battery compartment immediately to avoid corrosion.
Remove leaking batteries with protection gloves and a cloth. Wipe out the interior of the compartment with the cloth before inserting new batteries.
The batteries should be exchanged annually and never used beyond their expiry date.
BASIC FUNCTIONS
Powering the device on/off
Press  (19) or STANDBY (F:73) to power the device on. The LCD display (18) lights up and the main menu appears in the following order:
CD - i.Radio - USB |
SD/MMC - Radio - UPNP |
FileMgr - AUX - SETUP |
|
The menus are described in detail later. The device enters its last menu state when it is turned on from the standby mode.
The brightness of the LCD display can be adjusted in four levels using the DIMMER button (F:56). The brightness of the LCD display changes with every press of the DIMMER button.
Press  (19) or STANDBY (F:73) again to power the device off.
To turn the device off completely, please disconnect the device from the mains.
Headphone socket
The Headphone socket (12) can be used to connect headphones (not
supplied) with a 3.5 mm jack and an impedance of 32Ω. The loudspeakers (20, 24) are automatically disconnected when the headphones are connected.
E-11

Volume
The volume can be adjusted using the VOLUME knob (7) or the VOL+ (F:53) / VOL - (F:54) buttons. Turn the VOLUME knob or hold the VOL+ / VOL - buttons. The volume changes automatically and is displayed on the LCD display (18). To increase of decrease the volume in single step simply press the VOL+ / VOL – buttons. Every volume adjustment is dispayed momentarily in a volume bar on the LCD display.
Mute
Press MUTE/SNOOZE (1) or MUTE (F:57) to mute audio output. The message “MUTE” is displayed on the LCD display.
To turn the volume on again, simply press MUTE/SNOOZE (1) or MUTE (F:57) again. The original volume is then restored.
Playback mode
The following playback mode are available in the setup menu (not available with radio and internet radio):
normal, random, single repeat and repeat all.
Press the SETUP button (11 or F:64) during playback. Use the buttons Kor L (3, 4) to choose “Playback Mode” and confirm your selection by pressing SELECT/OK (13) or OK (F:66). Then you can make any desired adjustments.
Display |
Setting |
none |
normal |
Ran |
random |
One |
single repeat |
ALL |
repeat all |
Equalizer and bass |
|
You can choose from 10 pre-programmed equalizer settings (not available with radio and internet radio):
NORMAL, CLASSIC, JAZZ, POP, ROCK, as well as the combinations BASS+NORMAL, BASS+CLASSIC, BASS+JAZZ, BASS+POP, BASS+ROCK.
To change between settings during playback press the SETUP button (11 or F:64). The “Setup” menu appears on the LCD display. Use the buttons K or L (3, 4) to choose “EQUALIZER” and confirm your selection by pressing
SELECT/OK (13) or OK (F:66). With every press of the SELECT/OK (13) or OK (F:66) button the equalizer setting changes in the following order:
NORMAL, CLASSIC, JAZZ, POP, ROCK.
Press the button twice in the setup menu to enter the BASS setting. Then you can turn the BASS effect on or off. Press the SELECT/OK (13) or OK (F:66) button to do this.
Alternatively, you can set up the equalizer directly using the remote control. Press the P-EQ (F:59) button to do this. With every press of the P-EQ button the equalizer setting is changed in the mentioned order. Please note that the equalizer is display in abbreviated forms (e.g. classic = cls, jazz = jaz, pop = pop). In NORMAL mode EQ is not displayed.
The bass effect can also be turned on with the remote control. Press the X-BASS (F:60) button to turn the bass on or off.
E-12

Display |
|
Setting |
without bass |
with bass |
|
Cls |
B-C |
classical music |
Roc |
B-J |
rock music |
Pop |
B-P |
pop music |
Jaz |
B-R |
jazz music |
none |
B-n |
normal playback with bass |
none |
none |
normale or linear (i.e. flat) playback of the |
|
|
entire frequency range |
SETTING DATE AND TIME
Press  (19) or STANDBY (F:73) to power on the device.
Press the SETUP button (11 or F:64). The setup menu appears. Choose the submenu Date & Time.
Press the SELECT/OK (13) or OK (F:66) button to confirm your selection.
Use the button L or d to choose Date to adjust the date. Press the SELECT/OK (13) or OK (F:66) button to confirm your setting.
Use the buttons KL (3, 4) or cd (F:68, F:48) to choose a day. Press the button again to choose the next day. Press the SELECT/OK (13) or OK (F:66) button to confirm your selection. Use the same method to adjust month and year.
The screen returns to the Date & Time menu. Choose Time to adjust the time. Adjust the time using the same method that is used to adjust the date. Alternatively, you can access the Time menu directly by pressing CLOCK (F:62) on the remote control. “Time” appears on the LCD display together with the current time.
To adjust time and date automatically over the internet highlight the Time Synchronization option and confirm. The option changes to ON. Time synchronization is automatically performed when the device is powered off and every day at 12.00 and 24.00. Confirm the selection again to turn the function off. The option changes to OFF.
Use the button L or d to highlight the submenu Time Format to change time display to the 12 or 24 hour format. Press SELECT/OK
(13)or OK (F:66). The time format changes then either to the 12 or 24 hour mode.
Highlight the submenu Time Zone and press SELECT/OK (13) or OK (F:66). A list of time zones appears.
Use the submenu DST (Daylight Saving Time) to adjust summer and winter time. Choose ON to turn Daylight Saving Time on. Choose OFF to turn Daylight Saving Time off.
Note: Use the button /¬ (9) or STOP/ESC (F:44) to exit the current submenu.
Translator’s remark: time zone example should be changed to +0.
E-13
ALARM FUNCTION
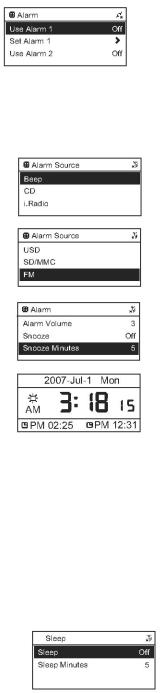
Alarm setup
There are two alarms that can be configured separately.
Enter the SETUP menu and use the buttons KL or cd to choose Alarm. Press SELECT/OK (13) or OK (F:66). The “Alarm” menu appears on the LCD display. Use the buttons KL or cd to highlight “Use Alarm 1” in order to turn on Alarm 1. Press SELECT/OK (13) or OK (F:66) to turn the alarm ON or OFF.
Select “Alarm 1 setup” and confirm by pressing SELECT/OK (13) or OK (F:66). Alternatively, you can access the Alarm menu directly by pressing TIMER (F:63) on the remote control. “Timer 1” appears on the LCD display together last alarm time.
Use the same method to adjust the alarm time that is used to adjust time.
Then a second alarm can be configured, if desired.
Then you can select an alarm source. Select “Alarm Source” and confirm by pressing
SELECT/OK (13 or F:66).
You can choose from 6 sources, such as USB device, SD/MMC card. Confirm the selected alarm source by pressing SELECT/OK (13 or F:66).
The select “Alarm Volume” to adjust the volume for the snooze function in a range from 1 – 3. Again, press the SELECT/OK (13) or OK (F:66) button to confirm your selection.
Then select “Snooze” to activate or deactivate the snooze function. Press
SELECT/OK (13) or OK (F:66) to turn the function ON or OFF.
Select “Snooze Duration” to choose an interval of 5, 10 or 15 minutes. With every press of the SELECT/OK (13) or OK (F:66) button the Snooze Duration setting changes accordingly.
To activate the alarm, power the device off by pressing  (19) or STANDBY (F:73).
All set alarms are displayed in the lower corners of the LCD display.
Once the alarm time is reached the device powers on automatically and playback of
the selected alarm source begins. In order to turn the device off again after the alarm time is reached press the button Taste  (19) / STANDBY (F:73) or /¬ (9) or STOP/ESC (F:47).
SLEEP MODE
To fall asleep while listening to music you can adjust a sleep time of up to 30 minutes. The device must be powered on to use this function.
Highlight the submenu Sleep Mode in the SETUP menu and press SELECT/OK (13) or OK (F:66).
Highlight the option “Sleep Mode” to turn the sleep function ON or OFF. Press the SELECT/OK (13) or OK (F:66) button to confirm your selection.
Highlight the option “Sleep Mode Minutes” to adjust the time after that the device turns itself off. Press SELECT/OK (13) or OK (F:66) repeatedly to adjust the time in the following order: 5, 10, 15, 20, 30 minutes.
Use the button /¬ (9) or STOP/ESC (F:44) to exit the menu.
The sleep mode can be activated or deactivated using the remote control. Press the SLEEP button (F:55) while the device is powered on to do this. When the sleep mode is activated, the symbol “Zz” appears in the upper right corner of the LCD display.
RADIO MODE
E-14

Power on the device as described in the section Basic Functions. The radio is now in operation. The menu with its function symbols appears on the LCD display (18).
Select the Radio symbol. The word “Radio” appears on the LCD display. Confirm your selection.
The FM frequency band appears with the last FM STEREO frequency. If a preset station is selected, the preset number appears on the display as well.
If the tuned station broadcasts in stereo mode, the word STEREO appears next to FM.
Tuning Stations
Frequency |
|
|
|
|
Press the button |
(16 or F:46) to increase the frequency by 0.05 MHz. Accordingly, the button (15 or F:67) can be used to |
|
|
decrease the frequency. |
||
Automatic Scan |
|
|
|
Hold the button |
or |
for about 2 seconds to start an automatic search. The words |
|
“Automatic Scan” appear on the LCD display. Once a station has been found, the scan stops automatically.
Pre-Scan
Hold the button SELECT/OK (13) or OK (F:66) pressed until “Pre-Scan” appears on the LCD display. The Pre-Scan begins. The device scans for all available stations in the FM band. Once the pre-scan is completed, the words
“Pre-Scan complete” appear on the LCD display. Press the button / repeatedly to select the found stations. With every press of this button the radio changes to next station respectively.
Station Presets
The device is equipped with station presets. You can save up to 10 FM stations.
Preset stations can be accessed easily any time.
Saving a Preset
Tune to a station as previously described.
Press the SETUP button (11) followed by the MEMORY button (10). The preset name KN1 appears flashing on the LCD display.
Use the buttons K or L to choose a station preset from KN1 to KN10. Confirm the selected preset by pressing SELECT/OK (13).
Repeat the mentioned steps to save more presets.
Recalling Presets
Press the buttons KL (3, 4) or cd (F:68, F:48) to choose a preset number. The preset number appears together with the corresponding frequency on the LCD display.
To leave the radio mode and return to the main menu, press /¬ (9) or STOP/ESC (F:44).
E-15

COMPACT-DISC PLAYER OPERATION
This device supports the formats Audio-CD, MP3, WMA and CD-R/RW. Do not insert any discs that use other formats!
Loading and Removing a Compact-Disc/MP3 Disc
Power on the device as described in the section Basic Functions. The device is now in operation.
The last mode used is activated.
Select the CD mode using the buttons KL (3,4), cd (F:68, F:48) or (16 or F:40) and (15 or F:52) if necessary, and confirm your selection with SELECT/OK (13) or OK (F:66). The device then tries to read in the CD.
If the CD tray is empty, “No Disc” appears on the LCD display.
If a CD is already in the tray, the words “Loading” followed by ALL and the tracks appear on the display. Additionally, “CD” appears on the LCD display, if
the disc is a compact disc. If it is an MP3 disc, you will see the names of albums and tracks.
Press on OPEN/CLOSE (28) to open the CD tray (29) and insert a CD. The CD tray opens slowly and “CD Open” appears on the display.
Insert a CD with the labelled side facing upwards into the tray.
Press the lid of the CD compartment at the button OPEN/CLOSE down. “Loading” appears on the LCD display. Press SELECT/OK (13) or OK (F:66). If the inserted
disc is an Audio CD, the Gracenote Logo  followed by ALL and the track names appear in the LCD display. If connected to the internet, the device connects to the Gracenote Media Database and tries to retrieve information on the CD.
Compact-Disc/MP3 Disc Playback
Insert a CD as described above. Use the buttons KL (3,4) or cd (F:68, F:48) to highlight the desired track to play a single track or on ALL to playback the whole
disc. Press on / (8) or PLAY/PAUSE (F:45) to start playback. As long as the disc is readable the track number, number of available tracks, track name, artist and album title, as well as playback time and elapsed time appear on the LCD display. If it is an MP3 disc, “MP3” and the number of albums appear as well. Some discs support the lyrics feature. If this feature is not available, the message “No Lyric File” is displayed.
To stop CD playback, press /¬ or STOP/ESC.
|
To interrupt playback momentarily, press / (8) or PLAY/PAUSE (F:45). The |
|
playback time indicator flashes in the display. |
|
To continue playback, press the / (8) or PLAY/PAUSE (F:45) again. |
Track Search (SKIP Function) |
|
|
NEXT: Jump to the beginning of the next track by pressing (16 or F:40). |
|
The track name of the respective track is then displayed. With every press on this button the device jump one |
|
track forwards. |
|
PREVIOUS: Jump to the beginning of the current track by pressing (15 or F:67). With every further press |
|
on this button the device jump one track backwards. |
E-16
To scan to a specific point in a track, hold down |
(16 or F:40) or |
(15 or F:67). |
Release the button once you have reached the desired section. The CD player continues playback from that point.
Selecting an Album (only for MP3 discs)
Choose the desired folder or album and press SELECT/OK (13) or OK (F:66). Then you can select the desired MP3 track. Press SELECT/OK (13) or OK (F:66). Playback starts and track number, MP3 and ID3 information are displayed.
Press /¬ or STOP/ESC (9 or F:47) to stop playback or to choose another album.
Recording from CD
Recordings in MP3 format (128 kbps) can be made from audio CDs and radio source onto USB sticks or
SD/MMC cards.
If not already selected, go into the CD mode. Enter a CD into the CD tray, as described. Make sure that the CD player is in stop mode and the LCD displays the CD information, ALL, as well as the track names. Plug your
USB stick into the device or insert an SD/MMC card.
Highlight the desired tracks by marking them with the MEMORY button (10 or F:69).
A tick appears behind every marked track.
Press the REC button (14 or F:65). If a USB stick and an SD/MMC card are connected to the device at the same time, the following message appears:
“Save USB
SD/MMC”
Choose the desired storage medium (e.g. USB) and confirm your selection by pressing SELECT/OK (13) or OK (F:66). After a few seconds the message “Free Space...MB. Starting to record” appears.
The recording starts. If only one storage medium is connected the message “Free Space...MB. Starting to record” appears a few seconds after you press the REC button.
While the device is in the recording state, the recording symbol z is displayed on the LCD display. Playback of the selected tracks begins. Once the recording has finished, the recording symbol z disappears an the LCD display states the last recorded tracks.
Inspect your recording by selecting the recording storage medium (USB or SD/MMC) in the menu.
Select the folder “Recording”. Press the SELECT/OK (13) or OK (F:66) button to confirm your selection. Choose “CD”. Press SELECT/OK (13) or OK (F:66) repeatedly until you see the recorded track in the display.To playback the tracks, press / (8) or PLAY/PAUSE (F:45).
Note on recording to USB and SD/MMC storage media:
If less than 10MB of free space is available on the device, the recording process is aborted automatically.
Section Repeat
You can mark a section within a track for repeat. Insert a CD and enter the repeat mode. Then press A-B (F-51) once. An “A” appears in the upper left corner of the LCD display. This marks the beginning of the repeated section. Press A-B (F-51) again to mark the end of the section. “AB” appears in the upper left corner of the LCD display. The marked section is repeated endlessly until you press A-B (F-51) a third time or playback is stopped by pressing STOP/ESC (9 or F:47).
E-17

INTERNET RADIO
Features
Highlight i.Radio and confirm your selection by pressing SELECT/OK (13) or
OK (F:66).
The internet radio menu appears on the display and shows the following options:
Favourites
- If connected to an internet radio station, you can save the station into your favourites list.
Up to 20 radio stations can be stored in this list. To save the station, press MEMORY (10 or F:69). This saves the station under “Favourites”. The next time the station can be accessed directly from the list.
World Stations
- A global selection of internet radio service providers, sorted by regions and countries. Make your selection by confirming the highlighted text with SELECT/OK (13) or OK (F:66).
SHOUTCast
-A global selection sorted by…
0 - 9: Music from the past decades. E.g. enter 8 to display stations that preferably play music from the eighties.
A - Z: An alphabetically sorted selection of various genres. Example: enter “E” for the genre “Experimental”. Then a list of stations that play experimental music is displayed.
After choosing a station it might takes up to several minutes to establish a connection. At the same time the message “Buffering” and a percentage is displayed.
Recording Internet Radio
If the station broadcasts in MP3 format, recordings from internet radio programmes can be made. The device recognises the format and displays it on the LCD display.
Select an internet radio station (e.g. from your favourites list). Plug your USB stick into the device or insert an SD/MMC card.
Press the REC button (14 or F:65). If a USB stick and an SD/MMC card
E-18
are connected to the device at the same time, the following message appears: “Save
USB SD/MMC”
Choose the desired storage medium (e.g. USB) and confirm your selection by pressing SELECT/OK (13) or OK (F:66). The message “Free Space...MB. Starting to record” appears on the LCD display.
The recording mode starts and the recording symbol z is displayed on the LCD display. Stop the recording by pressing /¬ or STOP/ESC (9 or F:47). Once the recording process is completed, the recording symbol z disappears.
Inspect your recording by selecting the recording storage medium (USB or SD/MMC) in the menu.
Select the folder “Recording”. Press the SELECT/OK (13) or OK (F:66) button to confirm your selection. Choose “ Favorites”. Press SELECT/OK (13) or OK (F:66). The recorded tracks are displayed on the LCD.
To playback the tracks, press / (8) or PLAY/PAUSE (F:45).
Note on recording to USB and SD/MMC storage media:
If less than 10MB of free space is available on the device, the recording process is aborted automatically.
USB Port
Features
Insert the USB plug of the external storage medium (hard disc, USB stick, MP3 player) into the USB port (5) of the device.
Highlight the USB symbol  and confirm your selection by pressing SELECT/OK (13) or OK (F:66).
“ALL” is displayed together with the MP3 tracks and folders, if the USB storage medium contains files. If the storage medium is empty, the message “No File” is display on the LCD display. If the storage medium contains already saved recorded files from previous recordings, the folder “Recording” appears. The “Recording” folder contains the following subfolders:
Cd |
- CD recordings |
Favorites |
- internet radio recordings from favourite stations |
Fm |
- FM radio recordings |
Line-in |
- recordings from external devices |
ShoutCAST |
- internet radio recordings |
WorldStation |
- internet radio recordings |
If you have created an MP3 folder, open it and choose the desired album/folder. In order to playback all tracks on the USB
storage, select “ALL” and press / (8) or PLAY/PAUSE (F:45).
The current track number and the total number of tracks is displayed in upper corner of the LCD display.
The functions available in the USB mode are mostly the same as in the CD mode. Please refer to the sections in “Compact Disc Player Operation”: Compact-Disc/MP3 Disc Playback, Track Search, Selecting an Album, Recording from CD, Section Repeat.
Note:
Before removing your USB storage device, it is recommended to stop playback by pressing /¬ or
STOP/ESC (9 or F:47).
External storage devices must be FAT32 formatted. NTFS formatted devices are not supported.
Note on recording to USB and SD/MMC storage media:
If less than 10MB of free space is available on the device, the recording process is aborted automatically.
E-19
Track Search
If the tracks are saved in the same way as with an MP3 disc, a title search can be conducted as described under “Compact Disc Player Operation – Track Search (SKIP function)”.
Important: The USB port (5) is only suited for external USB data storage devices. Other devices cannot be used with this USB port. Do not connect USB extension cables to the port.
SD/MMC Cards
Features
Push the SD/MMC card into the SD/MMC card slot (6) until it locks in. Insert the SD/MMC card with the contacts facing to the device into the card slot.
Highlight the SD/MMC menu and confirm.
“ALL” and available folders are displayed, as long as the SD/MMC card is not empty. If the SD/MMC card is empty, the message “No File” is appears on the LCD display. If the SD/MMC card contains already saved recorded files from previous recordings, the folder “Recording” appears.
The functions of the buttons are essentially the same as in the CD or USB mode. Please refer to the sections in
“Compact Disc Player Operation”:
Compact Disc Playback, Track Search, Selecting an Album, Recording from CD, Section Repeat.
Note:
Before removing your card, it is recommended to stop playback by pressing /¬ or STOP/ESC (9 or F:47).
External storage devices must be FAT32 formatted. NTFS formatted devices are not supported.
Track Search
If the tracks are saved in the same way as with an MP3 disc, a title search can be conducted as described under “Track Search (SKIP function) and Selecting an Album, Title Search and Album Search”.
To remove the card, press on it carefully until it unlocks and pull it out of the card slot (6).
EXTERNAL DEVICES (AUX)
The AUX socket (31) on the rear panel allows users to connect an external device (e.g. an MP3 player, CD player, etc.). The device amplifies then the audio signals from the external device.
Before connecting the external device, please make sure that the Internet Audio System and the external device are powered off and disconnected from the mains.
Connect a suitable cable to the audio output of the external device. Then connect the other side of the cable to the AUX socket on the rear panel.
Highlight the AUX symbol  in the menu and press SELECT/OK (13) or OK (F:66).
Start playback on the aux device. The Internet Audio System can control volume and equalizer settings in AUX mode.
E-20
Recording from external devices
You can record audio from an external device onto USB or SD storage media.
Press the REC button (14 or F:65) to do this. If a USB storage device and an SD/MMC card are connected to the device at the same time, a dialogue asks you to choose the desired storage medium. Select the desired medium. The message “Free Space...MB. Starting to record” appears on the LCD display. Then the message “Preparing to rip” appears. (If sufficient free space is not available on the storage device, the message “Space Not Enough! Free Space ...MB” appears.) The recording mode starts and the recording symbol z is displayed in the upper left corner of the LCD display.
Start playback on the aux device. Playback of the selected tracks begins.
Press /¬ or STOP/ESC (9 or F:47) to stop recording. If the recording is completed, the message “Saving to USB” appears (as long as it is a USB storage device) and the recording symbol z disappears.
Note on recording to USB and SD/MMC storage media:
If less than 10MB of free space is available on the device, the recording process is aborted automatically.
LYRICS DISPLAY
During playback of an MP3 disc or USB/SD storage media you can display lyrics on the LCD display, as long as the required lyrics files are available.
The following lyrics formats are supported: .txt /.lrc /.smi. MP3 – ID3V2 embedded lyrics .Lrc? .Txt
WMA – embedded lyrics .Smi? .Txt
Press INFO (F:52) during playback. If then supported lyrics are found, they appear on the display.
If no lyrics are found, the message “No Lyrics File”.
FILE MANAGER
In order to copy, move or delete files on a CD, USB storage device or SD/MMC card you can use the file manager. Make sure that the storage device is connected to the system or an SD/MMC card is inserted. Select FileMgr in the menu.
Highlight the CD, USB or SD/MMC and confirm your selection by pressing SELECT/OK (13) or OK (F:66). Please note that only data CD can be accessed by the FILE MANAGER. When an audio CD is inserted, the message in the picture to the right is displayed on the LCD display.
Select the storage medium that you want to accesss (e.g. USB).
You can open a folder (e.g. “Recording”) or highlight a file directly using the button MEMORY (10 or F:69).
E-21
All highlighted tracks are marked with a tick on the LCD display.
Press the REC button (14 or F:65).
The following menu appears on the display
”Copy Move Delete”
Press the SELECT/OK (13) or OK (F:66) button to confirm your selection (e.g. Copy).
Then choose the storage medium (USB or SD/MMC) on that the files shall be saved.
After you have selected the storage medium (e.g. SD/MMC) you can select a folder in that you want to save the file by pressing SELECT/OK (13) or OK (F:66).
The subfolder (e.g. ALL) opens. Press the REC button (14 or F:65). The following menu appears on the display
”Paste
Abort”.
Select “Paste” and press SELECT/OK (13) or OK (F:66). The device starts to copy the file.
The process is display in percent on the LCD display.
When the copy is completed the message “Successful! OK” appears.
If not sufficient space is available on the storage device, the system displays the error message “Error! Memory Full! OK”. In this case, please press the SELECT/OK (13) or OK (F:66) to return to the previous menu.
The same method can be used to transfer files from your USB or SD/MMC storage medium to your iPod.
UPnP MEDIA SERVER
WARNING: this device is capable to manage wirelessly remote library from UPnP servers with a maximum size of 18GB. Above this limit, the time-out will prevent your device to receive the whole library information from the UPnP server. In such a case, better cut your library into 2 distinct parts on your UPnP server.
Supported Media Servers
WMP11 (Windows Media Player 11 – operating system Windows XP SP2 /Vista)
Rhapsody URL: http://www.rhapsody.com/welcome.html
TwonkyMedia URL: http://www.twonkyvision.com/
In order to support TwonkyMedia ID3v2 tags must be edited.
MediaTomb (Linux platform) URL: http://mediatomb.cc/
E-22

UPnP Network Connection
Please also read the section “Network”.
Connect the UPnP Media Server to the same LAN and make sure that all network parameters are correct.
The network diagram should look like the following:
ADSL/DSL
Cable Modem
Alternative diagram for networks using a WiFi dongle:
ADSL/DSL
Cable Modem
E-23
Preparing the UPnP Environment
Connect your PC as Media Server.
Precondition for a successful connection is that your operating system is either Windows XP SP2 or Windows Vista and Windows Media Player 11 is installed.
Usually your PC’s firewall is configured to block unwanted connections. Please allow UPnP (Universal Plug and Play) connections on your PC to be able to use your PC as a Media Server. All corresponding files must be network shared explicitly. For further information, please refer to the Windows user manual or Windows Help.
Deactivate the proxy function of your Internet Audio Systems. Select Network in the SETUP menu. Then select Use Proxy. Press SELECT/OK (13) or OK (F:66). Then switch between Yes and No.
Notes on Configuring the Media Server
For Windows Media Player 11 under Windows XP, the following steps are required to configure the network:
Click on My Network Places with the right mouse button. Select Properties.
Select Local Area Connection followed by Advanced. Click the on Settings. The Firewall Window opens.
For unrestricted operation of your Media Server you can activate and deactivate ports. However, do not click on
“Don’t allow exceptions”.
Select the Exceptions tab and click on UPnP Framework. Then add a tick next to it. Click on OK to save all changes.
To check the network IP address, open the Control Panel and double click on Network Connections followed by
Local Area Connection. Left click on Support.
Configuring Windows Media Player 11:
1.Select Media Library, Extras, Options, Library, Activate Shares.
2.Click on Share Media and then on OK.
For further information on using shared media files refer to the corresponding sections of your Windows or Windows Media Players 11 manual.
Music Playback on the UPnP Media Server
Highlight the UPnP symbol  and confirm your selection by pressing SELECT/OK (13) or OK (F:66).
The message “Server Search” appears on the display.
Once the Media Server is found by the device, it is displayed on the LCD. If more than one Media Server is available, they are displayed on the display and you can select one of them. Press the SELECT/OK (13) or OK (F:66) button to confirm your selection.
Then a list of shared media files in display on the LCD display. Press SELECT/OK (13) or OK (F:66) to start playback of the selected media file.
E-24
NETWORK
Supports LAN (Ethernet) and WLAN (802.11 b/g USB Wifi Dongle available as optional accessory).
Supports WEP 64/128 and WPA-PSK WiFi encryption.
Supports Dynamic IP over DHCP (Dynamic Host Configuration Protocol) and Static IP.
Standard configuration is Ethernet with DHCP.
Supports UPnP.
Automatic detection of LAN and WLAN (wireless Ethernet).
Network Status Display
The Network Status is displayed in the right upper corner of the LCD display. The following status displays are supported:
LAN Status
-Ethernet cable not found.
-Ethernet found. DHCP information not available.
-Ethernet found. DHCP information available.
WLAN Status
-USB Wifi Adapter not found.
-USB Wifi Adapter found. DHCP information available.
-USB Wifi Adapter found. DHCP information not available.
-USB Wifi Adapter found. DHCP information available.
WLAN Signal Status
-Signal strength below 20%.
-Signal strength 21 - 59%.
-Signal strength 60 - 79%.
-Signal strength above 80%.
Note: A signal strength above 70% is seen a strong signal.
WiFi – Connection
Insert your USB WiFi Dongle into the USB WiFi port (27) on the rear panel. Enter SETUP Æ Network Æ Connection LAN and confirm. This will change the preferred network from LAN to WLAN and activates the WiFi interface.
If you select WLAN but no WiFi Dongle is connected, the message “No WiFi Interface detected!!!” appears. Otherwise the device tries automatically to find an Access Point (AP). A list of available access points appears on the LCD display.
Select your Access Point (AP) and press the SELECT/OK (13) or OK (F:66) button to confirm your selection.
You will be asked to enter your access code. WPA access codes do not have length limitations.
16 digit codes are not unusual. However, usually WPA access codes do not have more than 64 digits. WEP access codes have 13 digits. You can find or configure the access code on your router, your router's manual or access
E-25
configuration of your router, or else in your PC or website of your Internet Provider. Otherwise you can ask your provider to supply you with the necessary code. Enter the access code using the number keys or K (3) and L (4). Press the SELECT/OK (13) or OK (F:66) button after each number to confirm it.
If the desired Wireless Router is not found, more configurations might be necessary.
Select “Wireless” and confirm. You will possibly have to change the connection mode from “Infra” to
“Ad-Hoc” or change the option “Encryption” from “WEP” to “WPA” or “None”. Press the SELECT/OK (13) or OK (F:66) button to confirm your changes.
The setting Use Proxy should point to No.
To rescan the WiFi connection, select Wizard and press SELECT/OK (13) or OK (F:66) button to confirm. One of the mentioned network status symbols appears for a few seconds and displays signal strength and connection status.
Wizard
Select Wizard in the Network menu and confirm.
The words “Select AP” an “Scan” appear on the LCD display.
Then a list of available access points appears (AP). The signal strength is displayed next to the access point. Select the desired access point and confirm.
An access code dialogue appears. Enter the code using the number keys (F:37) on the remote control or select an existing code.
The words “Accept?” appear together with the access point on the LCD display. Select “Yes” and confirm. Wizard is highlighted on the LCD display. Use the button /¬ (9) or STOP/ESC (F:47) to exit the menu.
The words “Connect to AP. Don’t remove Dongle” appear on the LCD display.
The display return the to the network menu. Check now if you can receive internet radio.
E-26
Configuring a Static IP
Enter SETUP. Select Network and confirm.
Select IP Settings and confirm.
Select IP Source and change from Dynamic to Static, then confirm again.
Select TCP/IP and confirm.
Enter the IP number using the number keys on the remote control.
Alternatively, you can enter the numbers directly on the device using the buttons K (3) and L (4). Confirm every number you select.
After entering the IP press REC to save your changes.
Configuring a DNS (Dynamic Name Server)
Enter SETUP. Select Network and confirm.
Select DNS and confirm.
Enter the IP number using the number keys on the remote control.
Alternatively, you can enter the numbers directly on the device using the buttons K (3) and L (4). Confirm every number you select.
After entering the IP press SELECT/OK (13) or OK (F:66) to save your changes.
Note: After changing the network environment from LAN to WLAN activate the Wizard in the Network menu. The system tries to rescan the network then.
Always confirm your selections. The words “Connect to AP. Don’t remove Dongle”” appear on the LCD display. Then the WLAN connection is established.
BUTTONS INPUT – SELECTING DOMAIN OR IP ADDRESS
Button |
Description |
|
|
SELECT/OK |
Cancel Input |
STOP/ESC, /¬ |
Remove Character |
c |
Change Character: 0-9, a-z, A-Z, Symbol |
d |
Change Character: 0-9, a-z, A-Z, Symbol |
|
move left |
1 |
move right |
1 ./_!@# $ % ^ & * : ; ' " / \ ( ) [ ] { } space |
|
2 |
2 abc ABC |
3 |
3 def DEF |
4 |
4 ehi EHI |
5 |
5 jkl JKL |
6 |
6 mno MNO |
7 |
7 pqrs PQRS |
8 |
8 tuv TUV |
9 |
9 wxyz WXYZ |
0 |
0 |
|
|
E-27
Configuring a Proxy Address
Enter SETUP. Select Network and confirm.
Select Use Proxy and confirm to change from No to Yes and vice versa.
Select Proxy Server and confirm to enter domain and IP address of the proxy server.
Enter the numbers and characters using the number keys on the remote control. Alternatively, you can enter
the numbers directly on the device using the buttons K (3) and L (4). Confirm every number you select.
After entering the server information press SELECT/OK (13) or OK (F:66) to save your changes.
Select Proxy Port and confirm to enter a proxy port number.
Enter the IP number using the number keys on the remote control. Alternatively, you can enter the numbers directly on the device using the K (3) and L (4). Confirm every number you select.
After entering the port number press SELECT/OK (13) or OK (F:66) to save your changes.
BUTTONS INPUT – SELECTING A PROXY PORT
Button |
Description |
|
|
|
|
SELECT/OK |
Cancel Input |
|
STOP/ESC, /¬ |
Remove Character |
|
c |
Change Character: 0-9, a-z, A-Z, Symbol |
|
d |
Change Character: 0-9, a-z, A-Z, Symbol |
|
|
move left |
|
1 |
move right |
|
1 |
||
2 |
2 |
|
3 |
||
3 |
||
4 |
||
4 |
||
5 |
5 |
|
6 |
6 |
|
7 |
||
7 |
||
8 |
||
8 |
||
9 |
9 |
|
0 |
0 |
|
|
||
|
|
|
FIRMWARE UPGRADE |
|
Upgrade over USB or SD/MMC
Retrieve the latest firmware from your dealer. The firmware uses the UPG file format.
Copy the file to a USB or SD/MMC storage medium and connect it to the device.
Turn on the device and enter SETUP, then confirm. Select Firmware Upgrade.
Confirm your selection. The following dialogue appears:
“Upgrade No
Yes”
Select “Yes” and confirm.
E-28
A dialogue appears that asks on which storage medium the firmware file is. Select USB and confirm.
Then select “colilo” and confirm. The firmware upgrade starts.
Note: “Colilo” an display updater. This update is not required for every Firmware Upgrade.
CAUTION: Do not press any button on the device or remote control, otherwise the device might be damaged.
After the update the device returns to the standby mode.
Power the device on again and repeat the above steps to see the following message: “Upgrade
colilo
KW-1004-1.0.2.98” (Depends on latest version!)
Select “KW-1004-1.0.2.98” and confirm. The firmware upgrade starts.
CAUTION: Do not press any button on the device or remote control, otherwise the device might be damaged.
After the update the device returns to the standby mode.
Power the device on again and enter the SETUP menu. Select “Default Settings”. Select “Yes” and confirm. The Firmware Upgrade is completed.
Firmware Upgrade over the Internet
Make sure that an internet connection is available.
Select SETUP and confirm. Then select Firmware Upgrade.
Select “Yes” to start the upgrade. The device established a connection automatically and detects new firmware versions.
CAUTION: Do not press any button on the device or remote control, otherwise the device might be damaged.
After the upgrade you need to re-enter all network configurations. After restarting the device you will be asked to enter the access code for your network. Enter the code an confirm. Refer to section Network for further information.
LANGUAGE SETUP
Enter the SETUP menu and select Language. Then confirm. The available languages are listed on the LCD display. Select the desired language and confirm.
DISPLAY INFORMATION
To display the status information of your firmware version and network connections, enter the SETUP menu, select Information and confirm. The current firmware version is labelled as “OS Ver:”.
Use the buttons KL (3, 4) or cd (F:68, F:48) to navigate through this page.
E-29
RESET
If errors appear in the display or the device does not function according to the manual, execute the following steps.
1.Remove all storage media (CD, USB storage device and SD/MMC card) from the device.
2.Press STANDBY (19 or F:73) to turn the device into standby mode.
3.To turn the device off completely by disconnecting the device from the mains.
4.Reconnect the device to the mains socket after 20 seconds and power it on by pressing STANDBY again.
Alternatively, you can perform a RESET by inserting a pointed object (e.g. a paper clip) into the RESET hole (33) on the rear panel.
Before you do this remove all connected storage media.
Caution: Do not use a pin, as pins are too sharp and can damage the device.
TROUBLESHOOTING
Record:
1.Why can’t I retrieve any CD information from the Gracenote Media Database?
-Check if an internet connection is available.
-Check your network configuration.
-Try to open your CD compartment. Remove the CD and reinsert it.
-There is no information for your CD available in the Gracenote Media Database.
-Data CDs are not supported for this function.
2.Why can’t I record on why USB storage device or SD/MMC card?
-Make sure that your USB storage device or SD/MMC card is correctly connected with your device.
-Check if sufficient space is available for the recording.
-Check if the storage device or card is write protected.
Internet Radio
1.Why can’t I connect?
-Check if an internet connection is available.
-Check your network configuration.
-Check if the radio station is still available.
-Check if the proxy configuration is correct.
2.The internet radio hangs at connection or retrieval of stations.
-Check if an internet connection is available.
-Check your network configuration.
-Perform a RESET. See section “Reset”.
3.A list of radio stations is available but there is no reception.
-Check your network configuration.
-Make sure that your firewall does not block access to the stations.
-Check if the proxy configuration is correct.
CLEANING AND CARE
General
Unplug the device before cleaning.
Clean the housing only with a damp cloth.
Do not use any aggressive cleaning agents.
Do not use chemicals (e.g. benzine, alcohol) to clean the housing.
Clean the SD/MMC card slot and the USB port with a vacuum cleaner regularly.
E-30
 Loading...