Akg PERCEPTION 200, PERCEPTION 100 User Manual

PERCEPTION 100 PERCEPTION 200
User Instructions
Please read the manual before using the equipment!

1 Precaution/Unpacking
1.1 Precaution
Please make sure that the piece of equipment your microphone will be connected to fulfills the safety regulations in force in your country and is fitted with a ground lead.
1.2 Unpacking
Check that the packaging contains all of the items listed for your microphone. Should any item be missing, please contact your AKG dealer.
PERCEPTION 100: • Microphone
• Stand adapter
• Mini poster
PERCEPTION 200: • Microphone
• Spider suspension
• Carrying case
• Mini poster
2
. This Manual contains instructions for setting up and your equipment. Please take a to read the instructions before operating the and keep the Manual for
. Have fun and impress
100 and PERCEPTION heavy-duty, rugged true conbuilt to the same standards as all other AKG
.
on the basis of AKG’s decades -how and feedback from sound around the world using AKG every day, these purpose 1-inch large-diaphragm bring AKG studio quality to
sound, and
2.2 Common Features
The PERCEPTION 100 and 200 share the following features:
•Cardioid polar pattern: The microphone is most sensitive to sounds arriving from in front of it while picking up much less of sounds arriving from the sides or rear (from monitor speakers or neighboring instruments). This makes the microphone equally suited for recording and onstage use.
•Gold-sputtered diaphragm: The diaphragm is made of a plastic foil that is gold-sputtered on one side only to prevent shorting to the back electrode even at extremely high sound pressure levels.
PERCEPTION 100/200 

•All-metal body: The all-metal body adds to the rejection of RF interference so you can use the microphone near transmitter stations and along with wireless microphones or other communications equipment. The extremely rugged, heavy body and sturdy front grill protect the microphone from damage from tough handling on stage.
•High headroom, minimum distortion: Capable of handling sound pressure levels up to 135 dB without introducing perceptible distortion and built to resist high temperatures and humidity, the microphone will give excellent results in a wide range of applications.
2.3 PERCEPTION 200 Added Features
The PERCEPTION 200 is basically identical to the PERCEPTION 100 but provides
 PERCEPTION 100/200
the following additional features:
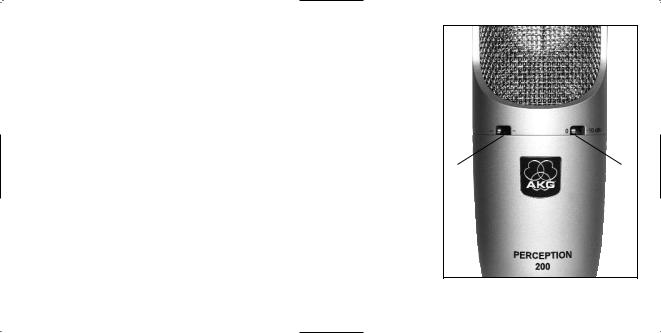
•Bass cut filter: Selector 1 on the microphone front (refer to fig. 1) further reduces low-end distortion caused by footfall or wind noise, etc. The filter also minimizes the proximity effect that close-in miking from less than 4 inches causes in any unidirectional microphone.The filter rolls off at 12 dB/octave from 300 Hz downward.
•Switchable preattenuation pad:
Selector 2 on the microphone front (refer to fig. 1) lets you increase the headroom by 10 dB for distortionfree close-in recording. The preattenuation pad prevents the microphone's output level, particularly at low frequencies, from overloading the miniature transformers used in many mixer input stages, etc.
1 |
2 |
Fig. 1: Bass cut and preattenuation switches on PERCEPTION 200 front.
3

2.4 Optional Accessories
•B 18 + A 48V battery supply and DC/DC converter for 48-V phantom powering
•PF 80 studio pop screen
•ST 305 floor stand
•W 4000 external windcscreen
4
|
|
|
|
|
|
|
|
|
|
|
the backplate |
|
|
|
|
|
|
|
|
|
|
|
so the micro- |
|
|
|
|
|
|
|
|
|
|
|
power supply. |
|
|
|
|
|
|
|
|
|
|
100 and the PERCEPTION 200. |
a balanced |
|
|
|
|
|
|
|
|
|
|
||
|
|
|
|
|
|
|
|
|
|
output on a 3-pin male XLR connector: |
|
|
|
|
|
|
|
|
|
|
|
uses a true condenser |
Pin 1: ground |
|
|
|
|
|
|
|
|
|
|
designed for 48-volt phan- |
Pin 2: hot |
|
|
|
|
|
|
|
|
|
|
to DIN 45 596/IEC 268-15. |
Pin 3: return |
|
2 |
|
2.3 |
Mic |
Phantom |
1 |
Mic |
|
2.2 |
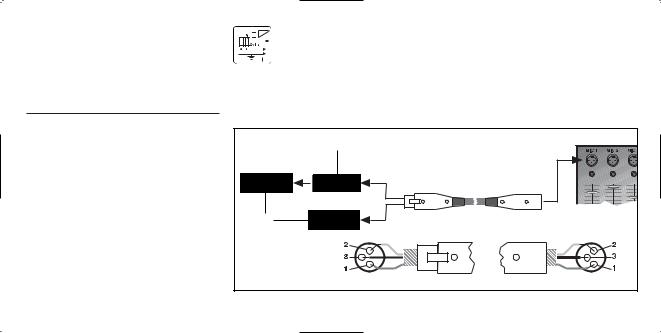
Fig. 2: Connecting to a balanced input with (2.2) or without (2.3) phantom power.
PERCEPTION 100/200 

You can connect the microphone either to a balanced microphone input with or without phantom power or an unbalanced microphone input.
3.2 Input with Phantom Power
Refer to fig. 2 on page 4.
1.Use an XLR cable to connect the microphone (1) to a balanced XLR input with phantom power.
2.Switch the phantom power on. (Refer to the user manual of the unit to which you connected your microphone.)
3.3 Input with No Phantom Power
Refer to fig. 2 on page 4.
• If your mixer provides no phantom power, connect an optional AKG
B 18 + A 48V phantom power supply (2) between the microphone and the mixer.
 PERCEPTION 100/200
Important: Using any power supply other than those recommended by AKG may damage your microphone and will void the warranty.
3.4 Unbalanced Input
Refer to fig. 3.
Use a cable with a female XLR connec-
tor and TS jack plug:
1.On the XLR connector, use a wire bridge to connect pin 1 to pin 3 and the cable shield.
2.Connect the inside wire of the cable to pin 2 on the XLR connector and the tip contact of the jack plug.
1 |
2 |
Mic |
Phantom |
Fig. 3: Connecting to an unbalanced input.
5
 Loading...