


 Loading...
STEREO DIGITAL SAMPLER
WARNING
To prevent fire or shock hazard, do not expose this appliance to rain or moisture.
Operator’s Manual
WARNING
WARNING!!
To prevent fire or shock hazard, do not expose this appliance to rain or moisture.
1-En
CAUTION
RISK OF ELECTRIC SHOCK
DO NOT OPEN
CAUTION: TO REDUCE THE RISK OF ELECTRIC SHOCK
DO NOT REMOVE COVER (OR BACK).
NO USER-SERVICEABLE PARTS INSIDE.
REFER SERVICING TO QUALIFIED SERVICE PERSONNEL.
THE SYMBOLS ARE RULED BY UL STANDARDS (U.S.A.)
The lightning flash with the arrowhead symbol superimposed across a graphical representation of a person, within an equilateral triangle, is intended to alert the user to the presence of uninsulated “dangerous voltage” within the product’s enclosure; that may be of sufficient magnitude to constitute a risk of electric shock.
The exclamation point within an equilateral triangle is intented to alert the user to the presence of important operating and maintenance (servicing) instructions in the literature accompanying the appliance.
5A-En
CD3000XL Operator’s Manual |
i |

WARNING
IMPORTANT SAFETY INSTRUCTIONS
SAVE THESE INSTRUCTIONS
WARNING - When using electric products, basic precautions should always be followed, including the following;
1)Read all the instructions before using the product.
2)Do not use this product near water - for example, near a bath tub, washbowl, kitchen sink, in a wet basement or near a swimming pool or the like.
3)This product should be used only with a cart or stand that is recommended by the manufacturer.
4)This product, either alone or in combination with an amplifier and headphones or speakers, may be capable of producing sound levels that could cause permanent hearing loss. Do not operate for a long period of time at a high volume level or at a level that is uncomfortable. If you experience any hearing loss or ringing in the ears, you should consult an audiologist.
5)The product should be located so that its location or position does not interfere with its proper ventilation.
6)The product should be located away from heat sources such as radiators, heat registers or other products that produce heat.
7)The product should be connected to a power supply only of the type described in the operating instructions or as marked on the products.
8)This product may be equipped with a polarized line plug (one blade wider than the other). This is a safety feature. If you are unable to insert the plug into the outlet, contact an electrician to replace your obsolete outlet. Do not defeat the safety purpose of the plug.
9)The power-supply cord of the product should be unplugged from the outlet, when left unused for long period of time.
10)Care should be taken so that objects do not fall and liquids are not spilled into the enclosure through openings.
11)The product should be serviced by qualified service personnel when;
a)The power-supply cord or the plug has been damaged; or
b)Objects have fallen, or liquid has been spilled onto the product; or
c)The product has been exposed to rain; or
d)The product does not appear to operate normally or exhibits a marked change in performance; or
e)The product has been dropped, or the enclosure damaged.
12)Do not attempt to service the product beyond that described in the user-maintenance instructions. All other servicing should be referred to qualified service personnel.
ii |
CD3000XL Operator’s Manual |

WARNING
GROUNDING INSTRUCTIONS
This product must be grounded. If it should malfunction or breakdown, grounding provides a path of least resistance for electric current to reduce the risk of electric shock. This product is equipped with a cord having an equipment-grounding conductor and a grounding plug. The plug must be plugged into an appropriate outlet that is properly installed and grounded in accordance with all local codes and ordinances.
DANGER - Improper connection of the equipment-grounding conductor can result in a risk of electric shock. Check with a qualified electrician or serviceman if you are in doubt as to whether the product is properly grounded. Do not modify the plug provided with the product - if it will not fit the outlet, have a proper outlet installed by a qualified electrician.
CD3000XL Operator’s Manual |
iii |

WARNING
WARNING
THIS APPARATUS MUST BE EARTHED
IMPORTANT
This equipment is fitted with an approved non-rewireable UK mains plug.
To change the fuse in this type of plug proceed as follows:
1)Remove the fuse cover and old fuse.
2)Fit a new fuse which should be a BS1362 5 Amp A.S.T.A or BSI approved type.
3)Refit the fuse cover.
If the AC mains plug fitted to the lead supplied with this equipment is not suitable for your type of AC outlet sockets, it should be changed to an AC mains lead, complete with moulded plug, to the appropriate type. If this is not possible, the plug should be cut off and a correct one fitted to suit the AC outlet. This should be fused at 5 Amps.
If a plug without a fuse is used, the fuse at the distribution board should NOT BE GREATER than 5 Amp.
PLEASE NOTE: |
THE SEVERED PLUG MUST BE DESTROYED TO AVOID A POSSIBLE SHOCK |
|
HAZARD SHOULD IT BE INSERTED INTO A 13 AMP SOCKET ELSEWHERE. |
The wires in this mains lead are coloured in accordance with the following code:
GREEN AND YELLOW |
— EARTH |
BLUE |
— NEUTRAL |
BROWN |
— LIVE |
As the colours of the wires in the mains lead of this apparatus may not correspond with the coloured markings identifying the terminals in your plug, please proceed as follows:
The wire which is coloured GREEN and YELLOW must be connected to the terminal which is marked with the letter E or with the safety earth symbol  or coloured GREEN or coloured GREEN and YELLOW.
The wire which is coloured BLUE must be connected to the terminal which is marked with the letter N or coloured BLACK.
The wire which is coloured BROWN must be connected to the terminal which is marked with the letter L or coloured RED.
THIS APPARATUS MUST BE EARTHED
Ensure that all the terminals are securely tightened and no loose strands of wire exist.
Before replacing the plug cover, make certain the cord grip is clamped over the outer sheath of the lead and not simply over the wires.
6D-En
VENTILATION
Do not prevent the unit's ventilation, especially by placing the unit on the soft carpet, in a narrow space, or by placing objects on the unit's chassis—top, side, or rear panels. Always keep the unit's chassis at least 10 centimeters from any other objects.
31C-En
CHANGES OR MODIFICATIONS NOT EXPRESSLY APPROYED BY THE MANUFACTURER FOR COMPLIANCE COULD VOID THE USER’S AUTHORITY TO OPERATE THE EQUIPMENT.
32-En
iv |
CD3000XL Operator’s Manual |

WARNING
FCC WARNING
This equipment has been tested and found to comply with the limits for a Class B digital device pursuant to Part 15 of the FCC rules. These limits are designed to provide reasonable protection against harmful interference in a residential installation. This equipment generates, uses, and can radiate radio frequency energy and, if not installed and used in accordance with the instructions, may cause harmful interference to radio communications. However, there is no guarantee that interference will not occur in a particular installation. If this equipment does cause harmful interference to radio or television reception, which can be determined by turning the equipment off and on, the user is encouraged to try to correct the interference by one or more of the following measures:
•Reorient or relocate the receiving antenna.
•Increase the separation between the equipment and receiver.
•Connect the equipment into an outlet on a circuit different from that to which the receiver is connected.
•Consult the dealer or an experienced radio/TV technician for help.
21B-En
AVIS POUR LES ACHETEURS CANADIENS DU CD3000XL
Le présent appareil numérique n’ément pas de bruits radioélectriques dépassant les limites applicables aux appareils numériques de la Class B prescrites dans le Règlement sur le brouillage radioélectrique édicté par
le ministère des Communications du Canada.
27-F
This digital apparatus does not exceed the Class B limits for radio noise emissions from digital apparatus set
out in the Radio Interference Regulations of the Canadian Department of Communications.
27-En
COPYRIGHT NOTICE
The AKAI CD3000XL is a computer-based device, and as such contains and uses software in ROMs. This software, and all related documentation, including this Operator’s Manual, contain proprietary information which is protected by copyright laws. All rights are reserved. No part of the software or its documentation may be copied, transferred or modified. You may not modify, adapt, translate, lease, distribute, resell for profit or create derivative works based on the software and its related documentation or any part there of without prior written consent from AKAI Electric Co. Ltd, Tokyo, Japan.
CERTIFICATION: PRODUCT COMPLIES WITH DHHS RULES 21 CFR, CHAPTER I, SUBCHAPTER J.
19-En
CAUTION
USE OF CONTROLS OR ADJUSTMENTS OR PERFORMANCE OF PROCEDURES OTHER THAN THOSE SPECIFIED HEREIN MAY RESULT IN HAZARDOUS RADIATION EXPOSURE.
CLASS 1 LASER PRODUCT
DANGER-INVISIBLE LASER RADIATION
WHEN OPEN AND INTERLOCK FAILED OR DEFEATED.
AVOID DIRECT EXPOSURE TO BEAM.
This product contains a low power laser device. To ensure continued safety, do not remove any covers or attempt to gain access to the inside of the product. Refer any servicing to qualified personnel.
CLASS 1 LASER PRODUCT KLASSE 1 LASER PRODUKT LUOKAN 1 LASER LAITE KLASS 1 LASER APPARAT
CAUTION; INVISIBLE LASER RADIATION WHEN OPEN
AND INTERLOCKS DEFEATED. AVOID EXPOSURE TO BEAM.
ADVARSEL; USYNLIG LASERSTRÅLNING VED ÅB-
NING NÅR SIKKERHEDSAFBRYDERE ER UDE AF FUNKTION.
UNDGÅ UDSÆTTELSE FOR STRÅLING.
VARO; AVATAESSA JA SUOJALUKITUS OHITETTAESSA OLET ALTTINA NÄKYMÄTTÖMÄLLE LASERSÄTEI-
LYLLE.
ÄLÄ KATSO SÄTESSEN !
VARNING; OSYNLIG LASERSTRÅLNING NÄR DENNA DEL ÄR ÖPPAND OCH SPÄRREN ÄR URKOPPLAD. BETRAKTA EJ STRÅRLEN !
23-En
CD3000XL Operator’s Manual |
v |

WARNING
WARNING
The CD3000XL is designed to be used in a standard household environment.
Power requirements for electrical equipment vary from area to area. Please ensure that your CD3000XL meets the power requirements in your area. If in doubt, consult a qualified electrician or Akai Professional dealer.
120 VAC |
@ 60 Hz for USA and Canada |
|
220~230/240 VAC |
@ 50 |
Hz for Europe |
240 VAC |
@ 50 |
Hz for Australia |
PROTECTING YOURSELF AND THE CD3000XL
•Never touch the AC plug with wet hands.
•Always disconnect the CD3000XL from the power supply by pulling on the plug, not the cord.
•Allow only an Akai Professional dealer or qualified professional engineer to repair or reassemble the CD3000XL. Apart from voiding the warranty, unauthorized engineers might touch live internal parts and receive a serious electrical shock.
•Do not put, or allow anyone to put any object, especially metal objects, into the CD3000XL.
•Use only a household AC power supply. Never use a DC power supply.
•If water or any other liquid is spilled into or onto the CD3000XL, disconnect the power, and call your dealer.
•Make sure that the unit is well-ventilated, and away from direct sunlight.
•To avoid damage to internal circuitry, as well as the external finish, keep the CD3000XL away from sources of direct heat (stoves, radiators, etc.).
•Avoid using aerosol insecticides, etc. near the CD3000XL. They may damage the surface, and may ignite.
•Do not use denaturated alcohol, thinner or similar chemicals to clean the CD3000XL. They will damage the finish.
•Modification of this equipment is dangerous, and can result in the functions of the CD3000XL being impaired. Never attempt to modify the equipment in any way.
•Make sure that the CD3000XL is always well-supported when in use (either in a speciallydesigned equipment rack, or a firm level surface).
•When installing the CD3000XL in a 19" rack system, always allow 1U of ventilated free space above it to allow for cooling. Make sure that the back of the rack is unobstructed to allow a clear airflow.
•In order to assure optimum performance of your CD3000XL, select the setup location carefully, and make sure the equipment is used properly. Avoid setting up the CD3000XL in the following locations:
1.In a humid or dusty environment
2.In a room with poor ventilation
3.On a surface which is not horizontal
4.Inside a vehicle such as a car, where it will be subject to vibration
5.In an extremely hot or cold environment
vi |
CD3000XL Operator’s Manual |

WARNING
WARRANTY
AKAI Electric Co. Ltd. warrants its products, when purchased from an authorized “AKAI professional” dealer, to be free from defects in materials and workmanship for a period of 12 (twelve) months from the date of purchase. Warranty service is effective and available to the original purchase only, and only on completion and return of the AKAI Warranty Registration Card within 14 days of purchase. Warranty coverage is valid for factory-authorized updates to AKAI instruments and their software, when their installation is performed by an authorized AKAI Service Center, and a properly completed Warranty Registration has been returned to your “AKAI professional” dealer.
To obtain service under this warranty, the product must, on discovery of the detect, be properly packed and shipped to the nearest AKAI Service Center. The party requesting warranty service must provide proof of original ownership and date of purchase of the product.
If the warranty is valid, AKAI will, without charge for parts or labor, either repair or replace the defective part(s). Without a valid warranty, the entire cost of the repair (parts and labor) is the responsibility of the product's owner.
AKAI warrants that it will make all necessary adjustments, repairs and replacements at no cost to the original owner within 12 (twelve) months of the purchase date if:
1)The product fails to perform its specified functions due to failure of one or more of its components.
2)The product fails to perform its specified functions due to defects in workmanship.
3)The product has been maintained and operated by the owner in strict accordance with the written instructions for proper maintenance and use as specified in this Operator's Manual.
Before purchase and use, owners should determine the suitability of the product for their intended use, and owner assumes all risk and liability whatsoever in connection therewith. AKAI shall not be liable for any injury, loss or damage, direct or consequential, arising out of use, or inability to use the product.
The warranty provides only those benefits specified, and does not cover defects or repairs needed as a result of acts beyond the control of AKAI, including but not limited to:
1)Damage caused by abuse, accident, negligence. AKAI will not cover under warranty any original factory disk damaged or destroyed as a result of the owner's mishandling.
2)Damage caused by any tampering, alteration or modification of the product: operating software, mechanical or electronic components.
3)Damage caused by failure to maintain and operate the product in strict accordance with the written instructions for proper maintenance and use as specified in this Operator's Manual.
4)Damage caused by repairs or attempted repairs by unauthorized persons.
5)Damage caused by fire, smoke, falling objects, water or other liquids, or natural events such as rain, floods, earthquakes, lightning, tornadoes, storms, etc.
6)Damage caused by operation on improper voltages.
IMPORTANT NOTE: This warranty becomes void if the product or its software is electronically modified, altered or tampered with in any way.
AKAI shall not be liable for costs involved in packing or preparing the product for shipping, with regard to time, labor, or materials, shipping or freight costs, or time or expense involved in transporting the product to and from AKAI Authorized Service Center or Authorized Dealer.
AKAI will not cover under warranty an apparent malfunction that is determined to be user error, or owner's inability to use the product.
THE DURATION OF ANY OTHER WARRANTIES, WHETHER IMPLIED OR EXPRESS, INCLUDING BUT NOT LIMITED TO THE IMPLIED CONDITION OF MERCHANTABILITY, IS LIMITED TO THE DURATION OF THE EXPRESS WARRANTY HEREIN.
AKAI hereby excludes incidental or consequential damages, including but not limited to:
1)Loss of time.
2)Inconvenience
3)Delay in performance of the Warranty.
4)The loss of use of the product.
5)Commercial loss.
6)Breach of any express or implied warranty, including the Implied Warranty of Merchantability, applicable to this product.
CD3000XL Operator’s Manual |
vii |

WARNING
CD-ROM care
Dust, dirt, scratches or warps on the CD-ROM may lead to faulty CD-ROM playback. In order to take full advantage of the CD-ROM player’s performance capabilities, follow the precautions outlined on this page.
Removing the disc from its case
After opening the CD-ROM case, depress the centre section of the case with the forefinger of one hand and use you other hand to lift the disc up by its edge.
Disc handling
Hold the CD-ROM by the outer edge only, supporting it at the center with your index finger if necessary.
Avoid touching the unprinted side of the disc.
Do not glue any labels or stickers etc., on the disc.
Disc storage
Do not store the CD-ROM in a location which is subject to direct sunlight, high humidity, or hot air from heating appliances.
Always return the CD-ROM to their plastic cases for storage.
Disc cleaning
It is recommended that you periodically wipe the recorded side of your CD-ROM with a commercially available silicone cloth (such as that used for cleaning camera lenses or glasses) in order to remove dust, dirt or fingerprints. Wipe the disc gently, being careful not to scratch its surface.
When wiping the disc, refer to the illustrations below. Unlike records, CD-ROM should always be wiped in a straight line from the center to the edge.
Do not use volatile chemical substances such as denatured alcohol, cleaning fluid intended for analog records, or antistatic fluids, as these may damage the CD-ROM.
viii |
CD3000XL Operator’s Manual |
INTRODUCTION . . . . . . . . . . . . . . . . . . . . . . . . . . . . . . . . . . . . . . . . . . . . . . . . . . . . . . . . . . . . . . . . . . . . . . . . . . . . . . . |
.1 |
FEATURES ......................................................................................................... |
2 |
ABOUT THIS MANUAL........................................................................................... |
5 |
FRONT PANEL..................................................................................................... |
6 |
TAKING CARE OF YOUR DISKS.............................................................................. |
10 |
REAR PANEL ...................................................................................................... |
11 |
SETTING UP THE CD3000XL.................................................................................. |
13 |
CONNECTIONS ................................................................................................... |
13 |
LOADING THE DEMO FLOPPY DISKS...................................................................... |
14 |
MOUNTING THE CD3000XL.................................................................................... |
15 |
GETTING AROUND THE CD3000XL ......................................................................... |
16 |
OPERATING MODES ................................................................................ |
16 |
SOFT KEYS ............................................................................................ |
17 |
SELECTING PARAMETERS AND ENTERING DATA......................................... |
17 |
MARK AND JUMP KEYS ............................................................................ |
18 |
NAMING FILES - THE NAME KEY ................................................................ |
19 |
THE ENT/PLAY KEY ................................................................................. |
19 |
LCD CONTRAST................................................................................................... |
19 |
RECORD LEVEL, MAIN VOLUME, HEADPHONE OUTPUT ............................................ |
20 |
HOW THE CD3000XL WORKS................................................................................. |
21 |
CD3000XL FLOWCHART........................................................................................ |
22 |
S I N G L E M O D E . . . . . . . . . . . . . . . . . . . . . . . . . . . . . . . . . . . . . . . . . . . . . . . . . . . . . . . . . . . . . . . . . . . . . . . . . . . . . . . . . . |
2 5 |
SELECTING PROGRAMS ...................................................................................... |
25 |
VIEWING PROGRAMS .......................................................................................... |
26 |
SETTING UP THE CD-ROM..................................................................................... |
26 |
MARKING FILES .................................................................................................. |
28 |
SEARCHING FOR FILES ON THE CD-ROM................................................................ |
29 |
LOADING SETUPS FROM FLOPPY.......................................................................... |
29 |
SCROLLING THROUGH MARKED FILES................................................................... |
30 |
USING SETUPS................................................................................................... |
30 |
SETTING PROGRAM LEVELS, PAN, FX SENDS......................................................... |
31 |
SETTING PROGRAMS’ MIDI PARAMETERS .............................................................. |
32 |
SETTING PROGRAM LOUDNESS AND VELOCITY...................................................... |
33 |
LOADING FROM FLOPPY DISK .............................................................................. |
34 |
LOADING FROM HARD DISK.................................................................................. |
35 |
DELETING PROGRAMS ........................................................................................ |
36 |
RENUMBERING PROGRAMS ................................................................................. |
38 |
USING THE CD3000XL IN ‘OLD AKAI’ MODE! ............................................................ |
39 |
USING SELECT PROG - PROGRAMS WITH THE SAME NUMBER ...................... |
39 |
LAYERING PROGRAMS............................................................................ |
39 |
CREATING KEYBOARD SPLITS.................................................................. |
39 |
USING RENUMBERING TO CREATE MULTI-TIMBRAL SETUPS......................... |
40 |
SINGLE VS MULTI.................................................................................... |
41 |
MULTI MODE - COMBINING SEVERAL PROGRAMS . . . . . . . . . . . . . . . . . . . . . . . . . . . . . . . . . . . . . . |
4 3 |
ASSIGNING PROGRAMS TO PARTS ....................................................................... |
44 |
SETTING A PART’S MIDI CHANNEL ......................................................................... |
44 |
MIXING THE PARTS ............................................................................................. |
44 |
SENDING PARTS TO THE INTERNAL EFFECTS ......................................................... |
44 |
ASSIGNING PARTS TO THE INDIVIDUAL OUTPUTS ................................................... |
45 |
TUNING AND TRANSPOSING PARTS....................................................................... |
45 |
SETTING A PART’S LOW AND HIGH KEYRANGES ..................................................... |
45 |
SETTING A PART’S PRIORITY................................................................................ |
46 |
INITIALISING A PART........................................................................................... |
46 |
SETTING UP A MULTI ........................................................................................... |
47 |
MODIFYING THE MULTI ........................................................................................ |
48 |
NAMING A MULTI ................................................................................................. |
49 |
SAVING A MULTI ................................................................................................. |
49 |
LOADING A MULTI ............................................................................................... |
49 |
RENUMBERING PROGRAMS ................................................................................. |
50 |
USING MULTI MODE FOR LAYERING PROGRAMS..................................................... |
53 |
USING MULTI MODE TO SET KEYBOARD SPLITS...................................................... |
54 |
PROGRAM EDITING . . . . . . . . . . . . . . . . . . . . . . . . . . . . . . . . . . . . . . . . . . . . . . . . . . . . . . . . . . . . . . . . . . . . . . . . . . |
.5 6 |
|
|
WHAT IS A KEYGROUP? ....................................................................................... |
57 |
|
KEYGROUP ZONES ............................................................................................. |
58 |
|
OVERLAPPING AND CROSSFADING KEYGROUPS ................................................... |
59 |
|
ASSIGNABLE PROGRAM MODULATION .................................................................. |
60 |
|
EDIT SINGLE ...................................................................................................... |
64 |
|
NAMING PROGRAMS - COPYING AND RENAMING .................................................... |
65 |
|
DELETING PROGRAMS ........................................................................................ |
66 |
|
MIDI PAGE ......................................................................................................... |
69 |
|
OUTPUT LEVELS PAGE ........................................................................................ |
71 |
|
PAN PAGE.......................................................................................................... |
74 |
|
THE TUNE PAGE.................................................................................................. |
76 |
|
MODULATION PAGES .......................................................................................... |
77 |
|
PITCH BEND ........................................................................................... |
78 |
|
LFO1 ..................................................................................................... |
79 |
|
SETTING LFO1 MODULATION DEPTH.......................................................... |
82 |
|
LFO2 ..................................................................................................... |
83 |
|
SETTING UP THE SOFT PEDAL .................................................................. |
86 |
|
PORTAMENTO ........................................................................................ |
87 |
|
KEYGROUP PARAMETERS - CREATING KEYGROUPS............................................... |
90 |
|
MAPPING OUT YOUR KEYGROUPS - SETTING KEYSPAN .............................. |
93 |
|
ASSIGNING SAMPLES TO KEYGROUPS AND ZONES - SMP1...................................... |
95 |
|
SMP2..................................................................................................... |
98 |
|
SMP3..................................................................................................... |
100 |
|
THE FILTERS ...................................................................................................... |
101 |
|
ENV1 - SHAPING AMPLITUDE................................................................................ |
104 |
|
ENV2 - SHAPING THE FILTER ................................................................................ |
106 |
|
USING THE FILTER AND ENVELOPE GENERATORS...................................... |
107 |
|
THE SECOND FILTERS ......................................................................................... |
108 |
|
CREATING 24db/8ve 4-POLE LOWPASS FILTER ........................................... |
112 |
|
THE TONE PAGE ..................................................................................... |
114 |
|
ENV3 ................................................................................................................. |
116 |
|
KEYGROUP PITCH/AMPLITUDE MODULATION ......................................................... |
117 |
EDIT |
MULTI . . . . . . . . . . . . . . . . . . . . . . . . . . . . . . . . . . . . . . . . . . . . . . . . . . . . . . . . . . . . . . . . . . . . . . . . . . . . . . . . . . . . . |
1 1 9 |
|
SCREEN DIFFERENCES IN EDIT MULTI ................................................................... |
120 |
SAMPLE MODE . . . . . . . . . . . . . . . . . . . . . . . . . . . . . . . . . . . . . . . . . . . . . . . . . . . . . . . . . . . . . . . . . . . . . . . . . . . . . . . . . |
1 2 1 |
|
|
WHAT IS SAMPLING?........................................................................................... |
122 |
|
RECORD MODE ................................................................................................... |
124 |
|
THE MAIN RECORD PAGE..................................................................................... |
126 |
|
RECORDING FROM AUDIO CDs.............................................................................. |
126 |
|
NAMING SAMPLES IN THE RECORD PAGE .............................................................. |
127 |
|
ADJUSTING THE RECORDING AND THRESHOLD LEVELS .......................................... |
128 |
|
RECORDING ON THE CD3000XL............................................................................. |
129 |
|
DIGITAL RECORDING........................................................................................... |
130 |
EDIT |
SAMPLE . . . . . . . . . . . . . . . . . . . . . . . . . . . . . . . . . . . . . . . . . . . . . . . . . . . . . . . . . . . . . . . . . . . . . . . . . . . . . . . . . . |
1 3 2 |
|
NAMING SAMPLES - COPYING AND RENAMING ....................................................... |
134 |
|
DELETING SAMPLES ........................................................................................... |
135 |
|
TRIMMING SAMPLES ........................................................................................... |
136 |
|
LOOPING ........................................................................................................... |
140 |
|
LOOP AUTO FIND AND CROSSFADE LOOPING......................................................... |
141 |
|
MAKING A GOOD LOOP............................................................................ |
142 |
|
LEVEL NORMALISATION ...................................................................................... |
144 |
|
DSP FUNCTIONS - TIMESTRETCH, RE-SAMPLING AND EQ......................................... |
145 |
|
TIMESTRETCH ........................................................................................ |
145 |
|
PERFORMING A TIMESTRETCH ................................................................. |
148 |
|
RE-SAMPLING ........................................................................................ |
149 |
|
PERFORMING A RE-SAMPLE..................................................................... |
150 |
|
EQ ........................................................................................................ |
151 |
|
EQ’ING A SAMPLE ................................................................................... |
153 |
|
USING THE EQ........................................................................................ |
153 |
|
FURTHER EDITING FUNCTIONS ............................................................................. |
154 |
THE PARAMETER PAGE ........................................................................... |
154 |
REVERSING SAMPLES............................................................................. |
156 |
SECTIONAL EDITING ............................................................................... |
157 |
THE JOIN PAGE ...................................................................................... |
160 |
SPLICING SAMPLES ................................................................................ |
161 |
CROSSFADING ....................................................................................... |
162 |
MIXING AND LAYERING SAMPLES............................................................. |
163 |
SETTING DIGITAL FADES ......................................................................... |
164 |
EFFECTS MODE . . . . . . . . . . . . . . . . . . . . . . . . . . . . . . . . . . . . . . . . . . . . . . . . . . . . . . . . . . . . . . . . . . . . . . . . . . . . . . . . |
1 6 5 |
ORGANISATION OF EFFECTS FILES....................................................................... |
168 |
ASSIGNING EFFECTS TO SINGLE PROGRAMS ........................................................ |
169 |
ASSIGNING EFFECTS TO MULTI PARTS.................................................................. |
171 |
ASSIGNING EFFECTS TO INDIVIDUAL KEYGROUPS ................................................. |
173 |
PROCESSING EXTERNAL SOUND SOURCES THROUGH THE EFFECTS ........................ |
174 |
ROUTING EXTERNAL SOUNDS THROUGH THE EFFECTS ........................................... |
175 |
SELECTING THE EFFECTS OUTPUT........................................................................ |
175 |
CHAINING EFFECTS............................................................................................. |
176 |
MUTING EFFECTS................................................................................................ |
178 |
EFFECTS EDIT . . . . . . . . . . . . . . . . . . . . . . . . . . . . . . . . . . . . . . . . . . . . . . . . . . . . . . . . . . . . . . . . . . . . . . . . . . . . . . . . . |
1 7 9 |
DISTORTION/RING MODULATION .......................................................................... |
180 |
EQ .................................................................................................................... |
181 |
MODULATION EFFECTS........................................................................................ |
183 |
CHORUS, PHASE SHIFT AND FLANGING EFFECTS........................................ |
183 |
ROTARY SPEAKER EFFECTS .................................................................... |
185 |
AUTOPAN AND FREQUENCY MODULATION EFFECTS.................................... |
187 |
STEREO PITCH SHIFT EFFECTS................................................................. |
188 |
BYPASSING THE MODULATION EFFECTS ................................................... |
190 |
DELAY AND ECHO EFFECTS.................................................................................. |
191 |
MONO DELAY/ECHO EFFECTS .................................................................. |
193 |
PING PONG ECHO EFFECTS ..................................................................... |
194 |
CROSSOVER DELAY................................................................................ |
195 |
STEREO DELAY/ECHO EFFECTS ............................................................... |
196 |
REVERB EFFECTS ............................................................................................... |
197 |
REVERSE REVERB .................................................................................. |
200 |
GATED REVERB...................................................................................... |
201 |
EFFECTS OUTPUT SECTION.................................................................................. |
203 |
EFFECTS DIRECTION ........................................................................................... |
204 |
SOLOING THE CURRENT EFFECT........................................................................... |
206 |
COPYING EFFECTS ............................................................................................. |
207 |
SAVE MODE . . . . . . . . . . . . . . . . . . . . . . . . . . . . . . . . . . . . . . . . . . . . . . . . . . . . . . . . . . . . . . . . . . . . . . . . . . . . . . . . . . . . |
2 0 9 |
SELECTING FLOPPY OR HARD DISK ...................................................................... |
209 |
SELECTING THE HARD DISK PARTITION ................................................................. |
209 |
SELECTING THE HARD DISK VOLUME .................................................................... |
209 |
SELECTING THE TYPE OF SAVE............................................................................ |
209 |
SAVING TO FLOPPY DISK..................................................................................... |
211 |
SAVING TO HARD DISK ........................................................................................ |
212 |
RENAMING FILES ................................................................................................ |
214 |
DELETING ITEMS FROM DISK................................................................................ |
215 |
HARD DISK CONTROL .......................................................................................... |
216 |
FORMATTING A FLOPPY DISK ............................................................................... |
217 |
FORMATTING A HARD DISK................................................................................... |
219 |
NOTES ON USING EXISTING S1000/S1100 SOUND LIBRARY...................................... |
220 |
LOAD MODE . . . . . . . . . . . . . . . . . . . . . . . . . . . . . . . . . . . . . . . . . . . . . . . . . . . . . . . . . . . . . . . . . . . . . . . . . . . . . . . . . . . . |
2 2 1 |
SELECTING FLOPPY OR CD-ROM .......................................................................... |
221 |
SELECTING THE HARD DISK OR CD-ROM PARTITION................................................ |
221 |
SELECTING THE HARD DISK OR CD-ROM VOLUME................................................... |
222 |
SELECTING THE TYPE OF LOAD ............................................................................ |
222 |
LOADING FROM FLOPPY DISK .............................................................................. |
223 |
LOADING FROM HARD DISK OR CD-ROM................................................................. |
224 |
LOADING S900/S950 SAMPLES AND PROGRAMS..................................................... |
226 |
LOADING S1000/S1100 DATA ................................................................................ |
226 |
AUTO LOADING FROM DISK .................................................................................. |
226 |
SEARCHING FOR FILES - USING THE FIND FUNCTION ............................................... |
227 |
USING THE TAG DIRECTORY SYSTEM .................................................................... |
229 |
NAMING TAGS ........................................................................................ |
231 |
NOTES ON USING THE TAGGING SYSTEM .................................................. |
231 |
HARD DISK CONTROL .......................................................................................... |
232 |
IMPORTING SOUNDS FROM OTHER MANUFACTURER’S CD-ROMS .............................. |
233 |
GLOBAL MODE . . . . . . . . . . . . . . . . . . . . . . . . . . . . . . . . . . . . . . . . . . . . . . . . . . . . . . . . . . . . . . . . . . . . . . . . . . . . . . . . . |
2 3 5 |
TUNING THE CD3000XL ........................................................................................ |
235 |
SETTING THE MASTER OUTPUT LEVEL................................................................... |
235 |
MIDI FUNCTIONS................................................................................................. |
236 |
MIDI FILTER............................................................................................ |
236 |
PPM PAGE - MONITORING MIDI ................................................................. |
237 |
MIDI RECEIVE PAGE - ANALYSING MIDI ..................................................... |
238 |
TRANSMIT TEST PAGE - SETTING THE ENT/PLAY KEY .................................. |
238 |
MIDI SAMPLE DUMPS............................................................................... |
239 |
PERFORMING A MIDI SAMPLE DUMP.......................................................... |
240 |
MIDI VIA SCSI ......................................................................................... |
241 |
ME35T DRUM SETTINGS ....................................................................................... |
242 |
DAT BACK-UP AND RESTORE................................................................................ |
244 |
PERFORMING A DAT BACK UP................................................................... |
245 |
PERFORMING A DAT RESTORE ................................................................. |
245 |
STANDARD MIDI FILE - MIDI SONG FILE PLAY.......................................................... |
246 |
LOADING STANDARD MIDI FILES............................................................... |
247 |
USING THE SMF FUNCTION....................................................................... |
248 |
HARD DISK RECORDING....................................................................................... |
249 |
APPLICATIONS....................................................................................... |
249 |
FORMATTING THE HARD DISK FOR DISK RECORDING .................................. |
250 |
CREATING NEW TAKES............................................................................ |
255 |
COPYING TAKES..................................................................................... |
255 |
RENAMING TAKES................................................................................... |
255 |
DELETING TAKES FROM DISK ................................................................... |
255 |
RECORDING A TAKE ................................................................................ |
259 |
EDITING A RECORDING............................................................................ |
262 |
PLAYING A TAKE IN THE EDIT PAGE .......................................................... |
263 |
USING THE EDITING FUNCTIONS ............................................................... |
264 |
PLAYING TAKES ..................................................................................... |
265 |
USING THE PLAY PAGE............................................................................ |
267 |
EDITING A TAKE FOR SYNCHRONISED PLAYBACK....................................... |
268 |
NOTES ABOUT SYNCHRONISING TO EXTERNAL AUDIO ................................ |
268 |
USING THE SONG MODE .......................................................................... |
269 |
CREATING A SONG.................................................................................. |
269 |
TRIGGERING TAKES FROM MIDI................................................................ |
272 |
USING MIDI TRIGGERING ......................................................................... |
272 |
USING THE SONG MODE TO CHAIN TAKES.................................................. |
275 |
BLOCK EDITING IN SONG MODE................................................................ |
276 |
NAMING SONGS...................................................................................... |
278 |
SAVING A SONG ..................................................................................... |
278 |
LOADING A SONG ................................................................................... |
278 |
BACKING UP TAKES TO DAT ..................................................................... |
279 |
RESTORING TAKES BACK FROM DAT TO DISK............................................. |
280 |
F L A S H R O M . . . . . . . . . . . . . . . . . . . . . . . . . . . . . . . . . . . . . . . . . . . . . . . . . . . . . . . . . . . . . . . . . . . . . . . . . . . . . . . . . . . . . . |
2 8 2 |
HOW THE FLASHROM WORKS............................................................................... |
282 |
FORMATTING THE FLASHROM............................................................................... |
283 |
ARRANGING THE FLASHROM................................................................................ |
284 |
SAVING DATA TO THE FLASHROM ......................................................................... |
285 |
USING THE FLASHROM AS A FAST HARD DISK......................................................... |
288 |
EDITING SOUNDS ON THE FLASHROM.................................................................... |
288 |
COPYING A FLASHROM SAMPLE TO RAM ............................................................... |
289 |
SAVING FLASHROM DATA BACK TO DISK ............................................................... |
290 |
BACKUP/RESTORE OF THE FLASHROM TO/FROM DAT.............................................. |
290 |
APPENDIX 1 . . . . . . . . . . . . . . . . . . . . . . . . . . . . . . . . . . . . . . . . . . . . . . . . . . . . . . . . . . . . . . . . . . . . . . . . . . . . . . . . . . . |
.2 9 1 |
CONNECTING AN EXTERNAL HARD DISK DRIVE....................................................... |
291 |
NOTES ON USING HARD DISK DRIVES.................................................................... |
291 |
SCSI CABLES ......................................................................................... |
291 |
TERMINATION......................................................................................... |
292 |
SCSI CABLE LENGTH ............................................................................... |
292 |
APPENDIX 2 . . . . . . . . . . . . . . . . . . . . . . . . . . . . . . . . . . . . . . . . . . . . . . . . . . . . . . . . . . . . . . . . . . . . . . . . . . . . . . . . . . . |
.2 9 3 |
DATA COMPATIBILITY ISSUES .............................................................................. |
293 |
SOUND DATA .......................................................................................... |
293 |
EFFECTS FILES....................................................................................... |
294 |
MULTIS .................................................................................................. |
294 |
ME-35T DRUM SETTINGS.......................................................................... |
294 |
SONGS AND QLISTS ................................................................................ |
294 |
APPENDIX 3 . . . . . . . . . . . . . . . . . . . . . . . . . . . . . . . . . . . . . . . . . . . . . . . . . . . . . . . . . . . . . . . . . . . . . . . . . . . . . . . . . . . |
.2 9 5 |
INSTALLING OPTIONS ......................................................................................... |
295 |
INSTALLING MEMORY EXPANSION........................................................................ |
296 |
INSTALLING THE FLASHROM ................................................................................ |
297 |
APPENDIX |
4 . . . . . . . . . . . . . . . . . . . . . . . . . . . . . . . . . . . . . . . . . . . . . . . . . . . . . . . . . . . . . . . . . . . . . . . . . . . . . . . . . . . |
.2 9 9 |
S3000XL SYNTHESISER PANEL............................................................................. |
299 |
|
APPENDIX |
5 . . . . . . . . . . . . . . . . . . . . . . . . . . . . . . . . . . . . . . . . . . . . . . . . . . . . . . . . . . . . . . . . . . . . . . . . . . . . . . . . . . . . |
3 0 0 |
MIDI CONTROLLER LIST....................................................................................... |
300 |
|

INTRODUCTION
Welcome to the Akai CD3000XL stereo digital sampler and thank you for buying it!
The CD3000XL features 32-voice polyphony, expandable memory, DSP functions, etc., and using the CD3000XL’s resonant lowpass filters, multiple LFOs, envelope generators and extensive modulation possibilities, your new sampler can double as a first class synthesiser as well.
Certain new functions are introduced in the CD3000XL In software, the new MULTI mode of operation simplifies multi-timbral sequencing and layering whilst hardware options include a multi-effects processor that offers no less than four channels that include two multi-effects channels with distortion, EQ, ring modulation, modulation effects such as chorus, flanging, pitch shifting, auto panning and rotary speaker effects plus delay and reverb. Two ‘spare’ channels of reverb are also available providing a total of four reverbs. Add to this the second bank of optional resonant multi-mode filters and you can see that the CD3000XL is a sampler that can grow with your needs.
Bundled with the CD3000XL is a software application for the Macintosh™ computer that allows you to operate the sampler from your Macintosh allowing large screen operation of waveform and program editing, sophisticated organisation of your sound library on the Macintosh as well as the ability to integrate your sampler more conveniently with your computer sequencer.
The CD3000XL also has an internal quad speed CD-ROM drive, allowing the sampler to read CD-ROMs without needing to connect any external drives.
Naturally, all sound library developed for the Akai S900, S950, S1000, S1100, S2000 and the S3000 range of samplers is compatible in the CD3000XL giving you access to thousands of sounds on floppy disk, hard disk, removable cartridges, MO disks and CD-ROM. The ability to read CD ROMs made for other manufacturer’s samplers gives access to an even further range of sounds.
All this adds up to a price breakthrough in sampling technology - the new Akai CD3000XL.
CD3000XL OperatorÕs Manual |
Page 1 |

INTRODUCTION
F E A T U R E S |
|
|
• |
Polyphony |
32 voices |
• |
A-D Conversion |
16-bit stereo with 64-times oversampling |
• |
Internal processing |
28-bit accumulation |
• |
D-A Conversion |
18-bit with 8-times oversampling |
• |
Sampling rates |
44.1kHz/22.050kHz |
•Phase locked stereo sampling and playback
• |
Internal memory |
8Mbytes standard, expandable to 32Mbytes using SIMMs |
|
• |
Sampling times |
8Mbytes |
92.13 seconds mono @ 44.1kHz |
|
|
32Mbytes |
5.92 minutes mono @ 44.1kHz |
|
|
(Halve these times for stereo sampling) |
|
• |
Inputs |
L/Mono and R jack inputs |
|
• |
Outputs |
L/R stereo jack outputs |
|
|
|
8 assignable individual outputs |
|
|
|
Stereo headphone jack output |
|
• |
Display |
40 x 6 character backlit LCD with graphic waveform editing. |
|
• |
Digital I/O |
SPDIF digital audio input/output on RCA phonos. |
|
• |
Effects |
Optional EB-16 4-channel multi-effects processor offering two |
|
|
|
channels of simultaneous distortion, four-band EQ, ring |
|
|
|
modulation, modulation (chorus, phase shift, flanging, pitch |
|
|
|
shift, autopan or rotary speaker), stereo delay and reverb plus |
|
|
|
two ‘spare’ channels of reverb (four reverb processors in total). |
|
• |
DSP Functions |
Timestretch, re-sampling and digital EQ. |
|
• |
Filters |
2-pole (12dB/Octave) resonant lowpass per voice. |
|
|
|
Optional IB-304F offers a 2nd bank of 2-pole resonant multi- |
|
|
|
mode (HP, BP, LP, EQ) filters and tone control. |
|
• |
Envelopes |
1 x ADSR and 1 x multi-stage envelope generator (an extra |
|
|
|
multi-stage envelope is added with the installation of the IB- |
|
|
|
304F). |
|
• |
LFOs |
2 x multi-wave low frequency oscillators (triangle, square, |
|
|
|
sawtooth and random waves). |
|
• |
Legato mode |
Single trigger playback to emulate old monophonic synths |
|
|
|
and solo instruments’ playing styles. |
|
• |
Portamento |
Polyphonic and monophonic portamento. |
|
• |
Sound library |
Fully compatible with Akai S900, S950, S1000, S1100, |
|
|
|
S2800, S3000, S3200, S2000 and S3200XL samplers. |
|
Page 2 |
CD3000XL OperatorÕs Manual |

|
|
INTRODUCTION |
|
|
The CD3000XL can also read CD-ROMs made for other |
|
|
manufacturer’s samplers1. |
• |
Data storage |
A variety of storage devices may be used to store data |
|
|
including floppy disk, hard disk, Syquest™ removable |
|
|
cartridges and Magneto Optical (MO) disks. Hard disk data may |
|
|
be backed up to a normal DAT tape using the digital i/o. |
• |
Flash ROM |
You may install up to 16Mbytes of FLASH ROM over and |
|
|
above the 32Mbytes of ordinary RAM giving you a total of |
|
|
48Mbytes of memory. FLASH ROM allows you to keep your |
|
|
favourite sounds in memory even when the sampler is |
|
|
switched off. |
• |
Disk recording |
Capable of stereo recording and editing on hard disk. |
• |
SMF capability |
The CD3000XL an play Standard MIDI files (sequences) from |
|
|
the floppy disk drive. This allows you, for example, to play |
|
|
sequenced backing tracks directly from the CD3000XL. |
• |
DAT Backup |
You can backup the hard disk (sound data and/or disk |
|
|
recordings) to an ordinary DAT recorder. |
• |
Real-time digital output |
This digital audio output can be used to mix down digitally to |
|
|
DAT or any other digital recorder such as DCC, MiniDisk or a |
|
|
hard disk recorder such as the Akai DR4d, DR8 or even the |
|
|
CD3000XL’s disk recorder. With the optional EB16 multi- |
|
|
effects processor installed, you may add four channels of |
|
|
effects processing to the mixdown. |
•OPERATING MODES
SINGLE |
For playing single programs. |
MULTI |
For playing up to 16 programs together for multi-timbral |
|
sequencing, layering and key splits. |
SAMPLE |
For making recordings. |
EFFECTS |
For selecting effects. |
EDIT |
For editing programs, samples and effects. |
GLOBAL |
For setting parameters that affect the sampler as a whole plus |
|
access to utilities such as DAT backup, MIDI song file play and |
|
hard disk recording |
SAVE |
For saving programs, samples, multis, effects and operating |
|
systems, etc., to floppy or hard disk. |
LOAD |
For loading programs, samples, multis, effects, operating |
|
systems, etc., from floppy or hard disk and CD-ROM. |
1Some sounds may need adjustment and ÔtweakingÕ depending on the sampler they were originally created on.
CD3000XL OperatorÕs Manual |
Page 3 |

INTRODUCTION
•EDITING FEATURES
EDIT SAMPLE |
Trim, Loop (with FIND and CROSSFADE functions), Join, |
|
Merge, Splice, Chop, Extract, Reverse, Gain normalisation, |
|
Timestretch, Re-sample. |
EDIT PROGRAM |
Resonant lowpass filters, ADSR envelope generator (with |
|
templates), multi-stage envelope generator (with templates), 2 |
|
x multi-wave LFOs, sample layering, 4-way velocity crossfade |
|
and switching, keygroup crossfade, portamento (rate and time |
|
modes), monophonic legato triggering, mute group function, |
|
panning and autopanning, held pitchbend mode, separate |
|
pitchbend up/down ranges, output selection. (With 2nd filter |
|
bank installed, a further set of multi-mode filters and a third |
|
multi-stage envelope generator are added). |
MULTI |
Part select, program select, MIDI channel, level, pan, |
|
transpose, fine tune, output routing, FX routing, FX send, low |
|
key range, high key range, note priority. |
EFFECTS |
In the two multi-effects channels (with the EB16 effects |
|
processor installed): |
|
DISTORTION - distortion, level |
|
EQ - low gain, mid1 gain, mid2 gain, high gain, |
|
RING MODULATION - frequency, depth |
|
MODULATION EFFECTS - chorus, flange, phase shift, rotary |
|
speakers, autopan/frequency mod, pitch shift with parameters |
|
as appropriate. |
|
DELAY - effect select (mono, stereo, ping pong), delay times, |
|
feedback. |
|
REVERB - effect select (large hall, small hall, large room, small |
|
room, gated, reverse, etc.), size, decay time, HF damping, LF |
|
damping, pre-delay. |
|
FX DIRECTION: |
|
dist/EQ/ring mod > mod/delay + reverb (parallel) |
|
dist/EQ/ring mod > mod/delay > reverb (series) |
|
dist/EQ/ring mod > reverb > mod/delay (series) |
|
In the two reverb channels: |
|
Effect select (large hall, small hall, large room, small room, |
|
reverse, gated, etc.), decay time, HF damping, LF damping, |
|
pre-delay, diffusion. |
|
A multi-effects channel may also be routed to its |
|
‘neighbouring’ reverb channel for dual reverb multi-effects. |
Page 4 |
CD3000XL OperatorÕs Manual |
INTRODUCTION
ABOUT THIS MANUAL
This manual has been written to allow you to get the most out of your new sampler. Please take the time to read it as a fuller understanding of the instrument will enable you to use the CD3000XL’s remarkable facilities to the full. Not only are the controls and screens explained in detail but you will find hints and tips to help you with your sampling and programming. If you are new to sampling or synthesisers, some of the sections explain the basic principles behind the techniques employed in the CD3000XL so if words like “bandpass”, “modulation”, “diffusion”, “multi-timbral” and “sample rates”, etc., are unfamiliar to you, we hope that this manual is not just a boring explanation of functions but something you can refer to for information beyond the scope of the CD3000XL. Even if you’re a seasoned programmer, we hope that there is information in this manual that you find useful..
CD3000XL OperatorÕs Manual |
Page 5 |

INTRODUCTION
FRONT PANEL
|
EMERGENCY |
|
RECORD LEVEL |
|
CD-ROM DRIVE |
LCD DISPLAY |
DATA ENCODER MAIN VOLUME |
||
EJECT |
|
|
|
|
|
|
|
STEREO CDROM SAMPLER |
DATA |
|
|
|
|
|||
|
|
|
|
|
|
|
|
|
|
|
|
|
|
|
|
|
|
|
|
|
|
|
|
|
|
|
|
REC GAIN |
MAIN |
|
|
|
|
|
|
|
|
|
|
|
|
|
|
VOLUME |
|||
|
|
|
|
|
|
|
|
|
|
|
|
|
|
||
|
|
|
|
|
|
|
|
|
|
|
|
MIN |
MA X |
MIN |
MAX |
|
|
F 1 |
F 2 |
F 3 |
F 4 |
F 5 |
F 6 |
F 7 |
F 8 |
|
|
|
|
|
|
|
|
|
|
|
|
|
|
|
|
|
CURSOR |
|
|
DISPLAY |
|
|
|
|
|
|
|
|
|
|
|
|
|
|
MARK |
CONTRAST |
|
|
|
|
|
|
|
|
|
|
|
|
|
|
|
|
|
|
|
|
|
|
SCREEN FUNCTION |
|
|
|
|
|
|
|
|
|
|
POWER |
F 1 |
F 2 |
|
F 3 |
F 4 |
F 5 |
F 6 |
|
F 7 |
F 8 |
|
|
JUMP |
|
|
ON |
|
|
|
|
|
|
|
|
|
|
|
|
PUSH ON / OFF |
||
|
|
|
|
|
|
|
|
|
|
|
|
|
|
||
|
|
|
|
|
|
|
|
|
|
|
|
|
NAME |
PHONES |
|
|
SINGLE |
MULTI |
|
SAMPLE |
EFFECT |
EDIT |
GLOBAL |
|
SAVE |
LOAD |
|
|
|
|
|
|
|
|
|
|
|
|
|
|
|
– / |
+ / |
ENT/ PLAY |
|
|
|
OFF |
|
|
|
|
|
|
|
|
|
|
|
|
|
|
|
POWER SWITCH |
FLOPPYDISK DRIVE MODE KEYS |
CURSOR KEYS |
HEADPHONE |
|
SOFT KEYS |
/ , / |
KEYS DISPLAY CONTRAST |
|
|
|
|
MODE KEYS |
Selects the operating mode for the sampler. |
||
‘SOFT’ KEYS |
These select functions displayed on the LCD above. They |
||
|
have no fixed function but change according to the page |
||
|
currently displayed on the screen. |
|
|
LCD |
The 40 x 8 character display shows parameters and values and |
||
|
displays the ‘soft’ keys’ function and graphic display of |
||
|
waveforms for sample editing, etc.. |
|
|
CURSOR KEYS |
This block of keys moves the cursor up, down and left and |
||
|
right around the screen. |
|
|
DATA ENCODER |
Allows you to enter data values and for scrolling through lists, |
||
|
etc.. |
|
|
-/<, +/> keys |
These keys are used to move the ‘digit’ cursor within long |
||
|
number fields (i.e samples). |
|
|
MARK/JUMP |
These keys allow you to mark two functions and switch |
||
|
between them using the JUMP key. In this way, it is quick and |
||
|
easy to enter data even across two different screens. |
||
NAME KEY |
This takes you the ‘naming mode’ where you may name |
||
|
samples, programs, effects, etc.. |
|
|
ENT/PLAY KEY |
Allows you to play a sound without the need for a MIDI |
||
|
controller to be connected. |
|
|
RECORD LEVEL |
Sets the record level for the analogue inputs. |
||
MAIN VOLUME |
The MAIN VOLUME control sets the main output level of the |
||
|
L/R stereo outputs (this control does not affect the level of the |
||
|
signal appearing at the individual outputs or digital output). |
||
POWER SWITCH |
Applies power to the CD3000XL. |
|
|
Page 6 |
CD3000XL OperatorÕs Manual |

|
INTRODUCTION |
PHONES |
This stereo jack socket allows you to monitor the L/R (stereo) |
|
output of the CD3000XL through stereo headphones. The |
|
level is regulated using the MAIN VOLUME control (see |
|
below). |
DISPLAY CONTRAST |
Sets the viewing angle for the LCD. You will note that pressing |
|
this control in switches off the LCD’ backlight thus preserving |
|
the LCD (think of it like a ‘screen saver’ on a computer). |
CD-ROM DRIVE |
The CD3000XL’s CD-ROM drive is a quad speed drive |
|
capable of reading digital data from CD-ROM disks four times |
|
faster than standard CD-ROM drives. |
|
Disks are available in 12 cm for 600MByte and 8 cm for |
|
200MByte. (1MByte = 230Byte). |
|
The drive has a long life and high durability due to non-contact |
|
read-out operation using laser beam. |
|
The CD3000XL’s CD-ROM drive is a high performance device |
|
with an average random seek time of150ms. Maximum |
|
continuous transfer rate is 600 KByte (1KByte=210 Byte) and |
|
average malfunction interval (MTBF) is 80,000 hours. |
CD ROM DRIVE FEATURES
•Fast random access time of 190 ms
•Fast random access seek time of 150 ms
•Maximum continuous data transfer rate of 600 KByte/s (1KByte=2 10 Byte)
•Emergency eject function
•LED Indicator for dirt on the optical system
•BUSY LED indicator
Access times: |
|
Average random access time |
190ms Typ. (4x) |
|
230ms Typ. (4x) |
|
320ms Typ. (4x) |
Average random seek time |
150ms Typ. (4x) |
|
180ms Typ. (4x) |
|
210ms Typ. (4x) |
Average full stroke access time 340ms Typ. (4x) 380ms Typ. (4x) 470ms Typ. (4x)
The ‘BUSY’ LEDon the front panel will show the condition of the drive and operates as follows:
1The LED is off when the tray is open.
2When you close the tray, the indicator will flash for 0.8 seconds, and will be in one of the following modes:
The indicator will be off when the drive is in “stand-by” mode. The indicator will be off when a disk is not installed on the tray.
The indicator will flash every 3.2 seconds if the disk or the pick-up head is dirty.
3During audio track playback, the indicator will flash at intervals of 1.6 seconds.
4The indicator will remain lit during data access or data transfer.
CD3000XL OperatorÕs Manual |
Page 7 |

INTRODUCTION
MAINTAINANCE
You need to perform maintenance if the BUSY LED indicator flashes at an interval of 2-3 seconds, indicating that the pick-up or the disk is dirty.
*Dirty disk
Do not touch the disk reading area (bottom surface of the disk), since dirt or a stain on the surface may slow down the access speed. To clean a disk, simply wipe the bottom of it with a clean, soft cloth.
*Dirty optical head
A dirty or dusty pick-up may lengthen access time. If you suspect a dirty optical head, consult your Akai dealer or service department.
EMERGENCY EJECT
Follow the procedure below if the tray does not eject when you press the eject button:
1.Turn off the power to the CD3000XL and wait about a minute.
2.Insert a something like a paper clip into the emergency eject hole and push it in. The tray will be ejected.
If you try to eject a disk using the emergency eject procedure while the power is on (or just after you have turned the power off), the disk inside may be spinning when the tray ejects which may cause scratches on the disk.
Akai cannot be held responsible for any damage to the disk under these circumstances.
You may find that a ‘rattling’ sound is heard when the tray is ejected. This is not a mechanical malfunction but is caused by one of the following:
1You pulled the tray with force after you performed the emergency eject procedure.
2You tried to block the movement of the tray while the tray was loading the disk.
Under these circumstances, the internal clutch that is linked to the tray will be disconnected. The drive will then try to re-connect the clutch, which will cause the mechanical noise. Once the clutch is connected, the sound will not be heard any more, and normal operation will be restored.
Page 8 |
CD3000XL OperatorÕs Manual |
|
|
|
|
|
|
|
|
INTRODUCTION |
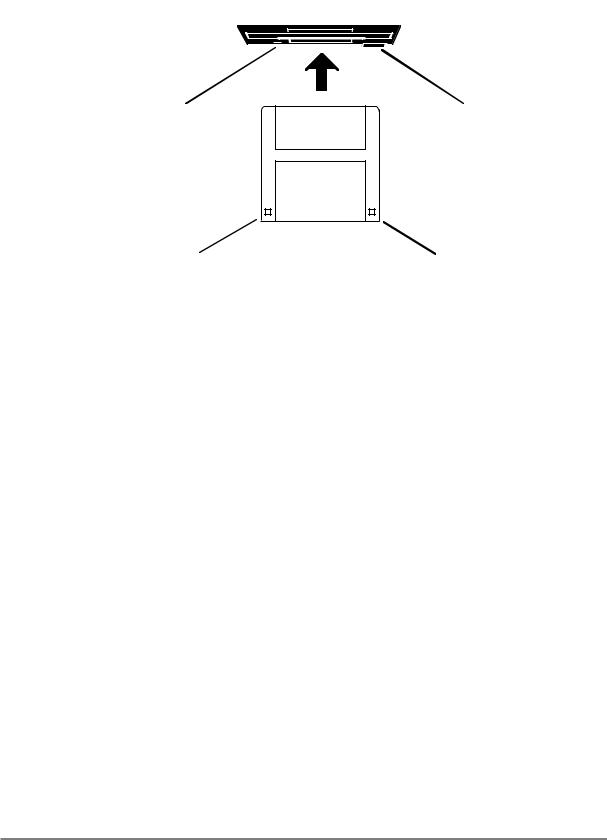
FLOPPY DISK DRIVE |
The 3.5 inch floppy disk drive will accept high density and low |
|||||||
|
density disks. Disks are inserted into the drive thus: |
|||||||
|
|
|
|
|
|
|
|
|
|
|
|
|
|
|
|
|
|
|
|
|
|
|
|
|
|
|
|
|
|
|
|
|
|
|
|
DISK ACTIVITY LED |
|
|
|
|
|
|
|
DISK EJECT BUTTON |
|
|
|
|
|
|
|
||
|
|
|
|
|
|
|
|
|
|
|
|
|
|
|
|
|
|
|
|
|
|
|
|
|
|
|
|
|
|
|
|
|
|
|
|
WRITE PROTECT TAB |
HIGH DENSITY |
|
DETECTION TAB |
The label should be facing upwards when it is inserted (actually, it is physically impossible to insert disks the wrong way round without using an extreme amount of brute force!).
To eject the disk, simply press the DISK EJECT button. When a disk is loading, saving or formatting, the DISK ACTIVITY LED will be lit.
It is important to remember that, unlike a synthesiser, the CD3000XL has no means of storing sounds in an internal memory. As a result, it is vital that you save your work to disk before turning the power off otherwise you will lose your work and, unless previously saved, it will be gone for ever. In fact, it is a good idea to regularly save your work as you are working. All good computer users do this and it prevents the accidental loss of data should power be accidentally removed from the instrument. This also serves as a form of ‘undo’ - if you make some kind of mistake in your programming and editing and can’t fix it, you can load the last level of editing back into the sampler. It may be a bit tedious to keep stopping every now and then to save your work but it is better than losing some valuable sounds. The data will be stored after the power is turned off if you have installed an optional FMX008 flash ROM.
CD3000XL OperatorÕs Manual |
Page 9 |

INTRODUCTION
TAKING CARE OF YOUR DISKS
These floppy disks contain valuable sound data and, as such, should be treated with extreme care. Please observe the following points, therefore:
1Never slide the metal cover back and touch the disk. Finger marks may render the disk unreadable.
2Don’t leave the disk in the drive wherever possible. When the disk is in the drive, the metal protective cover slides back exposing the actual disk inside - this makes the disk susceptible to picking up dust which may cause read errors.
3Do not leave your disks in a hot car.
4Do not place your disks next to any magnetic sources such as speakers, amplifiers, televisions, etc.. Also, try to avoid X-ray machines. At airports, it is sometimes possible to ask for your disks to be inspected by hand at security desks but, with the added security at airports these days, this may not be possible. Always check with the security officer though, just in case. Security X-ray machines are generally safe with disks, though. If in doubt, make backup copies which should be left at home.
NOTE: Some checked-in luggage is X-rayed by quite powerful machines that are not as safe as those that check hand luggage. It is probably best to take your disks as hand luggage.
5Do not leave your disks around when drinking liquids - one accidental spillage could ruin a lot of work!
6Always use high quality disks. Whilst cheap ones may be appealing, they are prone to errors more than good ones.
7Try to ensure that the write protect tab is switched on (i.e. the tab does not block the hole). This will prevent accidental erasure, formatting and loss of data. It may be a nuisance to try to write to the disk and find it write protected but it is less of a nuisance than accidentally over-writing a set of your favourite samples and programs!
8Try to get into the habit of labelling your disks - it will pay dividends in the end when you are searching for something.
9Invest in a sturdy carrying case for your floppies especially if you are a gigging musician. Heavy duty metal camera cases are ideal and some flight case manufacturers now make special heavy duty disk flightcases.
10Even if you are using a hard disk of any sort, please make sure you have backed up your work to floppy disks. It can be time consuming but it will be worth it if you ever have a problem with your hard disk!
Page 10 |
CD3000XL OperatorÕs Manual |
INTRODUCTION
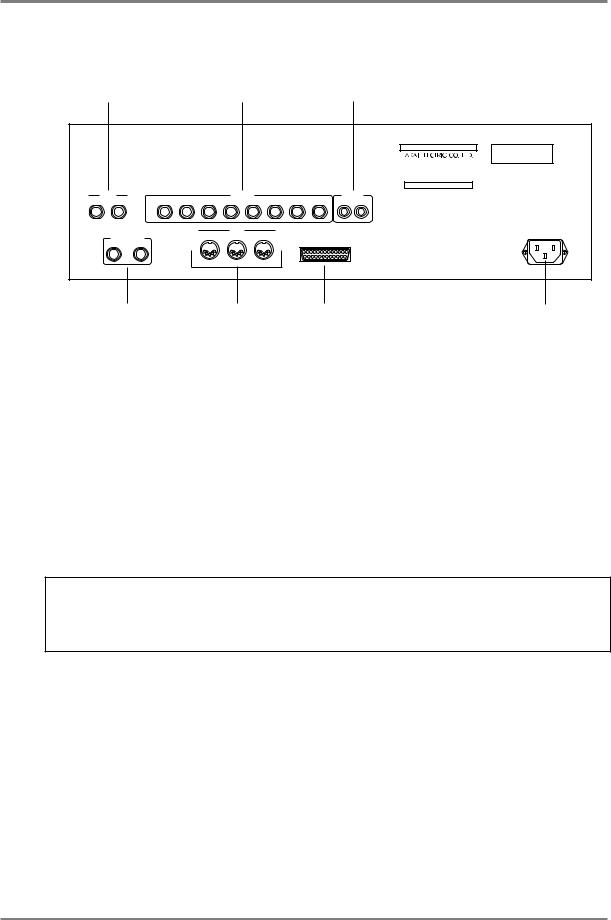
REAR PANEL
ANALOGUE AUDIO |
INDIVIDUAL AUDIO |
|
INPUTS |
OUTPUTS |
DIGITAL IN/OUT |
MODEL NUMBER CD3000XL
12-14, HIGASHI-KOJIYA 2-CHOME,
OHTA-KU, TOKYO, JAPAN
MADE IN JAPAN
CLASS 1LASER PRODUCT
INPUT |
|
|
|
OUTPUT |
|
|
|
|
DIGITAL |
||
L / MONO |
R |
1 |
2 |
3 |
4 |
5 |
6 |
7 |
8 |
IN |
OUT |
|
|
|
|
|
MIDI |
|
|
|
|
|
|
|
STEREO OUT |
|
IN |
OUT |
THRU |
|
|
|
|
|
|
|
|
|
|
|
|
|
SCSI |
|
|
||
|
L |
R |
|
|
|
|
|
|
|
|
|
CERTIFICATION: PRODUCT COMPLIES WITH DHHS RULES 21 CFR, CHAPTER I, SUBCHAPTER J.
L/R STEREO |
MIDI IN/OUT/THRU |
SCSI |
POWER CONNECTION |
|
OUTPUTS |
|
|
CONNECTION |
|
ANALOGUE AUDIO INPUTS |
You make recordings through these two inputs. You can |
|||
|
|
record in mono by connecting the audio source to only the |
||
|
|
L/MONO input. |
|
|
INDIVIDUAL OUTPUTS |
The CD3000XL has a total of ten analogue audio outputs. |
|||
|
|
There are the stereo L/R outputs which take a mix output of all |
||
|
|
programs. If the optional EB16 multi-effects processor is |
||
|
|
installed, the outputs of the four effects channels are also |
||
|
|
mixed here. You may also use the eight assignable individual |
||
|
|
outputs. Programs (or groups of programs) may be assigned |
||
|
|
to these outputs for mixing on a mixing console. Furthermore, |
||
|
|
individual keygroups may be assigned to these outputs so |
||
|
|
that, for example, individual drums could have a separate |
||
|
|
channel on the mixer for EQ’ing, adding effects, etc.. |
||
NOTE: In the case of you only connecting the L/MONO outpput, the CD3000XL only outputs the left channel signal and the left/right stereo signals are not mixed at this output. The old S3000 series carried a mixed output of the left/right channels. In the case of wanting to play some existing sound library in mono using only the L/MONO output, some ‘tweaking’ may be necessary to ‘monofy’ the program.
DIGITAL I/O |
The digital input can be used to record digitally from CD or |
|
DAT or any other audio source that has a digital output. |
|
The digital output carries a digital clone of the main stereo |
|
outputs so you may also mixdown digitally from the CD3000XL |
|
to any digital audio recorder such as DAT or a hard disk |
|
recorder/editor such as the Akai DR4 or DR8 thereby ensuring |
|
the highest quality audio during mixdown. |
|
The digital i/o is also used to back data up to a normal DAT |
|
tape. |
CD3000XL OperatorÕs Manual |
Page 11 |

INTRODUCTION
SCSI |
This 25-way connector is used to attach hard disks, CD-ROMs, |
|
Magneto Optical (MO) disks and removable cartridges to the |
|
CD3000XL for data storage and retrieval. You may also |
|
connect the CD3000XL to a Macintosh™ computer for use |
|
with the editing software that is bundled with the CD3000XL. |
MIDI |
Your MIDI controller (keyboard, drum pads, EWI, etc.) should |
|
be connected to the MIDI IN. The THRU socket carries a |
|
duplicate of the MIDI IN signal ‘thru’ to other modules or MIDI |
|
devices that may be connected. The OUT is normally only |
|
used to transmit MIDI System Exclusive data to another Akai |
|
sampler or to a computer. |
POWER CONNECTION |
This should be connected to an AC power source. |
** IMPORTANT NOTE **
BEFORE CONNECTING ANY AC POWER, PLEASE ENSURE THAT YOUR UNIT IS DESIGNED FOR YOUR AREA’S POWER SUPPLY. A MISTAKE NOW COULD RUIN YOUR WHOLE DAY NOT TO MENTION YOUR CD3000XL!!!
Page 12 |
CD3000XL OperatorÕs Manual |
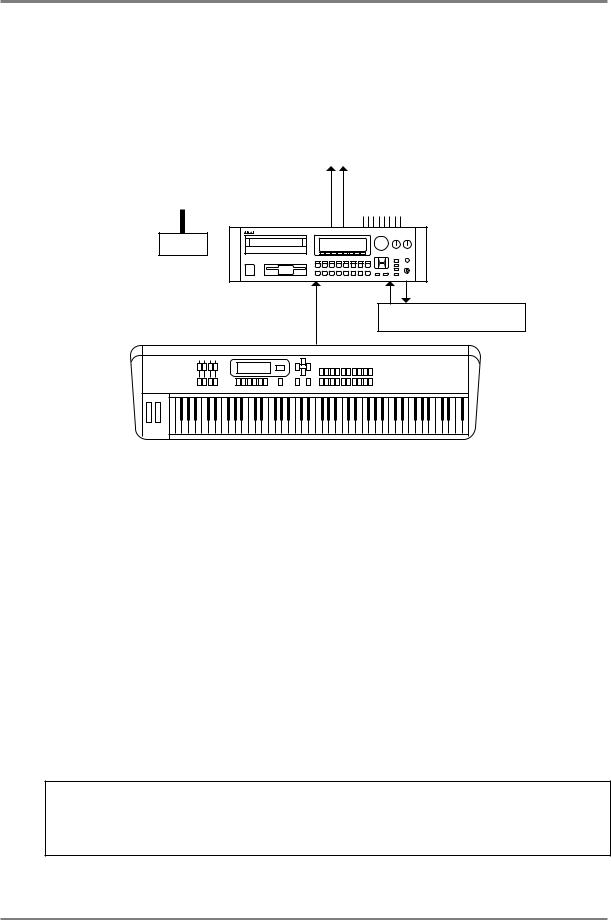
INTRODUCTION
SETTING UP THE CD3000XL
This short section tells you how to get ‘up and running’ fast. For full details of operation, please refer to the appropriate section in this manual.
CONNECTIONS
Don’t switch the CD3000XL on for the moment.
|
|
L/R OUTPUTS |
SCSI |
IND OUTS - to mixer |
|
|
|
|
|
|
|
|
cd3000xl |
|
HARD DISK, |
|
|
CD-ROM, |
DIGI I/O |
|
MO DRIVE, etc... |
||
MIDI IN |
||
|
||
|
DAT |
MIDI OUT
AKAI |
mx1000 |
Connect the MIDI output of your MIDI controller (in this example, an Akai MX1000 master keyboard) to the MIDI input of the CD3000XL. Connect the L/R audio output to a stereo amplifier (or use the L/MONO output of the sampler if you only have a mono amp) or to two channels of a mixer (remembering to pan each channel hard left and right accordingly to take full advantage of the CD3000XL’s stereo outputs). The digital i/o can be connected to a DAT machine (or any other digital recording device) or you could leave the digital outputs of a CD player connected to the CD3000XL’s digital input for sampling from the many special sampling CDs that are currently available..
Before turning on the sampler, it’s a good idea to turn its volume down or to turn the volume down on the amplifier or the mixer channels as the power up ‘thump’, although very slight, could damage sensitive speakers, especially if the amp is turned up loud. Now turn on the CD3000XL. You will see a message in the LCD informing you of what is going on.
After 15 seconds or so, your CD3000XL is ready for use. Turn the volume up on the sampler, amplifier and/or mixer.
Making sure that the MIDI controller is sending data on MIDI channel 1, play a few notes. You will hear the oh so impressive test tone! Hardly inspiring is it? We want something a bit more interesting than that.
NOTE: If no sound appears, check your MIDI connections and check that your MIDI controller is sending MIDI channel 1. If, after this, you still hear no sound, try pressing the ENT/PLAY key on the CD3000XL’s front panel. If you hear a sound, then at least your audio connections are o.k. and it’s the MIDI that needs attention. If you still don’t hear a sound when you press the ENT/PLAY key, check your audio connections, volume controls, etc..
CD3000XL OperatorÕs Manual |
Page 13 |

INTRODUCTION
LOADING THE DEMO FLOPPY DISKS
To get you started, some sounds are provided on floppy disk.
To load the sound library disk, insert it into the drive and press the LOAD key. Now simply press F7 - CLR. You will receive a prompt asking you if you want to clear the entire memory. Respond by pressing F8 - YES
The library disk supplied comes with several programs. In SINGLE mode, these may be selected from the CD3000XL’s front panel using the DATA wheel or alternatively, you may use MIDI PROGRAM CHANGE commands from your MIDI controller to select new programs.
You will also note that they are laid out in a MULTI for multi-timbral sequencing. You may use this to play the demo sequence that is also supplied on floppy disk with the CD3000XL.
To play the demo sequence on the CD3000XL, assuming the sound data disk has been loaded, follow the procedure below.
1Insert the DEMO SEQUENCE floppy disk into the disk drive.
2In GLOBAL mode, press  (F5) to get to the MIDI SONG PLAY page and press
  (F2) to get to the LOAD page for song files.
3Select and load a MIDI song file from the file list. You can load as many files as you like as long as there is enough memory space.
4Once the files are loaded, press  (F1) to return to the MIDI SONG PLAY page. Select the file you wish to play and press
  (F7) to play the selected MIDI song file. Press
  (F8) to stop playback.
If you have owned an Akai sampler before, you may also have other sounds on CD-ROM or hard disk. Operation is virtually identical to the S3000 series and the S1000/S1100. To load sounds from hard disk, press the LOAD key and select HARD at the top of the screen. Move the cursor to the volume name field and select the volume you wish to load. Press F7 - CLR - followed by F8 - YES - to clear the current contents of memory and load the entire hard disk volume. If you have not used an Akai sampler before and you need more detailed information on loading from hard disk or CD-ROM, please see the section LOAD MODE.
However you load sounds, whether it’s from floppy disk, hard disk, cartridge or CD-ROM, just load them and enjoy playing with your new sampler. Although we suggest you read the operator’s manual thoroughly, of course, at this stage, you don’t want be bothered with that so just experiment and get a feel for the CD3000XL. As long as you don’t press the SAVE key and accidentally overwrite your floppy disk or hard disk volume, you can’t damage your sounds permanently or come to any harm (you can’t damage a CD-ROM as it’s a read only device). If you do start messing with the samples and programs and don’t like the results, simply re-load the sounds in or load another bunch of sounds to play with.
Page 14 |
CD3000XL OperatorÕs Manual |
Loading...