


User Guide
English ( 3 – 10 )
Guía del usuario
Español ( 11 – 18 )
Guide d’utilisation
Français ( 19 – 26 )
Guida per l’uso
Italiano ( 27 – 33 )
Benutzerhandbuch
Deutsch ( 35 – 42 )
Appendix
English ( 43 )

2

User Guide (English)
Introduction
Box Contents
BT500
Power Adapter
Dust Cover
(2) Dust Cover Hinges
Turntable Belt (attached to platter)
Platter
AT95E Cartridge with Stylus
Plastic Stylus Cover
Slipmat
Counterweight
45 RPM Adapter
Stereo RCA Cable
USB Cable
Software Download Card
User Guide
Safety & Warranty Manual
Support
For the latest information about this product (system requirements, compatibility information, etc.) and product registration, visit akaipro.com.
For additional product support, visit akaipro.com/support.
3

Setup
Using the Bubble Level
Front Panel
Use the integrated bubble level located under the platter to ensure the turntable is on a level surface. The turntable is level when the bubble is in the center of the circle.
For example, if the bubble is on the left, this means the turntable is leaning too much to the right. Raise the turntable’s right feet by turning them counter-clockwise. The bubble will move toward the center.
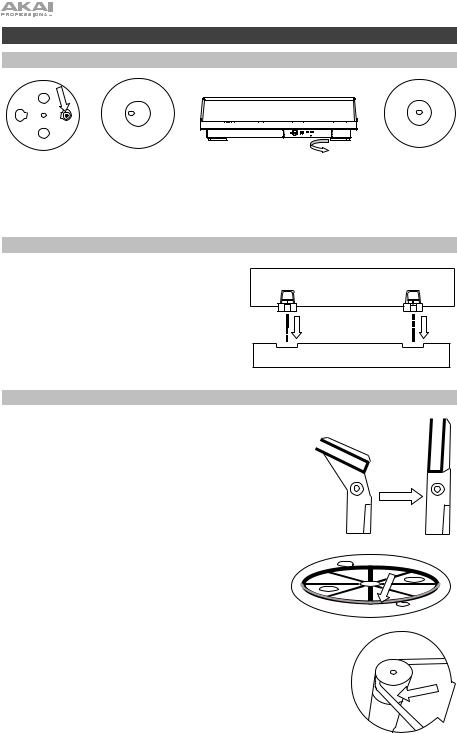
Connecting the Dust Cover to BT500
1.Insert the included hinges (found in plastic bags inside the foam packaging in the box contents) into
the back panel hinge plates.
2. Insert the dust cover into the space between the hinges to clasp the dust cover (see images on right).
3. Flip up the hinges so they are in the upright position (see images on right).
Attaching the Turntable Belt
1.Make sure the power adapter is not connected to
BT500.
2. Place the platter upside-down on a flat surface and position the belt so that it is wrapped around the underside of the platter’s inner ring, centered straight and free of any twists (see image on right).
3.Move your thumb through the platter’s larger belt window and carefully lift part of the belt up. Flip over the platter and place the belt over the groove in the brass motor spindle, while aligning the platter back onto the middle spindle (see image on right).
4.Connect the power adapter to the turntable and
power on the turntable.
5.Set the Motor Start/Stop switch to the Start
position to see if the platter motor spins. If the platter does not spin, try the steps listed above again.
4
Balancing the Tonearm
1.Attach the headshell (found in the box in the foam) to the tonearm.
2.Make sure the protective stylus cover is on the stylus.
3.Place the counterweight on the back of the tonearm (with the text facing toward the front of the turntable).
4.Adjust the Anti-Skate wheel to 0.
5.Lower the Raise/Lower Lever.
6.Move the tonearm horizontally left to where it would be when it plays on a 12” record.
7.Grab the counterweight from the rear and move it toward you on the tonearm until the tonearm stops bouncing and appears to float—halfway up, halfway down.
8.Once you have it floating, carefully adjust the tracking force dial on the front of the counterweight so 0 is on the center line of the tonearm.
9.Choose a counterweight amount. The counterweight can be adjusted in one of two ways: Pull/slide to provide coarse adjustment or rotate to provide fine adjustment. The tracking force range for the included cartridge is 1.5-2.5 grams, with 2 grams (20 mN) recommended. Generally, you want to use the smallest value possible in the recommended range without causing the record to skip.
10.Set the Anti-Skate wheel to your preferred setting (this may be the same value you chose for the counterweight) which ensures good sound and that the record does not skip.
Note: Selecting more than the recommended weight for your cartridge can lead to prematurely wearing out your stylus and/or records.
11.Enjoy your records!
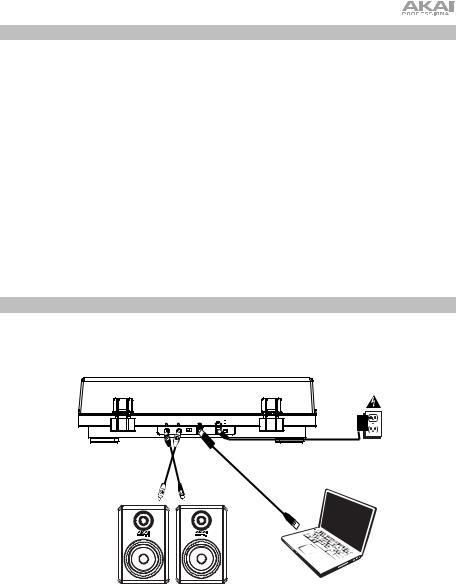
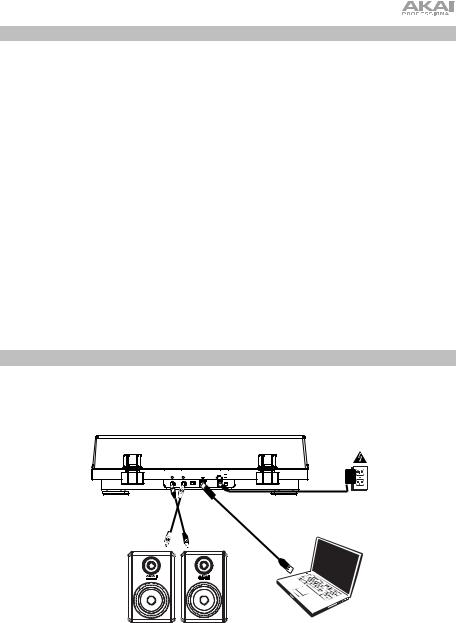
Connection Diagram
Items not listed under Introduction > Box Contents are sold separately.
|
|
|
|
POWER |
Power |
|
|
PRE AMP |
USB |
ON |
|
R |
L |
ON OFF |
|
OFF |
|
Computer
Powered
Speakers
5
Features
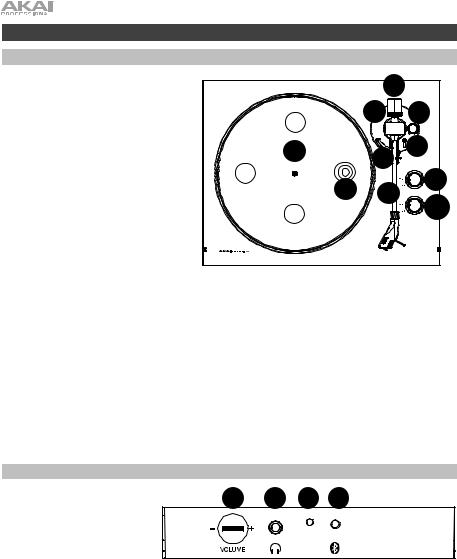
Top Panel
1.Platter: Place the slipmat here, and then place your record on the slipmat.
2.Bubble Level: This is found under the platter and is used to ensure the turntable is placed on an even surface when the bubble stays in the center of the circle. See Setup > Using the Bubble Level for more information.
3.Tonearm: The fixed tonearm can be raised and lowered by hand, or by using the raise / lower lever.
4.Arm Clip: This specially designed arm clip secures the tonearm when not in use. The arm clip has been designed to remain in the up position while unlocked.
|
|
7 |
|
|
8 |
|
6 |
1 |
4 |
5 |
|
|
9 |
||
|
2 |
3 |
|
|
10 |
||
|
|
|
|
5. Raise / Lower Lever: Use this to raise and lower the tonearm on the record.
6.Anti-Skate: Adjust this wheel to give a small amount of outward force on the tonearm, preventing the needle from moving toward the center of the record (see Setup > Balancing the Tonearm for more information).
7.Counterweight: Adjust this to balance the weight of the tonearm and provide proper tracking for the stylus (see Setup > Balancing the Tonearm for more information).
8.Tracking Force: Adjust this to control the pressure that the stylus has on the platter (see Setup > Balancing the Tonearm for more information).
9.33 / 45 RPM Selector: Adjust this to select the RPM of the turntable platter based on the type of record you are using.
Note: The 33 / 45 RPM speed adjustment screws on the bottom of the unit (located behind a compliance sticker) should only be adjusted by advanced users. Use only a plastic or non-conductive screwdriver to adjust the speed.
10.Motor Start/Stop: Adjust this to turn the turntable motor on or off. If the power button is in the On position and the motor is set to Start but the platter does not spin, check that the turntable belt is properly installed under the platter (see Setup > Attaching the Turntable Belt for more information).
Note: Stop the motor when your records are finished to avoid wearing out the stylus.
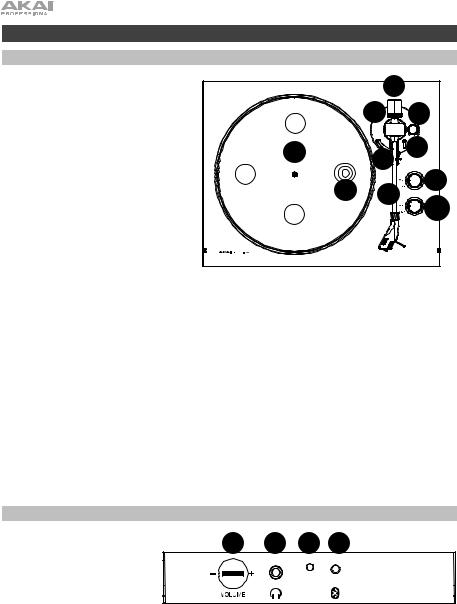
Front Panel
1. |
Volume: Adjust this to control |
1 |
2 |
3 |
4 |
|
the headphone and Bluetooth |
||||
|
output level. |
|
|
|
|
2. Headphone Output: Connect headphones (sold separately) to listen to your vinyl playback.
3.Bluetooth LED: This LED
blinks when pairing with a Bluetooth device. Once fully paired, the LED will remain solid. The LED will be off when Bluetooth is inactive, and when the BT500 is turned off.
4.Bluetooth Button: Press this button to start Bluetooth pairing. If after 5 minutes no Bluetooth speaker can be found to pair with, the Bluetooth transmitter will become inactive and the LED will turn off. If currently connected, press this to disconnect from a currently connected Bluetooth speaker.
6
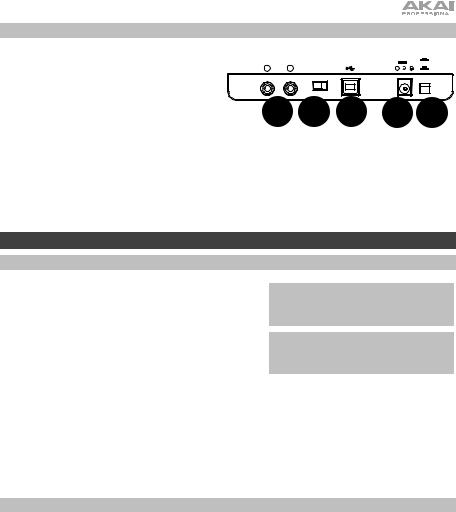
Rear Panel
1.RCA Output: The audio from a playing record is sent to the RCA audio output.
2.Preamp On/Off: If your receiver or amplifier has no phono inputs, switch on the preamp (on). If the system you are using has phono inputs, set this switch off.
3.USB Audio Output: Use the included USB cable to connect your turntable to your computer. The USB connection will send audio from the turntable to your computer. Please see the Operation > Computer Setup section of this manual for information.
4.Power Input: Use the included power adapter to connect to wall power.
5.Power Button: Press this button to turn BT500 on/off.
PRE AMP |
USB |
R |
L |
ON OFF |
1 |
2 |
3 |
|
POWER |
12V |
ON |
500mA |
|
|
OFF |
4 |
5 |
Operation
Getting Started
1.Connect the included power adapter to BT500 and use the power switch to power on BT500.
2.Remove the needle cover from the cartridge.
3.Place the slipmat on the platter and place a record on the slipmat. If using 45 RPM records, put the 45 RPM adapter on the center spindle before placing the record on the platter.
4.Use the 33/45 RPM Selector to set the platter rotation speed (33/45) to match the type of record.
IMPORTANT: Place the included slipmat on the platter; then place your record on the slipmat to carefully hold your records.
IMPORTANT: Remove the plastic cartridge cover (needle cover) before operating the turntable.
5.Turn the Motor Start/Stop dial to the Start position to begin spinning the platter.
6.Unlock the arm clip and set the Raise / Lower Lever to the up position.
7.Position the tonearm over the desired location (groove) on the record.
8.Move the tonearm lift lever to the down position to move the tonearm toward the record. Alternatively, place the needle over the desired location on the record.
9.Carefully lower the tonearm on the record.
10.When you are finished playing the record, raise the tonearm, return it to rest on the arm clip, and turn the
Motor Start/Stop dial to the Stop.
Pairing BT500 to a Bluetooth Speaker
BT500 has a Bluetooth transmitter to send audio to a Bluetooth speaker wirelessly.
1.Power on your Bluetooth speaker and ensure it is in pairing mode.
2.Power on the BT500 turntable.
3.Press and release the Bluetooth button on BT500 to start pairing to your Bluetooth device. Once BT500 is connected to the Bluetooth speaker, the Bluetooth LED will be solid blue. Your Bluetooth speaker should also indicate that it is paired.
Note: BT500 will connect to the closest Bluetooth speaker that is near it. If after 5 minutes no Bluetooth speaker can be found to pair with, the Bluetooth transmitter will become inactive and the LED will turn off.
Note: Maximum range will be achieved when using devices with Bluetooth 4.0 or higher.
4.Play music on your BT500 turntable. If you are connected to a Bluetooth speaker with a play/pause button, and do not hear audio, try pressing the play/pause button.
5.Adjust the volume on your Bluetooth speaker (if applicable) and the volume control on BT500 to control the output level.
6.To disconnect pairing, power off the BT500 turntable or turn of Bluetooth pairing on your Bluetooth speaker.
Note: Move other Bluetooth receivers/speakers out of range of BT500 (30 ft./9.1 m or more) or turn them off to connect to your Bluetooth speaker.
7

Recording
To record music to your computer, you can use EZ Vinyl/Tape Converter and a USB cable. EZ Vinyl/Tape Converter conveniently saves your recordings to your computer. After you finish converting your vinyl, you can then burn to CD or load onto portable media devices.
Use the included software download card to download and install the software, and follow the on-screen instructions. See Computer Setup > Setting BT500 as the Default Recording Device before starting to record.
1.With EZ Vinyl/Tape Converter installed on your computer, use the included USB cable to connect BT500's USB audio output to an available USB port on your computer.
2.On your computer, open EZ Vinyl/Tape Converter by going to Start Menu All Programs (Windows) or the Applications menu (Mac).
3.Follow the on-screen instructions to setup your recording. When prompted to play your music, move BT500's tonearm on the record to start playback.
Note: To listen to a record while it’s playing, listen through your computer's speakers, or connect BT500's RCA outputs to a stereo system or powered speakers.
4.When you have finished recording, raise BT500's tonearm from the record and return it to the arm clip.
Playback
You can listen to the music on your computer through its internal speakers or through headphones connected to it. (BT500 cannot be used as a playback device for your computer's audio.) See Computer Setup > Setting Your Computer’s Soundcard as the Default Playback Device before playing back your computer music.
To listen to a record while it's playing, listen through your computer's speakers, or connect BT500's RCA outputs to a stereo system or powered speakers.
8

Computer Setup
Setting BT500 as the Default Recording Device
•Windows XP: Click Start Menu Control Panel (or Settings Control Panel in Classic View)
Sound and Audio Devices. Click the Audio tab and under Sound recording, select USB Audio Codec as the default device. Select Properties and click the Advanced tab to select the Default Format, 44100 Hz or 48000 Hz.
•Windows Vista: Click Start Menu Control Panel (or Settings Control Panel in Classic View)
Hardware and Sound Sound. Click the Recording tab and select USB Audio Codec as the default device. Select Properties and click the Advanced tab to select the Default Format, 44100 Hz or 48000 Hz.
•Windows 7: Click Start Menu Control Panel Sound. Click the Recording tab and select USB Audio Codec as the default device. Select Properties and click the Advanced tab to select the Default Format, 44100 Hz or 48000 Hz.
•Windows 8: From the Start Menu, click the lower-left corner of the screen to bring yourself to the Desktop. In the bottom-right corner of the Taskbar, locate the Volume Control "Speaker" icon. Rightclick the speaker and select Playback Devices. In the Windows Sound control panel select the Recording tab. If USB Audio Codec does not have a green "check mark" symbol next to it, right-click it and select "Set as Default Device". Select Properties and click the Advanced tab to select the Default Format, 44100 Hz or 48000 Hz.
•Windows 10: Click Start Menu Control Panel (or Settings Control Panel in Classic View)
Hardware and Sound Sound. In the Windows Sound control panel select the Recording tab. If
USB Audio Codec does not have a green "check mark" symbol next to it, right-click it and select "Set as Default Device". Select Properties and click the Advanced tab to select the Default Format, 44100 Hz or 48000 Hz.
•Mac OS X 10.4-10.11: Click the upper-left "apple" icon then click System Preferences Sound. Click the Input tab. From the menu, select USB Audio Codec as the device. Under Format, select 44100.0 Hz or 48000.0 Hz.
Setting Your Computer's Soundcard as the Default Playback Device
•Windows XP: Click Start Menu Control Panel (or Settings Control Panel in Classic View) Sound and Audio Devices. Click the Audio tab and under Sound playback, select your computer's soundcard as the default device.
•Windows Vista: Click Start Menu Control Panel (or Settings Control Panel in Classic View) Hardware and Sound Sound. Click the Playback tab and select your computer's soundcard as the default device.
•Windows 7: Click Start Menu Control Panel Sound. Click the Playback tab and select your computer's soundcard as the default device.
•Windows 8: From the Start menu, click the lower-left corner of the screen to bring yourself to the Desktop. In the bottom-right corner of the Taskbar, locate the Volume Control "Speaker" icon. Rightclick the speaker and select Playback Devices. The Windows Sound control panel should appear set on the Playback tab. If your computer’s soundcard does not have a green "check mark" symbol next to it, right-click it and select "Set as Default Device".
•Windows 10: Click Start Menu Control Panel Sound. Click the Playback tab and select your computer's soundcard as the default device.
•Mac OS X 10.4-10.11: Click the upper-left "apple" icon then click System Preferences Sound. Click the Output tab. From the menu, select Internal Speakers if you are using the computer's internal speakers or select Headphones if you are using speakers or headphones attached to the computer's 1/8" headphone output.
9

Troubleshooting
If you experience any difficulties, please refer to the troubleshooting steps below.
The turntable is powered on but the motor is not spinning:
oEnsure that the turntable belt is properly installed under the platter. See Setup > Attaching the Turntable Belt for more information.
If you are recording to a computer:
o Make sure that BT500 is powered on and that the needle is on the record. o Make sure BT500 is selected as your computer's default recording device.
oIf you are listening through your computer's speakers, make sure those speakers are selected as your computer's default playback device. Alternatively, connect BT500’s RCA outputs to a stereo system or powered speakers.
(Note: The RCA outputs monitor the signal coming out of the turntable, not the signal coming from your
computer.)
o Disconnect then reconnect the USB cable connecting BT500 to your computer.
I'm not hearing any audio when playing music:
• If you are playing music from vinyl:
oMake sure that BT500 is powered on and that the needle is on the record.
oConnect BT500's RCA outputs to a stereo system or powered speakers.
•If you are playing music from your computer:
oMake sure your software music player's volume is turned up.
o Make sure your computer's volume is turned up.
oMake sure your computer's speakers are selected as your computer's default playback device. (BT500 cannot be used as a playback device for your computer's audio.)
I am hearing a hum through my speaker or laptop when using the turntable:
• If you are recording to a laptop:
oPlease connect the laptop to a grounded power supply (3 prong)
•If you are playing through a speaker:
oPlease connect to a grounded (3 prong) power supply.
My record is not playing at the correct speed; its pitch is too high or too low: o Ensure the 33/45 selector is set to the correct speed for your record.
The Bluetooth speaker that I want is not pairing to BT500.
oTurn off or move other nearby Bluetooth speakers over 30 ft. (9.1 m) so only the closest Bluetooth speaker you want will pair.
I am connected to a Bluetooth speaker but do not hear any audio.
oIf you are connected to a Bluetooth speaker with a play/pause button, and do not hear audio, try pressing the play/pause button.
oPress and release BT500’s Bluetooth button to disconnect it from the Bluetooth speaker, and then press it once more to try pairing it again.
o Turn BT500 off and then on again, and then press its Bluetooth button to try pairing it again.
My smartphone will not connect to BT500.
oBT500 acts as a Bluetooth transmitter, sending the audio out of BT500 into other Bluetooth speakers. BT500 cannot act as a Bluetooth receiver and play music from your smartphone over headphones or RCA outputs.
The Bluetooth LED will not stop blinking.
oOnce the Bluetooth button is pressed, BT500 will try to connect to nearby Bluetooth speakers for 5 minutes. To stop the blinking Bluetooth LED, power-cycle BT500.
10
Guía del usuario (Español)
Introducción
Contenido de la caja
BT500
Adaptador de corriente
Cubierta antipolvo
(2) Bisagras de la cubierta antipolvo Correa del giradiscos (sujeta al plato) Plato
Cápsula con púa AT95E
Cubierta de plástico de la púa
Alfombrilla antideslizante
Contrapeso
Adaptador para 45 rpm
Cable RCA estéreo
Cable USB
Tarjeta de descarga de software
Guía del usuario
Manual sobre la seguridad y garantía
Soporte
Para obtener la información más reciente acerca de este producto (requisitos de sistema, información de compatibilidad, etc.) y registrarlo, visite akaipro.com.
Para obtener soporte adicional del producto, visite akaipro.com/support.
11
Instalación
Uso del nivel de burbuja
panel frontal
Utilice el nivel de burbuja ubicado debajo del plato para asegurarse de que el giradiscos se encuentra sobre una superficie nivelada. El giradiscos está nivelado cuando la burbuja se encuentra en el centro del círculo.
Por ejemplo, si la burbuja se encuentra a la izquierda significa que el giradiscos está demasiado inclinado hacia la derecha. Suba la pata derecha del giradiscos rotándola en sentido antihorario. La burbuja se desplazará hacia el centro.
Cómo fijar la cubierta antipolvo al BT500
1.Inserte las bisagras incluidas (que se encuentran en bolsas de plástico dentro del embalaje de
espuma de polietileno en los contenidos de la caja) en las placas para bisagras del panel trasero.
2. Inserte la cubierta anti polvo en el espacio entre las bisagras para encastrar la cubierta (vea las imágenes a la derecha).
3.Voltee las bisagras de manera que queden en posición recta (vea las imágenes a la derecha).
Ajuste de la correa de transmisión
1.Asegúrese de que el adaptador de corriente no esté conectado al BT500.
2.Coloque el plato dado vuelta sobre una superficie plana y
coloque la correa de manera que envuelva el lado inferior del anillo interno del plato, quedando centrada, recta y sin ningún doblez (ver imagen a la derecha).
3. Mueva su dedo pulgar a lo largo de la ventana más grande de la correa del plato y cuidadosamente levante parte de la correa hacia arriba. Voltee el plato y coloque la correa encima del surco en el eje de latón del motor, mientras alinea el plato nuevamente sobre el eje central (vea la imagen a la derecha).
4. Conecte el adaptador de corriente al giradiscos y enciéndalo.
5. Ajuste el interruptor Motor Start/Stop (Iniciar/parar motor) a la posición Start (Iniciar) para comprobar si gira el motor del plato. Si el plato no gira, intente nuevamente los pasos enumerados arriba.
12
Balanceo del brazo de lectura
1.Coloque la portacápsula (la cual se encuentra entre la espuma de la caja) en el brazo de lectura.
2.Asegúrese de en la cubierta protectora de la púa esté sobre la misma.
3.Coloque el contrapeso en la parte trasera del brazo de lectura (con el texto hacia el frente del giradiscos).
4.Ajuste la rueda antideslizamiento a 0.
5.Baje la palanca subir/bajar.
6.Mueva el brazo de lectura horizontalmente hacia la izquierda hacia dónde se encontraría durante la reproducción de un disco de 12".
7.Sujete el contrapeso desde la parte trasera y muévalo hacia usted sobre el brazo de lectura hasta que el brazo deje de rebotar y parezca que flota —mitad hacia arriba, mitad hacia abajo.
8.Una vez que flote, ajuste cuidadosamente el cuadrante de fuerza de tracción en la parte delantera del contrapeso de manera que quede el 0 en la línea central del brazo de lectura.
9.Elija una cantidad de contrapeso. El contrapeso puede configurarse en una de dos maneras: Tire de él/deslícelo para realizar un ajuste grueso o gírelo realizar para un ajuste fino. El rango de la fuerza de tracción para la cápsula incluida es de 1,5- 2 ,5 gramos, con un valor recomendado de 2 gramos (20 mN). Generalmente, querrá usar el menor valor posible dentro del rango recomendado que no haga saltar el disco.
10.Ajuste la rueda antideslizamiento al valor de su preferencia (este podría ser el mismo valor que eligió para el contrapeso) lo cual garantiza un buen sonido y que el disco no saltará.
Nota: Seleccionar un peso mayor al recomendado para su cápsula puede llevar al desgaste prematuro de su púa y/o discos.
11.¡Disfrute su música!
Diagrama de conexión
Los elementos que no se enumeran en Introducción > Contenido de la caja se venden por separado.
R |
L |
ON OFF |
|
OFF |
Suministro |
|
|
|
|
POWER |
|
|
|
PRE AMP |
USB |
ON |
|
|
|
|
|
|
eléctrico |
Ordenador
Altavoces alimentados
13
Características
Panel superior
1.Plato: Coloque aquí la alfombrilla antideslizante y luego coloque su disco sobre ella.
2.Nivel de burbuja: Este se encuentra debajo del plato y se utiliza para garantizar que el giradiscos esté colocado sobre una superficie nivelada cuando la burbuja permanece en el centro del círculo. Consulte Ajustes > Uso del nivel de burbuja para mayor información.
3.Brazo de lectura: El brazo fijo se puede subir y bajar a mano o utilizando la palanca de subir / bajar.
4.Clip del brazo: Este clip diseñado especialmente fija el brazo mientras no se usa. El clip ha sido diseñado para que permanezca hacia arriba mientras está desbloqueado.
|
|
7 |
|
|
8 |
|
6 |
1 |
4 |
5 |
|
|
9 |
||
|
2 |
3 |
|
|
10 |
||
|
|
|
|
5.Palanca subir/bajar: Utilícela para levantar o bajar el brazo de lectura sobre el disco.
6.Antideslizamiento: Ajuste esta rueda para generar una pequeña cantidad de fuerza hacia afuera sobre el brazo de lectura, evitando que la púa se mueva hacia el centro del disco (consulte Ajustes > Balanceo del brazo de lectura para más información).
7.Contrapeso: Ajústelo para balancear el peso del brazo de lectura yproporcionar la tracción apropiada para la púa (consulte Ajustes > Balanceo del brazo de lectura para más información).
8.Fuerza de tracción: Ajústela para controlar la presión que la púa ejerce sobre el plato (consulte Ajustes > Balanceo del brazo de lectura para más información).
9.Selector de 33 y 45 RPM: Ajústelo para seleccionar las RPM del plato del giradiscos en base al tipo de disco que está utilizando.
Nota: Los tornillos de ajuste de velocidad de 33 / 45 RPM en la parte inferior de la unidad (ubicados detrás de una etiqueta de cumplimiento) sólo deben ser ajustados por usuarios experimentados. Utilice solamente destornilladores de plástico o no conductores para ajustar la velocidad.
10.Iniciar/parar motor: Ajuste este interruptor para encender y apagar el motor del giradiscos. Si el botón de encendido está en la posición On (encendido) y el motor está en Start pero el plato no se mueve, compruebe que la correa del giradiscos esté instalada correctamente debajo del plato (consulte Ajustes > Instalación de la correa del giradiscos para más información).
Nota: Detenga el motor cuando sus discos hayan terminado para evitar el desgaste de la púa.
Panel frontal
1. |
Volumen: Ajuste esto para |
1 |
2 |
3 |
4 |
|
controlar el nivel de salida del |
auricular y Bluetooth.
2. Salida auriculares: Conecte auriculares (que se venden por separado) para escuchar sus discos de vinilo.
3.LED Bluetooth: Este LED parpadea al aparearse con un dispositivo Bluetooth. Una vez totalmente apareado, el LED permanecerá encendido. Este LED permanecerá apagado cuando el Bluetooth esté inactivo y cuando el BT500 esté apagado.
4.Botón Bluetooth: Pulse este botón para comenzar el apareamiento Bluetooth. Si tras 5 minutos no puede encontrarse ningún altavoz Bluetooth con el cual aparearse, el transmisor Bluetooth se desactivará y el LED se apagará. Si está actualmente conectado, pulse este botón para desconectarlo del altavoz Bluetooth actualmente conectado.
14
 Loading...