


Deep Impact SB1
DEEP IMPACT SB1
English
English
WARNING!
To prevent fire or shock hazard, do not expose this appliance to rain or moisture.
CAUTION
RISK OF ELECTRIC SHOC K
DO NOT OPEN
CAUTION: TO REDUCE THE RISK OF ELECTRIC SHOCK
DO NOT REMOVE COVER (OR BACK).
NO USER-SERVICEABLE PARTS INSIDE.
REFER SERVICING TO QUALIFIED SERVICE PERSONNEL.
THE SYMBOLS ARE RULED BY UL STANDARDS (U.S.A.)
The lightning flash with arrowhead symbol, within an equilateral triangle,
is intended to alert the user to the presence of uninsulated “dangerous
voltage” within the product’s enclosure; that may be of sufficient magnitude to constitute a risk of electric shock to persons.
The exclamation point within an equilateral triangle is intended to alert
the user to the presence of important operating and maintenance
(servicing) instructions in the literature accompanying the appliance.
5B-En
1-En
Synth Bass Processor
English
CAUTION (Only for products sold in Canada and U.S.A.)
To prevent electric shock, do not use this polarized AC power plug with an extension cord,
receptacle, or other outlet unless the blades can be fully inserted to prevent blade exposure.
ATTENTION
Afin d’éviter tout risque de décharge électrique, n’ utilisez pas cette prise polarisée avec une
rallonge, une prise de courant ou autre sortie á moins que les lames puissent être complétement
insérées et qu’elles ne soient plus visibles.
IMPORTANT (for U.K. customers only)
This equipment is fitted with an approved converter plug.
To change the fuse in this type of plug proceed as follows:
1) Remove the fuse cover and old fuse.
2) Fit a new fuse which should be a BS1362 5 Amp A.S.T.A. or BSI approved type.
3) Refit the fuse cover.
If the AC mains plug fitted to the lead supplied with this equipment is not suitable for your type
of AC outlet sockets, it should be changed to an AC mains lead, complete with moulded plug of
the appropriate type.
If this is not possible, the plug should be cut off and a correct one fitted to suit the AC outlet. This
should be fused at 5 Amps.
If a plug without a fuse is used, the fuse at the distribution board should not be greater than 5 Amp.
PLEASE NOTE: THE SEVERED PLUG MUST BE DESTROYED TO AVOID A POSSIBLE
The wires in this mains lead are coloured in accordance with the following code:
As the colours of the wires in the mains lead of this apparatus may not correspond with the
coloured markings identifying the terminals in your plug, please proceed as follows:
The wire which is coloured BLUE must be connected to the terminal which is marked with the
letter N or coloured BLACK.
The wire which is coloured BROWN must be connected to the terminal which is marked with
the letter L or coloured RED.
DO NOT CONNECT ANY WIRE TO THE PIN MARKED E OR OR COLOURED GREEN
OR YELLOW & GREEN WHEN WIRING THE PLUG.
Ensure that all the terminals are securely tightened and no loose strands of wire exist.
Before replacing the plug cover, make certain the cord grip is clamped over the outer sheath of
the lead and not simply over the wires.
SHOCK HAZARD SHOULD IT BE INSERTED INTO A 13 AMP SOCKET
ELSEWHERE.
BLUE — NEUTRAL
BROWN — LIVE
14-En
14-F
6F-En
English
CHANGES OR MODIFICATIONS NOT EXPRESSLY APPROVED BY THE MANUFACTURER FOR COMPLIANCE COULD VOID THE USER’S AUTHORITY TO
OPERATE THE EQUIPMENT.
32-En
This appliance is not equipped with a main power switch. Even when the appliance
is turned off, the power supply to the appliance is not completely turned off when the
power cord is plugged in. Pull out the adaptor when not using the appliance for long
periods.
4-En
FCC WARNING
This equipment has been tested and found to comply with the limits for a Class B digital
device pursuant to Part 15 of the FCC rules. These limits are designed to provide
reasonable protection against harmful interference in a residential installation. This
equipment generates, uses, and can radiate radio frequency energy and, if not
installed and used in accordance with the instructions, may cause harmful interference to radio communications. However, there is no guarantee that interference will not
occur in a particular installation. If this equipment does cause harmful interference to
radio or television reception, which can be determined by turning the equipment off and
on, the user is encouraged to try to correct the interference by one or more of the
following measures:
• Reorient or relocate the receiving antenna.
• Increase the separation between the equipment and receiver.
• Connect the equipment into an outlet on a circuit different from that to which the receiver
is connected.
• Consult the dealer or an experienced radio/TV technician for help.
21B-En
This digital apparatus does not exceed the Class B limits for radio noise
emissions from digital apparatus set out in the Radio Interference Regulations
of the Canadian Department of Communications.
27-En
AVIS POUR LES ACHETEURS CANADIENS DU SB1
Le présent appareil numérique n’ément pas de bruits radioélectriques
dépassant les limites applicables aux appareils numériques de la Class B
prescrites dans le Règlement sur le brouillage radioélectrique édicté par le
ministère des Communications du Canada.
27-F
English
WARNING
The SB1 DEEP IMPACT is designed to be used in a standard household environment.
Power requirements for electrical equipment vary from area to area. Please ensure that your AC
Adaptor supplied meets the power requirements in your area. If in doubt, consult a qualified electrician
or AKAI professional dealer.
120 VAC @ 60 Hz for USA and Canada AC Adaptor MP-9 (CA)
220~230/240 VAC @ 50 Hz for Europe AC Adaptor MP-9 (EVB)
PROTECTING YOURSELF AND THE SB1 DEEP IMPACT
• Never touch the AC Adaptor with wet hands.
• Always disconnect the AC Adaptor from the power supply by pulling on the adaptor/plug, not the
cord.
• Allow only an AKAI professional dealer or qualified professional engineer to repair or reassemble
the SB1 DEEP IMPACT. Apart from voiding the warranty, unauthorized engineers might touch live
internal parts and receive a serious electrical shock.
• Do not put, or allow anyone to put any object, especially metal objects, into the SB1 DEEP IMPACT.
• Use only a household AC power supply. Never use a DC power supply.
• If water or any other liquid is spilled into or onto the SB1 DEEP IMPACT, disconnect the power, and
call your dealer.
• Make sure that the unit is well-ventilated, and away from direct sunlight.
• To avoid damage to internal circuitry, as well as the external finish, keep the SB1 DEEP IMPACT
away from sources of direct heat (stoves, radiators, etc.).
• Avoid using aerosol insecticides, etc. near the SB1 DEEP IMPACT. They may damage the surface,
and may ignite.
• Do not use denaturated alcohol, thinner or similar chemicals to clean the SB1 DEEP IMPACT. They
will damage the finish.
• Modification of this equipment is dangerous, and can result in the functions of the SB1 DEEP
IMPACT being impaired. Never attempt to modify the equipment in any way.
• Make sure that the SB1 DEEP IMPACT is always well-supported when in use on a firm level
surface.
• In order to assure optimum performance of your SB1 DEEP IMPACT, select the setup location
carefully, and make sure the equipment is used properly. Avoid setting up the SB1 DEEP IMPACT
in the following locations:
1. In a humid or dusty environment
2. In a room with poor ventilation
3. On a surface which is not horizontal
4. Inside a vehicle such as a car, where it will be subject to vibration
5. In an extremely hot or cold environment
• Be sure to wait for a few seconds before tuning the unit on again after the power has been turned
off to ensure proper operation.
• When you connect this unit to other equipment, make sure that all of the other equipment is turned
off in order to prevent malfunction or damage to speakers.
English
If you’re a bass player who loves those classic
synth bass lines but never wanted to learn to use
a keyboard, the DEEP IMPACT SB1 is just what
you’ve been waiting for: your favorite synth bass
sounds at the tips of your fingers. With 9 programmable presets to choose from, you can just
plug and play or shape the sounds to suit you.
the effect off, there is no coloration of the sound from the input.
1
5 7
With the true/clean bypass mode, when you turn
2
43
6
8 9 10
11
12 13
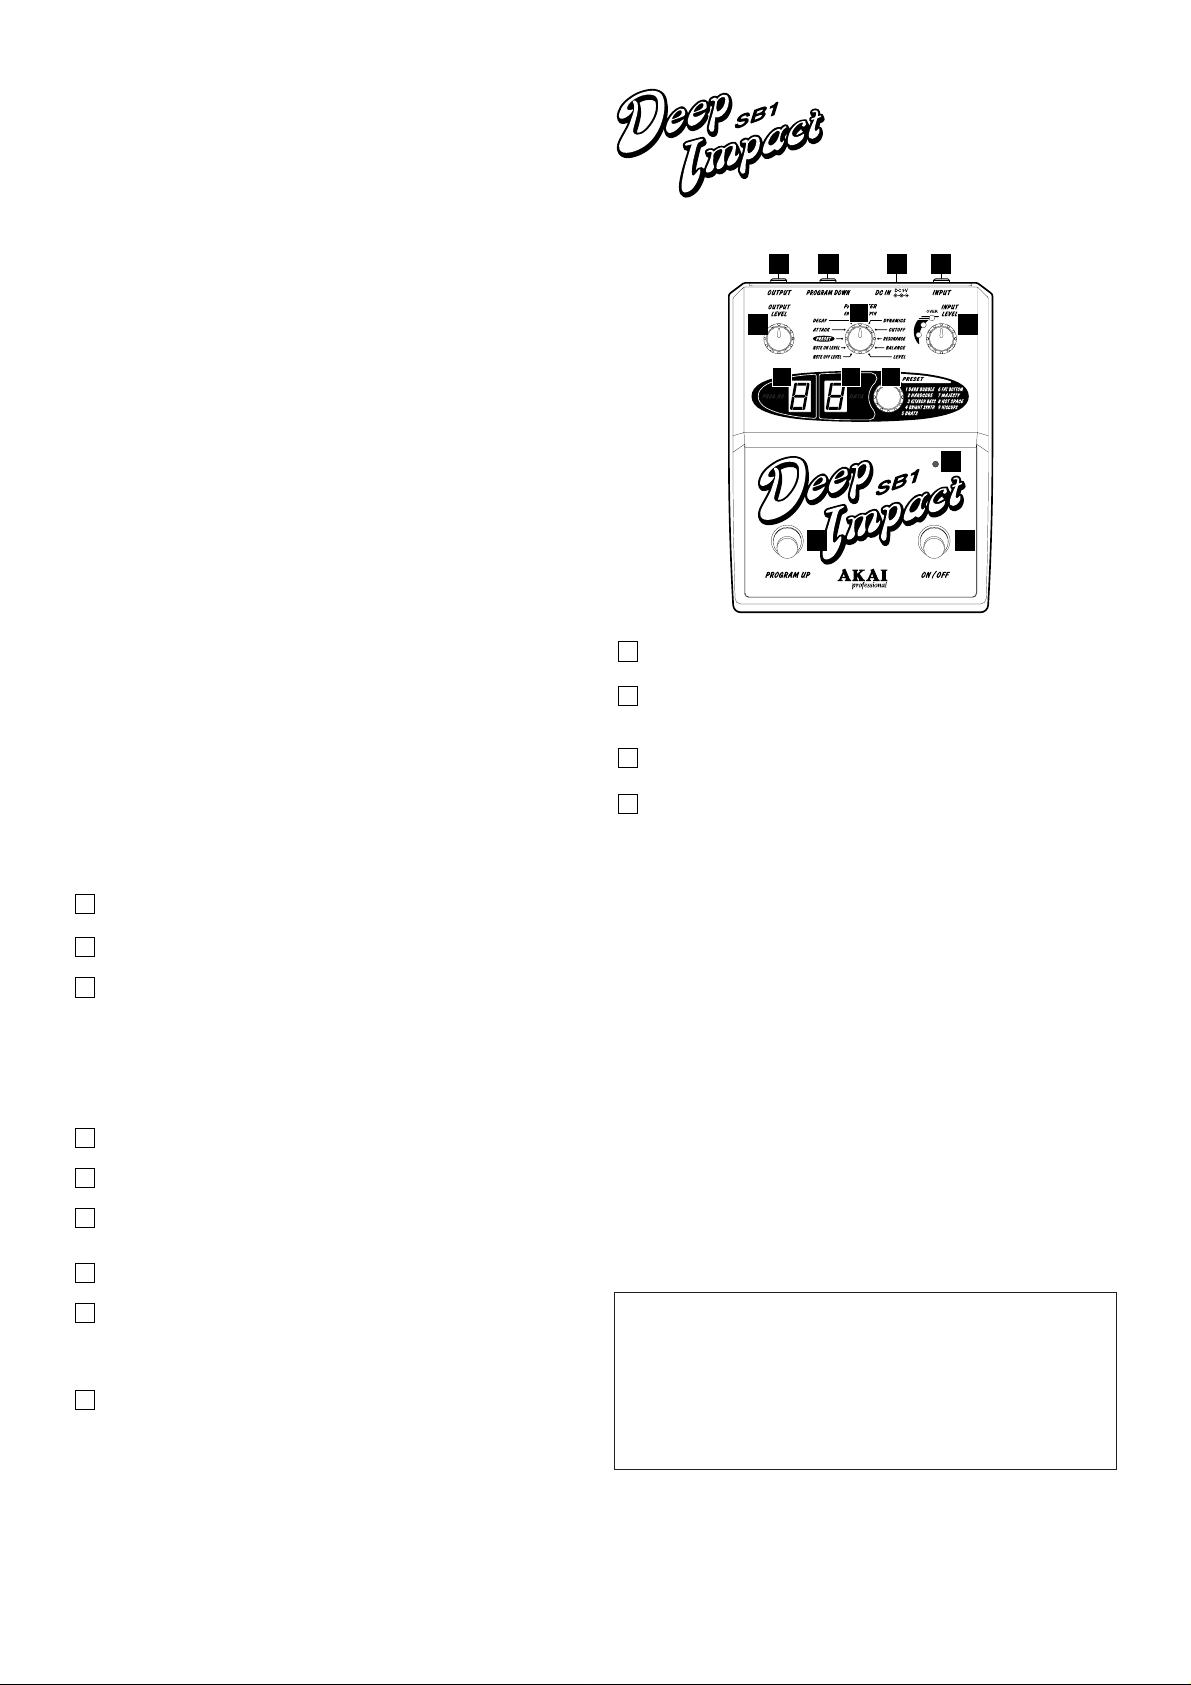
OUTPUT
1
This connects to your amp or to the input of another effect.
PROGRAM DOWN input
2
You can connect a separately sold footswitch here to decrement the program
numbers.
DC IN
3
Plug the supplied MP-9 (9-volt) AC adaptor in here.
INPUT
4
Plug your bass in here.
OUTPUT LEVEL control
5
This sets the output level (volume) of the effect.
PARAMETER selector
6
To select the parameters that you want to edit.
INPUT LEVEL control
7
This sets the input signal level.
Set it so that the red LED (OVER) doesn't light even when playing at your loudest.
Level meter: The LEDs show the following levels for the input signal:
Red - overload, level is too high / Yellow - correct level / Green - signal is too low
Note: It is important that the correct level (yellow) is set: If the level is too high, the
sound will be distorted. If the level is too low, the pitch will not be detected correctly
and the effect will not work properly.
PROG. NO display
8
Displays the program number.
DATA display
9
Displays the data value of the currently selected parameter.
DATA control
10
Turn this dial to adjust the parameter’s data value (select the parameter with the
PARAMETER selector).
LED (red)
11
Lights when the effect is turned on.
PROGRAM UP footswitch
12
Switches through the 9 programs.
The programs are selected from 1 through 9 and back to 1, you cannot select
lower program numbers (from 8 to 7 for example) unless a separately sold pedal
is connected to the PROGRAM DOWN input.
ON/OFF footswitch
13
Switches the effect on and off. Also used as an ‘enter’ button after a program has
been selected with the PROGRAM UP switch.
English
English
Operation:
1. Connect your bass to the INPUT jack.
2. Connect the OUTPUT jack to your amps INPUT jack or to the input of another
effect unit.
3. Turn your system on.
4. Press the ON/OFF (right) footswitch to turn the effect on (the LED (red) will light).
5. Adjust the INPUT LEVEL and OUTPUT LEVEL while playing the bass. The input
level should be adjusted so as the red LED of Level meter does not come on when
playing at your loudest. However, since the pitch cannot be determined properly if
the level is too low, the level should be adjusted as high as possible without turning
on the red LED (see “Important note” below for more detailed information).
Note: When the effect is turned off, the level display will not light. This is because
the SB1 is a true bypass and does not color the original sound of your bass when
turned off.
6. Select a program with the PROGRAM UP (left) footswitch.
The number will flash but the sound will not change. This is so that you can go
directly to a program without having to hear the other effects in between.
7. Press the ON/OFF switch to enable the selected effect (the number will stop
flashing).
Important notes:
• The SB1 performs the pitch detection of incoming signal. Depending on your
playing style, e.g., chord play, chopping, extremely fast passage, stc., the
pitch may be detected incorrectly and the effect sound may not sound at the
correct pitch.
• The SB1 is designed for bass. It can only handle the input signal of frequency
range between 30Hz and 470Hz (equivalent to the open 6th string note to
23rd fret of 1st string of a 6-string bass). If the incoming signal is outside this
range, it cannot detect the pitch correctly and so the synth sound (effect
sound) will be out of tune.
English
Editing the Sounds
You can edit the characteristics of each of the 9 programs and you should experiment
with the different parameters to see if there is a sound that better suits your musical
ideas. Each parameter is correlated with other parameters. If altering one parameter
doesn’t change the sound much, try altering the other parameters as well. The programs
can be returned to the factory presets very easily (see step 3 below), so you don’t have
to worry about losing the sounds that are already programmed.
1. Select a program, as shown in steps 6 and 7 above.
2. Turn the PARAMETER selector to the parameter that you want to edit (see next
PARAMETERS).
3. Adjust the parameter data value from 1 to 9 with the DATA control (the factory
preset is 5 for all parameters, except for PRESET, allowing you to set the offset of
+/- 4).
4. Repeat steps 2 and 3 until you have adjusted the parameters for that program.
When you have finished, the parameters are memorized automatically and you
can then go on to select another program number.
PARAMETERS
NOTE OFF LEVEL: Sets the sensitivity for triggering the end of the effect. Too high a
NOTE ON LEVEL: Sets the sensitivity for triggering the start of the effect. Too high
PRESET: Sets the preset sound for the program (Preset 1 to 9 are assigned
ATTACK: Sets how fast the effect sound sounds. If the change in sound is
DECAY: Sets how fast the effect sound diminishes. If the change in sound
ENVELOPE DEPTH: Sets the amout of changes the effect sound makes. If the change
setting may cut off the effect sound early and too low a setting
may make the separate notes indistinguishable.
This is a global parameter, which means that if you change this
level in one program, all the other programs are changed too.
a setting may not trigger the effect sound and too low a setting
may trigger the sound by merely touching the strings.
This is a global parameter, which means that if you change this
level in one program, all the other programs are changed too.
to Proram 1 to 9 respectively as factory default).
Example: instead of program 1 playing preset 1, you could
change it so that program 1 plays preset 7, etc.
not apparent, try setting the ENVELOPE DEPTH higher and/or
DYNAMICS lower.
is not apparent, try setting the ENVELOPE DEPTH higher and/
or DYNAMICS lower.
in sound is not apparent, try setting the DYNAMICS lower.
English
DYNAMICS: Sets the sensitivity of the tone variation dependant on how hard
CUTOFF: Adjusts the brightness of the effect sound.
RESONANCE: Adjusts how much the effect sound characterized by synthesizer
BALANCE: Sets the balance between the original bass sound and the syn-
LEVEL: Sets the loudness of each program.
or soft you hit a string. If the change in sound is not apparent, try
setting the ENVELOPE DEPTH lower.
sound.
thesized effect sound.
Specifications
Functions: Programs: 9 memorized preset sounds: DARK BUBBLE,
Connectors: INPUT (Input impedance: 500k ohms or more)
Controls: INPUT LEVEL
Indicators: Input Level (LED x 3), Effect on/off (LED x 1), PROGRAM NO
Power requirements: 9V DC/180mA, AC adaptor MP-9
Accessories: Operator’s Manual, AC adaptor MP-9
Dimensions: 140 (W) x 175 (D) x 61 (H)mm
Weight: 750g
Copyright Notice
The AKAI SB1 is a computer-based instrument and uses software contained in ROM.
Software that is provided with the instrument, including information contained in this
manual, is copyrighted by applicable laws. You can use that software or information
concerning the instrument only for personal use. You are strictly prohibited to copy or
modify any part of the software or manual without written permission from AKAI
professional M.I. Corp. in Japan.
• Specifications are subject to change without notice.
HARDCORE, KITAROH BASS, BRIGHT SYNTH, BRATS, FAT
BOTTOM, MAJESTY, HOT SPACE, HICCUPS.
Program Up
Effect on/off
OUTPUT (Output impedance: 1k ohms or less)
DC IN (9 Volts)
PROGRAM DOWN for optional footswitch connection.
PARAMETER
DATA
OUTPUT LEVEL
FOOTSWITCH x 2 (unlatch type) ON/OFF and PROGRAM UP .
(7 segment LED x 1), DATA (7 segment LED x 1)
Français
Avertissement
Le SB1 DEEP IMPACT est conçu pour être utilisé dans un environnement domestique
normal.
L’alimentation secteur des équipements électriques varie d’un pays à l’autre. Aussi, vérifiez que
la tension de votre SB1 correspond bien aux normes appliquées dans la région où vous vous
trouvez. En cas de doute, demandez conseil à un électricien qualifié ou à votre revendeur AKAI
professionnel.
120 V secteur @ 60 Hz pour les Etats-Unis et le Canada
220 V - 230/240 V secteur @ 50 Hz pour l’Europe
Pour votre protection et celle du SB1 DEEP IMPACT
• Ne touchez jamais l’adaptateur secteur avec des mains mouillées.
• Débranchez toujours l’adaptateur secteur à la prise murale en tirant sur la prise et non sur
le cordon d’alimentation.
• Ne confiez les réparations ou installations sur votre SB1 DEEP IMPACT qu’aux revendeurs
AKAI professionnel ou à des ingénieurs qualifiés. Mis à part le fait d’annuler la garantie, un
ingénieur non qualifié pourrait toucher des pièces internes sous tension et recevoir une
décharge électrique puissante.
• Ne laissez aucun objet métallique sur le SB1 DEEP IMPACT ou tomber dedans.
• N’utilisez que l’alimentation secteur fournie aux prises murales. N’utilisez jamais l’alimentation
CC.
• Si de l’eau ou un liquide quelconque venait à tomber dans ou sur le SB1 DEEP IMPACT,
débranchez la prise et portez l’appareil chez votre revendeur.
• Vérifiez si l’unité est bien aérée et qu’elle n’est pas exposée au soleil.
• Pour éviter d’endommager les circuits internes, ainsi que la finition du boîtier, éloignez le SB1
DEEP IMPACT des sources directes de chaleur (po,êles, radiateurs, etc.).
• Evitez d’utiliser des insecticides en aérosol, etc., à proximité du SB1 DEEP IMPACT. Ils
pourraient endommager la finition et s’enflammer.
• N’utilisez pas d’alcool à brûler, de diluant, de solvant ou tout produit chimique équivalent pour
nettoyer le SB1 DEEP IMPACT. Ils pourraient endommager la finition.
• Il est dangereux de modifier cet équipement qui pourrait mal fonctionner par la suite.
N’essayez jamais de modifier votre UB1 UNIBASS, de quelque manière que ce soit.
• Assurez-vous que le SB1 DEEP IMPACT repose toujours sur une surface stable.
• Pour assurer la performance optimisée de votre SB1 DEEP IMPACT, choisissez
soigneusement son emplacement. Evitez les endroits suivants:
1. Les endroits humides ou poussiéreux
2. Une pièce mal aérée
3. Une surface qui n’est pas horizontale
4. L’intérieur d’un véhicule comme une voiture, ou il serait soumis aux vibrations
5. Les endroits très chauds ou très froids
• Assurez-vous d’attendre quelques secondes avant de rallumer l’unite apres que l’alimentation
ait ete coupee pour assurer un fonctionnement correct.
• Lorsque vous connecter cet appareil à un autre équipement, assurez-vous que tout soit éteint
dans l'autre équipement afin d'empêcher tout dysfonctionnement ou dégât des enceintes.
Adaptateur CA MP-9 (CA)
Adaptateur CA MP-9 (EVB)
Français
Si vous êtes un bassiste qui aimez ces lignes
synthétiques classiques de basse mais qui
n’avez jamais voulu apprendre à utiliser un
clavier, le DEEP IMPACT SB1 est simplement
ce que vous attendiez : vos sons de basse
synthétiques préférés au bout de vos doigts.
Avec 9 préréglages programmables à choisir,
vous pouvez simplement brancher et jouer ou
Avec le mode de couplage propre, lorsque vous désactivez l’effet, il n’y a pas de
déformation du son venant de l’entrée.
5 7
former les sons qui vous conviennent.
2
1
6
43
8 9 10
11
12 13
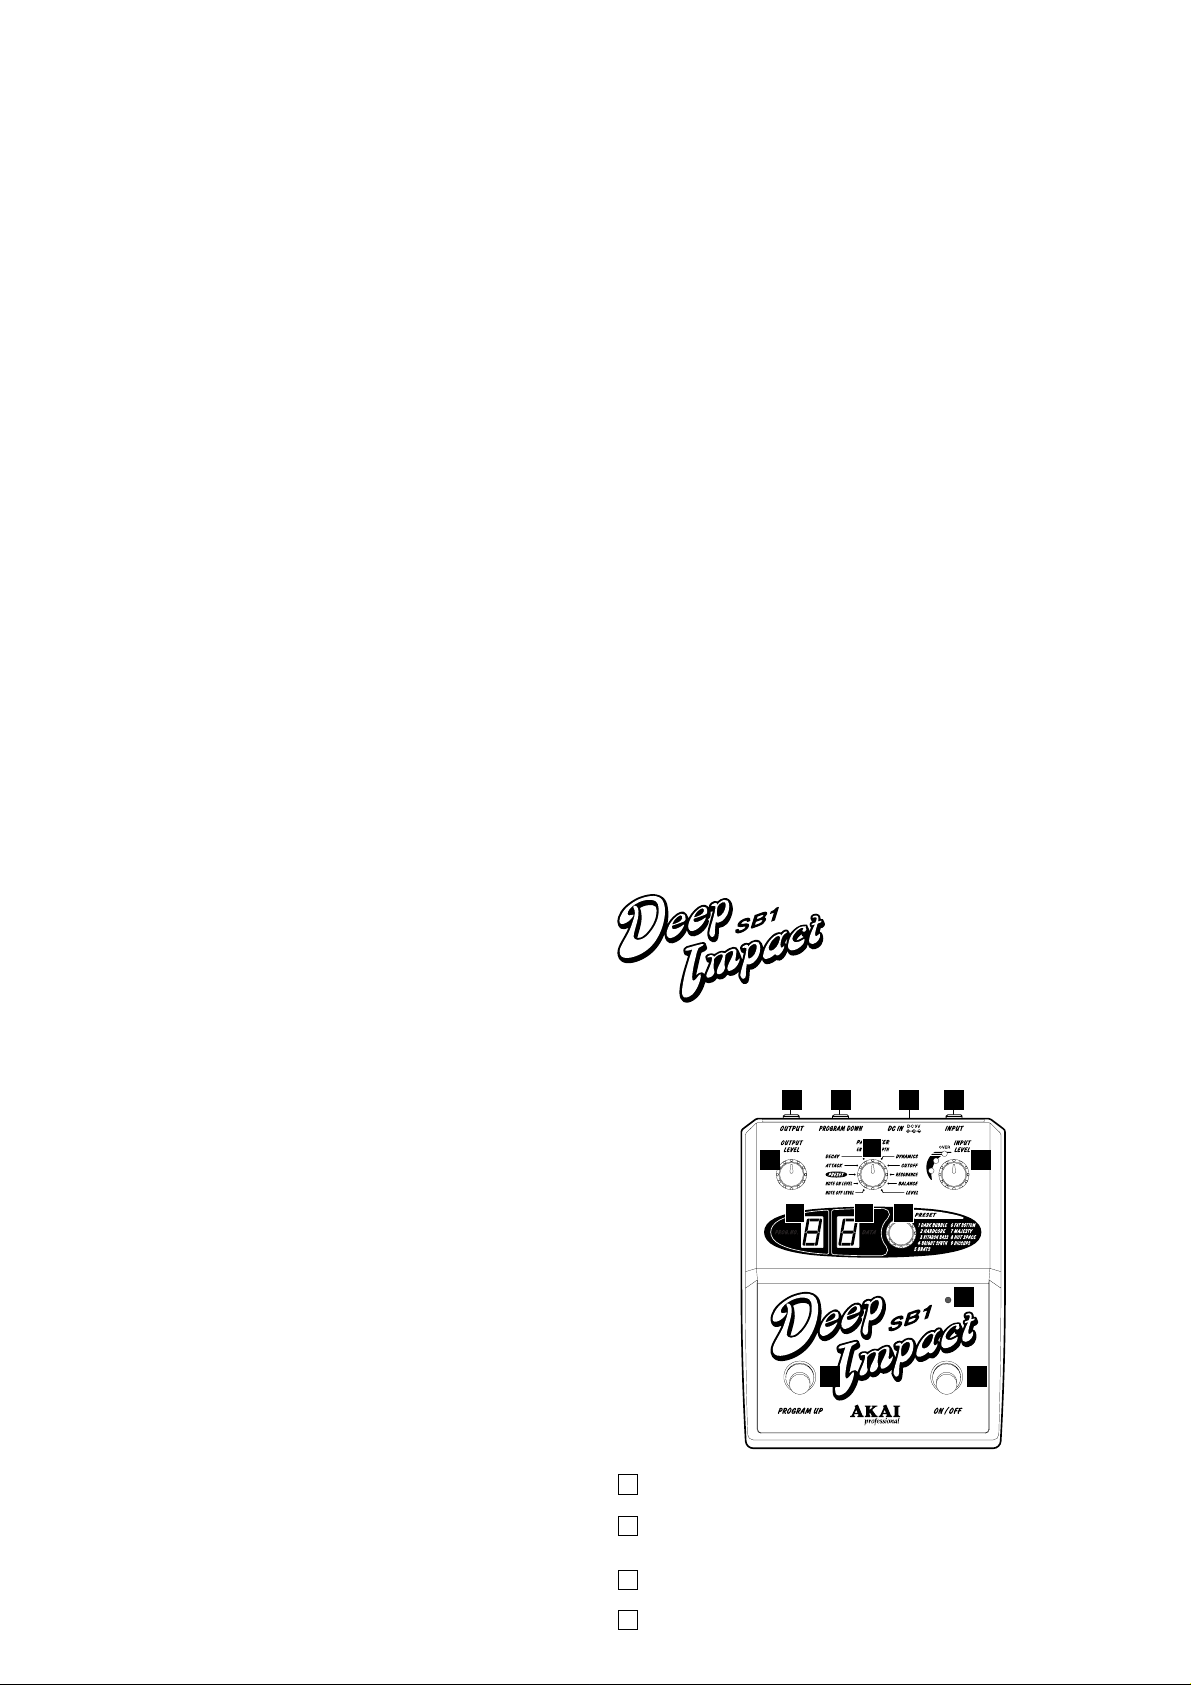
<SORTIE>
OUTPUT
1
Ceci se branche à votre amplificateur ou à l’entrée d’un autre effet.
PROGRAM DOWN input <Entrée PROGAM DOWN>
2
Vous pouvez connecter ici un interrupteur à pied vendu séparément pour
décrémenter les nombres de programme.
DC IN <
3
4
Entrée DC
Brancher ici l’adapteur secteur CA MP-9 (9 volts) fourni.
INPUT <ENTREE>
Brancher ici la basse.
>
 Loading...