

Page 1

s5000/ s6000
STEREO DIGITAL SAMPLER
Software version V1.21
WARNING
To prevent fire or shock hazard, do not
expose this appliance to rain or moisture.
Operator’ s Manual
Page 2

Important Notice
The material in this document is copyright to AKAI professional M.I. Corp., and may not be
quoted or reproduced in any form without written permission from the company.
LIMITED SOFTWARE WARRANTY POLICY
All the software provided with, or purchased especially for, AKAI professional products has
been tested for functionality. AKAI professional M.I. Corp. will make its best efforts to correct
reported software defects for future releases subject to technical practicabilities.
AKAI professional M.I. Corp. makes no warranty or representation either expressed or
implied with respect to the system's performance or fitness for a particular purpose.
In no event will AKAI professional M.I. Corp. be liable for direct or indirect damages arising
from any defect in the software or its documentation. Further, AKAI professional M.I. Corp.
will not accept any liability for any programs, sounds, audio recording or sequences stored in
or used with AKAI professional products, including the cost of recovery of such data.
The warranties, remedies and disclaimers above are exclusive and take precedence over all
others, oral or written, express or implied, to the extent permitted by law in the geographical
area of the product's use. No employee of AKAI professional M.I. Corp., agent, distributor or
employee of an agent or distributor is authorised to offer any variation from this policy.
WARNING!!
To prevent fire or shock hazard, do not expose this appliance to rain or moisture.
CAUTION
RISK OF ELECTRIC SHOCK
DO NOT OPEN
CAUTION: TO REDUCE THE RISK OF ELECTRIC SHOCK
DO NOT REMOVE COVER (OR BACK).
NO USER-SERVICEABLE PARTS INSIDE.
REFER SERVICING TO QUALIFIED SERVICE PERSONNEL.
THE SYMBOLS ARE RULED BY UL STANDARDS (U.S.A.)
The lightning flash with arrowhead symbol , within an equilateral triangle, is
intended to alert the user to the presence of uninsulated “dangerous voltage”
within the product’s enclosure; that may be of sufficient magnitude to
constitute a risk of electric shock to persons.
The exclamation point within an equilateral triangle is intented to alert the user
to the presence of important operating and maintenance (servicing) instructions in the literature accompanying the appliance.
1-En
5B-En
Lithium battery
This product uses a lithium battery for memory backup.
The lithium battery should only be replaced by qualified service personnel.
Improper handling may cause risk of explosion.
09/22/2000 Rev.4
24A-En
Page 3

s5000
/
s6000
WARNING
WARNING: WHEN USING ELECTRIC PRODUCTS, BASIC PRECAUTIONS SHOULD ALWAYS
BE FOLLOWED, INCLUDING THE FOLLOWING:
WARNING
The S5000/S6000 is designed to be used in a standard household environment.
Power requirements for electrical equipment vary from area to area. Please ensure that your S5000/
S6000 meets the power requirements in your area. If in doubt, consult a qualified electrician or AKAI
professional dealer.
120 VAC @ 60 Hz for USA and Canada
220~240 VAC @ 50 Hz for Europe
240 VAC @ 50 Hz for Australia
PROTECTING YOURSELF AND THE S5000/S6000
• Never touch the AC plug with wet hands.
• Always disconnect the S5000/S6000 from the power supply by pulling on the plug, not the
cord.
• Allow only an AKAI professional dealer or qualified professional engineer to repair or reassemble
the S5000/S6000. Apart from voiding the warranty, unauthorized engineers might touch live
internal parts and receive a serious electrical shock. There are no serviceable parts inside.
• Do not put, or allow anyone to put any object, especially metal objects, into the S5000/S6000.
• Use only a household AC power supply. Never use a DC power supply.
• If water or any other liquid is spilled into or onto the S5000/S6000, disconnect the power, and
call your dealer.
• Make sure that the unit is well-ventilated, and away from direct sunlight.
• To avoid damage to internal circuitry, as well as the external finish, keep the S5000/S6000
away from sources of direct heat (stoves, radiators, etc.).
• Avoid using aerosol insecticides, etc. near the S5000/S6000. They may damage the surface,
and may ignite.
• Do not use denatured alcohol, thinner or similar chemicals to clean the S5000/S6000. They will
damage the finish.
• Modification of this equipment is dangerous, and can result in the functions of the S5000/
S6000 being impaired. Never attempt to modify the equipment in any way.
• Make sure that the S5000/S6000 is always well-supported when in use (either in a speciallydesigned equipment rack, or on a firm level surface).
• When installing the S5000/S6000 in a 19” rack system, always allow 1U of ventilated free
space above it to allow for cooling. Make sure that the back of the rack is unobstructed to allow
a clear airflow.
• In order to assure optimum performance of your S5000/S6000, select the setup location carefully ,
and make sure the equipment is used properly . A void setting up the S5000/S6000 in the following
locations:
1. In a humid or dusty environment
2. In a room with poor ventilation
3. On a surface which is not horizontal
4. Inside a vehicle such as a car, where it will be subject to vibration
5. In an extremely hot or cold environment
Version 1.21 i
Page 4

WARNING
s5000
/
s6000
WARNING
THIS APPARATUS MUST BE EARTHED
IMPORTANT
This equipment is fitted with an approved non-rewireable UK mains plug.
To change the fuse in this type of plug proceed as follows:
1) Remove the fuse cover and old fuse.
2) Fit a new fuse which should be a BS1362 5 Amp A.S.T.A or BSI approved type.
3) Refit the fuse cover.
If the AC mains plug fitted to the lead supplied with this equipment is not suitable for your type of
AC outlet sockets, it should be changed to an AC mains lead, complete with moulded plug, to the
appropriate type. If this is not possible, the plug should be cut off and a correct one fitted to suit the
AC outlet. This should be fused at 5 Amps.
If a plug without a fuse is used, the fuse at the distribution board should NOT BE GREATER than
5 Amp.
PLEASE NOTE: THE SEVERED PLUG MUST BE DESTROYED TO AVOID A POSSIBLE
SHOCK HAZARD SHOULD IT BE INSERTED INTO A 13 AMP SOCKET
ELSEWHERE.
The wires in this mains lead are coloured in accordance with the following code:
GREEN and YELLOW — Earth
BLUE — Neutral
BROWN — Live
As the colours of the wires in the mains lead of this apparatus may not correspond with the coloured
markings identifying the terminals in your plug, please proceed as follows:
The wire which is coloured GREEN and YELLOW must be connected to the terminal which is
marked with the letter E or with the safety earth symbol or coloured GREEN or coloured
GREEN and YELLOW.
The wire which is coloured BLUE must be connected to the terminal which is marked with the
letter N or coloured BLACK.
The wire which is coloured BROWN must be connected to the terminal which is marked
with the etter L or coloured RED.
THIS APPARATUS MUST BE EARTHED
Ensure that all the terminals are securely tightened and no loose strands of wire exist.
Before replacing the plug cover, make certain the cord grip is clamped over the outer sheath of the
lead and not simply over the wires.
6D-En
ii Version 1.21
Page 5

s5000
FCC WARNING
This equipment has been tested and found to comply with the limits for a Class B digital device
pursuant to Part 15 of the FCC rules. These limits are designed to provide reasonable protection
against harmful interference in a residential installation. This equipment generates, uses, and
can radiate radio frequency energy and, if not installed and used in accordance with the
instructions, may cause harmful interference to radio communications. However, there is no
guarantee that interference will not occur in a particular installation. If this equipment does
cause harmful interference to radio or television reception, which can be determined by turning
the equipment off and on, the user is encouraged to try to correct the interference by one or
more of the following measures:
• Reorient or relocate the receiving antenna.
• Increase the separation between the equipment and receiver.
• Connect the equipment into an outlet on a circuit different from that to which the receiver is
connected.
• Consult the dealer or an experienced radio/TV technician for help.
/
s6000
WARNING
21B-En
AVIS POUR LES ACHETEURS CANADIENS DU S5000/S6000
Le présent appareil numérique n’ément pas de bruits radioélectriques dépassant les limites
applicables aux appareils numériques de la Class B prescrites dans le Règlement sur le
brouillage radioélectrique édicté par le ministère des Communications du Canada.
27-F
This digital apparatus does not exceed the Class B limits for radio noise emissions from digital
apparatus set out in the Radio Interference Regulations of the Canadian Department of
Communications.
27-En
VENTILATION
Do not prevent the unit’s ventilation, especially by placing the unit on the soft carpet, in a
narrow space, or by placing objects on the unit’s chassis—top, side, or rear panels. Always
keep the unit’s chassis at least 10 centimeters from any other objects.
31C-En
CHANGES OR MODIFICATIONS NOT EXPRESSL Y APPROVED BY THE MANUF ACTURER
FOR COMPLIANCE COULD VOID THE USER’S AUTHORITY TO OPERATE THE
EQUIPMENT.
32-En
COPYRIGHT NOTICE
The AKAI S5000/S6000 is a computer-based device, and as such contains and uses software in
ROMs. This software, and all related documentation, including this Operator’s Manual, contain
proprietary information which is protected by copyright laws. All rights are reserved. No part of
the software or its documentation may be copied, transferred or modified. You may not modify,
adapt, translate, lease, distribute, resell for profit or create derivative works based on the software
and its related documentation or any part there of without prior written consent from AKAI
professional M.I. Corp., Yokohama, Japan.
Version 1.21 iii
Page 6

WARNING
s5000
/
s6000
WARRANTY
AKAI professional M.I. Corp. warrants its products, when purchased from an authorized “AKAI professional”
dealer, to be free from defects in materials and workmanship for a period of 12 (twelve) months from the date
of purchase. Warranty service is effective and available to the original purchase only, and only on completion
and return of the AKAI professional
Warranty coverage is valid for factory-authorized updates to AKAI professional instruments and their software,
when their installation is performed by an authorized AKAI professional Service Center, and a properly
completed Warranty Registration has been returned to your “AKAI professional” dealer.
To obtain service under this warranty, the product must, on discovery of the detect, be properly packed and
shipped to the nearest AKAI professional Service Center . The party requesting warranty service must provide
proof of original ownership and date of purchase of the product.
If the warranty is valid, AKAI professional will, without charge for parts or labor, either repair or replace the
defective part(s). Without a valid warranty , the entire cost of the repair (parts and labor) is the responsibility of
the product’s owner.
AKAI professional warrants that it will make all necessary adjustments, repairs and replacements at no cost
to the original owner within 12 (twelve) months of the purchase date if:
1) The product fails to perform its specified functions due to failure of one or more of its components.
2) The product fails to perform its specified functions due to defects in workmanship.
3) The product has been maintained and operated by the owner in strict accordance with the written
instructions for proper maintenance and use as specified in this Operator’s Manual.
Before purchase and use, owners should determine the suitability of the product for their intended use, and
owner assumes all risk and liability whatsoever in connection therewith. AKAI professional shall not be liable
for any injury, loss or damage, direct or consequential, arising out of use, or inability to use the product.
The warranty provides only those benefits specified, and does not cover defects or repairs needed as a result
of acts beyond the control of AKAI professional, including but not limited to:
1) Damage caused by abuse, accident, negligence. AKAI professional will not cover under warranty any
original factory disk damaged or destroyed as a result of the owner’s mishandling.
2) Damage caused by any tampering, alteration or modification of the product: operating software,
mechanical or electronic components.
3) Damage caused by failure to maintain and operate the product in strict accordance with the written
instructions for proper maintenance and use as specified in this Operator’s Manual.
4) Damage caused by repairs or attempted repairs by unauthorized persons.
5) Damage caused by fire, smoke, falling objects, water or other liquids, or natural events such as rain,
floods, earthquakes, lightning, tornadoes, storms, etc.
6) Damage caused by operation on improper voltages.
IMPORTANT NOTE: This warranty becomes void if the product or its software is
AKAI professional shall not be liable for costs involved in packing or preparing the product for shipping, with
regard to time, labor, or materials, shipping or freight costs, or time or expense involved in transporting the
product to and from AKAI professional Authorized Service Center or Authorized Dealer.
AKAI professional will not cover under warranty an apparent malfunction that is determined to be user error,
or owner’s inability to use the product.
THE DURATION OF ANY OTHER WARRANTIES, WHETHER IMPLIED OR EXPRESS, INCLUDING BUT
NOT LIMITED TO THE IMPLIED CONDITION OF MERCHANTABILITY, IS LIMITED TO THE DURATION
OF THE EXPRESS WARRANTY HEREIN.
AKAI professional hereby excludes incidental or consequential damages, including but not limited to:
1) Loss of time.
2) Inconvenience
3) Delay in performance of the Warranty.
4) The loss of use of the product.
5) Commercial loss.
6) Breach of any express or implied warranty, including the Implied Warranty of Merchant-ability , applicable
to this product
Warranty Registration Card within 14 days of purchase.
electronically modified, altered or tampered with in any way.
iv Version 1.21
Page 7

s5000
CONTENTS
/
s6000
WARNING
INTRODUCTION ............................................................................................................... 1
WELCOME ............................................................................................................................ 1
KEY FEATURES ....................................................................................................................1
USER INTERFACE................................................................................................................ 3
ABOUT THIS MANUAL.......................................................................................................... 3
S6000 FRONT PANEL ........................................................................................................... 5
MAIN PANEL .............................................................................................................. 5
REMOVABLE PANEL (S6000 ONLY)......................................................................... 5
REMOVING THE PANEL (S6000 ONLY) ................................................................... 7
REMOVABLE PANEL CABLE LENGTH..................................................................... 7
S6000 REAR PANEL ............................................................................................................. 8
S5000 FRONT PANEL ......................................................................................................... 10
S5000 REAR PANEL ............................................................................................................11
CONNECTING THE S6000 ..................................................................................................11
MOUNTING THE S6000 ...................................................................................................... 12
SWITCHING THE S6000 ON............................................................................................... 13
KEY CONVENTIONS........................................................................................................... 15
POP-UP WINDOWS ............................................................................................................ 18
TOOLS MENUS ................................................................................................................... 20
NUMERIC KEYPAD............................................................................................................. 21
CURSOR KEYS ................................................................................................................... 21
NAMING............................................................................................................................... 21
MARK/JUMP KEYS ............................................................................................................. 22
USER KEYS (S6000 ONLY)................................................................................................ 22
STRUCTURE/TERMINOLOGY....................................................................................... 23
S6000 STRUCTURE ........................................................................................................... 23
VOICE ARCHITECTURE ..................................................................................................... 26
ASSIGNABLE PROGRAM MODULATION (APM)............................................................... 27
LOAD............................................................................................................................... 29
LOAD FOLDER.................................................................................................................... 30
LOADING MULTIS ............................................................................................................... 31
LOADING PROGRAMS ....................................................................................................... 31
LOADING SAMPLES ........................................................................................................... 32
AUTOLOAD ......................................................................................................................... 33
GET INFO ............................................................................................................................ 33
OPEN/CLOSE FOLDER ...................................................................................................... 34
AUDITION SAMPLE ............................................................................................................ 34
SELECTING DISKS ............................................................................................................. 35
DISK TOOLS........................................................................................................................ 36
DISK INFO................................................................................................................ 36
CLEAR MEMORY..................................................................................................... 36
VIEW ITEMS............................................................................................................. 36
MULTI .............................................................................................................................. 37
SELECTING PARTS ............................................................................................................ 40
CREATING A MUL TI ............................................................................................................ 42
ASSIGNING PROGRAMS TO PARTS................................................................................. 43
EDITING PARTS.................................................................................................................. 44
WINDOW FUNCTIONS ....................................................................................................... 47
PART LEVEL WINDOW............................................................................................ 47
OUTPUT WINDOW .................................................................................................. 47
EFFECTS SEND WINDOW...................................................................................... 48
FINE TUNE WINDOW .............................................................................................. 49
EDIT PART........................................................................................................................... 50
MULTI TOOLS .....................................................................................................................51
GET INFO................................................................................................................. 51
QUICKLOAD............................................................................................................. 52
QUICKSAVE............................................................................................................. 53
MULTI LIST............................................................................................................... 55
Version 1.21 v
Page 8

WARNING
s5000
SELECTING MULTIS REMOTELY VIA MIDI ....................................................................... 58
PAR T TOOLS MENU ........................................................................................................... 59
PROGRAM LIST....................................................................................................... 59
QUICKLOAD............................................................................................................. 69
QUICKSAVE............................................................................................................. 75
USING MULTIS ....................................................................................................................75
USING MULTI MODE TO PLAY SINGLE PROGRAMS ........................................... 76
USING MULTI MODE TO PLAY LAYERED PROGRAMS........................................ 76
USING MULTI MODE TO PLAY KEYSPLITS........................................................... 77
USING MUL TI MODE MULTI-TIMBRALLY............................................................... 77
PLAYING LIVE OVER A SEQUENCED BACKING TRACK ..................................... 78
USING THE S6000 AS TWO SAMPLERS ............................................................... 78
/
s6000
EDIT PROGRAM............................................................................................................. 80
EDIT PROGRAM ................................................................................................................. 80
EDIT PART........................................................................................................................... 80
OUTPUT .............................................................................................................................. 82
MIDI/TUNE........................................................................................................................... 86
EDIT USER............................................................................................................... 87
PITCHBEND ........................................................................................................................ 88
LFOS.................................................................................................................................... 89
LFO 2........................................................................................................................ 91
KEYGROUP......................................................................................................................... 95
SELECTING KEYGROUPS ................................................................................................. 97
KEYGROUP ZONES ........................................................................................................... 98
ZONE LEVEL WINDOW ......................................................................................... 101
PAN/BALANCE WINDOW ...................................................................................... 101
FINE TUNE WINDOW ............................................................................................ 102
PLAYBACK WINDOW ............................................................................................ 103
SELECTING AND EDITING ZONES...................................................................... 104
KEYSPAN .......................................................................................................................... 105
KEYGROUP CROSSFADE................................................................................................ 106
KG PITCH/AMP ................................................................................................................. 107
FILTER............................................................................................................................... 108
AMP ENVELOPE ............................................................................................................... 122
AMP ENVELOPE WINDOW FUNCTIONS............................................................. 123
FILTER ENVELOPE........................................................................................................... 124
AUX ENVELOPE ............................................................................................................... 125
AUX ENVELOPE WINDOWS................................................................................. 126
CREATING PROGRAMS................................................................................................... 127
CREATING (COPYING) KEYGROUPS............................................................................. 127
PROG TOOLS MENU ........................................................................................................ 128
GET INFO ............................................................................................................... 128
PROGRAM LIST..................................................................................................... 129
QUICKLOAD........................................................................................................... 140
QUICKSAVE........................................................................................................... 140
EDIT SAMPLE............................................................................................................... 141
EDIT SAMPLE ................................................................................................................... 141
MONITOR .......................................................................................................................... 141
MASTER ............................................................................................................................ 142
TRIM .................................................................................................................................. 145
CHOP................................................................................................................................. 148
LOOP ................................................................................................................................. 151
SETTING A GOOD LOOP ................................................................................................. 155
JOIN ................................................................................................................................... 157
MIX..................................................................................................................................... 160
FADE UP/DOWN ............................................................................................................... 162
TIMESTRETCH.................................................................................................................. 163
PITCH SHIFT ..................................................................................................................... 167
BPM MATCH ...................................................................................................................... 168
RE-SAMPLE ...................................................................................................................... 169
EQ ...................................................................................................................................... 170
vi Version 1.21
Page 9

s5000
/
s6000
SAMPLE TOOLS ............................................................................................................... 171
GET INFO............................................................................................................... 171
QUICKLOAD........................................................................................................... 172
QUICKSAVE........................................................................................................... 172
W/FORM................................................................................................................. 173
SAMPLE LIST......................................................................................................... 175
STEREO AND MONO SAMPLES...................................................................................... 177
WARNING
RECORD ....................................................................................................................... 178
RECORD............................................................................................................................178
SETTING RECORD LEVELS ............................................................................................ 180
NAMING RECORDINGS ................................................................................................... 180
MAKING A RECORDING ................................................................................................... 181
OVERWRITING AN EXISTING SAMPLE .......................................................................... 183
RE-RECORDING THE SAMPLER’S OUTPUTS ............................................................... 184
RECORD ERROR MESSAGES ........................................................................................ 185
FX .................................................................................................................................................. 186
FX....................................................................................................................................... 186
RING MOD/DISTORTION.................................................................................................. 192
EQ ...................................................................................................................................... 193
EQ TEMPLA TES .................................................................................................... 194
EQ MODULATION.................................................................................................. 195
MODULATION EFFECTS .................................................................................................. 196
CHORUS ................................................................................................................ 196
FLANGE ................................................................................................................. 196
PHASE.................................................................................................................... 197
ROTARY SPEAKERS............................................................................................. 198
FREQ/AMP MOD.................................................................................................... 200
PITCH SHIFT.......................................................................................................... 201
PITCH+FEEDBACK ............................................................................................... 202
MODULATION EFFECTS TEMPLATES................................................................. 203
DELAY FX .......................................................................................................................... 204
MONO LEFT........................................................................................................... 204
MONO L/R .............................................................................................................. 205
XOVER L+R ........................................................................................................... 206
STEREO DELAY .................................................................................................... 206
DELAY EFFECTS TEMPLATES ............................................................................. 206
REVERB EFFECTS ........................................................................................................... 207
OUTPUT MIX (MULTIFX1 AND 2 ONLY) .......................................................................... 210
EFFECTS TOOLS.............................................................................................................. 212
COPYING EFFECTS ......................................................................................................... 213
SAVE............................................................................................................................................. 216
SAVE.................................................................................................................................. 216
NOTES REGARDING SAVE.............................................................................................. 218
UTILITIES...................................................................................................................... 219
UTILITIES .......................................................................................................................... 219
SYSTEM SETUP ............................................................................................................... 219
SET CLOCK....................................................................................................................... 221
PREFERENCES ................................................................................................................ 222
MIDI SETUP....................................................................................................................... 223
MIDI FILTER ........................................................................................................... 224
FX IN/OUTS ....................................................................................................................... 225
DISK UTILS........................................................................................................................ 226
RENAMING ITEMS ON DISK................................................................................. 226
DELETING ITEMS FROM DISK............................................................................. 227
FORMATTING DISKS ............................................................................................ 228
UNLOCK DISK ....................................................................................................... 232
MEMORY TEST................................................................................................................. 233
SHOW HARDWARE .......................................................................................................... 234
SET PLAY KEY .................................................................................................................. 235
Version 1.21 vii
Page 10

WARNING
APPENDICES
s5000
TEST TONE ....................................................................................................................... 235
SAVE O/S TO FLASHROM................................................................................................ 236
SAVE O/S TO FLOPPY DISK ............................................................................................ 238
LOADING OPERATING SYSTEMS ................................................................................... 239
/
s6000
VIRTUAL SAMPLES ..................................................................................................... 242
VIRTUAL SAMPLES .......................................................................................................... 242
TO PLAY BACKING TRACKS ................................................................................ 242
FOR ‘SPINNING IN’................................................................................................ 242
FOR MASTERING.................................................................................................. 242
HOW DOES IT WORK?..................................................................................................... 243
RECORDING VIRTUAL SAMPLES ................................................................................... 245
LOADING VIRTUAL SAMPLES......................................................................................... 247
CONVERTING SAMPLE TYPES....................................................................................... 248
EDITING VIRTUAL SAMPLES .......................................................................................... 249
WORKING WITH VIRTUAL SAMPLES IN A PROGRAM .................................................. 249
SPECIFICATIONS ......................................................................................................... 250
SPECIFICATIONS ............................................................................................................. 250
APPENDIX A ................................................................................................................. 251
MIDI CONTROLLER LIST ................................................................................................. 251
S5000/S6000 MIDI IMPLEMENTATION CHART ............................................................... 252
APPENDIX B................................................................................................................. 253
NOTES ON USING HARD DISK DRIVES ......................................................................... 253
SCSI CABLES.................................................................................................................... 253
TERMINATION................................................................................................................... 253
SCSI IDs ............................................................................................................................ 254
SCSI CABLE LENGTH ...................................................................................................... 254
APPENDIX C................................................................................................................. 253
TRANSFERRING DATA BETWEEN THE S6000 AND A PC ............................................. 255
TRANSFERRING DATA BETWEEN THE S6000 AND A MAC .......................................... 257
USING WINDOWS 95 ON THE MAC ................................................................................ 260
SHARING DISKS BETWEEN AN S6000 AND A MAC/PC ................................................ 261
APPENDIX D................................................................................................................. 253
CONNECTING THE SAMPLER TO A MAC/PC VIA SCSI ................................................. 262
APPENDIX E ................................................................................................................. 265
SOUND LIBRARY COMPATIBILITY .................................................................................. 265
APPENDIX F ................................................................................................................. 265
INSTALLING EXTRA MEMORY (To Service Technicians)................................................. 268
NOTES ON BUYING MEMORY ........................................................................................ 269
APPENDIX G................................................................................................................. 271
WHAT IS SAMPLING? ....................................................................................................... 271
INDEX............................................................................................................................ 277
viii Version 1.21
Page 11

s5000
INTRODUCTION
/
s6000
INTRODUCTION
WELCOME
Congratulations on purchasing your new Akai sampler. The S5000 and S6000 represent the next
generation of Akai’ s already industry standard samplers with brand new technology, a unique and
innovative new user interface and new functionality. Some of it’s key features are:
• Unique removable panel allows you to place the S6000 functionality away from the rack and
into your work area.
• 128-voice polyphony on the S6000 1 and 64-voice polyphony (expandable to 128) on the
S5000.
• Expandable to 256Mbytes using SIMMs.
• 16 outputs configurable as 8 x stereo pairs or 16 individual mono outs (S5000 has 8 outputs
expandable to 16).
• Optional ADAT™ digital audio interface giving 16 digital outputs
• 320 x 240 backlit LCD.
• 44.1kHz/48kHz sampling frequencies.
• 18-bit stereo ADCs with 64 x oversampling 5th order Delta Sigma
• 20-bit DACs with 128 x oversampling Delta Sigma with 8 x digital filter on all outputs.
• SPDIF or AES/EBU digital I/O on balanced jacks or optical.
• EB20 4-channel 20-bit multi-effects processor (optional on S5000).
• PS2 QWERTY keyboard input for easy naming.
• 2 x MIDI IN/OUT/THRU for 32-channel multitimbral operation.
• 2 x SCSI ports for easy connection to disk drives.
• Wordclock input allows you to easily integrate the S5000 and S6000 into an all-digital
environment.
• Flash ROM programmable operating system.
• .WAV sample format allows access to a huge range of sounds from PCs or the Internet.
• DOS disk format allows connection of the sampler’s disk drive to PCs.
• Icon based operating system and GUI (graphical user interface).
• Virtual Sample function allows you to play long samples direct from disk within a program for
easy integration of disk recordings in a multi timbral environment.
1 Some S6000 configurations in the USA may differ. Please consult your dealer for information.
Version 1.21 1
Page 12

INTRODUCTION
s5000
/
s6000
• 26 powerful resonant filter types.
• 2 x Low Frequency Oscillators (LFOs) each offering 9 control waveforms.
• 2 x hardware ADSR envelope generators allow ultra fast and accurate shaping of sounds.
• A multi-stage auxiliary envelope can be used to create more complex envelope shapes.
• Assignable Program Modulation allows you to route the LFOs, envelope generators, MIDI
controllers, etc., to up to 17 different destinations - you can even route controllers to controllers!
• Stereo phase coherent timestretch sample processing.
• New off-line stereo pitch shift and BPM matching sample editing algorithms.
• 3-band off-line digital EQ.
• New QUICKLOAD functions allow you to get sounds into the sampler quickly and easily.
• Icon based DISK system makes navigation simple. Sounds are stored in folders and folders
can contain further sub-folders for efficient organisation of sound library.
• Responds to channel or polyphonic aftertouch.
• Compatible with S1000 and S3000 series samplers
And much, much more....
2
2 Due to the radical new developments in the S5000 and S6000, some old sound library
may need ‘tweaking’.
2 Version 1.21
Page 13

s5000
/
s6000
INTRODUCTION
USER INTERFACE
Perhaps the most physically obvious feature of the S6000 is its large LCD and 16 soft keys giving
rise to a unique new user interface.
Using what we at AKAI professional affectionately call “Touch and Tweak”, parameter access is
usually just one button press away - simply touch the key alongside the parameter you wish to
change and tweak its value with the DATA wheel! Not only does this make operation fast, simple
and intuitive but in most circumstances, completely eliminates the need for awkward cursor
movement. It also has the directness of a touch screen but with the reliability and tactile feedback
of physical switches.
The user interface also makes much use of graphics and icons and pop-up windows and prompts
are used throughout making the user experience more like that of a Mac™ or Windows™ computer.
ABOUT THIS MANUAL
This operator’s manual has been written to allow you to get the best out of your new sampler.
Please take the time to read it to gain a full understanding of its features, functions and operations.
It is written in the order you are most likely to work when you first use your sampler - i.e. the first
thing you will probably do is load some sounds. The next thing you will probably do is create a multi
using those sounds. The next thing you may do is edit the programs in that multi and after that, you
may edit the samples in those programs. You may try to record something yourself. After all that,
you may try to save your work. So the running order (after the description of the basics and getting
to know your way around your new sampler) is:
LOAD > MULTI > EDIT PROGRAM/PART > EDIT SAMPLE > RECORD > SAVE.
After that, we delve into the FX and UTILITIES modes and other issues.
Of course, if this is not the order in which you will use your new purchase, feel free to skip to each
appropriate section as you like/
Whatever, please try to find the time to read this operator’s manual as it is designed to help you get
the most from your investment.
You will note that both the S5000 and the S6000 are described in this manual. In most respects,
the two samplers are functionally identical except that the S6000 comes with the full complement
of options3 already installed and has the extra USER KEYS. By producing just one manual, we
can make a small contribution to the environment by saving paper and also, of course, it saves on
printing costs allowing us to bring you the new samplers at the best possible price.
All references will be to the S6000 except where specified.
3 Except for the ADAT™ digital interface board
Version 1.21 3
Page 14

INTRODUCTION
S6000 FRONT PANEL
s5000
/
s6000
MAIN PANEL
POWER Turns power on and off to the S6000.
FLOPPY DISK This accepts 3.5” floppy disks. It may be used to load sound library but
may also be used to boot operating systems.
DISK OPTION SLOT This allows you to install a 3.5” removable hard disk such as Zip, Jaz,
Syquest, etc.. Please consult your dealer or AKAI professional distributor
for details of compatible drives. If you plan to install a drive here, this
should be done by an Akai approved engineer.
MAIN VOLUME This sets the level of the main L/R outputs (outputs 1/2). Outputs 3/
4~15/16 are not affected by this control.
PHONES LEVEL This sets the level of the main L/R outputs (outputs 1/2) on the headphone
output.
The level of the headphone output is not affected by the MAIN VOLUME
setting.
PHONES This allows you to insert a pair of stereo headphones to monitor the
main L/R output (outputs 1/2).
NOTE: Sounds assigned to outputs 3/4 - 15/16 will not be heard at the headphone output.
L/MONO IN This accepts a 1/4-inch mono jack plug and is used when recording in
mono. This overrides the rear panel equivalent input.
RIGHT IN This accepts a 1/4 inch mono jack plug and, together with the L/MONO
IN jack, is used for recording stereo. This overrides the rear panel
equivalent input.
4 Version 1.21
Page 15

s5000
/
s6000
REMOVABLE PANEL (S6000 ONLY)
INTRODUCTION
ASCII KEYBOARD This will accept a PS2 QWERTY keyboard which can be used for naming.
Underneath the LCD are the sampler’s operating modes.
MUL TI This is where you play programs either singly , layered or multi-timbrally.
FX This is where you select and edit the effects you want to use in the
currently selected MULTI.
EDIT SAMPLE This is where you edit samples, the raw sound data used in programs.
EDIT PROGRAM This is where you edit programs, mapping samples out across the
keyboard range as appropriate. Programs are the basic sounds used in
a MULTI.
RECORD This is where you record your own samples. These are subsequently
edited in EDIT SAMPLE and then mapped out across the keyboard in
EDIT PROGRAM.
UTILITIES This is where you can set certain parameters that affect the S6000 as a
whole.
SAVE Here, you may save the data in memory to a storage device such as
floppy or hard disk.
LOAD This is used to load data into the sampler’s memory.
These keys illuminate when selected to indicate which mode you are in. Furthermore, they flash
upon reception of MIDI data.
Version 1.21 5
Page 16

INTRODUCTION
F1-F16 Function keys down either side of the LCD give direct access to
parameters. Their actual function varies according to the selected
page.
DATA WHEEL This is used to enter data.
CURSOR </> KEYS These are used to move the cursor left or right in parameter fields.
This is particularly useful when editing parameters with long
numeric values such as samples.
These keys are also used in conjunction with the DA TA wheel for
naming.
NUMERIC KEYPAD These are used to enter numeric data.
WINDOW This is used to open the ‘window’ function.
UNDO This has no function in Version 1.20 of the operating system.
EXIT This takes you out of the currently selected function and back to
the screen you were in previously.
s5000
/
s6000
ENT/PLAY This allows you to audition the currently selected sound.
MARK/JUMP These allow you to mark a page, go to another page and then
jump back and forth between them.
USER KEYS These allow you to assign the pages and functions you use most
often for quick, convenient access. For example, if you find yourself
always going to the FILTER, AMPLITUDE ENVELOPE and
REVERB 1 pages, these may be assigned to each of the USER
KEYS.
DISPLA Y CONTRAST This ‘thumbwheel’ control, found on the top/rear of the panel sets
the viewing angle for the LCD.
A screen saver function in UTILITIES allows you to turn the
backlight off at timed intervals to help preserve the LCD.
6 Version 1.21
Page 17

s5000
/
s6000
INTRODUCTION
REMOVING THE PANEL (S6000 ONLY)
T o remove the S6000 front panel, turn the two chrome ‘thumb screws’ found top left and right of the
panel counter clockwise until they feel very loose.
Using the recessed finger grips either side of the panel, with a gentle but firm action, pull the top of
the panel forward:
Try not to use too much force. Now lift the panel up and out of the recess.
If the panel does not come away, check the ‘thumbscrews’ in case one or both of them are still
attached to the main case.
To attach the panel, simply do the reverse.
REMOVABLE PANEL CABLE LENGTH
The S6000 is supplied with a short cable for packing and transportation purposes. This allows the
S6000 to be used immediately with the removable panel attached to the main chassis. If you wish
to use a longer cable, you need a simple 9-pin > 9-pin (female to female) extension lead. These
are readily available in most computer stores.
The maximum recommended length is 10 metres. If you use a cable longer than this, you may
experience unreliable operation.
If you have any difficulty obtaining such a cable, please contact your AKAI professional dealer.
Version 1.21 7
Page 18

INTRODUCTION
S6000 REAR PANEL
s5000
/
s6000
INPUT L/R These are the duplicates of the L/MONO IN and RIGHT IN inputs of the
front panel - S6000 only. The inputs on the front panel override these
inputs.
MAIN OUTPUT L/R These are the duplicates of the main stereo L/R outputs (Outputs 1/2) -
S6000 only. They both output the same signal.
OUTPUTS 1-16 These are the S6000’ s outputs. They can be used as 8 x stereo pairs or
as 16 individual outputs or any combination of the two (e.g. you could
have stereo sounds appearing at outputs 1/2 and 3/4 with, say, bass
appearing at output 5 and kick drum, snare drum and hi-hat appearing
at outputs 6, 7 and 8 respectively).
Output 1/2 is regarded as the ‘main’ stereo output for the S6000.
All outputs are polyphonic.
NOTE: Outputs 13-16 are also used as the sampler’s internal effects sends. Therefore, any
sounds routed to the effects channels FX1, FX 2, RV3 and/or RV4 will appear at outputs 13,
14, 15 and/or 16 respectively. If you wish to utilise all 16 outputs, you should not use the
internal effects. Similarly, if you are using the internal effects, you should avoid using outputs
13-16 as individual outputs. This is a hardware restriction that cannot be overcome in software.
DIGIT AL I/O This offers two balanced jacks for AES/EBU digital audio in and out (this
can be switched to SPDIF in the UTILITIES mode if you prefer). An
optical I/O is also provided.
Either digital input can be used to record digitally and both outputs carry
a stereo mix of the main L/R outputs (outputs 1/2). Sounds assigned to
outputs 3-8 (or 3-16 if the optional output expander is installed for S5000)
do not appear at the digital outputs.
8 Version 1.21
Page 19

s5000
/
s6000
INTRODUCTION
WORDCLOCK This BNC connector is used to synchronise the sampler to a studio’s
‘house sync’. This would be used in a predominantly digital studio to
ensure that all digital devices (mixer, hard disk recorder, effects, etc.)
are running at a common sampling frequency.
The terminator switch should be ON when the S6000 is the last digital
device in the wordclock chain. Otherwise, it should be OFF. Failure to
observe the correct switching of wordclock termination may result in
unpredictable results.
SCSI Two 50-pin high-pitch SCSI connectors are provided. One is simply a
‘thru’ of the other and is used when connecting the S6000 to a SCSI
chain.
SCSI TERMINATOR This should be switched ON when the S6000 is the last device in a SCSI
chain. If the S6000 sits somewhere in the middle of a SCSI chain, it
should be switched off. Failure to observe the correct switching of SCSI
termination may result in unpredictable results.
OPTION SLOTS These are provided to allow future expansion.
One such board is the optional ADAT digital I/O which offers 16 digital
outputs, ideal for interfacing with suitably equipped digital mixing
consoles. The ADAT I/O also allows you to record from a digital source
equipped with an ADAT output.
MIDI IN/OUT/THRU Two completely separate MIDI busses A and B are provided of fering 32-
channel operation (1-16A and 1-16B).
Each MIDI THRU passes on the data received at their respective MIDI
inputs.
MAINS INPUT This should be connected to a suitable mains outlet using the supplied
cable.
SIGNAL GROUND This can be used to reduce ground loops by connecting it to a common
earthing point.
Version 1.21 9
Page 20

INTRODUCTION
s5000
/
s6000
S5000 FRONT PANEL
Although laid out differently to accommodate the ergonomics of the S5000’s 3U panel, the keys
and controls on the S5000 are almost identical to the S6000’s except that the S5000 omits the
USER KEYS.
Another difference is that the S5000 does not have rear panel analogue audio inputs so the ones
found on the front of the S5000 are the main analogue record inputs.
It is also not possible to install an optional removable drive on the S5000’s front panel.
S5000 REAR PANEL
Again, the S5000’s rear panel is almost identical except that there are no balanced XLR inputs or
outputs and outputs 9-16 are optional.
10 Version 1.21
Page 21

s5000
/
s6000
CONNECTING THE S6000
HARD DISK,
CD-ROM,
MO, Jaz, Zip, etc..
INTRODUCTION
Main L/R outputs
(Outputs 1/2)
SCSI
Outputs 3-16
MIDI IN
DIGI I/O
MIDI OUT
%
mx1000
Connect the MIDI output of your MIDI controller (in this example, an Akai MX1000 master keyboard)
to MIDI IN A of the S6000. Connect outputs 1/2 to a stereo amplifier, a stereo input channel on a
mixer (or to two mono channels of a mixer remembering to pan each channel hard left and right to
take full advantage of the S6000’s stereo outputs). Outputs 3-16 (or 3-8 on the S5000 without the
optional expander board) should be connected to channels of your mixer where they may be
mixed, EQ’d and processed separately..
The digital I/O can be connected to any similarly equipped digital audio device such as DAT,
recordable CD, MiniDisk or the channels of a digital mixer.
The above diagram shows a fairly simple setup. When used with a sequencer, assuming it has two
or more MIDI outputs, connect one to MIDI IN A and the other to MIDI IN B. In this way, you can
achieve 32-channel multi-timbral sequencing.
Another option may be to connect one output from your sequencer to MIDI IN A and the output of
your MIDI keyboard to MIDI IN B. This way, you can have some sounds being sequenced whilst
you play certain other sounds from the keyboard. This might be a good setup for live applications
where the sequencer provides the backing tracks and you play live over the top of that.
There are many permutations and no doubt you will find your own according to your set-up and/or
application.
Version 1.21 11
Page 22

INTRODUCTION
s5000
/
s6000
MOUNTING THE S6000
If you plan to rack mount the S6000, try to leave some ‘breathing space’ around it to prevent
overheating. It is recommended you leave 1U of rack space above and below the sampler.
If you are placing the sampler on a table, make sure that the table is sturdy and that the sampler is
not positioned precariously.
If you are using the S6000 with a hard disk device of any kind, the disk drive MUST be mounted
horizontally . If the disk drive is at an angle, even a slight one, you may have unreliability problems
and even data corruption.
If you are planning to rack mount the hard disk with the sampler, it is recommended you use the
‘padded’ type of rack mount adapter available from most manufacturers of rack and flight cases
especially if you are likely to be travelling a lot with the set-up. The padding will help protect the
disk drive’s delicate head mechanism against shock and excessive vibration.
It goes without saying that the S6000 and the disk drive are delicate pieces of precision electronics
and they don’t take kindly to being thrown around however sturdy your flight case might be!
12 Version 1.21
Page 23

s5000
/
s6000
INTRODUCTION
SWITCHING THE S6000 ON
Before turning on the sampler, it’s a good idea to turn its volume down or to turn the volume down
on the amplifier or the mixer channels as the power up ‘thump’, although very slight, could damage
sensitive speakers, especially if the amp is turned up loud (this is good practice when turning the
S6000 off as well).
Now turn on the S6000. You will see the following LCD screen as it boots up:
The icons appearing at the bottom of the screen indicate what hardware is installed.
The icons are:
Shows the sampler’s polyphony4.
Shows the amount of memory installed.
Shows whether the EB20 multi-channel effects board is installed.
Shows whether the optional ADAT digital I/O is installed.
Indicates that an external ASCII keyboard is connected.
Those items
screen shot for the ADAT board).
NOT
installed will be shown with a ‘X’ through them (e.g. as shown in the above
4 On an unexpanded S5000, the same icon will be shown but with the number 64 instead.
Version 1.21 13
Page 24

INTRODUCTION
s5000
/
s6000
The S6000 then scans its SCSI buss to see what storage devices are connected and after a short
period of time5, you will see something like this screen:
Connected drives will be shown. The disk icons are:
Floppy disk
Removable hard disk
Fixed hard disk
CD-ROM
Your S6000 is now ready to use. Press any of the mode keys to continue.
You can check that the S6000 is receiving MIDI data by looking at the front panel - the selected
mode’s key will flash on and off whenever a note-on/off is received.
5 The exact time depends on how many drives you have attached and also the speed of those
drives. Of course, the more you have, the longer the scan will take and if you have, say, a particularly
slow old 4x CD-ROM attached, this will slow the boot up process further.
14 Version 1.21
Page 25

s5000
/
s6000
KEY CONVENTIONS
The following are the different types of keys and parameters:
This is a parameter down the left of the screen.
This is a parameter down the right of the screen.
To select them, simply touch the key to their left or right.
When a parameter is selected, it becomes highlighted:
INTRODUCTION
The parameter is immediately available for editing and the whole range of the parameter (0-100)
can be set in about three complete turns of the DATA wheel.
However, if you wish to make larger changes to the value more quickly, you can use the CURSOR
< key to move the cursor to the ‘tens’ or ‘hundreds’ field:
Whilst this not may save a lot of time with two or three digit numbers, moving the cursor around the
parameter is useful when the value is a long number such as when editing samples:
On ‘signed’ fields such as shown below:
The numeric keypad’s +/- keys can be used to quickly change the sign from + to - or
vice versa
.
Version 1.21 15
Page 26

INTRODUCTION
Other parameter conventions are:
The downward pointing arrow indicates that the parameter has a WINDOW function.
When you land on the parameter for the first time, the parameter is selected and is immediately
available for editing as described above. However, pressing the WINDOW key (or pressing the
selected parameter’s key again - i.e. ‘double clicking’ on it) pops up a window revealing further
‘sub-functions’ associated with the selected parameter . In this way , screens are clear and uncluttered
with only the most commonly used functions immediately available but with further functionality
hidden away by way of the WINDOW function.
For example, the PART LEVEL window looks like this:
s5000
/
s6000
The parameters shown in the window may be edited in much the same way simply by touching the
key alongside them and tweaking the DA T A wheel. The window may be closed by pressing CLOSE
WINDOW .
Another type of parameter is this:
This is a modulation input. When you land on this type of parameter for the first time, the modulation
depth is selected and is immediately available for editing as described above.
However, pressing the key again selects the modulation source:
You may select another modulation source using the DATA wheel. This is common for all such
parameters displaying the indicator.
16 Version 1.21
Page 27

s5000
/
s6000
The various function key types are shown below:
This is a typical ‘go to page’ key characterised by the border within the
key.
This is a typical ‘do it’ key and usually generates a YES/NO/CANCEL
type prompt.
This is a function ‘toggle’ ON/OFF key . The indicates ON. indicates
the function is switched OFF.
This highlighted key is a ‘selected function’ or ‘radio’ key. The key (i.e.
the function) will highlight when selected.
This is a typical ‘scroll up’ key. This is used to move up through a list.
INTRODUCTION
This is a typical ‘scroll down’ key. This is used to move down through a
list.
This is a typical ‘select up’ key. This is used to move up through a list
and
select the currently highlighted item.
This is a typical ‘select down’ key. This is used to move down through a
list
and
select the currently highlighted item.
SELECT and SCROLL UP/DOWN keys are ‘context sensitive’ in that
when you are at the top of a list, the ‘up’ arrow isn’t shown and at the
bottom of a list, the ‘down’ arrow isn’t shown.
They are also ‘repeater’ keys in that if you press and hold them, you will
scroll through the list automatically without having to press them each
time.
Version 1.21 17
Page 28

INTRODUCTION
s5000
/
s6000
POP-UP WINDOWS
Throughout the user interface, you will encounter various ‘pop-up’ windows and prompts. These
override the current page’s functions (which become ‘greyed out’ in the background) and use
further function keys to decide the outcome. There are ‘alert’ and ‘warning’ prompts. For example...
And there are ‘dialogue’ prompts:
18 Version 1.21
Page 29

s5000
/
s6000
INTRODUCTION
Progress bars are also used throughout the user interface to indicate status. For example, during
off-line sample editing functions or during record (in fact, any process that takes time), you would
see these progress displays....
Some progress displays (such as the sample processing window above) also show animated
icons as a further indicator of activity.
All off-line processing screens have an ABORT key so that you can cancel the process at any time
if you want. Also, all off-line processing displays end with this screen:
This allows you to audition the new processed version and the original so that you can compare
the two. You are also offered the opportunity to keep the new one and discard the original or keep
the original and discard the new one or you can choose to keep both. You may also choose to
overwrite the original version with the new, processed version.
The recording progress display ends with this screen:
Here you may audition the recording you have just made and, if you are happy with it, you can
keep it otherwise you can discard it and try again.
Version 1.21 19
Page 30

INTRODUCTION
s5000
/
s6000
TOOLS MENUS
In most of the pages, you will find a ‘tools’ key on F9 that offers a drop down menu with further
functionality.
For example, in MUL TI mode with a part selected, you have a PART TOOLS menu. Pressing this
would cause this drop down menu to appear:
In all cases, you will see that there is a certain consistency.
• F9 is always CLOSE TOOLS.
• F10 is always GET INFO and will show details of the selected item.
• F12 will always take you to a list of the selected item type (multi, program, sample).
• F13 is always QUICKLOAD which allows you to quickly load items relevant to the selected
mode (i.e. load multis, programs, samples).
• F14 is always QUICKSA VE which allows you to quickly save items relevant to the selected
mode (i.e. save multis, programs samples).
• F15 and F16’s functions change according to context.
NOTE: The LOAD and SAVE modes differ slightly in this respect. Please refer to those sections
for more details.
We will see these tools menus in each modes’ respective sections.
20 Version 1.21
Page 31

s5000
/
s6000
INTRODUCTION
NUMERIC KEYPAD
This is used to enter numeric data as an alternative to the DA T A wheel. It can also be used to enter
numbers into a name.
CURSOR KEYS
Whilst cursor movement is kept to a minimum with the unique ‘touch and tweak’ user interface,
there are times when you need to move a cursor, particularly in long numeric fields such as sample
start and end times, loop parameters, etc.. These keys allow you to move the cursor around
numeric parameters. They are also used occasionally to move between fields in some pages.
NAMING
Naming is also done by way of a pop-up prompt. Naming is done when copying and/or creating a
new item (i.e. a multi, program or sample) and when creating a new sample through any of the offline DSP functions such as timestretch, EQ, etc.. You may also name samples at the time of
recording.
A typical naming prompt looks like this:
This pops up when creating a new multi. Pretty much the same pop-up would be seen when
creating or copying a program and/or sample.
An autonaming process is used throughout the operating system and you may be happy to stick
with the autonamed version of the name. However, if you do choose to rename the item, use the
CURSOR </> keys to move the cursor around the name field and use the DA T A wheel to select the
letter, symbol or number. The full range of upper case and lower case characters are available to
you as are all the commonly used symbols. The SPACE and DELETE keys can be used to enter
spaces and/or delete characters.
A name can consist of up to 20 characters.
NOTE: Although it is only possible to enter up to 20 characters on the S6000 itself, long
filenames are supported if you are using files created or named on a PC.
Version 1.21 21
Page 32

INTRODUCTION
Of course, a much easier and quicker way to enter a name is to connect a standard PS2 QWERTY
keyboard to the ASCII KEYBOARD input on the front panel and type a name in from that. Use the
keyboard’s cursor left/right keys to move around the name and press RETURN to finish the name
(or ESC to cancel the process).
NOTE: The following are illegal characters in .DOS and cannot be used in names:
s5000
/
s6000
“ < > : * ? | / \
If you try to use any of these characters in a name, you will be prompted:
MARK/JUMP KEYS
The MARK and JUMP keys can be used to make navigation around the screens much easier and
faster.
For example, imagine you were constantly toggling between MUL TI MODE and the ENVELOPE 1
page in EDIT PROGRAM. Whilst this is only two or three keypresses, it can be made instant by
first going to the ENVELOPE 1 page and pressing MARK, then going back to MUL TI. Now, pressing
JUMP will take you straight back to ENVELOPE 1 and pressing JUMP again would return you
immediately to MULTI. And so on. In this way, you can ‘toggle’ between two pages with a single
key press.
The MARK and JUMP keys can be used to switch between any two pages in any mode.
USER KEYS (S6000 ONLY)
These allow you to assign the pages and functions you use most often for quick, convenient
access. For example, if you find yourself always going to the FILTER, AMPLITUDE ENVELOPE
and REVERB 1 pages, these may be assigned to each of the USER KEYS.
The keys default to showing you the various ‘lists’ of each mode (e.g. MULTI LIST, PROGRAM
LIST and SAMPLE LIST). However, it is possible to assign your own pages to the USER KEYS.
To do this, go to the page you wish to assign and simply press
the USER KEYS. This will assign that page to the selected USER KEY and in future, you need
only press that USER KEY to have direct access to the page you marked.
Please note that the assignments are not retained when you turn the sampler off.
and hold
MARK followed by one of
22 Version 1.21
Page 33

s5000
/
s6000
STRUCTURE
S6000 STRUCTURE
Before we go on to look at the sampler’s various operating modes, it would be a good idea to have
a basic understanding of how sounds are made up on the S60006.
The raw audio data used in any sound is a SAMPLE. This is denoted by this icon:
Samples may be extensively edited in the S6000 using a variety of different editing tools and
functions such as TRIM, LOOP, NORMALISE, FADE UP/DOWN and DSP processes such as
TIMESTRETCH, PITCH SHIFT, BPM MATCH and DIGITAL EQ.
Samples are then assigned to PROGRAMS denoted by this icon:
Programs are made up of keygroups and each keygroup can contain up to four stereo samples.
Keygroups allow you to map out a collection of samples across the keyboard range (a technique
known as ‘multi-sampling’). A keygroup has its own keyspan and a program can contain as many
as 99 keygroups mapped out across the keyboard range as you want or, at the other extreme, can
have just one keygroup spanning the entire keyboard range. Some typical examples would be as
follows:
KEYGROUP 1
A simple program with one keygroup covering the entire keyboard range
KEYGROUP 1 KEYGROUP 2
A program with two keygroups - a typical keysplit
KG1 KG2 KG3 KG4 KG5
A typical multi-sample program with each keygroup covering an octave range
A typical drums program with a collection of keygroups each assigned to their own notes.
6
Version 1.21 23
If you are new to sampling, you might like to read Appendix B which describes the process in more
detail.
Page 34

STRUCTURE
s5000
/
s6000
Keygroups can also overlap:
KEYGROUP 1 KEYGROUP 2
A program with two overlapping keygroups with a crossfade
In this case, when keygroups overlap, a crossfade is automatically applied to make the transition
smooth.
You can also layer keygroups:
KG 6
KG1 KG2 KG3 KG4 KG5
KG 6 KG7
KG1 KG2 KG3 KG4 KG5
KG6 KG7 KG8 KG9 KG1 0
KG1 KG2 KG3 KG4 KG5
Some examples of layered keygroups
Although layering keygroups in this way is excellent for creating rich textures, you may find it
easier to layer sounds in the multi simply by assigning the appropriate sounds to parts and playing
them all on the same MIDI channel.
Each keygroup has four ZONES where samples may be layered on top of each other and/or
switched between using velocity.
Different programs may share samples (for example, you could use the same kick and snare drum
in a variety of different drum programs).
As well as mapping samples/keygroups across the keyboard range, programs also allow you to
apply envelope shaping, filtering, LFO modulation (vibrato, etc.) and much more and such is the
flexibility of the program’s sound shaping functions that the S6000 can be used as a very powerful
synthesiser as well.
24 Version 1.21
Page 35

s5000
/
s6000
STRUCTURE
Once you have one or more programs in memory, these are then placed in a MULTI where they
can be played either singly or in combination with other programs. The multi mode allows up to
128 programs to be played simultaneously.
In the MULTI mode, the individual programs that go to make up a multi may be mixed, tuned,
routed to individual outputs and/or the internal effects processor (if installed on the S5000).
Up to 128 multis may reside in memory at any one time, each one containing a different combination
of programs. Different multis may share programs (for example, several multis may use the same
drum program or piano sound, whatever).
The overall structure of a multi, therefore, might look something like this:
AMBI DRUM SET (Multi Part 1) has sixteen keygroups/samples, each assigned to their own separate
notes whilst the program HIRES MINI BASS (Multi Part 2) has three keygroups/samples.
MELLOTRON CHOIR (Multi Part 3) has ten keygroups/samples whilst TRAD E.PF (Multi Part 4
contains just five. LEGAT O VLNS (Multi Part 5) has seven keygroups/samples mapped out across
C1-C6 whilst JAZZ GUITAR (Multi Part 6), like TRAD E.PF uses five samples. In this example,
each sound is being played on its own MIDI channel and shows a typical multi-timbral setup. The
same, of course, would be true of other parts (7-128) although some parts may be layered and
some could have keyboard splits set..
There are no hard and fast rules about how samples are assigned to keygroups (and hence
programs) and likewise, there are no rules on how programs are assigned to a multi and each
situation will vary according to the sound and the application.
Multis, samples and programs are saved to disk and can be subsequently loaded back into memory
at any time.
Version 1.21 25
Page 36

STRUCTURE
s5000
VOICE ARCHITECTURE
A single voice on the S6000 is not unlike any typical synthesiser and a simplified block
diagram of one voice looks something like this:
PROGRAM
KEYGROUP
/
s6000
Keygroup
Zones
APM
Aux
Envelope
Keygroup Pitch Mod
APM APM
LFO 1 LFO 2
Rate
Delay
Mod
Mod
Filter Amplifier
Filter Mod Amp Mod
APM
Filter
Envelope
Depth
Mod
Rate
Mod
APM
Delay
Mod
Amplitude
Envelope
Depth
Mod
APM
APM
APM
APM
APM
APM
APM
OUTPUT PAN
Output
Mod
Modwheel
Pitch Bend
Aftertouch
Keyboard
Velocity
External
Pan
Mod
Whereas on a synthesiser, you have oscillators with preset waveforms (or preset samples contained
in Read Only Memory - ROM) which you cannot change, the S6000 allows you to record any
sound you want which can be then used as a waveform in any of the four keygroup zones for an
almost unlimited range of sounds. These are then mixed, tuned and fed through a multi-mode
resonant filter and then through an amplifier. The keygroups are then mixed and fed through a final
output section that controls overall level and pan/balance.
The keygroup’s pitch, filter and amplifier and the final output section all have assignable modulation
inputs allowing them to be controlled by any of the controllers (the filter and amplifier also have
their own dedicated ADSR envelope generator).
Two Low Frequency Oscillators (LFOs) and a multi-stage auxiliary envelope are also available
and using the S6000’s Assignable Program Modulation (APM) function (see the next page for a
more detailed description of this), these can be freely assigned to pitch, filter, amplitude and also
LFO 1 and LFO 2 rate, depth and delay where their control signals may be mixed and inverted for
a wide range of effects. The dedicated filter envelope and amplitude envelope can also be used in
the APM matrix.
MIDI controllers such as modwheel, pitchbend, aftertouch, velocity and a user definable external
MIDI controller may also be routed to any of the pitch, filter, amplitude and/or LFO modulation
inputs. Each of the 128 voices on the S6000 is identical.
26 Version 1.21
Page 37

s5000
/
s6000
STRUCTURE
ASSIGNABLE PROGRAM MODULATION (APM)
Assignable Program Modulation is a concept that was introduced by Akai in 1993 with the release
of the S3000 series samplers and subsequently in the S2000 and S3000XL range and now, of
course, in the S5000 and S6000. Basically, APM allows you to route any of the controllers (128
MIDI controllers, LFO1, LFO2 and envelopes) to pitch, filter, amplitude and panning - even back to
the LFOs themselves. Thus the S6000 is also a powerful synthesiser as well.
However, these techniques are not limited to only creating wild and extravagant synth sounds you could, for example, use aftertouch routed to the filter to introduce swells and growls on brass
samples or you could use velocity to control detune to create a more ensemble sound in a layered
strings sound. The modwheel could be used to control the rate of amplitude, panning and/or pitch
modulation to recreate a rotary speaker effect on an organ sound. The auxiliary envelope could be
used to control the feedback element in a heavy metal guitar sound or could be used to fade
vibrato in and out in a controlled way over time. The possibilities are enormous.
One way to consider APM is as a matrix:
OUTPUT KEYGROUP
AMP
12
PAN P/AMP
A12
FILTER
123123
LFO1 LFO2
RDDL R DDL
MOD WHEEL
PITCH BEND
AFTERTOUCH
EXTERNAL MIDI
VELOCITY
KEYBOARD
LFO 1
LFO 2
AMP ENV
FILTER ENV
AUX ENV
MOD WHEEL
PITCH BEND
EXTERNAL
This resembles the ‘patch pin’ matrix used by an early make of British analogue synthesiser where
pins are inserted into a board to make a connection. Down the left are the modulation sources and
across the top are the destinations (or modulation inputs) they can be routed to and in the above
example, the MODWHEEL is routed to amplitude and panning. AFTERTOUCH is also routed to
the second amplitude modulation input. As you can see, LFO 2 is routed to control panning and
also filter cutoff frequency . In this example, the AUX ENV is controlling the depth of LFO 2’s output
whilst the MODWHEEL is controlling LFO 2 rate. As you can imagine, there are many permutations
and possibilities.
NOTE: A modulation input may only have one control source routed to it so it is not possible,
for example, to route LFO2 and the MODWHEEL to, say, FILTER mod input 1. However the
same effect can be achieved by routing MODWHEEL to filter input 1 and LFO 2 to filter input
2.
Version 1.21 27
Page 38

STRUCTURE
Routing controllers to destinations on the S6000 is easy.
Down the right side of many of the EDIT PROGRAM pages, you will see the modulation inputs.
For example, the FILTER:
OUTPUT, KG PITCH/AMP and the LFOs are similarly laid out for consistency between pages.
In this example, VELOCITY is routed to MOD INPUT 1, LFO2 to MOD INPUT 2 and the AMP ENV
to MOD INPUT 3. To set these controllers levels, simply press the soft key to their right and use the
DATA wheel to set a value between +/-100.
s5000
/
s6000
To assign another controller, simply press the appropriate key again. This will place the cursor on
the actual controller field:
You may now use the DATA wheel to select any of the controllers you want.
One other useful feature is the GOTO SOURCE found on F16 on any page that has modulation
inputs. Pressing this will take you directly to the selected controller’s page where you may set its
parameters. In the controller’s page, you will find an equivalent GOTO DEST (i.e. destination) to
return you back to where you came from. In this way, it is easy to interact with the control source
and the destination.
28 Version 1.21
Page 39

s5000
/
s6000
LOAD
Probably the first thing you will want to do after booting up your sampler is to load some sounds (if
you wish to record your own sounds first, then skip to the section that describes recording). When
you press LOAD, you will see something like this screen:
Here, you see a list of folders (or ‘directories’). These contain sounds or can contain further subfolders containing more sounds, etc.. Folders are selected using the SELECT keys on F15/F16 or
via the DATA wheel. Once you have selected a folder, if you know what’s in it, you can load its
entire contents into memory by pressing F14 - LOAD FOLDER.
LOAD
If you need to look inside a folder, it can be opened using F11- OPEN FOLDER. If the folder
contains sub-folders, you may see something like this:
Here, there are nested folders within the selected folder. The operation described above applies
equally to loading and opening sub-folders.
NOTE: These sub-folders could equally contain further sub-folders. For example, the
WOODWIND folder could contain further sub-folders FLUTE, CLARINET , OBOE, BASSOON
and PICCOLO. The same process applies to all nested sub-folders.
Version 1.21 29
Page 40

LOAD
s5000
/
s6000
LOAD FOLDER
When you press LOAD FOLDER, you will see this pop-up prompt window:
The ‘check boxes’ on F6, F7 and F14 allow you to disable certain items from loading. For example,
you may just wish to load only the programs and samples from a folder in which case, you could
disable the loading of multis by pressing F6.
You should press EXECUTE or CANCEL LOAD as appropriate.
NOTE: If a folder contains sub-folders, the contents of those folders will also be loaded when
you use LOAD FOLDER.
The load order is very specific - first, any multis, programs and samples in the ‘main’ folder are
loaded into memory followed by the contents of each sub-folder in turn. This is mentioned
because if a sub-folder contains items that have the same name as items in the main folder,
the items being loaded from the sub-folder(s) will overwrite those that have already been
loaded from the main folder. So, for example, if the main folder and a sub folder both have a
sample called SNARE 1 , first SNARE 1 will be loaded from the main folder but will overwritten
when the other SNARE 1 is loaded from the sub-folder.
Back in the main LOAD page, if a folder contains actual sounds, pressing OPEN FOLDER may
show something like this:
Here we see actual ‘sounds’ - multis, programs and samples. The icons are:
Multi
Program
Sample
You will note that the LOAD key on F14 is ‘context sensitive’ and as you select different items, so
the label changes on F14. With the cursor on a multi, F14 is labelled LOAD MULTI. Move the
cursor to a program and the key is labelled LOAD PROGRAM. Move the cursor to a sample and
the key is labelled LOAD SAMPLE. In this way , the type of load you wish to perform is automatically
taken care of.
30 Version 1.21
Page 41

s5000
/
s6000
LOADING MULTIS
It is possible to load a multi complete with all the programs and samples associated with it.
Simply select a multi and press LOAD MULTI. You will receive this pop-up prompt window:
Again, a series of ‘check boxes’ appear and you can, if you wish, select all multis in the current
folder if you wish and/or you may choose to load the multi(s) with or without the associated programs
and samples.
LOAD
LOADING PROGRAMS
When a program is selected, F14 changes to LOAD PROGRAM and if you press this, you will
receive this pop-up prompt window:
You may choose to load just the selected program or all programs in the current folder. You may
also choose whether or not to load the samples associated with the program(s).
Version 1.21 31
Page 42

LOAD
s5000
/
s6000
LOADING SAMPLES
When a sample is selected, F14 changes to LOAD SAMPLE and if you press this, you will receive
this pop-up prompt window:
Using the check boxes, you may choose to load just the selected sample or all the samples in the
current folder.
The OVERIDE TYPE check box allows you to choose how the selected sample will load. With this
key checked, F15 changes and you may select to load the sample as a ‘virtual’ sample or as a
normal RAM sample. Simply pressing F15 toggles between the two choices. In this way , you can
select that maybe a long sample which you recorded as a normal RAM sample is loaded as a
‘virtual’ sample or, alternatively, you may want to load a ‘virtual’ sample into RAM in its entirety to
facilitate easier sample editing.
NOTE: Y ou cannot overide the type for ALL SAMPLES. If OVERIDE TYPE is checked and you
select ALL SAMPLES, OVERIDE TYPE will be disabled. Similarly , if ALL SAMPLES is checked
and you press OVERIDE TYPE, the prompt will revert to THIS SAMPLE.
Please see the section that describes VIRTUAL SAMPLES for more details on this.
Whichever load type is used, you will see the filenames appear in a pop-up as they are loaded:
You can use F8 to cancel the load process if you wish.
32 Version 1.21
Page 43

s5000
/
s6000
AUTOLOAD
It is possible to create a special folder that will be automatically loaded when you switch the
sampler on. This may be useful in a live situation where you could load your set automatically
when you switch on.
To use the AUTOLOAD function, simply create a new folder (in SAVE) and call it AUTOLOAD:
LOAD
The folder MUST be in the root directory and not buried in another folder . It can use any combination
of ‘case’ and “AUTOLOAD”, “Autoload”, “AutoLoad” would be valid. However, “Auto Load” or
“Autoload 1” would not.
When you power on, the S6000 will scan the SCSI bus to identify the drive(s) connect and will then
do a quick search to see if it can find the AUT OLOAD folder. If it does, it will automatically load its
contents (including the contents of any sub-folders) as normal. At the end, it will automatically take
you to MULTI mode with the first multi in memory automatically selected and ready to play.
In this way , you can turn up at your gig, set up, switch on and be ready for action after the autoload.
NOTE: If you have several drives connected that have AUTOLOAD folders on them, the
S6000 will only load the first one it finds.
GET INFO
In the LOAD page you can use the GET INFO key to find out more about a selected item be it a
folder, multi, program, whatever. Pressing GET INFO will show this screen:
You can see what it is, where it is, how big it is and, if it’s a folder, what it contains. Press CLOSE
INFO to close the window.
Version 1.21 33
Page 44

LOAD
s5000
/
s6000
OPEN/CLOSE FOLDER
These keys allow you to open and close folders.
In the event of you trying to open or close an item on disk that is not a folder, you will receive the
following prompt:
Similarly, should you try to close a folder that is already closed, you will receive this prompt:
AUDITION SAMPLE
The AUDITION SAMPLE key in the main LOAD page allows you to audition a sample to check it
prior to loading. This function is only available when a sample is selected (you cannot audition
programs or multis). Should you try to audition anything other than a sample, you will get this
prompt:
When you press AUDITION SAMPLE, there will be a small delay as the sample is found on disk
and played out. You should press
NOTE: If the sound does not sound immediately, please try to be patient and do not keep
stabbing the key as this will cause the disk head to go off searching and searching for the
selected sample in a frenzy which may cause problems!
and hold
the AUDITION SAMPLE key until the sound is played.
34 Version 1.21
Page 45

s5000
/
s6000
SELECTING DISKS
If you have more than one disk drive attached, you may select the one you want to load from using
the DISK LIST. This is accessed by pressing F8 in the main LOAD page and you will something
like this screen:
If a disk has partitions, you will see something more like this:
LOAD
Disks and their partitions are shown as ‘virtual’ drives giving you direct access to them thus making
access to sounds very quick.
The disk you want to use is selected simply by touching the key to its left (or using the SCROLL
KEYS on F15/16 or using the DATA wheel) and pressing SELECT DISK (F8). This will select the
disk and automatically return you to the LOAD page where you will see its contents.
TIP: You can select a disk very quickly simply by ‘double clicking’ the key to its left.
**** VERY IMPORTANT NOTE ****
If you have removable disks of any kind (Zip, Jaz, CD-ROM, etc.) and change
the disk,
you must always press UPDATE on F11 to refresh the list.
Failure to do so may result in unpredictable behaviour.
If you need to find out about the selected disk, use GET INFO (this is described on the next page).
If you do not wish to select another disk, simply press CLOSE LIST (F9).
Version 1.21 35
Page 46

LOAD
s5000
/
s6000
DISK TOOLS
Back in the main LOAD page, there are other functions you may use. The DISK TOOLS drop down
menu on F9 shows this:
DISK INFO
This will display a pop-up giving information on the currently selected drive. For example:
CLEAR MEMORY
It is possible to clear the contents of memory using this key (the same function also appears at the
LOAD prompt).
VIEW ITEMS
These keys allow you to view file sizes or the date and time they were saved in the file list. For
example, with DATE+TIME selected:
To keep clutter on the screen to a minimum however, you may prefer to view NAME ONLY.
36 Version 1.21
Page 47

s5000
/
s6000
MULTI
Once you have some sounds in memory, you will want to play them. This is done in the MULTI
mode.
Programs may be played singly or in combination and the MULTI mode has up to 128 ‘parts’ slots into which programs may be assigned and typically , this is used to sequence several sounds
multi-timbrally by setting each part to be on a different MIDI channel.
MULTI
However, you don’t
to it if you want and just play that from your keyboard or whatever. In a similar way, it is also
possible to assign several programs to a multi and set them to the same MIDI channel so that you
can layer two or more programs on top of each other for a rich, expansive (expensive?) sound.
Furthermore, you may set low and high keyboard ranges for each part so that sophisticated keyboard
splits may be created.
Each part may be routed to one of the four effects channels and you have a total of four effects that
can be applied to the parts in the multi7. More than one part may be routed to any one of the
effects channels so that parts may share effects and each part has its own effects send level.
Effects settings are stored with each multi so that as you select different multis, so the correct
effects are recalled.
However, you may prefer to use your sampler with external effects processors using a mixing
console. To accommodate this, each part may be routed to the individual outputs. By doing this,
each part may have its own mixer channel where it can be EQ’d, mixed, panned and effected
using your favourite outboard effects processors. The individual outputs may be configured as
stereo pairs and/or as individual mono outputs.
Of course, a combination of these is possible and some parts may be on unique MIDI channels
whilst others share the same channels for layering and/or key splits. Some parts may be routed to
the internal effects processor in the S6000 whilst others are sent out via the individual outputs for
processing on the mixing console.
As you can see, the MULTI mode is very flexible.
have
to use the multi mode multi-timbrally - you can assign just one program
Furthermore, you may load up 128 multis into memory allowing you to switch from one setup of
sounds to another very quickly.
7 On the S5000, the EB20 is optional.
Version 1.21 37
Page 48
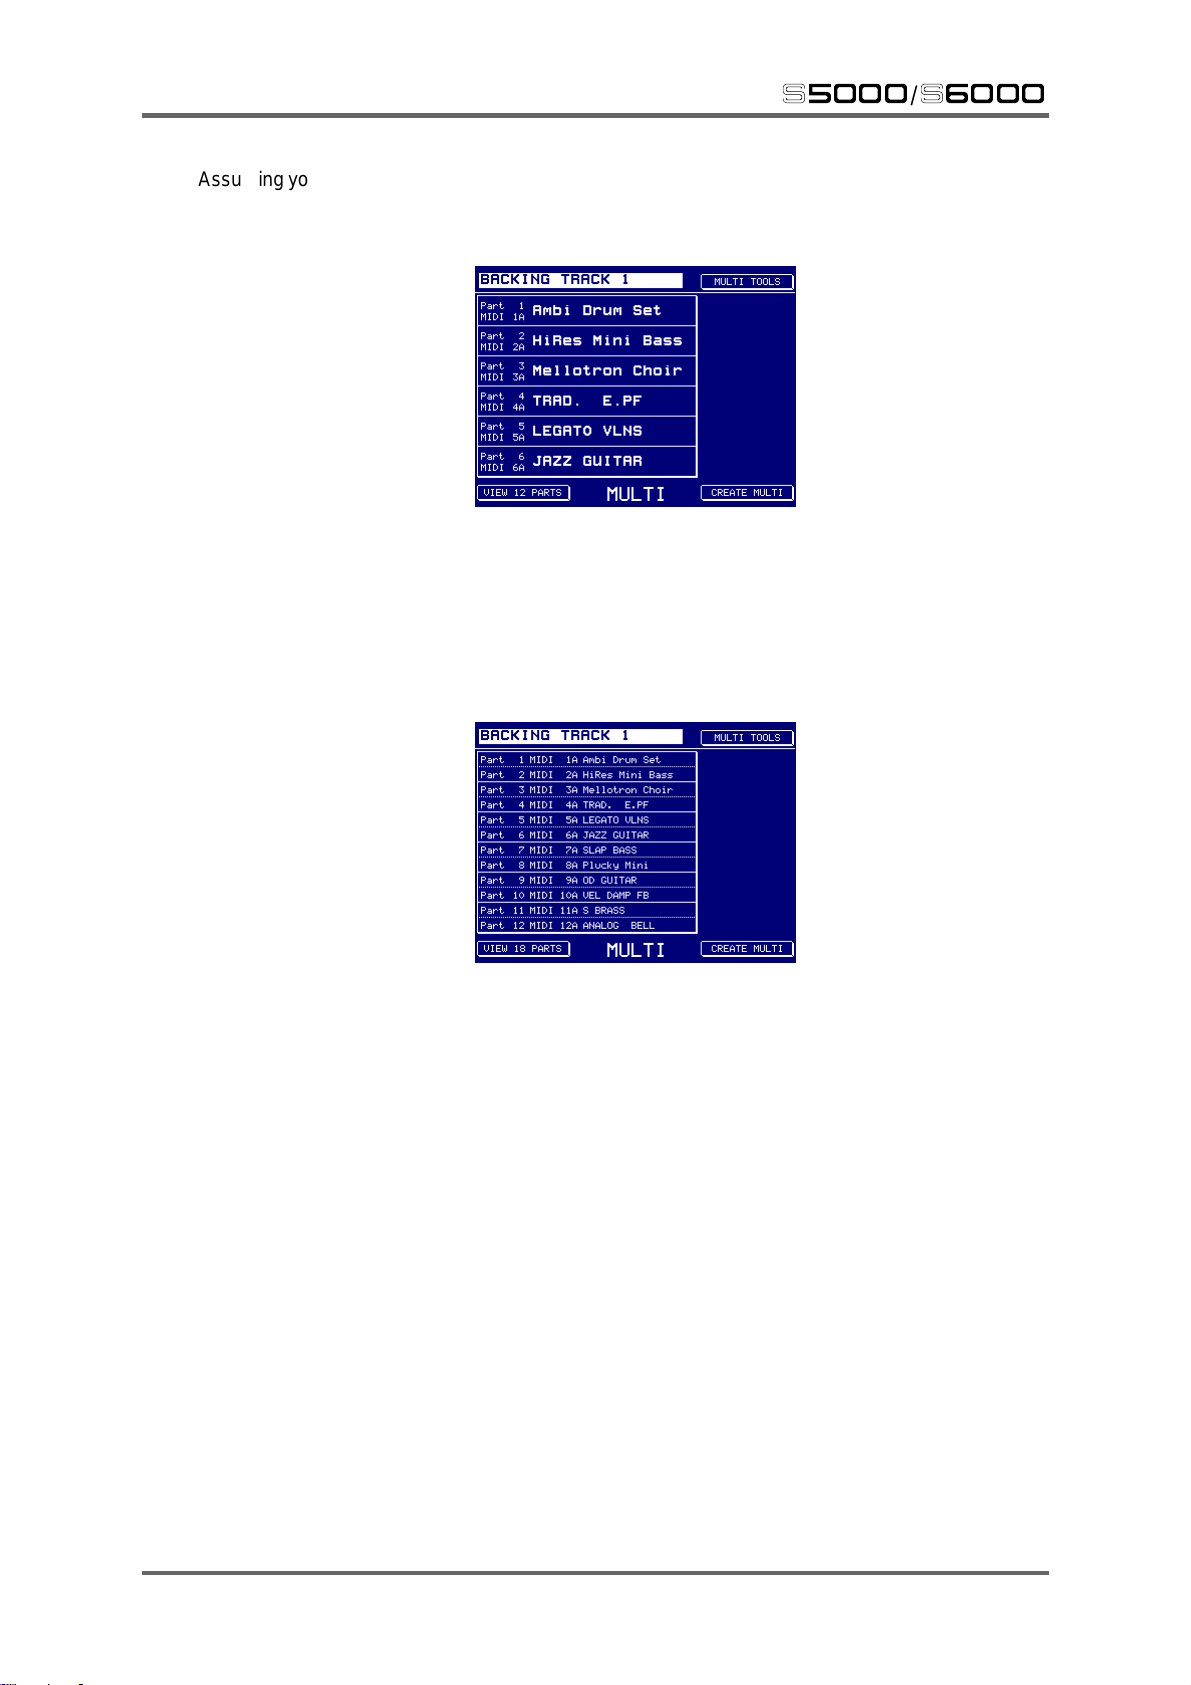
MULTI
Assuming you have loaded a multi and its associated programs, pressing MUL TI will show something
like this:
If you have more than one multi loaded, they are selected using F1 and the DA T A wheel (or can be
selected in the MULTI LIST).
Down the left hand side in a large, easily read font are the programs assigned to the first six parts.
However, you may select to view more parts if you wish by pressing VIEW 12 PARTS found on F8:
s5000
/
s6000
38 Version 1.21
Page 49

s5000
/
s6000
Or you may view 18 parts:
And you may revert back to 6 parts:
MULTI
Version 1.21 39
Page 50

MULTI
s5000
/
s6000
SELECTING PARTS
Parts are selected simply by pressing one of the function keys F2-F7 alongside it. For example,
pressing F2 would select Part 1 - DRUMS 1:
The part’s parameters appear down the right hand side of the screen where you may set level,
output assign, FX send level, etc.. The logic for selecting parts is as follows:
• When you press any F key 2-6, the part’s
through parts in the multi quickly and easily using the DATA wheel. You may also use the
SCROLL UP/DOWN keys to step through each part though this may be a slow way to move
through a multi with 128 parts!
number
field is always selected so that you can scroll
NOTE: When viewing 12 parts, the function keys select the parts in pairs. Press the function
key once to select the first part of the pair, then again to select the second.
When viewing 18 parts, the function keys select the parts in ‘threes’. Press the function key to
select the first of the three parts, again to select the second and again to select the third.
• When the cursor is on the number field as shown on the preceding page, press the CURSOR
> key to move to the part
name
field to assign a program to that part:
You can use CURSOR < to move back to the number field if you wish or you can just hit the F key
again.
When the part name field is selected as shown above, using the SCROLL DOWN/UP keys keeps
the cursor in the name field for every part. In this way, you can assign programs to parts very
quickly . For example, first press F2 to select Part 1 then press CURSOR > to select the name field
and assign the program. Now press scroll down, assign program, scroll down, assign program,
etc.).
40 Version 1.21
Page 51

s5000
/
s6000
MULTI
• When a part
parameter
is selected (e.g. LEVEL), the whole part box is highlighted:
In this situation, you can use the SCROLL UP/DOWN keys to select another part if you wish to edit
the same parameter for that part. For example, if, in the above screen shot, you wanted to balance
the levels for Parts 6, 7, 8, etc., you could use SCROLL DOWN very effectively:
Version 1.21 41
Page 52

MULTI
s5000
/
s6000
CREA TING A MUL TI
If you have just switched the S6000 on (or you loaded only programs and samples in the LOAD
mode) and no multis are loaded, pressing MULTI will show this screen:
To create a multi, you must first press CREATE MULTI (F16). You will receive this prompt:
A default name is provided by the S6000’s autoname function. You can use this name or you may
enter a name of your choosing either from the front panel using the cursor </> keys in conjunction
with the DATA wheel or, more conveniently, using an external QWERTY keyboard. Whether you
stick with the default name or enter a name of your own choosing (for example, BACKING TRACK
1), you have a choice of whether you want to create a multi with 32, 64 or 128 parts using F14 F16. Pressing one of these will display the new empty multi:
The new multi is initialised and Parts 1-16 are assigned to MIDI channels 1A-16A and Parts 17-32
are assigned to MIDI channels 1B-16B. If you created a 64 part multi, parts 33-48 will be assigned
to MIDI channels 1A-16A and parts 49-64 will be assigned to MIDI channels 1B-16B. A 128 part
multi will be similarly assigned. You may now fill those parts with sounds to play.
42 Version 1.21
Page 53

s5000
/
s6000
ASSIGNING PROGRAMS TO PARTS
If you already have some programs loaded into memory, these may be assigned to parts very
quickly and easily . First, touch the key to the left of the part you wish to assign the sound to. E.g..
Part 1:
Now press the CURSOR > key below the DATA wheel:
MULTI
The cursor moves to the program name field. Now simply rotate the DATA wheel to scroll
through the programs that are in memory until the one you wish to assign to the part is selected.
For example:
It could be that you only want to play the one sound in isolation and so this may be all you need to
do. However, to add more sounds to the multi, simply select another part and repeat the process
described above.
TIP: Once on the program name field, you may use the SCROLL UP/DOWN keys to move up
and down that column.
TIP: You may ‘cancel’ a part’ s program assignment at any time by turning the DA T A wheel fully
counter clockwise (it may take a few turns depending on how many programs are in memory).
Fully CCW, the part is effectively ‘emptied’ with no program assigned to it.
Version 1.21 43
Page 54

MULTI
s5000
/
s6000
EDITING PARTS
Once you have one or more programs assigned to parts, you may want to edit them. MUL TI mode
allows you to edit parameters such as part level, pan/balance, output assignment, tuning, effects
send, MIDI channel, etc.. We will use the following multi as our example:
Let’s imagine we want to edit Part 1. First select Part 1 by pressing the key to its left. It will become
highlighted:
Down the right hand side of the screen are the most commonly used parameters you may want to
edit. These are selected and edited simply by touching the keys to their right and turning the DA T A
wheel.
44 Version 1.21
Page 55

s5000
/
s6000
For example, to set the part’s level, simply press PART LEVEL (F10):
The parameter highlights and is immediately available for editing. Y ou will also note that the whole
of the part field is highlighted to show clearly which part you are editing.
Other parameters are selected and edited in exactly the same way. The parameters are:
PART LEVEL Sets the level of the selected part.
OUTPUT Allows you to route the selected part to any pair of outputs or individual
output. The range is 1/2~15/16 in pairs and then 1, 2, 3...~16 as individual
mono outputs.
MULTI
It is possible to route a stereo program to a single, individual output.
This will route both sides of the stereo image to the selected output in
mono.
Please note, however, that in this case, the PAN/BALANCE control is
still a BALANCE parameter even though the signal is effectively mono.
Setting it to L50 means you will only hear the left channel through the
single output. Likewise, setting it to R50 means you will only hear the
right channel. Setting it to MID will allow you to hear both channels equally
though summed in mono though the selected single output.
NOTE 1: On the S5000, unless the optional output expander is installed, the range is 1/2 ~ 7/
8 in pairs and then 1, 2, 3,...~8 individual outputs. Y ou may install the optional output expander
to have 16 outputs.
NOTE 2: Outputs 13-16 are also used as the effects sends. Therefore, any sounds routed to
the effects will appear at these outputs. If you wish to utilise all 16 outputs, you should not use
the internal effects8. Similarly, if you are using the internal effects, you should avoid using
outputs 13-16. This is a hardware restriction that cannot be overcome in software.
8 Ideally, you should also turn the effects off in UTILITIES > FX IN/OUT > FX OUTPUT.
Version 1.21 45
Page 56

MULTI
EFFECTS SEND This sets the effects send level of the part.
s5000
/
s6000
NOTE: On the S5000, the EB20 effects processor needs to be installed.
FINE TUNE This allows you to tune the part +/-50 ‘cents’ or +/-1 semitone.
MIDI CHANNEL This allows you to set the selected part’s MIDI channel. You may set 1-
16A and 1-16B.
Those, then, are the key parameters for the parts. To edit them, simply select the part you want to
edit, then select the parameter and turn the DATA wheel.
TIP: Once you have selected a parameter to edit, you can use the SCROLL UP/DOWN keys
to set the same parameter for other parts.
For example, to set the levels of parts, select one part, select (and set) the LEVEL parameter
and then use the SCROLL keys to set LEVEL for the other parts. In this way, you don’t have to
keep jumping between the soft keys on the left and those on the right of the screen.
46 Version 1.21
Page 57

s5000
/
s6000
WINDOW FUNCTIONS
There are times when you will want access to further functions. These are available using the
WINDOW function.
Any part parameters have the ‘window’ icon ( ) in them indicating that further functions are available
and these can be accessed by pressing the yellow WINDOW key. The window functions are as
follows.
PART LEVEL WINDOW
MULTI
The parameters are:
PART LEVEL A duplication of the main PART LEVEL parameter.
OUTPUT This is a duplication of the main OUTPUT parameter described on the
previous page and is included here for convenience.
PAN/BALANCE This allows you set the pan position of mono programs or the stereo
balance of stereo programs. If an individual output is select (e.g. 1, 2, 3,
4, etc.), this parameter has no effect.
MUTE PART This allows you to mute a part without having to disrupt mix settings.
SOLO PART This will mute all other parts so that you may hear the selected part in
isolation.
OUTPUT WINDOW
This is actually identical to the P ART WINDOW . Please see the preceding page for a description of
the parameters.
Version 1.21 47
Page 58

MULTI
EFFECTS SEND WINDOW
The parameters are:
EFFECTS CHANNEL You may select OFF, FX 1, FX 2 (the two multiFX channels), RV3 or
RV4 (the two reverb only channels).
s5000
/
s6000
EFFECTS SEND This is a duplication of the main EFFECTS SEND parameter.
NOTE 1: It is also possible to send individual keygroups to the FX. This can be useful in, say ,
a drums program where each individual drum can have its own effect type and send level. Of
course, other types of programs may also use this function.
This is mentioned here simply because you may load a sound, assign it to a part, set the
effects channel and send level in this window but get unpredictable results. For example, you
may load something, route it to RV4 but find that multiFX1 is applied. The reason for this will
almost undoubtedly be that the original programmer assigned the program’s keygroups to
multiFX1 in EDIT PROGRAM (for some reason!).. If you do experience this, go to EDIT P ART
(or EDIT PROGRAM) and check the OVERIDE FX parameter in the main KEYGROUP page.
NOTE 2: On the S5000, even if the EB20 is not installed, you still have access to these
parameters even though they have no function.
48 Version 1.21
Page 59

s5000
FINE TUNE WINDOW
FINE TUNE This is a duplication of the main FINE TUNE function.
TRANSPOSE This allows you to tune the part in semi-tone steps.
/
s6000
MULTI
NOTE: You will note that the TRANSPOSE parameter is not a pitch shift function but a MIDI
transpose function - this overcomes the problem of playing back samples out of their range.
What this function does is introduce an offset so that with a +12 setting, if you play C3 on the
keyboard, this is offset to play the samples on C4 - it is not playing the samples on C3 an
octave higher and hence introducing transposition distortion of any kind.
LOW NOTE/HIGH NOTE This sets the low and notes for a part allowing you to create
keysplits. To create a keysplit, you would normally assign two
programs to two parts, assign them to the same MIDI channel
and then set an appropriate keysplit (i.e. Part 1: C0-B2 and Part
2: C3-G8).
All windows are closed either by pressing CLOSE WINDOW (F9) or by pressing the WINDOW key
again.
Version 1.21 49
Page 60

MULTI
s5000
/
s6000
EDIT PART
Whilst it is possible to edit level, pan, effects send, tuning and other ‘superficial’ program parameters
within a part, sometimes you need to delve further into a sound. Maybe a string part’s attack is too
slow and it’s not sitting well in the track or maybe its release is too long causing it to ‘blur’ the part.
Maybe a piano is too bright or a synth bass has too much (or not enough) resonance. This level of
editing is done in EDIT PROGRAM.
However, in cases like this, you may need to hear the other parts playing as you adjust program
parameters - in the example of the string attack, you will want to hear the track playing so as to
adjust the attack time in context until the part is sitting correctly in the track.
This is done using EDIT PART.
This is slightly different to EDIT PROGRAM. When using EDIT PART , all editing is done
context of the current multi
You could use EDIT PROGRAM if you wanted to but the program would be heard in isolation and
out of context making adjustment potentially difficult.
T o edit a part at the program level, first select the part you want to edit and press EDIT PART (F8).
You will be taken to a variation of the EDIT PROGRAM screens where you may edit the sound at
the program level. Functionally, EDIT PART and EDIT PROGRAM are almost identical except for
the following points:
• In EDIT PART, you hear and edit the program in the context of the current multi (in EDIT
PROGRAM you hear it in isolation and out of context).
• In EDIT P ART, you cannot select another program for editing (in EDIT PROGRAM, any program
can be selected and edited).
Please see the section EDIT PROGRAM for more details on program editing.
and as you edit the program, you can also hear the other parts playing.
within the
50 Version 1.21
Page 61

s5000
/
s6000
MULTI TOOLS
With the cursor on the multi name (i.e. press F1), pressing MULTI TOOLS on F9 shows this:
The functions are:
GET INFO
MULTI
Shows how many multis and programs are currently in memory and how memory is used/
available. The current operating system version number is also shown as the time and
date:
Version 1.21 51
Page 62

MULTI
s5000
/
s6000
QUICKLOAD
In the MUL TI TOOLS menu or in MULTI LIST, QUICKLOAD allows you to load multis quickly and
easily. Pressing QUICKLOAD would show something like this:
This is showing you all the multis in a folder called “MINIMOOG STUFF” which is on a removable
hard disk called “S5000 DISK”. You may close the currently active folder and select and open a
different one and/or you may also select another disk to load from using DISK LIST on F8.
In QUICKLOAD, you only see the items that are appropriate to load and so, in this case, you only
see multis. To load them, simply select them and press LOAD MULTI (F14). You will receive this
prompt:
Using the ‘checkboxes’ on F6 and F7, you may select whether you want to load just the selected
multi or all the multis in the current folder. You may also select whether you want to load the
programs and samples associated with the multi(s). The default for this is ‘checked’ however , you
may override this if you want to load an empty multi to maybe use as a template for a new one.
The multis will be stored in memory in the order in which they are loaded. If ALL MUL TIS is selected
as the load option, the multis will be loaded in the order in which they appear on disk.
If you change your mind, press CANCEL LOAD to abort and press EXIT to leave QUICKLOAD.
52 Version 1.21
Page 63

s5000
/
s6000
QUICKSAVE
Pressing QUICKSAVE will show this screen:
The currently active multi is selected to save. You see its name and the folder it will be saved to.
Y ou also have the option to save all the multis in memory if you prefer (or just the currently selected
one) with or without the associated programs and samples.
MULTI
The CHECK NAMES key allows you to disable the file checking - with it ON (checked ), if a multi
of the same name exists in the selected folder, you will be prompted and asked if you want to
overwrite it or not. With CHECK NAMES switched OFF (checked ), files of the same name will
automatically be overwritten without prompting you.
The defaults are sensibly chosen to save just the selected multi and all its programs and samples
(though to save time, if you have previously saved all the programs and samples and are happy
that they are ok and/or haven’t been edited or changed in any way, you can disable PROGS/
SAMPS and just save the multi which will be very quick).
Press EXECUTE to save; CANCEL SAVE to abort.
NOTE: The folder the multi(s) will be saved to is shown. If this is not the right one, you should
press CANCEL SAVE and use the actual SAVE function to navigate your way to the folder
where you want the multi to be saved. The ‘full’ SAVE function is described in a separate
chapter.
Version 1.21 53
Page 64
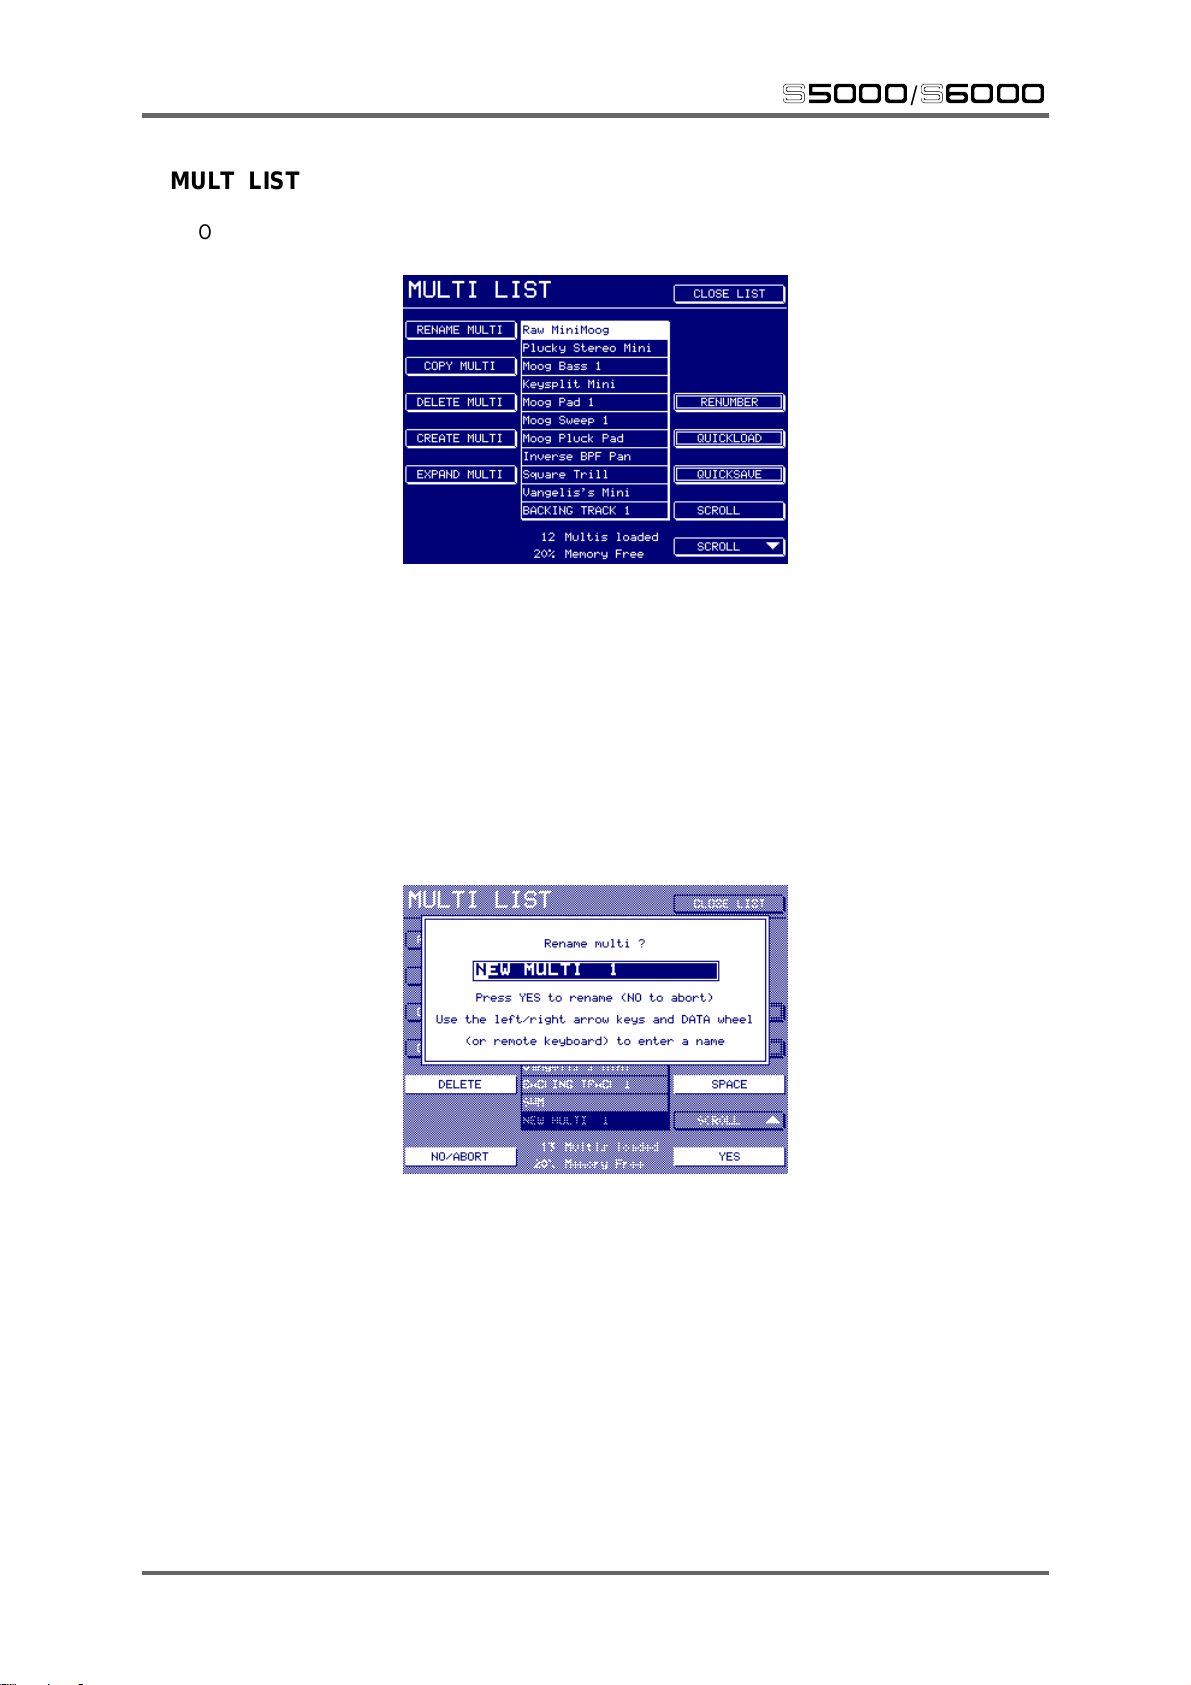
MULTI
s5000
/
s6000
MULTI LIST
Once you have some multis loaded, you may view them in MULTI LIST:
The currently active multi is highlighted.
You may select multis to play from this page. Simply scroll down to the multi you want using F15/
F16 and either press CLOSE LIST or press the main MULTI mode key. The multi you have
highlighted in the MULTI LIST page will become the currently active multi.
You may also rename, copy, delete, create and renumber multis in this page.
RENAME MULTI Pressing RENAME will pop-up this prompt:
You may enter a new name in the usual manner using the cursor </>
keys and the DATA wheel or more conveniently from an external
QWERTY keyboard. If you are entering the name from the front panel,
you may find the DELETE and SPACE keys a convenient way to delete
characters or add spaces.
54 Version 1.21
Page 65

s5000
COPY MULTI Pressing COPY MULTI will pop-up this prompt:
DELETE MULTI Pressing DELETE MULTI will pop-up this prompt:
/
s6000
The multi is given a default ‘autoname’ but you may enter a new name if
you prefer in the normal way.
MULTI
Y ou can use the check boxes to select whether or not the programs and
samples associated with the multi will also be deleted.
NOTE: With the PROGS/SAMPS checkbox ticked, if any programs in the selected multi are
used in one or more multis in memory , those programs will not be deleted as this would corrupt
the other multis.
However, if the programs and/or samples are not used by any other multis, they will be deleted.
You may also select to delete all multis in memory.
NOTE: Deleting ALL MULTIS and also selecting to delete the programs and samples is the
equivalent of clearing the memory completely
Pressing DELETE will initiate the delete function. CANCEL will close the
prompt.
CREATE MULTI This allows you to create multis. The function is identical to CREATE
MULTI in the main multi page.
Version 1.21 55
Page 66

MULTI
EXPAND MULTI
This allows you to change the number of parts in a multi. Pressing this
will pop-up a prompt and you have the option to expand the currently
selected multi to 64- or 128-parts (or to cancel). If the multi already has
64- or 128- parts, you will be prompted accordingly.
This is useful in the event of you accidentally creating a 32-part multi
when in fact you wanted a 64- or 128-part multi or in cases where you
reach the limit of the current multi and need to add more parts.
RENUMBER MULTI This takes you to a new page where you may change the MIDI program
number of the multis in memory. Pressing RENUMBER will show
something like this screen:
s5000
/
s6000
MIDI program numbers are used in order to select multis remotely via
MIDI. For example, in a live situation, you may wish to use MIDI program
change to select multis remotely from your keyboard or sequencer. Multis
may be given a number 1-128 or OFF.
To renumber a multi, simply move the cursor to the multi you want to
renumber and use the DATA wheel to set the appropriate number (or
switch it to OFF).
for example, “GIG FOLDER”). When you come to load that folder prior
to your gig, they will load in the correct order 1-XXX.
Pressing RENUMBER 1-XXX (F13) will renumber all the multis in memory
sequentially 1-128 (or whatever the upper limit is of the number of multis
in memory). The multis will be renumbered in the order in which they
appear in the list. For example:
If there are more than 128 multis in memory, any above 128 will be
renumbered to 128. When you press RENUMBER 1-XXX, you will receive
a prompt asking you to confirm that you wish to proceed. Respond
accordingly.
56 Version 1.21
Page 67

s5000
NOTE: If two (or more) multis are assigned the same program number, if that MIDI program
number is sent to the sampler, the first multi with that number will be selected.
NOTE: The numbers assigned here apply equally to bank numbers should you choose to
select multis using BANK SELECT in UTILITIES > MIDI SETUP > MULTI SELECT (see
below).
TIP: If you are using this function for live work, to set the multis in some sort of sensible, logical
order, load each one individually in the order you want them to appear . Then use RENUMBER
1-XXX to number them sequentially in that order and re-save them back to a new folder (called,
for example, “GIG FOLDER”). When you come to load that folder prior to your gig, they will
load in the correct order 1-XXX.
/
s6000
MULTI
Pressing SET ALL TO OFF will (not surprisingly!) turn all program
numbers off. This way, you can clear all program numbers so that it is
easier and clearer to renumber just those that will be affected by MIDI
program change. When you press SET ALL TO OFF, you will receive a
prompt asking you to confirm that you wish to proceed. Respond
accordingly.
Version 1.21 57
Page 68

MULTI
s5000
/
s6000
SELECTING MULTIS REMOTELY VIA MIDI
If you have numbered multis to select them remotely via MIDI, you also need to specify which MIDI
channel will be used for the multi’s program change command. This is set in the UTILITIES mode
in the MIDI page:
First it is necessary to enable remote selection of multis by switching MUL TI SELECT (F3) to ON.
Y ou must also set the MIDI channel you want the multi select MIDI program change commands to
be received on using MULTI SLCT CH (F4). Once set, any MIDI program change commands
received on that channel will cause the appropriate multi to be selected.
NOTE: The MIDI channel designated for receiving MIDI program change commands for remote
multi selection is automatically disabled for selecting programs via MIDI program change
commands. Therefore, be sure to set a MIDI channel that you know won’t be required for
selecting programs.
The MUL TI SELECT parameter also allows you to use MIDI BANK change commands to remotely
select multis. In this case, the numbers set in RENUMBER still apply but they will be selected
using the MIDI bank change command instead of MIDI program change. This has the advantage
that all 16 MIDI channels are still available for selecting programs within parts.
58 Version 1.21
Page 69

s5000
/
s6000
PART TOOLS MENU
When a part is selected, F9 is labelled PART TOOLS and, like MULTI TOOLS, it is a drop down
menu which offers further functionality. Pressing it displays this:
The functions are:
MULTI
PROGRAM LIST
This takes you to a page where you may see the programs currently loaded into memory:
This is not unlike MULTI LIST and you may rename, copy, delete and create programs.
RENAME PROGRAM This pops up a prompt and you may rename the program:
You can name the program in the usual way.
Version 1.21 59
Page 70

MULTI
COPY PROGRAM This pops up a prompt and you may copy the selected program:
You may use the name automatically generated by the copy process or
you may enter your own.
DELETE PROGRAM You may delete the selected program:
s5000
/
s6000
The SAMPLES checkbox on F14 allows you to select whether you also
want to delete the samples associated with the selected program. With
it checked, the samples will be deleted.
NOTE: If any samples are used by any other programs currently in memory, those particular
samples will not be deleted.
CREATE PROGRAM You may create a new program:
60 Version 1.21
Page 71

s5000
/
s6000
PURGE This useful function deletes all programs and samples not currently being
used by any multis in memory (these programs are referred to as
‘orphans’):
Y ou may end up with ‘orphans’ in memory when you load several sounds
to try out. For example, when building up a multi, you may load in a few
drums programs to see which one you like. Once you have settled on
the one you want to use, all the others are redundant. Rather than deleting
each one manually, you can use PURGE to get rid of these and make
more memory available.
MULTI
Whilst the PURGE function is useful for clearing orphan programs and their samples
from memory, it could be that you have programs ‘outside’ the multis that are intended to be
selected via MIDI program change within the parts.
Be careful with your use of PURGE as you may accidentally delete these.
Version 1.21 61
Page 72

MULTI
CONVERT -L/-R This allows you to convert ‘old’ Akai -L/-R stereo samples into interleaved
stereo .WAV samples. Pressing this pops-up this prompt:
To continue, press YES (or NO to cancel).
The process will examine the program and convert each -L/-R sample
into a single stereo file. It will remove the original samples from the
program (but not from memory) and will also make the appropriate
adjustments to the keygroup zones to which they are assigned (i.e.
instead of two mono zones panned hard left and right, you will end up
with one stereo zone panned centrally).
s5000
/
s6000
If the process is successful, you will be returned to the PROGRAM LIST
screen.
62 Version 1.21
Page 73
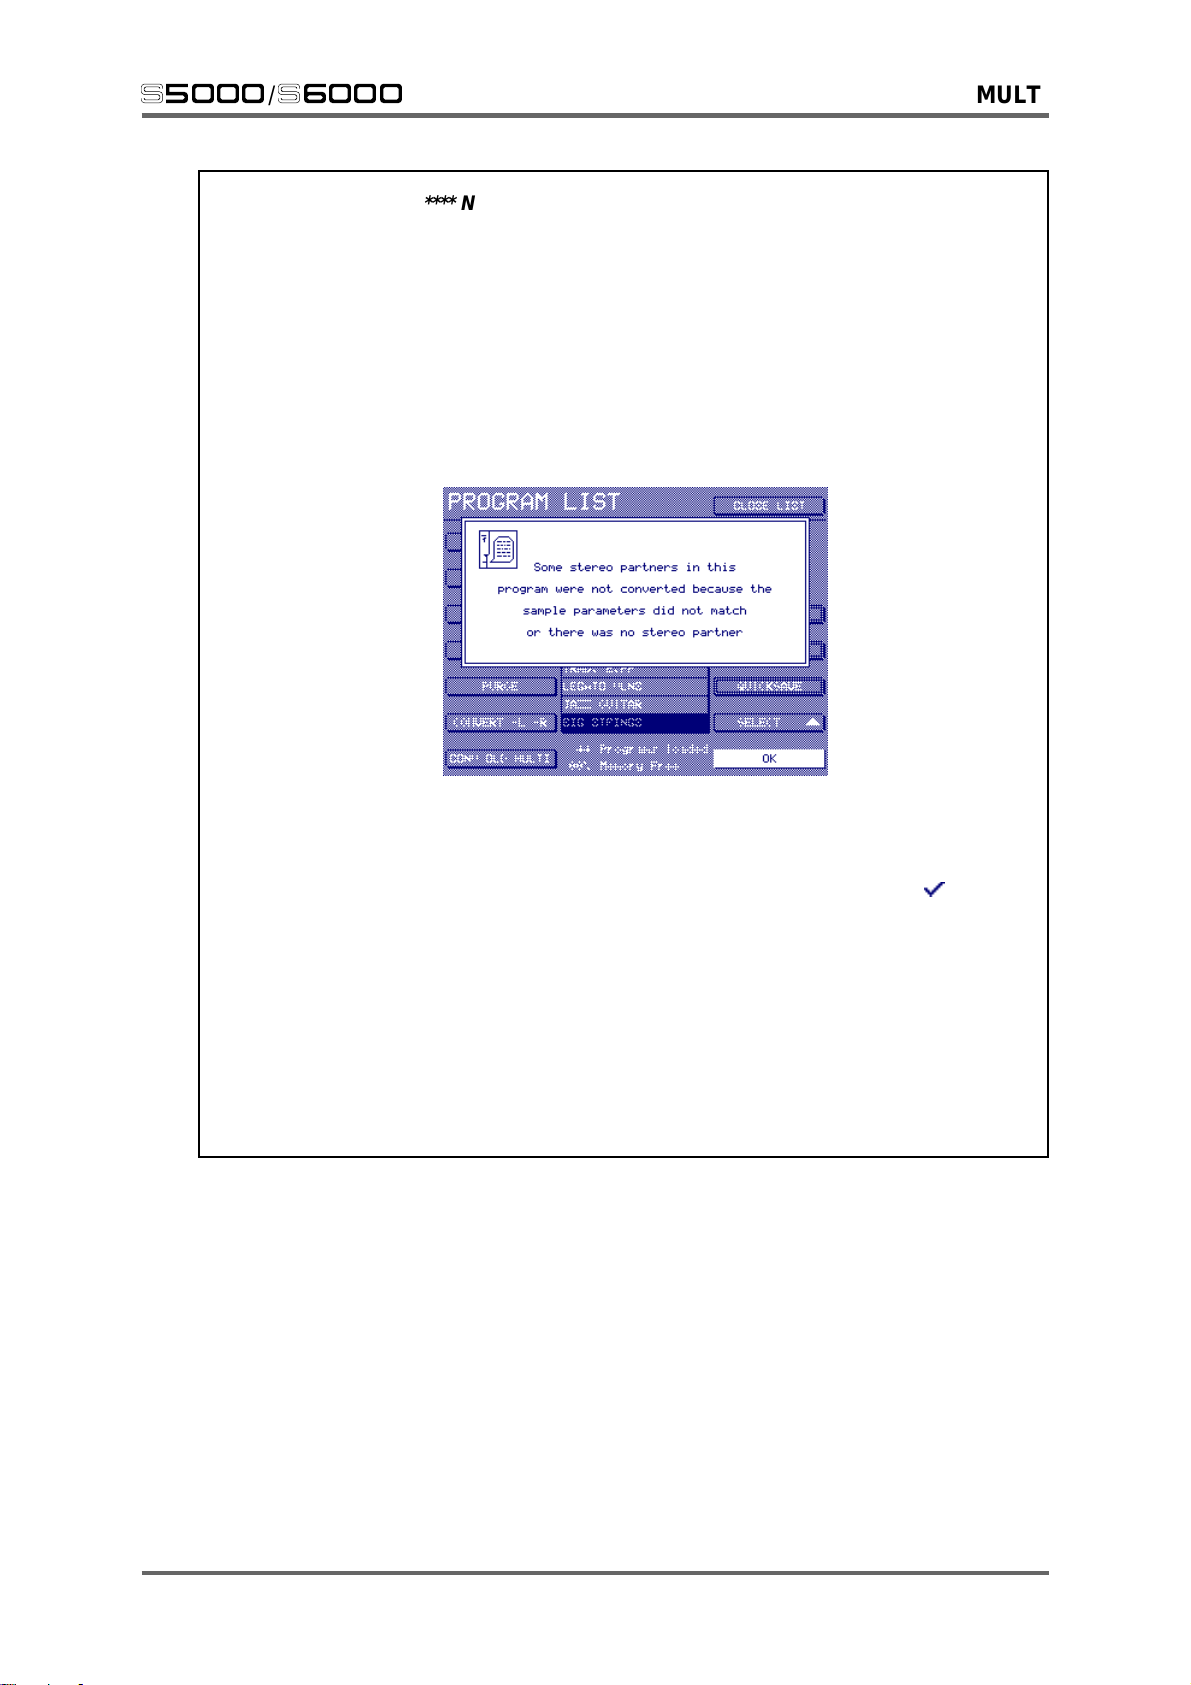
s5000
The process is looking for identically matching pairs.
Because it is not possible to have separate start and end times of left and right loop points in
an interleaved stereo sample, both samples have to have identical settings. This is normally
the case with stereo samples as any difference in start times, loop length or position will result
in the stereo imaging being inaccurate.
If the process finds a stereo pair of samples that do not match exactly, you will receive the
following prompt:
/
s6000
MULTI
**** NOTES REGARDING CONVERT -L/-R ****
You should press OK and identify those samples that do not match and make the necessary
adjustments.
Alternatively , you can try again but this time switch OVERIDE to ON (i.e. checked ). This will
run the process but will automatically copy the parameters from the left channel to the right
channel. Please note, however, that this may upset the loop on the right channel which may
cause clicks or other loop related glitches. In this case, you are advised to re-loop the new -S
stereo sample created by the process.
It must be said that this function assumes that the original sample editing was done in ‘stereo’
and so, to preserve stereo phase coherency, start times of the left and right channels should
be the same as should loop start and end times. If, however, some ‘mono’ editing was done on
each ‘leg’ of the stereo sample by the original programmer (which, ideally, it shouldn’t have!),
the success of this function cannot be guaranteed.
Version 1.21 63
Page 74

MULTI
CONV OLD MULTI This allows you to convert ‘old’ Akai ‘multis’ or layers into new, S5/6000
format multis. For newcomers to the S5/6000, to understand this function,
a quick history lesson is required!
On the S1000, S1100 and S3000, multis and layers were achieved by
setting several programs to the same program number. In the case of
multi-timbral setups, each program would be given its own unique MIDI
channel or, in the case of layering, programs would share the same
MIDI channel. Thus, you may have:
*1 DRUMS 1 MIDI 1
*1 GR PIANO MIDI 2
*1 E.PIANO MIDI 3
*1 SLAP BASS MIDI 4
*1 BIG STRINGS MIDI 5
*1 BASS SYNTH 4 MIDI 6
Etc..
Although the concept of multis was introduced on the S2000, S3000XL
and S3200XL, for the sake of ‘legacy’, this feature was retained (and,
indeed, some people continued to use it despite the convenience of the
multi). The CONVERT OLD MULTI allows you to convert such setups to
a new S5/6000 format multi. It works as follows:
s5000
/
s6000
Imagine you have loaded an ‘old’ S1/2/3000 multi. You will have several
programs all sharing the same program number:
64 Version 1.21
Page 75

s5000
/
s6000
MULTI
You can confirm this by pressing RENUMBER:
In either screen, you can convert such a setup simply by moving the
cursor to any program sharing the same program number and pressing
CONVERT OLD MULTI. You will receive this prompt:
Press ADD TO CURRENT to add the selected program number to the
currently selected multi or press CREATE NEW to create a new multi to
add the program(s) to. If you create a new multi, its name will be that
shown in the prompt (i.e. S1-3K MULTI 1).
The multi will now contain all programs of the same number and the
MIDI channels, levels, pan position, output assignments, tuning, etc.,
used in the ‘old’ multi/layer will automatically be set and the new format
multi should play pretty much the same as the original would on an S1000,
S3000 or whatever.
NOTE: The function is not foolproof. For example, you may load in an old S1000-style ‘multi’
numbered, say , #3. If any other programs with that number are already loaded, they too will be
converted in this process. As such, the function is best used in the RENUMBER page so that
you can see programs’ numbers. The RENUMBER function is described below.
Version 1.21 65
Page 76

MULTI
RENUMBER This takes you to a new page where you may change the MIDI program
number of the programs. Pressing RENUMBER will show something
like this screen:
Programs may be given a number 1-128 or OFF.
MIDI program numbers are used in order to select programs within a
part remotely via MIDI. For example, you may have a stereo acoustic
piano sound in Part 2/MIDI channel 2 that you want to use in the verses
of a song but which you want to change to an electric piano sound in the
chorus. By issuing an appropriate MIDI program change command on
channel 2, you can achieve this and the two will swap over when you
want them to. For example, if STEREO PIANO is MIDI program number
#5 and ELECTRIC PIANO is MIDI program #12 - by issuing program
change commands #5 and #12 on MIDI channel 2 at the appropriate
moments in the song, you can switch between these sounds.
s5000
/
s6000
However, a problem exists when you load these sounds into memory in
that, for example, the STEREO PIANO sound you loaded could have
MIDI program number #1 and the ELECTRIC PIANO sound could be
program #6 (or they could both be program #1 or OFF or whatever
depending on where they were loaded from). In other words, in order for
them to be selected correctly via MIDI program change, you need to
renumber them to the correct MIDI program numbers.
Another potential problem exists. You may renumber the stereo piano
and electric piano correctly but may find that other programs with these
numbers already exist in memory. To prevent a conflict in these
circumstances, other programs may need to be renumbered.
There is another problem too! The range of MIDI program numbers is 1-
128. However, it is possible to load many more programs than this into
the S6000’s memory and, theoretically, you may have hundreds of
programs loaded. However, there may only be a handful of programs
you need to change within a multi using MIDI program change.
The RENUMBER screen allows you to renumber those programs that
will be required to be changed via MIDI program change whilst switching
those that don’t to ignore such changes.
66 Version 1.21
Page 77

s5000
/
s6000
MULTI
To renumber a program (or programs), move the cursor to the program
you want to renumber and use the DATA wheel to set the appropriate
number (or switch it to OFF). Once they have been renumbered, simply
leave the RENUMBER page - the new numbers will be set.
Pressing RENUMBER 1-XXX will renumber all programs sequentially
1-128 (or whatever the upper limit is of the number of programs in
memory). The programs will be renumbered in the order in which they
appear in the list. If there are more than 128 programs in memory, any
above 128 will be renumbered as 128.
When you press RENUMBER 1-XXX, you will receive a prompt asking
you to confirm that you wish to proceed. Respond accordingly.
Pressing SET ALL TO OFF will (not surprisingly!) turn all programs
numbers off. This way, you can clear all program numbers so that it is
easier and clearer to renumber just those that will be affected by MIDI
program change.
When you press SET ALL TO OFF, you will receive a prompt asking you
to confirm that you wish to proceed. Respond accordingly.
KNOWN PROBLEMS WITH MIDI PROGRAM CHANGE
This scheme is far from foolproof and there are some problems associated with program
change. Some are unique to samplers whilst others are common to all sound modules. These
are listed here:
• If two programs share the same program number and you select that program number via
a MIDI program change command, the first program found will be selected.
• If several parts share the same MIDI channel and a program change command is sent on
that channel, all parts will select the one sound which will appear in all four parts.
• If a program is renumbered (perhaps because another program has that program number),
you will need to change the program change number on the sequencer.
• If SAVE MULTI+PROGS+SAMPS is used, programs ‘outside’ the multi that are intended
for remote selection via MIDI will not be saved and so it will be necessary to save these
separately (or to load them in separately next time you load the multi).
Version 1.21 67
Page 78

MULTI
If you try any of the above routines and no programs are loaded, you will receive this prompt:
You are offered the option to create one. To cancel the prompt, simply press NO (F8).
s5000
/
s6000
68 Version 1.21
Page 79

s5000
/
s6000
QUICKLOAD
QUICKLOAD allows you to load sounds from disk directly into parts. Imagine we want to add a
new sound to Part 7 in our existing multi. First, we need to select Part 7:
Next, press PART TOOLS followed by QUICKLOAD. You will see this screen display:
MULTI
Here you are taken to a variation of the main LOAD mode. In this example, we are in the ‘root
directory’ of a disk called S5000 DISK. Let’s imagine we want to load in something from the folder
SWM STUFF.
First, press SELECT DOWN (F16) to select the folder:
Version 1.21 69
Page 80

MULTI
Next, open the folder:
The QUICKLOAD screen is much like the normal load page except that, because you cannot load
samples or multis into a part, you only see the programs in the selected folder.
You need to select the sound you wish to load (for example, VOXY PAD):
s5000
/
s6000
Now press LOAD INTO PART (F14). You will receive this prompt:
If you change your mind, press F8 - CANCEL LOAD but, assuming you wish to proceed, press
EXECUTE.
70 Version 1.21
Page 81

s5000
/
s6000
As the program and its samples are being loaded, you will see a progress display:
MULTI
You will see the program and its associated samples being loaded in turn.
Version 1.21 71
Page 82

MULTI
At the end of the load process, you will be returned to this screen display:
As you can see, the program VOXY PAD is now loaded into Part 7. A feature of QUICKLOAD is
that you may immediately audition this sound by sending MIDI data on the appropriate channel. If
the sound is not to your liking, you can repeat the QUICKLOAD procedure until you find a sound
you like. Once you have settled on a sound you like, if you return to the main MULTI page (either
by pressing EXIT - F13 - followed by CLOSE TOOLS or more directly by pressing the MULTI mode
key), you would see this:
s5000
/
s6000
You can see the new sound in the selected part. If you want to build up more parts into your multi,
you can repeat the above procedure.
However, another feature of QUICKLOAD is that you do not necessarily have to return to the main
MULTI page to select another part to load into. By pressing F2 when in the QUICKLOAD page,
you may select another part. For example, let’s back-track to just after you loaded VOXY PAD:
72 Version 1.21
Page 83

s5000
/
s6000
By pressing F2, you may select the next part you wish to load into using the DATA wheel or +/keys on the numeric keypad:
T o move the cursor back to the list of programs to load (or folders to open), press SELECT DOWN
(F16) to return you to the list then proceed as described above. If you want to load further sounds
from the selected folder, then simply select the sound. Otherwise, use CLOSE FOLDER to return
to the ‘root directory’ and select another folder and proceed as described above. This process can
be repeated until you have loaded all the sounds (programs) you want into the various parts. In
this way , you can build up complex multis quickly and easily without having to leave QUICKLOAD.
When you have loaded all the parts you want, you can return to the main MULTI page.
MULTI
Of course, when using QUICKLOAD, it could be that sounds you want are contained on another
disk, To select another disk, press DISK LIST (F8). Y ou will see something like this screen display:
The disk you want to use is selected simply by touching the key to its left and pressing SELECT
DISK (or you may ‘double click’ the key). This will select the disk and automatically return you to
the QUICKLOAD page where you will see its contents. Y ou may proceed as above to load sounds
into the selected part.
Version 1.21 73
Page 84

MULTI
s5000
/
s6000
NOTE REGARDING QUICKLOAD:
It is possible to use QUICK LOAD even if you have not created a multi first. In the blank multi
page, select the part you wish to QUICKLOAD into. Now press PART TOOLS followed by
QUICKLOAD. Select the sound you want to load and press LOAD INTO PART. Because you
have not yet created the multi, you will receive this prompt first:
Pressing CREATE NEW will pop-up the name prompt:
You should create the multi after which you can proceed with QUICKLOAD as described.
74 Version 1.21
Page 85

s5000
/
s6000
QUICKSAVE
Pressing QUICKSAVE will pop-up this prompt:
The currently selected program is selected to save. You see its name and the folder it will
be saved to. Using the check boxes, you also have the option to save all the programs in
memory if you prefer (or just the currently selected one) with or without the samples.
The CHECK NAMES key allows you to disable the file checking - with it ON (checked ),
if a file of the same name exists in the selected folder, you will be prompted and asked if
you want to overwrite it or not. With CHECK NAMES switched OFF (checked ), files of
the same name will automatically be overwritten without prompting you.
MULTI
The defaults are sensibly chosen to save just the selected program and its associated
samples (though to save time, if you have previously saved the samples and are happy
that they are ok and/or they haven’t been edited or changed in any way, you can disable
SAMPLES and just save the selected program which will be very quick).
Press EXECUTE to save; CANCEL SAVE to abort.
NOTE: The folder the program(s) will be saved to is shown. If this is not the right one, you
should press CANCEL SAVE and use the actual SAVE function to navigate your way to the
folder where you want the program to be saved. The ‘full’ SAVE function is described in a
separate chapter.
USING MULTIS
As mentioned, it is possible to have up to 128 multis in memory at any one time. Each multi may
contain as many as 128 programs or as little as one and each multi may contain a different
combination of programs.
Basically , the MULTI mode is the S6000’s ‘play’ mode and is where you can play programs singly
or in combination and is designed to be flexible enough to cover a wide range of applications.
Whereas on most synthesisers, sound modules, samplers, etc., you have various playback modes
(single, multi, combi, performance, whatever), the S6000 has just one versatile and consistent
play mode to cover all applications.
Some suggestions are shown here on the next few pages.
Version 1.21 75
Page 86

MULTI
s5000
/
s6000
USING MULTI MODE TO PLAY SINGLE PROGRAMS
A multi may contain just one program:
The MULTI mode can be used to play single programs simply by assigning just one program to a
part. In this way (especially with 128 multis available), the S6000 can be used as a simple playback
module for playing single sounds.
NOTE: If you only intend using the S6000 to play single programs, you can simply use EDIT
PROGRAM if you prefer. Using a multi to play a single program does give you greater flexibility ,
however, especially regarding the use of effects and outputs.
USING MULTI MODE TO PLAY LAYERED PROGRAMS
An extension of ‘single’ playback - by assigning several programs to a multi with each part set to
the same MIDI channel, you may play layered programs:
Here, several sounds are played simultaneously for greater texture. Don’t forget that each of the
layers may be mixed, panned, tuned/detuned, routed to separate outputs and/or the internal effects
for even greater flexibility.
76 Version 1.21
Page 87

s5000
/
s6000
USING MULTI MODE TO PLAY KEYSPLITS
Using the LOW NOTE/HIGH NOTE function in the FINE TUNE ‘window’, you may set key splits:
In this example, UPRIGHT BASS could be set to cover C1-B2 with JAZZY ROADS PNO set to
cover C3-E5 with a handful of BRASS ST ABS on F5-C6. The same technique could be used in a
string section setup to have cellos in the bottom octaves and violas/violins in the top octaves.
Again, each ‘element’ in the keysplit may be routed to separate outputs and/or the effects for
greater flexibility.
MULTI
USING MULTI MODE MULTI-TIMBRALLY
Multi mode can also be used to play up to 128 sounds simultaneously on 32 MIDI channels9:
Here you can see each part has its own MIDI channel (VIEW 18 P ARTS is shown here to make the
example clearer).
Each sound may be mixed and panned and routed to different outputs (either as pairs or to individual
outputs). They may also be tuned and transposed and may also be routed to any one of the four
effects channels (the EB20 is optional on the S5000).
However, when using the S6000 in this way, certain parts may be set to the same MIDI channel so
that some parts will be layered (for example, in the above screen shot, Parts 10 and 1 1 both play
SLAP BASS #1, presumably detuned for a rich, chorus bass sound) whilst other parts just play
single programs. You could also use keysplits within such a multi.
9 Even though a multi can have up to 128 parts, only 32 channels may be used. However, whilst at
first this may seem strange, this does allow many parts to be layered in a multi-timbral environment.
Version 1.21 77
Page 88

MULTI
s5000
/
s6000
PLAYING LIVE OVER A SEQUENCED BACKING TRACK
As well as 32-channel multi-timbral operation, the two MIDI inputs also allow you to play one or
more sounds ‘live’ from a keyboard or other MIDI controller through one MIDI input whilst the other
input is fed by a sequencer to provide a 16-channel multi-timbral backing track. Such a multi may
look something like this:
In this example, the GRAND PIANO is the part you would play live through MIDI input B whilst the
other parts are sequenced via MIDI input A.
USING THE S6000 AS TWO SAMPLERS
Sometimes (especially in live situations), it is useful to have two keyboards on stage. This allows
you to play two sounds simultaneously and/or allows you to quickly switch between sounds without
having to mess around with program changes. By connecting one keyboard to MIDI input A and
the other to MIDI input B, you may effectively use your S6000 as two samplers! For example:
In this example, one keyboard would play the GRAND PIANO sound whilst the other plays the
huge layered pad combination. In such a situation, you might benefit from a weighted keyboard to
play the grand piano sound and a synth action keyboard for other sounds.
Don’t forget that to further enhance the S6000’s capabilities in this application, the sounds played
by each keyboard could be routed to their own sets of outputs.
A further variation on this would be to have two musicians playing the S6000 simultaneously. For
example, you could be vamping away on piano, clav - whatever - whilst the band’s drummer
triggers drum and percussion sounds from MIDI pads!
78 Version 1.21
Page 89

s5000
These are just a handful of examples of the flexibility of the S6000’s MULTI mode. No doubt you
will find your own applications.
/
s6000
NOTES FOR EXISTING AKAI SAMPLER USERS.
The S6000’s MULTI mode replaces all other playback modes of Akai’s previous samplers.
Previously , on the S1000, S1100 and S3000, S3200, multi-timbral operation, layers and keysplits
were achieved by renumbering several programs to the same program number and then setting
MIDI channels, levels, etc., for each program accordingly. This had the advantage that whilst
being a bit cumbersome to use, it did allow you to have up to 128 multi-timbral setups loaded
simultaneously and these could be selected from the front panel or via MIDI program change
very quickly and easily. This way of working was good for live work, because, with some preproduction work, you could program your entire live set and have all the sounds for each song
loaded into memory (notwithstanding the old samplers’ memory limits, of course) and ready
for action with a turn of the DATA wheel or by sending out a MIDI program change command
from your keyboard to recall either a single sound, a set of layered or keysplit sounds or an
entire multi-timbral setup.
Then, in the S2000 and XL range, Akai introduced the MUL TI mode. This had the advantage of
being quick and considerably easier to use plus had the benefit that you could use MIDI program
change on specific MIDI channels to change sounds within individual parts. However, having
only one multi in memory at any one time restricted the MULTI mode’s ability to be used live.
Furthermore, there was a limit of 16 parts (and 16 MIDI channels).
MULTI
The S6000’s new MULTI mode embraces the benefits of both ways or working (as well as
overcoming each one’s restrictions!) and offers the best of all worlds as well as many
improvements and advantages:
• It is quick and easy to use.
• Up to 128 programs can be played simultaneously without the need for awkward
renumbering. Furthermore, using the CONVERT OLD MULTI function (PART/PROGRAM
TOOLS > PROGRAM LIST) allows you to convert ‘old’ Akai multis into the new format.
• Single program playback, layered programs, keysplits and multi-timbral operation can all
be achieved within one convenient and consistent user interface.
• 32-channel multi-timbral operation.
• Up to 128 multis may be loaded into memory at any one time and can be selected from the
front panel or via MIDI program or bank change thus allowing you to switch between single
program playback, layered sounds, keysplits and/or multi-timbral operation quickly and
conveniently (much like the ‘old’ Akai SINGLE mode, in fact!).
• The programs in each part may be changed via MIDI program change on specific MIDI
channels.
Akai’s designers are well aware that for some ‘die-hard’ Akai users who may be used to using
the ‘old’ Akai way of working, the new regime may require some adaptation but it is felt that the
overwhelming benefits the new MULTI mode offers outweigh the temporary inconvenience of
‘converting’ to this new method of operation.
Version 1.21 79
Page 90

EDIT PROGRAM
s5000
/
s6000
EDIT PROGRAM
Pressing EDIT PROGRAM will show this screen:
This is ‘main’ EDIT PROGRAM page where you may select whatever it is you want to work on.
Pressing any of the keys takes you directly to that ‘section’. We will look at these in turn.
The program you wish to edit is selected by pressing F1 and turning the DATA wheel.
EDIT PART
It is also possible to edit a program within the context of a multi by pressing EDIT P ART (F8) in the
multi mode. First select a part to edit - you will see something like this:
Then press EDIT PART. You will see this screen:
80 Version 1.21
Page 91

s5000
As you can see, the ‘entry pages’ for EDIT PROGRAM and EDIT P ART are essentially very similar
except...
• In EDIT PART , you hear the selected program within the context of the selected multi (in EDIT
• In EDIT PART, you cannot select other programs to edit via F1 (in EDIT PROGRAM, you can
• In EDIT PART , PROG T OOLS is replaced by SOLO PART . This allows you to solo the selected
• Y ou cannot create a new program in EDIT P ART (in EDIT PROGRAM, F16 allows you to create
• In EDIT PART, the program in the selected part is automatically selected for editing (if you
/
s6000
PROGRAM, you hear it in isolation).
select
any
program to edit).
sound so that you may hear it in isolation if you need to. Y ou may toggle between SOLO on and
off very quickly simply by pressing F9.
a new program if you want to build up a program from scratch).
press EDIT PROGRAM, the correct program may not necessarily be selected and you will
have to select the program separately).
EDIT PROGRAM
EDIT PROGRAM, therefore, is where you can edit and create
where you edit a particular program within the context of the currently selected multi.
any
program whilst EDIT PART is
NOTE: If a program is shared between multis (i.e. in this example, if STRING SYNTH is
assigned to other multis), if you edit it using EDIT PART, those edits will be reflected in any
other multi where the program may be being used. If you need to edit differently within the
context of one multi without affecting other multis, you should first copy the program and work
on the copy.
Version 1.21 81
Page 92

EDIT PROGRAM
s5000
/
s6000
OUTPUT
Pressing this key (F2) will take you to the main OUTPUT page:
This page sets parameters that affect the final output level and pan position of the program. The
parameters are:
LOUDNESS This sets the basic working level of the program. 100 is maximum. For
some degree of velocity sensitivity , this should be set to less than 100 (a
value of 80 is about ‘average’) but this may be varied (in conjunction
with the VELOCITY SENSITIVITY parameter) according to your playing
technique and/or the velocity sensitivity you require.
VELOCITY SENS This sets the amount of effect velocity will have over the overall output
level of the program. +020 is about average but you may set this to any
value you like according to your playing technique. You may also invert
this for special effects where harder velocity makes loudness
This may be useful if you want to crossfade two programs with velocity .
In this case, set one to a positive velocity value and the other to a negative
velocity value.
quieter
!
82 Version 1.21
Page 93

s5000
/
s6000
EDIT PROGRAM
AMP MOD 1/2 These two parameters allow you to set the level for the controllers
assigned to these inputs. It is also possible to assign any of the sampler’s
controllers (MIDI controllers, LFOs, envelopes, etc.) to the two amplitude
modulation inputs.
To set the modulation amount, simply touch the key to the right of the
parameter you want to adjust and use the DA TA wheel to set the value.
The controller is selected by ‘double’ clicking the key alongside the
parameter. For example, pressing it once will show this:
Here, you may set the modulation level.
Pressing the key again will move the cursor to the controller field and
will show this:
Here you may use the DATA wheel to scroll through the various
controllers.
This principle applies to all modulation inputs throughout EDIT
PROGRAM - press once to set level, press again to select the controller.
This type of operation is signified by the icon in the corner of the
parameter field.
To do the same for the other AMP MOD input, repeat the above.
P AN MOD 1/2/3 These parameters allow you to create a variety of ‘autopan’ ef fects. The
most obvious of these, perhaps, would be to assign a slow LFO to one
of the P AN MOD inputs so that the sound moves backwards and forwards
across the stereo image. However, you could use velocity or aftertouch
or you could use an envelope so that the sound pans with every note.
Operation is identical to the AMP MOD inputs - press once to set level,
press again to select the controller.
Version 1.21 83
Page 94

EDIT PROGRAM
GOTO SOURCE When the cursor is on either mod input field (controller or level) of any of
the modulation inputs - for example:
Pressing GOTO SOURCE will take you directly to that controllers page.
In the above example, you would go straight to LFO2:
s5000
/
s6000
Here, you may tweak and edit the LFO 2 parameters.
84 Version 1.21
Page 95

s5000
/
s6000
GOTO DEST Pressing GOTO DEST in this page will pop up this window:
You may return to the OUTPUT page (or any other destination)
immediately.
If the cursor is not on a valid modulation input (for example, if the
LOUDNESS parameter is selected or the cursor is on, say , the program
name) and you press GOTO SOURCE, you will receive this pop-up
dialogue prompt:
EDIT PROGRAM
Similarly, if the mod source is one of the MIDI controllers (pitchbend,
modwheel, keyboard, etc. - in other words, a controller that has no
parameters associated with it), you will receive the same prompt.
NOTE: The GOTO SOURCE/DEST operation is common for all mod input functions in all
pages that have them.
MAIN This key takes you back to the main EDIT PROGRAM page.
Version 1.21 85
Page 96

EDIT PROGRAM
s5000
/
s6000
MIDI/TUNE
Pressing MIDI/TUNE in the main EDIT PROGRAM page will show this screen:
The parameters are:
PROGRAM NUMBER Sets the MIDI program number for the selected program. This allows
you to select programs remotely via MIDI within a part in a multi.
NOTE: You may also set the MIDI program number in the RENUMBER page in PART or
PROGRAM TOOLS > PROGRAM LIST. This may be more convenient as you can see the
program numbers for other programs simultaneously.
SEMITONE TUNE Allows you to tune the program in semitones.
FINE TUNE Allows you to fine tune the program.
TUNE TEMPLATE This allows you select from a variety of different tuning templates such
as EVEN-TEMPERED, ORCHESTRAL, WERKMEISTER, etc.. Y ou may
also set your own tuning template by selecting USER which you may
freely edit in the EDIT USER page.
KEY Sets the key signature for the tuning template. The normal Western
EQUAL TEMPERAMENT allows you play in any key you like (which is
why it was developed!) but the other tunings can only be used in certain
key signatures. So, for example, if you want to use the WERKMEISTER
tuning on a piano sound and the piece you want play is D#, select D# in
the KEY parameter.
COPY TO USER This key allows you to copy one of the preset templates to the USER
template so that you may edit it. To edit one of the templates, first select
it in the TUNE TEMPLA TE field and press COPY T O USER. Now select
USER as the TUNE TEMPLA TE. Y ou may now use EDIT USER to modify
it.
86 Version 1.21
Page 97

s5000
/
s6000
EDIT PROGRAM
EDIT USER
Pressing EDIT USER shows this screen:
Here you may tune each semitone. To return to the MIDI/TUNE page, press F16. To return to the
main EDIT PROGRAM page, press MAIN (F8).
If you edit the tuning of each semitone in this page, you will see the changes in the graphic
representation of the keyboard in the MIDI/TUNE page.
Version 1.21 87
Page 98

EDIT PROGRAM
s5000
/
s6000
PITCHBEND
Here you may set pitchbend and other related parameters. Pressing PITCHBEND in the main
EDIT PROGRAM page will show this:
The parameters are:
PITCHBEND UP This sets the limit for pitchbend up - the range is 24 semitones
PITCHBEND DOWN This sets the limit for pitchbend down - the range is 24 semitones.
BEND MODE You may select NORMAL or HELD.
NORMAL is the common type of pitchbend where all notes are bent as
you move the pitchbend wheel/lever regardless of whether you are
actually holding any notes down (i.e. they may be fading through their
release stage).
By selecting the HELD mode of pitchbend, ONLY THE KEY(S) YOU
ARE CURRENTLY HOLDING DOWN WILL BEND and all those notes
you are not playing but which may be fading through their release stage
will remain unchanged. If you release your finger from the key with the
pitchbend up (or down), as the note dies away, if you let the pitchbend
return to zero, that last note’s pitch will not change. If you release just
one note of a chord with pitchbend up or down, if you let the wheel or
lever settle at zero, only the notes you are holding will bend.
AFTERTOUCH As well as using the pitchbend wheel or lever, you may also use aftertouch
to bend notes. The range is -12 to +12. You may only bend up or down
depending on the selection made - unlike the bend wheel/lever, you
cannot pitchbend both ways.
88 Version 1.21
Page 99

s5000
/
s6000
EDIT PROGRAM
LFOS
Pressing LFOs shows something like this screen:
The parameters are:
RATE Sets the speed of the LFO. The range is very slow (at a setting of 0, it
takes over a minute to complete a full cycle) to very fast (around 100Hz).
An average vibrato rate setting is around 45.
DELAY This sets the time it takes for the modulation to fade in.
DEPTH Sets the initial depth of the modulation. This should be set to a value if
you want LFO1 modulation permanently on the sound (if you only want
to introduce vibrato or other modulation effects via the modwheel
however, this parameter should be set to 0 and the MODWHEEL
parameter - see below - should be set to a suitable value).
WAVEFORM Nine modulation waveforms are available. These are
SINE
A smooth waveform suitable for vibrato. Also useful
for slow, smooth panning and filter sweeps.
TRIANGLE
Another waveform suitable for vibrato and slow
sweep effects.
Version 1.21 89
Page 100

EDIT PROGRAM
SQUARE
SQUARE +
SQUARE -
SAW BI
s5000
A ‘bi-polar’ square wave that moves above and below the note you are playing.
This square wave only moves above the note you
are playing. It is suitable for trills and octave jumps,
etc..
This square wave only moves down from the note
you are playing.
A ‘bi-polar’ rising sawtooth wave that moves above
and below the note you are playing.
/
s6000
SAW UP
This sawtooth rises up to the note you are playing.
SAW DOWN
This sawtooth falls down from the note you are playing.
RANDOM
Gives out completely random control signals.
LFO SYNC When set to ON, all 128 LFOs10 (one per voice) run together at the
same rate. When switched to OFF, they each run at a slightly different
speed to create a more ‘ensemble’ effect on sounds such as strings,
brass, pads, etc..
RATE MOD You may modulate LFO 1’s rate with this parameter and here you may
select a controller and set the amount of rate modulation. Press the key
once to set the mod amount; press again to select the controller.
DELAY MOD You may modulate the delay time. Press once to set the amount of de-
lay modulation; press again to select the controller.
DEPTH MOD You may modulate the LFO’s output level here. The same principle ap-
plies - press once to set the depth mod amount; press again to select
the controller.
10 64 LFOs on an unexpanded S5000.
90 Version 1.21
 Loading...