

Page 1
s5000/ s6000
STEREO DIGITAL SAMPLER
Software Version V1.30 Addendum
WARNING
To prevent fire or shock hazard, do not
expose this appliance to rain or moisture.
Operator’ s Manual
Page 2

03/15/2000 Rev. 2
Page 3

s5000
Version 1.30 introduces new features and improvements.
/
s6000
O/S UPDATE
NEW FEATURES
• Emu EIII sound library compatibility.
• Software activated disk eject function for removable media such as Jaz, Zip, CD-ROM,
etc..
• RAMP START/END function in EDIT SAMPLE
• New looping options
• DISK backup facility
• MEMORY COMPACT function
• PLAYSHEET function
IMPROVEMENTS
Apple Macintosh filename problem
The long standing problem with filenames when an S5/6000 disk is taken to an Apple Mac has
been resolved. Previously, filenames that shared the first 8 characters in their name (e.g. NEW
SAMPLE 1, NEW SAMPLE 2, NEW SAMPLE 3 or NEW PROGRAM 1, NEW PROGRAM 2, etc.)
would all be renamed to the same name when taken to a Mac and as the Mac cannot have files of
the same name in one folder, they would all ‘dissappear’ leaving just the one filename displayed.
The files themselves were intact but not displayed. This has now been remedied.
Improved MULTI, PROGRAM and SAMPLE selection.
In previous versions, when selecting a program (for example) whilst playing another, the previous
sound would be cutoff and nothing would be heard until you play a new note (at which point you’d
hear the new program you selected). Similarly, if a sound was playing through its release phase
(i.e. you weren’t holding the note but it was fading out through a long release), selecting a new
program would cut the release dead. This has been improved.
Now, when playing and holding a note (or if the sound is going through its release phase), if you
select another program, the previous program will continue to sound until you release that note (or
the release reaches its ‘natural’ end). The same is true of multis and samples.
Improved compatibility with older sound library (in particular, loops).
The S5/6000 requires there to be at least 15 samples between the loop end and the end of the
actual sample. This is to allow for the high quality interpolation process that takes place when
transposing samples up in pitch.
However, many samples from older sound library (especially those created using the CUT S>LP
function in TRIM on the S3000 series samplers) and samples made in PC/Mac wave editors have
the sample end
rise to incorrect and buzzy or clicky loops particularly when transposing samples up in pitch. This
has now been fixed and the S5/6000 will now import looped S1000, S1100, S3000 series samples
and samples from wave editors more successfully now.
Improved SYSEX functionality.
The SysEx is extended to allow editing of MULTIS and PROGRAMS and some front panel
operations. Please see the document on our website for the implementation details.
exactly
on the loop end. If such samples are used in the S5000/6000, this can give
Version 1.30 1
Page 4
O/S UPDATE
Improved disk handling.
The disk system now does an auto re-scan of removable media after disk eject or insertion. So,
for example, if you eject your CD-ROM, the sampler will re-scan the SCSI bus and report back that
the disk has been removed and will show EMPTY DRIVE in the DISK LIST page (this ties in with
the ‘soft-eject’ feature explained later in these release notes).
Similarly, when a disk is inserted, the S5/6000 detects this and updates automatically.
The AUTO-SCAN can be switched ON or OFF ina new function found on the SYSTEM page in
UTILITIES (default is ON).
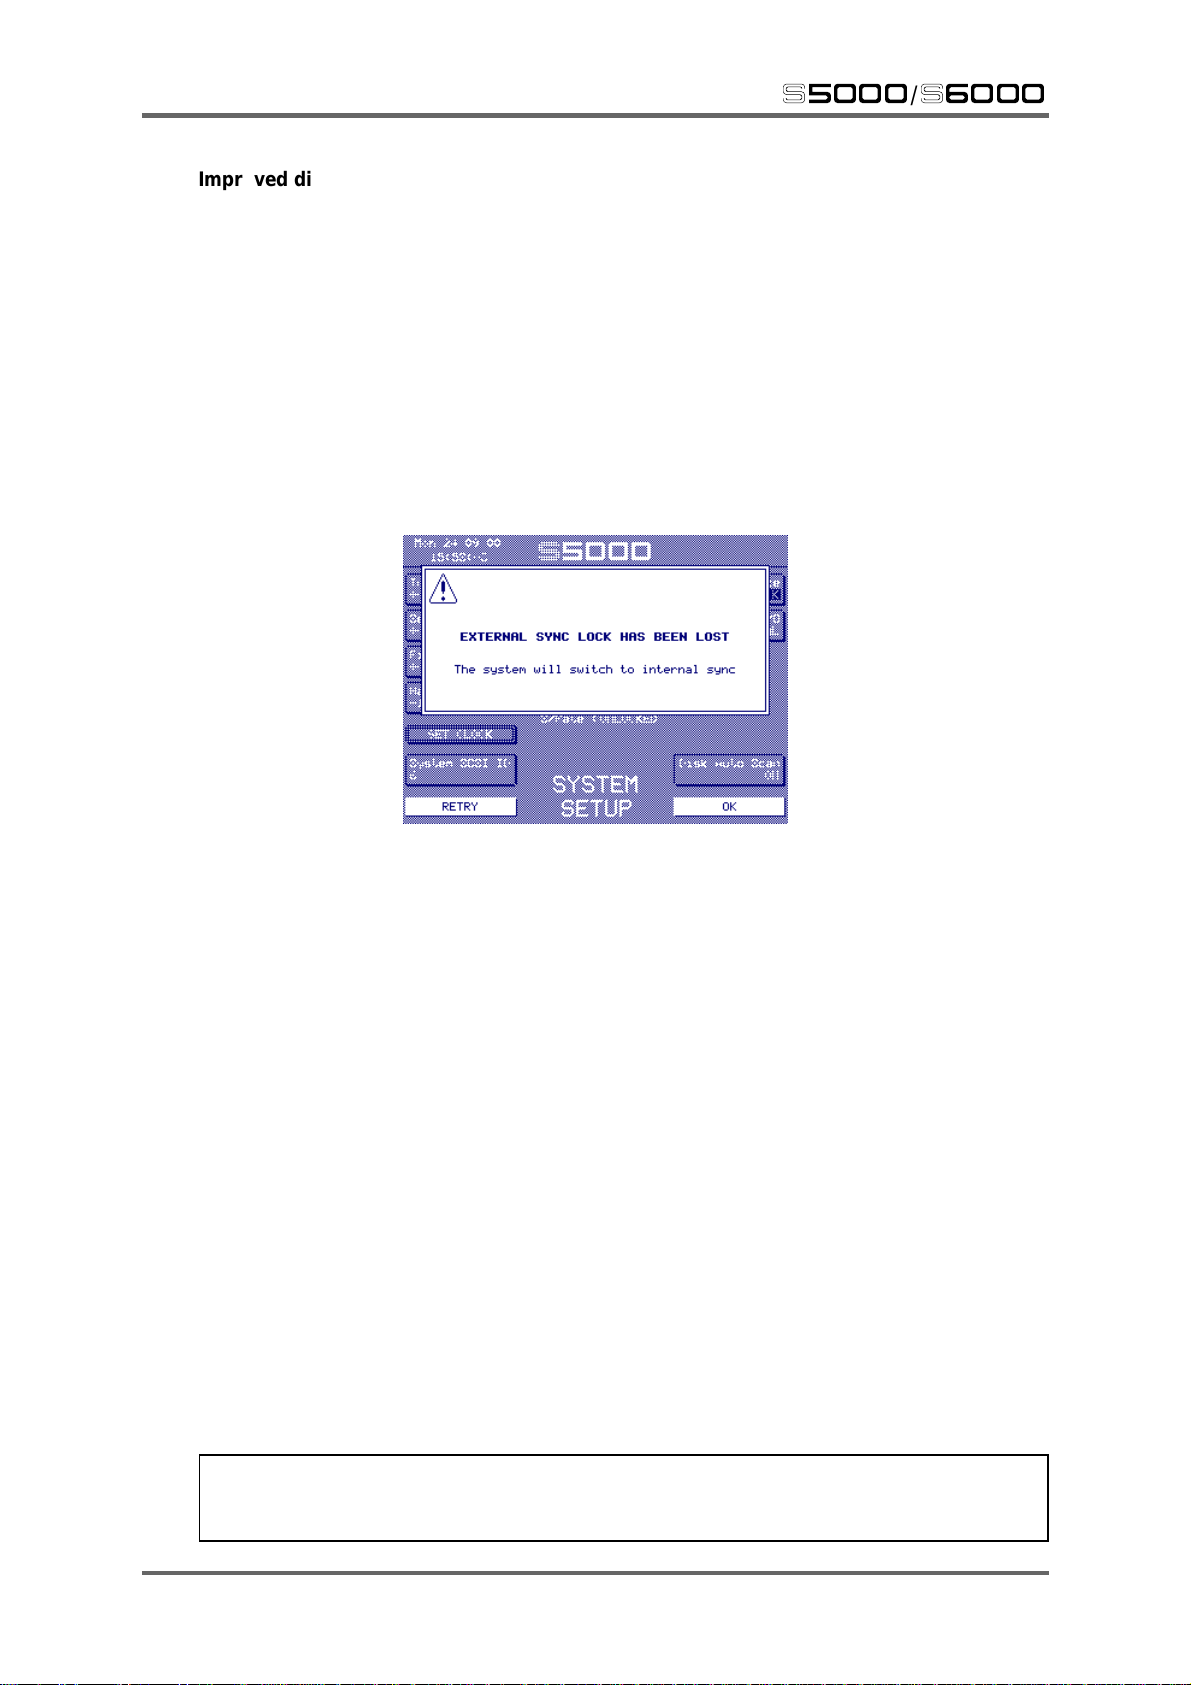
External Sync check
If you are attempting to sync the S5/6000 to external wordclock source and there is a problem (e.g.
the source is switched off or the cable has become detached), you will see this prompt:
s5000
/
s6000
This informs you if digital sync has been lost and provides the option of re-trying or locking to
internal 44.1Hz.
Separate load / save disks can be selected
Different disks may be selected when loading and saving. For example, you may be loading in
sounds from a CD-ROM to use in a multi which you are saving back to a hard disk. Previously , you
would have had to select the CD-ROM, load the sounds then, in SA VE, go to the DISK LIST, select
the hard disk and save it, then back to LOAD for the next sound, go to DISK LIST, select the CDROM, load... etc.. Now, you can select the hard disk to save to and the CD-ROM to load from
without having to switch back and forth between them.
Problems loading MULTIS/PROGRAMS
There used to be a problem when loading multiple MUL TIS or PROGRAMS that if an item was not
found (i.e. a PROGRAM or SAMPLE), then the rest of the MULTIS/PROGRAMS would not be
loaded. It’ll load all the items it can find and show the prompt for missing items after loading.
MIDI clock sync problem
When the MIDI clock was received on both MIDI inputs A and B, the sampler could hang. It can
handle the MIDI clock from both MIDI inputs.
AUDITION SAMPLE in EDIT SAMPLE/QUICKLOAD
It is now possible to audition a sample in the EDIT SAMPLE/QUICKLOAD page. To exit that page,
use the EXIT key.
TRADEMARKS
Macintosh is a registered trademark of Apple Computer Inc. All other trademarks, product
and company names are the property of their respective owners.
2 Version 1.30
Page 5
s5000
/
s6000
NEW FEATURES
EMU EIII SOUND LIBRARY COMPATIBILITY
The S5/6000 can now load Emu EIII sound library from Emu CD-ROMs.
No special operation is required - simply pop in the CD-ROM drive, select it in the DISK LIST page,
go to LOAD and load the sounds in the usual way.
Emu ‘banks’ are represented as folders and these contain the programs (‘presets’ in Emu-speak)
and samples. The normal load operations can be applied and you can load the entire folder or just
selected programs with or without their samples or just the samples. Samples may be auditioned
in the usual way.
Naturally you may save the programs back to your hard disk (or floppy) if you want but of course,
the programs will be saved as Akai format .AKP programs and the samples will be saved as .WAV
files.
NOTE 1: Whilst every effort has been made so that Emu sounds play correctly when used in
an S5/6000, because of intrinsic differences between the machines, absolute accuracy cannot
be guaranteed in all cases and so some tweaking may be necessary. Most sounds should
translate fairly well, however.
NOTE 2: Depending on your CD-ROM drive, you may find that loading Emu data is slower
than loading other data. This is due to the translation ‘fix-ups’ that are being performed during
the load process.
Version 1.30 3
Page 6
NEW FEATURES
s5000
/
s6000
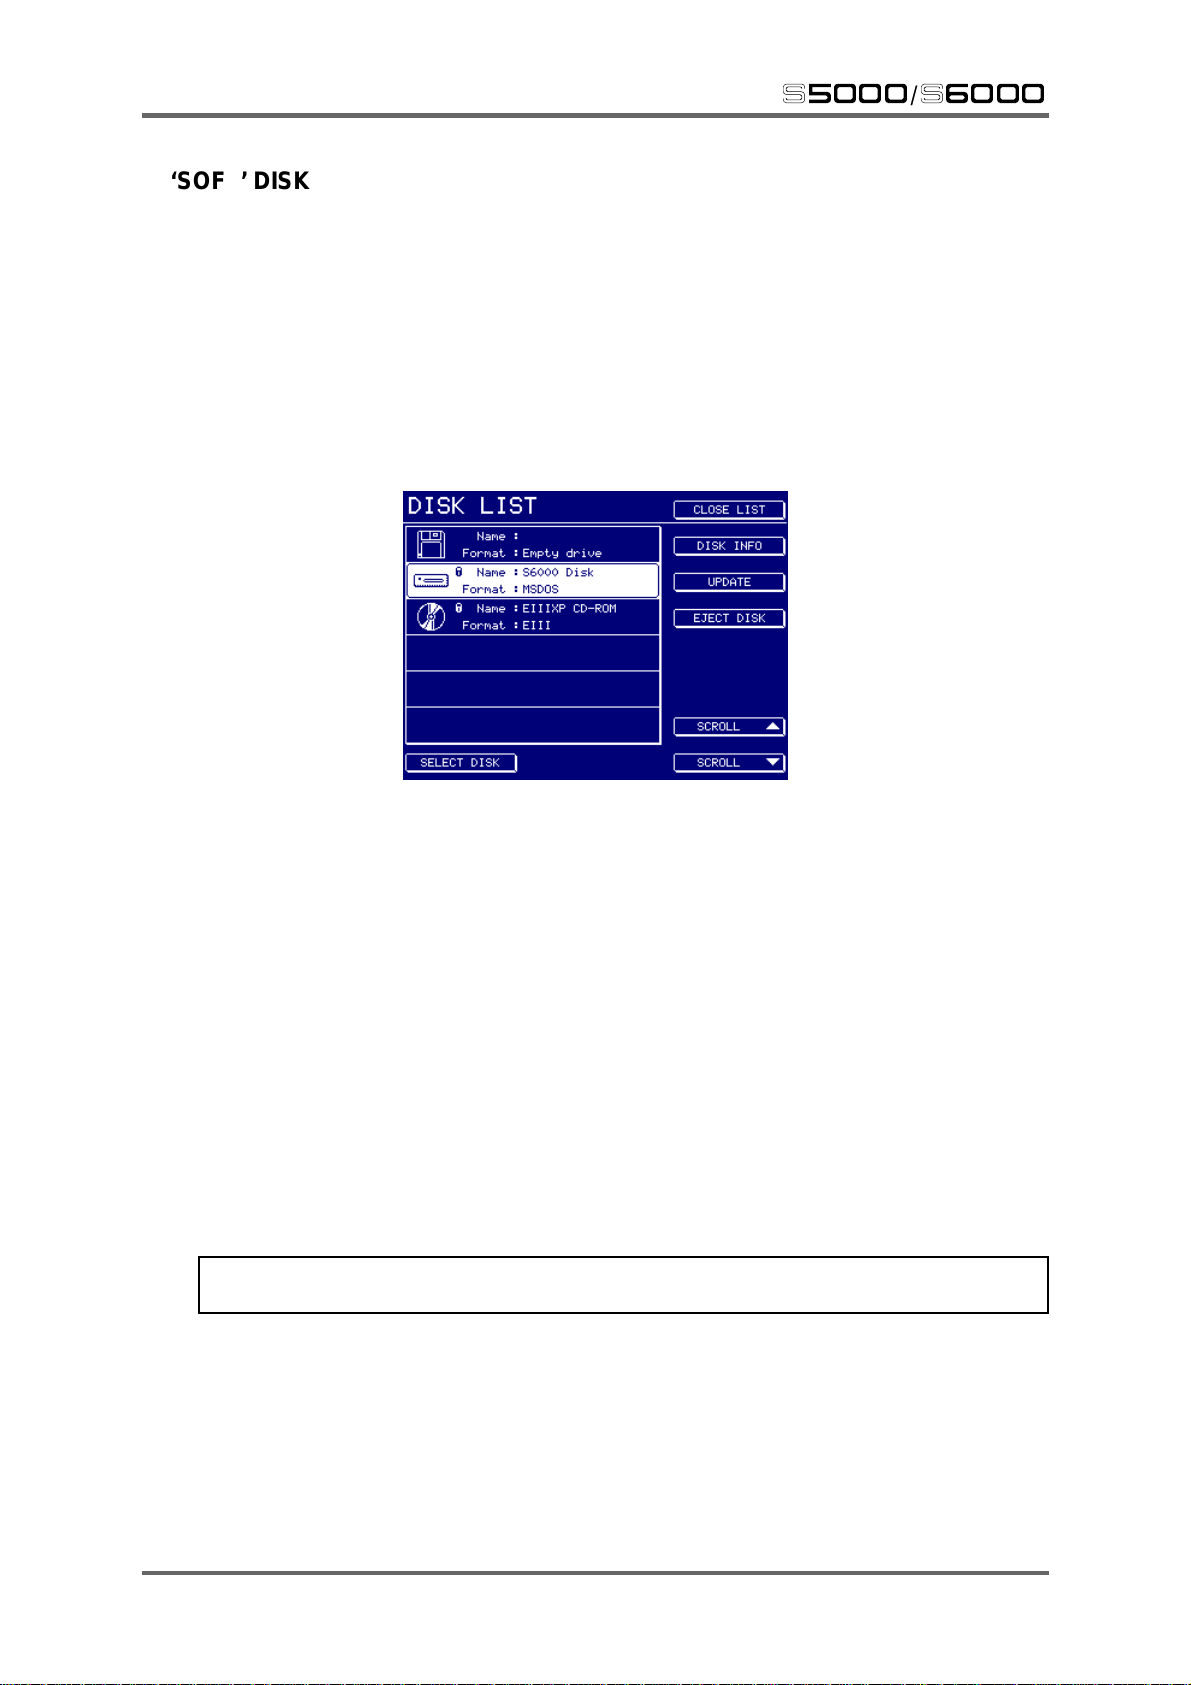
‘SOFT’ DISK EJECT
When swapping removable media and disks, it has been
the DISK LIST page and failure to do so has been responsible for many problems. In previous
versions, when a disk was ejected, its directory remained in the sampler’s CPU memory. When a
new disk was subsequently inserted, without pressing UPDATE, the sampler had no knowledge
that the disk had been changed at all and so any attempts at disk access (saving, loading, playback
of virtual samples, etc.) or even other operations could cause problems because the sampler had
a different directory to the one on the disk.
This has been radically overhauled in V1.30 and the DISK LIST page now looks something like
this:
essential
to use the UPDA TE function in
Whilst it may look superficially similar to before, the EJECT DISK function on F12 allows you to
eject the disk from the sampler itself (much like ejecting a disk on a Mac by dragging it into the
wastebasket). In this way , the sampler ‘knows’ that the disk has been removed and the directory is
flushed from its CPU memory . When another disk is subsequently inserted, the new AUT O SCAN
feature detects the new disk and updates automatically.
When removable media is inserted into drives connected to the S5/6000, they are ‘locked’ (indicated
by the padlock icon) and cannot be ejected from the drive’s own front panel (much like on a Mac).
To eject the disk, you must enter the DISK LIST page, select the disk you want to eject and press
F12. This will physically eject the disk from the drive. The sampler will then re-scan the SCSI bus
to see what’s there and you you will see a dialogue window , after which the selected drive will be
shown as “Empty”. Assuming the DISK AUTO SCAN function is enabled in UTILITIES/SYSTEM,
re-inserting the disk (or another) will cause an automatic scan of the bus and the sampler will
automatically update the latest disk directory into it’s CPU memory.
As a result of these improvements, there is no need to press UPDA TE (F11) every time you swap
disks around as this is taken care of automatically.
NOTE: The UPDATE function
must
be used when swapping disks if the DISK AUTO SCAN
function is switched OFF in UTILITIES/SYSTEM.
You will note that floppy disks are not affected by this function.
4 Version 1.30
Page 7
s5000
For those who still insist on hooking up their sampler to a Mac/PC via SCSI or for those having
two samplers sharing one disk drive (i.e. both cases have two SCSI initiators accessing a
common drive), the AUTO-SCAN is not infallible and some problems may still persist and you
should set the DISK AUTO SCAN parameter in UTILITIES/SYSEM SETUP to OFF in this
instance to avoid unexpected SCSI bus crashes. The reason being....
In the case of an S5/6000 connected to a Mac/PC, using the EJECT DISK function will, as
stated, eject the disk and flush the sampler’s CPU memory of the disk’s directory , do a re-scan
and report back to the sampler that the drive is empty but....
The Mac/PC has no knowledge of this change and as far as it’s concerned, the original disk is
still mounted. Any attempt to acces the disk on the Mac/PC in this state may cause unreliability .
Similarly, when using two samplers to access the one drive, the same principles apply. You
may use EJECT DISK on Sampler A but Sampler B has no knowledge of the change. Accessing
any disk functions on Sampler B may cause some problems.
This is a limitation of SCSI and not a failing of the S5/6000 OS.
/
s6000
NEW FEATURES
*** IMPORTANT NOTE ***
Please refer to the documentation on our website for more details of the dangers regarding
multiple initiators on one SCSI bus (in other words, hooking a sampler and its drive up to a
another SCSI initiator):
http://www.akaipro.com/downloads.html
or....
http://www.akaipro.com/tips-samplers.html
Whilst it is ‘theoretically’ possible to connect your sampler to a Mac/PC or another sampler via
SCSI, given the many potential problems outlined in the documentation referred to above, it
cannot be recommended and AKAI professional M.I. Corp., cannot be held responsible for any
problems and/or data loss you may encounter should you continue to use the S5/6000 in this
way .
If you plan to use your sampler in this way, it is recommended you switch DISK AUTO SCAN
to OFF in the UTILITIES/SYSTEM page.
For ‘standalone’ operation, however (i.e. one sampler connected to removable drives with no
Mac/PC or second sampler attached), you should find that the new AUTO-SCAN function
improves reliability greatly when swapping disks.
Version 1.30 5
Page 8
NEW FEATURES
s5000
/
s6000
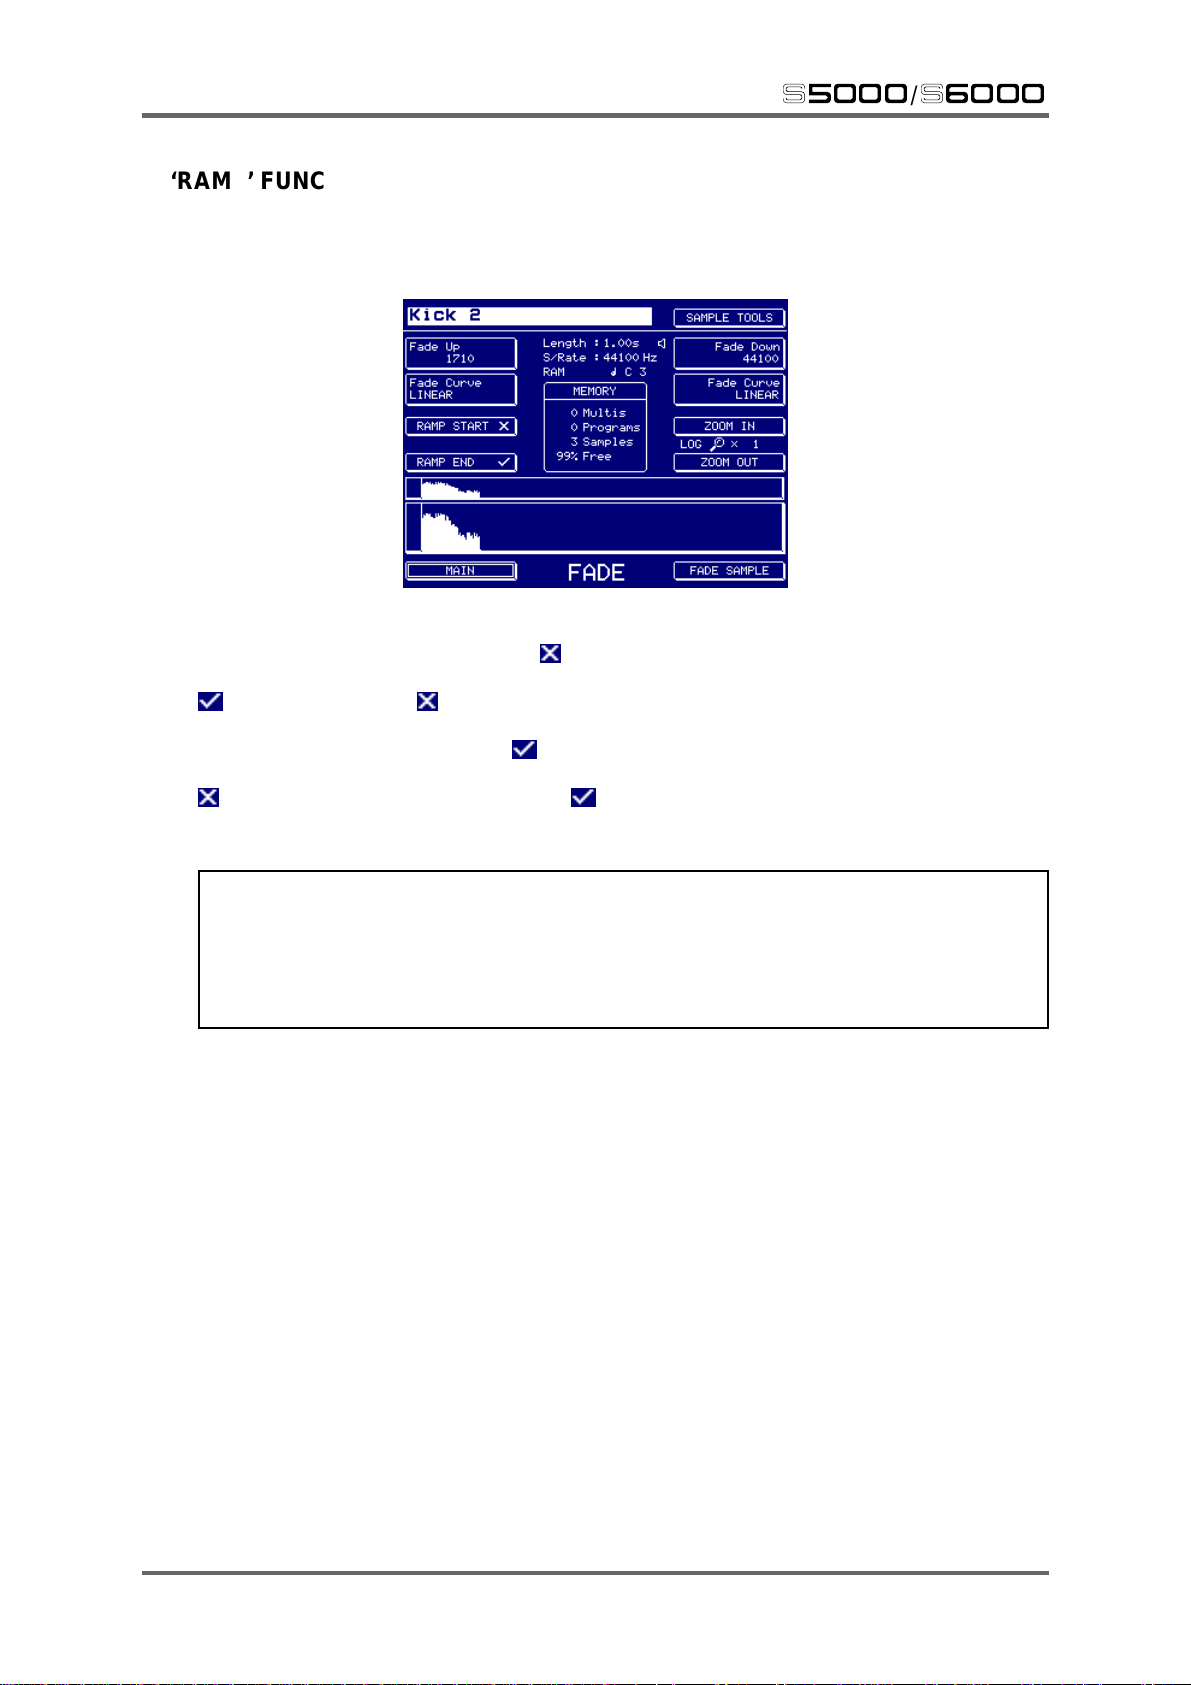
‘RAMP’ FUNCTIONS IN EDIT SAMPLE
To eliminate the possibility of clicks and pops at that start and end of samples, two new functions
- RAMP START and RAMP END - are introduced in EDIT SAMPLE - FADE UP/DOWN:
With RAMP START switched OFF (i.e. ), the rise time of the sampler is instant (0 milliseconds).
However, this may introduce clicks in some cases. If this occurs, switch RAMP START to ON (i.e.
). The default is OFF ( ).
With RAMP END switched ON (i.e. ), a short fade (128 samples or 3 milliseconds) is added at
the end of the sample to help reduce the possibility of clicks and pops. With it switched OFF (i.e.
), no fade is applied. The default is ON ( ).
Both functions are ‘real-time’ and can simply be switched ON or OFF according to your preference.
NOTE: Previous Akai samplers apply a short fade up and down by default at the start and end
of a sample. This is also true of other sampler and most sound modules, soundcards, hard
disk recorders, etc., as it is good practice to apply small fades to reduce the possibility of
clicks and pops. However, when applied to the start of a sample, this can have the effect of
‘softening’ the attack and/or missing important attack transient information. V1.30 gives you
the option of overriding these fades for optimum flexibility.
6 Version 1.30
Page 9

s5000
/
s6000
NEW FEATURES
NEW LOOP FUNCTIONS
Several new loop playback functions are introduced in V1.30 and are available in EDIT SAMPLE
- LOOP:
These are:
LIR -> RETRIG An abbreviation of LOOP IN RELEASE UNTIL RE-TRIGGERED. In other
words, once a sample has been triggered, it will loop endlessly until the
same note on the same MIDI channel is received.
So, for example, you may have a drum loop. Set it to LIR -> RETRIG
and assign it to (say) C1 in a program. Y ou may do the same for another
loop on D1. You may do the same for E1. When you play C1, you will
trigger the first loop. It will continue to sound, looping round until you hit
C1 again whereupon it will stop (actually, it will loop through the program’ s
release phase). Hitting D1 and E1 would do much the same.
Maybe a more specific description....
Y ou have a drum loop of the verse on C1 set to LIR -> RETRIG. You also
have a drum loop of the chorus on D1 and a drum loop of the bridge on
E1 with both of these also set to LIR -> RETRIG. Hit C1 to trigger the
verse loop. It will play endlessly and you can improvise over the top with
other sounds. When you feel like it, hit C1 and D1 together - the verse
loop will stop and the chorus loop will start. Improvise over that. At any
point, press D1 and C1 to go back to the verse. At any time, hit C1 and
E1 to go to the bridge. Etc.. Play with it and go figure!
This has been included not only to satisfy the needs of Playsheet users
(see later) but in response to requests for more ‘phrase sampling’
functionality.
PLAY -> RETRIG This allows you to trigger a one-shot sample as before BUT you can
stop it at any time by sending the same note again. In other words...
You have a long sample (RAM or virtual). It is X length long and you
want it to stop at a specific moment (normally, ONE-SHOT would just
play to end with no means to stop it). With PLAY -> RETRIG, you can
trigger the sample and, at the required point, play the same note to stop
it.
This feature has been introduced primarily to satisfy those using very
long virtual samples and also PLAYSHEET users (see later).
Version 1.30 7
Page 10

NEW FEATURES
s5000
/
s6000
SCSI COPY
The UTILITIES page has several new additions:
One of them - SCSI COPY - allows you to make a mirror image copy of one disk to another.
Depending on your setup, pressing SCSI COPY shows this screen:
The source and destination drives are shown.
Y ou should select the drive you want to copy by pressing F4 and selecting it using the DAT A wheel
(or entering the SCSI ID# directly from the keypad) and the drive you want to copy to using F12
and selecting it using the DA T A wheel (or entering the SCSI ID# from the keypad). Y ou may end up
with something like this:
Pressing copy will initiate the process.
8 Version 1.30
Page 11

s5000
IMPORT ANT NOTE 1: This function is just the first phase in the implementation of disk copying/
backup functions on the S5/6000. In V1.30, it simply makes a mirror image SCSI copy of the
source drive to the destination drive. As such, the destination drive has to be at least the same
size as (or larger than) the source drive. If it is not, you will see this prompt:
/
s6000
*** ALL DATA ON THE DESTINATION DRIVE WILL BE ERASED ***
Please be very careful when selecting the destination drive.
AKAI professional M.I. Corp. cannot be held responsible for loss of
data due to accidental misuse of this function.
NEW FEATURES
IMPORT ANT NOTE 2: Y ou cannot copy a disk to itself. If you attempt to do so, you will see this
prompt:
As mentioned, the SCSI COPY function simply makes a mirror image copy of one disk to
another to create safety backups of important data. This erases all data on the destination disk
and, of course, requires the destination disk to be the same size as (or larger than) the destination
disk.
We realise that ideally you want to just copy parts of one disk to a backup disk (for example,
selected folders) and maybe parts of another disk to the same backup disk but this is not
possible in this version. Subsequent releases will improve the backup capabilities and this
‘1st-phase’ release which, whilst admittedly not ideal, is considered better than no backup at
all or the alternative of loading data into memory from one disk and saving it to a backup disk
(which, of course, is still possible).
Version 1.30 9
Page 12

NEW FEATURES
s5000
/
s6000
MEMORY COMPACT
Another of the features introduced in UTILITIES is MEMORY COMPACT:
Samples in memory need to be held contiguously but when deleting samples, this can sometimes
leave a gap in memory . Normally , the sampler does this in the background automatically when you
delete something (especially with short samples) but, under certain circumstances (e.g. when
memory is full and you delete some long samples), it is not always possible to do this. The COMP ACT
MEMORY function is a manual means of de-fragmenting memory to close any holes left by deletion.
Pressing COMPACT MEMORY will show this progress bar.
10 Version 1.30
Page 13

s5000
It should not be necessary to use this new function regularly and the COMP ACT MEMORY should
be used when, for example, memory is full, you delete one or more long samples in order to free
up some space for new data to be loaded only to find that the sampler tells you there is no space
free to load anything! In this case what has happened is that the holes in memory have not been
automatically de-fragmented.
The COMPACT MEMORY function will overcome this, shuffling the data into a contiguous block
and freeing up space for new data. E.g.:
/
s6000
NEW FEATURES
8Mb total (0% free)
1.5Mb 1.2Mb 1.5Mb 1.2Mb 1.5Mb 1.1Mb
Sample 1 Sample 2 Sample 3 Sample 4 Sample 5 Sample 6
After delete (no automatic de-fragmenting)
1.5Mb 1.5Mb 1.2Mb 1.1Mb
Sample 1 Sample 3 Sample 4 Sample 6
After COMPACT MEMORY
1.5Mb 1.5Mb 1.2Mb 1.1Mb
Sample 1 Sample 3 Sample 4 Sample 6
2.7Mb free
Version 1.30 11
Page 14

NEW FEATURES
s5000
/
s6000
PLAYSHEET FUNCTION
The Playsheet function has been designed specifically for theatre work following requests from
users in that application for a method to play multiple sounds without using a music keyboard.
Samplers are often used to replace tape or cartridge machines in theatres but the music keyboard
or other MIDI controller is not the ideal way for the production’s sound engineer(s) to trigger sound
effect, music cues, etc., live. That they do use MIDI keyboards is more down to the fact that there
has been no alternative. Well now, maybe there is!
A playsheet allows up to ten ‘cues’ to be laid out and triggered from the front panel keys. The cues
are actually programs and this has been chosen over playing back just raw samples as it is possible
to use all of the program editing functions (envelopes, filters, LFOs) as well as stacking samples
on top of each other for creative sound design. It also allows access to routing cues to different
outpus as well as enabling the use of the EB20 effects board (if fitted on an S5000).
A playsheet is actually a multi and the playsheet mode is simply a means of presenting it dif ferently
for triggering sounds from the front panel. For example:
The above would be a very typical example of a playsheet for a theatrical production where sound
effects are laid out to be triggered ‘live’ using F3-7 and F11-15 according to action taking place on
stage. Of course, these cues could equally be music cues or whatever.
Furthermore, you can have up to 128 playsheets in memory and switch between them using F2
and F10. In this way , you can access all cues and playsheets from the one screen simply using the
soft keys down either side of the LCD with no other equipment required.
Also, playsheets can be organised into \scenes’ and you may switch between scenes using F8
and F16. In this way , you can organise the sound effects/music for your productions very efficiently .
12 Version 1.30
Page 15

s5000
/
s6000
NEW FEATURES
For example, a ‘scene list’ for a production of Shakespeare’s ‘The Tempest’ may look like this:
SCENE LIST
Act 1 Scene 1
Storm
Act 1 Scene 2
Prospero
Ariel
Caliban 1
Ariel 2 & Noises Off
Act 2 Scene 1
Court music
Solemn Ariel
Act 2 Scene 2
Caliban 2
Act 3 Scene 2
Caliban 3
Ariel
Act 3 Scene 3
Nymphs and spirits
Act 4 Scene 1
Ariel
Nymphs & Reapers
Ariel
Caliban 4
Act 5 Scene 1
Prospero & Ariel
Ariel
Ariel & Caliban
Epiloque
Prospero
SCENE
PLAYSHEET
Each scene can contain any number of playsheets and each playsheet contains the sound effect/
music cues for each part of the play. Playsheets and scenes can be selected using NEXT/PREV
SHEET (F2 and F11) and NEXT/PREV SCENE (F8 and F16) in the PLAYSHEET page. You will
note that some playsheets in this example (“Prospero” and “Ariel”, for example) are used over and
over again throughout the production - where there is a basic theme for certain scenes that keeps
recurring, this is an economical way to make use of playsheets.
In this example, it is not absolutely necessary to split the playsheets into different scenes - you
could have just one scene (called “The Tempest” perhaps) that contains all 19 playsheets.
Of course, a production need not be so complex and one playsheet may be all that is required for
a simple production with just a handful of sound effects.
Version 1.30 13
Page 16

NEW FEATURES
s5000
/
s6000
CREATING A PLAYSHEET
Because a playsheet is actually a multi, you must use MULTI mode to create playsheets and a
playsheet is made in exactly the same way - with the cursor on F1, press CREATE MULTI (F16).
You may give the playsheet an appropriate name if you wish (for example, “Storm”, “Prospero”,
“Ariel”, “Caliban 1”, “Ariel & noises off”, etc., as shown on the previous page). Once you have
created the multi, you can assign the appropriate programs to the parts in the usual way. These
components can be mixed, panned, tuned, sent to different outputs, etc., just like parts in a music
multi.
NOTE: A playsheet can only use the first ten parts of the multi so it’s not worth adding programs
to any parts higher than Part 10 as these will not be displayed in the PLAYSHEET page.
CREATING SCENES
Once you have a series of playsheets in memory , you need to place them in a ‘scene’. This is done
by pressing SHEET TOOLS in the PLAYSHEET page. You will see this menu
14 Version 1.30
Page 17

s5000
/
s6000
NEW FEATURES
Pressing SCENE LISTS will take you to this page:
This screen shot shows an empty scene list - you could have many scenes such as the example
shown on Page 13:
Version 1.30 15
Page 18

NEW FEATURES
To create a scene, simply press CREATE SCENE (F5). You will receive the usual name prompt
where you may name the scene if you wish.
Once you have a scene, you may begin to add playsheets to it. This is done by pressing EDIT
SCENE (F12). You will be taken to this page:
s5000
/
s6000
To add a playsheet to a scene, press ADD P-SHEET (F10). You will see this prompt:
16 Version 1.30
Page 19

s5000
/
s6000
NEW FEATURES
As the prompt advises, use the DATA wheel to select the playsheet (i.e. multi) you want to assign.
Continue to add playsheets as necessary . You should end up with something that looks not unlike
the following:
You may insert playsheets anywhere you want. For example, to insert a playsheet after the one
named “Caliban” in the above screeen shot, select Caliban and press INSERT P-SHEET . Playsheets
may also be deleted from a scene using DELETE P-SHEET.
As mentioned, you can use one playsheet several times, even in one scene:
This makes life easier to switch between playsheets using the NEXT SHEET key.
You can return to the SCENE LIST page at any time. In the SCENE LIST page, you can add
scenes, rename them, delete them, whatever, as you build up your production.
Version 1.30 17
Page 20

NEW FEATURES
s5000
/
s6000
EDITING SAMPLES FOR USE WITH A PLAYSHEET
Playsheet users have very specific requirements for playback options. With that in mind, several
new playback modes have been introduced in V1.30. The original modes are still useful for the
playsheet mode but the new functions offer more flexibility. The following are guides for playback
types for use with the playsheet:
ONE SHOT This will cause a sample to play to its end regardless. There is no way to
stop it once it has started and pressing the same key again will re-trigger
the sound. This playback mode is useful, therefore, for triggering sound
effects where their natural end is of no importance. It’s also useful if the
sound effect needs to be re-triggered whilst playing - for example, thunder
claps, gun shots, etc.
LOOP IN REL This is useful for looping sound effects, etc. (i.e. background ambience,
whatever). However, you
When you take your finger off the key, the sound will stop (or, if a long
release has been set in the program, will fade out).
LOOP UNTIL REL Pretty much the same as LOOP IN REL except that the loop will not
continue through the release phase (i.e. will not fade out) unless there is
sufficient sound after the loop.
must
keep the key pressed for the cue to loop.
LIR -> RETRIG This is one of the new options introduced for the playsheet and it allows
you to trigger a loop and have it keep looping without having to hold
down its key. This is the most useful looping option for the playback of
looped ambiences, music, etc., as you simply trigger the thing and let it
run. To stop it, press the key again.
Y ou will note that a sound that uses LIR -> RETRIG will continue to loop
even if you switch playsheets or scenes. To stop playback of the loop in
another playsheet/scene, simply assign the same program to the same
key in the appropriate playsheet. Pressing that key again in the new
playsheet/scene will cause it to stop playback.
PLA Y -> RETRIG This is a variation on ONE-SHOT in that you can stop the sound manually
at any time. Pressing the key once will trigger it, pressing it again will
stop it. This is useful for very long recordings (and/or virtual samples)
which need to be stopped manually at a certain time. If the sound is not
stopped manually , it will eventually stop of its own accord when it reaches
it’s natural end.
As with LIR -> RETRIG, a suitably long sound that uses PLA Y -> RETRIG
can continue to sound when you switch playsheets or scenes. To stop
playback manually in another playsheet/scene, put the same cue on the
same key in the appropriate playsheet. Pressing that key again in the
new playsheet/scene will cause it to stop playback.
18 Version 1.30
Page 21

s5000
/
s6000
NEW FEATURES
RECORDING SAMPLES FOR USE WITH A PLAYSHEET
No special requirements. However, as they are always played out on C3 within the playsheet, it’ s
probably best to record everything at C3.
CREATING PROGRAMS FOR USE WITH A PLAYSHEET
Because the playsheet is only playing one note (C3), multi-sampling is not an issue and multiple
keygroups need only be used when stacking samples on top of each other. For a simple sound
effect, just one keygroup spanning the entire keyboard range with the one sample it need be used.
Alternatively, you could set the keygroup’s keyspan to C3 - C3.
As mentioned, ideally , all samples should be recorded on C3 so that they play at their proper pitch.
If you are loading existing samples from disk and they are playing at the wrong pitch, they should
be edited in EDIT SAMPLE to have an original pitch of C3. Of course, alternatively , you can always
re-tune them within the program itself but this means that every program that uses XYZ sample
needs to be retuned - if XYZ sample is tuned in EDIT SAMPLE to C3, any program that uses won’t
need to be tweaked.
And talking of tuning, a program can contain stacked keygroups and these may be detuned against
each other for a variety of effects. For example, create an instant flange effect simply by stacking
a sample on top of itself and using keygroup or zone fine tune to set the depth of the effect or
create dramatic thunder cues by layering three thunder samples on top of each other, detuning
two for a flange effect and tuning one down an octave to add menacing rumble.
The sound design fun doesn’t stop there! Use the amplitude envelope to create fade in and fade
outs or to crossfade between one cue and other. You can use the filters to create dramatic tonal
changes - for example, use a bandpass filter to create a telephone quality voice effect.
Samples may also be panned anywhere in the stereo image for wide stereo effects - you can even
modulate pan to move a sound around. Samples may also be routed to individual outputs so that
they may be balanced and effected on an external mixing console.
All this and you haven’t even touched the EB20 effects yet!
CREATING A MULTI TO USE AS A PLAYSHEET
Creating a multi for use as a playsheet does not have any special considerations other than only
the first ten parts are used. Apart from that, parts (which will be cues in the playsheet) can be
mixed, panned, sent to individual outputs, tuned, etc., as normal.
Version 1.30 19
Page 22

NEW FEATURES
s5000
/
s6000
USING THE PLAYSHEET
All ten cues may be played simultaneously. When a cue is playing, it is highlighted and if two or
more are playing, they will all be highlighted:
Please note, however, that when pressing
pressing
LCD to be selected.
For example, press
and F15 will also be selected. Similarly , pressing
selected. This is a hardware limitation that cannot be overcome with software.
If this sounds a serious limitation, please note that this does not apply if the new playback options
LIR -> RETRIG or PLAY -> RETRIG are used or if the key is pressed but not held. Only when
pressing
holding
The current playsheet name is shown in the centre of the LCD. When you enter PLAYSHEET
mode, the first playsheet in the scene is always selected. Use NEXT and PREV SHEET to move
around the scene.
Similarly, press NEXT and PREV SCENE to select other scenes (you can also use the DATA
wheel and/or +/- keys if you prefer).
and holding
and holding
a key on the other side of the LCD does this occur.
a key on the side of the LCD will cause the same keys on the other side of the
and hold
multiple keys on one side of the LCD whilst simultaneously pressing
F3, F4 and F6 and also press
and holding
and holding
multiple keys down one side of the LCD,
and hold
F12 would cause F1 1 and F15 to be
F1 1 and you will see that F12
and
20 Version 1.30
Page 23

s5000
/
s6000
NEW FEATURES
LOADING AND SAVING SCENES AND PLAYSHEETS
Loading and savings scenes and playsheets is much like loading and saving multis, programs and
samples. A folder containing scenes and playsheets looks something like this:
A scene uses this icon - . As a playsheet is a multi, it uses the normal multi icon -
You can load a scene and all its associated playsheets or you can load just a playsheet (which is
actually a multi, of course) or the program(s) it contains with or without the samples.
Scenes and playsheets may also be saved much like any other item. Pressing SAVE in the playsheet
mode will show something like this:
Y ou may save the scene or just its component parts or you may save the entire contents of memory .
You can switch to the DISK view using F9 to navigate your way around folders to save to.
Version 1.30 21
Page 24

NEW FEATURES
In the actual playsheet mode, SHEET TOOLS gives you access to QUICKLOAD and QUICKSA VE:
s5000
/
s6000
QUICKLOAD will show this screen:
Because it is only possible to ‘quickload’ scenes, you are only shown the scenes in the selected
folder.
22 Version 1.30
Page 25

s5000
/
s6000
NEW FEATURES
Pressing QUICKSAVE shows something like this screen:
The selected scene is shown which will be saved to the last folder used for saving (as indicated
beneath the scene name). You may select to save the scene with or without its playsheets using
F14 - you can also save the selected scene or all scenes using F6 or F7.
Please refer to the main Operator’s Manual for more detailed information about loading and saving
items and for more information about QUICKLOAD and QUICKSAVE. Although the OM refers to
different ‘items’ (i.e. multis, programs and samples), the exact same basic principles apply
consistently.
Version 1.30 23
 Loading...