Page 1
Agilent 4396B
Analyzer
User's Guide
Network/Spectrum/Impedance
SERIAL
This
manual applies
number
NUMBERS
directly to
prex JP1KE.
instruments which
have
the
serial
Agilent Part No. 04396-90051
Printed in Japan May 2003
Fifth Edition
Page 2

c
Copyright 1997, 2000, 2002, 2003 Agilent Technologies Japan, Ltd.
Page 3
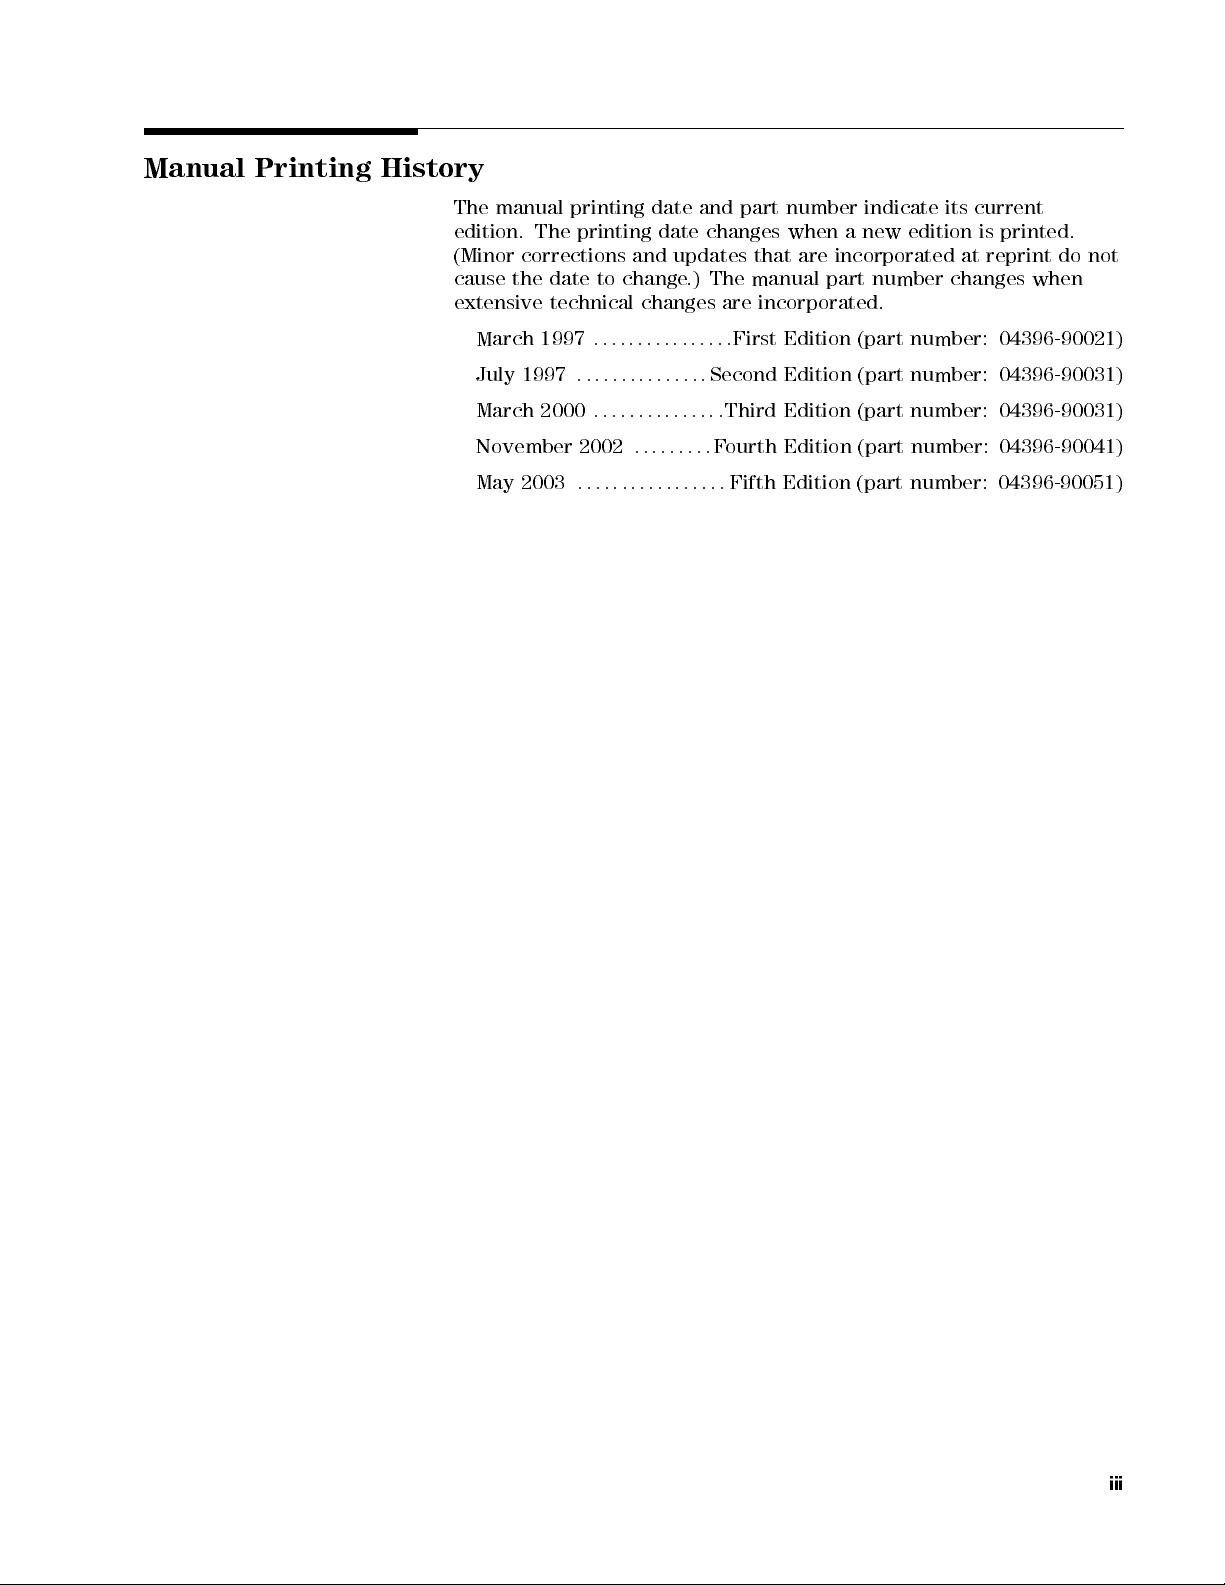
Manual Printing
History
The manual
edition. The
printing date
printing date
(Minor corrections
cause the
date to
extensive technical
March 1997
July 1997
March 2000
::
::
::
:
::
:
:
:
November 2002
May 2003
:
:
:
:
:
and part
changes when
and updates
change.)
changes are
:
:
:
:
:
:
:
:
:
:
:
:
:
:
:
:
:
:
:
:
:
:
:
:
:
:
:
:
:
:
:
:
:
:
:
:
:
:
:
:
:
:
:
:
:
:
:
:
that are
The
manual
incorporated.
:
:
:
First
Second
:
:
Third
F
ourth
:
:
Fifth
number indicate
a new
edition is
incorporated at
part
number
Edition
Edition
Edition
Edition
Edition
(part
number:
(part
number:
(part number:
(part
number:
(part number:
its current
printed.
reprint do
changes
04396-90021)
04396-90031)
04396-90031)
04396-90041)
04396-90051)
not
when
iii
Page 4
Certication
Warranty
Agilent
specications
T
echnologies further
traceable
T
echnology,
facility
Organization
This
defects
the
listed
be
T
echnologies
prove to
For
service facility
Technologies
,or
Agilent T
in material
date
of
in
General
for
the
be
warranty
at the
to the
to the
to the
members.
echnologies
shipment,
specied
will,
defective
service
designated by
United States
shipping charges
shall pay
Buyer shall
returned to
shipping
pay
Agilent
all
certies that
time of
certies that
this product
shipment from
its calibration
National Institute
extent allowed
by the
calibration facilities
instrument
and
workmanship
except
Information
period.
at
its
During
option,
that
of
either
in
this
.
or
repair
,
this
Agilent
to
Agilent
charges
shipping
T
echnologies
T
echnologies
to
return
charges
from
met its
the factory
measurements are
of Standards
Institution's calibration
of other
product
for
the
manual,
the
warranty
repair
product
T
echnologies
the
,
duties
another
International
is
a
period
case
of
or
must
and
Agilent
product
,
and
warranted
of
certain
the
warranty
period,
replace
be
.
to
taxes
country
published
. Agilent
one
year
components
Agilent
products
returned
Buyer
Buyer
shall
T
echnologies
.
for
products
.
and
Standards
against
from
shall
that
to
a
prepay
However
,
Limitation
Of
W
arranty
Agilent
designated
execute
instrument.
of
error
The
improper
software or interfacing, unauthorized modication or misuse
T
its
the
instrument,
free
foregoing
echnologies
by
Agilent
programming
Agilent
.
warranty
or
inadequate
warrants
T
echnologies
instruction
T
echnologies
or
software
shall
maintenance
that
,
not
or
its
software
for
use
when
does
not
rmware
apply
to
by
with
property
warrant
will
defects
Buyer
and
rmware
an
instrument
installed
that
the
be
uninterrupted
resulting
,
Buyer-supplied
will
on
that
operation
or
from
,
operation outside the environmental specications for the product, or
improper site preparation or
No other warranty is expressed
specically disclaims the implied warranties of
tness for a particular purpose
maintenance.
or implied. A
.
gilent Technologies
merchantability and
iv
Page 5
Exclusive Remedies
Assistance
The remedies
remedies.
indirect, special,
on contract,
provided herein
Agilent
Technologies
incidental, or
tort, or
Product maintenance
agreements are
F
or
any
assistance
and
Service
available for
,
contact
Oce
.
are buyer's
any other
agreements and
Agilent
your
A
ddresses
are
sole and
shall not
be liable
for any
consequential damages
legal
theory
.
other
customer
T
echnologies
nearest
provided
Agilent
at
products
T
echnologies
the
back
exclusive
direct,
, whether
assistance
.
of
this
based
Sales
manual.
v
Page 6
Safety
Summary
The
following general
phases
comply
in
In
intended
The
failure
of operation,
with these
this manual
addition it
use of
Agilent
to comply
safety precautions
service,
precautions or
may impair
violates safety
the instrument.
Technologies
with these
and repair
with specic
the protection
standards of
assumes no
requirements.
must be
of this
observed during
instrument. F
WARNINGS
provided by
design, manufacture
liability for
the
all
ailure to
elsewhere
the equipment.
,and
customer's
Ground
DO
NOT
K
eep
A
The
Operate
way
Note
Note
Instrument
In
An
From
Live
4396B
DEGREE
LEDs
CLASS
T
o
avoid electric
must
cable
Explosive
Do
not
fumes
constitutes
Circuits
Operating
replacement
maintenance
cable
exist
disconnect
comply
2
in
IEC1010-1.
in
this
product
1
LED
be
connected to
with
earth blade
Atmosphere
operate
.
Operation
a
denite
personnel
and
personnel.
connected.
even
with
power
with
INST
are
PRODUCT
shock hazard,
a safety
.
the
instrument
of
any
safety
must
internal
Under
the
power
and
discharge
ALLA
TION
4396B
Class
are
1
in
the instrument
earth ground
in
electrical
hazard.
not
remove
adjustments
Do
not
replace
certain
cable
conditions
removed.
circuits
CA
TEGORY
INDOOR
USE
accordance with
by the
the
presence
instrument
in
instrument
must
be
components
,
dangerous
T
o
avoid injuries
before
II
and
product.
IEC825-1.
chassis
supplied
of
ammable
such
covers
made
by
with
touching
POLLUTION
and
cabinet
power
gasses
an
environment
.
Component
qualied
the power
voltages
may
, always
them.
or
DO
NOT
DO NOT
vi
Service
Or
Substitute P
A
djust Alone
Do not attempt internal service or adjustment unless another person,
capable of rendering rst aid and resuscitation, is present.
arts Or Modify Instrument
Because of the danger of introducing additional hazards
install substitute parts or perform unauthorized modications to the
instrument. Return the instrument to a Agilent T
Service Oce for service and repair to ensure that safety features are
maintained.
, do not
echnologies Sales and
Page 7
Dangerous
Procedure
W
arnings
W
procedures
warnings
arnings
,
such
as
throughout
must
be
the
example
this
followed.
below
manual.
,
precede
Instructions
potentially dangerous
contained
in the
W
arning
Dangerous voltages
instrument. Use
adjusting this
extreme caution
instrument.
,
capable
of
causing
when handling,
death,
are
testing,
present
in
and
this
vii
Page 8
Safety
Symbols
General
are
listed below
denitions of
.
safety symbols
used on
equipment or
in manuals
Instruction
with
refer
Alternating
Direct
On
(Supply).
O
(Supply).
In position
Out
position
Frame
manual symbol:
this symbol
to the
instruction manual.
current.
current.
of push-button
of
(or
chassis)
frame (chassis)
include
This
attention to
like,
could result
This
to
if
in
all exposed
W
arning
which,
Caution
a
procedure
not
correctly
damage
a procedure
if
in
to
product.
when it
push-button
terminal.
of
the
metal
sign
denotes
not
correctly
injury
sign
,
or
denotes
practice
performed
or
destruction
the product
is necessary
switch.
switch.
A
equipment
structures
a
hazard.
,
practice
performed
death
to
a
hazard.
,
condition
or
adhered
of
part
for the
connection
which
normally
.
It
,
condition
or
personnel.
It
calls
or
the
to
,
or
all
is marked
user to
to
the
calls
or
the
adhered
attention
like
,
which,
could
result
of
the
to
,
This
Note
calls
attention
the
like
,
which
Axed
use
to
anti-static
electrostatic
sign
denotes
to
is
product
handling
discharge
important
a
procedure
essential
containing
procedures
damage
information.
,
practice
to
highlight.
static
to component.
,
condition
sensitive
to
prevent
It
or
devices
viii
Page 9
Typeface Conventions
Bold
Italics
Computer
4
HARDKEYS
N
N
N
N
N
N
N
N
N
N
N
N
N
N
N
N
N
N
N
N
SOFTKEYS
Boldface type
F
or example:
Italic type
of
manuals
Italic
type is
when
a name
place
of the
copy
lename
to
type a
a
le
such
Computer font
and
messages.
5
N
N
N
N
N
N
Labeled keys
are
enclosed
Softkeys
enclosed
is used
icons
is used
and
also used
or a
words in
space,
as
file1
on the
in
located
N
N
N
N
N
.
in
when a
are
for emphasis
other
publications
for keyboard
variable must
italics.
means
to type
and then
.
is used
for
instrument
5
.
4
to
the
symbols.
For
to type
on-screen
right
of
term is
and for
.
entries
be typed
example:
the word
the
prompts
front
the
CRT
dened.
titles
in
copy
name
of
panel
are
,
ix
Page 10
How T
o Use
This Manual
Installation
Quick Start
and
Setup
Tour
Measurement Examples
This is
a user's
manual contains
installation and
more information.
Guide
Chapters
initial
inspection,
connection.
rst.
Chapters
operating
you
will
become
Chapter
network
2
analyzer mode
Chapters 4
and spectrum
examples
contains
examples
guide for
two quick
the 4396B
start tours
setup guide
1
provides
If
2
and
the
analyzer
is
for
power
you
3
provide
familiar
the
installation
line
do
not
prepare
step-by-step
for
the
with
spectrum
.
and 5
provide
how
measurement. Chapter
of
spectrum measurement
of network
Network/Spectrum Analyzer
and a
table that
information
setting,
test-set
the
rst
time
the
basic
analyzer
to
use
applications
measurement
, measurement
tells you
that
includes
setup
,and
analyzer yet,
instructions
.By
performing these
operations
mode
,
and
chapter
the
analyzer
4
contains
measurement
,
and
applications
examples,
where to
keyboard
read this
for
you
of
the analyzer
for
typical
chapter
.
an
3
if
you
is
. This
an
nd
section
are
tours,
.
for
the
network
5
F
or
More
Information
Appendix
need
in
A
provides
the
documentation
a
table
set.
that
helps
you
nd
the
information
you
x
Page 11
Documentation Map
User's Guide
The
User's
make
basic
measurement
T
ask
Reference
T
ask
Reference
step-by-step
Function
Reference (Agilent
The
Function
softkeys
system
Programming
The
Programming
analyzer
GPIB
Command
The
GPIB
also
provides
features
Option
010
Operating
The following
(Agilent P
Guide
walks you
measurements
examples
(Agilent
helps
instructions
Reference
.
It
also
provides
performance
Guide
(Agilent
Guide
and
describes
Reference
Command
information
conform
to
Handbook
art
Number
.
After you
P
art
Number
you
without
Part
describes
,
and
P
shows
how
(Agilent
Reference
the
SCPI
manuals are
04396-900x1
through system
, explains
commonly used
receive your
04396-900x0
to
learn
how
concepts
Number
all
information
some
topics
art
Number
how to
Instrument B
P
art
provides
on
the
status
standard).
(Agilent
available for
1
setup and
to
use
the
.
04396-900x2
function
accessed
on options
about
the
04396-900x3
write and
ASIC works
Number
04396-900x4
a
summary
reporting
P
art
Number
the analyzer
)
initial power-on,
features,
analyzer,
1
)
analyzer
begin with
.
1
)
from
and accessories
analyzer's
use B
1
)
ASIC
features
with the
of
all
available
structure
04396-900x6
and typical
This
manual
the front
available
program
analyzer..
1
)
and
the
.
shows
application
this
manual.
provides simple
panel keys
,
specications
.
to
control
GPIB
commands
trigger
1
)
system
how
the
to
and
.
It
(these
,
The
option
functions
Instrument
The
Instrument
programming
provide
B
ASIC
Instrument
P
erformance T
The Performance T
010
Operation
of
the
4396B
B
ASIC
Manual
B
ASIC
language
a
general
programming
Programming
B
ASIC
est
Manual
Handbook
with
Set
(Agilent P
User's
,
provide
T
echniques
Language
(Agilent
option
Handbook
R
describes
010.
art Number
some
reference
,
Instrument
eference
P
art
Number
introduces
helpful
.
It
.
the
unique
impedance
04155-90151(E2083-90000))
you
to
the
Instrument
hints
on
getting
is
divided
B
ASIC
Interface
04396-901x0
into
the
three
1
)
T
most
books
echniques
measurement
est Manual explains how to verify conformance to published
specications.
1
Service Manual (Agilent
Part Number 04396-901x1
)
The Service Manual explains how to adjust, troubleshoot, and repair the instrument.
This manual is option 0BW only
1
The number
indicated by \x" in the part number of each manual, is allocated for numbers increased by one each
.
time a revision is made. The latest edition comes with the product.
B
ASIC
use
from
,
Instrument
,
and
it,
and
xi
Page 12

Page 13
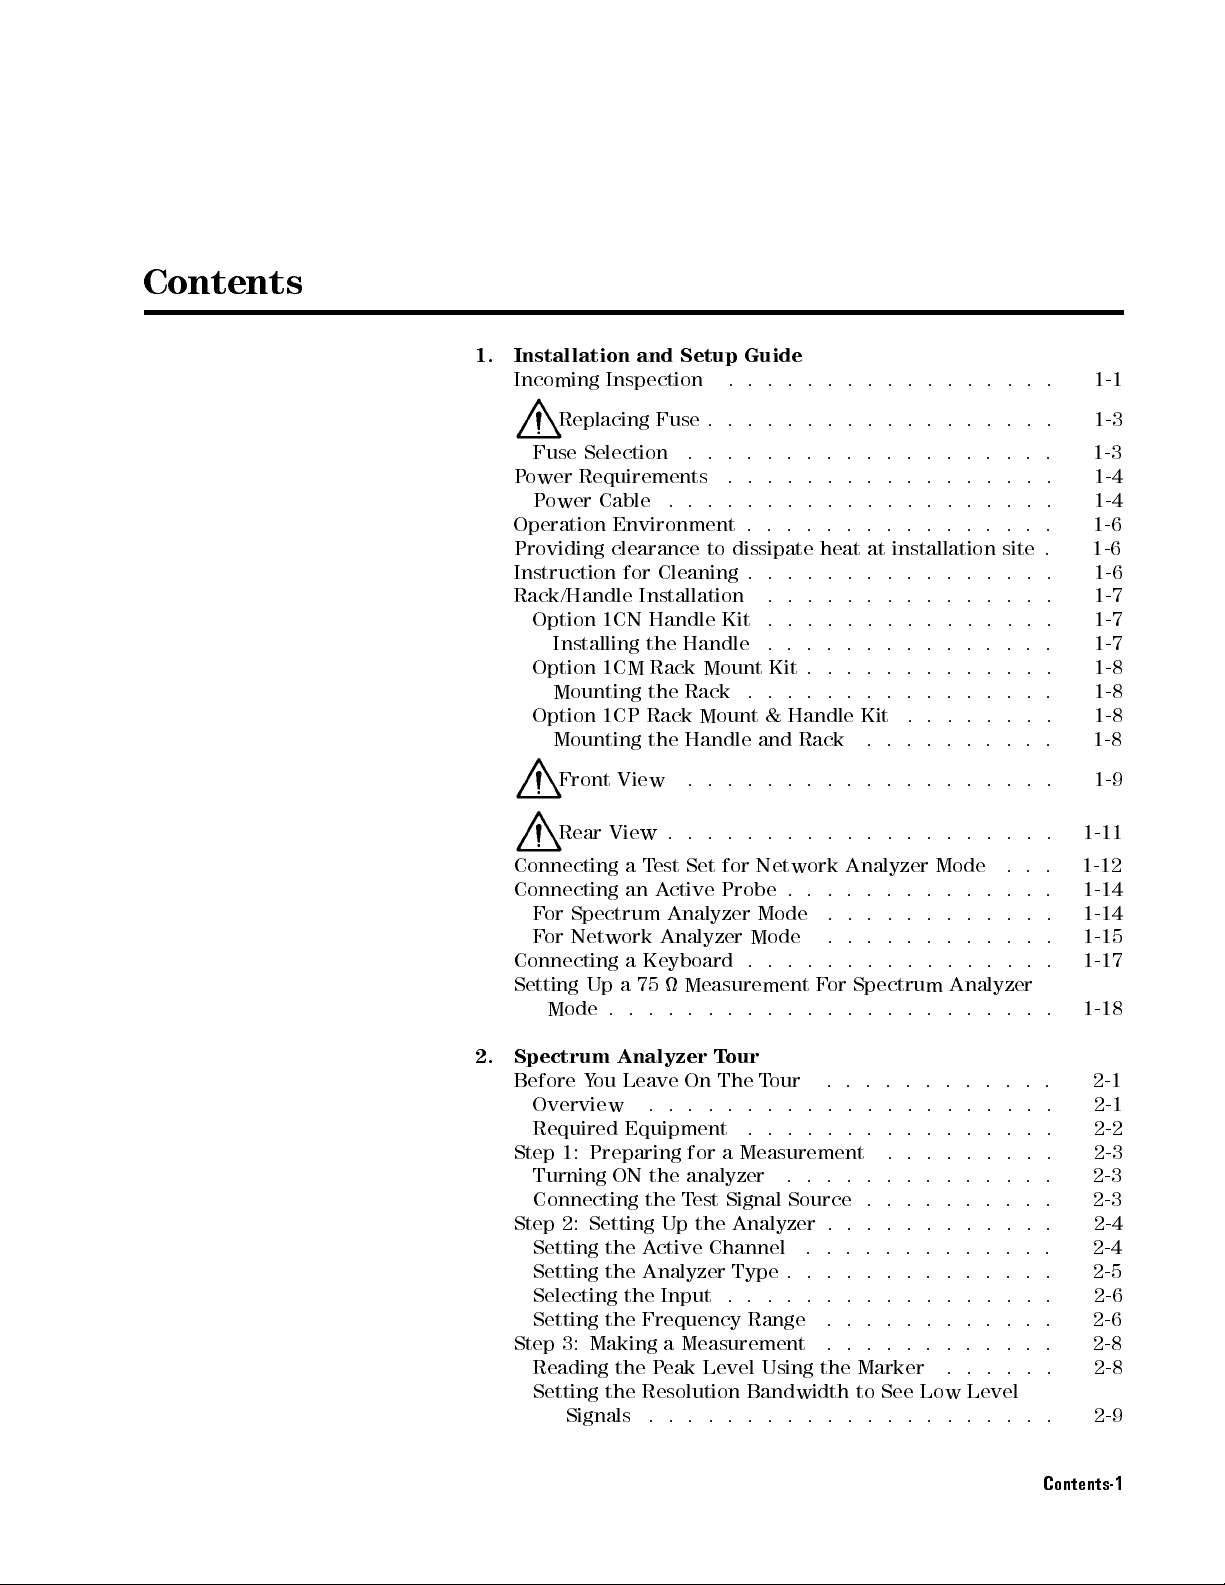
Contents
1.
Installation
Incoming
and
Setup
Inspection
Guide
.
.
.
.
.
.
.
.
.
.
.
.
.
.
.
..
1-1
Replacing
Fuse
Selection
Power
Operation Environment
Providing clearance
Instruction
Rack/Handle
Connecting a
Connecting an
Connecting
Setting
Requirements .
Power
Option
Installing
Option
Mounting
Option
Mounting
Front
Rear
For
Spectrum Analyzer
F
or
Network
Up
Mode
Fuse .
Cable .
for
Installation
1CN
Handle
the
1CM
Rack
the
1CP
Rack
the
View
View
Test
Active
a
Keyboard
a
75
.
.
.
..
.
.
to dissipate
Cleaning
Handle
Mount
Rack
Mount
Handle and
.
.
.
.
.
Set
Analyzer
Measurement
.
.
.
..
..
.
.
.
..
.
Kit
.
.
.
.
.
for
Network
Probe
Mode .
Mode
.
.
.
..
..
.
.
.
.
..
.
..
.
.
.
.
.
.
Kit
.
.
&
Handle
.
.
.
.
.
.
.
.
.
.
.
.
.
.
.
.
.
.
heat
.
.
.
..
.
..
.
.
.
.
Rack
.
.
.
.
.
.
.
.
.
F
or
.
.
.
.
.
.
.
.
.
.
.
.
.
.
.
.
.
.
.
.
.
.
at
installation
.
.
.
.
..
..
..
..
..
..
.
..
..
..
..
Kit
.
.
.
.
.
.
.
.
.
.
.
.
Analyzer
.
.
.
.
.
.
.
.
.
.
.
.
.
.
.
.
Spectrum
.
.
.
.
.
.
.
.
.
.
.
.
.
.
.
.
.
.
.
.
.
.
..
.
.
.
.
..
.
.
.
.
.
..
..
.
.
.
.
.
.
.
.
.
Mode
.
.
.
.
.
.
.
.
.
.
.
.
Analyzer
..
..
.
.
.
.
.
.
.
.
.
.
site
.
.
.
.
.
.
.
.
.
.
.
.
.
.
.
..
.
.
.
.
.
.
.
.
.
.
.
..
.
.
.
.
.
.
.
.
.
.
.
.
.
.
.
.
.
.
.
.
.
.
.
.
.
.
.
.
.
.
.
.
.
.
.
.
.
..
..
. 1-18
1-3
1-3
1-4
1-4
1-6
1-6
1-6
1-7
1-7
1-7
1-8
1-8
1-8
1-8
1-9
1-11
1-12
1-14
1-14
1-15
1-17
2.
Spectrum
Before
Overview ............
Required Equipment
Step 1: Preparing for a Measurement
Turning ON the analyzer
Connecting the T
Step 2: Setting Up the Analyzer . . . . . . . . . . . .
Setting
Setting the
Selecting the Input . . . . . . . . . . . . . . . . . 2-6
Setting the Frequency Range ............ 2-6
Step 3: Making a Measurement ............ 2-8
Reading the Peak Level Using the Marker ...... 2-8
Setting the Resolution Bandwidth to See Low Level
Analyzer
Y
ou
Leave
the A
Analyzer Type . . . . . . . . . . . . . .
Signals ..................... 2-9
T
our
On
The
T
our .
...........
est Signal Source . . . . . . . . . .
ctive Channel .............
.
.
.
.
.
.
.
.
.
.
.........
.....
...... ..
...... ..... ...
. 2-1
2-1
2-2
. 2-3
2-3
2-3
2-4
2-4
2-5
Contents-1
Page 14
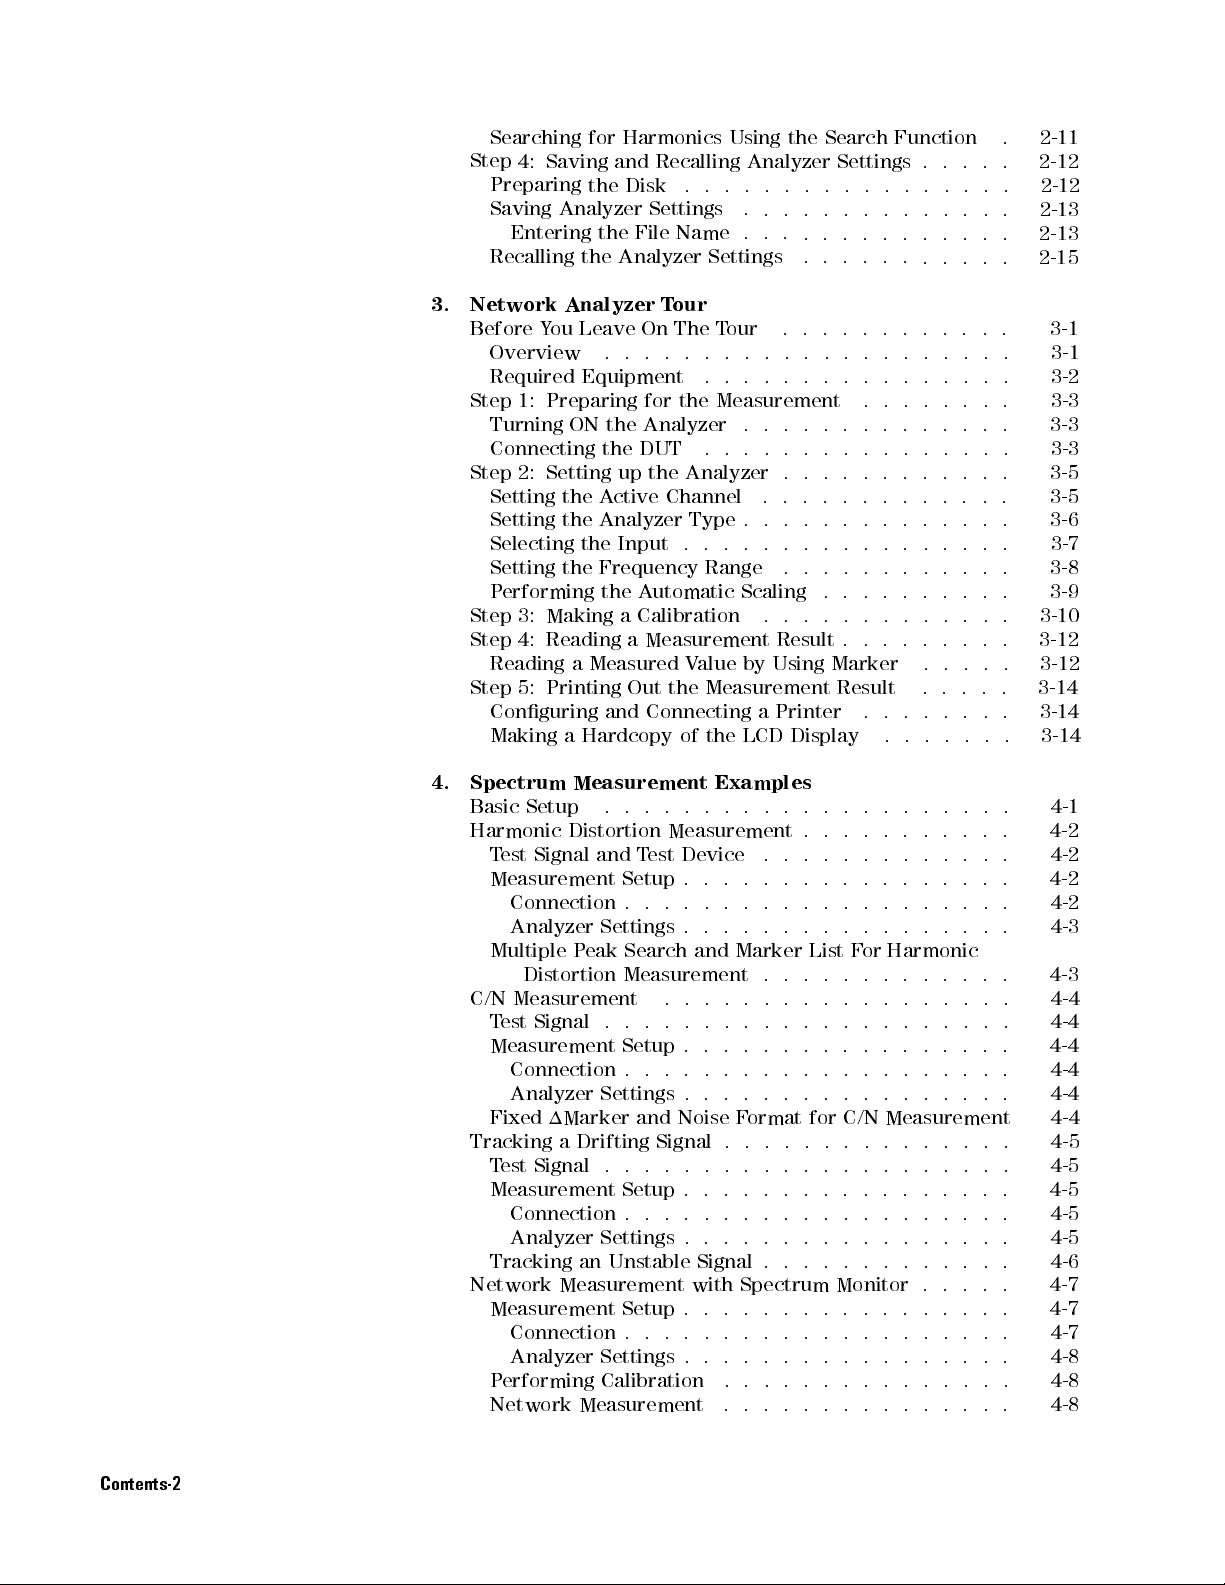
3.
Searching
Step
4: Saving
Preparing
Saving
Entering
Recalling
Network
Before
Step
Step
Step
Step
Step
Y
Overview
Required
1:
Turning
Connecting
2:
Setting
Setting
Selecting
Setting
P
erforming
3:
4:
Reading
5:
Conguring
Making
for Harmonics
and
Recalling
the Disk
Analyzer Settings
the File
the Analyzer
Analyzer
ou
Leave
.
Equipment
Preparing
ON
the
the
Setting
the
A
ctive
the
Analyzer
the
the
Frequency
the
Making
Reading
a
Measured
Printing
and
a
Hardcopy
Name
T
our
On
The
.
.
.
for
the
Analyzer
DUT
up
the
Channel
Input
A
utomatic
a
Calibration
a
Measurement
Out the
Connecting
of
Using the
Analyzer
.
.
.
.
.
.
.
.
.
Settings
T
our
.
.
.
.
.
.
.
.
.
Measurement
.
.
.
.
.
.
Analyzer
.
Type
.
.
.
.
.
.
.
Range
Scaling
.
Value
by Using
Measurement Result
a Printer
the
LCD Display
.
.
.
.
.
.
.
.
.
.
.
.
.
.
.
.
.
.
.
.
.
.
.
.
.
.
.
.
.
Result
Search
.
.
.
.
.
.
.
.
.
.
.
..
..
.
.
.
Marker
Function
Settings
.
.
.
.
.
.
.
.
.
.
.
.
.
.
.
.
..
.
.
.
.
.
.
..
.
.
..
.
.
.
.
.
.
..
..
.
.
.
.
.
.
..
..
.
.
.
..
.
.
..
.
.
.
.
.
.
..
..
.
.
.
.
..
..
..
..
..
.
.
.
.
.
.
..
..
.
.
.
.
.
.
.
.
..
.
..
..
.
.
..
..
..
..
..
..
..
..
.
.
.
.
.
.
.
.
.
..
.
.
.
.
.
.
.
.
.
.
.
..
. 2-13
..
.
. 2-15
..
..
..
..
..
.
..
..
.
.
.
.
.
. 3-8
.
.
.
.
..
.
.
.
.
.
.
.
.
2-11
2-12
2-12
2-13
3-1
3-1
3-2
3-3
3-3
3-3
3-5
3-5
3-6
3-7
3-9
3-10
3-12
3-12
3-14
3-14
3-14
4.
Spectrum
Basic
Harmonic
T
est Signal
Measurement
Connection
Analyzer
Multiple
C/N
T
est
Measurement
Connection
Analyzer Settings . . . . . . . .
Fixed 1Marker and Noise F
Tracking a Drifting Signal . . . . . . . .
Test Signal . . . . . . . . . . . . . . . . . . .
Measurement Setup . . . . . . . . . . . . . . . . .
Connection . . . . . . . . . . . . . . . . . . . .
Analyzer Settings . . . . . . . . . . . . . . . . .
Tracking an Unstable Signal . . . . . . . . . . . . .
Network Measurement with Spectrum Monitor . . . . . 4-7
Measurement Setup . . . . . . . . . . . . . . . . . 4-7
Connection . . . . . . . . . . . . . . . . . . . . 4-7
Analyzer Settings . . . . . . . . . . . . . . . . . 4-8
Performing Calibration ...... ...... ... 4-8
Network Measurement ............... 4-8
Measurement
Setup
Distortion
Measurement
Signal
.
Distortion
and
Setup .
Settings
P
eak
Measurement
.
Setup
.
.
.
.
Measurement
T
est
Device
.
.
.
.
.
Search
.
.
.
.
.
.
.
.
.
.
.
Examples
.
.
.
.
.
.
.
.
.
.
.
.
.
.
.
.
.
.
.
.
.
.
.
.
.
.
.
.
.
.
.
.
.
.
.
.
.
.
.
.
.
.
.
.
.
.
.
.
.
.
.
.
and
Marker
.
.
.
..
..
.
.
.
..
.
ormat for C/N Measurement
.
.
.
.
..
..
.
.
List
F
or
Harmonic
.
.
.
.
.
.
.
.
.
.
..
.
.
..
..
..
.
.
.
.
.
.........
.......
.
.
.
.
.
.
.
.
.
.
.
.
.
.
.
.
.
.
..
..
.
.
.
..
.
.
..
.
.
.
.
.
.
..
..
.
.
..
..
.
.
.
.
.
.
.
.
.
. 4-3
.
.
..
.
.
.
.
..
4-1
4-2
4-2
4-2
4-2
4-3
4-4
4-4
4-4
4-4
4-4
4-4
4-5
4-5
4-5
4-5
4-5
4-6
Contents-2
Page 15
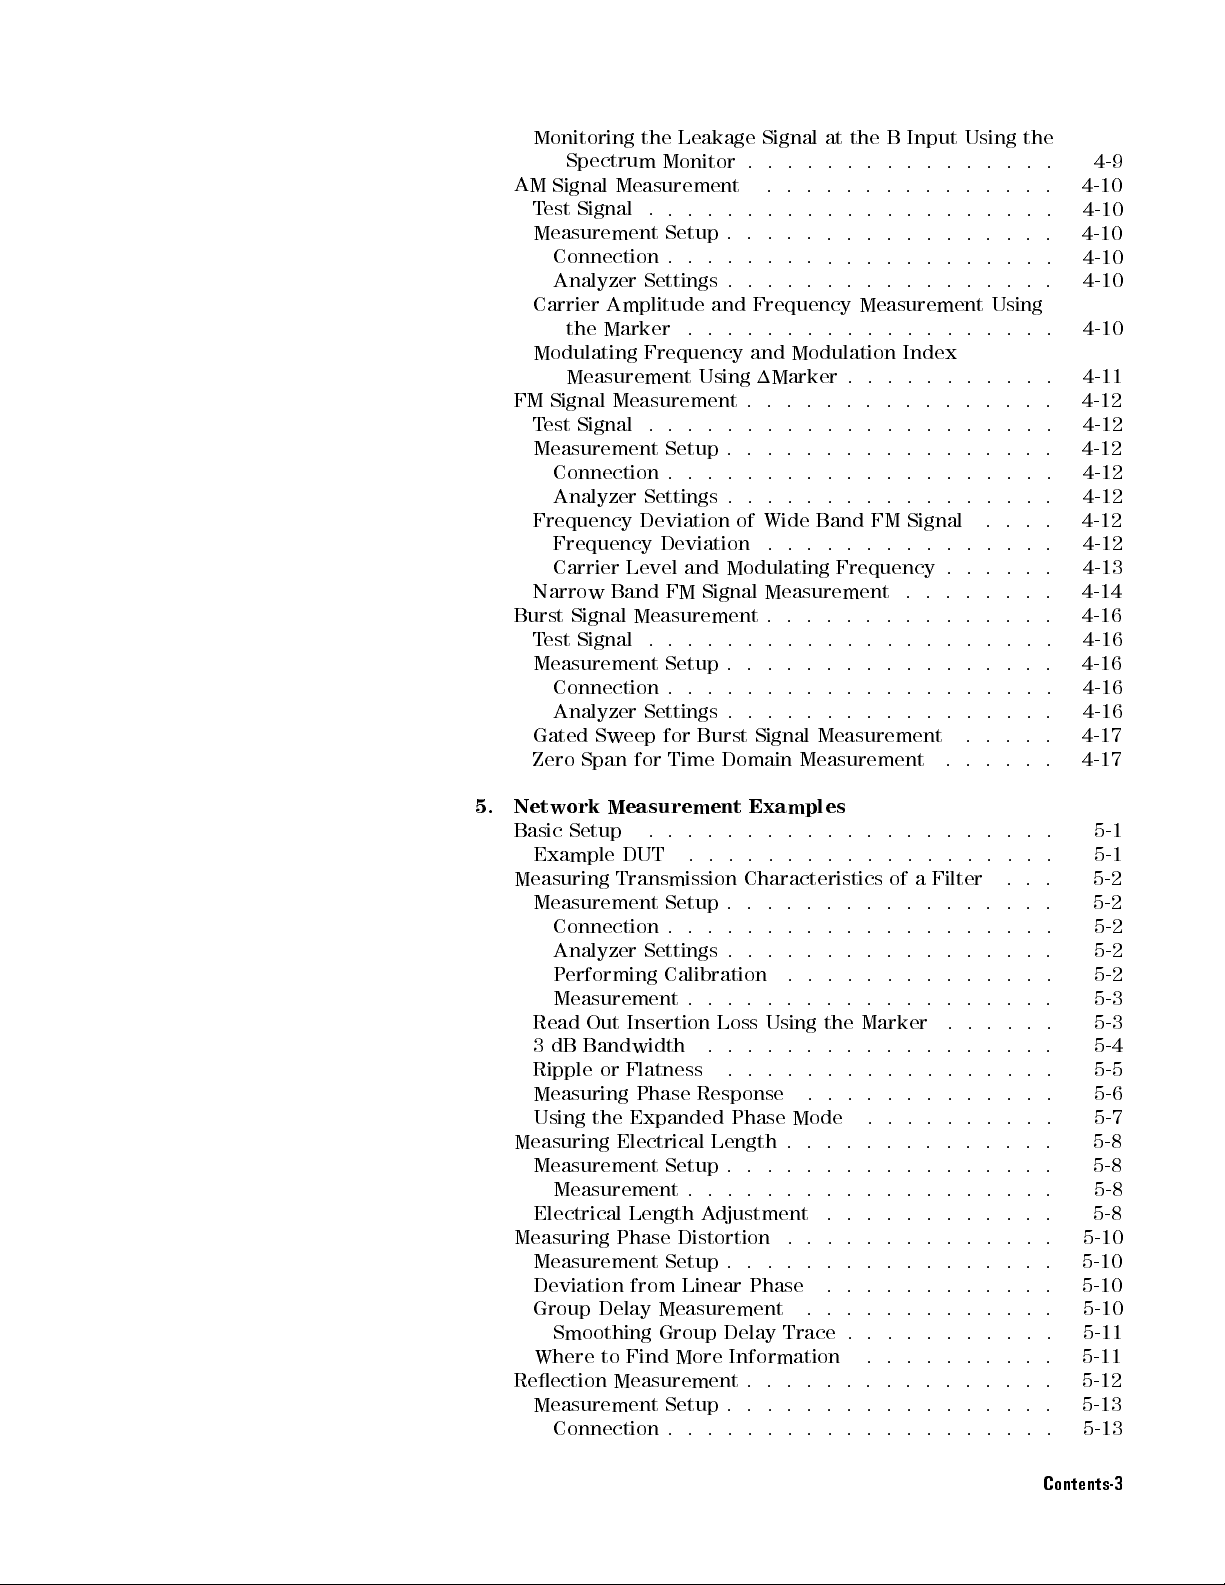
Monitoring
Spectrum
AM
Signal Measurement
T
est Signal
Measurement
Connection
Analyzer
Carrier
the
Modulating
Measurement
FM
Signal
T
est
Signal
Measurement
Connection
Analyzer
Frequency
Frequency
Carrier
Narrow
Burst
Signal
T
est
Signal
Measurement
Connection
Analyzer
Gated
Zero
the Leakage
Settings
Amplitude
Marker
Frequency
Measurement
Settings
Deviation
Level
Band
Measurement
Settings
Sweep
Span
for
Monitor .
.
.
.
.
Setup .
..
.
.
.
Using
.
.
.
.
Setup
.
.
.
Deviation
and
FM
Signal
.
.
.
.
Setup
.
.
..
for
Burst
Time
Signal at
.
.
.
.
.
.
.
.
.
.
.
.
.
and
Frequency
.
.
.
and
1Marker
.
.
.
.
.
.
.
.
.
.
.
.
.
.
of
Wide
.
Modulating
Measurement
.
.
.
..
.
..
..
.
..
Signal
Domain
the
B
Input
.
.
.
.
.
.
.
.
.
.
.
.
.
.
.
.
.
.
..
..
.
.
.
.
.
.
.
.
.
.
.
.
.
.
.
.
.
.
.
.
.
Measurement
.
.
.
.
.
.
.
Modulation
.
.
.
..
..
.
.
.
.
.
.
.
.
.
Band
.
.
.
Frequency
.
.
.
..
..
.
.
.
.
..
.
Measurement .
Measurement .
.
.
.
.
.
.
.
.
.
.
..
.
.
.
.
.
.
..
..
.
.
..
.
.
FM
.
.
..
..
.
.
.
.
.
Index
.
..
.
.
Signal
.
.
.
.
.
.
.
.
.
..
.
.
..
.
.
..
.
.
..
.
..
..
..
..
.
.
.
..
.
.
.
.
.
.
.
.
Using
.
..
.
..
..
..
..
..
Using
..
.
.
..
.
.
..
..
..
.
..
.
.
.
.
..
.
.
.
.
.
.
.
.
.
.
.
the
..
..
..
..
..
..
..
.
.
..
.
.
..
.
.
..
.
.
.
.
.
.
.
.
.
.
.
.
.
.
.
.
.
.
.
.
.
.
4-9
4-10
4-10
. 4-10
. 4-10
. 4-10
. 4-10
.
4-11
.
4-12
.
4-12
.
4-12
.
4-12
.
4-12
.
4-12
.
4-12
.
4-13
.
4-14
.
4-16
.
4-16
.
4-16
.
4-16
.
4-16
.
4-17
.
4-17
5.
Network
Basic
Example
Measuring
Measurement
Read
3
Ripple
Measuring Phase Response
Using the Expanded Phase Mode
Measuring Electrical Length . . . . . . . . .
Measurement Setup . . . . . . . . . . . . . . . . .
Electrical Length A
Measuring Phase Distortion
Measurement Setup . . . . . . . . . . . . . . . . .
Deviation from Linear Phase ............ 5-10
Group Delay Measurement ............. 5-10
Where to Find More Information .......... 5-11
Reection Measurement . . . . . . . . . . . . . . . . 5-12
Measurement Setup . . . . . . . . . . . . . . . . . 5-13
Measurement
Setup
Connection
Analyzer
P
erforming
Measurement
Out
dB
Bandwidth
Measurement . . . . . . . . . . . . . . . . . . .
Smoothing Group Delay Trace . . . . . . . . . . . 5-11
Connection........ ...... ..... . 5-13
.
.
.
DUT .
Transmission Characteristics
Setup
.
.
Settings
Calibration
.
Insertion
or
Flatness
Examples
.
.
.
.
.
.
.
.
.
.
.
.
.
.
.
.
.
.
.
.
.
.
.
.
.
.
.
.
.
.
.
.
.
.
of
a
Filter
.
.
.
.
.
.
.
.
.
.
.
.
.
.
.
.
.
.
.
.
.
.
.
..
.
.
.
.
.
.
.
.
.
.
.
.
.
.
.
.
.
.
.
.
.
.
.
.
.
.
.
.
.
.
.
.
.
.
Loss
Using
.
.
.
.
.
djustment ............
the
Marker
..
..
..
..
..
..
.
.
.
.
.
.
.
...... .
......
...... ...... ..
.
.
.
.
..
..
..
.
.
..
.
.
.
.
.
..
..
.
.
.
.
.
..
.
.
.
.
.
.
..
......
....
.....
.
5-1
.
5-1
.
5-2
. 5-2
. 5-2
. 5-2
. 5-2
5-3
.
5-3
.
5-4
5-5
5-6
5-7
5-8
5-8
5-8
5-8
5-10
5-10
Contents-3
Page 16
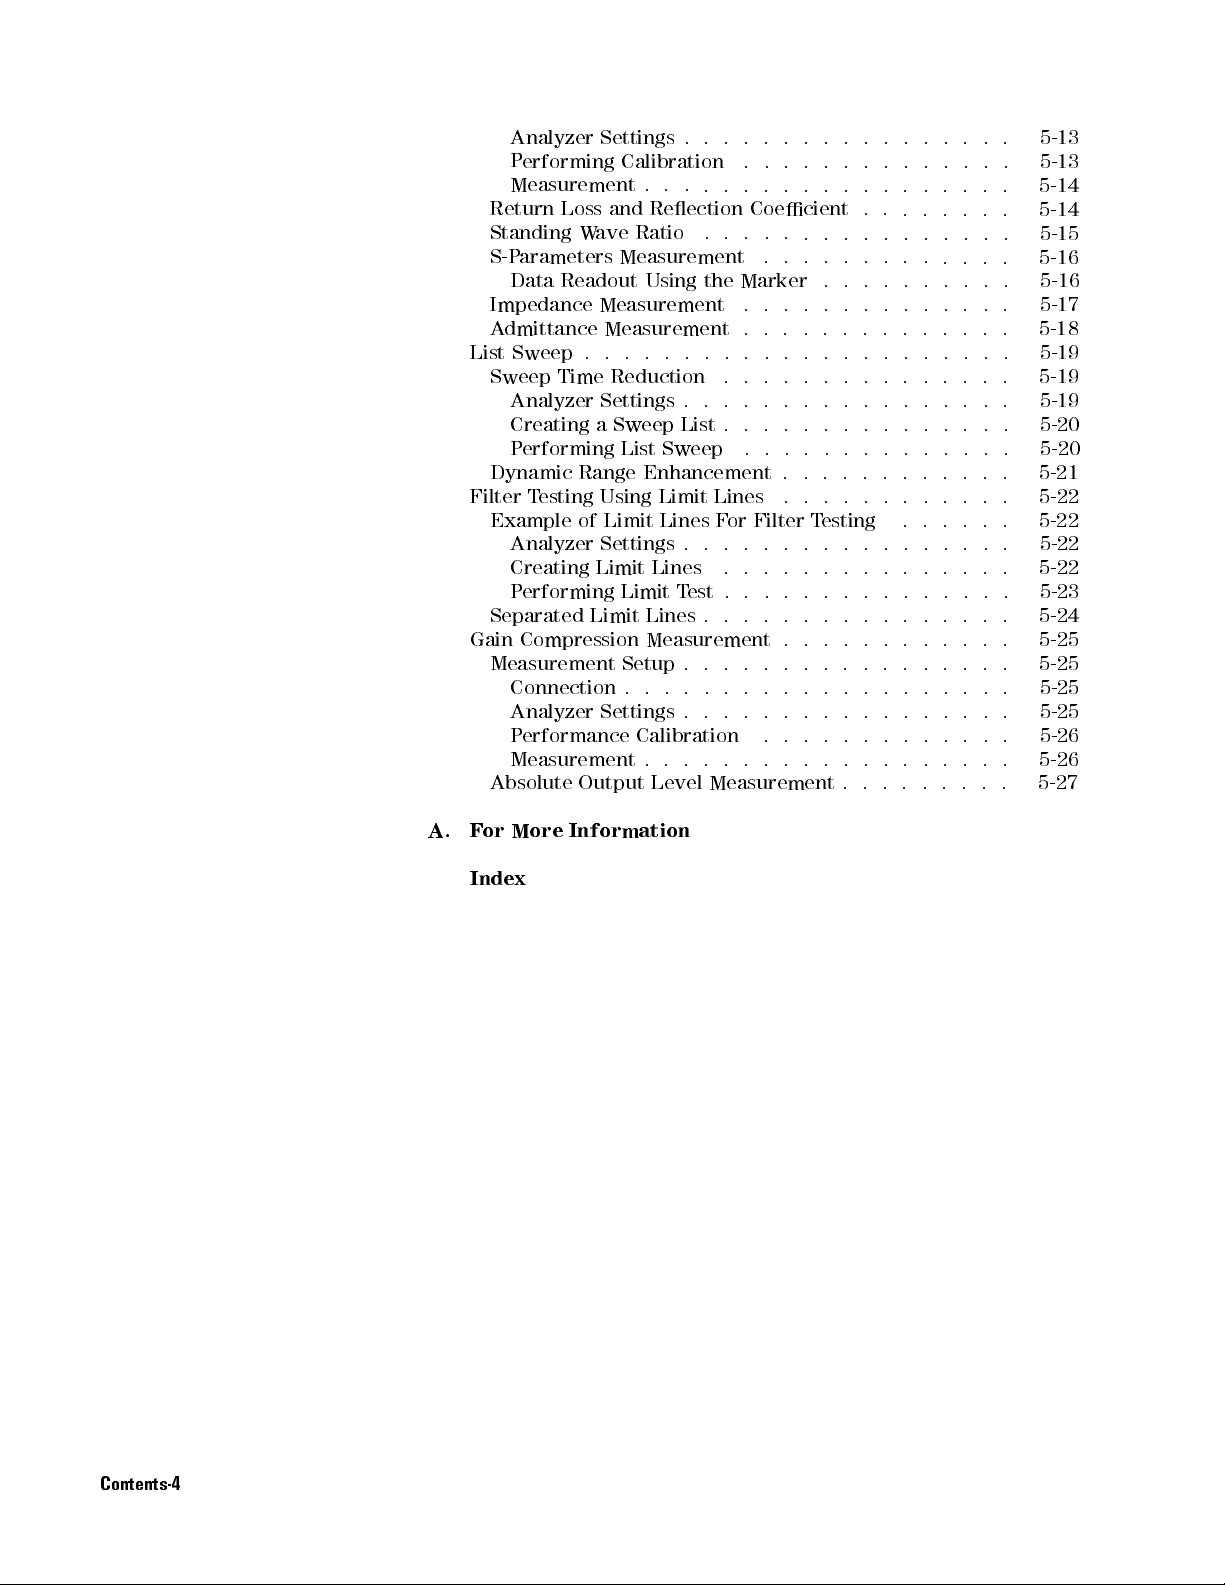
Analyzer
P
erforming Calibration
Measurement
Return
Standing
S-P
arameters Measurement
Data
Impedance
A
dmittance
List
Sweep
Sweep
Analyzer
Creating
P
erforming
Dynamic
Filter
T
esting
Example
Analyzer
Creating
P
erforming
Separated
Gain
Compression
Measurement
Connection
Analyzer
P
erformance
Measurement
Absolute
Settings .
Loss and
Wave
Readout
Measurement
Measurement
.
.
.
Time
Reduction
Settings
a
Sweep
List
Range
Using
of
Limit
Settings
Limit
Limit
Limit
Setup
.
Settings
Output
..
..
.
.
.
Reection
Ratio
Enhancement
.
Calibration
.
.
.
Using
the
Marker
.
.
.
.
.
.
.
.
.
List
.
Sweep
Limit
Lines
Lines
F
or
.
.
.
Lines
Lines
Measurement
.
Level
.
T
est
.
.
.
.
..
..
..
.
..
.
.
..
Measurement
.
.
.
.
.
.
.
.
.
.
.
.
Coecient
.
.
.
.
.
.
.
.
.
.
.
.
.
.
.
.
.
.
.
.
.
.
.
.
.
.
.
.
.
.
.
.
.
.
.
.
.
.
.
Filter
T
.
.
.
.
.
.
.
.
.
.
.
.
.
.
.
.
.
.
..
.
.
.
.
.
.
..
.
.
.
.
..
.
.
.
.
.
.
.
.
.
.
.
.
.
.
.
.
.
.
.
..
.
.
.
..
.
..
.
.
.
.
.
.
esting
.
..
.
.
.
.
..
.
.
.
.
.
.
.
.
.
.
.
.
.
.
.
.
.
.
.
.
.
.
.
.
.
.
.
.
.
.
..
.
.
..
..
.
.
.
.
.
.
..
.
.
.
.
..
.
.
.
.
.
.
.
.
.
.
.
.
.
.
.
.
.
.
..
.
.
..
.
.
.
.
.
.
.
.
..
.
.
..
..
..
.
.
..
.
.
.
.
.
.
.
..
..
.
.
.
.
.
.
.
.
.
.
.
.
.
.
.
..
..
.
.
..
.
.
.
.
.
.
.
..
..
..
..
..
..
.
..
..
.
..
.
.
.
..
..
.
.
..
.
.
.
.
.
.
.
.
.
.
.
.
.
. 5-13
. 5-13
..
.
.
..
..
.
. 5-16
..
. 5-18
.
.
..
.
.
..
. 5-21
..
. 5-22
.
.
.
.
.
.
.
..
.
.
.
.
.
.
.
.
.
.
.
.
5-14
5-14
5-15
5-16
5-17
5-19
5-19
5-19
5-20
5-20
5-22
5-22
5-22
5-23
5-24
5-25
5-25
5-25
5-25
5-26
5-26
5-27
A.
F
or
Index
More
Information
Contents-4
Page 17
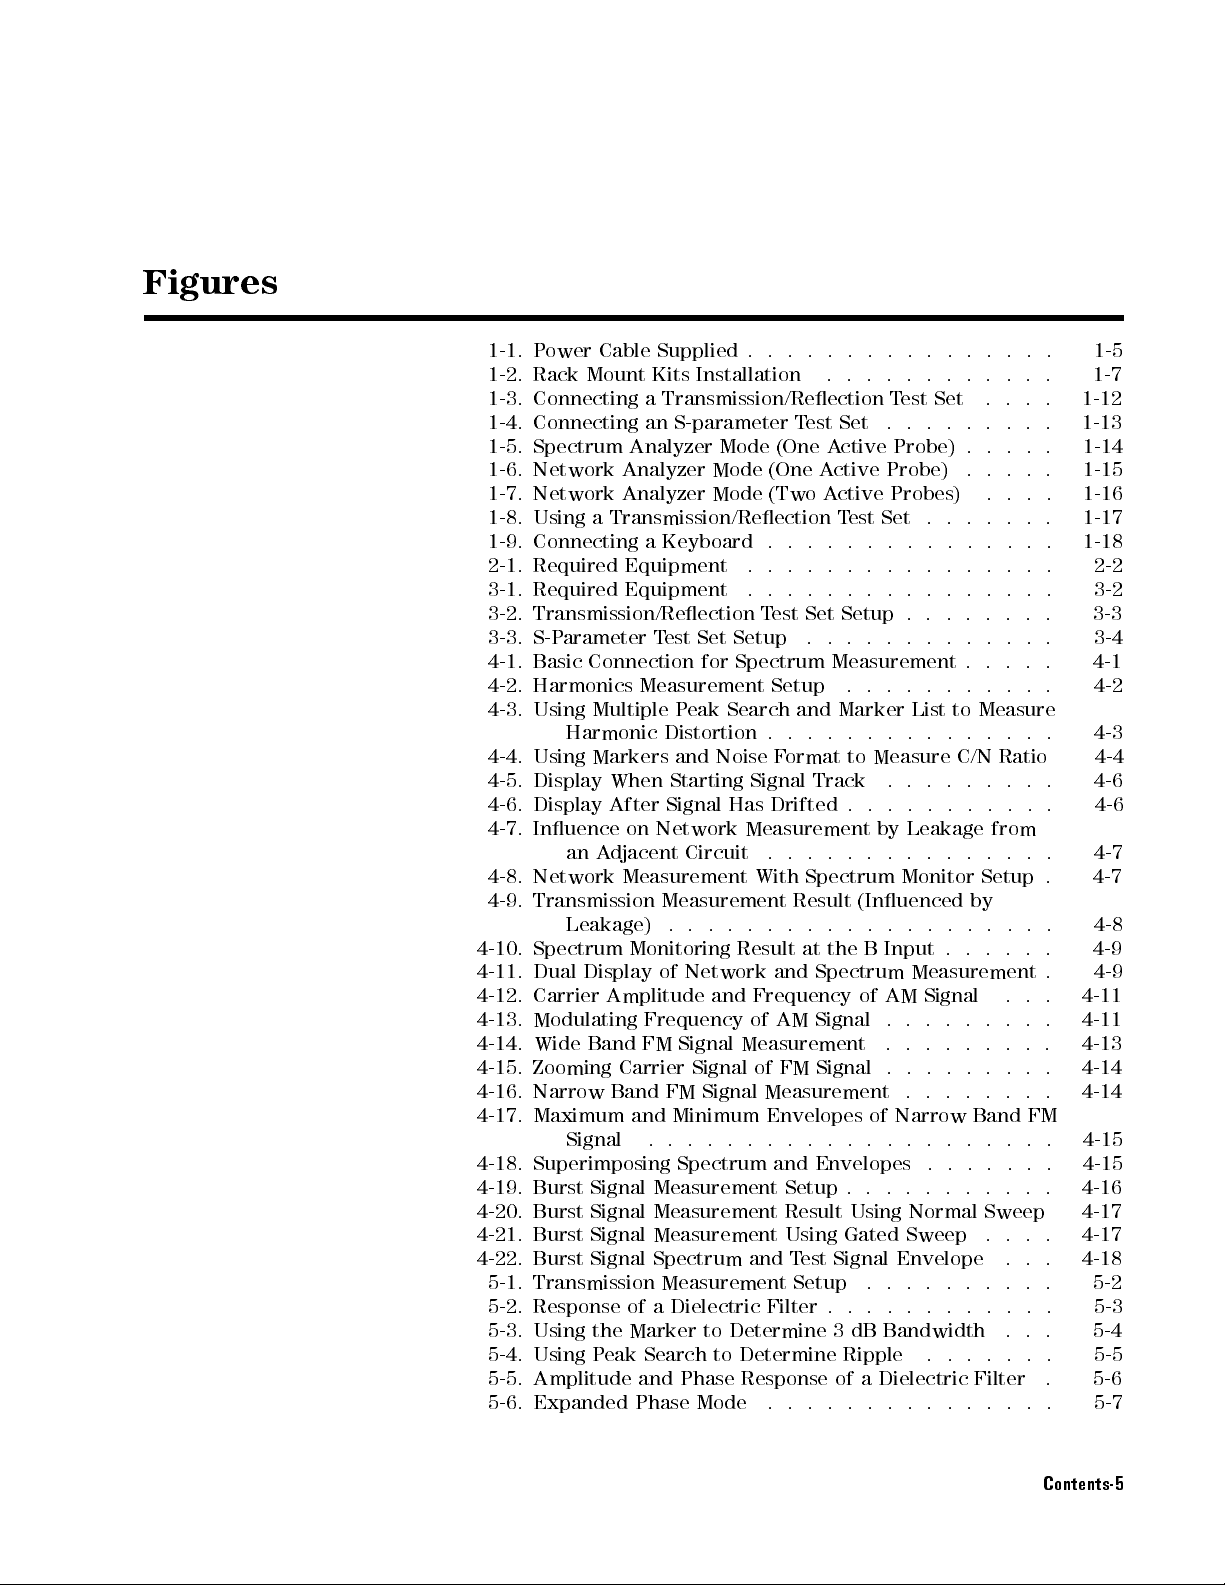
Figures
1-1. P
ower
Cable
Supplied
1-2. Rack
1-3. Connecting
1-4. Connecting
1-5. Spectrum
1-6.
1-7.
1-8.
1-9.
2-1.
3-1.
3-2.
3-3. S-P
4-1.
4-2.
4-3.
4-4.
4-5.
4-6.
4-7.
4-8.
4-9.
4-10.
4-11.
4-12.
4-13.
4-14.
4-15.
4-16. Narrow Band FM Signal Measurement
4-17. Maximum and Minimum Envelopes of
4-18. Superimposing Spectrum and Envelopes
4-19. Burst Signal Measurement Setup . . .
4-20. Burst Signal Measurement Result Using Normal Sweep
4-21. Burst Signal Measurement Using Gated Sweep
4-22. Burst Signal Spectrum and T
5-1. Transmission Measurement Setup .......... 5-2
5-2. Response of a Dielectric Filter . . . . . . . . . . . . 5-3
5-3. Using the Marker to Determine 3 dB Bandwidth ... 5-4
5-4. Using Peak Search to Determine Ripple ....... 5-5
5-5. Amplitude and Phase Response of a Dielectric Filter . 5-6
5-6. Expanded Phase Mode ............... 5-7
Mount
Network
Network
Using
a
Connecting
Required
Required
Transmission/Reection
arameter
Basic
Connection
Harmonics
Using
Multiple
Harmonic
Using
Markers
Display
Display
Inuence
an
Network
Transmission
Leakage)
Spectrum
Dual Display
Carrier Amplitude
Modulating Frequency
Wide Band
Zooming
Signal .. ....
Kits
a
Transmission/Reection
an
S-parameter
Analyzer
Analyzer
Analyzer
Transmission/Reection
a
Keyboard
Equipment
Equipment
T
est
Measurement
P
eak
Distortion
and
When
After
A
djacent
Starting
Signal
on
Network
Circuit
Measurement
Measurement
.
.
Monitoring
of Network
FM Signal
Carrier
.
.
.
Installation
T
Mode
(One
Mode
(One
Mode
(Two
.
.
.
.
.
.
.
.
T
est
Set
Setup
for
Spectrum
Setup
Search
Noise
Has
.
.
and Frequency
Signal
and
.
.
F
ormat
Signal
Drifted
Measurement
.
.
With
Result
.
.
..
Result
and Spectrum
of AM
Measurement .
of
FM
...... ...... ...
.
.
.
.
.
.
.
.
.
.
.
.
.
.
.
.
.
T
est
Set
est
Set
.
.
.
.
.
A
ctive
Probe)
A
ctive
Probe)
A
ctive
Probes)
T
est
Set
.
.
.
.
.
.
.
.
.
.
.
.
.
.
.
Set
Setup
.
.
.
.
.
Measurement
.
.
.
Marker
.
.
.
.
.
to
Measure
Track
.
Spectrum
at
Signal .
Signal
est Signal Envelope
.
.
by
.
.
..
(Inuenced
..
..
the
B
Input
of AM
.
.
Monitor
.
Narrow Band FM
.
.
.
.
.
.
.
.
.
.
.
.
.
.
.
.
.
.
.
.
.
.
.
.
.
.
.
.
.
.
List
to
.
.
.
.
C/N
.
.
.
.
.
.
.
.
Leakage
..
.
.
..
.
.
.
..
Measurement
Signal .
..
.
.
..
..
.
.
.
..
........
...
........
.
.
.
.
.
.
.
.
.
.
.
.
.
.
.
.
.
.
.
.
.
.
.
.
.
.
.
.
.
.
Measure
.
.
Ratio
.
.
.
.
from
.
.
Setup
by
.
.
..
.
.
.
.
.
....
....
...
..
.
.
.
.
.
.
.
.
.
.
.
.
.
.
.
.
.
.
.
.
.
.
.
. 3-4
.
.
.
.
..
.
.
.
.
.
.
.
.
.
. 4-9
.
.
.
.
.
.
.
.
.
1-12
1-13
1-14
1-15
1-16
1-17
1-18
4-11
4-11
4-13
4-14
4-14
4-15
4-15
4-16
4-17
4-17
4-18
1-5
1-7
2-2
3-2
3-3
4-1
4-2
4-3
4-4
4-6
4-6
4-7
4-7
4-8
4-9
Contents-5
Page 18
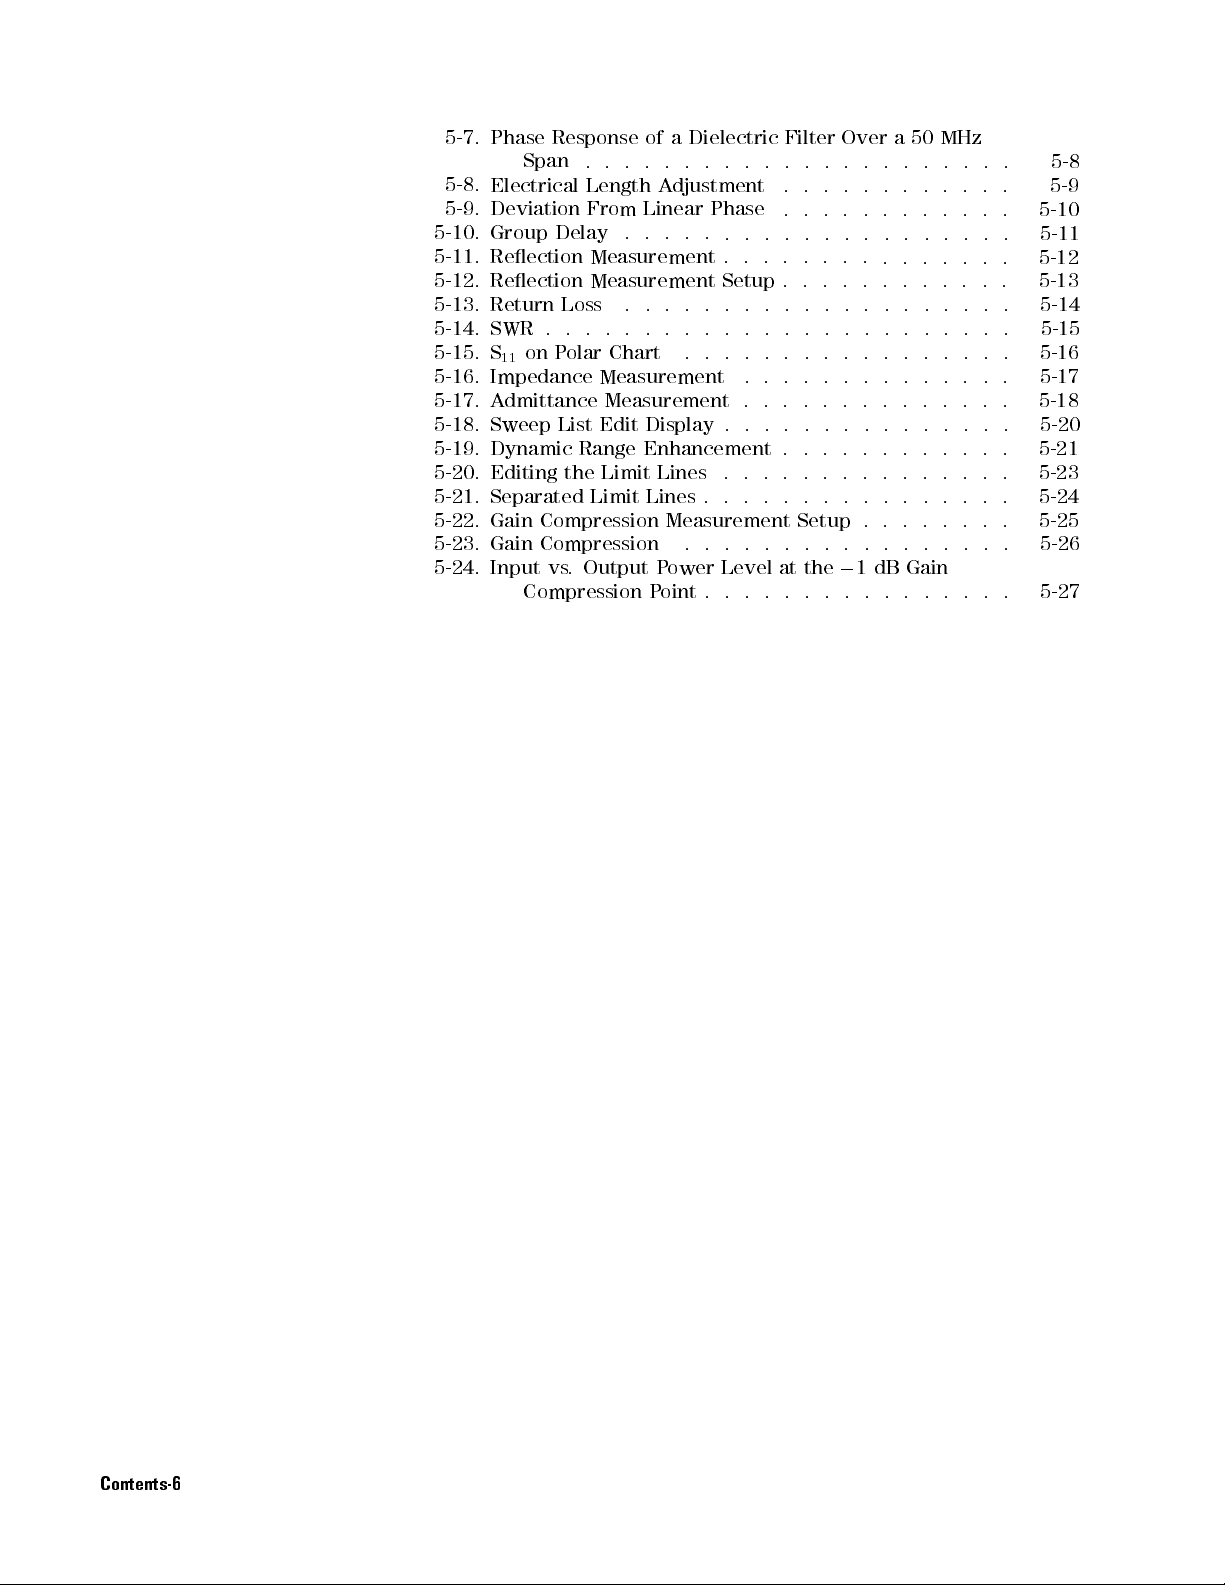
5-7.
Phase Response
Span
5-8.
Electrical Length
5-9.
Deviation From
5-10.
Group Delay
5-11.
Reection Measurement
5-12.
Reection
5-13.
Return
5-14.
SWR
5-15.
S
11
5-16.
Impedance
5-17.
A
dmittance
5-18.
Sweep
5-19.
Dynamic
5-20.
Editing
5-21.
Separated
5-22.
Gain
5-23.
Gain
5-24.
Input
..
Loss
.
.
.
on
P
olar
List
Range
the
Compression
Compression
vs
.
Output
Compression
of a
Dielectric
.
.
.
.
A
djustment
Linear
.
.
.
.
Measurement
.
.
.
.
.
.
.
.
.
Chart
.
Measurement
Measurement
Edit
Display
Enhancement
Limit
Lines
Limit
Lines
Measurement
.
P
ower
P
oint
.
.
Phase
.
.
.
Setup
.
.
.
.
.
.
.
.
.
.
.
.
Level
.
.
Filter
Over
a
50
MHz
.
.
.
.
.
..
..
..
..
. 5-8
.
.
.
.
.
.
.
.
.
..
. 5-9
.
.
.
.
.
.
.
.
.
..
. 5-10
.
.
.
.
.
..
..
..
..
. 5-11
.
.
.
.
.
.
.
.
.
.
..
..
5-12
.
.
.
.
.
.
.
.
.
.
..
5-13
.
.
.
.
.
..
..
..
..
.
5-14
.
.
..
..
..
..
.
.
.
.
5-15
.
.
.
.
.
.
.
..
..
..
. 5-16
.
.
.
.
.
.
.
.
.
.
.
..
. 5-17
.
.
.
.
.
.
..
..
..
..
5-18
.
.
.
.
..
..
..
..
.
.
5-20
.
.
.
.
.
.
.
.
..
..
5-21
.
.
.
.
.
.
..
..
..
.
.
5-23
.
.
.
.
.
.
..
..
..
.
.
5-24
Setup
.
.
.
at
.
.
.
.
the
.
..
0
.
.
.
..
1
.
.
dB
.
.
.
.
.
Gain
.
.
.
.
.
.
.
.
.
..
. 5-25
.
5-26
.
5-27
Contents-6
Page 19
T
ables
1-1. Contents
1-2.
Fuse
Selection
1-3.
Rack
Mount
..
.
Kits
.
.
.
.
.
.
.
.
.
.
.
.
.
.
.
.
..
. 1-2
.
.
.
.
.
.
.
.
.
.
.
.
.
.
..
..
. 1-3
.
.
.
.
.
.
.
.
.
.
.
.
.
..
..
. 1-7
Contents-7
Page 20

Page 21
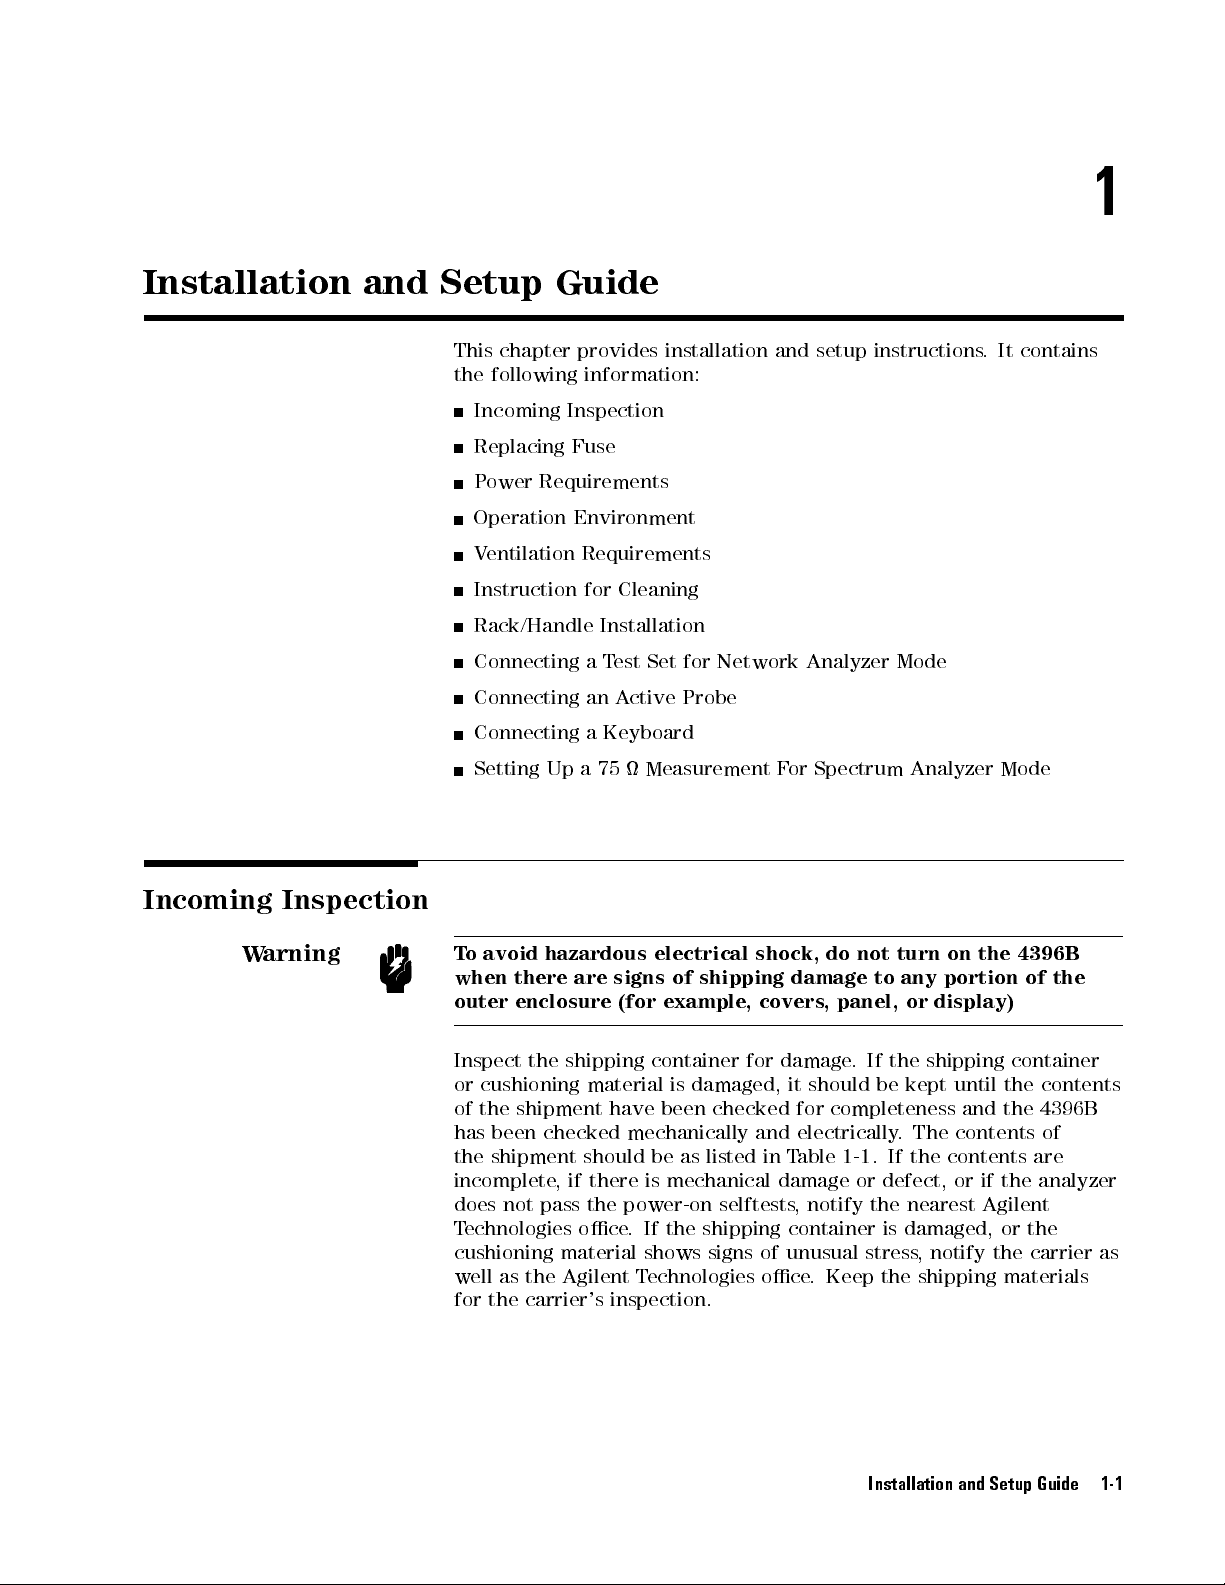
1
Installation
and Setup
This chapter
the following
Incoming Inspection
Replacing Fuse
P
ower
Operation
V
entilation
Instruction
Rack/Handle Installation
Connecting
Connecting
Connecting
Setting
Guide
provides
information:
Requirements
Environment
Requirements
for
Cleaning
a
T
est
Set
an
A
ctive
a
Keyboard
Up
a
75
Measurement
installation
for
Network
Probe
and
Analyzer
F
or
setup
instructions
Spectrum
Mode
Analyzer
.
It
Mode
contains
Incoming
Warning
Inspection
T
o
avoid
when
outer
Inspect
or
cushioning
of the shipment have been checked for
has been checked mechanically and electrically
the shipment should be as listed in T
hazardous
there are
signs
enclosure (for
the
shipping
material
electrical
of
shipping
example,
container
is
damaged, it
shock,
covers
for damage
do
damage
,
panel,
.If
should
not
turn
to
any
or
the shipping
be
kept
portion
display)
completeness and the 4396B
.The
able 1-1. If the contents are
on
the
4396B
of
container
until
the
contents of
the
contents
incomplete, if there is mechanical damage or defect, or if the analyzer
does not pass the power-on selftests
Technologies oce
. If the shipping container is damaged, or the
cushioning material shows signs of unusual stress
well as the Agilent T
echnologies oce
, notify the nearest Agilent
, notify the carrier as
. Keep the shipping materials
for the carrier's inspection.
Installation and Setup Guide 1-1
Page 22
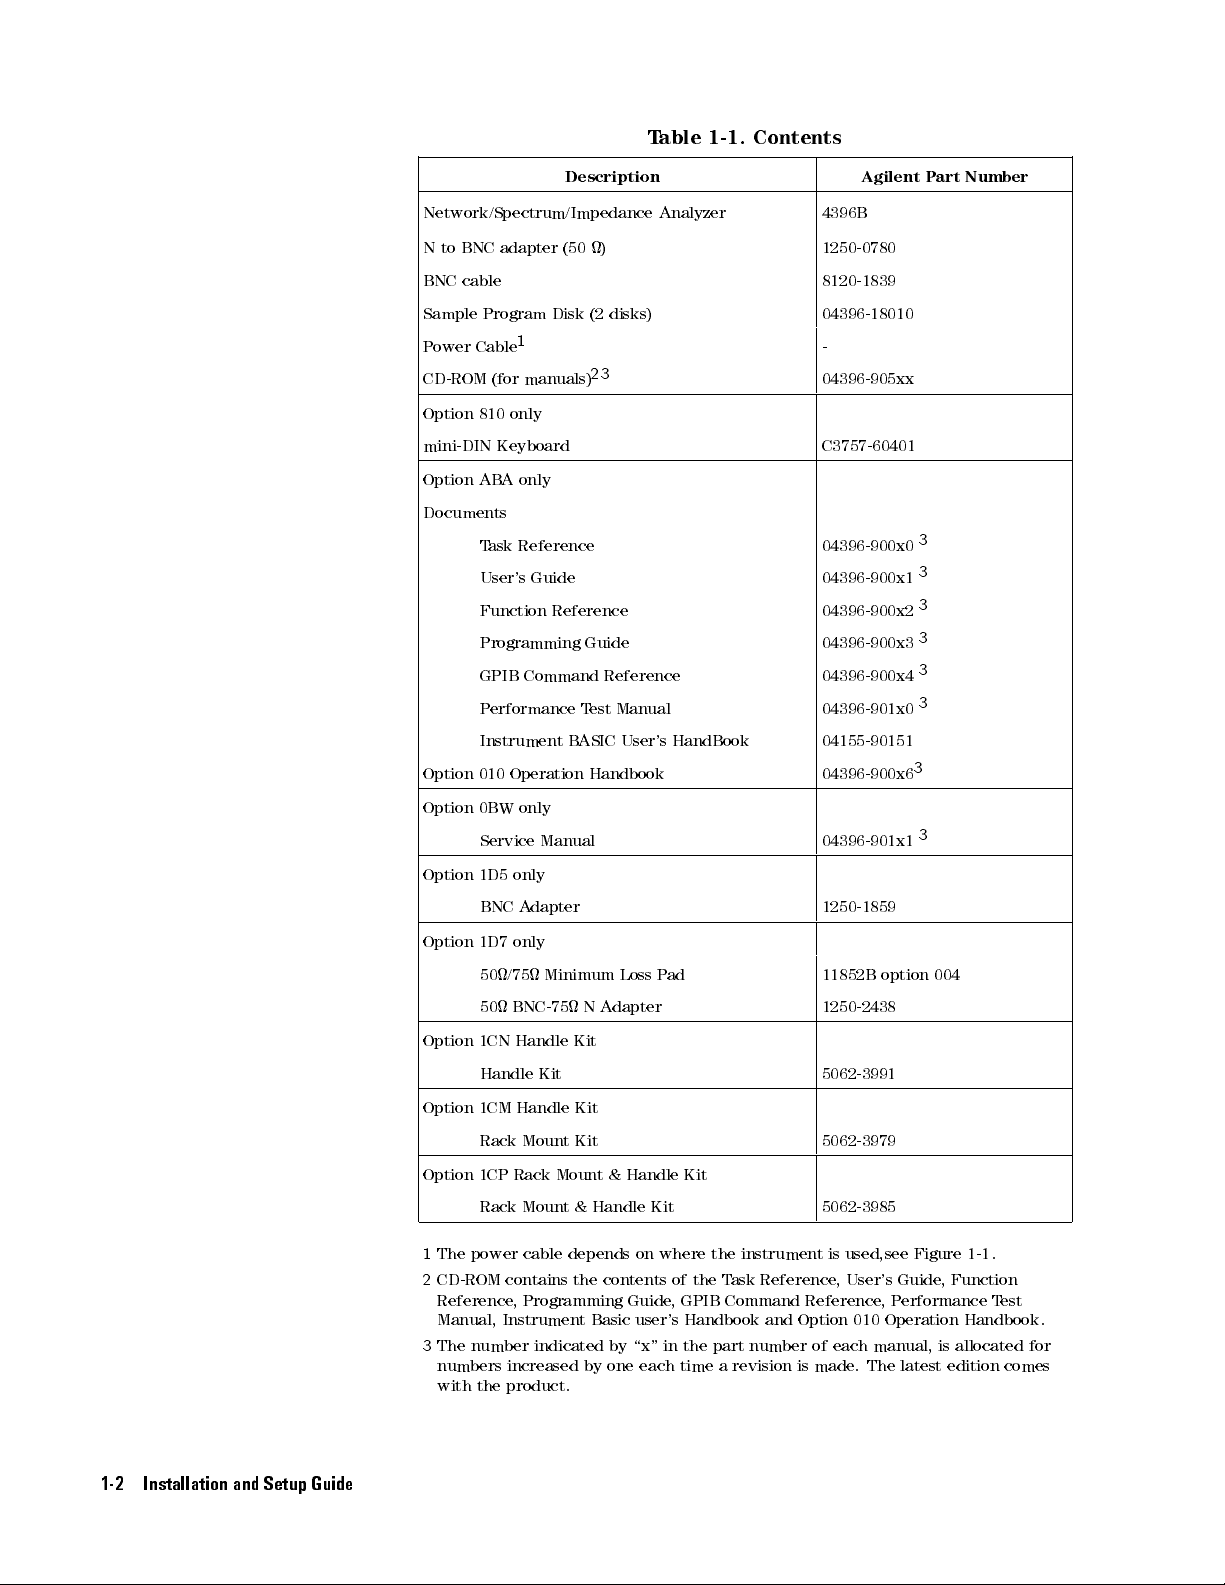
T
able 1-1.
Contents
Description Agilent
Network/Spectrum/Impedance Analyzer 4396B
N
to
BNC
BNC
cable
Sample
P
ower
CD-ROM
Option
mini-DIN
Option
adapter
Program
1
Cable
(for manuals)
810
only
Keyboard
AB
A
only
(50
Disk
)
(2 disks)
2
3
1250-0780
8120-1839
04396-18010
-
04396-905xx
C3757-60401
Documents
04396-900x0
04396-900x1
04396-900x2
04396-900x3
04396-900x4
04396-901x0
04155-90151
04396-900x6
Option
T
ask
Reference
User's
Guide
Function
Reference
Programming
GPIB
Command
P
erformance
Instrument
010
Operation
Guide
Reference
T
est
B
ASIC
Handbook
Manual
User's
HandBook
P
art
Number
3
3
3
3
3
3
3
Option
0BW
only
Service
Option
1D5
BNC
Option 1D7
50/75 Minimum
50 BNC-75
Option
1CN
Handle
Manual
only
A
dapter
only
Handle
Kit
Kit
N
Loss P
A
dapter
ad
04396-901x1
1250-1859
11852B option
1250-2438
5062-3991
3
004
Option 1CM Handle Kit
Rack Mount Kit 5062-3979
Option 1CP Rack Mount & Handle Kit
Rack Mount & Handle Kit 5062-3985
1
The
power cable depends on where the instrument is used,see Figure 1-1 .
Reference, Programming Guide, GPIB Command Reference,Performance Test
Manual, Instrument Basic user's Handbook and Option 010 Operation Handbook.
3
The number indicated by \x" in the part number of each manual, is allocated for
numbers increased by one each time a revision is made. The latest edition comes
with the product.
1-2 Installation and Setup Guide
Page 23
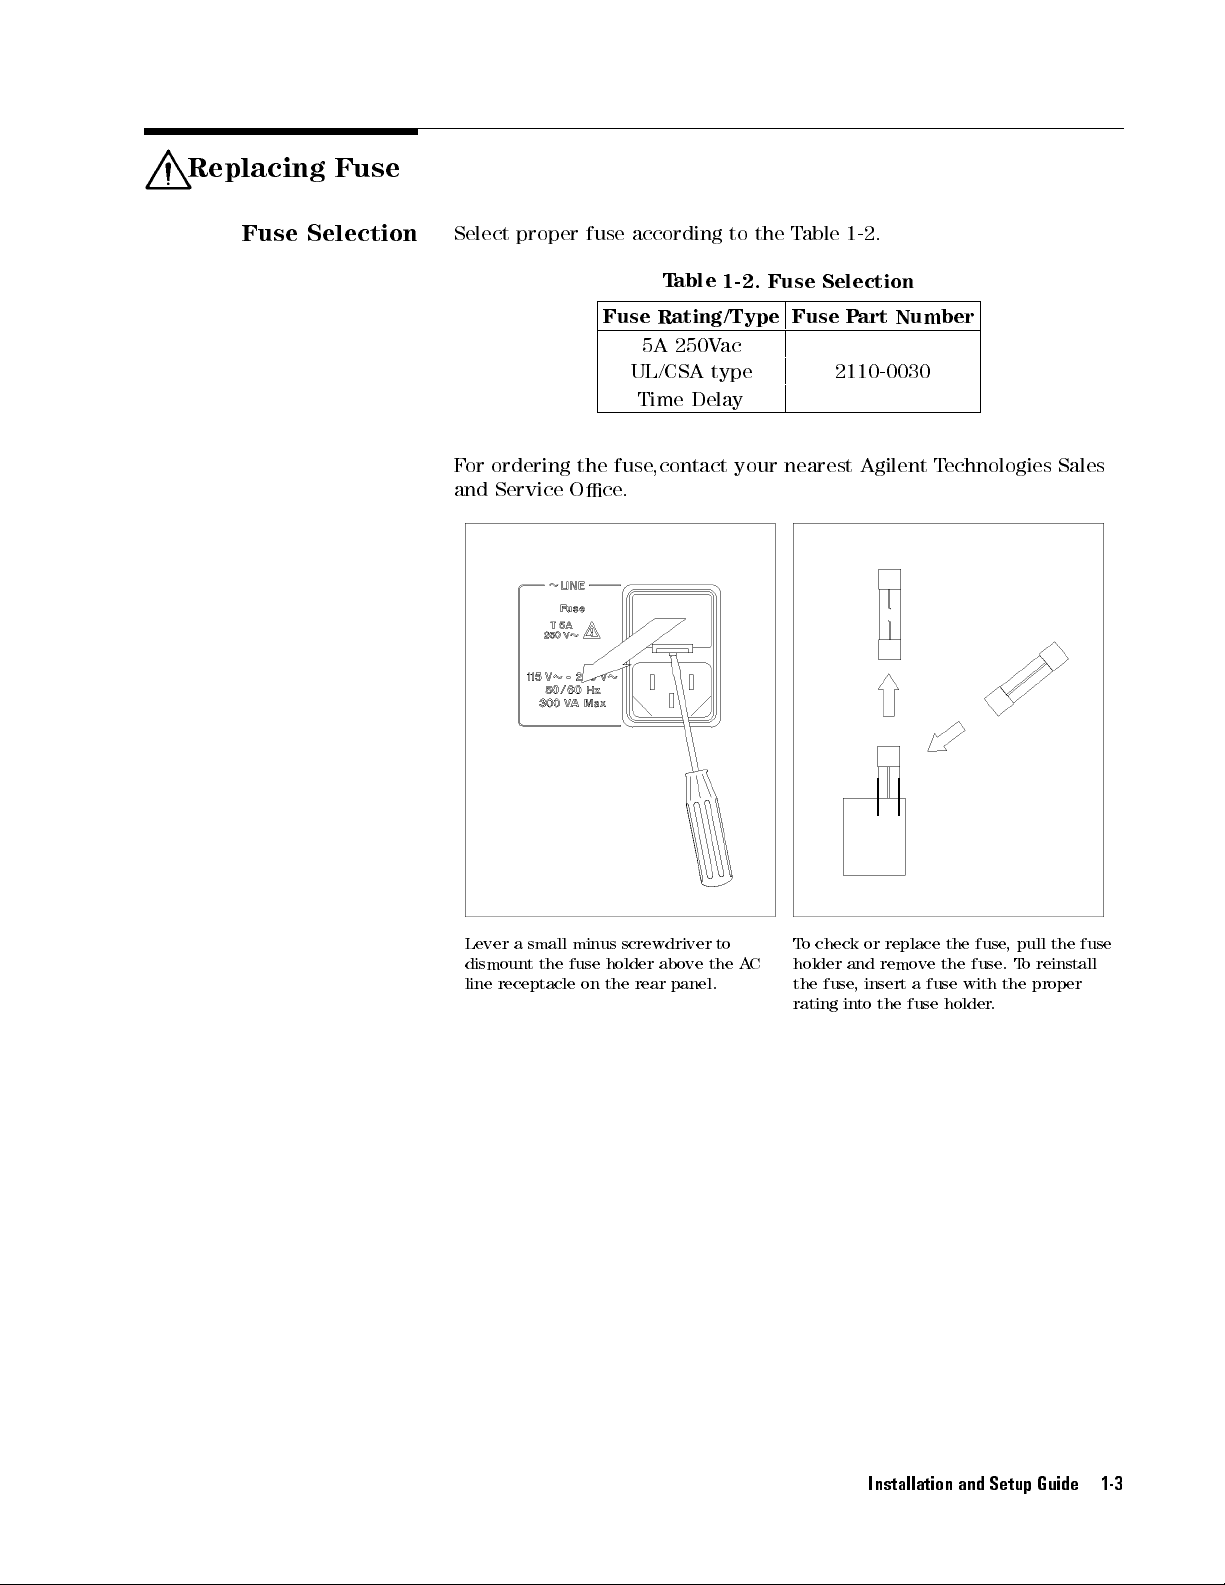
Replacing Fuse
Fuse
Selection
Select
F
or
ordering
and
proper fuse
Service
Fuse
the
Oce
according to
T
able
Rating/Type
5A
250V
UL/CSA
Time
Delay
fuse
,contact
.
1-2.
ac
type
your
the T
Fuse
nearest
able
Selection
Fuse
2110-0030
1-2
.
P
art
Agilent
Number
T
echnologies Sales
Lever
a
dismount
line
receptacle
small
the fuse
minus
holder above
on the
screwdriver
rear panel.
to
the
T
o
check
or
replace
the
fuse
,
pull
the
fuse
holder
the
rating
and remove
fuse
,insert
into
the
A
C
afuse
fuse
the fuse
with the
holder
.
T
o
reinstall
proper
.
Installation and Setup Guide 1-3
Page 24
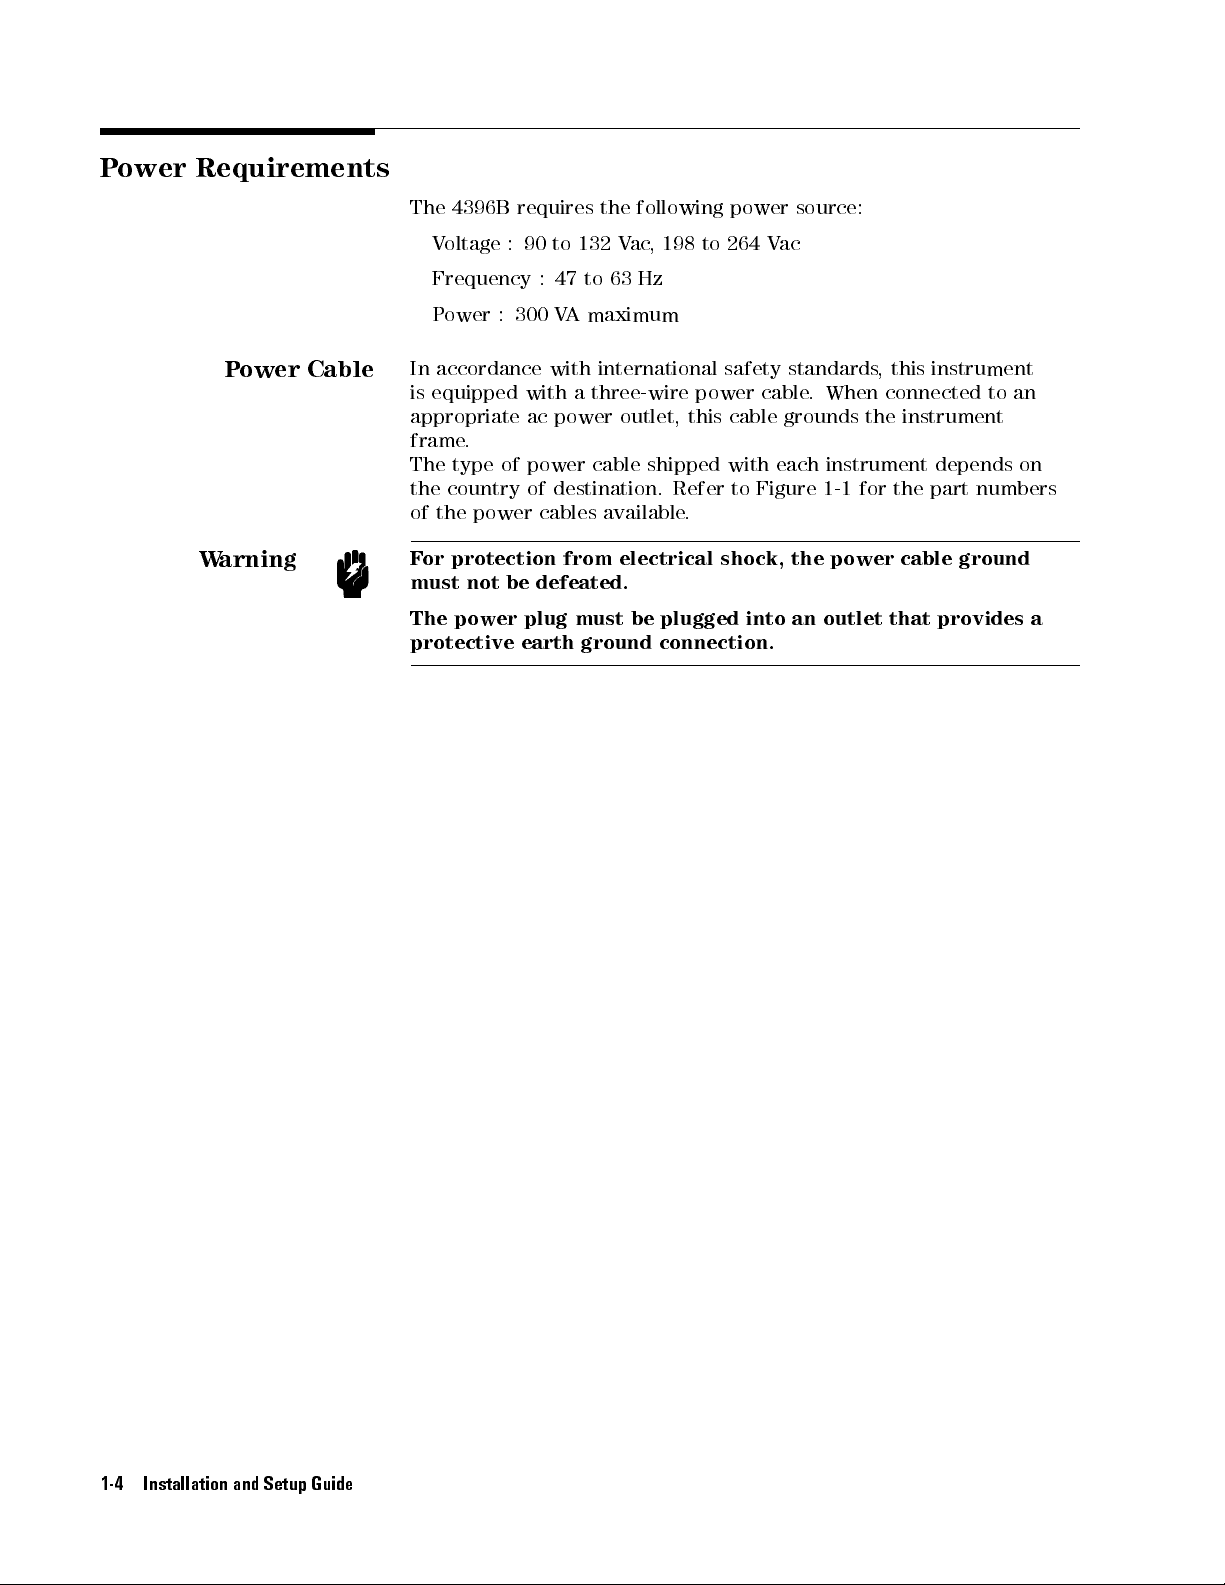
Power
Requirements
P
ower
W
arning
Cable
The 4396B
Voltage
requires the
:90
Frequency :
Power
:300
In accordance
is equipped
with a
appropriate ac
frame.
The type
the country
of the
F
or
must
The
protective
of power
of destination.
power cables
protection
not
be
power
plug
earth
following power
to 132
47 to
VA
Vac
,198
63 Hz
maximum
with international
three-wire power
power outlet,
cable
shipped
Refer
available
from
electrical
defeated.
must
be
plugged
ground
connection.
to 264
V
ac
safety standards
cable.
this
cable
with
each
to
Figure
.
shock,
into
source:
When
grounds
instrument
1-1
the
power
an outlet
,this
instrument
connected
the
instrument
depends
for
the
part
cable
that provides
to
numbers
ground
an
on
a
1-4 Installation and Setup Guide
Page 25
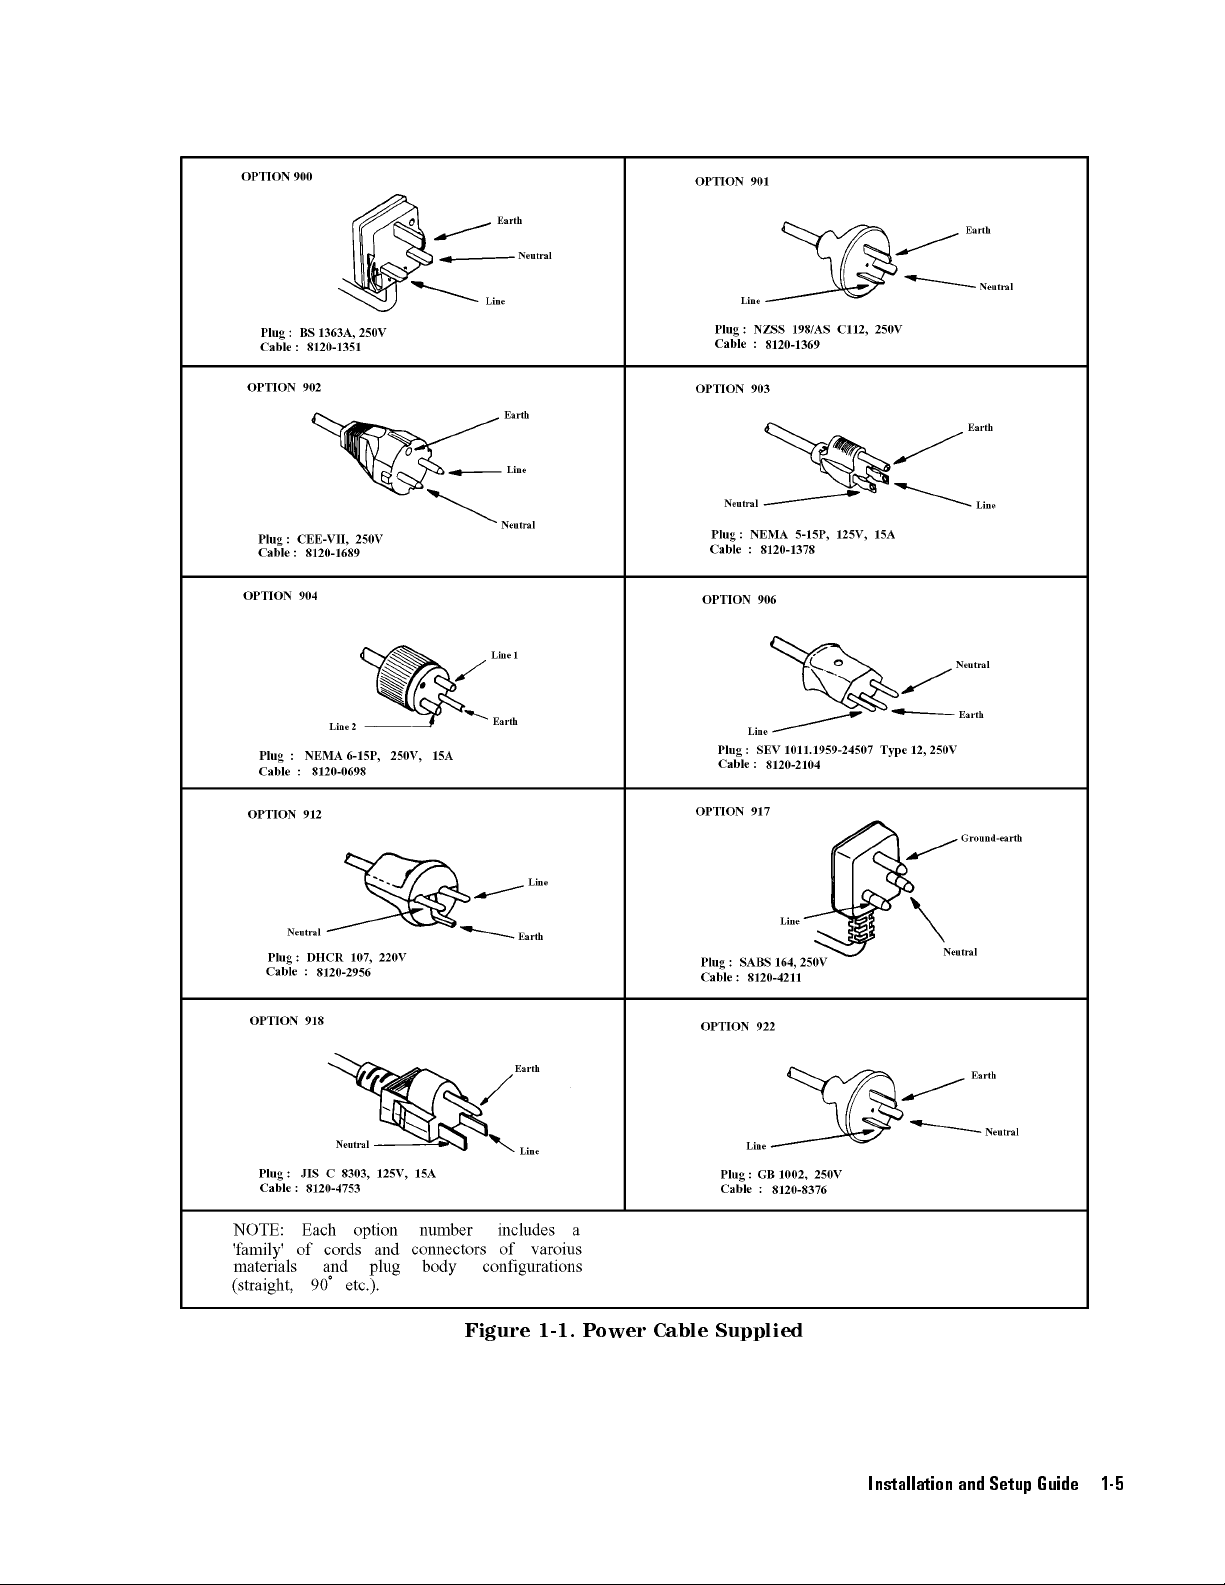
Figure 1-1. Power Cable Supplied
Installation and Setup Guide 1-5
Page 26
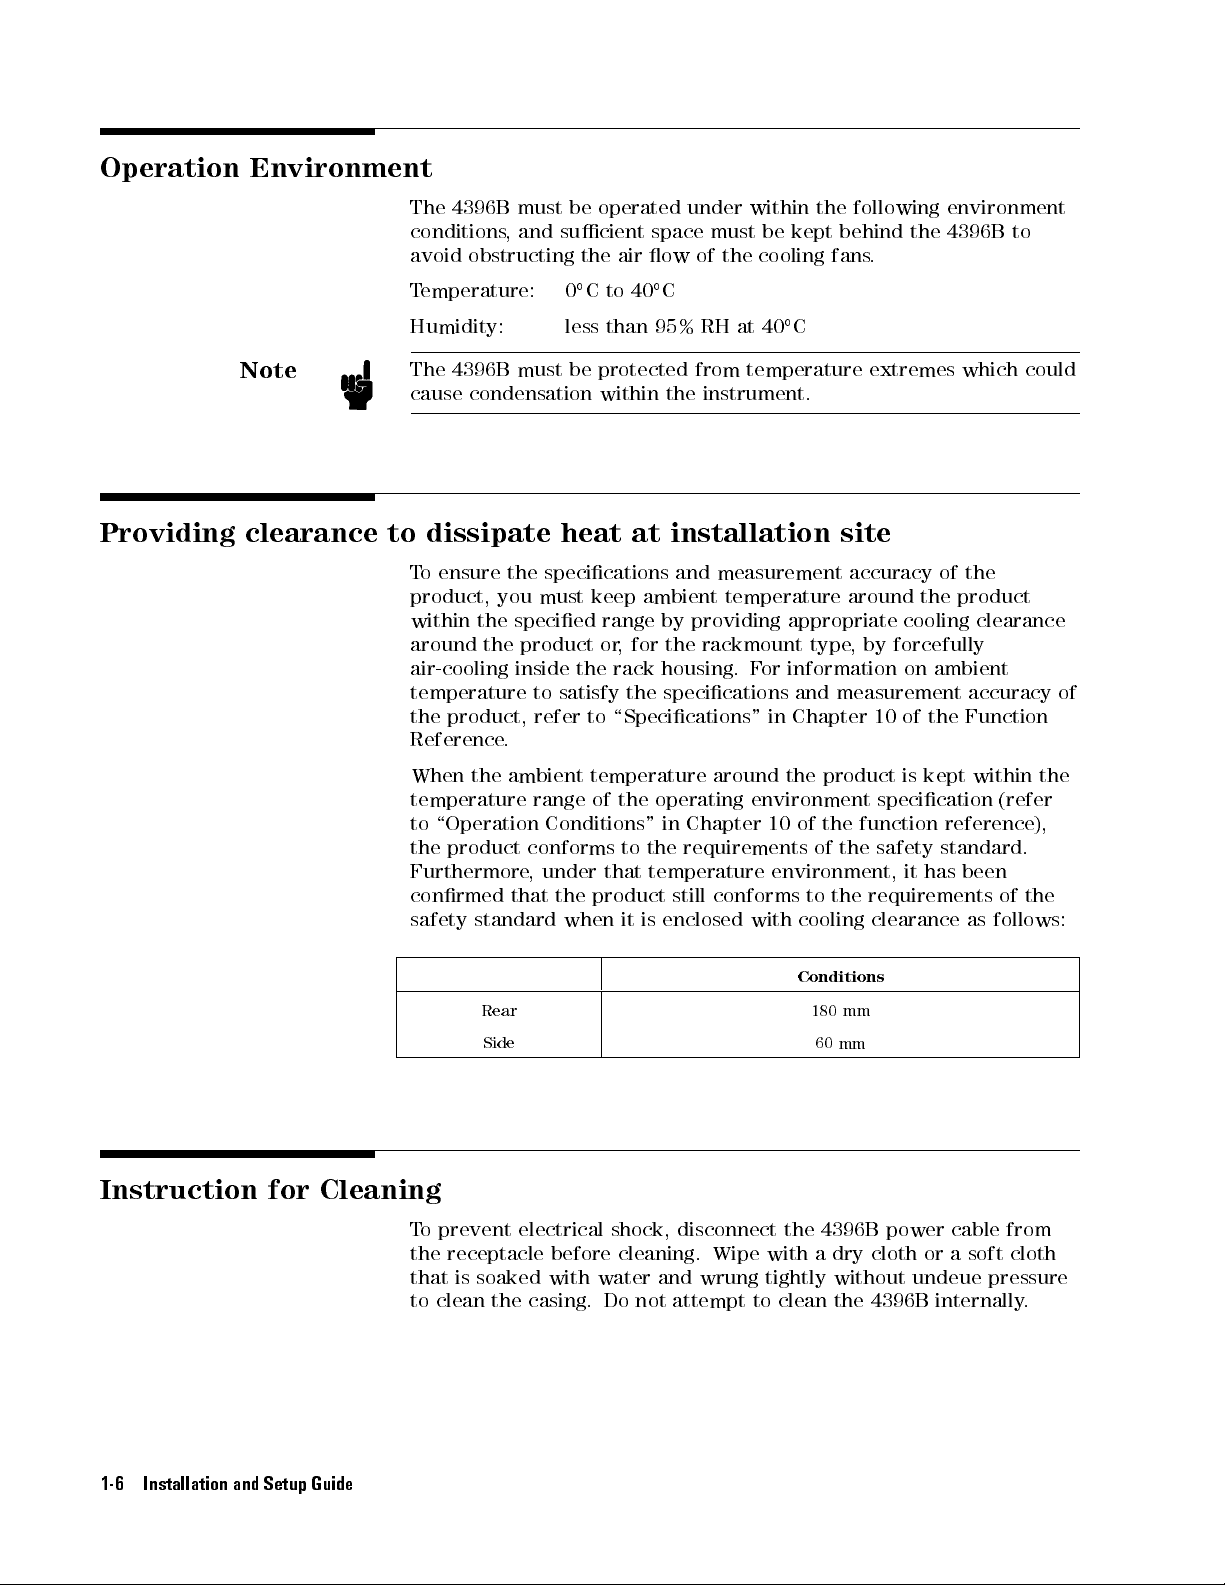
Operation Environment
Providing
Note
clearance
The 4396B
conditions,
must be
and sucient
avoid obstructing
Temperature:
Humidity: less
The
4396B
cause
to
dissipate
T
o
ensure
product,
within
around
air-cooling
temperature
the
product,
Reference
When
temperature
to
\Operation
the
product
Furthermore
conrmed
safety
must
condensation
the
you must
the
specied
the
product
inside
to
refer
.
the
ambient
range
conforms
,
that
standard
operated under
the air
Cto
0
40
than 95%
be
protected
within
heat
at
specications
keep
ambient
range
or
,
for
the
rack
satisfy
the
to
\Specications"
temperature
of
the
Conditions"
to
the
under
that
the
product
when it
temperature environment,
is enclosed
within the
space must
ow of
C
RH at
from
the
be kept
the cooling
40
temperature
instrument.
installation
and
measurement
temperature
by
providing
the
rackmount
housing.
F
or
specications
in
around
operating
in
Chapter
environment
10
requirements
still conforms
with cooling
following environment
behind the
fans.
C
extremes
site
accuracy
around
appropriate
type
,
by
information
and
measurement
Chapter
the
product
of
the
function
of
the
to the
requirements
4396B to
which could
of
the
the
product
cooling
forcefully
on
ambient
accuracy
10
of
the
Function
is
kept
specication
reference),
safety
standard.
it has
been
clearance as
clearance
within
the
(refer
of
the
follows:
of
Instruction for Cleaning
To prevent electrical shock, disconnect the 4396B power cable from
the receptacle before cleaning. Wipe with a dry cloth or a soft cloth
that is soaked with water and wrung tightly without undeue pressure
to clean the casing. Do not attempt to clean the 4396B internally.
1-6 Installation and Setup Guide
Conditions
Rear 180 mm
Side 60 mm
Page 27
Rack/Handle Installation
The analyzer
measurement system.
can be
rack mounted
Figure 1-2
and used
shows how
as a
component in
to rack
mount the
analyzer.
Table
1-3. Rack
Mount Kits
Option Description Agilent P
Number
1CN Handle
Kit
1CM Rack Mount
1CP Rack
Mount &
Handle
Kit
Kit
5062-3991
5062-3979
5062-3985
a
art
Option 1CN Handle Kit
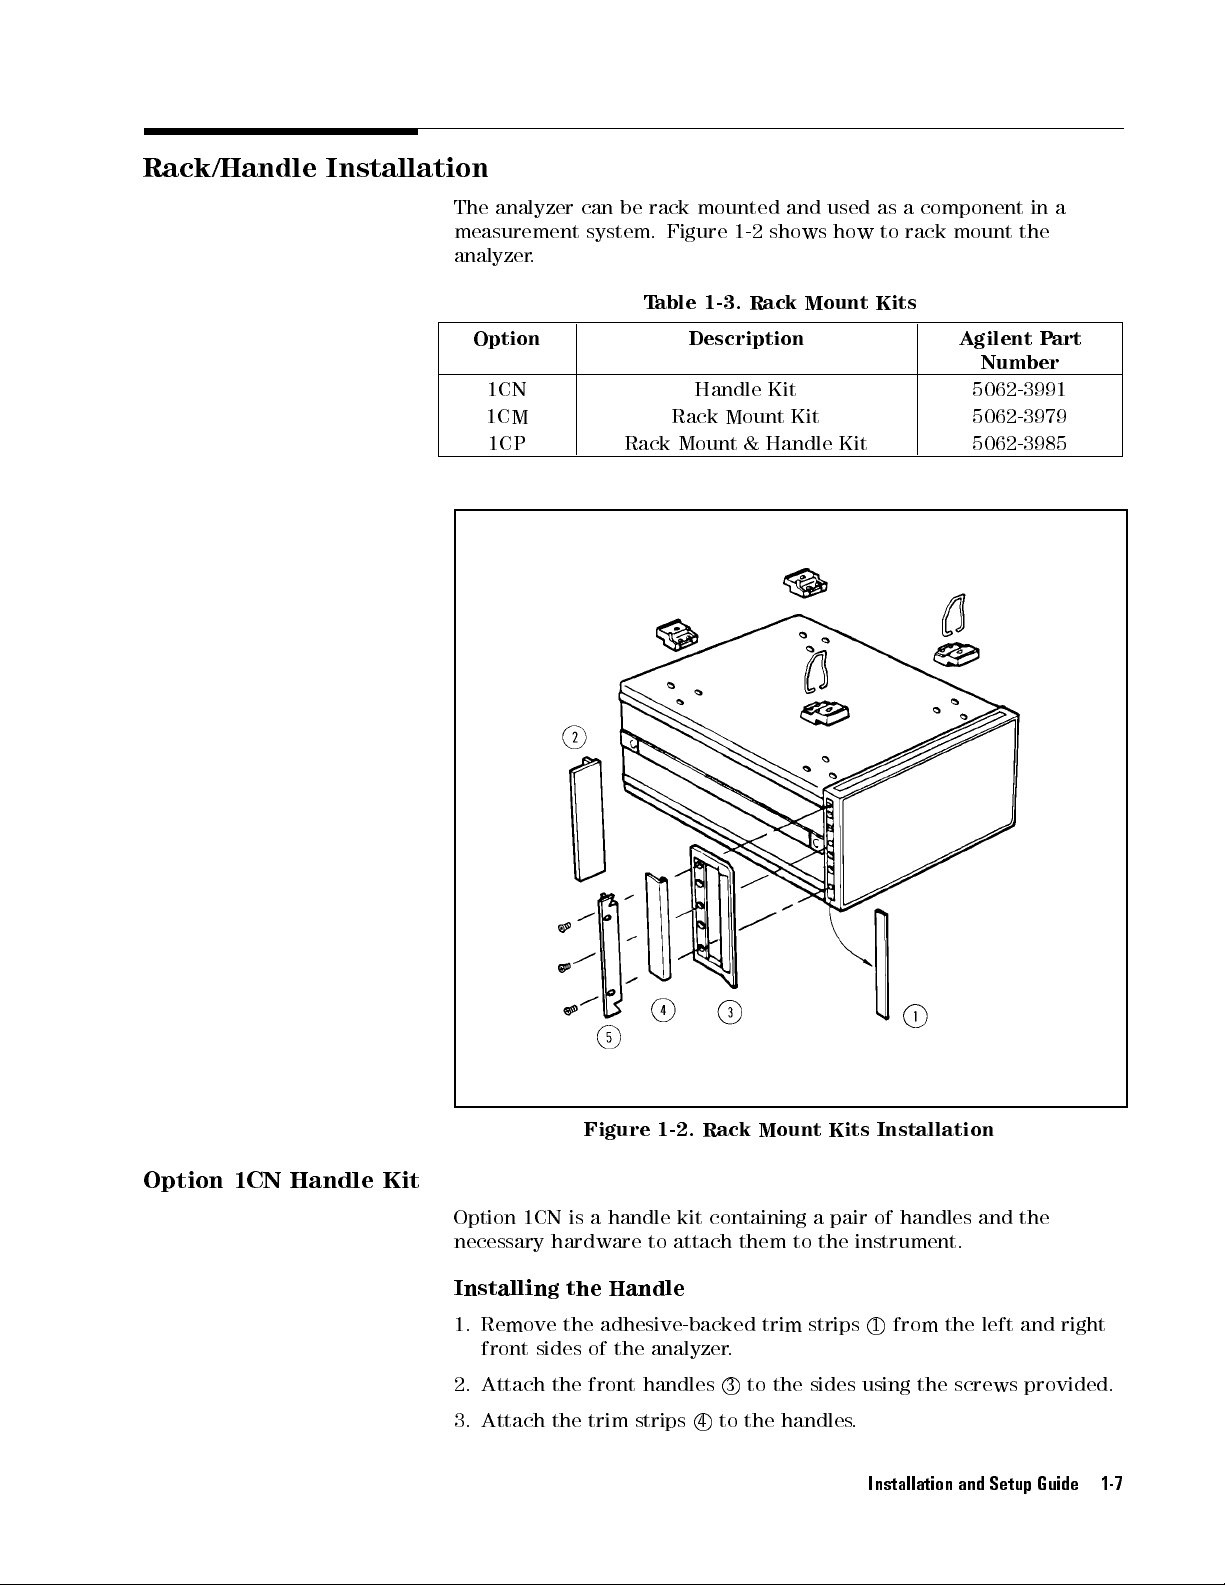
Figure 1-2. Rack Mount Kits Installation
Option
necessary hardware
1CN is a handle kit containing a pair of handles and the
to attach them to the instrument.
Installing the Handle
1. Remove the adhesive-backed trim strips1
front sides of the analyzer.
2. Attach the front handles3
3. Attach the trim strips4
to the sides using the screws provided.
to the handles.
Installation and Setup Guide 1-7
from the left and right
Page 28
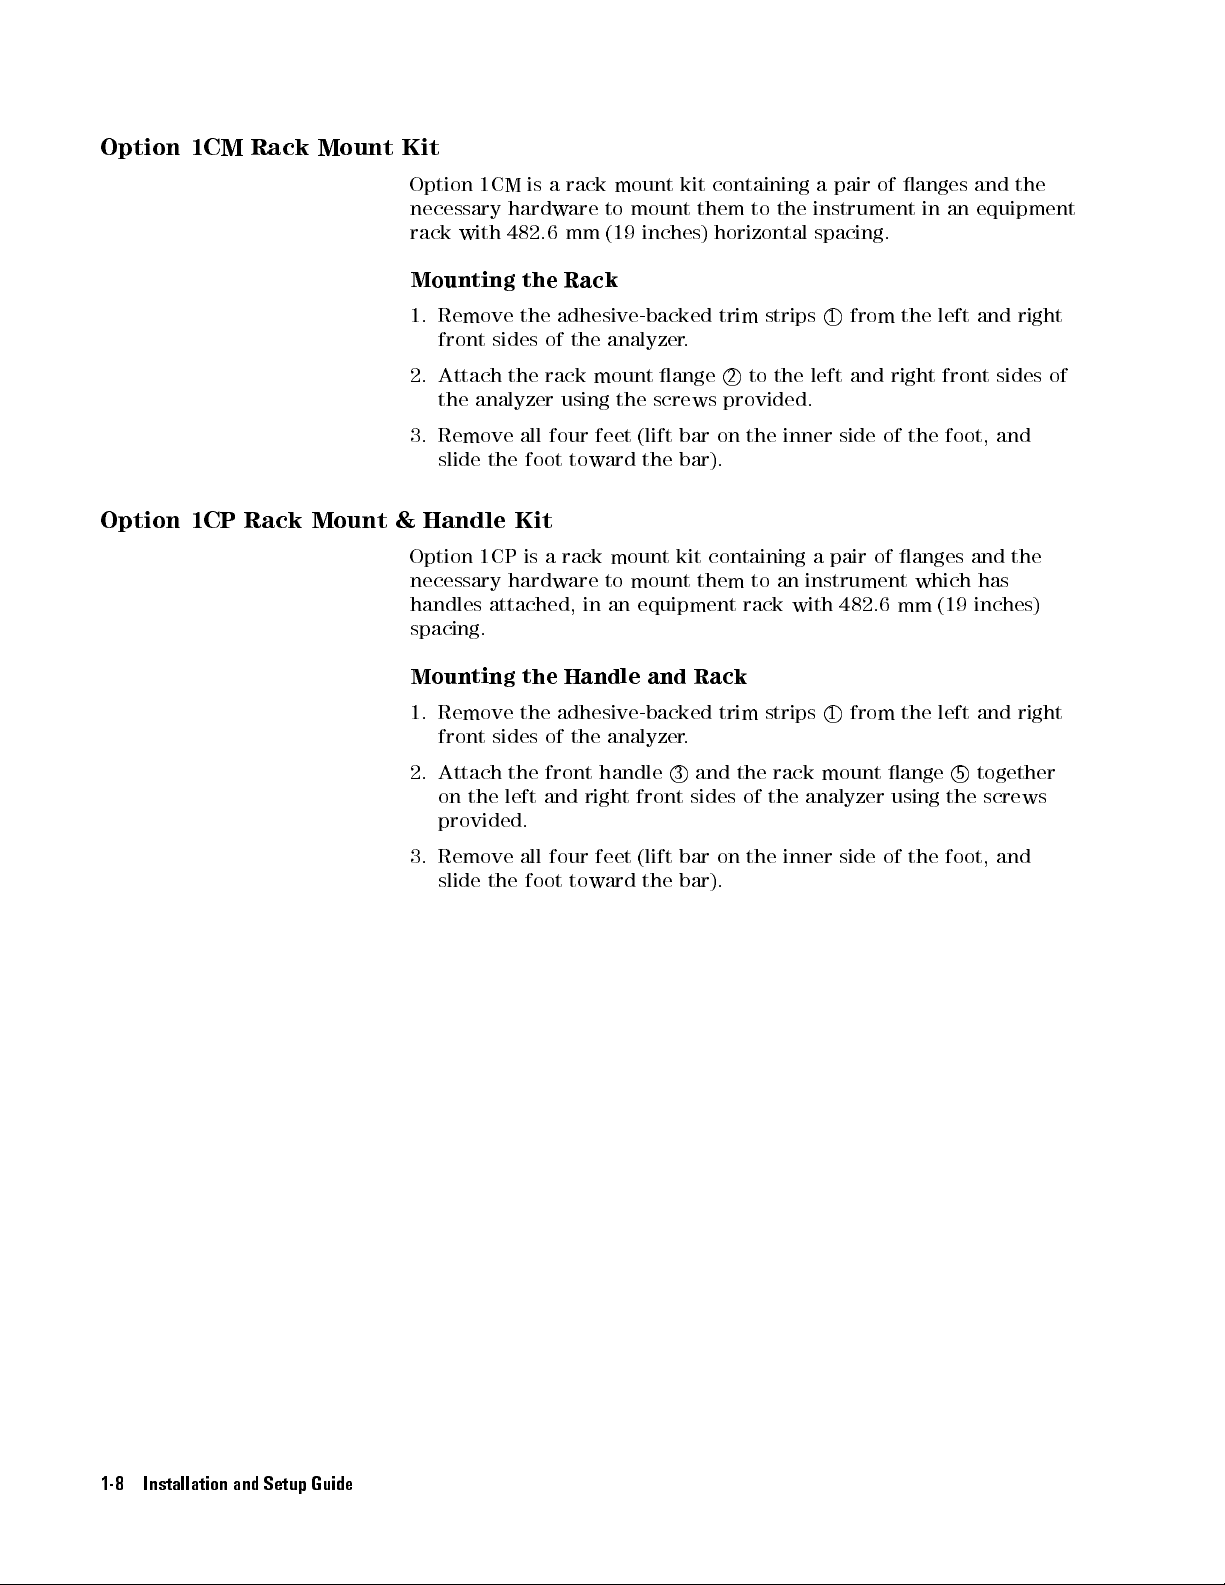
Option
1CM
Rack
Mount
Kit
Option
1CP Rack
Mount &
Option
1CM
necessary
rack
with
Mounting
1.
Remove
front
sides
2.
Attach
the
analyzer
3.
Remove
slide
the
Handle
Option
1CP
necessary
handles
attached,
spacing.
Mounting
1.
Remove
front
sides
is
a
rack
mount
hardware
482.6
the
the
the
all
foot
to
mount
mm
(19
inches)
Rack
adhesive-backed
of
the
analyzer
rack
using
four
toward
mount
feet
the
(lift
the bar).
ange
screws
Kit
is a
rack
mount
hardware
the
to
mount them
in
an
equipment
Handle and
the adhesive-backed
of
the
analyzer.
kit
containing
them
to
the instrument
horizontal spacing.
trim
strips
.
2
to the
provided.
bar
on
the inner
kit
containing
to
an
rack
with
Rack
trim strips
a
pair
of anges
1
from the
left and
right front
side of
a
pair
of
instrument
482.6
1
from
in an
left and
the foot,
anges
which
mm (19
the
left
and the
equipment
right
sides
and
and
the
has
inches)
and
right
of
2.
Attach
on
the
provided.
3. Remove
slide the
the
left
all
front
and
foot
four
toward
handle
right
feet
3
and
front sides
(lift
bar
on
the
bar).
the
of
the
rack
the
inner
mount
analyzer
side
ange
using
of
the
5
the
foot,
together
screws
and
1-8 Installation and Setup Guide
Page 29
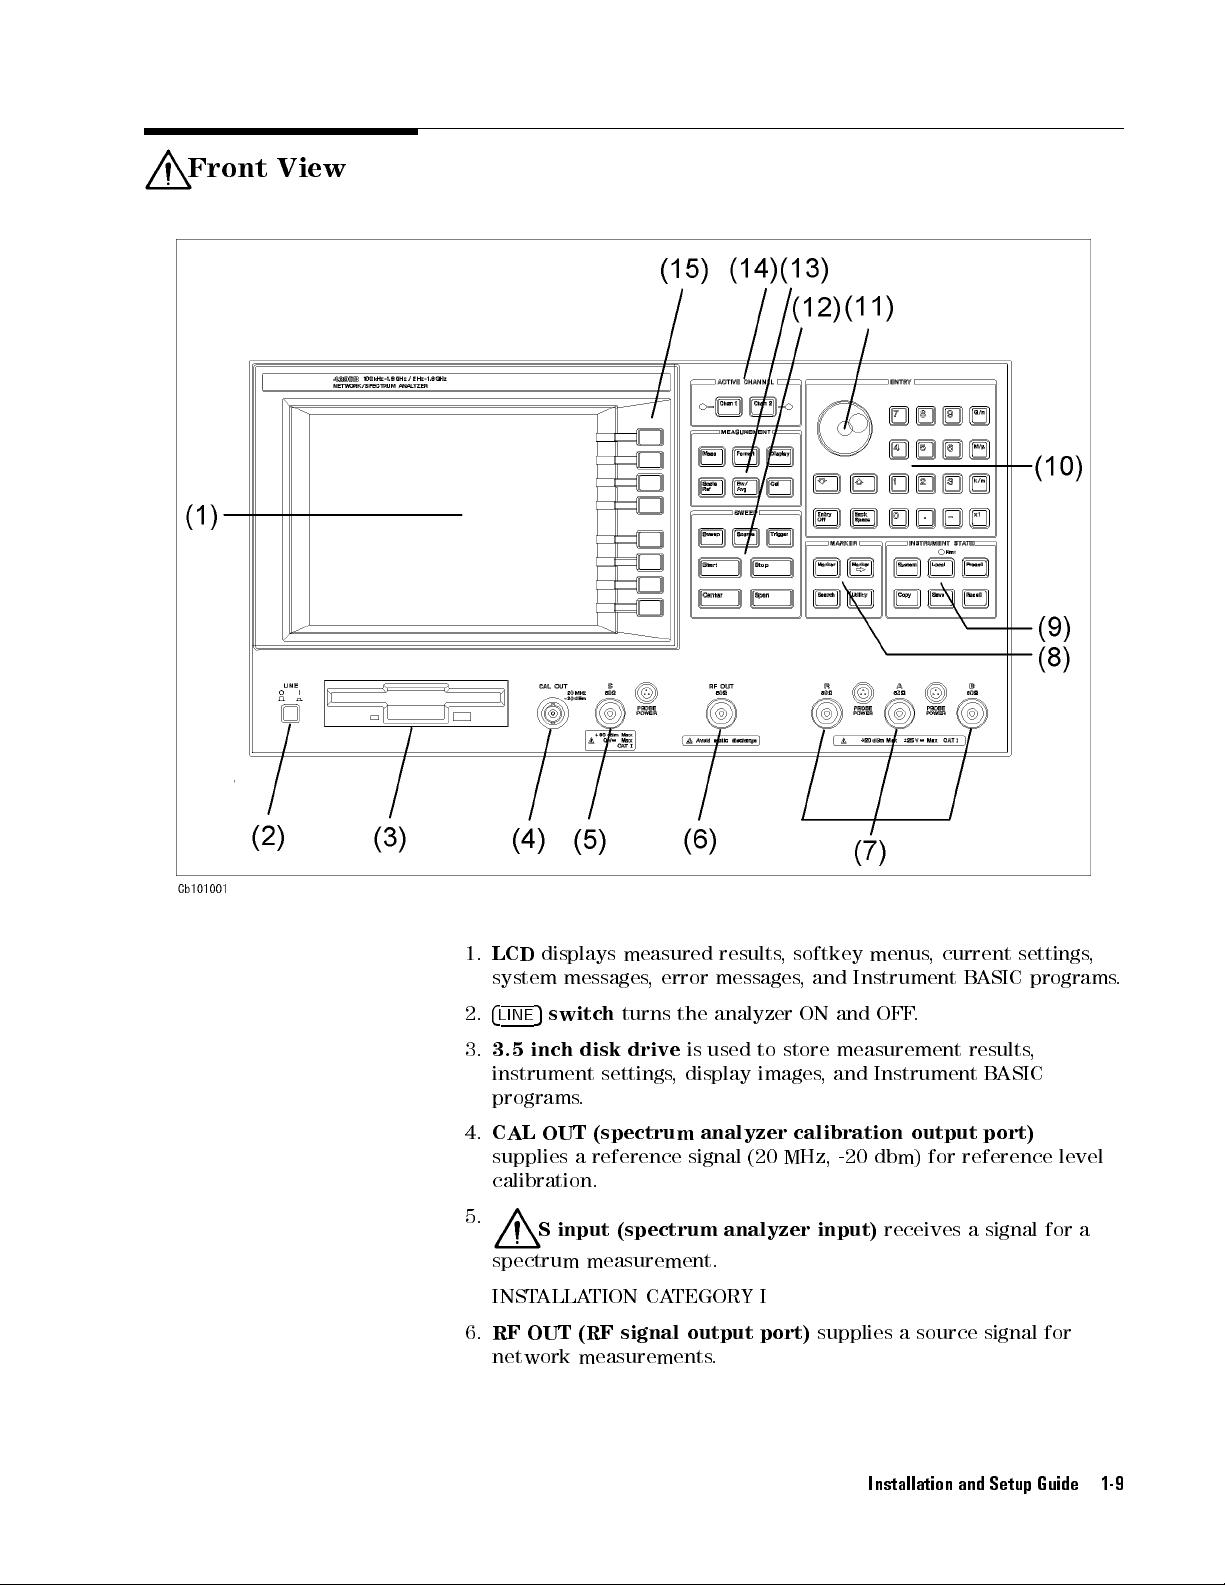
Front View
1.
LCD
system
2.
4
LINE
3.
3.5 inch
instrument
displays
5
switch
measured
messages,
turns
disk drive
settings
results
error
messages
the analyzer
is used
,
display
, softkey
,
and
ON
to store
images
menus,
Instrument
and
OFF
measurement
,
and
Instrument B
current settings
B
ASIC
.
results
ASIC
programs
,
programs.
4.
CAL OUT (spectrum analyzer calibration output port)
supplies a reference signal (20 MHz, -20 dbm) for reference level
calibration.
5.
S input (spectrum analyzer input)
receives a signal for a
spectrum measurement.
INSTALLATION CATEGORY I
6.
RF OUT (RF signal output port)
supplies a source signal for
network measurements.
Installation and Setup Guide 1-9
,
.
Page 30
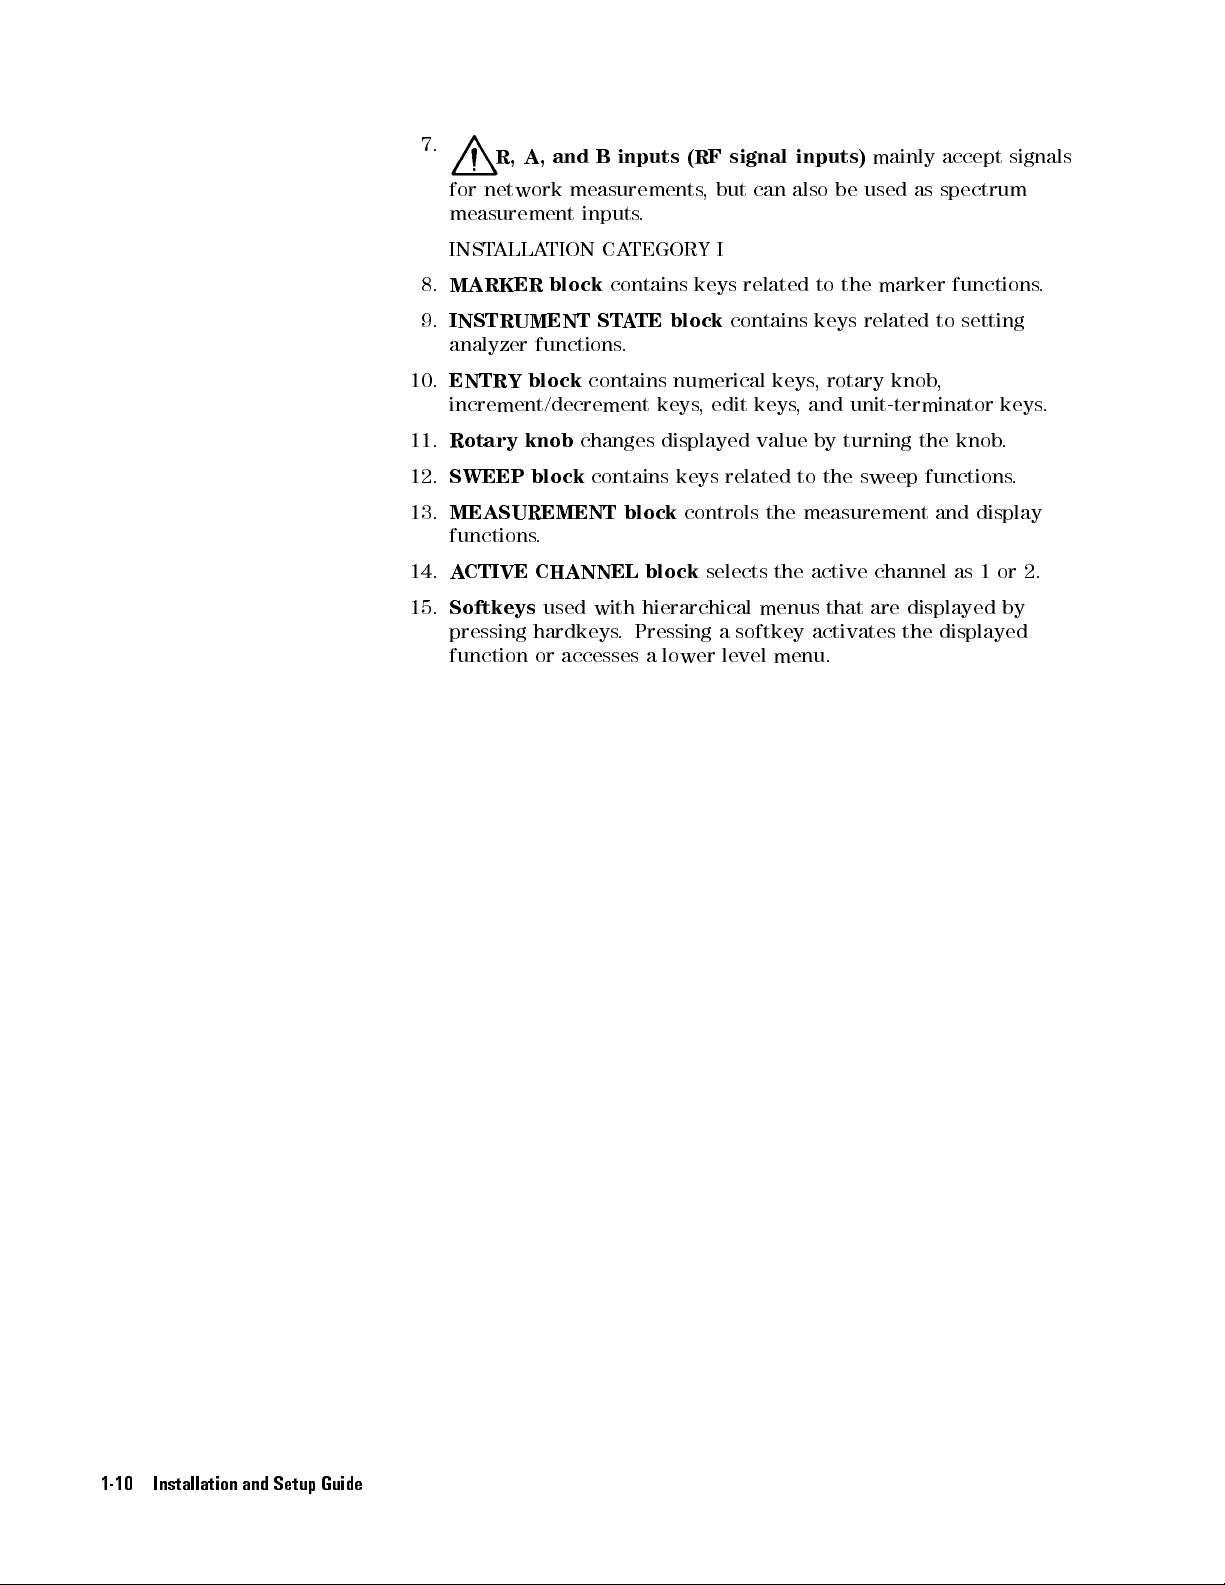
7.
R,
A,
and
for network
measurement inputs
B inputs
(RF signal
measurements,
.
but can
inputs)
also be
mainly
used as
accept signals
spectrum
INSTALLA
8.
MARKER
9.
INSTRUMENT
TION CA
block
STA
analyzer functions
10.
ENTRY
block
contains
increment/decrement keys
11.
Rotary
12.
SWEEP
13.
MEASUREMENT
functions
14.
ACTIVE
15.
Softkeys
pressing
function
knob
changes
block
contains
.
CHANNEL
used
with
hardkeys
or
accesses
TEGORY I
contains
TE block
.
displayed
block
block
hierarchical
.
Pressing
a
lower
keys related
contains keys
numerical keys
, edit
keys,
value
keys
related
controls
selects
to
the
the
menus
a
softkey
level
menu.
to the
, rotary
marker
related
knob
functions
to
setting
,
and unit-terminator
by
turning
the
measurement
active
that are
activates the
sweep
channel
displayed by
the
knob
functions
and
as
displayed
keys
.
.
display
1
or
2.
.
.
1-10 Installation and Setup Guide
Page 31

Rear View
Caution
16.
If you
may
TEST
test
set to
connect a
cause
SET-I/O
the analyzer
printer with
damage
to
the
connector.
17.
Parallel interface
18.
GPIB interface
connects the printer to the analyzer
controls an GPIB instrument or can be controlled
by an external controller
19.
Power cable receptacle
in the cover of the receptacle
INTERCONNECT
connects
.
the TEST
printer
.
SET-I/O INTERCONNECT
Do
not
connect
.
connects the power cable
.
Installation and Setup Guide 1-11
the
a
printer
. Fuse
S-parameter
,it
to this
.
is held
Page 32

Connecting a
Test
Set for
Network Analyzer
To
use the
required to
the device
You
can use
set or
the 85046A/B
measures reection
The 85046A/B
reverse directions
For
more
Function R
network analyzer
measure the
under test
either the
(DUT).
87512A/B
S-parameter test
and transmission
S-parameter test
without reconnection.
information
eference
about
manual.
Mode
mode of
the analyzer
transmission and
transmission/reection
set.
in the
set measures
the
test
sets
,a
test
set
is
reection characteristics
(T/R)
The
,
see
87512A/B
forward
both
chapter
the
T/R
direction
forward
9
of
the
test
test
only
of
set
.
and
Connecting a
Transmission/Reection
T
est
Set
1-12 Installation and Setup Guide
Figure 1-3. Connecting a Transmission/Reection T
est Set
1. Place the transmission/reection (T/R) test set in front of the
analyzer.
2. Connect the R and A ports of the analyzer and the T/R test set to
each other.
3. Connect the RF OUT port of the analyzer and the RF IN port of the
T/R test set with a semi-rigid cable.
Page 33

Note
When
4
5
2
1
to
you
set
use
the
the
characteristic
87512B
,
press
impedance
4
Cal
5
N
N
N
N
N
N
N
N
MORE
(Z
N
N
N
N
N
N
N
N
N
N
NN
NN
NN
NN
N
0
)
SET
to
75
NN
Z0
NN
.
NN
N
.
Then
press
5
5
4
4
7
5
Connecting
an
S-parameter
T
est
Set
Note
Figure
1.
Place
the
2.
Connect
rear
panel
INTERCONNECT
with
the test
3. Connect the RF OUT
analyzer
the
TEST
of
the
set.
1-4.
Connecting
on
the
S-parameter
SET-I/O
analyzer
interface
, R, A, and B inputs of the analyzer to the
S-parameter test set to each other
When you use the 85064B
5
to
4
2
set the characteristic impedance (Z
1
, press
an
S-parameter
test set.
INTERCONNECT
and
the
NETWORK ANAL
of
the
test
set
.
N
NNNN
NNNN
NNNNNNNNN
5
MORE
4
Cal
)to
0
interface
using
NNNNNNNNNNNNNNNN
SET Z0
75 .
T
est
Set
on the
YZER-I/O
the cable
. Then press
furnished
4
7545
5
Installation and Setup Guide 1-13
Page 34

Connecting an
Active
Probe
F
or Spectrum
The active
that has
be used
The analyzer
85024A High
41800A A
41802A 1
51701A A
11945A Close-eld
1141A Dierential
F
or
Function
Analyzer Mode
more
probe allows
no port
for both
can use
Frequency Probe
ctive Probe
M
Input
ctive
information
R
eference
you to
for connecting
spectrum and
the following
(5 Hz
A
dapter
Probe
(DC
Probe
to
Set
Probe
about
these
manual.
analyze an
to the
in-circuit signal
test set.
The active
network measurements
to
500
(5
2.5
active
(300 kHz
Hz
GHz)
active
MHz)
to
100
probes:
to
3
MHz)
probes
GHz)
,
see
.
chapter
or device
probe
can
9
of
the
1-14 Installation and Setup Guide
Figure 1-5. Spectrum Analyzer Mode (One A
ctive Probe)
1. Connect the output connector of the active probe to the S port of
the analyzer
2. Plug the probe power plug into
.
the PROBE POWER connector
.
Page 35
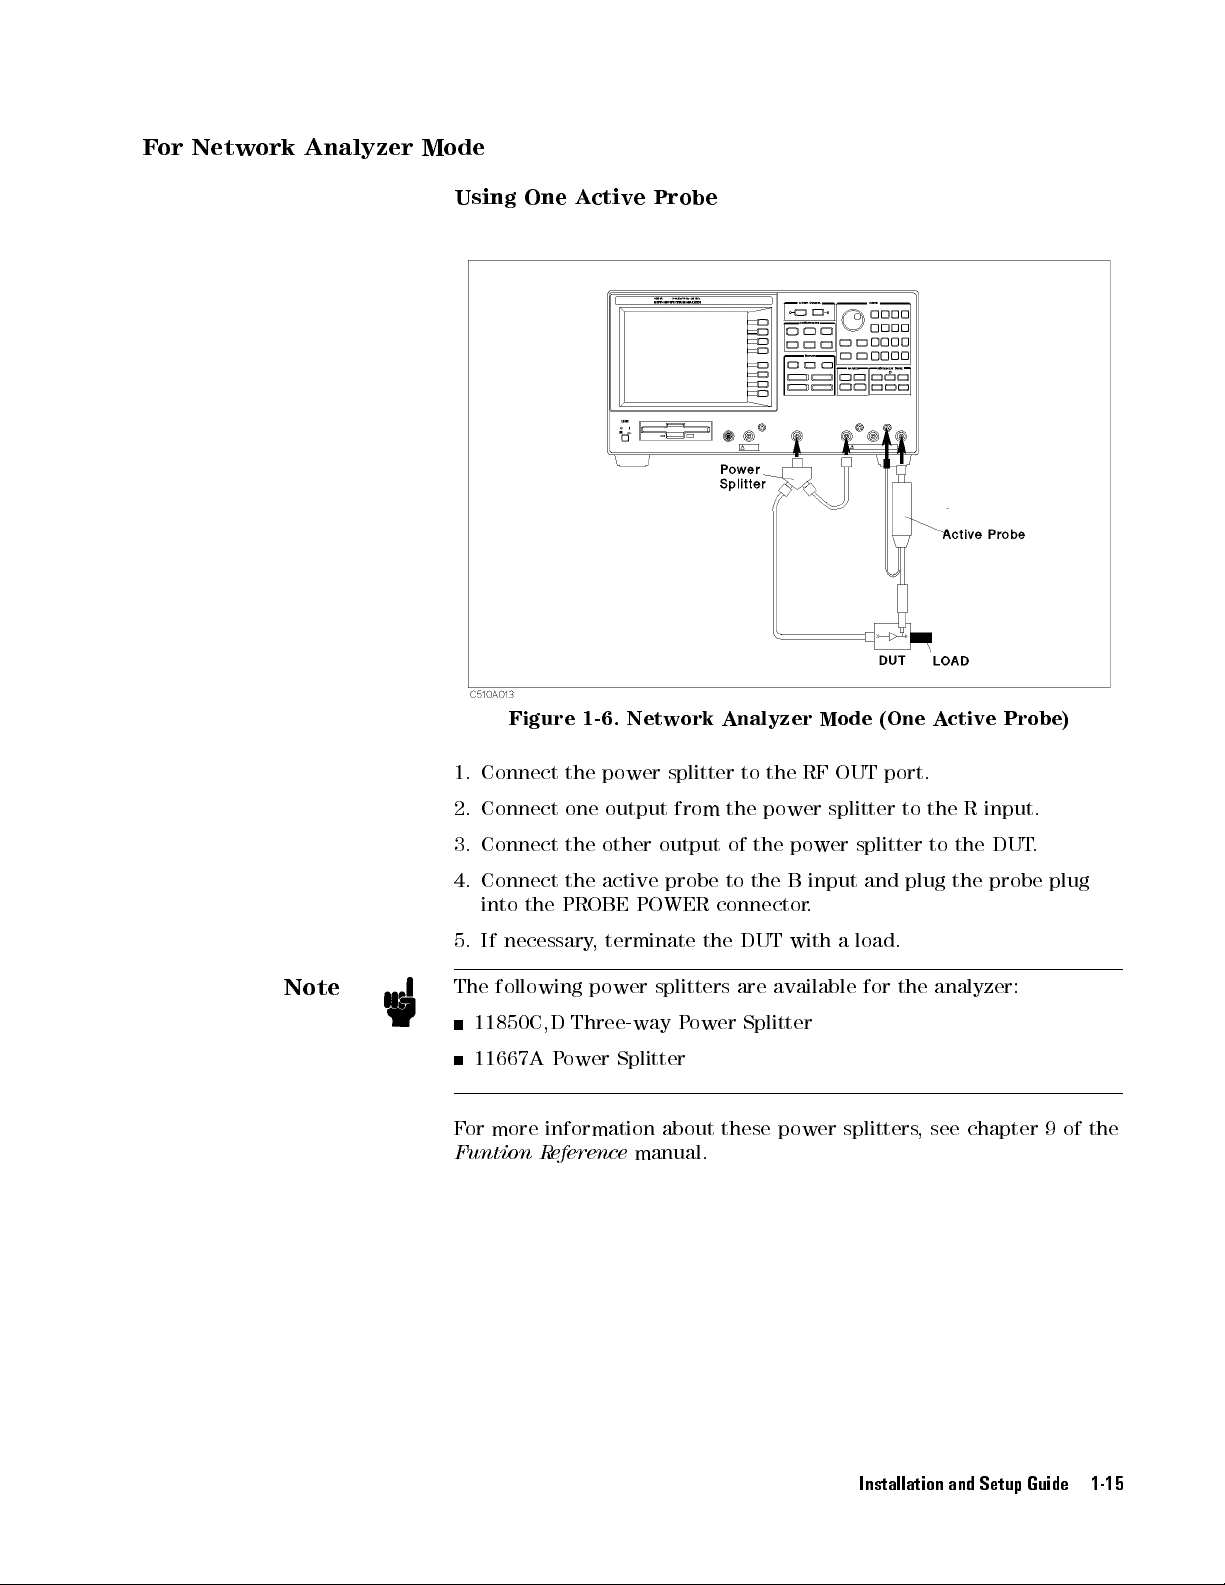
F
or
Network
Analyzer
Mode
Using
1.
Connect
One A
Figure
ctive Probe
1-6.
Network
the
power
splitter
Analyzer
to the
Mode
RF
OUT
(One
port.
Active
Probe)
Note
2.
Connect
3.
Connect
4. Connect
into the
5. If
necessary,
The
following power
11850C,D
11667A
one
output
the
other
the
active
PROBE
terminate
Three-way P
Power
Splitter
POWER
For more information
Funtion R
eference
manual.
from
the
power splitter
output
probe
splitters are
of
the
to
the
connector
the
DUT
power
B
input
.
with
a
available
splitter
and
load.
for
ower Splitter
about these power splitters
to
the
R
input.
to
the
DUT
.
plug
the
the
probe
analyzer:
plug
, see chapter 9 of the
Installation and Setup Guide 1-15
Page 36

Using
Two A
ctive Probes
1.
Connect
2.
Connect
3.
Connect
4.
If
Figure
one active
the
the
necessary
1-7.
other
RF
,
terminate
Network
probe to
active probe
OUT
port
Analyzer
the
to
the
the
DUT
R
to
DUT
with
Mode
input.
the
.
a
B
input.
load.
(Two
Active
Probes)
1-16 Installation and Setup Guide
Page 37
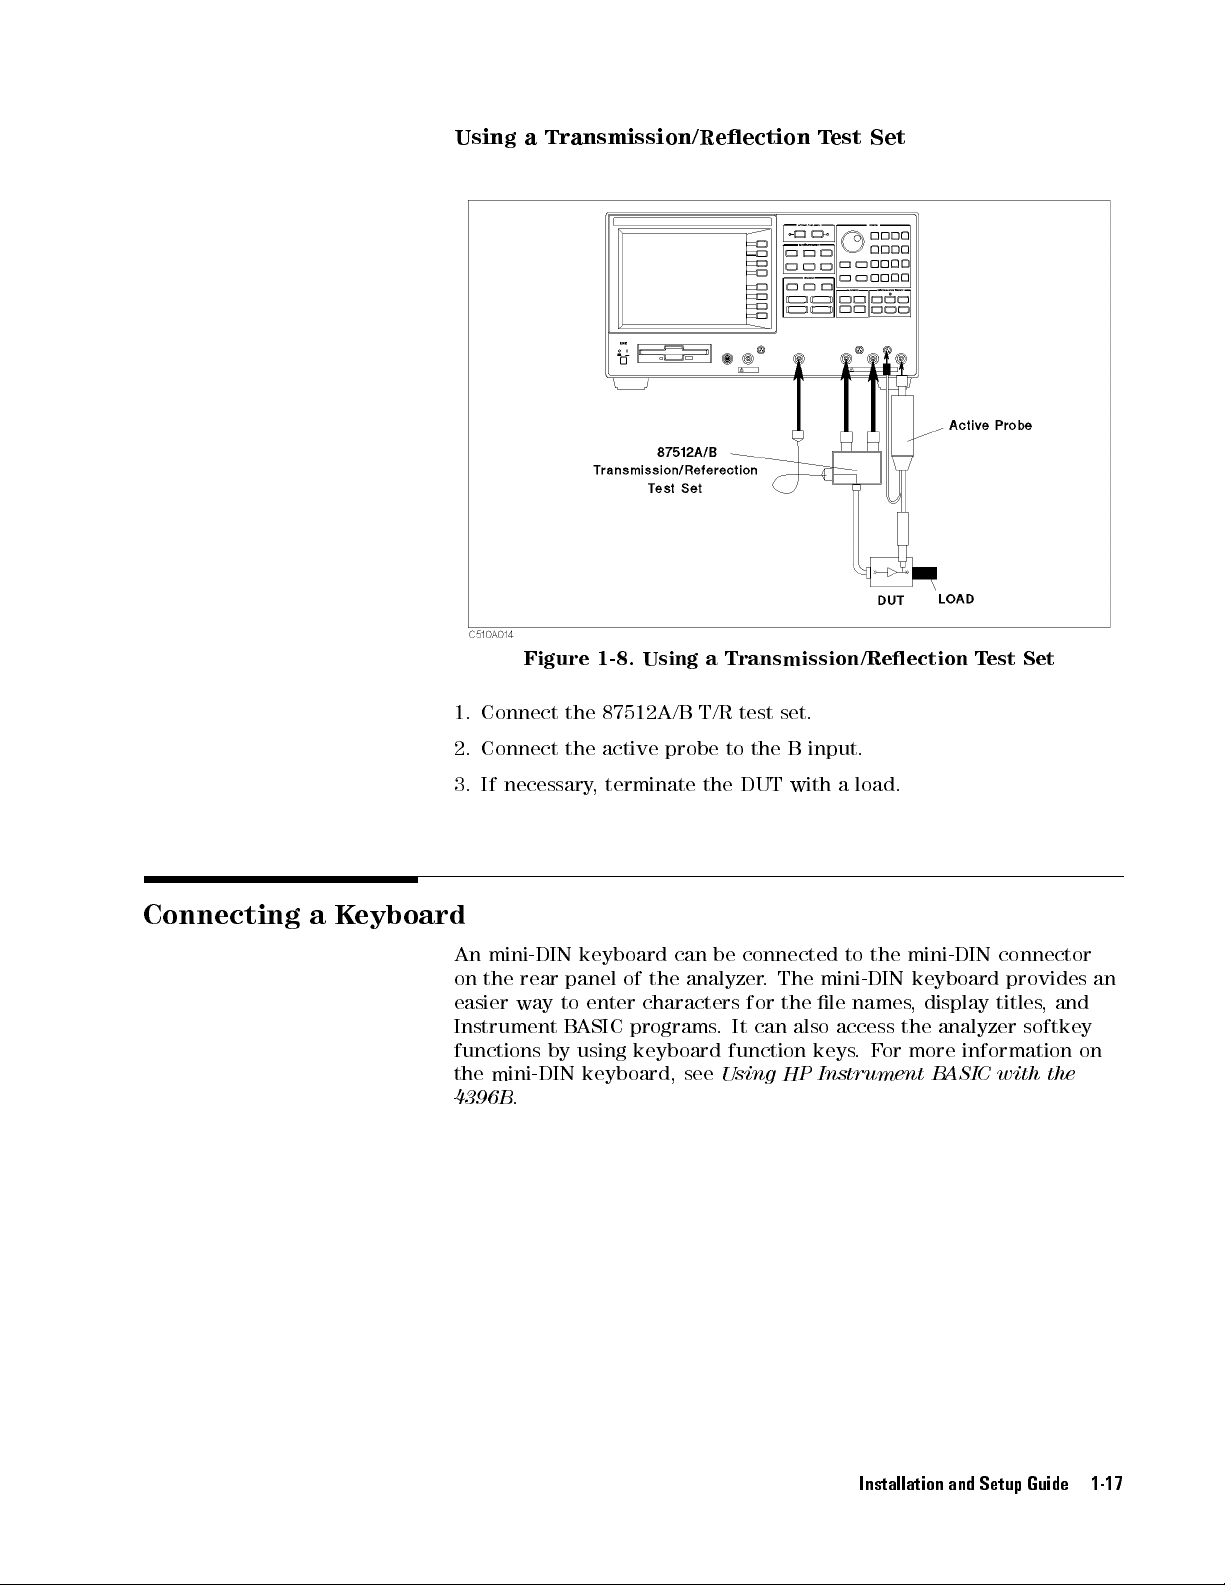
Using
a Transmission/Reection
Test
Set
Connecting
a
K
eyboard
Figure
1.
Connect
2.
Connect
3.
If
necessary
An
mini-DIN
on
the
rear
easier
way
Instrument
functions
the
mini-DIN
4396B
.
1-8.
the 87512A/B
the
active
,
terminate
keyboard
panel
of
to
enter
B
ASIC
programs
by
using
keyboard
keyboard, see
Using
a
T/R test
probe to
the
can
be
the
analyzer
characters
.
Using
Transmission/Reection
set.
the
B
input.
DUT
with
a
load.
connected
.
The
for
the
It
can
function
HP
to
mini-DIN
le
names
also
access
keys
.
Instrument
the
F
or
mini-DIN
keyboard
,
display
the
analyzer
more
B
ASIC
T
est Set
connector
provides
titles
,
and
softkey
information
with
the
an
on
Installation and Setup Guide 1-17
Page 38
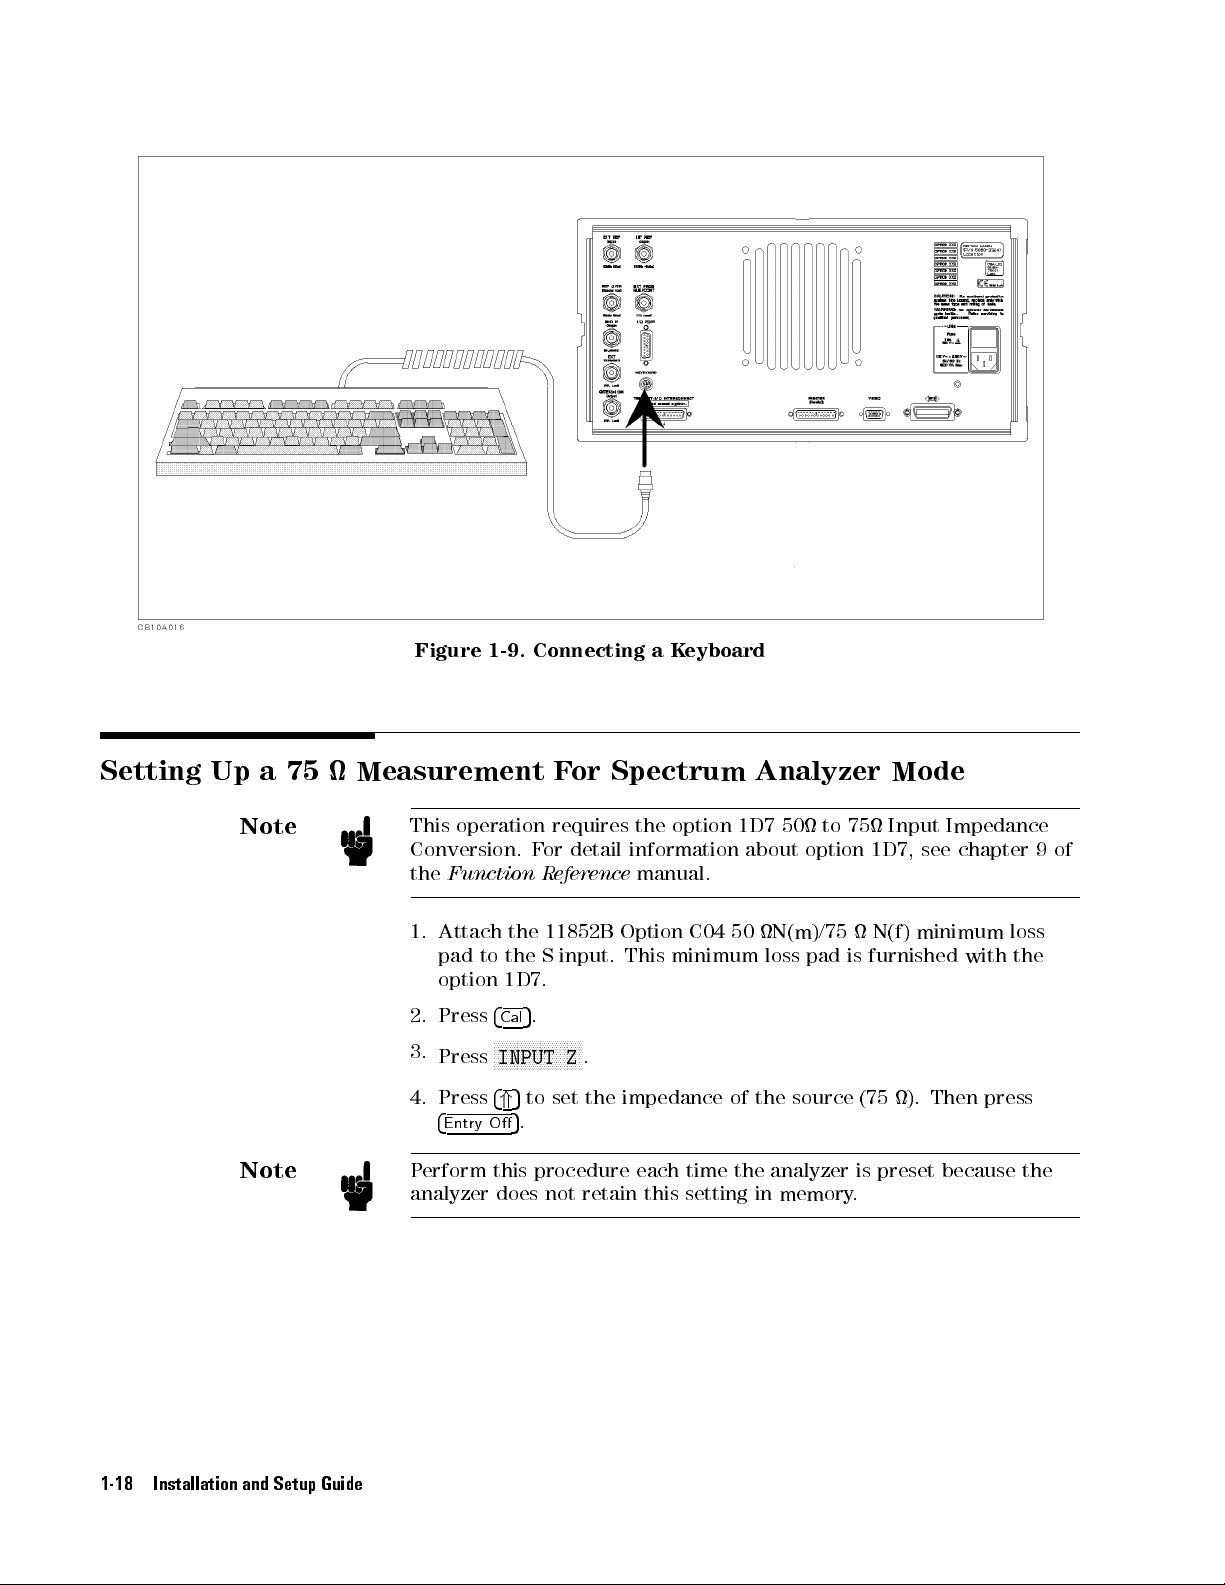
Figure
1-9.
Connecting
a
K
eyboard
Setting
Up
a
Note
Note
75
Measurement
This
Conversion.
the
1.
2.
3.
4. Press
Perform this procedure each time the analyzer is preset because the
analyzer does not retain this setting in memory
operation
Function
Attach
pad
to
option
Press
4
Cal
NN
INPUT Z
Press
4
*
4
Entry O
F
or
F
the
the
Spectrum
requires
or
detail
R
eference
11852B
S
input. This
the
option
information
manual.
Option
C04
minimum loss
Analyzer
1D7
50
about
option
50
N(m)/75
pad is
to
75
Mode
Input
1D7,
N(f)
furnished
Impedance
see
chapter 9
minimum loss
with
1D7.
5
.
NN
N
N
N
N
N
N
N
N
N
N
N
N
N
N
N
N
N
NN
.
5
to set the impedance of the source (75 ). Then press
5
.
.
of
the
1-18 Installation and Setup Guide
Page 39

2
Spectrum
Before
Y
ou
Analyzer T
In this
Before starting
(see chapter
information).
Leave
On
The
On
measurement by
Overview
The
1.
2.
our
chapter
T
our
this
tour
following
Preparing
Turning
Connecting
Setting
up
Setting the
,
you
this
1,
\Installation
,
you
will
measuring the
is
a
short
for
a
measurement
ON
the
the
the
analyzer
active channel
explore
tour
,
verify
learn
summary
analyzer
test
signal
the
and
how
spectrum
the
analyzer
Setup
to
make
CAL OUT
of
the
source
analyzer
Guide
a
basic
signal
tour:
is
correctly
,"
if
you
spectrum
of
mode
need
the
of
operation.
installed
additional
analyzer
analyzer
.
Selecting the
Selecting the
Setting the
3.
Making
Reading
Setting
a
analyzer type
input
frequency range
Measurement
the
peak
level
the
resolution bandwidth
using
the
marker
to
see
low
level
signals
Searching for harmonics using the search function
4. Saving and recalling the analyzer settings
Preparing the disk
Saving analyzer settings
Entering
the le name
Recalling the analyzer settings
After you nish this tour, you will understand how to make a basic
measurement in the spectrum analyzer mode of operation. If you
want to learn how to perform more complex tasks, see the
Reference
manual.
Task
Spectrum Analyzer Tour 2-1
Page 40
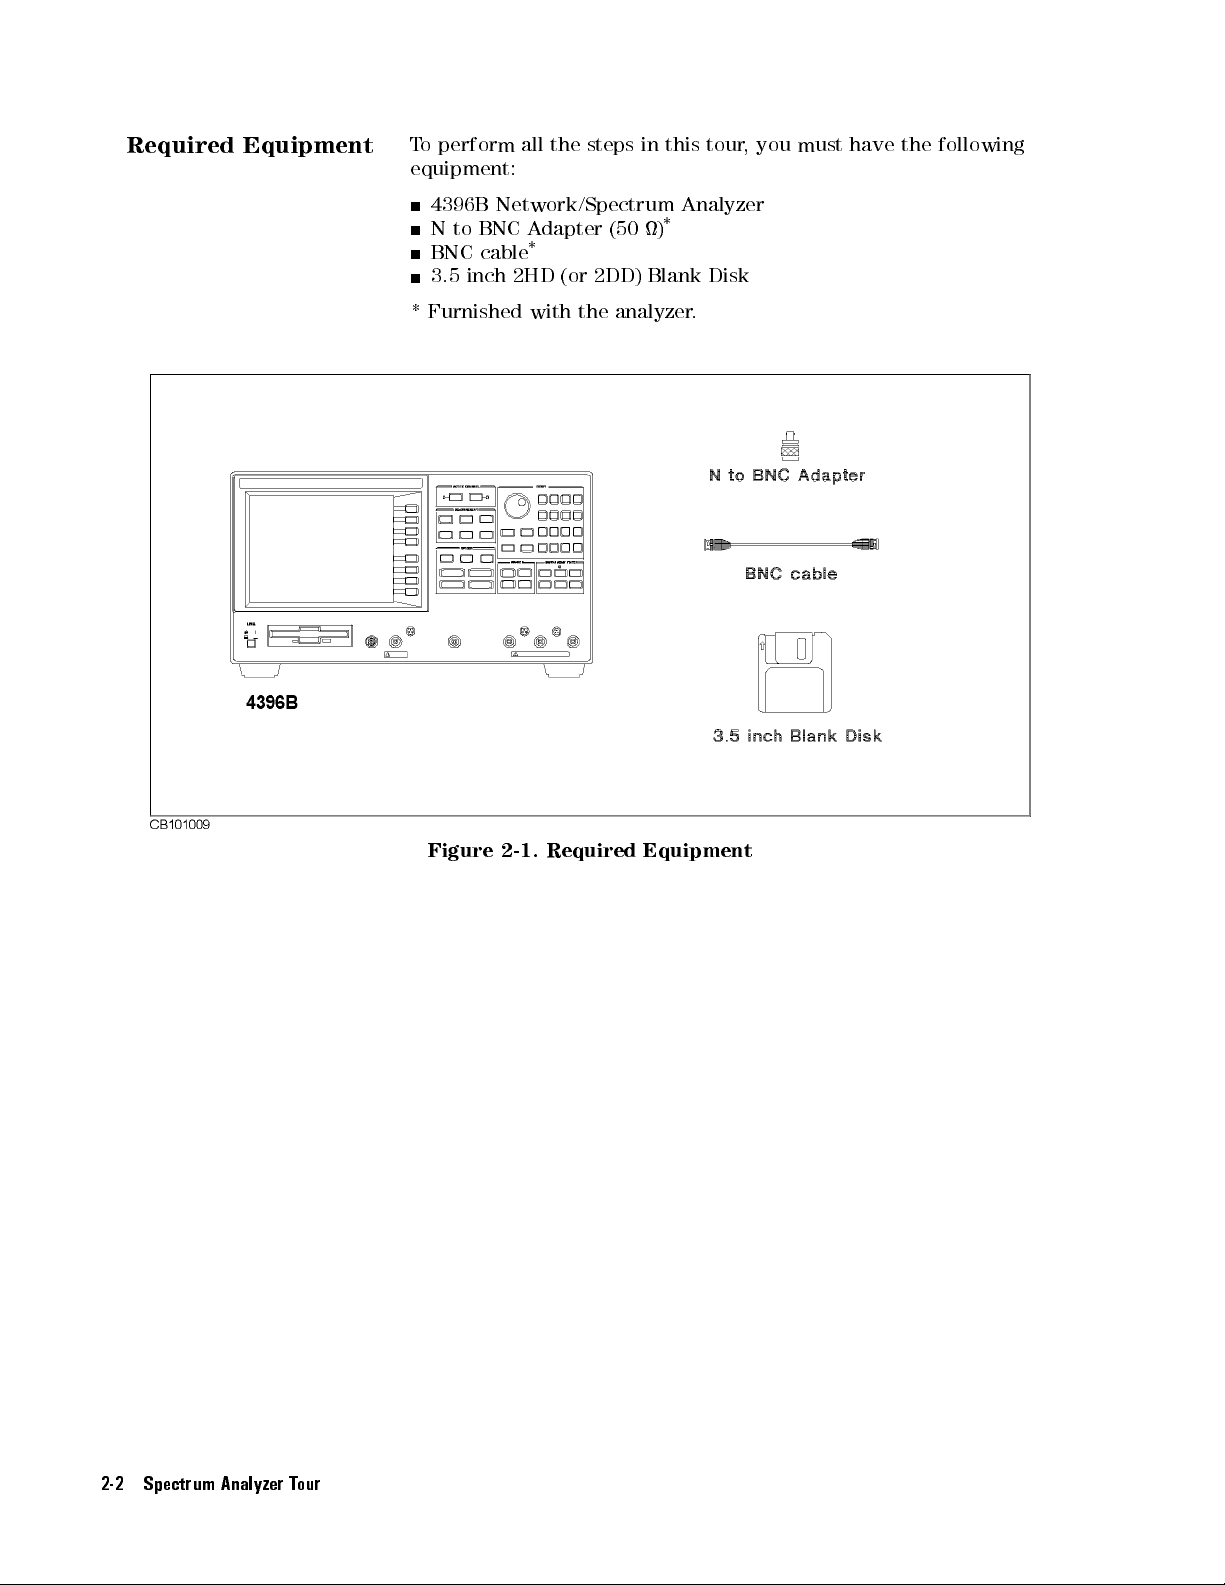
Required Equipment
T
o
perform
equipment:
all the
steps in
this tour
,you
must have
the following
4396B
N
BNC
3.5
*
Furnished with
Network/Spectrum Analyzer
to BNC
cable
inch 2HD
Adapter
*
(or 2DD)
the analyzer
(50 )
*
Blank
Disk
.
Figure
2-1.
Required Equipment
2-2 Spectrum Analyzer Tour
Page 41

Step 1:
Preparing for
a Measurement
Turning ON
Connecting
the analyzer
the
T
est
Signal
Verify
analyzer.
Press
The
operating
In
(20
the power
the
LINE
power
Source
this
MHz
If necessary
switch
on
self-test
correctly
tour
,
you
at
-20
source setting
,see
takes
,
the
following
use
the
front-panel
dBm).
is correct
chapter 1,
about
information
before you
\Installation
10
seconds
CAL
OUT
and
.
If
the
is
displayed
signal
turning
Setup
analyzer
as
the
on
test
ON
Guide
is
the
signal
the
."
LCD:
Connect
the CAL OUT output to the S input using the N-to-BNC adapter and the BNC cable
Spectrum Analyzer Tour 2-3
.
Page 42

Step 2:
Setting Up
the Analyzer
Setting
the
A
ctive
Channel
In this
Active
step,
you will
channel
Analyzer type
Input
Frequency Range
The
two
front
to
channel
analyzer
dierent
panel
has
measurement
aect
2:
set the
following parameters:
Channel
Spectrum analyzer
S
input
0Hz
to 80
two
measurement
setups
only
the
active channel.
2
MHz
channels
.
Other selections
mode
.
To
This
allows
set the
you to
you make
active
channel
have
on the
Note
In
the
A
CTIVE
4
5
.
Chan
2
All
selected
must
measurement
CHANNEL
select
settings
an
active
setup
block,
are
for
press
stored
channel
that
V
erify
lights
separately
(1
or 2)
channel.
the
Chan
.
for
each
before you
2
active
channel
channel.
can change
indicator
Y
ou
the
2-4 Spectrum Analyzer Tour
Page 43

Setting
the
Analyzer
Type
In
the
T
o
use
the
the
spectrum
MEASUREMENT
spectrum
analyzer
block,
analyzer
mode
press
4
Meas
mode
after
5
.
,
you
selecting
F
F
F
F
F
ANALYZER
Press
must
an active
F
F
F
F
F
F
F
F
F
F
F
set the
F
F
F
F
FF
FF
FF
F
TYPE
analyzer type
channel.
F
F
F
F
F
F
F
.
to
Note
FF
FF
F
F
F
F
F
F
F
F
F
F
F
SPECTRUM ANALYZER
Press
Changing the
channel.
changing
F
F
F
F
F
F
F
F
If
the
F
F
FF
FF
F
F
F
F
F
F
F
F
F
F
F
analyzer
you
want
analyzer
F
F
F
.
type
to
type
keep
,
presets
rst
the
the
current
set
the
analyzer
measurement
other
channel
for
the
active
settings
to
active
when
.
Spectrum Analyzer Tour 2-5
Page 44

Selecting the
Input
The
analyzer
measurements
be
used for
inputs
variable
the
S input
In
the spectrum
the
following steps
In
the
MEASUREMENT
has
, the
a spectrum
is 20
dB worse
. Therefore
for spectrum
block,
four inputs;
S input
is used.
measurement, but
than the
,to
get the
measurements.
analyzer mode
,you
verify the
press
4
Meas
S, R,
A, and
The R,
S input
and the
most accurate
,the
S
input
S
input
5
.
V
erify
the
(This
shows
spectrum
B.
In most
A, and
the dynamic
spectrum
Binputs
range of
can
attenuator is
results,
is
selected
is
selected.
F
F
FF
F
S
in
that
you should
FF
F
F
F
F
F
F
F
F
F
F
F
F
F
F
F
S
F
input
SPECTRUM:
the
by
F
FF
FF
FF
S
is
default.
FF
F
is
selected
analyzer measurement.)
also
these
not
use
In
underlined.
for
a
Setting
the
Frequency
Range
The
CAL
OUT
signal
source
.
T
o
see
this
frequency
range
In the SWEEP block, press
(in
4
(20
MHz
signal
Start
on
this
case
5
. Press
at
0
display
,
0
to
20
80
dBm)
,
you
must
MHz):
5
.
4
0
is
connected
set
as
the
appropriate
test
signal
2-6 Spectrum Analyzer Tour
Page 45

Press
Press
4
2
4
8
V
erify
as
4
Stop
4
M/
5
.
5
.
shown
below:
5
.
1
5
5
4
.
0
the
20
MHz
signal
is
displayed
Press
Press
Spectrum Analyzer Tour 2-7
Page 46

Step 3:
Making a
Measurement
Reading the
Peak
Level Using
Let's try
Press
4
Search
the Marker
to read
5
.
peak signal
level by
Marker
using the
appears
marker:
on
trace.
2-8 Spectrum Analyzer Tour
F
F
F
F
F
F
F
FF
FF
FF
FF
F
F
F
F
F
F
F
F
F
F
F
F
F
Press
SEARCH:PEAK
F
.
Read the marker value shown at the upper
right of grid.
Marker
signal.
moves
to
the top
of the
CAL OUT
Page 47

Setting
the
Resolution
Bandwidth
T
o
see
lower
noise
oor
to
level
level,
See
use
Low
signals
a
narrow
Level
that
Signals
are
approximately
resolution bandwidth
the
same level
(
rbw
as the
) setting.
Before
level.
technique
very
Press
The
top
4
Scale
This
close
Ref
trace
line
you
5
of
is
.
moves
set
the
increases
useful
to
the
noise
upward
the
grid.
RBW
the
when
,
set the
visibility
you
level.
to
maximum peak
of
the lower
are
measuring
Press
place
the
FF
MKR
tip
FF
FF
FF
F
F
!
of
level as
level signal.
two
signals
F
F
F
F
F
F
F
F
F
F
F
F
F
F
F
FF
REFERENCE
the
maximum
the reference
This
and
one is
FF
FF
FF
F
F
F
.
peak at
the
Spectrum Analyzer Tour 2-9
Page 48

Press
4
Bw/A
Now
bandwidth,
below:
,
5
vg
with
5
.
the
noise
oor
level
the
second
and
third
Press
lowered
harmonics
to
4
+
by
narrow
RBW
narrowing
can
be
seen
setting
the
resolution
as shown
to
3
kHz.
2-10 Spectrum Analyzer Tour
Page 49
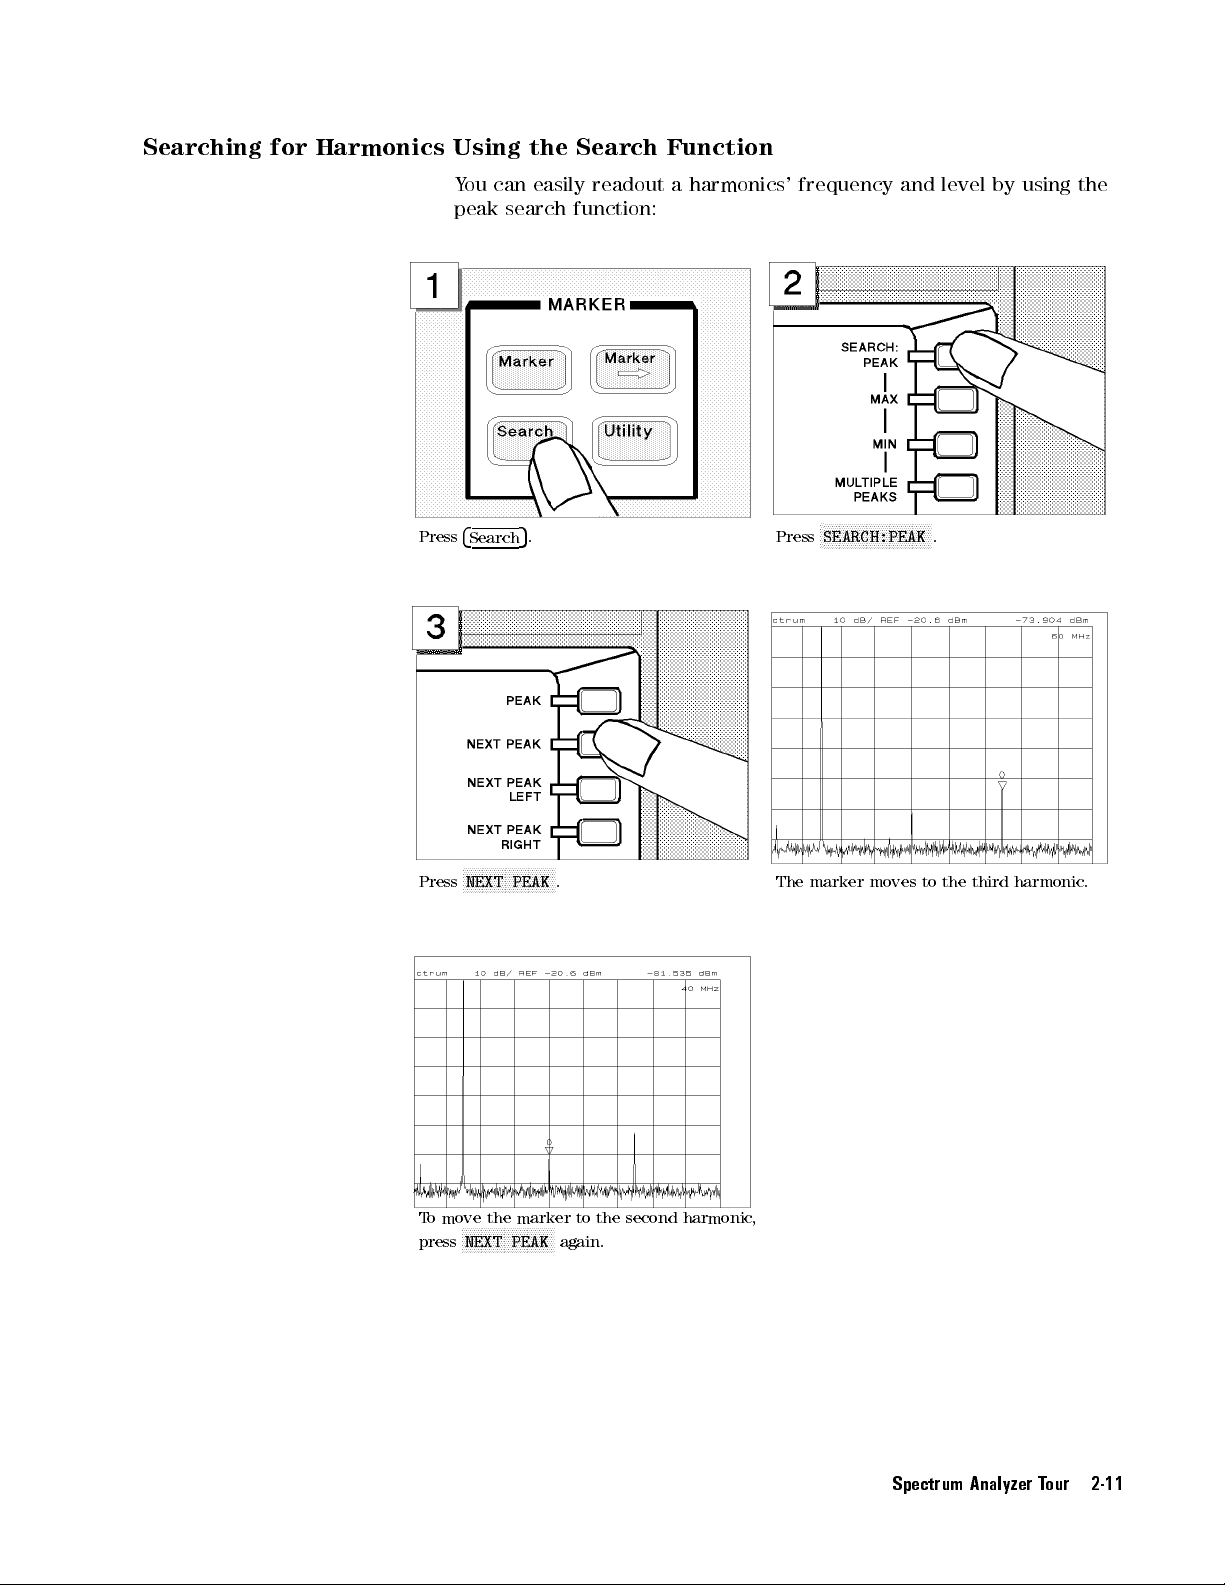
Searching
for
Harmonics
Press
Using
Y
ou
can
peak
search
4
Search
the
easily
5
.
Search
readout
function:
Function
a
harmonics'
frequency
F
F
F
SEARCH:PEAK
Press
and
level
by using
F
F
F
F
F
F
F
F
F
F
F
F
F
F
F
F
F
FF
FF
FF
F
F
F
.
the
FF
FF
F
F
F
F
F
F
F
F
F
F
F
F
F
F
F
F
F
F
F
NEXT PEAK
Press
To move the marker to the second harmonic
FFFFFFFFFFFFFFFFFFFFFFFF
press
NEXT PEAK
F
.
again.
The
marker
moves
to
the
third
harmonic
.
,
Spectrum Analyzer Tour 2-11
Page 50
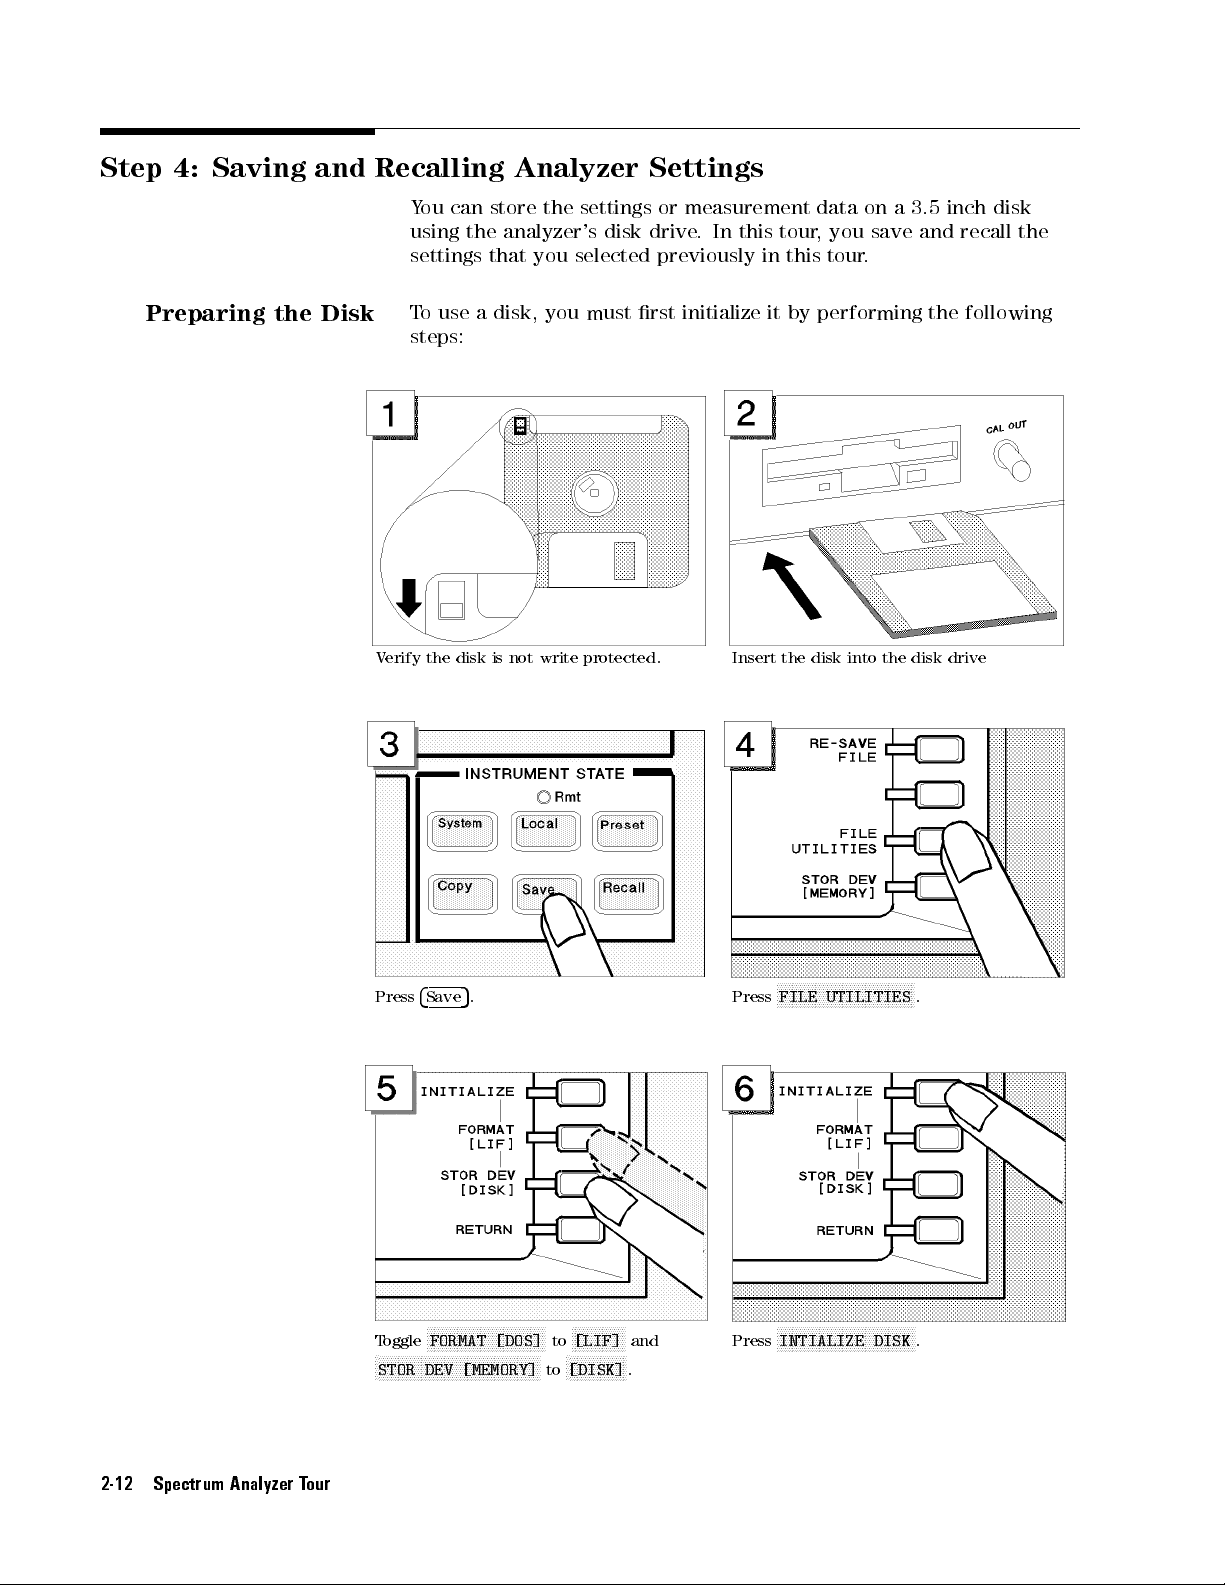
Step 4:
Preparing the
Saving and
Disk
Recalling Analyzer
You
can store
using the
settings that
T
o
use
a
the settings
analyzer's disk
you selected
disk,
you
must
steps:
V
erify
the
disk
is
not
write
protected.
Settings
or measurement
drive.
In this
previously in
rst initialize
Insert
data on
tour,
you save
this tour
it by
performing the
the
disk
into
.
a3.5
the
and
disk
inch
disk
recall
following
drive
the
2-12 Spectrum Analyzer Tour
Press
Toggle
F
FFFFFFFFFFFFFFFFFFFFFFFFFFFFFFFFFFFFFFFFFF
STOR DEV [MEMORY]
5
4
.
Save
FFFFFFFFFFFFFFFFFFFFFFFFFFFFFFF
FORMAT [DOS]
to
to
FFFFFFFFFFFFFF
[LIF]
F
FFFFFFFFFFFFFFF
[DISK]
and
.
F
F
F
F
F
F
F
F
F
FILE
Press
FFFFFFFFFFFFFFFFFFFFFFFFFFFFFFFFFFFF
Press
INTIALIZE DISK
F
F
F
F
F
F
F
F
F
F
F
FF
FF
UTILITIES
FF
F
F
F
F
F
F
F
F
F
F
.
.
Page 51
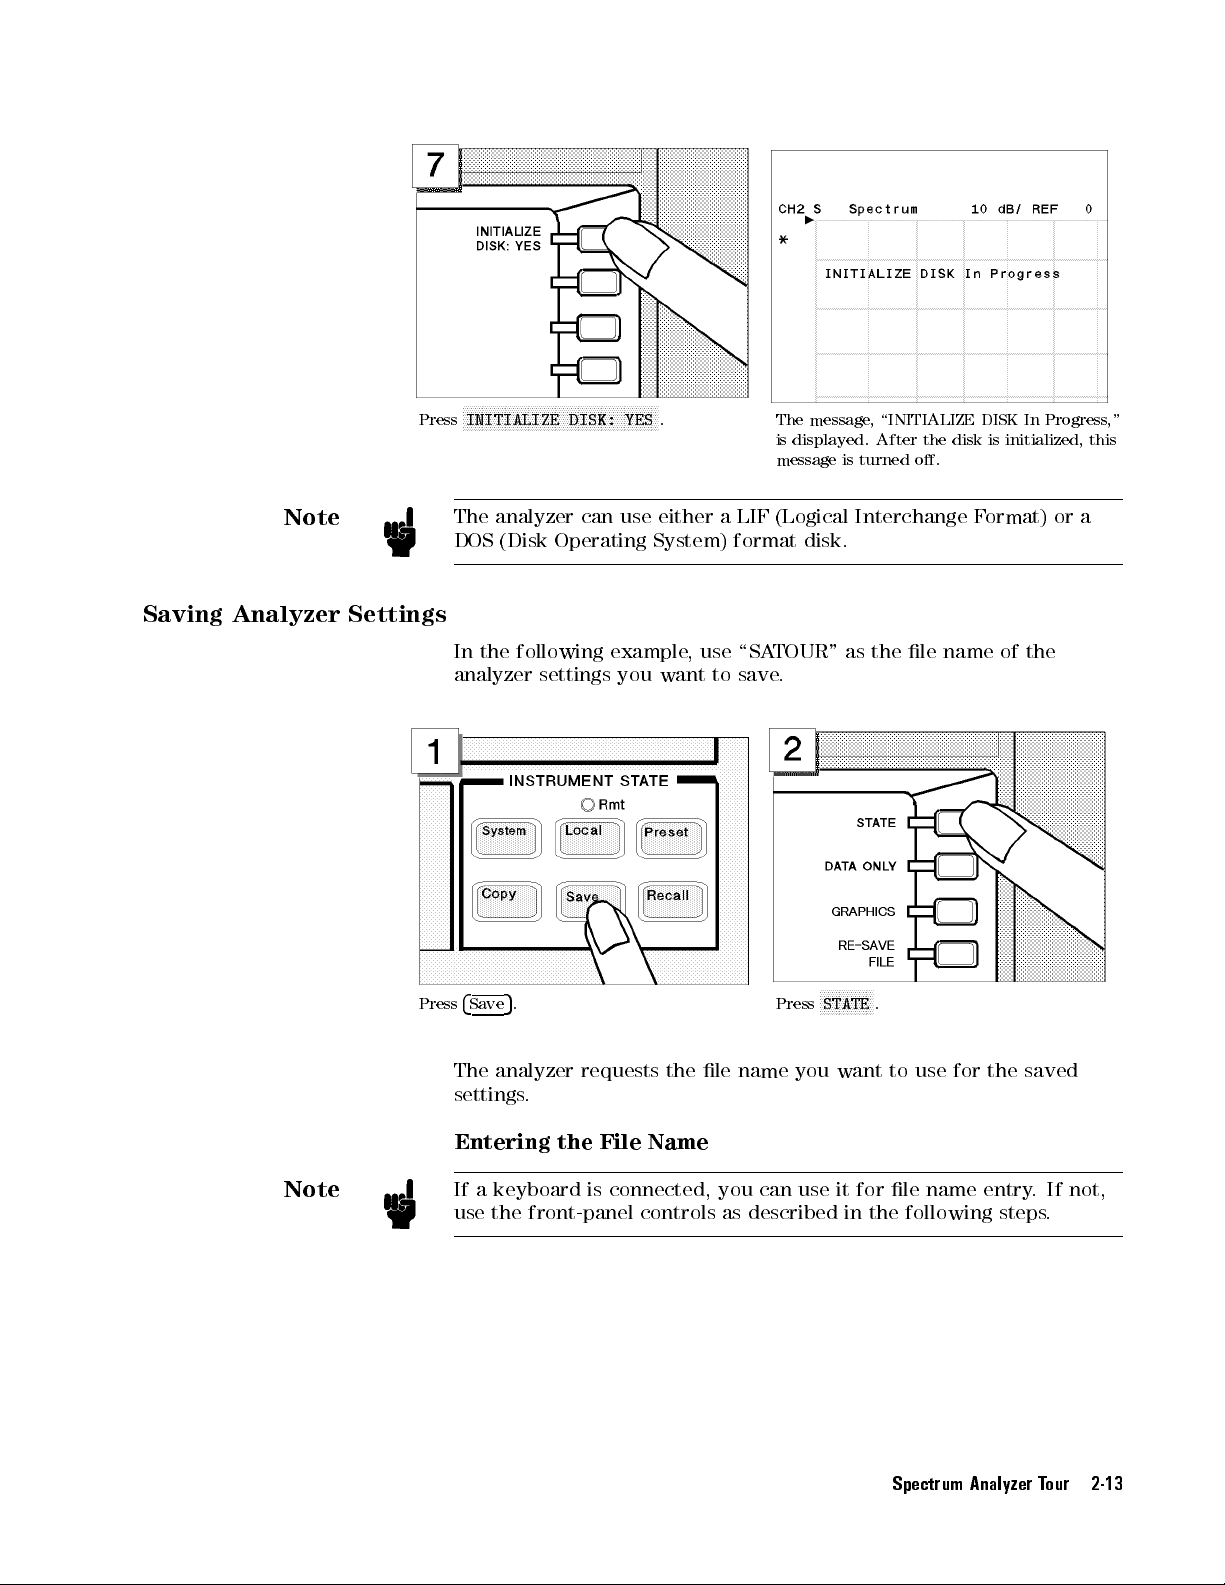
Note
Press
F
F
F
F
F
F
F
F
F
F
F
F
F
F
F
INITIALIZE
The
analyzer
DOS
(Disk
F
F
FF
FF
FF
FF
F
Operating
F
F
F
F
F
F
F
DISK:
can
F
F
F
F
F
F
F
F
F
FF
FF
FF
FF
F
YES
use
.
either
System)
a
LIF
format
The
message
is
displayed.
message is
(Logical
disk.
,
\INITIALIZE
After
the
turned o.
Interchange
DISK
disk
Format)
In
is
initialized,
Progress
this
or a
,"
Saving
Analyzer Settings
Press
Note
In
the following
analyzer
4
Save
The
settings
settings
5
.
analyzer
.
Entering the File
example,
you
requests
want
the
Name
use \SA
to
save
le
name
TOUR" as
.
F
F
F
F
F
F
F
F
STATE
Press
you
want
the
le
name
of
F
F
F
F
F
F
.
to
use for
the
If a keyboard is connected, you can use it for le name entry
use the front-panel controls as described in
the following steps
the
saved
. If not,
.
Spectrum Analyzer Tour 2-13
Page 52
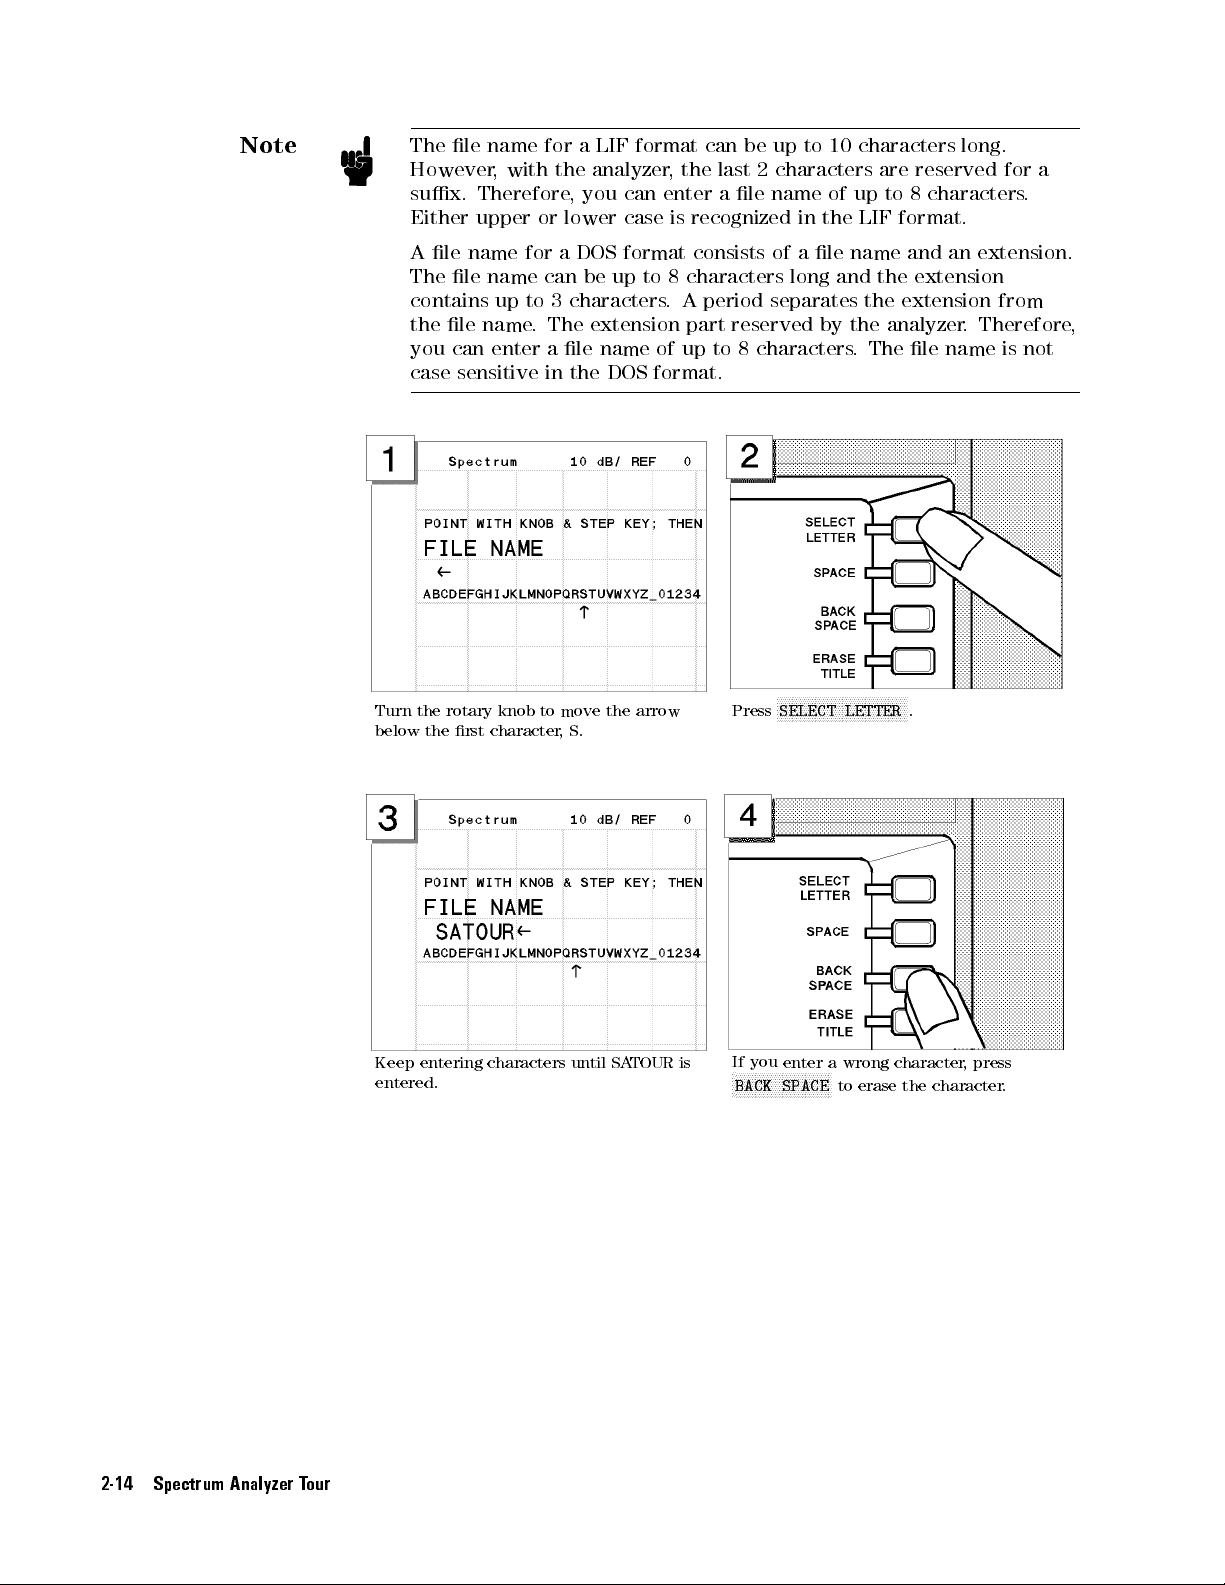
Note
The
However
sux.
Either
A
The
contains
the
you
case
Turn
below
le
the
the
le
name
,
Therefore
upper
name
le
name
up
le
name
can
enter
sensitive
rotary
knob
rst
character
with
for a
to
.
for
a
the
analyzer
,
you
or
lower
DOS format
can
be
3
characters
The
extension
a
le
in
the DOS
to move
,
S.
LIF
format
can
case
up
to
name
the arrow
can be
,
the
last 2
enter
a
le name
is
recognized
consists of
8 characters
.
A
period separates
part
reserved by
of
up to
8 characters
format.
Press
up to
10 characters
characters are
of up
to 8
in the
a le
long and
LIF format.
name and
the extension
the extension
the analyzer
.The
F
F
F
F
F
F
F
FF
FF
F
F
F
F
F
F
F
F
F
F
F
F
F
F
F
F
F
SELECT
LETTER
F
long.
reserved for
characters.
an extension.
le name
F
F
F
FF
.
a
from
. Therefore
is
not
,
2-14 Spectrum Analyzer Tour
Keep
entering
entered.
characters
until
SA
TOUR
If
you
enter
a
wrong
to
erase
character
the
is
F
F
FF
F
F
F
F
F
F
F
F
F
F
FF
F
F
F
F
F
F
F
F
F
SPACE
F
BACK
,
press
character
.
Page 53

T
o
complete
the
le
name
entry
,
press
F
F
F
F
F
DONE
F
F
F
F
F
F
F
.
V
erify
the
disk
access
shows
to the
that
disk).
the
indicator
analyzer
is
saving
lights
the
(this
settings
Recalling
the
Analyzer
Settings
Y
ou
can
recall
the
le
you
want.
settings
the
settings
containing
This
is
true
,
even
.
In
this
in
example
the
SA
,
TOUR
you
if
le
you
will
.
the
change
preset
saved
analyzer
the
the analyzer
current
Presetting
Press
4
5
.
Preset
The
analyzer
is
set
to the
preset
conditions
.
However
settings from the previous examples are stored in the SA
the disk.
settings
analyzer
and then
,
the
analyzer
TOUR le on
anytime
recall
Spectrum Analyzer Tour 2-15
Page 54
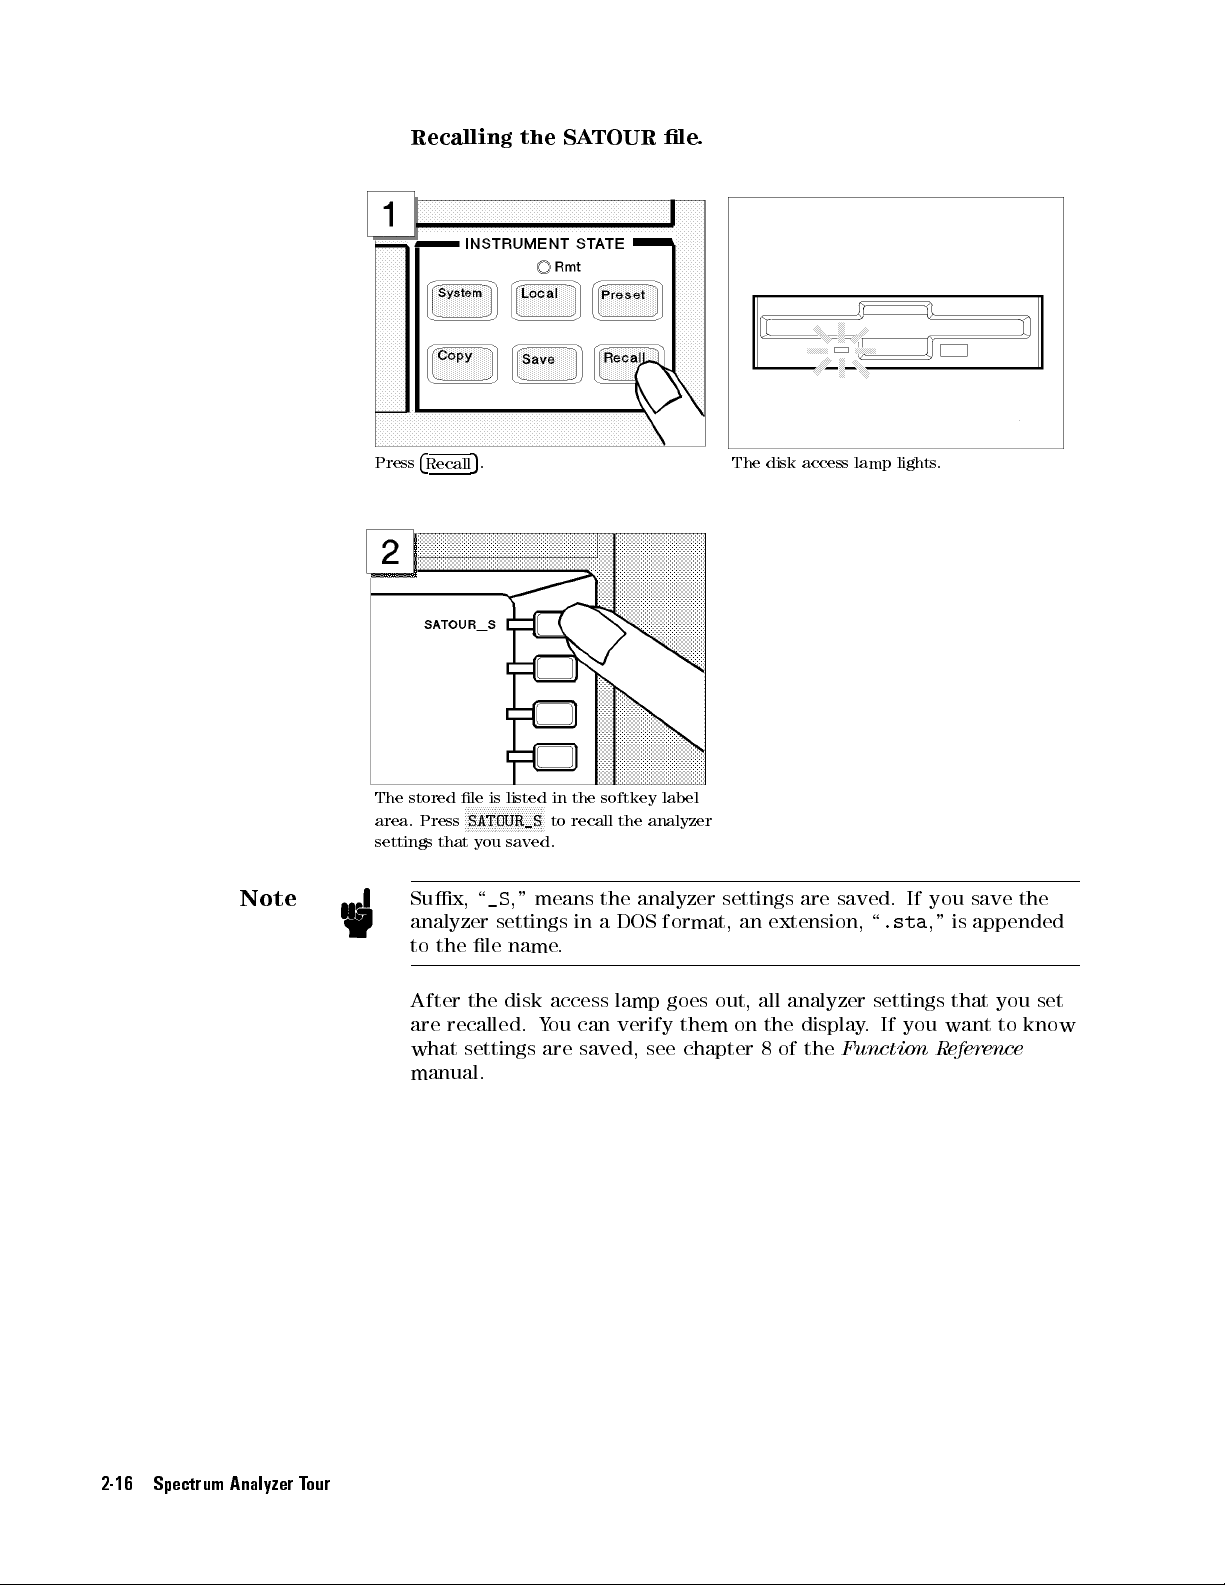
Recalling
the S
ATOUR
le
.
Note
Press
The
stored
area.
settings
Sux,
analyzer
to
After
are
what
manual.
4
Recall
Press
that
the
recalled.
5
.
le
is
listed
F
F
F
F
F
F
F
F
F
F
F
F
F
SATOUR_S
you
saved.
\
_S
,"
settings
le
name
the
disk
settings
in
the
F
F
F
F
FF
F
F
to
recall
means the
in
.
access
Y
ou
are
softkey
the
a
DOS
lamp
can
verify
saved,
label
analyzer
analyzer
format,
goes
out, all
them on
see chapter
The
disk access
settings
an
extension,
the display
8of
lamp lights
are
saved.
\
.sta
If
you
,"
analyzer settings
.If
you want
the
Function
.
save
is
appended
that you
to
Reference
the
set
know
2-16 Spectrum Analyzer Tour
Page 55

3
Network
Before
Y
ou
Analyzer T
In this
Before starting
(see chapter
information).
Leave
On
The
On
measurement by
bandpass lter
Overview
The
1.
2. Setting
our
chapter
T
our
this
tour
following
Preparing
Turning
Connecting
up
,
you
this
1,
\Installation
,
you
will
measuring the
.
is
a
short
for
a
ON
the
the
the
analyzer
explore
tour
,
verify
the
and
learn
how
summary
measurement
analyzer
DUT
network
the
Setup
to
analyzer
Guide
make
analyzer
is
correctly
,"
if
a
basic
mode
you
need
network
of
installed
analyzer
transmission characteristics
of
the
tour:
operation.
additional
of
a
Setting the
Selecting the
Setting
Setting
P
erforming
3. Making
active channel
analyzer type
the
input
the
frequency
the
automatic
a calibration
port
range
scaling
4. Reading a measurement result
Reading a measured value by using marker
5. Printing out the measurement result
Conguring and connecting a printer
Making
After you
a hardcopy of the display
nish this tour
, you will understand how to make a basic
measurement in the network analyzer of operation. If you want to
learn how to perform more complex tasks, see the
Task Reference
manual.
Network Analyzer Tour 3-1
Page 56

Required Equipment
T
o
perform
equipment:
all the
steps in
this tour
,you
must have
the following
4396B
Measurement
THRU
Two
T
Network/Spectrum Analyzer
Device:
This
tour assumes
bandpass
lter
(BNC female-to-female
BNC cables
est Set
(use either
Transmission/Reection
Two
N-to-BNC adapters
S-P
arameter T
Two
APC7-to-N adapters
Two
N-to-BNC adapters
HP
DeskJet Printer
P
arallel Interface
*
If
you
do
not
have
\Printing Out
the
the device
of the
following)
(T/R) T
est
Set
*
*
Cable
an
DeskJet
Measurement
under test
connector)
est Set
printer
and
Results".
(DUT) is
cable
,
skip
a70
step
MHz
5,
3-2 Network Analyzer Tour
Figure 3-1. Required Equipment
Page 57
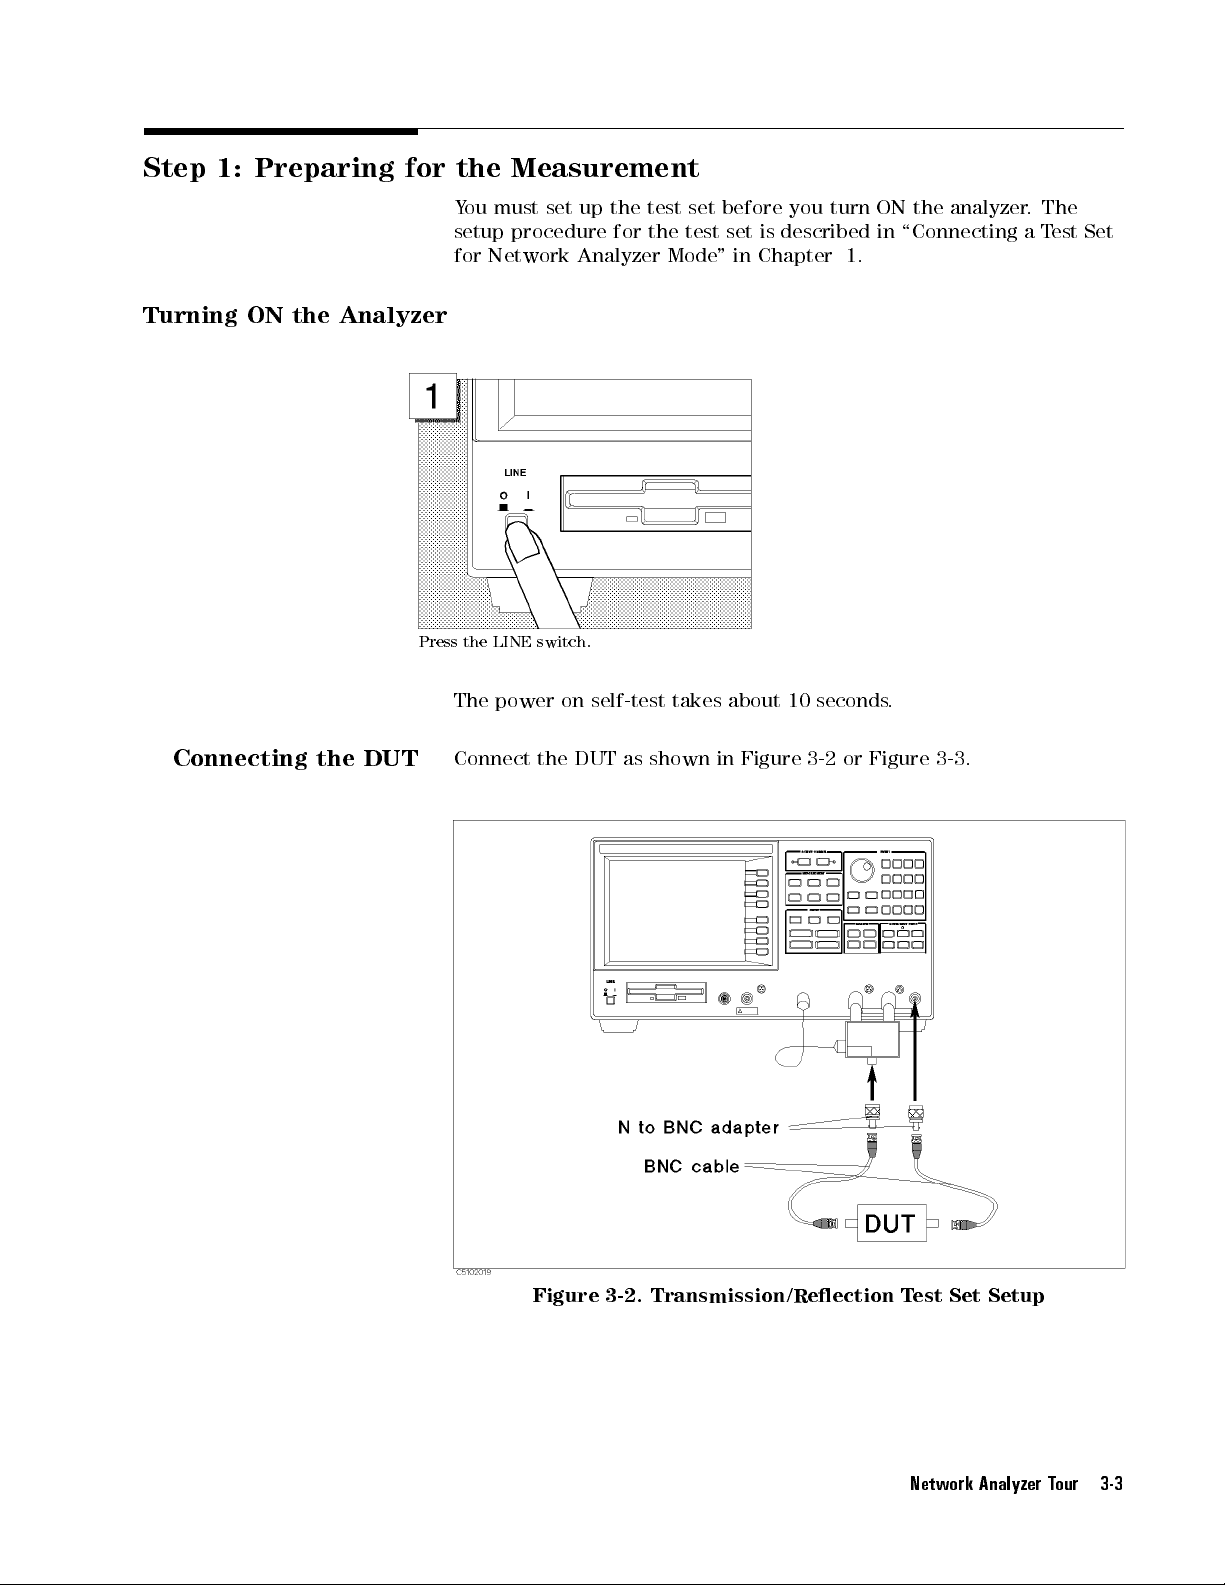
Step 1:
Preparing for
the Measurement
You
must set
setup procedure
for Network
up the
test set
for the
Analyzer Mode
before you
test set
"in
turn ON
is described
Chapter 1.
the
analyzer
in \Connecting
.
The
aT
est
Set
Turning
Connecting
ON
the
the
Analyzer
Press the
DUT
LINE switch.
The
power
Connect
on self-test
the
DUT
as
shown
takes about
in
Figure
10
seconds
3-2
or
.
Figure
3-3
.
Figure 3-2. Transmission/Reection Test Set Setup
Network Analyzer Tour 3-3
Page 58

Figure
3-3.
S-P
arameter
T
est
Set
Setup
3-4 Network Analyzer Tour
Page 59

Step 2:
Setting up
the Analyzer
Setting
the
A
ctive
Channel
Before you
t your
frequency range
start the
measurement requirements
of the
following parameters:
Active
channel
Analyzer type
Inputs
Format
Frequency Range
Because
two
active
the
dierent
channel
analyzer
measurement
to
channel
measurement, you
.F
measurement. In
Channel
1
Network analyzer
B/R
Log
Center
has
two
(depending on
or S
21
magnitude
70
MHz,
measurement
setups
at
the
1:
must set
or example
this step
mode
(default)
Span
500
channels
same
up the
,you
,you
the test
kHz
time
.
analyzer to
must set
will set
set)
you
can
T
o
change
the
the
have
the
In
4
Chan
the
A
CTIVE
5
.
1
CHANNEL
block,
press
V
erify
lights
the
Chan
1
active
channel
indicator
.
Network Analyzer Tour 3-5
Page 60

Setting
the
Analyzer
Type
In
the
T
o
use
the
analyzer
type
channel.
MEASUREMENT
analyzer
to
the
block,
in
the
network
press
4
network
analyzer
5
.
Meas
analyzer
mode after
F
F
ANALYZER
Press
mode
,you
must set
selecting the
F
F
F
F
F
F
F
F
F
F
F
F
F
F
F
F
F
FF
FF
F
F
F
F
F
F
F
F
F
F
F
TYPE
.
the
active
Press
F
FF
F
F
F
F
F
F
F
F
F
F
NETWORK
F
F
F
F
F
F
F
F
ANALYZER
F
F
F
FF
FF
F
F
F
F
F
F
F
F
F
F
F
F
F
.
3-6 Network Analyzer Tour
Page 61

Selecting the
Input
The
analyzer
and
B). Usually
A
input receives
receives
This
example assumes
because
the
DUT,
When
you use
and
reverse characteristics
the
inputs.
the
forward direction.
uses
,the
the transmission
you are
select B/R
the S-parameter
In that
three inputs
R input
the reection
signal through
you are
going to
measure
to measure
of a
case,
select
for network
accepts the
signal from
using the
the
the
ratio
test set,
2-port device
for
S
21
measurements (R,
RF OUT
signal directly
the DUT
the DUT
T/R test
.
set. Therefore
transmission
of
B
and
R
you
can
measure
without
a transmission
A,
,
,and
the B
input
characteristics
inputs
.
the
forward
reconnecting
measurement in
the
,
of
In
the
MEASUREMENT
F
F
F
F
B/R
Press
5
block,
press
F
F
F
F
F
.
4
Meas
.
F
Trans:FWD
Press
for
the forward
F
F
F
F
F
F
F
F
F
F
F
F
FF
FF
FF
FF
F
F
F
F
F
F
F
F
F
F
F
F
F
F
F
F
F
FF
FF
FF
FF
F
[B/R]
F
to
select
B/R
S21
direction.
Network Analyzer Tour 3-7
Page 62

Setting
the
Frequency
Range
T
o
lter
In
500
display
,
you
this
example
kHz
the
should
span.
transmission
specify
,
set
the
the
analyzer to
characteristics
frequency range
a70
MHz center
of
the
70
for the
MHz
bandpass
measurement.
frequency with
a
In
the
Press
SWEEP
5
4
M/
.
block,
press
4
Center
5
.
Press
In
the
5
4
4
7
0
SWEEP
5
.
block,
press
4
Span
5
.
3-8 Network Analyzer Tour
Press
4
5540540
5
. Press
4
k/m
5
.
Page 63

P
erforming
the
A
utomatic
Scaling
Often,
too
the
large
automatic
In
4
Scale
setting
the
The
shown
automatically
MEASUREMENT block,
5
.
Ref
transmission
below:
trace
or
too
scaling
obtained
small
after
vertically
function,
.
Press
characteristics
specifying
for the
you
can
Press
trace
the
grid. However
obtain
the optimum
F
F
FF
F
F
F
F
F
F
F
F
F
F
AUTO
SCALE
of
the
F
F
F
F
lter
frequency
,by
F
F
F
F
F
F
F
F
.
is
displayed
range
using the
vertical
is
as
All the settings are displayed on
1. A
ctive channel is set to channel 1.
the LCD
2. Inputs are set to B/R.
3. Format is set to log magnitude mode.
4. Center frequency is set to 70 MHz.
5. Frequency span is set to 500 kHz.
.
Network Analyzer Tour 3-9
Page 64

Step 3:
Making a
Calibration
To
ensure accurate
making a
uncertainty.
cancel a
connector) is
transmission measurement.
measurement results
measurement. Calibration
In this
frequency response
necessary to
example,
perform a
you perform
error.
, calibrate
reduces error
the response
A
THRU
(BNC
response
the analyzer
factor due
calibration to
female-to-female
calibration
for
before
to
the
Performing
Measurement)
Press
4
Cal
5
.
a Response
Calibration (for
F
F
F
F
F
F
F
F
F
F
F
FF
FF
F
F
F
F
Press
CALIBRATE
F
F
F
F
F
F
F
F
MENU
the
Transmission
F
F
F
F
F
F
F
F
F
.
3-10 Network Analyzer Tour
Press
Press
FF
FF
F
F
F
F
F
F
F
F
F
F
F
F
F
F
F
F
RESPONSE
FFFFFFFFFFFF
THRU
F
.
Disconnect the
DUT then,
. WAIT - MEASURING CAL STANDARD is
displayed.
connect
the
THRU
.
Page 65
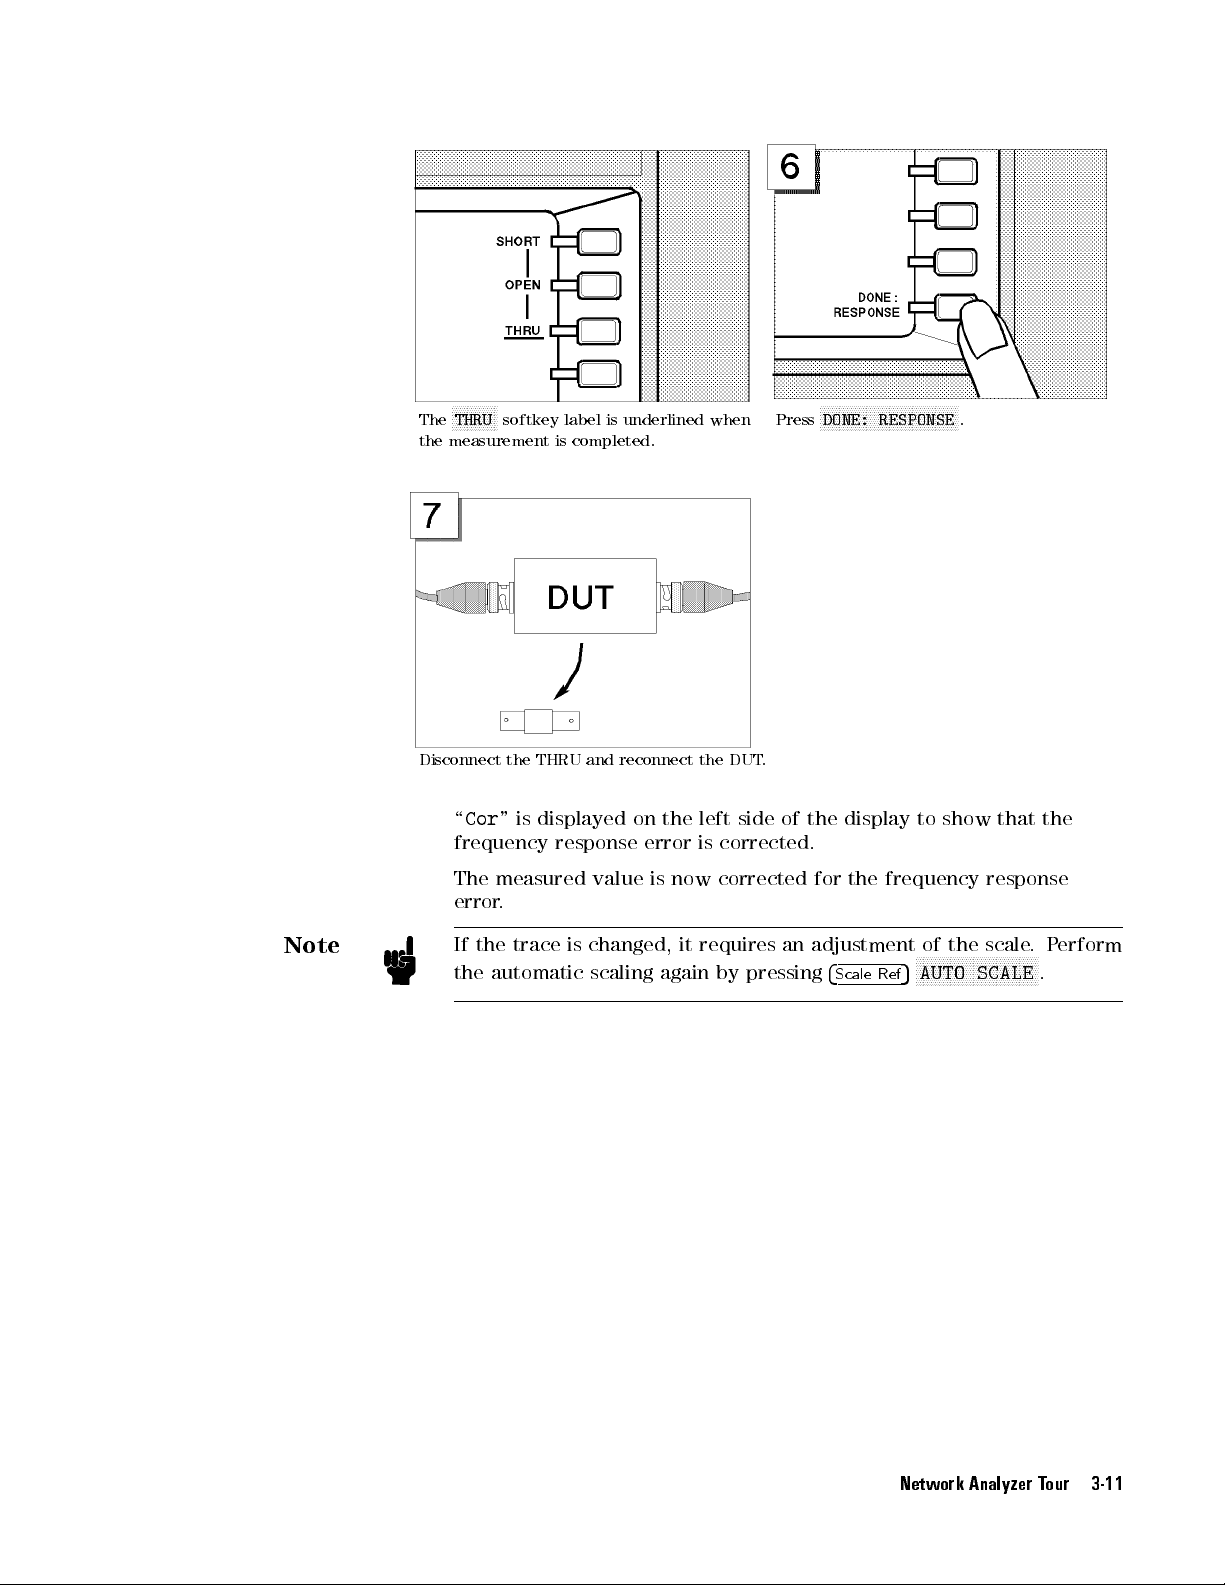
F
F
F
F
F
F
THRU
The
the
measurement
F
F
F
F
F
F
softkey
label
is
is
completed.
underlined
when
Press
F
F
F
F
F
F
F
F
DONE:
F
F
F
F
F
F
F
F
F
RESPONSE
FF
FF
FF
FF
F
F
F
F
F
F
F
F
F
F
F
.
Note
Disconnect
\
Cor
frequency
The
error
If
the trace
the
the
THRU
"
is
displayed
response
measured
.
automatic
and
reconnect
on
error
value
is
is changed,
scaling
the
the
left
is
corrected.
now
corrected
it requires
again
by
DUT
.
side
of
an adjustment
pressing
the
for
display
the
4
Scale
to
show
frequency
of
the
N
N
N
N
N
N
N
N
N
AUTO
5
Ref
N
N
N
N
NN
NN
NN
SCALE
that
the
response
scale
.
P
N
N
N
N
N
N
N
N
N
N
N
N
N
.
erform
Network Analyzer Tour 3-11
Page 66

Step 4:
Reading a
Measurement Result
You
may want
You
can use
the frequency
to readout
the marker
and response
the measured
function for
value at
values on
this purpose
the marker
the displayed
.The
marker
point.
trace
shows
.
Reading
a
Measured
V
alue
In
by
Using
the MARKER
Marker
block, press
4
Marker
5
. V
erify a
marker
appears
on
the
trace
.
3-12 Network Analyzer Tour
Turn
the
knob
to
the
right
to
move the
marker
toward
the
right.
The
marker has
evaluate
the trace
a
search
results
function
.
F
or
value and its frequency on the trace:
Read
that
example
the
values
makes
,
to
at
it
search
the
easier
for
right
and
the
top
of the
faster
maximum
display.
to
Page 67

In
the
MARKER
The
marker
maximum
block,
immediately
point
on
the
press
4
Search
moves
displayed
to
trace
the
F
F
F
F
F
F
F
F
F
5
.
.
MAX
Press
Read
the
displayed
.
frequency
at
the
upper
and
response
right
values
of
the
display
.
Network Analyzer Tour 3-13
Page 68
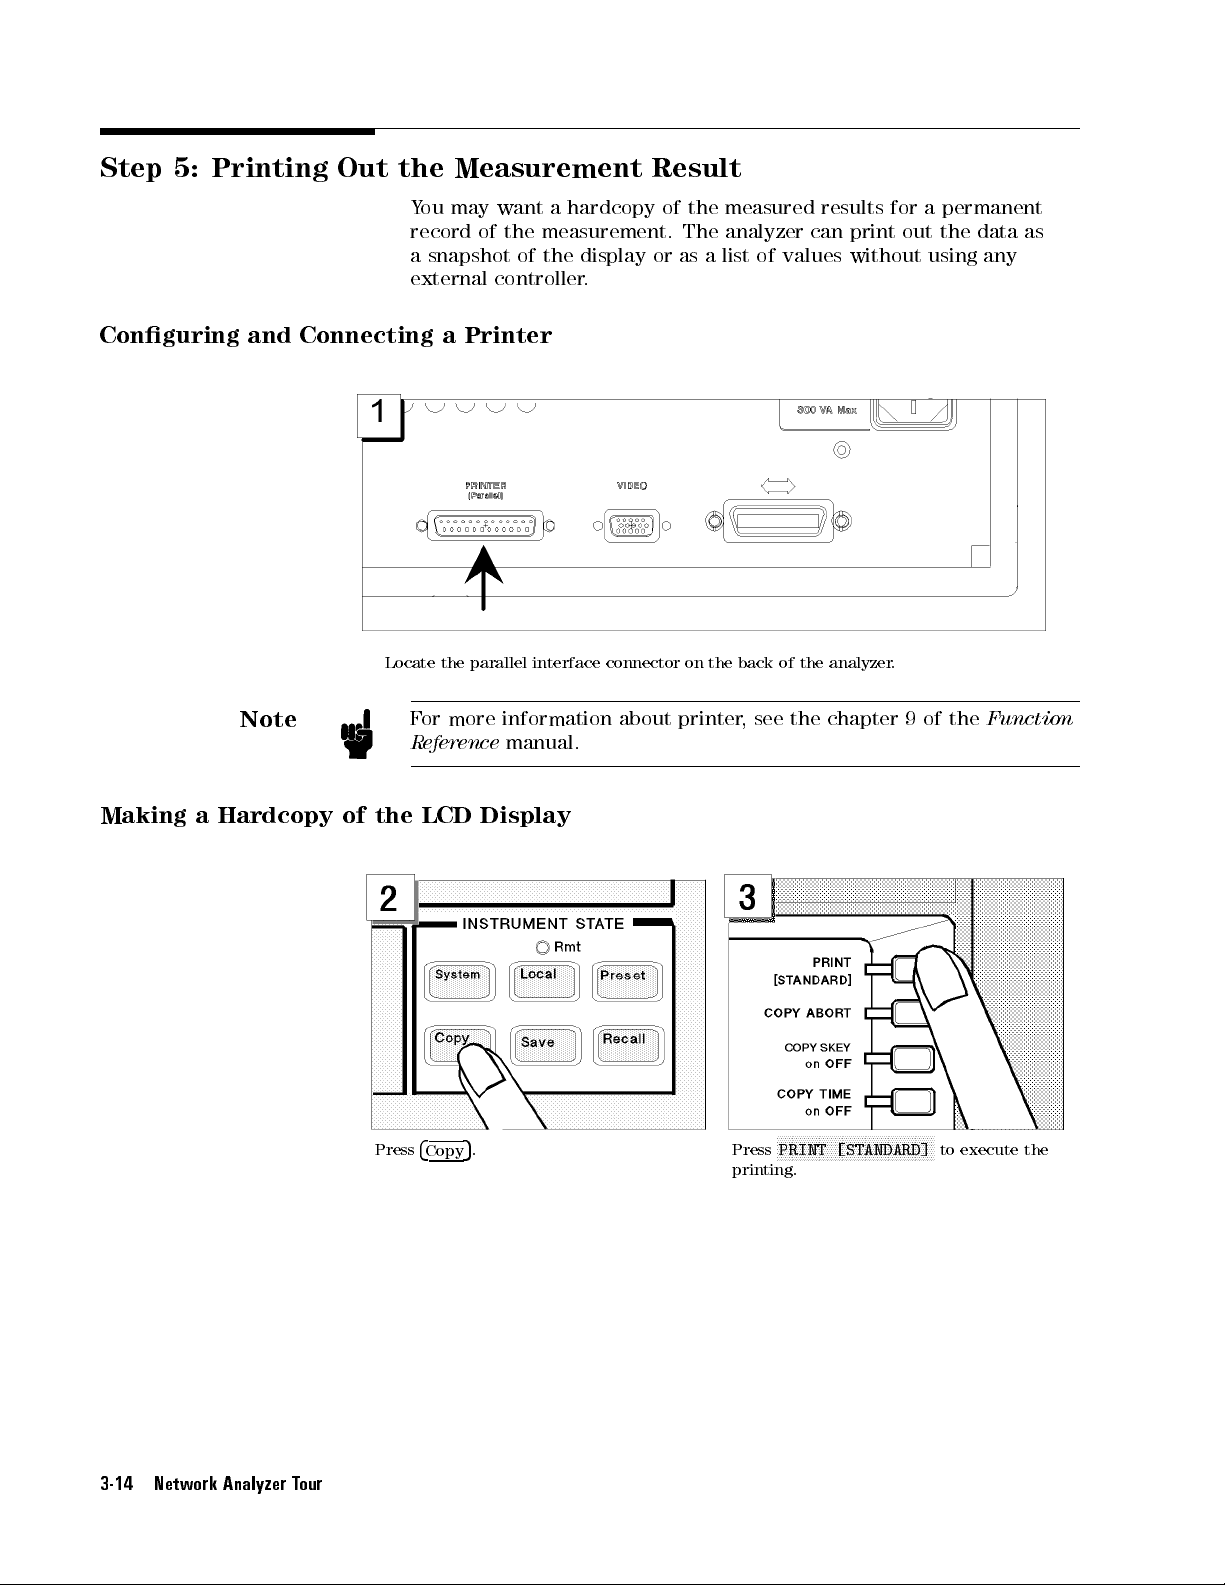
Step 5:
Printing Out
the Measurement
You
may want
record of
a snapshot
external controller
a hardcopy
the measurement.
of the
display or
.
Result
of the
measured results
The analyzer
as a
list of
for a
can print
out the
values without
permanent
data as
using
any
Conguring
Making
a
Hardcopy
and
Note
Connecting
Locate
F
Reference
of
the
a
the
or
more
LCD
Printer
parallel
interface
information
manual.
Display
connector
about
on
the
printer
back
, see
of
the
analyzer
the chapter
.
9
of
the
Function
3-14 Network Analyzer Tour
Press
4
Copy
F
FFFFFF
FFFFFFFFFFFFFFFFFFFFFFFFF
5
.
PRINT [STANDARD]
Press
FFFFFFFFF
to execute the
printing.
Page 69

4
Spectrum
Basic Setup
Measurement Examples
This chapter
Harmonic distortion
Carrier/noise ratio
Tracking a
Network
Amplitude
Frequency
Burst
T
o
measure
Figure
contains
drifting
measurement
modulation
modulation
signal
the
4-1
.
the
following
measurement
(
c/n
)
signal
with
(
am
(
fm
measurement
spectrum
of
measurement
)
)
a
spectrum
spectrum
signal
signal
test
signal,
measurement
measurement
measurement
monitor
use
the
S
input
examples:
as
shown
in
Figure 4-1. Basic Connection for Spectrum
Measurement
The spectrum of input signals can also be monitored at the A, B
R inputs
in
. The use of the spectrum monitor function is described later
this chapter
.
Spectrum Measurement Examples 4-1
, and
Page 70
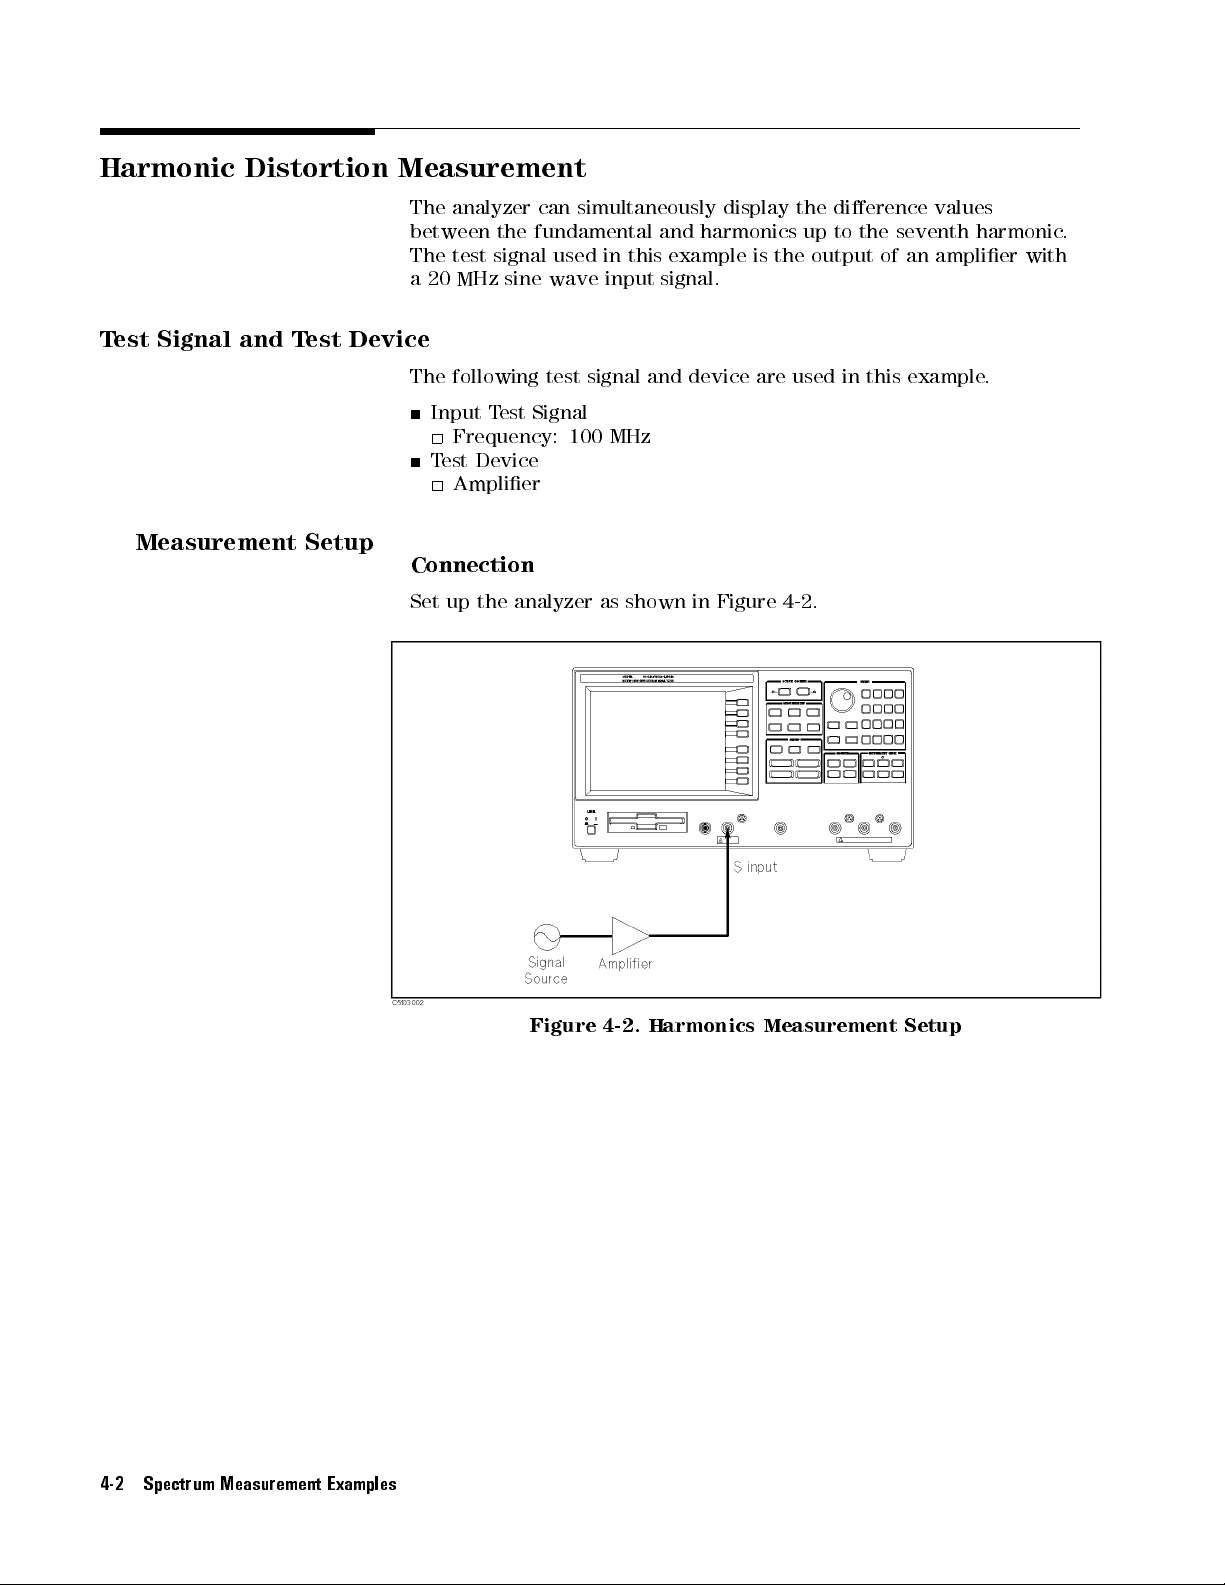
Harmonic Distortion
Measurement
T
est
Signal
Measurement
and
T
est
Setup
The analyzer
between the
The test
a20
Device
The
Connection
Set
signal used
MHz sine
following
Input
T
Frequency:
T
est
Device
Amplier
up
the
can simultaneously
fundamental and
in this
wave input
test
signal
est
Signal
100
MHz
analyzer
as
example is
signal.
and
shown
display the
harmonics up
the output
device
in
are
Figure
4-2
dierence values
to the
of an
used
in
this
.
seventh harmonic
amplier
with
example.
.
4-2 Spectrum Measurement Examples
Figure
4-2. Harmonics
Measurement Setup
Page 71
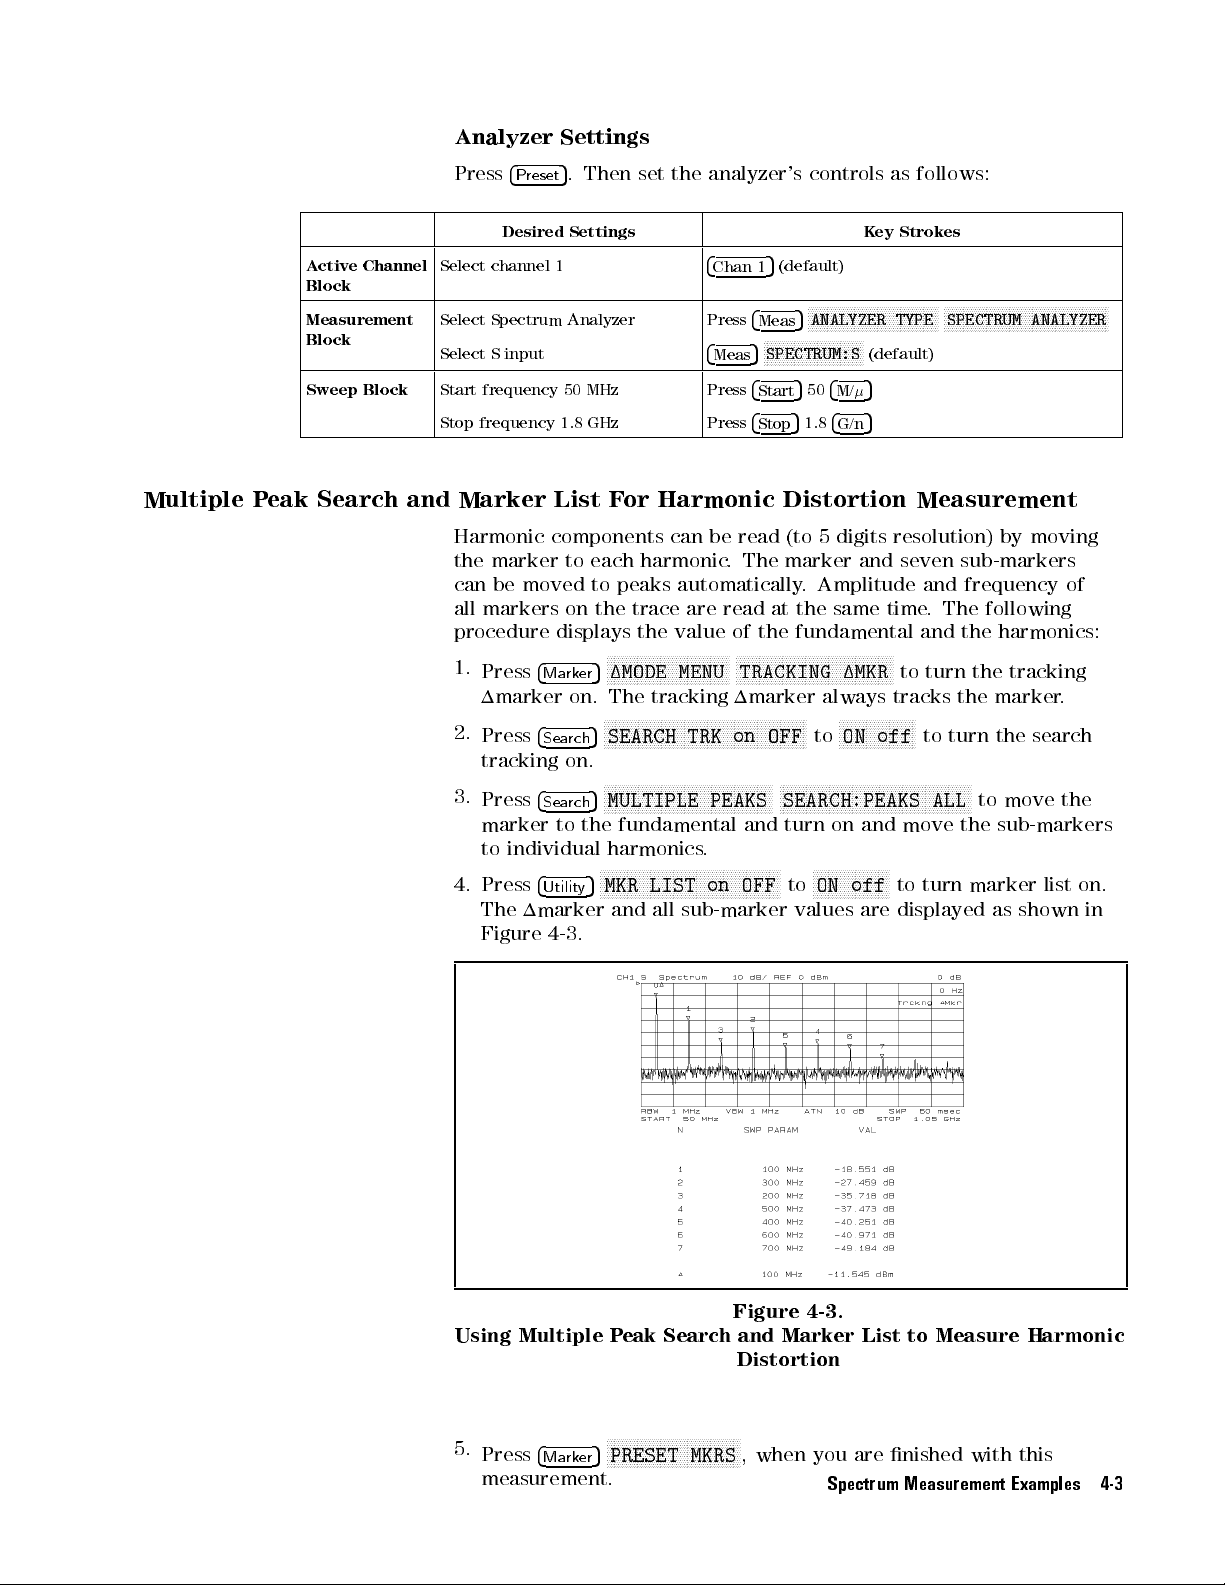
Analyzer
Settings
Multiple
A
ctive
Block
Measurement
Block
Sweep
P
eak Search
Channel
Block
Select
Select
Select
Start
Stop
and Marker
Press
channel
Spectrum
S
frequency
frequency
Harmonic components
the
marker
can
be
all
markers
procedure
1.
Press
1marker
2.
Press
tracking
3.
Press
marker
to
4.
Press
The
5
4
. Then
Preset
Desired Settings Key
1
Analyzer
input
50
1.8
List F
to
moved
on
displays
4
Ma
rk
on.
4
Sea
rch
on.
4
Sea
rch
to
individual
4
Utilit
1marker
4-3
set
the
MHz
GHz
or
Harmonic
can be
each
harmonic
to
peaks
the
N
N
N
N
1MODE
5
er
The
N
N
N
N
SEARCH
5
N
N
N
N
MULTIPLE
5
the
fundamental and
harmonics
N
N
N
N
N
MKR
5
y
and
.
trace
N
N
N
N
N
N
N
N
N
N
N
N
N
N
N
N
NN
NN
the
N
N
N
N
N
N
N
N
N
N
N
N
N
N
N
N
NN
tracking
N
N
N
NN
NN
N
N
N
NN
N
N
N
N
N
N
N
LIST
all
automatically
value
NN
MENU
N
N
N
N
N
N
N
N
sub-marker
analyzer's
4
Chan
Press
4
Meas
Press
Press
. The
are
read
of
N
NN
NN
N
N
N
N
N
N
N
N
1marker
N
N
N
N
N
N
N
N
N
N
N
N
N
N
TRK
on
N
N
N
N
N
N
N
N
N
N
N
N
N
N
PEAKS
.
N
N
N
N
N
N
N
N
N
N
NN
NN
on
5
(default)
1
4
Meas
FF
F
F
F
SPECTRUM:S
5
4
Start
4
Stop
read
at
the
N
N
N
N
N
N
N
N
N
N
N
TRACKING
N
N
N
N
N
NN
NN
N
N
OFF
N
N
N
N
N
N
NN
N
N
N
N
N
N
N
N
N
N
N
N
N
OFF
controls
F
F
F
F
F
F
ANALYZER
5
F
F
F
F
F
F
F
F
F
F
F
F
F
5
50
4
5
1.8
Distortion
(to
5
marker
. Amplitude
the
fundamental and
N
N
N
N
NN
NN
NN
NN
N
always tracks
N
N
N
N
N
N
N
to
N
N
N
N
N
N
N
N
N
N
N
N
N
SEARCH:PEAKS
turn
N
N
N
N
N
ON
to
values
F
F
F
F
FF
FF
F
FF
FF
FF
M/
4
G/n
digits
and
same
N
N
N
N
N
N
N
1MKR
N
N
N
N
N
N
ON
N
NN
N
N
N
N
on
N
N
NN
NN
N
off
as
Strokes
FF
FF
F
F
F
F
F
F
F
F
F
TYPE
F
(default)
5
5
resolution)
seven
time
N
N
N
N
N
N
N
N
N
to
N
N
N
N
N
N
N
N
N
NN
NN
off
N
N
N
N
N
N
N
N
N
N
N
N
N
and
move
N
N
N
N
N
N
N
N
to
are
displayed
follows:
F
F
F
F
F
F
F
F
F
F
FF
FF
FF
FF
F
F
F
F
F
F
F
F
F
F
F
F
F
F
F
F
SPECTRUM
Measurement
sub-markers
and
frequency
.
The
following
the harmonics:
turn
the
the marker
N
to
turn
N
N
N
N
N
N
NN
N
N
N
N
N
N
N
N
ALL
to
the
turn marker
F
ANALYZER
by
moving
tracking
the
search
move
sub-markers
list on.
as
shown
F
F
F
F
F
of
.
the
F
F
FF
FF
FF
FF
in
Figure 4-3.
Using Multiple Peak Search and Marker List to Measure Harmonic
Distortion
5.
Press
4
measurement.
Marker
NNNNNNNNNNNNNNNNNNNNNNNNNNNNNNNNNNN
5
PRESET MKRS
, when you are nished with this
Spectrum Measurement Examples 4-3
Page 72
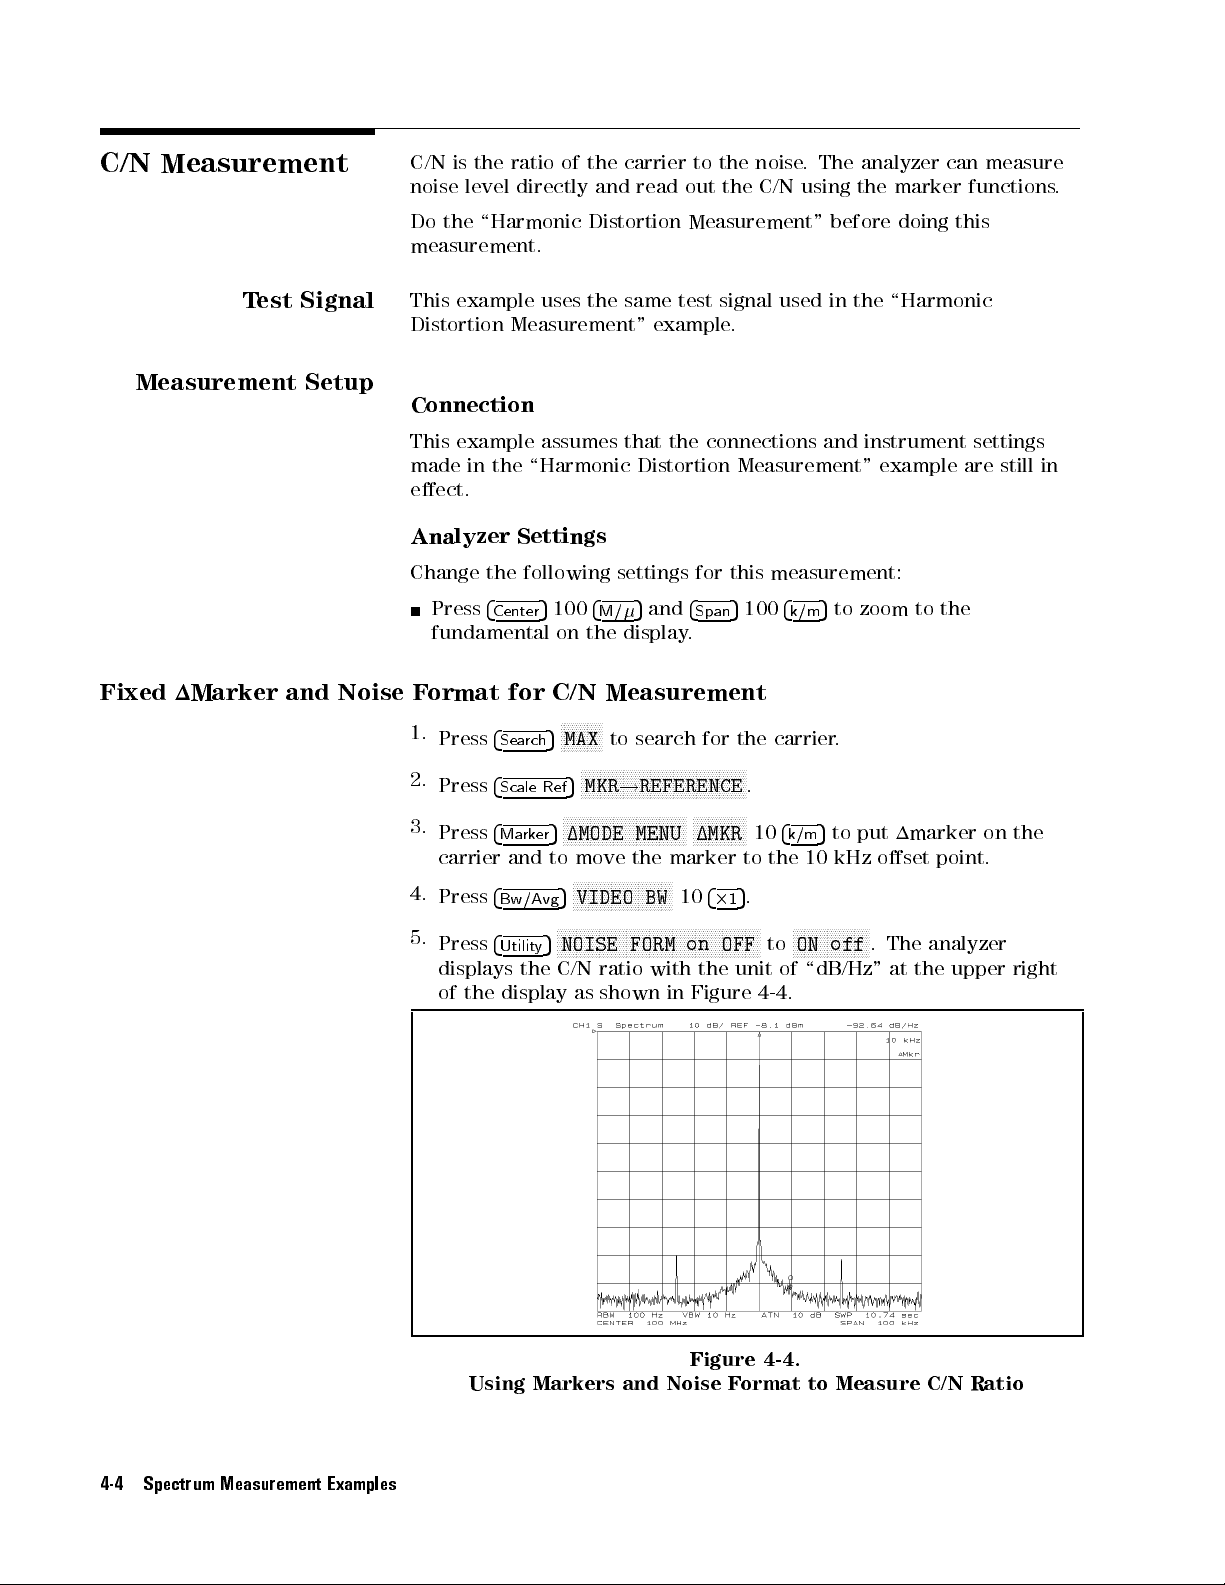
C/N
Measurement
T
est
Signal
C/N
is the
ratio of
noise
level directly
Do
the \Harmonic
measurement.
This
example
Distortion
Measurement"
the carrier
and read
Distortion Measurement"
uses
the same
to the
out the
test signal
example
noise.
C/N using
.
The analyzer
before doing
used in
can measure
the marker
the \Harmonic
functions.
this
Measurement
Fixed
1Marker
Setup
and
Noise
Connection
This
example
made
in
the
eect.
Analyzer
Change
Press
fundamental
F
ormat
1.
Press
2.
Press
3.
Press
carrier
4.
Press
5.
Press
displays
of
the
4
the
Settings
Center
for
4
Sea
4
Scale
4
Ma
and
4
Bw/Avg
4
Utilit
display
assumes
\Harmonic
following
5
100
4
on
the
C/N
N
N
N
N
N
N
N
N
N
N
MAX
5
rch
N
N
N
N
MKR
5
Ref
N
N
N
N
N
N
N
N
N
1MODE
5
rk
er
to
move
N
N
N
N
N
N
VIDEO
5
N
N
N
N
N
N
N
N
N
N
NOISE
5
y
the
C/N
as shown
that
the
connections
Distortion
settings
5
M/
display
Measurement
N
to
search
N
N
N
N
N
N
N
N
N
N
N
!
N
NN
N
N
N
N
N
N
N
N
MENU
the
N
NN
NN
N
N
N
N
N
N
N
N
N
N
NN
NN
NN
NN
FORM
ratio with
for
and
4
Span
.
for
N
N
N
N
N
N
N
N
N
NN
N
N
N
N
N
N
N
N
N
N
N
REFERENCE
N
N
N
N
N
N
N
N
N
N
N
N
N
N
BW
N
N
N
N
N
N
N
N
N
N
N
N
N
N
N
N
N
N
N
N
N
1MKR
marker
N
N
10
4
2
N
N
N
N
N
N
N
N
N
N
N
NN
NN
NN
on
OFF
the unit
in Figure
this
5
N
N
N
NN
1
NN
and instrument
Measurement"
measurement:
100
the
N
N
N
.
N
N
to
5
.
N
N
N
10
N
N
N
4-4.
5
4
to zoom
k/m
carrier
the
to
.
5
to
4
k/m
10
kHz
N
N
N
N
N
N
N
N
N
N
N
N
N
ON
off
of \dB/Hz"
N
NN
example are
to
put
1marker
oset
NN
NN
.
The
at
the
settings
the
on
point.
analyzer
upper
still in
the
right
4-4 Spectrum Measurement Examples
Figure 4-4.
Using Markers and Noise Format to Measure C/N Ratio
Page 73

6.
Press
4
measurement.
Ma
rk
5
er
N
NN
NN
NN
NN
NN
NN
PRESET
N
N
N
N
N
N
N
N
N
N
N
N
N
NN
NN
NN
NN
N
MKRS
when
you are
nished with
this
Tracking
Measurement
a
Drifting
T
est
Signal
A
ctive
Block
Measurement
Block
Setup
Channel
Signal
When
However
sweep
The
following
Frequency:
Connection
Connect
Analyzer
1.
Press
Desired
Select
channel
Select
Spectrum
Select
S
input
measuring
,
the
analyzer
parameter
test
900
the
test
Settings
5
4
Preset
Settings
1
Analyzer
.
a
drifting
values
signal
MHz
signal
Then
can
(not
to
set
signal,
track
sweep
is
used
stable)
the
the
4
Chan
Press
4
Meas
the
a
drifting
by
sweep
in
this
S
input.
analyzer's
5
(default)
1
F
F
ANALYZER
5
4
Meas
F
F
F
F
F
F
F
F
F
F
F
F
F
F
SPECTRUM:S
5
analyzer
signal
.
example
controls
K
ey
F
F
F
F
F
F
F
F
F
F
F
F
F
F
F
F
F
F
FF
F
F
F
F
F
F
F
F
(default)
can
Strokes
F
F
F
F
F
FF
TYPE
by
.
as
F
F
F
F
F
lose
changing
follows:
F
F
F
F
F
F
F
F
F
F
SPECTRUM
the
signal.
the
F
F
F
F
F
F
F
F
F
F
F
F
F
F
F
F
F
FF
F
F
F
F
F
F
F
F
F
F
F
F
F
F
F
F
F
ANALYZER
F
Sweep
Block
A
ctive
Channel
Block
Measurement
Block
Sweep
Block
same
Press
Press
as
4
Chan
Center
Span
2.
Select
frequency
frequency
Set
channel
Desired
channel
900
20
kHz
Settings
2
2
MHz
the
Select Spectrum Analyzer Press
Select S input
Center
frequency 900 MHz
4
Meas
Press
Span frequency 20 kHz Press
4
Center
4
Span
channel
5
2
4
Meas
FFF
FFFFFFFFFFFFFFFFFFFFFFF
SPECTRUM:S
5
4
Center
4
Span
5
900
4
M/
5
5
5
20
4
k/m
1
as
follows:
K
ey
FFFFFFFFFFFFFFFF
FFFFFFFFFFFFFFFFFF
ANALYZER TYPE
(default)
5
900
4
M/
k/m
5
5204
5
Strokes
FFFFFFFFFFFFFFFF
SPECTRUM ANALYZER
5
FFFFFFFFFFFFFFFFFFFFFFFFF
FF
Spectrum Measurement Examples 4-5
Page 74

Tracking
an
Unstable
Signal
In
1.
this
Press
example
4
Display
,
the
signal
NN
NN
N
N
N
N
N
N
N
N
N
N
N
DUAL CHAN
5
is
drifting.
NN
NN
N
N
N
N
N
N
N
N
N
N
N
NN
NN
NN
NN
NN
NN
NN
NN
NN
N
N
N
N
N
N
N
N
N
N
N
NN
NN
NN
NN
NN
on
OFF
to
ON off
N
.
2.
3.
4.
5.
Press
Press
Use
the
track.
Press
the
signal
bring
Figure
Figure
At
channel
the
drifting
that
4
Chan
4
Ma
knob
4
Sea
the
4-5
4-6
signal
5
.
1
5
to
rk
er
to
N
N
N
N
N
N
SIGNAL
5
rch
drifts
signal
shows
shows
1,
the
signal
frequency
turn
bring
N
N
N
NN
NN
,
the
and
the
NN
NN
N
N
N
N
N
center
the
a
display
a
display
center
at
the
marker
the
marker close
N
N
N
N
N
N
N
N
N
N
N
N
NN
NN
TRK
NN
on
frequency
marker
when
after
frequency
center
has
drifted
NN
N
OFF
N
N
N
on.
N
N
N
N
N
N
to
signal
the
of
to
to the
N
to
turn
automatically
the
center
track
analyzer
has
been
the
display
a
higher
signal you
the
signal track
of
the
is
ON
sweeps
changed
.
Channel
frequency
changes
display
at
channel
a
few
to
2
.
want to
on. As
to
.
1.
times
maintain
shows
.
4-6 Spectrum Measurement Examples
Figure 4-5.
Display
When
Starting
Signal
Figure 4-6. Display After Signal Has Drifted
Track
Page 75

Network Measurement
with Spectrum
Monitor
During a
from an
detect the
network measurement,
adjacent circuit
eect of
the spectrum
Inuence
on
these spurious
of the
input signal
Network
crosstalk or
can change
the measurement
inputs,
at
the
Figure 4-7.
Measurement
Circuit
leakage (such
the analyzer
R,
A,
and
by
Leakage
B
inputs
from
as noise)
results.
To
can monitor
.
an
A
djacent
Measurement
Setup
In
this
an
adjacent
240
example
MHz
and
,
signal
the
the
source
DUT
network
.
The
is
a
250 MHz
measurement
frequency
bandpass
circuit
of the
lter
has
signal
.
leakage
source
from
is
Connection
Figure 4-8. Network Measurement With Spectrum Monitor Setup
Spectrum Measurement Examples 4-7
Page 76

Analyzer
Settings
P
erforming
A
ctive
Channel
Block
Measurement
Block
Sweep
Block
Calibration
Press
4
Desired Settings Key
Select
channel
Select
Spectrum
Select
S
21
Select
LOG
Center
frequency
Span
frequency 200
P
erform
follows:
1.
Press
2.
Connect
cables
3.
Press
measurement.
4.
Press
N
N
N
CORRECTION
to
5
. Then
Preset
1
Analyzer
(or
B/R)
measurement
MA
G
format
250 MHz
MHz
a
frequency
N
N
N
N
N
N
N
N
N
N
N
NN
CALIBRATE
5
4
Cal
a
THRU
in
place
of
N
NN
N
N
N
N
N
N
N
N
N
N
N
THRU
to
perform
N
N
N
N
N
N
N
N
N
N
N
N
N
N
N
N
N
N
N
NN
N
DONE:RESPONSE
N
N
N
N
N
N
N
N
N
N
N
NN
N
N
N
N
N
N
N
N
N
N
N
N
N
N
N
N
set
the
response
NN
NN
N
N
N
N
N
N
N
N
N
N
N
N
calibration
the
DUT
N
N
N
N
N
N
N
N
N
N
N
N
N
N
N
N
N
N
N
N
N
N
N
N
N
NN
N
N
N
N
N
N
N
ON
off
analyzer's
4
Chan
1
Press
4
Meas
4
5
Meas
4
F
ormat
Press
4
Center
Press
4
Span
calibration
N
N
N
.
N
N
N
N
N
N
N
N
NN
NN
NN
N
N
MENU
standard
.
a
frequency
N
N
N
N
N
N
N
N
N
N
N
CORRECTION
(
N
N
N
.)
controls
5
(default)
F
F
F
F
F
F
F
ANALYZER
5
FF
F
F
F
F
F
F
F
F
F
F
F
F
F
F
F
F
F
N
N
N
N
F
F
LOG
N
N
N
N
F
F
F
F
FF
FF
MAG
5
5
200
N
N
NN
NN
NN
NN
N
N
N
N
N
N
F
FF
FF
250
N
N
N
N
response
N
N
N
N
Trans:FWD
5
N
N
N
N
RESPONSE
N
N
N
N
as
F
F
F
FF
FF
FF
FF
F
F
F
F
F
FF
FF
FF
FF
F
F
F
F
F
F
F
S21
F
F
F
F
(default)
5
4
M/
5
4
M/
for
this
N
N
N
N
N
.
between
N
N
N
N
N
N
N
N
N
N
N
N
N
NN
on
OFF
follows:
Strokes
F
F
F
F
F
F
F
F
F
F
F
F
F
TYPE
F
F
F
F
F
F
[B/R]
N
N
N
N
N
F
F
F
F
F
F
F
NETWORK
F
F
F
F
FF
FF
measurement
the
measurement
calibration
N
N
is
automatically
F
FF
FF
FF
FF
F
F
F
F
F
ANALYZER
data
F
F
F
F
F
F
F
F
F
F
F
F
FF
FF
FF
as
set
Network
Measurement
N
N
N
N
N
N
N
N
N
N
N
N
N
N
N
N
N
N
N
N
NN
NN
N
N
N
N
N
N
N
1.
Press
4
Scale
2.
Press
4
Sea
rch
trace
.
The
in
Figure
Transmission Measurement Result (Inuenced by Leakage)
AUTO
5
Ref
N
N
NN
NN
NN
NN
N
N
N
N
PEAK
5
transmission
4-9
.
to
N
SCALE
put the
to
marker on
measurement
Figure 4-9.
t
scale
to
an
result
the
trace
unknown
is
displayed
.
peak
as
of
the
shown
4-8 Spectrum Measurement Examples
Page 77

The
measurement result
shows an
unknown
peak
at
240
MHz.
Monitoring
the
Leakage
Signal
During
is
turned o.
1.
Press
2.
Press
3.
Press
4.
Press
at
the B
the spectrum
To
monitor the
5
Chan
Meas
Center
Span
.
2
N
NN
NN
NN
NN
ANALYZER
5
5
250
5
200
4
4
4
4
Input Using
measurement sweep
input signal
N
NN
N
N
N
N
N
N
N
N
N
N
N
N
N
N
N
N
N
NN
NN
TYPE
5
.
4
M/
5
.
4
M/
NN
NN
N
N
N
NN
N
N
N
N
SPECTRUM
the Spectrum
,the
network measurement
at the
NN
NN
N
N
N
N
N
N
N
N
N
N
N
N
N
N
N
N
N
NN
NN
NN
NN
Binput:
N
N
N
N
N
N
N
N
N
ANALYZER
Monitor
N
NN
NN
N
N
N
N
N
N
N
N
NN
B
.
The
Figure
spectrum
4-10.
Spectrum
measurement
Monitoring
result
shows
Result
at
the leakage
the
signal
B
Input
at
240
MHz.
N
N
N
N
N
N
N
N
N
NN
5.
Press
display both
same time
4
Displa
N
N
N
N
N
N
N
N
N
NN
NN
N
N
N
N
N
N
N
N
N
N
N
N
N
N
N
N
N
N
N
N
N
NN
NN
N
N
N
N
N
N
N
N
N
N
N
5
y
DUAL
the
CHAN
network
on
and
OFF
the
N
to
spectrum
.
ON
NN
N
N
N
N
N
N
N
off
to
perform
measurements
and
at
the
Figure 4-11. Dual Display of Network and Spectrum Measurement
Spectrum Measurement Examples 4-9
Page 78

AM Signal
Measurement
Test
Measurement
A
ctive
Block
Measurement
Block
Signal
Setup
Channel
In this
example,
are derived:
Carrier amplitude
Modulating frequency
The
following
AM
Signal
Frequency
Modulating
Modulation
test
(
signal
index
Connection
Connect
the
test
Analyzer Settings
Press
Select
channel
Select
Spectrum Analyzer
Select
S
4
Preset
Desired
input
5
.
Then
Settings
1
the following
)and
(
E
c
) and
(
f
m
signal
is
used
):
100
f
c
MHz
frequency
(
m
):
15%
signal
set
source
the
analyzer's
4
Chan
Press
4
Meas
parameters for
frequency (
f
modulation index
in
this
example:
):
10
(
f
m
to
the
S
input.
controls
5
(default)
1
F
F
FF
F
F
F
F
F
F
ANALYZER
5
4
Meas
F
F
F
F
F
F
F
F
F
F
F
F
F
F
F
F
F
F
F
F
SPECTRUM:S
5
F
)
c
kHz
F
F
F
F
FF
F
F
F
K
F
F
ey
F
F
(default)
AM signal
(
as
follows:
Strokes
F
F
F
F
TYPE
F
F
F
FF
F
F
F
F
F
F
F
F
measurement
m
)
F
FF
F
F
F
F
F
F
F
F
F
F
F
F
F
F
SPECTRUM
F
F
F
F
F
F
F
F
F
FF
F
F
ANALYZER
F
F
F
F
F
F
F
F
F
F
F
F
Carrier
Sweep
Amplitude
Block
and
Center
frequency
Span
frequency
Frequency
Press
4
Scale
rescaled.
1.
Press
2.
Press
and frequency
Figure 4-12.
100
MHz
200
kHz
Measurement
5
and enter
Ref
5
rch
to
turn
4
Sea
NNNNNNNNNNN
MAX
to search
are displayed in the upper right corner as shown in
Press
Press
Using
the reference
the
marker
4
Center
4
Span
5
on.
5
100
200
4
the
value if
5
4
M/
5
k/m
Marker
the
trace
needs
to
for the carrier signal. The carrier amplitude
be
4-10 Spectrum Measurement Examples
Page 79

Figure
4-12.
Carrier
Amplitude
and
Frequency of
AM Signal
Modulating
Frequency
The
frequency
and
Modulation
3.
Press
4.
Press
The
sweep
modulation
marker
4
Ma
4
Sea
oset
shows
)
is
(
100
f
c
Index
NN
N
N
N
N
1MODE
5
rk
er
N
N
N
N
N
N
N
SEARCH:PEAK
5
rch
value
parameter
frequency
that
N
N
N
N
N
NN
NN
N
from
the
carrier amplitude
MHz.
Measurement
NN
N
N
N
N
N
N
N
N
N
N
N
N
N
N
N
N
N
N
N
N
N
MENU
N
N
N
N
N
N
NN
NN
N
N
N
N
N
1MKR
N
N
N
N
N
N
N
N
N
N
N
NN
N
NEXT
the carrier
value
shown
.
N
N
N
N
N
N
N
N
N
N
N
NN
NN
in
N
N
.
N
N
N
N
N
N
N
N
N
PEAK
is
displayed
Figure
)
is
(
E
c
Using 1Marker
N
N
N
N
N
N
N
N
N
to
search
as
the
4-13
.
This
0
19.949
for
a sideband.
marker
value
dBm
is
and
the
Figure 4-13. Modulating Frequency of AM Signal
The 1marker shows that
carrier is
0
19.76
dB. The modulation index (
the following equation:
1
Mkr+6
m
=10
20
=20:51%
where
1Mkr
is the 1marker sweep parameter value shown in
Figure 4-13.
the sideband amplitude value relative to the
m
) can be derived from
Spectrum Measurement Examples 4-11
Page 80
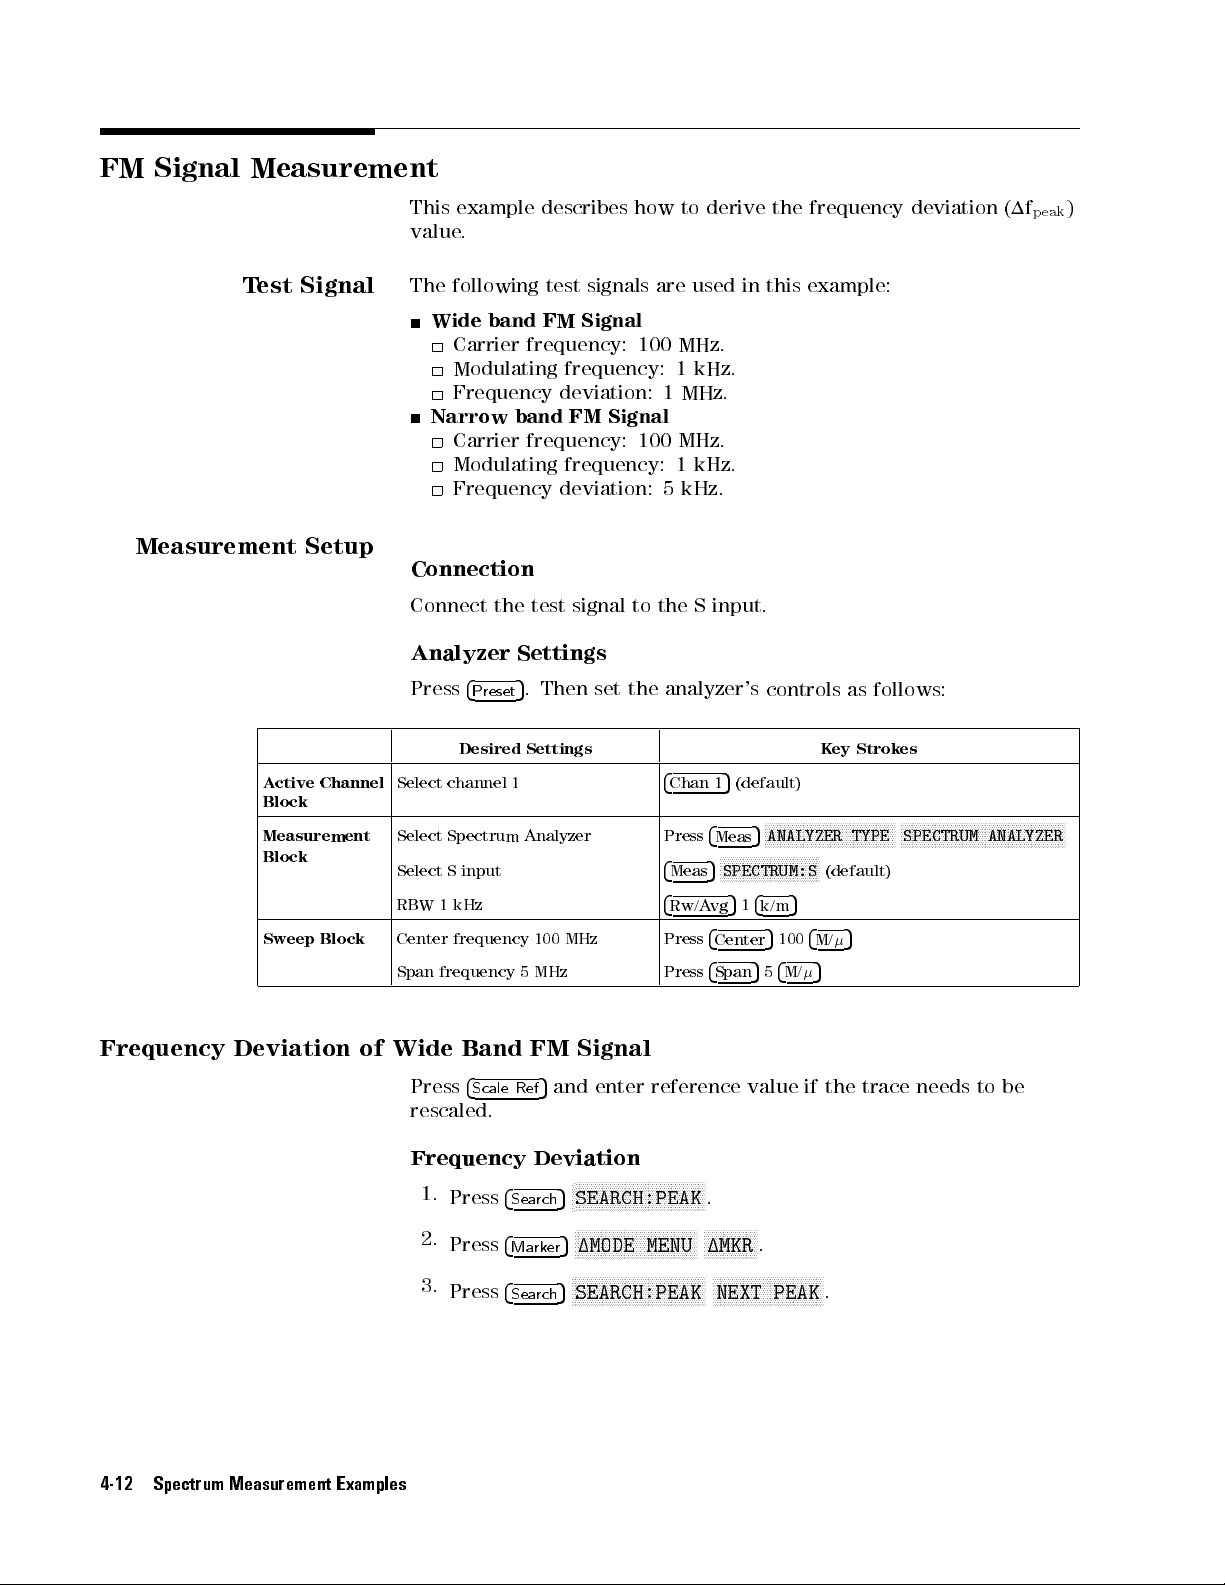
FM Signal
Measurement
T
est
Measurement
A
ctive
Block
Measurement
Block
Sweep
Signal
Setup
Channel
Block
This example
value.
The
following
Wide band
Carrier frequency:
Modulating frequency:
Frequency deviation:
Narrow band
Carrier frequency:
Modulating frequency:
Frequency deviation:
Connection
Connect
Analyzer
Press
Select
Select
Select
RBW
Center
Span
the
4
Preset
Desired
channel
Spectrum
S
input
1
kHz
frequency
frequency
test
Settings
5
.
Settings
1
Analyzer
100
5MHz
describes how
test
signals
are used
FM Signal
100 MHz.
FM Signal
100 MHz.
signal
Then
set
to
the
MHz
to derive
1kHz.
1MHz.
1kHz.
5kHz.
the
S
input.
analyzer's
4
5
Chan
1
Press
4
Meas
F
FF
SPECTRUM:S
4
5
Meas
4
Press
Press
Rw/Avg
4
4
5
Center
Span
the frequency
in this
example:
controls
(default)
F
F
F
F
F
F
F
F
F
F
F
F
ANALYZER
5
F
F
F
F
F
F
F
F
F
F
F
F
F
F
F
F
F
F
F
F
5
1
4
k/m
5
100
5
5
4
M/
K
ey
F
F
F
F
F
F
F
F
F
FF
(default)
4
M/
5
as
Strokes
F
F
F
FF
F
F
F
F
TYPE
5
deviation (1f
follows:
F
F
F
F
F
F
F
F
F
F
F
F
F
F
SPECTRUM
F
F
F
F
F
F
F
F
F
F
F
F
F
F
FF
F
F
ANALYZER
)
p
eak
F
F
F
F
F
F
F
F
F
F
F
F
F
F
F
F
Frequency
Deviation of
4-12 Spectrum Measurement Examples
Wide Band
Press
4
Scale Ref
FM Signal
5
and enter reference value if the trace needs to be
rescaled.
Frequency Deviation
NN
NNNNNNNNNNNNNNNNNNNNNNNNN
1.
2.
3.
Press
Press
Press
4
Search
4
Marker
4
Search
N
5
SEARCH:PEAK
NNNNNNNNNNNNN
5
1MODE MENU
NNNNNNN
5
SEARCH:PEAK
NNNNNNNNNNNNNNNNNNN
NNNNNNNNNNNNNNNNNNNNNNNNN
NNNNNNN
.
NNNNNNNNNNNNN
1MKR
NNNNNNN
NNN
NEXT PEAK
N
.
NNNNNNNNNNNNNNNNNNNNNN
.
Page 81

Figure
4-14.
Wide
Band
FM
Signal Measurement
The
frequency
equation:
1
f
where
Figure
kHz.
Press
measurement.
Carrier
The
method
zooming
signal.
4.
5.
6.
7.
8.
1Mkr
4-14
.
5
4
Ma
rk
er
Level
carrier
Press
Press
Press
Press
Press
level
similar
function
4
Displa
4
Ma
4
Mark
N
N
N
N
NN
CROSS CHAN on OFF
NNNNNNNNNNNNNNNNNN
RETURN
deviation
=
peak
is
the
In
this
N
N
N
N
N
NN
N
N
N
N
PRESET
and
and
to
5
y
5
to
rk
er
er
!
N
N
N
N
N
N
N
N
N
N
N
NN
NN
)
can
(
1f
peak
j
1
M
k
r
j
2
marker
example
N
N
N
N
N
N
N
N
the
is
used
N
N
N
NN
NN
NN
DUAL
put
NN
NN
MORE
5
N
N
N
N
N
N
N
N
NNNNNNNNNNNNNNNNNN
MKR ZOOM
sweep
,
the frequency
N
N
N
N
N
N
N
N
N
N
N
NN
N
N
N
MKRS
when
Modulating Frequency
modulating
AM
signal
to
measure
NN
N
N
N
N
N
N
N
N
N
N
N
N
N
N
N
N
N
NN
NN
CHAN on
the
maker
NN
NN
NN
N
NN
N
N
N
N
NN
N
N
N
N
N
N
N
N
N
N
N
N
N
N
N
ZOOMING APERTURE
N
N
N
N
N
N
N
NN
N
N
N
N
N
N
N
NNNNNNNN
to zoom up to the carrier signal.
be
parameter
you
frequency
measurement.
the
NN
NN
N
N
N
N
N
N
N
N
N
N
N
N
N
N
OFF
on
the carrier
N
N
N
N
N
N
N
N
N
N
N
NN
NN
NN
NN
N
N
N
N
NN
N
N
to
N
ON off
N
N
derived
are
nished
carrier
N
N
N
NN
ON
to
N
N
N
N
N
N
N
N
N
N
N
N
N
N
N
N
N
N
N
NN
N
from
value shown
deviation is
with
can
be
derived
In
this
and
NN
NN
NN
N
N
N
N
N
N
N
N
N
off
.
frequency.
N
N
N
N
N
N
NN
0.2
4
2
.
the following
in
about
this
using
example
the
adjacent
5
.
1
981
,
the
a
9. Press
10. Press
11. Press
12. Press
13.
4
5
Chan 2
4
Scale Ref
rescaled.
4
Marker
frequency. The carrier amplitude can be read as the marker
value.
4
Marker
Press
4
Search
the marker to the sideband.
.
5
and enter reference vale if the trace needs to be
5
5
100
NNNNNNNNNNNNNNNNNNNNNNNNNNNNNNNN
5
1MODE MENU
NNNNNNNNNNNNNNNNNNNNNNNNNNNNNNNNNNN
5
SEARCH:PEAK
to move the marker to the career
4
M/
NNNNNNNNNNNNNN
1MKR
to put the 1maker on the carrier.
NNNNNNNNNNNNNNNNNNNNNNNNNNNNN
LEFT PEAK
(or
Spectrum Measurement Examples 4-13
NNNNNNNNNNNNNNNNNNNNNNNNNNNNNNNN
RIGHT PEAK
)tomove
Page 82
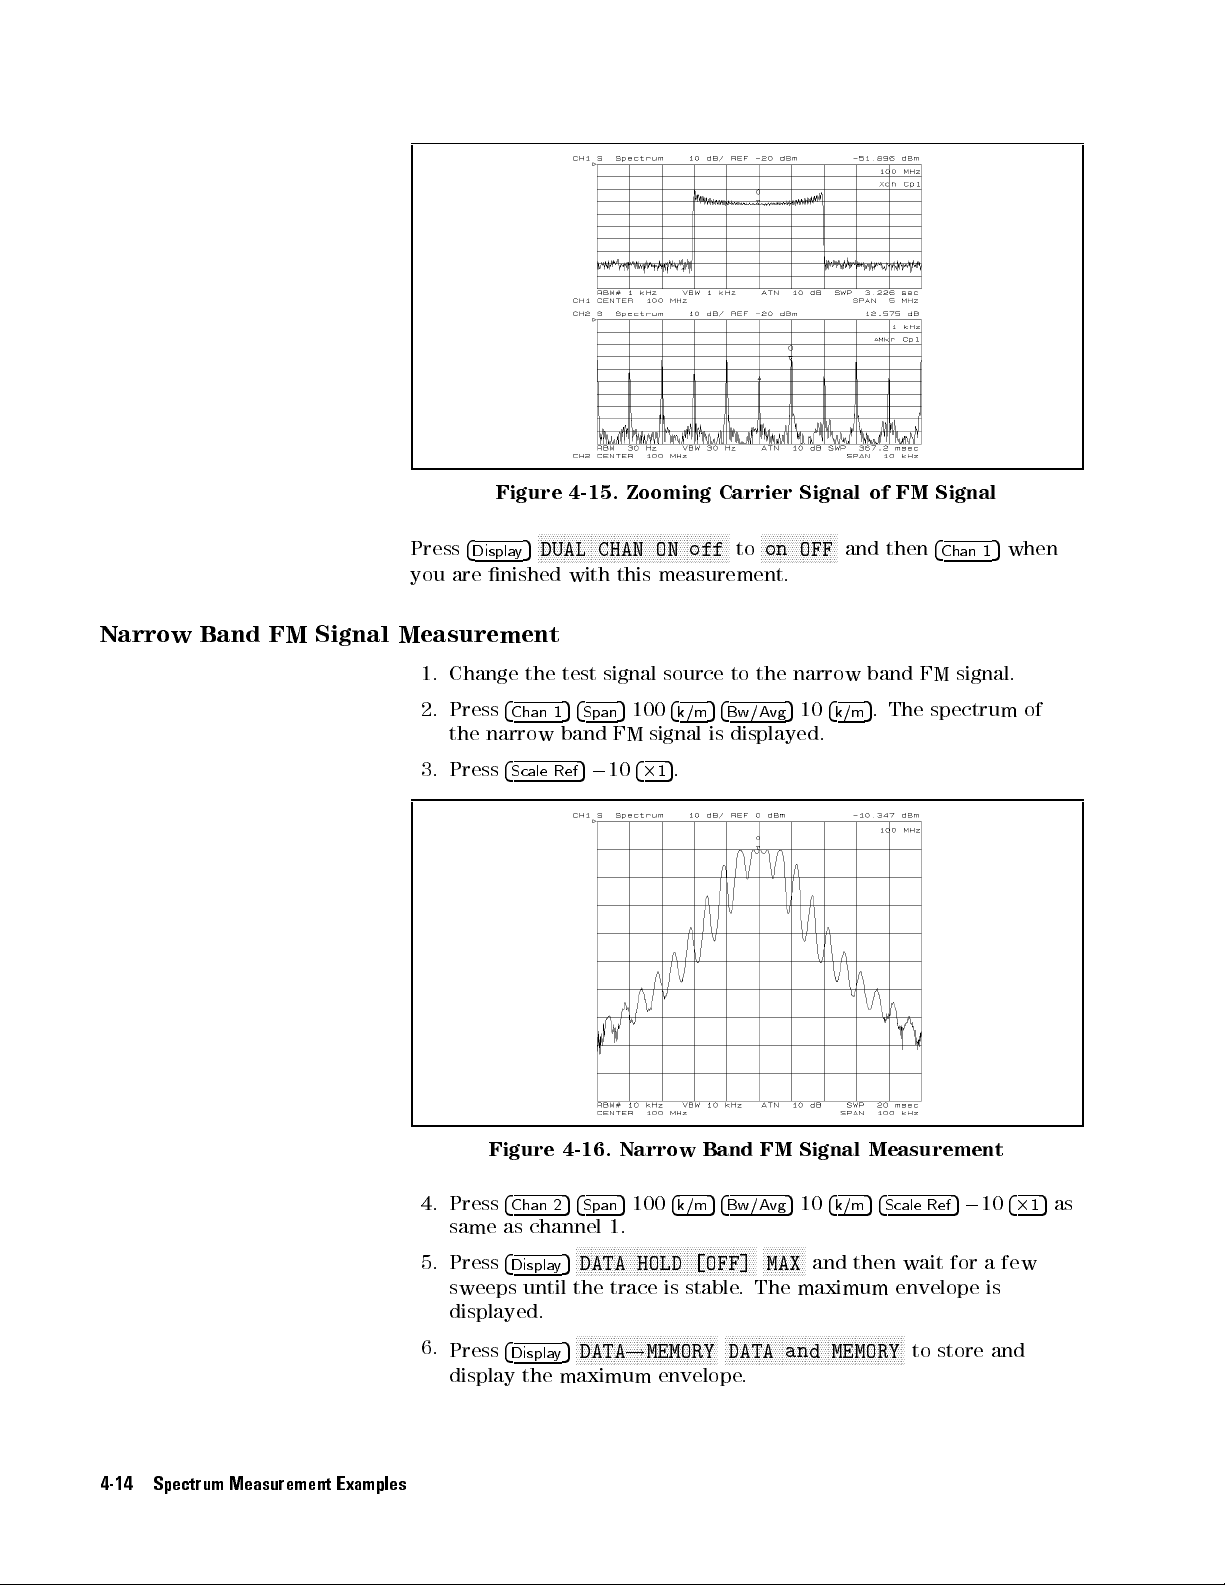
Press
you
4
are
Figure
Displa
y
nished
5
N
N
N
N
N
N
NN
N
DUAL
4-15.
NN
N
N
N
N
N
N
CHAN
with
Zooming
N
N
N
N
N
N
N
N
N
N
N
N
N
N
N
NN
ON
this
measurement.
NN
N
N
N
N
off
N
N
N
N
N
N
N
N
Carrier
N
N
N
N
N
N
on
to
Signal
N
N
N
NN
NN
OFF
of FM
N
N
N
N
N
N
N
N
N
and
then
Signal
4
Chan
5
1
when
Narrow
Band FM
Signal
Measurement
1.
2.
3.
Change
Press
the
Press
the
4
Chan
narrow
4
Scale
test
signal source
5
4
Span
1
band
5
0
10
Ref
5
FM
100
signal
4
2
to the
5
4
4
k/m
Bw/Avg
is
displayed.
5
.
1
narrow
5
10
4
k/m
band
5
.
Figure 4-16. Narrow Band FM Signal Measurement
4. Press
4
Chan 254Span
5
100
4
k/m54Bw/Avg
5104
k/m54Scale Ref
same as channel 1.
5. Press
4
Display
NNNNN
NNNNNNNNNNNNNNNNNNNNNNNNN
5
DATA HOLD [OFF]
NNNNNNNNNNNNNNNNN
NNNNN
NNNNNN
MAX
and then wait for a few
sweeps until the trace is stable. The maximum envelope is
displayed.
6.
Press
4
Display
NNNNNNNNNNNNNNNNNNNNNNNNNNNNNNNNNNNNN
5
DATA!MEMORY
NNNNNNNNNNNNNNNNNNNNNNNNNNNNNNNNNNNNNNNNNNNNNNN
DATA and MEMORY
display the maximum envelope.
FM
signal.
The
spectrum
5010
to store and
of
5
as
4
2
1
4-14 Spectrum Measurement Examples
Page 83

7.
Press
until
8.
Press
knob
frequency
9.
Press
10.
Press
to move
xed 1marker
N
NN
NN
NN
NN
NN
NN
N
N
N
N
N
N
N
N
DATA
the
4
Ma
to move
NN
NN
NN
1MODE MENU
N
N
N
N
N
N
RETURN
N
HOLD [MAX]
trace
N
N
N
N
MKR
5
rker
the marker
deviation.
N
N
N
N
N
N
N
N
N
N
N
N
N
N
N
N
N
N
N
N
N
N
N
N
N
NN
NN
N
the marker
N
N
N
N
NN
NN
NN
NN
NN
is
stable
N
N
N
N
N
N
N
N
N
NN
NN
ON
NN
N
NN
NN
NN
NN
N
FIXED 1MKR
N
N
N
N
N
N
N
N
N
N
N
N
N
N
MKR
ON
value.
NN
N
N
N
N
N
N
N
N
N
.
The
NN
NN
NN
NN
NN
N
N
[DATA]
NN
NN
N
N
N
N
N
N
N
N
N
NN
NN
NN
NN
N
N
N
[MEMORY]
to
the
N
NN
NN
NN
NN
NN
MIN
and then
minimum envelope
N
N
N
N
N
N
N
N
N
N
N
N
N
N
N
N
N
N
N
N
N
NN
to the
N
N
N
N
N
N
N
N
N
N
N
N
N
N
N
N
N
N
position
N
to
NN
NN
NN
NN
N
N
N
N
N
NN
NN
N
[MEMORY]
desired
N
.
N
N
N
NN
N
[DATA]
to
that
wait for
NN
NN
NN
NN
NN
position
N
N
N
N
N
N
N
N
N
N
N
is
the
NN
N
N
.
NN
Then
NN
N
.
Then
same
afew
sweeps
is displayed.
turn
the
to
measure
turn
the
value
as
the
knob
the
Maximum
The
equation
example
11.
Press
and
12.
Press
superimposes
Figure 4-18
and
frequency
that
,
1f
peak
5
4
Displa
y
its
envelope
N
N
MORE
N
N
N
N
N
N
N
N
N
N
N
N
N
N
SPLIT
.
Minimum
deviation
is
used
can
N
N
N
N
N
N
N
N
N
N
N
N
N
N
N
DUAL
are
N
N
N
N
N
N
N
N
N
N
N
N
N
NN
the
spectrum on
(
for
the
be
derived
N
N
N
NN
NN
N
N
N
N
N
N
N
N
CHAN
displayed
NN
NN
N
N
N
N
N
N
N
N
N
N
N
DISP
Figure
Envelopes
)
can
peak
wide
to
N
N
N
N
N
N
N
N
N
N
N
NN
NN
N
N
N
OFF
on the
N
N
N
N
N
NN
NN
NN
N
N
N
N
N
N
off
the envelopes
N
1f
N
N
on
N
N
ON
4-17.
of
be
band
be
5
kHz.
N
N
N
N
N
N
ON
to
split display
N
N
N
N
N
N
N
on
to
Narrow
derived
FM
signal. In
N
N
N
N
N
N
N
N
N
N
N
N
NN
off
N
N
N
N
N
N
N
N
N
NN
NN
N
OFF
Band
from
.
Both
.
.
The
analyzer
as shown
FM
the
this
the
in
Signal
same
spectrum
Figure 4-18. Superimposing Spectrum and Envelopes
Spectrum Measurement Examples 4-15
Page 84
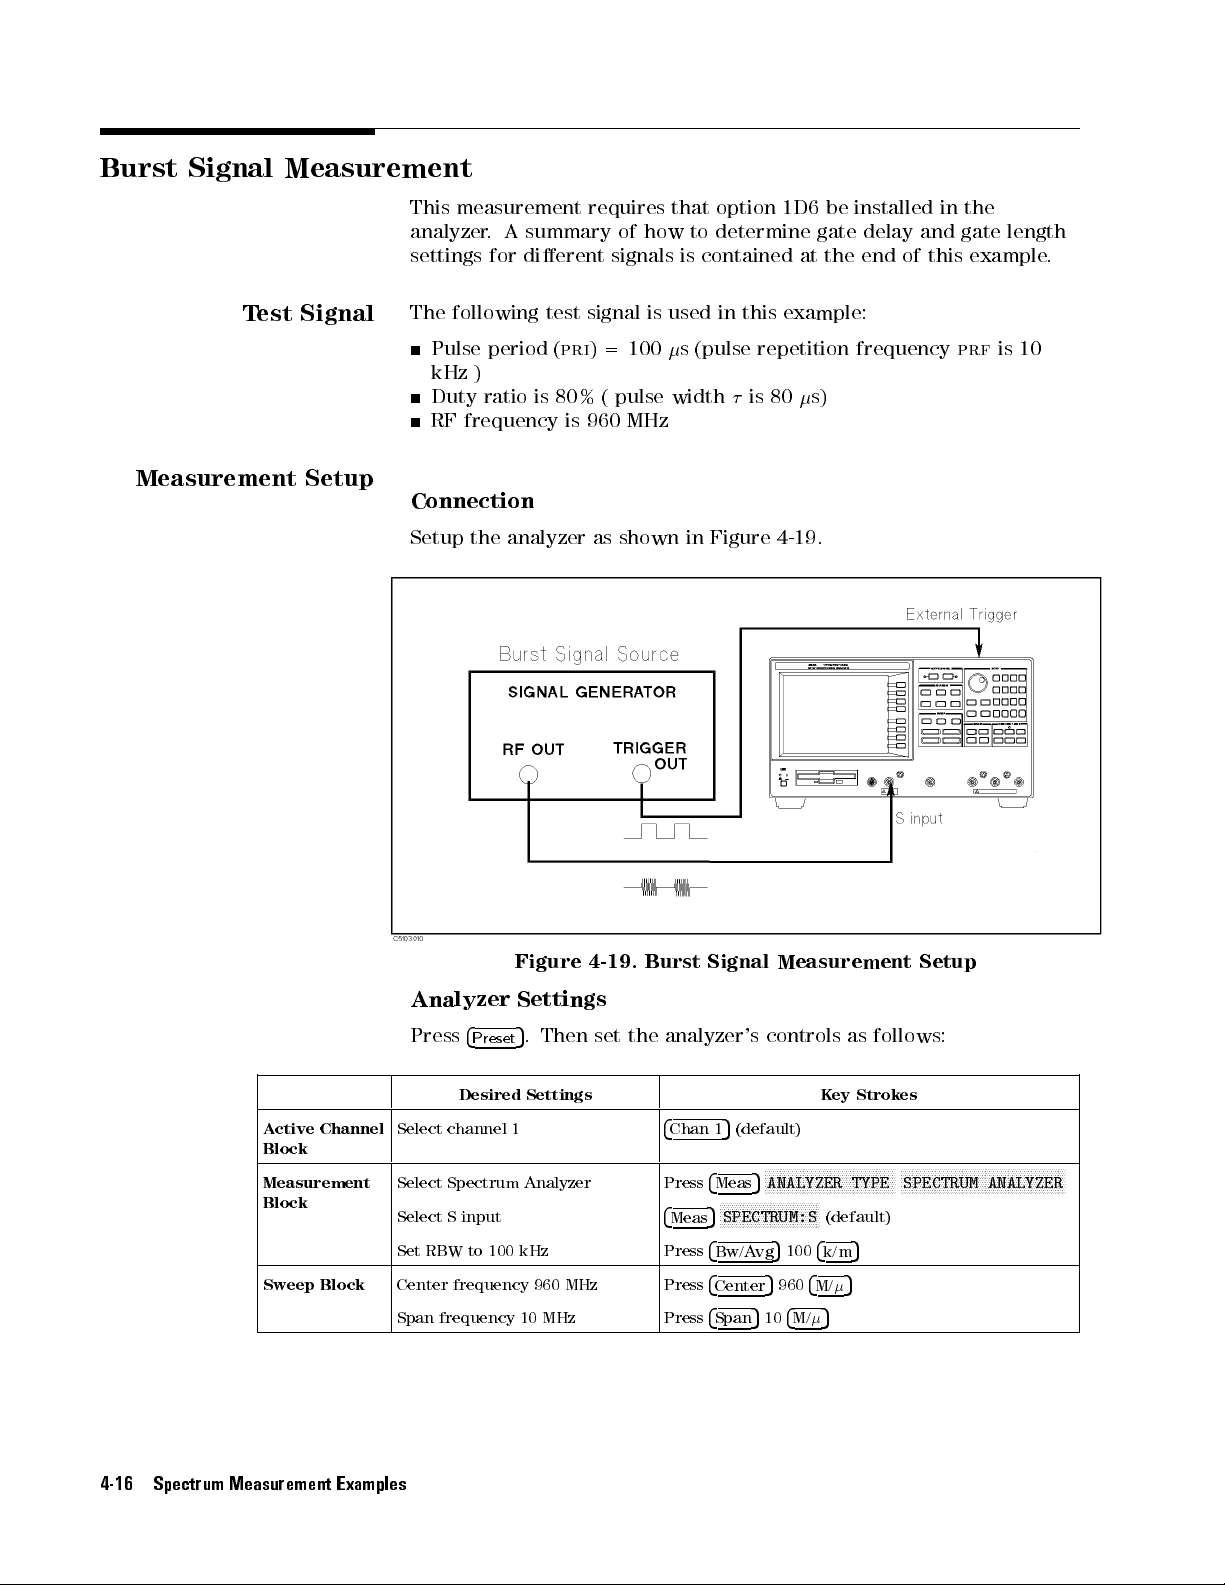
Burst Signal
Measurement
Test
Measurement
Signal
Setup
This measurement
analyzer.
settings for
The
Pulse
kHz
Duty
RF
A summary
dierent signals
following
period
)
ratio
frequency
test
is
(
pri
80% (
is
Connection
Setup
the
analyzer
requires that
of how
is contained
signal
is
used
)
=100
s
pulse width
960 MHz
as
shown
in
option 1D6
to determine
gate delay
at the
in
this example:
(pulse repetition
is
80
s)
Figure
4-19
.
be installed
end of
frequency
in the
and gate
length
this example
prf
is
.
10
Active Channel
Block
Measurement
Block
Sweep Block
4-16 Spectrum Measurement Examples
Analyzer
Press
4
Preset
Figure
Settings
5
.
Then
4-19.
set
Burst
the
analyzer's
Desired Settings Key Strokes
Select channel 1
4
Chan 1
Select Spectrum Analyzer Press
Select S input
4
Meas
Set RBW to 100 kHz Press
Center frequency 960 MHz Press
Span frequency 10 MHz Press
Signal
controls
5
(default)
FFFFFFFFFFFFFFFFFFFF
5
ANALYZER TYPE
4
Meas
FFFFFFF
FFFFFFFFFFFFFFFFFFF
5
SPECTRUM:S
4
Bw/Avg
4
5
Center
4
5104
Span
Measurement
as
follows:
FFFFFFFFFFFFFF
(default)
M/
4
4
M/
k/m
5
5
5
5
100
960
Setup
F
FFFFFFFFFFFFFFFFFFFF
SPECTRUM ANALYZER
FFFFFFFFFFFFFFFFFFFFFF
Page 85
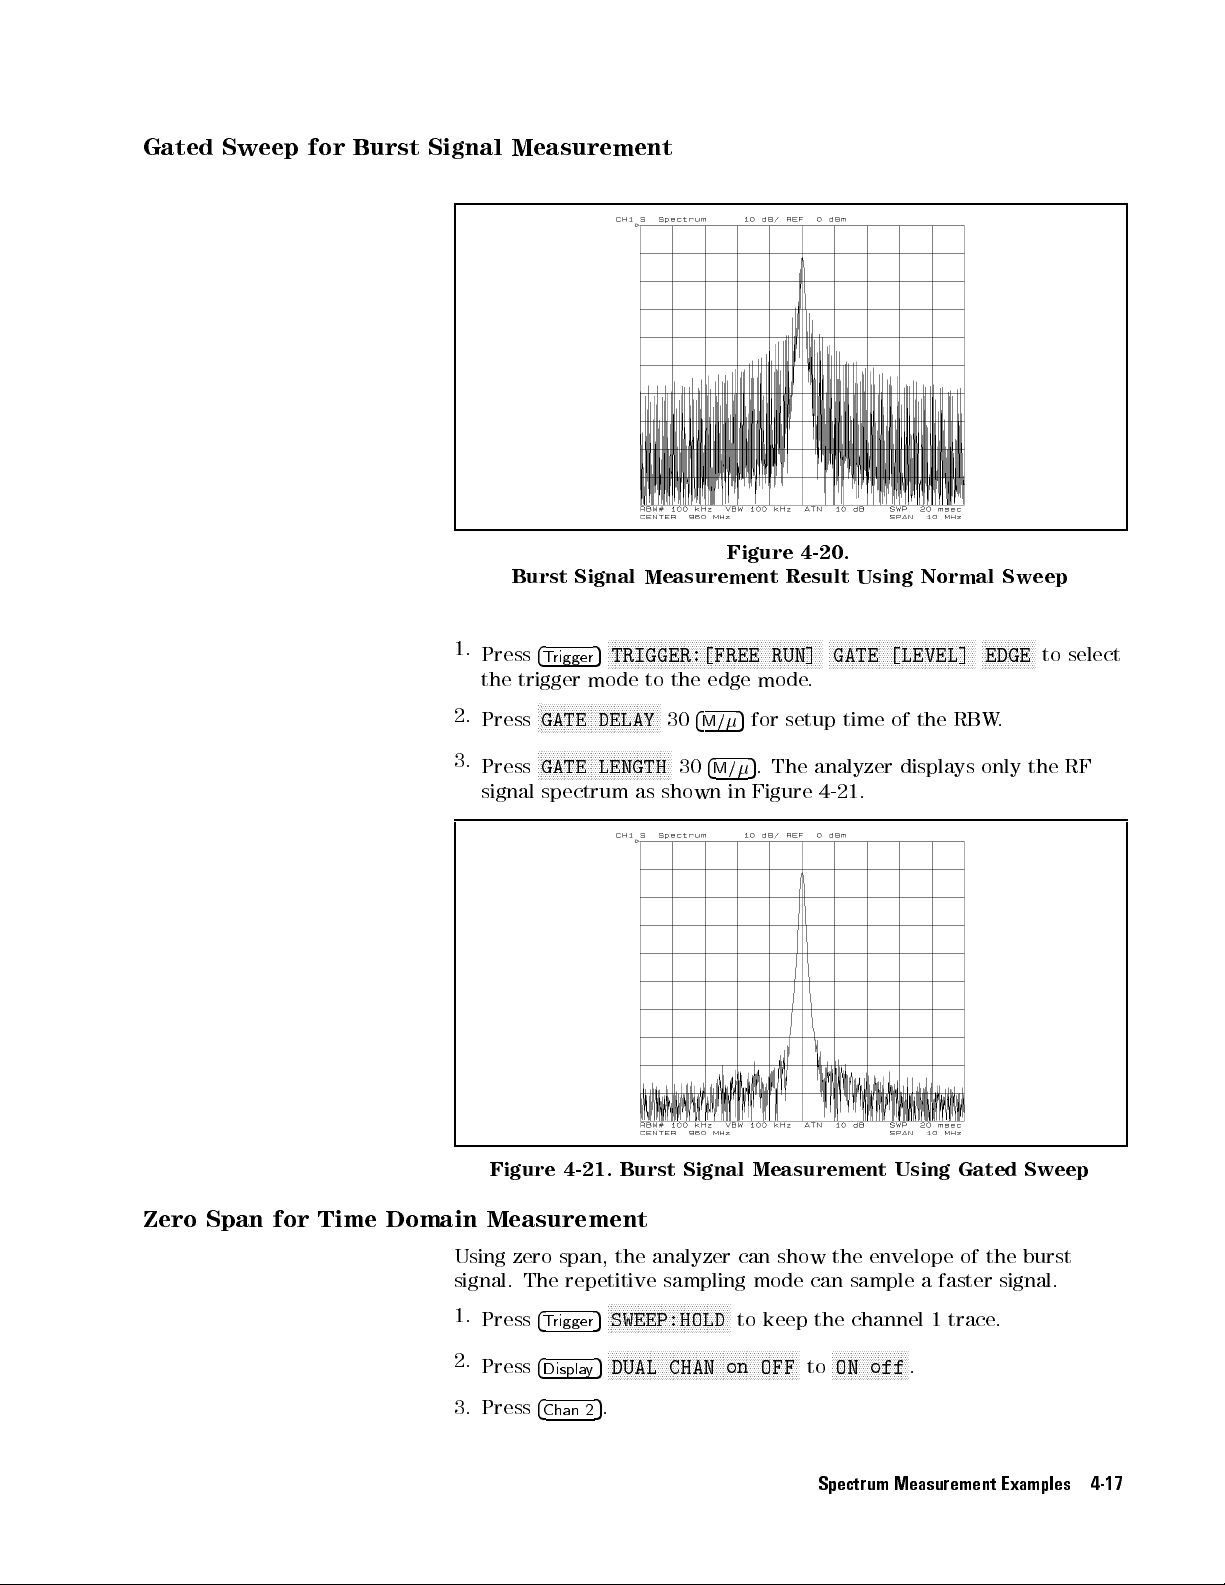
Gated
Sweep
for
Burst
Signal
Measurement
1.
2.
3.
Burst
Press
the
trigger
Press
Press
signal
4
Trigger
N
N
N
N
N
N
N
N
GATE
N
N
N
N
NN
N
N
Signal
N
N
N
N
N
N
N
N
Measurement
NN
N
N
N
N
N
N
N
N
TRIGGER:[FREE
5
mode
to
N
N
N
N
N
N
N
NN
NN
N
N
N
N
N
N
DELAY
N
N
N
N
N
N
N
N
N
N
N
N
N
N
N
N
N
GATE LENGTH
spectrum
as
N
N
N
N
N
N
N
N
N
the
N
N
N
30
NN
N
N
N
N
shown
NN
30
NN
NN
4
NN
N
N
N
N
edge
M/
4
M/
N
Figure
N
N
N
N
N
N
N
N
N
N
N
N
NN
RUN]
mode
5
for
5
.
The
in
Figure
4-20.
Result
NN
NN
NN
NN
N
N
N
N
.
setup
analyzer
4-21
Using
N
N
N
N
N
N
N
GATE
time
.
N
N
N
N
N
N
N
N
N
N
NN
[LEVEL]
of
displays
Normal
NN
NN
NN
N
N
N
N
N
N
N
the
RBW
N
N
N
N
NN
only
Sweep
N
N
N
N
N
N
N
EDGE
.
N
N
N
N
N
the
to
select
RF
Figure 4-21. Burst Signal Measurement Using Gated Sweep
Zero Span for Time Domain Measurement
Using zero span, the analyzer can show the envelope of the burst
signal. The repetitive sampling mode can sample a faster signal.
1.
Press
2.
Press
3. Press
4
Trigger
4
Display
4
Chan 2
NNNNNNNNNNNNNNNNNNNNNNNNNNNNNNNN
5
SWEEP:HOLD
NNNNNNNNNNNNNNNNNNNNNNNNNNNNNNNNNNNNNNNNNNNNNNNNNN
5
DUAL CHAN on OFF
5
.
to keep the channel 1 trace.
NNNNNNNNNNNNNNNNNNNN
to
ON off
.
Spectrum Measurement Examples 4-17
Page 86
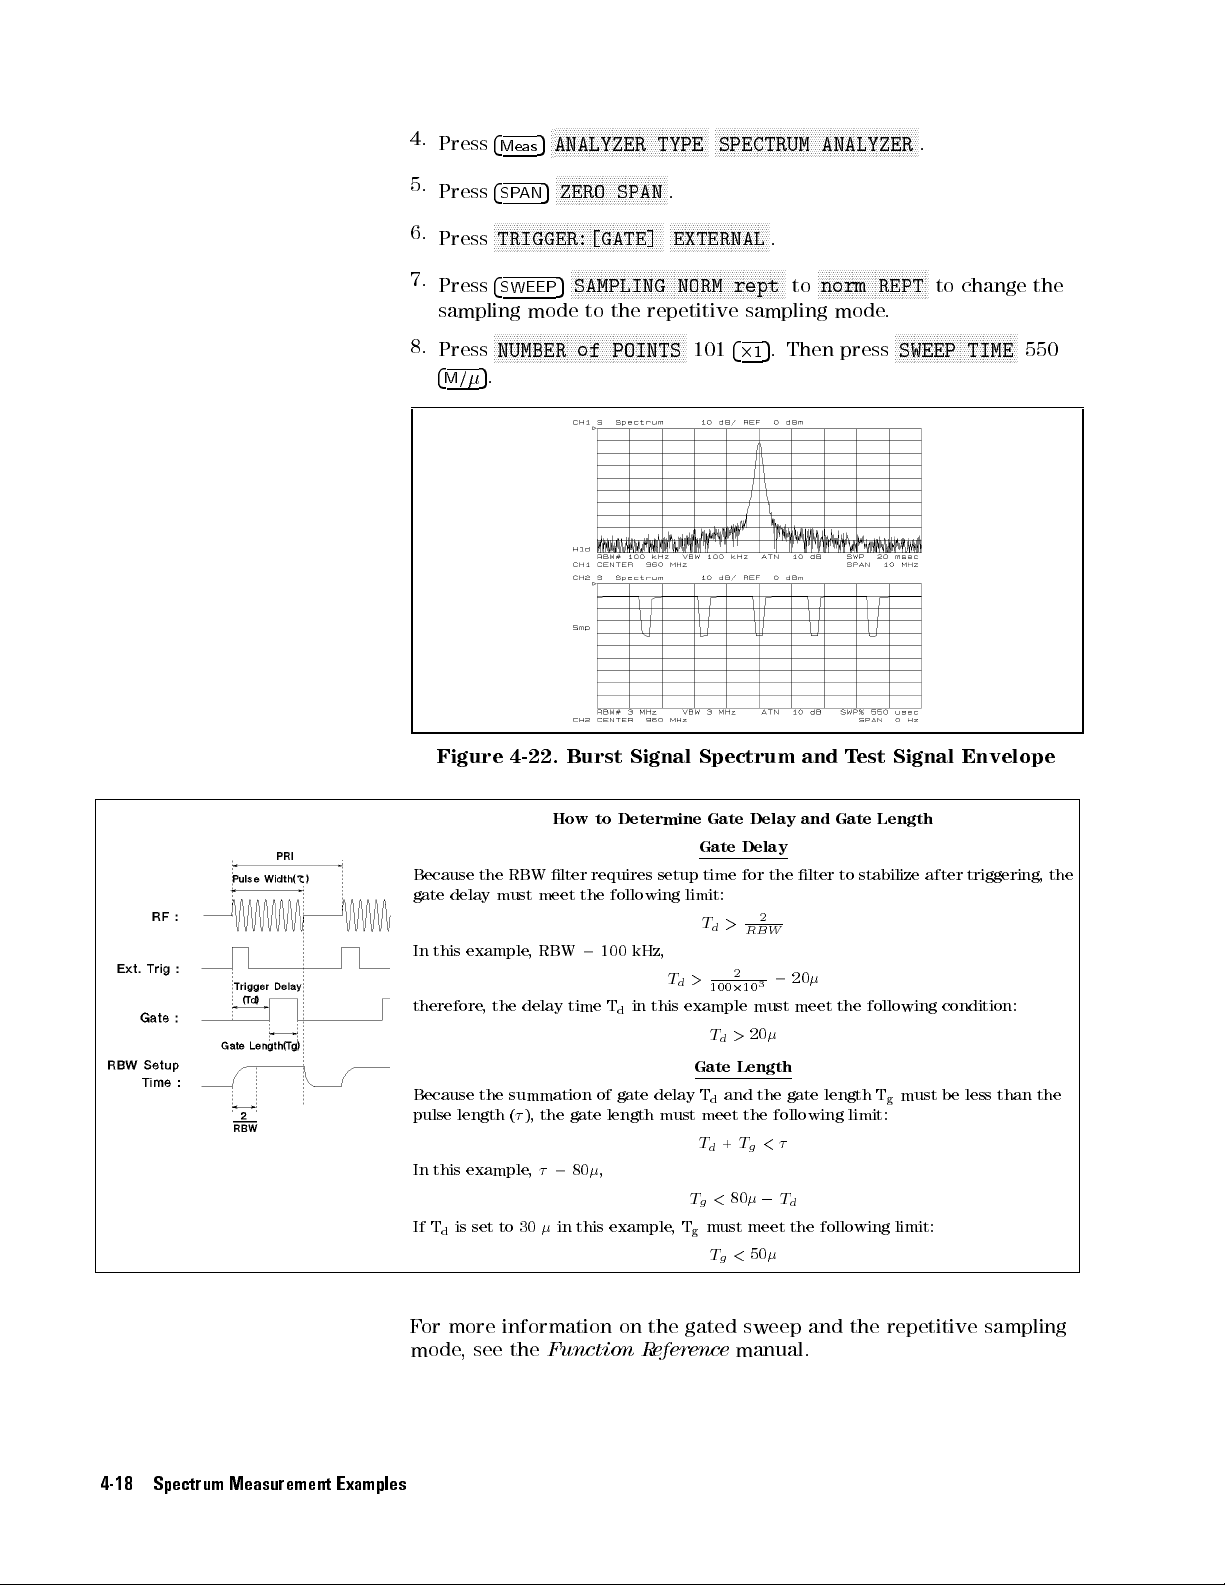
4.
Press
5.
Press
6.
Press
7.
Press
sampling
8.
Press
4
M/
N
NN
NN
NN
NN
N
ANALYZER
5
4
Meas
N
NN
NN
NN
ZERO
5
4
SP
AN
N
N
N
N
N
N
N
N
N
N
NN
NN
NN
NN
NN
NN
mode
N
N
N
N
N
N
N
N
NN
N
N
NN
SAMPLING
5
N
N
NN
NN
NN
of
TRIGGER:[GATE]
4
SWEEP
N
N
N
N
N
N
N
NUMBER
5
.
N
NN
N
N
NN
to
N
N
N
N
N
N
N
N
N
N
N
N
N
N
N
NN
NN
N
N
N
N
N
N
N
N
N
N
N
N
N
NN
NN
NN
N
N
N
N
NN
NN
NN
NN
SPAN
N
N
N
N
N
NN
NN
NN
NN
NN
NN
NN
N
N
N
N
N
N
N
the
repetitive
N
N
N
N
N
N
N
N
N
N
N
N
NN
POINTS
N
NN
NN
NN
N
N
N
N
N
N
TYPE
NN
N
.
N
N
N
N
N
N
N
N
N
N
NN
N
EXTERNAL
N
N
N
N
NN
NN
NN
NN
NN
NN
NORM
NN
NN
NN
101
NN
NN
NN
NN
N
N
N
N
N
N
N
N
N
N
NN
NN
NN
NN
N
N
.
N
N
N
N
N
N
N
N
N
N
NN
NN
rept
sampling
5
.
Then
4
2
1
N
SPECTRUM
NN
NN
NN
N
N
N
NN
NN
NN
NN
NN
NN
ANALYZER
N
N
NN
NN
norm
to
mode
press
N
N
N
N
N
N
N
N
N
N
N
N
N
NN
NN
NN
.
NN
NN
NN
NN
NN
N
N
N
N
N
N
N
N
N
N
N
NN
REPT
to
.
N
N
N
N
SWEEP
change
N
N
N
N
N
N
N
N
N
N
N
N
N
NN
NN
TIME
the
NN
NN
N
N
N
N
N
N
N
550
Figure
Because
gate
delay
In this
therefore
Because the summation of gate delay Tdand the gate length Tgmust be less than the
pulse length (
In this example
If Tdis set to 30
For more information on the gated sweep and the repetitive sampling
mode, see the
4-22.
Burst
How
the
RBW
lter
must
meet
example,
RBW =
,
the
delay time
), the gate length must meet the following limit:
,=80
in this example
Function Reference
to
requires
the
following
100
T
,
Signal
Determine
setup
limit:
kHz,
Td>
in
this
d
example
,T
Spectrum
Gate
Delay
Gate
Delay
time
for
Td>
R
2
100
2
10
must meet
Td>
20
Gate
Length
Td+
T
g
Tg<80
must meet the following limit:
g
Tg<
50
manual.
2
B
3
<
0
the
W
=
T
and
and
lter
20
d
T
est Signal
Gate
to
stabilize after
the following
Envelope
Length
triggering, the
condition:
4-18 Spectrum Measurement Examples
Page 87
5
Network
Measurement Examples
This chapter
contains
the
following
Transmission Measurement
3dB
bandwidth
Ripple or
Magnitude
Expanded
Electrical
Phase
Deviation
atness
and
phase
length
distortion
from
phase
characteristics
characteristics
measurement
measurement
linear
phase
Group delay
Reection
measurement
Return loss
Reection coecient
Standing
S-parameters
Impedance
List
sweep
Sweep
Dynamic
Filter
Gain
compression
time
testing
wave
ration
measurement
and
admittance
reduction
range
enhancement
using
limit
measurement
(
swr
line
network
)
measurement
measurement
examples:
Basic
Setup
Example
DUT
All
the
examples
S-parameter
approach
The
simplies the
DUT
used
lter with a 836 MHz center frequency
described
Test
Set
in
the examples
in
this chapter
to
connect
to
the
measurement setup
in
this
use the
device
under
85046A/B
test
(
dut
.
chapter
.
is
a
dielectric
If you use your own DUT
modify the parameter values (measurement frequency range
level, etc
.) as appropriate for your DUT
.
Network Measurement Examples 5-1
).
This
bandpass
,
, signal
Page 88
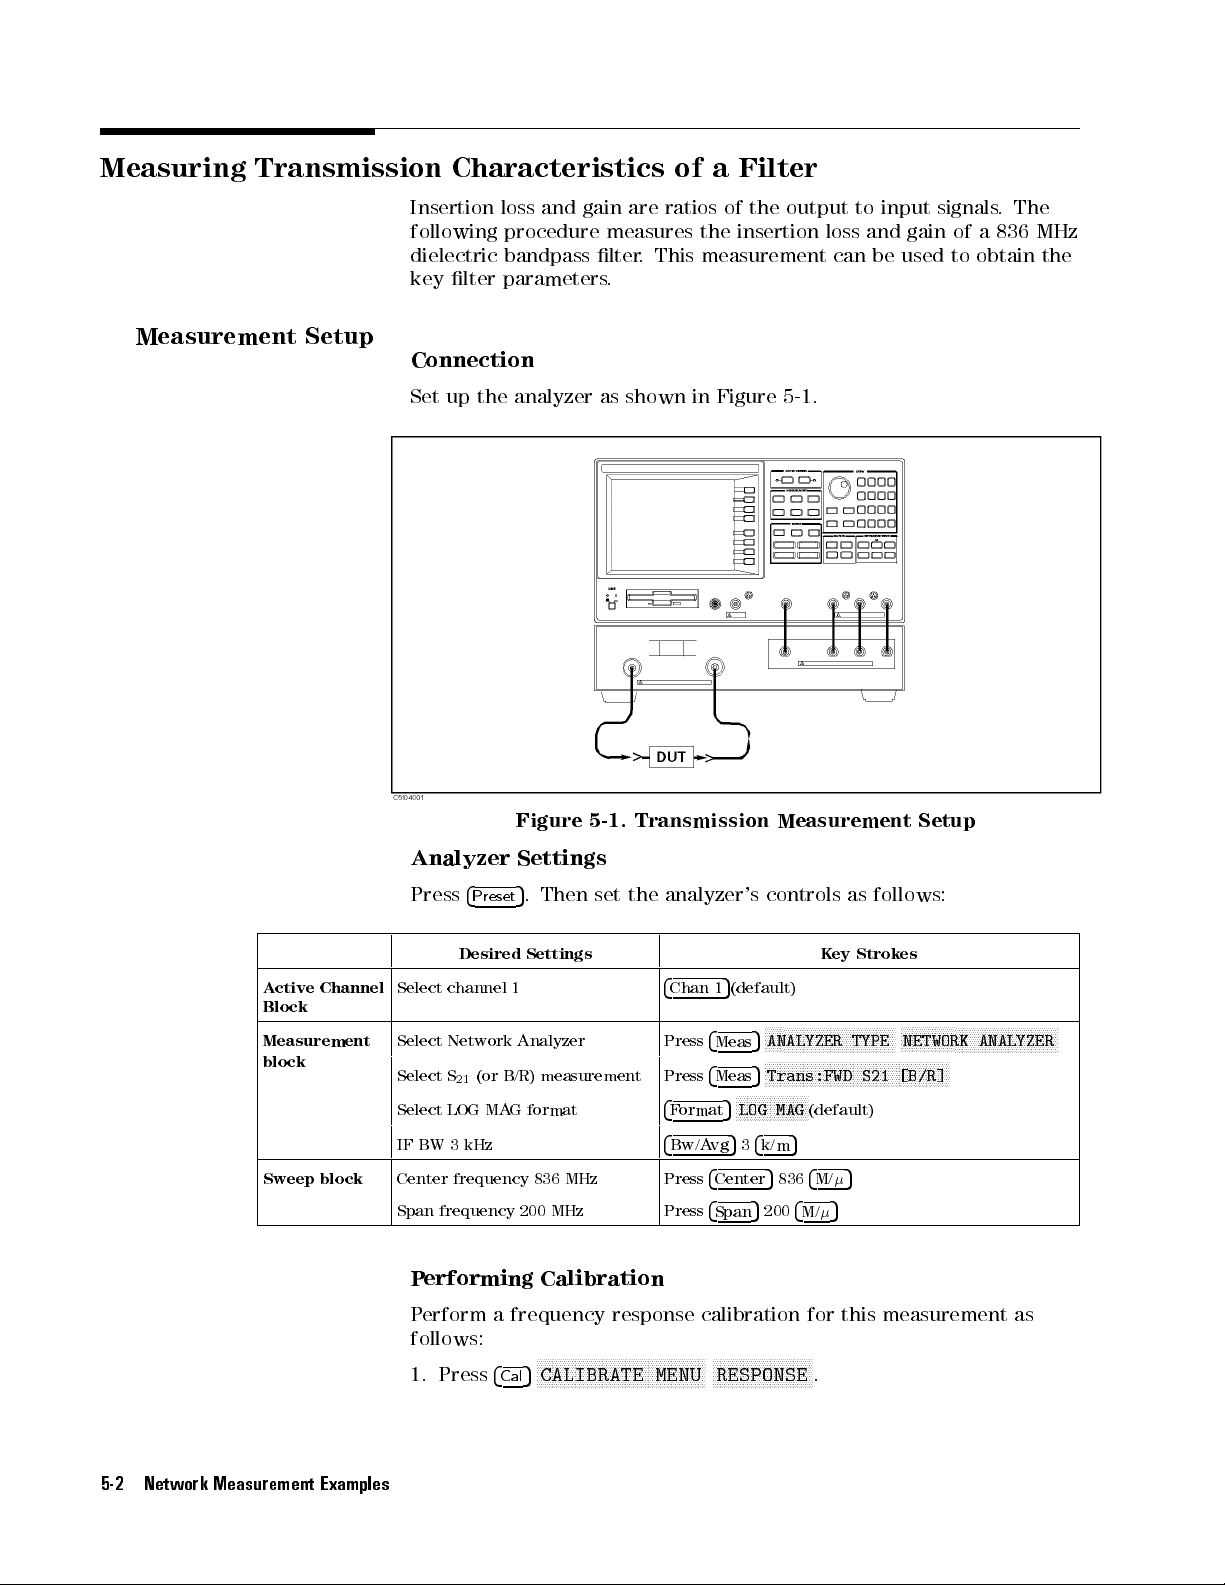
Measuring Transmission
Characteristics of
a Filter
Measurement
Setup
Insertion loss
and gain
following procedure
dielectric bandpass
key lter
parameters.
Connection
Set
up
the
analyzer as
are ratios
measures the
lter.
This measurement
shown in
of the
output to
insertion loss
Figure 5-1
can be
.
input signals
and gain
of a
used to
.
The
836 MHz
obtain the
A
ctive
Channel
Block
Measurement
block
Sweep block
Figure
Analyzer
Press
4
Preset
Settings
5
.
Desired Settings Key
Select
channel
Select
Network
Select
S
Select LOG MA
1
Analyzer
(or
B/R)
21
G format
IF BW 3 kHz
Center frequency 836 MHz Press
Span frequency 200 MHz Press
5-1.
Then
set
measurement
Transmission
the
analyzer's
4
5
Chan
Press
Press
4
Format
4
Bw/A
(default)
1
4
Meas
4
Meas
FFFFFFFFFF
5
534
vg
4
Center
4
Span
LOG MAG
Measurement
controls
F
F
F
F
F
F
F
F
F
F
F
F
F
F
FF
FF
FF
F
F
F
F
F
F
F
5
4
M/
FF
F
FF
FF
FF
FF
(default)
4
M/
5
ANALYZER
5
FF
F
F
F
Trans:FWD
5
FFFFFFFFF
k/m
5
836
5
200
as
follows:
Strokes
F
F
F
F
F
F
F
F
TYPE
FF
FF
FF
F
F
F
S21
5
F
F
F
F
F
F
NETWORK
F
F
F
F
F
F
F
F
[B/R]
Setup
F
F
F
F
F
F
F
F
FF
FF
FF
FF
F
F
F
F
FF
FF
FF
FF
FF
F
F
ANALYZER
Performing Calibration
Perform a frequency response calibration for this measurement as
follows:
1. Press
NNNNNNNNNNNNNNNNNNNNNNNNNNNNNNNNNNNNNNNNNNNN
4
5
CALIBRATE MENU
Cal
NNNNNNNNNNNNNNNNNNNNNNNNNN
RESPONSE
.
F
F
F
F
F
F
F
F
F
F
F
F
F
F
F
FF
5-2 Network Measurement Examples
Page 89

2.
Connect a
cables
3.
Press
THRU calibration
in place
NN
NN
NN
NN
NN
NN
N
THRU
measurement.
NN
NN
NN
NN
NN
NN
N
4. Press
DONE:RESPONSE
N
N
N
N
N
N
N
N
N
N
N
N
N
CORRECTION
to
N
N
N
N
N
N
N
N
Measurement
of the
N
to
perform a
N
N
N
N
N
N
N
N
N
N
NN
NN
NN
NN
N
N
N
N
N
N
NN
N
N
ON
standard between
the measurement
DUT.
frequency response
NN
NN
NN
NN
NN
NN
N
N
N
N
N
N
N
N
N
N
N
NN
NN
NN
NN
NN
NN
NN
NN
N
N
N
N
CORRECTION on
.
N
N
N
N
N
N
N
off
(
N
NN
NN
NN
N
.)
N
N
N
NN
NN
NN
calibration data
NN
N
N
N
N
N
N
N
N
N
N
N
NN
NN
N
OFF
is
automatically set
Read Out
Insertion Loss
Replace
N
N
N
N
N
AUTO
shows
NN
NN
NN
NN
N
the
N
N
N
N
N
N
N
N
N
N
SCALE
the
Using the
1.
Press
4
trace
.
upper
2.
Press
4
position of
3.
Enter
60
1marker
THRU
N
N
N
N
N
N
NN
if
complete
Marker
5
Sea
rch
The
marker
right
of
5
Ma
rk
er
the marker).
4
M/
.
The
standard
the trace
response
N
NN
NN
N
N
N
N
N
N
MAX
to move
reads
the
display
N
N
N
N
N
NN
NN
NN
N
N
N
N
N
N
1MARKER
5
to
move
1marker
needs to
N
N
N
N
N
N
N
N
N
N
N
MENU
the
value
with
out
.
N
N
NN
NN
of
the
the
be rescaled.
the
marker
the
N
N
N
N
N
NN
NN
NN
N
N
1MKR
marker
shows
DUT
.
bandpass
to
insertion
NN
N
N
N
to turn
to
the
the
Press
4
Scale
Note that
lter
under
the
maximum
loss
and
on the
point
oset
out-of-band
5
Ref
the
display
test.
value
displays
it
1Marker (at
from
the
rejection.
of
at the
the
Figure 5-2. Response of a Dielectric Filter
Network Measurement Examples 5-3
Page 90

3dB
Bandwidth
The
analyzer
power
relative
levels.
to the
calculates
In this
example,
lter center
the bandwidth
it calculates
frequency.
of the
the
DUT between
0
3dB
bandwidth
two equal
1.
Press
center
2.
Press
analyzer
(Quality
frequency
results
trace
3
show
4
Ma
rk
er
of the
4
Sea
rch
calculates
F
actor),
at
the
shows
the
5
. Then
use the
lter passband.
N
N
N
N
NN
NN
N
N
N
N
N
N
N
N
N
N
WIDTH
5
N
[OFF]
the
insertion
and
the
cuto
upper
the
location
right
passband
of
N
N
N
N
N
N
N
N
NN
NN
NN
0
3
dB
loss
frequencies
hand
center
the
0
rotary knob
N
N
N
N
NN
NN
NN
N
N
N
N
N
N
N
N
N
N
N
N
N
N
WIDTH
N
on
bandwidth,
,
and
dierences
of
of
the
frequency
3
dB cuto
to move
N
N
N
N
NN
NN
NN
N
N
N
OFF
center
the
display
points.
the marker
N
N
N
N
NN
NN
NN
N
N
N
N
N
N
ON
to
off
frequency
between
DUT
.
It
then lists
.
Sub-marker 1
and
sub-markers
N
N
N
.The
the
to the
,
Q
center
the
on the
2
and
Figure
T
o
have
levels
0
6
4
Press
2
,
select
5
1
4
Ma
the
for
rker
5-3.
0
5
measurement.
Using
analyzer
N
N
N
N
N
N
N
N
N
N
N
N
N
N
N
WIDTH
6dB).
N
N
N
N
N
N
N
N
N
N
N
N
N
N
N
PRESET
the
calculate
N
N
NN
NN
N
N
N
N
N
N
N
VALUE
N
N
N
NN
NN
NN
NN
N
N
MKRS
Marker
N
N
N
N
N
N
N
and
N
N
N
N
N
N
N
when
to
Determine
the
bandwidth between
enter
the
number
you
are
nished
3
dB
Bandwidth
other power
(for
example
with
this
,
enter
5-4 Network Measurement Examples
Page 91

Ripple or
Flatness
P
assband
specied
1.
Press
below
2.
Press
3.
Press
4.
Press
5.
Press
6.
Press
N
N
N
N
N
N
N
N
N
N
N
N
NN
SCALE/DEV
7.
Press
8.
Press
N
N
N
N
NN
NN
NN
N
N
N
N
PEAK PLRTY
NN
NN
NN
N
N
N
N
N
N
N
N
SEARCH:PEAK
peak-to-peak
displayed
ripple
portion of
5
4
Displa
y
channel
N
COUPLED
5
4
Sw
eep
N
5
4
Sea
rch
4
Ma
rk
er
!
NN
N
N
N
N
MORE
Chan
NN
N
N
N
N
N
Sea
Sea
N
N
N
N
N
N
N
N
N
N
N
N
N
N
N
N
NN
N
N
N
N
N
N
ZOOMING APERTURE
5
2
N
N
N
N
N
N
0.5
N
5
rch
N
5
rch
N
N
N
N
N
N
NN
NN
NN
NN
NN
NN
N
N
at
the
NN
4
NN
4
4
N
N
(or atness)
the passband.
N
N
N
N
NN
NN
NN
NN
NN
NN
NN
N
N
N
N
N
N
N
N
N
CHAN
NN
NN
NN
NN
NN
NN
N
CH
N
N
N
N
N
N
N
N
N
N
N
N
N
N
N
N
N
N
N
NN
NN
NN
NN
N
N
N
N
N
N
N
N
MAX
5
5
to
magnify
N
N
N
N
N
N
N
N
N
N
N
N
N
N
N
N
N
N
N
N
N
N
N
N
N
N
N
N
N
N
N
N
N
N
N
NN
to
passband
between
right
N
N
N
N
N
N
N
N
N
N
N
N
N
N
N
N
NN
DUAL
1.
N
N
N
N
N
N
N
N
N
N
N
NN
N
N
N
N
N
N
N
NN
N
MAX
.
NN
NN
NN
NN
CROSS CHAN
5
NN
N
N
N
N
N
N
N
N
N
N
N
4
Sea
rch
4
2
N
N
N
NN
NN
NN
N
N
N
SEARCH:PEAK
N
N
NN
N
N
N
N
N
N
N
N
SEARCH:PEAK
NN
N
N
N
N
N
N
N
N
N
N
POS neg
N
N
.
The
variation
upper
is the
N
NN
NN
NN
NN
NN
NN
on OFF
N
N
N
N
N
N
N
NN
NN
NN
ON
N
N
NN
NN
NN
NN
N
N
N
on OFF
N
N
N
N
N
N
N
N
N
N
N
N
.
Then
NN
NN
NN
.
Then
N
N
N
NN
N
N
N
N
N
PEAK
N
N
N
N
NN
NN
NN
pos NEG
of
variation in
N
N
N
N
N
NN
NN
N
N
N
N
NN
NN
press
the
N
N
N
N
N
N
N
N
the
the
N
N
to
NN
N
N
to
N
N
N
N
N
N
N
20
trace
press
N
N
N
N
N
N
N
DEF
N
N
N
N
N
N
N
display
N
NN
N
4
2
N
N
N
N
N
N
N
N
RETURN
is
markers
NN
NN
off
N
N
N
N
N
N
N
N
N
N
N
ripple
insertion loss
N
N
N
NN
NN
NN
NN
NN
NN
NN
N
ON
N
N
on
to
N
N
N
NN
4
N
off
to display
N
N
N
N
N
N
N
N
N
N
NN
NN
NN
NN
OFF
.
NN
NN
NN
NN
N
N
N
N
N
N
N
N
N
NN
NN
N
N
N
N
N
N
N
N
N
RETURN
5
Ref
to
resolve
Ma
rk
er
N
N
N
N
N
N
N
N
N
N
N
N
N
N
N
N
N
.
.
The
.
N
N
N
N
N
N
5
Then press
ON off
5
1
Scale
4
N
N
NN
N
N
MENU
NN
NN
N
N
automatically
N
N
.
NN
NN
N
N
N
N
N
N
N
N
MKR ZOOM
N
N
N
N
N
N
N
N
N
N
N
N
N
N
MKR
!
the
N
N
N
N
NN
NN
NN
N
N
N
N
1MODE
given
ripple
over a
channel 2
N
N
N
N
N
N
N
N
N
N
N
N
NN
NN
N
.
NN
NN
NN
N
N
N
N
N
N
N
N
N
N
N
N
N
N
N
N
N
N
N
N
N
N
value
N
N
as
NN
N
N
.
N
N
1MKR
the
REFERENCE
ripple
N
N
N
N
N
N
MENU
N
N
N
NN
N
N
N
NN
NN
NN
N
N
N
N
.
is
Figure
Press
4
Chan 154Marker
when you are nished with this
5-4.
Using
NNNNNN
PRESET MKRS
5
P
eak
NNNNNNNNNNNNNNNNNNNNNNNNN
Search
NNNN
measurement.
to
Determine
, and
4
Chan 254Marker
Network Measurement Examples 5-5
Ripple
NNNNNN
NNNNNNNNNNNNNNNNNNNNNNNNN
PRESET MKRS
5
NNNN
Page 92

Measuring
Phase
Response
A
two
input
ratio
the
phase
shift
information
With
the
in
the
into
same
previous
Transmission
1.
Press
4
Chan
sweep parameters
2.
Press
4
Chan
channel
If
the
trace
2.
needs
measurement
of
a
network.
a
related
parameter
connection,
example
(see
Characteristics
4
Sw
eep
5
5
1
N
N
N
N
N
N
N
N
COUPLED
of channel
N
NN
NN
NN
o
rmat
to
PHASE
5
be
rescaled,
5
4
F
2
can
also
The analyzer
,
instrument
\Measurement
of
a
Filter"),
N
N
N
N
N
N
N
NN
NN
NN
NN
N
N
N
N
N
N
N
N
N
N
CH
2to
NN
N
N
N
N
N
N
N
N
to display
press
provide
can translate
group delay
settings
Setup
make
N
N
N
N
N
N
N
NN
NN
NN
NN
N
N
N
N
OFF
N
to
on
channel 1.
the phase
4
Scale
Ref
information
.
,and
calibration used
"
in
\Measuring
the following
N
N
N
N
N
N
N
N
N
N
N
N
N
N
N
NN
ON
NN
off
response on
N
N
N
N
N
N
N
AUTO
5
and
N
N
N
N
this
to
N
NN
NN
about
changes:
couple
NN
N
N
N
N
N
N
N
N
N
SCALE
N
N
N
N
N
N
.
Figure
linear
occur
5-5
phase
outside
oor causes
This format
As phase
occurs
degrees
usually
responses
increases
in
the
.
This
seen
.
shows
shift
this
the
displays
display
wrap
on
the
phase
through
region.
spurious
phase
beyond
as
causes
devices
response
the
passband
The
random
out-of-band
over
the
these
the
trace
the
characteristic
with
linearly
of
phase
response
range
values
,
\wraps"
increasing
the
bandpass
and
of
a
sharp
between
the
lter
rapid
uctuations
of
the
broadband
.
0
180
to
+180
360
degree
+180
\sawtooth"
(or
decreasing)
.
Notice
degrees
transition
and
0
display
the
that
noise
.
180
phase
5-6 Network Measurement Examples
Figure 5-5. Amplitude and Phase Response of a Dielectric Filter
Page 93

Using
the
Expanded
Phase
Mode
The
analyzer can
N
N
NN
N
N
N
N
N
N
N
N
N
N
N
MORE
phase
is displayed
Press
4
NN
N
N
N
N
N
N
N
N
N
N
N
NN
NN
NN
EXPANDED
N
N
PHASE
5
F
o
rmat
display phase
NN
NN
NN
NN
N
N
N
N
N
N
N
N
N
N
N
NN
PHASE
with \no
Figure
N
N
N
N
N
NN
NN
N
N
N
N
N
N
when
Then
beyond
press
NN
N
.
wrap" (see
5-6. Expanded
you
are nished
6
180
4
Scale
Ref
Figure 5-6
Phase Mode
with this
degrees
N
NN
N
N
N
N
N
N
N
AUTO
5
).
.
Press
N
N
N
N
NN
NN
NN
SCALE
4
NN
NN
NN
NN
N
N
N
N
.
measurement.
F
ormat
The
5
Network Measurement Examples 5-7
Page 94

Measuring Electrical
Length
Measurement
Setup
The analyzer
mechanical \line
electrical length
electronically implements
stretchers" of
correction function
lossless transmission
removed from
cables or
measure the
With
the
in
the
previous
Transmission
1.
Press
a receiver's
other connections
electrical length
same
connection, instrument
example
Characteristics of
5
4
Chan
4
F
1
o
1.
2.
3.
Press
Press
4
Displa
4
Span
5
y
5
50
4
M/
N
N
N
N
N
N
DUAL
Measurement
If
the
trace
needs
to
rmat
N
N
N
N
N
line.
This simulated
input to
.In
(see
N
N
N
N
N
N
N
N
N
N
NN
PHASE
5
N
N
N
N
N
N
N
N
N
NN
NN
N
N
N
N
N
N
CHAN
5
to
zoom
be
rescaled,
a function
earlier analyzers
simulates a
line
can
compensate
this
of a
example
test
device
,
this
.
settings,
\Measurement Setup
a Filter"),
NN
NN
N
to
N
N
N
N
N
N
N
N
N
N
N
N
N
ON
off
the
display
N
N
NN
NN
press
make the
the
N
N
N
N
N
N
N
N
to
N
on
N
passband
4
Scale
N
N
N
N
N
OFF
Ref
phase
N
N
N
trace
similar to
. The
analyzer's
variable length
be
added
for
interconnecting
function
is
and calibration
"in
\Measuring
following
trace
on
N
N
N
.
on
the
display
N
N
N
N
N
N
N
N
N
N
N
NN
NN
N
N
N
N
N
N
N
N
N
N
N
5
AUTO
N
SCALE
the
or
used
used
changes:
channel
N
N
N
N
N
.
to
.
Electrical Length A
djustment
5-8 Network Measurement Examples
Figure 5-7.
Phase Response of a Dielectric Filter Over a 50 MHz Span
The linearly
This length
to compensate for
1. Press
2. Press
decreasing phase is due to the DUT's electrical length.
is measured by electronically adding length to the R input
it.
4
5
Chan 2
4
Marker
to activate channel 2.
5
. Then move the marker to any of the points
where the sloping trace crosses the center. Place the marker
on the sloping portion of the trace, not on the vertical phase
\wrap-around."
Page 95

3.
Press
adds
enough
at
the
measurement
4.
Press
results
Figure
4
Scale
marker
4
Displa
5-8.
5
Ref
electrical
N
DUAL
5
y
before and
N
NN
NN
NN
NN
NN
NN
N
N
N
N
ELEC
DELAY MENU
frequency
example).
N
N
N
N
N
N
N
N
N
N
N
NN
NN
NN
NN
NN
CHAN
after the
N
N
N
N
N
N
N
N
N
NN
NN
NN
NN
NN
NN
N
length
NN
NN
to
(group
N
N
N
N
N
N
N
N
N
N
N
NN
NN
NN
NN
on
OFF
adjustment. The
N
N
N
N
N
N
N
N
match
delay
NN
NN
N
N
NN
NN
NN
NN
NN
MARKER
is
N
N
N
N
N
N
ON
to
NN
N
N
N
N
N
N
N
N
N
N
N
N
N
NN
NN
NN
NN
!
DELAY
the
group delay
discussed in
N
N
N
N
N
N
NN
NN
NN
NN
off
to
results are
NN
NN
N
N
.The
the next
display
analyzer
present
the
shown
in
5.
To
display the
N
N
N
N
N
N
N
N
N
N
N
N
N
N
N
N
N
ELEC
DELAY
Y
ou
can
N
N
NN
NN
NN
NN
the
also
N
N
N
N
N
N
N
N
N
DELAY
displayed
N
N
N
N
N
ELEC
until
revolutions
N
NN
NN
NN
NN
N
N
N
N
determine
N
N
N
N
N
N
N
N
NN
NN
NN
MENU
of
the
Figure
amount
N
N
N
N
N
N
N
N
N
N
N
N
N
NN
MENU
N
N
NN
N
N
N
N
N
N
N
ELECTRICAL
trace
knob
of
electrical
N
N
N
N
N
N
N
N
N
N
N
N
N
N
NN
N
N
N
N
5-8.
N
ELECTRICAL
the
electrical
N
NN
NN
NN
NN
N
N
N
N
N
N
N
is
at
before
Electrical
NN
N
N
N
N
N
N
NN
NN
NN
DELAY
length
N
N
N
N
N
N
N
N
N
N
DELAY
length
NN
N
N
N
N
N
N
N
Figure
trace
Length
N
N
N
NN
NN
NN
N
N
N
N
N
N
N
N
(see
the
N
N
N
N
N
N
.
NN
NN
NN
Then
is
added,
N
.
by
pressing
turn
5-8
).
at.
A
djustment
It
press
the
may
4
4
Scale
rotary
take
Scale
Ref
5
Ref
knob
many
5
Network Measurement Examples 5-9
Page 96

Measuring Phase
Distortion
For
many networks
as important
frequencies.
two dierent
,the
as the
linearity of
The analyzer
ways:
amount of
the phase
can measure
insertion phase
shift over
this linearity
is not
nearly
a range
and express
of
it in
Measurement Setup
Deviation from
Directly (as
As group
This
Electrical
Linear Phase
By adding
have
remaining
Press
delay (a
example
Length
electrical length
already
response
5
4
Displa
y
deviation from
derived value).
assumes
"
(the
the
previous
removed the
is
the deviation
N
N
N
N
N
N
N
N
N
NN
N
N
N
N
N
N
N
N
N
N
N
N
N
N
N
N
N
N
DUAL
N
CHAN
linear phase).
measurement
example)
required to
linear phase
from
N
N
N
N
NN
N
N
N
N
N
N
N
N
N
N
N
N
N
off
N
to
ON
atten
shift
N
N
N
N
N
N
N
on
settings
are
caused
linear
N
N
NN
N
N
N
N
N
N
N
N
N
OFF
.
made
still in
the
phase
phase
in \Measuring
eect.
response
by
the
DUT
.
.
,
you
The
Group Delay Measurement
5-10 Network Measurement Examples
Press
you
4
are
Scale
Ref
nished
Figure
5
N
N
N
N
N
N
N
N
ELEC
with
N
N
N
N
5-9.
NN
NN
NN
NN
DELAY
this
N
N
N
N
N
N
N
N
Deviation
N
N
N
N
N
N
N
N
N
NN
MENU
N
N
N
N
N
N
NN
NN
NN
N
N
ELECTRICAL
From
N
N
N
measurement.
N
N
N
NN
NN
Linear
NN
NN
N
N
N
N
N
N
N
N
N
N
N
N
N
N
N
N
N
DELAY
Phase
NN
NN
NN
NN
N
N
N
N
N
5
0
when
4
2
1
The phase linearity of many devices is specied in terms of group
delay or envelope delay
components and systems
Group delay is the
a function of frequency
. This is especially true of telecommunications
.
dierence in propagation time through a device as
.
It is measured as a ratio of phase change
over a sample delta frequency as follows:
1
Group Delay=0
3601
F
Where: 1is phase change [deg]
Page 97
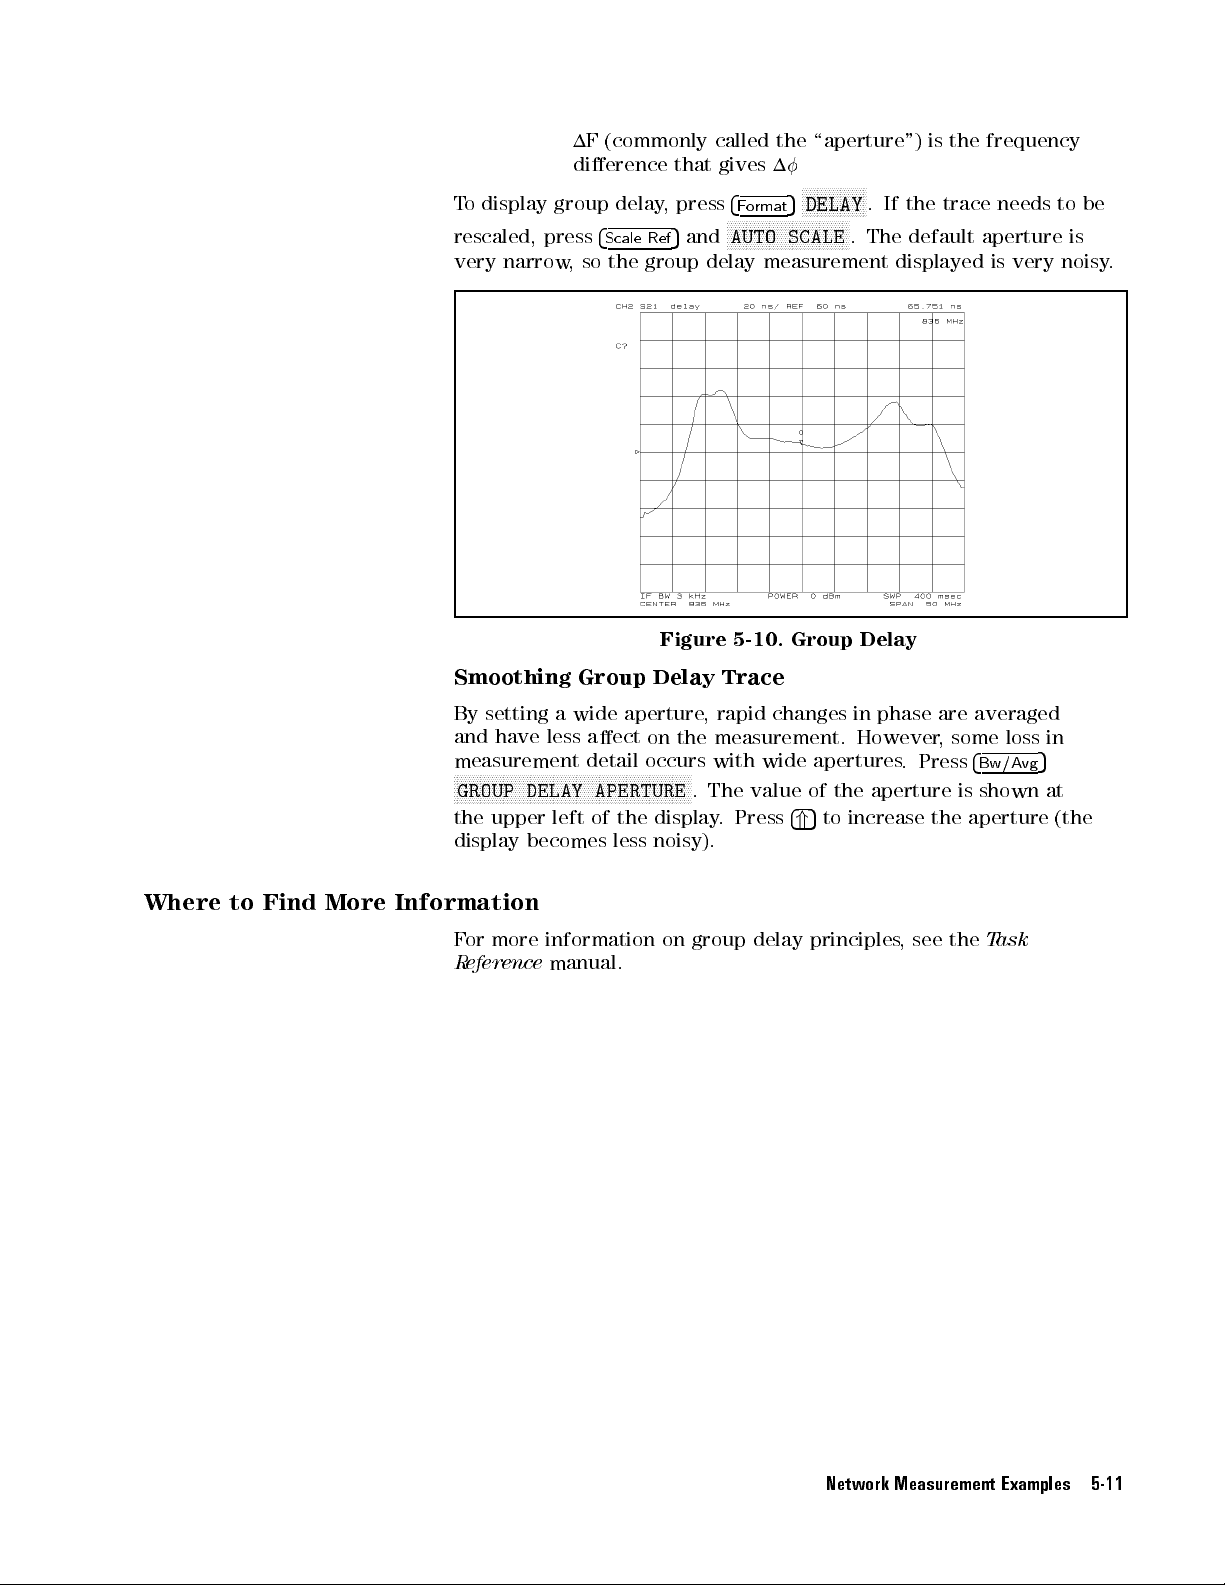
1F (commonly
dierence that
T
odisplay
group delay
rescaled, press
very narrow
,so
, press
4
Scale Ref
the group
called the
gives 1
N
5
4
F
ormat
NN
NN
NN
NN
N
N
N
N
N
N
N
N
N
N
N
5
and
AUTO SCALE
NN
delay measurement
\aperture") is
NN
NN
NN
NN
NN
N
N
N
N
N
N
DELAY
.If
N
. The
the trace
default aperture
NN
NN
NN
NN
NN
displayed is
the
frequency
needs to
very noisy
be
is
.
Where
to
Find
More
Smoothing
By
setting
and
have
measurement
N
N
N
N
N
NN
N
N
N
N
N
N
N
N
N
N
N
N
GROUP
the upper
display
Information
F
or
more
R
eference
Figure
N
N
N
N
N
a
less
N
N
N
N
N
N
Group
wide
aect
detail
NN
N
N
N
N
N
aperture
N
N
N
N
N
N
N
N
N
N
Delay
on
occurs
N
N
N
N
N
N
N
N
NN
DELAY APERTURE
left
of
the
display
becomes
information
less
noisy).
on
manual.
5-10.
Trace
,
rapid
the
measurement.
with
N
N
N
N
N
.
The
.
Press
group delay
changes
wide
value
Group
apertures
of
the
5
to
increase
4
*
principles,
Delay
in
phase
However
.
Press
aperture
see the
are
,
the
some
is
averaged
loss
4
Bw/Avg
shown
aperture
Task
in
5
at
(the
Network Measurement Examples 5-11
Page 98

Reection Measurement
When making
signal going
reected signal
incident and
or,
when expressed
a reection
to the
DUT and
from the
reected signals
in decibels
Reection measurements
device,
from the
independently of
such as
DUT.
a directional
This separation
the
incident
measurement, the
uses it
DUT to
require the
coupler
as the
the reference
is the
reection
,
the
return
connection of
,
to
is
necessary
power
(see
separate
analyzer monitors
reference.
It
signal. The
coecient
loss
.
a
directional
the
power
so
that
it
can
the
following
compares
ratio of
of
the
reected
be
measured
gure).
the
the
the
DUT
5-12 Network Measurement Examples
When
the
device
Figure
has
more
5-11.
Multi-P
one
Reection
ort
T
est
port,
connect
Measurement
Devices
high-quality
terminations
(loads) to
all unused DUT ports to terminate them into their characteristic impedance (usually
50 or 75 ). If this is not done
, reections o the unused ports will cause
measurement errors.
The S-parameter test set
for each
S-parameter measurement. When using a transmission/reection test set,
terminate the unused input port of the analyzer with
The signal
reected from the DUT is measured as a ratio with the
automatically switches the termination at the unused port
a high quality load.
incident signal. It can be expressed as a reection coecient, a return
loss, or as SWR. These measurements are mathematically dened as:
Page 99
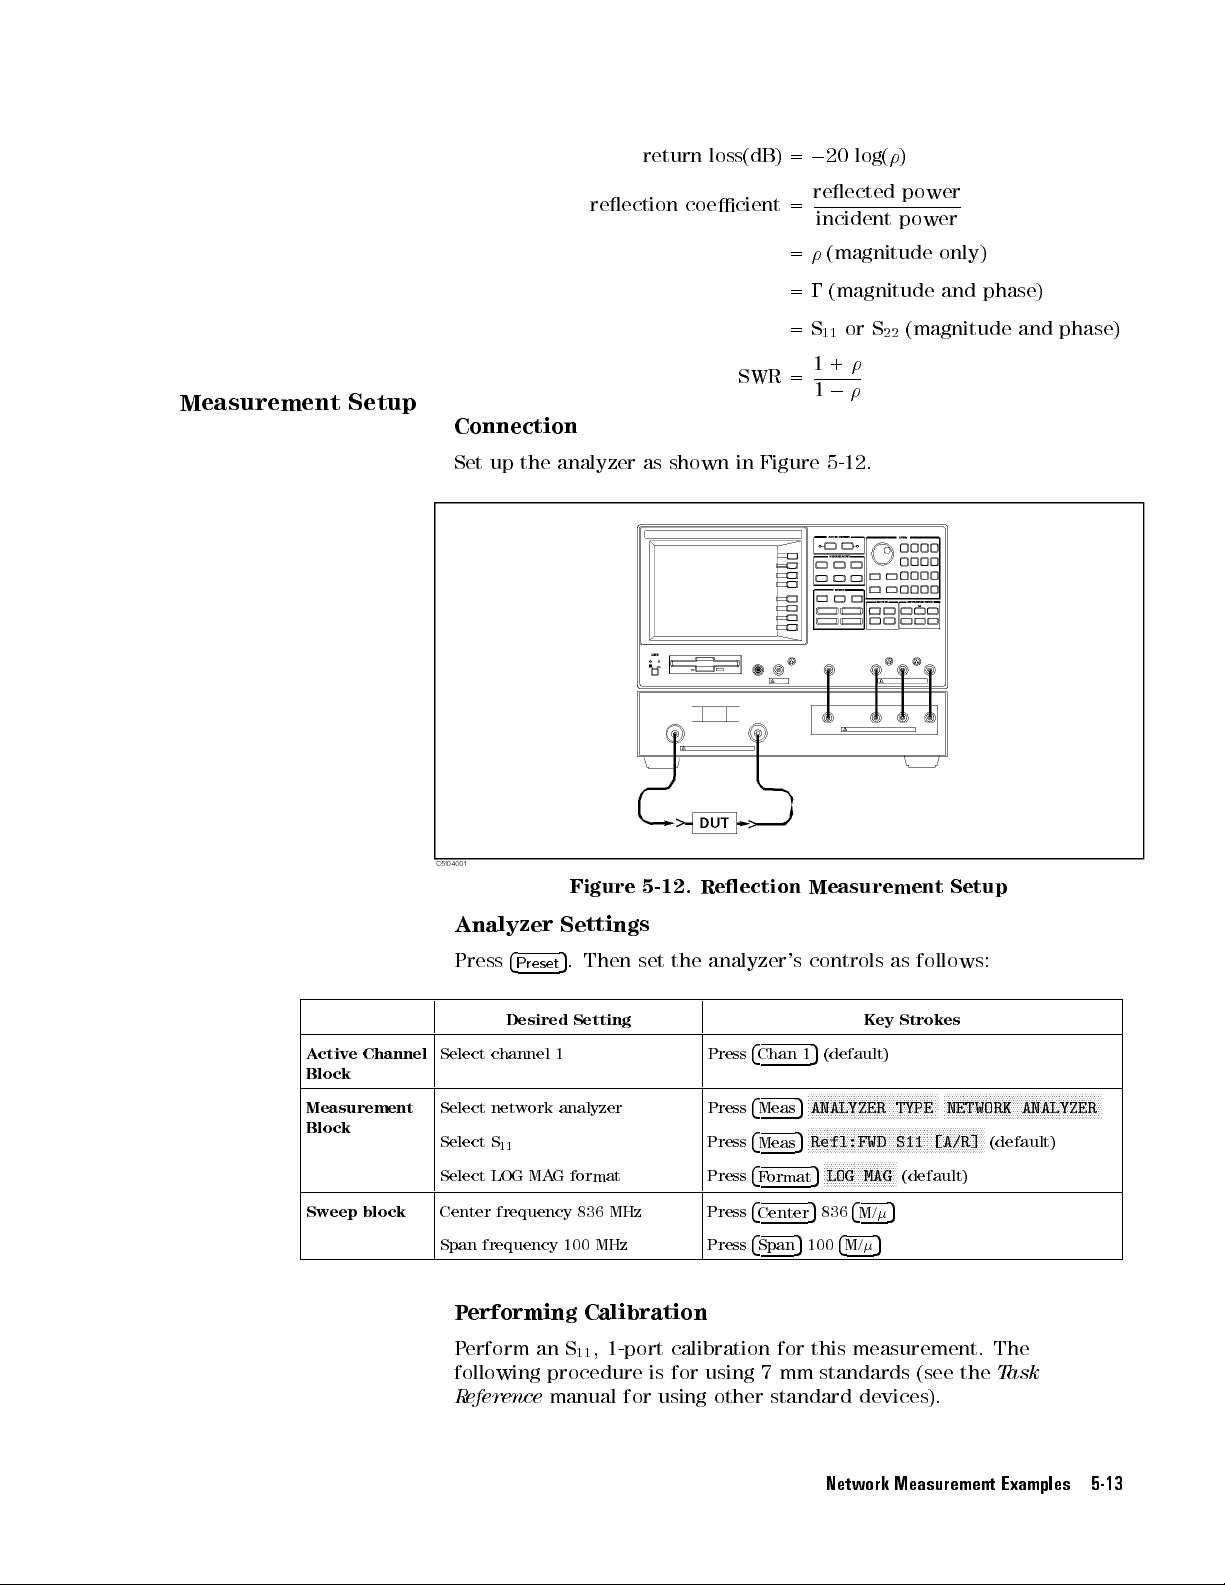
return
loss(dB) =
0
20
log(
)
Measurement
Setup
Connection
Set
up
the
analyzer
reection
as
coecient
shown
=
=
=0
=
SWR
=
in
Figure 5-12
reected
power
incident power
(magnitude
(magnitude
or
S
11
1
+
1
0
S
(magnitude
22
.
only)
and
phase)
and
phase)
A
ctive Channel
Block
Measurement
Block
Sweep block
Figure
Analyzer
Press
Select
channel 1
Select network
Select S
11
Select LOG MA
4
Preset
Desired
Settings
5
.
Setting
analyzer
G format
Center frequency 836 MHz Press
Span frequency 100 MHz Press
Then
5-12.
set
Reection
the
analyzer's
Press
Press
Press
Press
Measurement
controls
5
4
Chan
4
Meas
4
Meas
4
Format
4
Center
4
Span
(default)
1
FFFFF
FFFFFFFFFFFFFFFFFFFFFFFFF
5
ANALYZER TYPE
FFFFFFFF
FFFFFFFFFFFFFFFFFFFFFFFFF
Refl:FWD S11 [A/R]
5
FFFFFFFFFFFFFFFFFFF
5
LOG MAG
5
836
5
100
4
M/
Setup
as
follows:
K
ey
Strokes
FFFFF
FFFFFFFFFFFFFFFFFFFFFFFFF
FFFF
NETWORK ANALYZER
FFFFFFFFFFFFF
(default)
5
4
M/
5
Performing Calibration
Perform an S11, 1-port calibration for this measurement. The
following procedure is for using 7 mm standards (see the
Reference
manual for using other standard devices).
FFFFFFFFFFF
(default)
Task
Network Measurement Examples 5-13
Page 100

Note
1.
Press
4
2.
Connect
(The softkey
completed.)
3.
Connect
softkey
completed.)
4.
Connect the
softkey
completed.)
Press
set
to
next
doing
N
DONE:1-PORT
N
5.
The
corrections
before
N
NN
NN
NN
CALIBRATE
5
Cal
the OPEN
the
SHORT
label
LO
label
N
N
N
N
N
N
N
N
N
NN
NN
NN
N
N
N
N
N
N
N
N
NN
NN
NN
N
N
N
N
ON
off
example
you
the
NN
NN
NN
N
N
N
N
N
N
N
N
NN
label
N
N
N
N
N
N
NN
NN
NN
NN
SHORT
AD
N
N
N
N
N
N
N
N
N
N
N
N
N
LOAD
N
N
N
N
N
N
N
N
N
N
N
N
N
N
N
N
N
.)
\S-P
just
completed.
example
N
N
N
N
N
NN
NN
NN
NN
NN
NN
N
N
N
N
N
MENU
standard to
NN
N
N
N
N
N
N
N
N
N
N
OPEN
is
underlined
standard
N
N
N
is
underlined
standard
N
is
underlined
NN
N
N
N
N
N
N
.
.
N
CORRECTION
(
N
N
N
NN
NN
CAL
arameters
N
NN
NN
NN
NN
NN
NN
N
N
N
N
N
N
N
N
N
1-PORT
port
when
NN
NN
NN
N
N
not
N
1.
1.
when
1.
N
N
N
N
N
N
N
N
N
change
N
S11
port
to
to
port
N
N
N
N
N
N
N
N
N
Measurement"
Do
N
N
N
NN
NN
NN
.
N
NN
Then
when
the
Then press
the measurement
Then
press
the
measurement
N
N
N
N
N
N
N
N
NN
NN
NN
N
N
on
OFF
the
(S11):OPEN
press
measurement
NN
NN
LOAD
N
N
N
N
N
N
N
N
N
N
is
uses
the
calibration
NN
NN
N
N
N
N
N
N
N
N
N
N
N
NN
NN
NN
NN
NN
NN
NN
is
N
N
N
N
N
NN
NN
NN
NN
NN
NN
SHORT
N
automatically
.
is
N
N
N
N
N
N
N
N
N
.
(The
is
calibration
settings
(The
.
Return
Loss
Measurement
Connect
trace
and
Reection Coecient
The
Figure
the
reected
small
the
needs
return
passband.
loss
5-13
.
signal
transmitted
DUT
to
the
to
be
rescaled.
characteristics
The
value
A
large
just
as
signal.
test
inside
value
a
large
set.
are
the
for
value
Press
displayed
passband
return
for
4
Scale
Ref
in
is
loss
corresponds
insertion
N
N
N
N
N
N
N
AUTO
5
the
Log
greater
loss
N
N
N
N
N
NN
NN
N
N
N
N
N
N
N
N
N
N
N
SCALE
Mag
than
outside
to
a
corresponds
N
N
N
N
N
if
format
small
the
to
in
a
5-14 Network Measurement Examples
Figure 5-13. Return Loss
To display the same data in terms of reection coecient, press
4
Format
NNNNNNNNNNNNNNNNNNNNNNN
5
LIN MAG
. This redisplays the existing measurement in a linear
 Loading...