


LAV61900
LAVAMAT 61900
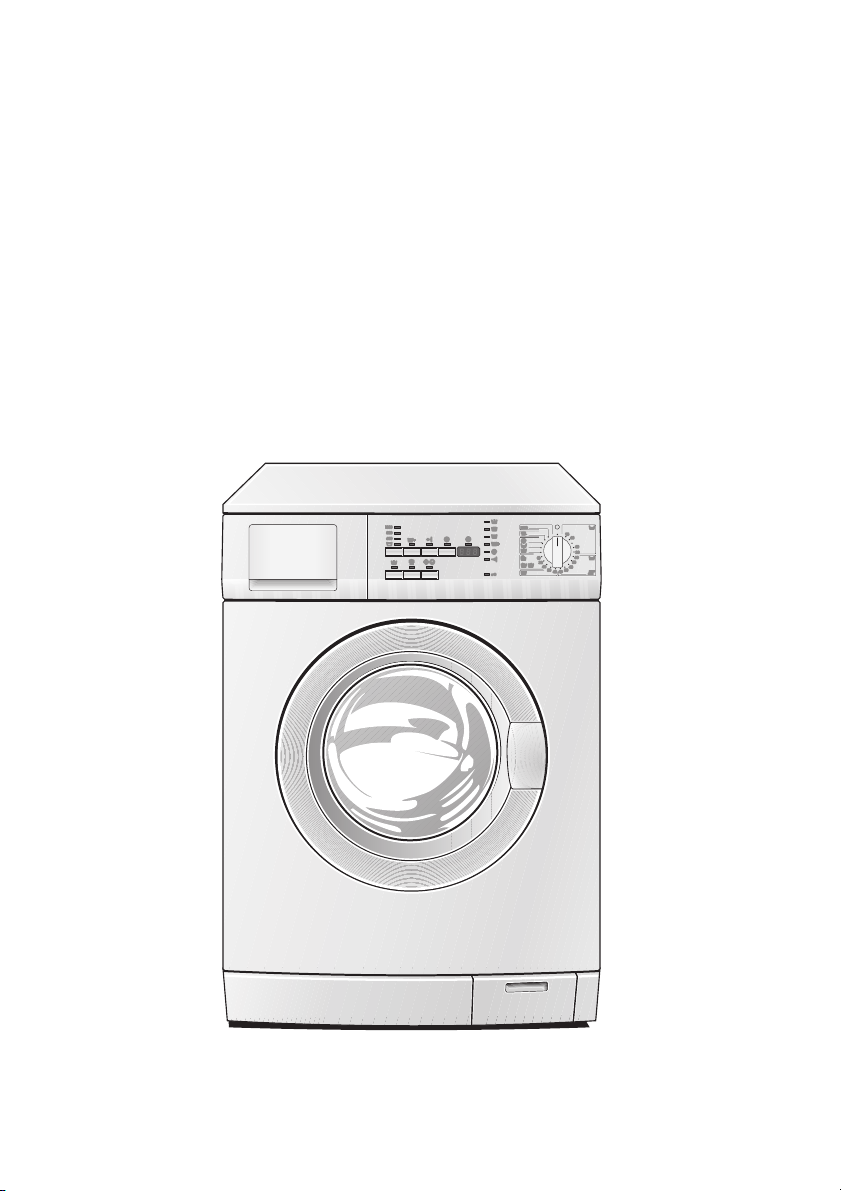
Washing machine
User information

Dear customer,
Please read this User Information carefully and keep it to refer to at a
later date.
Pass this User Information on to any subsequent owner of the appliance.
The following symbols are used in the text:
1 Safety instructions
Warning: Notes that concern your personal safety.
Attention: Notes that show how to avoid damage to the appliance.
3 Useful tips and hints
2 Environmental information
2

Contents
Operating Instructions. . . . . . . . . . . . . . . . . . . . . . . . . . . . . . . . . . . . . 5
Safety . . . . . . . . . . . . . . . . . . . . . . . . . . . . . . . . . . . . . . . . . . . . . . . . . . . . . . . . . 5
Description of the appliance . . . . . . . . . . . . . . . . . . . . . . . . . . . . . . . . . . . . 7
Control panel . . . . . . . . . . . . . . . . . . . . . . . . . . . . . . . . . . . . . . . . . . . . . . . . . . 7
Programme overview. . . . . . . . . . . . . . . . . . . . . . . . . . . . . . . . . . . . . . . . . . . . 8
Before the first wash. . . . . . . . . . . . . . . . . . . . . . . . . . . . . . . . . . . . . . . . . . . . 10
Preparing and sorting washing . . . . . . . . . . . . . . . . . . . . . . . . . . . . . . . . . . . 10
Running a washing cycle . . . . . . . . . . . . . . . . . . . . . . . . . . . . . . . . . . . . . . . . 11
Opening the door/Loading the washing . . . . . . . . . . . . . . . . . . . . . . . . . . . . . 11
Adding detergent/ additives . . . . . . . . . . . . . . . . . . . . . . . . . . . . . . . . . . . . . . . 11
Switching on the appliance/selecting a programme . . . . . . . . . . . . . . . . . . . 13
Changing the spin speed/Selecting rinse hold . . . . . . . . . . . . . . . . . . . . . . . . 13
Selecting the programme options . . . . . . . . . . . . . . . . . . . . . . . . . . . . . . . . . . 14
EXTRA RINSE . . . . . . . . . . . . . . . . . . . . . . . . . . . . . . . . . . . . . . . . . . . . . . . . 14
QUICK WASH . . . . . . . . . . . . . . . . . . . . . . . . . . . . . . . . . . . . . . . . . . . . . . . . 14
PREWASH. . . . . . . . . . . . . . . . . . . . . . . . . . . . . . . . . . . . . . . . . . . . . . . . . . . 14
STAIN . . . . . . . . . . . . . . . . . . . . . . . . . . . . . . . . . . . . . . . . . . . . . . . . . . . . . . 14
Setting the delay timer . . . . . . . . . . . . . . . . . . . . . . . . . . . . . . . . . . . . . . . . . . . 15
Starting a programme. . . . . . . . . . . . . . . . . . . . . . . . . . . . . . . . . . . . . . . . . . . . 15
Programme progress . . . . . . . . . . . . . . . . . . . . . . . . . . . . . . . . . . . . . . . . . . . . . 15
Interrupting a programme/Adding washing. . . . . . . . . . . . . . . . . . . . . . . . . . 16
End of the wash cycle/Removing the washing . . . . . . . . . . . . . . . . . . . . . . . 16
Child safety device. . . . . . . . . . . . . . . . . . . . . . . . . . . . . . . . . . . . . . . . . . . . . . 17
Cleaning and maintenance . . . . . . . . . . . . . . . . . . . . . . . . . . . . . . . . . . . . . . 18
What to do if.... . . . . . . . . . . . . . . . . . . . . . . . . . . . . . . . . . . . . . . . . . . . . . . . . 19
Remedying small malfunctions . . . . . . . . . . . . . . . . . . . . . . . . . . . . . . . . . . . . 19
If the wash results are not satisfactory. . . . . . . . . . . . . . . . . . . . . . . . . . . . . . 22
Carrying out an emergency drain . . . . . . . . . . . . . . . . . . . . . . . . . . . . . . . . . . 23
Drain pump. . . . . . . . . . . . . . . . . . . . . . . . . . . . . . . . . . . . . . . . . . . . . . . . . . . . . 24
Disposal . . . . . . . . . . . . . . . . . . . . . . . . . . . . . . . . . . . . . . . . . . . . . . . . . . . . . . . 25
Technical data. . . . . . . . . . . . . . . . . . . . . . . . . . . . . . . . . . . . . . . . . . . . . . . . . . 26
Consumption values. . . . . . . . . . . . . . . . . . . . . . . . . . . . . . . . . . . . . . . . . . . . . 26
3

Installation and connection instructions. . . . . . . . . . . . . . . . . 27
Safety information for the installation. . . . . . . . . . . . . . . . . . . . . . . . . . . . 27
Installing the appliance . . . . . . . . . . . . . . . . . . . . . . . . . . . . . . . . . . . . . . . . . 28
Transporting the appliance. . . . . . . . . . . . . . . . . . . . . . . . . . . . . . . . . . . . . . . . 28
Removing the transport lock . . . . . . . . . . . . . . . . . . . . . . . . . . . . . . . . . . . . . . 28
Where to install . . . . . . . . . . . . . . . . . . . . . . . . . . . . . . . . . . . . . . . . . . . . . . . . . 30
Making the appliance level. . . . . . . . . . . . . . . . . . . . . . . . . . . . . . . . . . . . . . . . 31
Electrical connection. . . . . . . . . . . . . . . . . . . . . . . . . . . . . . . . . . . . . . . . . . . . 31
Connecting to the water supply . . . . . . . . . . . . . . . . . . . . . . . . . . . . . . . . . . 31
Water inflow. . . . . . . . . . . . . . . . . . . . . . . . . . . . . . . . . . . . . . . . . . . . . . . . . . . . 32
Water drainage. . . . . . . . . . . . . . . . . . . . . . . . . . . . . . . . . . . . . . . . . . . . . . . . . . 33
Guarantee/Customer Service. . . . . . . . . . . . . . . . . . . . . . . . . . . . . . 34
Service . . . . . . . . . . . . . . . . . . . . . . . . . . . . . . . . . . . . . . . . . . . . . . . . . . . . . . 39
4

Operating Instructions
1 Safety
Prior to using for the first time
• Follow the ”Instructions for installation and connection”.
• If the appliance is delivered in the winter months when there are mi-
nus temperatures: Store the washing machine at room temperature
for 24 hours before using for the first time.
Correct use
• The washing machine is only designed for the washing of normal domestic laundry at home.
• Additions or modifications to the washing machine are not permitted.
• Use only detergents and additives that are suitable for use in domestic washing machines.
• The washing must not contain any inflammable solutions. Danger of
explosion!
• Do not use the washing machine for dry cleaning.
• Dyes/colour removers may only be used in the washing machine, if
the manufacturer of these products expressly permits this. We cannot
be held responsible for any damage arising.
Child safety
• Keep packaging away from children. There is a risk of suffocation.
• Children often do not recognise the hazards associated with electrical
appliances. Don’t allow children to use the washing machine unsupervised.
• Make sure that children and pets don’t climb into the drum of the
washing machine. Could endanger life!
5

General safety
• Repairs to the washing machine must only be carried out by qualified
service engineers.
• Never use the washing machine if the mains cable is damaged; or if
the control panel, work top or plinth area is damaged such that the
inside of the appliance is freely accessible.
• Switch off the washing machine before cleaning, maintenance and
servicing. In addition, pull the mains plug out of the socket or – in
the case of a permanent connection – switch off the cut-out in the
fuse box or remove the screw fuse completely.
• If operation is stopped, disconnect the appliance from the mains supply and shut off the water tap.
• Never unplug the appliance by pulling on the cable. Always pull the
plug.
• Multi-way plugs, connectors and extension cables must not be used.
This could constitute a fire hazard through overheating.
• Never wash the washing machine down with a water jet. Danger of
electric shock!
• In washing programmes with high temperatures the glass in the door
gets hot. Do not touch it.
• Before emergency emptying of the appliance, before cleaning the
drain pump or opening the door in an emergency, let the water cool
down.
• Small animals can nibble at the cables and water hoses. Danger of
electric shock and danger of water damage! Keep small animals away
from the washing machine.
6
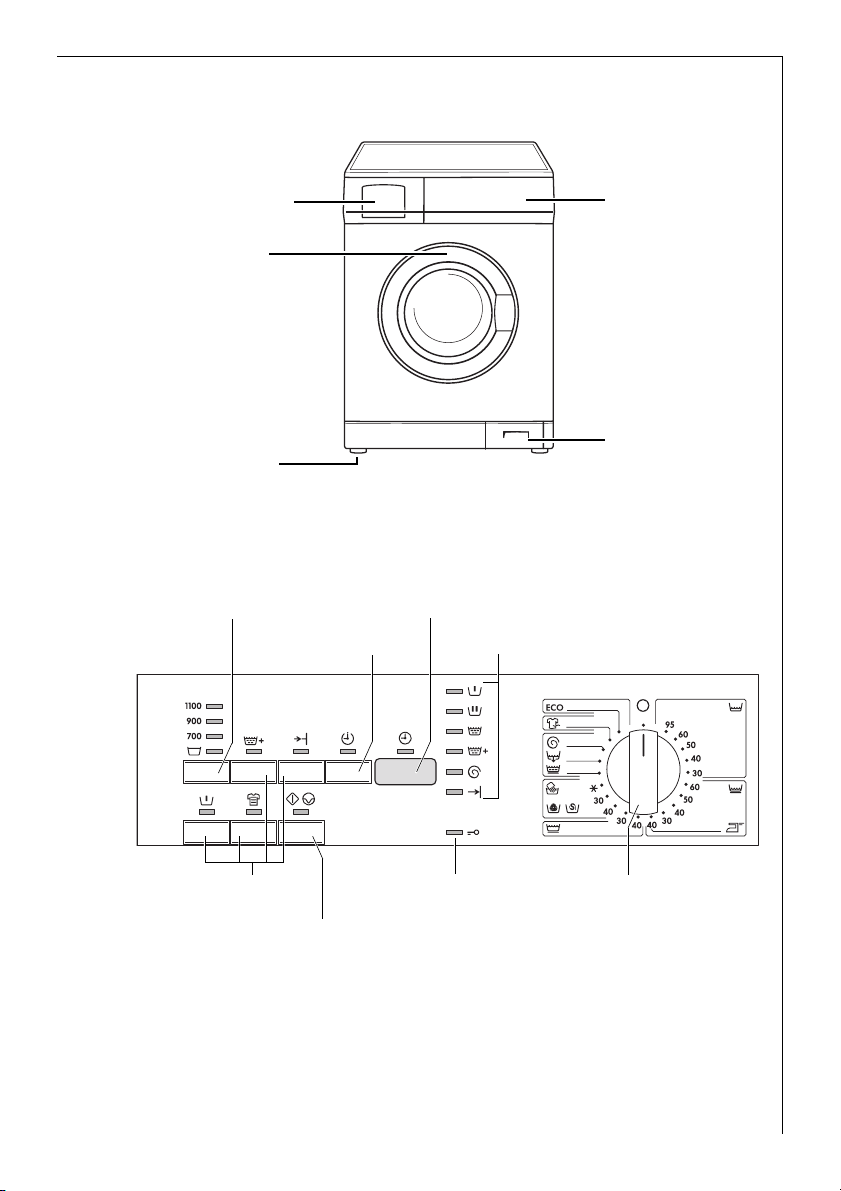
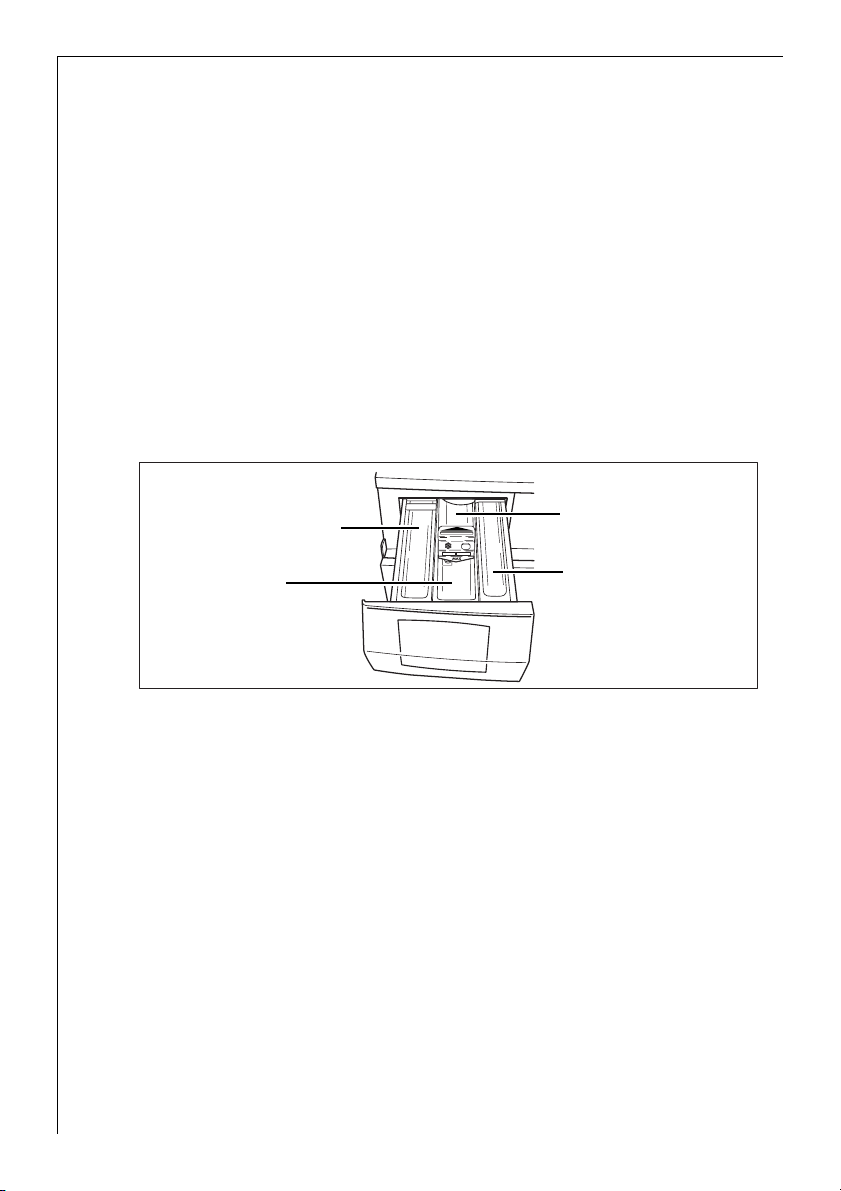
Description of the appliance
Detergent dispenser
drawer
Rating plate
(behind door)
Screw feet
(height adjustable)
Control panel
SPIN/RINSE HOLD button
DELAY TIMER button
Control panel
Plinth flap/
Drain pump
Multidisplay
Programme Progress display
Programme option
buttons
START/PAUSE button
DOOR indicator
Programme knob
7
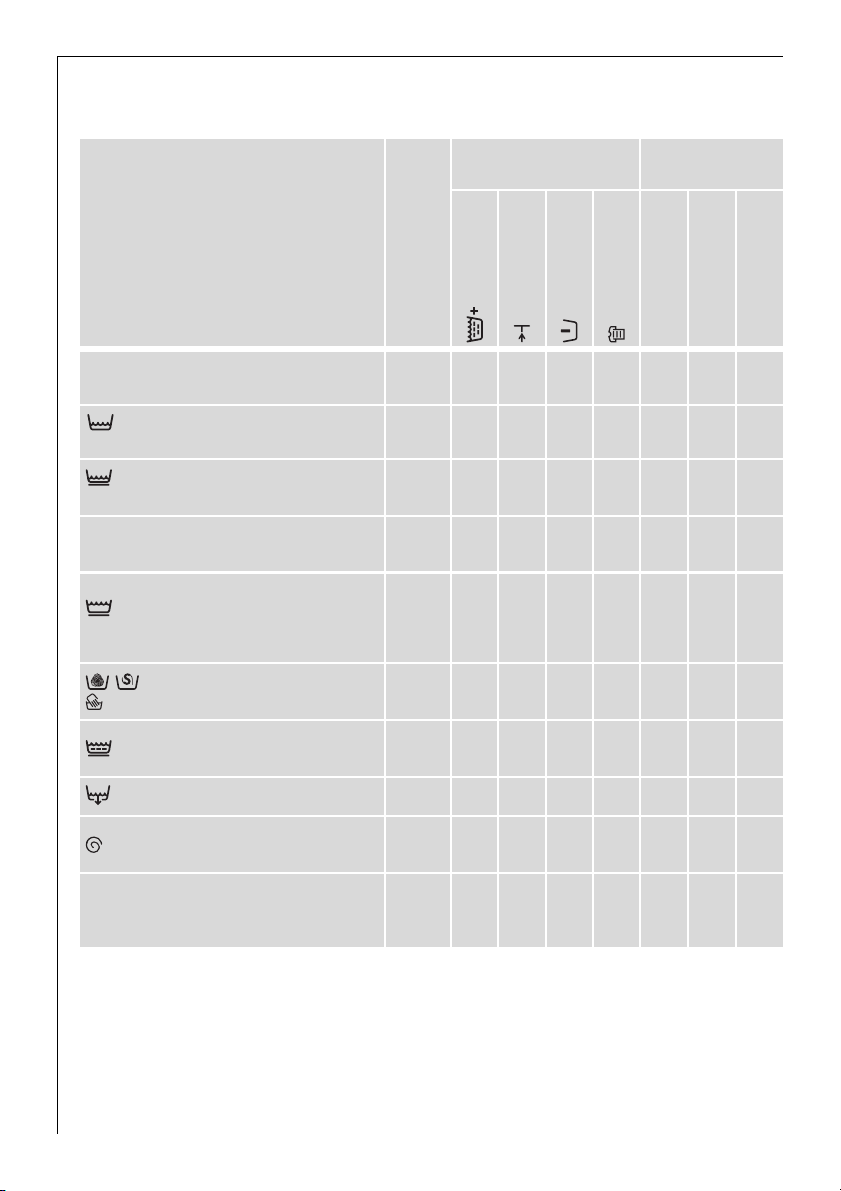
Programme overview
Programme options Spin speed
Programme
ECO (ENERGY SAVING)
(COTTONS/LINEN)
95, 60, 50, 40, 30
(EASY-CARES)
60, 50, 40, 30
2)
1)
max. load
(dry washing)
(EXTRA RINSE)
(QUICK WASH)
(PRE WASH)
(STAIN)
110 0
900/700
6kg • • • • • •
6kg • •
3)
3kg • • • •
• •
4)
• • •
4)
• •
l (EASY IRON) 40 1kg • • • • • •
(DELICATES)
40, 30
/ (WOOL/SILK)
(HANDWASH) 40, 30, X (COLD)
3kg • • • • •
2kg • •
(GENTLE RINSE) 3kg • •
(DRAIN)
n (RINSE HOLD)
(SPIN) 6kg • •
a (REFRESH) 3kg • •
1) A 10 litre bucket contains approx. 2.5 kg of dry washing (cotton)
2) Programme settings for tests in accordance with or support of EN 60 456 and IEC 60 456 are described in
the section “Consumption values”.
3) Recommended load for short progammes is 3 kg; full loading is possible however with somewhat reduced
cleaning results.
4) } (STAIN) can only be selected with wash temperatures of 40°C and above, as stain treatment products are
only effective at higher temperatures.
8

Application/features: Care symbols1)
Energy-saving programme at 60 °C for lightly to normally soiled whites/
coloureds made of cotton/linen.
Programme for normally to heavily soiled whites/coloureds made of cotton/
linen.
Programme for easy-care mixed fibres and synthetics.
Special programme which washes at 40 °C for easy-care fabrics which after
being washed using this programme need to be ironed only lightly or not at all.
Gentle programme for delicate fabrics such as bonded fabrics, microfibres,
synthetics, net curtains (max. load for net curtains 20 to 25 m
(RINSE HOLD) also suitable for fabrics with climate membrane, e.g., outdoor
clothing.
Particularly delicate programme for machine washable and hand washable
wool/silk.
Separate gentle rinse cycle (3 rinses, liquid conditioner is washed in from compartment &, gentle spin).
Drains water away after a rinse hold.
Drains water out and spins, e.g. after a rinse hold, or separate spin for handwashed cottons/linens.
Special programme at 30 °C, approx. 30 minutes long, for quickly washing
through items such as e.g. slightly dirty sports clothing that have been worn
once or new clothes.
1) The figures in the care symbols indicate the maximum temperatures.
2
). With n
M O
J M O
I K N
K N
I K
Q L H
I K N
Q L
H
J M O
J M O
I K N
9

Before the first wash
1. Open the detergent drawer.
2. Pour approx. 1 litre of water through the detergent drawer into the
washing machine.
This closes the water container when the next programme is started
and the economy valve can function properly.
3. In order to remove any residues from the drum and water container
which may have been left during manufacturing, perform the first
wash cycle without any washing in the machine. Programme:
(COTTONS/LINEN) 60, press (QUICK WASH), add approx. 1/4
measuring cup of washing powder.
Preparing and sorting washing
Preparing washing
• Empty pockets. Remove foreign bodies (e. g. coins, paper clips, nails,
etc.).
• Do up zips, button up covers to prevent damage to washing.
• Remove the runners from net curtains or cover them with a net or a
bag.
• Wash sensitive and small items in a net or a pillow case, e.g. net cur-
tains, tights, socks, handkerchiefs, bras.
Important! Bras and other items containing wires should only be
washed in a net bag. The wires can work loose and damage the appliance.
10
Sorting washing
• By colour: Wash white and coloured washing separately. Washing can
run.
• By temperature, type of washing and care symbol.
Important! Do not wash fabrics with care symbol G (= do not wash!)
in the washing machine.
Running a washing cycle
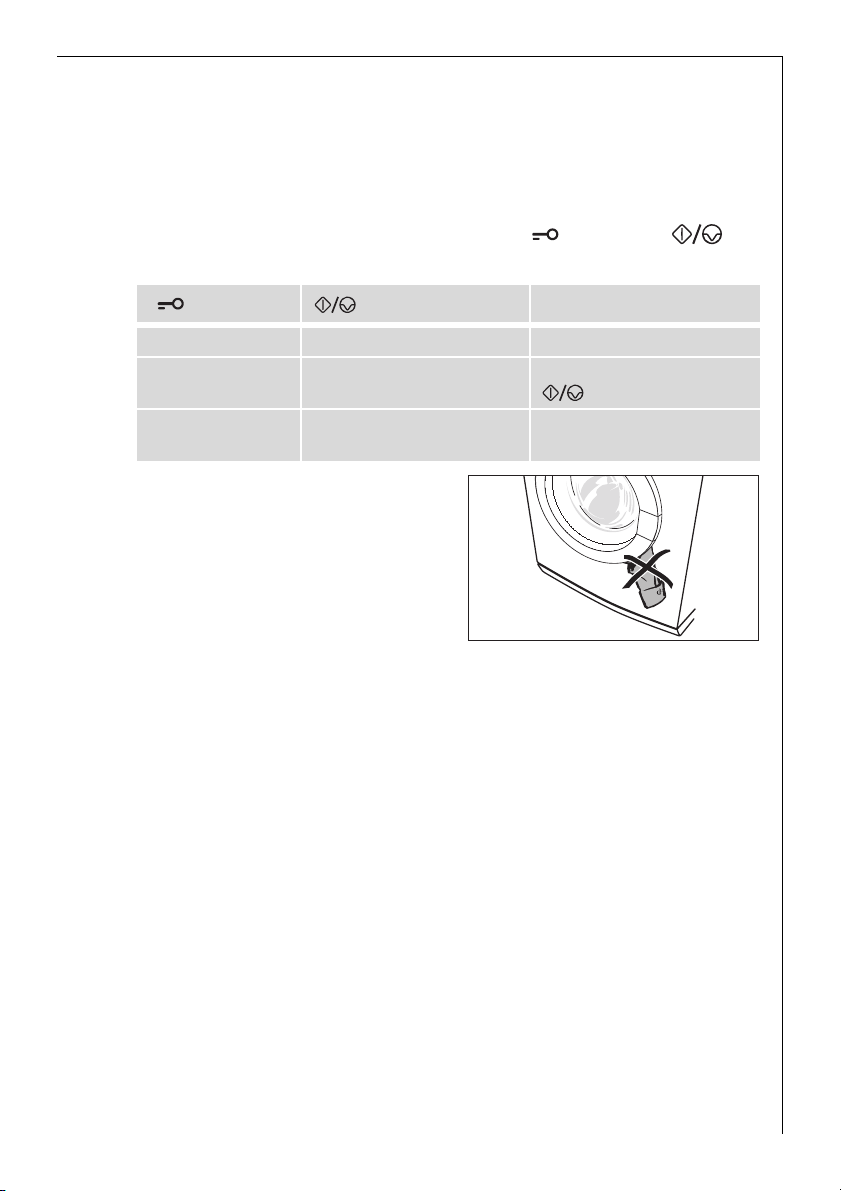
Opening the door/Loading the washing
1. To open the door: gently pull the handle on the door.
When the machine is switched on, the lights (DOOR) and
(START/PAUSE) indicate whether the door can be opened:
light (DOOR) light (START/PAUSE) Can the door be opened?
lit green flashes red or is off yes
lit green lit red
lit red
or is off
flashes red
or lit red
2. Unfold washing and load it loosely
into the machine. Mix large and
small items.
Important: Do not get any washing
caught between the door and the
rubber seal.
3. Press the door firmly shut. Door
catch must audibly latch.
yes, after pressing the
(START/PAUSE) button
no, water level too high or
temperature too high
Adding detergent/additives
Important: Use only detergents and additives that are suitable for use
in domestic washing machines.
1 For USA and Canada only!
Important! Only LOW-SUDSING detergent suitable for a front-loading
washing machine can be used in this machine. This machine can heat
the water up to 95 degrees celsius, or 200 degrees fahrenheit, and care
should be taken to ensure that the correct washing powder is used. If
you have any doubt, check with your dealer or the distributor.
WARRANTY AND CONSEQUENTIAL DAMAGES ARE VOIDED IF A LOW
SUDSING DETERGENT IS NOT USED.
Dose detergent and additives according to the instructions of the detergent and additive manufacturers. Follow the instructions on the
packaging.
11
Dosing depends upon:
– the washing’s degree of soiling,
– the size of the load
– the degree of hardness of the water supply.
• If the manufacturer does not give instructions for small loads: for a
half load, use a third less, for a very small load, use only half of the
detergent that is recommended for a full load.
• From water hardness 2 (= medium) upwards, water softener should
be used. Detergent can then always be dosed for water hardness 1
(= soft). Your local water company will be able to give you information about the water hardness in your area.
1. Pull the detergent dispenser drawer out as far as the stop.
2. Add the detergent/additives.
3. Push the drawer in fully.
Washing powder/tablets
for the main wash
Softeners/
wash-care products
to preserve the shape
of garments/
starch
In-wash stain treatment/
tablets
Washing powder/tablets
for the pre-wash
or for water softener
Washing powder/tablets for the main wash
If you are using water softener and need the right-hand compartment
for the pre-wash detergent, add the water softener to the main wash
detergent in the left-hand compartment.
Softeners, wash-care products to preserve the shape of garments,
starch
Do not fill the compartment beyond the MAX mark. Dilute thick liquid
concentrates according to the manufacturer’s instructions before
putting them into the drawer. Dissolve powder starches.
If you use liquid detergents:
Add liquid detergent using the dosage container provided by the detergent manufacturer.
12
 Loading...