

Page 1
University of Arizona Information Commons Training 1
USER’S GUIDE
Software/Hardware Module: ADOBE ACROBAT 7
Objective: Scan and create PDF Documents using Adobe Acrobat Software
p.1 Introduction
p.2 Scanning Documents into Adobe Acrobat
p.2 Launching the program
p.2 Scan into Adobe Acrobat
p.3 Editing the PDF file
p.3 Document properties
p.4 Performing OCR
p.4 Bookmarks and Page thumbnails
p.5 Adding Hyperlinks
p.5 Reduce File Size
p.5 Converting Files to PDF
p.5 HTML, images, text
p.6 Microsoft Office documents (Word, Excel, PowerPoint)
Portable Document Format (PDF) is a universal file type for making paper documents
available over the Web. It can also be used to convert other types of files to PDF format so they
can be opened without the software originally used to create them. PDF files can be opened
and printed by anyone with the Adobe Acrobat Reader installed on their computer, regardless of
platform. (The reader can be downloaded for free from Adobe.com.)
PDF files are created using the Adobe Acrobat program:
1. by scanning printed documents into it
2. by opening HTML, image files or text files as Adobe PDF
3. from documents created in Microsoft Office programs (Word, Excel, PowerPoint)
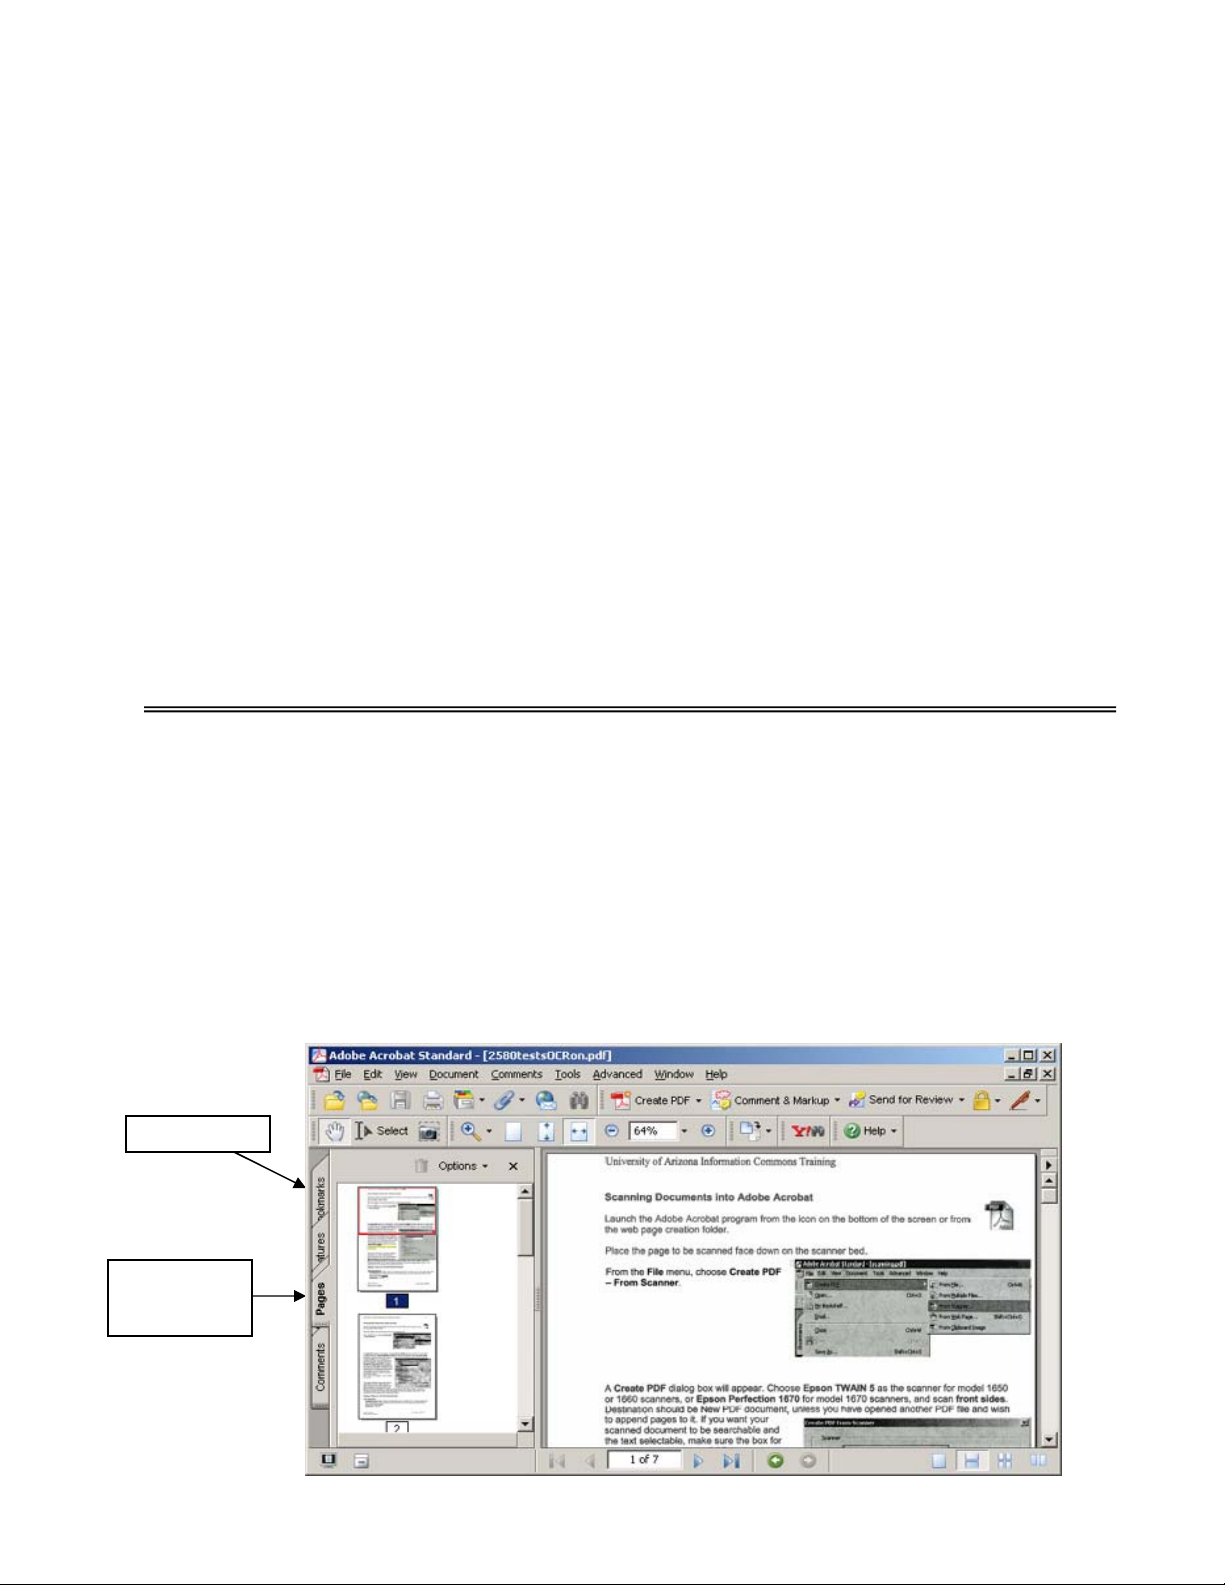
Bookmarks tab
Pages tab
(open)
Adobe Acrobat 7.doc Last Update: 8/12/2005
©Arizona Board of Regents
Page 2
University of Arizona Information Commons Training 2
Scanning Documents into Adobe Acrobat
Launch the Adobe Acrobat program from the icon on the bottom of the screen or from
the Scanning folder or Web Page Creation folder.
Place the page to be scanned face down on the scanner bed.
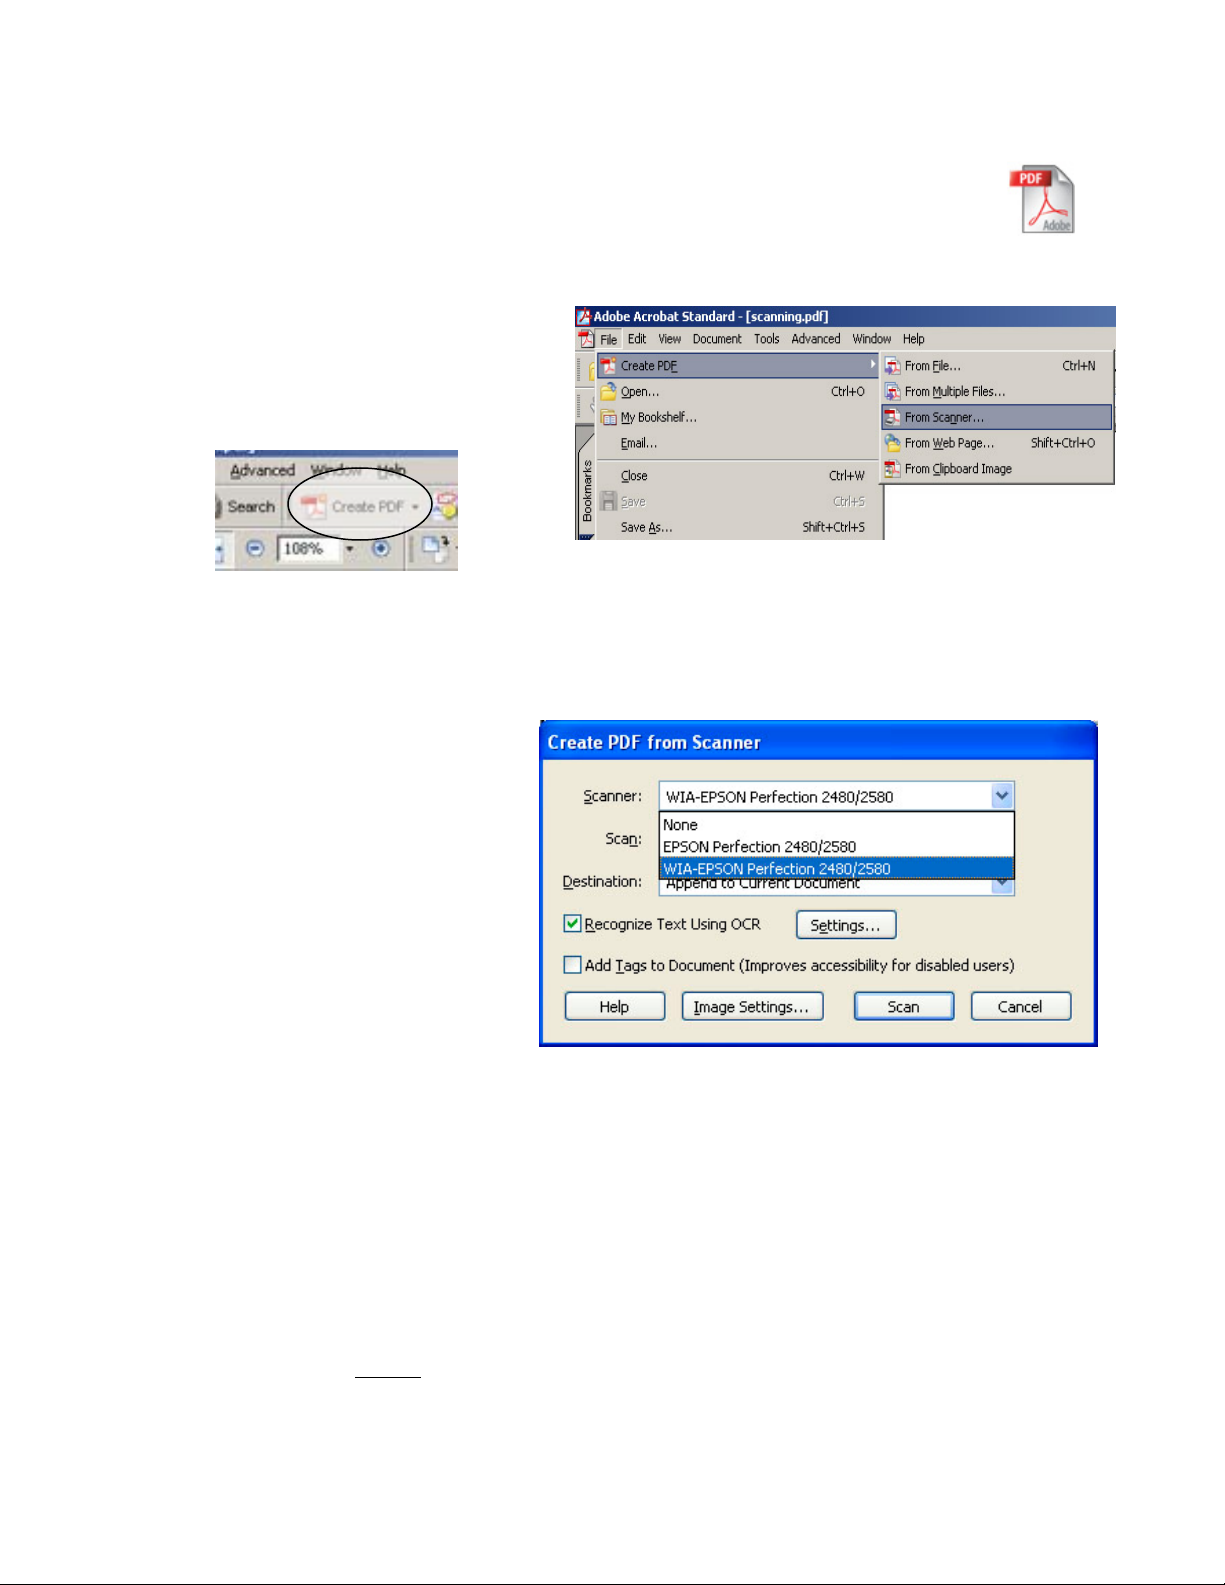
From the File menu, choose Create PDF
– From Scanner. (Or click on the Create
PDF button in the toolbar and select From
Scanner.)
A Create PDF dialog box will appear. Choose Epson Perfection 2480/2580 (or 1670 for model
1670 scanners), and scan front sides. Destination should be New PDF document, unless you
have opened another PDF file and wish to append pages to it. If you want your scanned
document to be searchable and the
text selectable, make sure the box for
Recognize Text using OCR is
checked. Checking the Add Tags to
Document box will improve
accessibility for disabled users.
Then click on Scan.
This opens the Epson scanning software. The options are Full Auto Mode, Home Mode and
Professional Mode. Choose the Home or Professional Mode. (See the guides for Scanning
Images using 2580 or 1670 scanners for more details about using these modes.)
Settings in Home or Professional Mode:
Text documents:
Image/Document Type: Black and White document or Text/Line Art. (Text documents with
color illustrations can be scanned as a Color Document, but text quality may suffer and file
sizes will increase
Resolution: 300 dpi
greatly.)
Adobe Acrobat 7.doc Last Update: 8/12/2005
©Arizona Board of Regents
Page 3

University of Arizona Information Commons Training 3
If the scanner has not already pre-scanned the document, click on the Preview button. When
the preview appears in the window, make sure the page or area to be scanned is enclosed
within dotted lines. Adjust dotted lines if necessary by dragging them with the mouse. Then click
on the Scan button.
When scanning is completed, after a few seconds Acrobat will ask if
there are more pages to scan. Click Next if scanning a multi-page
document, and Done when finished. (If the Acrobat Scan Plug-In
box does not appear, close out the Epson software.)
The scanned pages will then appear in the Adobe Acrobat program.
Editing the PDF file
Document properties
• From the File menu click on Document Properties
tab.
• Click on Description and add a title for the document.
• Click on Initial View tab. Here you can choose
options that determine how the file will open. If
bookmarks or page thumbnails have been
created, the option to open the page along with
the bookmarks or thumbnails should be
selected. A particular magnification and/or
page layout can also be selected; if unsure
about this, leave them set to default.
Adobe Acrobat 7.doc Last Update: 8/12/2005
©Arizona Board of Regents
Page 4

University of Arizona Information Commons Training 4
Perform OCR (Optical Character Recognition) to make the text searchable
If you selected Recognize Text using OCR when you initially scanned your document (see
p.2), this step is not necessary. But if you have a scanned PDF text document that has not had
this done, you may wish to do this.
Performing OCR on the scanned text and makes the text selectable and searchable. The results
vary, depending on the quality of the original scanned pages. Often (but not always), the file
size is reduced as a result of OCR.
In the menu under Document, select Recognize Text using OCR - Start. In the Recognize
Text window, select All Pages, or specific pages to be recognized, then click OK.
Bookmarks and Page Thumbnails
Bookmarks work the same as targets within a web page. They are useful if the document is
long and has several sections.
• Click on the Bookmarks tab on the left side of the screen to open the bookmark window
and begin creating bookmarks within the document.
• Scroll down to where you want to create a bookmark, so that the location to be
bookmarked is at the top of the window.
• Click on the Create New Bookmark button. Add a name for the bookmark. Repeat for
additional bookmarks.
• To expand the current bookmark and create a
hierarchy, click on Expand Current Bookmark.
• For additional bookmark options, click on
Options.
• To delete a bookmark, drag it to the trash can.
Click on the Pages tab on the left side to view thumbnails of pages. A thumbnail of each page of
the document should appear down the left side of the screen. Page order in the document can
be altered by clicking and dragging thumbnails before or after other thumbnails. Any page can
be viewed in the main document window by clicking on the thumbnail. It may be useful to
display thumbnails in a document containing drawings or pictures.
Create new
bookmark
Expand
current
bookmark
Adobe Acrobat 7.doc Last Update: 8/12/2005
©Arizona Board of Regents
Page 5

University of Arizona Information Commons Training 5
Adding hyperlinks to pages within the document or to other documents
• From the menu bar, select Tools,
then Advanced Editing, then Link
Tool.
• The cursor will then become
crosshairs and allow you to enclose
the text you want to link in a box. As
soon as you let go of the mouse
button, a Create Link box will appear.
• From the Link Action menu, choose the
desired action. To link to another web page,
select Open a web page and add the URL
to it in the address box.
• When this file is opened within a browser,
the link will be activated.
Reduce File Size
The final step in creating and saving a PDF file is to reduce the file size where possible. From
the File Menu, select Reduce File Size, set compatibility with Acrobat 5 or later, then click OK.
Often, but not always, this step will greatly reduce the size of the file.
Converting files to PDF
Web pages (HTML), image files (JPEG, GIF, BMP, TIFF, etc.) and text (TXT) files can be
converted easily to PDF files. Open Acrobat, then select File – Create PDF – From File then
select the file and open. Once opened in Acrobat, select Save As to save the file as a PDF.
(For MS Office files, see
next page.)
Adobe Acrobat 7.doc Last Update: 8/12/2005
©Arizona Board of Regents
Page 6

University of Arizona Information Commons Training 6
Converting Microsoft Office documents to PDF files
When Adobe Acrobat has been properly installed on computers with MS Office, three Acrobat
icons should appear in the toolbars whenever Word, Excel and PowerPoint are opened. The
icon on the left is for converting files in these programs to PDF. (The icon in the middle converts
the file to PDF and automatically attaches it to an outgoing email message. The icon on the right
creates and PDF for review by others within an organization. These options will not work on our
public computers.)
Word – Open Word, then open the Word document to be converted. Click on the left Acrobat
icon in the toolbar. Save the file. (
the file can still be converted by going to File – Print, and choosing either Acrobat Distiller or
Acrobat PDFWriter as the “printer”. Then click OK and save the file when prompted.)
Note: If the Acrobat icons do not appear on the Word toolbar,
Excel – Open Excel, then open the Excel document to be converted. Click on the left Acrobat
icon in the toolbar. Save the file. If the Excel workbook has multiple sheets, repeat this process
with each sheet to be converted. (If you would rather convert the entire workbook, go to the
Adobe PDF menu in Excel (next to Help) and select this from the options.)
PowerPoint – Open PowerPoint, then open the PowerPoint document to be converted. Click on
the left Acrobat icon in the toolbar. Save the file.
Adobe Acrobat 7.doc Last Update: 8/12/2005
©Arizona Board of Regents
 Loading...