

Page 1
General Safety Guidelines to
Follow When Working on Vehicles
To prevent accidents that could result in serious injury and/or
damage to your vehicle or test equipment, carefully follow
these safety rules and test procedures at all times when
working on vehicles:
DO NOT use Model KM2529 Fuel
Pressure Tester on Diesel or Flex
Fuel engines!
Always wear approved eye protec-
tion.
Always operate the vehicle in a well-
ventilated area. Do not inhale exhaust gases they are very poison-
ous!
Always keep yourself, tools and test
equipment away from all moving or
hot engine parts.
Always make sure the vehicle is in
Park (Automatic transmission) or
Neutral (manual transmission) and
that the parking brake is firmly set.
Block the drive wheels.
Never lay tools on vehicle battery.
You may short the terminals together
causing harm to yourself, the tools
or the battery.
Never smoke or have open flames
near vehicle. Vapors from gasoline
and charging battery are highly flammable and explosive.
Never leave vehicle unattended
while running tests.
Always keep a fire extinguisher suit-
able for gasoline/electrical/chemical
fires handy.
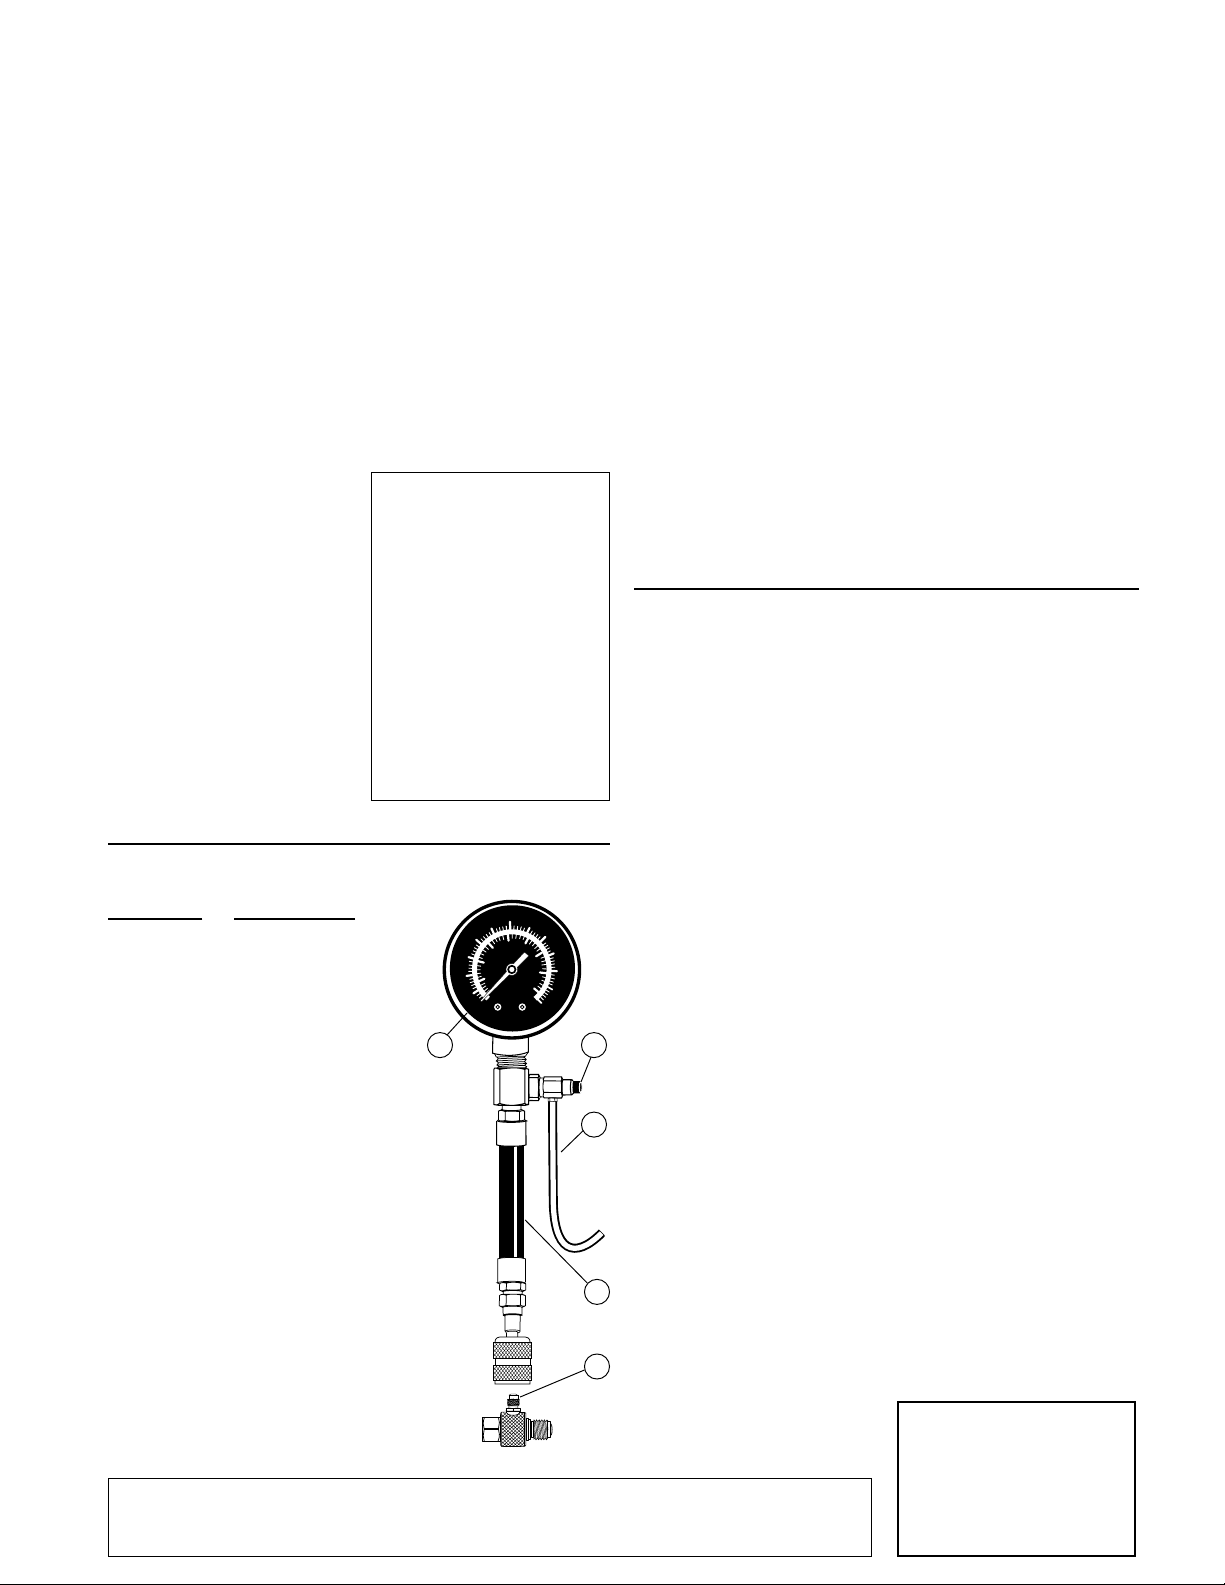
KM2529 Components
Part Number Part Description
0180-000-1320 GM TBI adapter, M16 x 1.5
0032-000-0126 42 in. hose, gauge connector
0031-000-0355 Fuel Pressure Gauge,
1.Dial Face: Measurement scale that shows
amount of fuel pressure present in fuel system.
2. Pressure Relief Button: Used to relieve
fuel pressure in the gauge hose before
disconnecting the gauge from the fuel line.
3.
Bleed-Off Hose:
fuel pressure when the pressure relief button is
pressed. Never use a bleed-off hose shorter than
6 ft.
IMPORTANT: Always make sure end of bleed-off
hose is in an approved fuel container during
testing and when bleeding off fuel pressure!
4. Gauge Hose: Hose that carries fuel to the
gauge so that pressure can be measured.
5. GM TBI Test Adapter: This adapter is used
to connect the gauge hose to GM TBI vehicles
NOT equipped with a fuel access valve test port
on the fuel rail.
All information, illustrations and specifications contained in this manual are based on the latest information available from industry
sources at the time of publication. No warranty (expressed or implied) can be made for its accuracy or completeness, nor is any responsibility assumed by Actron Manufacturing Co. or anyone connected with it for loss or damages suffered through reliance on any information contained in this manual or misuse of accompanying product. Actron Manufacturing Co. reserves the right to make changes at any
time to this manual or accompanying product without obligation to notify any person or organization of such changes.
fitting with pressure relief
button, and 72 in. plastic
tubing (bleed-off hose)
0-60 psi
A 6-ft. hose that bleeds off
Always use extreme caution when
working around the ignition coil, distributor cap, ignition wires, and
spark plugs. These components
contain high voltage when the engine is running.
Always turn ignition key OFF when
connecting or disconnecting electrical components, unless otherwise
instructed.
Always follow vehicle manu-
facturers warnings, cautions and
service procedures.
CAUTION:
Some vehicles are equipped
with safety air bags. You must
follow vehicle service manual
cautions when working
around the air bag components or wiring. If these precautions are not followed, the
air bag may deploy unexpectedly, resulting in personal injury. Note that the air bag can
still deploy several minutes
after the ignition key is off (or
even if the vehicle battery is
disconnected) because of a
special energy reserve module.
Figure 1
30
20
100
10
psi
40
200
300
50
400
kPa
60
1
Vehicle Service Information
The following is a list of publishers
who have manuals containing fuel
system testing information. Some
manuals may be available at auto
parts stores or your local public library.
For others, you need to write for availability and pricing, specifying the
make, model and year of your vehicle.
Vehicle Service Manuals
from General Motors Corp.:
Buick, Cadillac, Chevrolet, GEO,
GMC, Oldsmobile, & Pontiac
Helm Incorporated
Post Office Box 07130
Detroit, MI 48207
Saturn
Adistra Corporation
c/o Saturn Publications
101 Union St.
Post Office Box 1000
Plymouth, MI 48170
INITIAL CHECKS
Fuel System Checks
Before doing any fuel system pressure
testing, check the following fuel system components and correct any problems you may encounter:
1. Check fuel level and fuel tank venting (filler cap, etc.).
2. Check fuel for water or contamination.
3. Check fuel lines and hoses for damage or looseness.
4. Check fuel system electrical fuses.
Pre-Testing Checks
1. Read Safety Guidelines.
2. Do a thorough visual and handson inspection of the engine and
fuel system. Look for loose or
cracked electrical wiring, battery
cables, ignition wires, and fuel or
2
3
4
5
vacuum lines.
3. Verify that the battery is fully
charged and the fuel tank has an
adequate supply of fuel.
4. Verify that all fuel system fuses are
good.
5. Verify that the fuel vapor recovery
system and gas cap are in good
condition.
6. Verify that manifold vacuum is
within manufacturers specification
(typically 18-20 in. at idle).
7. Look for fuel leaks and wipe up any
spilled fuel immediately.
8. Has the vehicle been serviced
recently? Sometimes things get
reconnected in the wrong place, or
not at all.
Vehicle Service Manuals:
Chilton Book Company
Chilton Way
Radnor, PA 19089
Haynes Publications
861 Lawrence Drive
Newbury Park, CA 91320
Cordura Publications
Mitchell Manuals, Inc.
Post Office Box 26260
San Diego, CA 92126
Motor’s Auto Repair Manual
Hearst Company
250 W. 55th Street
New Y ork, NY 10019
Suitable manuals have titles such as:
“Electronic Engine Controls”
“Fuel Injection and Feedback
Carburetors”
“Fuel Injection and Electronic
Engine Controls”
9. Dont take shortcuts. Inspect wiring
which may be difficult to see
because of location beneath air
cleaner housings, alternators and
other components.
10. Inspect wiring harnesses for:
Contact with sharp edges (this
happens often).
Contact with hot surfaces, such
as exhaust manifolds.
Pinched, burned or chafed
insulation.
Proper routing and connections.
11. Check electrical connectors for:
Corrosion on pins.
Bent or damaged pins.
Contacts not properly seated in
housing.
NOTE: Problems with connectors
are common in the engine control
system. Inspect carefully. Note that
some connectors use a special
grease on the contact to prevent
corrosion. Do not wipe off! Obtain
extra grease, if needed, from your
vehicle dealer. It is a special type
for this purpose.
12. Check other vehicle systems:
IgnitionFor safety reasons,
most engine computers will not
deliver fuel without an ignition
spark.
Engine computerThe engine
computer has special drivers
which energize the fuel injectors.
These drivers are fragile and can
break easily. If you suspect a
computer driver problem, test by
replacing the computer with a
known good computer and retest.
One Year Warranty
If within one year from the date of purchase this equipment fails due to defect in materials or workmanship, return
it to Actron and Actron will repair it free
of charge.
This warranty gives you specific legal
rights, and you may also have other
rights which may vary from state to state.
Page 2
40
300
50
400
60
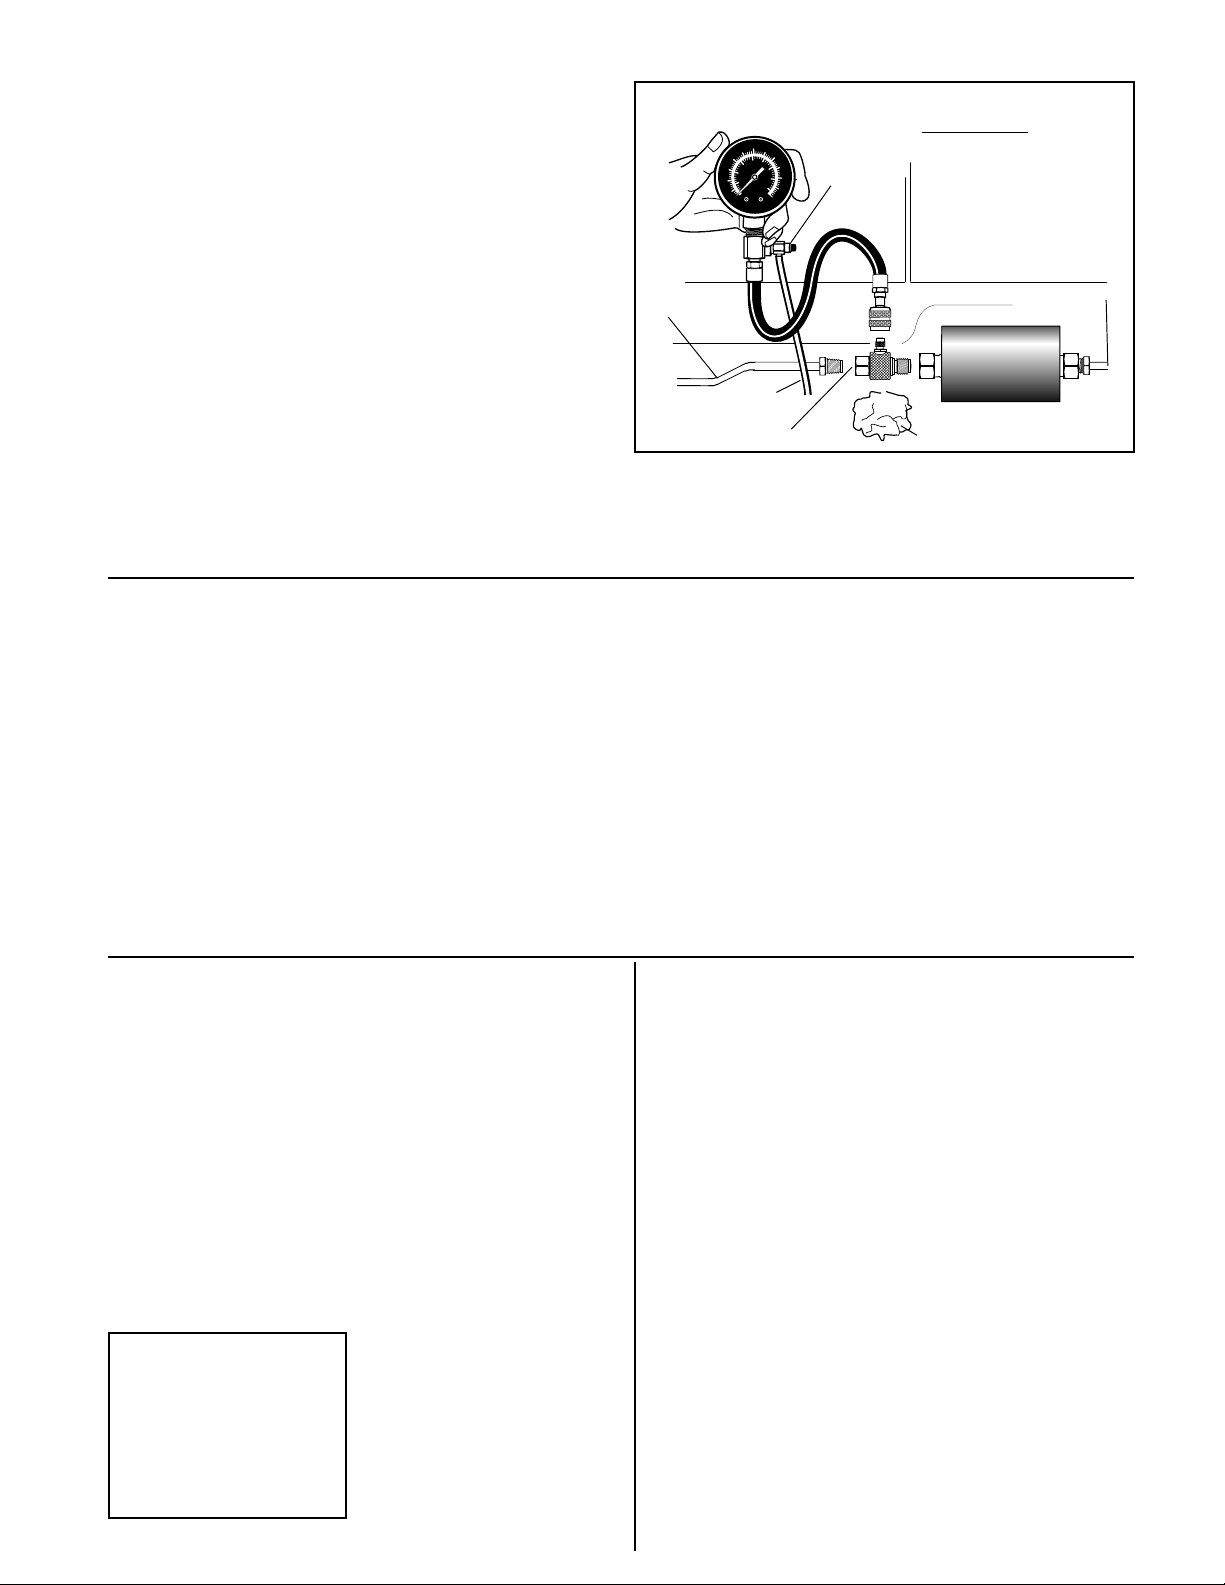
Figure 2
PRESSURE
RELIEF
BUTTON
INSTALLATION
For GM vehicles without a
fuel access valve test port
on the fuel rail:
When working on fuel system lines
and components, always make sure
to keep a dry chemical fire extinguisher ready. Never put water on a
fuel or electrical fire. Keep a supply of
clean dry shop towels handy to absorb
leaks and spills when disconnecting
fittings, lines, and hoses. Also have a
2-gallon or larger approved fuel container ready to collect fuel when testing or bleeding the fuel lines.
Install the fuel pressure tester as follows:
1. Relieve fuel system pressure by
following the instructions given in
the vehicle service manual. On
most vehicles this is done by
removing the fuel cap,
disconnecting or deactivating the
electric fuel pump(s), and running
the engine for about 30 seconds
until it stalls.
WARNING: Some vehicles may
have more than one fuel pump.
Failure to deactivate all fuel
pumps can result in spilled fuel,
fire, or other hazardous conditions that could cause vehicle
damage, personal injury, or
death.
CAUTION: The information provided here is not intended as a
substitute to the procedures
given in the vehicle service
manual. Always follow the
manufacturers instructions
when working on fuel systems.
2. At the location specified in vehicle
service manual, disconnect the fuel
line. Use a shop towel to catch any
released fuel. Figure 2 shows the
typical location at a fuel filter. If filter
is attached with a clamp, remove
the clamp and then remove the filter
if necessary. If the filter is dirty or is
suspect in any way, replace it.
3. Attach the special fuel tester
adapter to the fuel filter, and then
30
20
200
100
10
kPa
psi
FUEL LINE
from TANK
BLEED-OFF
HOSE
GM TBI ADAPTER
attach the fuel line to the adapter
as shown in Figure 2. Tighten all
fittings finger tight and then tighten
gently 1/2 turn with wrenches.
TESTING WITH THE FUEL SYSTEM TEST KIT
NOTE: Before beginning any testing, perform diagnostic procedures
described in vehicle service
manual to eliminate other possible
causes of driveability problem.
Compression and ignition problems may imitate fuel injection system problems.
Before proceeding with fuel pressure testing, read and understand
all safety guidelines and perform all
pre-testing checks.
1. Place end of 6-ft. bleed-off hose in
an approved fuel container. Bleedoff hose must remain in container
until testing is complete.
2. Turn all accessories OFF (i.e. ra-
dio, A/C, blower fan, headlights,
windshield wipers, etc.)
3. Turn ignition key ON.
Perform the following checks:
Pressurize fuel system by cycling
ignition ON and OFF every ten
seconds until fuel pressure is at
manufacturers specifications
(check vehicle service manual for
your particular application).
Check fuel system for leaks. If
leaks are found, turn ignition key
OFF and clean up fuel immedi-
ately!
If fuel pressure is not within
manufacturers specifications,
cycle ignition key 2 or 3 more
times. If fuel pressure is still not
within specification, service vehicle according to vehicle service
manual.
4. Start engine and let idle.
If test vehicles fuel system uses
a vacuum actuated
(compensated) fuel pressure
regulator, then fuel pressure
should drop 3-10 psi, depending
on manifold vacuum.
If test vehicles fuel system uses
a fuel pressure regulator without
a vacuum port, then fuel pressure
should remain constant during
both key-on-engine-off and idle.
CAUTION:
ALWAYS MAKE SURE
THAT BLEED-OFF HOSE
DRAINS INTO A
2-GALLON OR LARGER
APPROVED
CONTAINER!
FUEL LINE to
ENGINE
FUEL FILTER
SHOP TOWEL
4. Attach the 42-inch hose and pressure gauge assembly to adapter
top fitting and tighten fitting until finger tight.
• Read fuel pressure from dial
face.
• If fuel pressure is not within
manufacturer’s specification,
then service vehicle according to
vehicle service manual.
• When repair is complete and idle
fuel pressure is within
manufacturer’s specification,
then proceed to Step 5.
5. Turn ignition key OFF.
6. Disconnect fuel pressure gauge as
described in the following section.
DISCONNECTING FUEL
PRESSURE GAUGE
1. Verify that 6-ft. bleed-off hose is still
in an approved container for fuel.
2. Fully DEPRESS and HOLD the
pressure relief button until dial face
pointer is resting on stop pin.
CAUTION: Pressurized fuel will
spray out of bleed-off hose and into
approved container.
3. Shake bleed-off hose to make sure
that all fuel has gone into approved
container.
4. Remove gauge hose from fuel line
adapter fitting:
Wrap a shop rag around fuel line
adapter fitting in case a small
Customer Service
For product information or customer
service please call 1-800-ACTRON-7
(1-800-228-7667) or fax anytime at
(216) 651-2388.
For technical support call:
1-800-253-9880
Internet home page:
http://www.actron.com
amount of fuel drips out while
unscrewing test adapter.
Unscrew fuel pressure gauge
from fuel line adapter fitting.
Wrap a shop rag around end of
fuel pressure gauge hose to catch
any fuel dripping from hose.
Remove bleed-off hose from
approved fuel container and hold
gauge hose over container so any
remaining fuel will drip into
container.
5. After relieving fuel system pressure,
disconnect fuel line adapter and
reconnect fuel lines as described
in vehicle service manual. Use
correct fuel line fitting tools. Clean
up any spilled fuel immediately!
6. Store shop rags in an approved
container so they cannot cause
personal injury or a hazardous
situation.
7. Store fuel pressure gauge in a wellventilated area where it cannot
cause personal injury or a
hazardous situation.
GENERAL FUEL PRESSURE
DIAGNOSTICS
Checking fuel pressure is an essential part of fuel injection system
troubleshooting. High fuel pressure
will make an engine run rich, while
low fuel pressure will make an engine run lean or not at all. In some
cases, low fuel pressure can cause
additional damage such as burned
pistons, valves, spark plugs, or
blown head gaskets.
Fuel pressure readings which are
higher than manufacturers specifications are generally caused by a
problem in the fuel return line components. Conversely, fuel pressure
readings which are lower than
manufacturers specifications are
generally caused by a problem in
the fuel pressure line components.
If fuel pressure readings are not
within manufacturers specifications,
refer to a vehicle service manual for
step-by-step diagnostic procedures
which will pinpoint the faulty component for each specific vehicle.
Possible causes of high fuel
pressure readings may include:
Faulty fuel pressure regulator.
Restriction in fuel return line.
Faulty fuel line couplings at fuel
tank or fuel pickup.
Sticking or sluggish fuel
injectors.
Possible causes of low fuel pressure readings may include:
Clogged or restricted fuel filter.
Restriction in pressure line.
Faulty fuel pump(s).
Faulty fuel pump relay.
Blown fuel pump fuse.
Faulty fuel pump wiring.
Clogged or restricted fuel pump
filter.
Faulty fuel pressure regulator.
Leaking fuel injectors.
Faulty fuel line couplings at fuel
tank or fuel pickup.
0002-002-2350
 Loading...