

Page 1
Aastra Redirection and
Configuration Service (RCS)
User Guide
41-001302-01 Rev 00 – 06.2010
Page 2

Page 3

Content
Welcome. . . . . . . . . . . . . . . . . . . . . . . . . . . . . . . . . . . . . . . . . . . . . . . . . . . . . . . . . . . . . . . . . . . . . . . . . . . . . . . . . . . . . . . . . . . . . . . . . . . . . . . . .1
About this guide. . . . . . . . . . . . . . . . . . . . . . . . . . . . . . . . . . . . . . . . . . . . . . . . . . . . . . . . . . . . . . . . . . . . . . . . . . . . . . . . . . . . . . . . . . . . . 1
Audience . . . . . . . . . . . . . . . . . . . . . . . . . . . . . . . . . . . . . . . . . . . . . . . . . . . . . . . . . . . . . . . . . . . . . . . . . . . . . . . . . . . . . . . . . . . . . . . . . . . . 1
Documentation . . . . . . . . . . . . . . . . . . . . . . . . . . . . . . . . . . . . . . . . . . . . . . . . . . . . . . . . . . . . . . . . . . . . . . . . . . . . . . . . . . . . . . . . . . . . .1
Sections in this guide . . . . . . . . . . . . . . . . . . . . . . . . . . . . . . . . . . . . . . . . . . . . . . . . . . . . . . . . . . . . . . . . . . . . . . . . . . . . . . . . . . . . . . . . 2
Redirection and Configuration Service (RCS). . . . . . . . . . . . . . . . . . . . . . . . . . . . . . . . . . . . . . . . . . . . . . . . . . . . . . . . . . . . . 3
Introduction. . . . . . . . . . . . . . . . . . . . . . . . . . . . . . . . . . . . . . . . . . . . . . . . . . . . . . . . . . . . . . . . . . . . . . . . . . . . . . . . . . . . . . . . . . . . . . . . .3
Features . . . . . . . . . . . . . . . . . . . . . . . . . . . . . . . . . . . . . . . . . . . . . . . . . . . . . . . . . . . . . . . . . . . . . . . . . . . . . . . . . . . . . . . . . . . . . . . . . . . . 3
Redirection of the Aastra IP Phones. . . . . . . . . . . . . . . . . . . . . . . . . . . . . . . . . . . . . . . . . . . . . . . . . . . . . . . . . . . . . . . . . . . . . . . . . .3
Firmware Updates. . . . . . . . . . . . . . . . . . . . . . . . . . . . . . . . . . . . . . . . . . . . . . . . . . . . . . . . . . . . . . . . . . . . . . . . . . . . . . . . . . . . . . . . . . .4
RCS Boot Process . . . . . . . . . . . . . . . . . . . . . . . . . . . . . . . . . . . . . . . . . . . . . . . . . . . . . . . . . . . . . . . . . . . . . . . . . . . . . . . . . . . . . . . . . . .4
Benefits of Using the RCS . . . . . . . . . . . . . . . . . . . . . . . . . . . . . . . . . . . . . . . . . . . . . . . . . . . . . . . . . . . . . . . . . . . . . . . . . . . . . . . . . . . . 5
Using Basic RCS Features . . . . . . . . . . . . . . . . . . . . . . . . . . . . . . . . . . . . . . . . . . . . . . . . . . . . . . . . . . . . . . . . . . . . . . . . . . . . . . . . . . . . .6
Introduction. . . . . . . . . . . . . . . . . . . . . . . . . . . . . . . . . . . . . . . . . . . . . . . . . . . . . . . . . . . . . . . . . . . . . . . . . . . . . . . . . . . . . . . . . . . . . . . . .6
Logging into the RCS . . . . . . . . . . . . . . . . . . . . . . . . . . . . . . . . . . . . . . . . . . . . . . . . . . . . . . . . . . . . . . . . . . . . . . . . . . . . . . . . . . . . . . . .7
Adding a Configuration Server . . . . . . . . . . . . . . . . . . . . . . . . . . . . . . . . . . . . . . . . . . . . . . . . . . . . . . . . . . . . . . . . . . . . . . . . . . . . . . 8
Redirecting an IP Phone . . . . . . . . . . . . . . . . . . . . . . . . . . . . . . . . . . . . . . . . . . . . . . . . . . . . . . . . . . . . . . . . . . . . . . . . . . . . . . . . . . . . .9
Logging Out. . . . . . . . . . . . . . . . . . . . . . . . . . . . . . . . . . . . . . . . . . . . . . . . . . . . . . . . . . . . . . . . . . . . . . . . . . . . . . . . . . . . . . . . . . . . . . . 15
Managing Your Account. . . . . . . . . . . . . . . . . . . . . . . . . . . . . . . . . . . . . . . . . . . . . . . . . . . . . . . . . . . . . . . . . . . . . . . . . . . . . . . . . . . . 16
Introduction. . . . . . . . . . . . . . . . . . . . . . . . . . . . . . . . . . . . . . . . . . . . . . . . . . . . . . . . . . . . . . . . . . . . . . . . . . . . . . . . . . . . . . . . . . . . . . . 16
Changing User Preferences. . . . . . . . . . . . . . . . . . . . . . . . . . . . . . . . . . . . . . . . . . . . . . . . . . . . . . . . . . . . . . . . . . . . . . . . . . . . . . . . 17
Changing User Passwords . . . . . . . . . . . . . . . . . . . . . . . . . . . . . . . . . . . . . . . . . . . . . . . . . . . . . . . . . . . . . . . . . . . . . . . . . . . . . . . . . 18
Managing Users and Super Users (applicable to Super User only) . . . . . . . . . . . . . . . . . . . . . . . . . . . . . . . . . . . . . . . . . . 19
Managing Configuration Server Names and Addresses . . . . . . . . . . . . . . . . . . . . . . . . . . . . . . . . . . . . . . . . . . . . . . . . . . . . 22
Aastra IP Phones and the RCS . . . . . . . . . . . . . . . . . . . . . . . . . . . . . . . . . . . . . . . . . . . . . . . . . . . . . . . . . . . . . . . . . . . . . . . . . . . . . 25
Introduction. . . . . . . . . . . . . . . . . . . . . . . . . . . . . . . . . . . . . . . . . . . . . . . . . . . . . . . . . . . . . . . . . . . . . . . . . . . . . . . . . . . . . . . . . . . . . . . 25
Supported Models. . . . . . . . . . . . . . . . . . . . . . . . . . . . . . . . . . . . . . . . . . . . . . . . . . . . . . . . . . . . . . . . . . . . . . . . . . . . . . . . . . . . . . . . . .25
IP Phone MAC addresses. . . . . . . . . . . . . . . . . . . . . . . . . . . . . . . . . . . . . . . . . . . . . . . . . . . . . . . . . . . . . . . . . . . . . . . . . . . . . . . . . . . .26
Managing IP Phones . . . . . . . . . . . . . . . . . . . . . . . . . . . . . . . . . . . . . . . . . . . . . . . . . . . . . . . . . . . . . . . . . . . . . . . . . . . . . . . . . . . . . . .26
41-001302-01 Rev 00 – 06.2010 iii
Page 4

Content
Aastra IP Phone Brandings. . . . . . . . . . . . . . . . . . . . . . . . . . . . . . . . . . . . . . . . . . . . . . . . . . . . . . . . . . . . . . . . . . . . . . . . . . . . . . . . . . . .35
Introduction. . . . . . . . . . . . . . . . . . . . . . . . . . . . . . . . . . . . . . . . . . . . . . . . . . . . . . . . . . . . . . . . . . . . . . . . . . . . . . . . . . . . . . . . . . . . . . . . . .35
Types of Branding Files (applicable to a Super User only) . . . . . . . . . . . . . . . . . . . . . . . . . . . . . . . . . . . . . . . . . . . . . . . . . . . . .35
Verification of Branding Files (applicable to a Super User only) . . . . . . . . . . . . . . . . . . . . . . . . . . . . . . . . . . . . . . . . . . . . . . .39
Uploading Branding Sets (applicable to a Super User only) . . . . . . . . . . . . . . . . . . . . . . . . . . . . . . . . . . . . . . . . . . . . . . . . . . .39
Assigning Branding Sets to Phones . . . . . . . . . . . . . . . . . . . . . . . . . . . . . . . . . . . . . . . . . . . . . . . . . . . . . . . . . . . . . . . . . . . . . . . . . . .42
Setting Default Branding . . . . . . . . . . . . . . . . . . . . . . . . . . . . . . . . . . . . . . . . . . . . . . . . . . . . . . . . . . . . . . . . . . . . . . . . . . . . . . . . . . . . .46
Aastra IP Phone Firmware. . . . . . . . . . . . . . . . . . . . . . . . . . . . . . . . . . . . . . . . . . . . . . . . . . . . . . . . . . . . . . . . . . . . . . . . . . . . . . . . . . . . .47
Introduction. . . . . . . . . . . . . . . . . . . . . . . . . . . . . . . . . . . . . . . . . . . . . . . . . . . . . . . . . . . . . . . . . . . . . . . . . . . . . . . . . . . . . . . . . . . . . . . . . .47
Assigning Firmware to Phones. . . . . . . . . . . . . . . . . . . . . . . . . . . . . . . . . . . . . . . . . . . . . . . . . . . . . . . . . . . . . . . . . . . . . . . . . . . . . . . .48
Setting Default Firmware (Global Feature) . . . . . . . . . . . . . . . . . . . . . . . . . . . . . . . . . . . . . . . . . . . . . . . . . . . . . . . . . . . . . . . . . . .54
Index . . . . . . . . . . . . . . . . . . . . . . . . . . . . . . . . . . . . . . . . . . . . . . . . . . . . . . . . . . . . . . . . . . . . . . . . . . . . . Index-1
iv 41-001302-01 Rev 00 – 06.2010
Page 5

Welcome
Welcome
The Aastra Redirection and Configuration Service (RCS) is a service that offers touchless deployment, firmware
control, and branding of Aastra IP Phones. Aastra’s RCS eases the issues Service Providers face with mass deployments. By simply entering the MAC address of a SIP phone into Aastra’s Global RCS server, upon initial boot-up, a
phone can be loaded with the proper pre-determined firmware version, then routed to its assigned server for configuration.
About this guide
This Aastra Redirection Service Guide provides information on the basic setup, operation, and maintenance of the Aastra
Redirection Service for all models of Aastra IP phones. It also includes details on the configuration of IP phones using the
Aastra Redirection Service.
Audience
This guide is for distributors, deployers, service technicians, Users and Super Users of Aastra IP phone products who configure and manage phones, servers, and accounts.
This guide contains information that is at a technical level, more suitable for system or network administrators. Prior
knowledge of IP Telephony concepts is recommended.
Note:
For information and procedures for an RCS Administrator, see the Aastra Redirection and Configuration Service (RCS)
Administrator Guide which contains Administrator-only information.
Documentation
The related RCS documentation consists of:
• Aastra Redirection and Configuration Service (RCS) Administrator Guide - contains Administrator-only information
and procedures for maintaining and managing the RCS.
• Latest Aastra Redirection and Configuraiton Service (RCS) Release Notes - contains up-to-date information on new
features, issues resolved, and known issues pertaining to the RCS.
The related IP phone documentation consists of:
• <Model-specific> SIP IP Phone Installation Guide – contains installation and set-up instructions, information on gen-
eral features and functions, and basic options list customization. Included with the phone.
• Model 9xxxi and 67xxi SIP IP Phone Administrator Guide – explains how to set the phone up on the network, as well
as advanced configuration instructions for the SIP IP phone. This guide contains information that is at a technical level
more suitable for a system or network administrator. ‘
• <Model-specific> SIP IP Phone User Guides – explains the most commonly used features and functions for an end user.
This guide complements the Aastra product-specific Installation Guide and the Aastra product-specific User Guide.
41-001302-01 Rev 00 – 06.2010 1
Page 6

Welcome
Sections in this guide
This guide contains the following sections:
For Go to
Overview of the Aastra Redirection Service “Redirection and Configuration Service (RCS)” on page 3
Aastra IP Phones and the RCS “Aastra IP Phones and the RCS” on page 25
Aastra IP Phone branding information (configurable by Super User only) “Aastra IP Phone Brandings” on page 35
Aastra IP Phone firmware information “Aa str a IP Pho ne Fir mware” o n pa ge 4 7
2 41-001302-01 Rev 00 – 06.2010
Page 7

Redirection and Configuration Service (RCS)
Redirection and Configuration Service (RCS)
Introduction
This section provides an overview of the Redirection and Configuration Service (RCS) features, as well as basic operating
procedures.
Features
The Aastra Redirection and Configuration Service (RCS) is a service that offers Service Providers the option of auto-configuring the Aastra IP Phones when they are first powered up. Service providers can choose to redirect the phones to their
own configuration server, “soft” brand the phone and Web user interface (UI), and use the RCS to send firmware and/or
branding information to the phones. This service can prevent the end-user customers from manually configuring their
Aastra IP phones in the field upon first bootup or any time thereafter.
On the first bootup, the supported Aastra IP phones contact the RCS over the internet using HTTPS and certificate validation. If the phone’s MAC address is already registered on the RCS, the phone downloads any files specified by the server.
The end user does not need to manually configure the phone, simplifying the set-up of the phones in the network.
Using the RCS, Service Providers can simplify the configuration and maintenance of the end-user phones by pre-configuring them to access the RCS automatically after the end-user plugs in the phone at their location. Phone users no longer
need to download the latest firmware file manually or enter the address of the Service Provider’s configuration server
using the phone’s user interface. Configuration of the Aastra IP phones deployed in the field becomes an automated process.
Note:
The branding features can be created/edited by a Super User only. A User can load the pre-configured branding files to
the phone(s) as applicable but cannot edit or change the branding information.
Redirection of the Aastra IP Phones
The core feature of the RCS is to redirect unconfigured phones to configuration servers that provide the configuration to
the phones, allowing the end-user a plug-and-play provisioning capability. When the Aastra IP Phone is plugged in and
boots up for the first time, it contacts the RCS which then redirects the phone to the Service Provider’s configuration
server.
A phone only contacts the RCS during initial phone setup (factory default state), or when the local phone settings are reset
to the factory default. The IP Phone requirements for contacting the RCS are as follows:
• Must be loaded with Aastra IP Phone Release 2.4 or above
• Must have NO configuration loaded at all on first-time startup
If a factory default occurs on the phone, the phone attempts to contact the RCS automatically to request a configuration.
The following illustration shows the Aastra RCS process flow.
41-001302-01 Rev 00 – 06.2010 3
Page 8
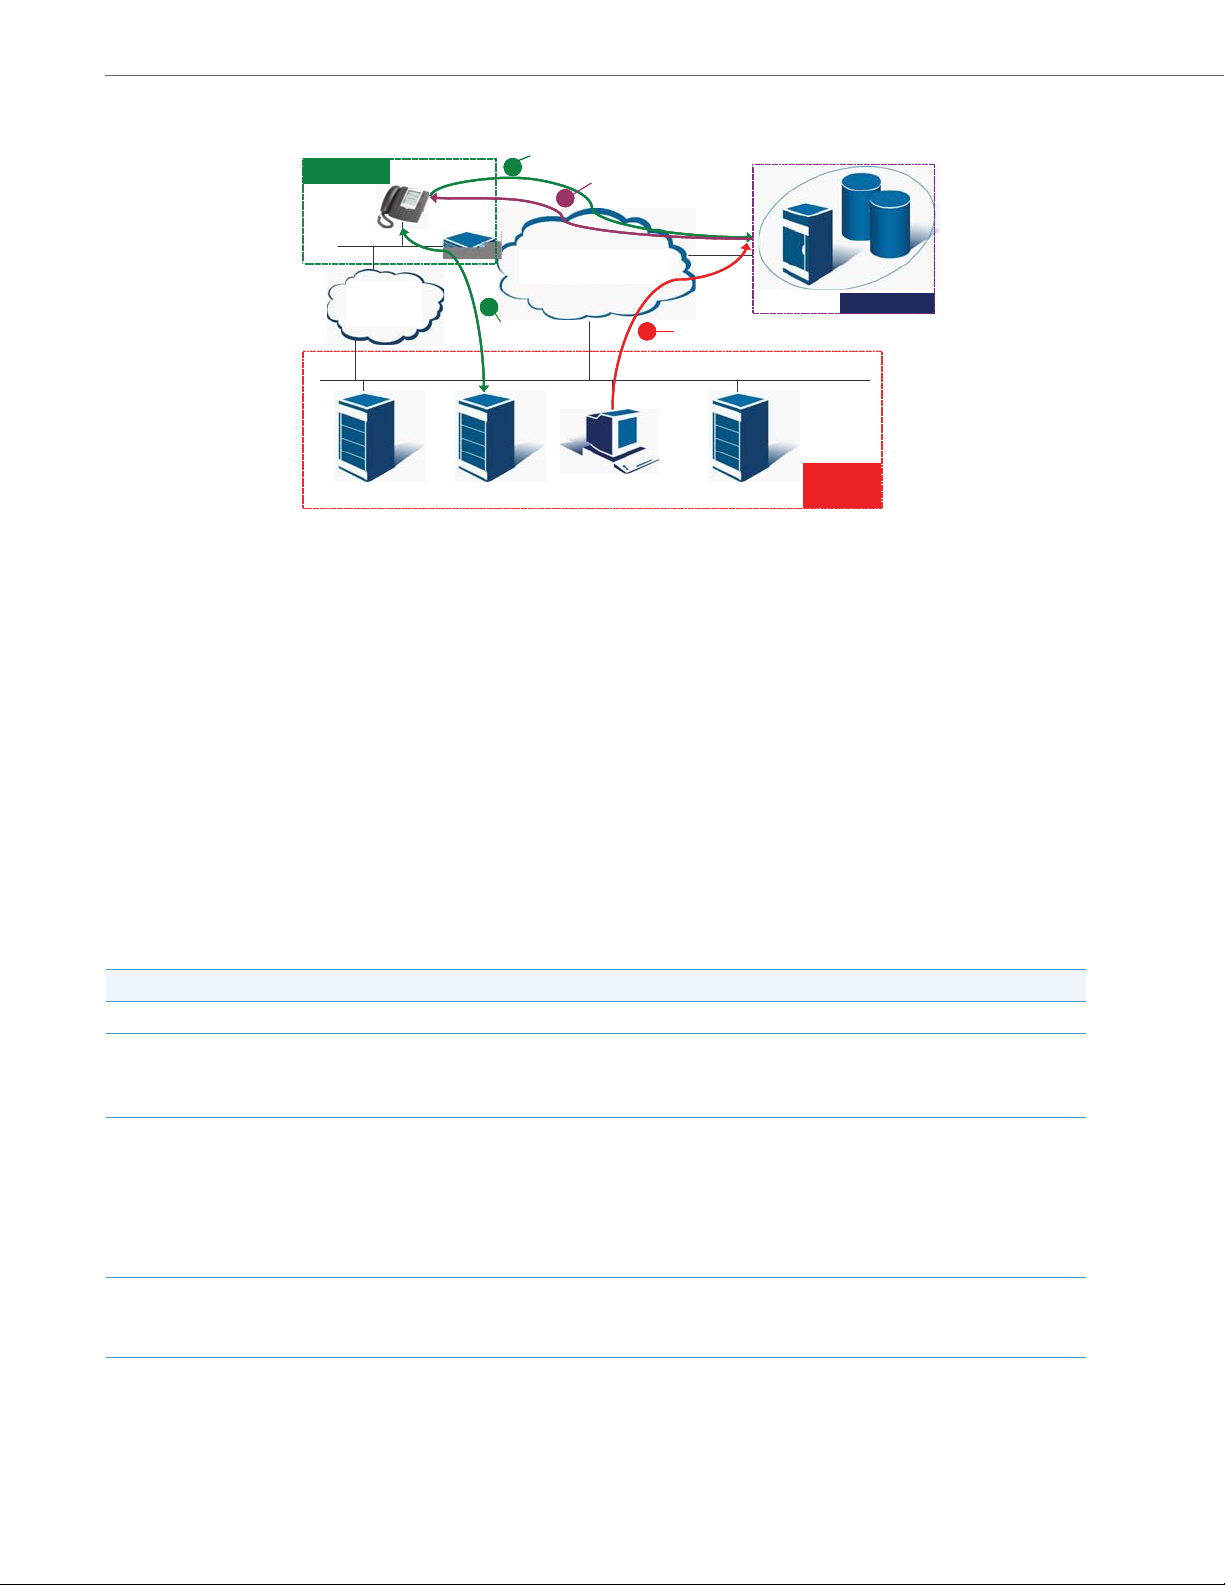
Redirection and Configuration Service (RCS)
RCS servers
Service
Provider
Customer
Configuration Server
Pro visio nin g
Back-Office
INTERNET
11
1
22
2
44
4
33
Ma na ged
Network
MAC Address registration on RCS
Phone contacts RCS during first boot
Ze r o t ou c h config
Config Server info is
provided to phone
Aastra RCS Process Flow
For more information about setting configuration servers for the phones using the RCS, see “Redirecting an IP Phone” on
page 9.
Firmware Updates
Optionally, new firmware files can be sent to the phones using the RCS. When a phone starts up, it contacts the RCS. The
RCS downloads any firmware files specified under the phone’s MAC address.
Service providers using specific firmware versions can upgrade or downgrade the phone firmware either from a configuration server or directly from the RCS, ensuring new phones receive updates immediately on initial installation.
For more information about firmware updates for the phones on the RCS network, see “Aastra IP Phone Firmware” on
page 47.
RCS Boot Process
When a phone with default factory settings starts up, it runs through a series of initialization steps. The first step in the
phone initialization process is to contact the RCS over the Internet.
Once the phone has connected to the RCS, it does the following:
IF THEN
a branding file(s) is set on the RCS and assigned to the phone, the RCS downloads the branding file(s) to the phone.
a Service Provider configuration server is set on the RCS and
assigned to the phone,
firmware updates are available for the phone, AND/OR the phone
has a different firmware file then the RCS,
configuration files and language files are available for the phone on
the configuration server,
the phone sets the configuration server to the specified address.
For more information about setting configuration servers for the Aastra IP
Phones using the RCS, see “Redirecting an IP Phone” on page 9.
the RCS downloads the firmware that is set for the phone. The phone reboots,
restarting the initialization process.
Note: The RCS can downgrade or upgrade firmware on a phone, depending
on how it is set for that phone on the RCS.
For more information about firmware updates for the Aastra IP Phones using
the RCS, see “Aastra IP Phone Firmware” on page 47.
the phone contacts the RCS and the RCS redirects the phone to the configuration serve. The configuration server then downloads the configuration files
and language files to the phone according to the download precedence
described in the Models 6700i and 9000i SIP IP Phone Administrator Guide.
4 41-001302-01 Rev 00 – 06.2010
Page 9

Redirection and Configuration Service (RCS)
Benefits of Using the RCS
The benefits of using the RCS vary depending on the configuration process you currently follow for your Aastra IP Phones.
• Automate redirection on initial bootup:
Users benefit from a plug-and-play phone.
• Update configuration server information for all new phones across the board:
New phones not yet installed can be updated regardless of their location.
• “Soft” brand the phone and Web UI:
Promotes the brand and simplifies support and sales contact .
Note:
The branding features can be created/edited by a Super User only. A User can load the pre-configured branding files to
the phone(s) as applicable but cannot edit or change the branding information.
41-001302-01 Rev 00 – 06.2010 5
Page 10
Using Basic RCS Features
Using Basic RCS Features
Introduction
The RCS Web UI allows Service Providers to log in, add the MAC addresses of their Aastra IP phones, and redirect the
phones to a specified server. The redirection takes effect when the phones first bootup, and again whenever the factory
default settings are restored. A User or Super User can set up the RCS to perform branding, download firmware, and/or
redirect the phones to a configuration server.
The following table identifies the functions for a User and Super User.
Func tion User Super User
General
Display a summary of current RCS statistics
Set preferences for your account (assign name, address, and up to 2 phone numbers associated with your
account (i.e., home number, cell number)
Change password for your account
Add a configuration server(s) to the RCS
Add phone(s) to the RCS (by MAC number)
Add User(s) to the RCS -
Create/edit branding file(s) and upload to RCS -
Create/edit default branding file(s) and upload to RCS -
RCS to Phone
Assign and download branding file(s) or default branding file(s) to phone(s)
Assign and download firmware version to phone(s)
Assign and download configuration server information to phone(s)
Phone to RCS
Register phone(s) that are unregistered to RCS
Assign branding file(s) to a phone(s) and upload to RCS
Assign firmware version to a phone(s) and upload to RCS
Assign configuration server information to a phone(s) and upload to RCS
For more information about Users and Super Users, see “User Types” on page 7.
The remainder of this User Guide describes these processes and provides procedures to perform these functions. Since
the User screens are a subset of the Super User screens, only the Super User screens have been used as examples in the
procedures that follow.
6 41-001302-01 Rev 00 – 06.2010
Page 11
Using Basic RCS Features
User Screen
Superuser Screen
Service Provider Account Name
User Screen
Super User Screen
Logging into the RCS
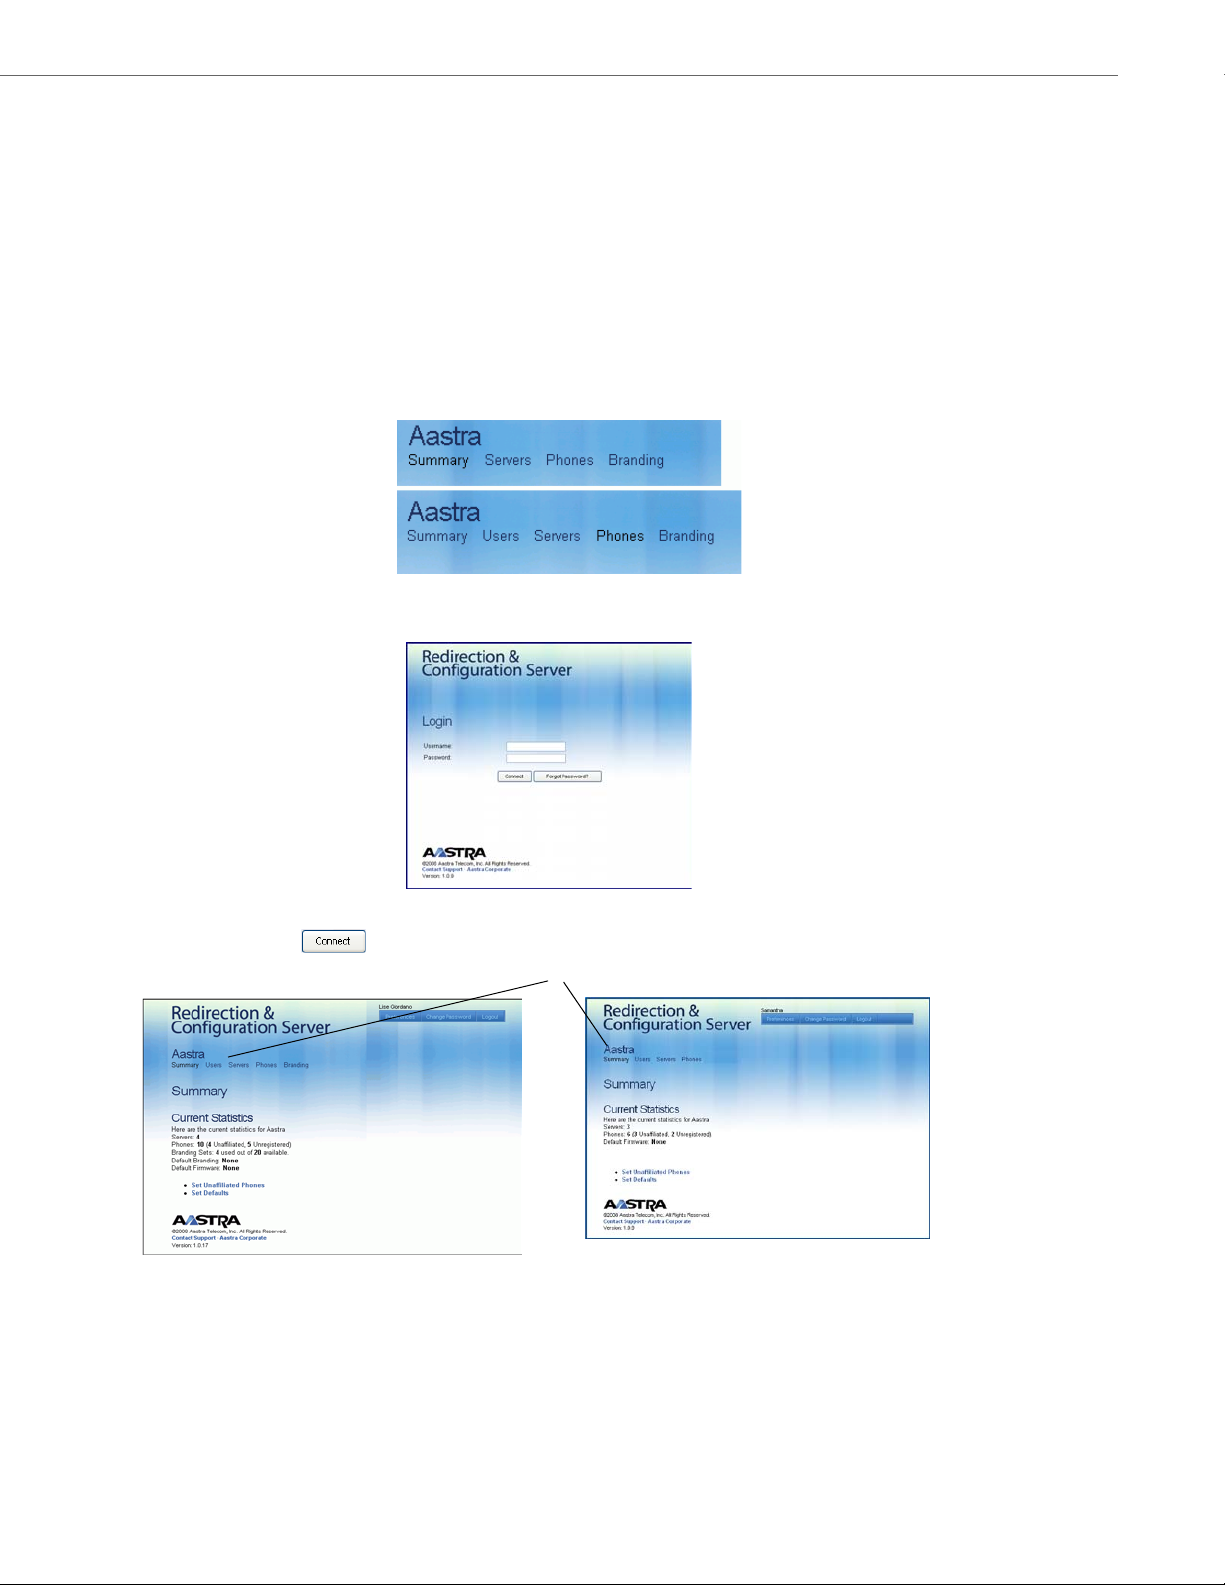
This section provides information about logging into the RCS as a User or as a Super User.
User Types
For added security, accounts on the RCS allow Service Providers two levels of access:
• Users - Full access to the Service Provider account. However, a User cannot add, change, or delete accounts for other
Users or Super Users. Users can assign branding files to a specific phone(s), but cannot create/edit branding files. Users
also cannot change their usernames.
• Super Users - Full access to the Service Provider account including adding, changing, and deleting accounts for Users
and Super Users. Super Users can create/edit branding files. Super Users cannot change their usernames.
A User and Super User can access the RCS via a Web user interface (UI). A User must be assigned a Username and Password
by the Super User, and use these credentials to login to the RCS Web UI.
When you are logged in to the RCS, you can identify your user type by looking at the menu options below your service
provider account name.
To login to the RCS Web UI:
1. In the address bar of your web browser, type https://rcs.aastra.com and press <Enter>. The Login page displays.
2. Enter the username (email address) and password provided to you by Aastra Telecom or your System Administrator
(Super User) and click to continue. The Summary page for your Service Provider account displays.
You are now logged in to the RCS.
Note: If you forget your password, you can enter your user name and click the <Forgot Password?> button on the
Login page. A password recovery email with a link to the password change page is sent to the email of the User.
(Email address for the User is the same as the “Username” on the Login page.)
41-001302-01 Rev 00 – 06.2010 7
Page 12
Using Basic RCS Features
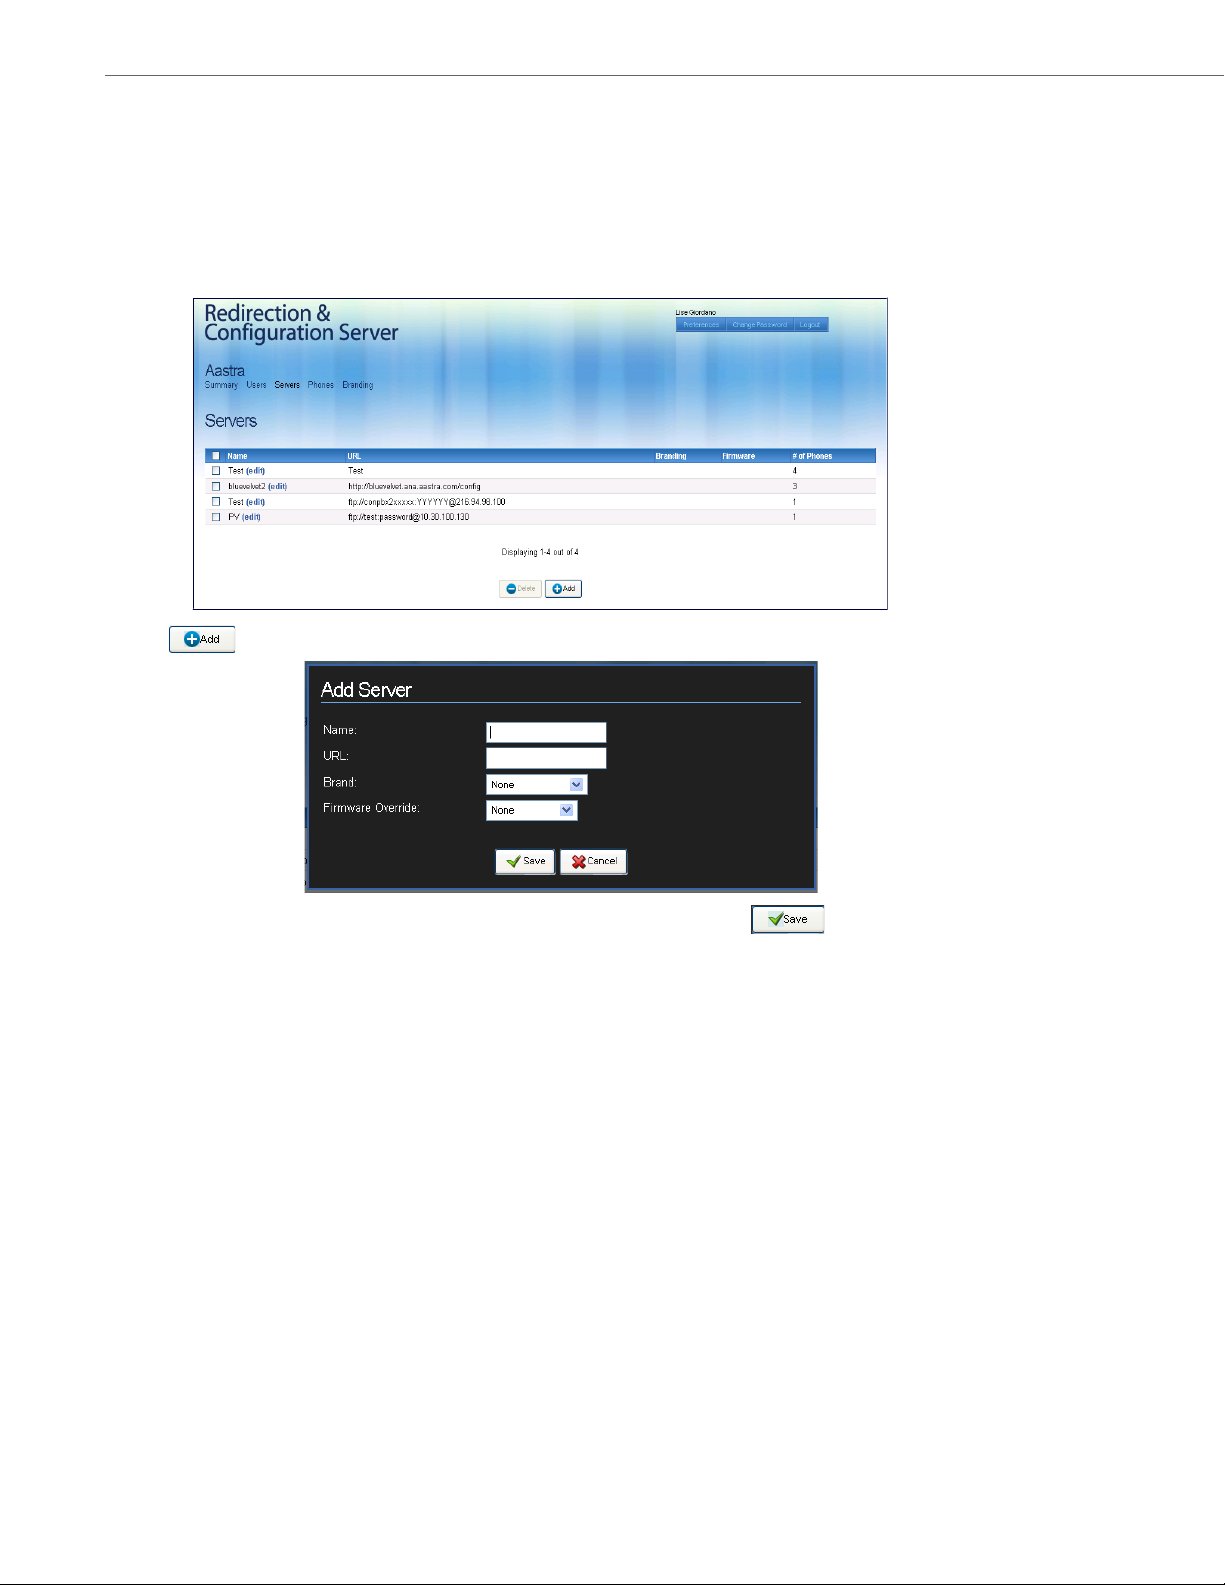
Adding a Configuration Server
Before a phone can be redirected to a specific configuration server, the server address must be added to the RCS.
To add a configuration server address to the RCS:
1. Login to the RCS. (See “Logging into the RCS” on page 7 for more information.)
2. Click Servers on the top menu. The Servers page displays.
3. Click
4. Enter the configuration Server name and Server URL in the applicable fields and click to add your server.
URLs can be any of the following types:
– tftp://MyServer.com
– ftp://MyServer.com
– http://MyServer.com
– https://MyServer.com
Note: The configuration server name can be up to 20 characters long and the URL can be up to 255 characters
long (entries longer than these maximums will be truncated).
The Server page displays, showing a list of all configuration servers including the server you have added.
to add a configuration server. The Add Server dialog displays.
References
For more information about managing configuration servers, see “Managing Configuration Server Names and
Addresses” on page 22.
8 41-001302-01 Rev 00 – 06.2010
Page 13
Using Basic RCS Features
Set Unaffiliated
Phones
Redirecting an IP Phone
Your phones need to be added and registered to the configuration server before the RCS can redirect a phone to that
server.
For more information about adding configuration servers, see “Adding a Configuration Server” on page 8.
Redirecting a Phone to a Configuration Server
If your phone or phones have already been added to the RCS, you can choose the configuration server for which the individual phones redirect to when they first bootup.
To redirect your phone(s) to a configuration server:
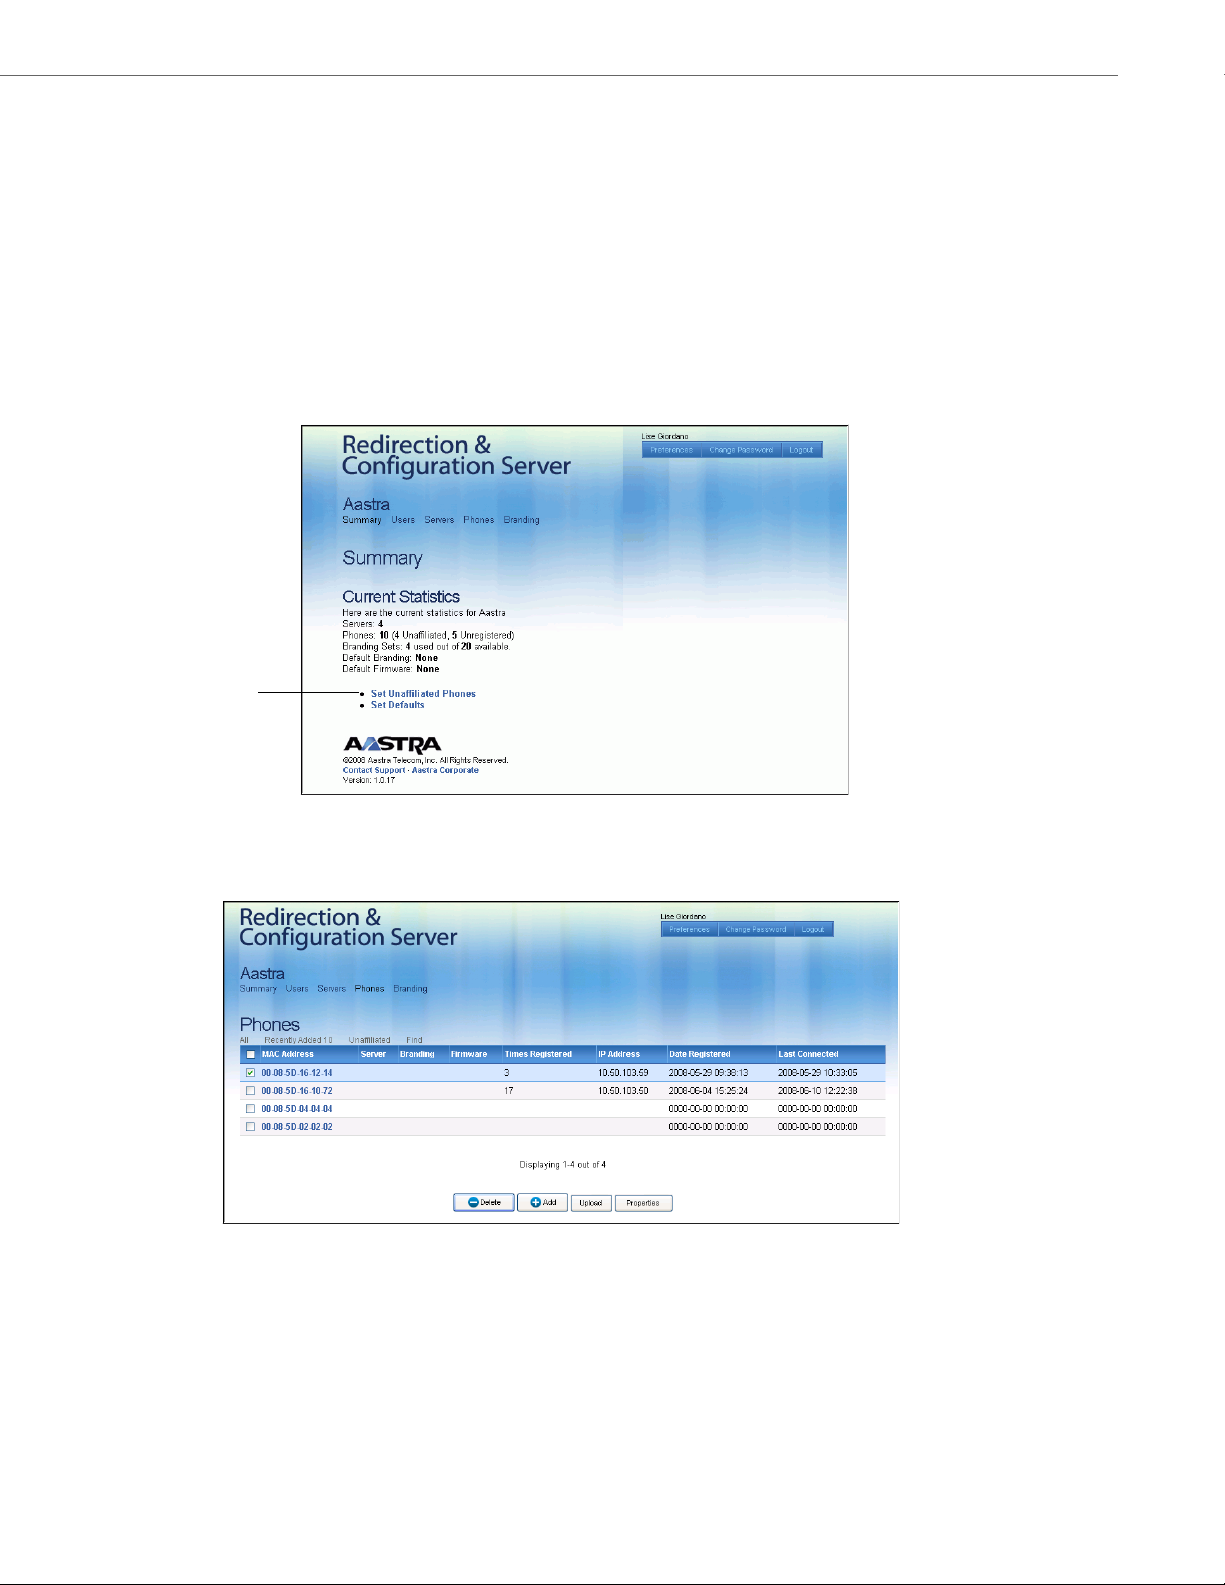
1. Login to the RCS. (See “Logging into the RCS” on page 7 for more information.) The Summary page displays..
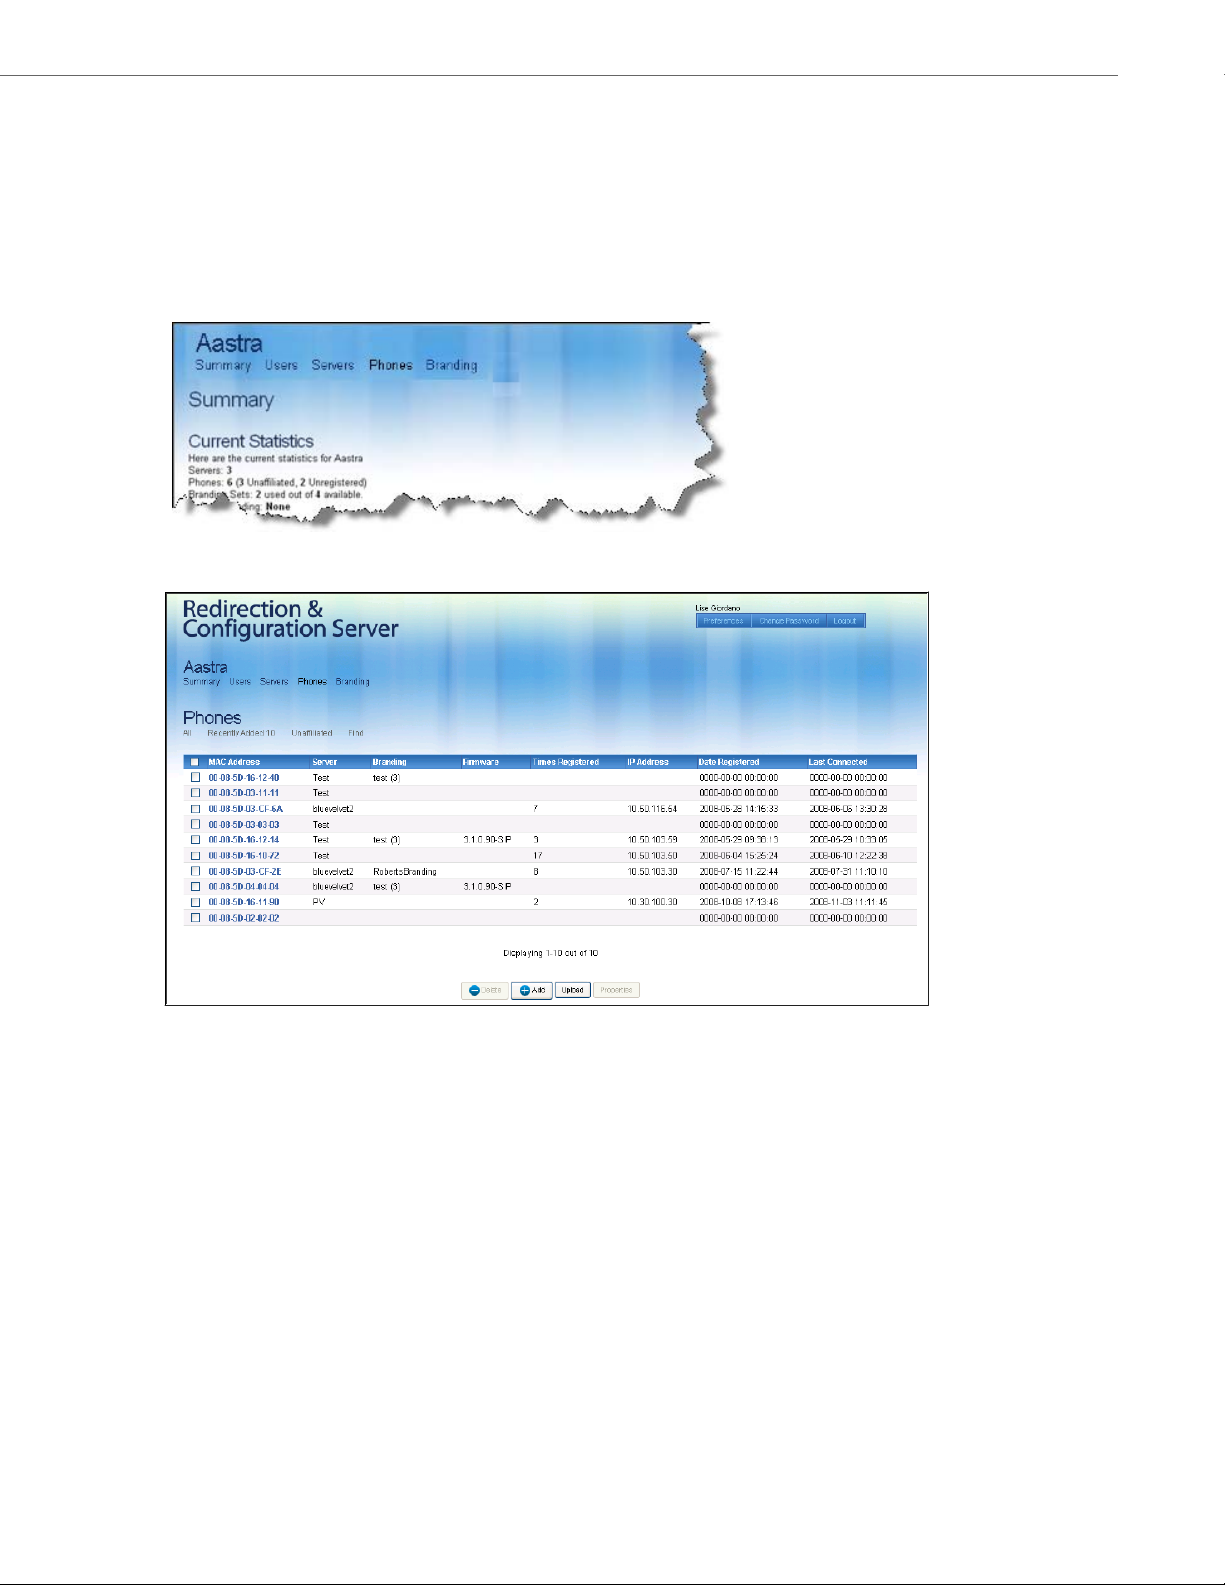
2. Under the Current Statistics section, click Set Unaffiliated Phones. The Phones page displays. This page shows
a list of all unregistered phones.
3. To select a specific phone to redirect, click the check box in the
MAC Address column for that phone. To select all phones, click the MAC Address check box.
41-001302-01 Rev 00 – 06.2010 9
Page 14
Using Basic RCS Features
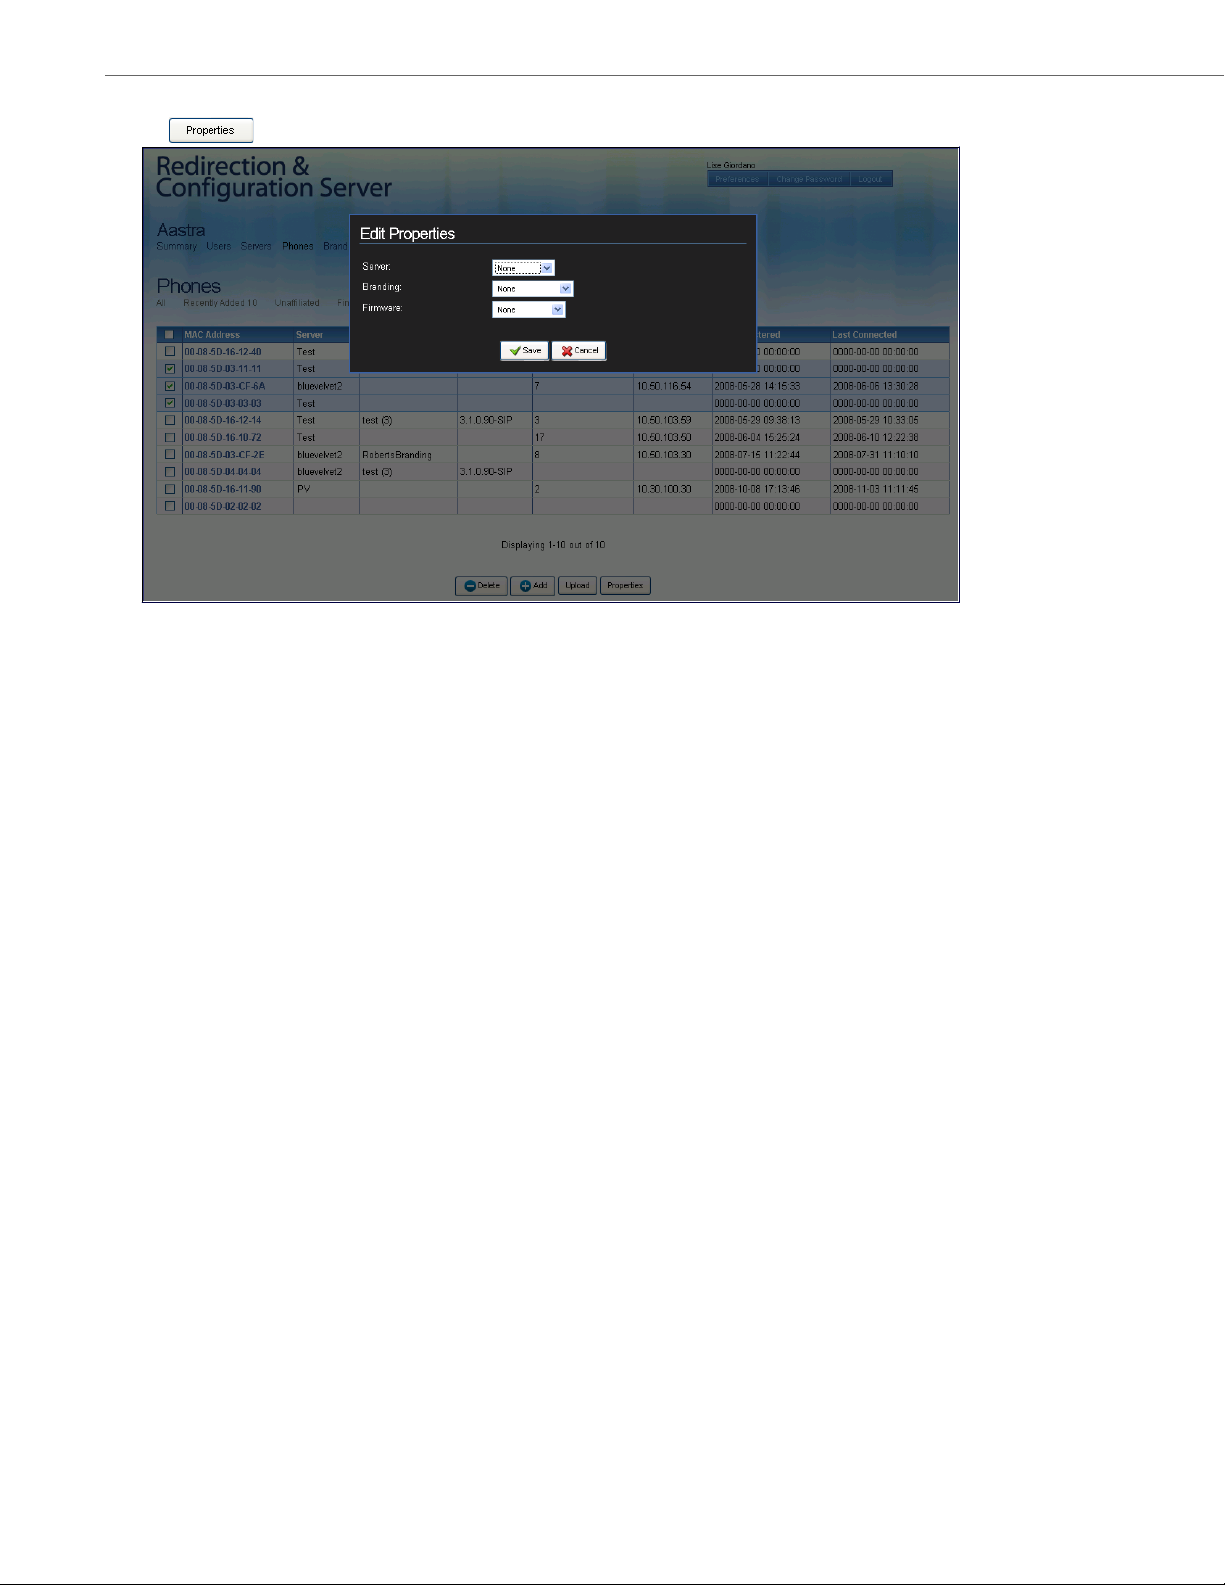
4. Click . The Edit Properties dialog displays.
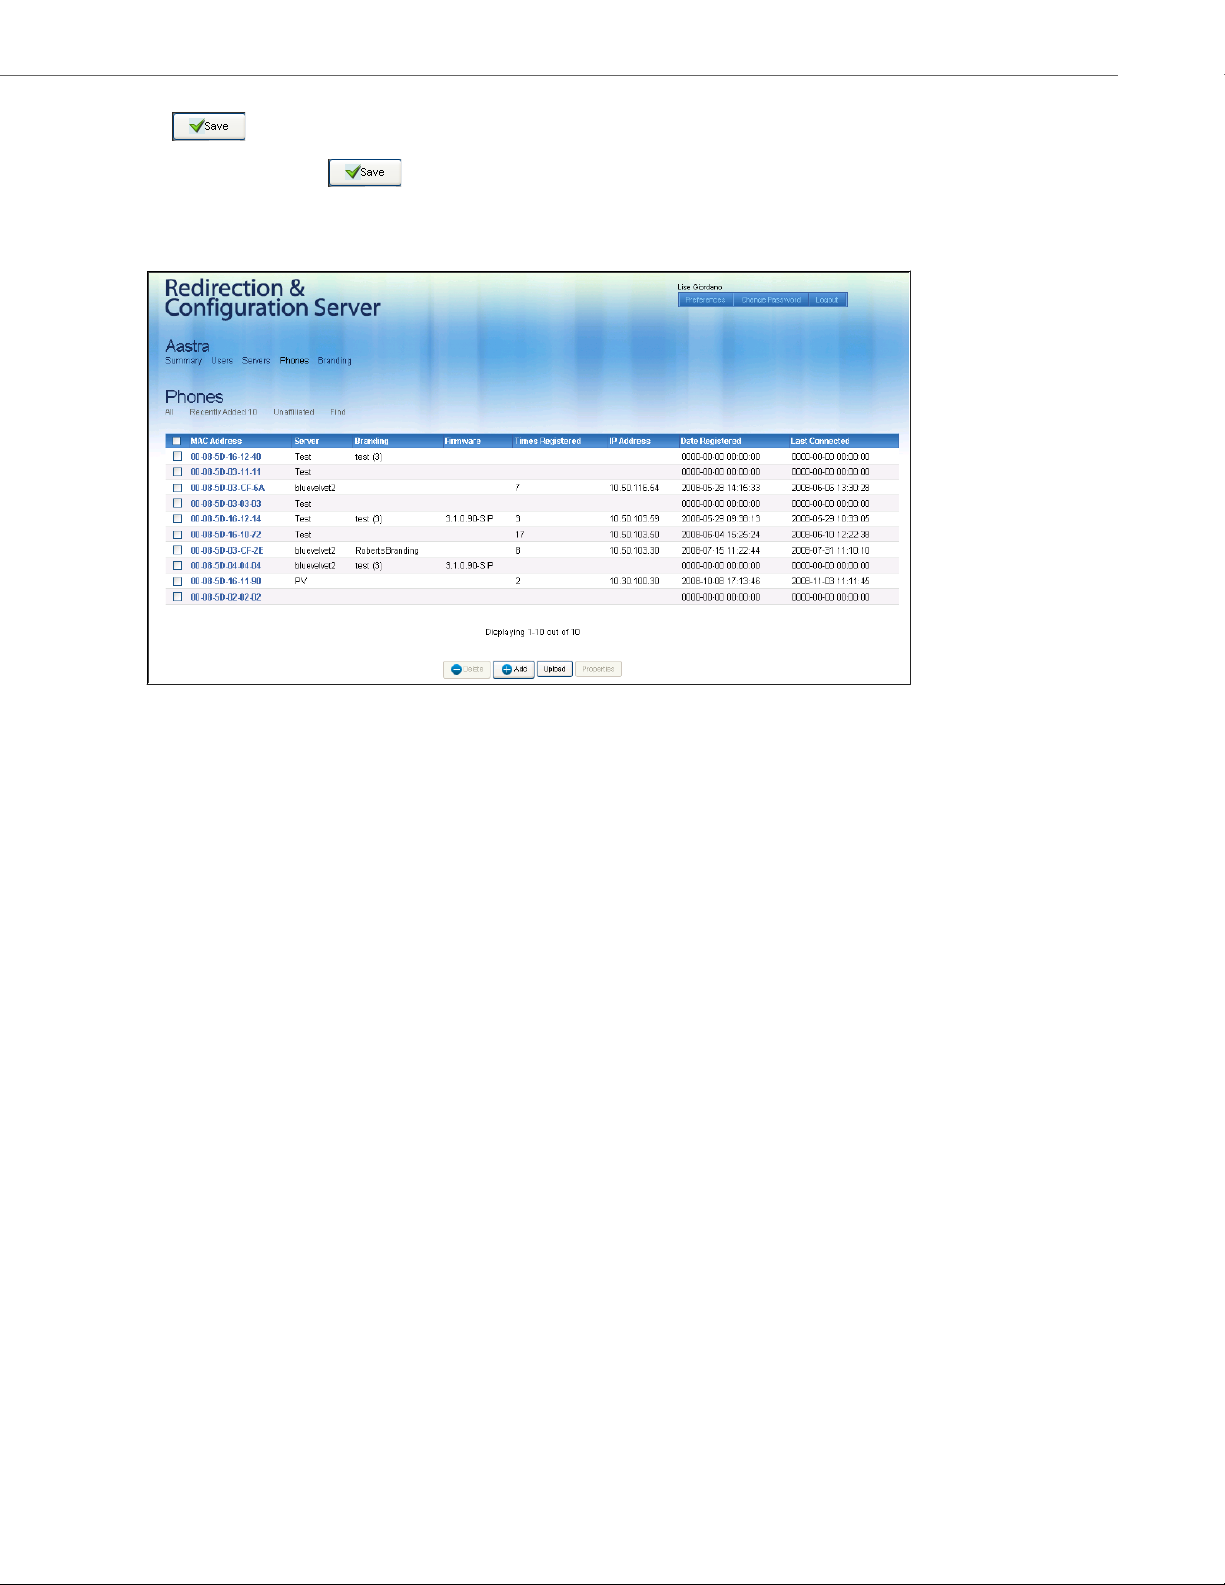
5. In the Server field, select a configuration server to assign to the phone(s) you selected in step 3.
6. Click .
The Phones page displays. This page shows a list of all phones including the phones for which you just edited.
The configuration server for redirection is listed under the Server column for each phone.
For more information on managing phones, see “Managing IP Phones” on page 26.
10 41-001302-01 Rev 00 – 06.2010
Page 15
Using Basic RCS Features
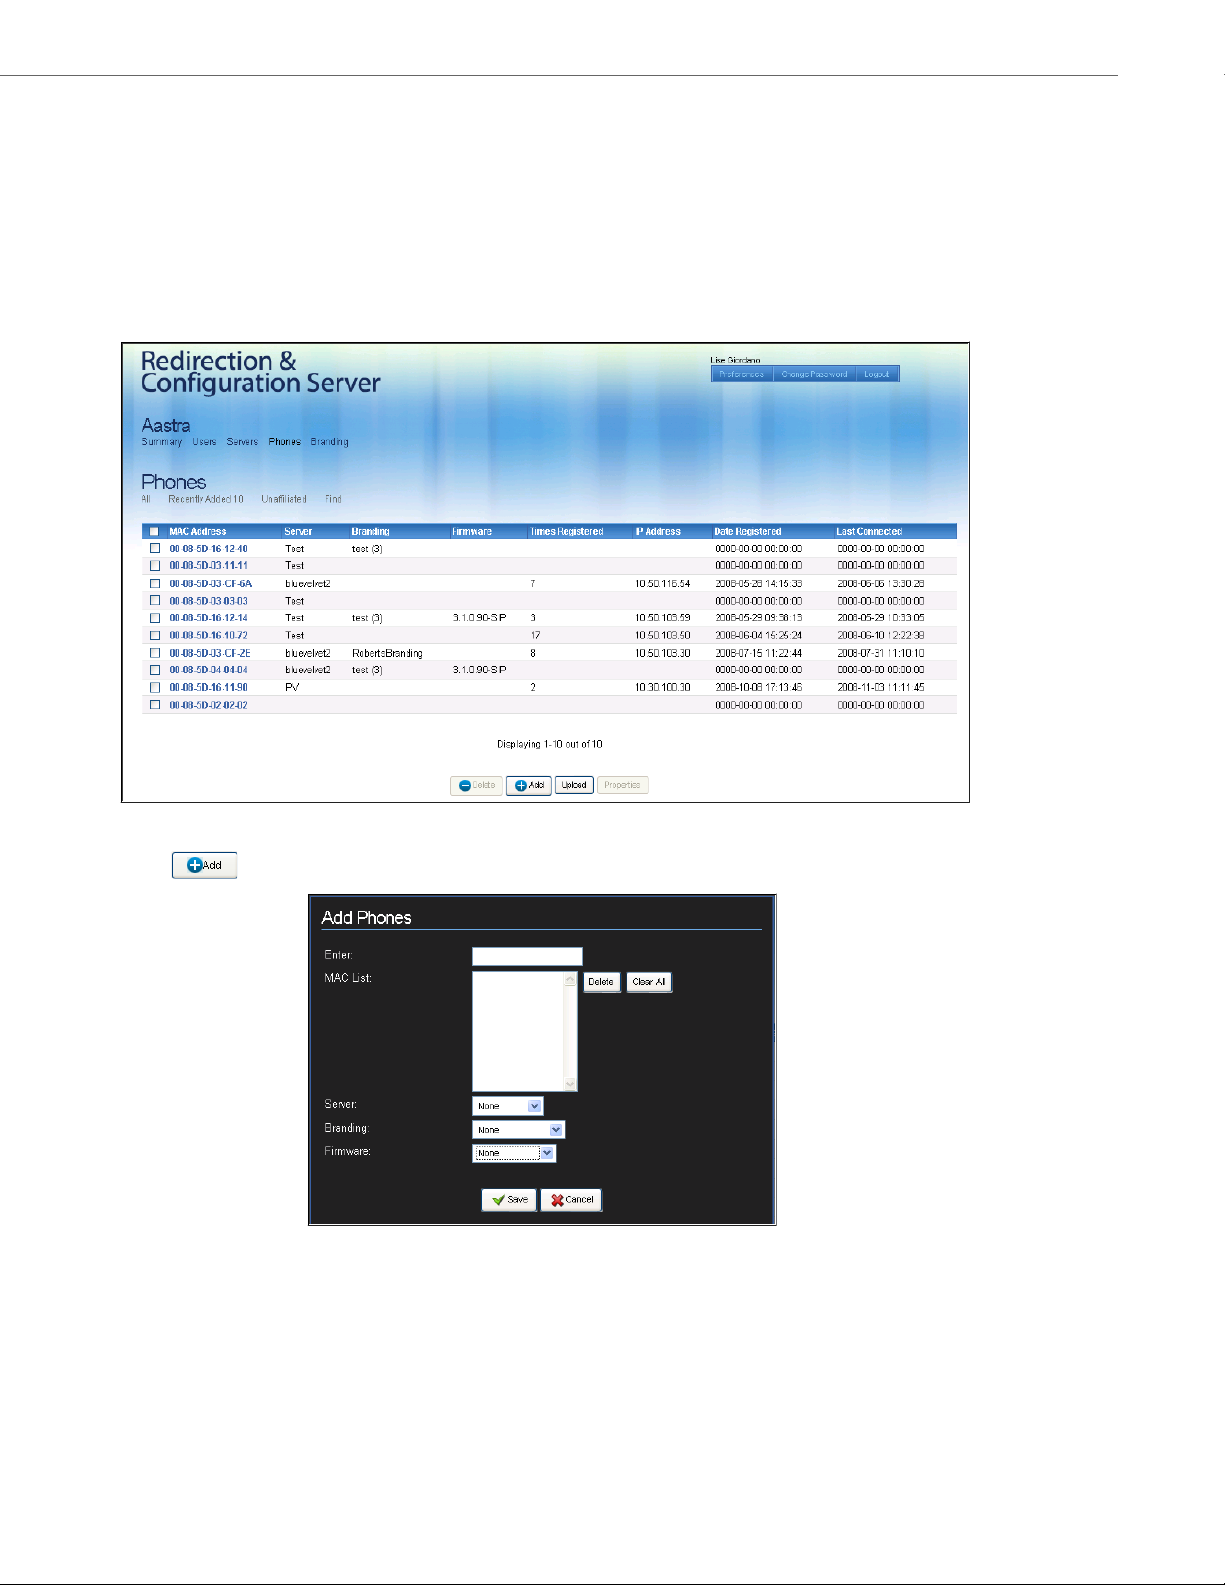
Adding and Redirecting a Phone Using the RCS Web UI
When you add new a new phone(s) to the RCS, you can choose whether or not the RCS redirects the phone(s) immediately
to the configuration server. You add a phone(s) to the RCS by entering it’s MAC address. If you prefer to add a phone without simultaneously redirecting, see “Managing IP Phones” on page 26.
To add and redirect a phone(s) to a configuration server using the RCS Web UI:
1. Login to the RCS Web UI. (See “Logging into the RCS” on page 7 for more information.)
2. Click Phones on the top menu. The Phones page displays.
3. Click to add a phone. The Add Phones dialog displays.
41-001302-01 Rev 00 – 06.2010 11
Page 16

Using Basic RCS Features
4. In the Enter field, enter a MAC address for the phone you are adding to the RCS, and click . The MAC
address you entered appears in the MAC List field.
Note: If you enter an incorrect MAC address, the following displays in the Enter field:
.
Reenter a valid MAC address for the phone you want to add to the RCS.
If you entered an incorrect MAC address and clicked , you can remove it from the MAC List by selecting
it and clicking . To clear all MAC addresses from the MAC List, click .
5. If you need to add additional phones, repeat step 4 until you have entered all the phones required. If you are
adding a large number of phones to the RCS, you may want to stop here and use the procedure defined at “Ad di ng
and Redirecting Multiple Phones Using a Comma-Separated Value (CSV) File” on page 13.
6. In the Server field, select the configuration server for which to redirect these phone(s). If your configuration server
is not in the list, see “Adding a Configuration Server” on page 8.
7. (optional) In the Branding field, select the Branding file you want to load to these phones.
8. (optional) In the Firmware field, select the firmware you want the RCS to apply to the phone(s) you are adding.
Notes:
1.This field allows the user to specify a firmware image that is loaded onto the phone by the RCS. If, for example,
you want to deploy the phones with the 2.4.0 firmware, you can select “2.4.0” from the list in the Firmware field.
If you select a later version of firmware to install then what is currently on the phone, the RCS automatically
upgrades the phone(s) to the firmware you select. The RCS performs the upgrade before the phone redirects to
the configuration server.
2.The RCS stores the firmware images which are supplied by Aastra Telecom. The Firmware field includes only official supported releases beginning at Release 2.4.0.
3.If you do not want the RCS to provide firmware, select “None”.
9. Click to add the phone(s) and redirect it to the specified configuration server simultaneously.
10.The Phones page displays. This page shows all IP phones including the phones you have just added, and also
shows the MAC addresses and configuration servers for each phone.
For more information on managing phones, see “Managing IP Phones” on page 26.
12 41-001302-01 Rev 00 – 06.2010
Page 17
Using Basic RCS Features
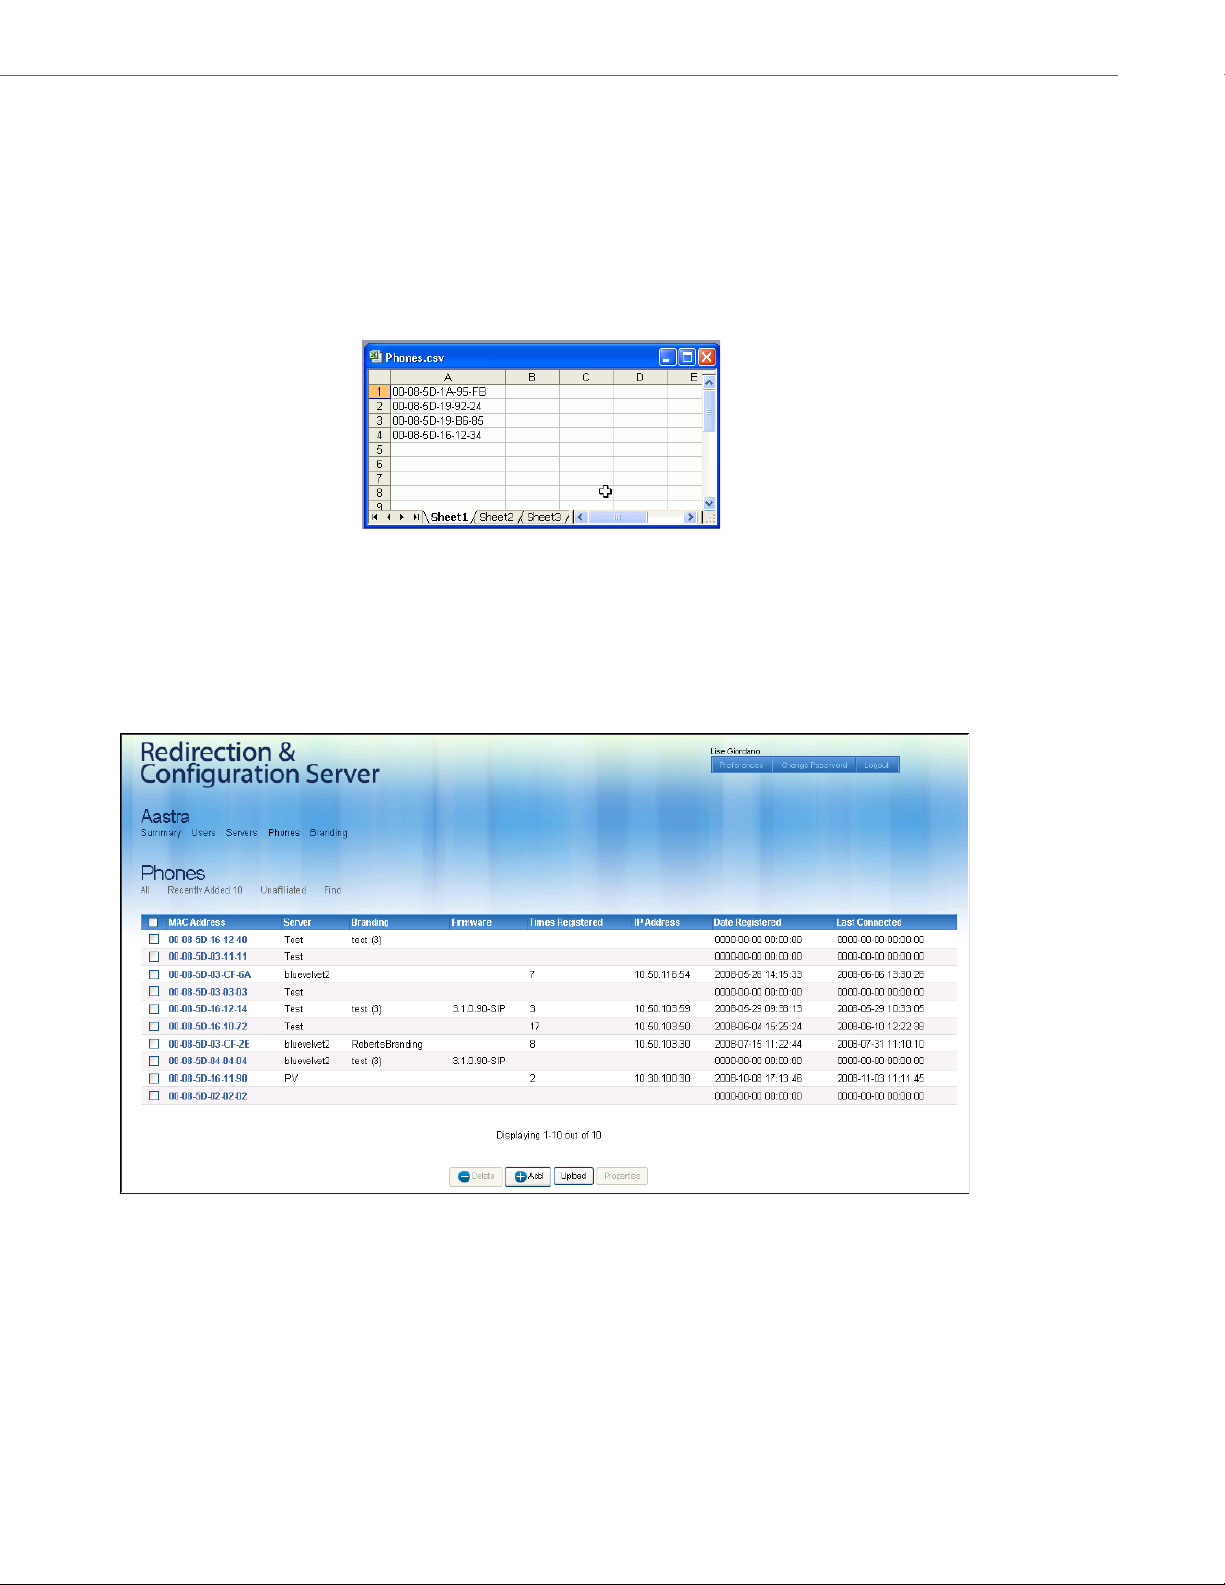
Adding and Redirecting Multiple Phones Using a Comma-Separated Value (CSV) File
When you need to add a large number of phones to the RCS, you can add the phones to a spreadsheet file (i.e., using
Microsoft Excel
phones to the configuration server.
To add and redirect multiple phones to a configuration server using a *.csv file:
1. Open a new document using a spreadsheet application (i.e., Microsoft Excel™).
2. In the first column, enter the MAC Address of the phone(s) you want to add to the RCS.
3. Save the file to your PC desktop using “Save As” in the format “.CSV” (commad delimited). In the above illustration,
the name of the CSV file is “Phones.csv”.
4. To check the validity of your CSV file, open the new file from a plain-text reading program (i.e., Notepad, TextEdit,
etc.). Make sure there are no extra commas, other than between fields.
™), save it as a “*.CSV” file (comma-separated value file), AND have the RCS simultaneously redirect these
5. Login to the RCS Web UI. (See “Logging into the RCS” on page 7 for more information.)
6. Click Phones on the top menu. The Phones page displays.
41-001302-01 Rev 00 – 06.2010 13
Page 18
Using Basic RCS Features
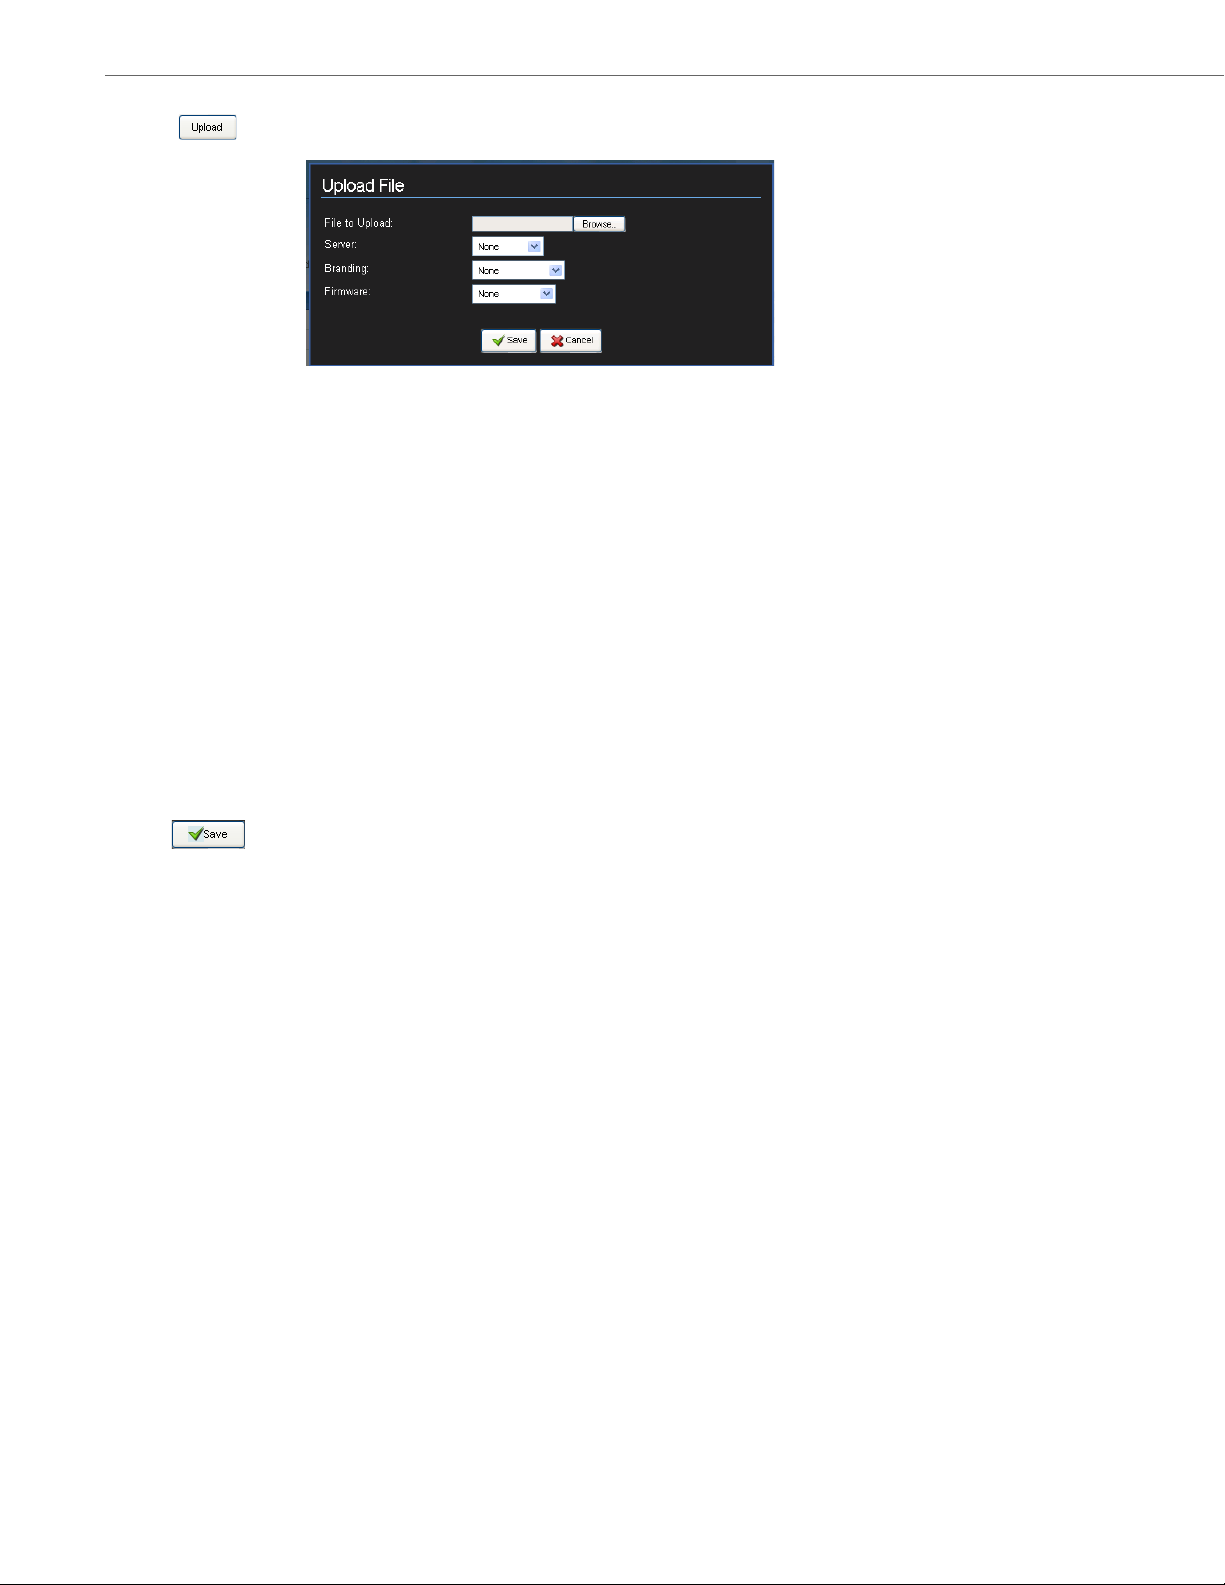
7. Click . The following dialog box displays.
8. In the File to Upload field, enter the file name (<filename>.csv) of the text file you just created in step 2 (or click
<Browse> to find the <filename>.csv file on your PC desktop).
9. In the Server field, select the configuration server for which the RCS redirects these phones to for retrieving their
configuration.
10.(optional) In the Branding field, select the Branding file you want to load to these phones.
11.(optional) In the Firmware field, select the firmware you want the RCS to apply to the phone(s) you are adding.
Notes:
1.This field allows the user to specify a firmware image that is loaded onto the phone by the RCS. If, for example,
you want to deploy the phones with the 2.4.0 firmware, you can select “2.4.0” from the list in the Firmware field.
If you select a later version of firmware to install then what is currently on the phone, the RCS automatically
upgrades the phone(s) to the firmware you select. The RCS performs the upgrade before the phone redirects to
the configuration server.
2.The RCS stores the firmware images which are supplied by Aastra Telecom. The Firmware field includes only official supported releases beginning at Release 2.4.0.
3.If you do not want the RCS to provide firmware, select “None”.
12.Click to add the phone(s) and redirect it to the specified configuration server simultaneously.
14 41-001302-01 Rev 00 – 06.2010
Page 19
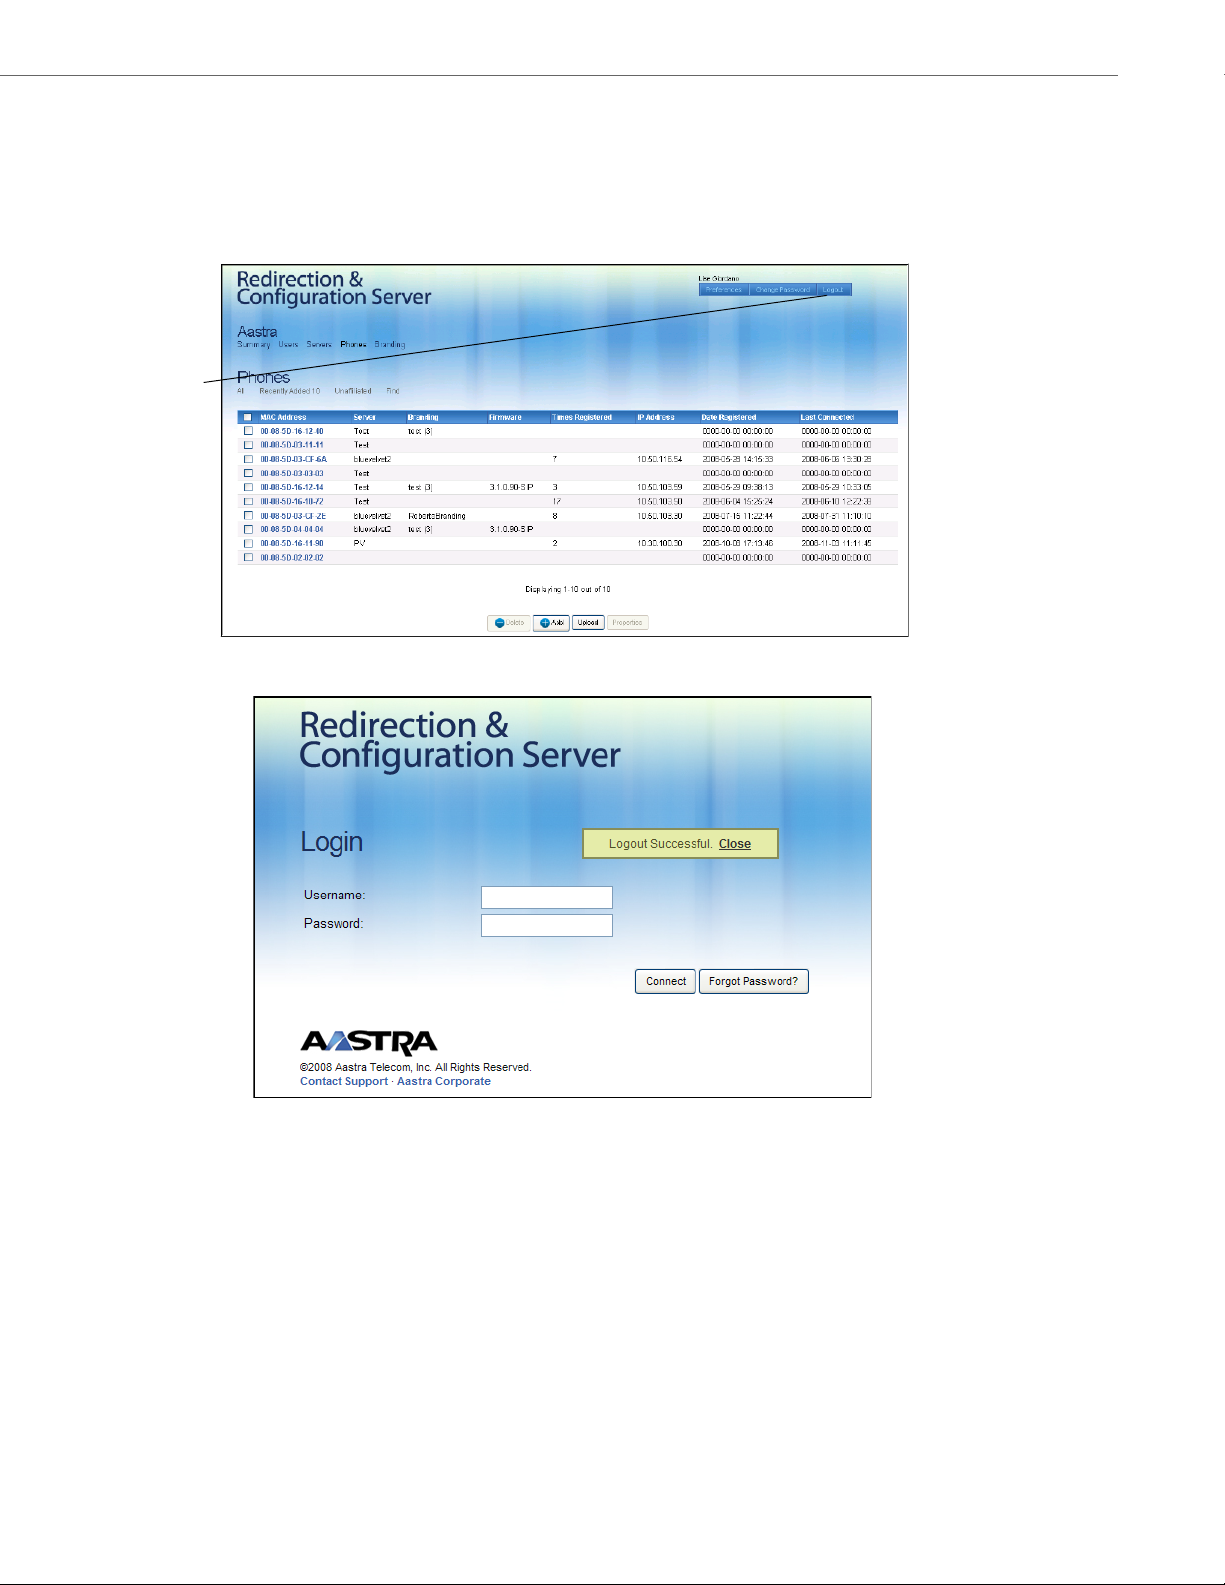
Logging Out
Logout
When you have finished managing your account on the RCS you can logout as required.
To logout of the RCS Web UI:
• Click Logout on the top menu bar of any screen in the RCS Web UI.
Using Basic RCS Features
The message “Logout Successful.” displays and the Login page displays.
You are now logged out of the RCS.
41-001302-01 Rev 00 – 06.2010 15
Page 20
Managing Your Account
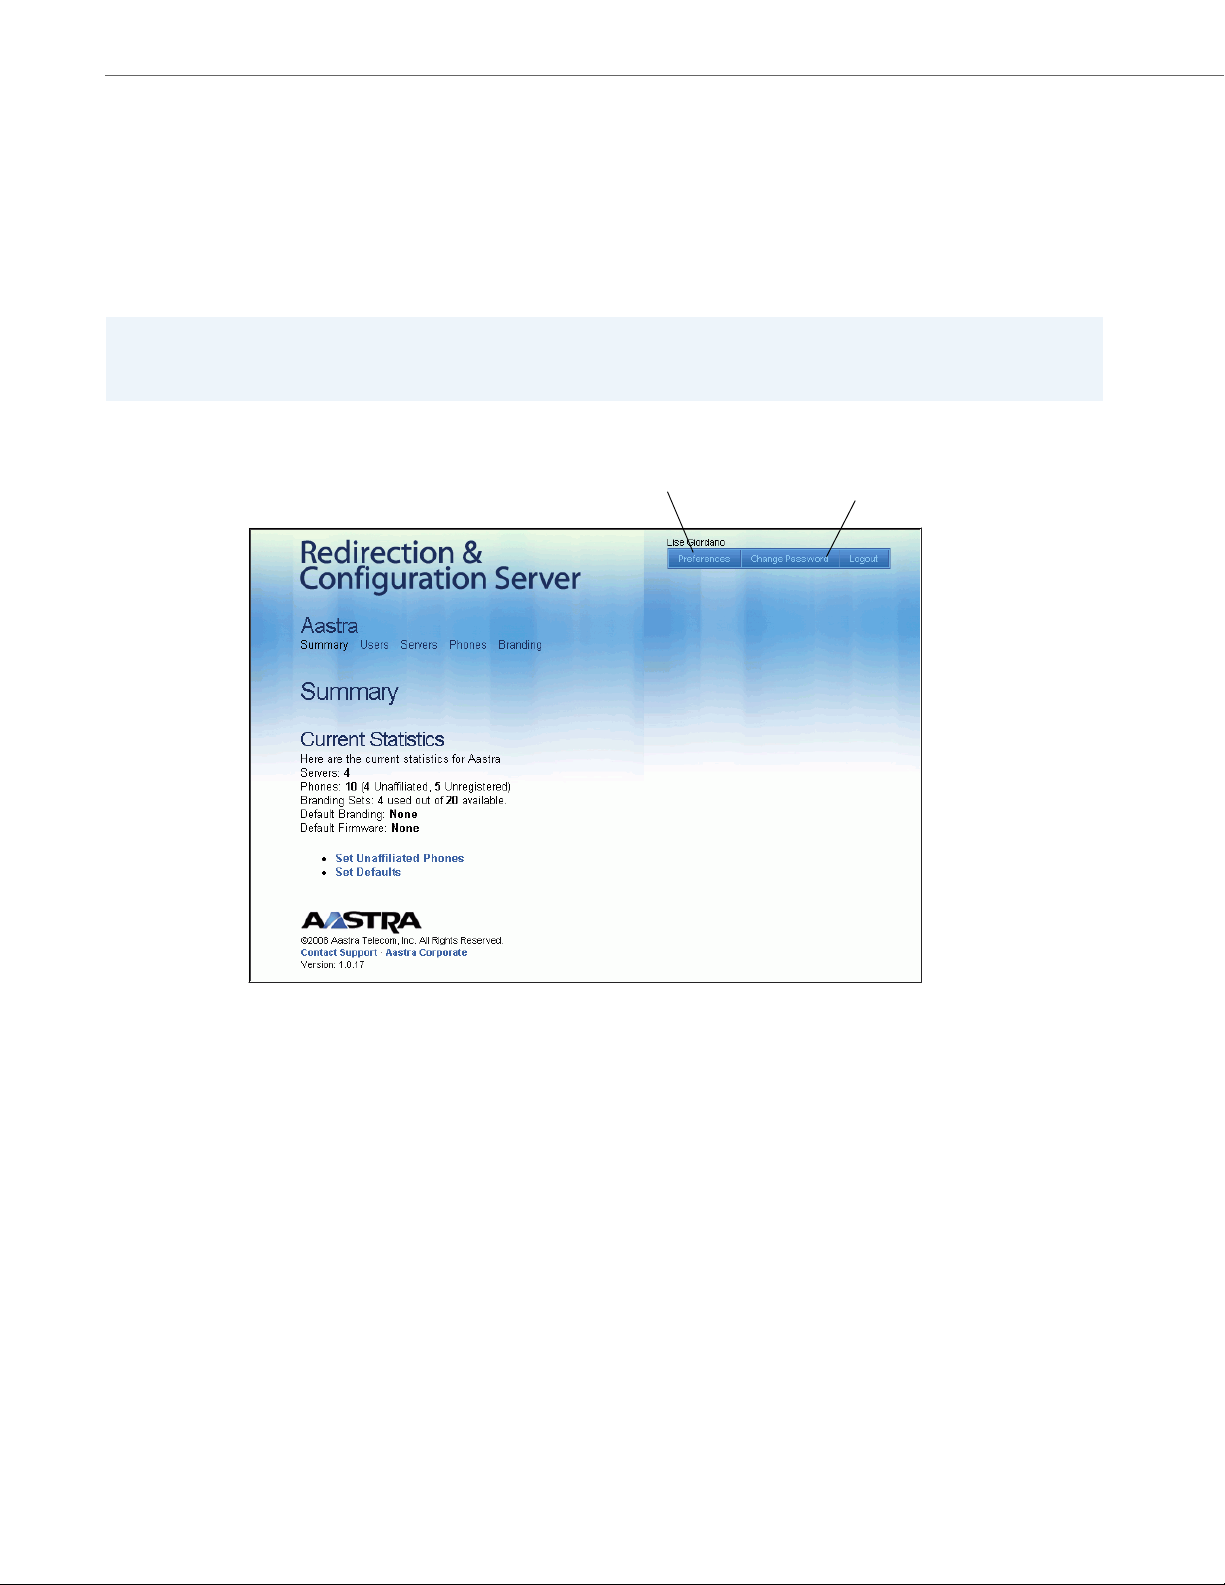
Preferences Link
Change Password Link
Managing Your Account
Introduction
When you are logged into your account in the RCS Web UI, you can edit your personal preferences (Name, Address,
Phone 1, and Phone 2) using the “Preferences” link, and/or edit/change your password using the “Change Password” link
at the top of the screen. These buttons display regardless of what page you are on in the RCS Web UI
Note:
The “Name” parameter on the Preferences screen is not the login “Username”. The login “Username” cannot be changed
by a User or Super User. Contact your Administrator for more information about changing login “Usernames”.
.
.
16 41-001302-01 Rev 00 – 06.2010
Page 21
Managing Your Account
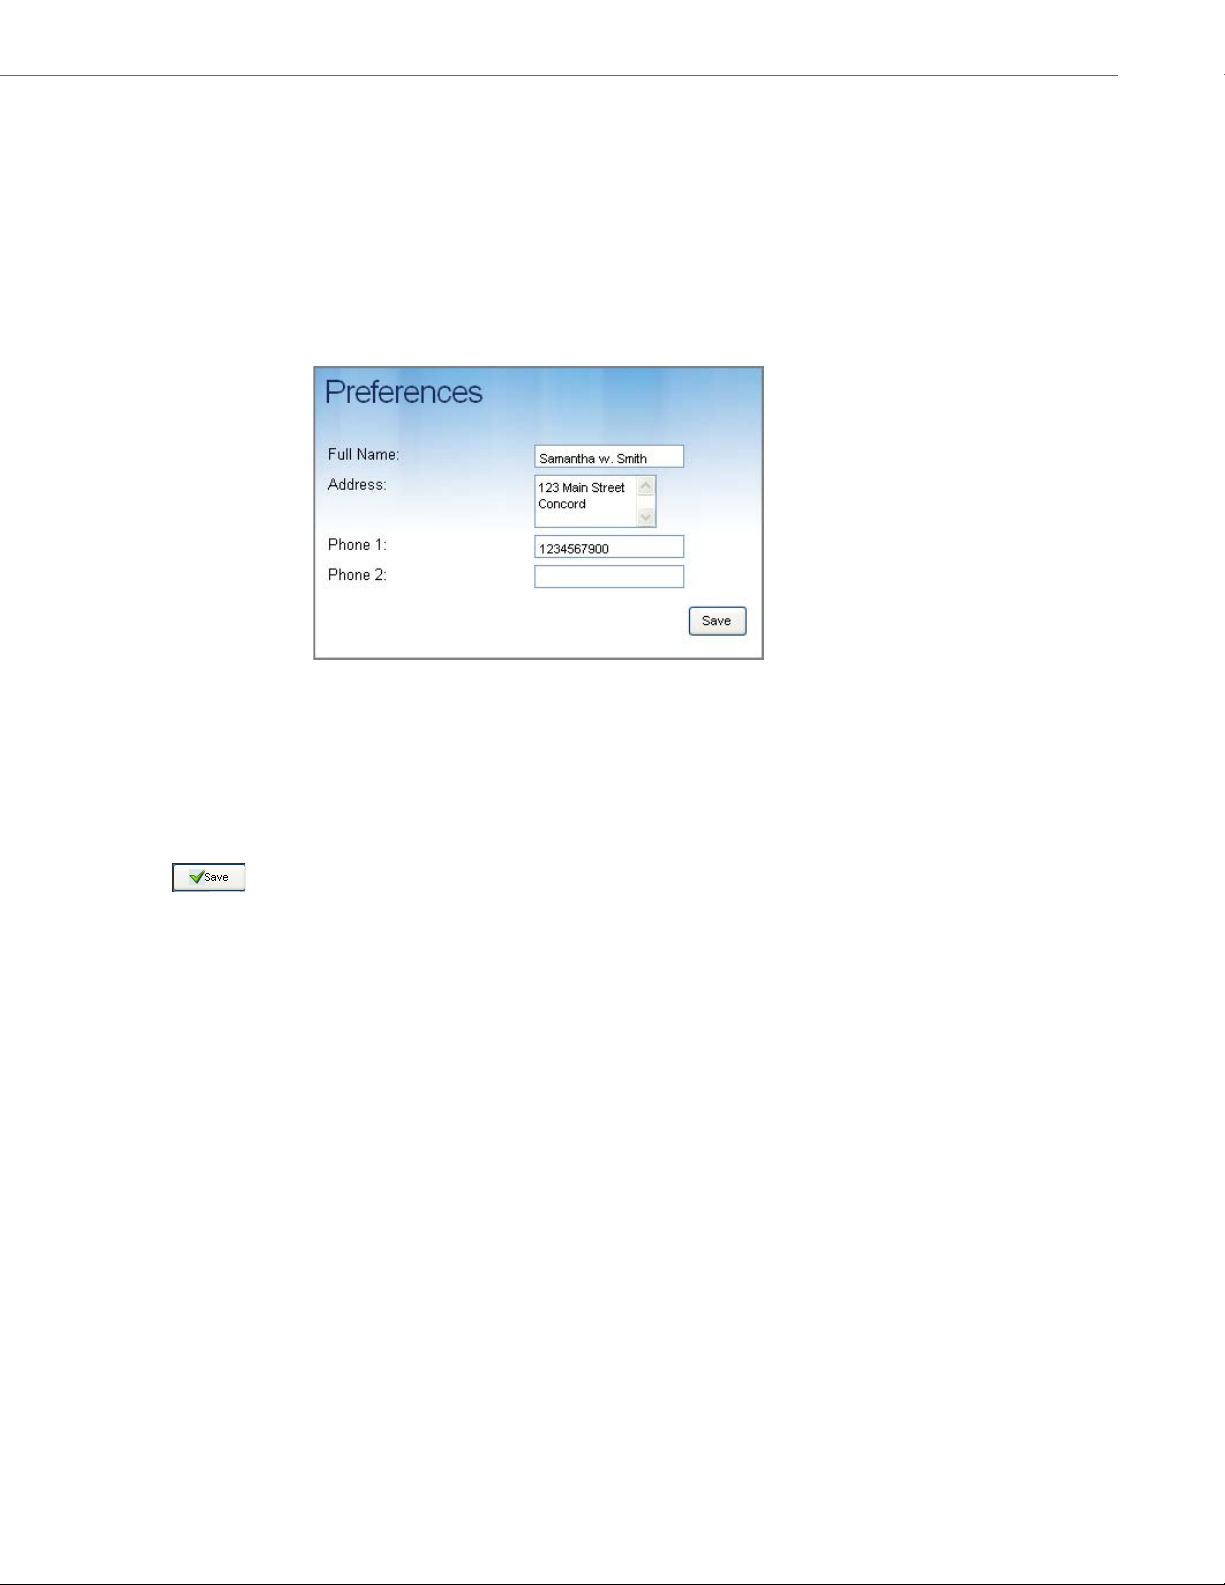
Changing User Preferences
Your user preferences for your account are initially set up by the Super User. You can logon to your account and change
these preferences as required. User preferences include your Full Name, Address, Phone Number 1, and Phone Number 2.
To change your RCS Web UI user preferences:
1. Login to the RCS Web UI. (See “Logging into the RCS” on page 7 for more information.)
Note: To change user preferences for other accounts on the RCS, see “Editing Users and Super Users” on page 20.
2. Click Preferences on the top menu bar. The Preferences page displays.
3. In the Full Name field, enter or change your user name. Valid values are up to 50 alpha-numeric characters.
4. In the Address field, enter or change your mailing address. Valid values are up to 255 alpha-numeric characters.
5. In the Phone 1 field, enter or change your home phone, cell phone, or office phone number. Valid values are 20
alpha-numeric characters.
6. In the Phone 2 field, enter or change your home phone, cell phone, or office phone number. Valid values are 20
alpha-numeric characters.
7. Click .
Note: You may need to logout (click Logout on the top menu) and log back in to return to the main RCS page
41-001302-01 Rev 00 – 06.2010 17
Page 22

Managing Your Account
Changing User Passwords
The password for your account is initially setup for you by the Super User before logging into the RCS Web UI. You can
logon to your account and change this password as required.
To change your RCS Web UI password:
1. Login to the RCS Web UI. (See “Logging into the RCS” on page 7 for more information.)
Note: To change passwords for other accounts on the RCS, see “Editing Users and Super Users” on page 20
2. Click Change Password on the top menu bar. The Change Password dialog displays.
3. In the Original Password field, enter the current password you use to login to the RCS Web UI. Valid values are
50 alpha-numeric characters.
4. In the New Password field, enter a new password to use to login to the RCS Web UI. Valid values are 50 alpha-
numeric characters.
5. In the Retype New Password field, re-enter the new password. Valid values are 50 alpha-numeric characters.
6. Click .
Note: You may need to logout (Click Logout on the top menu) and log back in to return to the main RCS page.
:
18 41-001302-01 Rev 00 – 06.2010
Page 23
Managing Your Account
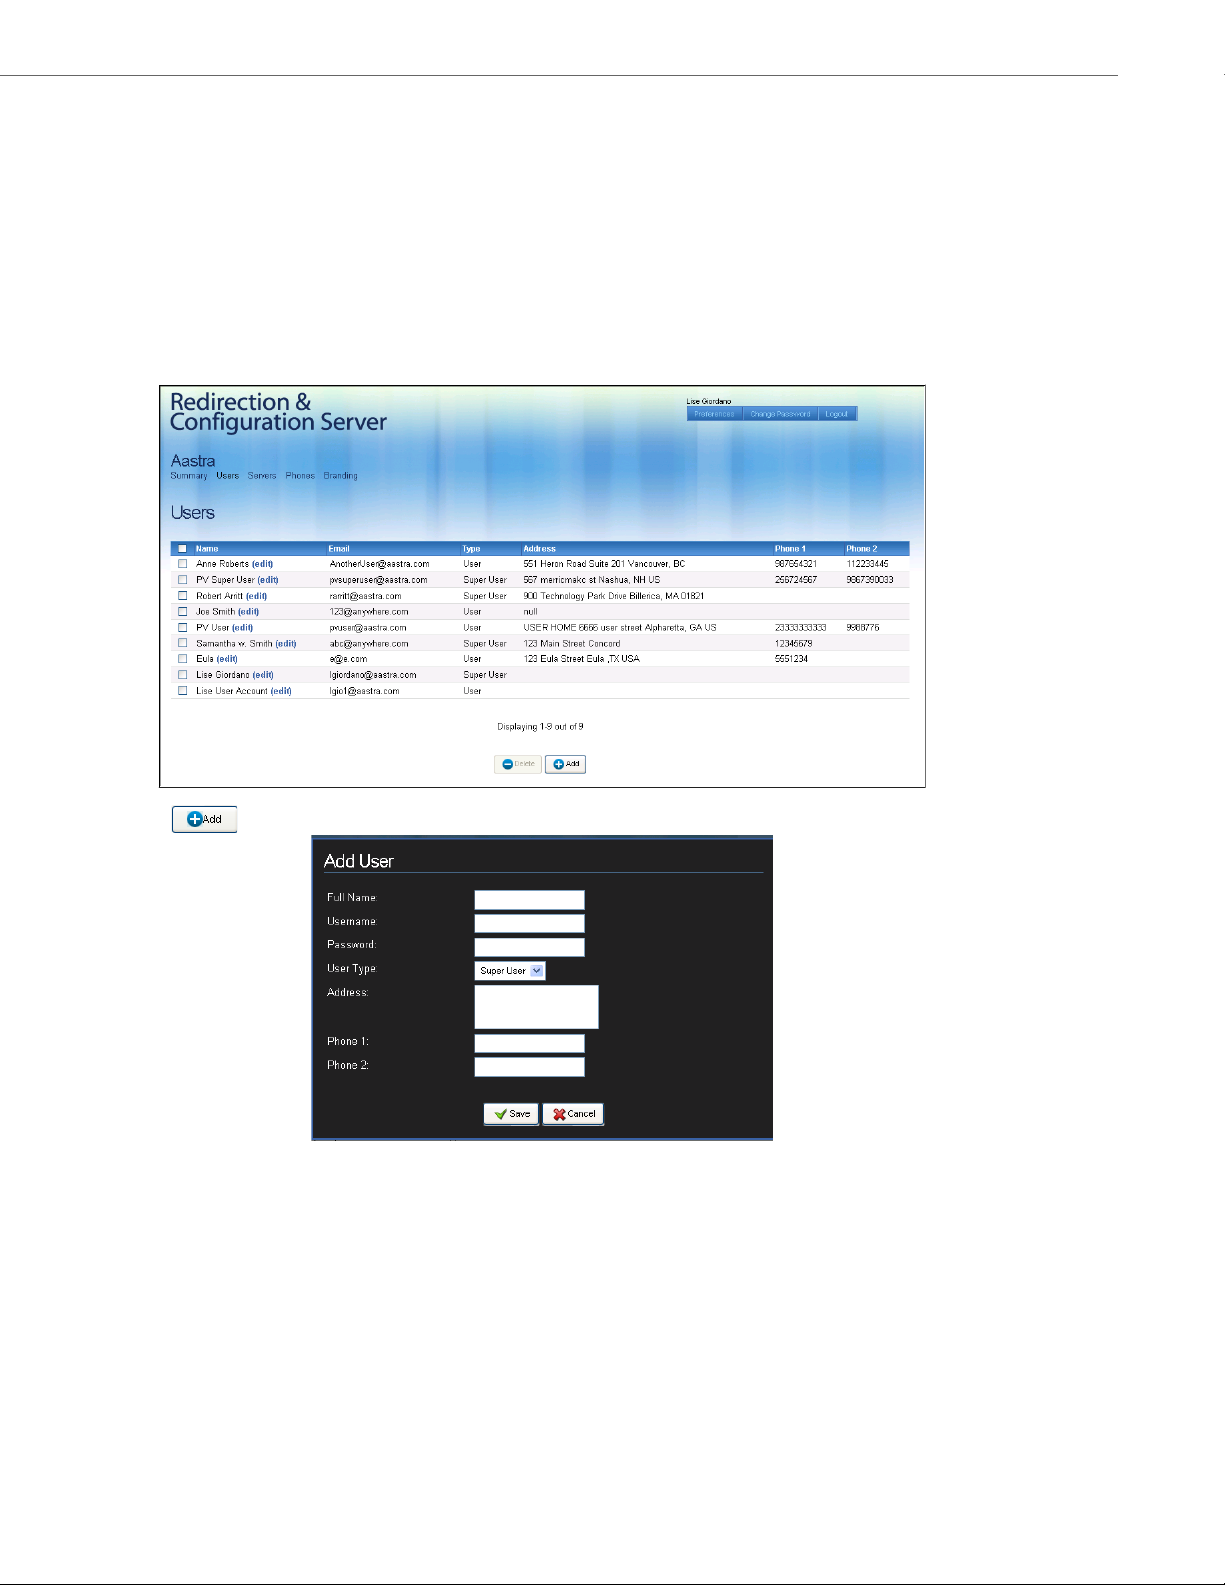
Managing Users and Super Users (applicable to Super User only)
Within an account on the RCS you can add as many Users or Super Users as required.
Adding Users and Super Users
A Super User can add Users and other Super Users to an account.
To add Users and/or Super Users to your account:
1. Login to a Super User account on the RCS. (See “Logging into the RCS” on page 7 for more information.)
2. Click Users on the top menu. The Users page displays.
3. Click to add a user. The Add User dialog displays.
4. In the Full Name field, enter the full name of the user you are adding to the account. Valid values are up to 50
alpha-numeric characters.
5. In the Username field, enter a username for the user you are adding to the account. Valid values are up to 50
alpha-numeric characters, and can only be an email address.
6. In the Password field, enter a password for the user you are adding to the account. Valid values are up to 50 alpha-
numeric characters.
7. In the User Type field, select whether the user you are adding is a Super User or a User.
8. In the Address field, enter the mailing address of the user. Valid values are up to 255 alpha-numeric characters.
41-001302-01 Rev 00 – 06.2010 19
Page 24

Managing Your Account
9. In the Phone 1 field, enter the home phone, cell phone, or office phone number for the user. Valid values are 20
alpha-numeric characters.
10.In the Phone 2 field, enter the home phone, cell phone, or office phone number of the user. Valid values are 20
alpha-numeric characters.
11.Click to add the user to the account.
12.The Users page displays, which shows a list of all users including the one you just added.
Editing Users and Super Users
A Super User can edit a User’s or a Super User’s account information, including user’s name, login username, login password, user type (User or Super User), mailing address, and personal phone numbers.
Caution:
If you are a Super User and you change your User Type to “User”, this will disable your ability to add, change, and delete
Users and Super Users on accounts on the RCS next time you login.
To edit account information for a user:
1. Login to the RCS Web UI. (See “Logging into the RCS” on page 7 for more information.)
2. Click Users on the top menu. The Users page displays, which shows a list of all users.
3. In the Name column, select a user to edit by clicking “(edit)” after the user’s name. The Edit User dialog for that
user displays.
20 41-001302-01 Rev 00 – 06.2010
Page 25

Managing Your Account
4. Edit the fields as applicable and click .
5. The Users page displays showing a list of all users including the user you edited.
Deleting Users and Super Users
A Super User can delete Users or other Super Users from an account.
To delete Users and/or Super Users from an account:
1. Login to the RCS Web UI. (See “Logging into the RCS” on page 7 for more information.)
2. In the Name column, click the checkbox beside the name of the User(s) or Super User(s) you want to delete. To
select all users in the list, click the checkbox next to the “Name” column heading.
3. Click .
The Users page displays with the changes.
41-001302-01 Rev 00 – 06.2010 21
Page 26

Managing Your Account
Managing Configuration Server Names and Addresses
Before an Aastra IP Phone can be redirected to a specific configuration server, the server address must be added to the
RCS. A Service Provider can add as many servers to the RCS as required. Once added to the RCS, you can edit or delete
the names and addresses of servers as applicable.
For information on adding servers, see “Adding a Configuration Server” on page 8.
Editing a Server for Redirection
If the name or address of your configuration server change, you need to update the information stored on the RCS in
order for the RCS to redirect to the appropriate server.
To edit server information on the RCS:
1. Login to the RCS Web UI. (See “Logging into the RCS” on page 7 for more information.)
2. Click Servers on the top menu. The Servers page displays, which shows a list of all servers you have added to the RCS.
3. In the Name column, select a configuration server to edit by clicking “(edit)” after the server name. The Edit Server
dialog for that server displays.
4. In the Name field, edit or change the name of the configuration server. Valid values are up to 50 alpha-numeric
characters.
5. In the URL field, edit or change the Uniform Resource Locator (URL) that identifies where the configuration server
can be found via the Internet.
6. (optional) In the Branding field, select the Branding file you want to load to this server.
22 41-001302-01 Rev 00 – 06.2010
Page 27

Managing Your Account
7. In the Firmware Override field, select the firmware that you want the configuration server to download to the
phones.
Note:
1.This setting specifies a firmware image that is loaded onto the phone by the RCS. If, for example, you want to
deploy the phones with the 2.4.0 firmware, you can select “2.4.0” from the list in the Firmware Override field. If
you select a later version of firmware to install then what is currently on the phone, the RCS automatically
upgrades the phone(s) to the firmware you select. The RCS performs the upgrade before the phone redirects to
the configuration server.
2.The RCS stores the firmware images which are supplied by Aastra Telecom. The Firmware field includes only official supported releases beginning at Release 2.4.0.
3.If you do not want the RCS to provide firmware, select “None”.
8. Click to save your changes.
The Servers page displays with the changes.
Deleting a Server for Redirection
To delete a configuration server from the RCS:
1. Login to the RCS Web UI. (See “Logging into the RCS” on page 7 for more information.)
2. In the Name column, click the checkbox beside the name of the configuration server(s) you
3. In the Name column, click the checkbox beside the name of the configuration server(s) you want to delete. To
select all servers in the list, click the checkbox next to the “Name” column heading.
4. Click .
The Servers page displays with the changes.
23 41-001302-01 Rev 00 – 06.2010
Page 28

Page 29

Aastra IP Phones and the RCS
6755i 6757i 6757i CT
6753i6751i
6730i 6731i
6739i
OptionsOptions
DirectoryDirectory
D
elete
D
elet
e
SaveS
a
ve
MuteM
ute
X
fer
X
fe
r
C
o
n
f
Co
n
f
L2L
2
L3L
3
L1L1
C
o
n
f
on
f
S
er
vi
vi
ces
e
s
X
f
er
er
Icom
om
H
o
l
dH
o
ld
R
e
d
ia
l
edia
l
Go
o
d
oo
d
bye
O
p
t
io
n
s
Opt
ions
9480i9480i
C
o
n
f
on
f
S
er
vi
vi
ces
e
s
X
f
er
er
Icom
om
H
o
l
dH
o
l
d
R
e
d
ia
l
ed
ia
l
G
o
o
d
o
o
d
b
y
e
O
p
tio
n
s
O
pt
io
ns
9480i CT9480i CT
9143i 9480i
9480i CT
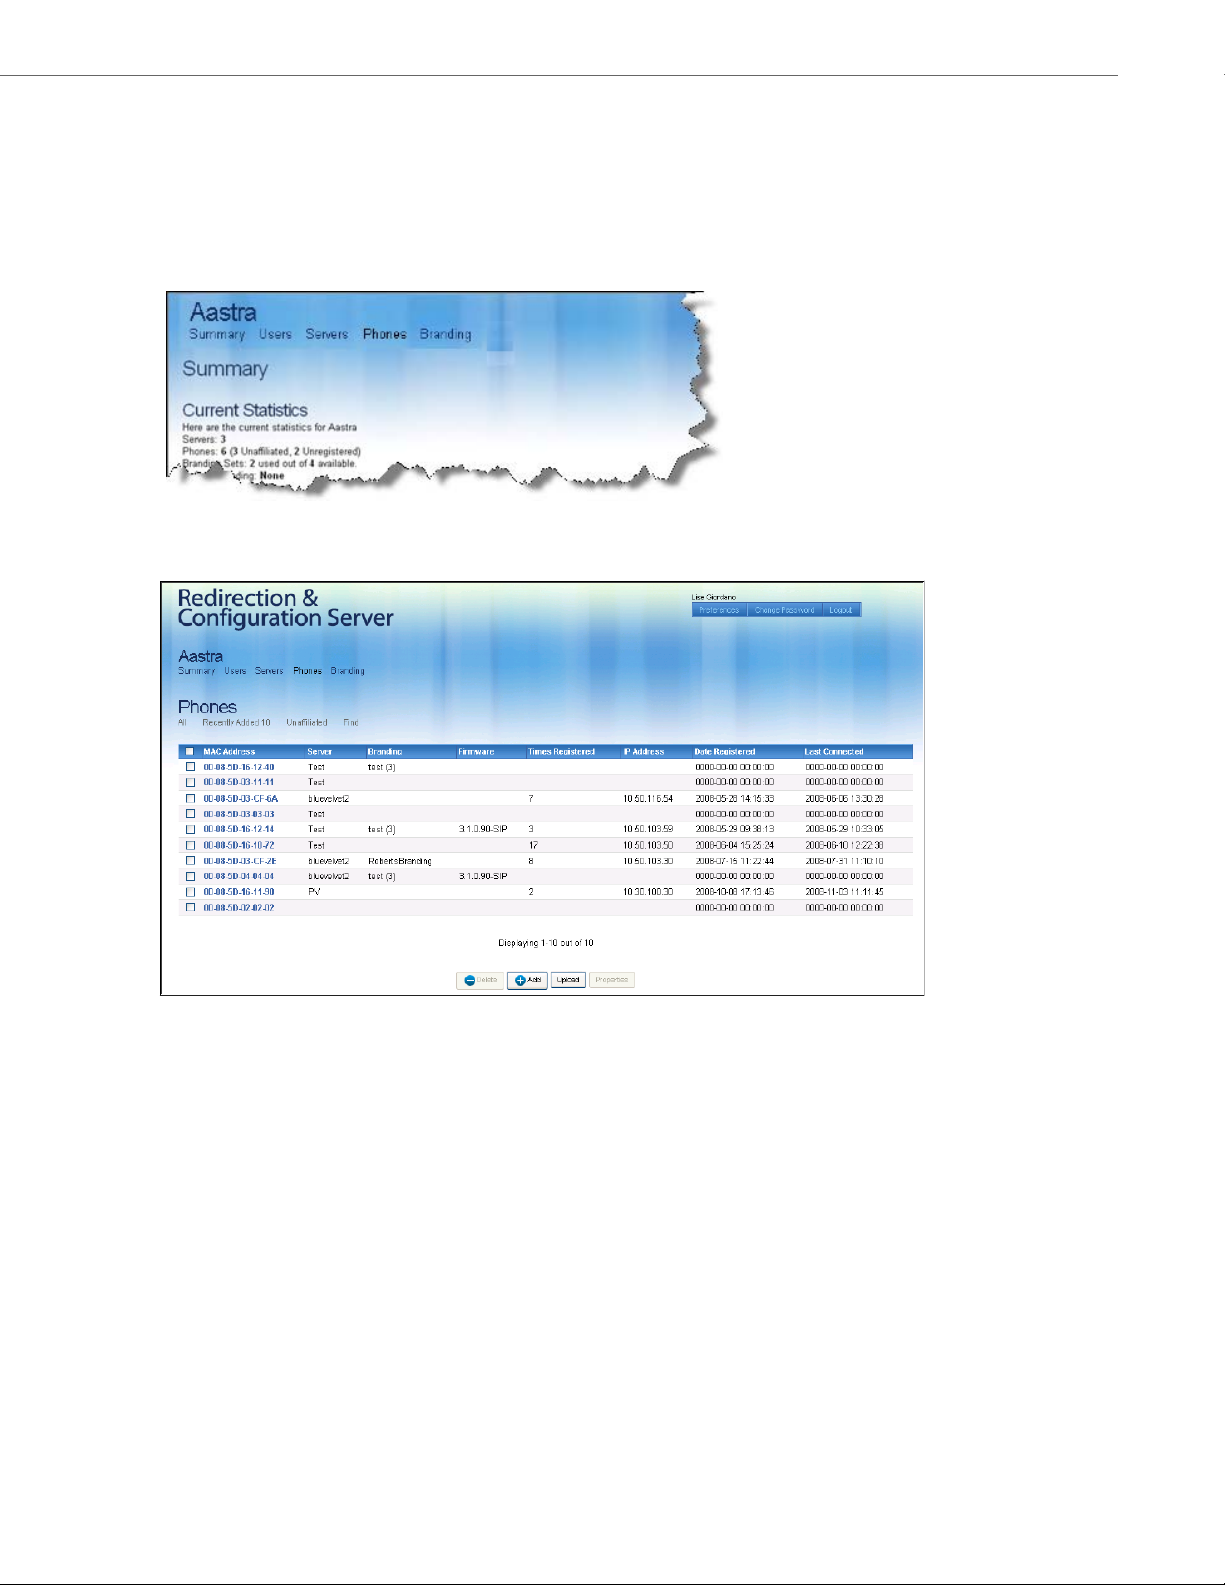
Aastra IP Phones and the RCS
Introduction
This section briefly describes the IP Phone Models supported by the RCS, and provides information on adding, managing,
and deleting phones in your account on the RCS.
Supported Models
The RCS supports Aastra IP Phone Models 6730i, 6731i, 6739i, 6751i, 6753i, 6755i, 6757i, 6757i CT, 9143i, 9480i, and
9480i CT. Please ensure you have the latest version of this document for an up-to-date list of supported phone models.
Note:
RCS supports the 6739i IP Phone, Release 3.1 and later.
References
For more information about phone features and installation requirements, see the SIP IP Phone Installation Guide for your
specific model.
The following illustrations show the supported Aastra IP Phone Models.
41-001302-01 Rev 00 – 06.2010 25
Page 30

Aastra IP Phones and the RCS
IP Phone MAC addresses
Each IP phone has a unique MAC address allowing easy identification. The MAC address is printed on the phone label
found on the bottom of the phone, and can also be found using the phone interface.
The RCS uses MAC addresses to identify phones for the purpose of redirection or overriding firmware files. On receipt of
their phones, Service Providers can add the phone MAC addresses to their account using the RCS Web UI. Service Providers may also have the alternative of receiving phones already registered by MAC address in the RCS.
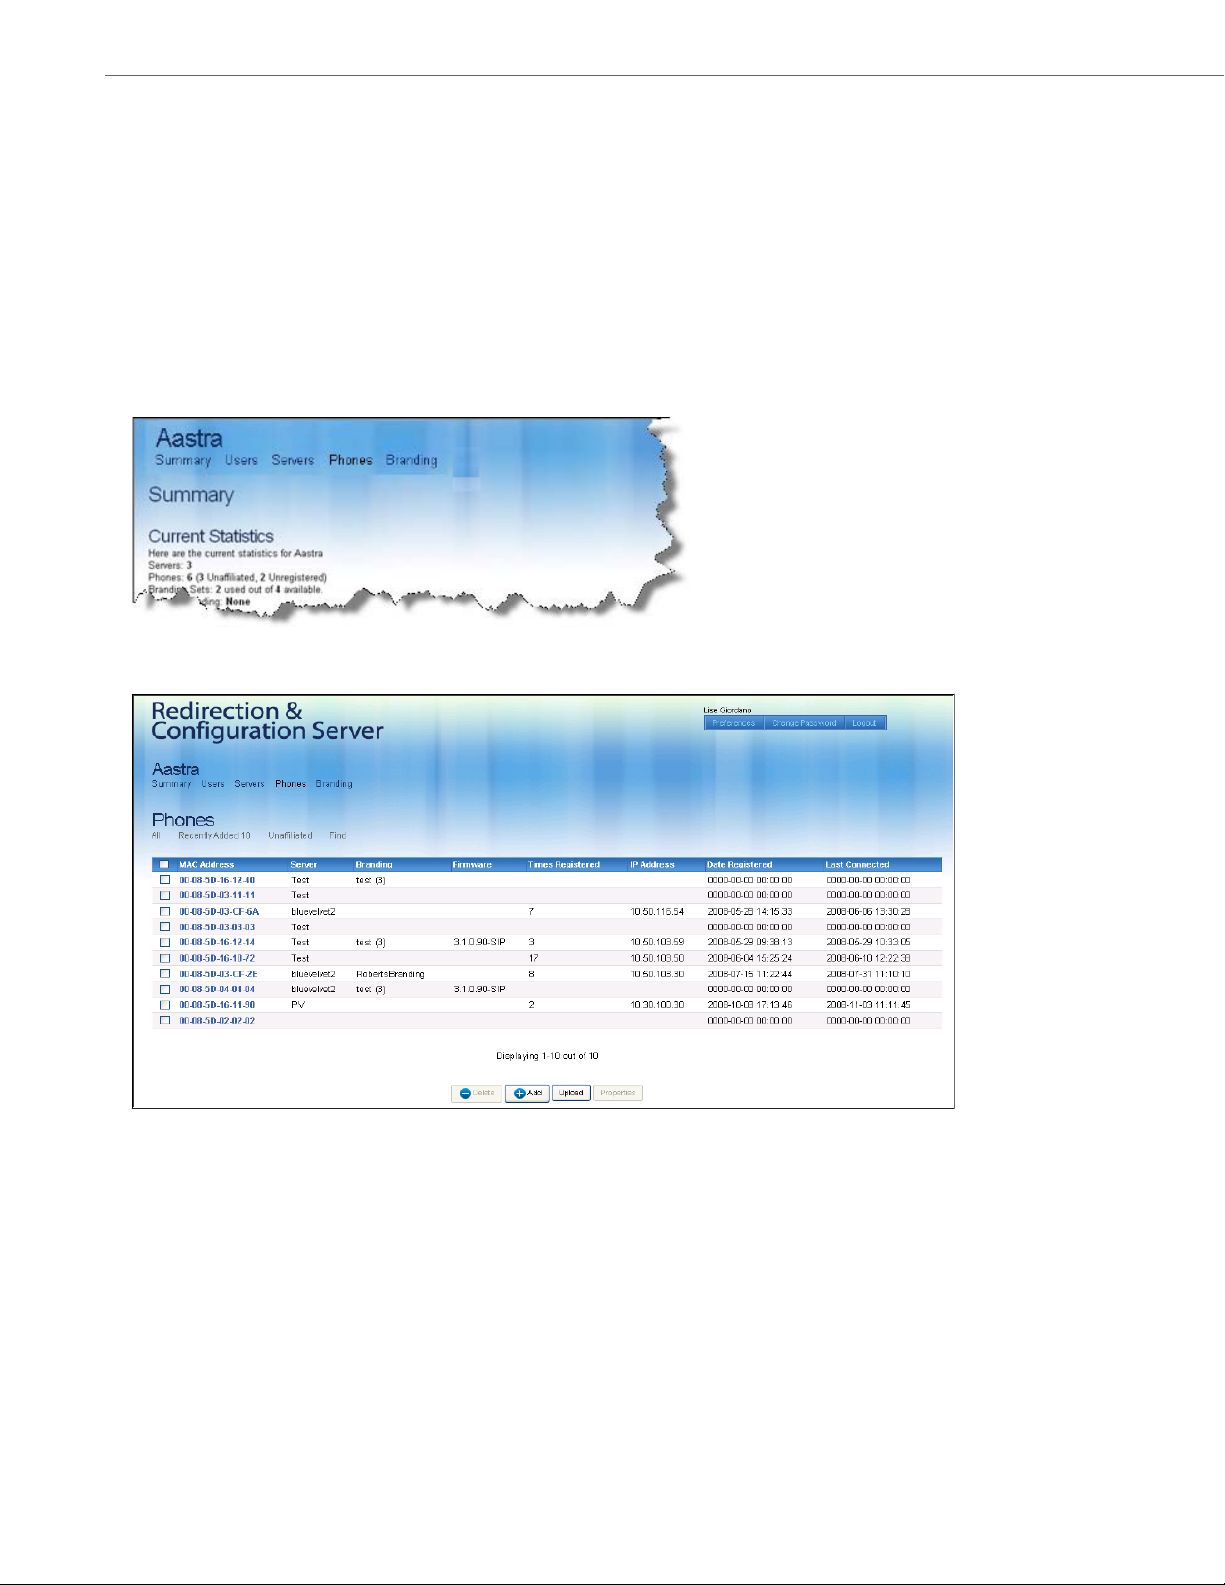
Managing IP Phones
The RCS allows manipulation of redirection through a Web UI. Once phones are added to the account, properties can be
edited for one or more phones quickly and easily.
Editing the Redirection Settings for a Single IP Phone
A phone’s RCS and firmware settings can be edited individually if required.
To edit the redirection settings of a single IP phone:
1. Login to an account on the RCS. (See “Logging into the RCS” on page 7 for more information.) The Summary page
opens.
2. Click Phones on the top menu. The Phones page opens.
Notes:
1.You can select the following to display specific phones in this window:
- “All” - displays all phones (registered, unregistered, and most recently added)
- “Recently Added 10” displays only up to the last 10 phones added to the RCS.
- “Unaffliated” displays only the non-registered phones
- “Find” displays a pop-up window that allows you to enter the MAC address of the phone you want to display.
2. You can click on any of the table headings to sort in ascending or descending order.
26 41-001302-01 Rev 00 – 06.2010
Page 31

3. Click the checkbox beside the MAC address of the phone you want to edit.
4. Click . The Edit Properties dialog displays.
5. In the Server field, select the configuration server for the phone to use.
6. (optional) In the Branding field, select the Branding file you want to load to this phone.
7. In the Firmware field, select the firmware you want the RCS to apply to this phone.
Aastra IP Phones and the RCS
:
Notes
This field allows the user to specify a firmware image that is loaded onto the phone by the RCS. If, for example,
1.
you want to deploy the phones with the 2.4.0 firmware, you can select “2.4.0” from the list in the Firmware field.
If you select a later version of firmware to install then what is currently on the phone, the RCS automatically
upgrades the phone(s) to the firmware you select. The RCS performs the upgrade before the phone redirects to
the configuration server.
2.The RCS stores the firmware images which are supplied by Aastra Telecom. The Firmware field includes only official supported releases beginning at Release 2.4.0.
3.If you do not want the RCS to provide firmware, select “None”.
41-001302-01 Rev 00 – 06.2010 27
Page 32
Aastra IP Phones and the RCS
8. Click .
WAR NIN G: After clicking , the phone settings override server settings as well as default settings.
Ensure you have specified all phone settings correctly.
9. The Phones page displays showing a list of all phones including the phone you have just changed. The updated
properties and other information display as well.
28 41-001302-01 Rev 00 – 06.2010
Page 33
Aastra IP Phones and the RCS
Editing Multiple IP Phones
Groups of phones can have identical redirection and firmware settings. Such groups can be modified at the same time.
To edit the properties of multiple IP phones:
1. Login to an account on the RCS. (See “Logging into the RCS” on page 7 for more information.) The Summary page
opens.
2. Click Phones on the top menu. The Phones page opens.
Notes:
1.You can select the following to display specific phones in this window:
- “All” - displays all phones (registered, unregistered, and most recently added)
- “Recently Added 10” displays only up to the last 10 phones added to the RCS.
- “Unaffliated” displays only the non-registered phones
- “Find” displays a pop-up window that allows you to enter the MAC address of the phone you want to display.
2. You can click on any of the table headings to sort in ascending or descending order.
3. In the MAC Address column, click the checkbox beside the phones you want to edit. To select all phones in the
list, click the checkbox next to the “MAC Address” column heading.
41-001302-01 Rev 00 – 06.2010 29
Page 34
Aastra IP Phones and the RCS
4. Click . The Edit Properties dialog displays.
5. In the Server field, select the RCS for the phones to use.
6. (optional) In the Branding field, select the Branding file you want to load to this phone.
7. In the Firmware field, select the firmware you want the RCS to apply to these phones.
Notes:
1.This field allows the user to specify a firmware image that is loaded onto the phone by the RCS. If, for example,
you want to deploy the phones with the 2.4.0 firmware, you can select “2.4.0” from the list in the Firmware field.
If you select a later version of firmware to install then what is currently on the phone, the RCS automatically
upgrades the phone(s) to the firmware you select. The RCS performs the upgrade before the phone redirects to
the configuration server.
2.The RCS stores the firmware images which are supplied by Aastra Telecom. The Firmware field includes only official supported releases beginning at Release 2.4.0.
3.If you do not want the RCS to provide firmware, select “None”.
30 41-001302-01 Rev 00 – 06.2010
Page 35
Aastra IP Phones and the RCS
8. Click .
WAR NI NG: After clicking , the phone settings override server settings as well as default settings.
Ensure you have specified all phone settings correctly.
9. The Phones page displays showing a list of all phones including the phones you have just changed. The updated
properties and other information display as well.
41-001302-01 Rev 00 – 06.2010 31
Page 36

Aastra IP Phones and the RCS
Deleting IP Phones
Phones can be removed from your Aastra RCS account if required. In order to remove a phone from your RCS account,
you must know the MAC address of the phone you want to remove.
Deleting a Single IP Phone
To delete a single IP phone from your RCS account:
1. Login to an account on the RCS. (See “Logging into the RCS” on page 7 for more information.) The Summary page
opens.
2. Click Phones on the top menu. The Phones page displays.
3. Click the checkbox beside the MAC address of the phone you want to delete.
Caution: Deleting a phone cannot be undone. Check the MAC address carefully to ensure you are removing the
correct phone.
4. Click . The phone is removed from the RCS and the Phones page displays, showing a list of all remaining
phones.
32 41-001302-01 Rev 00 – 06.2010
Page 37

Aastra IP Phones and the RCS
Deleting Multiple IP Phones
1. Login to an account on the RCS. (See “Logging into the RCS” on page 7 for more information.) The Summary page
opens.
2. Click Phones on the top menu. The Phones page displays.
Notes:
1.You can select the following to display specific phones in this window:
- “All” - displays all phones (registered, unregistered, and most recently added)
- “Recently Added 10” displays only up to the last 10 phones added to the RCS.
- “Unaffliated” displays only the non-registered phones
- “Find” displays a pop-up window that allows you to enter the MAC address of the phone you want to display.
2. You can click on any of the table headings to sort in ascending or descending order.
41-001302-01 Rev 00 – 06.2010 33
Page 38
Aastra IP Phones and the RCS
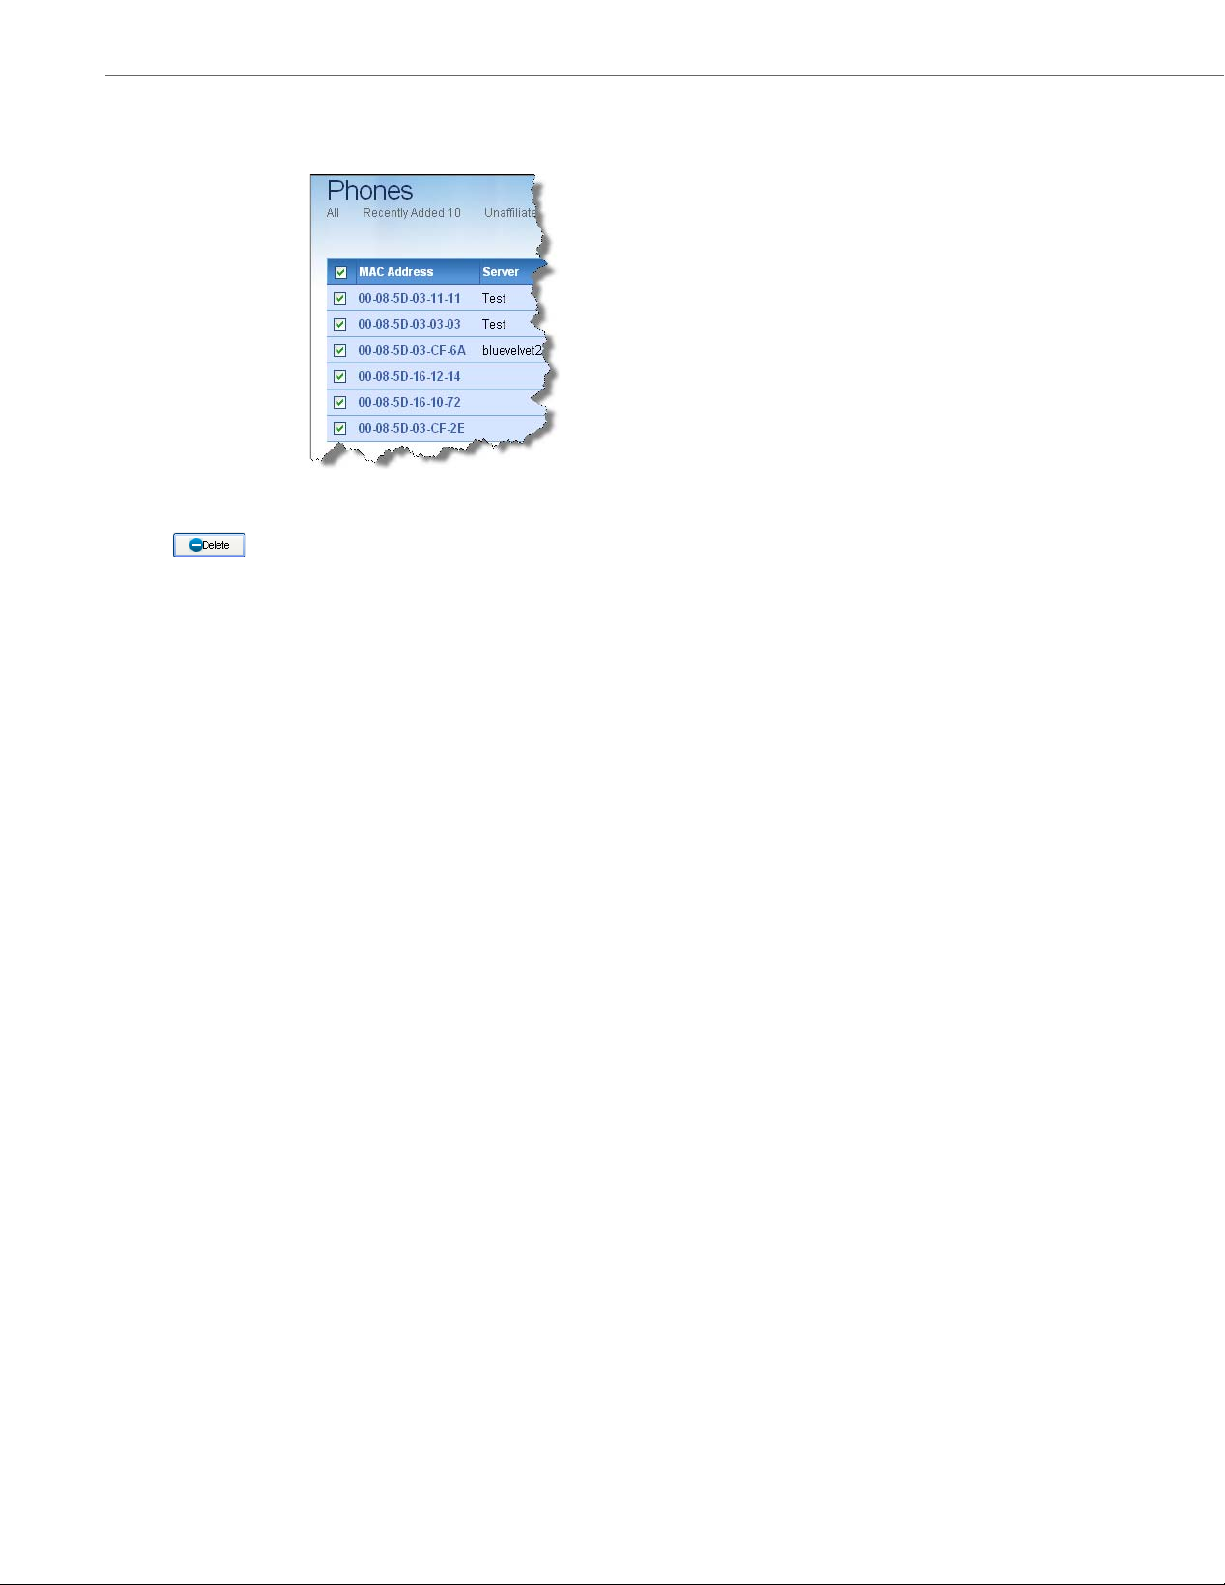
3. In the MAC Address column, click the checkbox beside the phones you want to delete. To select all phones in the
list, click the checkbox next to the “MAC Address” column heading.
Caution: Deleting a phone cannot be undone. Check the MAC address carefully to ensure you are removing the
correct phone.
4. Click . The phones are removed from the RCS and the Phones page displays, showing a list of all
remaining phones.
34 41-001302-01 Rev 00 – 06.2010
Page 39

Aastra IP Phone Brandings
Aastra IP Phone Brandings
Introduction
The RCS software allows a Super User to customize the Aastra IP Phones and firmware using branding features. This section describes the branding information you need to know before you begin, and provides procedures for performing the
branding on the phones.
Note:
The branding features can be created/edited by a Super User only. A User can load the pre-configured branding files to
the phone(s) as applicable but cannot edit or change the branding information.
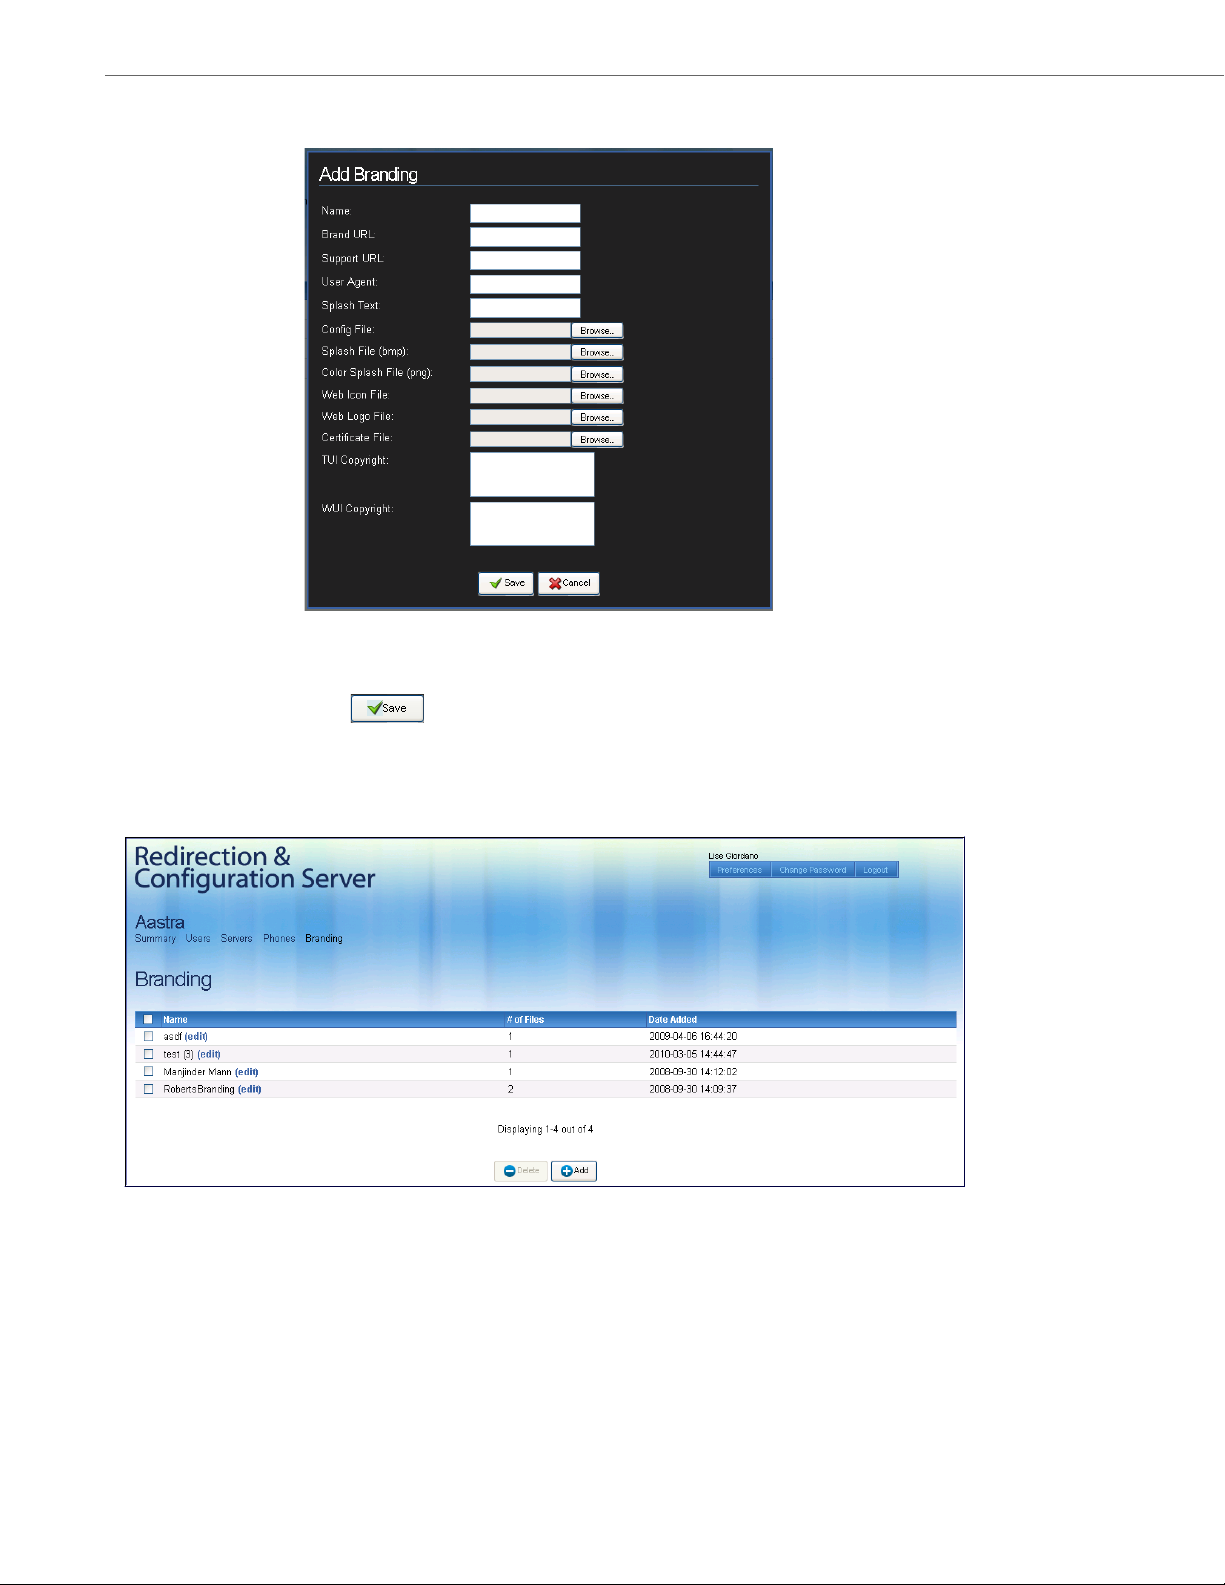
Types of Branding Files (applicable to a Super User only)
Branding files on the RCS are grouped together by branding name. A named branding set consists of text and image files
customizing both the phone Web UI and the phone interface:
Branding Set Component Component Type Description
Name text Name of the brand, for use within the RCS.
Brand URL URL URL link accessed when the user clicks the company logo in the Web UI.
Support URL URL URL link accessed when the user clicks ‘Customer Support’ in the phone
User Agent text Name of the brand, as it appears in the SIP header.
Splash Text text Branding text that appears when Aastra IP Phone models 9143i, 6730i,
Config File Aastra IP Phone configuration file (.cfg) Phone’s configuration information stored on the phone.
Splash File (.bmp)
See Splash File / Color Splash File
Color Splash File (.png)
See Splash File / Color Splash File
Web Icon File icon file (.ico) The icon displayed in the phone Web UI URL bar.
Web Logo File bitmap file (.bmp) The logo displayed in the corner of the phone Web UI in place of the Aas-
Certificate File
802.1x Certificate File
TUI Copyright text Copyright information that displays on the phone’s user interface (UI) at
WUI Copyright text Copyright information that displays in the phone’s Web UI on the lower
bitmap file (.bmp) The company logo that appears when Aastra IP Phone models 9480i,
portable network graphics file (.png) The company logo that appears when Aastra IP Phone model 6739i
privacy enhanced mail certificates (.pem) Certificate file required for server authorization purposes.
Web UI. Usually an email address.
6731i, 6751i, and 6753i boot up.
9480i CT, 6755i, 6757i, and 6757i CT boot up. The logo must be in “.BMP”
format.
boots up. This logo must be in “.PNG” format.
tra logo.
Certificate file required for switch authorization purposes.
the location Options->Status->Firmware->Copyright.
left corner of the System Information page after a user logs in.
41-001302-01 Rev 00 – 06.2010 35
Page 40
Aastra IP Phone Brandings
Brand URL
Support URL
Name
Name of the brand, for use within the RCS.
Brand URL
The brand URL link is accessed when the user clicks the company logo in the phone Web UI, as illustrated.
Support URL
The Support URL link is accessed when the user clicks ‘Customer Support’ in the phone Web UI, as illustrated.
User Agent
Name of the brand, as it appears in the SIP header.
Splash Text
Aastra IP Phones with smaller screens display text during the boot up process. The splash text specified within the branding set contains the text to display on Aastra IP Phone models 9143i, 6730i, 6731i, 6751i, and 6753i. The splash text is limited to 16 characters in length.
Config File
The Phone’s configuration information stored on the phone. The Config file contains some configuration information
which needs to be branded before the phone initializes; for example the VLAN ID parameter. File names are in the format
<filename>.cfg.
36 41-001302-01 Rev 00 – 06.2010
Page 41
Aastra IP Phone Brandings
Aastra Model 9480i Splash Screen Aastra Model 6739i Splash Screen
Logo Location
Splash File / Color Splash File
Aastra IP Phones with larger screens display a graphic during the boot up process. The splash file within the branding set
contains the graphics file to display on Aastra IP Phone models 9480i, 9480i CT, 6739i, 6755i, 6757i, and 6757i CT. The color
splash file contains the graphics file to display on the Model 6739i.
The splash file has the following requirements: The splash file has the following requirements:
• Bitmap (.bmp) format • Color depth: 24 bits depth recommended
• Black and white (monochrome mode) • Image Dimensions must be exactly 640 x 480 pixels
• Dimensions of exactly 126 x 40 pixels • File should be in PNG format
• Resolution of exactly 96 x 96 dots per inch • File size must not exceed 64 KB
• File size no greater than 1KB
Web Icon File
This is the company icon that is displayed in the Web UI URL/address bar, and must be in icon (.ico) format.
Web Logo File
All Aastra IP Phones can be customized through use of the Aastra Web UI interface. The logo file within the branding set
contains the graphics file to display on the Web UI in place of the default Aastra company logo.
The logo file has the following requirements:
• Portable network graphics (.png) format.
• Height no more than 50 pixels (to fit in the Aastra Web UI header).
• Logos created with an alpha-channel blend display best with the Aastra Web UI background.
• White logos may be clearer than full-color logos.
41-001302-01 Rev 00 – 06.2010 37
Page 42

Aastra IP Phone Brandings
Web UI
Copyright
Certificate File
A certificate authority (CA) is an authority in a network that issues and manages security credentials and public keys for
message encryption. A CA checks with a registration authority (RA) to verify information provided by the requestor of a
digital certificate. If the RA verifies the requestor's information, the CA can then issue a certificate. The IP phones use a
certificate file that contains the phone’s public key, the expiration date of the certificate, the phone’s name and other
information about the phone’s public key. The certificate file is usually in the format of <filename>.pem (privacy
enhanced mail certificate).
The certificate file is required for server authorization purposes.
802.1x Certificate File
The IP phones support the IEEE 802.1x Protocol. The 802.1x Protocol is a standard for passing Extensible Authentication
Protocol (EAP) over a wired or wireless Local Area Network (LAN). The 802.1x Protocol offers the capability to permit or
deny network connectivity, control LAN access, and apply traffic policy, based on user or endpoint identity. The certificate file is usually in the format of <filename>.pem (privacy enhanced mail certificate).
The 802.1x certificate file is required for switch authorization purposes.
TUI Copyright
The Copyright information that appears on the phone’s UI at the location Options->Status->Firmware->Copyright.
Example
Copyright @ 2010
Aastra Technologies
www.aastra.com
This product includes software developed by the OpenSSL Project for use in the OpenSSL Toolkit
(<http://www.openssl.org/>), contains content generated by Intel® authoring tools of UPnP™ technology, contains software derived from the RSA Data Security, Inc. MD5 Message-Digest Algorithm. Expat XML Parser Copyright© 1998-2000
Thai Open Source Software Center Ltd and Clark Cooper , 2001-2006 Expat maintainers.
See Aastra Administration Guide for Aastra EULA and full license texts.
WUI Copyright
The Copyright information that appears in the phone’s Web UI onthe lower left corner of the System Information page
after a user logs in.
Example
38 41-001302-01 Rev 00 – 06.2010
Page 43

Aastra IP Phone Brandings
Verification of Branding Files (applicable to a Super User only)
Aastra IP Phones connect to the RCS using https, and must have an MAC address matching an entry in the RCS before files
can be downloaded. In addition, branding files are transferred using an MD5 algorithm which verifies file integrity.
Uploading Branding Sets (applicable to a Super User only)
Before branding files can be assigned to specific phones on your RCS account, the files must be uploaded to the server and
grouped together as a named branding set. RCS accounts have a branding quota limiting the number of branding sets
you can upload. Should you need to increase your branding quota, contact Aastra Telecom.
For more information about branding file formats, see “Types of Branding Files (applicable to a Super User only)” on
page 35.
Adding a Branding Set
To add a branding set to the RCS, do the followings
1. Login to an account on the RCS. (See “Logging into the RCS” on page 7 for more information.)
2. Click Branding on the left menu. The Branding page opens.
41-001302-01 Rev 00 – 06.2010 39
Page 44
Aastra IP Phone Brandings
3. Click Add. The Add Branding dialog opens.
4. Enter values for the parameters in the “Add Branding” dialog box. For a description of each field, see the table,
“Types of Branding Files (applicable to a Super User only)” on page 35.
When you have finished click .
Note: If you have filled your branding quota, a message displays advising you to delete an existing branding set
before adding a new one.
The Branding Sets page opens, showing a list of all branding sets including the one you have just added.
40 41-001302-01 Rev 00 – 06.2010
Page 45

Deleting a Branding Set
You may want to delete a set of branding files when it changes or becomes obsolete.
To delete a branding set to the RCS, do the following:
1. Login to an account on the RCS. (See “Logging into the RCS” on page 7 for more information.)
2. Click Branding on the left menu. The Branding page opens.
Aastra IP Phone Brandings
3. Click the check boxes beside the name of the branding set you want to delete. To quickly check all boxes, click the
top checkbox beside the word Name.
Note: Deleting a branding set cannot be undone. Check the name of the branding carefully to ensure you are
removing the correct branding.
4. Click . The branding set is removed from the RCS.
5. The Branding Sets page opens, showing a list of all remaining branding sets.
41-001302-01 Rev 00 – 06.2010 41
Page 46

Aastra IP Phone Brandings
Assigning Branding Sets to Phones
Once a set of branding files has been named and uploaded to the RCS, this branding set can be assigned to phones for
use. Any phone booting up and contacting the RCS compares the branding files in local memory to the branding files
selected on the server. Any differences result in the Aastra IP Phone downloading the set of branding files.
Assigning Phone Branding
To assign a branding set to a phone or group of phones on the RCS, do the following:
1. Login to an account on the RCS. (See “Logging into the RCS” on page 7 for more information.)
2. Click Phones on the left menu. The Phones page opens.
3. Click the check boxes beside the MAC address or addresses you want to assign to an existing branding set. To
quickly check all boxes, click the top checkbox beside the word MAC.
Note: All phone settings are overwritten in this step, so ensure you select phones with the same firmware version
and redirection server setting as well as branding set.
42 41-001302-01 Rev 00 – 06.2010
Page 47

Aastra IP Phone Brandings
4. Click Properties. The Edit Phone Properties dialog opens.
Note: All settings are overwritten in this step. Ensure you have specified all phone settings correctly.
5. Select the branding set you want to apply, as well as the server for redirection and firmware version. When you
have finished click .
6. The Phones page opens, showing a list of all phones including those you have just changed.
41-001302-01 Rev 00 – 06.2010 43
Page 48

Aastra IP Phone Brandings
Editing Phone Branding
To edit the branding set assigned to a phone or group of phones on the RCS, do the following:
1. Login to an account on the RCS. (See “Logging into the RCS” on page 7 for more information.)
2. Click Phones on the left menu. The Phones page opens.
3. Click the check boxes beside the MAC address or addresses of phones you want to edit. To quickly check all boxes,
click the top checkbox beside the word MAC.
Note: All phone settings are overwritten in this step, so ensure you select phones with the same firmware version
and server setting as well as branding set.
44 41-001302-01 Rev 00 – 06.2010
Page 49

4. Click Properties. The Edit Phone Properties dialog opens.
Aastra IP Phone Brandings
Note: All settings are overwritten in this step. Ensure you have specified all phone settings correctly..
5. Select the branding set you want to change, as well as the server for redirection and firmware version. When you
have finished click .
6. The Phones page opens, showing a list of all phones including those you have just changed.
41-001302-01 Rev 00 – 06.2010 45
Page 50
Aastra IP Phone Brandings
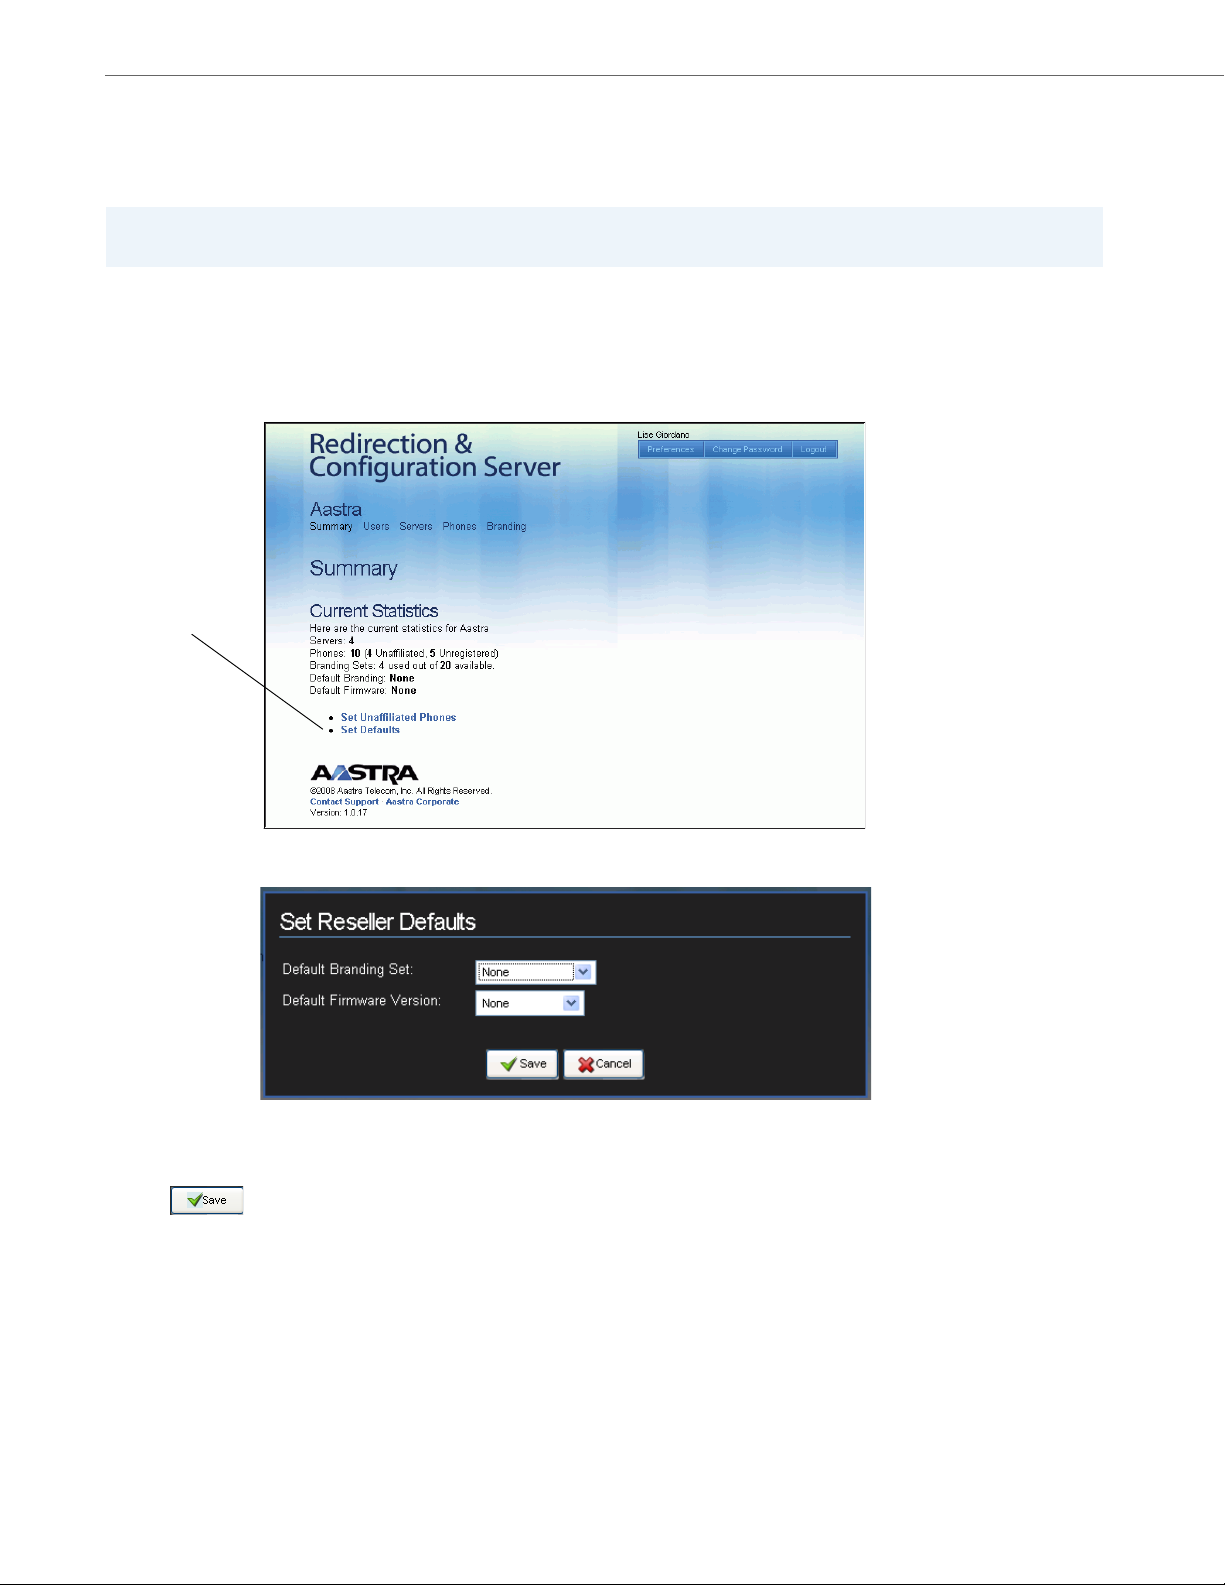
Set Defaults
Option
Setting Default Branding
You can also brand the phones and firmware using the “Set Defaults” option on the Summary page. This feature sets all
the phones and firmware to default branding settings.
Caution:
In RCS, the server can override the default values, and the phones can override the server values.
To set default branding settings on the phones:
1. Login to an account on the RCS. (See “Logging into the RCS” on page 7 for more information.)
2. Click Summary on the left menu. The Summary page opens.
3. Click the “Set Defaults” option. The “Set Reseller Defaults” screen displays..
4. Select the Default Branding Set you want to use to Brand your phones.
5. Select the Default Firmware Version you want to load to your phones..
6. click . A “Defaults Saved” prompt displays that allows you to undo the settings you just saved, or close
the prompt. The Summary page displays.
46 41-001302-01 Rev 00 – 06.2010
Page 51

Aastra IP Phone Firmware
Aastra IP Phone Firmware
Introduction
This section describes how firmware files are handled on the RCS. If the phones MAC address in the RCS are assigned a
firmware, after the phones contact the RCS, the RCS automatically downloads a version firmware file if it is a newer version
than the current phone firmware.
Note:
A phone administrator can enable and disable firmware updates on the phone as applicable.
Types of Firmware Files
The RCS downloads a firmware file to the phones if the firmware is a newer version than the current phone firmware, AND
if the phone is configured to accept automatic updates. A phone administrator can enable or disable automatic updates,
The IP Phone firmware file (.st) includes all the necessary files you need for your phone.
The firmware consists of the following:
• <phone model>.st - This file contains information about the specific IP Phone model and contains the language packs
to load to the phone.
IP Phone Models Associated Firmware
9143i 9143i.st
9480i 9480i.st
9480i CT 9480iCT.st
6730i 6730i.st
6731i 6731i.st
6739i* 6739i.st*
6751i 51i.st
6753i 53i.st
6755i 55i.st
6757i 57i.st
6757i CT 57iCT.st
*RCS supports 6739i IP Phone, Release 3.1 and later.
41-001302-01 Rev 00 – 06.2010 47
Page 52
Aastra IP Phone Firmware
Assigning Firmware to Phones
When new versions of phone firmware files become available, the files are uploaded to the RCS by Aastra Telecom. You
can update the firmware being used by your phones, by selecting the firmware version for the phones after logging into
your account.
Assigning IP Phone Firmware
You can assign IP phone firmware to a single phone or to multiple phones as required.
To assign firmware to a phone(s):
1. Login to an account on the RCS. (See “Logging into the RCS” on page 7 for more information.) The Summary page
opens.
2. Click Phones on the top menu. The Phones page opens.
3. In the MAC Address column, click the checkbox beside the MAC address of the phone for which you want to
assign the firmware. To select all phones in the list, click the checkbox beside the “MAC Address” column heading.
48 41-001302-01 Rev 00 – 06.2010
Page 53

4. Click . The Edit Properties dialog displays.
You do not need to change the configuration server in the Server field.
Aastra IP Phone Firmware
5. (optional) In the Branding field, select the Branding file you want to load to this phone(s).
6. In the Firmware field, select the firmware you want the RCS to apply to this phone.
Notes:
1.This field allows the user to specify a firmware image that is loaded onto the phone by the RCS. If, for example,
you want to deploy the phones with the 2.4.0 firmware, you can select “2.4.0” from the list in the Firmware field).
If you select a later version of firmware to install then what is currently on the phone, the RCS automatically
upgrades the phone(s) to the firmware you select. The RCS performs the upgrade before the phone redirects to
the configuration server.
2.The RCS stores the firmware images which are supplied by Aastra Telecom. The Firmware field includes only official supported releases beginning at Release 2.4.0.
3.If you do not want the RCS to provide firmware, select “None”.
41-001302-01 Rev 00 – 06.2010 49
Page 54

Aastra IP Phone Firmware
7. Click .
WAR NIN G: After clicking , the phone settings override server settings as well as default settings.
Ensure you have specified all phone settings correctly.
8. The Phones page displays showing a list of all phones including the phone you have just changed. The updated
properties and other information display as well.
50 41-001302-01 Rev 00 – 06.2010
Page 55
Aastra IP Phone Firmware
Updating IP Phone Firmware (during a factory reset)
When new versions of phone firmware files become available, the files are uploaded to the RCS by Aastra Telecom. During
a factory reset, your phone updates the current firmware on your phones with the lastest firmware as applicable.
To update firmware on a phone(s):
1. Login to an account on the RCS. (See “Logging into the RCS” on page 7 for more information.) The Summary page
opens.
2. Click Phones on the top menu. The Phones page opens.
3. In the MAC Address column, click the checkbox beside the MAC address of the phone for which you want to
update the firmware. To select all phones in the list, click the checkbox beside the “MAC Address” column heading.
41-001302-01 Rev 00 – 06.2010 51
Page 56

Aastra IP Phone Firmware
4. Click . The Edit Properties dialog displays.
You do not need to change the configuration server in the Server field.
5. (optional) In the Branding field, select the Branding file you want to load to this phone(s).
6. In the Firmware field, select the firmware you want the RCS to apply to this phone.
Notes:
1.This field allows the user to specify a firmware image that is loaded onto the phone by the RCS. If, for example,
you want to deploy the phones with the 2.4.0 firmware, you can select “2.4.0” from the list in the Firmware field).
If you select a later version of firmware to install then what is currently on the phone, the RCS automatically
upgrades the phone(s) to the firmware you select. The RCS performs the upgrade before the phone redirects to
the configuration server.
2.The RCS stores the firmware images which are supplied by Aastra Telecom. The Firmware field includes only official supported releases beginning at Release 2.4.0.
3.If you do not want the RCS to provide firmware, select “None”.
52 41-001302-01 Rev 00 – 06.2010
Page 57

Aastra IP Phone Firmware
7. Click .
WAR NI NG: After clicking , the phone settings override server settings as well as default settings.
Ensure you have specified all phone settings correctly.
8. The Phones page displays showing a list of all phones including the phone you have just changed. The updated
properties and other information display as well.
41-001302-01 Rev 00 – 06.2010 53
Page 58

Aastra IP Phone Firmware
Set Defaults
Option
Setting Default Firmware (Global Feature)
You can brand the phones and firmware using the “Set Defaults” option on the Summary page. This feature sets all the
phones to the default branding and firmware settings.
Caution:
In RCS, the server can override the default values, and the phones can override the server values.
To set default branding settings on the phones:
1. Login to an account on the RCS. (See “Logging into the RCS” on page 7 for more information.)
2. Click Summary on the left menu. The Summary page opens.
3. Click the “Set Defaults” option. The “Set Reseller Defaults” screen displays..
4. Select the Default Branding Set you want to use to Brand your phones.
5. Select the Default Firmware Version you want to load to your phones..
6. click . A “Defaults Saved” prompt displays that allows you to undo the settings you just saved, or close
the prompt. The Summary page displays.
54 41-001302-01 Rev 00 – 06.2010
Page 59

Index
Numerics
802.1x certificate files 38
A
About this template 1
account on the redirection server
B
basic features, using 6
brand URL
branding Aastra IP phones
branding files
branding set
brandings
36
types
35
uploading
verification of
802.1x certificate file
802.1x certificate files
brand URL
certificate file
certificate files
color splash file
config files
icon files
logo files
name
splash file
splash files
splash text
support URL
TUI copyright
user agent
Web icon file
Web logo file
WUI copyright
adding
assigning to phones
changing
deleting
39
39
35, 36
35
38
35
35, 36
37
37
36
35
37
35, 36
35, 36
35
35, 36
35
35
35
39
44
41
35
35
38
42
C
certificate files 38
config files
36
D
documentation 1
F
firmware files
assigning to phones
types
47
updates
4
48
I
icon files 37
L
logging out 15
logo files
37
16
M
MAC addresses 26
models of Aastra IP phones
P
phone firmware updates 4
phones
adding
11, 13, 15, 17, 18, 19, 20, 21, 22, 23
basic redirection
brandings
assigning
overview
uploading
contact process overview
deleting
deleting multiple
firmware
assigning
changing
overview
MAC addresses
managing
properties
setting multiple
redirecting phones, overview
server for redirecting
9
42
35
39
32
33, 39, 41, 42, 44, 46, 54
48
51
47
26
26
12
R
redirecting a phone 9
redirecting overview
redirection server
basic features, using
benefits
5
features
3
firmware updates overview
logging out
managing your account
phones
contact process overview
managing
supported models
redirecting
overview
users
managing
types
3
6
15
26
3
19
7
S
servers for redirecting
deleting
23
editing
22
managing
splash files
splash text
Super Users
support URL
supported phones
22
37
36
7
36
25
25
4
29
3
4
16
4
25
41-001302-01 Rev 00 – 06.2010 Index-1
Page 60

Index
U
user
agent
passwords
preferences
types
Users
7
36
7
18
17
users
adding
deleting
editing
managing
Super Users
types
19
21
20
19
7
7
Index-2 41-001302-01 Rev 00 – 06.2010v
Page 61

Disclaimer
Aastra Telecom will not accept liability for any damages and/or
long distance charges, which result from unauthorized and/or
unlawful use. While every effort has been made to ensure
accuracy, Aastra Telecom will not be liable for technical or editorial
errors or omissions contained within this documentation. The
information contained in this documentation is subject to change
without notice. Copyright © Aastra Telecom, www.aastra.com.
 Loading...