

Page 1

USER'S GUIDE
Radio Control Terminal
RCT
Version 2.0
Page 2

Copyright© Ericsson Enterprise AB 2001.
All Rights Reserved.
EN/LZT 103 36 R1A
Page 3

Contents
CHAPTER 1 OVERVIEW................................................................................................................................3
CHAPTER 2 GETTING STARTED..............................................................................................................5
THE CHANNEL LIST WINDOW ..........................................................................................................................7
Title Bar.......................................................................................................................................................8
Menu .............................................................................................................................................................9
Channel sub-menu....................................................................................................................................10
Configuration sub-menu..........................................................................................................................12
Help sub-menu..........................................................................................................................................13
Toolbar.......................................................................................................................................................14
Heading Bar..............................................................................................................................................15
Status Bar ...................................................................................................................................................16
The Function bar......................................................................................................................................17
The Radio window....................................................................................................................................18
THE AUDIO WINDOW ......................................................................................................................................19
CHAPTER 3 BASIC FEATURES ................................................................................................................21
CHOOSING A ROLE...........................................................................................................................................21
ASSIGNING A RADIO CHANNEL ...................................................................................................................... 23
Choosing a radio channel.......................................................................................................................24
Setting Selection .......................................................................................................................................24
Setting Individual Volume.......................................................................................................................25
Channel commands..................................................................................................................................26
DE-ASSIGNING A RADIO CHANNEL................................................................................................................27
SELECTING A RADIO CHANNEL FOR RECEIVING .......................................................................................... 28
SELECTING A RADIO CHANNEL FOR RECEIVING AND TRANSMITTING......................................................29
DE-SELECTING A RADIO CHANNEL ................................................................................................................ 30
RADIO CHANNEL INDICATIONS......................................................................................................................31
Squelch indication....................................................................................................................................31
Squelch on an Idle channel.....................................................................................................................32
Most recent Squelch indication..............................................................................................................33
PTT own/other indications.....................................................................................................................34
ADJUSTING INDIVIDUAL VOLUME SETTING FOR A RADIO CHANNEL........................................................35
TRANSMITTING ON A RADIO CHANNEL (PTT).............................................................................................38
MUTING TELEPHONY MICROPHONE(S )..........................................................................................................39
SELECTING AUDIO DEVICES............................................................................................................................40
iii
Page 4

ADJUSTING VOLUME ....................................................................................................................................... 41
MODIFYING BUZZER SETTINGS......................................................................................................................42
G ETTING HELP ................................................................................................................................................. 43
About Radio...............................................................................................................................................44
About Audio...............................................................................................................................................45
CHAPTER 4 ADVANCED FEATURES ....................................................................................................47
CROSS-COUPLING CHANNELS ........................................................................................................................ 47
PLAYBACK........................................................................................................................................................51
CHAPTER 5 CONFIGURATION................................................................................................................52
FILTERS.............................................................................................................................................................54
COLUMNS..........................................................................................................................................................55
DEFAULT ROLE................................................................................................................................................57
OTHER OPTIONS...............................................................................................................................................58
APPENDIX...........................................................................................................................................................61
LIST OF ABBREVIATIONS AND TERMS...........................................................................................................61
iv
Page 5

Welcome to Radio Control Terminal and MD110 CS
The Ericsson MD110 CS is a state-of-the-art control communications system. This User’s
Guide has been prepared especially for the operators of the RCT (Radio Control Terminal). The
operator is the user accessing the radio functionality in the MD110 CS.
The RCT consists of both hardware and software. The user interface is a screen-based series of
windows controlled by a mouse and keyboard. This User’s Guide is therefore designed for
operators who are somewhat familiar with the Windows NT/Windows 95 user interface and the
ways to operate a mouse. However, the information provided in the guide will hopefully be
clear enough to assist beginners as well.
1
Page 6

2 Welcome to Radio Control Terminal
Page 7

Chapter 1
Overview
This User’s Guide starts by a brief overview of RCT. It then gives an introduction to the RCT
and describes the main windows of the user interface.
The features of the RCT are placed under two main headings: Basic Features and Advanced
Features .
Basic features
• Choosing a role
• Assigning a radio channel
• De-assigning a radio channel
• Selecting a radio channel for receiving, or receiving and transmitting
• De-selecting a radio channel
• Radio channel indications
• Adjusting individual volume settings for a radio channel
• Transmitting on a radio channel
• Muting telephony microphones
• Selecting audio devices
• Adjusting volume
• Modifying buzzer settings
• Getting help
3
Page 8

4 Overview
Advanced features
• Cross-coupling channels
• Playback
At last the User's Guide contains information on how to configure the RCT.
The functions the operator is allowed to perform throughout the application are based on the
user profile and the role selected by the operator (see Chapter 2
Getting started). A gray (disabled) item indicates a function which the operator is not allowed to
perform (e.g., assigning/de-assigning a channel, channel cross-coupling, etc.). Text boxes and
buttons of dialog boxes will only be enabled if their access is allowed by the operator’s privilege
level. All mouse or “click” instructions in this guide refer to the left mouse button if not stated
otherwise.
This User’s Guide takes the operator step by step through the functions and features performed
by most operators in normal everyday operations, but not necessarily in the consecutive order in
which the various windows will appear on the screen.
Page 9
Chapter 2
Getting started
Each operator can act in a number of different roles, e.g. day operator, night operator, etc. These
roles define the radio channels that will be assigned when the operator logs on, and the
privileges and limitations of the operator when performing a specific role. The privileges and
limitations define if the operator may modify the selection of the assigned channels and in that
case how, the volume range available to the operator, and if a channel may be cross-coupled
with other channels.
Each operator shall be assigned at least one role. A number of operators may be assigned the
same role(s). These roles, which are created and maintained by the RCT administrator (the
person responsible for setting up the RCT to suit the needs of the users, i.e. operator(s) and
supervisor), are stored in a database.
When the application is starting, it must connect to the database and retrieve the user profile
data and the user configurations data. Next, the application must get the roles available for this
operator. When the operator chooses one role, or accepts the default role, the application will
retrieve the role data. When the necessary data has been retrieved, the application presents the
corresponding user interface and proceeds with the radio channel set-up.
5
Page 10
6 Getting started
Start the application in one of the ways defined by Windows NT. The startup window will
appear briefly on the screen.
The startup window displays the:
• Product name (RCT)
• RCT version (2.0)
• RCT product copyright information
Now you are logged on to RCT. Keep in mind that the features to which you have access
throughout the entire RCT operation depend on the privilege level to which you have been
assigned. Privileges, such as assigning/de-assigning a channel or channel cross-coupling, are
determined by the Supervisor .
The RCT consists of two main windows: The Channel List window and the Audio window.
Page 11

The Channel List window
Title bar
Icon button
Menu Toolbar Heading bar
Getting started 7
Status bar Filter setting Role Date/time
The Channel List window displays a list of 0-12 radio channels which have been assigned to
operator with information about each channel.
The operator must be familiar with the following features of the Channel List window (which is
based on Windows NT):
Page 12
8 Getting started
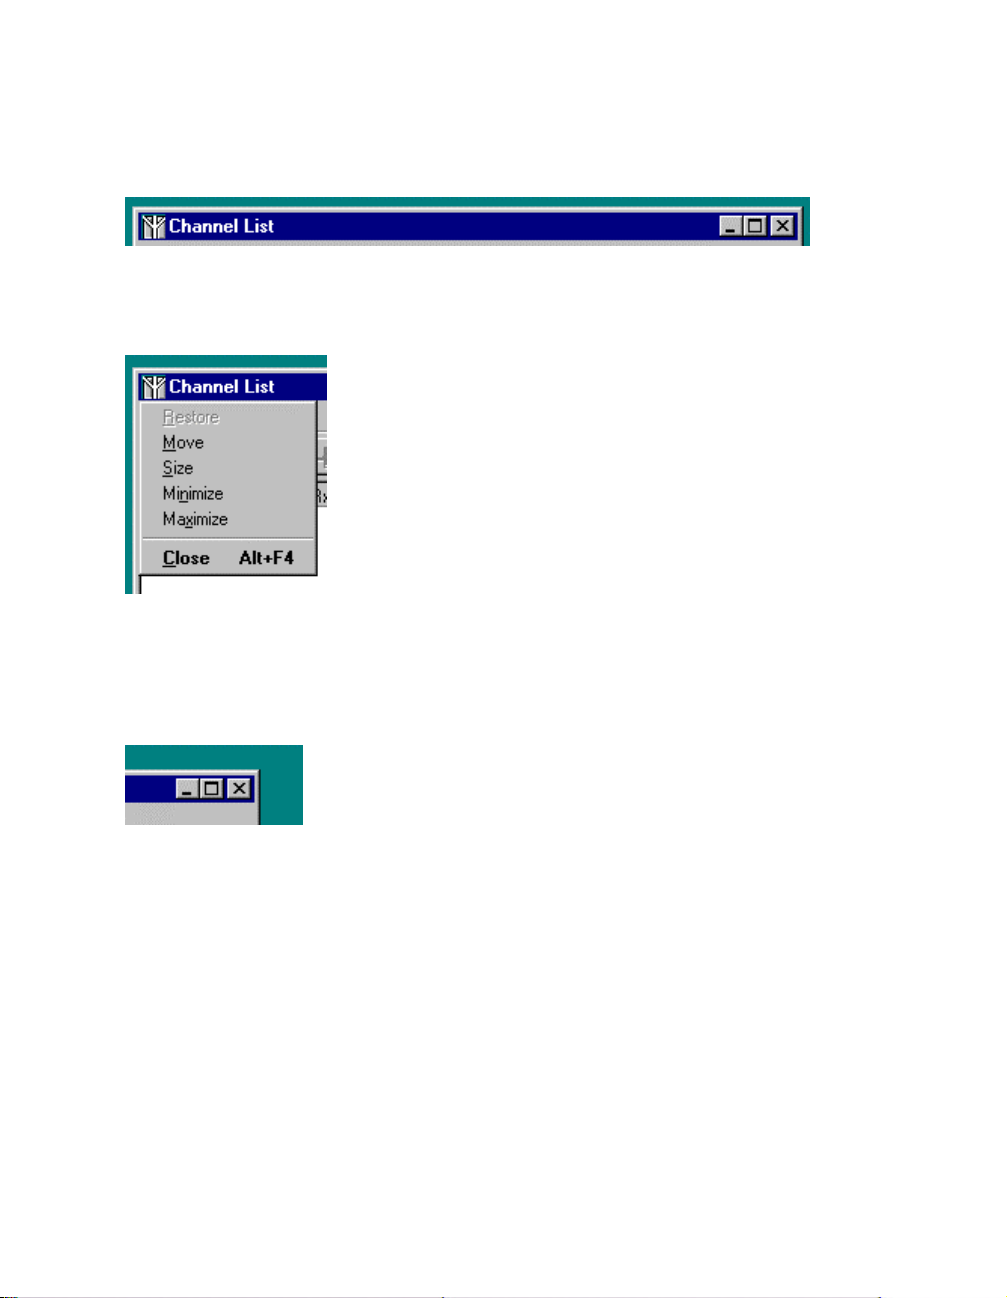
Title Bar
The Title Bar gives the name of the window, “Channel List”. When the right mouse button is
clicked on the Title bar, or any mouse button is clicked on the icon button to the far left, the
System menu appears:
The System menu gives access to commands for manipulating the window. Click anywhere on
the desktop to remove the System menu.
The buttons with symbols shown in the upper right-hand corner of the window are, from left to
right:
• minimize or iconize window.
• maximize window (symbol then changes to "Restore" to restore window to normal size.
• close window or exit application.
Page 13
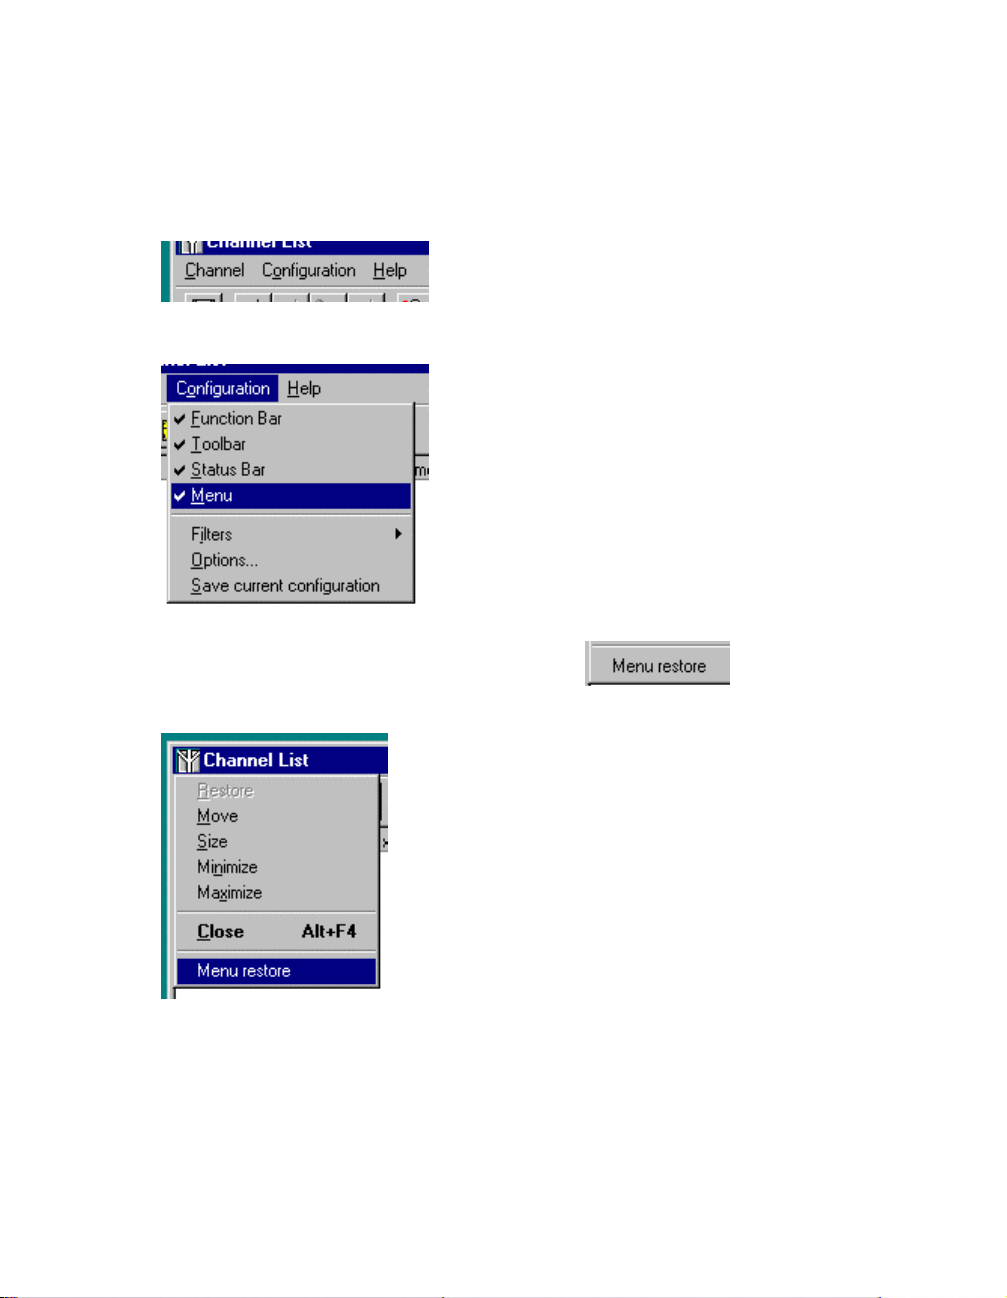
Menu
Beneath the Title Bar is the menu containing the sub-menus Channel , Configuration, and Help.
Click Configuration, then Menu to hide the menu.
Getting started 9
Open the System menu as described above and click in order to show it
again.
Page 14
10 Getting started
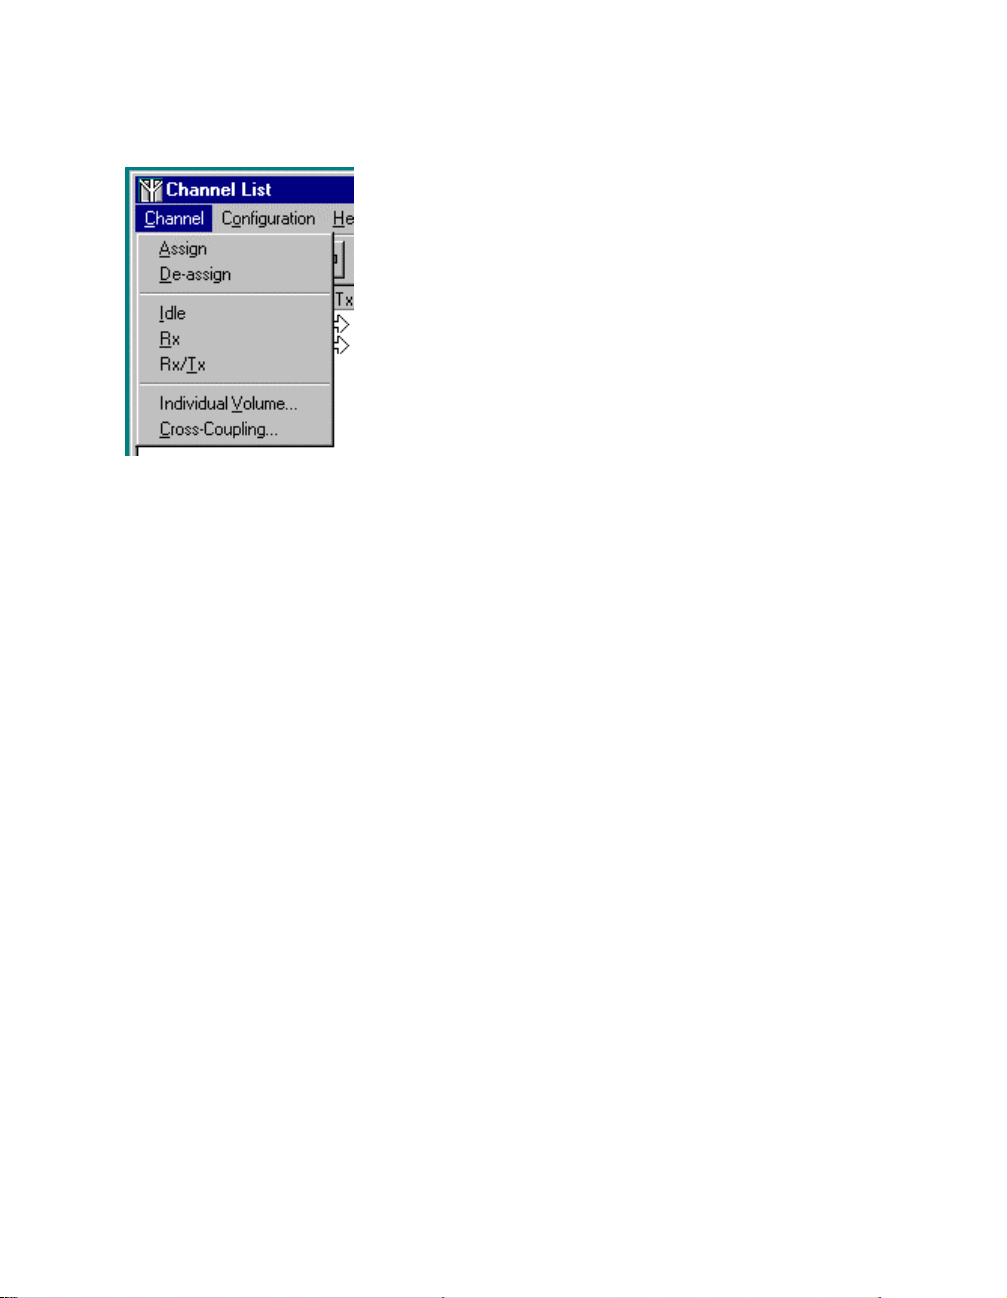
Channel sub-menu
The Channel sub-menu contains the following commands:
• Assign - assigns new radio channel to the channel list.
• De-assign - allows operator to cancel an assigned radio channel.
• Idle - sets the currently selected radio channel in the list to Idle mode (de-selected).
• Rx - sets the currently selected radio channel in the list to receive only mode .
• Rx/Tx - sets the currently selected radio channel in the list to receive and transmit mode.
• Individual volume - displays individual volume level setting for each radio channel.
• Cross Coupling assists in setting up a radio-radio cross-coupling group (X/C). The group
may have up to 4 radio channels (the channels must be in Rx/Tx mode). The cross-coupling
group name may have up to 15 alphanumeric characters.
Page 15
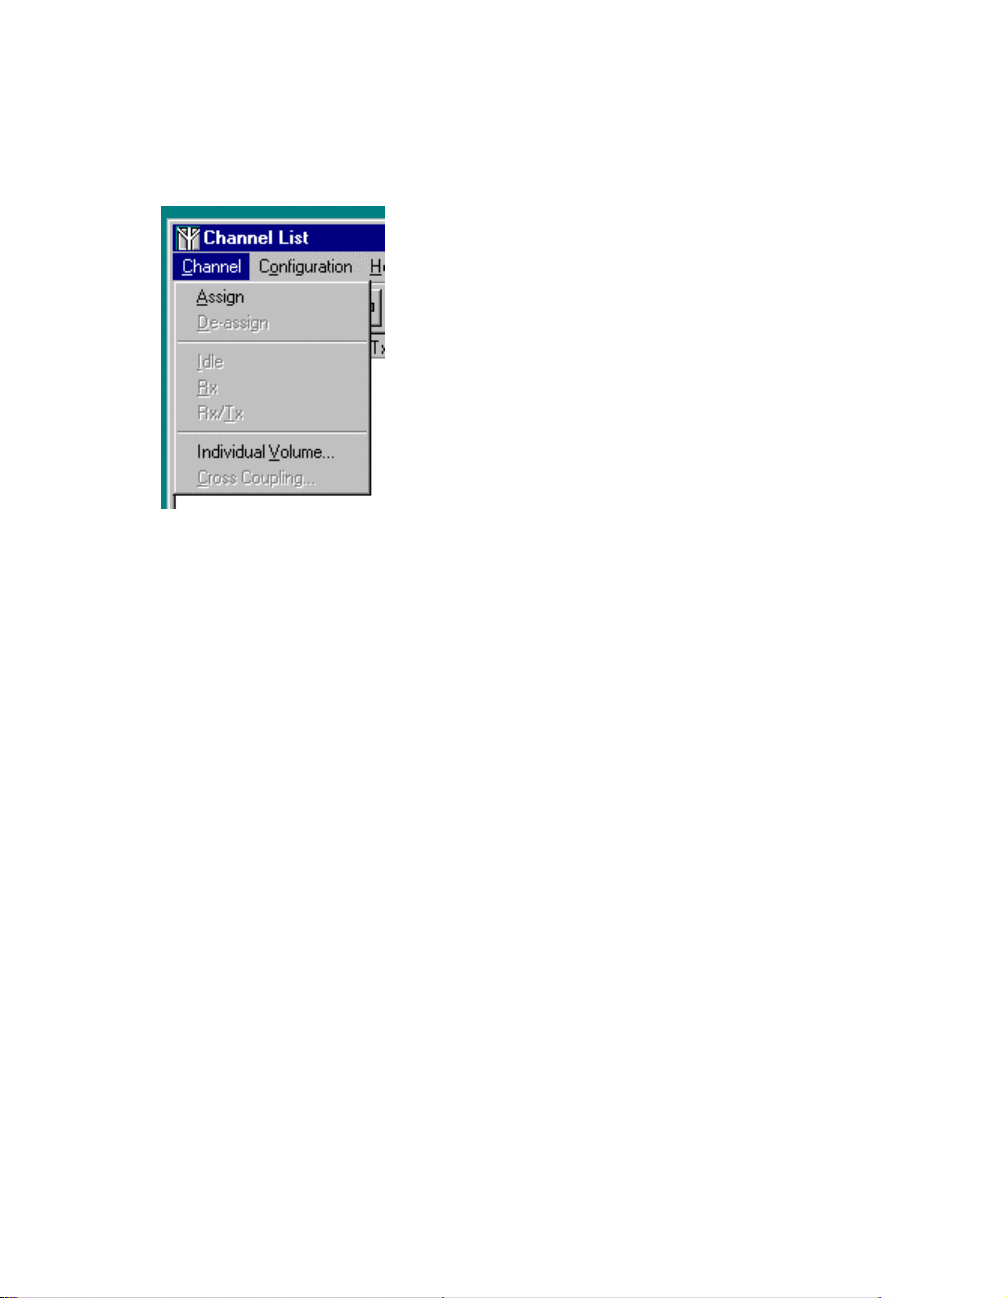
Getting started 11
Note: Some functions in the Channel sub-menu are dimmed (disabled) when no channel is
selected or the operator is not allowed to perform this function.
Page 16
12 Getting started
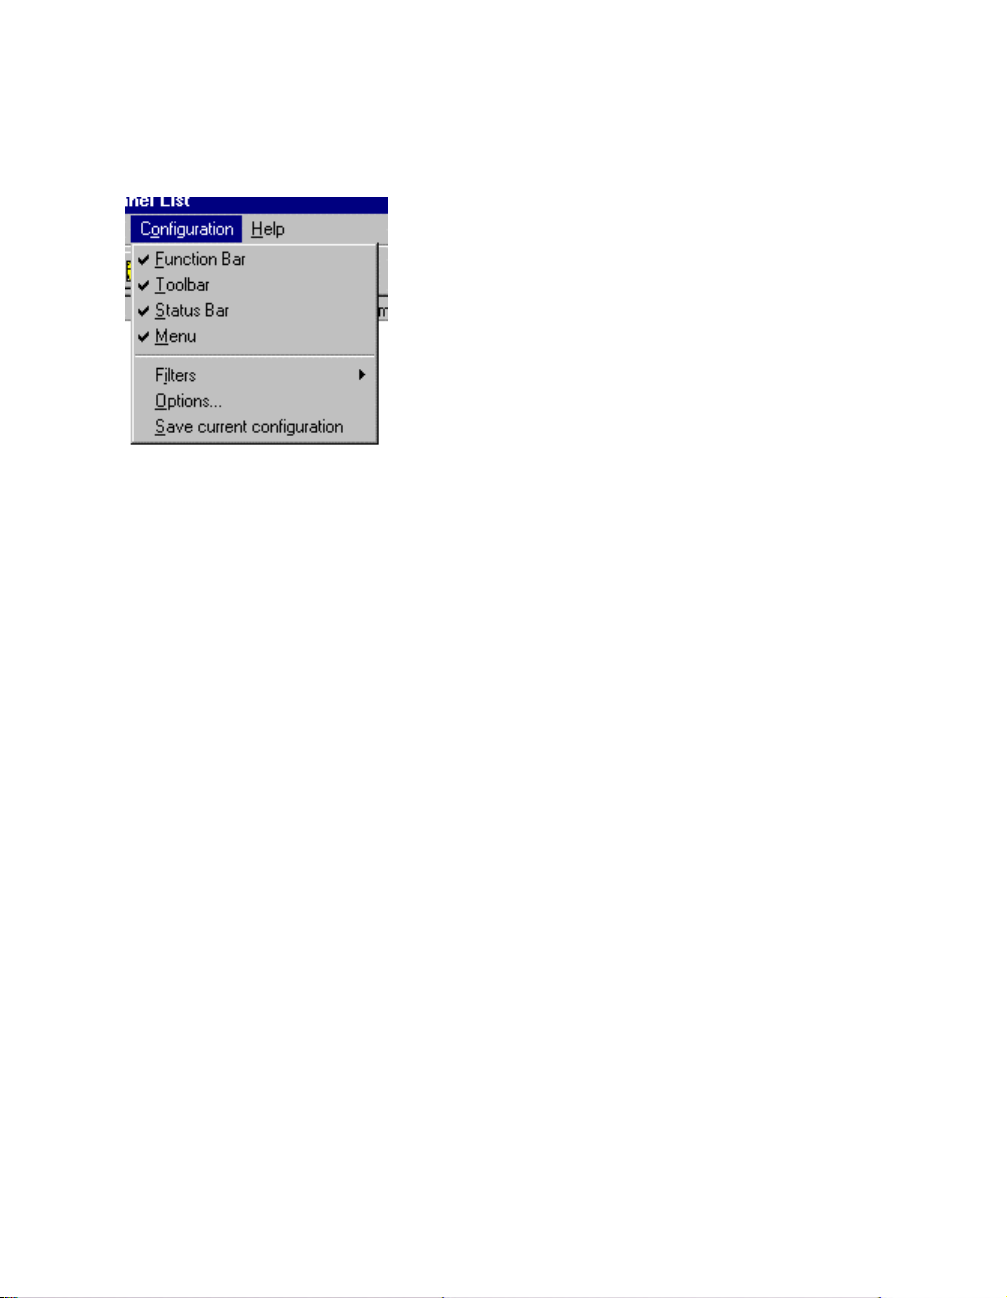
Configuration sub-menu
The Configuration sub-menu contains the following commands:
• Function Bar - if checked (√), the Function bar will be displayed; if not, it will be hidden.
• Toolbar - if checked (√) the Toolbar will be displayed; if not, it will be hidden.
• Status Bar - if checked (√), the Status bar will be displayed; if not, it will be hidden.
• Menu - if checked (√), the menu will be displayed; if not, it will be hidden.
• Filters - displays a sub-menu for setting filters
• Options… - displays options for customizing the RCT.
• Save current configuration - stores the current settings in the operator configuration.
Page 17
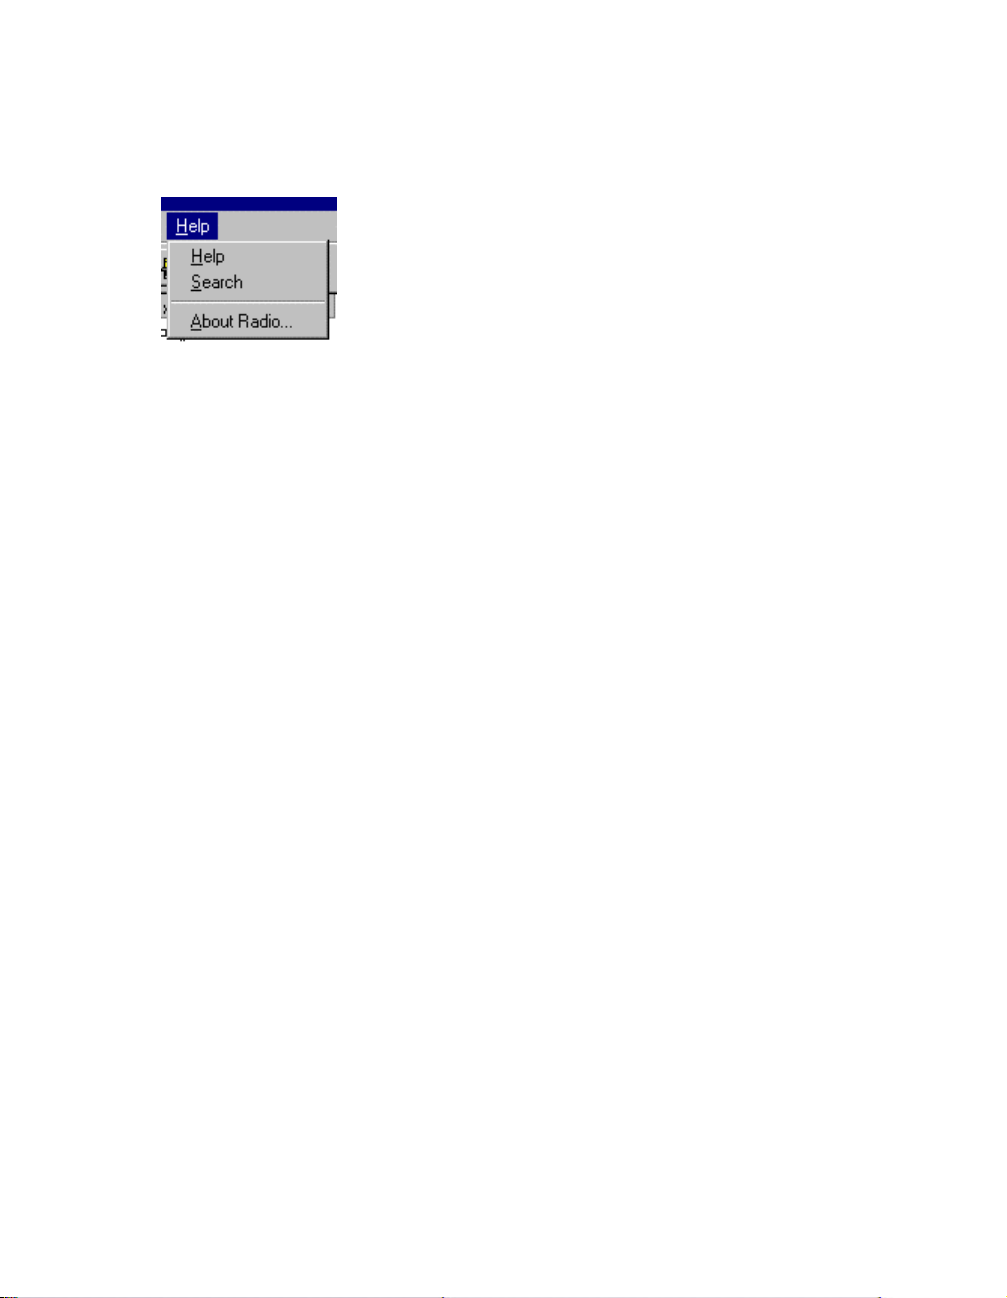
Help sub-menu
The Help sub-menu contains the following commands:
• Help - displays contents of the on-line help file.
• Search - displays the standard search dialogue for searching the help file.
• About RCT… - contains a short description of RCT such as name, version, copyright, etc.
Getting started 13
Page 18
14 Getting started
Toolbar
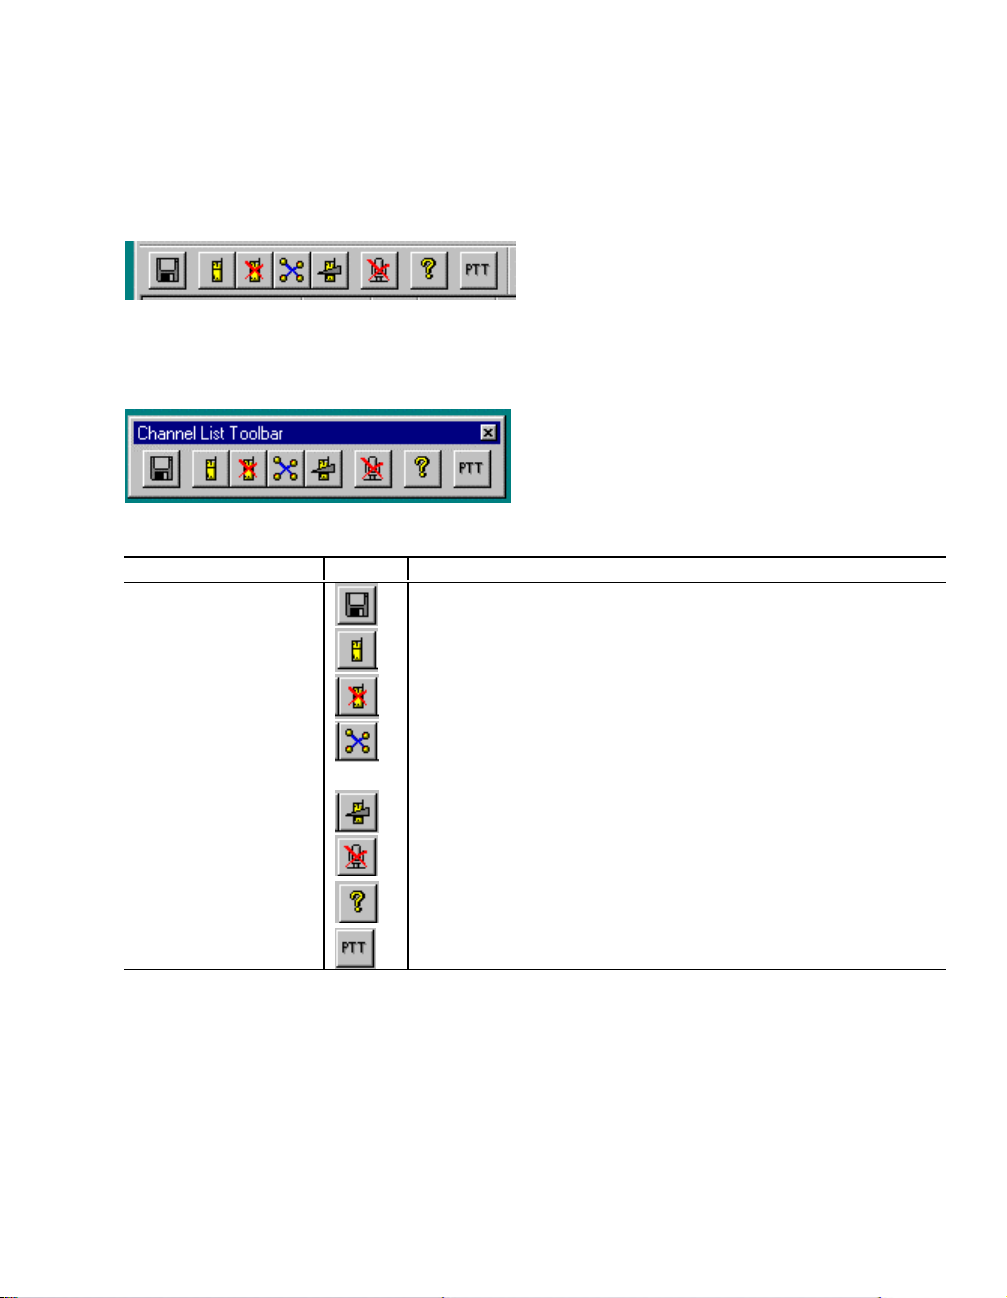
Each button in the Toolbar is associated with a function. The Toolbar looks like this:
The Toolbar can be moved to the desktop or to any side (vertical or horizontal) of the Channel
List window, in addition to its regular position. This is known as floating and docking Toolbar.
The Toolbar looks like this when floating:
The following table shows the Toolbar buttons and their functions:
Command Button Description
Save Current
Configuration
Assign assigns new radio channel to channel list
automatically saves configuration when button has been clicked
De-assign allows operator to cancel an assigned radio channel
Cross-coupling assists in setting up a radio-radio cross-coupling group with up
to 4 radio channels
Individual volume individual volume level setting for each assigned radio channel
Mute mutes microphone for telephony
Help activates on-line help function
PTT allows operator to transmit to mobile units
Page 19

Getting started 15
Heading Bar
The Heading Bar has several column headings: Channel Id, Rx/Tx, X/C, Volume, Squelch,
Message.
• Channel Id shows the identification of each radio channel . The channel name may contain
up to 25 alphanumeric characters. Optionally, an icon may also be used to identify the
channel (small symbol in front of channel name in Channel Id column).
• Rx/Tx shows if the channel is in receive and/or transmit mode and also squelch and PTT
indications. If no text is displayed in this column, the channel is in Idle mode.
• X/C shows the cross-coupling group in which each radio channel is a member (if any).
• Squelch shows when the start time of the last call or current call (hour, minute, second). The
start time of the latest Squelch among all channels is indicated with bold text.
• Message lists error or information messages concerning the channel.
Note: Click on the space between the columns and drag to change the width of columns. All
columns except the Channel Id column may be hidden. See Columns.
Page 20

16 Getting started
Status Bar
The Status Bar indicates from left to right: general information or function of menu item being
pointed to with mouse; filter setting; role file currently active; date and time.
"For Help, press F1" is a help/information message.
"All" is the currently active filter ( see Filters) which determines the channels visible in Channel
List window.
"DayShift.rol" is the name of the role file currently active ( see Choosing a role). This changes
according to the role selected.
Date and time is updated every second.
Page 21
Getting started 17
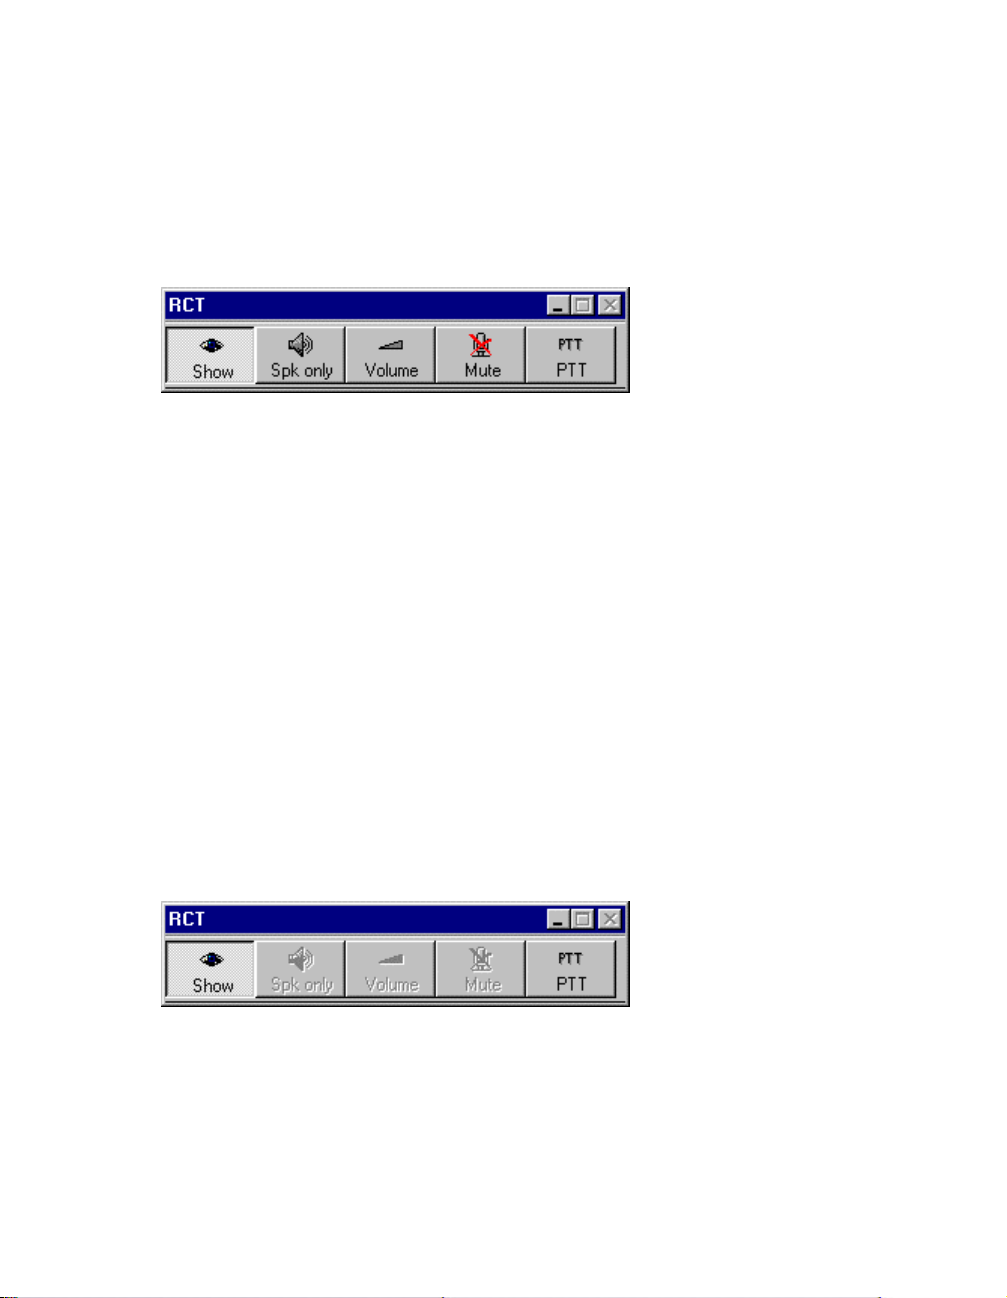
The Function bar
The Function Bar is a small window which behaves much as the floating toolbars in Windows.
It contains important controls which make it possible to use one or more applications without
taking up valuable screen space.
The Function Bar makes the most important functions of the Channel List and Audio windows
easily accessible. It contains the following functions:
• Show/Hide - shows or hides the Channel List window in either normal or minimized state.
• Speaker only - toggles the active audio device for the radio audio between the loudspeaker
and currently selected device.
• Volume - displays the Volume set-up dialogue in the Audio window for setting the radio and
telephony volume on all audio devices.
• Mute - disables telephony speech
• PTT (push to talk) - activates transmission on all radio channels selected for both monitoring
and transmission
The Function Bar window is always on top of other windows and will also show Squelch
indications. If the Audio window is not active, the audio function buttons are dimmed and can
not be used.
Page 22

18 Getting started
The Radio window
The Channel List is not the only way to represent channels in the RCT. It is possible to have
each channel in its own separate window by double-clicking on the channel in the channel list.
Each radio window will look like the window below.
The window title is the name of the channel. The radio window contains controls for controlling
all aspects of a radio channel. The radio window can exist in parallel with the Channel List
window.
Click Close in order to hide a radio window.
Page 23

The Audio window
Getting started 19
The Audio window allows the operator to control the radio and telephony audio. It contains a
toolbar and a tabbed dialogue with three tabs:
• Volume - contains controls for adjusting the volume of the audio devices: speaker, handset,
and headset. See Adjusting volume.
• Buzzer - contains controls for setting the buzzer type and volume. See Modifying buzzer
settings .
• Aux - contains controls for controlling the auxiliary input port. See Playback.
Page 24

Page 25

Chapter 3
Basic features
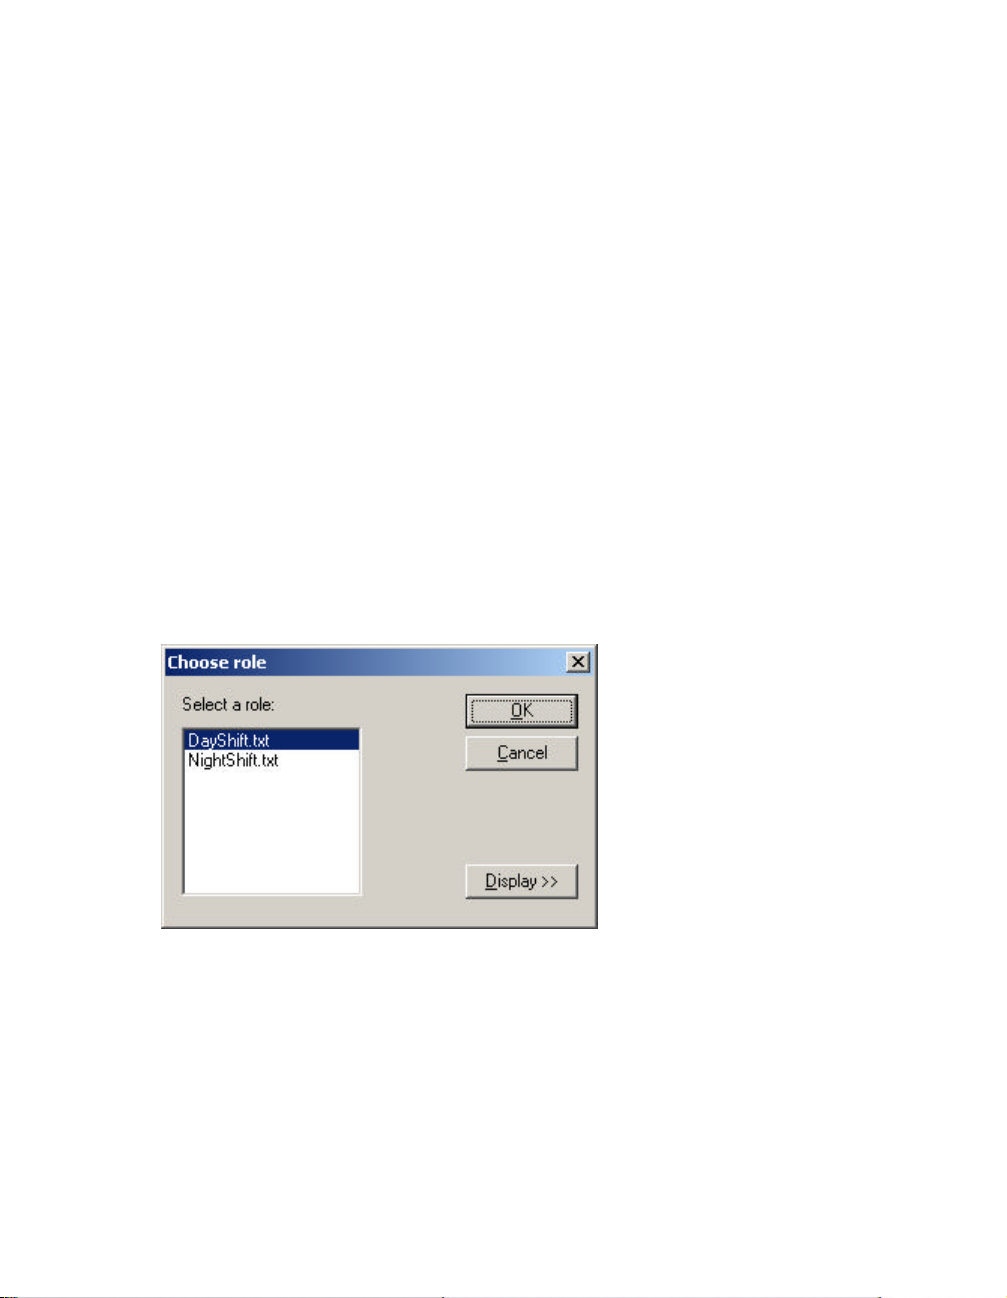
Choosing a role
The Choose Role window appears on the screen following the startup window.
Select a role and click OK or click OK if the desired role is highlighted in role list. The role
identifies the radio channels and their default settings that will be automatically set up when
accepting this role.
Note: The contents of the Choose Role window you see has been set up by your local
administrator and will not be the same as the window shown in this User’s Guide.
21
Page 26

22 Basic features
Click to see the contents of the selected role. Between 0-12 channels will appear
in the list in the Choose Role window.
The window shows that the "Test CTY 107" channel will be assigned to the operator . It will not
be active in either Receiving (Rx) or Transmitting (Tx) mode but will instead be de-selected
(Idle). The volume will be set to level 2.
Click to hide the channel display. Click OK to get to the Channel List window.
In order to change the role after the application has been started, the operator has to exit the
application and restart it.
Page 27

Assigning a radio channel
Before a radio channel can be used for receiving and transmitting audio, it must be assigned to
the operator position. A channel which is not assigned, can not be manipulated in any way.
An operator may assign a channel in addition to others (not more than 12). If 12 channels have
already been assigned, one or more of these channels must be de-assigned before assigning a
new channel.
Select the Assign function in the Channel sub-menu
Basic features 23
or press in Toolbar
in order to display the Assign channel window .
Page 28

24 Basic features
Choosing a radio channel
Select a channel from the list as shown in the window below.
In this case the radio channel "Test CTY 107" is selected.
Setting Selection
The operator may choose how the channel will function when it is assigned:
• Idle - clicking the mouse on this button will put the channel in Idle mode
• Rx - clicking the mouse on this button will put the channel in Receive mode.
• Rx/Tx - clicking the mouse on this button will put the channel in both Receive and Transmit
mode.
In this case the radio channel is specified to be active for both receiving and transmitting.
See also De-assigning a radio channel .
Page 29

Basic features 25
Setting Individual Volume
Drag the slider in the slide control to set the initial level of the individual volume control for the
radio channel to be assigned.
When the settings are in the desired positions, click OK to assign the channel. If the assignment
is successful the channel will be set up as specified.
The text appearing in the Message column is temporary and will be removed after a short time.
See also Adjusting individual volume setting for a radio channel.
Page 30

26 Basic features
Channel commands
When highlighting an assigned channel and clicking on the right mouse button, a menu is shown
which contains all functions which may be applied on the channel. This menu is the same as the
Channel sub-menu and will be referred to as Channel commands.
Page 31

Basic features 27
De-assigning a radio channel
More channels may available in the system than those which have been assigned to the operator.
The maximum number of channels which can be assigned to an operator at one time is 12. If
additional channels are to be assigned, as, e.g., in an emergency situation or instructions come
from the supervisor to listen to other channels, one or more of the original 12 channels must be
de-assigned before assigning new channels.
To de-assign an already assigned channel, the Channel List window must be visible on the
screen. Select the channel in the Channel Id column of the channel to be de-assigned, and select
De-assign from the Channel sub-menu
or click on the Toolbar. Before de-assigning the operator will be asked to confirm the
operation.
Click "Yes" to de-assign the channel or "No" in order to cancel the operation.
See also Assigning a radio channel .
Page 32

28 Basic features
Selecting a radio channel for receiving
When a channel has been assigned, it can be used for receiving audio from mobile units tuned to
the same frequency. To set up the channel for receiving mode, select Rx from the Channel sub-
menu.
The assigned channel will be in Receive mode only (indicated by ).
If the Rx indicator is red, then a mobile unit is transmitting.
See also De-selecting a radio channel.
Page 33

Basic features 29
Selecting a radio channel for receiving and transmitting
An assigned channel can also be used for transmitting. When a channel is set to transmitting
mode it is also automatically set up for receiving as well. To set the channel for receiving and
transmitting select Rx/Tx from the Channel sub-menu. The assigned channel will be in Receive
and Transmit mode.
The window below shows the assigned channel in Receive/Transmit mode.
If the Tx indicator is green, then PTT is active on own position. If the Tx indicator is gray,
then PTT is active on another position.
See also De-selecting a radio channel.
Page 34

30 Basic features
De-selecting a radio channel
An assigned channel can be in Idle mode or de-selected (neither receiving nor transmitting). To
de-select the channel select Idle from the Channel sub-menu. The assigned channel will be de-
selected.
The window below shows the assigned channel in Idle mode.
Page 35

Basic features 31
Radio channel indications
Squelch indication
The Squelch indication notifies that there is incoming traffic on the radio channel i.e., that a
mobile unit is transmitting. The Squelch indication is displayed by a left red arrow in the Rx/Tx
column. It shows that audio is being received on a channel
This window indicates that the operator is receiving on channel "Test CTY 107".
The Squelch indication is also displayed by the Function bar together with the channel name
and time.
Page 36

32 Basic features
Squelch on an Idle channel
The Squelch on an Idle channel indication notifies that there is incoming traffic i.e., that a
mobile unit is transmitting, on a radio channel which is assigned but still in Idle mode. The
Squelch on an Idle channel indication is displayed by a left gray arrow in the Rx/Tx column.
This window indicates that the a mobile unit is transmitting on channel "Test CTY 107".
However no audio will be received in this position as the channel is de-selected.
Page 37

Basic features 33
Most recent Squelch indication
The Most recent Squelch indication shows the time of the latest Squelch at the position. The
Most recent Squelch indication is displayed by using a bold typeface when displaying the start
time of the transmission in the Squelch column.
The window above shows that the Most recent Squelch was received on channel Test CTY 107.
Page 38

34 Basic features
PTT own/other indications
The PTT indications show that an operator (you or some other) is transmitting on a radio
channel. The PTT indications are displayed by a green right arrow (PTT own) and a gray right
arrow (PTT other) in the Rx/Tx column. It shows that audio is being transmitted from an
operator on a channel.
The window shows that the operator has activated PTT (Squelch and PTT own).
See also Transmitting on a radio channel (PTT).
Page 39

Basic features 35
Adjusting individual volume setting for a radio channel
The volume of each radio channel can be adjusted individually. The main reasons for having
different volume on separate channels are
• differences in audio quality
• importance of channels
The Individual Volume window is displayed either by clicking the Individual Volume button
on Toolbar or selecting Individual Volume in the Channel sub-menu.
Page 40

36 Basic features
When displaying the Individual volume window for the settings shown below…
…the following window is displayed for adjusting the Individual Volume on each radio
channel.
The window above shows that only one channel appears on the channel list (one channel has
been assigned). The volume may be adjusted with the slide control.
Page 41

Basic features 37
When displaying the Individual volume window for the settings shown below…
…the following window is displayed for adjusting the Individual Volume on each radio
channel.
.
The window above shows that three channels appear on the Channel List (have been assigned)
and their individual volume settings.
Click "Close" to hide the Individual Volume window.
Page 42

38 Basic features
Transmitting on a radio channel (PTT)
The operator can transmit on all channels which are in Receiving and Transmitting mode at the
same time.
PTT (Push-To-Talk ) is activated by the operator to activate or deactivate transmission on all
radio channels selected for both monitoring and transmission. When the operator wishes to have
voice communication with one or more units in the field, PTT button must be activated; when
the operator is finished speaking, PTT button must be de-activated.
PTT may also be activated from an external device e.g., a foot switch.
See also PTT own/other indications.
Page 43

Basic features 39
Muting telephony microphone(s)
The operator may mute the telephony microphones when the person on the other end should not
hear what is being said. To mute telephony microphones click on either Toolbar
or Function Bar
or Audio window
When the button is pressed all telephony speech is muted (disabled).
Page 44

40 Basic features
Selecting audio devices
The radio audio can be routed to several audio devices: handset, headset and loudspeaker.
To select an audio device for the radio audio, click on the appropriate button in the Audio
window. The telephony audio is treated separately. Contact your system administrator for more
information on the telephony audio.
The window shows Toolbar buttons for routing the radio audio to the preferred audio device(s)
loudspeaker: speech can be transmitted only if an external microphone is present at the
position.
handset : speech is transmitted through the handset microphone.
headset: speech is transmitted through the headset microphone.
The illustration above shows that the headset is selected, meaning that the radio audio is routed
to the headset. Also outgoing speech is transmitted through the headset microphone.
Default, only one device may be active at a time. When another device is activated, the
previously activated device is automatically de-activated. In order to activate several audio
devices simultaneously, click the "More than one audio device active" button . When this
button is pressed, the operator may activate any devices simultaneously. In order to de-activate
an active device, the operator must click on it. If more than one device is active when the
is de-activated (released), all devices but one will be de-activated. If the handset is one of the
active devices it will be the only active device left. If the handset was one of the active devices,
but not the headset, the handset will be the only active device left. If only the speaker was
active, it will remain active.
Page 45

Adjusting volume
The overall volume levels of the loudspeaker, handset and headset are adjusted from the Audio
window. Select the Volume tab if not already selected.
Basic features 41
The vertical slide controls are used to adjust the volume . There are also horizontal slide
controls for adjusting the radio volume level relative to the telephony volume level (balance).
The balance is separate for each audio device.
The rectangles inside the slide controls for the handset and headset indicate that the operator
may only set the volume within the range shown by the rectangle.
Page 46

42 Basic features
Modifying buzzer settings
The telephone buzzer is activated for incoming telephone calls or call-backs. The buzzer type
and volume level are set from the Audio window . Select the Buzzer tab if not already selected.
Use the mouse to select the buzzer type (signal). Each operator should have their own signal for
quick identification. The slide control is used to adjust the buzzer volume. Buzzer may be
disabled by selecting “No buzzer ” in the Buzzer type field.
Page 47

Getting help
When you need on-line assistance, click on Help in the menu in the Channel List window
or click in either the Channel List or Audio window or press F1, in order to access the
help system.
Basic features 43
Page 48

44 Basic features
About Radio
The About Radio window is accessed from the Help sub-menu in the Channel List window.
The information in this window is important for the technicians who provide service for the
RCT system.
Page 49

About Audio
The About Audio window is accessed from the System menu in the Audio window. The
information in this window is important for the technicians who provide service for the RCT
system.
Basic features 45
Page 50

Page 51

Chapter 4
Advanced features
Cross-coupling channels
Several mobile units may be tuned to the same channel at the same time and all will hear the
same thing. But they are not able to listen to mobile units on other channels. Cross-coupling
channels connects a maximum of four channels together. Now they can hear each other
speaking.
Cross-coupling is controlled by the operator in the control room. Each of the radios must be
assigned and in both Receive and Transmit mode. Further, the operator must be allowed to
perform this function for these channels. If all these conditions are fulfilled, the "Cross
coupling" button and menu item will be enabled.
47
Page 52

48 Advanced features
The operator must first click on Cross Coupling in the Channel sub-menu
or the Cross Coupling button on the Toolbar
Page 53

Advanced features 49
The New X/C group window now appears with the radio channels that may be cross-coupled
together
.
The name of the X/C group may be entered and at least two channels must be selected.
The window above shows that one channel has been selected.
Page 54

50 Advanced features
The window above shows that two channels have been selected and that a name has been
entered for the cross-coupling group.
Click OK in order to set up the cross-coupling group as specified. When the operation is
completed the Channel List window will mark the two channels as cross-coupled and in the
same group.
Page 55

Advanced features 51
Playback
An extra audio input (e.g. a tape recorder) may be connected to the RCT. This input (auxiliary
input) is controlled from the Audio window. Select the Aux tab if not already selected.
The window contains controls for activating the auxiliary audio input port and for setting the
volume of the input audio.
activates the auxiliary audio. The audio is routed to the selected audio device.
de-activates the auxiliary audio.
Page 56

52 Configuration
Chapter 5
Configuration
The operator may configure the RCT in order to customize both looks and behavior. Click on
the Configuration sub-menu.
If all bars (function bar, toolbar, status bar, and menu) are hidden the Channel List window will
occupy minimum space on the screen.
52
Page 57

Configuration 53
The following information is stored in the configuration among others:
• The default role.
• Volume settings.
• Size and position of the Channel List window
• Position of the Function Bar.
• Position of the audio window .
The operator’s configuration is saved when closing the application, if Save on Exit has been
selected, or by clicking Save Current Configuration. Note! The Channel List window and the
Audio window have separate Save on Exit switches.
Page 58

54 Configuration
Filters
The operator may hide channels in specific selection modes. Select the Filters item in the
Configuration sub-menu.
This function filters out the channels that the operator does not wish to have displayed on the
channel list:
• All channels - all channels on list are shown.
• Rx + Rx/Tx - all channels in Receive and Receive/Transmit mode are shown.
• Rx/Tx only - all channels in Receive/Transmit mode are shown.
The current filter setting is displayed in the status bar as shown below (All).
See also Selecting a radio channel for receiving, Selecting a radio channel for receiving and
transmitting, and De-selecting a radio channel .
54
Page 59

Columns
The operator may hide the columns which are of no interest in the Channel List window. Select
Options in the Configuration sub-menu.
The Options window is shown.
Configuration 55
The area in the Options window marked “Columns” gives the operator the option to choose the
columns to be displayed in the Channel List.
Page 60

56 Configuration
Selected (checked) items will be displayed in Channel List. Message, e.g., if checked (√), will
display all error and information messages.
56
Page 61

Default Role
The Default role shows the default role for the operator. This role is selected from all available
roles.
When logging in, the operator must select a role. When this has been done, the operator has
access to specifically assigned radio channels.
See also Choosing a role.
Configuration 57
Page 62

58 Configuration
Other Options
If Always on Top is checked (√), the Channel List window will always be displayed on top of
other windows. Note: The Function Bar will always be displayed on top of other windows.
If Restore channel list on Squelch is checked (√), the Channel List window will be restored if
minimized/iconized when a Squelch is received.
If Save configuration on Exit is checked (√), the current Channel List window configuration
will be saved automatically on exit. The current user configuration may also be saved by
clicking the Save current configuration button on the Toolbar
58
Page 63

Configuration 59
or by selecting the Save current configuration in the Configuration sub-menu in the Channel
List window .
In the Audio window , if Save on exit is checked (√), the current user configuration for the
Audio window will be saved automatically on exit.
Page 64

Page 65

Appendix
List of abbreviations and terms
Configuration: Parameter setting.
RCT: Radio Control Terminal
Interface: The meeting of two components of a computer system or of an information system
that have differing characteristics. They must be matched in for the system as a whole to
operate.
MD110: Ericsson PABX.
Operator/User: The user performing the control activities.
PTT: Push-To-Talk.
Role: Grouping units for the operators. The available roles are defined by the System
Administrator.
Squelch: Incoming calls from mobile units.
Supervisor: A supervisor is a person who is in charge of a number of operators. The supervisor
has the capacity to control/monitor/change the operations. This includes assignment of roles and
radio channels.
System Administrator : A person who maintains the RCT system.
User: The person using the RCT can be of three types: Operator, Supervisor or System
Administrator.
User Configuration: The User Configuration contains individual preferences/settings for each
user. This data is set indirectly when the user modifies/sets different aspects of the RCT.
User Interface: What the operator sees on the screen.
61
Page 66

User Profile: The User Profile contains data which are set/modified by the System
Administrator only. The data describes what the user is allowed to do regarding the RCT. The
individual user has no access to this data.
Window: An information display limited to a certain area of the screen.
62
Page 67

Index
A
About Audio window 45
About Radio window 44
About RCT 13
activate several audio devices simultaneously 40
activate the auxiliary audio 51
adjust buzzer volume 42
adjust volume 41
adjust volume of a radio channel 35
administrator 5, 21
Advanced Features 3
All channels 55
alphanumeric characters 10, 15
Always on Top 59
Assign 10, 14
Assign button 23
Assign channel window 23
assigned 23
assigned channel 23
audio 40
Audio window 19, 39, 41, 42, 43, 60
Aux tab 51
auxiliary audio 51
auxiliary audio input port 51
B
balance 41
Basic Features 3
buzzer signal 42
Buzzer tab 42
buzzer type 42
Buzzer type field 42
buzzer volume 42
C
change the role 22
change the width of columns 15
Channel commands 26
channel icon 15
Channel Id 15
Channel List 7, 43
Channel List window 60
Channel List. 56
channel name 15
Channel sub-menu 9, 10
Choose Role window 21
close window 8
closing the application 54
column headings 15
columns 56
Configuration 61
Configuration sub-menu 9, 12
configure the RCT 53
connect channels together 47
Cross Coupling 10
Cross coupling button 48
Cross-Coupling 14, 47
cross-coupling group name 10
current filter setting 55
currently active filter 16
currently active role file 16
currently selected device 17
D
database 5
date and time 16
de-activate the auxiliary audio 51
De-assign 10, 14, 27
de-assigned 23
default role 5, 53, 58
de-selected 30
de-selected (Idle) 22
desktop 14
desktop 8
dimmed 11, 17
disable buzzer 42
disabled 11
docking Toolbar 14
double-clicking on a channel 18
E
error and information messages 57
exit application 8
external device 38
F
F1 43
63
Page 68

filter setting 16
Filters 12, 55
Function Bar 12, 17, 31, 39, 54, 59
H
handset 40
Heading Bar 15
headset 40
Help 13, 14, 43
help file 13
Help sub-menu 9, 13
hide channels 55
hide columns 15
hide menu 9
hide the columns 56
I
icon button 8
iconize 8
identification of radio channel 15
Idle 24, 30
Idle 10
Idle mode 30
incoming traffic 31, 32
Individual volume 10, 14, 25, 35
Individual Volume button 35
Individual Volume window 35
information stored in the configuration 53
Interface 61
L
latest Squelch 15
left mouse button 4
loudspeaker 17, 40
M
main windows 6
maximize 8
maximum number of channels 27
MD110 61
MD110 CS 1
menu 9, 12
Message 15, 57
minimize 8
mobile units 47
Most recent Squelch indication 33
mouse 4
Mute 17
Mute 14
Mute button 39
mute telephony speech 39
mute the telephony microphones 39
N
New X/C group window 49
No buzzer 42
O
occupy minimum space 53
on-line assistance 43
operator 5, 22, 61
operator configuration 12
Options 12
Options window 56
P
Position of the audio window 54
Position of the Channel List window 54
preferred audio device(s) 40
privilege level 6
Product name 6
PTT 17, 29, 38, 61
PTT indications 34
PTT other 34
PTT own 34
Push-To-Talk 38
R
radio channel set-up 5
radio channels 7, 17
Radio Control Terminal 1
radio functionality 1
radio volume 17
radio volume level 41
radio window 18
radio-radio cross-coupling group 10
RCT 1, 3, 61
RCT product copyright information 6
RCT version 6
Receive 55
receive and transmit mode 10, 24, 47
Receive mode 24
Receive mode only 28
receive only mode 10
Receive/Transmit 55
Receiving (Rx) 22
receiving and transmitting 29, 30
receiving audio 28
receiving mode 28
Restore channel list on squelch 59
restore menu 9
right mouse button 8, 26
role 4, 5, 61
role file currently active 16
route radio audio 40
64
Page 69

Rx 28
Rx 10, 24
Rx + Rx/Tx 55
Rx indicator 28
Rx/Tx 15, 24, 29
Rx/Tx 10
Rx/Tx only 55
S
Save configuration on Exit 59
Save current configuration 12, 14, 54
Save on Exit 54, 60
Search 13
select a role 21
select audio device 40
Show/Hide 17
Size of the Channel List window 54
Slide control 42
slide controls 41
Speaker only 17
Squelch 15, 61
Squelch indication 31
Squelch indications 17
Squelch on an Idle channel indication 32
start the application 6
startup window 6
Status Bar 12, 16
Supervisor 6, 61
supervisor 27
System Administrator 61
System menu 8
T
telephone buzzer 42
telephony audio 40
telephony volume 17
telephony volume level 41
temporary message 25
Title Bar 8
Toolbar 12, 14, 23, 35, 39, 48
Toolbar buttons 14, 40
transmit on all channels 38
transmitting 29
Transmitting (Tx) 22
transmitting on a radio channel 34
Tx indicator 29
U
User 61
User Configuration 61
user configurations data 5
User Interface 62
user interface 1, 5
user profile 4, 62
user profile data 5
V
Volume 15
Volume 17, 41
volume range 41
volume settings 53
Volume tab 41
W
width of columns 15
Window 62
Windows 95 1
Windows NT 1, 7
X
X/C 10, 15
X/C group 49
65
 Loading...