


KH 6515

Kompernaß GmbH · Burgstrasse 21 · D-44867 Bochum
www.kompernass.com
ID Nr.: KH6515/6516-07/06-V3
UK
KH6515_16_A4_C_V3_EN.qxd 23.08.2006 14:19 Uhr Seite 1
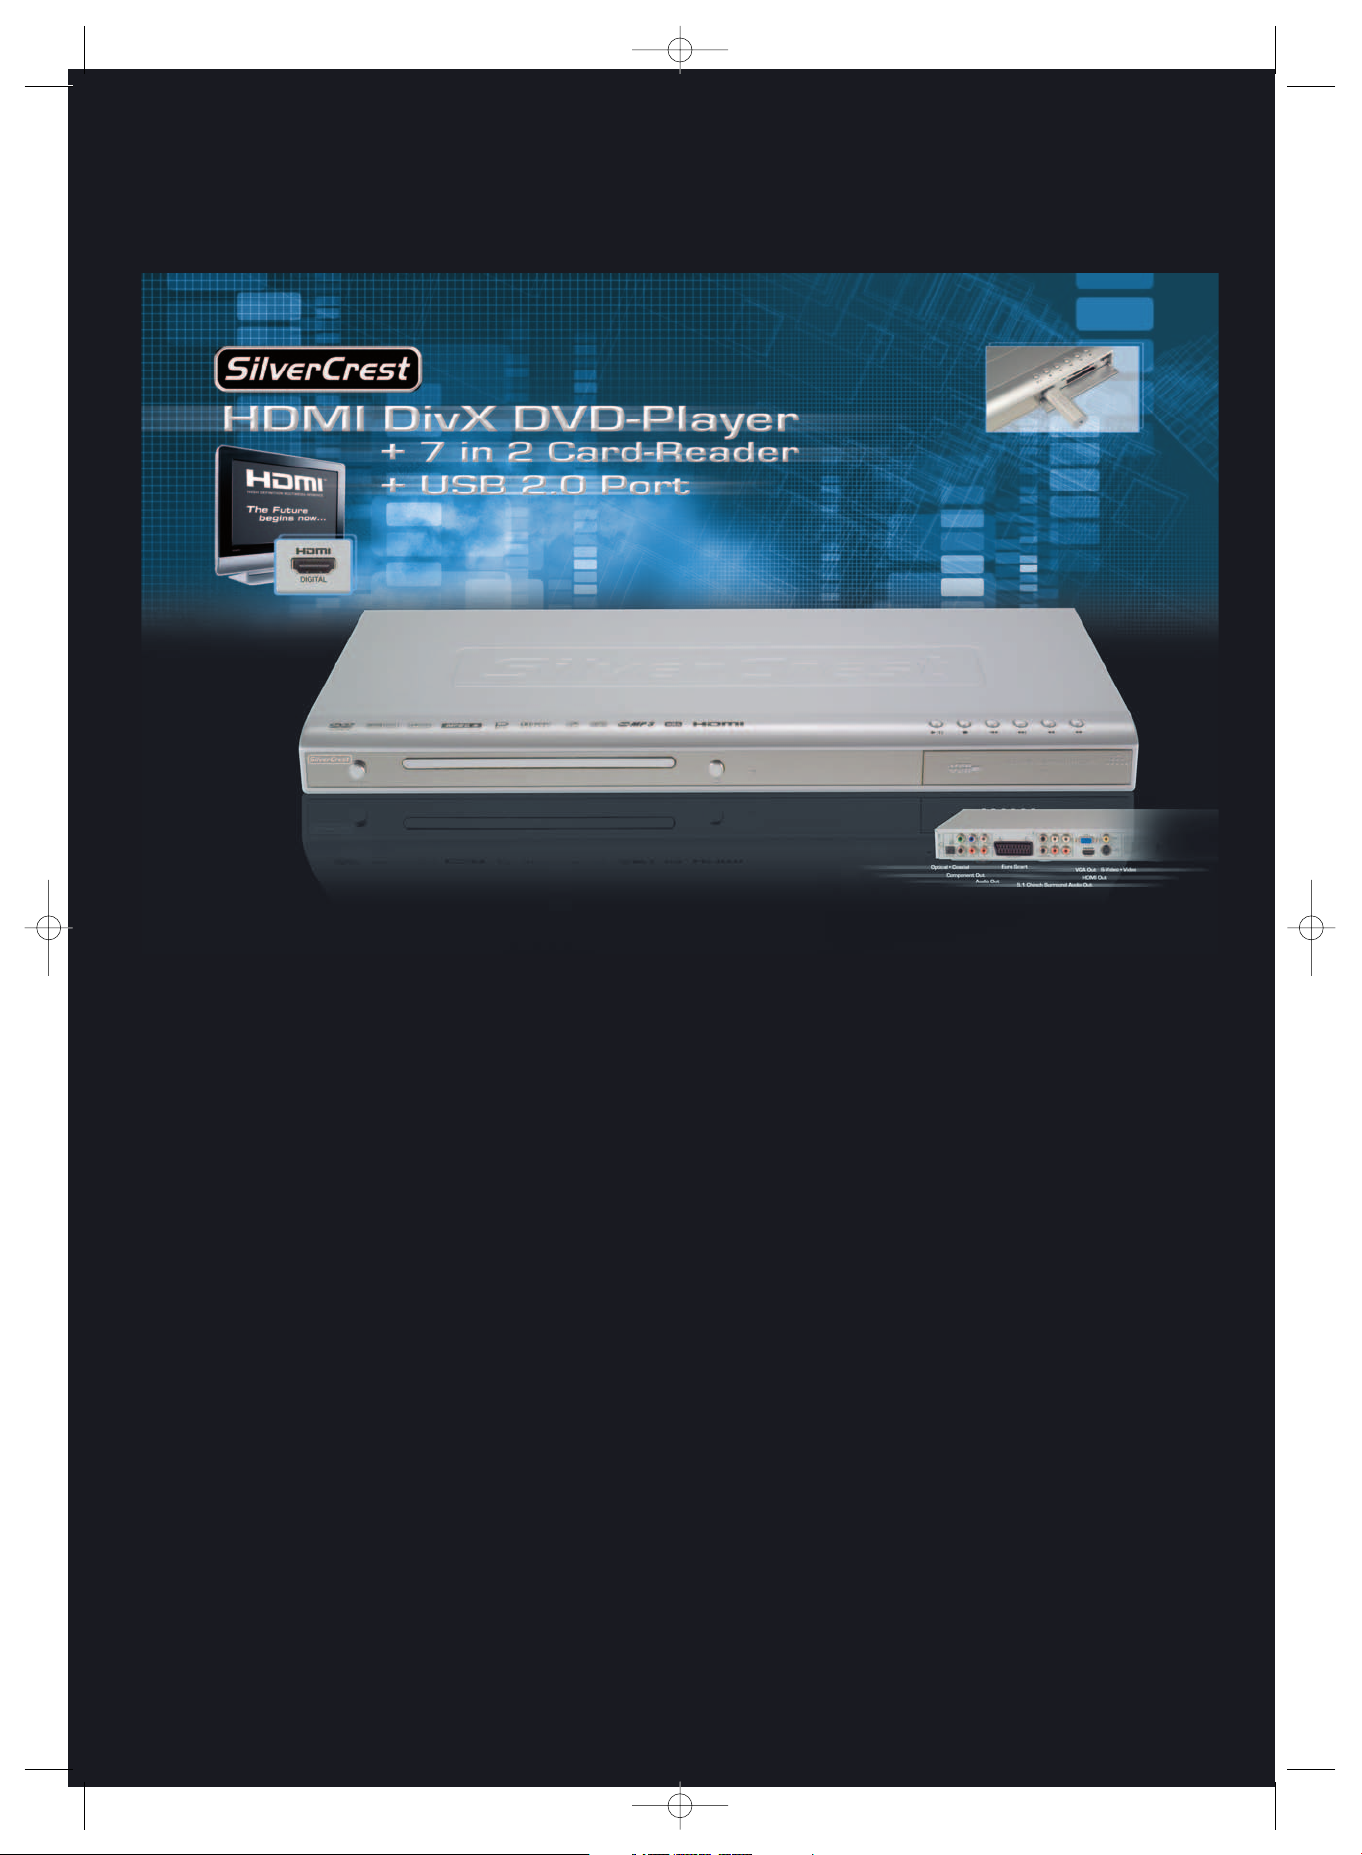
DVD player KH 6515/KH 6516
Operating instructions
KH6515_16_A4_C_V3_EN.qxd 23.08.2006 14:19 Uhr Seite 2

The Silvercrest KH 6515/6516 DVD player contains copyright protection technology, which protects it from process
claims of certain US patents, for example other intellectual property rights of the Macrovision corporation and
other copyright owners.
Use of this copyright protection technology must be approved by the Macrovision corporation and is restricted
exclusively to non-commercial private home use. any other use requires the express approval of Macrovision
Corporation.
Reverse engineering and disassembling are expressly prohibited.
Manufactured under license from Dolby Laboratories, Inc.
Dolby and the double-D-symbols are registered trademarks of Dolby Laboratories,
Inc. Confidential Unpublished Works.
1992-1997 Dolby Laboratories, Inc. All rights reserved.
This device is protected by US patents 4.631.603, 4.577.216, 4.819.098. 4.907.093 and 6.516.132.
The license applies exclusively for private use.
The Silvercrest KH 6515/6516 DVD player is licensed as a DivX Certified Product.
KH6515_16_A4_C_V3_EN.qxd 23.08.2006 14:19 Uhr Seite 3
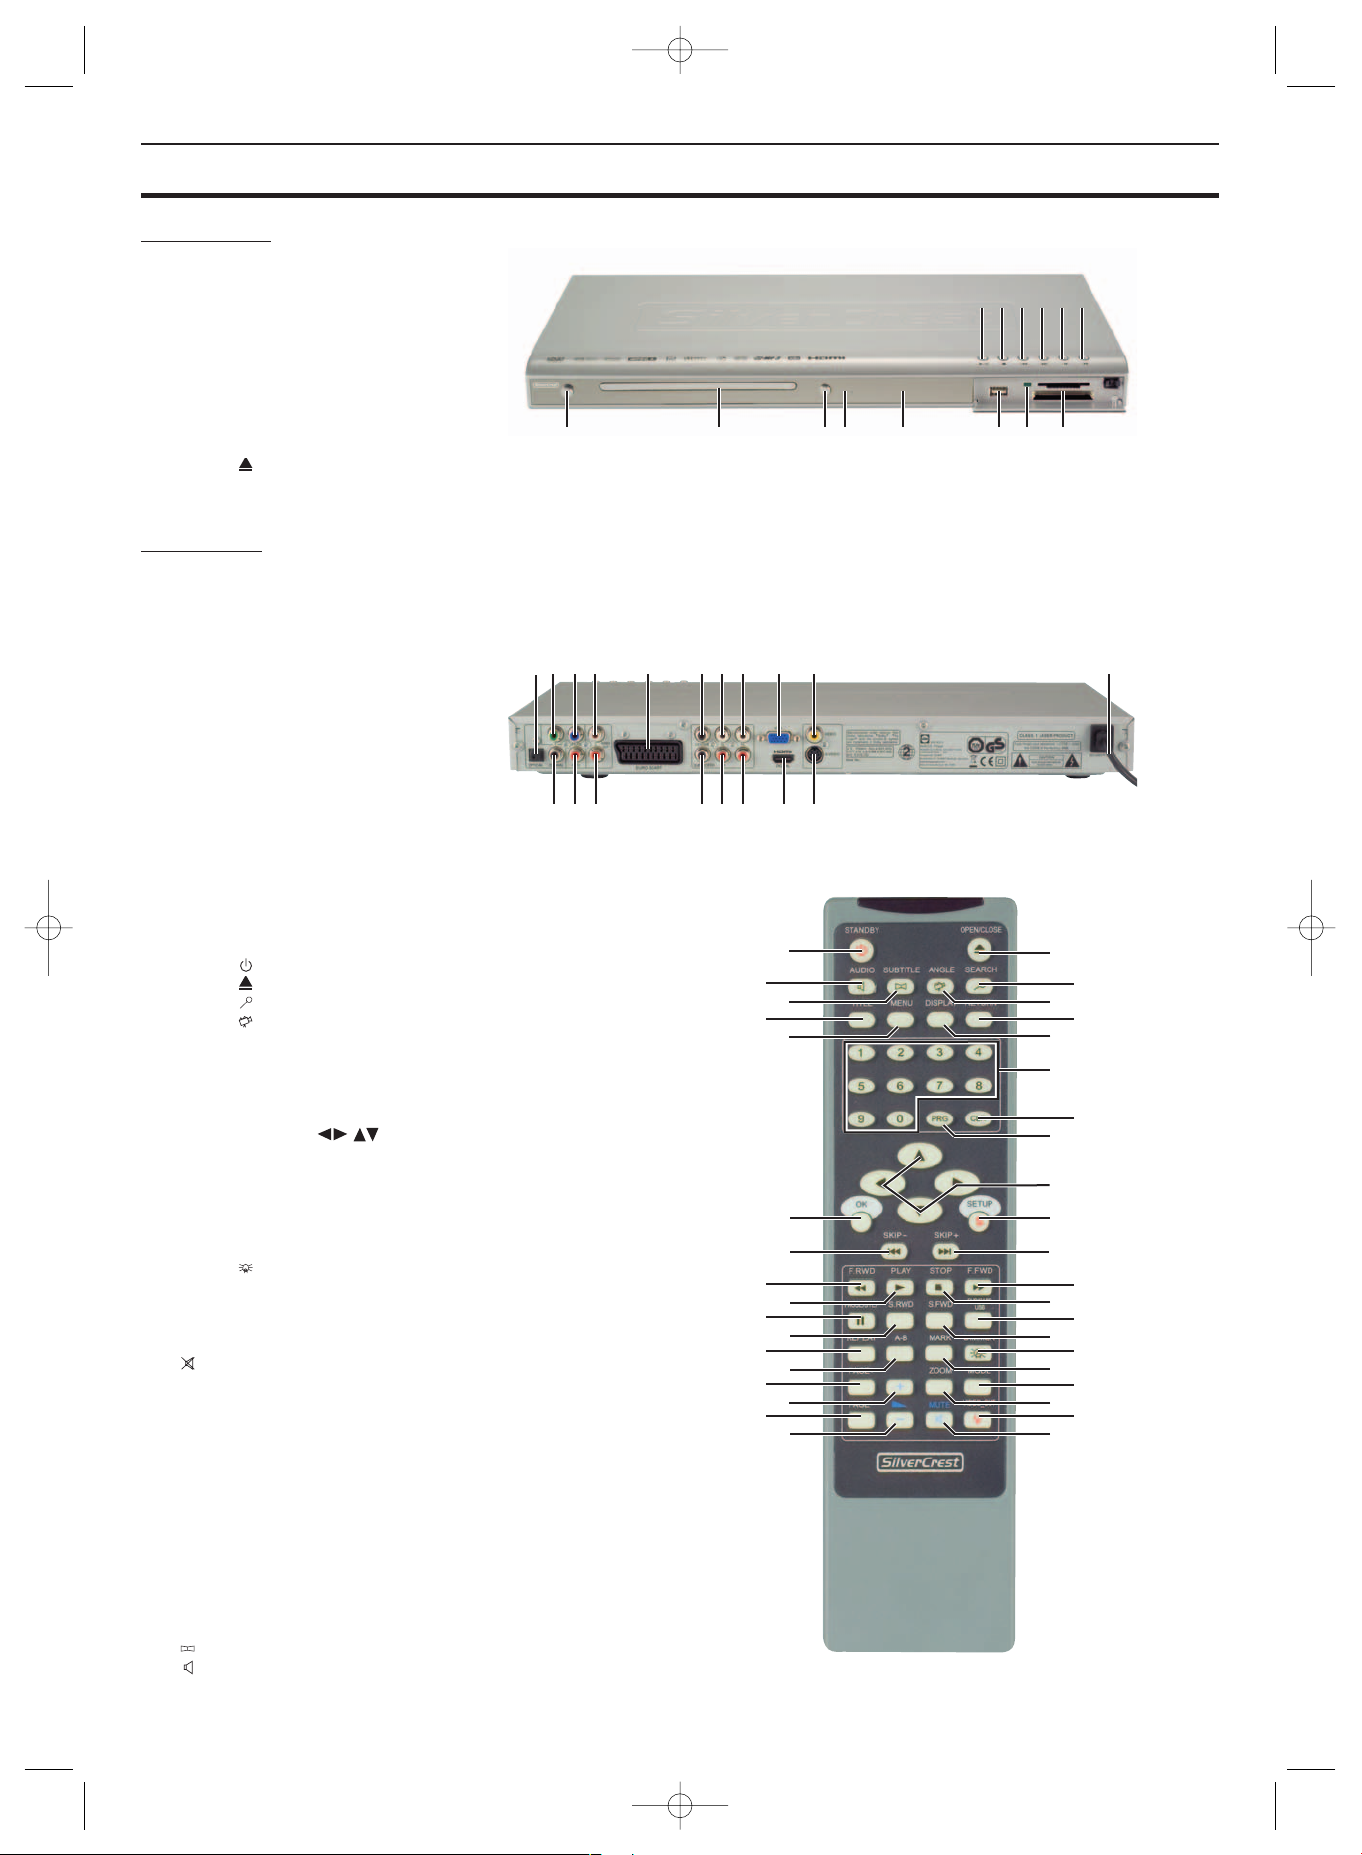
Operating controls and connections
Front panel
q Button/ (Play/Pause)
w Button(Stop)
e Button(Skip backwards)
r Button(Skip forward)
t Button(Scan
y Button(Scan forward) backwards)
u Memory card slots
i Pilot lamp
o USB port
a Display
s IR remote sensor
d Button (Open/Close)
f Disc tray
g Button ON/OFF
Rear panel
h Digital OUT socket "Optical"
j Socket "Y"
k Socket "Pb/Cb"
l Stereo cinch socket "L"
; "Euro Scart" socket
2) Surround "Centre" cinch socket
2! Surround cinch socket "SL"
2@ Surround cinch socket "FL"
2# "VGA OUT" Socket
2$ "Video Out" cinch socket
2% Mains cable with power plug
2^ "S Video Out" socket
2& "HDMI OUT" socket
2* Surround "FR" cinch socket
2( Surround "SR" cinch socket
3) Surround "Subwoofer" cinch socket
3! Stereo cinch socket "L"
3@ "Pr/Cr" cinch socket
3# Digital Out "Coaxial" socket
Remote control
q Button Standby
w Button (Open/Close)
e Button Search (Select time position)
r Button Angle (Change the camera perspective)
t Return button
y Display button (Superimpose disc information)
u Number buttons 0 to 9 (Number input 0-9)
i CLR button (Delete input)
o PRG button (Superimpose the programme menu)
a Control buttons
s Setup button (Superimpose OSD Menu)
d Skip + button (Skip forward)
f F.FWD button (Scan forward)
g (Stop) button
h DVD/Card/USB button (Show contents of memory card)
j S.FWD button
k Button Dimmer (Display brightness settings)
l Mark button (Bookmark function)
; Mode button (Superimpose playback mode)
2) Zoom button (Increase/reduce image size)
2! Video_Out button (Adjust video output)
2@ Mute button (Remove sound)
2# Vol - button (Reduce volume)
2$ Page - button
2% Vol + button (Increase volume)
2^ Page + button
2& A - B button (Repeat sequence)
2* Repeat button (Repeat playback)
2( S.RWD button
3) Pause/Step button
3! (Play) button
3@ button (Scan backwards)
3# Skip - button (Skip backwards)
3$ OK button (Confirm input)
3% Menu button (Superimpose DVD Menu)
3^ Title button (Superimpose DVD/CD contents)
3& Subtitle button (Superimpose subtitles)
3* button Audio (Change playback language)
Fig. 1 Front panel
Fig. 1.2 Rear panel
Fig. 2 Remote control
q
w
e
r
y
ui
oasdfg
hjkl ; 2)2!2@ 2# 2$
2^2&2*2(3)3!3@3#
w
e
r
t
y
u
i
o
a
s
d
f
g
h
k
;
2!
j
l
2)
2@
q
3&
3%
3$
3#
3@
3^
3*
3)
2*
2^
2$
3!
2(
2&
2%
2#
2%
t
KH6515_16_A4_C_V3_EN.qxd 23.08.2006 14:19 Uhr Seite 4

KH6515_16_A4_C_V3_EN.qxd 23.08.2006 14:19 Uhr Seite 5

KH6515_16_A4_C_V3_EN.qxd 23.08.2006 14:19 Uhr Seite 6

- 3 -
SilverCrest KH 6515/6516 DVD player Page
1. Technical data 4
2. Applications and functions 4
3. Delivery Contents 4
4. Setting up of the DVD player/Safety instructions 4
5. Remote control 5
5.1. Inserting the batteries 5
5.2. Using the remote control 5
5.3. Replacing the batteries 5
6. Connecting the DVD Player to a Television 6
6.1. Connecting to a Television via Scart Cable/RGB 6
6.2. Connecting to a Television via S-Video 6
6.3. Connecting to a television via video input (composite video) 7
6.4. Connection via component signal (YPbPr/Progressive Scan und YUV) 7
6.5. Connection via VGA 8
6.6. Connection via HDMI 8
7. Connecting audio components to the DVD player 9
7.1. Connecting a HiFi system 9
7.2. Connecting digital audio components via digital cables 9
7.3. Connecting digital audio components via analogue cables 10
8. Necessary settings to the DVD player before operation 10
8.1. Using the OSD Menu 11
8.2. Language Settings 11
8.3. Video settings 11
8.4. Audio settings 12
8.5. Rating settings 12
8.6. Misc settings 13
9. Initial operation of the DVD player 13
9.1. Inserting the DVD 13
9.2. Inserting memory cards/USB memory sticks with MP3-/WMA-/DivX-/JPEG- data 13
9.3. Removal of Memory cards/USB Memory sticks from the memory card slot 15
10. Playing back DVDs, VCDs or S-VCDs 15
10.1. Features during playback of a DVD, VCD or S-VCD 16
11. Playback of JPEG-Photo CD/WMA/MP3/MPEG4 23
12. Cleaning of the DVD player 24
13. Disposal 24
14. Troubleshooting 24
15. Glossary / Key Word Index 25
16. Important warranty notes 28
Read the operating instructions carefully before using the appliance for the first time and preserve this booklet for later
reference. Hand over the manual to whomsoever you might pass the appliance on to.
KH6515_16_A4_C_V3_EN.qxd 23.08.2006 14:19 Uhr Seite 3

- 4 -
1. Technical data
Power supply: AC 220 V - 240 V ~50 Hz
Power consumption : 15 Watt
TV standard: PAL/NTSC
Operating temperature: +5 ~ +35°C
Humidity: 5 ~ 90 % (no condensation)
Video Output
Output level: 1 + 0.2/-0.2 Vp-p (75 Ω)
Horizontal resolution: > = 500 Lines
Signal-to-noise ratio: 60 dB
Audio Output
Impedance: 10 kΩ
Output level: 1.8 + 0.2/-0.8 Vrms (1kHz 0 dB)
Harmonic distortion: 0.01 % (JIS-A 1kHz, typical)
Dynamic range: 80 dB (JIS-A 1 KHz, typical)
Signal-to-noise ratio: 95 dB (JIS-A 1 kHz, typical)
Digital audio output
Coaxial output and optical output
2. Applications and functions
The Silvercrest KH 6515/ KH 6516 DVD player is exclusively
intended...
• as an electronic entertainment device for the playback...
• ...of DVD videos in 12 cm and 8 cm (diameter) formats with
Country/Regional code 2 or , designated by the Logo
.
• ...of the video formats MPEG-4/MPEG-4 ASP and with DivX
3.11, DivX 4.x, DivX 5.x, multichannel DivX and DivX Pro as
well as Nero Digital compressed videos.
• ... of video-CDs (VCDs) and Super video-CDs (S-VCDs) in 12
cm and 8 cm (diameter) formats, designated by the Logo
.
• ... of audio-CDs in 12 cm and 8 cm (diameter) formats, desi-
gnated by the Logo .
• ... generally of the data format CD Audio (.cda), MP3 (.mp3),
Windows Media Audio (.wma), DivX (.avi), Nero Digital
(.mp4) und JPEG (.jpg) on the storage media CD-R, CD-RW,
USB memory sticks as well as Memory Cards of the type CF
I, CF II, SD, MS, MSPro, MMC und SM.
• ... for stationary operation in enclosed spaces
• ... for private, non commercial use
You can connect to the Silvercrest KH 6515/ KH 6516 DVD
player for image outputs during playback of DVDs, VCDs,
S-VCDs, Audio CDs and the MP3 data formats, Windows
Media Audio and JPEG
• Stereo and Mono televisions with the formats PAL or NTSC
and the picture formats 4:3 / 16:9.
• LCD/Plasma picture screens or video-projectors, if for this
the corresponding connection potential is available and
the connection of a DVD player is provided for/allowed
by the manufacturer of the playback device
You can connect to the Silvercrest KH 6515/KH 6516 DVD
player for sound output, for example music…
• from the speaker of one of the televisions connected to
the DVD player
• from external audio components such as a HiFi system,
receiver or surround sound system (analogue/digital)
IMPORTANT!
No liability/warranty will be assumed for damage resulting
from improper use of the device!
3. Delivery Contents
1. DVD player
2. Infra red remote control
3. 2 Batteries for remote control, type AAA/ (Micro cells)
4. RGB-Scart cable
5. Audio/Video RCA cable
6. Nero Digital CD
7. Instruction manual
8. Demo DVD (only in Germany/Austria)
4. Setting up of the DVD player/Safety instructions
1 Carefully remove the DVD player and the supplied accessories
from the packing
2 Remove the protective foil from the front reflector.
3 Place the DVD player on an even, straight, and non slippery
surface
In order to avoid technical glitches, damages, and the risk of
an electric shock do not run the DVD player...
• ... in the immediate vicinity of a heat source such as an
oven, heat fans and similar devices! Heat contact can lead
to the equipment overheating and to melting of plastic
parts, whereby the DVD player could be irreparably damaged!
• Do not place any open sources of fire, like candles, on the
device.
Warning!
In case of overheating there is a risk of fire!
• ... do not play in moist environments, for example in cellars
or in the sauna! Moisure penetrating the applicance can
lead to malfunctions and cause irreparable damage to the
DVD-Player!
• This device was only designed for stationary operation
under normal climatic conditions (temperate climate).
KH 6515/6516
KH6515_16_A4_C_V3_EN.qxd 23.08.2006 14:19 Uhr Seite 4

- 5 -
Warning!
Moisture penetrating into the device creates the risk of an
electric shock!
• ... not in the immediate vicinity of water, for example in the
bath tub or in the swimming pool. Do not place containers
filled with water, for example flower vases, on the DVD
player.
Warning!
If water runs into the DVD player or if it falls into water it
can be irreparably damaged and the risk of an electric shock
exists!
• ... not in cupboards, on shelves or other enclosed furnishings
as well as not on beds and covers because the ventilation
of the DVD player will be impaired and it could overheat.
For the same reason do not place another piece of equipment
(i.e. a television) on the DVD player.
In order to guarantee sufficient ventilation the selected location
of the DVD player must provide for a clearance of at least 10 cm
at the rear, on top, and on either side from walls and any other
object.
• This device must not be placed in the immediate vicinity
of flammable materials, for example curtains, flammable
liquids etc.
Warning!
When overheated the DVD player can be irreparably damaged
and the risk of a fire exists!
IMPORTANT!
For damage to the DVD player that results from...
• The effects of moisture
• water penetrating into the equipment
• Overheating
... no liability/warranty will be assumed!
IMPORTANT!
Do not plug the DVD player into an electrical outlet at this
time. Wait until you have connected the DVD player to a tele-
vision set.
In the event that you wish to change the type of video or
audio connection you must first pull the power plug from
the power socket! Otherwise the DVD player and possibly
equipment connected to it could become irreparably damaged
through voltage peak strikes!
Warning!
Equipment connected to a power supply can be damaged
during a thunderstorm. You should therefore always pull the
power plug from the power socket when there is a storm.
IMPORTANT!
The main switch on the front panel is used for the ON/OFF
function. It is not used as a disconnect switch for the mains
voltage. The power plug is used for disconnecting the mains
voltage. In order to completely disconnect the equipment
from the mains voltage the power plug must be pulled from
the power socket. The power socket for the power plug
should be situated close to the device and easily accessible
Danger! Laser radiation!
The DVD player is equiped with a "Class 1 Laser".
• Never open the device.
• Never attempt to repair the device. There is invisible
laser radiation inside the device.
• Do not expose yourself to the laser beam as this could
lead to eye injuries.
5. Remote control
5.1. Inserting the batteries
1 Open the battery compartment on the back of the remote
control.
2 Now insert the two batteries type AAA/R 03 (micro cells)
included in the package into the battery compartment.
Make sure that the batteries are inserted in accordance
with the correct polarity.
3 Replace the battery compartment cover.
5.2. Using the remote control
In order to guarantee faultless operation when using the
remote control…
• Always point the remote control, during use, directely
at the DVD player
• Make sure that there are no obstructions between the
remote control and the DVD player that will hinder re-
ception
• When using the remote control place yourself not more
than 5 metres from the DVD player
Otherwise interferences can occur during operation of the
DVD player functions with the remote control.
5.3. Replacing the batteries
If the operation of the DVD player via the remote control
does not function properly or does not function at all the
batteries must be replaced
• Always renew all batteries in order to return the remote
control to its full performance ability.
NOTE:
Used batteries may not be disposed of in household waste.
Hand in used batteries at a collection location or disposal
site or return them to the place where you bought them.
Should you yourself at some time dispose of the DVD player's
remote control then you should beforehand, without fail, re-
move the batteries!
Danger!
• Do not throw batteries into a fire.
• Do not recharge batteries unless, of course they are
specifically designated as "rechargable".
• Never open, solder or weld batteries.
The risk of explosions and injuries exist!
KH 6515/6516
KH6515_16_A4_C_V3_EN.qxd 23.08.2006 14:19 Uhr Seite 5
- 6 -
6. Connecting the DVD Player to a Television
After setting up the DVD player, you can now connect it to
a television. The DVD player can be connected to a television
that operates with the PAL, NTSC and SECAM standards.
If you want to use the DVD player on a television with...
• ... NTSC standard you will have to change the video setting
in the DVD's so called "OSD menu". There PAL is set as the
television standard at the factory.
• SECAM standard you do not need to change any settings.
The factory setting for the PAL standard also allows the
DVD player to operate with SECAM televisions in so far
as these can process the signals.
Ô
On this topic see also capital
8.3 "Video settings: Set the television standard"
Depending on the features of the television, there are various
options for connecting the DVD player to it:
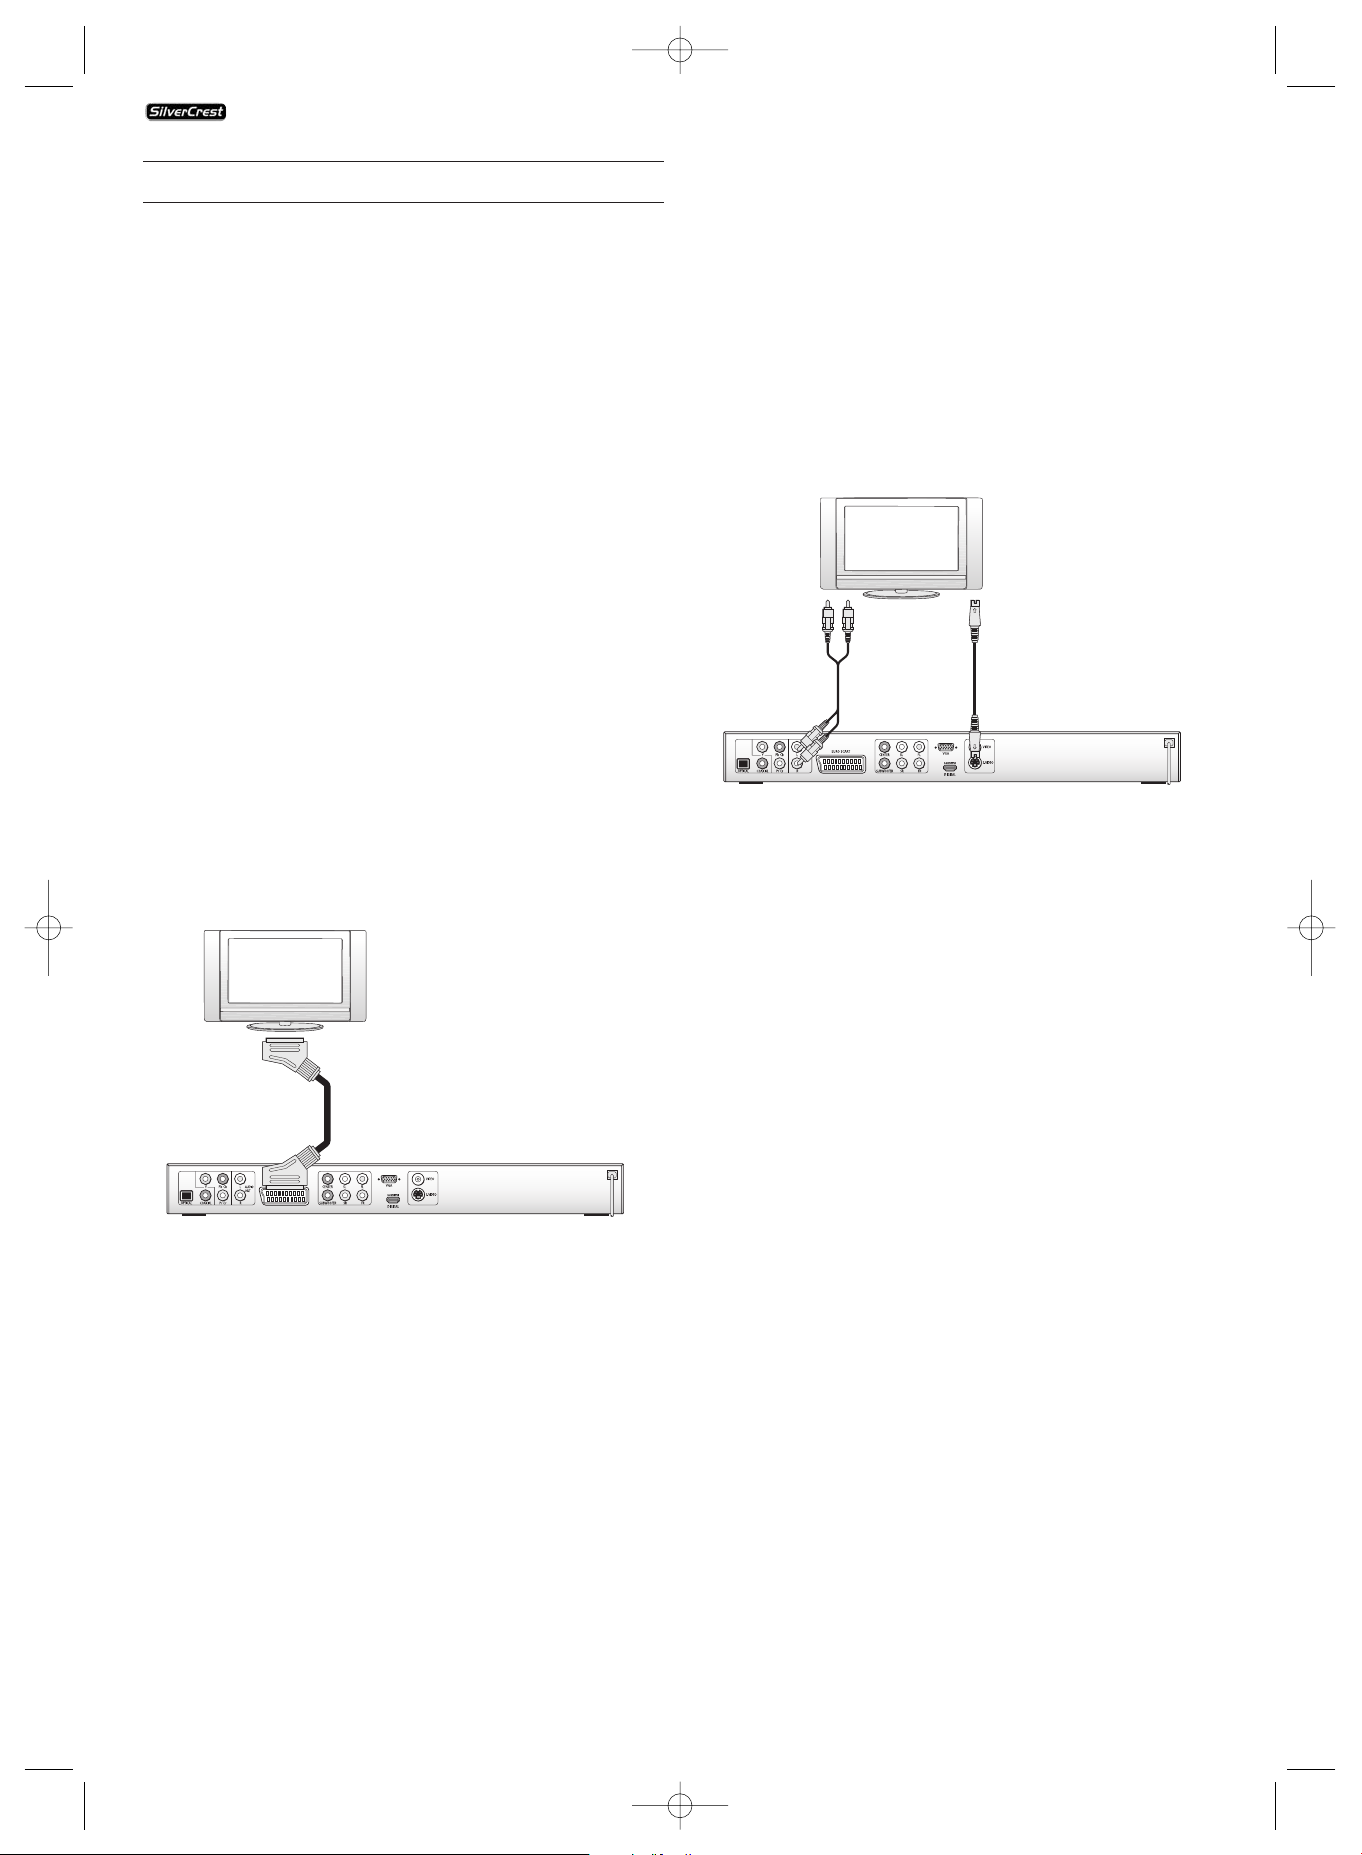
6.1. Connecting to a Television via Scart Cable/RGB
Note:
Connecting the DVD player to a television with a Scart cable
via the RGB input offers a high quality connection. Select this
connection variation in the case of televisions equiped with
an RGB input. If you are not sure if the television is equiped
with an RGB input then you can check this by consulting the
television's instruction manual.
• Connect the jack inscribed with Euro Scart to a television
Scart socket by using the supplied Scart cable.
• For playback select the matching channel on your tele-
vision Check with the television's instruction manual on
how you can set the AV channel.
• In the OSD menu select the menu Video/Video output/RGB.
Ô
On this topic see also capital 8.3
"Video settings: Video output.
6.2. Connecting to a Television via S-Video
NOTE:
For this connections variant the television must be equiped
with an S-Video input and two unoccupied audio cinch sockets.
If you are not sure if the television is capable of handling
S-video, for example via cinch sockets, then you can check
this by consulting the television's instruction manual.
For this connection variant you will need:
• an audio cinch cable (not supplied)
• an S-Video cable (not supplied) These can be obtained
from your dealer.
In order to connect the DVD player to a television via S-Video
• Connect the jack inscribed with S-video to a television
S-Video socket using an S-Video cable.
• Insert the white audio cinch cable plug into the cinch socket
inscribed "L" on the rear panel of the DVD player.
• Then insert the white plug at the other end of the audio
cinch cable into the left channel audio socket on the tele-
vision.
• Insert the red audio cinch cable plug into the cinch socket
inscribed "R" on the rear panel of the DVD player.
• Then insert the red plug at the other end of the audio
cinch cable into the right channel audio socket on the
television.
• For playback select the matching channel on your television
Check with the television's instruction manual on how you
can set the AV channel.
• In the OSD menu select the menu Video/Video output/RGB.
Ô
On this topic see also capital 8.3
"Video settings: Video output.
KH 6515/6516
KH6515_16_A4_C_V3_EN.qxd 23.08.2006 14:19 Uhr Seite 6
- 7 -
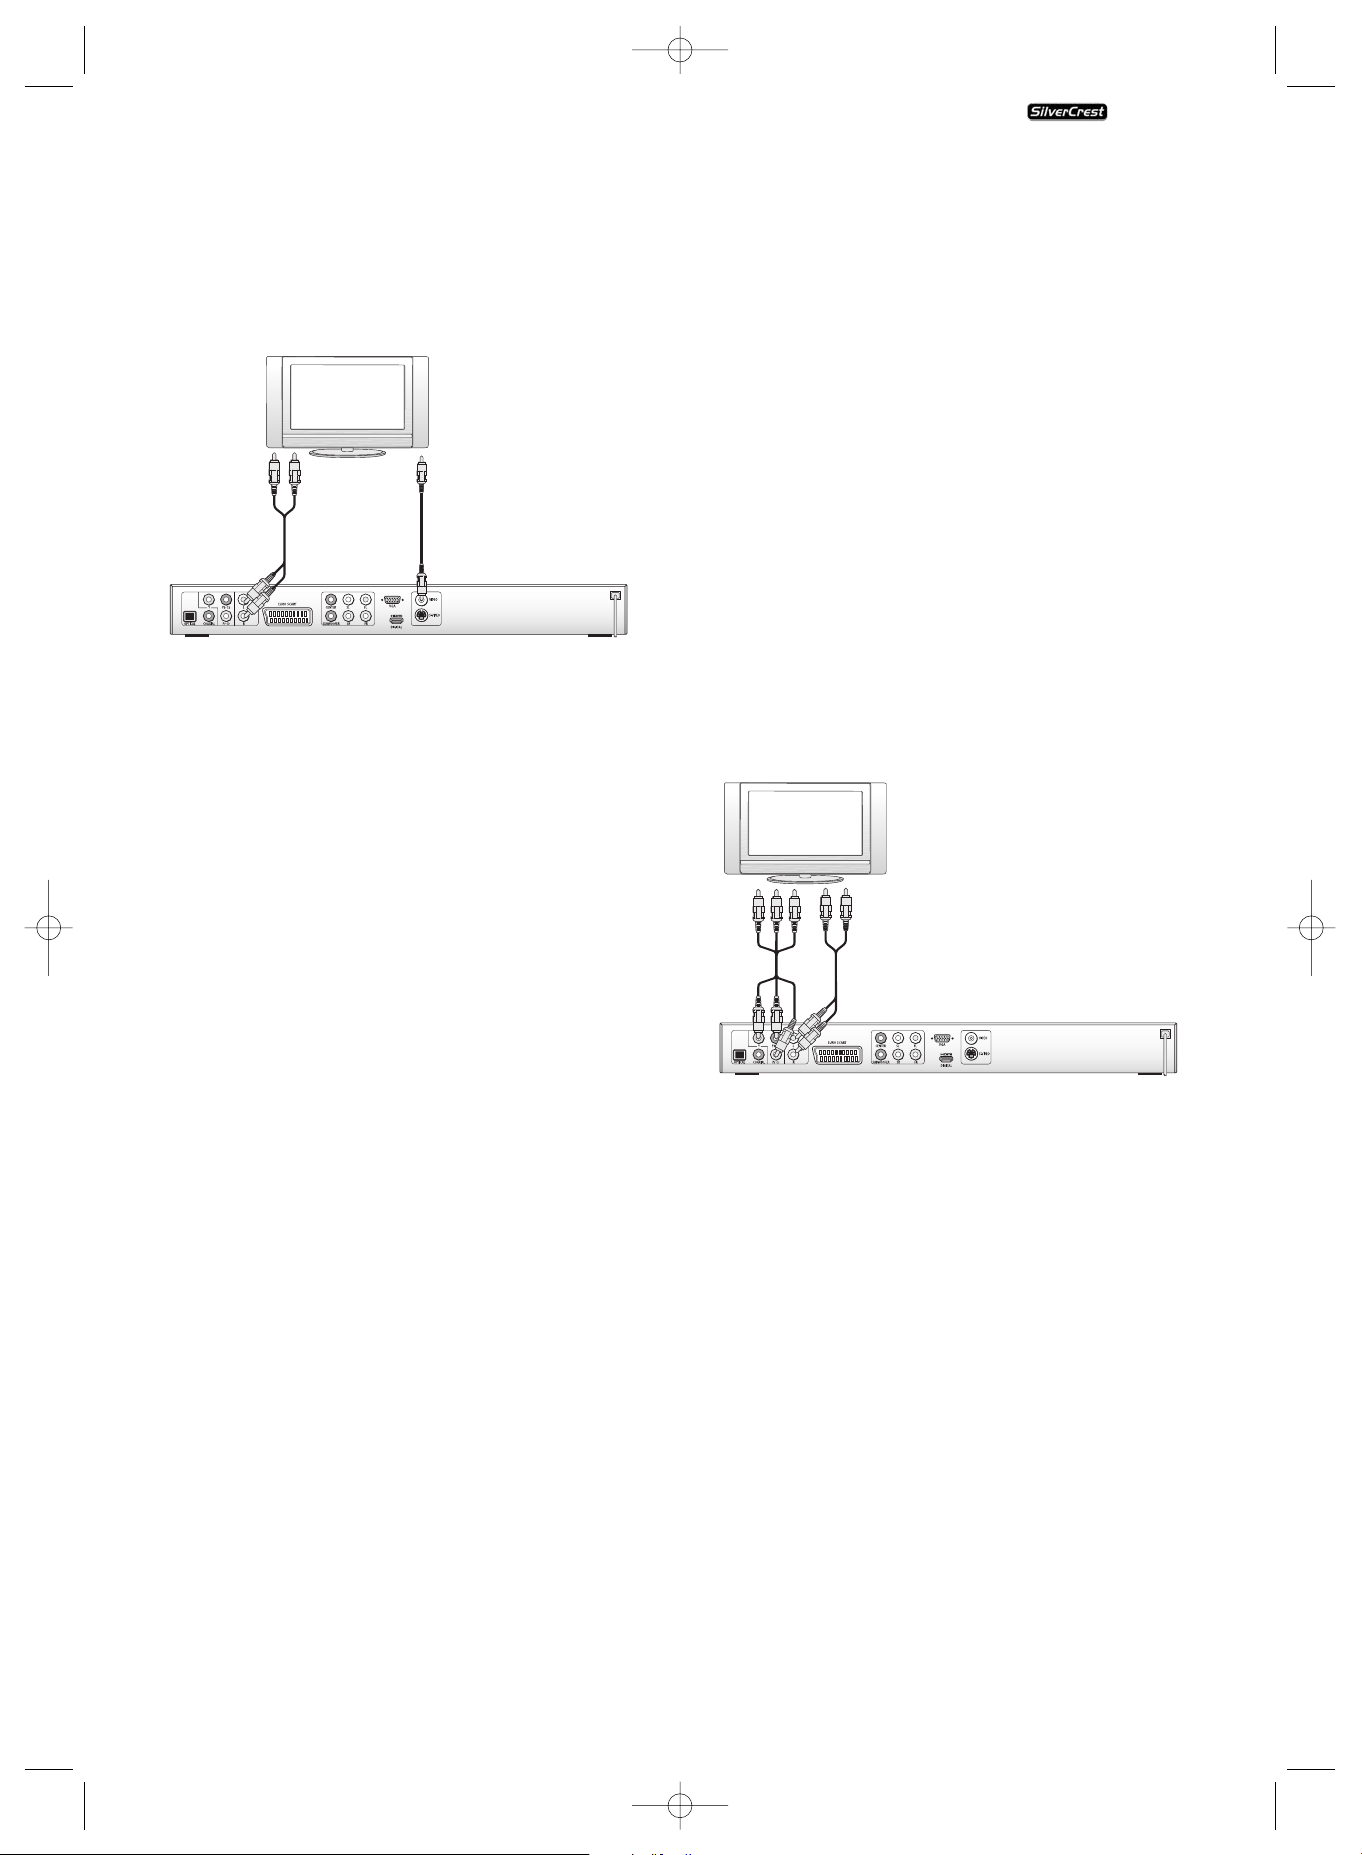
6.3. Connecting to a television via video input
(composite video)
For this connection variant the television must be equiped
with Audio/Video cinch sockets (Composite Video).
In order to connect the DVD player to a television via
Composite Video you will need:
• Audio/Video cinch cable
• Connect the yellow plug of the Audio/Video cinch cable
to the television's yellow video socket.
• Insert the white plug of the Audio/Video cinch cable into
the cinch socket inscribed "L" on the rear panel of the
DVD player.
• Then insert the white plug at the other end of the Audio/
Video cinch cable into the left channel audio socket on the
television.
• Insert the red Audio/Video cinch cable plug into the cinch
socket inscribed "R" on the rear panel of the DVD player.
• Then insert the red plug at the other end of the Audio/
Video cinch cable into the right channel audio socket on
the television.
• For playback select the matching channel on your television.
Check with the television's instruction manual on how you
can set the AV channel.
• In the OSD menu select the menu Video/Video output/RGB.
Ô
On this topic see also capital
8.3 "Video settings: Video output."
6.4. Connection via component signal
(YPbPr/Progressive Scan und YUV)
This connection variant is only possible with very high grade
televisions, LCD/Plasma screens or Video projectors
Check with the instruction manual of the corresponding playback
device to see if this connections variant is available. It is possible
that additional playback device settings must be implemented.
The so called "Component signal" is put out via the YPbPr
socket of the DVD player. The Component signal is also available
in the form of
• the so called "YUV" signals (Half images)
as well as in the form of
• so called "YPbPr" signal (Full image/Progressive Scan).
On this topic, please refer to Section 17.
"Glossary / KeyWord Index".
NOTE:
For both variants the television, to which you want to connect
the DVD player must have two unoccupied Audio cinch sockets
available.
The cable connections are the same in both cases; YPbPr-signal
for Progressive Scan however can only be used if the television
(or Video projector), to which you want to connect the DVD
player, is capable of Progressive Scan.
If you are not sure whether the television (or Video projector),
to which you want to connect the DVD player is capable of
Progressive Scan and has cinch sockets available then you can
check this by consulting the television's (or Video projectors's)
instruction manual.
For both variations – "YPbPr" and "YUV"– you will need
• an audio cinch cable (not supplied)
• an YUV cable (not supplied) These can be obtained from
your dealer.
On the rear panel of the DVD player you will find the three
so called "Component Colour Out" sockets "Y", "Pb/Cb" and
"Pr/Cr".
In order to connect the DVD player via component signal…
• Connect the sockets "Y"(green), "Pb/Cb"(blue), and
"Pr/Cr"(red) with the corresponding sockets on the tele-
vision.
• Insert the white plug of the Audio/Video cinch cable
(not supplied) into the cinch socket inscribed "L" on the
rear panel of the DVD player.
• Then insert the white plug at the other end of the audio
cinch cable into the left channel audio socket on the tele-
vision.
• Insert the red audio cinch cable plug into the cinch socket
inscribed "R" on the rear panel of the DVD player.
• Then insert the red plug at the other end of the audio
cinch cable into the right channel audio socket on the
television.
• For playback select the matching channel on your tele-
vision Check with the television's instruction manual
on how you can set the AV channel.
• In the OSD menu under the menu Video/Video
output/Component select respectively P-Scan.
Ô
On this topic see also capital 8.3
"Video settings: Video output."
KH 6515/6516
KH6515_16_A4_C_V3_EN.qxd 23.08.2006 14:19 Uhr Seite 7
 Loading...